

Page 1
User Guide
E N G L I S H
fgUnh
LG-A290
ENGLISH
fgUnh
5
P/N : MFL67450004 (1.0) www.lg.com
Page 2

Note: Changing the local language settings. You can change the language
ÌOûmmÉhÉÏ: xjÉÉlÉÏrÉ pÉÉwÉÉ xÉåÌOÇûaxÉ oÉSsÉåÇ| qÉålÉÔ MüÉ EmÉrÉÉåaÉ MüUMåü AÉmÉ AmÉlÉå TüÉålÉ Måü ÍsÉL pÉÉwÉÉ
xÉåÌOÇûaÉ MüÉå oÉSsÉ xÉMüiÉå WæÇû. qÉålÉÔ ->xÉåÌOÇûaxÉ->TüÉålÉ->pÉÉwÉÉ MüÉ cÉrÉlÉ MüUåÇ.
UÀªÀĤ¹:
¸ÀܽÃAiÀÄ ¨sÁμÉAiÀÄ ¸ÉnÖAUï UÀ¼À£ÀÄß §zÀ¯Á¬Ä¸À¯ÁUÀÄwÛzÉ. ¤ÃªÀÅ ¤ªÀÄä ¥sÉÆÃ£ï £À
¨sÁμÉAiÀÄ ¸ÉnÖAUï UÀ¼À£ÀÄß §zÀ¯Á¬Ä¸À®Ä, ªÉÄ£ÀÄ ->¸ÉnÖAUÀì -> ¥sÉÆãÀ ->¨sÁμÉAiÀÄ£ÀÄß MwÛ
D£ÀAvÀgÀ ¨sÁμÉAiÀÄ£ÀÄß DAiÉÄÌ ªÀiÁr.
ÌÈ¢ôÒ: ¯ûé÷ ¦Á¡Æ¢¸Ç¢ý «¨ÁôÒ¸¨Ç Á¡üȢ¨Áò¾ø.¯í¸ÇÐ
¦¾¡¨Ä§Àº¢ìÌ ¦Á¡Æ¢¨Â Á¡üÈ §ÅñÎÁ¡É¡ø ¦ÁÛ->«¨ÁôÒ¸û
->¦¾¡¨Ä§Àº¢->¦Á¡Æ¢ À¢ÈÌ ¦Á¡Æ¢¨Â §¾÷× ¦ºöÂ×õ.
Sμ¶¢ÀnO
μ: «¸ænOμ sû¹©¸ ȪdºàASμÀv¶mÀ ¶¢Ã±μÀÛd.¤À±μÀ ¤À rÒ´m sû¹©¸ ȪdºàASμÀv¶mÀ ¶¢À±¸Ûv¶mÀOÍAdÉ
È¢À¶mÀ -> ȪdºàASμÀvÀ-> rÒ´m-> sû¹¶¨ hμ±¸öhμ sû¹¶¨¶mÀ IAVμÀOÐAfº.
ôcçT±: å¾çcé³i g²çnç dè³ffYá²öc³f dŽ²èY² | ôhcë->ôoèT±ü->ôe²çc->g²çnç èT±dëc Gfü
Y²ç³fd³f g²çnç ècfáçP±c K²ö³f Açdèc Açdcç³f ôe²çöc³f å¾çcé³i g²çnç ôoèT±üo¯ dè³ffYá²c
K²³föY² dçö³fc |
ÌOûmmÉhÉÏ: xjÉÉlÉÏrÉ pÉÉwÉÉ oÉSsÉhrÉÉMüËUiÉÉ xÉåÌOÇûaxÉ.AÉmÉhÉ AÉmÉsrÉÉ TüÉålÉcÉÏ pÉÉwÉÉ xÉåÌOÇûaÉ oÉSsÉÔ
zÉMüiÉÉ , irÉÉMüËUiÉÉ qÉålÉÔ->xÉåÌOÇûaxÉ->TüÉålÉ->pÉÉwÉÉ qÉkrÉå eÉÉFlÉ rÉÉåarÉ iÉÏ pÉÉwÉÉ ÌlÉuÉQûÉ
setting for your phone by pressing Menu->Settings->Phone->Language .
ÌOûmmÉhÉÏ: xjÉÉlÉÏrÉ pÉÉwÉÉ xÉåÌOÇûaxÉ oÉSsÉåÇ| qÉålÉÔ MüÉ EmÉrÉÉåaÉ MüUMåü AÉmÉ AmÉlÉå TüÉålÉ Måü ÍsÉL pÉÉwÉÉ
xÉåÌOÇûaÉ MüÉå oÉSsÉ xÉMüiÉå WæÇû. qÉålÉÔ ->xÉåÌOÇûaxÉ->TüÉålÉ->pÉÉwÉÉ MüÉ cÉrÉlÉ MüUåÇ.
UÀªÀĤ¹:
¸ÀܽÃAiÀÄ ¨sÁμÉAiÀÄ ¸ÉnÖAUï UÀ¼À£ÀÄß §zÀ¯Á¬Ä¸À¯ÁUÀÄwÛzÉ. ¤ÃªÀÅ ¤ªÀÄä ¥sÉÆÃ£ï £À
¨sÁμÉAiÀÄ ¸ÉnÖAUï UÀ¼À£ÀÄß §zÀ¯Á¬Ä¸À®Ä, ªÉÄ£ÀÄ ->¸ÉnÖAUÀì -> ¥sÉÆãÀ ->¨sÁμÉAiÀÄ£ÀÄß MwÛ
D£ÀAvÀgÀ ¨sÁμÉAiÀÄ£ÀÄß DAiÉÄÌ ªÀiÁr.
ÌÈ¢ôÒ: ¯ûé÷ ¦Á¡Æ¢¸Ç¢ý «¨ÁôÒ¸¨Ç Á¡üȢ¨Áò¾ø.¯í¸ÇÐ
¦¾¡¨Ä§Àº¢ìÌ ¦Á¡Æ¢¨Â Á¡üÈ §ÅñÎÁ¡É¡ø ¦ÁÛ->«¨ÁôÒ¸û
->¦¾¡¨Ä§Àº¢->¦Á¡Æ¢ À¢ÈÌ ¦Á¡Æ¢¨Â §¾÷× ¦ºöÂ×õ.
Sμ¶¢ÀnO
: «¸ænOμ sû¹©¸ ȪdºàASμÀv¶mÀ ¶¢Ã±μÀÛd.¤À±μÀ ¤À rÒ´m sû¹©¸ ȪdºàASμÀv¶mÀ ¶¢À±¸Ûv¶mÀOÍAdÉ
È¢À¶mÀ -> ȪdºàASμÀvÀ-> rÒ´m-> sû¹¶¨ hμ±¸öhμ sû¹¶¨¶mÀ IAVμÀOÐAfº.
ôcçT±: å¾çcé³i g²çnç dè³ffYá²öc³f dŽ²èY² | ôhcë->ôoèT±ü->ôe²çc->g²çnç èT±dëc Gfü
Y²ç³fd³f g²çnç ècfáçP±c K²ö³f Açdèc Açdcç³f ôe²çöc³f å¾çcé³i g²çnç ôoèT±üo¯ dè³ffYá²c
K²³föY² dçö³fc |
ÌOûmmÉhÉÏ: xjÉÉlÉÏrÉ pÉÉwÉÉ oÉSsÉhrÉÉMüËUiÉÉ xÉåÌOÇûaxÉ.AÉmÉhÉ AÉmÉsrÉÉ TüÉålÉcÉÏ pÉÉwÉÉ xÉåÌOÇûaÉ oÉSsÉÔ
zÉMüiÉÉ , irÉÉMüËUiÉÉ qÉålÉÔ->xÉåÌOÇûaxÉ->TüÉålÉ->pÉÉwÉÉ qÉkrÉå eÉÉFlÉ rÉÉåarÉ iÉÏ pÉÉwÉÉ ÌlÉuÉQûÉ
2
Page 3
Disposal of your old appliance
1. When this crossed-out wheeled bin symbol is attached to a
product it means the product is covered by the e-waste
(Management and Handling) Rules, 2011.
2. All electrical and electronic products should be disposed of
separately from the municipal waste stream via designated
collection facilities appointed by the government or the local
authorities.
3. The correct disposal of your old appliance will help prevent
potential negative consequences for the environment and human
health.
4. For more detailed information about disposal of your old
appliance, please contact your city office, waste disposal service
or the shop where you purchased the product.
5. This product does not contain any of the hazardous substances
as specified in the rule 13 (1) and (2) of the e-waste
(Management and Handling) Rules, 2011.
3
Page 4

English
LG-A290 User Guide
This guide will help you understand your new mobile phone.
It will provide you with useful explanations of features on your
phone.
Some of the contents in this manual may differ from your phone
depending on the software of the phone or your service provider.
Product Registration Program
Dear LG Mobile customer,
You are entitled for one year warranty on this model.
For automatic registration, One SMS containing the IMEI no. of your phone
will be automatically sent to LG servers.
In return you will get one year warranty from the date of purchase at any
authorized LG Mobile Service center.
We assure you the information will be kept confidential and used for
internal purpose only.
LG Electronics India Pvt. Ltd. does not have any revenue sharing with any
cellphone operators for proceeds from SMS of automatic registration.
Page 5

Contents
Getting to know your phone ..7
Installing the SIM Card and
Charging the Battery ..............9
Menu Tree .............................10
Calls ...................................... 11
Making a call .....................11
Making a call from your
contacts ............................ 11
Answering and rejecting
a call ................................. 11
Using the speakerphone ..... 12
Speed dialling ....................12
Viewing your call logs ........12
Changing the call settings .. 12
Contacts ............................... 13
Searching for a contact ......13
Adding a new contact ........ 13
Adding a contact to
a group .............................14
Messaging ............................ 14
Sending a message ........... 14
Entering text ...................... 15
T9 mode ...........................15
Using the T9 Mode ............15
Abc mode .......................... 16
123 mode ........................ 16
Inserting symbols ...............16
Changing the language ...... 16
Message folders ................ 16
E-mail ................................... 18
Setting up your e-mail........18
Sending an e-mail using
your new account .............. 18
Schedule SMS ................... 18
Camera ................................. 18
Taking a quick photo .......... 18
Video camera ....................... 19
Shooting a quick video .......19
Media Player ........................19
Playing a song ................... 19
FM radio ............................... 20
Searching for stations ........ 20
Listening to the radio .........20
Recording your radio ..........20
Voice recorder ......................21
Recording your voice
memo ...............................21
Gallery .................................. 21
Secret Box .........................21
Applications .......................... 21
Organizer .............................. 22
Setting your alarm .............22
Using the calendar .............22
Adding an item to your
to do list ...........................22
Adding a note .................... 22
Adding a city to your world
time ..................................22
5
Page 6

Using your calculator..........22
Converting a unit ...............22
Using the stopwatch ..........23
Shortcuts .......................... 23
Torch .................................23
Internet ................................. 23
Accessing the internet
browser ............................. 23
Settings ................................ 23
Switching your SIM cards ...23
Activating SIM cards .......... 23
Setting ringtones ..............24
Changing your display
settings ............................ 24
Changing your date & time 24
Changing your connectivity
settings ............................. 24
Changing your Bluetooth
settings ............................. 24
Pairing with another
Bluetooth device ................ 25
Changing your phone
settings ............................ 26
Changing your security
settings ............................ 27
Resetting your phone ......... 27
SOS mode ........................27
Installing LG PC Suite
on your computer ..............28
Phone Software update ..........28
6
Guidelines for Safe and
Efficient Use ......................... 29
Accessories .......................... 36
Technical Data ......................37
Troubleshooting ....................38
Page 7
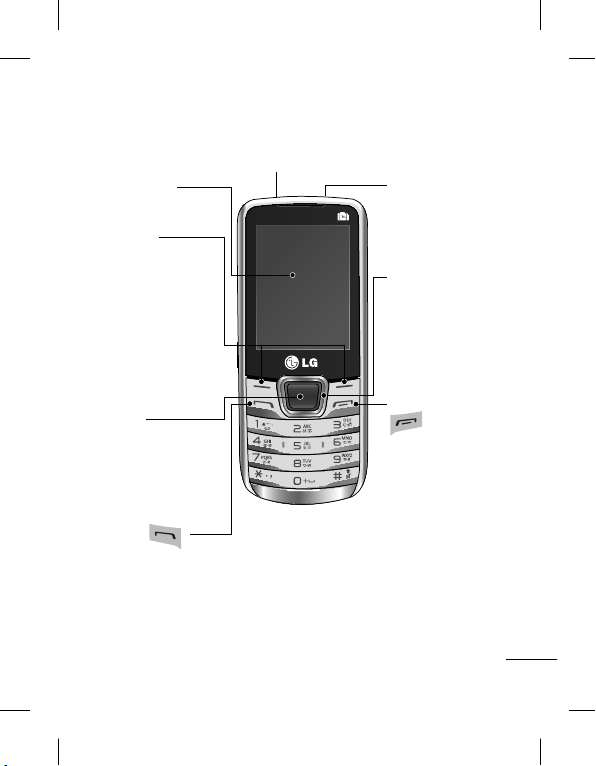
Getting to know your phone
Tor c h
Main screen
Soft keys
Each of these
keys performs
the functions
indicated by the
text on the display
immediately above
them.
Headset
Navigation keys
Use for quick
access to phone
functions.
OK key
Selects menu
options and
confirms actions.
Call key
Dials a phone
number and
answers incoming
calls.
End/Power key
• Ends or rejects
a call.
• Returns to the
home screen
when you use the
menu.
• Long Press to Turn
On/Off.
7
Page 8
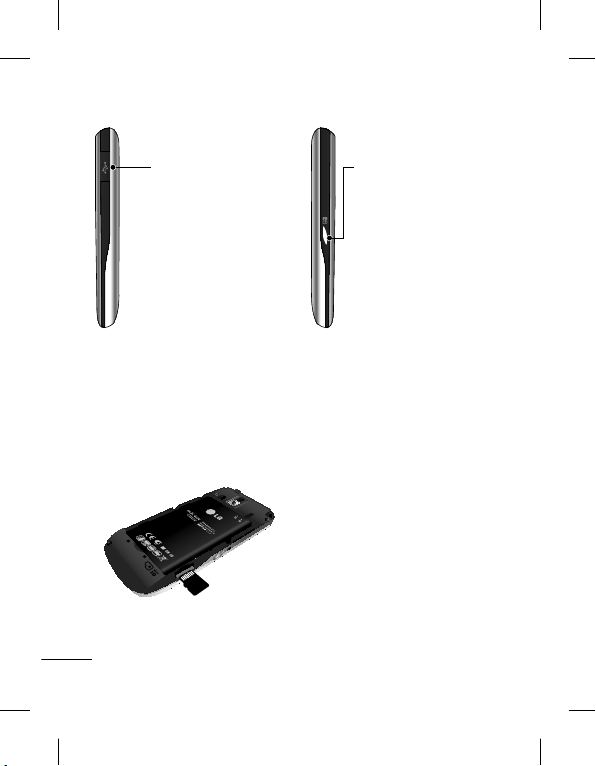
Charger /
USB Cable
connector
SIM Switch Key
SIM Switch Key
is used to switch
between 3 SIM
cards (Contacts,
Messages, MMS,
Call Logs)
Installing a memory card
Remove the Back cover and
insert a micro SD card with
the golden contact area
facing Upwards as shown in
the diagram.To remove the
memory card, gently push it.
8
Note: A memory card is an
optional accessory.
Formatting the memory
card
From your home screen, Press
Menu and select Gallery,
Select External Memory and
From Options choose Format
and insert Phone Password to
format the memory card.
WARNING: When you format
your memory card, all the
content will be Erased. If you
do not want to lose the data
on your memory card, take a
backup first.
Page 9
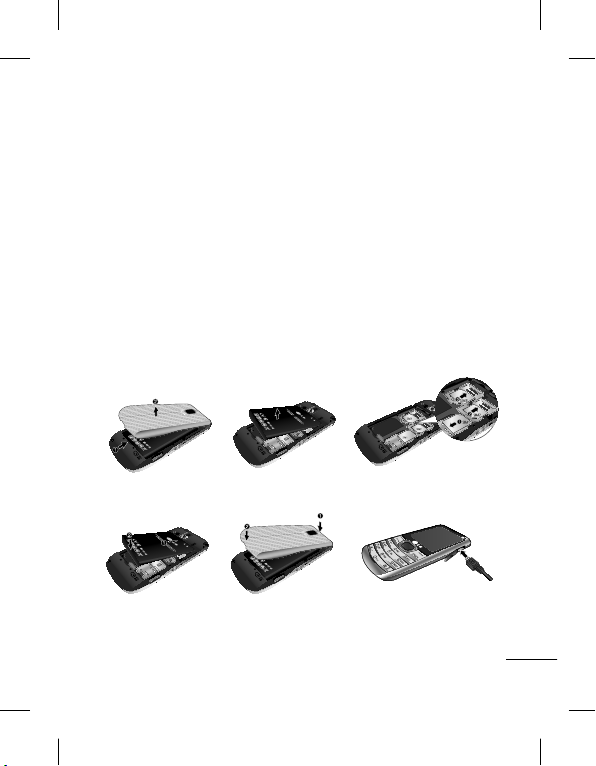
Installing the SIM Card and Charging the Battery
Installing the SIM Card
When you subscribe to a
cellular network, you are
provided with a SIM card
loaded with your subscription
details, such as your PIN, any
optional services available and
many others.
Important!
› The SIM card can be easily
damaged by scratches
or bending, so be careful
when handling, inserting or
1
4 5 6
WARNING: Do not remove the battery when the phone is switched
on, as this may damage the phone.
2 3
removing the card. Keep all
SIM cards out of the reach of
small children.
› only 2G/2.5G SIM supported
Illustrations
1. Open back cover.
2. Remove the battery.
3. Insert your SIM Cards.
4. Insert your battery.
5. Close the back cover.
6. Charge your battery.
9
Page 10

Menu Tree
10
1. Gallery
2. Contacts
Add new contact
3. Logs
All calls
Missed calls
Received calls
Dialled calls
Call duration
Text msg. counter
Data information
4. Multimedia
Camera
Image viewer
Video camera
Media player
Photo editor
Voice recorder
FM radio
5. Messaging
Write message
Inbox
Drafts
Outbox
Sent messages
Archive
Schedule SMS
Email
Broadcast messages
Templates
Message settings
SOS Message
6. Organizer
Alarm clock
Calendar
To-do list
Notes
Calculator
Stopwatch
Converter
World time
Shortcuts
Torch
SIM1 Toolkit
SIM2 Toolkit
SIM3 Toolkit
7. Applications
Nimbuzz
NewsHunt
LG Entertainment Portal
Opera Mini
My games
Settings
8. Internet
Internet service
Licence manager
9. Settings
Triple SIM switch
Tri SIM
Profiles
Display
Date & time
Connectivity
Call
Phone
Network
Security
Restore factory settings
Page 11

Turning Your Phone On
and Off
You can power the phone on
and off by pressing and holding
the power key.
Lock/Unlock Your Keypad
To lock, press Menu (LSK) in
main screen and then press
Key lock (RSK).
To Unlock, press Unlock(LSK)
and then press Ye s(RSK).
Calls
Making a call
1. Key in the number using
the keypad. To delete a digit
press Clear.
2. Press
3. To end the call, press
TIP! To enter + when making
an international call, press and
hold 0.
TIP! To control the volume
during a call, press the up and
down navigation keys.
to initiate the call.
.
TIP! You can record your
conversation during a call.
Press Options and select Voice
recorder.
Making a call from your
contacts
1. Select Contacts from the
home screen.
2. Using the keypad, enter the
first letter of the contact you
want to call.
3. Press
TIP! To scroll through your
contacts, use the up and down
navigation keys.
TIP! You can make a call from
any of the three SIM cards, by
selecting SIM Switching Key.
to initiate the call.
Answering and rejecting
a call
When your phone rings, press
to answer the call.
While your phone is ringing,
select Silent to mute the
ringing.
This is useful if you have
11
Page 12

forgotten to change your profile
to Silent for a meeting.
Press
or select Reject to
reject the incoming call.
TIP! You can change the
settings on your phone to
answer your calls in different
ways. Press Menu, select
Settings and choose Call. Select
Advanced settings then select
Answer mode and choose from
Any key, Auto answer when
headset mode.
Using the speakerphone
During a call, you can activate
speakerphone by pressing RSK
(H-Free) and you can use the
handset in hands-free mode.
If the speakerphone is active,
press RSK (H-Held) again
to resume normal handset
conversation mode.
Speed dialling
Press Menu and select Contacts
> Options > Phonebook
settings, then choose Speed
12
dial. Assign contacts to any keys
between 5 and 8.
Speed dial 1 is set to your voice
mail, 9 key is set to SOS mode
and 2,3 & 4 keys are assigned to
Speed SIM Budget. so you can
not change these keys.
TIP! Speed SIM budget is the
function that is easy way for
checking SIM budget. If you
register Speed SIM budget, you
can get the information of SIM
budget by long press of ‘2’ / ‘3’ /
‘4’ in idle screen.
Note : To activate Speed dial ,
status should be On (Speed dial
> Status)
Viewing your call logs
Press to view your missed,
received and dialled call logs.
Changing the call settings
You can set the menu relevant
to a call. Press Menu, select
Settings and choose Call.
Advanced settings Blacklist - This menu shows you
Page 13

the phone numbers of person
you have chosen to reject.
You can add the new number
in Blacklist numbers. The
incoming calls received from
the Blacklist numbers will be
automatically rejected.
Cost save mode - Every contact
is added along with assigned
SIM when adding in phone
book. During Calling, matching
operator SIM is identified and
the operation is completed
using the matching operator
SIM. This makes possible to
use benefit from using same
operator.
To use Cost save mode feature,
make sure the feature is On
[Settings -> Call -> Advanced
settings -> Cost save mode]
Note: Cost save mode doesn’t
work during in-call.
Fake call: You can set a fake
incoming call which will come
after specific time
Note: Fake call can be activated
or deactivated from idle screen
using shortcut code #*#.
Contacts
Searching for a contact
1. Select Contacts from the
home screen.
2. Using the keypad enter the
first letter of the contact you
want to call.
3. To scroll through the
contacts.
Adding a new contact
1. Select Contacts from the
home screen. Select Add
new contact.
2. Enter the first and last name
of your new contact.
3. Enter the number and select
Options then choose Save.
TIP! Assign SIM field is used to
assign the Contact to Default
SIM/SIM1/SIM2/SIM3. Call will
be originated via assigned SIM
for the Contact when Cost Save
mode is ON.
13
Page 14

Adding a contact to a
group
You can save your contacts
into groups, for example,
keeping your work colleagues
and family separate. To make
a group press Option from the
Contacts menu. And select
Caller groups. You can set the
Group name, Group picture,
Group ringtone in Add new
group.
TIP! LG Customer Care
number is available by
default in Contact list (1800180-9999)
Messaging
Sending a message
1. Press Menu, select
Messaging, and choose Write
message to send an SMS or
MMS.
2. A new message editor will
open. The message editor
combines text message
14
and multimedia messages
into one intuitive and easy
to switch between editor.
The default setting of the
message editor is text
message.
3. Enter your message using
either the T9 predictive
mode or Abc manual mode
or 123 mode. You can switch
text input modes by pressing
the
key.
4. If you want to add some
images or videos etc, select
Options and choose Add
Picture, Add sound, Add
video, Add subject.
5. Select
Enter recipient
from Phonebook
even add multiple contacts by
marking the contacts.
Note: Message can be sent to
a group also. Edit the message
then press send and select Add
from phonebook. Navigate to
the right to select caller groups
and select the group you want.
or
. You can
Add
Page 15

6. Press Send to send the
message.
TIP! User can send SMS to
Many recipients by selecting
‘Add from Phonebook‘ from
Send to option. User can select
Maximum 20 contacts from
the list. User Can send SMS to
groups by selecting Group icon
by pressing right navigation
key .
TIP! You can select your
message type as SMS or
MMS when you enter text by
pressing Options > Switch to
MMS/SMS.
WARNING: Image, Video clip,
Sound clip, Schedule, Business
card, Text field or Subject is
added to the message editor, it
will be automatically converted
to MMS mode and you will be
charged accordingly.
Entering text
You can enter alphanumeric
characters using the phone’s
keypad. The following text
input methods are available in
the phone: T9 mode, Abc mode
and 123 mode.
To change modes, press the
key.
Note: Some fields may allow
only one text input mode (e.g.
telephone number in address
book fields).
T9 mode
T9 mode uses a built-in
dictionary to recognise words
you’re writing based on the
key sequences you press.
Simply press the number key
associated with the letter
you want to enter, and the
dictionary will recognise the
word once all the letters are
entered.
Using the T9 Mode
1. When you are in the T9
predictive text input mode,
start entering a word by
pressing keys
Press one key per letter.
- If the word is still incorrect
to .
15
Page 16

after typing completely,
press the right & left
navigation key to scroll
through the other word
options.
- If the desired word is
missing from the word
choices list, add it by using
the Abc mode.
2. Enter the whole word.
- To delete letters, press Clear.
- Complete each word with
a space by pressing the
key.
Abc mode
This mode allows you to enter
letters by pressing the key
labeled with the required letter
once, twice, three or four times
until the letter is displayed.
123 mode
Type numbers using one
keystroke per number. You
can also add numbers while
remaining in letter modes
by pressing and holding the
16
desired key.
Inserting symbols
If you want to insert symbols,
press the
choose a symbol. Or you can
press Options and then choose
Insert symbol.
key, then you can
Changing the language
LG-A290 supports various
languages.
There are two ways to change
the writing language from
the writing screen. You can
press Options, go to Writing
language and then set the
language you want or long
press
key in editor.
Message folders
Press Menu, select Messaging.
And select the folder you want.
Inbox - You will be alerted
when you have received
messages. They will be stored
in Inbox.
TIP! Messages can be sorted
with the given sorting options
Page 17

for an easy access of messages
(Inbox > Options > Sort by :
Sender, Subject, Unread/read,
Message size and Message
type).
Drafts - If you don’t have time
to finish writing a message, you
can save what you have written
so far in here.
Outbox - This is a temporary
storage folder used while
messages are being sent.
Sent messages - After sending
out the message, the text
message or multimedia
message is saved in the Sent
folder.
Archive - You can access your
saved messages.
Broadcast messages - Choose
whether to receive, block, view
or edit channels to receive
information service messages
(broadcast messages). Also
choose the languages of
information service messages.
Message settings - Your
message settings are predefined so that you can send
messages immediately. If
you would like to change the
settings, you can do this using
the settings options.
17
Page 18

E-mail
Setting up your e-mail
You can stay in touch on the
move using e-mail on your LGA290. It’s quick and simple to
set up a POP3 or IMAP4 e-mail
account.
1. Press Menu Select
Messaging and choose
E-mail.
2. The first time you open the
E-mail, you need to setup
an email account. A setup
wizard opens to help you
add an e-mail account.
3. Follow the pop up
instruction and enter the
information required.
Sending an e-mail using
your new account
To send/receive an e-mail,
you should set up an e-mail
account.
1. From Menu Select
Messaging and choose
E-mail.
18
2. From Options Choose Write
e-mail and a new e-mail
editor screen will open.
3. Enter the recipient’s address
and write a subject.
4. Enter your message.
5. Press
Options
, select
Add
attachments
6. From Options Choose Send
to sent your e-mail.
to add a file.
Schedule SMS
Press (Menu >
Messaging>Schedule SMS)
User can schedule an SMS, so
that it can be sent to the pre
define number on Set date and
Set time.
Camera
Taking a quick photo
1. Press Menu and select
Multimedia. Select Camera
to open the viewfinder.
2. Holding the phone and,
point the lens towards the
subject of the photo.
Page 19

3. Press key to take a
photo.
Video camera
Shooting a quick video
1. Press Menu and select
Multimedia, then choose
Video camera.
2. Point the camera lens
towards the subject of the
video.
3. Press
4. Recording will start in the
5. Select RSK [
key to start
recording.
viewfinder and a timer will
show the length of your
video.
] to stop
recording and LSK [Yes] to
save the recorded Video.
Media Player
Your LG-A290 has a built-in
Media player so you can play all
your favourite music.
Playing a song
1. Press Menu and select
Multimedia, then choose
Media Player.
2. Choose My playlists then
select the song you want
to play.
3. Select
4. Select
5. Select
6. Select Back to minimise
Note: Music is copyright
protected in international
treaties and national copyright
laws. It may be necessary to
obtain permission or licence
to reproduce or copy music. In
some countries national law
prohibits private copying of
copyrighted material.
Please check the national
legislation of the applicable
country concerning the use of
such materials.
to pause the song.
to skip to the next
song.
to skip to the
previous song.
the music and return to the
Media player menu.
19
Page 20

FM radio
Your LG-A290 has an FM radio
feature so you can tune into
your favourite stations and
listen on the move.
During listening to the FM
radio, you can also record a
short clip and save it.
Note: You will need to insert
your headset in order to listen
to the radio. Insert the plug into
the headset connector in order
to listen to the radio and keep
the good radio reception.
Searching for stations
1. Press Menu and select
Multimedia, then choose
FM radio.
2. Select Options and choose
Auto search. You can
also use the left and right
navigation keys to search for
stations.
Listening to the radio
1. Press Menu and select
Multimedia, then choose
20
FM radio.
2. Select the channel number
of the station you would like
to listen to.
TIP! You can listen to the
radio via built-in speaker. Press
Options, select Settings then
choose Loud speaker status
as On.
Recording your radio
1. Press key during
listening to the radio.
2. The recording time is
displayed on your phone.
If you want to stop the
recording, press Stop.
The recorded contents will
be saved in Gallery as .amr
file.
Note: After recording your
radio, you can listen to all of the
radio recordings by selecting
Options and Choose File list.
TIP! To configure your settings
such as the Background play,
Loud speaker or Record
Page 21

storage, press Options and
select Settings.
Voice recorder
Use your Voice recorder to
record voice memos or other
sounds.
Recording your voice
memo
1. Press Menu and select
Multimedia, then choose
Voice recorder.
2. Press
3. Choose Stop to end the
4. Press Options and select
key to begin
recording.
recording and Press Yes to
Save audio.
Play to listen to the last
recorded audio.
Gallery
Secret Box
(Gallery>Phone
Memory>Secret Box)
You can Move the
multimedia files to Secret
box to avoid unauthorized
use. You will need a security
code to access the data. Default
Phone password is “0000” .
Applications
Your LG-A290 comes with
preloaded games to keep
you amused when you have
time to spare. If you choose
to download any additional
games or applications they will
be saved into this folder. Press
Menu and select Applications.
Choose My games & apps.
NewsHunt
NewsHunt is a unique mobile
application designed to
enable viewing and reading
newspapers in the regional
languages on the go.
Nimbuzz
Nimbuzz is a chat application
that lets you connect with
your buddies 24x7 on Gtalk,
Facebook, Yahoo, MSN etc.
21
Page 22

Organizer
Setting your alarm
(Menu > Organizer >
Alarm clock)
You can set up to 5 alarms to
invoke on a specified time.
Using the calendar
(Menu > Organizer >
Calendar)
When you enter this menu,
a calendar appears. A square
cursor is located on the current
date. You can move the cursor
to another date using the
navigation keys.
Adding an item to your to
do list
(Menu > Organizer > To-do
list)
You can view, edit and add
tasks to do.
Adding a note
(Menu > Organizer >
Notes)
22
You can register your own notes
here.
Adding a city to your
world time
(Menu > Organizer > World
time)
You can add a required city to
the list of world clock. You can
also check the current time of
major cities around the world.
Using your calculator
(Menu > Organizer >
Calculator)
The calculator provides the
basic arithmetic functions:
addition, subtraction,
multiplication, division and
Scientific applications also.
Converting a unit
(Menu > Organizer >
Converter)
This converts many
measurements into a unit you
want.
Page 23

Using the stopwatch
(Menu > Organizer >
Stopwatch)
This option allows you to use
the function of a stopwatch.
Shortcuts
(Menu > Organizer >
Shortcuts)
It helps you to go to the menu
you search for. You can set the
item as Shortcuts.
To rc h
(Menu > Organizer >
Torch)
It allows you to turn on/off the
light on the top of you phone.
TIP! Switch On/Off the Torch by
long pressing down navigation
key from standby screen.
Internet
Accessing the internet
browser
You can launch the wap
browser and access the
homepage of the activated
profile on Internet Profiles.
You can also manually enter
an URL address and access the
associated wap page. Press
Menu and select Internet.
Note: An additional cost is
incurred when connecting to
this service and downloading
content. Check your data charges
with your network provider.
Settings
Switching your SIM cards
(Menu > Settings > Triple
SIM switch)
You can choose which SIM card
you’re going to use between
manually or automatically.
Activating SIM cards
(Menu > Settings > Tri SIM)
You can choose one or all of
SIM cards you would like to
activate.
23
Page 24

Setting ringtones
(Menu > Settings >
Profiles)
You can adjust and customize
the phone tones for different
events, or environments.
Changing your display
settings
(Menu > Settings >
Display)
You can change the settings for
the phone display.
Changing your date & time
(Menu > Settings > Date
& Time)
You can set functions relating to
the date and time.
Changing your
connectivity settings
(Menu > Settings >
Connectivity > Data
account)
Your connectivity settings
have already been set up by
24
your network operator, so you
can enjoy your new phone
from switch on. If you want to
change any settings, use this
menu. You can configure the
Data account in this menu.
Changing your Bluetooth
settings
1. Press Menu and select
Settings > Connectivity
then choose Bluetooth.
• Status - Select Status as
On/Off.
• Visibility - Choose whether
to Permanent visible,
Temporary visible or Off your
device to others.
• My name - Enter a name for
your LG-A290.
• Advanced - Set your
Bluetooth settings for Audio
path, Storage, Sharing
permission and View your
Bluetooth address by
choosing My address.
Page 25

Pairing with another
Bluetooth device
1. Check your Bluetooth is
On and Visible. You can
change your visibility in
the Bluetooth menu, by
selecting Visibility, then
Permanent Visible or
Temporary visible.
2. Select My device and choose
Search new device from the
Bluetooth menu.
3. Your LG-A290 will search for
devices. When the search is
completed Pair and Back will
appear on screen.
4. Choose the device you want
to pair with, then handset
create pass code by default
everytime you connect.
5. Your phone will then
connect to the other device.
6. Your pass code protected
Bluetooth connection is now
ready.
TIP!
1. When you use a
Bluetooth headset, A2DP
and AVRCP profiles are
not supported while
you play video. It means
you will not listen
video sound if you use
Bluetooth headset.
2. Bluetooth file transferring
function will be blocked
under some applications
running. (Camera/
Camcorder/UMS)
25
Page 26

Changing your phone
settings
(Menu > Settings > Phone)
Enjoy the freedom of adapting
how your LG-A290 works for
your own style.
• Language/Preferred writing
language - You can change
the language for the display
texts in your phone. This
change will also affect the
Language Input mode.
• Greeting text - This menu
allows you to customize
the greeting text upon the
phone’s power on. You can
also choose whether you
want the greeting text on or
off upon power on.
• Dedicated key - Allows you
to change the preferences on
the Hotkeys that are currently
assigned for your navigation
keys (when in standby mode).
• Flight mode - You can use
this function to switch the
flight mode on. You will
26
not be able to make calls,
connect to the Internet, send
messages when flight mode is
switched on.
• UART settings - User will be
able to perform the operation
from PC using modem for
selected SIM card in UART
settings (like AT command
using HyperTerminal, PC
dialup). User will be able to
make the GPRS dialup on
PC using the SIM which is
selected in UART setting for
e.g. if SIM1 is selected then
user will be able to make the
connection using selected
SIM card.
• Misc. settings - You can set
the brightness and time of
the display screen.
Page 27

Changing your security
settings
(Menu > Settings >
Security)
Change your security settings
to keep your LG-A290 and the
important information safe.
• SIM1, SIM2, SIM3 security You can change security
setting for each SIM card.
• Phone security - You can
change password or set
phone lock on/off.
• Auto keypad lock - You can
set keypad lock on/off.
• Anti-theft mobile tracker When the handset is stolen,
handset sends the SMS to
the numbers configured
by real owner. To activate
the ATMT(Antitheft mobile
tracker) feature, enter the
security code. And you will
need to set ATMT on, and
configure the ATMT settings
with Sender name, Sending
number list. Default security
code is “0000.” The ATMT
SMS will be received from
the number who is using
that handset and it contain
information about the stolen
phone IMEI & Name of the
real owner of the handset
Resetting your phone
(Menu > Settings > Restore
factory settings)
Use Restore factory settings
to reset all the settings to their
factory definitions. You need
the security code to activate
this function. The default
security code is set to “0000”.
SOS mode
(Menu > Messaging > SOS
Message)
In an emergency situation,
press and hold ‘9’ in Idle Screen
to send SOS message when
SOS mode is On. This will send
to the assigned receivers. If
they call you back, your phone
will be automatically accepted.
27
Page 28

At that time, all notification
sound will be muted. And other
menus will be unavailable. To
exit the SOS mode, press the
End key in home screen.
Installing LG PC Suite on
your computer
1. Go to www.lg.com and
choose your country.
2. Select Support and Go to
Mobile Phone Support.
3. Follow the instructions on
screen to complete the
LG PC Suite Installation on
your PC.
NOTE:
You can also Install
"LG PC Suite" using CD
provided and follow the
Installation Guide.
28
Phone Software
update
LG Mobile Phone Software
update from internet
For more information on using
this function, please visit the
http://update.lgmobile.com or
http://www. lg.com/common/
index. jsp ----> select country.
This Feature allows you to
update the firmware of your
phone to the latest version
conveniently from the internet
without the need to visit a
service centre.
As the mobile phone firmware
update requires the user’s full
attention for the duration of the
update process, please make
sure to check all instructions
and notes that appear at each
step before proceeding. Please
note that removing the USB
data cable or battery during the
upgrade may seriously damage
your mobile phone.
Page 29

Guidelines for Safe and Efficient Use
Please read these simple
guidelines. Not following these
guidelines may be dangerous
or illegal.
Exposure to radio
frequency energy
Radio wave exposure and
Specific Absorption Rate
(SAR) information. This mobile
phone model LG-A290 has
been designed to comply with
applicable safety requirements
for exposure to radio waves.
These requirements are
based on scientific guidelines
that include safety margins
designed to assure the safety
of all persons, regardless of age
and health.
• The radio wave exposure
guidelines employ a unit of
measurement known as the
Specific Absorption Rate,
or SAR. Tests for SAR are
conducted using standardised
methods with the phone
transmitting at its highest
certified power level in all
used frequency bands.
• While there may be
differences between the
SAR levels of various LG
phone models, they are all
designed to meet the relevant
guidelines for exposure to
radio waves.
• The SAR limit recommended
by the International
Commission on Non-Ionizing
Radiation Protection (ICNIRP)
is 2W/kg averaged over 10g
of tissue.
• The highest SAR value for
this model phone tested
by DASY4 for use at the
ear is 1.14 W/kg (10 g) and
when worn on the body is
N/A W/kg(10 g), which is
100% compliant with Indian
Standards and Safe.
29
Page 30

• This device meets RF
exposure guidelines when
used either in the normal
use position against the ear
or when positioned at least
1.5 cm away from the body.
When a carry case, belt clip
or holder is used for bodyworn operation, it should not
contain metal and should
position the product at least
1.5 cm away from your body.
In order to transmit data
files or messages, this device
requires a quality connection
to the network. In some cases,
transmission of data files or
messages may be delayed
until such a connection
is available. Ensure the
above separation distance
instructions are followed
until the transmission is
completed.
30
Product care and
maintenance
WARNING
Only use batteries, chargers
and accessories approved
for use with this particular
phone model. The use
of any other types may
invalidate any approval
or warranty applying to
the phone and may be
dangerous.
• Do not disassemble this unit.
Take it to a qualified service
technician when repair work
is required.
• Repairs under warranty, at
LG’s discretion, may include
replacement parts or boards
that are either new or
reconditioned, provided that
they have functionality equal
to that of the parts being
replaced.
Page 31

Guidelines for Safe and Efficient Use (Continued)
• Keep away from electrical
appliances such as TVs, radios,
and personal computers.
• The unit should be kept away
from heat sources such as
radiators or cookers.
• Do not drop.
• Do not subject this unit to
mechanical vibration or
shock.
• Switch off the phone in any
area where you are required
to by special regulations.
For example, do not use
your phone in hospitals as it
may affect sensitive medical
equipment.
• Do not handle the phone
with wet hands while it is
being charged. It may cause
an electric shock and can
seriously damage your phone.
• Do not charge a handset near
flammable material as the
handset can become hot and
create a fire hazard.
• Use a dry cloth to clean the
exterior of the unit (do not
use solvents such as benzene,
thinner or alcohol).
• Do not charge the phone
when it is on soft furnishings.
• The phone should be charged
in a well ventilated area.
• Do not subject this unit to
excessive smoke or dust.
• Do not keep the phone next
to credit cards or transport
tickets; it can affect the
information on the magnetic
strips.
• Do not tap the screen with
a sharp object as it may
damage the phone.
• Do not expose the phone to
liquid or moisture.
• Use the accessories like
earphones cautiously.
Do not touch the antenna
unnecessarily.
• Your phone is an electronic
device that generates heat
during normal operation.
31
Page 32

Extremely prolonged, direct
skin contact in the absence
of adequate ventilation may
result in discomfort or minor
burns. Therefore, use care
when handling your phone
during or immediately after
operation.
Efficient phone operation
Electronic devices
All mobile phones may receive
interference, which could affect
performance.
• Do not use your mobile
phone near medical
equipment without
requesting permission. Avoid
placing the phone over
pacemakers, for example, in
your breast pocket.
• Some hearing aids might be
disturbed by mobile phones.
• Minor interference may affect
TVs, radios, PCs, etc.
32
Precautions
• Use a wireless hands-free
system (headphone, headset)
with a low power Bluetooth
emitter.
• Keep your calls short or send
text message (SMS) instead.
This advice applies especially
to children, adolescents and
pregnant women.
• Use the cell phone in good
quality network signal.
• People having active medical
implants should preferably
keep the cell phone at least
15cms away from the implant.
Road safety
Check the laws and regulations
on the use of mobile phones in
the area when you drive.
• Do not use a hand-held
phone while driving.
• Give full attention to driving.
• Use a hands-free kit, if
available.
• Pull off the road and park
Page 33

Guidelines for Safe and Efficient Use (Continued)
before making or answering
a call if driving conditions
require you to do so.
• RF energy may affect some
electronic systems in your
vehicle such as car stereos
and safety equipment.
• If your vehicle is equipped
with an air bag, do not
obstruct with installed or
portable wireless equipment.
It can cause the air bag to fail
or cause serious injury due to
improper performance.
• If you are listening to music
whilst out and about, please
ensure that the volume
is at a reasonable level so
that you are aware of your
surroundings. This is of
particular importance when
near roads.
Avoid damage to your
hearing
Damage to your hearing can
occur if you are exposed to loud
sounds for long periods of time.
We therefore recommend that
you do not turn the handset on
or off close to your ear. We also
recommend that music and call
volumes are set to a reasonable
level.
NOTE:
Excessive sound
pressure from earphones can
cause hearing loss.
Glass Parts
Some parts of your mobile
device are made of glass.
This glass could break if your
mobile device is dropped on
a hard surface or receives a
substantial impact. If the glass
breaks, do not touch or attempt
to remove. Stop using your
mobile device until the glass
is replaced by an authorised
service provider.
Blasting area
Do not use the phone where
blasting is in progress. Observe
restrictions, and follow any
regulations or rules.
33
Page 34

Potentially explosive
atmospheres
• Do not use your phone at a
refuelling point.
• Do not use near fuel or
chemicals.
• Do not transport or store
flammable gas, liquid or
explosives in the same
compartment of your vehicle
as your mobile phone or
accessories.
In aircraft
Wireless devices can cause
interference in aircraft.
• Turn your mobile phone off
before boarding any aircraft.
• Do not use it on the ground
without permission from the
crew.
Children
Keep the phone in a safe
place out of the reach of small
children. It includes small parts
which may cause a choking
hazard if detached.
34
Emergency calls
Emergency calls may not
be available on all mobile
networks. Therefore you should
never depend solely on your
phone for emergency calls.
Check with your local service
provider.
Battery information and
care
• You do not need to
completely discharge the
battery before recharging.
Unlike other battery systems,
there is no memory effect
that could compromise the
battery’s performance.
• Use only LG batteries and
chargers. LG chargers are
designed to maximise battery
life.
• Do not disassemble or shortcircuit the battery pack.
• Keep the metal contacts of
the battery pack clean.
• Replace the battery when
Page 35

Guidelines for Safe and Efficient Use (Continued)
it no longer provides
acceptable performance.
The battery pack may be
recharged hundreds of times
before it needs replacing.
• Recharge the battery if it has
not been used for a long time
to maximise usability.
• Do not expose the battery
charger to direct sunlight or
use it in high humidity, such
as in the bathroom.
• Do not leave the battery in
hot or cold places, as this
may deteriorate battery
performance.
• There is risk of explosion if the
battery is replaced with an
incorrect type.
• Dispose of used batteries
according to the
manufacturer’s instructions.
Please recycle when possible.
Do not dispose as household
waste.
• If you need to replace the
battery, take it to your nearest
authorised LG Electronics
service point or dealer for
assistance.
• Always unplug the charger
from the wall socket after
the phone is fully charged
to save unnecessary power
consumption of the charger.
• Actual battery life will depend
on network configuration,
product settings, usage
patterns, battery and
environmental conditions.
35
Page 36

Accessories
There are various accessories for your mobile phone. You can
select these options according to your personal communication
requirements.
Travel
CD
CD
Adapter
Standar
Battery
d
User
Guide
LG-A290
Headset
NOTE
• Always use genuine LG accessories. Failure to do this may
invalidate your warranty.
• Accessories may be different in different regions; Please
check with our regional service company or agent for further
enquires.
36
Page 37

Technical Data
Ambient Temperatures
Max.: +55°C (discharging)
+45°C (charging)
Min.: -10°C
DECLARATION OF CONFORMITY
Hereby, LG Electronics declares that this
LG-A290 product is in compliance with
the essential requirements and other
relevant provisions of Directive 1999/5/EC.
A copy of the Declaration of Conformity
can be found at http://www.lg.com/global/
support/cedoc/RetrieveProductCeDOC.jsp
37
Page 38

Troubleshooting
Problem Possible Solution
Telephone cannot
be switched on
Battery empty Charge battery. Check charging indicator
The battery doesn’t
charge properly
or the phone
sometimes turns
itself off
Usage time of
battery becomes
shorter
Charging error—
Temperature out of
range
Charging error—
Wrong charger
Charging error—
Battery defective
Charging error—No
battery icon appears
when charging
38
Please take out battery and insert again.
Then press Power on key to power on the
phone.
on display.
Wipe the charging contacts, both on the
phone and on the battery, with a clear
soft cloth.
If the battery time is short, it may be due
to the user environment, a large volume of
calls, or weak signals.
Make sure the ambient temperature is
right, wait for a while, and then charge
again.
Only use original LG accessories.
Replace battery.
The battery is empty or has been not used
for a long time. It may take a while before
the battery icon appears on the screen.
Page 39

Problem Possible Solution
Forgot the phone
The default phone code is “0000”.
code or password
Enter PUK The PIN code has been entered incorrectly
three times in succession, and the phone
is now blocked. Enter the PUK supplied by
your service provider.
Loss of Network You may be in a weak signal area. Move
and try again. You are trying to access an
option for which you have no subscription
with your service provider. Contact the
service provider for further details.
You have entered a
number but it was
not dialed
Be sure that you have pressed Call key.
Be sure that you have accessed the right
network service.
Be sure that you have not set an outgoing
call barring option.
Be sure that you have entered the area
code.
Your correspondent
cannot reach you
Be sure that your phone is switched on. Be
sure that you are accessing the network
service. Be sure that you have not set an
incoming call barring option.
39
Page 40

Troubleshooting
Problem Possible Solution
Your correspondent
cannot hear you
speaking
The voice quality of
the call is poor
No number is dialed
when you recall a
contact
Cannot use the
Browser
If the above
guidelines do not
help you to solve
the problem
40
Be sure that you have switched off the
loudspeaker. Be sure that you are holding
the phone close enough to your mouth.
The microphone is located at the bottom
of the phone.
Check the signal strength indicator on the
display. The number of bars indicates the
signal strength. Try moving the phone
slightly or moving closer to a window if
you are in a building.
Use the Phonebook Search feature to
ensure the number has been stored
correctly. Resave the number, if necessary.
Your subscription does not include data
capability. You will need to contact your
service provider to enable the service.
Take note of the model number of your
mobile phone and a clear description of
the problem. Contact your phone dealer
or LG Service Center for help.
Page 41

Page 42

vius iqjkus midj.k dk fuiVku
vius iqjkus midj.k dk fuiVku
1. tc ;g ifg;s okys dzkWl fcu dk fpUg fdlh mRikn ds lkFk layXu gksrk
gSa rks bldk vFkZ gS mRikn Ã&osLV (çca/ku vkSj gSaMfyax½ fu;e 2011 ds
vUrxZr vkrk gSA
2. lHkh bysDVªhdy vkSj bysDVªkWfud mRiknksa dks ljdkj ;k LFkkuh; vf/kdkfj;ksa
ds )kjk fu;qDr uxjikfydk vif’k”V /kkjk ls vyx çf/kd`r dh xà laxzg
lqfo/kkvksa ds ek/;e ls u”V fd;k tkuk pkfg,A
3. lgh rjhds ls vius iqjkus midj.kksa dk fuiVku] okrkoj.k vkSj ekkuoh;
LokLF; ds fy, laHkkfor _.kkRed ifj.kkeksa dks jksdus esa enn djsxkA
4. vius iqjkus midj.kksa ds fuiVku ds lac/k esa vkSj vf/kd foLr`r tkudkjh
ds fy,] d`i;k vius uxj dk;kZy;] vif’k”V fuiVku lsok ;k tgka ls
vkius mRikn [kjhnk Fkk] ogka laidZ djsaA
5. bl mRikn esa Ã&osLV (çca/ku vkSj gSaMfyax½ fu;e] 2011 fu;e 13(1½ vkSj
13(2½ esa fufnZ”V vuqlkj dksà Hkh gkfudkjd inkFkZ ‘kkfey ugha gSaA
Page 43

fganh
fganh
mRikn iathdj.k çksxzke
LG-A290 mi;ksxdrkZ ekxZnf’kZdk
;g ekxZnf’kZdk vkids u, eksckby Qksu dks le>us esa vkidh enn djsxhA
;g vkidks vkids Qksu esa nh x;h lqfo/kkvksa ds ckjsa esa mi;ksxh Li”Vhdj.k çnku
djsxhA
bl eSuqvy dh dqN lkexzh Qksu ds lk¶Vos;j ;k vkids lsok çnkrk ds vk/kkj
ij vkids Qksu ls vyx gks ldrh gSA
mRikn iathdj.k çksxzke
fiz; ,yth eksckby xzkgd,
vki bl ekWMy ij ,d o”kZ dh okjaVh ds iké gaSA
Lor% iathdj.k ds fy,] ,d ,l,e,l
ij Hkstk tk,xkA blds cnys esa vki dks fdlh Hkh vf/kd`r ,yth eksckby lsok
dsaæ ij [kjhn dh rkjh[k ls ,d lky dh okjaVh feysxhA
ge vkidks fo’okl fnykrs gSa] dh ;g tkudkjh xksiuh; j[kh tk,xh vkSj dsoy
vkarjhd mÌs’; ds fy, gh bLrseky fd tk;sxhA
,yth bysDVªkWfuDl bafM;k izkbosV fyfeVsM dk Lor% iathdj.k ds ,l,e,l ls
vk; ds fy, fdlh Òh lsy Qksu vkWijsVjksa ds lkFk fdlh Òh izdkj dk jktLo
lk>k ugha gSA
lfgr vki ds Qksu ls ,yth loZj
IMEI
Page 44

lkefxz;k¡
lkefxz;k¡
vius Qksu ds ckjs esa tku
5
fle dkMZ baLV‚y djuk vkSj
cSVjh pktZ djuk
7
esUkw Vªh
8
d‚Yl
9
laidZ
lans’k
bZbZ–esy
dSejk
ohfM;ks dSejk
ehfM;k Iys;j
jsfM;ks
o‚;l fjd‚MZj
xSysjh
vuqç;ksx
vk;kstd
vius Qksu ds ckjs esa tku ..........
fle dkMZ baLV‚y djuk vkSj
cSVjh pktZ djuk .....................
esUkw Vªh .................................
d‚Yl ..................................
d‚y djuk ....................... 9
vius laidZ ls d‚y djuk ..... 9
d‚y dk mÙkj nsuk ;k vLohdkj
djuk .............................. 9
Lihdj Qksu dk mi;ksx
djuk ............................. 10
LihM Mk;fyax .......................10
vius d‚y y‚x dks ns[kuk .... 10
d‚y lsfVaXl dks cnyuk ....... 10
laidZ .................................1111
laidZ ds fy, [kkst ............ 11
u;k laidZ tksM+s ................. 11
lewg esa laidZ tksM+u ........... 12
lans’k..................................1212
lans’k Hkstuk ..................... 12
VsDLV ,aVj djuk ............... 13
v{kj o vad çfo”V djus dh
rkfydk ........................... 14
fgUnh ’kCn fy[kus ds
mnkgj.k .......................... 15
T9 eksM ........................... 16
T9 eksM dk mi;ksx djuk ..... 16
Abc eksM ......................... 16
123 eksM ........................ 16
fpguksa dks balVZ djuk ......... 16
Hkk”kk cnyuk ..................... 17
lans’k QksYMlZ .................... 17
esy ................................1818
vius bZ&esy dh LFkkiuk] ...... 18
vius u, [kkrs dk mi;ksx djrs
gq, ,d bZ&esy Hkstuk ..........
f’kM~;wy SMS .....................18
dSejk .................................1818
rqjar Q+ksVks ysuk ................. 18
ohfM;ks dSejk ........................1919
Rofjr ohfM;ks ‘kwV djuk ....... 19
ehfM;k Iys;j ........................1919
xkuk pykuk ..................... 19
FM
jsfM;ks ...........................2020
LVs’kuksa ds fy, [kkst ........... 20
jsfM;ks lquuk ..................... 20
vius jsfM;ks dh fjd‚fMaZax
djuk ............................. 20
o‚;l fjd‚MZj .......................2121
viuh vkokt eseks fjd‚fMaZaaax .. 21
xSysjh .................................2121
SecretBox ....................... 21
vuqç;ksx..............................2121
vk;kstd .............................2222
viuk vykeZ lsV djuk ........ 22
dSysaMj dk mi;ksx djuk ...... 22
vkius dk;Zlwph esa vkbVe
tksM+uk ............................ 22
,d uksV tksM+uk ................. 22
18
3
Page 45

vkids oyZ~M Vkbe esa ,d ‘kgj
baVjusV
23
lsfVaXl
Qksu l‚¶Vos;j viMsV
lqjf{kr vkSj dq’ky mi;ksx ds fy,
fn’kkfunsZ’k
lgk;d midj.k
rduhdh MsVk
leL;k fuokj.k
tksM+uk ............................ 22
vius dSydqysVj dk mi;ksx
djuk ............................. 22
bdkbZ ¼;wfuV½ cnyuk .......... 22
LV‚iokWp dk mi;ksx djuk .... 23
‘k‚VZdV ........................... 23
V‚p ............................... 23
baVjusV ...............................2323
baVjusV czkmtj rd igq¡puk ...
lsfVaXl ................................2323
fle dkMZ cnyuk ............... 23
lfØ; fle dkMZ ................ 23
fjaxVksu lsfVaXl .................. 23
viuk fMLIys lsfVaXl cnyuk .. 24
vkius frfFk vkSj le; dks
cnyuk ........................... 24
viuh dusfDVfoVh lsfVaXl
cnyuk ........................... 24
viuh CywVwFk lsfVaXl cnyuk .. 24
vU; CywVwFk fMokbl dks
tksM+uk ............................ 24
viuh Qksu lsfVaXl cnyuk .... 25
viuh lqj{kk lsfVaXl dks
cnyuk ........................... 26
viuk Qksu jhlsV djuk ........ 26
SOS eksM ......................... 27
LG PC lwV vius daI;wVj esa
baLV‚y djuk .................... 27
Qksu l‚¶Vos;j viMsV .............2727
4
lqjf{kr vkSj dq’ky mi;ksx ds fy,
fn’kkfunsZ’k ............................2828
lgk;d midj.k ....................3434
rduhdh MsVk ........................3535
leL;k fuokj.k ......................3636
23
Page 46

vius Qksu ds ckjs esa tkusa
vius Qksu ds ckjs esa tkusa
eq[; LØhu
l‚¶V dht+
usfoxs’ku dqaft;k¡
lekIr
/ i‚oj dqath
Bhd dqath
d‚y dqath
VkpZ
gsMlsV
eq[; LØhu
l‚¶V dht+
buesa ls çR;sd dqath
fMLIys ds Bhd Åij
VsDLV }kjk bafxr fd,
x, QaD’ku dks iwjk
djrh gSaA
Bhd dqath
esuww fodYiksa dk p;u
djrh gS vkSj fØ;kvksa
dh iqf”V djrh gSA
d‚y dqath
fdlh Qksu uacj ij
d‚y djsa vkSj budfeax
d‚Yl dks mÙkj nsa A
VkpZ
gsMlsV
usfoxs’ku dqaft;k¡+
Qksu dk;ksaZ rd Rofjr
igq¡p ds fy, mi;ksx
djsaA
lekIr
• d‚y dks lekIr ;k
vLohdkj djrh gSA
• tc vki esuw dk
mi;ksx djrs gSa rks
gkse LØhu ij okil
tkrh gSA
• pkyw djus ;k can
djus ds fy, yacs
le; rd nck,¡A
i‚oj dqath
5
Page 47

Le`fr ¼esejh½ dkMZ baLV‚y djuk
lwpuk%
Le`fr dkMZ ,d oSdfYid
midj.k gS
Le`fr dkMZ dk la:i.k djuk
psrkouh%
pktZj
pktZj
/ USB
dscy dusDVj
fle fLop dh
dscy dusDVj
USB
fle fLop dh
fdlh 3 fle dkMZ~l
esa ifjorZu fy,¼laidZ]
lans’k]
ds fy, fle ifjorZu
dqath dk mi;ksx fd;k
tkrk gSA
MMS]d‚y y‚Xl½
Le`fr ¼esejh½ dkMZ baLV‚y djuk
fn[kk, x, fp= ds vuqlkj cSd doj
fudkysa vkSj xksYMsu d‚UVSDV {ks= okys
ekbØks ,lMh dkMZ dks Åij dh vksj
idM+dj vanj MkysaA eseksjh dkMZ dks
gVkus ds fy, bls /khjs ls nck,aA
6
lwpuk%
Le`fr dkMZ ,d oSdfYid
midj.k gS
Le`fr dkMZ dk la:i.k djuk
gkse LØhu ls] esuww nck,a vkSj xSysjh
pqusa] ,sDlVuZy eseksjh dk p;u djsa
vkSj Le`fr dkMZ ds Q‚esZV ds fy,
fodYi esa ls çk:i pqudj Qksu
i‚loMZ MkysaA
psrkouh% tc vki viuh Le`fr dkMZ
dk Q‚esZV djrs gS rc] lHkh lkefxz;ka
feV tk,axh A ;fnvki viuh Le`fr
dkMZ ij MsVk [kksuk ugha pkgrs rks]
lcls igys ,d cSdvi ysaA
Page 48

fle dkMZ baLV‚y djuk vkSj cSVjh pktZ djuk
fle dkMZ baLV‚y djuk vkSj cSVjh pktZ djuk
fle dkMZ baLV‚y djuk
lfp= O;k[;k
psrkouh
:
fle dkMZ baLV‚y djuk
tc vki fdlh lSY;wyj usVodZ dks
lClØkbc djrs gSa] rks vkidks vkids
lfCLØI’ku fooj.kksa]tSls fd vkidk
fiu]dksbZ vU; miyC/k oSdfYid lsok
vkSj cgqr lh vU; lsokvksa ds lkFk
yksM fd;k gqvk ,d fle dkMZ çnku
fd;k tk,xkA
egRoiw.kZ!
›fle dkMZ dks LØsp }kjk ;k eksM+dj
vklkuh ls {kfr igqapkbZ tk ldrh gS]
blfy, dkMZ lapkfyr djrs
1 2 3
4 5 6
psrkouh
Qksu pkyw gksus ij cSVjh u fudkysa] ,slk djus ls vkidk Qksu [kjkc
gks ldrk gS A
le;] Mkyrs le; ;k fudkyrs le;
lko/kkuh crsaZ A lHkh fle dkMksaZ dks
NksVs cPpksa dh igq¡p ls nwj j[ksaA
2G/2-5G SIM liksVZ djrk gS
›dsoy
lfp= O;k[;k
1- ihNs dk vkoj.k [kksysaA
2- cSVjh fudkysaA
3- viuk fle dkMZ MkysaaA
4- viuh cSVjh MkysaA
5- ihNs dk vkoj.k can djsaA
6- vius Q+ksu dh cSVjh pktZ djsaA
7
Page 49

esUkw Vªh
xSyjh
laidZ
ykWXl
eYVhehfM;k
lans’k
vk;kstd
lqfo/kk;sa
baVjusV
lsfVaXl
esUkw Vªh
1-
xSyjh
2-
laidZ
u;k laidZ tksMsa+sa
3-
ykWXl
lÒh dkWYl
NwVh dkYl
çkIr dkYl
Mk;y dh xbZ dkWYl
dkWy vof/k
ikB~; lans’k dkmaVj
MsVk tkudkjh
4-
eYVhehfM;k
dSejk
NfoO;wvj
ohfM;ks dSejk
ehfM;k Iys;j
QksVks ,fMVj
o‚bl fjd‚MZj
FM jsfM;ks
8
5-
6-
lans’k
lans’k fy[ksa
buc‚Dl
izkjwi
vkmVc‚Dl
Hksts lans’k
iqjkys[k
f’kM~;wy
SMS
bZ&esy
çlkj.k lans’k
VsEiysV~l
lans’k vuqdwyu
SOS lans’k
vk;kstd
vykeZ ?kM+h
dSysaMj
Vw-Mw lwph
uksV~l
dSydqysVj
LV‚io‚p
ifjorZd
‘kkWVZdV
VkWpZ
SIM1 VwyfdV
SIM2 VwyfdV
SIM3 VwyfdVZZ
7-
8-
9-
lqfo/kk;sa
Nimbuzz
NewsHunt
LG Entertainment Portal
Opera Mini
esjs [ksy
lsfVaXl
baVjusV
baVjusV lsok,¡
ykblsal izca/kd
lsfVaXl
frgjs fle dks
fLop djsa
frgjh fle lsfVax
çksQ+kbYl
iznf’Zkr djsa
fnukad vkSj le;
la;kstdrk
d‚yZ
Q+ksu
usVodZ
lqj{kk
Q+SDVªh lsfVaXl
iquLFkkZfir djsa
Page 50

vius Qk+su dks pkyw ;k can
vius Qk+su dks pkyw ;k can
djuk
vius dhiSM dks y‚d
/vuy‚d
djsaA
d‚Yl
d‚y djuk
lq>ko
!
0
lq>ko
!
lq>ko
!
vius laidZ ls d‚y djuk
lq>ko
!
lq>ko
!
d‚y dk mÙkj nsuk ;k
vLohdkj djuk
djuk
ikoj dh dks nckdj] vki Qksu dks
can vkSj pkyw dj ldrs gSaA
vius dhiSM dks y‚d
djsaA
can djus ds fy, eq[; LØhu ij esuw
LSK½ nck,a vkSj dqath vojksf/kr ¼RSK½
¼
dks nck,aA
vuy‚d djus ds fy,] vuykWd
LSK½nck,a vkSj ^gk¡^ ¼RSK½ nck,aA
¼
d‚Yl
d‚y djuk
1- dqathiVy ds ç;ksx ls vad ntZ
djsaA la[;k dks feVkus ds fy,
^lkQ+ djsa* nck,aA
2- d‚y vkjaHk djus ds fy,
nck,¡A
3- d‚y lekIr djus dk fy,
nck,¡A
lq>ko
varjkZ”Vªh; d‚y djus ds fy,
+ nckus dks
+
lq>ko
fu;af=r djus ds fy, usfoxs’ku dqath
0 nckdj j[ksaA
d‚y ds le; esa vkokt dks
dks Åij vkSj uhps nck,¡A
lq>ko
ckrphr dks fjdkMZ dj ldrs gSaA
fodYi nckdj okWbt+ fjdkWMZj dk
vuy‚d
p;u djsaA
vius laidZ ls d‚y djuk
1- gkse LØhu ls laidZ pqusaA
2- dqath iVy dk mi;ksx djrs gq,
3- d‚y ‘kq# djus ds fy,
lq>ko
Åij vkSj uhps usfoxs’ku dqath dk
mi;ksx djsaA
lq>ko
ls fdlh Hkh rhu fle dkMZ~l ds tfj,
vki d‚y dj ldrs gSA
d‚y dk mÙkj nsuk ;k
vLohdkj djuk
tc vkids Qksu dh ?kaVh ctrh gS]
Qksu dk tokc nsus ds fy,
nck,¡A
tc vkidk Qksu ct jgk gS] rc
mls E;wV djus ds fy, ^ekSu* dk
p;u djsaA
d‚y ds nkSjku vki] viuh
ftl laidZ ls d‚y djuk pkgrs gSa
mldk igyk v{kj ,aVj djsaA
nck,¡A
vius laidZ esa tkus ds fy,]
fle fLop dh dk p;u djus
9
Page 51

;fn vki ,d cSBd esa gSa vkSj vki
jn~ djsa
lq>ko
!
esuw
lsfVaXl
d‚y
vfxze lsfVaXl
mÙkj eksM
dksbZ daqth
tc
gSMlSV fof/k esa gksa rks Lor% mÙkj
Lihdj Qksu dk mi;ksx djuk
LihM Mk;fyax
esuw
laidZ
fodYi
Qksucqd lsfVaXl
lq>ko
!
lq>ko
:
(rhoz
Mk;y
>
LFkfr
vius d‚y y‚x dks ns[kuk
d‚y lsfVaXl dks cnyuk
esuw
lsfVaXl
d‚y
bls ekSu çksQkby cnyuk Hkwy x, gSa
rc ;g mi;ksxh gksrk gS A
budfeax d‚y dks vLohdkj djus ds
jn~ djsa dk p;u djsa ;k
fy,
nck,¡A
lq>ko
fHkUu rjhdksa ls mÙkj nsus ds
fy, vki] vius Qksu ds lsfVaXl cny
ldrs gSA
esuw nckdj
dk p;u djsaA
vkSj
gSMlSV fof/k esa gksa rks Lor% mÙkj
dk p;u djsaA
Lihdj Qksu dk mi;ksx djuk
d‚y ds nkSjku]
gq, Lihdj Qksu dks pkyw dj ldrs
gSa vkSj g‚UM~l Ýh eksM esa g‚UM lsV
mi;ksx dj ldrs gSa Avxj Lihdj
Qksu pkyw gS] lk/kkj.k g‚UM lsV
dUojls’ku eksM ij vkus ds fy,
fQj ls
lsfVaXl pqusa vkSj
mÙkj eksM ls
RSK ¼H-Free
vfxze lsfVaXl pqusa
dksbZ daqth ;k
RSK ¼H-Free
½ nck,¡A
LihM Mk;fyax
esuw nck,¡ vkSj
>
Qksucqd lsfVaXl > rhoz Mk;y pqusaA
10
laidZ pqusa >
5 ls 8 ds chp fdUgha dqaft;ksa dks
d‚UVSDV vlkbu djsaA
Rofjr Mk;y 1 viuh vkokt esay
djus ds fy, lsV dj fn;k tkrk gS]
SOS eksM ds fy, lsV dj
dqath 9
fn;k tkrk gS vkSj 2]3 vkSj 4 dqaft;k¡]
LihM fle ctV ds fy, vkoafVr
lsV dj fn;k tkrk gSA rkfd vki bu
pkfc;ksa dks cny ugha ldrsA
lq>ko
d‚y
tc
½ nckrs
LihM fle ctV fd fle
ctV dh tk¡p ds fy, vklku rjhdk
gSA ;fn vki LihM fle ctV jftLVj
djrs gSa] rks vki ‘2’/ ‘3’/‘4’ dh yach
çsl }kjk eq[; LØhu esa fle ctV dh
tkudkjh çkIr dj ldrs gSaA
lq>ko
LihM Mk;y dks lfØ; djus
ds fy,] fLFkfr pkyw gksuk pkfg,
Mk;y
vius d‚y y‚x dks ns[kuk
vkils gq, d‚y]çkIr vkSj Mk;y fd,
x, d‚y ns[kus ds fy,
d‚y lsfVaXl dks cnyuk
d‚y djus ds fy, çklafxd eusw lsV
fodYi
dj ldrs gSa A izsl
dk p;u djs vkSj
LFkfr)A
rhoz
nck,aA
esuw vkSj
lsfVaXl
d‚y p;u djsA
Page 52

mUur lsfVaXl
mUur lsfVaXl
CySdfyLV
ykxr cpkr eksM
[lsfVaXl
>
d‚y
>
vfxze lsfVaXl
>
ykxr cpkr eksM
]
lwpuk
:
ykxr
eksM cpku
QthZ dkWy
lwpuk
:
laidZ
laidZ ds fy, [kkst
u;k laidZ tksM+s
lq>ko
CySdfyLV - bl esu ls vki dks irk
pyrk gS fd fdl O;fä ds Qksu uacj
dks vLohdkj djus ds fy, pquk gSA
vki CySdfyLV la[;k esa u;k uacj
tksM+ ldrs gSaA CySdfyLV la[;k ls
çkIr gksus okyh d‚Yl Lopkfyr :i
ls [kkfjt dj fn;k tk,xkA
ykxr cpkr eksM - Qksucqd esa gj
laidZ] iqZofu/kkZfjr
tkrk gSA d‚fyax ds nkSjku] feyku
SIM ds lkFk tksM+k
v‚ijsVj fle dh igpku gksrh gS
vkSj v‚ijsVj fle dk mi;ksx djus
ds fy, vkijs’ku feyku iwjk gks x;k
tkrk gSA ,d gh v‚ijsVj dk mi;ksx
djus ls ykHk dk ;g laHko cukrk gSA
ykxr eksM cpkus dk mi;ksx lqfo/kk
gSa, ;dhu gS fd lqfo/kk pkyw esa gSaA
lsfVaXl
d‚y
vfxze lsfVaXl
ykxr cpkr eksM
lwpuk
bu&dkWy ds nkSjku
eksM cpkus lqfo/kk dke ugha dj
jdrk gSA
QthZ dkWy - vki ,d QthsZ
budfeax d‚y lsV dj ldrs gSa]
tks vkids }kjk lsV fd, x, uke
ykxr
;k uacj ds lkFk fufnZ”V le; ds
ckn vk,xhA
lwpuk
QthZ dkWy dks dksM #*# dk
mi;ksx djds vkbMy LØhu ls lfØ;
;k fufӯ; fd;k tk ldrk gSA
laidZ
laidZ ds fy, [kkst
1- gkse LØhu ls laidZ pqusaA
2- ftls vki d‚y djuk pkgrs gSa
ml laidZ ds igys v{kj dqath dk
ç;ksx djrs gq, ,aVj djsA
3- laidksZ dks LØkWy djus dsfy,
usfoXks’ku dqaft;ksa dk mi;ksx djsaA
u;k laidZ tksM+s
1- gkse LØhu ls laidZ pqusaA u;k
laidZ tksM+s pqusaA
2- vkids laidZ ds igyk vkSj vk[kjh
uke ,aVj djsA
3- uacj ,aVj djsa vkSj fodYi pqusa
rFkk lso dk p;u djsaA
lq>ko! vlkbu fle {ks=
SIM2/SIM3
fMQ‚YV laidZ vlkbu
djus ds fy, ç;ksx fd;k tkrk gSA
tc laidZ] fle dks lkSaik tk,xk
SIM/SIM1/
11
Page 53

rc] ewY; cpr eksM ds ek/;e ls
lewg esa laidZ tksMuk
laidZ
esu
fodYi
dkWyj
lewg
lewg uke] lewg fp=
lewg fjaxVksu
s u;k lewg
tksM
lans’k
lans’k Hkstuk
1-
esu
lans’k
lans’k fy£sa
lans’kksa
fofo”k; tksM+sa
5-
izkIrdrkZ Mkysa
Qksulwph
ls tksM+sa
lwpuk
:
Qksulwph ls tksM+sa
dkWyj lewg
lq>ko
d‚y] mRiUu gks tk,xkA
lewg esa laidZ tksMuk
vki vius laidksaZ dks lewgksa esa
jf{kr dj ldrs gSa mnkgj.k ds
fy,] viuk vkfQl lg;ksfx;ksa
vkSj ifjokj dks vyx j[kukA
,d lewg cukus ds fy,
esuww ds
fodYi nck,¡ vkSj
lewg dk p;u djsaA
vki
lewg uke] lewg fp= vkSj
lewg fjaxVksu dkdk
tksM+sa esa lsV dj ldrs gSaA
lq>ko!
LG Customer Care dk
uacj igys ls gh laidZ fyLV esa
miyC/k gS (1800-180-9999).
s u;k lewg
lans’k
lans’k Hkstuk
1-
esu nck,¡]
2- ,d u;k eSlst+ ,fMVj [kqysxk A
12
lans’k pqusa]
p;u djsa rkfd
Hkst ldsaA
eSlst+ ,fMVj ,d lgt Kku ;qä
lans’kksa ;k MMS
laidZ
lans’k fy£sa
gS vkSj laiknd ds chp fLop djus
ds fy, vklku esa VsDLV eSlst+ vkSj
eYVhehfM;k lans’k dks tksM+rh gS A
eSlst+ ,fMVj dh fMQ‚YV lsfVax
VsDLV lans’k gSA
3- T9 Hkfo”; dgusokyk eksM ;k Abc
eSuqvy eksM ;k 123 eksM dk
mi;ksx djds viuk lans’k ntZ
djsaA vki dqath
dkWyj
VsDLV buiqV eksM cny ldrs gSaA
4- ;fn vki dqN Nfo;ksa ;k ohfM;ks
tksM+uk pkgrs gSa] rks fodYi dk
p;u djsa vkSj fp= tksM+sa] /ofu
tksM+sa] ohfM;ks tksM+sa]
p;u djsaA
5-
izkIrdrkZ Mkysa dks pqusa ;k
ls tksM+sa dks pqusaA vki laidksaZ dks
vadu }kjk] ,dkf/kd laidksaZ dks tksM+
ldrs gSaA
lwpuk
: ,d lewg dks Hkh lans’k Hkstk
tk ldrk gSA lans’k dks ,fMV djsa
rFkk ^lsaM* nck,¡ vkSj
pqusaA Qksu djus okys lewgksa dk p;u
djus ds fy, nkbZ vksj usfoxsV djsa
dkWyj lewg dk p;u djsaA
vkSj
6- lans’kss Hkstus ds fy,
nckdj
k; tksM+sa dks
Qksulwph ls tksM+sa
Qksulwph
nck,¡A
Page 54

lq>ko
lq>ko
!
bUgsa Hkstsa
Qksulwph
ls tksMsa
lq>ko
!
fodYi
psrkouh
:
VsDLV ,aVj djuk
lwpuk
:
! mi;ksxdrkZ ,d le; eas dÃ
SMS Hkst ldrs gaSA dÃ
laidkZs dks
SMS Hkstus ds fy, fodYi
laidksZ dks
bUgsa Hkstsa pqusa] mlesa ls
ls
ls tksMsa fodYi pquus ls laidksZ dh
lqph [kqy tk,xhA mi;ksxdrkZ dsoy
20 laidksZ dks lans’k Hkst ldrs gSaA
mi;ksxdrkZ lewg dks
gSa] lewg dks
usfoxs’ku dqath ls dkWyj lewg vkbdu
pqusaA
lq>ko
(SMS) ;k ,e-,e-,l (MMS) ds :i esa
fy[kus dks p;u djuk gSa rc vki
SMS Hkstus ds fy;s nk,¡
! vki vius lans’k ,l-,e-,l
fodYi > esa tk,¡ (MMS)/(SMS) pqusaA
psrkouh
: Nfo] ohfM;ks fDyi]
/ofu fDyi] vuqlwph] O;kikj dkMZ]
VsDLV {ks= ;k fo”k; eSlst+ ,fMVj
ds fy, tksM+k x;k gS] ;g Lor% gh
MMS½ eksM esa ifjofrZr gks tk,xk
¼
vkSj vkils rnuqlkj ‘kqYd fy;k
tk,xkA
VsDLV ,aVj djuk
vki Qksu ds dqathiVy dk mi;ksx
djds vYQkU;wesfjd o.kZ ntZ dj
ldrs gSaA fuEu
Qksulwph
SMS Hkst ldrs
VsDLV buiqV
fof/k;k¡ Qksu esa miyC/k gSa :
,-ch-lhA bc eksM vkSj 123 eksMA
lwpuk
uksV : dqN {ks= dsoy ,d
VsDLV buiqV eksM ds fy, vuqefr ns
ldrk gS ¼mnk- irk iqfLrdk {ks=ksa esa
VsyhQksu uacj tSls½A
T9 eksM]
13
Page 55

v{kj o vad çfo
v{kj o vad çfo"
V djus dh rkfydk
ʜȱ ʜȲ ʜȬ ʜQ ʜP
V djus dh rkfydk
1
2
ʜȡ Ǔʜ ʜȢ
ʜȴ ʜȰ ʜȭ ʜȪ ʜȫ ʜȨ f g d j k h
3
4F
4
5
6
6H° ±
7
7I·
8
8J¹
9
¡ 9K ¾ À ½
sp
0
ac
e
14
1 . , ? !
ʜǕ ʜǗ ʜǙ \ ] ^ _ ` a b
¤ ¥ ¦
5G«
0 B
D
2
E
3
Page 56

fgUnh ’kCn fy[kus ds mnkgj.k
fgUnh ’kCn fy[kus ds mnkgj.k
15
Page 57

T9
eksM
eksM dk mi;ksx djuk
Abc
eksM
123
eksM
fpguksa dks balVZ djuk
fodYi
balVZ flEc‚y
eksM
T9
eksM dqath –’;ksa ds vk/kkj ij
vkids }kjk fy[ks x, ‘kCnksa dks
igpkuus ds fy, ,d fufeZr ‘kCndks’k
dk mi;ksx djrk gSA cl vki tks
‘kCn ços’k djuk pkgrs gSa mlds lkFk
tqM+h la[;k dqath nck,¡] vkSj lHkh o.kZ
ços’k djus ds ckn ‘kCndks’k] ‘kCn dks
igpku ysrk gSA
T9
eksM dk mi;ksx djuk
1- tc vki T9 çsfMfDVo dgus okyk
VsDLV buiqV eksM esa gksrs gSa] dqath
nckus ls ,d ‘kCn ,aVj
djuk
‘kq: dj ldrs gSaA
çfr ,d o.kZ ds fy, ,d dqath
nck,¡A
& ;fn ‘kCn iwjh rjg ls Vkbfiax
ds ckn Hkh xyr gS] nkbZa vkSj
ckbZa usfoxs’ku ds fy, vU; ‘kCn
fodYiksa ds ek/;e ls LØ‚y
dqath nck,¡A
& ;fn okafNr ‘kCn fodYi ‘kCn
lwph ls xk;c gS] mls ,chlh
(Abc) eksM dk mi;ksx djds
tksM+ ldrs gSaA
2- iwjk ‘kCn ,aVj djsaA
& o.kksaZ dks jí djus ds fy, lkQ
16
¼fDy;j½ nck,¡A
& gj ‘kCn dks txg ds lkFk dqath
nckdj iwjh dj ldrs gSaA
Abc
eksM
;g eksM vkidks vko’;d o.kZ yscy
ds lkFk dh dqath ,d ckj nks ckj]
rhu ;k pkj ckj nck,a tc rd o.kZ
çnf’kZr fd;k tkrk gS rc rd ,aVj
djus ds fy, vuqefr nsrk gSA
123
eksM
,d dhLVªksd dk mi;ksx djds çfr
la[;k Vkbi djrs gSa A vki Hkh okafNr
dqath nck, j[kdj ysVj eksM esa jgrs
gq, la[;k,¡ tksM+ ldrs gSaA
fpguksa dks balVZ djuk
;fn vki fpUgksa dks balVZ djuk pkgrs
gSa] rks dqath nck,¡] rks vki ,d fpà
pqu ldrs gSa ;k vki
nck,¡ vkSj rc
dj ldrs gSaA
balVZ flEc‚y dk p;u
fodYi
Page 58

Hkk
Hkk
”kk cnyuk
odYi
lans’k QksYMlZ
esuwww
lans’k
buc‚Dl
lwpuk
!
izkjwi
vkmVc‚Dl
Hksts lans’k
iqjkys[k
çlkj.k lans’k
lans’k vuqdwyu
kk cnyuk
LG-A290 fofHkUu Hkk”kkvksa dk leFkZu
djrk gSA
ys[ku LØhu ls ys[ku dh Hkk”kk cnyus
ds nks rjhds gSaA vki
ldrs gS] Hkk”kk ys[ku esa tk ldrs gSa
vkSj rc tks Hkk”kk vki pkgrs gS mls
lsV djsa ;k yacs le; rd laiknd
dqath nck,aA
odYi nck
lans’k QksYMlZ
esuwww nck,a]
lans’k lsok pqusa vkSj vki
viuh ilUn ds QksYMj dk p;u djsaA
buc‚Dl & vkidks lrdZ fd;k tk,xk
tc vki lans’k çkIr djrs gSA os
buc‚Dl esa laxzghr fd;k tk;saxsA
lwpuk
lans’kksa dh ,d vklku
N¡Vkb] fn, x, lans’k fodYiksa ds lkFk
gy fd;k tk ldrk gS
fodYi > ls dzec/n] izs”kd] fo”k;]
i<s ugha x,@i<s x, vkSj lans’k dk
½
çdkj
izkjwi
& ;fn vkids ikl ,d lans’k
fy[krs oä mldks lekIr djus ds
fy, le; ugha gS] rks vkius tks dqN
fy[kk gS mls ;gk¡ jf{kr dj ldrs gSaA
(buc‚Dl >
vkmVc‚Dl
& ;g ,d vLFkk;h
HkaMkj.k QksYMj gS ftldk
mi;ksx] Hksts tk jgs lans’k j{k.k
ds fy, gksrk gSA
Hksts lans’k
& ckgj lans’k
Hkstus ds ckn] VsDLV lans’k ;k
eYVhehfM;k lans’k Hksts x,
QksYMj esa lgstk tkrk gSA
iqjkys[k
& vki vius jf{kr
lans’k dk mi;ksx dj ldrs gSaA
çlkj.k lans’k
& ftls vki
çkIr djuk pkgrs gSa mldk
p;u djus ds fy,] jksdus]
ns[kus ;k lwpuk lsok ds lans’k
¼çlkj.k lans’k½ çkIr djus ds
fy, pkSuyksa dks laikfnrA blds
vykok lwpuk lsok ds lans’k ds
Hkk”kkvksa fy, pqurs gSaA
lans’k vuqdwyu
lsfVaXl iwoZfu/kkZfjr gSa rkfd vki lans’k
rqjar Hkst ldrs gSaA ;fn vki lsfVaXl
cnyuk pkgsa] rks vki bl lsfVaXl
fodYi dk mi;ksx dj ldrs gSaA
& vkids lans’k
17
Page 59

bZ&esy
bZ&esy
vius bZ&esy dh LFkkiuk
1-
esuw
lans’k
bZ&esy
bZ&esy
bZ&esy
vius u, [kkrs dk mi;ksx djrs
gq, ,d bZ&esy Hkstuk
bZ&esy
1-
esuw
lans’k
bZ&esy
2-
fodYi
bZ&esy
5-
fodYi
layXuds dks tksM+sa
6-
fodYi
bZ&esy
Hkstsa
f’kM~;wy
SMS
esuw
lans’k
f’kM~;wy
dSejk
rqjar Q+ksVks ysuk
1-
esuww
eYVhehfM;k
dSejk
vius bZ&esy dh LFkkiuk
vki vius LG-A290 ij bZ&esy dk
mi;ksx dj gj dne ij laidZ esa
jg ldrs gSaA ;g Rofjr vkSj ljy
gSA bls lsV djus ds fy, POP3 ;k
IMAP4 bZ&esy [kkrk gSA
1-
esuw nck,¡]
lans’k dk p;u djsa vkSj
bZ&esyA
pqusa
2- tc igyh ckj vki
gSa] rks vkidks ,d bZesy [kkrs dh
LFkkiuk dh t:jr gksrh gS A ,d
lsVvi fotkMZ ,d
tksM+us esa vkidh enn ds fy,
[kqyrk gSA
3- i‚i&vi vuqns’k dk ikyu djsa
vkSj vko’;d tkudkjh ntZ djsaA
vius u, [kkrs dk mi;ksx djrs
gq, ,d bZ&esy Hkstuk
,d bZ&esy Hkstsa / çkIr djus ds fy,]
18
bZ&esy [kkrk lsV djuk
vkidks ,d
pkfg,A
1-
esuw ls
lans’k dk p;u djsa vkSj
bZ&esy dk p;u djsaA
2-
fodYi esa ls
bZ&esy [kksyrs
bZ&esy [kkrk
bZ&esy fy[ksa pqusa vkSj
,d u;k bZ&esy laiknd LØhu
[kqy tk,xkA
3- çkIrdrkZ dk irk ntZ djsa vkSj
fo”k; fy[ksaA
4- viuk lans’k ntZ djsaA
5-
fodYi nck,a] ,d Qkby tksM+us ds
fy,
layXuds dks tksM+sa p;u djsaA
6-
fodYi ls vius
fy,
f’kM~;wy
esuw nck,¡]
f’kM~;wy
mi;ksxdrkZ dksbZ f’kM~;wy
dj ldrs gaS] rkfd ;g lsV dh
xbZ fnukad vkSj lsV fd, x, le;
ij igys ls fu/kkZfjr uacj dks Hkstk
tk lds A
bZ&esy Hkstus ds
Hkstsa pqusaA
SMS
lans’k dk p;u djsa vkSj
SMS
pquasA
dSejk
rqjar Q+ksVks ysuk
1-
esuww nck,a vkSj
p;u djsaA O;wQkbaMj [kksyus ds
fy,
2- Qksu idM+sa vkSj rLohj ysus ds
eYVhehfM;k dk
dSejk dk p;u djsaA
SMS
lsV
Page 60

fo”k; dh vksj ysal dsfUær djsaA
ohfM;ks dSejk
Rofjr ohfM;ks
‘kwV djuk
1-
esuww
eYVhehfM;k
ohfM;ks
dSejk
ehfM;k Iys;j
xkuk pykuk
1-
esuww
eYVhehfM;k
ehfM;k Iys;j
2-
esjk IysfyLVwl
lwpuk
3- rLohj ysus ds fy, dqath
nck,aA
ohfM;ks dSejk
Rofjr ohfM;ks
1-
esuww nck,a vkSj
p;u djsaA O;wQkbaMj [kksyus ds
fy,
2- dSejs ds ysal dks ohfM;ks ds fo”k;
dh vksj bafxr djsaA
3- fjd‚fMaZx ‘kq: djus ds fy, dqath
4- fjd‚fMaZx O;wQkbUMj esa ‘kq: gks
tk,xk vkSj ,d Vkbej vius
ohfM;ks dh yackbZ fn[kk,xkA
5- fjd‚fMaZx can djus ds fy, RSK
[
djus ds fy, LSK [Yes]]ntZ djsaA
eYVhehfM;k dk
ohfM;ks
dSejk dk p;u djsaA
nck,¡A
] pqusa vkSj ohfM;ks dks jf{kr
ehfM;k Iys;j
vkidk LG-A290 ehfM;k Iys;j ds
lkFk cuk;k x;k gS rkfd vki vius
lHkh ilanhnk laxhr pyk ldrs gSaA
kwV djuk
xkuk pykuk
1-
esuww nck,a vkSj
p;u djsa] vkSj fQj
pqusaA
2-
3- xhr dks cnyus ds fy, Fkke ¼i‚t+½
4- vxys xhr esa tkus ds fy, NksM+
5- fiNys xhr tkus ds fy, NksM+
6- laxhr dks de djus ds fy,
lwpuk: : laxhr d‚ihjkbV varjjk”Vªh;
laf/k;ksa vkSj jk”Vªh; d‚ihjkbV dkuwuksa
esa lqjf{kr gSA ;g vuqefr ;k ykblsal
laxhr dh çfrfyfi cukus ;k iqu:
is’k djus ds fy, vko’;d gks
ldrk gSA dqN ns’kksa esa jk”Vªh; dkuwu
d‚ihjkbV lkexzh ds futh udy ij
çfrca/k yxkrk gSA
,slh lkexzh ds mi;ksx ds fo”k;
esa ykxw ns’k ds jk”Vªh; dkuwu dh
tk¡p djsaA
esjk IysfyLVwl pqusa rFkk tks xhr
vki ctkuk pkgrs gSa mldk p;u
djsaA
p;u djsaA
dk
pqusaA
¼fLdi½
pqusaA
¼fLdi½
ihNs pqusa vkSj ehfM;k Iys;j esu
ij ykSVsaA
eYVhehfM;k dk
ehfM;k Iys;j
19
Page 61

FM
jsfM;ks
lwpuk
:
LVs’kuksa ds fy, [kkst
1-
esu
eYVhehfM;k
jsfM;ks
2-
fodYi
Lor%
[kkst
jsfM;ks lquuk
1-
esuww
eYVhehfM;k
jsfM;k
lq>ko
fodYi
ckgo
Lihdj
pkyw
vius jsfM;ks dh fjd‚fMaZx djuk
jksdsa
lwpuk%
fodYi
Qkby lwph
lq>ko
cSdxzkmaM Iys] ykmM
Lihdj
fjdkMZ
fodYi
lsfVaXl
jsfM;ks
vkidk LG-A290 esa FM jsfM;ks dh
lqfo/kk gS rkfd vki vius ilanhnk
LVs’kuksa dks Vîwu dj ldrs gSa vkSj
bls gj dne ij lqu ldrs gSaA
FM
jsfM;ks lquus ds nkSjku] vki Hkh
,d NksVh fDyi fjd‚MZ dj ldrs gSa
vkSj bls lqjf{kr dj ldrs gSA
lwpuk
vkidks vius jsfM;ks lquus
ds fy, gsMlsV ‘kkfey djus dh
vko’;drk gksrh gSA jsfM;ks lquus
ds fy, gsMlsV laca/kd esa IyxbalVZ
djsaA
LVs’kuksa ds fy, [kkst
1-
esu nck,a vkSj
p;u djsa] rFkk
p;u djsaA
2-
fodYi dk p;u djsa vkSj
[kkst pqusaA vki Hkh ck,¡ vkSj nk,¡
usfoxs’ku dqath dk mi;ksx djds
LVs’kuksa dh [kkst dj ldrs
eYVhehfM;k dk
FM
jsfM;ks lquuk
1-
esuww nck,a vkSj
p;u djsa] rFkk
20
eYVhehfM;k dk
FM
jsfM;ks dk
jsfM;ks dk
p;u djsaA
2- vkids ilanhnk LVs’ku ds pkSuy ds
uacj ij fDyd djsaA
lq>ko! vki bl esa fufeZr
Lihdj ds ek/;e ls jsfM;ks lqu
ldrs gSaA
fodYi nck,a vkSj
lsfVaXl dk p;u djsa rFkk
Lihdj fLFkfr dk
vius jsfM;ks dh fjd‚fMaZx djuk
1- jsfM;ks lquus ds nkSjku dqath
2- fjd‚fMaZx le; vkids Qksu
lwpuk%
Lor%
vki
fjd‚fMaZx ds lHkh Qkby lquus ds fy,
Qkby lwph pqusaA
lq>ko!
Lihdj ;k
d‚UQft+xj djus ds fy,
nckdj
nck,¡A
ij çnf’kZr gksrk gSA ;fn vki
fjd‚fMaZx dks jksduk pkgrs gSa] rks
jksdsa nck,aA .amr Qkby ds :i
esa ntZ lkexzh xSyjh esa lgstk
tk,xkA
vius jsfM;ks fjd‚fMaZx ds ckn]
fodYi dk p;u djds jsfM;ks
viuh
cSdxzkmaM Iys] ykmM
fjdkMZ LVksjst+] lsfVaXl
lsfVaXl dk p;u djsaA
ckgo
pkyw djsaA
fodYi
Page 62

o‚;l fjd‚MZj
viuh vkokt eseks fjd‚fMaZx
1-
esu
eYVhehfM;k
o‚;l fjd‚MZj
jksdsa
gk¡
4-
fodYi
pyk,sa
xSysjh
(xSysjh
> Qksu Le`fr
> Secret Box)
vuqç;ksx
o‚;l fjd‚MZj
viuh vkokt eseks ;k vU; /ofu;k¡
fjd‚MZ djus ds fy, o‚;l fjd‚MZj
dk mi;ksx djsaA
viuh vkokt eseks fjd‚fMaZx
1-
esuw nck,a vkSj
p;u djsa] rks
p;u djsaA
2- fjd‚fMaZx ‘kq: djus ds fy, dqath
3- fjd‚fMaZx var ds fy,
v‚fM;ks lgstus ds fy,
4-
fodYi nck,a vkSj vafre ntZ dh
x;h v‚fM;ks dks lquus ds fy,
pyk,sa dk p;u djsaA
xSysjh
Secret Box
xSysjh
vukf/kÑr bLrseky ls cPkkus ds
fy, vki eYVhehfM;k Qkby
dks
Secret Box
eYVhehfM;k dk
o‚;l fjd‚MZj dk
nck,¡A
Qksu Le`fr
eas Mky ldrs
Secret Box)
gSA MsVk dks bLrseky djus
ds fy, vkidkss Qksu ikloMZ
jksdsa pqusa vkSj
gk¡ pqusaA
pkfg,A fMQ‚YV Qksu ikloMZ
Þ0000ß gS-
vuqç;ksx
vkidk LG-A290 vkids [kkyh le;
esa vkuUn ysus ds fy, çhyksMsM [ksy
dh lqfo/kk çnku djrk gSA ;fn vki
fdlh Hkh vfrfjä [ksy ;k vkosnu i=
MkmuyksM djus ds fy, pqurs gSa rks
os bl QksYMj esa lgstk tk,xkA esuw
nck,a vkSj vuqç;ksx pqusaA ^ek; xsEl
,aM ,sIl* dk p;u djsaA
NewsHunt
jkg esa gksus ij Hkh {ks=h;
Hkk”kkvksa esa U;wt+isilZ ns[kus vkSj
i<+us gsrq l{ke fd, tkus ds
fy, fMt+kbu fd;k x;k ,d
fof’k”V eksckby vuqç;ksx gSA
Nimbuzz
Nimbuzz ,d pSV vuqç;ksx
gS tks fd vkidks vius nksLrksa
ds lkFk Gtalk, Facebook,
21
Page 63

Yahoo, MSN vkfn ij dusDV
vk;kstd
viuk vykeZ lsV djuk ¼esuw
>
vk;kstd
>
vykeZ ?kM+h½
dSysaMj dk mi;ksx djuk ¼esuw
>
vk;kstd
>
dSysaMj½
vkius dk;Zlwph esa vkbVe
tksM+uk ¼esuw
>
vk;kstd
>
Bw&Mw lwph½
,d uksV tksM+uk
¼
esuw
>
vk;kstd
> uksV~l½
vkids oyZ~M Vkbe esa ,d
‘kgj
tksM+uk ¼esuww
>
vk;kstd
>
fo’o le;½
vius dSyD;qysVj dk mi;ksx
djuk ¼esuww
>
vk;kstd
>
dSyD;qysVj½
bdkbZ ¼;wfuV½ cnyuk ¼esuww
>
vk;kstd
>
ifjorZd½
djrk gSA
vk;kstd
viuk vykeZ lsV djuk ¼esuw
vk;kstd
vki ,d fufnZ”V le; ij ykxw
djus ds fy, 5 vykeZ lsV dj
ldrs gSaA
dSysaMj dk mi;ksx djuk ¼esuw
tc vki bl esu esa ços’k djrs
gS] ,d dSysaMj çdV gksrk gSA
orZeku fnukad ij ,d oxkZdkj
dlZj fLFkr gSA vki usfoxs’ku
dqath dk mi;ksx djds rkjh[k
cnyus ds fy, dlZj ys tk
ldrs gSaA
vkius dk;Zlwph esa vkbVe
tksM+uk ¼esuw
Bw&Mw lwph½
vki ns[k ldrs gS] laikfnr
dj ldrs gSa vkSj dk;Z tksM+
22
vk;kstd
vykeZ ?kM+h½
dSysaMj½
vk;kstd
ldrs gSaA
,d uksV tksM+uk
esuw
vki vius [kqn ds uksV~l ;gk¡ jftLVj
dj ldrs gSA
vkids oyZ~M Vkbe esa ,d
tksM+uk ¼esuww
fo’o le;½
vki fo’o ?kM+h dh lwph ds
fy, ,d vko’;d ‘kgj tksM+
ldrs gSaA vki Hkh nqfu;k Hkj ds
çeq[k ‘kgjksa ds orZeku le; dh
tk¡p dj ldrs gSaA
vius dSyD;qysVj dk mi;ksx
djuk ¼esuww
dSyD;qysVj½
dSydqysVj cqfu;knh vadxf.krh; dk;Z
çnku djrk gS blds vykok] ?kVko]
xq.ku] foHkktu] vkSj oSKkfud vuqç;ksx
Hkh djrk gSA
bdkbZ ¼;wfuV½ cnyuk ¼esuww
vk;kstd
;g dbZ ekiksa dks vkidh bfPNr bdkbZ
vk;kstd
vk;kstd
vk;kstd
ifjorZd½
uksV~l½
kgj
Page 64

esa ifjofrZr djrh gSA
LV‚iokWp dk mi;ksx djuk ¼esuww
>
vk;kstd
>
LVkiWokpW½
‘k‚VZdV
¼esuww
>
vk;kstd
>
‘k‚VZdV½
V‚pZ
¼esuww
>
vk;kstd
>
V‚pZ½
lq>ko!
baVjusV
baVjusV czkmtj rd igq¡puk
esuw
baVjusV
lwpuk
lsfVaXl
fle dkMZ cnyuk ¼esuww
>
lfsVXal
>
frgjs fle dks fLop
djsa½
lfØ; fle dkMZ ¼es
uww
> lsfVaXl
>
frgjh fle lsfVax½
fjaxVksu lsfVaXl ¼esuww
>
lsfVaXl
>
izksQkbYl½
LV‚iokWp dk mi;ksx djuk ¼esuww
vk;kstd
;g fodYi vkidks ,d LV‚io‚p ds
dk;Z ds mi;ksx djus dh vuqefr
nsrk gSA
LVkiWokpW½
k‚VZdV
¼esuww
vk;kstd
;g vki vkids fy, esu [kkst esa tkus
ds fy, enn djrk gSA vki ‘k‚VZdV
ds :i esa vkbVe lsV dj ldrs gSaA
k‚VZdV½
V‚pZ
¼esuww
vk;kstd
;g vkidks Qksu ds ‘kh”kZ ij çdk’k
ckjh ds@can ;k pkyw ds fy, vuqefr
nsrk gS A
lq>ko! LVSaMckb LØhu esa yacs le;
rd uhps usfoxs’ku dqath nckus ds }kjk
V‚pZ@fLop can ;k pkyw dj ldrs gSA
V‚pZ½
baVjusV
baVjusV czkmtj rd igq¡puk
vki oSi czkmtj pkyw dj ldrs vkSj
baVjusV ij lfØ; çksQkby ds gkse
ist dk mi;ksx dj ldrs gSa A vki
Hkh eSU;qvy :i ls ,d ;w-vkj-,y- irk
ntZ dj ldrs gSa vkSj tqM+s oSi ist+
dk mi;ksx
esuw nck,a vkSj
p;u djsaA
lwpuk: fdlh lsok dks tksM+uk vkSj
lkexzh dks MkmuyksM djuk ,d
vfrfjä ykxr [kpZ gSA vius usVodZ
çnkrk ds lkFk vius MsVk ‘kqYd dh
tk¡p djsaA
lsfVaXl
fle dkMZ cnyuk ¼esuww
lfsVXal
frgjs fle dks fLop
djsa½
ftl fle dkMZ dks vki eSU;qvyh
vFkok Lopkfyr :i esa mi;ksx djus
tk jgs gSa] mldk p;u vki dj
ldrs gSaA
lfØ; fle dkMZ ¼es
frgjh fle lsfVax½
vki ,d fledkMZ ;k lHkh dkMZ
lfØ; djus dk p;u dj ldrs gSaA
fjaxVksu lsfVaXl ¼esuww
izksQkbYl½
vki Qksu dk Vksu fofHkUu ?kVukvksa] ;k
uww
baVjusV dk
lsfVaXl
lsfVaXl
23
Page 65

okrkoj.k ds vuqdwy lek;ksftr dj
viuk fMLIys lsfVaXl cnyuk
¼
esuww
> lsfVaXl
>
iznf’kZr djsas½
vkius frfFk vkSj le; dks
cnyuk ¼esuww
>
lsfVaXl
>
fnukad vkSj le;½
viuh dusfDVfoVh lsfVaXl
cnyuk ¼esuww
> lsfVaXl
>
la;kstdrk
>
MsVk vdkÅUV½
viuh CywVwFk lsfVaXl cnyuk
1-
esuw
lsfVXl
la;kstdrk
CywVwFk
Û fLFkfr –fLFkfr tSls can@pkyw
¼v‚u&v‚Q½
Û –’;rk
LFkk;h :i ls izdV]
vYidkfyd :i ls izdV]can
Û esjk uke
mUur
Qkbysa
lk>k djus dh vuqefr
vU; CywVwFk fMokbl dks tksM+uk
LFkk;h :i ls izdV
vYidkfyd jwi ls izdV
ldrs gSaA
viuk fMLIys lsfVaXl cnyuk
esuww
lsfVaXl
vki Qksu ds fMLIys ds fy,
lsfVaXl cny ldrs gSaA
iznf’kZr djsas½
vkius frfFk vkSj le; dks
cnyuk ¼esuww
fnukad vkSj le;½
vki fnukad vkSj le; ds fy,
lacaf/kr dk;ksaZ dks fu/kkZfjr dj
lsfVaXl
ldrs gSaA
viuh dusfDVfoVh lsfVaXl
cnyuk ¼esuww
la;kstdrk
vkidk dusfDVfoVh lsfVax igys ls gh
vius usVodZ v‚ijsVj }kjk LFkkfir
fd;k x;k gS rks vki ^fLop v‚u* ls
vius u, Qksu dk vkuan ys ldrs gSA
;fn vki fdlh Hkh lsfVax dks cnyuk
pkgrs gSa] bl esu dk mi;ksx djsaA
vki bl esu esa MsVk vdkmaV d‚fUQ+xj
dj ldrs gSaA
24
lsfVaXl
MsVk vdkÅUV½
viuh CywVwFk lsfVaXl cnyuk
1-
esuw nck,a vkSj
la;kstdrk rFkk
djsaA
fLFkfr –fLFkfr tSls can@pkyw
¼v‚u&v‚Q½•
–’;rk & vki vius fMokbl dks
nwljksa ds fy,
vYidkfyd :i ls izdV]can fn[kuk
pkgrs gSa ;k ugha bldk p;u dj
ldrs gSaAs
esjk uke & vius LG-A290 ds fy,
,d uke ntZ djsaA
mUur & v‚fM;ks iFk] laxzg.k]
lk>k djus dh vuqefr ds fy, vius
CywVwFk lsfVaXl lsV djsa vkSj esjk irk
¼ek; ,sMªsl½ dk p;u dj CywVwFk irk
ns[k ldrs gSaA
lsfVXl pqusa
CywVwFk dk p;u
LFkk;h :i ls izdV]
Qkbysa
vU; CywVwFk fMokbl dks tksM+uk
1- tkap djsa fd vkidk CywVwFk pkyw
¼v‚u½gS vkSj fn[kkbZ iM+ jgk gSA
foftfcfyVh dk p;u djus ds
LFkk;h :i ls izdV vFkok
ckn]
vYidkfyd jwi ls izdV dk p;u
dj vki CywVwFk esu esa –’;rk dks
cny ldrs gSaA
Page 66

2-
2-
CywVwFk
esjk fMokbl
u, fMokbl [kkstsa
viuh Qksu lsfVaXl cnyuk ¼esuq
>
lsfVaXl
>
Qksu½
Hkk
”kk
ojh;k ys[ku Hkk
”kk ys[ku Hkk
”kk
Lokxre ikB~;
vyx dqath
dqath
¶ykbV eksM
lq>ko!
CywVwFk esuww ls
esjk fMokbl pqusa vkSj
u, fMokbl [kkstsa p;u djsaA
3- vkidk
LG-A290 midj.kksa ds fy,
[kkst djsxk A tc [kkst iwjk gks
tkrk gS rks tksM+s vkSj okil LØhu
ij fn[kkbZ nsxkA
4- vki ftl fMokbl ds lkFk tksM+h
cukuk pkgrs gSa mls pqusa vkSj fQj
vki tc Hkh dusDV djsaxs fMQ‚YV
:i ls gSaMlsV] ikldksM cuk,xkA
5- blds ckn vkidk Qksu vU;
fMokbl ls dusDV djsxkA
6- vkidk ikldksM lajf{kr CywVwFk
dusD’ku vc rS;kj gSA
lq>ko!
1- tc vki ,d CywVwFk gsMlsV dk
mi;ksx djsaxs] ohfM;ks [ksyus ds
fy, A2DP vkSj AVRCP çksQkby
dks liksVZ ugha fd;k tkrkA
bldk eryc gS fd vxj vki
CywVwFk gsMlsV dk mi;ksx djsaxs
rks vki ohfM;ks /ofu ugha lqu
ldsaxsA
2- dqN py jgs ,sfIyds’kuksa ds
CywVwFk Qkby LFkkukarfjr dk;Z
can gks tk,xkA ¼dSejk@
Camcorder@UMS½
viuh Qksu lsfVaXl cnyuk ¼esuq
lsfVaXl
LG-A290 vkids LVkby esa dk;Z djs
blds p;u dh Lora=rk dk ykHk
mBk,aA
Hkk
vki vius Qksu esa fMLIysVsDlV dsfy,
Hkk”kk cny ldrs gSa ;g ifjorZu Hkh
Hkk”kk buiqV EkksM dks izHkkfor djsxkA
Lokxre ikB~; & ;g esu Qksu ds
ikoj v‚u gksus dh fLFkfr esa Lokxre
ikB~; dks vuqdwfyr djus dh vuqefr
nsrk gSA vki ikoj v‚u gksus ij VsDLV
ds v‚u ;k v‚Q gksus dk fodYi Hkh
pqu ldrs gSaA
vyx dqath &
esa ifjorZu dh vuqefr nsrk gS tks
orZeku esa vkids usfoxs’ku dqath ds
fy, vkoafVr fd, tkrs gSa ¼LVSaMckb
eksM esa½A
¶ykbV eksM & vki ¶ykbV eksM ij
fLop djus ds fy, bl dk;Z dk
mi;ksx dj ldrs gSaA ¶ykbV eksM
pkyw gksus ij vki d‚y djus] baVjusV
ls dusDV djus] lans’k Hkstus esa l{ke
ugha gksa ldsaxsA
UART lsfVaXl&UART lsfVaXl ¼gkbij
Qksu½
kk/
ojh;k ys[ku Hkk
dqath ij ojh;rkvksa
kk ys[ku Hkk
kk &
25
Page 67

VfeZuy] ihlh Mk;yvi dk mi;ksx
SIM1
fofo/k lsÇVx
viuh lqj{kk lsfVaXl dks cnyuk
¼esuw
>
lsfVaXl
>
lqj{kk½
Û SIM1, SIM2, SIM3
lqj{kk
Û Qksu lqj{kk
Û Lor% daqthiVy can
Û ,aVh&Fks¶V eksckby VSªdj
viuk Qksu jhlsV djuk
¼esuw
>
lsfVaXl
>
Q+SDVªh lsfVaXl
iquLFkkZfir djsa½
dj vkns’k ,-Vh½ ds p;fur fle dkMZ
ds fy, mi;ksxdrkZ e‚Me dk ç;ksx
dj ihlh ls dk;Z djus esa l{ke gksxkA
UART lsfVaXl esa pqus fle ds
ç;ksäk
ç;ksx ls ihlh ij thihvkj,l Mk;y
vi djus esa l{ke gksxk] tSls ;fn
SIM1 dk p;u fd;k tkrk gS] rks
ç;ksäk p;fur fle dkMZ ds ç;ksx ls
dusD’ku cuk ikus esa l{ke gksxkA
fofo/k lsÇVx & vki fMLIys LØhu dh
ped vkSj le; lsV dj ldrs gSaA
viuh lqj{kk lsfVaXl dks cnyuk
¼esuw
lsfVaXl
viuh LG-A290 vkSj eq[; tkudkjh
dks lqjf{kr j[kus ds fy, viuh lqj{kk
lqj{kk½
lsfVaXl cnysaA
SIM1, SIM2, SIM3
lqj{kk & vki
çR;sd fle dkMZ ds fy, lqj{kk
lsfVax dks cny ldrs gSaA
Qksu lqj{kk & vki ikloMZ cny
ldrs gS ;k Qksu y‚d pkyw@can
dj ldrs gSaA
Lor% daqthiVy can & vki dhiSM
y‚d lsV pkyw@can dj ldrs gSaA
,aVh&Fks¶V eksckby VSªdj & gaSMlsV
26
pksjh gks tkus ij] gSaMlsV okLrfod
Lokeh }kjk d‚fUQxj fd, x, uaclZ
SMS Hkstrk gS- ATMT ¼,aVh&Fks¶V
ij
eksckby VSªdj½ lqfo/kk dks lfØ;
djus ds fy,] Qksu ikloMZ ntZ
djsa- vkidks
ATMT dks pkyw ij
lsV djus] vkSj
uke vkSj uacj ds lkFk lsV djus
dh vko’;drk gksxh- fMQ‚YV Qksu
ikloMZ Þ0000ß gS- tks O;fä gSaMlsV
dk mi;ksx dj jgk gS ml uacj ls
,d
ATMT SMS çkIr fd;k tk,xk
ATMT SMS esa pksjh gq, Qksu
vkSj
IMEI vkSj gSaMlsV dk vlyh ekfyd
dk uke ds ckjs esa tkudkjh gksxkA
viuk Qksu jhlsV djuk
lsfVaXl
iquLFkkZfir djsa½
lHkh lsfVax dks mudh QSDVjh
ifjHkk”kkvksa ij jhlsV djus ds fy,
Q+SDVªh lsfVaXl iquLFkkZfir dk mi;ksx
djsaA bl dk;Z dks lfØ; djus ds
fy, vkidks lqj{kk dksM dh t:jr
gksrh gSA fMQ‚YV lqj{kk dksM
ij lsV fd;k tkrk gSA
Q+SDVªh lsfVaXl
ATMT lsfVaXl dks
¼esuw
“0000”
Page 68

SOS
SOS
eksM
¼esu
>
lans’k
> SOS
lans’k½
LG PC
lwV vius daI;wVj esa
baLV‚y djuk
www.lg.com
Qksu l‚¶Vos;j viMsV
baVjusV ls ,yth eksckby Qksu
l‚¶Vos;j dks v|ru djuk
eksM
¼esu
lans’k
SOS
vkikr fLFkfr eaS
ds fy, vkbMy LØhu esa
j[ksaA ;g lkSais x, fjlhoj dks Hkst
fn;k tk,xkA ;fn os vkidks okil
d‚y djrs gSa] vkidk Qksu Lopkfyr
:i ls Lohdkj dj fy;k tk,xkA ml
le;] lkjh uksfVfQds’ku lkmaM can
gks tk,xhA vkSj vU; esu vuqiyC/k gks
tk,xkA
ds fy,] gkse LØhe esa lekIr dqath
dks nck,¡A
LG PC
> SOS
eksM ds v‚u jgus ij fdlh
SOS
SOS
eksM ls ckgj fudyus
lwV vius daI;wVj esa
baLV‚y djuk
1-
www.lg.com esa tk,a vkSj vius
ns’k dk p;u djsaA
2- liksVZ dk p;u djsa vkSj eksckby
Qksu liksVZ ij tk,¡A
3- vius ihlh ij],yth ihlh lqbV
dk baLV‚ys’ku iwjk djus ds fy,
LØhu ij fn, funsZ’kksa dk ikyu
djsaA
lans’k½
lans’k Hkstus
‘9’
nckdj
Qksu l‚¶Vos;j viMsV
baVjusV ls ,yth eksckby Qksu
l‚¶Vos;j dks v|ru djuk
bl dk;Z ds mi;ksx ds ckjs esa
vf/kd tkudkjh ds fy,] ij tk,a
http://update.lgmobile.com ;k foftV
djsa
http://www.lg.com/common/index.
jsp ----> ns’k dk p;u djsaA ;g Qhpj
lfoZl lsaVj ij x, cxSj vkidks
baVjusV ls vius Qksu ds QeZos;j dks
uohu laLdj.k esa viMsV djus dh
vuqefr nsrk gSA
pwafd eksckby Qksu QeZos;j viMsV
ds fy, v|ru djus dh çfØ;k ds
nkSjku ç;ksäk dks iw.kZ /;ku nsus dh
vko’;drk gksrh gS] —i;k vkxs c<+us
ls igys gjsd pj.k ij fn[kk, tkus
okys lHkh funsZ’kksa vkSj uksV~l dk ikyu
djsaA —i;k /;ku nsa fd uohuhdj.k
çfØ;k ds nkSjku
cSVjh dks gVkus ls vkids eksckby Qksu
dks xaHkhj {kfr igqap ldrh gSaA
USB MsVk dscy ;k
27
Page 69

lqjf{kr vkSj dq’ky mi;ksx ds fy, fn’kkfunsZ’k
lqjf{kr vkSj dq’ky mi;ksx ds fy, fn’kkfunsZ’k
jsfM;ks vko`fÙk ÅtkZ ds fy,
,Dlikstj
—i;k bu ljy funsZ’kksa dks i<+saA bu
fn’kkfunsZ’kksa dk ikyu ugha djuk
[krjukd ;k voS/k gks ldrk gSA
jsfM;ks vko`fÙk ÅtkZ ds fy,
,Dlikstj
jsfM;ks rjax ls laidZ rFkk
fof’k”V vo’kks”k.k nj
(SAR)
lwpukA ;g eksckby Qksu
e‚My
LG-A290
fMtkbu jsfM;ks
rjaxksa ds fy, ykxw lqj{kk
vko’;drkvksa ds ikyu djus ds
fy, fMtkbu fd;k x;k gSA
;s vko’;drk,a oSKkfud fn’kk
funsZ’kksa ij vk/kkfjr gS] ftuesa
lHkh O;fä;ksa] pkgs os ftl Hkh
vk;q ds gksa ;k mudh tSlh Hkh
LokLF; fLFkfr gks] dh lqj{kk dks
lqfuf’pr okyh lqj{kk ekftaZl
‘kkfey gSaA
Û jsfM;ks rjax ds laidZ ds fn’kk
funsZ’kksa esa ,d mik; bdkbZ ‘kkfey
gksrh gS ftls fof’k”V vo’kks”k.k nj
(SAR) ds :i esa tkuk tkrk gSA
;k
(SAR) dk ijh{k.k lHkh ç;qä cSaM
esa Qksu ds mPpre çkekf.kd ikoj
28
ysoy ij mRltZu dh ekudhdj.k
fof/k }kjk laiUu fd;k tkrk gSA
(SAR)ysoy rFkk ,yth ds
Û Hkys
fofHkUu Qksu e‚Myksa esa varj jgrk
gS] ij os lHkh jsfM;ks rjxksa ds
,Dlikstj ds fn’kk&funsZ’kksa ds
vuqikyu ds fygkt ls fMtkbu
fd, x, gksrs gSaA
Û uku&vk;ksukftax jsfM,’ku ç‚VsD’ku
(ICNIRP) ds varjkZ”Vªh; vk;ksx
Onkjk vuq’kaflr
ÅÙkd ij vkSlru
Û DASY4 }kjk tkap fd, x;s bl
Qksu dk dku ij mPpre
1-14
/kkj.k gksus ds le;
gksrk gSA
Û ;g fMokbl dku ij lkekU;
mi;ksx dh fLFkfr esa ;k ‘kjhj ls
de ls de 1-5
gksus dh fLFkfr esa
fn’kk&funsZ’kksa dk vuqikyu djrk
gSA tc ‘kjhj ij /kkj.k djus gsrq
bLrseky djus ds fy, dSjh dsl]
csYV fDyi ;k gksYMj dk ç;ksx
fd;k tkrk gS] rc blesa /kkrq ekStwn
ugha gksuh pkfg, vkSj mRikn dks
SAR lhek 10 fd-xzk
2W/fd-xzk gSA
W/kg ¼10 xzk½ gS rFkk ‘kjhj ij
N/AW/kg(10g)
cm nwj bLrseky
RF ,Dlikstj
SAR eku
Page 70

lqjf{kr vkSj dq’ky mi;ksx ds fy, fn’kkfunsZ’k ¼tkjh½
lqjf{kr vkSj dq’ky mi;ksx ds fy, fn’kkfunsZ’k ¼tkjh½
mRikn dh ns[kHkky vkSj vuqj{k.k
j[kj[kko
vkids ‘kjhj ls de ls de 1-5cm
dh nwjh ij j[kuk pkfg,A MsVk
QkbYl ;k lans’kksa dks lapfjr djus
ds Øe esa bl fMokbl dk usVodZ
ds lkFk xq.koÙkkiw.kZ dusD’ku gksuk
pkfg,A dqN fLFkfr;ksa esa MsVk Qkby
;k lans’kksa ds lapj.k esa ,sls dusD’ku
ds miyC/k gksus rd foyEc gks
ldrk gSA lapj.k ds iwjk gksus rd
mijksä nwjh funsZ’k dk ikyu djuk
pkfg,A
mRikn dh ns[kHkky vkSj vuqj{k.k
j[kj[kko
bl fo’ks”k Qksu e‚My ds fy,
Loh—r cSVfj;k¡] pktZlZ vkSj
lgk;d midj.kksa dk gh mi;ksx
djsa fdlh Hkh nwljs çdkj dk
mi;ksx djus ij Qksu ij ykxw
gksus okys vuqeksnu ;k o‚jaVh
vekU; gks ldrs gSa vkSj ;g
[krjukd gks ldrk gS A
Û bl ;wfuV dks vyx u djsaA lq/kkjus
dh vko’;drk gksus ij bls ;ksX;
lsok rduhf’ku ds ikl ys tk,¡A
Û LG ds ,dkf/kdkj ij okjaVh ds rgr
gksus okys ejEer esa fjIyslesaV ikVZ~l
;k cksMZ~l ‘kkfey gks ldrs gSa] tks
u, ;k fjdaMh’kaM gks ldrs gSa] c’krsZ
fd mudk dk;Z fjIysl fd, tkus
okys ikVZ~l ds leku gksA
Û fctyh okys midj.kksa tSls Vhoh]
jsfM;ks] vkSj ilZuy daI;wVj ls
nwj j[ksaA
Û rki lzksrksa tSls jsfM,VlZ rFkk dqdj
bR;fn ls bl ;wfuV dks nwj j[kk
tkuk pkfg,A
Û bls u fxjk,aA
Û bl ;wfuV dks ;kaf=d daiu ;k
>Vds ls cpk,aA
Û dlh ml {ks= esa tgk¡ vkidks fo’ks”k
fu;euksa ds vuqikyu dh vko’;drk
gS] vki esa Qksu can j[ksaA mnkgj.k
ds fy, vius Qksu dk bLrseky
vLirky esa u djsa D;ksafd ,slk djus
ls laosnu’khy esfMdy midj.k
çHkkfor gks ldrs gSaA
Û pktZ gksus ds nkSjku Qksu dks xhys
gkFkksa ls u Nq,aA blls fctyh dk
>Vdk yx ldrk gS vkSj vkids
Qksu dks xaHkhj uqdlku igqap
ldrk gSA
Û gSaMlsV dks fdlh Toyu’khy lkexzh
29
Page 71

ds lehi u pktZ djsa blls gSaMlsV
n{k Qksu v‚ijs’ku
bysDVª‚fud midj.k
xeZ gks ldrk gS vkSj vkx ls tqM+h
nq?kZVuk ?kV ldrh gSA
Û ;wfuV ds ckgjh lQkbZ ds fy, ,d
lw[ks diM+s dk mi;ksx djsa ¼’kjkc ]
csathu tSls foyk;dksa dk mi;ksx
u djsa½-
Û Qksu tc uje pht+ ij j[kk gks rks
bls pktZ u djsaA
Û Qksu dks vPNh goknkj {ks= esa pktZ
fd;k tkuk pkfg,A
Û bl bdkbZ dks vR;f/kd /kweziku ;k
/kwy ds laidZ esa u ys tk,aA
Û ØsfMV dkMZ ;k ifjogu fVdV ds
vkxs Qksu u j[ksa] ;g eSXusfVd
fLVªIl esa ekStwn tkudkfj;ksa dks
çHkkfor dj ldrk gSA
Û Qksu dks fdlh rst oLrq dh enn
ls u idM+sa] blls Qksu dks uqdlku
igqap ldrk gSA
Û Qksu dks fdlh rjy inkFkZ ;k ueh
ds laidZ esa u ys tk,aA
Û b;jQksu tSls ,sDlslsjht dk mi;ksx
lko/kkuhiwoZd djsaA fcuk otg ,aVhuk
dks u Nq,aA
Û vkidk Qksu ,d bysDVª‚fud
fMokbl gSA tks lkekU; v‚ijs’ku ds
30
nkSjku rki mRiUu djrk gSA
i;kZIr osafVys’ku dh vuqifLFkfr
esa vR;ar yacs le; rd çR;{k]
Ropk ds laidZ esa vkus ls cspSuh
;k gYdh tyu gks ldrh gSA vr%
dk;Z ds nkSjku ;k Bhd ckn ds;j
dk bLrseky djsaA
n{k Qksu v‚ijs’ku
bysDVª‚fud midj.k
lHkh eksckby Qksu esa O;o/kku mRiUu
gks ldrk gS] tks blds çn’kZu dks
çHkkfor dj ldrk gSA
Û vius eksckby dk mi;ksx fpfdRlk
midj.kksa ds ikl fcuk vuqefr ds u
djsaA islesdj ij Qksu j[kus ls cpsa
mnkgj.k ds fy,]vius Åij dh tsc
esa bls u j[ksaA
Û dqN Jo.k ;a=ksa dks eksckby Qksu ls
ck/kk mRiUu gks ldrh gSA
Û gYds O;o/kku ls Vhoh] jsfM;ks] ihlh]
vkfn çHkkfor gks ldrs gSaA
Page 72

lqjf{kr vkSj dq’ky mi;ksx ds fy, fn’kkfunsZ’k ¼tkjh½
lqjf{kr vkSj dq’ky mi;ksx ds fy, fn’kkfunsZ’k ¼tkjh½
lM+d lqj{kk
viuh Jo.k {kerk dks uqdlku
ls cpk,aA
lwpuk
dkap ikVZ~l
lM+d lqj{kk
Mªkbo djrs le; eksckby Qksu ds
mi;ksx ls tqM+s dkuwuksa vkSj fofu;eksa
dh tk¡p dj ysa A
Û Mªkbfoax djrs le; Qksu dks gkFk
ls u idM+saA
Û Mªkbfoax ij iwjk /;ku nsA
Û vxj miyC/k gks rks gSaM Ýh fdV
dk ç;ksx djsaA
Û ;fn okgu pykrs le; vko’;d gks]
rks d‚y djus ;k mÙkj nsus ls igys
okgu dks lM+d ds fdukjs mrkj ysaA
Û RF ÅtkZ vkidh dkj dh dqN
bysDVª‚fud ç.kkfy;ksa tSls dkj
LVhfj;ks rFkk lqj{kk midj.k dks
çHkkfor dj ldrh gS&
Û tc vkidk okgu ,;j cSx ls
lqlfTtr gks] rks blesa LFkkfir ;k
iksVsZcy ok;jysl midj.k ls
ck/kk u Mkysa]blls ,;j cSx ds
dke u djus ;k Bhd ls dke u
djus dh otg ls xaHkhj uqdlku gks
ldrk gSA
viuh Jo.k {kerk dks uqdlku
ls cpk,aA
;fn vki yacs le; rd rst vkokt
lqusaxs rks vkidh Jo.k {kerk dks
uqdlku igqapsxkA blfy, vkidks
lykg nh tkrh gS fd vius dku ds
ikl vius gSaMlsV dks can ;k pkyw u
djsaA ge ;g Hkh vuq’kalk djrs gSa fd
laxhr rFkk d‚y dk o‚Y;we lgh Lrj
ij lsV j[ksaA
lwpuk:
vR;f/kd /ofu b;jQksu ds
ncko ls Jo.k {kerk dks uqdlku
igqap ldrk gSA
dkap ikVZ~l
vkids eksckby midj.k ds dqN fgLls
dkap ls cus gksrs gSaA ;fn vkidk
eksckby fdlh dM+h lrg ij fxjrk
gS] ;k blds lkFk tksj dk VDdj gks
rks ;g dkap VwV ldrh gSA ;fn dkap
VwV tk, rks mls u Nq,a ;k gVkus dk
ç;kl u djsaA vf/k—r lsok çnkrk
Onkjk VwVh gqbZ dkap ds cnys tkus rd
vius eksckby dk ç;ksx can dj nsaA
31
Page 73

foLQksV {ks=
foLQksV {ks=
laHkkfor foLQksVd okrkoj.k
foeku esa
cPps
vkikrdkyhu d‚y
cSVjh dh tkudkjh vkSj bldh
ns[kHkky
LG
LG
,sls {ks= esa tgka foLQksV fd;k tk
jgk gks vius Qksu dk bLrseky u
djsaA çfrca/kksa dk /;ku j[ksa vkSj
fu;e&dkuwuksa dk ikyu djsaA
laHkkfor foLQksVd okrkoj.k
Û blh ba/ku Hkjus okys LFkku ij vius
Qksu dk bLrseky u djsaA
Û ba/ku ;k jlk;u ds ikl bldk
ç;ksx u djsaA
Û ifjogu dh nqdku gS ;k ugha
vius okgu ds mlh dEikVZesaV
esa Toyu’khy xSl] rjy ;k
foLQksVdksa dks u j[ksa ftlesa vki
viuk eksckby Qksu ;k ,sDlsljht
j[krs gSaA
foeku esa
ok;jysl midj.kksa ls foeku esa
O;o/kku mRiUu gks ldrk gSA
Û fdlh Hkh foeku esa lokj gksus ls
igys viuk eksckby Qksu can djsaA
Û pkyd ny dh vuqefr ds cxSj vki
bldk bLrseky Hkwfe ij u djsaA
32
cPps
vius Qksu dks ,sls lqjf{kr LFkku ij
j[ksa tgka NksVs cPps u igqap ldsaA
blds dbZ NksVs&NksVs iqtsZ gksrs gSa] tks
muds xys esa vVd ldrs gSaA
vkikrdkyhu d‚y
lHkh eksckby usVodZ esa vkikrdkyhu
d‚y miyC/k ugha gks ldrs gSA vr%
vkidks vkikrdkyhu d‚yksa ds fy,
iwjh rjg ls Qksu ij fuHkZj ugha jguk
pkfg,A vius LFkkuh; lsok çnkrk ls
blds ckjs esa iwNrkN djsaA
cSVjh dh tkudkjh vkSj bldh
ns[kHkky
Û fjpktZ djus ls igys cSVjh dks
iwjh rjg ls fMLpktZ djus dh
vko’;drk ugha gksrhA vU; cSVjh
ç.kkfy;ksa ds foijhr dksbZ ,slk Le`fr
çHkko ugha gS] tks cSVjh ds çn’kZu
dks çHkkfor djsA
LG
cSVjh vkSj pktZj dk gh
Û dsoy
mi;ksx djsaA
dh vk;q dks vf/kdre j[kus ds fy,
fMtkbu fd;k x;k gSA
Û cSVjh iSd dks vyx&vyx u djsa
;k ‘k‚VZ lfdZV u mRiUu djsaA
LG
pktZj dks cSVjh
Page 74

lqjf{kr vkSj dq’ky mi;ksx ds fy, fn’kkfunsZ’k ¼tkjh½
lqjf{kr vkSj dq’ky mi;ksx ds fy, fn’kkfunsZ’k ¼tkjh½
Û cSVjh ds /kkrq okys fdukjs dks lkQ
j[ksaA
Û tc ;g Lohdk;Z çn’kZu u dj lds
rks bls cny nsaA cSVjh iSd dks
cnys tkus ls igys 100 ckj fjpktZ
fd;k tk ldrk gSA
Û mi;ksfxrk vf/kdre djus ds fy,
;fn cSVjh dks yacs le; bLrseky
esa u yk;k x;k gks] rks bls fjpkt
dj ysaA
Û cSVjh pktZj dks lh/ks /kwi esa u ys
tk,a] ;k bldk bLrseky ckFk:e
tSls mPp vknZzrk okys LFkku esa
u djsaA
Û cSVjh dks xeZ ;k BaMs LFkkuksa esa u
NksM+sa] D;ksafd blls cSVjh dk çn’kZu
{kerk de gks ldrh gSA
Û vxj cSVjh dks xyr çdkj ls
cnyk tkrk gS rks foLQksV dk [krjk
jgrk gSA
Û fuekZrk ds funsZ’kksa ds vuqlkj gh
cSVjh dk bLrseky djsaA tc Hkh
laHko gks —i;k bls fjlkbdy djsaA
bls ?kjsyw dpjs ds :i esa u QsadsaA
Û ;fn vkidks cSVjh cnyus dh t:jr
gS]bls vki vius fudVre vf/k—r
,yth bysDVª‚fuDl lsok dsaæ ij ys
tk,a ;k lgk;rk ds fy, Mhyj ds
ikl ysdj tk,aA
Û pktZj dks vuko’;d fctyh dh
[kir ls cpkus ds fy, iwjh rjg ls
pktZ gks tkus ds ckn pktZj dks oky
l‚dsV ls ckgj fudky nsaA
Û okLrfod cSVjh vk;q usVodZ
dafQxjs’ku] ç‚MDV lsfVax] mi;ksx
iSVuZ] cSVjh rFkk okrkoj.k dh
ifjfLFkfr;ksa ij fuHkZj djrh gSA
33
Page 75

lgk;d midj.k
lgk;d midj.k
lwpuk
:
LG
VSoªy
vMSiVj
ekud
cSVjh
mi;ksxdrkZ
ekxZnf’kZdk
LG-A290
gsMlsV
vkids eksckby Qksu ds fy, fofHkUu çdkj ds ,sDlsljht gksrs gSaA vki
viuh O;fäxr lapkj vko’;drkvksa ds vuqlkj bu fodYiksa dk p;u dj
ldrs gSaA
VSoªy
vMSiVj
ekud
cSVjh
gsMlsV
lwpuk
Û ges’kk okLrfod
ij vkidh okjaVh vekU; gks ldrh gSA
Û vyx&vyx {ks=ksa esa lgk;d midj.k vyx&vyx gks ldrs gSaA vf/kd
tkudkjh ds fy, —i;k vius {ks=h; lsok daiuh ;k ,tsaV ls laidZ djsaA
34
LG
lgk;d midj.kksa dk gh mi;ksx djsaA ,slk u djus
CD
mi;ksxdrkZ
ekxZnf’kZdk
LG-A290
•
Page 76

rduhdh MsVk
rduhdh MsVk
ifjos’k rkieku
vf/kdre++
0
U;wure
0
ifjos’k rkieku
vf/kdre++: $55
U;wure: &10
DECLARATION OF CONFORMITY
Hereby, LG Electronics declares that this
LG-A290 product is in compliance with
the essential requirements and other
relevant provisions of Directive 1999/5/EC.
A copy of the Declaration of Conformity
can be found at http://www.lg.com/global/
support/cedoc/RetrieveProductCeDOC.jsp
C ¼fMLpkftaZx½+ $450C (pkftaZx)
C
35
Page 77

leL;k fuokj.k
leL;k fuokj.k
leL;k
laHko lek/kku
LG
leL;k
VsyhQksu pkyw ugha fd;k
tk ldrk gSA
[kkyh cSVjh cSVjh pktZ djsa A fMLIys ij pkftaZx lwpuk ns[ksaA
cSVjh Bhd ls pktZ ugha
djrk gS ;k Qksu dHkh
dHkh vius vki can gks
tkrk gSA
cSVjh dk mi;ksx le;
de gks tkrk gSA
pkftaZx =qfV & jsat ds
ckgj rkieku
pkftaZx =qfV & xyr
pktZj
pkftaZx =qfV &
nks”kiw.kZ cSVjh
pkftaZx =qfV &pktZ
djrs oä cSVjh vkbdu
çdV ugha gksrk gS
36
laHko lek/kku
cSVjh ckgj fudkys vkSj fQj mls iqu% vanj
MkysaAfQj Qksu dk ikoj v‚u cVu nck,¡A
fdà eqyk;e diM+s ls Qksu rFkk cSVjh nksuksa ds
pkftaZx laidZ lrgksa dks iksNsaA
;fn cSVjh dk le; de gks tkrk gS] rc ;g
mi;ksxdrkZ okrkoj.k] dbZ lkjs d‚yksa] ;k detksj
flXuyksa ds dkj.k gks ldrk gSA
lqfuf’pr djsa fd ifjos’k dk rkieku lgh gks]
FkksM+h nsj ds fy, çrh{kk djsa] vkSj rc iqu% pktZ
djsaA
LG
dsoy ewy
djsaA
cSVjh cnysaA
cSVjh [kkyh gks ;k ,d yacs le; ds fy, ugha
bLrseky fd;k x;k gSA LØhu ij cSVjh vkbdu
fn[kkus ds fy, dqN le; yx ldrk gSA
lgk;d midj.k dk gh mi;ksx
Page 78

leL;k
leL;k
laHko lek/kku
Qksu dksM ;k ikloMZ
Hkwy x,A
PUK ,aVj djsaA fiu dksM rhu ckj yxkrkj :i ls xyr ntZ
usVodZ xqe vki ,d detksj ladsr {ks= esa gks ldrs gSaA
vkius ,d uEcj esa
ços’k fd;k gS] ysfdu
bls Mk;y ugha fd;k
x;k FkkA
vkidk laoknnkrk vki
rd ugha igq¡p ldrkA
laHko lek/kku
fMQ‚YV Qksu dksM gS “0000”.
fd;k x;k gS vkSj vc Qksu vo#) gks x;k gSA
vkids lsok çnkrk }kjk fn;k x;k PUK ntZ djsaA
pysa&fQjsa vkSj iqu% ç;kl djsaA vki ,sls fodYi
ikus dk ç;kl dj jgs gSa] ftlds fy, vkius lsok
pkyw ugha djokbZ gSA vf/kd tkudkjh ds fy, lsok
çnkrk ls laidZ djsaA
lqfuf’pr djsa fd vkius d‚y cVu nck;k gSA
lqfuf’pr djsa fd vkius lgh usVodZ lsok yh gSA
/;ku j[ksa fd vkius vkmV xksbax lsok can djus
okys fodYi dks lsV u fd;k gSA ,fj;k dksM ,aVj
djus dk /;ku j[ksaA
lqfuf’pr djsa fd vkidk Qksu fLop v‚u gSA
lqfuf’pr djsa fd vki usVodZ lsok rd igq¡p jgs
gSaA lqfuf’pr djsa fd vkius dksbZ budfeax d‚y
NksM+us okys fodYi dks lsV ugha fd;k gSaA
37
Page 79

leL;k fuokj.k
leL;k fuokj.k
leL;k
laHko lek/kku
LG
leL;k
vkidk laidZdrkZ vkidh
vkokt dks lqu ugha
ldrkA
d‚y dh vkokt xq.koÙkk
[kjkc gSA
tc vki fdlh uEcj dks
fjd‚y djrs gSa rks dksbZ
uEcj Mk;y ugha gksrkA
czkmtj dk mi;ksx ugha
dj ldrsA
;fn mijksä fn’kkfunsZ’kksa
lss vkidh leL;k gy
djus esa enn ugha
feyrh gSA
38
laHko lek/kku
lqfuf’pr djsa fd vkius ykmMLihdj can dj fn;k
gSA bl ckr dk /;ku j[ksa fd vki vius Qksu dks
vius eqag ds ikl j[ksaA ekbØksQksu Qksu ds ry
ij fLFkr gksA
fMLIys ij flXuy ‘kfä ds ladsr dh tkap djsaA
ifê;ksasa dh la[;k flXuy ‘kfä dks ladsr djrh gSA
Qksu dks FkksM+k fgyk,a ;k ;fn vki fdlh ?kj esa gSa
rks f[kM+dh ds lehi pys tk,aA
uEcj lgh rjg ls lafpr fd;k x;k gS bldh
tkap djus ds fy, Qksucqd lpZ Qhpj dk bLrseky
djsaA ;fn vko’;d gks rks uEcj dks iqu% lqjf{kr
¼lso½ djsaA
vkids lClfØI’ku esa MsVk {kerk ‘kkfey ugha gSA
vkidks ;g lsok pkyw djus ds fy, vius lsok
çnkrk ls laidZ djuk gksxkA
vius eksckby Qksu dh e‚My la[;k vkSj leL;k
dk ,d Li”V fooj.k fy[k ysaA lgk;rk ds fy,
vius Qksu Mhyj ;k
LG
lsok dsaæ ls laidZ djsaA
Page 80

Customer Information Center
For any query related to the after sales service and customer
support please contact us at below details
1800-180-9999
(Toll Free)
24 × 7
CALL CENTER
5757554
(Send SMS)
www.lg.com
serviceindia@lge.com
39
 Loading...