

LG LGA190 Owner’s Manual [in]

ENGLISH
fgUnh
USER GUIDE
LG-A190
P/NO : MFL67217602 (1.1) www.lg.com
Note: Changing the local language settings.
You can change the language setting for your phone by pressing
Menu and Settings, then select Language.
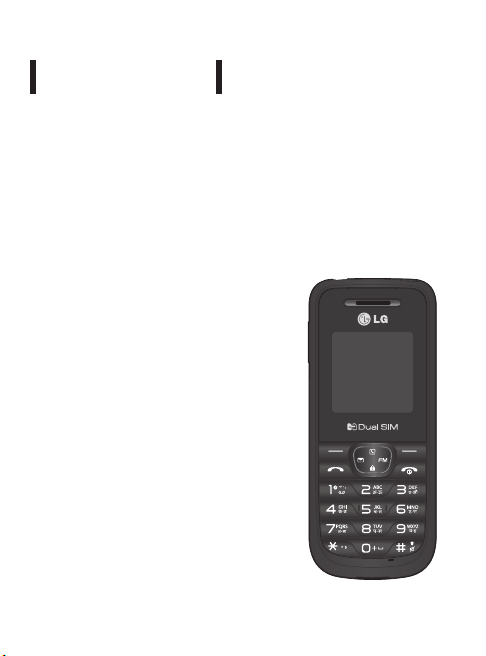
LG- A190
This guide will help you to understand your new mobile phone. It will
provide you with useful explanations of the features on your phone.
Some of the contents of this manual may dier from your phone
depending on the phone software or your service provider.
Product Registration Program
Dear LG Mobile customer,
You are entitled for one year warranty on this
model.
For automatic registration, One SMS containing
the IMEI no. of your phone will be automatically
sent to LG servers @ Rs.0.06p only.
In return you will get one year warranty from the
date of purchase at any authorized LG Mobile
Service center.
We assure you the information will be kept
condential and used for internal purpose only.
LG Electronics India Pvt. Ltd. does not have any
revenue sharing with any cellphone operators for
proceeds from SMS of automatic registration.
USER GUIDE

2
Contents
Getting to know your phone .........3
Installing the SIM Card and
Charging the Battery .........................4
Display Information ...........................5
Menu and Options .............................6
Keypad Information...........................7
Menu Map .......................................... 10
Entering Text .....................................11
Making a Call ..................................... 12
Messaging .......................................... 14
Contacts .............................................. 15
Call history .........................................17
Games .................................................. 17
FM radio (Wireless FM) ..................18
Proles ................................................. 18
Tools ..................................................... 19
Organiser ............................................ 20
Settings ...............................................20
Guidelines for safe and ecient
use ......................................................... 23
Accessories ........................................30
Troubleshooting .............................. 31
Technical Data .................................. 34
3
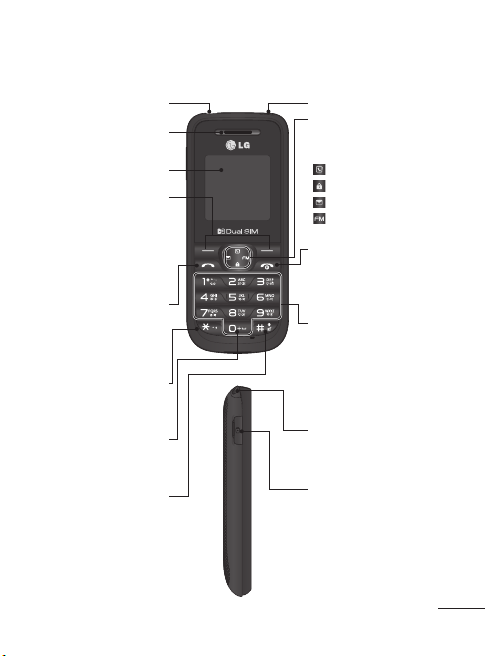
Getting to know your phone
Earphone jack Torch
Earpiece
Display screen
Soft keys
Each of these keys
performs the functions
indicated by the text on
the display immediately
above them.
Send key
You can dial a phone
number and answer
incoming calls.
* Key (Symbol key)
Insert symbol when
writing a message.
Insert space when writing
Long press this key to
enter Silent Mode.
0 Key
a message.
# Key
Navigation keys
Use for quick access to
phone functions.
(up) : Contacts
(down) : Keypad Lock
(left) : Messaging
(right) : FM radio
End/Power key
Allows you to power the
phone on or o, end calls,
or return to Standby mode.
Alphanumeric keys
Most of the time, the
numeric keys are used
to input numbers or
characters.
Hand Strap Hole
Charger port

4
Installing the SIM Card and Charging the Battery
Installing the SIM Card
When you subscribe to a mobile
phone network, you are provided
with a plug-in SIM card which is
loaded with your subscription
details, such as your PIN, any
optional services available and
many others.
Important!
› The plug-in SIM card and its
contacts can easily be damaged
by scratches or bending, so be
careful when handling, inserting
or removing the card. Keep all
SIM cards out of the reach of
small children.
› only 2G SIM supported
1 2 3
4 5 6
Illustrations
1 Open battery cover
2 Remove the battery
3 Insert your SIM
4 Insert the battery
5 Close the battery cover
6 Charge your battery
WARNING: Do not remove
the battery while the phone is
switched on, as this may damage
the phone.
5
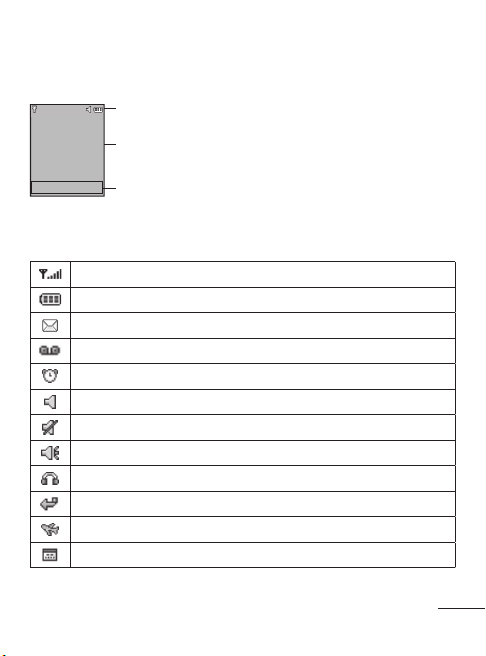
Display Information
Icon areas
Text and graphic area
Menu Contacts
Soft key indications
On-Screen Icons
Tells you the strength of the network signal.
Indicates the battery charge level.
Indicates new text message(s).
Indicates new voice message(s).
Indicates that the alarm clock is set.
Indicates that your phone is using the general settings.
Indicates that your phone is using the silent settings.
Indicates that your phone is using the outdoor settings.
Indicates that your phone is using the headset setting.
Indicates that all calls are being diverted to another number.
Indicates that your phone is in Flight mode.
Indicates new schedule(s).
6
Menu and Options Keypad Information
3 X 4 Keypad Low tier V 0.7
LGE Confidential
Ǒ¡Ȳȣ
1
ʜȱ ʜȲ ʜȬ ʜQ ʜP
1 . , ? !
2
ʜȡ ǔʜ ʜȢ ʜǕ ʜǗ ʜǙ \ ] ^ _ ` a b2D
3
ʜȴ ʜȰ ʜȭ ʜȪ ʜȫ ʜȨ f g d j k h3E
4
4F ¤ ¥ ¦
5
5G «
6
6H ° ±
7
7I ·
8
8J ¹
9
¡9K ¾ À ½
0
0
B
3 X 4 Keypad Low tier V 0.7
LGE Confidential
Multi-tap sequence table_ Kannada
1
ƈr ƈ2 ƈ31y
. , ? !
2
ƈe ƈf ƈfs ƈh ƈi ƈj 4 5 6 7 89:2z
3
ƈl ƈls ƈlt ƈli ƈlis ƈq < = > ? @ A 3 {
4
B C D E F 4 |
5
G H I J K 5 }
6
L M N O P 6 ~
7
Q R S T U 7
8
V W X Y Z 8
9
[ \ ^ ` a
b
c d _ 9
0
0
B
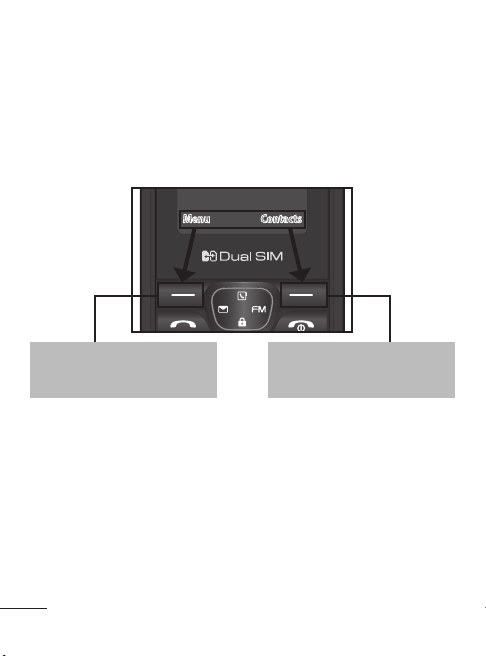
Your phone oers a set of functions that allow you to customise it. These
functions are arranged in menus and sub-menus, which are accessed via
the left and right soft keys. The label at the bottom of the display screen
immediately above the soft keys indicates their current function.
Menu Contacts
Press the left soft key to
access the available menu.
Press the right soft key
to access contacts.

7
Hindi
3 X 4 Keypad Low tier V 0.7
LGE Confidential
Ǒ¡Ȳȣ
1
ʜȱ ʜȲ ʜȬ ʜQ ʜP
1 . , ? !
2
ʜȡ ǔʜ ʜȢ ʜǕ ʜǗ ʜǙ \ ] ^ _ ` a b2D
3
ʜȴ ʜȰ ʜȭ ʜȪ ʜȫ ʜȨ f g d j k h3E
4
4F ¤ ¥ ¦
5
5G «
6
6H ° ±
7
7I ·
8
8J ¹
9
¡9K ¾ À ½
0
0
B
3 X 4 Keypad Low tier V 0.7
LGE Confidential
Multi-tap sequence table_ Kannada
1
ƈr ƈ2 ƈ31y
. , ? !
2
ƈe ƈf ƈfs ƈh ƈi ƈj 4 5 6 7 89:2z
3
ƈl ƈls ƈlt ƈli ƈlis ƈq < = > ? @ A 3 {
4
B C D E F 4 |
5
G H I J K 5 }
6
L M N O P 6 ~
7
Q R S T U 7
8
V W X Y Z 8
9
[ \ ^ ` a
b
c d _ 9
0
0
B
Kannada
8
3 X 4 Keypad Low tier V 0.7
LGE Confidential
Multi-tap sequence table_ Marathi
1
ʜȲ ʜȱ
ʜȬ ʜQ1C
. , ? !
2 ʜȡ ǔʜ ʜȢ ʜǕ ʜǗ ʜǙ \ ] ^ _ ` a b
2
D
3 ʜȴ ʜȭ ʜȰ ʜȪ ʜȫ ʜȨ f g d j k h
3
E
4
4
F ¤ ¥ ¦
5
5
G «
6
6
H ° ±
7
7
I ·
8
8
J
¹
9 ¡
9
K ½ ¾
À c m
ʜǝ ʜǞ
0
0
B
3 X 4 Keypad Low tier V 0.7
LGE Confidential
Multi-tap sequence table_ Tamil
1
Àc 5 1B
. , ? !
2
ÀX ÀY ÀZ À[ À\67 8 9 : ; 2
f
3
]À ^À _À ]ÀX ^ÀX ]Àd < = > ? @ A
3
g
4
B C D F
4
h
5
G H I J 5 i
6
L M N 6 j
7
O Q T 7 k
8
S R P K 8 l
9
E U V W 9 m
0
0
Ʈ
Telugu
3 X 4 Keypad Low tier V 0.7
LGE Confidential
Multi-tap sequence table_ Telugu
1
ɣ2 ɣ3 ɣ4 ɣs11
. , ? !
2
ɣf ɣg ɣh ɣi ɣj ɣk 5 6 7 8 9:; 2
3
ɣm ɣn ɣmu ɣp ɣq ɣr = > ? @ A B 3
4
C D E F G 4
5
H I J K L 5
6
M N O P Q 6
7
R S T U V 7
8
W X Y Z [ 8
9
\ ] _ a bcd e ` ^ 9
0
0
0
3 X 4 Keypad Low tier V 0.7
LGE Confidential
Multi-tap sequence table_ Bengali
1
ÝàÝá Ýâ ÝĜ
11| . , ? !
2
Ýđ ĒÝ Ýē ÝĔÝĕa ä i æ u è é22
3
e ì o î33
4
ï ð ñ ò ó44
5
ô õ ö ÷ ø55
6
ù ú û Ğ ü ğ ý66
7
þ ÿ Ā ā Ă77
8
ă Ą ą Ć ć88
9
Ĉ Ġ ĉ Ċ ċ Č č Ď99
0
0
o
Bengali

9
Marathi
3 X 4 Keypad Low tier V 0.7
LGE Confidential
Multi-tap sequence table_ Marathi
1
ʜȲ ʜȱ
ʜȬ ʜQ1C
. , ? !
2 ʜȡ ǔʜ ʜȢ ʜǕ ʜǗ ʜǙ \ ] ^ _ ` a b
2
D
3 ʜȴ ʜȭ ʜȰ ʜȪ ʜȫ ʜȨ f g d j k h
3
E
4
4
F ¤ ¥ ¦
5
5
G «
6
6
H ° ±
7
7
I ·
8
8
J
¹
9 ¡
9
K ½ ¾
À c m
ʜǝ ʜǞ
0
0
B
3 X 4 Keypad Low tier V 0.7
LGE Confidential
Multi-tap sequence table_ Tamil
1
Àc 5 1B
. , ? !
2
ÀX ÀY ÀZ À[ À\67 8 9 : ; 2
f
3
]À ^À _À ]ÀX ^ÀX ]Àd < = > ? @ A
3
g
4
B C D F
4
h
5
G H I J 5 i
6
L M N 6 j
7
O Q T 7 k
8
S R P K 8 l
9
E U V W 9 m
0
0
Ʈ
Tamil

Menu Map
1 Messaging
1.1 New message
1.2 Inbox
1.3 Drafts
1.4 Outbox
1.5 Sent
1.6 Listen voicemail
1.7 Info messages
1.8 Templates
1.9 Settings
2 Contacts
2.1 Search
2.2 New contact
2.3 Speed dials
2.4 Copy all
2.5 Delete all
2.6 Memory status
2.7 Information
3 Call history
3.1 All calls
3.2 Missed calls
3.3 Dialled calls
3.4 Received calls
3.5 Call duration
10
4 Games
4.1 Space ball
5 FM radio
6 Profiles
6.1 General
6.2 Silent
6.3 Outdoor
6.4 Flight mode
6.5 Headset
7 Tools
7.1 Torch
7.2 Self call
7.3 Calculator
7.4 Stopwatch
7.5 Unit converter
7.6 World clock
7.7 SIM services
8 Organiser
8.1 Alarms
8.2 Calendar
8.3 Memo
9 Settings
9.1 Dual SIM
9.2 Date & Time
9.3 Language
9.4 Display
9.5 Call
9.6 Auto key lock
9.7 Security
9.8 Power save
9.9 Network
selection
9.10 SOS service
9.* Reset settings
9.# Memory status

You can enter alphanumeric characters via the phone’s keypad. For
example, storing names in Contacts, writing a message and scheduling
events in the calendar all require entering text. To change modes, press
the key.
The input method is displayed in the upper right corner of your phone.
Indicator Function (English Smart mode)
Numeric
Multitap Abc
Multitap abc
Multitap ABC
T9 Mode
In Editor, Press Options Choose “Set T9” Select On. This mode allows
you to enter words with only one keystroke per letter. Each key on the
keypad is associated with more than one letter. T9 mode automatically
compares your keystrokes with an internal linguistic dictionary to
determine the correct word, thus requiring far fewer keystrokes than the
traditional ABC mode.
Note: T9 mode is only available for English and Hindi language.
Turning Your Phone On and O
You can power the phone on and o by pressing or holding the power
key.
11

12
Making a Call
1 Key in the number on the keypad.
2 Press
3 To end the call, press
TIP! To enter + when making an international call, press and hold 0.
Making a call from your contacts
1 Press (up) to open the address book.
2 On the keypad, enter the rst letter of the contact you want to call.
3 To scroll through your contacts, use the up and down navigation keys.
4 Press to initiate the call.
Answering and rejecting a call
When your phone rings, press Accept or press to answer the call.
While your phone is ringing, select Silent to mute the ringing. This
is great if you have forgotten to change your prole to Silent for a
meeting.
Press
TIP! You can change the settings on your phone to answer your calls in dierent
ways. Press Menu, select Settings and choose Call. Select Common settings >
Answer mode and choose Any key or Send key only.
• Any key – You can answer a call by pressing any key.
• Send key only – You can answer a call only by pressing the Send key.
to initiate the call.
.
And to scroll through their dierent numbers, use the left and right
navigation keys.
or Reject to reject the incoming call.

13
Changing your call settings
You can set the menu depending on the call. Press Menu, select
Settings and choose Call > SIM1 or SIM2.
• Call divert – Select methods for diverting calls.
• Call barring – Choose a barring password for all outgoing calls,
outgoing international, outgoing international except to home country,
all incoming calls, or incoming when abroad.
• Call waiting – Select Active or cancel call waiting.
• Fixed dial number – Choosing a PIN2 code to enable xed dial number
lets you restrict calls to only those in Contacts.
Checking your call history
You can check the record of all, missed, dialled, received calls and call
durations. The number and name (if available) are displayed together
with the date and time at which the call was made. You can also view the
number of times you have called. Press Menu, select Call history.

14
Messaging
• New message
1 Press Menu, select Messaging and choose New message.
2 A new message editor will open. The default setting of the message
editor is SMS mode.
3 Enter your message using either the T9 predictive mode or Abc
manual mode or 123 mode. You can switch text input modes by
pressing
4 Press Options and choose Insert to add an Symbol, Template,
Contact, Business card.
5 Press Send to.
6 Enter the phone number or press Options and select Contacts or
Recent list to open your contacts list.
7 Press Options and choose Send.
Note:
Move/Copy to SIM/Phone memory: Messages which are stored in
Phone or SIM memory can be moved/copied either to SIM or Phone
memory.
Send to: You can send SMS to maximum of 3 contacts at a time.
Note:
• To select the desired SIM, press Options > Send to > Add the
recipient > Options > Send via > SIM1 or SIM2.
• Inbox – You will be alerted when you have received a message. It will
also be saved here.
• Drafts – This menu shows the message you have saved.
.

15
• Outbox – This menu allows you to view the message which is about to
be send or that have failed to send.
• S e n t – This menu allows you to view the messages which have already
been sent, including time and content.
• Listen voicemail – This menu provides you with a quick way to access
your voice mailbox.
• Info messages – Info service messages are text messages that are
delivered by the network to your handset.
Note:
• Info. Service is only used for SIM1.
• Templates – There are pre-dened messages in the list. You can view
and edit the template messages or create new messages.
• Settings – This menu allows you to set the features of your network
service provider.
Contacts
You can search for a contact in your Contacts.
1 Press Contacts and choose Search, select Contacts from the Menu
screen or press
2 On the keypad enter the rst letter of the contact you want to call.
3 To scroll through the contacts, use the up and down navigation
keys. To scroll through their dierent numbers use the left and right
navigation keys.
• Search - You can Search for contacts in Phonebook.
Note: Instant searching is available by inputting the initial letter of the
name you want to search.
(right soft key) from the standby screen.

16
• New contact – You can add phonebook entries by using this menu.
• Speed dials – Assign contacts to any keys between 2 and 8.
› SOS Message – (Speed dials > OK > Key 9)
An emergency message can be sent to the predened number’s (3
maximum) by long press of 9 Key. On long press of 9 key, a popup
comes, ‘Set SOS message?’. Press ‘Yes’ then type the required message
and input 3 numbers for which you want to send the message in
emergency mode and press options select Save.
• Copy all – You can copy all entries from the SIM card memory to the
Phone memory or from the Phone memory to the SIM card memory.
• Delete all – You can delete all entries from the SIM card memory or
Phone memory.
• Memory status – You can check the memory status for your SIM and
phone.
• Information
› Service dial numbers – Access the list of service numbers assigned
by your service provider securely.
› Own number – You can save and check your own numbers on the
SIM card.
› Business card – You can save and check your business card
containing information including your name, mobile phone, home,
oce and email, and send it in a message.
Tips! LG Customer Care number is available by default in Contact list
(18001809999).

17
Call history
You can check the record of all, missed, dialled, received calls and call
durations. The number and name (if available) are displayed together
with the date and time at which the call was made. You can also view the
number of times you have called.
• All calls – Displays the lists of all three types (Received/Dialled/Missed
calls) by time.
• Missed calls – This option lets you view the last 20 unanswered calls.
• Dialled calls – This option lets you view the last 20 outgoing calls
(called or attempted).
• Received calls – This option lets you view the last 20 incoming calls.
• Call duration – Allows you to view the duration of your last call, all calls,
dialled calls and received calls.
Games
Your LG- A190 comes with preloaded games to keep you amused when
you have time to spare. Press Menu and select Games.

18
FM radio (Wireless FM)
With embedded FM antenna, you can receive FM radio without an
external earphone. You can listen to your favourite radio station anytime.
Note: In weak FM radio signal area the sensitivity can degrade with
wireless and antenna mode. So it is advisable to insert the ear-mic for
better and enhanced FM quality.
Listening to the radio
1 Press Menu and select FM radio.
2 Select the channel number of the station you would like to listen to.
Note: You can listen to the radio via built-in speaker. Press Options, select
Listen via and choose Speaker when ear-mic is inserted.
Proles
You change your prole, then choose from General, Silent, Outdoor,
Flight mode and Headset.
• General (Menu > Proles> General) – After setting up this prole, the
indicator
• Silent (Menu > Proles> Silent)– Ring tone is disabled and Vibrate
is activated. When you set up this prole, the indicator
displayed on the standby screen.
will be displayed on the standby screen.
will be

19
• Outdoor (Menu > Proles> Outdoor)– This is the default prole. Ring
tone and key tone volume are set to maximum. When you set up this
prole, the indicator
• Flight Mode (Menu > Proles> Flight Mode)– When you set up this
prole, the indicator
• Headset (Menu > Proles> Headset)– When the headset is connected
to the phone, the indicator
You can personalise your call alert type, ring tones, ring volume,
message alert type, message tones, message volume, keypad tones,
keypad volume, eect sound volume and power on/o volume.
will be displayed on the standby screen.
will be displayed on the standby screen.
will be displayed on the standby screen.
Tools
• Torch (Menu > Tools > Torch) – Turn on/o the torch. You can also
directly on/o the torch by holding the up navigation key in idle screen.
• Self call (Menu > Tools > Self call) – This is a useful function for avoiding
awkward situation politely. You can call yourself by setting the time in
self call menu.
Note: Self call can be activated or deactivated from idle screen using
shortcut code #*#.
• Calculator (Menu > Tools > Calculator) – This contains the standard
functions such as Addition, Subtraction, Multiplication and Division.
• Stopwatch (Menu > Tools > Stopwatch) – This option allows you to use
the function of a stopwatch.
• Unit converter (Menu > Tools > Unit converter) – This converts many
measurement into a unit you want.
• World clock (Menu > Tools > World clock) – Allows you to determine
the current time in another time zone or country.
 Loading...