

Page 1

ENGLISH
fgUnh
fgUnh
User Guide
LG-A155
P/NO : MFL67005501 (1.0) www.lg.com
Page 2

Bluetooth QD ID B017062
Page 3
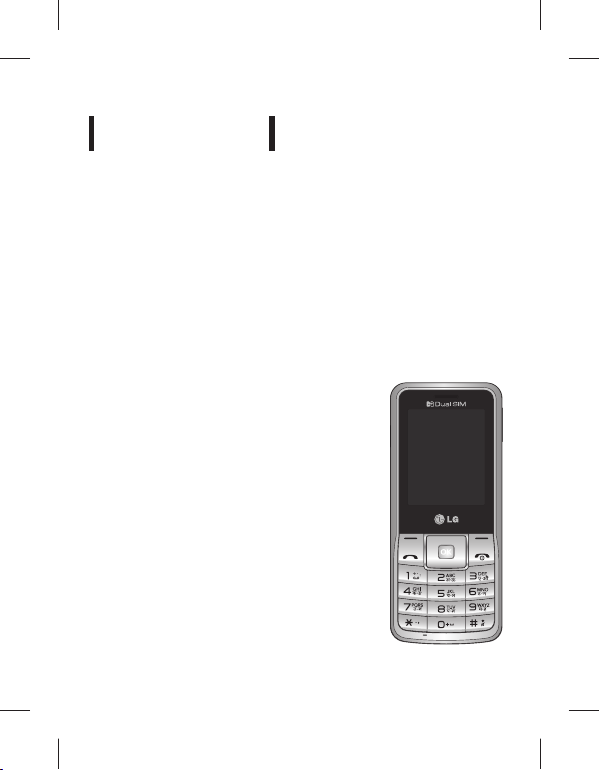
LG-A155
This manual may differ from the phone
depending on the phone software version
and service provider used.
USER GUIDE
Page 4

Contents
Installing the SIM card and the
handset battery ...................................3
Phone Components ..........................4
Selecting functions and
options ...................................................6
Entering Text ........................................7
Installing a Memory Card ................8
How to set the tone ...........................9
FM Radio ............................................. 10
Activating SIM cards ....................... 11
Anti Theft Mobile Tracker
(ATMT) ................................................. 12
Menu Tree...........................................13
Quick feature reference ................. 14
Installing LG PC Suite on your
computer ............................................ 22
Guidelines for safe and
e cient use ....................................... 23
Troubleshooting .............................. 27
Accessories ........................................ 30
Technical Data .................................. 31
2
Page 5
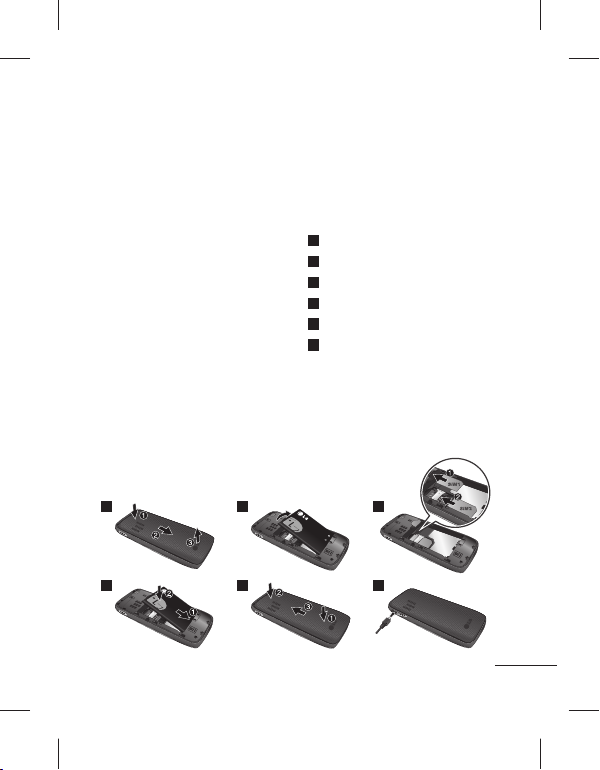
Installing the SIM card and the handset battery
Installing the SIM Card
When you subscribe to a cellular
network, you are provided with a
plug-in SIM card loaded with your
subscription details, such as your
PIN, any optional services available
and many others.
Important! › The plug-in SIM card
and its contacts can be easily
damaged by scratches or bending,
so be careful when handling,
inserting or removing the card.
Keep all SIM cards out of the reach
of small children.
1 2 3
4 5 6
Illustrations
Always switch the device o and
disconnect the charger before
removing the battery.
Remove the back cover.
1
Lift battery away.
2
Insert the SIM card.
3
Insert the battery pack.
4
Attach the back cover.
5
Charge the battery.
6
Note: Fully charge the battery
before using it for the rst time.
3
Page 6
Phone Components
Micro SD memory card
Use for quick access to
- Dial a phone number
- In standby mode: Shows
Alphanumeric keys
Dial numbers in standby
mode and input numbers
or characters in edit
* Key (Symbol key)
Insert symbol when
4
socket
Display screen
Navigation keys
phone functions.
Send key
and answer a call.
a history of calls.
mode.
writing a message.
Earpiece
Micro USB Port /
Earphone jack /
Charger port
Soft keys (Left soft key /
Right soft key)
These keys perform the
function Indicated in the
bottom of the display.
End key
- Switch on/o (hold
down)
- End or reject a call.
# key
Long press to enter silent
mode.
Page 7

Turning Your Phone On and O
1. Press and hold the End key until the power comes on.
2. Press and hold the End key until the power goes o .
Making a call
1. Enter a phone number including the area code.
2. Press the
3. To end the call, press the
[Send] key or select options > call to call the number.
key.
Making an international call
1.
Press and hold the key for the international pre x. The ‘+’ character
automatically selects the international access code.
2. Enter the country code, area code, and the phone number.
3. Press the
[Send] key or select options > call to call the number.
Answering a call
1. When you receive a call, the phone rings.
2. Press the
3. To end the call, press the
[Send] key or select option > OK to answer a call.
key.
5
Page 8
T
T
T
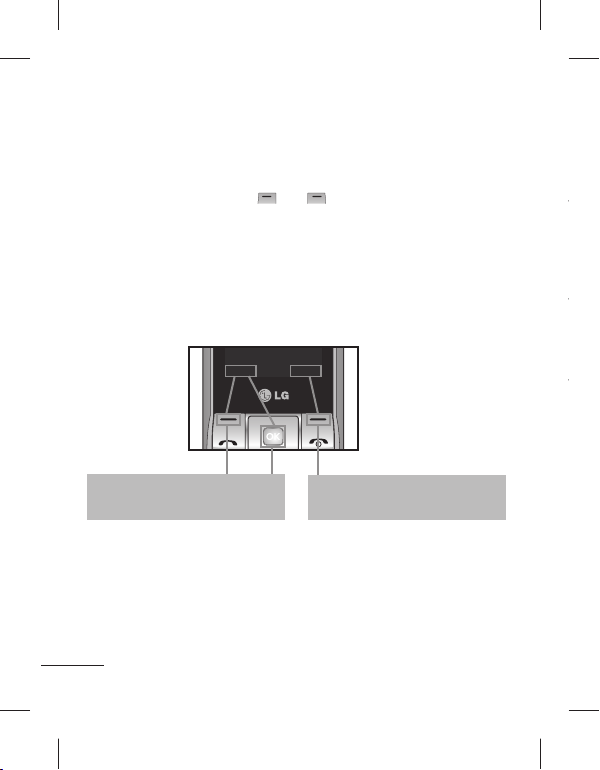
Menu
Names
Selecting functions and options
Your phone o ers a set of functions that allow you to customize the
phone. These functions are arranged in menus and sub-menus, accessed
via the two soft keys marked and . Each menu and sub-menu lets
you view and alter the settings of a particular function.
The roles of the soft keys vary according to the current context; the label
on the bottom line of the screen just above each key indicates its current
role.
Menu
Press the left soft key or center soft
key to access the available Menu.
6
Names
Press the right soft key to access the
available Names (Names).
Page 9

Entering Text
You can enter alphanumeric characters by using the phone’s keypad.
T9 Mode
The T9 predictive text input mode lets you enter words easily with a
minimum number of key presses. As you press each key, the phone
begins to display the characters that it thinks you are typing based on
the built-in dictionary.
123 mode
Type numbers using one keystroke per number. You can also add
numbers while remaining in letter modes by pressing and holding the
desired key.
Symbol Mode
The symbol mode enables you to enter various symbols or special
characters. To enter a symbol, select Options
Key. Use the navigation keys to select the desired symbol and press
the OK key.
Insert Symbol or press
7
Page 10
Installing a Memory Card
Using a memory card can expand the available storage space of your
mobile phone. To insert a memory card, insert it into the card slot until it
clicks into place. Ensure that the golden contact area faces downwords,
as shown in the gure.
Note: A memory card is an optional accessory.
8
Page 11

How to set the tone
You may set up the following di erent pro les to adapt to di erent
environmental conditions.
1. Select Settings from the main menu, then Select Pro les.
2. Select a pro le and press [Options - Customize] to set the ring tone.
3. Press the left soft key [OK] and then you can set the desired ring tone.
Your phone also provides the following options to customize tones/
alert types:
›
Tone settings: Selects a tone type (Incoming call, Power on, Power
o , Message, Keypad).
›
Volume: Sets desired volume (Ringtone, Key tone).
›
Alert type: Selects an alert type (Ring only, Vib. only, Vib. and ring,
Vib. then ring) for the ringing tone.
›
Ring type: Selects a ring type (Single, Repeat).
›
Extra tone: Selects a extra tone (Warning, Error, Camp on).
›
Answer mode: If you select the Any key, you can receive a call by
pressing any key except the key and the right soft key.
9
Page 12

FM Radio
(This function may be di erent in di erent regions.)
Listens to FM radio station. You can enjoy listening FM without using
headset as phone supports wireless FM service.
1. From main menu select Media then select FM radio.
2. Use navigation keypad to search radio station. You can also press
Options to search radio frequency for available channels and
automatically store to the channel list.
3. Press Options to edit the channel list. There are 9 stations you may
pre-set. Your phone provides the following options for FM radio:
›
Record: Records your favorite radio programs.
›
Channel list: Bookmark up to 9 radio stations by entering the
channel name and frequency.
›
Manual input: You can input frequency manually by using this
option.
›
Minimize: This function allows you to do other work on phone by
minimizing FM radio.
›
Auto search: Auto search available channels and automatically store
them to the channel list.
›
Settings: Allows you to switch the record audio quality and the
record format. You can record in AMR or WAV formats.
›
Schedule FM record: You can record FM program on schedule when
you set up the recording time.
›
Append: Resumes a previously recorded le.
10
Page 13

Activating SIM cards
Your phone supports the Dual SIM cards mode, enabling you to use two
SIM cards at the same time without changing them. When there are two
SIM cards installed, you can activate one of two or both SIM cards.
1. Select [Settings] from the main menu, and then select [Dual SIM
settings].
11
Page 14

Anti Theft Mobile Tracker (ATMT)
Anti-theft mobile tracker (ATMT) allows you to track your lost phone.
When someone uses your phone without your permission, the tracking
service will be activated.
You are reminded by a text message sent to the default phone number
you have set, without the unauthorized user’s knowledge. You can
always activate the ATMT and con gure your personal settings.
To activate Anti-theft mobile tracker
1. From the main menu, select Settings > Security settings > Anti-theft
mobile tracker and press OK.
2. Then in the Anti-theft mobile tracker menu, edit and save the name in
Sender name and numbers in Sending number list.
3. Select Set Anti-theft and press OK.
4. Switch On or O and press OK.
5. Input the security code to enable or disable this function.
Note
›
The default ATMT code is “0000”. You have to enter the code before
con guring the ATMT settings.
12
Page 15

Menu Tree
1. Messaging
1.1 Create message
1.2 Inbox
1.3 Drafts
1.4 Outbox
1.5 Sent items
1.6 Saved items
1.7 Broadcast
message
1.8 Templates
1.9 Message settings
1.10 SOS message
1.11 Schedule SMS
2. Contacts
2.1 Add new contact
3. Log
3.1 Sim1 call log
3.2 Sim2 call log
4. Settings
4.1 Dual SIM
settings
4.2 Profiles
4.3 Display
4.4 Connectivity
4.5 Call
4.6 Phone
4.7 Network
4.8 Security settings
4.9 Restore factory
settings
5. Gallery
5.1 My images
5.2 My sounds
5.3 My videos
5.4 My game & apps
5.5 Others
6. Media
6.1 Image viewer
6.2 Media player
6.3 FM radio
6.4 Voice recorder
7. Organiser
7.1 Alarm clock
7.2 Calendar
7.3 To-do list
7.4 Notes
7.5 Calculator
7.6 Stopwatch
7.7 Converter
7.8 World time
7.9 Go to
7.10 File manager
7.11 SIM services
8. Applications
8.1 My games &
apps
8.2 Settings
9. Web
9.1 Home
9.2 Bookmarks
9.3 Last web address
9.4 Settings
9.5 Go to address
9.6 Saved pages
9.7 Open file
9.8 Recent pages
13
Page 16

Quick feature reference
This section provides brief explanations of features on your phone.
Messaging Menu 1
Create message This menu includes functions related to SMS (Short
Inbox You will be alerted when you have received messages.
Drafts You can save the message temporarily in Drafts.
Outbox This is a temporary storage folder for the unsent
Sent items After sending out the message, the text message or
Saved items You can access your saved messages.
14
Message Service) and MMS (Multimedia Message
Service). You can send SMS to many contacts at a time.
Tip: User can send SMS to Many recipients by
selecting ‘Add from Contacts‘ from Send to
option. (User can select Maximum 20 contacts
from the list). User Can send SMS to groups by
selecting Group icon by pressing left navigation
key from “Add from Contacts” options.
They will be stored in Inbox.
Tip: SMS Sorting: Inbox Messages can be sorted with
the given sorting options for an easy access
of messages (Sender, Subject, Unread/read,
Message type, Message size).
messages or messages that you have sent but fail to
deliver.
multimedia message is saved in the Sent folder.
Page 17

Messaging Menu 1 (Continued)
Broadcast message Choose whether to receive, block, view or edit channels
to receive information service messages (broadcast
messages). Also choose the languages of information
service messages.
Templates There are pre-de ned messages in the list. You can
view and edit the template messages or create new
messages.
Message settings This menu allows you to set features of your network
service provider.
SOS message An emergency message can be sent to the prede ned
number’s (3 maximum) by long press of 9 Key. On long
press of 9 key, a popup comes, ‘Set SOS message?’.
Press ‘Yes’ then type the required message and input 3
numbers for which you want to send the message in
emergency mode and press Save/Done.
Schedule SMS User can schedule an SMS, so that it can be sent to the
pre de ne number/contact on Set date and Set time.
Contacts Menu 2
You can search for contacts in phonebook.
Note: Instant searching is available by inputting the initial letter of the name
you want to search.
Add new contact You can add phonebook entries by using this menu.
15
Page 18

Log Menu 3
Call log You can view all lists of outgoing or incoming calls.
Select sim1 call log or sim2 call log and from that select
the following.
›
missed calls: You can view the unanswered calls.
›
received calls: You can view the Received calls.
›
dialled numbers: You can view the outgoing call
numbers.
›
call duration: Allows you to view the duration of your
incoming and outgoing calls. You can also reset the call
timers.
›
text msg. counter: This application will count the
number of messages received and sent from the
phone.
›
packet data counter: You can check the amount of
data transferred over the network.
›
call costs: View the charges applied to your dialled
numbers and the call duration of all your received and
dialled calls. Also you can do Cost Settings.
Settings Menu 4
Dual SIM settings Choose from the options what you want to change:
16
Dual SIM open / Only SIM1 open / Only SIM2 open /
Flight mode.
Tip: Dual SIM Single Talk : while one of Dual SIM is
operating with network such like WAP/JAVA/
MMS/Call, another SIM can not use network
related service.
Page 19

Settings Menu 4 (Continued)
Pro les You can adjust and customize the phone tones for
Display You can change settings for the phone display.
Connectivity
Call You can set the menu relevant to a call.
Phone
di erent events, or environments.
›
Bluetooth: You can adjust setting on BT connection.
›
Data account: You can manage data account list that is
used for pro le setting on WAP or MMS.
Tip: Enable the Black list, by selecting Mode to ON
in Black list, from Advance Settings. Once you
switch On the Black List Mode, Type the Required
Number to be in the Black List and save it. User
can not receive any calls from the numbers which
are saved in Black list.
›
Time and date: Set date, time, time zone, and formats.
›
Schedule power on/o : This menu allows you to set
up time for the phone automatically power on or o .
Once the time is set by you, the phone will power on
automatically at the time speci ed. As for the powering
o , the phone will ask you for the con rmation before
powering o at the time speci ed by you. You can
specify up to 4 di erent times.
›
Language/Writing language: You can change the
language for the display texts in your phone. This
change will also a ect the Language Input mode.
17
Page 20

Settings Menu 4 (Continued)
›
Themes: Allows you to change the whole look of your
phone display.
›
Greeting text: This menu allows you to customize the
greeting text upon the phone’s power on. You can also
choose whether you want the greeting text on or o
upon power on.
›
Dedicated key: Allows you to change the preferences
on the Hotkeys that are currently assigned for your
navigation keys (when in standby mode).
›
Auto update of date and time: Allows you to set the
phone to automatically update the time and date
according to the current local time zone.
(The Auto-update feature is network dependent.)
›
UART settings: User will be able to perform the
operation from PC using modem for selected SIM
card in UART settings (like AT command using
HyperTerminal, PC dialup). User will be able to make
the GPRS dialup on PC using the SIM which is selected
in UART setting for e.g. if SIM1 is selected then user will
be able to make the connection using selected SIM
card.
›
Misc. settings: You can set the brightness and time of
the display screen.
Network You can set select network and network mode settings
18
using this menu. Also you can add a preferable network
to be connected to Preferred lists.
Page 21

Settings Menu 4 (Continued)
Security settings› sim1/sim2 security settings: This menu allows you to
Restore factory
settings
set the phone’s safety.
›
Phone lock: You can use a security code to avoid
unauthorized use of the phone.
›
Auto keypad lock: You can make the key pad locked
automatically after some time.
›
Change password: Changing your phone password,
enter the old code followed by the new code.
›
Anti-theft mobile tracker: The ATMT feature of this
phone provides you with the ability to have a tracking
system in place for your mobile in case you lose or
misplace it.
You can initialize all factory defaults. You need Security
code to activate this function.
Gallery Menu 5
My images Shows the list of image les.
My sounds Saved audio les are displayed in the list.
My videos Displays the list of video les.
My game & apps You can access a great selection of games and
Others When you receive les of an unde ned format via
applications on your phone.
Bluetooth, the les are saved in this folder.
19
Page 22

Media Menu 6
Image viewer Choose to View the picture which are stored in Photos
Media player The player allows you play audio and video les. You can
FM radio You can use FM radio with or without your external
Voice recorder You can record voice memo.
[Gallery > My image > photos].
also manage play lists.
earphone. You can listen to your favourite radio station
anytime.
Note: You have to insert Ear-mic into Handsfree
connector in order to listen to the Radio and keep the
good radio reception.
Organiser Menu 7
Alarm clock You can set the alarm clock to go on at a speci ed time.
Calendar You can see the calendar and add the events here in
To-do list You can view, edit and add tasks to do.
20
selected date.
Page 23

Organiser Menu 7 (Continued)
Notes You can add new memo, view and manage saved
Calculator The calculator provides the basic arithmetic functions:
Stopwatch This option allows you to use the function of a
Converter This converts any measurement into a unit you want.
World time The World time function provides time information on
Go to It helps you to go to the menu you search for. You can
File manager This function allows you to view the content in your
SIM services Display additional functions or applications provided by
memos.
addition, subtraction, multiplication and division.
stopwatch.
There are many types that can be converted into units:
Currency, Length, Weight.
major cities worldwide.
set the item as Go to.
internal phone memory and the external memory card.
your network service provider.
Applications Menu 8
My games & apps Your LG-A155 comes with preloaded games to keep you
amused when you have time to spare. If you choose to
download any additional games or applications they
will be saved into this folder. Press Menu and select
Applications. Choose My games & apps.
21
Page 24

Web Menu 9
Home Connects to a homepage. The homepage will be the site
Bookmarks This menu allows you to store the URL of favorite web
Last web address You can view the latest page when you connected
Settings You can set the pro le, cache and security related to
Go to address You can connect directly to the site you want. After
Saved pages Allows you to view your saved web pages.
Open le You can open the following les saved in the phone.
Recent pages This menu shows the history of recently browsed pages.
which is de ned in the activated pro le.
pages for easy access at a later time.
internet.
internet service.
entering a speci c URL, press OK key to make the
connection done to connect to the site.
WML, XTHML, HTM, HTML.
Installing LG PC Suite on your computer
1. Go to www.lgapplication.com and choose your country.
2. Select Manual & Software Download and click Download to
Download LG Mobile Support Tool to PC.
3. Follow the instructions on screen to complete the LG PC Suite
Installation on your PC.
22
Page 25

Guidelines for safe and e cient use
Please read these simple guidelines. Not following these guidelines
may be dangerous or illegal. Further detailed information is given in this
manual.
Warning
›
For your safety, use ONLY speci ed ORIGINAL batteries and chargers.
›
Switch o the phone in any area where required by special regulations,
e.g. in a hospital where it may a ect medical equipment.
›
Batteries should be disposed o in accordance with relevant
legislation.
Product care and maintenance
WARNING! Only use batteries, chargers and accessories approved for
use with this particular phone model. The use of any other types may
invalidate any approval or warranty applying to the phone, and may be
dangerous.
›
Do not disassemble this unit. Take it to a quali ed service technician
when repair work is required.
Repairs under warranty, at LG’s option, may include replacement parts
or boards that are either new or reconditioned, provided that they
have functionality equal to that of the parts being replaced.
›
The unit should be kept away from heat sources such as radiators or
cookers.
›
Use a dry cloth to clean the exterior of the unit. (Do not use any
solvents.)
›
Do not keep the phone next to credit cards or transport tickets; it can
a ect the information on the magnetic strips.
23
Page 26

Guidelines for safe and e cient use (Continued)
Electronic devices
All mobile phones may get interference, which could a ect performance.
›
Do not use your mobile phone near medical equipment without
requesting permission. Avoid placing the phone over a pacemaker, i.e.
in your breast pocket.
Road safety
Check the laws and regulations on the use of mobile phones in the areas
when you drive.
›
Do not use a hand-held phone while driving.
›
Use a hands-free kit, if available.
›
Pull o the road and park before making or answering a call if driving
conditions so require.
Blasting area
Do not use the phone where blasting is in progress. Observe restrictions,
and follow any regulations or rules.
Potentially explosive atmospheres
Do not use the phone at a refueling point. Do not use near fuel or
chemicals.
In aircraft
Wireless devices can cause interference in aircraft.
›
Turn o your mobile phone before boarding any aircraft.
Children
Keep the phone in a safe place out of children’s reach. It includes small
parts which if detached may cause a choking hazard.
24
Page 27

Guidelines for safe and e cient use (Continued)
Emergency calls
Emergency calls may not be available under all cellular networks.
Therefore, you should never depend solely on the phone for emergency
calls. Check with your local service provider.
Battery information and care
›
You do not need to completely discharge the battery before
recharging. Unlike other battery systems, there is no memory e ect
that could compromise the battery’s performance.
›
Use only LG batteries and chargers. LG chargers are designed to
maximize the battery life.
›
Do not disassemble or short-circuit the battery pack.
›
Replace the battery when it no longer provides acceptable
performance. The battery pack may be recharged hundreds of times
before it needs to be replaced.
›
Do not expose the battery charger to direct sunlight or use it in high
humidity, such as the bathroom.
›
Risk of explosion if battery is replaced by an incorrect type.
›
Dispose o used batteries according to the manufacturer’s
instructions.
25
Page 28

Guidelines for safe and e cient use (Continued)
Exposure to radio frequency energy
Radio wave exposure and Speci c Absorption Rate (SAR) information
This mobile phone model LG-A155 has been designed to comply
with applicable safety requirement for exposure to radio waves. This
requirement is based on scienti c guidelines that include safety margins
designed to ensure safety of all persons, regardless of age and health.
›
The radio wave exposure guidelines employ a unit of measurement
known as the Speci c Absorption Rate, or SAR. Tests for SAR are
conducted using standardised methods with the phone transmitting
at its highest certi ed power level in all used frequency bands.
›
While there may be di erences between the SAR levels of various LG
phone models, they are all designed to meet the relevant guidelines
for exposure to radio waves.
›
The SAR limit recommended by the International Commission on Non-
Ionizing Radiation Protection (ICNIRP) is
2W/kg averaged over ten (10) gram of tissue.
›
The highest SAR value for this model phone tested by DASY4 for use
at the ear is 1.19 W/kg (10g) and when worn on the body is 1.19 W/kg
(10g).
›
SAR data information for residents in countries/regions that have
adopted the SAR limit recommended by the Institute of Electrical and
Electronics Engineers (IEEE) is 1.6 W/kg averaged over one (1) gram of
tissue.
26
Page 29

Troubleshooting
Problem Possible Solution
Telephone cannot be
switched on
Battery empty Charge battery. Check charging indicator
The battery doesn’t
charge properly or
the phone sometimes
turns itself o
Usage time of battery
becomes shorter
Charging error—
Temperature out of
range
Charging error—
Wrong charger
Charging error—
Battery defective
Charging error—No
battery icon appears
when charging
Please take out battery and insert again.
Then press Power on key to power on the
phone.
on display.
Wipe the charging contacts, both on the
phone and on the battery, with a clear soft
cloth.
If the battery time is short, it may be due
to the user environment, a large volume of
calls, or weak signals.
Make sure the ambient temperature is right,
wait for a while, and the then charge again.
Only use original LG accessories.
Replace battery.
The battery is empty or has been not used
for a long time. It may take a while before
the battery icon appears on the screen.
27
Page 30

Troubleshooting
(Continued)
Problem Possible Solution
Forgot the phone code
or password
Enter PUK The PIN code has been entered incorrectly
Loss of Network You may be in a weak signal area. Move and
You have entered a
number but it was not
dialed
Your correspondent
cannot reach you
28
The default phone code is “0000”.
three times in succession, and the phone
is now blocked. Enter the PUK supplied by
your service provider.
try again. You are trying to access an option
for which you have no subscription with
your service provider. Contact the service
provider for further details.
Be sure that you have pressed Talk/Yes key.
Be sure that you have accessed the right
network service.
Be sure that you have not set an outgoing
call barring option.
Be sure that you have entered the area
code.
Be sure that your phone is switched on.
Press Talk/Yes key for more than one
second. Be sure that you are accessing the
network service. Be sure that you have not
set an incoming call barring option.
Page 31

Troubleshooting
(Continued)
Problem Possible Solution
Your correspondent
cannot hear you
speaking
The voice quality of the
call is poor
No number is dialed
when you recall a
contact
Cannot use the
Browser
If the above guidelines
do not help you to
solve the problem
Be sure that you have switched o the
loudspeaker. Be sure that you are holding
the phone close enough to your mouth.
The microphone is located at the bottom of
the phone.
Check the signal strength indicator on the
display. The number of bars indicates the
signal strength. Try moving the phone
slightly or moving closer to a window if you
are in a building.
Use the Phonebook Search feature to
ensure the number has been stored
correctly. Resave the number, if necessary.
Your subscription does not include data
capability. You will need to contact your
service provider to enable the service.
Take note of the model number of your
mobile phone and a clear description of the
problem. Contact your phone dealer or LG
Service Center for help.
29
Page 32

Accessories
There are various accessories for your mobile phone. You can select
these options according to your personal communication requirements.
Standard Battery Travel Adapter
Headset
Note
› Always use genuine LG accessories. Failure to do this may invalidate
your warranty.
› Accessories may be di erent in di erent regions; please check with our
regional service company or agent for further enquires.
30
Page 33

Technical Data
General
›
Product name : LG-A155
›
System : GSM 850 / E-GSM 900 /
DCS 1800 / PCS 1900
Declaration of Conformity
Suppliers Details
Name
LG Electronics Inc
Address
LG Electronics Inc. LG Twin Towers 20,
Yeouido-dong, Yeongdeungpo-gu, Seoul, Korea 150-721
Product Details
Product Name
GSM 850 / E-GSM 900 / DCS 1800 / PCS 1900 Quad band Terminal Equipment
Model Name
LG-A155
Trade Name
LG
Applicable Standards Details
R&TTE Directive 1999/5/EC
EN 301 489-01 V1.8.1, EN 301 489-07 V1.3.1, EN 301 489-17 V2.1.1
EN 301 511 V9.0.2
EN 50360:2001, EN62209-1:2006
EN 60950-1:2001
EN 300 328 V1.7.1
Supplementary Information
The conformity to above standards is verifi ed by the following Notifi ed Body(BABT)
BABT, Forsyth House-Churchfi eld Road - Walton-on-ThamesSurrey - KT12 2TD , United Kingdom
Notifi ed Body Identifi cation Number : 0168
Declaration
I hereby declare under our sole responsibility
that the product mentioned above to which this
declaration relates complies with the above
mentioned standards and Directives
LG Electronics Logistics and Services B.V.
Veluwezoom 15, 1327 AE Almere, The Netherlands
Ambient Temperatures
›
Max : +55°C (discharging)
+45°C (charging)
›
Min : -10°C
Name Issued Date
Doo Haeng Lee / Director 12. October. 2010
Signature of representative
31
Page 34

Page 35

LG-A155
;g eSU;qvy Q+ksu l‚¶+Vos;j laLdj.k vkSj mi;ksx fd, x, lsok çnkrk ds vk/kkj
ij Q+ksu ls fHkUu gks ldrk gS-
mi;ksxdrkZ ekxZnf’kZdk
Page 36

Lkkefxz;ksa dh rkfydk
Lkkefxz;ksa dh rkfydk
fle dkMZ vkSj gSaMlsV cSVjh LFkkfir
djuk .......................................................... 3
Q+ksu ?kVd .................................................. 4
Q+aD’kal vkSj fodYiksa dk p;u djuk .......... 6
ikB ntZ djuk ............................................ 7
eseksjh dkMZ LFkkfir djuk ........................... 8
Vksu dSls lsV djsa ....................................... 9
FM jsfM;ks .................................................10
SIM dkMZ~l lfØ; vkSj fLop djuk.........11
,aVh&Fks¶+V eksckby VªSdj ¼ATM T½ ............12
yGh J ykfU ŒrJ³ fUhlu fUe „tr˜fUt ..........13
rnà”e Nç” r˜Flu fuU W”tnhK ......................14
esuw Vªh ........................................................15
Rofjr lqfo/kk lanHkZ ....................................16
vkids daI;wVj ij LG PC lwV LFkkfir
djuk .........................................................24
lqjf{kr vkSj çHkkoh mi;ksx ds fy,
fn’kkfunsZ’k ..................................................25
leL;k fuokj.k ..........................................29
lgk;d midj.k ........................................32
rduhdh MsVk .............................................33
2
Page 37

fle dkMZ LFkkfir djuk
egRoiw.kZ!
mnkgj.k
uksV
fle dkMZ vkSj gSaMlsV cSVjh LFkkfir djuk
fle dkMZ vkSj gSaMlsV cSVjh LFkkfir djuk
fle dkMZ LFkkfir djuk
tc vki fdlh lSY;wyj usVodZ dks
lcLØkbc djrs gSa] rks vkidks vkids
lcfLØI’ku fooj.kksa] tSls fd vkidk PIN]
dksbZ vU; miyC/k oSdfYid lsok vkSj cgqr
lh vU; lsokvksa ds lkFk yksM ,d SIM dkMZ
çnku fd;k tk,xk-
egRoiw.kZ!
›
Iyx&bu fle dkMZ vkSj mlds
laidZ] [kjksapksa ;k eqM+us ls vklkuh ls [kjkc
gks ldrs gSa] blfy, dkMZ dks gSaMy djrs
le;] Mkyrs ;k fudkyrs le; lko/kkuh
j[ksa- lHkh fle dkMZ NksVs cPpksa dh igq¡p
ls nwj j[ksa-
1 2 3
4 5 6
mnkgj.k
cSVjh fudkyus ls igys fMokbl ges’kk can
djsa vkSj pktZj fMLdusDV dj nsa-
cSd doj fudkysa-
1
cSVjh ckgj fudkysa-
2
fle dkMZ Mkysa-
3
cSVjh iSd Mkysa-
4
cSd doj layXu djsa-
5
cSVjh pktZ djsa-
6
uksV: igyh ckj cSVjh dk mi;ksx djus ls
igys bls iw.kZ pktZ djsa-
3
Page 38

ekbØks ,lMh eseksjh dkMZ l‚dsV
ekbØks
iksVZ
b;jQ+ksu tSd
pktZj iksVZ
dqath
dqath
fMLIys LØhu
b;jihl
usfoxs’ku dqaft;k¡
l‚¶+V dqaft;k¡ ¼ckbZa l‚¶+V dqath
nkbZa l‚¶+V dqath½
Hkstsa dqath
lekIr dqath
vYQ+kU;wesfjd dqaft;k¡
Q+ksu ?kVd
Q+ksu ?kVd
ekbØks ,lMh eseksjh dkMZ l‚dsV
Q+ksu Q+aD’kal ij Rofjr igqap us
& dksbZ Q+ksu uacj Mk;y djsa vkSj
& LVSaMck; eksM esa d‚Yl dk
LVSaMck; eksM esa uaclZ Mk;y djsa
vkSj laiknu eksM esa uaclZ ;k o.kZ
ikB laiknu eksM esa fpUg Mky
4
fMLIys LØhu
usfoxs’ku dqaft;k¡
ds fy, mi;ksx djsa-
d‚y dk mÙkj nsa-
bfrgkl fn[kkrk gS-
vYQ+kU;wesfjd dqaft;k¡
Hkstsa dqath
buiqV djsa-
*
dqath
ldrs gSa-
b;jihl
ekbØks USB
iksVZ /
b;jQ+ksu tSd /
l‚¶+V dqaft;k¡ ¼ckbZa l‚¶+V dqath /
nkbZa l‚¶+V dqath½
;s daqft;k¡ çn’kZu ds uhps bafxr
fd;k x;k Q+aD’ku djrh gSa-
lekIr dqath
& blls vki Qksu pkyq ;k can
& fdlh d‚y dks lekIr ;k
#
ekSu eksM eSa tkus ds fy, yacsa
le; rd nck,-
pktZj iksVZ
dj ldrs gSa ¼nckdj j[ksa½-
vLohdkj djsa-
dqath
Page 39

vius Q+ksu dks pkyw ;k can djuk
vius Q+ksu dks pkyw ;k can djuk
1
2
d‚y djuk
1
2
3
varjk"Vªh; d‚y djuk
1
2
3
d‚y dk mÙkj nsuk
1
2
3
. i‚oj ds vk tkus rd lekIr dqath nck dj j[ksa-
. i‚oj ds pys tkus rd lekIr dqath nck dj j[ksa-
d‚y djuk
. {ks= dksM ds lkFk ,d Q+ksu uacj ntZ djsa-
. [Hkstsa] dqath nck,¡ ;k uacj ij d‚y djus ds fy, fodYi > Mk;y djsa. d‚y dks lekIr djus ds fy,] (lekIr dqath) dqath nck,¡-
varjk"Vªh; d‚y djuk
. varjk"Vªh; milxZ o.kZ ds fy, dqath dks nckdj j[ksa- ‘+’ o.kZ Lopkfyr :i ls
varjk"Vªh; igq¡p dksM dk p;u djrk gS-
. ns’k dk dksM] {ks= dksM vkSj Q+ksu uacj ntZ djsa-
. [Hkstsa] dqath nck,¡ ;k uacj ij d‚y djus ds fy, fodYi > Mk;y djsa-
d‚y dk mÙkj nsuk
. tc vki dksbZ d‚y çkIr djrs gSa] rks Q+ksu fjax gksrk gS-
. [Hkstsa] dqath nck,¡ ;k d‚y dk mÙkj nsus ds fy, fodYi > mÙkj nsa-
. d‚y dks lekIr djus ds fy,] (lekIr dqath) dqath nck,¡-
5
Page 40

lwph
uke
Q+aD’kal vkSj fodYiksa dk p;u djuk
Q+aD’kal vkSj fodYiksa dk p;u djuk
vkidk Q+ksu vkidks Q+aD’kal dk ,slk lsV çnku djrk gS] tks vkidks Q+ksu dks vuqdwfyr djus
dh vuqefr nsrk gS- ;s Q+aD’kal esuw vkSj lcesuw esa O;ofLFkr gksrs gSa vkSj ls fpfàr
nks l‚¶+V dqaft;ksa }kjk bu rd igq¡pk tkrk gS- çR;sd esuw vkSj lcesuw vkidks fdlh fo’ks"k
Q+aD’ku dks ns[kus vkSj mldh lsfVaXl ifjofrZr djus nsrk gS-
l‚¶+V dqaft;ksa ds dk;Z orZeku lanHkZ ds vuqlkj fHkUu gksrh gSa çR;sd dqath ds Bhd Åij LØhu
dh fupyh iafä ij ,d yscy blds orZeku dk;Z dks bafxr djrk gS-
lwph
miyC/k esuw rd igqap çkIr djus ds fy, ckbZa
l‚¶+V dqath ;k e/; l‚¶+V dqath nck,¡-
6
uke
miyC/k uke ¼ukeksa½ rd igqap çkIr djus ds
fy, nkbZa l‚¶+V dqath nck,¡-
Page 41

eksM
eksM
çrhd eksM
fodYi
fpà
Mkysa
ikB ntZ djuk
ikB ntZ djuk
vki Q+ksu ds dhiSM dk mi;ksx djds vYQ+kU;wesfjd o.kZ ntZ dj ldrs gSaeksM~l cnyus ds fy,] dqath nck,¡-
T9
eksM
T9 çhfMfDVo ikB buiqV eksM vkidks de ls de dqaft;k¡ nckdj vklkuh ls ’kCnksa dks ntZ
djus nsrk gS- tSls gh vki çR;sd dqath nckrs gSa] rks Q+ksu v{kjksa dks çnf’kZr djus yxrk gS tks
;g lksprk gS fd vki varfuZfgr ’kCndks’k ds vk/kkj ij Vkbi dj jgs gSa-
123
eksM
çfr la[;k ,d dqathLVªksd ds mi;ksx ls la[;k,a Vkbi djsa- vki v{kj eksM esa jgrs gq, Hkh
bfPNr dqath dks nck, j[kdj vad Mky ldrs gSa-
çrhd eksM
çrhd eksM vkidks fofHkUu çrhdksa ;k fo’ks"k v{kjksa dks ntZ djus esa l{ke cukrk gS- fpà dks
ntZ djus ds fy,]
p;u djus ds fy, usfoxs’ku dqaft;ksa dk mi;ksx djsa vkSj Bhd dqath nck,¡-
fodYi dk p;u djsa
fpà
Mkysa ;k dqath nck,¡- bfPNr çrhd dk
7
Page 42

uksV
eseksjh dkMZ LFkkfir djuk
eseksjh dkMZ LFkkfir djuk
eseksjh dkMZ dk mi;ksx djus ls vkids eksckby Qksu dk laxzg.k LFkku c<k;k tk ldrk
gSa- eseksjh dkMZ Mkyus ds fy, mls dkMZ LykWV esa Mkysa tc rd fd og vius LFkku ij cSB
u tk,+ +lqfuf’pr djsa fd lqugsjk laidZ {ksé fups dh fn’kk dh vkSj fLFkr gks] tSLkk fd fpé
esa fn[kk;k x;k gSa-
uksV: eSeksjh dkMZ ,d oSdfYid lgk;d midj.k gS-
8
Page 43

1
2
3
Vksu lsfVaXk
o‚Y;we
,yVZ çdkj
fjax çdkj
vfrfjä Vksu
mÙkj çdkj
Vksu dSls lsV djsa
Vksu dSls lsV djsa
vyx&vyx okrkoj.k dh ifjLfFkfr;ksa dks viukus ds fy, vkidk Qksu ofHkUu çksQkbYl
miyC/k djkrk gS- çR;sd çksQkby esa] vki eupkgh fjax VksUl vkSj vyVZ çdkj lsV dj ldrs
gSa-
. eq[; esuw ls lsfVaXk dk p;u djsa- vkSj fQj çksQkby dk p;u djsa-
. fjax Vksu lsV djus ds fy,] fdlh ,d çksQkby dk p;u djsa vkSj fodYi nck,¡,
dLVksekbt djsa-
. fjx VksUl vkSj vyVZ çdkjksa dks vuqdwfyr djus ds fy, vkidk Qksu fuEu fodYi
miyC/k djkrk gS:
›
Vksu lsfVaXk: Vksu çdkj p;u djsa ¼vkus ckyh dkWy] ikoj pkyq] ikoj can] lans’k] dhiSM½-
›
o‚Y;we: Åij/uhps usohxs’ku dqaft;k¡ nckrs gq, fjax Vksu dk o‚Y;we O;ofLFkr djrk
gS- ¼fjaxVksu] dhVksu½-
›
,yVZ çdkj: fjax Vksu ds fy,] fdlh ,d ,yVZ çdkj dk p;u djsa ¼dsoy fjax] dsoy
daiu] daiu rFkk fjax] daiu fQj fjax½-
›
fjax çdkj: fjax çdkj p;u djsa ¼,d] iqu%½-
›
vfrfjä Vksu: vfrfjä Vksu çdkj p;u djsa ¼psrkouh]éqfV]dSEi pkyq½-
›
mÙkj çdkj: ;fn dksbZ dqath esuw fodYi lsV fd;k x;k gS] rks ¼lekIr dqath) ;k nkbZa
l‚¶V dqath ds vykok vU; fdlh Hkh dqath dks nckus ij d‚y dk mÙkj fn;k tk,xk-
9
Page 44

1
2
3
fjdkWMZ
pSuy lwph
eSuqvy buiqV
NksVk djsa
iwoZ fu/kkZfjr vkWVks lpZ
lsfVaXl
’ksM~;qy
fjdkWMZ
layXu djsa
FM
jsfM;ks
¼;g QaD’ku vyx&vyx {ks=ksa esa vyx&vyx gks ldrk gS-½
jsfM;ks
¼;g QaD’ku vyx&vyx {ks=ksa esa vyx&vyx gks ldrk gS-½
FM jsfM;ks LVs’ku dks lqurk gS- vki gsMlsV ds fcuk FM lquus dk vkuan mBk ldrs gSa
D;ksafd Q+ksu ok;jysl FM lsok dk leFkZu djrk gS-
. eq[; esuw ls ehfM;k] dk p;u djsa vkSj fQj FM jsfM;ks] dk p;u djsa-
. jsfM;ks pSuYl dks [kkstus ds fy, usohxs’ku dqath dk mi;ksx djsa-
. pSuYl lwph dk laiknu djus ds fy, fodYi] nck,¡- vkidk Qksu FM jsfM;ks ds fy,
fuEu fodYi miyC/k djkrk gS:
›
fjdkWMZ: vkids ilanhnk jsfM;ks dk;ZØe fjd‚MZ djrk gS-
›
pSuy lwph: pSuy dk uke vkSj vko`fÙk ntZ djrs gq, 9 jsfM;ks pSuYl rd dks cqdekdZ
djrk gS-
›
eSuqvy buiqV: eSU;qvy :i ls jsfM;ks pSuy lsV djs-
›
NksVk djsa: bl lekjksg jsfM;ks dks feuhekbt djds vkidks Qksu esa vU; dke djus dh
lqfo/kk nsrh gS-
›
iwoZ fu/kkZfjr vkWVks lpZ: miyC/k jsfM;ks pSuYl dks Lopkfyr :i ls [kkstrk gS vkSj mUgsa
pSuy lwph ij laxzghr djrk gS-
›
lsfVaXl: a fjd‚MZ QkWesZV] ?ofu xq.koÙkk vkSj fjd‚MZ ds laxzg dks ifjofrZr djrh gSa-
›
’ksM~;qy FM
›
10
fjdkWMZ: le; ij FM dk;Zdze fjdkWMZ djus dsfy, lsfVax dj ldrs gS-
layXu djsa: fjd‚MZ dh xbZ fiNyh Qkbyksa dks çcaf/kr djrk gS-
Page 45

1
SIM
dkMZ~l lfØ; vkSj fLop djuk
dkMZ~l lfØ; vkSj fLop djuk
vkidk Qksu Dual SIM dkMZ~l eksM dk leFkZu djrk gS vkSj vkidks ,d ckj esa nks SIM
dkMZ~l dks u cnyrs gq, mi;ksx djus esa l{ke djrk gS- tc nks SIM dkMZ~l LFkkfir gksa] rks
vki nks esa ls ,d ;k nksuksa SIM dkMZ~l dks lfØ; dj ldrs gSa-
. eq[; esuw ls lsfVaXl] dk p;u djsa vkSj fQj nksgjh SIM lsfVaXl dk p;u djsa-
11
Page 46

1
lsfVax
lqj{kk lsVvi
pksjh&jks/kh eksokby VSªdj dk p;u djsa
Bhd
2
Hkstus okys dk uke esa uke dks
uacj fyLV Hkst
jgk gSa
3
dk p;u djsa vkSj
nck,
4
can djsa
Bhd
5
uksV
,aVh&Fks¶+V eksckby VªSdj ¼
,aVh&Fks¶+V eksckby VªSdj ¼AT MT
½
pksjh&jks/kh eksokby VSªdj ¼ATM T ½ vkidks vkids [kks, gq, Q+ksu dks VªSd djus dh vuqefr
nsrk gS- tc dksbZ vkidh vuqefr ds fcuk vkids Q+ksu dk mi;ksx djrk gS] rks VªSfdax
lqfo/kk lfØ; gks tk,xh-
vkidks] vuf/k—r mi;ksxdrkZ dks crk, fcuk vkius tks fMQ+‚YV Q+ksu uacj lsV fd;k gS]
mlij ikB lans’k Hkstdj ;kn fnyk;k tkrk gS- vki ges’kk ATM T dks lfØ; dj ldrs gSa
vkSj viuh O;fäxr lsfVaXl d‚fUQ+xj dj ldrs gSa-
,aVh&Fks¶+V eksckby VªSdj lfØ; djus ds fy,
. eq[; esuw ls]
nck,¡-
. fQj pksjh&jks/kh eksokby VSªdj esuw esa]
jgk gSa esa uacjksa dks laikfnr djsa vkSj lgstsa-
. pksjh&jks/kh lsV djsa
. pkyw ;k
. bl Q+aD’ku dks l{ke ;k v{ke djus ds fy, lqj{kk dksM buiqV djsa-
uksV
›
fMQ+‚YV ATMT dksM Þ0000ß gS- vkidks ATM T lsfVaXl d‚fUQxj djus ls igys dksM
12
can djsa vkSj
Mkyuk gksxk-
lsfVax >
lqj{kk lsVvi >
dk p;u djsa vkSj Bhd
Bhd nck,¡-
pksjh&jks/kh eksokby VSªdj dk p;u djsa vkSj
Hkstus okys dk uke esa uke dks vkSj
nck,¡-
Bhd
uacj fyLV Hkst
Page 47

yGh J ykfU ŒrJ³ fUhlu fUe „tr˜fUt
yGh J ykfU ŒrJ³ fUhlu fUe „tr˜fUt
13
Page 48

rnà”e Nç” r˜Flu fuU W”tnhK
rnà”e Nç” r˜Flu fuU W”tnhK
w
u
w
w
w
u
w
w
u
u
w
1) rfU„tc
fU :- fwkUse 4 fUtu 1 cth ”ctYk š
kUse 2 fUtu 2 cth ”ctYk š
r :- f
„ :- fwkUse 7 fUt
t :- fwkUse 2 fUtu 1 cth ”ctYk š
c :- fwkUse 8 fUtu 3 cth ”ctYk š
2) Grºtg
fU :- fwkUse 4 fUtu 1 cth ”ctYk š
T :- f
M :- f
„ :- f
T :- fwkUse 1 fUt
h :- fwkUse 9 fUtu 2 cth ”ctYk š
r :- fwkUse 2 fUtu 2 cth ”ctYk š
g :- f
3) Òttle
s :- fwkUse 5 fUtu 3 cth ”ctYk š
T :- f
™ :- fwkUse 5 fUt
t :- fwkUse 2 fUt
l :- fwkUse 7 fUtu 5 cth ”ctYk š
e :- f
14
1 cth ”ctYk š
kUse 1 fUtu 4 cth ”ctYk š
kUse 9 fUtu 6 cth ”ctYk š
kUse 7 fUtu 1 cth ”ctYk š
4 cth ”ctYk š
kUse 9 fUtu 1 cth ”ctYk š
kUse 1 fUtu 4 cth ”ctYk š
5 cth ”ctYk š
1 cth ”ctYk š
kUse 2 fUtu 3 cth ”ctYk š
Page 49

esuw Vªh
esuw Vªh
1. lans’k
2. laidZ O;fä
3. y‚x
4. lsfVaXk
5. xSyjh
6. ehfM;k
7. vkxZukbt+j
8. ,Iyhds’kUl
9. osc
lans’k
1.1 eSlst cuk,¡¡
1.2 buc‚Dl
1.3 Mªk¶+V~l
1.4 vkmVc‚Dl
1.5 Hksts x, vkbVe
1.6 lqjf{kr fd, x,
vkbVe
1.7 çlkj.k lans’k
1.8 VsEIysV
1.9 lans’k lsfVaXl
1.10 ,l-vks-,l eSlst
1.11 vuqlwph lans’k
laidZ O;fä
2.1 u;k laidZ tksM+sa
y‚x
3.1 SIM 1 d‚y y‚x
3.2 SIM 2 d‚y y‚x
lsfVaXk
4.1 nksgjh SIM lsfVaXl
4.2 çksQ+kby
4.3 fMLIys
4.4 dusfDVfoVh
4.5 d‚y
4.6 Q+ksu
4.7 usVodZ
4.8 lqj{kk lsVvi
4.9 ewy lsfVaXl fjLVksj
xSyjh
5.1 esjh Nfo;k¡
5.2 esjh lkmaM~l
5.3 esjs ohfM;ksl
5.4 esjk xse vkSj
5.5 vU;
ehfM;k
6.1 best O;wvj
6.2 ehfM;k Iys;j
6.3 FM jsfM;ks
6.4 o‚bl fjd‚MZj
vkxZukbt+j
7.1 vykeZ DykWd
7.2 dSysaMj
7.3 Vq&Mw fyLV
7.4 uksV~l
djsa
,Iyhds’kUl
7.5 dsydqysVj
7.6 LV‚io‚p
7.7 ifjorZd
7.8 fo’o le;
7.9 esa tk,a
7.10 Q+kby eSustj
7.11 SIM lsok,¡
,Iyhds’kUl
8.1 [ksy vkSj vuqç;ksx
8.2 lsfVaXl
osc
9.1 gkse
9.2 cqdekdZ
9.3 vafre osc irk
9.4 lsfVax
9.5 ,Msªl esa tk,a
9.6 lqjf{kr fd, x, ist
9.7 vksiu Qkby
9.8 gky ds i`"B
15
Page 50

Rofjr lqfo/kk lanHkZ
Rofjr lqfo/kk lanHkZ
lans’k
eSlst cuk,¡¡
lq>ko
buc‚Dl
lq>ko
Mªk¶+V~l
vkmVc‚Dl
Hksts x, vkbVe
lqjf{kr fd, x, vkbVe
lans’k
çlkj.k lans’k
VsEIysV
lans’k lsfVaXll
,l-vks-,l eSlst
vuqlwph lans’k
laidZ O;fä
uksV
u;k laidZ tksM+sa
;g vuqHkkx vkids Q+ksu ij miyC/k lqfo/kkvksa dh laf{kIr tkudkjh nsrk gS-
lans’k esuw 1
eSlst cuk,¡¡ ;g esuw SMS ¼’kkVZ eSlst lfoZl½ vkSj MMS ¼eYVhehfM;k eSlst
buc‚Dl tc vki lans’k çkIr djsaxs rks vkidks lwfpr fd;k tk,xk- os buc‚Dl esa
Mªk¶+V~l vki vLFkkbZ :i ls lans’k dks Mªk¶+V~l esa lgst ldrs gSavkmVc‚Dl ;g u Hksts x, lans’kksa ;k mu lans’kksa gsrq ftUgsa vkius Hkstk gS] ysfdu
Hksts x, vkbVe lans’k Hksts tkus ds ckn] ikB lans’k ;k eYVhehfM;k lans’k Hksts x,
lqjf{kr fd, x, vkbVe vki vius lgsts x, lans’kksa rd igq¡p çkIr dj ldrs gSa-
16
lfoZl½ ls lacaf/kr Q+aD’kal dks ’kkfey djrk gS-
lq>ko: mi;ksxdrkZ ,d le; esa dà laidksZ dks ,l,e,l Hkst ldrs gSa
A dà laidksZ dks ,l,e,l Hkstus ds fy, fodYi ls *dks Hkstsa* pqusa] mlesa
ls *Qksu iqfLrdk ls tksMsa^ fodYi pquus ls laidksZ dh lqph [kqy tk,xh
A mi;ksxdrkZ dsoy 20 laidksZ dks lans’k Hkst ldrs gSa A mi;ksxdrkZ
leqg dks ,l,e,l Hkst ldrs gSa] leqg dks ,l,e,l Hkstus ds fy;s
açkIrdrkZ ntZ djsa * fodYi pqus A
laxzghr fd, tk,¡xs-
lq>ko: buckaDl esa]ik, x, lans’k dk vklku ,Dlsl vuqdzfer fodYiks
ds lkFk gy fd;k tk ldrk gS A (çs"kd] fc"k;] vifBr@ifBr] lans’k
çdkj] lans’k vkdkj)
mudk forj.k foQy gks x;k gSa] dk ,d vLFkk;h laxzg.k Q+ksYMj gS-
Q+ksYMj esa lgstk tkrk gS-
Page 51

lans’k
lans’k esuw 1 ¼tkjh½
çlkj.k lans’k
VsEIysV
lans’k lsfVaXl
,l-vks-,l eSlst
vuqlwph lans’k
laidZ O;fä
uksV
u;k laidZ tksM+sa
çlkj.k lans’k ;fn tkudkjh lsok lans’kksa ¼çlkfjr lans’k½ dks çkIr djus ds fy, pSuYl
VsEIysV lwph esa iwoZ&fu/kkZfjr lans’k gSa- vki VsEIysV lans’kksa dks ns[k ldrs gSa vkSj
lans’k lsfVaXl ;g esuw vkidks usVodZ lsok çnkrk dh lqfo/kkvksa dks lsV djus dh
,l-vks-,l eSlst 9 dqath dks nsj rd nckdj igys ls fu/kkZfjr uacj ij ¼vf/kdre 3½
vuqlwph lans’k mi;ksxdrkZ dksbZ vuqlwph lans’k dj ldrs gSa] rkfd ;g lsV dh xbZ
dks çkIr djuk] vojksf/kr djuk] ns[kuk ;k laikfnr djuk gS rks çlkj.k
lans’k pqusa- lkFk gh tkudkjh lsok lans’kksa ds fy, Hkk"kk,¡ Hkh pqusa-
laikfnr dj ldrs gSa ;k u, lans’kksa dks cuk ldrs gSa-
vuqefr nsrk gS-
dksbZ vkikrdkyhu lans’k Hkstk tk ldrk gS- 9 dqath dks nsj rd nckdj
j[kus ij] ^,l-vks-,l eSlst lsV djsa\* i‚i vi vkrk gS- ^gka* nck,¡]
fQj vko’;d lans’k fy[ksa vkSj mu 3 uacjksa dks buiqV djsa] ftUgsa vki
vkikrdkyhu eksM esa lans’k Hkstuk pkgrs gSa] lso djsa vkSj gk¡ nck,¡-
fnukad vkSj lsV fd, x, le; ij igys ls fu/kkZfjr uacj/laidZ dks
Hkstk tk lds-
laidZ O;fä esuw 2
vki Q+ksucqd esa laidZ [kkst ldrs gSa-
uksV: vki ftl uke dks [kkstuk pkgrs gSa] mldk igyk v{kj Mkyus ls rqjar [kkst miyC/k gS-
u;k laidZ tksM+sa vki bl esuw dk ç;ksx dj Q+ksucqd çfof"V;ka tksM+ ldrs gSa-
17
Page 52

lsfVaXk
çksQ+kby
fMLIys
dusfDVfoVh
d‚y
Q+ksu le; rFkk fnukad
y‚x
y‚x esuw 3
d‚y y‚x
NwVh gqbZ dkWysa
çkIr dkWysa
Mk;y fd, x, uaclZ
d‚y vof/k
dkmaVj
iSdsV MsVk dkmaVj
d‚y ykxr
lsfVaXk
nksgjh
lsfVaXl
;qfä
d‚y y‚x vki vkmVxksbax ;k budfeax d‚Yl dh lHkh lwfp;k¡ ns[k ldrs gSa-
fle1 d‚y y‚x ;k fle2 d‚y y‚x dk p;u djsa vkSj fQj mlesa ls
fuEu dk p;u djsa-
›
NwVh gqbZ dkWysa: vki vuqÙkfjr d‚Yl ns[k ldrs gSa-
›
çkIr dkWysa: vki çkIr dh xbZ d‚Yl ns[k ldrs gSa-
›
Mk;y fd, x, uaclZ: vki vkmVxksbax d‚y uaclZ dks ns[k ldrs gSa-
›
d‚y vof/k: vkidks vkidh bu dfeax vkSj vkmVxksbax d‚Yl dh vof/k
ns[kus dh vuqefr nsrk gS- vki d‚y VkbelZ dks Hkh jhlsV dj ldrs gSa-
›
SMS
dkmaVj: ;g vuqç;sx Qksu esa çkIr fd, gq, vkSj Qksu ls Hksts
x, lana’kksa dh fxurh djrk gSa-
›
iSdsV MsVk dkmaVj: vki usVodZ ij LFkkukarfjr MsVk dh ek=k dks psd
dj ldrs gSa-
›
d‚y ykxr: vius Mk;y fd, x, uaclZ ij ykxw fd, x, ’kqYd vkSj
viuh lHkh çkIr vkSj Mk;y dh xbZ d‚Yl dh vof/k ns[ksa- vki ykxr
lsfVaXl Hkh dj ldrs gSa-
lsfVaXk esuw 4
nksgjh SIM
lsfVaXl fodYiksa ls pqusa fd vki D;k ifjofrZr djuk pkgrs gSa: nksgjh SIM vksiu
18
/ dsoy SIM1 vksiu / dsoy SIM2 vksiu / ¶+ykbV eksM-
;qfä: nksgjh fle ,dy okrkZyki: tc nksgjh fle esa ls dksbZ ,d
WAP/JAVA/MMS/d‚y tSls usVodZ ds lkFk fØ;k dj
jgsa gksa] rks nwljh fle usVodZ lacaf/kr lsok dk mi;ksx ugha
dj ldrh-
Page 53

lsfVaXk
lsfVaXk esuw 4 ¼tkjh½
çksQ+kby
fMLIys
dusfDVfoVh
CyqVqFk
MkVk ,dkmaV
d‚y
lq>ko
Q+ksu
le; rFkk fnukad
fu/kkZfjr ikoj pkyw@can
çksQ+kby çksQ+kby esa] vki fHkUu bZosaV~l] ;k okrkoj.kksa ds fy, Q+ksu VksUl dks
fMLIys vki Q+ksu çn’kZu ds fy, lsfVaXl cny ldrs gSadusfDVfoVh vki vU; fMokbl ;k usVodZ ls dusDV djus ds fy, Q+ksu lsVvi dj
d‚y vki fdlh d‚y ds laxr esuw dks lsV dj ldrs gSa-
Q+ksu
lek;ksftr ;k dLVksekbt dj ldrs gSa- lkr çksQkby igys ls gh lsV gSa
lkekU;] lEesyu] ckgjh] Hkhrjh] ekSu] gSMlsV vkSj CyqVwFk-
ldrs gSaCyqVqFk: vki CyqVqFk dusD’ku ij lsfVax lek;ksftr dj ldrs gSMkVk ,dkmaV: vki MkVk ,dkmaV lqph dks çcaf/kr dj ldrs gSa] tks
dh çksQkby ij WAP vkSj MMS LFkkfir djus ds fy, ç;ksx fd;k
tkrk gS-
lq>ko: CySd fyLV lqfo/kk miyO?k djus ds fy, mér lsfVax esuq esa tk;s
vkSj CySd fyLV pkyq djsa A CySd fyLV eksM pkyq djus ds ckn tks uacj
vki CySd fyLV esa Mkyuk pkgrs gS] mls pqusa vkSj lajf{kr djs A CySd
fyLV esa lajf{kr fd, x, uacj ls mi;ksxdrkZ dks dkWy çkIr usfga gksxhA
›
le; rFkk fnukad: vki fnukad vkSj le; ls lacaf/kr QaD’kal lsV dj
ldrs gSa-
›
fu/kkZfjr ikoj pkyw@can: ;g fodYi vkidks Q+ksu i‚oj dks Lopkfyr
:i ls v‚u ;k v‚Q+ djus ds fy, le; lsVvi djus dh vuqefr nsrk
gS- ,d ckj vkids }kjk le; lsV fd, tkus ds ckn] Q+ksu Lopkfyr
:i ls fufnZ"V le; ij i‚oj dks v‚u djsxk- i‚oj v‚Q+ djus ds
fo"k; esa] vkids }kjk fufnZ"V le; ls igys Q+ksu vkils i‚oj v‚Q+
djus ds fy, iqf"Vdj.k gsrq iwNsxk- vki 4 fHkUu le; rd le;
fufnZ"V dj ldrs gSa-
19
Page 54

lsfVaXk
Q+ksu fofHkUu lsfVaXl
usVodZ
lqj{kk lsVvil lqj{kk lsfVaXk
ewy lsfVaXl fjLVksj djsa
xSyjh
esjh Nfo;k¡
esjh lkmaM~l
esjs ohfM;ksl
esjk xse vkSj ,Iyhds’kUl
lsfVaXk
lsfVaXk esuw 4 ¼tkjh½
Hkk"kk
ys[ku Hkk"kk
FkhEl
vfHkuanu VsDLV
lefiZr dqath
fnukad rFkk le; dk vkWVksa viMsV
lsVvi
20
›
Hkk"kk/
ys[ku Hkk"kk: vki vius Q+ksu esa çn’kZu ikBksa ds fy, Hkk"kk cny
ldrs gSa- ;g cnyko Hkk"kk buiqV eksM dks Hkh çHkkfor djsxk-
›
FkhEl: vkidks vkids Q+ksu çn’kZu dh laiw.kZ fn[kkoV dks cnyus dh
vuqefr nsrk gS-
›
vfHkuanu VsDLV: ;g fodYi vkidks Q+ksu dh i‚oj v‚u gksus ij
vfHkuanu VsDLV dks vuqdwfyr djus dh vuqefr nsrk gS- vki pqu ldrs
gSa fd ;fn vkidks i‚oj v‚u gksus ij vfHkoknu ikB v‚u ;k v‚Q+
pkfg,-
›
lefiZr dqath: mu g‚V dht ij çkFkfedrk,¡ cnyus dh vuqefr nsrk
gSa] tks orZeku esa vkidh usfoxs’ku dqaft;ksa ¼tc LVSaMck; eksM esa gksa½ ds
fy, vlkbu dh xbZ gSa-
›
fnukad rFkk le; dk vkWVksa viMsV: vkidks Q+ksu dks orZeku LFkkuh;
le; tksu ds vuqlkj Lopkfyr :i ls le; vkSj fnukad dks viMsV
djus ij lsV djus dh vuqefr nsrk gS(vkWVkas viMsV ,d usVodZ fMisaMsV lqfo/kk gSa)
›
UART
lsVvi: mi;ksxdrkZ UART lsVvi ls p;fur fle dkMZ
ds fy, eksMse mi;ksx dj ds ihlh esaa dk;Z djus ds fy, l{ke gks
ik;sxk- ¼tSls ihlh Mk;yvi zgkbij Vjfeuky mi;ksx djds ,fV
dekMa½- mi;ksxdrkZ UART lsVvi ls p;fur fle dkMZ ds fy, ihlh
ij Mk;yvi cukus ds fy, l{ke gks ik,xk- mnkgj.k Lo:i% vxj
fle1 p;fur gS rks mi;ksxdrkZ fle p;u djds dusD’ku cukus ds
fy, l{ke gks ik,xk-
Page 55

lsfVaXk
lsfVaXk esuw 4 ¼tkjh½
Q+ksu
fofHkUu lsfVaXl
usVodZ
lqj{kk lsVvi
lqj{kk lsfVaXk
ksu y‚d
vkWVks dqathiV ykWd
ikloMZ cnysa
pksjh&jks/kh eksokby VSªdj
ewy lsfVaXl fjLVksj djsa
xSyjh
esjh Nfo;k¡
esjh lkmaM~l
esjs ohfM;ksl
esjk xse vkSj ,Iyhds’kUl
Q+ksu
usVodZ vki bl esuw dk mi;ksx djds usVodZ vkSj usVodZ lsfVaXl dk p;u
lqj{kk lsVvi
›
fofHkUu lsfVaXl: vki çn’kZu LØhu dh ped vkSj le; dks lsV dj
ldrs gSa-
djsa dks lsV dj ldrs gSa- vki ilanhnk lwfp;ksa ls dusDV jgus ds fy,]
ilanhnk usVodZ dks Hkh tksM+ ldrs gSa-
›
SIM1/SIM2
›
Q Q+
›
›
›
lqj{kk lsfVaXk: ;g esuw vkidks Q+ksu dh lqj{kk dks lsV
djus dh vuqefr nsrk gS-
ksu y‚d: vki Q+ksu ds vuf/k—r mi;ksx ls cpus ds fy, lqj{kk dksM
dk mi;ksx dj ldrs gSa vkWVks dqathiV ykWd: vki dqN le; ckn Lopkfyr :i ls dhiSM dks
y‚d dj ldrs gSa ikloMZ cnysa: vius Qksu dksM dks cnyus ds fy,] iqjkuk dksM ntZ djsa
fQj u;k dksM lsV djsapksjh&jks/kh eksokby VSªdj: bl Q+ksu dh ATM T lqfo/kk vkidks vkids
Q+ksu ds [kks tkus ij ;k dgha xyr txg j[kus ij vkids eksckby ds
fy, ,d VªSfdax flLVe {kerk çnku djrk gS-
ewy lsfVaXl fjLVksj djsa vki lHkh Q+SDVªh fMQ+‚YV~l çkjaHk dj ldrs gSa- bl Q+aD’ku dks lfØ;
djus ds fy, vkidks lqj{kk dksM dh vko’;drk gksrh gS- fMQ‚YV dksM
0000 gSa-
xSyjh esuw 5
esjh Nfo;k¡ Nfo Q+kbyksa dh lwph fn[kkrk gSesjh lkmaM~l lgsth xbZ v‚fM;ks Q+kbysa lwph esa çnf’kZr djrk gSaesjs ohfM;ksl ohfM;ks Q+kbyksa dh lwph dks çnf’kZr djrk gSesjk xse vkSj ,Iyhds’kUl vki vius Q+ksu ij xsEl vkSj vuqç;ksxksa ds ’kkunkj laxzg rd igqap çkIr
dj ldrs gSa-
21
Page 56

vkxZukbt+j
dSysaMj
Vq&Mw fyLV
uksV~l
dsydqysVj
LV‚io‚pL
ifjorZd
fo’o le;
esa tk,a
Q+kby eSustj
lsok,¡
,Iyhds’kUl
[ksy vkSj vuqç;ksx
xSyjh
xSyjh esuw 5
vU;
ehfM;k
best O;wvj
ehfM;k Iys;j
jsfM;ks
uksV
o‚bl fjd‚MZj
vkxZukbt+j
vykeZ DykWd
vU; tc vki CywVwFk ds ek/;e ls fdlh vfu/kkZfjr Lo:i dh Q+kbysa çkIr
djrs gSa] rks Q+kbysa bl Q+ksYMj esa lgsth tkrh gSa-
ehfM;k esuw 6
best O;wvj vki lHkh best ns[k ldrs gSa tks QksVkst esa lso gSa-
ehfM;k Iys;j Iys;j vkidks v‚fM;ks ;k ohfM;ks Q+kbYl pykus dh vuqefr nsrk gS- vki
jsfM;ks vki vius ckgjh b;jQ+ksu ds lkFk ;k mlds fcuk FM jsfM;ks dk
FM
o‚bl fjd‚MZj vki o‚bl eseks fjd‚MZ dj ldrs gSa-
vkxZukbt+j esuw 7
vykeZ DykWd ,d fufnZ"V le; ij tkus ds fy, vki vykeZ ?kM+h dks lsV dj ldrs
22
(xSyjh > esjh Nfo;k¡ > photos)
IysfyLV~l dks Hkh çcaf/kr dj ldrs gSa-
mi;ksx dj ldrs gSa- vki fdlh Hkh le; viuk ilanhnk jsfM;ks LVs’ku
lqu ldrs gSa-
uksV: vkidks jsfM;ks lquus vkSj jsfM;ks ds vPNs flXuy çkIr djus ds
fy,] gSaM~l¶+jh dusDVj esa bZ;j&ekbd dks Mkyuk vko’;d gS-
gSa-
Page 57

vkxZukbt+j
vkxZukbt+j esuw 7 ¼tkjh½
dSysaMj
Vq&Mw fyLV
uksV~l
dsydqysVj
LV‚io‚p
ifjorZd
fo’o le;
esa tk,a
Q+kby eSustj
lsok,¡
,Iyhds’kUl
[ksy vkSj vuqç;ksx
dSysaMj vki ;gk¡ p;fur fnukad esa dSysaMj ns[k ldrs gSa vkSj bZosaV~l tksM+
Vq&Mw fyLV vki djus ds fy, dk;ksaZ dks ns[k] laikfnr vkSj tksM+ ldrs gSauksV~l vki u;k eseks tksM+ ldrs gSa] lgsts x, esekst dks ns[k vkSj O;ofLFkr
dsydqysVj dsydqysVj esa ewyHkwr xf.krh; Q+aD’ku: tksM ]+?kVk] xq.kk vkSj Hkkx gksrs gSaLV‚io‚p ;g fodYi vkidks LV‚io‚p Q+aD’ku ds mi;ksx dh vuqefr nsrk gSifjorZd ;g fdlh Hkh eki dks bfPNr bdkbZ esa duoVZ dj nsrk gS- dbZ çdkj gSa]
fo’o le; fo’o le; Q+aD’ku nqfu;kHkj ds eq[; ’kgjksa dh le; tkudkjh çnku
esa tk,a vki ftl esuw dks [kkst jgs gSa] ogk¡ rd tkus esa ;g vkidh enn djrk
Q+kby eSustj ;g Q+aD’ku vkidks vkidh vkrafjd Q+ksu eseksjh vkSj cká eseksjh dkMZ esa
lsok,¡ vkids usVodZ lsok çnkrk }kjk miyC/k djk, x, vfrfjä QDa’kla ;k
SIM
ldrs gSa-
dj ldrs gSa-
ftUgsa bdkbZ;ksa esa ifjofrZr fd;k tk ldrk gS: eqæk] yackbZ] Hkkj-
djrk gS-
gS- vki vkbVe dks ;gk¡ tk,¡ ds :i esa lsV dj ldrs gSa-
lkexzh ns[kus dh vuqefr nsrk gS-
vuqç;ksxksa dks çnf’kZr djrk gS-
,Iyhds’kUl esuw 8
[ksy vkSj vuqç;ksx vkidk LG-A155 vkidks vkids [kkyh le; esa euksjatu ds fy, igys
ls yksM fd;k x, xsEl ds lkFk vkrk gS- ;fn vki dksbZ Hkh vfrfjä xse
;k vuqç;ksx MkmuyksM djuk pqurs gSa] rks os bl Q+ksYMj esa lgsts tk,¡xsesuw nck,¡ vkSj ,Iyhds’kUl dk p;u djsa- [ksy vkSj vuqç;ksx pqusa-
23
Page 58

lqjf{kr vkSj çHkkoh mi;ksx ds fy, fn’kkfunsZ’k
osc
osc esuw 9
gkse
cqdekdZ
vafre osc irk
lsfVax
,Msªl esa tk,a
lqjf{kr fd, x, ist
vksiu Qkby
gky ds i`"B
vkids daI;wVj ij
lwV LFkkfir djuk
1
2
3
gkse gkse ls dusDV djrk gS- eq[k i`"B og LFky gksxk tks lfØ; fd, x,
cqdekdZ ckn esa vklku igq¡p ds fy, ;g esuw vkidks ilanhnk osc i`"Bksa ds fy,
vafre osc irk tc vkius baVjusV ls dusDV fd;k gks] rks vki uohure i`"B ns[k
lsfVax vki baVjusV lsok ls lacaf/kr çksQ+kby vkSj lqj{kk lsV dj ldrs gSa,Msªl esa tk,a vki bfPNr lkbV ls lh/ks dusDV gks ldrs gSa- dksbZ fufnZ"V URL ntZ
lqjf{kr fd, x, ist vkidks vkids lgsts x, osc i`"B ns[kus dh vuqefr nsrk gSvksiu Qkby vki Q+ksu esa lgsth xbZ fuEu Q+kbyksa dks [kksy ldrs gSa- WML]
gky ds i`"B ;g esuw gky gh esa czkmt fd, x, i`"Bksa ds bfrgkl dks fn[kkrk gS-
vkids daI;wVj ij LG PC
. www.lgapplication.com ij tk,¡ vkSj viuk ns’k pqusa. Manual & Software Download dk p;u djsa vkSj Download LG Mobile
Support Tool to PC, MkmuyksM djus ds fy, Download fDyd djsa-
. vkids PC eSa LG PC lwV baLV‚yj fotkMZ iw.kZ djus ds fy, LØhu ij fn, x, funsZ’kksa
dk ikyu djsa-
24
çksQ+kby esa ifjHkkf"kr fd;k x;k gS-
URL dks laxzghr djus dh vuqefr nsrk gS-
ldrs gSa-
djus ds ckn] lkbV ls dusDV djus ds fy, dusD’ku dks iw.kZ djus gsrq
Bhd dqath nck,¡-
XTHML] HTM] HTML-
lwV LFkkfir djuk
Page 59

psrkouh
mRikn dh ns[kHkky vkSj j[kj[kko
psrkouh!
lqjf{kr vkSj çHkkoh mi;ksx ds fy, fn’kkfunsZ’k
lqjf{kr vkSj çHkkoh mi;ksx ds fy, fn’kkfunsZ’k
—i;k bu ljy fn’kkfunsZ’kksa dks i<+sa- bu fn’kkfunsZ’kksa dk ikyu u djuk [krjukd ;k
xSjdkuwuh gks ldrk gS- vU; foLr`r tkudkjh bl eSU;qvy esa nh xbZ gS-
psrkouh
›
viuh lqj{kk ds fy,] dsoy fufnZ"V okLrfod cSVfj;ka vkSj pktZlZ gh mi;ksx djsa-
›
tgk¡ dgha Hkh fo’ks"k fofu;eksa ds vuqlkj okafNr gks] ogk¡ Q+ksu can dj nsa] tSls fdlh
vLirky esa] tgk¡ ;s esfMdy midj.kksa dks çHkkfor dj ldrk gS-
›
cSVfj;ka laxr dkuwu ds vuqlkj u"V dh tkuh pkfg,-
mRikn dh ns[kHkky vkSj j[kj[kko
psrkouh! bl fo’ks"k Q+ksu e‚My ds lkFk dsoy crkbZ xbZ cSVfj;ka] pktZlZ vkSj lgk;d
midj.kksa dk gh mi;ksx djsa- fdlh Hkh nwljs çdkj dk mi;ksx djus ij Q+ksu ij ykxw gksus
okys vuqeksnu ;k o‚jaVh vekU; gks ldrs gSa vkSj ;g [krjukd gks ldrk gS-
›
bl ;wfuV dks fMlvlsacy u djsa- lq/kkjus dh vko’;drk gksus ij bls ;ksX; lsok
rduhf’k;u ds ikl ys tk,¡LG ds fodYi ij o‚jaVh ds varxZr fd, tkus okys lq/kkjksa esa] u, ;k lq/kkj fd, x, iqtksaZ
;k cksMZ~l dk çfrLFkkiu ’kkfey gS] c’krsZ mudh fØ;kRedrk çfrLFkkfir fd, tkus okys
iqtksaZ ds cjkcj gks-
›
;wfuV dks xehZ ds lzksrksa tSls jsfM,VlZ ;k dqdj ls nwj j[kuk pkfg,-
›
;wfuV ds ckgjh fgLls dks lkQ djus ds fy, lw[ks diM+s dk mi;ksx djsa- ¼fdlh ?kksy dk
mi;ksx u djsa-½
›
Q+ksu dks ØsfMV dkMZ~l ;k VªkaliksVZ fVdVksa ds ikl u j[ksa; ;g pqacdh; ifê;ksa ij vafdr
tkudkjh dks çHkkfor dj ldrk gS-
25
Page 60

bysDVª‚fud fMokblst
lM+d lqj{kk
foLQ+ksVd {ks=
laHkkfor :i ls foLQ+ksV okys okrkoj.k
,;jØ‚¶+V esa
cPps
lqjf{kr vkSj çHkkoh mi;ksx ds fy, fn’kkfunsZ’k ¼tkjh½
lqjf{kr vkSj çHkkoh mi;ksx ds fy, fn’kkfunsZ’k ¼tkjh½
lqjf{kr vkSj çHkkoh mi;ksx ds fy, fn’kkfunsZ’k ¼tkjh½
bysDVª‚fud fMokblst
lHkh eksckby Q+ksu esa O;o/kku vk ldrk gS] tks dk;Z{kerk dks çHkkfor dj ldrk gS-
›
fcuk vuqefr ds vius eksckby Q+ksu dk mi;ksx esfMdy midj.k ds ikl u djsa- Q+ksu dks
fdlh islesdj] tSls fny ds ikl okys i‚dsV esa j[kus ls cpsa-
lM+d lqj{kk
ftu {ks=ksa esa vki xkM+h pykrs gSa] ogka eksckby Q+ksu ds mi;ksx ls lacaf/kr dkuwuksa vkSj
fofu;eksa dh tkudkjh ys ysa-
›
okgu pykrs le; gSaM&gsYM Q+ksu dk mi;ksx u djsa-
›
;fn miyC/k gks] rks gSaM~l&Ýh fdV dk mi;ksx djsa-
›
;fn okgu pykrs le; vko’;d gks] rks d‚y djus ;k mÙkj nsus ls igys okgu dks lM+d
ds fdukjs yxk,¡-
foLQ+ksVd {ks=
Q+ksu dk mi;ksx ,sls LFkku ij u djsa tgk¡ foLQ+ksV gks jgs gksa- çfrca/kksa ij /;ku nsa] vkSj
fofu;eksa ;k fu;eksa dk ikyu djsalaHkkfor :i ls foLQ+ksV okys okrkoj.k
Q+ksu dk mi;ksx bZa/ku Hkjus ds LFkku ij u djsa- bZa/ku ;k jlk;uksa ds ikl mi;ksx u djsa,;jØ‚¶+V esa
ok;jysl fMokbl ls ,;jØ‚¶+V esa O;o/kku mRiUu gks ldrk gS-
›
fdlh ,;jØ‚¶+V esa tkus ls igys viuk eksckby Q+ksu can dj nsa-
cPps
Q+ksu dks cPpksa dh igq¡p ls nwj lqjf{kr LFkku ij j[ksa- blesa ,sls dbZ Hkkx gksrs gSa] ftUgsa gVkus
ij pksd gksus dk [krjk gks ldrk gS-
26
Page 61

vkikrdkyhu d‚Yl
cSVjh tkudkjh vkSj ns[kHkky
lqjf{kr vkSj çHkkoh mi;ksx ds fy, fn’kkfunsZ’k ¼tkjh½
lqjf{kr vkSj çHkkoh mi;ksx ds fy, fn’kkfunsZ’k ¼tkjh½
vkikrdkyhu d‚Yl
lHkh lsY;qyj usVodZ~l ds varxZr gks ldrk gS vkikrdkyhu d‚Yl miyC/k u gksa- blfy,]
vkidks vkikrdkyhu d‚Yl ds fy, dsoy Q+ksu ij gh fuHkZj ugha jguk pkfg,- vius LFkkuh;
lsok çnkrk ls bldh tkudkjh ysa-
cSVjh tkudkjh vkSj ns[kHkky
›
cSVjh fjpktZ djus ds igys vkidks mls iwjh rjg fMLpktZ djus dh vko’;drk ugha gS-
vU; cSVjh flLVEl ds foijhr] ,slk dksbZ eseksjh çHkko ugha gS ftlls cSVjh ds çn’kZu ij
vlj iM+rk gS-
›
dsoy LG cSVfj;ksa vkSj pktZlZ dk mi;ksx djsa- LG pktZlZ dks cSVjh dh vk;q vf/kdre
djus ds fy, fMtkbu fd;k x;k gS-
›
cSVjh iSd dks fMlvlsacy u djsa ;k mls ’k‚VZ&lfdZV ls cpk,a-
›
cSVjh dk çn’kZu vis{kkuqlkj u jgus ij mls cny nsa- cSVjh dks çfrLFkkfir djus dh
vko’;drk iM+~us ls igys]cSVjh iSd dks lSdM+ksa ckj jhpktZ fd;k tk ldrk gS-
›
cSVjh pktZj dks lh/ks /kwi esa u j[ksa ;k vf/kd ueh okyh txgksa ij tSls fd ckFk:e esa
bldk mi;ksx u djsa-
›
;fn cSVjh dks ,d xyr çdkj ls çfrLFkkfir fd;k tk,] rks foLQ+ksV gksus dk [krjk gS-
›
mi;ksx dh xbZ cSVfj;ksa dk fuiVku] fuekZrk ds funsZ’kksa ds vuqlkj gh djsa-
27
Page 62

leL;k fuokj.k
leL;k laHkkfor gy
jsfM;ks ÝhDosalh ÅtkZ ds laidZ esa vkuk
jsfM;ks rjax ,Dlikstj vkSj LisflfQ+d ,CtkiZ~’ku jsV ¼
½ dh tkudkjh
lqjf{kr vkSj çHkkoh mi;ksx ds fy, fn’kkfunsZ’k ¼tkjh½
lqjf{kr vkSj çHkkoh mi;ksx ds fy, fn’kkfunsZ’k ¼tkjh½
jsfM;ks ÝhDosalh ÅtkZ ds laidZ esa vkuk
jsfM;ks rjax ,Dlikstj vkSj LisflfQ+d ,CtkiZ~’ku jsV ¼SAR
;g eksckby Q+ksu e‚My LG-A155 jsfM;ks rjaxksa ds çfr ,Dlikstj ds fy, mi;qä lqj{kk
vko’;drkvksa ds laxr fMtkbu fd;k x;k gS- ;gk¡ vko’;drk oSKkfud funsZ’kksa ij vk/kkfjr
gS] ftlesa vk;q vkSj LokLF; ij /;ku fn, fcuk] lHkh yksxksa dh lqj{kk dks lqfuf’pr djus ds
fy, fMtkbu fd, x, lqj{kk mik; ’kkfey gS-
›
jsfM;ks rjax ,Dlikstj fn’kkfunsZ’k] LisflfQ+d vCtkiZ’ku jsV ;k SAR dgykus okyh ,d
ekiu bdkbZ dk mi;ksx djrs gSa- Q+ksu ij SAR ds ijh{k.k ekud fof/k;ksa ds mi;ksx ls
fd, tkrs gSa] blds fy, mi;ksx gksus okys lHkh ÝhDosalh cSaM~l esa Q+ksu ds mPpre çekf.kr
i‚oj Lrj ij laçs"k.k fd;k tkrk gS-
›
oSls rks fofHkUu LG Q+ksu e‚My ds SAR Lrj esa fHkUurk gks ldrh gS] fdarq mu lHkh dks
jsfM;ks rjaxksa ds çfr ,Dlikstj ds fy, lac) fn’kkfunsZ’kksa dks iwjk djus ds fy, cuk;k x;k
gS-
›
xSj&vk;ksukbftax jsfM,’ku lqj{kk ij varjkZ"Vªh; vk;ksx ¼ICNIRP½ }kjk vuq’kaflr SAR
lhek nl ¼10½ xzke fV’kw ij vkSlru 2o‚V/fdxzk gS-
›
DASY4 }kjk ifjf{kr] dku ds ikl mi;ksx ds fy, bl e‚My Q+ksu dk mPpre SAR
eku 1.19 W/kg ¼10xzk½ gS vkSj tc ’kjhj ij iguk tk, rks 1.19 W/kg ¼10xzk½ gS-
›
bysfDVªdy ,aM bysDVª‚fuDl baftfu;lZ laLFkku ¼IEEE½ }kjk vuq’kaflr SAR lhek dks
viukus okys ns’kksa/{ks=ksa ds fuokfl;ksa ds fy, SAR MsVk tkudkjh ,d ¼1½ xzke fV’kw ij
vkSlru 1.6 o‚V/fdxzk-
28
½ dh tkudkjh
Page 63

leL;k fuokj.k
leL;k fuokj.k
leL;k
laHkkfor gy
leL;k
VsyhQ+ksu pkyw ugha fd;k
tk ldrk
cSVjh [kkyh cSVjh pktZ djsa- çn’kZu ij pkftaZx ladsrd tk¡psa-
cSVjh Bhd ls pktZ ugha gksrh
gS ;k dHkh&dHkh Q+ksu Lo;a
can gks tkrk gS
cSVjh dk mi;ksx le; de
gks tkrk gS
pkftaZx =qfV—rkieku lhek ls
vf/kd gS
pkftaZx =qfV—xyr pktZj dsoy ewy LG lgk;d lkexzh dk mi;ksx djsa-
pkftaZx =qfV—cSVjh [kjkc gS cSVjh cnysa-
pkftaZx =qfV—pkftaZx ds
le; dksbZ cSVjh fpà ugha
fn[kkbZ nsrk
Q+ksu dksM ;k ikloMZ Hkwy
x, gSa
laHkkfor gy
—i;k cSVjh fudkydj fQj ls yxk,¡- mlds ckn Q+ksu
dh ikoj pkyw djus ds fy, ikoj pkyw dqath nck,a-
Q+ksu vkSj cSVjh ij pkftaZx dh lrgksa dks lkQ+ ueZ
diM+s ls iksNsa-
;fn cSVjh dk le; de gS] rks ,slk mi;ksxdrkZ
okrkoj.k] vf/kd d‚Yl ;k detksj flXuYl ds dkj.k
gks ldrk gS-
lqfuf’pr djsa fd ifjos’kh rkieku Bhd gS] dqN nsj
çrh{kk djsa] vkSj rc iqu: pktZ djsa-
cSVjh [kkyh gS ;k cgqr le; ls mi;ksx ugha dh xbZ
gS- LØhu ij cSVjh fpà fn[kkbZ nsus esa dqN le; yx
ldrk gS-
fMQ+‚YV Q+ksu dksM Þ0000ß gS-
29
Page 64

leL;k laHkkfor gyleL;k
laHkkfor gy
leL;k fuokj.k ¼tkjh½ leL;k fuokj.k ¼tkjh½
leL;k fuokj.k ¼tkjh½
leL;k
PUK ntZ djsa fiu dksM yxkrkj rhu ckj xyr ntZ fd;k x;k gS]
usVodZ xqe gks ldrk gS fd vki detksj flXuy {ks= esa gksa- ogk¡ ls
vkius ,d uacj ntZ fd;k gS
fdarq mls Mk;y ugha fd;k
x;k Fkk
vkidk laoknnkrk vki rd
ugha igq¡p ldrk
vkidk laoknnkrk vkidh
vkokt ugha lqu ldrk
30
laHkkfor gy
vkSj Q+ksu vc vojksf/kr gks x;k gS- vkids lsok çnkrk
}kjk fn;k x;k PUK ntZ djsa-
gVsa vkSj fQj ls ç;kl djsa- vki ,sls fodYi dk mi;ksx
djus dk ç;kl dj jgs gSa ftlds fy, vkius vius lsok
çnkrk ls lnL;rk ugha yh gS- vkxs dh tkudkjh ds
fy, vius lsok çnkrk ls laidZ djsa-
lqfuf’pr djsa fd vkius V‚d/gk¡ dqath nckbZ gSlqfuf’pr djsa fd vki lgh usVodZ lsok rd igq¡ps gSalqfuf’pr djsa fd vkius dksbZ tkod d‚y jks/ku fodYi
ugha lsV fd;k gS- lqfuf’pr djsa fd vkius {ks= dksM
ntZ dj fn;k gS-
lqfuf’pr djsa fd vkidk Q+ksu pkyw gS- V‚d/gk¡ dqath
dks ,d lsdsaM ls vf/kd nsj rc nck,¡- lqfuf’pr djsa
fd vki usVodZ lsok dk mi;ksx dj jgs gSa- lqfuf’pr
djsa fd vkius dksbZ vkod d‚y jks/ku fodYi ugha lsV
fd;k gS-
lqfuf’pr djsa fd vkius ykmMLihdj can dj fn;k
gS- lqfuf’pr djsa fd vkius viuk Q+ksu eq¡g ds ikl j[kk
gS- ekbØksQ+ksu] Q+ksu ds uhps fLFkr gS-
Page 65

leL;k
laHkkfor gy
leL;k fuokj.k ¼tkjh½
leL;k fuokj.k ¼tkjh½
leL;k
d‚y dh o‚bl DokfyVh cgqr
[kjkc gS
tc vki fdlh laidZ dks
jhd‚y djrs gSa] rks dksbZ uacj
Mk;y ugha fd;k tkrk
czkmtj dk mi;ksx ugha dj
ldrk
;fn mijksä fn’kkfunsZ’kksa ls
vkidh leL;k gy djus esa
enn ugha feyrh gS
laHkkfor gy
fMlIys ij flXuy ’kfä ladsrd dks tk¡psa- ifê;ksa dh
la[;k flXuy {kerk n’kkZrh gS- ;fn vki fdlh fcfYMax
esa gSa rks Q+ksu dks FkksM+k ?kqekdj ;k f[kM+dh ds ikl ys
tkdj ç;kl djsa-
uacj lgh rjg ls laxzghr fd;k x;k gS] ;g lqfuf’pr
djus ds fy, Q+ksucqd [kkst lqfo/kk dk mi;ksx djsa- ;fn
vko’;drk gks] rks uacj fQj ls lgstsa-
vkidh lnL;rk esa MsVk {kerk ’kkfey ugha gS- vkidks
lsok l{ke djus ds fy, vius lsok çnkrk ls laidZ
djuk gksxk-
vkids eksckby Q+ksu dk e‚My uacj vkSj leL;k dk
Li"V o.kZu uksV dj ysa- enn ds fy, vius Q+ksu Mhyj
;k LG lsok dsaæ ls laidZ djsa-
31
Page 66

rduhdh MsVk lgk;d midj.k
lgk;d midj.k
ekud cSVjh
VªWoy ,M‚IVj
gsMlsV
uksV
lgk;d midj.k fHkUu {ks=ksa esa fHkUu gks ldrs gSa —i;k vf/kd iwNrkN ds fy, gekjs {ks=h;
lsok daiuh ,tsaV ls laidZ djsa-
ekud cSVjh
gsMlsV
uksV
›
ges’kk çkekf.kd LG lgk;d midj.kksa dk mi;ksx djsa-
›
,slk ugha djus ij vkidh o‚jaVh vekU; gks ldrh gS-
32
VªWoy ,M‚IVj
Page 67

rduhdh MsVk
rduhdh MsVk
lkekU;
mRikn uke
flLVe
ifjos’k dk rkieku
vf/kdre-
U;wure
lkekU;
›
mRikn uke : LG-A155
›
flLVe : GSM 850 / E-GSM 900 /
DCS 1800 / PCS 1900
Declaration of Conformity
Suppliers Details
Name
LG Electronics Inc
Address
LG Electronics Inc. LG Twin Towers 20,
Yeouido-dong, Yeongdeungpo-gu, Seoul, Korea 150-721
Product Details
Product Name
GSM 850 / E-GSM 900 / DCS 1800 / PCS 1900 Quad band Terminal Equipment
Model Name
LG-A155
Trade Name
LG
Applicable Standards Details
R&TTE Directive 1999/5/EC
EN 301 489-01 V1.8.1, EN 301 489-07 V1.3.1, EN 301 489-17 V2.1.1
EN 301 511 V9.0.2
EN 50360:2001, EN62209-1:2006
EN 60950-1:2001
EN 300 328 V1.7.1
Supplementary Information
The conformity to above standards is verifi ed by the following Notifi ed Body(BABT)
BABT, Forsyth House-Churchfi eld Road - Walton-on-ThamesSurrey - KT12 2TD , United Kingdom
Notifi ed Body Identifi cation Number : 0168
Declaration
I hereby declare under our sole responsibility
that the product mentioned above to which this
declaration relates complies with the above
mentioned standards and Directives
LG Electronics Logistics and Services B.V.
Veluwezoom 15, 1327 AE Almere, The Netherlands
ifjos’k dk rkieku
›
vf/kdre- : 55°C ¼fMLpkftaZx½
›
U;wure : 10°C
Name Issued Date
Doo Haeng Lee / Director 12. October. 2010
Signature of representative
45°C ¼pkftaZx½
33
Page 68

Page 69

Page 70

Page 71

Page 72

Customer Information Center
For any query related to the after sales service and customer
support please contact us at below details
Page 73

Page 74

 Loading...