

Page 1
Menu
Contacts
-
LG-A120 User Guide
This manual may di er from the phone depending
on the phone software version and service provider used.
Product Authentication program
Dear Customers,
To protect all LG customers from counterfeit and grey market products and make sure that you receive
o cial warranty service, LG is now running a product authentication program.
To make sure your handset is a genuine product of LG, ONLY one SMS containing the IMEI No. of your
purchased handset will be automatically sent to LG on the date of purchase.
Once your phone is authenticated, you will receive the message ‘Your handset is a genuine LG product.’
The customer shall bear the cost of one SMS for the product authentication program.
In return, you will receive one additional month of warranty for free.
One additional month of warranty covers only mobile phone, not batteries and accessories.
The IMEI No. sent to LG guarantees your handset to be free from manufacturing defects during the
warranty period from the date of purchase without proof of purchase or warranty card.
English
P/N: MMBB0387703 (1.1)
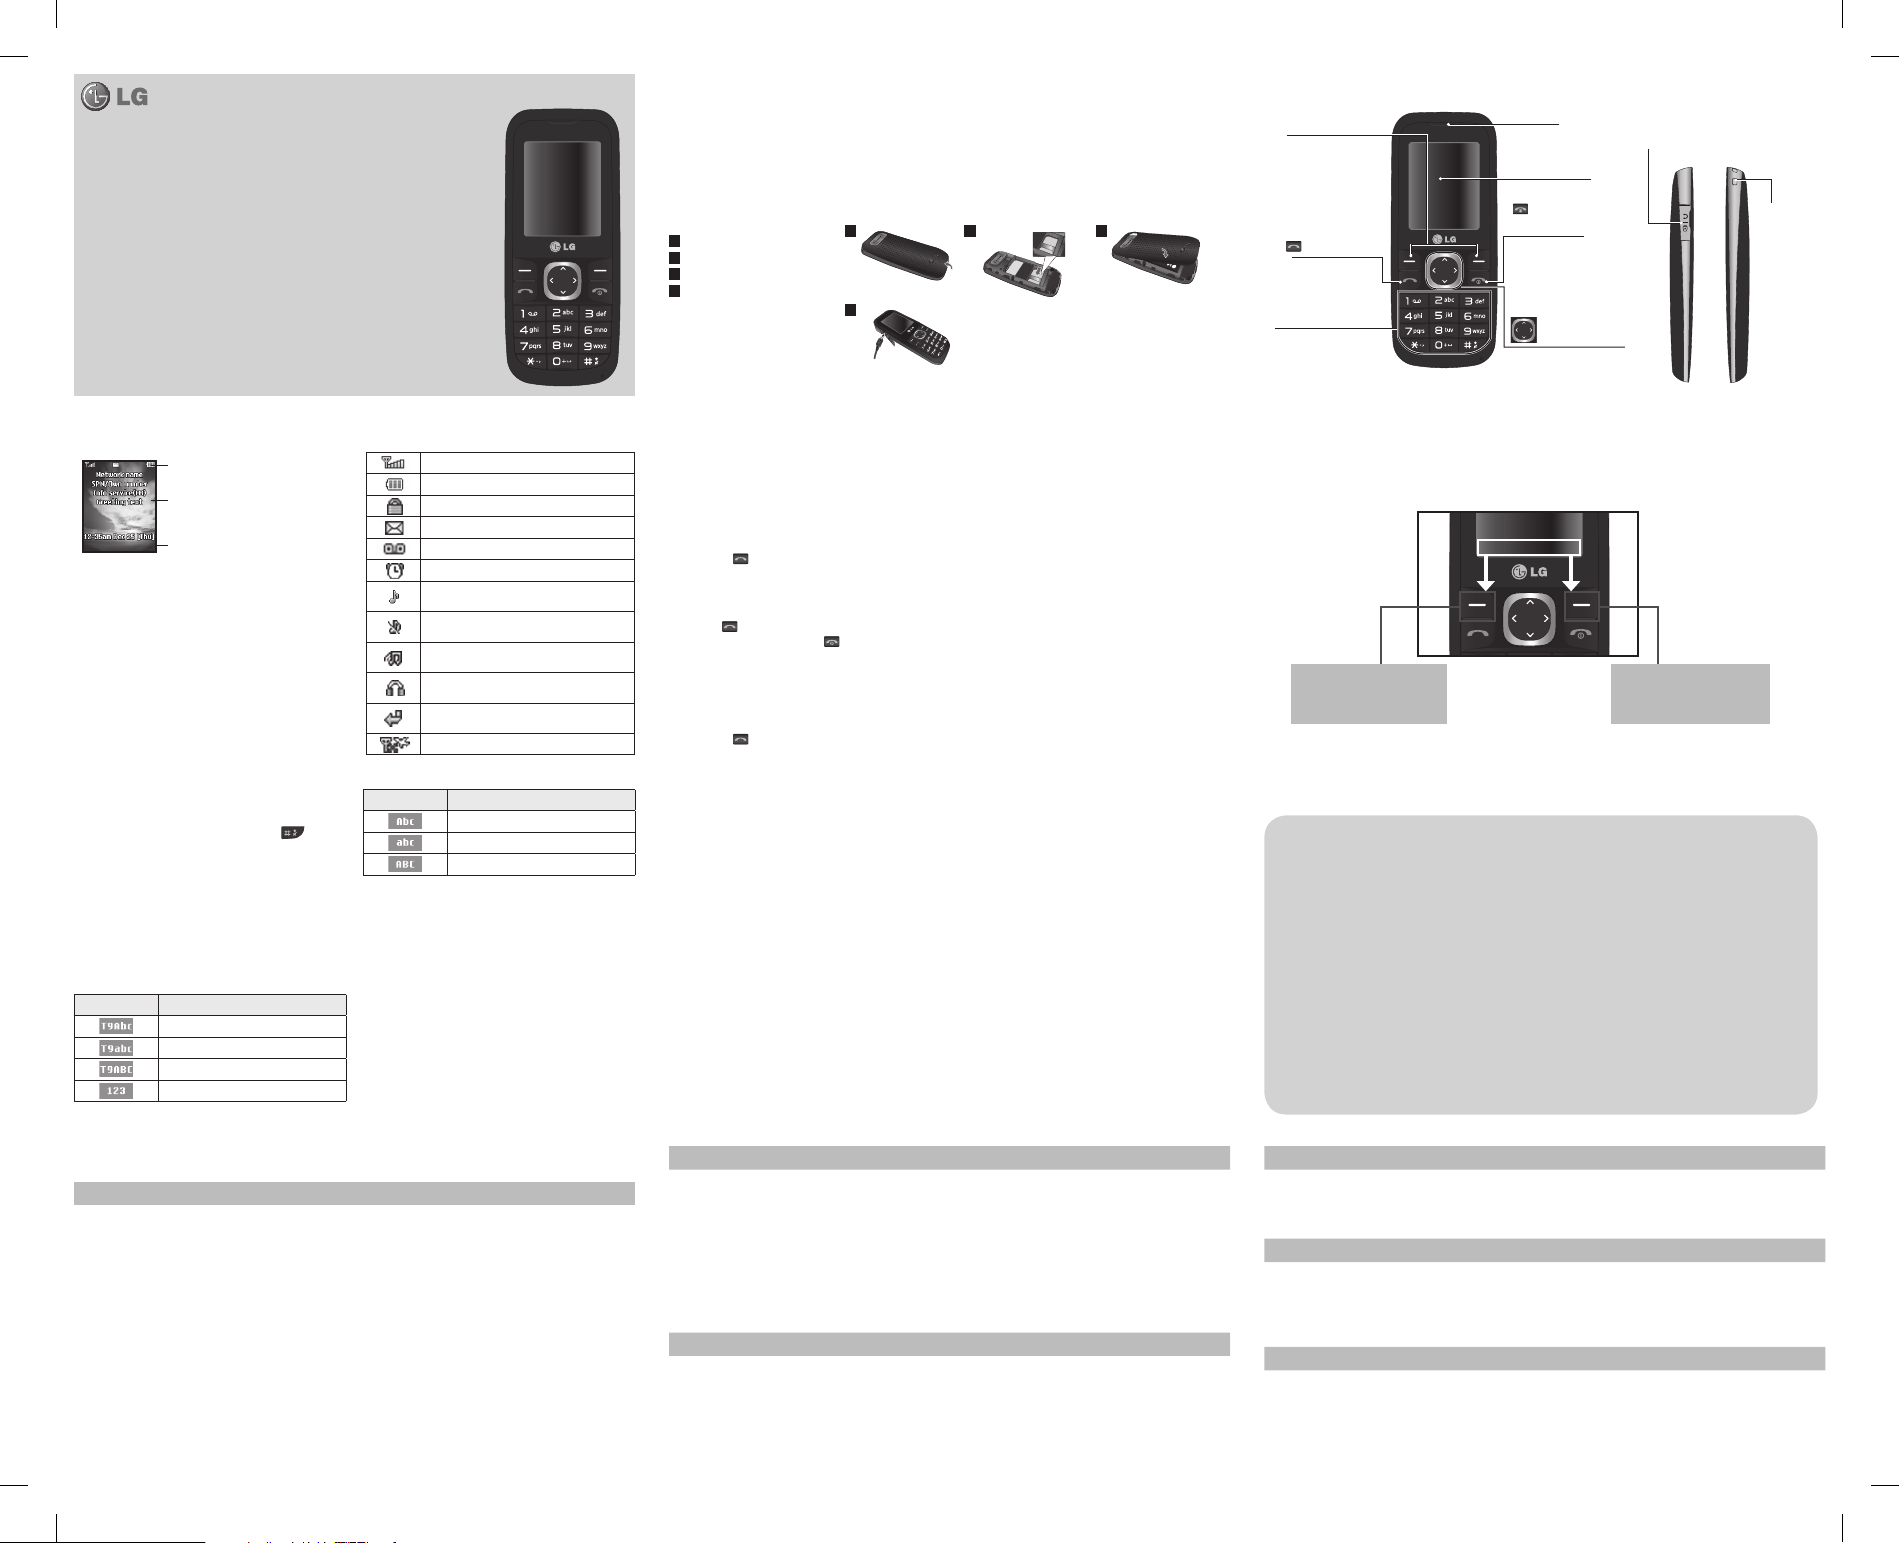
Installing the SIM Card and Charging the Battery
When you subscribe to a cellular network, you are provided with a SIM card loaded with your subscription details, such as
your PIN, any optional services available and many others.
Important!
› The SIM card and its contacts can be easily damaged by scratches or bending, so be careful when handling, inserting or
removing the card. Keep all SIM cards out of the reach of small children.
› USIM is not supported in this phone.
› If the battery is removed for about 1 minute, the clock returns to its default setting. You will then need to reset the time.
Illustrations
1
Open the battery cover
2
Insert your SIM card
3
Close battery cover
4
Charge your battery
1
4
Fully Charge the battery before using it for the rst time
2 3
Align the back cover to
the phone
Phone Components
Left soft key and
Right soft key
Each of these keys
performs the functions
indicated by the
text on the display
immediately above
You can dial a phone
number and answer
Alphanumeric keys
In most of the time, the
numeric keys are used
to Input number or
them.
: Talk/ Yes key
incoming calls.
characters.
Earpiece
Display screen
: End call/
Power on key
Allows you to power
the phone on or o ,
end calls, or return to
Standby Mode.
: Navigation key
Use for quick access to
phone functions.
Micro USB port
Earphone jack/
Charger port
Hand
Strap Hole
Display Information
Icon areas
Text and graphic area
Menu
Contacts
Soft key indications
Entering Text
You can enter alphanumeric characters by using the
phone’s keypad. To change modes, press the
T9 Mode
This mode allows you to enter words with only one
keystroke per letter. Each key on the keypad has more
than one letter. The T9 mode automatically compares
your keystrokes with an internal linguistic dictionary
to determine the correct word, thus requiring far fewer
keystrokes than the traditional ABC mode.
The input method is displayed at the upper right corner
of your phone.
Indicator Function (English Smart mode)
T9 Smart Abc
T9 Smart abc
T9 Smart ABC
Numeric
On-Screen Icons
Tells you the strength of the network signal.
Indicates the battery charge level.
Indicates your phone is locked.
Indicates new text message(s).
Indicates new voice message(s).
Indicates the alarm clock is set.
Indicates your phone uses the normal
settings.
Indicates your phone uses the silent
settings.
Indicates your phone uses the outdoor
settings.
Indicates your phone uses the headset
setting.
Indicates all calls are diverted to another
number.
Indicates your phone is in ight mode.
Indicator Function (English Smart mode)
key.
Multitap Abc
Multitap abc
Multitap ABC
How to set the tone
You may set up the following di erent pro les to adapt to
di erent environmental conditions. Your phone provides 4
di erent pro les.
1. Select [Pro les] from the main menu.
2. Select a pro le and press [Options - Personalise] to set
the ring tone.
3. Press the left soft key [OK] and then you can set the
desired ring tone.
Your phone also provides the following options to
customize tones/alert types:
• Call alert type: Selects an aler t type (Ring, Vibrate, Ring &
Vibrate, Ring after Vibrate, and Silent) for the ringing tone.
• Ring tones: Sets desired ring tone.
Turning Your Phone On and O
You can power on and power o the phone by pressing or holding the power key.
Making a call
1. In the standby mode, enter the area code and the phone number.
2. Press the
talk key to call the number.
Answering a call
Press the talk key to answer the call when the phone rings. If the Any Key menu option has been set, any key press
will answer a call except for the
End key or the right soft key.
Making an international call
1. In the standby mode, long press the 0 key until a + (international pre x character) sign is displayed.
2. Enter the country code, the area code and the phone number.
3. Press the
• Ring volume: Adjusts the volume of ring tone.
• Message alert type: Selects di erent alert types (Ring
Once, Ring periodically, Ring & Vibrate. Vibrate, Silent) for
message alert tone.
• Message tones: Selects desired message alert tone.
• Message volume: Adjusts the volume of message alert
tone.
• Keypad tones: Selects desired keypad tone.
• Keypad volume: Adjusts the keypad volume.
• Power on/o tones: Selects di erent type of ring tone
for power on/o .
• Power on/o volume: Adjusts the volume of power
on/o ring tone.
Anti Theft Mobile Tracker (ATMT)
Anti-theft mobile tracker (ATMT) allows you to track your
lost phone. When someone uses your phone without your
permission, the tracking service will be activated.
You are reminded by a text message sent to the default
phone number you have set, without the unauthorized
talk key to call.
user’s knowledge. You can always activate the ATMT and
con gure your personal settings.
To activate Anti-theft mobile tracker
1. From the main menu, select Settings > Security > Anti-
theft mobile tracker and press Ok.
2. Select Set ATMT and press Ok.
3. Switch On or O and press Ok.
4. Input the security code to enable or disable this
function.
5. Then from the “Number for ATMT ” menu, edit and save
the name in Sender name and numbers in Sending
number list.
Note:
The default ATMT code is “0000”. You have
to enter the code before configuring the ATMT
settings.
Menu and Options
Your phone o ers a set of functions that allow you to customize it. These functions are arranged in menus and sub-menus,
accessed via the left and right soft keys. The label on the bottom of the display screen immediately above the soft keys
indicates their current function.
Menu Contacts
Press the left soft key to access
the available Menu.
Press the right soft key to access
the Contacts.
Menu Tree
1. FM radio
2. Call history
2.1 All calls
2.2 Missed calls
2.3 Dialed calls
2.4 Received calls
2.5 Call duration
2.6 Call costs
3. Tools
3.1 Alarm clock
3.2 Calendar
3.3 Calculator
3.4 To do
3.5 Unit converter
3.6 World clock
3.7 Sim Services
3.8 Torch
4. Multimedia
4.1 Music player
4.2 Schedule FM record
4.3 Voice recorder
4.4 Melody composer
5. Messaging
5.1 New message
5.2 Inbox
5.3 Drafts
5.4 Outbox
5.5 Sent
5.6 Listen to voicemail
5.7 Info message
5.8 Templates
5.9 Settings
6. My stu
6.1 Sounds
6.2 Games & Apps
7. Pro les
7.1 Normal
7.2 Silent
7.3 Outdoor
7.4 Flight mode
8. Contacts
8.1 Search
8.2 New contact
8.3 Speed dials
8.4 Groups
8.5 Copy all
8.6 Delete all
8.7 Information
9. Settings
9.1 Date & Time
9.2 Languages
9.3 Display
9.4 Shortcut
9.5 Fake call
9.6 Call
9.7 Security
9.8 Connectivity
9.9 Power save
9.10 Reset
9.11 Memory status
Quick feature reference
FM radio Menu 1 (This function may be different in different regions.)
Listens to FM radio station. You can enjoy listening FM without using headset as phone supports wireless FM service.
1. From main menu select FM radio.
2. Use navigation keypad to search radio station. You can also press Options to search radio frequency for available
channels and automatically store to the channel list.
3. Press Options to edit the channel list. There are 9 stations you may pre-set.
Your phone provides the following options for FM radio:
• Radio on/o : Select radio state is on or o .
• Channel List: Bookmark up to 9 radio stations by entering the channel name and frequency.
• Manual Input: You can input frequency manually by using this option.
• Preset Auto Search: Auto search available channels and automatically store them to the channel list.
• Settings: Allows you to switch on the loud speaker. Changes the background play, the skin of the FM radio, the record
audio quality and the record format. You can record in AMR or WAV formats.
• Record: Records your favorite radio programs.
• Append: Resumes a previously recorded le.
• File list: Manages recorded audio les.
Call history Menu 2
You can check the record of missed, received, and dialed calls only if the network supports the Calling Line
Identi cation (CLI) within the service area. The number and name (if available) are displayed together with the date
and time at which the call was made. You can also view call durations.
• All calls: Displays all the lists of three types (Received/Dialled/Missed calls) by time.
• Missed calls: This option lets you view the last 40 unanswered calls.
• Dialed calls: This option lets you view the last 40 outgoing calls (called or attempted).
• Received calls: This option lets you view the last 40 incoming calls.
• Call duration: Allows you to view the duration of your incoming and outgoing calls.
• Call costs: Allows you to check the cost of your last call, all calls, and reset the cost.
Tools Menu 3
• Alarm clock: Allows you to set one of ve alarms. At the alarm time, the Alarm icon will be displayed on the LCD
screen and the alarm will sound.
• Calendar: You can check track of daily or monthly schedules.
• Calculator: This contains the standard functions such as Addition, Subtraction, Multiplication and Division.
• To do: You can save the tasks and you can view it.
• Unit converter: This converts any measurement into a unit you want.
Tools Menu 3
• World clock: Allows you to determine the current time in another time zone or country.
• Sim Services: Please add de nition/information about SIM services.
• Torch: You can activate torch menu.
Multimedia Menu 4
• Music player: Listen to MP3 music les on your phone.
• Schedule FM record: Allows you to pre-schedule FM radio recording.
• Voice recorder: Allows you to record voice memo.
• Melody composer: Allows you to make the melody in this menu.
Messaging Menu 5
• New message: This menu allows you to write a new SMS.
> Send to Many/Send to Group: (New Message->Options->Send to Many/Send to Group) You can send SMS to
many users at a time. Option Send to Many will open the contacts list where in user can mark/unmark contacts for
sending message. To send the SMS to a particular group of Contacts select Send to Group and then Press OK.
Page 2
Messaging Menu 5
• Inbox: You will be alerted when you have received a message and it will be saved here.
• Drafts: This menu shows the saved message.
• Outbox: This menu allows you to view the message which is about to be sent or has failed to be sent.
• Sent: This menu allows you to view the messages which have already been sent, including time and content.
• Listen to voicemail: This menu provides you with a quick way of accessing your voice mailbox.
• Info message: Info service messages are text messages delivered by the network to your handset.
• Templates: There are pre-de ned messages in the list. You can view and edit the template messages or create new
messages.
• Settings: This menu allows you to set features of your network service provider.
My stu Menu 6
• Sounds: This folder saves all of your audio les.
• Games & App: List of default games available in the phone.
Pro les Menu 7
• Normal: After activating this pro le, the indicator will be displayed on the standby screen.
• Silent: Ring tone and vibrator is set to be o . After activating this pro le, the indicator
the standby screen.
• Outdoor: This is the default pro le. Ring tone and key tone volume is set to maximum. After activating this pro le, the
indicator
• Flight Mode: Wireless network of your phone is disabled. Allows you to safely use the non-wireless functions of your
phone (such as multimedia, tools, or games…ext.). After activating this pro le, the indicator
on the screen.
will be displayed on the standby screen.
will be displayed on
will be displayed
Contacts Menu 8
• Search: You can Search for contacts in Phonebook.
Note:
Instant searching is available by inputting the initial letter of the name you want to search.
• New contact: You can add phonebook entries by using this menu.
• Speed dials: Assign contacts to any of the keys between 2 and 8.
>
SOS Message: (Speed dials-> Ok ->Key 9) An emergency message can be sent to the prede ned number/s (3 maximum)
by long press of 9 Key. On long press of 9 key, a popup comes, ‘Set SOS message?’. Press ‘Yes’ then type the required
message and input 3 numbers for which you want to send the message in emergency mode and press Save/Done.
Contacts Menu 8
• Groups: There are seven default groups on the phone. With Groups function, you can send a message to all members
of a group at the same time.
• Copy all: You can copy all entries from SIM card memory to Phone memory and also from Phone memory to SIM card
memory.
• Delete all: You can delete all entries from SIM card memory or Phone memory.
• Information
> Service dial number: Access the list of service numbers assigned by service provider safely.
> Own number: You can save and check your own numbers in SIM card.
Settings Menu 9
• Date & Time: You can set functions relating to the date and time.
Note:
Auto update feature is network provider dependent.
• Languages: You can change the language for the display texts in your phone. This change will also a ect the Language
Input mode.
• Display: You can adjust settings for the phone display.
• Shortcut: You can customize your shortcuts.
Settings Menu 9
• Fake call: You can set a fake incoming call which will come after speci c time with name and number you set. To set
fake Call, Goto Fake call in settings. Set fake call to ON. Select the time from the options when the set Fake call should
Invoke. Give the Name and Number from whom the Fake call should come and nally Press save to save the settings.
Now to invoke the fake call press
• Call: Changing the Call settings
You can set the menu relevant to a call. Press Menu, select Settings and choose Call.
> Call divert - Choose whether to divert your calls.
> Call barring – Select when you would like calls to be barred.
> Fixed dial number – Choose a list of numbers that can be called from your phone. You’ll need your PUK2 code from
your operator. Only numbers included in the xed dial list can be called from your phone.
> Answer mode - Choose whether to answer the call using any key or send key only.
> Send my number - Choose whether your number will be displayed when you call someone. (Depends on your
network provider.)
> Call waiting - Be alerted when you have a call waiting. (Depends on your network provider.)
> Minute minder - Select On to hear a tone every minute during a call.
> Auto redial - Choose On or O .
> Send DTMF tones - Please add information/de nition about send DTMF tones.
from idle screen .
❑ Guidelines for safe and e cient use (Continued)
› Do not use a hand-held phone while driving.
› Use a hands-free kit, if available.
› Pull o the road and park before making or answering a
call if driving conditions so require.
Blasting area
Do not use the phone where blasting is in progress.
Observe restrictions, and follow any regulations or rules.
Potentially explosive atmospheres
Do not use the phone at a refueling point. Do not use
near fuel or chemicals.
In aircraft
Wireless devices can cause interference in aircraft.
› Turn o your mobile phone before boarding any aircraft.
Children
Keep the phone in a safe place out of children’s reach.
It includes small parts which if detached may cause a
choking hazard.
Emergency calls
Emergency calls may not be available under all cellular
networks. Therefore, you should never depend solely on
the phone for emergency calls. Check with your local
service provider.
Battery information and care.
› You do not need to completely discharge the battery
before recharging. Unlike other battery systems, there is
no memory e ect that could compromise the battery’s
performance.
› Use only LG batteries and chargers. LG chargers are
designed to maximize the battery life.
› Do not disassemble or short-circuit the battery pack.
› Replace the battery when it no longer provides
acceptable performance. The battery pack may be
Settings Menu 9
• Security: This menu allows you to set the phone safely.
> Pin code request - Choose a PIN code to be requested when you turn your phone on.
> Auto key lock - You can make the key pad locked automatically after some time.
> Phone lock - Choose a security code to lock your phone, When power on, When SIM changed or Immediately.
> Anti-theft mobile tracker - When the handset is stolen, handset sends the SMS to the numbers con gured by real
owner. User has to con gure the ATMT settings with name, primary phone number, secondary phone. User has to
set ATMT ON to activate the ATMT feature. Default ATMT code is “0000”. ATMT SMS will contain information about the
stolen phone IMEI, current location & number of the person who is using that handset.
> Change codes - Changing your security code or PIN1 code or PIN2 code, ATMT code, enter the old code followed by
the new code.
• Connectivity: You can select a network that will be registered either automatically or manually.
• Power save: If you set this to On, you can save the power when you are not using the phone.
• Reset: 1. Reset settings: Allows you to reset the entire phone to its factory
2. Reset handset memory:delete all the les saved on your phone memory.
3.
Reset all: Allows you to reset the entire phone to its factory defaults and delete all the les saved on your
phone.
• Memory status: You can check free space and memory usage of each repository.
❑ Guidelines for safe and e cient use (Continued)
recharged hundreds of times before it needs to be
replaced.
› Do not expose the battery charger to direct sunlight or
use it in high humidity, such as the bathroom.
› There is risk of explosion if battery is replaced by an
incorrect type.
› Dispose of used batteries according to the
manufacturer’s instructions.
Exposure to radio frequency energy
Radio wave exposure and Speci c Absorption Rate (SAR)
information
This mobile phone model has been designed to comply
with applicable safety requirement for exposure to radio
waves. This requirement is based on scienti c guidelines
that include safety margins designed to ensure safety of
all persons, regardless of age and health.
› The radio wave exposure guidelines employ a unit of
measurement known as the Speci c Absorption Rate,
or SAR. Tests for SAR are conducted using standardized
methods with the phone transmitting at its highest
certi ed power level in all used frequency bands.
› While there may be di erences between the SAR levels
of various LG phone models, they are all designed to
meet the relevant guidelines for exposure to radio
waves.
› The SAR limit recommended by the international
Commission on Non-Ionizing Radiation Protection
(ICNIRP) is 2W/kg averaged over ten (10) gram of tissue.
› The highest SAR value for this model phone tested by
DASY4 for use at the ear/body is [0.837/0.487] W/kg
(10g).
› SAR data information for residents in countries/regions
that have adopted the SAR limit recommended by the
Institute of Electrical and Electronics Engineers (IEEE) is
1.6 W/kg averaged over one (1) gram of tissue.
❑ Guidelines for safe and e cient use
Please read these simple guidelines. Ignoring them may
be dangerous or illegal. Further detailed information is
given in this manual.
Warning
› For your safety, use ONLY speci ed ORIGINAL batteries
and chargers.
› Switch o the phone in any area where required by
special regulations, e.g. in a hospital where it may a ect
medical equipment.
› Batteries should be disposed of in accordance with
relevant legislation.
Product care and maintenance
WARNING! Only use batteries, chargers and accessories
approved for use with this particular phone model. The
use of any other types may invalidate any approval or
warranty applying to the phone, and may be dangerous.
› Do not disassemble this unit. Take it to a quali ed service
technician when repair work is required.
› The unit should be kept away from heat sources such as
radiators or cookers.
› Use a dry cloth to clean the exterior of the unit. (Do not
use any solvents.)
› Do not keep the phone next to credit cards or transport
tickets; it can a ect the information on the magnetic
strips.
Electronic devices
All mobile phones may get interference, which could
a ect performance.
› Do not use your mobile phone near medical equipment
without requesting permission. Avoid placing the phone
over a pacemaker, i.e. in your breast pocket.
Road safety
Check the laws and regulations on the use of mobile
phones in the areas when you drive.
❑ Troubleshooting
Problem Possible Solution
Telephone cannot be switched on
Battery empty Charge battery. Check charging indicator on display.
The battery doesn’t charge properly or
the phone sometimes turns itself o
Usage time of battery becomes
shorter
Charging error—Temperature out
of range
Charging error—Wrong charger Only use original LG accessories.
Charging error—Battery defective Replace battery.
Charging error—No battery icon
appears when charging
Please take out battery and insert again. Then press Power on key to power
on the phone.
Wipe the charging contacts, both on the phone and on the battery, with a
clean soft cloth.
If the battery time is short, it may be due to the user environment, a large
volume of calls, or weak signals.
Make sure the ambient temperature is right, wait for a while, and the then
charge again.
The battery is empty or has not been used for a long time. It may take a while
before the battery icon appears on the screen.
❑ Troubleshooting
Problem Possible Solution
Forgot the phone code or password The default phone code is “0000”.
Enter PUK
Loss of Network
You have entered a number but it
was not dialed
Your correspondent cannot reach you Be sure that your phone is switched on. Press Talk/ Yes key for more than
The PIN code has been entered incorrectly three times in succession, and the
phone is now blocked. Enter the PUK supplied by your service provider.
You may be in a weak signal area. Move and try again. You are trying to access
an option for which you have no subscription with your service provider.
Contact the service provider for further details.
Be sure that you have pressed Talk/ Yes key.
Be sure that you have accessed the right network service.
Be sure that you have not set an outgoing call barring option.
Be sure that you have entered the area code.
one second. Be sure that you are accessing the network service. Be sure that
you have not set an incoming call barring option.
❑ Troubleshooting
Problem Possible Solution
Your correspondent cannot hear you
speaking
The voice quality of the call is poor Check the signal strength indicator on the display. The number of bars
No number is dialed when you recall
a contact
If the above guidelines do not help
you to solve the problem
Be sure that you have switched o the loudspeaker. Be sure that you are
holding the phone close enough to your mouth. The microphone is located
at the bottom of the phone.
indicates the signal strength. Try moving the phone slightly or moving closer
to a window if you are in a building.
Use the Phonebook Search feature to ensure the number has been stored
correctly. Resave the number, if necessary.
Take note of the model number of your mobile phone and a clear
description of the problem. Contact your phone dealer or LG Service Center
for help.
❑ Technical Data
General
› Product name : LG-A120
› System : GSM 900 / DCS 1800
Ambient Temperatures
› Max. : Discharging (+55°C), Charging (+45°C)
› Min : -10°C
 Loading...