

Page 1

User Guide
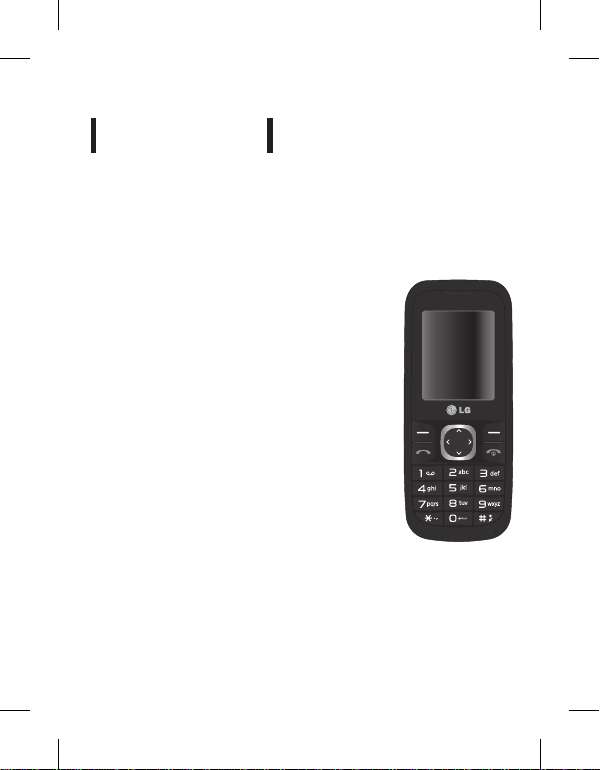
LG-A120
E n g l i s h
中文
Bahasa Malaysia
Bahasa Indonesia
P/N: MMBB0389410 (1.0)
www.lg.com
Page 2
LG-A120 USER GUIDE
This manual may differ from the phone depending
on the phone software version and service provider used.
Page 3

Contents
Installing the SIM Card and
Charging the Battery .........................3
Phone Components ..........................4
Turning Your Phone On and O ....7
Making a call ........................................7
Answering a call ..................................7
Making an international call ...........7
Menu and Options .............................8
Entering Text ........................................9
How to set the tone ....................... 10
Anti Theft Mobile Tracker (ATMT) 11
Menu Tree...........................................12
Quick feature reference ................. 13
Guidelines for safe and e cient
use ......................................................... 20
Troubleshooting .............................. 24
Technical Data .................................. 27
2
Page 4
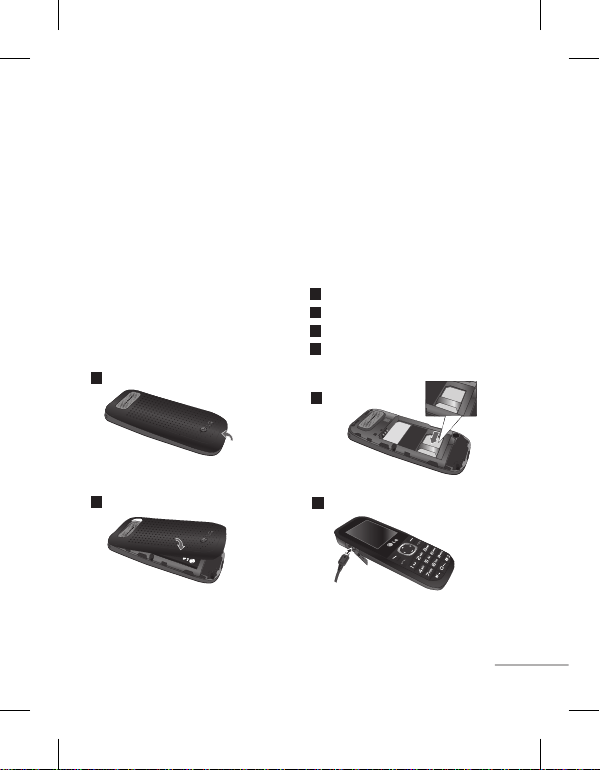
Installing the SIM Card and Charging the Battery
When you subscribe to a cellular
network, you are provided with
a SIM card loaded with your
subscription details, such as
your PIN, any optional services
available and many others.
Important!
› The SIM card and its contacts can
be easily damaged by scratches
or bending, so be careful when
handling, inserting or removing
the card. Keep all SIM cards out of
the reach of small children.
1
3
Align the back cover to the phone
› USIM is not supported in this
phone.
› If the battery is removed for about
1 minute, the clock returns to its
default setting. You will then need
to reset the time.
Illustrations
1
Open the battery cover
2
Insert your SIM card
3
Close battery cover
4
Charge your battery
2
4
Fully Charge the battery before using it
for the first time
3
Page 5
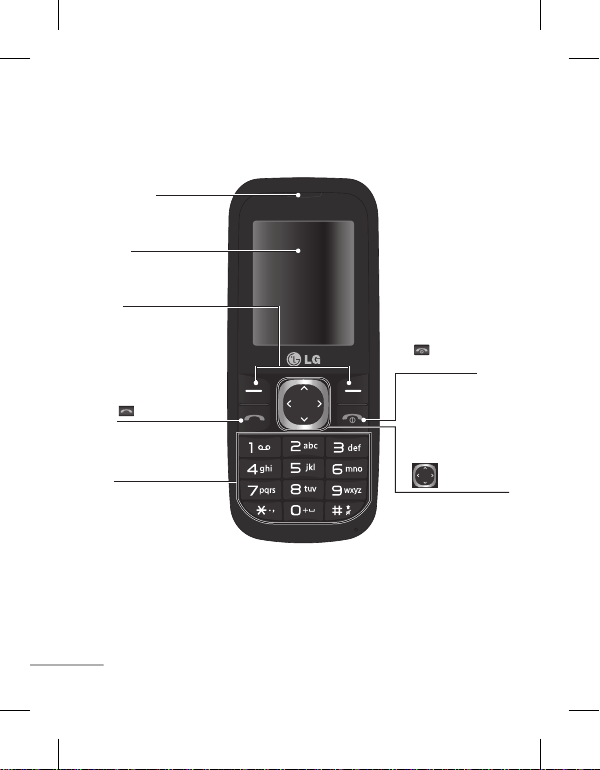
Phone Components
Earpiece
Display screen
Left soft key and
Right soft key
Each of these
keys performs the
functions indicated
by the text on the
display immediately
above them.
: Talk/ Yes key
You can dial a phone
number and answer
incoming calls.
Alphanumeric keys
In most of the time,
the numeric keys are
used to Input number
or characters.
4
: End call/
Power on key
Allows you to power
the phone on or off,
end calls, or return
to Standby Mode.
: Navigation key
Use for quick access
to phone functions.
Page 6
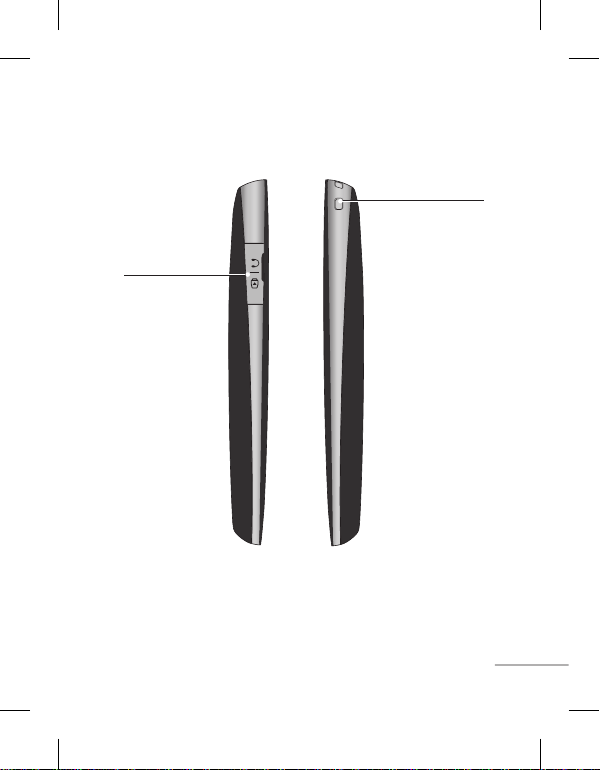
Micro USB port
Earphone jack/
Charger port
Hand Strap Hole
5
Page 7
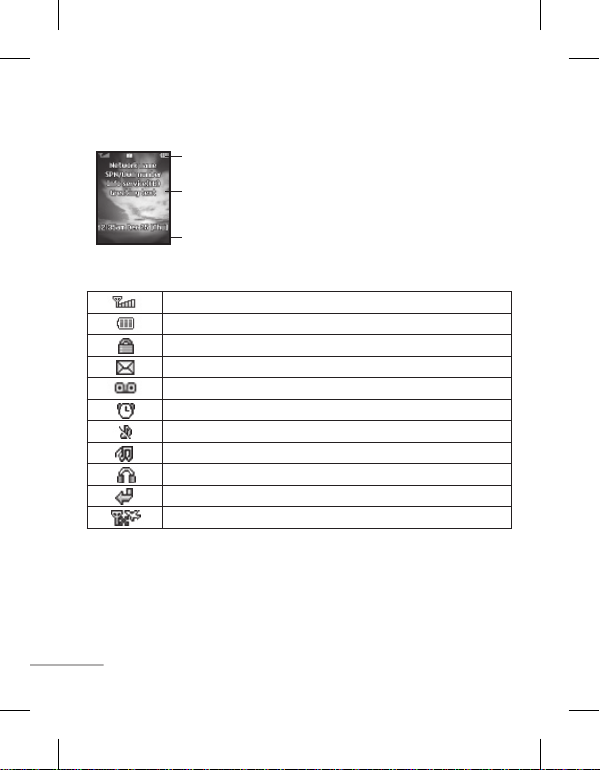
Display Information
Menu
Contacts
Icon areas
Text and graphic area
Menu
Contacts
Soft key indications
On-Screen Icons
Tells you the strength of the network signal.
Indicates the battery charge level.
Indicates your phone is locked.
Indicates new text message(s).
Indicates new voice message(s).
Indicates the alarm clock is set.
Indicates your phone uses the silent settings.
Indicates your phone uses the outdoor settings.
Indicates your phone uses the headset setting.
Indicates all calls are diverted to another number.
Indicates your phone is in flight mode.
6
Page 8

Turning Your Phone On and Off
You can power on and power off the phone by pressing or holding the power
key.
Making a call
1.
In the standby mode, enter the area code and the phone number.
2.
Press the talk key to call the number.
Answering a call
Press the talk key to answer the call when the phone rings.
If the Any Key menu option has been set, any key press will answer a call
except for the
End key or the right soft key.
Making an international call
1.
In the standby mode, long press the 0 key until a + (international prefix
character) sign is displayed.
2.
Enter the country code, the area code and the phone number.
3.
Press the talk key to call.
7
Page 9
Menu and Options
Your phone offers a set of functions that allow you to customize it. These
functions are arranged in menus and sub-menus, accessed via the left and right
soft keys. The label on the bottom of the display screen immediately above the
soft keys indicates their current function.
Menu Contacts
Press the left soft key
to access the available
Menu.
8
Press the right soft key
to access the Contacts.
Page 10
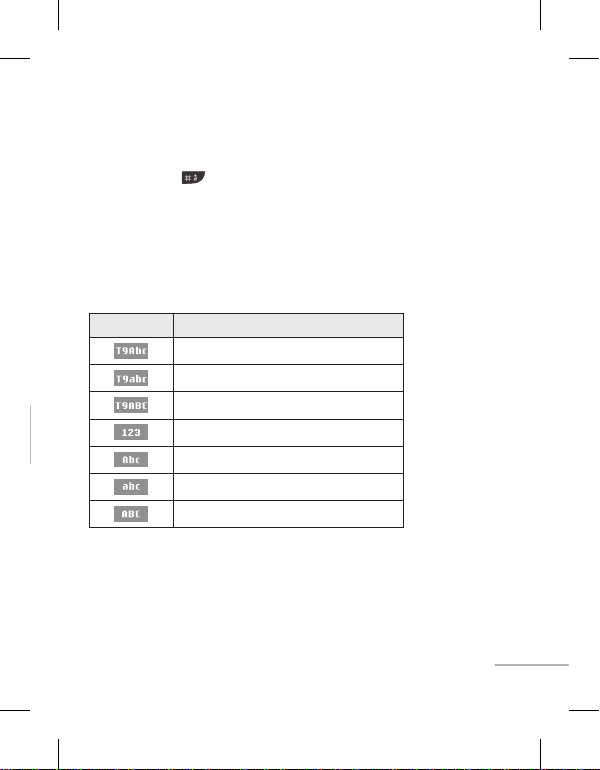
Entering Text
You can enter alphanumeric characters by using the phone’s keypad. To change
modes, press the key.
T9 Mode
This mode allows you to enter words with only one keystroke per letter. Each key
on the keypad has more than one letter. The T9 mode automatically compares
your keystrokes with an internal linguistic dictionary to determine the correct
word, thus requiring far fewer keystrokes than the traditional ABC mode.
The input method is display at the upper right corner of your phone.
Indicator Function (English Smart mode)
T9 Smart Abc
T9 Smart abc
T9 Smart ABC
Numeric
Multitap Abc
Multitap abc
Multitap ABC
9
Page 11

How to set the tone
You may set up the following different profiles to adapt to different
environmental conditions. Your phone provides 4 different profiles.
1.
Select [Profiles] from the main menu.
2.
Select a profile and press [Options - Personalise] to set the ring tone.
3.
Press the left soft key [OK] and then you can set the desired ring tone.
Your phone also provides the following options to customize tones/alert types:
•
Call alert type:
Vibrate, and Silent) for the ringing tone.
Ring tones:
•
•
Ring volume:
•
Message alert type:
periodically, Ring & Vibrate. Vibrate, Silent) for message alert tone.
Message tones:
•
Message volume:
•
Keypad tones:
•
Keypad volume:
•
Power on/off tones:
•
•
Power on/off volume:
10
Selects an alert type (Ring, Vibrate, Ring & Vibrate, Ring after
Sets desired ring tone.
Adjusts the volume of ring tone.
Selects different alert types (Ring Once, Ring
Selects desired message alert tone.
Adjusts the volume of message alert tone.
Selects desired keypad tone.
Adjusts the keypad volume.
Selects different type of ring tone for power on/off.
Adjusts the volume of power on/off ring tone.
Page 12

Anti Theft Mobile Tracker (ATMT)
Anti-theft mobile tracker (ATMT) allows you to track your lost phone. When
someone uses your phone without your permission, the tracking service will be
activated.
You are reminded by a text message sent to the default phone number you have
set, without the unauthorized user’s knowledge. You can always activate the
ATMT and configure your personal settings.
To activate Anti-theft mobile tracker
1.
From the main menu, select
tracker
and press Ok.
2.
Select
Set ATMT
3.
Switch On or
4.
Input the security code to enable or disable this function.
5.
Then from the “Number for ATMT” menu, edit and save the name in
name
Note:
configuring the ATMT settings.
Off
and numbers in
The default ATMT code is “0000”. You have to enter the code before
Settings > Security > Anti-theft mobile
and press Ok.
and press Ok.
Sending number list
.
Sender
11
Page 13

Menu Tree
1. FM radio
2. Call history
2.1 All calls
2.2 Missed calls
2.3 Dialed calls
2.4 Received calls
2.5 Call duration
2.6 Call costs
3. Tools
3.1 Alarm clock
3.2 Calendar
3.3 Calculator
3.4 To do
3.5 Unit converter
3.6 World clock
3.7 Sim Services
3.8 Torch
4. Multimedia
4.1 Music player
4.2 Schedule FM
record
4.3 Voice recorder
4.4 Melody
composer
12
5. Messaging
5.1 New message
5.2 Inbox
5.3 Drafts
5.4 Outbox
5.5 Sent
5.6 Listen to
voicemail
5.7 Info message
5.8 Templates
5.9 Settings
6. My stuff
6.1 Sounds
6.2 Games & Apps
7. Profiles
7.1 Normal
7.2 Silent
7.3 Outdoor
7.4 Flight mode
8. Contacts
8.1 Search
8.2 New contact
8.3 Speed dials
8.4 Groups
8.5 Copy all
8.6 Delete all
8.7 Information
9. Settings
9.1 Date & Time
9.2 Languages
9.3 Display
9.4 Shortcut
9.5 Fake call
9.6 Call
9.7 Security
9.8 Connectivity
9.9 Power save
9.10 Reset
9.11 Memory status
Page 14

Quick feature reference
FM radio
(This function may be different in different regions.)
Listens to FM radio station. You can enjoy listening FM without using headset
as phone supports wireless FM service.
1.
From main menu select FM radio.
2.
3.
Press Options to edit the channel list. There are 9 stations you may pre-set.
Your phone provides the following options for FM radio:
Radio on/off:
•
•
Channel List:
name and frequency.
•
Manual Input:
Preset Auto Search:
•
store them to the channel list.
•
Settings:
background play, the skin of the FM radio, the record audio quality and the
record format. You can record in AMR or WAV formats.
Record:
•
Append:
•
File list:
•
Menu 1
Use navigation keypad to search radio station. You can also press Options
to search radio frequency for available channels and automatically store to
the channel list.
Select radio state is on or off.
Bookmark up to 9 radio stations by entering the channel
You can input frequency manually by using this option.
Auto search available channels and automatically
Allows you to switch on the loud speaker. Changes the
Records your favorite radio programs.
Resumes a previously recorded file.
Manages recorded audio files.
13
Page 15

Call history
You can check the record of missed, received, and dialed calls only if the
network supports the Calling Line Identification (CLI) within the service area.
The number and name (if available) are displayed together with the date and
time at which the call was made. You can also view call durations.
•
All calls:
by time.
•
Missed calls:
•
Dialed calls:
attempted).
•
Received calls:
Call duration:
•
outgoing calls.
•
Call costs:
the cost.
Tools
•
Alarm clock:
Alarm icon will be displayed on the LCD screen and the alarm will sound.
Calendar:
•
Calculator:
•
Subtraction, Multiplication and Division.
•
To do:
Unit converter:
•
14
Menu 2
Displays all the lists of three types (Received/Dialled/Missed calls)
This option lets you view the last 40 unanswered calls.
This option lets you view the last 40 outgoing calls (called or
This option lets you view the last 40 incoming calls.
Allows you to view the duration of your incoming and
Allows you to check the cost of your last call, all calls, and reset
Menu 3
Allows you to set one of five alarms. At the alarm time, the
You can check track of daily or monthly schedules.
This contains the standard functions such as Addition,
You can save the tasks and you can view it.
This converts any measurement into a unit you want.
Page 16

Tools
Menu 3
•
World clock:
zone or country.
•
Torch:
Allows you to determine the current time in another time
You can activate torch menu.
Multimedia
•
Music player:
Schedule FM record:
•
Voice recorder:
•
Melody composer:
•
Messaging
•
New message:
Send to Many/Send to Group:
>
Many/Send to Group) You can send SMS to many users at a time. Option
Send to Many will open the contacts list where in user can mark/unmark
contacts for sending message. To send the SMS to a particular group of
Contacts select Send to Group and then Press OK.
•
Inbox:
be saved here.
Drafts:
•
Outbox:
•
sent or has failed to be sent.
Sent:
•
sent, including time and content.
Menu 4
Listens to MP3 music files on your phone.
Allows you to pre-schedule FM radio recording.
Allows you to record voice memo.
Allows you to make the melody in this menu.
Menu 5
This menu allows you to write a new SMS.
(New Message->Options->Send to
You will be alerted when you have received a message.And it will
This menu shows the saved message.
This menu allows you to view the message which is about to be
This menu allows you to view the messages which have already been
15
Page 17
Messaging
•
Listen to voicemail:
accessing your voice mailbox.
•
Info message:
network to your handset.
•
Templates:
edit the template messages or create new messages.
Settings:
•
provider.
Menu 5
This menu provides you with a quick way of
Info service messages are text messages delivered by the
There are pre-defined messages in the list. You can view and
This menu allows you to set features of your network service
My stuff
•
Sounds:
Games & App:
•
Profiles
•
Normal:
the standby screen.
•
Silent:
indicator will be displayed on the standby screen.
Outdoor:
•
maximum. After setup this profile, the indicator will be displayed on
the standby screen.
Flight Mode:
•
safely use the non-wireless functions of your phone (such as multimedia,
tools, or games…ext.). After setup this profile, the indicator will be
displayed on the screen.
16
Menu 6
This folder saved all of your audio files.
List of default games available in the phone.
Menu 7
After setup this profile, the indicator will be displayed on
Ring tone and vibrator is set to be off. After setup this profile, the
This is the default profile. Ring tone and key tone volume is set to
Wireless network of your phone is disabled. Allows you to
Page 18

Contacts
•
Search:
Note:
you want to search.
•
New contact:
•
Speed dials:
>
Menu 8
You can Search for contacts in Phonebook.
Instant searching is available by inputting the initial letter of the name
You can add phonebook entries by using this menu.
Assign contacts to any of keys between 2 and 8.
SOS Message:
(Speed dials-> Ok ->Key 9) An emergency message can be
sent to the predefined number’s (3 maximum) by long press of 9 Key. On
long press of 9 key, a popup comes, ‘Set SOS message?’. Press ‘Yes’ then type
the required message and input 3 numbers for which you want to send the
message in emergency mode and press Save/Done.
•
Groups:
There are seven default groups on the phone. With Groups function,
you can send a message to all members of a group at the same time.
•
Copy all:
You can copy all entries from SIM card memory to Phone memory
and also from Phone memory to SIM card memory.
•
Delete all:
memory.
Information
•
>
You can delete all entries from SIM card memory or Phone
Service dial number:
Access the list of service numbers assigned by
service provider safely.
>
Own number:
You can save and check your own numbers in SIM card.
17
Page 19

Settings
•
Date & Time:
•
Languages:
phone. This change will also affect the Language Input mode.
•
Display:
•
Shortcut:
Fake call:
•
time with name and number you set. To set fake Call, Goto Fake call in
settings. Set fake call to ON. Select the time from the options when the set
Fake call should Invoke. Give the Name and Number from whom the Fake
call should come and finally Press save to save the settings. Now to invoke
the fake call press from idle screen .
Call:
•
•
Call settings:
You can set the menu relevant to a call. Press Menu, select Settings and
choose Call.
>
>
>
>
>
>
>
>
18
Menu 9
You can set functions relating to the date and time.
You can change the language for the display texts in your
You can adjust settings for the phone display.
You can customize your shortcuts.
You can set a fake incoming call which will come after specific
You can set the menu relevant to a call.
Changing the
Call divert
Call barring
Fixed dial number
your phone. You’ll need your PIN2 code from your operator. Only numbers
included in the fixed dial list can be called from your phone.
Answer mode
send key only.
Send my number
when you call someone. (Depends on your network provider.)
Call waiting
network provider.)
Minute minder
Auto redial
- Choose whether to divert your calls.
– Select when you would like calls to be barred.
- Choose whether to answer the phone using any key or
- Be alerted when you have a call waiting. (Depends on your
- Choose On or Off.
Call settings
– Choose a list of numbers that can be called from
- Choose whether your number will be displayed
- Select On to hear a tone every minute during a call.
Page 20

Settings
•
Security:
>
>
>
>
>
Connectivity:
•
automatically or manually.
Power save:
•
not using the phone.
Reset:
•
1. Reset settings:Allow you to reset the entire phone to its factory
2. Reset handset memory:delete all the files saved on your phone memory.
3. Reset all: Allow you to reset the entire phone to its factory defaults or
Memory status:
•
repository.
Menu 9
This menu allows you to set the phone safely.
Pin code request
your phone on.
Auto key lock
some time.
Phone lock
on, When SIM changed or Immediately.
Anti-theft mobile tracker
the SMS to the numbers configured by real owner. User has to configure
the ATMT settings with name, primary phone number, secondary number.
User has to Set ATMT ON to activate the ATMT feature. Default ATMT code
is “0000”. ATMT SMS will contain information about the stolen phone IMEI,
current location & number of the person who is using that handset.
Change codes
ATMT code, enter the old code followed by the new code.
delete all the files saved on your phone.
- Choose a PIN code to be requested when you turn
- You can make the key pad locked automatically after
- Choose a security code to lock your phone, When power
- When the handset is stolen, handset sends
- Changing your security code or PIN1 code or PIN2 code,
You can select a network that will be registered either
If you set this to On, you can save the power when you are
You can check free space and memory usage of each
19
Page 21

❑ Guidelines for safe and efficient use
Please read these simple guidelines. Ignoring them may be dangerous or illegal.
Further detailed information is given in this manual.
Warning
› For your safety, use ONLY specified ORIGINAL batteries and chargers.
› Switch off the phone in any area where required by special regulations, e.g. in a
hospital where it may affect medical equipment.
› Batteries should be disposed off in accordance with relevant legislation.
Product care and maintenance
WARNING!
with this particular phone model. The use of any other types may invalidate any
approval or warranty applying to the phone, and may be dangerous.
› Do not disassemble this unit. Take it to a qualified service technician when
› The unit should be kept away from heat sources such as radiators or cookers.
› Use a dry cloth to clean the exterior of the unit. (Do not use any solvents.)
› Do not keep the phone next to credit cards or transport tickets; it can affect the
Electronic devices
All mobile phones may get interference, which could affect performance.
› Do not use your mobile phone near medical equipment without requesting
20
Only use batteries, chargers and accessories approved for use
repair work is required.
information on the magnetic strips.
permission. Avoid placing the phone over a pacemaker, i.e. in your breast
pocket.
Page 22

❑ Guidelines for safe and efficient use (Continued)
Road safety
Check the laws and regulations on the use of mobile phones in the areas when
you drive.
› Do not use a hand-held phone while driving.
› Use a hands-free kit, if available.
› Pull off the road and park before making or answering a call if driving
conditions so require.
Blasting area
Do not use the phone where blasting is in progress. Observe restrictions, and
follow any regulations or rules.
Potentially explosive atmospheres
Do not use the phone at a refueling point. Do not use near fuel or chemicals.
In aircraft
Wireless devices can cause interference in aircraft.
› Turn off your mobile phone before boarding any aircraft.
Children
Keep the phone in a safe place out of children’s reach. It includes small parts
which if detached may cause a choking hazard.
21
Page 23

❑ Guidelines for safe and efficient use (Continued)
Emergency calls
Emergency calls may not be available under all cellular networks. Therefore, you
should never depend solely on the phone for emergency calls. Check with your
local service provider.
Battery information and care.
› You do not need to completely discharge the battery before recharging. Unlike
other battery systems, there is no memory effect that could compromise the
battery’s performance.
› Use only LG batteries and chargers. LG chargers are designed to maximize the
battery life.
› Do not disassemble or short-circuit the battery pack.
› Replace the battery when it no longer provides acceptable performance.
The battery pack may be recharged hundreds of times before it needs to be
replaced.
› Do not expose the battery charger to direct sunlight or use it in high humidity,
such as the bathroom.
› Risk of explosion if battery is replaced by an incorrect type.
› Dispose off used batteries according to the manufacturer’s instructions.
22
Page 24

❑ Guidelines for safe and efficient use (Continued)
Exposure to radio frequency energy
Radio wave exposure and Specific Absorption Rate (SAR) information
This mobile phone model has been designed to comply with applicable safety
requirement for exposure to radio waves. This requirement is based on scientific
guidelines that include safety margins designed to ensure safety of all persons,
regardless of age and health.
› The radio wave exposure guidelines employ a unit of measurement known
as the Specific Absorption Rate, or SAR. Tests for SAR are conducted using
standardized methods with the phone transmitting at its highest certified
power level in all used frequency bands.
› While there may be differences between the SAR levels of various LG phone
models, they are all designed to meet the relevant guidelines for exposure to
radio waves.
› The SAR limit recommended by the international Commission on Non-Ionizing
Radiation Protection (ICNIRP) is 2W/kg averaged over ten (10) gram of tissue.
› The highest SAR value for this model phone tested by DASY4 for use at the
ear/body is [0.837/0.487] W/kg (10g).
› SAR data information for residents in countries/regions that have adopted the
SAR limit recommended by the Institute of Electrical and Electronics Engineers
(IEEE) is 1.6 W/kg averaged over one (1) gram of tissue.
23
Page 25
❑ Troubleshooting
Problem Possible Solution
Telephone cannot be
switched on
Battery empty Charge battery. Check charging indicator
The battery doesn’t charge
properly or the phone
sometimes turns itself off
Usage time of battery
becomes shorter
Charging error—Temperature
out of range
Charging error—Wrong
charger
Charging error—Battery
defective
Charging error—No battery
icon appears when charging
24
Please take out battery and insert again.
Then press
Power on key
the phone.
on display.
Wipe the charging contacts, both on the
phone and on the battery, with a clear soft
cloth.
If the battery time is short, it may be due
to the user environment, a large volume of
calls, or weak signals.
Make sure the ambient temperature is right,
wait for a while, and the then charge again.
Only use original LG accessories.
Replace battery.
The battery is empty or has been not used
for a long time. It may take a while before
the battery icon appears on the screen.
to power on
Page 26
❑ Troubleshooting
Problem Possible Solution
Forgot the phone code or
password
Enter PUK The PIN code has been entered incorrectly
Loss of Network You may be in a weak signal area. Move and
You have entered a number
but it was not dialed
Your correspondent cannot
reach you
The default phone code is “0000”.
three times in succession, and the phone
is now blocked. Enter the PUK supplied by
your service provider.
try again. You are trying to access an option
for which you have no subscription with
your service provider. Contact the service
provider for further details.
Be sure that you have pressed
key
.
Be sure that you have accessed the right
network service.
Be sure that you have not set an outgoing
call barring option.
Be sure that you have entered the area code.
Be sure that your phone is switched on.
Talk/ Yes key
Press
second. Be sure that you are accessing the
network service. Be sure that you have not
set an incoming call barring option.
Talk/ Yes
for more than one
25
Page 27

❑ Troubleshooting
Problem Possible Solution
Your correspondent cannot
hear you speaking
The voice quality of the call
is poor
No number is dialed when
you recall a contact
Cannot use the Browser Your subscription does not include data
If the above guidelines do
not help you to solve the
problem
26
Be sure that you have switched off the
loudspeaker. Be sure that you are holding
the phone close enough to your mouth.
The microphone is located at the bottom of
the phone.
Check the signal strength indicator on the
display. The number of bars indicates the
signal strength. Try moving the phone
slightly or moving closer to a window if you
are in a building.
Use the Phonebook Search feature to ensure
the number has been stored correctly.
Resave the number, if necessary.
capability. You will need to contact your
service provider to enable the service.
Take note of the model number of your
mobile phone and a clear description of the
problem. Contact your phone dealer or LG
Service Center for help.
Page 28
❑ Technical Data
General
›
Product name :
System :
›
DCS 1800
Ambient
Temperatures
›
Max. :
Charging (+45°C)
Min :
-10°C
›
LG-A120
GSM 900 /
Discharging (+55°C),
LG Electronics Inc. LG Twin Towers 20,
Yeouido-dong, Yeongdeungpo-gu, Seoul, Korea 150-721
GSM 900 / DCS 1800 Dual band Terminal Equipment
LG-A120
R&TTE Directive 1999/5/EC
EN 301 489-01 V1.8.1, EN 301 489-07 V1.3.1
EN 301 511 V9.0.2
EN 50360:2001, EN62209-1:2006
EN 60950-1:2001
The conformity to above standards is veried by the following Notied Body(BABT)
BABT, Forsyth House-Churcheld Road -Walton-on-ThamesSurrey -KT12 2TD, United Kingdom
Notied Body Identication Number : 0168
LG Electronics Logistics and Services B.V.
Veluwezoom 15, 1327 AE Almere, The Netherlands
Seung Hyoun, Ji / Director
17.June. 2010
27
Page 29

Memo
Page 30
LG-A120
LG-A120
用户指南
根据使用的手机软件版本和服务提供商不同,本手册会略有
不同。
用户指南
Page 31

目录
目录
安装 SIM 卡和充电.......... 3
手机部件................... 4
开机和关机................. 7
拨打电话................... 7
接听电话................... 7
拨打国际电话............... 7
功能表和选项............... 8
输入文本................... 9
如何设置铃声 ............. 10
防盗手机追踪器 (ATMT)..... 11
功能表树.................. 12
快速功能参考.............. 13
关于安全有效使用手机的准则 20
故障排除.................. 24
技术参数.................. 27
2
Page 32

重要!
说明
安装 SIM 卡和充电
安装 SIM 卡和充电
当您预定了手机网络后,您将得
到一个 SIM 卡,该卡上载入了
您的服务配套详情,如您的 PIN
码、任何可用的可选服务以及其
他服务。
重要!
› SIM 卡及其内容很容易因刮
擦或弯折而损坏,因此,在处
理、插入或移除卡时,请小心
谨慎。 请将所有 SIM 卡置于
儿童无法接触的地方。
› 本手机不支持 USIM 卡。
1
› 如果取出电池时间超过 1 分
钟,时钟将恢复为默认设置。
随后,您需要重设时间。
说明
1
打开电池盖
2
插入 SIM 卡
3
关闭电池盖
4
充电
2
3
将后盖与手机对齐
4
第一次使用前,请完全充电
3
Page 33

Micro USB 端口
耳机插孔/充电器端口
手机部件
手机部件
: 结束通话/开
机键
: 导航键
字母数字键
: 通话/确定键
听筒
显示屏
左软键和右软键
这两个按键分别执
行它们上方的屏幕文
字所指示的功能。
用于拨打电话号码和
多数情况下,数字
键用于输入数字或
4
听筒
显示屏
左软键和右软键
: 通话/确定键
接听来电。
字母数字键
字符。
: 结束通话/开
机键
用于开机或关机、
结束通话,或者返
回待机模式。
用于快速访问手机
功能。
: 导航键
Page 34

Micro USB 端口
Micro USB 端口
耳机插孔/充电器端口
腕带孔
耳机插孔/充电器端口
腕带孔
5
Page 35

显示资料
显示资料
屏幕图标
图标区域
文本和图形区域
功能表 电话本
屏幕图标
6
软键指示
指示网络信号强度。
指示电池电量水平。
指示手机已锁。
指示新文本信息。
指示新语音信息。
指示已设置闹钟。
指示手机使用“静音”设置。
指示手机使用“户外”设置。
指示手机使用“耳机”设置。
指示所有来电将转移至其它号码。
指示手机处于飞行模式。
Page 36

开机和关机
开机和关机
拨打电话
1.
2.
接听电话
拨打国际电话
1.
2.
3.
您可以通过按住电源键打开和关闭手机。
拨打电话
1.
在待机模式下,输入区号和电话号码。
2.
按 通话键呼叫号码。
接听电话
在手机响起时按 通话键接听来电。
如果已设置“按任意键”功能表选项,则除了
外,按任意键均可接听来电。
结束键和右软键以
拨打国际电话
1.
在待机模式下,长按 0 键,直到出现 +(国际前缀字符)符号。
2.
输入国家代码、地区代码和电话号码。
3.
按 通话键拨打电话。
7
Page 37

功能表和选项
功能表和选项
本款手机提供一系列可供您自定手机的功能。 这些功能位于功能表和子功
能表中,可以通过左右两个软键来访问。 显示屏底部软键上方的标签指示
当前的功能。
功能表 电话本
按左软键访问可用的
功能表。
8
按右软键接入电话簿。
Page 38

输入文本
输入文本
T9 模式
指示灯
功能(智能英文模式)
您可以使用手机键盘输入字母数字字符。 要更改模式,请按 键。
T9 模式
使用此模式,每个字母只需一次击键即可输入单词。 键盘上的每个按键对
应于多个字母。 T9 模式自动将所击按键与内部语言词典进行比较,然后确
定正确的单词,因此所需的击键次数比传统的 ABC 模式要少。
输入法显示在手机右上角。
指示灯
T9 智能 Abc
T9 智能 abc
T9 智能 ABC
数字
Abc
abc
ABC
功能(智能英文模式)
9
Page 39

如何设置铃声
如何设置铃声
1.
2.
3.
呼叫提示类型:
铃声:
响铃音量
信息提示音类型:
信息提示音:
信息提示音量:
按键音:
按键音量:
开机/关机音:
开/关机音量:
您可以设置以下不同的情况模式以适应不同的环境条件。 本手机提供 4 种
设置文件。
1.
从主功能表中,选择 [设置文件]。
2.
选择所需情景模式,然后按 [选项 - 个性化] 以便设置铃声。
3.
按左软键 [确定],然后设置所需铃声。
您的手机还提供以下选项供自定义铃声/提醒类型:
呼叫提示类型:
•
动后响铃、静音)。
铃声:
•
•
响铃音量
•
信息提示音类型:
振动及响铃、 振动、静音)。
信息提示音:
•
信息提示音量:
•
按键音:
•
按键音量:
•
开机/关机音:
•
•
开/关机音量:
10
选择铃声的提示类型(响铃、仅振动、振动和响铃、振
选择所需的铃声。
:调节铃声的音量。
选择信息提示音的提示类型(一次响铃、定时响铃、
选择所需的信息提示音。
调节信息提示音的音量。
选择所需的按键音。
调节按键音量。
选择不同类型的开机/关机音。
调节开机/关机铃声的音量。
Page 40

防盗手机追踪器 (ATMT)
防盗手机追踪器 (ATMT)
1.
设置 > 安全性 > 防盗手机追踪器
确定
2.
设定防盗追踪
3.
4.
5.
姓名
主线号
码和次级号码
备注
防盗手机追踪器 (ATMT) 允许您跟踪丢失的手机。 如果有人未经您的许可
使用您的手机,跟踪服务就会启动。
在未授权使用手机的人不知道的情况下,手机会向您设置的默认电话号码发
送文本信息以通知您。 您可以始终激活 ATMT,并配置个人设置。
激活防盗手机追踪器
1.
从主功能表中,选择
确定
。
2.
选择
设定防盗追踪
3.
选择开机开机
4.
输入安全码启用或停用此功能。
5.
从“防盗追踪号码”功能表中,在
备注:默认防盗追踪密码为“0000”。 配置防盗手机追踪器设置之
前,您需要输入密码。
或关机关机
次级号码
设置 > 安全性 > 防盗手机追踪器
,然后按确定确定
,然后按确定。
中修改并保存号码。
。
姓名
中修改并保存姓名,在
,然后按
主线号
11
Page 41

功能表树
功能表树
1. FM 收音机
2. 呼叫记录
3. 工具
4. 多媒体
5. 信息
6. 我的文档
7. 设置文件
8. 电话簿
9. 设置
快速功能参考
FM 收音机
1.
2.
3.
收音机开/关:
频道列表
手动输入:
自动搜索
设置:
录制
附加
文件列表
1. FM 收音机
2. 呼叫记录
2.1 所有呼叫
2.2 未接来电
2.3 拨出电话
2.4 已接来电
2.5 呼叫持续时间
2.6 呼叫费用
3. 工具
3.1 闹钟
3.2 日历
3.3 计算器
3.4 待办事项
3.5 单位转换器
3.6 世界时钟
3.7 SIM 卡服务
3.8 手电筒
4. 多媒体
4.1 音乐播放器
4.2 FM 定时录音
4.3 语音备忘录
4.4 自编铃声
12
5. 信息
5.1 新信息
5.2 收件箱
5.3 草稿箱
5.4 发件箱
5.5 已发送
5.6 收听语音邮件
5.7 小区广播
5.8 模板
5.9 设置
6. 我的文档
6.1 声音
6.2 游戏
7. 设置文件
7.1 标准
7.2 静音
7.3 户外
7.4 飞行模式
8. 电话簿
8.1 搜索
8.2 新联系人
8.3 快速拨号
8.4 群组
8.5 全部复制
8.6 全部删除
8.7 信息
9. 设置
9.1 日期和时间
9.2 语言
9.3 显示
9.4 快捷键
9.5 虚拟呼叫
9.6 呼叫
9.7 安全性
9.8 连接
9.9 电源节省
9.10 重置
9.11 内存状态
Page 42

快速功能参考
快速功能参考
FM 收音机
1.
2.
3.
收音机开/关:
频道列表
手动输入:
自动搜索
设置:
录制
附加
文件列表
FM 收音机
(在不同地区,此功能可能有所不同。)
收听 FM 收音机电台。 由于手机支持无线 FM 服务,您无需使用耳机也
可收听到 FM 节目。
1.
从主功能表中选择“FM 收音机”。
2.
使用导航键盘搜索收音机电台。 您也可以按选项搜索收音机频率以
获取可用频道,搜索到的频道将自动保存到频道列表中。
3.
按选项以修改频道列表。 您可以预设 9 个电台。
本手机针对 FM 收音机提供以下选项:
收音机开/关:
•
频道列表
•
签。
手动输入:
•
•
自动搜索
设置:
•
质和录音格式。 您可以以 AMR 或 WAV 格式播放录音。
•
录制
•
附加
文件列表
•
功能表 1
选择收音机状态是开还是关。
:通过输入频道名称和频率,最多可添加 9 个电台作为书
使用此选项,您可以手动输入频率。
:自动搜索可用频道,然后自动将其保存在频道列表中。
允许您打开扩音器。 更改背景播放、FM 收音机皮肤、声音品
:录下喜欢的电台节目。
:附加之前录制的文件。
:管理录制的音频文件。
13
Page 43

呼叫记录
呼叫记录
所有呼叫:
未接来电
已拨电:
已接来电
呼叫持续时间:
呼叫费用
工具
闹钟:
日历
计算器:
待办事项:
工具
单位转换器:
世界时钟:
手电筒:
多媒体
音乐播放器:
FM 定时录音:
录音机:
自编铃声:
信息
新信息:
› 发送给许多/发送到组:
收件箱:
草稿箱:
发件箱:
已发送:
收听语音邮件:
仅当网络支持服务区内的主叫线路识别 (CLI) 时,您才能查看未接来
电、已接来电和已拨电。 屏幕上显示电话号码和姓名(如果有)。 您还
可以查看通话时间。
•
所有呼叫:
的列表。
•
未接来电
•
已拨电:
已接来电
•
呼叫持续时间:
•
呼叫费用
•
工具
•
闹钟:
显示闹钟图标,闹钟响起。
日历
•
•
计算器:
待办事项:
•
14
功能表 2
按时间显示所有三种类型(已接来电/已拨电/未接来电)
:此选项用于查看最后 40 个未接来电。
此选项用于查看最后 40 个去电(已拨出或尝试拨出)。
:此选项用于查看最后 40 个已接来电。
用于查看来电和去电的通话持续时间。
:可检查最后通话、全部通话的费用,并重设费用。
功能表 3
允许您设置五种闹钟之一。 当到达闹钟时间时,LCD 屏幕上将
:您可以查看每天或每月的日程表记录。
包含加、减、乘、除等标准功能。
您可以保存任务并查看。
Page 44

工具
工具
单位转换器:
世界时钟:
手电筒:
多媒体
音乐播放器:
FM 定时录音:
录音机:
自编铃声:
信息
新信息:
› 发送给许多/发送到组:
收件箱:
草稿箱:
发件箱:
已发送:
收听语音邮件:
功能表 3
•
单位转换器:
•
世界时钟:
•
手电筒:
多媒体
•
音乐播放器:
FM 定时录音:
•
•
录音机:
•
自编铃声:
信息
•
新信息:
› 发送给许多/发送到组:
可同时发送信息给多个用户。发送给许多选项将打开电话簿, 让用户
标记/取消标记发送信息的联系人。发送信息给某个联系人群组,选择
发送到组,然后按确定。
收件箱:
•
•
草稿箱:
•
发件箱:
已发送:
•
•
收听语音邮件:
此功能用于将任一度量值转换成所需的单位。
允许您确定另一个时区或者国家的当前时间。
您可以激活手电筒功能表。
功能表 4
欣赏手机中的 MP3 音乐文件。
用于预设定 FM 广播节目的录制。
用于录制语音备忘录。
您可以在此功能表中编辑铃声。
功能表 5
您可以使用此功能表写新短信。
(新信息->选项->发送给许多/发送到组) 您
当接收到信息时,您将会收到提示,并且,信息保存在此。
此功能表显示保存的信息。
此功能表用于查看要发送或发送失败的信息。
此功能表用于查看已发送的信息,包括时间和内容。
此功能表提供访问语音邮箱的快速方法。
15
Page 45

信息
信息
小区广播:
模板:
设置:
我的文档
声音:
游戏:
设置文件
标准:
静音:
户外:
飞行模式:
电话簿
搜索:
备注:
新联系人:
快速拨号:
SOS 信息:
群组:
全部复制:
全部删除:
信息
服务拨号号码:
本机号码:
设置
日期和时间:
语言:
显示:
快捷键:
功能表 5
•
小区广播:
•
模板:
的信息。
•
设置:
我的文档
•
声音:
游戏:
•
设置文件
•
标准:
角。
静音:
•
•
户外:
定此设置文件后,指示符 将显示在待机屏幕的左上角。
飞行模式:
•
机的非无线功能(例如多媒体、工具或游戏等)。 设定此设置文件
后,指示符 将显示在屏幕的左上角。
16
小区广播信息是通过网络发送到您的手机的文本信息。
列表中有预定的信息。 您可以查看和编辑模板信息或创建新
此功能表用于设置网络服务提供商的功能。
功能表 6
此文件夹保存您的所有音频文件。
手机中可用的默认游戏的列表。
功能表 7
设定此设置文件后,指示符 将显示在待机屏幕的左上
铃声音量和振动器均设为关。 设定此设置文件后,指示符
将显示在待机屏幕的左上角。
这是默认情景模式。 铃声和按键音音量设置为最大音量。 设
禁用手机的无线网络功能。 这样您就可以安全地使用手
Page 46

电话簿
电话簿
搜索:
备注:
新联系人:
快速拨号:
SOS 信息:
群组:
全部复制:
全部删除:
信息
服务拨号号码:
本机号码:
设置
日期和时间:
语言:
显示:
快捷键:
功能表 8
•
搜索:
您可以在电话簿中搜索联系人。
备注:可以通过输入要搜索的姓名的第一个字母进行即时搜索。
•
新联系人:
•
快速拨号:
>
SOS 信息:
预定的号码 。长按9键,将弹出“设定SOS信息?“。按是,然后编写
信息,并输入您要在紧急模式里发送信息的三个号码,并按保存。
•
群组:
息发送给群组中的所有成员。
全部复制:
•
以从手机内存复制到 SIM 卡内存。
•
全部删除:
信息
•
>
服务拨号号码:
>
本机号码:
设置
•
日期和时间:
语言:
•
入模式。
•
显示:
快捷键:
•
使用此功能表,您可以添加电话簿条目。
将联系人分配 2 和 8 之间的任意键。
(快速拨号-> 确定 -> 键9) 长按9键,将发送紧急信息给
手机中有七个默认群组。 使用群组功能,您可以同时将一条信
您可以将 SIM 卡内存中的所有条目复制到手机内存,也可
您可以删除 SIM 卡内存或手机内存中的所有条目。
安全接入服务提供商指定的服务号码列表。
您可以在 SIM 卡中保存和检查您自己的号码。
功能表 9
您可以设置与日期和时间相关的功能。
您可以更改手机中显示文本的语言。 此更改还将影响语言输
您可以调节手机显示的设置。
您可以自定快捷键。
17
Page 47

设置
设置
虚拟呼叫:
呼叫:
呼叫设置:
呼叫转移
呼叫限制
固定拨号
接听模式
发送本机号码 -
呼叫等待
分钟提示
自动重播
设置
安全设置:
需要 PIN 码
自动键盘锁
手机锁
防盗手机追踪器
更改密码
连接:
省电:
重置:
内存状态:
功能表 9
•
虚拟呼叫:
拟呼叫。要设定虚拟呼叫,转至设置里的虚拟呼叫。设定虚拟呼叫为打
开。从选项,选择收到虚拟呼叫的时间。提供虚拟呼叫来源的姓名和号
码,并按保存。从待机屏幕键入 ,启用虚拟呼叫。
•
呼叫:
•
呼叫设置:
您可设定呼叫有关的功能表。按功能表,选择设置,再选择呼叫。
呼叫转移
>
>
呼叫限制
>
固定拨号
PIN2码。您的手机仅可拨打固定拨号列表中的号码。
>
接听模式
>
发送本机号码 供商)
>
呼叫等待
>
分钟提示
>
自动重播
18
您可以使用您设置的姓名和号码设置在指定时间收到的虚
您可以设置与呼叫相关的功能表。
更改呼叫设置。
- 选择是否转移您的呼叫。
- 选择在何时限制呼叫。
- 选择您的手机可拨打的号码列表。您需要向运营商索取
- 选择使用任意键或仅拨号键接听电话。
选择在呼叫时,是否显示您的号码。(按网络提
- 有呼叫在等待时,被警惕。(按网络提供商)
- 选择打开,将在呼叫时每分钟,听到提示音。
- 选择打开或关闭。
Page 48

设置
设置
安全设置:
需要 PIN 码
自动键盘锁
手机锁
防盗手机追踪器
更改密码
连接:
省电:
重置:
内存状态:
功能表 9
•
安全设置:
需要 PIN 码
>
>
自动键盘锁
>
手机锁
时或立即。
>
防盗手机追踪器
人所配置的号码。 用户需要设定防盗追踪设置,包括姓名、主线号
码、次级号码。 要启动防盗追踪功能,用户需要将防盗追踪设为打
开。 默认防盗追踪密码为“0000”。 防盗追踪短信将包含有关被盗
手机的相关信息:IMEI 号、目前使用该手机的人所在的位置和所用的
号码。
>
更改密码
入旧密码,然后输入新密码。
•
连接:
省电:
•
•
重置:
1. 恢复初始设定:用于将整部手机恢复到出厂默认值
2. 恢复手机内存:删除手机上保存的所有文件。
3. 全部重设:用于将整部手机恢复到出厂默认值,或者删除手机上保
内存状态:
•
此功能表允许您设置手机安全。
- 选择开机时要请求的 PIN 码。
- 您可以设置在一定时间后自动锁定键盘。
- 为以下选项选择安全码以锁定手机:开机时、更换 SIM 卡
- 一旦被盗,手机将发送一条短信至真正的手机主
– 更改安全码、PIN1 码、PIN2 码或新防盗追踪密码,输
您可以选择自动注册或手动注册的网络。
如果将此功能设置为“开”,可以在不使用手机时节省用电。
存的所有文件。
您可以检查各个存储器的可用空间和存储器使用率。
19
Page 49

❑ 关于安全有效使用手机的准则
关于安全有效使用手机的准则
警告
产品保养和维护
警告!
电子装置
请阅读以下简单的准则。 忽视这些准则可能造成危险或者触犯法律。 本手
册中提供进一步的详细资料。
警告
›
为了您的安全,请仅使用指定的原装电池和充电器。
› 在任何有特殊条例要求的区域关闭手机,例如,在医院中,因为它可能影
响医疗装置。
› 应按照相关条例处置电池。
产品保养和维护
警告!
仅使用经核准为用于此特定手机型号的电池、充电器和配件。 使用
任何其它类型可能导致适用于此手机的许可或保修失效,并可能造成危险。
› 不要拆解本机。 当需要维修时,请将手机送往合格的服务技术人员处。
› 远离诸如暖气片或厨灶之类的热源。
› 使用干布清洁手机外壳。 (不要使用任何溶剂。)
› 不要将手机放在信用卡或卡式车票旁边,它可能会影响磁条上的资料。
电子装置
所有手机都可能受到干扰,这种干扰会对性能造成影响。
› 在未经允许的情况下,不得在医疗装置附近使用手机。 不要将手机放在
心脏起搏点上,如:胸前的口袋内。
20
Page 50

公路安全
爆破区域
易爆环境
在飞机上
儿童
❑ 关于安全有效使用手机的准则(续)
关于安全有效使用手机的准则(续)
公路安全
查阅有关在驾驶时使用手机的本地法律法规。
› 不要在驾驶时使用手持式手机。
› 如果有免提装置,请使用免提装置。
› 如果行驶条件需要,请在拨打或接听电话之前将车辆驶离道路并停车。
爆破区域
不要在正进行爆破的地区使用手机。 请依照有关限制,并遵守任何规章或
规定。
易爆环境
不要在加油站内使用手机。 不要在靠近燃料或化学制品处使用手机。
在飞机上
无线装置可能对飞机造成干扰。
› 登机前,请关机。
儿童
将手机放在儿童接触不到的安全地方。 手机中包含细小零件,如果脱落可
能导致窒息危险。
21
Page 51

紧急呼叫
电池资料及保养
❑ 关于安全有效使用手机的准则(续)
关于安全有效使用手机的准则(续)
紧急呼叫
并非在所有蜂窝网络中均可使用紧急呼叫。 因此,您不应仅依赖于手机的
紧急呼叫功能。 请向本地的服务提供商核准。
电池资料及保养
› 您无需在再次充电前对电池进行完全放电。 与其它电池系统不同,本机
电池不具有可能影响电池性能的记忆效应。
› 只能使用 LG 电池和充电器。 LG 充电器设计为最大程度地延长电池使
用寿命。
› 不要拆解电池组或将其短路。
› 当电池不再提供合乎要求的性能时,请更换电池。 在需要更换之前,电
池组可以反复充电数百次。
› 不要将电池充电器暴露在直射阳光下,也不要在诸如浴室之类的高湿环
境中使用。
› 如果用不适当的电池进行替换,可能有爆炸危险。
› 请按制造商的说明处置用过的电池。
22
Page 52

暴露在射频能量之下
❑ 关于安全有效使用手机的准则(续)
关于安全有效使用手机的准则(续)
暴露在射频能量之下
无线电波暴露和“特定吸收率”(SAR) 信息。
此款手机已设计为遵守有关适用的无线电波暴露安全要求。 此要求基于相
关的科学准则,其中包括为确保所有人员(无论年龄和健康状况)安全而设
计的安全裕量。
› 无线电波暴露准则采用一种称为“特定吸收率”或 SAR 的测量单位。
SAR 测试是在所有用到的频带中以手机的最高认可功率电平进行发射时使
用标准化方法执行的。
› 不同的 LG 手机型号可能有不同的 SAR 能级,但它们均符合相关的无线
电波暴露准则。
› 国际非游离辐射防护委员会 (ICNIRP) 建议的 SAR 上限值为:每十 (10)
克重的人体组织吸收的能量平均值不超过 2W/kg。
› DASY4 对该型号手机进行的测试,人耳能够承受的 SAR 最大值为
[0.837/0.487] W/kg(10 克)。
› 电气电子工程师协会 (IEEE) 建议的 SAR 上限值为:每 1 克重的人体
组织吸收的能量平均值不超过 1.6W/kg,此 SAR 数据适用于各个国家/地
区的居民。
23
Page 53

❑ 故障排除
故障排除
问题
可能的解决方案
键
问题
手机无法打开 请取出电池,重新插入。 然后,按开机开机
电池电量空 为电池充电。 查看显示屏上的充电指
电池无法正确充电或手机有
时会自动关机
电池的使用时间缩短 如果电池使用时间缩短,可能是由于使
充电错误 - 温度超出范围 确保外部环境温度适当,稍等片刻,然后
充电错误 - 充电器错误 请仅使用原装 LG 配件。
充电错误 - 电池故障 替换电池。
充电错误 - 充电时不显示
电池图标
忘记手机密码 默认手机码为“0000”。
24
可能的解决方案
开机。
示器。
使用干净柔软的布擦拭手机和电池充电
触点。
用环境、通话音量过高或信号微弱等因
素造成。
重新充电。
电池为空或长时间未使用。 可能需要一
段时间,屏幕上才会显示电池图标。
Page 54

问题
可能的解决方案
通话/确定键
通话/确定键
❑ 故障排除
故障排除
问题
输入 PUK 码 PIN 码连续三次输入不正确,手机已锁。
无网络 您所在区域可能信号较弱。 请移到其它
您已输入号码却没有拨号 请确保您已按
您的联系人无法接通您
的电话
您的联系人无法听到您
的声音
通话声音质量较差 检查显示屏上的信号指示符。 栏数表示
可能的解决方案
请输入服务提供商提供的 PUK 码。
区域并重试。 您正在尝试接入未与服务
提供商订阅的选项。 有关详情,请与服
务提供商联系。
请确保您访问的是正确的网络服务。
请确保您未设置拨电限制选项。
请确保您已输入区号。
请确保手机已开机。 按
超过一秒钟。 请确保您正在访问网络服
务。 请确保您未设置来电限制选项。
请确保您已关闭扬声器。 请确保您将手
机放在嘴边较近位置。 麦克风位于手
机底部。
信号强度。 如果您位于某大楼内,请将
手机稍微移动或靠近窗户旁边。
通话/确定键
通话/确定键
。
25
Page 55

❑ 故障排除
故障排除
问题
可能的解决方案
问题
重新呼叫联系人时,未拨打
任何号码
无法使用浏览器 您的订阅未包括数据权限。 您需要联系
如果以上指南无法帮助您
解决问题
26
可能的解决方案
使用电话簿搜索功能确保号码储存正确。
如有必要,重新保存号码。
您的服务提供商才能使用此服务。
请记下手机型号和问题的简单说明。 请
联系您的手机经销商或 LG 服务中心以
获得帮助。
Page 56

标准
产品名称:
系统:
外部环境
最高温度 :
最低温度:
❑ 技术参数
技术参数
标准
›
产品名称:
系统:
GSM 900 /
›
DCS 1800
外部环境
›
最高温度 :
充电 (+45°C)
最低温度:
›
LG-A120
+55°C,
-10°C
LG Electronics Inc. LG Twin Towers 20,
Yeouido-dong, Yeongdeungpo-gu, Seoul, Korea 150-721
GSM 900 / DCS 1800 Dual band Terminal Equipment
LG-A120
R&TTE Directive 1999/5/EC
EN 301 489-01 V1.8.1, EN 301 489-07 V1.3.1
EN 301 511 V9.0.2
EN 50360:2001, EN62209-1:2006
EN 60950-1:2001
The conformity to above standards is veried by the following Notied Body(BABT)
BABT, Forsyth House-Churcheld Road -Walton-on-ThamesSurrey -KT12 2TD, United Kingdom
Notied Body Identication Number : 0168
LG Electronics Logistics and Services B.V.
Veluwezoom 15, 1327 AE Almere, The Netherlands
Seung Hyoun, Ji / Director
17.June. 2010
27
Page 57

Memo
Page 58

LG-A120 PANDUAN
PENGGUNA
Manual ini mungkin berbeza daripada telefon bergantung
kepada versi perisian telefon dan pembekal khidmat yang
digunakan.
Page 59

Kandungan
Memasang Kad SIM dan Mengecas
Bateri .......................................................3
Komponen Telefon.............................4
Menghidupkan dan Mematikan
Telefon Anda ........................................7
Membuat panggilan .........................7
Menjawab panggilan ........................ 7
Membuat panggilan antarabangsa
...................................................................7
Menu dan Pilihan................................8
Memasukkan Teks ..............................9
Bagaimana untuk menetapkan
nada .................................................... 10
Pengesan Mudah Alih Anti
Kecurian (ATMT) ............................... 11
Menu Utama ..................................... 12
Rujukan ciri pantas ......................... 13
Garis panduan untuk penggunaan
selamat dan e syen ........................20
Penyelesaian masalah .................... 24
Data Teknikal ..................................... 28
2
Page 60

Memasang Kad SIM dan Mengecas Bateri
Apabila anda melanggan rangkaian
selular, anda disediakan dengan kad
SIM yang dimuatkan dengan butiran
langganan anda, seperti PIN anda,
sebarang perkhidmatan pilihan
yang tersedia dan banyak lagi.
Penting!
› Kad SIM dan sesentuhnya mudah
rosak akibat tercalar atau
bengkokkan, oleh itu berhati-hati
semasa mengendali, memasang
atau mengeluarkan kad. Simpan
semua kad SIM jauh dari capaian
1
3
Selarikan penutup belakang pada
telefon
kanak-kanak kecil.
USIM tidak disokong pada telefon ini.
›
›
Jika bateri dikeluarkan kira-kira 1
minit, jam kembali keoada tetapan
lalainya. Anda kemudian akan
perlu menetapkan semula masa.
Ilustrasi
1
Buka penutup bateri
2
Masukkan kad SIM anda
3
Tutup penutup bateri
4
Caskan bateri anda
2
4
Caj bateri dengan penuh sebelum
menggunakannya buat pertama kali
3
Page 61

Komponen Telefon
Cuping telinga
Skrin paparan
Kekunci lembut kiri dan
kekunci lembut kanan
Setiap kekunci
melakukan fungsi
yang ditunjukkan
oleh teks pada
paparan dengan
segera di atasnya.
: Kekunci Bual/Ya
Anda boleh mendail
nombor telefon dan
menjawab panggilan
untuk Memasukkan
nombor atau aksara.
4
masuk.
Kekunci abjad angka
Dalam kebanyakan
masa, kekunci
nombor digunakan
: Kekunci panggil/
Kuasa
Membolehkan anda
menghidupkan
atau mematikan
kuasa telefon,
menamatkan
panggilan atau
kembali ke Mod
Siap Sedia.
: Kekunci
navigasi
Digunakan untuk
akses pantas ke
fungsi telefon.
Page 62

Port USB Mikro
Bicu fon telinga/Port
pengecas
Lubang Tali Tangan
5
Page 63

Memaparkan Maklumat
Menu
Kenalan
Kawasan ikon
Kawasan teks dan grafik
Menu
Kenalan
Penunjuk-penunjuk kekunci lembut
Ikon Pada Skrin
Memaklumkan anda kekuatan isyarat rangkaian.
Menunjukkan tahap cas bateri.
Menunjukkan telefon telah dikunci.
Menunjukkan mesej teks baru.
Menunjukkan mesej suara baru.
Menunjukkan jam penggera telah ditetapkan.
Menunjukkan telefon anda menggunakan tetapan senyap.
Menunjukkan telefon anda menggunakan tetapan luar bangunan.
Menunjukkan telefon anda menggunakan tetapan alat dengar.
Menunjukkan semua panggilan dialihkan ke nombor lain.
Menunjukkan telefon anda berada dalam mod penerbangan.
6
Page 64

Menghidupkan dan Mematikan Telefon Anda
Anda boleh hidupkan dan matikan telefon dengan menekan atau menahan
kekunci kuasa.
Membuat panggilan
1.
Dalam mod siap sedia, masukkan kod kawasan dan nombor telefon.
2.
Tekan kekunci cakap untuk memanggil nombor.
Menjawab panggilan
Tekan kekunci bual untuk menjawab panggilan apabila telefon
berdering.
Jika pilihan menu Sebarang Kekunci telah ditetapkan, menekan sebarang
kekunci akan menjawab panggilan kecuali untuk
kekunci lembut kanan.
kekunci Tamat atau
Membuat panggilan antarabangsa
1.
Dalam mod siap sedia, tekan lama kekunci 0 sehingga tanda a + (aksara
awalan antarabangsa) dipaparkan.
2.
Masukkan kod negara, kod kawasan dan nombor telefon.
3.
Tekan kekunci bual untuk memanggil.
7
Page 65

Menu dan Pilihan
Telefon anda menawarkan set fungsi yang membenarkan anda sesuaikannya.
Fungsi ini disusun dalam menu dan sub menu, akses melalui kekunci lembut
kiri dan kanan. Label pada bawah skrin paparan dengan segera di atas kekunci
lembut menandakan fungsi terkininya.
Menu Kenalan
Tekan kekunci lembut
kiri untuk mengakses
Menu yang tersedia.
8
Tekan kekunci lembut
kanan untuk mengakses
Kenalan.
Page 66

Memasukkan Teks
Anda boleh memasukkan aksara abjad angka dengan menggunakan pad
kekunci telefon. Untuk menukar mod, tekan kekunci.
Mod T9
Mod ini membenarkan anda untuk memasukkan perkataan dengan hanya satu
strok kekunci bagi setiap huruf. Setiap kekunci pada pad kekunci mempunyai
lebih daripada satu huruf. Mod T9 membandingkan strok kekunci anda secara
automatik dengan kamus linguistik dalaman untuk menentukan perkataan
yang betul, sekaligus memerlukan lebih sedikit strok kekunci daripada mod ABC
tradisional.
Kaedah input dipaparkan pada sudut kanan atas telefon anda.
Penunjuk Fungsi (mod Pintar Bahasa Inggeris)
T9 Pintar Abc
T9 Pintar abc
T9 Pintar ABC
Angka
Berbilang ketik Abc
Berbilang ketik abc
Berbilang ketik ABC
9
Page 67

Bagaimana untuk menetapkan nada
Anda boleh menyediakan profil yang berbeza berikut untuk menyesuaikan
keadaan persekitaran yang berbeza. Telefon anda memberikan 4 profil
berlainan.
1.
Pilih [Profil] dari menu utama.
2.
Pilih satu profil dan tekan [Pilihan - Peribadikan] untuk menetapkan nada
dering.
3.
Tekan kekunci lembut kiri [OK] dan kemudian anda boleh menetapkan nada
dering yang diingini.
Telefon anda juga memberikan pilihan yang berikut untuk menyesuaikan jenis
nada/awasan:
Jenis awasan panggilan:
•
Dering selepas Getar, dan Senyap) untuk nada dering.
•
Nada dering:
•
Kelantangan deringan:
Jenis isyarat mesej:
•
berkala, Dering & Getar. Getar, Senyap) untuk nada isyarat mesej.
•
Nada mesej:
Kelantangan mesej:
•
Nada pad kekunci:
•
•
Kelantangan pad kekunci:
•
Nada kuasa hidup/mati:
kuasa hidup/mati.
•
Hidupkan/matikan nada dering:
dering.
10
Menetapkan nada dering yang diingini.
Pilih nada isyarat mesej.
Pilih jenis awasan (Dering, Getar, Dering & Getar,
Melaras kelantangan nada dering.
Pilih jenis isyarat yang berlainan (Dering Sekali, Dering
Laras kelantangan nada isyarat mesej.
Pilih nada pad kekunci yang diingini.
Laras kelantangan pad kekunci.
Pilih jenis nada dering yang berlainan untuk
Melaras kelantangan hidup/mati nada
Page 68

Pengesan Mudah Alih Anti Kecurian (ATMT)
Pengesan mudah alih anti kecurian (ATMT ) membolehkan anda untuk
mengesan telefon anda yang hilang. Apabila seseorang menggunakan telefon
anda tanpa kebenaran anda, perkhidmatan pengesan akan diaktifkan.
Anda diingatkan melalui mesej teks yang dihantar ke nombor telefon lalai yang
telah anda tetapkan tanpa pengetahuan pengguna yang tidak dibenarkan.
Anda boleh sentiasa mengaktifkan ATMT dan menatarajah tetapan peribadi
anda.
Untuk mengaktifkan Pengesan mudah alih anti kecurian
1.
Dari menu utama, pilih
alih anti kecurian
2.
Pilih
Tetapkan ATMT
3. Hidupkan
4.
Masukkan kod keselamatan untuk mendayakan atau menyahdayakan fungsi
ini.
5.
Kemudian daripada menu “Nombor untuk ATMT”, edit dan simpan di dalam
Nama penghantar
nombor
.
Nota:
Kod lalai ATMT ialah “0000”. Anda perlu memasukkan kod sebelum
menatarajah tetapan ATMT.
Tetapan > Keselamatan > Pengesan mudah
dan tekan Ok.
dan tekan Ok.
atau
Matikan
dan tekan
dan nombor di dalam
Pilih
.
Menghantar senarai
11
Page 69

Menu Utama
1. Radio FM
2. Sejarah
panggilan
2.1 Semua
panggilan
2.2 Panggilan tidak
dijawab
2.3 Panggilan didail
2.4 Panggilan
diterima
2.5 Tempoh
panggilan
2.6 Kos panggilan
3. Alatan
3.1 Jam penggera
3.2 Kalendar
3.3 Kalkulator
3.4 Tugasan
3.5 Penukar unit
3.6 Jam dunia
3.7 Perkhidmatan
Sim
3.8 Lampu
4. Multimedia
4.1 Pemain muzik
4.2 Rekod jadual FM
12
4.3 Perakam suara
4.4 Penggubah
melodi
5. Mesej
5.1 Mesej baru
5.2 Peti masuk
5.3 Draf
5.4 Peti keluar
5.5 Dihantar
5.6 Mendengar mel
suara
5.7 Mesej maklumat
5.8 Templat
5.9 Tetapan
6. Bahan saya
6.1 Bunyi
6.2 Permainan
7. Profil
7.1 Biasa
7.2 Senyap
7.3 Luar rumah
7.4 Mod
penerbangan
8. Kenalan
8.1 Carian
8.2 Kenalan baru
8.3 Dailan cepat
8.4 Kumpulan
8.5 Salin semua
8.6 Padam semua
8.7 Maklumat
9. Tetapan
9.1 Tarikh & Masa
9.2 Bahasa
9.3 Paparan
9.4 Pintasan
9.5 Panggilan palsu
9.6 Panggil
9.7 Keselamatan
9.8 Kesambungan
9.9 Penjimatan
kuasa
9.10 Menetap
semula
9.11 Status memori
Page 70

Rujukan ciri pantas
Radio FM
(Fungsi ini mungkin berlainan di dalam wilayah yang berlainan.)
Mendengar stesen radio FM. Anda boleh bergembira mendengar FM tanpa
menggunakan alat dengar sebagai perkhidmatan FM wayarles sokongan
telefon.
1.
Dari menu utama pilih radio FM.
2.
Gunakan pad kekunci navigasi untuk mencari stesen radio. Anda juga
boleh menekan Pilihan untuk mencari frekuensi radio untuk saluran
tersedia dan menyimpan secara automatik pada senarai saluran.
3.
Tekan Pilihan untuk mengedit senarai saluran. Terdapat 9 stesen yang
boleh anda pratetapkan.
Telefon anda membekalkan pilihan berikut untuk radio FM:
•
Menghidupkan/mematikan radio:
atau dimatikan.
•
Senarai Saluran:
dengan memasukkan nama saluran dan frekuensi.
•
Masukkan Manual:
dengan menggunakan pilihan ini.
Pratetap Carian Auto:
•
menyimpannya pada senarai saluran.
•
Tetapan:
mainan latar belakang, kulit radio FM, kualiti merakam audio dan format
rakaman. Anda boleh merakam dalam format AMR atau WAV.
Rakam:
•
Sambung:
•
•
Senarai fail:
Menu 1
Pilih keadaan radio dihidupkan
Tandakan penanda buku sehingga 9 stesen radio
Anda boleh memasukkan frekuensi secara manual
Carian auto saluran tersedia dan secara automatik
Membenarkan anda menghidupkan pembesar suara. Menukar
Merakam program radio kegemaran anda.
Menyambung fail yang dirakam sebelum ini.
Mengurus fail audio yang dirakam.
13
Page 71

Sejarah panggilan
Anda boleh memeriksa rekod panggilan tidak dijawab, diterima dan didail
hanya jika rangkaian menyokong Pengenalan Talian Panggilan (CLI) dalam
kawasan perkhidmatan. Nombor dan nama (jika tersedia) dipaparkan
bersama dengan tarikh dan masa ketika panggilan tersebut dibuat. Anda juga
boleh melihat tempoh panggilan.
•
Semua panggilan:
Panggilan tidak dijawab) dengan masa.
•
Panggilan tidak dijawab:
panggilan terakhir yang tidak dijawab.
Panggilan didail:
•
keluar yang terakhir (dipanggil atau cuba memanggil).
Panggilan diterima:
•
terakhir yang masuk.
Tempoh panggilan:
•
masuk dan keluar.
•
Kos panggilan:
anda, semua panggilan dan menetapkan semula kos.
Alatan
Menu 3
•
Jam penggera:
penggera. Pada masa penggera, ikon Penggera akan dipaparkan pada skrin
LCD dan penggera akan berbunyi.
•
Kalendar:
anda.
Kalculator:
•
dan Bahagi.
Tugasan:
•
14
Anda boleh memeriksa perjalanan jadual harian atau bulanan
Ini mengandungi fungsi standard seperti Tambah, Tolak, Darab,
Anda boleh menyimpan tugasan dan anda boleh melihatnya.
Menu 2
Paparkan semua tiga jenis senarai (Diterima/Didail/
Pilihan ini membolehkan anda melihat 40
Pilihan ini membolehkan anda melihat 40 panggilan
Pilihan ini membolehkan anda melihat 40 panggilan
Benarkan anda untuk melihat tempoh panggilan
Membolehkan anda memeriksa kos panggilan terakhir
Membolehkan anda menetapkan satu daripada lima
Page 72

Alatan
Menu 3
•
Penukar unit:
mahu.
•
Jam dunia:
masa atau negara yang lain.
•
Lampu suluh:
Ini menukar sebarang pengukuran ke dalam unit yang anda
Membolehkan anda menentukan masa semasa di dalam zon
Anda boleh mengaktifkan menu lampu suluh.
Multimedia
•
Pemain muzik:
Jadualkan rakaman FM:
•
FM.
Perakam suara:
•
Penggubah melodi:
•
menu ini.
Pemesejan
•
Mesej baru:
•
Peti masuk:
akan disimpan di sini.
Draf:
•
•
Peti keluar:
atau telah gagal dihantar.
•
Dihantar:
dihantar, termasuk masa dan kandungan.
Mendengar mel suara:
•
mengakses peti mel suara anda.
Menu 4
Mendengar fail muzik MP3 pada telefon anda.
Benarkan anda untuk pra jadual rakaman radio
Benarkan anda untuk merakam memo suara.
Membolehkan anda membuat melodi di dalam
Menu 5
Menu ini membolehkan anda menulis SMS baru.
Anda akan diberitahu apabila anda menerima mesej. Dan ia
Menu ini menunjukkan mesej yang disimpan.
Menu ini benarkan anda melihat mesej yang akan dihantar
Menu ini benarkan anda untuk melihat mesej yang telah
Menu ini memberikan anda cara pantas untuk
15
Page 73

Pemesejan
•
Maklumat mesej:
dihantar oleh rangkaian pada telefon anda.
•
Templat:
dan mengedit mesej templat atau membuat mesej baru.
•
Tetapan:
khidmat rangkaian anda.
Menu 5
Mesej maklumat perkhidmatan ialah mesej teks yang
Terdapat mesej pratetap di dalam senarai. Anda boleh melihat
Menu ini membenarkan anda menetapkan ciri pembekal
Bahan saya
•
Bunyi:
•
Permainan:
Profil
•
Normal:
pada skrin siap sedia.
Senyap:
•
menyediakan profil ini, penunjuk akan dipaparkan pada skrin siap
sedia.
•
Luar:
ditetapkan kepada maksimum. Selepas menyediakan profil ini, penunjuk
Mod Penerbangan:
•
Benarkan anda menggunakan dengan selamat fungsi tanpa wayarles telefon
anda (seperti multimedia, alat, atau permainan…dll.). Selepas menyediakan
profil ini, penunjuk akan dipaparkan pada skrin.
16
Menu 6
Folder ini menyimpan semua fail audio anda.
Senarai permainan lalai yang tersedia di dalam telefon.
Menu 7
Selepas menyediakan profil ini, penunjuk akan dipaparkan
Nada dering dan penggetar ditetapkan kepada mati. Selepas
Ini ialah profil lalai. Kelantangan nada dering dan nada kekunci
akan dipaparkan pada skrin siap sedia.
Rangkaian wayarles telefon anda dinyahdayakan.
Page 74

Kenalan
•
Carian:
•
Kenalan baru:
menggunakan menu ini.
Dailan pantas:
•
2 dan 8.
•
kumpulan:
Kumpulan, anda boleh menghantar mesej pada semua ahli kumpulan pada
masa yang sama.
•
Salin semua:
memori Telefon dan juga dari memori Telefon pada memori kad SIM.
Padam semua:
•
memori Telefon.
Maklumat
•
› Nombor dailan perkhidmatan:
perkhidmatan yang diperuntukkan oleh pembekal khidmat dengan selamat.
› Nombor sendiri:
sendiri di dalam kad SIM.
Menu 8
Anda boleh Mencari kenalan dalam Buku Telefon.
Nota: Pencarian segera tersedia dengan memasukkan huruf pertama
nama yang anda mahu cari.
Anda boleh menambah entri buku telefon dengan
Peruntukkan kenalan pada mana-mana kekunci di antara
Terdapat tujuh kumpulan lalai pada telefon. Dengan fungsi
Anda boleh salin semua entri dari memori kad SIM pada
Anda boleh padam semua entri dari memori kad SIM atau
Mengakses senarai nombor
Anda boleh menyimpan dan memeriksa nombor anda
Tetapan
•
Tarikh & Masa:
dan masa.
Bahasa:
•
anda. Pertukaran ini juga akan menjejaskan mod Input Bahasa .
•
Paparan:
Pintasan:
•
Menu 9
Anda boleh menetapkan fungsi berkaitan dengan tarikh
Anda boleh menukar bahasa untuk paparan teks dalam telefon
Anda boleh melaras tetapan untuk paparan telefon.
Anda boleh sesuaikan pintasan anda.
17
Page 75

Tetapan
•
Panggilan palsu:
akan berlaku pada masa yang dikhaskan dengan nama dan nombor yang
anda tetapkan.
Nota:
untuk mengaktifkan panggilan palsu, untuk menyahaktifkan Tetapkan Panggilan
Palsu, Tekan Tidak” dari pop timbul yang dipaparkan.
•
Panggil:
Keselamatan:
•
dengan selamat.
>
>
>
>
18
Menu 9
Anda boleh menetapkan panggilan masuk palsu yang
Untuk menetapkan Panggilan palsu, dari skrin melahu, taipkan
“Tetapkan pop timbul panggilan palsu Ya/Tidak” dipaparkan. Pilih “ya”
Anda boleh menetapkan menu yang relevan pada panggilan.
Menu ini membenarkan anda untuk menetapkan telefon
Permintaan kod pin
menghidupkan telefon anda.
Kunci kekunci auto
automatik selepas beberapa ketika.
Kunci telefon
Apabila dihidupkan, Apabila SIM ditukar atau Serta-merta.
Pengesan mudah alih anti kecurian
menghantar SMS ke nombor yang dikonfigurasikan oleh pemilik sebenar.
Pengguna perlu mengkonfigurasikan tetapan ATMT dengan nama, nombor
telefon utama, nombor kedua. Pengguna perlu Tetapkan ATMT HIDUP
untuk mengaktifkan ciri ATMT. Kod ATMT lalai ialah “0000”. SMS ATMT
mengandungi maklumat mengenai IMEI telefon yang dicuri, lokasi dan
nombor semasa individu yang menggunakan telefon bimbit tersebut.
- Pilih kod PIN untuk diminta apabila anda
- Anda boleh membuat pad kekunci dikunci secara
- Pilih kod keselamatan untuk mengunci telefon anda,
- Apabila telefon dicuri, telefon
Page 76

Tetapan
>
•
Kesambungan:
ada secara automatik atau secara manual.
•
Jimat kuasa:
menjimatkan kuasa apabila anda tidak menggunakan telefon.
•
Set semula:
1. Menetap semula tetapan:Membolehkan anda menetapkan semula
2. Menetap semula memori telefon:padam semua fail yang disimpan pada
3. Menetap semula semua: Membolehkan anda untuk menetap semula
•
Status memori:
setiap repositori.
Menu 9
Menukar kod
PIN2, masukkan kod yang lama diikuti oleh kod yang baru.
keseluruhan telefon kepada kilang
memori telefon anda.
keseluruhan telefon kepada lalai kilang atau memadam semua fail yang
disimpan pada telefon anda.
- Menukar kod keselamatan anda atau kod PIN1 atau kod
Anda boleh pilih rangkaian yang akan didaftarkan sama
Jika anda menetapkan ini kepada Hidup, anda boleh
Anda boleh periksa ruang bebas dan penggunaan memori
19
Page 77

❑ Garis panduan untuk penggunaan selamat dan
efisyen
Sila baca garis panduan yang mudah ini. Membiarkannya mungkin merbahaya
atau tidak sah. Maklumat terperinci lanjut diberi dalam manual ini.
Amaran
› Demi keselamatan anda, gunakan HANYA bateri dan pengecas ASAL.
› Matikan telefon dalam sebarang kawasan di mana diperlukan oleh peruntukan
khusus, cth. di dalam hospital di mana ia memberi kesan kepada peralatan
perubatan.
› Bateri perlu dilupuskan sejajar dengan perundangan yang relevan.
Penjagaan dan penyelenggaraan produk
AMARAN!
untuk digunakan bersama model tertentu telefon ini. Penggunaan sebarang
jenis lain boleh mentaksahkan sebarang kelulusan atau waranti yang berkaitan
dengan telefon, dan mungkin berbahaya.
› Jangan buka bahagian-bahagian unit ini. Bawanya ke juruteknik perkhidmatan
› Unit perlu dijauhkan daripada sumber haba seperti radiator atau pemasak.
› Gunakan kain kering untuk membersihkan bahagian luaran unit. (Jangan
gunakan sebarang pelarut.)
› Jangan simpan telefon di sebelah kad kredit atau tiket pengangkutan; ia boleh
Peranti elektronik
Semua telefon mudah alih mungkin mendapat gangguan, yang boleh
menjejaskan prestasi.
› Jangan gunakan telefon mudah alih anda berhampiran kelengkapan
20
Hanya gunakan bateri, pengecas dan aksesori yang diluluskan
yang kelayakan apabila kerja pembaikan diperlukan.
menjejaskan maklumat pada jalur magnetik.
perubatan tanpa meminta kebenaran. Elakkan meletakkan telefon pada
Page 78

❑ Garis panduan untuk penggunaan selamat dan
efisyen (Teruskan)
perentak jantung, cth. dalam poket dada anda.
Keselamatan jalan
Periksa undang-undang dan peraturan mengenai penggunaan telefon bimbit di
kawasan-kawasan tempat anda memandu.
› Jangan gunakan telefon pegang tangan semasa memandu.
› Gunakan kit bebas tangan, jika tersedia.
› Keluar dari jalan raya dan letak kereta sebelum membuat atau menjawab
panggilan jika keadaan pemanduan memerlukan anda berbuat demikian.
Kawasan letupan
Jangan gunakan telefon di mana peletupan sedang dijalankan. Perhatikan
sekatan,dan patuhi sebarang peraturan atau undang-undang.
Suasana berpotensi letupan
Jangan gunakan telefon anda di tempat pengisian minyak. Jangan gunakan
berhampiran bahan bakar atau bahan kimia.
Dalam pesawat
Peranti wayarles boleh menyebabkan gangguan di dalam pesawat.
› Matikan telefon bimbit anda sebelum menaiki sebarang pesawat.
Kanak-kanak
Pastikan telefon di tempat selamat dan jauh dari jangkauan kanak-kanak. Ia
termasuk bahagian kecil yang boleh menyebabkan bahaya tercekik jika ia
ditanggalkan.
21
Page 79

❑ Garis panduan untuk penggunaan selamat dan
efisyen (Teruskan)
Panggilan kecemasan
Panggilan kecemasan mungkin tidak tersedia di bawah semua rangkaian selular.
Oleh itu, anda tidak seharusnya bergantung pada mana-mana telefon untuk
panggilan kecemasan. Semak dengan pembekal khidmat tempatan anda.
Maklumat dan penjagaan bateri.
› Anda tidak perlu menyahcas bateri sepenuhnya sebelum mengecasnya
semula. Tidak seperti sistem bateri yang lain, tiada kesan memori yang boleh
menjejaskan prestasi bateri.
› Gunakan hanya bateri dan pengecas LG. Pengecas LG direka bentuk untuk
memaksimumkan hayat bateri.
› Jangan buka atau litar pintaskan pek bateri.
› Gantikan bateri apabila ia tidak lagi memberi prestasi yang boleh diterima. Pek
bateri akan dicas semula seratus kali sebelum ia perlu digantikan.
› Jangan dedahkan pengecas bateri kepada cahaya matahari langsung atau
gunakannya pada kelembapan yang tinggi, seperti di bilik air.
› Risiko meletup jika bateri diganti dengan jenis yang salah.
› Lupuskan bateri yang telah digunakan mengikut arahan pengilang.
22
Page 80

❑ Garis panduan untuk penggunaan selamat dan
efisyen (Teruskan)
Terdedah kepada kuasa frekuensi radio
Maklumat pendedahan gelombang radio dan Kadar penyerapan Khusus (SAR)
Telefon mudah alih model ini telah direka bentuk untuk mematuhi keperluan
keselamatan yang berkenaan bagi pendedahan kepada gelombang radio.
Keperluan ini berdasarkan pada garis panduan saintifik yang memasukkan
margin keselamatan untuk memastikan keselamatan semua orang, tidak kira
umur dan kesihatan.
› Garis panduan bagi pendedahan kepada gelombang radio menggunakan
unit ukuran yang disebut sebagai Kadar Penyerapan Khusus, atau SAR. Ujian
bagi SAR dijalankan menggunakan kaedah yang dipiawaikan dengan telefon
memancarkan pada aras kuasa diperakui yang tertinggi dalam semua jalur
frekuensi.
› Walaupun terdapat perbezaan antara tahap SAR pelbagai model telefon
LG, ia semua direka bentuk untuk memenuhi garis panduan relevan bagi
pendedahan kepada gelombang radio.
› Had SAR yang disyorkan oleh Suruhanjaya mengenai Perlindungan Sinaran
Bukan-Ion (Commission on Non-Ionizing Radiation Protection) (ICNIRP)
antarabangsa, iaitu 2W/kg dipuratakan ke atas sepuluh (10) gram tisu.
› Nilai SAR tertinggi untuk telefon model ini yang diuji oleh DASY4 bagi
penggunaan di telinga/badan ialah [0.837/0.487] W/kg (10g).
› Maklumat data SAR bagi penduduk di negara/kawasan yang telah mengambil
had SAR yang disyorkan oleh Institut Jurutera Elektrik dan Elektronik (IEEE),
iaitu 1.6 W/kg dipuratakan ke atas satu 1 gram tisu.
23
Page 81

❑ Penyelesaian masalah
Masalah Penyelesaian Kemungkinan
Telefon tidak boleh
dihidupkan
Bateri kosong Mengecas bateri. Periksa penunjuk
Bateri tidak mengecas
dengan betul atau telefon
mati dengan sendiri.
Masa penggunaan bateri
menjadi pendek
Ralat pengecasan—Suhu di
luar julat
Ralat pengecasan—Pengecas
salah
24
Sila keluarkan bateri dan masukkan semula.
Kemudian tekan
untuk menghidupkan telefon.
pengecasan pada paparan.
Kesat sesentuh pengecasan pada telefon
dan pada bateri dengan kain lembut yang
bersih.
Jika masa bateri singkat, ia mungkin
disebabkan oleh persekitaran pengguna,
jumlah panggilan yang besar, atau isyarat
yang lemah.
Pastikan suhu ambien betul, tunggu
sebentar, dan kemudian cas lagi.
Hanya gunakan aksesori LG asal.
Kekunci kuasa hidup
Page 82

❑ Penyelesaian masalah
Masalah Penyelesaian Kemungkinan
Ralat pengecasan—Bateri
rosak
Ralat pengecasan—Tiada
ikon bateri muncul semasa
mengecas
Terlupa kod telefon atau kata
laluan
Masukkan PUK Kod PIN yang salah telah dimasukkan
Ketiadaan Rangkaian Anda mungkin berada di kawasan yang
Gantikan bateri.
Bateri kosong atau tidak digunakan buat
masa yang panjang. Ia mungkin mengambil
beberapa waktu sebelum ikon bateri
muncul pada skrin.
Kod telefon lalai ialah “0000”.
sebanyak tiga kali secara berturut-turut, dan
telefon kini telah telah dihalang. Masukkan
PUK yang dibekalkan oleh pembekal
khidmat anda.
lemah isyaratnya. Pindah dan cuba lagi.
Anda sedang mencuba untuk mengakses
pilihan yang anda tidak langgani dengan
pembekal khidmat anda. Hubungi
pembekal khidmat untuk mendapatkan
butiran lanjut.
25
Page 83

❑ Penyelesaian masalah
Masalah Penyelesaian Kemungkinan
Anda telah memasukkan
nombor tetapi ia tidak didail
Pemanggil anda tidak dapat
menghubungi anda
Pemanggil anda tidak dapat
mendengar percakapan
anda.
26
Pastikan anda telah menekan
Bual/Ya
.
Pastikan bahawa anda telah mengakses
rangkaian perkhidmatan yang betul.
Pastikan bahawa anda belum menetapkan
pilihan sekatan panggilan keluar.
Pastikan anda telah memasukkan kod
kawasan.
Pastikan telefon anda dihidupkan. Tekan
kekunci Bual/Ya
satu saat. Pastikan bahawa anda mengakses
perkhidmatan rangkaian. Pastikan bahawa
anda belum menetapkan pilihan sekatan
panggilan masuk.
Pastikan anda telah mematikan pembesar
suara. Pastikan anda memegang telefon
cukup dekat dengan mulut anda. Mikrofon
terletak di bahagian bawah telefon.
untuk lebih daripada
kekunci
Page 84

❑ Penyelesaian masalah
Masalah Penyelesaian Kemungkinan
Kualiti suara panggilan tidak
baik
Tiada nombor didail semasa
anda memanggil semula
kenalan
Tidak boleh menggunakan
Penyemak Imbas
Jika garis panduan di atas
tidak membantu anda untuk
menyelesaikan masalah
tersebut
Periksa penunjuk kekuatan isyarat
pada paparan. Bilangan bar
menunjukkankekuatan isyarat. Cuba
rapatkan lagi telefon atau bergerak lebik
dekat ke tingkap jika anda berada di dalam
bangunan.
Gunakan ciri Carian Buku Telefon untuk
memastikan nombor telah disimpan dengan
betul. Simpan semula nombor, jika perlu.
Langganan anda tidak menyertakan
kemampuan data. Anda perlu
menghubungi pembekal khidmat anda
untuk mendayakan perkhidmatan.
Catat nombor model telefon bimbit anda
dan huraian jelas masalahnya. Hubungi
penjual telefon atau Pusat Servis LG untuk
mendapatkan bantuan.
27
Page 85

❑ Data Teknikal
Umum
›
Nama produk :
Sistem :
›
DCS 1800
Suhu Ambien
›
Maks. :
Mengecas (+45°C)
Min :
-10°C
›
LG-A120
GSM 900 /
+55°C,
LG Electronics Inc. LG Twin Towers 20,
Yeouido-dong, Yeongdeungpo-gu, Seoul, Korea 150-721
GSM 900 / DCS 1800 Dual band Terminal Equipment
LG-A120
R&TTE Directive 1999/5/EC
EN 301 489-01 V1.8.1, EN 301 489-07 V1.3.1
EN 301 511 V9.0.2
EN 50360:2001, EN62209-1:2006
EN 60950-1:2001
The conformity to above standards is veried by the following Notied Body(BABT)
BABT, Forsyth House-Churcheld Road -Walton-on-ThamesSurrey -KT12 2TD, United Kingdom
Notied Body Identication Number : 0168
LG Electronics Logistics and Services B.V.
Veluwezoom 15, 1327 AE Almere, The Netherlands
Seung Hyoun, Ji / Director
17.June. 2010
28
Page 86

LG-A120 PETUNJUK
PENGGUNAAN
Buku petunjuk ini mungkin berbeda dari ponselnya, tergantung
pada versi perangkat lunak ponsel dan penyedia layanan yang
dipakai.
Page 87

Daftar Isi
Memasang Kartu SIM dan Mengisi
Baterai .....................................................3
Komponen Ponsel ..............................4
Menghidupkan dan Mematikan
Ponsel Anda ..........................................7
Membuat panggilan .........................7
Menjawab panggilan ........................ 7
Membuat panggilan internasional
...................................................................7
Menu dan Opsi ....................................8
Mengisikan teks ..................................9
Cara mengatur nada ..................... 10
Anti Theft Mobile Tracker (ATMT) 11
Susunan Menu.................................. 12
Referensi tur cepat ....................... 13
Pedoman untuk pemakaian yang
aman dan e sien ............................. 20
Pemecahan masalah ......................24
Data Teknis ......................................... 28
2
Page 88

Memasang Kartu SIM dan Mengisi Baterai
Bila Anda berlangganan ke jaringan
seluler, Anda akan diberikan
kartu SIM yang telah diisi dengan
perincian berlangganan, seperti
halnya PIN, layanan opsional yang
tersedia dan banyak lagi.
Penting!
›
Kartu SIM dan kontaknya gampang
rusak oleh goresan atau tekukan,
karena itu berhati-hatilah saat
memegang, menyisipkan atau
melepas kartu. Jauhkan semua
kartu SIM dari jangkauan anak kecil.
1
3
Sejajarkan penutup belakang dengan
ponsel
› USIM tak didukung di ponsel ini.
› Jika baterai dikeluarkan selama
kurang-lebih 1 menit, jam akan
kembali ke pengaturan default.
Anda kemudian perlu mereset
waktu.
Ilustrasi
1
Buka penutup baterai
2
Masukkan kartu SIM Anda
3
Pasang kembali penutup baterai
4
Isi baterai Anda
2
4
Isi Penuh baterai sebelum memakainya
untuk pertama kali
3
Page 89

Komponen Ponsel
Lubang suara
Layar tampilan
Tombol lunak kiri dan
Tombol lunak kanan
Masing-masing
tombol ini
menjalankan fungsi
yang ditunjukkan teks
pada tampilan tepat
di atasnya.
: Tombol Bicara/Ya
Anda dapat
memanggil nomor
telepon dan
menjawab panggilan
angka dipakai untuk
memasukkan angka
4
masuk.
Tombol alfanumerik
Umumnya, tombol
atau karakter.
: Tombol Akhiri
panggilan/Hidupkan
Memungkinkan
Anda
menghidupkan
atau mematikan
ponsel, mengakhiri
panggilan, atau
kembali ke Mode
Siaga.
: Tombol
navigasi
Pakailah untuk
mengakses cepat
fungsi ponsel.
Page 90

Port USB mikro
Lubang earphone/Port
pengisi daya
Lubang Tali Ponsel
5
Page 91

Informasi Tampilan
Menu
Kontak
Area ikon
Area teks dan gambar
Menu
Kontak
Indikator tombol lunak
Ikon Pada Layar
Memberi tahu Anda kekuatan sinyal jaringan.
Menunjukkan level daya baterai.
Menunjukkan ponsel terkunci.
Menunjukkan pesan teks baru.
Menunjukkan pesan suara baru.
Menunjukkan jam alarm telah diatur.
Menunjukkan ponsel memakai pengaturan senyap.
Menunjukkan ponsel memakai pengaturan luar ruang.
Menunjukkan ponsel memakai pengaturan headset.
Menunjukkan semua panggilan Anda dialihkan ke nomor lain.
Menunjukkan ponsel dalam mode penerbangan.
6
Page 92

Menghidupkan dan Mematikan Ponsel Anda
Anda dapat menghidupkan dan mematikan ponsel dengan menekan atau
menahan tombol daya.
Membuat panggilan
1.
Dalam mode siaga, isikan kode area dan nomor teleponnya.
2.
Tekan tombol bicara untuk memanggil nomor tersebut.
Menjawab panggilan
Tekan tombol bicara untuk menjawab panggilan saat ponsel berdering.
Jika opsi menu Sembarang Tbl telah diatur, menekan sembarang tombol
akan menjawab panggilan kecuali tombol Akhiri
kanan.
atau tombol lunak
Membuat panggilan internasional
1.
Dalam mode siaga, tekan lama tombol 0 hingga tanda + (karakter awalan
internasional) ditampilkan.
2.
Isikan kode negara, kode area, dan nomor telepon.
3.
Tekan tombol bicara untuk memanggil.
7
Page 93

Menu dan Opsi
Ponsel Anda menyediakan serangkaian fungsi yang memungkinkan Anda
menyesuaikannya. Fungsi-fungsi ini disusun dalam menu dan sub-menu,
yang diakses melalui tombol lunak kiri dan kanan. Label di bagian dasar layar
tampilan, persis di atas tombol lunak, menunjukkan fungsi yang sekarang.
Menu Kontak
Tekan tombol lunak
kiri untuk mengakses
Menu yang tersedia.
8
Tekan tombol lunak
kanan untuk mengakses
Kontak.
Page 94

Mengisikan teks
Anda dapat mengisikan karakter alfanumerik dengan memakai keypad ponsel.
Untuk mengubah mode, tekan tombol .
Mode T9
Mode ini memungkinkan Anda mengisikan kata hanya dengan satu ketukan per
huruf. Setiap tombol pada keypad terdiri lebih dari satu huruf. Mode T9 secara
otomatis membandingkan tekanan tombol Anda dengan kamus linguistik
internal untuk menentukan kata yang benar, sehingga lebih sedikit tekanan
tombol yang diperlukan dibandingkan mode ABC biasa.
Metode input ditampilkan di sudut kanan atas ponsel Anda.
Tanda Fungsi (Mode Cerdas Bahasa Inggris)
T9 Abc Cerdas
T9 abc Cerdas
T9 ABC Cerdas
Angka
Multitap Abc
Multitap abc
Multitap ABC
9
Page 95

Cara mengatur nada
Anda dapat mengatur aneka profil berikut untuk menyesuaikan dengan kondisi
lingkungan yang berbeda. Ponsel Anda menyediakan 4 profil berbeda.
1.
Pilih [Profil] dari menu utama.
2.
Pilih sebuah profil dan tekan [Opsi - Personalisasi] untuk mengatur nada
dering.
3.
Tekan tombol lunak kiri [OK] maka Anda dapat mengatur nada dering yang
diinginkan.
Ponsel Anda juga menyediakan opsi berikut untuk menyesuaikan nada dering/
jenis tanda:
•
Jenis tanda pgl:
setelah Getar, dan Senyap) untuk nada dering.
•
Nada dering:
•
Volume dering:
Jenis tanda pesan:
•
Berkala, Dering & Getar, Getar, Senyap) untuk nada tanda pesan.
•
Nada pesan:
Volume pesan:
•
Nada tombol:
•
•
Volume tombol:
Nada hidupkan/matikan:
•
menghidupkan/mematikan.
•
Volume hidupkan/matikan:
menghidupkan/mematikan.
10
Memilih jenis tanda (Dering, Getar, Dering & Getar, Dering
Mengatur nada dering yang diinginkan.
Menyesuaikan volume nada dering.
Memilih beragam jenis tanda (Dering Sekali, Dering
Memilih nada peringatan pesan yang diinginkan.
Menyesuaikan volume nada tanda pesan.
Memilih nada tombol yang diinginkan.
Menyesuaikan volume keypad.
Memilih jenis nada dering yang berbeda untuk
Menyesuaikan volume nada dering saat
Page 96

Anti Theft Mobile Tracker (ATMT)
Anti Theft Mobile Tracker (ATMT) memungkinkan Anda melacak ponsel Anda
yang hilang. Bila ada orang yang memakai ponsel Anda tanpa izin, layanan
pelacakan akan diaktifkan.
Anda akan diingatkan melalui pesan teks yang dikirimkan ke nomor telepon
default yang telah Anda atur, tanpa sepengetahuan pihak lain yang tidak sah
tersebut. Anda senantiasa dapat mengaktifkan ATMT dan mengkonfigurasi
pengaturan pribadi.
Untuk mengaktifkan Anti Theft Mobile Tracker
1.
Dari menu utama, pilih
Mobile Tracker
2.
Pilih
Atur ATMT
3.
Pilih
Hidup
atau
4.
Masukkan kode pengaman untuk mengaktifkan atau menonaktifkan fungsi
ini.
5.
Kemudian, dari menu “Nomor untuk ATMT”, edit dan simpan nama dalam
Nama pengirim
Catatan:
Kode ATMT default adalah “0000”. Anda harus mengisikan kode sebelum
mengkonfigurasi pengaturan ATMT.
Pengaturan > Pengamanan > Anti Theft
dan tekan OK.
dan tekan OK.
Mati
dan tekan
Pilih
.
dan nomor dalam
Daftar nomor pengirim
.
11
Page 97

Susunan Menu
1. Radio FM
2. Riwayat pgl
2.1 Semua
panggilan
2.2 Pgln tak
terjawab
2.3 Panggilan keluar
2.4 Panggilan masuk
2.5 Durasi panggilan
2.6 Biaya panggilan
3. Peranti
3.1 Jam alarm
3.2 Kalender
3.3 Kalkulator
3.4 Tugas
3.5 Konverter satuan
3.6 Jam dunia
3.7 Layanan SIM
3.8 Senter
4. Multimedia
4.1 Pemutar musik
4.2 Jadwalkan
rekaman FM
12
4.3 Perekam suara
4.4 Komposer
melodi
5. Pesan
5.1 Pesan baru
5.2 Kotak masuk
5.3 Draf
5.4 Kotak keluar
5.5 Terkirim
5.6 Dengarkan
pesan suara
5.7 Pesan info
5.8 Templet
5.9 Pengaturan
6. Milikku
6.1 Suara
6.2 Permainan
7. Profil
7.1 Normal
7.2 Senyap
7.3 Luar ruang
7.4 Mode
penerbangan
8. Kontak
8.1 Cari
8.2 Kontak baru
8.3 Panggil cepat
8.4 Grup
8.5 Salin semua
8.6 Hapus semua
8.7 Informasi
9. Pengaturan
9.1 Tanggal & Waktu
9.2 Bahasa
9.3 Tampilan
9.4 Pintasan
9.5 Panggilan palsu
9.6 Panggil
9.7 Pengamanan
9.8 Konektivitas
9.9 Hemat daya
9.10 Reset
9.11 Status memori
Page 98

Referensi fitur cepat
Radio FM
(Fungsi ini dapat berbeda di wilayah yang berbeda.)
Mendengarkan stasiun radio FM. Anda dapat mendengarkan FM tanpa
memakai headset karena ponsel mendukung layanan FM nirkabel.
1.
Dari menu utama, pilih Radio FM.
2.
Pakailah tombol navigasi untuk mencari stasiun radio. Anda juga dapat
menekan Opsi untuk mencari frekuensi radio dan kanal yang tersedia serta
secara otomatis menyimpannya ke daftar kanal.
3.
Tekan Opsi untuk mengedit daftar kanal. Ada 9 stasiun yang dapat Anda
buat preset-nya.
Ponsel Anda menyediakan opsi berikut untuk radio FM:
Radio Hidup/Mati:
•
•
Daftar Kanal:
nama kanal dan frekuensinya.
•
Input Manual:
memakai opsi ini.
Preset Auto Cari:
•
dan secara otomatis menyimpannya ke daftar kanal.
•
Pengaturan:
pemutaran di latar belakang, sampul radio FM, kualitas audio rekaman dan
format rekaman. Anda dapat merekam dalam format AMR atau WAV.
Rekam:
•
Gabung:
•
•
Daftar file:
Menu 1
Pilih status radio, hidup atau mati.
Mem-bookmark hingga 9 stasiun radio dengan mengisikan
Anda dapat memasukkan frekuensi secara manual dengan
Mencari secara otomatis berbagai kanal yang tersedia
Memungkinkan Anda mengaktifkan speaker. Mengubah
Merekam siaran radio favorit Anda.
Melanjutkan file yang direkam sebelumnya.
Mengelola file audo rekaman.
13
Page 99

Riwayat panggilan
Anda dapat mengecek rekaman panggilan yang tak dijawab, yang diterima,
dan panggilan keluar, jika jaringan mendukung Identifikasi Saluran Penelepon
(Calling Line Identification/CLI) di dalam area layanan. Nomor dan nama (jika
tersedia) ditampilkan bersama tanggal dan waktu panggilan dibuat. Anda
juga dapat melihat durasi panggilan.
•
Semua panggilan:
Dipanggil/Pgln tak terjawab) menurut waktu.
•
Pgln tak terjawab:
tak dijawab terakhir.
Panggilan keluar:
•
panggilan keluar terakhir (berhasil atau gagal).
Panggilan masuk:
•
masuk terakhir.
Durasi panggilan:
•
dan masuk.
•
Biaya panggilan:
terakhir, semua panggilan, dan mereset biaya.
Peranti
Menu 3
•
Jam alarm:
Pada waktu alarm, ikon Alarm akan ditampilkan pada layar LCD dan alarm
akan berbunyi.
•
Kalender:
Kalkulator:
•
Pengurangan, Perkalian, dan Pembagian.
Tugas:
•
14
Memungkinkan Anda mengatur salah satu dari lima alarm.
Anda dapat mengecek pelacakan jadwal harian atau bulanan.
Ini berisi berbagai fungsi standar seperti halnya Penambahan,
Anda dapat menyimpan tugas dan melihatnya.
Menu 2
Menampilkan daftar ketiga jenis panggilan (Diterima/
Opsi ini memungkinkan Anda melihat 40 panggilan
Opsi ini memungkinkan Anda untuk melihat 40
Opsi ini memungkinkan Anda melihat 40 panggilan
Memungkinkan Anda melihat durasi panggilan keluar
Memungkinkan Anda untuk mengecek biaya panggilan
Page 100

Peranti
Menu 3
•
Konverter satuan:
Anda inginkan.
•
Jam dunia:
waktu atau negara lain.
•
Senter:
Anda dapat mengaktifkan menu senter.
Ini akan mengubah ukuran ke dalam satuan yang
Memungkinkan Anda menentukan waktu saat ini di zona
Multimedia
•
Pemutar musik:
Jadwalkan rekaman FM:
•
menjadwalkan rekaman radio FM.
Perekam suara:
•
Komposer melodi:
•
ini.
Pesan
•
Pesan baru:
•
Kotak masuk:
akan disimpan di sini.
Draf:
•
•
Kotak keluar:
dikirim atau yang gagal dikirim.
•
Terkirim:
terkirim, termasuk waktu dan isinya.
Dengarkan pesan suara:
•
mengakses kotak pesan suara Anda.
Menu 4
Mendengarkan file musik MP3 pada ponsel Anda.
Memungkinkan Anda lebih dulu
Memungkinkan Anda merekam memo suara.
Memungkinkan Anda membuat melodi dalam menu
Menu 5
Menu ini memungkinkan Anda menulis pesan SMS baru.
Anda akan diberi tahu bila telah menerima pesan. Pesan
Menu ini menayangkan pesan tersimpan.
Menu ini memungkinkan Anda melihat pesan yang akan
Menu ini memungkinkan Anda melihat pesan yang telah
Menu ini menyediakan Anda cara cepat
15
 Loading...