

Page 1

Part 15.21 statement
" Change or Modifications that are not expressly approved by the manufacturer could void
the user's authority to operate the equipment. “
Part 15.105 statement
This equipment has been tested and found to comply with the limits for a class B digital
device, pursuant to Part 15 of the FCC Rules.
These limits are designed to provide reasonable protection against harmful interference in
a residential installation. This equipment generates uses and can radiate radio frequency
energy and, if not installed and used in accordance with the instructions, may cause harmful
interference to radio communications. However, there is no guarantee that interference will
not occur in a particular installation. If this equipment does cause harmful interference or
television reception, which can be determined by turning the equipment off and on, the user
is encouraged to try to correct the interference by one or more of the following measures:
- Reorient or relocate the receiving antenna.
- Increase the separation between the equipment and receiver.
- Connect the equipment into an outlet on a circuit different from that to
which the receiver is connected.
- Consult the dealer or an experienced radio/TV technician for help.
Page 2

Part 15 Class B Compliance
This device and its accessories comply with part15 of FCC rules.
Operation is subject to the following two conditions:
(1) This device & its accessories may not cause harmful interference.
(2) This device & its accessories must accept any interference received,
including interference that may cause undesired operation.
Body-worn Operation
This device has been tested for typical body-worn operations
with the distance of 0.79inches (2.0cm) from the user’s body.
To comply with FCC RF exposure requirements, a minimum separation distance
of 0.79inches(2.0cm) must be maintained from the user's body.
Additionally, Belt clips, holsters & other body-worn accessories may not contain
metallic components.
Page 3
5
When you enter this menu a calendar
will be displayed. The square cursor is
used to locate a particular day. The
orange colored date indicates
schedule(s) on for that day. This function
helps to remind you of the schedule. The
phone will sound an alarm tone if it has
been set for a specific schedule item.
For changing the day, month, and year.
] View: Allows you to view the selected
schedule.
] Delete: Allows you to delete the
selected schedule.
] New Schedule: You can edit a
maximum of 30 characters and create
up to 30 notes.
] Edit: Allows you to edit the selected
schedule.
] Ca lendar: Allows you to consult the
calendar.
] Scheduler Tone: The phone can sound
an alarm tone when the scheduled
date for an event has been reached
with this option.
] All Schedules: Shows the notes that
are set for all days. Use the up/down
navigation keys to browse through the
note lists. You can use the menu by
press the right soft key [Options].
] Go to Date: Allows you to jump to a
specific date.
] Delete Old: Delete the past schedule
event that has already been notified.
] Delete All: Delete all schedules. You
are asked to confirm your action.
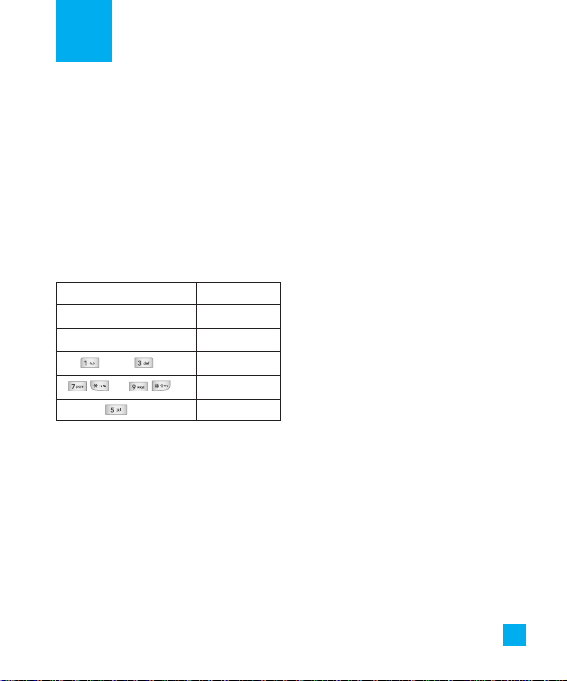
Calendar
KeyDescription
up/down navigation key Weekly
left/right navigation key Daily
key / key Yearly
key/ key
Monthly
key Today
Page 4

6
Contact List
Menu 2.1
This menu allows you to save and
manage contact address information.
The Contact List functions allow you to
add a new address or search saved
contact addresses by name.
New Contact
Menu 2.2
This menu allows you to add a new
contact address. You can input contact
address information including name,
phone numbers, email addresses, group
information items, and memos.
Ca ller Groups
Menu 2.3
1. Every Group list will be displayed:
Family, VIP, Friends, Colleague,
Group 1, Group 2, No Group.
2. Select the Group name that you want
to manage by pressing the right soft
key [Options].
3. You will see the following submenus
under the predefined groups except
for the No Group group.
• Members List: Allows you to see the
member list in the group.
• Group Ringtone: Allows you to
select the ringtone to be used when
you receive a voice phone call from a
person in the group.
• Group Icon: Allows you to select the
graphic icon to be displayed on the
group of Group List.
• Add Member: Allows you to add the
member to the group.
• Remove Member: Allows you to
delete the member in the group.
• Rename: Allows you to assign a
name to the group.
Speed Dial List
Menu 2.4
This menu allows you to configure the
speed dial numbers. You can select a
number as a speed dial from 2 to 9. You
can configure speed dial numbers for
any of the 8 numbers for a specific
contact address.
Address Book
Page 5

7
Copy All Contacts
Menu 2.5
This menu allows you to copy all of the
information from your SmartChip, e.g.
name, handset number, etc., to your
handset vice versa. If a name is
duplicated during the copying operation,
the information is also duplicated.
] SmartChip to Handset: You can copy
the entry from the SmartChip card to
the handset memory.
] Handset to SmartChip: You can copy
the entry from the handset memory to
the SmartChip card (not all the data
will be copied).
Delete All Contacts
Menu 2.6
You can delete all entries in the
SmartChip and the Handset.
Press the [END] key to return to
standby mode.
My Business Card
Menu 2.7
This feature allows you to create your
own name card. You can key in the
Name, Mobile number, Office number,
Fax number and E-mail address.
] Edit: Allows you to write a new
message or edit the selected name
card.
] Send Via Text Message: Sends the
selected name card by SMS.
] Delete: Allows you to delete the
selected name card.
My Numbers
Menu 2.8
Allows you to display your phone
number in the SmartChip card.
Address Book
Page 6

8
Games
Page 7

9
Set the alarm to ring at a specific time. In
the Set Alarm Clock menu, the following
options are available:
On: Set the time(hour and minute) for
activating the alarm.
1. Enter the menu.
2. Select [On] by pressing the right/left
navigation keys.
3. If you want to set the time for
activating the alarm, press the down
navigation key.
4. Enter the required time, press the
down navigation key.
5. The following options are available.
• Once: The alarm rings only once and
is then deactivated.
• Daily: The alarm rings every day at
the same time.
• Mon ~ Fri: The alarm rings every
week on the same day and at the
same time.
• Sat ~ Sun: The alarm rings every
month on the same day and at the
same time.
6. Allows you to select the alarm melody
by using the right/left navigation keys.
7. Press the right soft key [Save].
Off: Cancel the alarm setting.
n Notice
If this option is set to On, the alarm will
ring at the specified time, even when the
phone is switched off.
To stop the alarm when it rings, press the
right soft key[Quit].
Alarm Clock
Page 8

10
New Message
Menu 5.1
You can write and edit text messages of
up to 913 characters.
1. Type in a message using key presses.
For details on how to enter text, refer
to page 22 (Entering Text).
2. After completing the message select
the required option by pressing the
right soft key [Options].
The following options are available.
] Send: Enter the phone number or
select the number from the address
book.
] Insert
• Symbol: You can insert symbols
ranging from sentence notes to
emoticons. Select the one you want
by navigating the left/soft keys.
• Picture: You can select a graphic
image by using the left/right
navigation keys. You can preview the
selected picture by pressing the
center key [View]. If you press
[Cancel] on the right key, it allows you
to go back to the previous screen.
(There is no picture on the phone
that is pre-installed)
• Animation: You can attach an
animation in a message can be done
through EMS(Enhanced Messaging
Service).
• Audio: You can insert various
ringtones.
• Text Template: You can easily insert
the frequently used sentences in the
text message.
• Contact: You can browse one of your
contacts and insert it.
• Business Card: Input your own
business card created in (Menu 2.7.2).
For further details, see page 35.
] Save to Drafts: Saves the selected
slide to draft.
] Set T9: You can set on and off for the
T9 input mode.
] Clear Text: Deletes the written
message.
] Cancel: Exit the text editor.
Messaging
Page 9

11
Inbox
Menu 5.2
You will be alerted when you receive a
message. They will be stored in the
Inbox.
In the Inbox, you can identify each
message by icons.
The following [Options] are available in
the Inbox list.
] View: You can view the received
messages.
] Delete: Deletes the selected message
from the Inbox.
] Reply: Allows you to reply to the
sender of the selected message.
] Forw ard: Forwards a received message
to other recipients. After recipients are
entered, the message can be
forwarded.
] Return Call: Call back the sender.
] Delete All Read: Deletes all messages
that you have read in the list.
] Delete All
- Text Messages: Deletes only text
messages in the list.
- Download Messages: Deletes only
downloaded messages in the list.
- All Messages: Deletes all messages in
the list.
Drafts
Menu 5.3
You can view the messages saved as a
draft. The draft messages are listed with
the date and time of when the messages
were saved.
The following [Options] are available.
] Edit: Modifies the message you
choose.
] Delete: Deletes the message you
choose.
] Delete All: Deletes all messages in the
folder.
Messaging
Page 10

Outbox
Menu 5.4
If the message transmission fails, you can
save the message in the Outbox.
The following [Options] are available in
the Outbox list.
] View: View the message you choose.
] Delete: Deletes the message you
choose.
] Edit: Allows you to edit the selected
message.
] Delete All: Deletes all messages in the
folder.
Sent
Menu 5.5
This menu allows you to save the sent
successfully messages. For sent messages
you can see the delivery status.
The following [Options] are available in
the Sent list.
] View: View the selected message from
the Sent list.
] Delete: Deletes the selected message
from the Sent list.
] Forw ard: Forwards the current
message to other recipients.
] Delete All: Deletes all messages in the
folder.
Voicemail
Menu 5.6
This menu provides you with a quick way
of accessing your voice mailbox (if
provided by your network).
Before using this feature, you must enter
the voice server number obtained from
your service provider.
This may already be available; to check the
voicemail, press and hold the key.
When new voicemail is received, the
symbol will be displayed on the screen.
n Note
Please check with your network service
provider for details of their service in order
to configure the handset accordingly.
Messaging
12
Page 11

Templates
Menu 5.7
There are 6 predefined messages in the
list. You can view and edit the template
messages or create new messages.
Text Templates
(Menu 5.7.1)
• Please call me back
• I’m late. I will be there at
• Where are you now?
• I’m on the way.
• Urgent! Please contact.
• I love you
The following [Options] are available.
] View: Allows you to view the selected
template message.
] Edit: Allows you to write a new
message or edit the selected template
message.
] Send Via Text Message: Allows you to
send the selected template message
via SMS.
] Delete: Allows you to delete the
selected template message.
] New Template: Use this to create new
template.
] Delete All: Deletes all messages in the
folder.
My Business Card
(Menu 5.7.2)
This feature allows you to create your
own name card. You can key in the
Name, Mobile number, Office number,
Fax number and E-mail address.
] Edit: Allows you to write a new
message or edit the selected name
card.
] Send Via Text Message: Sends the
selected name card by SMS.
] Delete: Allows you to delete the
selected name card.
Message Settings
Menu 5.8
Text Message
(Menu 5.8.1)
]
Message Center Number: If you want
to send a text message, you can receive
the address of the SMS center through
this menu.
] Email Gateway: You can send the text
message to an Email Address via this
gateway.
13
Messaging
Page 12

] Subject: You can enter the SMS
Subject when this menu is on.
] Bearer Setting: You can select GSM or
GPRS. Contact your network operator
or service provider for information
related to setting a selected bearer,
pricing and connection speed.
Voicemail Number
(Menu 5.8.2)
Allows you to change the voicemail
server number, if necessary.
n Note
Voice Mail is a network feature. Please
contact your service provider for further
details.
Messaging
14
Page 13

You can check the record of missed,
received, and dialed calls only if the
network supports the Calling Line
Identification (CLI) within the service
area.
The number and name (if available) are
displayed together with the date and
time of the call. You can also view call
times.
Missed Calls
Menu 6.1
• View the number, if available, and call it
or save it in the Address Book
• Enter a new name for the number and
save both in the Address Book
• Send a message by this number
• Delete the call from the list
Dialed Ca lls
Menu 6.2
• View the number, if available, and call it
or save it in the Address Book
• Enter new name for the number and
save both in the Address Book
• Send a message by this number
• Delete the call from the list
Received Calls
Menu 6.3
• View the number, if available, and call it
or save it in the Address Book
• Enter a new name for the number and
save both in the Address Book
• Send a message by this number
• Delete the call from the list
All Calls
Menu 6.4
Allows you to view all of missed,
received, and dialed call records.
Ca ll Duration
Menu 6.5
This allows you to view the duration of
the incoming and outgoing calls. You can
also reset the call times. The following
timers are available:
Last Call
(Menu 6.5.1)
Duration of the last call.
Dialed Calls
(Menu 6.5.2)
Duration of the outgoing calls.
Received Calls
(Menu 6.5.3)
Duration of the incoming calls.
15
Recent Calls
Page 14

All Calls
(Menu 6.5.4)
Total Duration of all calls made and
incoming calls since the timer was last
reset.
16
Recent Calls
Page 15

17
Game
Menu 7.1
You can play the game that is pre-installed
on the phone.
Audio & Ringtones
Menu 7.2
The right soft key [Options] will bring up
the following options.
] Set as Ringtone: You can set as the
Ringtone with the selected audio file.
n Note
Sounds supplied as default can only be
used under the Set as Ringtone mode.
Graphics
Menu 7.3
The right soft key [Options] will bring up
the following options.
] View: You can see the currently
selected picture.
] Set as Wallpaper: Currently selected
picture can be set as a Wallpaper.
] List/Icon View: You can configure the
graphic files to List style or Icon style.
n Note
Pictures supplied as default can only be
used under the Set as Wallpaper mode.
My Stuff
Page 16

Alarm Clock
Menu 8.1
For further details, see page 31.
Ca lendar
Menu 8.2
When you enter this menu a calendar
will be displayed. The square cursor is
used to locate a particular day. The
orange colored date indicates
schedule(s) on for that day. This function
helps to remind you of the schedule. The
phone will sound an alarm tone if it has
been set for a specific schedule item.
For changing the day, month, and year.
] View: Allows you to view the selected
schedule.
] Delete: Allows you to delete the
selected schedule.
] New Schedule: You can edit a
maximum of 30 characters and create
up to 30 notes.
] Edit: Allows you to edit the selected
schedule.
] Ca lendar: Allows you to consult the
calendar.
] Scheduler Tone: The phone can sound
an alarm tone when the scheduled
date for an event has been reached
with this option.
] All Schedules: Shows the notes that
are set for all days. Use the up/down
navigation keys to browse through the
note lists. You can use the menu by
press the right soft key [Options].
] Go to Date: Allows you to jump to a
specific date.
] Delete Old: Delete the past schedule
event that has already been notified.
] Delete All: Delete all schedules. You
are asked to confirm your action.
18
To ols
KeyDescription
up/down navigation key Weekly
left/right navigation key Daily
key / key Yearly
key/ key
Monthly
key Today
Page 17

19
Notepad
Menu 8.3
You can create up to a maximum of 20
memos.
1. Select a memo pad to edit.
2. Press the right soft key [New] to create
a new memo.
3. Input the memo and press the right
soft key [Options] - [Save] to save.
Ca lculator
Menu 8.4
Using this feature, you can use the phone
as a calculator. The calculator provides
the basic arithmetic functions: addition,
subtraction, multiplication and division.
Using the Calculator
1. Enter the first number using the
numeric keys.
2. Use the navigation keys to select a
sign for calculation.
n Note
To input a decimal point, press the key.
3. To calculate the result, press the
key.
Tip Calculator
Menu 8.5
This feature allows you to quickly and
easily calculate the tip amount based on
the total bill as well as the split of the
total bill based on the number of people.
World Clock
Menu 8.6
Allows you to check the current
Greenwich Mean Time(GMT) and major
cities around the world, using the
left/right navigation keys.
The screen shows the city name, current
date and time.
To select the time zone in which you are
located, proceed as follows:
1. Select the city corresponding to your
time zone by pressing the left/right
navigation keys one or more times.
The local date and time are displayed.
2. If you want to set, press the right soft
key [Options].
3. If you want to set Daylight Savings,
press the right soft key [Options].
To ols
Page 18

n Note
The time zone setting of each city in World
time menu may be affected by network
condition.
Stop Watch
Menu 8.7
1. Press[Start] to take time and record the
lap time by pressing[Lap].
2. Press[Stop] to ascertain the record of
lap time.
3. Press[Reset] to default condition.
Unit Converter
Menu 8.8
This function converts any measurement
into the unit you want.
There are 4 types that can be converted
into units: Length, Surface, Weight, and
Volume.
1. You can select one of four unit types
by pressing the right soft key [Unit].
2. Select the standard value by using the
left/right navigation keys.
3. Select the unit you want to convert by
pressing the up/down navigation keys.
4. You can check the converted value for
the unit you want. Also, you can input
a decimal number by pressing the
key.
20
Tools
Page 19

21
Audio & Ringtones
Menu 9.1
Pressing and holding the key on idle
screen mode can swap Normal and
Vibrate mode. Ear Mic is available when
respective instruments are attached.
Ringtones
(Menu 9.1.1)
Shows and plays ringtones. These can be
downloaded ringtones from Ringtone
shops.
Volume
(Menu 9.1.2)
This menu controls Ringtone, Key Tone,
Earpiece and Headset volume. It is
available on Ringtone volume level 1~5.
Message Alert Tones
(Menu 9.1.3)
Allows you to select an alert tone which
is played when a message is received.
Alert Type
(Menu 9.1.4)
Supports 3 ring alert types. Ring, Ring
and Vibrate, and Vibrate then Ring.
Increasing Ringtone
(Menu 9.1.5)
Allows you to select an Increasing
Ringtone type which is played when a
incoming call. You can set the On or Off.
Power On/Off Tones
(Menu 9.1.6)
Allows you to select an Power On/Off
tone. You can set the On or Off.
Display
Menu 9.2
Wa llpapers
(Menu 9.2.1)
This option allows you to change the
background image (wallpaper) to be
displayed in idle mode.
1. Scroll through the list by pressing the
left or right navigation key.
You have various preset images available.
You can also select any images
downloaded from the Internet.
2. Press the right soft key [View ] when
the required image is highlighted.
3. Press the right soft key [Set], then the
selected image will be displayed in
standby mode.
Settings
Page 20

Backlight Timer
(Menu 9.2.2)
You can select whether or not the phone
uses the backlight.
Brightness
(Menu 9.2.3)
Contrast
(Menu 9.2.4)
This option allows you to adjust the
contrast of the LCD screen by pressing
the navigation key.
Languages
(Menu 9.2.5)
You can change the language for the the
display text in your phone. This feature
also change the Language Input mode.
Date & Time
Menu 9.3
Set Date
(Menu 9.3.1)
This allows you to enter the day, month
and year. You can change the date
format via the Date Format menu
option.
Date Format
(Menu 9.3.2)
YYYY/MM/DD(year/month/day)
DD/MM/YYYY(day/month/year)
MM/DD/YYYY(month/day/year)
Set Time
(Menu 9.3.3)
This allows you to enter the current time.
You can choose the time format via the
Time Format menu option.
Time Format
(Menu 9.3.4)
24 Hours/12 Hours
Auto Update
(Menu 9.3.5)
Select On to set the phone to
automatically update the time and date
according to the current time zone.
22
Settings
Page 21

23
Settings
Ca ll
Menu 9.4
Call Forwarding
(Menu 9.4.1)
When this network service is activated,
you can direct your incoming calls to
another number, for example, to your
voice mailbox number. For details,
contact your service provider. Select one
of the divert options, for example, select
If Busy to divert voice calls when your
number is busy or when you reject
incoming calls.
The following options are available:
] All Voice Calls: Diverts voice calls
unconditionally.
] If Busy: Diverts voice calls when the
phone is in use.
] If No Reply: Diverts voice calls which
you do not answer.
] If Out Of Reach: Diverts voice calls
when the phone is switched off or out
of coverage.
] All Data Calls: Diverts to a number
with a PC connection unconditionally.
] All Fax Calls: Diverts to a number with
a fax connection unconditionally.
] Cancel All: Cancels all call divert
service.
Call Barring
(Menu 9.4.2)
Send My Number
(Menu 9.4.3)
This network service allows you to set
your phone number to be displayed On
or hidden Off from the person to whom
you are calling. You can select Set by
Network if you prefer to have different
settings for different service provider.
Auto Redia l
(Menu 9.4.4)
Select On, your phone redials the
number you're trying to call up to 10
times after you hear a quick, busy signal.
Press [END] key to stop the call
attempts.
This feature attempts to redial numbers
that are busy due to the wireless
network. It does not redial numbers to a
busy party.
Page 22

Answer Mode
(Menu 9.4.5)
This allows you to determine when to
answer the phone.
] Send Key Only: You can answer an
incoming call by only pressing the
[SEND] key.
] Any Key: You can answer an incoming
call by pressing any key, except the
[END] key.
Minute Minder
(Menu 9.4.6)
This option allows you to specify
whether the phone must beep every
minute during an outgoing call to keep
you informed of the length of the call.
Call Waiting
(Menu 9.4.7)
The network will notify you of a new
incoming call while you have a call in
progress. Select Activate to request the
network to activate call waiting, Cancel
to request the network to deactivate call
waiting, or View Status, to check if the
function is active or not.
TTY
(Menu 9.4.8)
Allows you to attach a TTY device
enabling you to communicate with
parties also using a TTY device.
A phone with TTY support is able to
translate typed characters to voice. Voice
can also be translated into characters
and then displayed on the TTY.
Send DTMF Tones
(Menu 9.4.9)
You can send the DTMF (dual tone multifrequency) tones of the number on the
display during a call.
This option is helpful for entering a
password or account number when you
call an automated system, like a banking
service.
Settings
24
Page 23

25
Settings
Security
Menu 9.5
Various codes and passwords are used to
protect the features of your phone. They
are described in the following sections
(see pages 18)
Auto Key Lock
(Menu 9.5.1)
This menu allows to set the time of Auto
Keypad Lock.
n Note
You cannot make emergency calls under
the key lock.
PIN Code Request
(Menu 9.5.2)
When the PIN code request feature is set
to ‘Enable’, you must enter your PIN each
time you switch the phone on.
Consequently, any person who does not
have your PIN cannot use your phone
without your approval.
n Note
Before disabling the PIN code request
feature, you must enter your PIN.
The following options are available:
] Ena ble:You must enter the PIN each
time the phone is switched on.
] Disa ble:The phone connects directly
to the network when you switch it on.
Fixed Dial Number (FDN)
(Menu 9.5.3)
This allows you to restrict your outgoing
calls to selected phone numbers, if this
function is supported by your SmartChip.
The PIN2 code is required.
The following options are available:
] Ena ble:You can make a call by only
phone numbers stored in the Number
List. You must enter your PIN2.
] Disa ble:You can call any number.
] Number List: You can view the
number list saved as fixed dial number.
n Note
Not all SmartChip cards have a PIN2. If your
SmartChip card does not, this menu option
is not displayed.
Page 24

Change Codes
(Menu 9.5.4)
The Change codes feature allows you to
change your current password to a new
one. You must enter the current
password before you can specify a new
one.
You can change the access codes for:
Security Code, PIN1 Code, PIN2 Code
n Note
PIN: Personal Identification Number.
Power Save
Menu 9.6
Network Selection
Menu 9.7
] Automatic: This function automatically
searches for the network and registers
the handset to the network.
] Manua l:This function enables you to
search the network list and specify
which network to attempt registration
with.
Flight Mode
Menu 9.8
This allows you to use only the phone’s
features that do not require the use of
the wireless network when you are in an
airplane or in places where the wireless
network is prevented.
If you set the flight mode on, the
icon will be displayed on the screen
instead of the network signal icon.
] On: You cannot make (or receive) any
calls, including emergency calls, or use
other features that require network
coverage
] Off: You can deactivate the flight mode
and restart your handset to access the
network.
Settings
26
Page 25

Check Memory
Menu 9.9
You can check the current memory
status of each memory for Text.
Handset Information
Menu 9.0
This menu is used to view My Numbers,
Manufacturer and Model Name
information etc.
Reset Settings
Menu 9.*
You can easily reset your phone to its
default configuration. To do so, proceed,
as follows.
1. Select the Reset Settings menu option.
2. Enter the 8-digit phone password.
n Note The password is preset to
00000000.
27
Settings
Page 26

Please check to see if any problems you have encountered with the phone are
described in this section before taking the phone in for a service or calling a service
engineer.
Q&A
28
Q How do I view the list of outgoing calls,
incoming calls and missed calls?
A Press the [SEND] key.
Q How do I view all numbers stored in
memory?
A Press the down navigation key.
Q Why is the connection inconsistent or
not audible in certain areas?
A When frequency environment is
unstable in a certain area, connection
may be inconsistent and not audible.
Relocate to another area and try again.
Q Why is the connection not consistent
abruptly disconnects even when
established?
A When frequency is unstable or weak
or if there are too many users,
connection may be cut off even after it
was established. Please try again later
or attempt after relocating to other
areas.
Q Why does the LCD not turn on?
A Remove the battery and turn on the
power after placing it back on. If there
is no change, fully charge the battery
and try again.
Q Why is there an echo when a
connection is made with certain
telephones in a certain area?
A This is called the ‘Echo Phenomenon’,
where it occurs if connection volume is
too high or caused by special
properties (semi electronic telephone
exchange) of the equipment on the
other end.
Page 27

Q Why does the phone heat up?
A The phone may get hot when there is
a very long call duration or when
games are played or even when
surfing the Internet for a long time.
This has no effect upon the life of the
product or performance.
Q Why does the battery life get shorter in
standby mode?
A The battery is worn out. As time
passes, the battery life gradually
becomes shorter. If the battery lasts
about half the amount of time as when
first purchased, it’s time to purchase a
new battery.
Q Why does the battery run out so
quickly during normal use?
A It is due to the user environment or a
large number of calls or weak signal.
Q Why is no number dialed when you
recall a Address Book entry?
A Check that the number has been
stored correctly by using the Address
book Search feature. Re-store them, if
necessary.
Q I cannot find the lock, PIN, or PUK
code. What is my password?
A The default lock code is ‘0000’. If you
forget or lose the lock code, contact
your phone dealer. If you forget or lose
a PIN or PUK code, or if you have not
received such a code, contact your
network service provider.
29
Q&A
 Loading...