

Page 1

All you need to know to get going.
Inicio. Todo lo que necesitas saber para empezar.
TRIM
P/N:MFL67475501 (1.1)
MW
Page 2

Quick
Guía De
TRIM
Reference
Guide
Keep this important owner information with you
in case you need to contact a Boost Customer
Care Representative.
Mobile Phone # N0 de teléfono
Account PIN # (4-digit number) N0 PIN de la cuenta (4-dígitos)
Plan Info/Payment Date Plan/Fecha de Pago
Voicemail Passcode (4-10 digits) Código de correo de voz (4-10 dígitos)
Referencia
Rápida
Lleva esta importante información contigo
en caso de que necesites comunicarte con
un representante del Servicio de Atención
al Cliente de Boost.
Page 3

Correo de Voz
Para configurar tu correo de voz y obtener acceso
a los mensajes en el buzón de tu correo de voz
1. Mantén presionada la tecla 1, o desde el Menú
principal de tu teléfono ve a Mensajería,
desplázate hasta Correo de voz.
2. Para obtener acceso a los mensajes de tu
correo de voz, cuando se te solicite, ingresa
el código de accesso de tu correo de voz que
estableciste.
3. Presiona 1 para escuchar los mensajes.
4. Presiona 7 para eliminarlos o 9 para guardarlos.
Lo Básico de Boost®
Re-Boost® Marca #ADD (#233) desde tu teléfono
Boost Mobile
tarjeta de crédito o débito, o compra una tarjeta
Re-Boost
Para encontrar tiendas Re-Boost
Principal de tu teléfono, dirígete a Re-Boost
desplázate al Localizador de Re-Boost
Saldo Revisa tu saldo gratis en cualquier momento,
marcando #BAL (#225) desde tu teléfono.
Asistencia Telefónica Simplemente marca 4-1-1
para comunicarte con un operador.
Tarifas dependen del precio de tu plan.
®
para agregar crédito con una
®
y sigue las instrucciones en el reverso.
®
, desde el Menú
®
y
®
.
Servicio al cliente de Boost®
Marca #611 desde tu teléfono Boost o llama al
1-888-BOOST-4U (1-888-266-7848).
No se aplican cargos por tiempo de uso al llamar al 6-1-1.
Visita espanol.boostmobile.com/userguides.
ADVERTENCIA: Este producto contiene químicos
conocidos por el Estado de California de causar
cáncer y defectos de nacimiento u otros daños
reproductivos.
manipular
Lávese las manos después de
.
Voicemail
To set up your voicemail and to access your
voicemail box messages
1. Press and hold down the #1 key.
2. To access your voicemail messages, when
prompted, enter the voice mail passcode
you set up.
3. Press 1 to play messages.
4. Press 7 to delete or press 9 to save.
Boost® Basics
Re-Boost® Dial #ADD (#233) from your Boost
®
phone to add money with a credit/
Mobile
debit card, or pick up a Re-Boost
follow the instructions on the back. To find
®
locations from your phone’s Main
Re-Boost
Menu, go to Re-Boost
®
locator.
Re-Boost
Balance Check your balance for free at any
time by dialing #BAL (#225) from your phone.
Directory Assistance Simply dial 411 to
get connected.
Rates dependent on your price plan.
®
®
Card and
and scroll down to
Boost® Customer Care
Call #611 from your Boost phone or dial
1-888-BOOST-4U (1-888-266-7848).
Airtime charges do not apply when calling 611.
Visit boostmobile.com/userguides.
WARNING: This product contains chemicals known
to the State of California to cause cancer and birth
defects or other reproductive harm.
after handling
.
Wash hands
TRIM
Page 4

W
elcom
e
TRIM
Get Up & Running – Fast
This guide gives you directions on the basics of getting started with
Boost Mobile and your new LG Rumor Reflex. Follow simple, step-by-step
instructions to learn how to:
+ Activate Your Device
+ Manage Your Account
+ Power Up Your Device
Welcome
+ Get Started with Email
+ Send Text and Picture Messages
+ Take Pictures & Video
+ Personalize Your Phone
+ Find Additional Support
If you have any questions, check out www.boostmobile.com/userguides
and download the full user guide for your device.
Page 5
mor e
x
+ 3" Touchscreen
+ Full QWERTY Keypad
+ 2MP Camera with Video
+ Easy Access to Facebook
+ Keep in Touch with Email
(Yahoo!
+ GPS Enabled
+ Bluetooth
+ Wireless Web Enabled
+ Speakerphone
+ Voicemail, Caller ID, Call Waiting
& 3-Way Calling
®
, Gmail®, Hotmail®)
®
Technology
®
and Twitter
Welcome
TRIM
Page 6

vendo
TRIM
Bienvenido
Ponlo a funcionar, rápido
Esta guía te ofrece indicaciones sobre los conceptos básicos para
comenzar con Boost Mobile y tu nuevo LG Rumor 4. Sigue estas
simples instrucciones paso a paso para saber cómo:
+ Activar tu equipo
+ Encender tu equipo
+ Ingresar contactos
+ Comenzar con el correo electrónico
+ Crear mensajes de texto y de imágenes
+ Tomar fotos y grabar videos
+ Descargar juegos, tonos y más
+ Obtener ayuda adicional
Si tienes alguna pregunta, visita www.boostmobile.com y descarga
la guía de usuario completa para tu equipo.
Page 7
mor e
x
+ Pantalla Táctil de 3"
+ Teclado QWERTY complete
+ Cámara de 2MP con video
+ Acceso fácil a Facebook y Twitter
+ Mantente en contacto con Email
+ Habilitado con tecnología Bluetooth
+ Habilitado con Internet Móvil
+ Altavoz
+ Buzón de voz, ID de Llamadas,
®
(Yahoo!
, Gmail®, Hotmail®)
Llamada en espera
®
Bienvenido
TRIM
Page 8

Follow these 3
steps to complete
TRIM
activation of your
®
new Boost
Keep this guide in a safe place. You’ll need to follow these steps to activate your new account.
phone.
Page 9

S
e 1
.
S
e 2
Get Your Numbers
You will need the phone’s MEID (DEC) number to activate your phone.
The MEID (DEC) can be located on the box that the phone came in or
on the back of the phone in the battery compartment. The MEID is an
18-digit number.
.
Get Activated
Go to boostmobile.com/activate to start up your service and set up
your account.
Note: During the activation process you can choose to get a new number or use
an existing number.
Step 3.
Finalize Your Activation
You’ll receive a message from Boost letting you know that your phone
number and account is ready to go.
MEID (DEC) #
Activation
TRIM
Page 10

Ste
p
p
4
.
TRIM
Now Use Your Phone
Once you’ve activated your phone, make a payment so you can start using
all the great features Boost has to offer.
For Monthly Plans: Add enough to cover your monthly payment. Pay on or
before your monthly payment date each month to keep your service from
being interrupted.
For Other Plans: Make a payment when your account gets low.
Activation
Simple as that.
For All Plans: Keep a little extra money in your account so you can
customize your phone with the latest ringtones and wallpapers. Register
your debit or credit card to set up worry-free automatic payments with
Auto Re-Boost
Make sure you charge the battery before trying to use your phone.
Note: If you don’t have access to the web, call Boost Customer Care by dialing
1-888-BOOST-4U (1-888-266-7848) from a landline or another phone.
SM
.
Page 11

Quick Tip.
4-digit Account PIN
Be sure to remember the 4-digit Account PIN you set up during activation.
You’ll need to enter your Account PIN when you log in to ‘My Account’ or
anytime you call Boost about your account. If you forget your Account PIN,
you will need to remember the month and year you activated your phone.
Activation
TRIM
Page 12

TRIM
Sigue estos tres
pasos para realizar
la activación de tu
nuevo teléfono Boost.
Guarda esta guía en un lugar seguro. Necesitarás estos pasos informativos activar tu nueva cuenta.
Page 13

S
e 1
.
S
e 2
.
S
e 3
.
Busca Tu Número
Necesitarás los números de MEID (DEC) del télefono para activar tu télefono.
El MEID (DEC) se pueden encontrar en la caja que el teléfono vino en o en
la parte posterior del teléfono en el compartimento de la batería. El MEID es
un número de 18-dígitos.
Activa Teléfono
Visita boostmobile.com/activate para activar el servicio y configurar tu cuenta.
Nota: Durante el proceso de activación puedes escoger un nuevo número de
teléfono o decidir usar tu número actual.
Completa Tu Activación
Recibirás una confirmación del sitio de Boost Mobile con tu nuevo o actual
número de teléfono de 10 dígitos, o si haz llamado desde un teléfono fijo u
otro teléfono, recibirás confirmación del servicio de Atención al Cliente.
MEID (DEC) #
Activación
TRIM
Page 14

Sepp 4.
TRIM
Ya Tienes El Teléfono; Ahora Úsalo
Una vez que hayas activado tu teléfono, realiza un pago para que puedas
empezar a usar las funciones y servicios que ofrece Boost Mobile.
Para planes mensuales: Agrega bastante dinero para cubrir tu pago
mensual. Paga antes o en el día de tu pago mensual cada mes para
mantener tu servicio sin interrupciones.
Activación
Para los otros Planes: Haz un pago cuando tú cuenta esta baja.
Es así de simple.
Para todos los otros planes: Mantén un poco de dinero extra en tu cuenta
para que puedas personalizar tu teléfono con los timbres y salvapantallas.
Registra tu tarjeta de debito o crédito para configurar una manera de
realizar tu pago automático sin preocupaciones con Re-Boost
Carga La Bateria. Asegúrate de cargar la batería antes de intentar usar
tu teléfono. Si no tienes acceso a Internet, llama al servicio de Atención al
Cliente de Boost al 1-888-BOOST-4U (1-888-266-7848) desde un teléfono fijo
u otro teléfono.
.
SM
Automático
Page 15

Quick Tip.
El Pin De 4-Dígitos.
Asegúrate de recordar el PIN de 4-dígitos que creastes durante la
activación. Necesitas saber tu PIN cuando accedas a ‘Mi Cuenta’
(My Account) o en cualquier momento que nos llames sobre tu cuenta.
Además, en caso de que se te olvide el PIN de tu cuenta, tendras que
recordar el mes y año en que activaste tu teléfono.
Activación
TRIM
Page 16

TRIM
Device Guide
& Setup
Guía y Configuración del Dispositivo
Page 17

Device Guide
TRIM
Page 18
Y
r ece eares
TRIM
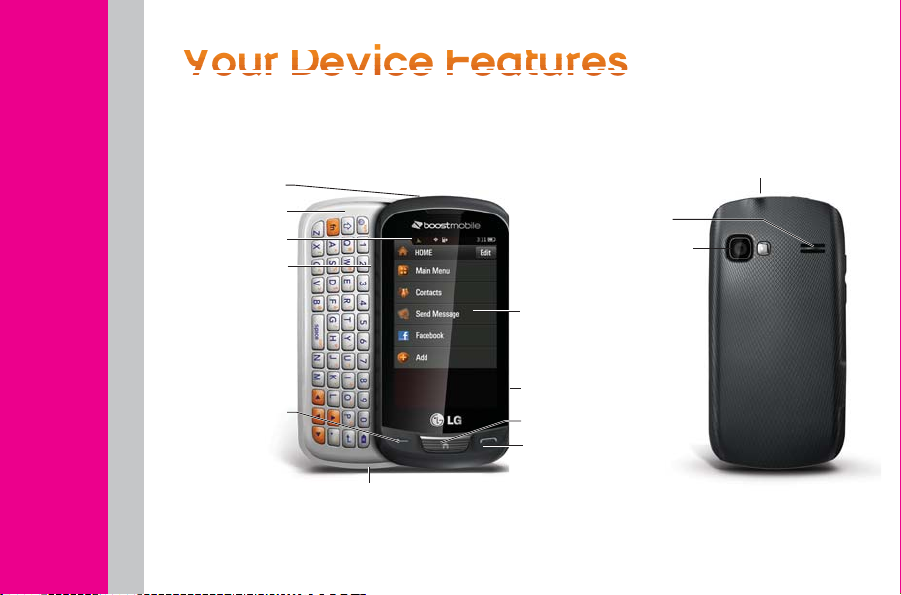
Power Button
QWERTY Keyboard
Device Guide
Status Bar Icons
Volume Button
BACK Key
Microphone
Touchscreen
Display
Camera Button
HOME Key
PHONE Key
Headset Jack
Speaker
Camera Lens
Page 19

age
Y
r A
c
o
Access Your Account at
boostmobile.com to:
+ Review your account information.
+ Add money to your account.
+ Enroll in Auto Re-Boost
automatic payments.
+ Buy accessories.
+ View available Boost service plans
and options.
+ Learn more about data services and
other products, like games, ringtones,
wallpapers, and more.
SM
to make
From Your Boost Phone
+ Make a payment or sign up for
Auto Re-Boost
+ Check your account balance
by dialing #225
From Any Other Phone
+ Call Boost Customer Care at
1-888-BOOST-4U (1-888-266-7848)
SM
by dialing #233
Device Guide
TRIM
Page 20
You
r evc Rea
d
y
TRIM
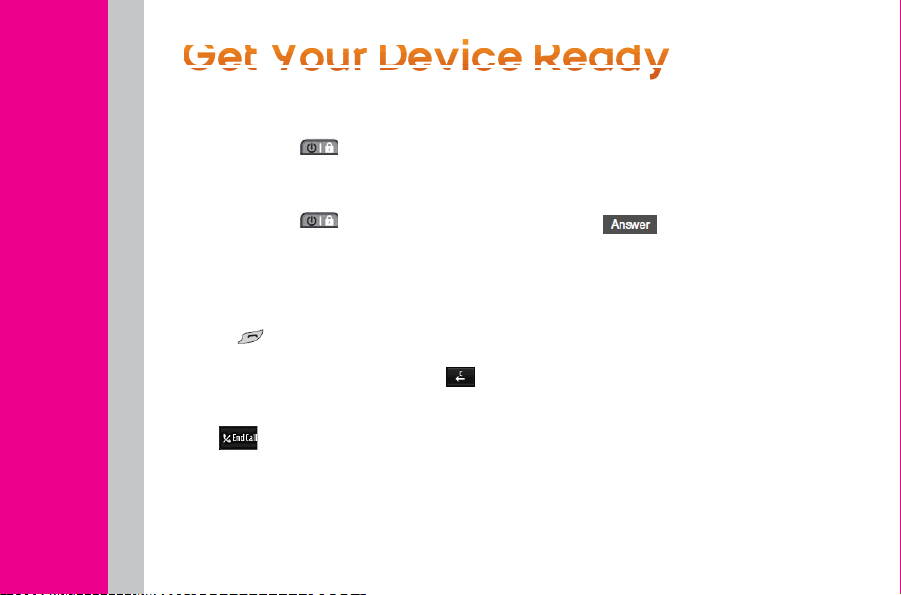
Turning Your Phone On
Press and hold .
Turning Your Phone Off
Press and hold for two seconds until
Device Guide
you see the powering-down animation on
the display screen.
Making Calls
1. Press and enter a phone number
using the dial pad or the keyboard. (If you
make a mistake while dialing, touch
2. To end the call, drag the toggle key
to
.
Answering Calls
1. Make sure your phone is on.
(If your phone is off, incoming calls go
to voicemail.)
2. Touch
Your phone notifies you of incoming calls
in the following ways:
+ The phone rings or vibrates.
+ The indicator light flashes.
+ The backlight illuminates.
.
+ The screen displays an incoming
call message.
If the incoming call is from a number
stored in your Contacts, the entry’s name
will appear on your screen. You may also
see the caller’s phone number, if
it’s available.
.
Page 21

You also see the following options if your
phone is on standby. To select an option,
touch the corresponding touch key.
+ Silence to mute the ringer.
+ Send to Voicemail to send the call
to voicemail.
Ignore with Text to send a text
+
message. You can send the preset
message or write a new one.
+
Answer to answer the call.
Contacts
Your phone can store up to 600 Contacts
entries. Contacts entries can store up to
a total of 7 phone numbers, and each
entry’s name can contain 64 characters.
To Add a Contact
1. Touch
2. Touch
> Contacts .
> New Contact.
3. Touch Enter Name and type in the new
contact name using the touch keypad
or QWERTY keyboard, and then
touch
4. Touch Add Number, enter a phone
number, and then touch
5. Touch a phone label to select it
(Mobile, Home, Work, Pager, Fax,
or Other).
6. Scroll down to additional fields and
enter or edit any information you want.
7. Touch
After saving the number, your phone will
display the Contacts list.
Your phone’s email application lets you
access and manage multiple email
accounts simultaneously in one
convenient location.
.
.
.
Device Guide
TRIM
Page 22

a
TRIM
Getting Started With Email
1. Touch > Main Menu > (slide the
screen up) > Messaging > Email.
(The Email setup wizard will start.)
2. Touch NEXT to continue.
3. Select an email provider (such as
Device Guide
Windows Live
AOL Mail
- or Select Work to set up an exchange email
account using Outlook Web Access
from a Microsoft Exchange Server for
direct access.
– or –
Select More to choose from additional
options. There are many available email
options listed, or you may add your own
POP or IMAP email accounts.
4. Follow the setup wizard instructions to
enter the required sign-up information.
Touch ACCEPT or CONTINUE if you
®
, Hotmail®, Yahoo!®, Gmail®,
®
) and press the right softkey.
are prompted to accept any license
agreements or disclaimers.
5. If applicable, read the notice regarding
Mail Push. If you would like to enable Mail
Push, touch Yes.
Accessing Email
Using Email on your phone is even easier
than using multiple email accounts on
your computer. Launch the application for
instant access to all your accounts.
1. Once you have set up your Email, touch
> Main Menu > (slide the screen
up) > Messaging > Email to launch the
application. (You will see your default
account inbox.)
– or –
From an Email New Message notice
(if you have enabled Mail Push), touch
GO to go to your inbox.
Page 23

2. Use your keyboard and touch the
corresponding keys to read, manage,
and reply to your email messages.
+ Touch Menu to select messaging
options, such as Delete, Check Mail,
Reply to, Mark as, or Other.
+ Touch Options > Compose to
create new messages.
3. To view a different email account, touch
the tab to the left or right of the Inbox tab
at the top of the screen and then select
an account.
4. To add a new account from the Email
account screen, touch options and then
select Add Account.
Device Guide
TRIM
Page 24

esa
ggg
g
TRIM
Sending Text & Picture Messages
1. Slide the keyboard out and touch Message.
– or –
Touch
2. Select an entry method:
Device Guide
+ Touch New Addr to use the keypad to
+ Go to Contacts to select a recipient
3. Touch
entering recipients. (You may include up
to 40 recipients per message.)
4. Enter your message.
+ To type a message, use your keyboard
> Send Message.
enter a wireless phone number or email
address of the recipient directly.
from your Contacts. (Qualifying Contacts
entries must contain a wireless phone
number or an email address.)
when you have finished
or touch keypad to enter your message.
+ To use a preset message, touch Preset
Msgs in the upper right corner, and then
touch a message to enter.
+ To enter a symbol, an emoticon, or
a smiley:
- (On the touch keypad) touch
and select Symbols, Emoticons, or
Smileys. Touch a symbol, emoticon,
or smiley and
5. To add attachments, touch
6. Review your message and touch
(You may select additional messaging
options by touching
set the message priority urgent, set the
callback number, or save it as draft.)
.
to add subject,
.
Page 25

res
To Take A Picture
1. Touch > Main Menu > Photos &
Videos > Camera to activate camera
mode. (Additional camera options are
available through the camera mode
options menu.)
2. Using the phone’s display screen as a
viewfinder, aim the camera lens at
your subject.
3. Touch
button until the shutter sounds. (Your
phone automatically saves the picture to
the default storage area.)
+ To return to camera mode to take
another picture, touch
the side camera button.
4. Touch
+ Send to send your picture in a message.
or press the side camera
for more options:
, or
+ Assign to assign the picture as a:
- Screen Saver to use the picture as a
screen saver.
- Picture ID to display the picture for all
incoming calls.
- Delete to delete the picture you
just took.
- Go to Album to go to the In Phone
folder or Memory Card folder
(if available) to review your
saved pictures.
- Lock Screen to display picture as
background while screen is locked.
- Take New Picture to return to camera
mode to take another picture.
Device Guide
TRIM
Page 26

V
d
TRIM
To Record a Video
1. Touch > Main Menu > Photos &
Videos > Camcorder to activate video
mode. (Additional video options are
available through the video mode
Device Guide
options menu.)
2. Select Video Mail or Long Video.
3. Using the phone’s display screen as
a viewfinder, aim the camera lens at
your subject.
4. Touch
camera button.
+ To pause and then resume the
recording, touch
5. Touch
button to stop recording. (Your phone
automatically saves the video in your
default storage area.)
6. Touch for more options:
+
(only for Video Mail videos) to
send the video.
, or press the side
, or press the side camera
+ Play to play the video that was just
recorded.
+ Assign to assign the video as a
ringtone.
+ Record New Video to return to
camcorder mode.
+ Delete to delete the video that was just
recorded.
+ Review My Videos to go to the In
Phone folder or Memory Card folder
(if available) to review your
saved videos.
+ Cancel to close the options menu.
or .
Page 27

a
d
g
Getting Games, Ringtones & More
Accessing the Download Menus
1. Touch
2. Select a download category (Games,
Ringtones, Wallpapers, Applications),
and then select Get New. (The browser will
start and take you to the corresponding
download menu.)
Selecting an Item to Download
You can search for downloads in a few
different ways:
+ Featured displays various featured items.
+ Categories allows you to narrow your
search to a general category. (There may
be several pages of available content in
a list.)
+ Search allows you to type in a search
term. You may enter an entire word or title or
perform a partial-word search.
> Main Menu > My Stuff.
Downloading an Item
Once you’ve chosen and highlighted an
item, touch it to select it. You will see a
summary page for the item including its
title, cost, and expiration date (if applicable).
Links allow you to view the Preview page,
to preview an item, Description page, which
outlines the file size, description of the item,
the vendor, and its version, and the License
Info page, which details the price, license
type, expiration, and terms of use.
Device Guide
TRIM
Page 28

E
TRIM
Botón de Poder
Teclado QWERTY
Guía del Dispositivo
Iconos de Barra
Botón del Vol
Tecla BACK (Atras)
Auricular
Altavoz
Lentes de Cámara
Pantalla Táctil
Cámara
Tecla Pantalla Inical
Tecla del Tel
Micrófono
Page 29

Accede A Tu Cuenta En
Admra T Centa
boostmobile.com Para:
+ Acceder a la información de tu cuenta.
+ Ver y agregar dinero a tu cuenta.
+ Suscribirte a Auto Re-Boost para hacer
pagos automáticos.
+ Comprar accesorios.
+ Ver los planes de servicio y las opciones
de Boost disponibles.
+ Averigua más acerca de los servicios de
datos y otros productos como juegos,
tonos, fondos de pantalla y más.
Desde Tu Teléfono de Boost
+ Hacer un pago o registrarte en Auto
Re-BoostSM marcando #233.
+ Consultar el saldo de tu cuenta
marcando #225.
Desde Cualquier Otro Teléfono
+ Llamar al servicio de atención al
cliente de Boost al 1-888-BOOST-4U
(1-888-266-7848).
TRIM
Guía del Dispositivo
Page 30

a
Dsosv
TRIM
Para Encender Tu Teléfono
Mantén presionado .
Para Apagar Tu Teléfono
Guía del Dispositivo
Mantén presionado por dos
segundos hasta que veas la animación de
apagado en la pantalla.
Para Hacer Llamadas
1. Presiona y escribe un número de
teléfono usando el teclado numérico o el
teclado normal. (Si cometes un error al
marcar, toca
borrar los números.)
2. Toca
una llamada mientras estás en roaming y la
opción Protección de llamada está activada,
toca Llda. roam y luego
o presiona para
o presiona . (Para hacer
.)
3. Para finalizar una llamada, pasa la tecla
alternar a
.
Para Responder Llamadas
1. Asegúrate de que tu teléfono esté
encendido. (Si tu teléfono está apagado,
las llamadas entrantes van al correo
de voz.)
2. Toca
Tu teléfono te notificará que hay una
llamada entrante de las siguientes maneras:
+ El teléfono sonará o vibrará.
+ La luz indicadora parpadeará.
+ La luz de fondo se iluminará.
+ La pantalla mostrará un mensaje de
llamada entrante.
Si la llamada entrante es de un número
guardado en tus Contactos, se mostrará
.
Page 31

el nombre del registro. También puedes
ver el número de teléfono de quien llama,
si está disponible.
Si tu teléfono está en modo de espera,
también podrás ver las siguientes
opciones. Para seleccionar una opción,
toca la tecla táctil correspondiente.
+ Silenciar, para desactivar el timbre.
Enviar correo de voz, para enviar la
+
llamada al correo de voz.
+
Ignorar con texto, para enviar un mensaje
de texto. Puedes enviar un mensaje
preestablecido o escribir uno nuevo.
Responder, para responder una llamada.
+
Contactos
Tu teléfono puede almacenar hasta 600
registros de Contactos. Los registros de
Contactos pueden almacenar un total de
7 números de teléfono, y cada nombre de
registro puede contener hasta 64 caracteres.
Para Agregar Un Contacto
1. En modo de espera, toca
2. Toca
3. Toca Escribir Nombre y escribe el
nombre del nuevo contacto usando el
teclado táctil o el teclado QWERTY, y luego
toca
4. Toca Agregar Número, escribe un
número de teléfono y luego toca
5. Toca la etiqueta de un teléfono para
seleccionarla (Móvil, Casa, Trabajo,
Buscapersonas, Fax u Otro).
6. Deslízate hacia abajo para para ver los
campos adicionales y para ingresar o
editar información como desees.
7. Toca
número, tu teléfono mostrará una lista
de Contactos.
> Nuevo Contacto.
.
. Después de guardar el
> Contactos.
.
TRIM
Guía del Dispositivo
Page 32

m
a
TRIM
La aplicación de correo electrónico de
tu teléfono te permite acceder y administrar
varias cuentas de correo electrónico de
manera simultánea desde una
ubicación conveniente.
Guía del Dispositivo
Primeros Pasos Con
El Correo Electrónico
1. Toca > Menú Principal >
(desliza la pantalla hacia arriba) >
Mensajería > Correo Electrónico.
(Se iniciará el asistente de
configuración del correo electrónico.)
2. Toca CONTINUAR para continuar.
3. Selecciona un proveedor de correo
electrónico (como Windows Live
®
Yahoo!
, Gmail®, AOL Mail®) y presiona la
tecla multifunción derecha
- o bien -
Selecciona Trabajo para configurar una
cuenta de correo electrónico corporativo
®
, Hotmail®,
usando Outlook con acceso a Internet
desde un servidor de Microsoft Exchange
para tener acceso directo
– o bien –
Selecciona Más... para elegir entre las
opciones adicionales. Existen muchas
opciones de correo electrónico disponibles
en la lista o puedes agregar tus propias
cuentas de POP o IMAP.
4. Sigue las instrucciones del asistente de
configuración para ingresar la información
de registro necesaria. Toca ACEPTAR
o CONTINUAR, si se te pide aceptar
contratos de licencia o cláusulas de
exención de responsabilidad.
5. Si corresponde, lee el aviso respecto a Mail
Push. Si quieres activar Mail Push, toca Sí.
Cómo Acceder Al Correo Electrónico
Usar un correo electrónico en tu teléfono es
incluso más fácil que usar varias cuentas
de correo electrónico en tu computadora.
Page 33

Abre la aplicación para acceder de manera
instantánea a todas tus cuentas.
1. Una vez que hayas configurado tu correo
electrónico, toca
> (desliza la pantalla hacia arriba) >
Mensajería > Correo Electrónico para
abrir la aplicación to launch the application.
(Verás la bandeja de entrada de tu cuenta.)
– o bien –
Desde el aviso de un Mensaje Nuevo De
Correo Electrónico (si has activado Mail
Push), toca IR para ir a tu bandeja
de entrada.
2. Usa tu teclado y toca la tecla
corres-pondiente para leer, administrar
y responder tus mensajes de
correo electrónico.
+ Toca Menú para seleccionar las op-
ciones de mensajería, como Eliminar,
Revisar correo, Responder a, Marcar
como, u Otro.
> Menú Principal
+ Toca Menú > Otro > Crear para crear
nuevos mensajes.
3. Para ver una cuenta de correo electrónico
diferente, toca el menú desplegable a
la izquierda de la pestaña Bandeja de
entrada, en la parte superior de la pantalla,
y luego selecciona una cuenta. También
puedes tocar la pestaña Inicio, en la parte
superior de la pantalla, y seleccionar una
cuenta disponible desde allí.
4. Para agregar una nueva cuenta, toca la
pestaña Inicio, en la parte superior de
la pantalla, y luego selecciona Agregar
Cuenta. También puedes tocar el menú
desplegable a la izquierda de la bandeja de
entrada, en la parte superior de la pantalla,
y seleccionar Agregar Cuenta.
TRIM
Guía del Dispositivo
Page 34

een
ssjjees
s
TRIM
Para Crear Mensajes de
Texto/Imágenes
1. Desliza el teclado hacia afuera y toca
Enviar Mensaje – or –
Guía del Dispositivo
Toca
2. Selecciona un método de registro:
+ Nueva dir. para usar el teclado para
+ Ir a Contactos para seleccionar el
3. Toca
ingresar destinatarios. (Puedes incluir
hasta 40 destinatarios por mensaje.)
4. Escribe un mensaje o usa los mensajes
preestablecidos, símbolos, caritas
sonrientes o emoticones.
> Enviar Mensaje.
escribir directamente el número de
teléfono inalámbrico o dirección de
correo electrónico del destinatario.
destinatario de tus Contactos. (Los
registros de los contactos habilitados
contienen un número de teléfono
inalámbrico o una dirección de
correo electrónico).
cuando hayas terminado de
+ Para escribir un mensaje, usa tu teclado
o toca el teclado numérico.
+ Para usar un mensaje preestablecido,
toca Msjs Preest. en la esquina superior
derecha y luego toca un mensaje
para introducirlo.
+ Para ingresar un símbolo, un emoticón o
una carita sonriente:
- (En el teclado táctil) toca
selecciona Símbolos, Emoticones o
Caritas sonrientes. Toca el símbolo,
emoticón o carita sonriente que
desees y
5. Para adjuntar archivos, toca
6. Revisa tu mensaje y toca
seleccionar opciones adicionales de
mensajes, toca
un asunto, establecer la prioridad
del mensaje como urgente, asignar
un número para llamar de regreso o
guardarlo como borrador).
.
para poder agregar
y
(Para
.
Page 35

ggeen
Cómo Tomar Fotografías
1. Toca > Menú principal > Fotos y
videos > Cámara para activar el modo
cámara. (En el menú de opciones del
modo cámara, hay opciones adicionales
para la cámara.
2. Usando la pantalla del teléfono como
visor, apunta el lente de la cámara hacia
tu objetivo.
3. Toca
la parte lateral de la cámara hasta que
se escuche el sonido del obturador.
(Tu teléfono guardará automáticamente
la foto en tu área de almacenamiento
predeterminada).
Para regresar al modo cámara y tomar
otra foto, toca
de la parte lateral de la cámara.
4. Toca
+ Enviar para enviar tu imagen en
un mensaje.
o presiona el botón de
para ver más opciones:
o el botón
+ Asignar para asignar la imagen como:
+ Protector de pantalla para usar la
imagen como protector de pantalla.
+ Foto para ID para mostrar la foto para
todas las llamadas entrantes.
+ Eliminar para eliminar la foto que
acabas de tomar.
+ Ir Al Álbum para ir a la carpeta En
el teléfono o a la carpeta Tarjeta de
memoria (si está disponible) para ver
las imágenes guardadas.
+ Imprimir para imprimir las imágenes.
Usa una impresora compatible con
PictBridge (consulta la página 91) o una
impresora compatible con Bluetooth
(consulta la página 92).
+ Tomar Una Nueva Foto para regresar
al modo cámara y tomar otra foto.
TRIM
Guía del Dispositivo
Page 36

V
d
TRIM
Para Grabar Un Video
1. Toca > Menú Principal > Fotos y
Videos > Videocámara para activar el
modo video. (En el menú de opciones
Guía del Dispositivo
del modo video, hay opciones
adicionales para la grabación de videos.
Consulta “Opciones del modo video” en
la página 86).
2. Seleciona Video para Correo o
Video Largo.
3. Usando la pantalla del teléfono como
visor, apunta el lente de la cámara hacia
tu objetivo.
4. Toca
parte lateral de la cámara.
Para pausar y reanudar la grabación,
toca
5. Toca
parte lateral de la cámara para detener
la grabación. (Tu teléfono guardará
o presiona el botón de la
o .
o presiona el botón de la
automáticamente el video en tu área de
almacenamiento predeterminada).
6. Toca
(sólo para los videos para Correo) para
enviar el video. (Consulta la página 87
para ver más detalles).
+ Reproducir para reproducir el video
que acabas de grabar.
+ Asignar para asignar el video
como timbre.
+ Grabar nuevo video para regresar al
modo videocámara.
+ Eliminar para eliminar el video que
acabas de grabar.
+ Ver mis videos para ir a la carpeta En
el teléfono o a la carpeta Tarjeta de
memoria (si está disponible) para ver
los videos guardados.
+ Cancelar para cerrar el menú de opciones.
para ver más opciones:
Page 37

caa
r
Para Acceder A Los Menús
de Descarga
1. Toca > Menú Principal > Mis Archivos.
2. Selecciona una categoría de descarga
(Juegos, Timbres, Protectores de
pantalla, Aplicaciones o Tonos de
llamada) y luego selecciona Obtener Uno
Nuevo. (El navegador se iniciará y te llevará
al menú de descarga correspondiente).
Para acceder a los menús de descarga
desde el navegador web:
1. Desde la página de inicio, selecciona
Mapa del sitio > Descargas.
2. Selecciona Tonos de llamada, Juegos,
Timbres, Protectores de pantalla,
Aplicaciones y más para ir al menú de
descargas correspondiente.
Para seleccionar un artículo y descargarlo
Puedes buscar los artículos disponibles
para descarga de varias formas:
Destacados muestra una selección de
artículos destacados.
Categorías te permite reducir tu búsqueda
a una categoría general. (Pueden haber
varias páginas de contenido disponible en
una lista. Selecciona Siguientes 9 para ver
más artículos).
Buscar te permite usar tu teclado para
escribir un criterio de búsqueda para
localizar un artículo. Puedes ingresar una
palabra o título completo o realizar una
búsqueda de una parte de la palabra.
Para Descargar Un Artículo Una vez que
hayas elegido y resaltado un artículo, tócalo
para seleccionarlo. Verás una página de
resumen del artículo que incluye su título,
costo y fecha de vencimiento. Los enlaces
te permiten ver la página Vista previa, para
acceder a una vista previa del artículo, la
página Descripción, que detalla el tamaño
del archivo, la descripción del artículo, el
proveedor y su versión, y la página Info
Licencia, que detalla el precio, el tipo de
licencia, el vencimiento y los términos
de uso.
TRIM
Guía del Dispositivo
Page 38

Sor
TRIM
For additional LG Rumor Reflex support information, please
see the web and mobile support pages listed below.
Boost Mobile Device Support Webpage
http://www.boostmobile.com/support/device-support/
Device Guide
Page 39

Apoyo
Para información adicional acerca del LG Rumor Reflex,
favor de visitar nuestro sitio web y las siguientes paginas
de internet de apoyo.
Pagina de Apoyo para Dispositivos de Boost Mobile
http://www.boostmobile.com/support/device-support/
(Elije Español en la parte superior/mano derecha de la página web).
Device Guide
TRIM
Page 40

TRIM
Get Personal.
It’s Your Phone.
Personalízalo. Es tu teléfono.
Page 41

Add-Ons
TRIM
Page 42

Boost Mobile® offers wireless entertainment services with the latest games,
ers
o
n
z
e
real music ringtones, and unique wallpapers for download right to your phone.
Get the hottest ringtones, wallpapers, and more! Go to ‘Get Stuff’ on your
phone to get started.
*
TRIM
Add-Ons
*Certain plans require that you have a balance in your Boost Mobile account AFTER purchasing any Get Stuff products.
If you don’t, Re-Boost
Airtime, data charges, and/or additional charges may apply. Certain services may require a compatible handset. Premium
services (e.g., ringtones, wallpapers, games, and ringback tones) are available for an additional fee. Chat services may
require per text charges in addition to standard rates. For more information on our products, prices and services check
out boostmobile.com.
®
and try again. No credit card needed. Purchases are deducted from your Boost Mobile account.
Page 43

Pick How You Want To Pay
RBo
Boost Mobile® makes it easy to add money to your account. You decide exactly
how and where you want to pay. Keep your account active by using your phone
and adding money to your account.
Pay With Cash
Use the Re-Boost® Locator on your phone to find an Authorized Re-Boost®
Retailer near you. Pick up a Re-Boost
register, where available.
®
Card or recharge for as low as $10 at the
Pay Anytime With A Credit/Debit Card
Dial #ADD (#233) to add money from your phone or visit ‘My Account’ at
boostmobile.com to do it online. Securely register your credit/debit card with Boost
for more convenient one-time payments or to set up easy Auto Re-Boost
Set Up Worry-Free Payments With Auto Re-Boost
Visit boostmobile.com/reboost to get the details on all your Re-Boost® options.
SM
SM
payments.
Add-Ons
TRIM
Page 44

TRIM
ortat o
Add-Ons
Voicemail Setup
To set up your voicemail, call your Boost Mobile® number from either a landline
phone or your Boost Mobile phone. If calling from a landline phone, use your
7-digit phone number as the password. If calling from your Boost Mobile phone,
you will not be prompted for a password. Follow the steps to record your name,
a greeting, and a new voicemail password.
Managing Your Account
You can go to ‘My Account’ at boostmobile.com to view your account
information, Re-Boost
‘My Account,’ you will need your 7-digit phone number and the Boost account
PIN number you set up at activation. For questions about your Boost account,
please call 1-888-BOOST-4U (1-888-266-7848).
Your Account PIN
For security purposes, and to protect your account, you must set up a 4-digit
Account PIN (personal identification number) during activation. You’ll need to
enter your Account PIN anytime you log in to ‘My Account’ or when you call us
about your account. Also, in case you forget your Account PIN, you will need to
remember the month and year you activated your phone.
®
, or to make account changes. To log into
Page 45

Lost/Stolen Service
If your phone is ever lost or stolen, call Boost immediately at 1-888-BOOST-4U
(1-888-266-7848). We will secure your account balance and your account
information and help you keep your phone number.
BuyBack Program
Allows Boost Mobile customers to sell their unwanted phones back to Boost for
an account credit. Boost Mobile accepts hundreds of models of phones, including
phones from other carriers. To view the full program details and a list of phones
with their values, visit buyback.boostmobile.com. Phones that are not eligible for
a buyback credit can still be sent back for proper recycling.
Boost Xtras
Get more from Boost. Sign up for Xtras. Learn about events, promotions and more.
Visit boostmobile.com/xtras.
Can’t live without your phone?
Get Phone Insurance today so you don’t have to. For $5/month and a low
deductible, you are covered if your device breaks or is lost, stolen, or damaged –
even with liquid. To sign up, call Boost Customer Care at 1-888-266-7848 within
15 days of a new phone activation.
Visit plans.boostmobile.com/phone-insurance.aspx for more information.
Add-Ons
TRIM
Page 46

TRIM
ersoz
a
Boost Mobile® ofrece servicios de entretenimiento móvil, con los últimos juegos,
timbres de musica real, y salvapantallas únicos para bajar directamente a tu
teléfono. ¡Consigue lo último en timbres, salvapantallas y más! ¡Ingresa a ‘Get Stuff’
desde tu teléfono para iniciar!
Opciones Adicionales
*Ciertos planes requieren que tengas un saldo de en tu cuenta de Boost Mobile DESPUÉS de comprar cualquier producto
de “Get Stuff.” En caso contrario, sólo recarga tu cuenta e inténtalo de nuevo. No necesitas tarjeta de crédito. Las compras
se deducirán de tu cuenta Boost Mobile. Es posible que se apliquen cargos adicionales, cargos por datos y por tiempo de
uso. Para algunos servicios es necesario tener un equipo compatible. Los servicios Premium (por ejemplo, timbres, salvapantallas, juegos y tonos) se encuentran disponibles a través de una tarifa adicional. Los servicios de chat pueden requerir
cargos por cada mensaje de texto además de las tarifas estándares. Para obtener más información acerca de nuestros
productos, precios y servicios, visita boostmobile.com.
*
Page 47

Escoge Cómo Deseas Pagar
o
o
Boost Mobile® te facilita la manera de agregar fondos a tu cuenta. Tú decides cómo
y dónde quieres pagar. Para que tu cuenta siga activa, usa tu teléfono y agrega
crédito a tu cuenta.
Paga En Efectivo
Utiliza el Re-Boost® Locator (Localizador de Re-Boost) en tu teléfono para
encontrar la Tienda Re-Boost
recarga desde $10 en una caja registradora, dónde esté disponible.
®
más cercana. Elige una Tarjeta de Re-Boost® o
Paga En Cualquier Momento Con Una Tarjeta De Crédito O Débito
Marca #ADD (#233) para agregar fondos a tu teléfono o visita My Account (Mi Cuenta)
en boostmobile.com para hacerlo por Internet. De forma segura, registra tu método
de pago preferido en Boost para realizar pagos únicos de manera más práctica o
para configurar los prácticos pagos Auto Re-Boos
Configura Pagos Sin Preocupaciones Con Auto Auto Re-Boost
Ingresa a boostmobile.com/reboost para obtener los detalles sobre
las opciones de Re-Boost®.
tSM.
SM
TRIM
Opciones Adicionales
Page 48

TRIM
oormaaóó
oortaante
e
Configuración del Correo de Voz
Para configurar tu correo de voz, tendrás que llamar a tu teléfono Boost Mobile®
desde un teléfono de línea fija o desde tu teléfono móvil. Si llamas desde un
teléfono de línea fija, usa tu número de teléfono de 7 dígitos como contrasena.
Si llamas desde tu teléfono móvil, no se te pedira la contrasena. Sigue los pasos
Opciones Adicionales
para grabar tu nombre, un saludo y una nueva contraseña para tu correo de voz.
Administración de tu Cuenta
Para ver la información de tu cuenta, recarga tu cuenta con Re-Boost, o para realizar cambios a tu cuenta, puedes acceder a My Account (Mi Cuenta) a través de tu
teléfono o en boostmobile.com. Para acceder a My Account (Mi Cuenta) desde tu
teléfono, ve al icono de Navegación en el Main Menu (Menú Principal), selecciona
My Account (Mi Cuenta) e ingresa tu número de teléfono y número PIN.
El PIN de tu Cuenta
Por motivos de seguridad y para proteger tu cuenta, debes configurar un PIN
(número de identificación personal) para la cuenta de 4-dígitos durante la
activación. Necesitarás conocer tu PIN de la cuenta siempre que ingreses a
My Account (Mi Cuenta) o cuando nos llames acerca de tu cuenta. Además,
en caso de que olvides tu PIN de la cuenta, necesitarás recordar el mes y año
en que activaste tu teléfono.
Page 49

Teléfono Extraviado/Robado
Podemos ayudarte. Si alguna vez pierdes tu teléfono o te lo roban, llama inmediatamente a Boost al 1-888-BOOST-4U (1-888-266-7848). Bloquearemos el saldo y la
información de tu cuenta y te ayudaremos a que conserves tu número telefónico.
Programa BuyBack
Les permite a los clientes de Boost Mobile a vender sus teléfonos no deseados a Boost
por un crédito en la cuenta. Boost Mobile acepta cientos de modelos de teléfonos,
incluyendo los teléfonos de otros proveedores. Para ver todos los detalles del programa
y la lista de teléfonos junto a sus valores, visita buyback.boostmobile.com. Los
teléfonos que no califiquen para un crédito de recompra todavía pueden ser enviados
para un reciclaje apropiado.
Boost Xtras
Obtén más de Boost. Regístrate para Xtras. Entérate de eventos, promociones y mucho
más. Visita boostmobile.com/xtras.
¿No Puedes Vivir Sin Tu Teléfono?
Obtén seguro para tu teléfono para que no tengas que hacerlo. Por $5 al mes y un
bajo deducible, estás cubierto por si el dispositivo se rompe o se pierde, te lo roban
o se daña – incluso con líquido. Para registrarte, llama a atención al cliente de Boost
al 1-888-266-7848 dentro de los 15 días siguientes a la activación del nuevo teléfono.
Visita plans.boostmobile.com/phone-insurance.aspx para más información.
TRIM
Opciones Adicionales
Page 50

Opciones Adicionales
TRIM
Tarifas de Llamadas Internacionales
Mantente en contacto con los tuyos a través de tu teléfono Boost Mobile. Puedes
hacer llamadas internacionales desde los Estados Unidos usando International
Connect con llamadas sin limite a ciertos paises o puedes aprovecharte de
excelentes tarifas por minuto. La habilidad de hacer llamadas internacionales es
conectada durante la activación. Recuerda que no necesitas usar tarjetas
internacionales para tus llamadas desde tu teléfono Boost Mobile.
El costo de las llamadas internacionales es la suma de la tarifa internacional más el tiempo de uso estándar. Se pueden aplicar cargos
adicionales y están sujetos a cambios. Visita boostmobile.com/international para conocer los detalles y las tarifas internacionales.
Page 51

TRIM
Opciones Adicionales
Page 52

TRIM
Safety & Warranty
Information
Page 53

TRIM
Safety & Warranty
Page 54

Safety & Warranty
Sae
y
TRIM
Important Safety Information
This phone guide contains important operational and safety information that will help
you safely use your phone. Failure to read and follow the information provided in this
phone guide may result in serious bodily injury, death, or property damage.
General Precautions
There are several simple guidelines to operating your phone properly and maintaining
safe, satisfactory service.
+ To maximize performance, do not touch the bottom portion of your phone where the
internal antenna is located while using the phone.
+ Speak directly into the mouthpiece.
+ Avoid exposing your phone and accessories to rain or liquid spills. If your phone does
get wet, immediately turn the power off and remove the battery.
+ Do not expose your phone to direct sunlight for extended periods of time (such as on
the dashboard of a car).
+ Although your phone is quite sturdy, it is a complex piece of equipment and can be
broken. Avoid dropping, hitting, bending, or sitting on it.
+ Any changes or modifications to your phone not expressly approved in this
document could void your warranty for this equipment and void your authority to
operate this equipment.
+ Do not disassemble or open, crush, bend or deform, puncture or shred.
+ Do not modify or remanufacture, attempt to insert foreign objects into the battery,
Page 55

immerse or expose to water or other liquids, expose to fire, explosion or other hazard.
+ Only use the battery for the system for which it is specified.
+ Only use the battery with a charging system that has been qualified with the system
per this standard. Use of an unqualified battery or charger may present a risk of fire,
explosion, leakage, or other hazard.
+ Do not short circuit a battery or allow metallic conductive objects to contact battery
terminals.
+ Replace the battery only with another battery that has been qualified with the system
per this standard, IEEEStd-1725-200x. Use of an unqualified battery may present a risk
of fire, explosion, leakage or other hazard.
+ Promptly dispose of used batteries in accordance with local regulations.
+ Battery usage by children should be supervised.
+ Avoid dropping the phone or battery. If the phone or battery is dropped, especially on a
hard surface, and the user suspects damage, take it to a service center for inspection.
+ Improper battery use may result in a fire, explosion or other hazard.
+ For those host devices that utilize a USB port as a charging source, the host
device’s user manual shall include a statement that the phone shall only be
connected to products that bear the USB-IF logo or have completed the USB-IF compliance program.
Note: For the best care of your phone, only LG-authorized personnel should service
your phone and accessories. Failure to do so may be dangerous and void
your warranty.
TRIM
Safety & Warranty
Page 56

Safety & Warranty
TRIM
HAC statement
This phone has been tested and rated for use with hearing aids for some of the
wireless technologies that it uses. However, there may be some newer wireless
technologies used in this phone that have not been tested yet for use with hearing
aids.
It is important to try the different features of this phone thoroughly and in different
locations, using your hearing aid or cochlear implant, to determine if you hear any
interfering noise.
Consult your service provider or the manufacturer of this phone for information on
hearing aid compatibility. If you have questions about return or exchange policies,
consult your service provider or phone retailer.
Part 15.19 statement
This device and its accessories comply with part15 of FCC rules. Operation is subject
to the following two conditions:
(1) This device & its accessories may not cause harmful interference.
(2) This device & its accessories must accept any interference received, including
interference that may cause undesired operation.
Part 15.21 statement
Change or Modifications that are not expressly approved by the manufacturer could
void the user’s authority to operate the equipment.
Page 57

Part 15.105 statement
This equipment has been tested and found to comply with the limits for a class
B digital device, pursuant to Part 15 of the FCC Rules. These limits are designed
to provide reasonable protection against harmful interference in a residential
installation. This equipment generates uses and can radiate radio frequency energy
and, if not installed and used in accordance with the instructions, may cause
harmful interference to radio communications. However, there is no guarantee that
interference will not occur in a particular installation. if this equipment does cause
harmful interference or television reception, which can be determined by turning the
equipment off and on, the user is encouraged to try to correct the interference by
one or more of the following measures:
+ Reorient or relocate the receiving antenna.
+ Increase the separation between the equipment and receiver.
+ Connect the equipment into an outlet on a circuit different from that to which
the receiver is connected.
+ Consult the dealer or an experienced radio/TV technician for help.
Maintaining Safe Use of and Access to Your Phone
Do Not Rely on Your Phone for Emergency Calls
Mobile phones operate using radio signals, which cannot guarantee connection in all
conditions. Therefore you should never rely solely upon any mobile phone for essential
TRIM
Safety & Warranty
Page 58

Safety & Warranty
TRIM
communication (e.g., medical emergencies). Emergency calls may not be possible on all
cellular networks or when certain network services or mobile phone features are in use.
Check with your local service provider for details.
Using Your Phone While Driving
Talking on your phone while driving (or operating the phone without a hands-free device)
is prohibited in some jurisdictions. Laws vary as to specific restrictions. Remember that
safety always comes first.
Following Safety Guidelines
To operate your phone safely and efficiently, always follow any special regulations in a
given area. Turn your phone off in areas where use is forbidden or when it may cause
interference or danger.
Using Your Phone Near Other Electronic Devices
Most modern electronic equipment is shielded from radio frequency (RF) signals.
However, RF signals from wireless phones may affect inadequately shielded electronic
equipment. RF signals may affect improperly installed or inadequately shielded electronic operating systems or entertainment systems in motor vehicles. Check with the
manufacturer or their representative to determine if these systems are adequately
shielded from external RF signals. Also check with the manufacturer regarding any
equipment that has been added to your vehicle. Consult the manufacturer of any personal medical devices, such as pacemakers and hearing aids, to determine if they are
adequately shielded from external RF signals.
Page 59

Note: Always turn off the phone in healthcare facilities, and request permission before
using the phone near medical equipment.
Turning Off Your Phone Before Flying
Turn off your phone before boarding any aircraft. To prevent possible interference with
aircraft systems, the U.S. Federal Aviation Administration (FAA) regulations require you
to have permission from a crew member to use your phone while the plane is on the
ground. To prevent any risk of interference, FCC regulations prohibit using your phone
while the plane is in the air.
Turning Off Your Phone in Dangerous Areas
To avoid interfering with blasting operations, turn your phone off when in a blasting
area or in other areas with signs indicating two-way radios should be turned off.
Construction crews often use remote-control RF devices to set off explosives.
Turn your phone off when you’re in any area that has a potentially explosive
atmosphere. Although it’s rare, your phone and accessories could generate sparks.
Sparks can cause an explosion or fire, resulting in bodily injury or even death. These
areas are often, but not always, clearly marked. They include:
+ Fueling areas such as gas stations.
+ Below deck on boats.
+ Fuel or chemical transfer or storage facilities.
+ Areas where the air contains chemicals or particles such as grain, dust, or metal powders.
TRIM
Safety & Warranty
Page 60

Safety & Warranty
TRIM
+ Any other area where you would normally be advised to turn off your vehicle’s engine.
Note: Never transport or store flammable gas, flammable liquids, or explosives in the
compartment of your vehicle that contains your phone or accessories.
Restricting Children’s Access to Your Phone
Do not allow children to play with it as they could hurt themselves and others, damage
the phone or make calls that use your airtime balance.
Using Your Phone With a Hearing Aid Device
A number of Boost phones have been tested for hearing aid device compatibility. When
some wireless phones are used with certain hearing devices (including
hearing aids and cochlear implants), users may detect a noise which can interfere
with the effectiveness of the hearing device.
Some hearing devices are more immune than others to this interference noise, and
phones also vary in the amount of interference noise they may generate. ANSI standard
C63.19 was developed to provide a standardized means of measuring both wireless
phone and hearing devices to determine usability rating categories for both.
Ratings have been developed for mobile phones to assist hearing device users find
phones that may be compatible with their hearing device. Not all phones have been
rated for compatibility with hearing devices. Phones that have been rated have a label
located on the box. Your LG Rumor Reflex has an M4 and a T4 rating.
Page 61

These ratings are not guarantees. Results will vary depending on the user’s hearing
device and individual type and degree of hearing loss. If a hearing device is particularly
vulnerable to interference noise; even a phone with a higher rating may still cause
unacceptable noise levels in the hearing device. Trying out the phone with your
hearing device is the best way to evaluate it for your personal needs.
M-Ratings: Phones rated M3 or M4 meet FCC requirements for hearing aid compatibility
and are likely to generate less interference to hearing devices than unrated phones.
(M4 is the better/higher of the two ratings.)
T-Ratings: Phones rated T3 or T4 meet FCC requirements and are likely to be more
usable with a hearing device’s telecoil (“T Switch”or “Telephone Switch”) than unrated
phones. (T4 is the better/higher of the two ratings. Note that not all hearing devices
have telecoils in them.)
Caring for the Battery
Protecting Your Battery
The guidelines listed below help you get the most out of your battery’s performance.
+ Recently there have been some public reports of wireless phone batteries overheat-
ing, catching fire, or exploding. It appears that many, if not all, of these reports involve
counterfeit or inexpensive, aftermarket-brand batteries with unknown or questionable
manufacturing standards. LG is not aware of similar problems with LG phones
resulting from the proper use of batteries and accessories approved by LG or the
TRIM
Safety & Warranty
Page 62

Safety & Warranty
TRIM
manufacturer of your phone. Use only approved batteries and accessories approved by LG. Buying the right batteries and accessories is the best way to ensure
they’re genuine and safe.
+ In order to avoid damage, charge the battery only in temperatures that range from
32° F to 113° F (0° C to 45° C).
+ Don’t use the battery charger in direct sunlight or in high humidity areas, such as
the bathroom.
+ Never dispose of the battery by incineration.
+ Keep the metal contacts on top of the battery clean.
+ Don’t attempt to disassemble or short-circuit the battery.
+ The battery may need recharging if it has not been used for a long period of time.
+ It’s best to replace the battery when it no longer provides acceptable performance.
It can be recharged hundreds of times before it needs replacing.
+ Don’t store the battery in high temperature areas for long periods of time. It’s best
to follow these storage rules:
- Less than one month: 4° F to 140° F (-20° C to 60° C)
- More than one month: 4° F to 113° F (-20° C to 45° C)
Disposal of Lithium-Ion Polymer (Li-poly) Batteries
Do not handle a damaged or leaking Li-poly battery as you can be burned.
Page 63

Special Note: Be sure to dispose of your battery properly. In some areas, the disposal of batteries in household or business trash may be prohibited.
Radio Frequency (RF) Energy
Understanding How Your Phone Operates
Your phone is basically a radio transmitter and receiver. When it’s turned on, it
receive and transmits radio frequency (RF) signals. When you use your phone, the
system handling your call controls the power level. This power can range from 0.006
watt to 0.2 watt in digital mode.
Knowing Radio Frequency Safety
The design of your phone complies with updated NCRP standards described below. In
1991–92, the Institute of Electrical and Electronics Engineers (IEEE) and the American
National Standards Institute (ANSI) joined in updating ANSI’s 1982 standard for safety
levels with respect to human exposure to RF signals. More than 120 scientists,
engineers and physicians from universities, government health agencies and industries
developed this updated standard after reviewing the available body of research. In 1993,
the Federal Communications Commission (FCC) adopted this updated standard in a
regulation. In August 1996, the FCC adopted hybrid standard consisting of the existing
ANSI/IEEE standard and the guidelines published by the National Council of Radiation
Protection and Measurements (NCRP).
TRIM
Safety & Warranty
Page 64

Safety & Warranty
TRIM
Body-Worn Operation
To maintain compliance with FCC RF exposure guidelines, if you wear a handset on
your body, use a Sprint-supplied or Sprint-approved carrying case, holster or other
body-worn accessory. If you do not use a body-worn accessory, ensure the antenna
is at least 25/32 inch (2 centimeters) from your body when transmitting. Use of
non-Sprint-approved accessories may violate FCC RF exposure guidelines. For more
information about RF exposure, visit the FCC website at www.fcc.gov.
Specific Absorption Rates (SAR) for Wireless Phones
The SAR value corresponds to the relative amount of RF energy absorbed into the
head of a user of a wireless handset. The SAR value of a phone is the result of an extensive testing, measuring and calculation process. It does not represent how much
RF the phone emits. All phone models are tested at their highest value in strict laboratory settings. But when in operation, the SAR of a phone can be substantially less than
the level reported to the FCC. This is because of a variety of factors including its proximity to a base station antenna, phone design and other factors. What is important to
remember is that each phone meets strict federal guidelines. Variations in SARs do
not represent a variation in safety. All phones must meet the federal standard, which
incorporates a substantial margin of safety. As stated above, variations in SAR values
between different model phones do not mean variations in safety. SAR values at or
below the federal standard of 1.6 W/kg are considered safe for use by the public.
Page 65

The highest reported SAR values of the LG Rumor Reflex are:
Cellular CDMA mode:
Part22 Head: 0.54 W/kg; Body: 0.85 W/kg
Part24 Head: 1.15W/kg; Body: 0.66W/kg
Part90 Head: 0.50W/kg; Body: 0.79W/kg
FCC Radio Frequency Emission
This phone meets the FCC Radio Frequency Emission Guidelines.
FCC ID number: ZNFLN272
More information on the phone’s SAR can be found from the following
FCC website: http://transition.fcc.gov/oet/ea/fccid/.
Owner’s Record
The model number, regulatory number, and serial number are located on a nameplate inside the battery compartment. Record the serial number in the space provided
below. This will be helpful if you need to contact us about your phone in the future.
Model: LG272, Serial No.:
User Guide template version 9a_FM (July 2009)
TRIM
Safety & Warranty
Page 66

Safety & Warranty
W
rraay
y
TRIM
Your phone has been designed to provide you with reliable, worry-free service. If for
any reason you have a problem with your equipment, please refer to the manufacturer’s warranty in this section.
1. WHAT THIS WARRANTY COVERS:
LG offers you a limited warranty that the enclosed subscriber unit and its enclosed
accessories will be free from defects in material and workmanship, according to the
following terms and conditions:
(1) The limited warranty for the unit and enclosed accessories shall be a period of
one (1) year from the date of original purchase. The remaining warranty period for
the unit being repaired or replaced shall be determined by presentation of the
original sales receipt for the purchase of the unit.
(2) The limited warranty extends only to the original purchaser of the product and is
not assignable or transferable to any subsequent purchaser / end user.
(3) The limited warranty is good only to the original purchaser of the product during
the warranty period as long as it is in the U.S., including Alaska, Hawaii, U.S.
Territories, and all Canadian Provinces.
(4) The external housing and cosmetic parts shall be free of major defects at the
time of shipment and, therefore, shall not be covered under these limited
warranty terms.
(5) Upon request from LG, the consumer must provide information satisfactory to LG
to prove the date of purchase or exchange.
Page 67

(6) The customer shall bear the cost of shipping the product to the Customer
Service Department of LG. LG shall bear the cost of shipping the product back
to the consumer after the completion of service under this limited warranty.
2. WHAT THIS WARRANTY DOES NOT COVER:
(1) Defects or damage resulting from use of the product in other than its normal
and customary manner.
(2) Defect or damage from abnormal use, abnormal conditions, improper storage,
exposure to moisture or dampness, unauthorized modifications, unauthorized
connections, unauthorized repair, misuse, neglect, abuse, accident, alteration,
improper installation, or other acts which are not the fault of LG, including
damage caused by shipping, blown fuses, or spills of food or liquid.
(3) Breakage or damage to antennas unless caused directly by defects in material
or workmanship.
(4) Alleged defects or malfunctions of the product if the Customer Service
Department at LG was not notified by the consumer during the applicable
limited warranty period.
(5) Products which have had the serial number removed or made illegible.
(6) This limited warranty is in lieu of all other warranties, expressed or implied, either
in fact or by operations of law, statutory or otherwise, including, but not limited
to, any implied warranty of marketability, merchantability, or fitness for a
particular use.
TRIM
Safety & Warranty
Page 68

Safety & Warranty
TRIM
(7) Damage resulting from use of non-LG approved accessories.
(8) All plastic surfaces and all other externally exposed parts that are scratched or
damaged due to normal customer use.
(9) Products operated outside published maximum ratings.
(10) Products used or obtained in a rental program.
(11) Consumables (such as fuses).
3. WHAT LG WILL DO:
LG will, at its sole option, either repair, replace or refund the purchase price of any
unit that does not conform to this limited warranty. LG may choose at its option to use
functionally equivalent re-conditioned, refurbished or new units or parts or any units.
In addition, LG will not reinstall or back-up any data, applications or software that you
have added to your phone. It is therefore recommended that you back-up any such
data or information prior to sending the unit to LG to avoid the permanent loss of
such information.
4. STATE LAW RIGHTS:
No other express warranty is applicable to this product. THE DURATION OF ANY
IMPLIED WARRANTIES, INCLUDING THE IMPLIED WARRANTY OF MARKETABILITY
OR MERCHANTABILITY, IS LIMITED TO THE DURATION OF THE EXPRESS WARRANTY
HEREIN. LG SHALL NOT BE LIABLE FOR THE LOSS OF THE USE OF THE PRODUCT,
INCONVENIENCE, LOSS OR ANY OTHER DAMAGES, DIRECT OR CONSEQUENTIAL,
Page 69

ARISING OUT OF THE USE OF, OR INABILITY TO USE, THIS PRODUCT OR FOR ANY
BREACH OF ANY EXPRESS OR IMPLIED WARRANTY, INCLUDING THE IMPLIED WARRANTY OF MARKETABILITY OR MERCHANTABILITY APPLICABLE TO THIS PRODUCT.
Some states do not allow the exclusion of limitation of incidental or consequential
damages or limitations on how long an implied warranty lasts; so these limitations
or exclusions may not apply to you. This warranty gives you specific legal rights and
you may also have other rights, which vary from state to state.
5. HOW TO GET WARRANTY SERVICE:
To obtain warranty service, please call the following telephone number from anywhere
in the continental United States:
LG Electronics Service
201 James Record Road
Huntsville, AL 35824
Tel. 1-800-793-8896 Email: http://us.lgservice.com
Please call or write for the location of the LGE authorized service center nearest you
and the procedures for obtaining warranty claims.
TRIM
Safety & Warranty
Page 70

TRIM
General terms &
conditions of service
Page 71

Basic Definitions
In this document: (1) “we,” “us,” “our,” and “Boost” mean Boost Mobile LLC; (2) “you,” “your,” “customer,” and “user” mean
an account holder or user with us; (3) “Device” means any phone, aircard, mobile broadband device, any other device,
accessory, or other product that we provide you, we sell to you, or is active on your account with us; and (4) “Service”
means our offers, rate or service plans, options, wireless services, billing services, applications, programs, products, or
Devices on your account with us. “Service(s)” also includes any other product or service that we offer or provide to you
that references these General Terms and Conditions of Service (“Ts&Cs”).
The Service Agreement
These Ts&Cs are part of your service agreement with us (the “Agreement”) and constitute a contract under which
we provide you Services under terms and conditions that you accept. THIS CONTRACT CONTAINS A MANDATORY
ARBITRATION PROVISION THAT DISALLOWS CLASS ACTIONS, A CLASS ACTION WAIVER PROVISION, AND A JURY
WAIVER PROVISION. In addition to these Ts&Cs, there are several parts of the Agreement, which includes but is not
limited to the following: (i) the subscriber agreement or transaction materials that you sign or accept; (ii) the plan(s) that
you chose as set forth in our written services and transaction materials that we provide or refer you to during the sales
transaction (if your service plan is not specifically set forth in any printed materials, the requirements and terms set
forth in the current written services and transaction materials apply, excluding the plan charges and number of minutes
included in your service plan); (iii) any confirmation materials that we may provide to you; and (iv) the terms set forth in the
coverage map brochures. It is important that you carefully read all of the terms of the Agreement.
Additional Terms
Additional terms will apply when you use certain applications, programs, Devices, and services, and these terms will be
provided to you prior to your use of the items. Depending on who provides the items, the terms may come from Boost
or a third party. You are subject to any terms provided by the third party, and the terms are directly between you and
that third party. Boost is not responsible for these third-party items and associated terms.
Terms & Conditions
Page 72

Our Policies
Services are subject to our business policies, practices, and procedures (“Policies”). You agree to adhere to all of our
Policies when you use our Services. Our Policies are subject to change at any time with or without notice.
When You Accept The Agreement
You must have the legal capacity to accept the Agreement. You accept the Agreement when you do any of the following:
(a) accept the Agreement through any printed, oral, or electronic statement, for example, on the Web by electronically
marking that you have reviewed and accepted; (b) attempt to or in any way use the Services; (c) pay for the Services; or
(d) open any package or start any program that says you are accepting the Agreement when doing so. If you don’t want
to accept the Agreement, don’t do any of these things.
Terms & Conditions
Service Activation
To activate the Service, you must both activate your account and establish an appropriate account balance to pay for payper-use charges and applicable subscription charges (defined in the “Types of Charges” section) based on the service
plan you select. To establish an account balance, pay a subscription charge, or make any other appropriate payments,
follow the instructions provided with the equipment; at www.boostmobile.com; or through Boost Customer Care.
Our Right To Change The Agreement & Your Related Rights
We may change any part of the Agreement at any time, including, but not limited to, rates, charges, how we calculate
charges, discounts, coverage, technologies used to provide services, or your terms of Service. We will provide you
notice of material changes—and we may provide you notice of non-material changes—in a manner consistent with
this Agreement (see “Providing Notice To Each Other Under The Agreement” section). If you continue to access or use
our Services or increase your account balance on or after the effective date of a change, you accept the change. Do not
access or use our Services after the effective date of a change if you decide to reject the change and terminate Service.
You will not be entitled to any credit for the unused portion of your account balance if you decide to terminate Service in
response to a change to the Agreement.
Our Right To Suspend Or Terminate Services
We can, without notice, suspend or terminate any Service at any time for any reason. For example, we can suspend
or terminate any Service for the following: (a) failure to have or maintain an appropriate account balance for applicable
charges; (b) harassing/threatening/abusing/offending our employees or agents; (c) providing false or inaccurate
Page 73

information; (d) interfering with our operations; (e) using/suspicion of using Services in any manner restricted by or
inconsistent with the Agreement and Policies; (f) breaching, failing to follow, or abusing the Agreement or Policies; (g)
modifying a Device from its manufacturer specifications (for example, rooting the device); or (h) if we believe the action
protects our interests, any customer’s interests, or our networks.
Your Right To Change Services & When Changes Are Effective
The account holder can typically change Services upon request. In some instances, changes may be conditioned on
payment of certain charges. The effective date of any changes will depend on our Policies, the old Services, and the
requested Services. We will not credit or refund any subscription or other charges as a result of a change in Services.
We may—but are not obligated to—provide you the opportunity to authorize someone else to make changes to your
Services. You are responsible for any changes to your Services made by a person you authorize, and those changes will
be treated as modifications to this Agreement.
Restrictions On Using Services
You can’t use our Services: (a) in a way that could cause damage or adversely affect any of our other customers or our
reputation, networks, property, or Services; or (b) in any way prohibited by the terms of our Services, the Agreement, or
our Policies. You cannot in any manner resell the Services to another party. For additional restrictions on the use of our
Services, see our Acceptable Use Policy and Visitors Agreement, which are available on our website, and the detailed
plan or other information on Services that we provide or refer you to during the sales transaction.
Your Device, Number, & Email Address; Caller ID
We don’t manufacture any Device that we might sell to you or that is associated with our Services, and we aren’t
responsible for any defects, acts, or omissions of the manufacturer. The only warranties on your Device are the limited
warranties given to you by the manufacturer directly or that we pass through. Device performance may vary based
on device specifications (for example, a device’s software, memory, and storage), and device performance may
impact access to all of our Services. This Device is sold exclusively for use with our Service and in other coverage
areas that we may make available to you. As programmed, it will not accept wireless service from another carrier.
Except for any legal right you may have to port/transfer your phone number to another carrier, you have no—and
cannot gain any (for example, through publication, use, etc.)—proprietary, ownership, or other rights to any phone
number, identification number, email address, or other identifier that we assign to you, your Device, or your account.
We’ll notify you if we decide to change or reassign them.
Terms & Conditions
Page 74

Porting/Transferring Phone Numbers
We don’t guarantee that number transfers to or from us will be successful. If you authorize another carrier to transfer
a number away from us, then that is considered a request by you to us to terminate all of the Services associated
with that number.
Coverage; Where Your Device Will Work; Service Speeds
Our coverage maps are available at our authorized retail locations or www.boostmobile.com. The specific network
coverage you get will depend on the radio transmissions your Device can pick up and Services you’ve chosen. Our
coverage maps provide high level estimates of our coverage areas when using Services outdoors under optimal
conditions. Coverage isn’t available everywhere. Coverage and Service speeds are not guaranteed. Coverage
is subject to change without notice. Service speeds may depend on the Service purchased. Actual speeds will
Terms & Conditions
vary. Estimating wireless coverage, signal strength, and Service speed is not an exact science. There are gaps in
coverage within our estimated coverage areas that—along with other factors both within and beyond our control
(for example, network problems, network or Internet congestion, software, signal strength, your Device, structures,
buildings, weather, geography, topography, server speeds of the websites you access, actions of third parties,
etc.)—may result in dropped and blocked connections, slower Service speeds, or otherwise impact the quality of
Service. Services that rely on location information, such as E911 and GPS navigation, depend on your Device’s ability
to acquire satellite signals (typically not available indoors) and network coverage. While your Device is receiving a
software update, you may be unable to use your Device in any manner until the software update is complete.
Roaming
The term “roaming” typically refers to coverage on another carrier’s network that we may make available to you based
on our agreements with other carriers. These agreements may change from time to time, and roaming coverage is
subject to change without notice. Your ability to receive roaming coverage depends on the radio transmissions your
Device can pick up and the availability of roaming coverage. We make no guarantee that roaming coverage will be
available. Roaming coverage may exist both within and outside our network coverage areas. Your Device will generally
indicate when you’re roaming. Depending on your Services, separate charges or limits on the amount of minutes used
while roaming may apply. Certain Services may not be available or work the same when roaming (for example, data
Services, voicemail, call waiting, etc.).
Page 75

About Data Services & Content
Our data Services and your Device may allow you to access the Internet, text, pictures, video, games, graphics, music,
email, applications, sound, and other materials (“Data Content”) or send Data Content elsewhere. Some Data Content
is available from us or our vendors, while other Data Content can be accessed from others (for example, third party
websites, games, ringers, applications, etc.). We make absolutely no guarantees about the Data Content that you
access on your Device. Data Content may be: (1) unsuitable for children/minors; (2) unreliable or inaccurate; or (3)
offensive, indecent, or objectionable. You’re solely responsible for evaluating the Data Content accessed by you
or anyone through your Services. We strongly recommend that you monitor data usage by children/minors. Data
Content from third parties may also harm your Device or its software. We are not responsible for any Data Content. We
are not responsible for any damage caused by any Data Content that you access through your Services, that you load
on your Device, or that you request that our representatives access or load on your Device. To protect our networks and
Services or for other reasons, we may place restrictions on accessing certain Data Content (such as certain websites,
applications, etc.); impose separate charges; limit throughput or the amount of data that you can transfer; or otherwise
limit or terminate Services. If we provide you storage for Data Content that you have purchased, then we may delete the
Data Content without notice or place restrictions/limits on the use of storage areas. Data Content stored on a Device,
transmitted over our networks, or stored by Boost may be deleted, modified, or damaged. You may not be able to make
or receive voice calls while using data Services. Data Content provided by our vendors or third parties is subject to
cancellation or termination at any time without notice to you, and you may not receive a refund for any unused portion
of the Data Content.
Specific Terms & Restrictions On Using Data Services
In addition to the rules for using all of our other Services, unless we identify the Service or Device that you have
selected as specifically intended for that purpose (for example, wireless routers, Data Link, etc.), you can’t use our data
Services: (1) with server devices or host computer applications, or other systems that drive continuous, heavy traffic or
data sessions; (2) as a substitute or backup for private lines or frame relay connections; or (3) for any other unintended
use as we determine in our sole discretion. We reserve the right to limit, suspend, or constrain any heavy, continuous
data usage that adversely impacts our networks’ performance or hinders access to our networks. If your Services
include Web or data access, you also can’t use your Device as a modem for computers or other equipment, unless we
identify the Service or Device you have selected as specifically intended for that purpose (for example, with “phone as
modem” plans, mobile broadband card plans, wireless router plans, etc.).
Terms & Conditions
Page 76

Software License
If Boost provides you software as part of the Service and there are not software license terms provided with the
software (by Boost or by a third party), then Boost grants you a limited, revocable, non-exclusive, non-transferable
license to use the software to access the Services for your own individual use. You will not sell, resell, transfer, copy,
translate, publish, create derivative works of, make any commercial use of, modify, reverse engineer, decompile, or
disassemble the software. Boost may revoke this license at any time.
Activation & Miscellaneous Charges
Based on our Policies, we may charge activation, prepayment, reactivation, program, or other fees to establish or maintain
Services. Certain transactions may also be subject to a charge (for example, convenience payment, changing phone
numbers, handset upgrades, etc.). You will be provided notice of these types of fees before we complete the requested
Terms & Conditions
transaction.
Usage Charges
The types of charges that you incur will vary depending on the Service used and your service plan. You are responsible
for the Services on your account and associated charges, including charges made by a person you permit to have
direct or indirect access to your device even if you did not authorize its use. Charges may include, but are not limited
to, prepayment for service charges; charges for additional services; and taxes, surcharges, and fees associated with
your Services. For the actual usage charges applicable to your Service, see the detailed plan or other information
we provide or refer you to during the sales transaction or on our website. Depending on your Services, charges for
additional services may include operator and directory assistance, voicemail, call forwarding, data calls, texts, and
Web access. If you (the account holder) allow end users to access or use your Device, you authorize end users to
access, download, and use Services. You will generally be charged for use of Services before or at the time of use
in accordance with your service plan. In certain instances, we may charge at some point after you use the Service.
Charges are generally deducted from your account balance (for example, pay-per-use charges, subscription charges,
etc.), though in some instances you may be able to pay for certain Services through a credit card, debit card, or other
payment method. If you have incurred charges or fees that were not charged prior to your account balance reaching a
zero balance, we may deduct these outstanding, unpaid charges and fees from any subsequent amounts you add to
your account balance.
Page 77

Types of Charges
We typically assess the following types of charges: (1) “pay-per-use charges,” which are charges assessed each time
a Service is used; (2) “subscription charges,” which are charges that allow you access to a Service or provide you a
certain amount of use of a Service for a defined period of time. Subscription charges for Services end at 11:59 p.m., in
the time zone in which your phone number is based, on the last day of your subscription period. Also, depending on
your Service, certain types of subscription charges may be assessed automatically upon activation and automatically
assessed for subsequent subscription periods; and (3) “download charges,” which are charges assessed when you
download or access content, which we collect on behalf of ourselves or third-party content providers.
How We Calculate Your Charges
Regular Voice Calls: We round up partial minutes of use to the next full minute. Time starts when you press “Talk” or
your Device connects to the network and stops when you press “End” or the network connection otherwise breaks.
You’re charged for all calls that connect, even to answering machines, voicemail, or voice transcription services. You
won’t be charged for unanswered calls or if you get a busy signal. For incoming calls answered, you’re charged from
the time shortly before the Device starts ringing until you press “End” or the network connection otherwise breaks.
You’re charged for the entire call based on the rate that applies to the time period in which the call starts. However, the
types of charges actually deducted from your account balance will vary depending on your Service.
Walkie-Talkie Charges: Charges for walkie-talkie calls apply to the person who starts the call and the person who
receives the call. Depending on your Services, you may incur a charge for use of walkie-talkie Services for a designated
period (for example, daily or monthly), or walkie-talkie usage may be charged on a pay-per-use basis. Pay-per-use
charges work as follows: (1) usage is calculated by multiplying the duration of the call by the applicable rate; (2) you’re
charged at least 6 seconds of airtime for each call you start, and subsequent communications in the same call are
rounded up to and charged to the next second; (3) time begins when you press any button to start a walkie-talkie
call and ends approximately 6 seconds after completion of a communication to which no participant responds, and
subsequent walkie-talkie communications are considered new calls; and (4) responses to call alert transmissions are
treated as new walkie-talkie transmissions even when responding within 6 seconds of receiving the alert. For the actual
usage charges applicable to your Service, see the detailed plan or other information we provide or refer you to during
the sales transaction (also available at www.boostmobile.com).
Terms & Conditions
Page 78

Data Usage: Depending on your Service, you may be charged for data usage. Unless we specifically tell you otherwise,
data usage is measured in bytes, kilobytes, megabytes, and gigabytes—not in minutes/time. 1024 bytes equals 1
kilobyte (“KB”), 1024 KB equals 1 megabyte, and 1024 megabytes equals 1 gigabyte. Bytes are rounded up to KB, so you
will be charged at least 1 KB for each data usage session (“data session”). Rounding occurs at the end of each data
session and sometimes during a data session. Depending on your data Services, usage may be charged against an
allowance or on a fixed price per KB, and you may be subject to limitations on the amount of data usage. If you are
charged on a fixed price per KB, any fractional cents will be rounded up to the next cent. You are charged for all data
directed to your Device’s Internet address, including data sessions you did not initiate and for incomplete transfers. As
long as your Device is connected to our data networks, you may incur data charges. Examples of data for which you
will be charged includes the size of a requested file or Data Content (game, ringer, etc.); Web page graphics (logos,
pictures, banners, advertisement, etc.); additional data used in accessing, transporting, and routing the file on our
Terms & Conditions
network; data from partial or interrupted downloads; re-sent data; and data associated with unsuccessful attempts
to reach websites or use applications. These data charges are in addition to any charges for the Data Content itself
(game, ringer, etc.). Data used and charged to you will vary widely, even between identical actions or data sessions.
Estimates of data usage—for example, the size of downloadable files—are not reliable predictors of actual usage.
Taxes & Government Fees
Depending on your Services, we may deduct from your account balance all federal, state, and local taxes, fees, and
other assessments that we’re required by law to collect and remit to the government on the Services that we provide
to you. These charges may change from time to time without advance notice. If you’re claiming any tax exemption, you
must provide us with a valid exemption certificate. Tax exemptions generally won’t be applied retroactively.
Surcharges
Depending on your Services, you agree to pay all surcharges (“Surcharges”) that we may deduct from your account
balance, which may include, but are not limited to: Federal Universal Service; various regulatory charges; Boost
administrative charges; gross receipts charges and certain other taxes imposed upon Boost; or charges for the costs
that we incur and pass along to you. Surcharges are not taxes, and we are not required to assess them by law.
They are charges we choose to collect from you, are part of our rates, and are kept by us in whole or in part. The
number and type of Surcharges will be provided and may vary depending upon the location of the transaction or
the primary account address of the payment method or Device and can change over time. We determine the rate for
these charges, and these amounts are subject to change as are the components used to calculate these amounts.
Page 79

We will provide you notice of any changes to Surcharges in a manner consistent with this Agreement (see “Providing
Notice To Each Other Under The Agreement” section). However, since some Surcharges are based on amounts set
by the government or based on government formulas, it will not always be possible to provide advance notice of new
Surcharges or changes in the amount of existing Surcharges. Information on Surcharges is provided during the sales
transaction and is available on our website.
Disputing Charges
Any dispute to a charge that we assess you must be made in writing within 60 days of the date we deduct the charge
from your account balance. You accept all charges not properly disputed within the above time period.
About Account Balances
To ensure continued access to the Service, you must maintain a positive account balance at all times or pay any
applicable subscription charges (depending on your service plan). Account balances are not transferable, redeemable
for cash, or refundable; that is, once you make payment on your account, you are provided a credit on your account
that can only be used to pay for our Services during the effective period, which varies depending on your service plan.
Positive account balances are forfeited if they are not used within the effective period specified in your service plan
(if you properly replenish your account balance during the effective period, the effective period restarts). If you do not
use your account balance during the effective period, your account balance will expire and you will not be entitled
to a refund or service credit. Your Service will be interrupted if you fail to maintain a positive account balance or timely
pay applicable subscription charges for each effective period. When this service interruption occurs, you will be given a
period of time (which varies depending on your service plan) to make any appropriate payments on your account. If you
do not make such payments within this time period, your account will be cancelled. If your account is cancelled, you
will lose any phone number, identification number, or email address associated with your account. Reactivation fees
will apply if you choose to restart Service after cancellation. There may be limits over which your account balance
may not exceed. See the detailed plan or other information we provide or refer you to during the sales transaction (also
available at www.boostmobile.com) for the effective period and cancellation period that applies to your Service.
Establishing or Replenishing Account Balances
Information on how you can establish and maintain an account balance will be provided at activation and is also
available at www.boostmobile.com or through Boost Customer Care. The replenishment methods available to you will
depend on the terms of your Services. A fee may apply to certain replenishment methods. Some service plans may
provide for automatic account balance replenishment through, for example, automatic billing to a credit card or debit
Terms & Conditions
Page 80

card or automatic debit from an eligible account with a financial institution. Payment through these methods may be
subject to limitations, including, but not limited to, the number of times an account may be debited or charged in a
particular time period; the amount that may be debited or charged from an account; or other limitations imposed by us
or the financial institution that holds the account.
Protecting Our Network & Services
We can take any action to: (1) protect our networks, our rights and interests, or the rights of others; or (2) optimize
or improve the overall use of our networks and Services. Some of these actions may interrupt or prevent legitimate
communications and usage—for example, message filtering/blocking software to prevent spam or viruses; limiting
throughput; limiting access to certain websites, applications or other Data Content; prohibitions on unintended uses
(for example, use as a dedicated line or use as a monitoring service), etc. For additional information on what we do to
Terms & Conditions
protect our customers, networks, Services and equipment, see our Acceptable Use Policy and Visitors Agreement at
our website.
Your Privacy
Our Privacy Policy is available at www.boostmobile.com/privacy. This policy may change from time to time, so review it
with regularity and care.
Call Monitoring: To ensure the quality of our Services and for other lawful purposes, we may monitor or record calls
between us (for example, your conversations with our customer service or sales departments).
Authentication and Contact: You (the account holder) may password protect your account information by establishing a
personal identification number (“PIN”). You may also set a backup security question and answer in the event you forget
your PIN. You agree to protect your PIN, passwords, and other account access credentials like your backup security
question from loss or disclosure. You further agree that Boost may, in our sole discretion, treat any person who presents
your credentials that we deem sufficient for account access as you or an authorized user on the account for disclosure
of information or changes in Service. You agree that we may contact you for Service-related reasons through the
contact information that you provide, through the Services or Devices to which you subscribe, or through other available
means, including text message, email, fax, recorded message, mobile, residential or business phone, or mail.
CPNI: As we provide telecommunications products and Services to you (the account holder), we develop information
about the quantity, technical configuration, type, location, and destination of telecommunications products and Services
you use, as well as some other information found on your bill (“CPNI”). Under federal law, you have the right, and we
Page 81

have a duty, to protect the confidentiality of your CPNI. For example, we implement safeguards that are designed to
protect your CPNI, including authentication procedures when you contact us. For some accounts with a dedicated Boost
representative, we may rely on contacting your pre-established point of contact as the standard authentication measure.
Third-Party Applications: If you use a third-party application, the application may access, collect, use, or disclose your
personal information or require Boost to disclose your information—including location information (when applicable)—
to the application provider or some other third party. If you access, use, or authorize third-party applications
through the Services, you agree and authorize Boost to provide information related to your use of the Services or
the application(s). You understand that your use of third-party applications is subject to the third party’s terms and
conditions and policies, including its privacy policy.
Information on Devices: Your Device may contain sensitive or personal information (for example, pictures, videos,
passwords, or stored credit card numbers). Boost is not responsible for any information on your Device, including
sensitive or personal information. If possible, you should remove or otherwise safeguard any sensitive or personal
information when your Device is out of your possession or control, for example, when you relinquish, exchange, return,
or recycle your Device. By submitting your Device to us, you agree that our employees, contractors, or vendors may
access all of the information on your Device.
Location-Enabled Services
Our networks generally know the location of your Device when it is outdoors and/or turned on. By using various
technologies to locate your Device, we can provide enhanced emergency 911 services and optional location-enabled
services provided by us or a third party. Network coverage or environmental factors (such as structures, buildings,
weather, geography, landscape, and topography) can significantly impact the ability to access your Device’s location
information and use of location-enabled services.
You agree that any authorized user may access, use, or authorize Boost or third-party location-enabled applications
through the Services. You understand that your use of such location-enabled applications is subject to the application’s
terms and conditions and policies, including its privacy policy. If you activate location-enabled services for devices
used by other authorized users, you agree to inform the authorized user(s) of the terms of use for location-enabled
applications and that the Device may be located. For additional information on location-enabled services, see our
Privacy Policy at our website.
Terms & Conditions
Page 82

911 Or Other Emergency Calls
Public safety officials advise that when making 911 or other emergency calls, you should always be prepared to provide
your location information. Unlike traditional wireline phones, depending on a number of factors (for example, whether your
Device is GPS-enabled, where you are, whether local emergency service providers have upgraded their equipment, etc.),
911 operators may not know your phone number, your location, or the location of your Device. In certain circumstances,
an emergency call may be routed to a state patrol dispatcher or alternative location set by local emergency service
providers. Enhanced 911 service (“E911”)—where enabled by local emergency authorities—uses GPS technology to provide
location information. Even when available, however, E911 does not always provide accurate location information. If your
Device is indoors or for some other reason cannot acquire a satellite signal, you may not be located. Some Devices have
a safety feature that prevents use of the keypad after dialing 911—you should follow voice prompts when interacting with
emergency service providers employing interactive voice response systems to screen calls.
Terms & Conditions
If Your Device Is Lost or Stolen
Call us immediately if your Device is lost or stolen because you may be responsible for usage charges before you notify us
of the alleged loss or theft. You agree to cooperate if we choose to investigate the matter (provide facts, sworn statements,
etc.). We may not credit or refund any account balance if you choose to terminate Services as a result of loss or theft of
your Device.
Disclaimer of Warranties
UNLESS EXPRESSLY PROVIDED IN WRITING OTHERWISE, WE MAKE NO REPRESENTATIONS OR WARRANTIES, EXPRESS
OR IMPLIED, INCLUDING (TO THE EXTENT ALLOWED BY LAW) ANY IMPLIED WARRANTY OF MERCHANTABILITY,
NON-INFRINGEMENT, OR FITNESS FOR A PARTICULAR PURPOSE CONCERNING YOUR SERVICES (INCLUDING YOUR
DEVICE). WE DON’T PROMISE UNINTERRUPTED OR ERROR-FREE SERVICES AND DON’T AUTHORIZE ANYONE TO MAKE
WARRANTIES ON OUR BEHALF.
You Agree That We Are Not Responsible For Certain Problems
You agree that neither we nor our subsidiaries, affiliates, parent companies, vendors, suppliers, or licensors are responsible
for any damages resulting from: (a) anything done or not done by someone else; (b) providing or failing to provide
Services, including, but not limited to, deficiencies or problems with a Device or network coverage (for example, dropped,
blocked, interrupted Services, etc.); (c) traffic or other accidents, or any health-related claims relating to our Services; (d)
Data Content or information accessed while using our Services; (e) an interruption or failure in accessing or attempting
Page 83

to access emergency services from a Device, including through 911, Enhanced 911 or otherwise; (f) interrupted, failed, or
inaccurate location information services; (g) information or communication that is blocked by a spam filter; (h) damage
to your Device or any computer or equipment connected to your Device, or damage to or loss of any information stored
on your Device, computer, equipment, or Boost storage space from your use of the Services or from viruses, worms, or
downloads of malicious content, materials, data, text, images, video, or audio; or (i) things beyond our control, including
acts of God (for example, weather-related phenomena, fire, earthquake, hurricane, etc.), riot, strike, war, terrorism, or
government orders or acts. You should implement appropriate safeguards to secure your Device, computer, or equipment
and to back-up your information stored on each.
You Agree Our Liability Is Limited–No Consequential Damages
TO THE EXTENT ALLOWED BY LAW, OUR LIABILITY FOR MONETARY DAMAGES FOR ANY CLAIMS THAT YOU MAY HAVE
AGAINST US IS LIMITED TO NO MORE THAN THE PROPORTIONATE AMOUNT OF THE SERVICE CHARGES ATTRIBUTABLE
TO THE AFFECTED PERIOD. UNDER NO CIRCUMSTANCES ARE WE LIABLE FOR ANY INCIDENTAL, CONSEQUENTIAL,
PUNITIVE, MULTIPLE, OR SPECIAL DAMAGES OF ANY NATURE WHATSOEVER ARISING OUT OF OR RELATED TO
PROVIDING OR FAILING TO PROVIDE SERVICES IN CONNECTION WITH A DEVICE, INCLUDING, BUT NOT LIMITED TO,
LOST PROFITS, LOSS OF BUSINESS, OR COST OF REPLACEMENT PRODUCTS AND SERVICES.
Terms & Conditions
Page 84

DISPUTE RESOLUTION
We Agree To First Contact Each Other With Any Disputes
We each agree to first contact each other with any Disputes (defined below) and provide a written description of
the problem, relevant documents and supporting information, and the proposed resolution. We agree to contact
each other as described in the “Providing Notice To Each Other Under The Agreement” section.
Instead Of Suing In Court, We Each Agree To Arbitrate Disputes
We each agree to arbitrate all Disputes between us, on an individual basis, not on a class-wide or consolidated
basis. This agreement to arbitrate is intended to be broadly interpreted. In arbitration, there’s no judge or jury.
Terms & Conditions
However, just as a court would, the arbitrator must honor the terms and limitations in the Agreement and can
award damages and relief, including any attorneys’ fees authorized by law. The arbitrator’s decision and award is
final and binding, with some exceptions under the Federal Arbitration Act (“FAA”), and judgment on the award may
be entered in any court with jurisdiction. We each also agree as follows:
(1) “Disputes” are any claims or controversies against each other related in any way to or arising out of in
any way our Services or the Agreement, including, but not limited to, coverage, Devices, billing services and
practices, policies, contract practices (including enforceability), service claims, privacy, or advertising, even if
it arises after Services have terminated. Disputes include claims that you bring against our employees, agents,
affiliates, or other representatives or that we bring against you. It also includes but is not limited to claims related in
any way to or arising out of in any way any aspect of the relationship between us, whether based in contract, tort,
statute, fraud, misrepresentation, or any other legal theory.
(2) If either of us wants to initiate a claim to arbitrate a Dispute, we each agree to send written notice to the other
providing a description of the dispute, a description of previous efforts to resolve the dispute, relevant documents
and supporting information, and the proposed resolution. Notice to you will be sent as described in the “Providing
Notice To Each Other Under The Agreement” section and notice to us will be sent to: General Counsel; Arbitration
Office; 12502 Sunrise Valley Drive, Mailstop VARESA0202-2C682; Reston, Virginia 20191. We each agree to make
attempts to resolve the dispute prior to filing a claim for arbitration. If we each cannot resolve the dispute within
forty-five (45) days of receipt of the notice to arbitrate, then we each may submit the dispute to formal arbitration.
Page 85

(3) The FAA applies to this Agreement and arbitration provision. We each agree that the FAA’s provisions—not state
law—govern all questions of whether a dispute is subject to arbitration.
(4) Unless we each agree otherwise, the Arbitration will be conducted by a single neutral arbitrator and will take
place
in the county of the last billing address of the Service.
(5) The arbitration will be governed and conducted by (a) a neutral third party arbitrator selected by each of us and
based upon rules mutually agreed to by each of us or (b) JAMS. The JAMS rules, including rules about the selection
of an arbitrator, filing, administration, discovery, and arbitrator fees, will be conducted under JAMS Comprehensive
Arbitration Rules & Procedures. The JAMS rules are available on its website at www.jamsadr.com. To the extent that
this “Dispute Resolution” section conflicts with JAMS’s minimum standards for procedural fairness, the JAMS’s rules
or minimum standards for arbitration procedures in that regard will apply. However, nothing in this paragraph will
require
or allow us or you to arbitrate on a class-wide or consolidated basis.
(6) WE EACH AGREE THAT WE WILL ONLY PURSUE ARBITRATION ON AN INDIVIDUAL BASIS AND WILL NOT
PURSUE ARBITRATION ON A CLASS-WIDE OR CONSOLIDATED BASIS. We each agree not to pursue arbitration
on a classwide basis. We each agree that any arbitration will be solely between you and Boost (not brought
on behalf of or together with another individual’s claim). If for any reason any court or arbitrator holds that this
restriction is unconscionable
or unenforceable, then our agreement to arbitrate doesn’t apply and the dispute must be brought in court.
(7) We each are responsible for our respective costs relating to counsel, experts, and witnesses, as well as any
other costs relating to the arbitration. However, we will pay for the arbitration administrative or filing fees, including
the arbitrator fees. Otherwise the JAMS Comprehensive Arbitration Rules & Procedures and the JAMS Policy on
Consumer Arbitrations Pursuant to Pre-Dispute Clauses, Minimum Standards of Procedural Fairness regarding
costs and payment apply.
Terms & Conditions
Page 86

No Class Actions
TO THE EXTENT ALLOWED BY LAW, WE EACH WAIVE ANY RIGHT TO PURSUE DISPUTES ON A CLASSWIDE BASIS;
THAT IS, TO EITHER JOIN A CLAIM WITH THE CLAIM OF ANY OTHER PERSON OR ENTITY OR ASSERT A CLAIM IN A
REPRESENTATIVE CAPACITY ON BEHALF OF ANYONE ELSE IN ANY LAWSUIT, ARBITRATION, OR OTHER PROCEEDING.
No Trial By Jury
TO THE EXTENT ALLOWED BY LAW, WE EACH WAIVE ANY RIGHT TO TRIAL BY JURY IN ANY LAWSUIT, ARBITRATION, OR
OTHER PROCEEDING.
Indemnification
You agree to indemnify, defend, and hold Boost and our subsidiaries, affiliates, parent companies harmless from any
Terms & Conditions
claims arising out of or relating to your actions, including, but not limited to, your use of the Service and any information
you submit, post, transmit, or make available via the Service; failing to provide appropriate notices regarding locationenabled services (see “Location-Enabled Services” section); failure to safeguard your passwords, backup question to
your shared secret question, or other account information; or violating this Agreement or any policy referenced in this
Agreement, any applicable law or regulation, or the rights of any third party.
Providing Notice To Each Other Under The Agreement
Except as the Agreement specifically provides otherwise, you must deliver written notice to us by mail to P.O. Box
54988, Irvine, CA 92619 or email to Boostmobilecustomerassistance@boostmobile.com. We will provide you notice by
correspondence to your last known address in our records, to any fax number or email address you’ve provided us, by
calling you on your Device or any other phone number you’ve provided us, by voice message on your Device or any
other phone number you’ve provided us, or by text message on your Device.
Other Important Terms
Subject to federal law or unless the Agreement specifically provides otherwise, this Agreement is governed solely
by the laws of the state encompassing the area code assigned to your Device, without regard to the conflicts of law
rules of that state. If either of us waives or doesn’t enforce a requirement under this Agreement in an instance, we
don’t waive our right to later enforce that requirement. Except as the Agreement specifically provides otherwise, if
any part of the Agreement is held invalid or unenforceable, the rest of this Agreement remains in full force and effect.
Page 87

This Agreement isn’t for the benefit of any third party except our corporate parents, affiliates, subsidiaries, agents, and
predecessors and successors in interest. You can’t assign the Agreement or any of your rights or duties under it. We can
assign the Agreement without notice. You cannot in any manner resell Devices or Services to another party. You cannot
export any Device. The Agreement and the documents it incorporates make up the entire agreement between us and
replaces all prior written or spoken agreements—you can’t rely on any contradictory documents or statements by sales or
service representatives. The rights, obligations, and commitments in the Agreement that—by their nature—would logically
continue beyond the termination of Services (for example, those relating to billing, payment, 911, dispute resolution, no
class action, no jury trial) survive termination of Services.
rev. 01/30/12
Terms & Conditions
Page 88

TRIM
Welcome
boostmobile.com
©2012 Boost Worldwide, Inc. All Rights Reserved. Boost, the Logo, Re-Boost and Boost Mobile are trademarks of Boost Worldwide, Inc. The Bluetooth
word mark and logos are owned by Bluetooth SIG, Inc. The LG name and logo are owned by LG Electronics, Inc. All Rights Reserved. LG is a registered
trademark of LG Electronics, Inc.
This booklet is made from 60% post-consumer recycled paper.
This booklet is printed with soy ink. Printed in Mexico
BM-11-15519
 Loading...