

Page 1

User GUide
LG 236C
MFL67883001 (1.0) Printed in China
Page 2

&RS\ULJKW/*(OHFWURQLFV,QF$OOULJKWVUHVHUYHG
/*DQGWKH/*ORJRDUHUHJLVWHUHGWUDGHPDUNVRI/**URXSDQG
LWVUHODWHGHQWLWLHV$OORWKHUWUDGHPDUNVDUHWKHSURSHUW\RIWKHLU
UHVSHFWLYHRZQHUV
Page 3

LG 236C User Guide - English
Some of the contents in this manual may differ from your phone
depending on the software of the phone or your service provider.
Page 4

Table of Contents
Phone Overview 6
Menus Overview 8
Menu Access .......................................... 8
Getting Started with Your
Phone 12
The Battery ............................................ 12
Charging the Battery .......................... 13
Battery Charge Level .......................... 13
Turning the Phone On and Off ....... 13
Signal Strength .................................... 14
Screen Icons ......................................... 14
Making Calls .......................................... 14
Correcting Dialing ...............................14
Redialing Calls ...................................... 14
Receiving Calls ..................................... 15
Mute Function.......................................16
Quick Volume Adjustments ............. 16
Call Waiting ........................................... 16
Caller ID .................................................. 16
Speed Dialing ...................................... 16
Text Input ............................................... 18
The Basics of Storing Contacts
Entries ..................................................... 19
2
Phone Numbers With Pauses ......... 19
Searching Your Phone’s Memory .. 20
Making a Call From Your Phone’s
Memory ...................................................21
Using Phone Menus 23
Prepaid 23
1. Add Airtime ....................................23
2. My Phone Number ....................... 23
3. Serial Number ...............................23
4. Code Entry Mode..........................23
Contacts 24
1. New Contact...................................24
2. Contact List ...................................24
3. Groups ...........................................25
4. My vCard ........................................25
5. Speed Dials ...................................25
Messages 26
1. New Message .................................26
2. New Picture Message ..................28
Page 5

Table of Contents
3. Inbox...............................................29
4. Outbox ...........................................30
5. Drafts ..............................................31
6. Voicemail........................................32
7. Templates ....................................... 32
8. Settings ..........................................33
1. All Messages .................................... 33
2. CMAS Settings .............................. 33
9. Delete All ......................................33
Recent Calls 34
1. Missed Calls ................................... 34
2. Received Calls .............................34
3. Dialed Calls ..................................34
4. All Calls .......................................... 35
5. Call Timer ......................................35
Games 36
1. Buy Games ..................................... 36
Browser 36
Multimedia 38
1. Take Photo ......................................38
2. Record Voice .................................39
3. Images ...........................................39
4. Sounds ...........................................39
Voice Command 41
1. Start Command ..............................41
1.1 Call <Name> or <Number> ..........41
1.2 Voicemail ..........................................41
1.3 Missed Calls ....................................41
1.4 Messages ....................................... 42
1.5 Time & Date .................................. 42
1.6 Help ..................................................42
2. Command Mode ...........................42
3. Announce Alert .............................43
4. Train Word ...................................... 43
5. Best Match ....................................43
My Schedule 44
1. Alarm Clock ....................................44
2. Calendar ........................................44
3. Notepad .........................................45
3
Page 6

Table of Contents
Bluetooth 45
1. Paired Devices ...............................46
2. Power .............................................46
3. My Visibility ................................... 47
4. My Bluetooth Info .........................47
Tools 47
1. Calculator .......................................47
2. Ez Tip Calculator ...........................48
3. Stopwatch ......................................48
4. Unit Converter...............................48
Settings 49
1. Sound ..............................................49
1.1 Ringtones ........................................ 49
1.2 Volume ............................................ 49
1.3 Message Alerts ............................. 49
1.4 Alert Type .......................................50
1.5 Service Alerts ................................ 50
1.6 Power On/Off Tone ..................... 50
1.7 Flip Tone ........................................... 51
1.8 TTS (Text-to Speech) ..................51
1.9 Emergency Tone ............................ 51
4
2. Display ............................................51
2.1 Wallpaper .........................................51
2.2 Backlight .......................................51
2.3 Menu Style .................................... 52
2.4 Languages (Idiomas) .................52
2.5 Clocks & Calendar .....................52
2.6 Font Settings ................................ 52
2.7 Word Prediction ........................... 53
2.8 Name Match for Dialing ........... 53
3. Security ..........................................53
3.1 Lock Phone ....................................53
3.2 Camera Restriction .................... 54
3.3 Change Lock Code .................... 54
3.4 Reset Default................................54
4. Call Settings ..................................54
4.1 Answer Options ............................ 55
4.2 One-Touch Dial .......................... 55
4.3 Senior Mode .................................55
4.4 Airplane Mode ............................. 55
4.5 TTY Mode...................................... 55
5. System ........................................... 56
5.1 Network ........................................... 56
5.2 Location ......................................... 56
6. Memory .........................................56
7. Phone Info ......................................57
Page 7

Accessories 58
Index 59
Table of Contents
5
Page 8
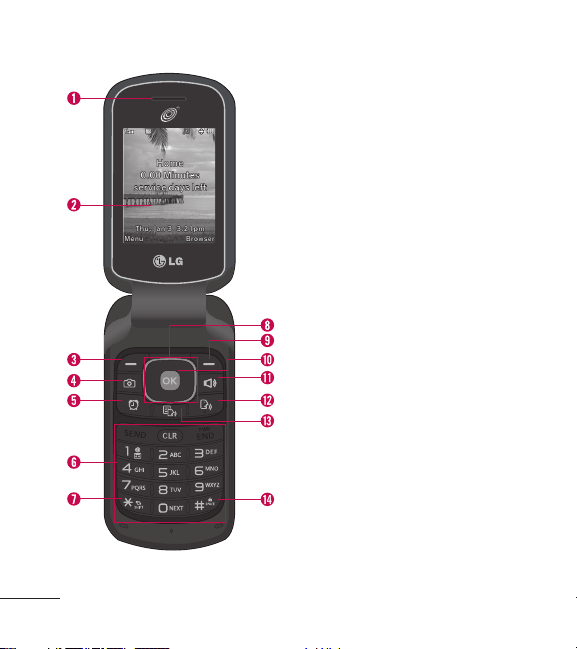
Phone Overview
1.
Earpiece Lets you hear the caller.
6
2.
LCD Screen Displays messages and
status icons. When the phone is turned
on, Power Save mode automatically dims
the screen and then darkens it if no keys
are pressed.
3.
Left Soft Key Use to access the Main
menu from the Home screen or the
function immediately above it.
4.
Camera Key Lets you activate the camera
and take pictures.
5.
Alarm Clock Key Use to access the Alarm
Clock menu.
6.
Alphanumeric Keypad Use to enter
numbers and characters and select menu
items.
7.
Shift/Vibrate Key Use to set the vibration
mode from standby mode. To set it, press
and hold for about 2 seconds. When
entering text, you can switch between
upper case and lower case letters.
8.
Directional Key Use to navigate through
menus and options. When on the
Home screen, use for quick access to
Messages, Contact List, Games and
Sound.
9.
Right Soft Key Use to access the Browser
menu from the Home screen or the
function immediately above it.
10.
OK Key Use to access the Prepaid menu
from the Home screen or to select items
when navigating menus.
11.
Speakerphone Key Use to turn the
Speaker on and off.
Page 9

12.
Voice Command Key Use to start the
Voice Command feature when in standby
mode.
13.
Text to Speech Key Lets you turn the
Text to Speech mode on and off.
14.
Space/Lock Key Use to lock the phone
from standby mode. To lock the phone,
press and hold for about 2 seconds.
When entering text, this enters a space.
1.
Headset Jack Allows the use of a headset
to hear caller’s voice.
2.
Volume Keys Use to adjust the ringer
volume in standby mode and the earpiece
volume during a call.
3.
Charger/Accessory Port Connects the
phone to the battery charger or other
available accessories.
Phone Overview
Charging with the PC USB Port
You can use your computer to charge your
phone. Connect one end of a USB cable to
the Charger/Accessory Port on your phone
and the other end to a high-power USB
port on your PC (commonly located on the
front panel of the computer).
4.
Camera Lens Lets you take pictures.
7
Page 10
Menus Overview
Menu Access
While in standby mode, press the Left Soft Key Menu to access
your phone’s menus. There are two methods of accessing menus and
submenus:
Use the Directional Keys to highlight a menu/option and press
to select it.
Press the number key on the keypad to activate the corresponding
menu/option.
Prepaid
1. Add Airtime
2. My Phone Number
3. Serial Number
4. Code Entry Mode
Contacts
1. New Contact
2. Contact List
3. Groups
4. My vCard
5. Speed Dials
8
Messages
1. New Message
2. New Picture
Message
3. Inbox
4. Outbox
5. Drafts
6. Voicemail
7. Templates
8. Settings
1. All Messages
1. Entry Mode
2. Signature
2. CMAS Settings
1. Presidential Alert
2. Extreme Alert
3. Severe Alert
4. AMBER(Child
Abduction
Emergency)
5. Alert Vibrate
6. Alert Sound
7. Alert Reminder
9. Delete All
1. Delete Inbox
2. Delete Outbox
3. Delete Drafts
Page 11

Menus Overview
4. Delete All
Messages
Recent Calls
1. Missed Calls
2. Received Calls
3. Dialed Calls
4. All Calls
5. Call Timer
6. Data Counter
Games
1. Buy Games
Block Breaker3
Unlimited
Texas Hold'Em Poker
2
Browser
Multimedia
1. Take Photo
2. Record Voice
3. Images
1. My Images
2. Default
3. Buy Graphics
4. Sounds
1. My Sounds
2. Default
3. Buy Ringtones
Voice Command
1. Start Command
1. Call <Name> or
<Number>
2. Voicemail
3. Missed Calls
4. Messages
5. Time & Date
6. Help
2. Command Mode
1. Normal
2. Speed
3. Announce Alert
1. Disable
2. Announce
3. Announce + Ring
4. Train Word
1. Voice Command
2. Answer
3. Digit Dial
5. Best Match
1. 1Match
2. 4 Matches
My Schedule
1. Alarm Clock
2. Calendar
3. Notepad
Bluetooth
1. Paired Devices
2. Power
9
Page 12

Menus Overview
3. My Visibility
4. My Bluetooth Info
Tools
1. Calculator
2. Ez Tip Calculator
3 Stopwatch
4. Unit Converter
1. Area
2. Length
3. Mass
4. Temperature
5. Volume
6. Velocity
Settings
1. Sound
1. Ringtones
1. All Calls
2. Caller ID
3. No Caller ID
10
4. Buy Ringtones
2. Volume
1. Master Volume
2. Keypad
3. Earpiece
4. Speaker
3. Message Alerts
1. Message
2. Picture Message
3. Voicemail
4. Message
Reminder
4. Alert Type
5. Service Alerts
1. Call Connect
2. Back to Top
3. Low Battery
4. Roam Alert
6. Power On/Off
Tone
7. Flip Tone
8. TTS
9. Emergency Tone
2. Display
1. Wallpaper
1. My Images
2. Default
3. Buy Graphics
2. Backlight
1. Display
2. Keypad
3. Brightness
3. Menu Style
4. Languages
(Idiomas )
5. Clocks & Calendar
1. Main Screen
2. Front Screen
6. Font Settings
1. Font Type
2. Dial Font Style
3. Dial Font Size
7. Word Prediction
8. Name Match for
Page 13

Menus Overview
Dialing
3. Security
1. Lock Phone
2. Camera Restriction
3. Change Lock Code
4. Reset Default
4. Call Settings
1. Answer Options
2. One Touch Dial
3. Senior Mode
4. Airplane Mode
5. TTY Mode
5. System
1. Network
1. System Select
2. Serving System
2. Location
6. Memory
1. Reserved Memory
2. Multimedia
7. Phone Info
1. My Number
2. ESN/MEID
3. Icon Glossary
4. Version
11
Page 14
Getting Started with Your Phone
The Battery
Note
It is important to fully charge the
battery before initial use of the phone.
The phone comes with a
rechargeable battery. The battery
charge level is shown at the top
right corner of the LCD screen.
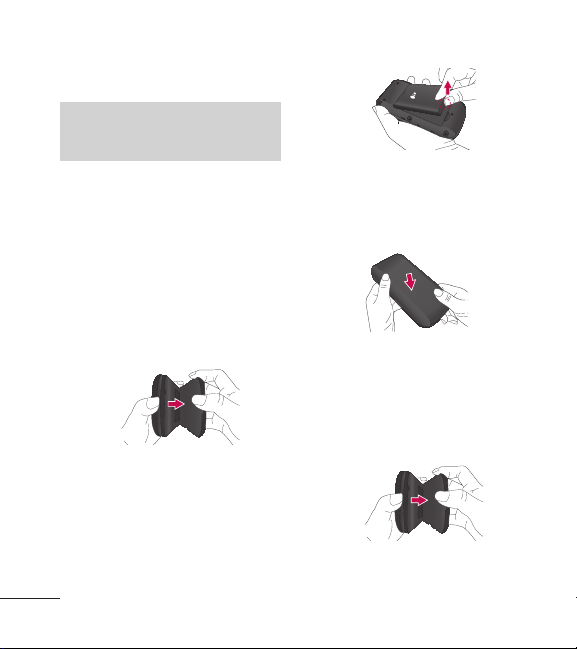
Installing the Battery
1. Insert your fingertip in the
fingertip cutout at the bottom of
the phone and gently lift off the
back cover to remove it.
2. Align the battery contacts with
the terminals in the battery
compartment and push the
battery down until it clicks into
place.
12
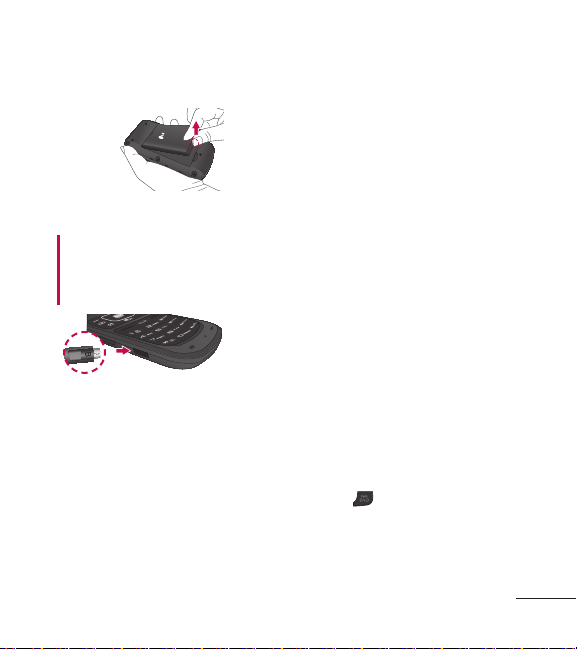
3. Place the back cover over the
battery compartment, then
press downward until it clicks
into place.
Removing the Battery
1. Turn the phone off and insert
your fingertip in the fingertip
cutout at the bottom of the
phone and gently lift off the
back cover to remove it.
2. Use the fingertip cutout at
the bottom of the battery
Page 15
Getting Started with Your Phone
compartment to lift the battery
out.
Charging the Battery
9CTPKPI Use only the charger
provided with the phone. Using any
charger other than the one included
with the phone may damage your
phone or battery
Notice
Please make sure that the 'B' side
faces up before inserting a charger
or USB cable into the Charger/
Accessory Port of your phone.
Plug one end of the charger into
the phone’s Charger/Accessory
Port and the other end into an
electrical outlet. The charge time
varies depending upon the battery
level.
Battery Charge Level
The battery charge level is shown
at the top right corner of the LCD
screen. When the battery charge
level becomes low, the low battery
sensor alerts you in up to three
ways: sounding an audible tone,
blinking the battery icon, and
displaying a warning message. If
the battery charge level becomes
exceedingly low, the phone
automatically switches off and any
function in progress is not saved.
Turning the Phone On and Off
Turning the Phone On
1. Install a charged battery or
connect the phone to an
external power source if the
battery level is low.
2. Press
for about 3 seconds
until the LCD screen turns on.
13
Page 16

Getting Started with Your Phone
Turning the Phone Off
Press and hold until the screen
turns off.
Signal Strength
Call quality depends on the signal
strength in your area. The signal
strength is indicated on the screen
as the number of bars next to the
signal strength icon
bars, the better the signal strength.
If the signal quality is poor, move
to an open area. If you are in a
building, the reception may be
better near a window.
Note
The call quality may also be affected
by your location and weather/ambient
conditions.
; the more
Screen Icons
To see the icon glossary, press
the Left Soft Key
the standby mode, then press
Settings >
Icon Glossary.
14
Menu from
Phone info >
Making Calls
1. Enter the phone number (include
the area code if needed).
2. Press
3. Press
to dial the number.
to end the call.
Correcting Dialing
If you make a mistake while dialing
a number, press
the last digit entered, or hold down
for at least 2 seconds to erase
all the digits entered.
once to erase
Redialing Calls
Press twice to redial the last
number you dialed. The last 150
numbers (50 missed, 50 received
and 50 dialed) are stored in the call
history list and you can also select
any of these to redial.
Page 17
Getting Started with Your Phone
Tip
To select your method for answering
calls, you can change your Answer
Options.
Menu > Settings >
Call Settings>
Choose from the following options:
Flip Open/ SEND Key Only / Any
Key/ Auto with Handsfree
Receiving Calls
1. When the phone rings and/or
vibrates, press
Note
If you press
while the phone is ringing, the ringing
or vibration is muted for that call.
2. Press to end the call.
Answer Options.
to answer.
or (the Volume Keys),
15
Page 18

Quick Access to Convenient Features
Mute Function
The Mute function is used during
a phone call. To quickly activate
Mute, press the Left Soft Key
Mute. To cancel, press the Left
Soft Key
Unmute.
Quick Volume Adjustments
Quickly adjust the ringer and
earpiece volumes by pressing the
Volume Up Key to increase the
volume and the Volume Down Key
to decrease it.
Note
Keypad Volume is adjusted through
the Sound V
Sound >
olume menu:
Menu > Settings >
Volum e > Keypad.
Call Waiting
Your cellular service may offer
call waiting. While a call is in
progress one beep indicates an
incoming call. When call waiting
is enabled, you may put the active
call on hold while you answer the
16
other incoming call. Check with
your cellular service provider for
information about this function.
1. Press
2. Press
to receive a waiting
call.
again to switch
between calls.
Caller ID
Caller ID displays the phone
number or name of the incoming
call. If the caller’s identity is stored
in Contacts, the name will appear
along with the phone number.
Check with your service provider to
ensure they offer this feature.
Speed Dialing
Speed dialing is a convenient
feature that allows you to make
phone calls quickly. A number
key can be assigned to a specific
phone number. By pressing and
holding down a number key, your
phone will recall the phone number
associated from the Contact List
Page 19

Quick Access to Convenient Features
and dial that phone number for
you. Speed Dial Number 1 is set
to your Voicemail by default and
cannot be changed.
Dialing Single Digit Speed Dials
(from 2 to 9)
Press and hold the Speed Dial
number.
OR
Enter the Speed Dial number
and press
Dialing Double Digit Speed Dials
(from 10 to 99)
Press the first digit and then
press and hold the key of the
second digit.
OR
Enter the first and second digits
and press
.
.
17
Page 20

Entering and Editing Information
Text Input
You can input and edit your
Calendar, Contacts, and more.
Key Functions
Left Soft Key:
Press to scroll through the
following text input modes:
T9Word: T9WORD/T9Word/
T9word
Abc: ABC/Abc/abc
123
Symbols
Shift Key: Press to change
capitalization.
T9Word: T9Word >
T9WORD > T9word
Abc: Abc > ABC > abc
Next: In T9 mode, press
to display other matching
words.
Space: Press to complete
a word if in T9 mode;
otherwise, press to insert a
18
space.
Clear: Press to delete a
single space or character.
Hold to delete the whole
message.
Punctuation: Press to insert
punctuation in a word and
complete a sentence.
Page 21

Contacts in Your Phone’s Memory
The Basics of Storing Contacts Entries
1. From standby mode, enter the
phone number you want to
save (up to 48 digits).
2. Press
3. Select either Add New Contact
Note
Use U
phone number to a contact already
stored in your phone.
4. Use to highlight a Label and
Mobile 1/ Home 1/ Office 1/
5. Enter a name for the phone
Save.
or Update Existing.
pdate Existing to add another
press
.
Mobile 2/ Home 2/ Office 2/
Fax
number (up to 32 characters)
and press
confirmation message is
displayed briefly.
Save. A
Phone Numbers With Pauses
When you call automated systems,
such as voicemail or credit billing
numbers, you often have to enter
a series of numbers to navigate
through the system. Instead of
entering these numbers by hand,
you can store the numbers in your
Contacts separated by special
pause characters (W, P). There are
two different types of pauses you
can use when storing a number:
Wait (W)
The phone stops dialing until
you press the Left Soft Key
Release to advance to the next
number.
Pause (P)
The phone waits 2 seconds before
sending the next string of digits.
Storing a Number with Pauses
1. Press Menu.
2. Press
Contacts.
19
Page 22

Contacts in Your Phone’s Memory
3. Press New Contact.
4. Enter a name (up to 32
characters).
5. Enter the phone number in any
of the number labels.
6. While entering the number,
press the Right Soft Key
Options.
7. Press
8. Enter the additional number(s)
and press
Wait or Pause.
Save.
Adding a Pause to an Existing
Number
1. While in standby mode, press
the Down Directional Key
to display your Contacts
alphabetically.
2. Use
3. Press the Left Soft Key
4. Use
20
to highlight the Contact
entry to edit, then press
View.
Edit.
to highlight the
number.
5. Press the Right Soft Key
Options.
6. Press
7. Enter the additional number(s)
and press
Searching Your Phone’s Memory
The phone is able to perform a
dynamic search of the contents in
your phone’s memory. A dynamic
search compares entered letters
or numbers against the entries in
your Contacts. A matching list is
displayed in descending order. You
can then select a number from the
list to call or edit.
Wait or Pause.
Searching by Letter
1. While in standby mode, press
the Down Directional Key
to display your Contacts
alphabetically.
2. Press (or press repeatedly)
the key on the keypad that
corresponds with the letter for
Save.
Page 23

Contacts in Your Phone’s Memory
the contact's name.
3. The matching contacts will be
automatically highlighted.
Scrolling Through Your
Contacts
1. Press the Down Directional Key
to display your Contacts
alphabetically.
2. Use
to scroll through the
list.
Contact List Options
1. While in standby mode, press
the Down Directional Key
and highlight a Contact entry.
2. Press the Right Soft Key
Options.
3. Select from the following
options:
Send Message: Send a
text/picture message to the
selected contact.
Delete: Delete the selected
entry in your Contacts.
Edit: Edit the selected contact
information.
Delete Multiple: Allows you
to delete multiple entries at
one time or all at once.
Send via Bluetooth: Send a
contact (vCard) via Bluetooth.
In case Bluetooth power is
not on, a notice pops up to
turn Bluetooth on.
Set Speed Dial: Set a speed
dial.
Making a Call From Your Phone’s Memory
Once you have stored phone
numbers in your Contacts, you
can place calls to those numbers
quickly and easily.
By pressing after searching
for a phone number in Contacts
or Recent Calls and highlighting
it.
By using Speed Dialing.
21
Page 24

Contacts in Your Phone’s Memory
From Contacts
1. While in standby mode, press
the Down Directional Key
to display your Contacts.
2. Use
3. Use
4. Press
to highlight the Contact
entry, then press
to highlight the phone
number.
to place the call.
View.
From Recent Calls
1. Press Menu.
2. Press
3. Use
recent call, then press
Missed Calls/ Received Calls/
Dialed Calls/ All Calls
4. Use
number.
5. Press
Recent Calls.
to highlight the type of
.
to highlight the phone
to place the call.
Speed Dialing
For a single-digit Speed Dial, press
and hold the digit or press the digit,
22
then press
Speed Dial, press the first digit
and hold the second digit or press
the first and second digits, then
press
. For a double-digit
.
Page 25

Using Phone Menus
Prepaid
For prepaid services, this menu
provides shortcut access to the
following items among others:
1. Add Airtime
Allows you to add airtime.
1. Press
2. Enter airtime PIN and press
3. Read the displayed message,
then select Yes or No.
2. My Phone Number
My Phone Number displays the
device’s phone number.
1. Press
3. Serial Number
Serial Number simply displays the
information of your phone’s MEID.
1. Press
Menu, , .
Menu, , .
Menu, , .
4. Code Entry Mode
Code Entry Mode will allow the
phone to accept TracFone-related
codes in order to add units, modify
specific data and troubleshoot the
phone. In using the Code Entry
Mode, you can’t receive incoming
calls or use events alert.
1. Press
.
Menu, , .
23
Page 26

Contacts
Contacts
The Contacts menu allows you to
store names, phone numbers and
other information in your phone’s
memory.
Note
When you access your Contacts, the
number in parentheses represents the
number of entries you have stored (up
to 1000).
1. New Contact
Allows you to add a new contact to
your Contact List.
1. Press
2. Enter the name, then press
to highlight the field in which
you wish to store the contact
information.
3. Enter the phone number or
e-mail address.
4. Continue adding the desired
contact information to the entry.
5. When you are finished entering
24
Menu, , .
the desired contact information,
press
Save to save the entry
into your Contact List.
2. Contact List
Allows you to view your Contact
List.
1. Press
2. Choose from the following
options:
Press to scroll through
Press the Right Soft Key
Send Message/ Delete/
Press View to view the
Press the Left Soft Key
Menu, , .
your Contacts alphabetically.
Options to select one of the
following:
Edit/ Delete Multiple / Send
via Bluetooth/ Set Speed
Dial
contact’s information.
New to create a new contact.
Page 27

Contacts
3. Groups
Allows you to view your grouped
Contacts, add a new group, change
the name of a group, or delete a
whole group.
1. Press
2. Choose from the following
options:
Use to highlight a group,
Press the Left Soft Key
Use to highlight a group,
Menu, , .
then press
the contacts in the selected
group.
New to add a new group.
then press the Right Soft Key
Options to choose from
the following options:
Delete/ Send Message/
Rename Group/ Group
Ringtone/ Delete All
View to view
4. My vCard
Allows you to edit and view your
personal Contact information,
including your name and phone
numbers.
1. Press
2. Use
you wish to edit and press the
Left Soft Key
3. Edit the information as desired
and press
Menu, , .
to highlight the feature
Edit.
Save.
5. Speed Dials
Allows you to view your Speed
Dials list, designate new Speed
Dials, or remove Speed Dial
designations entered in your
Contacts.
1. Press
2. Use
Speed Dial location (or enter
the Speed Dial digit using the
keypad), and press
Menu, , .
to highlight the desired
Assign.
25
Page 28

Contacts/ Messages
3. Use to highlight the Contact
and press
A confirmation message is
displayed.
26
.
Messages
The phone can store a total of up
to 735 (400 text messages, 100
CMAS messages, 100 multimedia
messages, and 100 multimedia
message notifications in the
Inbox; 15 text messages and 20
multimedia messages in the Drafts
folder) messages and drafts. The
information stored in the messages
is determined by phone mode and
service capability. Other limits,
such as available characters per
message, may exist. Please check
with your service provider for
system features and capabilities.
1. New Message
Allows you to send text messages
and e-mail. Each message will be
formatted and sent according to
the destination address.
The Basics of Sending a Text
Message
1. Press Menu, , .
Page 29

Messages
2. Enter the recipient’s address.
3. Press
4. Type your message.
5. Press
to access the text
field.
Send.
A confirmation message is
displayed.
Select Recipient(s) Using
Options
1. Press Menu, , .
2. Press the Right Soft Key
Options while in the To field.
3. Use
to highlight an option
and press
Contacts To select a recipient
from your Contact List.
Call History To select a
recipient from your Recent
Calls.
Recent Messages Choose
Inb
recipient from your Recent
Messages.
.
ox or Outbox to select a
Groups Select a recipient from
your Groups.
Cancel Cancels your message.
Complete your message and
4.
send it.
Customize Your Text Message
Using Options
You have various options to
customize the text while you are
composing a message.
1. Press
2. Enter the recipient’s address.
3. Press
field.
4. Press the Right Soft Key
Options.
5. Select from the following
options:
Insert T
Name & Number
Save as Draf
Priority Level High/ No
Cancel Cancels your message.
Menu, , .
to access the text
emplates/ Signature/
ts/ Templates
rmal
27
Page 30

Messages
6. Complete your message and
send it.
Message Icon Reference
Inbox
Picture Message
New/Unread Text Message
Opened/Read Text Message
High Priority Message
Sent
Picture Message
Failed Text Message
Multiple Failed Text Message
Sent Text Message
Multiple Sent Text Messages
Drafts
Draft Text Message
Draft Picture Message
2. New Picture Message
Allows you send messages with
text, images, and audio.
1. Press
28
Menu, , .
2. Enter the recipient’s address
or press the Right Soft Key
Options to search recent
contacts.
3. Use
4. Use
5. Type your message, then use
6. With the Image field
7. If you choose Image, use
8. With the Audio field
to highlight the
Subject field and enter your
subject.
to highlight the Tex t
field.
to highlight other fields.
highlighted, press the Left Soft
Key
Add and press to
select:
Image / Take Photo
to highlight a picture then press
the Left Soft Key
you choose Tak e Photo, take
the picture by pressing
Capture and then
highlighted, press the Left Soft
Key
Add.
Set. If
Set.
Page 31

Messages
9. Use to highlight a sound,
then press the Right Soft Key
Set.
10. When editing a field, the
following options are available
by pressing the Right Soft Key
Options:
* Editing the To: field
Contacts/ Call History/
Recent Messages/ Groups/
Cancel
* Editing the Subject/Text fields
Preview/ Add/ Go to/ Save
As/ Priority Level / Delivery
Notice/ Remove/ Cancel
* Editing the Image/Audio fields
Preview/ Add Slide/ Go
to/ Save As Draft/ Priorit y
Level/ Delivery Notice/
Remove/ Cancel
11. Press
Send to send the
message.
3. Inbox
The phone can alert you in several
ways when you receive a new
message, including:
Displaying a notification
message on the screen.
Displaying the message icon
/ on the status bar (It blinks
when the message is urgent).
Ringing and/or Vibrating
(depending on the Master
Volume settings).
Received messages are displayed
from newest to oldest.
Viewing Your Inbox
Up to 700 (400 text messages, 100
CMAS, 100 multimedia messages
and 100 multimedia message
notifications) messages can be
stored in the Inbox.
1. Press
2. Use
3. Press the Left Soft Key
Menu, , .
to highlight a message.
29
Page 32

Messages
Reply/D-load to reply or
download the attachment,
View to view the message, or
the Right Soft Key
for the following options:
For text messages: Delete/
Forward/ Save Contact/ Lock/
Delete Multiple
For picture messages: Delete/
Forward/ Save Contact/ Lock/
Delete Multiple
4. While viewing a message,
press the Left Soft Key
Reply to reply or the Right Soft
Key
Options to access the
following options.
Delete Deletes the selected
message.
Forward Forwards a received
message to other destination
address(es).
Save Contact Stores the
callback number
, e-mail
address, and numbers in the
received message into your
Contacts.
30
Options
Save to Templates Stores
the message as a template for
future messages.
Go to URL Accesses the
website by starting Browser
(Only for messages containing
a URL).
Lock Locks the selected
message.
Message Info Shows the
message type priority and
status.
Note
Press the T
ext to Speech Key
while viewing a message to listen to
the message out loud.
4. Outbox
Up to 100 sent messages (50
text messages and 50 multimedia
messages) can be stored in the
Sent folder. View the contents of
sent messages and verify whether
the transmission was successful.
1. Press
2. Use
Menu, , .
to highlight a sent
Page 33

Messages
message. Press the Left Soft
Key
Resend to resend the
message to the recipient,
View to view the message, or
the Right Soft Key
to access additional options:
Delete/ Forward / Save
Contact/ Lock/ Delete
Multiple
3. While viewing the selected sent
message, press the Left Soft
Key
Resend to resend the
message to the recipient, or the
Right Soft Key
access the following options:
Delete Deletes the selected
message.
Forward Forwards a received
message to other destination
address(es).
Save Contact Stores the
callback number
address, and numbers in the
received message into your
Contacts.
Options to
, e-mail
Options
Save to Templates Stores
the message as a template for
future messages.
Lock Locks the selected
message.
Message Info Shows the
message type priority and
status.
Note
For picture messages:
P
lay Again/ Delete/ Forwar d/ Save
Contact/ Save Media/ Loc k/ Extract
Address/ Message Info
5. Drafts
Displays saved draft messages.
1. Press
2. Use
message.
Press Edit to edit the
Press the Right Soft Key
Menu, , .
to highlight a Draft
message.
Options to access the
following options:
31
Page 34

Messages
Delete Deletes the selected
message from the Drafts.
Save Contact Allows you to
save the number to a new
contact or an existing contact.
Lock Locks a message so
that it cannot be erased.
Delete Multiple Allows you
to delete multiple messages
at one time.
6. Voicemail
Allows you to hear new voice
messages recorded in your voice
mailbox. Your phone will alert you
when you receive a new voice
message.
Checking Your Voice Mailbox
1. Press
2. Choose from the following
options:
Press the Left Soft Key
32
Menu, , .
Clear to clear the voicemail
counter.
Press to listen to the
message(s).
Press the Right Soft Key
Exit to return to the
Messages menu.
7. Templates
Allows you to display, edit, and
add text phrases. These templates
allow you to reduce manual text
input into messages.
1. Press
2. Press the Left Soft Key
New to create a new template.
3. Enter the desired text and press
4. Use
and press the Right Soft Key
5. Use
Delete and press
Menu, , .
Save to save the template.
to highlight a template
Options.
to highlight Edit or
.
Page 35

Messages
8. Settings
1. All Messages
1. Press Menu, , , .
2. Use
Messaging Settings Sub- Menu
Descriptions
1. Entry Mode
2. Signature (On/ Off/ Edit)
to highlight Entry
Mode or Signature and press
.
Allows you to select the default
text input method between
T9Word, Abc and 123.
Allows you to create/edit a
signature to automatically send
with your messages.
2. CMAS Settings
1. Press Menu, , , .
2. Use
to highlight the alert
categories below and press
Presidential Alert/ Extreme
Alert/ Severe Alert/
AMBER(Child Abduction
Emergency)/ Alert Vibrate/
Alert Sound/ Alert Reminder
3. Select the desired option.
9. Delete All
Allows you to erase the messages
stored in your Inbox, Outbox, or
Drafts folders. You can also erase
all messages at the same time.
1. Press
2. Use
Inbox, Delete Outbox,
Delete Drafts, or Delete All
Messages and press
3. Use
and press
.
Menu, , .
to highlight Delete
to highlight Yes or No
.
.
33
Page 36

Recent Calls
Recent Calls
The Recent Calls menu is a list
of the last phone numbers or
Contacts entries for calls you
placed, accepted, or missed.
It is continually updated as
new numbers are added to the
beginning of the list and the oldest
entries are removed from the
bottom of the list.
1. Missed Calls
Allows you to view the list of
missed calls; up to 50 entries.
1. Press
2. Use
and press the Right Soft Key
options:
Save (Details)/ Delete/ Delete
All/ Call Timer
3. Press
mode or highlight an entry and
press
34
Menu, , .
to highlight an entry
Options for the following
to return to standby
to dial that number.
2. Received Calls
Allows you to view the list of
incoming calls; up to 50 entries.
1. Press
2. Use
and press the Right Soft Key
options:
Save (Details)/ Delete/ Delete
All/ Call Timer
3. Press
mode or highlight an entry and
press
Menu, , .
to highlight an entry
Options for the following
to return to standby
to dial that number.
3. Dialed Calls
Allows you to view the list of
outgoing calls; up to 50 entries.
1. Press
2. Use
and press the Right Soft Key
options:
Save (Details)/ Delete/ Delete
All/ Call Timer
Menu, , .
to highlight an entry
Options for the following
Page 37

Recent Calls
3. Press to return to standby
mode or highlight an entry and
press
to dial that number.
4. All Calls
Allows you to view the list of
missed, received and dialed calls;
up to 150 entries.
1. Press
2. Use
and press the Right Soft Key
options:
Save (Details)/ Delete/ Delete
All/ Call Timer
3. Press
mode or highlight an entry and
press
Menu, , .
to highlight an entry
Options for the following
to return to standby
to dial that number.
5. Call Timer
Allows you to view the duration of
selected calls.
1. Press
2. Use
Menu, , .
to scroll through the
call type categories and press
to exit.
Last Call/ Home Calls/ Roam
Calls/ All Calls
3. If available, press the Left Soft
Key
Reset to reset the
highlighted call timer.
35
Page 38

Games/ Browser
Games
Allows you to use the preloaded
games or buy new games.
1. Buy Games
1. Press Menu, , .
2. Search for a game and
follow the on-screen steps to
download it.
OR
Select from the following
pre-loaded games:
Block Breaker 3 Unlimited /
Texas Hold’Em Poker 2
36
Browser
The Browser feature allows you
to initiate a Web session and view
Internet content. Accessibility
and selections within this feature
are dependent upon your service
provider. For specific information
on the Internet, contact your
service provider.
1. Press
2. After a few seconds, you will
see the home page.
Ending an Web Session
End an Web session by pressing
.
Navigating Through the Browser
On-screen items may be presented
in one of the following ways:
Numbered options
You can use your numeric
keypad.
Menu, .
Page 39

Browser
Links embedded in content
You can act on the options or
the links by using the Soft Keys
at the bottom of the display
screen.
Tex t or n um be rs
You can select the items by
moving the cursor and pressing
the appropriate Soft Keys.
Scrolling
Use to scroll through the
content if the current page does
not fit on one screen. The currently
selected item is indicated by a
cursor on the screen.
Fast Scrolling
Press to quickly move the cursor
up and down on the current screen.
Soft Keys
The Left Soft Key is used
primarily for first options or
selecting an item, but its function
may change depending on the
content displayed.
The Right Soft Key
primarily for secondary options or a
menu of secondary options.
Entering Text, Numbers, or
Symbols
When prompted to enter text, the
current text entry method appears
above the Right Soft Key
abc, ABC, Sym, 123, etc., press
the Right Soft Key
to upper case, press
Clearing Out Text/Numbers
Entered
When entering text or numbers,
press
to clear the last number,
letter, or symbol. Press and hold
to clear the input field completely.
Initiating a Phone Call From Web
You can make a phone call from
Web if the site you are using
supports the feature. The Browser
connection is terminated when you
initiate the call.
is used
as
. To change
.
37
Page 40

Multimedia
Multimedia
View, take, and share your digital
pictures right from your wireless
phone.
1. Take Photo
1. Press Menu, , .
2. Press
toolbar and set camera
settings, including Brightness,
Resolution, Capture, Zoom or
Multishot. Press the Left Soft
Key
Images, or press the Right Soft
Key
following settings:
Options tab
Color Effects C
Mono/ Negative
White Balance Auto/
Su
Fluorescent
Night Mode On/ Off
Self Timer Off/ 3 Seconds/
38
to display the
Gallery to view My
Options to change the
olor/ Sepia/
nny/ Cloudy/ Tungsten/
5 S
econds/ 10 Seconds
View Mode Fit to Screen/
ndscape
La
Settings tab
Shutter Sound None/
Sound 1/ Sound 2/ Sound 3/
Sound 4
Auto Save On/ Off
Send Reminder On/ Off
Reset Yes/ No
Take a picture by highlighting
3.
Capture and pressing
4. Select Send or View. Send will
open a new Picture Message
and View will allow you to view
the following additional options:
.
Save: Allows you to save the
image.
Gallery: Opens My Images.
Send: Allows you to send the
picture in a picture message
or via Bluetooth.
Set As: Allows you to set the
Page 41

Multimedia
image as your Wallpaper or a
Contact’s Picture ID.
Delete: Deletes the image.
2. Record Voice
Record Voice allows you to record
short verbal/voice messages.
1. Press
2. Press
new voice memo.
3. Talk into the microphone, then
press
memo title is the date and time
of recording.
4. Once recording has stopped,
press the Right Soft Key
following:
Set As/ Rename / Delete
Or press the Left Soft Key
Save to save the recording
or
multimedia message or via
Bluetooth.
Menu, , .
Record to record a
Stop. The default
Options to access the
Send to send it in a
3. Images
Allows you to browse through the
images saved on your handset.
1. Press
2. Select My Images or Default.
Or select Buy Graphics
and follow the on-screen
instructions to buy images.
3. Use the Directional Keys to
view and scroll through the
pictures.
4. Press the Right Soft Key
Options for the following
options:
Set As / Slide Show/ Edit/
Image Effects / Take Photo/
Delete/ Rename/ Lock/
Unlock/ List View/ Sort By
4. Sounds
Allows you to access your
recorded sounds or record new
ones.
1. Press
Menu, , .
Menu, , .
39
Page 42

Multimedia
2. Press the Left Soft Key
Voice to record an audio clip.
3. Press the Left Soft Key
Sound to access My Sounds
or press
recording.
While recording, press the Left
Soft Key
Stop to
4. When you are finished
recording, press the Left Soft
Key
clip or the Right Soft Key
Options to access additional
options. Use
Set As, Rename, or Delete and
press
OR
2. Use
Sounds or Default and press
and follow the on-screen
instructions to buy ringtones.
3. Use
clip.
40
Record to begin
Pause to pause or
Stop recording.
Save to save the audio
to highlight
.
to highlight My
. Or select Buy Ringtones
to highlight the audio
Press Play to play the
selected audio clip.
Press the Right Soft Key
Options to access the
following options:
For My Sounds: Set As/
Record Voice/ Delete/
Rename/ Lock/Unlock/ File
Info/ Sort By
For Default: Set As (Ringtone,
Contact ID, Alert Sounds)
Page 43

Voice Command
Voice Command
Allows you to make phone calls
quickly and easily by voice. Your
phone recalls the number from
your Contacts and then dials it.
This menu also includes features
that are useful for those who
are driving or blind. It delivers
time information by voice and
allows you to check missed calls,
messages and voicemails.
1. Start Command
Allows you to initiate a Web
session.
To enter the Voice Command
menu, press
.
OR
Press the Voice Command Key
.
Menu, ,
1.1 Call <Name> or <Number>
Allows you to call a Contact or dial
a number.
1. Press the Voice Command
Key
.
2. Say Call, followed by the name
as it is saved in your Contact
List or say the number.
1.2 Voicemail
Allows you to call and listen to your
voicemail.
1. Press the Voice Command
Key
and say “Voicemail”.
2. The phone will announce any
new Voicemail(s).
3. You will be prompted to call
voicemail. Say Yes or No.
1.3 Missed Calls
You can hear details about missed
calls.
1. Press the Voice Command
Key
and say “Missed
Calls”.
41
Page 44

Voice Command
2. The phone will announce any
missed calls.
3. You will be prompted to call
back the missed calls. Say Yes
or No.
1.4 Messages
This voice command feature
will read out information from
messages received.
1. Press the Voice Command
Key
and say “Messages”.
2. The phone will announce any
messages you have received.
3. You will be prompted to call
the numbers that sent you the
messages. Say Yes or No.
1.5 Time & Date
This voice command feature will
read out the current time & date.
1. Press the Voice Command
Key
.
2. Say Time & Date to listen to
the time and date.
42
1.6 Help
Allows you to view more
information about the features in
Voice Control.
1. Press the Voice Command
Key
.
2. Say Help to view help
information.
2. Command Mode
Allows you to choose between
Normal or Speed settings. The
Speed setting allows you to access
the Voice Command functions
more quickly with a non-verbal
prompt.
1. Press
2. Select an option.
Normal/ Speed
Menu, , .
Page 45

Voice Command
3. Announce Alert
Allows you to customize the
Announce Alert function. Alert
Announce allows you to hear more
information about an incoming call
in addition to, or instead of, the
ringtone.
1. Press
2. Select an option.
Disable/ Announce/
Announce + Ring
Menu, , .
4. Train Word
Allows you to train the voice
recognition for improved results.
1. Press
2. Select an option.
Voice Command/ Answer/
Digit Dial
3. Follow the prompts.
Menu, , .
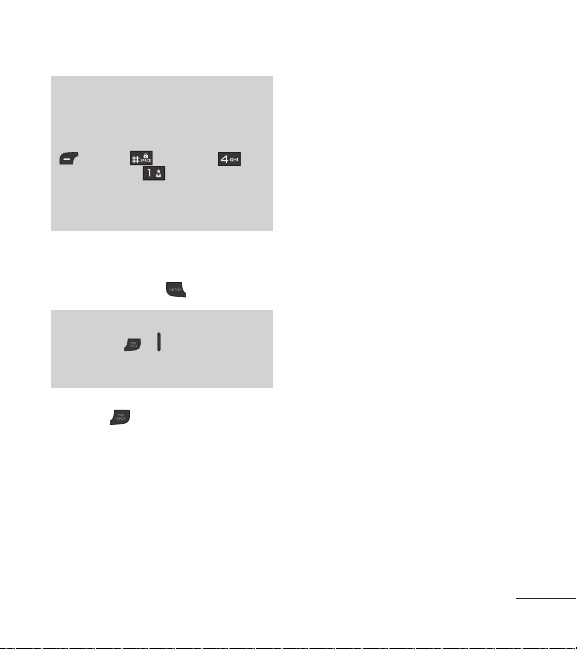
5. Best Match
Allows you to choose whether
the phone displays 1 or up to the
4 closest matches when using
the “Call <Name> or <Number>”
function.
1. Press
2. Select an option.
1 Match/ 4 Matches
Menu, , .
43
Page 46

My Schedule
My Schedule
1. Alarm Clock
Allows you to set up to five alarms.
At the alarm time, any set alarm
will sound the tone of your choice,
and an alarm message will be
displayed on the LCD screen.
1. Press
2. Use
you wish to set, then press
to select it.
3. Press the Left Soft Key
to set the alarm time.
4. Use
(recurrence setting).
5. Press
following.
Once / Daily/ Mon - Fri /
Weekends
6. Use
press the Left Soft Key
and select a ringtone.
7. Press
44
Menu, , .
to highlight the alarm
to highlight Repeat
to select one of the
to highlight Ringtone,
Save.
2. Calendar
Allows you to store and access
your agenda(s). Simply enter your
appointments in the Calendar, and
your phone will alert you with a
reminder.
1. Press
2. Use
scheduled day.
Set
3. Press the Left Soft Key
New.
4. Use
you wish to edit, then press the
Left Soft Key
Set
your schedule information.
Menu, , .
to highlight the
Moves cursor to the
previous day.
Moves cursor to the next
day.
Moves to the previous
week.
Moves to the next week.
to highlight the field
Set to edit
Page 47

My Schedule/ Bluetooth
5. Once you have entered all the
necessary information, press
Save.
3. Notepad
Allows you to add, read, edit, and
erase notes to yourself.
1. Press
2. Press the Left Soft Key
New to write a new note.
3. Type the note, then press
Save.
A confirmation message
displays briefly, then displays
your list of notes.
Note
Press the T
while viewing a note to listen to it
out loud.
Menu, , .
ext to Speech Key
Bluetooth
The phone is compatible with
devices that support the Bluetooth®
headset, Basic Printing, File
Transfer, hands-free, serial port,
object push and phonebook access
profiles. You may create and store
several pairings and connect
to one device at a time. The
approximate communication range
for Bluetooth® wireless technology
is up to 30 feet (10 meters).
Note
Read the user guide of each
Bluetooth® accessory that you are
trying to pair with your phone because
the instructions may be different.
Note
The Bluetooth® features of this
handset may not be compatible with
all devices which are Bluetooth®
enabled; your service provider or
handset manufacturer cannot be
responsible for compatibility with
devices not sold by the service
provider or handset manufacturer.
45
Page 48

Bluetooth
1. Paired Devices
Pairing is the process that allows
the handset to locate, establish and
register 1-to-1 connection with the
target device.
For pairing new Bluetooth®
device
1. Press Menu, , .
2. Follow the Bluetooth®
accessory instructions to set
the device to pairing mode.
3. Press the Left Soft Key
Search to search for devices
to pair. If Bluetooth® power is
set to off, you will be prompted
to turn the power on. Highlight
Yes and press
4. Highlight New Search and
press
in the Device Found menu once
it has been located. Highlight
the device and press
5. The handset may prompt
you for the passkey. Consult
46
.
. The device will appear
Pair.
the Bluetooth® accessory
instructions for the appropriate
passkey (typically “0000” - 4
zeroes). Enter the passkey
and press
prompted to confirm matching
passkeys.
6. Once pairing is successful,
select a connection preference
(Always Ask or Always
Connect).
7. Once connected, you will see
the device listed in the Paired
Devices menu.
2. Power
Allows you to set the Bluetooth
power to On or Off.
1. Press
2. Use
then press
Note
By default, your device’s Bluetooth®
functionality is turned off.
Menu, , .
to highlight On or Off,
. Or you might be
.
Page 49

Bluetooth/ Tools
3. My Visibility
Allows you to set the visibility of
your Bluetooth® function.
1. Press
2. Use
then press
Note
If you turn on My Visibility, your device
is able to be searched by other inrange Bluetooth® devices.
Menu, , .
to highlight On or Off,
.
4. My Bluetooth Info
Allows you to view information
about the Bluetooth functionality
and change the device's name.
1. Press
2. Press the Left Soft Key
Rename.
3. Enter the new name and press
Menu, , .
Save.
Tools
Your phone is equipped with
helpful tools, which include a
Calculator, EZ Tip Calculator,
Stopwatch, and Unit Converter.
1. Calculator
Allows you to perform simple
mathematical calculations.
1. Press
2. Enter the necessary data.
Use the keypad to enter
Use to enter decimals.
Use to enter parenthesis.
Press the Left Soft Key
Press the Right Soft Key
Use the Directional Keys to
Menu, , .
numbers.
Reset to erase the entry.
Operator for additional
calculating options.
enter functions.
47
Page 50

Tools
Press to complete
equation.
2. Ez Tip Calculator
Allows you to quickly and easily
estimate the tip and total amount
of a bill by inputting the bill amount
before tip, the tip percentage, and
dividing it by the number of people
paying.
1. Press
2. Enter the variable fields (Bill,
Tip(%), Split).
3. The Tip ($) and Tot al fields will
automatically be calculated.
4. Press the Left Soft Key
calculation.
Menu, , .
Reset to make another
3. Stopwatch
Allows you to record the elapsed
time of an event.
1. Press
2. Press
48
Menu, , .
Start to start, and
press
Stop to stop.
You can use the Lap function
by pressing the Left Soft Key
Lap to record up to 99
laps and lap times.
4. Unit Converter
Allows you to convert units of
Area, Length, Temperature, Mass,
Volume and Velocity.
1. Press
2. Select the unit of measurement
you want to convert:
Area / Length/ Mass/
Tem pe rature/ Volume /
Velocit y
3. Select the type of known
unit and enter the desired
amount. The conversion will
automatically be calculated.
Menu, , .
Page 51

Settings
Settings
1. Sound
Options to customize your phone’s
sounds.
1.1 Ringtones
Allows you to assign ringtones for
incoming calls.
1. Press
2. Select All Calls/ Caller ID / No
Caller ID/ Buy Ringtones.
3. Highlight My Sounds/ Default/
Buy Ringtones and press
open the desired folder.
4. Use
ringtone.
5. Press
ringtone and the Left Soft Key
your phone.
Menu, , , .
to
to highlight the
Play to play the
Set to set the ringtone to
1.2 Volume
Allows you to set various volume
settings.
1. Press
2. Select Master Volume/
Keypad/ Earpiece/ Speaker.
3. Use
the function, then press
save the setting.
Menu, , , .
to adjust the volume of
to
1.3 Message Alerts
Allows you to select the alert tone
for a new message.
1. Press
2. Select Message/ Picture
Message/ Voicemail/ Message
Reminder.
3. Highlight My Sounds/ Default/
Buy Ringtones and press
open the desired folder.
4. Use
or setting, then press the Left
Soft Key
Menu, , , .
to
to highlight a ringtone
Set or press .
49
Page 52

Settings
1.4 Alert Type
Allows you to select the alert
types.
1. Press
2. Use
you wish to edit.
Call Alert/ Message Alert/
Schedule Alert/ Alarm Alert
3. Use
alert types.
Ring Only/ Vibrate Only/ Ring
& Vibrate
4. Press
Menu, , , .
to highlight the alert
to scroll through the
to save.
1.5 Service Alerts
Allows you to set any of the 4 Alert
options to On or Off.
1. Press
2. Select an alert option.
Menu, , , .
1.5.1 Call Connect
Alerts you when the call is
connected.
50
1.5.2 Back to Top
Alerts you when you scroll through
the end of a menu list.
1.5.3 Low Battery
Alerts you when the battery charge
level is low.
1.5.4 Roam Alert
Alerts you when the Roam service
activates.
3. Use
to highlight On or Off,
then press
Battery are: Announce/ Tone)
. (Options for Low
1.6 Power On/Off Tone
Allows you to set the phone to
sound a tone when the phone is
powered on and off.
1. Press
2. Use
then press
Menu, , , .
to highlight On or Off,
.
Page 53

Settings
1.7 Flip Tone
Allows you to set a Flip tone that
will play when you flip open your
phone.
1. Press
2. Use
then press
Menu, , , .
to highlight On or Off,
.
1.8 TTS (Text-to Speech)
When you set this on, text
messages and Notepad notes be
read out.
1. Press
Note
When the phone is in Vibration mode,
the TTS setting is off.
2. Use to highlight On or Off,
then press
Menu, , , .
.
1.9 Emergency Tone
Allows you to set the phone
to sound a tone when it is in
Emergency mode.
1. Press
Menu, , , .
2. Use
to highlight Ring,
Vibrate, or Off, then press
.
2. Display
Options to customize your phone’s
display screen.
2.1 Wallpaper
Allows you to choose the kind of
background to be displayed on the
phone.
1. Press
2. Use
Default, or Buy Graphics, then
press
3. Use
and press the Left Soft Key
Menu, , , .
to highlight My Images,
.
to highlight an image
Set.
2.2 Backlight
Allows you to set the duration for
illuminating the backlight.
1. Press
2. Use
Keypad, or Brightness, then
Menu, , , .
to highlight Display,
51
Page 54

Settings
press .
3. Use
to highlight a setting,
then press
.
2.3 Menu Style
Allows you to view the main Menu
items as icons or on a list.
1. Press
2. Highlight Icon or List and press
Menu, , , .
.
2.4 Languages (Idiomas)
Allows you to use the bilingual
feature according to your
preference. Choose between
English and Español.
1. Press
2. Use
Español, then press
Menu, , , .
to highlight English or
.
2.5 Clocks & Calendar
Allows you to select the type of
clocks displayed on the main LCD.
1. Press
2. Highlight Main Screen or Front
52
Menu, , , .
Screen, then press
.
2.5.1 Main Screen
Use to highlight Normal
Clock, Analog Clock, Digital 12
Clock, Digital 24 Clock, Calendar,
or Off, then press
.
2.5.2 Front Screen
Use to highlight Digital Clock
or Minimize, then press
.
2.6 Font Settings
Allows you to select the type of
font displayed on LCD.
1. Press
2. Highlight a sub-menu and press
Font Type / Dial Font Style /
Dial Font Size
3. Use
then press
Options for Font Type
LG Gothic / LG Greentea / LG
Mint / LG Round / LG Secret
Menu, , , .
.
to highlight an option,
.
Page 55

Settings
Options for Dial Font Style
Digital/ Blackboard/
Sketchbook/ Sky/ Basic
Options for Dial Font Size
Normal/ Large
2.7 Word Prediction
Allows you to activate word
prediction, a function that uses
your past text entries to predict
what your next word will be.
1. Press
2. Use
then press
Menu, , , .
to highlight On/ Off,
.
2.8 Name Match for Dialing
Allows you to turn Name Match for
Dialing On or Off.
1. Press
2. Use
then press
Menu, , , .
to highlight On or Off,
.
3. Security
The Security menu allows you to
secure the phone electronically.
3.1 Lock Phone
Keeps your phone from
unauthorized use. Once the phone
is locked, it is in restricted mode
until the lock code is entered. You
can still receive phone calls and
make emergency calls. You can
modify the lock code by setting a
new lock code within the Security
menu.
1. Press
2. Enter the four-digit lock code.
The default lock code is
commonly the last 4 digits of
your phone number.
3. Press
4. Use
then press
Unlock The phone will remain
unlocked.
Menu, , .
Lock Phone.
to select an option,
.
53
Page 56

Settings
Lock The phone is locked until it
is unlocked again. When locked,
you can receive incoming calls
and make only emergency calls.
On Power Up The phone is
locked when it is turned on.
3.2 Camera Restriction
Allows you to block Camera use.
1. Press
2. Enter the four-digit lock code.
3. Press
4. Use
Lock and press
Menu, , .
Camera Restriction.
to highlight Unlock or
.
3.3 Change Lock Code
Allows you to enter a new fourdigit lock code.
1. Press
2. Enter the four-digit lock code.
3. Press
4. Use
Only or Camera and press
5. Enter your current four-digit lock
54
Menu, , .
Change Lock Code.
to highlight Phone
code.
6. Enter a new four-digit lock code.
7. For confirmation, it will ask you
to enter the new lock code
again.
3.4 Reset Default
Allows you to reset your phone to
the factory default settings.
1. Press
2. Enter the four-digit lock code.
3. Press
4. Read the message and if you
agree, press
5. Use
Cancel and press
Menu, , .
Reset Default.
.
to highlight Revert or
4. Call Settings
The Call Settings menu allows
you to designate how the phone
handles both incoming and
outgoing calls.
.
.
Page 57

Settings
4.1 Answer Options
Allows you to determine how to
answer an incoming call.
1. Press
2. Use
then press
Flip Open / SEND Key
Only / Any Key / Auto with
Handsfree
Menu, , , .
to highlight a setting,
.
4.2 One-Touch Dial
Allows you to initiate a speed dial
call by pressing and holding the
speed dial digit. If set to Off, Speed
Dial numbers designated in your
Contacts will not function.
1. Press
2. Use
then press
Menu, , , .
to highlight On or Off,
.
4.3 Senior Mode
Senior mode is a function that
amplifies a sound for seniors to
hear the voice well by emphasizing
a low voice. It is used for
enhancing the speech quality while
you are on the phone.
1. Press
2. Use
then press
, , , .
to highlight On/ Off,
.
4.4 Airplane Mode
Allows you to use features on your
phone that do not require wireless
communications.
1. Press
2. Read the displayed message
and press
3. Use
then press
Menu, , , .
to continue.
to highlight On or Off,
.
4.5 TTY Mode
Allows you to attach a TTY
(Teletype writer) device, enabling
you to communicate with parties
also using a TTY device. A phone
with TTY support is able to
translate typed characters to voice.
Voice can also be translated into
characters and then displayed on
55
Page 58

Settings
the TTY device.
1. Press
2. Read the displayed message
and press
3. Use
then press
TTY Full/ TTY + Talk/ TT Y +
Hear/ TTY Off
Menu, , , .
to continue.
to highlight a setting,
.
5. System
The System menu allows you to
designate specific system network
settings.
5.1 Network
5.1.1 System Select
Allows you to set up the phone
producer’s management
environment. Leave this setting as
the default unless you want to alter
system selection as instructed by
your service provider.
1. Press
56
Menu, , , ,
.
2. Use
to highlight Home
Only or Automatic, then press
.
5.1.2 Serving System
Identifies the channel number of
a system that is served as an SID
Number. This information should
only be used for technical support.
1. Press
Menu, , , ,
.
5.2 Location
Menu for GPS (Global Positioning
System: Satellite assisted location
information system) mode.
1. Press
2. Use
On or E911 Only, then press
Menu, , , .
to highlight Location
.
6. Memory
Allows you to check the memory
status of your phone.
1. Press
Menu, , .
Page 59

2. Use to highlight Reserved
Memory or Multimedia and
press
.
7. Phone Info
The Phone Info menu provides you
with specific information pertaining
to your phone model.
1. Press
2. Use
Number, ESN/ MEID, Icon
Glossary, or Version and press
Menu, , .
to highlight My
.
Settings
57
Page 60

Accessories
There are a variety of accessories available for your mobile phone. Consult
your local dealer for availability. Optional items are sold separately.
Battery Charger
The battery charger allows you to
charge your phone battery.
Battery
Standard battery is available.
58
Page 61

Index
A
Add Airtime 23
Airplane Mode 55
Alarm Clock 44
Alert Type 50
All Calls 35
All Messages 33
Announce Alert 43
Answer Options 55
B
Backlight 51
Battery Charge Level
13
Best Match 43
Bluetooth 45
Browser 36
Buy Games 36
C
Calculator 47
Calendar 44
Caller ID 16
Call <Name> or
<Number> 41
Call Settings 54
Call Timer 35
Call Waiting 16
Camera Restriction 54
Change Lock Code 54
Charging the Battery
13
Clocks & Calendar 52
CMAS Settings 33
Code Entry Mode 23
Command Mode 42
Contact List 24
Contacts 24
Correcting Dialing 14
D
Delete All 33
Dialed Calls 34
Display 51
Drafts 31
E
Emergency Tone 51
Ez Tip Calculator 48
F
Flip Tone 51
Font Settings 52
G
Games 36
Getting Started with
Your Phone 12
Groups 25
H
Help 42
I
Images 39
Inbox 29
59
Page 62

Index
L
Languages (Idiomas)
52
Location 56
Lock Phone 53
M
Making a Call From
Your Phone’s Memory
21
Making Calls 14
Memory 56
Menu Access 8
Menus Overview 8
Menu Style 52
Message Alerts 49
Messages 26, 42
Missed Calls 34, 41
Multimedia 38
Mute Function 16
My Bluetooth Info 47
My Phone Number 23
My Schedule 44
60
My vCard 25
My Visibility 47
N
Name Match for Dialing
53
Network 56
New Contact 24
New Message 26
New Picture Message
28
Notepad 45
O
One-Touch Dial 55
Outbox 30
P
Paired Devices 46
Phone Info 57
Phone Numbers With
Pauses 19
Phone Overview 6
Power 46
Power On/Off Tone 50
Prepaid 23
Q
Quick Volume
Adjustments 16
R
Received Calls 34
Receiving Calls 15
Recent Calls 34
Record Voice 39
Redialing Calls 14
Reset Default 54
Ringtones 49
S
Screen Icons 14
Searching Your Phone’s
Memory 20
Security 53
Senior Mode 55
Page 63

Index
Serial Number 23
Service Alerts 50
Settings 33, 49
Signal Strength 14
Sound 49
Sounds 39
Speed Dialing 16
Speed Dials 25
Start Command 41
Stopwatch 48
System 56
T
Take Photo 38
Templates 32
Text Input 18
The Basics of Storing
Contacts Entries 19
The Battery 12
Time & Date 42
Tools 47
Train Word 43
TTS 51
TTY Mode 55
Turning the Phone On
and Off 13
U
Unit Converter 48
Using Phone Menus
23
V
Voice Command 41
Voicemail 32, 41
Volume 49
W
Wallpaper 51
Word Prediction 53
61
Page 64

Printed in China
 Loading...