

LG LFX23965SB Owner’s Manual

ENGLISH
ESPAÑOL
FRANÇAIS
OWNER´S MANUAL
BOTTOM FREEZER
REFRIGERATOR
Please read this manual carefully before operating
your set and retain it for future reference.
Model Name
LFX23961**
LFX23965**
P/No. MFL65001601
**=color number, número de color, numéro de couleur
www.lge.com

Visit our web site http://www.lgservice.com
LG Electronics
LIMITED WARRANTY
United States of America
LG Electronics will repair or at its option replace, without charge, your product which proves to be defective
in material or workmanship under normal use during the warranty period listed below from the date of
original purchase.
This warranty is good only to the original purchaser of the product during the warranty period as long as it is
in the U.S. including Alaska, Hawaii, and U.S. Territories.
LG Refrigerator / Freezer Warranty Period
Product Parts Labor
Refrigerator / Freezer 1 year 1 year [In-Home Service (Except Model GR-051)]
Sealed System 7 years 1 year [In-Home Service (Except Model GR-051)]
(Compressor, Condenser, Evaporator)
No other express warranty is applicable to this product. THE DURATION OF ANY IMPLIED WARRANTIES.
INCLUDING THE IMPLIED WARRANTY OF MERCHANTABILITY, IS LIMITED TO THE DURATION OF
THE EXPRESS WARRANTY HEREIN. LG ELECTRONICS SHALL NOT BE LIABLE FOR THE LOSS OF
USE OF THE PRODUCT, INCONVIENCE, LOSS OR ANY OTHER DAMAGES, DIRECT OR
CONSEQUENTIAL, ARISING OUT OF THE USE OF OR INABILITY TO USE, THIS PRODUCT OR FOR
ANY BREACH OF ANY EXPRESS OR IMPLIED WARRANTY, INCLUDING THE IMPLIED WARRANTY
OF MERCHANTABILITY APPLICABLE TO THIS PRODUCT.
Some States do not allow the exclusion or limitation of incidental or consequential damages or limitations on how
long an implied warranty lasts; so these limitations or exclusions may not apply to you. This warranty gives you
specific legal rights and you may also have other rights which vary from state to state.
THE ABOVE WARRANTY DOES NOT APPLY TO:
1. Service trips to your home to deliver and pickup, install, instruct, or replace house fuses or correct house wiring or
plumbing, or correction of unauthorized repairs.
2. Damage to the product caused by accident, pests, fire, floods, or acts of God.
3. Repairs when your LG product is used in other than normal, single-family household use.
4. Damage resulting from accident, alteration, misuse, abuse, or improper installation.
Damages caused during and/or after delivery.
5.
Display, discount, or refurbished units purchased with scratches, dents, or defects.
6.
Proof of purchase is required and must be provided to LG in order to validate warranty.
Therefore, these costs are paid by the consumer.
If the product is installed outside the normal service area, any cost of transportation involved in the repair of the product, or the
replacement of defective parts, shall be borne by the owner.
CUSTOMER ASSISTANCE NUMBERS:
To obtain Warranty Coverage: Retain your Bill of Sale to prove date of purchase.
A Copy of your Sales Receipt must be submitted at the time
warranty service is provided.
To obtain Product or Customer
Service Assistance: Press the appropriate menu option, and have your product type
To obtain the nearest
Authorized Service Center:
Call 1-800-243-0000
(24 hrs a day, 7 days per week, 365 days per year)
(Refrigerator), model number, serial number, and ZIP/Postal
Code ready.
Call 1-800-243-0000
(24 hrs a day, 7 days per week, 365 days per year)
Press the appropriate option, and have your product type
(Refrigerator), model number, serial number, and ZIP/Postal
Code ready.
2

TABLE OF CONTENTS
Warranty (USA)
Warranty (Canada)
English Version
Spanish Version
French Version 73
Important Safety Instructions 7 - 8
Requirements for Ground Connection
Parts and Features
Refrigerator Installation
Unpacking
Installation
Installation of Base Grille
Removing and Replacing
refrigerator doors
How to remove and Install Pull Out Drawer
Closing and Aligning the doors
Using your Refrigerator
Ensuring Proper Air Circulation
Multi Flow
Door Alarm
Control Panel
Configurating the Controls
How to regulate the Controls
Adjusting Control Settings
Food Storage Guide
Storing Frozen Food
Refrigerator Section
Refrigerator Shelves
Frozen Meat Comparment (Chef Fresh
/ Snack Pan)
2 - 3
4 - 5
39
10 - 16
10
10
10
12 - 13
14 - 15
16
17 - 28
17
17
17
17
18
18 - 19
19 - 20
20
20
21 - 24
21
22
Crisper Humidity Control
Optibin Crispers
6
8
9
Crisper cover with interior lattice
Door Racks
Dairy Compartment
Egg Compartment
Freezer Section
Ice Bin
DuraBase
Durabase Divider
Tilting Door
Glide Out Drawer
Water Dispenser
Water Filter
Ice Maker
Refrigerator Care and Cleaning
Refrigerator Cleaning
Outside
Inside
Door Lining & Gaskets
Plastic Parts (Covers and Panel)
Back Cover
Replacing Refrigerator Lights
Power Interruptions
When Going on Vacation
When Moving
About the Automatic Ice Maker
Connecting the Water Line
Troubleshooting Guide
22
22
22 - 23
23
24
24
24 - 28
24
24
25
24 - 25
25
25
25 - 27
27 - 28
29 - 30
29
29
29
29
29
29
29 - 30
30
30
30
31
32 - 34
35 - 38
6
IMPORTANT SAFETY INSTRUCTIONS
SAFETY MESSAGES
This manual contains several important safety notices. Always read and obey all of the following safety messages.
This is the safety alert symbol. This symbol is a warning to potential dangers that could cause death,
injury or damage to you, others or the product.
All safety messages will follow after this warning symbol and the word “DANGER”, “CAUTION” or
“WARNING”. These words mean:
DANGER
WARNING
CAUTION
All safety messages inform you of potential danger,advise you on how to reduce the risk of injury and tell you what can
occur if the instructions are not followed.
You may be killed or suffer fatal damage if you do not follow instructions.
You may be killed or seriously injured if you do not follow instructions.
Indicates a potentially hazardous situation which, if not avoided, may result in minor
injury or damage to the product.
WARNING
To reduce the risk of fire, electrical shock or personal injury,
the following precaution measures should be followed:
NEVER disconnect the refrigerator by pulling the power cord,
always grip the plug firmly and disconnect it directly from the
outlet.
Immediately repair or replace all faulty or damaged service
cables. Do not use cords that have cracks or abrasion damage
on the length of the cord or on the plug.
When moving your refrigerator, take care not to roll over the
electrical cord.
DO NOT store or use gasoline or other combustible liquids
or vapors in proximity with this or any other electrical appliance.
DO NOT permit children to climb, stand or swing from the doors
or shelves of the refrigerator. This can cause serious injury to
them and damage to the product.
Keep your fingers away from areas in which they can become
caught, such as the doors, hinges and cabinets. Be careful
closing the doors when children are near.
Unplug the refrigerator before cleaning or repairing.
NOTE: We strongly recommend that any repair services be
performed by a qualified professional.
Before replacing a burned-out light bulb, unplug the refrigerator
or shut down the circuit breaker to avoid contact with a live
wire (the bulb could break while being replaced). NOTE:
Setting the control to the OFF position does not disconnect the
power from the light bulb circuit.
Do not keep bottles in the freezer compartment, they could
explode after freezing and cause damage.
For your safety, this product should be properly grounded.
Have a qualified professional check the electrical circuit and
outlet to ensure a proper ground connection.
Read all instructions before utilizing the product.
Utilize this product only as explicitly expressed in this guide.
Once the refrigerator is operating, avoid touching cold
surfaces of the freezer with damp or wet hands; the skin
could become adhered to these surfaces.
In refrigerators with an automatic ice dispenser, avoid
contact with moving parts of the ejector mechanism or with
the heating mechanism that discharges the cubes. DO NOT
place your fingers or hands in the ice dispenser mechanism
while the refrigerator is connected.
DO NOT refreeze foods which have already thawed. The
Department of Agriculture of the United States, in your
Bulletin of Home and Gardens No. 69 establishes that:
“...You can refreeze food that have thawed if they contain
ice crystals or are cold and below 40 °F (4 °C)”.
“...Ground beef, perishable food or seafood that is discolored
or has an unpleasant odor should not be frozen or consumed.
Consumption of melted ice cream should also be avoided.
If the odor or color of food is questionable, discard it. The
food may be dangerous to consume”.
“Partial thawing or refreezing reduces the quality of the food,
especially fruit, vegetables and prepared meals. The quality
of red meat is less affected than that of other foods. Use
refrozen products as soon as possible in order to maintain
their quality”.
KEEP THESE INSTRUCTIONS
7
CAUTION
This appliance is not intended for use by children, persons with physical or mental disabilities, persons with reduced
sensory or mental capacity, or persons that lack experience or know-how, unless they have supervision or instruction in
relation to the use of the appliance by the person responsible for their safety. Children should be supervised to assure that
they do not play with the appliance.
DANGER: CHILDREN MAY BECOME TRAPPED
Children becoming trapped or suffocated is not a problem
of the past. Discarded and abandoned refrigerators are a
hazard, even if they remain there “for just a few days”.
If you would like to dispose of your old refrigerator, please
follow the instructions below to prevent any accidents.
BEFORE DISPOSING YOUR
REFRIGERATOR OR FREEZER
WHEN NO LONGER IN USE:
Remove the doors.
Leave the shelves in place so that children
cannot easily become stuck in them.
CFC DISPOSAL
Your old refrigerator may have a cooling system that uses If you decide to throw out your old refrigerator, ensure that
CFC’s (chlorofluorocarbons). CFC affects the stratospheric CFC contaminants are properly disposed of by a qualified
layer of the ozone. professional. If you intentionally remove the CFC
refrigerant, you could be subject to fines or prison in
accordance with environmental legislation in effect.
REQUIREMENTS FOR GROUND CONNECTION
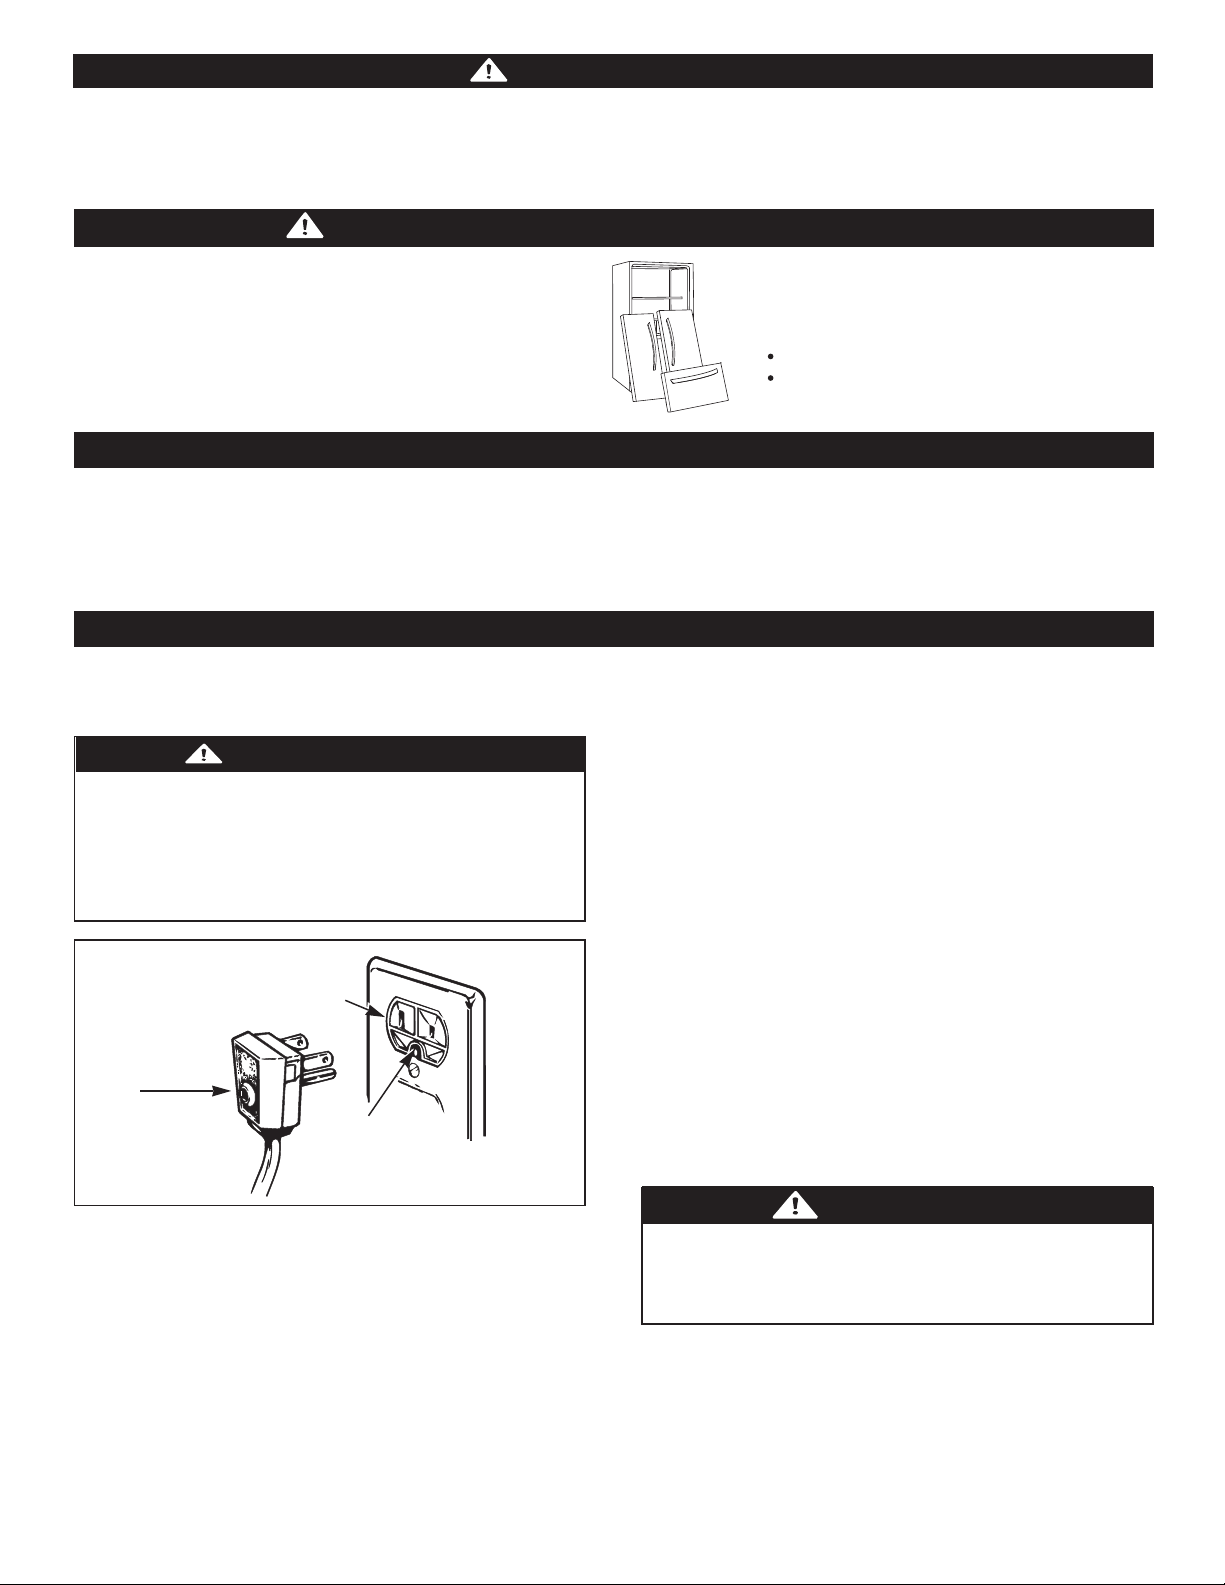
IMPORTANT:
TO CONNECT ELECTRICITY
FOR YOUR PERSONAL SAFETY, this appliance must
be properly grounded. Have a qualified electrician
check your wall outlet to ensure that the plug is
3-prong
grounding
plug
Attentively read the following.
WARNING
Electrical Shock Hazard
grounded properly.
3-prong
grounding type
wall receptacle
It is your responsibility and obligation to replace
two-prong outlets with that of an adequately
grounded three-prong outlet. Do not, under any
circumstance, cut or extract the third prong from
the plug.
NOTE: Before installation, cleaning or replacing light
bulbs, you must disconnect the appliance from the
power source. When finished, plug the appliance back
in and adjust the thermostat to the desired position.
USE OF EXTENSION CABLES
We do not recommend the use of extension cables.
However, if you still choose to utilize an extension cable,
it is absolutely necessary that it is listed in the UL (in
the United States) or CSA (in Canada), that it supports
three-pronged plugs and that the electrical current
support a minimum of 15 A and 120 V.
Ensure proper
ground exists
before use.
RECOMMENDED GROUNDING METHOD
Your refrigerator must always be connection to its own
outlet which is adequately grounded. The energy current
should only be 115 V, 60 Hz, C.A. and fused at 15 or 20 A.
This provides the best performance and prevents an
overload which could cause a fire from the overheating of
the cables. It is recommended that a separate circuit be
used for this appliance, as well as a receptacle that cannot
be disconnected with a switch. Do not use an extension
cable.
The use of an extension cable will increase the amount
of space needed behind the refrigerator.
WARNING
REPLACING ELECTRICAL CABLE
If the power cord is damaged, it must be replaced
by our service center or qualified LG technician to
avoid any risk.
8
A
B
C
PARTS AND FEATURES
I
J
K
D
E
E
F
L
M
G
H
N
O
P
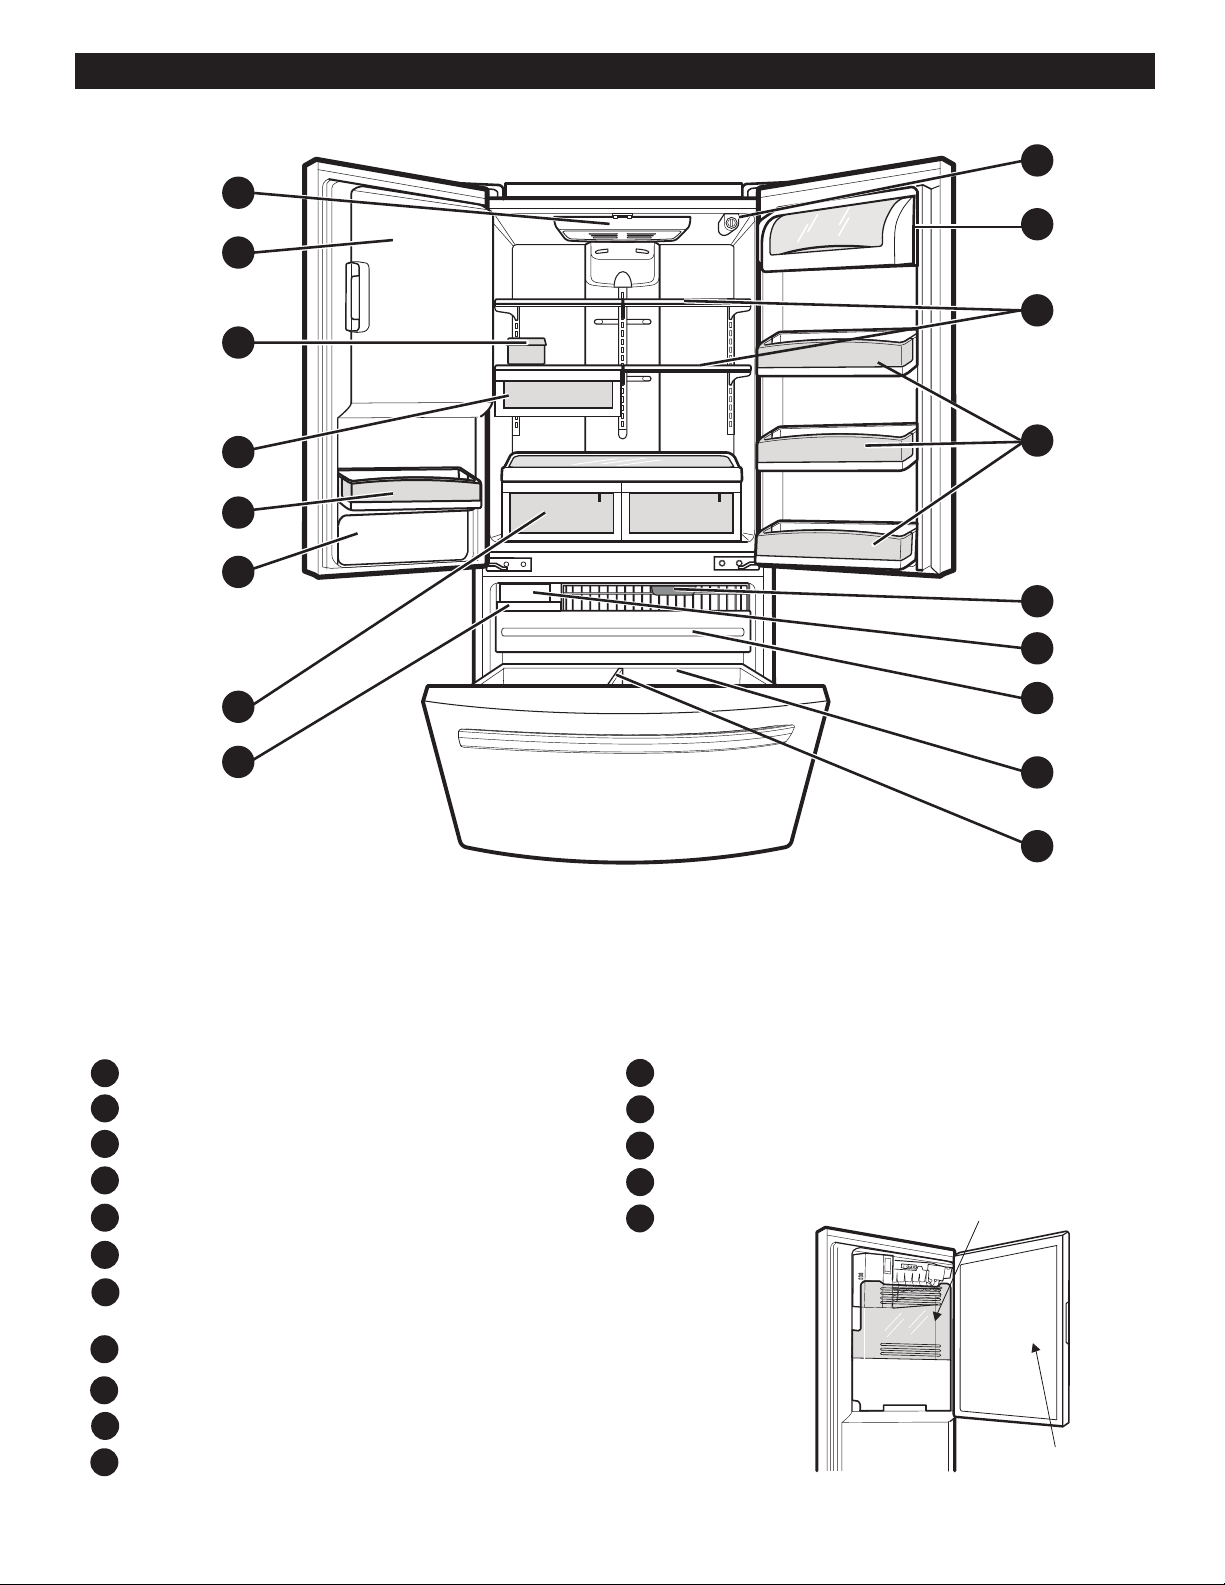
Read this section to familiarize yourself with the parts and features of your new refrigerator.
NOTE: This guide covers different models. Your refrigerator could have some or all of the features and parts listed
below. The location of some of the parts may not correspond to that of your model.
A
Refrigerator Light
B
Ice Maker
C
Egg Compartment
D
Frozen Meat Compartment (Chef Fresh / Snack Pan)
Door Racks
E
F
Water Tank Lid
Optibin Crisper
G
Keeps fruits and vegetable fresh and crisp
Ice Bin
H
Filter (Inside the Refrigerator)
I
J
Dairy Compartment
K
Shelves
L
Freezer Light
M
Turbo Motor
N
Glide Out Drawer
O
Durabase
P
Durabase Divider
9
Ice Deposit
Ice Maker Door

REFRIGERATOR INSTALLATION
WARNING
Excessive Weight Hazard
Use the assistance of two or more persons to move or
install the refrigerator. Not following these instructions
may cause injury to the back and other parts of the body.
UNPACKING
Before installing your refrigerator, remove any tape or
temporary stickers. Do not remove any stickers that feature
warnings, the model serial number or the technical label of
the product located on the back of the refrigerator.
To remove adhesive tape residue, rub it well with your
fingers and a little liquid detergent. Clean with warm water
and let dry.
Do not use sharp instruments, rubbing alcohol, flammable
liquids or abrasive cleaning products to remove the
adhesive tape or glue. These products can damage the
surface of your refrigerator. For more information, see the
section on “Important Safety Instructions”.
The shelves come already installed in their factory position.
Remove the shelves and replace them according to your
spacing needs.
3. Install the refrigerator in an area between 55 ° F (13 °C)
and 110° F (43 °C). If the surrounding temperature is
lower or higher than previously mentioned, it can
adversely affect the unit.
CAUTION: Avoid placing the unit near heat sources,
direct sunlight or humidity.
ONCE INSTALLED
1. Carefully clean your refrigerator and remove and
dust accumulated during shipping.
2. Install accessories such as the ice bin, door racks,
shelves, etc., in their proper places. These are already
packed to prevent any possible damage during shipping.
3. Leave your refrigerator on for 2 to 3 hours before
storing food inside. Verify that there is a flow of cold
air in the freezer compartment to ensure proper
cooling. Your refrigerator is now ready for use.
WARNING:
Take care when working with the hinges, base cover
and stops, etc. You may injure yourself.
DO not place your hands or any tools in the air vents,
the base cover or in the bottom of the refrigerator. This
may cause injury or electrical shock.
Moving Your Refrigerator:
Your refrigerator is extremely heavy. Make sure you
protect the floor when moving your refrigerator for
cleaning or servicing. Always pull your refrigerator
straight out when moving it. Do not shift from side to
side or “walk” the refrigerator when attempting to move
it as this can cause damage to the floor.
WARNING
Explosion Hazard
Keep all flammable materials and vapors (such as
gasoline) away from the refrigerator. Not following
these instructions may cause death, explosion or fire.
INSTALLATION
1. Avoid placing the unit near heat sources, direct sunlight,
or humidity.
2. To avoid vibration, the unit should be leveled. If needed,
adjust the leveling screws to compensate for an unlevel
floor. The front should be slightly taller than the rear to
ensure that the doors close properly. The leveling
screws can easily be turned by slightly tilting the front of
the refrigerator, turning the leveling screws clockwise
( ) to raise it and counter-clockwise ( ) to lower it.
INSTALLATION OF BASE GRILLE
Uninstalling or Replacing the Base Grille
1. Remove the 2 screws from the bottom front part of
your refrigerator (see Figure A).
2. Take off the cover.
Figure A
Installing the Base Grille
1. Align the bottom cover and place in position. Insert
the 2 screws and twist in place (see Figure B).
Figure B
Keep a Proper Distance from Adjacent
Objects
Please keep the refrigerator at an
adequate distance from other objects.
Insufficient spacing can reduce the
refrigerator's freezing efficiency and
increase electricity consumption.
(5.08 cm) 2”
10

REFRIGERATOR INSTALLATION
T O O L S Y O U M A Y N E E D
10 mm
1/4 in
3/8 in
Hex head socket wrench
Phillips Screwdriver
Flat head Screwdriver
Allen Wrench
1/4 in
3/32 in
To move refrigerator through a house door, it maybe necessary to remove refrigerator and freezer door handles.
NOTE: Handle appearance may vary from illustrations on this page.
1. Removing Refrigerator Handle
• Loosen the set screws with the 3/32 ” Allen
wrench and remove the handle.
NOTE: If the handle mounting fasteners
Mounting
Fasteners
need to be tightened or removed, use a 1/4 ”
Allen wrench.
Set Screw
2. Removing Freezer Drawer Handle
• Loosen the set screws located on the lower
side of the handle with the 3/32 ” Allen
wrench and remove the handle.
NOTE: If the handle mounting fasteners
need to be tightened or removed, use a 1/4 ”
Allen wrench.
Allen Wrench
11
REFRIGERATOR INSTALLATION
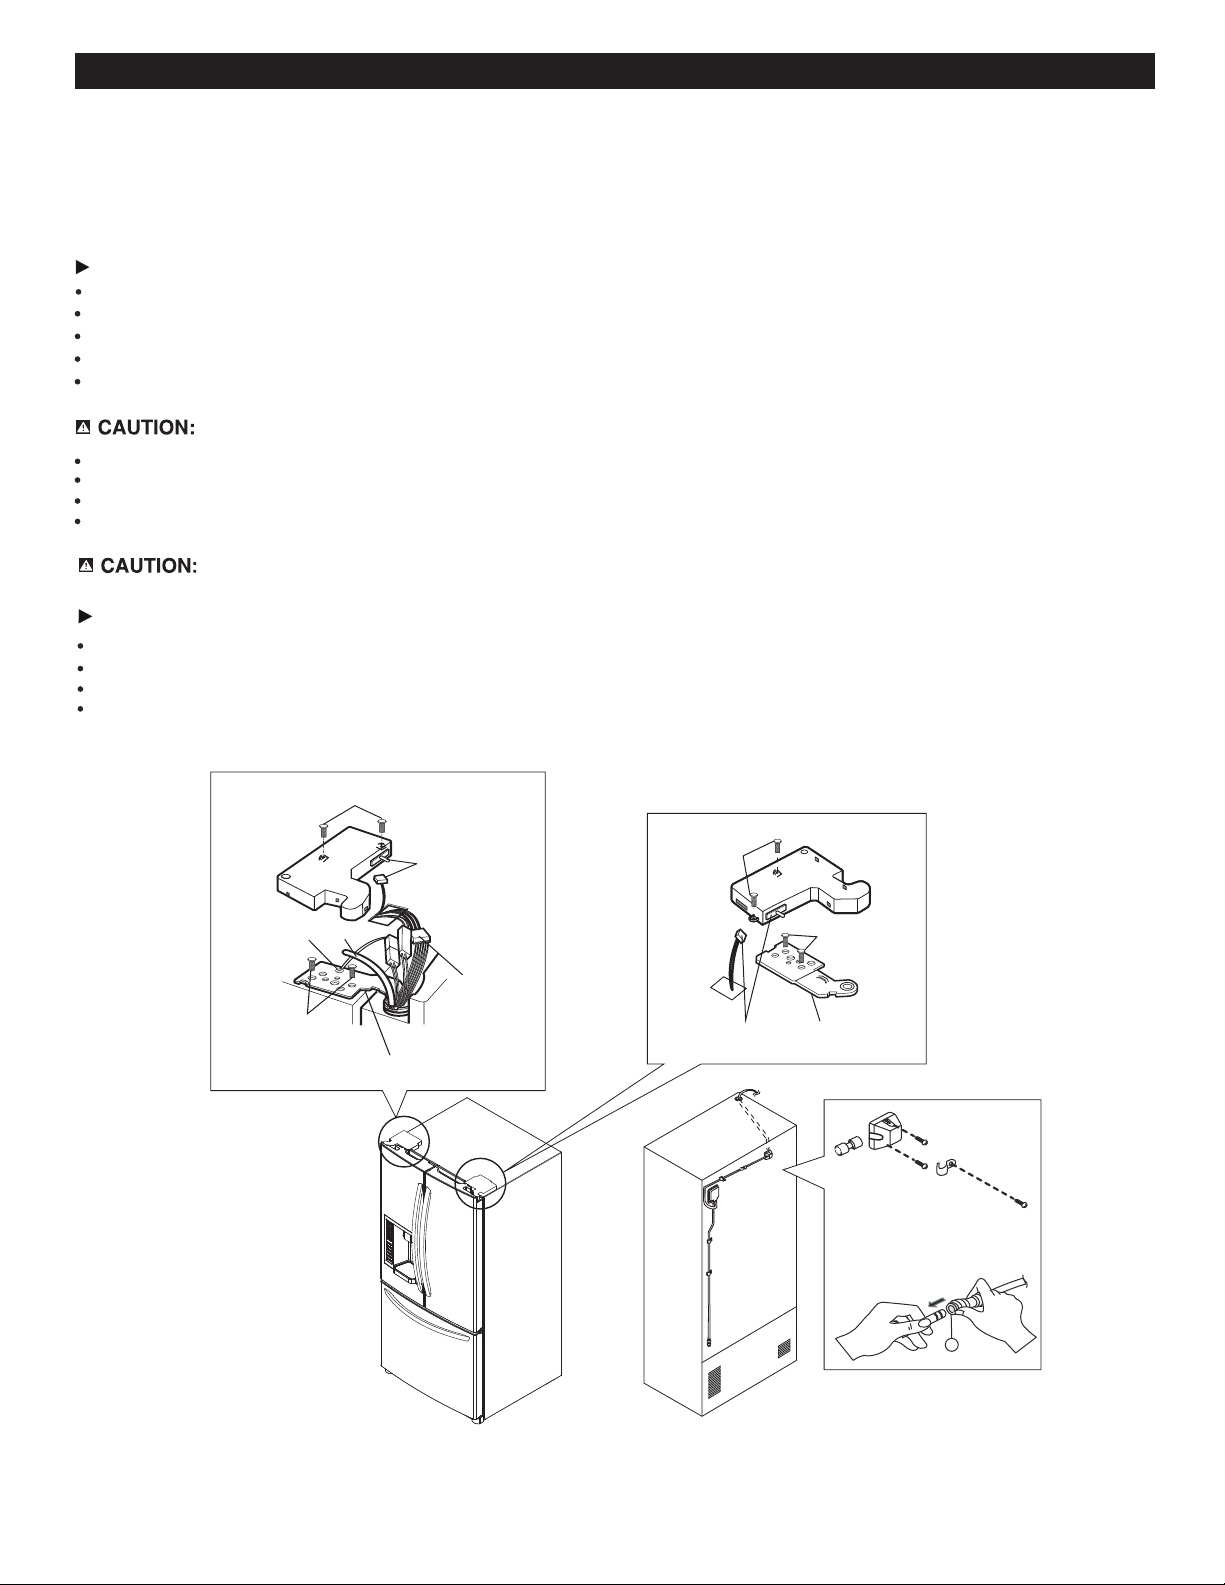
REMOVING AND REPLACING REFRIGERATOR DOORS
1. Removing Refrigerator Door
NOTE: Handle appearance may vary.
IMPORTANT: Before you begin, turn the refrigerator OFF and unplug it. Remove food and any racks from doors.
Left Door
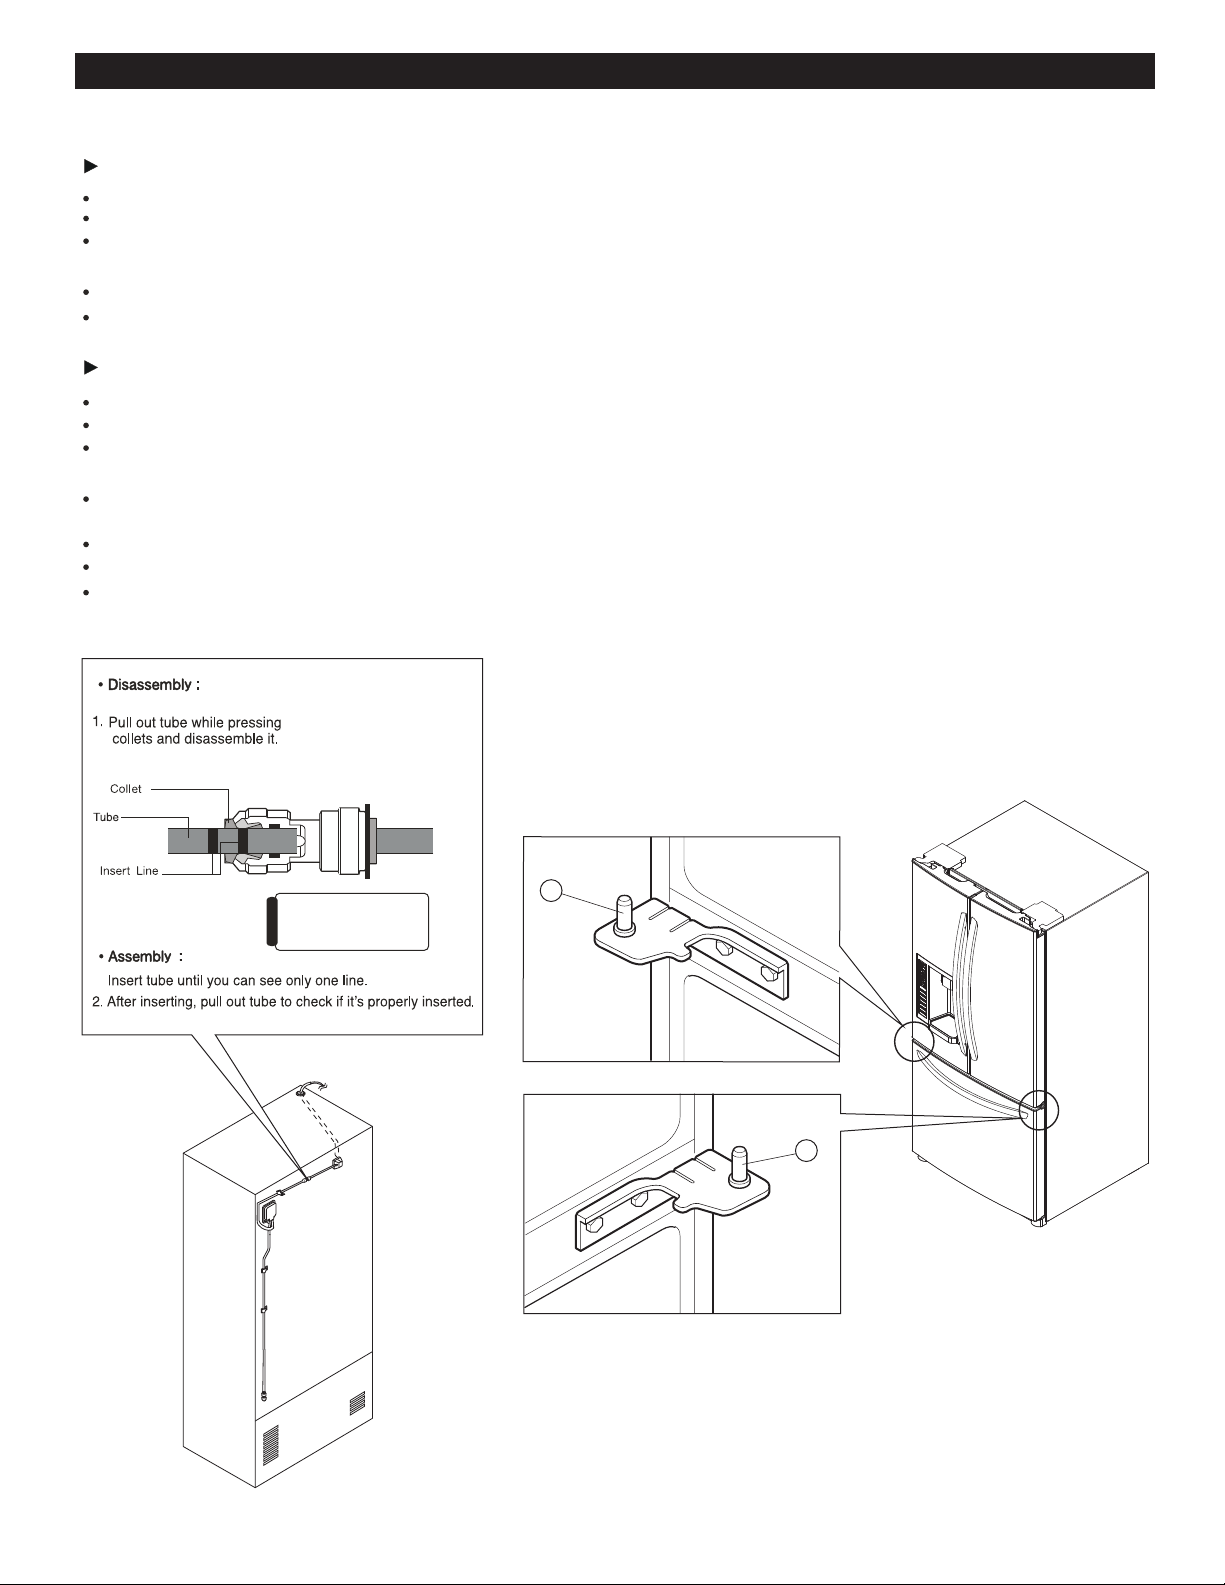
Loosen the screws and remove the cover on back side (see figure A).
Disconnect water supply tube by pushing back on the disconnect ring (3).
Loosen the cover screw (1).
Disconnect door switch wire (2).
Pull out the tube (4).
If a tube end is deformed or worn out, cut the damaged portion away.
Disconnect wire harness (5).
Remove the grounding screw (6).
Loosen screws (7) and lift off the top hinge (8).
Place the door on a non-scratching surface with the inside up.
When removing top hinge, be careful that the door does not fall forward.
Right Door
Loosen the cover screw (1).
Disconnect door switch wire (2).
Loosen screws (7) and lift off the top hinge (8).
Place the door on a non-scratching surface with the inside up.
(1)
(4)
(6)
(7)
(8)
Left Door
(2)
(5)
(1)
(2)
Right Door
(7)
(8)
Figure A
3
12
REFRIGERATOR INSTALLATION
2. Replacing Refrigerator Door
Right Door
Lower the door onto the middle hinge pin (9). Make sure the door is aligned with the cabinet.
Replace the top hinge (8) installing hinge screws (7) to secure it.
Make sure the gasket on the door is flush against the cabinet and is not folded. Support the door on the handle side
while securing hinge. Make sure the door is straight and the gap between the doors is even.
Connect the door switch wire (2).
Tighten the cover screw (1).
Left Door
Lower the door onto the middle hinge pin (10). Make sure the door is aligned with the cabinet.
Replace the top hinge (8) installing hinge screws (7) to secure it.
Make sure the gasket on the door is flush against the cabinet and is not folded. Support the door on the handle side
while tightening. And make sure the door is straight and the gap between the doors is even.
Insert the water supply tube (4) into the connector tube until you see only one scale mark. (Fully insert the tube over
5/8” (15mm)).
Install the grounding screw (6) and connect the harness (5).
Connect the door switch wire (2).
Tighten the cover screw (1).
Connecting tube color
• Blue to Blue
Caution
• White to White
1.
10
9
13
REFRIGERATOR INSTALLATION
HOW TO REMOVE AND INSTALL THE
PULL OUT DRAWER
IMPORTANT: To avoid possible injury or damage to the
product or your property, please use two people to perform
the following instructions:
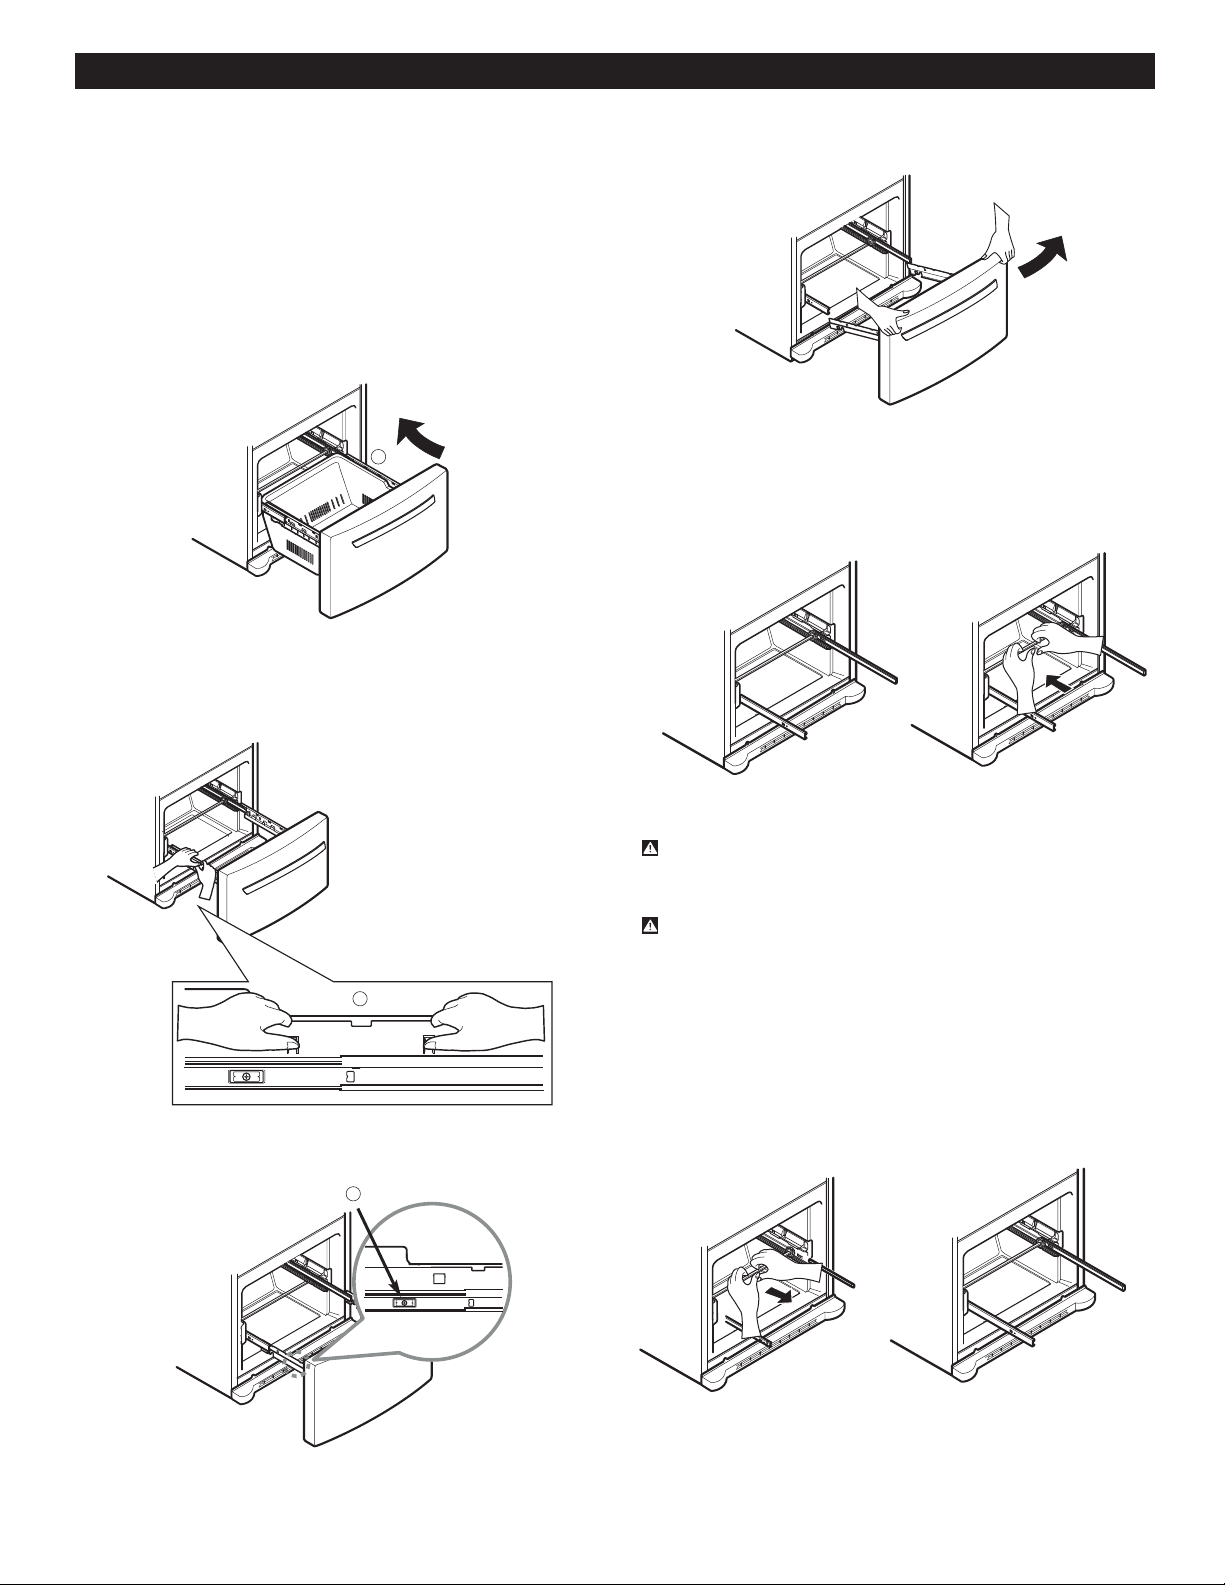
1. Removing the Pull Out Drawer
• Pull the drawer out to maximum extension. Remove the
bottom rack (1) by tilting it back a little and then lifting it
off the railing tracks.
1
• Put pressure on the two hangers (2) with your thumbs in
order to lift it up.
Separate the left and right rail cover.
•
• With both hands, hold both sides of the door and pull up
to separate it.
• With both hands, hold the center of the bar and push it
in so that it is fit to both rails simultaneously.
2
• Remove the screws (3) from both sides of the rail track.
3
CAUTION:When removing the drawer, do not hold the
handle. If it comes off, it could cause personal injury.
CAUTION: To place the drawer on the floor, take care
not to damage the floor or hurt your feet with the sharp
edges on the side with the hinges.
2. Installing the Pull Out Drawer
• With both hands, hold the center of the bar and pull it
outward so that the two rails extend out at the same
time.
14
 Loading...