

Page 1

ENGLISH
FRANÇAIS
ESPAÑOL
OWNER’S MANUAL
FRENCH DOOR
REFRIGERATOR
Please read this owner's manual thoroughly before
operating and keep it handy for reference at all times.
LFX21976**
P.No.:MFL63264263
www.lg.com
Page 2

2
TABLE OF CONTENTS
TABLE OF CONTENTS
ENGLISH
3 PRODUCT FEATURES
4
IMPORTANT SAFETY
INSTRUCTIONS
7 COMPONENTS
7 Refrigerator Exterior
8 Refrigerator Interior
9 INSTALLATION
9 Installation Overview
10 Specifications
11 Unpacking Your Refrigerator
11 Choosing the Proper Location
11 - Flooring
12 - Ambient Temperature
12 - Measuring the Clearances
12 Removing/Assembling the Refrigerator
Door Handles
13 Removing/Assembling the Freezer
Drawer Handle
13 Removing/Assembling the Doors and
Drawers
13 - Removing the Left Refrigerator Door
14 - Removing the Right Refrigerator Door
15 - Assembling the Right Refrigerator Door
15 - Assembling the Left Refrigerator Door
16 - Removing the Freezer Drawers
17 - Assembling the Freezer Drawers
19 Connecting the Water Line
19 - Before You Begin
19 - Water Pressure
19 - What You Will Need
20 - Water Line Installa
22 Turning On the Power
23 Leveling and Door Alignment
23 - Leveling
23 - Door Alignment
tion Instructions
24 HOW TO USE
24 Before Use
25 Control Panel
25 - Control Panel Features
27 In-Door Ice Bin
27 - Detaching the In-Door Ice Bin
27 - Assembling the In-Door Ice Bin
28 Automatic Icemaker
28 - Turning the Automatic Icemaker On or Off
29 - When You Should Turn the Icemaker Off
29 - Normal Sounds You May Hear
29 - Preparing for Vacation
30 Ice and Water Dispenser
30 - Dispenser
30 - Using the Dispenser
30 - Locking the Dispenser
30 - Cleaning the Dispenser Stand
31 Storing Food
31 - Food Preservation Location
32 - Food Storage Tips
32 - Storing Frozen Food
33 Humidity Controlled Crisperand Glide’N’Serve
34 Detaching and Assembling the Storage Bins
35 Adjusting the Refrigerator Sh
elves
36 MAINTENANCE
36 Cleaning
37 Replacing the Water Filter
39 SMART DIAGNOSIS
39 Using Smart Diagnosis
40 TROUBLESHOOTING
50 WARRANTY
Page 3
PRODUCT FEATURES
3
PRODUCT FEATURES
* Depending on the model, some of the following functions may not be available.
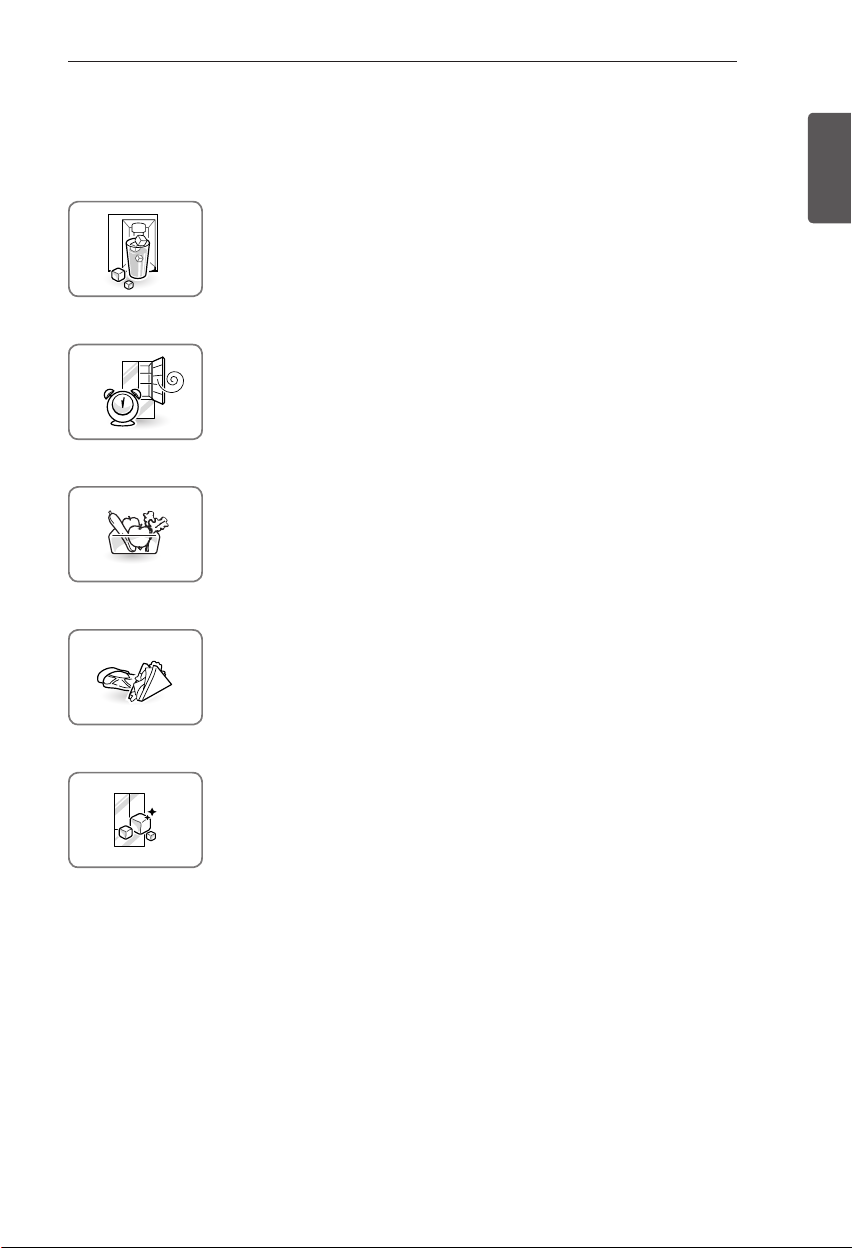
FILTERED WATER AND ICE DISPENSER
The water dispenser dispenses fresh, chilled water.
The ice dispenser dispenses cubed and crushed ice.
DOOR ALARM
The Door Alarm function is designed to prevent refrigerator malfunctioning
that could occur if a refrigerator door or freezer drawer remains open. If a
refrigerator door or freezer drawer is left open for more than 60 seconds, a
warning alarm sounds in 30 second intervals.
HUMIDITY CONTROLLED CRISPER
The Humidity Controlled Crisper is designed to help keep your fruits and
vegetables fresh and crisp. You can control the amount of humidity in the
crisper by adjusting the setting between Low and High.
GLIDE‘N’SERVE
Glide`N’Serve provides storage space that keeps the compartment colder
than the refrigerator.
It is a convenient place to store sandwiches or meat to be cooked.
ENGLISH
ICE PLUS
Ice production can be increased by approximately 20 percent when the
freezer section is maintained at the coldest temperature for a 24-hour
period.
Page 4

4
IMPORTANT SAFETY INSTRUCTIONS
IMPORTANT SAFETY INSTRUCTIONS
ENGLISH
READ ALL INSTRUCTIONS BEFORE USING THE APPLIANCE.
This guide contains many important safety messages. Always
This is the safety alert symbol. It alerts you to safety messages that inform you of
hazards that can kill or hurt you or others, or cause damage to the product.
All safety messages will be preceded by the safety alert symbol and the hazard
signal word WARNING or CAUTION. These words mean:
WARNING
CAUTION
You can be killed or seriously injured if you do not follow instructions.
Indicates an imminently hazardous situation which, if not avoided, may result
in minor or moderate injury, or product damage.
read and obey
all safety messages.
WARNING
To reduce the risk of fire, electric shock, or personal injury when using your product, basic safety
precautions should be followed, including the following.
Power
NEVER unplug your refrigerator by pulling on the power cord. Always grip the plug firmly and
y
pull it straight out from the outlet.
Immediately repair or replace all power cords that have become frayed or otherwise
y
damaged. Do not use a cord that shows cracks or abrasion damage along its length or at
either the plug or connector end.
Do not use an uncertified power outlet.
y
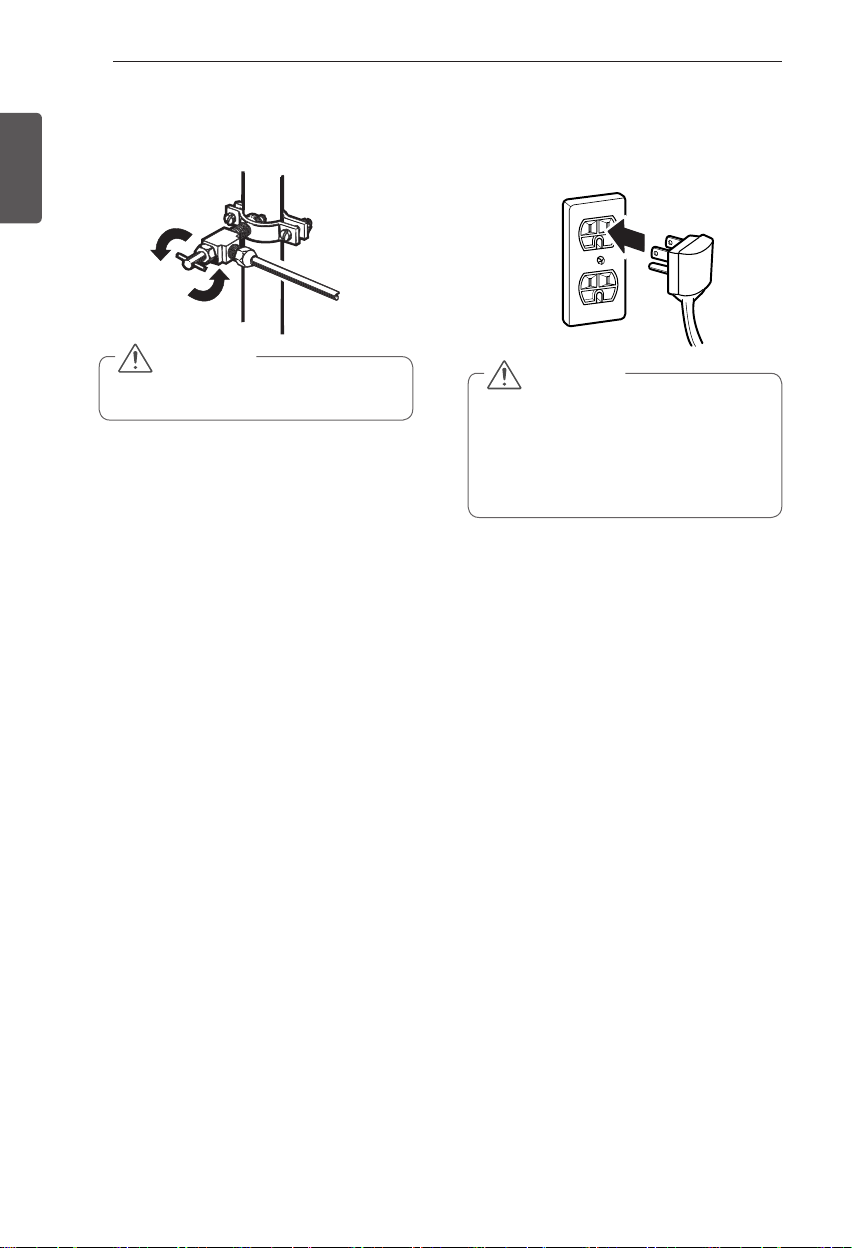
Unplug the power plug immediately in the event of a blackout or thunderstorm.
y
Plug in the power plug with the power cord facing downward.
y
Installation
Contact an authorized service center when you install or relocate the refrigerator.
y
When moving your refrigerator away from the wall, be careful not to roll over or damage the
y
power cord.
Connect this product to a dedicated grounded electric outlet conforming with the rating prior
y
to use. It is the user’s responsibility to replace a standard 2-prong wall outlet with a standard
3-prong wall outlet.
Do not install the refrigerator where there may be a danger of falling.
y
Use
DO NOT allow children to climb, stand, or hang on the refrigerator doors or shelves in the
y
refrigerator. They could damage the refrigerator and seriously injure themselves.
Do not place heavy objects on the dispenser of the refrigerator or hang onto it.
y
Do not place heavy or dangerous objects (bottles with liquid) on the refrigerator.
y
Do not put live animals inside of the refrigerator.
y
Do not allow children to climb into the product when it is in use.
y
In the event of a gas leak (propane/LPG), ventilate sufficiently and contact an authorized
y
service center before use. Do not touch or disassemble the electric outlet of the refrigerator.
In the event of a refrigerant leak, move flammable objects away from the refrigerator.
y
Ventilate sufficiently and contact an authorized service center.
Do not use or place flammable substances (chemicals, medicine, cosmetics, etc) near the
y
refrigerator or store them inside the refrigerator. Do not place the refrigerator in the vicinity
of flammable gas.
Page 5

IMPORTANT SAFETY INSTRUCTIONS
5
READ ALL INSTRUCTIONS BEFORE USING THE APPLIANCE.
To reduce the risk of fire, electric shock, or personal injury when using your product, basic safety
precautions should be followed, including the following.
Do not use this product for special purposes (storage of medicine or test materials or for ships,
y
etc).
Unplug the power plug before cleaning or repairing the refrigerator.
y
When you replace the light bulb in the refrigerator, unplug the refrigerator or turn off the power.
y
Do not modify or extend the power cord.
y
Do not use a dryer to dry the interior. Do not light a candle to remove the interior odor.
y
For your safety, this appliance must be properly grounded. Have the wall outlet and the circuit
y
checked by a qualified electrician to make sure the outlet is properly grounded.
Do not use an outlet that can be turned off with a switch. Do not use an extension cord. It is the
y
user’s responsibility to replace a standard 2-prong wall outlet with a standard 3-prong wall outlet.
Do not, under any circumstances, cut or remove the third (ground) prong from the power cord.
y
Do not use an adapter plug and plug the power plug into a multi-outlet extension cord.
y
Disconnect the power cord immediately if you hear a noise, smell a strange odor or detect
y
smoke.
Turn the power off if water or dust penetrates into the refrigerator. Call a service agent.
y
Do not disassemble or modify the refrigerator.
y
Do not put hands, feet, or metal objects below or behind the refrigerator.
y
Do not operate the refrigerator or touch the power cord with wet hands.
y
In refrigerators with automatic icemakers, avoid contact with the moving parts of the ejector
y
mechanism or with the heating element that releases the cubes. Do not place fingers or hands
on the automatic ice-making mechanism while the refrigerator is plugged in.
When dispensing ice from the dispenser, do not use crystal ceramics.
y
Do not touch the cold surfaces in the freezer compartment with wet or damp hands, when your
y
refrigerator is in operation.
Do not put glass containers, glass bottles or soda in the freezer.
y
This appliance is not intended for use by persons (including children) with reduced physical,
y
sensory or mental capabilities, or lack of experience and knowledge, unless they have been given
supervision or instruction concerning the use of the appliance by a person responsible for their
safety.
Do not refreeze frozen food that have thawed completely. It may result in a serious health issue.
y
If you are throwing away your old refrigerator, make sure the CFC coolant is removed for proper
y
disposal by a qualified servicer. If you release CFC coolant, you may be fined or imprisoned in
accordance with the relevant environmental law.
Junked or abandoned refrigerators are dangerous, even if they are sitting for only a few days.
y
When disposing the refrigerator, remove the packing materials from the door or take off the
doors but leave the shelves in place so that children may not easily climb inside.
ENGLISH
Page 6

6
IMPORTANT SAFETY INSTRUCTIONS
READ ALL INSTRUCTIONS BEFORE USING THE APPLIANCE.
ENGLISH
To reduce the risk of fire, electric shock, or personal injury when using your product, basic safety
precautions should be followed, including the following.
CAUTION
Installation
The refrigerator must be properly installed in accordance with the Installer Instructions that
y
were taped to the front of the refrigerator.
Be careful when you unpack and install the refrigerator. Immediately dispose of packing
y
materials (plastic) out of reach of children.
Use
Close the door carefully when children are around.
y
Keep fingers out of pinch point areas; clearances between the doors and cabinets are
y
necessarily small. Be careful closing doors when children are in the area.
If you store food properly, beware that it may fall and cause injury.
y
Maintenance
Do not use strong detergents like wax or thinners for cleaning. Clean with a soft fabric.
y
Wipe foreign objects (dust, water, etc) off the prongs of the power plug and contact areas
y
regularly.
SAVE THESE INSTUCTIONS
Page 7
COMPONENTS
7
COMPONENTS
Use this page to become more familiar with the parts and features of your refrigerator.
Page references are included for your convenience.
*The appearance and specifications of the actual product may differ depending on the model.
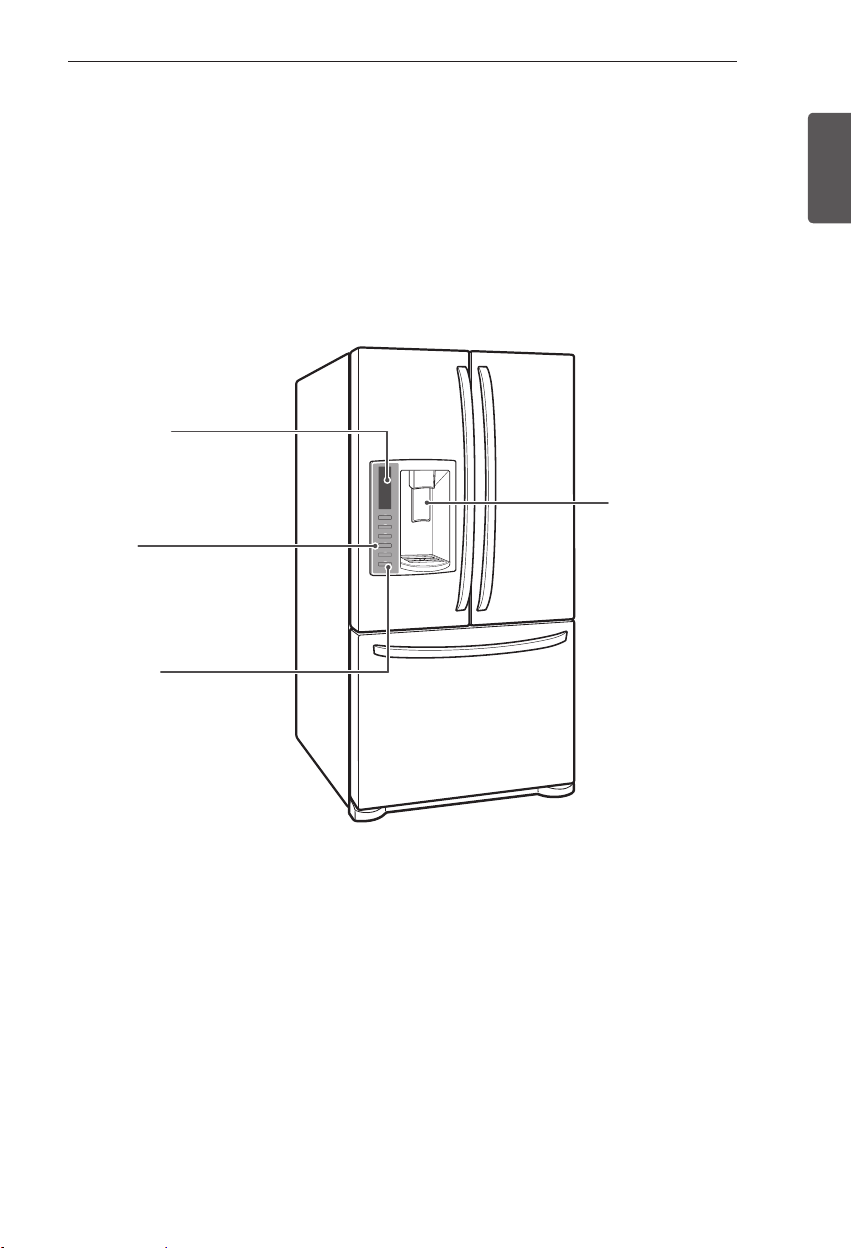
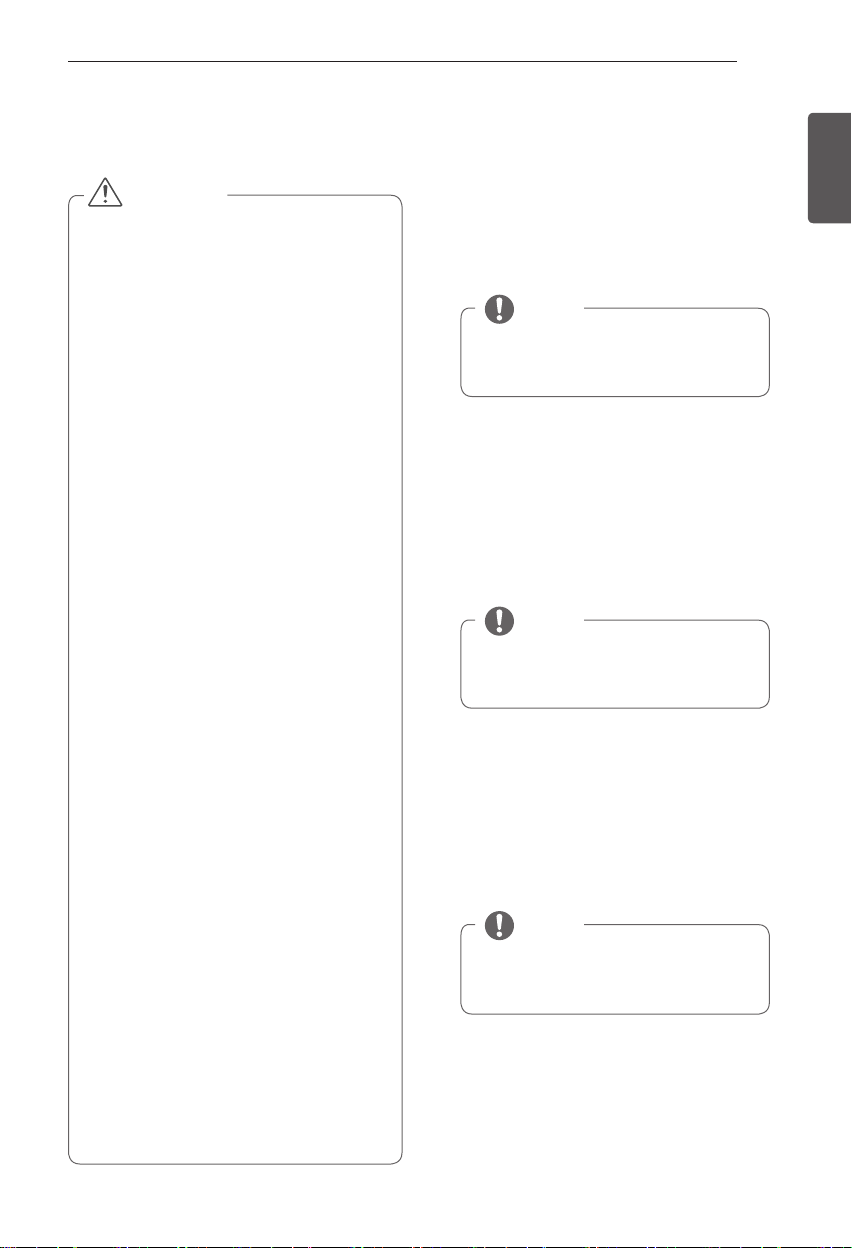
Refrigerator Exterior
LED Display
Displays the refrigerator and
freezer temperature, the water
filter condition and the dispenser
status.
Ice Plus
When this feature is activated,
the freezer section will run at the
coldest temperature for a 24-hour
period to increase ice production.
Door Alarm
A warning alarm sounds at 30second intervals when the
refrigerator or freezer door is left
open for more than 60 seconds.
Filtered Water and
Ice Dispenser
Dispenses fresh, chilled,
filtered water through
the door. The ice
dispenser offers cubed
or crushed ice.
ENGLISH
Page 8
8
COMPONENTS
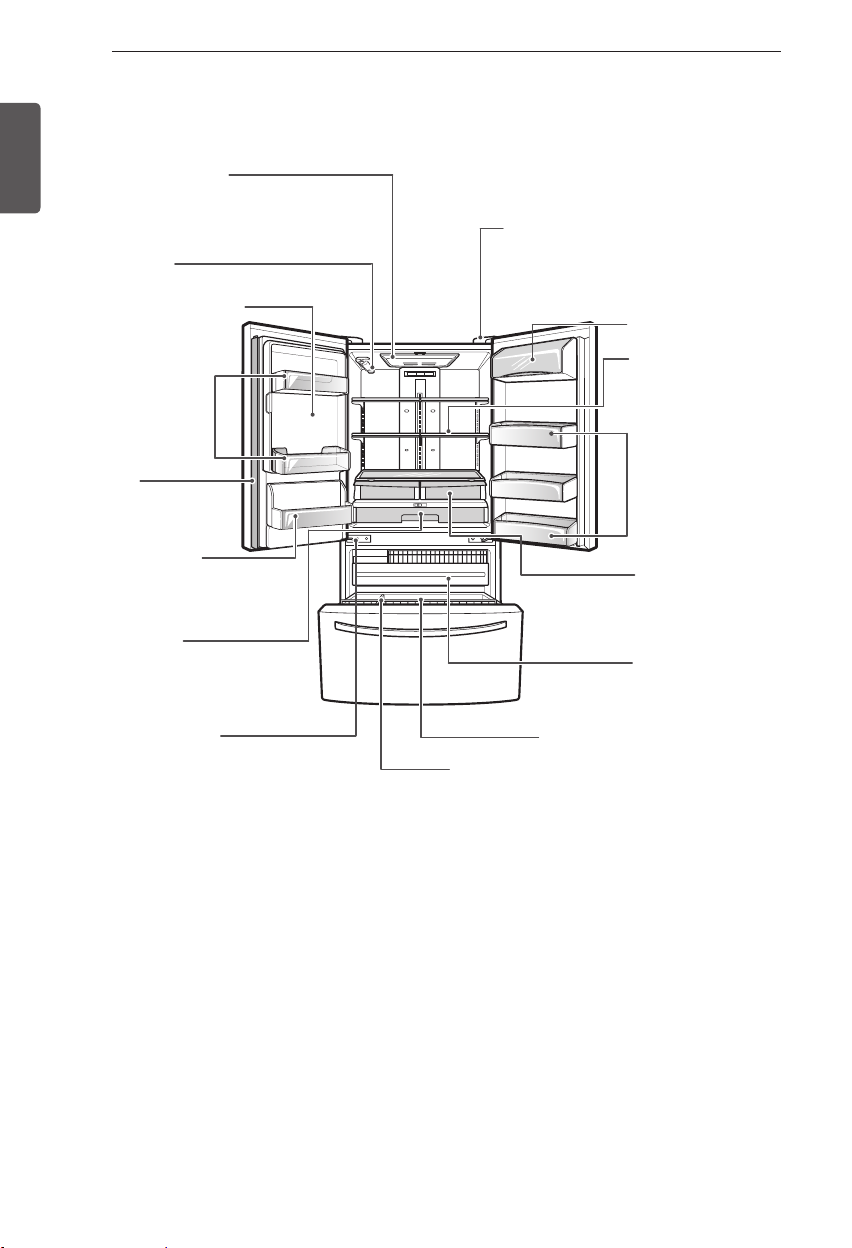
Refrigerator Interior
ENGLISH
LED Interior Lamps
The interior lamps light up the
inside of the refrigerator.
Water Filter
SpacePlus Ice System
Automatically produces
80-130 ice cubes in a
24-hour period.
Fixed Door Bins
Smart Diagnosis Speaker
Hold your phone to this speaker when
activating Smart Diagnosis. Refer to the
Smart Diagnosis section for more details.
Dairy Product Bin
Adjustable
Refrigerator Shelves
The shelves in your
refrigerator are adjustable
to meet your individual
storage needs.
Mullion
Folds in when the
left door is opened.
Can Storage Bin
Used to preserve chilled
food or drinks.
Glide’N’Serve
Allows you to store food items
at a different temperature than
the regular refrigerator area.
Auto Closing Hinge
The refrigerator doors
and freezer drawers close
automatically when you push
them slightly.
(The door only closes
automatically when it is open
at an angle of less than 30°.)
Modular Door Bins
Crispers
Controls humidity and
helps vegetables and
fruit to stay crisp.
Pullout Drawer
Durabase
Durabase Divider
Page 9
INSTALLATION
9
INSTALLATION
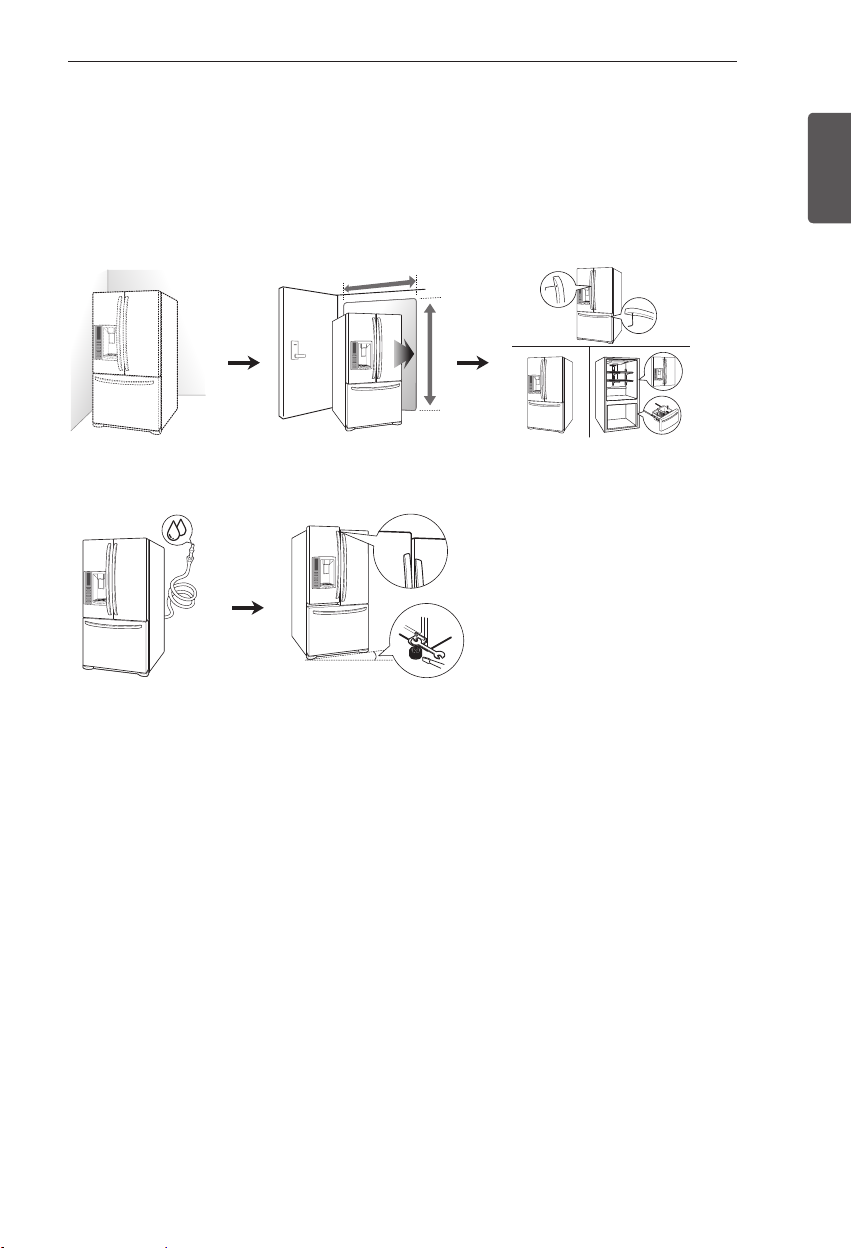
Installation Overview
Please read the following installation instructions first after purchasing this product or transporting
it to another location.
1 Unpacking your
refrigerator
4 Connecting the water
supply and water line
2 Choosing the proper
location
5 Leveling and Door
Alignment
3 Disassembling/Assembling
ENGLISH
Page 10
10
INSTALLATION
Specifications
ENGLISH
The appearance and specifications listed in this manual may vary due to constant product
improvements.
Bottom-freezer refrigerator model LFX21976
Description French door refrigerator
Electrical requirements 115 VAC @ 60 Hz
Min. / Max. Water pressure 20 and 120 psi (140 and 830 kPa)
Dimensions 35 3/4” (W) X 30 1/4” (D) X 69 3/4” (H), 42 1/2” (D w/ door open)
908 mm (W) X 768 mm (D) X 1772mm (H), 1073 mm (D w/ door open)
Net weight
Refrigerator storage
capacity
Freezer storage capacity 5.8 cu. ft.
287 lb. (130kg)
14.7 cu. ft.
Page 11
INSTALLATION
11
Unpacking Your Refrigerator
WARNING
Use two or more people to move and
install the refrigerator. Failure to do so
can result in back or other injury.
Your refrigerator is heavy. When moving
the refrigerator for cleaning or service,
be sure to protect the floor. Always pull
the refrigerator straight out when moving
it. Do not wiggle or walk the refrigerator
when trying to move it, as floor damage
could occur.
Keep flammable materials and vapors,
such as gasoline, away from the
refrigerator. Failure to do so can result in
fire, explosion, or death.
Remove tape and any temporary labels from your
refrigerator before using. Do not remove any
warning-type labels, the model and serial number
label, or the Tech Sheet that is located under the
front of the refrigerator.
To remove any remaining tape or glue, rub the
area briskly with your thumb. Tape or glue residue
can also be easily removed by rubbing a small
amount of liquid dish soap over the adhesive with
your fingers. Wipe with warm water and dry.
Do not use sharp instruments, rubbing alcohol,
flammable fluids, or abrasive cleaners to remove
tape or glue. These products can damage the
surface of your refrigerator.
tor shelves are installed in the shipping
Refrigera
position. Please reinstall shelves according to
your individual storage needs.
Choosing the Proper Location
Select a place where a water supply can
be easily connected for the automatic
icemaker.
NOTE
The water pressure must be between 20
and 120 psi (140 and 830 kPa)on models
without a water filter and between 40 and
120 psi (280 and 830kPa) on models with
a water filter.
The refrigerator should always be plugged
into its own individual properly grounded
electrical outlet rated for 115 Volts, 60 Hz,
AC only, and fused at 15 or 20 amperes.
This provides the best performance
and also prevents overloading house
wiring circuits which could cause a fire
hazard from overheated wires. It is
recommended that a separate circuit
serving only this appliance be provided.
WARNING
To reduce the risk of electric shock, do not
install the refrigerator in a wet or damp
area.
Flooring
To avoid noise and vibration, the unit must be
leveled and installed on a solidly constructed
floor. If required, adjust the leveling legs to
compensate for unevenness of the floor. The
front should be slightly higher than the rear to
aid in door closing. Leveling legs can be turned
easily by tipping the cabinet slightly. Turn the
leveling legs to the left to raise the unit or to
the right to lower it. (See Leveling and door
AlIgnment.)
ENGLISH
NOTE
Installing on carpeting, soft tile surfaces,
a platform or weakly supported structure
is not recommended.
Page 12
12
INSTALLATION
Ambient Temperature
ENGLISH
Install this appliance in an area where the
temperature is between 55°F (13°C) and 110°F
(43°C). If the temperature around the appliance
is too low or high, cooling ability may be
adversely affected.
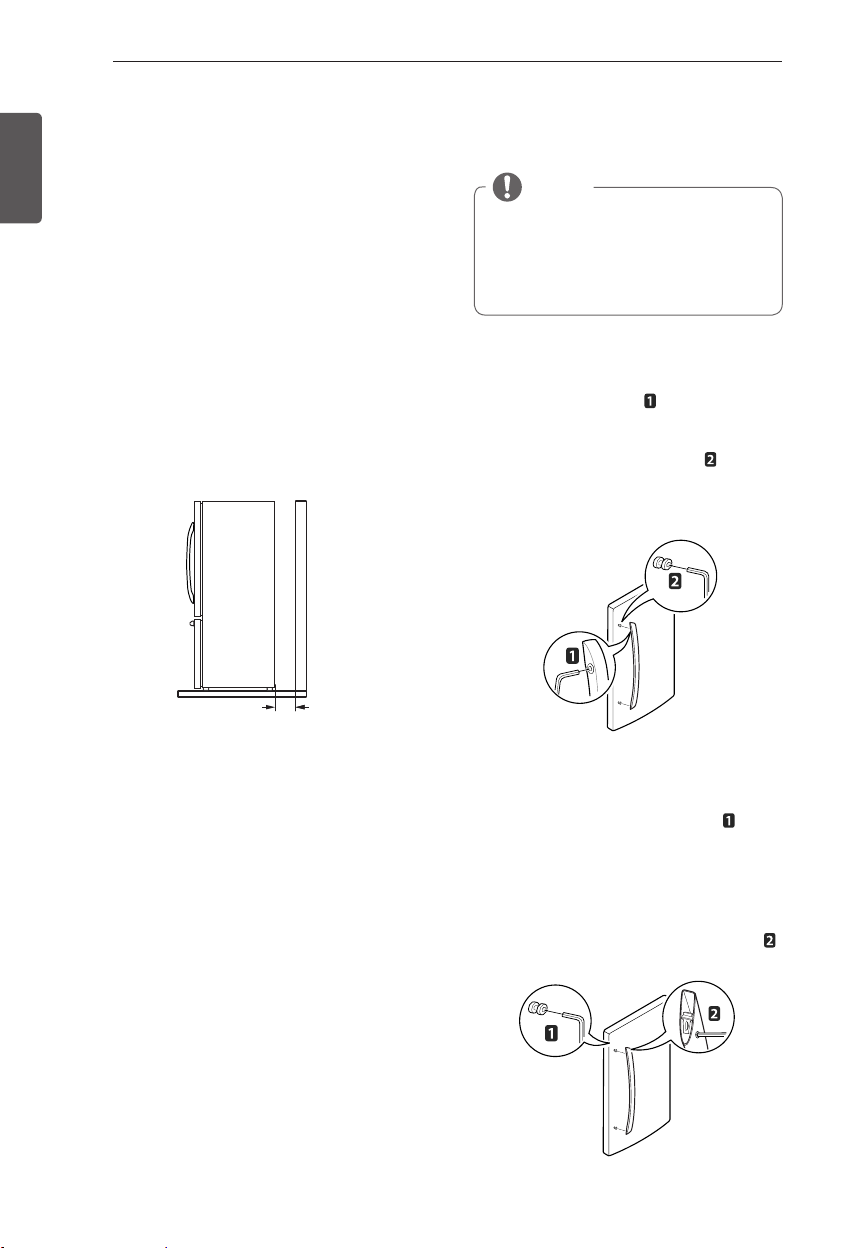
Measuring the Clearances
Too small of a distance from adjacent items
may result in lowered freezing capability and
increased electricity consumption charges.
Allow at least 24 inches (61 cm) in front of the
refrigerator to open the doors, and at least
2 inches (5.08 cm) between the back of the
refrigerator and the wall.
24” (61 cm)
Removing/Assembling the
Refrigerator Door Handles
NOTE
Removing the doors is always
recommended when it is necessary to
move the refrigerator through a narrow
opening. If it is necessary to remove the
handles, follow the directions below.
Removing the Handles
Loosen the set screws with a 3/32 in.
1
Allen wrench and remove the handle.
Loosen the mounting fasteners that
2
connect to the refrigerator door and handle
using a 1/4 in. Allen wrench, remove the
mounting fasteners.
2” (5.08 cm)
Assembling the Handles
Assemble the mounting fasteners at
1
both ends of the handle using a 1/4 in.
Allen wrench.
Place the handle on the door by fitting
2
the handle footprints over the mounting
fasteners and tightening the set screws
with a 3/32 in. Allen wrench.
Page 13
INSTALLATION
13
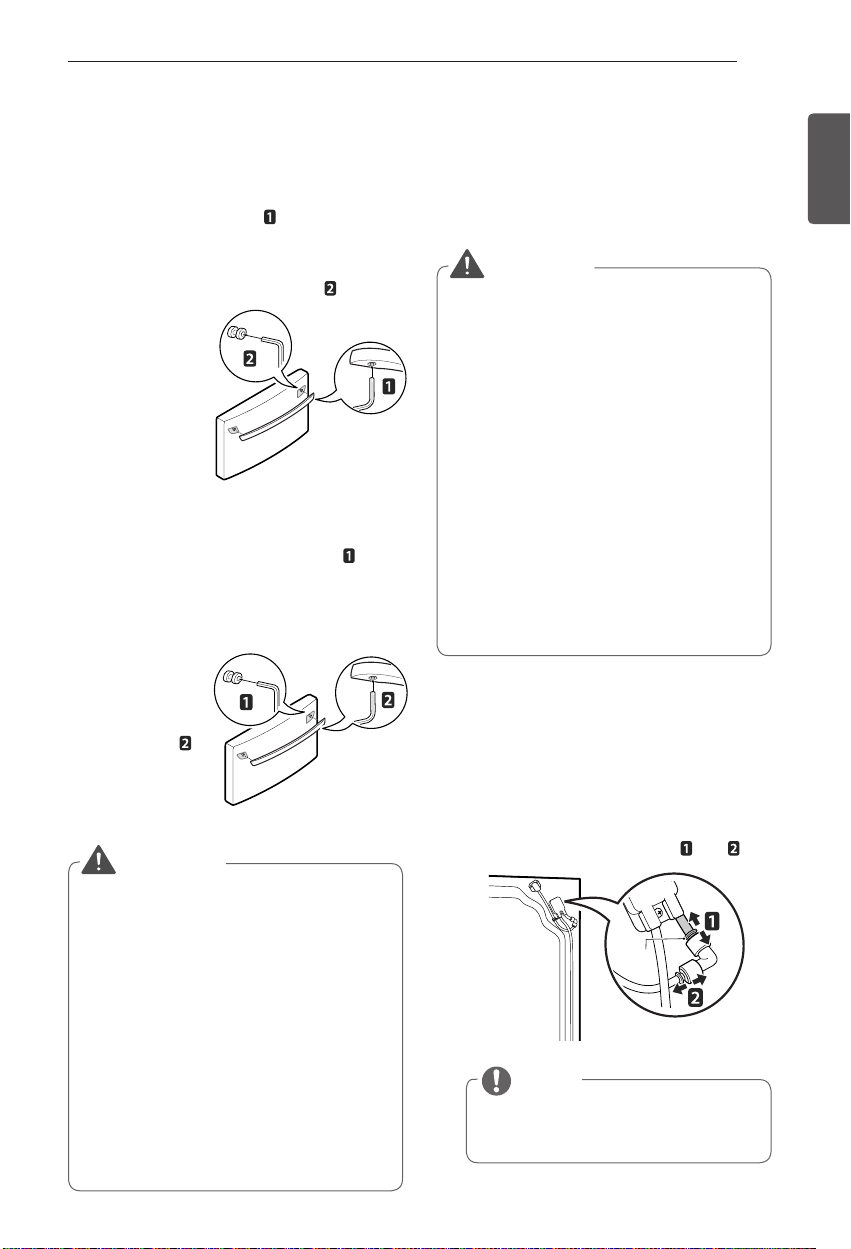
Removing/Assembling the
Freezer Drawer Handle
Removing the Handles
Loosen the set screws located on the
1
lower side of the handle with a 1/8 in. Allen
wrench and remove the handle.
Loosen the mounting fasteners that
2
connect to the
freezer drawer
and handle
using a 1/4 in.
Allen wrench,
and remove
the mounting
fasteners.
Assembling the Handles
Assemble the mounting fasteners at
1
both ends of the handle using a 1/4 in. Allen
wrench.
Place the handle on the door by fitting
2
the handle
footprints over
the mounting
fasteners and
tightening the
set screws
with a 1/8 in.
Allen wrench.
WARNING
When the customer takes apart the handle
or assemble it from a refrigerator, please be
cautious of following things.
Hold the handle with your own hand to
y
make sure not to drop the handle to the
floor or instep while taking apart the handle
from a refrigerator.
Do not swing the handle towards people or
y
animals after taking apart the handle.
Insert the bracket hole of the handle into
y
the stopper bolt of the door exactly, and
then assemble the set screws to fix the
handle.
Check if there’s any gap between the door
y
and handle after fixing the handle.
Removing/Assembling the
Doors and Drawers
Removing the doors is always recommended
when it is necessary to move the refrigerator
through a narrow opening.
WARNING
If your entrance door is too narrow for the
y
refrigerator to pass through, remove the
refrigerator doors and move the refrigerator
sideways through the doorway.
Use two or more people to remove and
y
install the refrigerator doors. Failure to do
so can result in back or other injury.
Disconnect the electrical supply to the
y
refrigerator before installing. Failure to do
so could result in serious injury or death.
Do not put hands, feet or other objects into
y
the air vents or bottom of the refrigerator.
You may be injured or receive an electrical
shock.
Be careful when handling the hinge and
y
stopper. It may result in injury.
Remove food and bins from the doors and
y
drawers before detaching.
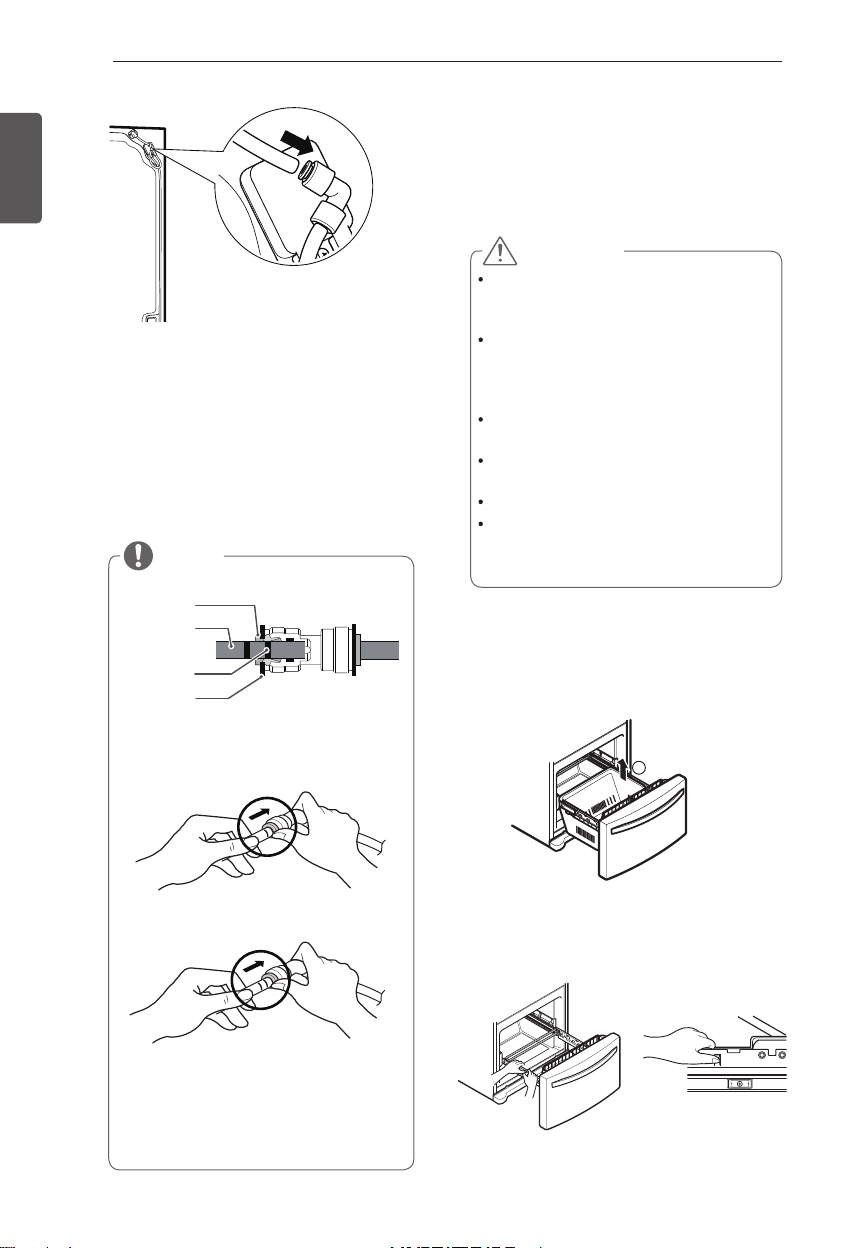
Removing the Left Refrigerator Door
The water supply is connected to the
1
upper right part of the rear surface of the
refrigerator. Remove the ring in the joint
area. Hold the water supply connection
and gently push the Collet to detach the
water supply line as shown in and .
Collet
NOTE
Detachment of the water supply line is
applicable only when detaching the left
refrigerator door.
ENGLISH
Page 14
14
(2)
(3)
(4)
(5)
(1)
INSTALLATION
ENGLISH
2
3
4
5
6
7
8
9
(2)
(3)
(5)
(6)
(7)
(8)
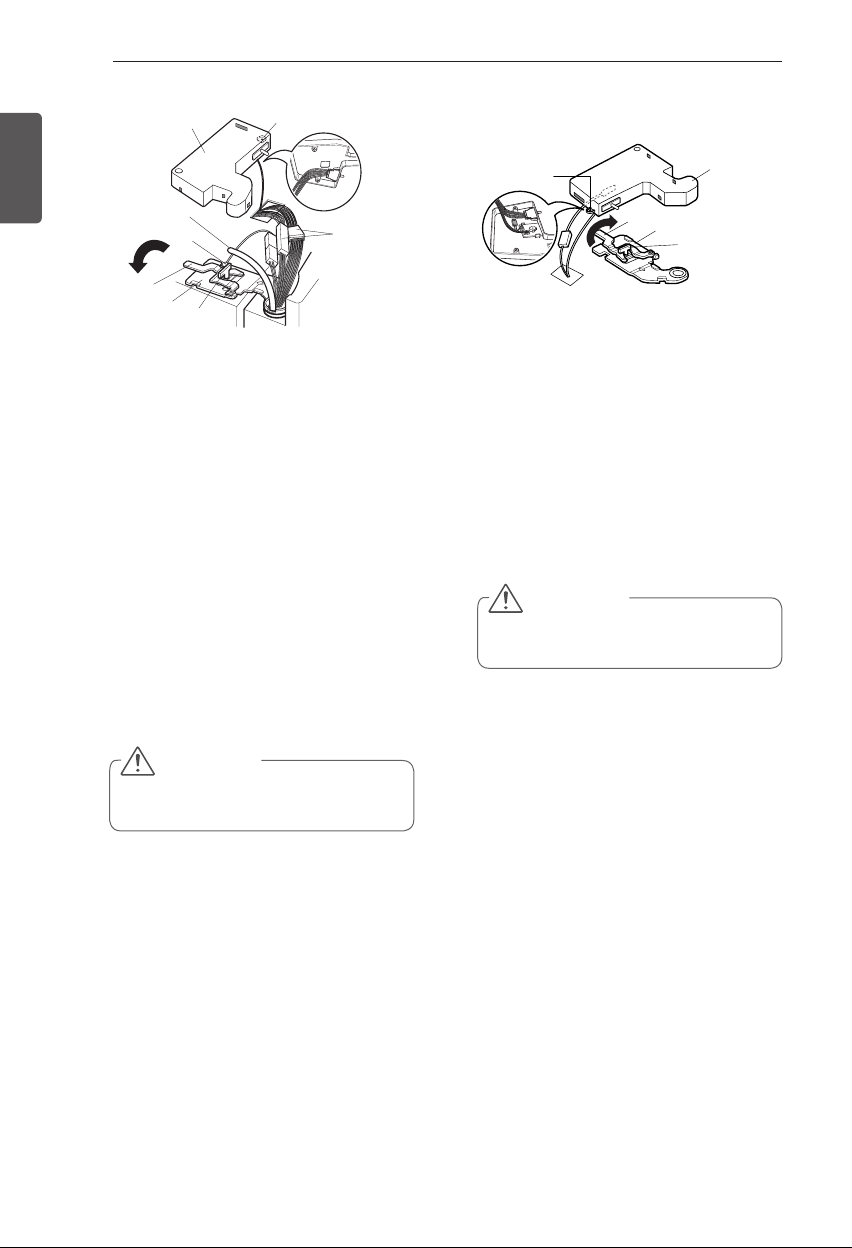
Open the left door. Remove the top hinge
cover screw (1). Lift up the cover (2).
Remove the cover.
Pull out the tube (3).
Disconnect all wire harnesses (4).
Remove the grounding screw (5).
Rotate the hinge lever (6)
counterclockwise. Lift the top hinge (7)
free of the hinge lever latch (8).
Lift the door from the middle hinge pin and
remove the door.
Place the door, inside facing up, on a non-
scratching surface.
(1)
(4)
Removing the Right Refrigerator Door
Open the door. Remove the top hinge
1
cover screw (1). Lift up the cover (2).
Remove the cover.
2
Rotate the hinge lever (3) clockwise. Lift
3
the top hinge (4) free of the hinge lever
latch (5).
Lift the door from the middle hinge pin and
4
remove the door.
Place the door, inside facing up, on a non-
5
scratching surface.
CAUTION
When lifting the hinge free of the latch, be
careful that the door does not fall forward.
CAUTION
When lifting the hinge free of the latch, be
careful that the door does not fall forward.
Page 15
INSTALLATION
(2)
(3)
(4)
(5)
(1)
15
Assembling the Right Refrigerator
Door
Install the right-side door first.
Lower the door onto the middle hinge
1
pin. Make sure that the plastic sleeve is
inserted into the bottom of the door.
Fit the top hinge (4) over the hinge lever
2
latch (5) and into place.
Rotate the lever (3) counterclockwise to
3
secure the hinge.
Hook the tabs on the right side of the
4
hinge cover (2) under the edge of the top
hinge (4) and position the cover in place.
Insert and tighten the cover screw (1).
5
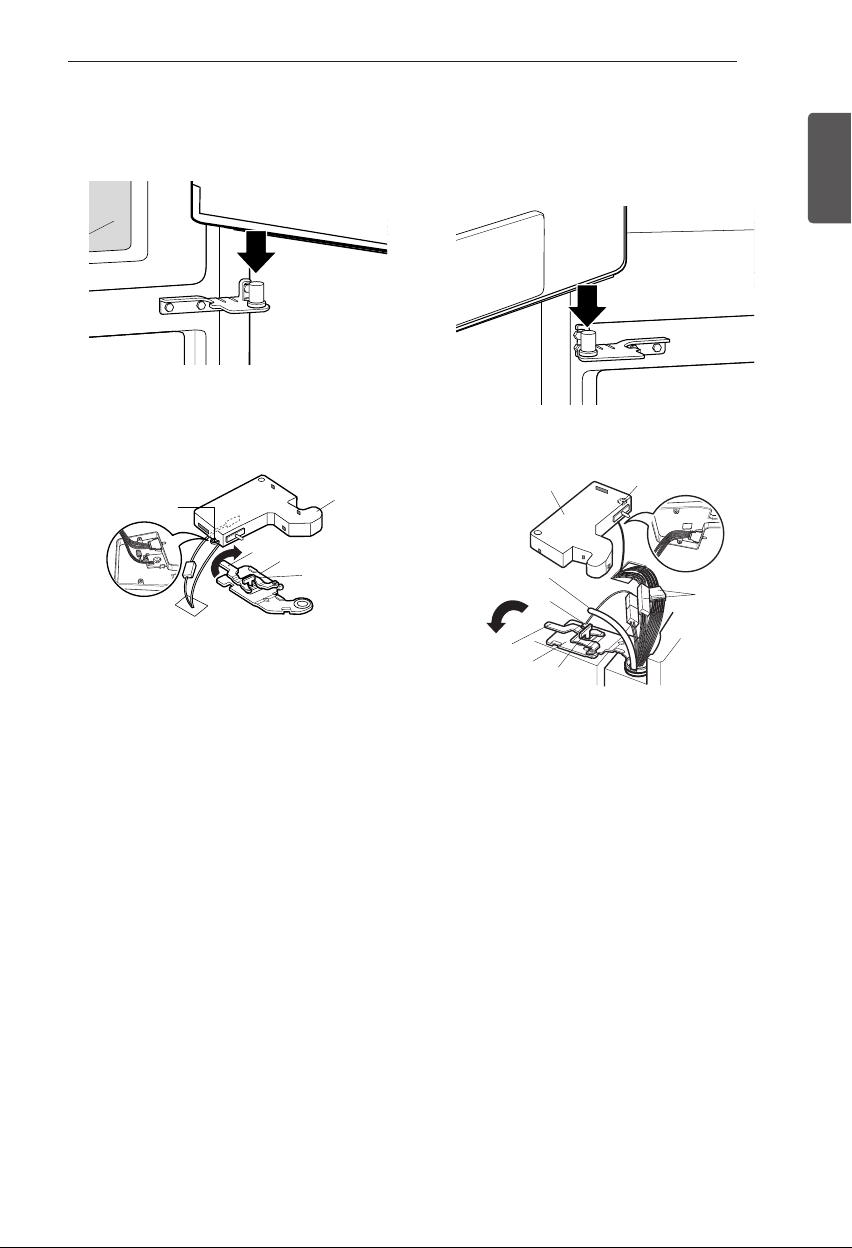
Assembling the Left Refrigerator
Door
Install the left refrigerator door after the right
door is installed.
Lower the door onto the middle hinge pin.
1
(2)
(3)
(5)
(6)
(7)
(8)
Fit the top hinge (7) over the hinge lever
2
latch (8) and into place.
Rotate the lever (6) clockwise to secure
3
the hinge.
Install the grounding screws (5) and
4
connect the two wire harnesses (4).
Push the water tube (3) located at the top
5
of the left door into the hole beside the left
hinge on the top of the cabinet until it exits
through the back.
Insert the water supply tube (3) into the
6
connector until you see only one scale
mark. Fully insert the tub cover (15 mm).
Hook the tabs on the left side of the hinge
7
cover (1) under the edge of the top hinge (7)
and position the cover in place.
Insert and tighten the cover screw (1).
8
(1)
(4)
ENGLISH
Page 16
16
INSTALLATION
ENGLISH
9
1 0
1 1
Insert the water supply tube at least 5/8 in.
(15 mm) into the connector.
Hook the tab on the door switch side
of the cover under the edge of the wire
opening in the cabinet top.
Position the cover into place. Insert and
tighten the cover screw.
NOTE
Collet
Tube
Insert Line
Clip
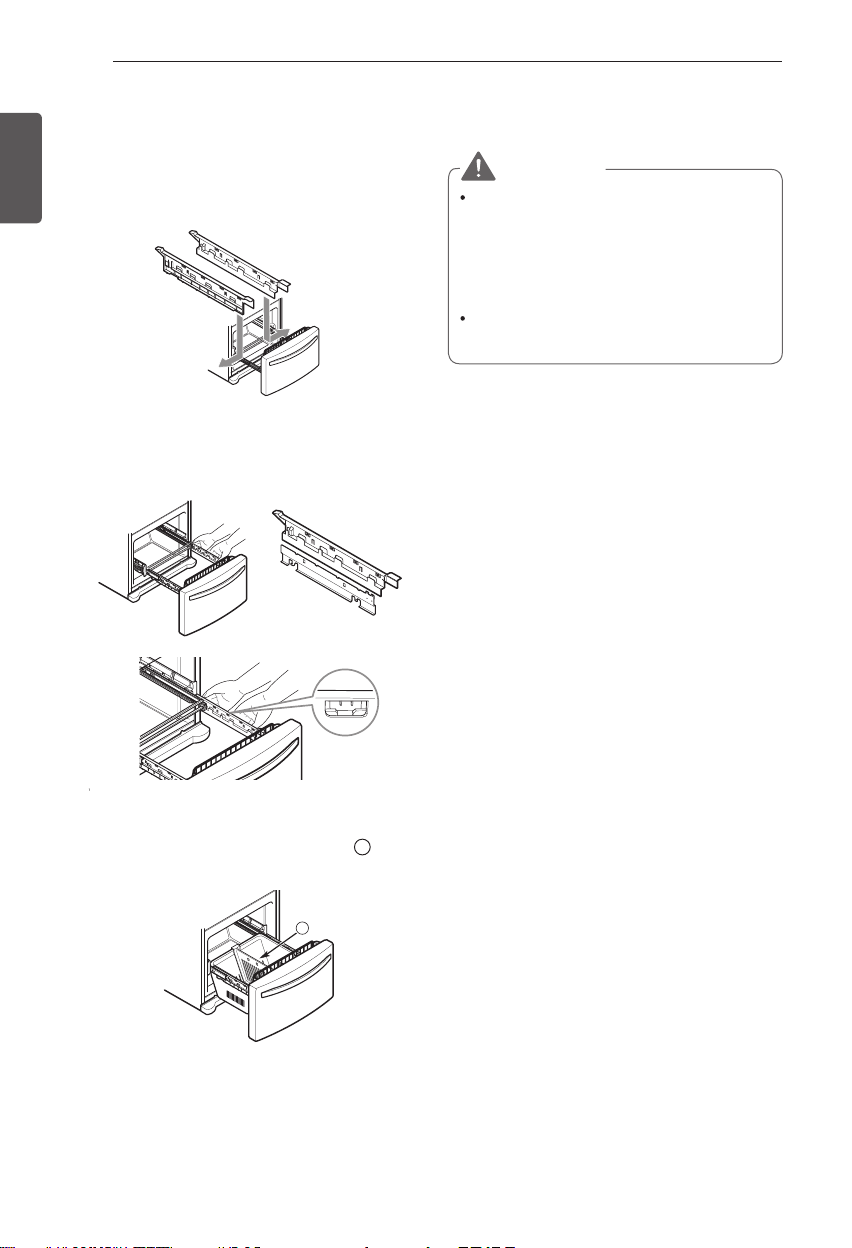
Removing the Freezer Drawers
The top, middle and bottom drawers are all
removed in the same way. In the following
figures, the Pullout Drawer located above the
freezer drawer is not shown for clarity.
CAUTION
Use two or more people to remove and
install the freezer drawer. Failure to do so
can result in back or other injury.
Do not hold the handle when removing
or replacing the drawer. The handle may
come off and it could cause personal
injury.
Be careful of sharp hinges on both sides
of the drawer.
When you lay the drawer down, be
careful not to damage the floor.
Do not sit or stand on the freezer drawer.
To prevent accidents, keep children and
pets away from the drawer. Do not leave
the drawer open.
Pull the drawer open to full extension.
1
Remove the lower basket by lifting basket
from rail system.
1) Gently press the Collet and insert the
tube until only one line shows on the
tube.
(Correct)
(Incorrect)
2) Pull the tube to make sure that the
tube is tightly fastened and then insert
the clip.
1
Press in the tabs on the rail covers and
2
lift them up to separate from the rail
assembly.
Page 17
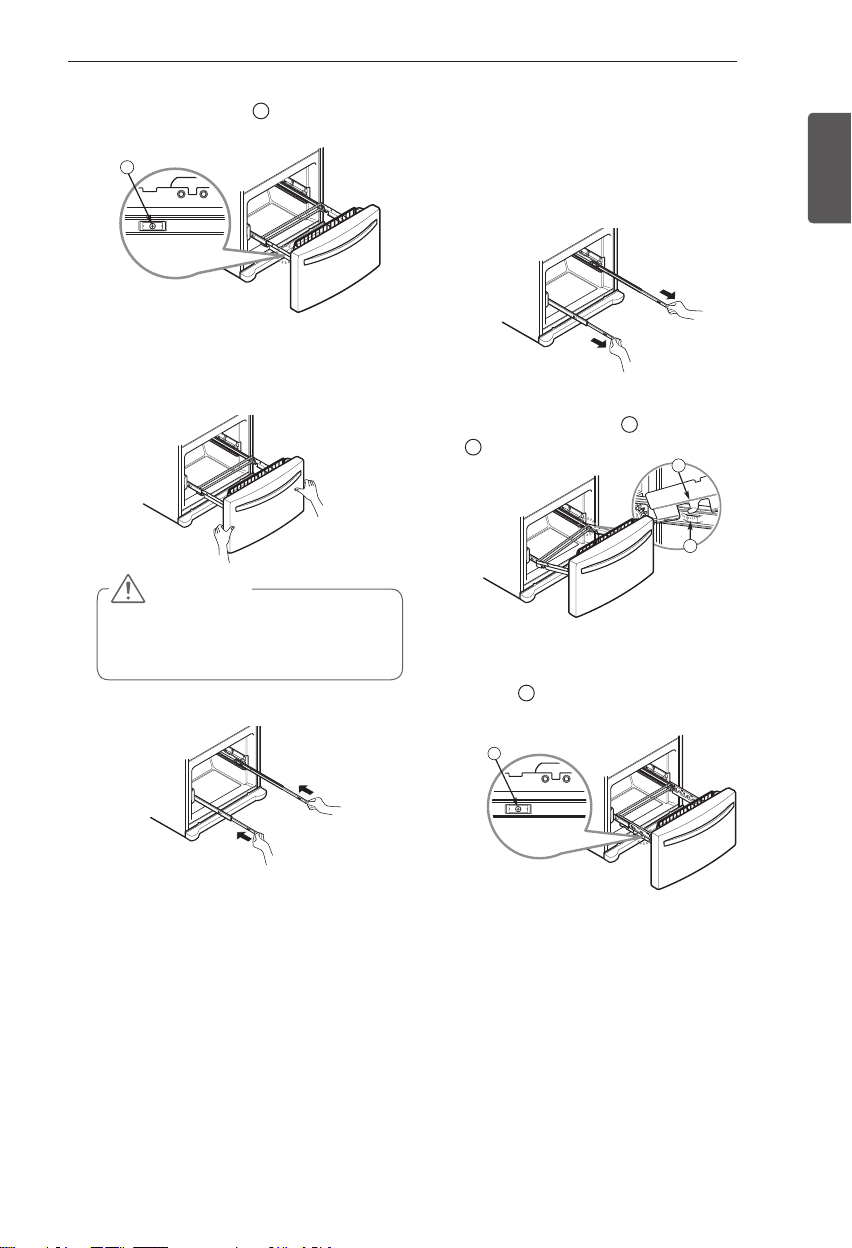
Remove the rail screw 2 on both the left
3
and right rails.
2
With both hands, grasp the sides of the door
4
and pull it up to separate it from the rails.
CAUTION
When you remove the drawer, do not
hold the handle. The handle may come
off and it could cause personal injury.
INSTALLATION
Assembling the Freezer Drawer
With both hands, pull out each rail
1
simultaneously until both rails are fully
extended.
Hook the door support 1 into the rail tabs
2
2
on both sides.
Lower door into final position and tighten the
3
3
screws
.
1
2
17
ENGLISH
With both hands, hold each rail and push it in
5
to allow both rails to slide in simultaneously.
3
Page 18
18
INSTALLATION
Assembling the Freezer Drawer
ENGLISH
(continued)
Make sure you have the correct rail cover
4
for each side.
Left Rail
Cover
Align the tabs on the covers with the
5
assembly holes on each rail, and snap the
rail covers in place to secure.
Right Rail
Cover
WARNING
If the Durabase divider is removed, there is
enough open space for children or pets to
crawl inside. To prevent accidental child and
pet entrapment or suffocation risk, DO NOT
allow them to touch or go near the freezer
drawer.
DO NOT step or sit down on freezer
drawer.
With the drawer pulled out to full
6
extension, insert the lower basket
the rail assembly.
4
Assembly
Hole
4
in
Page 19
INSTALLATION
19
Connecting the Water Line
Before You Begin
This water line installation is not covered by the
refrigerator warranty. Follow these instructions
carefully to minimize the risk of expensive water
damage.
Water hammer (water banging in the pipes) in
house plumbing can cause damage to refrigerator
parts and can lead to water leakage or flooding.
Call a qualified plumber to correct water hammer
before installing the water supply line to the
refrigerator.
CAUTION
To prevent burns and product damange,
only connect the refrigerator water line to
a cold water supply.
If you use your refrigerator before connecting
the water line, make sure the icemaker power
switch is in the OFF (O) position.
CAUTION
Do not install the icemaker tubing in
areas where temperatures fall below
freezing.
Water Pressure
A cold water supply. The water pressure must
be between 20 and 120 psi (140 and 830 kPa)
on models without a water filter and between 40
and 120 psi (280 and 830kPa) on models with
a water filter.
If a reverse osmosis water filtration system is
connected to your cold water supply, this water
line installation is not covered by the refrigerator
warranty. Follow the following instructions
carefully to minimize the risk of expensive water
damage.
If a reverse osmosis water filtration system is
connected to your cold water supply, the water
pressure to the reverse osmosis system needs to
be a minimum of 40 and 60 psi ( 280 and 420
kPa), less than 2.0~3.0 sec. to fill a cup of 7 oz
(200 cc) capacity.
CAUTION
Wear eye protection during installation
to prevent injury.
If the water pressure from the reverse osmosis
system is less than 21 psi (145 kPa) (takes more
than 4.0 sec to fill a cup of 7 oz (200 cc) capacity):
Check to see if the sediment filter in
the reverse osmosis system is blocked.
Replace the filter if necessary.
Allow the storage tank on the reverse
usage.
If the issue concerning water pressure
from reverse osmosis remains, call a
licensed, qualified plumber.
All installations must be in accordance
with local plumbing code requirements.
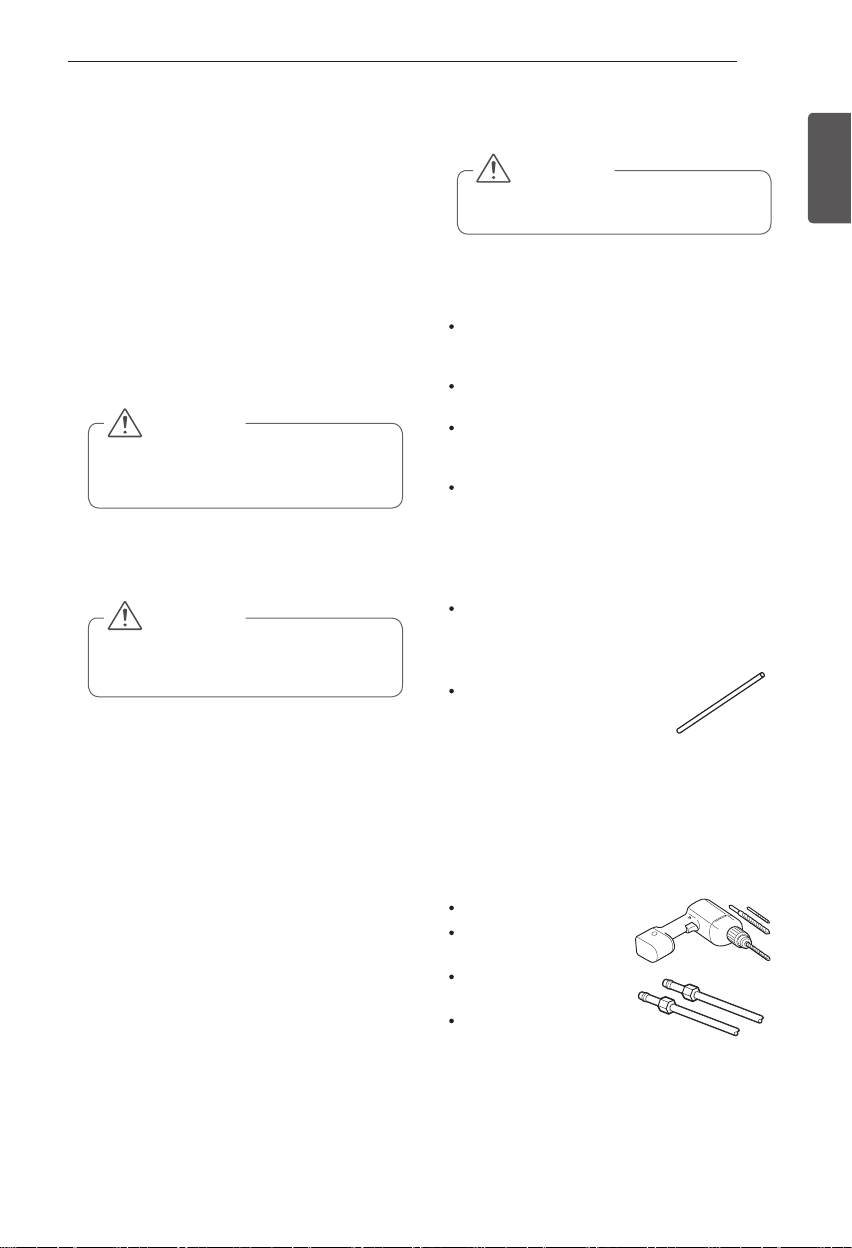
What You Will Need
Copper Tubing,
connect the refrigerator to the water
supply. Be sure both ends of the tubing
are cut square.
To determine how
much tubing you need:
measure the distance
from the water valve on the back of the
refrigerator to the water supply pipe.
Then, add 8 feet
(2.4 m). Be sure there is sufficient extra
tubing (about 8 feet [2.4 m] coiled into 3
turns of about 10 in. [25 cm] diameter)
to allow the refrigerator to move out
from the wall after installation.
Power drill.
½ in. or adjustable
wrench.
Flat blade and Phillips
head screwdrivers.
Two ¼ in. outer
diameter compression
nuts and 2 ferrules (sleeves)
copper tubing to the shutoff valve and
the refrigerator water valve.
¼ in. outer diameter, to
to connect the
ENGLISH
Page 20
20
INSTALLATION
ENGLISH
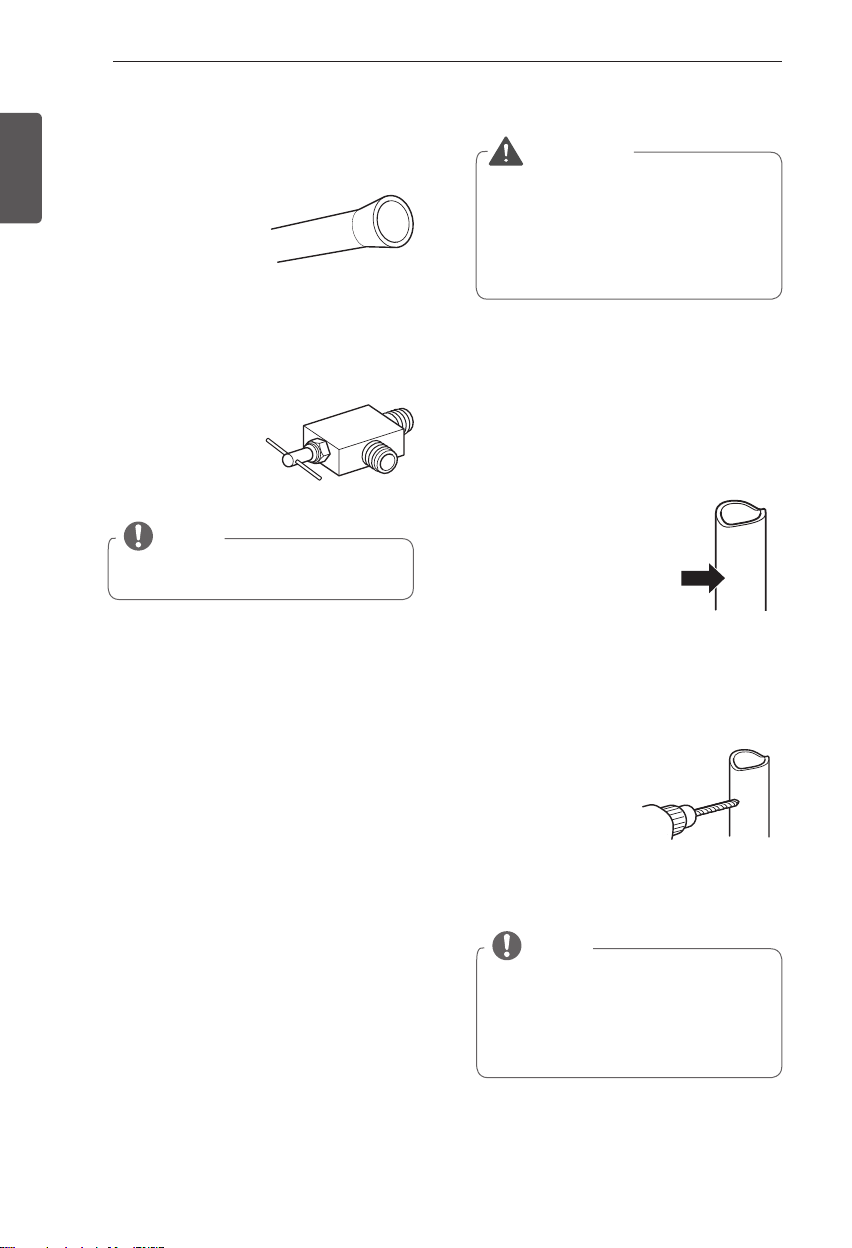
If your existing copper water line has a
y
flared fitting at the end, you will need
adapter
an
stores) to connect the water line to the
refrigerator OR you can cut off the flared
fitting with a tube
cutter and then use a
compression fitting.
Shutoff valve to
y
connect to the cold water line.
valve should have a water inlet with a
minimum inside diameter of 5/32 in. at
the point of connection to the COLD
WATER LINE. Saddle-type shutoff valves
are included in many water supply kits.
Before purchasing,
make sure a saddletype valve complies
with your local
plumbing codes.
A self piercing saddle type water valve
should not be used.
(available at plumbing supply
The shutoff
NOTE
Water Line Installation Instructions
WARNING
When using any electrical device
(such as a power drill) during
installation, be sure the device is
battery powered, double insulated
or grounded in a manner that will
prevent the hazard of electric shock.
Install the shutoff valve on the nearest
frequently used drinking water line.
SHUT OFF THE MAIN WATER SUPPLY
1
Turn on the nearest faucet to relieve the
pressure on the line.
CHOOSE THE VALVE LOCATION
2
Choose a location for
the valve that is easily
accessible. It is best to
connect into the side of a
vertical water pipe. When
it is necessary to connect
into a horizontal water
pipe, make the connection to the top or
side, rather than at the bottom, to avoid
drawing off any sediment from the water
pipe.
DRILL THE HOLE FOR THE VALVE
3
Drill a ¼ in. hole in
the water pipe using
a sharp bit. Remove
any burrs resulting
from drilling the hole
in the pipe. Be careful
not to allow water
to drain into the drill. Failure to drill a ¼ in.
hole may result in reduced ice production
or smaller cubes.
NOTE
The hookup line cannot be white, plastic
tubing. Licensed plumbers must use
only copper tubing NDA tubing #49595
or 49599 or Cross Link Polyethylene
(PEX) tubing.
Page 21
INSTALLATION
21
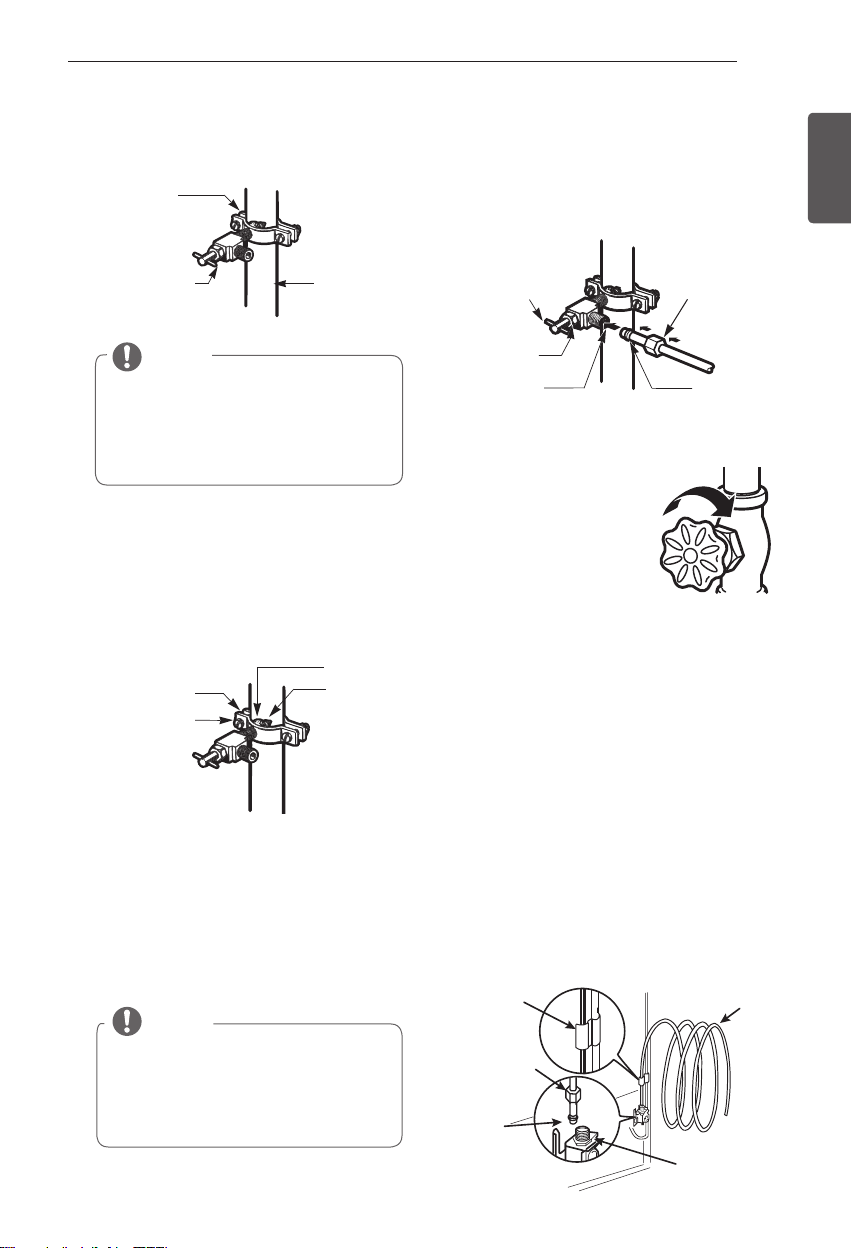
FASTEN THE SHUTOFF VALVE
4
Fasten the shutoff valve to the cold water
pipe with the pipe clamp.
Pipe Clamp
Saddle-Type
Shutoff Valve
Vertical Cold
Water Pipe
NOTE
Commonwealth of Massachusetts
Plumbing Codes 248CMR shall be
adhered to. Saddle valves are illegal and
use is not permitted in Massachusetts.
Consult with your licensed plumber.
TIGHTEN THE PIPE CLAMP
5
Tighten the clamp screws until the sealing
washer begins to swell.
NOTE: Do not overtighten clamp or
you may crush the tubing.
Washer
Pipe Clamp
Clamp Screw
ROUTE THE TUBING
6
Route the tubing between the cold water
line and the refrigerator.
Route the tubing through a hole drilled in
the wall or floor (behind the refrigerator or
adjacent base cabinet) as close to the wall
as possible.
NOTE
Be sure there is sufficient extra tubing
(about 8 feet coiled into 3 turns of
about 10 in. diameter) to allow the
refrigerator to move out from the wall
after installation.
Inlet End
CONNECT THE TUBING TO THE VALVE
7
Place the compression nut and ferrule
(sleeve) for copper tubing onto the end of
the tubing and connect it to the shutoff
valve. Make sure the tubing is fully inserted
into the valve. Tighten the compression
nut securely.
Saddle-Type
Shutoff Valve
Packing Nut
Outlet Valve
FLUSH OUT THE TUBING
8
Compression
Nut
Ferrule (sleeve)
Turn the main water
supply on and flush out
the tubing until the water
is clear.
Shut the water off at the
water valve after about
one quart of water has
been flushed through the tubing.
CONNECT THE TUBING TO THE
9
REFRIGERATOR
Before making the connection
NOTE:
to the refrigerator, be sure that the
refrigerator power cord is not plugged into
the wall outlet.
a. Remove the plastic flexible cap from
the water valve.
b. Place the compression nut and ferrule
(sleeve) onto the end of the tubing as
shown.
c. Insert the end of the copper tubing into
the connection as far as possible. While
holding the tubing, tighten the fitting.
Tubing Clamp
¼ in.
Compression
Nut
Ferrule
(sleeve)
¼ in. Tubing
Refrigerator
Connection
ENGLISH
Page 22
22
INSTALLATION
ENGLISH
VALVE
Tighten any connections that leak.
CAUTION
Check to see if leaks occur at the water
line connections.
PLUG IN THE REFRIGERATOR
11
Arrange the coil of tubing so that it
does not vibrate against the back of the
refrigerator or against the wall. Push the
refrigerator back to the wall.
START THE ICEMAKER
12
Set the icemaker power switch to the ON
position.
The icemaker will not begin to operate
until it reaches its operating temperature
of 16°F (-9°C) or below. It will then begin
operation automatically if the icemaker
power switch is in the ON (I) position.
TURN THE WATER ON AT THE SHUTOFF
10
Turning On The Power
Plug in the refrigerator.
1
CAUTION
Connect to a rated power outlet.
y
Have a certified electrician check
y
the wall outlet and wiring for proper
grounding.
Do not damage or cut off the ground
y
terminal of the power plug.
Page 23
INSTALLATION
23
Leveling and Door Alignment
Leveling
After installing, plug the refrigerator’s power
cord into a 3-prong grounded outlet and push
the refrigerator into the final position.
Your refrigerator has two front leveling legs—
one on the right and one on the left. Adjust the
legs to alter the tilt from front-to-back or sideto-side. If your refrigerator seems unsteady, or
you want the doors to close more easily, adjust
the refrigerator’s tilt using the instructions
below:
Remove the base grille. Refer to the Base
1
Grille Installation section.
Turn the leveling leg to the left to raise
2
that side of the refrigerator or to the right
to lower it. It may take several turns of
the leveling leg to adjust the tilt of the
refrigerator.
ENGLISH
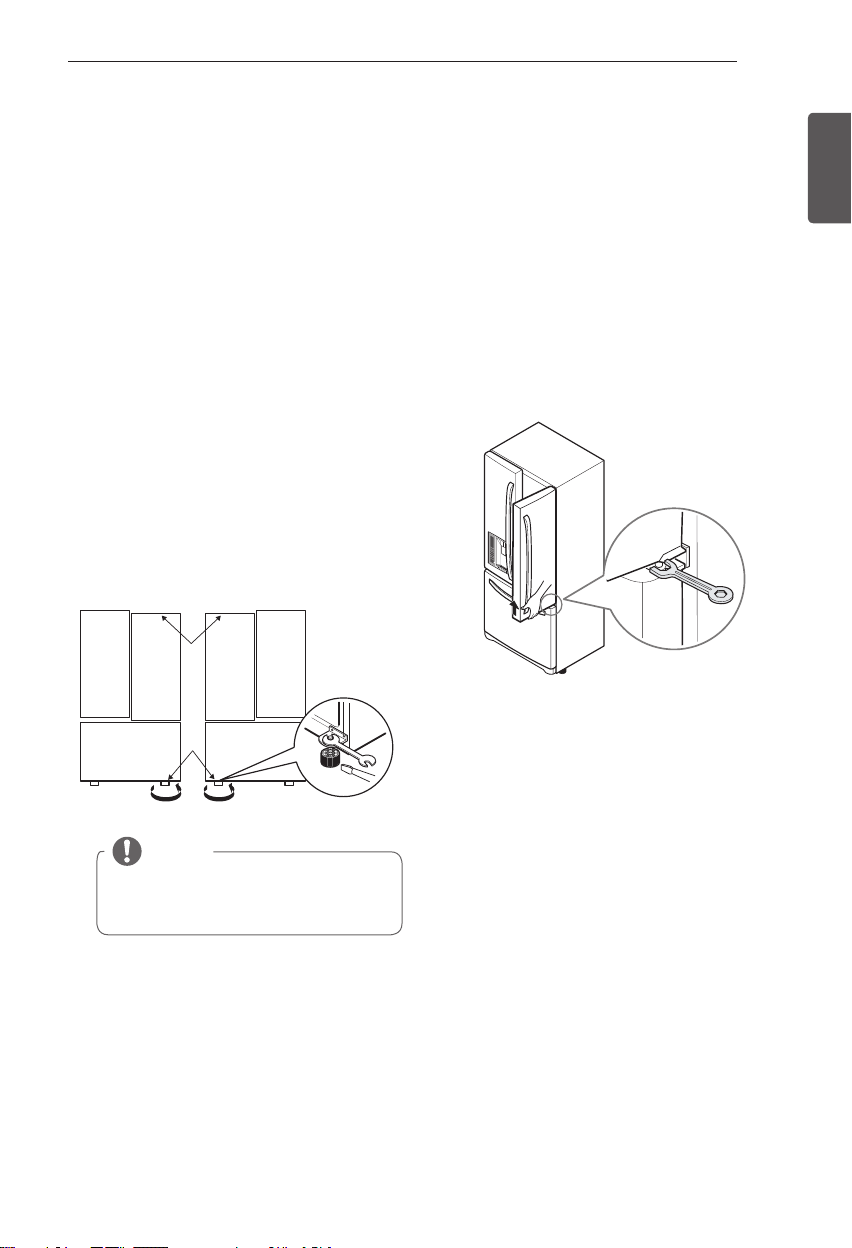
Door Alignment
Both the left and right refrigerator doors have
an adjustable nut, located on the bottom hinge,
to raise and lower them to align properly.
If the space between your doors is uneven,
follow the instructions below to align the doors
evenly:
Use the wrench (included with the Owner’s
Manual) to turn the nut in the door hinge to
adjust the height. To the right to raise or to the
left to lower the height.
NOTE
A flare nut wrench works best, but an
open-end wrench will suffice.
Do not over-tighten.
Open both doors again and check to make
3
sure that they close easily. If the doors do
not close easily, tilt the refrigerator slightly
more to the rear by turning both leveling
legs to the left. It may take several more
turns, and you should turn both leveling
legs the same mount.
Replace the base grille.
4
Page 24
24
HOW TO USE
HOW TO USE
ENGLISH
Before use
Clean the refrigerator.
Clean your refrigerator thoroughly and wipe off all dust that accumulated during
shipping.
CAUTION
Do not scratch the refrigerator with a sharp object or use a detergent that
y
contains alcohol, a flammable liquid or an abrasive when removing any tape
or adhesive from the refrigerator,.
Do not peel off the model or serial number label or the technical information
y
on the rear surface of the refrigerator.
NOTE
Remove adhesive residue by wiping it off with your thumb or dish detergent.
Connect the power supply.
Check if the power supply is connected before use.
Read the “Turning On The Power” section.
Turn off the icemaker if the refrigerator is not yet connected to the
water supply.
Turn off the automatic icemaker and then plug the power plug of the refrigerator
into the grounded electric outlet.
* This is applicable only to certain models.
CAUTION
Running the automatic icemaker before connecting it to the water
supply may cause the refrigerator to malfunction.
Wait for the refrigerator to cool.
Allow your refrigerator to run for at least two to three hours before putting food in
it. Check the flow of cold air in the freezer compartment to ensure proper cooling.
CAUTION
Putting food in the refrigerator before it has cooled could cause the
food to spoil, or a bad odor could remain inside the refrigerator.
The refrigerator makes a loud noise after initial operation.
This is normal. The loudness will decrease as the temperature lowers.
Open refrigerator doors and freezer drawers to ventilate the interior.
The inside of the refrigerator may smell like plastic at first. Remove any adhesive
tape from inside the refrigerator and open the refrigerator doors and the freezer
drawers for ventilation.
Page 25

HOW TO USE
25
Control Panel
* Depending on the model, some of the following functions may not be available.
Control Panel Features
The LED Display shows the temperature settings, dispenser options, water filter, door alarm, and
locking status messages.
LED Display
Ice Type Ice Type
Press the ICE TYPE button to select either
Crushed or Cubed Ice. The selected option will
illuminate on the LED display.
Freezer Freezer
Press the FREEZER button to adjust the
temperature in the freezer compartment.
To change the display from Fahrenheit to
Celsius, press and hold the FREEZER and
REFRIGERATOR button for five seconds.
NOTE
ENGLISH
Control
Buttons
Refrigerator Refrigerator
Press the REFRIGERATOR button to adjust the
temperature in the freezer compartment.
Ice Plus Ice Plus
This function increases both ice making and
freezing capabilities.
When you touch the Ice Plus button, the
y
graphic will illuminate in the display and
will continue for 24 hours. The function will
automatically shut off after 24 hours.
You can stop this function manually by
y
touching the button one more time.
Page 26

26
HOW TO USE
Control Panel Features (continued)
ENGLISH
Energy Saving Energy Saving
The Energy Saving function disables the mullion
heater located on the refrigerator door in order to
conserve electricity. Press and hold the Energy
Saving button for three seconds to activate or
deactivate this function.
NOTE
Discontinue using the Energy Saving function
if excessive moisture begins to collect on the
door mullion.
LightLight
Press the LIGHT button, to turn on the
dispenser light. The indicator will appear on the
LED display.
Change Filter Change Filter
When the water filter indicator turns on, you
have to change the water filter. After changing
the water filter, press and hold the FILTER
button for three seconds to turn the indicator
light off. You need to change the water filter
approximately every six months.
Alarm Alarm
When power is connected to the
y
refrigerator, the door alarm is initially set to
ON. When you press the ALARM button,
the display will change to OFF and the
Alarm function will deactivate.
When either the refrigerator or the freezer
y
door is left open for more than 60 seconds,
the alarm tone will sound to let you know
that the door is open.
When you close the door, the door alarm
y
will stop.
Control Lock Control Lock
The Control Lock function disables every other
button on the display.
When power is initially connected to the
y
refrigerator, the Lock function is off.
If you want to activate the Lock function to
y
lock other buttons, press and hold the Lock
button for three seconds or more. The Lock
icon will display and the Lock function is
now enabled.
To disable the Lock function, press and hold
y
the Lock button for approximately three
seconds.
CAUTION
Display Mode (For Store Use Only)
The Display Mode disables all cooling
in the refrigerator and freezer sections
to conserve energy while on display in
a retail store. When activated, OFF will
display on the control panel.
To deactivate:
With either refrigerator door opened,
press and hold the Refrigerator and Ice
Plus buttons at the same time for five
seconds. The control panel will beep and
the temperature settings will display to
confirm that Display Mode is deactivated.
Use the same procedure to activate the
Display Mode.
Page 27
HOW TO USE
27
In-Door Ice Bin
* Depending on the model, some of the
following functions may not be available.
CAUTION
Keep hands and tools out of the ice
y
compartment door and dispenser chute.
Failure to do so may result in damage or
personal injury.
The icemaker will stop producing ice when
y
the in-door ice bin is full. If you need more
ice, empty the ice bin into the extra ice bin
in the freezer compartment. During use,
the ice can become uneven causing the
icemaker to misread the amount of ice
cubes and stop producing ice. Shaking the
ice bin to level the ice within it can reduce
this problem.
Storing cans or other items in the ice bin will
y
damage the icemaker.
Keep the ice compartment door closed
y
tightly. If the ice compartment door is not
closed tightly, the cold air in the ice bin will
freeze food in the refrigerator compartment.
This could also cause the icemaker to stop
producing ice.
If the O
y
N/OFF switch on the icemaker is
set to OFF for an extended period of time,
the ice compartment will gradually warm
up to the temperature of the refrigerator
compartment. To prevent ice cubes from
melting and leaking from the dispenser,
ALWAYS empty the ice bin when the
icemaker is set to OFF for more than a few
hours.
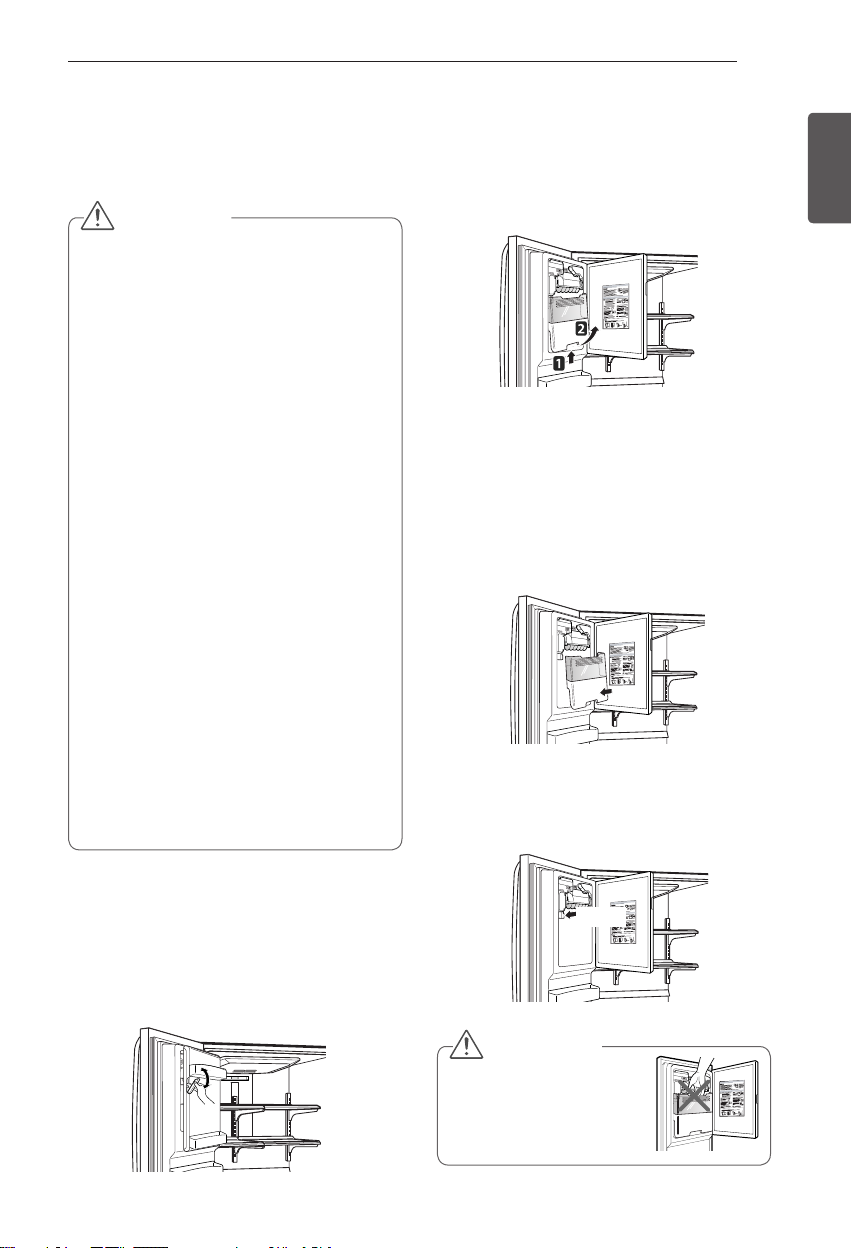
To remove the in-door ice bin, grip the
2
front handle, slightly lift the lower part,
and slowly pull out the bin as shown.
Assembling the In-Door Ice Bin
Carefully insert the in-door ice bin while
1
slightly slanting it to avoid contact with the
icemaker.
Avoid touching the ice-detecting sensor
2
when replacing the ice bin. See the label
on the ice compartment door for details.
ENGLISH
Detaching the In-Door Ice Bin
Gently pull the handle to open the ice
1
compartment.
Ice-detecting
sensor
CAUTION
When handling the ice bin,
keep hands away from the
icemaker tray area to avoid
personal injury.
Page 28

28
HOW TO USE
Automatic Icemaker
ENGLISH
* Depending on the model, some of the
following functions may not be available.
Ice is made in the automatic icemaker and
sent to the dispenser. The icemaker will
produce 70~210 cubes in a 24-hour period,
depending on freezer compartment temperature,
room temperature, number of door openings and
other operating conditions.
It takes about 12 to 24 hours for a newly
installed refrigerator to begin making ice. Wait
72 hours for full ice production to occur.
Ice making stops when the in-door ice bin is full.
When full, the in-door ice bin holds approximately
6 to 8 (12~16 oz or 340~455 cc) glasses of ice.
The water pressure must be between 20 and 120
psi (140 and 830 kPa)on models without a water
filter and between 40 and 120 psi (280 and 830
kPa) on models with a water filter to produce the
normal amount and size of ice cubes.
Foreign substances or frost on the ice-detecting
sensor can interrupt ice production.
Make sure the sensor area is clean at all times
for proper operation.
Water fills the ice tray.
1 hour later from
supplying water
60 minutes after water has been added
to the ice tray, the ice tray will sit slightly
tilted to help the cold air reach the ice.
Power
Switch
Ice-detecting
Sensor
Icemaker
The ice-detecting sensors will sense
when the ice is ready to be dumped
into the ice bin.
Turning the Automatic Icekamer
On or Off
To turn off the automatic icemaker, set the
icemaker switch to
automatic icemaker, set the switch to
OFF (O)
. To turn on the
ON (I)
.
Page 29
HOW TO USE
29
Automatic Icemaker
(continued)
CAUTION
The first ice and water dispensed may
y
include particles or odor from the water
supply line or the water tank.
Throw away the first few batches of ice
y
(about 24 cubes). This is also necessary if
the refrigerator has not been used for a long
time.
Never store beverage cans or other items in
y
the ice bin for the purpose of rapid cooling.
Doing so may damage the icemaker or the
containers may burst.
If discolored ice is dispensed, check the
y
water filter and water supply. If the problem
continues, contact a Sears or other qualified
service center. Do not use the ice or water
until the problem is corrected.
Keep children away from the dispenser.
y
Children may play with or damage the
controls.
The ice passage may become blocked with
y
frost if only crushed ice is used. Remove the
frost that accumulates by removing the ice
bin and clearing the passage with a rubber
spatula. Dispensing cubed ice can also help
prevent frost buildup.
Never use thin crystal glass or crockery to
y
collect ice. Such containers may chip or
break resulting in glass fragments in the ice.
Dispense ice into a glass before filling it
y
with water or other beverages. Splashing
may occur if ice is dispensed into a glass
that already contains liquid.
Never use a glass that is exceptionally
y
narrow or deep. Ice may jam in the ice
passage and refrigerator performance may
be affected.
Keep the glass at a proper distance from
y
the ice outlet. A glass held too close to the
outlet may prevent ice from dispensing.
To avoid personal injury, keep hands out of
y
the ice door and passage.
Never remove the dispenser cover.
y
If ice or water dispenses unexpectedly, turn
y
off the water supply and contact a qualified
service center.
When You Should Turn the
Icemaker Off
When the water supply will be shut off
y
for several hours.
When the ice bin is removed for more
y
than one or two minutes.
When the refrigerator will not be used
y
for several days.
NOTE
The ice bin should be emptied when the
icemaker on/off switch is turned to the
position.
OFF
Normal Sounds You May Hear
The icemaker water valve will buzz as
y
the icemaker fills with water. If the
power switch is in the ON (I) position,
it will buzz even if it has not yet been
hooked up to water. To stop the buzzing,
move the power switch to OFF (O).
NOTE
Keeping the power switch in the ON
(I) position before the water line is
connected can damage the icemaker.
You will hear the sound of cubes
y
dropping into the bin and water running
in the pipes as the icemaker refills.
Preparing For Vacation
Set the icemaker power switch to OFF (O) and
shut off the water supply to the refrigerator.
NOTE
The ice bin should be emptied anytime
the icemaker on/off switch is turned to
the OFF (O) position.
If the ambient temperature will drop below
freezing, have a qualified technician drain
the water supply system to prevent serious
property damage due to flooding caused by
ruptured water lines or connections.
ENGLISH
Page 30
30
HOW TO USE
Ice and Water Dispenser
ENGLISH
* Depending on the model, some of the
following functions may not be available.
CAUTION
Keep children away from the dispenser.
Children may play with or damage the
controls.
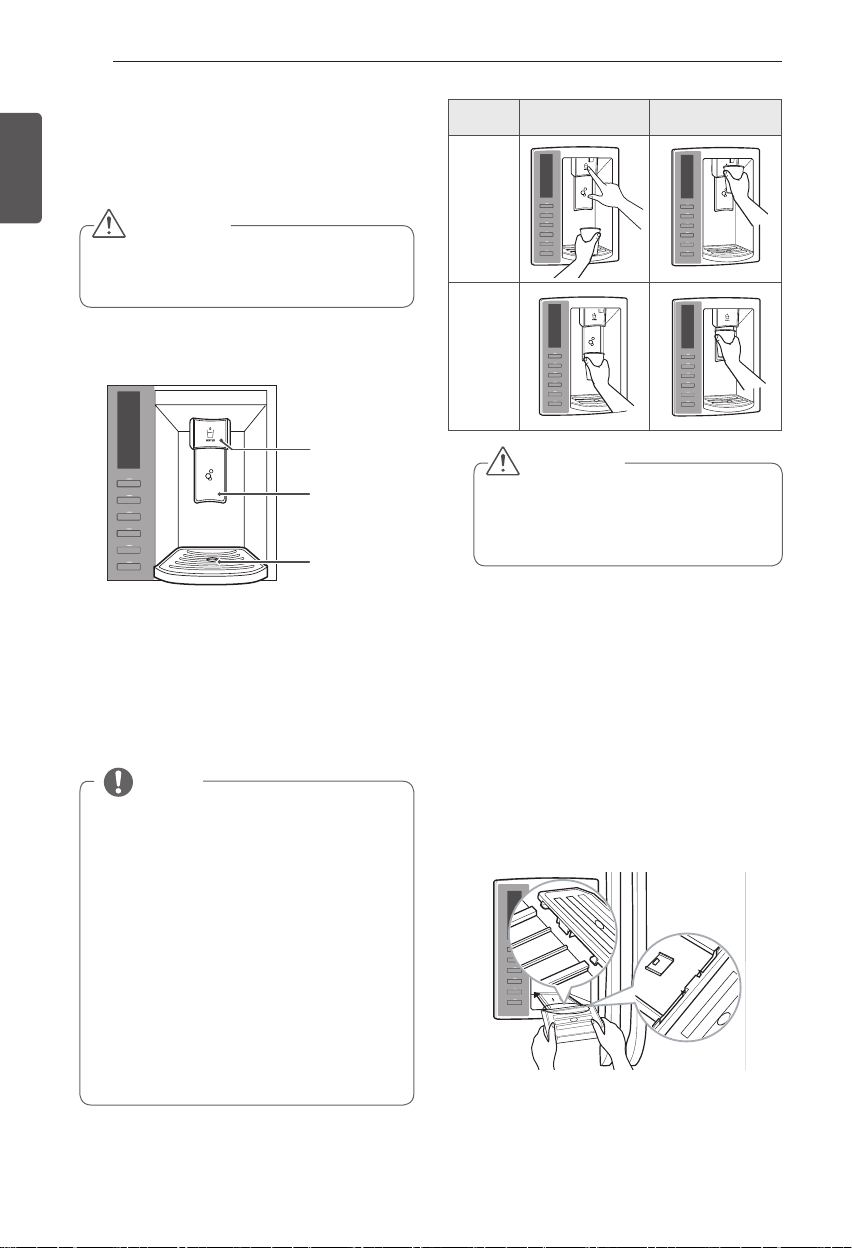
Dispenser
Using the Dispenser
To dispense
y
water switch with a glass.
To dispense
y
with a glass.
cold water
, push on the ice switch
ice
Water Switch
Ice Switch
Stand
, push on the
Incorrect Way Correct Way
Water
Ice
CAUTION
Throw away the first few batches of ice
(about 24 cubes). This is also necessary
if the refrigerator has not been used for
a long time.
Locking the Dispenser
Press and hold the Alarm and Lock button
simultainously for 3 seconds to lock the
dispenser and all the control panel functions.
Follow the same instructions to unlock.
NOTE
If discolored ice is dispensed, check
y
the water filter and water supply. If the
problem continues, contact a qualified
service center. Do not use the ice or
water until the problem is corrected.
The dispenser will not operate when
y
either of the refrigerator doors are open.
If dispensing water or ice into a container
y
with a small opening, place it as close to
the dispenser as possible.
Some dripping may occur after
y
dispensing. Hold your cup beneath
the dispenser for a few seconds after
dispensing to catch all of the drops.
Cleaning the Dispenser Stand
Grip the stand with both hands and pull it
1
out.
Wipe out dirty areas with a clean cloth.
2
Page 31

HOW TO USE
31
Storing Food
Food Preservation Location
Each compartment inside the refrigerator is designed to store different types of food.
Store your food in the optimal space to enjoy the freshest taste.
Adjustable refrigerator shelf
Adjustable shelves to meet
your individual storage
needs.
Vegetable storage
(Crisper)
Preserves vegetables and
fruit.
®
Durabase
Largest storage space in
the freezer.
Dairy product bin
Store milk products such as
butter and cheese.
Gallon Storage Bin
Store drinks such as
juice and soda, as well as
seasonings, salad dressings
and other food items.
Glide‘N’Serve
Provides storage space that
keeps the compartment
at a different temperature
than the refrigerator. It is a
convenient place to store
sandwiches or meat to be
cooked.
ENGLISH
CAUTION
Do not store food with high moisture content towards the top of the refrigerator. The moisture
could come in direct contact with the cold air and freeze.
Wash food before storing it in the refrigerator. Vegetables and fruit should be washed, and food
packaging should be wiped down to prevent adjacent foods from being contaminated.
If the refrigerator is kept in a hot and humid place, frequent opening of the door or storing a lot of
vegetables in the refrigerator may cause condensation to form. Wipe off the condensation with a
clean cloth or a paper towel.
If the refrigerator door or freezer drawer is opened or closed too often, warm air may penetrate
the refrigerator and raise its temperature. It can also increase the cost of electricity.
NOTE
If you are leaving home for a short period of time, like a short vacation, the refrigerator should
be left on. Refrigerated foods that are able to be frozen will stay preserved longer if stored in the
freezer.
If you are leaving the refrigerator turned off for an extended period of time, remove all food and
unplug the power cord. Clean the interior, and leave the door open to prevent fungi from growing
in the refrigerator.
Page 32

32
HOW TO USE
Food Storage Tips
ENGLISH
* The following tips may not be applicable
depending on the model.
Wrap or store food in the refrigerator in airtight
and moisture-proof material unless otherwise
noted. This prevents food odor and taste transfer
throughout the refrigerator. For dated products,
check date code to ensure freshness.
Food How to
Butter or
Margarine
Cheese
Milk Wipe milk cartons. For best
Eggs Store in original carton on
Fruit Do not wash or hull the fruit
Leafy
Vegetables
Vegetables
with skins
(carrots,
peppers)
Fish Store fresh fish and shellfish
Leftovers
Keep opened butter in a covered
dish or closed compartment.
When storing an extra supply,
wrap in freezer packaging and
freeze.
Store in the original wrapping
until you are ready to use it.
Once opened, rewrap tightly in
plastic wrap or aluminum foil.
storage, place milk on interior
shelf, not on door shelf.
interior shelf, not on door shelf.
until it is ready to be used. Sort
and keep fruit in its original
container, in a crisper, or store
in a completely closed paper
bag on a refrigerator shelf.
Remove store wrapping and
trim or tear off bruised and
discolored areas. Wash in cold
water and drain. Place in plastic
bag or plastic container and
store in crisper.
Place in plastic bags or plastic
container and store in crisper.
in the freezer section if they
are not being consumed the
same day of purchase. It is
recommended to consume
fresh fish and shellfish the
same day purchased.
Cover leftovers with plastic
wrap, aluminum foil, or plastic
containers with tight lids.
Storing Frozen Food
NOTE
Check a freezer guide or a reliable cookbook
for further information about preparing food
for freezing or food storage times.
FreezingFreezing
Your freezer will not quick-freeze a large
quantity of food. Do not put more unfrozen
food into the freezer than will freeze within
24 hours (no more than 2 to 3 lbs. of food per
cubic foot of freezer space). Leave enough
space in the freezer for air to circulate around
packages. Be careful to leave enough room at
the front so the door can close tightly.
Storage times will vary according to the quality
and type of food, the type of packaging or wrap
used (how airtight and moisture-proof) and
the storage temperature. Ice crystals inside a
sealed package are normal. This simply means
that moisture in the food and air inside the
package have condensed, creating ice crystals.
NOTE
Allow hot foods to cool at room temperature
for 30 minutes, then package and freeze.
Cooling hot foods before freezing saves
energy.
Page 33

HOW TO USE
33
Storing Frozen Food (continued)
PackagingPackaging
Successful freezing depends on correct
packaging. When you close and seal the
package, it must not allow air or moisture in or
out. If it does, you could have food odor and
taste transfer throughout the refrigerator and
could also dry out frozen food.
Packaging recommendations:Packaging recommendations:
Rigid plastic containers with tight-fitting
lids
Straight-sided canning/freezing jars
Heavy-duty aluminum foil
Plastic-coated paper
Non-permeable plastic wraps
Specified freezer-grade self-sealing plastic
bags
Follow package or container instructions for
proper freezing methods.
Do not use
Bread wrappers
Non-polyethylene plastic containers
Containers without tight lids
Wax paper or wax-coated freezer wrap
Thin, semi-permeable wrap
Humidity Controlled Crisper
and Glide’N’Serve
* Depending on the model, some of the
following functions may not be available.
The crispers provide fresher tasting fruit
and vegetables by letting you easily control
humidity inside the drawer.
You can control the amount of humidity in
the moisture-sealed crispers by adjusting the
control to any setting between
keeps moist air in the crisper for
HGIH
best storage of fresh, leafy vegetables.
lets moist air out of the crisper for
WOL
best storage of fruit.
HIGH and LOW.
Glide‘N’Serve
The Glide‘N’Serve provides storage space with a
variable temperature control that keeps the
compartment colder than refrigerator.
This drawer can be used for large party trays, deli
items, or beverages. (but this drawer can't be
used for vegetable.)
Controls
The control regulates the air temperature in the
drawer. Set control level to COLD (print on
surface) to provide normal refrigerator
temperature. Use the COLDER (print on surface)
setting for meats or other deli items.
NOTE
Cold air directed to the Glide‘N’Serve can
decrease refrigerator temperature.
Refrigerator control may need to be adjusted.
ENGLISH
Page 34

34
HOW TO USE
Detaching and Assembling the
ENGLISH
Storage Bins
Glide’N’Serve and Humidity
Controlled Crisper
To remove the Humidity Controlled Crisper and
the Glide’N’Server, pull out the Crisper
Glide’N’Server
up, and pull straight out.
To install, slightly tilt up the front, insert the
drawer into the frame and push it back into
place.
to full extension, lift the front
and
To Remove the Glass
(Pantry drawer not shown for clarity)
Lift up the glass under the crisper cover, and
pull up and out.
Door Bins
The door bins are removable for easy cleaning
and adjustment.
To remove the bin, simply lift the bin up and
1
pull straight out.
To replace the bin, slide it in above the
2
desired support and push down until it snaps
into place.
NOTE
Storage Bins may vary in appearance,
depending on your model.
NOTE
Some bins may vary in appearance and
will only fit in one location.
CAUTION
Do not apply excessive force while
detatching or
assembling the storage bins.
Do not use the dishwasher to clean
the storage bins and shelves.
Regularly detach and wash the
storage bins and shelves; they can
become easily contaminated by the
food.
Page 35

HOW TO USE
35
Adjusting the Refrigerator
Shelves
The shelves in your refrigerator are adjustable To separate the ice bin, pull out the drawer
to meet your individual storage needs. Your
model may have glass or wire shelves.
Adjusting the shelves to fit different heights
of items will make finding the exact item you
want easier. Doing so will also reduce the
amount of time the refrigerator door is open
which will save energy.
Detaching the Shelf
Tilt up the front of the shelf and lift it straight
up. Pull the shelf out.
Assembling the Shelf
Ice Bin
to full extension. Gently lift and pull out the
ice bin. To reinstall, simply set the ice bin
in its correct position.
Drawer
CAUTION
Pinch hazard! Keep hands and feet clear
of the bot- ytom of the door when
opening and closing.
DuraBase ® Divider
ENGLISH
Tilt the front of the shelf up and guide the shelf
hooks into the slots at a desired height. Then,
lower the front of the shelf so that the hooks
drop into the slots.
CAUTION
Make sure that shelves are level from
one side to the other. Failure to do so
may result in the shelf falling or spilling
food.
WARNING
Child Entrapment Hazard
If the Durabase divider is removed, there
is enough yopen space for children or
pets to crawl inside. To prevent
accidental child and pet entrapment or
suffocation risk, DO NOT allow them to
play inside of drawer.
Page 36

36
MAINTENANCE
MAINTENANCE
ENGLISH
Cleaning
Both the refrigerator and freezer sections defrost automatically; however, clean both
sections about once a month to prevent odors.
Wipe up spills immediately.
Always unplug the refrigeration before cleaning.
General Cleaning Tips
Unplug refrigerator or disconnect power.
Remove all removable parts, such as
shelves, crispers, etc.
Use a clean sponge or soft cloth and a
mild detergent in warm water. Do not
use abrasive or harsh cleaners.
Hand wash, rinse and dry all surfaces
thoroughly.
Exterior
Waxing external painted metal surfaces helps
provide rust protection. Do not wax plastic
parts. Wax painted metal surfaces at least
twice a year using appliance wax (or auto paste
wax). Apply wax with a clean, soft cloth.
For products with a stainless steel exterior,
use a clean sponge or soft cloth and a mild
detergent in warm water. Do not use abrasive
or harsh cleaners. Dry thoroughly with a soft
cloth.Do not use appliance wax, bleach, or
other products containing chlorine on
stainless steel.
CAUTION
Do not use a rough cloth or sponge
when cleaning the interior and exterior
of the refrigerator.
Do not place your hand on the bottom
surface of the refrigerator when
opening and closing.
Inside Walls (allow freezer to warm
up so the cloth will not stick)
To help remove odors, you can wash the inside
of the refrigerator with a mixture of baking
soda and warm water. Mix 2 tablespoons of
baking soda to 1 quart of water (26 g soda
to 1 liter water.) Be sure the baking soda is
completely dissolved so it does not scratch the
surfaces of the refrigerator.
Door Liners and Gaskets
Use a clean sponge or soft cloth and a mild
detergent in warm water. Do not use cleaning
waxes, concentrated detergents, bleaches,
or cleaners containing petroleum on plastic
refrigerator parts.
Plastic Parts (covers and panels)
Use a clean sponge or soft cloth and a mild
detergent in warm water. Do not use window
sprays, abrasive cleansers, or flammable fluids.
These can scratch or damage the material.
Condenser Coils
Use a vacuum cleaner with an attachment to
clean the condenser cover and vents. Do not
remove the panel covering the condenser coil
area.
WARNING
so can result in fire, explosion, or death.
od ot eruliaF .renaelc elbammalf-non esU
Page 37

MAINTENANCE
2.5 gallon (9 litters)
37
ENGLISH
(9 litters)
2.5 gallon
Page 38

38
MAINTENANCE
ENGLISH
Models Number 5231JA2002A-S Use with replacement cartridge 5231JA2002A
Performance Data Sheet
This system has been tested according to NSF/ANSI Standards 42 for the reduction of the substances
listed below. The concentration of the indicated substances in water entering the system was reduced
to a concentration less than or equal to the permissible limit for water leaving the system as specified in
NSF/ANSI 42.
System tested and certified by NSF International against NSF/ANSI Standard 42 for
the reduction of Chlorine Taste and Odor and Nominal Particulate Class III.
Capacity: 500 gal (1,892 L)
Substance
Nominal Particulate
Class I Particle size:
>0.5 to < 1 um
Chlorine taste and
odor Class III
Note that while the testing was performed under standard laboratory conditions, actual performance may vary.
Average
Influent
Concentration
24,333 At least 10,000 particles/ml 915 96
1.9 2.0 mg/L ± 10% 0.07 96.4
Application Guidelines/Water Supply Parameters
Service Flow 0.5 gpm (1.89 lpm)
Water Pressure
20 and 120 psi
(140 and 830 kPa)
Water Temperature
WARNING
Do not use with water that is microbiologically
unsafe or of unknown quality without adequate
disinfection before or after the system.
Systems must be installed and operated
y
in accordance with manufacturer’s
recommended procedures and guidelines.
Warranty: See Warranty Card for Details.
Influent Challenge
Concentration. Units apply
to each row
36 °F - 100 °F
(0.6 °C - 37.8 °C)
Average
Product Water
Concentration
Average %
Reduction
CAUTION
To reduce the risk of property damage due to
water leakage:
Read and follow. Use instructions before
y
installation and use of this system.
Install on COLD water lines only.
y
Comply with all state and local plumbing
y
codes.
Install a pressure limiting device and water
y
hammer arrester for inlet water pressures
exceeding 80 psi (552 kPa). Refer to
Uniform Plumbing Code, Sections 608.2
and 609.10).
Never install or operate where inlet water
y
pressure may exceed 125 psi (862 kPa).
Protect filter from freezing. Remove filter in
y
temperatures below 33°F (0.6°C).
Replace cartridge at specified service
y
NSF % reduction req.
or Max. permissible
product water
concentration
≥
≥
interval. Cartridge MUST be replaced at
For a replacement cartridge or for service
least every 12 months.
contact your local dealer.
You can also visit our website;
or call
1-877-714-7486.
www.lg.com
85%
50%
Manufactured for LG® Electronics by:
CUNO Incorporateda 3M Company 400
Research Parkway Meriden, CT 06450 U.S.A.
Telephone: 203-237-5541
Fax: 203-238-8701
Page 39

SMART DIAGNOSIS
39
SMART DIAGNOSIS
Should you experience any problems with
your refrigerator, it has the capability of
transmitting data via your telephone to the LG
service center. This gives you the capability of
speaking directly to our trained specialists. The
specialist records the data transmitted from
your machine and uses it to analyze the issue,
providing a fast and effective diagnosis.
If you experience problems with your
refrigerator, call 1-800-243-0000. Only use
the Smart Diagnosis feature when instructed
to do so by the LG call center agent. The
transmission sounds that you will hear are
normal and sound similar to a fax machine.
Smart Diagnosis cannot be activated unless
your refrigerator is connected to power. If
your refrigerator is unable to turn on, then
troubleshooting must be done without using
Smart Diagnosis.
Using Smart Diagnosis
First, call 1-800-243-0000. Only use the Smart
Diagnosis feature when instructed to do so by
the LG call center agent.
Lock the display. To lock the display,
1
press and hold the Lock button for three
seconds. (If the display has been locked
for over five minutes, you must deactivate
the lock and then reactivate it.)
Open the right refrigerator door.
2
Hold the mouthpiece of your phone in
3
front of the speaker that is located on the
right hinge of the refrigerator door, when
instructed to do so by the call center.
Press and hold the Freezer Temperature
4
button for three seconds while continuing
to hold your phone to the speaker.
After you hear three beeps, release the
5
Freezer Temperature button.
Keep the phone in place until the tone
6
transmission has finished. This takes about
15 seconds, and the display will count
down the time. Once the countdown is
over and the tones have stopped, resume
your conversation with the specialist, who
will then be able to assist you in using the
information transmitted for analysis.
NOTE
For best results, do not move the phone
y
while the tones are being transmitted.
If the call center agent is not able to get
y
an accurate recording of the data, you
may be asked to try again.
NOTE
Call quality differences by region may
y
affect the function.
Use the home telephone for better
y
communication performance, resulting
in better service.
Bad call quality may result in poor data
y
transmission from your phone to the
machine, which could cause Smart
Diagnosis to not work properly.
ENGLISH
Page 40

40
TROUBLESHOOTING
TROUBLESHOOTING
ENGLISH
Review the Troubleshooting section before calling for service; doing so will save you both time
and money.
Problem Possible Causes Solutions
Refrigerator and
Freezer section
are not cooling.
Cooling System
runs too much.
The refrigerator control is set to
OFF (some models).
Refrigerator is in the defrost
cycle.
Refrigerator was recently
installed.
Refrigerator was recently
relocated.
Refrigerator is replacing an
older model.
Refrigerator was recently
plugged in or power restored.
Door opened often or a large
amount of food / hot food was
added.
Doors are not closed
completely.
Refrigerator is installed in a hot
location.
Condenser / back cover is
clogged.
Turn the control ON. Refer to the Setting the
Controls section for proper temperature settings.
During the defrost cycle, the temperature of
each compartment may raise slightly. Wait 30
minutes and confirm the proper temperature
has been restored once the defrost cycle has
completed.
It may take up to 24 hours for each compartment
to reach the desired temperature.
If the refrigerator was stored for a long period of
time or moved on its side, it is necessary for the
refrigerator to stand upright for 24 hours before
connecting it to power.
Modern refrigerators require more operating
time but use less energy due to more efficient
technology.
The refrigerator will take up to 24 hours to cool
completely.
Adding food and opening the door warms the
refrigerator, requiring the compressor to run
longer in order to cool the refrigerator back
down. In order to conserve energy, try to get
everything you need out of the refrigerator
at once, keep food organized so it is easy to
find, and close the door as soon as the food is
removed. (Refer to the Food Storage Guide.)
Firmly push the doors shut. If they will not
shut all the way, see the Doors will not close
completely or pop open section in Parts &
Features Troubleshooting.
The compressor will run longer under warm
conditions. At normal room temperatures (70°F)
expect your compressor to run about 40% to
80% of the time. Under warmer conditions,
expect it to run even more often. The refrigerator
should not be operated above 110°F.
Use a vacuum cleaner with an attachment to
clean the condenser cover and vents. Do not
remove the panel covering the condenser coil
area.
Page 41

TROUBLESHOOTING
41
Problem Possible Causes Solutions
Refrigerator or
Freezer section is
too warm.
Refrigerator was recently
installed.
Air vents are blocked. Rearrange items to allow air to flow throughout
Doors are opened often or for
long periods of time.
Unit is installed in a hot location. The refrigerator should not be operated in
A large amount of food or
hot food was added to either
compartment.
Doors not closed correctly. See the Doors will not close correctly or pop open
Temperature control is not set
correctly.
It may take up to 24 hours for each compartment
to reach the desired temperature.
the compartment. Refer to the Airflow diagram in
the Using Your Refrigerator section.
When the doors are opened often or for long
periods of time, warm, humid air enters the
compartment. This raises the temperature and
moisture level within the compartment. To lessen
the effect, reduce the frequency and duration of
door openings.
temperatures above 110F.
Adding food warms the compartment requiring
the cooling system to run. Allowing hot food to
cool to room temperature before putting it in the
refrigerator will reduce this effect.
section in Parts & Features Troubleshooting.
If the temperature is too warm, adjust the
control one increment at a time and wait for the
temperature to stabilize. Refer to the Setting the
Controls section for more information.
ENGLISH
Defrost cycle has recently
completed.
During the defrost cycle, the temperature of each
compartment may raise slightly and condensation
may form on the back wall. Wait 30 minutes
and confirm the proper temperature has been
restored once the defrost cycle has completed.
Page 42

42
TROUBLESHOOTING
ENGLISH
Interior moisture
buildup.
Food is freezing
in the refrigerator
compartment.
Frost or ice
crystals form
on frozen food
(outside of
package).
Refrigerator or
Freezer section is
too cold.
Problem Possible Causes Solutions
Doors are opened often or for
long periods of time.
Doors not closed correctly. See the Doors will not close correctly section in
Weather is humid. Humid weather allows additional moisture
Defrost cycle recently
completed.
Food is not packaged correctly. Food stored uncovered or unwrapped, and damp
Food with high water content
was placed near an air vent.
Refrigerator temperature control
is set incorrectly.
Refrigerator is installed in a cold
location.
Door is opened frequently or for
long periods of time.
Door is not closing properly. Refer to the Doors will not close correctly or pop
Incorrect temperature control
settings.
When the doors are opened often or for long
periods of time, warm, humid air enters the
compartment. This raises the temperature and
moisture level within the compartment. To
lessen the effect, reduce the frequency and
duration of door openings.
the Troubleshooting section.
to enter the compartments when the doors
are opened leading to condensation or frost.
Maintaining a reasonable level of humidity in the
home will help to control the amount of moisture
that can enter the compartments.
During the defrost cycle, the temperature
of each compartment may raise slightly and
condensation may form on the back wall.
Wait 30 minutes and confirm that the proper
temperature has been restored once the defrost
cycle has completed.
containers can lead to moisture accumulation
within each compartment. Wipe all containers
dry and store food in sealed packaging to prevent
condensation and frost.
Rearrange items with high water content away
from air vents.
If the temperature is too cold, adjust the control
one increment at a time and wait for the
temperature to stabilize. Refer to the Setting the
Controls section for more information.
When the refrigerator is operated in temperature
below 41°F (5°C), food can freeze in the
refrigerator compartment. The refrigerator should
not be operated in temperature below 55°F (13°C).
When the doors are opened often or for long
periods of time, warm, humid air enters the
compartment. This raises the temperature and
moisture level within the compartment. Increased
moisture will lead to frost and condensation.
To lessen the effect, reduce the frequency and
duration of door openings.
open section in the Troubleshooting section.
If the temperature is too cold, adjust the control
one increment at a time and wait for the
temperature to stabilize. Refer to the Setting the
Controls section for more information.
Page 43

TROUBLESHOOTING
43
Problem Possible Causes Solutions
Frost or ice
crystals on frozen
food (inside of
sealed package).
Icemaker is not
making enough
ice.
Condensation from food with a
high water content has frozen
inside of the food package.
Food has been left in the freezer
for a long period of time.
Demand exceeds ice storage
capacity.
House water supply is not
connected, valve is not turned
on fully, or valve is clogged.
Water filter has been
exhausted.
Low house water supply
pressure.
This is normal for food items with a high water
content.
Do not store food items with high water content
in the freezer for a long period of time.
The icemaker will produce approximately
70~210 cubes in a 24 hour period.
Connect the refrigerator to a cold water supply
with adequate pressure and turn the water
shutoff valve fully open.
If the problem persists, it may be necessary to
contact a plumber.
It is recommended that you replace the water
filter:
Approximately every six months.•
When the water filter indicator turns on.•
When the water dispenser output decreases.
•
When the ice cubes are smaller than normal.
•
The water pressure must be between 20 and 120
psi (140 and 830 kPa) on models without a water
filter and between 40 and 120 psi (280 and 830
kPa) on models with a water filter.
If the problem persists, it may be necessary
to
contact a plumber.
ENGLISH
Reverse Osmosis filtration
system is used.
Tubing connecting refrigerator
to house supply valve is kinked.
Reverse osmosis filtration systems can reduce
the water pressure below the minimum amount
and result in icemaker issues.
(Refer to Water Pressure section.)
The tubing can kink when the refrigerator is
moved during installation or cleaning resulting
in reduced water flow. Straighten or repair the
water supply line and arrange it to prevent future
kinks.
Page 44

44
TROUBLESHOOTING
ENGLISH
Icemaker is not
making enough
ice (continued).
Dispensing water
slowly.
Problem Possible Causes Solutions
Doors are opened often or for
long periods of time.
Doors are not closed
completely.
The temperature setting for the
freezer is too warm.
Water filter has been exhausted.
Reverse osmosis filtration
system is used.
If the doors of the unit are opened often, ambient
air will warm the refrigerator which will prevent
the unit from maintaining the set temperature.
Lowering the refrigerator temperature can help,
as well as not opening the doors as frequently.
If the doors are not properly closed, ice
production will be affected. See the Doors will
not close completely or pop open section in Parts
& Features Troubleshooting for more information.
The recommended temperature for the freezer
compartment for normal ice production is 0°F (-18°C).
If the freezer temperature is warmer, ice production
will be affected.
It is recommended that you replace the water filter:
Approximately every six months.•
When the water filter indicator turns on.
•
When the water dispenser output decreases.
•
When the ice cubes are smaller than normal.
•
Reverse osmosis filtration systems can reduce
the water pressure below the minimum amount
and result in icemaker issues.
If the problem persists, it may be necessary to
contact a plumber.
Low house water supply
pressure.
The water pressure must be between 20 and 120
psi (140 and 830 kPa) on models without a water
filter and between 40 and 120 psi (280 and 830
kPa) on models with a water filter.
If the problem persists, it may be necessary to
contact a plumber.
Page 45

TROUBLESHOOTING
45
Problem Possible Causes Solutions
Not dispensing
ice.
Icemaker is not
making ice.
Doors are not closed
completely.
Infrequent use of the dispenser. Infrequent use of the ice dispenser will cause
The delivery chute is clogged
with frost or ice fragments.
The dispenser display is locked. Press and hold the Lock button for three seconds
Ice bin is empty. It may take up to 24 hours for each compartment
Refrigerator was recently
installed or icemaker recently
connected.
Icemaker not turned on. Locate the icemaker ON/OFF switch and confirm
The ice detecting sensor is
obstructed.
The refrigerator is not connected
to a water supply or the supply
shutoff valve is not turned on.
Icemaker shutoff (arm or
sensor) obstructed.
Reverse osmosis water filtration
system is connected to your
cold water supply.
Ice will not dispense if any of the refrigerator
doors are left open.
the cubes to stick together over time, which
will prevent them from properly dispensing.
Check the ice bin for ice cubes clumping/sticking
together. If they are, break up the ice cubes to
allow for proper operation.
Eliminate the frost or ice fragments by removing
the ice bin and clearing the chute with a plastic
utensil. Dispensing cubed ice can also help
prevent frost or ice fragment buildup.
to unlock the control panel and dispenser.
to reach the desired temperature and for the
icemaker to begin making ice. Make sure that the
shutoff
(arm/sensor) is not obstructed.
Once the ice supply in the bin has been
completely exhausted, it my take up to 90
minutes before additional ice is available, and
approximately 24 hours to completely refill the
bin.
It may take up to 24 hours for each compartment
to reach the desired temperature and for the
icemaker to begin making ice.
that it is in the ON (I) position.
Foreign substances or frost on the ice-detecting
sensor can interrupt ice production. Make sure
that the sensor area is clean at all times for proper
operation.
Connect refrigerator to the water supply and turn
the water shutoff valve fully open.
If your icemaker is equipped with an ice shutoff
arm, make sure that the arm moves freely. If
your icemaker is equipped with the electronic ice
shutoff sensor, make sure that there is a clear
path between the two sensors.
Reverse osmosis filtration systems can reduce
the water pressure below the minimum amount
and result in icemaker issues.
(Refer to the Water Pressure section.)
ENGLISH
Page 46

46
TROUBLESHOOTING
ENGLISH
Not dispensing
water.
Problem Possible Causes Solutions
New installation or water line
recently connected.
The dispenser panel is locked. Press and hold the Lock button for three
The dispenser is not set for
water dispensing.
Refrigerator or freezer doors are
not closed properly.
Water filter has been recently
removed or replaced.
Tubing connecting refrigerator
to house supply valve is kinked.
Dispense 2.5 gallons (9 litters) of water (flush for
approximately 5 minutes) to remove trapped air
and contaminates from the system.
Do not dispense the entire2.5 gallons (9 litters)
amount continuously. Depress and release the
dispenser pad for cycles of 30 seconds ON and
60 seconds OFF.
seconds to unlock the control panel and dispenser.
The dispenser can be set for ice or water. Make
certain that the control panel is set for the proper
operation. Press the Water button on the control
panel to dispense water.
Water will not dispense if any of the refrigerator
doors are left open.
After the water filter is replaced, dispense 2.5
gallons (9 litters) of water (flush for approximately
5 minutes) to remove trapped air and contaminates
from the system. Do not dispense the entire2.5
gallons (9 litters) amount continuously. Depress
and release the dispenser pad for cycles of 30
seconds ON and 60 seconds OFF.
The tubing can kink when the refrigerator is
moved during installation or cleaning resulting in
reduced water flow. Straighten or repair the water
supply line and arrange it to prevent future kinks.
The house water supply is not
connected, the valve is not
turned on fully, or the valve is
clogged.
Connect refrigerator to the water supply and turn
the water shutoff valve fully open.
If the problem persists, it may be necessary to
contact a plumber.
Page 47

TROUBLESHOOTING
47
Problem Possible Causes Solutions
Ice has bad taste
or odor.
Dispensing warm
water.
Water supply contains minerals
such as sulfur.
Icemaker was recently installed. Discard the first few batches of ice to avoid
Ice has been stored for too
long.
The food has not been stored
properly in either compartment.
The interior of the refrigerator
needs to be cleaned.
The ice storage bin needs to be
cleaned.
Refrigerator was recently
installed.
The water dispenser has been
used recently and the storage
tank was exhausted.
Dispenser has not been used
for several hours.
Refrigerator is connected to the
hot water supply.
A water filter may need to be installed to
eliminate taste and odor problems.
NOTE: In some cases, a filter may not help. It
may not be possible to remove all minerals / odor
/ taste in all water supplies.
discolored or bad tasting ice.
Ice that has been stored for too long will shrink,
become cloudy, and may develop a stale taste.
Throw away old ice and make a new supply.
Rewrap the food. Odors may migrate to the ice if
food is not wrapped properly.
See the Care and Cleaning section for more
information.
Empty and wash the bin (discard old cubes).
Make sure that the bin is completely dry before
reinstalling it.
Allow 24 hours after installation for the water
storage tank to cool completely.
Depending on your specific model, the water
storage capacity will range from approximately
20 to 30 oz (570 to 850 cc)
If the dispenser has not been used for several
hours, the first glass dispensed may be warm.
Discard the first 10 oz (280 cc).
Make sure that the refrigerator is connected to a
cold water pipe.
ENGLISH
Water has bad
taste or odor.
WARNING: Connecting the refrigerator to a
hot water line may damage the icemaker.
Water supply contains minerals
such as sulfur.
Water filter has been exhausted.It is recommended that you replace the water
Refrigerator was recently
installed.
A water filter may need to be installed to
eliminate taste and odor problems.
filter:
Approximately every 6 months.•
When the water filter indicator turns on.•
When the water dispenser output decreases. •
When the ice cubes are smaller than normal.•
Dispense 2.5 gallons (9 litters) of water (flush for
approximately 5 minutes) to remove trapped
air and contaminates from the system. Do
not dispense the entire 2.5 gallons (9 litters) amount
continuously. Depress and release the dispenser
pad for cycles of 30 seconds ON and 60 seconds
OFF.
Page 48

48
TROUBLESHOOTING
ENGLISH
Icemaker is
making too much
ice.
Clicking The defrost control will click
Rattling Rattling noises may come from
Whooshing Evaporator fan motor is
Gurgling Refrigerant flowing through the
Popping Contraction and expansion of
Sizzling Water dripping on the defrost
Vibrating If the side or back of the
Dripping Water running into the drain pan
Problem Possible Causes Solutions
Icemaker shutoff (arm/sensor)
is obstructed.
when the automatic defrost
cycle begins and ends.
The thermostat control (or
refrigerator control on some
models) will also click when
cycling on and off.
the flow of refrigerant, the
water line on the back of the
unit, or items stored on top of
or around the refrigerator.
Refrigerator is not resting solidly
on the floor.
Refrigerator with linear
compressor was jarred while
running.
circulating air through the
refrigerator and freezer
compartments.
Air is being forced over the
condenser by the condenser
fan.
cooling system.
the inside walls due to changes
in temperature.
heater during a defrost cycle.
refrigerator is touching a cabinet
or wall, some of the normal
vibrations may make an audible
sound.
during the defrost cycle.
Empty the ice bin. If your icemaker is equipped
with an ice shutoff arm, make sure that the arm
moves freely. If your icemaker is equipped with
the electronic ice shutoff sensor, make sure that
there is a clear path between the two sensors.
Reinstall the ice bin and wait 24 hours to confirm
proper operation.
Normal Operation
Normal Operation
Floor is weak or uneven or leveling legs need to
be adjusted. See the Door Alignment section.
Normal Operation
Normal Operation
Normal Operation
Normal Operation
Normal Operation
Normal Operation
To eliminate the noise, make sure that the sides
and back cannot vibrate against any wall or
cabinet.
Normal Operation
Page 49

TROUBLESHOOTING
49
Problem Possible Causes Solutions
Pulsating or
High-Pitched
Sound
Doors will not
close correctly or
pop open.
Doors are difficult
to open.
Refrigerator
wobbles or
seems unstable.
Lights do not
work.
Refrigerator has
an unusual odor.
The interior of
the refrigerator
is covered with
dust or soot.
Your refrigerator is designed
to run more efficiently to keep
your food items at the desired
temperature. The high efficiency
compressor may cause your
new refrigerator to run longer
than your old one, but it is still
more energy efficient than
previous models. While the
refrigerator is running, it is
normal to hear a pulsating or
high-pitched sound.
Food packages are blocking the
door open.
Ice bin, crisper cover, pans,
shelves, door bins, or baskets
are out of position.
The doors were removed during
product installation and not
properly replaced.
Refrigerator is not leveled
properly.
The gaskets are dirty or sticky. Clean the gaskets and the surfaces that they
Door was recently closed. When you open the door, warmer air enters the
Leveling legs are not adjusted
properly.
Floor is not level. It may be necessary to add shims under the
LED interior lighting failure. The refrigerator compartment lamp is LED interior
The Air Filter may need to
be set to the MAX setting or
replaced.
The refrigerator is located near a
fire source, such as a fireplace,
chimney or candle.
Normal Operation
Rearrange food containers to clear the door and
door shelves.
Push bins all the way in and put crisper cover,
pans, shelves and baskets into their correct
positions. See the Using Your Refrigerator section
for more information.
Remove and replace the doors according to the
Removing and Replacing Refrigerator Handles
and Doors section.
See Door Alignment in the Refrigeration
Installation section to level refrigerator.
touch. Rub a thin coat of appliance polish or
kitchen wax on the gaskets after cleaning.
refrigerator. As the warm air cools, it can create
a vacuum. If the door is hard to open, wait one
minute to allow the air pressure to equalize, then
see if it opens more easily.
Refer to the Leveling and Door Alignment section.
leveling legs or rollers to complete installation.
lighting, and service should be performed by a
qualified technician.
Set the Air Filter to the MAX setting. If the odor
does not go away within 24 hours, the filter may
need to be replaced. See the Replacing the Air
Filter section for replacement instructions.
Make sure that the refrigerator is not located near
a fire source, such as a fireplace, chimney or
candle.
ENGLISH
Page 50

50
WARRANTY
WARRANTY (USA)
ENGLISH
Should your LG Refrigerator (“Product”) fail due to a defect in materials or workmanship under
normal home use, during the warranty period set forth below, LG will at its option repair or replace
the product. This limited warranty is valid only to the original retail purchaser of the product and
applies only when purchased and used within the United States including U.S. Territories. Proof of
original retail purchase is required to obtain warranty service under this limited warranty.
WARRANTY PERIOD
Refrigerator
One (1) year from
the date of original
retail purchase
Parts and Labor
(internal/functional
parts only)
Noises associated with normal operation and failure to follow instructions found in the use and
care and installation guides or operating the unit in an unsuitable environment will not be covered
under this warranty.
Replacement products and parts are warranted for the remaining portion of the original warranty
X
period or ninety (90) days, whichever is greater.
Replacement products and parts may be new or remanufactured.
X
THIS WARRANTY IS IN LIEU OF ANY OTHER WARRANTY, EXPRESS OR IMPLIED,
INCLUDING WITHOUT LIMITATION, ANY WARRANTY OF MERCHANTABILITY OR FITNESS
FOR A PARTICULAR PURPOSE. TO THE EXTENT ANY IMPLIED WARRANTY IS REQUIRED
BY LAW, IT IS LIMITED IN DURATION TO THE EXPRESS WARRANTY PERIOD ABOVE.
NEITHER THE MANUFACTURER NOR ITS U.S. DISTRIBUTOR SHALL BE LIABLE FOR ANY
INCIDENTAL, CONSEQUENTIAL, INDIRECT, SPECIAL, OR PUNITIVE DAMAGES OF ANY
NATURE, INCLUDING WITHOUT LIMITATION, LOST REVENUES OR PROFITS, OR ANY
OTHER DAMAGE WHETHER BASED IN CONTRACT, TORT, OR OTHERWISE.
not allow the exclusion or limitation of incidental or consequential damages or limitations on how
long an implied warranty lasts, so the above exclusion or limitation may not apply to you. This
warranty gives you specific legal rights and you may also have other rights that vary from state
to state.
(Condenser, Dryer, Connecting Tube,
One (1) year from the
date of original retail
purchase
Parts and Labor Parts only (Consumer
Sealed System
Refrigerant and Evaporator)
Seven (7) years from
the date of original
retail purchase
will be charged for
labor)
Linear Compressor
Ten (10) years from the
date of original retail
purchase
Part only (Consumer will
be charged for labor)
Some states do
Page 51

WARRANTY
51
THIS LIMITED WARRANTY DOES NOT COVER:
1. Service trips to deliver, pick up, install, or repair the product; instruct the customer on
operation of the product; repair or replace fuses or correct wiring or plumbing, or correction of
unauthorized repairs/installation.
2. Failure of product to perform during power failures and interruptions or inadequate electrical
service.
3. Damage caused by leaky or broken water pipes, frozen water pipes, restricted drain lines,
inadequate or interrupted water supply or inadequate supply of air.
4. Damage resulting from operating the product in a corrosive atmosphere or contrary to the
instructions outlined in the product owner’s manual.
5. Damage to the product caused by accidents, pests and vermin, lightning, wind, fire, floods, or
acts of God.
6. Damage resulting from misuse, abuse, improper installation, repair, or maintenance. Improper
repair includes use of parts not approved or specified by LG.
7. Damage or failure caused by unauthorized modification or alteration, or if it is used for other
than the intended purpose, or any water leakage where the unit was not properly installed.
8. Damage or failure caused by incorrect electrical current, voltage, or plumbing codes,
commercial or industrial use, or use of accessories, components, or consumable cleaning
products that are not approved by LG.
9. Damage caused by transportation and handling, including scratches, dents, chips, and/or other
damage to the finish of your product, unless such damage results from defects in materials or
workmanship and is reported within one (1) week of delivery (Call: 1-800-243-0000).
10. Damage or missing items to any display, open box, discounted, or refurbished product.
11. Products with original serial numbers that have been removed, altered, or can not be readily
determined. Model and Serial numbers, along with original retail sales receipt, are required for
warranty validation.
12. Increases in utility costs and additional utility expenses.
13. Replacement of light bulbs, filters, or any consumable parts.
14. Repairs when your product is used in other than normal and usual household use (e.g.
commercial use, offices, and recreational facilities) or contrary to the instructions outlined in
the product owner’s manual.
15. Costs associated with removal of your product from your home for repairs.
16. The removal and reinstallation of the product if it is installed in an inaccessible location or is
not installed in accordance with published installation instructions, including LG’s owner’s and
installation manuals.
17. Shelves, door bins, drawers, handles, accessories, and other parts besides those that were
originally included with this particular model.
The cost of repair or replacement under these excluded circumstances shall be borne
by the consumer.
ENGLISH
For complete warranty details and customer assistance, please call or visit our website:
Call 1-800-243-0000 (24 hours a day, 365 days a year) and select the appropriate option from the
menu, or visit our website at
P. O. Box 240007, 201 James Record Road Huntsville, Alabama 35813 ATTN: CIC
Write your warranty information below: _______________________________________________
Product Registration Information: _____________________________________________________
Model: ____________________________________________________________________________
Serial Number: _____________________________________________________________________
Date of Purchase: __________________________________________________________________
http://www.lg.com
Or by mail: LG Customer Information Center:
Page 52

52
WARRANTY
WARRANTY (Canada)
ENGLISH
WARRANTY
under normal home use during the warranty period set forth below, LG Canada will at its option
repair or replace the Product upon receipt of proof of original retail purchase. This warranty is valid
only to the original retail purchaser of the product and applies only to a Product distributed in Canada
by LG Canada or an authorized Canadian distributor thereof. The warranty only applies to Products
located and used within Canada.
One (1) year from
the date of original
retail purchase
Parts and Labor
(internal/functional
parts only)
Noises associated with normal operation and failure to follow instructions found in the use and care
and installation guides or operating the unit in an unsuitable environment will not be covered under
this warranty.
Replacement products and parts are warranted for the remaining portion of the original warranty
X
period or ninety (90) days, whichever is greater.
Replacement products and parts may be new or remanufactured.
X
LG Authorized Service Center warranties their repair work for thirty (30) days.
X
LG CANADA’S SOLE LIABILITY IS LIMITED TO THE WARRANTY SET OUT ABOVE. EXCEPT
AS EXPRESSLY PROVIDED ABOVE, LG CANADA MAKES NO AND HEREBY DISCLAIMS
ALL OTHER WARRANTIES AND CONDITIONS RESPECTING THE PRODUCT, WHETHER
EXPRESS OR IMPLIED, INCLUDING, BUT NOT LIMITED TO, ANY IMPLIED WARRANTY OR
CONDITION OF MERCHANTABILITY OR FITNESS FOR A PARTICULAR PURPOSE, AND
NO REPRESENTATIONS SHALL BE BINDING ON LG CANADA. LG CANADA DOES NOT
AUTHORIZE ANY PERSON TO CREATE OR ASSUME FOR IT ANY OTHER WARRANTY
OBLIGATION OR LIABILITY IN CONNECTION WITH THE PRODUCT. TO THE EXTENT THAT
ANY WARRANTY OR CONDITION IS IMPLIED BY LAW, IT IS LIMITED TO THE EXPRESS
WARRANTY PERIOD ABOVE. LG CANADA, THE MANUFACTURER OR DISTRIBUTOR SHALL
NOT BE LIABLE FOR ANY INCIDENTAL, CONSEQUENTIAL, SPECIAL, DIRECT OR INDIRECT
DAMAGES, LOSS OF GOODWILL, LOST PROFITS, PUNITIVE OR EXEMPLARY DAMAGES
OR ANY OTHER DAMAGE, WHETHER ARISING DIRECTLY OR INDIRECTLY FROM ANY
CONTRACTUAL BREACH, FUNDAMENTAL OR OTHERWISE, OR FROM ANY ACTS OR
OMISSIONS, TORT, OR OTHERWISE.
have other rights which may vary from province to province depending on applicable provincial
laws. Any term of this warranty that negates or varies any implied condition or warranty under
provincial law is severable where it conflicts with provincial law without affecting the remainder
of this warranty’s terms.
: Should your LG Refrigerator (“Product”) fail due to a defect in material or workmanship
WARRANTY PERIOD:
the warranty will begin sixty (60) days from the date of manufacture)
Refrigerator/
Freezer
(Note: If the original date of purchase can not be verified,
(Condenser, Dryer, Connecting Tube,
One (1) year from
the date of original
retail purchase
Parts and Labor Parts only (Consumer
Sealed System
Refrigerant and Evaporator)
Seven (7) years from
the date of original
retail purchase
will be charged for
labor)
This warranty gives you specific legal rights. You may
Linear Compressor
Ten (10) years from the
date of original retail
purchase
Part only (Consumer will
be charged for labor)
Page 53

WARRANTY
53
THIS LIMITED WARRANTY DOES NOT COVER:
1. Service trips to deliver, pick up, or install the product; instructing a customer on operation of
the product; repair or replacement of fuses or correction of wiring or plumbing, or correction of
unauthorized repairs/installation.
2. Failure of the product to perform during power failures and interruptions or inadequate
electrical service.
3. Damage caused by leaky or broken water pipes, frozen water pipes, restricted drain lines,
inadequate or interrupted water supply or inadequate supply of air.
4. Damage resulting from operating the Product in a corrosive atmosphere or contrary to the
instructions outlined in the Product owner’s manual.
5. Damage to the Product caused by accidents, pests and vermin, lightning, wind, fire, floods, or
acts of God.
6. Damage resulting from the misuse, abuse, improper installation, repair, or maintenance of the
Product. Improper repair includes use of parts not approved or specified by LG Canada.
7. Damage or product failure caused by unauthorized modification or alteration, or use for other
than its intended purpose, or resulting from any water leakage due to improper installation.
8. Damage or Product failure caused by incorrect electrical current, voltage, or plumbing codes,
commercial or industrial use, or use of accessories, components, or cleaning products that are
not approved by LG Canada.
9. Damage caused by transportation and handling, including scratches, dents, chips, and/or other
damage to the finish of your product, unless such damage results from defects in materials or
workmanship and is reported within one (1) week of delivery.
10. Damage or missing items to any display, open box, discounted, or refurbished Product.
11. Products with original serial numbers that have been removed, altered, or cannot be readily
determined. Model and Serial numbers, along with original retail sales receipt, are required for
warranty validation.
12. Increases in utility costs and additional utility expenses.
13. Replacement of light bulbs, filters, or any consumable parts.
14. Repairs when your Product is used in other than normal and usual household use (including,
without limitation, commercial use, in offices or recreational facilities) or contrary to the
instructions outlined in the Product owner’s manual.
15. Costs associated with removal of the Product from your home for repairs.
16. The removal and reinstallation of the Product if it is installed in an inaccessible location or is not
installed in accordance with published installation instructions, including the Product owner’s
and installation manuals.
17. Shelves, door bins, drawers, handles, and accessories to the Product. Also excluded are parts
besides those that were originally included with the Product.
ENGLISH
All costs associated with the above excluded circumstances
For complete warranty details and customer assistance, please call or visit our website:
Call 1-888-542-2623 (24 hours a day, 365 days a year) and select the appropriate option from the
menu, or visit our website at
Write your warranty information below: _________________________________________________
Product Registration Information: _______________________________________________________
Model: ______________________________________________________________________________
Serial Number: _______________________________________________________________________
Date of Purchase: ____________________________________________________________________
shall be borne by the consumer.
http://www.lg.com
Page 54

Page 55

MANUEL DU PROPRIÉTAIRE
FRANÇAIS
RÉFRIGÉRATEUR À
PORTE-FENÊTRE
Veuillez lire ce manuel attentivement avant l’utilisation et
conservez-le pour référence en tout temps.
LFX21976**
P/No. : MFL63264254
www.lg.com
Page 56

2
TABLE DES MATIÈRES
TABLE DES MATIÈRES
3
CARACTÉRISTIQUES DU PRODUIT
FRANÇAIS
4
CONSIGNES IMPORTANTES DE
SÉCURITÉ
7 COMPOSANTS
7 Extérieur du réfrigérateur
8 Intérieur du réfrigérateur
9 INSTALLATION
9 Vue d’ensemble de l’installation
10 Spécifications
11 Déballage de Votre Réfrigérateur
11 Choisir le Bon Emplacement
11 - Mise au Sol
12 - Température Ambiante
12 - Mesure des Espaces
12 Enlèvement/Montage des Poignées de
Porte du Réfrigérateur
13 Enlèvement/Montage de la Poignée du
Tiroir du Congélateur
13 Enlèvement/Montage des Battants et
Tiroirs
Réfrigérateur
14 - Enlèvement de la Porte Droite du
Réfrigérateur
15 - Montage de la Porte Droite du
Réfrigérateur
15 - Montage de la Porte Gauche du
Réfrigérateur
16 - Enlèvement des Tiroirs du Congélateur
17 - Montage des Tiroirs du Congélateur
19 Connexion de la Canalisation D’eau
19 - Avant de Commencer
19 - Pression de L’eau
19 - Ce dont Vous Aurez Besoin
20 - Instructions D’installation de la Ligne D’eau
22 Mise en Marche
23 Nivellement et Alignement des Portes
23 - Nivellement
23 - Alignement de la Porte
24 MODE D’EMPLOI
24 Avant l’Utilisation
25 Panneau de Commande
25 -
Caractéristiques du Panneau de Commande
27 Utilisation du Bac à Glaçons
27 - Détachement du bac à glaçons
27 - Montage du Bac à Glaçons
28 Machine à Glaçons Automatique
28 - Mise en Marche et Arrêt de la Machine à
Glaçons Automatique
29 - Quand Devez-Vous Mettre L’interrupteur
de la Machine à Glaçons sur Off (O)
29 - Sons Normaux que Vous Entendrez
29 - Préparation des Vacances
30 Distributeur de Glace et D’eau
30 - Dispensador
30 - Utilisation du Distributeur
30 - Verrouillage du Distributeur
30 - Nettoyage du Stand du Distributeur
31 Stockage des Aliments
31 - Lieu de Conservation des Aliments
32 - Conseils pour le Stockage des Aliments
32
- Stockage D’aliments Congelés
33 Bac à fruits et légumes à humidité contrôlée
ud ehcuag etroP al ed tnemevèlnE - 31
et Glisser et servir
34 Détachement et Montage des Bacs de
Stockage
35 Réglage des Étagères du Réfrigérateur
36 ENTRETIEN
36 Nettoyage
37 Remplacement du filtre à eau
39 SMART DIAGNOSIS
39 Utiliser Smart Diagnosis
40 DÉPANNAGE
50 GARANTIE
Page 57

CARACTÉRISTIQUES DU PRODUIT
CARACTÉRISTIQUES DU PRODUIT
* Selon le modèle, certaines des fonctions suivantes pourraient ne pas être disponibles.
3
EAU FILTRÉE ET DISTRIBUTEUR À GLAÇONS
Le distributeur d’eau fournit de l’eau fraîche et glacée.
Le distributeur de glaçons fournit des glaçons et de la glace pilée.
ALARME DE PORTE
La fonction d’alarme de porte est conçue pour empêcher tout
dysfonctionnement réfrigérateur qui pourrait se produire si une porte du
réfrigérateur ou un tiroir du congélateur restaient ouverts. Si une porte ou
un tiroir du réfrigérateur sont laissés ouverts pendant plus de 60 secondes,
un signal sonore d’avertissement retentit par intervalles de 30 secondes.
BAC À FRUITS ET LÉGUMES À HUMIDITÉ CONTRÔLÉE
Le bac à légumes à humidité contrôlée est conçu pour conserver vos fruits
et légumes frais et croquants. Vous pouvez contrôler le niveau d’humidité
dans le bac à légumes en ajustant le réglage entre Bas et Haut.
GLISSER ET SERVIR
La zone ´ Prêt à l’emploi ª vous permet de disposer d’un compartiment
de stockage dont la température est plus basse que dans le reste du
réfrigérateur. Il s’agit de l’emplacement idéal pour stocker des sandwiches
ou de la viande prévue pour être préparée.
FRANÇAIS
GLACE PLUS
La production de glace peut être augmentée d’environ 20 pour cent lorsque
la section du congélateur est maintenue à la température la plus froide pour
une période de 24 heures.
Page 58

4
CONSIGNES IMPORTANTES DE SÉCURITÉ
CONSIGNES IMPORTANTES DE SÉCURITÉ
LIRE TOUTES LES INSTRUCTIONS AVANT D’UTILISER L’APPAREIL.
Ce guide contient de nombreux messages de sécurité importants. Toujours lire et suivre tous les messages de
sécurité.
FRANÇAIS
Ceci est le symbole d’alerte de sécurité. Il vous alerte de messages de sécurité qui vous informent
de dangers qui peuvent vous tuer ou vous blesser, blesser autrui ou causer des dommages au
produit.
Tous les messages de sécurité seront précédés par le symbole d’alerte de sécurité et par le mot
AVERTISSEMENT OU ATTENTION. Ces mots signifient :
AVERTISSEMENT
ATTENTION
AVERTISSEMENT
Pour réduire le risque d’incendie, d’électrocution ou de blessures lors de l’utilisation de votre
produit, des préATTENTIONs de base devraient être prises, y compris les suivantes.
Alimentation
NE JAMAIS débrancher le réfrigérateur en tirant sur le cordon d’alimentation. Toujours tenir
y
fermement la fiche et la retirer de la prise.
Réparer ou remplacer immédiatement tout cordon effiloché ou endommagé. Ne pas utiliser un
y
cordon qui présente des fissures ou des traces de frottement sur sa longueur ou à l’extrémité de
la fiche ou du connecteur.
Ne pas utiliser une prise de courant non certifiée.
y
Débrancher le cordon d’alimentation immédiatement en cas de panne ou d’orage.
y
Brancher dans la prise d’alimentation avec le cordon d’alimentation vers le bas.
y
Installation
Contacter un centre de service autorisé lorsque vous installez ou déplacez le réfrigérateur.
y
Lorsque vous déplacez votre réfrigérateur loin du mur, faites attention de ne pas rouler au-dessus
y
ou endommager le cordon d’alimentation.
Branchez cet appareil à une prise mise à la terre conforme au régime nominal avant l’utilisation. Il
y
incombe à l’utilisateur de remplacer une prise murale standard à 2-broches avec une prise murale
standard à 3 broches.
Ne pas installer le réfrigérateur où il peut y avoir un danger de chute.
y
Utilisation
NE yPAS permettre aux enfants de grimper, de se tenir, ou de se suspendre à la porte du
réfrigérateur ou sur des étagères dans le réfrigérateur. Ils pourraient endommager le réfrigérateur
et se blesser gravement.
Ne pas placer d’objets lourds sur le distributeur du réfrigérateur et ne pas s’y accrocher.
y
Ne pas placer d’objets lourds ou dangereux (bouteilles de liquide) sur le réfrigérateur.
y
Ne pas mettre d’animaux vivants à l’intérieur du réfrigérateur.
y
Ne pas laisser les enfants monter dans le produit lorsqu’il est en cours d’utilisation.
y
Dans le cas d’une fuite de gaz (propane / GPL), ventiler suffisamment et contacter un centre de
y
service autorisé avant l’utilisation. Ne pas toucher ni démonter la prise électrique du réfrigérateur.
Dans le cas d’une fuite de fluide réfrigérant, déplacer les objets inflammables loin du
y
réfrigérateur. Ventiler suffisamment et contacter un centre de service autorisé.
Ne pas utiliser ni mettre des substances inflammables (produits chimiques, médicaments,
y
cosmétiques, etc.) près du réfrigérateur et ne pas les stocker à l’intérieur du réfrigérateur. Ne pas
placer le réfrigérateur à proximité de gaz inflammables.
Vous pouvez être tué ou gravement blessé si vous ne suivez pas ces
instructions.
Indique une situation extrêmement dangereuse qui, si elle n’est pas évitée, peut
entraîner des blessures mineures ou modérées, ou endommager le produit.
Page 59

CONSIGNES IMPORTANTES DE SÉCURITÉ
LIRE TOUTES LES INSTRUCTIONS AVANT D’UTILISER L’APPAREIL.
Pour réduire le risque d’incendie, d’électrocution ou de blessures lors de l’utilisation de votre
produit, des préATTENTIONs de base devraient être prises, y compris les suivantes.
Ne pas utiliser ce produit à des fins particulières (stockage de médicaments ou de matériaux d’essai
y
ou pour du transport, etc.).
Débrancher le cordon d’alimentation avant de nettoyer ou de réparer le réfrigérateur.
y
Lorsque vous remplacez l’ampoule dans le réfrigérateur, débranchez le réfrigérateur ou éteignez
y
l’appareil.
Ne pas modifier ou étendre le cordon d’alimentation.
y
Ne pas utiliser de séchoir pour sécher l’intérieur. Ne pas allumer une bougie pour enlever l’odeur à
y
l’intérieur.
Pour votre sécurité, cet appareil doit être correctement mis à la terre. Faites vérifier la prise murale
y
et le circuit électrique par un électricien qualifié pour vous assurer que la prise est correctement
mise à la terre.
Ne pas utiliser une prise qui puisse être éteinte avec un interrupteur. Ne pas utiliser de rallonge. Il
y
incombe à l’utilisateur de remplacer une prise murale standard à 2-broches avec une prise murale
standard à 3 broches.
Ne pas couper ou enlever la troisième broche (terre) du cordon d’alimentation, en aucune
y
circonstance.
Ne pas utiliser une prise d’adaptateur et brancher le cordon d’alimentation à une rallonge multi-
y
prise.
Débrancher le cordon d’alimentation immédiatement si vous entendez un bruit, sentez une odeur
y
étrange ou détectez de la fumée.
Couper l’alimentation si de l’eau ou de la poussière pénètre dans le réfrigérateur. Appeler un agent
y
de service.
Ne pas démonter ou modifier le réfrigérateur.
y
Ne pas mettre les mains, les pieds ou des objets métalliques en-dessous ou derrière le
y
réfrigérateur.
Ne pas faire fonctionner le réfrigérateur ni toucher le cordon d’alimentation avec les mains
y
mouillées.
Dans les réfrigérateurs des machines à glaçons automatiques, éviter tout contact avec les pièces
y
mobiles du mécanisme d’éjection ou avec l’élément chauffant qui libère les glaçons. Ne pas
placer les doigts ou les mains sur le mécanisme automatique de fabrication de glace tandis que le
réfrigérateur est branché
Pendant la distribution de glace par le distributeur, ne pas utiliser de la céramique de cristal.
y
Ne pas toucher les surfaces froides dans le compartiment du congélateur avec les mains
y
mouillées ou humides, quand votre réfrigérateur est en marche.
Ne pas mettre de récipients en verre, de bouteilles en verre ou de sodas dans le congélateur.
y
Cet appareil n’est pas destiné à être utilisé par des personnes (enfants compris) avec des
y
capacités physiques, sensorielles ou mentales limitées, ou un manque d’expérience et de
connaissances, à moins qu’elles n’aient été encadrées ou aient reçu des instructions concernant
l’utilisation de l’appareil par une personne responsable de leur sécurité.
Ne pas recongeler un aliment congelé qui ait complètement dégelé. Cela pourrait entraîner un
y
grave problème de santé.
Si vous vous débarrassez de votre vieux réfrigérateur, assurez-vous que le liquide de
y
refroidissement CFC soit retiré pour une élimination appropriée par un réparateur qualifié. Si vous
versez du réfrigérant CFC, vous pouvez être condamné à une amende ou à l’emprisonnement en
conformité avec la législation pertinente sur l’environnement.
Les réfrigérateurs jetés ou abandonnés sont dangereux, même s’ils sont déposés pour seulement
y
quelques jours. Lors de l’élimination du réfrigérateur, retirer les matériaux d’emballage de la porte
ou décoller les portes, mais laisser les étagères en place afin que les enfants ne puissent pas y
pénétrer facilement.
5
FRANÇAIS
Page 60

6
CONSIGNES IMPORTANTES DE SÉCURITÉ
LIRE TOUTES LES INSTRUCTIONS AVANT D’UTILISER L’APPAREIL.
Pour réduire le risque d’incendie, d’électrocution ou de blessures lors de l’utilisation de votre
produit, des préATTENTIONs de base devraient être prises, y compris les suivantes.
FRANÇAIS
Installation
y
y
Utilisation
y
y
y
Entretien
y
y
ATTENTION
Le réfrigérateur doit être installé conformément aux instructions d’installation qui ont été
collées à l’avant du réfrigérateur.
Soyez prudent lorsque vous déballez et installez le réfrigérateur. Disposer immédiatement le
matériel d’emballage (plastique) hors de portée des enfants.
Fermer soigneusement la porte lorsque les enfants sont à proximité.
Éloignez vos doigts des zones de coincement; les espaces entre les portes et les armoires
sont inévitablement réduits. Soyez prudent en fermant les portes lorsque des enfants se
trouvent dans la zone.
Si vous stockez les aliments correctement, soyez conscients qu’ils pourraient tomber et
provoquer des blessures.
Ne pas utiliser de détergents puissants comme de la cire ou des diluants de nettoyage.
Nettoyer avec un tissu doux.
Essuyer les objets étrangers (poussière, eau, etc.) hors des broches de la fiche d’alimentation
et des zones de contact régulièrement.
CONSERVEZ CES INSTRUCTIONS
Page 61

COMPOSANTS
COMPOSANTS
Utilisez cette page pour vous familiariser davantage avec les parties et les caractéristiques de votre
réfrigérateur. Les références des pages sont inclues pour votre commodité.
*L’apparence et les spécifications du produit réel peuvent différer selon le modèle.
Extérieur du réfrigérateur
Affichage
électroluminescent
Affiche la température du
réfrigérateur et du congélateur,
l’état du filtre à eau et le niveau
du distributeur
Plus de Glace
Lorsque cette partie est activée,
le congélateur générera la
température la plus froide
possible pendant 24 heures afin
d’augmenter la production de
glace.
Eau filtrée et
Distributeur de glace
Distribue de l’eau fraîche
et filtrée à travers la
porte. Le distributeur de
glace offre de la glace
en cube ou pilée.
7
FRANÇAIS
Alarme de porte
Une alarme de rappel sonne toutes
les 30 secondes lorsque la porte
du réfrigérateur ou du congélateur
est laissée ouverte pendant plus
de 60 secondes.
Page 62

8
COMPOSANTS
Intérieur du réfrigérateur
Lampes DEL intérieures
Les lampes intérieures éclairent l’intérieur
du réfrigérateur.
FRANÇAIS
Filtre à eau
Système SpacePlus Ice
Produit automatiquement
80 à 130 cubes de glace en
24 h.
Bacs de porte
fixes
Haut Parleur Smart Diagnosis
Placez votre téléphone devant ce hautparleur lors de l’activation de Smart
Diagnosis. Pour plus de détails, consultez la
section Smart Diagnosis.
Bac à produits
laitiers
Étagère de
réfrigérateur réglable
Les étagères de
votre réfrigérateur
sont ajustables pour
répondre à vos besoins
personnels.
Meneau
Se replie sur lui-même
lors de l’ouverture de la
porte gauche.
Rangement à conserves
Permet de conserver
des aliments frais ou des
boissons.
Glide’N’Serve
Vous permet de stocker vos
aliments à une température
différente de celle du reste du
réfrigérateur.
La charnière
La porte ne se ferme
automatiquement que si elle
est ouverte à un angle de
moins de 30 degrés.
Bacs modulables de
porte
Le Crisper
Contrôle l’humidité
et garde les fruits et
légumes croquants.
Tiroir de
dégagement
Durabase
Cloison du durabase
Page 63

INSTALLATION
Vue d’ensemble de l’installation
INSTALLATION
9
Veuillez d’abord lire les instructions d’installation après l’achat de ce produit ou son transport vers
un autre emplacement.
1 Déballez votre
réfrigérateur
4 Connexion de
l’alimentation en eau et
de la canalisation d’eau
2 Choisissez un
emplacement approprié
5 Nivellement et
alignement de la porte.
3 Démontage/Montage
FRANÇAIS
Page 64

10
INSTALLATION
Spécifications
L’apparence et les spécifications énumérées dans ce manuel peuvent varier à cause des
améliorations constantes du produit.
FRANÇAIS
Modèle de réfrigérateur à congélateur inférieur
Description
Exigences électriques
Pression de l’eau Min.
/ Max.
Dimensions
Poids net
Capacité de stockage du
réfrigérateur
Cap. de stockage du
congélateur
LFX21976
Réfrigérateur à porte-fenêtre
115 VAC @ 60 Hz
20 and 120 psi (140 and 830 kPa)
35 3/4” (W) X 30 1/4” (D) X 69 3/4” (H), 42 1/2” (D avec porte ouverte)
908 mm (W) X 768 mm (D) X 1772 mm (H), 1073 mm (D avec porte ouverte)
287 lb. (130 kg)
14,7 pieds cube
5,8 pieds cube
Page 65

INSTALLATION
11
Déballage de votre réfrigérateur
AVERTISSEMENT
Utiliser deux ou plusieurs personnes
y
pour déplacer et installer le réfrigérateur.
Ne pas le faire pourrait provoquer un
démembrement, une électrocution, ou une
blessure mortelle.
Votre réfrigérateur est lourd. Lors du
y
déplacement du réfrigérateur pour le
nettoyage ou le service, veiller à protéger le
plancher. Toujours déplacer le réfrigérateur
en position verticale. Ne pas remuer ou
faire marcher le réfrigérateur lorsque vous
essayez de le déplacer car le plancher
pourrait être endommagé.
Maintenir les produits inflammables et
y
les vapeurs, tels que l’essence, loin du
réfrigérateur. L’incapacité à le faire pourrait
provoquer un démembrement, une
électrocution, ou une blessure. mortelle.
Enlever le ruban adhésif et toute étiquette
temporaire de votre réfrigérateur avant de l’utiliser.
Ne pas enlever les étiquettes d’avertissement,
l’étiquette du numéro de modèle et de série, ou
la fiche technique qui est située sous l’avant du
réfrigérateur.
Pour supprimer toute bande adhésive ou colle
restante, frotter la surface vivement avec le
pouce. Les résidus de ruban adhésif ou de colle
peuvent également être enlevés en frottant une
petite quantité de savon à vaisselle liquide sur
l’adhésif avec les doigts. Essuyez-les avec de l’eau
chaude et séchez.
Ne pas utiliser d’instruments tranchants, d’alcool
à friction, de liquides inflammables ou de
nettoyants abrasifs pour enlever le ruban adhésif
ou de la colle. Ces produits peuvent endommager
la surface de votre réfrigérateur.
Les étagères des réfrigérateurs sont installées
dans la position de transport. Veuillez réinstaller
les étagères selon vos besoins individuels.
Choisir le bon emplacement
Choisir un emplacement où
y
l’alimentation en eau puisse être
facilement connectée pour la machine à
glaçons automatique.
REMARQUE
La pression de l’eau doit être entre 20
et 120 psi (140 et 830 kPa) sur les
modèles sans filtre à eau et entre 40
et 120 psi (280 et 830kPa) sur les modèles
avec filtre à eau.
Le réfrigérateur devrait toujours être
y
branché sur sa propre prise individuelle
correctement mise à la terre, d’une
valeur nominale de 115 Volts, 60 Hz,
C.A. uniquement, et fusionnée à 15 ou
20 ampères. Cela offre les meilleures
performances et évite de surcharger
les circuits électriques qui pourraient
provoquer un incendie par surchauffe
des fils. Il est recommandé de prévoir
un circuit distinct pour alimenter
uniquement pour cet appareil.
AVERTISSEMENT
Pour réduire le risque de choc électrique,
ne pas installer le réfrigérateur dans un
endroit mouillé ou humide.
Mise au sol
Pour éviter le bruit et les vibrations, l’appareil
doit être mis à niveau et installé sur un
plancher stable. Si nécessaire, ajuster les
pieds de nivellement pour compenser les
inégalités du sol. La face avant devrait être
légèrement plus élevée que l’arrière pour
faciliter la fermeture de la porte. Les pieds
de nivellement peuvent être facilement
tournés en inclinant légèrement le boîtier.
Tourner les pieds de nivellement vers la droite
pour soulever l’unité ou vers la gauche pour
l’abaisser. (Voir Nivellement et alignement des
portes.)
FRANÇAIS
REMARQUE
L’installation sur des tapis, des surfaces
molles, une plate-forme ou une structure
faiblement soutenue.
Page 66

12
INSTALLATION
Température ambiante
Installez cet appareil dans un endroit où la
température est comprise entre 55°F (13°C)
et 110°F (43°C). Si la température autour de
l’appareil est trop basse ou trop élevée, la
capacité de refroidissement peut être affectée.
FRANÇAIS
Mesure des espaces
Une distance trop réduite des éléments
adjacents peut réduire a capacité de
congélation et augmenter les charges de
consommation d’électricité . Laisser au moins
24 pouces (61cm) à l’avant du réfrigérateur
pour ouvrir les portes et au moins 2 pouces
(5,08 cm) entre l’arrière du réfrigérateur et le
mur.
24” (61 cm)
Enlèvement/Montage des poignées
de porte du réfrigérateur
REMARQUE
L’enlèvement des portes est toujours
recommandé lorsqu’il est nécessaire de
déplacer le réfrigérateur à travers une
ouverture étroite. S’il est nécessaire
d’enlever les poignées, suivez les
instructions ci-dessous :
Enlèvement des poignées
Desserrer les vis avec une clef Allen de
1
3
/32 “et retirer la poignée.
Desserrer les fixations de montage qui
2
sont reliées à la porte et aux poignées du
réfrigérateur en utilisant une clef Allen de
1
/4 “, enlever les fixations de montage.
2” (5,08 cm)
Montage des poignées
Assembler les fixations de montage aux
1
deux extrémités de la poignée en utilisant
une clef Allen de 1/4 “.
Placer la poignée sur la porte en ajustant
2
les empreintes de la poignée sur les
fixations de montage et en serrant les vis
de réglage
avec une clef Allen de 3/32 “
Page 67

INSTALLATION
13
Enlèvement/Montage de la
poignée du tiroir du congélateur
Enlèvement des poignées
Desserrer les vis de serrage situées sur
1
le côté inférieur de la poignée avec une
clef 1/8 “ et enlever la poignée.
Desserrer les fixations de montage qui
2
se connectent au tiroir du congélateur et
à la poignée
en utilisant
une clef Allen
de 1/4 “ et
enlever les
fixations de
montage.
Assemblage des poignées
Assembler les fixations de montage aux
1
deux extrémités de la poignée en utilisant
une clef Allen de
Placer la poignée sur la porte en ajustant
2
les empreintes de la poignée sur les
fixations de
montage et
en serrant les
vis de réglage
avec une
clef Allen de
1
/8 “.
AVERTISSEMENT
Lorsque vous retirez ou installez la poignée
du réfrigérateur, prenez les précautions
suivantes.
Tenez fermement la poignée dans votre
y
main pour qu’elle ne tombe pas par terre
lorsque vous la retirez du réfrigérateur.
Ne lancez pas la poignée vers des
y
personnes ou des animaux après l’avoir
enlevée.
Alignez exactement les trous de la plaque
y
de la poignée sur l’axe de butée de la porte,
puis vissez les vis pour fixer la poignée.
Assurez-vous qu’il n’y a pas d’espace entre
y
la porte et la poignée après avoir fixé cette
dernière.
1
/4 “.
Enlèvement/Montage des
Battants et Tiroirs
L’enlèvement des portes est toujours
recommandé lorsqu’il est nécessaire de déplacer
le réfrigérateur à travers une ouverture étroite.
AVERTISSEMENT
Si votre porte d’entrée est trop étroite pour
y
permettre le passage du réfrigérateur,
enlevez les portes du réfrigérateur et
déplacez le réfrigérateur latéralement à
travers les portes.
Utiliser deux ou plusieurs personnes
y
pour déplacer et installer les portes du
réfrigérateur. Ne pas le faire pourrait
provoquer un démembrement, une
électrocution, ou une blessure mortelle.
Débrancher le réfrigérateur avant
y
l’installation. Ne pas le faire pourrait
provoquer une blessure grave, ou mortelle.
Ne pas mettre de mains, de pied ou placer
y
des objets dans les aérations ou au-dessus
du réfrigérateur. Vous pourriez vous blesser
ou recevoir un choc électrique.
Soyez vigilant lors de la manipulation de la
y
charnière et du butoir. Vous pourriez vous
blesser.
Enlevez les aliments et les bacs des portes
y
et des tiroirs avant de les détacher.
Enlèvement de la porte gauche du
réfrigérateur
La prise d’eau est connectée à la partie
1
supérieure droite de la surface arrière du
réfrigérateur. Enlever l’anneau de la zone
du joint. Tenez la prise d’eau et poussez
doucement le Collet pour détacher la ligne
d’approvisionnement comme figuré en
Collet
REMARQUE
Le détachement de la ligne d’alimentation
en eau est applicable uniquement lors
du détachement de la porte gauche du
réfrigérateur.
et .
FRANÇAIS
Page 68

14
(2)
(3)
(4)
(5)
(1)
INSTALLATION
FRANÇAIS
2
Enlevez la protection.
3
Tirez le tube (3).
4
Débranchez tous les fils (4).
5
Enlevez la vis de maintien (5).
6
Faites tourner le levier de la charnière (6)
7
Soulevez la porte en l’enlevant de la
8
Posez la porte, côté intérieur vers le haut,
9
(2)
(3)
(5)
(6)
(7)
(8)
Ouvrez la porte de gauche. Enlevez la vis
de la charnière supérieure (1). Soulevez la
protection (2).
dans le sens contraire des aiguilles d’une
montre. Séparez la charnière supérieure (7)
du loquet attaché au levier (8).
charnière du milieu et retirez la porte.
contre une surface non abrasive.face.
(1)
(4)
Enlèvement de la porte droite du
réfrigérateur :
Ouvrez la porte. Enlevez la vis de la
1
charnière supérieure (1). Soulevez la
protection (2).
Enlevez la protection.
2
Faites tourner le levier de la charnière (3)
3
dans le sens des aiguilles d’une montre.
Séparez la charnière supérieure (4) du
loquet attaché au levier (5).
Soulevez la porte en l’enlevant de la
4
charnière du milieu et retirez la porte.
Posez la porte, côté intérieur vers le haut,
5
contre une surface non abrasive.
ATTENTION
En soulevant la charnière pour la dégager,
veillez à ce que la porte ne tombe pas en
avant.
ATTENTION
En soulevant la charnière pour la dégager,
veillez à ce que la porte ne tombe pas en
avant.
Page 69

INSTALLATION
15
Montage de la porte droite du
réfrigérateur
Installez la porte droite en premier.
Placez la porte sur la charnière du milieu.
1
Assurez-vous que la fiche en plastique est
bien insérée dans la porte.
(1)
(3)
Placez la charnière supérieure (4) sur la
2
manette du levier de la charnière (5) et
insérez-la.
Faites tourner le levier (3) dans le sens
3
inverse des aiguilles d’une montre afin de
resserrer la charnière.
Accrochez les languettes au côté droit
4
de la charnière (2), sous les bords de la
charnière supérieure (4) et remettez la
protection en place.
Insérez et serrez la vis de protection (1).
5
(2)
(4)
(5)
Montage de la porte gauche du
réfrigérateur
Installez la porte gauche du réfrigérateur une
fois que la porte droite est installée.
Placez la porte sur la charnière du milieu.
1
(2)
(3)
(5)
(6)
(7)
(8)
Placez la charnière supérieure (7) sur la
2
manette du levier de la charnière (8) et
insérez-la.
Faites tourner le levier (6) dans le sens des
3
aiguilles d’une montre afin de resserrer la
charnière.
Posez les vis de maintien (5) et branchez
4
les deux fils (4).
Poussez le tuyau d’eau (3) situé en haut
5
de la porte gauche jusqu’à l’insérer dans le
trou situé devant la charnière gauche audessus du cabinet jusqu’à ce qu’il ressorte
par l’arrière.v
Insérez le tuyau d’eau (3) dans l’embout
6
jusqu’à ne plus voir qu’une strie. Insérez
entièrement la protection (15mm).
Accrochez les languettes au côté gauche
7
de la charnière (1), sous les bords de la
charnière supérieure (7) et remettez la
protection en place.
Insérez et serrez la vis de protection (1).
8
(1)
(4)
FRANÇAIS
Page 70

16
FRANÇAIS
Insérez l’arrivée d’eau au moins aux
9
10
11
INSTALLATION
5/8èmes (15mm) dans l’embout.
Accrochez la languette à la protection, du
côté sur lequel la porte pivote, sous le
câble partant du haut du coffre.
Remettez la protection en place. Posez et
serrez la vis de protection.
REMARQUE
Bague de
serrage
Tu ya u
Insertion
de ligne
Attache
1) Appuyer doucement sur le Collet et
insérer le tube jusqu’à ce qu’une seule
ligne apparaisse sur le tube.
Enlèvement des tiroirs du congélateur
Les tiroirs supérieurs, inférieurs et centraux sont
tous enlevés de la même façon. Dans les images
suivantes, le tiroir amovible au-dessus du tiroir du
congélateur n’est pas montré pour plus de clarté.
ATTENTION
Utiliser deux ou plusieurs personnes pour
y
déplacer et installer le tiroir du congélateur.
Ne pas le faire pourrait provoquer un
démembrement, une électrocution, ou
une blessure mortelle.
Ne tenez pas la poignée lorsque vous
y
enlevez ou remplacez le tiroir. Celle-ci
pourrait se détacher et pourrait provoquer
de graves blessures.
Faites attention aux charnières pointues
y
sur les deux côtés du tiroir.
Lorsque vous posez le tiroir à terre, veillez
y
à ne pas endommager le plancher.
Ne pas s’asseoir ni se tenir debout sur le
y
tiroir.
Pour empêcher les accidents, maintenez
y
les enfants et les animaux domestiques
loin du tiroir. Ne laissez pas le tiroir ouvert.
Tirez pour ouvrir le tiroir complètement.
1
Déposez le panier inférieur en soulevant le
panier du dispositif sur rails.
1
(Correcte)
(Incorrecte)
2) Tirer sur le tube pour s’assurer que le
tube soit bien serré, puis insérer le clip.
Appuyer sur les languettes des capots de
2
rails et les soulever pour les séparer des
rails.
Page 71

Retirez les vis 2 du rail des deux côtés.
3
2
Avec les deux mains, attrapez les côtés de
4
la porte, tirez-la vers le haut pour la détacher
des rails.
ATTENTION
Ne tenez pas la poignée en retirant le
tiroir.
La poignée risque de céder, ce qui peut
causer des blessures.
INSTALLATION
Montage des tiroirs du congélateur
Avec un rail dans chaque main, tirez
1
simultanément les rails jusqu’à ce qu’ils
soient complètement étendus.
Montez le connecteur de la porte 1 sur le
2
2
bras du rail
Poussez vers le bas et fixez le connecteur de
3
la porte en serrant les vis
.
1
2
3
.
17
FRANÇAIS
Avec un rail dans chaque main, poussez les
5
rails simultanément pour les insérer.
3
Page 72

18
INSTALLATION
Montage des tiroirs du congélateur
(suite)
Vérifiez que vous disposez bien des capots
4
de rail appropriés de chaque côté.
FRANÇAIS
5
Rail du
couvercle
gauche
Alignez les languettes des capots sur les
trous d’assemblage de chaque rail et d’un
coup sec mettez les capots de rail en place
pour les fixer.
Rail du couvercle
droit
AVERTISSEMENT
Si la cloison de répartition Durabase est
y
retirée, il y a alors suffisamment de place
pour que des enfants ou des animaux
domestiques puissent y pénétrer à
l’intérieur. Afin de prévenir des risques de
suffocation ou d’empêcher de coincer un
animal domestique ou un enfant, NE PAS
les laisser toucher ou s’approcher du tiroir.
NE MONTEZ ni vous asseyez sur le tiroir du
y
congélateur.
Orifice de
montage
Avec le tiroir étendu à son extension
6
totale, insérez le panier inférieur
système de guidage jusqu’à ce qu’il ne se
déplace pas en avant.
4
4
dans le
Page 73

Connexion de la canalisation d’eau
INSTALLATION
19
Avant de commencer
Cette installation de canalisation d’eau n’est pas
couverte par la garantie du réfrigérateur. Suivez
attentivement ces instructions afin de minimiser
le risque de dégâts d’eau coûteux.
Le martellement de l’eau (eau frappant dans les
tuyaux) dans la tuyauterie de la maison peut causer
des dommages aux pièces de votre réfrigérateur
et peut provoquer des fuites ou des inondations.
Contactez un plombier qualifié pour corriger le
martellement de l’eau avant d’installer la ligne
l’alimentation d’eau sur le réfrigérateur.
ATTENTION
Pour éviter les brûlures et les dommages
au produit, ne relier la ligne d’eau du
réfrigérateur qu’à une prise d’eau froide.
Si vous utilisez un réfrigérateur avant de
connecter la ligne d’alimentation d’eau, veillez
à ce que l’interrupteur de la machine à glace
se trouve sur la position ARRÊT (O).
ATTENTION
Ne pas installer les tuyaux de la machine à
glaçons dans les zones où la température
descend en dessous de zéro.
Pression de l’eau
Approvisionnement d’eau froide La pression de
l’eau doit être comprise entre 20 et 120 psi
(140 et 830 kPa) sur les modèles sans filtre à
eau et entre 40 et 120 psi (280 et 830kPa)
sur les modèles avec filtre à eau.
Si un système de filtration d’eau par osmose
inverse est connecté à votre alimentation d’eau
froide, cette installation de canalisation d’eau
n’est pas couverte par la garantie du réfrigérateur.
Suivez attentivement les instructions suivantes
pour minimiser les risques de dégâts d’eau
coûteux.
Si un système de filtration d’eau par osmose
inverse est connecté à votre alimentation en
eau froide, la pression d’eau dans le système
d’osmose inverse doit être d’un minimum de
40 et 60 psi ( 280 et 420 kPa), moins de 2,0 ~
3,0 sec . pour remplir une tasse d’une capacité de
7 oz (200 cc).
ATTENTION
Porter des lunettes de protection lors de
l’installation pour éviter les blessures.
Si la pression de l’eau du système d’osmose
inverse est inférieure à 21 psi (145 kPa) (cela
prend plus de 4.0 sec pour remplir une tasse
d’une capacité de 7 oz (200 cc) :
Vérifiez pour voir si le filtre à sédiments
dans le système d’osmose inverse est
bloqué. Remplacez le filtre si nécessaire.
Laisser le réservoir de stockage dans le
système d’osmose inverse se remplir
après une utilisation intense.
Si le problème concernant la pression de
l’osmose inverse persiste, appelez un
plombier qualifié.
Toutes les installations doivent être
conformes aux exigences du code de
plomberie local.
Ce dont vous aurez besoin
Tuyaux en cuivre,
pour relier le réfrigérateur à la prise d’eau.
Veillez à ce que les deux
extrémités des tuyaux soient
coupées au carré.
Pour déterminer de combien de tuyaux
vous avez besoin : mesurez la distance de
la vanne d’eau à l’arrière du réfrigérateur
au tuyau d’alimentation d’eau. Ensuite,
ajoutez 8 pieds (2,4m). Assurez-vous
que vous disposez de suffisamment de
tuyaux supplémentaires (environ 8 pieds
[2,4 m] enroulés en 3 tours d’environ 10
po. [25 cm] diamètre) pour permettre au
réfrigérateur d’être retiré du mur après
l’installation.
Perceuse électrique.
Clef ajustable ou clef de
½“
Tournevis à lame plate et
pour vis cruciformes.
Deux boulons de
compression de diamètre extérieur ¼ “ et
2 ferrules (mancheons)
tube en cuivre à la vanne d’arrêt et à la
vanne d’eau du réfrigérateur.
¼ po. diamètre extérieur,
pour connecter le
FRANÇAIS
Page 74

20
INSTALLATION
y
FRANÇAIS
y
Si votre canalisation en cuivre existante
a un raccord évasé à l’extrémité, vous
aurez besoin d’un adaptateur (disponible
dans les magasins de fournitures de
plomberie) pour connecter la ligne d’eau
au réfrigérateur OU
BIEN vous pouvez
couper la coupe
évasée avec un
découpeur de tube et puis utiliser un
raccord de compression.
Connecter la vanne d’arrêt à la ligne d’eau
froide.
La vanne d’arrêt doit avoir une
prise d’eau avec un diamètre intérieur
minimal de 5/32 po. au point de
connexion à la LIGNE
D’EAU FROIDE. Les
vannes d’arrêt à étrier
sont comprises dans
beaucoup de kits
d’approvisionnement d’eau. Avant de
l’acheter, assurez-vous qu’une vanne
à étrier est conforme aux codes de
plomberie locaux.
REMARQUE
Une vanne d’eau à étrier auto-perceuse
ne devrait pas être utilisée.
Instructions d’installation de la ligne d’eau
AVERTISSEMENT
Lorsque vous utilisez un appareil
électrique (comme une perceuse
électrique) lors de l’installation,
assurez-vous que le dispositif soit
alimenté par batterie, ait une double
isolation ou soit mis à la terre d’une
manière qui permettra d’éviter le
risque de choc électrique.
Installer la vanne d’arrêt sur la fréquence la
plus proche en utilisant la ligne d’eau potable.
FERMER LA PRISE D’EAU PRINCIPALE
1
Ouvrir le robinet le plus proche pour
soulager la pression sur la ligne.
CHOISIR L’EMPLACEMENT DE LA VANNE
2
Choisir un emplacement
pour la vanne qui soit
facilement accessible. Il
est préférable de la relier
sur le côté d’un tuyau
d’eau vertical. Lorsqu’il
est nécessaire de la relier
à un tuyau d’eau horizontal, réalisez la
connexion sur le haut ou sur le côté, plutôt
que sur le bas, pour éviter de recevoir des
sédiments du tuyau d’eau.
PERCER LE TROU POUR LA VANNE
3
Percer un trou de ¼
“ dans le tuyau d’eau
en utilisant une pièce
pointue. Enlevez toutes
les bavures résultant
de forage du trou dans
le tuyau. Faites attention à ne pas laisser
l’eau drainer par le trou. Le défaut de
percer un trou de ¼ “ peut entraîner une
production de glace réduite ou des glaçons
plus petits.
REMARQUE
La ligne de raccordement ne peut pas
être composée de tubes en plastique
blancs. Les plombiers autorisés doivent
utiliser uniquement des tubes en cuivre
NDA # 49595 ou 49599 ou des tubes
croisés en Polyéthylène (PEX).
Page 75

INSTALLATION
21
RESSERRER LA VANNE D’ARRÊT
4
Resserrer la vanne d’arrêt du tuyau d’eau
froide avec le collier de serrage
Collier de
serrage
Vanne d’arrêt
type étrier
Tube vertical
d’eau froide
REMARQUE
Les codes de plomberie de la
Commonwealth of Massachusetts
248CMR doivent être respectés. Les
vannes à étrier sont illégales et ne sont
pas autorisées dans le Massachussetts.
Consultez votre plombier agréé.
RESSERRER LA BRIDE DE SERRAGE
5
Serrer les vis du jusqu’à ce que la rondelle
de fermeture commence à enfler.
REMARQUE: Ne serrez pas la bride
excessivement ou vous pourriez
écraser le tuyau.
Rondelle
Collier de serrage
Vis de serrage
DIRIGER LES TUBES
6
Faire passer le tuyau entre la ligne d’eau
froide et le réfrigérateur.
Faire passer le tuyau par un trou percé
dans le mur ou le plancher (derrière
le réfrigérateur ou armoire de cuisine
adjacente), aussi près que possible du mur.
REMARQUE
Assurez-vous qu’il y ait assez de tuyaux
supplémentaires (environ 8 pieds
enroulés en 3 tours d’environ 10 cm de
diamètre) pour permettre de décoller
le réfrigérateur du mur après son
installation.
Extrémité
de la prise
d’eau
RELIER LE TUBE À LA VANNE
7
Placer un écrou de compression et une
bague (manchon) pour le tube de cuivre à
l’extrémité de la tuyau et le connecter à la
vanne d’arrêt. Veiller à ce que le tuyau soit
entièrement inséré dans la vanne. Serrer
l’écrou à compression.
Vanne d’arrêt
type étrier
Écrou
d’emballage
Vanne de sortie
RINCER LES TUBES
8
Ouvrir la prise d’eau principale et rincer
le tuyau jusqu’à ce que
l’eau soit claire.
Fermer le robinet d’eau
après qu’environ un
quart de l’eau ait été
rincée à travers le tuyau.
BRANCHER LE TUYAU AU
9
RÉFRIGÉRATEUR
REMARQUE:
Avant de faire la connexion
Écrou à
compression
Ferrule
(manchon)
au réfrigérateur, assurez-vous que le
cordon d’alimentation électrique ne soit
pas branché dans la prise murale.
a. Enlever le capuchon flexible en
plastique de la vanne d’eau.
b. Placer l’écrou à compression et la
bague (manchon) à l’extrémité du tuyau
comme indiqué.
c. Insérer l’extrémité du tuyau de cuivre
dans la connexion aussi loin que
possible. En tenant le tuyau, serrez la
fixation.
Collier de
serrage
Écrou à
compression
Ferrule
(manchon)
Tube de ¼”
Connexion au
réfrigérateur
FRANÇAIS
Page 76

22
INSTALLATION
10
FRANÇAIS
11
12
FERMER L’EAU À LA VANNE D’ARRÊT
Serrer tous les raccords qui fuient.
ATTENTION
Vérifier pour voir si des fuites se
produisent sur les connexions de la
ligne d’eau.
BRANCHER LE RÉFRIGÉRATEUR
Disposer la bobine de tuyaux de sorte
qu’elle ne vibre pas contre l’arrière du
réfrigérateur ou contre le mur. Poussez le
réfrigérateur contre le mur.
DÉMARRER LA MACHINE À GLAÇONS
Placer l’interrupteur de la machine à
glaçons sur la position
machine à glaçons ne commence à
fonctionner que lorsqu’elle a atteint
sa température de fonctionnement
de 16 °F (-9 °C) ou une température
inférieure. Elle commencera à fonctionner
automatiquement si l’interrupteur de la
machine à glaçons est sur la position
MARCHE (I)
.
MARCHE
. La
Mise en marche
Brancher le réfrigérateur.
1
ATTENTION
Connectez-vous à une sortie de
y
puissance nominale.
Demandez à un électricien certifié
y
de vérifier la prise murale et que le
câblage soit correctement mis à la
terre.
Ne pas endommager ni couper la
y
borne de terre de la prise de courant.
Page 77

Nivellement et alignement des portes
INSTALLATION
23
Nivellement
Après l’installation, branchez le cordon
d’alimentation du réfrigérateur dans une prise
à 3 broches mise à la terre et poussez le
réfrigérateur dans sa position finale.
Votre réfrigérateur a deux pieds de nivellement
à l’avant—un sur la droite et un sur la gauche.
Ajuster les pieds pour modifier l’inclinaison de
l’avant vers l’arrière ou côte-à-côte. Si votre
réfrigérateur semble instable, ou si vous voulez
que les portes se ferment plus facilement,
ajuster le l’inclinaison du réfrigérateur en
utilisant les instructions ci-dessous :
Enlever la grille de base. Consultez la
1
section sur l’installation de la grille de base.
Tourner le pied de nivellement vers
2
la gauche pour soulever ce côté du
réfrigérateur ou vers la droite pour le
baisser. Cela peut prendre plusieurs
tours du pied de nivellement pour ajuster
l’inclinaison du réfrigérateur.
Alignement de la porte
Les deux portes gauche et droite du
réfrigérateur ont un écrou ajustable, situé
sur la charnière inférieure, pour les soulever
et abaisser pour les aligner correctement. Si
l’espace entre les portes est inégale, suivre les
instructions ci-dessous pour aligner les portes
également:
Utiliser la clé (fournie avec le manuel du
propriétaire) pour tourner l’écrou dans la
charnière de porte afin de régler la hauteur.
Vers la droite pour augmenter ou vers la
gauche pour diminuer la hauteur.
FRANÇAIS
REMARQUE
Une clé polygonale à têtes fendues
fonctionne le mieux, mais une clé à
fourche suffira. Ne serrez pas trop.
Ouvrir les deux portes à nouveau et vérifier
3
pour s’assurer qu’elles ferment facilement.
Si les portes ne se referment pas
facilement, incliner le réfrigérateur un peu
plus à l’arrière en tournant les deux pieds
de nivellement vers la gauche. Cela peut
prendre plusieurs tours supplémentaires,
et vous devriez tourner les deux pieds de
nivellement de la même façon.
Remplacer la grille de base.
4
Page 78

24
MODE D’EMPLOI
MODE D’EMPLOI
Avant l’utilisation
FRANÇAIS
Nettoyer le réfrigérateur
Nettoyez votre réfrigérateur à fond et enlevez toute la poussière qui s’est
accumulée pendant le transport.
ATTENTION
Ne pas gratter le réfrigérateur avec un objet pointu et ne pas utiliser
y
un détergent qui contienne de l’alcool, du liquide inflammable ou une
substance abrasive pour retirer le ruban adhésif ou la colle du réfrigérateur.
Ne pas retirer le modèle ou le numéro de série ou les informations
y
techniques sur la surface arrière du réfrigérateur.
REMARQUE
Enlever les résidus de colle en essuyant avec votre pouce ou du détergent à
vaisselle.
Brancher l’alimentation
Vérifier que l’alimentation soit connectée avant l’utilisation.
Lire la section “La mise sous tension”.
Éteindre la machine à glace si le réfrigérateur n’est pas encore
connecté à la prise d’eau.
Éteindre la machine à glace automatique, puis branchez la prise de courant du
réfrigérateur dans la prise mise à la masse.
* Ceci n’est applicable qu’a certains modèles.
ATTENTION
Allumer la machine à glaçons avant de le connecter à la prise d’eau
peut provoquer une panne du réfrigérateur.
Attendre que le réfrigérateur refroidisse.
Laissez votre réfrigérateur en marche pendant au moins deux à trois heures avant
d’y mettre des aliments. Vérifiez le flux d’air froid dans le compartiment congélateur
pour assurer un refroidissement correct.
ATTENTION
Mettre des aliments dans le réfrigérateur avant qu’il ait refroidi pourrait
entraîner la détérioration des aliments, ou une mauvaise odeur pourrait
rester à l’intérieur du réfrigérateur.
Le réfrigérateur émet un bruit fort après la mise en marche initiale.
Ceci est normal. L’intensité diminuera à mesure que baissera température.
Ouvrir les portes du réfrigérateur et les tiroirs pour ventiler l’intérieur.
L’intérieur du réfrigérateur peut dégager une odeur de plastique au début. Enlever
tout ruban adhésif de l’intérieur du réfrigérateur et ouvrir les portes du réfrigérateur
et les tiroirs du congélateur pour la ventilation.
Page 79

MODE D’EMPLOI
25
Panneau de commande
* Selon le modèle, certaines des fonctions suivantes pourraient ne pas être disponibles.
Caractéristiques du panneau de commande
L’affichage électroluminescent comprend les réglages de température, les options de distribution,
le filtre à eau, l’alarme de la porte et les notifications de la position de fermeture.
Ice TypeIce Type
Appuyez sur ICE TYPE pour choisir entre pilée
ou en cubes. L’option choisie s’illuminera sur
l’affichage électroluminescent.
FRANÇAIS
Affichage
électroluminescent
Boutons de
contrôle
Freezer Freezer
Appuyez sur le bouton FREEZER pour régler la
température du congélateur.
REMARQUE
Pour modifier le mode de température de
°F à °C, appuyer et tenir les boutons de
température du réfrigérateur et du congélateur
simultanément pendant environ cinq secondes.
Refrigerator Refrigerator
Appuyez sur le bouton REFRIGERATOR pour
régler la température du réfrigérateur.
Ice Plus Ice Plus
Cette fonction augmente la production de glace
ainsi que les capacités de congélation.
Lorsque vous pressez le bouton Ice Plus,
y
l’icône s’illuminera pendant 24 heures.
L’arrêt est automatique après 24 heures.
Vous pouvez arrêter cette fonction
y
manuellement en pressant de nouveau le
bouton.
Page 80

26
MODE D’EMPLOI
Caractéristiques du panneau de commande (suite)
Économies d’énergie Économies d’énergie
La fonction Économies d’énergie désactive
le meneau situé sur la porte du réfrigérateur
FRANÇAIS
afin d’économiser l’électricité. Maintenez le
bouton Économies d’énergie enfoncé pendant
trois secondes pour activer ou désactiver cette
fonction.
REMARQUE
Cesser d’utiliser le fonction d’économie
d’énergie si l’humidité excessive commence à
être perçue sur le meneau de la porte.
LightLight
Appuyez sur LIGHT pour allumer la lumière du
distributeur. L’icône apparaîtra sur l’affichage
électroluminescent.
Change Filter Change Filter
Lorsque le voyant du filtre à eau s’allume,
vous devez changer celui-ci. Après l’avoir
remplacé, pressez le bouton FILTER pendant
trois secondes afin d’éteindre le voyant. Vous
devez changer le filtre à eau environ tous les
six mois.
Alarm Alarm
Lorsque le réfrigérateur est branché,
y
l’alarme de porte est initialement en mode
MARCHE. Lorsque vous appuyez sur le
bouton ALARME, le voyant passera à
ARRÊT et l’alarme sera désactivée.
Si la porte du réfrigérateur ou celle du
y
congélateur est laissée ouverte pendant
plus de 60 secondes, l’alarme sonnera pour
vous faire savoir que la porte est ouverte.
L’alarme s’arrêtera lors de la fermeture de
y
la porte.
Control Lock Control Lock
La fonction de Verrouillage désactive tous les
autres boutons de l’affichage.
Lorsque du branchement du réfrigérateur,
y
le Verrouillage est en mode ARRÊT.
Si vous souhaitez activer la fonction
y
Verrouillage afin de désactiver les autres
boutons, appuyez sur le bouton Verrouillage
pendant trois secondes ou plus. Le voyant
Verrouillage s’affichera alors et la fonction
Verrouillage sera alors activée.
Pour désactiver la fonction Verrouillage,
y
maintenez le bouton Verrouillage enfoncé
pendant environ trois secondes.
ATTENTION
Mode Présentation (pour une utilisation
en magasin uniquement)
Le mode Présentation désactive tout
refroidissement dans les compartiments
du réfrigérateur et du congélateur afin de
conserver l’énergie lors de la présentation
dans un magasin. Lorsque ce mode est
activé, l’indication OFF est affichée sur le
panneau de commande.
Pour la désactiver :
En laissant la porte du réfrigérateur
ouverte, maintenez simultanément les
boutons Refrigerator et Ice Plus enfoncés
pendant cinq secondes. Le panneau de
commande émet un signal sonore et les
réglages de température s’affichent pour
confirmer que le mode Présentation est
désactivé. Utilisez la même procédure
pour activer le mode Présentation.
Page 81

Utilisation du bac à glaçons
MODE D’EMPLOI
27
* Selon le modèle, certaines des fonctions
suivantes pourraient ne pas être disponibles.
ATTENTION
Retirer les mains et les outils de la porte
y
du compartiment de glace et goulotte de
distribution. L’incapacité à le faire peut
provoquer des dommages ou des blessures
personnelles.
La machine à glaçons cessera de produire
y
de la glace lorsque le bac à glace intérieur
sera plein. Si vous avez besoin de plus de
glace, vider le bac à glace dans le bac à glace
supplémantaire du compartiment congélateur.
En cours d’utilisation, la glace peut devenir
inégale, ce qui entraîne la machine à glaçons
à mal interpréter la quantité de glaçons et à
arrêter la production de glace. Secouer le bac
à glaçons au niveau de la glace à l’intérieur
pour réduire ce problème.
Stocker des boîtes de conserve ou
y
d’autres objets dans le bac à glace pourrait
endommager la machine à glaçons.
Garder la porte du compartiment à glace
y
fermée. Si la porte du compartiment de
glace n’est pas bien fermée, l’air froid dans
le bac à glaçons congèlera les aliments dans
le compartiment réfrigérateur. Cela pourrait
également entraîner la machine à glaçons à
arrêter la production de glace.
Si l’interrupteur ON/OFF sur la machine à
y
glaçons est sur OFF pendant une longue
période de temps, le compartiment à
glace se réchauffera progressivement
jusqu’à la température du compartiment
du réfrigérateur. Pour éviter que les
glaçons fondent et coulent de distributeur,
TOUJOURS vider le bac à glaçons lorsque la
machine à glaçons est sur la position Arrêt
pendant plus de quelques heures.
Détachement du bac à glaçons
Pour enlever le bac à glaçons à l’intérieur
2
de la porte, saisir la poignée avant, soulever
légèrement la partie inférieure, et retirer
doucement le bac comme indiqué.
Montage du bac à glaçons
Insérer doucement le bac à glaçons
1
à l’intérieur de la porte en l’inclinant
légèrement pour éviter tout contact avec la
machine à glaçons.
Éviter de toucher le capteur de détection
2
de glace lors du remplacement du bac à
glaçons. Voir l’étiquette sur la porte du
compartiment à glaçons pour plus de
détails.
Capteur de
détection de
glaçons
FRANÇAIS
Tirer doucement la poignée pour ouvrir le
1
compartiment à glace.
ATTENTION
Lorsque vous manipulez le bac
à glaçons, gardez vos mains
loin de la zone du plateau de la
machine à glaçons pour éviter
de vous blesser.
Page 82

28
MODE D’EMPLOI
Machine à glaçons
automatique
* Selon le modèle, certaines des fonctions
suivantes pourraient ne pas être disponibles.
FRANÇAIS
La glace est fabriquée par la machine à glaçons
automatique et passe dans le distributeur.
La machine à glaçons produit 70 à 210 glaçons
par période de 24 heures, en fonction de la
température du congélateur, de la température
de la pièce, du nombre de fois que la porte est
ouverte et en fonction d’autres conditions.
Cela prend environ 12 à 24 heures pour
un réfrigérateur nouvellement installé de
commencer à produire de la glace. Attendre
72 heures pour que la production de glaçons
commence.
La machine arrête de fabriquer des glaçons
lorsque le bac de la porte est plein. Lorsque le
bac est plein, il contient environ 6 à 8 verres
de glaçons à ras bord.
La pression de l’eau doit être comprise entre
1,38 et 8,27 bars (20 à 120 psi ou 140 à 830
kPa) pour les modèles sans filtre à eau et entre
2,76 et 8,27 bars (40 à 120 psi ou 280 à 830
kPa) pour les modèles avec filtre à eau afin
de produire des glaçons de bonne taille en
quantité normale.
Les substances étrangères ou le givre sur
le capteur de détection de glace peuvent
interrompre la production de glace. Assurezvous que la surface du capteur est propre en
tout temps pour un bon fonctionnement.
Machine à
glaçons
L’eau rempli le plateau à glace.
1 heure après
l’approvisionnement
en eau
60 minutes après l’ajout de l’eau dans
le plateau à glace, le plateau à glace se
penchera légèrement pour permettre à
l’air froid d’atteindre la glace.
Interrupteur
de courant
Capteur de
détection de glace
Les détecteurs de glace détecteront
lorsque la glace est prête à être jetée
dans le bac à glace.
Mise en marche et arrêt de la
machine à glaçons automatique
Pour éteindre la machine à glaçons automatique,
mettre l’interrupteur de la machine à glaçons sur
ARRÊT(O)
automatique, mettre l’interrupteur de la machine
à glaçons sur
. Pour allumer la machine à glaçons
MARCHE (I)
.
Page 83

MODE D’EMPLOI
29
Machine à glaçons automatique
(suite)
ATTENTION
La première glace et l’eau distribuées peuvent
y
contenir des particules ou des odeurs
provenant de la ligne d’approvisionnement en
eau ou du réservoir d’eau.
Jetez les premiers lots de glace (environ 24
y
glaçons). Cela est également nécessaire si le
réfrigérateur n’a pas été utilisé pendant une
longue période.
Ne jamais stocker des cannettes de boissons
y
ou d’autres objets dans le bac à glaçons dans
le but de les refroidir rapidement. Cela pourrait
endommager la machine à glaçons ou les
récipients peuvent éclater.
Si de la glace décolorée est distribuée, vérifier
y
le filtre à eau et l’alimentation en eau. Si
le problème persiste, contacter un centre
commercial Sears ou un autre centre de
service qualifié. Ne pas utiliser la glace ou l’eau
jusqu’à ce que le problème soit résolu.
Maintenir les enfants loin du distributeur. Les
y
enfants peuvent jouer avec ou endommager
les commandes du passage de glace.
Le passage de glace peut être obstrué par le
y
gel si uniquement de la glace pilée est utilisée.
Enlever le givre qui s’accumule en retirant le
bac à glaçons et dégageant le passage avec
une spatule en caoutchouc. La distribution
de glaçons peut aussi aider à prévenir
l’accumulation de givre.
Ne jamais utiliser de la verrerie ou de la
y
vaisselle en cristal pour recueillir la glace.
Ces récipients peuvent se casser ou éclater
en projetant des fragments de verre dans la
glace.
Distribuer la glace dans un verre avant de le
y
remplir avec de l’eau ou d’autres boissons.
Des éclaboussures peuvent se produire si la
glace est distribuée dans un verre qui contient
déjà du liquide.
Ne jamais utiliser un verre trop étroit ou
y
profond. Un embâcle peut se produire dans le
passage de la glace et le fonctionnement du
réfrigérateur peut être affecté.
Garder le verre à une distance appropriée de la
y
prise de glace. Un verre trop proche de la prise
peut empêcher la distribution de glace.
Pour éviter les blessures, garder les mains loin
y
de la porte et du passage de glace.
Ne jamais retirer le couvercle du distributeur.
y
Si de la glace ou de l’eau sont distribuées
y
façon inattendue, couper l’alimentation en eau
et contacter un centre de service qualifié.
Quand devez-vous mettre l’interrupteur
de la machine à glaçons sur off (o)
Lorsque l’alimentation en eau aura été
y
coupée plusireurs heures.
Lorsque le bac à glace est retiré pendant
y
plus d’une ou deux minutes.
Lorsque le réfrigérateur n’est pas utilisé
y
pendant plusieurs jours.
REMARQUE
Le bac à glaçons doit être vidé lorsque
l’interrupteur de la machine à glaçons
est en position
OFF
.
Sons normaux que vous entendrez
La vanne d’eau de la machine à glaçons
y
vibrera tandis que la machine à glaçons
se remplit d’eau. Si l’interrupteur est
placé sur la position MARCHE (I), il
vibrera même s’il n’a pas été connecté
à l’eau. Pour arrêter la vibration, placer
l’interrupteur sur ARRÊT (O).
y
y
REMARQUE
Laisser le bouton d’alimentation en position
ON (I) avant que l’alimentation en eau
ne soit connectée peut endommager la
machine à glaçons.
Vous entendrez le son de glaçons
tombant dans le bac et l’eau qui coule
dans les tuyaux tandis que la machine à
glaçons se remplit à nouveau.
Préparation des vacances
Mettez l’interrupteur de la machine à glaçons
sur ARRÊT (O) et fermer l’alimentation en eau
du réfrigérateur.
REMARQUE
Le bac à glaçons doit être vidé lorsque
l’interrupteur de la machine à glaçons est
en position
Si la température ambiante baisse en-dessous
de la congélation, demander à un technicien
qualifié de drainer le système d’alimentation en
eau pour empêcher des dommages importants
dues à l’inondation causée par des lignes ou
des connexions d’eau endommagées.
OFF
.
FRANÇAIS
Page 84

30
MODE D’EMPLOI
Distributeur de glace et d’eau
* Selon le modèle, certaines des fonctions
suivantes pourraient ne pas être disponibles.
FRANÇAIS
ATTENTION
Maintenir les enfants loin du distributeur.
Les enfants peuvent jouer avec ou
endommager les commandes du passage
de glace.
Dispensador
Utilisation du distributeur
Pour distribuer de l’eau froide, appuyer
y
sur l’interrupteur de l’eau avec un verre.
Pour distribuer des glaçons, appuyer sur
y
l’interrupteur de la glace avec un verre.
Interrupteur d’eau
Interrupteur de
glace
Stand
Incorrecte Correcte
Eau
Glace
ATTENTION
Jetez les premiers lots de glace (environ
24 glaçons). Cela est également
nécessaire si le réfrigérateur n’a pas
été utilisé pendant une longue période.
Verrouillage du distributeur
Appuyez et maintenez les bouttons d’Alarme
et de Verrouillage simultanément pendant
3 secondes pour verrouiller le distributeur
et toutes les fonctions du panneau de
commande. Suivre les mêmes instructions
pour déverrouiller.
REMARQUE
Si de la glace décolorée est distribuée,
y
vérifier le filtre à eau et l’alimentation en
eau. Si le problème persiste, contacter un
centre de service qualifié. Ne pas utiliser la
glace ou l’eau jusqu’à ce que le problème
soit résolu.
Le distributeur ne fonctionne pas lorsque
y
l’une des portes du réfrigérateur est
ouverte.
Si vous distribuez de l’eau ou de la glace
y
dans un récipient avec une petite ouverture,
placez-le aussi près du distributeur que
possible.
Quelques gouttes peuvent tomber après
y
la distribution. Tenez votre tasse sous le
distributeur pendant quelques secondes
après la distribution pour recueillir toutes
les gouttes.
Nettoyage du stand du distributeur
Saisir le stand avec les deux mains et le
1
retirer.
Nettoyer les zones sales avec un chiffon
2
propre.
Page 85

MODE D’EMPLOI
Stockage des aliments
Lieu de conservation des aliments
Chaque compartiment à l’intérieur du réfrigérateur est conçu pour stocker différents types de
nourriture. Rangez vos aliments dans l’espace optimal pour profiter d’un goût plus frais.
31
FRANÇAIS
Étagère de réfrigérateur réglable
Étagères ajustables pour
satisfaire vos besoins de
stockage individuels.
Stockage de légumes
(Bac à fruits et légumes)
Conserve les légumes et les
fruits.
®
Durabase
Le plus grand espace
de stockage dans le
congélateur.
Bac à produits laitiers
Pour stocker des produits
laitiers comme du beurre et
du fromage.
Bac de porte modulaire
Stocker des boissons tels
que des jus et du soda, ainsi
que des assaisonnements,
sauces pour salade et autres
aliments.
Glisser et Servir
Permet de disposer d’une
zone de stockage dont
la température est plus
basse que dans le reste
du réfrigérateur. C’est
un endroit pratique pour
conserver des sandwiches
ou de la viande à cuire.
ATTENTION
Ne pas stocker d’aliments avec des contenus très humides vers la partie supérieur du
réfrigérateur. L’humidité pourrait entrer directement en contact avec l’air froid et geler.
Laver les aliments avant de les stocker dans le réfrigérateur. Les fruits et les légumes devraient
être lavés, et l’emballage des aliments devrait être nettoyé pour empêcher de contaminer les
aliments à proximité.
Si le réfrigérateur est conservé dans un endroit chaud et humide, l’ouverture fréquente de la porte
ou le fait de stocker beaucoup de légumes dans le réfrigérateur peut provoquer la formation de
condensation. Essuyer la condensation avec un chiffon propre ou une serviette en papier.
Si la porte du réfrigérateur ou le tiroir du congélateur sont ouverts ou fermés trop souvent, l’air
chaud peut pénétrer dans le réfrigérateur et élever sa température. Cela peut aussi augmenter le
coût de l’électricité.
REMARQUE
Si vous quittez votre domicile pendant une courte période de temps, pour partir, par exemple,
en vacances, le réfrigérateur devrait rester allumé. Les aliments qui peuvent être congelés se
conserveront plus longtemps s’ils sont stockés dans le congélateur.
Si vous laissez le réfrigérateur éteint pendant une longue période de temps, enlevez tous les
aliments et débranchez le cordon d’alimentation. Nettoyez l’intérieur, et laissez la porte ouverte
pour empêcher les moisissures de se développer dans le réfrigérateur.
Page 86

32
MODE D’EMPLOI
Conseils pour le stockage des aliments
* Les conseils suivants pourraient ne pas être
applicables, selon le modèle.
Envelopper ou conserver des aliments dans le
réfrigérateur et le matériel étanche à l’humidité,
FRANÇAIS
sauf indication contraire. Cela empêche les
odeurs de nourriture et le transfert de goût dans
le réfrigérateur. Pour les produits datés, vérifier la
date de péremption pour assurer la fraîcheur.
Aliment Comment stocker
Conservez le beurre ouvert dans un
plat couvert ou un compartiment
Beurre ou
margarine
Fromage
Lait
Oeufs
Fruits
Légumes à
feuilles
Légumes
à peaux
(carottes,
poivrons)
Poissons
Restes
fermé. Lorsque vous stockez un
approvisionnement supplémentaire,
enveloppez-le dans un emballage pour
congélateur et le congeler.
Stockez dans l’emballage d’origine
jusqu’au moment d’utilisation. Une
fois le produit ouvert, réemballez
hermétiquement dans un papier
d’emballage plastifié ou du papier
aluminium.
Essuyez les cartons de lait. Pour un
meilleur stockage, placez le lait sur une
étagère intérieure, non pas sur une
étagère de porte.
Stockez dans le carton d’origine ou sur
une étagère intérieure, non pas sur une
étagère de porte.
Ne pas laver ou écosser les fruits
jusqu’à ce qu’ils soient prêts à être
consommés. Trier et conserver les
fruits dans leur récipient d’origine,
dans un bac à fruits et légumes, ou
les stocker dans un sac en papier bien
fermé sur une étagère du réfrigérateur.
Retirer l’emballage de stockage
et couper ou éliminer les sections
endommagées et décolorées. Laver
dans de l’eau froide et drainer. Placer
dans un sac ou un récipient en plastique
et stocker dans un bac à légumes.
Placer dans des sacs ou un récipient en
plastique et stocker dans le bac à fruits
et légumes.
Stocker le poisson frais et les crustacés
dans la section congélateur s’ils ne
sont pas consommés le même jour
de l’achat. Il est recommandé de
consommer le poisson frais et les
crustacés le même jour de l’achat.
Couvrez les restes avec une pellicule
plastifiée, du papier aluminium ou
des récipients en plastique avec des
couvercles hermétiques.
Stockage d’aliments congelés
REMARQUE
Consulter un manuel sur les congélateurs
ou un livre de recettes fiable pour plus
de renseignements sur la préparation
d’aliments pòur leur congélation ou les
périodes de stockage des aliments.
CongélationCongélation
Votre congélateur ne congèlera pas
rapidement une grande quantité de nourriture.
Ne placez pas d’aliments non congelés dans le
congélateur que vont geler dans les 24 heures
(pas plus de 2 à 3 livres d’aliments par pied
cube d’espace de congélateur).
Les périodes de stockage varieront en fonciton
de la qualité et du type d’aliments, du type
d’emballage ou de la pellicule utilisée (degré
d’étanchéité et résistance à l’humidité) et de
la température de stockage. Les cristaux de
glace dans un emballage scellé sont normaux.
Cela signifie simplement que l’humidité dans
les aliments et l’air à l’intérieur de l’emballage
se sont condensés, en créant des cristaux de
glace.
REMARQUE
Laisser refroidir les aliments chauds à
température ambiante pendant 30 minutes,
puis, emballer et congeler. Refroidir les
aliments chauds avant de les congler
économise de l’énergie.
Page 87

Stockage d’aliments congelés (suite)
Emballage
Une congélation réussie dépend d’un
emballage correct. Lorsque vous fermez
et scellez l’emballage, celui-ci ne doit pas
permettre l’entrée ou la sortie d’air ou
d’humidité. Si cela se produit, vous pourriez
avoir des odeurs d’aliments et du transfert de
goût à travers le réfrigérateur et pourriez aussi
sécher des aliments secs.
Recommandaitons d’emballage :
Récipients en plastique rigides avec
couvercles ajustés
Bocaux de conserve/congélation à bords
droits
Feuille d’aluminium épaisse
Papier plastifié
Pellicules plastifiées non perméables
Sacs en plastique plastifiés de qualité
pour congélateur, auto-étanches
Suivez les instructions de l’emballage ou du
récipient pour les méthodes de congélation
correctes.
Ne pas utiliser
Papier d’emballage pour pain
Récipients en plastique sans polyéthylène
Récipients sans couvercles ajustés
Papier paraffiné ou papier d’emballage
pour congélateur recouvert de cire
Papier d’emballage fin, semi-perméable
Bac à fruits et légumes à humidité
contrôlée et Glisser et servir
* Selon le modèle, certaines des fonctions
suivantes pourraient ne pas être disponibles.
Les bacs à légumes permettent de conserver
un goût plus frais des fruits et légumes en vous
permettant de facilement contrôler l’humidité à
l’intérieur du tiroir.
Vous pouvez contrôler le niveau d’humidité
dans les bacs étanches à humidité en réglant la
commande sur n’importe quel réglage entre
et
.
LOW
garde l’air humide dans le bac pour
HIGH
une meilleure conservation des légumes à
feuilles frais.
évacue l’air humide du bac à légumes
LOW
pour une meilleure conservation des fruits.
HIGH
MODE D’EMPLOI
Glide‘N’Serve (Glissez et servez)
Le Glide‘N’Serve fournit un espace de stockage avec
un contrôle de température variable qui permet de
disposer d’un compartiment plus froid que le reste du
réfrigérateur.Ce tiroir peut être utilisé pour les grands
plateaux, la charcuterie ou les boissons. (mais ce tiroir
n’est pas convenable pour les legumes.)
Commandes
La commande permet de réguler la température d’air
dans le tiroir. Réglez la commande sur COLD (imprimé
sur la surface) pour obtenir une température normale,
identique au réfrigérateur. Réglez sur COLDER
(imprimé sur la surface) pour les viandes et autre
charcuterie.
REMARQUE
L'air refroidi orienté vers le Glide‘N’Serve
(Glissez et servez) peut faire diminuer la
température du réfrigérateur. Il pourrait alors être
nécessaire de régler la commande du réfrigérateur.
33
FRANÇAIS
Page 88

34
MODE D’EMPLOI
Détachement et montage des
bacs de stockage
Glisser et Servir et bac à légumes
avec contrôle d’humidité
FRANÇAIS
Pour enlever le bac à légumes à contrôle d’
humidité et le Glisser et servir, tirez le bac à
fruits et légumes
jusqu’à leur pleine extension, soulevez l’avant
et les retirez directement.
Pour installer, inclinez légèrement le devant,
insérez le tiroir dans le cadre et le remettez-le
en place en le poussant.
et le Glisser et servir
Pour enlever le verre
(Tiroir non montré pour plus de clarté.)
Soulevez le verre sous le couvercle du bac à
légumes, le soulever vers le haut et le retirer.
Bacs de porte
Les bacs de porte sont amovibles pour faciliter
le nettoyage et l’ajustement.
Pour retirer le bac, il suffit de soulever le bac
1
et le retirer directement.
Pour remplacer le bac, faites-le glisser au-
2
dessus du support souhaité e tpoussez-le
jusqu’à ce qu’il s’enclenche en place.
REMARQUE
L’apparence des bacs de rangement peut
varier selon le modèle.
REMARQUE
Certains bacs peut varier en apparence et
ne rentreront que dans un seul endroit.
ATTENTION
Ne pas appliquer de force excessive
y
lors du détachement ou du montage
des bacs de stockage
Ne pas utiliser le lave-vaisselle pour
y
nettoyer les bacs de stockage et les
étagères.
Régulièrement détacher et laver les
y
bacs de rangement et les étagères,
ils pourraient devenir facilement être
contaminés par les aliments.
Page 89

Réglage des étagères du
réfrigérateur
Les étagères de votre réfrigérateur sont
ajustables pour remplir vos besoins de
stockage individuels. Votre modèle peut
comporter des étagères en verre ou en fil.
Ajuster les étagères pour les imbriquer à
différentes hauteurs d’objets vous permettra
de trouver l’objet exact que vous cherchez
plus facilement. Cela permettra également
de réduire le temps d’ouverture de la porte
du réfrigérateur, ce qui vous permettra
d’économiser de l’énergie.
Détachement de l’étagère
Faites basculer le devant de l’étagère et
soulevez-la. Retirez-la.
MODE D’EMPLOI
35
Bac à glace
Pour dégager le bac à glace, tirez le tiroir vers
l’extérieur à sa pleine extension.
En procédant délicatement, soulevez puis tirez
le bac à glace pour le sortir. Pour le remettre
en place, placez simplement le bac dans la
position correcte.
Tiroir
ATTENTION
Risque de coincement ! Gardez les
mains et les pieds à l’é cart du bas de la
porte lors de l’ouverture et de la fermeture.
FRANÇAIS
Montage de l’étagère
Faites basculer le devant de l’étagère et guidez
les crochets de l’étagère dans les fentes à
la hauteur désirée. Ensuite, abaissez l’avant
de l’étagère de telle sorte que les crochets
tombent dans les fentes.
ATTENTION
Assurez-vous que les étagères
soient équilibrées d’un côté à l’autre.
L’incapacité à le faire peut provoquer la
chute de l’étagère ou des aliments.
Diviseur DuraBase ®
AVERTISSEMENT
Risque de piégeage des enfants
Si le séparateur Durabase est retiré, il y
a suffisamment yd’espace ouvert à
l’intérieur pour qu’un enfant ou des
animaux se glissent à l’intérieur.
Pour prévenir les risques qu’un enfant ou
un animal soit coincé ou suffoque
accidentellement, NE les laissez PAS
jouer à l’intérieur du tiroir.
Page 90

36
ENTRETIEN
ENTRETIEN
Nettoyage
FRANÇAIS
Les sections de réfrigérateur et de congélateur dégivrent automatiquement, mais, nettoyez
les deux sections une fois par mois pour éviter les odeurs.
Essuyez immédiatement les déversements.
Toujours débrancher la réfrigération avant de le nettoyer.
Conseils généraux de nettoyage
Débrancher le réfrigérateur ou couper le
courant.
Enlever toutes les pièces amovibles, telles
que les étagères, bacs, etc.
Utiliser une éponge propre ou un chiffon et
un détergent doux avec de l’eau chaude.
Ne pas utiliser de produits de nettoyage
abrasifs ou forts.
Se laver et se rincer les mains et sécher
complètement toutes les surfaces
externes.
Extérieur
Appliquer de la cire sur les surfaces métalliques
peintes aide à fournir une protection antirouille. Ne
pas cirer les pièces en plastique. Cirer les surfaces
métalliques peintes au moins deux fois par an
avec de la cire pour appareils électroménagers (ou
cire autocollante). Appliquer la cire avec un chiffon
propre et doux.
Pour les produits avec un extérieur en acier
inoxydable, utiliser une éponge propre ou un
chiffon et un détergent doux dans de l’eau
chaude. Ne pas utiliser des produits de nettoyage
abrasifs ou forts. Bien essuyer avec un chiffon
doux.Ne pas utiliser de cire pour appareils, de
décolorant, ou d'autres produits contenant du
chlore sur l'acier inoxydable.
ATTENTION
Ne pas utiliser de chiffons ou d’éponges
rugueuses en nettoyant l’intérieur et
l’extérieur du réfrigérateur.
Ne placez pas votre main sur la surface
intérieure du réfrigérateur lors de
l’ouverture et la fermeture.
Parois intérieures (laisser le congélateur
se réchauffer pour que le chiffon ne
colle pas)
Pour éliminer les odeurs, vous pouvez laver
l’intérieur du réfrigérateur avec un mélange de
bicarbonate de soude et d’eau chaude. Mélangez
2 cuillères à soupe de bicarbonate de soude à
1 litre d’eau (26 g de soude pour 1 litre d’eau.)
Assurez-vous que le bicarbonate de soude est
complètement dissous afin de ne pas rayer les
surfaces du réfrigérateur.
Doublures et joints de porte
Utiliser une éponge propre ou un chiffon et un
détergent doux avec de l’eau chaude. Ne pas
utiliser des cires de nettoyage, de détergents
concentrés, d’eaux de Javel ou de nettoyants
contenant du pétrole sur les pièces en plastique
du réfrigérateur.
Pièces en plastique (couvercles et
panneaux)
Utiliser une éponge propre ou un chiffon et un
détergent doux avec de l’eau chaude. Ne pas
utiliser d’aérosols pour fenêtres, de nettoyants
abrasifs ou de liquides inflammables. Ces produits
peuvent rayer ou endommager lematériel.
Serpentins du condenseur
Utiliser un aspirateur avec un accessoire pour
nettoyer le couvercle du condenseur et ses
évents. Ne pas retirer le panneau qui recouvre la
zone du condenseur.
AVERTISSEMENT
Utiliser un produit de nettoyage non
inflammable. Ne pas le faire pourrait
provoquer un incendie, une explosion ou
la mort.
Page 91

2,5 litres (9 litters)
ENTRETIEN
2,5 litres (9 litters)
37
FRANÇAIS
Page 92

38
ENTRETIEN
Fiche technique
Numéro de série 5231JA2002A-S A utiliser avec une cartouche de remplacement 5231JA2002A
Ce dispositif a été testé conformément aux normes NSF/ANSI n°42 pour la réduction des substances
listées ci-dessous. La concentration des substances indiquées dans l'eau d'arrivée (influent) a été
diminuée d'une concentration inférieure ou égale à la limite autorisée pour de l'eau quittant le système
comme indiquée dans la norme NSF/ANSI n°42.
FRANÇAIS
Le système a été testé et certifié par NSF International pour la norme n°42 pour la
réduction du goût et de l'odeur de chlore et les particules nominales de classe III.
Capacité : 1.892 L
%
Substance
Taille de particule
nominale de classe I
: >0,5 à < 1 µm
Goût et odeur de
chlore de classe III
A noter : les tests ont été menés avec des conditions laboratoire standard, la performance réelle est susceptible de varier.
Concentration
d’influent
moyen
24 333
1,9 2,0 mg/L ± 10% 0,07 96,4
Concentration d’influent.
Unités appliquées à
chaque ligne
Au moins
10 000 particules/ml
Concentration
de l’eau du
produit moyen
915 96
réduction
moyenne
Req. de % de réduction
NSF ou concentration
en
de l’eau du produit
admissible max.
≥
≥
85%
50%
Lignes d’application/Paramètres
d’alimentation en eau
Flux de service 0,5 gpm (1,89 lpm)
Pression de l'eau
Température de
l'eau
20 et 120 psi (140 et 830 kPa)
36 °F - 100 °F
(0,6 °C - 37,8 °C)
AVERTISSEMENT
Ne pas utiliser de l’eau qui est insalubre au
niveau microbiologique ou dont la qualité n’est
pas connue sans désinfection adaptée avant
ou après le dispositif.
Les systèmes doivent être installés et
y
manipulés conformément aux procédures et
instructions recommandées par le fabricant.
Garantie : voir la fiche de garantie pour de
plus amples détails.
Pour obtenir une cartouche de remplacement
ou un service, veuillez contacter le revendeur
se trouvant près de chez vous.
Vous pouvez également visiter notre site web
www.lg.com
Fabriqué pour LG® Electronics par : CUNO
Incorporateda 3M Company 400 Research
Parkway Meriden, CT 06450 U.S.A.
Téléphone : (001) 203-237-5541
Télécopie : (001) 203-238-8701
ou appeler le
1-877-714-7486
.
ATTENTION
Pour éviter des dommages matériels suite à
des fuites d’eau :
Lire et suivre les instructions. Bien prendre
y
connaissance des instructions avant
l’installation et l’utilisation du système.
Installer uniquement sur des lignes d’eau
y
FROIDE.
Doit être conforme à tous les codes de
y
plomberie en vigueur.
Installer un dispositif limitant la pression et
y
un capteur d’eau pour les pressions d’eau
de l’orifice d’entrée excédant 552kPa. Se
reporter au code de plomberie, sections
608,2 et 609,10.
Ne jamais installer ou mettre en service à
y
des endroits ou la pression de l’eau peut
dépasser 862 kPa.
Protéger le filtre du gel. Retirer le filtre à
y
des températures inférieures à 0,6°C.
Remplacer la cartouche pour des durées de
y
service indiquées. La cartouche DOIT être
remplacée au moins tous les 12 mois.
Page 93

SMART DIAGNOSIS
Au cas où vous rencontreriez des problèmes
avec votre réfrigérateur, celui-ci a la capacité de
transmettre des données via votre téléphone
au centre d’assistance LG. Cela vous permet de
parler directement à l’un de nos spécialistes. Le
spécialiste enregistrera les données transmises
par votre appareil, les utilisera pour analyser le
problème, et apportera un diagnostic rapide et
efficace.
En cas de problème avec votre réfrigérateur,
appelez le 1-800-243-0000. N’utilisez la
technologie Smart Diagnosis que lorsque l’agent
du centre d’assistance LG vous le demande. Les
bruits de transmission que vous entendrez sont
normaux et ressemblent à ceux d’un fax.
La technologie Smart Diagnosis ne peut être
activée à moins que votre réfrigérateur ne soit
sous tension. Si votre réfrigérateur ne peut pas
s’allumer, alors la résolution de problème devra
se faire sans Smart Diagnosis.
Utiliser Smart Diagnosis
Appelez tout d’abord le 1-800-243-0000.
N’utilisez la technologie Smart Diagnosis que
lorsque l’agent du centre d’assistance LG vous
le demande.
Bloquez l’affichage. Pour bloquer
1
l’affichage, appuyez sur le bouton
Verrouillage pendant trois secondes. (Si
l’affichage a déjà été bloqué pendant plus
de cinq minutes, vous devez désactiver le
Verrouillage pour ensuite le réactiver.)
SMART DIAGNOSIS
Approchez le microphone de votre téléphone
3
devant le haut-parleur situé sur la charnière
droite de la porte de votre réfrigérateur, lorsque
le centre d’assistance vous le demande.
Maintenez le bouton Température du
4
congélateur enfoncé pendant trois secondes
tout en continuant à tenir votre téléphone
devant le haut-parleur.
Après avoir entendu trois signaux sonores,
5
relâchez le bouton de température du
congélateur.
Maintenez le téléphone jusqu’à ce que le bruit
6
de transmission disparaisse. Cela prendra
environ 15 secondes, et un décompte du
temps s’affichera sur l’écran d’affichage.
Une fois le décompte terminé et le bruit
disparu, reprenez votre conversation avec le
spécialiste, qui sera alors en mesure de vous
aider grâce à l’information transmise pour
l’analyse. the tones have stopped, resume
your conversation with the specialist, who
will then be able to assist you in using the
information transmitted for analysis.
REMARQUE
Pour améliorer les résultats, veuillez ne pas
y
bouger le téléphone lorsque les bruits de
transmission sont émis.
Si le représentant du centre d’appel n’est pas
y
capable d’obtenir un enregistrement précis des
données, il vous sera demandé de réessayer.
39
FRANÇAIS
Ouvrez la porte droite du réfrigérateur.
2
REMARQUE
Les différences de qualité des appels selon la
y
région peuvent affecter cette fonction.
Utilisez le téléphone de votre domicile pour
y
bénéficier de meilleures performances de
communication et, en conséquence, d’un
meilleur service.
Une mauvaise qualité d’appel peut entraîner
y
une piètre transmission de données entre
votre téléphone et la machine, de sorte que
la fonction Smart Diagnosis risque de ne pas
fonctionner correctement.
Page 94

40
DÉPANNAGE
DÉPANNAGE
Consulter la section Dépannage avant d’appeler le service, car cela vous permettra d’économiser du
temps et de l’argent.
FRANÇAIS
Les
compartiments
Réfrigérateur et
Congélateur ne
refroidissent pas
Le système de
refroidissement
est trop puissant
Problème Causes possibles Solutions
Le contrôle du réfrigérateur est
réglé sur ARRÊT (sur certains
modèles)
Le réfrigérateur est réglé sur le
mode Démo
Le réfrigérateur est en cycle de
Dégivrage
Le réfrigérateur a récemment été
déplacé
Le réfrigérateur remplace un ancien
modèle
Le réfrigérateur vient d’être
branché ou remis sous tension
La porte a souvent été ouverte ou
beaucoup d’aliments / des aliments
chauds y ont été placés
Les portes ne sont pas
complètement fermées
Le réfrigérateur est installé dans un
environnement chaud
Le condensateur / couvercle arrière
est obstrué
Réglez le contrôle sur MARCHE. Veuillez vous reporter
à la section Réglage du Contrôle pour le paramétrage
approprié des températures.
Le mode Démo permet un fonctionnement normal de
l’éclairage et de l’affichage du panneau de contrôle
mais désactive le refroidissement pour économiser
l’énergie durant l’exposition en magasin. Veuillez vous
reporter à la section Réglage du Contrôle pour les
instructions de désactivation du mode Démo.
Durant le cycle de dégivrage, la température de chaque
compartiment peut légèrement augmenter. Attendez
30 minutes et assurez-vous que la température est
revenue à sa valeur correcte une fois le cycle de
dégivrage complété.
Si le réfrigérateur a été débranché ou couché pendant
une longue période, celui-ci doit être placé à la verticale
pendant 24h avant d’être mis sous tension.
Les réfrigérateurs modernes nécessitent un temps de
fonctionnement plus long mais consomment moins
d’énergie grâce à une technologie plus efficace.
Le réfrigérateur mettra 24h à refroidir complètement
L’ajout d’aliments ou l’ouverture de la porte réchauffe
le réfrigérateur, ce qui demande au compresseur
de fonctionner plus longtemps pour refroidir les
compartiments. Afin de conserver l’énergie, essayez
de sortir tout ce dont vous avez besoin du réfrigérateur
en une seule fois, rangez vos aliments de manière
organisée afin de les localiser facilement, et fermez la
porte dès que les aliments sont sortis. (Veuillez vous
reporter à la section Guide de Stockage des Aliments)
Poussez les portes fermement. Si elles ne se ferment
pas complètement, reportez vous à la section Les
portes ne se ferment pas complètement ou s’ouvrent
toutes seules de la partie Dépannage des Pièces &
Fonctions.
Le compresseur fonctionnera plus longtemps dans
un environnement chaud. Lorsque la température
ambiante est normale (70°F), votre compresseur
doit fonctionner entre 40% et 80% du temps. Si la
pièce est plus chaude, attendez-vous à ce qu’il tourne
encore plus souvent. Le réfrigérateur ne doit pas être
mis en fonction lorsque la température ambiante est
supérieure à 110°F.
Utilisez un aspirateur muni d’un embout pour nettoyer
la protection du condensateur et la ventilation. Ne pas
ôter le panneau recouvrant la bobine du condensateur.
Page 95

Problème Causes possibles Solutions
Le compartiment
Réfrigérateur ou
Congélateur est
trop chaud
Le réfrigérateur a été installé
récemment
Les bouches d’aération sont
obstruées
24h peuvent être nécessaires pour que chaque
compartiment atteigne la température désirée
Réorganisez les éléments afin de permettre
la libre circulation de l’air à l’intérieur du
compartiment. Veuillez vous reporter au
diagramme de circulation de l’air dans la section
Utilisation de votre Réfrigérateur.
DÉPANNAGE
41
FRANÇAIS
Les portes sont souvent
ouvertes ou restent ouvertes
pendant longtemps.
L’appareil est installé dans un
endroit chaud
Beaucoup d’aliments ou des
aliments chauds ont été placés
dans l’un des compartiments
Les portes ne sont pas
correctement fermées
Le contrôle de la température
n’est pas réglé correctement
Le cycle de dégivrage vient de
se terminer
Lorsque les portes sont souvent ouvertes ou
restent ouvertes pendant longtemps, de l’air
chaud et humide entre dans le compartiment. La
température et le niveau d’humidité augmentent
ainsi à l’intérieur du compartiment. Pour limiter
cet effet, réduisez la fréquence et la durée
d’ouverture des portes.
Le réfrigérateur ne doit pas être mis en fonction
si la température ambiante est supérieure à
110°F.
L’ajout d’aliments augmente la température du
compartiment, ce qui entraine le déclenchement
du système de refroidissement. Pour limiter
cet effet, laissez les aliments chauds refroidir à
température ambiante avant de les placer dans le
réfrigérateur.
Veuillez vous reporter à la section Les portes ne
se ferment pas correctement ou s’ouvrent toutes
seules de la partie Dépannage des Pièces &
Fonctions
Si la température est trop chaude, ajustez le
contrôle une position à la fois et attendez que la
température se stabilise. Veuillez vous reporter
à la section Réglage du Contrôle pour plus
d’informations
Durant le cycle de dégivrage, la température
de chaque compartiment peut légèrement
augmenter. Attendez 30 minutes et assurezvous que la température est revenue à sa valeur
correcte une fois le cycle de dégivrage complété.
Page 96

42
De l’humidité se
forme à l’intérieur
FRANÇAIS
Les aliments
congèlent dans
le compartiment
réfrigérateur
Du givre ou des
cristaux de glace
se forment sur les
aliments surgelés
(à l’extérieur de
l’emballage)
Le compartiment
Réfrigérateur ou
Congélateur est
trop chaud
DÉPANNAGE
Problème Causes possibles Solutions
Les portes sont trop souvent
ouvertes ou restent ouvertes
trop longtemps
Les portes ne sont pas
correctement fermées
L’atmosphère est humide Une atmosphère humide permet à plus d’humidité
Le cycle de dégivrage vient de
se terminer
Les aliments ne sont pas
correctement emballés
Des aliments avec une teneur
en eau importante ont été
placés à proximité des bouches
d’aération
Le contrôle de la température
du réfrigérateur est mal réglé
Le réfrigérateur est installé dans
un endroit froid
La porte est souvent ouverte
ou reste ouverte pendant
longtemps
La porte ne se ferme pas
correctement
Mauvais réglage du contrôle de
la température
Lorsque les portes sont souvent ouvertes ou
restent ouvertes pendant longtemps, de l’air
chaud et humide entre dans le compartiment. La
température et le niveau d’humidité augmentent
ainsi à l’intérieur du compartiment. Pour limiter
cet effet, réduisez la fréquence et la durée
d’ouverture des portes.
Veuillez vous reporter à la section Les portes
ne se ferment pas correctement de la partie
Dépannage
de pénétrer dans le compartiment lorsque la porte
est ouverte, ce qui génère de la condensation
et du givre. Vous pouvez contrôler l’humidité qui
pénètre dans le réfrigérateur en maintenant un
niveau d’humidité approprié à votre domicile
Durant le cycle de dégivrage, la température
de chaque compartiment peut légèrement
augmenter. Attendez 30 minutes et assurezvous que la température est revenue à sa valeur
correcte une fois le cycle de dégivrage complété.
Les aliments stockés sans couvercle ni
emballage et les conteneurs humides peuvent
conduire à une accumulation d’humidité dans
les compartiments. Essuyez bien tous les
compartiments et rangez les aliments dans
des emballages hermétiques pour prévenir la
condensation et le givre
Réorganisez les aliments avec une teneur en eau
importante loin des bouches d’aération
Si la température est trop froide, ajustez le
contrôle une position à la fois et attendez que la
température se stabilise. Veuillez vous reporter
à la section Réglage du Contrôle pour plus
d’informations
Lorsque le réfrigérateur est mis en fonction sous
une température ambiante inférieure à 41°F (5°C),
les aliment peuvent geler dans le compartiment
réfrigérateur. Le réfrigérateur ne doit pas être
mis en fonction sous une température ambiante
inférieure à 55°F (13°C).
Lorsque les portes sont souvent ouvertes ou
restent ouvertes pendant longtemps, de l’air
chaud et humide entre dans le compartiment. La
température et le niveau d’humidité augmentent
ainsi à l’intérieur du compartiment. Pour limiter
cet effet, réduisez la fréquence et la durée
d’ouverture des portes.
Veuillez vous reporter à la section Les portes
ne se ferment pas correctement de la partie
Dépannage
Si la température est trop froide, ajustez le
contrôle une position à la fois et attendez que la
température se stabilise. Veuillez vous reporter
à la section Réglage du Contrôle pour plus
d’informations
Page 97

Problème Causes possibles Solutions
Du givre ou des
cristaux de glace
se forment sur les
aliments surgelés
(à l’intérieur
de l’emballage
hermétique)
Le distributeur
de glace ne
produit pas de
glace
La condensation issue
d’aliments à haute teneur
en eau a gelé à l’intérieur de
l’emballage alimentaire.
Des aliments ont été laissés
dans le congélateur pendant
une longue période
La demande dépasse la
capacité de production de glace
L’arrivée d’eau du domicile n’est
pas connecté, le robinet n’est
pas complètement ouvert ou la
valve est bouchée
Ce phénomène est normal pour des aliments à
haute teneur en eau.
Ne stockez pas des aliments à haute teneur en
eau dans le congélateur pendant une longue
période
Le distributeur de glace peut produire
approximativement 70 à 210 glaçons par période
de 24 heures.
Connectez le réfrigérateur à une alimentation
d’eau froide avec une pression adéquate et
ouvrez le robinet d’eau complètement.
Si le problème persiste, il sera peut-être
nécessaire de contacter un plombier.
Il est recommandé de remplacer le filtre à eau:Le filtre à eau est épuisé
Tous les six mois environ•
Lorsque le voyant du filtre à eau s’allume•
Lorsque la sortie de la distribution d’eau •
diminue
Lorsque les cubes de glace sont plus petits que •
la normale
DÉPANNAGE
43
FRANÇAIS
La pression de l’arrivée d’eau
du domicile est trop faible
Le système de filtrage par
osmose inversée est en cours
de fonctionnement
Le tuyau reliant le réfrigérateur
au robinet d’approvisionnement
est plié
La pression de l’eau doit être comprise entre 1,38
et 8,27 bars (20 à 120 psi ou 140 à 830 kPa) pour
les modèles sans filtre à eau et entre 2,76 et 8,27
bars (40 à 120 psi ou 280 à 830 kPa) pour les
modèles avec filtre à eau.Si le problème persiste,
contactez un plombier.
Les systèmes de filtrage par osmose inversée
peuvent réduire la pression de l’eau en dessous
de sa valeur minimale et occasionner un
disfonctionnement du distributeur de glace.
(Veuillez vous reporter à la section pression de
l’eau).
Le tuyau peut se plier lorsque le réfrigérateur est
déplacé lors de l’installation ou du nettoyage,
provocant une réduction du débit d’eau.
Redressez ou réparez la ligne d’arrivée d’eau et
disposez-la afin d’éviter un nouveau pliage
Page 98

44
Le distributeur de
glace ne produit
pas suffisamment
de glace (suite)
FRANÇAIS
DÉPANNAGE
Problème Causes possibles Solutions
Les portes sont trop souvent
ouvertes ou restent ouvertes
trop longtemps
Lorsque les portes de l’appareil sont souvent
ouvertes, l’air ambiant va réchauffer le
réfrigérateur et empêcher le maintien de la
température programmée de l’appareil. La
diminution de la température programmée peut
résoudre ce problème, tout comme la réduction
du nombre d’ouvertures des portes
L’eau est servie
trop lentement
Les portes ne se ferment pas
complètement
Si les portes ne sont pas correctement fermées,
la production de glace en sera affectée. Veuillez
vous reporter à la section Les portes ne se
ferment pas correctement ou s’ouvrent toutes
seules de la partie Dépannage
des Pièces &
Fonctions pour plus d’informations.
Le réglage de la température du
congélateur est trop chaud.
La température recommandée pour la production
de glace dans le congélateur est de -18°C (0°F).
Si la température du congélateur est plus élevée,
la fabrication de glaçons est affectée.
Le filtre à eau est épuisé Il est recommandé de remplacer le filtre à eau :
Tous les six mois environ•
Lorsque le voyant du filtre à eau s’allume•
Lorsque la sortie de la distribution d’eau •
diminue
Lorsque les cubes de glace sont plus petits •
que la normale
Le système de filtrage par
osmose inversée est en cours
de fonctionnement
Les systèmes de filtrage par osmose inversée
peuvent réduire la pression de l’eau en dessous
de sa valeur minimale et occasionner un
disfonctionnement du distributeur de glace.
Si le problème persiste, il sera peut-être
La pression de l’arrivée d’eau du
domicile est trop faible
nécessaire de c
La pression de l’eau doit être comprise entre
1,38 et 8,27 bars (20 à 120 psi ou 140 à 830 kPa)
pour les modèles sans filtre à eau et entre 2,76 et
8,27 bars (40 à 120 psi ou 280 à 830 kPa)
pour les modèles avec filtre à eau.
ontacter un plombier.
Si le problème persiste, il sera peut-être
nécessaire de contacter un plombier
Page 99

Problème Causes possibles Solutions
La distribution de
glace ne se fait
pas
Le distributeur de
glace ne produit
pas de glace
Les portes ne sont pas fermées
correctement
Utilisation peu fréquente du
distributeur
La glissière de distribution est
obstruée par le givre ou des
morceaux de glace
L’affichage du distributeur est
verrouillé
Le bac à glace est vide 24 heures peuvent être nécessaires pour que
Le réfrigérateur vient d’être
installé ou le distributeur de glace
vient d’être branché
Le distributeur de glace n’est pas
mis en marche
Le détecteur de glace est obstrué La présence de corps étrangers ou de givre sur le
Le réfrigérateur n’est pas
raccordé à l’alimentation d’eau et
le robinet de sectionnement de
l’alimentation n’est pas ouvert.
Le contrôle (levier ou capteur) du
distributeur de glace est obstrué
Le système de filtrage par
osmose inversée est connecté à
votre arrivée d’eau froide.
La distribution de glace ne se fait pas si les portes
du réfrigérateur sont ouvertes
L’utilisation peu fréquente du distributeur de glace
conduit les glaçons à se coller avec le temps, ce
qui empêche leur distribution. Veuillez vérifier que
des glaçons ne sont pas bloqués/collés dans le bac.
S’ils le sont, cassez les glaçons pour permettre le
fonctionnement correct du distributeur.
Enlevez le bac et nettoyez la glissière avec un
ustensile en plastique pour supprimer le givre ou
les morceaux de glace. La distribution de glace en
cubes peut également aider à prévenir la formation
de givre ou de morceaux de glace.
Maintenez le bouton Verrouillage enfoncé pendant
trois secondes pour déverrouiller le panneau de
contrôle et le distributeur.
chaque compartiment atteigne la température
désirée et que le distributeur de glace se mette à
fonctionner. Assurez-vous que le contrôle (levier /
capteur) n’est pas obstrué.
Une fois que la réserve de glace dans le bac est
complètement épuisée, la fabrication de glace
supplémentaire peut prendre jusqu`à 90 minutes, et
environ 24h pour le remplissage complet du bac.
24 heures peuvent être nécessaires pour que
chaque compartiment atteigne la température
désirée et que le distributeur de glace se mette à
fonctionner.
Localisez l’interrupteur MARCHE/ARRÊT du
distributeur de glace et vérifiez qu’il est sur la
position MARCHE (I).
capteur de détection de glace peuvent interrompre
la production de glace. Assurez-vous que la zone
du capteur est toujours propre pour garantir le bon
fonctionnement de l’appareil.
Raccordez l’appareil à une canalisation d’alimentation
en eau et ouvrez complètement le robinet
d’alimentation.
Si votre distributeur est équipé d’un levier de
contrôle de la glace, assurez-vous que celui-ci pivote
normalement. Si votre distributeur de glace est
équipé d’un capteur de contrôle de la production
de glace, assurez-vous que l’espace entre les deux
capteurs est dégagé.
Les systèmes de filtrage par osmose inversée
peuvent réduire la pression de l’eau en dessous
de sa valeur minimale et occasionner un
disfonctionnement du distributeur de glace. (Veuillez
vous reporter à la section pression de l’eau).
DÉPANNAGE
45
FRANÇAIS
Page 100

46
La distribution
d’eau ne se fait
pas
FRANÇAIS
DÉPANNAGE
Problème Causes possibles Solutions
Le réfrigérateur vient d’être
installé ou la ligne d’arrivée
d’eau vient d’être connectée
Videz 9 litres d’eau (faites couler pendant environ 5
minutes) pour éliminer l’air et les bactéries du système.
Ne videz pas les 9 litres en continu.Désactivez et
relâchez le bouton du distributeur pendant des cycles
de 30 secondes en position ON et de 60 secondes
en position OFF.
Le panneau de distribution est
verrouillé
Le distributeur n’est pas réglé
pour la distribution d’eau
Les portes du réfrigérateur ou
du congélateur ne sont pas
fermées correctement
Le filtre à eau vient d’être
enlevé ou remplacé
Le tuyau reliant le réfrigérateur
au robinet d’approvisionnement
est plié
L’arrivée d’eau du domicile n’est
pas connecté, le robinet n’est
pas complètement ouvert ou la
valve est bouchée
Maintenez le bouton Verrouillage enfoncé
pendant trois secondes pour déverrouiller le
panneau et le distributeur.
Le distributeur peut être réglé pour la distribution
de glace ou d’eau. Assurez-vous que le panneau
de contrôle est réglé correctement. Appuyez sur
le bouton Eau du panneau de contrôle pour servir
de l’eau.
La distribution d’eau ne se fait pas si les portes
du réfrigérateur
Après le remplacement du filtre à eau, videz 9
litres d’eau (faites couler pendant environ 5 minutes)
pour éliminer l’air et les bactéries du système.
Ne videz pas les 9 litres en continu.Désactivez et
relâchez le bouton du distributeur pendant des
cycles de 30 secondes en position ON et de 60
secondes en position OFF.
Le tuyau peut se plier lorsque le réfrigérateur est
déplacé lors de l’installation ou du nettoyage,
provocant une réduction du débit d’eau.
Redressez ou réparez la ligne d’arrivée d’eau et
disposez-la afin d’éviter un nouveau pliage.
Connectez le réfrigérateur à une alimentation
d’eau et ouvrez le robinet d’eau complètement.
Si le problème persiste, il sera peut-être
nécessaire de contacter un plombier.
sont ouvertes.
 Loading...