

LG LF98105GF Owner’s Manual

OWNER’S MANUAL
FREE STANDING GAS COOKER
Please read this manual carefully before operating
your set and retain it for future reference.
LF98105SB
LF98110SB
LF98105GF
LF98100GF
LF98110GF
P/No.: MFL67010901
www.lg.com

Contents
Introduction ................................................................................. 3
1. Instructions for safe and proper use .......................................3
Instructions for the installer ...................................................... 6
2. Installation of the appliance ....................................................6
3. Adaptation to different types of gas ......................................12
4. Final operations ....................................................................15
Instructions for the user .......................................................... 17
5. Description of controls ..........................................................17
6. Use of the hob ......................................................................19
7. Use of the oven ....................................................................21
8. Digital timer (certain models only) ........................................26
9. Analogue clock (Only on equipped models) .........................27
10. Available accessories .........................................................28
11. Cleaning and maintenance .................................................29
12. Extraordinary maintenance ................................................ 32
These instructions are valid only for the end user countries
whose identification symbols appear on the cover of this
manual.
INSTRUCTIONS FOR THE INSTALLER: these are for the
authorised person who must carry out a suitable check of the gas
system, install the appliance, set it functioning and carry out an
inspection test.
INSTRUCTIONS FOR THE USER: these contain user advice,
description of the commands and the correct procedures for
cleaning and maintenance of the appliance.
2

Introduction
1. Instructions for safe and proper use
This manual is an integral part of the appliance and therefore must
be kept in its entirety and in an accessible place for the whole
working life of the cooker. We advise reading this manual and all
the instructions therein before using the cooker. Also keep the
series of nozzles supplied. Installation must be carried out by
qualified personnel in accordance with the regulations in force. This
appliance is intended for domestic uses and conforms to current
regulations in force. The appliance has been built to carry out the
following functions: Cooking and heating-up of food. All other
uses are considered improper.
The manufacturer declines all responsibility for improper use.
Do not leave the packing in the home environment. Separate the
various waste materials and take them to the nearest special
garbage collection centre.
It is compulsory that the appliance be grounded according to the
methods required by safety rules.
The plug to be connected to the power cable and the socket must
be the same type and must conform to current regulations.
The socket must be accessible after the appliance has been built in.
Never unplug by pulling out the cable.
Immediately after installation carry out a brief inspection test of
the appliance, following the instructions below. Should the
appliance not function, disconnect it from the supply and call the
nearest technical assistance centre.
Never attempt to repair the appliance.
DO NOT USE OR STORE FLAMMABLE MATERIALS IN THE
APPLIANCE STORAGE DRAWER OR NEAR THIS
APPLIANCE.
3
Introduction
DO NOT MODIFY THIS APPLIANCE
When not in use, make sure that the control knobs are in the correct
(OFF) position .
Never put inflammable objects in the oven: They could be
accidentally catch fire and burn.
The I.D plate with technical date, serial number and brand name is
positioned visibly in the storage compartment.
The plate must not be removed.
Do not put pans without perfectly smooth and flat bottoms on the
hob pan stands.
During use the appliance becomes very hot. Take care not to
touch the heating elements inside the oven.
Do not use containers or broilers that extend beyond the outer
perimeter of the hob.
The appliance is designed for use by adults. Do not allow
children to go near or play with it.
When operating the grill all accessible parts could become very hot:
keep out of the way of children.
If the appliance is to be positioned on a platform it must be installed
in such a way as to prevent it from tilting off it.
This appliance is designed for cooking food and it shall not be used
as a space heater.
Do not spray aerosols in the vicinity of this appliance while it is in
operation.
4

Do not apply decorative panels to the lower part of the cooker as
they may prevent correct air circulation and cause overheating.
Before the appliance is put into operation, all the labels and
protective films applied inside or outside must be removed.
Lower the glass cover slowly and by hand.
Warning: The glass cover may shatter if it overheats. Switch off
all rings and wait for them to cool down before closing the cover.
The manufacturer declines all responsibility for damage to
persons or things caused by non-observance of the above
prescriptions or by interference with any part of the appliance or
by the use of non-original spares.
5
Instructions for the installer
2. Installation of the appliance
The appliance must be installed by a qualified technician and
according to the regulations in force.
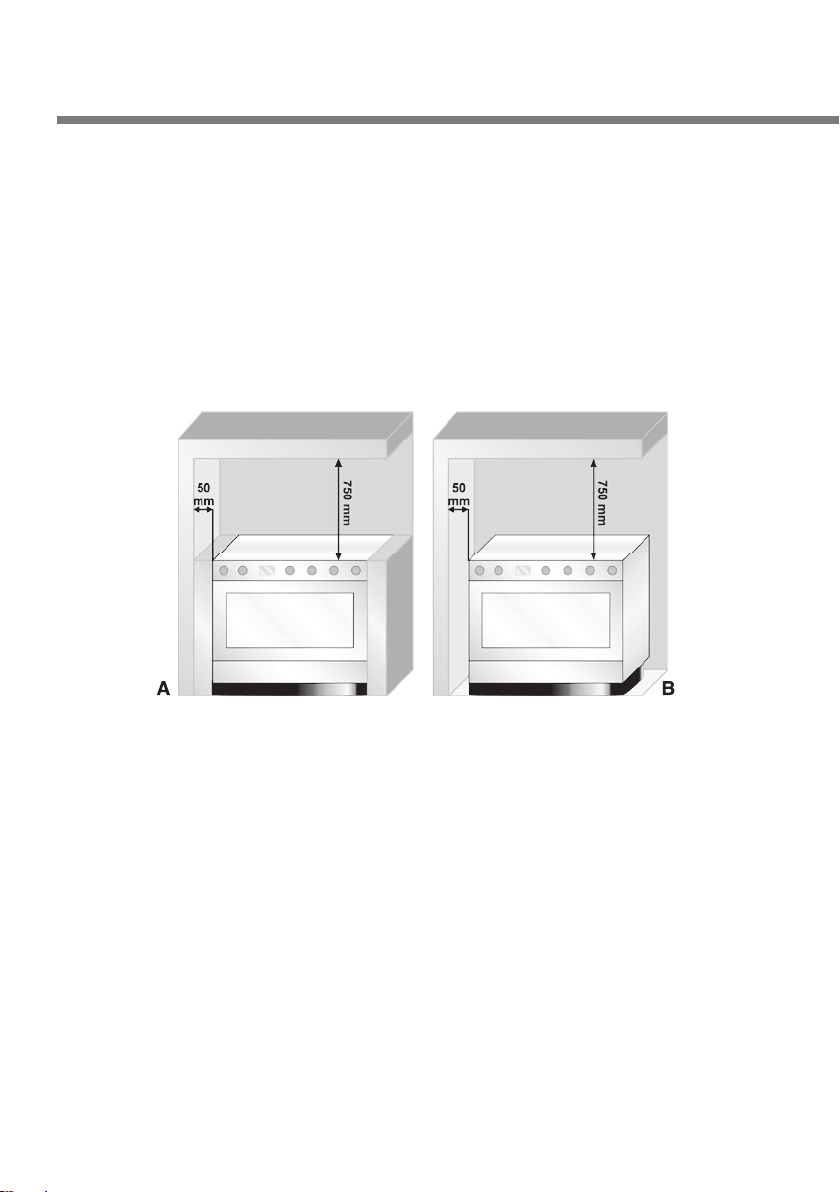
This appliance may be installed next to a wall which is higher than
the appliance, with a minimum distance of 50 mm from the side of
the appliance, as shown in drawings A and B showing the correct
installation conditions. Any wall cupboards or shelves must be at a
distance of atA least 75 cm above the work surface.
Built-in appliance Free-standing installation
6
2.1 Electrical connection
Make sure that the power line voltage matches the specifications
indicated on the rating plate located inside the storage compartment.
This rating plate must never be removed.
If the appliance is hooked-up to the supply by means of a fixed
connection, install a multipolar cut-out device on the line, with
contact opening distance equal to or greater than 3 mm, located
near the appliance and in an easily reachable position.
Hook-up to the supply may be fixed or with plug and socket. In the
latter case the plug and socket must be suitable for the cable
employed and conform with the regulations in force. Regardless of
the type of connection, earthing of the appliance is absolutely
obligatory. Before connection make sure that the supply line is
suitably earthed. Avoid the use of reducers, adapters or shunts.1
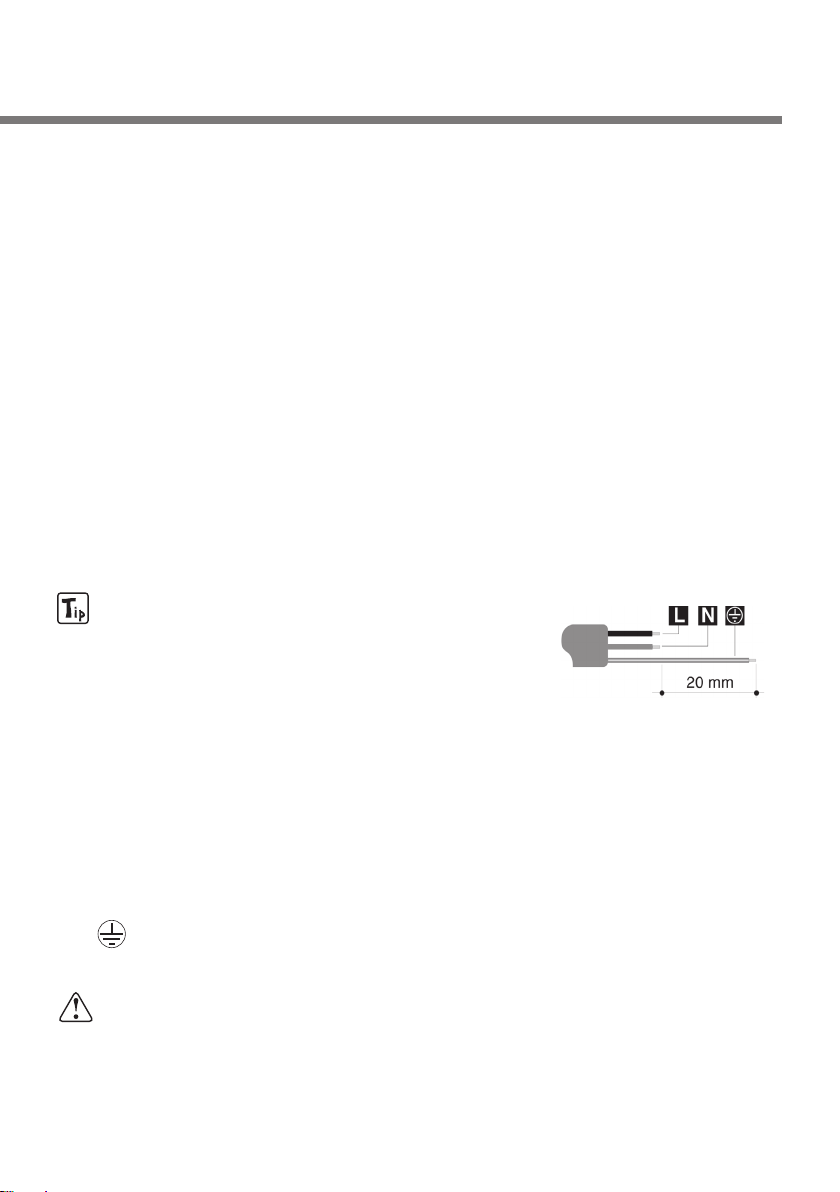
If the power cable is replaced, the wire
section on the new cable must not be less
than 1.5 mm2 (3 x 1.5 cable), keeping in
mind that the end to be connected to the
hob must have the ground wire (yellow-green) longer by at least
20 mm. Use only H05V2V2-F cable or similar which has a
maximum temperature of 90°C. This must be done by a
specialised technician, who must connect the cooker to the
electricity supply according to the diagram shown here.
L = brown
N = blue
= yellow-green.
Warning: The values indicated above refer to the cross-section
of the internal conductor.
7

Instructions for the installer
2.2 Ventilation requirements
2.2.1 Room ventilation
The room containing the appliance should have an air supply in
accordance with the standards in force.
The room where the appliance is installed must have enough air
flow as required for the regular combustion of gas and by the
necessary air exchange of the same room. The air vent, protected
by grilles, must be suitably dimensioned in compliance with the
current regulations and positioned so that no part of it is obstructed.
The cooker must be kept adequately ventilated in order to eliminate
the heat and humidity produced by cooking: in particular, after
prolonged use, it is recommended to open a window or to increase
the speed of any ventilators.
2.2.2 Extraction of the products of combustion
Extraction of the products of combustion must be ensured by
means of hoods connected to a natural draught chimney whose
efficiency is assured or via forced extraction. An efficient extraction
system requires precision planning by a specialist qualified in this
area and must comply with the positions and distances indicated by
the regulations. When the job is complete, the installer must issue a
certificate of conformity.
2.3 Connection to gas
At the end of the installation, check for any leaks with a soapy
solution, never with a naked flame.
2.3.1 Connector installation
Carefully screw the connector B to the
gas outlet A of the appliance, placing the
seal C between them.
8

The connector must be screwed so that
it remains vertical as shown in the
adjacent figure.
2.3.2 Connection with a rubber hose
Installation of the standards-compliant rubber hose must be carried
out so that the hose length is no greater than 1.5 metres. Make
sure that the hose does not come into contact with moving parts or
is squashed. The inside diameter of the hose must be 8 mm for
LIQUID GAS and 13 mm for NATURAL GAS.
Verify that all the following conditions are met:
• the hose is fixed to the hose connection with safety clamps;
• no part of the hose is in contact with the hot walls (max. 50 °C);
• the hose is not under traction or tension and has no tight curves or
twists;
• the hose is not in contact with sharp objects or sharp corners;
• if the hose is not perfectly airtight and leaks gas, do not try and
repair it: replace it with a new hose;
• verify that the hose is not beyond its life cycle (serigraphed on the
hose itself).
Connection using rubber hoses complying with the current
regulations is only permitted if the hose can be inspected along
its entire length.
Tighten securely all the connections, ensuring the connection
incorporating the seal is at least 15 Nm and does not exceed
20 Nm.
9
Instructions for the installer
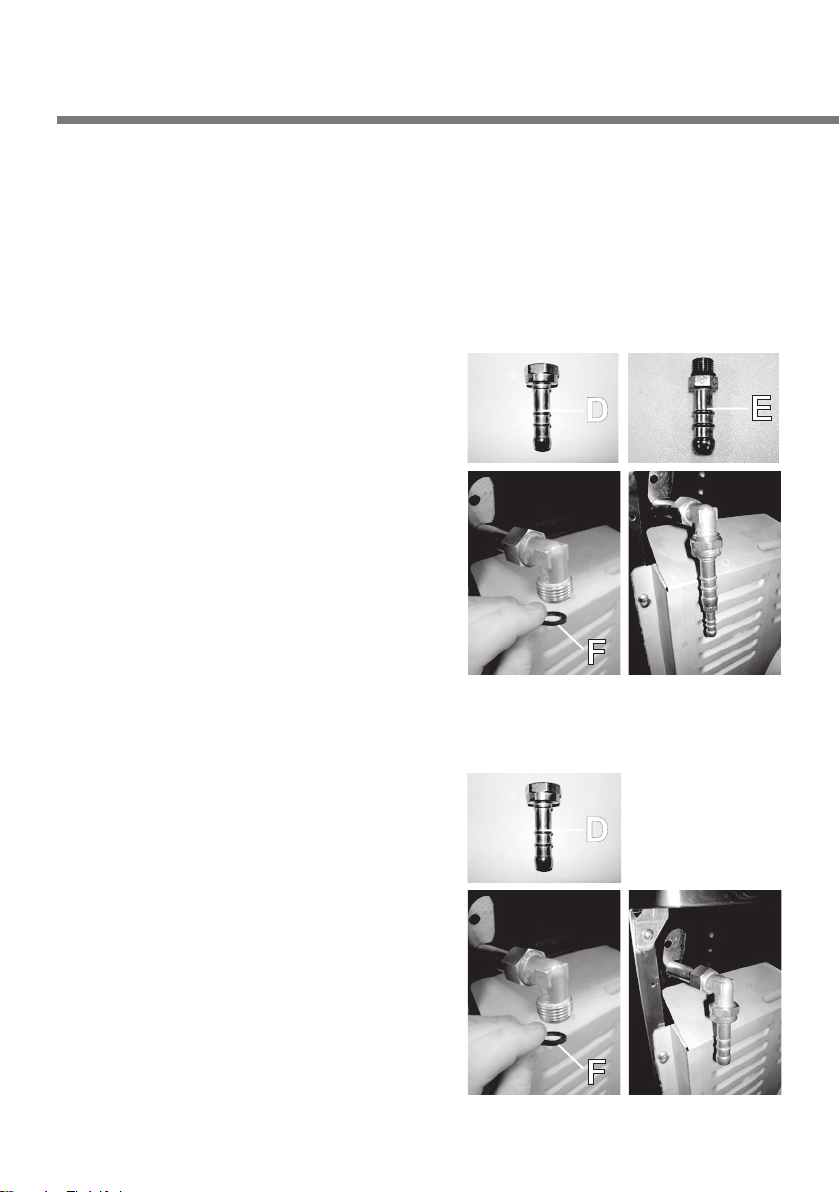
2.3.3 Connection to liquid gas
Both the pressure regulator and the connection to the cylinder must
be standards-compliant.
Make the connection to the gas mains using a rubber hose whose
specifications comply with the current regulations (verify that the
reference standard is stamped on the hose).
After having installed the connector
as indicated in “2.4.1 Connector
installation”, fit the small hose
connector E to the large hose
connector D.
Place the seal F between the lock
just obtained and the previously
installed connector.
Then, push the rubber hose onto the
hose connector E and secure it with
a clamp that is compliant with the
current standard.
2.3.4 Connection to natural gas
After having installed the connector
as indicated in “2.4.1 Connector
installation”,
Fit the large hose connector D by
placing the seal F between the
previously installed connector.
Push the rubber hose D onto the
hose connector A and secure it with
the clamp E that is compliant with the
current standard.
10
2.3.5 Connection with a flexible steel hose (for all types of gas)
This type of connection can be made on both built-in and
freestanding appliances. Only use standards-compliant steel hoses
whose length is not greater than 2 metres.
After having installed the connector as indicated in “2.4.1 Connector
installation”, screw the end of the flexible hose to the threaded 1/2
external gas connector (ISO 228-1), placing the seal in between.
At the end of the installation, check for any leaks with a soapy
solution, never with a flame.
For the connection between the cooker and the gas cylinder
use a portion of standards-compliant hose not less than 1.4 m
in length.
11
 Loading...