

LG LDS5540BB, LDS5560ST, LDS5560WW, LDS5560BB, LDS5540WW Owner's Manual

1
ENGLISHENGLISH
P/No. : MFL66281421
www.lg.com
OWNER’S MANUAL
DISHWASHER
Please read this owner's manual thoroughly before
operating and keep it handy for reference at all times.
LDS5540ST/WW/BB
LDS5560ST/WW/BB
FRANÇAISESPAÑOL

2
TABLE OF CONTENTS
2
TABLE OF CONTENTS
TABLE OF CONTENTS
3 IMPORTANT SAFETY INFORMATION
3 Basic Safety Precautions
4 Electrical Safety
4 Before Using the Dishwasher
5
PARTS AND FEATURES
5 Fe atures
6 Parts
6 Specifications
7 Control Panel
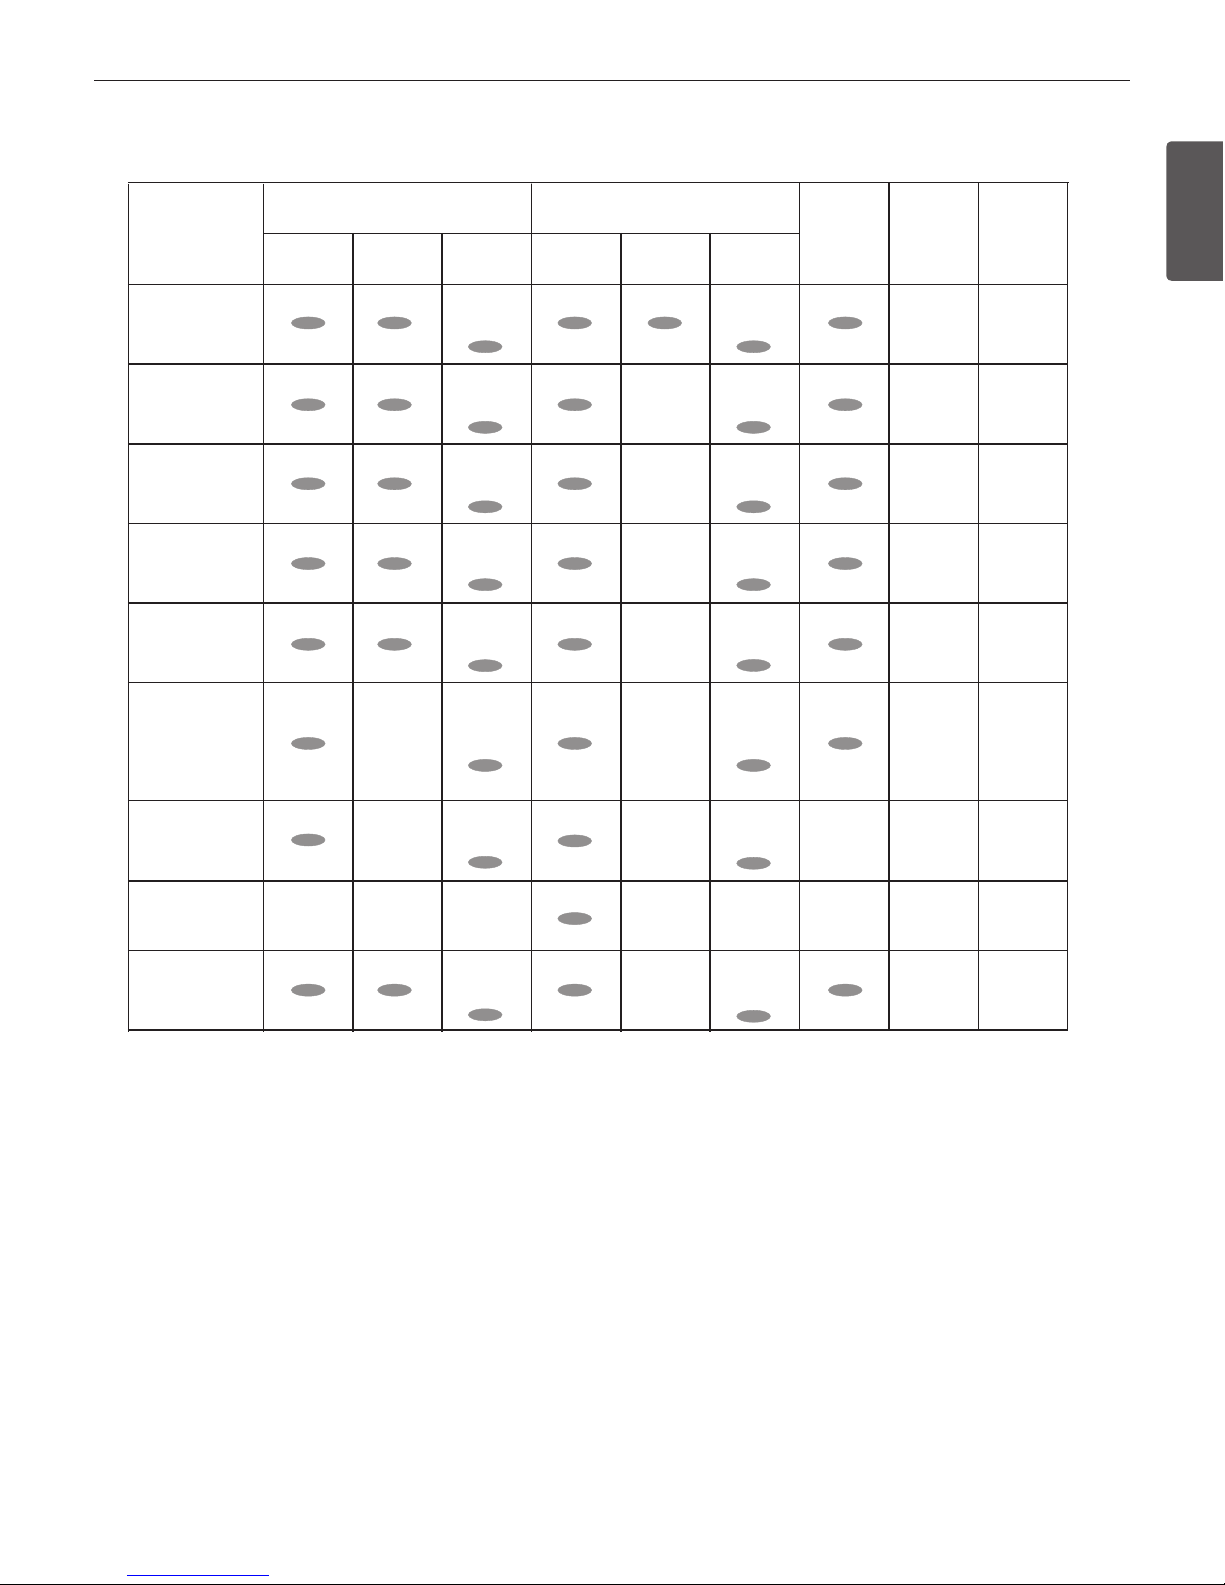
10 Cycle Option Chart
11 Cycle Selection Chart
12 OPERATING INSTRUCTIONS
12 Quick Start
Loading the Lower Rack
14 Fo lding Down the Lower Tines
15 Loading the Silverware Basket
Height Adjustable Upper Rack
16 Loading the Upper Rack
16 Fo lding Down the Upper Tines
17 Loading the Cutlery Rack (on some models)
17 Height Adjustable Tray (on some models)
18
Adding Detergent to the Dispenser
19 Adding Rinse Aid to the Dispenser
20 CARE AND CLEANING
20 Keeping the dishwasher
20 Cleaning the Metallic Parts
20 Cleaning the Upper Spray Arm
21 Cleaning the To p Spray Arm
21 Seasonal Maintenance and Storage
22 FAQS
24 TROUBLESHOOTING
24 Before Calling for Service
26 Smart Diagnosis™ System
27 WARRANTY
27 Product Registration Information
15
1 3
TABLE OF CONTENTS
ENGLISH
IMPORTANT SAFETY INFORMATION
3
3
IMPORTANT SAFETY INSTRUCTIONS
IMPORTANT SAFETY INSTRUCTIONS
READ ALL INSTRUCTIONS BEFORE USE
Your safety and the safety of others is very important. This owner's manual contains many important safety messages; as well as on your
appliance. Always read and follow all safety messages.
BASIC SAFETY PRECAUTIONS
WARNING
shock, or injury to persons when
using this appliance, follow basic
precautions, including the following:
Read all instructions carefully before using the dishwasher.
Use the dishwasher only for its intended function.
Only use detergents or rinse agents recommended for use in a
dishwasher. Keep all dishwasher detergents and additives out
of the reach of children.
This appliance is not intended for use by young children.
When loading items to be washed:
1) Load sharp items so that they are not likely to damage the
door seal.
2) Load sharp knives with the handles up to reduce the risk of
injury when reaching into the dishwasher.
Do not wash plastic items in the dishwasher unless they are
labeled “dishwasher safe” or the equivalent. For plastic items
that are not so labeled, check the manufacturer’s recommendations.
Do not operate the dishwasher unless all enclosure panels are
properly in place.
Do not tamper with the controls.
Do not abuse, sit on, or stand on the door or dish racks of the
dishwasher.
To reduce the risk of injury, do not allow children to play in or
around the dishwasher.
Under certain conditions, hydrogen gas may be produced in
a hot water system that has not been used for two weeks or
more. HYDROGEN GAS IS EXPLOSIVE. If the hot water system
has not been used for such a period of time, turn on all hot
will release any accumulated hydrogen gas. Since hydrogen
this time.
Remove the door to the wash compartment when disposing of
an old dishwasher.
enclosed at the time of installation.
WARNING: This product contains chemicals known to the State of
California to cause cancer and birth defects or other reproductive
harm. Wash hands after handling.
This manual contains very important information regarding the installation, use, and maintenance of your dishwasher. The manufacturer
cannot be responsible for injuries or damage caused by failure to follow these safety and caution instructions.
This is the safety alert symbol. This symbol alerts you to potential hazards that can result in property damage or serious bodily harm, even death.
The safety alert symbol will be followed by either the word “WARNING” or “CAUTION” then an important safety message. These words mean:
WARNING
Indicates the possibility of serious bodily harm or death.
CAUTION
Indicates the possibility of injury or damage to property.
ENGLISH
IMPORTANT SAFETY INFORMATION
4
IMPORTANT SAFETY INFORMATION
4
IMPORTANT SAFETY INFORMATION
BASIC SAFETY PRECAUTIONS
WARNING
including the following:
For a permanently connected dishwasher:
This appliance must be connected to a grounded metal, permanent wiring system, or an equipment grounding conductor must
be run with the circuit conductors and connected to the equipment grounding terminal or lead on the appliance. Consult with a
Tip Hazard
Do not put excessive downward force on the open dishwasher
door prior to installation, as this could cause damage to the unit
or cause it to tip over. Do not use the dishwasher before installation has been completed in accordance with the Installation Instructions.
ELECTRICAL SAFETY
WARNING
Electrical Shock Hazard
The dishwasher MUST be grounded. Connect the ground wire to the green ground connector in the terminal box.
Do not use an extension cord with this appliance.
The dishwasher is designed to be used with standard household current (120 Volts AC, 60Hz.). Before connecting the dishwasher, ensure
that the outlet or cable is properly grounded and polarized by circuit breakers or fuses. Failure to provide adequate grounding of this
Do not install or store the dishwasher where it will be exposed to weather conditions. Failure to observe this precaution may result in
Do not damage or place heavy items on the power cord of the appliance. Do not use the dishwasher if it has a damaged power cord.
Do not grasp the power cord or touch the dishwasher controls with wet hands. Do not use the dishwasher if it has a damaged power
cord or plug, and do not plug the dishwasher into a damaged outlet. Failure to observe these instructions may result in electrical shock.
Disassembly or repair must be performed by experienced service persons. Improper disassembly or repair could lead to product failure
or electrical shock.
BEFORE USING THE DISHWASHER
Before using the dishwasher, please read the Important Safety Instructions.
Water supply temperature should be a minimum of 120°F (49°C) for better washing and reasonable cycle time.
-
ing. When loading the dishwasher, make sure that insoluble items such as bones, toothpicks, and pieces of paper have been removed.
When loading the dishwasher, observe the following general guidelines:
1.
2. Remove solid, burned-on scraps from dishes prior to loading in the dishwasher.
3. Only load items that are dishwasher-safe.
Do not load utensils that are not heat-resistant, have
decorative metal trim, etc.
NOTE
SAVE THESE INSTRUCTIONS
BASIC SAFETY PRECAUTIONS
ENGLISH
PARTS AND FEATURES
5
ENGLISH
5
PARTS AND FEAT URES
PARTS AND FEATURES
FEATURES
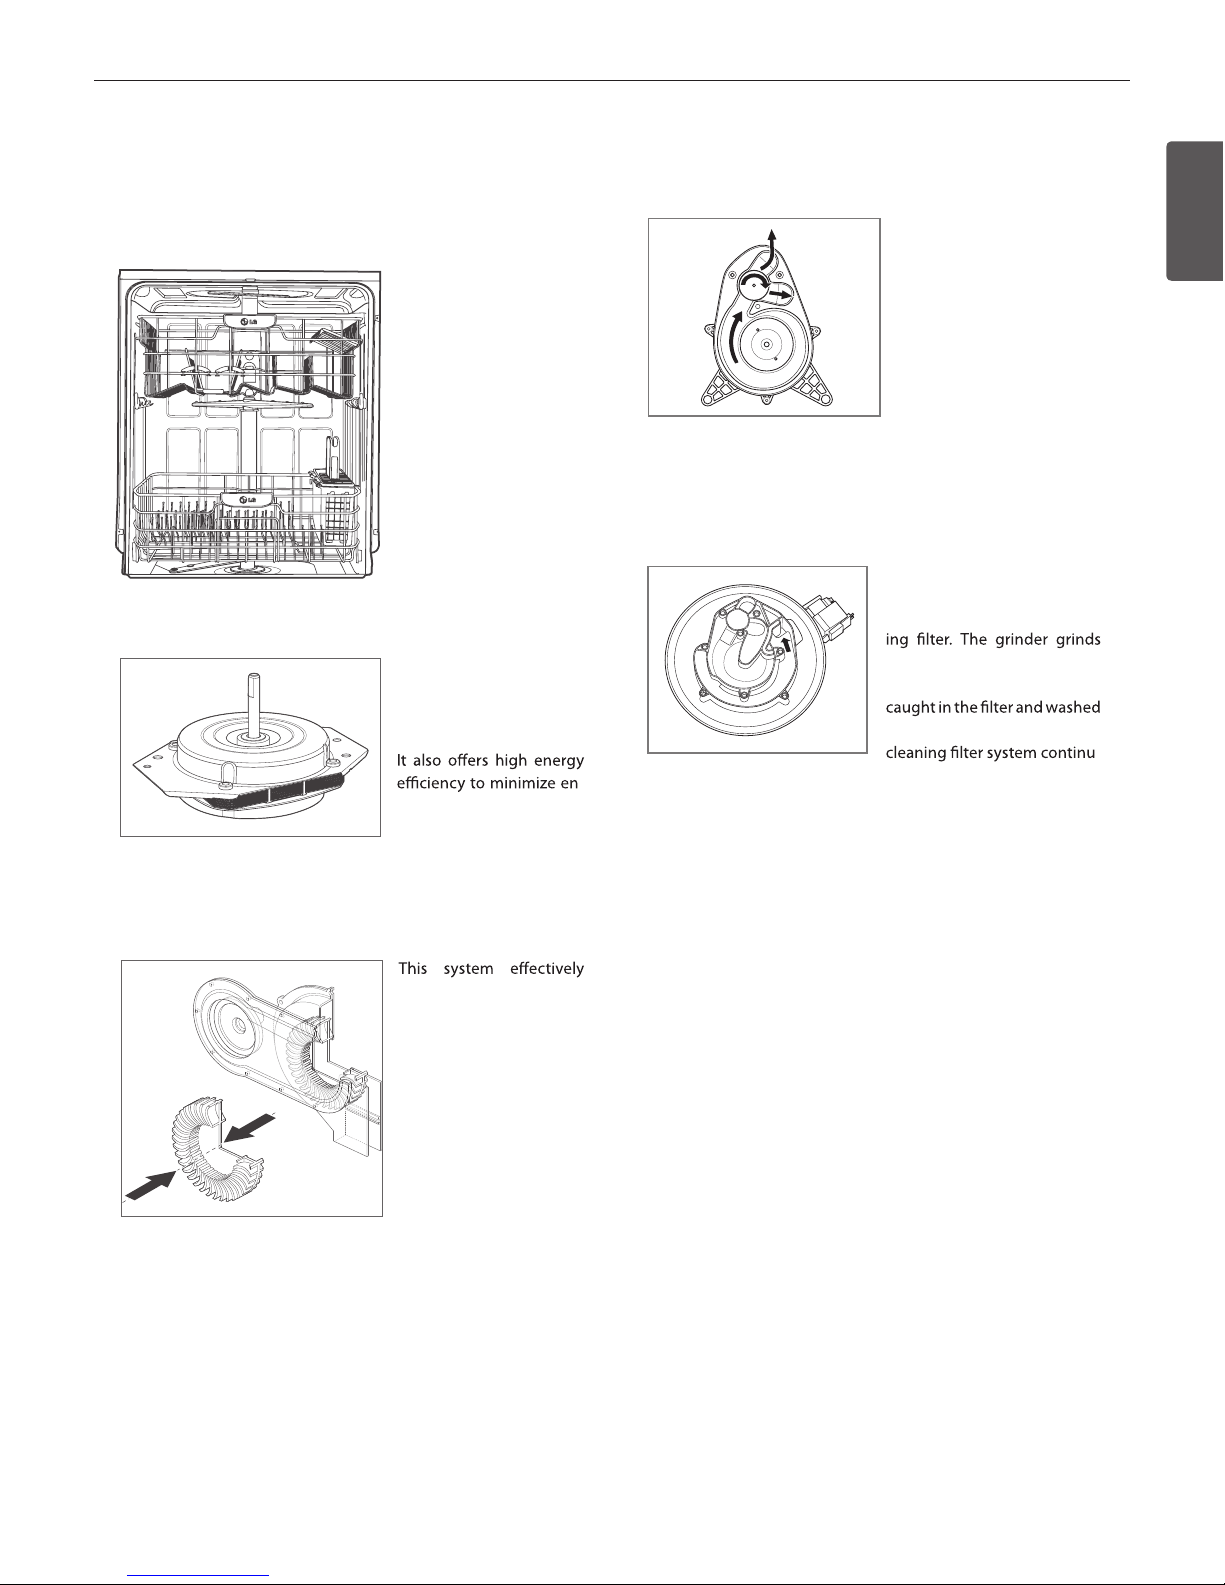
LARGE CAPACITY
LG dishwashers allow you
to load very large items in
both the upper and lower
racks. The tall tub provides extra overall capacity and the clearance to accommodate large dishes.
Extra large items (max. 14
in.) may be loaded in the
lower rack by raising the
upper rack.
SLIM DIRECT MOTOR™
The new Slim Direct Motor™ is inverter-controlled.
Wash power is controlled
based on cycle selection.
-
ergy use.
HYBRID DRYING SYSTEM
dries dishes without the
use of a heating element
that would increase energy consumption.
VARIO SPRAY SYSTEM
The water spray alternates
between the upper and
lower racks, so all of the
power from the motor is directed to one rack at a time.
This concentrates all of the
cleaning power of the motor
on each rack in turn.
SOFT FOOD GRINDER AND SELFCLEANING FILTER
For best wash results, your LG
dishwasher has a built-in soft
food grinder and a selfclean-
up soft food and residue into
small particles that can be
down the drain. The self-
-
ously cleans the wash water as
it circulates to separate any residue from the wash water. All dirt
and residue easily washes down the drain.
PARTS AND FEATURES
6
PARTS AND FEATURES
6
PARTS
PARTS AND FEATURES
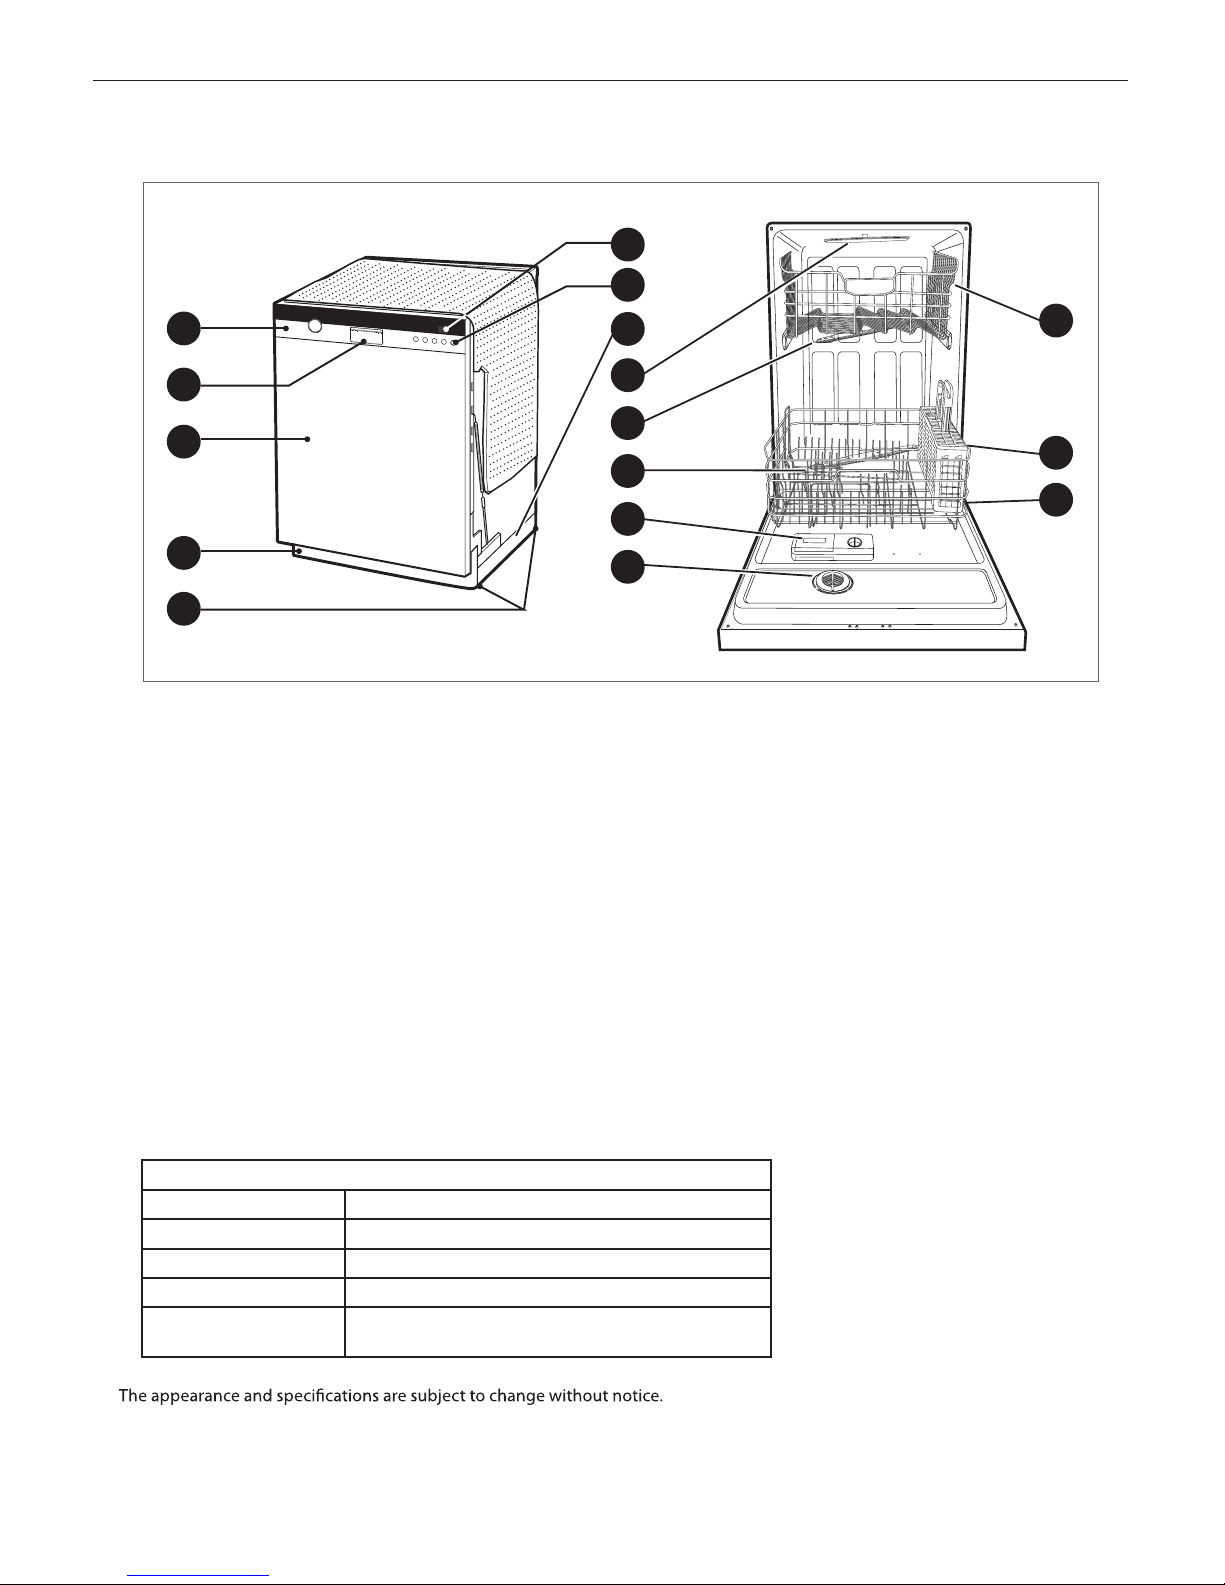
1. CONTROL PANEL
2. DOOR HANDLE
3. FRONT COVER
4. LOWER COVER
5. LEVELING FEET
6. DISPLAY WINDOW
7. POWER BUTTON
8. BASE
9. TOP SPRAY ARM
10. UPPER SPRAY ARM
11. LOWER SPRAY ARM
12. DETERGENT AND RINSE AID DISPENSER
13. DRYING VENT COVER
14. UPPER RACK
15. SILVERWARE BASKET
16. LOWER RACK
1
2
5
6
3
4
8
7
11
9
10
14
15
16
13
12
SPECIFICATIONS
Model: LDS5540ST/WW/BB, LDS5560ST/WW/BB
Power Supply
Water Pressure 20–120 psi (140–830 kPa)
Size (WxDxH)23 3/4" x 24 5/8"x 33 1/2" (603 mm x 625 mm x 851 mm)
Inlet Water Temperature
Product Weight
120 V, 60 Hz AC only, minimum 15 A circuit breaker
120 °F (49 °C) minimum
LDS5540 : 90.8 lbs. (41.2 kg)
LDS5560 : 97.8 lbs. (44.4 kg)
ENGLISH
PARTS AND FEATURES
7
ENGLISH
7
PARTS AND FEAT URES
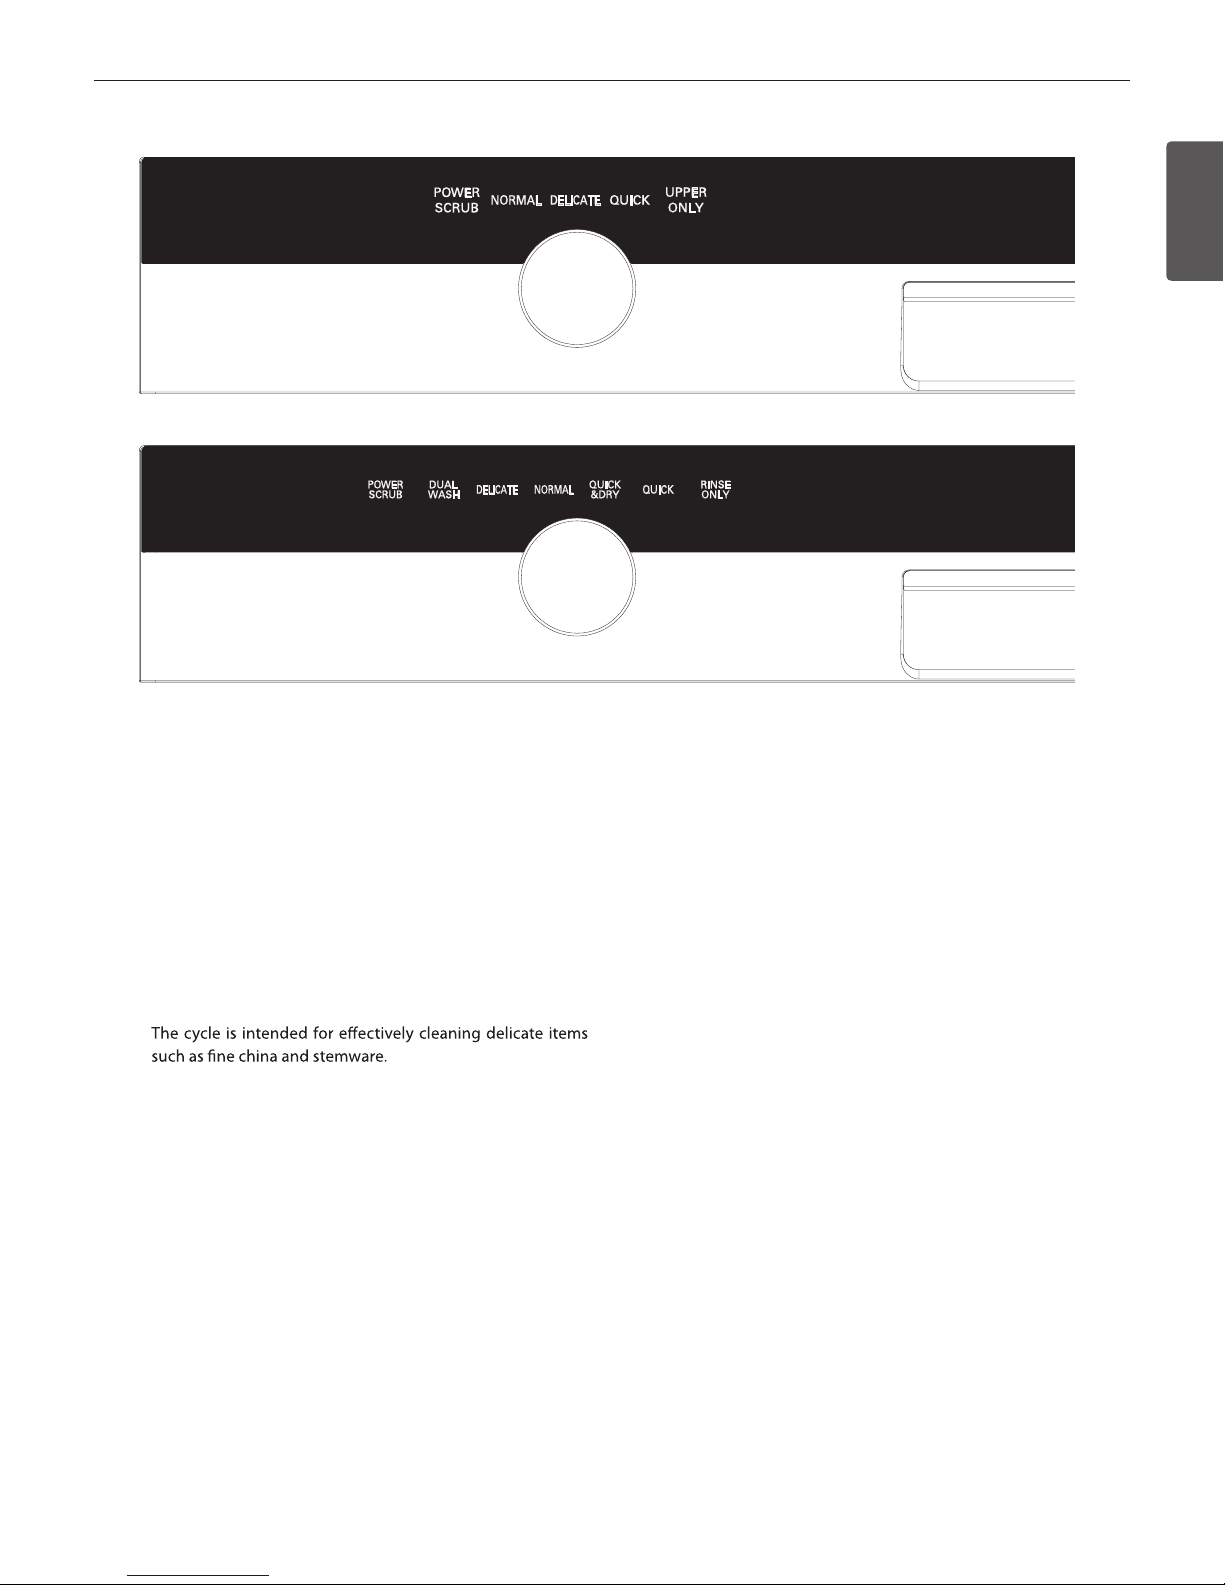
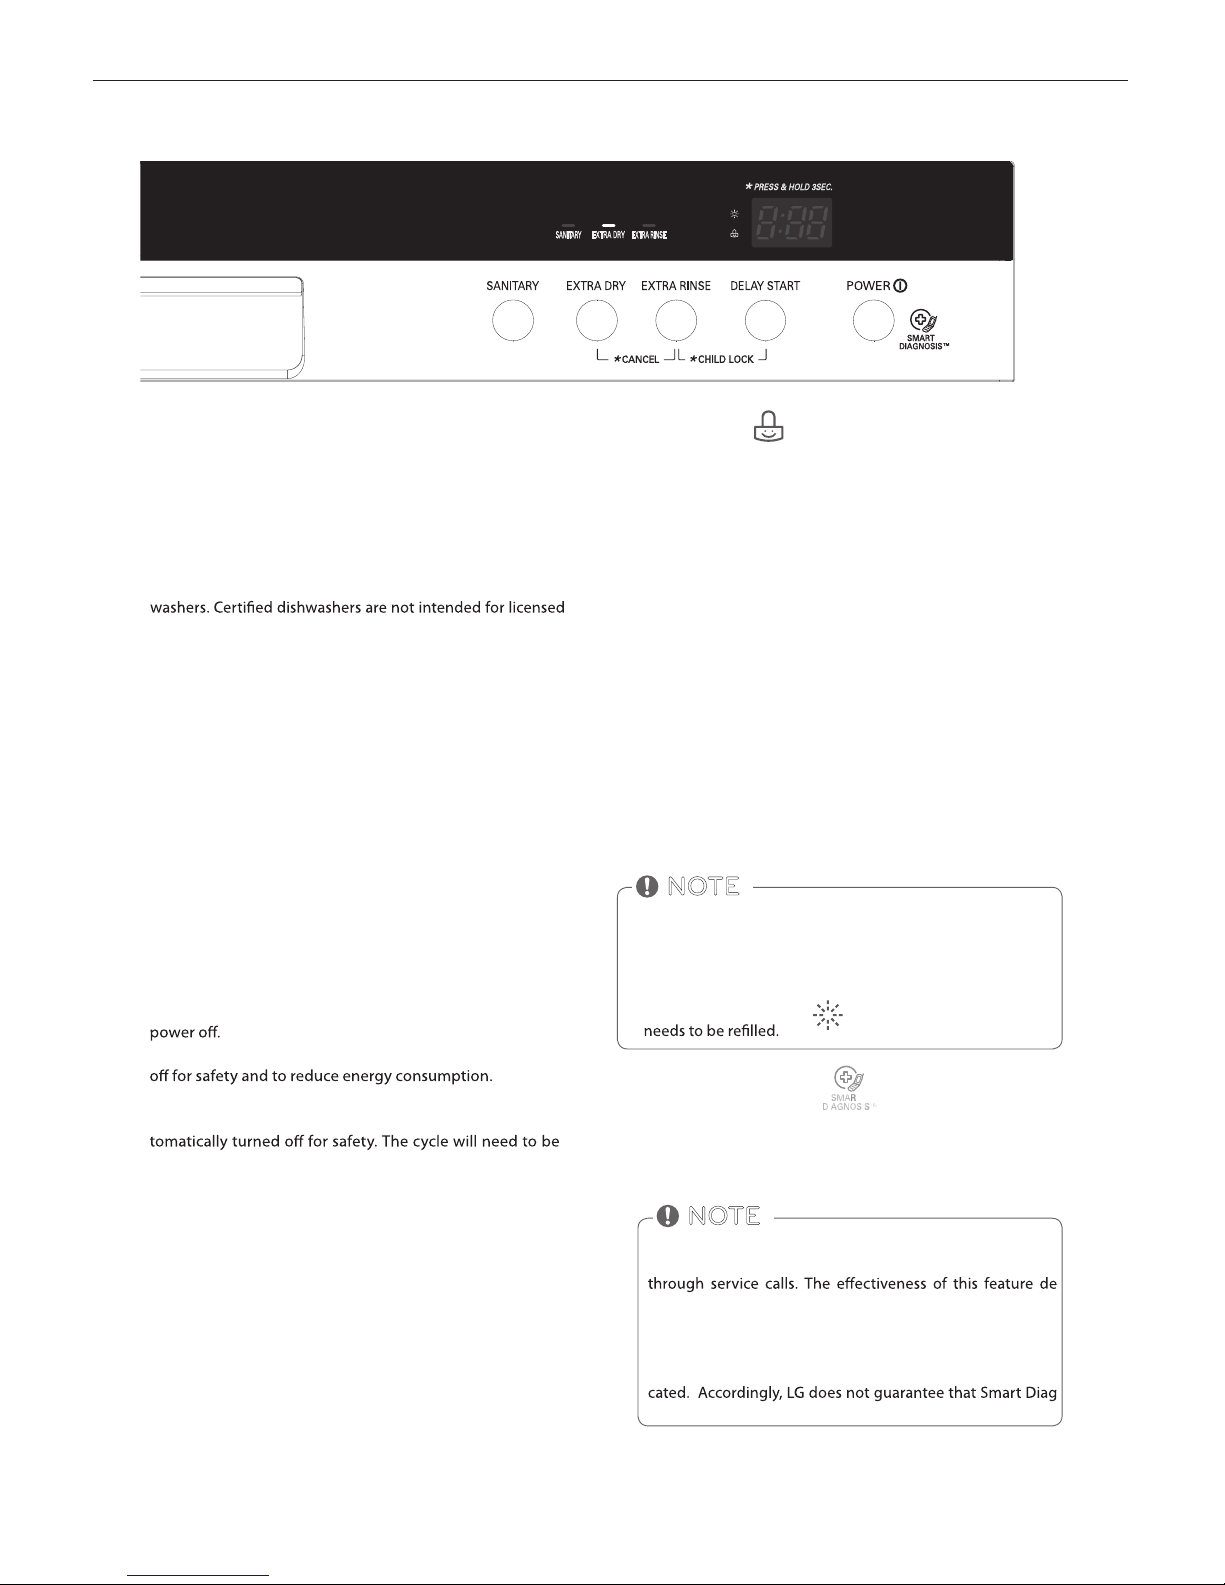
CONTROL PANEL
Cycles
Select your desired cycle.
POWER SCRUB
This cycle is for heavily and hard soiled dishes. Power Scrub
can also help reduce hard water spotting on dishes.
NORMAL
This cycle is for normally soiled, everyday loads.
DELICATE
QUICK(LDS5540), QUICK & DRY(LDS5560)
This is a shortened cycle that is intended for washing and dry
This is a shortened cycle that is intended to wash recently used
or lightly soiled loads, without drying.
-
ing recently used dishes or lightly soiled loads.
UPPER ONLY
This cycle is only for washing items placed on the upper rack.
RINSE ONLY
This cycle is a quick rinse for dishes that will not be washed
immediately. This cycle will rinse dishes that have excess
soil to soften dried on residue. Rinsing the dishes will help
prevent odors in the dishwasher. No detergent should be
used.
QUICK (LDS5560)
Display varies by model(LDS5540)
Display varies by model(LDS5560)
DUAL WASH
This cycle washes the upper and lower racks at dierent spray
intensities. The default setting for this cycle washes the lower
rack with strong spray intensity and the upper rack with soft
spray intensity. This provides optimum cleaning performance
for mixed loads, including ne china and stemware. If other
combinations are desired, use the steps listed below to change
the intensities or to use the HALF LOAD feature.
How To Use Dual Wash:
1. Select Dual Wash.
2. Press the Spray button to toggle between Soft, Medium
and Strong for the upper spray arm.
3. After making your selection for the upper spray arm, press
the Half Load button.
4. Press the Spray button to toggle between Soft, Medium
and Strong for the lower spray arm.
5. Close the door to start the cycle.
Display varies by model(LDS5540)
Display varies by model(LDS5560)
8
PARTS AND FEATURES
8
PARTS AND FEAT URES
CONTROL PANEL
Cycle Options
Press the desired cycle and then select the options for that
cycle.
SANITARY
This high-temperature rinse sanitizes dishes and glassware in
accordance with NSF/ANSI Standard 18 4 for residential dish-
food establishments.
EXTRA DRY
Select the EXTRA DRY option for better drying performance.
This option adds 60 minutes of extra drying time to the cycle.
EXTRA RINSE
The Extra Rinse symbol indicates that an extra rinse has been
added to the cycle.
DELAY START
The Delay Start feature allows you to delay the start of a selected cycle. Each time the Delay Start button is pressed, the
delay time will increase an hour. The delay start time can be
set from 1 to 19 hours, in one-hour increments.
CHILD LOCK
The Child Lock feature helps prevent your settings from being changed during a cycle. Selecting this feature locks all
of the buttons, except for the Power button, on the control
panel. This feature does not lock the door.
To activate the Child Lock:
1. Press the Power button.
2. Select the cycle (and desired options).
3. Press and hold the Extra Rinse and Delay Start buttons for
three seconds. The Child Lock indicator will illuminate in
the display once the Child Lock is activated.
DIGITAL DISPLAY
The Digital Display on the control panel shows the ESTIMATED cycle time. When the dishwasher is powered up, the display will be blank. When the cycle and options are selected,
the display will show the total estimated time to complete
those selections. During operation, the display shows the remaining estimated operating time.
• The estimated time shown in the display does not include
delay times for heating water, etc.
• If Delay Wash is selected, the display shows the delay time
in hours.
• Time may vary depending on the soil level of your load.
• The RINSE AID symbol
indicates that the rinse aid
NOTE
POWER
Press the Power button to turn on the control panel. If no
cycle is selected within four minutes, the dishwasher will
After the cycle is complete, the power automatically turns
If there is a power surge, power outage, or disruption of
any kind, the PF indicator will display and power will be au-
restarted.
SMART DIAGNOSIS
Should you experience any problems with your dishwasher,
it has the capability of transmitting data to your Smart Phone
using the LG Smart Laundry & DW Application or via you telephone to the LG call center.
Smart Diagnosis is a troubleshooting feature designed to assist, not replace, the traditional method of troubleshooting
pends upon various factors, including, but not limited to, the
reception of the cellular phone being used for transmission,
any external noise that may be present during the transmission, and the acoustics of the room where the machine is lo-
nosis would accurately troubleshoot any given issue.
NOTE
Display varies by model(LDS5540)
TO CANCEL A CYCLE
CHIME ON/OFF
To enable or disable the chime, rst, turn on the dishwasher.
Press and hold the Extra Dry and Delay Start buttons simultaneously for approximately three seconds.
To cancel a cycle, open the door and then press and hold
the Extra Dry and Extra Rinse buttons simultaneously for
approximately three seconds. The drain pump will activate
and the cycle will cancel. The display will show “dr” and
the dish-washer will drain the water. After the dishwasher
is drained, the power will turn o.
If power is turned on and no cycle has been selected, the
dishwasher will power o within four minutes.
Display varies by model(LDS5540)
ENGLISH
PARTS AND FEATURES
9
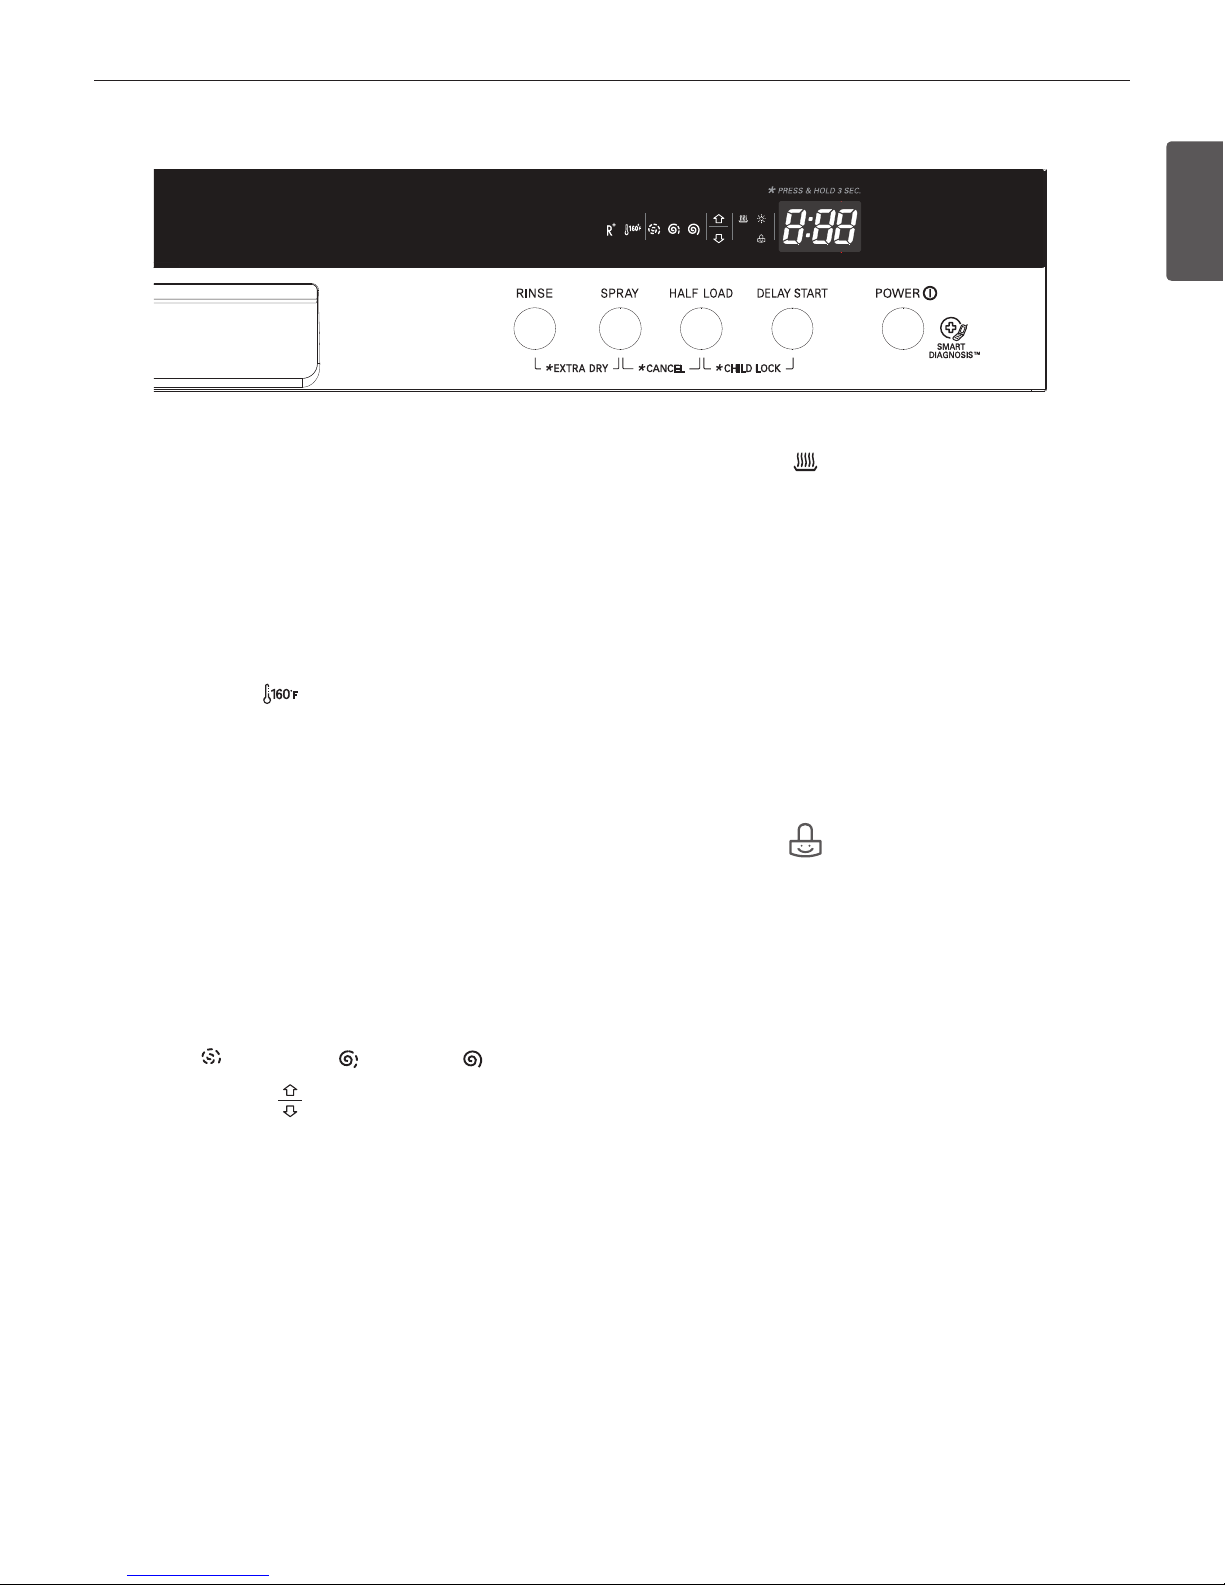
CONTROL PANEL
Display varies by model(LDS5560)
Cycle Options
Press the desired cycle and then select the options for that
cycle.
RINSE
Repeated pressing of the Rinse button will select the desired
Rinse option. The Sanitary, Extra Rinse, or Sanitary and Extra
Rinse lights will show in the bottom left portion of the display.
SANITARY ( )
This high-temperature rinse sanitizes dishes and glassware in
accordance with NSF/ANSI Standard 184 for residential dishwashers. Certied dishwashers are not intended for licensed
food establishments.
EXTRA RINSE ( R+ )
The Extra Rinse symbol indicates that an extra rinse has been
added to the cycle. An extra rinse can help reduce hard water
spotting on dishes. To add an extra rinse, press the Rinse button repeatedly until the Extra Rinse symbol appears in the
display.
SPRAY (INTENSITY)
First, select the desired cycle. Press the Spray button repeatedly until the desired spray intensity is selected.
Soft ( ), Medium ( ), Strong ( )
HALF LOAD ( )
For small loads, you may use just the upper or lower rack to
save energy. Each press of the Half Load button cycles between upper rack only and lower rack only.
DELAY START
The Delay Start feature allows you to delay the start of a selected cycle. Each time the Delay Start button is pressed, the
delay time will increase an hour. The delay start time can be
set from 1 to 19 hours, in one-hour increments.
POWER
Press the Power button to turn on the control pan el. If no cycle
is selected within four minutes, the dishwasher will power o.
After the cycle is complete, the power automatically turns
o for safety and to reduce energy consumption. If there is a
power surge, power outage, or disruption of any kind, the PF
indicator will display and power will be automatically turned
o for safety. The cycle will need to be restarted.
EXTRA DRY ( )
Select the Extra Dry option for better drying performance.
This option adds 60 minutes of extra drying time to the cycle.
The Extra Dry button will illuminate when the option has
been selected.
Press and hold the Rinse and Spray but tons for three seconds.
TO CANCEL A CYCLE
To cancel a cycle, open the door and then press and hold
the Spray and Half Load buttons simultaneously for approximately three seconds. The drain pump will activate and the
cycle will cancel. The display will show “dr” and the dishwasher will drain the water. After the dishwasher is drained,
the power will turn o.
If power is turned on and no cycle has been selected, the
dishwasher will power o within four minutes.
CHILD LOCK
The Child Lock feature helps prevent your settings from being changed during a cycle. Selecting this feature locks all
of the buttons, except for the Power button, on the control
panel. This feature does not lock the door.
To activate the Child Lock:
1. Press the Power button.
2. Select the cycle (and desired options).
3. Press and hold the Half Load and Delay Start buttons for
three seconds. The Child Lock indicator will illuminate in
the display once the Child Lock is activated.
4. Close the door to begin the cycle.
CHIME ON/OFF
To enable or disable the chime, rst, turn on the dishwasher.
Press and hold the Spray and Delay Start buttons simultane-
ously for approximately three seconds.
DIGITAL DISPLAY
The Digital Display on the control panel shows the ESTIMATED cycle time. When the dishwasher is powered up, the display will be blank. When the cycle and options are selected,
the display will show the total estimated time to complete
those selections. During operation, the display shows the remaining estimated operating time.
10
PARTS AND FEATURES
10
PARTS AND FEATURES
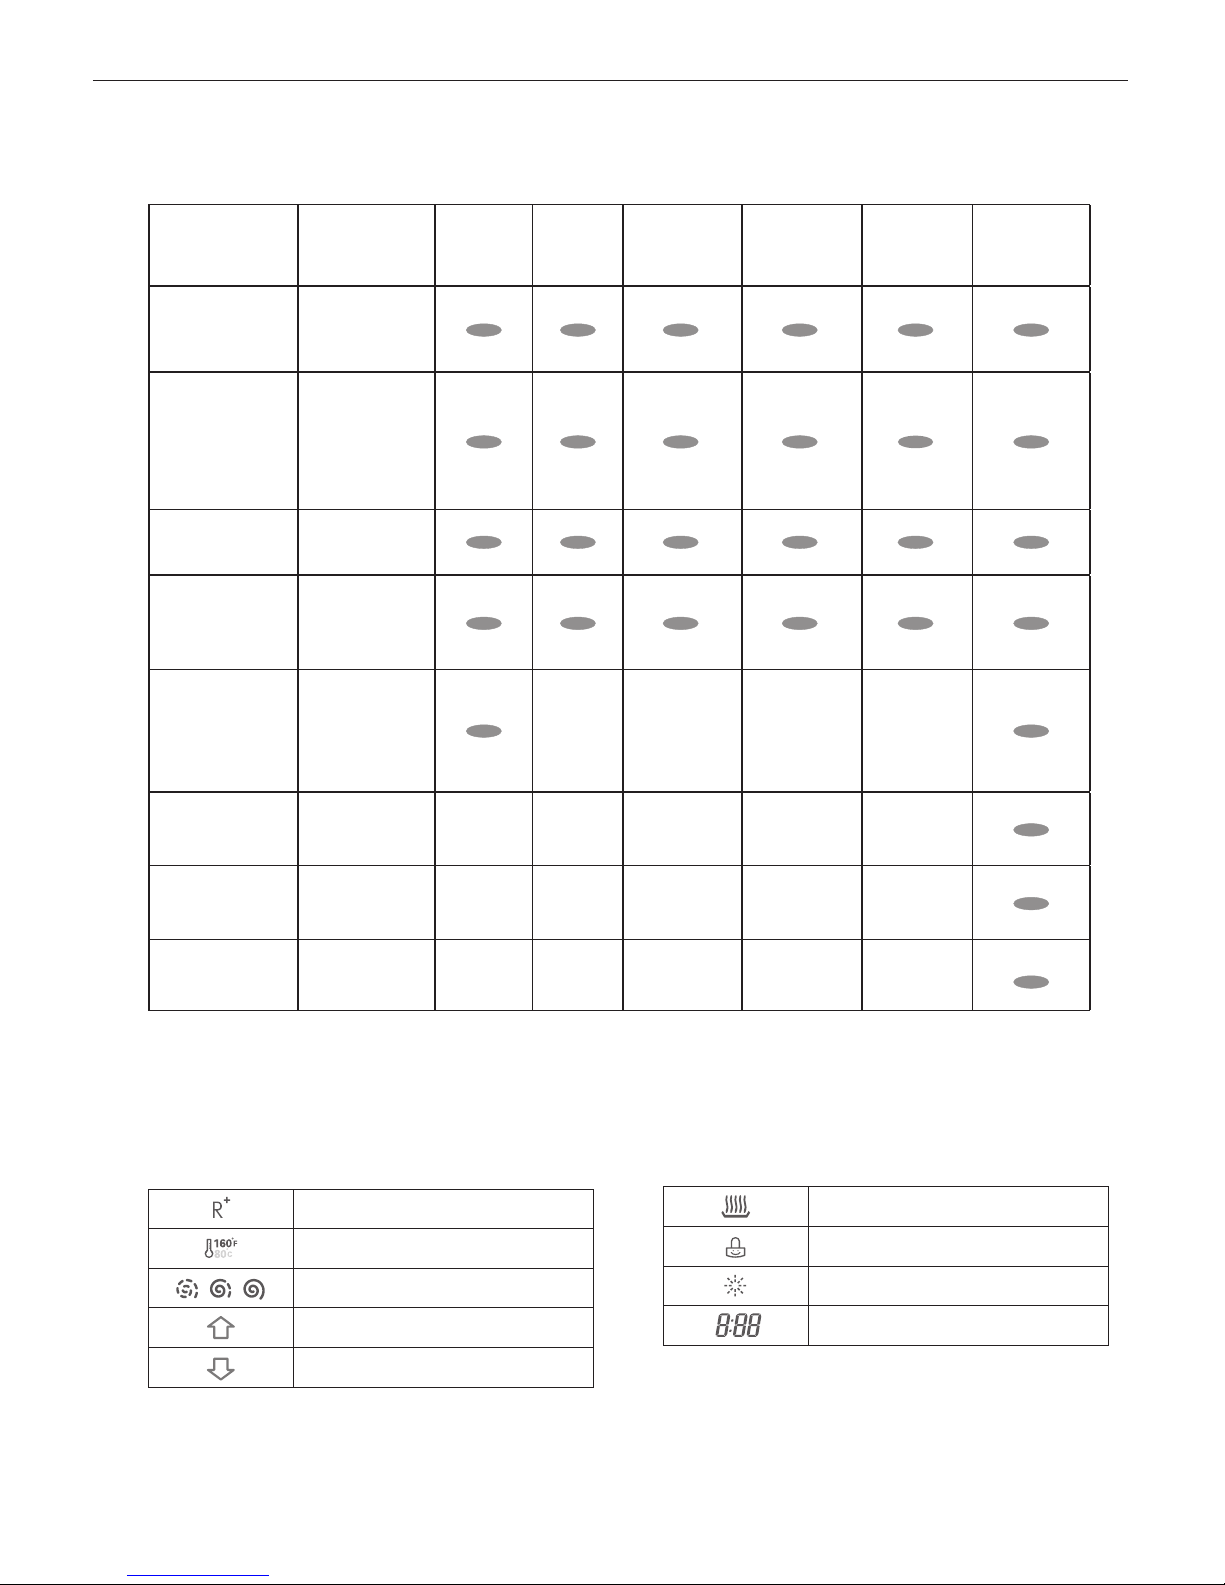
Cycle
*Available Spray
Lavel
(Default bold)
Extra DryRinseSanitary
Sanitary
Rinse
*Half
Load
Delay Start
Power Scrub
Soft
(Upper Arm)
Medium
Strong
(Lower Arm)
Normal
Soft
Medium
Delicate
Soft
Medium
Strong
Strong
Strong
Strong
-
Medium
Strong
CYCLE OPTION CHART
The cycle guide below shows the available options for each cycle.
Extra Rinse
Sanitary Rinse
Low, Medium, High Spray, Intensity
Upper Spray Arm
Lower Spray Arm
ICONS
Child Lock
Low Rinse Aid Indicator
Cycle Time Indicator
Extra Dry
Dual Wash
(LDS5560)
Quick&Dry
(LDS5560)
Quick
(LDS5540)
Quick
(LDS5560)
Rinse Only
(LDS5560)
Upper Only
(LDS5540)
ENGLISH
PARTS AND FEATURES
11
ENGLISH
11
PARTS AND FEAT URES
Cycle
Power Scrub
Dual Wash
Normal
Delicate
Quick
Quick & Dry
Quick
Rinse Only
CYCLE SELECTION CHART
The cycle guide below shows the default settings and available options for each cycle.
145 ℉
63 ℃
154 ℉
68 ℃
122 ℉
50 ℃
140 ℉
60 ℃
140 ℉
60 ℃
140 ℉
60 ℃
149 ℉
65 ℃
140 ℉
60 ℃
140 ℉
60 ℃
158 ℉
70 ℃
154 ℉
68 ℃
154 ℉
68 ℃
7.7 gal.
29 L
6.7 gal.
25.3 L
6.1 gal.
23 L
7.5 gal.
28.5 L
6.3 gal.
24 L
5 gal.
19 L
5 gal.
19 L
1.3 gal.
4.75 L
6.1 gal.
23 L
149 ℉
65 ℃
149 ℉
65 ℃
115 ℉
46 ℃
115 ℉
46 ℃
* Actual water consumption will vary depending on soil level and water hardness.
** Actual cycle times may vary depending on soil level, water temperature and hardness.
Wash Rinse
Pre1 Pre2
Main
Wash
Rinse 1 Rinse 2
Heated
Rinse
Dry
*Water
Usage
**Cycle
Time
166 Min
144 Min
130 Min
84 Min
65 Min
18 Min
107 Min
105~152
Min
105~141
Min
(LDS5560)
(LDS5560)
Normal
(LDS5540)
(LDS5560)
(LDS5560)
(LDS5560)
(LDS5540)
Upper Only
(LDS5540)

12
OPERATING INSTRUCTIONS
12
OPERATING INSTRUCTIONS
QUICK START
1. LOAD THE DISHES
Scrape the dishes free of excess food, bones, and any other
hard, non-soluble residue. Pull each rack out and load the
dishes as described in this manual.
2. MEASURE THE DETERGENT
with the recommended amount of detergent and close the
lid. If a prewash is desired, the recess on top of the lid should
3. TURN ON THE DISHWASHER
To turn on the display panel, press the Power button.
4. CHECK THE RINSE AID
The Rinse Aid indicator light will illuminate if the level of rinse
aid in the dishwasher is low. Add rinse aid if the level is low to
5. SELECT THE CYCLE AND OPTIONS
to the Cycle Selection Chart. The display will show the estimated time for the cycle and options selected.
6. CLOSE THE DOOR
The dishwasher will start automatically, after a slight delay,
when the door is closed and latched. During the cycle, the
display will indicate the estimated time remaining for the
cycle and options selected. If the door is opened during the
cycle, the dishwasher will stop. When the door is closed, the
cycle will resume from the point where it was stopped.
7. END OF CYCLE
When the cycle is complete, a chime will sound and the display will show “END.” After a short time, the display and con-
CAUTION
water from dripping from the upper rack onto dishes in the lower
rack.
WARNING
In general, it is not advisable to open the door while the dishwasher is in operation. If the door is opened, a safety device stops
the dishwasher. Care should be taken when opening the door immediately following the cycle, as steam may escape.
AUTO-OFF
or if the door is not closed within four minutes.
OPERATING INSTRUCTIONS
ENGLISH
OPERATING INSTRUCTIONS
13
ENGLISH
13
OPERATING INSTRUCTIONS
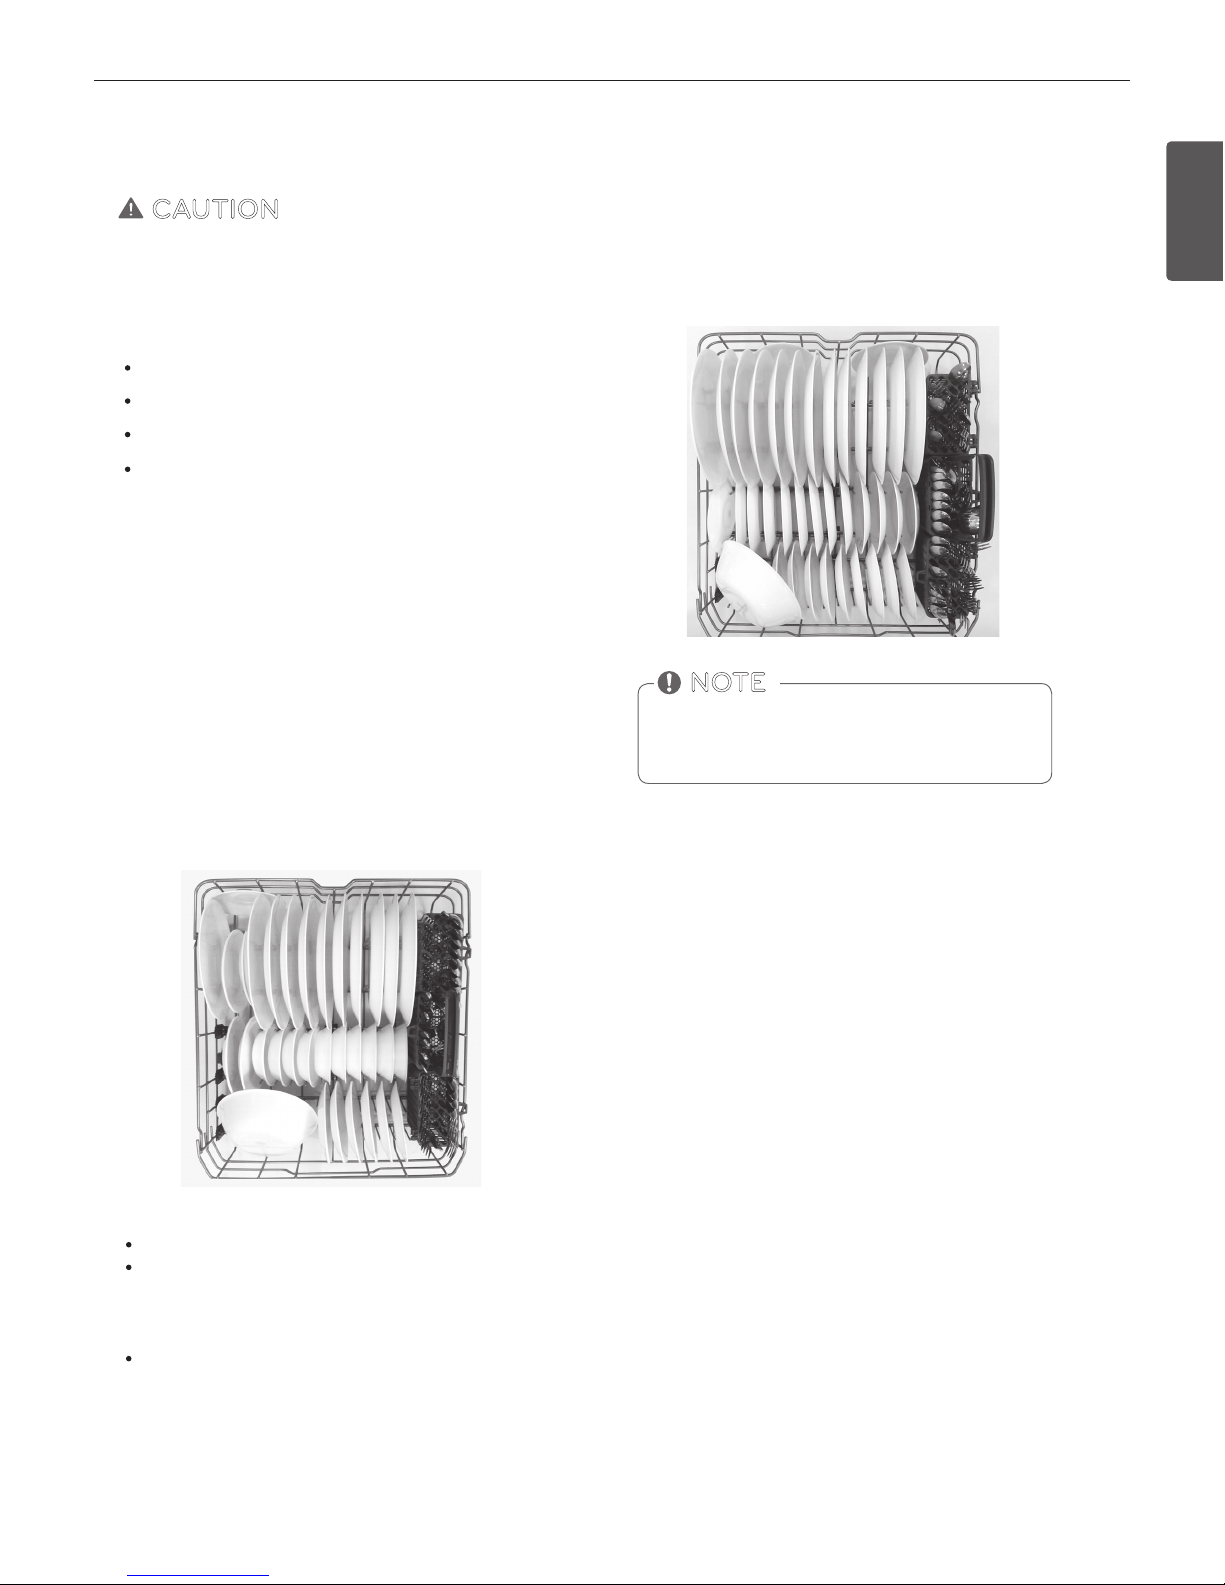
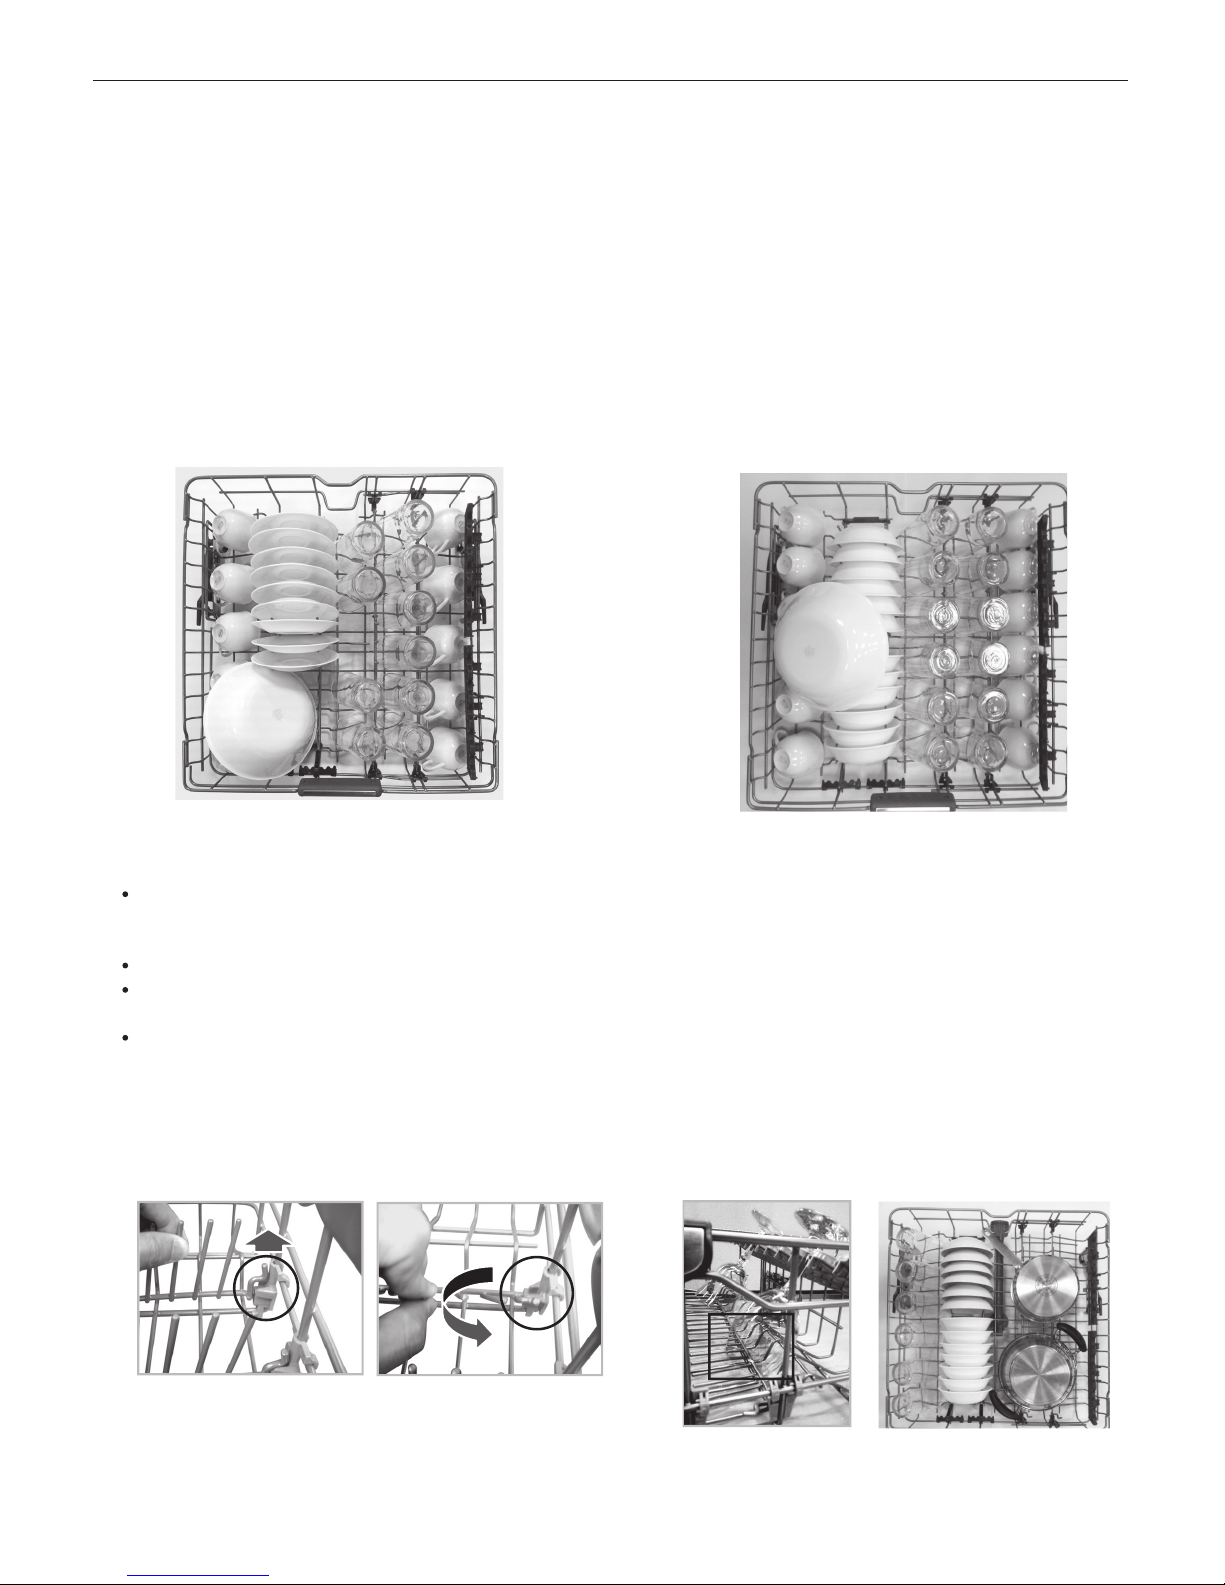
LOADING THE LOWER RACK
CAUTION
NON-DISHWASHER SAFE ITEMS
The combination of high water temperature and dishwasher detergents may damage certain items. LG does not recommend
washing the following items in the dishwasher:
Hand painted silver or gold leaf dishes
Wood or bone handled utensils
Iron or other rust prone utensils
Plastic items that are not dishwasher safe
When in doubt, check the manufacturers’ recommendations.
The extra tall tub allows loading of dishes, pans, or other utensils
up to 14 inches high.
The lower rack is recommended for dinner plates, soup bowls,
dishes, pots, pans, lids, and grill trays. Plates should be positioned
vertically and facing the center of the rack. Pots, pans, and large
bowls must be turned so that the inside faces downward. The silverware basket may be used in either the lower or upper rack.
RACK LOADING TIPS
LOADING 10 PLACE SETTINGS
Load plates, soup bowls etc. between the tines.
Load cookie sheets, cake pans and other large items on the
sides or back of the rack. Loading these items in the front of
the dishwasher can prevent the water spray from reaching the
detergent dispenser.
Make sure that pot handles and other large items do not stop
the rotation of the spray arms.
The lower rack should not be used for small items such as cups,
wine glasses, or small plates. These items should be loaded in the
upper rack.
LOADING 12 PLACE SETTINGS
Make sure that large items do not interfere with the
rotation of the spray arms, and do not prevent the
detergent dispenser from opening.
NOTE
14
OPERATING INSTRUCTIONS
14
OPERATING INSTRUCTIONS
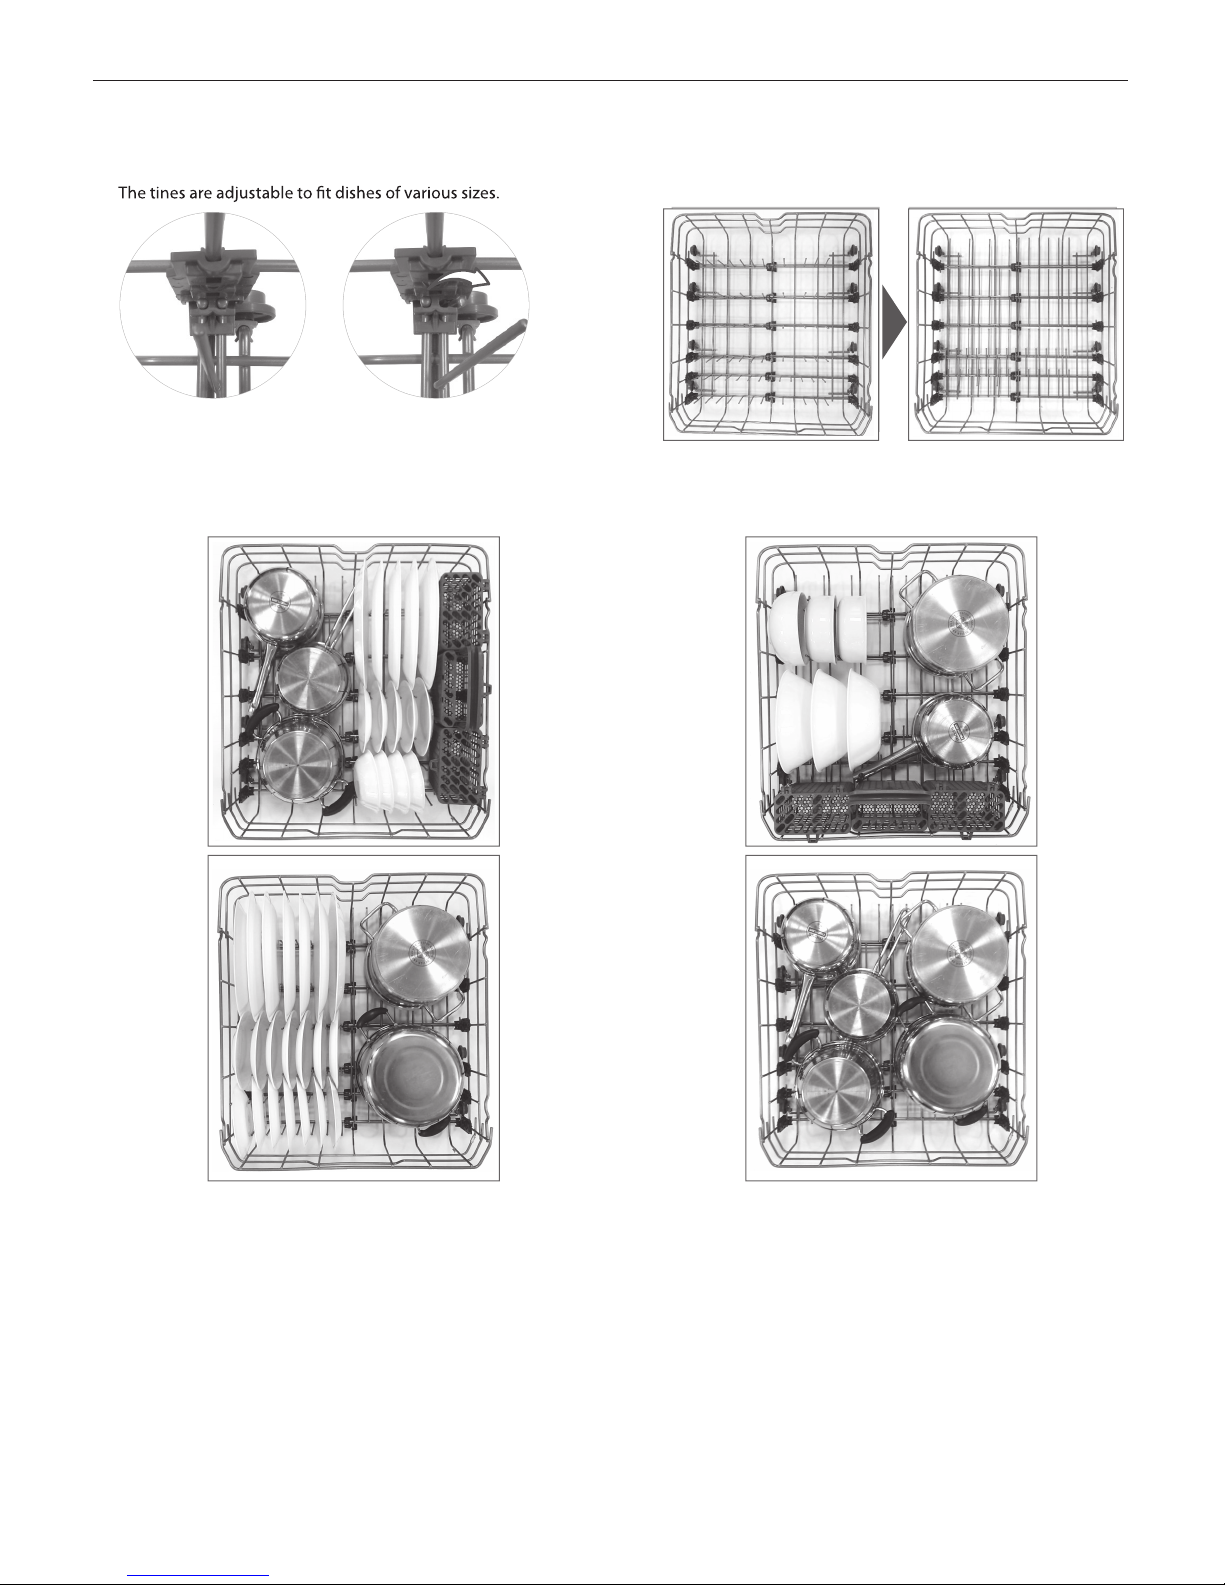
FOLDING DOWN THE LOWER TINES
LOADING DISHES & POTS
LOADING POTS & BOWLS
:MIZ
.ZWV\
ENGLISH
OPERATING INSTRUCTIONS
15
ENGLISH
15
OPERATING INSTRUCTIONS
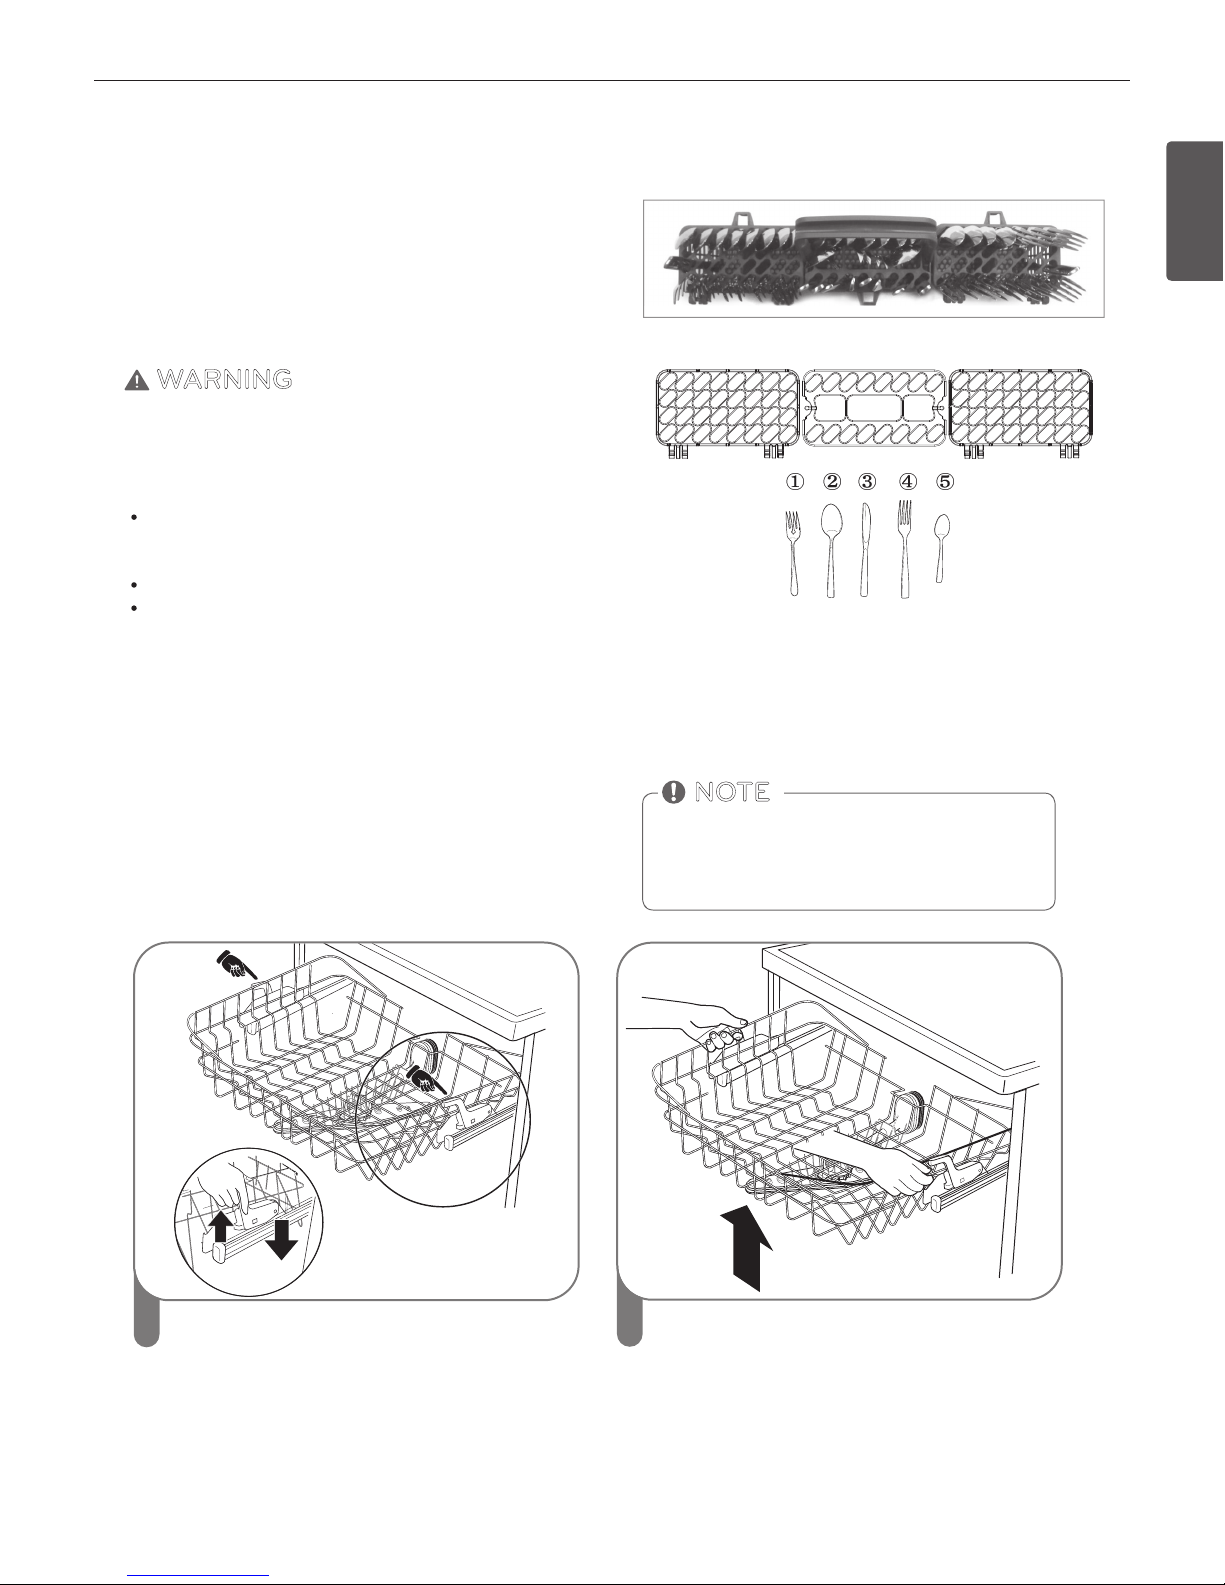
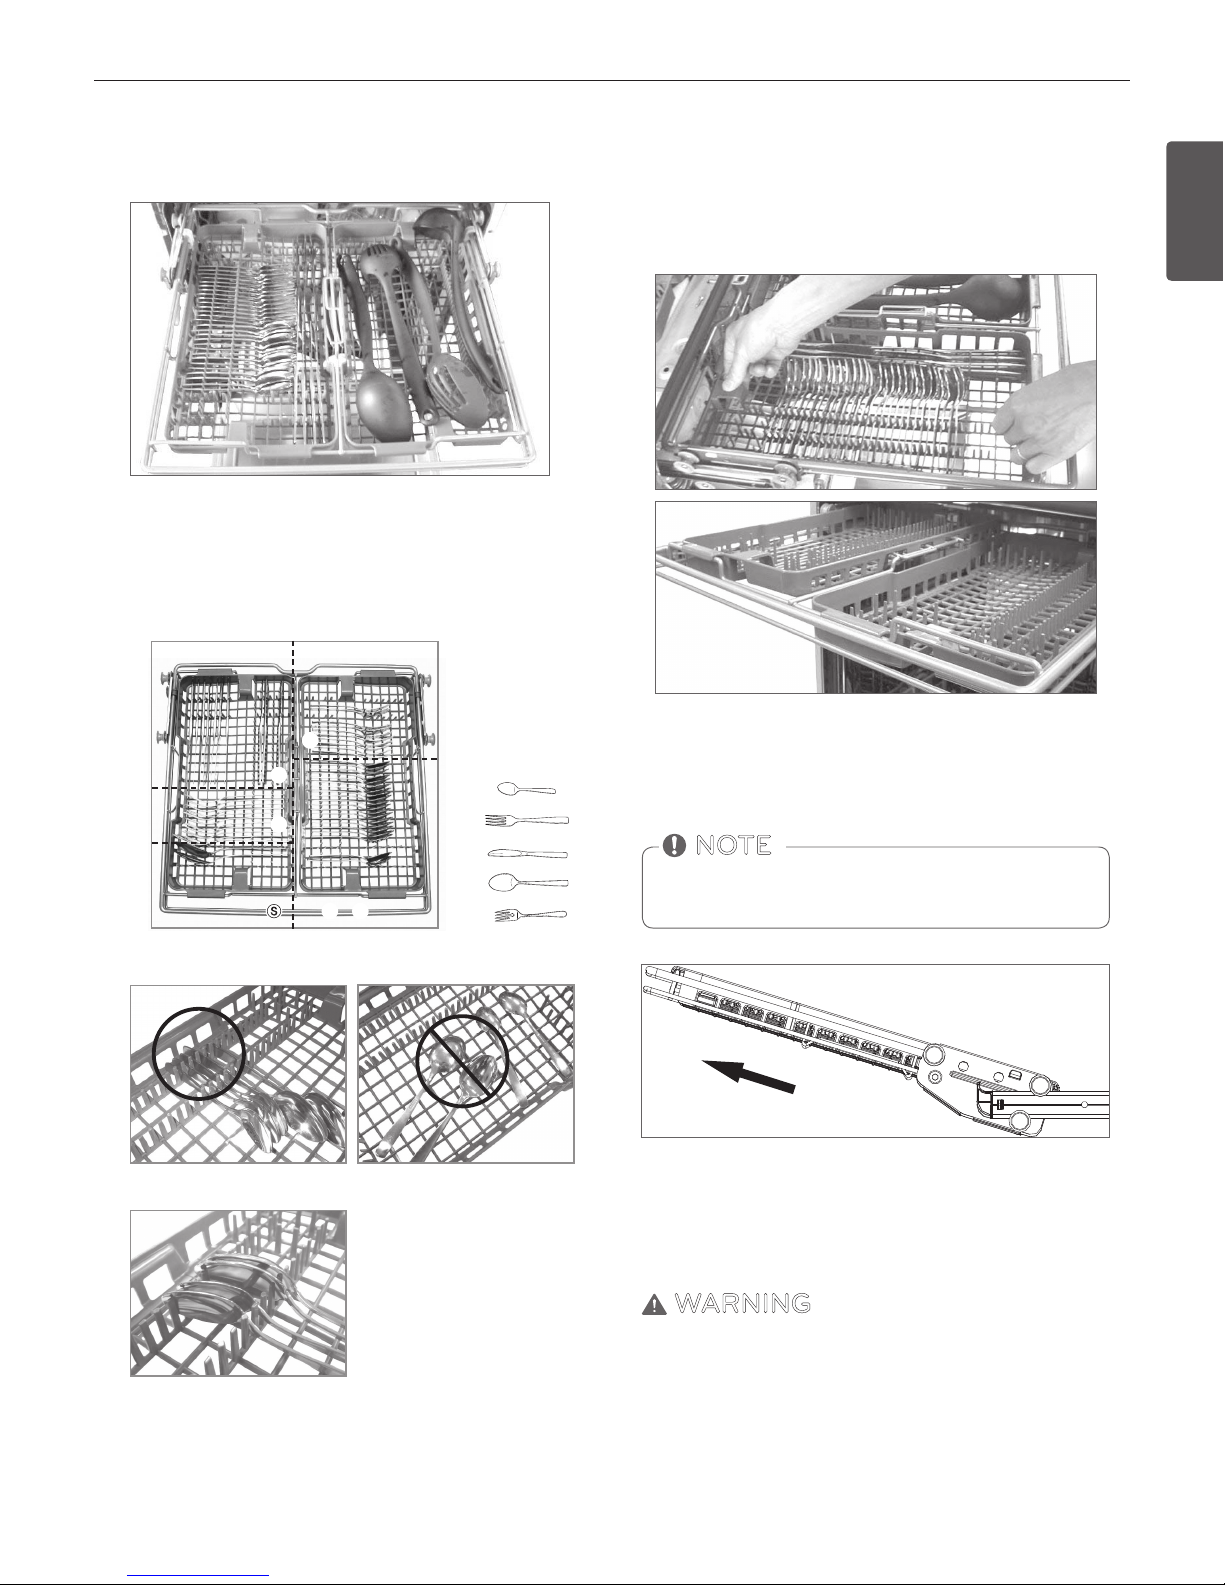
LOADING THE SILVERWARE BASKET
The silverware basket has separators to avoid scratching and tarnishing of delicate silverware. The basket can be separated into
three separate baskets that can be used individually in both the
upper and lower racks. Unlock the tabs above the left and right
side to separate.
WARNING
Be careful when loading and unloading sharp items. Load sharp
knives with the handles up to reduce the risk of personal injury.
SILVERWARE LOADING TIPS:
For best cleaning results, use the top separators in the basket
when loading silverware. The separators will prevent nesting
of silverware.
Load sharp items, such as knives, pointing down.
When unloading the dishwasher, it is best to start with the silverware basket. Doing so will prevent water droplets from falling on your silverware from the upper rack.
111111
111111
22222222 222222
5555
44444444
444444
33333333
33
33SS
55 55555555
SSSSSSSS
11
33
HEIGHT ADJUSTABLE UPPER RACK
The upper rack adjusts up and down. Adjust the upper rack up to
allow tall and oversized items of up to 14 inches high in the lower rack. Adjust the upper rack down to allow placement of large
dishes of up to 12 inches high in the upper rack. The upper rack
comes in the upper position.
To raise the rack:
Simply lift the rack at the center of each side (see illustra-
tion) until the rack locks into place in the upper position.
It is not necessary to lift the lock levers to raise the rack
To lower the rack:
Hold the rack at the center of each side to support its
weight. Then, lift the lever on each side to release the rack
and lower it to the lower position.
1
2
After adjusting, make sure that dishes in the upper
and lower racks do not interfere with the rotation
of the spray arm. Do not adjust the rack while it is
loaded with dishes.
NOTE
16
OPERATING INSTRUCTIONS
16
OPERATING INSTRUCTIONS
LOADING THE UPPER RACK
LOADING 10 PLACE SETTINGS
Use the upper rack for small or delicate items such as small plates,
cups, saucers, glasses, and dishwasher-safe plastic items. Cups,
glasses, and bowls must be positioned upside down. Extra cups
or cooking utensils can be laid on the fold down cup racks, which
may also provide support for long stemmed glasses. Make sure
items do not interfere with the rotation of the spray arms above
and below the upper rack.
LOADING 12 PLACE SETTINGS
UPPER RACK LOADING TIPS:
Place cups and glasses in the rows between the rack tines. Placing them over the rack tines can lead to breakage and water
spots.
To avoid chipping, do not let stem ware touch other items.
Place items so that the open end faces down for cleaning and
drying.
Do not stack items on top of each other.
FOLDING DOWN THE UPPER TINES
Pull up the tine
Rotate the tine
The tines can be adjusted up or down. The right side tines have
handles for wider or small dishes.
ENGLISH
OPERATING INSTRUCTIONS
17
LOADING THE CUTLERY RACK
(on some models)
HEIGHT ADJUSTABLE TRAY
(on some models)
Each side tray can be adjusted independently to a high or low
position to accommodate dierent sizes of utensils or cutlery. Remove dishes before adjusting the tray.
The cutlery rack is best suited for atware and most cooking or
serving utensils. Heavily soiled utensils or items with baked on
foods should be placed in the middle rack or spoon basket for
best performance. The separators on the cutlery racks help keep
atware separated to avoid damage and improve cleaning.
Sample 10-place setting.
Right Wrong
Alternate
If the handles of your atware
are too thick, then reverse the
pieces so that the handles face
the other direction, as shown
in the bottom gure.
Each tray is adjusted by lifting it out and rotating it front to back.
Removing the Cutlery Rack
The entire cutlery rack can be removed if more space is needed
on the upper rack for larger items.
Always remove the cutlery from the rack before removing
the rack.
NOTE
Pull the rack out to the end of the rails. Then, lift the front of the
rack so that the rollers clear the stop on the end of the rail. The
rack can now be slid forward and removed from the rails.
WARNING
Be careful when loading and unloading sharp edged items. Load
sharp knives with the blade down to reduce the risk of injury.
①
①
③
③
④
④
⑤
⑤
②
②
18
OPERATING INSTRUCTIONS
18
OPERATING INSTRUCTIONS
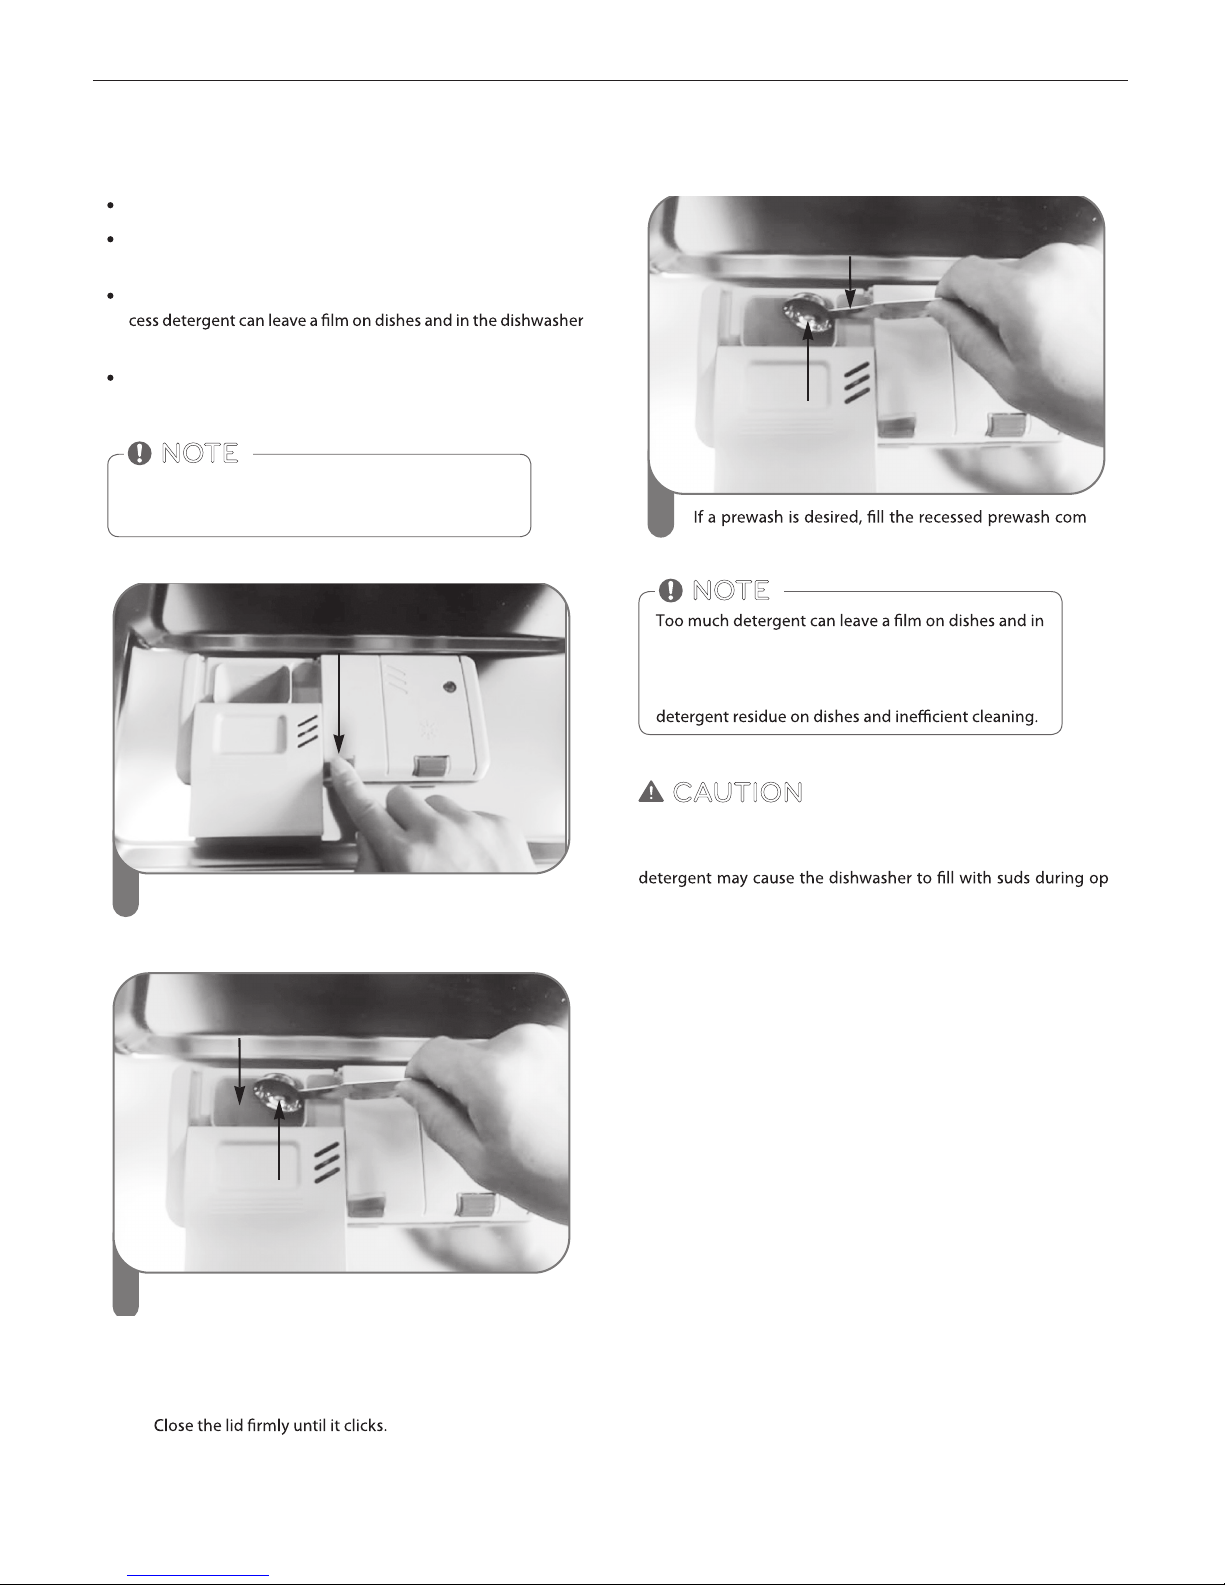
ADDING DETERGENT TO THE DISPENSER
Only use detergent intended for automatic dishwashers.
Detergent must be put into the detergent compartment before starting any cycle.
Use less detergent if the dishes are only lightly soiled. Using ex-
resulting in poor wash performance.
The amount of detergent needed depends on the cycle, load
size, and soil level of dishes.
Remove the label on the dispenser prior to running
the dishwasher.
NOTE
3
Pre wash
Compartment
Place proper detergent
into this compartment
-
partment area in the lid with detergent.
CAUTION
DETERGENT INFORMATION
Use only detergent intended for automatic dishwashers. Incorrect
eration. Excess sudsing may reduce wash performance and may
cause the dishwasher to leak. DO NOT use hand dish washing detergent in this dishwasher.
Do not use detergent tablets for shorter wash cycles.
the dishwasher, resulting in poor wash performance.
The tablet may not dissolve completely, causing
NOTE
1
Push button to open
If the lid is closed, press the lever on the bottom side of
the lid to open the dispenser.
Add dish washing detergent to the main wash compartment until the level is between the lines marked 20
and 30. Fill to the 30 line for hard water or heavily soiled
loads. Fill to the 20 line for soft water or lightly soiled
loads.
2
Place proper detergent
into this compartment
Main wash
Compartment
ENGLISH
OPERATING INSTRUCTIONS
19
ENGLISH
19
OPERATING INSTRUCTIONS
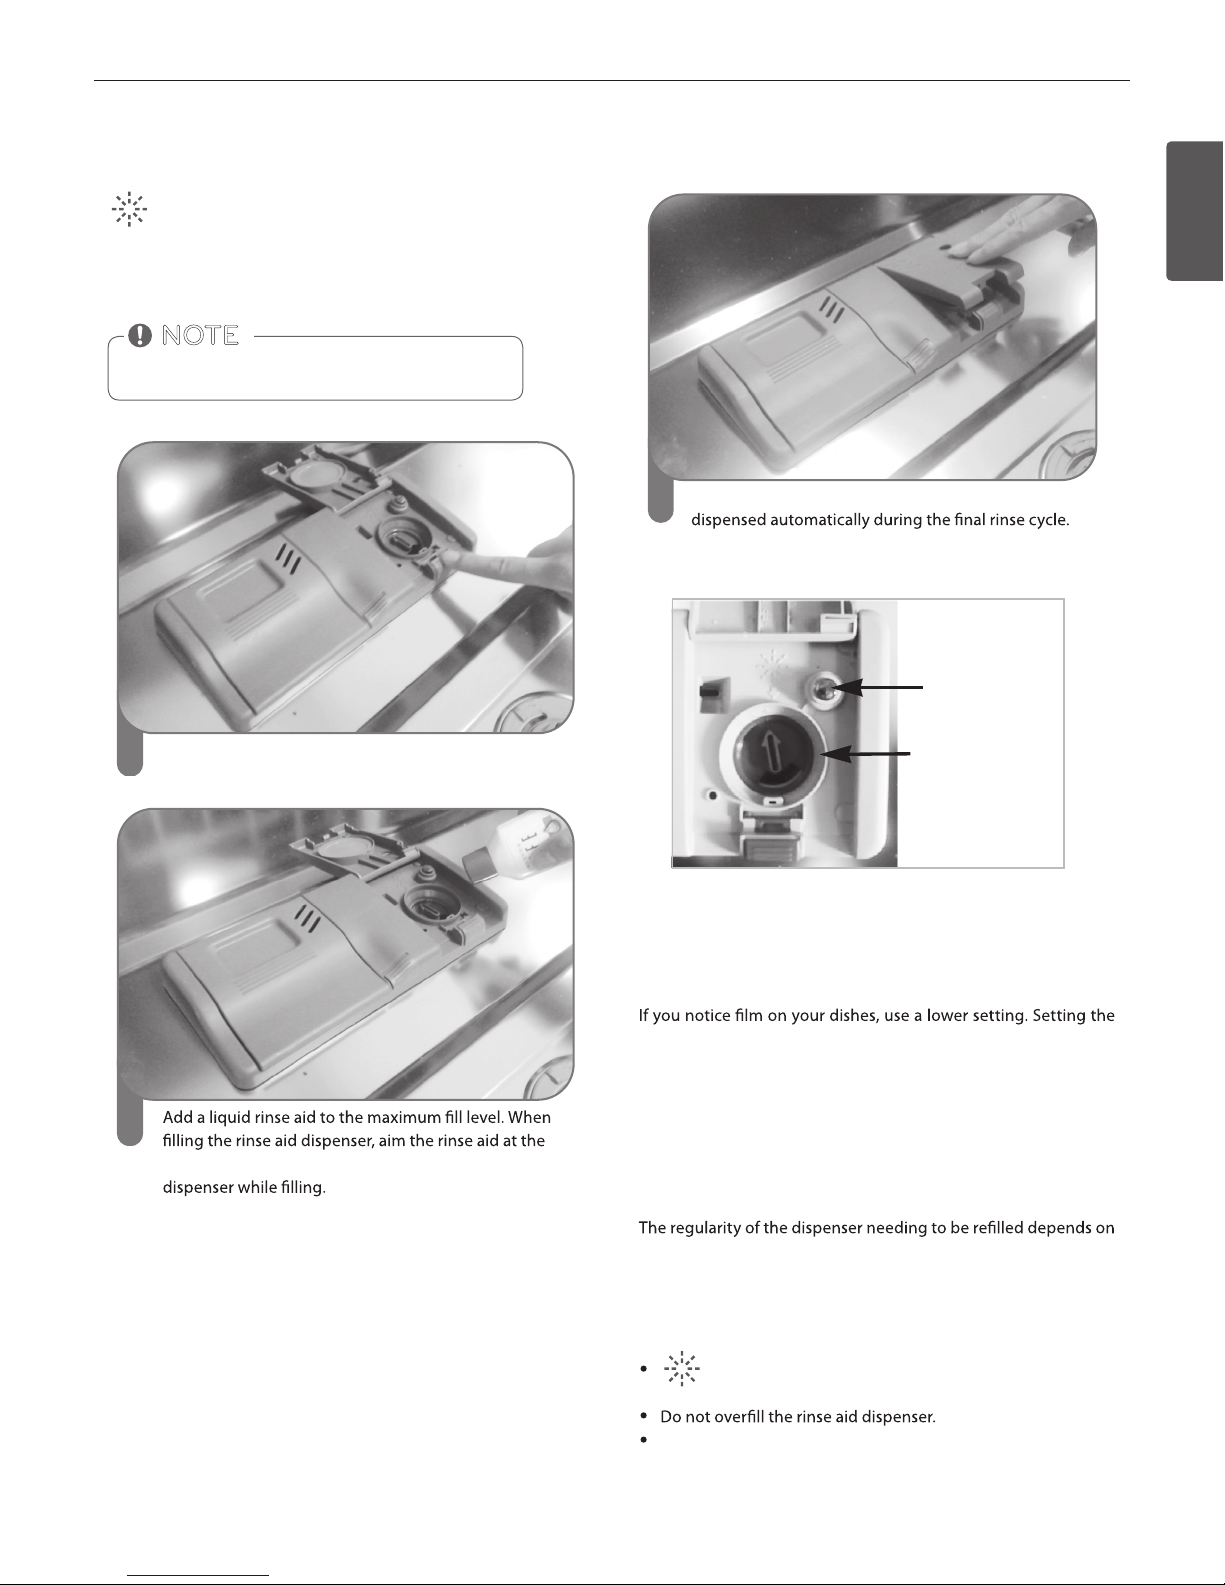
ADDING RINSE AID TO THE DISPENSER
The Low Rinse Aid indicator will appear in the display when
more rinse aid is needed.
The use of rinse aid is recommended to prevent water droplet
spots on dishes and to enhance the drying performance.
Only use liquid rinse aid in the dishwasher.
NOTE
1
Push button to open lid.
2
arrow. Make sure that the rinse aid is settled in the
3
Close the lid to lock the dispenser. Rinse aid will be
RINSE AID DISPENSER ADJUSTMENT
The rinse aid dispenser is set to level 3, which should provide
the best performance under most conditions. Adjust the setting
higher if you have hard water and notice calcium buildup on your
dishes.
rinse aid control too low will contribute to spotting and streaking
of dishes and poor drying performance. Setting the control too
high can cause foaming, which will cause poor wash performance.
To adjust the rinse aid dispenser setting, remove the cap and adjust the rinse aid lever to the desired setting. Point the arrow to
the left for a lower setting, right for a higher setting.
REFILLING THE RINSE AID
how often dishes are washed and the rinse aid setting used. If the
rinse aid level is low, the Rinse Aid light on the control panel will
illuminate.
RINSE AID FILLING TIPS:
The Low Rinse Aid indicator will appear in the display
when more rinse aid is needed.
Clean up any spilled rinse aid to prevent sudsing.
Rinse-Aid
Indicator
Adjust Lever
(Rinse)
20
CARE AND CLEANING
20
CARE & CLEANING
For best results, it is important to periodically check and care for the spray arms.
WARNING
To prevent injury during care and maintenance/cleaning, wear gloves and/or protective clothing.
CARE & CLEANING
KEEPING THE DISHWASHER
If you will not be using the dishwasher for a long period time, run
clean the dishwasher according to the CARE & CLEANING instructions to remove the food debris at the bottom of the dishwasher
and close the door.
CLEANING THE METALLIC PARTS
Some exterior and interior parts can be cleaned with a damp cloth
steel tub, especially with hard water.
Make sure that the water jet holes are not blocked by food particles.
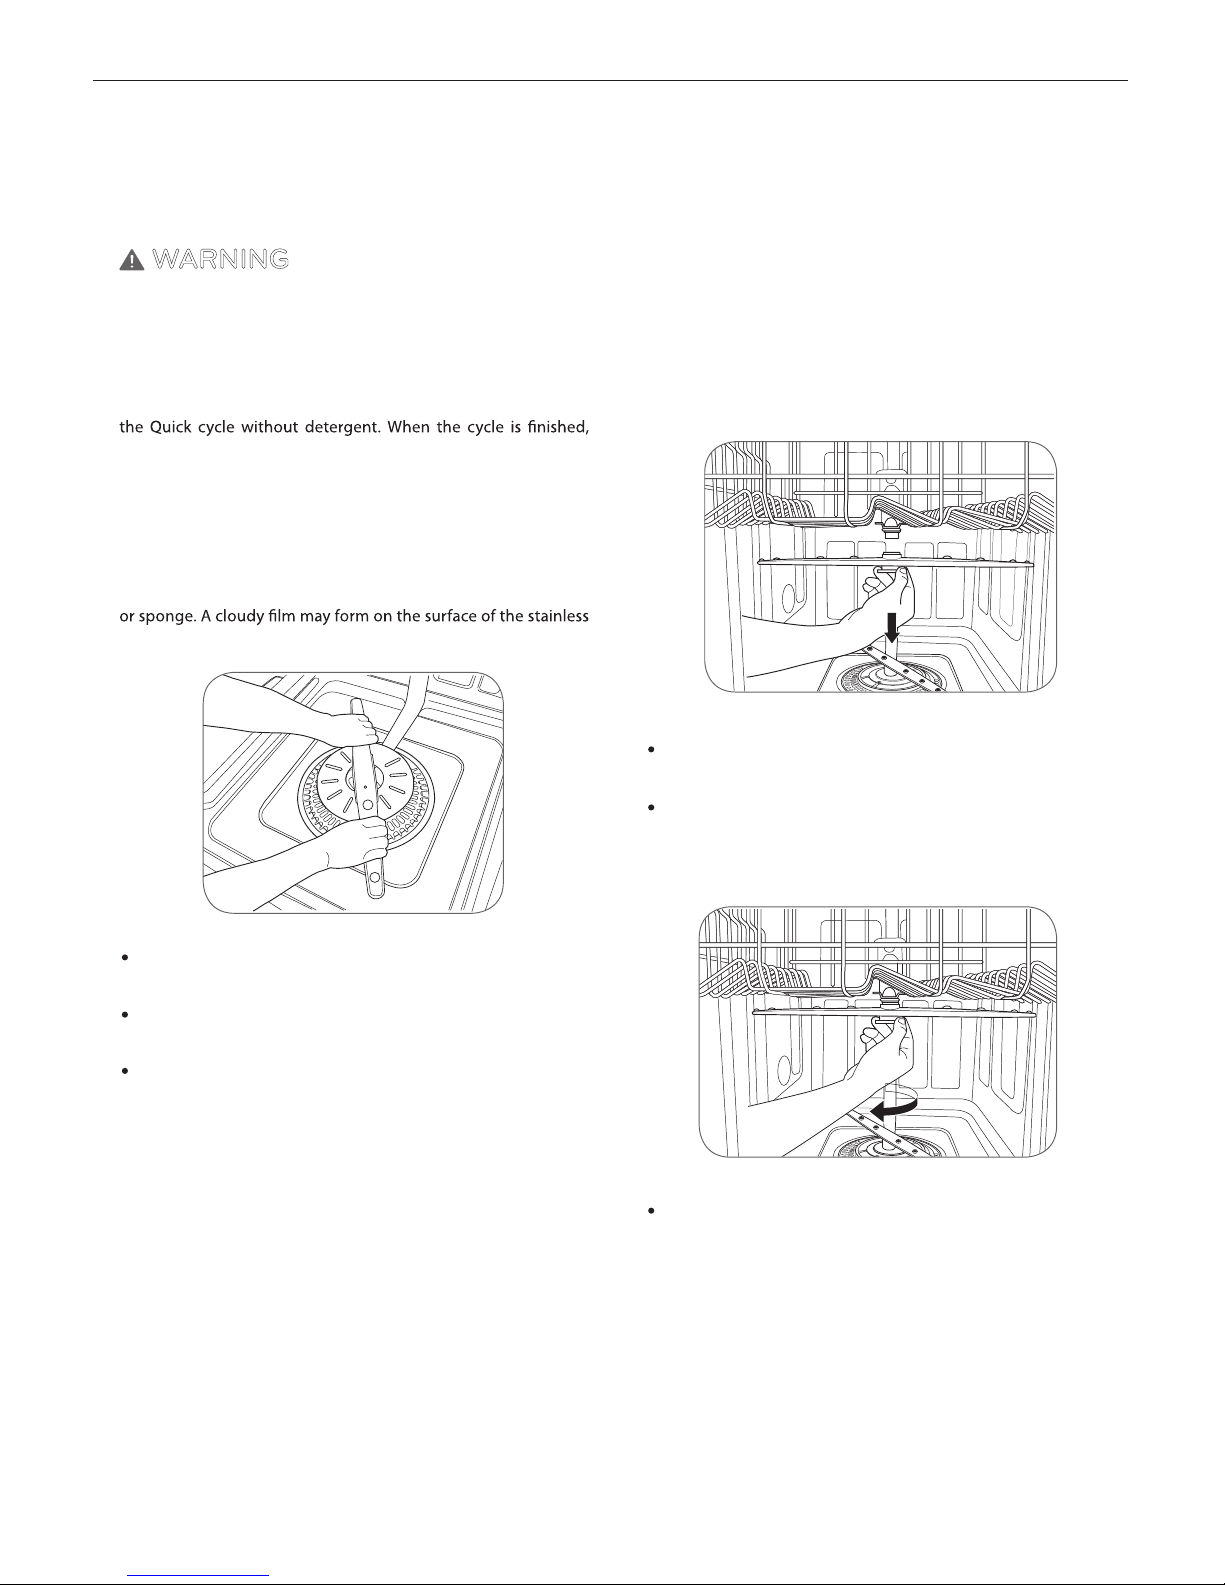
When cleaning is necessary, remove the lower spray arm by
pulling up.
After cleaning the lower spray arm, replace it by pushing down
until it clips into place. Be sure that the spray arm is able to turn
freely.
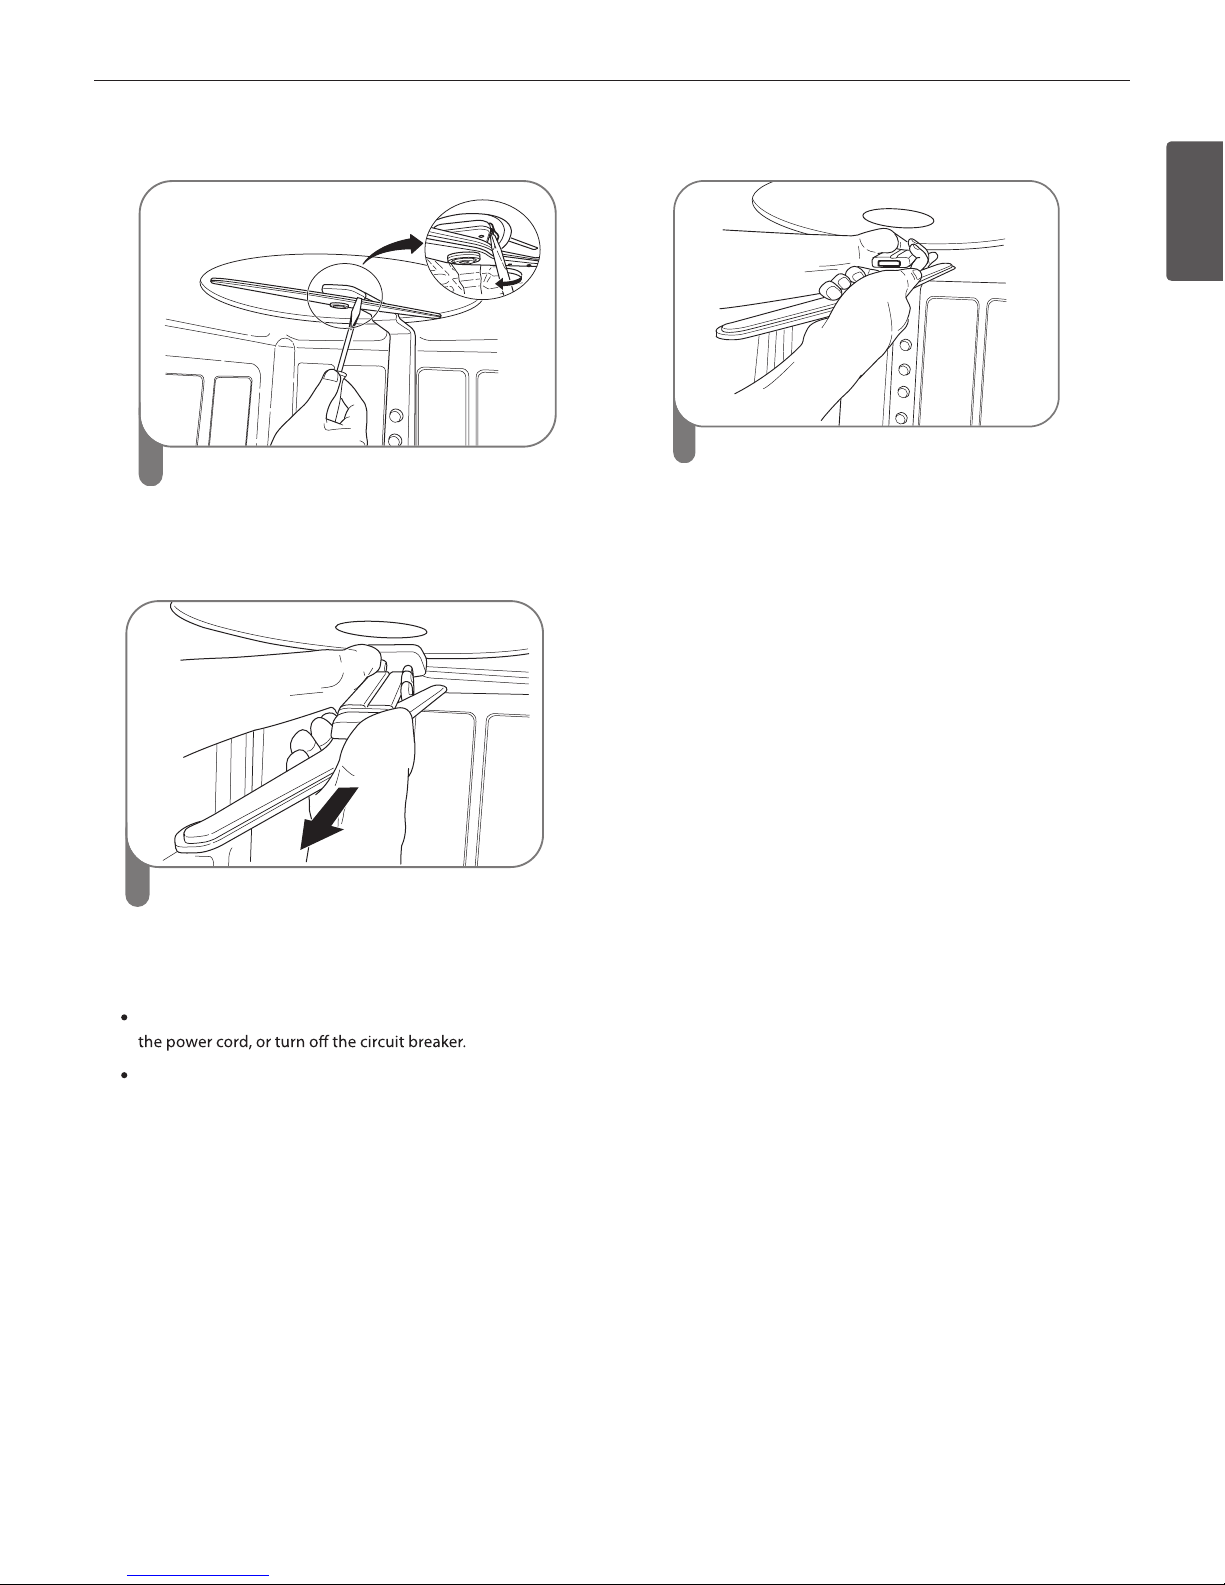
CLEANING THE UPPER SPRAY
ARM
•
Pull the upper rack forward. Make sure that the water jet holes
are not blocked by food particles.
When cleaning is necessary, remove the upper spray arm by
turning the nut on the bottom of the spray arm 1/8 turn counterclockwise and pulling down.
After cleaning the upper spray arm, press it up into place. Turn
the nut 1/8 turn clockwise to make sure that the nut locks back
into place.
ENGLISH
CARE AND CLEANING
21
ENGLISH
21
CARE & CLEANING
CLEANING THE TOP SPRAY ARM
Make sure that the water jet holes are not blocked
by food particles. When cleaning is necessary, use
a screwdriver to release the retainer clip from the
bracket that holds the top spray arm assembly to the
tub.
1
2
Pull the spray arm out.
3
After cleaning the top spray arm, replace it. Slide it back
into place and make sure the retainer clip engages.
SEASONAL MAINTENANCE AND STORAGE
If you will be absent for an extended period of time during warmer months, it is recommended that you close the water valve and unplug
If you will be absent for an extended period of time during colder months, and there is a possibility of freezing temperatures, it is recommended that you winterize the water supply lines and the dishwasher itself. Winterization must be performed by experienced service
personnel.
22
FAQ S
22
FAQs
FAQs
COMMON PRODUCT QUESTIONS
Is a rinse aid required to be used?
Rinse aid is strongly recommended to enhance the drying perfor-
hybrid drying system does not utilize a heating element in order
to assist in drying, so a rinse aid plays an integral role in the dry
process. If a rinse aid is not used, water may remain on the dishes
and the tub. Rinse aid will help to ensure that the majority of the
and that the load is ready for the dry cycle.
What can be done if my dishes have a cloudy, white
ing with the dishwasher detergent. First, be certain not to use too
much detergent. Refer to the owner’s manual for recommended
detergent amounts by cycle. Add an Extra Rinse or run the Power
Scrub cycle. LG Dishwashers use less water than traditional dish-
If the water supply is hard, it may be necessary to add a performance booster that addresses the hard water condition.
What is the Sanitary Rinse and how is it activated?
Sanitary Rinse will increase the heated rinse to approximately
161°F (72°C). The normal heated rinse temperature will vary from
cycle to cycle.
What steps can I take to improve drying results?
remains in the tub after the heated rinse is performed. If your
dishwasher is far away from your home’s hot water heater, it may
be necessary to run the hot water tap in the sink before starting a
wash cycle, to ensure that cool water is purged from the hot water
lines. This will ensure your dishwasher has a consistent supply of
also aid in keeping the inner drum temperature and dishes hotter
before drying begins.
LG dishwashers are designed to be used in conjunction with a
rinse aid. Using a rinse aid will maximize the amount of water that
has already been sheeted away from the dishes before the dry
cycle begins. If a rinse aid is used and the performance still needs
a boost, adjust the amount of rinse aid used by the indicator on
the rinse aid cap. 3 is the default setting, but if necessary, set the
level to 4 so more rinse aid will be used.
opening the door. If the door is opened mid dry cycle, the heat
that is necessary for the hybrid dry system to work will escape out.
This will cause all of the dishes inside to remain wet once the cycle
What is the hybrid drying system?
The dishwasher does not rely on a heating element for the drying
process; instead, it relies on the heat that is retained by the dishes
and the tub during the wash and rinse cycles to turn the moisture
in the tub into humidity. Warm, moist air in the dishwasher is then
pulled into a condensing duct in the door by a fan. The air then
cools, which causes the humidity to condense. Room temperature air is also drawn into the duct to help the air cool down faster.
When this moisture condenses into a liquid, it is drained out.
Rinse aid is required to enhance the drying perfor-
mance. If no rinse aid is used, water may remain on
the dishes and the tub.
NOTE
Why is there a whistling sound?
It is important to determine how long the noise occurs and when
it happens (what part of the cycle). When water is drawn into the
dishwasher, a whistling noise can be heard. This is normal. If the
water pressure is too high, it will be louder so it may be necessary
to adjust the water valve to lower the pressure if the noise is too
loud.
What kind of dishes can be placed in the
dishwasher?
Ensure that the dishes you place in the dishwasher are dishwasher
al dishware. Plastic items do not retain heat as well as glass and
metal dishware. Plastic cups and dishes may require some hand
drying before being put away at the end of the cycle.
Can I perform a drain only cycle?
The dishwasher does not have a drain only function; however, the
cycle. To drain standing water, select a wash cycle and let it run
as necessary.
Why does my dishwasher continuously beep if
I open the door during a cycle or right after the
This is normal. The dishwasher is letting you know that the interior
temperatures of the unit are hot and to use caution when placing
your hands inside. Once the unit has cooled down, the beeping
will stop.

ENGLISH
FAQ S
23
ENGLISH
23
FAQs
PRODUCT FEATURES AND
OPERATION
What is Child Lock and how is it activated?
Child Lock is a feature that will prevent the controls from being
changed during the cycle. It does not prevent the door from be-
activate, press the Extra Rinse and Delay Start buttons simultaneously for 3 seconds.
Why is “PF” showing up on the display?
PF is not an error code indicating a malfunc tion. PF indicates that
there was a power failure. This function protects the dishwasher
in the event that the power goes out or the power to the unit is
disrupted. When power is returned and a button is pushed, this
will display for 10 seconds and then go away.
INSTALLATION
What size is the 90° elbow?
The 90° elbow should have a 3/8” NPT on the end that connects
to the dishwasher.
Can I add an extension to the drain hose?
No, an extension cannot be added.
24
TROUBLESHOOTING
24
TROUBLESHOOTING
BEFORE CALLING FOR SERVICE
ProblemPossible Causes Solutions
Dishwasher will not
operate
Door is not completely closed.Make sure that the door is completely closed and
latched.
Power supply or power cord is not connected. Connect the power supply or cord properly.
Fuse is blown or circuit breaker tripped. Replace the fuse or reset the circuit breaker.
Dishwasher operates too
long
Dishwasher is connected to cold water. Check the water supply connection or water heater set-
ting. (Heating cold water takes longer.)
Odor Previous cycle was stopped before
completion.
The dishwasher is not used daily.
Operate the Quick cycle with detergent without loading
any dishes.
If the dishwasher is not used daily, it is recommend to
run the Quick cycle once or twice a day until you have
a full load. In case odor still persists, run a vinegar rinse
through a Quick cycle by putting 2 cup(500ml) of white
vinegar in an upright measuring cup in the lower rack,
without detergent. It is recommended to maintain according to the CARE & CLEANING section.
Water remains in tub
after completion of cycle
Drain hose is kinked or clogged. Adjust hose or clear blockage.
dishes
Low water temperature. Water supply should be at least 120°F for best wash
performance.
Wrong amount of detergent used.Use the recommended amount of detergent.
Overloading. Do not overload the dishwasher.
Improper loading. See the Using Your Dishwasher section.
Water pressure should be between 20 and 120 psi.
Add the recommended amount of detergent. See the Us-
ing Your Dishwasher section.
Rinse aid dispenser is empty.
Extremely hard water
The best way to eliminate spots on your dishes is to install a whole house water softener in your home. If
a water softener is already installed or you do not plan on installing one, run a Power Scrub cycle to help
minimize this condition. To add an extra rinse to the cycle, select the wash cycle and then press the Extra
Rinse button.
To remove hard water build up in the tub
Remove all dishes, silverware and the silverware holder from the dishwasher. Only the racks should remain
in the tub.
Fill a measuring cup with white vinegar, approximately 14~17 ounces (400~500mL), and place the measur-
ing cup in the lower rack.
Run a Normal cycle and select Extra Rinse and Sanitary then close the door.
DO NOT USE DETERGENT
NOTE: Make sure to let the dishwasher complete the entire cycle. This cleaning method should only be
done as needed.
If you have followed this troubleshooting guide and the problem persists, or if the problem you are experiencing is not listed here, please
call LGE Customer Service at 1-800-243-0000(US), 1-888-542-2623(Canada).
ENGLISH
TROUBLESHOOTING
25
ENGLISH
25
TROUBLESHOOTING
BEFORE CALLING FOR SERVICE
Food soil remains on dishes.Improper cycle selection. Select correct cycle based on soil level and
type of dishware being washed.
Water temperature too low. Check water supply connection or water
heater setting.
Dish washing detergent was not used.Use recommended detergent.
Low inlet water pressure.Water pressure should be between 20 and
120 psi.
Water jet holes on spray arms blocked. Clean the spray arms.
Improper loading of dishes Make sure dishes do not block spray arm ro-
tation or interfere with detergent dispenser.
Filters are clogged.
NoiseSome level of noise is normal during opera-
tion.
Detergent cover opening.
Drain pump at the beginning of drain cycle.
The dishwasher is not level. Adjust leveling feet.
Nozzle arm knocking against dishes.Reposition the dishes.
Cloudiness on glassware.Combination of excessive detergent and
hard water.
Use less detergent and use a rinse aid to
minimize the problem.
Black or gray marks on dishes.Aluminum items rubbing dishes during
cycle.
Reposition the dishes.
of dishwasher.
Eliminate the stain by using a stain removal
product.
Dishes don’t dry. Rinse agent dispenser empty.
empty.
Lamps do not illuminate.Power is not connected. Connect power supply.
Sprays arms do not rotate smoothly.Holes of spray arms are blocked by food
particles.
Clean the holes of spray arms.
Upper rack is crooked.Rack is poorly adjusted.See the Height Adjustable Upper Rack
section.
Dishwasher continuously beeps when the
door is opened, during or right after a cycle
has completed.
The contents of the dishwasher are hot and
care should be used when placing your
hands inside the dishwasher.
Close the door until the dishwasher and
dishes have cooled down. The beeping will
go away if the door is closed or the interior
temperature has been cooled.
IE ErrorWater inlet problem. Check for a clogged, kinked or frozen water
inlet hose.
Check water supply.
OE ErrorDrainage Problem. Check for a clogged, kinked or frozen drain
hose.
FE ErrorExcessive Water supplied.
Please call an Authorized Service Center or
LGE Customer Service at 1-800-243-0000
(US) 1-888-542-2623 (Canada).
HE ErrorHeater circuit failure.
tE ErrorThermistor failure or very high inlet water
temperature (over 194
F)
If you have followed this troubleshooting guide and the problem persists, or if the problem you are experiencing is not listed here, please
call LGE Customer Service at 1-800-243-0000(US), 1-888-542-2623(Canada).
LE Error Motor Trouble
26
TROUBLESHOOTING
26
TROUBLESHOOTING
SMART DIAGNOSIS™ SYSTEM
Should you experience any problems with your dishwasher, it has
the capability of transmitting data to your Smart Phone using the
LG Smart Laundry & DW Application or via your telephone to the
LG call center.
Smart Diagnosis cannot be activated unless your dishwasher is
turned on by touching the POWER button. If your dishwasher is
unable to turn on, then troubleshooting must be done without
using Smart Diagnosis.
Smart Diagnosis Using Your Smart Phone
1. Download the LG Smart Laundry & DW application on your
smart phone.
2. Open the LG Smart Laundry & DW application on your smart
phone.
3. Press the Smart Diagnosis button on your smart phone.
4. Press the Diagnosis button on your smart phone
5. Press the Dishwasher button on your smart phone.
6. Press the RECORD button on the smart phone and then hold
the mouth piece of the smart phone near the speaker located
on the panel. Hold the phone no more than one inch (but not
touching) the machine.
7. Press and hold the Sanitary button on the dishwasher display for three seconds.
NOTE
8. With the phone held in place, press the Smart Diagnosis but-
ton on the phone.
Do not touch any other buttons or icons on the display
screen.
NOTE
9. ished. This takes about 17(LDS5540), 6(LDS5560) seconds
and the display will count down the time.
10. When the recording is complete, view the diagnosis by pressing the Next button on the phone.
Smart Diagnosis Through the Call Center
1. Call the LG call center at: (LG U.S.) 1-800-243-0000
(LG Canada) 1-888-542-2623.
2. When instructed to do so by the call center agent, hold the
mouthpiece of your phone near the speaker located on the
panel. Hold the phone no more than one inch (but not touching) the machine.
Do not touch any other buttons or icons on the display
screen.
NOTE
3. Press and hold the Sanitary button on the display screen for
three seconds.
4.
-
ished. This takes about 17(LDS5540), 6(LDS5560) seconds and
down the time.
5. Once the countdown is over and the tones have stopped, resume your conversation with the call center agent, who will
then be able to assist you in using the information transmitted for analysis.
Smart Diagnosis is a troubleshooting feature designed to assist, not replace, the traditional method of troubleshooting
pends upon various factors, including, but not limited to, the
reception of the cellular phone being used for transmission,
any external noise that may be present during the transmission, and the acoustics of the room where the machine is lo-
nosis would accurately troubleshoot any given issue.
NOTE
After three seconds, the display will change from - : -- to 17
(LDS5540), 6(LDS5560) and then start counting down the
remaining time.
the display will count
ENGLISH
WARRANTY
27
ENGLISH
27
WARRANTY
DISHWASHER LIMITED WARRANTY (USA)
of the original part. Replacement parts are warranted for the unexpired portion of the original warranty period. This limited warranty is good only to the
WARRANTY PERIOD
For the Period of: LG Will Replace:
One year from date of original purchase Any part of the Dishwasher which fails due to a defect in materials or workmanship. During this full
one-year of original purchase warranty, LGE will also provide, free of charge, all labor and on-site
service to replace the defective part.
Two year from date of original purchase
Any part of the dishwasher (except as listed below) which fails due to a defect in materials or
workmanship.
During this two-year parts warranty, you will be responsible for any labor or on-site service costs.
Five year from date of original purchase
Electronic control board and dishwasher rack which fails due to a defect in materials or workmanship.
During this , you will be responsible for any labor or on-site service costs.
Ten year from date of original purchase
Direct Drive motor which fails due to a defect in materials or workmanship.
During this ten-year warranty, you will be responsible for any labor or on-site service costs.
Limited Lifetime
Stainless steel door liner and tub (as long as owned by the original purchaser) which fails due to a
defect in materials or workmanship. During this limited lifetime parts warranty, you will be respon-
sible for any labor or on-site service costs
Replacement units and repair parts may be new or factory remanufactured. Replacement units and repair parts are warranted for the remaining portion
of the original unit’s warranty period
No other warranty is applicable to this product. THIS WARRANTY IS IN LIEU OF ANY OTHER WARRANTY, EXPRESS OR IMPLIED, INCLUDING WITH-
OUT LIMITATION, ANY WARRANTY OF MERCHANTABILITY OR FITNESS FOR A PARTICULAR PURPOSE. TO THE EXTENT ANY IMPLIED WARRANTY IS
REQUIRED BY LAW, IT IS LIMITED IN DURATION TO THE EXPRESS WARRANTY PERIOD ABOVE. NEITHER THE MANUFACTURER NOR ITS U.S. DISTRIBUTOR SHALL BE LIABLE FOR ANY INCIDENTAL, CONSEQUENTIAL, INDIRECT, SPECIAL, OR PUNITIVE DAMAGES OF ANY NATURE, INCLUDING WITHOUT
LIMITATION, LOST REVENUES OR PROFITS, OR ANY OTHER DAMAGE WHETHER BASED IN CONTRACT, TORT, OR OTHERWISE. Some states and/or
territories do not allow the exclusion or limitation of incidental or consequential damages or limitations on how long an implied warranty lasts, so the above
from state to state or territory to territory.
THIS LIMITED WARRANTY DOES NOT COVER:
1. Service calls to your home for delivery or pick-up, installation, instruction, replacement of house fuses, connection of house wiring or
plumbing, or to correct unauthorized repairs.
2. Failure of product to perform during power failures and interruptions or inadequate electrical service.
3. Damage caused by transportation or handling.
4.
5. Damages caused by leaky or broken water pipes, frozen water pipes, restricted drain lines, or inadequate or interrupted water supply.
6. Damages caused by inadequate supply of air.
7. Damages caused by operating the product in a corrosive atmosphere.
8. Repairs when your LG product is used in other than normal, singlefamily household use or contrary to the instructions described in the
product User’s Guide.
9. Damage resulting from accident, alteration, misuse, abuse, or improper installation, repair, or maintenance. Improper repair includes
10.
11. Use of accessories or components that are not compatible with this product.
12. Products with altered or removed serial numbers.
13.
14. Increases in utility costs and additional utility expenses. The cost of repair or replacement under these excluded circumstances shall be
borne by the consumer.
The cost of repair or replacement under these excluded circumstances shall be borne by the consumer.
For complete warranty details and customer assistance, please call or visit our
website:
Product Registration Information:
Model: ____________________________________________
Serial Number: ______________________________________
Date of Purchase: ____________________________________
Dealer Name: _______________________________________
Call 1-800-243-0000 (24 hours a day, 365 days a year) and select the appropriate option from the menu, or visit our website at http://us.lgservice.com
Or by mail: LG Customer Information Center:
P. O. Box 240007
201 James Record Road
Huntsville, Alabama 35813
ATTN: CIC
 Loading...