

LG LDF8572ST, LDF8072ST Owner's Manual

P/NO : MFL62077 185 www.lg.com
OWNER’S MANUAL
DISHWASHER
Please read this owner's manual thoroughly before
operating and keep it handy for reference at all times.
ENGLISH
LDF8572ST
LDF8072ST

ENGLISH
2
ENGLISH
TABLE OF CONTENTS
TABLE OF CONTENTS
3 IMPORTANT SAFETY INFORMATION
3 Basic Safety Precautions
4 Electrical Safety
5 Before Using the Dishwasher
6 PARTS AND FEATURES
6 Features
7 Parts
8 Control Panel
10 Cycle Options Chart
10 Icons
11 Cycle Selection Chart
12 OPERATING INSTRUCTIONS
1 2 Quick Start
1 3 Loading the Lower Rack
1 4 Folding Down the Lower Tines
1 4 Difficult to Remove Food on Dishes
1 5 Loading the Silverware Basket
1 6 Loading the Upper Rack
1 6 Folding Down the Upper Tines
1 7 Height Adjustable Upper Rack
1 7 Removing the Upper Rack
1 8 Loading the Cutlery Rack
1 9 Adding Detergent to the Dispenser
20 Adding Rinse Aid to the Dispenser
21 CARE AND CLEANING
2 1 Cleaning the Filters
2 2 Cleaning Metallic Parts
2 2 Cleaning the Lower Spray Arm
2 2 Cleaning the Upper Spray Arm
2 3 Cleaning the Top Spray Arm
2 3 Seasonal Maintenance and Storage
24 FAQ S
26 TROUBLESHOOTING
2 6 Before Calling for Ser vice
THANK YOU
Congratulations on your purchase and
welcome to the LG family. Your new LG
Dishwasher combines quiet, ecient
operation with advanced cleaning
technology. By following the operating
and care instructions in this manual,
your dishwasher will provide you with
many years of reliable service.
29 SPECIFICATIONS
2 9 Specif ications
30 WARRANTY
3 0 Product Registration Information

ENGLISH
3
IMPORTANT SAFETY INSTRUCTIONS
IMPORTANT SAFETY INSTRUCTIONS
READ ALL INSTRUCTIONS BEFORE USE
Your safety and the safety of others is very important.
We have provided many important safety messages in this manual and on your appliance. Always read and follow all safety messages.
This is the safety alert symbol. This symbol alerts you to potential hazards that can result in property damage or serious bodily
harm, even death.
The safety alert symbol will be followed by either the word “WARNING” or “CAUTION” then an important safety message. These
words mean:
WARNING
Indicates the possibility of serious bodily harm or death.
CAUTION
Indicates the possibility of injury or damage to property.
BASIC SAFETY PRECAUTIONS
WARNING
To reduce the risk of re, electric shock, or injury to persons when using this appliance, follow basic
precautions, including the following:
y Read all instructions carefully before using the dishwasher.
y Use the dishwasher only for its intended function.
y Only use detergents or rinse agents recommended for use in a
dishwasher. Keep all dishwasher detergents and additives out
of the reach of children.
y This appliance is not intended for use by young children.
y When loading items to be washed:
1) Load sharp items so that they are not likely to damage the
door seal.
2) Load sharp knives with the handles up to reduce the risk of
injury when reaching into the dishwasher.
y Do not wash plastic items in the dishwasher unless they are
labeled “dishwasher safe” or the equivalent. For plastic items
that are not so labeled, check the manufacturer’s recommendations.
y Do not operate the dishwasher unless all enclosure panels are
properly in place.
y Do not tamper with the controls.
y Do not abuse, sit on, or stand on the door or dish racks of the
dishwasher.
y To reduce the risk of injury, do not allow children to play in or
around the dishwasher.
y Under certain conditions, hydrogen gas may be produced in
a hot water system that has not been used for two weeks or
more. HYDROGEN GAS IS EXPLOSIVE. If the hot water system
has not been used for such a period of time, turn on all hot
water faucets and let the water ow for several minutes. This
will release any accumulated hydrogen gas. Since hydrogen
gas is ammable, do not smoke or use an open ame during
this time.
y Remove the door to the wash compartment when disposing of
an old dishwasher.
This manual contains very important information regarding the installation, use, and maintenance of your dishwasher. The manufacturer
cannot be responsible for injuries or damage caused by failure to follow these safety and caution instructions.

ENGLISH
4
IMPORTANT SAFETY INFORMATION
BASIC SAFETY PRECAUTIONS
WARNING
To reduce the risk of re, electric shock, or injury to persons when using this appliance, follow basic precautions,
including the following:
For a permanently connected dishwasher:
This appliance must be connected to a grounded metal, permanent wiring system, or an equipment grounding conductor must
be run with the circuit conductors and connected to the equipment grounding terminal or lead on the appliance. Consult with a
qualied electrician.
Tip Hazard
Do not put excessive downward force on the open dishwasher
door prior to installation, as this could cause damage to the unit
or cause it to tip over. Do not use the dishwasher before installation has been completed in accordance with the Installation Instructions.
ELECTRICAL SAFETY
WARNING
Electrical Shock Hazard
Failure to follow these instructions can result in death, re, or electrical shock.
y The dishwasher MUST be grounded. Connect the ground wire to the green ground connector in the terminal box.
y Do not use an extension cord with this appliance.
y The dishwasher is designed to be used with standard household current (120 Volts AC, 60Hz.). Before connecting the dishwasher, ensure
that the outlet or cable is properly grounded and polarized by circuit breakers or fuses. Failure to provide adequate grounding of this
appliance may cause electrical shock or malfunction of the appliance. Consult with a qualied electrician.
y Do not install or store the dishwasher where it will be exposed to weather conditions. Failure to observe this precaution may result in
electrical shock, re, malfunction, and/or deformation of the dishwasher.
y Do not damage or place heavy items on the power cord of the appliance. Do not use the dishwasher if it has a damaged power cord.
Power cord damage may cause re and electrical shock. Consult with a qualied electrician.
y Do not grasp the power cord or touch the dishwasher controls with wet hands. Do not use the dishwasher if it has a damaged power
cord or plug, and do not plug the dishwasher into a damaged outlet. Failure to observe these instructions may result in electrical shock.
y Disassembly or repair must be performed by experienced service persons. Improper disassembly or repair could lead to product failure
or electrical shock.

ENGLISH
5
IMPORTANT SAFETY INFORMATION
BEFORE USING THE DISHWASHER
Before using the dishwasher, please read the Important Safety
Instructions.
Water supply temperature should be a minimum of 120°F (49°C)
for better washing and reasonable cycle time.
For this reason, use the hot water supply only. It is also important
that the dishwasher is loaded according to instructions for eective cleaning. When loading the dishwasher, make sure that insoluble items such as bones, toothpicks, and pieces of paper have
been removed.
SAVE THESE INSTRUCTIONS
When loading the dishwasher, observe the following general
guidelines:
1. Place items with deep dish bottoms at an angle to help water
run o and speed the drying process.
2. Remove solid, burned-on scraps from dishes prior to loading
in the dishwasher.
3. Only load items that are dishwasher-safe.
Do not load utensils that are not heat-resistant, have
decorative metal trim, etc.
NOTE

ENGLISH
6
PARTS AND FEATURES
PARTS AND FEATURES
FE ATU RE S
LARGE CAPACITY
LG dishwashers allow you
to load very large items in
both the upper and lower
racks. The tall tub provides extra overall capacity and the clearance to accommodate large dishes.
Extra large items (max. 14
in.) may be loaded in the
lower rack by raising the
upper rack.
SLIM DIRECT MOTOR™
The new Slim Direct Motor™ is inverter-controlled.
Wash power is controlled
based on cycle selection.
It also oers high energy
eciency to minimize energy use.
HYBRID DRYING SYSTEM
This system eectively
dries dishes without the
use of a heating element
that would increase energy consumption.
STEAM WASHING
Steam technology provides better cleaning
performance than regular wash systems. Steam
is the most energy ecient gentle care for your
nest china and stemware.
VARIABLE SPRAY SYSTEM
Because the water spray
alternates between the
upper and lower racks,
all of the power from the
motor is directed to one
rack at a time. This concentrates all the cleaning power of the motor
on each rack in turn.
LIGHT TOUCH BUTTONS AND BLUE LCD
The light touch buttons
on the control panel
make selections easy
and convenient. The
blue LCD display clearly
displays the selected
cycle and options.
ENGLISH
7
PARTS
PARTS AND FEATURES
1
2
4
5
3
6
9
7
8
11
14
12
10
15
16
17
18
19
13
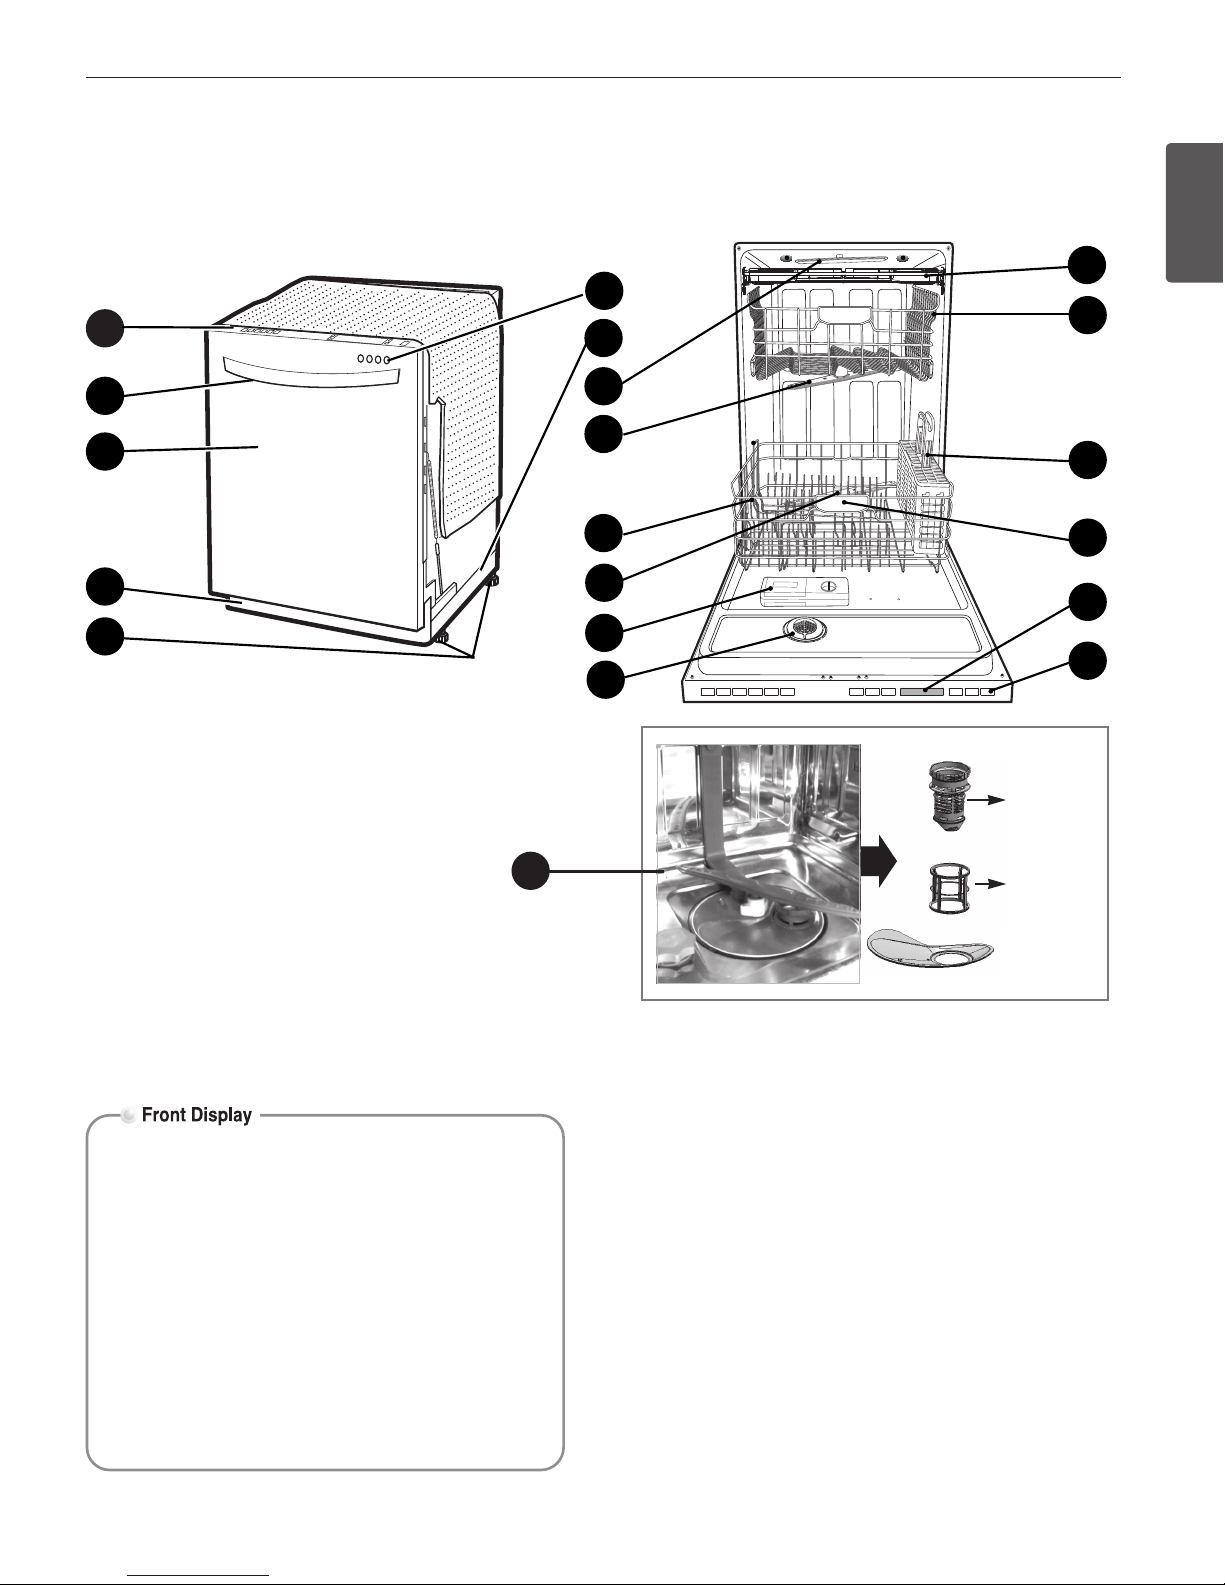
1. CONTROL PANEL
2. DOOR HANDLE
3. FRONT COVER
4. LOWER COVER
5. LEVELING FEET
6. FRONT DISPLAY SIGNALIGHT™
7. BASE
8. TOP SPRAY ARM
9. UPPER SPRAY ARM
10. STEAM NOZZLE
11. LOWER SPRAY ARM
12. DETERGENT AND RINSE AID DISPENSER
13. DRYING VENT COVER
14. CUTLERY RACK
15. UPPER RACK
16. SILVERWARE BASKET
17. LOWER RACK
18. TOP DISPLAY
19. POWER BUTTON
20. FILTRATION SYSTEM
The WASH, RINSE and DRY lamps
twinkle while each phase of washing
process. The CLEAN lamp turns off after
all procedure is ended for 4 minutes.
Keep Clean Light On
Press EXTRA DRY and HALF LOAD
Button on control panel to keep Clean
light on until Customer open door.
SignaLights (indicator lights)
The SignaLights illuminate when a cycle is selected
to indicate which stage is running (WASH, RINSE,
DRY, CLEAN). When a cycle is running, the SignaLight will illuminate for the active stage. Once the
cycle is complete, the CLEAN light will illuminate
for four minutes.
To keep the CLEAN light on until the door is open,
turn the power on, and then press and hold the
EXTRA DRY and HALF LOAD buttons on the control panel simultaneously until O or On appears
in the display. The dishwasher will remember this
setting until manually changed.
Mesh filter
Outer filter
Upper STS
filter
20
ENGLISH
8
PARTS AND FEATURES
CONTROL PANEL
1
2
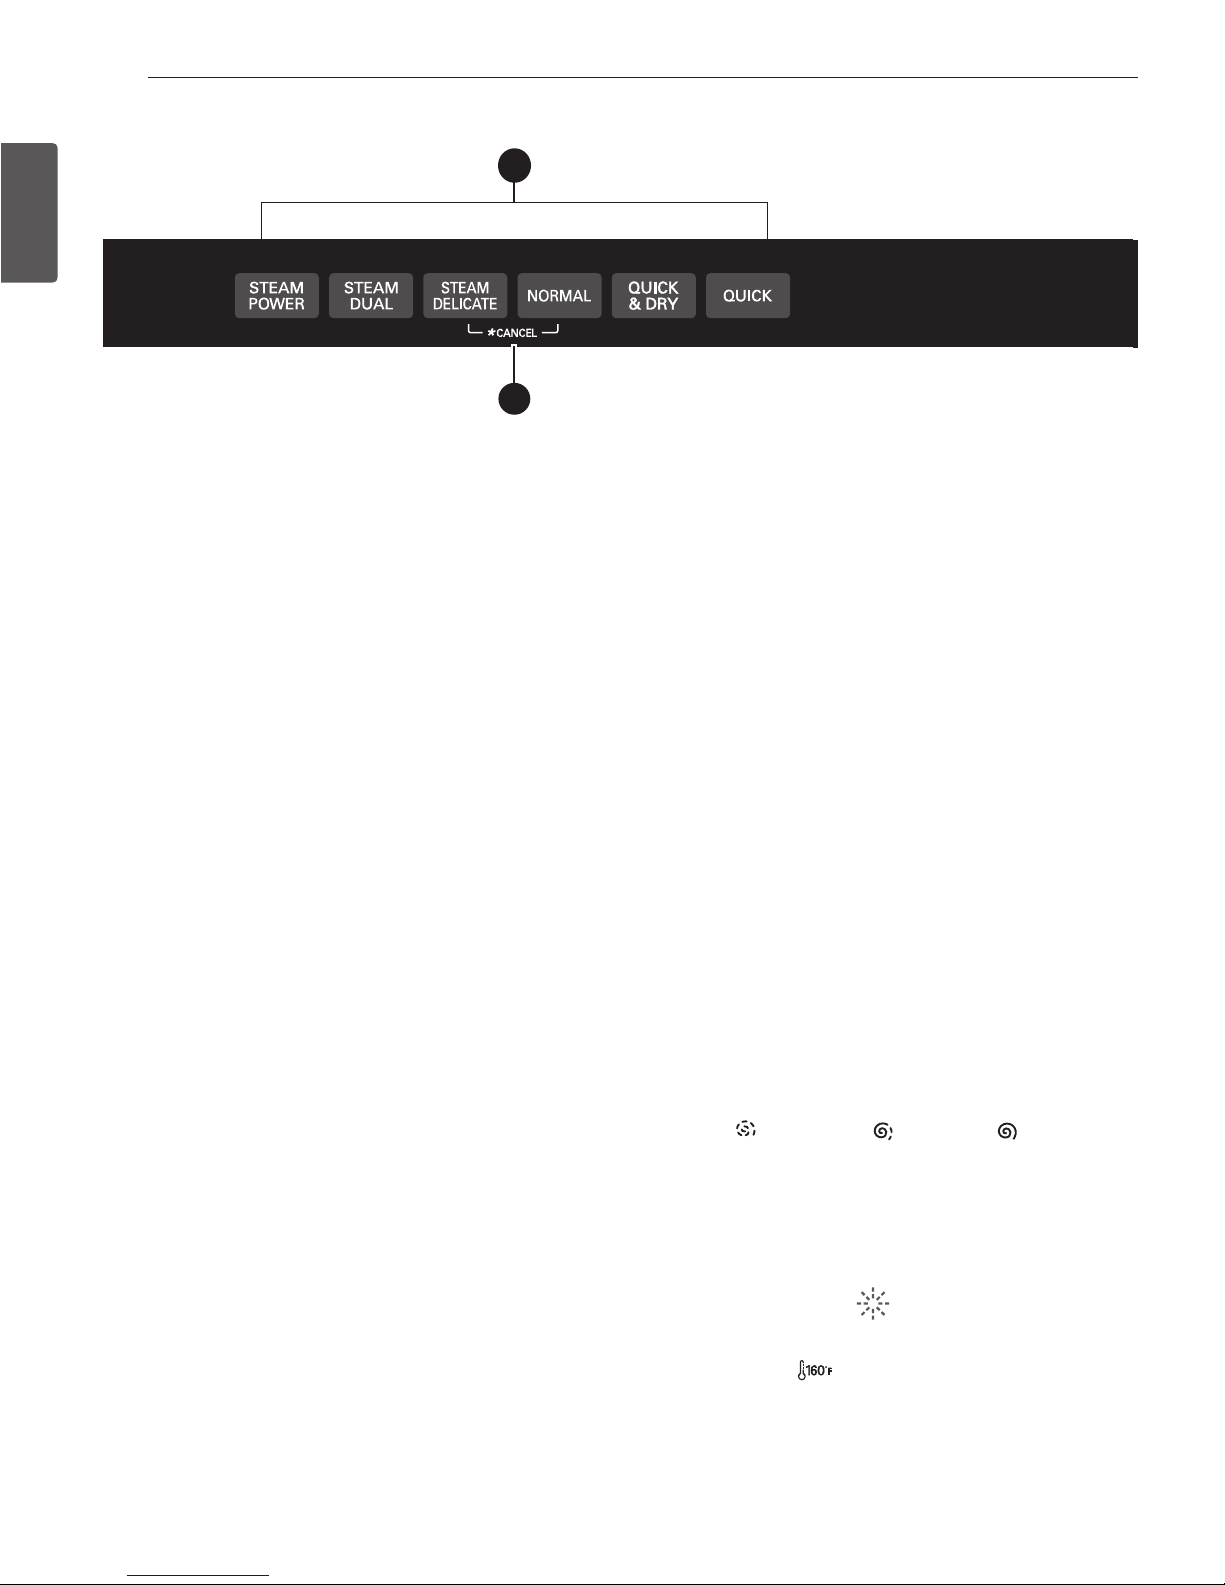
1. CYCLES
Select your desired cycle.
STEAM POWER
This cycle is for heavily and hard soiled dishes. Steam Power
defaults to the highest spray intensity and uses the power of
steam to wash heavily soiled dishes.
STEAM DUAL
This cycle washes the upper and lower racks at dierent spray
intensities. The default setting for this cycle washes the lower rack with strong spray intensity and the upper rack with
soft spray intensity. This provides optimum cleaning performance for mixed loads, including ne china and stemware. If
other combinations are desired, use the steps listed below to
change the intensities or to use the HALF LOAD feature.
How To Use Dual Intensity:
1. Select Steam Dual.
2. Press the Spray button to toggle between Soft, Medium
and Strong for the upper spray arm.
3. After making your selection for the upper spray arm, press
the Half Load button.
4. Press the Spray button to toggle between Soft, Medium
and Strong for the lower spray arm.
5. Close the door to start the cycle.
STEAM DELICATE
This cycle adds the gentle power of steam to boost the cleaning power of the delicate cycle. The cycle is intended for effectively cleaning delicate items such as ne china and stemware.
NORMAL
This cycle is for normally soiled, everyday loads.
QUICK & DRY
This is a shortened c ycle that is intended for washing and drying recently used dishes or lightly soiled loads. During this
cycle, both spray arms will run at the same time.
QUICK
This is a shortened cycle that is intended to wash recently
used or lightly soiled loads, without drying.
CHIME ON/OFF
To enable or disable the chime, rst, turn on the dishwasher.
Press and hold the Quick and Steam Delicate buttons simultaneously for approximately three seconds.
2. CANCEL
To cancel a cycle, open the door and then press and hold the
Steam Delicate and Normal buttons together for approximately three seconds. The drain pump will deactivate and
the cycle will cancel. The display will show “dr” and the dishwasher will drain the water. After the dishwasher is drained,
the power will turn o.
If power is turned on and no cycle has been selected, the
dishwasher will power o within four minutes.
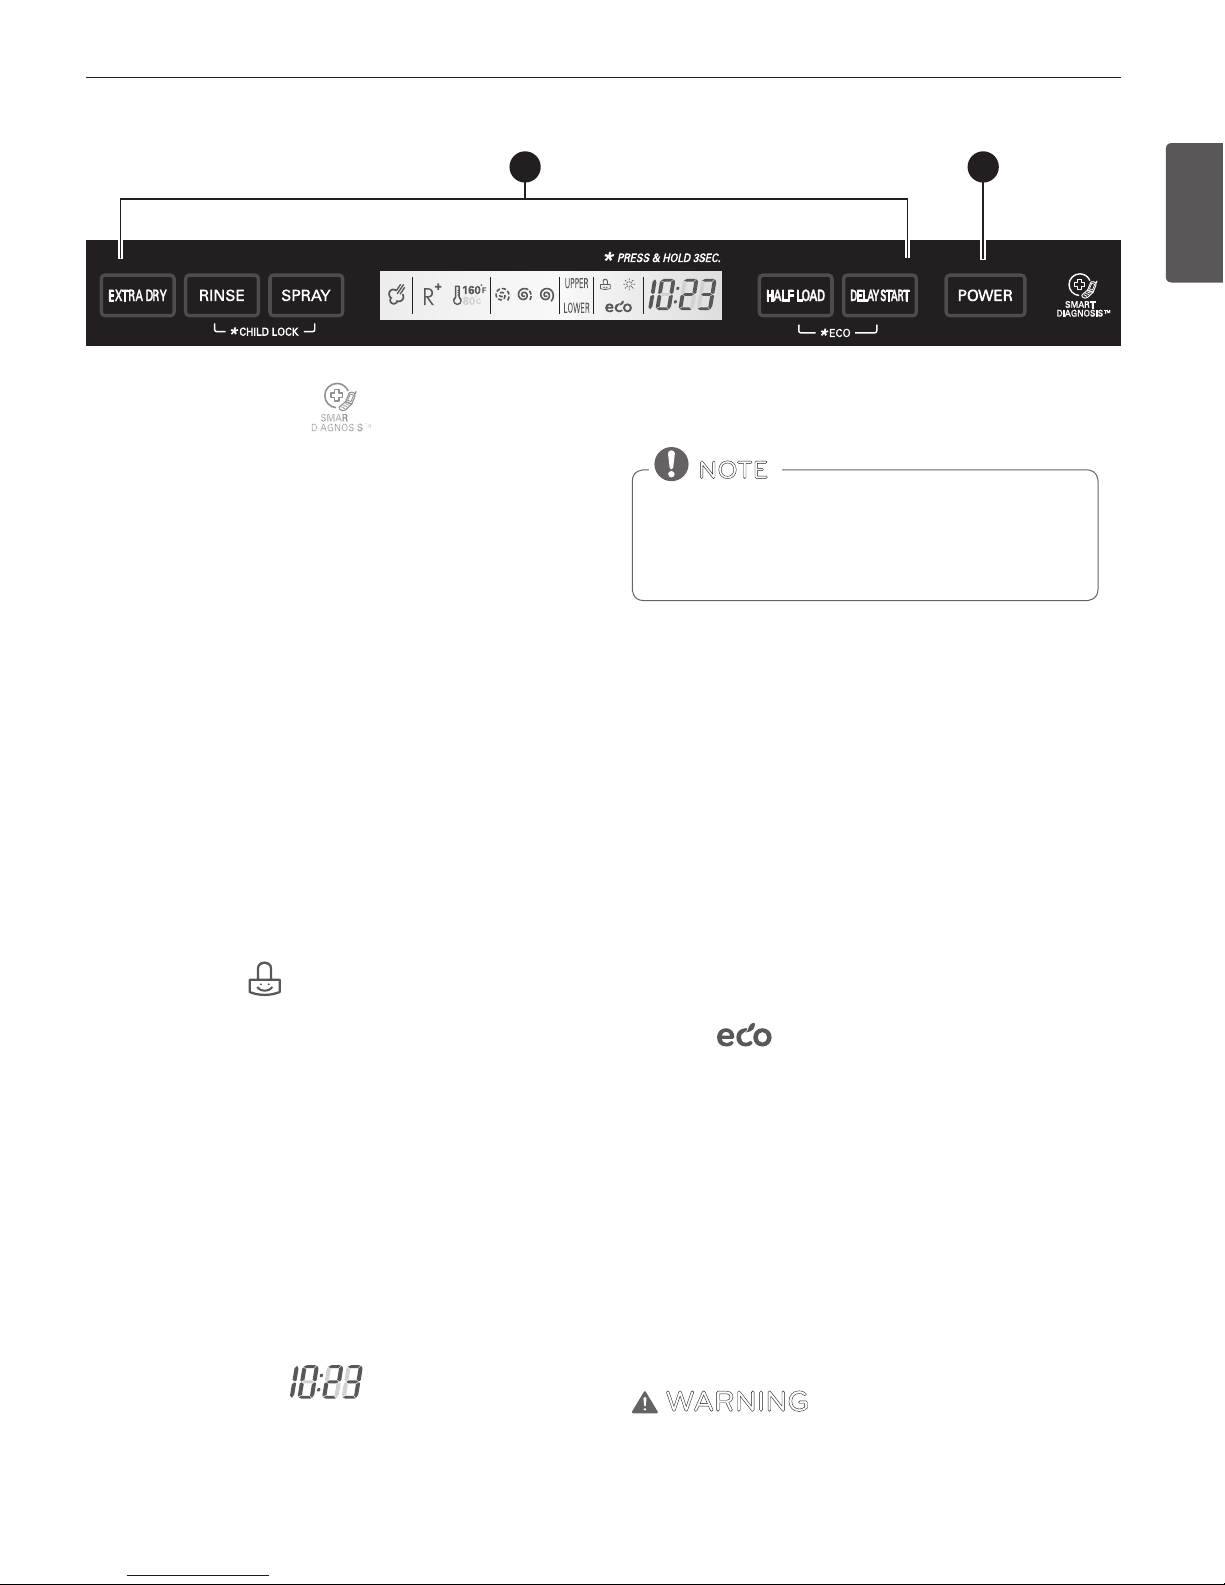
3. CYCLE OPTIONS
(Refer to the control panel on the next page)
Press the desired cycle and then select the options for that
cycle.
SPRAY (INTENSITY)
First, select the desired cycle. Press the Spray button repeatedly until the desired spray intensity is selected.
Soft ( ), Medium ( ), Strong ( )
RINSE
Repeated pressing of the Rinse button will select the desired
Rinse option. The Sanitary, Extra Rinse, or Sanitary and Extra
Rinse lights will show in the bottom left portion of the display.
The RINSE AID symbol indicates that the rinse aid
needs to be relled.
SANITARY ( )
This high-temperature rinse sanitizes dishes and glassware in
accordance with NSF/ANSI Standard 184 for residential dishwashers. Certied dishwashers are not intended for licensed
food establishments.
ENGLISH
9
PARTS AND FEATURES
CONTROL PANEL
3 4
SMART DIAGNOSIS
Should you experience any problems with your dishwasher,
it has the capability of transmitting data to your Smart Phone
using the LG Smart Laundry & DW Application or via you telephone to the LG call center.
EXTRA RINSE ( R+ )
The Extra Rinse symbol indicates that an extra rinse has been
added to the cycle. An extra rinse can help reduce hard water
spotting on dishes. To add an extra rinse, press the Rinse button repeatedly until the Extra Rinse symbol appears in the
display.
RINSE ONLY
This cycle is a quick rinse for dishes that will not be washed
immediately. This cycle will rinse dishes that have excess soil
to soften dried on residue. Rinsing the dishes will help prevent odors in the dishwasher. No detergent should be used.
To select the Rinse Only cycle, turn the dishwasher on, and
press the Rinse button once without pressing any other cycle
buttons.
The Rinse Only cycle is not available with any other cycles.
CHILD LOCK
The Child Lock feature helps prevent your settings from being changed during a cycle. Selecting this feature locks all
of the buttons, except for the Power button, on the control
panel. This feature does not lock the door.
To activate the Child Lock:
1. Open the dishwasher door.
2. Press the Power button.
3. Select the cycle (and desired options).
4. Press and hold the Rinse and Spray buttons for three seconds. The Child Lock indicator will illuminate in the display
once the Child Lock is activated.
5. Close the door to begin the cycle.
DIGITAL DISPLAY
The Digital Display on the control panel shows the ESTIMATED cycle time. When the dishwasher is powered up, the display will be blank. When the cycle and options are selected,
the display will show the total estimated time to complete
those selections. During operation, the display shows the remaining estimated operating time.
• The estimated time shown in the display does not include delay times for heating water, etc.
• If Delay Wash is selected, the display shows the delay
time in hours.
• Time may vary depending on the soil level of your load.
NOTE
HALF LOAD
For small loads, you may use just the upper or lower rack to
save energy. Each press of the Half Load button cycles between upper rack only and lower rack only.
DELAY S TA RT
The Delay Start feature allows you to delay the start of a selected cycle. Each time the Delay Start button is pressed, the
delay time will increase an hour. The delay start time can be
set from 1 to 24 hours, in one-hour increments.
EXTRA DRY
Select the EXTRA DRY option for better drying performance.
This option adds 30 minutes of extra drying time to the cycle.
The EXTRA DRY button will illuminate when the option has
been selected.
ECO
The ECO option saves energy by using less water. This option
should only be used with light to medium soiled dishes.
4. POWER
y Press the Power button to turn on the control panel. If no
cycle is selected within four minutes, the dishwasher will
power o.
y After the cycle is complete, the power automatically turns
o for safety and economy purposes.
y If there is a power surge, power outage, or disruption of
any kind, the PF indicator will display and power will be automatically turned o for safety. The cycle will need to be
restarted.
WARNING
Steam can cause burns. Use caution in the area of the steam nozzle, on the left side of the dishwasher, if the door is opened during
the steam portion of a cycle. Contact with the steam or the steam
nozzle can cause burns.
LDF8572ST, LDF8072ST LED Display
ENGLISH
10
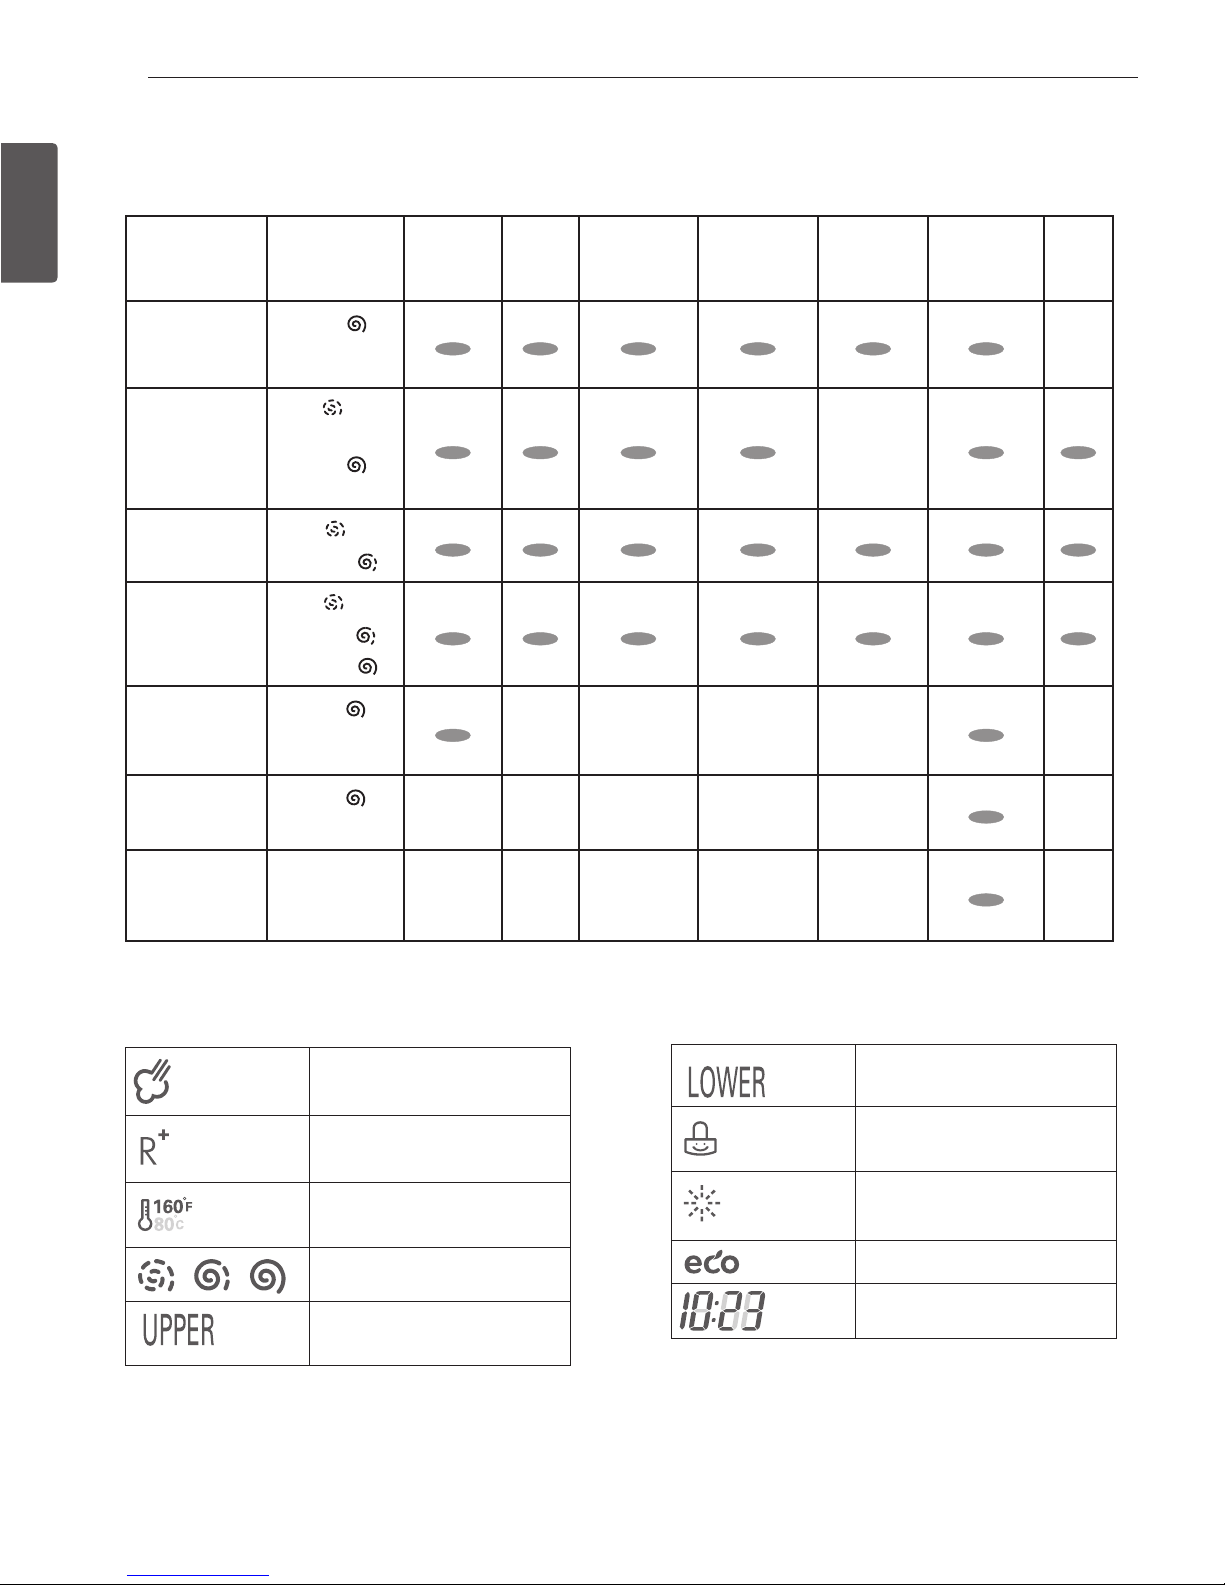
Cycle Available
Spray Level
(default bold)
Extra Dry Sani
Rinse
Extra Rinse Sanitary/
Extra Rinse
Half Load Delay Start Eco
Steam Power
Strong
Steam Dual
Soft
(upper arm)
Strong
(lower arm)
Steam Delicate
Soft
Medium
Normal
Soft
Medium
Strong
Quick & Dry
Strong
Quick
Strong
Rinse
PARTS AND FEATURES
CYCLE OPTION CHART
The cycle guide below shows the default settings and available options for each cycle.
Steam Cycle
Extra Rinse
Sani Rinse
Low, Medium, High Spray
Intensity
Upper Spray Arm
Lower Spray Arm
Child Lock
Low Rinse Aid Indicator
Eco Cycle
Cycle Time Indicator
ICONS
 Loading...