

Page 1

ENGLISH ESPAÑOL FRANÇAIS
USER’S GUIDE & INSTALLATION INSTRUCTIONS
CERAMIC-GLASS
INDUCTION COOKTOP
Please read this guide thoroughly before operating
and keep it handy for reference at all times.
HN7413AG
LCE30845
www.lg.com
MFL41494801
Page 2
INTRODUCTION
IMPORTANT SAFETY INFORMATION
Important Notice: Radio Interference. . . . . . . . . . . . . 3
Important Safety Precautions . . . . . . . . . . . . . . . . 4–8
INTRODUCTION TO INDUCTION COOKING
Induction Cooking . . . . . . . . . . . . . . . . . . . . . . . . . . . 9
Selecting Cookware. . . . . . . . . . . . . . . . . . . . . . . 9–11
PARTS AND FEATURES
Parts and Features of Your Cooktop . . . . . . . . . . . . 12
Touch Control Features . . . . . . . . . . . . . . . . . . . . . . 13
OPERATING INSTRUCTIONS
Before Using the Cooktop . . . . . . . . . . . . . . . . . . . . 14
Setting the Controls . . . . . . . . . . . . . . . . . . . . . . 14–16
Using the Bridge Cooking Zones. . . . . . . . . . . . . . . 17
Using the Timer . . . . . . . . . . . . . . . . . . . . . . . . . . . . 17
Using Child Lock . . . . . . . . . . . . . . . . . . . . . . . . . . . 18
Other Functions............................18
CARE AND CLEANING
Cleaning the Cooktop . . . . . . . . . . . . . . . . . . . . . . . 19
INSTALLATION INSTRUCTIONS
Before You Begin . . . . . . . . . . . . . . . . . . . . . . . . . . 20
Unpacking the Cooktop ......................20
Technical Specifications. . . . . . . . . . . . . . . . . . . . . . 20
Preparing the Installation Location .............21
Dimensions and Clearances . . . ...............22
Electrical Connections....................23–25
Cooktop Installaton . . . . . . . . . . . . . . . . . . . . . . 25, 26
Final Check . . . . . . . . . . . . . . . . . . . . . . . . . . . . . . . 26
THANK YOU!
Congratulations on your purchase
and welcome to the LG family.
Your new LG Induction Cooktop
combines precision cooking
features with simple operation
and stylish design. By following
the operating and care instructions
in this manual, your cooktop will
provide you with many years of
reliable service.
TROUBLESHOOTING
Before Calling for Service. . . . . . . . . . . . . . . . . 27, 28
WARRANTY
Warranty for customers in the U.S.A.. . . . . . . . . . . 29
Warranty for customers in Canada . . . . . . . . . . . . . 30
Product Registration Information
Model:__________________________________
Serial Number: __________________________
2
Date of Purchase: ________________________
Page 3

WARNING For your safety, the information in this manual must be
followed to minimize the risk of fire, electric shock, or to prevent property damage,
personal injury, or death.
IMPORTANT SAFETY INFORMATION
READ ALL INSTRUCTIONS BEFORE USE
This unit has been tested and found to comply with
You can download an owner's & installation manual at http://www.lg.com.
the limits for a class B digital device, pursuant to
Part 18 of the FCC rules. These limits are
designed to provide reasonable protection against
harmful interference in a residential installation.
This unit generates, uses and can radiate radio
frequency energy and, if not installed and used in
accordance with the instructions, may cause
harmful interference to radio communications.
However there is no guarantee that interference
will not occur in a particular installation. If this unit
does cause harmful interference to radio or
television reception, which can be determined by
turning the unit off and on, the user is encouraged
to try to correct the interference by one or more of
the following measures:
• Reorient or relocate the radio and/or television
receiving antennae.
• Increase the distance between the cooktop unit
and radio or television receiver.
• Connect the cooktop unit into an outlet or a
circuit different from that to which the radio or
television receiver is connected.
IMPORTANT NOTICE: RADIO INTERFERENCE
ENGLISH
3
Page 4
IMPORTANT SAFETY INFORMATION
READ ALL INSTRUCTIONS BEFORE USE
SAFETY PRECAUTIONS
• Proper Installation: Be sure your appliance is
properly installed and grounded by a qualified
technician in accordance with the National
Electrical Code ANSI/NFPANo. 70, latest
edition in the United States, and all local code
requirements. Install only per installation
instructions.
• Do not attempt to repair or replace any
part of your cooktop unless it is specifically
recommended in this manual. All other service
should be referred to a qualified technician.
• Remove all tape and packaging wrap before
using the appliance. Destroy the carton and
plastic bags after unpacking the appliance.
Never allow children to play with packaging
material.
• The safety aspects of this appliance comply
with accepted technical standards.
• Know how to disconnect the electrical
power to the appliance at the circuit
breaker or fuse box in case of an
emergency. Mark the breaker or fuse for ease
of identification and swift action if necessary.
• Do not repair or replace any part of the
appliance. All servicing should be done only
by a qualified technician to avoid the risk of
personal injury and damage to the appliance.
• Never modify or alter the construction of an
appliance such as removal of panels, wire
covers or any other permanent part of the
product.
• Storage on appliance: Flammable materials
should not be stored near or on the
cooking surface. This includes paper, plastic
and cloth items, such as cookbooks,
plasticware and towels, as well as flammable
liquids. Do not store explosives, such as
aerosol cans, on or near the appliance.
Flammable materials may explode and result
in fire or property damage.
• Do not leave children alone. Children
should not be left alone or unattended in
the area where an appliance is in use. They
should never be allowed to sit or stand on any
part of the appliance.
• Do not store or use gasoline or other
flammable vapors and liquids in the vicinity
of this or any other appliance.
CAUTION
Items of interest to children should not be
stored in cabinets above a cooktop or on the
backsplash of a cooktop—children climbing
on the cooktop to reach items could be
seriously injured.
W ARNING
Never use your appliance for warming or
heating a room.
W ARNING
Persons with a pacemaker or similar
medical device should exercise caution
using or standing near an induction
unit while it is in operation, as the
electromagnetic field may affect the working
of the pacemaker or similar medical device.
It would be advisable to consult your doctor
or the pacemaker or similar medical device
manufacturer about your particular situation.
CAUTION
DO NOT touch Cooking Zones or areas
near these surfaces. Cooking Zones may be
hot from residual heat even though they are
dark in color. Areas near the Cooking Zones
may become hot enough to cause burns.
During and after use, do not touch or let
clothing or other flammable materials touch
these areas until they have had sufficient
time to cool.
4
Page 5

• The installation and connection of the new
appliance must only be carried out by qualified
personnel.
• Flush-mounted appliances may only be
operated following installation in suitable
cabinets and workplaces which conform to the
relevant standards. This ensures sufficient
protection against electric shock as required
by certification agencies.
• If your appliance malfunctions or fractures,
switch off all cooking zones, and contact
Service Center.
ELECTRICAL SAFETY
IMPORTANT SAFETY INFORMATION
READ ALL INSTRUCTIONS BEFORE USE
• Wear proper apparel. Loose-fitting or
hanging garments should never be worn
while using the appliance. Do not let clothing
or other flammable materials contact hot
surfaces.
• Do not use water or flour on grease fires.
Smother the fire with a pan lid, or use baking
soda, a dry chemical or foam-type
extinguisher.
• When heating fat or grease, watch it
closely . Fat or grease may catch fire if
allowed to become too hot.
• Use only dry pot holders. Moist or damp pot
holders on hot surfaces may result in burns
from steam. Do not let the pot holders touch
hot surface units. Do not use a towel or other
bulky cloth instead of a pot holder.
• Do not heat unopened food containers.
Buildup of pressure may cause the container
to burst and result in injury.
SAFETY PRECAUTIONS (cont.)
• If the surface is cracked, switch off the
appliance to avoid the possibility of
electric shock. Do not reuse your
COOKTOP until the glass surface has
been changed.
• When using the COOKTOP, never use
aluminum foil, products wrapped in
aluminum foil, or deep-frozen food in
aluminum cookware.
• If the supply cord is damaged, it must
be replaced by the manufacturer, its
service agent or similarly qualified
persons in order to avoid a hazard.
CHILD SAFETY
• This appliance is not intended for use by
young children or infirm persons unless
they have been adequately supervised by
a responsible person to ensure that they
can use the appliance safely.
• Young children should be supervised to
ensure that they do not play with the
appliance.
• Accessible parts may become hot
during use. Young children should be
kept away.
W ARNING
W ARNING
ENGLISH
5
Page 6

IMPORTANT SAFETY INFORMATION
READ ALL INSTRUCTIONS BEFORE USE
SAFETY DURING USE
• This appliance may only be used for normal
cooking and frying in the home. It is not
designed for commercial or industrial purposes.
• Do not use the cooktop to heat the room.
• Take care when plugging in electric
appliances near the cooktop. Cords must not
come into contact with the hot surface. This
could cause damage to the cooktop and cable
insulation.
• Overheated fats and oils catch fire quickly.
You should supervise cooking when preparing
foods in fat or oil.
• After use, switch off the hob element by its
control and do not rely on the pan detector.
• Always keep the control panels clean and
dry. Do not let liquids or grease remain on the
cooktop controls area. Spilled or burnt-on foods
can activate or deactivate the appliance. Clean
the controls area thoroughly to resume normal
operation of the appliance.
• Never place combustible items on the
cooktop.
• Never keep any combustible items or
aerosol cans in a drawer located under
the cooktop.
• Avoid placing metal cooking utensils on
the cooking surface areas. Metal objects
can become hot and cause burns.
• Know which touch keypad controls each
surface of the cooking zones.
• Clean the appliance regularly to keep all
parts free of grease that could catch fire.
Exhaust fan ventilation hoods and grease filters
should be kept clean. Do not allow grease to
accumulate on hood or filter. Greasy deposits
in the fan could catch fire. Refer to hood
manufacturer's instructions for cleaning.
• Use proper pan size. This appliance is
equipped with one or more Cooking Zones
of different sizes.
• Select utensils having flat bottoms large
enough to cover the Cooking Zones. The
pan detection sensors will not allow the
affected cooking zones to operate without
a pan present.
• Do not place any object on or near the
control keypad area in order to prevent
accidental activation of the cooktop
controls.
• Utensil handles should be turned inward
and should not extend over adjacent
cooking zones to reduce the risk of burns,
ignition of flammable materials, and spillage
due to unintentional contact with the utensil.
• Never leave prepared food on the Cooking
Zones. Boilovers cause smoking and greasy
spillovers that may ignite, or a pan that has
boiled dry may melt or become damaged.
• Protective liners: Do not use aluminum foil
to line any part of the cooktop. Only use
aluminum foil as recommended after the
cooking process, if used as a cover to be
placed over the food. Any other use of
aluminum foil may result in the risk of electric
shock, fire or short circuit.
• Glazed cooking utensils: Only certain
types of glass, glass/ceramic, ceramic,
earthenware, or other glazed utensils are
suitable for rangetop service without
breaking due to the sudden change in
temperature. Check the manufacturer’s
recommendations for cooktop use.
• Ventilating hood: The ventilating hood
above your cooking surface should be
cleaned frequently, so the grease from
cooking vapors does not accumulate
on the hood or filter.
• Do not clean or operate a broken cooktop.
If cooktop should break, cleaning solutions and
spillovers may penetrate the broken cooktop
and create a risk of electric shock. Contact a
qualified technician immediately.
• Clean cooktop with caution. If a wet sponge
or cloth is used to wipe spills on a hot cooking
area, be careful to avoid a steam burn. Some
cleaners can produce harmful fumes if applied
to a hot surface.
6
Page 7

COOK MEAT AND POULTRY THOROUGHLY
Cook meat and poultry thoroughly—meat to at
least an INTERNAL temperature of 160°F and
poultry to at least an INTERNAL temperature of
180°F. Cooking to these temperatures usually
protects against foodborne illness.
IMPORTANT SAFETY INFORMATION
• Do not place hot cookware on cold cooktop
glass. This could cause glass to break.
• Do not slide pans across the cooktop
surface. They may scratch the cooktop
surface.
• Do not let pans boil dry. This may cause
permanent damage in the form of breakage,
fusion, or marking that can affect the ceramicglass cooktop. (This type of damage is not
covered by your warranty.)
• Never leave surface units unattended at
high heat settings. Boilover causes smoking
and greasy spillovers that may ignite.
SAFETY DURING USE (cont.)
DO NOT pick up the supplied bridge pan
handles after cooking. They might be hot
and there is a risk of burning yourself.
• Always switch off the appliance before
cleaning.
• For safety reasons, do not clean the
appliance with a steam jet or high-pressure
cleaner.
• Clean the cooktop in accordance with the
maintenance and cleaning instructions in
this manual.
• Steam cleaner is not to be used for
cleaning of the cooktop.
• Do not use harsh abrasive cleaners or
rough metal scrapers to clean the cooktop
glass since they can scratch the surface,
which may result in shattering of the glass.
SAFETY WHEN CLEANING
CAUTION
READ ALL INSTRUCTIONS BEFORE USE
ENGLISH
7
Page 8
IMPORTANT SAFETY INFORMATION
READ ALL INSTRUCTIONS BEFORE USE
HOW TO AVOID DAMAGE TO THE APPLIANCE
• Prior to using your cooktop for the first time,
apply the recommended cooktop cleaning
creme to the ceramic surface. Buff with a
non-abrasive cloth or pad. This will make
cleaning easier when soiled from cooking.
The special cooktop cleaning cream leaves
a protective finish on the glass to help prevent
scratches and abrasions.
• Do not use the cooktop as a worksurface or
storage space.
• Please be careful at the edges when moving
pots and pans around.
• Do not have the cooking zones on with empty
pans, or with no pots or pans on them.
• Ceramic glass is very tough, and impervious
to sharp temperature changes but is not
unbreakable. It can be damaged if particularly
hard or sharp objects fall onto it.
• Be very cautious if using pots made of cast
iron, or other pots with rough edges or burrs.
Moving these can cause scratches on glass.
• If sugar or a mixture containing sugar falls onto
a hot cooking zone and melts, remove
immediately, while still hot. If left to cool down,
it may damage the surface when removed.
NOTE: There is a risk of burning yourself
when the glass scraper is used on a hot
cooking zone!
• Keep meltable objects or materials away from
the ceramic glass surface, for example, plastic
utensils, aluminum foil, or cooking wraps.
If any materials or foodstuffs melt on the
ceramic-glass surface, these should be
cleaned up immediately.
DISPOSAL OF OLD APPLIANCES
To protect the environment, it is important that
worn-out appliances are disposed of in the
correct manner.
• The appliance must not be disposed of with
household rubbish.
• You can obtain information about collection
dates or public refuse disposal sites from
your local health council or environmental
health office.
Before disposing of old appliances please
make them inoperable so they cannot be
a source of danger. To do this, have a
qualified person disconnect the appliance
from the house circuitry.
CAUTION
CALIFORNIA SAFE DRINKING WATER AND TOXIC
ENFORCEMENT ACT
WARNING:This product contains chemicals known to the State of California to cause
cancer. Wash hands after handling.
READ AND FOLLOW THIS SAFETY INFORMA TION CAREFULLY.
SAVE THESE INSTRUCTIONS
8
Page 9
INTRODUCTION TO INDUCTION COOKING
INDUCTION COOKING
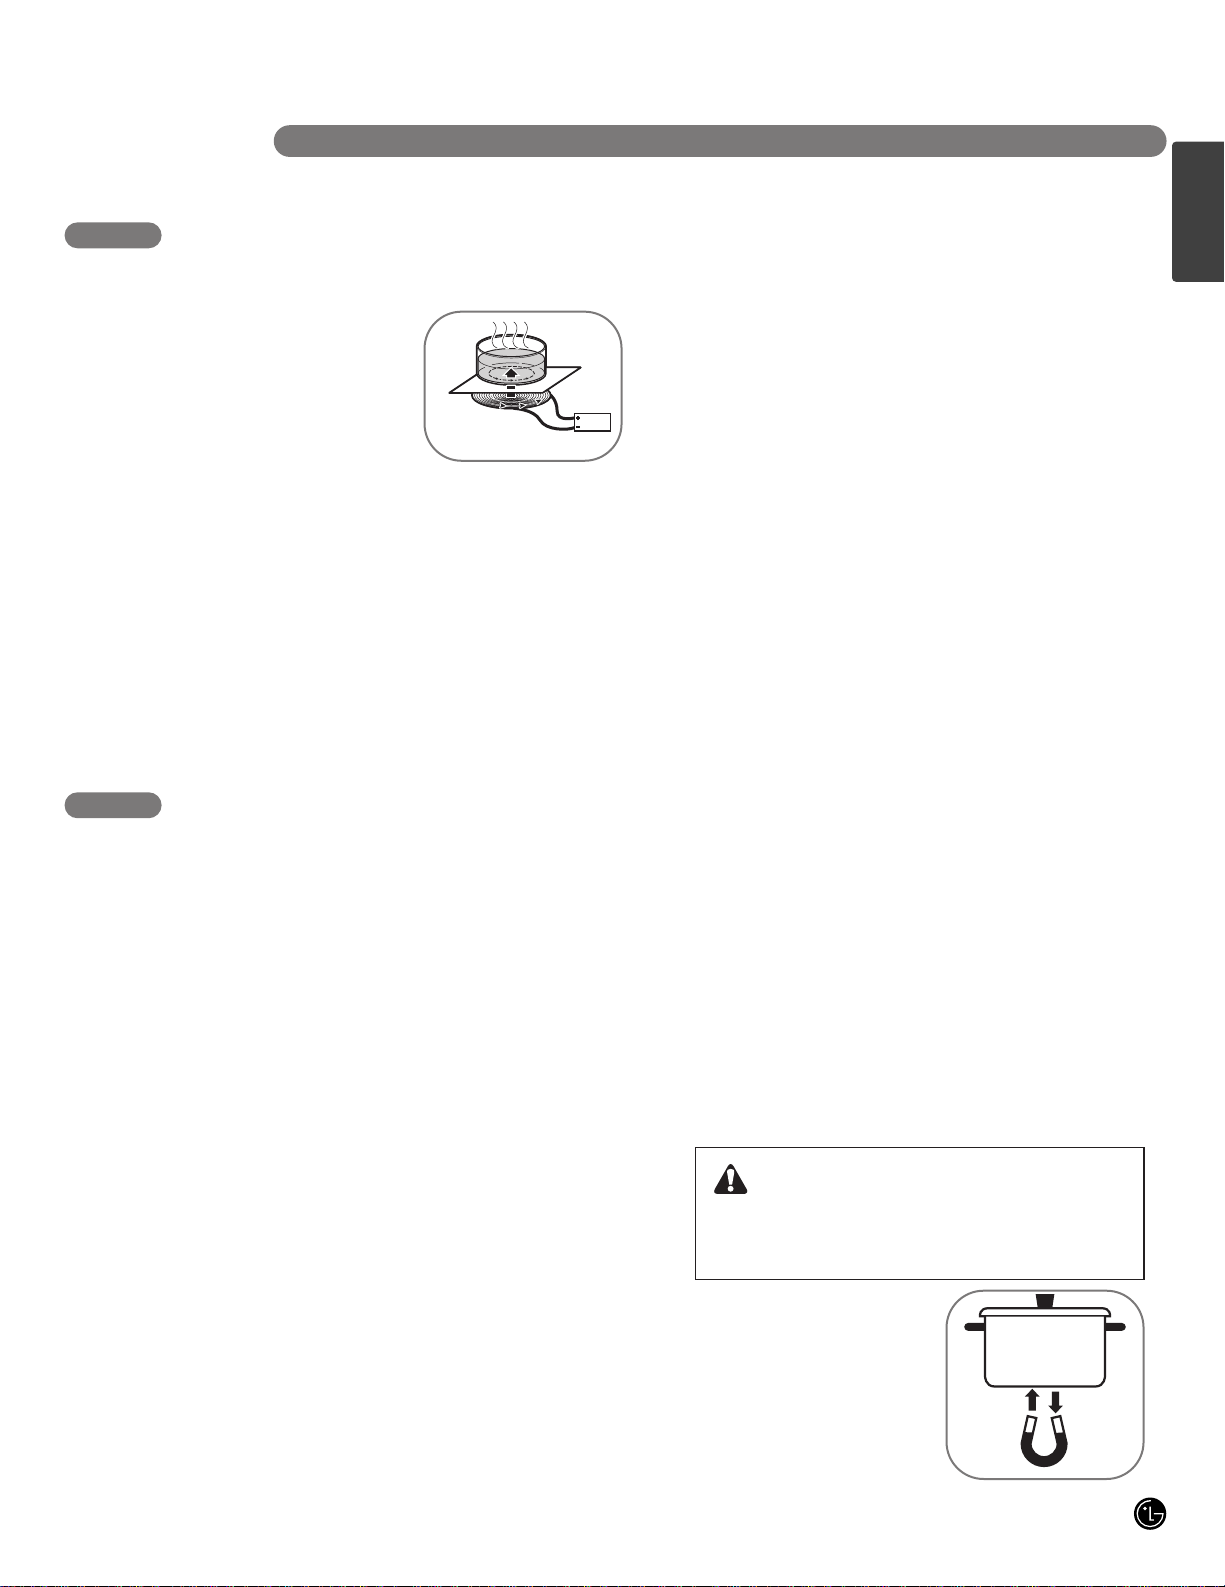
HOW INDUCTION COOKING WORKS
An induction coil is beneath
the ceramic glass cooking
surface. This generates
magnetic fields, which act
directly on the base of the
pots and pans as
compared to methods that
first heat the ceramic glass. This means that the
base of the pan is immediately heated up,
saving time and energy.
Since the heat required for cooking is generated
directly in the base of the pan, the Cooking Zone
itself warms up only slightly. The cooktop becomes
hot from the heat from the base of the pan.
NOTE: If there is no pot or pan on the cooking
zone, there is no energy transfer (heating up).
This prevents the Cooking Zones being switched
on and becoming hot accidentally.
IMPORTANT:
• Remove all tape and packaging wrap before
using the appliance. Destroy the carton and
plastic bags after unpacking the appliance.
Never allow children to play with packaging
materials.
• Electromagnetic fields can affect electronic
circuits and interfere with portable radios
and phones.
• Do not put magnetically active objects (e.g.,
credit cards, computer diskettes, cassettes) on
or near the ceramic glass surface while one or
more induction cooking zones are in use!
• Do not put any metallic objects (e.g., spoons,
pan lids) on the Cooking Zones as they can
become hot when the Cooking Zones are
in use.
SELECTING COOKWARE
POTS AND PANS
• In principle, all pots and pans with magnetic
bases are suitable. These include steel, steelenamel, as well as cast-iron pots and pans.
• High grade steel pans with a mixed metal base
(sandwich base, e.g. Tefal
®
with an
aluminum/copper base) are suitable for
induction only if the manufacturer has
expressly marked them as such. In that case
they have a magnetic material in the base.
• If you wish to use a special type of pan (e.g., a
pressure cooker, simmering pan, wok), please
follow the manufacturer’s instructions and do
not use a very thin pan.
NOTE: Some cookware can produce noises
when used on induction cooking zones. This is
not a fault in the cooktop, and its function will not
be impaired in any way as a result.
SUITABILITY TEST:
If you are not sure if a pot or pan is suitable for
use with your induction cooktop, you can find out
with a few simple tests:
• Place a pot filled with a little water (1/8ʺ–1/4ʺ)
on the Cooking Zone. Set the Cooking Zone to
full power (power level 9).
• You can also check
cookware suitability
with a magnet. If the
magnet remains fixed to
the base of the pan, the
pan is suitable for
induction cooking.
The pan base of suitable kitchenware
heats up within a few seconds! Water
should boil rapidly.
The magnetic Cooking Zone sensors located below the cooktop surface require the use of cookware
made with magnetic material in order to start the heating process on any of the Cooking Zones.
When purchasing pans, look for cookware specifically labeled by the manufacturer for use with
induction cooktops.
CAUTION
ENGLISH
9
Page 10
INTRODUCTION TO INDUCTION COOKING
SELECTING COOKWARE (continued)
AVOIDING SCRATCHES
It is recommended to always use heavier gauge
stainless steel cookware on your induction
cooktop surface. This will help reduce the
possibility of developing scratches on the
ceramic surface. Low-quality cookware can
scratch the cooktop surface.
Cookware should always be lifted over the
ceramic cooktop surface to prevent scratching.
Sliding any type of cookware over the ceramic
cooktop can affect the overall appearance of the
cooktop. Over time, sliding ANY type of cookware
over the ceramic cooktop may alter the overall
appearance of the cooktop. Eventually, the
buildup of scratches can make cleaning the
surface difficult and degrade the overall
appearance of the cooktop.
Scratches can also result from grains of sand
(e.g., after washing vegetables) which are
dragged with the pot across the cooking surface.
FOR BEST RESULTS:
Always follow the recommendations for proper
cookware type and size. In addition:
• Do not use dirty pans with grease buildup.
Always use pans that are easy to clean after
cooking, and make sure that the bottoms of the
pans are clean and dry.
• When cooking with large amounts of liquid, use
large pots so that nothing can boil over.
• Do not let pans boil dry. This may cause
permanent damage in the form of breakage,
fusion, or marring that can affect the ceramic
cooktop. (This type of damage is not covered
by your warranty.)
• Match the pan size and Cooking Zone to the
amount of food being prepared.
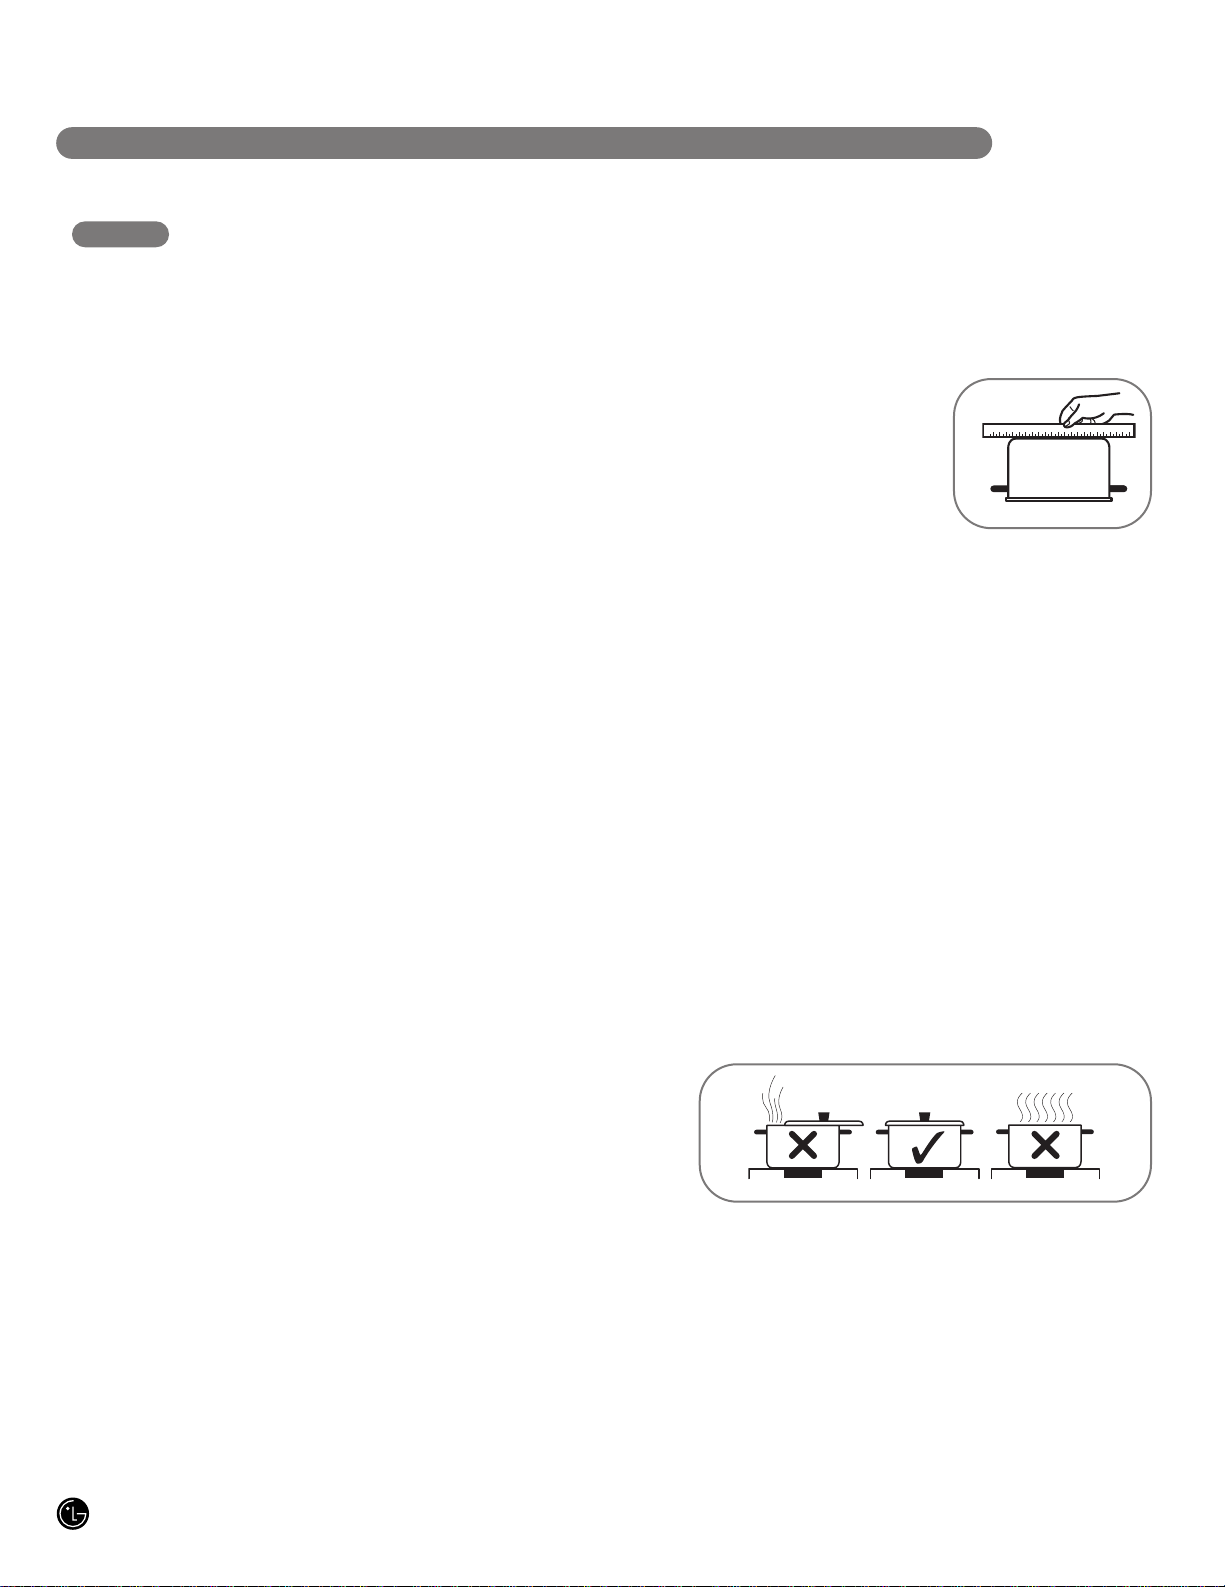
USE FLAT-BOTTOMED COOKWARE
Cookware must fully contact the surface of the
cooking element. Use flat-bottomed pans sized to
fit the cooking element and
amount of food being
prepared. Check for
flatness by rotating a ruler
across the bottom of the
cookware.
TIPS FOR SAVING ENERGY:
• Always position pots and pans before you
switch on the Cooking Zone.
• Dirty cooking zones and cookware use
more electricity.
• Whenever possible, always have the lid firmly
placed on the pots and pans so that they are
completely covered.
10
Page 11
INTRODUCTION TO INDUCTION COOKING
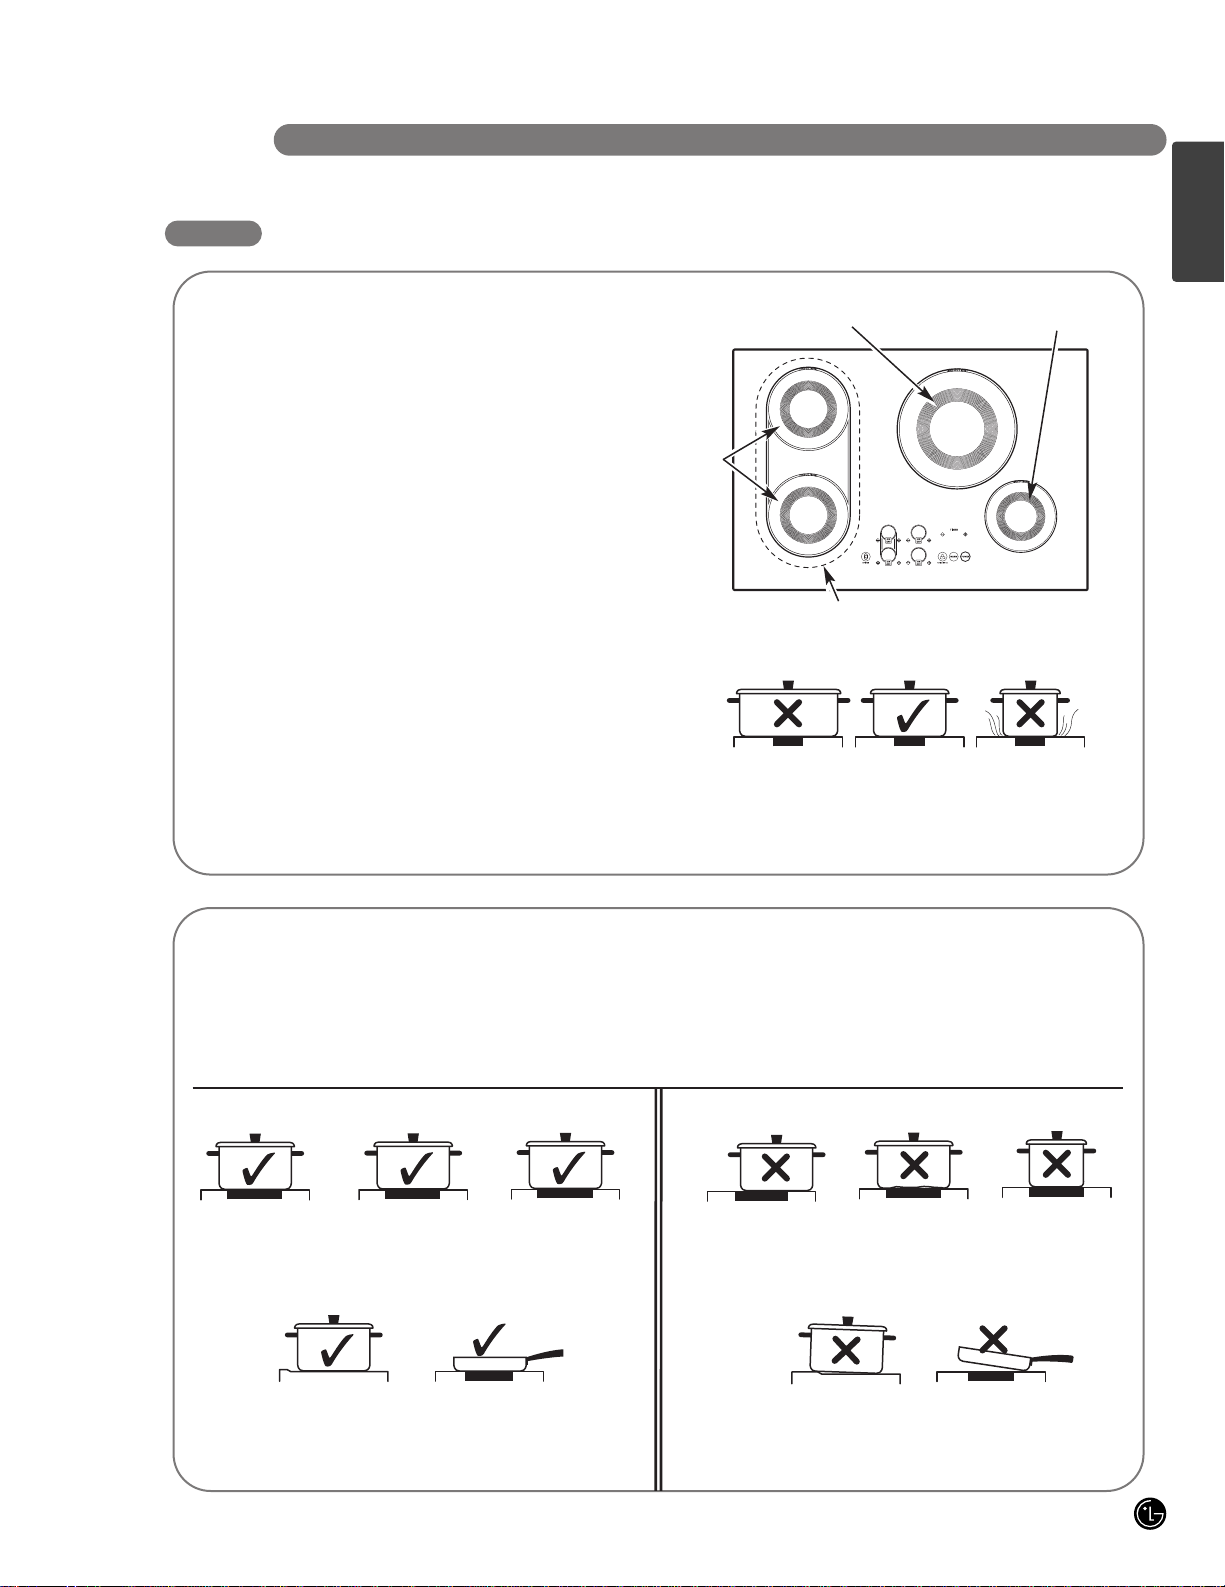
COOKWARE SELECTION AND PLACEMENT
It is important that the proper cookware be used and placed correctly on the cooktop. ANY one of the
incorrect conditions shown below may be detected by the sensors located below the ceramic
cooktop surface. If this happens, one or more of the Cooking Zones will not heat, and an F will
appear in the affected Cooking Zone display. Correct the problem before attempting to use the
cooktop.
CORRECT
INCORRECT
Cookware centered
correctly on Cooking
Zone surface.
Flat pan bottom &
straight sides.
Pan size meets or
exceeds the
recommended
minimum size for
the Cooking Zone.
Cookware not
centered on Cooking
Zone surface.
Curved or warped
pan bottoms or
sides.
Pan does not meet
the minimum size
required for the
Cooking Zone used.
Pan rests completely
on the cooktop
surface.
Pan is properly
balanced.
Pan bottom rests on
cooktop trim or does
not rest completely
on the cooktop
surface.
Heavy handle
tilts pan.
SELECTING COOKWARE
If a pan made of the correct material is centered
properly on any of the active Cooking Zones but is
TOO SMALL, the affected Cooking Zone LED will
blink and the pan will not heat.
Minimum pan size =
71⁄4ʺ (180 mm)
Minimum pan size =
5ʺ (125 mm)
Minimum
pan size =
53⁄4ʺ (145 mm)
Only use the supplied pan on
the bridge element.
SELECTING THE PROPER PAN SIZE
• There are 4 Cooking Zones on the
induction cooktop. Each element requires a
minimum pan size to be used effectively.
The inner ring of each cooking zone is a
guide to correctly match the minimum pan
size. The bottom of the pan must fully
cover the inner ring for proper cooking
to occur.
• The thicker outer ring at each Cooking
Zone is helpful to determine the pan
MAXIMUM size. After centering the
cookware on the Cooking Zone, make sure
the cookware does not extend more than
1/2ʺ beyond the thicker line on the Cooking
Zone. The pan must make FULL contact
on the glass surface without the bottom of
the pan touching the metal cooktop trim.
ENGLISH
11
Page 12
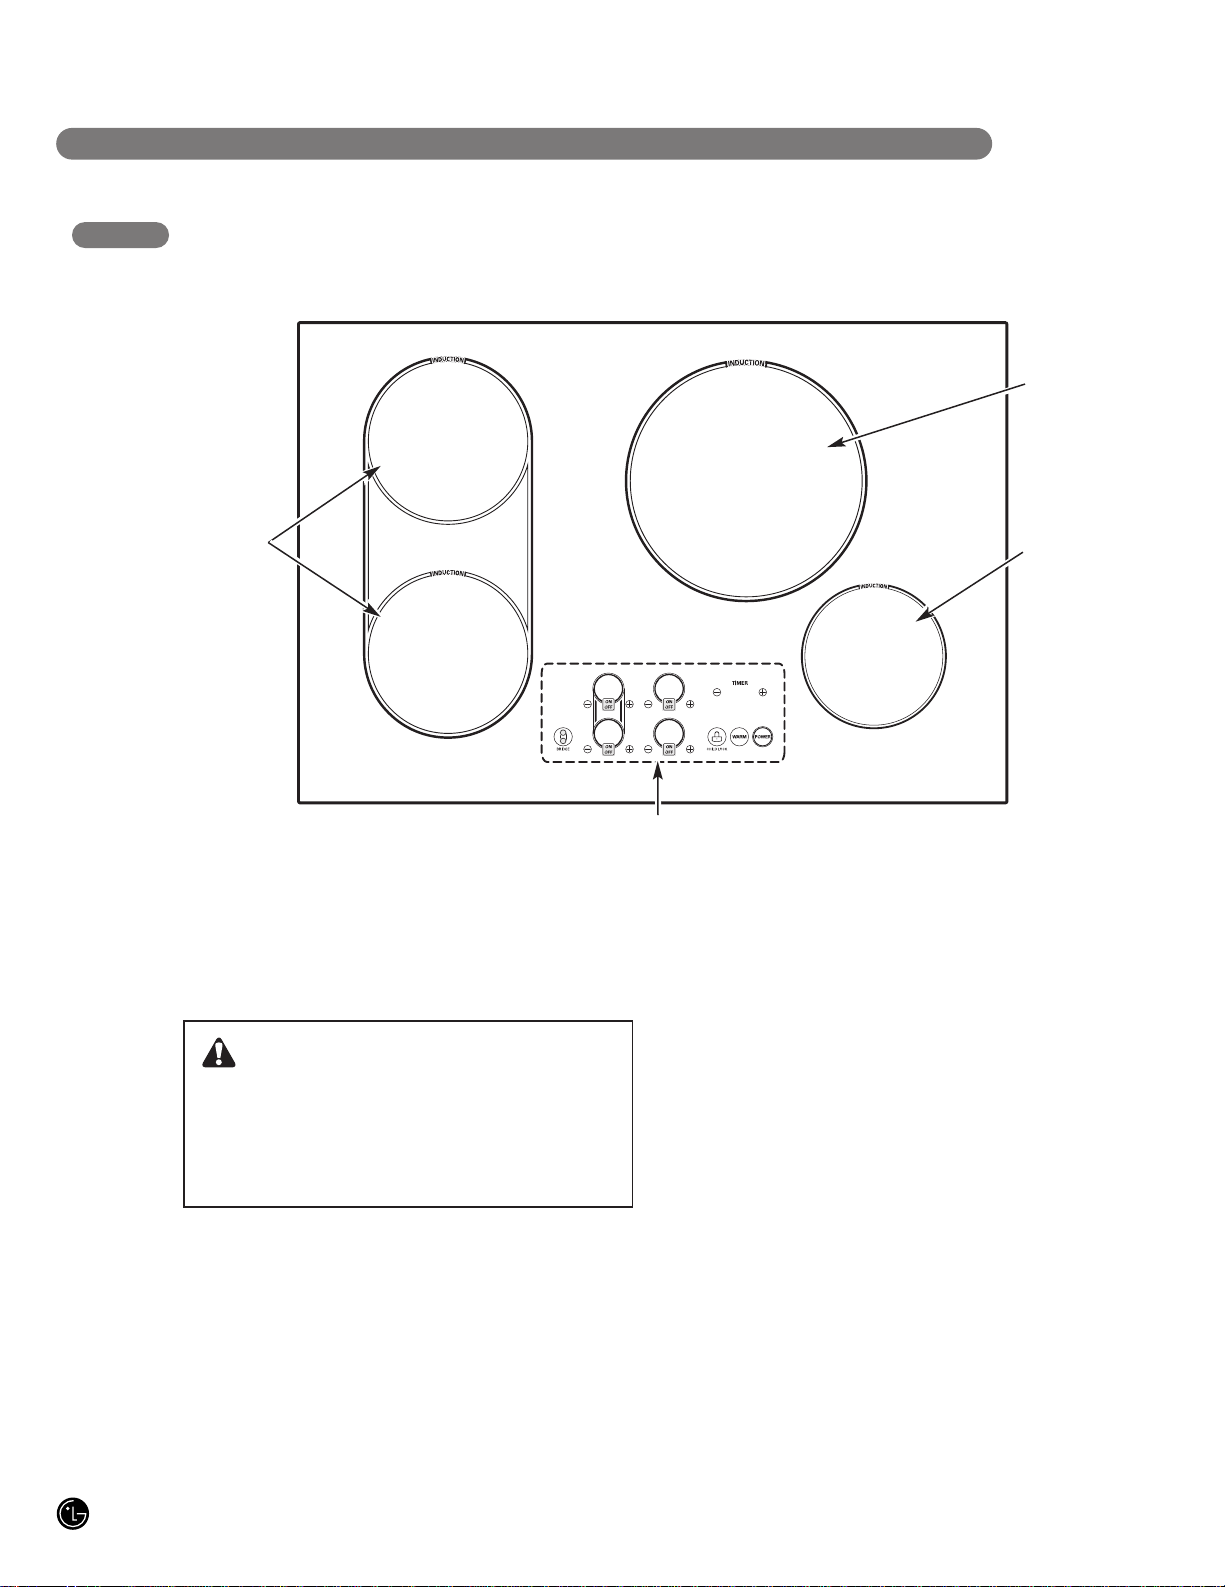
PARTS AND FEATURES
PARTS AND FEATURES OF YOUR COOKTOP
Throughout this manual, features and appearance may vary from your model.
1800W (Normal)
2400W (Boost)
2400W (Normal)
3300W (Boost)
1400W (Normal)
1800W (Boost)
Electronic touch controls
Ceramic Cooktop: LG’s new induction cooktop
features a ceramic cooktop surface that remains
cooler than conventional ceramic cooktops,
regardless of whether it is ON or OFF.
CAUTION
Burn Hazard: The Cooking Zones may
appear cool when turned ON and after
they have been turned OFF. The ceramic
surface may be HOT from residual heat
transferred from cookware.
Magnetic Detector: The coil sensor
automatically detects suitable cookware and
prevents accidental activation.
Pan Size Detection: The pan recognition sensor
automatically detects and adapts the Cooking
Zones to the pan size being used.
Improved Efficiency: Induction cooking heats
faster while using less energy. Induction cooking
brings liquids to a boil quickly yet allows even,
steady simmering.
Induction Cooking Zones: Induction Cooking
Zones under the ceramic cooktop heat the base
of the pan immediately without heating the
ceramic-glass cooktop first. The two mediumsized zones can be used together for larger
oblong pans.
Touch Controls: Easy-to-use touch controls
provide precise operation.
Easy Cleaning: The ceramic-glass cooking
surface and touch control make for easy cleanup and eliminate crevices and gaps where
grease can accumulate.
Control and Function Displays: Digital displays
show current settings and warn you of hot
surfaces from any residual heat of the
corresponding cooking zone.
Safety Shutoff: All Cooking Zones feature a
safety shut off that turns off the Cooking Zone if
ON/OFF is pressed but no power level is
selected within 10 seconds.
12
Page 13
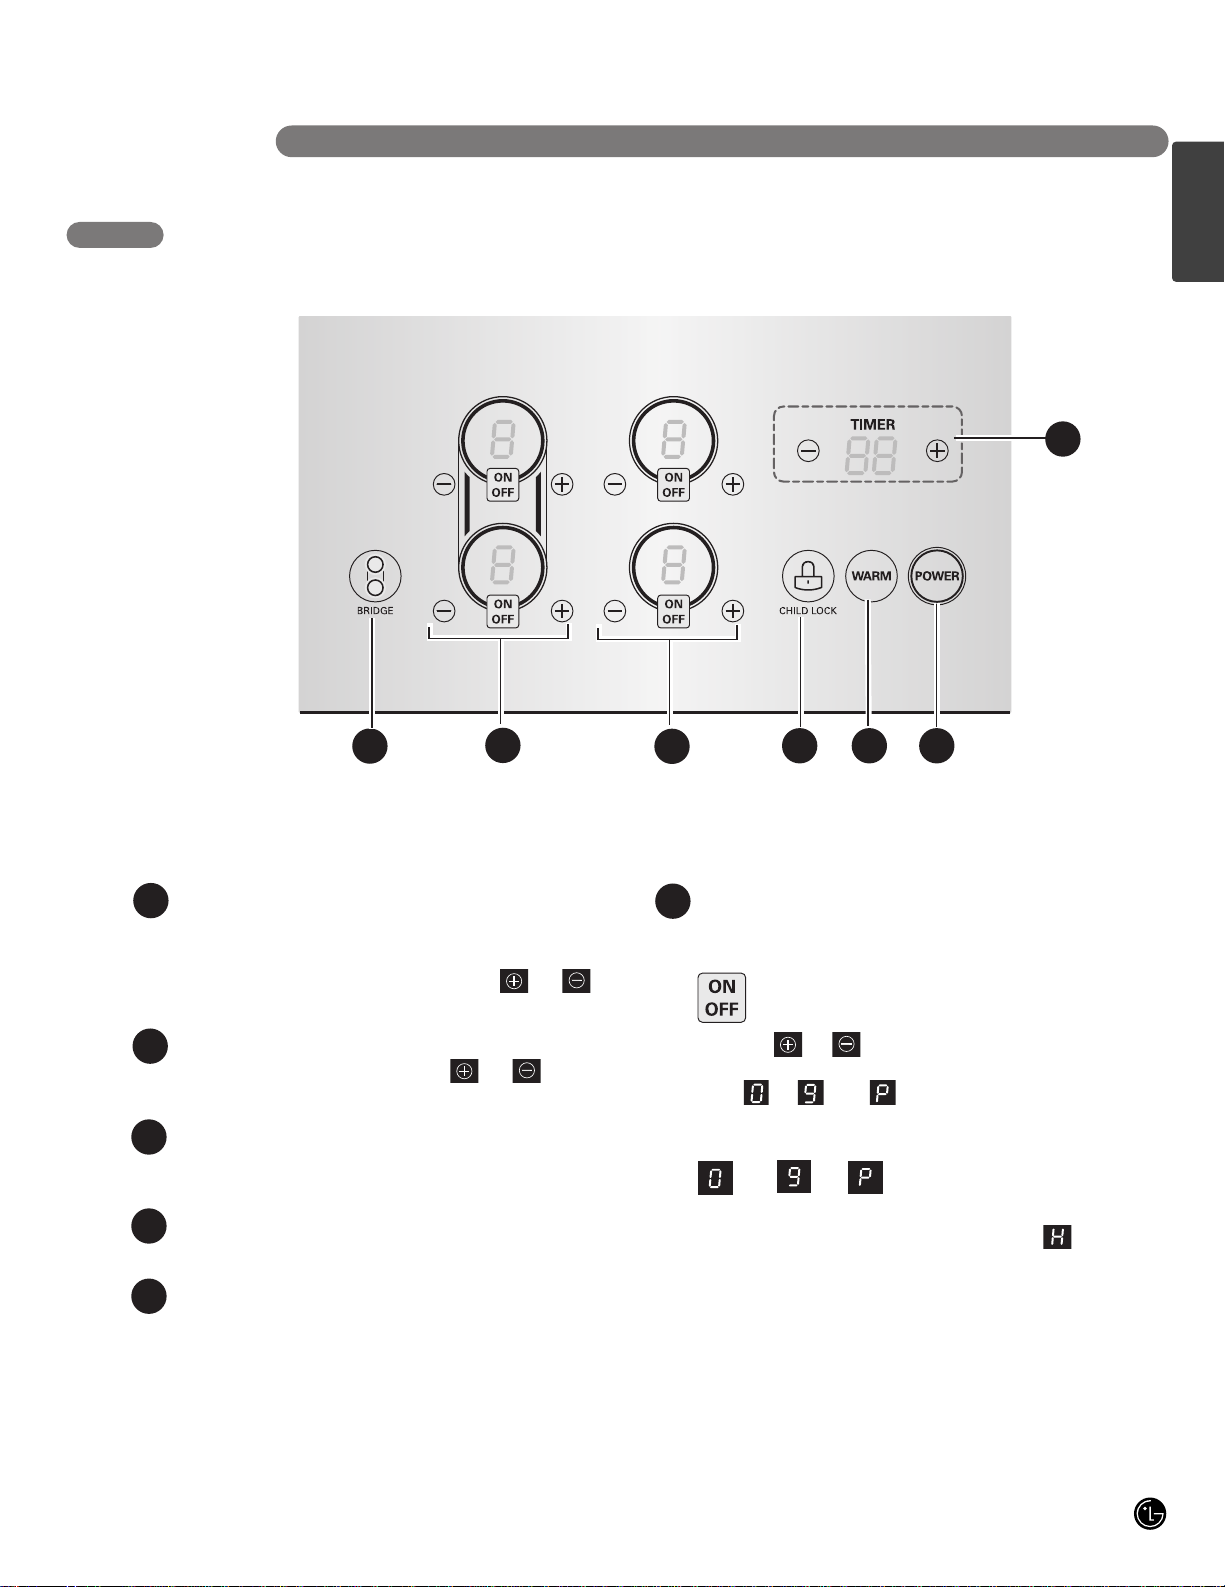
TOUCH CONTROL FEATURES
PARTS AND FEATURES
1
2
5
4
BRIDGE: Activates the two left Cooking Zones
together as a single large Cooking Zone.
For bridge operation, touch this pad to activate
and adjust the power level with the or
pads for either left Cooking Zone.
TIMER: When activated, the time remaining is
shown in the display. Use the or pads to
adjust the timer.
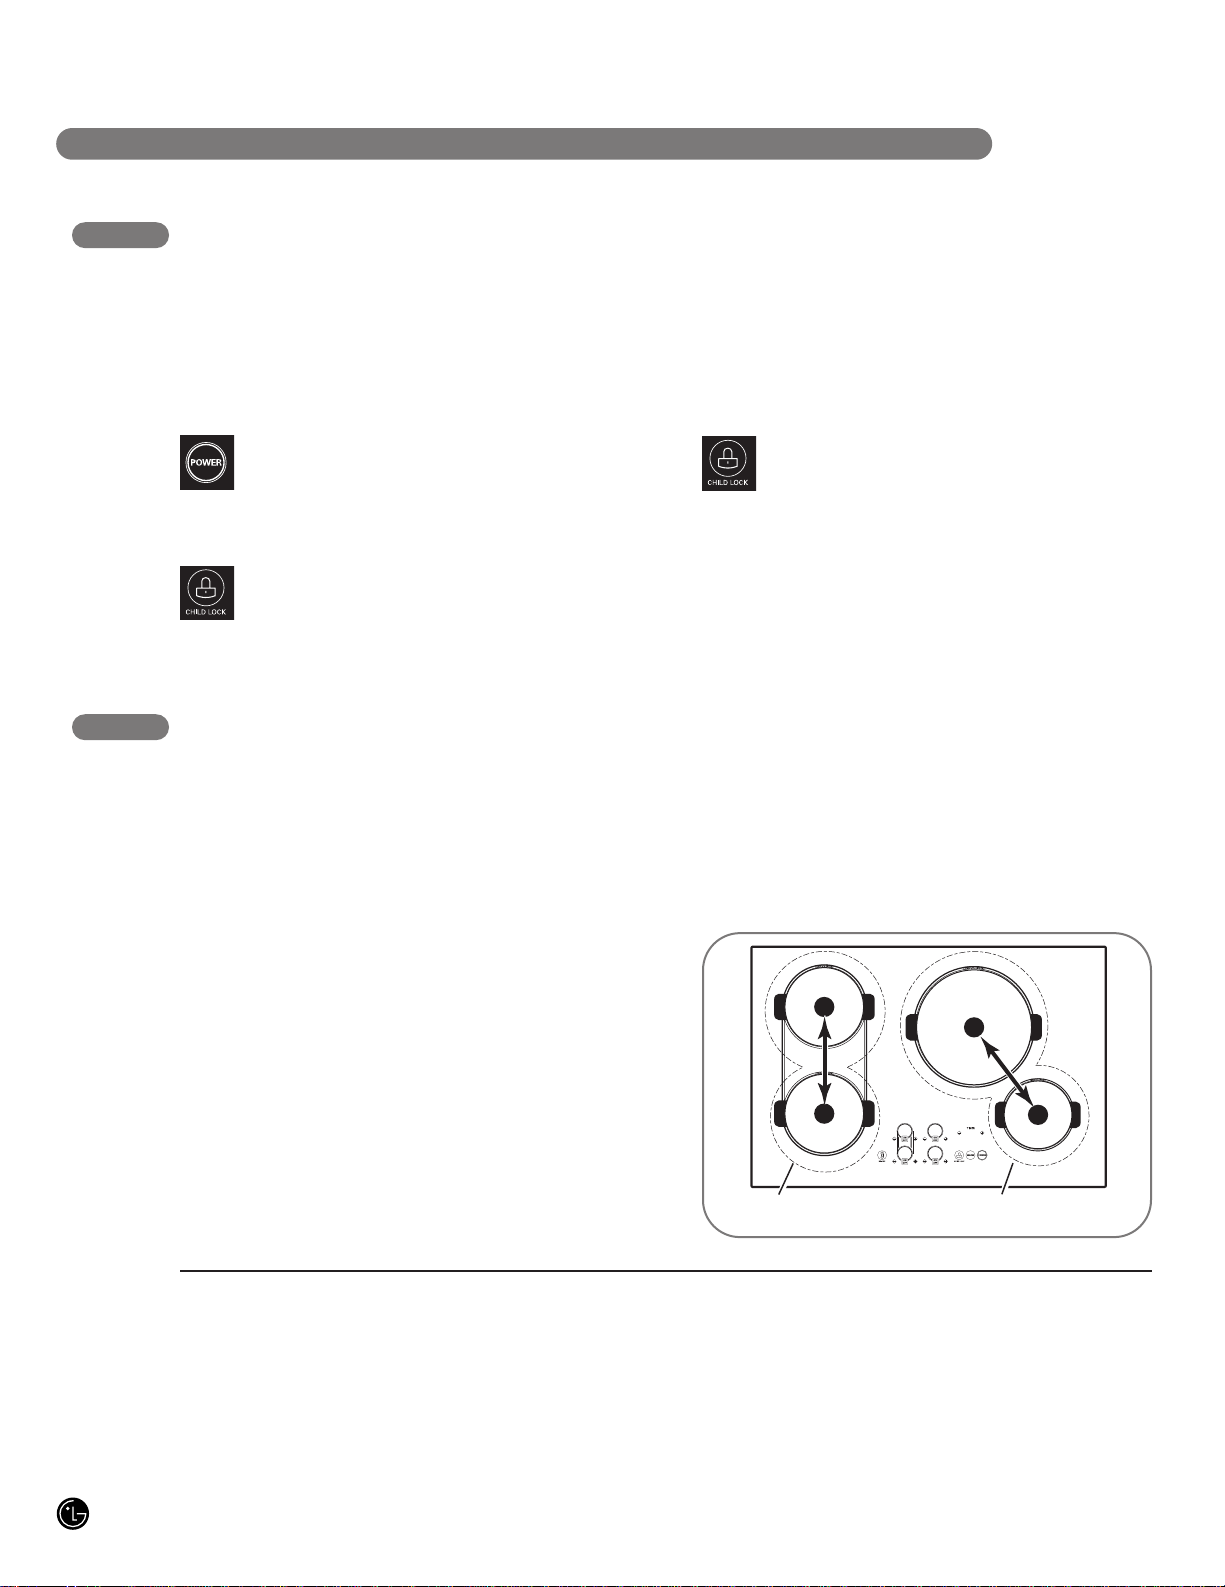
CHILD LOCK: Press and hold for 3 seconds to
activate and deactivate the child lockout function.
WARM: This pad automatically lowers the last
selected active element to the lowest setting.
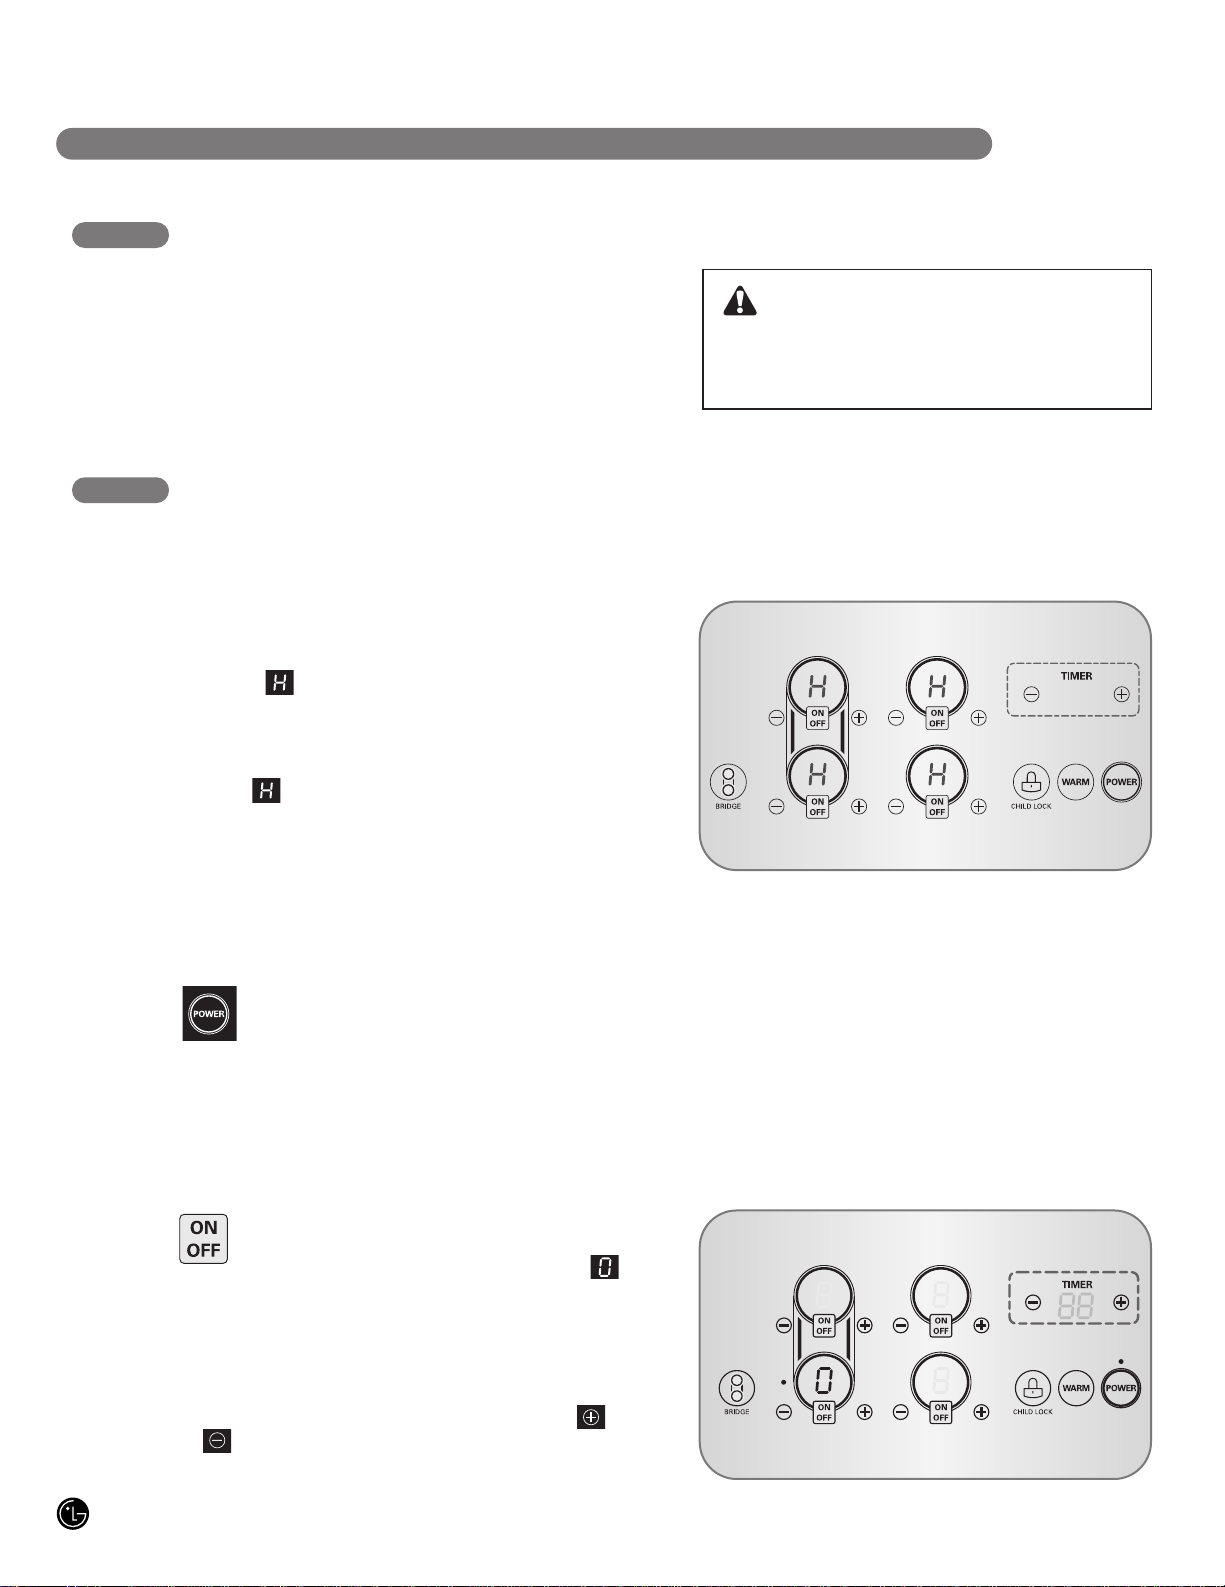
POWER: Press the POWER pad to turn the
entire cooktop ON and OFF. When it is ON, the
cooktop is in standby mode until a Cooking Zone
is activated.
1
2
3 4 5
6
6
3
COOKING ZONE CONTROLS: Each Cooking
Zone features its own control, and can be
activated individually.
The ON/OFF pad activates the desired
Cooking Zone.
Use the or pads for the active
Cooking Zone to adjust the power level
from to and (Boost).
The display in the Cooking Zone control will
show the power level:
to or
Hot Surface Indicator: After use, an will
appear in the Cooking Zone power level display
until the cooking surface has cooled down.
6
ENGLISH
13
Page 14
OPERATING INSTRUCTIONS
BEFORE USING THE COOKTOP
Before using the cooktop for the first time, clean
it thoroughly with the included cleaner or ceramic
cooktop cleaner according to the Care and
Cleaning instructions in this guide. This will
remove any help protect the ceramic surface
and make future cleanup easier.
SETTING THE CONTROLS
To operate the touch control pads, touch the pad
firmly with the flat part of your fingertip.
FIRST OPERATION
The first time that power is supplied to the
cooktop, will flash in the display for each
cooking zone for 60 seconds or until the
POWER pad is touched for approximately
2 seconds.
CAUTION
Never use scrub pads or abrasive cleaners.
They can cause permanent damage to the
cooktop surface.
NOTE: will also flash when power is restored
after a power outage.
ACTIVATING THE COOKTOP
To turn on the cooktop, touch the
POWER pad for approximately
2 seconds. The indicator above
the pad will light.
SELECTING THE COOKING ZONE
To select the desired Cooking Zone,
press the ON/OFF pad. The display for
the selected Cooking Zone will show
and and an indicator will light to indicate
that the Cooking Zone is on but no
power level is set.
NOTE: Once the Cooking Zone has been
selected with the ON/OFF pad, the power level
must be selected within 5 seconds with the
or pad. Otherwise, the Cooking Zone
will turn off for safety reasons.
NOTE: After turning on the cooktop with
the POWER pad, you must select one of
the Cooking Zones within 20 seconds using
the Cooking Zone ON/OFF pad(s). If no
selection is made, the cooktop will turn off
for safety reasons.
14
Page 15
OPERATING INSTRUCTIONS
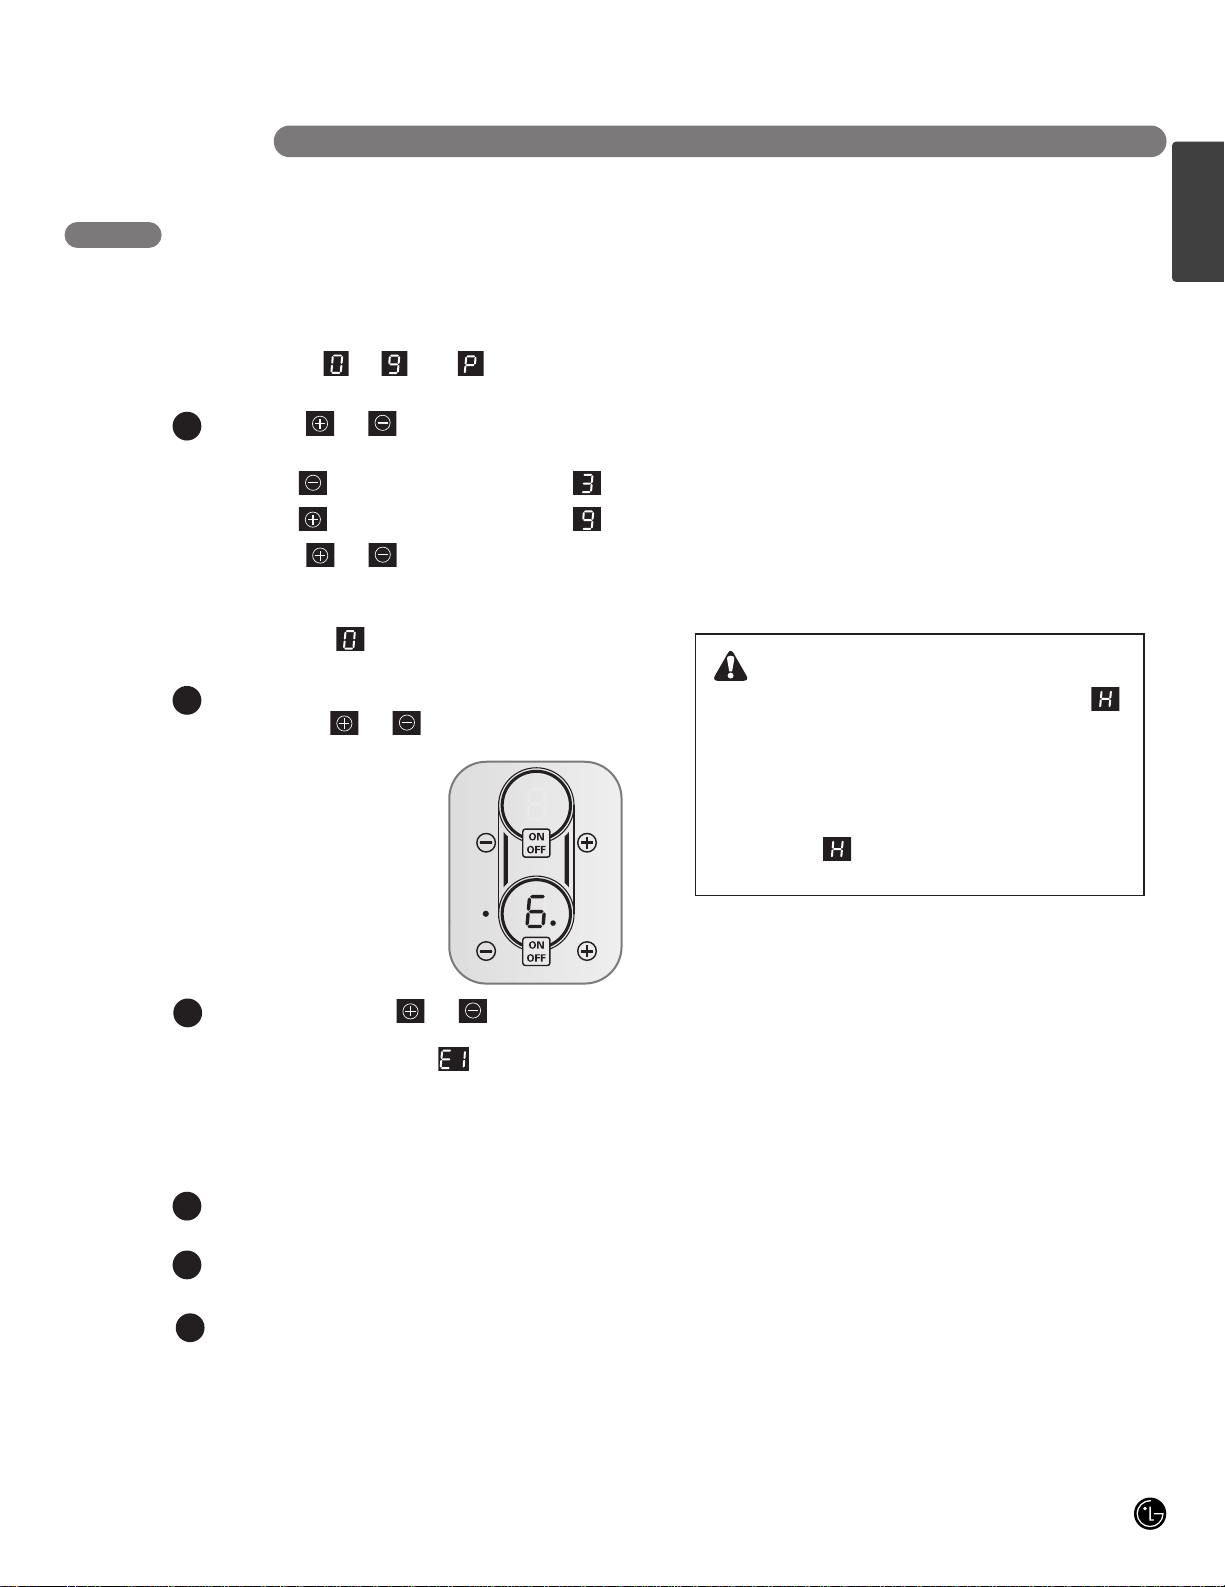
The power level for the selected Cooking Zone
can be set from to and (Boost).
To adjust the power level:
Touch the or pad for the selected
Cooking Zone.
Touching will set the power level to .
Touching will set the power level to .
Touch the or pad of the selected
Cooking Zone to increase or decrease the
power level.
If power level is selected, the Cooking
Zone will turn off after 5 seconds.
For faster power level adjustments, touch
and hold the or pads until the
desired setting is reached.
NOTE: Normal power
settings range in 1/2 step
increments for power
levels from 2 to 6 to
allow precision cooking.
A dot will appear next to
the number to indicate a
1/2 power level step.
If the Cooking Zone or pads are held
for more 10 seconds, the timer display will
show the error message . To clear this
error message, press the ON/OFF pad for
the Cooking Zone you were setting. This
message does NOT relate to the timer pad.
To turn off the cooking zone:
Once cooking is complete, touch the
ON/OFF pad to turn the cooking zone OFF.
The corresponding cooking zone display witll
turn off.
If the POWER pad is touched instead of
ON/OFF, the entire cooktop will turn off.
1
2
3
SETTING THE POWER LEVEL
NOTE:
• If the cookware or pan is moved from the
center of any active Cooking Zone for any
reason, a sensor will detect this and the
Cooking Zone will no longer heat. The display
for that Cooking Zone will flash the last power
level setting for the Cooking Zone.
• The Cooking Zone will remember the power
level setting for up to 90 seconds before the
Cooking Zone will automatically shut off.
Your cooktop has a residual heat indicator
for each Cooking Zone. This indicator will warn
that this area has been used and is still giving
off enough heat to cause burns.
Avoid touching the burner when this
indicator is shown. Although the cooktop
is OFF, the will stay lit until the
cooktop has cooled down.
SETTING THE CONTROLS
1
2
3
W ARNING
ENGLISH
15
Page 16
OPERATING INSTRUCTIONS
SETTING THE CONTROLS (cont.)
POWER BOOST
Boost is the highest power level, designed for
quickly heating or boiling larger quantities. Boost
will operate for a maximum of 12 minutes. After
12 minutes, it will automatically revert to power
level 9.
ACTIVATING POWER BOOST
Turn on the desired Cooking Zone with the
1
ON/OFF pad for that Cooking Zone.
2
Touch the pad and will be displayed.
Touch the pad again and will be
3
displayed.
NOTE: The power boost function will be
activated for a maximum of 12 minutes. At
the end of the power boost cycle, the
Cooking Zone will automatically default to
the back to the power level . The power
boost function CANNOT be used with the
front and rear Cooking Zones on the same
side at the same time.
4
To deactivate the power boost function
and revert to normal power levels, touch
the pad.
NOTE: To protect the internal electronic
components of the cooktop, the cooktop
may automatically deactivate the power
boost function and return to a normal
power level before 12 minutes have passed.
This is normal.
NOTE: The electronic processes involved
with induction cooking create some unusual
background noises. These noises are normal
and part of the induction cooking process.
Please note that these noises are more
noticeable while cooking with power boost.
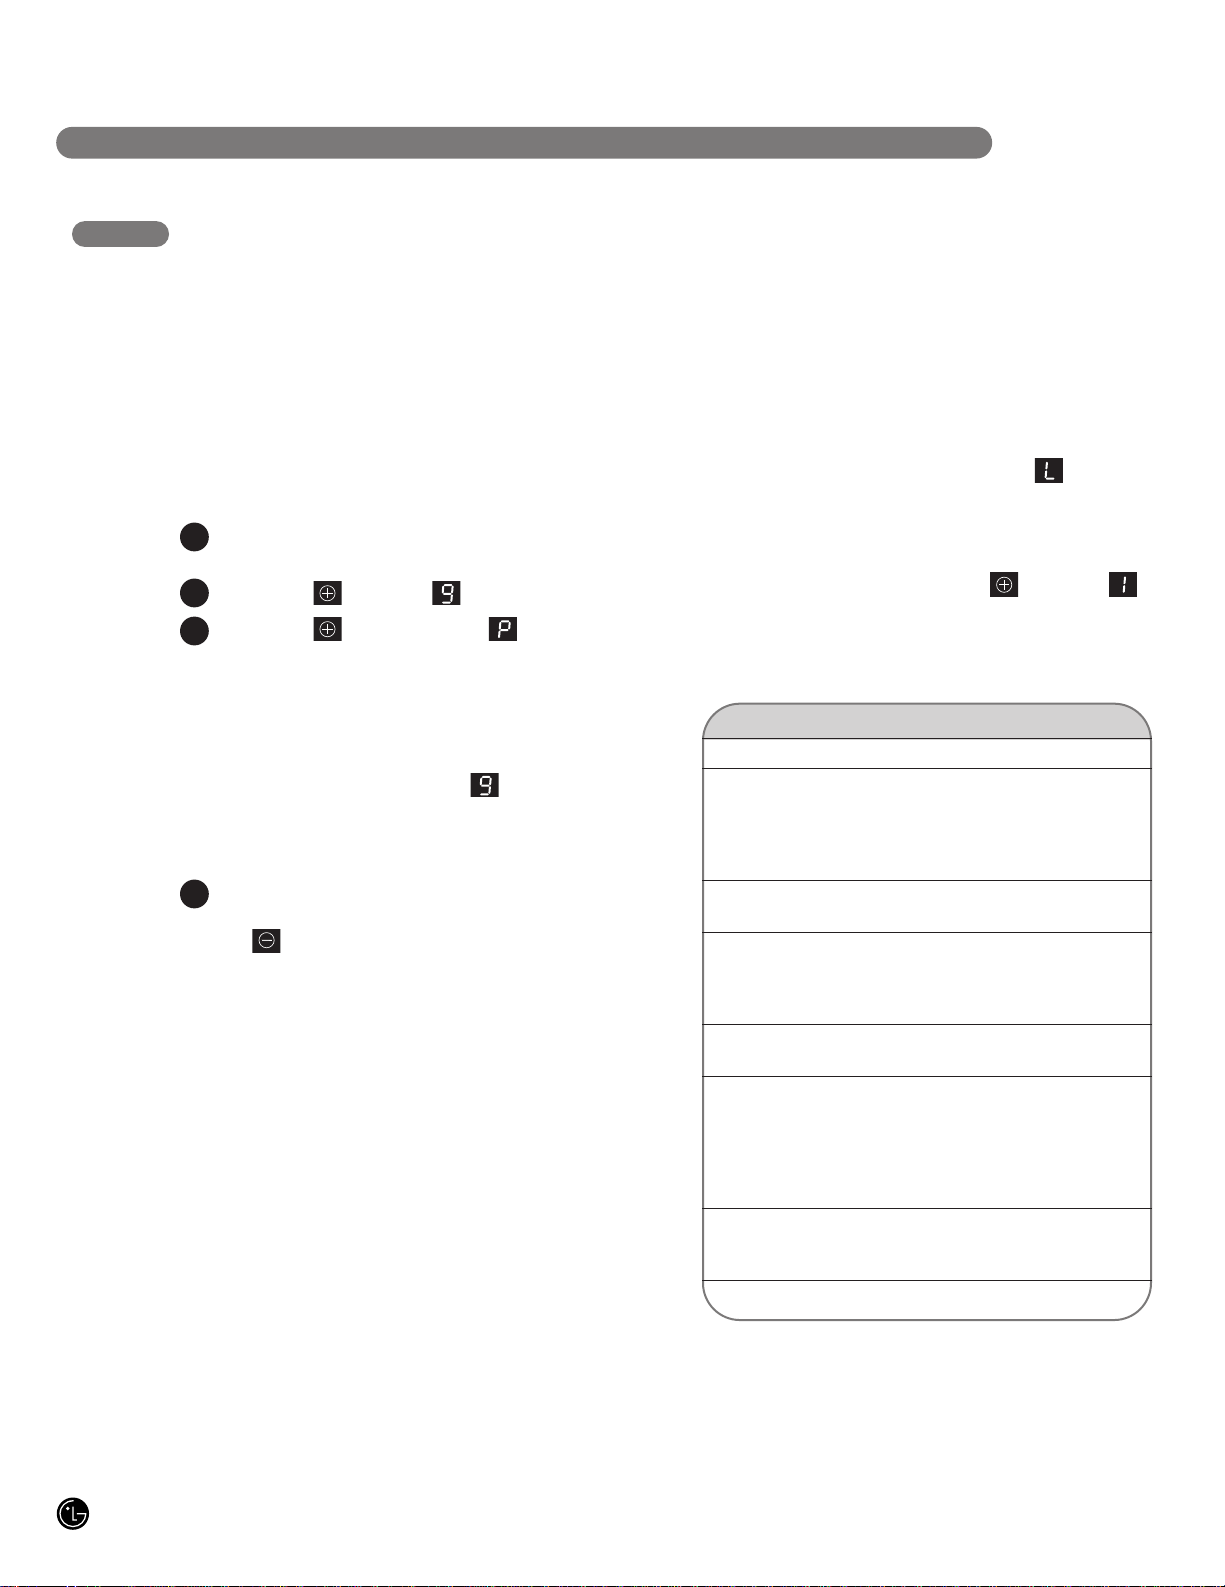
WARM
The cooktop features a WARM setting that
operates the last Cooking Zone used at the
LOW power level.
To activate:
Touc h the WARM pad and the last Cooking Zone
used will be set to the LOW setting. will
appear in the display.
To deactivate:
To turn off the WARM function and return to
normal power levels, touch the pad and
will be displayed.
POWER LEVEL GUIDE
Setting Function Used for
9 or Boost Fast heating Bringing liquids to a boil.
7–9 Heaving browning, Browning meats, heating
deep fat frying oil for deep-fat frying,
sautéing, maintaining a
fast boil for large amounts
of liquids.
6–7 Roasting, frying Frying meats, chops,
pancakes, sausages, eggs.
4–5 Boiling, general Cooking larger quantities,
cooking soups and stews, steaming
potatoes, cooking meat
stock or bouillon.
3–4 Steaming Steaming vegetables,
braising meats.
2–3 Simmering Simmering rice or milk-
based dishes, steaming
smaller quantities of
potatoes and vegetables,
heating ready-to-serve
meals.
1–2, L Melting Fluffy omelettes, keeping
dishes warm, melting
butter or chocolate.
0 OFF Off setting.
16
NOTE: These settings are recommended guidelines for
cooking. You may need to adjust the power level for the type
of food and pan.
Page 17
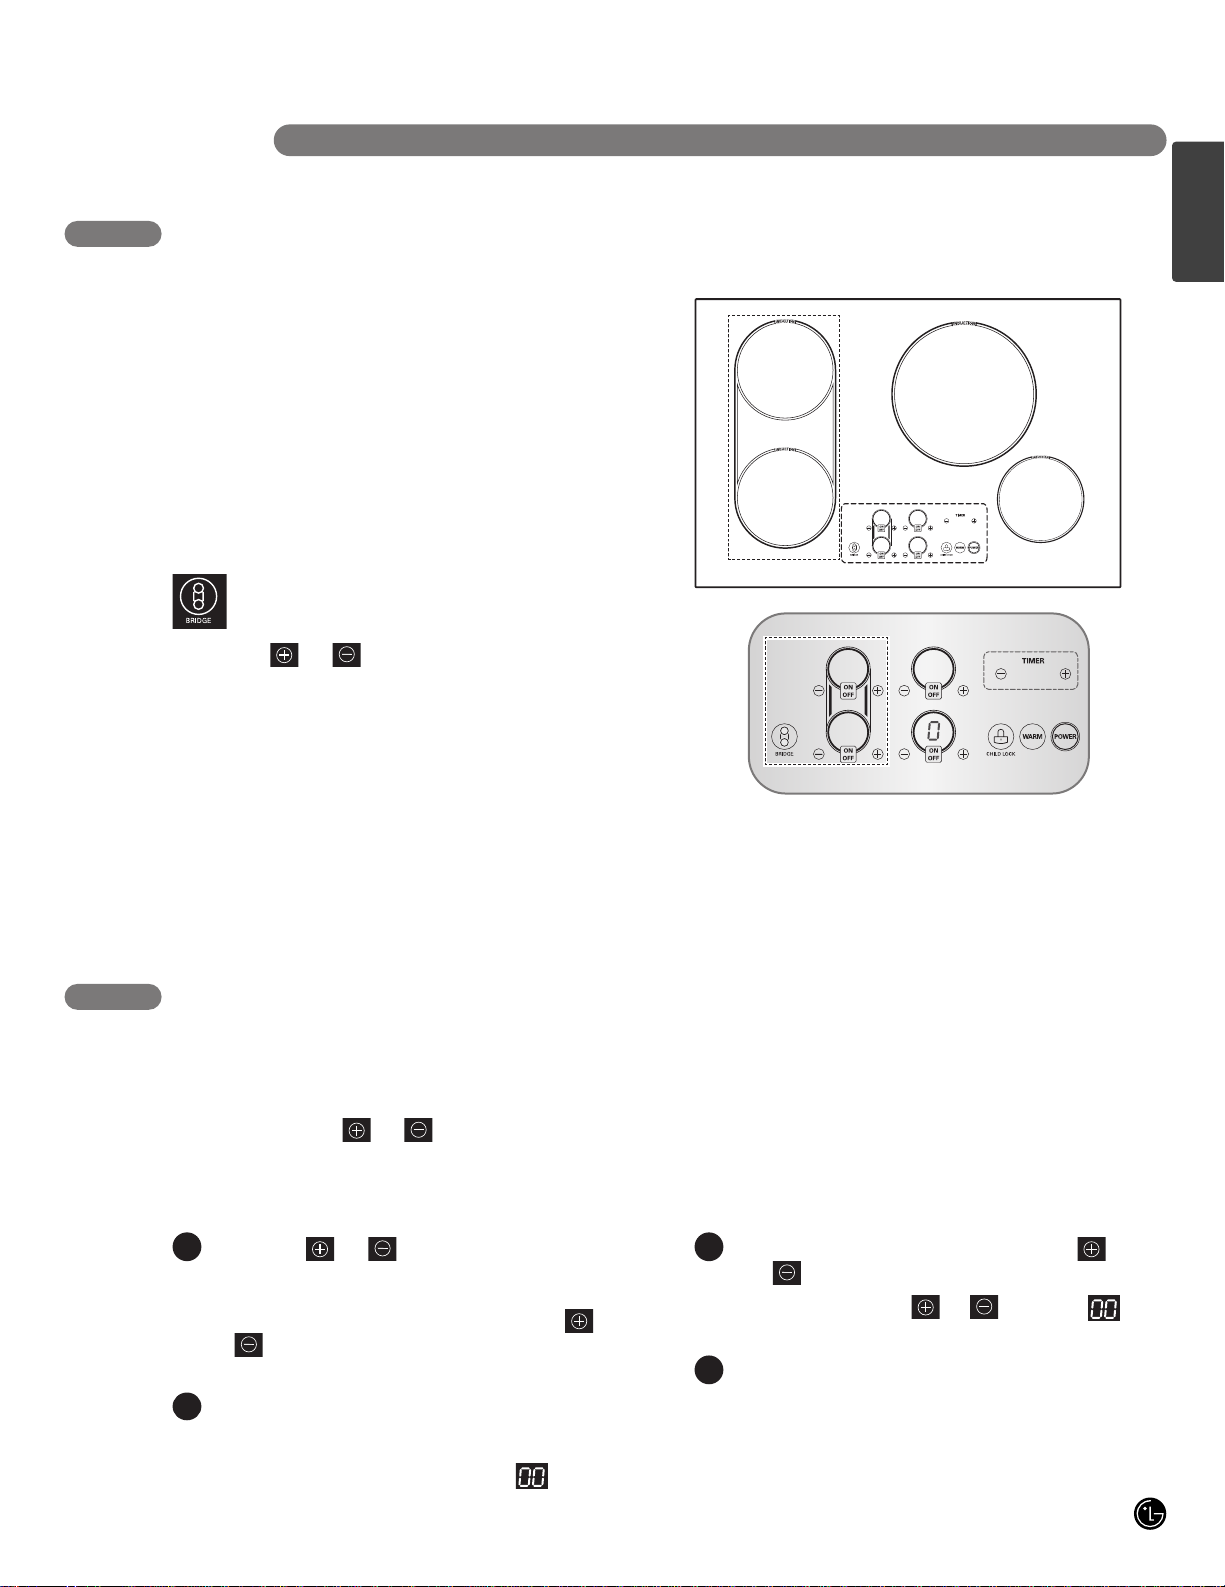
USING THE BRIDGE COOKING ZONES
The two left Cooking Zones can be used
together as a single Cooking Zone using the
Bridge function. This allows you to cook with
larger, oblong pans.
NOTE: When using the supplied bridge pan, it
is important to rub it with oil to prevent burning
and sticking.
BRIDGE COOKING ZONES
ACTIVATING THE BRIDGE
COOKING ZONE
Touch the BRIDGE pad. The indicator
above the pad will light.
Touch the or pad for either left
Cooking Zone to adjust the power level for
both Cooking Zones.
USING THE TIMER
The timer feature may be helpful if a recipe calls
for cooking for a set time. The timer can be set
from 1 to 99 minutes. Once set, the digital display
between the timer or pads will begin to
count down the remaining time in minutes.
NOTE: The timer function is a minute timer only.
It does NOT turn the cooktop ON or OFF.
SETTING THE TIMER
Touch the or pads under the word
TIMER. Each touch will increase or decrease
the time by one minute, from 1 to 99
minutes. You may also touch and hold
or to scroll up or down. The timer
display will flash.
Once the desired time is set, the display will
stop flashing and the timer will start counting
down after no pad has been touched for 5
seconds. Once the timer reaches , a long
beep will sound to indicate the time is up.
1
2
CANCELING THE TIMER
To cancel the timer, touch the TIMER
and pads at the same time, OR
Touch and hold the or pad until
appears in the display.
The timer display will turn off.
1
2
OPERATING INSTRUCTIONS
NOTE:
• Use the supplied bridge pan ONLY on the
bridge cooking zone.
• To purchase a replacement or additional bridge pan, call 1-800-243-0000 (U.S.A)
or 1-800-542-2623 (Canada) and choose the appropriate prompt from the menu.
Or, visit our Web site at us.lgservice.com (U.S.A) or ca.lgservice.com (Canada).
ENGLISH
17
Page 18
OPERATING INSTRUCTIONS
USING CHILD LOCK
You can lock the entire cooktop at any time when
it is not in use. Locking the cooktop will prevent
Cooking Zones from being turned on
accidentally.
SETTING CHILD LOCK
The cooktop must be OFF to set the
CHILD LOCK function. If it is not OFF,
touch and hold the POWER pad for
approximately 2 seconds. The indicator
above the POWER pad will turn OFF.
Touch and hold the CHILD LOCK pad for
3 seconds. The indicator light above the
CHILD LOCK pad will turn on to indicate
that the cooktop is locked.
OTHER FUNCTIONS
POWER SHARING
Your cooktop is equipped with four induction
Cooking Zones within two heating sections. The
right and left Cooking Zones are powered by two
independent induction inverters—one inverter for
each of the two heating sections. Two Cooking
Zones in a heating section share the power of
one inverter. This is called power sharing.
For example, if you are cooking on both right
Cooking Zones, the last power level set will be
maintained, while the first Cooking Zone may
experience a slight reduction in the power level.
POWER SHARING TIPS:
Remember to set the power level for the food
item you wish to keep constant last. When using
two Cooking Zones, you can maintain a constant
power level for two pans on separate heating
CANCELING CHILD LOCK
To turn off CHILD LOCK, touch and
hold the CHILD LOCK pad for 3
seconds. The indicator light above the
pad will go off and the cooktop can now
be used normally.
sections. Place one pan on one of the Cooking
Zones of the left heating section and the other
pan on one of the Cooking Zones of the right
heating section.
Left heating
section
Right heating
section
18
AUTOMATIC SHUTOFF
If a Cooking Zone is in constant use for more
than 17 hours and the control setting is not
changed, the Cooking Zone will shut off
automatically.
AUTOMATIC POWER LEVEL CONTROL
The power level displayed may be different from
the actual power level at the high temperature
range. To prevent the cooktop from overheating,
the power level is controlled automatically.
Page 19
General cleaning for induction ceramic glass
cooking surfaces is considerably easier than
for cooking surfaces with radiant heating.
NOTE:
To prevent accidental activation of the controls, it
is recommended that you set the CHILD LOCK
feature before cleaning.
CLEANING THE COOKTOP
CARE AND CLEANING
IMPORTANT:
• Cleaning agents must not come in contact with
the hot ceramic-glass surface. All cleaning
agents must be rinsed off thoroughly with
clean water.
• Do not use any aggressive cleaners such as
grill or oven sprays, coarse scouring cleansers,
or abrasive pan cleaners.
• Clean the ceramic-glass surface after each
use when it is warm to the touch or cold.
This will prevent spills from becoming burnt on.
Remove water marks, grease and discoloration
with a glass scraper and ceramic-glass
cleaner.
When it is cool, wipe the ceramic-glass
surface with a damp cloth and a small
amount of ceramic glass cleaner.
Wipe dry with a clean cloth.
Once a week, thoroughly clean the entire
ceramic-glass cooking surface with a
commercially available ceramic-glass
cleaner.
Then, wipe the ceramic-glass surface
using a clean, soft cloth dampened with
clean water, and polish dry with a clean
lint-free cloth.
1
2
GENERAL CLEANING
3
4
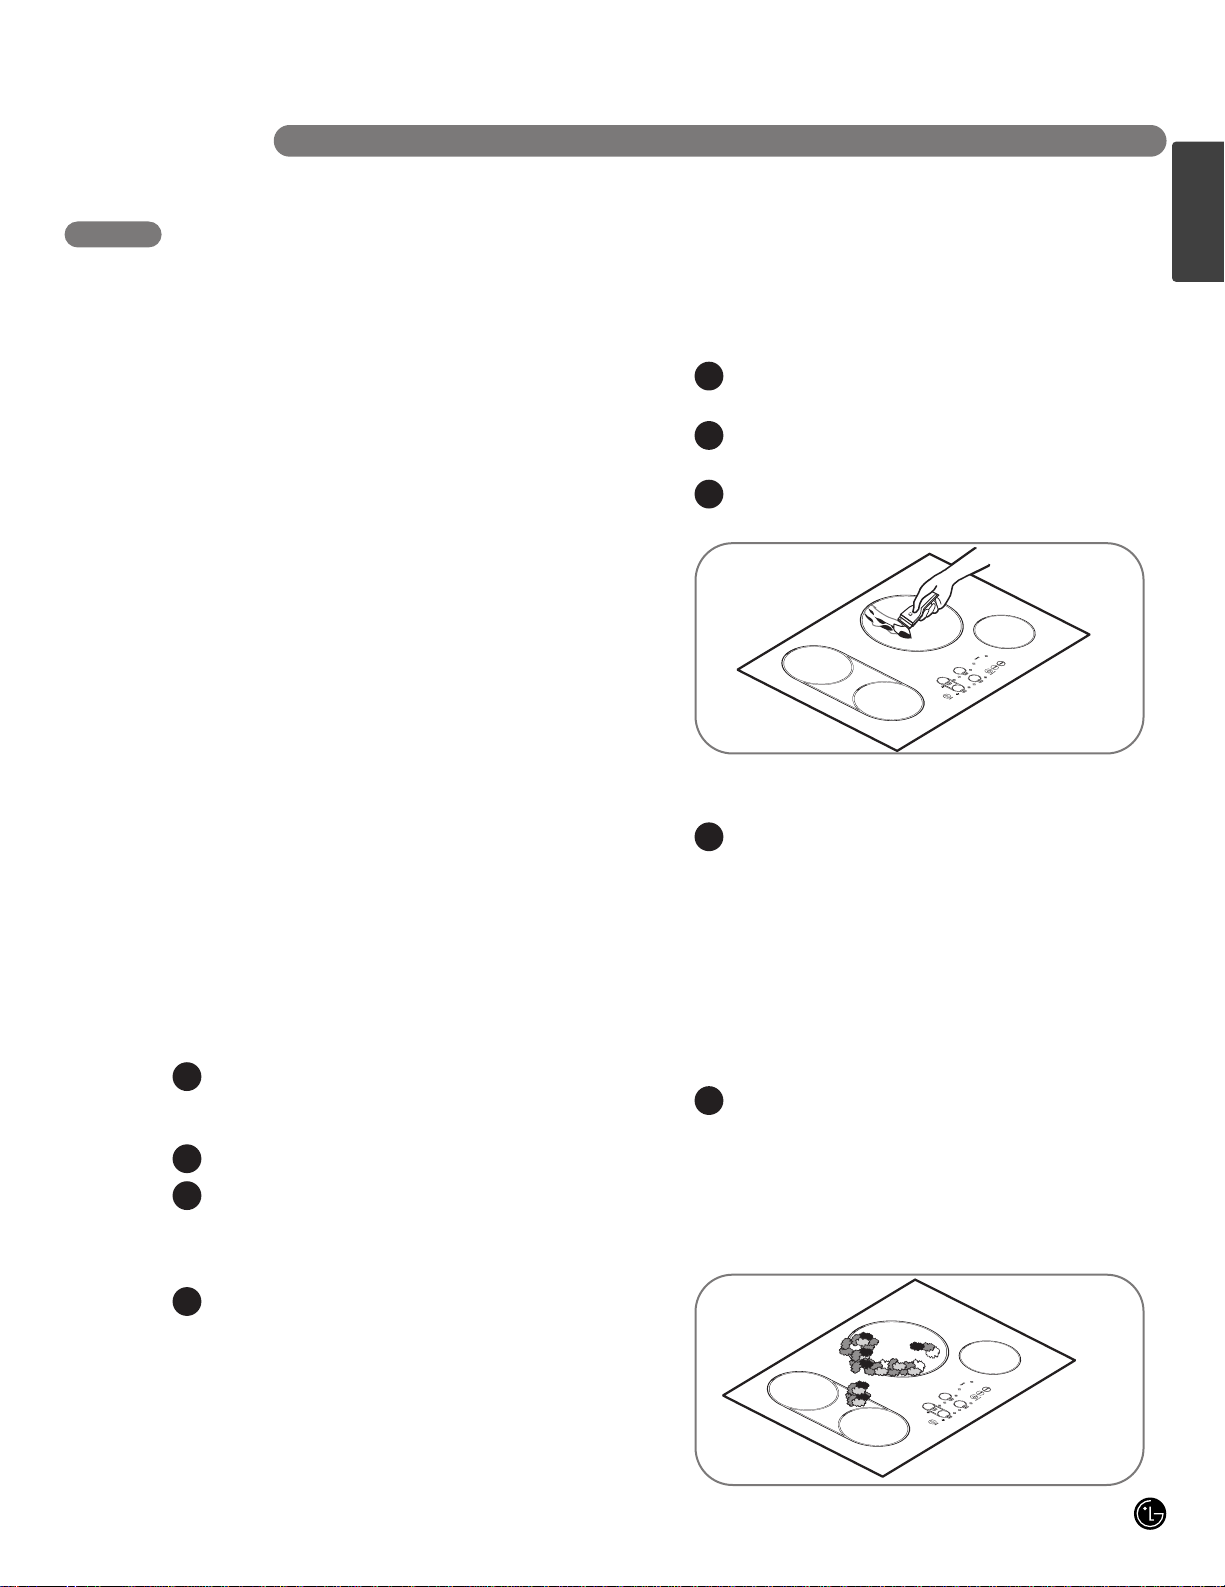
To remove food that has boiled over or stubborn
spills, use a glass scraper.
Hold the glass scraper at an angle of about
45° to the ceramic-glass surface.
Remove soiling by sliding the blade across
the area.
Use a ceramic glass cleaner as described in
GENERAL CLEANING.
1
2
REMOVING HEAVY SOIL
3
Remove sugar, melted plastic, aluminum foil,
or other meltable materials with a glass
scraper immediately and while still hot.
Failure to do so can cause permanent
damage to the cooktop surface. If the
Cooking Zone has already cooled down,
warm it up again.
IMPORTANT: There is a risk of burning yourself
when the glass scraper is used on a hot Cooking
Zone. Use care and wear an oven mitt.
Then clean the cooktop normally when it has
cooled down.
NOTE: Scratches or dark marks on the ceramicglass surface caused by a pan base with sharp
edges cannot be removed. However, they do not
impair the function of the cooktop.
1
2
PROBLEM SOILS
NOTE:
You can obtain glass scrapers and ceramicglass cleaners from your local hardware store.
ENGLISH
19
Page 20

INSTALLATION INSTRUCTIONS
INSTALLATION AND SERVICE MUST BE PERFORMED BY A QUALIFIED INSTALLER.
IMPORTANT: SAVE THESE INSTRUCTIONS FOR LOCAL ELECTRICAL
INSPECTOR’S USE.
READ AND SAVE THESE INSTRUCTIONS FOR FUTURE REFERENCE.
BEFORE YOU BEGIN
Read these instructions completely
and carefully.
NOTES TO INSTALLER:
• Read all instructions contained in these
installation instructions before installing the
cooktop.
• Remove all packing material before connecting
the electrical supply to the cooktop.
• Observe all governing codes and ordinances.
• Only certain cooktop models may be installed
over certain built-in electric oven models.
• Be sure to leave these instructions with the
consumer.
UNPACKING THE COOKTOP
Unpack and visually inspect the cooktop for
1
any damage or missing components.
NOTE TO CONSUMER:
Keep this User’s Guide and Installation
Instructions for future reference.
NOTE: This appliance must be properly
grounded.
Damage caused by failure to follow these
instructions is not covered by the cooktop
warranty.
Be sure the bottle of cleaner and conditioner
2
packed in the literature bag is left where the
user can find it easily. It is important that the
ceramic-glass cooktop be pretreated before
use. See CARE AND CLEANING.
20
TECHNICAL SPECIFICATIONS
COOKTOP DIMENSIONS
Width 307⁄8ʺ (783 mm)
Depth 21
Height 2
COOKING ZONES
Position Diameter Power*
Front Left 7ʺ (180 mm) 1800W (2400W Boost)
Rear Left 7ʺ (180 mm) 1800W (2400W Boost)
Front Right 6ʺ (150 mm) 1400W (1800W Boost)
Rear Right 10
* The rated power consumption may vary according to pan size and type.
1
/4ʺ (260 mm) 2400W (3300W Boost)
1
⁄2ʺ (546 mm)
3
⁄16ʺ (56 mm)
COUNTERTOP CUTOUT DIMENSIONS
Width 293⁄8ʺ (746 mm)
Depth 20
1
⁄4ʺ (515 mm)
ELECTRICAL SPECIFICATIONS
Connection voltage:
240/208 VAC, 60Hz.
Maximum connected power load:
7.4 kW/6.7 kW
Page 21
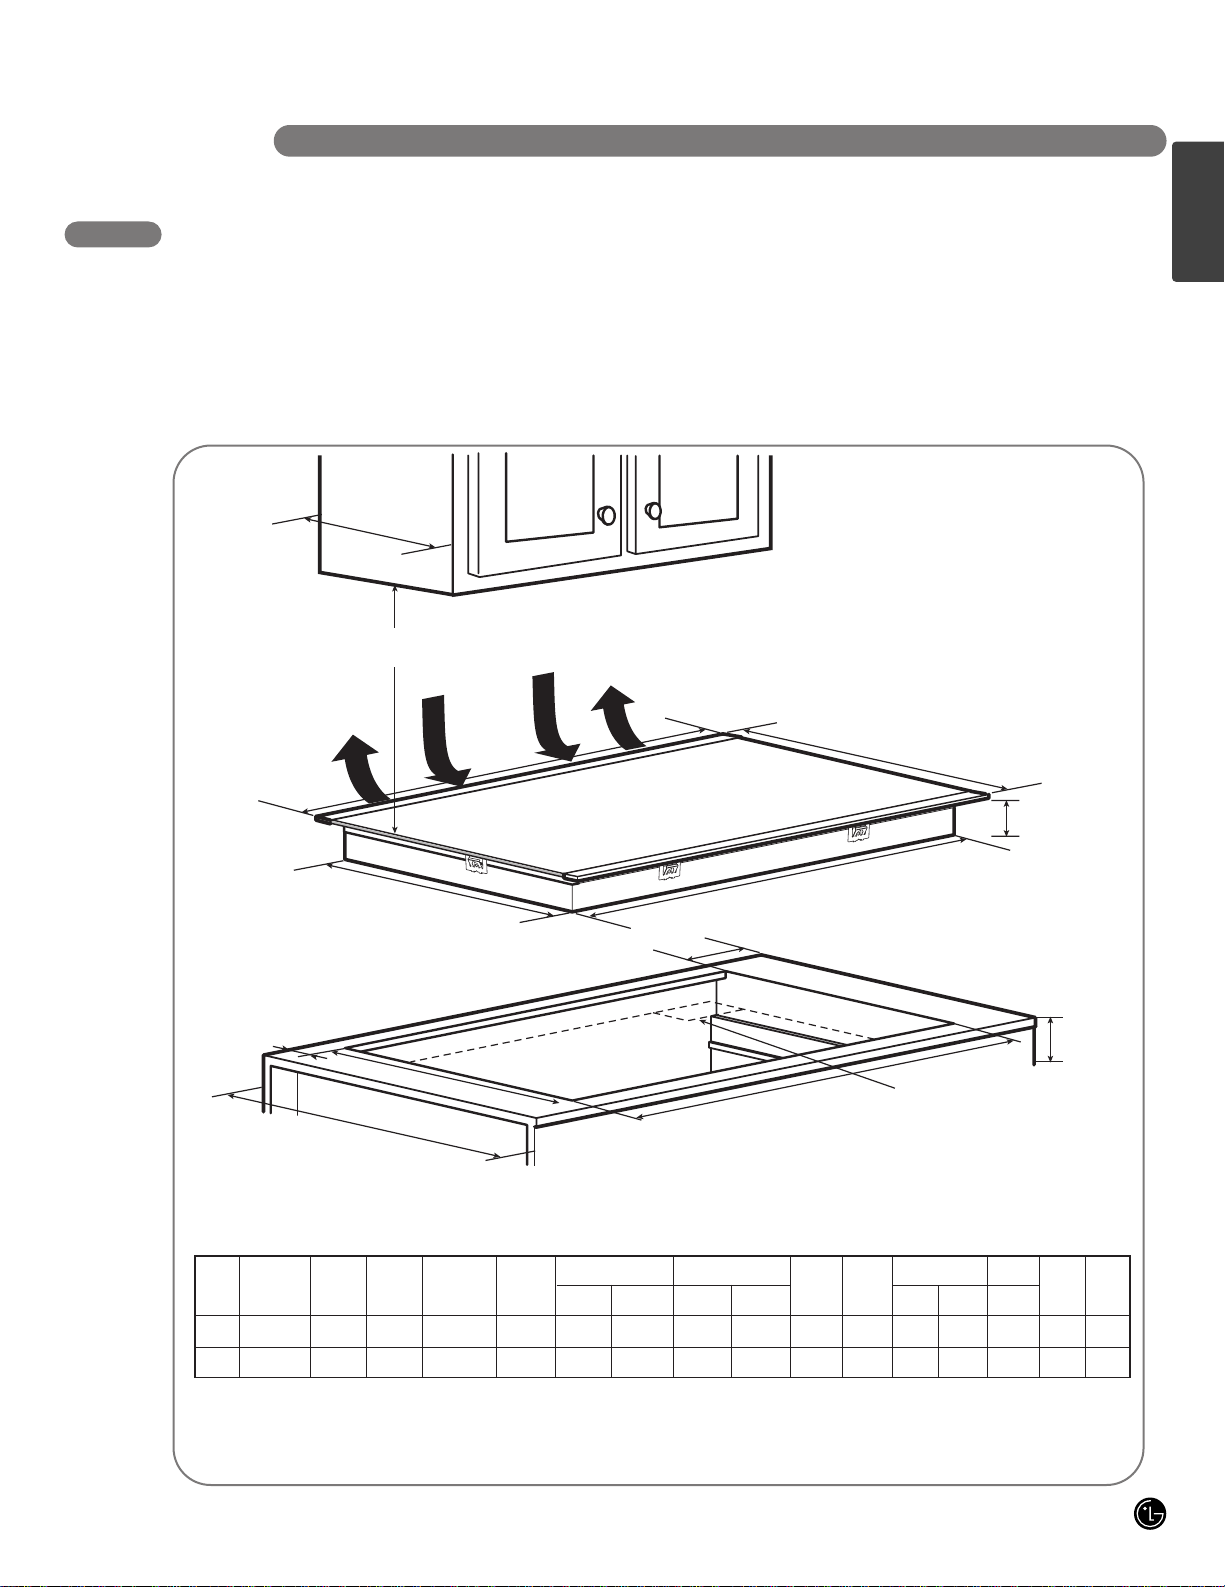
IMPORTANT INSTALLATION INFORMATION
• All electric cooktops run off a single phase,
three-wire or four-wire cable, 240/208 volt,
60 hertz, AC-only electrical supply with ground.
• Minimum distance between cooktop and
overhead cabinetry is 30ʺ (76.2 cm).
INSTALLATION INSTRUCTIONS
A
B
I
J
C
D
H
E
F
G
L
M
K
** Do not obstruct these areas!
Fresh air intake**
Air exhaust**
Air exhaust**
30” Min.
(76.2 cm)
4" X 8" (10.2 cm x 20.3 cm)
opening to route armored
cable if panel is present.
All dimensions are stated in inches and millimeters (mm).
Allow 2ʺ (5 cm) space below the armored cable opening to clear the electric cable and allow
space for installation of the junction box on the wall at the back of the cooktop.
PREPARING THE INSTALLATION LOCATION
ENGLISH
FG
Unit A B C D E
Inch 30
mm 783 546 56 732.2 498 746 749 515 518 20 33 610 762 106 38 610
13
/16211/223/162813/16195/8293/8291/2201/4203/
Min Max Min Max Min Max Min
HI
13
/1615/1624 30 43/1611/224
8
JK
LM
21
Page 22
INSTALLATION INSTRUCTIONS
J
F
G
I
10"
( 25.4 cm)
18"
( 45.7 cm)
12"
(30.5 cm)
24"
(61 cm)
L
M
H
K
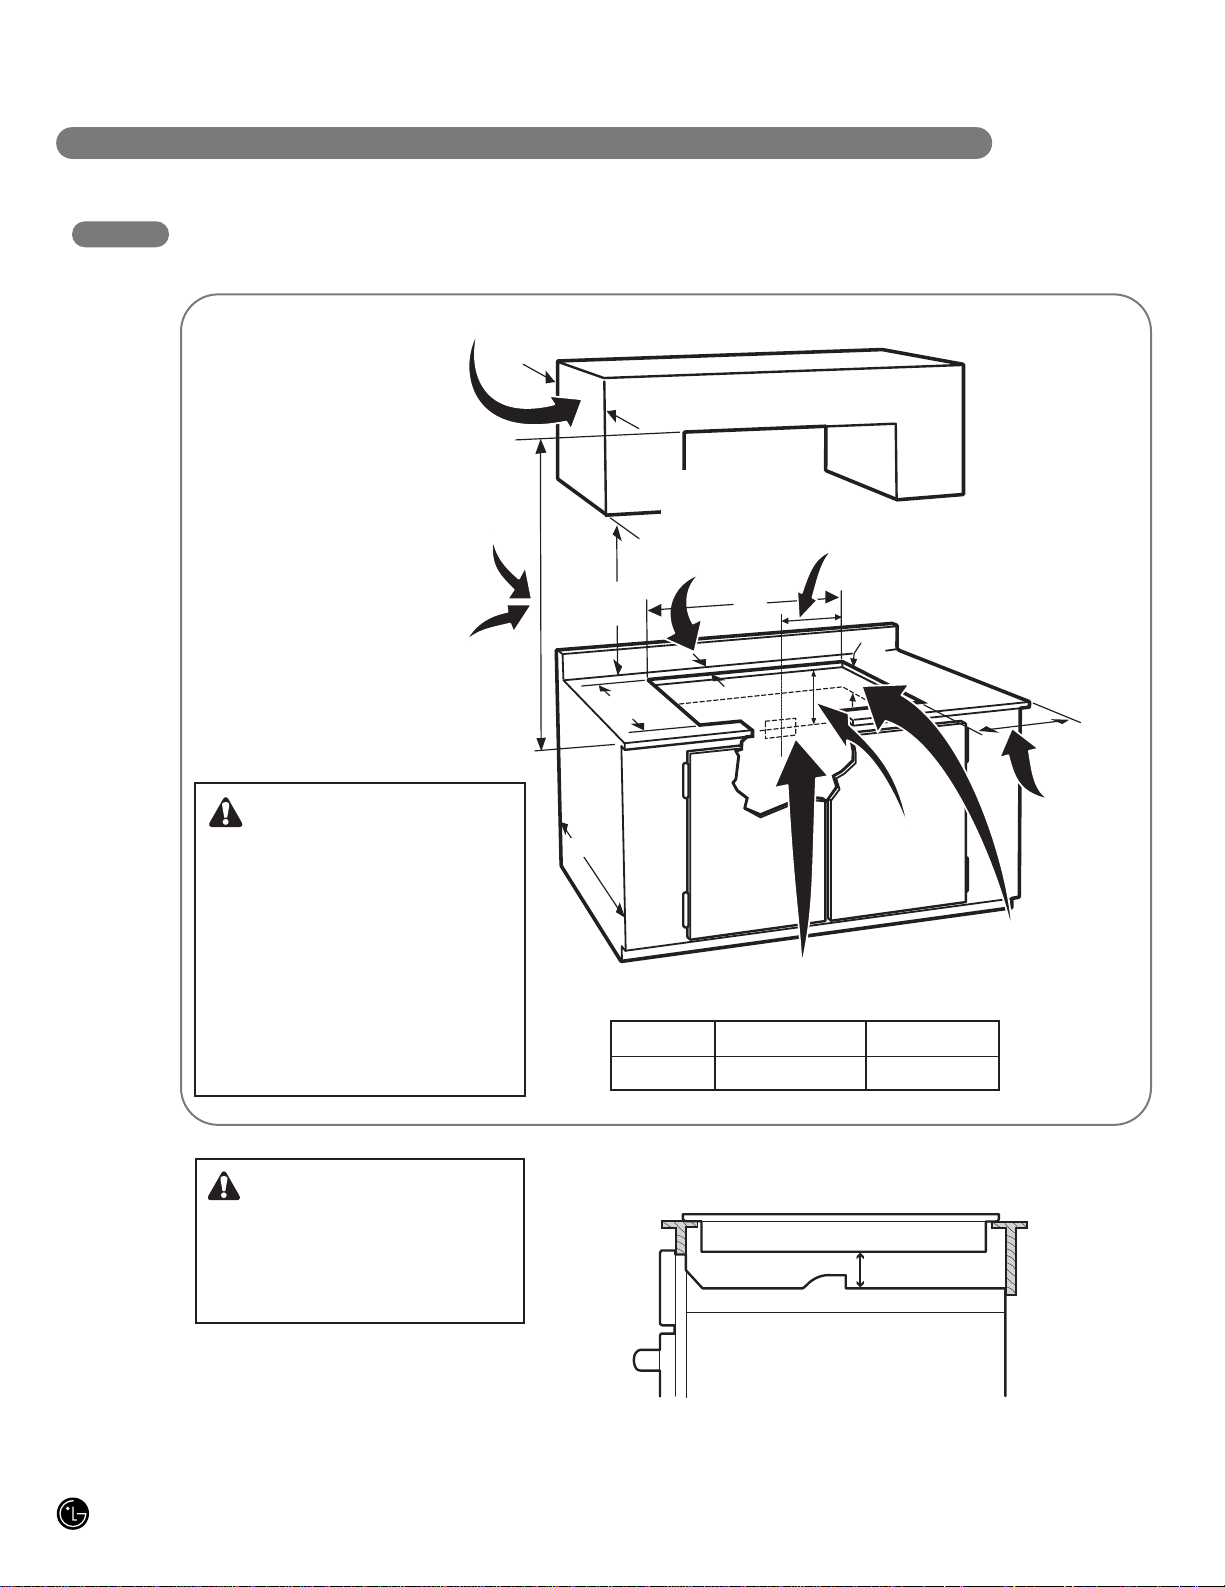
DIMENSIONS AND CLEARANCES
Overhead cabinet should not exceed a maximum
depth of 13” (33 cm).
30” (76.2 cm) min. clearance
between the top of the
cooktop and the bottom of
an unprotected wood or
metal cabinet.
24” (61 cm) min. when bottom of
wood or metal cabinet is protected by
not less than 1/8” flame-retardant
millboard covered with no less than
No. 28 MGS sheet steel, 0.015” (0.4
mm) stainless steel, 0.024” (0.6 mm)
aluminum, or 0.020” (0.5 mm) copper.
CAUTION
To eliminate the risk of burns
or fire by reaching over heated
surfaces, cabinet storage space
located above the cooktop
should be avoided. If cabinet
storage is provided, risk can be
reduced by installing a range
hood that projects horizontally
a minimum of 5” (127 mm)
beyond the face of the cabinets.
Min. recommended
distance between rear
edge of cutout and
nearest combustible
surface.
Min. from edge of
cooktop to nearest
combustible wall
(either side of unit).
Empty space is needed underneath
Approximate location of junction box.
Model H L
30ʺ 71/2ʺ (191mm) 11/2ʺ (38mm)
the cooktop for installation purposes.
22
CAUTION
It is very important to keep
3
/
2
” (70 mm) distance
4
between the cooktop and the
oven.
ᵉ Recommend space cooktop and oven
3
/
4
2
” (70 mm)
Page 23
IMPORTANT SAFETY INSTRUCTIONS
• Be sure your cooktop is installed and grounded
properly by a qualified installer or service
technician.
• This cooktop must be electrically grounded in
accordance with local codes or, in their
absence, with the National Electrical Code
ANSI/NFPA No. 70, latest edition in the
United States.
ELECTRICAL CONNECTIONS
INSTALLATION INSTRUCTIONS
The electrical power to the cooktop must be
shut off while line connections are being
made. Failure to do so could result in
serious injury or death.
PROVIDING THE
ELECTRICAL CONNECTION
Install the junction box under the cabinet and run
120/240 or 120/208 volt, AC wire from the main
circuit panel.
NOTE: DO NOT connect the wire to the circuit
panel at this time.
ELECTRICAL REQUIREMENTS
Observe all governing codes and local
ordinances.
A 3-wire or 4-wire single-phase 120/240 or
120/208 volt, 60 Hz AC-only electrical supply
is required on a separate circuit fused on
both sides of the line (time-delay fuse or
circuit breaker is recommended). DO NOT
fuse neutral. The fuse size must not exceed
the circuit rating of the appliance specified on
the nameplate.
This unit can consume up to 7,400W at
240 VAC. A40 Amp circuit breaker with wire
gauge #8 AWG must be used.
NOTE: Wire sizes and connections must
conform with the fuse size and rating of the
appliance in accordance with the National
Electrical Code ANSI/NFPA No. 70, latest
edition, and local codes and ordinances.
The appliance should be connected to the
fused disconnect (or circuit breaker) box
through flexible armored or nonmetallic
sheathed cable. The flexible armored cable
extending from this appliance should be
connected directly to the grounded junction
box. The junction box should be located as
shown on page 22 with as much slack as
possible remaining in the cable between the
box and the appliance, so it can be moved if
servicing is ever necessary.
A suitable strain relief must be provided to
attach the flexible armored cable to the
junction box.
1
2
3
4
An extension cord must not be used with
this appliance. Such use may result in a fire,
electrical shock, or other personal injury.
W ARNING
W ARNING
ENGLISH
23
Page 24
INSTALLATION INSTRUCTIONS
ELECTRICAL CONNECTIONS (cont.)
ELECTRICAL CONNECTION
Connect the flexible armored cable that extends
from the surface unit to the junction box using a
suitable strain relief at the point the armored
cable enters the junction box. Then make the
electrical connection as follows.
Electrical ground is required on this
appliance.
This appliance is manufactured with a supply
wire and a frame connected green or bare
copper grounding wire.
NOTE TO ELECTRICIAN:
The armored cable leads supplied with the
appliance are UL-listed for connection to larger
gauge household wiring. The insulation of the
leads is rated at temperatures much higher than
the temperature rating of household wiring. The
current-carrying capacity of the conductor wire
is governed by the temperature rating of the
insulation around the wire, rather than the
wire gauge alone.
W ARNING
DO NOT ground to a gas supply pipe. DO
NOT connect to electrical power supply
until appliance is permanently grounded.
Connect the ground wire before turning
on the power.
W ARNING
This appliance is equipped with a copper
conductor flexible cable. If connection is
made to aluminum house wiring, use only
special connectors which are approved for
joining copper and aluminum wires in
accordance with the National Electrical Code
and local codes and ordinances. Improper
connection of aluminum house wiring to
copper leads can result in a short circuit or
fire. Follow the connector manufacturer’s
recommended procedure closely.
WHERE LOCAL CODES PERMIT CONNECTING THE APPLIANCE-GROUNDING
CONDUCTOR TO THE NEUTRAL (WHITE) WIRE
Observe all governing codes and local
ordinances.
1
Disconnect the power supply.
2
At the circuit breaker box, fuse box or
junction box, connect appliance and power
supply cable wires as shown.
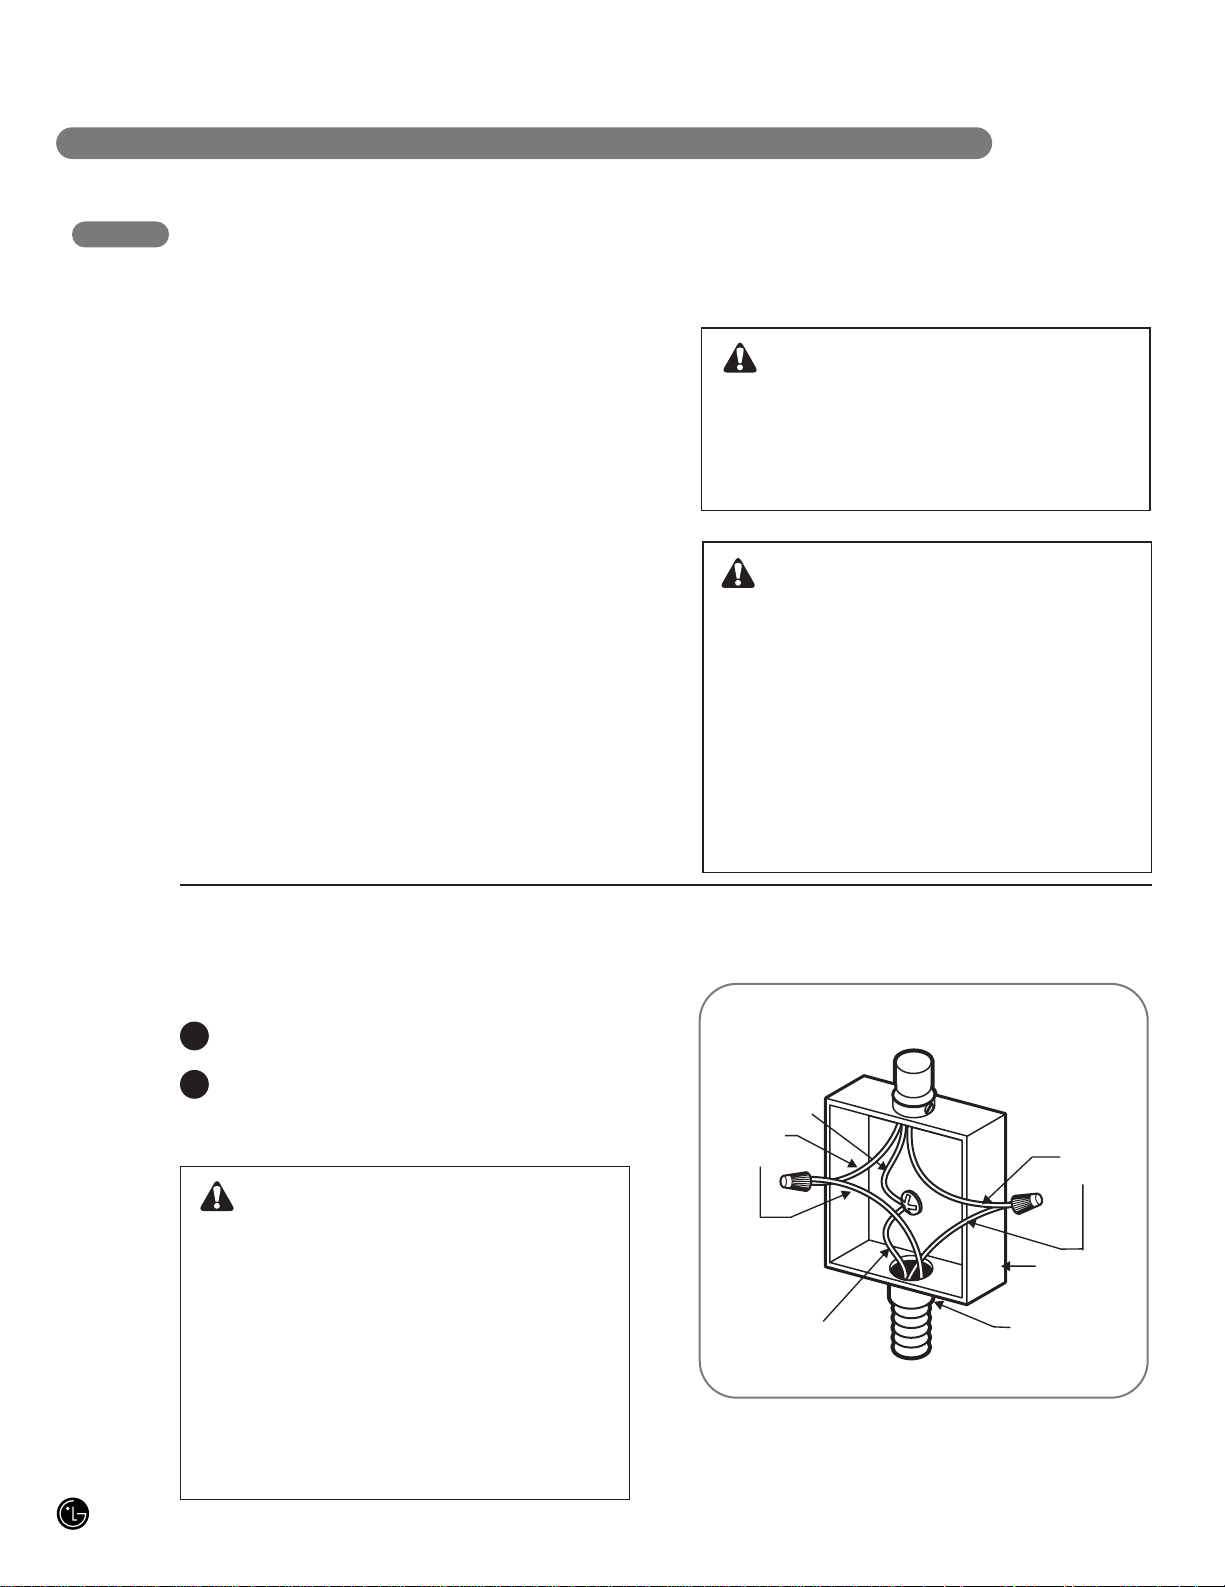
3-WIRE GROUNDED JUNCTION BOX
Cable from power supply
White wire
(neutral)
Red
wires
W ARNING
You may not ground the cooktop through
the neutral (white) wire if cooktop is used
in a new branch circuit installation (1996
NEC), mobile home, recreational vehicle, or
where local codes do not permit grounding
to the neutral (white) wire. When grounding
to the neutral (white) wire is prohibited, you
must use a 4-wire power supply cable.
Failure to heed this warning may result
in electrocution or other serious
personal injury.
Green wire (ground)
Cable from cooktop
UL-listed conduit
connector
Black
wires
Junction box
24
Page 25
ELECTRICAL CONNECTIONS (cont.)
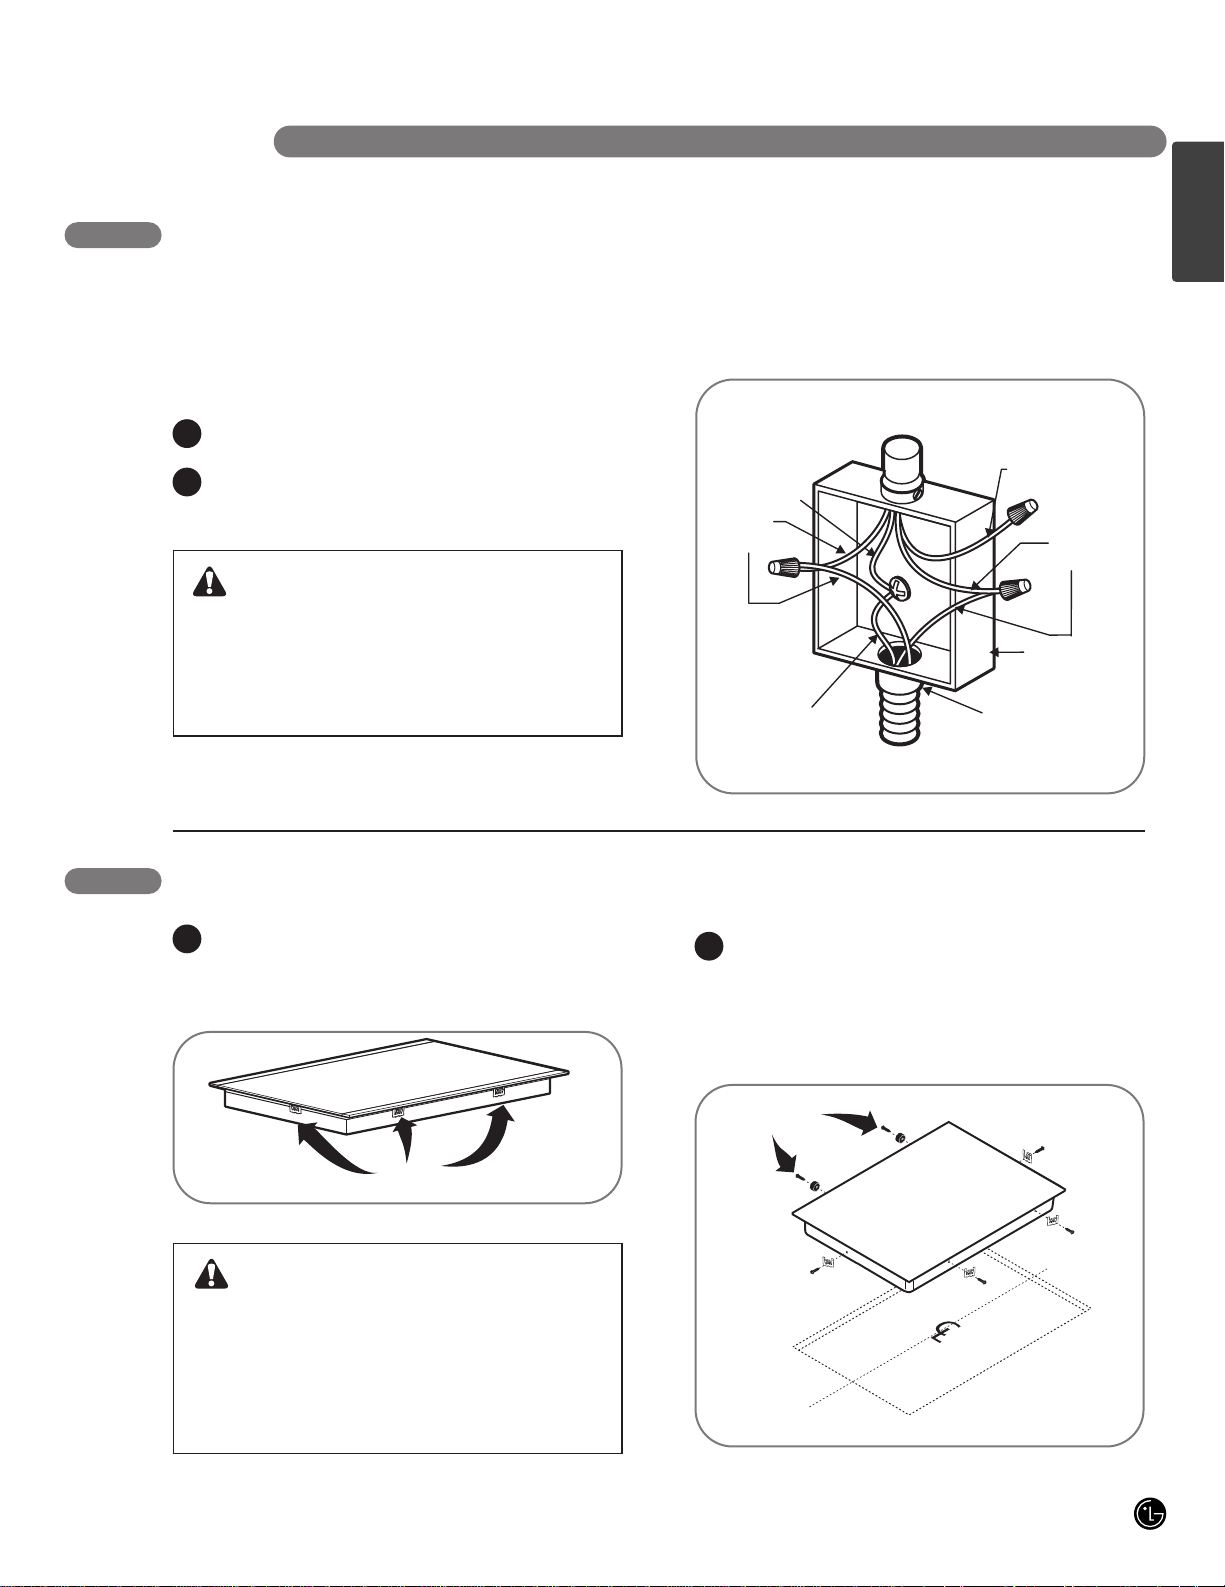
IF COOKTOP IS USED IN A NEW BRANCH CIRCUIT INSTALLATION (1996 NEC), MOBILE
HOME, RECREATIONAL VEHICLE, OR WHERE LOCAL CODES DO NOT PERMIT
GROUNDING TO THE NEUTRAL (WHITE) WIRE
Observe all governing codes and local
ordinances.
Disconnect the power supply.
At the circuit breaker box, fuse box or
junction box, connect appliance and power
supply cable wires as shown.
1
2
If connecting to a 4-wire power supply cable
electrical system, the appliance frame
connected ground wire MUST NOT be
connected to the neutral wire of the 4-wire
electrical system.
4-WIRE GROUNDED JUNCTION BOX
INSTALLATION INSTRUCTIONS
COOKTOP INSTALLATION
Visually inspect the cooktop for damage.
Make sure all cooktop screws are tight
(see below for locations).
1
Screws
Carefully lower the cooktop into the countertop cutout, making sure not to trap any wires.
NOTE: Do not use caulking compound. The
cooktop must be removable, should service
be required.
2
Do not remove the nylon spacers on the
edges of the cooktop. These spacers center
the cooktop in the space provided. The
cooktop must be centered to allow proper
venting and to prevent excess heat buildup
that may result in heat damage or fire.
Nylon spacers
Cable from power supply
Ground
wire
Black
wires
Green wire (ground)
Cable from cooktop
UL-listed conduit
connector
Junction box
Red
wires
White wire
(no connection)
W ARNING
W ARNING
ENGLISH
25
Page 26
INSTALLATION INSTRUCTIONS
COOKTOP INSTALLATION (cont.)
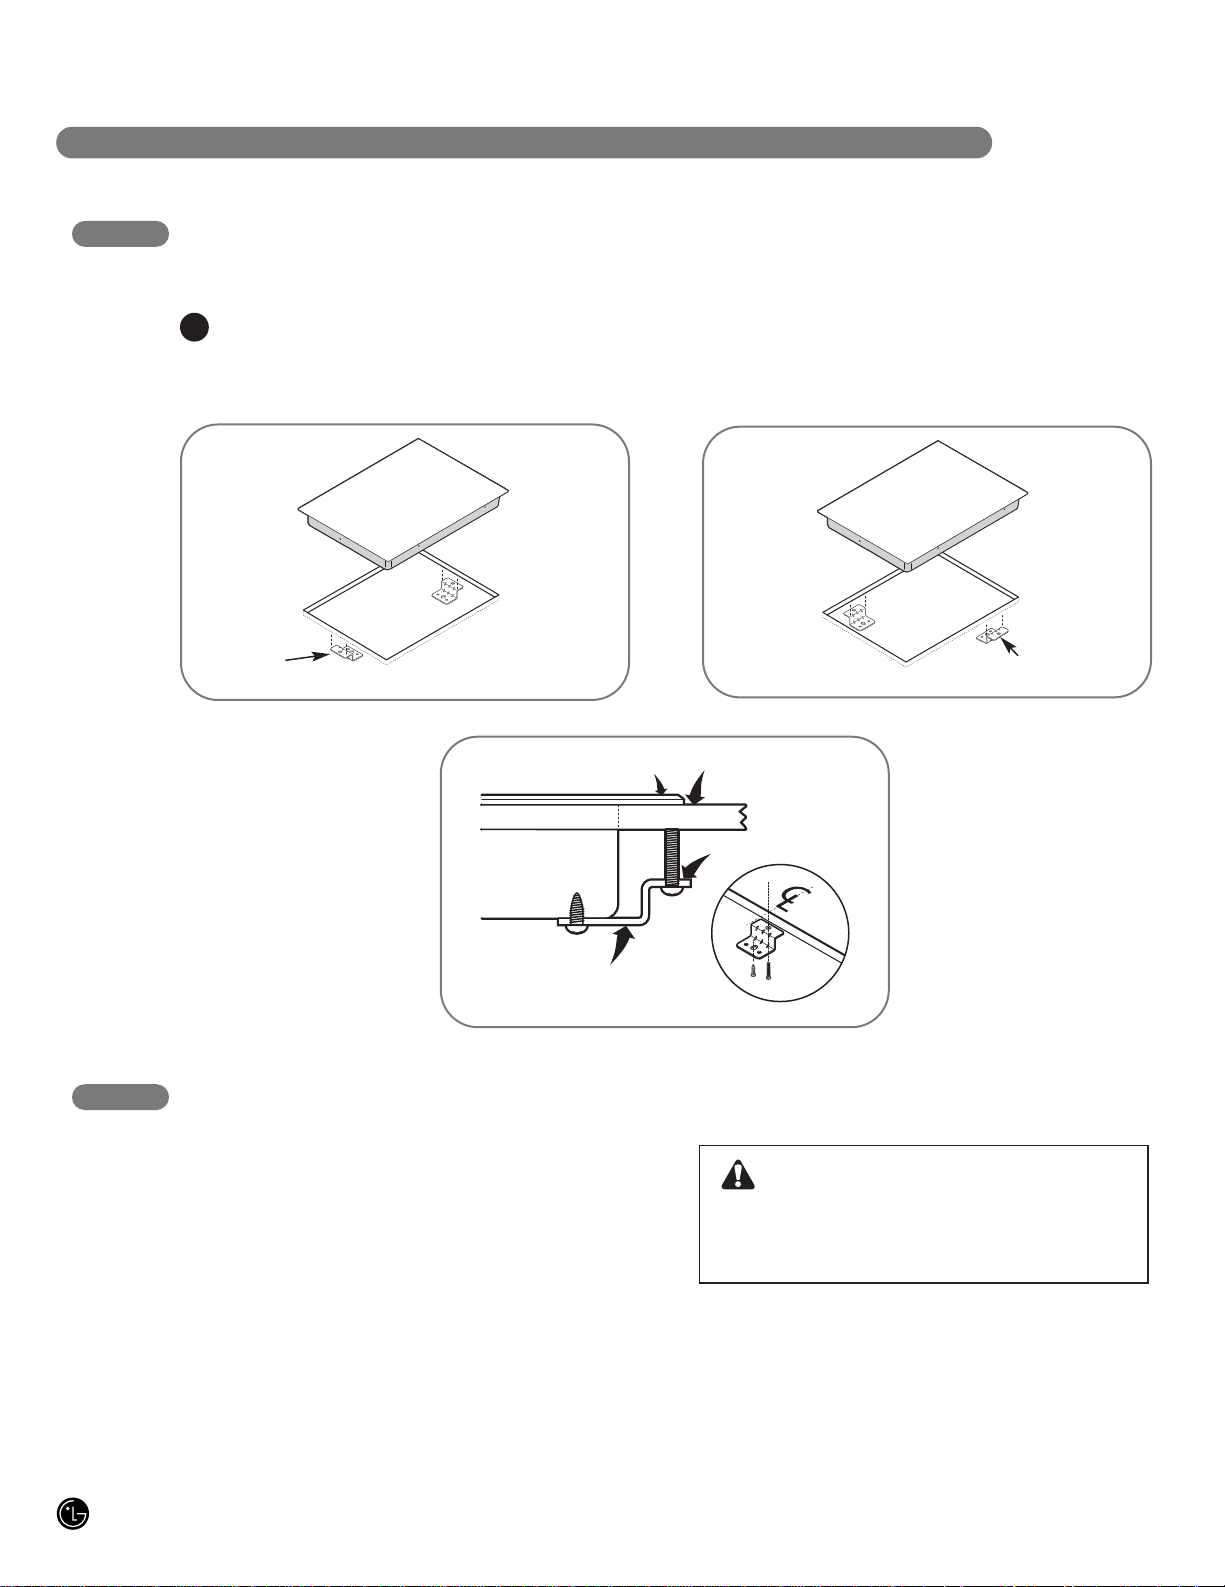
3
Install the retainer brackets to the bottom of
the cooktop; then snug the bolts against the
bottom of the countertop as shown.
NOTE: The retainer brackets MUST be
installed to meet local codes or, in their
absence, with the National Electrical Code
ANSI/NFPA No. 70, latest edition.
Preferred
installation
Retainer
brackets
Cooktop
Retainer
brackets
Alternative
installation
Retainer
brackets
Countertop
Bolt
26
FINAL CHECK
Perform a final operational check of the cooktop,
making sure the cooktop powers on properly and
that each Cooking Zone operates correctly. Refer
to the Operating Instructions in this guide for
details.
MODEL AND SERIAL NUMBER LOCATION
The model and serial numbers are located on a
plate on the bottom of the cooktop. Please
record them in this guide; you will need them
for warranty registration.
CAUTION
Do not touch cooktop glass or Cooking
Zones. They may be hot enough to
cause burns.
Page 27
Problem Possible Causes Solutions
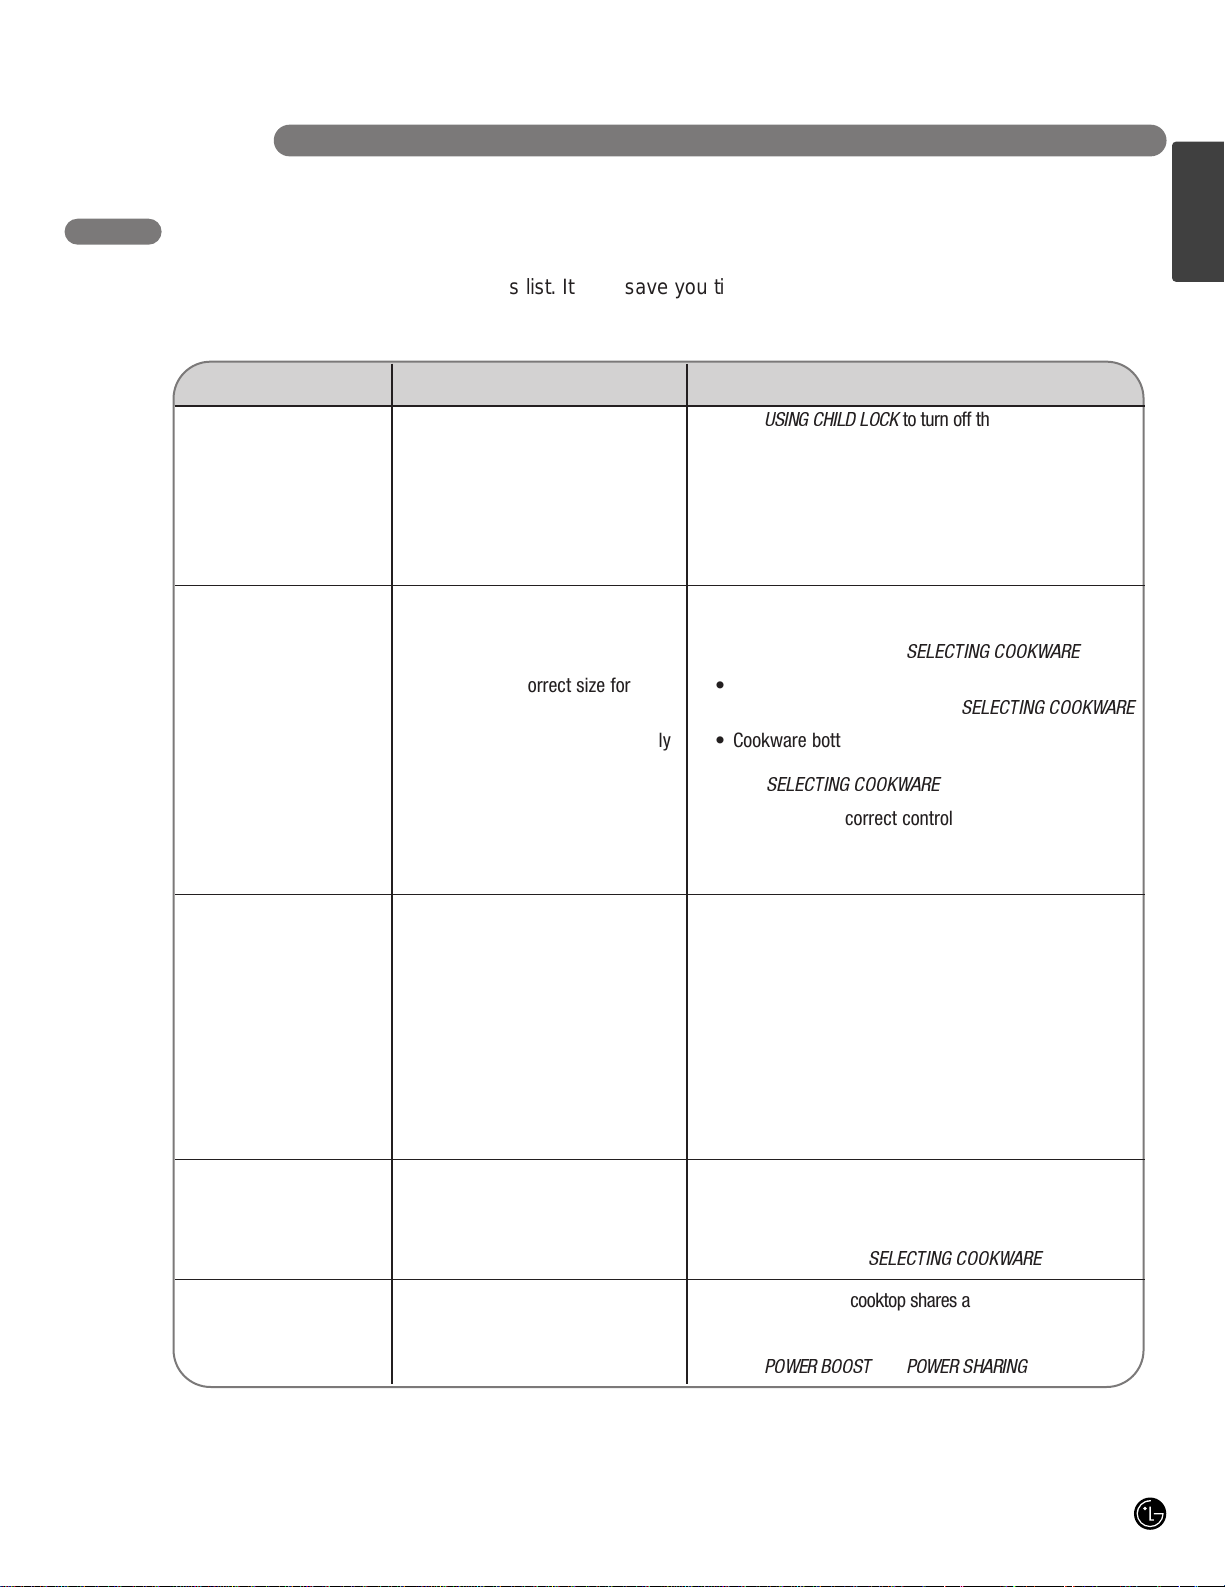
Cooktop does not work • Cooktop controls are locked. • See
USING CHILD LOCK
to turn off the
CHILD LOCK feature.
• Circuit breaker has tripped or • Reset the circuit breaker or replace the fuse.
fuse is blown.
• Power outage. • Check house lights to confirm power outage.
• Installation wiring not complete. • Contact the installer or dealer.
Cooktop does not heat • No cookware or improper • Make sure that cookware is centered on the cooking
cookware on Cooking Zone. zone, and that cookware is of the proper type for
induction cooking. See
SELECTING COOKWARE
.
• Cookware incorrect size for • Cookware bottom must be large enough to cover
selected Cooking Zone. Cooking Zone completely. See
SELECTING COOKWARE
.
• Cookware not resting completely • Cookware bottoms must be flat and centered on the
on Cooking Zone. Cooking Zone, and must not rest on the cooktop triim.
See
SELECTING COOKWARE
.
• Incorrect Cooking Zone selected. • Make sure the correct control is ON for the Cooking
Zone being used.
• No power to cooktop. • See “Cooktop does not work” above.
Cooktop turns off • Cooktop internal heat sensor • Make sure the cooktop vents are not blocked. See
while cooking has detected high temperature page 21 for Air Exhaust and Fresh Air Intake locations.
inside the cooktop.
• Automatic shutoff has activated. • The cooktop features an automatic shutoff feature
that turns the entire cooktop off if any Cooking Zone
has been on continuously for 17 hours.
• Liquid or object on controls area. • The cooktop control may read liquids or objects in
the controls area as a touch, which could cause the
cooktop to shut off. Clean up spills or remove objects
and restart cooktop.
The power level for a • Cookware has been removed from • Place the cookware back on the Cooking Zone within
Cooking Zone is flashing the Cooking Zone. 90 seconds to maintain the power level settings.
• Cookware not centered on • Make sure cookware is centered and resting flat on the
eeS.enoZ gnikooC.enoZ gnikooC
SELECTING COOKWARE
.
Power Boost does • Power Boost being used with two • Each side of the cooktop shares an inverter for both
not work Cooking Zones on the same side of Cooking Zone. Power Boost cannot be used with two
.emit emas eht ta retrevni emas eht no senoZ gnikooC.potkooc eht
See
POWER BOOST
and
POWER SHARING
.
TROUBLESHOOTING
BEFORE CALLING FOR SERVICE
Before you call for service, review this list. It may save you time and expense. This list includes common
occurrences that are not the result of a defect in workmanship or materials.
ENGLISH
27
Page 28
TROUBLESHOOTING
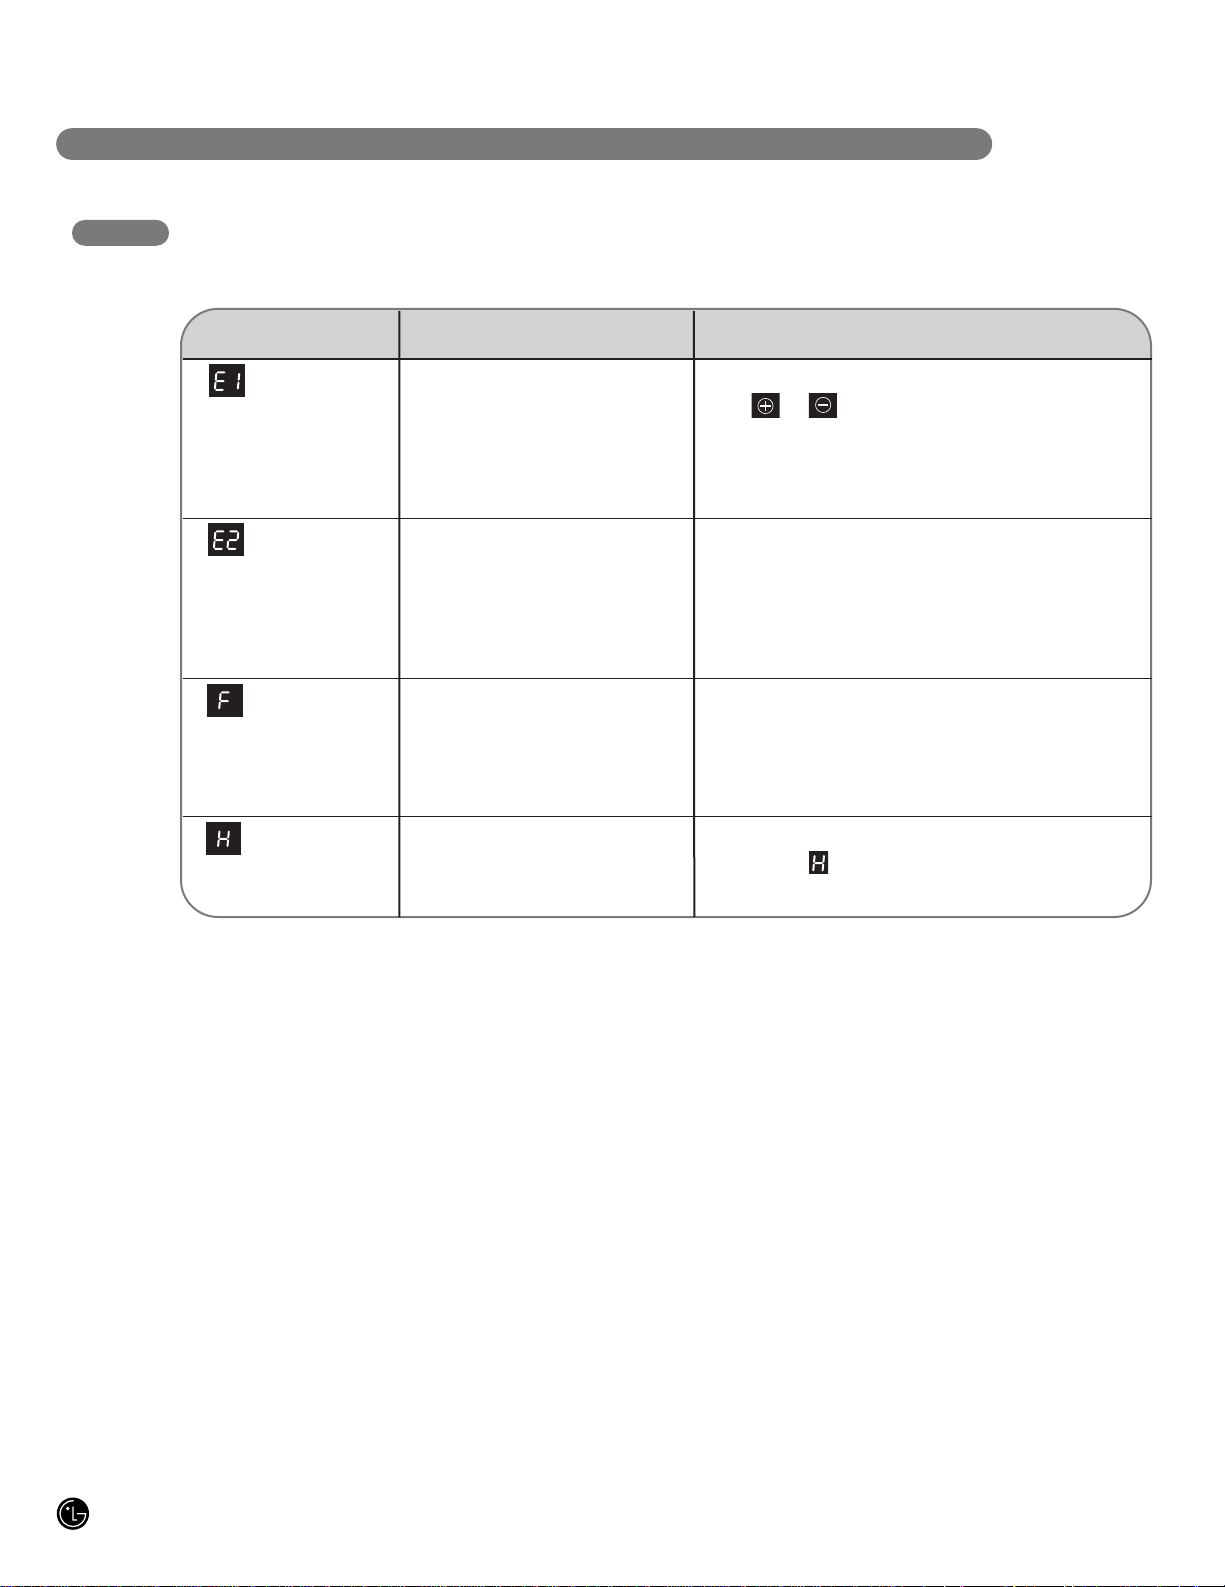
BEFORE CALLING FOR SERVICE
Problem Possible Causes Solutions
appears in the • Control pad was touched too long. • This message will appear if any pad except the Timer
timer display or pads is touched for more than 10 seconds.
appears in the • Supplied voltage to cooktop is • If the voltage of the power supplied to the cooktop is too
timer display rorre siht wohs lliw dna ylreporp etarepo tonnac ti,wol.wol oot
It will also appear if liquids or objects are spilled or left
on the controls area. To clear the error code, remove any
liquid or objects from the controls area and press the
POWER pad to reset the cooktop.
code. This may be caused by reduced voltage being
supplied to the house circuit. If connections are
correct and the supplied voltage returns to normal,
the code will disappear.
appears in the • Electronics fault error message. • Turn the cooktop OFF; then shut off power at the fuse or
display and a number circuit breaker for about 30 seconds. Turn power back
appears in the timer on to the cooktop and turn the cooktop on using the
display POWER pad. If the error message is still displayed, call
for service.
flashes in the • Power outage or initial startup. • When the cooktop is first turned on or after a power
display outage, will blink in the display for 90 minutes or
until the POWER pad is touched for 2 seconds.
28
Page 29

ENGLISH
29
Page 30

30
Page 31

ESPAÑOL
GUÍA PARA EL USO & INSTRUCCIONES
DE INSTALACIÓN
COCINA A INDUCCIÓN DE
VIDRIO CERÁMICO
Lea detenidamente estas instrucciones antes utilizar y
guárdelas como referencia para el futuro.
HN7413AG
LCE30845
P/No.: MFL41494801
www.lg.com
Page 32

INTRODUCCIÓN
_
_
INFORMACIÓN IMPORTANTE DE
SEGURIDAD
Aviso Importante: Interferencia Radio . . . . . . . . . . . . 3
Precauciones Importantes de Seguridad . . . . . . . 4–8
INTRODUCCIÓN A LA COCCIÓN
POR INDUCCIÓN
Cocción por Inducción . . . . . . . . . . . . . . . . . . . . . . . . 9
Selección de Utensilio . . . . . . . . . . . . . . . . . . . . . 9–11
PARTES Y CARACTERÍSTICAS
Partes y Características de su Cocina . . . . . . . . . . 12
Funciones del Control Táctil . . . . . . . . . . . . . . . . . . 13
INSTRUCCIONES DE USO
Antes de Usar la Cocina . . . . . . . . . . . . . . . . . . . . . 14
Configuración de Controles . . . . . . . . . . . . . . . . 14–16
Uso de las zonas de Cocción del Puente . . ......17
Uso del Temporizador . . . . . . . . . . . . . . . . . . . . . . . 17
Uso del Bloqueo para Niños . . . . . . . . . . . . . . . . . . 18
Otras Funciones ...........................18
CUIDADO Y LIMPIEZA
Limpieza de la Cocina.......................19
INSTRUCCIONES DE INSTALACIÓN
Antes de Comenzar ........................ 20
Desempaque de la Cocina . . . . . . . . . . . . . . . . . . . 20
Especificaciones Técnicas. . . . . . . . . . . . . . . . . . . . 20
Preparación del Lugar de Instalación ...........21
Dimensiones y Despeje......................22
Conexiones Eléctricas . . . . . . . . . . . . . . . . . . . . 23–25
Instalación de la Cocina . . . . . . . . . . . . . . . . . . 25, 26
Control Final . . . . . . . . . . . . . . . . . . . . . . . . . . . . . . 26
¡GRACIAS!
Felicitaciones por su compra y
bienvenido a la familia de LG.
Su nueva Cocina de Inducción
combina características precisas
para la cocción con un uso simple
y diseño elegante. Siguiendo las
instrucciones de funcionamiento y
cuidado de este manual, su cocina
le brindará muchos años de
uso confiable.
SOLUCIÓN DE PROBLEMAS
Antes de Solicitar Reparaciones . . . . . . . . . . . 27, 28
GARANTÍA
Información de Registro del Producto . . . . . . . . . . 29
Información sobre registro de producto
Modelo: ________________________________________
Número de serie: _______________________________
2
Fecha de compra: _____________________________
Page 33

ADVERTENCIA Para su seguridad, siga las instrucciones de
este manual a fin de minimizar riesgos de incendio, descargas eléctricas, daños en
su propiedad, heridas personales o la muerte.
INFORMACIÓN IMPORTANTE DE SEGURIDAD
LEA TODAS LAS INSTRUCCIONES
ANTES DE USAR
Este equipo ha sido probado y cumple con los
límites establecidos para un dispositivo digital de
clase B, según la parte 18 de la Normativa de la
FCC. Estos límites han sido establecidos para
ofrecer una protección razonable contra
interferencias perjudiciales en la instalación
residencial. Este equipo genera, usa y puede
emitir energía de radiofrecuencia y, si no se instala
y utiliza de acuerdo con las instrucciones, puede
ocasionar interferencias perjudiciales para las
comunicaciones de radio. Sin embargo, no se
garantiza que no se presenten interferencias en
una instalación en particular. Si el equipo provoca
interferencias perjudiciales para la recepción de
radio o televisión, lo que puede comprobar
encendiendo y apagando el equipo, se aconseja al
usuario que intente corregir la interferencia con
una o más de las siguientes medidas:
• Reoriente o reubique la antena receptora de la
radio y/o televisión.
• Aumente la distancia entre la cocina y el
receptor de radio o televisión.
• Conectar la cocina a un tomacorriente de un
circuito diferente del tomacorriente al que se
encuentra conectado el receptor de radio o
televisión.
AVISO IMPORTANTE: INTERFERENCIA RADIO
Puede descargar un manual del usuario y de instalación en http://www.lg.com.
ESPAÑOL
3
Page 34

INFORMACIÓN IMPORTANTE DE SEGURIDAD
LEA TODAS LAS INSTRUCCIONES
ANTES DE USAR
PRECAUCIONES DE SEGURIDAD
• Instalación Adecuada: Asegúrese que el
dispositivo sea instalado y conectado en forma
adecuada por un técnico calificado, de acuerdo
con el Código de Electricidad Nacional
ANSI/NFP ANº 70 – la última edición en los
Estados Unidos y todos los requisitos del código
local. Realice la instalación sólo de acuerdo con
las instrucciones.
• No intente reparar o reemplazar ninguna parte
de la cocina, a menos que se lo recomiende
específicamente en este manual. Cualquier otra
reparación deberá ser realizada por un técnico
calificado.
• Quite todas las cintas y envoltorios antes de usar
el electrodoméstico. Destruya las bolsas de
plástico y cartón luego de desempacar el
electrodoméstico. Nunca permita que los niños
jueguen con el material de empaque.
• Los aspectos de seguridad de este
electrodoméstico cumplen con las normas
técnicas aceptadas.
• Sepa cómo desconectar el encendido
eléctrico del electrodoméstico en el disyuntor
o la caja del fusible en caso de emergencia.
Marque el disyuntor o fusible para poder
identificarlo de manera fácil y poder actuar
rápidamente si fuera necesario.
• No repare o reemplace ninguna parte del
electrodoméstico. Todas las reparaciones
deberán ser realizadas únicamente por un
técnico calificado a fin de evitar riesgos de
heridas personales y daños sobre el
electrodoméstico.
• Nunca modifique ni altere la construcción del
electrodoméstico ya sea quitando paneles,
cobertores de cables o cualquier otra parte
permanente del producto.
• Ubicación de objetos sobre el
electrodoméstico: No se deberán colocar
materiales inflamables cerca o sobre la
superficie de cocción. Esto incluye ítems de
papel, plástico y tela, tales como libros de
cocina, elementos plásticos y toallas y líquidos
inflamables. No coloque materiales explosivos,
tales como aerosoles en lata sobre ni cerca del
electrodoméstico. Los materiales inflamables
pueden explotar y ocasionar incendios o daños
en la propiedad.
• No deje solos a los niños. No se deberá dejar
alos niños solos o fuera de su radio de
atención en la zona donde el
electrodoméstico se encuentre en uso. Nunca
se les deberá permitir sentarse o pararse sobre
ninguna parte del electrodoméstico.
• No guarde ni use materiales combustibles,
gasolina u otros vapores o líquidos cerca de
este o cualquier otro aparato.
PRECAUCIÓN
Los ítems de uso de los niños no se deben
guardar en armarios sobre una cocina o en el
tablero posterior de dicha cocina – al trepar
los niños en la cocina para alcanzar un ítem
podrían sufrir heridas graves.
ADVERTENCIA
Nunca use el electrodoméstico para calentar
o calefaccionar una habitación.
ADVERTENCIA
Aquellas personas que utilicen un marcapasos
o un dispositivo médico similar deberán ser
cuidadosas al usar o colocarse cerca de una
unidad de inducción mientras ésta se encuentre
en uso, ya que el campo electromagnético
podrá afectar el funcionamiento del
marcapasos o dispositivo médico similar.
Se recomienda consultar a su médico o al
fabricante el marcapasos o dispositivo médico
similar sobre su situación particular.
PRECAUCIÓN
NO toque las zonas de cocción o zonas
cercanas a estas superficies. Es posible que
las zonas de cocción se encuentren calientes
debido al calor residual, aunque su color sea
oscuro. Es posible que las zonas cercanas a las
zonas de cocción se calienten lo suficiente
como para provocar quemaduras. Durante y
después del uso, no toque ni permita que telas
u otros materiales inflamables toquen estas
zonas hasta que haya pasado un tiempo
suficiente para que se enfríen.
4
Page 35

• La instalación y conexión del nuevo
electrodoméstico sólo deberá ser realizada por
personal calificado.
• Los electrodomésticos montados al ras sólo
se podrán usar realizando la instalación en
gabinetes adecuados y lugares de
funcionamiento que estén en conformidad con
las normas relevantes. Esto asegura un nivel de
protección suficiente contra descargas eléctricas,
según lo establecido por las agencias de
certificación.
• Si el electrodoméstico funciona mal o sufre
fracturas: apague todas las zonas de cocción y
comuníquese con el Centro de Servicios.
SEGURIDAD ELÉCTRICA
INFORMACIÓN IMPORTANTE DE SEGURIDAD
• Use ropa adecuada. Nunca se deben usar
prendas sueltas o que cuelguen mientras se
usa el electrodoméstico. Evite que la ropa u
otros materiales inflamables tomen contacto con
las superficies calientes.
• No use agua ni harina sobre fuego con grasa.
Apague el fuego con la tapa de una cacerola o
use bicarbonato de sodio, un químico seco o un
extintor contra incendios.
• Al calentar grasa, controle dicha cocción de
cerca. Es posible que la grasa se prenda fuego
si se deja calentar demasiado.
• Use sólo ollas con sostenedores secos.
Los sostenedores húmedos o mojados sobre
superficies calientes pueden ocasionar
quemaduras debido al vapor. Evite que los
sostenedores tomen contacto con unidades con
superficies calientes. No use una toalla u otra tela
voluminosa en lugar de un sostenedor.
• No caliente envases de comida que no fueron
abiertos. La acumulación de presión pueden
ocasionar que el contenedor explote y ocasione
heridas.
PRECAUCIONES DE SEGURIDAD (continua)
•
Si la superficie se encuentra resquebrajada,
apague el electrodoméstico a fin de evitar
una posible descarga eléctrica. No vuelva a
usar la COCINA hasta que la superficie de
vidrio se haya cambiado.
• Al usar la COCINA, nunca use papel de
aluminio, productos envueltos en papel de
aluminio o comida congelada en cacerolas
de aluminio.
•
Si el cable suministrado está dañado, deberá
ser reemplazado por el fabricante, su agente
de servicios o personas con calificación
similar a fin de evitar riesgos.
SEGURIDAD PARA LOS NIÑOS
• Este dispositivo no debe ser usado por
niños pequeños o personas que sufren
cierta debilidad, a menos que una persona
responsable las supervise de modo
adecuado a fin de asegurar que puedan
usar el electrodoméstico de manera segura.
• Los niños pequeños deberán ser
supervisados a fin de asegurar que no se
juegue con el electrodoméstico.
• Es posible que las partes accesibles se
vuelvan calientes durante el uso. Se deberá
mantener alejados a niños pequeños.
LEA TODAS LAS INSTRUCCIONES
ANTES DE USAR
ADVERTENCIA
ADVERTENCIA
ESPAÑOL
5
Page 36

INFORMACIÓN IMPORTANTE DE SEGURIDAD
LEA TODAS LAS INSTRUCCIONES
ANTES DE USAR
SEGURIDAD DURANTE EL USO
• Este electrodoméstico sólo se podrá usar
para una cocción o fritura normal. No fue
diseñado para uso comercial o industrial.
•
No use la cocina para calefaccionar el ambiente.
• Sea cuidadoso al enchufar aparatos eléctricos
cerca de la cocina. Los cables no deben entrar
en contacto con la superficie caliente. Esto podría
dañar la cocina y el cable aislante.
• Las grasas y aceites sobrecalentados se
prenden fuego rápidamente. Se deberá
supervisar la cocción al preparar comidas con
grasa o aceite.
• Cuando termine de usarlo, apague el elemento
el control y confíe en el detector de sartén.
• Mantenga siempre los paneles de control
limpios y secos. No permita que queden
líquidos o grasa en la zona superior de los
controles de la cocina. Las comidas derramadas
o quemadas pueden activar o desactivar el
electrodoméstico. Limpie las zonas de los
controles con cuidado a fin de reestablecer el
funcionamiento normal del electrodoméstico.
• Nunca coloque elementos combustibles
sobre la cocina.
• Nunca deje ningún elemento combustible o
latas de aerosol en un cajón ubicado debajo
de la cocina.
• Evite colocar utensilios metálicos sobre la
superficie de la cocina. Los objetos metálicos
pueden generar calor y ocasionar quemaduras.
• Sepa qué perilla controla cada superficie de
las zonas de cocción.
• Limpie el electrodoméstico en forma regular a
fin de mantener todas las partes sin grasa,
evitando que se provoquen incendios. Las
campañas de escape de la ventilación y los filtros
de grasa se deben mantener limpios. No permita
la acumulación de grasa en la campana ni en el
filtro. Los depósitos de grasa sobre el ventilador
pueden provocar incendios. Lea las instrucciones
de limpieza del fabricante de la campana.
• Use cacerolas del tamaño adecuado. Este
electrodoméstico está equipado con una o más
zonas de cocción de diferentes tamaños.
• Seleccione los utensilios con fondos planos
que sean lo suficientemente largos como para
cubrir las zonas de cocción. Los sensores de
detección de cacerolas no permitirán que las
zonas de cocción afectadas funcionen sin que
6
haya una cacerola presente.
• No coloque ningún objeto sobre o cerca dla
zona de la perilla de control, a fin de evitar la
activación accidental de los controles de la
cocina.
• Las manijas de los utensilios se deberán
colocar hacia dentro y no extenderse sobre
zonas de cocción adyacentes. La finalidad de
esto es disminuir el riesgo de quemaduras, el
encendido de materiales inflamables y derrames
debido a un contacto no intencional con el
utensilio.
• Nunca deje comidas preparadas en las zonas
de cocción. Los excesos de hervor causan
vapores y derrames de grasa que se pueden
encender, o una cacerola que se secó debido al
hervor puede sufrir derretimiento o daños.
• Cobertores de protección: No use papel de
aluminio para cubrir ninguna parte de la
cocina. Use sólo papel de aluminio como se
recomienda luego del proceso de cocción, si se
usa como cobertor de la comida. Cualquier otro
uso de papel de aluminio podrá provocar
riesgos de descargas eléctricas, incendios
o cortocircuitos.
• Utensilios de cocción de vidrio: Sólo ciertos
tipos de vidrio, vidrio/cerámico, cerámico,
objetos de barro u otros utensilios de vidrio
son aptos para la superficie de la cocina sin
que se produzcan roturas debido a un
cambio brusco de temperatura. Lea las
recomendaciones del fabricante sobre el
uso de la cocina.
• Campana de ventilación: La campana de
ventilación sobre la superficie de cocción se
debe limpiar de forma frecuente, de modo que
la grasa de los vapores de cocción no se
acumulen sobre la campana o el filtro.
• No limpie ni use una cocina rota. Si la cocina
sufriera roturas, los productos de limpieza y los
derrames podrán penetrar sobre dichas roturas,
creando riesgos de descargas eléctricas.
Comuníquese con un técnico calificado
de inmediato.
• Limpie la cocina con cuidado. Si se usa una
esponja o trapo para limpiar derrames sobre una
superficie de cocción caliente, evite quemaduras
de vapor.Algunos productos de limpieza pueden
producir gases nocivos si se aplican sobre una
superficie caliente.
Page 37

ES
COCINE CARNES Y CARNES DE AVE
EN FORMA COMPLETA
Cocine carnes y carnes de ave en forma
completa – la carne por lo menos a una
temperatura INTERIOR de 160° F (71° C) y la
carne de ave por lo menos a una temperatura
INTERIOR de 180° F (82° C). Normalmente la
cocción a estas temperaturas brindan una
protección contra enfermedades transmitidas
por la comida.
INFORMACIÓN IMPORTANTE DE SEGURIDAD
• No coloque cacerolas calientes sobre el
vidrio frío de la cocina. Esto podría hacer
que el vidrio se rompa.
• No deslice cacerolas sobre la superficie
de la cocina. Las mismas pueden rayar la
superficie de la cocina.
• No deje que las cacerolas hiervan
excesivamente. Esto podría ocasionar daños
permanentes tales como roturas, fusiones o
marcas que pueden afectar la cocina.
(Este tipo de daños no están cubiertos
por la garantía).
• Nunca descuide las unidades cuando se
encuentren a altas temperaturas. Los
hervores excesivos causan vapores y
derrames de grasa que se pueden encender.
SEGURIDAD DURANTE EL USO (continua)
NO tome las manijas de las cacerolas
luego de la cocción. Podrían estar
calientes y existe riesgo de que sufra
quemaduras.
• Siempre apague el electrodoméstico antes
de realizar la limpieza.
• Por razones de seguridad, no limpie el
electrodoméstico con limpiadores de vapor
de presión o alta presión.
• Limpie la cooktop de acuerdo con las
instrucciones de mantenimiento y limpieza
que figuran en este manual.
• El limpiador por vapor no debe usarse para
limpiar los quemadores de una cocina.
• No use limpiezadores abrasivos ásperos ni
raspadores metálicos ásperos para limpiar
el vidrio de la cocina, ya que pueden rayar
la superficie, ocasionando la rutura del
vidrio.
SEGURIDAD DURANTE LA LIMPIEZA
PRECAUCIÓN
LEA TODAS LAS INSTRUCCIONES
ANTES DE USAR
ESPAÑOL
7
Page 38

INFORMACIÓN IMPORTANTE DE SEGURIDAD
LEA TODAS LAS INSTRUCCIONES
ANTES DE USAR
CÓMO EVITAR DAÑOS SOBRE EL ELECTRODOMÉSTICO
• Antes de usar la cocina por primera vez,
aplique la crema de limpieza recomendada
sobre la superficie cerámica de la cocina. Pula
con una tela o estropajo no abrasivo. Esto
facilitará la limpieza al quitar la suciedad de la
cocción. La crema especial de la cocina deja
una capa protectora sobre el vidrio que evita
rayas y abrasiones.
• No use la superficie de cocción para trabajar o
guardar cosas.
•
Evite que se produzcan daños sobre los
bordes al trasladar ollas y cacerolas alrededor
de la cocina.
• No use las zonas de cocción con cacerolas
vacías o sin ollas ni cacerolas sobre dichas
zonas.
• El vidrio cerámico es muy duro y resistente a
cambios extremos de temperatura, pero no es
irrompible. Puede sufrir daños si caen sobre el
mismo objetos particularmente duros o
puntiagudos.
• Sea muy cuidadoso si usará ollas de hierro
fundido u otras ollas con extremos duros o
ásperos. Al mover las mismas se podrán
producir marcas sobre el vidrio.
• Si cae azúcar o una mezcla que contenga
azúcar sobre la zona caliente de cocción y se
derrite, quite la misma de inmediato, mientras
aún se encuentra caliente. Si se la deja enfriar,
es posible que la superficie sufra daños al
quitar la misma.
NOT A: ¡Corre el riesgo de sufrir
quemaduras al utilizar el raspador para
vidrio sobre un área de cocción que se
encuentre caliente!
• Mantenga los objetos con riesgos de sufrir
derretimiento alejados de la superficie de vidrio
cerámico; por ejemplo, utensilios de plástico,
papel de aluminio o envoltorios de cocción. Si
cualquier otro material o comidas se derritieron
en la superficie de vidrio cerámico, se deberán
limpiar en forma inmediata.
ELIMINACIÓN DE ELECTRODOMÉSTICOS VIEJOS
A fin de proteger el medioambiente, es
importante que se eliminen los electrodomésticos
viejos de la forma correcta.
• No se deberá deshacer del electrodoméstico
del mismo modo en que se deshace la basura
del hogar.
• Puede obtener información sobre fechas de
recolección o lugares públicos para arrojar
deshechos a través del consejo u oficina de
salud medioambiental.
PRECAUCIÓN
Antes de deshacerse de electrodomésticos
viejos, asegúrese de hacer que ya no
funcionen a fin de que no se conviertan
en un elemento peligroso. Para hacer
esto, solicite a una persona calificada
que desconecte el electrodoméstico del
circuito eléctrico de su hogar.
ACTO DE REFORZAMIENTO DE LA INGESTA SEGURA DE
AGUA LIBRE DE TOXICOS
ADVERTENCIA:
de causar cáncer. Lávese las manos después de manipular.
LEA Y SIGA EST A INFORMACIÓN DE SEGURIDAD CUIDADOSAMENTE.
Este producto contiene quimicos conocidos por el Estado de California
CONSERVE ESTAS INSTRUCCIONES
8
Page 39

INTRODUCCIÓN A LA COCCIÓN POR INDUCCIÓ N
COCCIÓN POR INDUCCIÓN
FUNCIONAMIENTO DE LA COCCIÓN
POR INDUCCIÓN
Debajo de la superficie de
cocción de vidrio cerámico
se encuentra una bobina de
inducción. La misma genera
campos magnéticos, los
cuales actúan sobre la base
de las ollas y cacerolas, cuando otros métodos
calentando primero el vidrio cerámico. Esto
significa que la base de la cacerola se calienta
de inmediato, ahorrando tiempo y dinero.
Debido a que el calor necesario para la cocción se
genera directamente sobre la base de la cacerola,
la zona de cocción apenas se calienta. Sólo recibe
el calor que rebota desde la base de la cacerola.
NOT A: Si no hay una olla o cacerola en la zona de
cocción, no se produce transferencia de energía
(calentamiento). Esto evita que las zonas de
cocción se puedan encender y calentar de forma
accidental.
IMPORTANTE:
• Quite todas las cintas y envoltorios antes de usar
el electrodoméstico. Destruya las bolsas de
plástico y cartón luego de desempacar el
electrodoméstico. Nunca permita que los niños
jueguen con el material de empaque.
• Los campos electromagnéticos pueden afectar
los circuitos electrónicos e interferir con radios y
teléfonos portátiles.
•¡No coloque objetos magnéticamente activos
(por ejemplo: tarjetas de crédito, discos de
computadora, cassettes) sobre o cerca de la
superficie del vidrio cerámico mientras una o
más zonas de cocción se encuentren en uso!
• No coloque ningún objeto metálico (por ejemplo:
cucharas, tapas de ollas) sobre las zonas de
cocción, ya que las mismas se pueden calentar
cuando las zonas de cocción se encuentren
en uso.
SELECCIÓN DE UTENSILIOS
OLLAS Y CACEROLAS
• En principio, todas las ollas y cacerolas con
base magnética son aptas. Las mismas son de
acero o de hierro fundido.
• Las ollas de acero de un alto grado con una
base metálica mixta (tipo sándwich, es decir,
de Tefal
®
con una base de aluminio/cobre) son
aptas sólo para inducción si el fabricante lo
indicó expresamente de ese modo. En tal caso
cuentan con un material magnético en la base.
• Si desea usar un tipo de cacerola especial (por
ejemplo: a presión, para cocción lenta), siga
las instrucciones del fabricante y no use una
olla demasiado fina.
NOT A:Algunos utensilios pueden producir ruidos
al ser usados en zonas de cocción por inducción.
No se trata de un defecto de la cocina y su
funcionamiento no se verá afectado como
resultado de esto.
PRUEBA DE IDONEIDAD:
Si no está seguro si una olla o cacerola es apta
para el uso con la cocina de inducción, podrá
averiguarlo con unas simples pruebas:
• Coloque una cacerola que contenga un poco
de agua (1/8ʺ–1/4ʺ [3–6mm) sobre la zona de
cocción. Coloque la zona de cocción en su
máximo nivel (ajústela en 9).
• También puede realizar
el control con un imán.
Si el mismo se mantiene
adherido a la base de la
cacerola, significa que
es apto para las zonas
de cocción por
inducción.
¡La base de las cacerolas aptas se
calientan en pocos segundos!
El agua hervirá de forma rápida.
Los sensores magnéticos de la Zona de Cocción ubicados debajo de la superficie de la cocina requieren
el uso de utensilios fabricados con material magnético, a fin de iniciar el proceso de calentamiento sobre
cualquiera de las Zonas de Cocción. Al adquirir las cacerolas, busque aquellas que posean etiquetas
donde el fabricante indique que son aptas para uso con cocinas de inducción.
PRECAUCIÓN
ESPAÑOL
9
Page 40

INTRODUCCIÓN A LA COCCIÓN POR INDUCCIÓN
SELECCIÓN DE UTENSILIOS (continúa)
EVITE QUE SE PRODUZCAN RAYAS
Se recomienda usar siempre utensilios de acero
inoxidable de calibre grueso sobre la superficie
de la cocina de inducción. Esto ayudará a reducir
la posibilidad que se produzcan rayas sobre la
superficie cerámica. Los utensilios de baja
calidad pueden ocasionar rayas sobre la
superficie de la cocina.
Los utensilios siempre se deben levantar de la
superficie de cocción de cerámica a fin de evitar
que se produzcan rayas. El deslizamiento de
cualquier tipo de utensilio sobre la cocina de
cerámica puede afectar la apariencia completa
de la misma. Con el paso del tiempo, el
deslizamiento de CUALQUIER tipo de utensilio
sobre la cocina de cerámica puede alterar la
apariencia completa de la misma. Finalmente, la
acumulación de rayas puede hacer que la
limpieza de la superficie sea dificultosa y que
degrade la apariencia completa de la cocina.
También se pueden producir rayas a partir de
granos de arena (por ejemplo: luego de lavar
vegetales), los cuales son arrastrados con la
cacerola sobre la superficie de cocción.
USE UTENSILIOS CON FONDO PLANO
El utensilio debe tomar contacto completo con la
superficie del elemento de cocción. Use
cacerolas con fondo plano
cuyos tamaños sean
adecuados al elemento de
cocción y a la cantidad de
comida que se preparará.
Controle que sea plano
rotando una regla sobre el
fondo del utensilio.
10
PARA UN MEJOR RESULTADO:
Siempre siga las recomendaciones para un tipo
ytamaño de utensilio adecuado. Además:
• No use cacerolas sucias con grasa acumulada.
Siempre use cacerolas de fácil limpieza luego
de la cocción, y asegúrese que los fondos de
las mismas estén limpios y secos.
• Al cocinar con gran cantidad de líquido, use
cacerolas grandes de modo que no se
produzca hervor excesivo.
• No deje que las cacerolas hiervan
excesivamente. Esto podría ocasionar daños
permanentes tales como roturas, fusiones o
marcas que pueden afectar los utensilios de
cerámica. (Este tipo de daños no están
cubiertos por la garantía).
• Haga que el tamaño de la cacerola y la
zona de cocción coincidan con la cantidad
de comida preparada.
CONSEJOS PARA AHORRAR ENERGÍA:
• Siempre ubique las ollas y cacerolas antes de
encender la zona de cocción.
• Las zonas de cocción y utensilios sucios
consumen más electricidad.
• Siempre que sea posible, coloque la tapa con
firmeza sobre las ollas y cacerolas de modo
que queden completamente cubiertas.
Page 41

INTRODUCCIÓN A LA COCCIÓN POR INDUCCIÓ N
SELECCIÓN Y UBICACIÓN DEL UTENSILIO
Es importante que se usen utensilios adecuados y que se los ubique de modo correcto sobre la
cocina. Cualquiera de las condiciones incorrectas que figuran a continuación podrá ser detectada
por los sensores ubicados debajo de la superficie cerámica de la cocina. Si esto sucede, una o más
de las zonas de cocción no se calentarán y aparecerá una F en la pantalla de la zona de cocción
afectada. Corrija el problema antes de intentar usar la cocina.
CORRECTO
INCORRECTO
El utensilio está
ubicado en forma
correcta sobre la
superficie de la zona
de cocción.
El fondo de la
cacerola es plano
y los costados
rectos.
El tamaño de la
cacerola alcanza o
supera el tamaño
mínimo recomendado
para la zona de
cocción.
El utensilio no está
centrado sobre la
superficie de la zona
de cocción.
El fondo o laterales
de la cacerola son
curvos o combados.
La cacerola no
alcanza el tamaño
mínimo requerido
para ser usado en la
zona de cocción.
La cacerola reposa
completamente sobre
la superficie de la
cocina.
La cacerola está
adecuadamente
equilibrada.
El fondo de la cacerola
reposa sobre el borde de
la cocina o no reposa
completamente sobre la
superficie de la cocina.
Las manijas pesadas
producen la
inclinación de
la cacerola.
SELECCIÓN DE UTENSILIOS (continúa)
Si una cacerola fabricada del material correcto se
ubica de forma adecuada sobre cualquier de las
zonas de cocción pero es DEMASIADO PEQUEÑA,
la LUZ dla zona de cocción afectada titilará y la
cacerola no se calentará.
Ta ma ño de cacerola min. =
71⁄4ʺ (180mm)
Tamaño de cacerola min. =
5ʺ (125mm)
Tamaño de
cacerola
min. =
53⁄4ʺ (145 mm)
Sólo use la cacerola provista
sobre la parte del puente.
SELECCION DEL TAMAÑO
CORRECTO DE LA CACEROLA
• La cocina de inducción cuenta con 4 zonas
de cocción. Cada elemento requiere que el
tamaño de la cacerola sea mínimo para
que pueda ser usado en forma efectiva.
El anillo interior de cada zona de cocción
es una guía para enlazar de modo
correcto el tamaño mínimo de la cacerola.
El fondo de la cacerola deberá cubrir
completamente el anillo interior para
lograr una cocción adecuada.
• El anillo exterior más grueso en cada zona
de cocción ayuda a determinar el tamaño
MÁXIMO de la cacerola. Luego de ubicar
el utensilio en la cocina, asegúrese que
el utensilio no supere en más de 1/2ʺ
(12,7mm) la línea más gruesa de la zona
de cocción. La cacerola deberá tener
un contacto TOTAL con la superficie
de vidrio, evitando que el fondo de la
cacerola tome contacto con el borde
metálico de la cocina.
ESPAÑOL
11
Page 42

PARTES Y CARACTERÍ STICAS
PARTES Y CARACTERÍSTICAS DE SU COCINA
Es posible que las funciones y apariencias varíen con relación a su modelo a lo largo del manual.
1800W (Normal)
2400W (Aumentado)
2400W (Normal)
3300W (Aumentado)
1400W (Normal)
1800W (Aumentado)
12
Controles electrónicos táctiles
Cocina de Cerámica: La nueva cocina de
inducción de LG cuenta con una superficie
cerámica que permanece más fría que las
superficies cerámicas de las cocinas
convencionales, independientemente de
si se encuentra ENCENDIDA o APAGADA.
PRECAUCIÓN
Riesgo de quemaduras:
Las zonas de cocción aparecen friás al
estar ENCENDIDAS y luego de haber sido
AP AGADAS. La superficie de cerámica podrá
permanecer CALIENTE debido al calor
residual transferido desde el utensilio.
Detector Magnético: El sensor de bobina detecta
de forma automática el utensilio y evita activaciones
accidentales.
Detección del Tamaño de la Cacerola: El sensor
de reconocimiento de la cacerola detecta y adapta
de forma automática las zonas de cocción al tamaño
de la cacerola que se está usando.
Mayor Eficiencia:
calienta más rápido y al mismo tiempo consume
menos energía. La cocción por inducción lleva los
líquidos a su punto de hervor de manera rápida,
permitiendo al mismo tiempo un hervor lento y parejo.
La cocción por inducción se
zonas de Cocción por Inducción: Las zonas de
cocción por inducción debajo de la cocina cerámica
calientan la base de la cacerola de forma
inmediata sin calentar la cocina de vidrio cerámica
primero. Las dos zonas de tamaño mediano se
pueden usar juntas para cacerolas más grandes y
apaisadas.
Controles Táctiles: Los botones táctiles de fácil
uso brindan un funcionamiento preciso.
Fácil Limpieza: La superficie de cocción de vidrio
cerámico y el control táctil facilitan la limpieza, ya
que no incluyen aberturas ni espacios donde se
puede producir la acumulación de grasa.
Pantallas de Control y Función: Las pantallas
digitales muestran las configuraciones actuales y le
advierten sobre superficies calientes de cualquier
calor residual dla zona de cocción correspondiente.
Apagado Automático de Seguridad: Todas
las zonas de cocción cuentan con la función de
apagado de seguridad, la cual apaga la zona
de cocción si se presiona el botón ENCENDIDO/
AGAGADO (ON/OFF) pero no se selecciona
ningún nivel dentro de los 10 segundos.
Page 43

CARACTERÍSTICAS DEL CONTROL TÁCTIL
PARTES Y CARACTERÍ STICAS
1
2
5
4
PUENTE: Active las dos zonas de cocción
izquierdas al mismo tiempo como una gran
zona de cocción.
Para activar la función de puente, toque esta
tecla a fin de activar y ajustar el nivel de energía
con las teclas o de cualquiera de las
zonas de cocción izquierdas.
TEMPORIZADOR: Al activarlo, el tiempo
restante se visualizará en la pantalla. Use las
teclas o para ajustar el temporizador.
BLOQUEO PARA NIÑOS: Mantenga la tecla
presionada durante 3 segundos para activar y
desactivar la función de bloqueo para niños.
CALIENTE: Esta tecla reduce de forma
automática el último elemento seleccionado que
se encuentre activo al nivel de configuración
más bajo.
ENCENDIDO: Presione la tecla ENCENDIDO
para ENCENDER o APAGAR la cocina. Cuando
esté ENCENDIDA, la cocina quedará en el
modo de espera hasta que se active un área
de cocción.
1
2
3 4 5
6
6
3
CONTROLES DE LAS ZONAS DE COCCIÓN:
Cada área de cocción cuenta con su propio
control, el cual se puede activar de forma
individual.
La tecla ENCENDIDO/APAGADO
(ON/OFF) activa la zona de cocción
deseada.
Use las teclas or para configurar
el nivel de la zona de cocción activa
de a y (nivel más alto de intensidad).
La pantalla del control de la zona de cocción
mostrará el nivel seleccionado:
ao
Indicador de Superficie Caliente: Luego de
usarlo, una aparecerá en la pantalla
indicadora del nivel de la zona de cocción, hasta
que la superficie de cocción se haya enfriado.
6
ESPAÑOL
13
Page 44

INSTRUCCIONES DE USO
ANTES DE USAR LA COCINA
Antes de usar la cocina por primera vez, limpie
la misma completamente con el limpiador
incluido o con un limpiador para cocinas de
cerámica, de acuerdo con las instrucciones de
Cuidado y Limpieza de esta guía. Esto ayudará
a proteger la superficie de cerámica y facilitará
la limpieza en el futuro.
CONFIGURACIÓN DE CONTROLES
Para usar las teclas de control táctil, toque la
tecla firmemente con la parte plana de la punta
de su dedo.
USO POR PRIMERA VEZ
La primera vez que se enchufe la cocina, una
aparecerá en la pantalla de cada área de cocción
durante 60 segundo o hasta que la tecla
ENCENDIDO (POWER) se toque durante
aproximadamente 2 segundos.
PRECAUCIÓN
Nunca use estropajos para fregar ni
limpiadores abrasivos. Los mismos pueden
ocasionar daños permanentes sobre la
superficie de la cocina.
14
NOT A: La también aparecerá cuando vuelva la
corriente luego de un corte de luz.
ACTIVACIÓN DE LA COCINA
Encienda la cocina, toque la tecla
ENCENDIDO (POWER) durante
aproximadamente 2 segundos.
El indicador sobre la tecla se iluminará.
SELECCIONE LA ZONA DE COCCIÓN
Para seleccionar la zona de cocción
deseada, presione la tecla
ENCENDIDO/AP AGADO (ON/OFF).
La pantalla para la zona de cocción
seleccionada mostrará 0 y un indicador
se iluminará para indicar que la zona de
cocción está encendida pero que no se
estableció el nivel de intensidad.
NOT A: Una vez que se haya seleccionado la zona
de cocción con la tecla ENCENDIDO/APAGADO
(ON/OFF) el nivel de intensidad se deberá
seleccionar dentro de los 5 segundos con la tecla
o . De otra forma, la zona de cocción se
apagará por razones de seguridad.
NOT A: Luego de encender la cocina presionando
la tecla de ENCENDIDO (POWER), deberá
seleccionar una de las zonas de cocción dentro de
los 20 segundos utilizando la tecla(s)
ENCENDIDO/AP AGADO (ON/OFF). Si no se
realiza ninguna selección, la cocina se apagará por
razones de seguridad.
Page 45

INSTRUCCIONES DE USO
Puede ajustar el nivel de intensidad de la zona
de cocción seleccionada a y (nivel
más alto de intensidad).
Para ajustar el nivel de intensidad:
Presione la tecla o de la zona de
cocción seleccionada.
Si presiona el nivel de intensidad
se configurará en .
Si presiona el nivel de intensidad
se configurará en .
Presione la tecla o de la zona de
cocción seleccionada para aumentar o
reducir el nicel de intensidad.
Si selecciona , la zona de cocción se
apague despues de 5 segundos.
Para realizar ajustes de nivel más rápido,
mantenga presionada la tecla o
hasta llegar al ajuste deseado.
NOT A: Las
configuraciones
normales de intensidad
son de 1/2 paso entre
los niveles de intensidad
de 2 a 6 a fin de permitir
una cocción precisa. Un
punto aparecerá junto al
número para indicar un
cambio de 1/2 paso en
el nivel de intensidad.
Si las teclas or de la zona de
cocción se mantienen presionadas durante
más de 10 segundos, la pantalla del
temporizador mostrará el mensaje de error
. Para borrar este mensaje de error,
presione la tecla ENCENDIDO/APAGADO
(ON/OFF) de la zona de cocción que estaba
configurando. Este mensaje NO se
relaciona con la tecla del temporizador.
Apague el área de cocción:
Una vez completada la cocción, presione la
tecla ENCENDIDO/APAGADO (ON/OFF)
para apagar el área de cocción.
La pantalla correspondiente al área de
cocción se apagará.
Si se presiona la tecla de ENCENDIDO
(POWER) en lugar de ENCENDIDO/
APAGADO (ON/OFF), se apagará toda
la cocina.
1
2
3
AJUSTE EL NIVEL DE INTENSIDAD
NOTA:
• Si se mueve el utensilio o cacerola del centro
de cualquier zona de cocción activa por
cualquier razón, un sensor detectará dicha
acción y la zona de cocción ya no emitirá
calor. La pantalla de dicha zona de cocción
mostrará el último nivel de intensidad en esa
área de cocción.
• La zona de cocción recordará el nivel de
intensidad configurado hasta 90 segundos
antes de que la zona de cocción se apague
de forma automática.
La cocina cuenta con un indicador de calor
residual para cada zona de cocción. Este
indicador advertirá que esta zona fue usada y
que aún está emitiendo calor suficiente como
para producir quemaduras.
Evite tocar el mechero cuando aparece
este indicador.Aunque la cocina esté
en posición de APAGADO (OFF), la H
permanecerá hasta que la cocina se
haya enfriado.
CONFIGURACIÓN DE CONTROLES (cont.)
1
2
3
ADVERTENCIA
ESPAÑOL
15
Page 46

INSTRUCCIONES DE USO
CONFIGURACIÓN DE CONTROLES (cont.)
NIVEL SUPERIOR DE INTENSIDAD
El nivel más alto de intensidad (power boost),
fue diseñado para calentar o hervir grandes
cantidades de forma rápida. El nivel más alto
funcionará durante un tiempo máximo de 12
minutos. Luego de 12 minutos, revertirá la
intensidad automáticamente a 9.
ACTIVACIÓN DEL NIVEL MÁS ALTO
Encienda la zona de cocción deseada con la
1
tecla ENCENDIDO/APAGADO (ON/OFF) de
dicha zona.
Al presionar la tecla aparecerá el .
2
3
Al presionar la tecla nuevamente
aparecerá la .
NOTA: La función de nivel más alto se
activara durante un máximo de 12 minutos.
Al finalizar el ciclo de intensidad más alto, la
zona de cocción regresará por omisión al
nivel de intensidad de . La función del
nivel más alto NO se puede usar en las
zonas de cocción del frente y de la parte
trasera del mismo lado en forma simultánea.
4
Para desactivar la función de nivel más alto
y regresar la intensidad al nivel normal,
toque la tecla .
NOTA: A fin de proteger los componentes
electrónicos interiores de la cocina, esta
última podrá desactivar de forma automática
la función del nivel más alto de intensidad y
regresar al nivel normal antes de haber
transcurrido los 12 minutos. Esto es normal.
NOTA: Los procesos electrónicos
involucrados con la cocción por inducción
producen algunos ruidos de fondo atípicos.
Estos ruidos son normales y son parte del
proceso de cocción por inducción. Se debe
tener en cuenta que estos ruidos son aún
más notorios al cocinar con EL NIVEL MÁS
ALTO DE INTENSIDAD.
CALIENTE
La cocina cuenta la una función de configuración
CALIENTE (WARM), la cual funciona en la
última zona de cocción usada en el nivel de
intensidad más BAJO (LOW).
Para activarla:
Presione la tecla CALIENTE (WARM) y la última
zona de cocción usada se configurará en BAJO
(LOW). Aparecerá la en la pantalla.
Para desactivarla:
Para desactivar la función CALIENTE (WARM) y
recomenzar la cocción normal, presione la tecla
y aparecerá la .
GUÍA DE NIVEL DE INTENSIDAD
Configuración
9 o el Nivel Calentar de Que los líquidos lleguen
más Alto forma rápida lleguen al punto de hervor.
7–9 Dorado intenso, Dorar carnes,calentar
6–7 Asar, freír Freír carnes, costillas,
4–5 Hervir, cocción Cocinar cantidades grandes,
3–4 Vapor Cocinar vegetales al vapor,
2–3 Hervor a Hervir a fuego lento arroz
1–2, L Derretimiento Omelettes esponjosos,
0 APAGADO (OFF) Configuración de
Función Usada para
fritura de grasas aceite para freír grasas,
rehogar,mantener un
hervor rápido para grandes
cantidades de líquido.
panqueques, salsas,
huevos.
general sopas y estofados, tomates
al vapor,cocinar carne o
caldo.
dorar carnes a fuego lento.
fuego lento o platos a base de leche,
cocinar al vapor cantidades
más pequeñas de papas
y vegetales, calentar carnes
listas para servir.
mantener platos calientes,
derretir manteca o
chocolate.
Apagado (Off).
16
NOTA:Estas configuraciones son pautas recomendadas para
la cocción. Es posible que deba configurar el nivel de
intensidad de acuerdo al tipo de comida y cacerola.
Page 47

USO DE LAS zonas DE COCCIÓN DEL PUENTE
Las dos zonas de cocción restantes se pueden usar
juntas como una sola área de cocción utilizando la
función Puente (Bridge). Esto le permitirá cocinar
con cacerolas más grandes y apaisadas.
NOT A: Al usar la cacerola provista para el área del
puente, es importante frotar la misma con aceite a fin
de evitar quemaduras o adherencias no deseadas.
ÁREA DE COCCIÓN DEL PUENTE
ACTIVACIÓN DEL PUENTE ÁREA
DE COCCIÓN
Presione la tecla PUENT (BRIDGE).
El indicador sobre la tecla se iluminará.
Presione la tecla o para que cualquiera
de las zonas de cocción izquierdas ajusten el
nivel de intensidad para ambas zonas de cocción.
AJUSTE DEL TEMPORIZADOR
La función de temporizador puede ser de ayuda
si es necesario realizar la cocción de una receta
durante un tiempo específico. El temporizador se
puede configurar entre 1 y 99 minutos. Una vez
configurado, la pantalla digital entre las teclas
ocomenzará la cuenta regresiva de los
minutos restantes.
NOTE: La función de temporizador sólo cuenta
por minutos. NO cumple la función de
ENCENDIDO (ON) o APAGADO (OFF)
de la cocina.
USO DEL TEMPORIZADOR
Presione las teclas o debajo de la
palabra TEMPORIZADOR (TIMER). Cada
vez que presione aumentará o disminuirá el
tiempo en un minuto, de 1 a 99 minutos.
También puede mantener presionado
o para aumentar o disminuir la
intensidad. La pantalla del temporizador
se iluminará.
Una vez que haya configurado el tiempo
deseado, la pantalla dejará de estar iluminada
y el temporizador comenzará la cuenta
regresiva, una vez que no se haya tocado
ninguna tecla durante 5 segundos. Cuando el
temporizador llegue a , se escuchará un
pitido largo que indicará que finalizó el conteo.
1
2
CÓMO CANCELAR EL TEMPORIZADOR
Para cancelar el temporizador, toque las
teclas y del TEMPORIZADOR
(TIMER) al mismo tiempo, O
Mantenga presionada la tecla o
hasta que aparezca en la
pantalla.
La pantalla del temporizador se apagará.
1
2
INSTRUCCIONES DE USO
NOTA:
• Use la cacerola provista para el área del puente
SÓLO sobre el área de cocción del puente.
•
Para adquirir cacerolas para el puente adicionales
o de reemplazo, llame al 1-800-243-0000 y elija la
opción adecuada del menú. O visite nuestro sitio
web en http://us.lgservice.com.
ESPAÑOL
17
Page 48

INSTRUCCIONES DE USO
USO DEL BLOQUEO PARA NIÑOS
Puede bloquear la cocina totalmente en
cualquier momento cuando no esté en uso.
CONFIGURACIÓN DEL BLOQUEO
PARA NIÑOS
Para configurar la función de BLOQUEO
PARA NIÑOS (CHILD LOCK) la cocina
deberá estar apagada. Si no se
encuentra apagada, mantenga
presionada a tecla de ENCENDIDO
(POWER) durante aproximadamente 2
segundos. El indicador sobre la tecla de
ENCENDIDO (POWER) se apagará.
Mantenga presionada la tecla BLOQUEO
PARA NIÑOS (CHILD LOCK) durante 3
segundos. La luz indicadora sobre la tecla
BLOQUEO PARA NIÑOS (CHILD LOCK)
se encenderá a fin de indicar que la
cocina está bloqueada.
OTRAS FUNCIONES
INTERCAMBIO DE ENERGÍA
La cocina está equipada con cuatro zonas de
cocción por inducción dentro de dos secciones
para calentar. Las zonas de cocción derechas e
izquierdas cuentan con dos inversores de
inducción independientes – un inversor para cada
una de las dos secciones para calentar. Dos zonas
de cocción de una sección para calentar
comparten la energía de un inversor. Esto se llama
intercambio de energía (power sharing). Por
ejemplo, si está cocinando sobre ambas zonas de
cocción derechas, se mantendrá el último nivel de
intensidad (power level), mientras que la primera
área de cocción podrá experimentar una mínima
reducción del nivel de intensidad.
CONSEJOS SOBRE INTERCAMBIO
DE ENERGÍA
Recuerde configurar el nivel de energía para el
ítem de comida que desee mantener para el final
en una cocción constante. Al usar dos zonas de
cocción, puede permanecer un nivel de energía
Bloquear la cocina evitará que las zonas de
cocción se enciendan en forma accidental.
CÓMO CANCELAR EL BLOQUEO
PARA NIÑOS
Para apagar la función de BLOQUEO
PARA NIÑOS (CHILD LOCK), mantenga
presionada la tecla BLOQUEO PARA
NIÑOS (CHILD LOCK) durante 3
segundos. La luz indicadora sobre la
tecla se apagará y la cocina podrá ahora
ser usada normalmente.
constante para dos cacerolas en utilisando dos
sección para calentar. Ubicando una cacerola
en una de las zonas de cocción de la sección
izquierda y la otra cacerola en una de las zonas
de cocción de la sección derecha.
Sección de
cocción izquierda
Sección de
cocción derecha
18
APAGADO AUTOMÁTICO
Si la zona de cocción se usa de forma constante
durante más de 17 horas y la configuración de
control no varía, la zona de cocción se apagará de
forma automática.
CONTROL AUTOMÁTICO DEL NIVEL
DE INTENSIDAD
Es posible que el nivel de intensidad que
aparece sea diferente del nivel real en el
rango de temperatura alta. Afin de evitar el
sobrecalentamiento de la cocina, el nivel de
intensidad se controla de forma automática.
Page 49

La limpieza general sobre superficies de cocción
de vidrio cerámico de inducción es
considerablemente más fácil que sobre
superficies de calor radiante.
NOT A:
A fin de evitar la activación accidental de los
controles, se recomienda que configure la función
de BLOQUEO PARA NIÑOS (CHILD LOCK) antes
de efectuar la limpieza
LIMPIEZA DE LA COCINA
CUIDADO Y LIMPIEZA
IMPORT ANTE:
• Los agentes de limpieza no deben tomar
contacto con la superficie de vidrio cerámico
caliente. Todos los agentes de limpieza se deben
eliminar completamente con agua potable.
• No utilice limpiadores agresivos tales como
rociadores para horno o parrilla, limpiadores
ásperos que producen desgaste ni limpiadores
para ollas que sean abrasivos.
• Limpie la superficie de vidrio cerámico luego de
cada uso cuando esté caliente al tacto o fría.
Esto evitará que los derrames se quemen.
Quite marcas de agua, grasa o decoloración
con un raspador para vidrio y un limpiador
para vidrio cerámico.
Una vez fría, limpie la superficie de vidrio
cerámico con un trapo húmedo y una cantidad
pequeña de limpiador de vidrio cerámico.
Seque con un trapo seco.
Una vez por semana, limpie totalmente toda la
superficie de vidrio cerámico con un limpiador
de vidrio cerámico comercialmente disponible.
Luego limpie la superficie de vidrio cerámico
con un trapo limpio y suave, humedecido con
agua potable y pula y seque con un trapo
limpio sin hilachas.
1
2
LIMPIEZA GENERAL
3
4
Para eliminar comida que hirvió o manchas
difíciles, use un raspador para vidrio.
Sostenga el raspador para vidrio en un ángulo
de aproximadamente 45° sobre la superficie de
vidrio cerámico.
Elimine la suciedad deslizando la hoja sobre
la zona.
Use un limpiador de vidrio cerámico del tipo
descrito en LIMPIEZA GENERAL.
1
2
CÓMO ELIMINAR MUCHA SUCIEDAD
3
Elimine azúcar, plástico derretido, papel de
aluminio u otros materiales que se derriten
con un raspador para vidrio de forma inmediata
y mientras se encuentren calientes. Si no
realiza esta acción, se podrá ocasionar daños
permanentes sobre la superficie de la cocina.
Si la zona de cocción ya se enfrió, caliente la
misma nuevamente.
IMPORT ANTE:Corre el riesgo de sufrir
quemaduras al utilizar el raspador para vidrio sobre
un área de cocción que se encuentre caliente. Use
un protector y un guante para horno.
Luego limpie la cocina normalmente una vez
que esté fría.
NOT A: Las rayas o marcas oscuras sobre la
superficie del vidrio cerámico ocasionadas por la
base de una cacerola con puntas filosas no se
podrán eliminar. Sin embargo, las mismas no
impiden el buen funcionamiento de la cocina.
1
2
SUCIEDAD PROBLEMÁTICA
NOT A:
Puede usar raspadores de vidrio o limpiadores de
vidrio cerámico que encontrera en su tienda local
de productos de este tipo.
ESPAÑOL
19
Page 50

INSTRUCCIONES DE INSTALACIÓN
LA INSTALACIÓN Y REPARACIÓN DEBERÁ SER REALIZADA POR UN INSTALADOR
CALIFICADO.
IMPORTANTE: GUARDE ESTAS INSTRUCCIONES PARA USO DEL INSPECTOR DE
ELECTRICIDAD LOCAL.
LEA Y GUARDE ESTAS INSTRUCCIONES PARA REFERENCIA FUTURA.
ANTES DE COMENZAR
Lea estas instrucciones en su totalidad
y atentamente.
NOTAS PARA EL INSTALADOR:
• Lea todas las instrucciones que aparecen en
estas instrucciones de instalación antes e
instalar la cocina.
• Retire el material de empaque antes de conectar
la cocina al enchufe.
• Cumpla con todos los códigos y ordenanzas
gubernamentales.
• Sólo ciertos modelos de cocinas se pueden
instalar sobre ciertos modelos de hornos
eléctricos incorporados.
• Asegúrese de que estas instrucciones queden
en manos del comprador.
DESEMPAQUE DE LA COCINA
Desempaque e inspeccione visualmente
1
cualquier daño o componentes faltantes
de la cocina.
NOTA PARA EL CONSUMIDOR:
Guarde esta Guía del Usuario e Instrucciones de
Instalación para referencia futura.
NOTA: Este electrodoméstico deberá estar
conectado a tierra de forma adecuada.
Aquellos daños ocasionados por no cumplir
con estas instrucciones no estarán cubiertos
por la garantía de la cocina.
Asegúrese de guardar la botella del limpiador y
2
acondicionador que se encuentran dentro de la
bolsa con documentación, en un lugar donde el
usuario pueda encontrarla con facilidad. Es
importante que la cocina de vidrio cerámico se
precaliente antes de usar. Lea la sección de
CUIDADO Y LIMPIEZA.
20
ESPECIFICACIONES TÉCNICAS
DIMENSIONES DE LA COCINA
Ancho 307⁄8ʺ (783 mm)
Profundidad 21
Altura 2
DIMENSIONES DE LA BASE DE APOYO
Ancho 293⁄8ʺ (746 mm)
Profundidad 20
ESPECIFICACIONES ELÉCTRICAS
Voltaje de conexión:
240/208 VAC, 60Hz.
Carga de corriente máxima:
7.4 kW/6.7 kW
1
⁄2ʺ (546 mm)
3
⁄16ʺ (56 mm)
1
⁄4ʺ (515 mm)
ZONAS DE COCCIÓN
PosiciónDiámetro Potenciá *
Frente Izquierdo 7ʺ (180 mm) 1800W
Parte Trasera 7ʺ (180 mm) 1800W
Frente Derecho 6ʺ (150 mm) 1400W
Parte Trasera 10
* El nivel de consumo de corriente puede variar de acuerdo con el
tamaño y tipo de cacerola.
1
/4ʺ (260 mm) 2400W
(2400W Nivel Máximo)
(1800W Nivel Máximo)
)omixáM leviN W0042(adreiuqzI
)omixáM leviN W0033( ahcereD
Page 51

INFORMACIÓN IMPORTANTE DE INSTALACIÓN
• Todas las cocinas eléctricas usan un cable de
tres o cuatro polos, de una sola fase, 240/208
voltios, 60 hertz, con suministro eléctrico a
tierra de AC (corriente alterna).
• Se debe mantener una distancia mínima de
30ʺ (76.2 cm.) entre la cocina y los muebles
sobre ésta.
INSTRUCCIONES DE INSTALACIÓN
A
B
I
J
C
D
H
E
F
G
L
M
K
** No obstruya estas áreas.
4" X 8" (10.2 cm x 20.3 cm)
abertura para cable blindado
si hay un panel presente.
Entradadeaire fresco**
Escape de aire**
Escape de aire**
30” Min.
(76.2 cm)
Todas las dimensiones están expresadas en pulgadas y milímetros (mm.).
Deje un espacio de 2ʺ (5 cm.) debajo de la abertura del cable blindado a fin dejar espacio
para el cable eléctrico y para la instalación de la caja de empalmes sobre la pared en la
parte trasera de la cocina.
PREPARACIÓN DEL LUGAR DE INSTALACIÓN
Uni-
dad
Pulg.
mm
ESPAÑOL
Unit A B C D E
Inch 30
mm 783 546 56 732.2 498 746 749 515 518 20 33 610 762 106 38 610
13
/16211/223/162813/16195/8293/8291/2201/4203/
Min Max Min Max Min Max Min
FG
HI
13
8
/1615/1624 30 43/1611/224
JK
LM
21
Page 52

INSTRUCCIONES DE INSTALACIÓN
J
F
G
I
10"
( 25.4 cm)
18"
( 45.7 cm)
12"
(30.5 cm)
24"
(61 cm)
L
M
H
K
DIMENSIONES Y DESPEJE
El gabinete de la parte Superior no deberá superar
una profundidad máxima de 13Ó (33 cm.)
30" (76.2 cm.) min. de
despeje entre la parte
superior de la plataforma
de la cocina y la parte
inferior del gabinete de
madera o metal sin
protección
24" (61 cm.) min. cuando la parte
inferior de madera o metal del
gabinete está protegida por no menos
de cartón de retardo de Incendios de
1/8” cubierto con no menos que una
hoja de acero Inoxidable N˚ 28 MGS,
0.015Ó (0.4 mm.), de aluminio de
0.024 (0.6 mm.) o de cobre de
0.020 (0.5 mm.).
PRECAUCIÓN
A fin de eliminar el riesgo de
quemaduras o incendios al
alcanzar superficies calientes, no
se deberá usar el espacio de
almacenamiento del gabinete
ubicado sobre la cocina. De haber
un gabinete de almacenamiento,
el riesgo se puede reducir
instalando una campana de salida
de aire con proyección horizontal
”
(12.7 cm.) como mínimo del
a 5
frente de los gabinetes.
Min. distancia
recomendada entre el
extremo trasero del apoyo y
de la superficie combustible
más cercana sobre
la base
Min. desde el extremo
de la cocina hasta la
pared combustible
más cercana (sobre
cualquier lado de la
unidad
Ubicación aproximada de la caja
de empalmes
Se debe dejar un espacio vacío
debajo de la cocina por cuestiones
de instalación
Modelo
30ʺ 71/2ʺ (191mm) 11/2ʺ (38mm)
HL
22
PRECAUCIÓN
Es muy importante mantener
una distancia de (70 mm)
entre la encimera y el horno.
3
/
2
”
4
ᵉ Espacio recomendado entre la encimera y el horno
3
2
/
4
” (70 mm)
Page 53

INSTRUCCIONES IMPORTANTES
DE SEGURIDAD
• Asegúrese que su cocina sea instalada y
conectada a tierra de forma adecuada por un
instalador o técnico calificado.
• La cocina deberá estar conectada a tierra de
acuerdo con los códigos locales o, en su
ausencia, con el Código Nacional de
Electricidad ANSI/NFP ANº 70 – última edición
en los Estados Unidos.
CONEXIONES ELÉCTRICAS
INSTRUCCIONES DE INSTALACIÓN
El encendido eléctrico de la cocina deberá
estar apagado mientras se realizan las
conexiones de línea. Si esto no se cumple,
se pueden sufrir heridas personales graves
o la muerte.
CÓMO BRINDAR LA CONEXIÓN
ELÉCTRICA
Instale la caja de empalmes debajo del gabinete
y extienda un cable de 120/240 o 120/208
voltios, de AC (corriente alterna) desde el panel
del circuito principal.
NOTA: NO conecte el cable al panel del circuito
en esta oportunidad.
REQUISITOS ELÉCTRICOS
Cumpla con todos los códigos y ordenanzas
gubernamentales.
Se requiere un cable eléctrico de una fase
de tres o cuatro polos de 120/240 o 120/208
voltios, 60 Hz, AC (corriente alterna) en un
circuito separado con fusible en ambos lados
de la línea (se recomienda un fusible de
retardo de tiempo o un disyuntor). NO use
un fusible neutro. El tamaño del fusible no
deberá exceder el promedio del circuito del
electrodoméstico especificado en la placa.
Esta unidad puede consumir hasta 7,400 W
en 240 VAC. Se debe usar un disyuntor de
40 Amp con un cable de calibre nº 8 AWG.
NOTA: Los tamaños de los cables y las
conexiones deben ser acordes al tamaño del
fusible y al promedio que figura en la placa
del electrodoméstico, de acuerdo con el
Código Nacional de Electricidad ANSI/NFPA
Nº 70 – última edición y códigos y
ordenanzas locales.
El electrodoméstico se debe conectar a la
caja del fusible de desconexión (o disyuntor),
através de un cable enfundado no metálico
y blindado que sea flexible. El cable
blindado y flexible que se extiende del
electrodoméstico se debe conectar
directamente a la caja de empalmes
conectada a tierra. La caja de empalmes
se deberá ubicar como se muestra en la
página 22, con la mayor soltura posible
del cable que queda entre la caja y el
electrodoméstico, de modo que se pueda
mover en caso de necesitar reparaciones.
Se deberá brindar un amortiguador con
refuerzos adecuado a fin de ajustar el cable
blindado y flexible a la caja de empalmes.
1
2
3
4
No se deberá usar un prolongador con este
electrodoméstico. El uso del mismo podrá
ocasionar un incendio, descarga eléctrica u
otras heridas personales.
ADVERTENCIA
ADVERTENCIA
ESPAÑOL
23
Page 54

INSTRUCCIONES DE INSTALACIÓN
CONEXIONES ELÉCTRICAS (cont.)
CONEXIÓN ELÉCTRICA
Conecte el cable blindado y flexible que se
extiende desde la unidad de la superficie
hasta la caja de empalmes, utilizando un
amortiguador de refuerzo adecuado sobre el lugar
por donde ingresa el cable blindado a la caja de
empalmes. Luego realice la conexión eléctrica
de la siguiente manera.
Este equipo requiere que se realice una
conexión a tierra.
Este electrodoméstico se fabricó con un cable de
corriente y un cable a tierra conectado de color
verde o cobre.
NOT APARA EL ELECTRICISTA:
Las puntas del cable blindado suministradas con el
electrodoméstico son de clasificación UL para
conexión a un cableado hogareño de calibre más
grande. El aislante de las puntas resiste a
temperaturas mucho más altas que las estimadas
para el cableado hogareño. La capacidad de
transmisión de corriente del cable conductor
depende del nivel de temperatura del aislante
alrededor del cable, y no del calibre del cable
únicamente.
NO se debe conectar a tierra en una tubería de
suministro de gas. NO conectar al enchufe de
corriente hasta que el electrodoméstico se
haya conectado a tierra de forma permanente.
Conecte el cable a tierra antes de encender el
electrodoméstico.
Este electrodoméstico está equipado con un
cable conductor flexible y de cobre. Si se
realiza la conexión a un cableado hogareño de
aluminio, use sólo conectores especiales que
estén aprobados para unir cables de cobre y
aluminio, de acuerdo con el Código Nacional
de Electricidad y los códigos y ordenanzas
locales. Una conexión incorrecta del cableado
hogareño de aluminio a las puntas de cobre
pueden producir un cortocircuito o un
incendio. Siga el procedimiento de conexión
recomendado por el fabricante de forma
cuidadosa.
ADVERTENCIA
ADVERTENCIA
DONDE LOS CÓDIGOS LOCALES PERMITEN LA CONEXIÓN DEL CONDUCTOR A TIERRA
DEL ELECTRODOMÉSTICO AL CABLE NEUTRO (BLANCO)
Cumpla con todos los códigos y ordenanzas
gubernamentales.
Desconecte el suministro de corriente.
1
En la caja del disyuntor, la caja del fusible o la
2
caja de empalmes, conecte los cables del
electrodoméstico y al suministro de energía
como se muestra.
3-CAJA DE EMPALME CON
CABLE A TIERRA
Cable del suministro de corriente
Cable blanco
(neutro)
Cables
rojos
Cables
negros
ADVERTENCIA
No podrá conectar a tierra la cocina a través
del cable neutro (blanco) si la misma se usa
en una instalación de circuito derivado nueva
(1996 NEC), casa móvil, vehículo de recreación
o donde los códigos locales no permitan la
conexión a tierra a través del cable neutro
(blanco). Cuando la conexión a tierra a través
del cable neutro (blanco) esté prohibida, se
deberá usar un cable de conexión de cuatro
polos. No cumplir con esta advertencia podrá
ocasionar como resultado electrocutamiento
u otras heridas personales graves.
Cable verde (a tierra)
Cable del electrodoméstico
Caja de
empalmes
Conexión con
clasificación UL
24
Page 55

CONEXIONES ELÉCTRICAS (cont.)
SI LA COCINA SE USA EN UNA INSTALACIÓN DE CIRCUITO DERIVADO NUEVA (1996
NEC), CASA MÓVIL, VEHÍCULO DE RECREACIÓN O DONDE LOS CÓDIGOS LOCALES NO
PERMITAN LA CONEXIÓN A TIERRA A TRAVÉS DEL CABLE NEUTRO (BLANCO)
Cumpla con todos los códigos y ordenanzas
gubernamentales.
Desconecte el suministro de corriente.
En la caja del disyuntor, la caja del fusible o
la caja de empalmes, conecte los cables del
electrodoméstico y al suministro de energía
como se muestra.
1
2
Si conectará un sistema de cableado
eléctrico de conexión de 4 polos, el
cable de conexión a tierra NO DEBE ser
conectado al cable neutro del sistema
eléctrico de 4 polos.
INSTRUCCIONES DE INSTALACIÓN
INSTALACIÓN DE LA COCINA
Inspeccione visualmente que la cocina no
esté dañada. Asegúrese que todos los
tornillos de la cocina estén ajustados (vea
ubicaciones más abajo).
1
Screws
Mueva con cuidado hacia abajo la cocina
sobre la base de apoyo, asegurándose que
no se enrede con ningún cable.
NOTA: No use compuestos de masilla. La
cocina se debe poder retirar en caso de que sea
necesaria una reparación.
2
No quite los espaciadores de nylon sobre
los bordes de la cocina. Estos espaciadores
centran la cocina en el espacio provisto. La
cocina se debe centrar a fin de permitir una
salida de aire adecuada y para evitar la
acumulación excesiva de calor que podría
producir daños por calor o incendios.
Espaciadores
de nylon
CAJA DE EMPALME CON 4 CABLES
A TIERRA
Cable del suministro de corriente
A tierra
Cables
negros
Cable verde (e tierra)
Cable del electrodomestico
Conector con
clasificación UL
Caja de
empalmes
Cables
rojos
Cable blanco
Tornillos
ADVERTENCIA
ADVERTENCIA
ESPAÑOL
25
Page 56

INSTRUCCIONES DE INSTALACIÓN
INSTALACIÓN DE LA COCINA (cont.)
3
Instale los soportes de retención en la parte
inferior de la cocina; luego ajuste los tornillos
contra la parte inferior de la base como se
muestra.
NOTA: Los soportes de retención DEBEN ser
instalados de acuerdo con los códigos
locales o, en ausencia de los mismos, con el
Código Nacional de Electricidad ANSI/NFPA
Nº 70 – última edición.
Instalación
preferida
Soportes de
retención
Cocina
Soportes de
retención
Instalación
Alternativa
Soportes de
retención
Base
Tor n il lo
26
CONTROL FINAL
Realice un control final del funcionamiento de la
cocina, asegurando que la misma se encienda
de modo correcto y que cada zona de cocción
funcione adecuadamente. Para más detalles,
lea las Instrucciones de Uso de esta guía.
UBICACIÓN DEL NÚMERO DE MODELO Y DE SERIE
Los números de modelo y de serie está
ubicados en una placa que se encuentra en la
parte inferior de la cocina. Escriba los mismos
en esta guía; los necesitará para registrar la
garantía.
No toque el vidrio de la cocina ni las
zonas de cocción. Es posible que estén
lo suficientemente calientes como para
provocar quemaduras.
PRECAUCIÓN
Page 57

Problema Causas Posibles Soluciones
La cocina no funciona • Los controles de la cocina • Lea sobre el
USO DEL BLOQUEO PARA NIOS
para
están bloqueados. apagar dicha función.
• Se activó el disyuntor o saltó • Vuelva a activar el disyuntor o reemplace el fusible.
el fusible.
• Corte de corriente. • Controle las luces del hogar para confirmar que se
trata de un corte de corriente.
• Instalación de cableado • Comuníquese con el instalador o el vendedor.
incompleta.
La cocina no calienta • No se colocó ningún utensilio o • Asegúrese que el utensilio esté centrado en la zona de
se colocó un utensilio inadecuado cocción y que sea del tipo adecuado para la cocción
en la zona de cocción. por inducción. Lea
SELECCIîN DE UTENSILIO
.
• El tamaño del utensilio es • La parte inferior del utensilio debe ser lo
incorrecto para la zona de cocción suficientemente grande como para cubrir la zona de
seleccionada. cocción en su totalidad. Lea
SELECCIîN DE UTENSILIO
.
• El utensilio no se apoya de forma • Las partes inferiores del utensilio deben ser planas y
completa sobre la zona de cocción. estar centradas en la zona de cocción, y no deben
descansar sobre los bordes de la cocina. Lea
SELECCIîN DE UTENSILIO
.
•Área de cocción seleccionada • Asegúrese que el control correcto de la zona de
.)NO( ODIDNECNE nóicisop al ne étse adasu nóiccoc.atcerrocni
• La cocina no recibe corriente. • Lea “La cocina no funciona” más arriba.
La cocina se apaga • El sensor de calor interior de la • Asegúrese que las salidas de aire de la cocina no
mientras se cocina cocina detectó temperatura alta estén bloqueadas. Lea página 21 en las Instrucciones
dentro de la cocina. de Installación.
• Se activó el apagado automático. • La cocina cuenta con la función de apagado
automático, la cual apaga la misma en su totalidad si
un área de cocción estuvo encendida en forma
ininterrumpida durante 17 horas.
• Líquido u objeto en la zona • El control de la cocina puede interpretar los líquidos u
le,otcatnoc nu omoc selortnoc ed anoz al ne sotejbo.selortnoc ed
cual puede hacer que la cocina se apague. Limpie
derrames o quite objetos y vuelva a encender la cocina.
El nivel de intensidad • Se retiró el utensilio de la zona • Vuelva a colocar el utensilio en la zona de cocción dentro
de una zona de cocción led nóicarugifnoc al renetnam ed nif a sodnuges 09 sol ed.nóiccoc ed
se iluminó nivel de intensidad
• El utensilio no está centrado en la • Asegúrese que el utensilio esté centrado y que descanse
zona de cocción. de forma plana sobre la zona de cocción. Lea
SELECCIîN
DE UTENSILIO
.
SOLUCIÓN DE PROBLEMAS
ANTES DE SOLICITAR REPARACIONES
Antes de solicitar reparaciones, revise esta lista. Es posible que le ahorre tiempo y gastos. Esta lista
incluye hechos comunes que no son el resultado de un defecto de fabricación o materiales.
ESPAÑOL
27
Page 58

SOLUCIÓN DE PROBLEMAS
ANTES DE SOLICITAR REPARACIONES
Problema Causas Posibles Soluciones
El NIVEL DE INTENSIDAD • El NIVEL DE INTENSIDAD MÁS ALTO • Cada lado de la cocina comparte un inversor para ambas
MÁS ALTO (POWER se está usando en dos zonas de zonas de cocción. El Nivel de Intensidad Más Alto no se
BOOST) no funciona cocción del mismo lado de la cocina. puede usar con dos zonas de cocción en el mismo
aparece en la • Se presionó una tecla del control • Este mensaje aparecerá en cualquier tecla excepto que
pantalla del temporizador durante demasiado tiempo. se presionen las teclas o del Temporizador
inversor al mismo tiempo. Lea sobre
INTENSIDAD MçS ALTO (POWER BOOST)
INTERCAMBIO DE ENERGêA (POWER SHARING)
durante más de 10 segundos. También aparecerá si
se derraman líquidos o se dejan objetos en la zona de
controles. Para borrar el código de error, retire
cualquier líquido u objetos del área de controles y
presione la tecla de ENCENDIDO (POWER) para
reiniciar la cocina.
NIVEL DE
e
.
aparece en la • El nivel de voltaje que recibe la • Si el voltaje suministrado a la cocina es demasiado
pantalla del temporizador cocina es demasiado bajo. bajo, no funcionará correctamente y aparecerá este
mensaje de error. Esto se puede deber a un nivel de
voltaje reducido en el suministro del circuito del
hogar. Si las conexiones son correctas y el voltaje
suministrado vuelve al nivel normal, el código
desaparecerá.
aparece en la • Mensaje de error por falla electrónica. • APAGUE la cocina; luego apague el encendido del fusible
pantalla y un número o disyuntor durante aproximadamente 30 segundos.
aparece en la pantalla Vuelva a encender el suministro de corriente y encienda
del temporizador la cocinapresionando la tecla ENCENDIDO (POWER). Si el
mensaje de error permanece, comuníquese con el
servicio de reparaciones.
se ilumina en • Corte de luz o arranque inicial. • Cuando la cocina se enciende por primera vez o luego
la pantalla de un corte de corriente, la se iluminará en la
pantalla durante 90 segundos, o hasta que la tecla de
ENCENDIDO (POWER) se toque durante 2 segundos.
28
Page 59

ESPAÑOL
29
Page 60

NOTES
30
Page 61

MANUEL DE L’UTILISATEUR ET
DIRECTIVES D’INSTALLATION
TABLE DE CUISSON À
FRANÇAIS
INDUCTION EN VERRE
CÉRAMIQUE
Veuillez lire attentivement ce manuel avant de vous servir de l’appareil et
gardez-le en tout temps à portée de la main pour référence.
HN7413AG
LCE30845
P/No.: MFL41494801
www.lg.com
Page 62

INTRODUCTION
INFORMATION IMPORTANTE SUR LA
SÉCURITÉ
Avis important : Interférences radio. . . . . . . . . . . . . . 3
Mesures de sécurité importantes . . . . . . . . . . . . . 4–8
INTRODUCTION À LA CUISSON PAR
INDUCTION
La cuisson par induction . . . . . . . . . . . . . . . . . . . . . . 9
Choix d’une batterie de cuisine . . . . . . . . . . . . . . 9–11
PIÈCES ET CARACTÉRISTIQUES
Pièces et caractéristiques de votre
table de cuisson. . . . . . . . . . . . . . . . . . . . . . . . . . . . 12
Commandes à effleurement . . . . . . . . . . . . . . . . . . 13
CONSIGNES D’UTILISATION
Avant d’utiliser la table de cuisson . . . . . . . . . . . . . 14
Réglage des commandes . . . . . . . . . . . . . . . . . 14–16
Utilisation des zones de cuisson pontées . . . . . . . . 17
Utilisation de la minuterie . . . . . . . . . . . . . . . . . . . . 17
Utilisation du verrou pour enfants . . . ...........18
Autres fonctions............................18
ENTRETIEN ET NETTOYAGE
Nettoyage de la table de cuisson . . . . . . . . . . . . . . 19
DIRECTIVES D’INSTALLATION
Avant de commencer........................20
Déballage de la table de cuisson . . . . . . . . . . . . . . 20
Caractéristiques techniques . . . ...............20
Préparation du point d’installation . . . . . . . . . . . . . . 21
Dimensions et dégagement...................22
Raccordements électriques . . . . . . . . . . . . . . . . 23–25
Installation de la table de cuisson . . . . . . . . . . . 25, 26
Vérification finale ...........................26
MERCI!
Félicitations pour votre achat et
bienvenue dans la famille LG.
Votre nouvelle table de cuisson à
induction allie les caractéristiques
d’une cuisson de précision à la
simplicité d’utilisation et à un
design de style. Si vous suivez
les consignes d’utilisation et
d’entretien de ce manuel, votre
table de cuisson vous procurera
de nombreuses années de
service fiable.
DÉPANNAGE
Avant d’appeler le service de réparation. . . . . . 27, 28
GARANTIE
Garantie pour la clientel. . . . . . . . . . . . . . . . . . . . . . 29
Information sur l’enregistrement
du produit
Modèle : ________________________________
Numéro de série : ________________________
2
Date d’achat : ____________________________
Page 63

AVERTISSEMENT Pour votre sécurité, vous devez suivre les
directives de ce manuel afin de minimiser les risques d’incendie, de décharges
électriques ou pour prévenir les dommages à la propriété, les blessures ou la mort.
INFORMATION IMPORTANTE SUR LA SÉCURITÉ
LIRE TOUTES LES DIRECTIVES
AVANT L’UTILISATION
Cet appareil a été testé et trouvé conforme aux
limites pour un dispositif numérique de classe B,
conformément à la Partie 18 des règlements de
la FCC des États-Unis et à la norme ICES-003
d’Industrie Canada. Ces limites sont destinées
à donner une protection raisonnable contre les
interférences nuisibles dans une installation
résidentielle.
Cet appareil produit, utilise et peut émettre de
l’énergie de fréquence radio, et s’il n’est pas
installé et utilisé en conformité avec les directives,
il peut causer des interférences nuisibles aux
communications radio. Il n’y a toutefois aucune
garantie qu’une installation particulière ne produira
pas d’interférence. Si cet appareil produit des
interférences nuisibles à la réception radio ou
télévisuelle, ce qu’on peut vérifier en éteignant
l’appareil et en le rallumant, on encourage
l’utilisateur à essayer de corriger ces interférences
par l’une ou plus des mesures suivantes :
• Réorienter ou déplacer l’antenne de réception
de la radio ou du téléviseur.
• Augmenter la distance entre la table de
cuisson et le récepteur radio ou le téléviseur.
• Brancher la table de cuisson à une prise ou
un circuit différent de celui où est branché le
récepteur radio ou le téléviseur.
AVIS IMPORTANT : INTERFÉRENCE RADIO
Vous pouvez télécharger le manuel de l’utilisateur et d’installation à l’adresse http://www.lg.com.
FRANÇAIS
3
Page 64

INFORMATION IMPORTANTE SUR LA SÉ CURITÉ
LIRE TOUTES LES DIRECTIVES
AVANT L’UTILISATION
MESURES DE SÉCURITÉ
• Installation adéquate : Assurez-vous que
votre appareil est correctement installé et
mis à la terre par un technicien qualifié
conformément, à la deuxième édition de la
CSA C22.2 no 107.3 au Canada et à toutes
les exigences du code de l’endroit. Installez
l’appareil uniquement selon les directives
d’installation.
• Ne tentez de réparer ou de remplacer aucune
pièce de votre table de cuisson sauf si c’est
spécifiquement recommandé dans ce manuel.
Toutes les autres réparations doivent être
effectuées par un technicien qualifié.
• Enlevez tout ruban adhésif et toute pellicule
d’emballage de l’appareil avant de l’utiliser.
Détruisez la boîte en carton et les sacs en
plastique après avoir déballé l’appareil. Ne
laissez jamais les enfants jouer avec les
matériaux d’emballage.
• Les aspects sécuritaires de cet appareil sont
conformes aux normes techniques reconnues.
• Sachez comment débrancher l’alimentation
de l’appareil au panneau électrique en cas
d’urgence. Marquez le disjoncteur ou le
fusible pour que vous puissiez l’identifier
facilement et agir rapidement si nécessaire.
• Ne réparez ou remplacez aucune partie de
l’appareil. Toute réparation doit être effectuée
uniquement par un technicienqualifié pour
éviter les risques de blessures et les
dommages à l’appareil.
• Ne modifiez ou transformez jamais la
construction d’un appareil, tel que
l’enlèvement de panneaux, de couvre-fils
ou de toute autre pièce permanente
du produit.
• Rangement sur l’appareil. Les matières
inflammables ne doivent pas être rangées
sur la surface de cuisson ou à proximité de
celle-ci. Ceci comprend les articles en papier,
en plastique ou en tissu, tels les livres de
recettes, les contenants en plastique et les
serviettes, ainsi que les liquides inflammables.
Ne rangez pas d’articles explosifs, comme
les aérosols, sur l’appareil ou à proximité de
celui-ci. Les matières inflammables peuvent
exploser et provoquer un incendie ou des
dommages à la propriété.
• Ne laissez pas les enfants seuls. Les
enfants ne doivent pas être laissés seuls
4
ou sans surveillance dans un endroit ou un
électroménager est utilisé. On ne doit jamais
leur permettre de s’asseoir ou de se tenir
debout sur n’importe quelle partie de l’appareil.
• Ne gardez pas d’essence ou autres liquides
ou gaz inflammables à proximité de cet
appareil ou de tout autre électroménager.
MISE EN GARDE
Les articles susceptibles d’intéresser les
enfants ne doivent pas être rangés dans les
armoires au-dessus d’une cuisinière ou sur le
dosseret anti-éclaboussure d’une cuisinière –
les enfants qui grimpent sur une cuisinière
pour atteindre ces articles peuvent être
grièvement blessés.
AVERTISSEMENT
Ne vous servez jamais de cet appareil pour
réchauffer ou chauffer une pièce.
AVERTISSEMENT
Les personnes avec un simulateur cardiaque
ou un autre appareil médical similaire doivent
faire preuve de prudence lorsqu’ils se servent
ou qu’ils sont à proximité d’un appareil à
induction en marche, car le champ
électromagnétique peut affecter le
fonctionnement du simulateur cardiaque ou
d’un autre appareil médical similaire. Il est
conseillé de consulter votre médecin, ou le
fabricant du simulateur cardiaque ou d’un
autre appareil médical similaire, au sujet de
votre situation.
MISE EN GARDE
NE TOUCHEZ PAS les zones de cuisson ou
les points près de ces surfaces. Les zones
de cuisson peuvent être chaudes à cause de la
chaleur résiduelle même si elles ont une couleur
foncée. Les points près des zones de cuisson
peuvent devenir assez chauds pour causer des
brûlures. Pendant et après l’utilisation, ne
touchez pas, ou ne laissez pas les vêtements
ou d’autres matières inflammables toucher ces
points, avant qu’ils aient eu suffisamment de
temps pour refroidir.
Page 65

• L’installation et le branchement d’un nouvel
appareil doivent être effectués uniquement
par un personnel qualifié.
• Les appareils encastrés doivent être utilisés
uniquement après avoir été installés dans
des armoires et une aire de travail qui sont
conformes aux normes en vigueur. On assure
ainsi une meilleure protection contre les
décharges électriques, comme l’exigent
certains organismes de certification.
• Si votre appareil fonctionne mal ou qu’il se
fêle, éteignez toutes les zones de cuisson et
communiquez avec le Centre de réparation.
SÉCURITÉ ÉLECTRIQUE
INFORMATION IMPORTANTE SUR LA SÉ CURITÉ
• Portez des vêtements appropriés. Vous ne
devriez pas porter des vêtements amples ou
tombants lorsque vous utilisez cet appareil.
Ne laissez pas les vêtements ou d’autres
matières inflammables entrer en contact avec
les surfaces chaudes.
• Ne jetez pas d’eau ou de farine sur des feux
de graisse. Étouffez les flammes à l’aide d’un
couvercle ou utilisez du bicarbonate de soude ou
un extincteur à poudre chimique ou à mousse.
• Lorsque vous faites chauffer de l’huile ou de
la graisse, surveillez-les attentivement. L’huile
et la graisse peuvent prendre feu si on les laisse
devenir trop chaudes.
• Utilisez uniquement des manicles sèches.
Les manicles humides ou mouillées sur des
surfaces chaudes peuvent causer des brûlures
par la vapeur. Ne laissez pas les manicles
toucher les surfaces de cuisson. N’utilisez pas
de serviettes ou de grands linges à la place
des manicles
• Ne chauffez pas de contenants de nourriture
non ouverts. L’augmentation de la pression
peut faire exploser le contenant et provoquer
des blessures.
MESURES DE SÉCURITÉ (suite)
• Si la surface est fêlée, éteignez l’appareil
pour éviter la possibilité de décharges
électriques. Ne réutilisez pas votre table
de cuisson tant que la surface de verre
n’aura pas été changée.
• Lorsque vous utilisez votre table de
cuisson, n’utilisez jamais de papier
d’aluminium, de produits emballés
dans du papier d’aluminium ou
d’aliments congelés dans une
casserole en aluminium.
• Si le cordon d’alimentation est
endommagé, il doit être remplacé par
le fabricant, son agent de service ou
des personnes tout aussi qualifiées
afin d’éviter les risques.
SÉCURITÉ DES ENFANTS
• Cet appareil n’est pas conçu pour être
utilisé par de jeunes enfants ou des
personnes infirmes, sauf s’ils sont
adéquatement supervisés par une
personne responsable qui s’assurera
qu’ils sont capables de se servir de
l’appareil de manière sécuritaire.
• Les jeunes enfants doivent être
surveillés pour s’assurer qu’ils ne
jouent pas avec l’appareil.
• Certaines parties accessibles peuvent
devenir très chaudes lorsque l’appareil
est en marche. Les jeunes enfants
doivent en être tenus éloignés.
LIRE TOUTES LES DIRECTIVES
AVANT L’UTILISATION
AVERTISSEMENT
AVERTISSEMENT
FRANÇAIS
5
Page 66

INFORMATION IMPORTANTE SUR LA SÉ CURITÉ
LIRE TOUTES LES DIRECTIVES
AVANT L’UTILISATION
SÉCURITÉ PENDANT L’UTILISATION
• Cet appareil ne peut être utilisé que pour la
cuisson et la friture normale à domicile. Il
n’est pas conçu à des fins commerciales ou
industrielles.
• N’utilisez jamais la table de cuisson pour
chauffer la pièce.
• Faites attention lorsque vous branchez un
appareil électrique près de la table de
cuisson. Le cordon d’alimentation ne doit pas
entrer en contact avec la surface chaude; ceci
pourrait endommager la table de cuisson et le
cordon d’alimentation.
• Les graisses et les huiles surchauffées
prennent feu rapidement. Vous devez faire
attention lorsque vous vous faites cuire des
aliments dans la graisse ou l’huile.
• Après utilisation, éteignez la plaque à l'aide
du bouton et ne vous fiez pas au détecteur
de récipient.
• Gardez toujours le panneau de commande
propre et sec. Ne laissez pas de liquides ou de
graisses rester sur les commandes de la table
de cuisson. Les aliments renversés ou brûlés
peuvent activer ou désactiver l’appareil. Nettoyez
soigneusement les commandes avant de
reprendre l’utilisation normale de l’appareil.
• Ne mettez jamais d’articles combustibles sur
la table de cuisson.
• Ne conservez jamais d’articles combustibles
ou d’aérosols dans un tiroir situé sous la
table de cuisson.
• Évitez de mettre des ustensiles en métal sur
les surfaces de la table de cuisson. Les objets
métalliques peuvent devenir chauds et causer
des brûlures.
• Sachez quelle surface des zones de cuisson
est commandée par chacune des touches des
commandes à effleurement.
• Nettoyez régulièrement l’appareil pour qu’il
n’y ait aucune graisse sur les parties où elle
risquerait de prendre feu. La hotte et le filtre à
graisse du ventilateur d’extraction doivent être
gardés propres. Ne laissez pas la graisse
s’accumuler sur la hotte ou le filtre. Les dépôts
graisseux sur le ventilateur pourraient prendre
feu. Consultez les instructions du fabricant de
la hotte pour son nettoyage.
• Servez-vous de casseroles de la bonne taille.
Cet appareil est muni de zones de cuisson de
6
tailles différentes.
• Choisissez des casseroles avec un fond plat
suffisamment grand pour couvrir la zone
de cuisson. Les capteurs de détection des
casseroles ne laisseront pas fonctionner ces
zones de cuisson sans qu’il y ait une casserole
présente.
• Ne mettez aucun objet sur le panneau de
commande ou à proximité de celui-ci afin
d’éviter toute activation accidentelle des
commandes de la table de cuisson.
• Les poignées des casseroles doivent être
tournées vers l’intérieur et ne doivent pas
dépasser au-dessus des zones de cuisson
adjacentes afin de réduire les risques de
brûlures, d’allumage de matières inflammables
ou de déversements causés par un contact
involontaire avec la casserole.
• Ne laissez jamais les aliments cuits sur
les zones de cuisson. Un débordement par
ébullition peut causer de la fumée, un
déversement graisseux peut prendre feu
et une casserole desséchée par ébullition
peut fondre ou s’endommager.
• Revêtements de protection : N’utilisez jamais
de papier d’aluminium pour recouvrir toute
partie de la table de cuisson. N’utilisez du
papier d’aluminium que de la manière
recommandée après le processus de cuisson,
s’il doit servir à couvrir la nourriture. Toute autre
utilisation du papier d’aluminium sur la table
de cuisson peut occasionner des risques de
décharge électrique, d’incendie ou de
court-circuit.
• Casseroles vernissées : Seuls certains types
de casseroles en verre, en verre céramique,
en céramique, en terre cuite ou autres types
de vernissage peuvent servir à la cuisson
sur cuisinière sans se briser à cause du
changement subit de température. Vérifiez
les recommandations du fabricant avant de les
utiliser sur une cuisinière.
• Hotte de ventilation : La hotte de ventilation
au-dessus de votre surface de cuisson doit
être nettoyée fréquemment pour que la
graisse provenant des vapeurs de cuisson
ne s’accumule pas sur la hotte ou le filtre.
Page 67

BIEN CUIRE LA VIANDE ET LA VOLAILLE
Faites bien cuire la viande et la volaille – la
viande à une température INTERNE d’au moins
71°C (160°F) et la volaille à une température
INTERNE d’au moins 82°C (180°F). La cuisson
à ces températures protège habituellement des
maladies d’origine alimentaire.
INFORMATION IMPORTANTE SUR LA SÉ CURITÉ
• Ne nettoyez pas et n’utilisez pas une table
de cuisson fêlée. Si la table de cuisson
se fêle, les produits de nettoyage et les
déversements peuvent pénétrer la table de
cuisson fêlée et occasionner des risques de
décharge électrique. Communiquez
immédiatement avec un technicien qualifié.
• Nettoyez la table de cuisson avec prudence.
Si vous utilisez une éponge ou un linge mouillé
pour essuyer un déversement sur une surface
de cuisson chaude, prenez soin d’éviter les
brûlures par la vapeur. Certains nettoyants
peuvent produire des émanations nocives s’ils
sont appliqués sur une surface chaude.
• Ne mettez pas de casseroles chaudes sur le
verre froid de la table de cuisson. Ceci peut
faire briser le verre.
• Ne glissez pas de casseroles sur la surface
de la table de cuisson. Elles peuvent
égratigner la surface de la table de cuisson.
• Ne laissez pas de casseroles sécher par
ébullition. Ceci peut causer des dommages
permanents sous forme de fêlure, de fonte
ou de marquage qui peuvent abîmer le verre
céramique de la table de cuisson. (Ce type
de dommages n’est pas couvert par notre
garantie.)
• Ne laissez jamais les unités de surface
sans surveillance lorsqu’elles sont réglées
à haute température. Les débordements
par ébullition peuvent produire de la fumée
et des déversements graisseux qui peuvent
prendre feu.
SÉCURITÉ PENDANT L’UTILISATION (suite)
Après la cuisson, NE SAISISSEZ PAS les
poignées de la casserole de pont fournie.
Elles peuvent être chaudes et vous risquez
de vous brûler .
• Éteignez toujours l’appareil avant de
le nettoyer.
• Pour des raisons de sécurité, ne nettoyez
pas l’appareil à l’aide d’un appareil de
nettoyage à jet de vapeur ou à haute
pression.
• Nettoyez la table de cuisson conformément
aux directives d’entretien et de nettoyage
de ce manuel.
• N'utilisez pas un nettoyeur à vapeur pour
nettoyer la table de cuisson.
• N’utilisez pas de nettoyant abrasif rude ou
de grattoir en métal pour nettoyer le verre
de la table de cuisson, car ils peuvent en
égratigner la surface, ce qui peut provoquer
l’éclatement du verre.
SÉCURITÉ LORS DU NETTOYAGE
MISE EN GARDE
LIRE TOUTES LES DIRECTIVES
AVANT L’UTILISATION
FRANÇAIS
7
Page 68

INFORMATION IMPORTANTE SUR LA SÉ CURITÉ
LIRE TOUTES LES DIRECTIVES
AVANT L’UTILISATION
COMMENT ÉVITER LES DOMMAGES À L’APPAREIL
• Avant d’utiliser votre table de cuisson la
première fois, appliquez la crème de nettoyage
recommandée à la surface de céramique.
Polissez avec un linge ou un tampon non
abrasif. Ceci facilitera le nettoyage après la
cuisson. Cette crème conçue spécialement
pour nettoyer la table de cuisson laisse un
fini protecteur sur le verre pour aider à prévenir
les égratignures et les abrasions.
• Ne vous servez pas de l’aire de cuisson en tant
que surface de travail ou de rangement.
• Veuillez faire attention aux bords lorsque vous
déplacez les casseroles.
• Ne laissez pas les zones de cuisson allumées
avec des casseroles vides ou sans casserole.
• Le verre céramique est très résistant et il
est à l’épreuve des changements subits de
température, mais il n’est pas incassable. Il
peut s’endommager si on y laisse tomber des
objets particulièrement durs ou tranchants.
• Faites attention lorsque vous utilisez des
casseroles en fonte ou d’autres casseroles
avec des bords ou un fini rugueux. Elles
peuvent égratigner le verre si on les déplace
en les glissant.
• Si du sucre ou un mélange contenant du
sucre tombe et fond sur une zone de cuisson
chaude, enlevez-le immédiatement pendant
qu’il est chaud. Si on le laisse refroidir, il peut
endommager la surface lorsqu’on tentera de
l’enlever.
NOTE : Vous risquez de vous brûler si vous
utilisez un grattoir sur une zone de cuisson
chaude!
• Tenez les objets susceptibles de fondre loin
de la surface de verre céramique, comme les
ustensiles en plastique, le papier d’aluminium
ou les pellicules de cuisson. Si d’autres
substances ou aliments ont fondu sur la
surface de verre céramique, il faut les
nettoyer immédiatement.
DISPOSITION DES VIEUX APPAREILS
Pour protéger l’environnement, il est important
de disposer de la bonne manière des vieux
électroménagers.
• L’appareil ne doit pas être jeté avec les déchets
domestiques.
• Vous pouvez obtenir de l’information sur les
dates de collecte ou sur les sites publics de
recyclage ou d’enfouissement en vous
adressant à votre conseil municipal ou au
bureau du ministère de l’environnement le
plus près de chez vous.
MISE EN GARDE
Avant de disposer de vieux
électroménagers, veuillez les rendre non
fonctionnels pour qu’ils ne représentent
aucun danger. Pour ce faire, faites-les
débrancher du circuit d’alimentation par
une personne qualifiée.
APPLICATION DE LA LOI CALIFORNIENNE À L’ÉGARD DE
L’EAU POTABLE ET TOXIQUE
AVERTISSEMENT:
la Californie comme étant cancérigènes. Bien laver ses mains avant la manipulation.
LISEZ ET SUIVEZ SOIGNEUSEMENT CES CONSIGNES DE SÉCURITÉ.
8
CONSERVEZ CES INSTRUCTIONS
Ce produit contient des produits chimiques reconnus par l’état de
Page 69

INTRODUCTION À LA CUISSON PAR INDUCTION
LA CUISSON PAR INDUCTION
COMMENT FONCTIONNE LA CUISSON
PAR INDUCTION
Ilyaunebobine d’induction
en dessous de la surface
de cuisson en verre
céramique. Celle-ci produit
un champ magnétique qui
agit directement sur la base
de la casserole plutôt que
de chauffer d’abord le verre
céramique. Ce qui signifie que la base de la
casserole est immédiatement chauffée,
économisant ainsi temps et énergie.
Comme la chaleur nécessaire à la cuisson est produite
directement dans la base de la casserole, la zone de
cuisson elle-même chauffe à peine. Elle ne reçoit que
la chaleur diffusée par la base de la casserole.
NOTE : S’il n’y a pas de casserole sur la zone
de cuisson, il n’y a aucun transfert d’énergie
(réchauffement). Ceci empêche les zones de
cuisson de s’allumer et de devenir chaudes
accidentellement.
IMPORTANT :
• Enlevez tout ruban adhésif et toute pellicule
d’emballage avant de vous servir de l’appareil.
Détruisez le carton et les sacs de plastique
après avoir déballé l’appareil. Ne laissez
jamais les enfants jouer avec les matériaux
d’emballage.
• Les champs électromagnétiques peuvent
perturber les circuits électroniques et interférer
avec les radios et les téléphones portables.
• Ne mettez aucun objet magnétiquement
rechargeable (par ex. carte de crédit, disquette
d’ordinateur, cassette) sur la surface en verre
céramique lorsqu’une ou plusieurs zones de
cuisson sont utilisées!
• Ne mettez aucun objet métallique (par ex.
cuillère, couvercle de casserole) sur les
surfaces à induction parce qu’il peut chauffer
lorsque la surface d’induction est utilisée.
CHOIX D’UNE BATTERIE DE CUISINE
CHAUDRONS ET CASSEROLES
• En principe, tous les chaudrons et toutes les
casseroles qui ont une base magnétique font
l’affaire, c'est-à-dire ceux en acier, en acier
émaillé et en fonte.
• Les casseroles en acier fin avec une base
métallique mixte (base lamellée, par ex. Tefal
®
avec une base en aluminium et cuivre) sont
appropriées pour l’induction seulement si le
fabricant les a expressément marquées en tant
que telles. Dans ce cas leur base contient une
substance magnétique.
•
Si vous souhaitez utiliser un type particulier de
casserole (par ex. autocuiseur, mijoteuse, wok),
veuillez suivre les instructions du fabricant et
n’utilisez pas de chaudrons très minces.
NOTE : Certains chaudrons peuvent produire
des bruits lorsqu’ils sont utilisés sur les zones de
cuisson à induction. Il ne s’agit pas d’un défaut
de la table de cuisson et son fonctionnement
n’en sera aucunement affecté.
TEST DE CONVENANCE :
Si vous n’êtes pas certain si une casserole peut
convenir à votre table de cuisson à induction, vous
pouvez vous en assurer par quelques tests faciles :
• Mettez un peu d’eau dans la casserole (1/8 –
1/4 po) et placez-la sur la zone de cuisson.
Réglez la zone de cuisson à la chaleur
maximum (réglage à 9).
• Vou s pou vez également
vérifier à l’aide d’un
aimant. Si l’aimant reste
collé à la base de la
casserole, celle-ci
convient à la cuisson
par induction.
La base d’une casserole qui convient
chauffera en quelques secondes! L’eau
devrait bouillir rapidement.
Les capteurs magnétiques situés sous la surface de cuisson nécessitent l’utilisation d’une batterie de
cuisine faite d’une substance magnétique pour que puisse s’effectuer le processus de chauffage des
zones de cuisson. Lors de l’achat d’une batterie des cuisine, choisissez-en une que le fabricant a
étiquetée comme étant utilisable avec une cuisinière à induction.
MISE EN GARDE
FRANÇAIS
9
Page 70

INTRODUCTION TO INDUCTION COOKING
CHOIX D’UNE BATTERIE DE CUISINE (suite)
POUR ÉVITER LES ÉGRATIGNURES
Il est recommandé de toujours utiliser des
casseroles en acier inoxydable épais sur la
surface de votre table de cuisson à induction.
Ceci aidera à réduire la possibilité d’égratignures
sur la surface de verre céramique. Les
casseroles de qualité inférieure peuvent
égratigner la surface de la table de cuisson
On doit toujours soulever les casseroles pour les
déplacer sur la surface en céramique de la table
de cuisson pour éviter de l’égratigner. Faire
glisser n’importe quel type de casserole sur le
verre céramique de la table de cuisson peut
avoir un effet sur l’apparence générale de cette
dernière. À la longue, faire glisser N’IMPORTE
QUEL type de casserole sur le verre céramique
de la table de cuisson peut changer l’apparence
générale de la table de cuisson. À la longue,
l’accumulation d’égratignures peut rendre difficile
le nettoyage de la surface et abîmer l’apparence
générale de la table de cuisson.
POUR DE MEILLEURS RÉSULTATS
Suivez toujours les recommandations pour le
type et la taille de casserole appropriés. De plus :
• N’utilisez pas de casseroles sales avec une
accumulation de graisse. Servez-vous toujours
de casseroles qui sont faciles à nettoyer après
la cuisson et assurez-vous que les fonds de
casserole sont propres et secs.
• Quand vous faites la cuisson avec de grandes
quantités de liquide, utilisez de grands
chaudrons pour que rien ne déborde par
ébullition.
• Ne laissez pas les casseroles sécher par
ébullition. Ceci peut causer des dommages
permanents sous forme de fêlure, de fonte
ou de marquage qui peuvent abîmer le verre
céramique de la table de cuisson. (Ce type
de dommages n’est pas couvert par notre
garantie.)
• Assortissez la taille de la casserole et la zone
de cuisson à la quantité de nourriture qui
est préparée.
Les égratignures peuvent aussi être causées par
des grains de sable (par ex. après avoir lavé des
légumes) qui peuvent être traînés sur la surface
de cuisson avec la casserole.
SE SERVIR DE CASSEROLES À
FOND PLAT
La casserole doit être entièrement en contact
avec la surface de la zone de cuisson. Servez-
vous de casseroles d’une
taille qui convient à
l’élément de cuisson et
à la quantité de nourriture
qui est préparée. Vérifiez-
en la planéité en faisant
tourner une règle sur le
fond de la casserole
CONSEILS POUR ÉCONOMISER
L’ÉNERGIE
• Positionnez toujours les casseroles et
chaudrons avant d’allumer la zone de cuisson.
• Les zones de cuisson et casseroles sales
consomment davantage d’électricité.
• Lorsque c’est possible, fermez bien les
couvercles sur les casseroles et chaudrons
pour qu’ils soient entièrement couverts.
10
Page 71

INTRODUCTION TO INDUCTION COOKING
CHOIX ET POSITIONNEMENT DE LA CASSEROLE
Il est important d’utiliser la bonne casserole et qu’elle soit placée correctement sur la table de
cuisson. CHACUNE des conditions incorrectes illustrées ci-dessous peut être détectée par les
capteurs situés sous la surface de céramique de la table de cuisson. Lorsque cela se produit, la zone
de cuisson ne chauffera pas et un F apparaîtra sur l’afficheur de la zone de cuisson. Corrigez le
problème avant de tenter d’utiliser la table de cuisson.
CORRECT
INCORRECT
Casserole correctement
centrée sur la surface
de la zone de cuisson.
Casserole dont le
fond est plat et
dont les côtés sont
droits.
La taille de la casserole
respecte ou excède
la taille minimum
recommandée pour
la zone de cuisson.
La casserole n’est
pas centrée sur la
surface de la zone
de cuisson.
Casserole dont le
fond ou les côtés
sont gauchis.
La taille de la casserole
ne respecte pas
la taille minimum
recommandée pour
la zone de cuisson
utilisée..
La casserole repose
complètement sur la
surface de la table
de cuisson.
La casserole est
correctement
équilibrée.
Le fond de la casserole repose
sur la moulure de la table de
cuisson ou ne repose pas
complètement sur la surface
de la table de cuisson.
Une poignée lourde
fait pencher la
casserole.
CHOIX D’UNE BATTERIE DE CUISINE
Si une casserole faite du bon matériau est correctement
centrée sur n’importe laquelle des zones de cuisson
actives, mais qu’elle est trop petite, la DEL de la zone de
cuisson touchée clignotera et la casserole ne chauffera pas.
Taille minimum de casserole =
71⁄4ʺ (180 mm)
Taille minimum de casserole =
5ʺ (125 mm)
Taille
minimum de
casserole =
53⁄4ʺ (145 mm)
Utilisez uniquement la casserole
fournie sur les éléments pontés.
CHOISIR LA BONNE TAILLE DE
CASSEROLE
• Il y a quatre zones de cuisson sur la table
de cuisson. Chaque élément requiert une
taille minium de casserole pour fonctionner
effectivement. Le cercle intérieur de
chaque zone de cuisson est un guide
pour déterminer la taille minimum de la
casserole qui convient. Le fond de la
casserole doit couvrir entièrement le cercle
intérieur pour une cuisson adéquate.
• Le cercle extérieur plus large de chaque
zone de cuisson est utile pour déterminer
la taille MAXIMUM de la casserole. Après
avoir centré la casserole sur la zone de
cuisson, assurez-vous qu’elle ne dépasse
pas de plus de 1,27 cm (1/2 po) la ligne
plus large de la zone de cuisson. La
casserole doit être ENTIÈREMENT en
contact avec la surface de verre sans que
le fond touche à la moulure métallique de
la table de cuisson.
FRANÇAIS
11
Page 72

PIÈ CES ET CARACTÉ RISTIQUES
PIÈCES ET CARACTÉRISTIQUES DE VOTRE TABLE
DE CUISSON
Tout au long de ce manuel, les caractéristiques et l’apparence peuvent différer de votre modèle.
1800 W (Normal)
2400 W (amplifié)
2400 W (Normal)
3300 W (amplifié)
1400 W (Normal)
1800 W (amplifié)
12
Commandes électroniques
à touches sensitives
Table de cuisson céramique : La nouvelle table
de cuisson à induction LG est dotée d’une surface
de céramique qui reste plus fraîche que celle des
autres tables de cuisson, peu importe si elle est
allumée ou éteinte.
MISE EN GARDE
Risque de brûlure : Les zones de cuisson
peuvent paraître froides lorsqu’elles sont
allumées et après qu’elles ont été éteintes.
La surface de céramique peut être
CHAUDE à cause de la chaleur résiduelle
transférée par la casserole.
Détecteur magnétique : Le capteur de la
bobine détecte automatiquement les ustensiles
convenables et prévient l’activation accidentelle.
Détection de la taille de la casserole : Le
capteur détecte automatiquement la taille de
casserole et adapte la zone de cuisson à la taille
de casserole utilisée.
Meilleure efficacité : La cuisson par induction
chauffe plus vite tout en utilisant moins d’énergie.
La cuisson par induction fait bouillir les liquides
plus rapidement tout en permettant un mijotage
égal et stable.
Zones de cuisson par induction : Les zones de
cuisson par induction sous la surface de la table
de cuisson chauffent immédiatement la base de
la casserole sans chauffer le verre céramique le
la table de cuisson. Les deux zones de taille
moyenne peuvent être utilisées ensemble pour
les casseroles oblongues plus grandes.
Commandes à effleurement : Les commandes à
effleurement offrent un fonctionnement précis.
Nettoyage facile : La surface de cuisson en verre
céramique et les commandes à effleurement
permettent un nettoyage plus facile et éliminent
les fissures et les interstices où la graisse peut
s’accumuler .
Affichage des commandes et des fonctions :
Des affichages numériques montrent les réglages
actuels et vous avertissent des surfaces chaudes
ainsi que de toute chaleur résiduelle de la zone de
cuisson correspondante.
Arrêt de sûreté : Toutes les zones de cuisson sont
dotées d’un arrêt de sûreté qui éteint la zone de
cuisson si la touche ON/OFF est activée mais
qu’aucun niveau de chaleur n’a été choisi en
dedans de 10 secondes.
Page 73

CARACTÉRISTIQUES DES COMMANDES À
EFFLEUREMENT
PIÈ CES ET CARACTÉ RISTIQUES
1
2
5
4
PONT : Active ensemble les deux zones de
cuisson de gauche comme une seule grande
zone de cuisson.
Pour utiliser le pont, touchez cette touche pour
l’activer et ajustez le niveau de puissance avec
les touches ou de l’une des zones de
cuisson de gauche.
MINUTERIE : Lorsqu’elle est activée, l’afficheur
indique le temps restant. Utilisez les touches
ou pour régler la minuterie.
VERROU POUR ENFANTS : Touchez et
maintenez pendant 3 secondes pour activer
et désactiver la fonction de verrouillage pour
enfants.
RÉCHAUFFER : Cette touche baisse
automatiquement le dernier élément actif
sélectionné au réglage le plus bas.
ALIMENTATION : Touchez la touche POWER
pour activer ou désactiver toute la table de
cuisson. Lorsqu’elle est à ON, la table de
cuisson est en mode d’attente jusqu’à ce
qu’une zone de cuisson soit activée.
1
2
3 4 5
6
6
3
COMMANDES DES ZONES DE CUISSON :
Chaque zone de cuisson est dotée de ses
propres commandes et elle peut être activée
individuellement.
La touche ON/OFF active la zone de
cuisson désirée.
Utilisez les touches ou d’une zone de
cuisson pour ajuster le niveau de puissance de
à et (Boost).
L’afficheur de la zone de cuisson montre le
niveau de puissance :
à ou
Indicateur de surface chaude : Après avoir
utilisé une zone de cuisson, un apparaît à
l’afficheur jusqu’à ce que la surface de cuisson
soit froide.
6
FRANÇAIS
13
Page 74

CONSIGNES D’ UTILISATION
AVANT D’UTILISER LA TABLE DE CUISSON
Avant d ’utiliser la première fois la table de
cuisson, nettoyez-la soigneusement avec le
nettoyant fourni ou un nettoyant pour céramique
de table de cuisson comme il est recommandé
dans la partie NETTOYAGE ET ENTRETIEN de
ce guide. Ceci fera disparaître toute saleté et
aidera à protéger la surface de céramique tout
en facilitant les nettoyages subséquents.
RÉGLAGE DES COMMANDES
Pour se servir des commandes à effleurement,
touchez fermement la touche avec le plat du
bout de votre doigt.
PREMIÈRE UTILISATION
MISE EN GARDE
N’utilisez jamais de tampons à récurer ou
de nettoyants abrasifs. Ils causent des
dommages permanents à la surface de la
table de cuisson.
14
La première fois que la table de cuisson est mise
sous tension, un clignote sur l’afficheur de
chacune des zones de cuisson pendant 60
secondes ou jusqu’à ce qu’on appuie sur la
touche POWER pendant environ 2 secondes.
NOTE : Un clignote également lorsque le
courant est rétabli après une panne de courant.
ACTIVATION DE LA TABLE DE CUISSON
Pour activer la table de cuisson, touchez
la touche POWER pendant environ 2
secondes. L’indicateur au-dessus de la
touche s’allumera.
CHOIX D’UNE ZONE DE CUISSON
Pour choisir la zone de cuisson désirée,
touchez la touche ON/OFF.L’afficheur
de la zone de cuisson choisie affichera
un et un indicateur s’allumera pour
indiquer que la zone de cuisson est
activée mais que le niveau de puissance
n’a pas été réglé.
NOTE : Une fois que la zone de cuisson a été
choisie à l’aide de la touche ON/OFF le niveau
de puissance doit être sélectionné en dedans de
5 secondes au moyen de la touche ou .
Sinon, la zone de cuisson se désactivera pour
des raisons de sécurité.
NOTE : Après avoir activé mis la table de
cuisson avec la touche POWER vous avez
20 secondes pour choisir une zone de cuisson
à l’aide d’une des touches ON/OFF de zone de
cuisson. Si aucun choix n’est effectué, la table
de cuisson se désactivera pour des raisons de
sécurité.
Page 75

CONSIGNES D’ UTILISATION
Le niveau de puissance peut être réglé de
à et (Boost) pour chacune des
zones de cuisson.
Pour ajuster le niveau de puissance :
Touchez la touche ou de la zone de
cuisson choisie.
En touchant le niveau de puissance sera
réglé à .
En touchant le niveau de puissance sera
réglé à .
Touchez la touche ou de la zone de
cuisson choisie pour augmenter ou réduir le
niveau de puissance.
Si le niveau de puissance est r églé, la
zone de cuisson s’éteindra après 5 secondes.
Pour un ajustement plus rapide du niveau de
puissance, touchez ou maintenez les
touches ou jusqu’à ce le niveau
désiré soit atteint.
NOTE : Pour plus de
précision, les réglages de
puissance varient par 1/2
échelon pour les niveaux
de puissance de 2 à 6.
Un point apparaît à côté
du chiffre pour indiquer
un niveau de puissance
de 1/2 échelon.
Si la touche ou d’une zone de cuisson
est maintenue pendant plus de 10 secondes,
le message d’erreur . apparaîtra à
l’afficheur de la minuterie. Pour effacer ce
message d’erreur, touchez la touche ON/OFF
de la zone de cuisson que vous étiez en train
de régler. Ce message ne se rapporte PAS
aux commandes de la minuterie.
Pour éteindre la zone de cuisson :
À la fin de la cuisson, appuyez sur la touche
ON/OFF pour mettre la zone de cuisson en
position OFF.
L’écran correspondant de la zone de cuisson
s’éteindra.
Si vous appuyez sur la touche POWER
(courant) au lieu de la touche ON/OFF,toute
la surface de cuisson s’éteindra.
1
2
3
RÉGLAGE DU NIVEAU DE PUISSANCE
NOTE :
• Si pour quelque raison que ce soit la casserole
est déplacée du centre de la zone de cuisson
active, un capteur le détectera et la zone de
cuisson cessera de chauffer. L’afficheur de
cette zone de cuisson clignotera en indiquant
le dernier réglage de puissance pour cette
zone de cuisson.
• La zone de cuisson se souviendra du réglage
du niveau de puissance pendant 90 secondes
avant de s’éteindre automatiquement.
Votre table de cuisson est dotée d’un indicateur
de chaleur résiduelle pour chaque zone de
cuisson. Celui-ci vous avertit que cette zone a
été utilisée et qu’elle est encore suffisamment
chaude pour causer des brûlures.
Évitez de toucher à la zone de cuisson
lorsque cet indicateur est affiché. Même si
la table de cuisson est à OFF, le restera
allumé jusqu’à ce que la table de cuisson
ait refroidi.
RÉGLAGE DES COMMANDES
1
2
AVERTISSEMENT
FRANÇAIS
15
Page 76

CONSIGNES D’ UTILISATION
RÉGLAGE DES COMMANDES (suite)
AMPLIFICATION DE PUISSANCE
L’amplification de puissance représente le
réglage de puissance le plus élevé; elle est
conçue pour faire chauffer ou bouillir rapidement
de plus grandes quantités. L’amplification de
puissance fonctionnera pendant un maximum
de 12 minutes. Après 12 minutes, la zone de
cuisson passera automatiquement au niveau
de puissance 9.
ACTIVATION DE L’AMPLIFICATEUR
DE PUISSANCE
Allumez la zone de cuisson désirée à l’aide
1
de la touche ON/OFF de cette zone de
cuisson.
Touchez la touche et le s’affichera.
2
Touchez de nouveau la touche et un
3
s’affichera.
NOTE : La fonction d’amplification de puissance
ne reste activée que pendant 12 minutes. À la
fin du cycle d’amplification, la zone de cuisson
reviendra automatiquement au niveau de
puissance . La fonction d’amplification de
puissance ne peut PAS être utilisée en même
temps sur les zones de cuisson avant et arrière
d’un même côté.
Pour désactiver la fonction d’amplification
4
de puissance et revenir à un niveau de
puissance normal, touchez la touche .
NOTE : Pour protéger les composants
électroniques internes de la table de cuisson,
celle-ci peut automatiquement désactiver la
fonction d’amplification de puissance et
revenir à un niveau de puissance normal
avant que les 12 minutes ne soient
écoulées. Ceci est normal.
NOTE : Les processus électroniques utilisés
dans la cuisson par induction produisent
certains bruits de fond inhabituels. Ces bruits
sont normaux et font partie du processus de
cuisson par induction. Veuillez prendre note
que ces bruits se remarquent davantage
lorsqu’on utilise la fonction d’amplification
de puissance.
RÉCHAUD
La table de cuisson est dotée d’un réglage
WARM qui agit sur la dernière zone de cuisson
utilisée au niveau de puissance FAIBLE.
Pour activer :
Touchez la touche WARM et la dernière zone de
cuisson utilisée sera réglée à FAIBLE puissance.
Un apparaîtra à l’afficheur.
Pour désactiver :
Pour désactiver la fonction WARM et retourner
aux niveaux de puissance normale, touchez la
touche et le s’affichera.
GUIDE DE NIVEAU DE PUISSANCE
Réglage : Fonction : Utilisé pour :
9 ou amplifié Chaleur rapide Amener les liquides à
ébullition.
7–9 Rissoler, grande Saisir la viande, chauffer
friture l’huile pour la grande
friture, sauter, maintenir
en ébullition une grande
quantité de liquide.
6–7 Griller, frire Poêler les viandes, les
côtelettes, les saucisses,
cuire les crêpes, frire
les œufs.
4–5 Bouillir, cuisson Faire cuire de grandes
générale quantités, soupes et
ragoûts, pommes de terre,
bouillons ou consommés.
3–4 Cuisson à la Cuisson de légumes à la
vapeur vapeur, braiser les viandes.
2–3 Réchauffer Cuire à feu doux le riz ou
les plats à base de lait,
cuire à la vapeur de plus
petites quantités de
pommes de terre et de
légumes, réchauffer des
repas prêts à servir.
1–2, L Fondre Omelettes soufflées, tenir
les plats chauds, faire
fondre du beurre ou du
chocolat.
0 OFF Désactivé.
NOTE : Ces réglages sont des indications recommandées pour
la cuisson. Vous pourriez avoir à ajuster le niveau de puissance
selon le type d’aliment ou de casserole.
16
Page 77

CONSIGNES D’ UTILISATION
UTILISATION DES ZONES DE CUISSON PONTÉES
Les deux zones de cuisson de gauche peuvent
être utilisées ensemble comme une seule zone
de cuisson à l‘aide de la fonction de pontage.
Ceci vous permet de cuisiner avec des
casseroles oblongues plus grandes.
NOTE : Pour utiliser la casserole de pont
fournie, vous devez la frotter d’huile pour éviter
qu’elle brûle et qu’elle colle la nourriture.
ZONES DE CUISSON PONTÉES
ACTIVATION DE LA ZONE DE
CUISSON PONTÉE
Touchez la touche BRIDGE. L’indicateur
au-dessus de la touche s’allumera.
Touchez la touche ou d’une des zones
de cuisson de gauche pour ajuster le niveau de
puissance des deux zones de cuisson.
UTILISATION DE LA MINUTERIE
La fonction de minuterie peut être utile si une
recette exige un temps de cuisson précis. La
minuterie peut être réglée de 1 à 99 minutes.
Une fois la minuterie réglée, l’afficheur numérique
entre les touches ou de la minuterie fera
le décompte en minutes du temps qui reste.
NOTE : La fonction de minuterie ne fait que
compter les minutes. Elle ne commande PAS
l’activation ou la désactivation de la table de
cuisson.
RÉGLAGE DE LA MINUTERIE
Touchez la touche ou située en
dessous du mot TIMER. Chaque touche
augmentera ou réduira le temps par tranches
d’une minute, de 1 à 99 minutes. Vous
pouvez également toucher et maintenir la
touche ou pour faire défiler les
chiffres de façon croissante ou décroissante.
L’afficheur de la minuterie clignotera.
Une fois que le temps désiré est réglé,
l’afficheur cesse de clignoter et commence le
décompte si pendant 5 secondes, aucune
touche n’est touchée. Lorsque la minuterie
atteint , un long signal sonore indique
que le temps est écoulé.
1
2
DÉSACTIVATION DE LA MINUTERIE
Pour désactiver la minuterie, touchez les
touches TIMER et en même temps,
OU :
Touchez et maintenez la touche
ou jusqu’à ce que
apparaisse à l’afficheur.
L’afficheur de la minuterie s’éteindra.
1
2
NOTE :
• N’utilisez la casserole de pont fournie QUE sur
la zone de cuisson de pont.
• Pour acheter une casserole de pont de
remplacement ou d’autres casseroles de pont ,
appelez lel 1-800-243-0000 et choisissez le
signe approprié du menu. Ou bien, visitez notre
site Web à l’adresse http://us.lgservice.com.
FRANÇAIS
17
Page 78

CONSIGNES D’ UTILISATION
UTILISATION DU VERROU POUR ENFANTS
Vous pouvez désactiver toute la table de cuisson
en tout temps lorsqu’elle n’est pas utilisée. Le
verrouillage de la table de cuisson évite que les
zones de cuisson soient activées accidentellement.
ACTIVATION DU VERROU
La table de cuisson doit être
DÉSACTIVÉE pour activer la fonction de
VERROUILLAGE. Si la table de cuisson
n’est pas hors tension, touchez et
maintenez la touche POWER pendant
environ 2 secondes. L’indicateur situé au-
dessus de la touche POWER s’éteindra.
Touchez et maintenez la touche CHILD
LOCK pendant 3 secondes. Le témoin
indicateur au-dessus de CHILD LOCK
s’allumera pour indiquer que la table de
cuisson est verrouillée.
AUTRES FONCTIONS
PARTAGE DU COURANT
Votre table de cuisson est équipée de quatre
zones de cuisson à induction réparties en deux
sections chauffantes. Les zones de cuisson de
droite et de gauche sont alimentées par deux
onduleurs d’induction indépendants, un pour
chacune des sections chauffantes. Les deux
zones de cuisson comprises dans une section
chauffante se partagent le courant d’un onduleur.
C’est qu’on appelle le partage du courant.
Par exemple, si vous cuisinez sur les deux
zones de cuisson de droite, le dernier niveau
de puissance réglé est maintenu, alors que la
première zone de cuisson peut subir une légère
réduction du niveau de puissance.
CONSEILS SUR LE PARTAGE DU COURANT :
N’oubliez pas de régler en dernier le niveau de
puissance qui doit être maintenu pour le plat que
vous souhaitez maintenir constant. Lorsque vous
DÉSACTIVATION DU VERROU
Pour désactiver le verrou pour enfants,
touchez et maintenez la touche CHILD
LOCK pendant 3 secondes. L’indicateur
situé au-dessus de CHILD LOCK
s’éteindra pour indiquer que la table de
cuisson est prête à utiliser normalement.
utilisez deux zones de cuisson, vous pouvez
maintenir le niveau de puissance pour 2 plats
en plaçant une casserole sur une des zones de
cuisson de la section de gauche et l’autre sur une
des zones de cuisson de la section de droite.
Section chauffante
de gauche
Section chauffante
de droite
18
ARRÊT AUTOMATIQUE
Si une zone de cuisson est en usage continu
pendant 17 heures et que le réglage de
puissance n’est pas changé, la zone de cuisson
s’éteindra automatiquement.
GESTION AUTOMATIQUE DU NIVEAU
DE PUISSANCE
À haute température, le niveau de puissance
affiché peut être différent du niveau de
puissance réel. Pour empêcher que la table de
cuisson surchauffe, le niveau de puissance est
gouverné automatiquement.
Page 79

Pour enlever les aliments qui ont débordé par
ébullition ou les taches tenaces, servez-vous
d’un grattoir pour le verre.
Tenez le grattoir à un angle de 45° sur la
surface du verre céramique.
Enlever la saleté en glissant la lame sur la
partie sale.
Utilisez un nettoyant à verre céramique
comme décrit sous NETTOYAGE GÉNÉRAL.
Enlevez immédiatement et pendant qu’ils sont
encore chauds le sucre, le plastique fondu, le
papier d’aluminium ou autres matériaux fusibles
avec un grattoir pour le verre. Si vous ne le
faites pas immédiatement, la surface de la table
de cuisson pourrait être endommagée de façon
permanente. Si la zone de cuisson a eu le
temps de refroidir, chauffez-la de nouveau.
IMPORTANT : Il y a un risque de se brûler en
utilisant le grattoir pour le verre sur une zone de
cuisson chaude. Soyez prudent et portez un gant
de cuisine.
Ensuite, lorsqu’elle aura refroidi, nettoyez la
table de cuisson normalement.
NOTE : Les égratignures et les marques foncées
sur le verre céramique qui sont causées par une
base de casserole aux bords tranchants ne peuvent
pas être enlevées. Elles ne nuisent cependant pas
au fonctionnement de la table de cuisson.
Le nettoyage général du verre céramique
des tables de cuisson à induction et
considérablement plus facile que celui des tables
de cuisson à chauffage à rayonnement.
NOTE :
Pour éviter une activation accidentelle des
commandes, il est recommandé de mettre le
VERROU POUR ENFANTS pendant le nettoyage.
NETTOYAGE DE LA TABLE DE CUISSON
ENTRETIEN ET NETTOYAGE
IMPORTANT :
• Les produits de nettoyage ne doivent pas venir
en contact avec le verre céramique chaud.
Tous les produits de nettoyage doivent être
rincés à fond à l’eau claire.
• N’utilisez pas de nettoyants corrosifs comme
ceux pour nettoyer les fours ou les rôtisseries,
les récurants à gros grains ou les nettoyants
abrasifs pour casseroles.
• Nettoyez la surface de verre céramique après
chaque utilisation lorsqu’elle est tiède ou froide
au toucher. Ceci empêchera les
renversements de brûler. Enlevez les taches
d’eau, de graisse et les décolorations à l’aide
d’un grattoir pour le verre ou d’un nettoyant
pour verre céramique.
Lorsqu’elle est refroidie, essuyez la surface
de verre céramique avec un linge humide
et une petite quantité de nettoyant à verre
céramique.
Séchez avec un linge propre.
Une fois par semaine, nettoyez à fond toute
la table de cuisson avec un nettoyant à verre
céramique vendu en magasin.
Essuyez ensuite la surface de verre
céramique à l’aide d’un linge propre et
doux humecté d’un peu d’eau claire et
séchez en polissant avec un linge propre
non pelucheux.
1
2
NETTOYAGE GÉNÉRAL
3
4
1
2
NETTOYAGE DE LA GROSSE SALETÉ
3
1
2
SALETÉ TENACE
NOTE :
Vous pouvez vous procurer des grattoirs pour le
verre et des nettoyants pour le verre céramique
de votre quincaillerie locale.
19
FRANÇAIS
Page 80

DIRECTIVES D’ INSTALLATION
L’INSTALLATION ET LE SERVICE DOIVENT ÊTRE EFFECTUÉS PAR UN
INSTALLATEUR QUALIFIÉ.
IMPORTANT : CONSERVEZ CES DIRECTIVES POUR L’INSPECTEUR LOCAL.
LISEZ ET CONSERVEZ CES DIRECTIVES POUR CONSULTATION FUTURE.
AVANT DE COMMENCER
Lisez attentivement et entièrement ces
directives.
NOTES À L’INSTALLATEUR :
• Lisez toutes les instructions contenues dans
ces directives d’installation avant d’installer la
table de cuisson.
• Enlevez tout matériau d’emballage avant de
brancher l’alimentation électrique à la table de
cuisson.
• Observez tous les codes et toutes les
ordonnances applicables.
• Seuls certains modèles de tables de cuisson
peuvent être installés au-dessus de certains
modèles de fours encastrés.
• Assurez-vous de laisser ces instructions au
consommateur.
NOTE AU CONSOMMATEUR :
Conservez ce Manuel de l’utilisateur et ces
directives d’installation pour consultation future.
NOTE : Cet appareil doit être correctement
mis à la terre.
Les dommages causés par le non-respect de
ces directives ne sont pas couverts par la
garantie.
DÉBALLAGE DE LA TABLE DE CUISSON
Déballez et inspectez visuellement la table de
1
cuisson pour tout dommage et pour toute
composante manquante.
Veillez à ce que la bouteille de nettoyant
2
emballée dans le sac de documentation soit
laissée à un endroit où l’utilisateur peut la
trouver facilement. Il est important que la table
de cuisson en verre céramique soit prétraitée
avant son utilisation. Voir ENTRETIEN ET
NETTOY AGE .
20
CARACTÉRISTIQUES TECHNIQUES
DIMENSIONS DE LA TABLE DE CUISSON
Largeur 307⁄8ʺ (783 mm)
Profondeur 21
Épaisseur 2
1
⁄2ʺ (546 mm)
3
⁄16ʺ (56 mm)
ZONES DE CUISSON
Position Diamètre Puissance
Avant gauche 7ʺ (180 mm) 1800 W (2400 W amplifié)
Arrière gauche 7ʺ (180 mm) 1800 W (2400 W amplifié)
Avant droit 6ʺ (150 mm) 1400 W (1800 W amplifié)
Arrière droit 10
* La consommation nominale peut varier selon la taille et le type de casserole.
1
/4ʺ (260 mm) 2400 W (3300 W amplifié)
DIMENSIONS DE LA DÉCOUPE
DU COMPTOIR
Largeur 293⁄8ʺ (746 mm)
Profondeur 20
SPÉCIFICATIONS ÉLECTRIQUES
Tension d’alimentation :
240/208 VAC, 60Hz.
Charge maximum au kilowatt :
7,4 kW/6,7 kW
1
⁄4ʺ (515 mm)
Page 81

INFORMATION IMPORTANTE SUR L’INSTALLATION
• Toutes les tables de cuisson électriques
sont alimentées uniquement par un câble
monophasé à trois ou à quatre conducteurs de
240/208 volts, 60 hertz, CA avec mise à la terre.
• La distance minimum entre la table de cuisson
et les armoires du haut est de 30ʺ (76,2 cm).
DIRECTIVES D’ INSTALLATION
A
B
I
J
C
D
H
E
F
G
L
M
K
** Do not obstruct these areas!
Fresh air intake**
Air exhaust**
Air exhaust**
30” Min.
(76.2 cm)
4" X 8" (10.2 cm x 20.3 cm)
opening to route armored
cable if panel is present.
Toutes les dimensions sont données en pouces et en millimètres (mm).
Laissez 5 cm (2 po.) d’espace libre sous l’ouverture du câble armé pour laisser passer le câble
électrique et permettre d’installer la boîte de jonction sur le mur à l’arrière de la table de cuisson.
PRÉPARATION DU POINT D’INSTALLATION
**Ne pas obstruer ces zones.
4ʺ X8ʺ (10,2 cm x 20,3 cm)
ouverture pour passer le
câble armé s’il y a un
panneau présent.
Sortie d’air**
Sortie d’air**
30ʺ Min.
(76,2 cm)
Entrée d’air
frais**
FRANÇAIS
Unit A B C D E
Inch 30
mm 783 546 56 732.2 498 746 749 515 518 20 33 610 762 106 38 610
13
/16211/223/162813/16195/8293/8291/2201/4203/
Min Max Min Max Min Max Min
FG
HI
13
8
/1615/1624 30 43/1611/224
JK
LM
21
Page 82

DIRECTIVES D’ INSTALLATION
J
F
G
I
10"
( 25.4 cm)
18"
( 45.7 cm)
12"
(30.5 cm)
24"
(61 cm)
L
M
H
K
n
DIMENSIONS ET DÉGAGEMENT
L’armoire du haut ne doit pas avoir une profondeur
maximum de plus de 13” (33 cm).
30” (76,2 cm) Dégagement minimum
entre le dessus de la plateforme de
cuisson et le dessous non protégé
d’une armoire en bois ou en métal
24” (61 cm) Min. lorsque le dessous
de l’armoire en bois ou en métal est
protégé par pas moins de 1/8” de
carton enroulé ignifuge recouvert par
de l’acier en feuille d’au moins no28
MGS, de l’acier inoxydable d’au
moins 0,015” (0,4 mm) d’épaisseur, de
l’aluminium d’au moins 0,024” (0,6
mm) d’épaisseur ou du cuivre d’au
moins 0,020” (0,5 mm) d’épaisseur.
MISE EN GARDE
Pour éliminer le risque de brûlure
ou d’incendie qui peut survenir
lorsqu’on tend le bras au-dessus
de surfaces chauffantes, on doit
éviter d’utiliser un espace de
rangement situé au-dessus de la
table de cuisson. S’il existe déjà
une armoire, on peut réduire ce
risque en installant une hotte qui
projette horizontalement d’au
moins 5ʺ (12,7 cm) du devant de
l’armoire.
Distance minimum
ecommandée entre le bord
arrière de la découpe et la
surface combustible la plus
proche au-dessus du comptoir
Distance minimum
entre le bord de la
table de cuisson et le
mur combustible le
plus proche (de chaque
côté de l’appareil).
Un espace vide sous de la table
Emplacement approximatif
Modèle H L
30ʺ (76,2 cm) 71/2ʺ (191 mm) 11/2ʺ (38 mm)
de la boîte de jonction
de cuisson est nécessaire pour
l’installation.
22
MISE EN GARDE
Il est très important de
respecter une distance de
3
/
ʺ (70 mm) entre la surface
2
4
de cuisson et le four.
ᵉ Distance recommandée entre la surface de cuisso
et le four
3
/
2
4
ʺ
(70 mm)
Page 83

CONSIGNES DE SÉCURITÉ
IMPORTANTES
RACCORDEMENTS ÉLECTRIQUES
DIRECTIVES D’ INSTALLATION
L’alimentation électrique à la table de cuisson
doit être coupée pendant qu’on procède aux
raccordements de ligne. Le non-respect de
cette consigne peut occasionner des
blessures graves ou la mort.
BRANCHEMENT DE L’ALIMENTATION
ÉLECTRIQUE
Installez la boîte de jonction sous l’armoire et
passez un fil 120/240 volts ou 120/208 volts, CA
entre celle-ci et le panneau électrique principal.
NOTE : NE PAS brancher le fil au panneau
électrique à ce moment.
EXIGENCES ÉLECTRIQUES
Observez tous les codes et toutes les
ordonnances de l’endroit.
Un câble d’alimentation à 3 ou 4 conducteurs
120/240 ou 120/208 volts, 60 Hz CA est
requis sur un circuit avec fusible de chaque
côté de la ligne (on recommande un fusible
à retardement ou un disjoncteur). NE PAS
mettre de fusible au fil neutre. La taille du
fusible ne doit pas excéder la capacité du
circuit de l’appareil indiquée sur la plaque.
Cet appareil peut consommer jusqu’à 7400
W à 240 VCA. Un disjoncteur de 40 Aavec
un fil de calibre n
o
10 AWG doit être utilisé.
NOTE : La grosseur du fil et les
raccordements doivent être conformes à la
capacité du fusible et à la classe d’appareil
conformément à la plus récente édition du
National Electrical Code ANSI/NFPA n
o
70
aux États-Unis ou à la deuxième édition de
la CSA C22.2 n
o
107.3 au Canada et aux
codes et ordonnances de l’endroit.
L’appareil doit être branché au boîtier à
fusibles ou à disjoncteurs à l’aide d’un câble
flexible armé sous gaine non métallique. Le
câble flexible armé partant de cet appareil
doit être raccordé directement à la boîte de
jonction mise à la terre. Cette boîte de
jonction doit être située à l’endroit indiqué à
la figure 22 avec suffisamment de jeu entre la
boîte et l’appareil pour qu’il soit possible de
déplacer celui-ci pour une réparation si elle
s’avérait nécessaire.
Un serre-câble approprié doit être utilisé
pour fixer le câble flexible armé à la boîte
de jonction.
1
2
3
4
On ne doit pas utiliser de rallonge
électrique avec cet appareil. Une telle
utilisation pourrait causer un incendie, des
décharges électriques ou des blessures.
• Assurez-vous que votre table de cuisson est
correctement installée et mise à la terre par un
installateur ou un technicien de service qualifié.
• Cette table de cuisson doit être électriquement
mise à la terre conformément aux codes de
l’endroit ou, en leur absence, à la plus récente
édition du National Electrical Code ANSI/NFPA
n
o
70 aux États-Unis ou à la deuxième édition
de la CSA C22.2 n
o
107.3 au Canada.
AVERTISSEMENT
AVERTISSEMENT
FRANÇAIS
23
Page 84

DIRECTIVES D’ INSTALLATION
RACCORDEMENTS ÉLECTRIQUES (suite)
RACCORDEMENT ÉLECTRIQUE
Raccordez le câble armé flexible qui va de
l’appareil à la boîte de jonction à l’aide d’un
serre-câble approprié au point où le câble entre
dans la boîte de jonction. Procédez ensuite au
raccordement électrique de la façon suivante.
Une mise à la terre est requise pour
cet appareil.
Cet appareil est fabriqué avec un fil
d’alimentation et un fil vert, ou de cuivre nu,
de mise à la terre branché au châssis.
NOTE À L’ÉLECTRICIEN :
Les conducteurs du câble fourni avec l’appareil
sont approuvés UL-CSA pour raccordement
à un câblage domestique de plus gros calibre.
L’isolant des conducteurs est classé à des
températures beaucoup plus élevées que le
câblage domestique. La capacité actuelle du fil
conducteur est déterminée par la température
nominale de l’isolant qui gaine le fil plutôt que
seulement par le calibre.
AVERTISSEMENT
NE PAS mettre à la terre sur une conduite
de gaz. NE PAS raccorder l’appareil à
l’alimentation électrique tant que celui-ci
n’est pas mis à la terre de façon
permanente. Brancher le fil de mise à
la terre avant de mettre le courant.
AVERTISSEMENT
Cet appareil est équipé d’un câble flexible à
conducteurs en cuivre. Si le raccordement
est fait à un câblage domestique en
aluminium, utilisez uniquement un
connecteur spécial approuvé pour joindre
des fils de cuivre et d’aluminium
conformément au Code national de
l’électricité et aux codes et ordonnances de
l’endroit. Le raccordement incorrect d’un
câblage domestique en aluminium à des
conducteurs en cuivre peut causer un courtcircuit ou un incendie. Suivez attentivement
la procédure recommandée par le fabricant
du connecteur.
24
OÙ LE CODE PERMET LE BRANCHEMENT DU CONDUCTEUR DE MISE À LA TERRE DE
L’APPAREIL AU FIL NEUTRE (BLANC)
Observez tous les codes et toutes les
ordonnances applicables de l’endroit.
1
Coupez l’alimentation.
Au panneau électrique ou à la boîte de
2
jonction, branchez les fils du câble de l’appareil
et du câble d’alimentation comme illustré.
AVERTISSEMENT
Vous ne pouvez pas mettre la table de
cuisson à la terre par le fil neutre (blanc)
si celle-ci est utilisée dans une nouvelle
installation sur un circuit de dérivation
(1996 NEC), une maison mobile, un
véhicule récréatif, ou là où les codes de
l’endroit ne permettent pas la mise à la
terre par le fil neutre (blanc). Lorsque la
mise à la terre par le fil neutre (blanc) est
interdite, vous devez utiliser un câble
d’alimentation à 4 conducteurs. Le nonrespect de cet avertissement peut entraîner
l’électrocution ou des blessures graves.
BOÎTE DE JONCTION AVEC
3 CONDUCTEURS ET MISE À LA TERRE
Câble d’alimentation
Fil blanc
(neutre)
Fils
rouges
Fil vert (mise à la terre)
Câble de l’appareil
Fils
noirs
Boîte de
jonction
Connecteur de
conduit approuvé
U.L. CSA
Page 85

RACCORDEMENTS ÉLECTRIQUES (suite)
SI LA TABLE DE CUISSON EST UTILISÉE DANS UNE NOUVELLE INSTALLATION SUR
UN CIRCUIT DE DÉRIVATION (1996 NEC), DANS UNE MAISON MOBILE, UN VÉHICULE
RÉCRÉATIF, OU LÀ OÙ LES CODES DE L’ENDROIT NE PERMETTENT PAS LA MISE À
LA TERRE SUR LE FIL NEUTRE (BLANC)
Observez tous les codes et toutes les
ordonnances applicables de l’endroit.
Coupez l’alimentation.
Au panneau électrique ou à la boîte de
jonction, branchez les fils du câble de l’appareil
et du câble d’alimentation comme illustré.
1
2
AVERTISSEMENT
Si vous branchez à un système de câbles
d’alimentation électrique à 4 fils, vous NE
DEVEZ PAS brancher le fil de mise à la
terre du châssis de l’appareil au fil neutre
du système électrique à 4 fils.
BOÎTE DE JONCTION AVEC
4 CONDUCTEURS ET MISE À LA TERRE
DIRECTIVES D’ INSTALLATION
INSTALLATION DE LA TABLE DE CUISSON
Inspectez visuellement la table de cuisson
pour tout dommage. Assurez-vous que toutes
les vis de la table de cuisson sont bien
serrées (voir leur emplacement ci-dessous).
1
Screws
2
AVERTISSEMENT
N’enlevez pas les rondelles d’espacement
en nylon des bords de la table de cuisson.
Ces rondelles servent à centrer la table de
cuisson dans l’espace aménagé. La table
de cuisson doit être centrée pour permettre
une bonne ventilation et pour prévenir
l’accumulation d’un excès de chaleur qui
peut provoquer des dommages par
échauffement ou un incendie.
Rondelles
d’espacement
en nylon
Câble d’alimentation
Ground
wire
Fils
noirs
Fil vert (mise à la terre)
Câble de l’appareil
Connecteur de conduit
approuvé U.L. CSA
Boîte de
jonction
Fils
rouges
Fil blanc
(pas de
branchement)
Vis
Faites descendre avec précaution la table de
cuisson dans le trou découpé du comptoir,
en veillant à ne coincer aucun des fils.
NOTE : N’utilisez pas de produit de calfeutrage.
La table de cuisson doit être amovible, au cas
où elle nécessiterait une réparation.
FRANÇAIS
25
Page 86

DIRECTIVES D’ INSTALLATION
INSTALLATION DE LA TABLE DE CUISSON (suite)
3
Installez les supports de retenue sur le
dessous de la table de cuisson, puis ajustez
les boulons contre le dessous du comptoir
comme illustré.
NOTE : Les supports de retenue DOIVENT être
installés pour répondre aux codes de l’endroit
ou, en leur absence, à la plus récente édition
du National Electrical Code ANSI/NFPA n
aux États-Unis, à la deuxième édition de la
CSA C22.2 n
o
107.3 au Canada.
o
70
Installation
privilégiée
Supports
de retenue
Table de cuisson
Supports
de retenue
Installation
alternative
Supports
de retenue
Comptoir
Boulon
26
VÉRIFICATION FINALE
Effectuez une dernière vérification du
fonctionnement de la table de cuisson, en vous
assurant que celle-ci s’allume correctement
et que chaque zone de cuisson fonctionne
correctement. Consultez les Consignes
d’utilisation contenues dans ce guide pour
plus de détails.
EMPLACEMENT DU NUMÉRO DE MODÈLE ET DU NUMÉRO DE SÉRIE
Les numéros de modèle et de série sont situés
sur une plaque sur le dessous de la table de
cuisson. Veuillez les noter dans ce guide; vous
en aurez besoin pour l’enregistrement de la
garantie.
MISE EN GARDE
Ne touchez pas au verre de la table de
cuisson ou aux zones de cuisson. Ils
peuvent être assez chauds pour causer
des brûlures.
Page 87

D É PANNAGE
AVANT D’APPELER LE SERVICE DE RÉPARATION
Avant d ’appeler le service de réparation, examinez cette liste. Elle peut vous faire économiser temps et
argent. Cette liste comprend les cas les plus communs qui ne proviennent pas d’un défaut de fabrication
ou de matériel.
Problème Causes possibles Solutions
La table de cuisson ne • Les commandes de la table de • Voir
UTILISATION DU VERROU POUR ENFANTS
pour
fonctionne pas cuisson sont verrouillées. désactiver la fonction CHILD LOCK.
• Le disjoncteur s’est déclenché ou • Réenclencher le disjoncteur ou remplacer le fusible.
le fusible est grillé.
• Panne de courant. • Vérifier l’éclairage pour confirmer la panne.
• Câblage d’installation incomplet. • Contacter l’installateur ou le dépositaire.
La table de cuisson ne • Pas de casserole ou casserole • S’assurer que la casserole est centrée sur la zone de
chauffe pas non appropriée sur la zone cuisson et que la casserole est du type approprié
rioV.noitcudni rap nossiuc al ruop.nossiuc ed
CHOIX DÕUNE
BATTERIE DE CUISINE.
• Casserole de taille non appropriée • Le fond de la casserole doit être assez grand pour
pour la zone de cuisson choisie. couvrir entièrement la zone de cuisson. Voir
CHOIX
DÕUNE BATTERIE DE CUISINE
.
• Casserole qui n’est pas • Le fond de la casserole doit être plat et centré sur la
entièrement en contact avec la zone de cuisson, et il ne doit pas reposer sur le
surface de la zone de cuisson. rebord de la table de cuisson. Voir
CHOIX DÕUNE
BATTERIE DE CUISINE.
• Mauvaise zone de cuisson • S’assurer que la bonne commande est ON pour
choisie. la zone de cuisson qui est utilisée.
• Pas de courant à la table • Voir ci-dessus « La table de cuisson ne fonctionne pas ».
de cuisson.
La table de cuisson • Le capteur interne a détecté de • S’assurer que l’aération de la table de cuisson n’est
s’éteint pendant qu’on hautes températures à l’intérieur pas obstruée. Voir la page 21 pour l’emplacement
s’en sert de la table de cuisson. de la sortie d’air et l’entrée d’air frais.
• Arrêt automatique activé. • La table de cuisson est dotée d’une fonction d’arrêt
automatique si une zone de cuisson fonctionne sans
arrêt pendant 17 heures.
• Liquide ou objet sur le panneau • Les commandes de la table de cuisson peuvent
tcatnoc el emmoc tejbo nu uo ediuqil ud riovecrep.ednammoc ed
d’un doigt, ce qui peut causer la désactivation de la
table de cuisson. Ramasser le liquide ou enlever
l’objet et redémarrer la table de cuisson.
Le niveau de puissance • Casserole enlevée de la zone • Remettre la casserole sur la zone de cuisson dans les 90
d’une zone de cuisson .ecnassiup ed segalgér sel revresnoc ruop sednoces.nossiuc ed
clignote
• Casserole non centrée sur la zone • S’assurer que la casserole est centrée et qu’elle repose
rioV.nossiuc ed enoz al rus talp à neib.nossiuc ed
CHOIX DÕUNE
BATTERIE DE CUISINE.
L’AMPLIFICATEUR • AMPLIFICATEUR DE PUISSANCE • Chacune des zones de cuisson d’un côté se partage un
DE PUISSANCE ne utilisé sur les deux zones de même onduleur. L’amplification de puissance ne peut
fonctionne pas cuisson d’un même côté de pas être utilisée en même temps sur deux zones de
la table de cuisson. cuisson qui sont sur le même onduleur. Voir
AMPLIFICATION DE PUISSANCE
et
PARTAGE DU COURANT.
FRANÇAIS
27
Page 88

D É PANNAGE
AVANT D’APPELER LE SERVICE DE RÉPARATION
Problème Causes possibles Solutions
apparaît à • Une touche de commande a été • Ce message s’affiche lorsque n’importe laquelle des
l’afficheur de la touchée trop longtemps. touches ou , sauf celles de la minuterie, est
minuterie touchée pendant plus de 10 secondes. Il apparaît aussi
apparaît à • La tension fournie à la table de • Si la tension du courant fourni à la table de cuisson
l’afficheur de la cuisson est trop faible. est trop faible, celle-ci ne peut pas fonctionner
minuterie correctement et elle affichera ce code d’erreur. Ceci
lorsqu’il y a du liquide ou un objet sur la zone des
commandes. Pour effacer ce code d’erreur, enlever
tout liquide ou objet de la zone des commandes et
touchez la touche POWER pour redémarrer la table de
cuisson.
peut être causé parce qu’une tension réduite est
fournie au circuit de la maison. Si les raccordements
sont corrects et que la tension fournie revient à la
normale, le code d’erreur s’effacera.
apparaît à • Message d’erreur pour une •Éteindre la table de cuisson, puis couper l’alimentation
l’afficheur de la anomalie électronique. au panneau électrique pendant environ 30 secondes.
minuterie, suivi Remettre le courant sur le circuit et allumer la table de
d’un chiffre cuisson à l’aide de la touche POWER. Si le message
d’erreur est encore affiché, appeler le service de
réparation.
clignote à • Panne de courant ou démarrage • Lorsque la table de cuisson est activée la première fois
l’afficheur à aretongilc nu,tnaruoc ed ennap enu sèrpa uo.laitini
l’afficheur pendant 90 minutes ou jusqu’à ce que la
touche POWER soit touchée pendant 2 secondes.
28
Page 89

FRANÇAIS
29
Page 90

NOTES • REMARQUES
30
Page 91

NOTES • REMARQUES
31
Page 92

LG Customer Information Center
1-800-243-0000
1-888-865-3026
1-888-542-2623
Register your product Online!
www.lg.com
USA, Consumer User
USA, Commercial User
CANADA
Printed in Korea
Impreso en Korea
Imprimé en Corée
 Loading...