

LG LCD17VLED User Manual
17.3" VGA LED MONITOR
LCD17VLED

TABLE OF CONTENTS
Important Safety Instructions…………………………………………………………………………………………………1
1.Introduction ………………………………………………………………………………………………………………… 3
1.1 General information ……………………………………………………………………………………………………3
1.2 Features …………………………………………………………………………………………………………………3
1.3 Check the list …………………………………………………………………………………………………………… 3
2.Installing the monitor……………………………………………………………………………………………………… 3
………………………………………………………………………………………………………4
…………………………………………………………………………………4
………………………………………………………………………………………………5
Audio cable connection …………………………………………………………………………………………………5
2.5 ………………………………………………………………………………………………5
2.6 Power on …………………………………………………………………………………………………………………5
2.7 Self test pattern …………………………………………………………………………………………………………5
2.8 Adjust the picture ………………………………………………………………………………………………………6
3.Operation ……………………………………………………………………………………………………………………6
3.1 Power LED indicator……………………………………………………………………………………………………6
3.2 OSD control keys ………………………………………………………………………………………………………7
3.3 OSD menu ………………………………………………………………………………………………………………7
3.4 Safety mode …………………………………………………………………………………………………………… 11
3.5 Timing guide ……………………………………………………………………………………………………………11
3.6 Plug & Play ……………………………………………………………………………………………………………12
3.7 Power management……………………………………………………………………………………………………12
3.8 Volume adjust …………………………………………………………………………………………………………12
4.Specification ………………………………………………………………………………………………………………13
5.Simple troubleshooting …………………………………………………………………………………………………15
2.1 Base Installation
2.2 Wall Mounting with VESA Standard
2.3 Signal Cable Connection
2.4
Power Cord Connection
书

1
1. Read the manual carefully before using the monitor.
2. Save the user manual for later use.
3. Unplug the monitor from the power source when you clean the monitor. Don't use liquid
cleaners or aerosol cleaners. Use cloth to clean it. If it doesn't do, please use LCD screen
cleaners.
4. Don't use attachments not recommended as they may cause hazards.
5. Please grasp the plug to unplug the connector from the wall outlet. Don't pull the power
cord to unplug it.
6. Don't place anything on the power cord or step on it.
7. Don't place the monitor near water source such as bathtub, washbowl, sink, laundry tub,
swimming pool etc.
8. The slots are designed for ventilation, simultaneously to keep the machinery workable
and protect it from overheating. For the same reason, please do not place the monitor on
the bed, sofa, carpets or other similar surface. Don't place the monitor near or over heat
source or place in built-in installation.
9. Keep 5 cm away from the wall or other goods.
10.This monitor can only use the power source indicated on the label. If you have questions,
please consult your dealer.
11. As safety measure, this monitor is equipped with a three-wire ground style plug. If you
can't insert the plug into outlet, contact your electrician to replace your outlet. Don't
defeat the safety purpose of the grounding- type plug.
Important Safety Instructions

12. Please make sure that the outlet and power cord can afford the total electricity of the
products.
13. Place the monitor in safe place where the cord will not be abused by persons working on
it.
14. Follow all the warnings and instructions illustrated on the manual.
15. Don't overload the wall outlets and extend cords as this can result in fire or electric
shocks.
16. Don't remove or open the cover to service this monitor yourself. It may expose you to
dangerous voltage or other hazards before all servicing to qualified service personnel.
17. Unplug this monitor from the outlet and refer servicing to qualified service personnel
under the following conditions.
● The power cord is frayed or damaged.
● The monitor has been dropped or the cabinet has been damaged.
● When the monitor displays a distinct change in performance ,this indicates a need
for service.
18. The power cord is the main device to disconnect the power.
19. Unplug the power cord when you do not use it for a long time.
20. Place the monitor in good ventilation and protect it from strong light, overheating and
damp environment.
21. This monitor must be stored in temperature -20℃~55℃. Otherwise, it may cause
permanent damage.
22. When power plug or appliance coupler is used as the disconnect device, it is convenient
for operating the machine.
2

3
1. Introduction
1.1 General Information
This monitor is a high-performance intelligent multi-scanning color monitor. It is with LED backlight TFT LED
screen and MCU digital control low radiation and glary. The shape is tiny and thin adapting to small places,
save your more place.
1.2 Features
● Power saving compliant with EPA energy star and VESA DPMS.
● Auto color balance. When connected to different graphic adapter, the monitor can calibrate the white and
black reference voltage.
● Plug & play, compatible with Windows9X&ME&NT&2000&XP and VESA DDC1/2B.
1.3 Check the list
Please make sure that all of the following items are included before operating this monitor,
■
■
■
2. Installing the monitor
Please consider the following advice before you install your monitor.
Position
Choose a place that reflects less to place your monitor. Generally ,there is a suitable angle with a window.
LED monitor(include base)
AC adapter, Power cord, VGA signal cable, DVI-D signal cable (optional), Audio cable(optional)
User's manual
If any of above listed items are missing, please contact your dealer for technical support.
4
Highness
The peak of the monitor should be a little lower than your eyes when you sit down.
Inclination
You will feel comfortable with the sloping screen.
Base equipment act as . Equip the base with the machine according to arrow point, and lock the
bolt tightly.
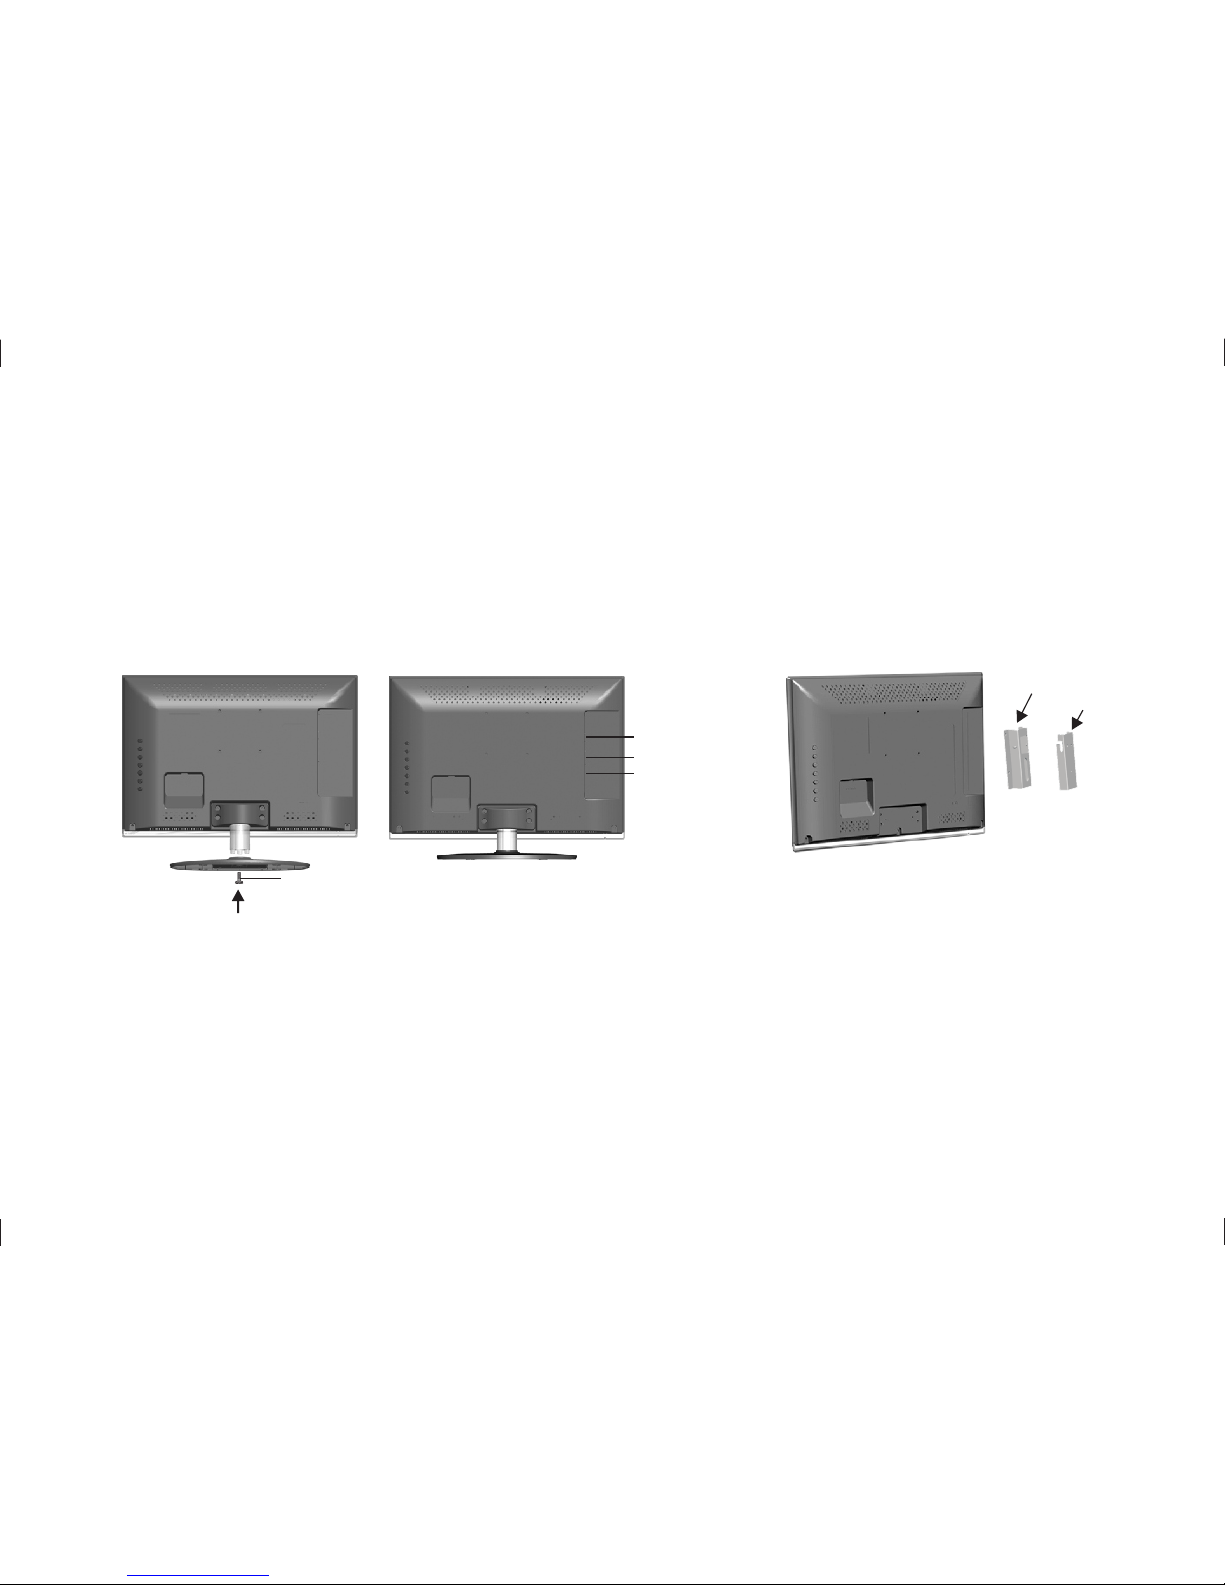
2.1 Base Installation
Fig.1, Fig.2
2.2 Wall Mounting with VESA Standard ( Fig.3)
subassembly1. Take off the base
2. Fasten the wall mounting board. ( The height can be confirmed by the user)
3. Fasten the wall mounting stand at the position of VESA on the rear cover with bolts.
4. Spin M4 bolts into the left-right nuts on the wall mounting stand. 3-4 mm of depth from bolts washer to
stand is recommended.
Fig.1
VGA ca ble
DVI c ab le(op tiona l)
Audio c able (o ption al)
Fig.1
Fig.3
Wall M ounti ng Stan d
Wall M ounti ng Boar d
Scr ew
书
 Loading...