


Built In Oven
Operating Instructions
Please read this instruction manual carefully before
using the oven.
This will ensure that you know the important safety
information and the correct operation of the oven.
Please keep this manual in a easily accessible place
and refer to it anytime.
Please transfer this manual to new owner if you sell the
oven.
LB672098S
P/No. :MFL38291407

2
Contents
Safety ............................................................................. 4~8
Appliance description .................................................. 9
Control panel ................................................................. 10~11
Accessories ................................................................... 12~15
Runners (Optional) ........................................................ 16~17
Telescopic runners ....................................................... 16~17
Side runners.................................................................. 17
Before using for the first time .................................... 18~19
Operating the oven ....................................................... 20~21
Operating sequence ..................................................... 20
The timer ....................................................................... 21
Oven functions .............................................................. 22~24
Manual cook ................................................................... 25~26
Using the oven .............................................................. 27~33
Changing the temperature ........................................... 27
Enter the Duration ........................................................ 27
Changing the Duration .................................................. 28
Cooling system.............................................................. 28
Residual Heat Indicator................................................. 28
Before starting the rotisserie function............................ 29
Using the rotisserie ....................................................... 30
Rotisserie Table............................................................. 31
Safety Lock .................................................................. 32
Energy efficiency........................................................... 32
Safety cut-out ................................................................ 32
Rapid heat-up................................................................ 33
Speed Cook ................................................................... 34
Healthy Roast ................................................................ 35~38
Auto cook ....................................................................... 39
My Recipe ....................................................................... 40~41
e-Cookbook .................................................................... 42~43
Changing settings ........................................................ 44~47
Language ..................................................................... 44
Clock ............................................................................. 44
Heating up phase .......................................................... 45
Oven lighting ................................................................. 45

3
Display .......................................................................... 46
Sound............................................................................ 46
Default setting ............................................................... 47
Start............................................................................... 47
Temperature .................................................................. 47
Initial stage .................................................................... 47
Speed autocook table.................................................... 48~49
Auto cook table.............................................................. 50~73
Fish .............................................................................. 50~51
Meat ............................................................................. 52~53
Pastry ........................................................................... 54~55
Potato products ............................................................ 54~55
Poultry and game ......................................................... 56~59
Snacks ......................................................................... 60~61
Pizza ............................................................................ 60~61
International automatic recipes .................................... 62~73
Baking ............................................................................ 74~75
Baking table .................................................................. 76~80
Roasting ......................................................................... 81~82
Roasting table ................................................................ 83
Grilling ............................................................................ 84~85
Grilling table................................................................... 85
Defrosting....................................................................... 86
Special functions .......................................................... 87
Cleaning and care ......................................................... 88
Pyrolytic cleaning ......................................................... 89
Oven light ...................................................................... 90
Oven door....................................................................... 91~95
Troubleshooting ............................................................ 96~97
Error codes..................................................................... 98
Technical specifications................................................ 99~100
Installation instructions ............................................... 101
Customer service & spare parts................................... 102
Warranty .. ...................................................................... 103

• This oven must only be installed by a licensed electrician.
• The installer is responsible for the correct electrical connection of
the appliances and the observance of the relative safety
recommendations.
Electrical Safety
If the oven has been damaged in transport, do not connect it.
• This appliance must be connected to the mains power supply by a
specially licensed electrician only.
• In the event of a fault or damage to the appliance, do not attempt
to operate it.
• Repairs of the appliance should be carried out by a licensed
technician only. Wrong repairs may result in considerable danger.
If you need repairs, contact an LG Service Center or your dealer
• If the supply cord is damaged, it must be replaced by the
manufacturer, its service agent or similarly qualified persons in
order to avoid a hazard.
• Electrical leads and cables should not be allowed to touch the
oven.
• The oven should be connected to the electricity supply by means
of a proper circuit breaker or fuse.
Never use multiple plug adapters or extension leads.
4
Safety

5
• Rating plate is located on the left side of door and on the back
cover.
• The power supply of the appliance should be turned off when it is
being repaired or cleaned.
• Be careful in connecting electrical appliances to sockets near to
this appliance.
• This connection may be achieved by having the plug accessible or
by incorporation a switch in the fixed wiring in accordance with the
wiring rules.
• Do not use harsh abrasive cleaners or sharp metal scrapers to
clean the oven door glass since they can scratch the surface,
which may result in shattering of the glass.
WARNING: The appliance should be powered down before
replacing the lamp to avoid the possibility of electric
shock.
WARNING: When the oven operates, the interior parts will be
very hot.
WARNING: Accessible parts may become hot during use.
Young children should be kept away.
WARNING: Accessible parts may become hot when the grill is in
use. Children should be kept away.
WARNING: Please ensure cooking times are correctly set as
over cooking may result in the food catching fire and
subsequent damage to your oven.

6
Safety
Safety during Operation
• This oven has been designed only for the cooking of household
foods.
• When in use, the oven interior surfaces become very hot!
Care should be taken to avoid touching heating elements inside
the oven.
• Never store flammable or easily deformable materials in the oven.
• The oven surfaces will become hot when the appliance is
operated at a high temperature for a long period of time.
• Excess spillage should be removed before self cleaning and all
utensils should not be left in the oven during pyrolytic selfcleaning.
• During self cleaning the surfaces get hotter than usual and
children should be kept at a safe distance.
• When cooking, take care when openning the oven door as hot air
and steam will escape rapidly.
• When cooking dishes that contain alcohol, the alcohol can
evaporate due to the high temperatures. The vapour can catch fire
if it comes into contact with a hot oven part.
• Do not use high-pressure water cleaners or steam jet cleaners for
electrical safety reasons.

7
• Children should be kept at a safe distance when the oven
operates.
• Frozen foods such as pizzas should be cooked on the wire grill.
If the Baking tray is used, it may become deformed due to the
great difference in temperature.
• Don’t pour water into the oven bottom when it is hot.
This could cause damage to the enamel surfaces.
• The oven door must be closed when cooking is performing.
• Don’t spread aluminium foil on the bottom of the oven and do not
place any baking trays or tins on it.
The aluminium foil blocks the heat, which may result in damage to
the enamel surfaces and cause poor cooking results.
• Dripping fruit juices from the baking tray will leave stains, which
become indelible. When cooking very moist cakes, use the deep
pan.
• Do not use the oven door as a rest table for hot or cold
cookwares.
• The appliance is not intended for use by young children or infirm
persons without supervision.
• Children should be kept at a safe distance until the oven has
cooled down after cooking.

8
Safety
Disposal
Packaging material
• Your new oven has been correctly packaged for transportation.
Remove all of the packaging material before putting the appliance
into use.
• The packaging material can be completely recycled.You can
obtain addresses for environmentally-friendly disposal operations
from your local authority.
Used appliances
WARNING
• Used appliances must be rendered unusable prior to disposal so
that they no longer present a risk.To achieve this,disconnect from
the mains supply and remove the power supply cable.
For the protection of the environment,used appliances must be
disposed of properly.
• The appliance must not be disposed of along with normal
domestic waste.
• Your local authority will inform you of times for uplifting special
waste or identify public disposal facilities for you.
9
Overview
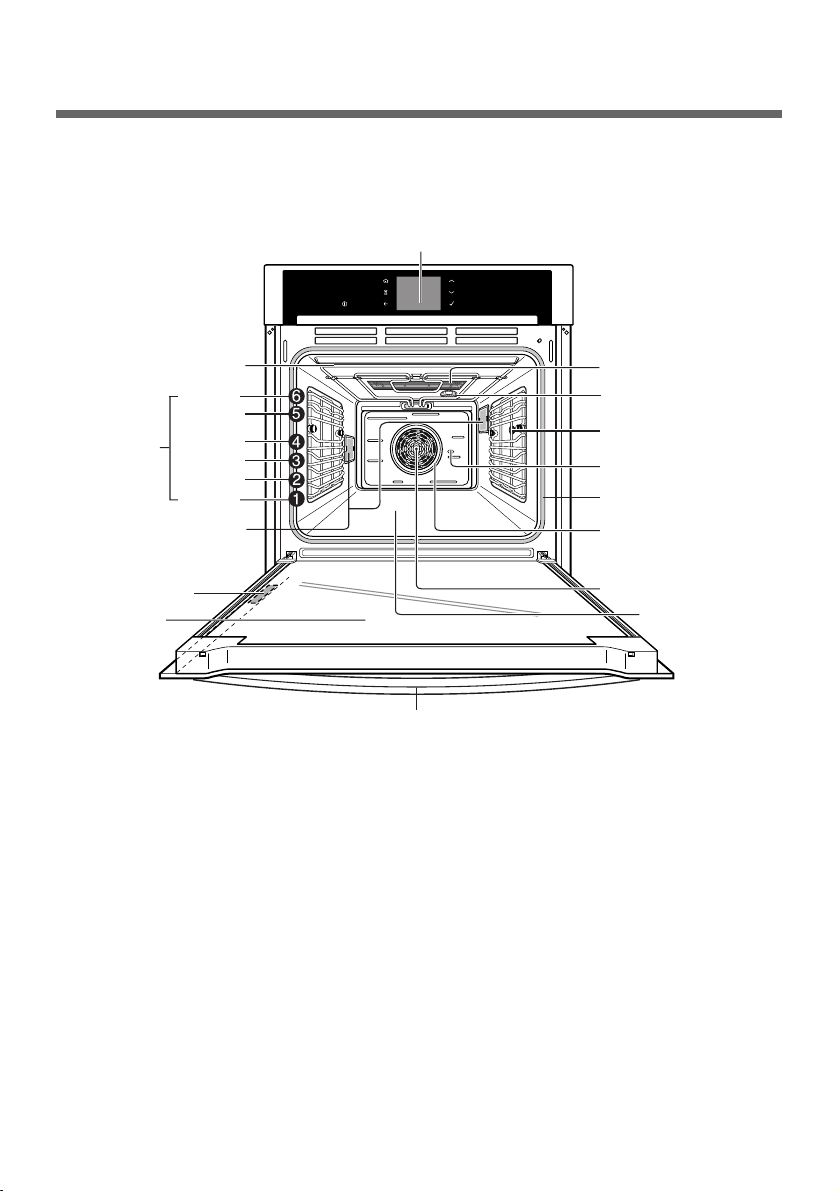
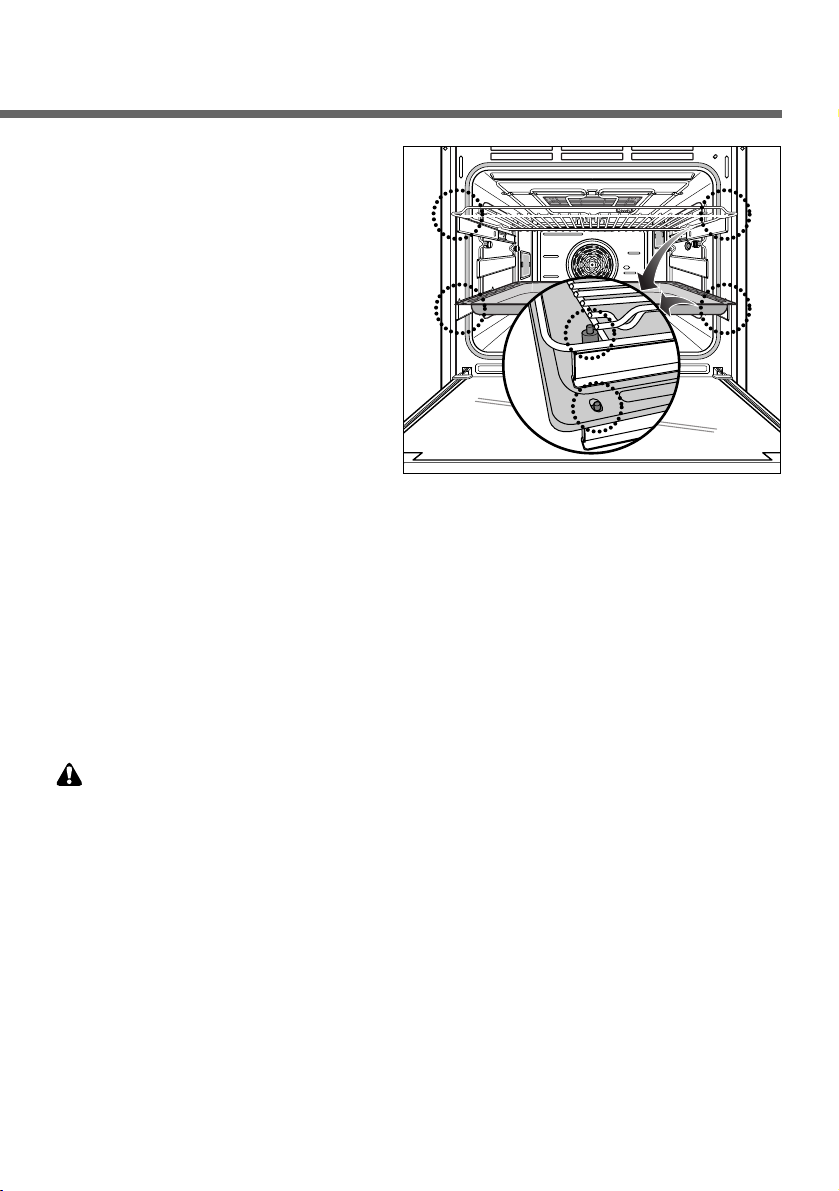
Appliance description
Top-heating
and grill heating
element
Side runners
or Grooves
Control panel
Door
handle
Halogen heater mesh
Air outlet filter
Door seal
Rear wall heating
element
Rotisserie motor
Meat probe socket
Oven lights
Fat Filter
Oven cavity
Level 6
Level 5
Level 4
Level 3
Level 2
Level 1
Oven levels are numbered from the bottom up.
The 5 and 6 levels are mainly used for grill functions.
The cooking tables throughout this operating instructions give you
suggested oven level, however you can change these to suit
yourself.
Note : Rating plate can be located at left-hand inner edge of the
door or front-side of the oven.
Rating plate
Full glass
door
10
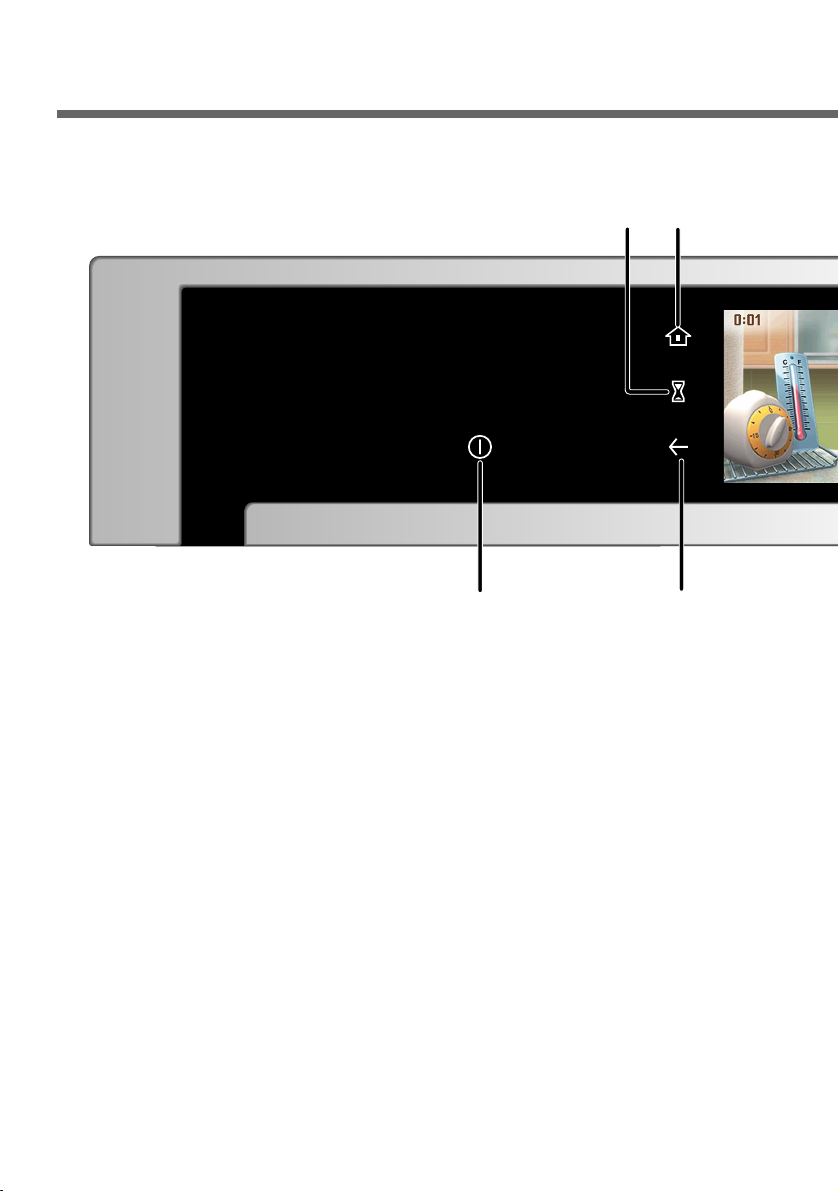
Control panel
1
4
32
1. Power key
2. Home key
3. Timer key
4. Back space key
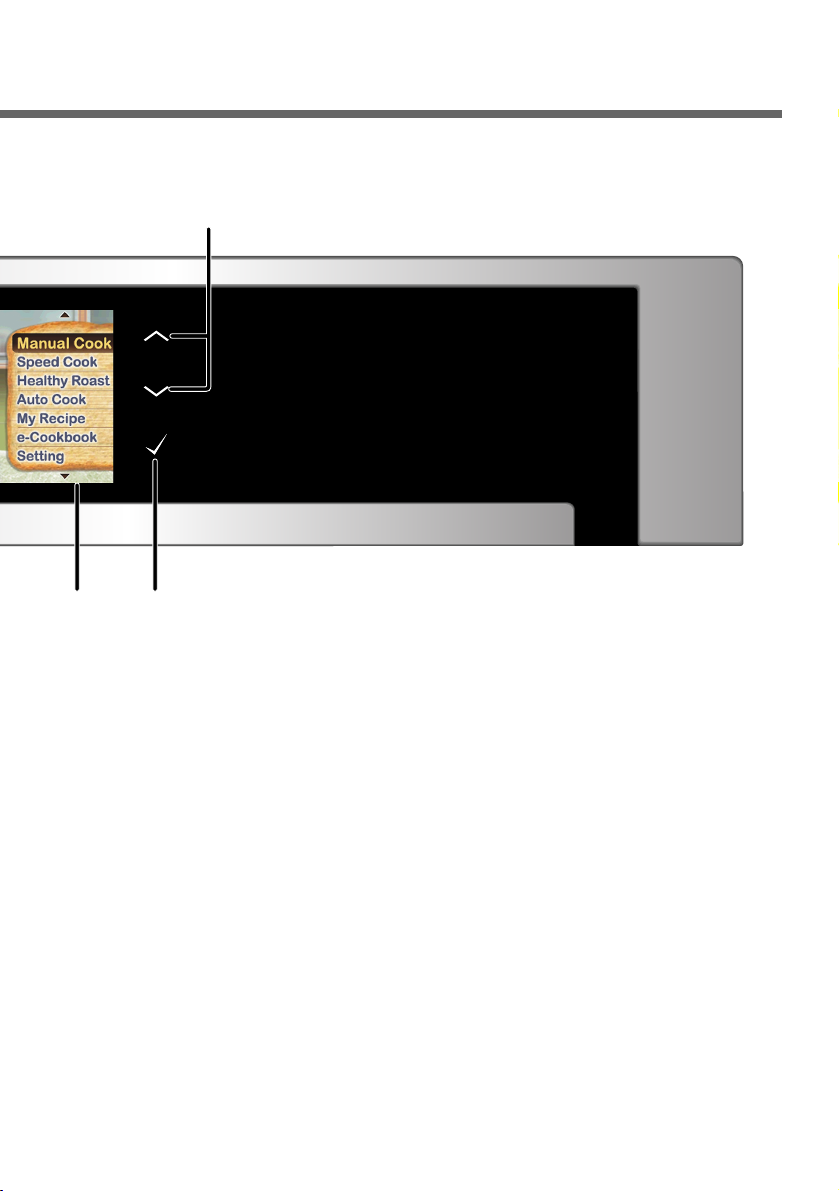
11
75
6
5. Display(TFT Color LCD)
6. Up & Down key
7. Enter(OK or Yes) key
12
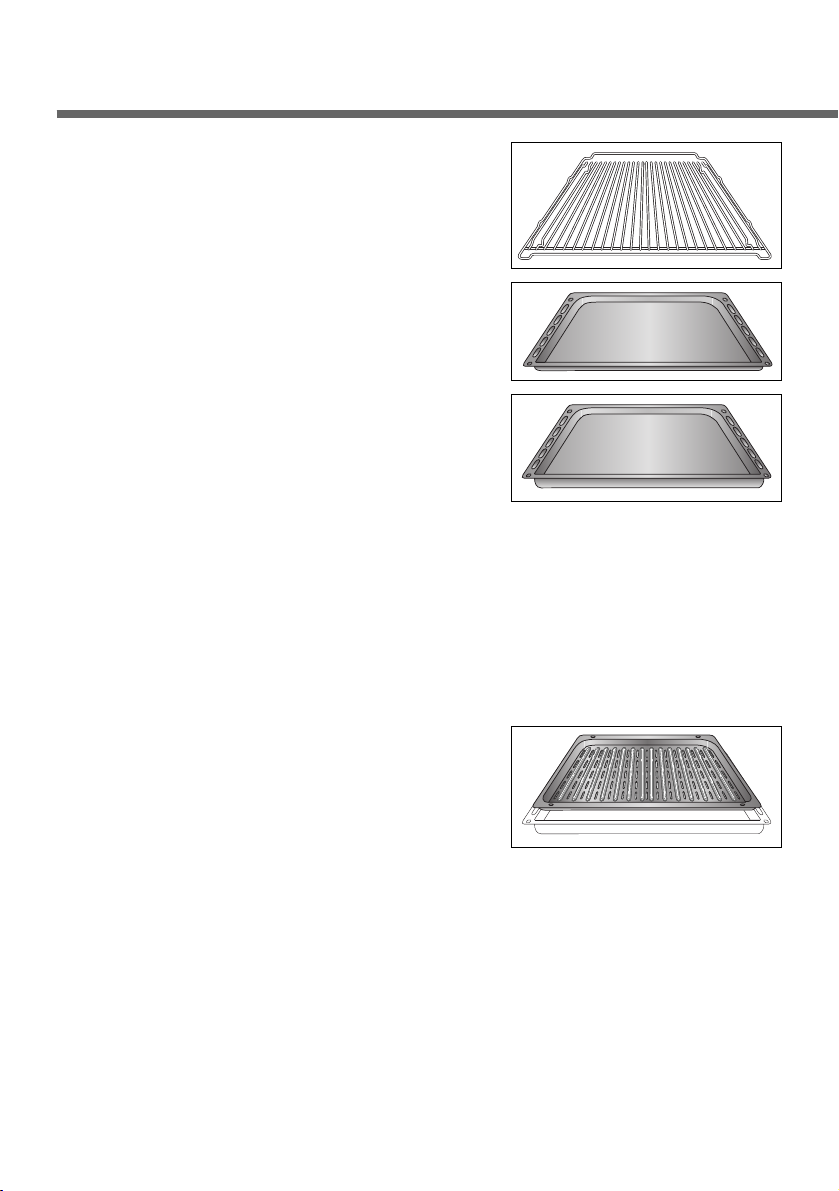
Wire grill
For dishes, baking tins, grilling and
roasting tins.
Baking tray
For cakes, sponges and biscuits.
Deep pan
For moist cakes, for roasting and for
catching roasting juices or fat.
Tip :
When using the tray and wire grill with
groove type oven for the first time, smear
the groove with cooking oil, using a
cloth. Then wipe the groove with a dry
cloth. Now you can use them more
smoothly.
Grill tray
For grilling meat, to be placed on top of
the deep pan. Dripping fat is caught in
the deep pan.
Accessories
13
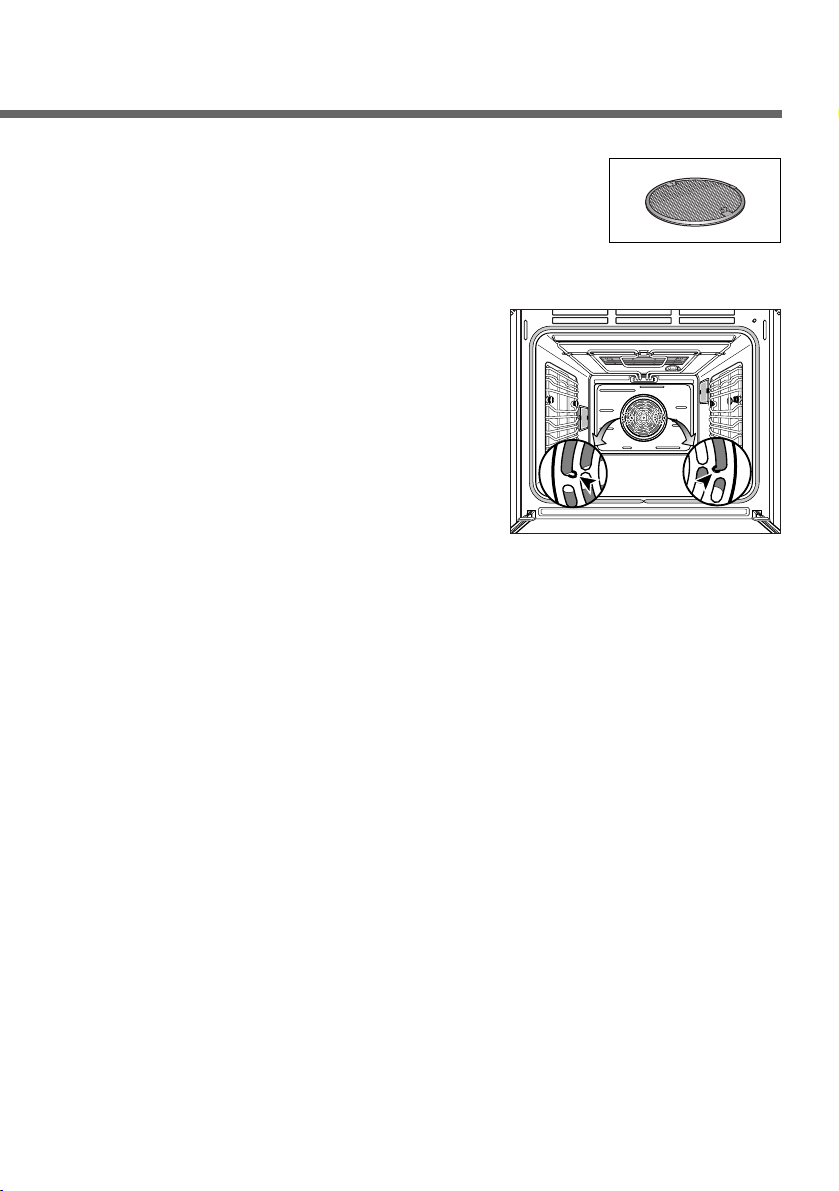
Fat filter
(Optional)
For protecting the fan against fat building up.
The filter may be in place when the fan is used
for roasting.
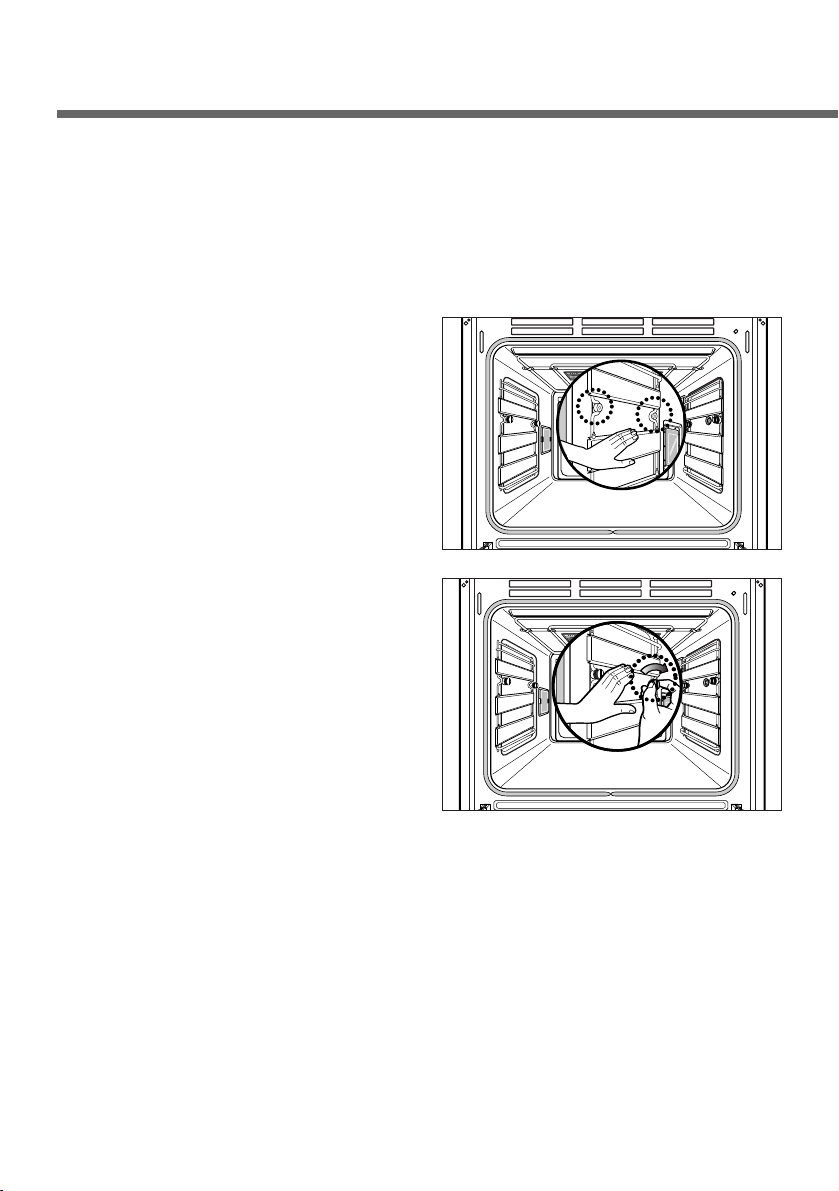
Note:
To install the fat filter, insert the two hooks
Into the holes on the fan cover as
illustrated.
The fat filter must cover the fan venting
holes completely. Do not use the fat filter
In baking mode, as it restricts the air flow.
14
Accessories
Tips on using the trays and wire grills
Ensure that the trays
and wire grills are
properly fitted onto the
two side oven levels.
Take particular care
when removing finished
dishes and meals from
the oven!
Use a suitable cloth pot
holder or oven gloves.
If you are using the grill tray in combination with the deep pan or
some other tray to catch dripping liquids or fat, then do not put the
trays down on the bottom of the oven, slide them into the lower
levels.
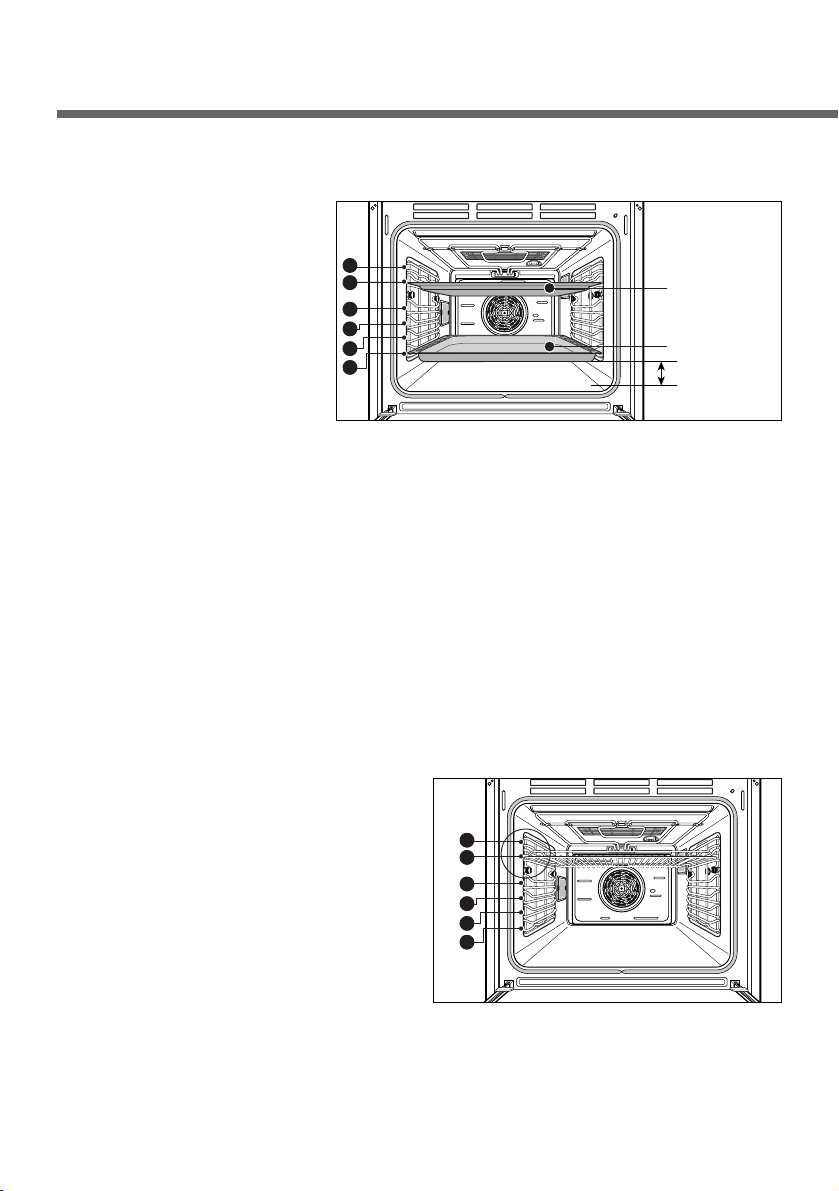
If you place trays on the oven floor, the resulting build-up of heat
can damage the surface of the oven. For this reason, there must
always be a minimum gap of 2 cm between the accessories and the
oven floor.
Fitting the wire grill, baking tray and deep pan
Slide the tray or wire grill in at
the desired level.
The oven levels are numbered
from the bottom up to the top.
6
5
3
2
1
4
Baking tray
Deep pan
gap 2cm
6
5
4
3
2
1
15
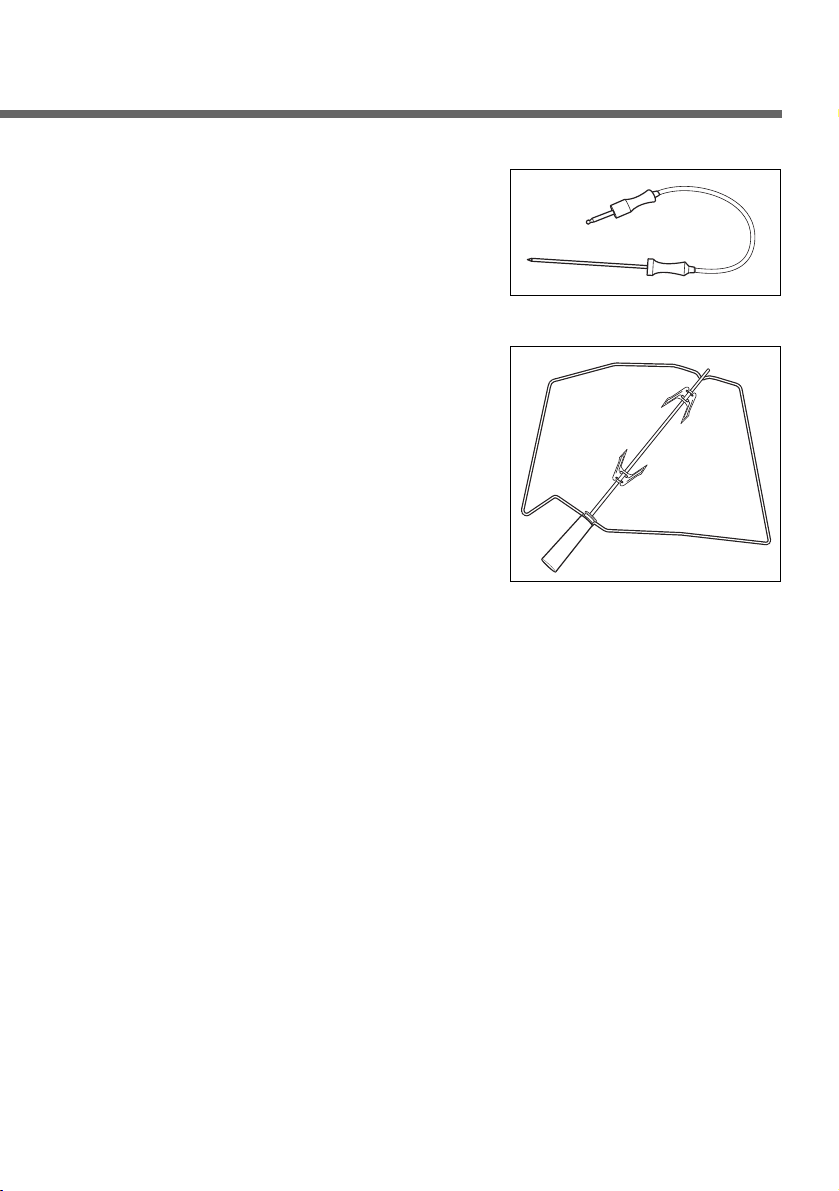
Meat probe
The electronic meat probe enables the
meat temperature to be monitored while
cooking and to assist in giving good
cooking results each time it is used.
Rotisserie
For grilling thicker items such as stuffed
meat, poultry and kebabs. The rotisserie
motor turns the spit to grill food evenly
from all sides. Food does not need to be
manually turned when using the rotisserie.
Note :
Before using the rotisserie for the first time, it shoult be cleaned with
hot water and a little washing up liquid.
16
Runners (Optional)
Attaching the telescopic runners
When purchasing for the first time, attach the telescopic
runners as following procedures.
1. Place the U-form of the
telescopic runner between the
two screw holes as illustrated.
2. Insert and fasten the two screws.
3. Attach the other telescopic runner in the same way.
17
4. Baking tray and Wire grill
should be positioned
accurately on the hook of
telescopic runners.
An unstable coupling
between the baking tray and
the telescopic runners may
cause the trays to drop or
food to fall onto the oven
floor.
Attaching the side runners
When using the oven for the first time, attach the side runners.
The attaching procedure are the same as telescopic runners.
You can find the side runners in the accessory box.
WARNING: You should not do self-cleaning with these
telescopic runners and other all accessories in the
oven.
Because this self-cleaning is performed in high
temperature (about 500°C), the telescopic runners
and utensils may be distorted and become
unuseable.

18
Before using for the first time
When the oven is connected to
the electrical supply, it will
switch on automatically and LG
logo will appear in the display.
After selecting the language
you can set the clock.
When the oven Is first switched
on the clock will show 00:00
until you have set the correct
time. Set the clock using the
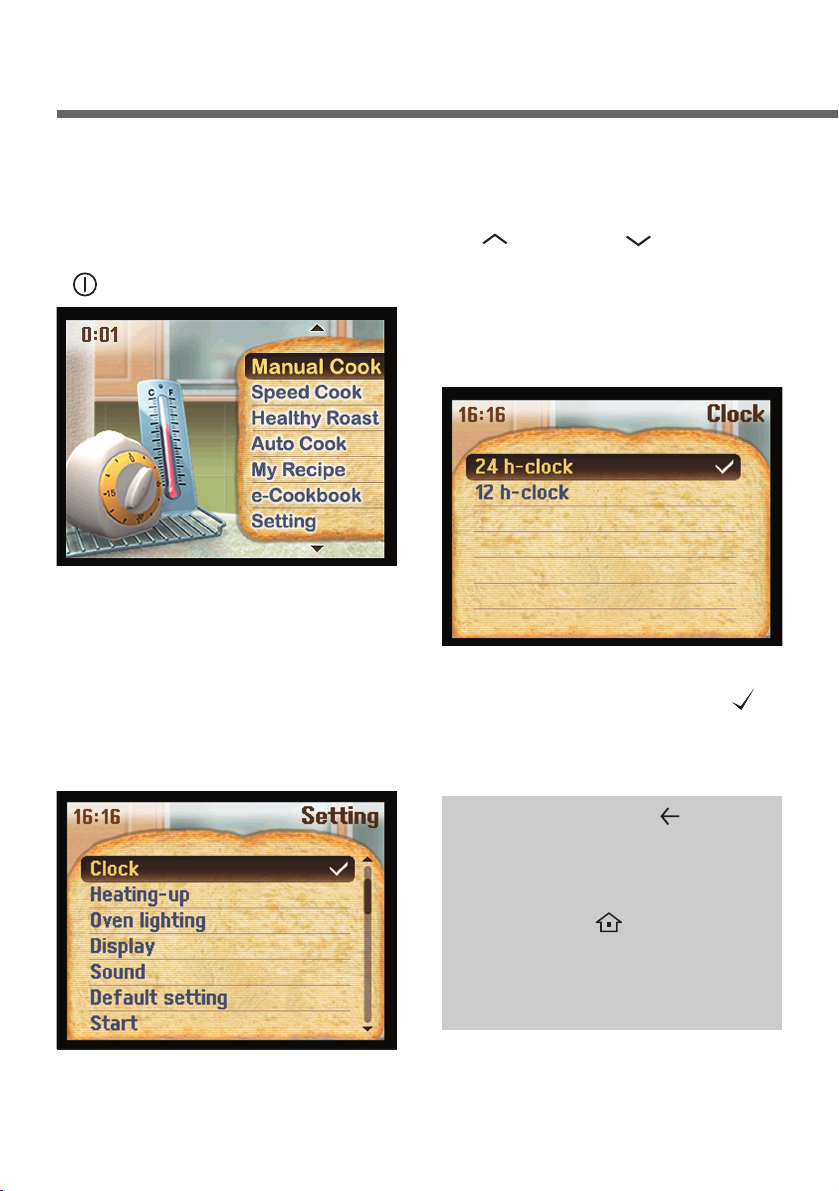
Up( ) and Down( ) key and
Enter( ) keys.
See “Changing settings Clock” for details. The Main
menu will then appear in the
display. The factory default
setting for the clock is 24h.
Tip : When you set the clock or
temperature if you press and
hold the Up( ) or Down( )
key by about 2 seconds, the
hours and minutes can be
changed more easily.
The oven is now ready for use.
The language settings menu
will then appear in the display.
Press the Up( ) or Down
( ) key until the language
you want is highlighted in
the display.
Press the Enter key( ) to
confirm your selection.
1
2

19
Initial cleaning
Clean the oven carefully before using it for the first time.
Important : Do not use any caustic or abrasive cleaners. These
can damage the oven surfaces.
Appliance front
The oven with a metal front must be cleaned with standard detergents only. Wipe the front of the appliance with a slightly damp
cloth.
Oven interior
1. Take all accessories out of the oven and wash them with warm
water and dishwashing liquid.
2. Clean the oven interior in the same way, using warm water and
dishwashing liquid.
3. Allow the oven to dry.
Heating up
Before baking or roasting for the first time, the oven should be
turned on and allowed to heat up(200~250°C) with nothing in it.
Then allow the oven cool down to room temperature. New ovens
have a unpleasant odours. Open the window and ensure there is
adequate ventilation during this period.
1. Ensure that the time of day is set correctly.
2. Remove all accessories from the oven.
3. Use Convection heat( ), or Fan grill( ) functions to heat the
oven up.
4. Leave the oven on for at least one hour.
20
Operating the oven
Operating sequence
The Main menu will appear in
the display after switching the
oven on by pressing the Power
( ) key.
The scroll bar indicates that
there are further options. You
can see them by pressing the
Up( ) or Down( ) key.
If you select an option e.g.
Clock, you will be taken to the
next step within that option.
You can now select the option
you want. Press the Enter( )
key to confirm your choice.
✒ Back space key ( )
You can return to the previous
menu by pressing the Back
key.
✒ Home key ( )
If you want to return to the
Main menu directly, press the
Home key.
Seven menus will appear in the
display. They can be selected
directly.
If you select the one of the
menus, e.g. Setting, you will be
taken to the next step.
Press the Timer( ) key
once to set the time to
“0:00”.
Press the Enter( ) key.
21
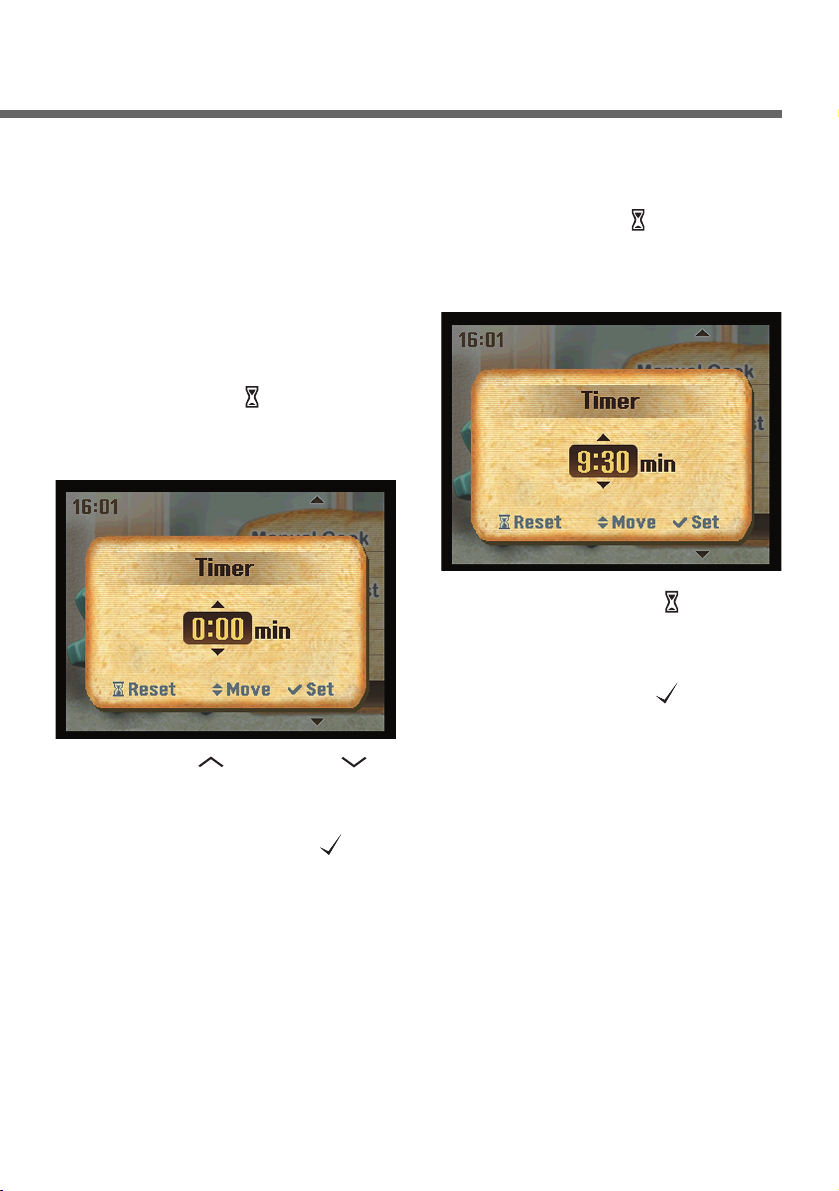
The timer
The timer can be used to time
any activity in the kitchen e.g.
boiling eggs.
You can enter a time up to
9hours 59minutes
❏ Using the timer
Press the Timer( ) key. A pop
up window will appear in the
display.
❏ Canceling the timer
function
Press the Timer( ) key. The
pop up window for the Timer
will appear in the display.
You can use the Timer function
at any time without operating
any cooking functions.
The time set for the Timer
begins to count down in upperleft of the display.
You will hear a signal tone at
the end of the set time.
1
2
Press Up( ) or Down( )
key until the time you want
appear in the display and
then press the Enter( )
key.
1
22
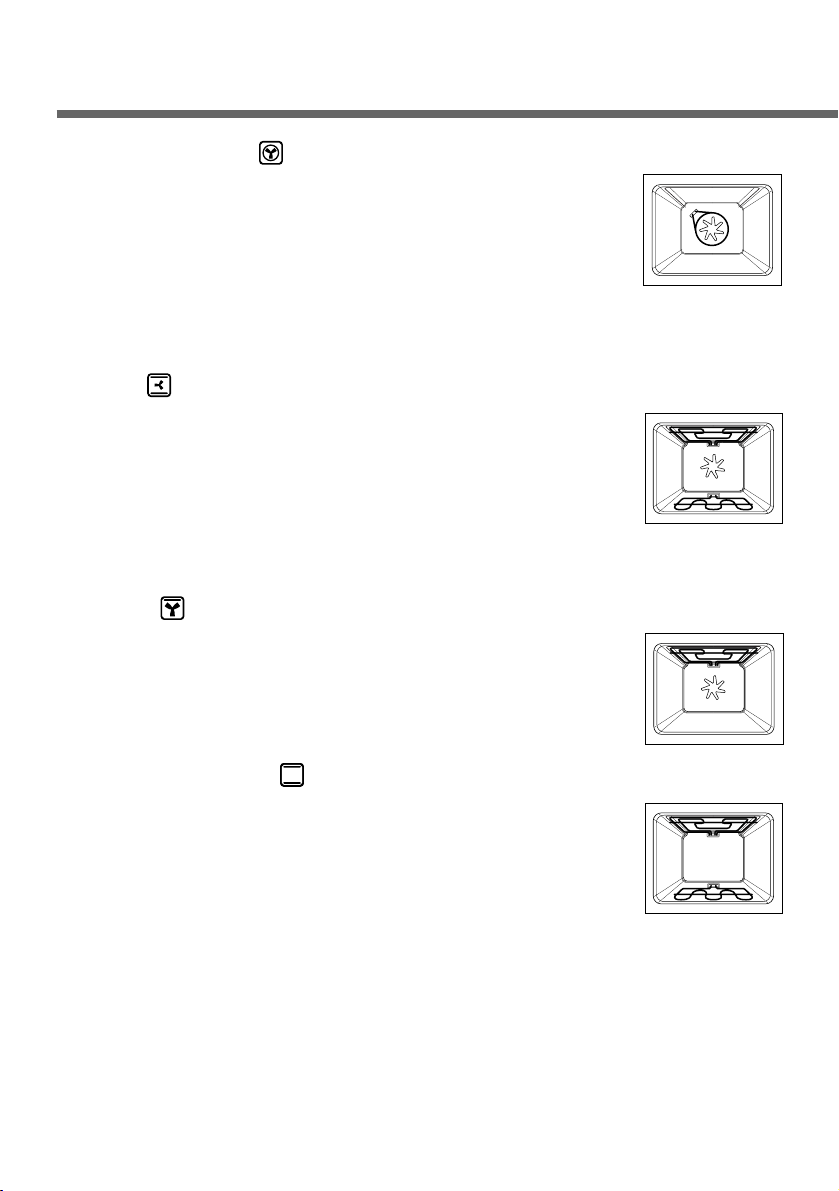
Convection heat
Convection heat uses only the rear wall heating
element and the fan situated on the back wall of the
oven .
It is possible to bake on more than one level in
Convection heat. This means that it is suitable for fruit
cakes and stirred cake or yeast-dough, for example a bread plait.
Hot air
In addition to the Conventional heat elements, Hot air
uses the fan in the back of the oven. This means that
the roasting and baking temperature can be reduced
by 20~40°C. This mode is suitable for cakes and
biscuits, as it is possible to bake on more than one
level at the same time.
Fan grill
In this operating mode, the grill element and the fan
on the rear wall are on. This function is suitable for
pizzas, quiche lorraine or cheesecakes.
Grill with the oven door closed.
Conventional heat
For Conventional heat, the heating elements above
and below the oven cavity are used. This operating
mode is suitable for baking cakes, baking with a short
baking time, sensitive doughs and for roast beef and
fillet of beef on the one level.
Oven functions
23
Bottom heat
In bottom mode, only the heating element in the oven
floor is used. This function is particularly suitable for
finishing off cakes or pizzas on one of the lower oven
levels.
Large grill (1, 2, 3)
The Large grill uses the entire top heating element.
No specific temperature can be set. You can choose
between three settings. The Large grill is suitable for
cooking steaks, cutlets, fish or making toast, and for
browning when cooking larger dishes with a Gratin
topping.
Small grill (1, 2, 3)
The Small grill operates in the same way as the
Large grill, how-ever, only inner part of the top
heating element is used. This makes it suitable for
smaller dishes.
Defrost
In defrost mode, the fan is used without heating.
The circulating air speeds up the defrosting process.
Place the frozen food in a suitable container to trap
the liquid produced during defrosting. Where
appropriate, you can use the wire grill and the deep
pan to avoid soiling the oven. If water is allowed to run out into the
oven, the door seals will be contaminated and an unpleasant odour
may result.
24
Oven functions
Warm dishes
This system use a heating element located around the
fan at the back of the oven and the circulation of
heated air. It is ideal for keep dishes warm evenly.
Keep warm
Heat from the top and bottom elements are used to
maintain a temperature of 75°C. You can use this
function for keeping food warm until ready to serve.
Pyrolytic cleaning
Traces of food are burned up by the high temperature
and can be easily wiped after the cleaning process.
For your safety, during Pyrolytic cleaning the oven
door is locked shut. The lock is only released once the
temperature falls below 240°C after this mode has
been switched off. For Pyrolytic cleaning, you have a three
programmes of different length!
P1 : approx. 75 min
P2 : approx. 95 min
P3 : approx. 120 min
Take care, as surfaces become very hot during Pyrolytic cleaning.
Keep children at a distance. Do not pour water into the hot oven.
The sudden generation of steam can cause burns or damage to the
oven. Do not wipe the oven until it has cooled down to a safe leve.
IMPORTANT : If you have started the pyrolytic cleaning with the
meat probe inserted into the socket, the heating
elements will not be operated and the fan will be
operated only for safety reasons.
25
Manual cook
Setting the functions
You first have to switch the
oven on by pressing the Power
( ) key. The Main menu will
then appear in the display.
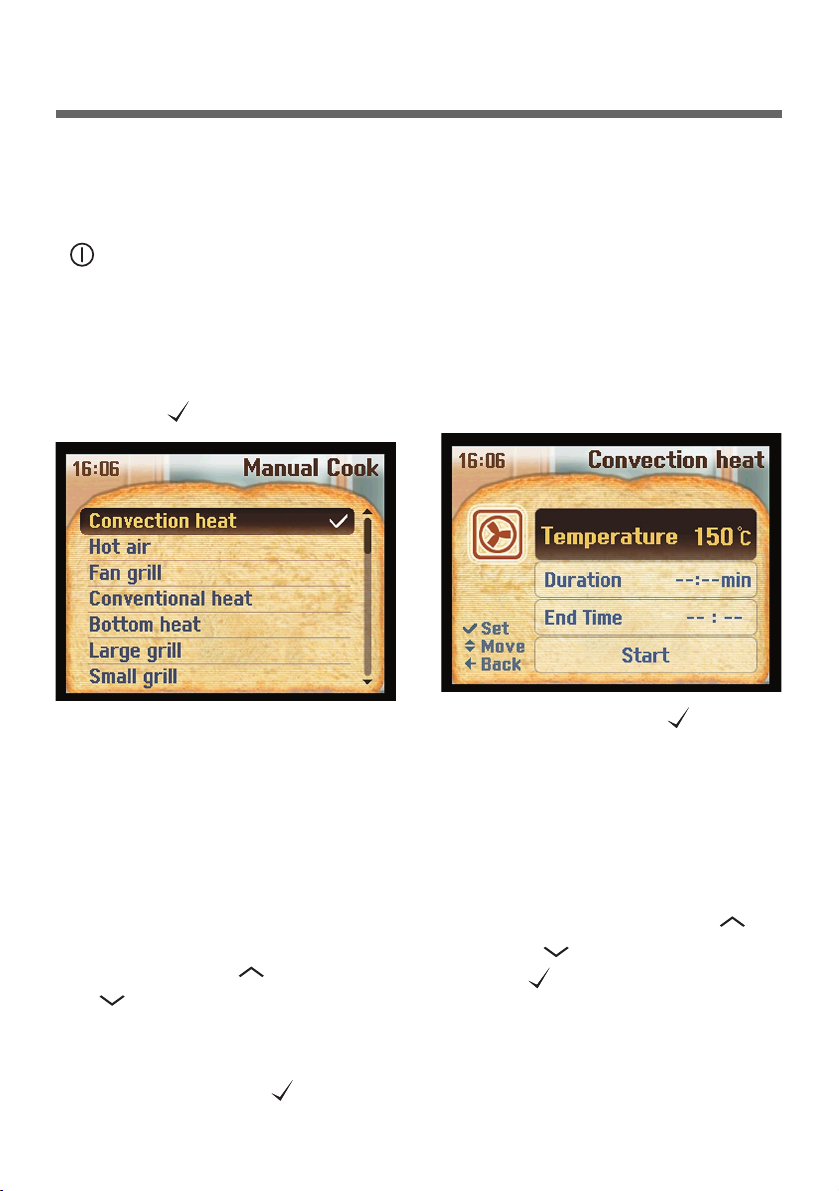
Select the “Manual Cook” and
confirm the choice by pressing
the Enter( ) key.
Selecting an oven
function
You can select any of the
functions in the display by simply
highlighting the one you want and
confirming your selection.
Proceed as follows :
Setting a temperature
Each cooking function has
been given a pre-set
temperature to make it easier.
You can either accept it or
change it to suit your recipe.
If you select a function e.g.
Convection heat, you will be
taken to the setting display.
Press the Enter key( ) to
change the temperature. The
triangle symbols will appear
next to the pre-set
temperature. You can now
change the recommended
temperature to suit your
preferences using the Up( )
or Down( ) key then press
the OK( ) key to confirm your
selection.
Duration and End Time can
also be entered but are not
required for cooking to
commence.
Press the Up( ) or Down
( ) key until the function
you want is highlighted in
the display.
Press the Enter( ) key to
confirm your selection.
1
2

26
Manual cook
The following temperatures are set at the factory :
Pre-set temperature
Convection heater,
fan
Top heater,
Bottom heater, fan
Top heater, fan
Top heater,
Bottom heater
Bottom heater
Convection heater,
fan
Top heater, Bottom
heater
Convection heat
Hot air
Fan grill
Conventional heat
Bottom heat
Warm dishes
Keep warm
150°C
160°C
190°C
190°C
170°C
65°C
75°C
40°C - 300°C
40°C - 300°C
40°C - 300°C
40°C - 300°C
40°C - 300°C
40°C - 100°C
40°C - 100°C
Function
Pre-set
temperature
Temperature
range
Heating element /
fan
For the Large grill, Small grill and Pyrolytic cleaning, you can use
any of three settings by selecting the one you want and confirming
your choice without temperature setting. If you select the Defrost,
you can set the Duration and End time only.
Each function can be used with the following elements.
• Large grill : Inner heater, Outer heater
• Small grill : Inner heater
• Pyrolytic cleaning : Top heater, Bottom heater, fan
• Defrost : fan

27
Using the oven
Changing the temperature
If you want to change the
temperature after a cooking
programme has been started,
press the Enter( ) key to call
up the setting display again.
Press the Enter( ) key a
second time to prompt the
temperature display, and then
use the Up( ) or Down( )
keys to change the temperature.
Cooking will then recommence
5 seconds after the last key
press at the new temperature.
Enter the Duration
You can set the Duration and
End Time to switch a cooking
programme off, or on and off
automatically. If you select a
function e.g. Convection heat,
you can now set the cooking
duration using the Up( ),
Down( ) and Enter( ) key.
Duration
You can enter the duration of a
cooking programme.
Once the time set has elapsed,
the oven will switch itself off
automatically.
End Time
You can specify the time at
which you want cooking to end.
The oven will be switched off
automatically at the time you
want.
• You can either enter the
Duration or just the End Time.
To switch a programme off
automatically
• Enter the Duration and End
Time.
The time which has not been
entered is calculated
automatically.
The Start time will be shown in
the display up until the heating
elements are switched on.
To switch a programme on
and off automatically

28
Using the oven
Changing the Duration
You can change the times
entered for a cooking
programme at any time.
Cooling system
The cooling fan switches on
automatically to keep the
appliance’s surfaces cool.
The air is displaced from in
between the oven door and the
control panel. When the oven
is switched off, the cooling fan
runs on and only switches off
once the appliance has cooled
down. The fan speed will be
higher during the pyrolytic
cleaning.
Residual Heat
Indicator
When the oven is on the
residual heat is indicated on
the display until the
temperature has gone down to
60°C.
Tip : When you set the
temperature if you press
and hold the Up( ) or
Down( ) key by about 2
seconds, you can reach
the temperature you want
more quickly.
Note : During cooking, baking
or roasting, If you leave
the door open for more
than 10 minutes, all
settings are cancelled.
Call up the setting display
by pressing the Enter( )
key.
Use the Up( ), Down( )
keys to select the duration,
then press the Enter( )
key, then use the Up( )
or Down( ) keys to make
the changes. The changes
will apply automatically after
5 seconds.
Press the Back space( )
key to return to the
previous display.
1
2
3

29
Rotisserie is ideal for grilling thicker items such as stuffed meat,
poultry, kebabs. The rotisserie can be used with Fan grill, Large
grill, and Small grill functions.
Before starting the rotisserie function
1. Place the deep pan at level 1 to collect the cooking juices. Then
place the fat filter on the back wall. If vegetables and potatoes
are placed around the edge of the deep pan, they will be roasted
at the same time.
2. Secure the meat to the rotisserie
spit using the clamps. Make sure
the meat is balanced in the middle
to give even rotation.
3. Place the cradle on the level 3 and
position with the “U” shape at the
front.
4. Reset the spit onto the cradle with
the pointed end towards the back
and gently push until the tip of the
spit enters the turning mechanism
at the back of the oven. Then lay
the other end onto the “U” shape
holder.
Note : The rotisserie skewer
handle must be removed
before closing the door.
It can be reattached at the
end of the cooking period to
help remove the loaded
skewer.
30
Using the oven
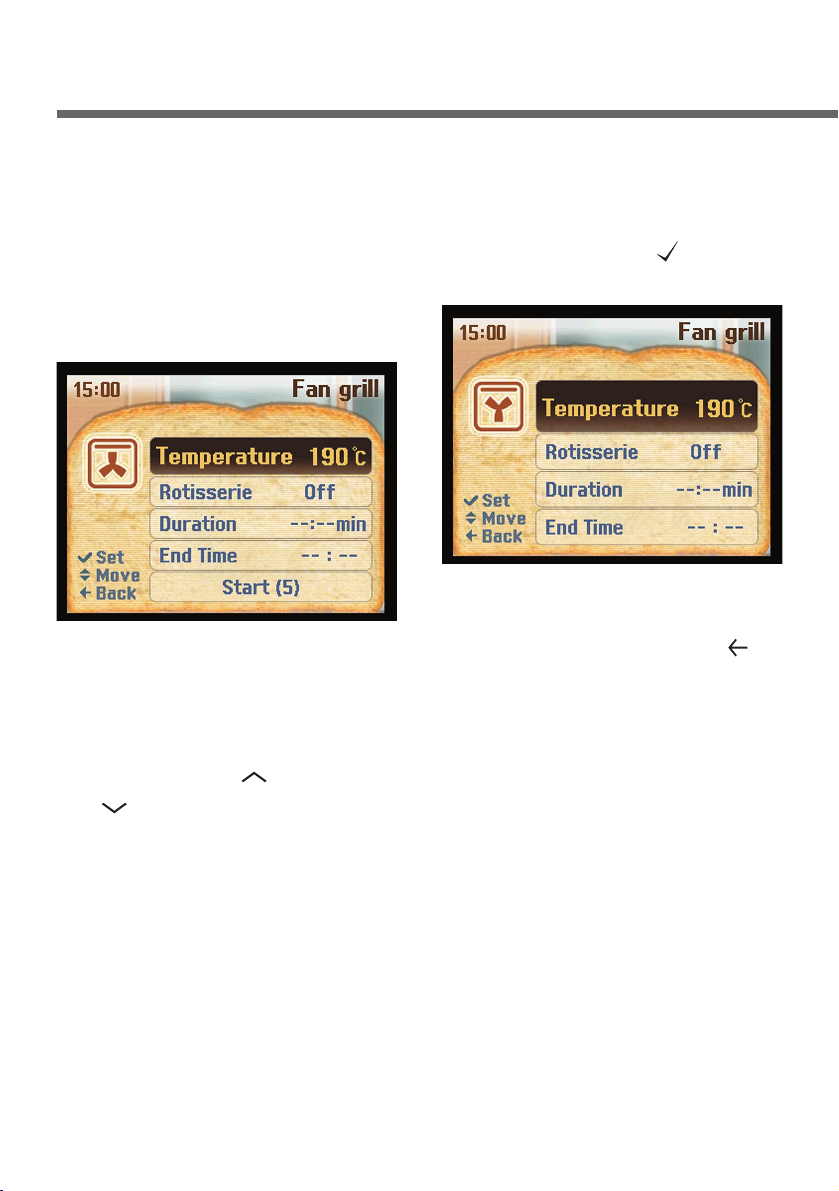
Using the rotisserie
You can use Fan grill, Large
grill and Small grill functions for
the rotisserie. If you select one
of the functions, e.g. Fan grill
the following will be shown in
the display.
You can use the rotisserie
function even after starting a
cooking programme.
If there is no changes for about
5 seconds, the display will
return to the previous display.
Note : Clean the rotisserie
skewer in a solution of
hot water and a little
washing up liquid. If
necessary a notabrasive proprietary
stainless steel cleaner
may be used.
Change the rotisserie
option.
Press the Back space( )
key to return to the cooking
display.
2
3
Press the Enter( ) key to
adjust the settings.
1
Change the recommended
temperature if necessary.
Enter a Duration if
necessary.
Press the Up( ) or Down
( ) key until “Rotisserie” is
highlighted in the display.
Select either “On” or “Off”.
Select and confirm the word
“Start”.
1
2
3
4
5

31
Type of
meat
Poultry
Small chicken
Medium chicken
Large chicken
Marinated chicken portions
Chicken leg, Chicken breast
Baby chicken
Duck (medium bird)
Beef
Topside, small joint
Lamb
Rolled, boned leg
Rolled, boned shoulder
Pork
Boned leg
Weight of
meat
1.1 kg
1.3 kg
1.8 kg
700 g
385 g
450 g
1.6 kg
0.7 kg
1.3 kg
1 kg
900 g
Temperature
(Fan Grill)
240 °C
240 °C
240 °C
240 °C
240 °C
240 °C
240 °C
220 °C
200 °C
200 °C
240 °C
Cooking
time
30 ~ 40 mins
45 ~ 60 mins
60 ~ 70 mins
15 ~ 20 mins
15 ~ 20 mins
30 ~ 35 mins
60 mins
Rare 30~40 mins
Medium 45~60 mins
Well done 60~70 mins
Medium 50~60 mins
Well done 75~85 mins
Medium 50~60 mins
Well done 75~85 mins
60 ~ 75 mins
Rotisserie Table
When using the rotisserie, the maximum weight of meat is 2.5kg, and
the maximum weight of poultry is 1.8kg.
The cooking time can be adjusted according to your preference.
Place the fat filter in the oven if you are going to roast.
Note : Place the meat on the middle of the rotisserie skewer and fasten as
firmly as you can. If you are cooking poultry remember to secure the
wings and legs with thread as tightly as possible.

32
Using the oven
Safety Lock
The oven is fitted with a
SAFETY LOCK function.
Energy efficiency
These appliances are rated
energy efficiency class A in
accordance with EN 50304.
Tests were carried out using
Convection heat.
To activate SAFETY LOCK
While the oven is on, press and
hold the Timer key for about 4
seconds until “It is locked”
appears in the display.
De-activating SAFETY LOCK
While the oven is on, press and
hold the Timer key for about 4
seconds until “It is unlocked”
appears in the display.
Safety cut-out
If the oven has been operating
for an extended period with no
change in settings. It is
automatically switched off.
Maximum operating time
Below 100°C - 12 hours
100°C ~ 240°C - 8 hours
240°C ~ 300°C - 4 hours
Restarting after safety cutout
Press the Home or Back space
key. You can now use the oven
in the normal way.
• The appliance cannot be
operated.
Before starting a cooking
programme
• It prevents settings being
changed accidentally.
After starting a cooking
programme

33
Rapid heat-up
The oven is supplied with rapid
heat-up switched off. If you
want to use rapid heat-up
function, you first have to
activate it. See “Changing
settings - Heating up phase” for
details.
Rapid heat-up engaged when
Convection heat, Hot air,
Conventional heat functions
are selected.
During the rapid heat-up phase
the top and rear element in the
oven are used to reach the
required temperature as
quickly as possible.
Canceling the rapid heat-up
To cancel the rapid heat-up
function you have to chage the
setting to “Normal”. See
“Changing settings - Heating
up phase” for details.
Rapid heat-up should be
switched off during the
heating up phase when
baking delicate items such as
pizza, biscuits and small
cakes. Because they will
brown too quickly from the
top.

34
Speed Cook
The two functions enable you
perform the speed cooking by
the aid of the upper halogen
heater.
Using the speed cook
You can use the speed cook
functions by selecting the
Speed Cook menu in main
display.
❏ Speed autocook
In this operating mode, cooking
times can be cut by 50%, thanks
to the optimum combination of
halogen energy, conventional
and convection heating methods.
If you select Speed autocook,
you will be taken to the next step.
You can now select the weight
using the Up( ), Down( )
and Enter( ) key. The oven
will do the rest for you. For
further information, see “Speed
autocook table”.
Note : In manual start mode
you have to select and
confirm the word “Start”
to start programme.
Refer to “Changing
settings”.
Speed cook functions
❏ Speed roast
In this operating mode, upper
elements and the fan on the
rear wall are on. The pre-set
temperature is 190°C.
❏ Speed grill
In addition to the grill element,
Speed Grill uses the upper
halogen heating element. If you
select this function, the
temperature is preset and
cannot be adjusted.
A Duration can be entered if
desired. If no Duration is
entered cooking will continue
until the maximum operating
time has expired.
(Refer to page 32)
Select the menu you want.
Press the Enter( ) key to
confirm your selection.
1
2

35
Healthy Roast
Using the Heathy Roast
If you select Healthy Roast in main
display, you can now use either
Low temp cook or Meat Probe
function.
Note : The meat probe must not
be used at the same time
as the rotisserie. The probe
would entangle and
immediately damage.

36
Healthy Roast
Tips for the Low temp cook
• Preheat the oven for about 5 minutes. When the preheating
procedure is completed, you will hear a signal tone.
• The oven switches automatically to a temperature of 90°C.
This remains constant for the whole of the cooking time.
• After searing the meat in a very hot frying pan, place it in a
underneath it and then roast it in the preheated oven.
Low temp cook
With the Low temp cook function, meat becomes marvelously
tender and remains particularly succulent. Up to 20 percent less
energy is consumed than with normal roasting, when roasting with
low temperatures.
❏ Ovenware
• At low temperatures, always roast meats uncovered.
❏ Oven levels and cooking times
• You can find the proper shelf position and cooking time in the
following table.
Type of food
Roast beef
Fillet of beef
Roast veal
Weight
(Kg)
1 - 1.5
1 - 1.5
1 - 1.5
Temp.
(°C)
Preheating Cooking
150
150
150
Temp.
(°C)
90
90
90
Time
(mins)
110 - 130
95 - 120
120 - 140
Oven
level
2
2
2

37
Meat Probe
The meat probe enables the monitoring of internal food temperature
during the roasting or baking process.
The meat probe can be used with Convection heat, Conventional
heat and Fan grill functions in the Healthy roast menu.
Using the Meat Probe
1. Push the probe as deeply as
possible into the meat. The tip of
the probe must reach the central
area of the meat.
2. Insert the plug of the probe into
the socket as far as it will go.
3. Select the desired oven function.
4. Set the desired oven temperature
and meat probe temperature.
Note : The oven temperature can be set up to 250°C for safety
reasons. The maximum probe temperature you can set is
99°C. If the preset oven temperature is under 99°C, then
the core temprature cannot be set higher than the preset
oven temperature.

38
Healthy Roast
When pre-set core temperature is reached, you can hear a signal
tone. and the oven will switch off automatically.
Removing the meat probe
Note : The meat probe becomes very
hot, Be careful when removing
the plug and the tip of the meat
probe.
1. Switch off the appliance.
2. Remove the plug from the socket,
and take the meat out of the oven.
Important :
Only use the temperature probe recommended for this oven.
Note :
Wipe with a damp cloth. Do not put the meat probe into water, or
clean It in the dishwasher. This would damage it.

Press the Up( ) or Down
( ) key until the category
you want is highlighted in
the display.
Press the Enter( ) key to
confirm your selection.
39
Auto cook
Using the Auto Cook
Auto Cook function allows you
to cook 40 menus of your
favorite foods without selecting
operating function, temperature
and times. With this function,
you can reduce the cooking
time thanks to the optimum
combination of heating
elements.
If you select Auto Cook, the
cook category appears in the
display.
If you select a cook category,
e.g. Fish, you will be taken to
the next level within that option.
You can then select the weight
of the dish using the up, down
and Enter( ) key. Select and
confirm the one you want.
The oven will do the rest for
you. See “Auto cook table” for
more information.
1
2
Select the menu you want.
Press the Enter( ) key to
confirm your selection.
1
2

40
My Recipe
Select the option “Create”.
Select and confirm the
function you want.
Change the recommended
temperature and duration if
necessary by using the Up
( ), Down( ) and Enter
( ) keys.
Save the create function by
highlighting the Ok icon and
pressing the Enter( ) key.
The settings used frequently can
be saved under a user-defined
name and used as required.
A maximum of 20 user-defined
programmes can be stored.
Storing the setting
Select the My Recipe.
If you have not yet created a
recipe only the word “Create”
will appear in the display.
The following will then appear
in the display.
❏ New step
You can store up to 4 different
cooking stages within each
created programme by
selecting ‘New step’ and
repeating the last 3 instruction
steps.
1
2
3

41
❏ Save as
You can save each created
programme you made using a
name of your choice.
After storing a ‘Create’
programme, scroll down to
the ‘Save as’ function and
press the Enter( ) key.
Press the Up( ) or Down
( ) key until the letter you
want is highlighted in the
display.
Confirm your choice by
pressing the Enter( ) key.
Your name will start to
appear in the display. If you
make a mistake you can
use “ ” symbol to delete
the last letter or number you
entered.
Check all your settings and
then confirm your selection.
You can then call up your
programme using the name
you gave it. You can even
put it into the initail stage if
you wish. See “Changing
settings - Initial stage”.
1
2
3
4
❏ Delete
You can delete the stage you
create individually.
Select the word “Delete”.
Select the stage to be
deleted in the display.
Confirm your choice by
pressing the Enter( ) key.
Now the stage you have
selected is deleted.
Note : If you have saved a
recipe by name, you can
not delete a stage within
that recipe individually.
1
2
3
❙

42
e-Cookbook
Press the Up( ) or Down
( ) key until the category
you want is highlighted in
the display.
Press the Enter( ) key to
confirm your selection.
Using the e-Cookbook
This oven allows you to use eCookbook function providing
over 120 recipes through TFT
COLOR LCD display.
If you select e-Cookbook, the
12 cook categorys appear in the
display.
The scroll bar indicate that
there are further options. You
can see them by pressing the
Up( ) or Down( ) key.
If you select one of the menus,
the words “Show recipe” and
“Start cooking” are appear in
the display.
If you select a category e.g.
Starters, you will be taken to
the next step within that option.
e.g. Scampi with apple and red
cabbage.
1
2
Select and confirm the
menu you want.
1

4343
❏ Show recipe
If you select “Show recipe”, the
full recipe including the
ingredients appear in the
display. You can then select
and confirm the word “Start
cooking”.
The oven will be operated with
overall stages the menu has if
you select “Overall start”.
You can also use each stage
the menu has by selecting the
one you want and confirming
your selection.
❏ Start cooking
If you select “Start cooking”,
you will be taken to the next
step within that option.
Note :
After preheating if you leave
the oven on for more than
1 hour without opening the
door, the cooking will be
cancelled.
If you select one of the
menus, corresponding picture
appear in the display for
some menus.

44
Changing settings
Select and confirm the
basic settings you wish to
change.
The oven is supplied with
preset basic settings. You can
change these settings
individually.
Proceed as follows :
3
Switch the oven on.
Select ‘Setting’ in the
display and press the
Enter( ) key.
1
2
Select and confirm the
language you want.
1
Language
You can select either English or
German.
The language you have
selected will appear in the
display.
Select and confirm the one
you want. The time of day
can then be set.
Enter and confirm the hour.
Then enter and confirm the
minutes. The time of day is
now saved.
1
2
Clock
You can select either 12h-clock
or 24h-clock.
✒ To select
Press the Up( ) or Down
( ) key.
✒ To confirm
Press the Enter( ) key.

45
Select and confirm the one
you want.
1
Oven lighting
You can select either On for 20
seconds or Fully on.
If you select “On for 20
seconds”, the oven lighting
goes out 20 secconds after a
cooking programme has
started. The oven lighting also
can stay on for maximum 3
hours if you select “Fully on”.
In pyrolytic cleaning function,
the oven lamp cannot be
switched on during operating.
Select and confirm the one
you want.
1
Heating up phase
You can select Normal or Rapid.
If the option “Rapid” has been
selected, the message “Rapid
Heat Up” will appear in the
display during the heating-up
phase.
Information
If Rapid heating is selected, it
will only operate in the
Convection, Hot air and
Conventional heat mode.

46
Changing settings
Select and confirm the one
you want.
1
Sound
The key sounds can be
switched on or off . If you select
“OFF”, the key sounds will not
be rung during operating.
Select and confirm the one
you want.
1
Display
If you select “Display”, you will
be taken to the next step within
that option.
If you select “Power saving”, the
display will be dimmed in about
10 minutes after the last entry
was made.
❏ Display
You can select Normal or
Power saving.
But if you select “Normal” the
display will not be dimmed
during operating.
Select and confirm the one
you want.
1
If you select “Default”, the
display only shows the LG
icon, letters, and a colored
background during the cooking.
Additionally the display shows
a specific character decorating
the display window visually if
you select “Character”.
The preset level is “3”.
❏ Animation
You can select either “Default”
or “Character”.
Select and confirm the setting
you want.
1
❏ Brightness
The brightness can be adjusted.

47
Select and confirm the one
you want.
1
Default setting
You can select My recipes or All
setting.
Select and confirm the
function you want.
Change the temperature.
1
2
Temperature
The preset temperature for
each Manual cook function can
be changed in this setting as
an alternative to the default set
temperature.
Select and confirm the one
you want.
1
Initial stage
You can select or change the
main menu that appears in the
display each time the oven is
turned on.
Initial stage is now changed.
When you select “My recipes”,
a message will appear in the
display. You can then delete all
my recipes if you wish.
If you select “All setting”, any
settings that you have altered
will be reset to the factory
default setting.
My recipes will also be deleted
Select and confirm the setting
want.
1
Start
You can select either Automatic
or Manual.
If you select “Automatic”, the
cooking programme will start
automatically about 5 seconds
after the last entry is made or
by selecting the start option
before 5 seconds expires.
In manual start, you must
confirm the start option to start
the cooking function.

48
Speed autocook table
Speed autocook
SP-1
SP-2
SP-3
SP-4
SP-5
SP-6
SP-7
SP-8
SP-9
SP-10
Salmon, steak
Jumbo Shrimps
Meat loaf
Leg of lamb
Roast veal
Roast potatoes
French fries,
frozen
Chicken, whole
Chicken, legs
Pizza, frozen,
thin base
Menu Category Weight limit Step Utensil
Deep pan + Grill tray
Deep pan + Grill tray
Wire grill +
Heat proof glass dish
Wire grill +
Heat proof glass dish
Wire grill +
Heat proof glass dish
Wire grill +
Heat proof glass dish
Baking tray +
Baking paper
Deep pan + Grill tray
Deep pan + Grill tray
Wire grill
400 ~ 1200g
300 ~ 1000g
600 ~ 1200g
1000 ~ 2000g
1000 ~ 2000g
400 ~ 1600g
250 ~ 750g
1000 ~ 2000g
600 ~ 1800g
200 ~ 400g
200g
100g
200g
500g
500g
200g
250g
250g
200g
100g

49
See the instructions on page 51
See the instructions on page 51
See the instructions on page 53
See the instructions on page 53
See the instructions on page 53
See the instructions on page 55
See the instructions on page 55
See the instructions on page 57
See the instructions on page 57
See the instructions on page 61
Oven level,
from bottom
Food Temp. Instructions
Refrigerated
Refrigerated
Refrigerated
Refrigerated
Refrigerated
Room
Frozen
Refrigerated
Refrigerated
Frozen
5
5
4
2
2
4
5
2
5
1
To avoid residual cooking, remove food from oven immediately.
You can adjust the preset cooking time according to the food performing or your
preference. Press the OK key to call up the setting display.

50
Auto cook table
Fish
1-1
1-2
1-3
1-4
Trout
Salmon,
steak
Tuna, steak
Jumbo
Shrimps
Menu
Category Weight limit Step Utensil Food Temp.
Deep pan
+ Grill tray
Deep pan
+ Grill tray
Deep pan
+ Grill tray
Deep pan
+ Grill tray
Refrigerated
Refrigerated
Refrigerated
Refrigerated
600-1600g
400-1200g
400-1200g
300-1000g
200g
200g
200g
100g

51
Choose trout of 300-400g weight each. Brush with oil or melted
butter, season as desired. Place trout on deep pan with grill tray
and insert into oven. When oven beeps, turn food over.
Choose salmon steaks of 200g weight and 2.5cm thickness each.
Brush salmon with oil or melted butter, season as desired. Place
salmon onto deep pan with greased grill tray. When oven beeps,
turn food over.
Choose tuna fish steaks of 200g weight and 2.5cm thickness
each. Brush tuna fish with oil or melted butter, season as desired.
Place tuna steak onto deep pan with greased grill tray. When oven
beeps, turn food over. It is normal for the tuna to be a little pink
inside after cooking.
Remove feelers of shrimps. Brush with oil or melted butter.
Season as desired, place shrimps onto deep pan with grill tray.
Insert into oven. When oven beeps, turn food over.
Oven level,
from bottom
Instructions
3
3
4
4
To avoid residual cooking, remove food from oven immediately.
You can adjust the preset cooking time according to the food performing or your
preference. Press the OK key to call up the setting display.

52
Auto cook table
Meat
2-1
2-2
2-3
2-4
2-5
2-6
Roast beef
Spare ribs
Meat loaf
Roast pork
Leg of lamb
Roast Veal
Menu
Category Weight limit Step Utensil Food Temp.
Wire grill +
heat proof
glass dish
Deep pan +
Grill tray
Wire grill +
heat proof
glass dish
Wire grill +
heat proof
glass dish
Wire grill +
heat proof
glass dish
Wire grill +
heat proof
glass dish
Refrigerated
Refrigerated
Refrigerated
Refrigerated
Refrigerated
Refrigerated
1000-2500g
800-1400g
600-1200g
1000-2500g
1000-2000g
1000-2000g
500g
200g
200g
500g
500g
500g

53
Brush beef with oil or melted butter, season as desired. Put beef in
open dish and insert into oven. When oven beeps, add a big cup
of hot water and cover with lid.After cooking, allow to rest covered
with foil for 10 minutes. Use generated juice for gravy or sauce.
Brush spare ribs with oil, season as desired and place onto deep
pan with grill tray. Insert into oven. When oven beeps, turn food
over.
Form a meatloaf using fresh minced meat, egg, some
breadcrumbs and seasoning. Place into open dish and insert into
oven.
Brush pork with oil or melted butter, season as desired. Place pork
into dish, add a big cup of water, cover with lid and insert into oven.
When oven beeps, remove lid. After cooking, allow to rest covered
with foil for 10 minutes. Use generated juice for gravy or sauce.
Brush leg of lamb with oil or melted butter, season as desired.
Place lamb into dish, insert into oven. When oven beeps, add a
big cup of water and cover with lid. After cooking, allow to rest
covered with foil for 10 minutes. Use generated juice for gravy or
sauce.
Brush veal with oil or melted butter, season as desired. Place veal
into dish, add a big cup of water, cover with lid and insert into oven.
After cooking, allow to rest covered with foil for 10 minutes. Use
generated juice for gravy or sauce.
Oven level,
from bottom
Instructions
2
3
2
2
2
2
To avoid residual cooking, remove food from oven immediately.
You can adjust the preset cooking time according to the food performing or your
preference. Press the OK key to call up the setting display.

54
Auto cook table
Pastry
3-1
3-2
Croissants
Small bread,
bake off
Menu
Category Weight limit Step Utensil Food Temp.
Baking tray +
baking paper
Wire grill
Refrigerated
Room
120-600g
100-600g
120g
100g
Potato products
4-1
4-2
4-3
4-4
Gratinated
potatoes
Roast
potatoes
French fries,
frozen
Croquettes,
frozen
Menu
Category Weight limit Step Utensil Food Temp.
Wire grill +
heat proof
glass dish
Wire grill +
heat proof
glass dish
Baking tray +
baking paper
Baking tray +
baking paper
Room
Room
Frozen
Frozen
500-1500g
400-1600g
250-750g
250-500g
500g
200g
250g
250g

55
Place croissants on baking tray with baking paper. Brush
croissants with milk or water and insert into oven.
Brush small bread or rolls with water or milk. Place on wire grill and
insert into oven.
Oven level,
from bottom
Instructions
2
3
Cut pre-cooked gratin potatoes into slices. Place potatoes in dish,
cover with grated cheese (30g per 500g gratin potatoes) and
insert into oven.
Choose small potatoes (100-150g each). Peel, wash, dry and cut
potatoes into halves. Mix potatoes with salt, pepper and oil or
melted butter and put into open dish. Insert into oven. When oven
beeps, turn food over.
Spread frozen fries evenly on baking tray with baking paper. For
best results, cook in a single layer. Insert baking tray into oven.
When oven beeps, turn food over. After cooking, season with salt
or as desired.
Spread frozen croquettes on baking tray, insert into oven. When
oven beeps, turn food over. After cooking, season with salt or as
desired.
Oven level,
from bottom
Instructions
2
2
4
4
To avoid residual cooking, remove food from oven immediately.
You can adjust the preset cooking time according to the food performing or your
preference. Press the OK key to call up the setting display.

56
Auto cook table
Poultry and game
5-1
5-2
5-3
5-4
Chicken,
whole
Chicken,
legs
Duck, whole
Turkey,
whole
Menu
Category Weight limit Step Utensil Food Temp.
Deep pan +
Grill tray
Deep pan +
Grill tray
Deep pan +
Grill tray
Deep pan +
Grill tray
Refrigerated
Refrigerated
Refrigerated
Refrigerated
1000-2000g
600-1800g
1700-2500g
3200-4700g
250g
200g
200g
500g

57
Brush chicken with oil or melted butter, season as desired. Place
chicken onto deep pan with grill tray. Add water to deep pan. Insert
into oven. When the oven beeps, turn food over. After cooking,
allow to rest covered with foil for 10 minutes. Use generated juice
for gravy or sauce.
Brush chicken legs with oil or melted butter, season as desired.
Place chicken legs onto grill tray, fill water into deep pan, put grill
tray on top and insert into oven. When oven beeps, turn food over.
After cooking, allow to rest covered with foil for 3 minutes. Use
generated juice for gravy or sauce.
Brush duck with oil or melted butter, season as desired. Wrap thin
part of the legs in foil, place duck onto deep pan with grill tray. Add
water to deep pan. Insert into oven. After cooking allow to rest
covered with foil for 5 minutes. Use generated juice for gravy or
sauce.
Brush turkey with oil or melted butter, season as desired. Wrap
thin part of the legs in foil, place turkey onto deep pan with grill tray.
Add water to deep pan. When oven beeps, turn food over. If
turkey gets too dark, cover with foil. After cooking, allow to rest
covered with foil for 10 minutes. Use generated juice for gravy or
sauce.
Oven level,
from bottom
Instructions
2
3
2
1
To avoid residual cooking, remove food from oven immediately.
You can adjust the preset cooking time according to the food performing or your
preference. Press the OK key to call up the setting display.

58
Auto cook table
Poultry and game
5-5
5-6
5-7
5-8
5-9
Turkey, legs
Hare, parts
Goose,
whole
Goose, legs
Roast
venison,
back
Menu
Category Weight limit Step Utensil Food Temp.
Deep pan +
Grill tray
Deep pan
Wire grill +
Deep pan
Deep pan +
Grill tray
Wire grill +
heat proof
glass dish
Refrigerated
Refrigerated
Refrigerated
Refrigerated
Refrigerated
800-2000g
700-2100g
3500-5000g
800-2000g
1000-2000g
400g
700g
500g
400g
500g

59
Brush turkey legs with oil or melted butter, season as desired.
Wrap thin part of the legs in foil. Place legs onto deep pan with grill
tray. Add water to deep pan. Insert into oven. When oven beeps,
turn food over. After cooking, allow to rest covered with foil for 3
minutes. Use generated juice for gravy or sauce.
Brush hare/rabbit pieces with a little mustard, season as desired
and place onto greased deep pan. Insert into oven. When oven
beeps, turn food over. Use generated drip for gravy or sauce.
Brush goose with oil or melted butter, season as desired. Place
goose onto wire grill and insert into oven placing deep pan
underneath to catch dripping fat. When oven beeps, turn food
over. If goose gets too dark, cover with foil. After cooking, allow to
rest covered with foil for 10 minutes. Use generated juice for gravy
or sauce.
Brush goose legs with oil or melted butter, season as desired.
Place legs onto deep pan with grill tray. Add water to deep pan.
Insert into oven. When oven beeps, turn food over. After cooking,
allow to rest covered with foil for 3 minutes. Use generated juice
for gravy or sauce.
Marinate venison for at least 24 hours. Brush venison with oil or
melted butter, season as desired. Put venison in open dish and
insert into oven. After cooking, allow to rest covered with foil for 10
minutes. Use generated juice for gravy or sauce.
Oven level,
from bottom
Instructions
2
3
2+1
3
2
To avoid residual cooking, remove food from oven immediately.
You can adjust the preset cooking time according to the food performing or your
preference. Press the OK key to call up the setting display.

60
Auto cook table
Snacks
6-1
6-2
6-3
Crumbed
squid rings,
frozen
Meat on
skewers
Cordon Bleu,
frozen
Menu
Category Weight limit Step Utensil Food Temp.
Baking tray +
baking paper
Deep pan +
Grill tray
Wire grill +
Baking tray
Frozen
Refrigerated
Frozen
200-600g
400-900g
340-1360g
200g
250g
170g
Pizza
7-1
7-2
Pizza, frozen,
thin base
Pizza, frozen,
thick base
Menu
Category Weight limit Step Utensil Food Temp.
Wire grill
Wire grill
Frozen
Frozen
200-400g
400-500g
100g
100g

61
Spread frozen squid rings evenly on baking tray with baking paper.
Insert into oven. When oven beeps, turn food over.
Place meat on skewers on greased grill tray with deep pan. Insert
into oven. When oven beeps, turn food over.
Spread frozen Cordon bleu evenly on wire grill. Insert into oven,
placing baking tray underneth to catch dripping liquid.
Oven level,
from bottom
Instructions
4
4
3+2
Place frozen pizza on wire grill. Insert into oven. Use only one
frozen pizza at a time.
Place frozen pizza on wire grill. Insert into oven. Use only one
frozen pizza at a time.
Oven level,
from bottom
Instructions
1
2
To avoid residual cooking, remove food from oven immediately.
You can adjust the preset cooking time according to the food performing or your
preference. Press the OK key to call up the setting display.

62
Auto cook table
International automatic recipes
8-1
8-2
8-3
8-4
8-5
8-6
8-7
8-8
8-9
8-10
Lasagna
Homemade pizza
White bread
Quiche Lorraine
Sea bream
Guglhupf
Muffins
Moussaka
Cinnamon buns
Swedish apple pie
Menu
Category Utensil
Wire grill + heat proof lasagna dish
Deep pan
Wire grill + bread baking tin
Wire grill + round baking tin
Deep pan
Wire grill + Guglhupf tin
Wire grill + muffin tin
Wire grill + heat proof dish
Baking tray + deep pan
Wire grill + round baking tin

63
Oven level,
from bottom
Instructions
2
2
1
1
2
1
2
2
2+4
1
See the recipe on page 64
See the recipe on page 65
See the recipe on page 66
See the recipe on page 66~67
See the recipe on page 68
See the recipe on page 69
See the recipe on page 70
See the recipe on page 70~71
See the recipe on page 72
See the recipe on page 73
To avoid residual cooking, remove food from oven immediately.
You can adjust the preset cooking time according to the food performing or your
preference. Press the OK key to call up the setting display.

64
Auto cook table
8-1. Lasagna
Ingredients:
Preparation:
- Cook onion and garlic, then add meat, cook until no longer pink.
- Add all tomatoes, simmer for approx. 1 hour.
- Add pepper and salt for taste, then add basil.
- Let sauce cool.
- Pre-cook noodles if required.
- Put some sauce at bottom of lasagne pan, place noodles on top,
then crème fraîche, then mozzarella.
- Sprinkle with oregano.
- Repeat placing noodles in other direction.
- Sprinkle with oregano.
- 300 g ground beef
- 1 small onion
- 1-2 garlic gloves, sliced
- 1 can peeled plum tomatoes
(400 g)
- 1 can chopped tomatoes
(400 g)
- 75 g tomato paste
- 1 can diced tomatoes (40 g)
- 250 g shredded mozzarella
cheese
- 200 g crème fraîche
- 6-8 lasagne noodles
- Fresh basil leaves
- Pepper, salt, oregano

65
8-2. Homemade pizza
Ingredients:
Preparation:
- Dissolve yeast in warm water.
- Stir in salt and sugar.
- Add flour slowly, kneading constantly.
- Add oil and keep kneading.
- If dough is sticky, add a little more flour.
- Cover dough and allow to rise for
1
/2 hour.
- Using floured hands, knead dough and spread it on greased cookie
sheet with fingertips.
- Spread tomato sauce over dough, add toppings in layers.
- Sprinkle cheese over dough.
- 15 g fresh yeast
- 250 ml warm water
- 1 tsp. salt
- 450 g flour
- 1 tsp. sugar
- 2 tbsp. vegetable oil
- 1 small jar tomato sauce
- 450 g ground beef, browned
- 200 g pepperoni slices
- 2 peppers, sliced
- 1 large onion
- 100 g sliced olives
- 450 g shredded mozzarella
cheese

66
Auto cook table
8-3. White bread
Ingredients:
Preparation:
- In a big bowl, mix flour and salt.
- Dissolve yeast in lukewarm milk and add to flour.
- Knead until a smooth dough is formed.
- Add a little more milk if required.
- Cover dough and allow to rise for about 40-50 minutes.
- Place dough in a greased bread baking tin.
- Allow dough to rise for another 10-20 minutes.
- Dust bread with flour before baking.
- Using a sharp knife, cut bread diagonally 3-4 times, approx. 1 cm
deep.
- If desired, brush with a little butter after baking and cooling down.
8-4. Quiche lorraine
Ingredients for short pastry:
Ingredients for filling:
- 500 g flour
- 1 package dry yeast
- 325 g lukewarm milk
- 5 g salt
- 200 g plain flour
-
1
/2 tsp. salt
- 85 g butter
- 1 egg
- 1 tbsp. white wine vinegar
- 250 g thick bacon
- 5 eggs
- 300 ml cream
- Salt and pepper
- 1/4 tsp. freshly grated nutmeg
- 200 g grated cheese, Gruyère
or cheddar (optional)

67
Preparation of short pastry:
- In a large bowl or food processor sift flour and salt.
- Cut cold butter into small cubes and add to flour.
- Rub butter into flour using both hands or food processor, until it
resembles fine breadcrumbs.
- Make a well in the centre, add 1 beaten egg and vinegar mixing to a
firm dough.
- If dough seems a little dry add a little water.
- Handle as little as possible as this prevents pastry from becoming
hard when baked.
- Roll into a ball, cover with plastic wrap and refrigerate for 30 minutes.
Preparation of filling:
- Cut bacon into small strips, sauté until crisp and put aside to cool.
- Whisk together eggs, cream, grated nutmeg and pepper in a large
bowl.
Assembly:
- On a lightly floured board roll out short pastry until approx. 5 mm
thick.
- Line flan or pie dish with dough, flute and crimp edges decoratively.
- Scatter half the cheese over the bottom of the pie crust.
- Continue by placing cooled bacon over evenly and pour in egg and
cream filling mixture.
- Sprinkle with remaining cheese.
- Let quiche cool for 15 minutes before cutting.

68
Auto cook table
8-5. Sea bream
Ingredients:
Preparation:
- Cut peppers, tomatoes and onions into cubes and distribute on a
baking sheet.
- Sprinkle with some olive oil and white wine, season with salt and
pepper.
- Season fish with salt and pepper as well and put onto vegetables.
- Again sprinkle with olive oil and white wine.
- Put rosemary, thyme and garlic slices on top of the fish.
- 4 peppers
- 6-8 tomatoes
- 3 onions
- 1 kg sea bream
- 8 tbsp. olive oil
- 3 tbsp. white wine
- 3 garlic gloves
- Rosemary and thyme
- Salt and pepper

69
8-6. Marble guglhupf
Ingredients:
Preparation:
- Cut vanilla pod open lengthwise, scratch out inside with a sharp knife
and mix with butter and sugar until creamy.
- Gradually beat in eggs, whisking until frothy and then add rum.
- Sieve flour and baking powder and stir into egg mixture.
- Stir in cream and split mixture into 2 even-sized portions.
- Melt chocolate and stir evenly into one portion of mixture.
- Grease Guglhupf tin (1
1
/2 litre capacity) with butter and dust with a
little flour.
- Put half of the light mixture into tin, pour dark half onto it and cover
with rest of light mixture.
- Run a fork through the mixture in the shape of a spiral to achieve
desired marbling effect.
- Allow to cool a little.
- Turn out of tin, leave to cool and dust with icing sugar.
- 1 Tahitian vanilla pod
- 200 g soft butter
- 180 g sugar
- 4 eggs
- 2 tablespoons rum
- 350 g flour
- 20 g baking powder
- 200 g cream
- 100 g dark chocolate
- 1 tablespoon butter
- A little flour
- Icing sugar

70
Auto cook table
8-7. Muffins
Ingredients:
Preparation:
- Combine flour and sugar in a mixing bowl; make a well in centre of
mixture.
- Combine remaining ingredients except for confectioners' sugar; add
to dry ingredients, stirring just until moistened.
- Spoon into greased and floured muffin pans, filling about two-thirds
full.
- Remove from pans and sprinkle with confectioners' sugar.
8-8. Moussaka
Ingredients:
- 150 g flour
- 1
1
/2 tsp. baking powder
- 60 g granulated sugar
- 1 egg, beaten
- 130 ml milk
- 70 ml vegetable oil
- 1/2 tsp. vanilla extract
- 50 g semisweet chocolate chips
- 50 g chopped walnuts
- Sifted confectioners’ sugar
- 1 large eggplant
- 450 g ground beef or lamb
- Vegetable oil
- 2 medium onions, chopped
- 2 cloves garlic, minced
- 1 tsp. salt
-
1
/2 tsp. thyme
- 1/2 tsp. oregano
- 1/2 tsp. nutmeg
- 2 tbsp. chopped parsley
- 280 g canned tomatoes
- 120 ml white wine
- 2 egg whites
- 30 g bread crumbs
- 2 tbsp. grated Parmesan
cheese
- 60 g butter
- 3 tbsp. flour
- 350 ml milk
- 2 egg yolks
- 1/2 tsp. salt
- 1/4
tsp. pepper

71
Preparation:
- Pare eggplant and cut into 1.5 cm thick slices.
- Sprinkle with salt and set aside for 30 minutes.
- Rinse and dry thoroughly.
- Brown meat in vegetable oil with onions and garlic.
- Drain off the fat.
- Add salt, seasonings, parsley, tomatoes and wine.
- Cover and cook slowly for 30 minutes, then cool.
- Mix in unbeaten egg whites and half of the crumbs.
- Brown eggplant slices in vegetable oil.
- Sprinkle bottom of a rectangular baking dish (approx. 20 x 30 cm)
with remaining crumbs.
- Cover with eggplant.
- Spoon meat mixture over eggplant.
- Melt butter, add flour slowly, stirring constantly.
- Remove from heat, slowly stir in milk.
- Return to heat and stir until sauce thickens.
- Beat egg yolks well, gradually stir yolks, salt and pepper into the
sauce, blend well.
- Pour sauce over this mixture.
- Top with cheese.

72
Auto cook table
8-9. Cinnamon buns (Kanelbullar)
Ingredients (for 2 sheets):
Preparation:
- Melt butter over low heat.
- Pour in cold milk.
- Wait until the butter-milk mixture is finger warm.
- Dissolve yeast in the mixture and let rest for 5 minutes.
- Stir in sugar, cardamom and flour.
- Gather dough into a ball and knead until smooth and shiny.
- Cover dough and allow to rise until nearly double in size, about 30
minutes.
- Turn dough out onto a floured surface and knead again until smooth
and shiny.
- Divide dough into two parts.
- Roll each part out into a rectangle about 6 mm thick.
- Spread half of the softened butter over each rectangle.
- Stir together the remaining sugar and the cinnamon and spread half
of the mixture on each rectangle.
- Roll the rectangles up and cut into 1,5 cm thick slices.
- Place slices on a cookie sheet (greased or covered in parchment
paper).
- Cover and let rise again for about 30 minutes while preheating the
oven, brush tops of buns with beaten egg and sprinkle with pearl
sugar.
- 1 cube fresh yeast
- 50 g sugar
- 75 g unsalted butter
- 250 ml milk
-
1
/2 tsp. cardamom
- 500 g flour
- 60 g unsalted butter, softened
- 5 tbsp. sugar
- 4 tsp. cinnamon
- 1 egg, beaten
- Pearl sugar

73
8-10. Swedish apple pie
Ingredients:
Preparation:
- Fill a greased baking tin
2
/3 full of apples.
- Sprinkle with 1 tablespoon sugar and the cinnamon.
- Mix together remaining ingredients.
- Pour over apples.
- 5 green apples, peeled and
sliced
- 1 tbsp. sugar
- 1 tsp. cinnamon
- 170 g melted butter
- 120 g flour
- 200 g sugar
- 1 egg
- 75 g chopped nuts
(pecans or walnuts)
- Pinch of salt

74
Baking
General information
When baking, use the Convection heat( ) or Conventional heat
( ) modes.
Baking tins
• When baking in Conventional heat( ) modes, use baking tins
with a dark metal or coated surface.
• When baking with Convection heat( ), you can also use baking
tins with a bright metal surface.
• Always place cake tins in the middle of the tray or Wire grill.
• When baking with Conventional heat( ), you can place two
baking tins side by side in the
oven. This means that the baking
time is only slightly longer.
• When using 2 trays (baking tray
and deep pan), place the deep pan
on Level 5 and the baking tray on
Level 2.
Oven levels
The Oven levels are numbered from the bottom up.
When using Conventional heat( ), you can bake on one level
only, for example Level 4.
When using Convection heat( ), you can bake sponge bases and
biscuits up to 2 baking trays at the same time, for example on levels
2 and 5.
5
2

75
Using baking tables
The tables contain the temperature settings, baking time and Oven
levels for a selection of typical dishes.
• Temperatures and baking times should be regarded as reference
figures only. The actual values depend on the type of preparation,
quality of ingredients and the baking tin in use.
• We recommend first selecting a lower temperature and then
increasing it if necessary, for example if you want a higher degree
of browning or the baking time is too long.
• If you cannot work out the settings for a specific recipe, simply use
the settings for the most similar recipe.
• When baking cakes on baking trays or in tins on more than one
level, the baking time may be extended by 10 –15 minutes.
• Baking with a high liquidity content (e.g. pizza, fruit cakes, etc.)
should be baked on a single level only.
• With cakes and baking with different levels of dough, uneven
browning may take place initially. In this case, do not alter the
temperature setting. The degree of browning will even itself out
over the baking process.
• For energy saving, use the residual heat for 8 minutes before
finishing cooking times.

76
Baking Tables
Baking on a single oven level
Oven
level
2
2
2
2
2
2
2
2
4
4
2
4
4
4
For both types
of baking, in
hrs, mins.
0:50–1:10
1:10–1:30
0:25–0:40
0:10–0:25
0:20–0:25
0:50–1:00
0:30–1:10
1:00–1:30
0:30–0:40
0:40–1:00
0:20
0:30–1:00
0:15–0:30
0:10–0:20
0:40–1:20
Recipe
Cakes in baking tins
Ring-shaped pound
cake
Biscuits / pancakes
Sponge finger
Flan base – shortcrust
pastry
Flan base – cake
mixture
Apple pie
Spicy cakes and flan
base (e.g. quiche
lorraine)
Cheesecake
3)
Cakes on baking tray
Bread plaits / larger
cakes
Christmas stollen
Bread (rye bread)
initially, then later
Pie / eclair
Swiss roll
Fruit cake with
shortcrust pastry
Temp.
in °C
160–180
150–170
160–180
190–210
1)
170–190
170–190
190–210
170–190
170–190
160–180
1)
230
1)
160–180
190–210
180–200
1)
170–190
1)
Oven
level
2
2
2
3
3
2
2
2
3
3
2
3
3
3
Temp.
in °C
150–160
140–160
150–160
170–180
150–170
150–170
160–180
140–160
160–170
150–170
1)
180–200
1)
140–160
160–170
1)
150–170
1)
160–170
1)
Operating mode
Convection Conventional
Baking time
heat heat

77
1)
Preheat the oven.
2)
Switch off “rapid heat-up”.
3)
Use deep pan.
Always count Oven levels from the bottom up.
Oven
level
4
1
1
1
1
4
4
4
4
4
4
4
4
For both types
of baking, in
hrs, mins.
0:40–1:20
0:30–1:00
0:10–0:25
0:08–0:15
0:35–0:50
0:06–0:20
0:10–0:40
0:15–0:20
2:00–2:30
0:30–0:60
0:20–0:40
0:20–0:30
0:20–0:35
Recipe
Slices with topping/
filling, e.g. quark,
cream, sugar,
almonds
Pizza (thick base)
2) 3)
Pizza (thin base)
2)
Unleavened bread
Wähe (Swiss flan)
Biscuits
2)
Shortcrust biscuits
2)
Iced biscuits
2)
Cake mixture biscuits
2)
Cakes and pastries
with egg white,
meringues
Macaroons
Yeast dough biscuits
2)
Puff pastry cakes and
pastries
Bread rolls
Temp.
in °C
160–180
1)
190–210
1)
230
1)
230
1)
210–230
170–190
1)
160–180
170–190
100–120
120–140
170–190
190–210
1)
180–220
1)
Oven
level
–
1
1
1
1
3
3
3
3
3
3
3
3
Temp.
in °C
–
180–200
200–220
200–220
180–200
150–160
140–150
150–160
80–100
100–120
160–170
160–180
1)
180–200
1)
Operating mode
Convection Conventional
Baking time
heat heat

78
Baking Tables
Baking on more than one oven level
0:35–0:60
0:30–0:60
0:15–0:35
0:20–0:60
0:25–0:40
2:10–2:50
0:40–1:20
0:30–0:60
0:30–0:50
0:30–0:55
Cakes /cakes and
pastries on baking
sheet
2)
Pie / eclair
2)
Dry sponge cake with
crumble topping
2)
Biscuits
2)
Shortcrust biscuits
2)
Iced biscuits
2)
Cake mixture biscuits
2)
Cakes and pastries with
egg white, meringues
2)
Macaroons
2)
Yeast dough cookies
2)
Puff pastry cakes and
pastries
2)
Bread rolls
2)
Oven level
2/5
2/5
2/5
2/5
2/5
2/5
2/5
2/5
2/5
2/5
Temp. in °C
160–180
1)
140–160
150–160
140–150
160–170
80–100
100–120
160–170
170–180
1)
180–190
1)
Hot air
Recipe
Baking time in
hrs, mins.
1)
Preheat the oven.
2)
Switch off “rapid heat-up”.
Always count Oven levels from the bottom up.
Place the deep pan on level 5.

79
0:45–1:00
0:25–0:40
0:15–0:30
0:15–0:30
0:15–0:30
0:30–1:00
0:30–1:00
Baked pasta
Lasagne
Baked vegetables
Pizza baguette
Soufflé
Fish pie
Stuffed vegetables
Oven level
1
1
1
1
1
1
1
Temp. in °C
180–200
180–200
200–220
1)
200–220
1)
180–200
180–200
180–200
Conventional heat Baking time in
hrs, mins.
Table for strudel and baked dishes
1)
Preheat the oven.
Always count Oven levels from the bottom up.
Dish
Frozen
pizza
Baguettes
Fruit cake
base
Chips
Oven
level
3
3
3
3
Oven
function
Conventional
Heat
Conventional
Heat
Conventional
Heat
Convection
Heat
Temperature
Follow instructions
on pack.
Follow instructions
on pack.
Follow instructions
on pack.
200–220°C
Time
Follow instructions
on pack.
Follow instructions
on pack.
Follow instructions
on pack.
15–25 mins.
Baking tables for frozen ready–made dishes
Always count Oven levels from the bottom up.
Note: Turn chips 2 or 3 times when heating.
When heating frozen dishes, the baking tray may bend out of shape because
of the great difference in the temperature of the frozen food and the oven.
Trays normally return to their original shape once they have cooled down.

80
Baking tables
Baking tips
Results of baking
The cake base is
too light
Cake collapses
(turns lumpy,
soggy)
Cakes are too dry
Cakes are
browned unevenly
Baking time too
long
Possible cause
Wrong Oven level
Oven temperature too
high
Baking time too short
Mixture contains too
much liquid
Oven temperature too
low
Baking time too long
Baking temperature
too high and baking
time too short
Mixture unevenly
distributed
Temperature too
low
Solution
Use a dark baking tin or put the
cake one level lower down.
Set the temperature slightly
lower.
Set a longer baking time. The
baking time cannot be
reduced by setting a higher
temperature.
Use less liquid. Follow
instructions for dough mixing
times, especially when using
kitchen appliances.
Next time set a slightly higher
temperature.
Set a slightly shorter baking
time.
Set a slightly lower baking
temperature and a slightly
higher baking time.
Distribute the mixture evenly
over the baking tray/tin.
Next time set a slightly
higher temperature.

81
Roasting
When roasting, use the Fan grill( ), Conventional heat ( )
modes, or Speed roast( )mode. When using the Speed roast
( ) mode, the cooking time at the same temperature is reduced
by 20% in comparison with the Fan grill function and the convection
fan will cycle on and off.
TIP:
• Use heat resistant dishes when roasting (follow manufacturer’s
instructions).
• Stainless steel roasting pans are only of limited use, as they
reflect the heat to a very large extent.
• When using dishes with plastic handles, ensure that the handles
are heat resistant (follow manufacturer’s instructions).
• Large items for roasting or a number of items can be placed
directly on the deep pan or on the wire grill above the deep pan
(e.g. turkey, goose, 3~4 chickens, 3~4 knuckles of veal).
• Lean meat should be roasted in a roasting tray with a lid (e.g.
veal, braised beef, deep frozen meat). This keeps the juices in the
meat.
• For cooking crispy crusts or bacon, a casserole with no lid should
be used (e.g. pork, minced meat, lamb, mutton, duck, knuckle of
veal, chicken, poultry meat, roast beef, fillet of beef, game birds).
TIP:
• Clean the oven as soon as possible after use if you are roasting in
an open-topped tin. It is easier to remove fat splashes when the
oven is still warm, without using the pyrolytic self cleaning
function.
WARNING: Allow the oven to cool down enough to ensure there
is no risk of burning yourself.

82
Roasting
The table contains the required temperatures,roasting times and
Oven levels for various kinds of meat. The figures stated are
approximate figures only.
• We recommend cooking meat and fish weighing over 1 kg in the
oven.
• For lean meat and fish, use Conventional heat. For all other kinds
of meat we recommend Fan grill( ) mode.
• Add a little liquid into the baking tray or deep pan to prevent
roasting juices or fat from getting burned on.
• Turn the food over after about half or two thirds of the cooking
time.
TIP: For better roasting results,baste joints and poultry with
their own juices a number of times during the roasting process.

83
Roasting tables
Beef
(approx. 1kg)
Venison
(approx. 1kg)
Leg of pork
(approx. 1kg)
Rolled pork
(approx. 1kg)
Leg of lamb
(approx. 2kg)
Poultry
(approx. 1kg)
Poultry
(approx. 2kg)
Stuffed
Poultry
(approx. 4kg)
Whole fish
(approx. 1.5kg)
60~80
65~75
80~90
80~90
80~85
-
-
-
-
-
180
180
185
180~190
180
180~190
180~190
180~190
170~180
160~180
60~80
75~100
75~100
90~120
110~130
60~80
100~110
100~120
160~180
35~55
2
4)
2
4)
2
4)
2
4)
2
2
4)
2
2
2
2
4)
200
200~240
200
200~220
200
200~220
200~220
200~220
190~210
200~220
70~90
100~120
100~120
110~130
150
70~90
110~120
110~140
170~190
35~55
190
180
180~190
180~190
180
210
200
180~190
180~190
160~180
40~60
70~80
70~90
80~100
90~110
40~50
50~70
80~100
90~120
25~45
This table is intended as a guide only, individual tastes and cuts of meat will vary.
1) Fit the fat filter for roasting.
2) If pot roasting set the temperature 20°C higher.
3) Use the core temperature. Refer to the meat probe instructions.
4) Use the 4th level from the bottom when using Conventional heat.
5) Very rare:60~65°C, medium rare:65~75°C, medium:75~80°C, well done 80°C.
Roasting Table
Time
(mins.)
Oven
level
Fan grill
– (1)
Conventional
heat – (1)
Speed roast
– (1)
Core
Temp.
Food
Temp.
(°C) – (2)
Time
(mins.)
Temp.
(°C) – (2)
Time
(mins.)
Temp.
(°C) – (2)
(°C)
(1)(3)(5)

84
Grilling
For grilling, you have a choice of 4 different operating modes.
Large grill
For larger quantities of flat food for grilling, for top-baking in large
tins. Choose 1 of 3 power levels (1 low, 2 medium and 3 high), as
suitable for the food being grilled.
Small grill
For smaller quantities of flat food for grilling, for top-baking in small
tins. Choose 1 of 3 power levels (1 low, 2 medium and 3 high), as
suitable for the food being grilled.
Fan grill
For grilling larges pieces of meat or poultry, such as rolled roast or
turkey.
Speed grill
Use Speed grill function for rapid grilling.
In this mode, the halogen heating element is intermittently used on
and the cooking time is reduced by about 20%.
Note: When grilling, the oven door must be kept closed at all times.
As a basic principle, the oven should be preheated for 3 minutes!
Grilling dishes
Use the grill tray or the deep pan for grilling. Use the wire grill for
making toast. To catch dripping liquids, slide the baking tray or deep
pan in at Level 1 or 2.

85
Oven levels
Use levels 5 or 6 for grilling flat pieces of meat.
WARNING : exposed parts of the oven can become hot during
grilling. Keep children at a distance.
Using the grilling table
The grilling times are intended as approximate values only. The
actual times may vary depending on the quality of the actual meat
or fish.
Grilling is particularly suitable for cooking flat pieces of meat and
fish.
Turn the grilled food over about halfway through the cooking time.
Grilling table
Rissoles
Pork fillet
Grilling sausages
Beef or veal steaks
Fillet of beef
(1 kg approx.)
Toast
1)
Toast with topping
5
5
5
5
4
4
4
1st side
8–10 mins.
10–12 mins.
8–10 mins.
6–7 mins.
10–12 mins.
2–3 mins.
6–8 mins.
2nd side
6–8 mins.
6–10 mins.
6–8 mins.
5–6 mins.
10–12 mins.
2–3 mins.
–
1st side
6–8 mins.
8–10 mins.
6–8 mins.
4–6 mins.
8–10 mins.
1–2 mins.
4–6 mins.
2nd side
5–7 mins.
5–8 mins.
5–7 mins.
4–5 mins.
8–10 mins.
1–2 mins.
–
Large grill step 3 Speed grill
Food for grilling
Oven
level
1)
Wire grill or deep pan
Always count the Oven levels from the bottom up.

86
Defrosting
Use the "Defrost( )" operating mode to defrost food.
Defrosting dishes
• Remove the dish from its packaging, put it on a plate and place
the plate on the wire grill.
• Do not cover the dish with a plate or bowl, as this can
considerably extend the defrosting time.
• Do not use the liquid produced during defrosting for cooking the
dish to avoid the risk of salmonella. Ensure that the liquid
produced during defrosting is free to run off the food.
Oven levels
• For defrosting,use the wire grill on Level 1, or Level 2 for larger
dishes.
Defrosting table
The following table contains reference values for defrosting.
Dish
Chicken, 1000 g
Meat, 1000 g
Meat, 500 g
Trout, 150 g
Strawberries, 300 g
Defrosting time
(mins.)
100–140
100–140
90–120
23–35
20–30
Comments
Use the wire grill with the deep
pan. Turn the chicken after half of
the time.
Turn the meat after half of the time
or cover with tin foil.
Turn the meat after half of the time
or cover with tin foil.
Do not cover.
Do not cover.

87
Special functions
You can set your oven to low temperatures from 40°C and up. This
allows you to make yoghurt, for example, or to let dough rise.
How to make yoghurt
Dishes
Glasses or cups of 150 ml capacity which you cover with a lid or a
piece of tin foil.
Oven level
Place the wire grill on Level 4.
Preparation
1. Heat 1 litre of milk to 60–70°C.
2. Leave the milk to cool to roughly 40°C.
3. Stir 150g of natural yoghurt into the milk, and then pour the
mixture into the individual containers and cover.
4. Leave the individual containers on the wire grill for approx. 5–8
hours (until the yoghurt has reached a set consistency), mature
in the oven with Conventional heat elements set at 40°C.
How to raise yeast dough
Dishes
Use a heat-resistant bowl for the dough (40°C).
Oven level
Place the wire grill on Level 2.
Preparation
1. Put the dough in the bowl. Cover the bowl with a damp cloth and
place on the wire grill.
2. Switch on Conventional heat( ) mode at 40°C.
3. Leave the dough to rise until it has doubled in size.

88
Cleaning and care
WARNING: Switch the oven off before cleaning and allow to
cool.
Outside
Wipe the front of the appliance with a soft cloth using a mild
detergent.
• Do not use any caustic or abrasive cleaning materials.
• For aluminium front panels use a mild window cleaner and for
stainless steel front panels use the corresponding cleaner for
stainless steel.
Oven interior
Note!
Clean the appliance after use,as soon as it has cooled down. This
makes it easier to remove any deposits and they cannot get burnt
on.
• Switch the oven light on.
• Wipe down the oven with water and dishwashing liquid. Allow to
dry. Do not use any abrasive cleaners.
• Remove persistent deposits with a special oven cleaning product.
Important: When using a spray-on cleaner, it is essential to follow
the manufacturer’s instructions!
Do not clean the door seal by hand.
Accessories
Clean the accessories (wire grill, baking tray, etc.) after use and
allow to dry fully. If necessary, treat in advance to soften deposits.

89
Pyrolytic cleaning
WARNING: The surfaces of the oven become very hot during
Pyrolytic cleaning. Accordingly, keep children away
from the oven.
NOTE: before self cleaning, all accessories (wire grill, baking tray,
deep pan, grill tray) must be taken out of the oven. Before
proceeding, switch the oven off and allow to cool to an appropriate
level.
Before self cleaning, larger deposits should be removed from the
oven. Larger crumbs, fat and meat juices are flammable. These can
cause the oven to catch fire during the self-cleaning process.
1. Select and confirm the “Manual cook”.
2. Select “Pyrolytic cleaning” and press the Enter( ) key.
3. Depending on the degree of soiling, select and confirm the
cleaning level.
4. On completion, the programme automatically switches off and a
regular signal tone is heard.
5. Once the oven has cooled down, the ramaining deposits can be
wiped off with a damp cloth.
Length of self cleaning operation:
Setting 1: approx. 75 minutes
Setting 2: approx. 95 minutes
Setting 3: approx. 120 minutes
Important: During self cleaning, the oven light is not switched on.
For reasons of safety, the oven door is locked shut at a temperature
of 250°C.
It is not unlocked until the temperature falls to 240°C.

90
Oven light
Risk of electric shock!
• Switch the oven off before replacing bulbs.
• Disconnect the appliance from the electricity supply
Note : To protect the bulbs and glass cover, a soft cloth should be
placed on the oven floor.
Replacing the oven light / cleaning the glass
cover
Step. 1
Remove the glass cover with the
aid of a narrow, flat implement(e.g.
tea-spoon) and clean it.
Step. 2
Remove the defective halogen
bulb by lifting it out.
Then replace it with a new
one(20W, 12V, OSRAM).
Note : Always use a cloth or tissue
to remove or fit a halogen
light to avoid it burning on
fatty deposits.
Step. 3
Refit the glass cover.
Note : Make sure that all parts are
correctly in place.
Both right and left side oven lamp
can be replaced in an identical
manner.

91
Oven door
Removing the oven door
Step. 1
To remove the oven door for
easier cleaning, open the door
fully.
Step. 2
To release the locking
clamps on the hinges turn
inner area of clamps
upwards and outer area of
them downwards as
illustrated.
Step. 3
Then lift the door upwards as far
as it will go.
Note : Do not attempt to take the
door off the hinge guides
when it is in a horizontal
position. The guides will
close, and damage the
appliance.
Step. 4
Hold the door securely at both
sides and lift upwards off the hinge guides.
Locking clamp
1
2

92
Oven door
Rehanging the oven door
Step. 1
Hold the door securely at
both sides and carefully
fit it back onto the hinge
guides.
Note : Make sure that the
door goes back on
straight.
Step. 2
Turn inner area of clamps
downwards and outer
area of them upwards as
far as they will go into a
horizontal position. Make
sure that the notches on
the locking clamps hook
into the slots on the door
as illustrated.
1
2
1

93
Dismantling the oven door
The oven door is fitted with four glass panels, mounted one
behind the other. The inner glass panels can be removed for
cleaning.
Note : The following steps must be performed only after the
oven door has been removed. Place the door on a soft
and even surface with the handle facing down to protect
it from breakage and to prevent it getting scratched.
Step. 1
Remove the two screws at
the right and left-hand side
of the door and pull the top
cover above the glass
panels forward.
Step. 2
Lift the innermost pane up and out from the door carefully. Then
remove the insulator.
1
1
2
Door top cover
insulator

94
Oven door
Step. 3
Lift the second pane up and
out. Then remove the spacer
from the Door.
Note : Spacers are located
next to the mount
bracket to keep the
Individual door panels in
position.
Step. 4
Now the third pane can be
removed.
Handle them very carefully to
avoid the risk of breakage.
Spacer
Insulator
Pane #1
Pane #2
Pane #3
Pane #4
Door top cover
mount bracket

95
Refitting the glass panels
Step. 1
Refit the third pane and spacer.
Then refit the second pane
carefully.
Step. 2
Refit the black printed pane.
The print should face in
towards the middle pane.
Note : Individual panes must
be located correctly in their
retainers.
Step. 3
Finally refit the top cover by securing the screws onto the door.
Note : Clean the glass panels with a mild detergent. Do not use
harsh abrasive cleaners or sharp metal scrapers to clean
the oven door glass since they can scratch the surface,
which may result in shattering of the glass.

96
Troubleshooting
Fault
The oven does not
heat up.
The oven does not
heat up even after
function and
temperature are set.
The clock symbol
flashes in the
display.
The oven lighting is
not operating.
The meat probe
does not work.
Touch control
function is poor to
respond or
intermittent.
Possible cause
The oven is not
switched on.
The clock is not set.
The required settings
have not been set.
Fault in the mains
power supply. The
protective electrical
system or the fuses
have been tripped.
An automatic programme has been set to
run at a later time.
There has been a
power failure.
The oven bulb is
faulty.
The meat probe not
inserted correctly, or
is faulty.
Excessive grease or
moisture build up on
touch panel.
Solution
Switch the oven on.
Set the clock.
Check the settings.
Check out fuses
and the protective
system. If the fault
recurs, consult a
qualified electrician.
Cancel the settings
or set them again.
Set the current time
on the clock display.
Change the oven
bulb. See “Oven
light” for details.
Check the meat
probe socket.
Clean touch panel
with warm soapy
water and dry off
with a clean soft
cloth.

97
If the fault cannot be rectified by the above measures, contact
your local Customer Service Centre.
Note! If faulty,the appliance must not be used. If a fault occurs, the
appliance must be isolated by removing the mains plug or switched
off by removing the fuse.
The appliance must only be repaired by a specially trained and
qualified electrical professional only. Repairs carried out
improperly may result in considerable damage and void all
warranties.
Caution! Repairs to the appliance must be carried out by a
specially licensed technician only! Considerable danger may
result from incorrect repairs and void all warranties.
Caution! Do not use the appliance if damaged. In the event of a
fault or failure, switch off at the mains.In the event of a fault, visits
by technicians from Customer Service or dealer may not be
covered by guarantee, even during the warranty period, if the cause
of failure is the result of abnormal customer use.

98
Error codes
Error Code
Oven
thermistor
short error
Oven
thermistor
open error
Door locking
system error
Meat probe
open error
Meat probe
short error
Possible Cause
Sensor(Thermistor) is
short.
Sensor(Thermistor) is
open.
The door will be locked
as if the oven is in selfcleaning mode.
Door Locking system is
in troubled.
Meat probe is not
inserted.
Meat probe is defective.
Solution
Please contact the LG
service center.
Please contact the LG
service center.
Shut off the power supply
and reconnect the power.
(wait a few minutes)
If the door is unlocked,
you can use the oven
normally. But if the fault
message appears again,
please contact the LG
service center.
Insert the meat probe
plug into the socket or
switch the oven off then
switch it on again.
Replace the meat probe.
But if the fault message
appears again, please
contact the LG service
center.

99
Technical specifications
Mains connection 220-240V~ 50Hz
MAX power consumption 3500 watt
Oven installation dimensions
Height min. 600
Width min. 560
Depth min. 556
Oven interior dimensions (mm)
Height x width x depth 330 x 454 x 415
Volume (useful capacity) 65L

100
Technical specifications
Regulations, standards and directives
The appliance complies with the following standards:
• EN 60335–1 and EN 60 335–2–6 (Safety of electrical appliances
for use in the domestic household and for similar purposes).
• EN 60335 or DIN 44546 / 44547 / 44548 (Operating
characteristics of electrical domestic cooking appliances, hot
plates, ovens and grills).
• EN 55014–2 / VDE 0875 Part 14–2
• EN 55014-1 / VDE 0875 Part 14-1 / 1999–10
• EN 61000–3–2 / VDE 0838 Part 2
• EN 61000–3–3 / VDE 0838 Part 3 (Basic requirements in relation
to electro-magnetic interference (EMI))
The appliance complies with the following EU directives:
• 73/23/EEC issued 19.02.1973 (Low voltage), including
supplement 90/683/EEC
• 89/336/EEC issued 03.05.1989 (EMI), including supplement
92/31/EEC
• 93/68/EWG (Identification marking)
 Loading...