

LG LB645479T Owner's Manual

ENGLISH
ČESKÝ
SLOVENSKÝ
OWNER'S MANUAL
BUILT IN OVEN
Please read this instruction manual carefully before using the oven.
This will ensure that you know the important safety information and
the correct operation of the oven. Please keep this manual in a easily
accessible place and refer to it anytime. Please transfer this manual to
new owner if you sell the oven.
LB645479T
www.lg.com
MFL30482207_00

Contents
Important safety instructions ............................................................... 4~5
Safety .................................................................................................... 6~20
Appliance description ............................................................................. 21
Control panel ..................................................................................... 22~23
Accessories .........................................................................................24~26
Telescopic runners .................................................................................... 27
Display symbols .................................................................................28~29
Setting the clock(24Hr Clock Display) ............................................. 30~33
Initial cleaning .......................................................................................... 34
Operation ............................................................................................ 35~40
Switching on the oven ............................................................................ 35
Changing the temperature, grill levels or duration time .......................... 35
Switching off the oven ............................................................................ 36
Child lock ................................................................................................. 37
De-activating the lock system .................................................................. 37
Rapid heat-up ......................................................................................... 37
Canceling the “rapid heating up” ............................................................. 38
Safety cut-out ......................................................................................... 38
Baking dishes ...........................................................................................38
Soft Closing ..............................................................................................38
Programming the overall cooking time ................................................... 39
Combining overall cooking time and end of cooking time ...................... 40
Easy Clean mode ............................................................................... 41~46
Manual cook mode .............................................................................47~54
Functions .......................................................................................... 47~50
Switching the oven on (Example : Convection heat) ............................... 51
Switching the oven on Example : Large grill) .......................................... 52
Switching the oven on (Example : Defrost) ............................................ 53
Defrosting table ........................................................................................54
Auto cook mode ................................................................................ 55~57
Functions .................................................................................................55
Switching the oven on ....................................................................... 56~57
2

Setting mode ...................................................................................... 58~63
Functions ................................................................................................ 58
Enter the Setting mode .......................................................................... 59
Changing the language ........................................................................ 59
Changing the clock ................................................................................. 60
Heating-up phase ................................................................................... 60
Oven lighting .......................................................................................... 61
Sound ..................................................................................................... 61
Automatic start ....................................................................................... 62
Clock display .......................................................................................... 63
Auto cook table .................................................................................. 64~67
Fish ................................................................................................... 64~65
Meat ................................................................................................. 64~65
Potato products ................................................................................ 66~67
Poultry and game ............................................................................. 66~67
Pizza ................................................................................................. 66~67
Baking ................................................................................................. 68~69
Baking tables ..................................................................................... 70~74
Roasting ............................................................................................. 75~76
Roasting tables ........................................................................................ 77
Grilling ................................................................................................ 78~79
Special functions ..................................................................................... 80
Cleaning and care .................................................................................... 81
Smart features .................................................................................... 82~85
Oven light ................................................................................................. 86
Oven door ........................................................................................... 87~90
Troubleshooting ...................................................................................... 91
Error codes ............................................................................................... 92
Technical specifications ......................................................................... 93
Installation instructions ........................................................................... 94
Customer service & spare parts ............................................................ 95
EasyClean Quick Reference Guide ................................................ 96~101
ENGLISH
3
Important safety instructions
Read and follow all instructions before using your
oven to prevent the risk of fire, electric shock,
personal injury, or damage when using the appliance.
This guide does not cover all possible conditions
that may occur. Always contact your service agent
or manufacturer about problems that you do not
understand.
This is the safety alert symbol.This symbol
alerts you to potential hazards that can cause
death or serious injury. All safety messages will
follow the safety alert symbol and either the
word “WARNING” or “CAUTION”. These words
mean:
WARNING
hazards or unsafe practices which could cause
serious bodily harm or death.
CAUTION
hazards or unsafe practices which could cause
bodily injury or property damage.
This symbol will alert you to
This symbol will alert you to
4
• This oven must only be installed by a licensed
electrician.
• The installer is responsible for the correct electrical
connection of the appliances and the observance of
the relative safety codes and recommendations.
• Rating plate is located on the left side of the door or
on the back cover.
Electrical Safety
• This appliance must be connected to the mains
power supply by a specially licensed electrician only.
• Electrical leads and cables should not be allowed to
touch the oven.
ENGLISH
WARNING
• The oven should be connected to the
electricity supply by means of a proper circuit
breaker or fuse. Never use multiple plug
adapters or extension leads.
• This connection may be achieved by having
the plug accessible or by incorporation a
switch in the fixed wiring in accordance with
the wiring rules.
- Failure to do so can result in a fire.
5
Safety
Damage
WARNING
• If the oven has been damaged in transport, do
not connect it.
• In the event of a fault or damage to the
appliance, do not attempt to operate it.
• Repairs of the appliance should be carried out
by a licensed technician only. Wrong repairs
may result in considerable danger. If you need
repairs, contact an LG Service Center or your
dealer.
• If the supply cord is damaged, it must be
replaced by the manufacturer, its service
agent or similarly qualified persons in order to
avoid a hazard.
• Never remove the outer casing from the oven.
If the oven is faulty and needs servicing or
you are in doubt about its condition, unplug it
from the wall socket and contact the nearest
after-sales service centre.
- Failure to do so can result in malfunctioning and
death or electrical shock when using.
6

Maintenance
WARNING
• The power supply of the appliance should
be turned off when it is being repaired or
cleaned.
• Be careful in connecting electrical appliances
to sockets near to this appliance.
• Do not use high-pressure water cleaners
or steam jet cleaners for electrical safety
reasons.
• Do not use harsh abrasive cleaners or sharp
metal scrapers to clean the oven door glass
ENGLISH
since they can scratch the surface, which may
result in shattering of the glass.
• The appliance should be powered down
before replacing the lamp to avoid the
possibility of electric shock.
- Failure to do so can result in malfunctioning and
death or electrical shock when using.
7

Safety
Safety during Operation
WARNING
• Do not touch interior parts until it has cooled
down sufficiently.
- When the oven operates, the interior parts will
be very hot and burns may occur.
WARNING
• Accessible parts may become hot during use.
Young children should be kept away.
• The appliance is not intended for use by
young children or infirm persons without
supervision.
• Young children should be supervised
to ensure that they do not play with the
appliance.
• Children should be kept at a safe distance
when the oven operates.
8
WARNING
• Children should be kept at a safe distance
until the oven has cooled down after cooking.
• This appliance is not intended for use by
persons (including children)with reduced
physical, sensory or mental capabilities,
or lack of experience and knowledge,
unless they have been given supervision or
instruction concerning use of the appliance
by a person responsible for their safety.
• The appliance and its accessible parts
become hot during use. Care should be taken
ENGLISH
to avoid touching heating elements. Children
less than 8 years of age shall be kept away
unless continuously supervised.
9

Safety
Safety during Operation
WARNING
• This appliance can be used by children
aged from 8 years and above and persons
with reduced physical, sensory or mental
capabilities or lack of experience and
knowledge if they have been given
supervision or instruction concerning use of
the appliance in a safe way and understand
the hazards involved. Children shall not
play with the appliance. Cleaning and user
maintenance shall not be made by children
without supervision.
• Never block the air vents
- The oven may overheat and automatically switch
itself off. It will remain inoperable until it has
cooled sufficiently.
• Do not cover or obstruct the ventilation with
cloths or paper.
- The cloths or paper may catch fire as hot air is
emmited from the oven.
• Do not spill or pour water in the vents.
10
WARNING
• When in use, the oven interior surfaces
become very hot! Care should be taken to
avoid touching heating elements inside the
oven.
- These walls may be hot enough to burn skin
even after cooking is finished, though they do
not appear to be so, avoid placing hands and
arms inside the oven.
• The oven surfaces will become hot when the
appliance is operated at a high temperature
for a long period of time.
ENGLISH
• The oven door must be closed when cooking
is performing.
• When cooking, take care when opening the
oven door as hot air and steam will escape
rapidly.
- The hot air or steam released may cause
scalding.
11
Safety
Safety during Operation
WARNING
• When cooking dishes that contain alcohol,
the alcohol can evaporate due to the high
temperatures. The vapor cancatch fire if it comes
into contact with a hot oven part.
• Never store flammable or easily deformable
materials in the oven to reduce the risk of fire in
the oven cavity.
• Should an oven fire occur, leave the oven door
closed and turn the oven off. If the fire continues,
throw baking soda on the fire or use a fire
extinguisher. Do not put water or flour on the fire.
- Flour may be explosive and water can cause a
grease fire to spread and cause personal injury.
• Use oven gloves when removing a dish from the
oven.
- The trays and racks are hot.
• The oven must be secured by screwing a
minimum of 2 thin general purpose self tapping
screws into the 2 upper mounting holes located
on the outer side facias, into the cabinetry. Check
if the oven is installed properly.
12
WARNING
• Do not store or operate this equipment
outdoors. Do not use this product near water
(for example, near a kitchen sink, in a wet
basement, or near a swimming pool, and the
like)
• Be sure all packing materials are removed
from the appliance before operating it.
• Do not use this oven for commercial
purposes.
- This oven has been designed only for the
ENGLISH
cooking of household foods and for Domestic
use.
• Do not use the oven door as a rest table for
hot items or cookware.
• Never use your appliance for warming or
heating the room.
• Do not step, lean, or sit on the door of the
oven.
- These can cause the oven to tip resulting in
burns or serious injuries.
13

Safety
Safety during Operation
WARNING
• Do not touch an electric cord with a wet hand.
- It is very dangerous. You can get an electric
shock.
• Be careful not to damage the power cable.
• Do not operate this appliance if it has a
damaged power cable or plug.
• Do not immerse power cable or plug in water
and keep power cable away from heated
surfaces.
• Do not let cord hang over edge of table or
counter.
14
WARNING
• Don’t spread aluminium foil on the bottom of
the oven and do not place any baking trays or
tins on it.
- The aluminium foil blocks the heat, which may
result in damage to the enamel surfaces and
cause poor cooking results and this will result in
poor baking by lack of heat circulation.
WARNING
ENGLISH
• Please ensure cooking times are correctly set.
- Over cooking may result in the food catching fire
and subsequent damage to your oven.
15
Safety
Safety during Operation
WARNING
• Don’t pour water into the oven bottom when it
is hot.
- This could cause damage to the enamel surface
and deform the base.
• When cooking very moist cakes, use the deep
pan(or baking tray).
- Dripping fruit juices from the baking tray will
leave stains, which become indelible.
• Frozen foods such as pizzas should be
cooked on the wire grill.
- If the Baking tray is used, it may become
deformed due to the great difference in
temperature.
• Do not heat unopened food containers.
- Build-up of pressure may cause the container to
burst and result in injury.
16

WARNING
• Do not use the oven door as a rest table
under any circumstances.
• Be careful when you remove the door. The
door is heavy.
• Do not use the appliance as a storage
surface.
• Do not let sparks or open flames to come in
contact with the appliance when you open
the door.
• Always cook with the oven door closed.
ENGLISH
• Be careful when you remove or install the
accessories.
• Remaining fat or food in the appliance can
cause fire.
• Do not change the specification of this
appliance.
• Internally the appliance becomes hot when
in operation.
• Do not touch the heating elements that are
in the appliance.
17

Safety
WARNING
• Do not close or open oven door by foot
excessively.
• Do not obstruct vent hole with tissue.
• Do not put live animal to dry the wet.
• The appliance must not be installed
behind a decorative door in order to avoid
overheating.
18

Disposal
CAUTION
• Your new oven has been correctly packaged
for transportation. Remove all of the
packaging material before putting the
appliance into use.
• The packaging material can be completely recycled.
You can obtain addresses for environmentallyfriendly disposal operations from your local City
Council.
• If you wish to store your oven away temporarily,
ENGLISH
choose a dry, dust-free place. Dust and damp may
adversely affect the working parts in the oven.
19
Safety
Used appliances
WARNING
Used appliances must be rendered unusable prior
to disposal so that they no longer present a risk.
To achieve this, disconnect from the mains supply
and remove the power supply cable.
For the protection of the environment, used
appliances must be Disposed of property.
• The appliance must not be disposed of along with
normal domestic waste.
• Your local City Council will inform you of times for
uplifting special waste or identify public disposal
facilities for you.
20
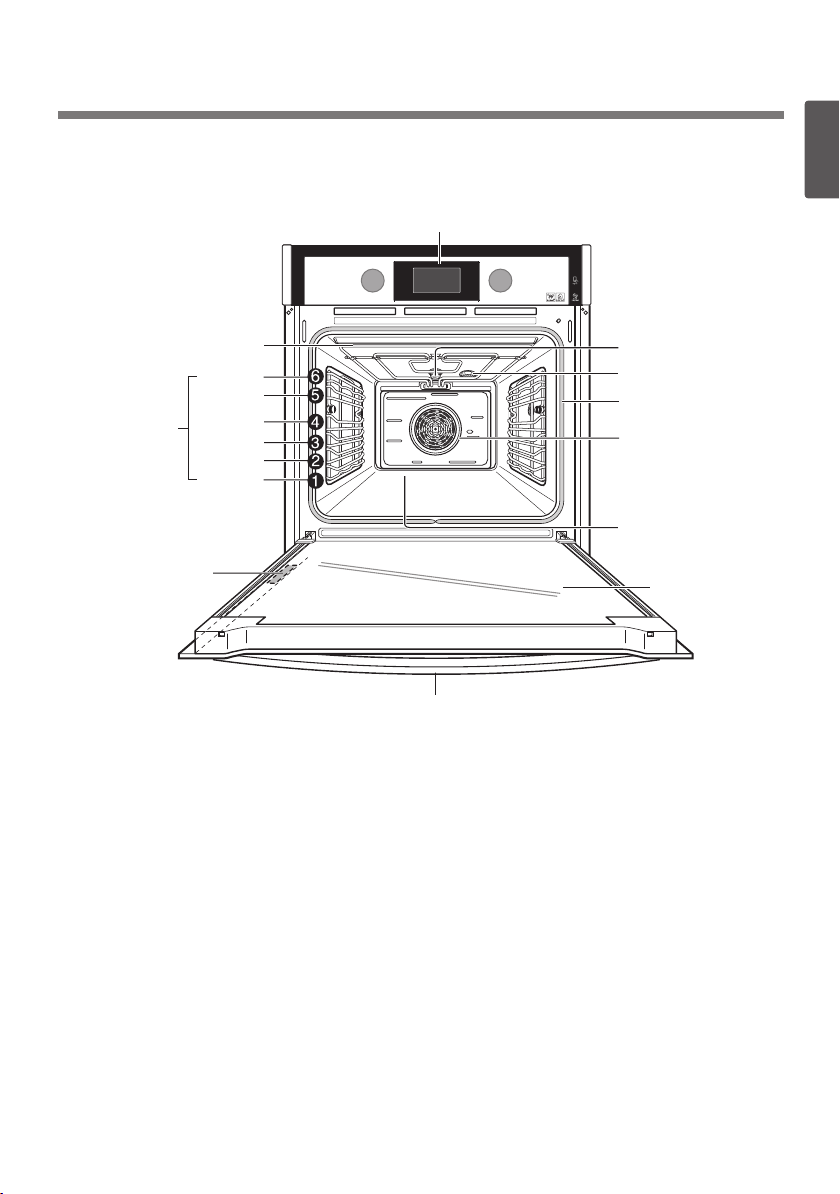
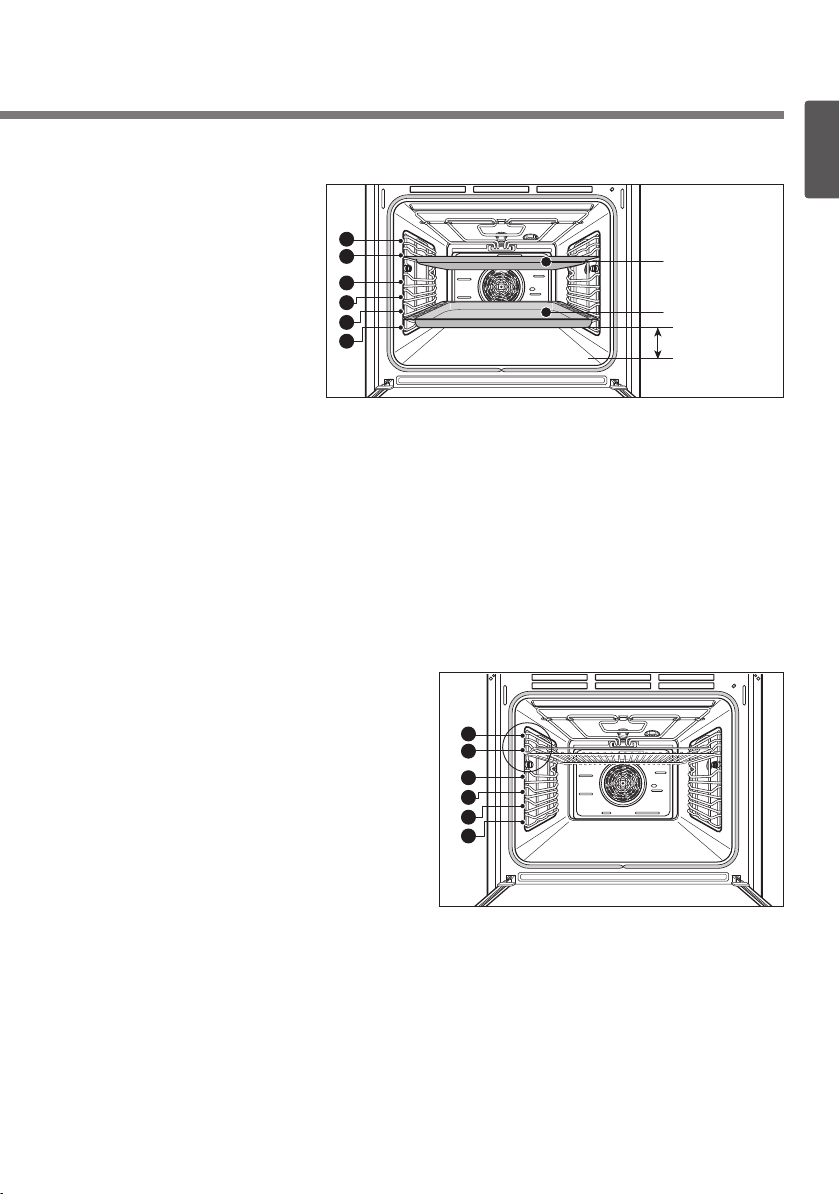
Appliance description
Overview
Control panel
Top-heating and grill
heating element
Level 6
Level 5
Side runners
Level 4
Level 3
Level 2
Level 1
ENGLISH
Oven light
Air outlet
Door seal
Rear wall heating
element
Oven cavity
Rating label
Door handle
NOTE : The above picture may be
different with actual product.
Full glass door
Oven levels are numbered from the bottom up.
The 5 and 6 levels are mainly used for grill functions. Always grill
with the door closed.
Grilling must be operated with the door closed.
The cooking tables throughout these operating instructions give you
suggested oven settings, however you can change these to suit
yourself.
NOTE : The rating label is located at the left-hand inner edge of the
door or front-side of the oven.
21
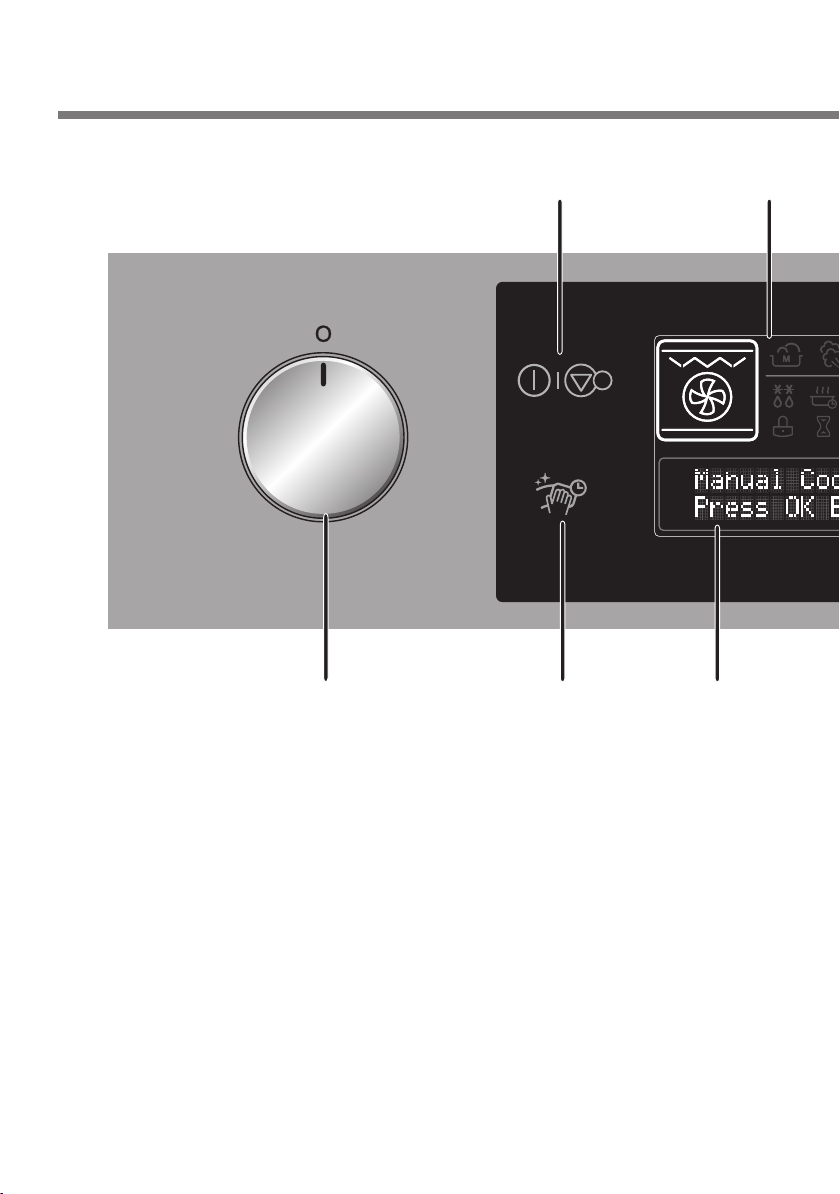
Control Panel
1357
42
1. Function dial
2. Power/Cancel key
3. EasyClean key
4. Icon area
5. Text area
22
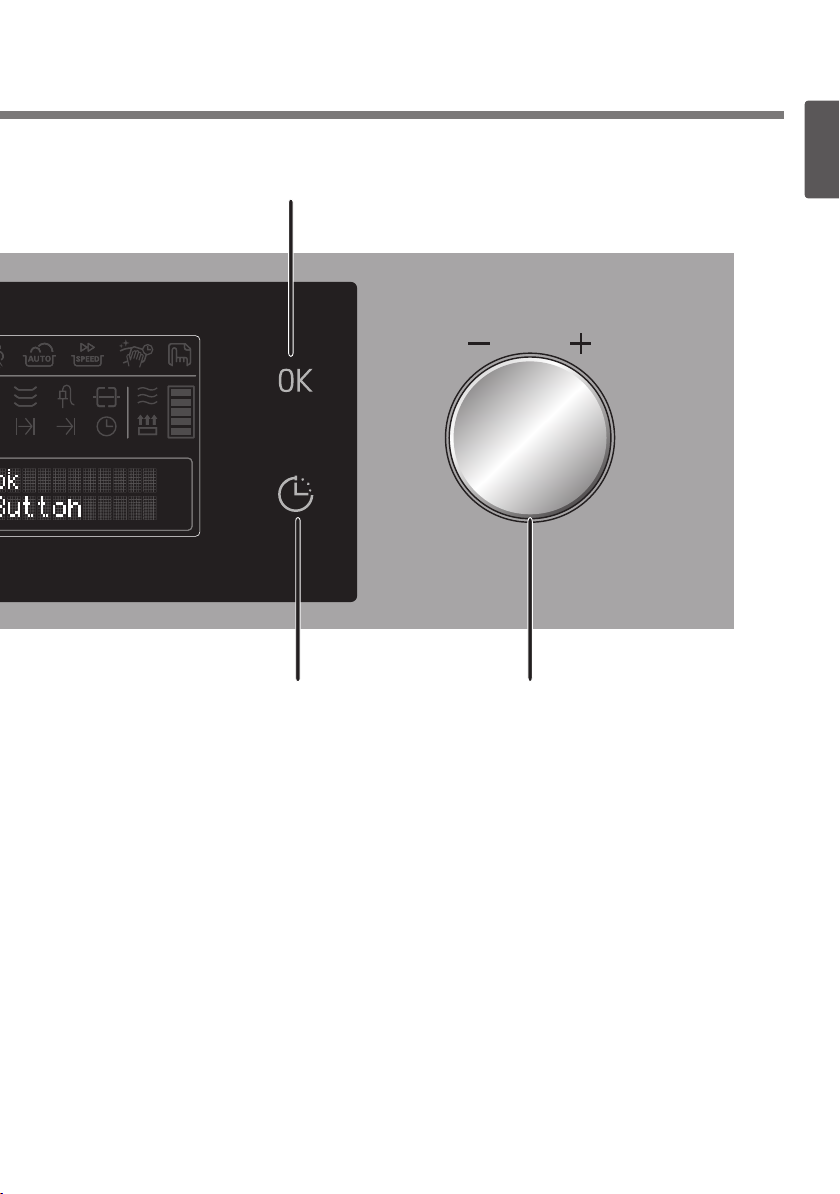
6
8
ENGLISH
6. OK key
7. Time key
8. Adjustment dial
23
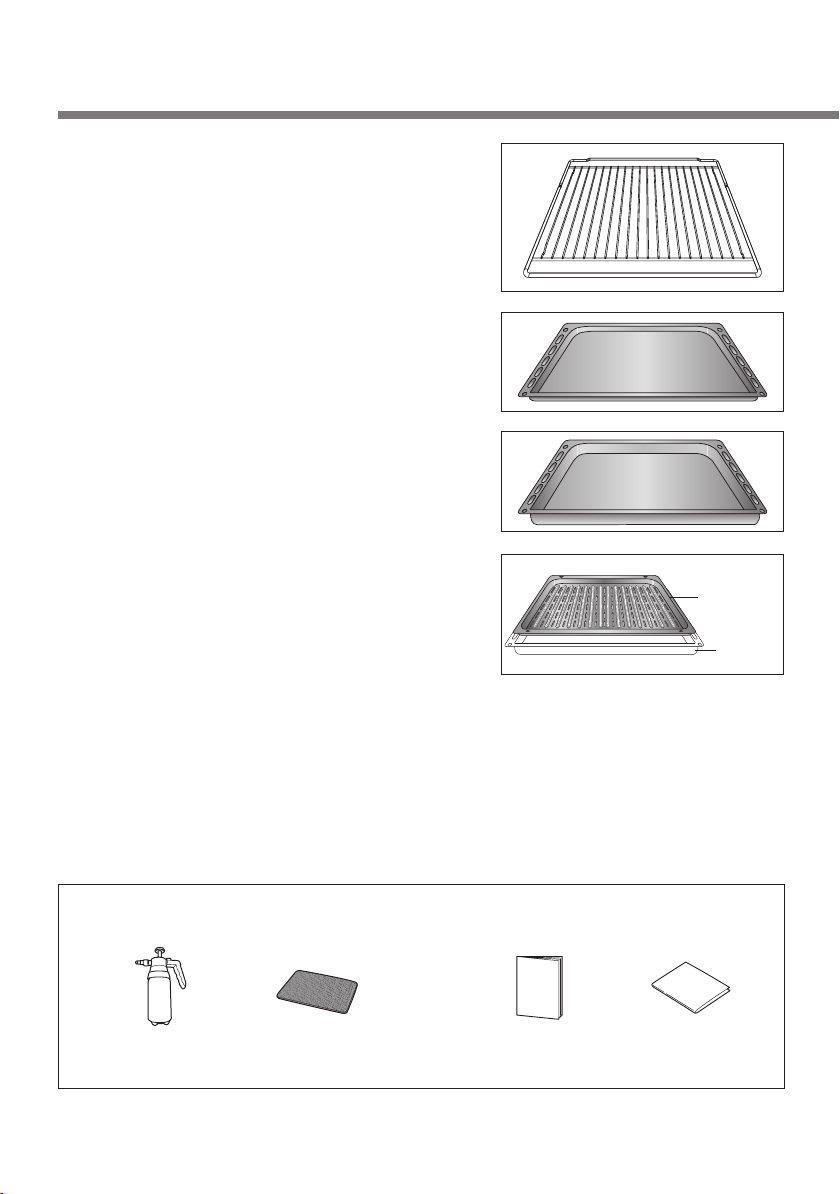
Accessories
Wire grille
For dishes, baking tins, grilling and
roasting tins.
For grilling meat, place the wire grille on
the upper level above the deep pan.
Baking tray
For cakes, sponges and biscuits.
Deep pan
For moist cakes, for roasting and for
catching roasting juices or fat.
Grill tray
To be placed on top of the deep pan.
Dripping fat is caught in the deep pan
when grilling meat.
Grill tray
Deep pan
NOTE : Included accessories
may differ depending on the
product.
NOTE: When you cook meat & poultry, you have to pour enough
water into the tray to prevent smoke generation. Please refer
to roasting and autocook mode section for more information.
Accessories for EasyClean Manual
Sprayer (1ea) Owner's manual
Scouring Pad (1ea)
Installation manualNon-scratch
24
Tips on using the tray and wire grille
Ensure that the tray and
wire grille are properly
fitted onto both sides
of the desired level.
Take particular care
when removing finished
6
5
4
3
2
1
Baking tray
Deep pan
gap 2cm
dishes and meals from
the oven!
Use a suitable cloth pot
holder or oven gloves.
If you place trays on the oven floor, the resulting build-up of heat
can damage the surface of the oven. For this reason, there must
always be a minimum gap of 2cm between the accessories and the
oven floor.
Fitting the wire grille, baking tray and deep pan
Slide the tray or wire grille in at the desired level.
The oven levels are numbered
from the bottom up to the top.
6
5
4
3
2
1
ENGLISH
25
Accessories
Using the wire grille
The wire grille is equipped with
a mechanical safety lock which
prevents them from being taken
out accidentally. To insert the wire
grille correctly, check that the lock is
facing downwards (as shown in the
illustration below). To take it out, lift
the front edge of the wire grille slightly
while sliding it out on the side runners.
The mechanical lock must always face the back of the oven.
TIP: Insert wire grille and trays fully into the oven until they come to
a stop.
26
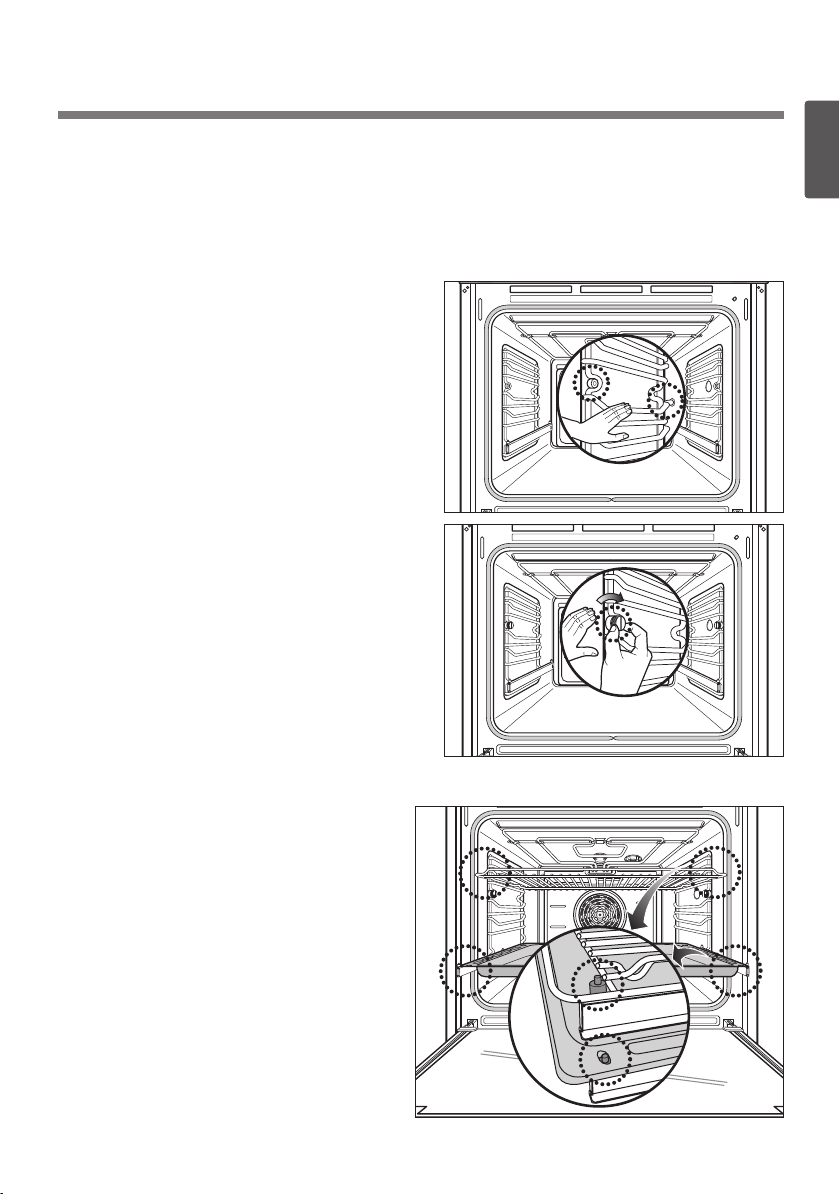
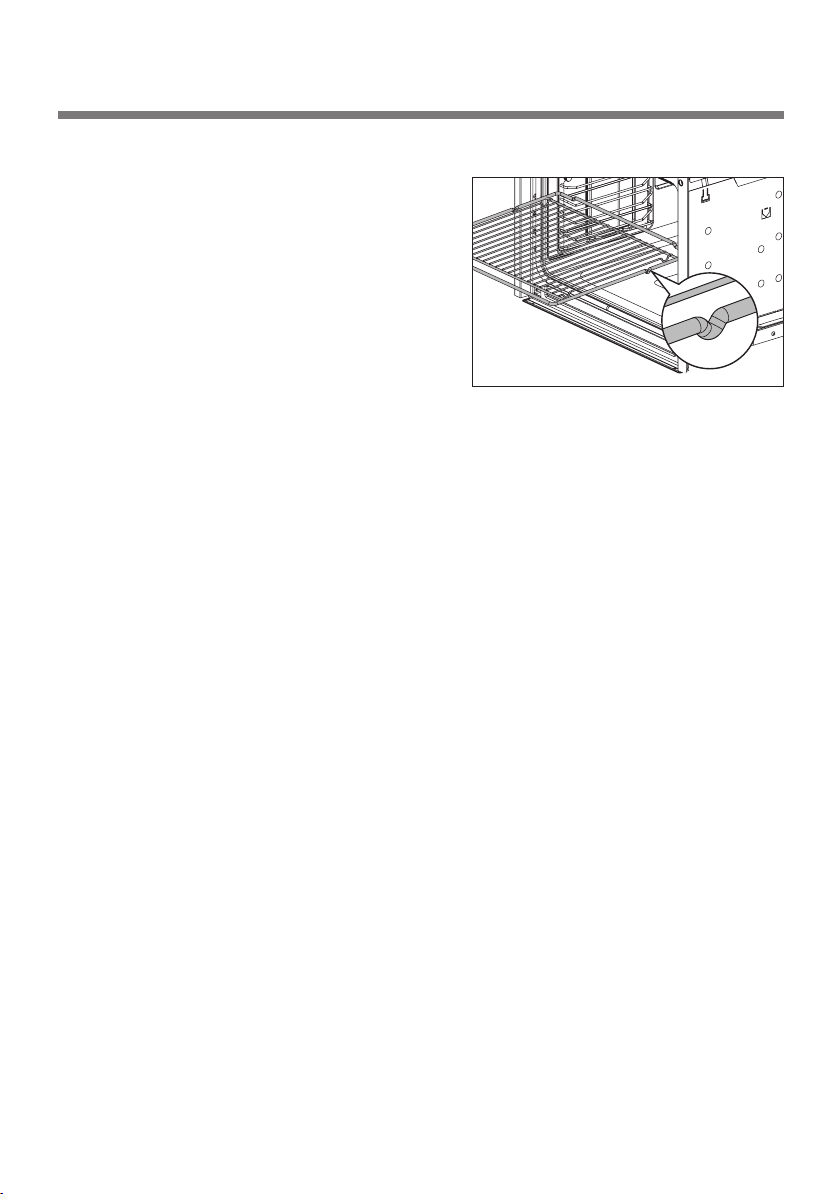
Telescopic runners
Attaching the telescopic runners
Before using the oven for the first time, attach the telescopic runners
as per the following procedures.
1. Put the inserting bar of the side
telescopic runner into the hole.
2. Align the front recess with the
front screw hole. Insert and
fasten the screw clockwise.
ENGLISH
3. Attach the other telescopic runner in the same way.
4. The baking tray and Wire
grille should be positioned
accurately on the upright pins
of the telescopic runners.
An unstable coupling between
the baking tray and the
telescopic runners may cause
the trays to drop or food to fall
onto the oven floor.
27
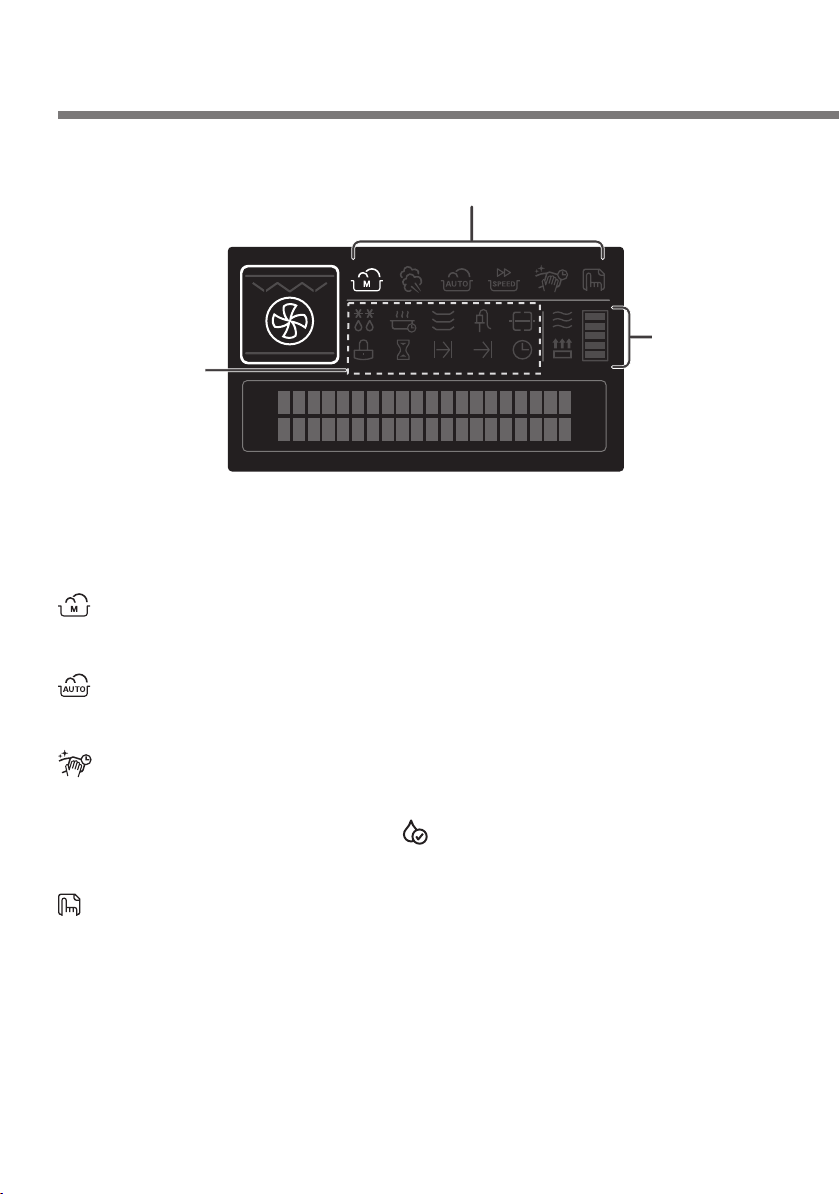
Display symbols
Menu icon
Manual cook / Auto cook /
EasyClean / Settings
Indicator(Working icon)
Indicator(Function icon)
Defrost / Keep warm /
Warming dishes / Lock /
Timer / Overall cooking /
End of cooking / Clock
C o n v e c t i o n h e a t
1 5 0 ˚ C 0 0 h : 0 0 m
Menu icon
Manual cook
Lights up when the Manual cook mode is being set or displayed.
Cooling /
Rapid heat up /
Residual heat
Auto cook
Lights up when the Auto cook mode is being set or displayed.
EasyClean
Lights up when the Cleaning mode is being set or displayed.
NOTE : Depending on the product, icon may represent EasyClean
mode.
Settings
Lights up when the Settings mode is being set or displayed.
28
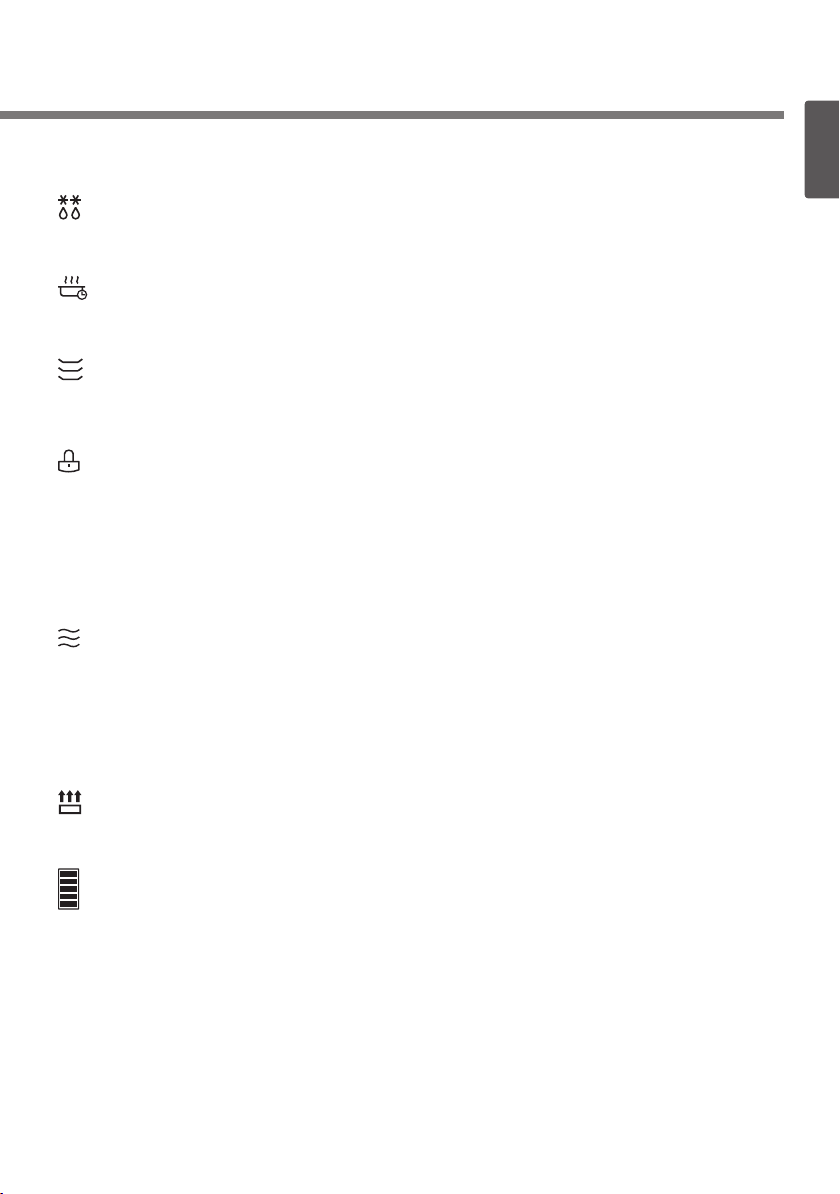
Indicator (Function icon)
Defrost
Lights up when the Defrost function is being set or displayed.
Keep warm
Lights up when the Keep warm mode is being set or displayed.
Warming dishes
Lights up when the Warming dishes mode is being set or displayed.
Lock
Lights up when the Child lock is set.
Indicator(Working icon)
Cooling indicator
Lights up when the Cooling fan operates and whilst residual
temperature remains in the oven when it is switched off after
cooking, in conjunction with a 'Residual heat' indication on the
display.
ENGLISH
Rapid heat up
Lights up when the Rapid heat up function is operating.
Temperature Progress Indicator
This icon display increasing gradients until the temperature reaches
the correct set value.
29
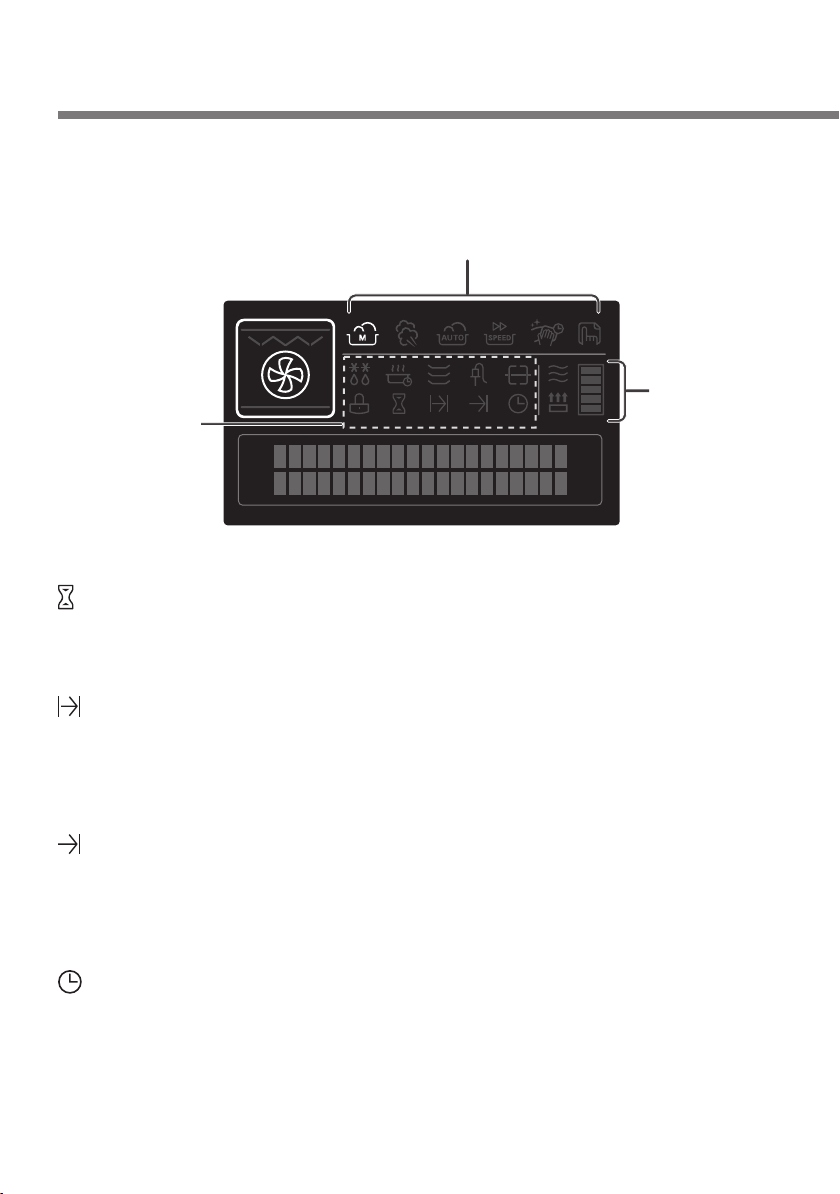
Setting the clock (24Hr Clock Display)
Clock functions and symbols
Menu icon
Manual cook / Auto cook /
EasyClean / Settings
Indicator(Working icon)
Indicator(Function icon)
Defrost / Keep warm /
Warming dishes / Lock /
Timer / Overall cooking /
End of cooking / Clock
C o n v e c t i o n h e a t
1 5 0 ˚ C 0 0 h : 0 0 m
Timer
Lights up when the function timer is activated (e.g. minute minder
when boiling eggs).
Cooling /
Rapid heat up /
Residual heat
Overall cooking time
Lights up when the overall cooking time is being set or displayed.
The oven switches off automatically after the cooking time set has
expired.
End of cooking time
Lights up when the point in time set for the end of the cooking /
baking time is set or displayed. The oven switches off automatically
at the stipulated time.
Clock
Lights up when the time is being set, changed or displayed.
30
 Loading...