

LG LB563B Users manual

Contents
Introduction ...........................................................A1
Connecting the Monitor.........................................A2
Location and Function of Controls........................A3
Control Panel Function..........................................A4
On Screen Display (OSD) Control Adjustment ....A5
On Screen Display(OSD) Selection
and Adjustment .....................................................A6
Video Memory Modes ...........................................A8
Troubleshooting .....................................................A9
Specifications .......................................................A10
Einleitung................................................................B1
Anschließen............................................................B2
Ort und Funktion der Bedienungselemente ..........B3
Bedienungselemente der Bildkontrolle..................B4
On Screen Display (OSD) Anpassung ...................B5
OSD Einstellung und Auswahlsymbole .................B6
Videospeichermodi ................................................B8
Störungen................................................................B9
Produktbeschreibung...........................................B10
Introduction ...........................................................C1
Branchement du Moniteur ....................................C2
Nomenclature et Fonctions ...................................C3
Fonctions du Paneau de Commande.....................C4
Réglage des Commandes Affichage Écran.............C5
Options de sélection et de Réglage
OSD (affichage écran) ..........................................C6
Mise en Mémoire de Modes Vidéo........................C8
Quelques Conseils en Cas D’incident....................C9
Spécifications D'entree........................................C10
Introduzione ..........................................................D1
Collegamento del Monitor ....................................D2
Posizione e Funzione dei Conando di Controllo ..D3
Funzione del Pannello di Controllo.......................D4
Controllo Regolazione On Screen Display (OSD)
....D5
Elementi di Selezione e Regolazione dell'OSD.....D6
Modalità di Memoria Video..................................D8
In Caso di Problemi ...............................................D9
Specifiche.............................................................D10
Introducción ...........................................................E1
Conectando del Monitor ........................................E2
Ubicacion y Funcion de los Controles...................E3
Función del Panel de Control.................................E4
Ajuste del Control de Exhibición en Pantalla (OSD)
.......E5
Ajuste del OSD y Selección de Elementos.............E6
Modos de Memoria de Video.................................E8
Sugerencias para Localizar las Fallas......................E9
Especificaciones....................................................E10
Introdução...............................................................F1
Conectando o Monitor...........................................F2
Posição dos Controles e Descrição........................F3
Funções do Painel de Controle ..............................F4
Ajuste On Screen Display(OSD)............................F5
Ajustes OSD e Itens de Seleção .............................F6
Modos de Memória de Vídeo.................................F8
Resolvendo Problemas............................................F9
Especificações.......................................................F10
Inleiding .................................................................N1
De Monitor Aansluiten..........................................N2
De plaatsing en de werking van de knoppen........N3
Het bedieningspaneel............................................N4
Bediening via het beeldscherm OSD
(On Screen Display) ..............................................N5
Kiezen en instellen via het OSD-systeem..............N6
Modi voor videogeheugen.....................................N8
Problemen oplossen...............................................N9
Specificaties .........................................................N10
ENGLISH
DEUTSCH
FRANÇAIS
ITALIANO
ESPAÑOL
PORTUGUÊS
NEDERLANDS

A1
Introduction
The FLA TRON LCD 563LE/LS Flat Panel Monitor has an active matrix
TFT (Thin-Film T ransistor) LCD (Liquid Crystal Display).
This monitor is designed for use in small working areas or for those who need
more working space on the desk.
Features
The FLATRON LCD 563LE/LS is a 15.1-inch (15.1 inches viewable) intelligent
micropro-cessor based monitor.
Digitally controlled auto-scanning is done with the microprocessor for horizontal
scan frequencies between 31 and 61kHz, and vertical scan frequencies
between 56 and 75Hz.
The microprocessor-based digital controls allow you to adjust conveniently a
variety of image controls by using the OSD (On Screen Display).
It supports resolutions up to 1024x768, and has a wide viewing angle of ±60
degrees horizontal and ±45 degrees vertical.
The monitor is shipped with 14 factory pre-programmed video modes that are
permanently resident. In addition, there are 16 user-storable modes, for a total
of 30 memory modes.
Plug and play capability if supported by your system.
This monitor has DDC 2B function.*
Compliant with the following regulated specifications :*
-
EPA ENERGY STAR
-
Swedish TCO’99
ENGLISH
*
For detailed information, please refer to the Reference Guide provided .
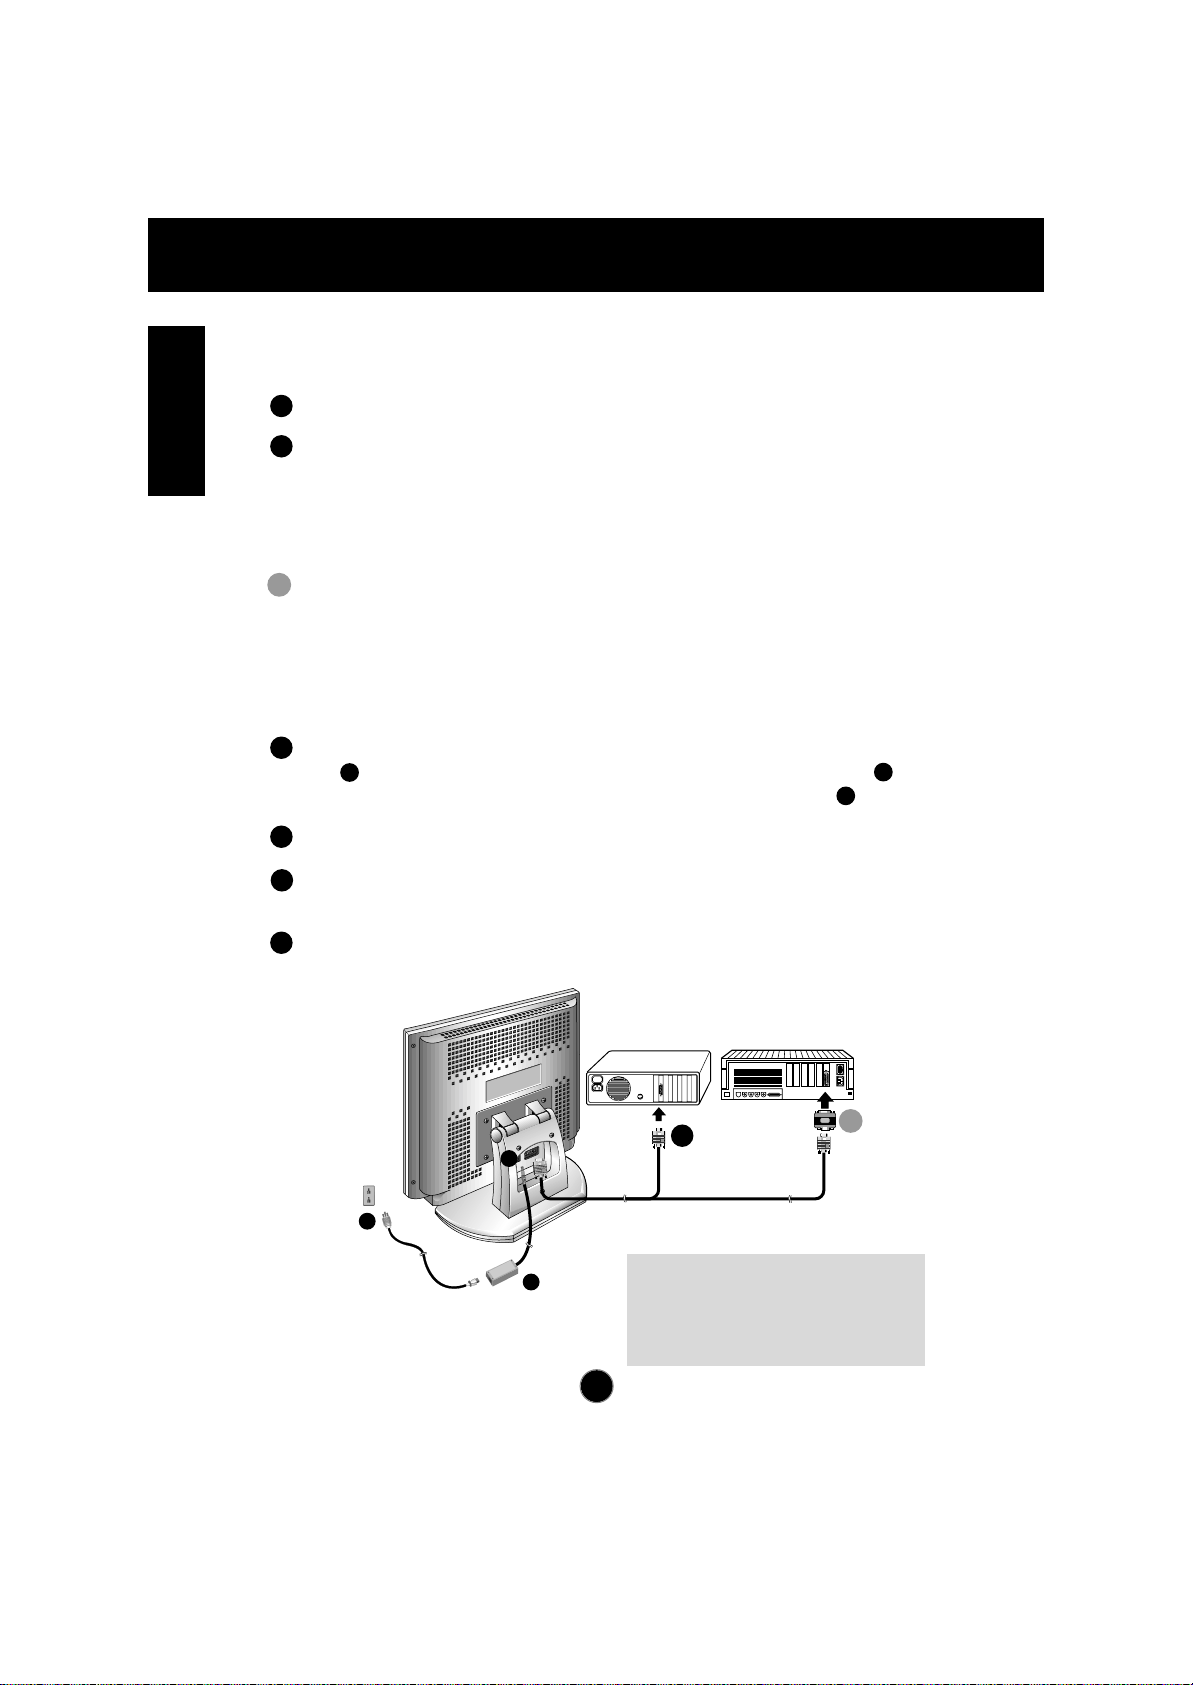
Connecting the Monitor
A2
On the back of the monitor are two plug-in connections; one for the AC
power cord, and the other for the signal cable from the video card.
Power off both the monitor and PC.
Connect the 15 pin VGA connector of the supplied signal cable to the output
VGA video connector on the PC and the matching input connector on the rear
of the monitor. The connectors will mate only one way. If you cannot attach
the cable easily, turn the connector upside down and try again. When mated,
tighten the thumbscrews to secure the connection.
Locate the appropriate MAC to VGA adapter block at your local computer
store. This adapter changes the high density 3 row 15 pin VGA connector to
the correct 15 pin 2 row connection to mate with your MAC. Attach the other
end of the signal cable to the side of the adapter block with 3 rows.
Connect the attached adapter block/signal cable to the video output on your
MAC.
Connect the plug from the AC-DC adapter into the connector on the display
unit. Connect one end of the AC power cord into the AC-DC adapter.
Plug the other end into a properly grounded three-prong AC outlet.
Power on the PC, then the monitor.
If you see the
NO SIGNAL
message, check the signal cable and
connectors.
After using the system, power off the monitor, then the PC.
3
2
1
Power Cord
Signal Cable
D-15P
IBM PC MACINTOSH
D-15P
Mac Adapter
* NOTE : If you see the “OUT OF
RANGE” message, check to make
sure your system is set to one of the
factory preset modes.(see page A8)
1
2
3
3
2
1
4
5
6
2'
2
2'
AC-DC adapter
 Loading...