

Page 1

L-05D
Contents / Precautions
Confirmation and
Settings before Using
docomo Palette UI
Calling /
Network Services
Settings
INSTRUCTION MANUAL
Mail / Internet
File Management
Application
Using Overseas
Appendix / Index
Page 2

Thank you for purchasing "L-05D".
Introduction
Before or while using, be sure to thoroughly read this
manual to ensure its correct use.
Before Using this Terminal
• This terminal supports LTE, W-CDMA, GSM/GPRS,
and wireless LAN systems.
• This terminal uses wireless, therefore, it may not
function in locations where it is difficult for radio
waves to penetrate or areas where radio wave
signals are weak, such as tunnels, underground
passages, and some buildings or places out of the
Xi and FOMA service areas. Even when you are
on a higher floor of a tall building or condominium
and nothing blocks your view outside, this terminal
may not be able to receive or transmit signals. Also
communication may be interrupted even when the
Antenna Indication Lamp indicates a strong signal
reception with four antenna indication bars.
• Because the terminal uses radio waves, there is a
possibility that a third party may intercept your call.
However, LTE, W-CDMA, and GSM/GPRS systems
automatically support privacy functions for all calls,
so even if a third party intercepts a call through a
receiver, it is only received as noise.
• This terminal encodes sound communication by
wireless and also as digital data. When you are
operating your terminal while moving to a location
subject to weaker radio wave conditions, the
transmitted data may not be correctly decoded and
as a result the decoded sound may differ somewhat
from the actual sound.
• This terminal is supported in Xi Areas, FOMA Plus-
Areas, and FOMA HIGH-SPEED Areas.
• Keep a separate record of any information stored on
this terminal and store the copies in a safe location.
DOCOMO assumes no responsibility for any loss
of your data resulting from malfunctions, repair,
changing of the model or other handling of the
terminal.
• As with PCs, some applications that you install may
cause unstable terminal operation, or may send
your location information or personal information
registered in the terminal to outside via the Internet
and the information may be used improperly.
Therefore, verify the supplier and operating
conditions of the applications before using.
• It is recommended that you save important data to a
microSD card.
Page 3

Unlocking SIM
Unlocking SIM is available on this terminal. Unlocking
SIM enables a SIM card from other makers to be used.
• Unlocking SIM is available at a docomo Shop.
• A fee is required to unlock the SIM.
• When a SIM card from another maker is used,
LTE is not available. In addition, its services and
functions may get restricted. DOCOMO assumes no
responsibility for any operation problems based on
SIMs from other makers.
• Visit the DOCOMO website for detailed information
on unlocking SIM.
Download the latest information of this manual
from DOCOMO website. Also you can check the
latest information from this terminal.
Quick Start Guide (Accessories, in Japanese
only)
Basic function operations are explained.
INSTRUCTION MANUAL (Applications for this
Terminal, in Japanese only)
Details about functions and operations are
explained.
Tap "Applications" u "Instruction Manual" on the
Home screen.
INSTRUCTION MANUAL (PDF file)
Details about functions and operations are
explained.
Download from DOCOMO website.
http://www.nttdocomo.co.jp/support/trouble/
manual/download/index.html
* The URL and information contained in the
manual are subject to change without prior
notice.
1
Page 4

Supplied Accessories
About other optional accessories and related
equipment →P207
L-05D
(with warranty and back cover )
Contents / Precautions
2
Quick Start Guide
Battery Pack
Page 5

microSDHC card (4GB) (sample)
(with manual)
Contents / Precautions
3
Page 6
How to Use this Manual
• Any reprint of this manual is prohibited.
• This manual is subject to change without prior notice.
• "This terminal" indicates "L-05D" in this manual.
Please keep this in mind.
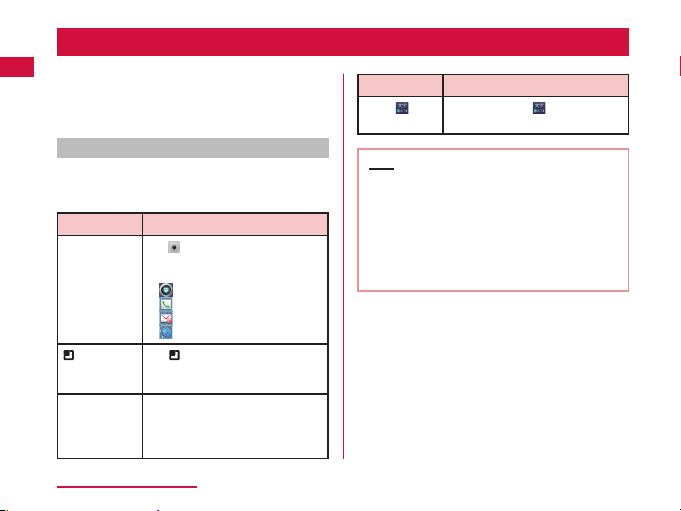
Explanation of operations
The selection operations of those icons and items
displayed on the touch screen are described below in
this manual.
Description Operation description
"Applications"
on the Home
screen
u"Settings"
on the Home
screen
"Wireless &
networks"
"Mobile
u
networks"
Contents / Precautions
4
on the Home screen.
Tap
• The icons on the Home screen
are explained below.
: Applications
: Phone
: sp-mode mail
: Browser
at the bottom of the screen,
Tap
and then tap "Settings" from the
displayed Option menu.
Tap "Wireless & net works"
displayed on the screen, and then
tap "Mobile networks".
Description Operation description
for
Touch
over 1 second
Tap and hold the displayed on
the screen for 1 to 2 seconds.
Note
• The operations described in this manual are
followed by the default settings of the Home
screen where the Home Switcher is set to
"docomo Palette UI". If the contents of the Home
screen are changed, the operation description
may differ.
• Images used in this manual may differ from
those on this terminal.
Page 7

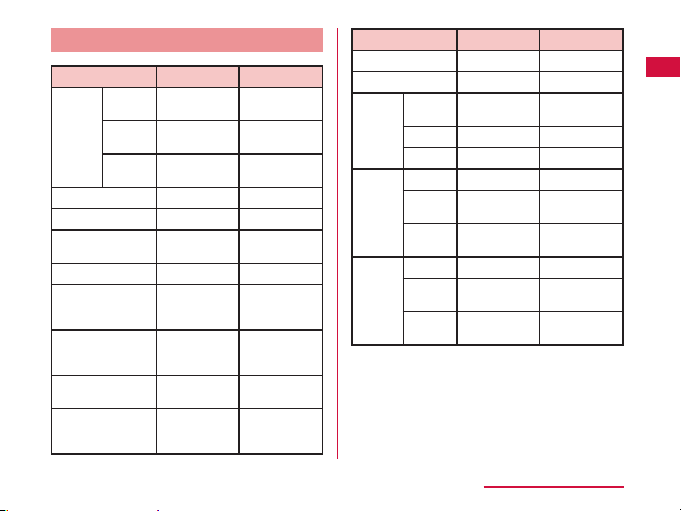
Table of Contents
Supplied Accessories …………………………………… 2
How to Use this Manual ………………………………… 4
Notes on Using this Terminal …………………………… 8
Safety Precautions (ALWAYS FOLLOW THESE
PRECAUTIONS) …………………………………………9
Handling and Care …………………………………… 22
Confirmation and Settings before Using … 29
Part Names and Functions …………………………… 29
UIM ……………………………………………………… 31
microSD Card ………………………………………… 33
Battery Pack …………………………………………… 34
Charging ……………………………………………… 35
Turning ON/OFF the Power ………………………… 40
Basic Operations (Touch Screen Operations) ……… 41
Initial Settings ………………………………………… 46
Screen Display/Icons ………………………………… 53
Character Entry………………………………………… 57
docomo Palette UI ………………………… 62
Viewing the Home Screen …………………………… 62
Home Screen Management ………………………… 63
Viewing the Application Screen ……………………… 66
Manage Applications ………………………………… 73
Group Management …………………………………… 74
Searching Applications ……………………………… 76
Switching Application Screen Display ……………… 76
Home Application Information ……………………… 76
Calling / Network Services ………………… 78
Making/Receiving Calls ……………………………… 78
Operations during a Call ……………………………… 82
Call Log ………………………………………………… 83
Phonebook …………………………………………… 85
Network Services ……………………………………… 91
Settings ……………………………………… 100
Settings Menu …………………………………………10 0
Wireless & Networks ………………………………… 101
Call Settings ……………………………………………106
docomo Service ……………………………………… 107
Sound …………………………………………………… 108
Display …………………………………………………10 9
Gesture …………………………………………………10 9
Location & Security …………………………………… 110
Applications …………………………………………… 11 5
Accounts & Sync ……………………………………… 115
Privacy ………………………………………………… 116
Storage ………………………………………………… 11 6
Language & Keyboard ………………………………… 117
Voice Input & Output ………………………………… 117
Accessibility …………………………………………… 11 7
Connectivity Settings ………………………………… 11 8
Date & Time ……………………………………………12 0
Contents / Precautions
5
Page 8

About Phone ……………………………………………12 0
Mail / Internet ……………………………… 122
sp-mode Mail……………………………………………12 2
SMS ……………………………………………………12 2
Gmail ……………………………………………………12 4
Early Warning "Area Mail" ……………………………125
Browser …………………………………………………126
Talk ………………………………………………………129
File Management …………………………… 131
File Operation …………………………………………131
Folder and File Operations ……………………………133
Bluetooth Communication ……………………………134
External Device Connection …………………………138
Application …………………………………… 141
Camera …………………………………………………141
Gallery ………………………………………………… 146
Media Player ……………………………………………148
Market …………………………………………………15 6
Maps ……………………………………………………16 0
Latitude …………………………………………………16 7
Navigation ………………………………………………168
Places……………………………………………………16 9
1Seg ……………………………………………………16 9
Osaifu-Keitai ……………………………………………177
ToruCa …………………………………………………18 0
Alarm Clock ……………………………………………18 1
Calendar ………………………………………………18 3
Contents / Precautions
6
Calculator ………………………………………………186
SmartWorld …………………………………………… 186
YouTube …………………………………………………18 7
Polaris Office ……………………………………………187
iD設定アプリ
Electronic Dictionary …………………………………18 9
Downloads ………………………………………………19 1
Application Manager …………………………………19 1
Data Backup and Settings Backup …………………192
Using Overseas …………………………… 197
Overview of International Roaming
(WORLD WING) ………………………………………19 7
Available Services ……………………………………198
Confirming before Using ………………………………198
How to Make and Receive Calls at your
Destination………………………………………………202
Settings for Network Connection at Overseas ………205
Appendix / Index …………………………… 207
Introduction of Options and Related Devices ………207
Troubleshooting (FAQs) ………………………………208
Warranty and After-Sales Service …………………… 216
Updating Software ……………………………………218
Main Specifications ……………………………………225
Specific Absorption Rate (SAR), etc. of
Mobile Phones …………………………………………229
Radio Frequency (RF) Signals ………………………230
Declaration of Conformity ……………………………232
Important Safety Information …………………………233
(iD appli) ………………………………18 8
Page 9

Export Administration Regulations……………………235
Intellectual Property Right ……………………………235
Index ……………………………………………………238
Contents / Precautions
7
Page 10
Notes on Using this Terminal
• This terminal does not support accessing the i-mode
site (programs) and i-αppli, etc.
• This terminal automatically performs communication
for some functions, for example, to synchronize data,
update the latest software, maintain connection with
the server, etc. When you download applications
or watch movies etc., a large amount of packet
communication is executed. Therefore, it is highly
recommended to use packet flat-rate service.
• This terminal does not support Pubic mode (driving
mode).
• You can confir m your own phone number as follows.
From the Home screen, tap
phone" u "Status".
• You can confir m the software version of this terminal
as follows.
From the Home screen, tap
phone".
• You can update the software of this terminal. Refer to
"Updating Software" (P218) for detailed infor mation.
Contents / Precautions
8
u "Settings" u "About
u "Settings" u "About
• In order to improve the quality of this terminal,
sometimes the OS is upgraded through software
updates. Therefore, it is required to always use the
latest version of the OS. Also, applications may
not be able to use any longer if the OS is old, or
problems may occur.
• This terminal uses only UIM. Bring your miniUIM/
FOMA card to a docomo Shop to exchange it.
• Set screen lock or password for this terminal to
ensure its security in case it gets lost. For details,
refer to "Location & Security" (P110).
• In case of loss, please change passwords of each
service accounts on PC to prevent others from using
Google service such as Google Talk, Gmail, Android
Market, etc.
• This terminal does not support service providers
other than sp-mode, mopera U or Business mopera
Internet.
• This terminal does not support 64K data
communication.
Page 11
• Backup your data such as images, videos and music
on PC. For details about connection method, refer
to "File Management" (P131) and "External Device
Connection" (P138). Also, it is recommended to use
various on-line data backup services.
• Packet communication fee differs when using
tethering depending on the plan. Packet flat-rate
service is recommended.
• Subscription to sp-mode is required when using
tethering.
• Security between external device and mobile phone
is not configured in the default settings for Wi-Fi
tethering. Set security as needed.
• For detailed information about fees, refer to
http://www.nttdocomo.co.jp/.
Safety Precautions (ALWAYS
FOLLOW THESE PRECAUTIONS)
Before using this terminal, read these "Safety
Precautions" carefully so that you can use it properly.
After reading the safety precautions, keep this manual
in a safe place for later reference.
These precautions are intended to protect you and
others around you. Read and follow them carefully
to avoid injury, damage to the product or damage to
property.
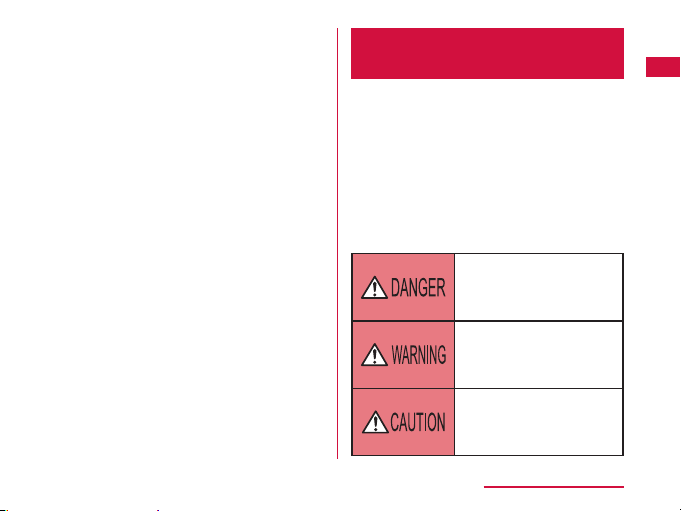
The signs below indicate the levels of danger or
damage that may occur if the particular precautions
are not observed.
This sign indicates that
incorrect handling has a high
possibility of causing death or
serious injury.
This sign indicates that
incorrect handling poses
a risk of causing death or
serious injury.
This sign indicates that incorrect
handling poses a risk of causing
slight injury or damage to the
product or property.
Contents / Precautions
9
Page 12
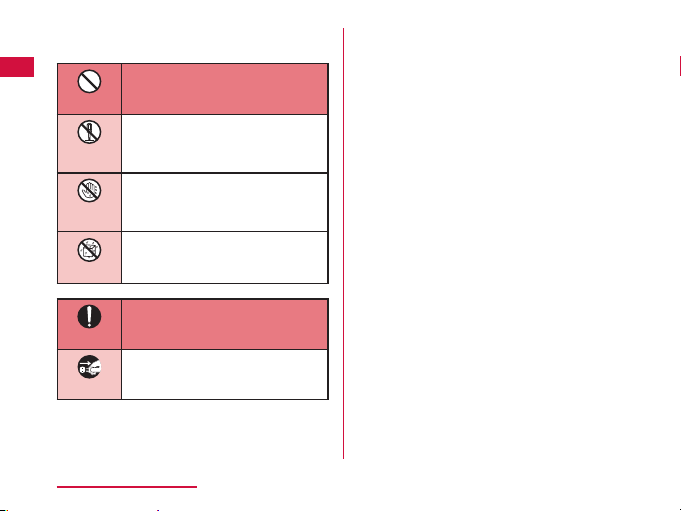
The following symbols indicate special warnings
regarding product usage.
Denotes things not to do (prohibition).
Don’t
Denotes not to disassemble.
Not
disassembly
Denotes not to use with wet hands.
No
wet hands
Denotes not to use where it could get
Not liquids
Unplug
Contents / Precautions
10
wet.
Denotes mandatory instructions
(matters that must be complied with).
Do
Denotes that the equipment should
be unplugged.
"Safety Precautions" are explained in the following
seven sections.
General Precautions for Terminal, Battery Pack,
Adapter, UIM ………………………………………P11
Precautions for Terminal …………………………P 13
Precautions for Batter y Pack ……………………P15
Precautions for Adapter ……………………………P17
Precautions for UIM ………………………………P19
Precautions on Using near Electronic Medical
Equipment …………………………………………P19
Material List ……………………………………… P21
Page 13
General Precautions for
Terminal, Battery Pack, Adapter,
UIM
Use the battery pack and adapter specified by
NTT DOCOMO for this terminal.
Do
Fire, burns, injury, or electr ic shock may result.
Do not use or leave this terminal and its
accessories in places with a high temperature
Don’t
such as besides fire, under direct sunlight or in
cars under the blazing sun.
Fire, burns, or injury may result.
Do not put this terminal and its accessories
in heating appliances such as microwaves or
Don’t
high pressure containers.
Fire, burns, injury, or electr ic shock may result.
Do not disassemble or remodel this terminal
and its accessories.
Not
Fire, burns, injury, or electr ic shock may result.
disassembly
Do not get this terminal and its accessories
wet with water, drinking water, pet urine, etc.
Not liquids
Fire, burns, injury, or electr ic shock may result.
Do not subject this terminal and its
accessories to severe shocks, or throw them.
Don’t
Fire, burns, injury, or electr ic shock may result.
Keep conductive materials (metal pieces,
pencil lead, etc.) from coming in contact with
Don’t
the charging terminal or external connection
terminal (microUSB connection terminal,
earphone/microphone terminal). Do not put
those materials inside the terminal.
Fire, burns, injury, or electr ic shock may result.
Do not cover or wrap this terminal or its
accessories with bedding, etc. while using or
Don’t
charging.
Fire or burns may result.
Contents / Precautions
11
Page 14
Do
Do
Don’t
Contents / Precautions
12
Make sure to turn off the terminal or stop
charging before going to the places like a gas
station where a flammable gas fumes.
Catching fire may result.
Turn off the power when using Osaifu-Keitai
at gas stations (before turning the power off,
release the lock for Osaifu-Keitai if it is set).
If the equipment starts giving off a strange
smell, overheats, becomes discolored or
deformed during use, charging or in storage,
immediately perform the following operations.
• Remove the power plug from the wall outlet
or cigar lighter socket.
• Turn off the terminal.
• Remove the battery pack from the terminal.
Fire, burns, injury, or electr ic shock may result.
Do not place the terminal and its accessories
on unstable locations such as wobbly tables or
slanted locations.
Damage may result from falling down.
Do not store this terminal and its accessories
in humid, dusty places, or in hot areas.
Don’t
Fire, burns, or electric shock may result.
If children use this terminal and its
accessories, a guardian should explain the
Do
precautions and correct operations. Also make
sure that the instructions are followed during
use.
Injury may result.
Keep out of reach of babies and small children.
Accidental swallowing or injury may result.
Do
Be careful especially when using the terminal
with the adapter connected continuously for a
Do
long time.
If you use an application or watch 1Seg
programs for a long time while charging, the
temperature of the terminal, battery pack and
adapter may get high.
Directly touching a hot part for a long time
may cause redness, itching or rash on your
skin, or low-temperature burns depending on
your constitution and/or health condition.
Page 15
Precautions for Terminal
Do not lighten the light near eyes. Especially,
when you shoot photos of babies or infants,
Don’t
keep the terminal 1 m or more away from
babies and infants.
Vision problems may result. Accident may
result from being shocked and being blind.
Do not get liquids such as water or foreign
objects such as metal pieces or flammable
Don’t
materials into the UIM slot or microSD card
slot of the terminal.
Fire, burns, injury, or electr ic shock may result.
Do not turn on lights in front of the auto driver
directly.
Don’t
Accident may result from the weak vision
caused by light.
Turn off the terminal in places where use is
prohibited such as airplanes or hospitals.
Do
Electronic devices or electronic medical
devices may be adversely affected. Follow
the instructions when using inside medical
facilities. Also, you will get punished
according to law if any prohibited action, such
as using the phone in airplane, is conducted.
However, if use is permitted by setting for
disconnecting radio wave, etc., follow airline
instructions for proper use.
When talking on the phone with speaker on or
when the terminal is ringing, keep it away from
Do
your ear. And, when connecting the earphone/
microphone etc. to the terminal and playing a
game or music, adjust the volume moderately.
Too loud volume may cause a hearing loss.
And, if you cannot hear the sound around you
clearly, it may cause an accident.
If you have a weak heart, be careful when
setting the Vibrate alert (vibration) or alert
Do
volume setting.
Harmful effect on heart may result.
Contents / Precautions
13
Page 16

Do
Do
Contents / Precautions
14
When you use electronic medical equipment,
check with the equipment manufacturer to
determine how the device is affected by radio
waves before using.
Harmful effect on electronic medical
equipment etc. may result.
Turn off the terminal in places near highprecision electronic devices or devices using
weak electronic signals.
Electronic devices may be adversely affected
by reasons such as malfunction.
* Examples of electronic devices to avoid
Hearing aids, implanted cardiac
pacemakers, implanted defibrillators, other
medical electronic devices, fire alarms,
automatic doors and other automatically
controlled devices.
If you are using an implanted cardiac
pacemaker, implanted defibrillator or any
other electronic medical device, consult
the manufacturer or retailer of the device
for advice regarding possible effects from
radio waves.
When the display or camera lens is
accidentally broken, be careful of broken glass
Do
or exposed internal parts of the terminal.
Since the reinforced glass is used on the
surface of the display and the camera lens,
they are structured for the glass not to scatter.
However, if you carelessly touch broken or
exposed parts, you may get injured.
Do not swing the terminal by its antenna, etc.
It may hit you or someone else and may result
Don’t
in an accident such as an injury.
Do not use a broken terminal.
Fire, burns, injury, or electr ic shock may result.
Don’t
When using the motion sensor, ensure the
safety of you and those around you, hold the
Don’t
terminal firmly, and avoid extreme movements.
Injury may result.
Page 17
If the display part is accidentally broken and
liquid crystal leaks out, do not make the
Don’t
material contact with your skin of face or
hands.
It may cause loss of sight or skin problems.
If liquid crystal gets into your eyes or mouth,
rinse it with clean water and see a doctor
immediately.
And, if the material adheres to skin or clothing,
use alcohol etc. to wipe it off, and then wash
with soap.
If you use this terminal in a car, contact the car
manufacturer or dealer to ask about the effect
Do
from radio waves.
Depending on the type of car, in-car electronic
devices could be adversely affected. In this
case, stop using this terminal immediately.
Itching, rash or eczema may be caused
depending on your physical conditions or
Do
predisposition. If an abnormality occurs, stop
using the terminal immediately, and then seek
medical attention.
• For the material of each part → "Material
List" (P21)
When watching the display, take a certain
distance from the display in a fully bright place.
Do
Visual loss may result.
Precautions for Battery Pack
Confirm the battery type referring to the label on the
battery pack.
Display Battery type
Li-ion00 Lithium-ion battery
Do not get the terminal placed in contact
with metal materials such as a needle. Also,
Don’t
do not store or bring in contact with metallic
necklaces.
Fire, explosion, getting heated or liquid leak of
the battery pack may result.
Contents / Precautions
15
Page 18
Don’t
Don’t
Don’t
Do
Contents / Precautions
16
When inserting battery pack into the terminal,
make sure to confirm the direction of the
battery pack and not place excessive force on
it.
Fire, explosion, getting heated or liquid leak of
the battery pack may result.
Do not throw the terminal into fire.
Fire, explosion, getting heated or liquid leak of
the battery pack may result.
Do not sting the terminal with a nail, and do
not hammer or step upon the terminal.
Fire, explosion, getting heated or liquid leak of
the battery pack may result.
When the liquid from battery pack splashes
into your eyes, do not rub your eyes. Wash
your eyes and go to consult with a doctor
immediately.
Blindness may result.
Do not use this terminal when transformation
or damage is resulted from falling down.
Don’t
Fire, explosion, getting heated or liquid leak of
the battery pack may result.
When battery pack leaks liquid or gives off
odor, stop using it and keep it away from fire.
Do
Fire, explosion may result from liquid.
Do not let the pet bite the battery pack.
Fire, explosion, getting heated or liquid leak of
Do
the battery pack may result.
Page 19

Do not discard it as combustible waste.
Fire and environmental pollution may result.
Don’t
Bring the terminal to a docomo Shop after
insulating the battery pack by wrapping the
terminal with tape or follow the local disposal
regulations.
Precautions for Adapter
Do not use it if the adapter cord gets damaged.
Fire, burns, or electric shock may result.
Don’t
Do not use or charge the terminal when the
battery pack is wet.
Don’t
Fire, explosion, getting heated or liquid leak of
the battery pack may result.
If battery fluid or another substance leaks from
the battery pack, do not allow it to get on the
Do
skin of your face, hands, etc.
It may cause loss of sight or skin problems.
If battery fluid or another substance gets
in your eyes or mouth, or on your skin
or clothing, rinse it off with clean water
immediately.
Furthermore, if battery fluid gets in your eyes
or mouth, rinse your eyes or mouth with clean
water and then consult a doctor immediately.
Do not use the AC adapter in a bathroom or
other highly humid area.
Don’t
Fire, burns, or electric shock may result.
DC adapter is only for minus earth car. Do not
use it on plus earth car.
Don’t
Fire, burns, or electric shock may result.
When it starts to thunder, do not touch the
adapter.
Don’t
Electric shock may result.
Do not short the charging terminal while being
connected to the outlet or cigar lighter socket.
Don’t
Do not touch the charging terminal with a part
of your body such as your hands or fingers.
Fire, burns, or electric shock may result.
Contents / Precautions
17
Page 20
Don’t
Don’t
No
wet hands
Do
Contents / Precautions
18
Do not place heavy objects on the adapter
cord.
Fire, burns, or electric shock may result.
When you insert and remove AC adapter from
the power outlet, do not contact a metal strap
or other metal objects with the terminal.
Fire, burns, or electric shock may result.
Do not touch the Adapter cord or outlet with
wet hands.
Fire, burns, or electric shock may result.
Only use with the specified power source
and voltage. When charging overseas, use a
compatible AC adapter.
If incorrect voltage is used, this may cause
fire, burns or electric shock.
AC adapter: AC 100V
DC adapter: DC 12V/24V (only for minus earth
car)
AC adapter for overseas use: Between
AC 100V and 240V (Connect to the AC outlet
for internal household use)
Use the specified fuse when the fuse of DC
adapter blows.
Do
Fire, burns, or electric shock may result. Refer
to the manual for detailed information of the
specified fuse.
Wipe off any dust that accumulated on the
power plug.
Do
Fire, burns, or electric shock may result.
When you connect the AC adapter to an outlet,
do not fail to properly connect to the outlet.
Do
Fire, burns, or electric shock may result.
When you disconnect the power plug from the
outlet or cigar lighter socket, do not pull the
Do
adapter cord with excessive force. Instead,
hold the adapter to disconnect.
Fire, burns, or electric shock may result.
Always remove the power plug from the outlet
or cigar lighter socket when not using the
Unplug
adapter for an extended period.
Fire, burns, or electric shock may result.
Page 21
Immediately remove the power plug from the
outlet or cigar lighter socket if water or other
Unplug
fluids get into the adapter.
Fire, burns, or electric shock may result.
Always remove the power plug from the outlet
or cigar lighter socket when cleaning the
Unplug
equipment.
Fire, burns, or electric shock may result.
Precautions for UIM
Be careful not to touch the edge of UIM when
removing it.
Do
Injury may result.
Precautions on Using near
Electronic Medical Equipment
The description below meets "Guideline on the Use
of Radio-communication Equipment such as Cellular
Telephones - Safeguards for Electronic Medical
Equipment" by the Electromagnetic Compatibility
Conference.
Contents / Precautions
19
Page 22
Do
Do
Contents / Precautions
20
Be sure to adhere to the following regulations
inside medical facilities.
• Keep the terminal out of operating rooms,
intensive care units (ICUs) or coronary care
units (CCUs).
• Turn off the terminal in hospital wards.
• Turn off the terminal in hospital lobbies
and corridors if electronic medical devices
could be nearby.
• If the medical facility has specific zones
where use or possession of mobile
terminals is prohibited, follow those
regulations.
Turn off the terminal in crowded trains or
other public places where implanted cardiac
pacemaker or defibrillator wearers could be
nearby.
Operation of an implanted cardiac pacemaker
or implanted defibrillator may be adversely
affected by radio waves.
If you use electronic medical equipment
such as an implanted cardiac pacemaker or
Do
implanted defibrillator, use the mobile terminal
22cm or more away from the implanted cardiac
pacemaker or implanted defibrillator.
Operations of electronic medical equipment
may be adversely affected by radio waves.
Patients using electronic medical equipment
other than implanted cardiac pacemakers or
Do
implanted defibrillators (using outside medical
facilities for treatment at home, etc.) should
check the influence of radio waves upon the
equipment by consulting the manufacturer.
Operations of electronic medical equipment
may be adversely affected by radio waves.
Page 23
Material List
Part Material
Outer
Display Tem pere d
case
Power key PC+TPU resin UV coatin g
Volume key PC+TPU resin UV coatin g
Camera panel Tem pere d
Flash panel PC resin Silk Prin t
Camera decoration AL Diamond-cut
microUSB
connector terminal
cover
Batter y
compartment
Charging terminal
connec tor (Battery
compartment)
Glass
Front
PC resin NCVM
cover
Back
PC resin SF coatin g
cover
Glass
PC+TPU resin UV coatin g
Diecasting
(Magnesium)
Ti-Cu
Surface Treatment
-
BK Rear
Printed
aluminum
panel
Urethane
coating
-
Part Material
Speaker grill PET -
Screws Mild stee l ZnB plating
Batter y
Batter y
pack
microSD
card slot
UIM slot Guide SUS304 Nickel pl ating
PC resin PC resin
pack
Sticker PET Ink coati ng
Terminals
Au + Ni Gold plating
Guide Stainless steel Nickel pl ating
Fixing
LCP
plate
Metal
Phosphor
contacts
Bronze
Fixing
LCP Pa46
plate
Metal
C_7035 Nickel an d
contacts
Surface Treatment
-
Nickel an d
Gold plating
-
Gold plating
Contents / Precautions
21
Page 24

Handling and Care
General Usage Guidelines
Keep this terminal away from water.
This terminal, battery pack, adapter and UIM are not
waterproof. Do not use them in places where high
humidity such as a bath or where rain may get it wet.
If you carry the terminal close to your body, moisture
from sweat may corrode the internal parts causing
a malfunction. Note that malfunctions deemed to be
caused by water are not covered by the warranty or
impossible to repair. Since these malfunctions are
not under warranty, even when repair is possible, it
will be done at the user's expense.
Clean the terminal with a dry, soft cloth (lens cleaning
cloth), etc.
• Rubbing it roughly with a dry cloth may scratch the
display.
• Drops of water or dirt left on the display may cause
stains.
• If the terminal is wiped with alcohol, paint thinner,
benzine or detergent, the printing may disappear
or color may fade.
Contents / Precautions
22
Keep the connector contacts clean with a dry cotton
swab.
Clean the connector contacts with a dry cotton swab
to prevent contacts from getting dirty which can
result in intermittent connections.
Be careful when cleaning the connector contacts.
Do not place the equipment near air conditioner
outlets.
Condensation may form due to rapid changes in
temperature, and this may corrode internal parts and
cause malfunction.
Do not place excessive force on the terminal or
battery pack.
If the terminal is inserted to a full bag, or placed in a
pocket and sat on, the display, its internal PCBs or
battery pack may be damaged or malfunction.
Also, while the external device is connected to the
external connection terminal (microUSB connection
terminal and earphone/microphone terminal), it may
damage the connector and cause malfunction.
Do not rub or scratch the display with metal.
The display may get scratched and it may cause
malfunction or damage.
Read the individual manual attached to the batter y
pack and adapter.
Page 25

Notes about the Terminal
Do not place excessive force on pressing the
touch panel, or operate by sharp objects such as
fingernails, ballpoint pen and pins.
Damage of touch panel may result.
Avoid using in extremely high or low temperatures.
The terminal should be used within a temperature
range from 5˚C to 35˚C and a humidity range from
45% to 85%.
This terminal may adversely affect fixed phones,
televisions or radios in use nearby. Use as far as
possible from such appliances.
Keep a separate record of any information stored on
this terminal and store the copies in a safe location.
DOCOMO assumes no responsibility for the loss of
any of your data.
Do not drop the terminal or subject it to shocks.
Damage or malfunction may result.
Do not insert a microUSB connection terminal,
earphone/microphone terminal crookedly or pull them
strongly.
Damage or malfunction may result.
It is normal for this terminal to become warm during
use. You can continue using without problems.
Do not leave the camera under direct sunlight.
Discoloring or burn-in of materials may result.
Always use the terminal with the microUSB connector
terminal cover closed.
Malfunction may result from dust or water.
Do not use the terminal without the back cover.
Battery pack may come off. Malfunction and damage
may result.
Do not remove microSD card or turn off the terminal
while using a microSD card.
Data loss or malfunction may result.
Do not bring any magnetic cards close to the terminal.
The magnetic data in cash cards, credit cards,
telephone cards, floppy disks, etc. may be erased.
Do not bring strong magnetic objects close to the
terminal.
Strong magnetism may cause malfunction.
Contents / Precautions
23
Page 26

Notes about the Battery Pack
The battery pack is a consumable accessory.
Battery life varies depending on usage conditions,
etc., but it is time to change battery packs when the
usage time has become extremely short even though
the battery pack has been fully recharged. Change
to a specified new battery pack.
Charge the battery pack in an environment with the
proper ambient temperature (5˚C to 35˚C).
Battery life may differ depending on the use
environment or degradation level of the battery pack.
Depending on the usage condition, the battery pack
may inflate slightly when the battery life is almost
over. Note that it is not a problem.
Be careful especially about the following points when
storing the battery pack.
• Keeping under fully charged state (right after the
charging ends)
• Keeping under not charged state (consumed too
much to turn on the terminal)
The performance and life of the battery pack may
deteriorate.
It is recommended that you store the batter y pack
with around 40% battery level.
Contents / Precautions
24
Notes about the Adapter
Charge the battery pack in an environment with the
proper ambient temperature (5˚C to 35˚C).
Do not charge in the following places.
• Places that are very humid, dusty or exposed to
strong vibrations.
• Near ordinary phone or TV/radio.
It is normal that the adapter becomes warm while
being charged. You can continue using without
problems.
Use the DC adapter only when the car engine is
running.
The car battery may be exhausted.
When using an outlet with a mechanism preventing
unplugging, follow the handling instructions of the
outlet.
Do not give a strong impact to the adapter. Also, do
not deform the charging terminal or terminal guide.
Malfunction may result.
Page 27

Notes about the UIM
Do not put excessive force on the UIM when inserting
into or removing from this terminal.
Note that DOCOMO assumes no responsibility for
malfunctions occurring as the result of inserting and
using a UIM with other IC card reader/writer.
Always keep the IC portion of the UIM clean.
Clean the UIM with a dry, soft cloth (lens cleaning cloth),
etc.
Be sure to keep a separate note of the infor mation
registered on the UIM.
DOCOMO assumes no responsibility for the loss of
any of your data.
Visit docomo Shop to return the UIM for the
environmental purpose.
Do not scratch, touch carelessly or short circuit the IC
portion.
Data loss or malfunction may result.
Do not drop or give force to the UIM.
Malfunction may result.
Do not bend or put heavy things on the UIM.
Malfunction may result.
Do not insert UIM into this terminal with labels or
stickers attached on.
Malfunction may result.
Notes about the Bluetooth
Function
To secure the Bluetooth communication securit y, the
terminal supports the security function compliant
with Bluetooth standards, but the security may not be
sufficient depending on the settings. Be aware of the
communication using the Bluetooth function.
Note that DOCOMO is not responsible for data or
information leakage when making data
communications using Bluetooth.
In the terminal, applications for Hands free, Headset,
Object push, Serial port, Audio, Phonebook access,
File transfer (server) are available. Also Audio/Video
remote control may be available for Audio (only
compatible Bluetooth devices).
Contents / Precautions
25
Page 28
Frequency band
Frequency bands used by the terminal Bluetooth
function/Wireless LAN function are described on the
terminal battery compartment. They are described
as follows.
2.4FH1/DS4/OF4
2.4 : Indicates radio equipment using
FH/DS/OF : Indicates that modulation methods
1 : Indicates that assumed inducing
4 : Indicates that assumed inducing
Available channels vary by the country.
For use in an aircraft, contact the airline company
beforehand.
Contents / Precautions
26
2,400 MHz.
are FH-SS, DS-SS or OFDM.
interference from distances is
10 m or less.
interference from distances is
40 m or less.
: The full band between 2,400 MHz
and 2,483.5 MHz is used and the
band of the mobile identification
device is avoidable.
Bluetooth Device Cautions
The operating frequency band of this terminal is
used by industrial, scientific, consumer and medical
equipment including microwave ovens, premises
radio stations for identifying mobile units used in the
manufacturing lines of plants (radio stations requiring
no license) and amateur radio stations (hereinafter
referred to as "another station").
1. Before using this terminal, confirm that "another
station" is not being operated nearby.
2. In the event of this terminal causing harmful
radio wave interference with "another station",
promptly change the location or stop radio
wave emission by turning off the power, etc.
3. If you have further questions, contact docomo
Information Center provided on the last page of
this manual.
Page 29

Notes about Wireless LAN (WLAN)
Wireless LAN (WLAN) uses radio waves to enable
communications between compatible devices, thus
allowing connection to a local area network from
anywhere within range. However, there is a risk of
data interception by malicious third parties unless
security is established. Users are advised to assess
their responsibilities and accordingly configure security
settings.
Wireless LAN
Do not use wireless LAN near magnetic devices
such as electrical appliances or AV/OA devices, or in
radio waves.
- Magnetism or radio waves may increase noises or
disable communications (especially when using a
microwave oven).
- When using near TV, radio, etc., reception
interference may occur, or channels on the TV
screen may be disturbed.
- If there are multiple wireless LAN access points
nearby and the same channel is used, search may
not work correctly.
2.4 GHz Device Cautions
The operating frequency band of the WLAN device
is used by home electrical appliances such as
microwave ovens, industrial, scientific, consumer and
medical equipment including premises radio stations
for identifying mobile units used in the manufacturing
lines of plants stations (radio stations requiring no
license) and amateur radio stations (radio stations
requiring a license).
1. Before using the device, confirm that premises
radio stations for identifying mobile units,
specified low power radio stations and amateur
radio stations are not being operated nearby.
2. If the device causes harmful radio interference
to premises radio stations for identifying mobile
units, immediately change the frequency band
or stop use, and contact "docomo Information
Center" on the last page of this manual for
crosstalk avoidance, etc. (e.g. partition setup).
3. If the device causes radio interference to
specified low power radio stations or amateur
radio stations, contact "docomo Information
Center" on the last page of this manual.
Contents / Precautions
27
Page 30
Handling the FeliCa Reader/Writer
The FeliCa reader/writer function for this terminal
handles delicate signals that require no radio station
license.
The 13.56 MHz frequency band is used. If there is
another reader/writer near the terminal, keep enough
distance between the terminal and the reader/writer.
Also, make sure that there is no radio station using
the same frequency band nearby.
Caution
Do not use a modified terminal. Using a modified
terminal results in violating the law of Electromagnetic
Compatibility.
This terminal has been complied with technical
standard of wireless equipment stipulated by law of
Electromagnetic Compatibility. As a proof, "Technical
standard compliance mark
inscription seal.
If this terminal is modified by turning the screw to the
left to disassemble, technical standard compliance
becomes invalid.
Please do not use this terminal during the time when
technical standard compliance is being invalid, since
you are in violation of the law of Electromagnetic
Compatibility.
Contents / Precautions
28
" is indicated in the
Be careful when using the terminal while driving.
Using the mobile phone in your hand while driving is
subject to punishment.
However, absolutely necessary cases such as
rescue of a sick person or maintaining public safety
are exempted.
The FeliCa reader/writer function can only be used in
Japan.
The FeliCa reader/writer function for this terminal is
compliant with the radio standards for Japan.
Overseas usage may be subject to punishment.
Do not make unauthorized modifications to the basic
software.
Repairs may be refused if the software has been
modified.
Page 31

Confirmation and Settings before Using
Bluetooth/Wi-Fi
Part Names and Functions
Earpiece (receiver)
a
Front camera
b
Proximity sensor:
c
Switch the touch
screen to on or
off to prevent from
unintentionally
activating functions
resulted from face
touch while making a
call.
Display (touch screen)
d
Menu key
e
Home key
f
Back key
g
*1 Do not remove stickers from the back surface of the
back cover. If a sticker is removed, the IC card may
not be read or written.
*2 Antenna is built inside the terminal. If the antenna
area is covered by your hand, quality may be
affected.
h
antenna area
Main camera
i
microSD card slot
j
(internal)
Flash
k
UIM slot (internal)
l
GPS/Xi antenna area
m
n
Back cover
o
Speaker
p
Xi antenna area
q
mark
*2
*2
*1
*2
Confirmation and Settings before Using
29
Page 32

r
s
t
u
v
w
x
Note
• Do not put any sticker on the sensor area.
Confirmation and Settings before Using
30
Earphone microphone
terminal
Top microphone
microUSB connection
terminal
Power key/Screen lock
key
1Seg antenna
Volume key
Bottom microphone
There are three keys on the front of the ter minal. The
roles of these keys are shown below.
Menu key
Tap this key to display the options menu for
the current screen or application.
Home key
• If you tap this key, you will return to the
Home screen, regardless of the application
being used or the screen being displayed.
• If you touch this key for over 1 second, the
icons of the most recently used applications
appear. Tap an icon to open the application.
(It may be displayed as horizontal screen.)
Back key
Tap this key to return to the previous screen. It
also closes a dialog box, an options menu, the
Notification panel, or the on-screen keyboard.
Page 33

UIM
UIM is an IC card that stores informations of each
customer.
You cannot use some of the ter minal functions if the
UIM is not inserted. Before inserting or removing
the UIM, you must always turn OFF the power and
disconnect the AC adapter cable.
This terminal uses only the UIM. Bring your miniUIM/
FOMA card to a docomo Shop to exchange it.
UIM security codes
The UIM can set security code named PIN code. This
code is set to "0000" at the time of subscription, but you
may subsequently change it. For details about changing
this security code, refer to "Security Code and UIM
Protection" (P111).
Inserting the UIM
Insert a fingernail into the groove in the
a
back cover, and pull up in the direction
of the arrow (a) while pressing ● part
slightly to remove the back cover
Confirmation and Settings before Using
31
Page 34

Remove the batter y pack (P35), and
b
insert the UIM into the slot with the goldcolored IC side facing down
Confirmation and Settings before Using
32
Removing the UIM
Remove the back cover and the battery
a
pack. Gently press the UIM with your
fingertip and slide it out
Page 35

microSD Card
A microSD card can be used with any other compatible
devices.
• When a microSD card is not inserted, camera
functions and playing or downloading music or
videos are not available.
• The terminal supports a microSD card of up to 2
GB, and a microSDHC card of up to 32 GB (as of
November 2011).
• Consult with the manufacturers about the supporting
microSD cards.
Inserting a microSD Card
Remove the back cover (P31)
a
Insert the microSD card into the slot
b
with the metal contacts facing down
• Insert a microSD card properly, paying attention
to the insertion direction. Improper insertion of a
microSD card may damage the card itself and
the slot, or may be unable to eject the card.
Removing a microSD Card
Remove the back cover and take out the
a
microSD card
Confirmation and Settings before Using
33
Page 36

Battery Pack
Attaching the Battery Pack
Remove the back cover (P31)
a
Insert the battery pack in the direction of
b
the arrow (a) with the "CE" mark facing
up. Ensure that the tabs on the terminal
and the battery pack are aligned with
each other
Confirmation and Settings before Using
34
Check the direction of the back cover
c
and attach it to the terminal (b). Press
portion to close it firmly (c)
• Make sure there is no gap between the terminal
and the back cover.
Page 37

Removing the Battery Pack
Remove the back cover (P31)
a
Put your fingernail into the groove, and
b
lift out the battery pack in the direction
of the arrow (b), pushing it to the
direction of the arrow (a)
Note
• Turn the power OFF before attaching/removing
the battery pack.
Charging
Battery Pack Life
• The battery pack is a consumable accessory. The
usage time of the battery per one charge decreases
gradually each time the battery is recharged.
• When the usage time from one charge becomes
about half of a new battery pack, the life of the
battery pack is assumed to be almost over. We
recommend that you replace the battery ahead of
time. Refer to "Repairs" on the back of the manual
or consult a specified DOCOMO repair center for
battery exchanging information.
Battery Charging
• For detailed information, refer to manuals for FOMA
charging microUSB conversion adapter L01, FOMA
AC Adapter 01/02 (optional), FOMA AC Adapter 01
for Global use (optional) and FOMA DC Adapter
01/02 (optional).
• FOMA AC Adapter 01 only suppor ts AC 100V.
FOMA AC Adapter 02 and FOMA AC Adapter 01 for
Global use support AC 100V to 240V.
Confirmation and Settings before Using
35
Page 38

• The shape of the AC adapter plug is for AC 100V
(Japanese standard). The conversion plug adapter
for overseas is required if you use an adapter for
AC 100V to 240V. Also do not use a transformer for
overseas travel.
• Do not force the connector when inserting/pulling it
out. Instead, insert/pull it out slowly.
• If you start charging when the battery pack is empty,
you may not be able to power ON the terminal for a
while.
• Make sure to unplug the power cord after finishing
charging.
• When charging in combination with the FOMA
charging microUSB conversion adapter L01, it is not
possible to fully charge if charging starts when the
battery pack is empty.
Do not charge for a long time (several days)
• If you carry on charging the terminal after it has been
fully charged, the battery pack will start supplying
power to the terminal. This will reduce the actual
usage time and deplete the battery. If this happens,
please charge it again correctly. Before recharging,
remove the terminal from FOMA charging microUSB
conversion adapter L01 and reset.
Confirmation and Settings before Using
36
Charging Time (estimate)
The estimated time for charging an empty battery pack
is shown below. Charging under low temperatures
requires longer time.
FOMA AC Adapter 01/02 Approx. 330 minutes
FOMA DC Adapter 01/02 Approx. 330 minutes
Usage Time (estimate)
A list of the charging time (estimate) of a fully charged
battery is shown below. The usage time varies depending
on the usage conditions and the battery pack condition.
For details, refer to "Main Specifications" (P225).
Continuous
standby
time
Continuous
call time
1Seg watching time Approx. 240 minutes
Xi/LTE Stationar y (Automatic):
FOMA/3G Stationary (Automatic):
GSM Stationary (Automatic):
FOMA/3G Approx. 340 minutes
GSM Approx. 240 minutes
Approx. 240 hours
Approx. 300 hours
Approx. 240 hours
Page 39

Charging with the AC Adapter
How to use the supplied AC adapter to charge the
terminal is described below.
Insert the USB connector of the supplied
a
USB connection cable into the USB
connection terminal of AC adapter
Open the microUSB connector terminal
b
cover of the terminal
Insert the microUSB connector of USB
c
connection cable into the microUSB
connection terminal of the terminal
• Insert the USB connection cable horizontally
with the USB mark facing up.
Insert the AC adapter plug into the power
d
outlet
• During charging, the battery level icon in the
status bar either appears like
appearance in the order of
u .
• When the battery pack is fully charged, the battery
level icon on the status bar changes to
When charging is completed, remove
e
the microUSB connector from the
terminal and close the microUSB
connector terminal cover
Remove the USB connector of USB
f
connection cable from the USB connection
terminal of AC adapter
Remove AC adapter plug from power outlet
g
or changes its
u u u
.
Confirmation and Settings before Using
37
Page 40

Charging with the Desktop Holder
Using the optional desktop holder L12, you can charge
by attaching the terminal, and also charge by attaching
the battery pack L15.
By dragging the terminal display while charging, it is
possible to display the clock and calendar, and to use
the slideshow of images stored in the Gallery.
Confirmation and Settings before Using
38
Charging by attaching the terminal
Insert the USB connector of the supplied
a
USB connection cable into the USB
connection terminal of AC adapter
Insert the microUSB connector of the
b
USB connection cable into the connection
terminal on the back of the desktop holder
L12.
• Insert the USB connection cable horizontally
with the USB mark facing up.
• The charge indicator on the desktop holder
blinks Red → Green → Orange.
Open the microUSB connector terminal
c
cover of the terminal
While holding the desktop holder L12,
d
insert the terminal in the a direction
shown in the figure, and then attach it
firmly to the connection terminal of the
desktop holder L12
Page 41

Insert the AC adapter plug into the outlet
e
• Charging begins. The charge indicator turns
OFF during charging.
• After charging is completed, a message
explaining that charging is completed is
displayed on the screen.
When charging is completed, remove
f
the terminal according to the reverse
procedure while holding the desktop
holder L12
Remove AC adapter plug from power outlet
g
Charging by attaching only the battery
pack
You can inser t the battery pack to the slot opening
for the battery pack on the top surface of the desktop
holder L12 for charging. The charge indicator turns
red during charging. After charging is completed,
the charge indicator turns green.
Charging by attaching the battery pack
and terminal together
Charging begins for the terminal first. The charge
indicator turns OFF while the terminal is charging.
After charging of the terminal is completed, the
battery pack begins to charge. At that time, the
charge indicator turns red.
Charging with a PC
Open the microUSB connector terminal
a
cover of the terminal
Insert the microUSB connector of USB
b
connection cable into the microUSB
connection terminal of the terminal
Connect USB connector of USB connection
c
cable to PC USB port
"Charge only" u "OK"
d
• For details about the connection method
between the terminal and PC, refer to
"Connecting the Terminal with a PC" (P138).
When charging is completed, remove
e
the microUSB connector from the
terminal and close the microUSB
connector terminal cover
Remove the USB connector from the PC
f
USB port
Confirmation and Settings before Using
39
Page 42

Turning ON/OFF the Power
Turning ON the Power
Press and hold the power key for over 1
a
second
Tap to release the screen lock.
b
Confirmation and Settings before Using
40
Note
The "Locked" screen appears when the power is
•
turned ON or when the backlight is turned on.
• If the screen lock has been set using a screen
unlock pattern, the "Draw pattern to unlock"
screen appears when the power is turned ON.
• If the screen lock has been set using a PIN code
or password, the "Locked" screen appears
when the power is turned ON. After releasing
the screen lock by following Step 2, enter the
PIN code or password and tap "OK". To correct
the typing error, tap
.
Turning OFF the Power
Press and hold the power key for over 1
a
second
"Power off"
b
"OK"
c
Page 43

Turning on Backlight
To prevent unintended operation and to save power,
the backlight turns off after a set period. If you then tur n
on the backlight to release the screen lock, the screen
that was displayed before the backlight was turned off
appears again.
Press the power key
a
• The "Locked" screen appears. The backlight
automatically lights up when you receive a call
or when alarm is ringing.
Note
• Screen gets locked if pressing the power key
while the backlight is on.
• You can set the length of time before the
backlight turns off. For details, refer to "Display"
(P109).
• If a screen unlock pattern has been set, you will
be prompted to enter the patter n when pressing
the power key. For more details about setting a
screen unlock pattern and releasing the screen
lock, refer to "Location & Security" (P110).
Basic Operations (Touch
Screen Operations)
The display of the terminal has a touch screen that
allows you to perform various operations by touching it.
Precautions on Using Touch Screen
The touch screen has been designed for finger touching
slightly. Do not press it with sharp objects (fingernail,
ballpoint pen, pin etc.) or press it hard with your finger.
The following user actions may cause the touch screen
not to work properly. They may also cause malfunction.
• Touching the screen with gloved hands
• Touching the screen with the tip of a finger nail
• Placing a foreign object on the screen
• Sticking a protective sheet or seal on the screen
Confirmation and Settings before Using
41
Page 44

Touch Screen Operations
You can perform the following actions on the touch
screen.
• Tap: Touch the screen lightly
• Double-tap: Touch the screen lightly twice
successively
• Touch for over 1 second: Touch and hold down the
screen
• Swipe: Lightly flick the screen
• Drag: Touch and hold down to flick the screen, and
then release your finger
• Pinch-out: Touch the screen with 2 fingers and then
move them apart
• Pinch-in: Touch the screen with 2 fingers apart and
then move them together, as if pinching
Opening Items
Tap an item
a
Checking or Unchecking Options
Tap an item that has a checkbox
a
• If the checkbox was unmarked, a check mark
now appears in it.
• If the checkbox was marked, the check mark
now disappears from it.
Confirmation and Settings before Using
42
Scrolling Screen
You can scroll the screen up or down. On some web
pages, you can also scroll side to side.
Drag up or down to
scroll.
Swipe to scroll quickly.
To stop scrolling, touch
the screen.
Page 45

Zooming In or Out
Some applications allow you to zoom in on small text
that is difficult to read. After zooming in, you can also
zoom out to a full-screen view.
The movement of your
fingers enlarges the
screen display by
pinching it out.
• The movement of
your fingers reduces
the screen display by
pinching it in.
• Pinch in on the Home
screen to display the
Home screen list, and
then set the Home
screen.
Note
• Sometimes appears when you drag the
screen. You can also zoom in or out by tapping
this zoom control icon. Tap
one level. Tap
However,
already zoomed in to the maximum or zoom out
to the minimum. This grays out indicates that
you cannot zoom in or out any further.
to zoom out by one level.
or grays out if you have
to zoom in by
Confirmation and Settings before Using
43
Page 46

Using Motion Gesture
Various functions can be operated simply by moving the
terminal.
• To use motion gestures, tap
"Gesture" from the Home screen, and place a check
mark in each item.
Using motion gesture on alarm
Stopping alarm
Flip the terminal while alarm is ringing
a
• Alarm stops.
Confirmation and Settings before Using
44
u "Settings" u
Using motion gesture while an incoming
call arrives
Muting ringtone
When an incoming call arrives, flip the
a
terminal
• The ringtone is muted.
Page 47

Using motion gesture in gallery
Viewing previous/next image
While an image in gallery is being
a
displayed, tap the left or right side of the
terminal
• The left or right image is displayed.
Changing Screen Orientation
The terminal screen automatically rotates to horizontal
(landscape) or vertical (portrait) views, depending on
the direction in which it is turned.
Note
• Screen orientation may not change in some
applications.
• You can disable screen rotation by tapping
"Settings" u "Display" on the Home screen, and
unmarking the "Auto-rotate screen" checkbox on
the "Display settings" screen.
u
Confirmation and Settings before Using
45
Page 48

Initial Settings
First-time Settings
When the power is first turned ON, you need to set the
language and date for the terminal. Once you set those
settings, there is no need to set them the next time the
power is turned ON. You can also change these settings
later.
• Procedures differ depending on the connection with
network and settings. Here, an explanation is given
for the docomo Palette UI.
Press and hold the power key for over 1
a
second
Tap to cancel the screen lock
b
On the "あなたのL-05Dです。ガイドに
c
沿って設定をはじめましょう" screen, tap
"続ける"
"English (United States)" / "日本語" on
d
the "言語の選択" screen
Set each item on the "Set date & time"
e
screen and tap "Next"
"Mobile network or Wi-Fi" / "Wi-Fi only"
f
on the "Set internet connection" screen
Confirmation and Settings before Using
46
Set each item on the "Wi-Fi settings"
g
screen and tap "Next"
Tap "Next" on the "Add a Google
h
account" screen and set by following
screen instructions
• If you tap "Skip", you can skip the operation and
make the settings later.
"OK" on the "Software Update" screen
i
"Next" on the "docomo service initial
j
settings" screen
"Install" / "Not install" on the "Install all
k
apps" screen
"Set"
l
Keitai" screen
Tap "Set" on the "docomo apps
m
password settings" screen, input a
docomo apps password, and then tap
"OK"
"Location providing ON" / "Location
n
providing OFF" / "Unknown blocking"
on the "Location providing setting"
screen
"OK" on the "Complete setting" screen
o
/
"Not set"
u
"Next"
u
u
"Next"
on the
"Next"
"Use Osaifu-
Page 49

Note
• A data connection (LTE/3G/GPRS) is required
to set online services. For details on enabling
data connection, refer to "Wireless & Networks"
(P101).
Configuring Wi-Fi Settings
The terminal connects to the Internet via access points
for Wi-Fi networks or public wireless LAN services.
To connect, you must configure the access point
connection settings on the terminal.
Reception interference caused by Bluetooth devices
• As the terminal's wireless LAN devices and
Bluetooth device use the same frequency
(2.4 GHz), reception interference may occur or the
communications speed may lower. Also, you may
hear noise or have a connection problem. In these
cases, do the following:
- Keep the wireless LAN device over 10 m away
from the Bluetooth device.
- Within 10 m, turn off either the wireless LAN
device or the Bluetooth device.
Note
• Packet communication can be connected, even
when Wi-Fi function is ON. However, while WiFi is available, Wi-Fi is prioritized. When the
Wi-Fi network is disconnected, the terminal
automatically connects to the LTE/3G/GPRS
network. Packet communication charges apply
if you use it with LTE/3G/GPRS connected.
• You can reduce battery consumption by turning
OFF Wi-Fi when you are not using it.
Wi-Fi network status
When the terminal is connected to a Wi-Fi net work,
appears in the status bar. An open network with
no security protection is detected when Wi-Fi network
notification is set to ON,
bar.
always appears in the status
Confirmation and Settings before Using
47
Page 50

Connecting to a Wi-Fi net work
From the Home screen, u "Settings"
a
u "Wireless & networks"
• The "Wireless & network settings" screen
appears.
Place a check mark on "Wi-Fi"
b
"Wi-Fi settings"
c
• The "Wi-Fi settings" screen appears.
Tap the Wi-Fi network that you want to
d
connect to
• If you try to connect to a protected Wi-Fi
network, you will be prompted to enter the
security key for that Wi-Fi network. Tap the
"Password" box, enter the network password
and tap "Connect".
• Usually, when you enter a password, the last
character entered is displayed and as many
"・" as the number of characters appear instead
of previously entered characters. All characters
can be displayed when you place a check mark
on "Show password".
Confirmation and Settings before Using
48
Note
• There are two types of available networks - open
networks and protected networks. The network
type is indicated by an icon to the network
represents an open network and
name.
represents a protected network.
• The icon also indicates the signal strength.
Strong signal
Weak signal
• To search Wi-Fi network again, from the Home
screen, tap
networks" u "Wi-Fi settings", and then tap
"Scan".
• Network name does not appear depending
on the settings for the access point even if the
network is connectable. If this happens, you can
still connect to the network. Refer to "Adding a
Wi-Fi network" (P50).
• When establishing a Wi-Fi network connection,
the required information is generally obtained
from a DHCP server automatically. However, it is
possible to specify these items separately.
• To check the Wi-Fi MAC address and IP
address, from the Home screen, tap
"Settings" u "Wireless & networks" u "Wi-Fi
settings", and then tap
u "Settings" u "Wireless &
u
u "Advanced".
u
Page 51

Connecting to a Wi-Fi net work by
specifying a static IP address
From the Home screen, u "Settings"
a
u "Wireless & networks" u "Wi-Fi
settings"
• The "Wi-Fi settings" screen appears.
u "Advanced"
b
Place a check mark on "Use static IP"
c
Tap in the order of "IP address",
d
"Gateway", "Netmask", "DNS 1", and
"DNS 2" to set
• A menu appears for each item. Set the
appropriate value for each item. Make sure
to enter value on "IP address", "Gateway",
"Netmask", and "DNS 1".
Notifying when Wi-Fi network with no
security protection is detected
From the Home screen, u "Settings"
a
u "Wireless & networks" u "Wi-Fi
settings"
• The "Wi-Fi settings" screen appears.
Place a check mark on "Wi-Fi"
b
Place a check mark on "Network
c
notification"
• You will be automatically notified when an open
network with no security protection is detected.
Confirmation and Settings before Using
49
Page 52

Adding a Wi-Fi network
From the Home screen, u "Settings"
a
u "Wireless & networks" u "Wi-Fi
settings"
• The "Wi-Fi settings" screen appears.
Place a check mark on "Wi-Fi"
b
"Add Wi-Fi network"
c
• The "Add Wi-Fi network" menu appears.
Enter the network SSID in the "Network
d
SSID" box
"Security"
e
• "Security" menu appears. Select the appropriate
type from "Open", "WEP", "WPA/WPA2 PSK", and
"802.1x EAP".
• The setting method differs depending on the
security settings.
"Save"
f
• The Wi-Fi network is added.
Confirmation and Settings before Using
50
Changing the Wi-Fi network password
From the Home screen, u "Settings"
a
u "Wireless & networks" u "Wi-Fi
settings"
• The "Wi-Fi settings" screen appears.
Touch the Wi-Fi network name for over 1
b
second
• A menu appears.
"Modify network"
c
• The network settings are displayed. Tap the
"Password" box and enter the new password.
Disconnecting from a Wi-Fi network
From the Home screen, u "Settings"
a
u "Wireless & networks" u "Wi-Fi
settings"
• The "Wi-Fi settings" screen appears.
Touch the name of Wi-Fi network that
b
you want to disconnect from for over 1
second
• A menu appears.
"Forget network"
c
• You are disconnected from the Wi-Fi network.
Page 53

Setting Wi-Fi to sleep mode
Set Wi-Fi to sleep mode and specify the timing of
switching the terminal to data communications.
From the Home screen, u "Settings"
a
u "Wireless & networks" u "Wi-Fi
settings"
• The "Wi-Fi settings" screen appears.
u "Advanced"
b
"Wi-Fi sleep policy"
c
• "Wi-Fi sleep policy" menu appears. Choose from
"When screen turns off", "Never when plugged
in" and "Never".
Setting Online Service Accounts
You can update your status on Google and other online
services once you have set up your online service
account on the terminal. You can also configure the
terminal to automatically sync updates from the online
service.
You can also delete unnecessar y accounts.
Adding an online service account
From the Home screen, u "Settings"
a
u "Accounts & sync"
• The "Accounts & sync settings" screen appears.
"Add account"
b
• The "Add an account" screen appears.
Tap the online ser vice that you want to set
c
an account
• Follow the screen instructions and enter your
login details.
• When you have finished adding the account, the
added online service appears in the "Manage
accounts" group.
Confirmation and Settings before Using
51
Page 54

Note
• If you mark the "Background data" checkbox,
all installed applications on the terminal
will automatically communicate with their
respective services. If you mark the "Autosync" checkbox, the applications will also
automatically synchronize data with their
respective services. These operations may incur
packet communication charges. Mar king these
checkboxes also runs down the batter y.
Manually synchronizing online service
data
From the Home screen, u "Settings"
a
u "Accounts & sync"
• The "Accounts & sync settings" screen appears.
Tap the account that you want to
b
synchronize with
• A list of online service's synchronized data
appears.
• The data with a check mark is synchronized.
Place a check mark on synchronized
c
data
• The data with a check mark is synchronized.
Confirmation and Settings before Using
52
Deleting an online service account
From the Home screen, u "Settings"
a
u "Accounts & sync"
• The "Accounts & sync settings" screen appears.
Tap the account that you want to delete
b
• The "Data & synchronization" screen appears.
"Remove account"
c
• The "Remove account" screen appears.
"Remove account"
d
• The selected account is deleted.
Note
• The Google account that you set for the first
time cannot be deleted with the operation
above. To delete it, initialization of the terminal
is required from the Home screen, tap
"Settings" u "Privacy" u "Factory data reset".
• docomo account cannot be deleted.
u
Page 55

Screen Display/Icons
Status Bar
The status bar is displayed at the top of the screen. The
terminal status and notifications are displayed in the
status bar. Notification icons are displayed on the left
side, and the terminal status icons are displayed on the
right side.
Main status icons
Signal strength
Out of service area
Bluetooth ON
Connected to Bluetooth device
When you are roaming overseas
GPRS available
3G available
LTE available
FOMA high speed/HSDPA network
available
Communicating by GPRS
Communicating by 3G
Communicating by LTE
Communicating by FOMA high speed/
HSDPA network
Battery level
Confirmation and Settings before Using
53
Page 56

The battery needs to be charged
The battery is charging
GPS enabled
GPS is positioning
Airplane mode activated
UIM locked or UIM not inserted
Phone microphone is muted
Silent mode is set (no vibration)
Silent mode is set (vibration)
Alarm is set
Connected to Wi-Fi
Synchronizing data
Osaifu-Keitai lock activated
Confirmation and Settings before Using
54
Main notification icons
New Gmail
New SMS message
Problem with an SMS message
New Google Talk message
Making a call or during a call
Call on hold
Missed call
New voicemail message
Upcoming calendar event
Music is playing
Discovered Open Network (Wi-Fi)
UIM is not inserted
USB is connected
microSD card is not inserted
No space in the microSD card
Page 57

Uploading data
Downloading data/Data download
completed
Problem with login or synchronization
Update of installed application available
Viewing 1Seg
More notifications
Connected to a VPN/Not connected to a
VPN
USB debug mode is connected
USB tethering available
Wi-Fi tethering available
Notification Panel
Notification icons are displayed in the Notification
panel. You can open notifications, such as messages,
reminders, or event notifications, directly from the
Notification panel.
Opening the Notification panel
Drag or swipe the status bar downwards
a
• The Notification panel appears. Icons are
displayed at the top of the Notification panel.
Icons are blue when they are on, and gray when
they are off.
Confirmation and Settings before Using
55
Page 58

Silent mode
a
Switch between on and off. Touch for over 1 second
to display the "Sound settings" screen.
Wi-Fi
b
Switch between on and off. Touch for over 1 second
to display the "Wi-Fi settings" screen.
Bluetooth
c
Switch between on and off. Touch for over 1 second
to display the "Bluetooth settings" screen.
GPS
d
Switch between on and off. Touch for over 1 second
to display the "Location & security settings" screen.
Mobile network settings
e
When Wi-Fi is not available, set if access to mobile
network. Touch for over 1 second to display "Mobile
network settings" screen.
Clear
f
Delete notification information and icons.
Notification information
g
Display details of notification information.
Confirmation and Settings before Using
56
Viewing notification details
Tap the notification message on the
a
Notification panel
• The notification details are displayed in the
appropriate application.
Clearing notification informations
Tap "Clear" on the Notification panel
a
Note
• Some notifications cannot be cleared,
depending on their content.
Closing the Notification panel
Drag or swipe the bottom of the
a
Notification panel upwards
Note
• You can also close the Notification panel by
.
tapping
Page 59

Character Entry
The terminal has an on-screen keyboard that is
displayed in the touch screen for character entry.
Character Entry Using the Onscreen Keyboard
If you tap a text box on the screen, the on-screen
keyboard appears in the touch panel. The terminal
provides two types of on-screen keyboards: an onscreen 10-key keyboard and an on-screen QWERTY
keyboard.
Tap key icon to switch the entry operation such as
character mode change.
On-screen 10-key keyboard
Use this for entering Japanese in "Kana character
input".
On-screen QWERTY keyboard
Use this for entering Japanese in "Roman letter
input".
Reverse order key/Undo key
a
Displays the previous character (reverse
sequence). When "Undo" is displayed, this undoes
the last operation.
Left cursor key
b
The highlight moves to the left. Touch this for over 1
second to move it continuously. It can also narrow
the conversion range.
Symbol key
c
Displays a list of pictograms, symbols and
emoticons.
Switch character mode key/Setting key
d
Switch the character mode. Touch for over 1 second
to display "iWnn IME Menu".
Confirmation and Settings before Using
57
Page 60

Deletion key
e
Deletes the character to the left of the cursor. Touch
this for over 1 second to delete the characters
continuously.
Right cursor key
f
The highlight moves to the right. Touch this for over
1 second to move it continuously. It can also widen
the conversion range. Also, if you tap this icon when
the highlight is at the right end of an unconfirmed
character string, the number of characters
applicable to predictive conversion increases.
Space key/Conversion key
g
Enter a space. Execute consecutive segment
conversions.
Execution key/Enter key
h
Confirms the entered characters or conver ted
characters. If the entered characters or converted
characters have already been confirmed, this
executes the function of the text box in which the
characters were entered.
Shift key
i
Switch between upper case letter and lower case
letter.
Tap once: Only the first letter is capitalized
Tap twice: All letters are capitalized
Tap three times: Lowercase
Confirmation and Settings before Using
58
Note
• The key display varies depending on the entry
screen or character mode.
• For information on switching the type of on-
screen keyboard, refer to "Switching the
keyboard" (P58).
• When you no longer need the keyboard, you
can close it by tapping
tap the text box on the screen.
There are 8 character input modes. The current mode is
indicated by the following icons in the status bar.
Hiragana and Kanji
input
Full-width Katakana
input
Half-width Katakana
input
Full-width alphabet
input
. To display it again,
Half-width alphabet
input
Full-width number
input
Half-width number
input
Voice Input
Switching the keyboard
On the on-screen keyboard, touch for
a
over 1 second
• "iWnn IME Menu" appears.
Page 61

"10-key ⇔ QWERTY"
b
• The keyboard is switched.
• When the input mode is changed, the keyboard
switches automatically. Switch back using "10key ⇔ QWERTY".
Switching the character mode
Each time you tap on a character entry screen, the
character mode switches in the order of "HiraganaKanji" u "Half-width Alphabet" u "Half-width Numeric".
If you check "Voice Input" on "Common Keyboard
Settings", voice input is enabled.
You can also switch the input mode by touching
over 1 second and then tapping "Input Mode" on the
"iWnn IME Menu" that appears.
for
Note
• In some character entry screens, certain
character modes may not be available or
selectable.
Entering symbols/emoticons
Tap in a character entry screen to switch to symbol/
emoticon input mode, and display the available symbols
and emoticons on the display.
Tap "Symbol" and "Emoticon" to display respectively
the available symbols and emoticons. Tap one of the
available symbols or emoticons to enter it.
Tap "文字" to return to the on-screen keyboard that was
displayed before the symbol or emoticon was entered.
Changing character entry settings
Tap for over 1 second on a character entry screen
to display "iWnn IME Menu". Tap "Change Settings" to
change the character entry settings.
Common Keyboard Settings
Sound on Key
Press
Vibrate on
Key Press
Key Preview Mark this checkbox to display an
Auto
Capitalization
Mark this checkbox to play a brief
sound on each key press.
Mark this checkbox to make the
terminal vibrate on each key press.
enlarged popup of the entered key.
Mark this checkbox to automatically
capitalize the first letter of the first
word at the beginning of a sentence.
Confirmation and Settings before Using
59
Page 62

Keyboard
Type
Voice Input Mark the checkbox to enable voice
10-key Keyboard
Flick Input Mar k this checkbox to change the
Flick
Sensitivity
Toggle Input If you mark this checkbox when the
Auto Cursor
Movement
Confirmation and Settings before Using
60
This allows you to set the type of
keyboard to use on each screen
view (horizontal/vertical) or for each
input mode.
input, and add it to the character
entry modes.
input method on the on-screen 10key keyboard to flick input. Unmark
this checkbox to change it back to
toggle input.
If you tap this when the "Flick
Input" checkbox is marked, the
"Flick Sensitivity(Low⇔High)" menu
appears, allowing you to set the flick
sensitivity using a slide bar.
"Flick Input" checkbox is marked,
toggle input is enabled as well as
flick input.
Specify the speed for auto cursor
movement.
Conversion
Input Word
Learning
Word
Prediction
Typing Error
Correction
Wildcard
Prediction
Lines of
Candidate
Area
Font size of
candidate
External Application
Mushroom This allows you to set whether to use
If you mark this checkbox, the phrase
confirmed by the conversion process
is learned by iWnn IME.
Mark this checkbox to display the
predictive conversion candidates.
Mark this checkbox to display the
candidates for corrections for input
errors.
Mark this checkbox to display
conversion candidates based on the
number of characters in the word or
phrase.
This allows you to set the number
of lines of conversion candidates
displayed in horizontal (landscape)
and vertical (portrait) screens.
This allows you to set the font size
for characters displayed in the
conversion candidate window.
the Mushroom application.
Page 63

Dictionary
Japanese
User
Dictionary
English User
Dictionary
Clear
Learning
Dictionary
About IME
iWnn IME Displays information about iWnn IME,
Tap this to display the "Word List
in Japanese User Dictionary"
screen. Tap
delete words, or to delete the entire
Japanese User Dictionary.
Tap this to display the "Word List in
English User Dictionary" screen. Tap
or to delete the entire English User
Dictionary.
Delete all contents of the learning
dictionary.
such as its version.
to register, edit or
to register, edit or delete words,
Confirmation and Settings before Using
61
Page 64

docomo Palette UI
The docomo Palette UI is a home application that allows
you to quickly find and operate what you want such as
access to the Web and applications.
Viewing the Home Screen
You can customize the Home screen by adding or
moving shortcuts and widgets, and by changing the
wallpaper.
The Home screen has up to 12 screens each on the left
and right for adding shortcuts and widgets.
docomo Palette UI
62
Page 65

Home Screen Management
What You can Add to the Home
Screen
You can customize the Home screen.
Touch the Home screen for over 1 second
a
• The "Add to home screen" list screen appears.
Shortcut You can create shortcuts.
Widget You can layout Widgets.
Folder You can create folders.
Kisekae You can select the background
Wallpaper You can choose the wallpaper
Group You can select from groups.
Tap the item you want to add/set.
b
• It is added/set to the Home screen.
and icon design.
for the Home screen.
Moving Shortcuts, etc.
From the Home screen, touch the icon you
a
want to move for over 1 second
Drag the icon and release your nger
b
• The icon is moved.
Note
• You can also drag the icon to one of the Home
screen's extended screens to the left or r ight.
Deleting Shortcuts, etc. from the
Home Screen
From the Home screen, touch a shortcut
a
icon or widget for over 1 second
Drag it to and release your nger
b
• The icon is deleted from the Home screen.
Note
• It is also possible to delete by tapping “Delete"
displayed in the balloon of Step 1.
docomo Palette UI
63
Page 66

Uninstalling Applications and
Widgets
From the Home screen, "Applications"
a
Touch the application you want to delete for
b
over 1 second u "Uninstall"
"OK"
c
• The application is deleted.
Note
• Applications installed in the terminal when
purchasing cannot be uninstalled.
Changing Folder Names
From the Home screen, tap a folder you
a
want to change name
• The folder window opens.
Touch the title bar for over 1 second
b
• The "Edit name" menu appears.
Enter a new name of the folder and tap
c
"OK"
• The name of the folder is changed.
docomo Palette UI
64
Changing Kisekae
Change the wallpaper and icon of the Home screen to
change the image.
Touch the Home screen for over 1 second
a
• The "Add to home screen" list screen appears.
Tap "Kisekae", select a design, and tap
b
"Set"
• It is possible to select and set designs that you
like from a website.
• It is also possible to set from the Home screen
u "Kisekae/Wallp" u "Kisekae".
by
Page 67

Changing Wallpaper
Touch the Home screen for over 1 second
a
"Wallpaper"
b
"Gallery" / "Live wallpapers" / "Wallpaper
c
gallery"
• If you have tapped "Gallery", tap an image that
you want to use as wallpaper. Drag the square
displayed on the screen to select the section
that you want to use as wallpaper, and then tap
"Save".
• Live wallpaper list appears when tapping
"Live wallpapers". Tap to select one of the live
wallpaper, then tap "Set wallpaper". Depending
on the type of wallpaper, you can set the live
wallpaper settings by tapping "Settings...".
Adding Home Screens
You can add Home screens.
From the Home screen, u "Home
a
screens"
• The "Home screens" screen appears.
• You can create up to 12 Home screens.
Tap one of the thumbnails with a "+" mark
b
• The "+" appears for screens that can be added.
Sorting Home Screens
You can sor t the scroll order for Home screens.
From the Home screen, u "Home
a
screens"
• The "Home screens" screen appears.
Touch the thumbnail for over 1 second, and
b
drag it to the location where you want to
move it
docomo Palette UI
65
Page 68

Deleting Home Screens
From the Home screen, tap u "Home
a
screens"
• The "Home screens" screen appears.
Touch the thumbnail for over 1 second,
b
drag it over to
Note
• It is also possible to delete by tapping "Delete"
displayed in the balloon of Step 2.
docomo Palette UI
66
and release your nger
Viewing the Application
Screen
From the Home screen, "Applications"
a
Groups of applications are displayed as an icon
list.
Page 69

Application List
Some applications need to be applied separately (paid).
DOCOMO Services
dmenu This is a shortcut application
dmarket This is the application
iチャネル
Machi-chara This is the application for
for "dmenu" to easily nd fun
and convenient contents
for smart phones including
contents used in i-mode.
for starting dmarket.
From dmarket, you can
purchase contents such as
music, videos, and books.
Also, applications from
the Android market are
introduced.
This is the application for
using i-Channel.
displaying characters on the
terminal screen. Characters
move on the Widget, and
noties information such as
incoming calls and email.
docomo
backup
Basic Functions
Phone Make or receive a call.
Phonebook Register Phonebook, make a
PhoneBookCopy
声の宅配便
This is the application for
backing up and restoring
data such as for the
phonebook.
(P78)
call or send a message from
the registered phonebook.
(P85)
This is the application
for moving and copying
phonebook data using
external recording media
such as a microSD card.
(P89)
This is the application
for easily using "Koe-noTakuhaibin" on a smart
phone. You can easily record
and play voice messages.
(P90)
docomo Palette UI
67
Page 70

docomo Palette UI
68
spモードメー
ル
Gmail Send and receive Google
Area Mail This is the application for
Messaging Available to send and
Talk It allows you to chat (text
Anshin Scan This application is for
This allows you to send
and receive emails using a
docomo email address
(@docomo.ne.jp). It allows
you to use pictograms
and Deco-mail, and also
supports auto receive.
(P122)
account emails. (P124)
receiving and conrming
early warning "Area Mail".
(P125)
receive SMS. (P122)
chatting) with friends who
have Google accounts.
(P129)
protecting the terminal from
viruses. It can detect viruses
in installed applications and
in the microSD card.
災害用キット
Browser Browse web page. (P126)
Google Search Search for Phonebook,
Voice Search Search by voice.
Downloads Conr m, display or play the
Market Access applications and
Instruction
Manual
(Japanese)
This application is for
registering and conrming
messages on the disaster
message board.
application, web page, etc.
inside the terminal.
downloaded data. (P191)
games directly via Android
market to download and
install them to the terminal.
(P156)
Manual of this terminal.
Activate the function
you want to use from the
description.
Page 71

Entertainment
Hulu This is the application for
Qik Video This service is for
JOOKEY This is for viewing
Media Player This is the application for
Music You can play songs from the
watching popular Hollywood
movies and overseas
dramas at a xed rate.
enjoying integrated video
communication for social
video sharing/video chat/
video mail/video archives
using one application.
information variety programs
provided by celebrities and
experts, mainly Yoshimoto
entertainers.
playing music and videos.
(P148)
Songs, Albums, Artists, and
Playlists folders.
Gガイド
番組表
TV You can watch TV (1Seg).
YouTube Play YouTube videos, and
ビデオ
マーケット
ジークラウド
SF IV HD
Trailer
With this application you
can view program guides
for terrestrial digital, BS
digital, and other broadcast
services. You can search
for a program by keyword,
genre, etc., and schedule
watching 1Seg programs.
(P169)
upload the videos you have
shot to YouTube. (P187)
You can enjoy various highquality video programs.
This application is for
enjoying games using the
cloud provided by NHN
Japan.
This is the application
for downloading STREET
FIGHTER IV HD.
docomo Palette UI
69
Page 72

docomo Palette UI
70
Book Store
MyShelf
BOOKストア
2Dfacto
Twonky
Special
Twitter This is the official Twitter
Gallery A software to view still
This is the application for
viewing e-books that were
purchased through the
dmarket BOOK Store.
This is an electronic book
store where you can
purchase and browse a
variety of books such as
literary books, popular
comics, and famous
business books.
This is the application for
connecting terminals with
home electrical appliances.
Wirelessly play videos,
photos and music stored
in the terminal or on the
Internet via TV or audio.
client application. You can
publish short messages on
site to communicate with
others.
images (photos) and videos.
(P146)
Tools
Camera A software for shooting still
Memo Memo is available to use.
Schedule Memos can be registered
Calendar View calendar and manage
地図アプリ
ご当地ガイド
Maps View current location, search
images (photos) or videos.
(P141)
and schedule management
is possible.
schedule. (P183)
Supplies Maps, Shop
Search, Navigation, Transfer
and Visited places functions
to support you when you are
outdoors.
This is for introducing
information for
recommended locations
throughout Japan including
pictures and local foods to
help support walking tours.
places or routes. (P160)
Page 73

Navigation Voice guidance is available
Places Search for the nearest
Latitude Conrm your friend's
Evernote Save website content and
to show the route to
destination. (P168)
restaurant, cafe, Japanesestyle bar, travel spot, ATM or
gas station. (P169)
location and share status
message. It also enables you
to send emails and search
for a route to your friend's
location. (P167)
information such as the shot
images, the memos of ideas,
etc. to a server to search
or view when necessary.
The information can also be
saved or viewed from a PC
or other devices in addition
to this terminal.
Name card
creator
Calculator Four arithmetic operations
Alarm Clock You can use the stopwatch,
Dictionary Look for a word and register
Polaris Office Read and edit various
Application
Manager
Link Backup Backup call log, calendar
SmartWorld Enables to enjoy various
This is the application for
creating original name cards
that can be displayed to
your My prole box in the
"Phonebook" application.
are available. (P186)
and set the timer, world
clock, and alarms. (P181)
the word to Wordbook.
(P189)
document formats. (P187)
This allows you to manage
application. (P191)
(Schedule), etc. to microSD
card. (P192)
applications, dramas and
variety shows. (P186)
docomo Palette UI
71
Page 74

Osaifu/Shopping
Settings
docomo Palette UI
72
Osaifu-Keitai You can set Osaifu-Keitai.
iD設定アプリ
ToruCa Acquire, display, search and
Settings Set various settings. (P100)
ecoモード
AUTO-GPS This application is for using
(P177)
This is the application for
setting e-money iD for using.
(P188)
update Tor uCa. (P180)
This is the application
for setting "eco Mode"
for reducing battery
consumption by adjusting
various settings such as
screen brightness.
auto GPS compatible
services that notify
weather information, local
information such as shops,
and tourist information
according to your current
location.
docomo
location
information
ドコモ海外
利用
Home
Switcher
This is the application
for providing location
information by imadoco
search, imadoco kantan
search, Keitai-Osagashi
Service, and emergency
information location
notications. You can also
change various settings
and access the setting site/
service site.
This is the application for
supporting overseas packet
communication. You can
easily set data roaming and
carrier for using overseas
Pake-hodai.
This is the application
for switching the home
application.
Page 75

Note
• This is a list of the applications that have been
installed in this terminal at the time of purchase.
• If the software is updated, application content
and icon positions may change.
• The names of some applications may not be
fully displayed below their respective icons.
Manage Applications
Adding Shortcuts to the Home
Screen
From the Home screen, "Applications"
a
Touch the application icon for which you
b
want to create a shortcut for over 1 second,
and tap "Add"
The shortcut icon is added to the Home screen.
Uninstalling an Application
From the Home screen, "Applications"
a
Touch the application icon you want
b
to uninstall for over 1 second, and tap
"Uninstall"
The conrmation screen appears,
c
then tap "OK"
docomo Palette UI
73
Page 76

Moving Applications
From the Home screen, "Applications"
a
Touch the application you want to move for
b
over 1 second
Drag the application and release your
c
nger
• The application is moved.
docomo Palette UI
74
Group Management
Manage groups on the application screen and sort
icons.
Adding Groups
From the Home screen, "Applications"
a
u "Add group"
b
Enter a group name and tap "OK"
c
• The group is added on the application screen.
Sorting Groups
From the Home screen, "Applications"
a
Touch the group name for over 1 second,
b
and drag it
• The group location is moved.
Page 77

Editing Group Names
From the Home screen, "Applications"
a
Touch the group name for over 1 second,
b
and tap "Edit name"
Enter a new group name and tap "OK"
c
• The group name is changed.
Changing Group Colors
From the Home screen, "Applications"
a
Touch the group name for over 1 second,
b
and tap "Edit label"
• Select a color and tap.
Adding Groups to the Home
Screen
From the Home screen, "Applications"
a
Touch the group name for over 1 second,
b
and tap "Add"
• The group shortcut icon is added to the Home
screen.
Deleting Groups
From the Home screen, "Applications"
a
Touch the group name for over 1 second,
b
and tap "Delete"
"OK"
c
• The group is deleted.
docomo Palette UI
75
Page 78

Searching Applications
From the Home screen, "Applications"
a
u "Search"
b
• The Search widget starts. Enter a keyword or
use Voice Input to search.
Switching Application
Screen Display
Select the display for the Application screen as Tile or
List.
From the Home screen, "Applications"
a
u "List format" / "Tile format"
b
docomo Palette UI
76
Home Application Information
You can view the operation guide for the docomo Palette
UI.
From the Home screen, u "More" u
a
"Help"
• An explanation for the docomo palette UI
operation is displayed.
Version Information
From the Home screen, u "More" u
a
"Application info"
• The application name, provider, and version are
displayed.
Page 79

Home Application Settings
From the Home screen, u "More" u
a
"Home settings"
• "Home settings" screen appears.
Personal area Personal area is displayed.
Wallpaper loop The wallpaper display is
Sync function Auto communication is
International
roaming
looped.
executed when personal area
information is updated.
Auto communication is
executed during international
roaming.
docomo Palette UI
77
Page 80

Calling / Network Services
Making/Receiving Calls
Making a Call
You can use the ter minal to make international calls
and emergency calls, as well as standard calls. You can
also enter a pause when using phone services, such as
reserving tickets or checking your bank balance.
Making a call
From the Home screen, "Phone" u
a
"Dial"
• The "Dial" tab appears.
Enter the phone number u Tap
b
• If you enter a wrong number, tap to
delete the number.
Calling / Network Services
78
Tab
a
"Recent calls" tab (P83)
"Favorites" tab (P89)
"Dial" tab: Dial screen appears.
"Phonebook" tab (P85)
Phone number entry box
b
The input phone number is displayed.
Dial key
c
Page 81

Call button
d
"Add to phonebook" button
e
The input phone number is registered to the
Phonebook.
Edit button
f
The input text is deleted.
"Koe-no-Takuhaibin" button
g
The Koe-no-Takuhaibin is sent to the input phone
number. (P90)
"SMS" button
h
Create and send SMS. (P122)
Entering a pause
From the Home screen, "Phone" u
a
"Dial"
• The "Dial" tab appears.
Enter the phone number and tap u
b
"Add 2-sec pause"
• A comma "," is displayed after the phone
number.
• It is also possible to send a push signal
manually by touching "*" for over 1 second.
After ";" is entered next to the phone number, go
to Step 3.
Enter the menu number of the service
c
that you are using u Tap
Ending a call
During a call, "End"
a
Emergency call
Emergency call Phone number
Police 110
Fire department or
ambulance service
Japan Coast Guard 118
Note
• When you are making an emergency call (110,
119, and 118) from your terminal, be sure
to notify that you are calling from a mobile
phone and give your mobile phone number
and present location clearly, as the police/fire
department may call you back for confirmation.
During an emergency call, be sure to stay where
you are so that your call will not be interrupted.
After making an emergency call, do not turn
off your mobile phone immediately. Keep it on
for about 10 minutes so that it can receive an
incoming call.
119
Calling / Network Services
79
Page 82

• Depending on the location from which you make
an emergency call, connection may be made
to the fire department or the police of another
jurisdiction.
• In Japan, the 110, 119, and 118 emergency
numbers cannot be dialed when UIM is not
inserted, from the PIN code input screen or from
the PIN unblocking key input screen. For details
on PIN code, refer to "Security Code and UIM
Protection" (P111).
Making an international call (WORLD CALL)
WORLD CALL is an international call service that
enables you to make a call in Japan via the DOCOMO
terminals.
Customers who have subscribed to the FOMA service
would also have automatically subscribed to "WORLD
CALL" at the same time. (However, you can decline to
use "WORLD CALL" when subscribing to the FOMA
services.)
• Available to make a call over 240 countries or areas.
You can make an overseas call to a fixed line
telephone or a mobile phone.
• For information about the possible countries and
carriers at overseas, refer to "Mobile Phone User's
Guide [International Services]" or the DOCOMO
"International Services website".
• The fee of WORLD CALL will be charged together
with FOMA service communication fee every month.
Calling / Network Services
80
• Subscription fee and monthly fee will not be charged.
• Contact "General Inquiries" on the back of this
manual for detailed information about WORLD CALL.
• When using an international call service company
other than DOCOMO, consult with the international
call service company you use.
• Depending on the carrier, the caller's number may
not be notified or displayed correctly. In that case,
making a call from call log is not available.
Calls to fixed-line telephone
From the Home screen, "Phone" u
a
"Dial"
• The "Dial" tab appears.
Enter "010" u Country code u Area
b
code u Recipient's phone number, and
tap
Page 83

Calls to mobile phone
From the Home screen, "Phone" u
a
"Dial"
• The "Dial" tab appears.
Enter "010" u Country code u
b
Recipient's mobile phone number, and
tap
Note
• If a recipient's mobile phone number or an area
code begins with "0", omit "0". However, "0" may
be required when calling some countries or
areas, such as Italy.
• "+" (touch "0" for over 1 second to input "+") or
"009130-010" can also be used instead of "010".
• For details on WORLD CALL, refer to DOCOMO
"International Services website".
Receiving a Call
The terminal plays a ringtone when there is an incoming
call. In Silent mode, the ringtone does not sound. If the
terminal has been set to vibrate, it vibrates when there
is an incoming call.
Receiving a call
When an incoming call arrives, tap
a
"Activate" u "Accept"
• You can talk to the caller.
Note
• If the caller has been saved in Contacts
(Phonebook), the caller's name and phone
number are displayed. If the caller is not saved
in Contacts (Phonebook), only the phone
number is displayed.
Declining a call
When an incoming call arrives, tap
a
"Activate" u "Reject"
• The incoming call is declined.
Muting ringtone
Press the Volume key (upper)/Volume
a
key (lower) while an incoming call
ringing
• The ringtone is muted.
Calling / Network Services
81
Page 84

Operations during a Call
During a call, you can adjust the volume, turn the
speaker ON/OFF, mute the microphone, and put the call
on hold, depending on the usage conditions.
Adjusting Call Volume
During a call, you can adjust the reception volume.
Press Volume key (upper)/Volume key
a
(lower)
• The call volume changes accordingly.
Using Call Options
During a call, you can put the caller onto speaker or
temporarily mute the microphone.
Tur ning the speaker ON/OFF
During a call, "Speaker"
a
• You can hear the caller's voice through the
speaker.
With the speaker ON, "Speaker"
b
• You can no longer hear the caller's voice
through the speaker.
Calling / Network Services
82
Note
• Do not hold the terminal against your ear with
the speaker ON.
• Speak into the terminal from a distance of no
more than 50 cm. If you find it difficult to hear
what is being said, turn off the speaker.
Muting the microphone
During a call, "Mute"
a
• The caller can no longer hear what you are
saying.
With the microphone OFF, "Mute"
b
• The caller can hear what you are saying again.
Putting the call on hold
During a call, "Hold"
a
• The call is put on hold.
In the hold state, "Unhold"
b
• Hold is canceled, and you can resume the call.
Note
• To use the function for putting a call on hold, a
subscription to Call Waiting Service (P95) is
required.
Page 85

Call Log
This automatically records a history of your incoming
and outgoing calls. You can also use the call log to call a
phone number or add it to Phonebook.
The names of the recipient and caller are displayed.
a
A call is made.
b
Log icons are displayed.
c
: Dialed calls log
: Received calls log
: Missed calls log
: International call log
Call icon
d
: Call icon without caller ID notification
: Call icon other than without caller ID notification
Logs with the same person are displayed together as
e
. The number in parentheses shows the number of
logs.
Calling to Answer a Missed Call
When you have missed calls, a missed call notification
appears in the status bar.
If you see in the status bar, drag or
a
swipe the status bar downwards
• The missed call notification appears in the
Notification panel. The missed call notification
displays the caller's phone number or the
caller's name that is saved in Phonebook, and
the time or date of the missed call.
Tap the missed call notification
b
• The "Incoming history" tab appears.
• For the missed call log,
Tap on the right of the missed call log
c
• The call is made.
is displayed.
Calling / Network Services
83
Page 86

Calling a Number from the Call Log
You can make calls to the phone numbers stored in the
call log.
From the Home screen, "Phone" u
a
"Recent calls" tab
• "Incoming history" and "Outgoing history"
appear.
Tap on the right of the other party's
b
name or phone number
• The call is made.
Note
• You can make a call by tapping the name or
phone number on the "Recent calls" tab and
then "Call".
• You can also make a call by touching the name
or phone number on the "Recent calls" tab for
over 1 second and then tapping "Call ЧЧЧ-ЧЧЧЧЧЧЧЧ" in the menu that appears.
Calling / Network Services
84
Registering Phone Numbers from
the Call Log to the Phonebook
You can register unregistered items from the call log to
the Phonebook.
On the "Recent calls" tab, tap a phone
a
number
"Add to phonebook"
b
• The "Register/Update phonebook" screen
appears.
"Register new"
c
• When multiple accounts have been registered,
select the account for which you want to create
a phonebook.
Enter information, and tap "Save"
d
• It is registered as a Phonebook.
Note
• It is also possible to register to the Phonebook
by touching the phone number that you want
to register for over 1 second on the "Recent
calls" tab and tapping "Add to phonebook" u
"Register new".
Page 87

Deleting the Call Log
The call log is automatically added. However, you can
delete a call log or all call logs.
Deleting a desired call log
On the "Recent calls" tab, touch a phone
a
number for over 1 second
• A menu appears.
"Remove from call log" u "OK"
b
• The call log is deleted.
Deleting the entire call log
On the "Recent calls" tab, "Incoming
a
history" / "Outgoing history" u
"Delete all" u "OK"
• The entire "Incoming history"/"Outgoing history"
call log is deleted.
u
Phonebook
In Phonebook, you can enter information about your
personal contacts, such as their phone numbers, email
addresses and web service accounts.
Displaying the Phonebook
You can view all the information that is saved in
Phonebook.
From the Home screen, "Phone" u
a
"Phonebook" tab
• The Phonebook appears.
Calling / Network Services
85
Page 88

The Phonebook (profile) is displayed.
a
Call log is displayed. You can also confirm the sent/
b
received details for sp-mode mail and SMS.
Your profile (My profile) is displayed.
c
Tap the icon that is displayed by selecting the image
d
to make a call, create an email, or use various
services on the internet.
Phonebook belonging to the selected group are
e
displayed.
A new phonebook is registered.
f
Enter a keyword and search Phonebook.
g
Note
• When you open Phonebook for the first time,
descriptions for adding Phonebook are
displayed. Tap
to import or export contacts from your UIM or
microSD card.
Calling / Network Services
86
u "Others" u "Import/Export"
Registering Phonebook
You can register a new phonebook.
On the "Phonebook" tab, "Register"
a
• When multiple accounts are registered, select
the account for which you want to create a
phonebook.
Enter information, and tap "Save"
b
• The entered information is added to Phonebook.
Editing Phonebook
You can edit a phonebook that has already been
registered.
On the "Phonebook" tab, tap a
a
phonebook that you want to edit
• The Profile screen appears.
"Edit"
b
• The "Edit profile" screen containing previously
entered information appears.
Add, delete or edit the information, and
c
tap "Save"
• The Phonebook is updated.
Page 89

Searching the Phonebook
You can search for a phonebook on the "Phonebook"
tab by dragging in the tab or by text entry.
On the "Phonebook" tab, "Search"
a
Enter the word(s) that you are looking
b
for
• Search candidates and search results in the
terminal are displayed.
Tap a phonebook
c
• The Phonebook menu appears.
Making Calls/Sending Emails/
Chatting via Phonebook
You can make a call directly from Phonebook. If you
have added an email address or chat account to the
phonebook entry, you can also send an email or launch
a chat application.
On the "Phonebook" tab, tap one of the
a
Phonebook contacts
• The Profile information is displayed.
Tap , , , or
b
• You can now make a call, send an email or chat.
Make a call.
Send an SMS message.
Record Koe-no-Takuhaibin
Send an email.
Note
• Touch the Phonebook for over 1 second to
display the option menu. You can now make a
call if you tap "Phone", or send an SMS message
if you tap "SMS".
Calling / Network Services
87
Page 90

Viewing the Map of a Contact's
Address
If the address has been added to the Phonebook, you
can view its location in a map.
On the "Phonebook" tab, tap one of the
a
Phonebook contacts
• The phonebook information appears.
On the "Profile" tab, touch the address
b
for over 1 second u "Display map"
• When selecting "Maps" or "
switches to the application to display the
location set as the address.
地図アプリ
Deleting Phonebook
On the "Phonebook" tab, touch one
a
of the Phonebook contacts for over 1
second
• The phonebook information appears.
"Delete" u "OK"
b
• The phonebook is deleted.
Calling / Network Services
88
", it
Note
• You can also delete a phonebook by tapping
u "Delete" on the "Phonebook" tab, placing a
mark on the phonebook you want to delete, and
tapping "Delete".
Sharing Phonebook
You can share the phonebook saved in the terminal with
other applications.
On the "Phonebook" tab, tap one of the
a
Phonebook contacts
• The phonebook information appears.
u "Share"
b
• A menu listing the applications that the contact
can be shared with appears.
Tap one of the applications
c
• The screen of the selected application appears.
Follow the instructions on the screen.
Page 91

Adding a Phonebook to Favorites
When you add a phonebook to Favorites, it appears on
the "Favorites" tab. The "Favorites" tab allows you to
quickly display a specific Phonebook.
On the "Phonebook" tab, tap the
a
phonebook that you want to add to
Favorites
• The Profile screen appears.
Tap
b
• The phonebook is added to the "Favorites" tab.
Note
• When you display a phonebook that has been
added to Favorites, the star icon in the top righthand corner of the screen turns yellow.
• If you tap the yellow star icon, it turns gray.
- If the phonebook has a call log, the
phonebook is displayed in the "Favor ites" tab.
- If the phonebook has no call log, the
phonebook is undisplayed in the "Favor ites"
tab.
• If you tap a gray star icon, it turns yellow and
the phonebook is displayed in "Favor ites".
Using Phonebook Copy Tool
Copy Phonebook data between this terminal and other
terminals via microSD card. Also, you can copy the
Phonebook data stored in your Google account to your
docomo account.
Opening the Phonebook copy tool
From the Home screen, "Applications"
a
u "PhoneBookCopy"
• For the first time users, to accept the "
" (License agreement) is required.
契約書
Exporting Phonebook to microSD card
Insert a microSD card to the terminal
a
From "エクスポート" (Export) tab screen,
b
"開始" (Start)
• Phonebook data stored in docomo account is
saved on microSD card.
"OK"
c
使用許諾
Calling / Network Services
89
Page 92

Importing Phonebook from microSD card
Insert the microSD card on which your
a
Phonebook data is saved to the terminal
From "インポート" (Import) tab screen,
b
tap a file to import u "上書き"
(Overwrite) / "追加" (Add)
• The imported Phonebook data is saved to
docomo account.
"OK"
c
Copying Contacts on Google account to
docomo account
From "docomoアカウントへコピー "
a
(Copy to docomo account) tab screen,
tap the Google account you want to
copy u "上書き " (Overwrite) / " 追加"
(Add)
• The copied Phonebook data is saved on
docomo account.
"OK"
b
Calling / Network Services
90
Note
• When the items of Phonebook (number, etc.) in
other terminals are different from those in this
terminal, the item names may be changed or
deleted. The characters may be deleted when
they are not registerable on some terminals.
• It is not available to import group information.
• When exporting Contacts (Phonebook) to
microSD card, Phonebook data with no name
registered is not available to copy.
• When importing Contacts (Phonebook) from
microSD card, the file created in the "Link
Backup" application cannot be read.
Koe-no-Takuhaibin
This service is for sending voice messages via phone.
• For details about Koe-no-Takuhaibin, refer to the
DOCOMO website.
• The message can be recorded up to 15 minutes
per 1 message, up to 500 messages, and stored
up to 720 hours. A maximum of 5 messages can
be protected, and will automatically be deleted 720
hours after protection cancellation.
Page 93

Message recording
From the Home screen, "Phone" u "Dial"
a
Enter the phone number u Tap
b
"Koe-no-Takuhaibin"
• The terminal is connected to the Koe-noTakuhaibin Service Center. Record a message
according to the voice guidance.
• You can also send it from the "Recent calls" and
Phonebook.
Play messages
The message is recorded and is notified by SMS.
From the Notification panel, tap the Koe-
a
no-Takuhaibin notification u " メッセー
ジ再生" (Play Message) u "はい " (Yes)
• The terminal is connected to the Koe-no-
Takuhaibin Service Center.
Note
• A call fee will be charged for recording and
playing messages.
• Koe-no-Takuhaibin cannot be used from
overseas.
• To set Koe-no-Takuhaibin, from the Home
screen, tap
"Network service" u "Koe-no-Takuhaibin".
u "Settings" u "Call settings" u
Network Services
Available Network Service
You can use the following DOCOMO network ser vices
on the terminal.
Service name
Koe-noTakuhaibin
Voice Mail
Service
Call Forwarding
Service
Call Waiting
Service
Caller ID
Notification
Service
Nuisance Call
Blocking Service
Caller ID Display
Request Service
Monthly
Application Page
charge
Free Not
required
Paid Required P92
Free Required P96
Paid Required P95
Free Not
required
Free Not
required
Free Not
required
P90
P98
P106
P106
Calling / Network Services
91
Page 94

Service name
Call Notification
Service
English
Guidance
Public Mode
(Power OFF)
Monthly
charge
Free Not
Free Not
Free Not
Note
• You cannot use the net work services when you
are outside of the service area or in a location
with no radio reception.
• Deactivating a service does not mean canceling
the contract of a service like the Voice Mail
Service or the Call Forwarding Service.
• For subscriptions and inquiries, contact
"General Inquiries" provided on the last page of
this manual.
• In this manual, the outlines of each network
service are described with menu operations of
the terminal. For details, refer to "Mobile Phone
User's Guide [Network Services]".
Calling / Network Services
92
Application Page
required
required
required
P106
P106
P99
Voice Mail Service
If you are in a location with no radio reception, the
terminal is powered off, or you are unable to take the
call within the preset ring time, the Voice Mail Ser vice
answers a call with a voice mail greeting and records
the caller's message.
Note
• The message can be recorded up to 3 minutes
per 1 message, up to 20 messages, and stored
up to 72 hours.
• If you do not answer an incoming call when the
Voice Mail Service is set to "Activate", the call
is saved in "Incoming history" as a missed call,
appears in the status bar.
and
• This terminal does not record voice messages
on internal memory. Use the Voice Mail Service.
Page 95

Basic flow of the Voice Mail Service
Start the Voice Mail Service.
A call is made to your terminal.
If you do not answer the call, a connection is
made to the Voice Mail Ser vice Center.
A caller records a message.
You are notified of the message at the Voice
Mail Service Center.
Play the voice message.
▼
▼
▼
▼
▼
Setting the Voice Mail Service
From the Home screen, u "Settings"
a
u "Call settings" u "Network service" u
"Voice mail service"
• The "Voice mail service" screen appears.
Activate
service
Ring time
setting
Deactivate
service
Settings
confirmation
Play
messages
Settings Tap "OK" to connect to the Voice
Tap "OK" to star t the Voice Mail
Service.
Enter 0 to 120 (seconds) for the
ring time.
If the ring time is set to "0", calls
will not be saved in Incoming
history.
Tapping "OK" when setting the
Voice Mail Service deactivates
the Voice Mail Service.
Display the setting state of the
Voice Mail Service.
Tap "OK" to connect to the Voice
Mail Service Center. Follow the
guidance to play messages.
Mail Service Center. Follow the
guidance to change the Voice
Mail settings.
Calling / Network Services
93
Page 96

Checking
messages
Message
notification
settings
Note
• If you have messages at the Voice Mail Service
Center,
all messages have been cleared or stored,
following the guidance,
Calling / Network Services
94
Check whether there is a new
Voice Mail message. After
checking, the completion
message appears.
Configure the setting for whether
to notify when new messages
arrive.
appears in the status bar. Once
will disappear.
Playing a voice message
Drag or swipe the status bar downwards
a
• The Notification panel appears.
"Voice mail" u "OK"
b
• The terminal is connected to the Voice Mail
Service Center. Follow the guidance to play
messages.
Page 97

Call Waiting Service
When there is another incoming call while you are on a
call, the in-call ringtone notifies you of the second call.
You can answer the second call by putting the first call
on hold. You can also put your current call on hold and
make a call to another party.
Note
• Even when the call is on hold, the caller is
charged for a call fee.
Setting the Call Waiting Service
From the Home screen, u "Settings"
a
u "Call settings" u "Network service" u
"Call waiting"
• The "Call waiting" screen appears.
Activate
service
Deactivate
service
Settings
confirmation
Tap "OK" to star t the Call Waiting
Service.
Tap "OK" to deactivate the Call
Waiting Service.
The current settings are
displayed.
Putting the current call on hold and
answering an incoming call
If you hear a beep during a call,
a
"Activate" u "Accept"
• The first call is automatically put on hold and the
incoming call is answered.
Switch to the first call
b
• To end the second call, tap "End". The second
call is terminated and you return to the first call.
• To put the second call on hold, tap "Swap". The
second call is put on hold and you return to the
first call. Tapping "Swap" switches to the other
party.
Calling / Network Services
95
Page 98

Putting the current call on hold and
making a call to another party
During a call, "Add call"
a
• The "Dial" tab appears.
Enter the other party's phone number
b
Tap
• The first call is automatically put on hold and
you are put through to the new call. You can
also search for a phonebook if you tap the
"Phonebook" tab or "Recent calls" tab.
Switch to the first call
c
• To ter minate the new call, tap "End". The new
call is terminated and you return to the first call.
• To put the new call on hold, tap "Swap". The new
call is put on hold and you return to the first call.
Tapping "Swap" switches to the other party.
Calling / Network Services
96
Call Forwarding Service
The Call Forwarding Service forwards a call to a preset
forwarding number if you do not answer the call within
the preset ring time, or are outside of the service area
or if the terminal is powered off.
u
Note
• If you do not answer an incoming call when the
Call Forwarding Service is set to "Activate", the
call is saved in "Incoming history" as a missed
appears in the status bar.
call, and
Basic flow of the Call Forwarding Ser vice
Register the forwarding number.
Set the Call Forwarding Service to activate.
A call is made to your terminal.
If you do not answer a call, it is automatically
forwarded to the specified forwarding number.
▼
▼
▼
Page 99

Call charge for the Call Forwarding
Service
Caller
Subscriber to the Call Forwarding Service
Forwarding number
Call charges are incurred by
▼
the caller.
Call charges are incurred
by the subscriber to the Call
▼
Forwarding Service.
Note
• Even when the Call Forwarding Service is
active, you can answer a call while the ringtone
sounds.
Setting the Call Forwarding Service
From the Home screen, u "Settings"
a
u "Call settings" u "Network service" u
"Call forwarding service"
• The "Call forwarding service" screen appears.
Activate
service
Deactivate
service
Change call
forwarding
number
Call forwarding
settings
Guidance
settings
Settings
confirmation
* A subscription to the Voice Mail Service is
required.
Change the forwarding
number and the ringing time.
Tap "OK" to deactivate the Call
Forwarding Service.
Enter a new forwarding
number and tap "OK" to
change the forwarding
number.
Tap "Yes" to automatically
connect an incoming call to
the Voice Mail Service Center
if the forwarding number is
busy*.
Turn the guidance ON/OFF.
The current Call Forwarding
Service settings are displayed.
Calling / Network Services
97
Page 100

Setting the Call Forwarding guidance
on/off
From the Home screen, "Phone"u "Dial"
a
• The "Dial" tab appears.
"1" u "4" u "2" u "9" u
b
• Voice guidance is played. Follow the guidance
to configure the settings. For details, refer to
"Mobile Phone User's Guide [Network Services]".
Calling / Network Services
98
Caller ID Notification Service
When making a call, your phone number can be shown
in the display of the other party's phone.
Note
• The Caller ID Notification Service is not available
(out of service area) is displayed.
when
• The service is only available when the other
party's phone can display the caller ID.
• If an announcement requesting caller ID is
heard when making a call, activate Caller ID
Notification or add the "186" prefix to the phone
number and call again.
From the Home screen, u "Settings"
a
u "Call settings" u "Network service" u
"Caller ID notification"
• The "Caller ID notification" screen appears.
Settings Set whether the other party is
Settings
confirmation
notified of your caller ID. Tap
"Notify" to enable notification, and
"Not notify" to disable notification.
The current Caller ID Notification
settings are displayed.
 Loading...