

LG JMC8127DDS, JMC8127DD, JMC8130DD Owner's Manual
Microwave Oven
Owner's Manual
JM C812 7D D /JM C813 0D D
Installer: Please leave this manual
with this appliance.
Consumer: Please read and keep
this manual for future reference. Keep
sales receipt and/or cancelled check
as proof of purchase.
ORDER # 53001218
Model Number
Serial Number
Date of Purchase
If you have questions, write us
(include your model number and
phone number) or call:
Maytag ServicesSM
Attn: CAIFPCenter
P.O.Box 2370
Cleveland,TN 37320-2370
1-800-JENNAIR (1-800-536-6247)
U.S.A.and Canada
(Mon.-Fri.,8 am-8 pm Eastern Time)
Internet: http://www.jennair.com
Contents
Important Safety Instructions ................................................................ 2-4
Installation and Operation ..................................................................... 5-6
Cooking Utensils ...................................................................................... 7
Features ................................................................................................ 8-9
Control Panel .......................................................................................... 10
Operating Instructions ...................................................................... .11-15
Fresh Vegetable Chart ............................................................................ 16
Care and Cleaning ................................................................................. 17
Troubleshooting ...................................................................................... 18
Warranty ................................................................................................. 20
Guide de I'utilisateur ............................................................................... 21
Gufa del Usuario .................................................................................... 41
Electric Microwave
Keep instructions for future reference.
Be sure manual stays with oven.
A/01/03
MCS P/N 53001181
_2003 Maytag Appliances Sales Company
Part No.8112P218-60
3828W5A2905

IMPORTANT SAFETY INSTRUCTIONS
What You Need
to Know About
Safety Instructions
Warning and Important Safety In-
structions appearing in this manual
are not meant to cover all possible
conditions and situations that may
occur. Common sense, caution, and
care must be exercised when
installing, maintaining, or operating a
microwave.
Always contact your dealer, distribu-
tor, service agent, or manufacturer
about problems or conditions you do
not understand.
I &WARNING I
To avoid risk of electrical shock
or death, this oven must be
grounded and plug must not be
altered.
Grounding Instructions
Oven MUST be grounded.
risk of electric shock
Grounding reduces __
Recognize Safety Symbols, Words, Labels
DANGER I
DANGER m Immediate hazards which WILL result in severe personal injuryor
death.
_WARNING I
WARNING--Hazards or unsafe practices which COULD result in severe per-
sonal injury or death.
I _i_ CAUTION ]
CAUTIONm Hazards or unsafe practices which COULD result in minor per-
sonal injury.
by providing an escape wire for the
electric current if an electrical short
occurs. This oven is equipped with a
cord having a grounding wire with a
grounding plug. The plug must be
plugged into an outlet that is properly
installed and grounded.
Consult a qualified electrician or ser-
vicer if grounding instructions are not
completely understood, or if doubt
exists as to whether the oven is prop-
erly grounded.
Do not use an extension cord. If
the product power cord is too short,
have a qualified electrician install a
three-slot receptacle. This oven
should be plugged intoa separate 60
hertz circuit with the electrical rating
as shown in specifications table.
When the oven is on a circuit with
other equipment, an increase in
cooking times may be required and
fuses can be blown.
Microwave operates on standard
household current, 110-120V.
FEDERAL COMMUNICATIONS COMMISSION RADIO FREQUENCY
INTERFERENCE STATEMENT ( U.S.A. ONLY)
This equipment generates and uses ISM frequency energy and if not installed and used properly, that is in strict
accordance with the manufacturer's instructions, may cause interference to radio and television reception. It has
been type tested and found to comply with limitsfor ISM Equipment pursuant to part 18 of FCC Rules, which are
designed to provide reasonable protection against such interference in a residential installation.
However, there is no guarantee that interference will not occur in a particular installation. If this equipment does
cause interference to radio or television reception, which can be determined by turning the equipment off and on,
the user is encouraged to try to correct the interference by one or more of the following:
° Reorient the receiving antenna of the radio or television.
° Relocate the microwave oven with respect to the receiver.
• Move the microwave oven away from the receiver.
• Plug the microwave oven into a different outlet so that the microwave oven and the receiver are on different
branch circuits.
The manufacturer is not responsible for any radio or TV interference caused by unauthorized modification to
this microwave oven. It isthe responsibility of the user to correct such interference.
SAVE THESE INSTRUCTIONS

Recognize this symbol as a SAFETY message
I &WARNING ]
When using electrical microwave, basic safety precautions should be followed to reduce risk of burns, electric
shock, fire, or injury to persons or exposure to excessive microwave energy.
1. READ all instructions before using the appliance. 9.
2. READ AND FOLLOW the specific PRECAU-
TIONS TO AVOID POSSIBLE EXPOSURE TO
EXCESSIVE MICROWAVE ENERGY in IMPOR-
TANT SAFETY INSTRUCTIONS.
3. This appliance MUST BE GROUNDED. Connect
only to properly grounded outlet. See GROUND-
ING INSTRUCTIONS in Installation Instructions.
4. Install or locate this appliance ONLY in accor-
dance with the installation instructions.
,
Some products such as whole eggs and sealed
containers--for example, closed glass jars--are
able to explode and SHOULD NOT be HEATED
in this oven.
.
Use this appliance ONLY for its intended use as
described in this manual. Do not use corrosive
chemicals or vapors in this appliance. This type of
oven is specifically designed to heat, cook or dry
food. It is not designed for industrial or laboratory
use.
7. As with any appliance, CLOSE SUPERVISION is
necessary when used by CHILDREN or INFIRM
PERSONS.
8. See door cleaning instructions in the Care and
Cleaning section of manual on page 17.
10. DO NOT use this oven for commercial purposes.
11. DO NOT heat baby bottles in oven.
12. DO NOT operate this equipment if it has a dam-
13. This oven, including power cord, must be serviced
14. DO NOT cover or block filter or other openings on
15. DO NOT store this appliance outdoors. DO NOT
16. DO NOT immerse cord or plug in water.
17. Keep cord AWAY from HEATED surfaces.
18. DO NOT let cord hang over edge of table or
Baby food jars shall be open when heated and
contents stirred or shaken before consumption, in
order to avoid burns.
It is made for household use only.
aged cord or plug, if it is not working properly, or
if it has been damaged or dropped.
ONLY by qualified service personnel. Contact the
nearest authorized service facility for examina-
tion, repair, or adjustment.
the appliance.
use this product near water - for example, near a
kitchen sink, in a wet basement, or near a swim-
ming pool, or similar locations.
counter.
PRECAUTIONSTO AVOID POSSIBLE EXPOSURE
TO EXCESSIVE MICROWAVEENERGY
A. DO NOT attempt to operate this oven with the door open since open door operation can result in harmful expo-
sure to microwave energy. It is important not to defeat or tamper with the safety interlocks.
B. DO NOT place any object between the oven front face and the door or allow soil or cleaner residue to accu-
mulate on sealing surfaces.
C. DO NOT operate the oven if it is damaged. It is particularly important that oven door close properly and that
there is no damage to:
1. door (bent),
2. hinges and latches (broken or loosened),
3. door seals and sealing surfaces.
D. Oven should not be adjusted or repaired by anyone except properly qualified service personnel.
SAVE THESE INSTRUCTIONS
3
IMPORTANT SAFETY INSTRUCTIONS, cont.
To avoid risk of personal injury or property damage,
observe the following:
1. Do not deep fat fry in oven. Fat could overheat
and be hazardous to handle.
.
Do not cook or reheat eggs in shell or with an
unbroken yolk using microwave energy. Pressure 8.
may build up and erupt. Pierce yolk with fork or
knife before cooking. 9.
.
Pierce skin of potatoes, tomatoes and similar
foods before cooking with microwave energy.
When skin is pierced, steam escapes evenly.
,
Do not operate oven without load or food in oven
cavity.
.
Use only popcorn in packages designed and
labeled for microwave use. Popping time varies
depending on oven wattage. Do not continue to
heat after popping has stopped. Popcorn will
scorch or burn. Do not leave unattended.
Do not use regular cooking thermometers in oven.
Most cooking thermometers contain mercury and
may cause an electrical arc, malfunction, or dam-
age to oven.
.
Do not use metal utensils in oven.
Never use paper, plastic or other combustible
materials that are not intended for cooking.
When cooking with paper, plastic or other com-
bustible materials, follow manufacturer's recom-
mendations for product use.
10.
Do not use paper towels which contain nylon or
other synthetic fibers. Heated synthetics could
melt and cause paper to ignite.
11.
Do not heat sealed containers or plastic bags in
oven. Food or liquid could expand quickly and
cause container or bag to break. Pierce or open
container or bag before cooking.
12.
To avoid pacemaker malfunction, consult physi-
cian or pacemaker manufacturer about effects of
microwave energy on pacemaker.
CAUTION ]
To reduce the risk of fire in the oven cavity:
a.
DO NOT overcook food. Carefully attend appli-
ance if paper, plastic, or other combustible
materials are placed inside the oven to facili-
tate cooking.
b.
Remove wire twist-ties from paper or plastic
bags before placing bag in oven.
c.
If materials inside the oven should ignite,
KEEP OVEN DOOR CLOSED, turn oven off,
and disconnect the power cord or shut off
power at the fuse or circuit breaker panel.
d.
DO NOT use the cavity for storage purposes.
DO NOT leave paper products, cooking uten-
sils, or food in the cavity when not in use.
iLWARNING
Liquids such as water, coffee, or tea are able to be
overheated beyond the boiling point without appear-
ing to be boiling due to surface tension of the liquid.
Visible bubbling or boiling when the container is
removed from the microwave oven is not always
present. THIS COULD RESULT IN VERY HOT LIQ-
UIDS SUDDENLY BOILING OVER WHEN A
SPOON OR OTHER UTENSIL IS INSERTED INTO
THE LIQUID. To reduce the risk of injuryto persons:
1. Do not overheat the liquid.
2. Stir the liquid both before and halfway through
heating it.
3. Do not use straight-sided containers with nar-
row necks.
4. After heating, allow the container to stand in the
microwave oven for a short time before remov-
ing the container.
5. Use extreme care when inserting a spoon or
other utensil into the container.
SAVE THESE INSTRUCTIONS
4
Installation and Operation
CIRCUITS
For safety purposes this oven must
be plugged into a 15 or 20 Amp cir-
cuit. No other electrical appliances or
lighting circuits should be on this line.
If in doubt, consult a licensed electri-
cian.
VOLTAGE
The voltage used at the wall recepta-
cle must be the same as specified on
the oven name plate located inside
oven door. Use of a higher voltage is
dangerous and may result in a fire or
other type of accident causing oven
damage. Low voltage will cause slow
cooking. In case your microwave
oven does not perform normally in
spite of proper voltage, remove and
reinsert the plug.
UNPACKING OVEN
• Inspect oven for damage such as
dents in door or inside oven cavity.
• Report any dents or breakage to
source of purchase immediately.
Do not attempt to use oven if
damaged.
• Remove all materials from oven
interior.
• If oven has been stored in extreme-
ly cold area, wait a few hours
before connecting power.
PLACEMENT OF
THE OVEN
Your microwave oven can be placed
easily in your kitchen, family room, or
anywhere else in your home. Place
the oven on a flat surface such as a
kitchen countertop or a specially
designed microwave oven cart. Free
air flow around the oven is important.
Do not place oven above a gas or
electric range or cooktop. Exposure
to heat from a cooking surface will
damage the microwave oven.
DO NOT BLOCK
AIR VENTS
All air vents should be kept clear dur-
ing cooking. If air vents are covered
during oven operation the oven may
overheat. In this case, a sensitive
thermal safety device automatically
turns the oven off. The oven will be
inoperable until it has cooled suffi-
ciently.
GETTING THE BEST
RESULTS FROM YOUR
MICROWAVE OVEN
Pay attention as food cooks. The
instructions in this book have
been formulated with great care,
but your success in preparing food
depends, of course, on how much
attention you pay to the food as it
cooks. Always watch your food while
it cooks. Your microwave oven is
equipped with a light that turns on
automatically when the oven is in
operation so that you can see inside
and check the progress of your
recipe. Directions given in recipes to
elevate, stir, and the like should be
thought of as the minimum steps rec-
ommended. If the food seems to be
cooking unevenly, simply make the
necessary adjustments you think
appropriate to correct the problem.
Factors affecting cooking times.
Many factors affect cooking times.
The temperature of ingredients used
in a recipe makes a big difference in
cooking times. For example, a cake
made with ice-cold butter, milk, and
eggs will take considerably longer to
bake than one made with ingredients
that are at room temperature. All of
the recipes in this book give a range
of cooking times. In general, you will
find that the food remains under-
cooked at the lower end of the time
range, and you may sometimes want
to cook your food beyond the maxi-
mum time given, according to per-
sonal preference. The governing phi-
losophy of this book is that it is best
for a recipe to be conservative in giv-
ing cooking times. While under-
cooked food may always be cooked a
bit more, overcooked food is ruined
for good. Some of the recipes, partic-
ularly those for bread, cakes, and
custard, recommend that food be
removed from the oven when they
are slightly undercooked. This is not
a mistake. When allowed to stand,
usually covered, these foods will con-
tinue to cook outside of the oven as
the heat trapped within the outer por-
tions of the foods gradually travels
inward. If the foods are left in the
oven until they are cooked all the way
through, the outer portions will
become overcooked or even burned.
As you gain experience in using your
microwave oven, you will become
increasingly skillful in estimating both
cooking and standing times for vari-
ous foods.
SPECIAL TECHNIQUES
IN MICROWAVE
COOKING
Browning: Meats and poultry that
are cooked fifteen minutes or longer
will brown lightly in their own fat.
Foods that are cooked for a shorter
period of time may be brushed with a
browning sauce to achieve an appe-
tizing color. The most commonly
used browning sauces are
Worcestershire sauce, soy sauce,
and barbecue sauce. Since relatively
small amounts of browning sauces
are added to foods, the original flavor
of recipes is not altered.
Covering: A cover traps heat and
steam and causes food to cook more
quickly.You may either use a lid or
microwave cling-film with a corner
folded back to prevent splitting.
Covering with waxed paper: Waxed
paper effectively prevents spattering
and helps food retain some heat.
Since it makes a looser cover than a
lid or cling-film, it allows the food to
dry out slightly.
5
Installation and Operation, cont.
Wrapping in waxed paper or paper
towel: Sandwiches and many other
foods containing prebaked bread
should be wrapped prior to
microwaving to prevent drying out.
Arranging and spacing: Individual
foods such as baked potatoes, small
cakes, and hors d'oeuvres will heat
more evenly ifplaced inthe oven and
equal distance apart, preferably in a
circular pattern. Never stack foods on
top of one another.
Stirring: Stirring is one of the most
important of all microwaving tech-
niques. In conventional cooking,
foods are stirred for the purpose of
blending. Microwaved foods, howev-
er, are stirred in order to spread and
redistribute heat. Always stir from the
outside towards the center as the
outside food heats first.
Turning over: Large, tall foods such
as roasts and whole chickens should
be turned so that the top and bottom
willcook evenly. It is also a good idea
to turn cut up chicken and chops.
Placing thicker portions near the
edge: Since microwaves are attract-
ed to the outside portion of foods, it
makes sense to place thicker por-
tions of meat, poultry and fish to the
outer edge of the baking dish. This
way, thicker portions will receive the
most microwave energy and the
foods will cook evenly.
Elevating: Thick or dense foods are
often elevated so that microwaves
can be absorbed by the underside
and center of the foods.
Piercing: Foods enclosed in a shell,
skin, or membrane are likely to burst
in the oven unless they are pierced
prior to cooking. Such foods include
both yolks and whites of eggs, clams
and oysters, and many whole vegeta-
bles and fruits.
Testing if cooked: Because foods
cook so quickly in a microwave oven,
itis necessary to test food frequently.
Some foods are left in the microwave
until completely cooked, but most
foods, including meats and poultry,
are removed from the oven while still
slightly undercooked and allowed to
finish cooking during standing time.
The internal temperature offoods will
rise between 5° F (3° C) and 15° F
(8° C) during standing time.
Standing time: Foods are often
allowed to stand for 3 to 10 minutes
after being removed from the
microwave oven. Usually the foods
are covered during standing time to
retain heat unless they are supposed
to be dry in texture (some cakes and
biscuits, for example). Standing
allows foods to finish cooking and
also helps flavors to blend and
develop.
HOW FOOD
CHARACTERISTICS
AFFECT MICROWAVE
COOKING
Density of foods: Light, porous food
like cakes and breads cook more
quickly than heavy, dense foods such
as roasts and casseroles. You must
take care when microwaving porous
foods that the outer edges do not
become dry and brittle.
Height of foods: The upper portion
of tall foods, particularly roasts, will
cook more quicklythan the lower por-
tion. Therefore, it is wise to turn tall
foods during cooking, sometimes
several times.
Moisture content of foods: Since
the heat generated from microwaves
tends to evaporate moisture, relative-
ly dry foods such as roasts and some
vegetables should either be sprinkled
with water priorto cooking or covered
to retain moisture.
Bone and fat content of foods:
Bones conduct heat and fat cooks
more quickly than meat. Therefore,
care must be taken when cooking
bony or fatty cuts of meat that the
meats do not cook unevenly and do
not become overcooked.
NOTE: It is a common misconception
that microwaves cook food from the
inside out. This comes from heating
filled pastries with a high sugar con-
tent, likejelly doughnuts. The pastry
is cool but the filling is very hot!If you
cook a chicken or a roast, you'll see
the outside is cooked first.
Shape of foods: Microwaves pene-
trate only about 1 inch (2.5cm) into
foods; the interior portion of thick
foods is cooked as the heat generat-
ed on the outside travels inward. In
other words, only the outer edge of
any food is actually cooked by
microwave energy; the rest is cooked
by conduction.
It follows then that the worst possible
shape for a food that is to be
microwaved is a thick cube. The cor-
ners will burn long before the center
is even warm. Round, thin, and ring
shaped foods cook most successfully
in the microwave.
Quantity of foods: The number of
microwaves in your oven remains
constant regardless of how much
food is being cooked. Therefore, the
more food you place in the oven, the
longer the cooking time. Remember
to decrease cooking times by at least
one-third when halving a recipe.
6

Cooking Utensils
I CAUTION I
To avoid risk of personal injury or property damage, do not use stoneware, aluminum foil, metal utensils, or metal
trimmed utensils in the oven.
MICROWAVE-SAFE
UTENSILS
Just read through the following 5.
checklist.
Never use metal or metal-trimmed
utensils in your microwave oven:
Microwaves cannot penetrate metal.
They will bounce off any metal object
in the oven and cause arcing, an
alarming phenomenon that resem- 2.
bles lightning. Most heat-resistant
non-metallic cooking utensils are
safe for use in your microwave oven.
However, some may contain materi-
als that render them unsuitable as
microwave cookware. If you have any
doubts about a particular utensil,
there is a simple way to find out if it
can be used inyour microwave oven.
Testing utensils for microwave
use: Place the utensil in question
next to a glass bowl filled with water
in the microwave oven. Microwave at
power HIGH for 1 minute. If the water
heats up but the utensil remains cool
to the touch, the utensil is
microwave-safe. However, if the
water does not change temperature
but the utensil becomes warm,
microwaves are being absorbed by
the utensil and it is not safe for use in
the microwave oven. You probably
have many items on hand in your
kitchen that can be used as cooking
equipment in your microwave oven.
.
Dinner plates: Many kinds of
dinnerware are microwave-safe.
If in doubt, consult the manufac-
turer's literature or perform the
microwave test.
Glassware: Glassware that is
heat-resistant is microwave-
safe. This includes all brands of
oven-tempered glass cookware.
However, do not use delicate
glassware, such as tumblers or
wine glasses, as these might
shatter as the food warms.
3.
Paper: Paper plates and con-
tainers are convenient and
safe to use in your microwave
oven, provided the cooking
time is short and foods to be
cooked are low in fat and
moisture, Paper towels are also
very useful for wrapping foods
and for lining baking trays in
which greasy foods, such as
bacon, are cooked. In general,
avoid colored paper products as
the color may run.
.
Plastic storage containers:
These can be used to hold foods
that are to be quickly reheated.
However, they should not be
used to hold foods that will need
considerable time inthe oven as
hot foods will eventually warp or
melt plastic containers.
Plastic cooking bags: These
are microwave-safe provided
they are specially made for
cooking. However, be sure to
make a slit in the bag so that
steam can escape. Never use
ordinary plastic bags for cooking
in your microwave oven, as they
will melt and rupture.
.
Plastic microwave cookware:
A variety of shapes and sizes of
microwave cookware is avail-
able. For the most part, you can
probably cook with items you
already have on hand rather
than investing in new kitchen
equipment.
,
Pottery, stoneware, and
ceramic: Containers made of
these materials are usually fine
for use in your microwave oven,
but they should be tested to be
sure.

Features
NOTE: This unit is not designed for 50 Hz or any circuit other than a 120-
Volt/60 Hz AC circuit. This oven is designed for built-in installation.
Specifications subject to change without notice.
Oven Front Plate
Window Display Window
Door Screen Control Panel
Safety Door
Lock System
Your oven will be packed with the fol-
Turntable
Shaft
Rotating Ring
lowing materials:
Glass Turntable .......... 1 each
Owner's Manual .......... 1 each
Turntable Shaft .......... 1 each
Rotating Ring ............ 1 each
This microwave oven is designed for
household use only. It is not recom-
mended for commercial purposes
and will void the warranty.
OVEN SPECIFICATIONS
JMC8127DD
Power Source 120 VAC, 60 Hz
Input Current 13 A
Power Consumption 1,500 W
Output (IEC 60705 1,000 W
Standard)
Oven Capacity 1.5 cu.ft.
Turntable Diameter 12¾"
Weight (approx.):
Black/White/Bisque 69.8 Ibs.
Stainless Steel 71.8 Ibs.
Outer Dimensions 26_'4"x 237A6''
(W x H x D) x 20N6"
JMC8130DD
Power Source 120 VAC, 60 Hz
Input Current 13 A
Power Consumption 1,500 W
Output (IEC 60705 1,000 W
Standard)
Oven Capacity 1.5 cu.ft.
Turntable Diameter 12¾"
Weight (approx.):
Black/White/Bisque 76.7 Ibs.
Stainless Steel 78.7 Ibs.
Outer Dimensions 29¾" x 23_46"
(W x H x D) x 20_6"
8
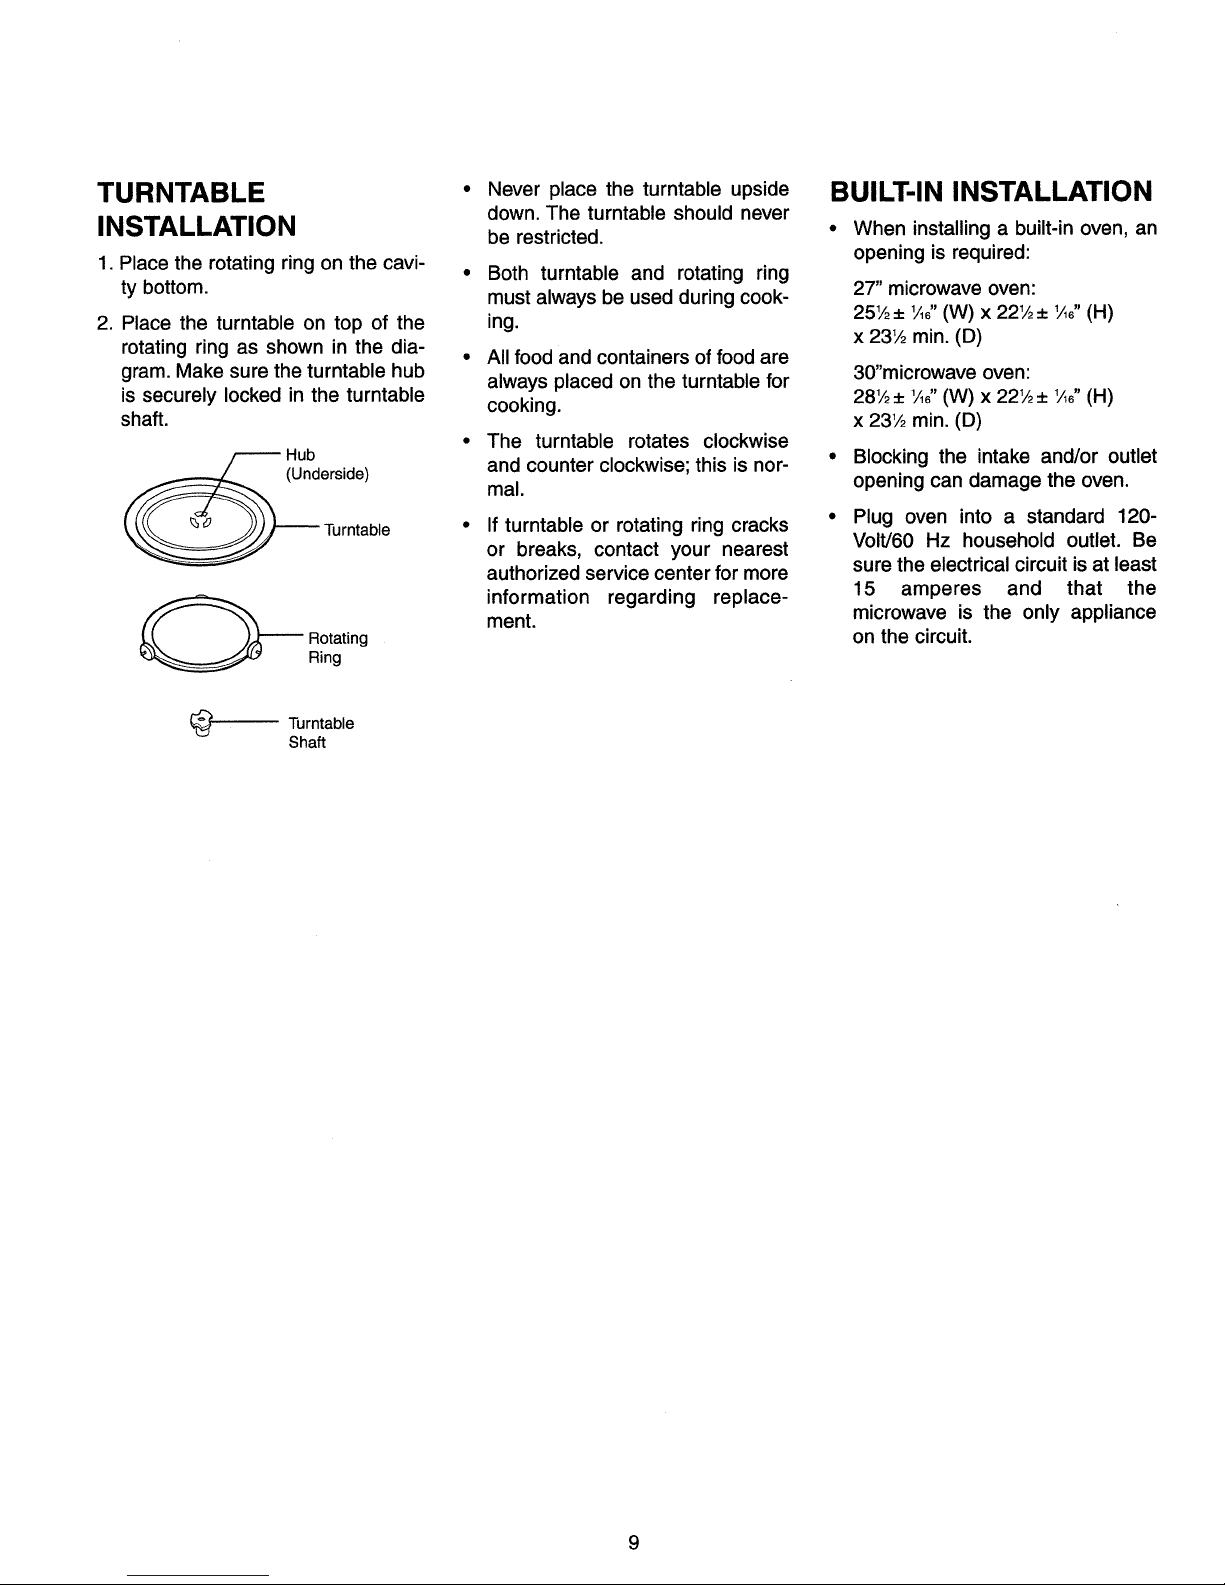
TURNTABLE
INSTALLATION
1. Place the rotating ring on the cavi-
ty bottom.
2. Place the turntable on top of the
rotating ring as shown in the dia-
gram. Make sure the turntable hub
is securely locked in the turntable
shaft.
Hub
(Underside)
Turntable
_ otating
Ring
Never place the turntable upside
down. The turntable should never
be restricted.
Both turntable and rotating ring
must always be used during cook-
ing.
All food and containers of food are
always placed on the turntable for
cooking.
The turntable rotates clockwise
and counter clockwise; this is nor-
mal.
If turntable or rotating ring cracks
or breaks, contact your nearest
authorized service center for more
information regarding replace-
ment.
BUILT-IN INSTALLATION
• When installing a built-in oven, an
opening is required:
27" microwave oven:
251,_+ 1/_6"(W) x 221_± 1/_6"(H)
x 231/_min. (D)
30"microwave oven:
281/2± 1/_8"(W) x 221_± 1/_6"(H)
x 231/2min. (D)
• Blocking the intake and/or outlet
opening can damage the oven.
Plug oven into a standard 120-
Volt/60 Hz household outlet. Be
sure the electrical circuit is at least
15 amperes and that the
microwave is the only appliance
on the circuit.
(__ Turntable
Shaft
9

Control Panel
soup/
Sauce
Frozen
Entree
Reheat
Entree
Pizza
1. Display window
Upper line: The word prompt
scrolls to guide you when setting
the clock and at every operating
stage. It shows power level when
using timed cooking.
Lower line: Counts down cooking
time in minutes and/or seconds.
Shows clock time when oven is
not in use. Shows kitchen timer
time when this feature is selected.
2. Auto Sensor Keypads
(pgs. 13-14)
- Soup/Sauce
- Reheat Entree
- Frozen Entree
- Pizza Slice
- Popcorn
- Baked Potato
- Fresh Vegetable
- Frozen Vegetable
These Sensor keypads provide
accurate and fast microwaving for
a variety of popular foods with no
guesswork.
?
5!ice
Baked
Potato
Frozen
Vegetable
Fr_h
V_Jetobte
Popcom
N
Ra id
Defrost
Auto
ILoverage
Custom Control _13_ Start Cook Power
Program Setup _ Time I 0 I tevd
3. Rapid Defrost (pg. 15)
Provides faster defrosting results.
This option is excellent for thaw-
ing lib. of frozen ground beef.
4. Auto Defrost (pg. 15)
Provides thorough defrosting
results.
5. Beverage (pg. 13)
This keypad heats one to three 8
oz. cups.
6. Stop/Clear
Clears all previous settings if
pressed before cooking starts.
Press once to stop oven during
cooking, press twice to stop and
clear all entries.
7. Timer (pg. 11)
8. Clock (pg. 11)
9. Custom Program (pg. 11)
?
I t++o++ll7 2 3
I I I 1 Mln+ 2 Mtn. 3 Min.
ILe. 114 5 6
4 Min+ S Min,
I JI
@._ Add3oseo17 8 9
10.Control Setup (pg. 13)
Allows the customization of the
following oven feature settings.
- Sound
- Clock Display
- Display Scroll Speed
- Lbs/Kg
- Volume Level
- Language Option
11. More/Less (pg. 13)
12. Add 30 Sec. (pg. 11)
13. Start
To start cooking.
14. Number Keys
Allows for the immediate start of
one of 5 preset times from 1 to 5
minutes,
15. Cook Time (pg. 12)
16, Power Level (pg.12)
10
Operating Instructions
12-Hour CLOCK and
TIMER
Oven is equipped with a 12-hour clock
and a timer that can be set up to 99
minutes and 99 seconds. Clock does
not display AM or PM.
To set clock:
Stop
Clear
Clock
Start
To set timer:
Stop
Clear
Timer
Start
1. Touch STOP
CLEAR pad.
2. Touch CLOCK
pad.
• ENTER TIME
OF DAY scrolls
through display.
3. Enter desired time
by using digit
touch pads.
• TOUCH START
scrolls through
display.
4. Touch START.
1. Touch STOP
CLEAR pad.
2. Touch TIMER pad.
• ENTERTIME IN
MIN. AND SEC.
scrolls through
display.
3. Enter desired time
by using digit
touch pads.
• TOUCH START
scrolls through
display.
4. Touch START.
• To cancel timer
at any time,
press STOP
CLEAR pad.
ADD 30 SEC.
A time-saving pad, this simplified
control lets you quickly set and start
microwave cooking without the need
to touch START.
NOTE: If you touch Add 30 Sec., it
will add 30 seconds up to 9 minutes
59 seconds.
Example: To set for 2 minutes.
Add Touch Add 30 Sec.
30 Sec. 4 times. The oven
begins cooking and
display shows time
counting down.
CHILD LOCK
This safety feature prevents unwant-
ed oven operation. Once the child
lock is set, no cooking can take
place. The Child Lock feature is also
useful when cleaning the control
panel. Child Lock prevents accidental
programming when wiping the con-
trol panel.
If the CHILD LOCK is set and you
touch another cooking pad, the word
LOCKED shows in the display.
Cancel the child lock according to the
procedure below.
To set the child lock:
Stop 1. Touch STOP
Clear CLEAR.
0
To cancel the child lock:
0
2. Touch and hold 0
pad until the word
LOCKED
appears in the
display and two
beeps are heard.
Touch and hold 0
pad until the word
LOCKED
disappears in the
display.
CUSTOM PROGRAM
CUSTOM PROGRAM lets you recall
one cooking instruction previously
placed in memory and begin cooking
immediately
Example: To cook for 2 minutes at
60% power.
Custom
Program
Power
Level
Start 5.Touch START.
To recall the custom program:
Custom 1. Touch CUSTOM
Program PROGRAM.
Start 2. Touch START.
1. Touch CUSTOM
PROGRAM.
Display scrolls
the words
TOUCH START
OR ENTER NEW
TIME.
2. Enter cooking
time. Display
scrolls TOUCH
START OR
POWER.
3. Touch POWER
LEVEL. Display
scrolls ENTER
POWER LEVEL
0TO 10.
4. Enter power level
6. Display scrolls
P 60 TOUCH
START.
Display scrolls
the words
TOUCH START
OR ENTER NEW
TIME.
After the CHILD LOCK is turned off,
the oven will operate normally.
11
Instructions (cont'd)
COOK TIME
This function allows you to cook food
for a desired amount of time.
Because many foods need slower
cooking (at less than HI-POWER),
there are 10 power level settings in
addition to HI-POWER.
When cooking is complete, beeps will
sound. The word COOKEND shows
in the display window. Then the oven
shuts itself off.
NOTE: If you do not select the power
level, the oven will operate at power
HIGH. To set HI-POWER cooking,
skip steps 4 and 5 below.
Example: To cook food on 80%
Power (power 8) for 5 minutes 30
seconds.
Cook 1. Touch COOK
Time TIME pad.
2. Touch number
keys.
• ENTER COOK-
ING TIME scrolls
through display.
5 3 0 3. Enter 5 minutes 30
5 Min.3 Min. seconds by touch-
ing [5], [3], and
[0]. Display scrolls
the words 5:30
TOUCH START
OR POWER.
Power 4. Touch POWER
Level LEVEL. Display
scrolls the words
ENTER POWER
LEVEL 0 TO 10.
5. Touch 8.
8
To select power
level 80%. Display
scrolls the words
P 80 TOUCH
START.
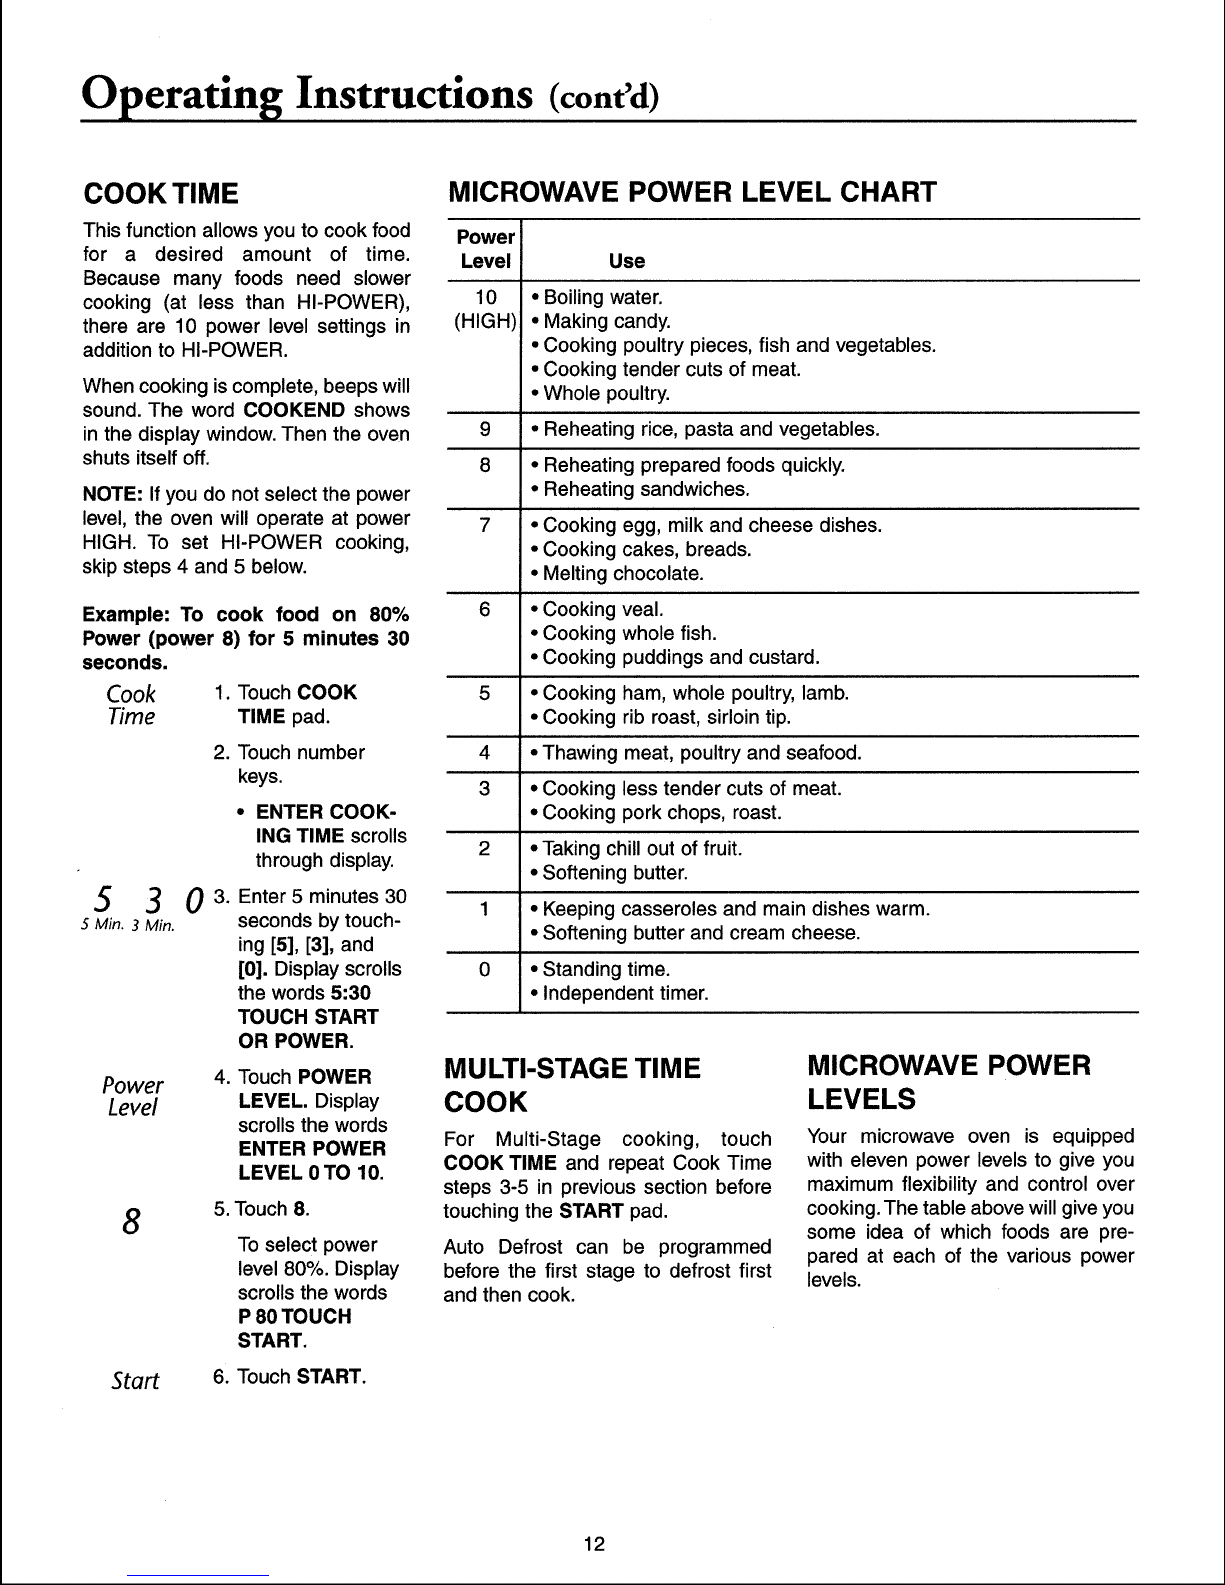
MICROWAVE POWER LEVEL CHART
Power
Level Use
10
• Boiling water.
(HIGH)
MULTI-STAGE TIME
COOK
For Multi-Stage cooking, touch
COOK TIME and repeat Cook Time
steps 3-5 in previous section before
touching the START pad.
Auto Defrost can be programmed
before the first stage to defrost first
and then cook.
• Making candy.
• Cooking poultry pieces, fish and vegetables.
• Cooking tender cuts of meat.
• Whole poultry.
9 • Reheating rice, pasta and vegetables.
8 • Reheating prepared foods quickly.
• Reheating sandwiches.
7 • Cooking egg, milk and cheese dishes.
• Cooking cakes, breads.
• Melting chocolate.
6 • Cooking veal.
• Cooking whole fish.
• Cooking puddings and custard.
5 • Cooking ham, whole poultry, lamb.
• Cooking rib roast, sirloin tip.
4 • Thawing meat, poultry and seafood.
3 • Cooking less tender cuts of meat.
• Cooking pork chops, roast.
2 • Taking chill out of fruit.
• Softening butter.
1 • Keeping casseroles and main dishes warm.
• Softening butter and cream cheese.
0 • Standing time.
• Independent timer.
MICROWAVE POWER
LEVELS
Your microwave oven is equipped
with eleven power levels to give you
maximum flexibility and control over
cooking. The table above will give you
some idea of which foods are pre-
pared at each of the various power
levels.
Start 6. Touch START.
12

MORE/LESS
By using the MORE or LESS keys, all
of the Cook time, Add 30 Sec., and
Sensor Cook programs can be
adjusted to cook food for a longer or
shorter time. Pressing MORE will add
10 seconds to the cooking time each
time you press it. Pressing LESS will
subtract 10 seconds of cooking time
each time you press it.You must wait
until the control display begins to
count down before adding or sub-
tracting time.
Example: To adjust the SENSOR
COOK (ex. popcorn) cooking time
for a longer time, or for a shorter
time.
Popcorn 1. Touch POPCORN.
Display scrolls the
word POPCORN.
2. Press the MORE or
LESS pad during time
countdown. MORE or
LESS will not operate
during display scrolling.
BEVERAGE
This pad heats beverages in 8 oz.
cups.
Example: To heat two 8 oz. cups of
coffee:
Beverage 1. TouchBEVERAGE.
Display scrolls the
words BEV TOUCH 1
TO 3 SERVING.
2 2. Touch number 2. The
2 Min. oven will start automat-
ically.
NOTE: Be careful, the beverage will
be very hot. Sometimes liquids heat-
ed in cylindrical containers will
splash out when the cup is moved.
CONTROL SET-UP
CONTROL SET-UP allows you to set
the oven for your preferences.
You can select SOUND ON/OFF,
CLOCK ON/OFF, SCROLL SPEED,
LBS/KG, VOLUME LEVEL and LAN-
GUAGE OPTION.
Example 1: To turn off Sound of
beeper.
Control 1.
Setup
1 the words SOUND ON
7Min. TOUCH 1 OFF TOUCH
,-_ the words SOUND OFF.
f.
2 Min.
NOTE: To turn beep sound back on,
repeat steps 1 - 2 then touch num-
ber 1.
Example 2: To select kg unit.
Control 1.Touch CONTROL SET-
Setup UP. Six modes show
Touch CONTROL SET-
UP. Six modes show in
the display repeatedly.
2. Touch 1. Display scrolls
2.
3. Touch 2. Display scrolls
The current time will be
displayed.
4
4 Min.
2 Min.
NOTE: To select LBS., repeat steps
1-2 then, touch number 1.
in the display continu-
ously.
2. Touch 4. Display scrolls
the words LBS. TOUCH
1 KG TOUCH 2.
3. Touch 2. Display scrolls
the words KG. The cur-
rent time will be dis-
played.
SENSOR COOK
OPERATION
INSTRUCTIONS
For most Sensor Cook programs, a
chart with specific food examples and
cooking instructions is provided on
the next pages. The Sensor Cook
system works by detecting a build-up
of vapor.
Hints
1. Make sure the door remains
closed.
2. Once the vapor is detected, two
beeps will sound.
3. Opening the door or touching the
STOP CLEAR pad before the
vapor is detected will abort the
process. The oven will stop.
4. Before using Sensor Cook, make
sure the exterior of the cooking
container and the interior of the
oven are dry, to assure the best
results.
cont.
CONTROL SET-UP FUNCTION CHART
NO
1
2
3
4
5
6
NOTE: When the power cord is first plugged in, the default settings are Sound ON, Clock ON, Normal Speed, LBS, Medium
FUNCTION
SOUND ON / OFF
CLOCK ON / OFF
SCROLL SPEED
LBS./ KG
VOLUME LEVEL
LANGUAGE OPTION
Volume and English.
Sound On or Sound Off
Clock On or Clock Off
Slow, Normal, or Fast
Low, Medium, High
English, Spanish, French
CHOICE
Lbs or Kg
REMARKS
All of the keysound and End of Cycle sound on or off.
When clock isoff nothingdisplays when oven is not in use.
Control speed of message that scrollsacross display.
Set controlto LBS. or KG for Auto Defrost.
Controls volume of key sound.
Select language of message that scrolls across display.
13
Instructions (cont'd)
5. Room temperature should not
exceed 95° F.
6. Oven should be plugged in at
least 5 minutes before Sensor
Cooking.
Categories: Soup/Sauce
Baked Potato
Frozen Entree
Frozen Vegetable
Reheat Entree
Fresh Vegetable
Pizza Slice
Popcorn
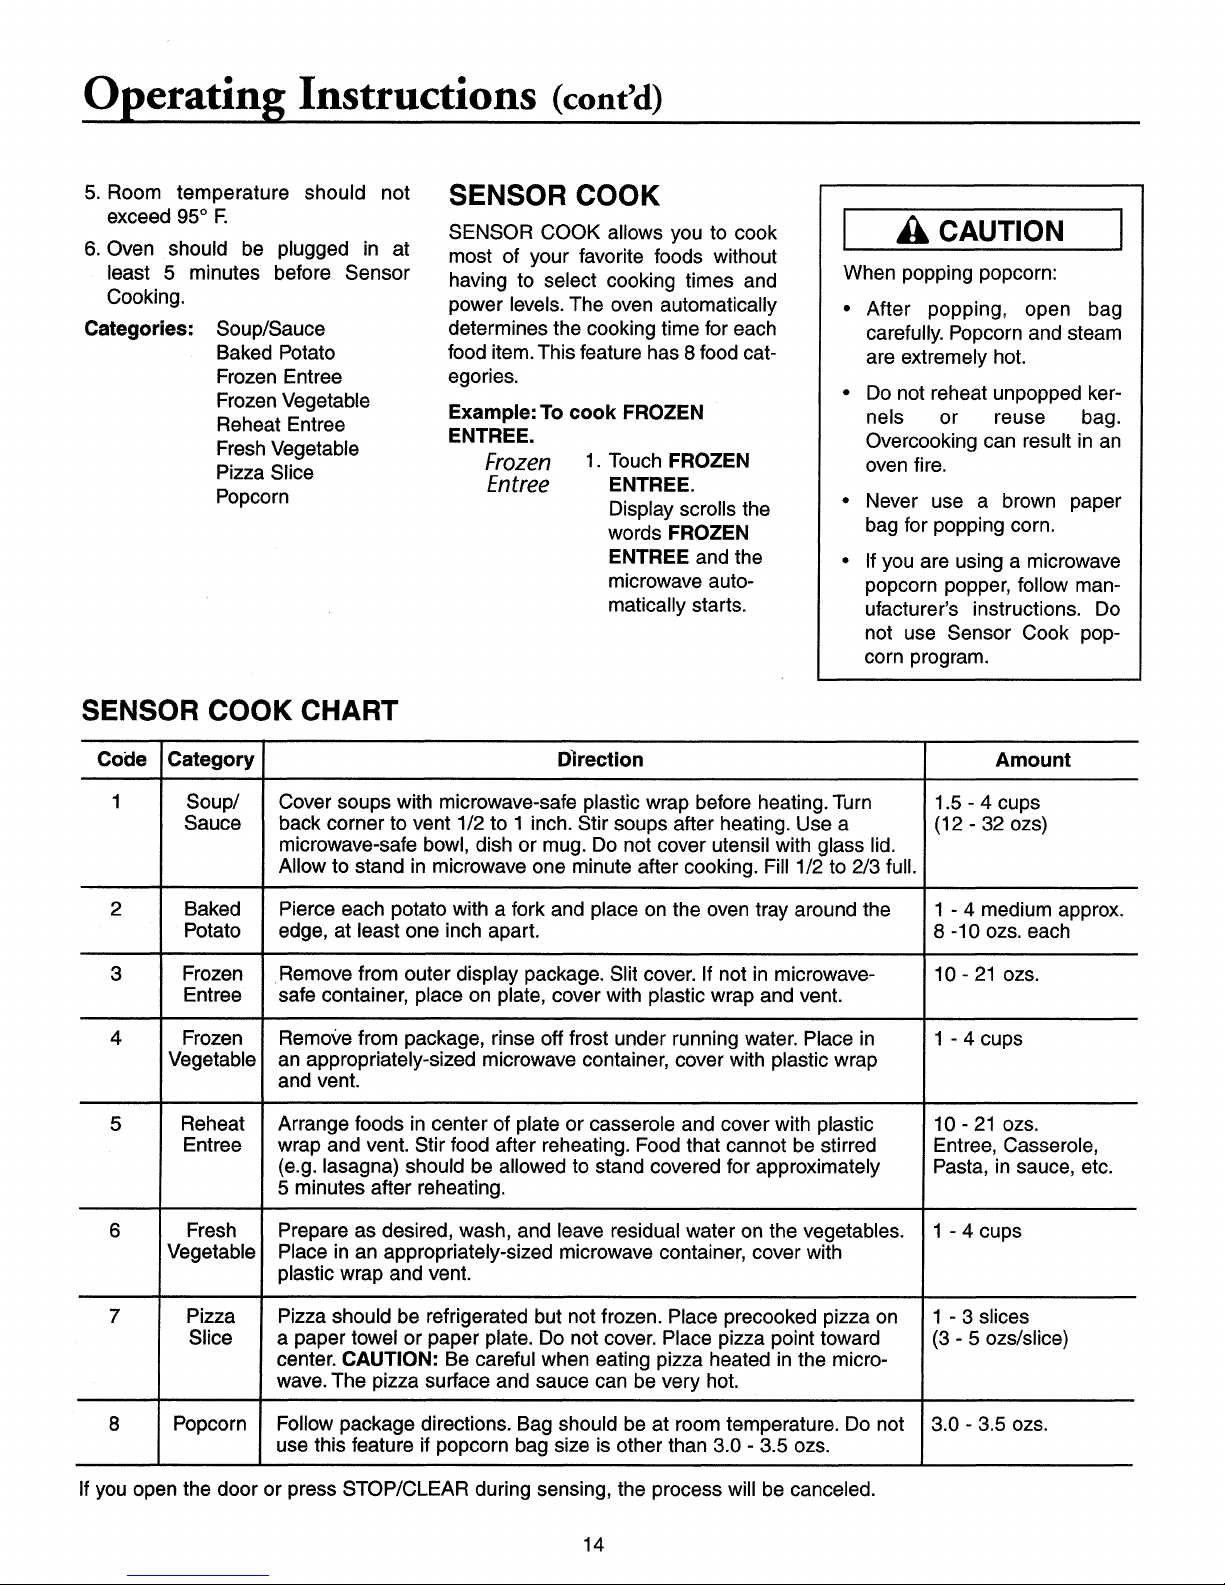
SENSOR COOK CHART
Code
Category
SENSOR COOK
SENSOR COOK allows you to cook
most of your favorite foods without
having to select cooking times and
power levels. The oven automatically
determines the cooking time for each
food item. This feature has 8 food cat-
egories.
Example: To cook FROZEN
ENTREE.
Frozen 1. Touch FROZEN
Entree ENTREE.
Display scrolls the
words FROZEN
ENTREE and the
microwave auto-
matically starts.
Direction
CAUTION
When popping popcorn:
After popping, open bag
carefully. Popcorn and steam
are extremely hot.
Do not reheat unpopped ker-
nels or reuse bag.
Overcooking can result in an
oven fire.
Never use a brown paper
bag for popping corn.
If you are using a microwave
popcorn popper, follow man-
ufacturer's instructions. Do
not use Sensor Cook pop-
corn program.
Amount
1
2 Baked Pierce each potato with a fork and place on the oven tray around the 1 - 4 medium approx.
3 Frozen Remove from outer display package. Slit cover. If not in microwave- 10 - 21 ozs.
4 Frozen Remove from package, rinse off frost under running water. Place in 1 - 4 cups
5 Reheat Arrange foods in center of plate or casserole and cover with plastic 10 - 21 ozs.
6 Fresh Prepare as desired, wash, and leave residual water on the vegetables. 1 - 4 cups
7 Pizza Pizza should be refrigerated but not frozen. Place precooked pizza on 1 - 3 slices
Soup/
Sauce
Potato edge, at least one inch apart. 8 -10 ozs. each
Entree safe container, place on plate, cover with plastic wrap and vent.
Vegetable an appropriately-sized microwave container, cover with plastic wrap
Entree wrap and vent. Stir food after reheating. Food that cannot be stirred Entree, Casserole,
Vegetable Place in an appropriately-sized microwave container, cover with
Slice a paper towel or paper plate. Do not cover. Place pizza point toward (3 - 5 ozs/slice)
Cover soups with microwave-safe plastic wrap before heating. Turn
back corner to vent 1/2 to 1 inch. Stir soups after heating. Use a
microwave-safe bowl, dish or mug. Do not cover utensil with glass lid.
Allow to stand in microwave one minute after cooking. Fill 1/2 to 2/3 full.
and vent.
(e.g. lasagna) should be allowed to stand covered for approximately Pasta, in sauce, etc.
5 minutes after reheating.
plastic wrap and vent.
center. CAUTION: Be careful when eating pizza heated in the micro-
wave. The pizza surface and sauce can be very hot.
1.5 - 4 cups
(12 - 32 ozs)
8 Popcorn Follow package directions. Bag should be at room temperature. Do not 3.0 - 3.5 ozs.
use this feature if popcorn bag size is other than 3.0 - 3.5 ozs.
If you open the door or press STOP/CLEAR during sensing, the process will be canceled.
14

AUTO DEFROST
Three defrost sequences are preset
in the oven. The defrost feature pro-
vides you with the best defrosting
method for frozen foods. The AUTO
DEFROST guide will show you which
defrost sequence is recommended
for the food you are defrosting.
With the Auto Defrost feature, the
oven automatically sets the defrost-
ing time and power levels for you.
The oven automatically determines
required defrosting times for each
food item according to the weight you
enter.
For added convenience, the Auto
Defrost includes a built-in beep
mechanism that reminds you to
check, turn over, separate, or
rearrange. Three different defrosting
levels are provided.
1 MEAT
2 POULTRY
3 FISH
• You can select the category
by touching the numeric key 1
(MEAT), numeric key 2 (POUL-
TRY), and numeric key 3 (FISH)
after touching the AUTO
DEFROST pad.
• Available weight is 0.1 - 6.0 Ibs.
(0.1 - 2.7 kgs).
Example: To defrost 1.2 Ibs. of
ground beef.
Auto
Defrost
1
1 Min,
1. Touch AUTO
DEFROST.
Display scrolls the
words
MEAT TOUCH 1
POULTRY
TOUCH 2
FISH TOUCH 3.
Touch 1.
,
Display scrolls the
words ENTER
WEIGHT.
I 2 3.
1 Min. 2 Min.
Start 4.
NOTE:
When you touch the START pad, the
display changes to defrost time count
down. The oven will beep during the
DEFROST cycle. At beep, open the
door and turn, separate, or rearrange
the food. Remove any portions that
have thawed. Return frozen portions
to the oven and touch START to
resume the defrost cycle.
• For best results, remove fish, shell-
fish, meat, and poultry from its orig-
inal closed paper or plastic package
(wrapper). Otherwise, the wrap will
hold steam and juice close to the
foods, which can cause the outer
surface of the foods to cook.
Enter the weight
by touching 1 and
2.
Display scrolls the
words 1.2 TOUCH
START.
Touch START.
Defrosting starts.
AUTO DEFROST GUIDE
Sequence
1
MEAT
2
POULTRY
3
FISH
BEEF
Ground beef, Round steak, Cubes for stew, Tenderloin steak,
Pot roast, Rib roast, Rump roast, Chuck roast, Hamburger
patty.
LAMB
Chops (1 inch thick), Rolled roast
PORK
Chops (½ inchthick), Hot dogs, Spareribs, Country-style ribs.
Rolled roast, Sausage.
VEAL
Cutlets (1 lb. ½ inch thick)
POULTRY
Whole (under 4 Ibs.), Cut-up, Breasts (boneless)
CORNISH HENS
Whole
TURKEY
Breast
FISH
Fillets, Whole Steaks
SHELLFISH
Crab meat, Lobster tails, Shrimp, Scallops
• For best results, shape your ground
meat into the form of a doughnut
before freezing. When defrosting,
scrape off thawed meat when the
beep sounds and continue defrost-
ing.
• Place foods in a shallow container
or on a microwave roasting rack to
catch drippings.
• Food should still be somewhat icy
in the center when removed from
the oven.
RAPID DEFROST
This feature provides defrosting for
1.0 lb. frozen ground beef.
Rapid
Defrost
Food
1. Touch RAPID
DEFROST.
The oven begins
defrosting without
the need to touch
START.
15

Fresh Chart
Cook time
Vegetable
Artichokes
(8 ozs. each)
Asparagus,
Fresh, spears
Beans, green and
wax
Beets, Fresh
Broccoli, Fresh,
speam
Cabbage, Fresh,
chopped
Carrots, Fresh,
sliced
Cauliflower,
Fresh, whole
Celery, Fresh,
sliced
Corn, Fresh
Amount
2 medium
4 medium
1 lb.
1 lb.
1 lb.
1 lb.
1 lb.
2 cups
1 lb.
2 cups
4 cups
2 ears
at HIGH
(minutes)
5-8
10-12
3-7
7-10
12-16
5-9
5-7
3-6
6-10
3-5
7-9
5-8
Instructions
Trim. Add 2 tsp. water and 2 tsp. lemon juice.
Cover. Cook stem end up.
Wash and turn half of spears around.
Add ½ cup water. Cover.
Add ½ cup water in 1½ qt. casserole.
Stir halfway through cooking.
Add ½cup water in 1½ qt. covered casserole.
Rearrange halfway through cooking.
Place broccoli in baking dish.
Add ½ cup water.
Add ½ cup water in 1½ qt. covered casserole.
Stir halfway through cooking.
Add ¼ cup water in 1 qt. covered casserole.
Stir halfway through cooking.
Trim. Add ¼cup water in 1 qt. covered casserole.
Stir halfway through cooking.
Slice. Add Y2cup water in 1½ qt. covered
casserole.
Husk. Add 2 tsp water in 1½ qt. baking dish.
Cover.
Standing
Time
2-3 minutes
2-3 minutes
2-3 minutes
2-3 minutes
2-3 minutes
2-3 minutes
2-3 minutes
2-3 minutes
2-3 minutes
2-3 minutes
Mushrooms,
Fresh, sliced
Parsnips, Fresh,
sliced
Peas, Green,
Fresh
Sweet Potatoes,
Whole Baking
(6-8 ozs. each)
White Potatoes,
Whole Baking
(6-8 ozs. each)
Spinach, Fresh,
leaf
Squash, Acorn or
Butternut, Fresh
Zucchini, Fresh,
sliced
Zucchini, Fresh,
whole
½ lb.
1 lb.
4 cups
2 medium
4 medium
2 potatoes
4 potatoes
1 lb.
1 medium
1 lb.
1 lb.
2-3½
4-8
6-9
5-7
6-11
5-7
8-13
5-7
6-8
5-8
7-8
Place mushrooms in 1½ qt. covered casserole.
Add ½ cup water in 1½ qt. covered casserole.
Add ½ cup water in 1½ qt. covered casserole.
Stir halfway through cooking.
Pierce potatoes several times with fork.
Pierce potatoes several times with fork.
Add ½ cup water in 2 qt. covered casserole.
Cut squash in half. Remove seeds.
Place in 8x8-inch baking dish. Cover.
Add ½ cup water in 1½ qt. covered casserole.
Pierce. Place on 2 paper towels.
Turn zucchini over and rearrange halfway
through cooking.
2-3 minutes
2-3 minutes
2-3 minutes
2-3 minutes
2-3 minutes
2-3 minutes
2-3 minutes
2-3 minutes
2-3 minutes
2-3 minutes
2-3 minutes
16

I CAUTION I
To avoid risk of property damage, unplug the microwave oven or disconnect power at soume by removing fuse or
throwing circuit breaker.
Before cleaning the oven, unplugthe power supply cord of the oven or open the oven door to prevent an accidental
oven start.
Part
Inside of the Oven
Glass Tray and Rotating
Ring
Control Panel
Door
Outside Oven Surface
Description
• Use a damp cloth to wipe out crumbs and spillovers.
• It is important to keep the area between door and cavity front clean to
assure a tight seal.
• Remove greasy spatters with a sudsy cloth, then rinse and dry.
• Do not use harsh detergent or abrasive cleaners.
• The glass tray and rotating ring can be washed by hand or in the dishwasher.
° Rinse and dry thoroughly.
• Wipe with a damp cloth followed immediately by a dry cloth.
• The Child Lock feature is also useful when cleaning the control panel. Child Lock
prevents accidental programming when wiping the control panel.
• If steam accumulates inside or around the outside of the oven door,
wipe the panel with a soft cloth.
• This may occur when the microwave oven is operated under high
humidity conditions and in no way indicates a malfunction of the unit.
• Wipe with a soft cloth and a mild detergent solution. Rinse and dry. Do not use
harsh detergent or abrasive cleaners.
= To prevent damage to the operating parts inside the oven, water should not be
allowed to seep into the ventilation openings.
Stainless Steel
° DO NOT USE ANY CLEANING PRODUCT CONTAININGCHLORINE BLEACH.
• ALWAYSWIPE WITH THE GRAIN WHEN CLEANING.
• Daily Cleaning/Light Soil - Wipe with one of thefollowing - soapy water, whitevinegar/water
solution, Formula409 Glassand SurfaceCleaner* or a similarglasscleaner- usinga sponge
or softcloth.Rinseand dry.Topolishand help preventfingerprints, follow withStainlessSteel
MagicSpray.*
• Moderate/Heavy Soil- Wipewithone ofthefollowing - Bon Ami, BakingSoda or Soft
Scrub*- usinga dampspongeor softcloth.Rinseand dry.Stubbornsoilsmay be removed
witha dampScotch-Brite*pad;rubevenlywiththe grain.Rinseanddry.To restorelusterand
removestreaks, follow withStainlessSteelMagic Spray.
• Discoloration - Usinga damp spongeor softcloth,wipe withCameo Stainless Steel
Cleaner*. Rinseimmediatelyanddry.Toremovestreaksand restoreluster,followwith
StainlessSteel MagicSpray.
After cleaning the oven, be sure the rotating ring and glass tray are in the correct position.
Press the STOP/CLEAR pad twice to reset any accidental key setting.
*Brand names for cleaning products are registered trademarks of the respective manufacturers.
17
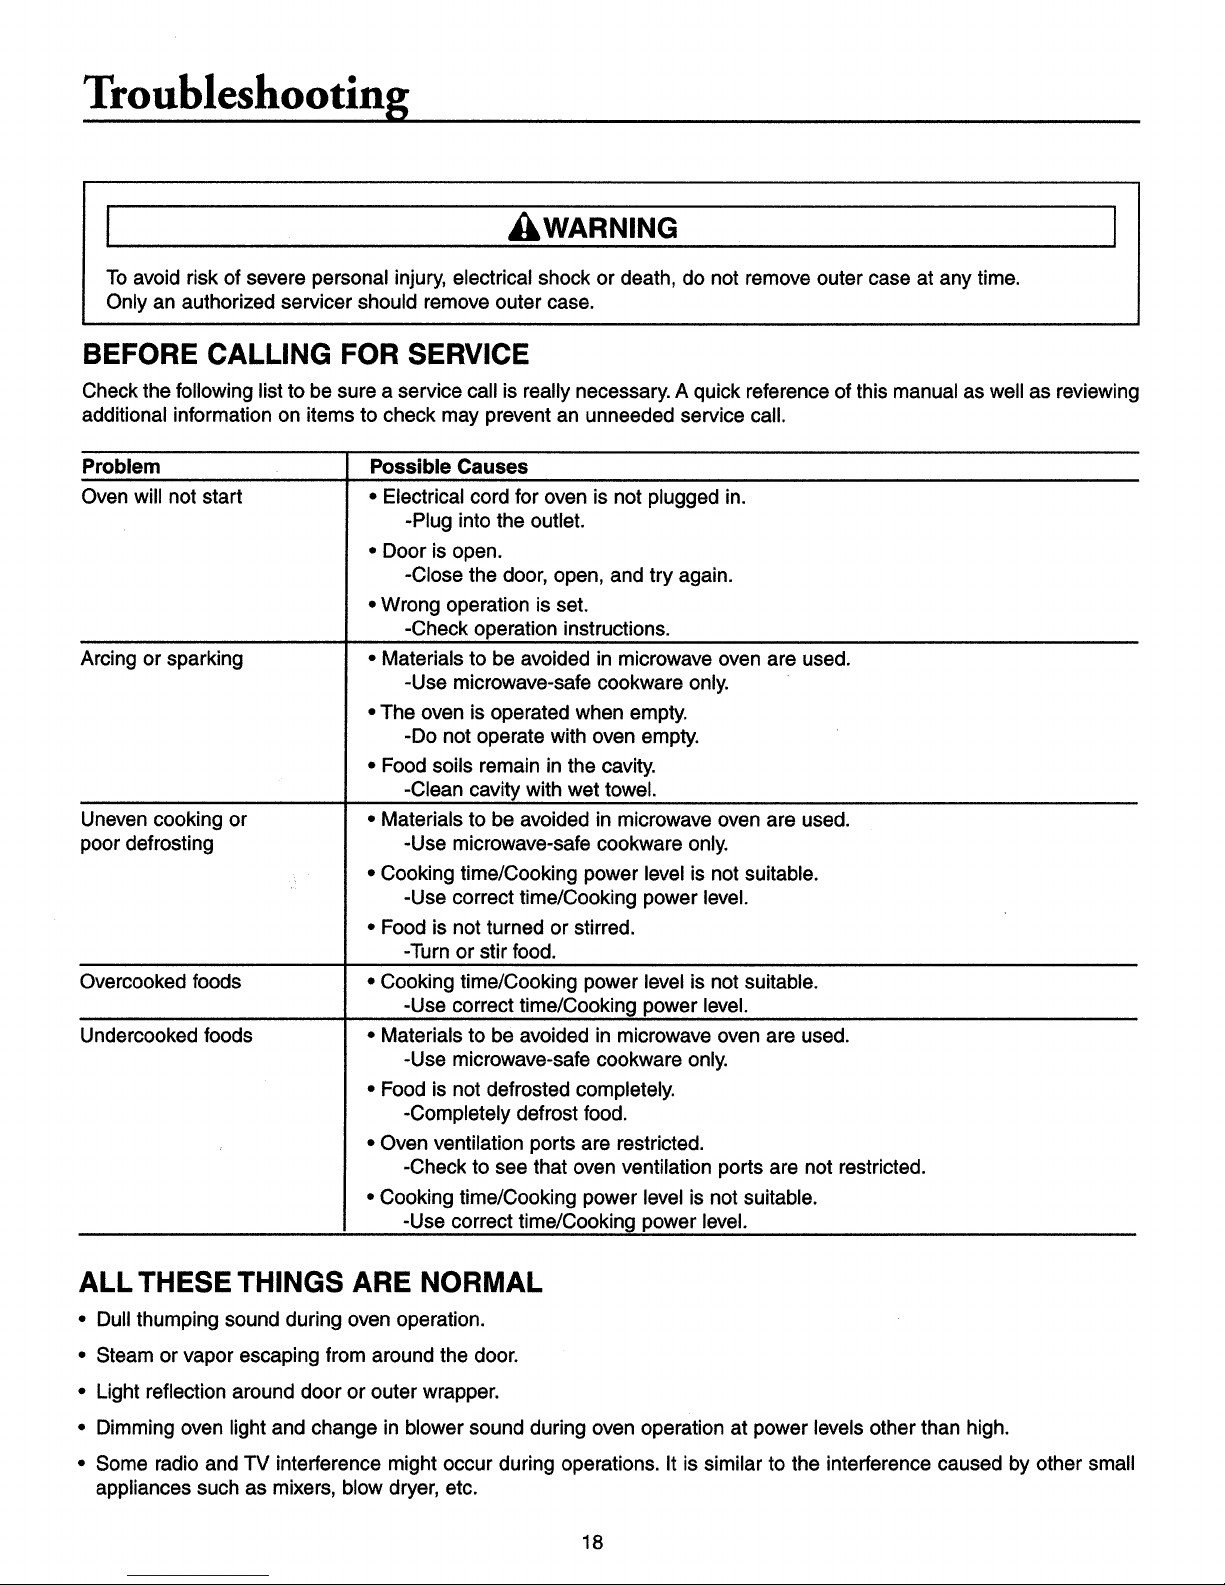
I &WARNING I
To avoid risk of severe personal injury, electrical shock or death, do not remove outer case at any time.
Only an authorized servicer should remove outer case.
BEFORE CALLING FOR SERVICE
Check the following listto be sure a service call is really necessary. A quick reference of this manual as well as reviewing
additional information on items to check may prevent an unneeded service call.
Problem
Oven will not start
Arcing or sparking
Uneven cooking or
poor defrosting
Overcooked foods
Undercooked foods
Possible Causes
• Electrical cord for oven is not plugged in.
-Plug into the outlet.
• Door is open.
-Close the door, open, and try again.
• Wrong operation is set.
-Check operation instructions.
• Materials to be avoided in microwave oven are used.
-Use microwave-safe cookware only.
• The oven is operated when empty.
-Do not operate with oven empty.
• Food soils remain in the cavity.
-Clean cavity with wet towel.
• Materials to be avoided in microwave oven are used.
-Use microwave-safe cookware only.
• Cooking time/Cooking power level is not suitable.
-Use correct time/Cooking power level.
• Food is not turned or stirred.
-Turn or stir food.
• Cooking time/Cooking power level is not suitable.
-Use correct time/Cooking power level.
• Materials to be avoided in microwave oven are used.
-Use microwave-safe cookware only.
• Food is not defrosted completely.
-Completely defrost food.
• Oven ventilation ports are restricted.
-Check to see that oven ventilation ports are not restricted.
• Cooking time/Cooking power level is not suitable.
-Use correct time/Cooking power level.
ALL THESE THINGS ARE NORMAL
• Dull thumping sound during oven operation.
• Steam or vapor escaping from around the door.
• Light reflection around door or outer wrapper.
• Dimming oven light and change in blower sound during oven operation at power levels other than high.
• Some radio and TV interference might occur during operations. It is similar to the interference caused by other small
appliances such as mixers, blow dryer, etc.
18
 Loading...