

Page 1

OWNER’S MANUAL
DLP PROJECTOR
Please read this manual carefully before operating
your set and retain it for future reference.
HX350T
P/NO : MFL66679801 (1012-REV06)
www.lg.com
Page 2
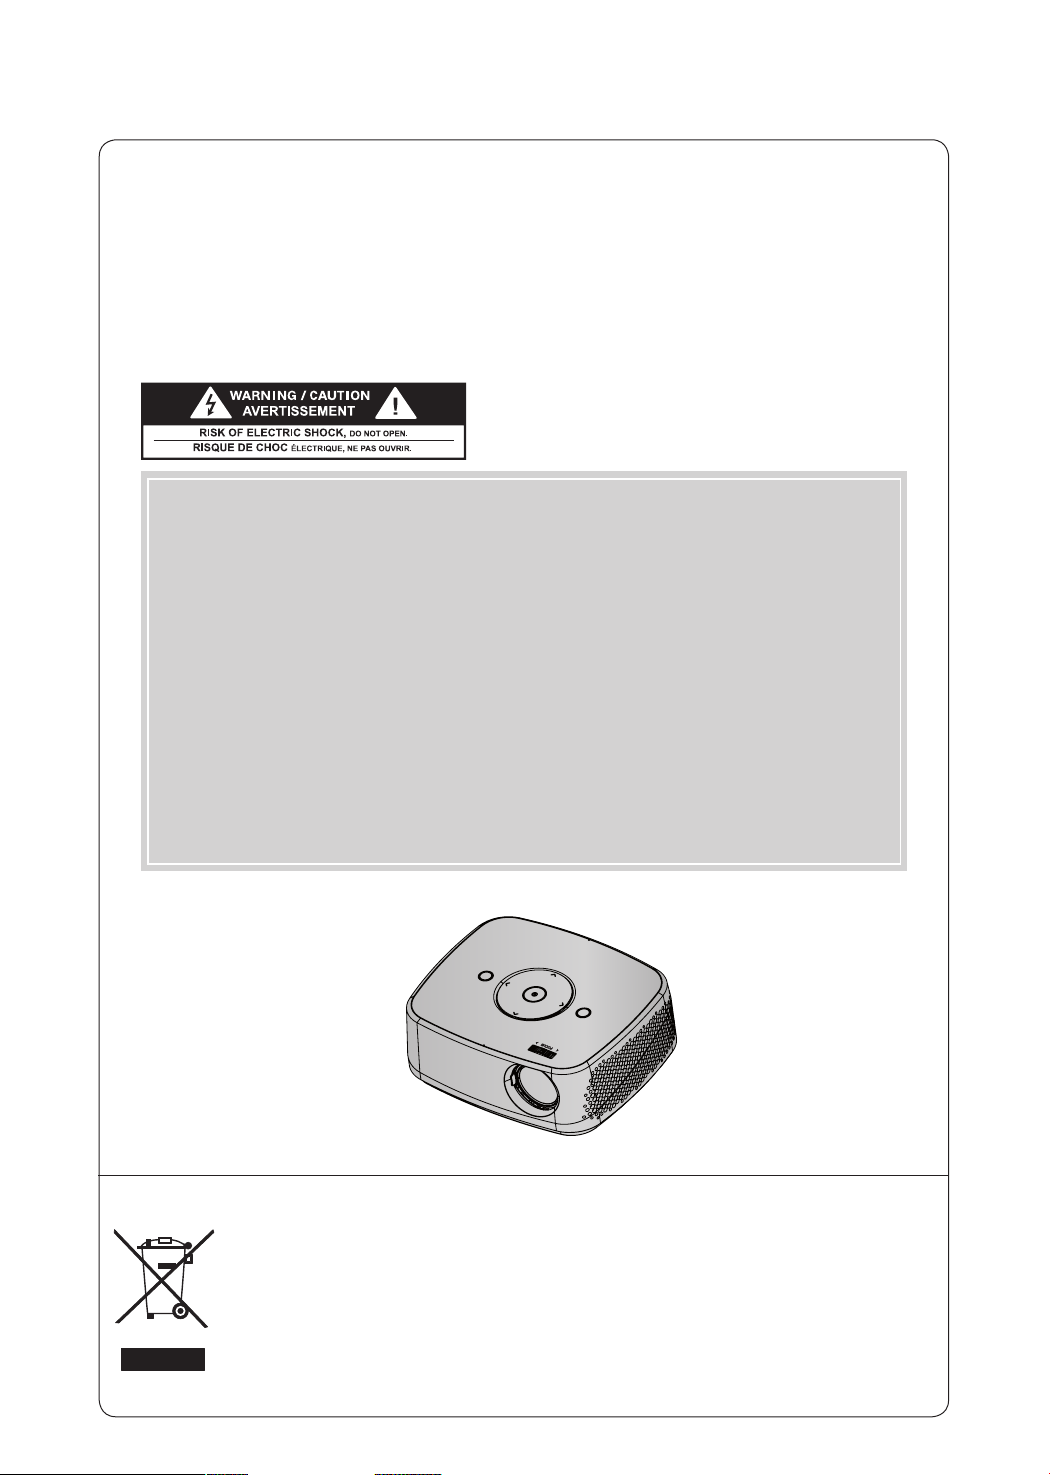
DLP PROJECTOR
DLP PROJECTOR
Warning - Class B
(b) For a Class B Digital device or peripheral, the instructions furnished the user shall include the fol-
lowing or similar statement, placed in a prominent location in the text of the manual:
NOTE: This equipment has been tested and found to comply with the limits for a Class B digital device,
pursuant to part 15 of the FCC Rules. These limits are designed to provide reasonable protection against harmful interference in a residential installation. This equipment generates, uses
and can radiate radio frequency energy and, if not installed and used in accordance with the
instructions, may cause harmful interference to radio communications. However, there is no
guarantee that interference will not occur in a particular installation. If this equipment does
cause harmful interference to radio or television reception, which can be determined by turning
the equipment off and on, the user is encouraged to try to correct the interference by one or
more of the following measures:
- Reorient or relocate the receiving antenna.
- Increase the separation between the equipment and receiver.
- Connect the equipment into an outlet on a circuit different from that to which the receiver is
connected.
- Consult the dealer or an experienced radio/TV technician for help.
Disposal of your old appliance
1. When this crossed-out wheeled bin symbol is attached to a product it means the product is covered by the European Directive 2002/96/EC.
2. All electrical and electronic products should be disposed of separately from the municipal waste
stream through designated collection facilities appointed by your government or your local authorities.
3. The correct disposal of your old appliance will help prevent potential negative consequences for the
environment and human health.
4. For more detailed information about disposal of your old appliance, please contact your city office,
waste disposal service or the shop where you purchased the product.
5. The fluorescent lamp used in this product contains a small amount of mercury. Do not dispose of
this product with general household waste. Disposal of this product must be carried out in accordance to the regulations of your local authority.
Page 3

Contents
Contents
Safety Instructions .......................................................4
Projector Description
Main Body ..........................................................................................7
Control Panel .....................................................................................7
Connections ...................................................................................... 8
Remote Control .............................................................................. 9
Installing Batteries ........................................................................... 9
Accessories ......................................................................................10
Optional Extras ..............................................................................10
Installation
Installation Precautions .................................................................. 11
Basic Operation of the Projector ............................................... 12
How to install the projector using a tripod .............................13
Kensington Security System ....................................................... 13
Turning on the Projector ..............................................................14
Turning off the Projector .............................................................. 14
Focus and Position of the Screen Image ................................14
Selecting input mode ...................................................................14
Connections
Connecting to a Speaker or Headphone ................................15
Connecting to an Antenna or Cable ........................................15
Connecting to a Computer .........................................................15
Connecting to a Video Source ...................................................16
Connecting to a DVD Player .......................................................16
Connecting to a DTV Settop Box .............................................. 16
Operating the Projector
CHANNEL Menu Options
Channel Setup - Auto Scan ....................................................... 17
Channel Selection .......................................................................... 17
Add/Delete Channel ..................................................................... 17
Channel Editing ..............................................................................18
Favorite Channel Setup ................................................................18
Favorite Channel List .....................................................................18
Brief Information .............................................................................19
PICTURE Menu Options
Picture Mode ................................................................................... 19
Adjusting Picture Mode ................................................................19
Advanced Control Function ........................................................20
Picture Reset Function ..................................................................21
SCREEN Menu Options
To Change PJT Mode .................................................................. 22
Using Aspect Ratio Function ..................................................... 22
Using Keystone Function ............................................................22
Auto Configure Function .............................................................23
RGB Config. Function ..................................................................23
Using the Still Function ...............................................................23
AUDIO Menu Options
Adjusting Volume ..........................................................................24
Stereo/SAP Broadcast Setup .................................................... 24
Adjusting Speaker Balance ........................................................ 25
Adjusting Treble .............................................................................25
TIME Menu Options
Clock Setting ..................................................................................26
On/Off Time Setting ....................................................................26
Sleep time Function ..................................................................... 27
Auto Off Function ......................................................................... 27
OPTION Menu Options
Selecting Menu Language .........................................................28
Selecting Audio Language .........................................................28
Setting Caption ..............................................................................29
Using Blank Function ...................................................................30
Selecting Blank image .................................................................30
Screen Capture Function ............................................................. 31
To adjust the brightness of the screen .................................... 31
To make the power of the projector turn on automatically
when power is applied .................................................................32
Demo Mode Function ..................................................................32
Initial Setting Function ................................................................. 33
INFORMATION Menu Options
To See The Projector Information .............................................33
PARENTAL CONTROL/RATINGS
Set Password & Lock System
Setting up Your Password ...........................................................34
Set Password .................................................................................. 35
Lock System ...................................................................................35
Channel Blocking ..........................................................................35
MOVIE & TV RATING
Movie Rating (MPAA) ...................................................................36
TV Rating Children .......................................................................36
TV Rating General......................................................................... 37
Downloadable Rating ................................................................... 37
External Input Blocking ................................................................ 37
USB
To use the USB device
Connecting the USB device .......................................................38
Eject USB ........................................................................................38
USB notes .......................................................................................39
PHOTO LIST
Screen Components ....................................................................40
Photo Selection and Popup Menu ...........................................40
Full Screen Menu ........................................................................... 41
MUSIC LIST
Screen Components ....................................................................42
Music Selection and Popup Menu ...........................................42
MOVIE LIST
Supported Movie Formats ..........................................................43
Precautions When Playing Video Files ....................................44
Screen Components ....................................................................45
Movie Selection and Popup Menu ...........................................45
Playing the Movie ..........................................................................46
Option Menu Selection................................................................46
To See The DivX Registration Code......................................... 47
Deactivation Function ................................................................... 47
FILE VIEWER
Screen Components ....................................................................48
View File ...........................................................................................48
Information
Supported Monitor Display ......................................................... 49
Maintenance ................................................................................... 49
Specifications .................................................................................50
Open Source Software Notice ....................................................51
3
3
Page 4
Safety Instructions
Safety Instructions
Please take note of the safety instructions to prevent any potential accident or misuse of the projector.
ꔈ Safety Instructions are given in two forms as detailed below.
WARNING : The violation of this instruction may cause serious injuries or even death.
NOTES : The violation of this instruction may cause injuries or damage to the projector.
After reading this manual, keep it in the place that you can access easily.
ꔈ
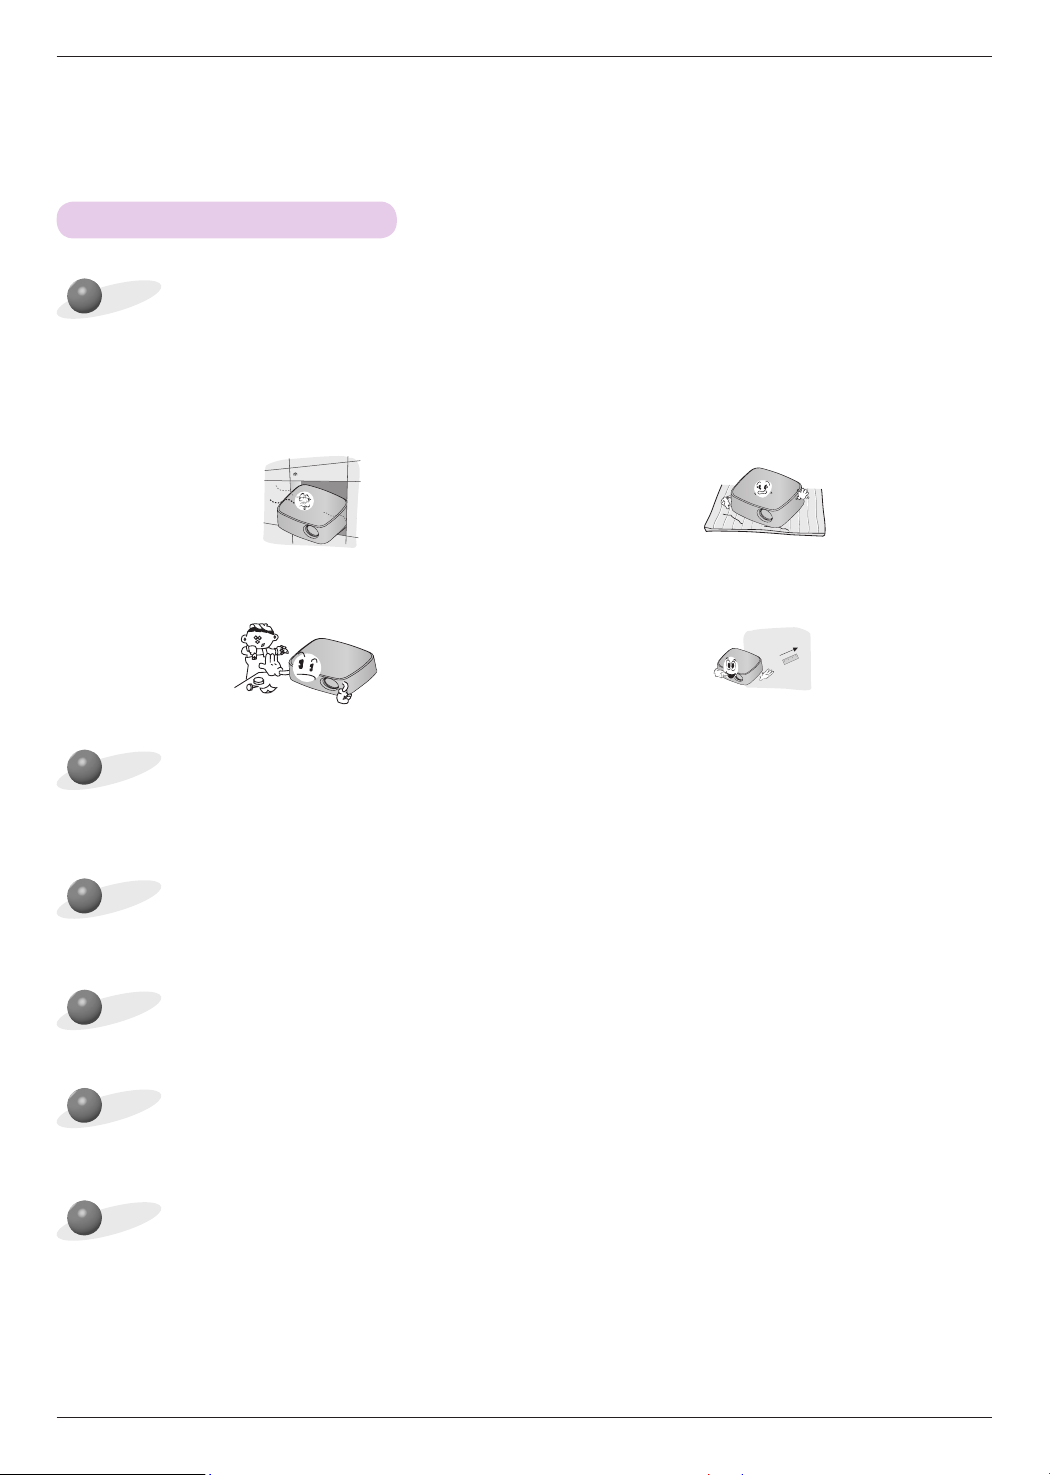
Indoor Installation WARNING
Do not place the Projector in direct
sunlight or near heat sources such
as radiators, fires, stove etc.
This may cause a fire hazard.
Do not block the vents of the projector or restrict air-flow in any way.
This would cause the internal temperature to increase and could cause a fire
hazard or damage to the unit.
Do not use the projector in a
damp place such as a bathroom
where it is likely to get wet.
This may cause a fire or an electric
shock hazard.
Do not place flammable materials in, on or near the projector.
This may cause a fire hazard.
Do not place the projector close
to sources of steam or oil such
as a humidifier.
This may create a fire hazard or an
electric shock hazard.
Do not place the projector directly on a carpet, rug or place where
ventilation is restricted.
This would cause its internal temperature to increase and might create a
fire hazard or damage the unit.
Indoor Installation NOTES
When installing the projector on
a table, be careful not to place it
near the edge.
The projector could fall causing injur y
and damage to the projector.
Only use a suitable stand.
Disconnect from the power supply and remove all connections
before moving, or cleaning.
Do not hang on the installed
projector.
It may cause the projector to fall,
causing injury or death.
Do not place the projector where
it might be exposed to excessive dust.
This may cause a fire hazard or
damage to the unit.
Ensure good ventilation around the
projector. The distance between
the projector and the wall should
be more than 30 cm.
An excessive increase in its internal
temperature may cause a fire hazard or
damage to the unit.
Only use the projector on a level
and stable surface.
It may fall and cause injury and/or
damage to the unit.
Power WARNING
Earth wire should be connected.
Ensure that you connect the earth ground
wire to prevent possible electric shock (That
is a Projector with a three-prong grounded
AC plug must be connected to a threeprong grounded AC outlet).
If grounding methods are not possible, have
a qualified electrician install a separate circuit
breaker.
Do not try to ground the unit by connecting
it to telephone wires, lightening rods, or gas
pipes.
4
The power cord should be inserted
fully into the power outlet to avoid
a fire hazard!
This may cause a fire hazard or damage
the unit.
Do not place heavy objects on
the power cord.
This may cause a fire or an electric
shock hazard.
Page 5
Power WARNING
Safety Instructions
Never touch the power plug with
a wet hand.
This may cause an electric shock
hazard!
Power NOTES
Hold the plug firmly when
unplugging. If you pull the cord,
it may be damaged.
This may cause a fire hazard!
Place the projector where people
will not trip or tread on the power
cord.
This may cause a fire or an electric
shock hazard or damage to the unit!
Using WARNING
Do not place anything containing
liquid on top of the projector
such as flowerpot, cup, cosmetics or candle.
This may cause a fire hazard or
damage to the unit!
Do not plug-in too many items
into one power outlet.
It may result in overheating of the outlet and create a fire hazard!
Do not use if the power cord or
the plug is damaged or any part
of the power outlet is loose.
This may cause a fire or an electric
shock hazard or damage to the unit!
Prevent dust from collecting on
the power plug pins or outlet.
This may cause a fire hazard!
Ensure the power cord does not
come into contact with sharp or
hot objects.
This may cause a fire or an electric
shock hazard or damage to the unit!
Do not turn the projector On/Off by plugging-in or unplugging the
power plug to the wall outlet.
(Allow the unit to cool before removing power.)
It may cause mechanical failure or could cause an electric shock.
In case of impact shock or damage
to the projector switch it off and
unplug it from the power outlet and
contact an authorized service center.
This may cause a fire or an electric shock
hazard or damage to the unit!
Do not allow any objects to fall
into the projector.
This may cause an electric shock hazard or damage to the unit!
If water is spilt into the projector unplug it from the power supply
immediately and consult your Service Agent.
This may cause an electric shock hazard or damage to the unit!
Do not remove any covers. High
risk of Electric Shock!
Don’t look directly into the lens
when the projector is in use. Eye
damage may occur!
Dispose of used batteries
carefully and safely.
In the case of a battery being
swallowed by a child please consult
a doctor immediately.
Do not touch metal parts during
or soon after operation since the
vents will remain very hot!
CAUTION concerning the Power Cord
It is recommend that most appliances be placed on a dedicated circuit; that is, a single outlet circuit
which powers only that appliance and has no additional outlets or branch circuits.Check the specification
page of this owner's manual to be certain.
Do not overload wall outlets. Overloaded wall outlets, loose or damaged wall outlets, extension cords,
frayed power cords, or damaged or cracked wire insulation are dangerous.Any of these conditions could
result in electric shock or fire. Periodically examine the cord of your appliance, and if its appearance
indicates damage or deterioration, unplug it, discontinue use of the appliance, and have the cord
replaced with an exact replacement part by authorized service personnel.
Protect the power cord from physical or mechanical abuse, such as being twisted, kinked, pinched,
closed in a door, or walked upon. Pay particular attention to plugs, wall outlets, and the point where the
cord exits the appliance.
5
Page 6
Safety Instructions
Using WARNING
If the projector is in a room that experiences a gas leak, do not touch
the projector.
It can cause a fire or a burn by a spark.
Using NOTES
Do not place heavy objects on
top of projector.
This may cause mechanical failure or
personal injury!
Do not use any sharp tools on
the projector as this will damage
the casing.
Take care not to impact the lens
particularly when moving the
projector.
In the event that an image does
not appear on the screen please
switch it off and unplug it from the
power outlet and contact your
Service Agent.
This may cause a fire or an electric
shock hazard or damage to the unit!
Cleaning WARNING
Do not use water while cleaning
the projector.
This may cause damage to the projector or an electric shock hazard.
In the unlikely event of smoke or
a strange smell from the projector, switch it off, unplug it from
the wall outlet and contact your
dealer or service center.
This may cause a fire or an electric
shock hazard or damage to the unit!
Always open the lens door or
remove the lens cap when the
projector lamp is on.
Do not touch the lens of the projector. It is delicate and easily
damaged.
Do not drop the projector or
allow impact shock.
This may cause mechanical failure or
personal injury!
Use an air spray or soft cloth that
is moist with a neutral detergent
and water for removing dust or
stains on the projection lens.
Cleaning NOTES
Contact the Service
Center once a year to
clean the internal
parts of the projector.
Accumulated dust can
cause mechanical failure.
When cleaning the plastic parts such as projector case, unplug the power and
wipe it with a soft cloth. Do not use cleanser, spray water or wipe with a wet
cloth. Especially, never use cleanser (glass cleaner), automobile or industrial
shiner, abrasive or wax, benzene, alcohol etc., which can damage the product.
Use an air spray or soft cloth that is moist with a neutral detergent and water
for removing dust or stains on the projection lens.
It can cause fire, electric shock or product damage (deformation, corrosion and damage).
Others WARNING
Do not attempt to service the projector yourself. Contact your dealer or service center.
This may cause damage to the projector and could give an electric Shock as well as invalidating the warranty!
Others NOTES
Do not mix new batteries with old
batteries.
This may cause the batteries to overheat and leak.
Be sure to unplug if the projector is
not to be used for a long period.
Accumulated dust may cause a fire hazard or damage to the unit!
6
Only use the specified type
of battery.
This could cause damage to the
remote control.
Page 7
Projector Description
Projector Description
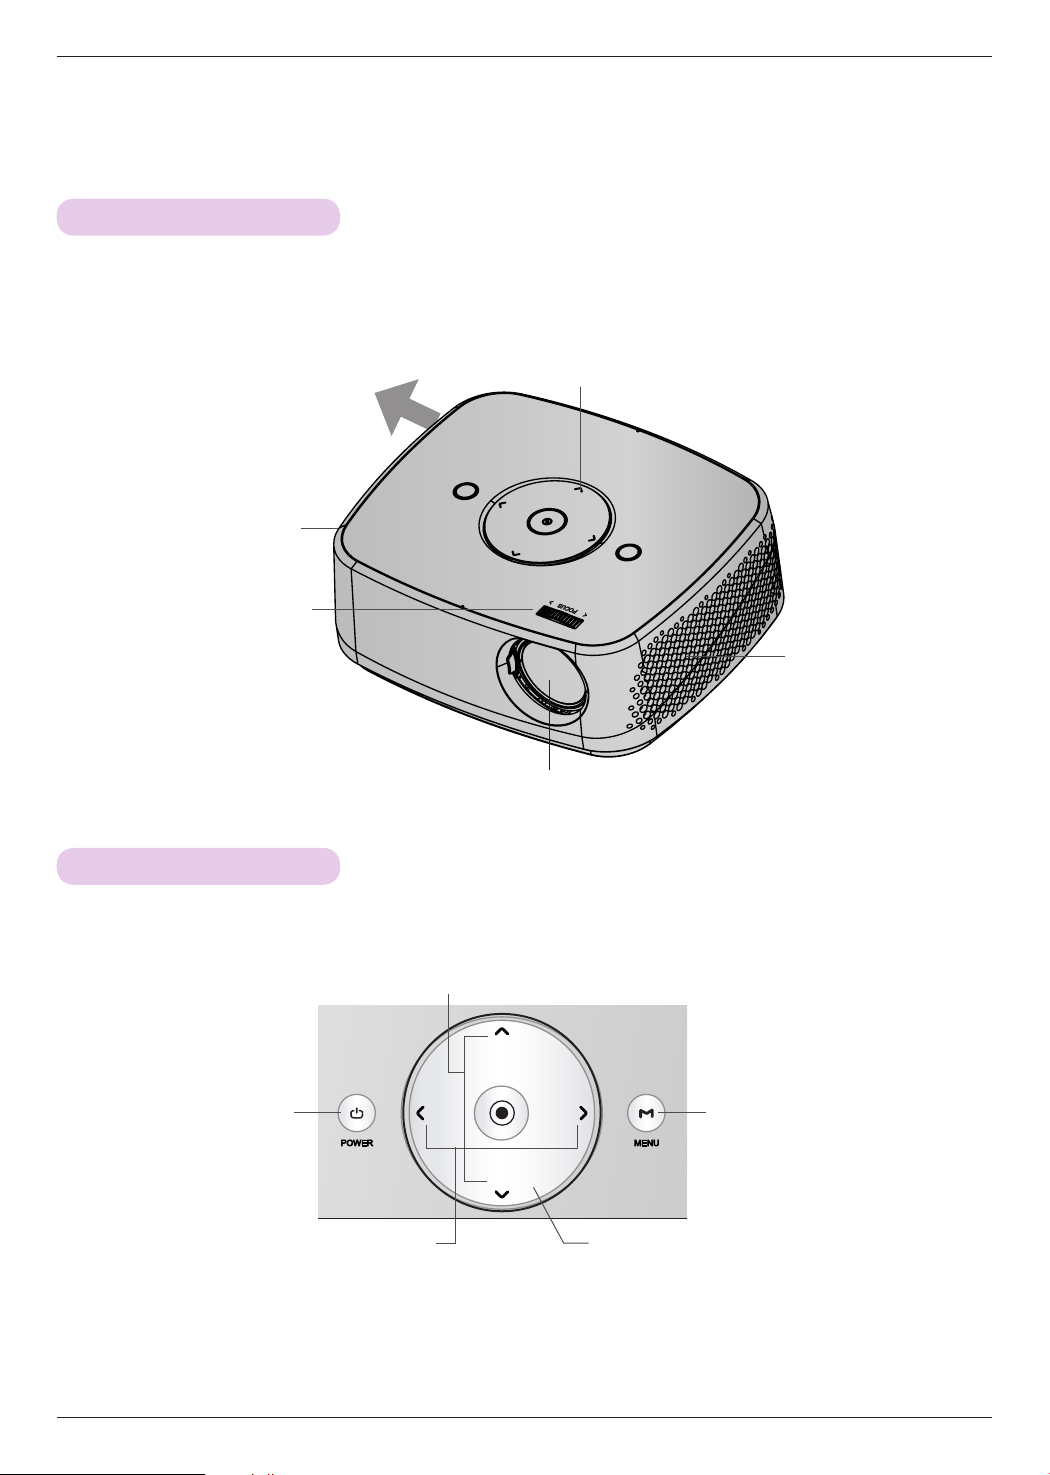
Main Body
* The projector is manufactured using high-precision technology. You may, however, see on the Projector screen tiny black
points and/or bright points (red, blue, or green). This can be a normal result of the manufacturing process and does not
always indicate a malfunction.
High heat, keep the area near
Exhaustion Direction
the exhaust clear.
Speaker
Focus ring
* Do not touch the lens when using the projector or opening the lens door.
Control panel
Control Panel
Speaker
Turns the projector ON/OFF.
POWER Button
VOL -/+ (Volume) Button
Adjusts volume.
CH∧/∨ (Channel) Button
Select a channel number.
CH
-VOL VOL+
CH
MENU Button
Displays or closes menus.
∧/∨/</> Button
Adjusts functions of menus.
◉OK Button
Checks present mode and saves the change of functions.
7
Page 8
Projector Description
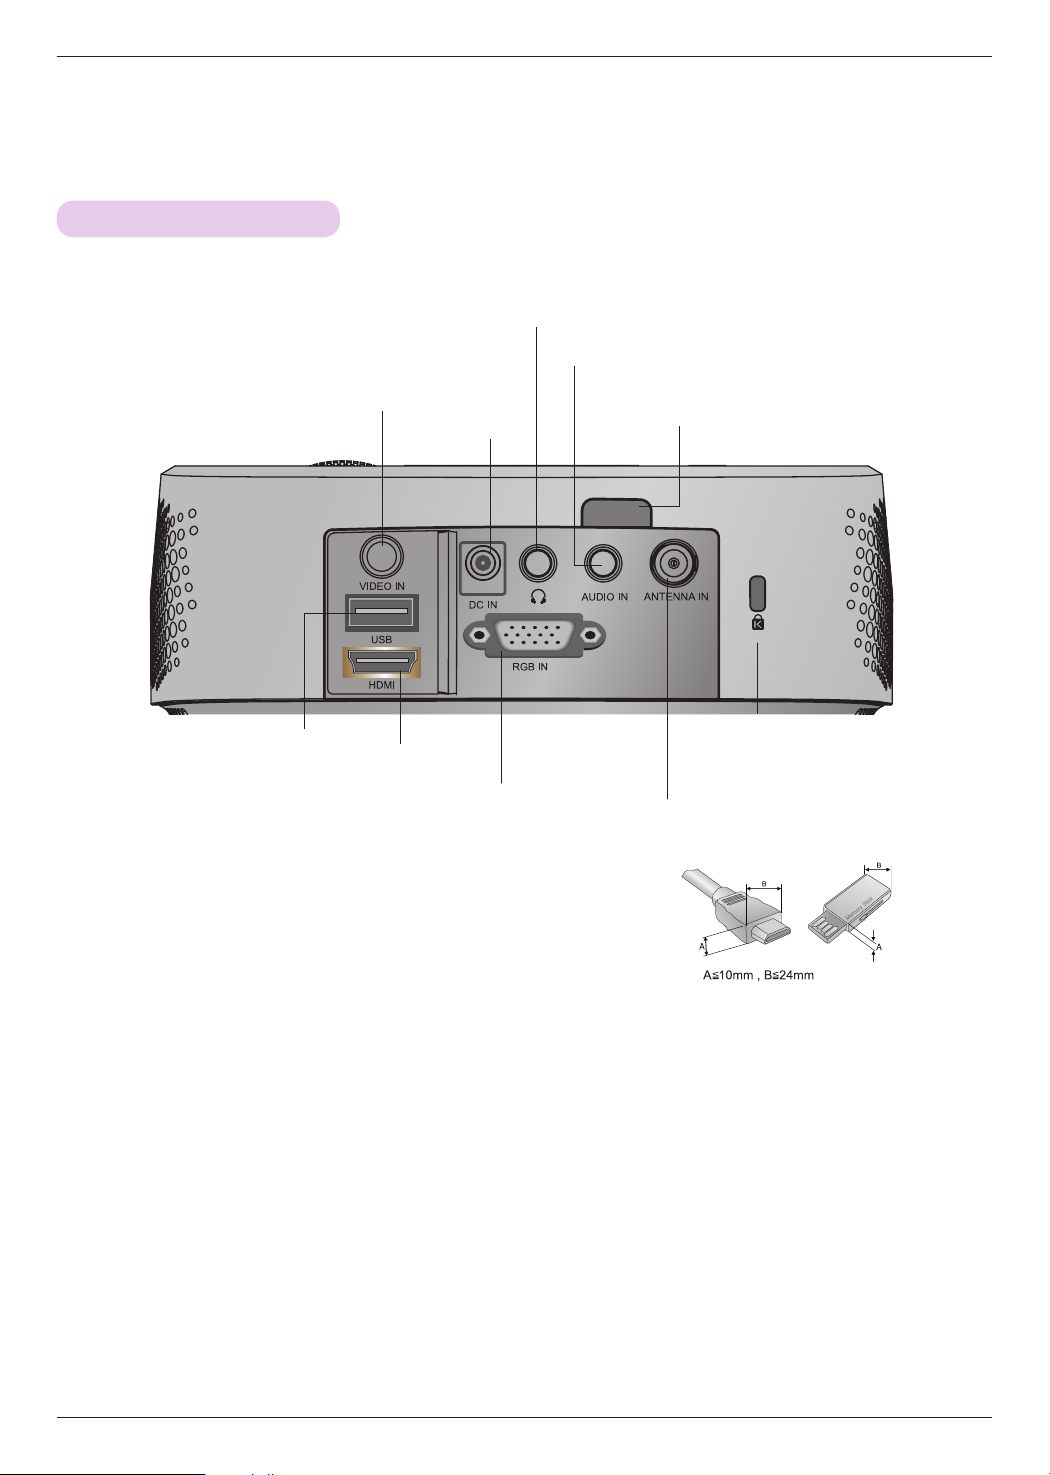
Connections
VIDEO IN
DC Power IN
Audio Out port
AUDIO IN
IR (Remote control sensor)
*
Do not block the IR port for normal operation
of remote control.
USB
* Note that clearance is limited between the USB and HDMI inputs.
Using devices of a non-standard size may block other ports.
HDMI
RGB IN
ANTENNA IN
Kensington Security
System Connector
(Refer to page 13)
8
Page 9
Remote Control
정보표시
방송안내
*
빨강 초록 노랑 파랑
*
Projector Description
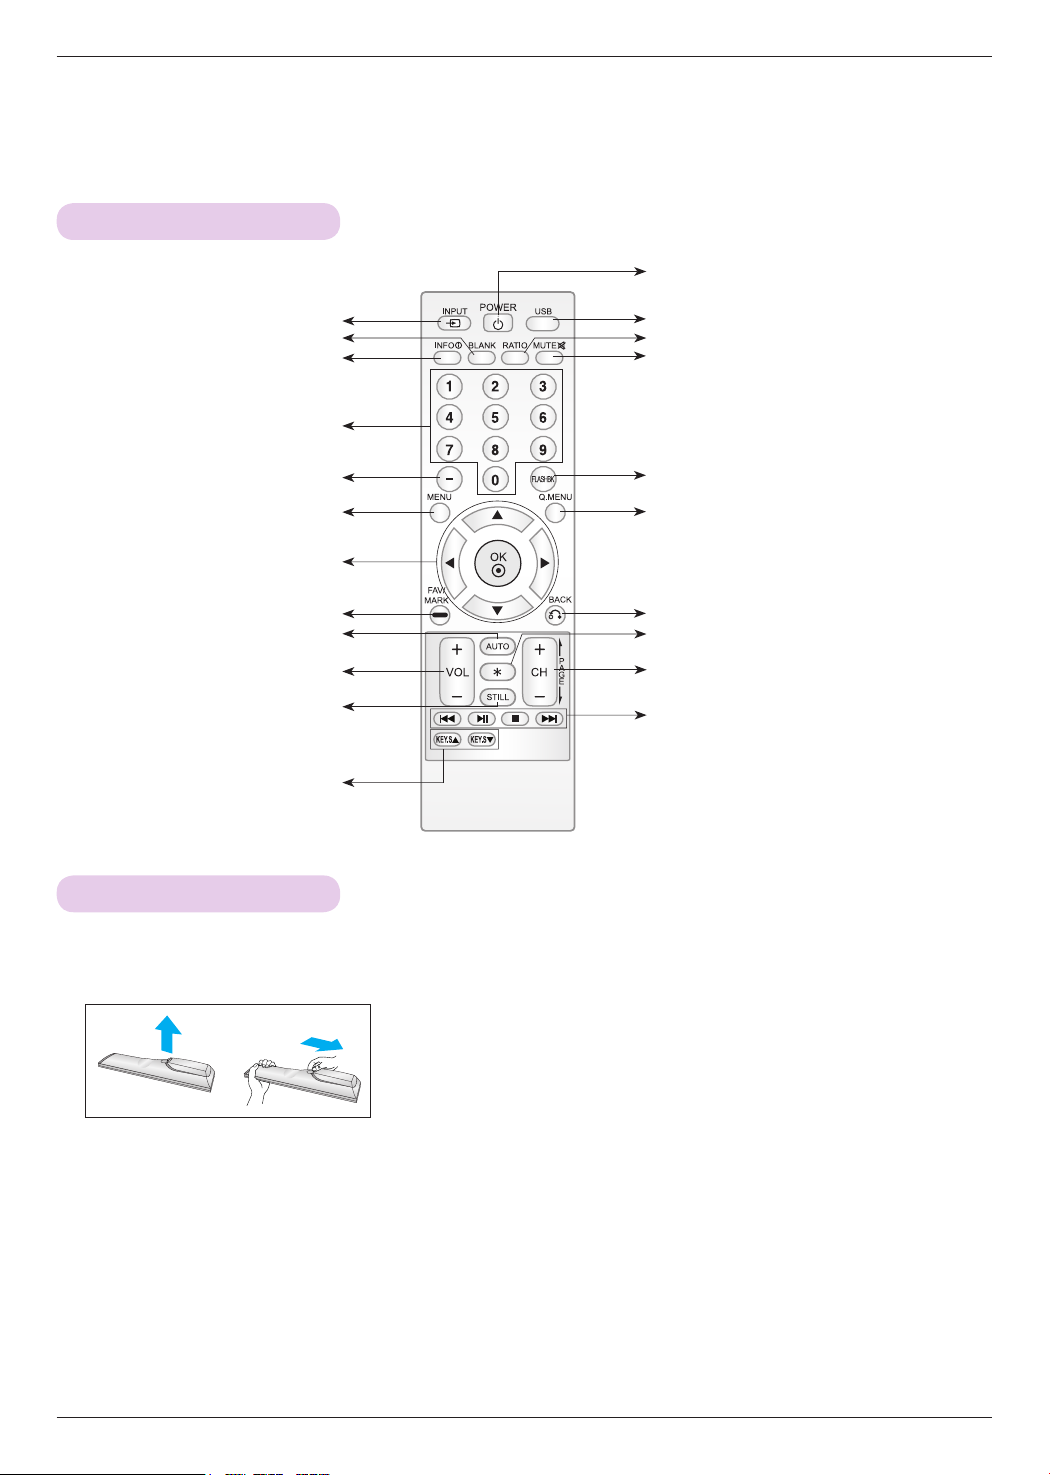
POWER Button
INPUT Button
BLANK Button
INFO Button
NUMBER Button
— (DASH) Button
MENU Button
OK◉, ꔌ/ꔍ/ꔗ/ꔃ Button
FAV/MARK Button
AUTO Button
VOLUME +/- Button
STILL Button
(Functions as the STILL button in
any mode other than DivX.)
KEYSTONE ꔌ,ꔍ Button
Installing Batteries
CAUTION
RISK OF EXPLOSION IF BATTERY IS REPLACED WITH AN INCORRECT TYPE.
DISPOSE OF USED BATTERIES AT A RECYCLING DROP-OFF LOCATION.
• Open the battery compartment cover on the back of the remote control.
USB Button
RATIO Button
MUTE Button
FLASHBK Button
Tunes to the last channel viewed.
Q.MENU Button
BACK Button
Do not use button.
CHANNEL +/- Button.
PAGE UP/DOWN Button
USB control Buttons
• Insert the specified type of batteries with correct polarity, match “+” with “+”,
and match “-” with “-”.
• Install two 1.5V AAA batteries. Don’t mix used batteries with new batteries.
9
Page 10
Projector Description
정보표시
방송안내
*
빨강 초록 노랑 파랑
*
정보표시
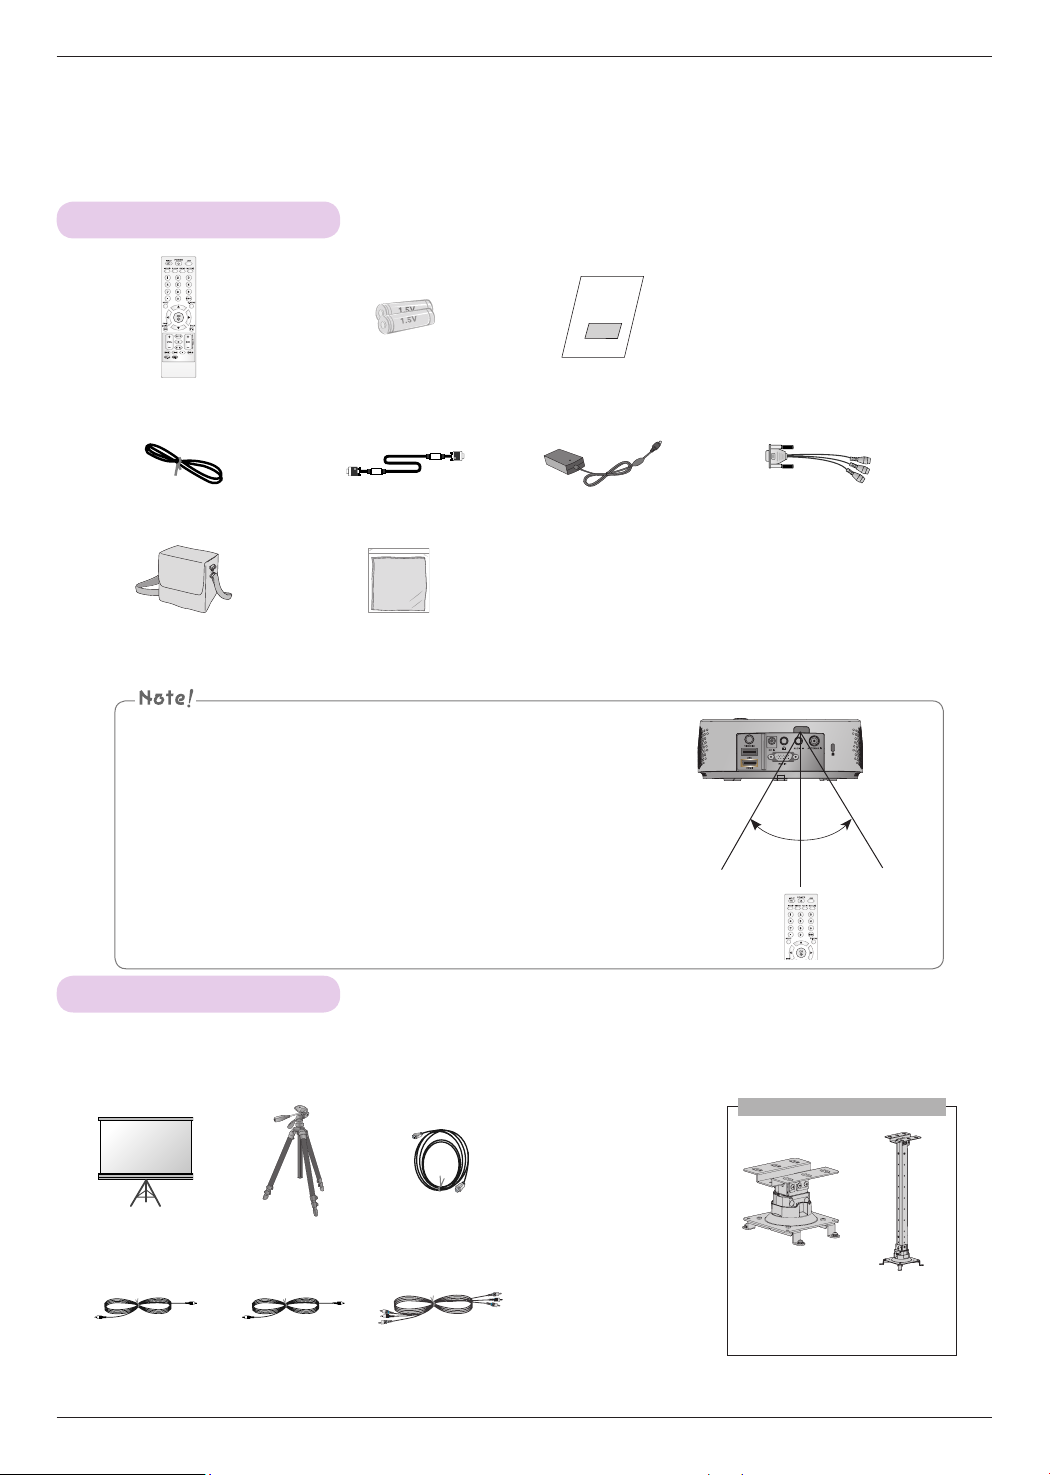
Accessories
Remote Control AAA Batteries Owner’s manual
Power Cord Computer Cable AC-DC Adapter RGB to Component Cable
Portable bag Polishing Cloth
▪ Optimal remote range is less than 6 meters and within a 60 degree
arc of the IR receiver.
▪ The remote range may be less when cables are connected to the pro-
jector.
▪ When you carry the remote control in the portable bag, make sure that
the buttons on the remote control are not pressed by the projector,
cables, documents or any other accessories in the bag. Otherwise, it
30° 30°
may reduce the battery life significantly.
Optional Extras
* Below are some optional accessories you may need to operate the projector. These are not made or sold by LG.
* Contact your dealer to purchase these items.
* Optional parts can be changed without notice to improve the quality of the product, and new optional parts can be added.
Ceiling mount for projector
Projection Screen Tripod HDMI Cable
Video Cable Audio Cable Component Cable
10
AJ-CB2
AJ-CB2
+AJ-CS60
* Use screw size: M4x6-M4x8
Page 11
Installation
Installation Precautions
Provide proper ventilation for this projector.
• The projector is equipped with ventilation holes(intake) on
the bottom and ventilation holes(exhaust) on the front. Do
not block or place anything near these holes. Internal heat
build-up may occur, causing picture degradation or damage to the projector.
Installation
• Do not place the projector on a carpet, rug or other similar
surface. It may prevent a adequate ventilation of the projector bottom. This projector should be placed in the plain
floor or mounted to the ceiling.
• Never push the projector or spill any kind of liquid into the
projector.
Place this projector in adequate temperature and humidity conditions.
• Install this projector only in a location where adequate temperature and humidity is available. (refer page 50)
Don’t place the projector where it can be covered with excessive dust.
• This may cause overheating of the projector.
Do not obstruct the slots and openings of the projector. This may cause overheating and cause a fire hazard.
This projector is manufactured using high-precision technology. You may, however, see tiny black points and/or bright
points (red, blue or green) that continuously appear on the projector Screen. This is a normal result of the manufacturing
process and does not indicate a malfunction.
• Leave an adequate distance (30 cm or more) around the
projector.
The remote control may not work when a lamp equipped with electronic ballast or a three-wavelength lamp is installed.
Replace those lamps with international standard products to use the remote control normally.
11
Page 12
Installation
Basic Operation of the Projector
1. Place the projector on a sturdy and horizontal surface.
2. Place the projector with the desired distance from the screen. The distance between the projector and the
screen determines the actual size of the image.
3. Position the projector so that the lens is set at a right angle to the screen. If the projector is not set at a
right angle, the screen image will be crooked. Although, slight angles can be counteracted using the
Keystone adjustement. (Refer to page 22.)
4. After placing the projector in its desired location, connect the video input(s). Then connect the power
cable to the projector and the wall outlet.
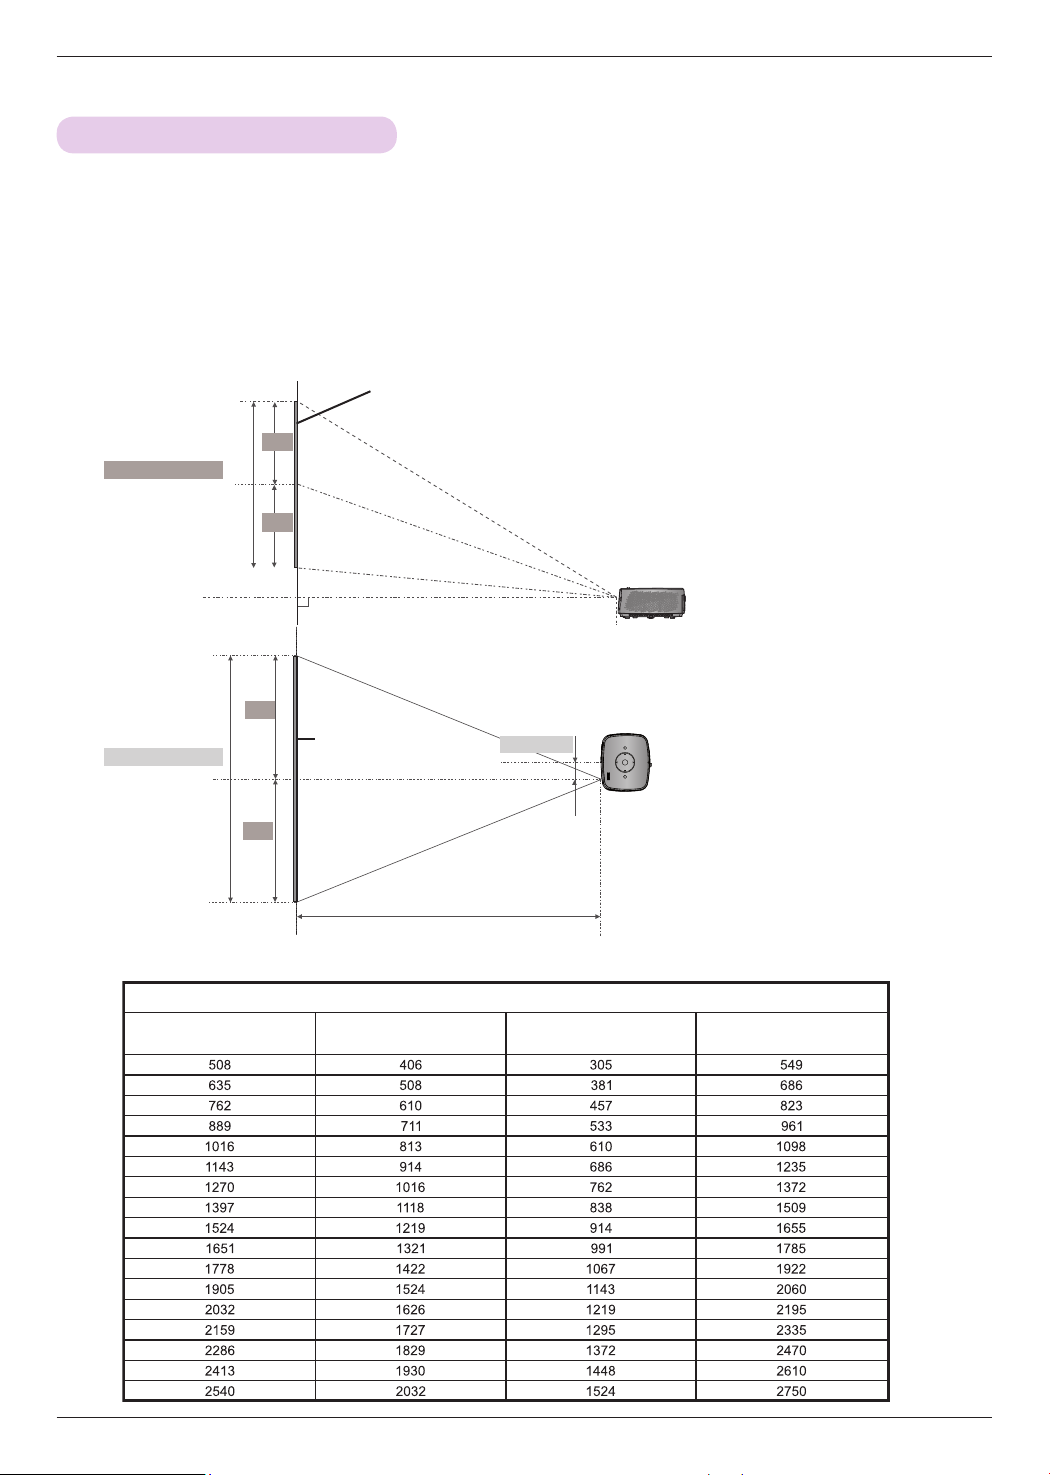
projection distance based on the picture format
Screen
X/2
Screen height (X)
X/2
Projection distance (D)
Y/2
Screen Width (Y)
Y/2
Diagonal Size (mm) Screen Width (Y) (mm) Screen height (X) (mm)
Screen
Projection distance (D)
Projection offset ratio: 110%
38.6 mm
4 : 3 Scale
Projection Distance (D)
(mm)
12
Page 13
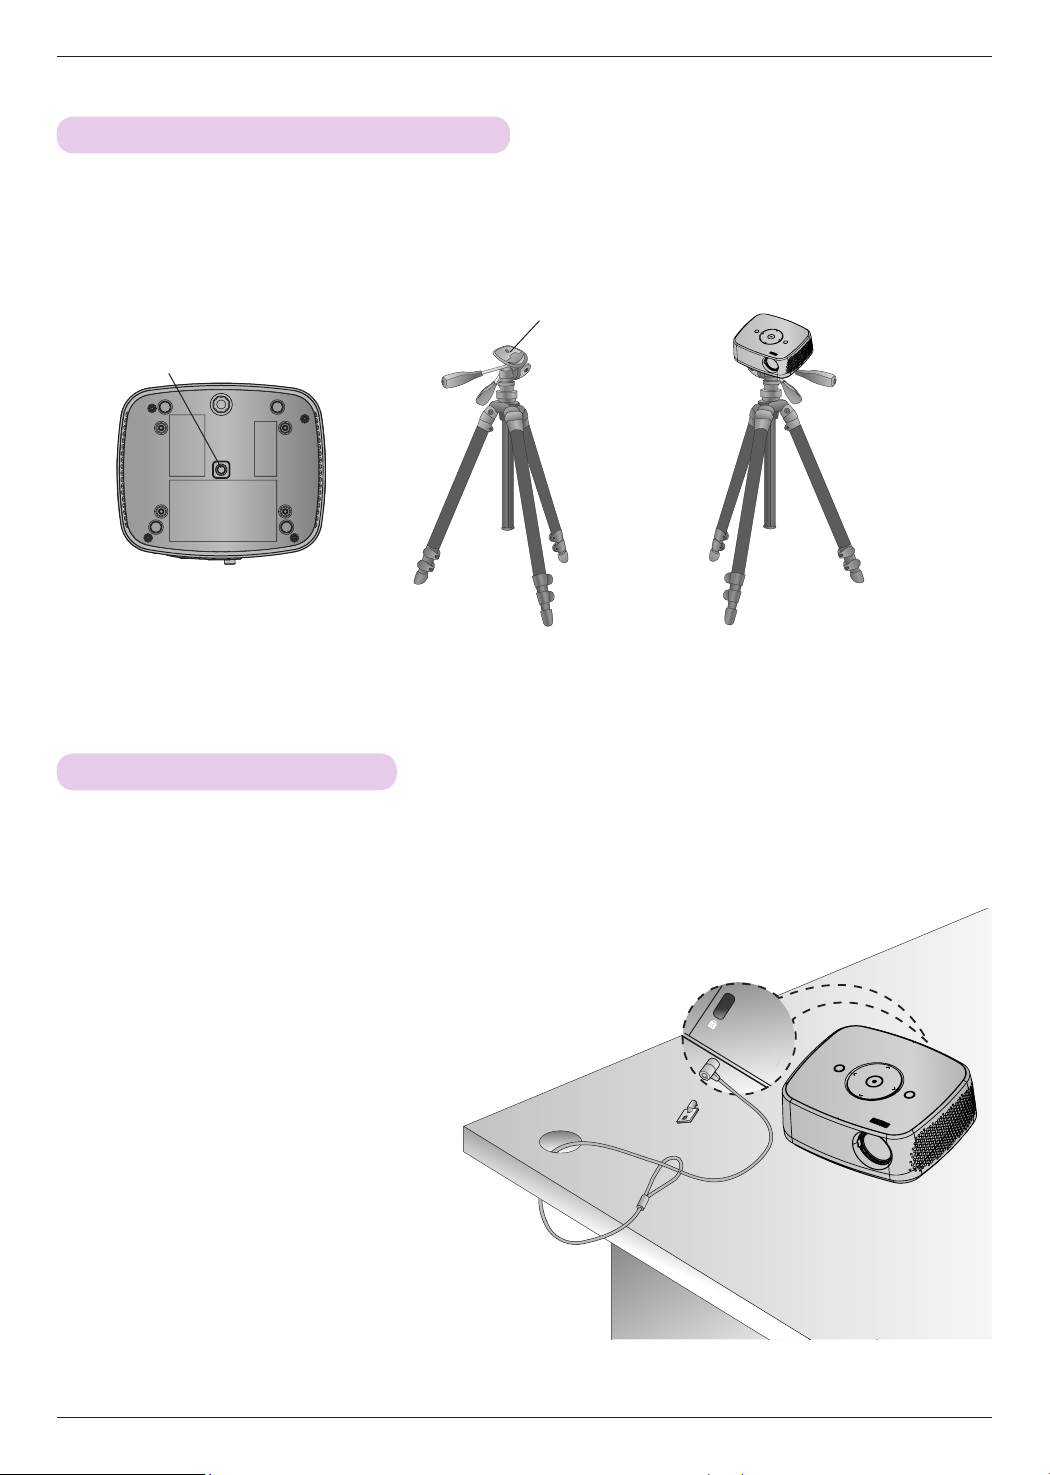
How to install the projector using a tripod
* You can install this projector using a camera tripod.
* When stabilizing the tripod, we recommend using the locking bolt of standard size 4.5 mm or less.The maximum size
allowed for the locking bolt is 6.5 mm.(If it is longer than the maximum allowed size, it may damage the projector.)
Part connected to the projector
Part connected to the tripod
+ =
Bottom side of Projector
Camera Tripod
Projector is install on the tripod
Installation
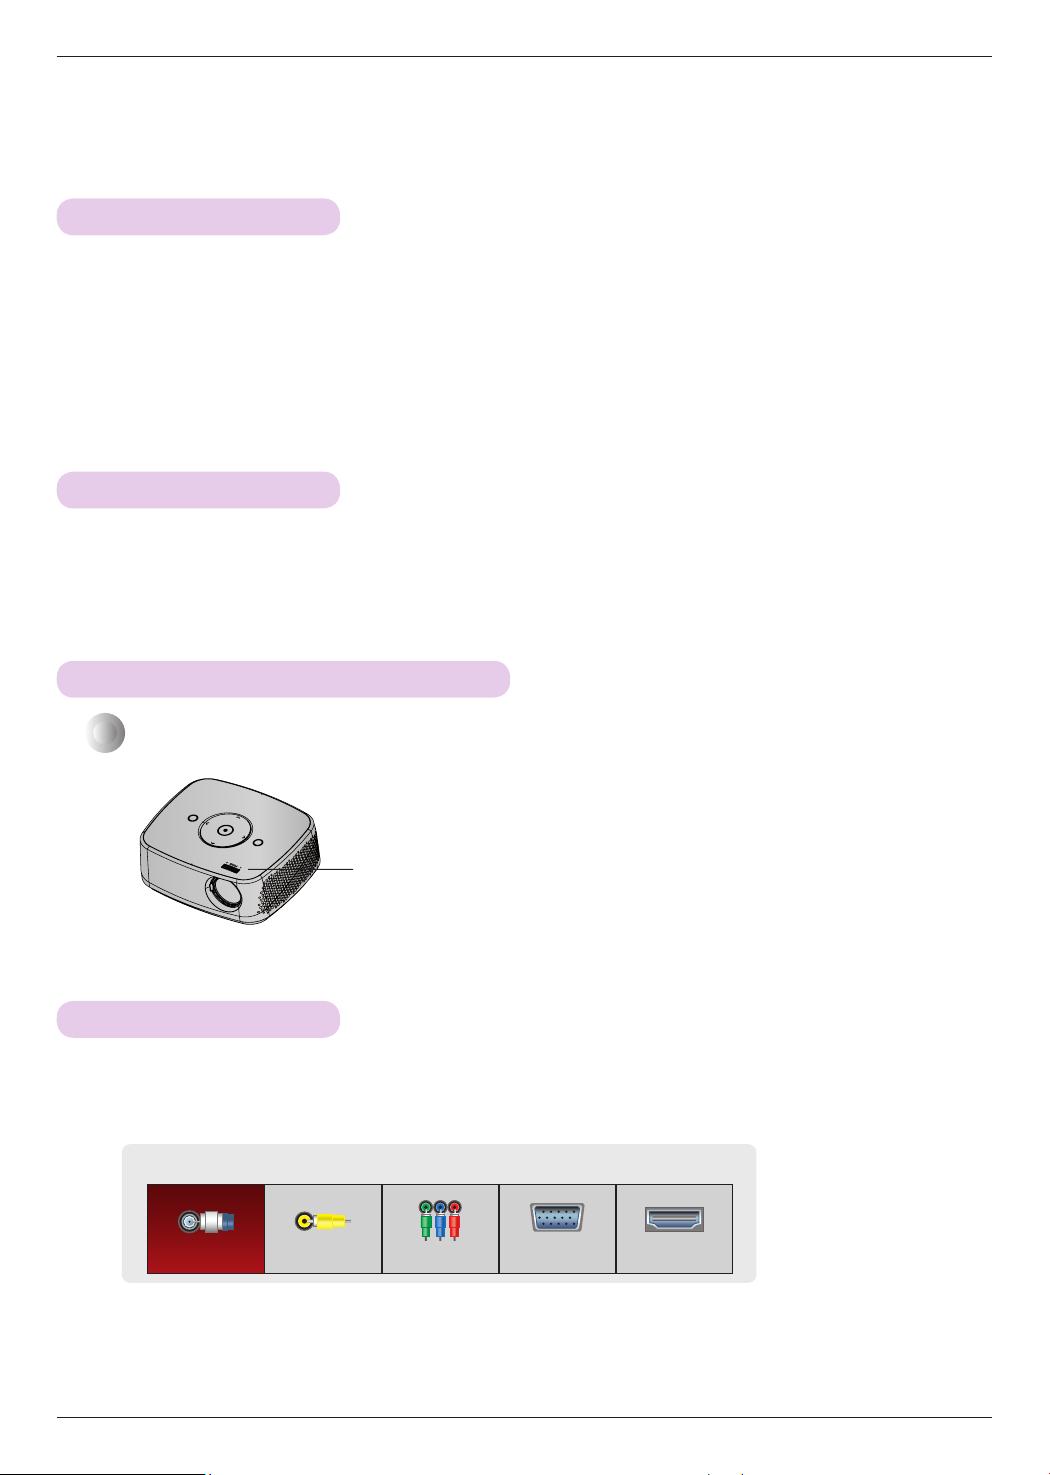
Kensington Security System
• This projector has a Kensington Security System Connector on the connect panel. Connect a Kensington Security
System cable as below.
• For detailed installation and use of the Kensington Security System, refer to the user’s guide included with the
Kensington Security System set. And for further information, contact http://www.kensington.com, the internet homepage
of the Kensington company that deals with expensive electronic equipment such as notebook PCs or projectors.
• The Kensington Security System is an optional item.
13
Page 14
Installation
Turning on the Projector
1. Make sure the power cord is connected correctly.
2. After wait for a moment, press the POWER button on the top cover or the POWER button on the remote
control. (The light on the control panel will be turned on.)
• Press the INPUT button on the remote control to select the input signal you want.
• When you press the POWER button on the remote control or the POWER button on the control panel when you
turn on the projector, the lights for POWER and MENU buttons on the control panel will be turned on.
• Check if the lens door is open before turning on the power.
Turning off the Projector
Press the POWER button on the top cover or the POWER button on the remote control.
Focus and Position of the Screen Image
When an image appears on the screen, check if it is in focus and fits the screen properly.
Focus ring
• To adjust the focus of the image, rotate the focus ring.
Selecting input mode
1. Press the INPUT button on the remote control.
2. Selecting an input signal with the INPUT button will only change the projector only to connected inputs. You
can change it to any inputs with the ꔗ, ꔃ button.
Input
TV Video Component RGB-PC HDMI
• The component input is always active.
• You can also use this function through the MENU button.
14
Page 15
Connections
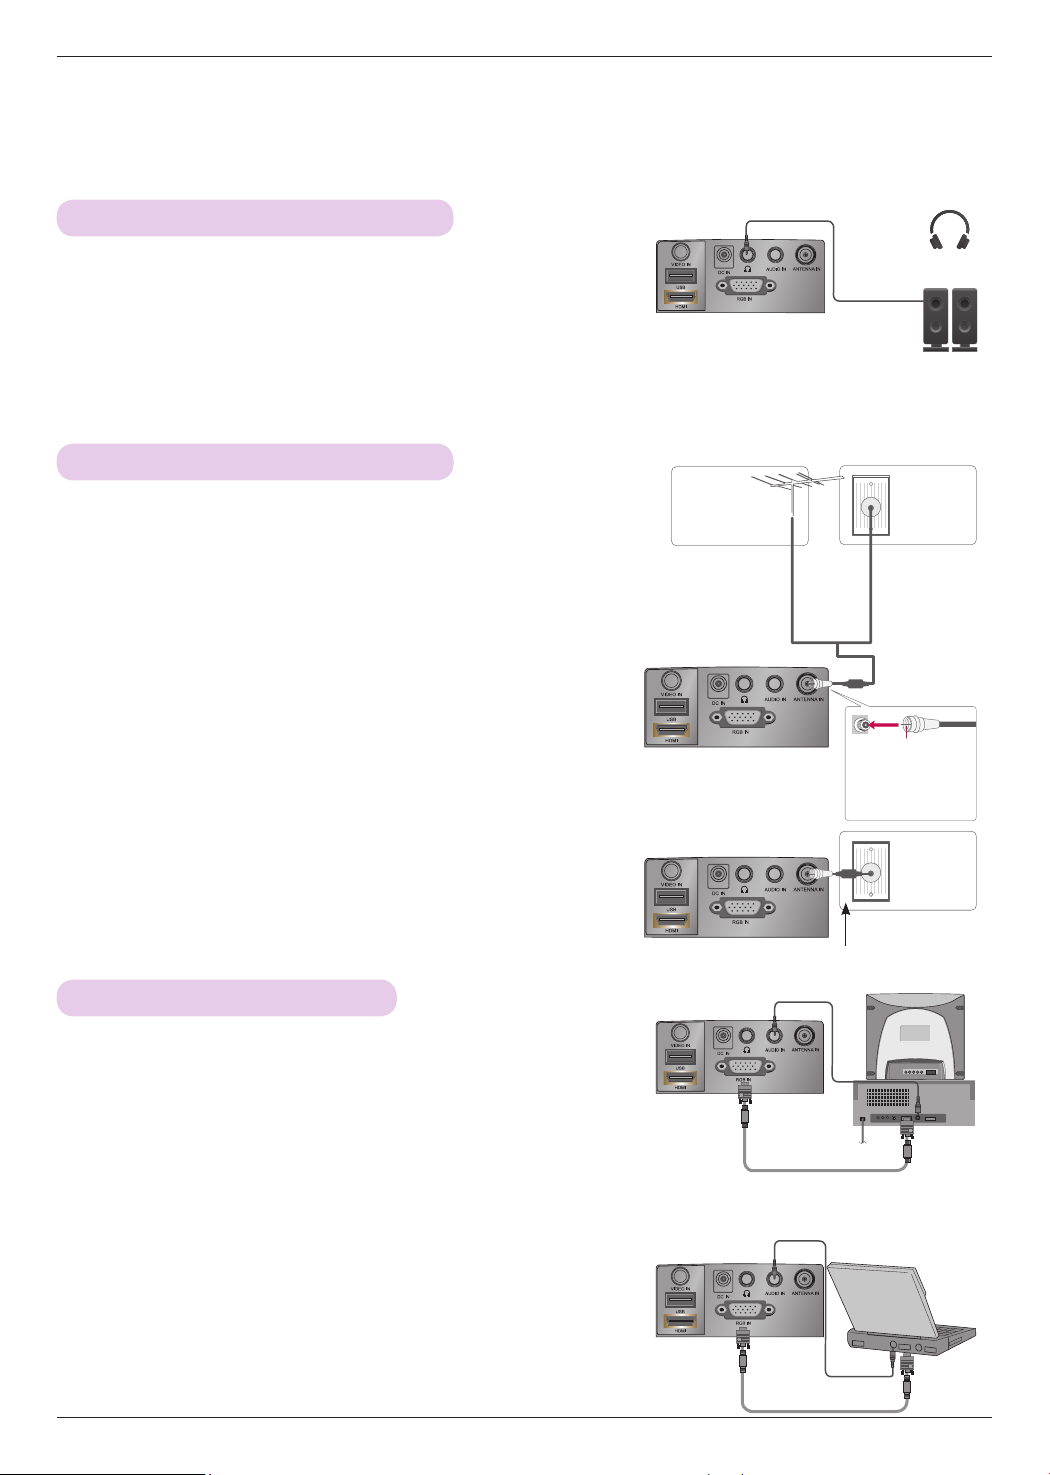
Connecting to a Speaker or Headphone
Connections
Connect the Audio Out port of the projector to headphones or
powered speakers.
Connecting to an Antenna or Cable
* To prevent damage do not connect to the power outlet until all connections
are made between the devices.
< How to connect >
Connect a RF Coaxial wire to the Wall Antenna Socket or Outdoor
Antenna. For Optimum pictrue quality, adjutst the antenna direction if ourdoor antenna is uesd.
* If the antenna needs to be split for two Projector’s, install a 2-Way
Signal Splitter.
* For much more information about antennas visit our Knowledgebase
at http://lgknowledgebase.com. Search for antenna.
Antenna (Analog or Digital)
Outdoor Antenna
(VHF, UHF)
Single-family
Dwellings /Houses
(Connect to wall jack
for outdoor antenna)
Cable
or
Wall Antenna
Socket
Multi-family
Dwellings/
Apartments
(Connect to wall
antenna socket)
RF Coaxial Wire
(75 Ω)
Copper Wire
Be careful not to
bend the copper
wire when connecting the antenna.
Cable TV
Wall Jack
Connecting to a Computer
* You can connect the projector to a computer with VGA, SVGA, XGA, SXGA
output.
* Refer to page 49 for resolutions the projector supports.
< How to connect >
1. Connect the RGB IN of the projector and the computer output
port with a computer cable.
2. Connect the AUDIO IN of the projector and the computer audio
output port with an audio cable.
* You may have to change the resolution that your PC exports to one
supported by the projector. (Refer to page 49.) This projector may not
support output from laptops when the laptop screen is on.
RF Coaxial Wire (75 Ω)
Audio Cable
Computer Cable
Audio Cable
Computer Cable
15
Page 16
Connections
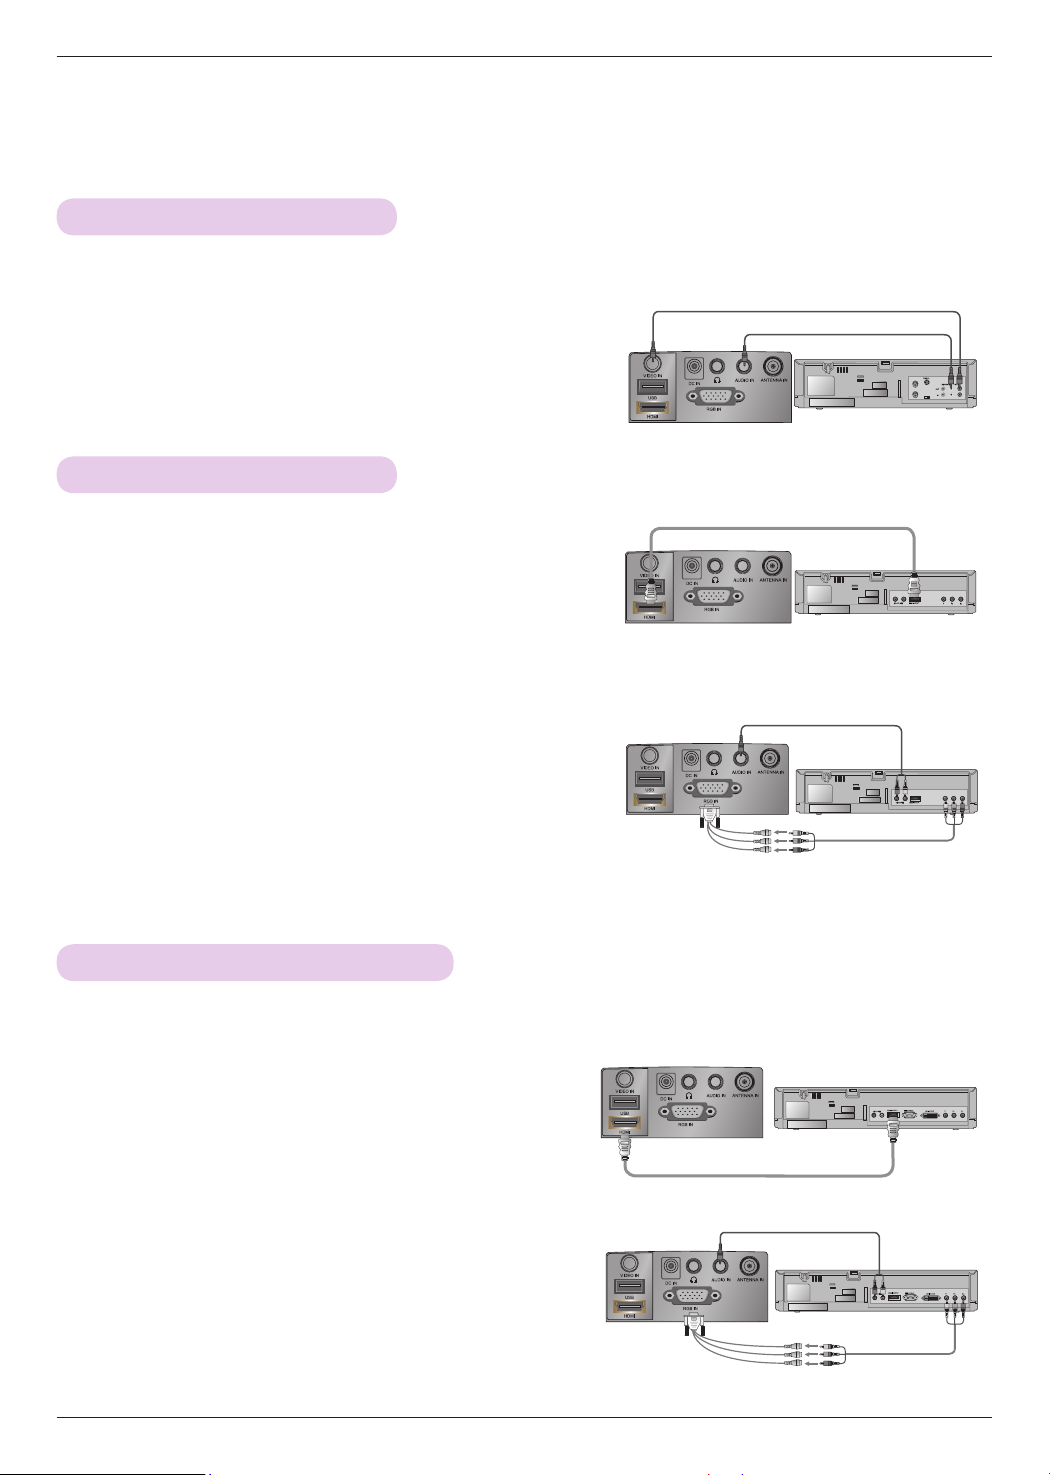
Connecting to a Video Source
* You can connect a VCR, a camcorder or any other compatible video image source to the projector.
< How to connect >
1. Connect the VIDEO IN of the projector to the output jack of
the video source with a video cable.
2. Connect the AUDIO IN of the projector to the output jack of
the audio source with an audio cable.
Connecting to a DVD Player
< How to connect a HDMI source >
1. Connect the HDMI of the projector and the HDMI output port
of the DVD Player with an HDMI cable.
2. Set the DVD Player's resolution to one of the following:
480p/720p/1080i/1080p mode.
Video Cable
Audio Cable
<VCR>
HDMI Cable
<DVD Player>
< How to connect a Component source >
* Depending on the equipment, the component output jacks (Y, PB, PR) of the DVD
Player may be labeled as Y, Pb, Pr/Y, B-Y, R-Y/Y, Cb, Cr.
1. After connecting the Component cable of DVD Player to the
Audio Cable
<DVD Player>
RGB to Component cable, connect it to the RGB IN terminal
of the projector.
* When connecting the component cable, match the jack colors
with the component cable.(Y=green, PB=blue, PR =red)
2. Connect the AUDIO IN of the projector to the output jacks of
the audio source with an audio cable.
RGB to Component
Cable
Component cable
Connecting to a DTV Settop Box
* Please refer to the owner's manual of the DTV settop box for the connection between the projector and DTV set-
top box.
< How to connect a HDMI source >
<DTV Settop Box>
1. Connect the HDMI of the projector and the HDMI output
port of the DTV settop box with an HDMI cable.
2. Set the DTV receiver's resolution to one of the following:
480p/720p/1080i/1080p mode.
< How to connect a Component source >
1. Connect the DTV settop box Component cable with
RGB to Component cable and than connect it to RGB
IN of the projector.
* When connecting the component cable, match the jack
colors with the component cable.(Y=green, PB=blue, PR
=red)
2. Connect the AUDIO IN of the projector to the output
jacks of the audio source with an audio cable.
16
HDMI Cable
Audio Cable
<DTV Settop Box>
RGB to Component
Cable
Component cable
Page 17

Operating the Projector
Operating the Projector
* The On-Screen Display (OSD) in this manual may be slightly different from your projector.
CHANNEL Menu Options
Channel Setup - Auto Scan
* Automatically finds all channels available through antenna or cable inputs, and stores them in memory on the channel list.
Run this function if you change your residence or move the projector. Also, make sure to run this function with the antenna
connected during projector broadcasting hours. Auto Tuning memorizes only the channels available at the time.
1. Press the MENU button. Then, move to CHANNEL with the ꔌ, ꔍ,
ꔗ, ꔃ buttons and press the ◉OK button.
2. Press the ꔌ, ꔍ buttons to move Auto Turning and press the ◉OK
button.
3. Press the ꔌ, ꔍ buttons to move Yes and press the ◉OK button.
Auto Turning
Manual Turning
Channel Edit
Check your antenna connection.
The previous channel information
will be updated during Auto Tuning.
ꔂMove ꔉOKCHANNEL
Start
Close
• When setting the Auto Tuning or Manual Tuning, the number of maxi-
mum channels you can store is 1000. It is subject to change depending
on the broadcasting signal environment.
• Memorizes all the available channels in the order of DTV, TV, CADTV and CATV.
• Press the BACK button to exit the menu screen.
Channel Selection
Press the CH +, - or Number 0 - 9 buttons to select a channel number.
Add/Delete Channel
* When selecting DTV or CADTV input signal in the Manual Tuning menu, you can view the on-screen signal strength monitor
to see the quality of the signal being received.
1. Press the MENU button. Then, move to CHANNEL with the ꔌ, ꔍ,
ꔗ, ꔃ buttons and press the ◉OK button.
2. Press the ꔌ, ꔍ buttons to move Manual Turning and press the
◉OK button.
Auto Turning
Manual Turning
Channel Edit
◀
Select channel type and
RF-channel
Channel
DTV 2-1
Bad Normal Good
DTV
number.
ꔂMove ꔉOKCHANNEL
▶
2
3. Press the ꔗ, ꔃ buttons to move DTV, TV, CADTV, or CATV and
press the ꔍ button.
4. Press the ꔗ, ꔃ buttons to move channel you want to add or delete.
5. Press the ꔍ buttons to move Add or Delete and press the ◉OK button.
• Press the BACK button to exit the menu screen.
Delete
Close
17
Page 18

Operating the Projector
Channel Editing
1. Press the MENU button. Then, move to CHANNEL with
the ꔌ, ꔍ, ꔗ, ꔃ buttons and press the ◉OK button.
2. Press the ꔌ, ꔍ buttons to move Channel Edit and press
the ◉OK button.
3. Press the ꔌ, ꔍ, ꔗ, ꔃ buttons to move channel you want.
4. Edit channels using the following buttons.
ꔉ Ch. Change ꔂ Navigation
+
CH
Page Change
-
ꕉ Provious
ꔛ Add/Delete
Button Description
ꔌ, ꔍ, ꔗ, ꔃ
OK
◉
CH +, -
ꕗ
(Stop)
Scrolls through channel types or channels.
Selects the highlighted channel to view.
Moves to the previous or next page.
Adds or deletes a channel. The deleted channel displays in blue.
• Press the BACK button to exit the menu screen.
Favorite Channel Setup
* Favorite Channels are a convenient feature that lets you quickly select channels of your choice without waiting for the pro-
jector to select all the in-between channels. To tune to a favorite channel, press the FAV (Favorite) button repeatedly.
1. Press the CH +, - or Number buttons to select your desired channel.
2. Press the Q.MENU button on the remote control.
3. Press the ꔗ, ꔃ buttons to move Del/Add/Fav. .
4. Press the ꔌ, ꔍ button to select Favorite.
• Press the BACK button to exit the menu screen.
Del/Add/Fav
CH
Favorite
Favorite Channel List
1. Press the FAV. button on the remote control.
2. Press the ꔌ,ꔍ button to select a channel and then press the ◉OK button.
- Press the CH +, - button to turn the pages.
• Press the BACK button to exit the menu screen.
18
❤ Favorite List
ꔖ 2-1 ꔉ
ꔖ 3-1
ꔖ 4-1
ꕉ Exit
Page 19

Brief Information
Press the INFOⓘ button on the remote control and then show the brief info on the screen.
Operating the Projector
• Press the BACK button to exit the menu screen.
PICTURE Menu Options
Picture Mode
* Set the projector picture settings to your preference in the Picture Mode menu.
1. Press the Q.MENU button on the remote control.
2. Press the ꔗ, ꔃ buttons to move Picture Mode.
3. Press the ꔌ, ꔍ button to toggle through the preset picture settings.
Vivid
DTV
ꘋ ꔫ
ABC
1 23 4 5 6
1 Banner information
2 Program title
3 Day, Month, Year
4 Program audio, video information
5 Program start/finish time, progress bar
6 Present time
Brief Info Title Test..
11-1
Sat, Jul 2, 2011 6:30 PM 7:45 PM
ꔥ Multilingual ꔨ ꔯ Caption ꔷ 1080i
Picture Mode
Standard
CinemaStandard
CH
Sport
6:35 PM
Expert2 GameExpert1
• You can also use this function through the MENU button.
• Press the BACK button to exit the menu screen.
Adjusting Picture Mode
1. Press the MENU button. Then, move to PICTURE with the
ꔌ, ꔍ, ꔗ, ꔃ buttons and press the ◉OK button.
2. Press the ꔌ, ꔍ buttons to move a desired function and
press the ◉OK button.
3. Press the ꔗ, ꔃ buttons to make a desired adjustment and
then press the ◉OK button.
• You can set image values differently for each input and Picture Mode.
• Saving after making adjustments will display (User) in adjusted Picture Mode. (except Expert 1/2)
• Execute Picture Reset for Picture Mode to restore back to default factory settings.
• Press the BACK button to exit the menu screen.
Picture Mode : Standard
• Contrast 50
• Brightness 50
• Sharpness 5
• Color 70
• Tint 0
• Advanced Control
• Picture Reset
ꔂMove ꔉOKPICTURE
R G
19
Page 20

Operating the Projector
Advanced Control Function
1. Press the MENU button. Then, move to PICTURE with the ꔌ, ꔍ, ꔗ,
ꔃ buttons and press the ◉OK button.
2. Press the ꔌ, ꔍ buttons to move Advanced Control and press the
◉OK button.
3. Move to a desired item with the ꔌ, ꔍ buttons.
4. Press the ꔗ, ꔃ buttons to make a desired adjustment and then
press the ◉OK button.
• You can set image values differently for each input and Picture Mode.
• Execute Picture Reset for Picture Mode to restore back to default factory settings.
• Press the BACK button to exit the menu screen.
- This function enables Vivid/Standard/Cinema/Sport/Game.
Color Temperature
Dynamic Contrast
Dynamic Color
Noise Reduction
Gamma
Black Level
White Peaking
Film Mode
ꔈSet to warm to enhance hotter colors such as red, or set to cool to enhance cooler colors
such as blue..
ꔈAdjusts the contrast to keep it at the best level according to the brightness of the screen.
The picture is improved by making bright parts brighter and dark parts darker.
- This function enables Vivid/Standard/Cinema/Sport/Game.
ꔈAdjusts screen colors so that they look livelier, richer and clearer. This feature enhances
hue, saturation and luminance so that red, blue, green and white look more vivid.
ꔈReduces screen noise without compromising video quality.
Low : Make dark and middle gray level area of the picture brighter.
Medium: Express original picture levels.
High: Make dark and middle gray level area of the picture darker.
ꔈYou can adjust brightness of dark area and middle gray level area of the picture.
Low: The reflection of the screen gets darker.
High: The reflection of the screen gets brighter.
ꔈSet black level of the screen to proper level.
ꔈThis option is disabled in RGB-PC mode.
ꔈThe default value may change depending on input mode.
ꔈWhite peaking can be adjusted from 0 to 10.
ꔈAdjust to higher setting to achieve brighter picture. Adjust to lower setting for darker pic-
ture.
ꔈMakes video clips recorded in film look more natural by eliminating judger effect.
< When Picture Mode is Vivid/Standard/
Cinema/Sport/Game >
Color Temperature
Dynamic Contrast
Picture Mode : Standard
• Contrast 50
Dynamic Color
• Brightness 50
Noise Reduction
• Sharpness 5
Gamma
• Color 70
• Tint 0
Black Level
• Advanced Control
White Peaking
• Picture Reset
Film Mode
Color Gamut
Edge Enhancer
< When Picture Mode is Expert 1/2 >
Dynamic Contrast
PICTURE
Noise Reduction
Picture Mode : Standard
• Contrast 50
Gamma
• Brightness 50
Black Level
• Sharpness 5
Film Mode
• Color 70
• Tint 0
White Peaking
• Advanced Control
Color Standard
• Picture Reset
Color Gamut
Edge Enhancer
White Balance
Close
ꔍ
Close
ꔗ
Medium
ꔂMove ꔉOKPICTURE
Medium
Medium
ꔗ
High
ꔂMove ꔉOK
High
High
Auto
Standard
High
Warm
High
High
Auto
10
On
Wide
High
On
10
SD
ꔃ
ꔃ
20
Page 21

Color Gamut
Edge Enhancer
Color Standard
White Balance
Color Management
System
Operating the Projector
Standard: Displays standard color area.
Wide: Mode to use and set the rich color area of the display.
ꔈMaximize the utilization of color to increase color quality.
- This function enables Cinema/Expert 1/2.
ꔈShow clearer and distinctive yet natural corners of the video.
ꔈChange the color standard used.
- This function enables Expert 1/2.
ꔈThis is the function to adjust the overall color of the screen to the feeling you want.
a. Method : 2 Points
- Pattern: Inner, Outer
- Red/Green/Blue Contrast, Red/Green/Blue Brightness: The adjustment range is -50 +50.
b. Method : 20 Points IRE
- Pattern: Inner, Outer
- IRE (Institute of Radio Engineers) is the unit to display the size of the video signal and
can be set among 5, 10, 15 - 95, 100. You can adjust Red, Green or Blue according to
each setting.
- Red/Green/Blue: The adjustment range is -50 - +50.
- This function enables Expert 1/2.
ꔈAs the tool used by the experts to make adjustments by using the test patterns, this does
not affect other colors but can be used to selectively adjust the 6 color areas (Red/Green/
Blue/Cyan/Mgt/Yellow).
Color difference may not be distinctive even when you make the adjustments for the general video.
Adjusts Red/Green/Blue/Yellow/Cyan, Magenta.
- Red/Green/Blue/Yellow/Cyan, Magenta Color: The adjustment range is -30 - +30.
- Red/Green/Blue/Yellow/Cyan, Magenta Tint: The adjustment range is -30 - +30.
- This feature is disable in PC mode.
Picture Reset Function
* Settings of the selected PICTURE function for each input and Picture Mode return to the default factory settings.
1. Press the MENU button. Then, move to PICTURE with the ꔌ, ꔍ, ꔗ,
ꔃ buttons and press the ◉OK button.
2. Press the ꔌ, ꔍ buttons to move Picture Reset and press the ◉OK
button.
3. Press the ꔗ, ꔃ buttons to move Yes and press the ◉OK button.
• Press the BACK button to exit the menu screen.
PICTURE
Picture Mode : Standard
• Contrast 50
• Brightness 50
• Sharpness 5
• Color 70
• Tint 0
• Advanced Control
• Picture Reset
ꔂMove ꔉOK
R G
21
Page 22

Operating the Projector
SCREEN Menu Options
To Change PJT Mode
* This function turns the projected image upside down or flips horizontal.
1. Press the Q.MENU button on the remote control.
2. Press the ꔗ, ꔃ buttons to move PJT Mode.
3. Press the ꔌ, ꔍ button to select a desired item.
• Select Rear when projecting from the back of the transparent screen purchased separately.
• Select Ceiling when installing the product on the ceiling.
• When PJT Mode is Rear/Front Ceiling, the left/right of the speaker changes automatically.
• You can also use this function through the MENU button.
• Press the BACK button to exit the menu screen.
PJT Mode
CH
Front
Using Aspect Ratio Function
Press the RATIO button to select a desired screen size.
4:3
Cinema Zoom1 16:9Zoom
• Some options may not be available depending on input signals.
• You can also use this function through the MENU button.
• Press the BACK button to exit the menu screen.
Set By ProgramJust Scan
Aspect Ratio
CH
Using Keystone Function
* Use this function when the screen is not at a right angle to the projector and the image is a trapezoid shape.
* Only use the Keystone function when you can’t get the best angle by moving the projector.
1. Press the KEY.Sꔌ, KEY.Sꔍ button of remote control.
2. Press the KEY.Sꔌ, KEY.Sꔍ button to adjust the screen condition as
you want.
•Keystone 0
- +
ꔗ
16:9
ꔃ
ꔉOK
• Keystone can be adjusted from -40 to 40.
• You can also use this function through the MENU button.
• Press the BACK button to exit the menu screen.
22
Page 23

Operating the Projector
Auto Configure Function
* This function assures you of getting the best video quality by automatically adjusting the horizontal size and
synchronization of the image.
* Auto Tracking function works in RGB PC input only.
Press the AUTO button of the remote control.
• If you execute screen adjustment for a video from PC graphic signal, optimal state
may not be found. Execute the Auto Config. function for a still image.
• You can also use this function through the MENU button.
RGB Config. Function
1. Press the MENU button. Then, move to SCREEN with the ꔌ, ꔍ, ꔗ, ꔃ
buttons and press the ◉OK button.
2. Press the ꔌ, ꔍ buttons to move RGB Config. and press the ◉OK but-
ton.
3. Move to a desired item with the ꔌ, ꔍ buttons and then press the ꔃ
button.
4. Press the ꔌ, ꔍ, ꔗ, ꔃ button to adjust the screen condition as you want
and then press the ◉OK button.
• Resolution can be chosen between 768 resolution (1024x768/1280x768/1360x768, 60Hz).
• Press the BACK button to exit the menu screen.
RGB Config.
Resolution ꔃ
Auto Config.
Position
Size
Phase
Reset
Auto config.
ꔂMove ꕉPrev.
ꔐ 1024 x 768
1280 x 768
1360 x 768
Using the Still Function
1. Press the STILL button on the remote control.
* You can freeze the moving image.
< Moving Image >
2. To exit Still, press any button.
* The STILL function will release automatically after approximately 10 minutes.
< Still Image >
23
Page 24

Operating the Projector
AUDIO Menu Options
Adjusting Volume
Press the VOL +, - button to adjust the volume.
• If you want to switch the sound off, press the MUTE button.
You can cancel the mute function by pressing the MUTE, VOL +, - button.
• You can also use this function through the MENU button.
Stereo/SAP Broadcast Setup
* On analog signals, this projector can receive MTS stereo programs and any SAP (Secondary Audio Program) that accompa-
nies the stereo program if the station transmits an additional sound signal. Mono sound is automatically used if the broadcast is only in Mono.
< Analog TV >
1. Press the Q.MENU button on the remote control.
2. Press the ꔗ, ꔃ buttons to move SAP.
3. Press the ꔌ, ꔍ button to select a desired item.
• Press the BACK button to exit the menu screen.
< Digital TV >
1. Press the Q.MENU button on the remote control.
2. Press the ꔗ, ꔃ buttons to move Multi Audio.
3. Press the ꔌ, ꔍ button to select a desired item.
• Press the BACK button to exit the menu screen.
SAP
Stereo
Multi Audio
English
CH
CH
24
Page 25

Adjusting Speaker Balance
* Adjust the left/right sound of speaker to suit your taste and room situations.
Operating the Projector
1. Press the MENU button. Then, move to AUDIO with the
ꔌ, ꔍ, ꔗ, ꔃ buttons and press the ◉OK button.
2. Press the ꔌ, ꔍ buttons to move Balance and press the
◉OK button.
3. Press the ꔗ, ꔃ buttons to adjusting audio balance and
press the ◉OK button.
• Press the BACK button to exit the menu screen.
Adjusting Treble
* Adjust the treble your taste and room situations.
1. Press the MENU button. Then, move to AUDIO with the ꔌ, ꔍ, ꔗ,
ꔃ buttons and press the ◉OK button.
2. Press the ꔌ, ꔍ buttons to move Treble and press the ◉OK but-
ton.
AUDIO
Volume 20
Balance 0
Treble 50
Volume 20
Balance 0
Treble 50
ꔂMove ꔉOK
L R
ꔂMove ꔉOKAUDIO
L R
3. Press the ꔗ, ꔃ buttons to adjusting audio treble and press the
◉OK button.
• Press the BACK button to exit the menu screen.
25
Page 26

Operating the Projector
TIME Menu Options
Clock Setting
* The time is set automatically from a digital channel signal.
The digital channel signal includes information for the current time provided by the broadcasting station.
Set the clock manually if the current time is set incorrectly by the auto clock function.
1. Press the MENU button. Then, move to TIME with the ꔌ, ꔍ, ꔗ, ꔃ
buttons and press the ◉OK button.
Clock
2. Press the ꔌ, ꔍ buttons to move Clock and press the ◉OK button.
< Auto Clock Setup >
3. Press the ꔌ, ꔍ, ꔗ, ꔃ buttons to select Auto.
4. Press the ꔌ, ꔍ, ꔗ, ꔃ buttons to select your viewing area time zone.
• Eastern, Central, Mountain,
5. Press the ꔌ, ꔍ, ꔗ, ꔃ buttons to select Auto, Off, or On (depending
on whether or not your viewing area observes Daylight Saving time).
Pacific, Alaska, or Hawaii.
Off Time : Off
On Time : Off
Sleep Timer : Off
Auto Off : 60 Min.
ꔗ
A u to
Month
Date
Year
Hour
Minute
Time Zone
Daylight
Saving
ꔂMove ꔉOKTIME
Close
ꔃ
7
4
2010
10 AM
30
Eastern
Auto
< Manual Clock Setup >
3. Press the ꔌ, ꔍ, ꔗ, ꔃ buttons to select Manual.
4. Press the ꔌ, ꔍ, ꔗ, ꔃ buttons to set the Year, Month, Date, Hour, or Minutes option.
• Press the BACK button to exit the menu screen.
On/Off Time Setting
* This function operates only if the current time has been set.
The Of f Time function overrides the On Time function if they are both set to the same time.
The projector must be in standby mode for the On Time to work.
If you do not press any button within 2 hours after the projector turns on with the On Time function, the projector will
automatically revert to standby mode.
1. Press the MENU button. Then, move to TIME with the ꔌ, ꔍ, ꔗ, ꔃ
buttons and press the ◉OK button.
2. Press the ꔌ, ꔍ buttons to move Off time or On time and press the
◉OK button.
3. Press the ꔌ, ꔍ, ꔗ, ꔃ buttons to select Repeat.
4. Set a desired item with the ꔌ, ꔍ, ꔗ, ꔃ buttons and then press the
◉OK button.
• Press the BACK button to exit the menu screen.
Clock
Off Time : Off
On Time : Off
Sleep Timer : Off
Auto Off : 60 Min.
Clock
Off Time : Off
On Time : Off
Sleep Timer : Off
Auto Off : 60 Min.
ꔎ Oct. 10. 2002 3:35 AM
Repeat
ꔗ
Hour
Minute
Repeat
Hour
Minute
Input
Channel
Volume
Off
Close
ꔎ Oct. 10. 2002 3:35 AM
ꔗ
Off
Close
ꔂMove ꔉOKTIME
6 AM
ꔂMove ꔉOKTIME
TV 2-0
ꔃ
30
ꔃ
6 AM
30
TV
10
26
Page 27

Operating the Projector
Sleep time Function
* The sleep timer turns the projector off at the preset time.
1. Press the Q.MENU button on the remote control.
2. Press the ꔗ, ꔃ buttons to move Sleep Timer.
3. Press the ꔌ, ꔍ buttons to select a desired preset time.
240
Off
Min.
10
180
Min.
Min.
20
120
Min.
Min.
• You can also use this function through the MENU button.
• Press the BACK button to exit the menu screen.
30
60
90
Min.
Min.
Min.
Auto Off Function
* This function turns the projector off automatically after the preset time is passed when there is no signal.
1. Press the MENU button. Then, move to TIME with the ꔌ, ꔍ, ꔗ, ꔃ
buttons and press the ◉OK button.
2. Press the ꔌ, ꔍ buttons to move Auto Off and press the ◉OK but-
ton.
Clock
Off Time : Off
On Time : Off
Sleep Timer : Off
Auto Off : 60 Min.
Sleep Timer
CH
Off
ꔂMove ꔉOKTIME
3. Move to a desired item with the ꔌ, ꔍ buttons and then press the
◉OK button.
• Press the BACK button to exit the menu screen.
27
Page 28

Operating the Projector
OPTION Menu Options
Selecting Menu Language
1. Press the MENU button. Then, move to OPTION with the ꔌ, ꔍ, ꔗ,
ꔃ buttons and press the ◉OK button.
2. Press the ꔌ, ꔍ buttons to move Menu Language and press the
◉OK button.
3. Move to a desired item with the ꔌ, ꔍ buttons and then press the
◉OK button.
• On-Screen-Display (OSD) is displayed in the selected language.
• Press the BACK button to exit the menu screen.
Menu Language :English
Audio Language :English
Caption :Service1
Blank Image :Blue
Screen Capture
LED Mode :Normal
Auto Power :Off
Demo Mode :Off
Initial Setting :Home Use
Selecting Audio Language
* Other languages may be available if a digital signal is provided by the broadcasting station.
This feature operates only in DTV/CADTV mode.
1. Press the MENU button. Then, move to OPTION with the ꔌ, ꔍ, ꔗ,
ꔃ buttons and press the ◉OK button.
2. Press the ꔌ, ꔍ buttons to move Audio Language and press the
◉OK button.
3. Press the ꔌ, ꔍ buttons to select English, Spanish or French and
press the ◉OK button.
Menu Language :English
Audio Language :English
Caption :Service1
Blank Image :Blue
Screen Capture
LED Mode :Normal
Auto Power :Off
Demo Mode :Off
Initial Setting :Home Use
ꔂMove ꔉOKOPTION
ꔂMove ꔉOKOPTION
• Press the BACK button to exit the menu screen.
28
Page 29

Setting Caption
Operating the Projector
1. Press the MENU button. Then, move to OPTION with the ꔌ, ꔍ, ꔗ,
ꔃ buttons and press the ◉OK button.
2. Press the ꔌ, ꔍ buttons to move Caption and press the ◉OK but-
ton.
3. Press the ꔗ, ꔃ buttons to select On.
OPTION
Menu Language :English
Audio Language :English
Caption :Service1
Blank Image :Blue
Screen Capture
LED Mode :Normal
Auto Power :Off
Demo Mode :Off
Initial Setting :Home Use
ꔗ
O n
Mode
ꔂMove ꔉOK
Service1
Digital Option
Close
< Analog Broadcasting System Captions >
* Caption must be provided to help people with hearing loss watch program.
Select a caption mode for displaying captioning information if provided on a program. Analog
caption displays information at any position on the screen and is usually the program's dialog. Caption/Text, if provided by
the broadcaster, would be available for both digital and analog channels on the Antenna/Cable. This projector is programmed to memorize the caption/text mode which was last set when you turned the power off. This function is only available when Caption is set On.
4. Press the ꔗ, ꔃ buttons to select CC1-4 or Text1-4.
• When selecting Off, Sub-menus for Analog, DTV, and Digital Option become disabled.
• CAPTION: The term for the words that scroll across the bottom of the screen; usually the audio portion of the program provided for the hearing impaired.
TEXT: The term for the words that appear in a large black frame and almost cover the entire screen; usually messages
provided by the broadcaster.
< Digital Broadcasting System Captions >
* Choose the language you want the DTV/CADTV Captions to appear in.
Other Languages can be chosen for digital sources only if they are included on the program.
This function in only available when Caption is set On.
ꔃ
4. Press the ꔗ, ꔃ buttons to select CC1-4, Text1-4 or Service1 - 6.
5. Press the ꔌ, ꔍ buttons to move Digital Option and press the ◉OK button.
6. Press the ꔗ, ꔃ buttons to select Custom.
7. Press the ꔌ, ꔍ, ꔗ, ꔃ buttons to customize the Style, Font, etc., to your preference. A preview icon is provided
at the bottom of the screen, use it to see the caption language.
• Size: Set the word size.
Font: Select a typeface for the text.
Text Color: Choose a color for the text.
Text Opacity: Specify the opacity for the text color.
Bg (Background) Color: Select a background color.
Bg (Background) Opacity: Select the opacity for the background color.
Edge Type: Select an edge type.
Edge Color: Select a color for the edges.
• Press the BACK button to exit the menu screen.
29
Page 30

Operating the Projector
Using Blank Function
* This function may be effective if you need to get the attention of the audience during presentations, meetings or briefings.
1. Press the BLANK button on the remote control.
• The screen turns off to a background color.
• You can choose the background color.
2. Press any button to cancel the blank function.
• To temporarily turn off the lamp, press BLANK on the remote control. Do not block the projection lens with any
objects when the projector is under operation as this could cause the objects to become heated and deformed or
even cause a fire.
(Refer to ‘Selecting Blank image’)
Selecting Blank image
1. Press the MENU button. Then, move to OPTION with the ꔌ, ꔍ, ꔗ,
ꔃ buttons and press the ◉OK button.
2. Press the ꔌ, ꔍ buttons to move Blank Image and press the ◉OK
button.
3. Move to a desired item with the ꔌ, ꔍ buttons and then press the
◉OK button.
• Background image will be altered to the selected Blank function image.
• If there is no Screen Captured, selecting Captured Image will display the Logo.
• Press the BACK button to exit the menu screen.
OPTION
Menu Language :English
Audio Language :English
Caption :Service1
Blank Image :Blue
Screen Capture
LED Mode :Normal
Auto Power :Off
Demo Mode :Off
Initial Setting :Home Use
ꔂMove ꔉOK
30
Page 31

Screen Capture Function
Operating the Projector
1. Press the MENU button. Then, move to OPTION with the ꔌ, ꔍ, ꔗ,
ꔃ buttons and press the ◉OK button.
2. Press the ꔌ, ꔍ buttons to move Screen Capture and press the
◉OK button.
• It can only be selected when there is an input signal.
• It may take up to 2 minutes to save the screen capture.
• Press the BACK button to exit the menu screen.
To adjust the brightness of the screen
1. Press the Q.MENU button on the remote control.
Menu Language :English
ꔂMove ꔉOKOPTION
Audio Language :English
Caption :Service1
Blank Image :Blue
Screen Capture
LED Mode :Normal
Auto Power :Off
Demo Mode :Off
Initial Setting :Home Use
LED Mode
2. Press the ꔗ, ꔃ buttons to move LED Mode.
3. Move to a desired item with the ꔌ, ꔍ buttons.
• LED Mode changes into Dimming mode automatically at specific temperatures
(37°C or higher).
• LED Mode changes into Dimming mode automatically if use a portable battery.
• You can also use this function through the MENU button.
• Press the BACK button to exit the menu screen.
Normal
CH
31
Page 32

Operating the Projector
To make the power of the projector turn on automatically when power is applied
1. Press the MENU button. Then, move to OPTION with the ꔌ, ꔍ, ꔗ,
ꔃ buttons and press the ◉OK button.
2. Press the ꔌ, ꔍ buttons to move Auto Power and press the ◉OK
button.
3. Press the ꔌ, ꔍ buttons to move On and press the ◉OK button.
• On: Connecting DC cable to the projector turns on the projector.
• Off: Connecting DC cable to the projector makes the projector in standby state.
• Press the BACK button to exit the menu screen.
Demo Mode Function
1. Press the MENU button. Then, move to OPTION with the ꔌ, ꔍ, ꔗ,
ꔃ buttons and press the ◉OK button.
2. Press the ꔌ, ꔍ buttons to move Demo Mode and press the ◉OK
button.
3. Press the ꔌ, ꔍ buttons to move On and press the ◉OK button.
• It can be selected when Initial Setting is set as Store Demo.
• Press the BACK button to exit the menu screen.
OPTION
Menu Language :English
Audio Language :English
Caption :Service1
Blank Image :Blue
Screen Capture
LED Mode :Normal
Auto Power :Off
Demo Mode :Off
Initial Setting :Home Use
Menu Language :English
Audio Language :English
Caption :Service1
Blank Image :Blue
Screen Capture
LED Mode :Normal
Auto Power :Off
Demo Mode :Off
Initial Setting :Store Demo
ꔂMove ꔉOK
ꔂMove ꔉOKOPTION
32
Page 33

Initial Setting Function
Operating the Projector
1. Press the MENU button. Then, move to OPTION with the ꔌ, ꔍ, ꔗ,
ꔃ buttons and press the ◉OK button.
2. Press the ꔌ, ꔍ buttons to move Initial Setting and press the ◉OK
button.
3. Move to a desired item with the ꔌ, ꔍ buttons and then press the
◉OK button.
• Set as Home Use when used in homes.
• Press the BACK button to exit the menu screen.
INFORMATION Menu Options
To See The Projector Information
OPTION
Menu Language :English
Audio Language :English
Caption :Service1
Blank Image :Blue
Screen Capture
LED Mode :Normal
Auto Power :Off
Demo Mode :Off
Initial Setting :Home Use
ꔂMove ꔉOK
1. Press the MENU button. Then, move to INFORMATION with
the ꔌ, ꔍ, ꔗ, ꔃ buttons and press the ◉OK button.
2. You can see the current information of the projector.
• Resolution details does not appear when input mode is TV
• Press the BACK button to exit the menu screen.
Model Name : HX350T
ꔂMove ꔉOKINFORMATION
Input : TV
Resolution :
Fh/Fv : 0 Khz/0 Hz
33
Page 34

PARENTAL CONTROL/RATINGS
PARENTAL CONTROL/RATINGS
* Parental Control can be used to block specific channels, ratings and other viewing sources.
The Parental Control Function (V-Chip) is used to block program viewing based on the ratings sent by the broadcasting station. The default setting is to allow all programs to be viewed. Viewing can be blocked by choosing the
type of the program and the categories. It is also possible to block all program viewing for a time period. To use
this function, the following must be done :
1. Set ratings and categories to be blocked.
2. Specify a password
3. Enable the lock
V-Chip rating and categories
Rating guidelines are provided by broadcasting stations. Most television programs and television movies
can be blocked by TV Rating and/or Individual Categories. Movies that have been shown at the theaters or directto-video movies use the Movie Rating System (MPAA) only.
Ratings for Television programs including made-for-TV movies:
• TV-G (General audience)
• TV-PG (Parental guidance suggested)
• TV-14 (Parents strongly cautioned)
• TV-MA (Mature audience only)
• TV-Y (All children)
• TV-Y7 (Children 7 years older)
Set Password & Lock System
Setting up Your Password
* Set up blocking schemes to block specific channels, ratings, and external viewing sources.
A password is required to gain access to this menu.
1. Press the MENU button. Then, move to LOCK with the ꔌ, ꔍ, ꔗ, ꔃ
buttons and press the ◉OK button.
2. Press the number 0 - 9 to input the password.
• Enter the password as requested.
• The Projector is set up with the initial password “0-0-0-0”.
• If you forget your password, press “0-3-2-5” on the remote control.
• Press the BACK button to exit the menu screen.
Lock System :Off
Set Password
Block Channel
Movie rating
TV Rating-Children
TV Rating-General
Downloadable Rating
Input Block
ꔂMove ꔉOKLOCK
Enter Password
* ** *
Close
34
Page 35

Set Password
* Change the password by inputting a new password twice.
PARENTAL CONTROL/RATINGS
1. Press the MENU button. Then, move to LOCK with the ꔌ, ꔍ, ꔗ, ꔃ
buttons and press the ◉OK button.
2. Press the number 0 - 9 to input the password.
3. Press the ꔌ, ꔍ buttons to move Set Password and press the ◉OK
button.
4. Press the number 0 - 9 to choose any 4 digits for your new password. As soon as the 4 digits are entered, re-enter the same 4 digits on the Confirm.
• Press the BACK button to exit the menu screen.
Lock System
* Activates or deactivates the lock system.
1. Press the MENU button. Then, move to LOCK with the ꔌ, ꔍ, ꔗ, ꔃ
buttons and press the ◉OK button.
2. Press the number 0 - 9 to input the password.
3. Press the ꔌ, ꔍ buttons to move Lock System and press the ◉OK
button.
Lock System :Off
ꔂMove ꔉOKLOCK
Set Password
Block Channel
Movie rating
TV Rating-Children
TV Rating-General
Downloadable Rating
Input Block
ꔂMove ꔉOKLOCK
Lock System :On
Set Password
Block Channel
Movie rating
TV Rating-Children
TV Rating-General
Downloadable Rating
Input Block
4. Press the ꔌ, ꔍ buttons to move On and press the ◉OK button.
• When you select On, the Lock System is enable.
• Press the BACK button to exit the menu screen.
Channel Blocking
* Blocks any channels that you do not want to watch or that you do not want your children to watch.
1. Press the MENU button. Then, move to LOCK with the ꔌ, ꔍ, ꔗ, ꔃ
buttons and press the ◉OK button.
2. Press the number 0 - 9 to input the password.
3. Press the ꔌ, ꔍ buttons to move Block Channel and press the ◉OK
button.
4. Move to a desired channel with the ꔌ, ꔍ, ꔗ, ꔃ buttons and then
press the (Stop) button. Block or unblock a channel.
• If a channel is locked, enter the password to unlock it temporarily.
• Press the BACK button to exit the menu screen.
Lock System :On
Set Password
Block Channel
Movie rating
TV Rating-Children
TV Rating-General
Downloadable Rating
Input Block
ꔂMove ꔉOKLOCK
35
Page 36

PARENTAL CONTROL/RATINGS
MOVIE & TV RATING
Movie Rating (MPAA)
* Blocks movies according to the movie ratings limits specified, so children cannot view certain movies. You can set the rat-
ings limit by blocking out all the movies with the ratings above a specified level. Keep in mind that the movie ratings limit
only applies to movies shown on projector, not TV programs, such as soap operas.
1. Press the MENU button. Then, move to LOCK with the ꔌ, ꔍ, ꔗ, ꔃ
buttons and press the ◉OK button.
2. Press the number 0 - 9 to input the password.
3. Press the ꔌ, ꔍ buttons to move Movie rating and press the ◉OK
button.
Lock System :On
Set Password
Block Channel
Movie rating
TV Rating-Children
TV Rating-General
Downloadable Rating
Input Block
ꔂMove ꔉOKLOCK
4. Move to a desired item with the ꔌ, ꔍ buttons and then press the
◉OK button.
• If Movie Rating, TV Rating-Children or TV Rating-General is locked,
enter the password to unlock it temporarily.
• If you set PG-13: G and PG movies will be available, PG-13, R, NC-17
and X will be blocked.
• Press the BACK button to exit the menu screen.
Menu Description
G General audience
PG Parental guidance suggested
PG-13 Parents strongly cautioned)
R Restricted
NC-17 No one 17 and under admitted
X Adult only
Blocking Off Permits all programs
TV Rating Children
* Prevents children from watching certain children's TV programs, according to the ratings limit set. The children rating does
not apply to other TV programs. Unless you block certain TV programs intended for mature audiences in the TV Rating sub menu, your children can view those programs.
1. Press the MENU button. Then, move to LOCK with the ꔌ, ꔍ, ꔗ, ꔃ
buttons and press the ◉OK button.
2. Press the number 0 - 9 to input the password.
3. Press the ꔌ, ꔍ buttons to move TV Rating-Children and press the
◉OK button.
4. Move to a desired item with the ꔌ, ꔍ buttons and then press the
◉OK button.
• Press the BACK button to exit the menu screen.
36
LOCK
Lock System :On
Set Password
Block Channel
Movie rating
TV Rating-Children
TV Rating-General
Downloadable Rating
Input Block
Menu Description
Age applies to TV-Y, TV-Y7
Fantasy Violence applies to TV-Y7
ꔂMove ꔉOK
Page 37

PARENTAL CONTROL/RATINGS
TV Rating General
* Based on the ratings, blocks certain TV programs that you and your family do
not want to view.
1. Press the MENU button. Then, move to LOCK with the ꔌ, ꔍ, ꔗ, ꔃ
buttons and press the ◉OK button.
Lock System :On
Set Password
Block Channel
Movie rating
TV Rating-Children
TV Rating-General
Downloadable Rating
Input Block
ꔂMove ꔉOKLOCK
2. Press the number 0 - 9 to input the password.
3. Press the ꔌ, ꔍ buttons to move TV Rating-General and press the
◉OK button.
4. Move to a desired item with the ꔌ, ꔍ buttons and then press the
◉OK button.
• Press the BACK button to exit the menu screen.
Downloadable Rating
* This function is available only for digital channels. This function operates only when projector has received Region5 Rating
data.
1. Press the MENU button. Then, move to LOCK with the ꔌ, ꔍ, ꔗ, ꔃ
buttons and press the ◉OK button.
2. Press the number 0 - 9 to input the password.
3. Press the ꔌ, ꔍ buttons to move Downloadable Rating and press
the ◉OK button.
Menu Description
Age
Dialogue-sexual
dialogue
Language-adult
language
Sex-sexual situa-
tions
Violence
Lock System :On
Set Password
Block Channel
Movie rating
TV Rating-Children
TV Rating-General
Downloadable Rating
Input Block
applies to TV-G, TV-PG,
TV-14, TV-MA
applies to TV-PG, TV-14
applies to TV-PG, TV-14,
TV-MA
applies to TV-PG, TV-14,
TV-MA
applies to TV-PG, TV-14,
TV-MA
ꔂMove ꔉOKLOCK
4. Move to a desired item with the ꔌ, ꔍ buttons and then press the
◉OK button.
• If a Downloadable rating is locked, enter the password to unlock it temporarily.
• Press the BACK button to exit the menu screen.
External Input Blocking
* Enables you to block an input.
1. Press the MENU button. Then, move to LOCK with the ꔌ, ꔍ, ꔗ, ꔃ
buttons and press the ◉OK button.
2. Press the number 0 - 9 to input the password.
3. Press the ꔌ, ꔍ buttons to move Input Block and press the ◉OK
button.
4. Move to a desired external input with the ꔌ, ꔍ buttons
5. Press the ꔗ, ꔃ buttons to move On.
6. Press the ꔌ, ꔍ buttons to move Close and press the ◉OK button.
• Press the BACK button to exit the menu screen.
Lock System :Off
ꔂMove ꔉOKLOCK
Set Password
Block Channel
Movie rating
TV Rating-Children
TV Rating-General
Downloadable Rating
Input Block
37
Page 38

USB
USB
* Image shown may differ from your projector.
To use the USB device
Connecting the USB device
1. Connect the USB device to the USB jack on the back of the projector.
2. The USB media menu will open automatically.
PHOTO LIST
MUSIC LIST
MOVIE LIST FILE VIEWER
Eject USB
* Select “Eject” in order to eject a USB device.
1. Press the Q.MENU button on the remote control.
2. Press the ꔗ, ꔃ buttons to move USB Device.
3. Press the ◉OK button on the remote control.
• After Eject USB, USB memory cannot be read. Remove USB memory, and connect
again.
• Press the BACK button to exit the menu screen.
USB memory stick
USB Device
CH
Eject ꔉ
38
Page 39

USB
USB notes
► Only a USB storage device is recognizable.
► USB hubs are not supported.
► A USB storage device which uses its own driver may not be recognized.
► The recognition speed of a USB storage device will depend on each device.
► Please do not turn off the projector or unplug the USB device when the connected USB storage device is operating.
When such a device is suddenly separated or unplugged, the stored files or the USB storage device may be damaged.
► Please do not connect the USB storage device which was artificially maneuvered on the PC. The device may cause the
product to malfunction or fail to be played. Never forget to use only a USB storage device which has normal music files,
image files, movie files or text files.
► Please use only a USB storage device which was formatted as a FAT16, FAT32 and NTFS file system provided with the
Windows operating system. In case of a storage device formatted as a different utility programmed which is not supported by Windows, it may not be recognized.
► Please connect power to a USB storage device which requires an external power supply. If not, the device may not be rec-
ognized.
► Please connect a USB storage device with cable is offered by USB maker. If connected with cable is not offered by USB
maker or an excessively long cable, the device may not be recognized.
► Some USB storage devices may not be supported or operate smoothly.
► If the name of a folder or file is too long, it will not be displayed or recognized.
► File alignment method of USB storage device is similar to Window XP and filename can recognize up to 100 English
characters.
► Please backup important files because a data of USB device may be damaged. Data management is consumer's respon-
sibility and in consequence the manufactures does not cover data damage.
► The recommended capacity is 1TB or less for a USB external hard disk and 32GB or less for USB memory. Any device
with more than the recommended capacity may not work properly.
► Only the FAT32 file system supports the delete function.
► If the USB memory device does not work properly, disconnect and reconnect it.
► If a USB external hard disk with a “Energy Saving” function does not work, turn the hard disk off and on again to make it
work properly.
► USB storage devices below USB 2.0 are supported as well. But they may not work properly in the movie list.
► If your USB memory device has multiple partitions, or if you use a USB multi-card reader, you can use up to 4 partitions
or USB memory devices.
► How fast a USB memory device is detected differs from device to device.
► If the USB is connected in Standby Mode, specific hard disk will automatically be loaded when the projector is turned on.
39
Page 40

USB
PHOTO LIST
* The projector can display JPEG files.
The On Screen Display may be different from your set. Images are an example to assist with the projector operation.
PHOTO(*.JPEG) supporting file
Baseline : 64 x 64 - 15360 x 8640
Progressive : 64 x 64 - 1920 x 1440
• You can play JPEG files only.
• Non-supported files are displayed in the form of predefined icon.
Screen Components
1. Moves to upper level file
2. Preview: Display the thumbnail/folder name of the photo
in the selected folder
3. Current page/Total pages
4. Total number of marked photos
5. Corresponding buttons on the remote control
Photo Selection and Popup Menu
1. Press the USB button. Then, move to PHOTO LIST with
the ꔗ, ꔃ buttons and press the ◉OK button.
2. Press the ꔌ, ꔍ, ꔗ, ꔃ buttons to move a desired photo
file and press the ◉OK button.
3. Move to a desired item with the ꔌ, ꔍ buttons and then
press the ◉OK button.
PHOTO LIST
[090704]
Butterfly
2
1366x768 125KB
1
Up Folder
ꔂ
Navigation ꔉ PopUp Menu
PHOTO LIST
[090704]
Butterfly
1366x768 125KB
Up Folder
ꔂ
Navigation ꔉPopUp Menu
3 4
Page 1/1
X.Box
DSC0001
DSC0002
DSC0003
DSC0004
Page 1/1
Up Folder
Photo
X.Box
DSC0001
DSC0002
DSC0003
DSC0004
No Marked
Up Folder
Photo
+
CH
Page Change ꘁ Mark ꕉ Exit
-
5
No Marked
i 1366x768, 125KB
View
Mark All
Delete
Close
+
CH
Page Change ꘁMark ꕉExit
-
• View: Display the selected item.
• Mark All: Mark all photos on the screen.
• Delete: Delete the selected photo item.
• Close: Close the pop-up menu.
• If the picture file is damaged, it may not be displayed properly.
• High resolution pictures may take longer time to display on the entire screen.
40
Page 41

Full Screen Menu
1. Press the USB button. Then, move to PHOTO LIST with the ꔗ,
ꔃ buttons and press the ◉OK button.
2. Press the ꔌ, ꔍ, ꔗ, ꔃ buttons to move desired photo and
press the ◉OK button.
3. Press the ꔌ, ꔍ buttons to move View and press the ◉OK
button.
USB
4. The selected photo is displayed in full size and show up the
Slideshow BGM Delete Option Hide
menu.
5. Use ꔌ, ꔍ, ꔗ, ꔃ button to select and control the menu on the
full-sized screen.
• Use ꔗ, ꔃ button to select the previous or next photo.
• Slideshow: Selected photos are displayed during the slide show. If no photo is selected, all photos in
the current folder are displayed during slide show.
- Set the time interval of the slide show in Option.
• BGM: Listen to music while viewing photos in full size.
- Set the BGM device and album in Option.
• (Rotate): Rotate photos.
• Delete: Delete photos.
• Option: Set values for Slide Speed and Music Folder.
- You cannot change Music Folder while BGM is playing.
• Hide: Hide the menu on the full-sized screen.
- To see the menu again on the full-sized screen, press ◉OK button to display.
41
Page 42

USB
MUSIC LIST
* You can use the Music List menu to play MP3 files from a USB storage device.
The On Screen Display on your model may be slightly different.
MUSIC (*.MP3) supporting file
Bit rate range 32 Kbps - 320 Kbps
• Sampling rate MPEG1 Layer3 : 32kHz, 44.1kHz, 48kHz
• Sampling rate MPEG2 Layer3 : 16kHz, 22.05kHz, 24kHz
• Sampling rate MPEG2.5 Layer3 : 8kHz, 11.025kHz, 12kHz
Screen Components
1. Moves to upper level file
2. Preview: Display the title/folder name of the music in
the selected folder
3. Current page/Total pages
4. Total number of marked music
5. Corresponding buttons on the remote control
Music Selection and Popup Menu
1. Press the USB button. Then, move to MUSIC LIST with
the ꔗ, ꔃ buttons and press the ◉OK button.
2. Press the ꔌ, ꔍ, ꔗ, ꔃ buttons to move a desired music
file and press the ◉OK button.
3. Move to a desired item with the ꔌ, ꔍ buttons and then
press the ◉OK button.
MUSIC LIST
Drive 1
Flower
2
ꔛ 00:00 / 05:42
1
Up Folder
ꔂ
Navigation ꔉPopUp Menu
MUSIC LIST
Drive 1
Arirang
ꔛ 00:00 / 05:42
Up Folder
ꔂ
Navigation ꔉPopUp Menu
3 4
Page 1/1
Page 1/1
No Marked
Title Duration
Up Folder
Flower
Oblivious
+
CH
Page Change ꘁMark ꕉExit
-
5
No Marked
Title Duration
Up Folder
Arirang
Good Bye
+
CH
Page Change ꘁMark ꕉExit
-
i
3945 KB,128 Kbps
Play
Play with Photo
Mark All
Delete
Close
05:42
05:24
04:12
05:30
• Play: Once a song finishes playing, the next selected one will be played. When there are no selected
files to play, the next one in the current folder will be played. If you go to a different folder and
press the ◉OK button, the current music in playback will stop.
When music is playing, is displayed in front of the music play time.
After certain time elapsed,the full music list screen disappears and the playback information
screen runs as a screen saver. Press ◉OK, ▇ , or BACK button to stop the screen saver.
A damaged or corrupted music file that does not play displays 00:00 as the play time.
Music files with copy-protection will not play.
• Play with Photo: Start playing the selected song and then move to the PHOTO LIST.
• Mark All: Mark all music in the folder.
• Delete: Delete the selected file.
• Close: Close the pop-up menu.
42
Page 43

MOVIE LIST
* The movie list is activated once USB is detected. It is used when playing movie files on projector.
Supported Movie Formats
USB
Extension name Video Codec Audio Codec
mpg, mpeg, vob MPEG1, MPEG2 Dolby Digital,MPEG,MP3,LPCM
dat MPEG1 Dolby Digital,MPEG,MP3,LPCM
ts,trp,tp MPEG2, H.264/AVC Dolby Digital,AAC,MPEG
mp4
avi
mkv H.264/AVC, MPEG 1, MPEG 2, MPEG 4 SP, MPEG4 ASP Dolby Digital,HEAAC,AAC,MPEG,MP3,LPCM
divx
MPEG4 SP, MPEG4 ASP, DivX 3.11, DivX 4.12, DivX 5.x
DivX 6, Xvid 1.00, Xvid 1.01, Xvid 1.02, Xvid 1.03
Xvid 1.10–beta 1, Xvid 1.10-beta 2, H.264/AVC
MPEG 2, MPEG 4 SP, MPEG4 ASP, DivX 3.11, DivX 4
DivX 5, DivX 6, Xvid 1.00, Xvid 1.01, Xvid 1.02, Xvid 1.03
Xvid 1.10–beta 1, Xvid 1.10–beta 2, H.264/AVC
MPEG 2, MPEG 4 SP, MPEG4 ASP, DivX 3.11, DivX 4
DivX 5, DivX 6, Xvid 1.00, Xvid 1.01, Xvid 1.02, Xvid 1.03
Xvid 1.10–beta 1, Xvid 1.10–beta 2, H.264/AVC
Dolby Digital,HEAAC,
AAC,MPEG,MP3,LPCM
Dolby Digital,HEAAC,AAC,MPEG,
MP3,LPCM
Dolby Digital,HEAAC,AAC,MPEG,
MP3,LPCM
Bit rate range : within 32 kbps - 320 kbps (MP3)
Subtitle format : *.smi/*.srt/*.sub(MicroDVD, SubViewer1.0/2.0)/*.ass/*.ssa/*.txt(TMPlayer)/*.psb(PowerDivX)
Max Resolution
1920x1080
@30p
43
Page 44

USB
Precautions When Playing Video Files
► A DivX movie file and its subtitle file must be located in the same folder.
► At this time, a movie file name and its subtitle file name must be identical for it to be displayed.
► Specific subtitles created by the user may not operate normally.
► Some special characters are not supported in subtitles.
► HTML tags are not supported in subtitles.
► Subtitles in languages other than the supported languages are not available.
► Time information in an external subtitle file should be arranged in ascending order to be played.
► Damaged movie files may not be played, and certain functions could be limited during the playback.
► Certain video files created with an encoder may not be played.
► If the video and audio structure of recorded file is not interleaved, either video or audio is outputted.
► Video with resolution higher than maximum resolution supported for each frame, cannot be guaranteed for smooth
playback.
► DTS Audio codec is not supported.
► Playback for movie files exceeding 30 GB (Giga Byte) is not supported.
► Playing a video through a USB connection that doesn’t support high speed may not work properly.
► When watching a video using MOVIE LIST, the function to ajdust screen does not work.
► The screen may suffer temporary interruptions (image stoppage, faster playback, etc.) when the audio language is
changed.
► Movie files other than the specified types and formats may not work properly.
► Max bitrate of playable movie file is 20Mbps.
► Files encoded with GMC(Global Motion Compensation) may not be played.
► When you are watching the movie by Movie List function, user setup for each image mode does not operate.
► Only the files saved in ASCII CODE is supported for the external subtitles of the movie.
► Only 500 letters and 500 numbers are supported for each line of the subtitle.
► Only 10000 of sync blocks can be supported within the subtitle file.
44
ꔈ ABOUT DIVX VIDEO: DivX® is a digital video format created by DivX,Inc. This is an official DivX Certified device that
plays DivX video. Visit www.divx.com for more information and software tools to convert your files into DivX video.
ꔈ ABOUT DIVX VIDEO-ON-DEMAND: This DivX Certified® device must be registered in order to play DivX Video-on-
Demand (VOD) content. To generate the registration code, locate the DivX VOD section in the device setup menu. Go to
vod.divx.com with this code to complete the registration process and learn more about DivX VOD.
ꔈ "DivX Certified® to play DivX® video up to HD 1080p, including premium content"
ꔈ "Covered by one or more of the following U.S. Patents: 7,295,673; 7,460,668; 7,515,710; 7,519,274"
Manufactured under license from Dolby Laboratories. “Dolby “and the double-D symbol are trademarks of
Dolby Laboratories.
Page 45

USB
Screen Components
1. Moves to upper level folder
2. Preview: Display the title/folder name of the movie in the
selected folder
3. Current page/Total pages
4. Total number of marked movies
5. Corresponding buttons on the remote control
Movie Selection and Popup Menu
1. Press the USB button. Then, move to MOVIE LIST with
the ꔗ, ꔃ buttons and press the ◉OK button.
2. Press the ꔌ, ꔍ, ꔗ, ꔃ move to a desired movie file and
press the ◉OK button.
3. Move to a desired item with the ꔌ, ꔍ buttons and then
press the ◉OK button.
MUSIC LIST
Movie
2
704 x 396 668 MB
1
Up Folder
ꔂ
Navigation ꔉPopUp Menu
MUSIC LIST
Movie
704 x 396 668 MB
Up Folder
ꔂ
Navigation ꔉPopUp Menu
3 4
Page 1/1
Page 1/1
No Marked
Title Duration
Up Folder
+
CH
Page Change ꘁMark ꕉExit
-
5
No Marked
Title Duration
Up Folder
+
CH
Page Change ꘁMark ꕉExit
-
i
704 x 396 668 MB
Play
Mark All
Delete
Close
• Play: Play the selected movie titles.
- In the case of files not supported, a message regarding non-supported file is displayed.
- The screen is played, but when the audio file is not supported, the following message shows.
• Mark All: Mark all movies in the folder.
• Delete: Delete the selected movie.
• Close: Close the pop-up menu.
i
This file is invalid.
i
Unsupported Audio.
45
Page 46

USB
Playing the Movie
* You can adjust various method during the movie play.
1. Press the USB button. Then, move to MOVIE LIST with
the ꔗ, ꔃ buttons and press the ◉OK button.
2. Press the ꔌ, ꔍ, ꔗ, ꔃ move to a desired movie file and
press the ◉OK button.
3. Press the ꔌ, ꔍ buttons to move Play and press the
◉OK button.
◆ Use of remote control
ꔈ Press the ▶II (Play/Pause) button to play/pause the screen.
ꔈ Press the ▇ (Stop) button to stop.
ꔈ Press the I◀◀ (REW) button to rewind.
ꔈ Press the ▶▶I (FF) button to forward fast.
Option
Option Menu Selection
On MOVIE LIST play mode.
Press the ꔅ (Red) button on the remote control.
ꔈPicture Size: Select the Full, Original or 16:9 screen size.
ꔈPicture Mode: Select the Vivid, Standard, Cinema, Sport or Game.
ꔈ Audio Language: Select Language Group of the audio during movie play.
ꔈ Subtitle Language: Select Language Group of the subtitle during movie play. Subtitle
- Sync: When the video is not synchronized with the caption, it can be adjusted by the
unit of 0.5 second.
- Position: Move the location of the subtitle.
Subtitle Language Group Supported Language
Latin1
Korean
language option can be differ according to choice of the language
for menu.
French, Spanish, Catalan Basque, Portuguese, Italian, Albanian, Rhaeto-Romanic, Dutch, German,
Danish, Swedish, Norwegian, Finnish, Faeroese, Icelandic, Irish, Scottish, English
English, Korean
Picture Size
Picture Mode
Audio Language
Subtitle Language
Sync
Position
Close
ꔗ
Full
Standard
Latin1
Full
ꔃ
0
0
46
Page 47

To See The DivX Registration Code
* Confirm the DivX registration code number of the projector.
Using the registration number, movies can be rented or purchased at www.divx.com/vod.
USB
1. Press the MENU button. Then, move to USB with the ꔌ, ꔍ, ꔗ, ꔃ
buttons and press the ◉OK button.
2. Press the ꔌ, ꔍ buttons to move DivX Reg. Code and press the
◉OK button.
USB
Photo List
Musci List
Movie List
File Viewer
DivX Reg. Code
Deactivation
ꔂMove ꔉOK
3. You can see the DivX registration code of the projector.
• With a DivX registration code from other projector, playback of rented
or purchased DivX file is not allowed. (Only DivX files matched with the
registration code of the purchased projector are playable.)
• The video or audio of a file converted based on a standard other than the DivX codec standard may be corrupted
or unable to be played.
• Press the BACK button to exit the menu screen.
Deactivation Function
* Delete the existing authentication information to receive a new DivX user authentication for projector. Once this function is
executed, a DivX user authentication is required again to see DivX DRM files.
1. Press the MENU button. Then, move to USB with the ꔌ, ꔍ, ꔗ, ꔃ
buttons and press the ◉OK button.
2. Press the ꔌ, ꔍ buttons to move Deactivation and press the ◉OK
button.
Photo List
Musci List
Movie List
File Viewer
DivX Reg. Code
Deactivation
3. Move to a desired item with the ꔗ, ꔃ buttons and then press the
◉OK button.
• DRM (Digital Rights Management) function:
These are the technology and the service that prevents the illegal use of digital contents to protect the copyrights
owners’ benefits and rights. File can be played after the license is cleared through the methods of online, etc.
• Press the BACK button to exit the menu screen.
ꔂMove ꔉOKUSB
47
Page 48

USB
FILE VIEWER
Supported File : XLS, DOC, PPT, TXT, XLSX, PPTX, DOCX, PDF
• Microsoft Office Version 97 / 2000 / 2002 / 2003 / 2007
• Adobe PDF Version 1.0 / 1.1 / 1.2 / 1.3 / 1.4
- File Viewer realigns the document, so it may look different than when viewed on a PC.
- For the documents that include images, the resolution may look lower during the realigning process.
- If the document volume is big or it has many pages, loading may take long time.
- Unsupported fonts may be replaced with other fonts.
Screen Components
1. Moves to upper level file
2. Preview: Display the title/folder name of the file in
the selected folder
3. Current page/Total pages
4. Corresponding buttons on the remote control
View File
1. Press the USB button. Then, move to FILE VIEWER
with the
2. Press the
the ◉OK button.
ꔗ, ꔃ
buttons and press the ◉OK button.
ꔌ, ꔍ, ꔗ, ꔃ
move to a desired file and press
FILE VIEWER
Drive 1
Requiem 2 story.txt
2
1
Up Folder
ꔂ
Navigation ꔉPopUp Menu
Page 1/1
3
Up Folder
Requiem 2 story.txt
information.ppt
4
Title Date
+
CH
Page Change ꕉExit
-
• Use Page CH +, - button to move the previous or next page.
• Go Page: Move to a desired page.
0 3 /14 page
1. Press the USB button. Move to Go Page with
2. Press the
ꔌ, ꔍ, ꔗ, ꔃ
buttons select a desired page and press the ◉OK button.
• Zoom: Zoom in or zoom out.
100 % - + horizontal array vertical array
◉OK
1. Press the USB button. Move to Zoom with
2. Press the
ꔗ, ꔃ
buttons select a desired page and press the ◉OK button.
• Hide: Close the menu.
- To see the menu again on the full-sized screen, press MENU button to display.
48
Menu Go Page Zoom Hide
ꔗ, ꔃ
buttons and press ꔌ button.
ꔗ, ꔃ
buttons and press ꔌ button.
Page 49

Information
Supported Monitor Display
* The following table lists the display formats supported by the projector.
Format Vertical Freq.(Hz) Horizontal Freq.(kHz)
Information
* If the projector does not support the input signal,
“Invalid Format” message appears on the screen.
* The projector supports DDC1/2B type as Plug &
Play. (Auto recognition of PC monitor)
* PC synchronization signal types supported
:Separate type synchronization.
* To get the the best picture quality, adjust the PC
graphics card to 1024x768.
< DVD/DTV Input >
Signal Component-*1 HDMI-*2
480i O X
480p O O
NTSC (60 Hz)
24 / 30 Hz 1080p
720p O O
1080i O O
1080p O O
O O
* Cable type
1- RGB to Component Cable
2- HDMI Cable
Maintenance
* The projector needs little maintenance. You should keep the lens clean because any dirt or stains may appear on the
screen. If any parts need to be replaced, contact your dealer. When cleaning any part of the projector, always turn the
power off and unplug the projector.
Cleaning the lens
Use an air spray or cleaning cloth for product exterior, provided with the product, to lightly clean the product. Please use a
recommended air spray or lens cleaning product.To clean lens, small amount of cleaning agent on a swab or a soft cloth
and rub on the lens. Please be aware that liquid may flow pass through the lens if the product is sprayed on lens directly.
Cleaning the Projector Case
To clean the projector case, first unplug the power cable. To remove dirt or dust, wipe the casing with polish cloth provided. When you want to remove the dust or stain on the lens, use the cloth for product exterior, provided with the product.
Do not use alcohol, benzene, thinners or other chemical detergents as these can cause the casing to be warped or discolored.
49
Page 50

Information
Specifications
MODEL
HX350T (HX350T-JE)
Resolution 1024 (Horizontal) x 768 (Vertical) pixel
Horizontal / Vertical Ratio 4:3 (horizontal:vertical)
Panel size (mm) 13.97
Projection distance
(Screen size)
0.55 m - 2.75 m (50.8 cm - 254.0 cm)
Projection Offset 110 %
Remote control distance 6 m
Video compatibility NTSC
AC-DC Adapter LG, SD-B191A, 19.5 V , 5.64 A
Audio Output 1 W + 1 W
Television System NTSC-M, ATSC, 64 & 256 QAM
Program Coverage VHF 2 - 13, UHF 14 - 69, CATV 1 - 135, DTV 2 - 69, CADTV 1 - 135
External Antenna Impedance 75 Ω
Height (mm) 57.5 (without foot), 61.0 (with foot)
Width (mm) 160
Length (mm) 134.5
Weight (g) 790
USB Device 5 V, 0.5 A (max)
Operating Condition
Temperature
In operation : 0°C - 40°C (presentation mode: 0°C - 37°C)
In storage and transit : -20°C - 60°C
Humidity
In operation : 0 % - 80% relative humidity
Not in operation : 0 % - 85% relative humidity
50
Page 51

Information
Open Source Software Notice
The following GPL executables and LGPL, MPL libraries used in this product are subject to the
GPL2.0/LGPL2.1/MPL1.1 License Agreements:
GPL EXECUTABLES:
Linux kernel 2.6, busybox, lzo, u-boot
LGPL LIBRARIES:
uClibc
MPL LIBRARIES:
nanox
LG Electronics offers to provide source code to you on CD-ROM for a charge covering the cost of
performing such distribution, such as the cost of media, shipping and handling upon e-mail request
to LG Electronics at: opensource@lge.com
This offer is valid for a period of three (3) years from the date of the distribution of this product by
LG Electronics.
You can obtain a copy of the GPL, LGPL and MPL licenses on the CD-ROM provided with this
product.
Also you can obtain the translation of GPL, LGPL licenses from
http://www.gnu.org/licenses/old-licenses/gpl-2.0-translations.html,
http://www.gnu.org/licenses/old-licenses/lgpl-2.1-translations.html.
This product includes
► cmap: copyright © 1990-1998 Adobe Systems Incorporated.
► GIF LZW Decoder: copyright © 1987, by Steven A. Bennett
► md5: copyright © 1991-2, RSA Data Security, Inc
► jpeg: Independent JPEG Group, copyright © 1991 – 1998, Thomas G. Lane.
► libpng: copyright © 2004 Glenn Randers-Pehrson
► OSSP str - String Handling:
- copyright © 1999-2005 Ralf S. Engelschall <rse@engelschall.com>
- copyright © 1999-2005 The OSSP Project http://www.ossp.org/
► random number generator : copyright © 1990, 1993 The Regents of the University of California.
► Standard C functions
- copyright © 1998 Softweyr LLC.
- copyright © 1988, 1993 The Regents of the University of California.
► tinyxml: copyright © 2000-2006 Lee Thomason
► zlib: copyright © 1995-2002 Jean-loup Gailly and Mark Adler.
All rights reserved.
Permission is hereby granted, free of charge, to any person obtaining a copy of this software and
associated documentation files (the "Software"), to deal in the Software without restriction, including
without limitation the rights to use, copy, modify, merge, publish, distribute, sublicense, and/or sell
copies of the Software, and to permit persons to whom the Software is furnished to do so, subject
to the following conditions:
THE SOFTWARE IS PROVIDED "AS IS", WITHOUT WARRANTY OF ANY KIND, EXPRESS OR
IMPLIED, INCLUDING BUT NOT LIMITED TO THE WARRANTIES OF MERCHANTABILITY, FITNESS
FOR A PARTICULAR PURPOSE AND NONINFRINGEMENT. IN NO EVENT SHALL THE AUTHORS
OR COPYRIGHT HOLDERS BE LIABLE FOR ANY CLAIM, DAMAGES OR OTHER LIABILITY,
WHETHER IN AN ACTION OF CONTRACT, TORT OR OTHERWISE, ARISING FROM, OUT OF OR
IN CONNECTION WITH THE SOFTWARE OR THE USE OR OTHER DEALINGS IN THE SOFTWARE.
51
Page 52

The model and serial number of the projector is
located on the back or one side of the projector.
Record it below should you ever need service.
LG Customer Information Center
1-800-243-
0000
USA, Consumer User
MODEL
SERIAL
1-888-865-3026
1-888-542-2623
USA, Commercial User
CANADA
 Loading...