

Page 1

OWNER’S MANUAL
DVD Home Cinema
System
Please read this manual carefully before operating
your set and retain it for future reference.
HT1100BB (HT1100BB, SH96TA-S/ W, SH96SB-C)
HT906TA-N0_BTURLLK_ENG_6156.indd 1 2011-12-13 �� 5:17:01
Page 2
Getting Started2
Safety Information
1
Getting Started
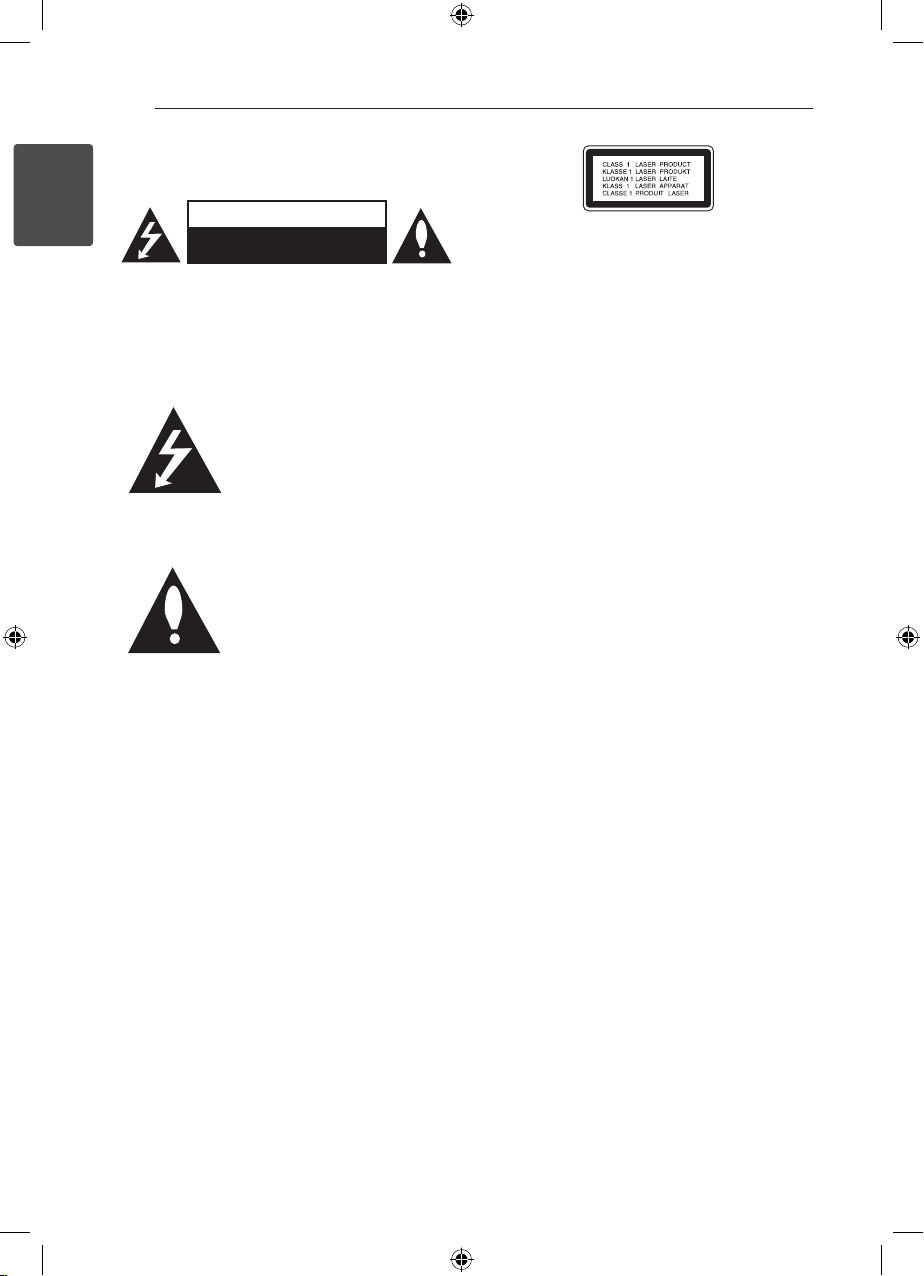
CAUTION: TO REDUCE THE RISK OF ELECTRIC
SHOCK DO NOT REMOVE COVER (OR BACK) NO
USER-SERVICEABLE PARTS INSIDE REFER SERVICING
TO QUALIFIED SERVICE PERSONNEL.
WARNING: TO PREVENT FIRE OR ELECTRIC SHOCK
HAZARD, DO NOT EXPOSE THIS PRODUCT TO RAIN
OR MOISTURE.
WARNING: Do not install this equipment in a
conned space such as a book case or similar unit.
CAUTION: Do not block any ventilation openings.
Install in accordance with the manufacturer’s
instructions.
Slots and openings in the cabinet are provided for
ventilation and to ensure reliable operation of the
product and to protect it from over heating. The
openings shall be never be blocked by placing
the product on a bed, sofa, rug or other similar
surface. This product shall not be placed in a builtin installation such as a bookcase or rack unless
proper ventilation is provided or the manufacturer’s
instruction has been adhered to.
CAUTION
RISK OF ELECTRIC SHOCK
DO NOT OPEN
This lightning ash with
arrowhead symbol within an
equilateral triangle is intended to
alert the user to the presence of
uninsulated dangerous voltage
within the product’s enclosure that
may be of sucient magnitude to
constitute a risk of electric shock
to persons.
The exclamation point within an
equilateral triangle is intended
to alert the user to the presence
of important operating and
maintenance (servicing)
instructions in the literature
accompanying the product.
CAUTION: This product employs a Laser System.
To ensure proper use of this product, please read
this owner’s manual carefully and retain it for future
reference. Shall the unit require maintenance,
contact an authorized service center.
Use of controls, adjustments or the performance of
procedures other than those specied herein may
result in hazardous radiation exposure.
To prevent direct exposure to laser beam, do not try
to open the enclosure. Visible laser radiation when
open. DO NOT STARE INTO BEAM.
CAUTION concerning the Power Cord
Most appliances recommend they be placed upon
a dedicated circuit;
That is, a single outlet circuit which powers only
that appliance and has no additional outlets or
branch circuits. Check the specication page of this
owner’s manual to be certain. Do not overload wall
outlets. Overloaded wall outlets, loose or damaged
wall outlets, extension cords, frayed power cords, or
damaged or cracked wire insulation are dangerous.
Any of these conditions could result in electric
shock or re. Periodically examine the cord of your
appliance, and if its appearance indicates damage
or deterioration, unplug it, discontinue use of the
appliance, and have the cord replaced with an
exact replacement part by an authorized service
center. Protect the power cord from physical or
mechanical abuse, such as being twisted, kinked,
pinched, closed in a door, or walked upon. Pay
particular attention to plugs, wall outlets, and
the point where the cord exits the appliance. To
disconnect power from the mains, pull out the
mains cord plug. When installing the product,
ensure that the plug is easily accessible.
HT906TA-N0_BTURLLK_ENG_6156.indd 2 2011-12-13 �� 5:17:02
Page 3
Getting Started 3
This device is equipped with a portable battery or
accumulator.
Safety way to remove the battery or the
battery from the equipment: Remove the
old battery or battery pack, follow the steps
in reverse order than the assembly. To prevent
contamination of the environment and bring on
possible threat to human and animal health, the
old battery or the battery put it in the appropriate
container at designated collection points. Do
not dispose of batteries or battery together with
other waste. It is recommended that you use
local, free reimbursement systems batteries and
accumulators. The battery shall not be exposed to
excessive heat such as sunshine, re or the like.
CAUTION: The apparatus shall not be exposed to
water (dripping or splashing) and no objects lled
with liquids, such as vases, shall be placed on the
apparatus.
Copyrights
It is forbidden by law to copy, broadcast, show,
broadcast via cable, play in public, or rent
copyrighted material without permission. This
product features the copy protection function
developed by Macrovision. Copy protection signals
are recorded on some discs. When recording and
playing the pictures of these discs picture noise
will appear. This product incorporates copyright
protection technology that is protected by U.S.
patents and other intellectual property rights. Use
of this copyright protection technology must be
authorized by Macrovision, and is intended for
home and other limited viewing uses only unless
otherwise authorized by Macrovision. Reverse
engineering or disassembly is prohibited.
CONSUMERS SHOULD NOTE THAT NOT ALL
HIGH DEFINITION TELEVISION SETS ARE FULLY
COMPATIBLE WITH THIS PRODUCT AND MAY CAUSE
ARTIFACTS TO BE DISPLAYED IN THE PICTURE. IN
CASE OF 525 OR 625 PROGRESSIVE SCAN PICTURE
PROBLEMS, IT IS RECOMMENDED THAT THE USER
SWITCH THE CONNECTION TO THE ‘STANDARD
DEFINITION’ OUTPUT. IF THERE ARE QUESTIONS
REGARDING OUR TV SET COMPATIBILITY WITH THIS
MODEL 525p AND 625p UNIT, PLEASE CONTACT
OUR CUSTOMER SERVICE CENTER.
You have to set the disc format option to [Mastered]
in order to make the discs compatible with the LG
players when formatting rewritable discs. When
setting the option to Live File System, you cannot
use it on LG players.
(Mastered/ Live File System : Disc format system for
Windows Vista)
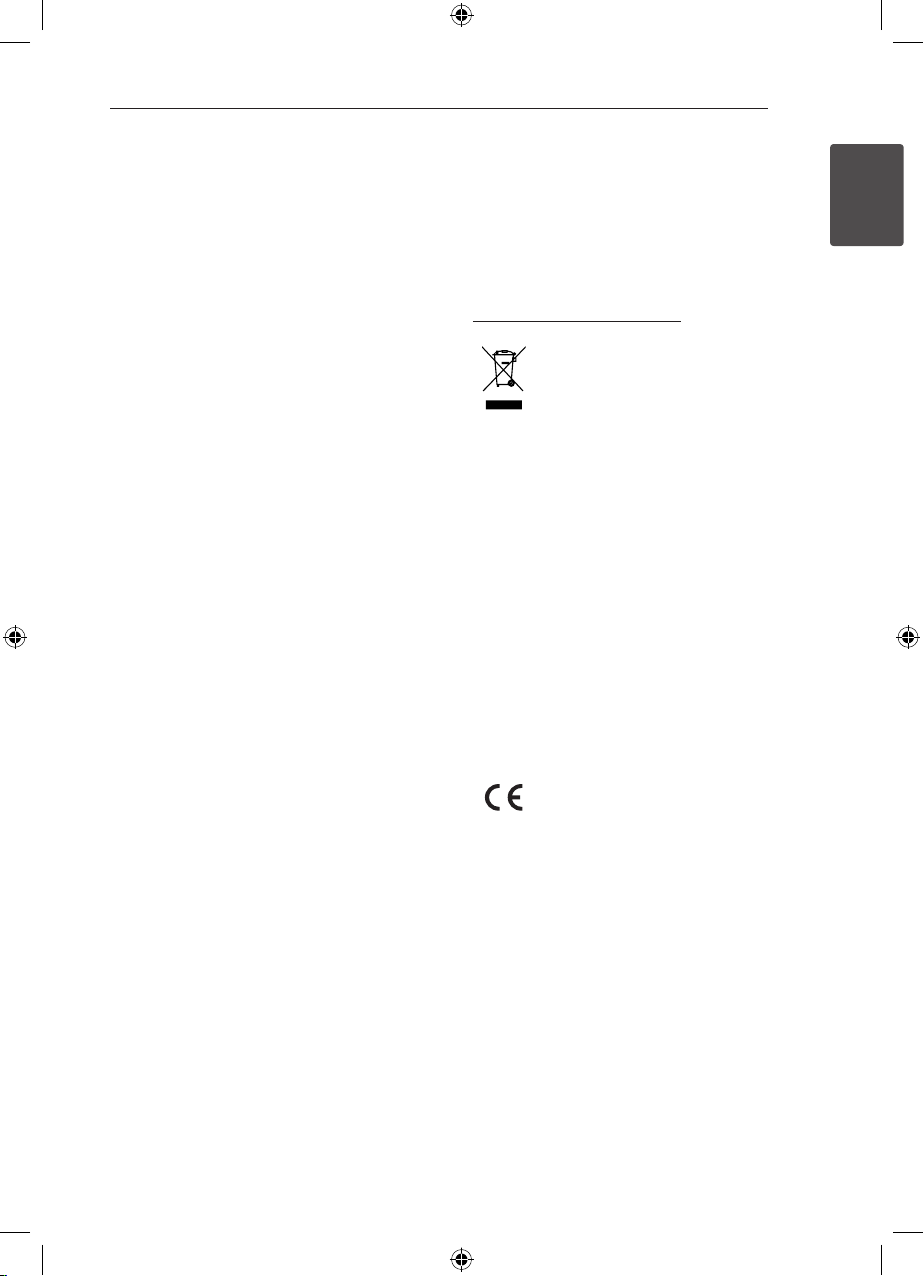
Disposal of your old appliance
1. When this crossed-out wheeled bin
symbol is attached to a product it
means the product is covered by
the European Directive 2002/96/EC.
2. All electrical and electronic products
should be disposed of separately
from the municipal waste stream
via designated collection facilities
appointed by the government or
the local authorities.
3. The correct disposal of your
old appliance will help prevent
potential negative consequences
for the environment and human
health.
4. For more detailed information about
disposal of your old appliance,
please contact your city oce,
waste disposal service or the shop
where you purchased the product.
5. EEE Compliance with Directive.
LG Electronics hereby declares that this/
these product(s) is/are in compliance
with the essential requirements and
other relevant provisions of Directive
2004/108/EC, 2006/95/EC, and
2009/125/EC.
European representative :
LG Electronics Service Europe B.V.
Veluwezoom 15, 1327 AE Almere, The
Netherlands (Tel : +31–(0)36–547–8888)
1
Getting Started
HT906TA-N0_BTURLLK_ENG_6156.indd 3 2011-12-13 �� 5:17:02
Page 4
Table of Contents4
Table of Contents
1 Getting Started
2 Safety Information
6 Unique Features
6 – Portable In
6 – USB Direct Recording
6 – Full HD up-scaling
6 – Home Theater Speaker ez Setup
6 Accessories
7 Introduction
7 – Playable Discs
7 – About the “&” Symbol Display
7 – Symbols Used in this Manual
7 – Regional Codes
8 Playable file Requirement
9 Remote control
10 Front panel
11 Rear panel
2 Connecting
12 Assembling the speaker
14 Attaching the speakers to the unit
15 Positioning the system
16 Connections to Your TV
16 – Component Video Connection
17 – HDMI Out Connection
18 – Video Connection
19 – Resolution Setting
19 Video Output Resolution
20 Optional Equipment Connection
20 – AUX In Connection
20 – AUDIO (PORT. IN) In Connection
20 – Listening to music from your portable
player or external device
21 – USB Connection
22 – OPTICAL In connection
22 – Home theater speaker ez setup
3 System Setting
23 Adjust the setup settings
23 – OSD Initial language settings -
Optional
23 – To display and exit the Setup menu
24 – Language
24 – Display
25 – Audio
26 – Lock (Parental Control)
27 – Others
4 Operating
28 Using the Home Menu
28 Basic Operations
29 Other Operations
29 – Displaying Disc Information on-screen
30 – To display the DVD Menu
30 – To display the DVD title
30 – 1.5 times speed playback
30 – Screen Saver
30 – Starting play from selected time
30 – Resume playback
30 – Changing subtitle code page
31 – Marked Playback
32 – Viewing a PHOTO file
33 – Sleep Timer Setting
33 – Dimmer
33 – Turn off the sound temporarily
33 – Last Scene Memory
33 – System Select - Optional
33 – Adjust the speaker level settings
34 Sound adjustment
34 – Setting the surround mode
35 Advanced Operations
35 – Recording to USB
HT906TA-N0_BTURLLK_ENG_6156.indd 4 2011-12-13 �� 5:17:02
Page 5
5 Troubleshooting
36 Troubleshooting
Table of Contents 5
6 Appendix
37 Maintenance
37 – Handling the Unit
37 – Notes on Discs
38 Area Code List
39 Language code List
40 Trademarks and Licenses
41 Specifications
1
2
3
4
5
6
HT906TA-N0_BTURLLK_ENG_6156.indd 5 2011-12-13 �� 5:17:02
Page 6
Getting Started6
Unique Features
Portable In
1
Getting Started
Listen to music from your portable device. (MP3,
Notebook, etc)
USB Direct Recording
Records music from CD to your USB device.
Full HD up-scaling
Views Full HD picture quality with simple setup.
Home Theater Speaker ez
Setup
Listen to sounds from TV, DVD and Digital device
with vivid 5.1 (2.1 or 2.0) ch mode.
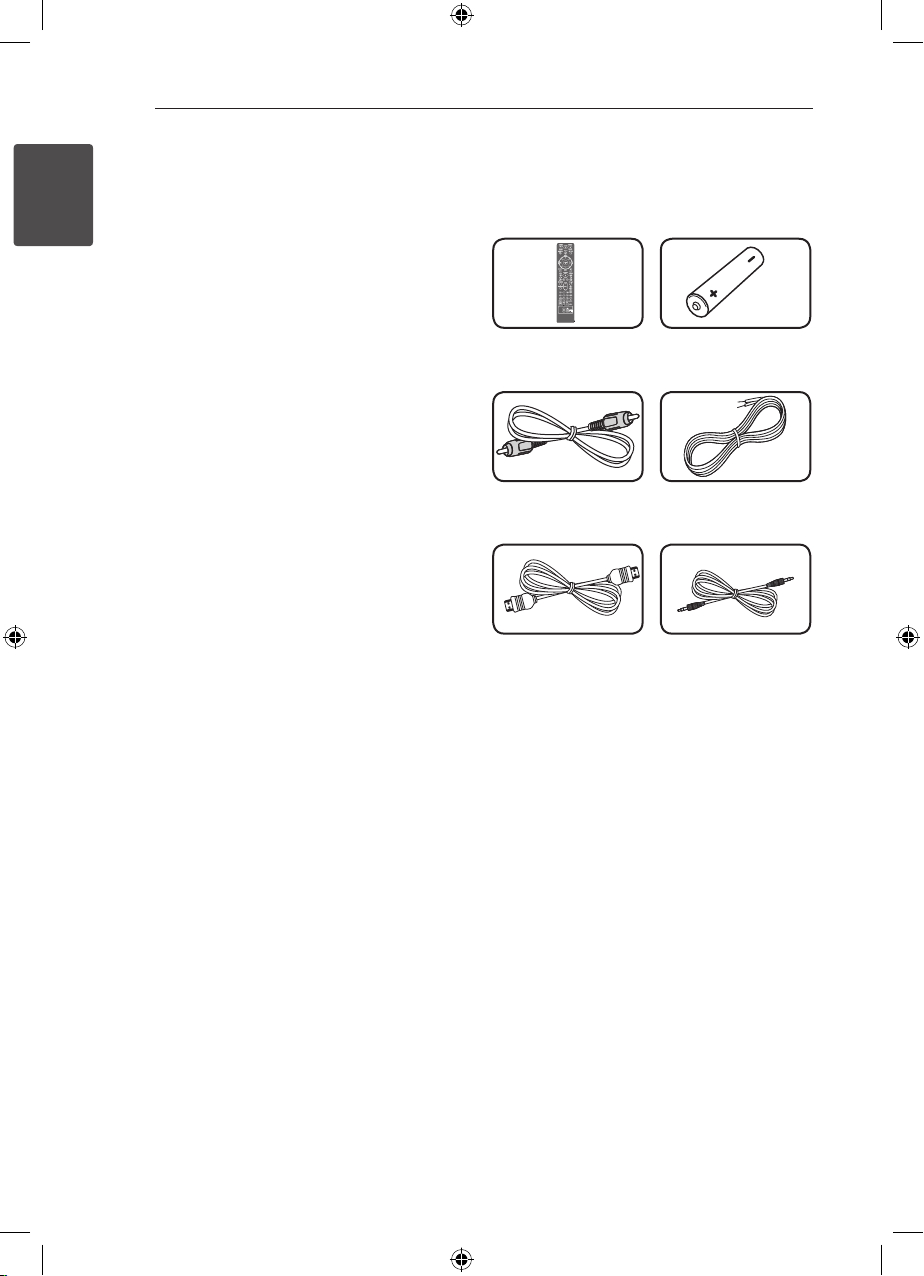
Accessories
Please check and identify the supplied accessories.
Remote control (1) Battery (1)
Video cable (1) Speaker cables (6)
HDMI cable (1) Portable cable (1)
HT906TA-N0_BTURLLK_ENG_6156.indd 6 2011-12-13 �� 5:17:02
Page 7
Getting Started 7
Introduction
Playable Discs
This unit plays DVD±R/RW and CD-R/RW that
contains audio titles, DivX, MP3, WMA and/or
JPEG les. Some DVD±RW/DVD±R or CD-RW/
CD-R cannot be played on this unit due to the
recording quality or physical condition of the disc,
or the characteristics of the recording device and
authoring software.
DVD-VIDEO (8 cm / 12 cm disc)
Discs such as movies that can be
purchased or rented.
DVD±R (8 cm / 12 cm disc)
Video mode and nalized only.
DVD-RW (8 cm / 12 cm disc)
Video mode and nalized only.
DVD+R: Video mode only
Supports the double layer disc also.
DVD+RW (8 cm / 12 cm disc)
Video mode and nalized only.
Audio CD: Music CDs or CD-R/CDRW in music CD format that can be
purchased.
About the “&” Symbol
Display
“&” may appear on your TV display during
operation and indicates that the function explained
in this owner’s manual is not available on that
specic media.
Symbols Used in this Manual
r
t
y
u
i
Note
,
Indicates special notes and operating features.
Tip
,
Indicates tip and hints for making the task easier.
Caution
>
Indicates cautions for preventing possible damages
from abuse.
DVD-Video, DVD±R/RW in Video
mode or VR mode and nalized
Audio CDs
Video les contained in the
USB/Disc
Audio les contained in the
USB/Disc
Photo les
Regional Codes
This unit has a regional code printed on the rear of
the unit. This unit can play only DVD discs labeled
same as the rear of the unit or “ALL”.
yMost DVD discs have a globe with one or more
numbers in it clearly visible on the cover. This
number must match your unit’s regional code or
the disc cannot play.
yIf you try to play a DVD with a dierent regional
code from your unit, the message “Check
Regional Code” appears on the TV screen.
1
Getting Started
HT906TA-N0_BTURLLK_ENG_6156.indd 7 2011-12-13 �� 5:17:03
Page 8
Getting Started8
Playable file
Requirement
1
Getting Started
MP3/ WMA music file requirement
MP3/ WMA le compatibility with this unit is limited
as follows :
ySampling frequency : within 32 to 48 kHz (MP3),
within 32 to 48 kHz (WMA)
yBit rate : within 32 to 320 kbps (MP3),
40 to 192 kbps (WMA)
ySupport Version : v2, v7, v8, v9
yMaximum les : Under 999
yFile extensions : “.mp3”/ “.wma”
yCD-ROM le format : ISO9660/ JOLIET
yWe recommend that you use Easy-CD Creator,
which creates an ISO9660 le system.
Photo file requirement
Photo le compatibility with this unit is limited as
follows :
yMax pixel in width : 2 760 x 2 048 pixel
yMaximum les : Under 999
ySome discs may not operate due to a dierent
recording format or the condition of disc.
yFile extensions: “.jpg”
yCD-ROM le format : ISO9660/ JOLIET
DivX file requirement
DivX le compatibility with this unit is limited as
follows:
yAvailable resolution: within 720 x 576 (W x H)
pixels.
yThe le name of the DivX subtitle should be
entered within 45 characters.
yIf there is impossible code to express in the
DivX le, it may be displayed as “ _ “ mark on the
display.
yFrame rate : less than 30 fps.
yIf the video and audio structure of recorded
les is not interleaved, either video or audio is
outputted.
yPlayable DivX le : “.avi”, “.mpg”, “.mpeg”, “.divx”
yPlayable Subtitle format : SubRip (*.srt/ *.txt),
SAMI (*.smi), SubStation Alpha (*.ssa/ *.txt),
MicroDVD (*.sub/ *.txt), SubViewer 2.0 (*.sub/
*.txt), Vobsub (*.sub)
yPlayable Codec format : “DIVX3.xx”, “DIVX4.xx”,
“DIVX5.xx”, “MP4V3”, “3IVX”.
yPlayable Audio format : “AC3”, “PCM”, “MP3”, “WMA”,
“DTS”.
ySampling frequency : within 32 to 48 kHz (MP3),
within 32 to 48 kHz (WMA)
yBit rate : within 32 to 320 kbps (MP3), 40 to 192
kbps (WMA)
yFor Discs formatted in Live le system, you can
not it on this unit.
yIf the name of movie le is dierent from that of
the subtitle le, during playback of a DivX le,
subtitle may not be display.
yIf you play a DivX le dier from DivXspec, it may
not operate normally.
HT906TA-N0_BTURLLK_ENG_6156.indd 8 2011-12-13 �� 5:17:03
Page 9
Remote control
Getting Started 9
a
b
c
d
e
f
Battery Installation
Remove the battery cover on the
rear of the Remote Control, and
insert one (size AAA) battery with
and 5 matched correctly.
4
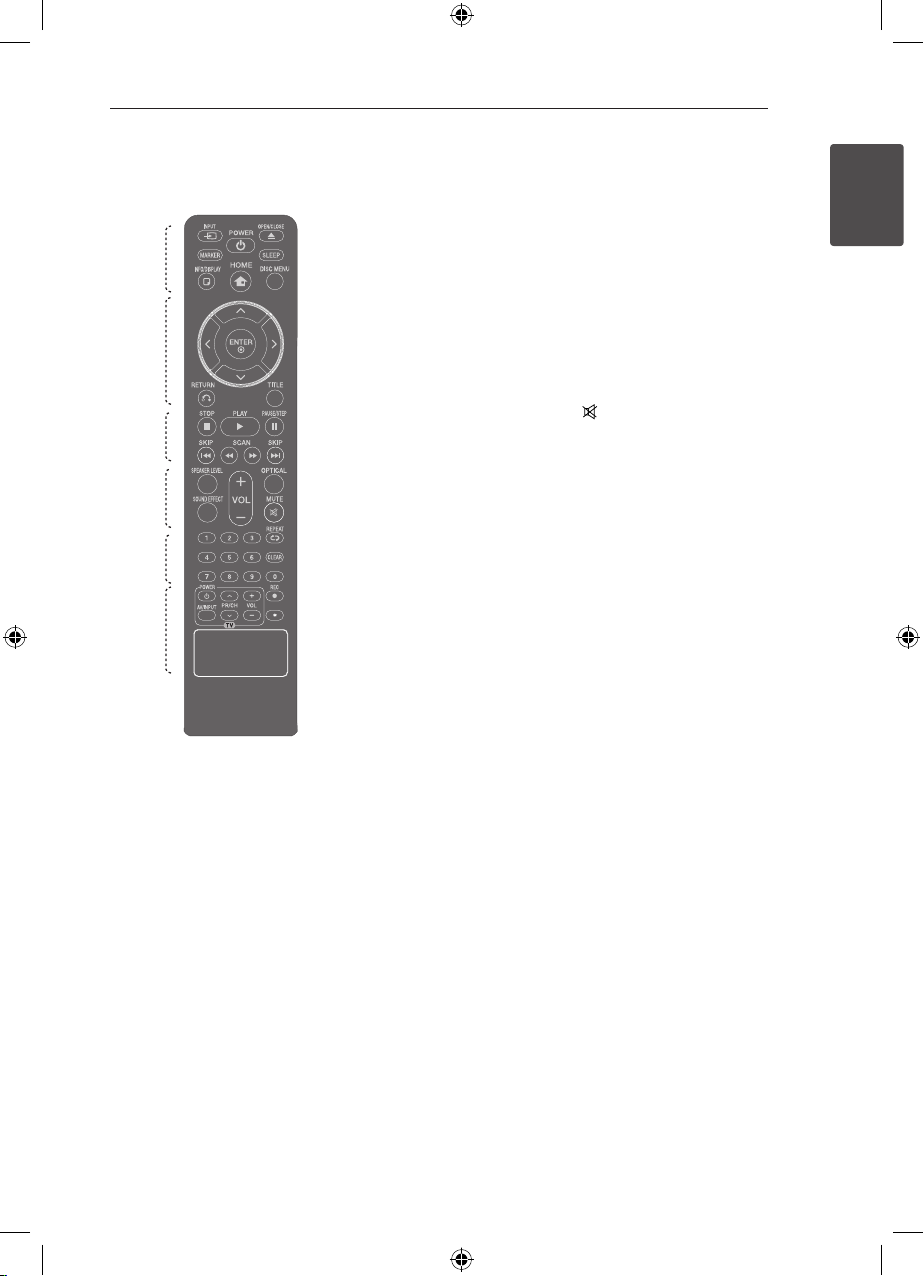
• • • • • • a • • • • •
INPUT: Changes input
P
sources.
MARKER: Marks play list.
POWER: Switches the unit ON
1
or OFF.
OPEN/CLOSE: Opens and
B
closes the disc drawer.
SLEEP: Sets the System to turn o
automatically at a specied time.
(Dimmer : The display window will
be darken by half.)
INFO/DISPLAY: Accesses On-
m
Screen Display.
HOME: Displays the [Home
n
Menu].
DISC MENU: Accesses the menu
on a DVD disc.
• • • • • • b • • • • •
W/S/A/D
right): Used to navigate on-screen
displays.
ENTER: Acknowledges menu
b
selection.
RETURN: Moves backwards
x
in the menu or exits the setup
menu.
TITLE: If the current DVD title has
a menu, the title menu appears
on the screen. Otherwise, the disc
menu may not appear.
• • • • • • c • • • • •
STOP: Stops playback.
Z
PLAY: Starts playback.
d
PAUSE/STEP: Pauses playback.
M
C/V
or previous chapter / track / le.
c/v
backward or forward.
(up/ down/ left/
SKIP: Goes to the next
SCAN: Searches
• • • • • • d • • • • •
SPEAKER LEVEL: Sets the sound
level of desired speaker.
SOUND EFFECT: Selects a sound
eect mode.
VOL -/+ (Volume): Adjusts
speaker volume.
OPTICAL: Changes input source
to optical directly.
MUTE: Mutes the sound.
• • • • • • e • • • • •
0-9 numerical buttons: Selects
numbered options in a menu.
REPEAT: Selects a play
h
mode. (Repeat/ Random)
CLEAR: Removes a number when
setting the password.
• • • • • • f • • • • •
TV Control buttons: Controls the
TV. (LG TV only)
-You can control the sound
level, input source, and power
switching of LG T Vs as well.
Hold POWER (T V) and press PR/
CH (
until the TV turns on or o.
REC: USB Direct Recording.
X
: This button is not available.
?
) button repeatedly
W/S
1
Getting Started
HT906TA-N0_BTURLLK_ENG_6156.indd 9 2011-12-13 �� 5:17:03
Page 10
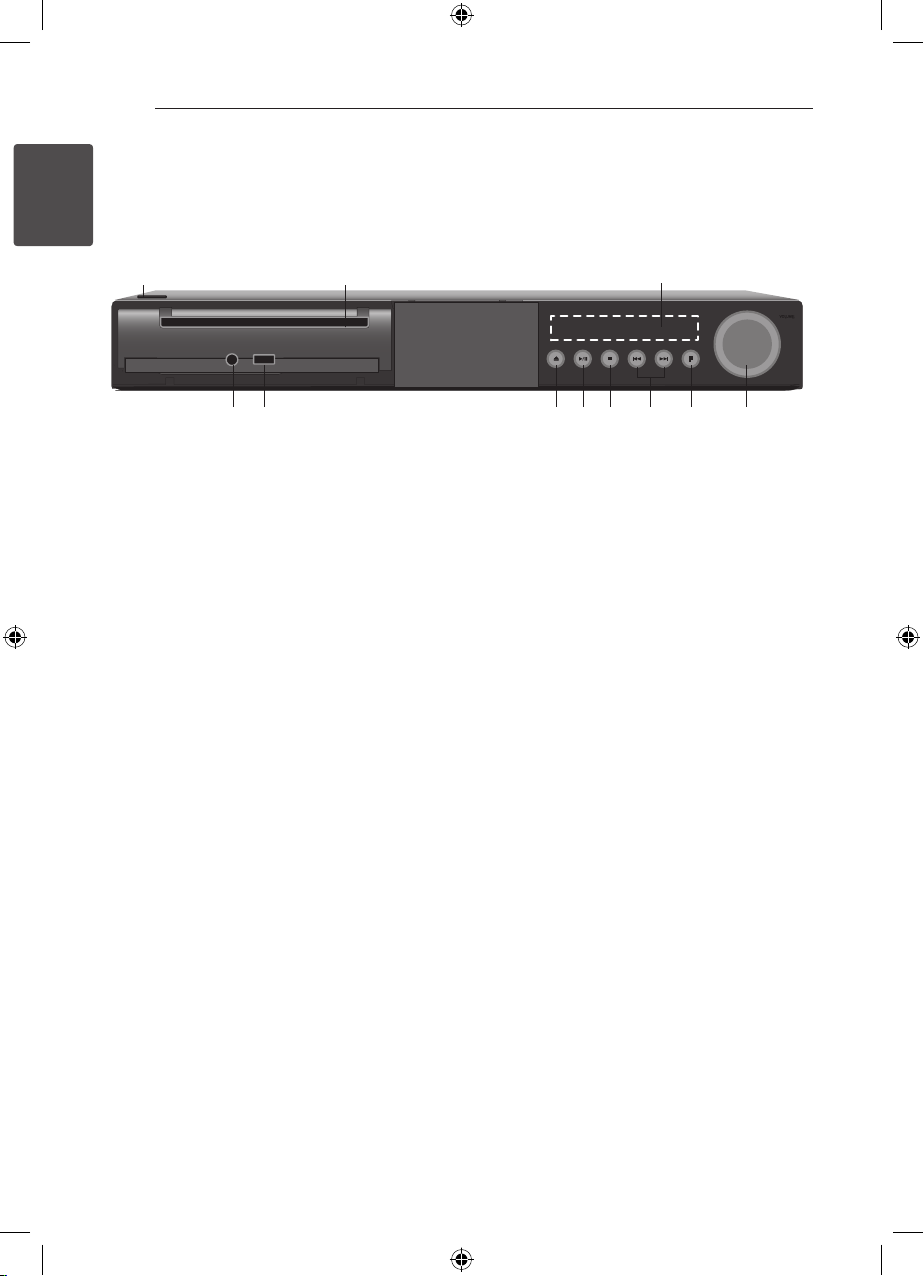
Getting Started10
Front panel
1
Getting Started
a b c
k j i h g f e d
a 1/!
b
c
d
e
f C/V
(POWER)
Switches the unit ON or OFF.
Disc Tray
Display window
Shows the current status of the unit.
VOLUME
Adjusts speaker volume.
F (FUNCTION)
Changes the input source or function.
(SKIP)
Go to next or previous le/track/chapter.
Searches backward or forward (Press and hold).
(STOP)
g Z
Stops playback.
h z/M
i B
j
k
(PLAY/PAUSE)
Starts playback.
Pauses playback temporarily, press again to exit
pause mode.
(OPEN/CLOSE)
Opens or closes the disc tray.
USB Port
Connects a USB device.
PORT. IN
Connects to a portable player with audio
outputs.
HT906TA-N0_BTURLLK_ENG_6156.indd 10 2011-12-13 �� 5:17:03
Page 11
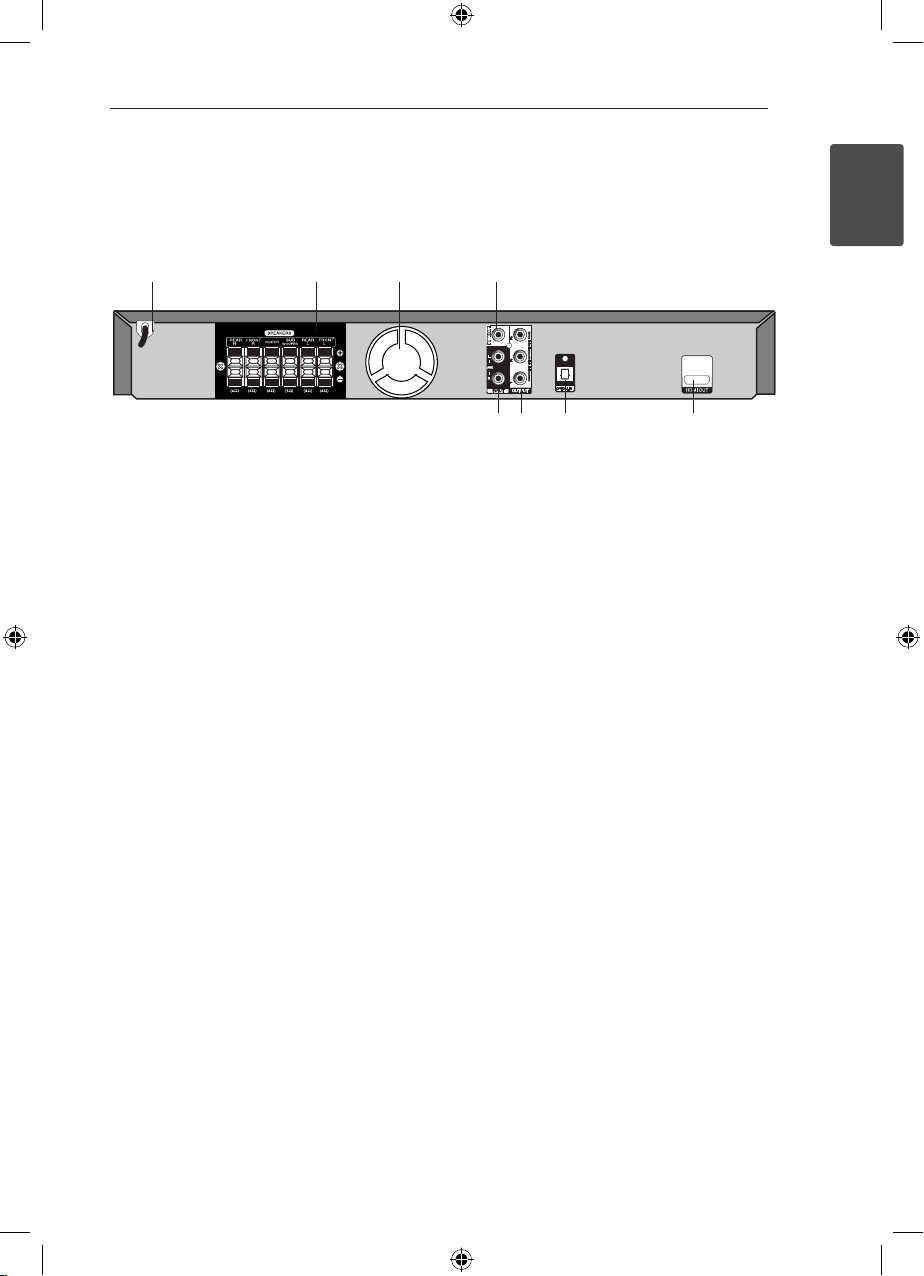
Getting Started 11
Rear panel
a b c d
h g f e
1
Getting Started
Power cord
a
Speakers connectors
b
Connects the speaker cables.
Cooling Fan
c
VIDEO OUT
d
Connects to a TV with video inputs.
HDMI OUT
e
Connects to TV with HDMI inputs.
(Interface for digital audio and video)
OPTICAL IN
f
Connects to optical audio equipment.
COMPONENT VIDEO (Y PB PR)OUTPUT
g
(PROGRESSIVE SCAN)
Connects to a TV with Y PB PR inputs.
AUX (L/R) INPUT
h
Connects to an external source with 2 channel
audio outputs.
HT906TA-N0_BTURLLK_ENG_6156.indd 11 2011-12-13 �� 5:17:03
Page 12
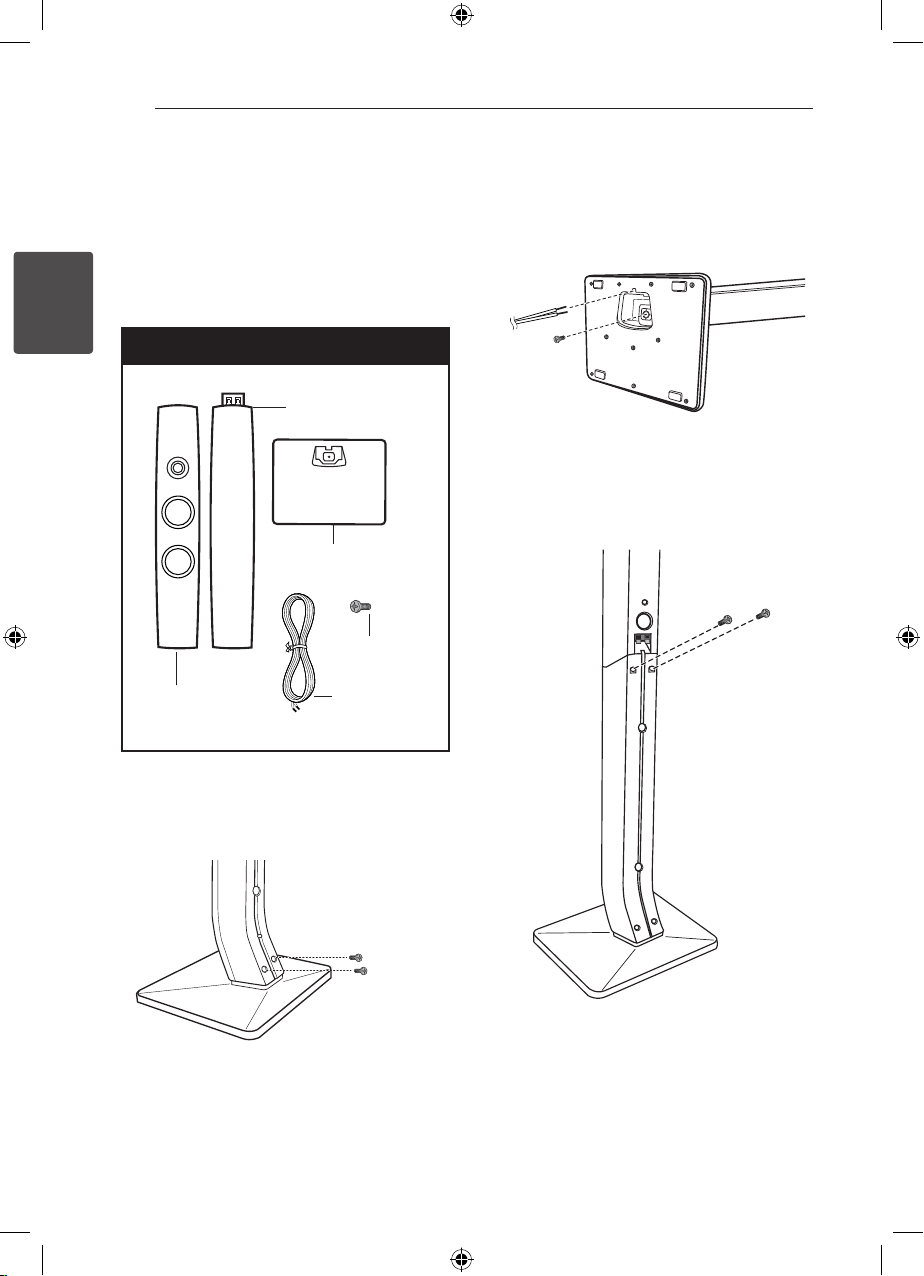
Connecting12
Assembling the
speaker
Before connecting the speakers, assemble the
speakers. Please check the items for assembling the
speakers.
2
Connecting
Preparation
Pole
Base
Speaker
2. Secure the connection with a supplied screw,
then insert a speaker wire from the bottom of
the base.
(Big screw)
3. Attach the speakers to the speaker stands by
rotating the screws.
Screw
(Small screw)
Cable
1. Attach the pole to the base, then secure the
connection with a supplied screw.
(Small screw)
HT906TA-N0_BTURLLK_ENG_6156.indd 12 2011-12-13 �� 5:17:04
Page 13
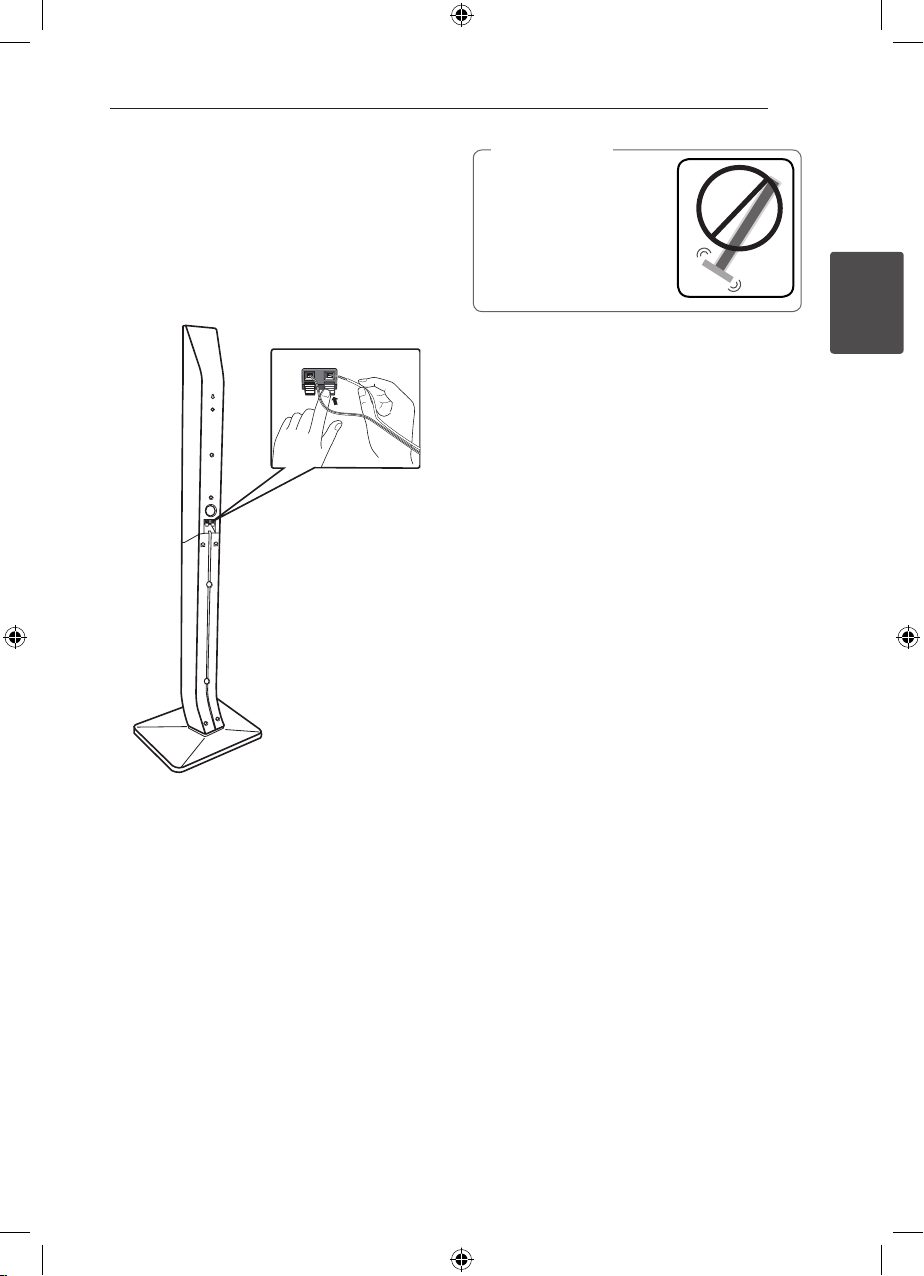
Connecting 13
4. Connect the speaker wire to the terminal on the
speaker.
Make sure the wire marked black goes in to the
terminal marked “–” (minus) and the other wire
goes in to the terminal marked
“+” (plus).
Caution
>
Be careful that the speaker
does not fall down.
Otherwise it may result in
the speaker malfunctioning
and causing personal injury
and/ or property damage.
2
Connecting
HT906TA-N0_BTURLLK_ENG_6156.indd 13 2011-12-13 �� 5:17:04
Page 14
14
Connecting
Attaching the speakers
to the unit
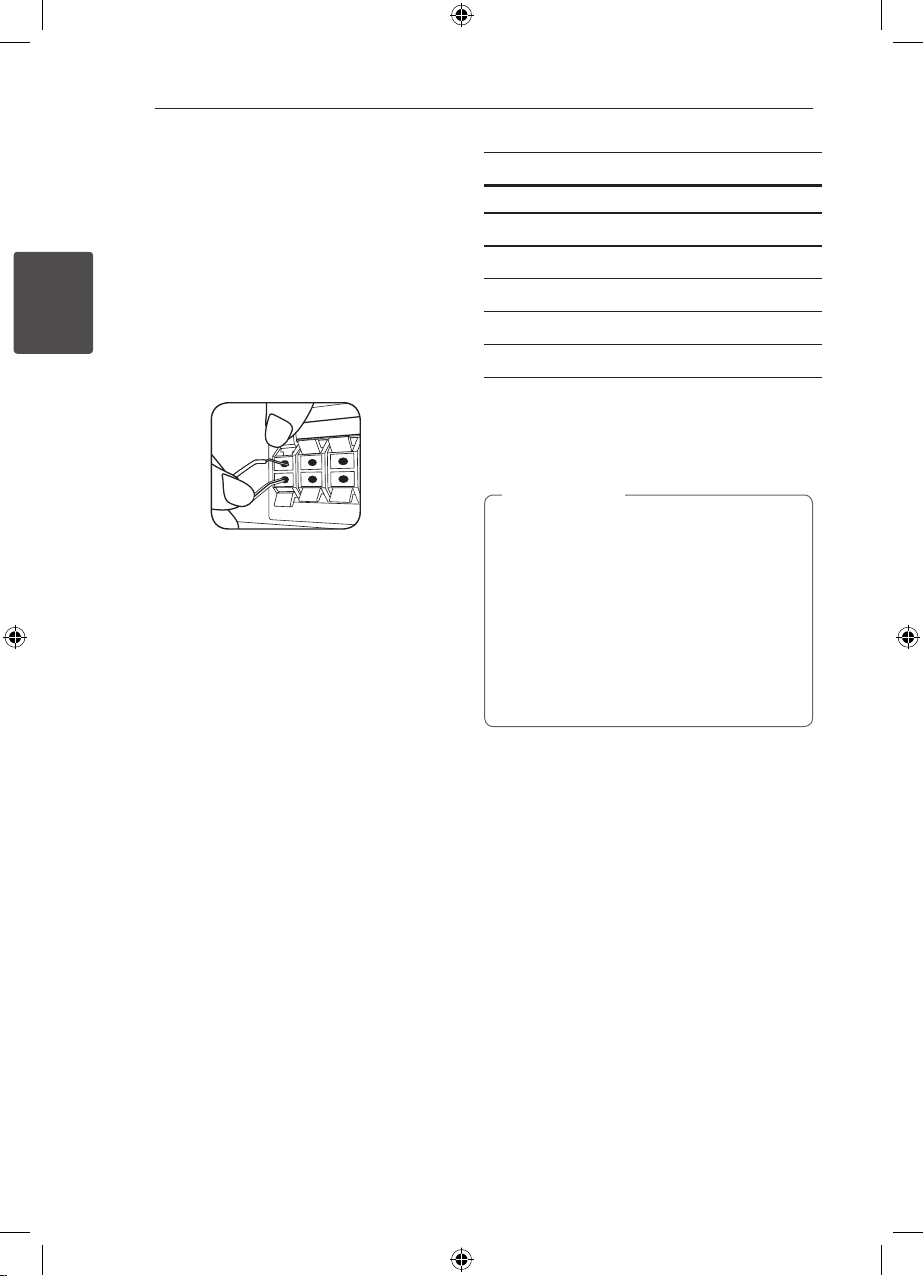
1. Connect the wires to the unit.
Match each wire’s colored band to the same
colored connection terminal on the rear of the
unit. To connect the cable to the unit, press
2
Connecting
each plastic nger pad to open the connection
terminal. Insert the wire and release the nger
pad.
Connect the black stripe of each wire to the
terminals marked -(minus) and the other end
to the terminals marked + (plus).
2. Connect the wires to the speakers.
Connect the other end of each wire to the
correct speaker according to the color coding:
Color Speaker Position
Grey Rear Rear right
Blue Rear Rear left
Green Center Center
Orange Sub woofer Any front position
Red Front Front right
White Front Front left
To connect the cable to the speakers, press each
plastic nger pad to open the connection terminals
on the base of each speaker. Insert the wire and
release the nger pad.
Caution
>
yBe careful to make sure children do not put
their hands or any objects into the *speaker
duct.
*Speaker duct : A hole for plentiful bass
sound on speaker cabinet (enclosure).
yThe speakers contain magnet parts, so color
irregularity may occur on the TV screen or
PC monitor screen. Please use the speakers
far away from either TV screen or PC
monitor.
HT906TA-N0_BTURLLK_ENG_6156.indd 14 2011-12-13 �� 5:17:04
Page 15
Connecting 15
A
B
D
E
F
A
A
A
A
A
G
C
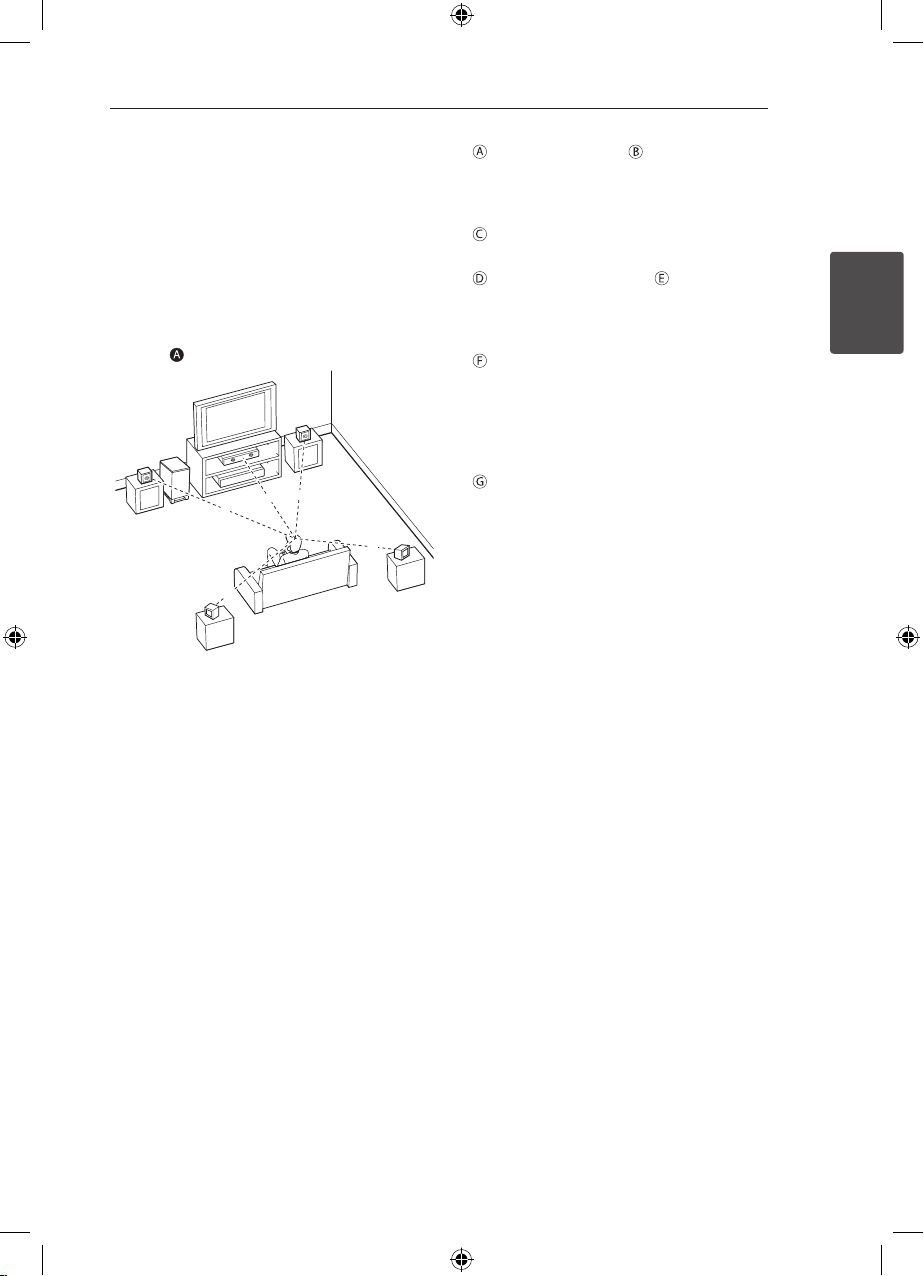
Positioning the system
The following illustration shows an example of
positioning the system. Note that the illustrations
in these instructions dier from the actual unit for
explanation purposes.
For the best possible surround sound, all the
speakers other than the subwoofer should be
placed at the same distance from the listening
position ( ).
Front left speaker (L)/ Front right speaker (R):
Place the front speakers to the sides of the
monitor or screen and as ush with the screen
surface as possible.
Center speaker: Place the center speaker above
or below the monitor or screen.
Surround left speaker (L)/ Surround right
speaker (R):
Place these speakers behind your listening
position, facing slightly inwards.
Subwoofer: The position of the subwoofer is
not so critical, because low bass sounds are not
highly directional. But it is better to place the
subwoofer near the front speakers. Turn it slightly
toward the center of the room to reduce the wall
reections.
Unit
2
Connecting
HT906TA-N0_BTURLLK_ENG_6156.indd 15 2011-12-13 �� 5:17:05
Page 16
Connecting16
Connections to Your
TV
Make one of the following connections, depending
on the capabilities of your existing equipment.
Note
,
yDepending on your TV and other
2
Connecting
equipment you wish to connect, there are
various ways you could connect the player.
Use only one of the connections described
in this manual.
yPlease refer to the manuals of your T V,
Stereo System or other devices as necessary
to make the best connections.
Caution
>
yMake sure the unit is connected directly
to the TV. Tune the TV to the correct video
input channel.
yDo not connect your player via your VCR.
The image could be distorted by the copy
protection system.
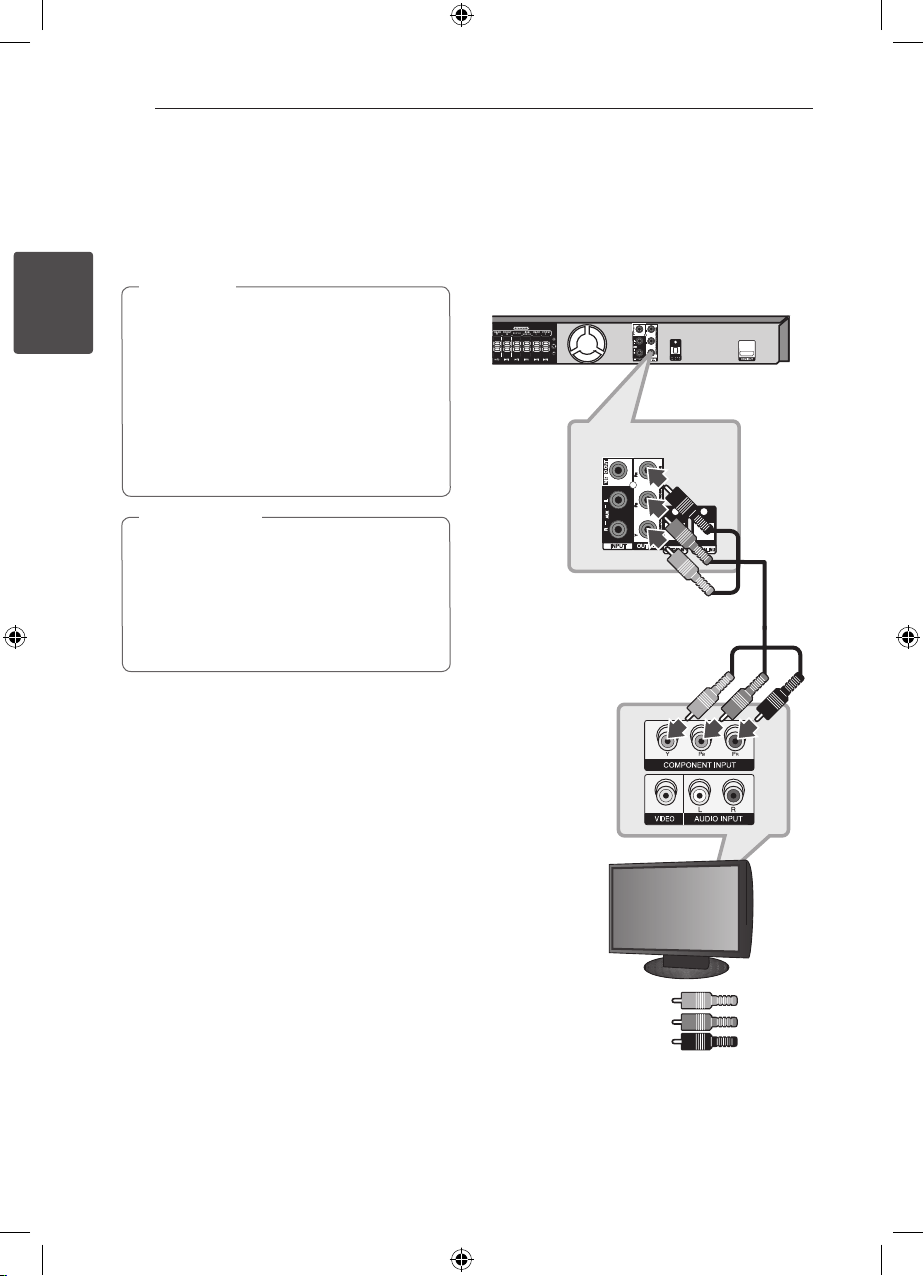
Component Video Connection
Connect the COMPONENT VIDEO OUTPUT
(PROGRESSIVE SCAN) jacks on the unit to the
corresponding input jacks on the TV using
component cables.
You can hear the sound through the system’s
speakers.
Unit
TV
Green
Blue
Red
HT906TA-N0_BTURLLK_ENG_6156.indd 16 2011-12-13 �� 5:17:05
Page 17
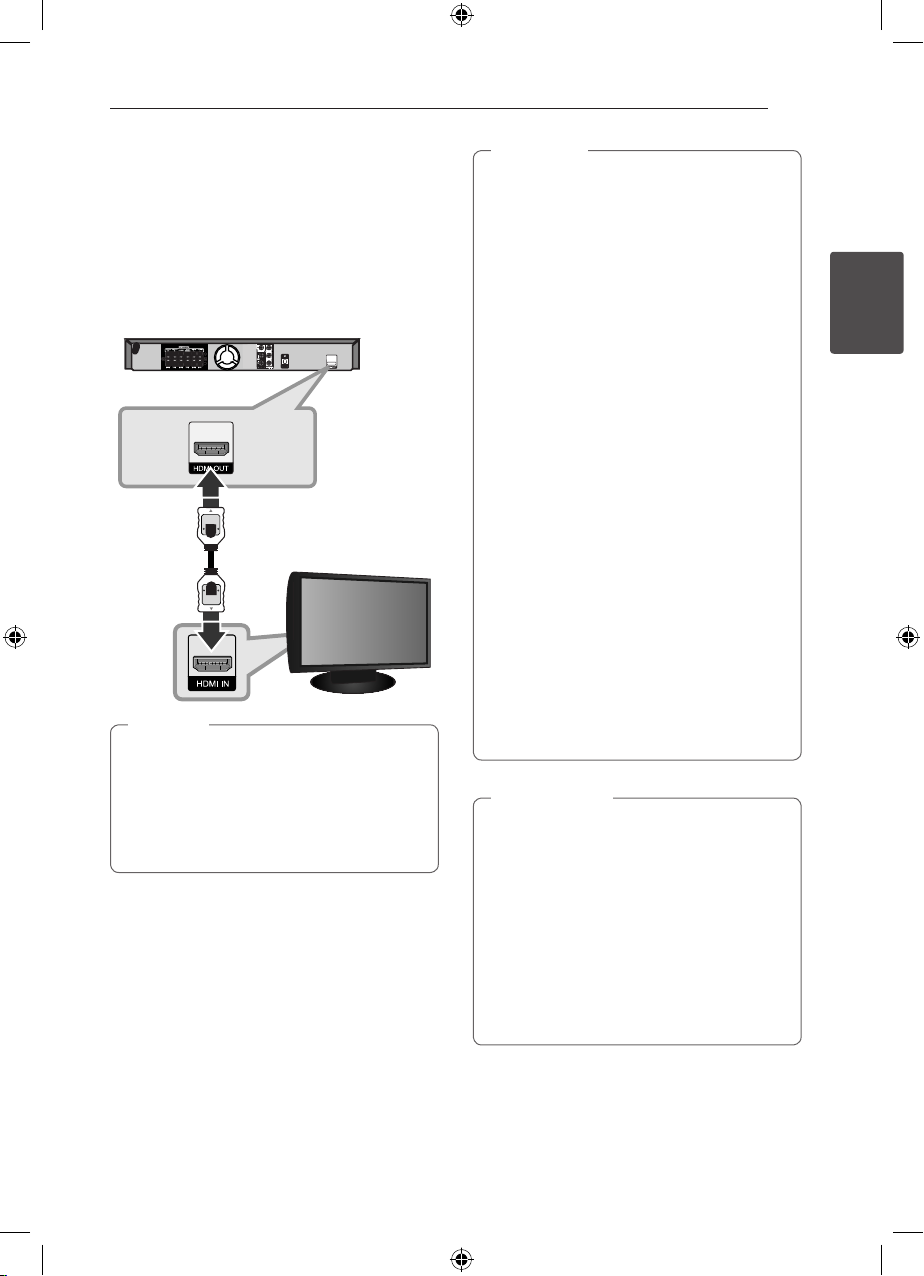
HDMI Out Connection
If you have a HDMI TV or monitor, you can connect
it to this unit using a HDMI cable (Type A, High
Speed HDMI™ Cable).
Connect the HDMI OUT jack on the unit to the
HDMI IN jack on a HDMI compatible TV or monitor.
Set the TV’s source to HDMI (refer to TV’s Owner’s
manual).
Unit
TV
Tip
,
yYou can fully enjoy digital audio and video
signals together with this HDMI connection.
yWhen you use HDMI connection, you can
change the resolution for the HDMI output.
(Refer to “Resolution Setting” on page 19.)
Connecting 17
Note
,
yIf a connected HDMI device does not accept
the audio output of the unit, the HDMI
device’s audio sound may be distorted or
may not output.
yWhen you connect a HDMI or DVI
compatible device make sure of the
following:
- Try switching o the HDMI/DVI device
and this unit. Next, switch on the HDMI/
DVI device and leave it for around 30
seconds, then switch on this unit.
- The connected device’s video input is set
correctly for this unit.
- The connected device is compatible with
720 x 480i (or 576i), 720 x 480p (or 576p),
1 280 x 720p, 1920 x 1080i or 1920 x 1080p
video input.
yNot all HDCP-compatible HDMI or DVI
devices will work with this unit.
- The picture will not be displayed properly
with non-HDCP device.
- This unit does not playback and TV screen
is changed to black or green screen or the
snow noise may occur on the screen.
yIf there is noise or lines on the screen, please
check the HDMI cable and use a higher
version cable than High Speed HDMI™
Cable.
Caution
>
yChanging the resolution when the
connection has already been established
may result in malfunctions. To solve the
problem, turn o the unit and then turn it
on again.
yWhen the HDMI connection with HDCP is
not veried, TV screen is changed to black
or green screen or the snow noise may
occur on the screen. In this case, check the
the HDMI connection, or disconnect the
HDMI cable.
2
Connecting
HT906TA-N0_BTURLLK_ENG_6156.indd 17 2011-12-13 �� 5:17:05
Page 18
Connecting18
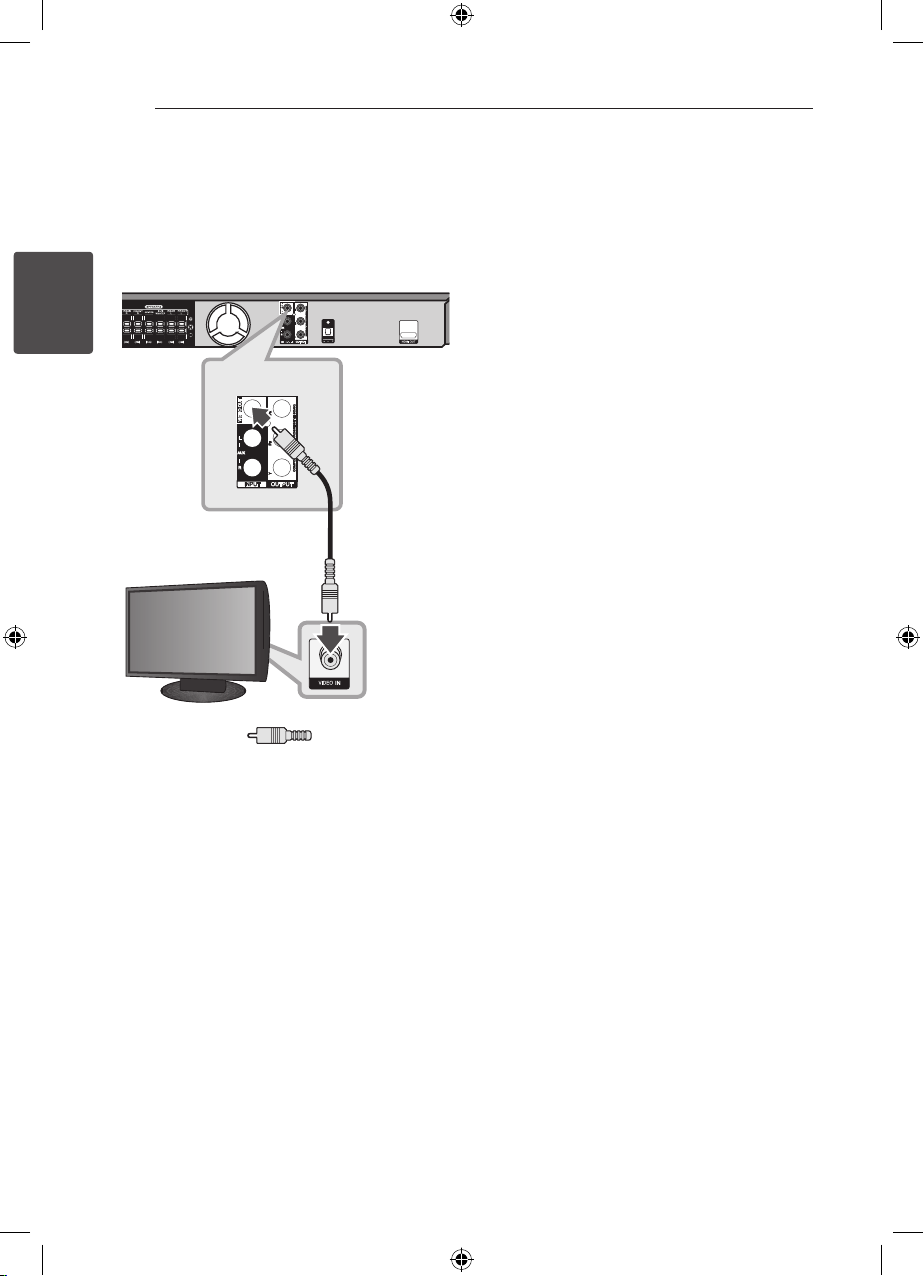
Video Connection
Connect the VIDEO OUT jack on the unit to the
video in jack on the TV using a video cable.
You can hear the sound through the system’s
speakers.
2
Connecting
TV
Unit
Yellow
HT906TA-N0_BTURLLK_ENG_6156.indd 18 2011-12-13 �� 5:17:06
Page 19
Connecting 19
Resolution Setting
The unit provides several output resolutions for
HDMI OUT and COMPONENT VIDEO OUT jacks. You
can change the resolution using [Setup] menu.
1. Press n HOME.
2. Use
ENTER. The [Setup] menu appears.
3. Use
D
4. Use
then press D to move to the third level.
5. Use
press b ENTER to conrm your selection.
If your TV does not accept the resolution you
have set on the player, you can set resolution
to 480p (or 576p) as follows:
Press Z STOP for more than 5 seconds.
to select the [Setup] and press b
A/D
to select [Display] option then press
W/S
to move to the second level.
to select the [Resolution] option
W/S
to select the desired resolution then
W/S
Note
,
Video Output
Resolution
Displayed resolution in display window and
outputted resolution may dierent according to
connection type.
[HDMI OUT]: 1080p, 1080i, 720p and 480p (or 576p)
and 480i (or 576i)
[COMPONENT VIDEO OUT]: 480p (or 576p) and 480i
(or 576i)
[VIDEO OUT ]: 480i (or 576i)
2
Connecting
HT906TA-N0_BTURLLK_ENG_6156.indd 19 2011-12-13 �� 5:17:06
Page 20
Connecting20
Optional Equipment
Connection
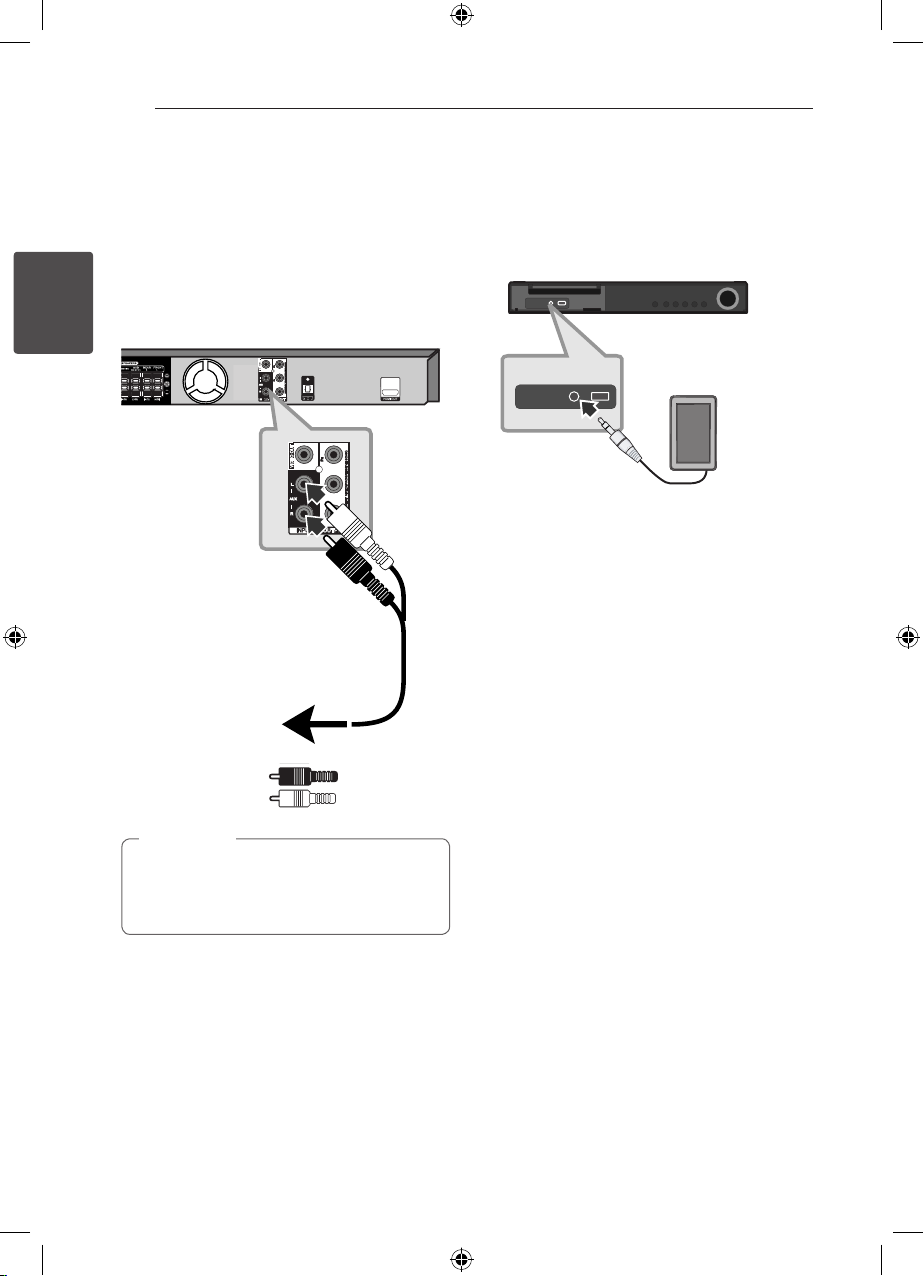
AUX In Connection
Connect an Output of auxiliary device to the AUX
(L/R) INPUT Connector.
2
Connecting
To the audio output jacks
of your component
(TV, VCR, etc.)
Note
,
If your TV has only one output for audio
(mono), connect it to the left (white) audio jack
on the unit.
Red
White
AUDIO (PORT. IN) In
Connection
Connect an output of portable device (MP3 or PMP
etc) to the AUDIO (PORT. IN) input connector.
MP3 player, etc...
Unit
Listening to music from your
portable player or external
device
The unit can be used to play the music from many
types of portable player or external devices.
1. Connect the portable player to the
PORT. IN (PORTABLE IN) connector of the unit.
Or
Connect the external device to the AUX
connector of the unit.
2. Turn the power on by pressing 1 (POWER).
3. Select the PORTABLE or AUX (L/R) INPUT
function by pressing P INPUT.
4. Turn on the portable player or external device
and start it playing.
HT906TA-N0_BTURLLK_ENG_6156.indd 20 2011-12-13 �� 5:17:06
Page 21
Connecting 21
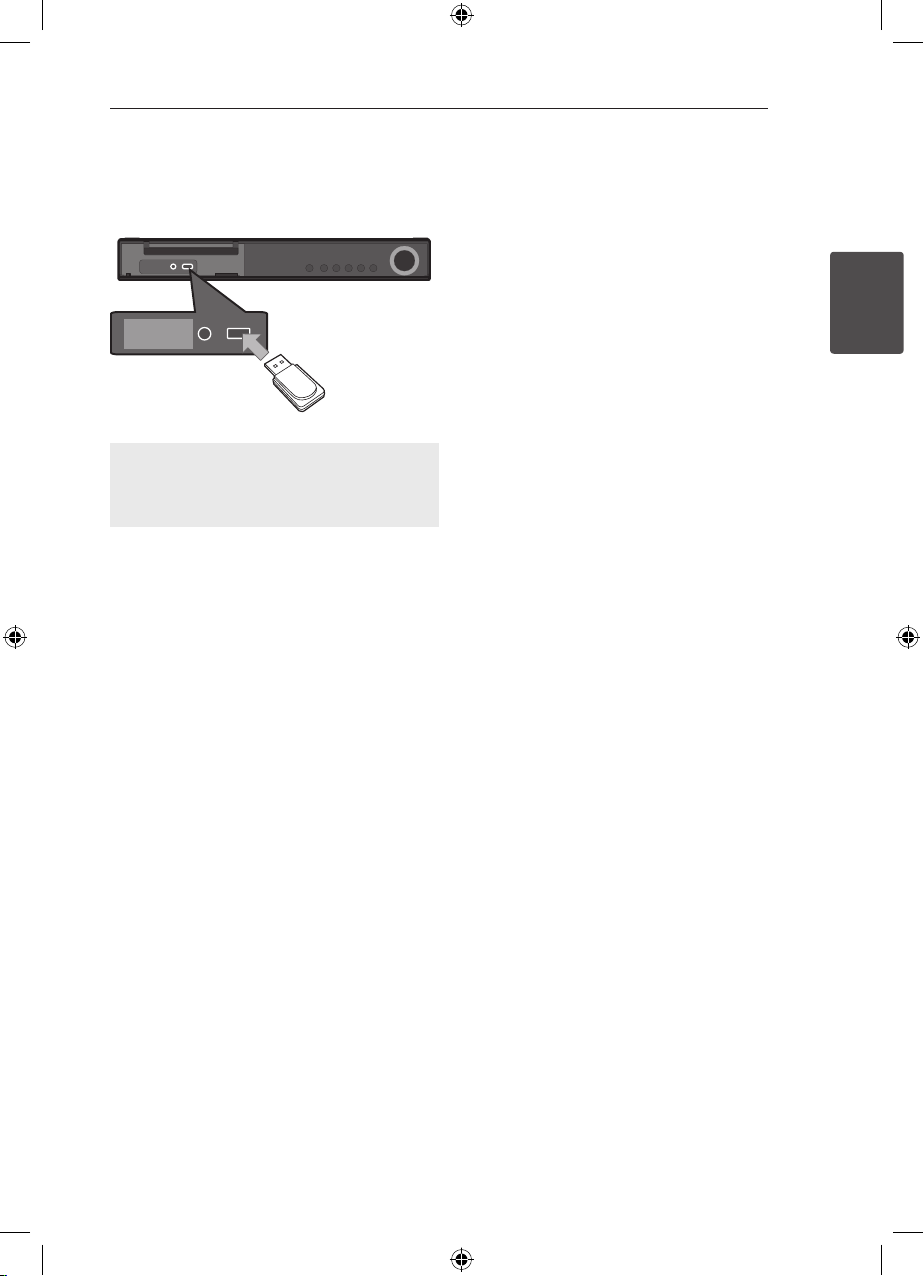
USB Connection
Connect the USB port of USB Memory (or MP3
player, etc.) to the USB port on the front of the unit.
Removing the USB Device from the unit
1. Choose a dierent function mode or press Z
STOP twice in a row.
2. Remove the USB device from the unit.
Compatible USB Devices
yMP3 Player : Flash type MP3 player.
yUSB Flash Drive : Devices that support USB2.0 or
USB1.1.
yThe USB function of this unit does not support
some USB devices.
USB device requirement
yDevices which require additional program
installation connected to a computer, are not
supported.
yDo not extract the USB device while in operation.
yFor a large capacity USB, it may take longer than
a few minute to be searched.
yTo prevent data loss, back up all data.
yIf you use a USB extension cable or USB hub, the
USB device is not recognized.
yUsing NTFS le system is not supported. (Only
FAT(16/32) le system is supported.)
yThis unit is not supported when the total
number of les is 1 000 or more.
yExternal HDD, Card readers, Locked devices,
or hard type usb devices are not supported.
yUSB port of the unit cannot be connected to PC.
The unit can not be used as a storage device.
2
Connecting
HT906TA-N0_BTURLLK_ENG_6156.indd 21 2011-12-13 �� 5:17:06
Page 22
Connecting22
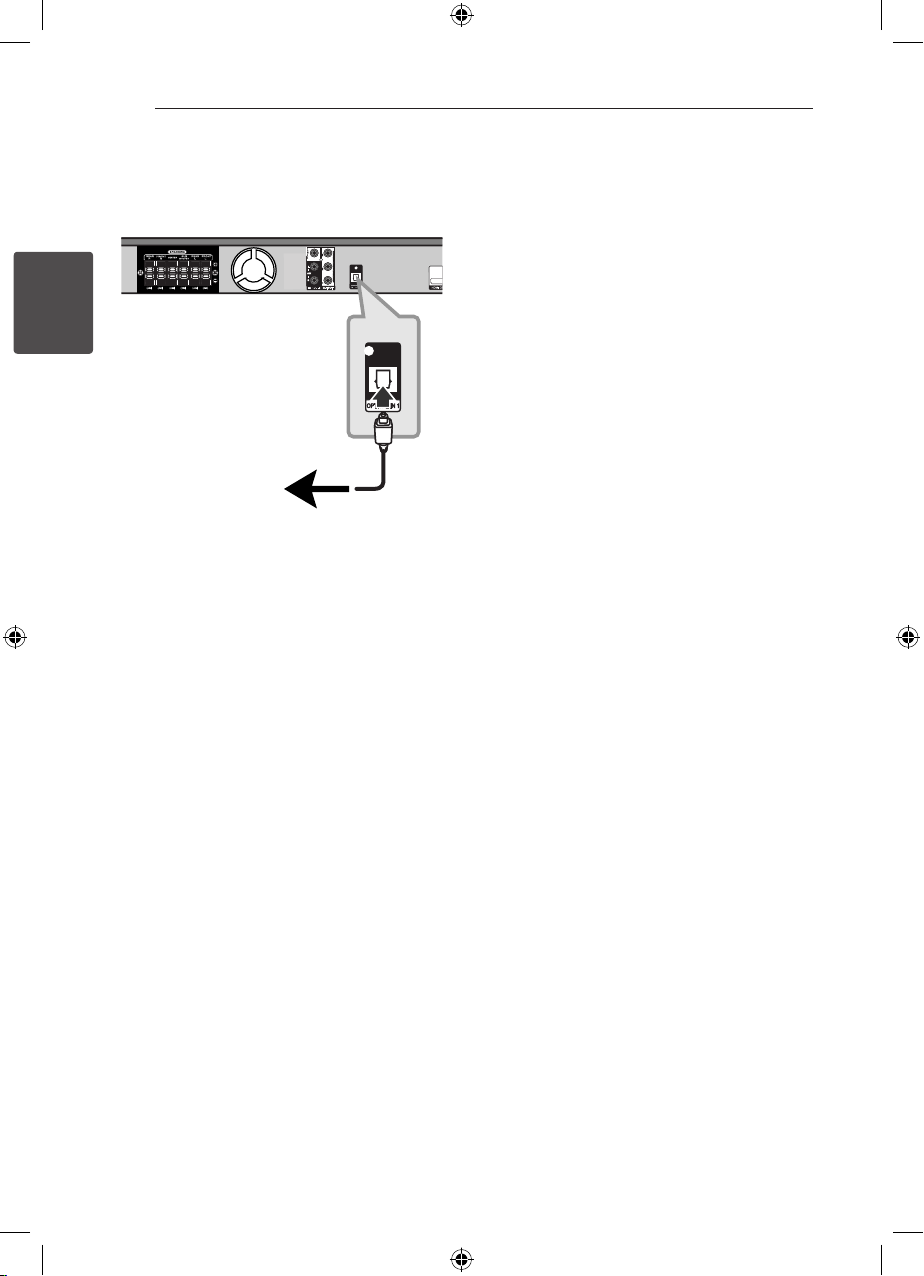
OPTICAL In connection
Connect an optical output of Unit (or Digital Device
etc) to the OPTICAL IN connector.
2
Connecting
To the digital
optical output jack
of your component
Home theater speaker ez
setup
Listen to sound from TV, DVD and Digital Device
with 5.1(2.1 or 2)ch mode. Even in power o
mode, if you press OPTICAL, then power is on and
automatically changed to AUX OPT mode.
1. Connect the unit’s OPTICAL IN jack to jack on
optical out of your TV (or Digital Device etc.).
2. Select the AUX OPT by using the OPTICAL.
To select the AUX OPT directly.
3. Listen sound with 5.1(2.1 or 2)ch speaker.
4. To escape from AUX OPT by using the OPTICAL.
Function is retuned to previous one.
HT906TA-N0_BTURLLK_ENG_6156.indd 22 2011-12-13 �� 5:17:06
Page 23
System Setting 23
Adjust the setup
settings
By using the Setup menu, you can make various
adjustments to items such as picture and sound.
You can also set a language for the subtitles and
the Setup menu, among other things. For details on
each Setup menu item, see pages 23 to 28.
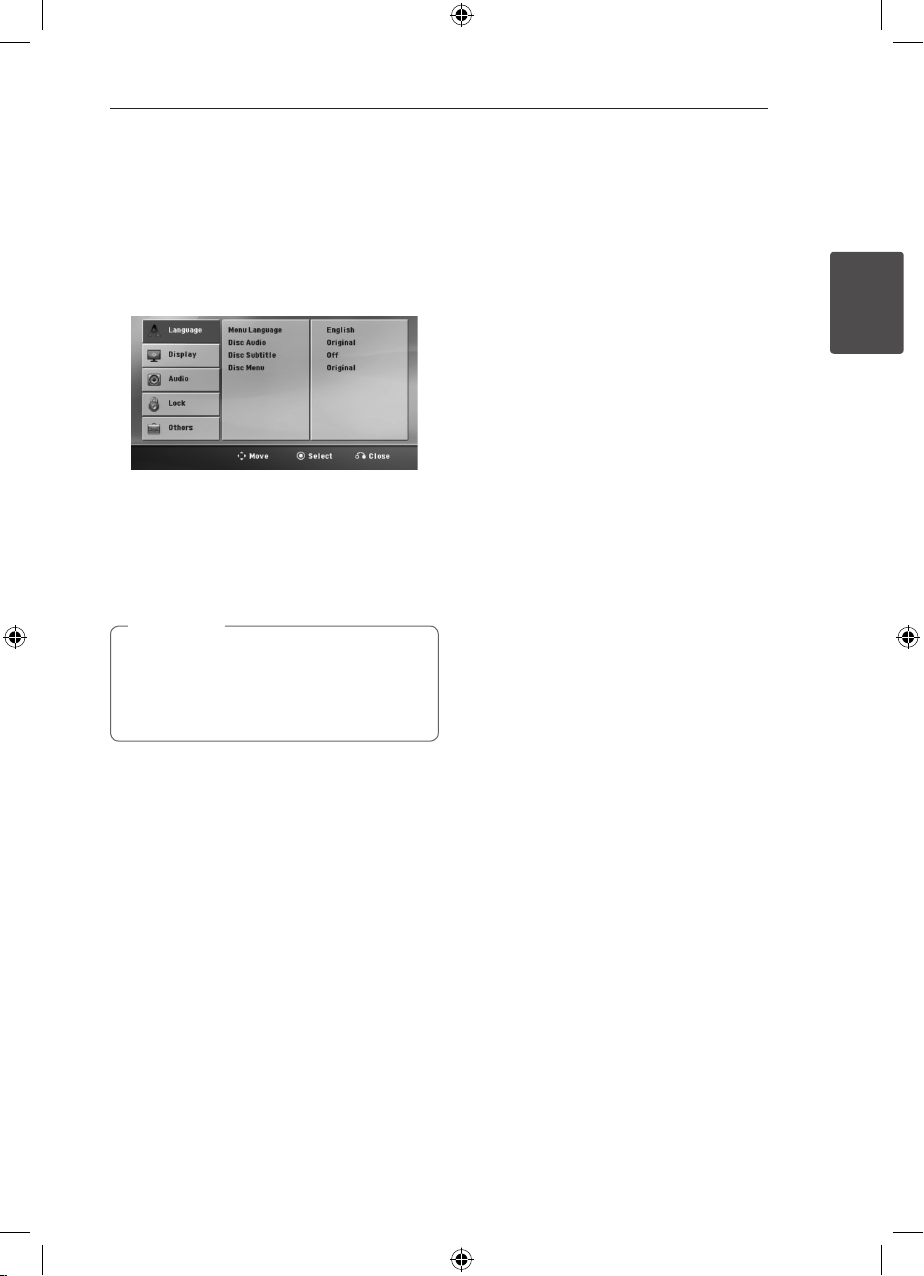
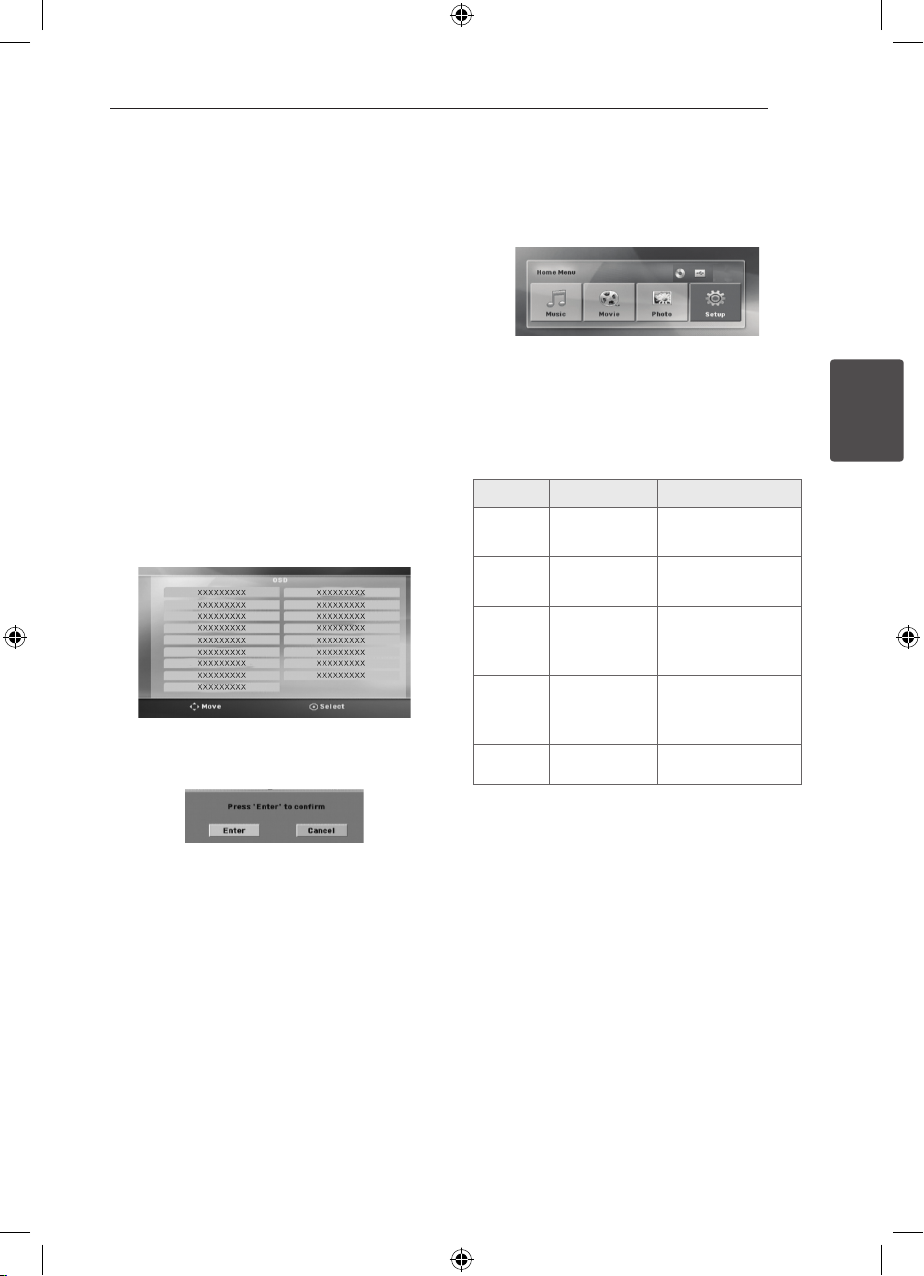
OSD Initial language settings
- Optional
During the rst use of this unit, the initial language
setup menu appears on your TV screen. You must
complete initial language selection before using
the unit. English will be selected as the initial
language.
1. Press 1 (POWER) to turn the unit on. The
language setup menu will appear on the screen.
2. Use
WSAD
ENTER.
b
The conrm menu will appear.
to select a language then press
To display and exit the Setup
menu
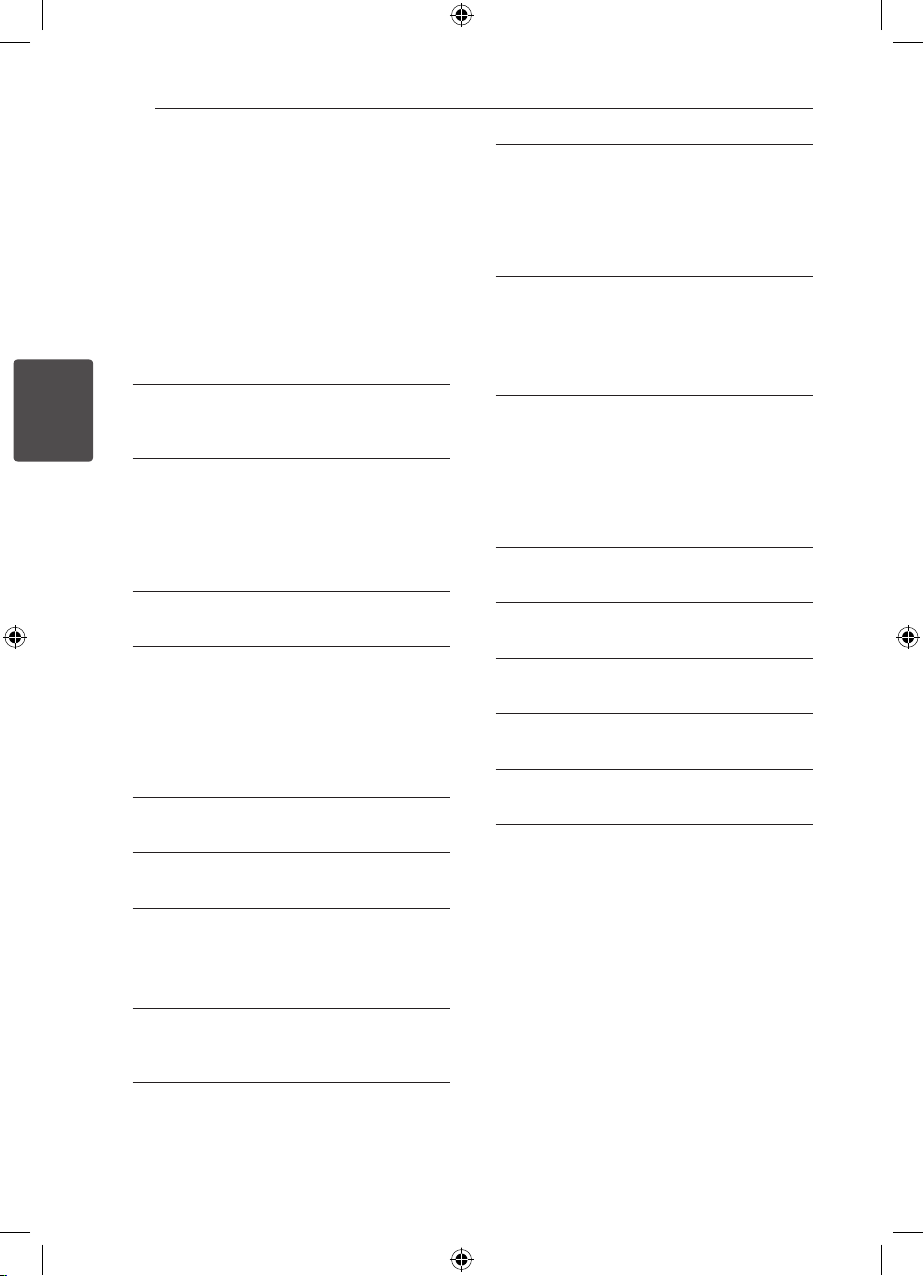
1. Press n HOME.
Displays the [Home Menu].
2. Select an [Setup] by using AD.
3. Press b ENTER.
Displays the [Setup].
4. Press n HOME or x RETURN to exit in the
[Setup] Menu.
About help menu for Setup
Menu Buttons Operation
ws
Move
a
Move
d
Move
x
Close
b
Select
WS
A
D
RETURN
x
ENTER To conrm menu.
b
Moving to another
menu.
Moving to previous
level.
Moving to next
level or selecting
menu.
To exit the [Setup]
menu or [ 5.1
Speaker Setup].
3
System Setting
3. Use AD to select the [Enter] then press b
ENTER to nish the language setup.
HT906TA-N0_BTURLLK_ENG_6156.indd 23 2011-12-13 �� 5:17:06
Page 24
System Setting24
Language
Menu Language
Select a language for the Setup menu and then on
screen display.
Disc Audio / Disc Subtitle / Disc
Menu
Select the language you prefer for the audio track
(disc audio), subtitles, and the disc menu.
[Original]
Refers to the original language in which the
3
System Setting
disc was recorded.
[Other]
To select another language, press numeric
buttons and then b ENTER to enter the
corresponding 4-digit number according to
the language code list on the page 39. If you
enter the wrong language code, press CLEAR.
[O (for Disc Subtitle)]
Turn o Subtitle.
Display
TV Aspect
Select which screen aspect to use based on the
shape of your TV screen.
[4:3]
Select when a standard 4:3 TV is connected.
[16:9]
Select when a 16:9 wide TV is connected.
[Panscan]
Automatically displays the wide picture on the
entire screen and cuts o the portions that do
not t. (If the disc/le is not compatible with
Pan Scan, the picture is displayed at Letterbox
ratio.)
Resolution
Sets the output resolution of the Component and
HDMI video signal. Refer to “Resolution Setting” for
details about the resolution (page 19).
[Auto]
If the HDMI OUT jack is connected to
TVs providing display information (EDID),
automatically selects the resolution best suited
to the connected TV. If the COMPONENT
VIDEO OUT is only connected, this changes the
resolution to 480i (or 576i) as default resolution.
[1080p]
Outputs 1080 lines of progressive video.
[1080i]
Outputs 1080 lines of interlaced video.
[720p]
Outputs 720 lines of progressive video.
[480p (or 576p)]
Outputs 480 (or 576) lines of progressive video.
[480i (or 576i)]
Outputs 480 (or (576) lines of interlaced video.
Display Mode
The Display Mode setting works only when the TV
Aspect mode is set to 4:3.
[Letterbox]
Displays a wide picture with bands on the
upper and lower portions of the screen.
HT906TA-N0_BTURLLK_ENG_6156.indd 24 2011-12-13 �� 5:17:06
Page 25
System Setting
25
Audio
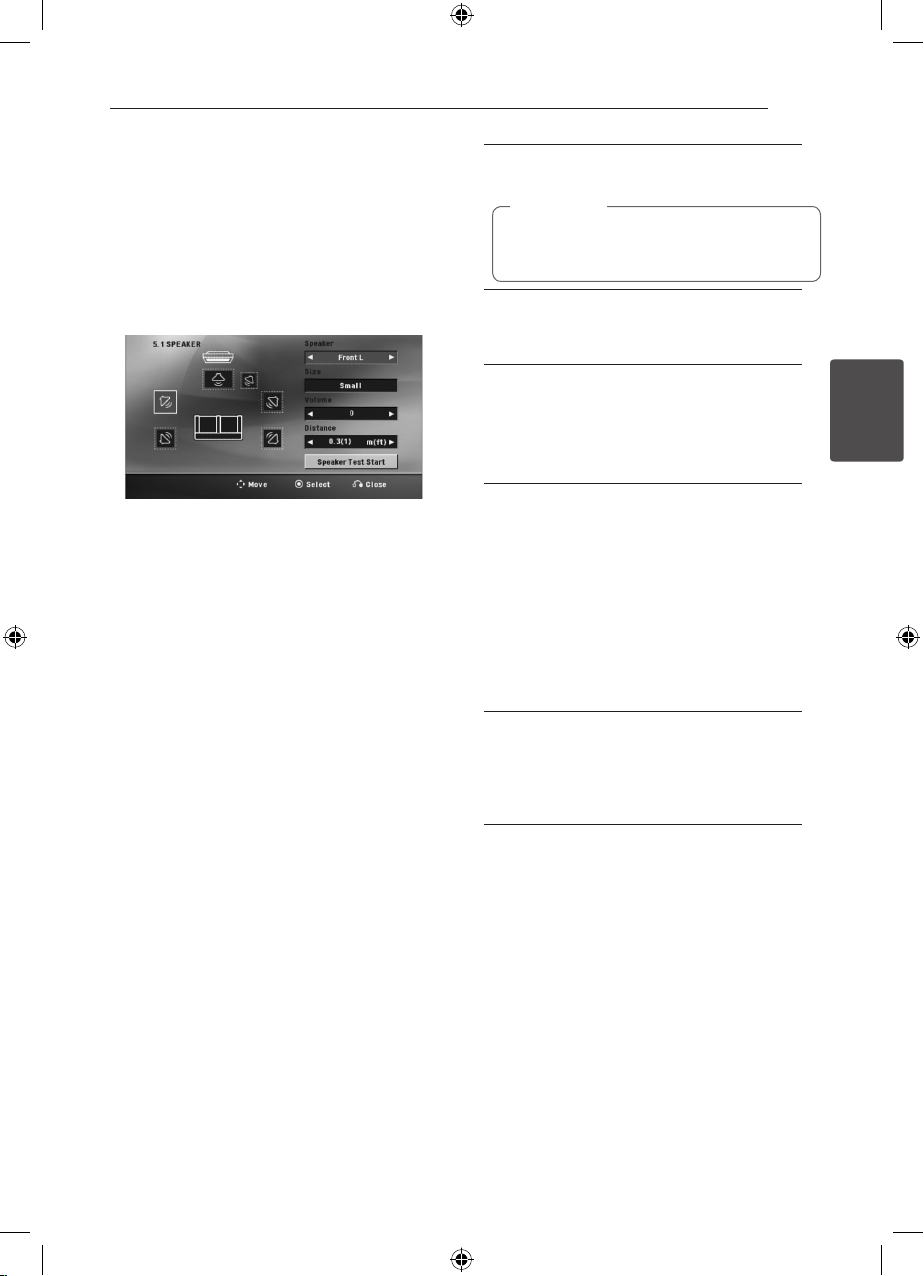
5.1 Speaker Setup
Make the following settings for the built-in 5.1
channel surround decoder.
1. Select [5.1 Speaker Setup] on the [Audio] menu.
2. Press b ENTER.
The [5.1 SPEAKER] appears.
3. Use AD to select the desired speaker.
4. Adjust options using
5. Returns to the previous menu by pressing x
RETURN.
WSAD
buttons.
[Speaker]
Select a speaker that you want to adjust.
Note
,
Certain speaker settings are prohibited by the
Dolby Digital licensing agreement.
[Size]
Since the speaker settings are xed, you cannot
change the settings.
[Volume]
Press AD to adjust the output level of the
selected speaker.
Front L/R : 0 - -5
SubWoofer, Rear L/R, Center : 5 - -5
[Distance]
After you connected speakers to your unit,
set the Distance between the speakers and
your listening point if the distance of Center
or Rear speakers is bigger than the distance
of Front speakers. This allows the sound from
each speaker to reach the listener at the same
time. Press AD to adjust the Distance of the
selected speaker. This distance is equivalent to
a dierence of the distance between Center or
Rear speaker and Front speakers.
[Test]
Select [Speaker Test Start] by using the WS
and press b ENTER. Press b ENTER again to
stop. Adjust the volume to match the volume
of test signals memorized in the system.
3
System Setting
HT906TA-N0_BTURLLK_ENG_6156.indd 25 2011-12-13 �� 5:17:06
Page 26
System Setting26
DRC (Dynamic Range Control)
Make the sound clear when the volume is turned
down (Dolby Digital only). Set to [On] for this eect.
Vocal
Select [On] to mix karaoke channels into normal
stereo.
This function is eective for multi-channel karaoke
DVDs only.
HD AV Sync
Sometimes Digital TV encounters a delay between
picture and sound. If this happens you can
compensate by setting a delay on the sound so
3
that it eectively ‘waits’ for the picture to arrive:
System Setting
this is called HD AV Sync. Use WS (on the remote
control) to scroll up and down through the delay
amount, which you can set at anything between 0
and 300m sec.
Lock (Parental Control)
Initial Setting the Area Code:
When you use this unit for the rst time, you have
to set the Area Code.
1. Select the [Lock] menu and then press D.
2. Press D.
To access the [Lock] options, you must input the
password you have created. Input a password
and press b ENTER. Enter it again and press b
ENTER to verify. If you make a mistake before
pressing b ENTER, press CLEAR.
3. Select the rst character using WS buttons.
4. Press b ENTER and select the second character
using WS buttons.
5. Press b ENTER to conrm your Area code
selection.
Rating
Blocks playback of rated DVDs based on their
contents. Not all discs are rated.
1. Select [Rating] on the [Lock] menu then press
.
D
2. Input a password and press b ENTER.
3. Select a rating from 1 to 8 using the WS
buttons.
[Rating 1-8]
Rating one (1) has the most restrictions and
rating eight (8) is the least restrictive.
[Unlock]
If you select unlock, parental control is not
active and the disc plays in full.
4. Press b ENTER to conrm your rating selection.
HT906TA-N0_BTURLLK_ENG_6156.indd 26 2011-12-13 �� 5:17:07
Page 27
System Setting 27
Password
You can enter or change password.
1. Select [Password] on the [Lock] menu and then
press D.
2. Press b ENTER.
3. Input a password and press b ENTER.
To change the password, press b ENTER when
the [Change] option is highlighted. Input a
password and press b ENTER. Enter it again
and press b ENTER to verify.
4. Press n HOME to exit the menu.
Note
,
If you forget your password, you can clear it
using the following steps:
1. Select the [Setup] menu on the [Home
Menu].
2. Input the 6-digit number “210499” and
press b ENTER. The password is cleared.
Area Code
Enter the code of the area whose standards were
used to rate the DVD video disc, based on the list
on page 38.
1. Select [Area Code] on the [Lock] menu then
press D.
2. Input a password and press b ENTER.
3. Select the rst character using WS buttons.
4. Press b ENTER and select the second character
using WS buttons.
5. Press b ENTER to conrm your Area code
selection.
Others
DivX VOD
We provide you with the DivX® VOD ( Video On
Demand) registration code that allows you to rent
and purchase videos using the DivX® VOD service.
For more information, visit www.divx.com/vod.
[Register]
Displays the registration code of your player.
[Deregister]
Deactivate your player and display the
deactivation code.
Note
,
All the downloaded videos from DivX VOD can
only be played back on this unit.
3
System Setting
HT906TA-N0_BTURLLK_ENG_6156.indd 27 2011-12-13 �� 5:17:07
Page 28
Operating28
Using the Home Menu
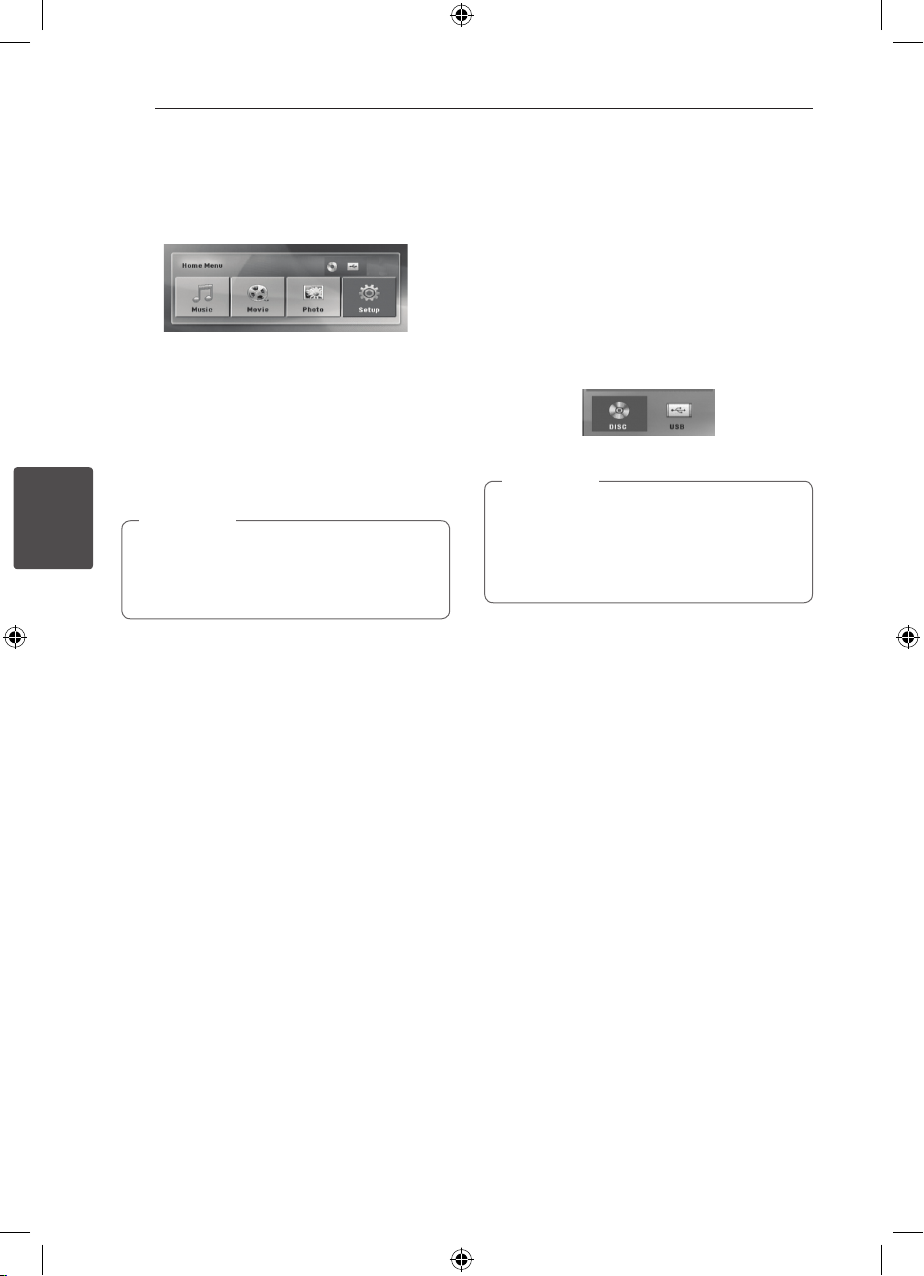
1. Press n HOME.
Displays the [Home Menu].
2. Select an option by using AD.
3. Press b ENTER then selected option menu.
[Music] – Displays [MUSIC] menu.
[Movie] – Start video media’s playback or displays
the [MOVIE] menu.
[Photo] – Displays [PHOTO] menu.
[Setup] – Displays the [Setup] menu.
Note
,
4
Operating
You can not select the [Music], [Movie] or
[Photo] option when the USB device is not
connected or a disc is not inserted.
Basic Operations
1. Insert the disc by using the B OPEN/CLOSE or
Connect the USB device to the USB port.
2. Press n HOME.
Displays the [Home Menu].
3.
Select an option by using AD.
If you select the [Movie], [Photo] or [Music]
option when you connect up to two devices,
it appears as belows. Select a media then press
ENTER.
b
4. Press b ENTER then selected option menu.
Note
,
yFor the most Audio CD and DVD-ROM discs,
playback starts automatically.
yThe unit plays only music le contained in
the USB storage device or disc automatically.
HT906TA-N0_BTURLLK_ENG_6156.indd 28 2011-12-13 �� 5:17:07
Page 29
Operating 29
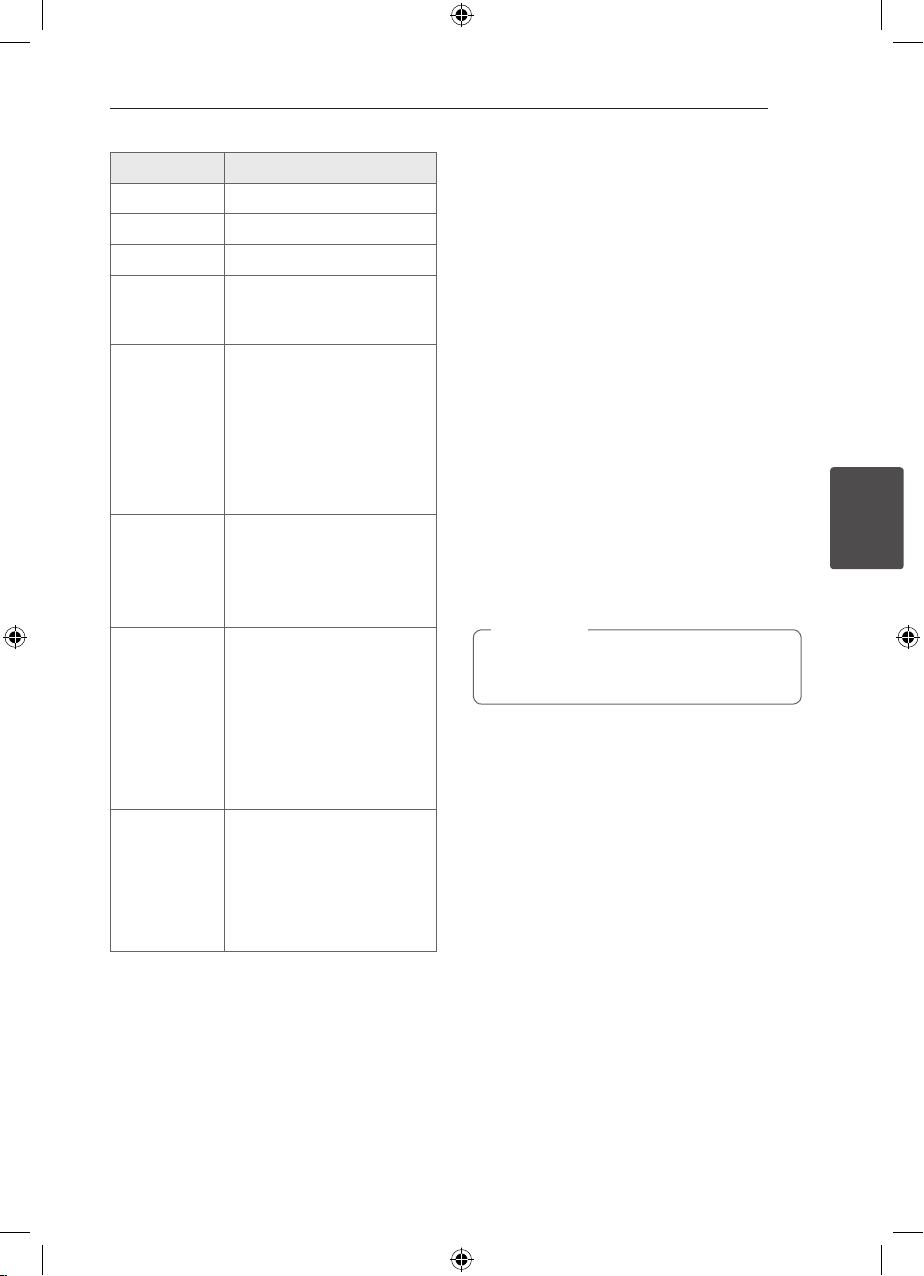
To Do this
Stop Press Z STOP.
Playback
Pause Press M PAUSE/STEP.
Frame-by-
Frame playback
Skipping to the
next/ previous
chapter/ track/
le
Locating a
point quickly by
playing a le in
fast forward or
fast reverse
Playing
repeatedly or
randomly
Press
PLAY.
d
Press M PAUSE/STEP
repeatedly to play title Frameby-Frame. (DVD, DivX only)
During playback, press
SKIP to go to the next
V
chapter/ track/ le or to
return to the beginning of the
current chapter/ track/ le.
Press C SKIP twice briey
to step back to the previous
chapter/ track/ le.
During playback, press c/
SCAN repeatedly to
v
select the required scan speed.
To return to normal speed,
press d PLAY.
Press h REPEAT repeatedly,
and the current title, chapter
or track will be played back
repeatedly or randomly.
- DVD : Chapter/ Title/ O
- DivX : Title/ All/ O
- Audio CD/ MP3/ WMA : Track/
All/ Random/ O
C/
Other Operations
Displaying Disc Information
on-screen
You can display various information about the disc
loaded on-screen.
1. Press m INFO/DISPLAY to show various
playback information.
The displayed items dier depending on the
disc type or playing status.
2. You can select an item by pressing
change or select the setting by pressing AD.
Title – Current title number/ total number of titles.
Chapter – Current chapter number/ total number
Time – Elapsed playing time.
Audio – Selected audio language or channel.
Subtitle – Selected subtitle.
Angle – Selected angle/ total number of angles.
of chapters.
Note
,
If any button is not pressed for a few seconds,
the on-screen display disappears.
WS
and
4
Operating
Slowing down
the playing
speed
HT906TA-N0_BTURLLK_ENG_6156.indd 29 2011-12-13 �� 5:17:07
In the pause mode, press
SLOW (c or v) to select
the required speed. (DVD, DivX
only) The DivX le cannot be
slow down reverse playback.
Page 30
Operating30
To display the DVD Menu
r
When you play a DVD which contains several menu,
you can select the menu you want using the Menu.
1. Press DISC MENU.
The disc’s menu appears.
2. Select the menu by using
3. Press d PLAY to conrm.
WSAD
To display the DVD title
r
When you play a DVD which contains several title,
you can select the title you want using the Menu.
1. Press TITLE.
The disc’s title appears.
2. Select the menu by pressing
3. Press d PLAY to conrm.
4
Operating
1.5 times speed playback
r
The 1.5 speed allows you to watch the pictures and
listen to the sound quicker than playing at a normal
speed.
1. During playback, press d PLAY to play at 1.5
times speed. “dX1.5” appears on the screen.
2. Press d PLAY again to exit.
Screen Saver
The screen saver appears when you leave the unit
in Stop mode for about ve minutes.
.
WSAD
Starting play from selected
time
ry
To start playing at any chosen time on the le or
title.
1. Press m INFO/DISPLAY during playback.
2. Press WS to select the time clock icon and
“--:--:--” appears.
3. Input the required start time in hours, minutes,
and seconds from left to right. If you enter the
wrong numbers, press CLEAR to remove the
numbers you entered. Then input the correct
numbers.
For example, to nd a scene at 1 hour, 10
minutes, and 20 seconds, enter “11020” by using
numerical buttons.
.
4. Press b ENTER to conrm. Playback starts from
the selected time.
Resume playback
ryut
The unit records the point where you pressed the
STOP depending on the disc.
Z
If “MZ (Resume Stop)” appears on the screen
briey, press d PLAY to resume playback (from the
scene point).
If you press Z STOP twice or unload the disc,
“Z”(Complete Stop) appears on the screen. The
unit will clear the stopped point.
Note
,
The resume point may be cleared when a
button is pressed (for example; 1 (POWER),
OPEN/CLOSE, etc).
B
Changing subtitle code page
y
If the subtitle is not displayed properly, you can
change the subtitle code page to view the subtitle
le properly.
1. During playback, press m INFO/DISPLAY to
display the On-Screen display.
2. Use WS to select the [Code Page] option.
3. Use AD to select desired code option.
4. Press x RETURN to exit the On-Screen display.
HT906TA-N0_BTURLLK_ENG_6156.indd 30 2011-12-13 �� 5:17:07
Page 31
Operating 31
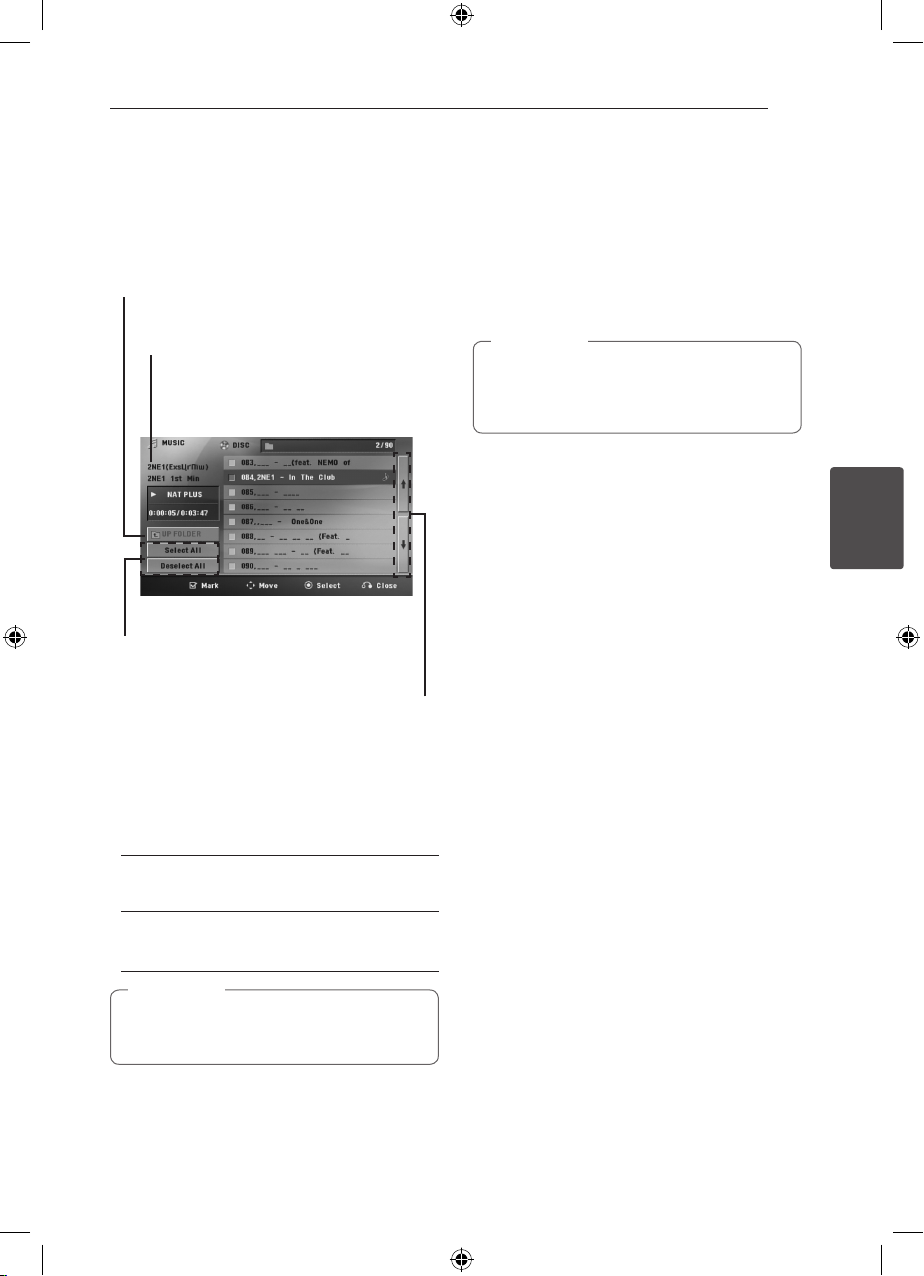
Marked Playback
ut
The mark function enables you to store your
favourite les from any disc or USB device in the
unit memory.
1. Select [Music] on the [Home Menu].
Returning to the upper folder.
(MP3/ WMA only)
File information will be displayed
according to the ID3TAG information
on the appropriate music le. (MP3
only)
Selecting all tracks/ les.
Deselecting all tracks/les.
Moving to the previous or
2. Select a desired music on the [List] by using the
then press MARKER to appears the mark on
WS
the list.
3. Press b ENTER or d PLAY.
Displays the play mode.
4. Select the play mode by using the WS and press
ENTER.
b
next le list.
To delete a Marker
1. Use WS to select the track that you wish to erase
from the marked le.
2. Press MARKER.
To delete all Markers
Use
WSAD
ENTER in program edit mode.
The markers are also cleared when the disc or
USB device is removed, the unit is switched to
power o or the function is switched to others.
to select [Deselect All] then press b
Note
,
4
Operating
[Mark Play]
Marked playback.
[Current Play]
Normal playback.
Note
,
If you want to select all les on the list, select
[Select All] and press b ENTER.
HT906TA-N0_BTURLLK_ENG_6156.indd 31 2011-12-13 �� 5:17:07
Page 32
32
Operating
Viewing a PHOTO file
i
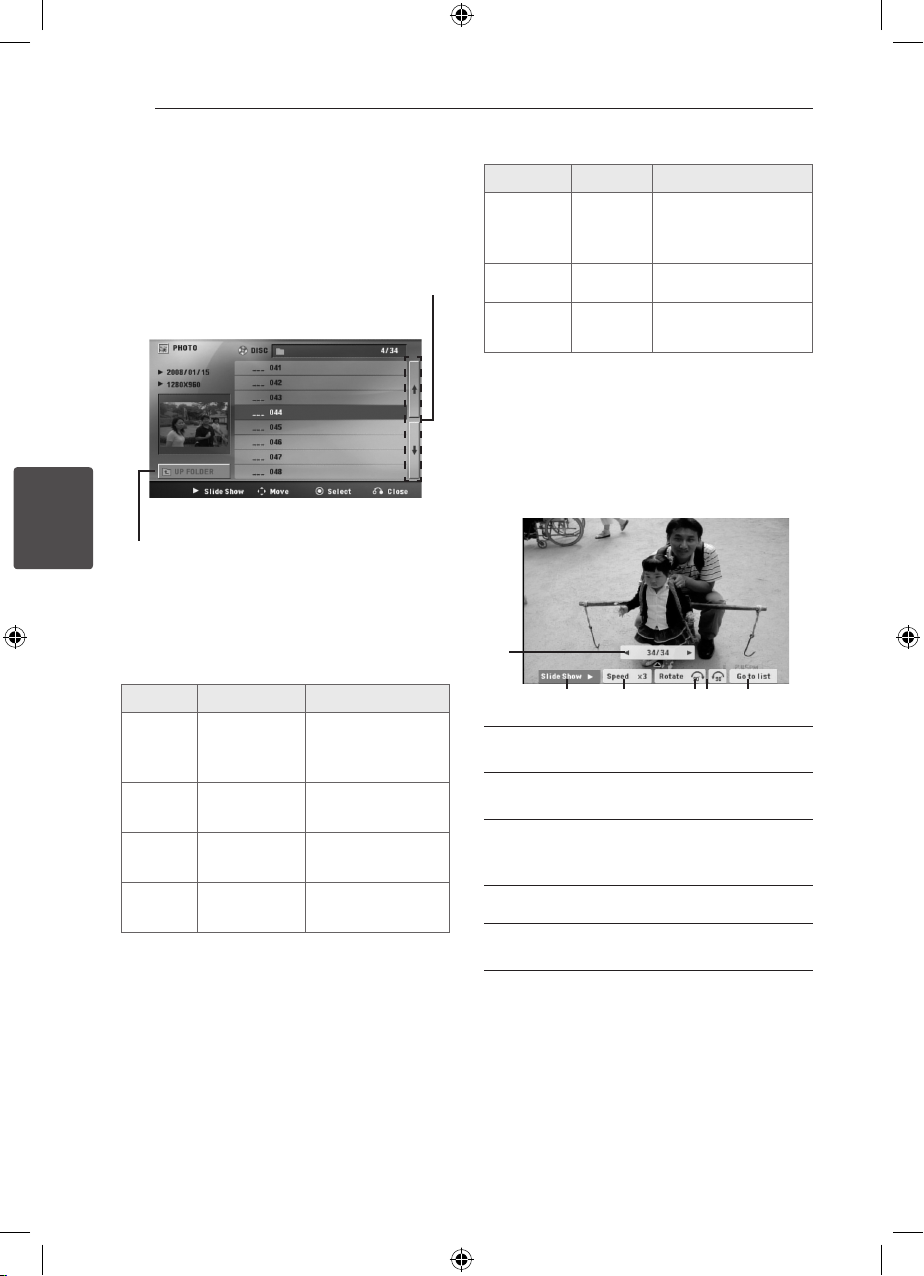
This unit can play discs with photo les.
1. Select [Photo] on the [Home Menu] and press
ENTER.
b
Moving to the previous or
Returning to the upper
folder.
4
Operating
2. Press WS to select a folder, and then press b
ENTER.
3. If you want to view a slide show, press WS to
highlight a le and press d PLAY.
About help menu in the [Photo] menu
Menu Buttons Operation
next le list.
About help menu in the full screen
Menu Buttons Operation
m
Menu
a/d
Prev./ Next
x
Close
INFO/
DISPLAY
A/D
x
RETURN
Displaying the Option
menu.
Moving to another le.
Returning to the
[Photo] menu.
Options while viewing a photo
You can use various options during viewing a
photo in full screen.
1. While viewing a photo in full screen, press
INFO/DISPLAY to display the option menu.
m
2. Select an option using
a
b c d e
WSAD
.
Slide
d
Show
wsad
Move
b
Select
x
Close
HT906TA-N0_BTURLLK_ENG_6156.indd 32 2011-12-13 �� 5:17:07
PLAY
WSAD
ENTER
b
RETURN
x
d
Viewing a slide
show.
Moving to another
le or content.
Viewing a particular
le.
Returning to the
[Home Menu].
a Current photo/ Total number of photos –
Use AD to view previous/next photo.
b
Slide Show z/M– Press ENTER to start
or pause slide show.
c
Speed x3/ x2/ x1 – Use ENTER to select
a delaying speed between photos in a slide
show.
d
Rotate – Press ENTER to rotate the photo.
e
Go to list – Press ENTER to return [Photo]
menu.
Page 33
Operating 33
Sleep Timer Setting
Press SLEEP one or more times to select delay time
between 10 and 180 minutes, after the unit will
turn o.
To check the remaining time, press SLEEP.
To cancel the sleep function, press SLEEP
repeatedly until “SLEEP 10” appears, and then press
SLEEP once again while “SLEEP 10” is displayed.
Note
,
You can check the remaining time before the
Unit turns o.
Press SLEEP The remaining time appears in the
display window.
Dimmer
Press SLEEP once. The display window will be
darken by half. To cancel it, press SLEEP repeatedly
until dim o.
Turn off the sound temporarily
Press MUTE to mute your unit.
You can mute your unit in order, for example, to
answer the telephone, appears the MUTE in the
display window.
Adjust the speaker level
settings
You can adjust the sound level of each speaker.
1. Press SPEAKER LEVEL repeatedly to select a
desired speaker to set.
2. Press VOL -/+ to adjust the sound level of the
selected speaker while the level setting memu
is displayed on the display window.
3. Repeat and adjust the sound level of the other
speakers.
4
Operating
Last Scene Memory
r
This unit memorizes last scene from the last disc
that is viewed. The last scene remains in memory
even if you remove the disc from the unit or switch
o the unit. If you load a disc that has the scene
memorized, the scene is automatically recalled.
System Select - Optional
You must select the appropriate system mode for
your TV system. Press and hold M PAUSE/STEP
for more than ve seconds to be able to select a
system in the [Home Menu].
Note
,
If the USB device is connected or a disc is
inserted, this function is not operated.
HT906TA-N0_BTURLLK_ENG_6156.indd 33 2011-12-13 �� 5:17:07
Page 34
Operating34
Sound adjustment
Setting the surround mode
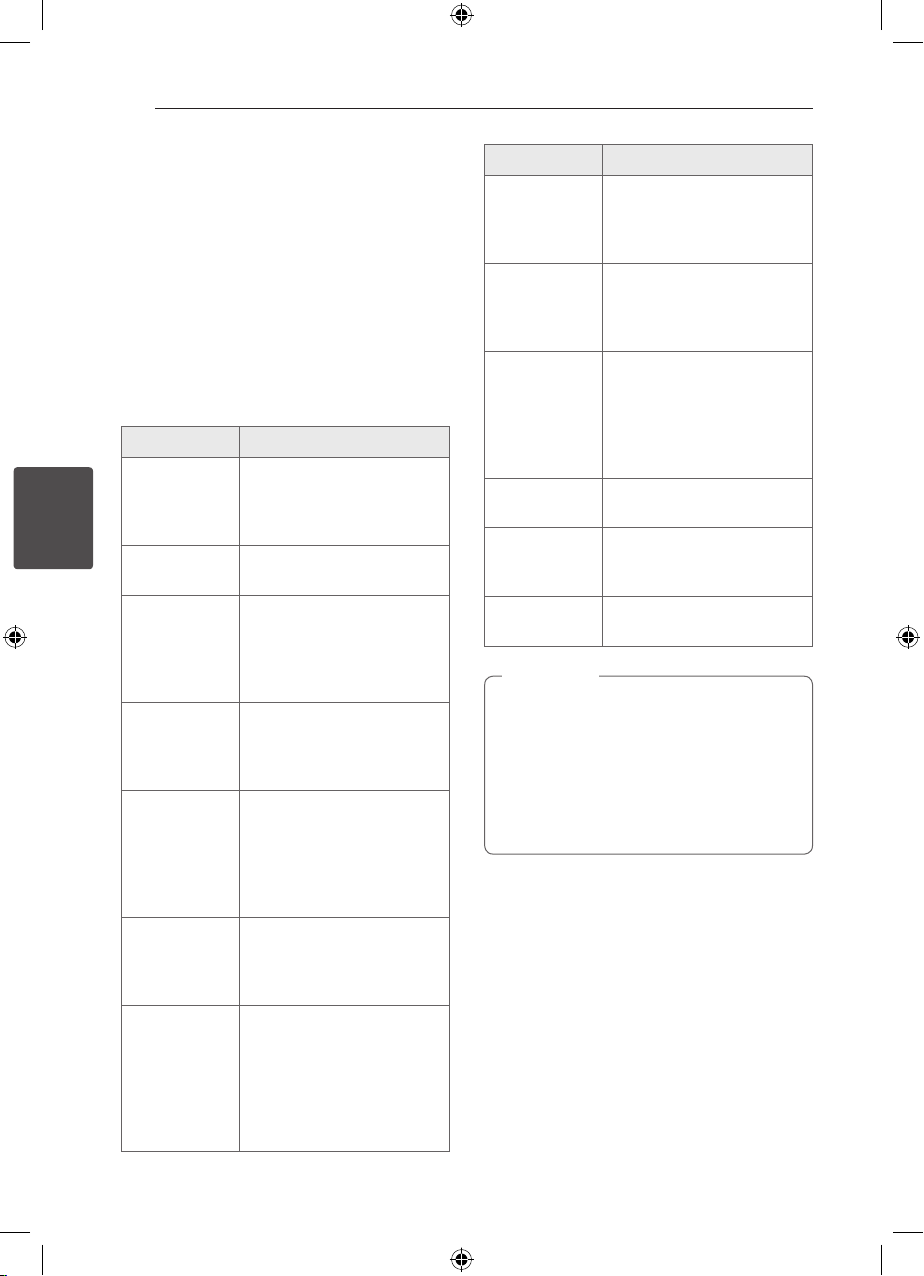
This system has a number of pre-set surround
sound elds. You can select a desired sound mode
by using SOUND EFFECT.
You can change the SOUND EFFECT using AD
arrow key while the sound eect information is
displayed on.
The displayed items for the equalizer maybe
dierent depending on sound sources and eects.
On Display Description
The NAT PLUS is Natural Plus
sound eect. You can enjoy
the natural sound eect same
as a 5.1-channel.
You can enjoy comfortable
and natural sound.
Regionally optimized sound
eect. (DANGDUT/ ARABIC/
PERSIAN/ INDIA/ REGUETON/
MERENGUE/ SAMBA/ SALSA/
CUMBIA/ AFRO)
Realizes the sound equalizer
that is the most similar to the
genre of which is included in
the MP3 ID3 tag of song les.
This program lends an
enthusiastic atmosphere to
the sound, giving you the
feeling you are at an actual
rock pop, jazz or classic
concert.
The BASS is Bass Blast. During
playback, reinforce the treble,
bass and surround sound
eect.
The CLRVOICE is Clear Voice.
This program make voice
sound clear, improving the
quality of voice sound. (We
encourage to use this EQ
when you watch the movie of
5.1 channel.)
4
Operating
NAT PLUS
NATURAL
Local
specialization
equalizer
AUTO EQ
POP
CLASSIC
JAZZ
ROCK
BASS
CLRVOICE
On Display Description
The GAME is Game Equalizer.
GAME
NIGHT
RETOUCH
LOUDNESS
VIRTUAL
BYPASS
Note
,
yIn some of surround modes, some speakers,
there’s no sound or low sound. It depends
on the mode of surround and the source of
audio, it is not defective.
yYou may need to reset the surround mode,
after switching the input, sometimes even
after the sound track changed.
You can enjoy more virtual
sound while playing video
games.
The NIGHT is Night Mode.
This may be useful when you
want to watch movies at low
volume late at night.
The RETOUCH is MP3 UpScaling. When listening to
MP3 les or other compressed
music, you can enhance the
sound. This mode is available
only to 2 channel sources.
Improves the bass and treble
sound.
The VIRTUAL is VSM Plus.
You can enjoy more virtual
surround sound.
You can enjoy the sound
without equalizer eect.
HT906TA-N0_BTURLLK_ENG_6156.indd 34 2011-12-13 �� 5:17:07
Page 35
Advanced Operations
Recording to USB
You can record music or sound souce to USB device
by connecting in to the port on the unit.
1. Connect the USB device to the unit.
2. Select a mode in which you want to record.
Play back a sound source rst.
3. Start the recording by pressing X REC.
4. To stop recording, press Z STOP.
[All tracks/ les recording]
Record to USB in stop or play mode.
[Program list recording]
After marking desired le(s) and you can record
it to USB (Refer to the page 31).
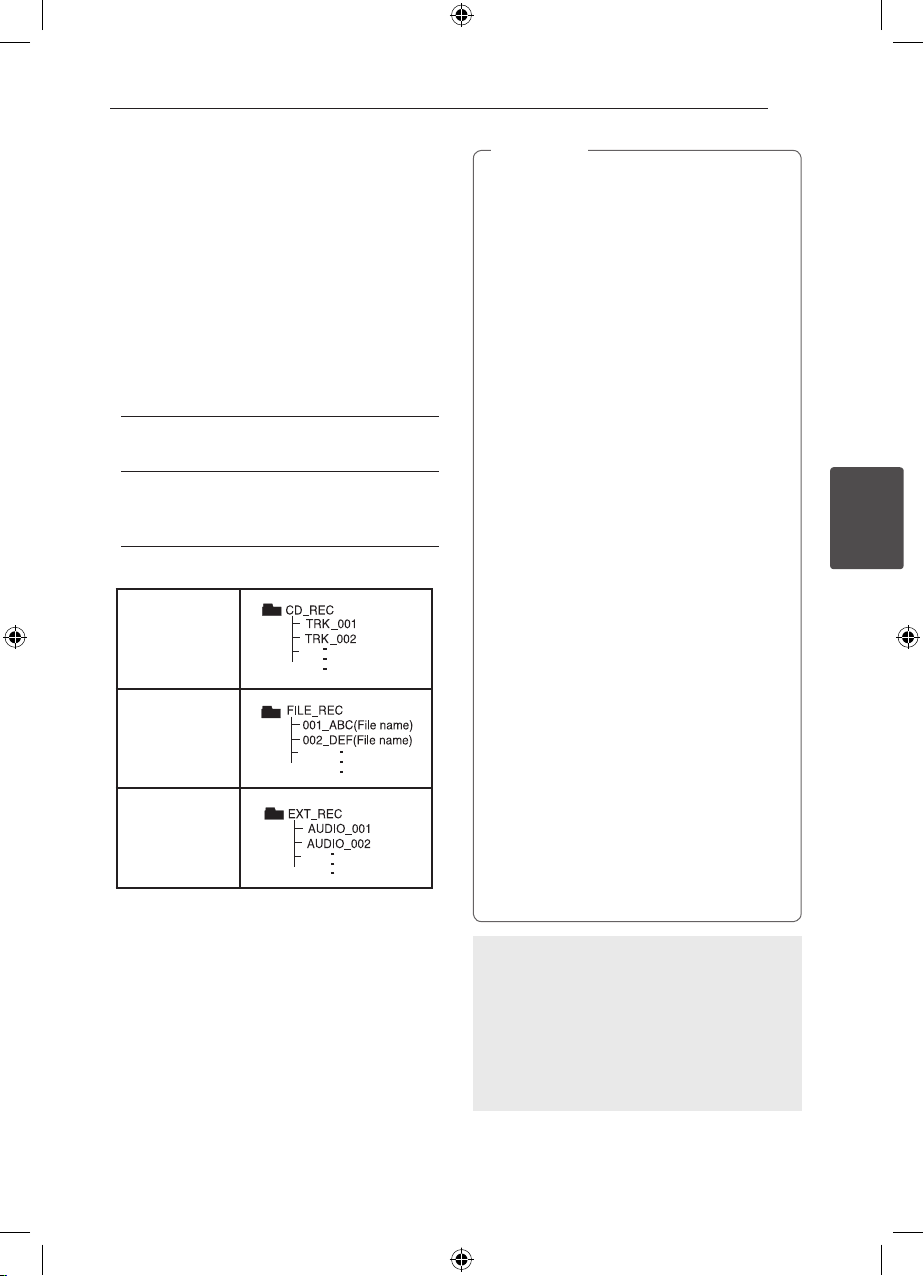
It’ll be stored as follows.
Audio CD
MP3/ WMA
The other
sources (AUX,
Portable)
Operating 35
Note
,
yYou can check the recording percentage
rate for the USB record on the screen during
the recording. (Audio CD or MP3/ WMA CD
only)
yDuring recording MP3/WMA, there is no
sound.
yWhen you stop recording during playback,
the le that has been recorded at that time
will be stored. (Audio CD only)
yDo not remove the USB device or turn
o the unit during USB recording. If not,
an incomplete le may be made and not
deleted on PC.
yIf USB recording does not work, the
message like “NO USB”, “ERROR”, “USB FULL”
or “NO REC” is displayed on the display
window.
yMulti card reader device or external HDD
can not be used for USB recording.
yA le is recorded by 128 Mbyte (about 2
hours) when you record for a long term.
There are recorded less than 4 les.
yWhen you stop recording during playback,
the le will not be stored.
yIn the state CD-G, DTS disc USB record is not
operated.
yThe les in the sub-folders are not recorded
during all track recording.
yYou may not record more than 999 les.
yThe numbering of the recording le is
entered from the lowest number. So if you
delete some of the recording les, the next
recording le could be the lowest number
among them.
4
Operating
The making of unauthorized copies of copy-
protected material, including computer programs,
les, broadcasts and sound recordings, may be
an infringement of copyrights and constitute a
criminal oense. This equipment should not be
HT906TA-N0_BTURLLK_ENG_6156.indd 35 2011-12-13 �� 5:17:07
used for such purposes.
Be responsible
Respect copyrights.
Page 36
Troubleshooting36
Troubleshooting
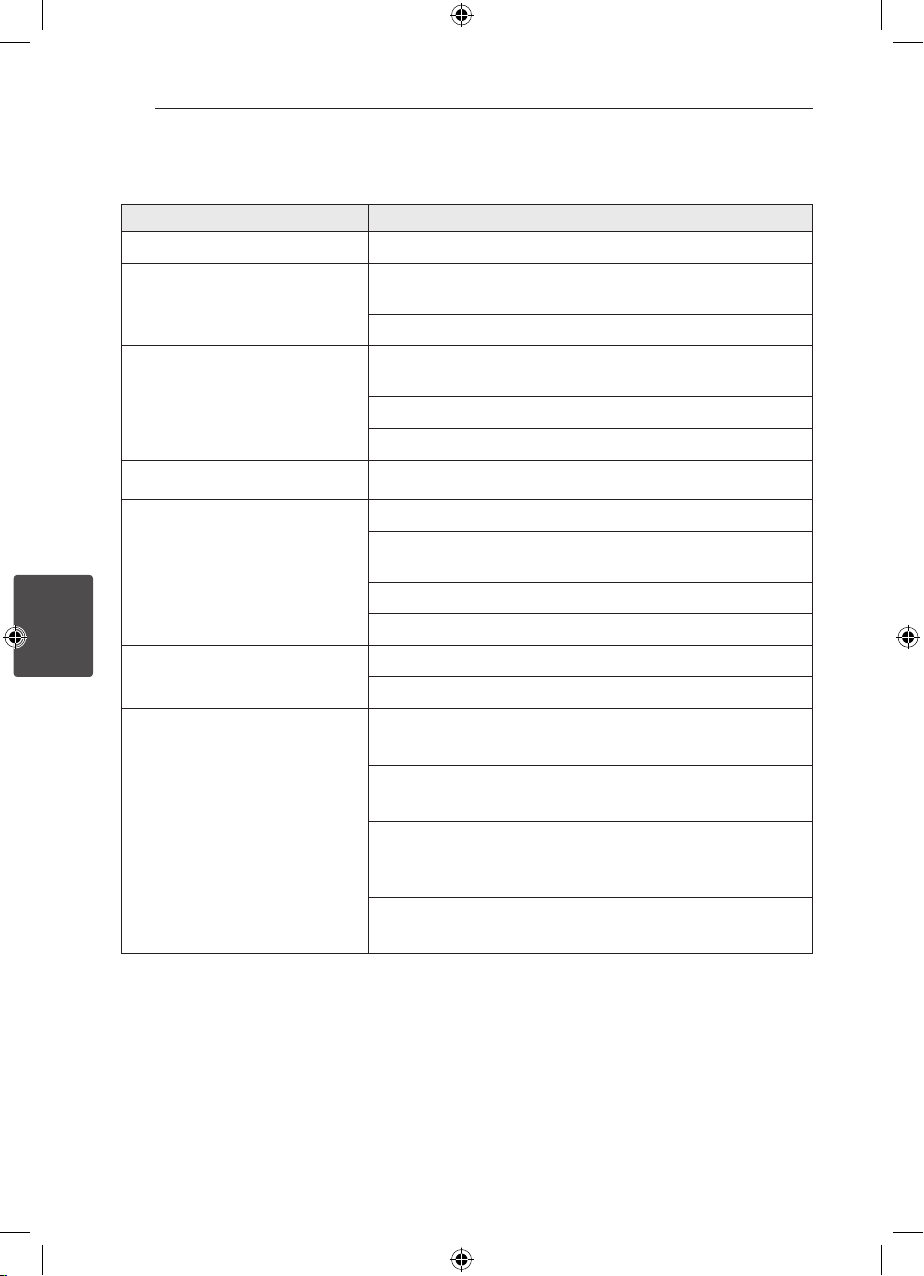
PROBLEM CORRECTION
No power Plug the power cord into the wall outlet securely.
No picture
There is little or no sound
Select the appropriate video input mode on the TV so the picture
from the unit appears on the TV screen.
Connect the video cables securely to both the TV and unit.
Select the correct input mode of the unit so you can hear the sound
from the unit.
Connect the audio cables into the connection terminals correctly.
Replace with a new audio cable.
5
Troubleshooting
The DVD picture quality is poor
A DVD/CD will not play
Humming noise heard while a DVD
or CD is playing
The remote control doesn’t work
well / at all
Clean the disc using a soft cloth with outward strokes.
Insert a disc.
Insert a playable disc (check the disc type, colour system and
regional code).
Place the disc with the label or printed side facing upwards.
Enter your password or change the rating level.
Clean the disc using a soft cloth with outward strokes.
Move unit and audio components further away from your TV.
The remote is not pointed directly at the unit.
Point the remote directly at the unit.
The remote is too far from the unit.
Use the remote within 23 feet (7m) of the unit.
There is an obstacle in the path between the remote control and
the unit.
Remove the obstacle.
The battery in the remote control are at.
Replace the battery with new ones.
HT906TA-N0_BTURLLK_ENG_6156.indd 36 2011-12-13 �� 5:17:08
Page 37
Appendix 37
Maintenance
Handling the Unit
When shipping the unit
Please save the original shipping carton and
packing materials. If you need to ship the unit, for
maximum protection, re-pack the unit as it was
originally packed at the factory.
Keeping the exterior surfaces clean
yDo not use volatile liquids such as insecticide
spray near the unit.
yWiping with strong pressure may damage the
surface.
yDo not leave rubber or plastic products in
contact with the unit for a long period of time.
Cleaning the unit
To clean the player, use a soft, dry cloth. If the
surfaces are extremely dirty, use a soft cloth lightly
moistened with a mild detergent solution. Do not
use strong solvents such as alcohol, benzine, or
thinner, as these might damage the surface of the
unit.
Maintaining the Unit
The unit is a high-tech, precision device. If the
optical pick-up lens and disc drive parts are dirty
or worn, the picture quality could be diminished.
For details, please contact your nearest authorized
service center.
Notes on Discs
Handling Discs
Do not touch the playback side of the disc. Hold
the disc by the edges so that ngerprints do not
get on the surface. Never stick paper or tape on the
disc.
Storing Discs
After playing, store the disc in its case. Do not
expose the disc to direct sunlight or sources of heat
and never leave it in a parked car exposed to direct
sunlight.
Cleaning Discs
Fingerprints and dust on the disc can cause poor
picture quality and sound distortion. Before playing,
clean the disc with a clean cloth. Wipe the disc from
the center to out.
Do not use strong solvents such as alcohol,
benzine, thinner, commercially available cleaners,
or anti-static spray intended for older vinyl records.
6
Appendix
HT906TA-N0_BTURLLK_ENG_6156.indd 37 2011-12-13 �� 5:17:08
Page 38
Appendix38
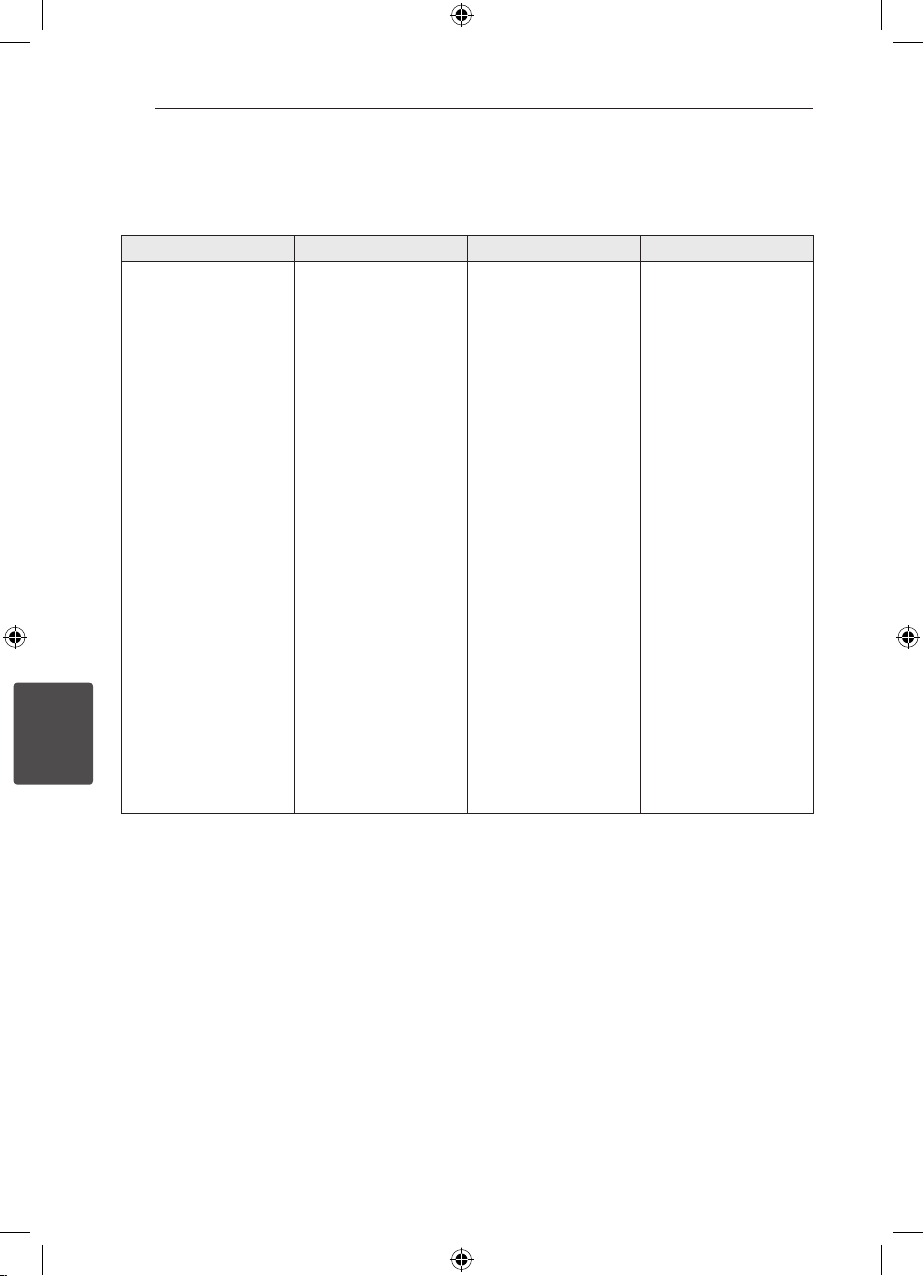
Area Code List
Choose an area code from this list.
Area Code Area Code Area Code Area Code
Afghanistan AF
Argentina AR
Australia AU
Austria AT
Belgium BE
Bhutan BT
Bolivia BO
Brazil BR
Cambodia KH
Canada CA
Chile CL
China CN
Colombia CO
Congo CG
Costa Rica CR
Croatia HR
Czech Republic CZ
Denmark DK
Ecuador EC
Egypt EG
6
El Salvador SV
Appendix
Ethiopia ET
Fiji FJ
Finland FI
France FR
Germany DE
Great Britain GB
Greece GR
Greenland GL
Hong Kong HK
Hungary HU
India IN
Indonesia ID
Israel IL
Italy IT
Jamaica JM
Japan JP
Kenya KE
Kuwait KW
Libya LY
Luxembourg LU
Malaysia MY
Maldives MV
Mexico MX
Monaco MC
Mongolia MN
Morocco MA
Nepal NP
Netherlands NL
Antilles AN
New Zealand NZ
Nigeria NG
Norway NO
Oman OM
Pakistan PK
Panama PA
Paraguay PY
Philippines PH
Poland PL
Portugal PT
Romania RO
Russian
Federation RU
Saudi Arabia SA
Senegal SN
Singapore SG
Slovak Republic SK
Slovenia SI
South Africa ZA
South Korea KR
Spain ES
Sri Lanka LK
Sweden SE
Switzerland CH
Taiwan TW
Thailand TH
Turkey TR
Uganda UG
Ukraine UA
United States US
Uruguay UY
Uzbekistan UZ
Vietnam VN
Zimbabwe ZW
HT906TA-N0_BTURLLK_ENG_6156.indd 38 2011-12-13 �� 5:17:08
Page 39
Appendix 39
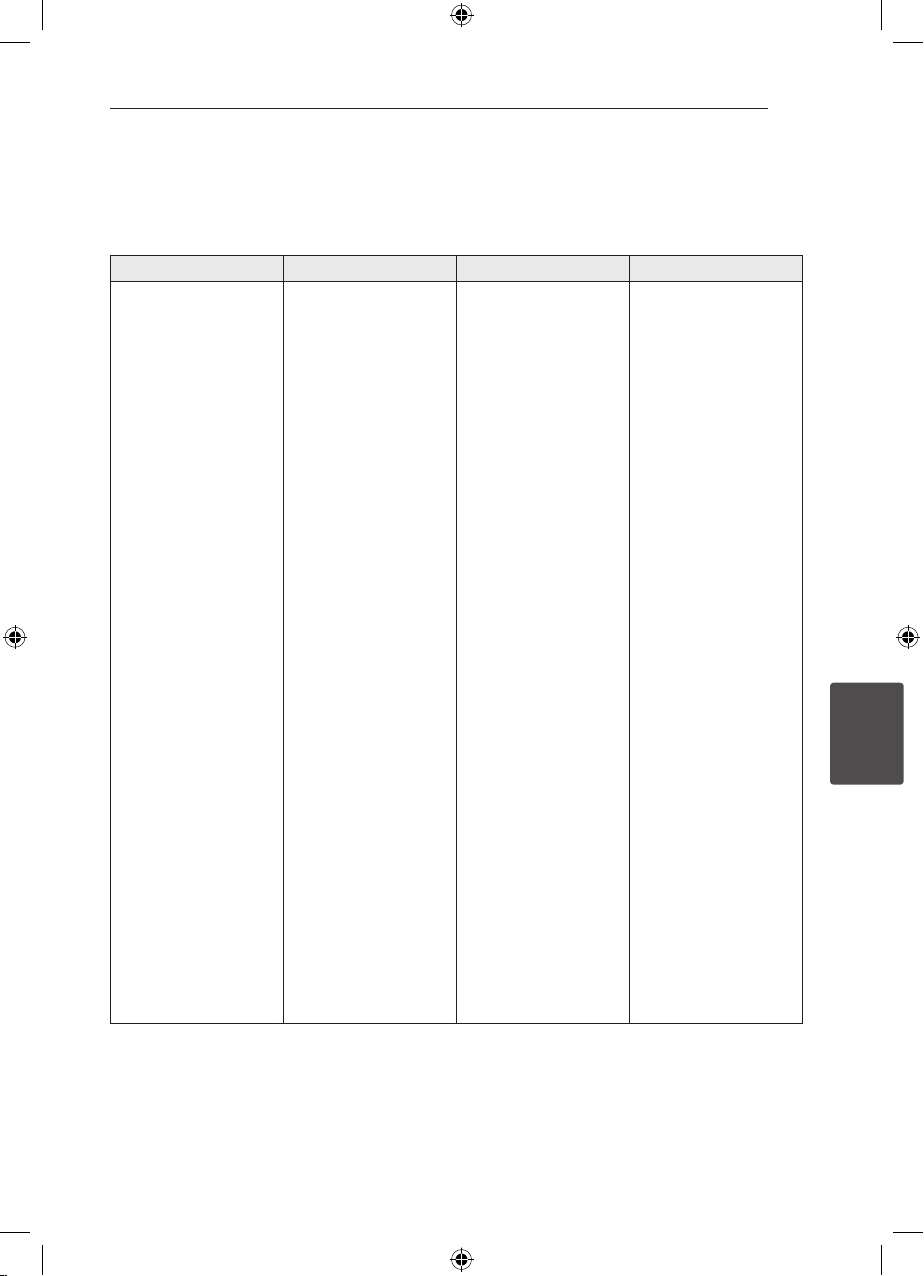
Language code List
Use this list to input your desired language for the following initial settings: [Disc Audio],
[Disc Subtitle] and [Disc Menu].
Language Code Language Code Language Code Language Code
Afar 6565
Afrikaans 6570
Albanian 8381
Ameharic 6577
Arabic 6582
Armenian 7289
Assamese 6583
Aymara 6588
Azerbaijani 6590
Bashkir 6665
Basque 6985
Bengali; Bangla 6678
Bhutani 6890
Bihari 6672
Breton 6682
Bulgarian 6671
Burmese 7789
Byelorussian 6669
Chinese 9072
Croatian 7282
Czech 6783
Danish 6865
Dutch 7876
English 6978
Esperanto 6979
Estonian 6984
Faroese 7079
Fiji 7074
Finnish 7073
French 7082
Frisian 7089
Galician 7176
Georgian 7565
German 6869
Greek 6976
Greenlandic 7576
Guarani 7178
Gujarati 7185
Hausa 7265
Hebrew 7387
Hindi 7273
Hungarian 7285
Icelandic 7383
Indonesian 7378
Interlingua 7365
Irish 7165
Italian 7384
Japanese 7465
Kannada 7578
Kashmiri 7583
Kazakh 7575
Kirghiz 7589
Korean 7579
Kurdish 7585
Laothian 7679
Latin 7665
Latvian, Lettish 7686
Lingala 7678
Lithuanian 7684
Macedonian 7775
Malagasy 7771
Malay 7783
Malayalam 7776
Maori 7773
Marathi 7782
Moldavian 7779
Mongolian 7778
Nauru 7865
Nepali 7869
Norwegian 7879
Oriya 7982
Panjabi 8065
Pashto, Pushto 8083
Persian 7065
Polish 8076
Portuguese 8084
Quechua 8185
Rhaeto-Romance 8277
Rumanian 8279
Russian 8285
Samoan 8377
Sanskrit 8365
Scots Gaelic 7168
Serbian 8382
Serbo-Croatian 8372
Shona 8378
Sindhi 8368
Singhalese 8373
Slovak 8375
Slovenian 8376
Spanish 6983
Sudanese 8385
Swahili 8387
Swedish 8386
Tagalog 8476
Tajik 8471
Tamil 8465
Telugu 8469
Thai 8472
Tonga 8479
Turkish 8482
Turkmen 8475
Twi 8487
Ukrainian 8575
Urdu 8582
Uzbek 8590
Vietnamese 8673
Volapük 8679
Welsh 6789
Wolof 8779
Xhosa 8872
Yiddish 7473
Yoruba 8979
Zulu 9085
6
Appendix
HT906TA-N0_BTURLLK_ENG_6156.indd 39 2011-12-13 �� 5:17:08
Page 40
Appendix40
Trademarks and
6
Appendix
Licenses
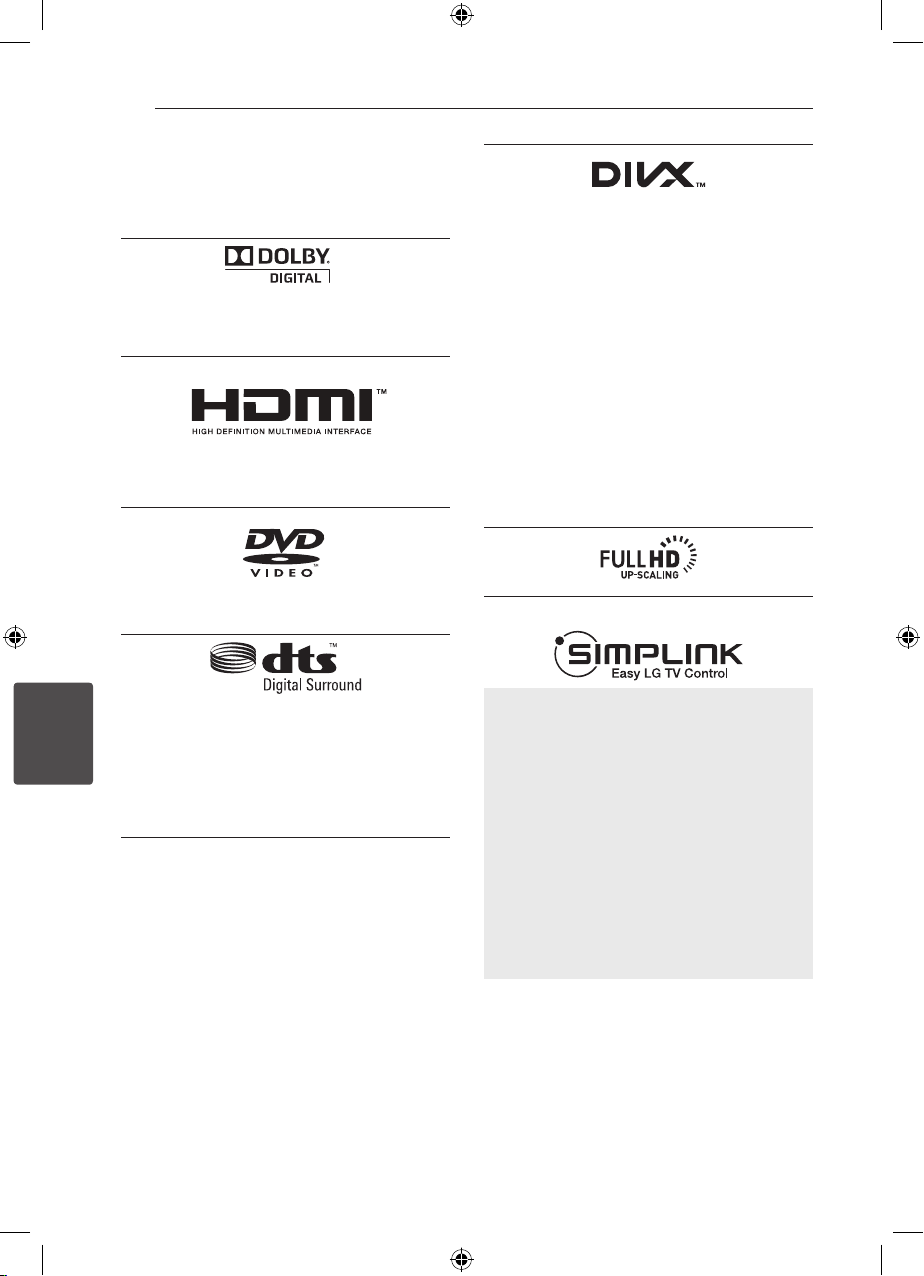
Manufactured under license from Dolby
Laboratories. Dolby and the double-D symbol
are trademarks of Dolby Laboratories.
HDMI, the HDMI logo and High-Denition
Multimedia Interface are trademarks or registered
trademarks of HDMI licensing LLC.
“DVD Logo” is a trademark of DVD Format/Logo
Licensing Corporation.
Manufactured under license under U.S. Patent
#’s: 5,451,942; 5,956,674; 5,974,380; 5,978,762;
6,487,535 & other U.S. and worldwide patents
issued & pending. DTS and the Symbol are registered trademarks & DTS Digital Surround and
the DTS logos are trademarks of DTS, Inc. Product
includes software. © DTS, Inc. All Rights Reserved.
DivX®, DivX Certied® and associated logos are
trademarks of DivX, Inc. and are used under
license.
ABOUT DIVX VIDEO: DivX® is a digital video
format created by DivX, Inc. This is an ocial
DivX Certied® device that plays DivX video.
Visit www.divx.com for more information and
software tools to convert your les into DivX
video.
ABOUT DIVX VIDEO-ON-DEMAND: This DivX
Certied® device must be registered in order to
play purchased DivX Video-on-Demand (VOD)
movies. To obtain your registration code, locate
the DivX VOD section in your device setup menu.
Go to vod.divx.com for more information on how
to complete your registration.
What is SIMPLINK?
Some functions of this unit are controlled by
TV’s remote control when this unit and LG TV
with SIMPLINK are connected through HDMI
connection. Controllable functions by LG TV’s
remote control; Play, Pause, Scan, Skip, Stop,
Power O, etc.
yRefer to the TV owner’s manual for the details
of SIMPLINK function.
yLG TV with SIMPLINK function has the logo as
shown above.
yUse a higher version cable than High Speed
HDMI™ Cable.
HT906TA-N0_BTURLLK_ENG_6156.indd 40 2011-12-13 �� 5:17:08
Page 41
Specifications
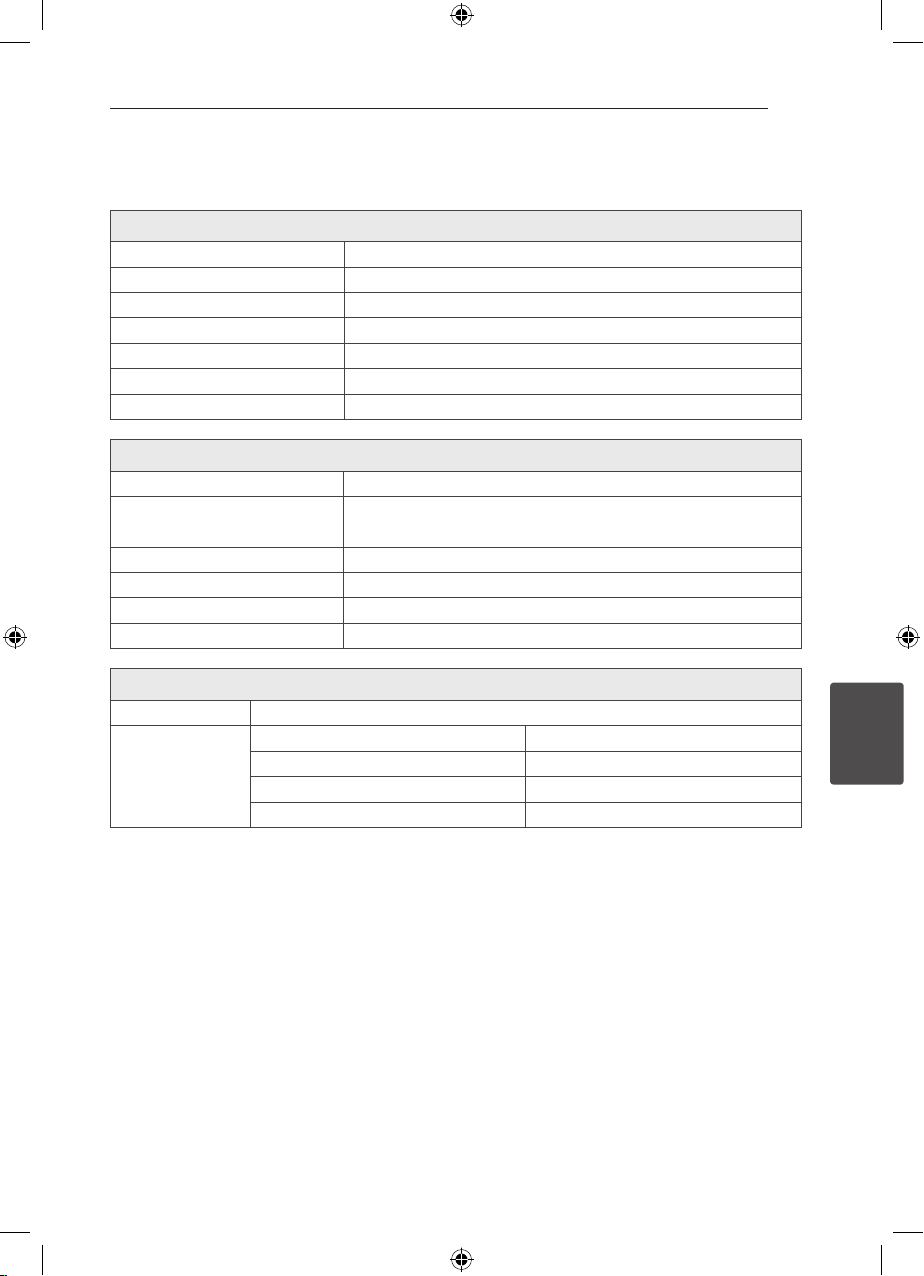
General
Power requirements Refer to main label.
Power consumption Refer to main label.
Dimensions (W x H x D) 430 X 60 X 310 mm without foot
Net Weight (Approx.) 4.0 kg
Operating temperature 41 °F to 95 °F (5 °C to 35 °C)
Operating humidity 5 % to 90 %
Bus Power Supply (USB) DC 5 V 0 500 mA
Inputs/ Outputs
VIDEO OUT 1.0 V (p-p), 75 Ω, sync negative, RCA jack x 1
COMPONENT VIDEO OUT
HDMI OUT (video/audio) 19 pin (Type A, HDMI™ Connector )
ANALOG AUDIO IN 2.0 Vrms (1 kHz, 0 dB), 600 Ω, RCA jack (L, R) x 1
DIGITAL IN (OPTICAL) 3 V (p-p), Optical jack x 1
PORT. IN 0.5Vrms (3.5 mm stereo jack)
(Y ) 1.0 V (p-p), 75 Ω, sync negative, RCA jack x 1
(Pb)/(Pr) 0.7 V (p-p), 75 Ω, RCA jack x 2
Appendix 41
Amplier
Stereo mode 180 W + 180 W (4 Ω at 1kHz)
Front 180 W + 180 W (4 Ω at 1 kHz)
Surround mode
HT906TA-N0_BTURLLK_ENG_6156.indd 41 2011-12-13 �� 5:17:08
Center 180 W (4 Ω at 1 kHz)
Surround 180 W + 180 W (4 Ω at 1 kHz)
Subwoofer 200 W (3 Ω at 60 Hz)
6
Appendix
Page 42
Appendix42
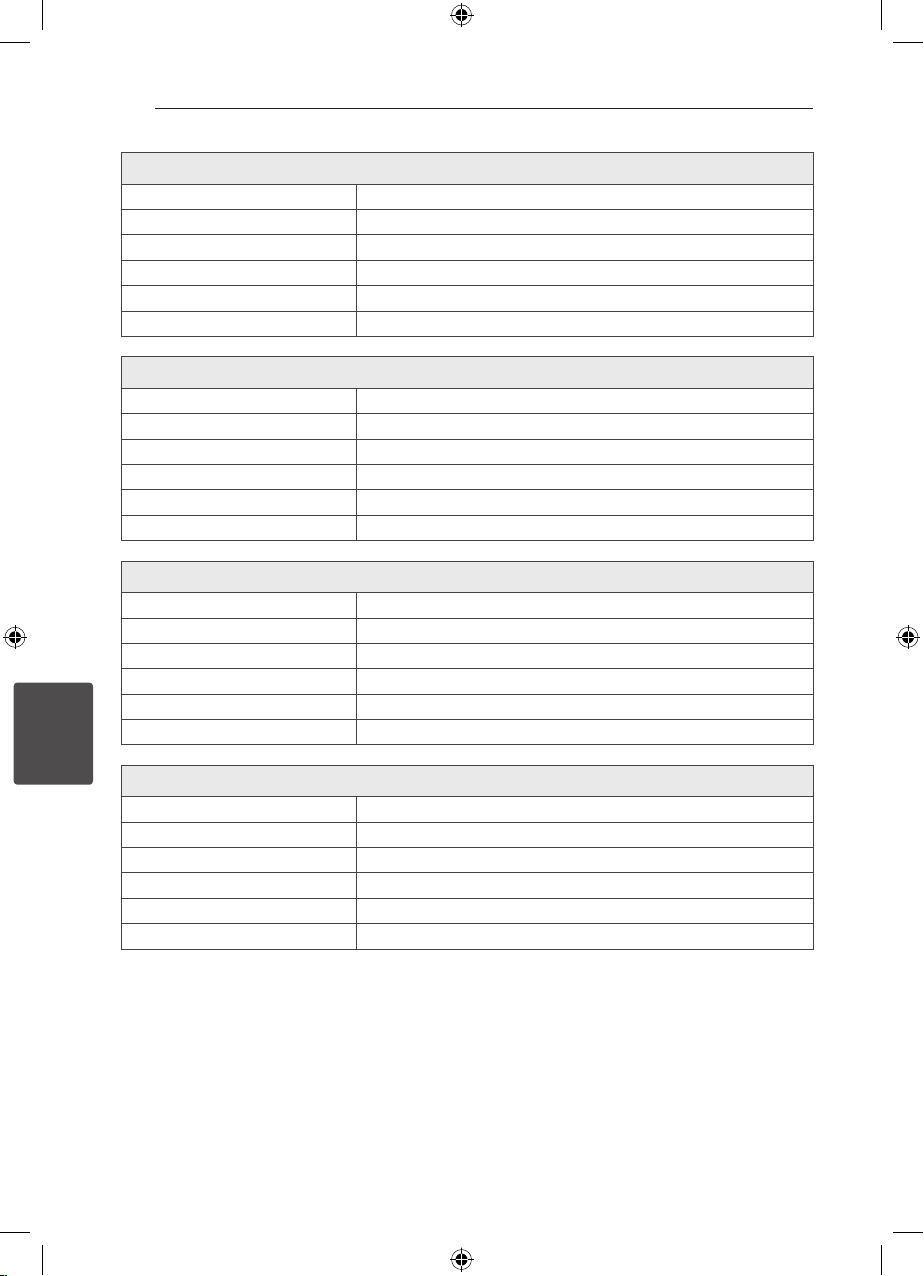
Front Speaker
Type 2 Way 3 speaker
Impedance Rated 4 Ω
Input Power 180 W
Max. Input Power 360 W
Net Dimensions (W x H x D) 280 X 1 152 X 225 mm
Net Weight 3.33 kg
Rear Speaker
Type 2 Way 3 speaker
Impedance Rated 4 Ω
Input Power 180 W
Max. Input Power 360 W
Net Dimensions (W x H x D) 280 X 1 152 X 225 mm
Net Weight 3.33 kg
Centre Speaker
Type 2 Way 3 speaker
Impedance Rated 4 Ω
Input Power 180 W
Max. Input Power 360 W
Net Dimensions (W x H x D) 327 x 99 x 76 mm
Net Weight 1.21 kg
6
Appendix
HT906TA-N0_BTURLLK_ENG_6156.indd 42 2011-12-13 �� 5:17:08
Passive Subwoofer
Type 1 Way 1 Speaker
Impedance Rated 3 Ω
Input Power 200 W
Max. Input Power 400 W
Net Dimensions (W x H x D) 190 X 385 X 358 mm
Net Weight 5.4 kg
Design and specications are subject to change without notice.
Page 43
HT906TA-N0_BTURLLK_ENG_6156.indd 43 2011-12-13 �� 5:17:08
 Loading...