

Page 1
P/NO : MFL61944511
DEUTSCH
FRANÇAIS
NEDERLANDS
SLOVENŠČINA
ITALIANO
ESPAÑOL
∂§§H¡π∫A
PORTUGUÊS
English
English
Page 2

CAUTION : The apparatus shall not be exposed to water (dripping or splashing) and
no objects filled with liquids, such as vases, shall be placed on the apparatus.
CAUTION concerning the Power Cord
Most appliances recommend they be placed upon a dedicated circuit ;
That is, a single outlet circuit which powers only that appliance and has no additional
outlets or branch circuits. Check the specification page of this owner's manual to be
certain.
Do not overload wall outlets. Overloaded wall outlets, loose or damaged wall outlets,
extension cords, frayed power cords, or damaged or cracked wire insulation are
dangerous. Any of these conditions could result in electric shock or fire. Periodically
examine the cord of your appliance, and if its appearance indicates damage or
deterioration, unplug it, discontinue use of the appliance, and have the cord replaced
with an exact replacement part by an authorized service center.
Protect the power cord from physical or mechanical abuse, such as being twisted,
kinked, pinched, closed in a door, or walked upon. Pay particular attention to plugs,
wall outlets, and the point where the cord exits the appliance.
To disconnect power from the mains, pull out the mains cord plug. When installing the
product, ensure that the plug is easily accessible.
Disposal of your old appliance
1. When this crossed-out wheeled bin symbol is attached to a product it
means the product is covered by the European Directive 2002/96/EC.
2. All electrical and electronic products should be disposed of separately from
the municipal waste stream via designated collection facilities appointed by
the government or the local authorities.
3. The correct disposal of your old appliance will help prevent potential
negative consequences for the environment and human health.
4. For more detailed information about disposal of your old appliance, please
contact your city office, waste disposal service or the shop where you
purchased the product.
This product is manufactured to comply with EMC Directive
2004/108/EC and Low Voltage Directive 2006/95/EC.
European representative :
LG Electronics Service Europe B.V.
Veluwezoom 15, 1327 AE Almere, The Netherlands
(Tel : +31-036-547-8940)
Page 3

3
Page 4
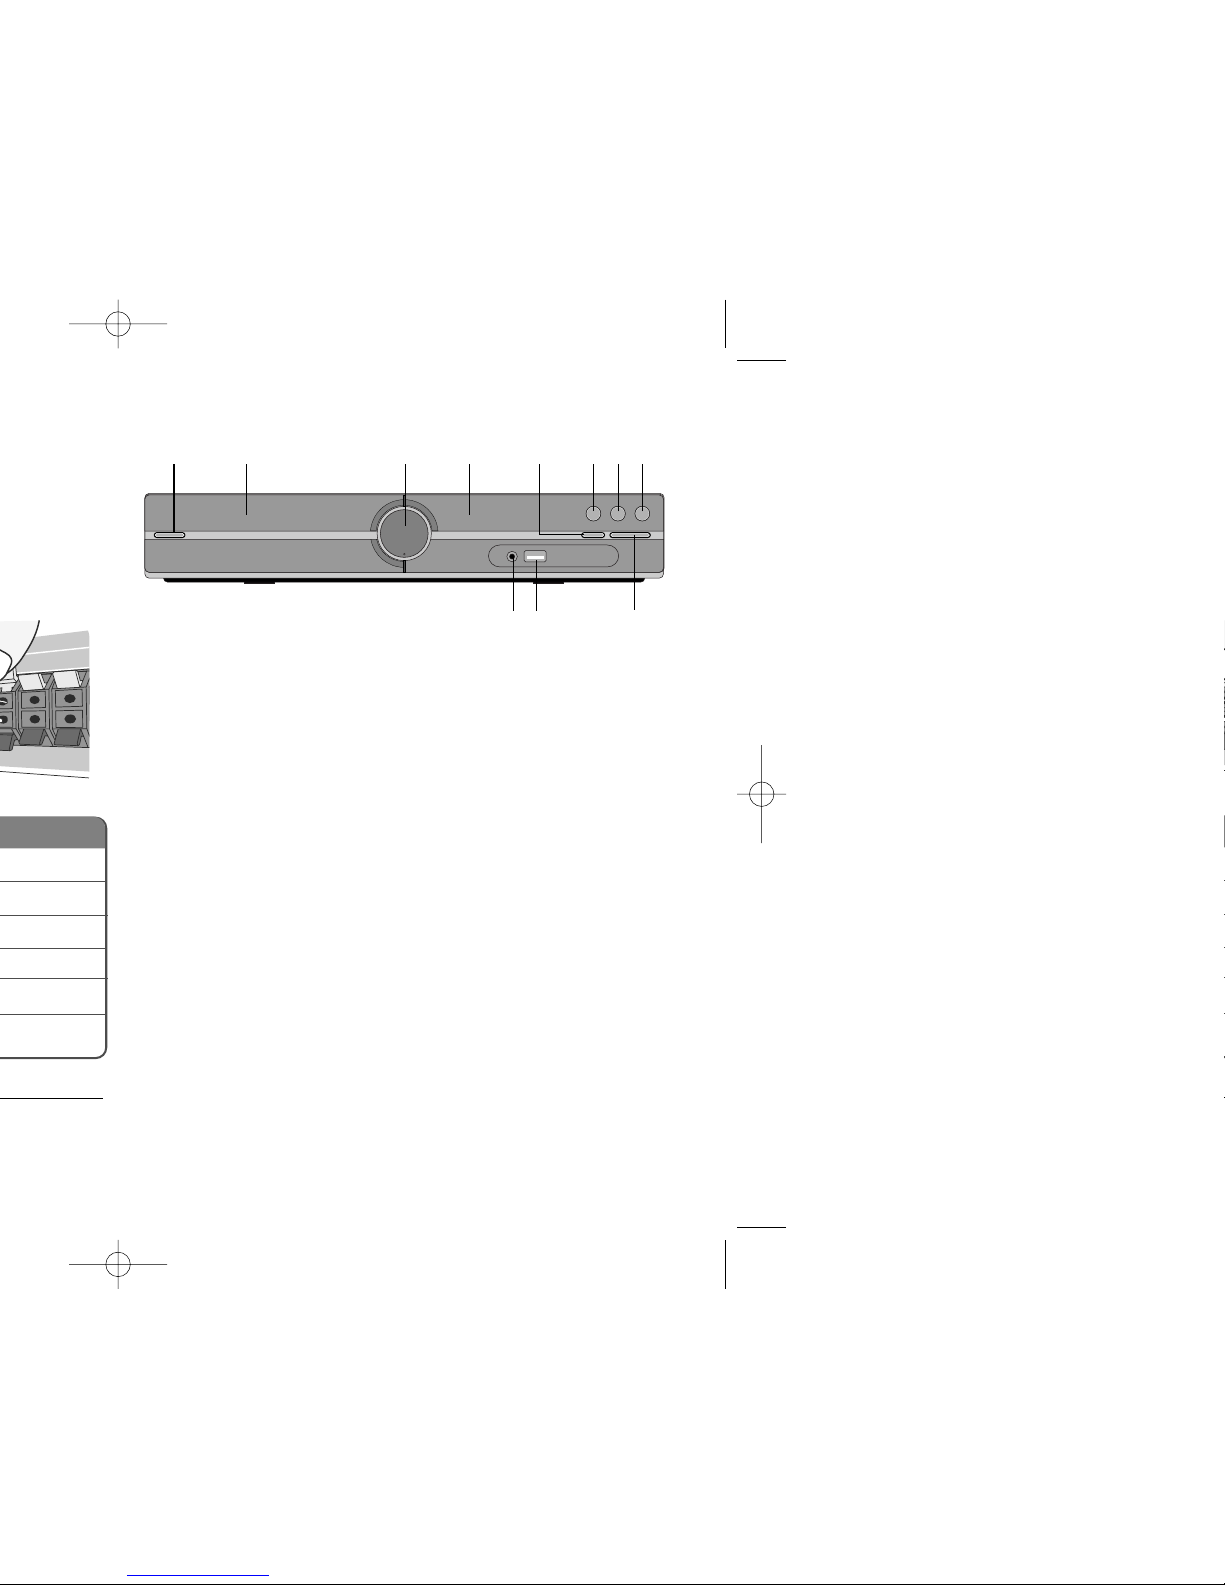
Main Unit
12 345678
11 10 9
1 Power (11/``)
Turns the unit on and off.
2 DVD/CD Disc Drawer
3 Volume (VOL.)
Controls the volume when using any function.
4
Display window
5 Open/Close (ZZ)
6 Play/Pause(BB/XX)
7 Stop (xx)
8 Function (F)
Selects the function and input source.
(DVD/CD
, USB, AUX, TV-AUDIO, PORTABLE, FM)
9 TUNING (-/+) (
..>>
), Skip/Search (Press and hold)
10 USB port
You can play video, image and sound files by connecting the USB
device.
11 PORT.(Portable) IN port
You can enjoy music from portable device on your unit.
Page 5
5
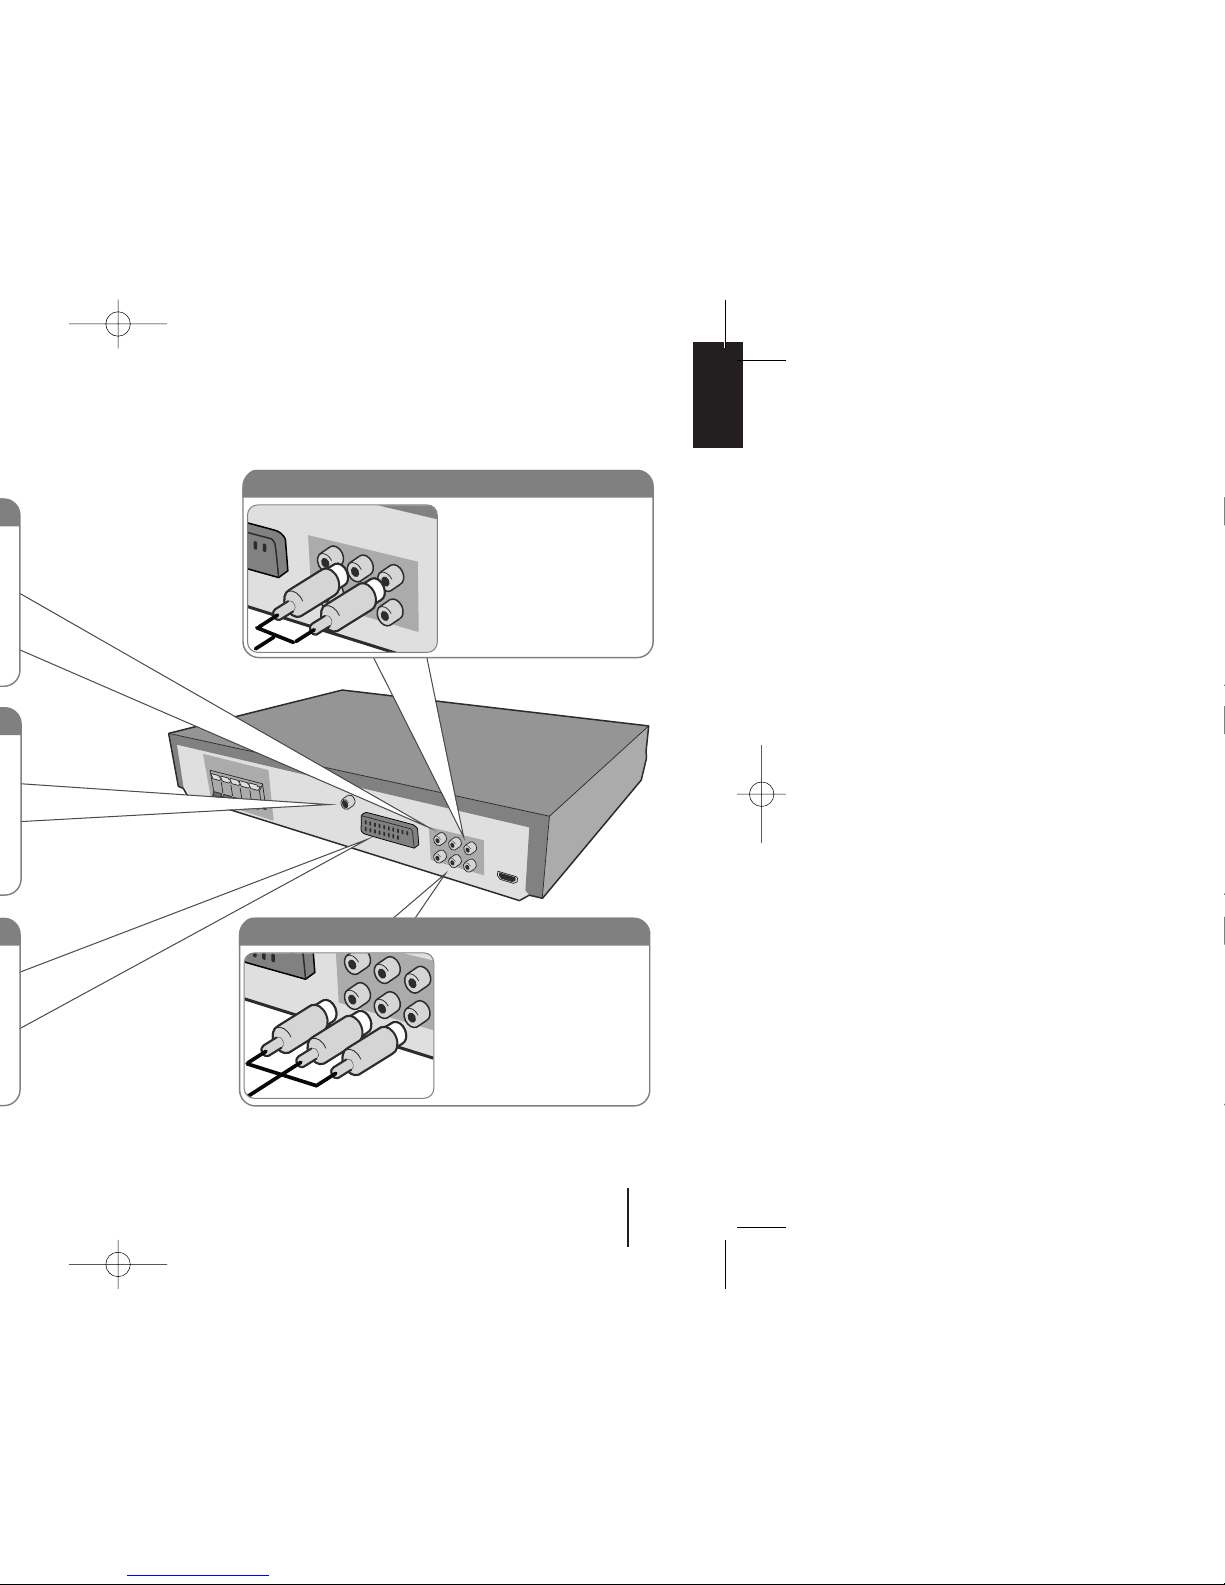
Audio In connection
The unit’s Audio jacks are
colour coded (red for right
audio and white for left
audio). If your TV has only
one output for audio (mono),
connect it to the left (white)
audio jack on the unit.
Component Video connection (B)
Connect the COMPONENT
VIDEO (PROGRESSIVE
SCAN) OUTPUT jacks on
the unit to the corresponding
input jacks on your TV using
a Y PB PR cable.
Page 6
Available resolution according to connection
Displayed resolution in display window and outputted resolution may different
according to connection type.
[HDMI OUT] : 1080p, 1080i, 720p and 480p (or 576p), 480i(or 576i)
[COMPONENT VIDEO OUT] : 480p (or 576p) and 480i (or 576i)
[VIDEO OUT] : 480i (or 576i)
[SCART] : 576i
Notes on HDMI Out connection
• If your TV does not accept your resolution setting, abnormal picture appears
on the screen.(“TV do not support” will appears in screen)
Please read owner’s manual for TV, and then set the resolution that your TV
can accept.
• Changing the resolution when the unit is connected with HDMI connector
may result in malfunctions. To solve the problem, turn off the unit and then
turn it on again.
• When you connect a HDMI or DVI compatible device make sure of the
following :
-Try switching off the HDMI/ DVI device and this unit. Next, switch on the
HDMI/ DVI device and leave it for around 30 seconds, then switch on this
unit.
- The connected device’s video input is set correctly for this unit.
- The connected device is compatible with 720X576i(480i), 720X576p(480p),
1280X720p, 1920X1080i or 1920X1080p video input.
- The 1080p, 720p and 576p(480p) resolutions are the progressive scan
applied resolution.
• Not all HDCP-compatible DVI devices will work with this unit.
- The picture will not be displayed properly with non-HDCP device.
R
Page 7

7
REPEAT/RANDOM: To select a play mode.(Random,
repeat)
MUTE : To mute the sound.
VOL (Volume) (+/-) :
Adjusts speaker volume.
LGEQ : You can select a Natural or Local Specialization
equalizer effect by using LG EQ.
EQ (EQUALIZER effect) : You can choose sound
impressions.
CLEAR : Removes a track number on the Program List.
SUBTITLE : During playback, press SUBTITLE
repeatedly to select a desired subtitle language .
0-9 numerical buttons : Selects numbered options in a
menu.
TV Control buttons : Controls the TV. (LG TV only)
PROG./MEMO. : Accesses or removes Program menu.
RESOLUTION : Sets the output resolution for HDMI
and COMPONENT VIDEO OUT jacks.
RDS : Radio Data System.
PTY : Views the various displays of the RDS.
: This button is not available.
Controlling the TV.
You can control the sound level, input source, and
power switching of LG TVs as well. Hold POWER (TV)
and press PR/CH (+/–) button repeatedly until the TV
turns on or off.
Put the battery into the remote control
Make sure for the + (plus) and – (minus) on the
battery to be matched on the remote control.
c
d
Page 8

Adjusting the general settings
- more you can do
Adjusting the language settings
Menu Language – Select a language for the Setup menu and on-screen
display.
Disc Audio/ Disc Subtitle/ Disc Menu – Select a language for the Disc Audio/
Disc Subtitle/ Disc Menu.
[Original] : Refers to the original language in which the disc was recorded.
[Other] : To select another language, press number buttons then ENTER to
enter the corresponding 4-digit number according to the language code list in
the reference chapter (see page 17). If you make a mistake before pressing
ENTER, press CLEAR.
[Off] (for Disc Subtitle) : Turn off Subtitle.
Adjusting the general settings
ON REMOTE
1 Display setup menu SETUP
2Select a desired option on the first level
UU uu
3 Move to the second level
ii
4 Select a desired option on the second level
UU uu
5 Move to the third level
ii
6 Change the setting
UU uu
, ENTER
and
Page 9

9
5.1 Speaker Setup
ON REMOTE
1 Open the settings menu SETUP
2 Select to the audio icon
UU uu
3 Select right to enter the audio menu, then
select 5.1 Speaker Setup
ii UU uu
ENTER
4 Select the speaker you want to adjust
II ii
5 Select a option and change
the settings
UU uu II ii
6 Set the output level (volume) of a speaker
from -5dB to +5dB.
The speaker size setting are
fixed, so you cannot change the setting.
II ii
7 If you connect speakers to your unit,
setting the Distance lets the speakers to
know how far the sound has to travel to
reach your set listening point. This allows
the sound from each speaker to reach the
listener at the same time.
II ii
8Test the signals of each speaker
Adjust the volume to your taste
according to these signals.
II ii
9 Save your settings and exit the Setup
menu RETURN
Page 10

®
Enjoying a pre-programmed sound field
This system has a number of pre-set surround sound fields. You can select a
desired sound mode by using EQ/ LG EQ. You can change the EQ/ LG EQ
using
II ii
arrow key while the EQ/ LG EQ information is displayed on.
The displayed items for the Equalizer may be different depending on sound
sources and effects.
NATURAL You can enjoy comfortable and natural sound.
AUTO EQ Realizes the sound equalizer that is the most similar to the
genre of which is included in the MP3 ID3 tag of song files.
POP This program lends an enthusiastic atmosphere to the
CLASSIC sound, giving you the feeling you are at an actual rock
ROCK pop, jazz or classic concert.
JAZZ
MP3 OPT This function is optimized for compressible MP3 file. It
improves the bass sound.
BASS Reinforce the treble, bass and surround sound effect.
VIRTUAL You can enjoy more virtual surround sound.
PLII MOVIE Dolby Pro Logic II enables you to play stereo source on
PLII MUSIC 5.1-channel.
PLII MTRX(matrix)
NORMAL(OFF) You can enjoy the sound without equalizer effect.
ON DISPLAY Description
Page 11

11
Playing a Disc or file - more you can do
Playing a DVD that has a menu
Most DVDs now have menus which load first before the film begins to play.
You can navigate these menus using
UU uu II ii
to highlight an option.
Press ENTER to select.
Skipping to the next/ previous chapter/ track/ file
Press SKIP (>) to move to the next chapter/ track/ file.
Press SKIP (.) to return to the beginning of the current chapter/ track/ file.
Press SKIP (.) twice briefly to step back to the previous chapter/ track/ file.
Pauseing playback
Press PAUSE/STEP (X) to pause playback. Press ENTER to continue
playback.
Frame-by-Frame playback
Press PAUSE/STEP (X) repeatedly to play title Frame-by-Frame.
Playing repeatedly or randomly
Press REPEAT/RANDOM repeatedly, and the current title, chapter or track will
be played back repeatedly or randomly. To return to normal playback, press
REPEAT/RANDOM repeatedly.
- Random play mode : only music files.
ALL
DivXDVD
ALL
ALL
DVD
Playing a Disc or file
ON REMOTE
1 Insert a disc on unit
ZZ
OPEN/CLOSE
2 Select a DVD/CD FUNCTION
3 Adjust the menu settings
UU uu II ii
or Select a file from the menu
UU uu
4 Start the Disc playing ENTER
5To stop the Disc playing
xx
STOP
Page 12

Viewing the DVD MENU
Press MENU to display the disc menu, if available.
Changing the character set to display DivX®subtitle correctly
If the subtitle does not display properly during playback, press and hold
SUBTITLE for about 3 seconds then press
II ii
or SUBTITLE to select another
language code until the subtitle is displayed properly and then press ENTER.
DivX file requirement
DivX disc compatibility with this player is limited as follows :
•Available resolution: within 720x576 (W x H) pixels
• The file name of the DivX subtitle should be entered within 45 characters.
• If there is impossible code to express in the DivX file, it may be displayed as
" _ " mark on the display.
• Frame rate : less than 30 fps
•If the video and audio structure of recorded files is not interleaved,
either video or audio is outputted.
• Playable DivX file : ".avi", ".mpg", ".mpeg", ".divx"
•Playable Subtitle format : SubRip (*.srt/ *.txt), SAMI (*.smi), SubStation
Alpha (*.ssa/ *.txt), MicroDVD (*.sub/ *.txt), SubViewer 2.0 (*.sub/ *.txt),
VobSub (*.sub)
• Playable Codec format : "DIVX3.xx", "DIVX4.xx", "DIVX5.xx", "MP43",
"3IVX".
• Playable Audio format : "AC3", "PCM", "MP3", "WMA".
• Sampling frequency : within 32 - 48 kHz (MP3), within 24 - 48kHz (WMA)
• Bit rate: within 32 - 320kbps (MP3), 40 - 192kbps (WMA)
• Max bitrate : USB : 6Mbps, CD : 4Mbps, DVD : 7Mbps
• For Discs formatted in Live file system, you can not it on this player.
• If the name of movie file is different from that of the subtitle file, during
playback of a DivX file, subtitle may not be display.
• If you play a DivX file differ from DivXspec, it may not operate normally.
Fall asleep while listening to your player
Press SLEEP one or more times to select delay time between 10 and 180
minutes, after the player will turn off.
To check the remaining time, press SLEEP. To cancel the sleep function, press
SLEEP repeatedly until “SLEEP 10” appears, and then press SLEEP once
again while “SLEEP 10” is displayed.
DIMMER
Press SLEEP once. The LED (Light-emitting diode) of front panel is turned off
and the display window will be darken by half. To cancel it, press SLEEP
repeatly until dim off.
DivX
DivX
DVD
Page 13

13
Viewing photo files - more you can do
Viewing photo files as a slide show
Use
UU uu II ii
to highlight ( ) icon then press ENTER to start slide Show.
You can change slide show speed using
II ii
when ( ) icon is highlighted.
Depending on the size and resolution of JPEG files, it may take longer for slider
show to be set.
Skipping to the next/ previous photo
Press SKIP (. or >) or
II ii
to view the previous/ next photo.
Rotating a photo
Use
UU uu
to rotate the photo in full screen counterclockwise or clockwise while
viewing a photo in full screen.
Pauseing a slide show
Press PAUSE/STEP (X) to pause a slide show. Press PLAY (B)or
PAUSE/STEP (X) to continue the slide show.
Listening to music during slide show
You can listen to music during slide show, if the disc contain music and photo
files together. Use
UU uu II ii
to highlight ( ) icon then press ENTER to start
slide show. This function is available only in disc.
Photo file requirement
JPEG disc compatibility with this player is limited as follows :
• Normal JPEG - Max pixel in width : 8902 pixel/ Progressive JPEG - Max pixel
in width : 1609 pixel
• Maximum files : Under 999.
• Some discs may not operate due to a different recording format or the
condition of disc.
• File extensions: “.jpg”
Viewing photo files
ON REMOTE
1 Insert a disc on unit
ZZ
OPEN/CLOSE
2 Select a DVD/CD FUNCTION
3 Select a photo file
UU uu
4 Display the selected file in full screen ENTER
5To return to the menu
xx
STOP
Page 14

Seeing information about a radio station
The FM tuner is supplied with the RDS (Radio Data System) facility. This shows
information about the radio station being listened to. Press RDS repeatedly to cycle
through the various data types. :
PS (Programme Service Name)
The name of the channel will appear in the display
PTY (Programme Type Recognition)
The programme type (e.g. Jazz or News) will appear in the display.
RT (Radio Text)
A text message contains special information from the broadcast station.
This text may scroll across the display.
CT (Time controlled by the channel)
This shows the time and date as broadcast by the station.
UU uu
UU uu
Page 15

15
Listening to music from your
portable player or external device
1
Connect the portable player
to the
PORT.IN(PORTABLE IN) connector of the unit.
Or
Connect the external device to the AUX connector
of the unit.
> If your TV has only one output for audio(MONO).
connect it to the left(white) audio jack on the unit. -
2Turn the power on POWER
3 Select the PORTABLE or AUX function FUNCTION
4Turn the portable external device and
start it playing -
The unit can be used to play the music from many types of portable player or
external device.
ON REMOTE
PORT. IN (PORTABLE IN)
Main unit
VCR, TV, ...
Page 16

When you are recording, look out for the following
•You can check the recording percentage rate for the USB record on the
screen during the recording.(AUDIO, MP3/ WMA CD only)
• During recording MP3/ WMA, there is no sound.
• When you stop recording during playback, the file that has been recorded at
that time will be stored.(AUDIO CD Only)
• Do not remove the USB device or turn off the unit during USB recording. If
not, an incomplete file may be made and not deleted on PC.
• If USB recording does not work, the message like “NO USB”, “ERROR”,
“USB FULL” or “NO REC” is displayed on the display window.
• Multi card reader device or External HDD can not be used for USB
recording.
•Afile is recoreded by 128Mbyte when you record for a long term.
• when you stop recording during playback, the file will not be stored.
• In the state CD-G, DTS disc USB record is not operated.
•You may not record more than 999files.
• The numbering of the recording file is entered from the lowest number.
So if you delete some of the recording files, the next recording file could be
the lowest number among them.
• It’ll be stored as follows.
The making of unauthorized copies of copy-protected material, including
computer programs, files, broadcasts and sound recordings, may be an
infringement of copyrights and constitute a criminal offense. This
equipment should not be used for such purposes.
Be responsible
Respect copyrights
MP3/ WMA
The other sources
(Tuner, AUX,
Portable, etc)
AUDIO CD
Page 17

17
Language Code
Lingala 7678
Lithuanian 7684
Macedonian 7775
Malagasy 7771
Malay 7783
Malayalam 7776
Maori 7773
Marathi 7782
Moldavian 7779
Mongolian 7778
Nauru 7865
Nepali 7869
Norwegian 7879
Oriya 7982
Panjabi 8065
Pashto, Pushto 8083
Persian 7065
Polish 8076
Portuguese 8084
Language Code
Quechua 8185
Rhaeto-Romance 8277
Rumanian 8279
Russian 8285
Samoan 8377
Sanskrit 8365
Scots Gaelic 7168
Serbian 8382
Serbo-Croatian 8372
Shona 8378
Sindhi 8368
Singhalese 8373
Slovak 8375
Slovenian 8376
Spanish 6983
Sudanese 8385
Swahili 8387
Swedish 8386
Tagalog 8476
Language Code
Tajik 8471
Ta mil 8465
Telugu 8469
Thai 8472
Tonga 8479
Turkish 8482
Turkmen 8475
Twi 8487
Ukrainian 8575
Urdu 8582
Uzbek 8590
Vietnamese 8673
Volapük 8679
Welsh 6789
Wolof 8779
Xhosa 8872
Yiddish 7473
Yoruba 8979
Zulu 9085
Area Code
Maldives MV
Mexico MX
Monaco MC
Mongolia MN
Morocco MA
Nepal NP
Netherlands NL
Netherlands Antilles AN
New Zealand NZ
Nigeria NG
Norway NO
Oman OM
Pakistan PK
Panama PA
Area Code
Paraguay PY
Philippines PH
Poland PL
Portugal PT
Romania RO
Russian Federation RU
Saudi Arabia SA
Senegal SN
Singapore SG
Slovak Republic SK
Slovenia SI
South Africa ZA
South Korea KR
Spain ES
Area Code
Sri Lanka LK
Sweden SE
Switzerland CH
Taiwan TW
Thailand TH
Turkey TR
Uganda UG
Ukraine uaw
United States US
Uruguay UY
Uzbekistan UZ
Vietnam VN
Zimbabwe ZW
Page 18

Plug the power cord into the wall outlet securely.
Select the appropriate video input mode on the TV so the
picture from the DVD Receiver appears on the TV screen.
Connect the video cables securely to both the TV and DVD
Receiver.
Select the correct input mode of the audio receiver so you can
hear the sound from the DVD receiver.
Connect the audio cables into the connection terminals
correctly.
Replace with a new audio cable.
Clean the disc using a soft cloth with outward strokes.
Insert a disc
Insert a playable disc (check the disc type, colour system
and regional code).
Place the disc with the label or printed side facing
upwards.
Press SETUP to close the menu screen.
Enter your password or change the rating level.
Clean the disc using a soft cloth with outward strokes.
Move DVD receiver and audio components further away from
your TV.
Check the antenna connection and adjust its position.
Attach an external aerial if necessary.
Tune to the station manually.
Preset some radio stations, see page 14 for details.
Point the remote directly at the unit.
Use the remote within 23 feet (7m) of the DVD receiver.
Remove the obstacle.
Replace the batteries with new ones.
CORRECTION
Page 19

19
About the Symbol Display
“
” may appear on your TV display during operation and indicates that the
function explained in this owner’s manual is not available on that specific DVD
video disc.
Regional Codes
This unit has a regional code printed on the rear of the unit. This unit can play
only DVD discs labeled same as the rear of the unit or “ALL”.
• Most DVD discs have a globe with one or more numbers in it clearly visible
on the cover. This number must match your unit’s regional code or the disc
cannot play.
• If you try to play a DVD with a different regional code from your player, the
message “Check Regional Code” appears on the TV screen.
Copyrights
It is forbidden by law to copy, broadcast, show, broadcast via cable, play in
public, or rent copyrighted material without permission. This product features
the copy protection function developed by Macrovision. Copy protection signals
are recorded on some discs. When recording and playing the pictures of these
discs picture noise will appear. This product incorporates copyright protection
technology that is protected by U.S. patents and other intellectual property
rights. Use of this copyright protection technology must be authorized by
Macrovision, and is intended for home and other limited viewing uses only
unless otherwise authorized by Macrovision. Reverse engineering or
disassembly is prohibited.
CONSUMERS SHOULD NOTE THAT NOT ALL HIGH DEFINITION
TELEVISION SETS ARE FULLY COMPATIBLE WITH THIS PRODUCT AND
MAY CAUSE ARTIFACTS TO BE DISPLAYED IN THE PICTURE. IN CASE OF
525 OR 625 PROGRESSIVE SCAN PICTURE PROBLEMS, IT IS
RECOMMENDED THAT THE USER SWITCH THE CONNECTION TO THE
‘STANDARD DEFINITION’ OUTPUT. IF THERE ARE QUESTIONS
REGARDING OUR TV SET COMPATIBILITY WITH THIS MODEL 525p AND
625p UNIT, PLEASE CONTACT OUR CUSTOMER SERVICE CENTER.
You have to set the disc format option to [Mastered] in order to make the discs
compatible with the LG players when formatting rewritable discs. When setting
the option to Live File System, you cannot use it on LG players.
(Mastered/ Live File System : Disc format system for Windows Vista)
Logo
Page 20

Speakers (HT304SQ)
Front/Rear Center Passive
Speaker speaker Subwoofer
Type 1 Way 1 Speaker 1 Way 1 Speaker 1Way1Speaker
Impedance 4 Ω 4 Ω 8 Ω
Rated Input Power 45 W 45 W 75 W
Max. Input Power 90 W 90 W 150 W
Net Dimensions (W x H x D)
99 x 114 x 86 mm 99 x 114 x 86 mm 156 x 325 x3 20 mm
Net Weight 0.35 kg 0.35 kg 3.5 kg
Specifications
 Loading...