

Page 1

User Guide
LG-H326t
ENGLISH
MFL00000000 (1.0) www.lg.com
Page 2
Important notice
Please read this before you start using your phone!
Please check to see whether any problems you encountered with your phone are
described in this section before taking the phone in for service or calling a service
representative.
1. Phone memory
When there is less than 10% of space available in your phone memory, your phone
cannot receive new messages. You need to check your phone memory and delete some
data, such as applications or messages, to make more memory available.
To uninstall applications:
1 Ta p > > Apps tab > Settings > General tab > Apps.
2 Once all applications appear, scroll to and select the application you want to
uninstall.
3 Ta p Uninstall.
2. Optimizing battery life
Extend your battery's power by turning off features that you don't have to run constantly
in the background. You can monitor how applications and system resources consume
battery power.
Extending your phone's battery life:
• Turn off radio communications when you are not using. If you are not using Wi-Fi,
Bluetooth or GPS, turn them off.
• Reduce screen brightness and set a shorter screen timeout.
• Turn off automatic syncing for Gmail, Calendar, Contacts and other applications.
• Some applications you have downloaded may reduce battery power.
• While using downloaded applications, check the battery charge level.
20
Page 3
NOTE: If you accidently press the Power/Lock Key while the device is in your
pocket, the screen will turn off automatically in order to save battery power.
To check the battery power level:
• Tap > > Apps tab > Settings > General tab > About phone >
Battery.
The battery status (charging or discharging) and battery level (percentage charged) is
displayed at the top of the screen.
To monitor and control how battery power is being used:
• Tap > > Apps tab > Settings > General tab > About phone >
Battery > Battery use.
Battery usage time is displayed on the screen. It tells you how long it has been since
you last connected your phone to a power source or, if currently connected, how long
the phone was last running on battery power. The screen shows the applications or
services using battery power, listed in order from the greatest to smallest amount used.
3. Before installing an open source application and OS
WARNING
If you install and use an OS other than the one provided by the manufacturer
it may cause your phone to malfunction. In addition, your phone will no longer
be covered by the warranty.
WARNING
To protect your phone and personal data, only download applications from trusted
sources, such as Play Store™. If there are improperly installed applications on your
phone, the phone may not work normally or a serious error may occur. You must
uninstall those applications and all associated data and settings from the phone.
21
Page 4
Important notice
4. Using an unlock pattern
Set an unlock pattern to secure your phone. Tap > > Apps tab > Settings
> Display tab > Lock screen > Select screen lock > Pattern. This opens a screen
that will guide you through how to draw a screen unlock pattern. You have to create a
Backup PIN as a safety measure in case you forget your unlock pattern.
Caution: Create a Google account before setting an unlock pattern and
remember the Backup PIN you created when creating your pattern lock.
WARNING
Precautions to take when using pattern lock.
It is very important to remember the unlock pattern you set. You will not be
able to access your phone if you use an incorrect pattern 5 times. You have 5
opportunities to enter your unlock pattern, PIN or password. If you have used
all 5 opportunities, you can try again after 30 seconds.
When you can’t recall your unlock Pattern, PIN or Password:
< If you have forgotten your pattern >
If you logged in to your Google account on the phone but failed to enter the correct
pattern 5 times, tap the Forgot pattern? button at the bottom of the screen. You are
then required to log in with your Google Account or you have to enter the Backup PIN
which you entered when creating your Pattern Lock.
If you have not created a Google account on the phone or you forgot Backup PIN, you
have to perform a hard reset.
< If you have forgotten your PIN or Password >
If you forget your PIN or Password, you will need to perform a hard reset.
Caution: If you perform a hard reset, all user applications and user data will be
deleted.
22
Page 5
NOTE: If you have not logged into your Google Account and have forgotten
your Unlock Pattern, you will need to enter your Backup PIN.
5. Using the Hard Reset (Factory Reset)
If your phone does not restore to its original condition, use a Hard Reset (Factory Reset)
to initialize it.
1 Turn the power off.
2 Press and hold the Power/Lock key + Volume Down key on the back of the
phone.
3 Release the Power/Lock Key only when the LG logo is displayed, then immediately
press and hold the Power/Lock Key again.
4 Release all keys when the Factory hard reset screen is displayed.
5 Press the Power/Lock Key to continue or either of the Volume Keys to cancel.
6 Press the Power/Lock Key once more to confi rm or either of the Volume Keys to
cancel.
WARNING
If you perform a Hard Reset, all user applications, user data and DRM licenses
will be deleted. Please remember to backup any important data before
performing a Hard Reset.
6. Opening and switching applications
Multi-tasking is easy with Android, you can keep more than one application running
at the same time. There is no need to quit an application before opening another one.
Use and switch between several open applications. Android manages each application,
stopping and starting them as needed to ensure that idle applications don't consume
resources unnecessarily.
23
Page 6
Important notice
1 Ta p Recent Key . A list of recently used applications will be displayed.
2 Tap the application you want to access. This does not stop the previous app
running in the background on the phone. Make sure to tap Back Key
an app after using it.
• To remove an app from the recent apps list, swipe the app preview to the left or right.
To clear all apps, tap Clear all.
7. Transferring music, photos and videos using Media
sync (MTP)
1 Ta p > > Apps tab > Settings > General tab > Storage to check out
the storage media.
2 Connect the phone to your PC using the USB cable.
3 Slide down the status bar and tap USB connected and select Media device
(MTP) option.
4 Open the memory folder on your PC. You can view the mass storage content on
your PC and transfer the fi les from PC to Device memory folder or vice versa.
5 After transfering fi les ,slide down the status bar and tap USB connected and
select Charge phone from USB connection type list.
8. Hold your phone upright
Hold your cell phone vertically, as you would a regular phone. Your phone has an
internal antenna. Be careful not to scratch or damage the back of the phone, as this
may affect performance.
When making/receiving calls or sending/receiving data, avoid holding the lower part of
the phone where the antenna is located. Doing so may affect call quality.
to exit
24
Page 7

9. Do not connect your phone when you power on/off
your PC
Make sure to disconnect your phone from the PC when powering your PC on or off as it
might result in PC errors.
25
Page 8
Getting to know your phone
Phone overview
Proximity Sensor
Front Camera Lens
Earpiece
Touch Screen
Back Key
• Returns to the previous screen. Also closes pop-up
items such as menus, dialog boxes, and the on-screen
keyboard.
Home Key
• Return to the Home screen from any screen.
Recent Key
• Displays recently used applications. If you touch and hold
this key, it opens available options menu.
SIM Switch Key
• Touch the key for SIM1/SIM2 selection (Selected SIM is
marked by Rectangle box on RSSI icon). Touch and Hold
the key to go to Dual SIM settings.
NOTE: Proximity sensor
When receiving and making calls, the proximity sensor automatically turns the backlight off
and locks the touch screen by sensing when the phone is near your ear. This extends battery
life and prevents you from unintentionally activating the touch screen during calls.
WARNING
Placing a heavy object on the phone or sitting on it can damage the LCD and touch screen
functions. Do not cover the LCD proximity sensor with protective film. This could cause the
sensor to malfunction.
26
Page 9
Microphone
Earphone Jack
Power/Lock Key
• Switch your phone on/
off by pressing and
holding this key
• Short press to lock/
unlock the screen
Speaker
WARNING
• This part encloses the battery compartment.
DTV Antenna
Rear Camera Lens
Flash
Volume Keys (Whilst screen
is switched off)
• Long Press Up to launch
QuickMemo
• Long Press Down to launch
Camera
Microphone
Charger/USB port
27
Page 10

Getting to know your phone
Installing the SIM card and battery
Before you can start exploring your new phone, you'll need to set it up.
1 To remove the back cover, hold the phone fi rmly in one hand. With your other hand,
lift off the back cover with your thumbnail as shown in fi gure below.
2 Slide the SIM card into the lower slot for the SIM card as shown in fi gure. Make
sure the gold contact area on the card is facing downwards.
28
Page 11

3 Insert the battery into place by aligning the gold contacts on the phone and the
battery (1) and pressing it down until it clicks into place (2).
4 Align the back cover over the battery compartment (1) and press it down until it
clicks into place (2).
29
Page 12
Getting to know your phone
Charging your phone
Charge the battery before using it for the first time. Use the charger to charge the
battery. A computer can be also used to charge the device by connecting them via the
USB cable.
WARNING
Use only LG-approved chargers, batteries and cables. If you use unapproved
chargers, batteries or cables, it may cause battery charging delay or pop up
message regarding slow charging, Or this can cause the battery to explode or
damage the device, which are not covered by the warranty.
The charger connector is at the bottom of the phone. Insert the charger and plug it into
an electrical outlet.
NOTE:
• The battery must be fully charged initially to improve battery lifetime.
• Do not open the back cover while your phone is charging.
30
Page 13
Using the memory card
Your phone supports the use of microSDTM or microSDHCTM memory cards of up to
32GB capacity. These memory cards are specifically designed for mobile phones and
other ultra-small devices and are ideal for storing media-rich files such as music,
programs, videos, and photographs for use with your phone.
To insert a memory card:
Insert the memory card into the upper slot for the memory card. Make sure the gold
contact area of Memory card is facing downwards.
To safely remove the memory card:
Touch > Apps tab > Settings > General tab > Storage > Unmount SD card.
NOTE:
• Use only compatible memory cards with your phone. Using incompatible
memory cards may damage the card and data stored on the card, as well
as the phone.
• It’s important to unmount the memory card prior to removing it from the
phone to avoid damage to it or the data saved on the card.
31
Page 14
Getting to know your phone
To format the memory card:
Your memory card may already be formatted. If it isn't, you must format it before you
can use it.
NOTE: All files on your memory card are deleted when it is formatted.
1 Touch to open the application list.
2 Scroll and touch Settings > General tab > Storage.
3 Touch Unmount SD card.
4 Touch Erase SD card > Erase SD card > Erase everything.
5 If you have set a pattern lock, input the pattern lock then select Erase everything.
NOTE: If there is content on your memory card, the folder structure may be
different after formatting, as all the files will have been deleted.
Locking and unlocking the screen
If you do not use the phone for a while, the screen will be automatically turned off and
locked. This helps to prevent accidental taps and saves battery power.
When you are not using the phone, press the Power/Lock key
If there are any programs running when you lock your screen, they may be still running
in Lock mode. It is recommended that you exit all programs before entering Lock mode
to avoid unnecessary charges (e.g. phone calls, web access and data communications).
To wake up your phone, press the Power/Lock key
Touch and slide the Lock screen in any direction to unlock your Home screen. The last
screen you viewed will open.
. The Lock screen will appear.
to lock your phone.
32
Page 15
Knock Code
The Knock Code feature allows you to tap the screen with your own Knock Code
pattern using the screen divided by 4 squares to easily turn the screen on or off. You
can disable this feature in the Lock screen settings.
NOTE:
• If you enter the wrong Knock Code 6 times, it will compulsorily take you to
your google account log in/backup PIN.
• Use the fingertip instead of finger nail to tap the screen for turning it on or
off.
• When the Knock Code is not in use, you can use Knock On function by taping the
screen.
1 From the Home screen, tap the Apps Key > Settings.
2 Ta p Lock screen > Select screen lock > Knock Code.
3 Tap the squares in a pattern to set your knock code.
Your knock code pattern can be 3 to 8 taps. Tap Done when you're finished.
33
Page 16

Getting to know your phone
Unlock the screen using the Knock Code
You can unlock the screen by tapping the Knock Code pattern you already set.
1 When the screen turns off, press the Power key .
2 Tap the Knock Code pattern you set before.
KnockON
You can lock or unlock the screen by just double-tap.
Double-tap the center screen quickly to unlock the screen. To lock the screen, doubletap the status bar in any screen (except on the camera viewfinder) or empty area on the
Home screen.
To activate KnockON feature
1 From the Home screen, tap the Apps Key > Settings > General tab >
Gestures.
2 Place a checkmark on Screen on/off.
NOTE: When turning the screen on, make sure you do not cover the proximity
sensor. Doing so will turn the screen off immediately after turning it on in order
to prevent abnormal turning on in your pocket or bag.
34
Page 17

Your Home screen
Touch screen tips
Here are some tips on how to navigate on your phone.
Tap or touch – A single finger tap selects items, links, shortcuts and letters on the
on-screen keyboard.
Touch and hold – Touch and hold an item on the screen by tapping it and not lifting
your finger until an action occurs. For example, to open a contact's available options,
touch and hold the contact in the Contacts list until the context menu opens.
Drag – Touch and hold an item for a moment and then, without lifting your finger, move
your finger on the screen until you reach the target position. You can drag items on the
Home screen to reposition them.
Swipe or slide – To swipe or slide, quickly move your finger across the surface of the
screen, without pausing when you first tap it (so you don’t drag an item instead). For
example, you can slide the screen up or down to scroll through a list, or browse through
the different Home screens by swiping from left to right (and vice versa).
Double-tap – Double-tap to zoom on a webpage or a map. For example, quickly
double-tap a section of a webpage to adjust that section to fit the width of the screen.
You can also double-tap to zoom in and out while viewing the picture.
Pinch-to-Zoom – Use your index finger and thumb in a pinching or spreading motion
to zoom in or out when using the browser or Maps, or when browsing pictures.
Rotate the screen – From many applications and menus, the orientation of the screen
adjusts to the device's physical orientation.
NOTE:
• To select an item, tap the center of the icon.
• Do not press too hard; the tap screen is sensitive enough to pick up a light,
yet firm tap.
• Use the tip of your finger to tap the option you want. Be careful not to tap
any other keys.
35
Page 18
Your Home screen
Home screen
The Home screen is the starting point for many applications and functions, and it allows
you to add items like application shortcuts, or Google widgets to give you instant access
to information and applications. This is the default canvas and accessible from any
menu by tapping
Extended home screen
The operating system provides multiple Home screen canvases to provide more space
for adding icons, widgets, and more.
Slide your finger left or right across the Home screen.
.
Status Bar
Shows phone's status information including the time,
signal strength, battery status, and notification icons.
Widget
Widgets are self-contained applications that can be
accessed through the Apps screen or on the Home
screen or an extended home screen. Unlike a shortcut,
the Widget appears as an on-screen application.
Application Icons
Tap an icon (application, folder, etc.) to open and use it.
Location Indicator
Indicates which Home screen canvas you are viewing.
Quick Key Area
Provides one-touch access to the function in any home
screen canvas.
Home touch buttons
Back Key, Home Key, Recent Key and SIM Switch Key
36
Page 19
Customizing the Home screen
You can customize your Home screen by adding apps, widgets or changing wallpapers.
To add items on your Home screen
1 Touch and hold the empty part of the Home screen.
2 In the Add Mode menu, select the item you wish to add. You will then see this
added item on the Home screen.
3 Drag it to the desired location and lift your fi nger.
TIP! To add an application icon to the Home screen from the Apps menu,
touch and hold the application you want to add.
To remove an item from the Home screen
Home screen > touch and hold the icon you want to remove > drag it to .
To add an app as a Quick key
From the Apps menu or on the Home screen, touch and hold an application icon
and drag it to the Quick key area. Up to 7 apps can be added.
To remove an app from the Quick key area
Touch and hold the desired quick key and drag it to .
NOTE: Apps key cannot be removed.
To customize apps icons on the Home screen
1 Touch and hold an application icon until it is unlocked from its current position.
Then drop it on the screen. The editing icon
corner of the application.
2 Tap the application icon again and select the desired icon design and size.
3 Ta p OK to save the change.
will appear in the upper right
37
Page 20
Your Home screen
Returning to recently-used applications
1 Ta p . A list of recently used applications will be displayed.
2 Tap an icon to open the application. Or tap to return to your previous screen.
Notifications panel
Notifications alert you the arrival of new messages, calendar events, and alarms, as
well as to ongoing events, such as when you are on a call.
When a notification arrives, its icon appears at the top of the screen. Icons for pending
notifications appear on the left, and system icons such as Wi-Fi or battery strength
shown on the right.
NOTE: The available options may vary depending on the region or service
provider.
Pending
notifications
38
Bluetooth, Wi-Fi &
battery status
Page 21
Opening the notifications panel
Swipe down from the status bar to open the notifications panel.
Quick Toggle Area
Tap each quick toggle key to turn it on/off. Touch
and hold the key to access the settings menu of the
function. To see more toggle keys, swipe left or right.
Tap
to remove, add, or rearrange toggle keys.
Tap to clear all the notifications.
Notifications
The current notifications are listed, each with a brief
description. Tap a notification to view it.
To close the notifications panel, touch and drag the tab
toward the top of the screen.
Indicator icons on the Status Bar
Indicator icons appear on the status bar at the top of the screen to report missed calls,
new messages, calendar events, device status and more.
39
Page 22
Your Home screen
The icons displayed at the top of the screen provide information about the status of the
device. The icons listed in the table below are some of the most common ones.
Icon Description Icon Description
No SIM card inserted Ringer is silenced
No network signal available Vibrate mode is on
Airplane mode is on Battery fully charged
Connected to a Wi-Fi network Battery is charging
Wired headset connected
Call in progress Downloading data
Missed call Uploading data
Bluetooth is on GPS is on
System warning Data is synchronizing
An alarm is set
New voicemail available
New text or multimedia
message
A song is currently playing
Mobile hotspot is active
40
Phone is connected to PC via
USB cable
New Gmail message available
New Hangouts message
available
Choose input method
Media server content sharing
on
Page 23
NOTE: The icons location in the status bar may differ according to the
function or service.
Using Dual SIM
When two SIM cards are inserted on your phone, the SIM cards information are
displayed on your notification drawer. When you touch the SIM switch key, currently
active SIM is switched.
NOTE: If only one SIM card is inserted or one SIM is off, SIM switching is
not available, and the SIM switch key has no action. During a call, sending a
message or using a data service, the other SIM’s RSSI might be displayed as
‘No service’ due to the network service status.
WARNING
If you are outside of the service area, it may cause your device to consume
more battery power.
41
Page 24

Your Home screen
On-screen keyboard
You can enter text using the on-screen keyboard. The on-screen keyboard appears
automatically on the screen when you need to enter text. To manually display the
keyboard, simply tap a text field where you want to enter text.
Using the keypad & entering text
Tap once to capitalize the next letter you type. Double-tap for all caps.
Tap to switch to the numbers and symbols keyboard.
Tap to access the keyboard settings. Touch and hold to access voice input mode,
handwriting mode or the Clip Tray.
Tap to enter a space.
Tap to create a new line.
Tap to delete the previous character.
Entering accented letters
When you select French or Spanish as the text entry language, you can enter special
French or Spanish characters (e.g. "á").
For example, to input "á", touch and hold the "a" key until the zoom-in key grows
bigger and displays characters from different languages.
Then select the special character you want.
42
Page 25
Google account setup
When you first turn on your phone, you have the opportunity to activate the network, to
sign into your Google Account and select how you want to use certain Google services.
To set up your Google account:
• Sign into a Google Account from the prompted set-up screen.
OR
• Tap > > Apps tab > select a Google application, such as Gmail > select
New to create a new account.
If you have a Google account, tap Existing, enter your email address and password,
then tap
Once you have set up your Google account on your phone, your phone automatically
synchronizes with your Google account on the Web.
Your contacts, Gmail messages, Calendar events and other information from these
applications and services on the Web are synchronized with your phone. (This will
depend on your synchronization settings.)
After signing in, you can use Gmail™ and take advantage of Google services on your
phone.
.
43
Page 26
Connecting to Networks and Devices
Wi-Fi
With Wi-Fi, you can use high-speed Internet access within the coverage of the wireless
access point (AP). Enjoy wireless Internet using Wi-Fi, without extra charges.
Connecting to Wi-Fi networks
To use Wi-Fi on your phone, you need to access a wireless access point or ‘hotspot’.
Some access points are open and you can simply connect to them. Others are hidden
or use security features; you must configure your phone to be able to connect to them.
Turn off Wi-Fi when you're not using it to extend the life of your battery.
NOTE: If you are out of the Wi-Fi zone or have set Wi-Fi to OFF, additional
charges may be applied by your mobile operator for mobile data use.
Turning Wi-Fi on and connecting to a Wi-Fi network
1 Ta p > > Apps tab > Settings > Networks tab > Wi-Fi.
2 Set Wi-Fi to ON to turn it on and start scanning for available Wi-Fi networks.
3 Tap the Wi-Fi menu again to see a list of active and in-range Wi-Fi networks.
• Secured networks are indicated by a lock icon.
4 Tap a network to connect to it.
• If the network is secured, you are prompted to enter a password or other
credentials. (Ask your network administrator for details)
5 The status bar displays icons that indicate Wi-Fi status.
44
Page 27
Bluetooth
You can use Bluetooth to send data by running a corresponding application, but not
from the Bluetooth menu as on most other mobile phones.
NOTE:
• LG is not responsible for the loss, interception or misuse of data sent or
received via the Bluetooth wireless feature.
• Always ensure that you share and receive data with devices that are trusted
and properly secured. If there are obstacles between the devices, the
operating distance may be reduced.
• Some devices, especially those that are not tested or approved by Bluetooth
SIG, may be incompatible with your device.
Turning on Bluetooth and pairing up your phone with a Bluetooth device
You must pair your device with another device before you connect to it.
1 Ta p > > Apps tab > Settings > Networks tab > set Bluetooth to
ON.
2 Tap the Bluetooth menu again. You will see the option to make your phone visible
and option to search devices. Now tap Search for devices to view the devices in
the Bluetooth Range.
3 Choose the device you want to pair with from the list.
Once the paring is successful, your device will connect to the other device.
NOTE: Some devices, especially headsets or hands-free car kits, may have a
fixed Bluetooth PIN, such as 0000. If the other device has a PIN, you will be
asked to enter it.
45
Page 28
Connecting to Networks and Devices
Send data using the Bluetooth wireless feature
1 Select a fi le or item, such as a contact, calendar event or media fi le, from an
appropriate application or from Downloads.
2 Select the option for sending data via Bluetooth.
NOTE: The method for selecting an option may vary by data type.
3 Search for and pair with a Bluetooth-enabled device.
Receive data using the Bluetooth wireless feature
1 Ta p > > Apps tab > Settings > Networks tab > set Bluetooth to
ON.
2 Tap the Bluetooth menu again and mark the checkbox at the top of the screen to
visible on other devices.
NOTE: To select the length of time that your device will be visible, tap >
Visibility timeout.
3 Select Accept to confi rm that you are willing to receive data from the device.
Sharing your phone's data connection
USB tethering and portable Wi-Fi hotspot are great features when there are no wireless
connections available. You can share your phone's mobile data connection with a
single computer via a USB cable (USB tethering). You can also share your phone's data
connection with more than one device at a time by turning your phone into a portable
Wi-Fi hotspot.
When your phone is sharing its data connection, an icon appears in the status bar and
as an ongoing notification in the notifications drawer.
For the latest information about tethering and portable hotspots, including supported
operating systems and other details, visit http://www.android.com/tether.
46
Page 29
To share your phone's data connection as a portable Wi-Fi hotspot
1 Ta p > > Apps tab > Settings > Networks tab > Tethering &
networks > Wi-Fi hotspot switch to activate.
2 Enter a password and tap Save.
TIP! If your computer is running Windows 7 or a recent distribution of some
flavours of Linux (such as Ubuntu), you will not usually need to prepare your
computer for tethering. But, if you are running an earlier version of Windows
or another operating system, you may need to prepare your computer to
establish a network connection via USB. For the most current information
about which operating systems support USB tethering and how to configure
them, visit http://www.android.com/tether.
To rename or secure your portable hotspot
You can change the name of your phone's Wi-Fi network name (SSID) and secure its
Wi-Fi network.
1 Ta p > > Apps tab > Settings > Networks tab > Tethering &
networks > Wi-Fi hotspot.
2 Ta p Set up Wi-Fi hotspot.
• The Set up Wi-Fi hotspot dialogue box will open.
• You can change the Wi-Fi name(SSID) that other devices see when scanning for
Wi-Fi networks.
• You can also tap the Security menu to configure the network with Wi-Fi Protected
Access 2 (WPA2) security using a pre-shared key (PSK).
• If you touch the WPA2 PSK security option, a password field is added to the Set
up Wi-Fi hotspot dialogue box. If you enter a password, you will need to enter
that password when you connect to the phone's hotspot with a computer or other
device. You can set Open in the Security menu to remove security from your Wi-Fi
network.
3 Ta p Save.
47
Page 30
Connecting to Networks and Devices
ATTENTION! If you set the security option as Open, you cannot prevent
unauthorised usage of online services by other people and additional charges
may be incurred. To avoid unauthorized usage, you are advised to keep the
security option active.
Wi-Fi Direct
Wi-Fi Direct supports a direct connection between Wi-Fi enabled devices without an
access point. Due to the high battery usage of Wi-Fi direct, it is recommended that you
plug your phone into a power outlet while using the Wi-Fi Direct feature. Check your
Wi-Fi & Wi-Fi Directed network in advance and make sure the users are connected to
the same network.
To turn on Wi-Fi Direct:
1 Ta p > > Apps tab > Settings > Networks tab > Wi-Fi.
2 Tap the Menu Key > Wi-Fi Direct.
3 Select a device to connect with from the scanned device list.
PC connections with a USB cable
Learn to connect your device to a PC with a USB cable in USB connection modes.
Transferring music, photos and videos using the USB mass storage mode
1 Connect your phone to a PC using a USB cable.
2 If you haven't installed the LG Android Platform Driver on your PC, you will need to
manually change the settings. Slide down the status bar > Tap USB connected >
Select USB connection method, then select Media device (MTP).
3 You can now view the mass storage content on your PC and transfer the fi les.
48
Page 31

Synchronize with Windows Media Player
Ensure that Windows Media Player is installed on your PC.
1 Use the USB cable to connect the phone to a PC on which Windows Media Player
has been installed.
2 Select the Media sync (MTP) option. When connected, a pop-up window will
appear on the PC.
3 Open Windows Media Player to synchronize music fi les.
4 Edit or enter your device’s name in the pop-up window (if necessary).
5 Select and drag the music fi les you want to the sync list.
6 Start synchronization.
• The following requirements must be satisfied to synchronize with Windows Media
Player.
Items Requirement
OS Microsoft Windows XP SP2, Vista or higher
Window Media Player version Windows Media Player 10 or higher
• If the Windows Media Player version is lower than 10, install version 10 or higher.
49
Page 32

Calls
Making a call
1 Ta p to open the keypad.
2 Enter the number using the keypad. To delete a digit, tap the .
3 Ta p to make a call.
4 To end a call, tap the End icon .
TIP! To enter "+" to make international calls, touch and hold .
Calling your contacts
1 Ta p to open your contacts.
2 Scroll through the contact list or enter the fi rst few letters of the contact you want
to call by tapping Search contacts.
3 In the list, tap you want to call.
Answering and rejecting a call
When you receive a call in Lock state, swipe the in any direction to Answer the
incoming call.
Swipe the
Adjusting the in-call volume
To adjust the in-call volume during a call, use the Volume up and down keys on the
back side of the phone.
in any direction to Decline an incoming call.
50
Page 33

Making a second call
1 During your fi rst call, tap Menu key > Add call and dial the number. You can
also go to the recently dialled numbers list by tapping Call logs or can search
contacts by tapping Contacts and selecting the contact you want to call. Also, you
can search contacts by tapping Favorites or Groups.
2 Ta p to make the call.
3 Both calls are displayed on the call screen. Your initial call is locked and put on
hold.
4 Tap the displayed number to toggle between calls. Or tap Merge calls to start
a conference call.
5 To end active calls, tap End or tap and slide the notifi cation bar down and
select the End call icon
NOTE: You are charged for each call you make.
.
Viewing your call logs
On the Home screen, tap and choose the Call logs.
View a complete list of all dialled, received and missed calls.
TIP!
• Tap any call log entry to view the date, time and duration of the call.
• Tap the Menu key , then tap Delete all to delete all the recorded items.
51
Page 34

Calls
Call settings
You can configure phone call settings such as call forwarding, as well as other special
features offered by your carrier.
1 On the Home screen, tap .
2 Ta p .
3 Ta p Call settings and choose the options that you wish to adjust.
52
Page 35

Contacts
Add contacts to your phone and synchronize them with the contacts in your Google
account or other accounts that support contact syncing.
Searching for a contact
On the Home screen
1 Ta p to open your contacts.
2 Ta p Search contacts and enter the contact name using the keyboard.
Adding a new contact
1 Ta p , enter the new contact's number, then tap the Menu key . Tap Add to
Contacts > New contact.
2 If you want to add a picture to the new contact, tap the image area.
Choose from Take photo or Select from Gallery.
3 Tap a category of contact information and enter the details about your contact.
4 Ta p Save.
Favourites contacts
You can classify frequently called contacts as favourites.
Adding a contact to your favourites
1 Ta p to open your contacts.
2 Tap a contact to view its details.
3 Tap the star to the right corner of the contact's name. The star will turn yellow color.
53
Page 36

Contacts
Removing a contact from your favourites list
1 Ta p to open your contacts.
2 Tap the Favourites tab, and choose a contact to view its details.
3 Tap the yellow color star to the right corner of the contact's name. The star turns
gray color and the contact is removed from your favourites.
Creating a group
1 Ta p to open your contacts.
2 Ta p Groups and tap the Menu key . Select New group.
3 Enter a name for the new group. You can also set a ringtone for the newly created
group.
4 Ta p Save to save the group.
NOTE: If you delete a group, the contacts assigned to that group will not be
lost. They will remain in your contacts.
54
Page 37

Messaging
Your phone combines SMS and MMS into one intuitive, easy-to-use menu.
Sending a message
1 Ta p on the Home screen and tap to open a blank message.
2 Enter a contact name or contact number in the To fi eld. As you enter the contact
name, matching contacts will appear. You can tap a suggested recipient. You can
add more than one contact.
NOTE: You will be charged for a text message for every person to whom you
send the message.
3 Tap the Enter message fi eld and begin composing your message.
4 Ta p to open the Options menu. Choose from Quick message, Insert smiley,
Schedule sending, Add subject and Discard.
TIP! You can tap the icon to attach the file, that you want to share with
message.
5 Ta p Send to send your message.
6 Responses will appear on the screen. As you view and send additional messages, a
message thread is created.
WARNING:
• The 160-character limit may vary from country to country, depending on the
language and how the SMS is coded.
• If an image, video or audio file is added to an SMS message, it is
automatically converted into an MMS message and you are charged
accordingly.
55
Page 38

Messaging
Threaded box
Messages (SMS, MMS) exchanged with another party can be displayed in chronological
order so that you can conveniently see an overview of your conversation.
Changing your message settings
Your phone message settings are pre-defined, so you can send messages immediately.
You can change the settings according to your preferences.
• Tap the Messaging icon on the Home screen, tap and then tap Settings.
56
Page 39

E-mail
You can use the E-mail application to read emails from services like Gmail. The E-mail
application supports the following account types: POP3, IMAP and Exchange.
Your service provider or system administrator can provide you with the account settings
you need.
Managing an email account
The first time you open the E-mail application, a set-up wizard opens to help you to set
up an email account.
After the initial set-up, E-mail displays the contents of your inbox.
To add another email account:
• Tap > > Apps tab > E-mail >tap > Settings > Add account.
To change an email account's settings:
• Tap > > Apps tab > E-mail > tap > Settings > General settings.
To delete an email account:
• Tap > > Apps tab > E-mail > tap > Settings > tap > Remove
account > Select the account to delete > Remove > select Yes .
Working with account folders
Tap > > Apps tab > E-mail > tap and select Folders.
Each account has an Inbox, Outbox, Sent and Drafts folder. Depending on the features
supported by your account's service provider, you may have additional folders.
57
Page 40

E-mail
Composing and sending email
To compose and send a message
1 While in the E-mail application, tap the .
2 Enter an address for the message's intended recipient. As you enter text, matching
addresses will be proposed from your Contacts. Separate multiple addresses using
semicolons.
3 Tap the to add a Cc/Bcc and tap to attach fi les, if required.
4 Enter the text of the message.
5 Ta p .
TIP! When a new email arrives in your Inbox, you will be notified by a sound
or vibration.
58
Page 41

Camera and Video
You can use the camera or camcorder to take and share pictures and videos. Your
phone comes with a 8 megapixel camera with an autofocus feature that lets you
capture sharp pictures and videos.
NOTE: Be sure to clean the protective lens cover with a microfiber cloth
before taking pictures. A lens cover with smudges from fingers can cause
blurry pictures with a "halo" effect.
To open the Camera application
From the Home screen, tap the Apps Key > Camera .
OR
Tap the Camera icon
TIP! If you’ve set your phone to use the Swipe unlock method, from
the locked screen, simply press the Power/Lock Key , on the back of
the phone, then drag the Camera icon upward to open the Camera
application.
Getting to know the viewfinder
from the Home screen.
5
1
2
3
4
1
Flash – Taps to turn the flash On, Off or set it to Auto.
6
7
59
Page 42

Camera and Video
2
Swap camera – Tap to swap between the rear camera lens and the front camera
lens.
3
Mode – Mode to select the mode from: Auto and Panorama.
4
Settings – Tap to adjust the following camera and video settings.
5
Gallery – Tap to access your Gallery.
6
Video Recording button – Tap to start recording a video.
7
Capture button – Tap to take a photo.
Take Pictures
Taking pictures with your phone’s built-in camera is as simple as choosing a subject,
pointing the lens, and pressing a button.
To take a picture:
1 From the Home screen, tap the Apps Key > Camera .
2 Frame your subject on the screen.
3 A square around the subject indicates that the camera has focused.
4 Ta p to take a photo. Your picture will be automatically saved to the Gallery.
Record Videos
In addition to taking pictures, you can record, view, and send videos with your phone’s
built-in video camera.
1 From the Home screen, tap the Apps Key > Camera .
2 Frame your subject on the screen.
3 Ta p to start recording the video.
4 The length of the recording is displayed on the top of the screen.
NOTE: Tap to take pictures while recording video.
60
Page 43

5 Ta p to pause recording video. You can resume recording again tapping .
OR
6 Ta p to stop recording. Your video will be automatically saved to the Gallery.
Camera and Video Settings
From the camera mode, tap each icon to adjust the following camera settings.
• Flash : Taps to turn the flash On, Off or set it to Auto.
• Swap camera : To swap between the rear camera lens and the front camera lens.
• Mode : Mode to select the mode from: Auto and Panorama.
Auto: Captures a auto photo shot.
Panorama: Creates a wide photo of a panoramic view. Hold the phone horizontally,
press the shutter to start and slowly sweep the camera across the scene.
• Settings : To adjust the following camera and video settings.
Image size: Set the size of your picture. Choose from 8M, W6M, 5M or 3M. Set the
size of your video. Choose from FHD, HD or WVGA.
Cheese shutter: Allows you to take pictures with voice commands. When on, you
just say "Cheese", "Smile", "Whiskey", "Kimchi", or "LG" to take a picture.
Timer: Set your camera's timer. This is ideal if you want to be a part of the picture.
Grid: It is easily used to take better pictures to keeping horizontal and verticals.
SD card: Set the storage location for your pictures. Choose from IN or SD. This
menu appears only when the SD card is inserted.
Help: Allows you to learn how a function works. This icon will provide you with a
quick guide.
61
Page 44

Camera and Video
Gesture shot
Take a picture with hand gesture. To take photo, raise your hand until front camera
detects it and a box appears on the screen.
View Your Pictures
The Gallery is where you can access the Gallery of stored camera images. You can view
them in a slideshow, share them with your friends, and delete and edit them.
1 From the Home screen, tap the Apps Key > Gallery .
2 Select a location and tap an image to view your picture.
62
Page 45

Gallery Options
The Gallery application presents the pictures and videos in your storage, including those
you’ve taken with the Camera application and those you downloaded from the web or
other locations.
If you have one of your phone’s Google Accounts, you’ll also see your Picasa web
albums in Gallery.
1 From the Home screen, tap the Apps Key > Gallery to view the images
stored in the storage.
Drag left or right to view more albums.
2 Tap an album to open it and view its contents. (The pictures and videos in the
album are displayed in chronological order.)
3 Tap a picture in an album to view it.
Tap a picture group again to reveal the following icons:
• Camera: Opens the Camera.
• Share: You can share the picture via various methods such as Messaging or
Bluetooth.
•
Delete: Deletes the picture.
Tap a picture in an album then tap for the following options: Set image as,
63
Page 46

Camera and Video
Move, Copy, Copy to Clip Tray, Slideshow, Rotate left, Rotate right, Crop, Add
location, Rename, Print and Details.
Tap the Back Key to return to the previous screen.
Assign Pictures
After taking a picture, assign it as a picture ID for a Contacts entry or as the Home
screen background image (wallpaper).
1 From the Home screen, tap the Apps Key > Gallery .
2 Tap an album and tap an image to view it.
3 With the picture displayed, tap > Set image as.
4 Select an option.
Contact photo to assign the picture to a Contact entry as a picture ID. Tap an
entry from Contacts, crop the image and tap OK to assign the picture.
Home screen wallpaper to assign the picture as a background image, crop the
image and tap OK to assign the picture.
Lock screen wallpaper to assign the picture as a background image for your lock
screen.
Wallpaper to assign the picture as a background image, crop the image and tap
SET WALLPAPER to assign the picture.
Video Options
The Gallery is where you can access the Gallery of stored video images. You can view
them, share them with your friends, and delete and edit them.
1 From the Home screen, tap the Apps Key > Gallery to view the videos
stored in storage.
Scroll left or right to view more albums.
2 Tap an album to open it and view its contents. (The pictures and videos in the
album are displayed in chronological order.)
3 Tap a video to view it. You can access the following options:
64
Page 47

QSlide: Enables an overlay on your phone’s display for easy multitasking.
Menu: Tap to access Screen ratio, Subtitles, Share, Settings, Details
options.
Screen shot: Captures a screen shot while playing a video.
NOTE: Tap > Settings > Screenshot on.
Volume: Tap to display the Volume slider bar, then adjust the playback volume
on the slider bar.
Lock/Unlock: Locks the touch keys to prevent unintentional touches.
Play a Video
1 From the Home screen, tap the Apps Key > Gallery to view videos stored
in the storage.
Scroll left or right to view more albums.
2 Tap an album to open it and view its contents. (The pictures and videos in the
album are displayed in chronological order.)
3 3. Tap a video in an album to play.
Tap the video to view the playback controls.
NOTE: While a video is playing, slide the left side of the screen up or down to
adjust the screen brightness. While a video is playing, slide the right side of the
screen up or down to adjust the sound. While playing a video, tap the timeline
point to preview that portion of the video via a small screen. Tap the small
screen to jump to that part of the video. While playing a video, slide your finger
from left to right (or vice versa) to fast-forward and rewind.
65
Page 48

Camera and Video
Live Zoom
Live Zoom allows you to zoom in or zoom out on a portion of a video that is being
played to make the desired section appear larger or smaller.
When viewing a video, use your index finger and thumb in a pinching or spreading
motion to zoom in or out.
NOTE: Do not press too hard; the touch screen is sensitive enough to pick up
a light, but firm touch.
Gallery
Open the Gallery application to view albums of your pictures and videos.
To open the Gallery application
• From the Home screen, tap the Apps Key > Gallery .
Viewing your albums
The Gallery application presents the pictures and videos saved in your phone, including
those you’ve taken with the Camera application and those you downloaded from the
web or other locations.
• Tap an album to open it and view its contents.
• Tap a picture or video in an album to view it.
66
Page 49
• Tap the Menu Key (at the top right corner of the screen) to access New Album,
Delete, Hide/Show album, Settings, and Help.
• Tap the Camera icon to return to the Camera application.
To share an album
You can share the entire contents of one or more albums or individual images or videos
from an album.
1 From the Home screen, tap the Apps Key > Gallery .
2 Touch and hold the desired album, tap Share, select the application to use to share
your images, then complete the sending method as necessary.
Working with photos
Use the Gallery application to view pictures that you’ve taken with the Camera
application, downloaded.
To view and browse photos
1 From the Home screen, tap the Apps Key > Gallery .
2 Open an album and tap a picture.
3 Tap the Menu Key (at the top right corner of the screen) to access Set image
as, Move, Copy, Copy to Clip Tray, Slideshow, Rotate left, Rotate right, Crop,
Add/Remove location, Rename, Print, or Details.
67
Page 50

Camera and Video
Camera Mode Icon
Tap here to go to camera mode.
Gallery Icon
Tap here to return to your
Gallery.
Edit Icon
Tap here to edit your picture.
Share Icon
Tap here to share the photo using
the method you select.
Delete Icon
Tap here to delete the photo.
Swipe horizontally to scroll through
the photos in the current album.
Swipe here to quickly scroll through
the images in the album, then tap
the one you want to view.
To share a video
1 Open an album to view its contents, then tap the Share icon at the top of the
Gallery screen.
2 Checkmark the video(s) you want to share, tap Share at the bottom of the screen,
select how to share the fi le(s), then complete as necessary.
To delete a video
1 Open an album to view its contents, then tap the Delete icon at the top of the
Gallery screen.
2 Checkmark the video(s) you want to delete, tap Delete at the bottom of the screen,
then tap Yes to confi rm.
NOTE: You can also pinch in on your video list, then swipe a video up, off the
screen to quickly delete it.
68
Page 51

QSlide while playing videos
You can play videos in a QSlide window allowing you to use other applications while the
video is playing.
1 Open the Gallery application and begin playing the video.
2 Tap the QSlide icon at the top right corner of the screen to activate the QSlide
feature to play the video in a QSlide window.
3 To close the QSlide window, tap the in the upper-right corner of its title bar.
69
Page 52

Function
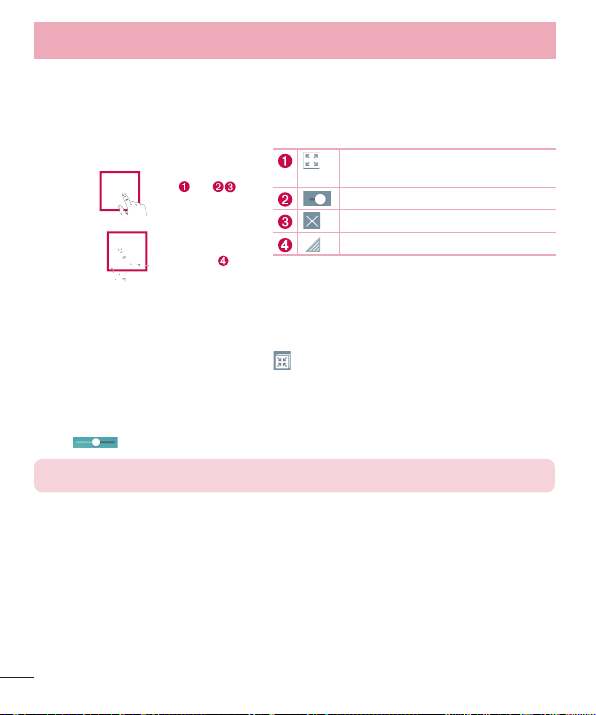
QuickMemo+
The QuickMemo+ allows you to create memos and capture screen shots.Capture
screens, draw on them and share them with family and friends with QuickMemo+.
1 (While screen is locked) Press and
hold the Volume Up key.
OR
OR
Touch and slide the status bar downward
and tap
2 Select the desired menu option from
Pen type, Colour, Eraser and create
a memo.
.
70
Page 53

3 Ta p in the Edit menu to save the
memo with the current screen. To exit
QuickMemo+ at any time, tap
NOTE: Please use a fingertip while using the QuickMemo+. Do not use your
fingernail.
Using the QuickMemo+ options
You can easily use the editing tools when using the QuickMemo+.
Undo or Redo.
Use complex concept function.
Select the pen type and the colour.
Erase the memo that you created.
Save the memo with the current screen in the Gallery or QuickMemo+.
Option: Tap to choose Share, Paper style for the memo.
Viewing the saved QuickMemo+
Tap QuickMemo+/Gallery and select the QuickMemo+ album.
.
71
Page 54
Function
QSlide
From any screen, bring up a notepad, calendar, and more as a window inside your
screen.
Tap to exit the QSlide and return to
full window.
Tap to adjust transparency.
OR
1 Touch and slide the status bar downwards > tap QSlide apps or while using
applications that support QSlide, tap
as a small window on your screen.
2 You can make a call, browse the Web, or choose other phone options. You can also
use and tap the screen under the small windows when the transparency bar is not
full
NOTE: The QSlide can support up to two windows at the same time.
.
Tap to end the QSlide.
Tap to adjust the size.
. The function will be continuously displayed
72
Page 55

Smart Keyboard
Smart Keyboard recognizes your keyboard input habit and provide your own keyboard
quickly inputting without errors.
Move cursor using space bar
Touch and hold the space bar and left or right to move
the cursor.
Enter suggested word using gesture
control
Enter text on the keyboard and the related word
suggestions appear. Flick upward on the left to select the
left-side suggestion. Flick upward on the right to select
the right-side suggestion.
73
Page 56

Function
LG SmartWorld
LG SmartWorld offers an assortment of exciting content – fonts, themes, games,
applications.
How to Get to LG SmartWorld from Your Phone
1 Ta p > > Apps tab > tap the icon to access LG SmartWorld.
2 Tap Sign in and enter ID/PW for LG SmartWorld. If you have not signed up yet, tap
Register to receive your LG SmartWorld membership.
3 Download the content you want.
* When you use Cellular network, data fee could be charged by data plan that you
signed-up with carrier.
* LG SmartWorld may not be available from all carriers or in all countries.
NOTE: What if there is no icon?
1 Using a mobile Web browser, access LG SmartWorld (www.lgworld.com)
and select your country.
2 Download the LG SmartWorld App.
3 Run and install the downloaded file.
4 Access LG SmartWorld by tapping the icon.
Special benefit only in LG SmartWorld
1 Decorate your own style on your Smartphone, Use Home Theme &
Keyboard Theme & Font that provided on LG SmartWorld. (However this
service is available to specific device. please check in LG SmartWorld
website whether it is feasible or not whether it is feasible or not)
2 Enjoy LG SmartWorld's special service by joining promotion that consistently
provided.
74
Page 57

Multimedia
Music
Your phone has a built-in music player that lets you play all your favorite tracks. To
access the music player, tap
Add music files to your phone
Start by transferring music files to your phone:
• Transfer music using Media sync (MTP).
• Download from the wireless Web.
• Synchronize your phone to a computer.
• Receive files via Bluetooth.
Transfer music using Media sync (MTP)
1 Connect the phone to your PC using the USB cable.
2 Select the Media sync (MTP) option. Your phone will appear as another hard drive
on your computer. Click on the drive to view it. Copy the fi les from your PC to the
drive folder.
3 When you’re fi nished transferring fi les, swipe down on the Status Bar and tap USB
connected > Charge phone. You may now safely unplug your device.
Playing a song
1 Ta p > > Apps tab > Music.
2 Ta p Songs.
3 Select the song you want to play.
Tap to pause playback.
Tap to resume playback.
Tap to skip to the next track in the album, playlist, or shuffle. Touch and hold
to fast forward.
> > Apps tab > Music.
75
Page 58

Multimedia
Tap to restart the current track or skip to the previous track in the album,
playlist, or shuffle. Touch and hold to rewind.
Tap to display the Volume slider bar, then adjust the playback volume on the
slider bar.
Tap to set audio effects.
Tap to open the current playlist.
Tap to add the song to your favourites.
Tap to play the current playlist in shuffle mode (tracks are played in random
order).
Tap to toggle through the repeat modes to repeat all songs, repeat current
song, or repeat off.
To change the volume while listening to music, press the up and down volume keys on
the back side of the phone.
Touch and hold any song in the list. The Play, Add to playlist, Delete, Share, Set as
ringtone, Details and Search options will be displayed.
NOTE:
• Some file formats are not supported, depending on the device software.
• If the file size exceeds the available memory, an error can occur when you
open files.
NOTE: Music file copyrights may be protected by international treaties and
national copyright laws.
Therefore, it may be necessary to obtain permission or a licence to reproduce
or copy music.
In some countries, national laws prohibit private copying of copyrighted
material. Before downloading or copying the file, check the national laws of
the relevant country concerning the use of such material.
76
Page 59

Utilities
Setting your alarm
1 Ta p > > Apps tab > Clock > .
2 After you set the alarm, your phone lets you know how much time is left before the
alarm will go off.
3 Set Repeat, Snooze duration, Vibration, Alarm sound, Alarm volume, Auto app
starter, Puzzle lock and Memo. Tap Save.
NOTE: To change alarm settings in the alarm list screen, tap the Menu key
and select Settings.
Using your calculator
1 Ta p > > Apps tab > Calculator.
2 Tap the number keys to enter numbers.
3 For simple calculations, tap the function you want to perform (+, –, x or ÷) followed
by =.
4 For more complex calculations, slide the left then choose sin, cos, tan, log etc.
5 To check the history, tap the icon .
Adding an event to your calendar
1 Ta p > > Apps tab > Calendar.
2 On the screen, you can fi nd the different view types for the Calendar (Day, Week,
Month, Year, Agenda).
3 Tap on the date for which you wish to add an event and tap .
4 Ta p Event name and enter the event name.
5 Ta p Location and enter the location. Check the date and enter the time you wish
your event to start and fi nish.
6 If you wish to repeat the alarm, set REPEAT and set REMINDERS, if necessary.
7 Ta p Save to save the event in the calendar.
77
Page 60

Utilities
Voice Recorder
Use the voice recorder to record voice memos or other audio files.
Recording a sound or voice
1 Ta p > > Voice Recorder.
2 Ta p to begin recording.
3 Ta p to end the recording.
4 Ta p to listen to the recording.
NOTE: Tap to access your album. You can listen to the saved recording.
The available recording time may differ from actual recording time.
Sending the voice recording
1 Once you have fi nished recording, you can send the audio clip by tapping .
2 Choose from Bluetooth, Drive, Email, Gmail, Messaging or QuickMemo+ .
When you select Bluetooth, Drive, Email, Gmail, Messaging or QuickMemo+
the voice recording is added to the message. You may then write and send the
message as you usually would.
Tasks
This task can be synchronized with MS Exchange account. You can create task, revise it
and delete it in MS outlook or MS Office Outlook Web Access.
To Synchronize MS Exchange
1 From the Home Screen, Tap > > Apps tab > Settings.
2 Ta p General tab > Accounts & sync > Add account.
3 Ta p Microsoft Exchange to create Email address and Password.
4 Make sure if you checkmark Sync task.
78
Page 61

NOTE: MS Exchange may not be supported depending on email server.
Google+
Use this application to stay connected with people via Google’s social network service.
• Tap > > Apps tab > Google+.
NOTE: This application may not be available depending on the region or
service provider.
Voice Search
Use this application to search webpages using voice.
1 Ta p > > Apps tab > Voice Search.
2 Say a keyword or phrase when Speak now appears on the screen. Select one of
the suggested keywords that appear.
NOTE: This application may not be available depending on the region or
service provider.
Downloads
Use this application to see what files have been downloaded through the applications.
• Tap > > Apps tab > Downloads.
NOTE: This application may not be available depending on the region or
service provider.
79
Page 62

The Web
Internet
Use this application to browse the Internet. Browser gives you a fast, full-color world of
games, music, news, sports, entertainment and much more, right on your mobile phone
wherever you are and whatever you enjoy.
NOTE: Additional charges apply when connecting to these services and
downloading content. Check data charges with your network provider.
1 Ta p > > Apps tab > Internet.
Using the Web toolbar
Tap slide it upwards with your finger to open.
Tap to go back one page.
Tap to go forward one page, to the page you connected to after the current
one. This is the opposite of what happens when you tap
you to the previous page.
Tap to go to the Home page.
Tap to add a new window.
Tap to access bookmarks.
Viewing webpages
Tap the address field, enter the web address and tap Go.
Opening a page
To go to new page, tap .
To go to another webpage, tap , scroll up or down, and tap the page to select it.
, which takes
80
Page 63

Searching the web by voice
Tap the address field, tap , speak a keyword, and then select one of the suggested
keywords that appear.
NOTE: This feature may not be available depending on the region or service
provider.
Bookmarks
To bookmark the current webpage, tap > Add to bookmarks > OK.
To open a bookmarked webpage, tap and select one.
History
Tap > History to open a webpage from the list of recently-visited webpages. To
clear all history, tap
Yes .
Using Popup Browser
Use this feature to access the Internet without closing the current application.
While viewing content, such as contacts or notes that include web addresses, select a
web address and then tap Popup Browser to open the pop-up browser. Touch and drag
the browser to move it to another location.
To view the browser in full screen, tap
To close the browser, tap .
.
81
Page 64

The Web
Chrome
Use Chrome to search for information and browse webpages.
1 Ta p > > Apps tab > Chrome.
NOTE: This application may not be available, depending on your region and
service provider.
Viewing webpages
Tap the Address field, and then enter a web address or search criteria.
Opening a page
To go to a new page, tab New tab.
To go to another webpage, tap , scroll up or down and tap the page to select it.
Syncing with other devices
Sync open tabs and bookmarks to use with Chrome on another device when you are
logged in with the same Google account.
To view open tabs on other devices, tap Menu key
Select a webpage to open.
To add bookmarks, tap .
Other devices.
82
Page 65

Settings
This section provides an overview of items you can change using your phone's System
settings menus.
To access the Settings menu:
Tap
> > Apps tab > Settings.
- or Tap , then touch and hold > System settings.
Networks
< Dual SIM card >
You can configure Dual SIM card settings.
Activate slot 1/2 - Allows you to activate or deactivate the SIM card in the slot.
SIM card colour theme - Allows you to select your desired colors.
Cost save mode - Every contact is added along with assigned SIM when adding in
phone book. During Calling, matching operator SIM is identified and the operation is
completed using the matching operator SIM. This makes possible to use benefit from
using same operator.
NOTE: Cost save mode doesn’t work during in-call.
Mobile data – Tap to tick. This enables data access over the mobile network.
SIM card to use – You can select which SIM card to use for data network.
< Wi-Fi >
Wi-Fi – Turns on Wi-Fi to connect to available Wi-Fi networks.
83
Page 66

Settings
TIP! How to obtain the MAC address
To set up a connection in some wireless networks with MAC filters, you may
need to enter the MAC address of your phone in the router.
You can find the MAC address in the following user interface: tap > >
Apps tab > Settings > Networks tab > Wi-Fi > > Advanced Wi-Fi >
MAC address.
< Bluetooth >
Turn the Bluetooth wireless feature on or off to use Bluetooth.
< Mobile data >
Displays the data usage and set mobile data usage limit.
[SIM card 1/SIM card 2 Tab ]
< Call >
Configure phone call settings such as call forwarding and other special features offered
by your carrier.
Voicemail – Allows you to select your carrier’s voicemail service.
Fixed dialing numbers – Turn on and compile a list of numbers that can be called
from your phone. You’ll need your PIN2, which is available from your operator. Only
numbers within the fixed dial list can be called from your phone.
Call forwarding – Choose whether to divert all calls when the line is busy, when there
is no answer or when you have no signal.
Call barring – Lock incoming, outgoing or international calls.
Call duration – View the duration of calls including Last call, Outgoing calls, Incoming
calls and All calls.
Additional call settings – Allows you to change the following settings:
Caller ID: Choose whether to display your number in an outgoing call.
Call waiting: If call waiting is activated, the handset will notify you of an incoming call
while you are on a call (depending on your network provider).
84
Page 67

[Common Tab ]
Smart forward – You can receive SIM2 calls if you are busy on SIM1 and vice versa.
Incoming voice call pop-up – Display incoming voice call pop-up when an app is in
use.
Call reject – Allows you to set the call reject function. Choose from Call reject mode or
Reject calls from.
Decline with message – When you want to reject a call, you can send a quick
message using this function. This is useful if you need to reject a call during a meeting.
Privacy keeper – Hides the caller name and number for an incoming call.
Auto answer – Set the time before a connected hands-free device automatically
answers an incoming call. Choose from Disable, 1 second, 3 seconds, and 5 seconds.
Connection vibration – Vibrates your phone when the other party answers the call.
Save unknown numbers – Add unknown numbers to contacts after a call.
Power key ends call – Allows you to select your end call.
< Share & connect >
LG PC Suite – Connect LG PC Suite with your phone to easily Manage multimedia
content and apps.
< Tethering & networks >
USB tethering – Connect the USB cable to share the internet connection with the
computer.
Wi-Fi hotspot – You can also use your phone to provide a mobile broadband
connection. Create a hotspot and share your connection. Please "Sharing your
phone's data connection" for more information.
Bluetooth tethering – Allows you to set your phone whether you are sharing the
Internet connection or not.
Help – Tap to view help information on the Wi-Fi hotspot and Bluetooth tethering
functions.
Airplane mode – After switching to Airplane mode, all wireless connections are disabled.
85
Page 68

Settings
VPN – Displays the list of Virtual Private Networks (VPNs) that you've previously
configured. Allows you to add different types of VPNs.
Mobile networks – Set options for data roaming, network mode & operators, access
point names (APNs) etc.
NOTE: You must set a lock screen PIN or password before you can use
credential storage.
Sound
Sound profile – Choose the Sound, either Sound, Vibrate only or Silent.
Volumes – Adjust the phone's volume settings to suit your needs and your
environment.
Quiet mode – Set up your Quiet mode. Tap the switch to toggle it on or off. You can
schedule Quiet mode to activate automatically and designate exceptions to your Quiet
mode.
Sound profile – Choose the sound, either Silent or Vibrate only.
Set time – Choose the Set time, either Always on or schedule. If you tap schedule,
you can set the days and times to automatically turn Quiet mode on.
Block alarms – Checkmark to allow the screen not to turn on and no alarms sound.
Block incoming calls – Checkmark to allow or block incoming calls from certain
contacts.
Incoming call settings
Auto reply to block calls – Set how to you want to automaticlly reply to silenced
calls.
Allow repeated calls – Checkmark to allow a call that is repeated within 3 minutes.
Allowed contact lists – Designate which contacts calls will be allowed.
Help – Display Quiet mode setting information.
86
Page 69

SIM1/SIM2 ringtone – Set the ringtone for calls. You can also add a ringtone by
tapping
at the top right corner of the screen.
SIM1/SIM2 notification sound – Set the notification sound. You can also add a
notification sound by tapping
Ringtone with vibration – Checkmark to set the phone to vibrate in addition to the
ringtone when you receive calls.
SIM1/SIM2 vibration type - Set the vibration type for calls. You can also create a
vibration type by tapping
Vibrate on tap – Checkmark to vibrate when tapping the Home touch buttons and
during other UI interactions.
Sound effects – Tap to set the dial pad touch tones, touch sounds, and screen lock
sound.
Dial pad touch tones – Checkmark to play tones while using dial pad.
Touch sounds – Checkmark to play sound when making screen selection.
Screen lock sound – Checkmark to play sound when locking and unlocking the
screen.
Message/call voice notification – Tap the Message/call voice notification switch
to toggle it On or Off. On allows your device to incoming call and message events
automatically
at the top right corner of the screen.
at the top right corner of the screen.
Display
< HOME & LOCK >
Home screen
Select Home – Set Home or EasyHome as default home.
Smart Bulletin – Tap the Smart Bulletin switch to toggle it On or Off. It includes an
additional Home screen showing customized information. Checkmark LG Health, or
Smart Tips.
87
Page 70

Settings
Theme – Sets the screen theme for your device. You can download it from LG
SmartWorld.
Wallpaper – Sets the wallpaper to use on your Home screen. Select it from Gallery,
Live Wallpapers, Multi-photo, Photos or Wallpaper gallery.
Screen swipe effect – Sets the effect when you swipe to change screens. Choose
from Domino, Breeze, Accordion, Panorama, Carousel, Layer, or Slide.
Allow Home screen looping – Checkmark to allow continuous Home screen scrolling
(loop back to first screen after last screen).
Home backup & restore – Set to backup and restore Home app layout and wallpaper.
Help – Displays information regarding the Home screen items and functions.
Lock screen
Select screen lock – Set a screen lock type to secure your phone. Opens a set of
screens that guide you through drawing a screen unlock pattern. Set None, Swipe,
Face Unlock, Knock Code, Pattern, PIN or Password.
If you have enabled a Pattern lock type when you turn on your phone or wake up the
screen, you will be asked to draw your unlock pattern to unlock the screen.
Screen swipe effect – Sets the screen swipe effect options. Choose from Ripple,
Dewdrop, White hole, Particle, and Crystal.
NOTE: This setting name may be Pattern effect if the Screen lock is set to
Pattern.
Wallpaper – Sets your Lock screen wallpaper. Select it from Gallery or Wallpaper
gallery.
Missed calls & new messages – Checkmark to show notifications of missed calls
and new messages on Lock screen.
Shortcuts – Allows you to change the shortcuts on the Swipe Lock screen.
Weather animation – Checkmark to show weather animation for current location on
lock screen.
88
Page 71

Contact info for lost phone – Checkmark to set the device owner’s name to be
displayed on the Lock screen. Tap
to enter the text to be displayed as the Owner
info.
Lock timer – Sets the amount of time before the screen automatically locks after the
screen has timed-out.
Power button instantly locks – Checkmark to instantly lock the screen when the
Power/Lock Key is pressed. This setting overrides the Security lock timer setting.
Home touch buttons
Set the Home Touch Keys displayed at the bottom of all of the screens. Set which ones
are displayed, their position on the bar, and what they look like. Select the keys and
order, the theme, and the background.
< FONT >
Font type – Sets the type of font used for the phone and menus.
Font size – Sets the size of the font displayed in the phone and menus.
< OTHER SCREEN SETTINGS >
Brightness – Adjusts the brightness of the screen. For best battery
performance, use the dimmest comfortable brightness.
Auto-rotate screen – Checkmark to set the phone to automatically rotate the screen
based on the phone orientation (portrait or landscape).
Screen timeout – Sets the amount of time before the screen times out.
< ADVANCED SETTINGS >
Screen-off effect – Sets the screen-off effect. Choose from Fade out, Black hole, and
Retro TV.
Daydream – Tap the Daydream switch to toggle it On or Off. On allows the set
screensaver to be displayed when the phone is sleeping while docked and/or charging.
Choose from Clock and Goole Photos.
89
Page 72

Settings
General
< Language & input >
Use the Language & input settings to select the language for the text on your phone
and to configure the on-screen keyboard, including words you've added to its dictionary.
Language – Sets the language to use on your device.
Default – Sets the default on-screen keyboard to use when entering text.
LG Keyboard – Checkmark to select the LG Keyboard to enter data. Tap the Settings
icon to change the following settings:
Input language and keyboard layout – Sets the keyboard language and characters.
Keyboard height and layout – Allows you to adjust various height and layout options
for you keyboard to make it easier to use.
Path input – Checkmark to enter a word by drawing a path through all of the letters.
Show word suggestions – Checkmark to show words through text prediction.
Auto-correction – Choose from Off, Mild, Moderate, and Aggressive.
Update word suggestions – To update word suggestions. You need to accept the
Agreement Rights.
Additional settings – Sets additional settings including Vibrate on keypress, Sound
on keypress, Pop-up on keypress, Auto-capitalization, Auto-punctuation, Spell
checker, Personalized data, Multilingual suggestions, Clear word suggestion history,
and Personal dictionary.
Help – Tap the Help for more information.
Google voice typing – Checkmark to select Google voice typing to enter data. Tap the
Settings icon (Settings icon)to change the Google voice settings.
Choose input languages – Sets the languages supported with Google voice typing.
Block offensive words – Checkmark to hide recognized offensive text.
Offline speech recognition – Enables voice input while offline.
Voice Search – Sets voice search options.
Language – Sets the Google search by voice language.
90
Page 73

Speech output – Sets when to use speech output. Choose from Always, Informative
only, or Hands-free only. To turn on speech output only when you’ve got a headset
attached to your phone, select Hands-free only.
Block offensive words – Checkmark to hide offensive voice results.
Offline speech recognition – Sets one or more additional languages for speech
recognition when you don’t have a network connection.
Bluetooth headset – Checkmark to record audio through a connected Bluetooth
headset.
Text-to-speech output – Sets the preferred speech engine and speech rate (very slow
to very fast). Also plays a short demonstration of speech synthesis.
Pointer speed – Sets the pointer speed on a slide bar.
< Location >
Turn on location service, your phone determines your approximate location using GPS,
Wi-Fi and mobile networks.
Mode – Set the location mode from High accuracy, Battery saving and Device
sensors only.
Google Play services – Tap to check Google Play services app information.
LOCATION SERVICES
Camera – Checkmark to tag photos or videos with their locations.
Google Location Reporting – Select whether to turn on or off Google Location
Reporting options. For further information, tap
> Help.
< Accounts & sync >
Permits applications to synchronize data in the background, whether or not you are
actively working in them. Deselecting this setting can save battery power and lower (but
not eliminate) data usage.
< Accessibility >
Use the Accessibility settings to configure accessibility plug-ins you have installed on
your phone.
91
Page 74

Settings
NOTE: Requires additional plug-ins to become selectable.
< One-handed operation >
Dial keypad – Checkmark to enable you move the dial keypad to the right or left side
of the device. Simply tap the arrow to move it to one side or the other.
LG keyboard – Checkmark to enable you move the keyboard to the right or left side of
the device. Simply tap the arrow to move it to one side or the other.
Lock screen – Checkmark to enable you move the PIN Lock screen keypad to the right
or left side of the device. Simply tap the arrow to move it to one side or the other.
Help – Displays information regarding one-handed operation.
< Shortcut key >
Get quick access to apps by pressing and holding the Volume keys when screen is off
or locked. Tap the Shortcut key switch at the top right corner of the screen to toggle it
On or Off.
< Security >
Encrypt phone – Allows you to encrypt data on the phone for security. You will be
required to enter a PIN or password to decrypt your phone each time you power it on.
Encrypt SD card storage – Allows you to encrypt SD card storage and keep data
unavailable for other devices.
Set up SIM card lock – Set up Micro-USIM card lock or change the Micro-USIM card
PIN.
Password typing visible – Show the last character of the hidden password as you
type.
Phone administrators – View or deactivate phone administrators.
Unknown source – Default setting to install non-Play store applications.
Verify apps – Disallow or warn before installation of apps that may cause harm.
Notification access – Checkmark to enable the Lock screen to read your notifications.
Storage type – Display the storage type.
92
Page 75

Trusted credentials – Display trusted CA certificates.
Install from storage – Choose to install encrypted certificates.
Clear credentials – Remove all certificates.
< Guest mode >
To protect your privacy or limit some applications to your children, you can use the
Guest mode.
When you lend your phone to others, you can limit the applications to be displayed.
In advance, set the Guest mode and customize the options.
< Gestures >
Screen on/off – Checkmark to enable KnockON to turn the screen on and off. Quickly
double-tap center screen to turn it on. Double-tap the Status Bar, an empty area on
the Home screen, or the Lock screen to turn the screen off. For the best results, do not
move the phone while using the KnockON feature.
Silence incoming calls – Checkmark to enable you to flip the phone to silence
incoming calls.
Snooze or stop alarm – Checkmark to enable you to simply flip the device to snooze
or stop the alarm.
Pause video – Checkmark to enable you to simply flip the device to pause the
currently playing video.
Help – Opens a help guide on how to use the Gestures features of your device.
Motion sensor calibration – Allows you to improve the accuracy of the tilt and speed
of the sensor.
93
Page 76

Settings
< QuickCircle case >
Activate to make features, such as music, weather, and clock, available in small view
when using the QuickCircle case.
< Date & time >
Use Date & time settings to set how dates will be displayed. You can also use these
settings to set your own time and time zone rather than obtaining the current time from
the mobile network.
< Storage >
INTERNAL STORAGE – View the internal storage usage.
< Battery >
BATTERY INFORMATION
The Battery charge information is displayed on a battery graphic along with the
percentage of the remaining charge and its status.
Touch the Battery charge icon to display the Battery use screen to see battery usage
level and battery use details. It displays which components and applications are using
the most battery power. Tap one of the entries to see more detailed information.
Battery percentage on status bar – Checkmark to display the battery level
percentage on the Status Bar next to the battery icon.
BATTERY SAVER
Tap the Battery saver switch to toggle it On or Off. Tap Battery saver to access the
following settings:
Turn Battery saver on – Sets the battery charge percent level that will automatically
turn on Battery saver. Choose from Immediately, 10% battery, 20% battery, 30%
battery, and 50% battery.
BATTERY SAVING ITEMS
Auto-sync – Checkmark to turn off Auto-sync when Battery saver is activated.
Wi-Fi – Checkmark to turn Wi-Fi off when data is not being used while Battery saver is
activated.
94
Page 77

Bluetooth – Checkmark to turn Bluetooth off when not connected while Battery saver
is activated.
Vibrate on tap – Checkmark to turn off touch feedback when Battery saver is
activated.
Brightness – Checkmark to set the screen brightness when Battery saver is activated.
Tap
to change the setting.
Screen timeout – Checkmark to set the screen timeout when Battery saver is
activated. Tap the Settings icon to change the setting.
Help – Display battery saving items information.
< Smart cleaning >
Display the space in use and free in your phone. Tap (... icon) at the top right corner of
the screen to set notification interval and idle time period.
< Apps >
View and manage your applications.
< Default message app >
Set Messaging or Hangouts as default app.
< Backup & reset >
Change the settings for managing your settings and data.
Backup my data – Set to backup your settings and application data to the Google
server.
Backup account – Set to backup your account.
Automatic restore – Set to restore your settings and application data when the
applications are reinstalled on your device.
LG Backup service – Backs up all information on the device and restores it in the
event of data loss or replacement.
Factory data reset – Reset your settings to the factory default values and delete all
your data. If you reset the phone this way, you are prompted to re-enter the same
information as when you first started Android.
95
Page 78

Settings
< Printing >
Cloud Print – Tap to searching for printers. Tap the Cloud Print switch at
the top right corner of the screen to toggle it ON or OFF.
< About phone >
View legal information and check your phone status and software version.
96
Page 79

PC software (LG PC Suite)
"LG PC Suite" PC software is a program that helps you connect your device to a PC via
a USB cable and Wi-Fi. Once connected, you can use the functions of your device from
your PC.
With your "LG PC Suite" PC Software, You Can...
• Manage and play your media contents (music, movie, picture) on your PC.
• Send multimedia contents to your device.
• Synchronizes data (schedules, contacts, bookmarks) in your device and PC.
• Backup the applications in your device.
• Update the softwares in your device.
• Backup and restore the device data.
• Play multimedia contents of your PC from your device.
• Backup and create and edit the memos in your device
NOTE: You can use the Help menu from the application to find out how to use
your "LG PC Suite" PC software.
Installing "LG PC Suite" PC Software
"LG PC Suite" PC software can be downloaded from the webpage of LG.
1 Go to www.lg.com and select a country of your choice.
2 Go to Support > MOBILE SUPPORT > LG Mobile Phones > Select the Model
or
Go to Support > Mobile > Select the Model.
3 Click PC SYNC from MANUALS & DOWNLOAD and click DOWNLOAD to download
"LG PC Suite" PC software.
97
Page 80

PC software (LG PC Suite)
System Requirements for "LG PC Suite" PC software
• OS: Windows XP (Service pack 3) 32bit, Windows Vista, Windows 7, Windows 8
• CPU: 1 GHz or higher processors
• Memory: 512 MB or higher RAMs
• Graphic card: 1024 x 768 resolution, 32 bit color or higher
• HDD: 500 MB or more free hard disk space (More free hard disk space may be
needed depending on the volume of data stored.)
• Required software: LG integrated drivers, Windows Media Player 10 or later
NOTE: LG Integrated USB Driver
LG integrated USB driver is required to connect an LG device and PC and
installed automatically when you install "LG PC Suite" PC software application.
Synchronizing your Device to a PC
Data from your device and PC can be synchronized easily with "LG PC Suite"
PC software for your convenience. Contacts, schedules and bookmarks can be
synchronized.
The procedure is as follows:
1 Connect your device to PC. (Use a USB cable or Wi-Fi connection.)
2 Slide down the status bar > Tap USB connected > Select USB connection
method, then select Media device (MTP).
3 After connection, run the program and select the device section from the category
on the left side of the screen.
4 Click Personal information to select.
5 Select the checkbox of contents to synchronize and click the Sync button.
NOTE: To synchronize your phone with your PC, you need to install LG PC
Suite onto your PC. Please refer to previous pages to install LG PC Suite.
98
Page 81

Moving contacts from your Old Device to your New Device
1 Import your contacts as a CSV fi le from your old device to your PC using a PC sync
program.
2 Install "LG PC Suite" on the PC fi rst. Run the program and connect your Android
mobile phone to the PC using a USB cable.
3 On the top menu, select Phone > Import/Export contacts > Export to your
phone.
4 A popup window to select the fi le type and a fi le to export will appear.
5 On the popup, click the Select a fi le and Windows Explorer will appear.
6 Select the contacts fi le to export in Windows Explorer and click the Open.
7 Click Export.
8 A Field mapping popup to link the contacts in your device and new contacts data
will appear.
9 If there is a confl ict between the data in your PC contacts and device contacts,
make the necessary selections or modifi cations in LG PC Suite.
10 Click OK.
99
Page 82

Phone software update
Phone software update
LG Mobile phone software update from the Internet
For more information about using this function, please visit http://www.lg.com/common/
index.jsp
This feature allows you to conveniently update the firmware on your phone to a newer
version from the Internet without needing to visit a service center. This feature will only
be available if and when LG makes a newer firmware version available for your device.
Because the mobile phone firmware update requires the user's full attention for the
duration of the update process, please make sure you check all instructions and notes
that appear at each step before proceeding. Please note that removing the USB data
cable during the upgrade may seriously damage your mobile phone.
NOTE: LG reserves the right to make firmware updates available only for
selected models at its own discretion and does not guarantee the availability
of the newer version of the firmware for all handset models.
LG Mobile Phone software update via Over-the-Air (OTA)
This feature allows you to conveniently update your phone's software to a newer
version via OTA, without connecting using a USB data cable. This feature will only be
available if and when LG makes a newer firmware version available for your device.
You should first check the software version on your mobile phone: Settings > General
tab > About phone > Update Center > Software Update > Check now for update.
select your country and language.
100
Page 83

NOTE: Your personal data from internal phone storage—including information
about your Google account and any other accounts, your system/application
data and settings, any downloaded applications and your DRM licence—
might be lost in the process of updating your phone's software. Therefore,
LG recommends that you backup your personal data before updating your
phone's software. LG does not take responsibility for any loss of personal
data.
NOTE: This feature depends on your network service provider, region and
country.
101
Page 84

About this user guide
About this user guide
• Before using your device, please carefully read this manual. This will ensure that you
use your phone safely and correctly.
• Some of the images and screenshots provided in this guide may appear differently on
your phone.
• Your content may differ from the final product, or from software supplied by service
providers or carriers, This content may be subject to change without prior notice. For
the latest version of this manual, please visit the LG website at www.lg.com.
• Your phone's applications and their functions may vary by country, region, or
hardware specifications. LG cannot be held liable for any performance issues resulting
from the use of applications developed by providers other than LG.
• LG cannot be held liable for performance or incompatibility issues resulting from
edited registry settings being edited or operating system software being modified. Any
attempt to customize your operating system may cause the device or its applications
to not work as they should.
• Software, audio, wallpaper, images, and other media supplied with your device are
licensed for limited use. If you extract and use these materials for commercial or
other purposes is, you may be infringing copyright laws. As a user, you are fully are
entirely responsible for the illegal use of media.
• Additional charges may be applied for data services, such as messaging, uploading
and downloading, auto-syncing, or using location services. To avoid additional
charges, select a data plan to is suitable for your needs. Contact your service provider
to obtain additional details.
102
Page 85

Trademarks
• LG and the LG logo are registered trademarks of LG Electronics.
• All other trademarks and copyrights are the property of their respective owners.
Notice: Open Source Software
To obtain the corresponding source code under GPL, LGPL, MPL and other
open source licences, please visit http://opensource.lge.com/
All referred licence terms, disclaimers and notices are available for download
with the source code.
103
Page 86

Accessories
These accessories are available for use with the your phone. (Items described below
may be optional.)
Travel adaptor Stereo headset
Quick Start Guide Data cable
Battery
NOTE:
• Always use genuine LG accessories.
• Failure to do this may void your warranty.
• Accessories may vary in different regions.
104
Page 87

Troubleshooting
This chapter lists some problems you might encounter when using your phone. Some
problems require you to call your service provider, but most are easy to fix yourself.
Message Possible causes Possible corrective measures
There is no
Micro-USIM
card error
Micro-USIM card
in the phone
or it is inserted
incorrectly.
Make sure that the Micro-USIM card is
correctly inserted.
No network
connection/
Dropped
network
Codes do
not match
Signal is weak or
you are outside the
carrier network.
Operator applied
new services.
To change a
security code,
you will need
to confirm the
new code by
re-entering it.
The two codes
you have entered
do not match.
Move toward a window or into
an open area. Check the network
operator coverage map.
Check whether the Micro-USIM card
is more than 6~12 months old. If so,
change your Micro-USIM card at your
network provider's nearest branch.
Contact your service provider.
If you forget the code, contact your
service provider.
105
Page 88

Troubleshooting
Message Possible causes Possible corrective measures
106
No
applications
can be set
Calls not
available
Phone
cannot be
switched on
Not supported by
service provider
or registration
required.
Dialling error New network not authorized.
New Micro-USIM
card inserted.
Pre-paid charge
limit reached.
On/Off key
pressed too briefly.
Battery is not
charged.
Contact your service provider.
Check for new restrictions.
Contact service provider or reset limit
with PIN2.
Press the On/Off key for at least two
seconds.
Charge battery. Check the charging
indicator on the display.
Page 89

Message Possible causes Possible corrective measures
Charging
error
Number not
allowed
Impossible
to receive /
send SMS
& photos
Files do not
open
Battery is not
charged.
Outside
temperature is too
hot or cold.
Contact problem
No voltage Plug the charger into a different socket.
Charger defective Replace the charger.
Wrong charger Use only original LG accessories.
The Fixed dialling
number function
is on.
Memory full
Unsupported file
format
Charge battery.
Make sure phone is charging at a
normal temperature.
Check the charger and its connection
to the phone.
Check the Settings menu and turn the
function off.
Delete some messages from your
phone.
Check the supported file formats.
107
Page 90

Troubleshooting
Message Possible causes Possible corrective measures
The screen
does not
turn on
when I
receive a
call.
No sound Vibration mode
Hangs up
or freezes
Proximity sensor
problem
Intermittent
software problem
108
If you use a protection tape or case,
make sure it has not covered the area
around the proximity sensor. Make
sure that the area around the proximity
sensor is clean.
Check the settings status in the sound
menu to make sure you are not in
vibration or silent mode.
Try to perform a software update via
the website.
Page 91

FAQ
Category
Sub-
Category
BT
Bluetooth
Devices
BT
Bluetooth
Headset
Data
Contacts
Backup
Data
Synchronization
Data
Synchronization
Google™
Service
Gmail Log-In
Question Answer
You can connect a Bluetooth audio
What are the functions
available via Bluetooth
If my Bluetooth
headset is connected,
can I listen to my
music through
my 3.5 mm wired
headphones?
How can I backup
Contacts?
Is it possible to set up
one-way sync with
Gmail?
Is it possible to
synchronize all email
folders?
Do I have to log into
Gmail whenever I want
to access Gmail?
device such as a Stereo/Mono headset
or Car Kit. Also, when the FTP server
is connected to a compatible device,
you can share content stored on the
storage media.
When a Bluetooth headset is
connected, all system sounds are
played over the headset. As a result,
you will not be able to listen to music
through your wired headphones.
The Contacts data can be
synchronized between your phone and
Gmail™.
Only two-way synchronization is
available.
The Inbox is automatically
synchronized. You can view other
folders by tapping the Menu Key
and select Folders to choose a folder.
Once you have logged into Gmail, no
need to log into Gmail again.
109
Page 92

FAQ
Category
Sub-
Category
Google™
Service
Google
Account
Phone
Function
Email
Phone
Function
Ringtone
Phone
Function
Message
Time
Phone
Function
Navigation
Phone
Function
Synchronisation
Question Answer
Is it possible to filter
emails?
What happens when
I execute another
application while
writing an email?
Is there a file size
limitation for when I
want to use MP3 file
as ring tone?
My phone does not
display the time of
receipt for messages
older than 24 hrs. How
can I change this?
Is it possible to install
another navigation
application on my
phone?
Is it possible to
synchronize my
contacts from all my
email accounts?
No, email filtering is not supported via
the phone.
Your email will automatically be saved
as a draft.
There is no file size limitation.
You will only be able to see the times
for messages received the same day.
Any application that is available at Play
Store™ and is compatible with the
hardware can be installed and used.
Only Gmail and MS Exchange server
(company email server) contacts can
be synchronized.
110
Page 93

Category
Sub-
Category
Phone
Function
Wait and
Pause
Phone
Function
Security
Question Answer
If you transferred a contact with the W
& P functions saved into the number,
you will not be able to use those
features. You will need to re-save each
Is it possible to save a
contact with Wait and
Pause in the numbers?
What are the phone’s
security functions?
number.
How to save with Wait and Pause:
1. From the Home screen, tap the
Phone icon
2. Dial the number, then tap the Menu
Key .
3. Tap Add 2-sec pause or Add wait.
You are able to set the phone to
require that an Unlock Pattern be
entered before the phone can be
accessed or used.
.
111
Page 94

FAQ
Category
Sub-
Category
Phone
Function
Unlock
Pattern
Question Answer
1. From the Home screen, tap the
Menu Key
2. Tap System settings > Display tab
> Lock screen.
3. Tap Select screen lock > Pattern.
The first time you do this, a short
tutorial about creating an Unlock
Pattern will appear.
4. Set up by drawing your pattern
once, and once again for
How do I create the
Unlock Pattern?
confirmation.
Precautions to take when using the
pattern lock.
It is very important to remember the
unlock pattern you set. You will not
be able to access your phone if you
use an incorrect pattern five times.
You have five chances to enter your
unlock pattern, PIN or password. If you
have used all 5 opportunities, you can
try again after 30 seconds. (Or, if you
preset the backup PIN, you can use
the backup PIN code to unlock the
pattern.)
.
112
Page 95

Category
Sub-
Category
Phone
Function
Unlock
Pattern
Phone
Function
Memory
Phone
Function
Language
Support
Question Answer
If you have forgotten your pattern:
If you logged into your Google account
on the phone but failed to enter the
correct pattern 5 times, tap the forgot
What should I do if
I forget the unlock
pattern and I didn’t
create my Google
account on the
phone?
Will I know when my
memory is full?
Is it possible to change
my phone's language?
pattern button. You are then required
to log in with your Google account
to unlock your phone. If you have
not created a Google account on the
phone or you have forgotten it, you will
have to perform a hard reset.
Caution: If you perform a factory reset,
all user applications and user data
will be deleted. Please remember to
backup any important data before
performing a factory reset.
Yes, you will receive a notification.
The phone has multilingual capabilities.
To change the language:
1. From the Home screen, tap the
Menu Key
settings.
2. Ta p General tab > Language &
input > Language.
3. Tap the desired language.
and tap System
113
Page 96

FAQ
Category
Sub-
Category
Phone
Function
VPN
Phone
Function
Screen time
out
Phone
Function
Wi-Fi &
mobile
network
Phone
Function
Home
screen
Question Answer
VPN access configuration is different
How do I set up a
VPN?
My screen turns off
after only 15 seconds.
How can I change the
amount of time for the
backlight to turn off?
When Wi-Fi and
mobile network are
both available, which
service will my phone
use?
Is it possible to remove
an application from the
Home screen?
for each company. To configure VPN
access from your phone, you must
obtain the details from your company’s
network administrator.
1. From the Home screen, tap the
Menu Key
2. Tap System settings > Display tab.
3. Tap Screen timeout.
4. Tap the preferred screen backlight
timeout time.
When using data, your phone may
default to the Wi-Fi connection (if
Wi-Fi connectivity on your phone is
set to On). However, there will be no
notification when your phone switches
from one to the other.
To know which data connection is
being used, view the mobile network or
Wi-Fi icon at the top of your screen.
Yes. Just touch and hold the icon until
the dustbin icon appears at the top
and center of the screen. Then, without
lifting your finger, drag the icon to the
trash can.
.
114
Page 97

Category
Sub-
Category
Phone
Function
Application
Phone
Function
Charger
Phone
Function
Alarm
Phone
Function
Alarm
Phone
Function
Alarm
Question Answer
1. From the Home screen, tap the
I downloaded an
application and it
causes a lot of errors.
How do I remove it?
Is it possible to charge
my phone using a USB
data cable without
installing the necessary
USB driver?
Can I use music files
for my alarm?
Will my alarm be
audible or will it go off
if the phone is turned
off?
If my ringer volume is
set to Off or Vibrate,
will I hear my alarm?
Menu Key
2. Tap System settings > General tab
> Apps > DOWNLOADED.
3. Tap the application, then tap
Uninstall.
Yes, the phone will be charged by the
USB cable regardless of whether the
necessary drivers are installed or not.
Yes. After saving a music file as a
ringtone, you can use it as your alarm.
1. Touch and hold a song in a library
list. In the menu that opens, tap Set
as ringtone > Phone ringtone or
Contact ringtone.
2. In the alarm clock setting screen,
select the song as a ringtone.
No, this is not supported.
Your alarm is programmed to be
audible even in these scenarios.
.
115
Page 98

FAQ
Category
Sub-
Category
Recovery
Solution
Hard Reset
(Factory
Reset)
Question Answer
How can I perform a
factory reset if I can’t
access the phone’s
setting menu?
If your phone does not restore to its
original condition, use a hard reset
(factory reset) to initialize it.
116
Page 99

For your safetyFor your safety
Safety Information
Please read and observe the following information for safe and proper use of your
phone and to prevent damage.
WARNING! This product contains chemicals known to the State of California to cause
cancer and birth defects or reproductive harm.
Wash hands after handling.
Caution: Violation of the instructions may cause minor or serious
damage to the product.
t
For your safety, do not remove the battery incorporated in the product.
t
Do not disassemble or open crush, bend or deform, puncture or shred.
t
Repairs under warranty, at LG’s option, may include replacement parts or boards
that are either new or reconditioned, provided that they have functionality equal to
that of the parts being replaced.
t
Do not modify or remanufacture, attempt to insert foreign objects into the battery,
immerse or expose to water or other liquids, expose to fire, explosion or other
hazard.
t
Avoid dropping the phone. If the phone is dropped, especially on a hard surface,
and the user suspects damage, take it to a service center for inspection.
t
For those host devices that utilize a USB port as a charging source, the host
device’s user manual shall include a statement that the phone shall only be
connected to products that bear the USB-IF logo or have completed the USB-IF
compliance program.
2-1
Page 100

Charger and Adapter Safety
t
The charger and adapter are intended for indoor use only.
t
Insert the battery pack charger vertically into the wall power socket.
t
Unplug the power cord and charger during lightning storms to avoid electric shock
or fire.
t
Use the correct adapter for your phone when using the battery pack charger
abroad.
Battery Information and Care
t
Please read the manual of specified charger about charging method.
t
Do not damage the power cord by bending, twisting, or heating. Do not use the
plug if it is loose as it may cause electric shock or fire. Do not place any heavy
items on the power cord. Do not allow the power cord to be crimped as it may
cause electric shock or fire.
t
Unplug the power cord prior to cleaning your phone, and clean the power plug
pin when it’s dirty. When using the power plug, ensure that it’s firmly connected. If
not, it may cause excessive heat or fire. If you put your phone in a pocket or bag
without covering the receptacle of the phone (power plug pin), metallic articles
(such as a coin, paperclip or pen) may short-circuit the phone. Short-circuit of
the terminal may damage the battery and cause an explosion. Always cover the
receptacle when not in use.
t
Charging temperature range is between 0°C/32°F and 45°C /113 °F. Do not
charge the battery out of recommended temperature range. Charging out of
recommended range might cause the generating heat or serious damage of
2-2
 Loading...