

Page 1

LG GU290f
User Guide
Page 2

Part 15.21 statement
This device is not intended for sale in the USA.
" Change or Modifications that are not expressly approved by the manufacturer could void
the user's authority to operate the equipment. “
Part 15.105 statement
This equipment has been tested and found to comply with the limits for a class B digital
device, pursuant to Part 15 of the FCC Rules.
These limits are designed to provide reasonable protection against harmful interference in
a residential installation. This equipment generates uses and can radiate radio frequency
energy and, if not installed and used in accordance with the instructions, may cause harmful
interference to radio communications. However, there is no guarantee that interference will
not occur in a particular installation. If this equipment does cause harmful interference or
television reception, which can be determined by turning the equipment off and on, the user
is encouraged to try to correct the interference by one or more of the following measures:
- Reorient or relocate the receiving antenna.
- Increase the separation between the equipment and receiver.
- Connect the equipment into an outlet on a circuit different from that to
which the receiver is connected.
- Consult the dealer or an experienced radio/TV technician for help.
Page 3

Part 15 Class B Compliance
This device and its accessories comply with part15 of FCC rules.
Operation is subject to the following two conditions:
(1) This device & its accessories may not cause harmful interference.
(2) This device & its accessories must accept any interference received,
including interference that may cause undesired operation.
Body-worn Operation
This device has been tested for typical body-worn operations
with the distance of 0.79inches (2.0cm) from the user’s body.
To comply with FCC RF exposure requirements, a minimum separation distance
of 0.79inches(2.0cm) must be maintained from the user's body.
Additionally, Belt clips, holsters & other body-worn accessories may not contain
metallic components.
Page 4
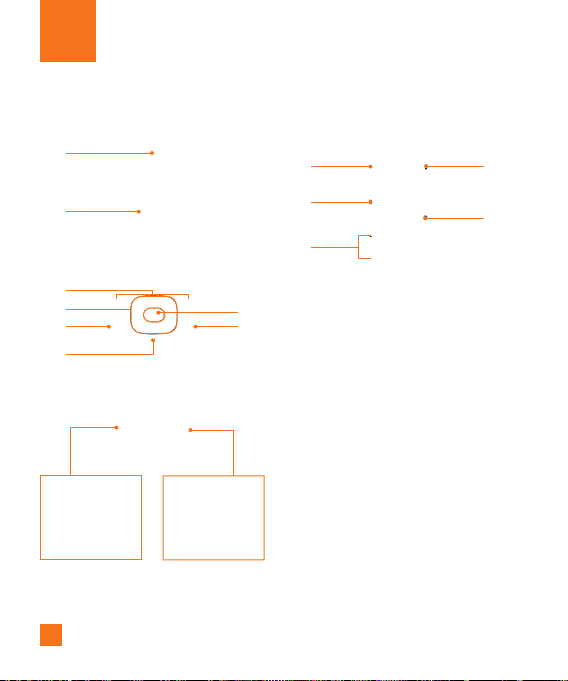
Your Phone
Phone Components
1
2
3
4
5
6
Holding down this
key opens the Voice
Recorder.
6
7
8
Holding down this
key activates/
deactivates
Vibration mode.
9
10
11
12
13
Page 5

Your Phone
1. Earpiece: Lets you hear the caller and
automated prompts.
2. Main LCD: Displays phone status icons,
menu items, web items, web information,
pictures and more in full color.
3. Left soft key/Right soft key: Each of
these keys perform the functions indicated
by the text on the display immediately above
them.
4. Navigation Keys
- In standby mode:
Contact List
New Message
IM
My Stuff
- In a menu: Navigates between menus.
5. Send key: Press this key in standby mode
to quickly access the most recent incoming,
outgoing and missed calls.
6. Clear key: Allows you to return to the
previous screen. Holding down the Clear
Key will also activate the Voice Command
function.
7. Center [OK] key
8. End/Power key: Allows you to power
the phone on or off, end calls, or return to
Standby Mode.
9. The Charger Port/USB connector
10. Push-To-Talk key: Use for quick access
to the PTT function.
• Pressing and releasing this key while idle
displays your PTT contacts.
• Pressing and holding this key while idle
displays your PTT history.
• Pressing and holding this key while in a
PTT call allows you to speak to the other
call participants.
11. Volume keys: These keys are used to
control the volume of ringtones in standby
mode and Earpiece volume during a call.
12. microSD™ memory card
13. Opens the multitasking menu
7
Page 6

Your Phone
Rear view
SIM CARD SOCKET
EXTERNAL
CAMERA LENS
8
BATTERY COVER
BATTERY
Page 7

Getting Started
Installing the SIM card and
battery
1. Remove the battery cover
Slide up the battery cover to remove the
battery cover, and lift off the battery cover.
2. Remove the battery
Hold the top edge of the phone and, using
the battery cover, lift it from the battery
compartment.
Note
For your convenience, we recommend that you
use the battery cover to remove the battery
instead of your fingernail.
Warning
Do not remove the battery when the phone is
turned on, this can damage the phone.
9
Page 8

Getting Started
3. Install the SIM card
Slide the SIM card into the SIM card holder.
Make sure that the gold contact area on
the card is facing downwards. To remove
the SIM card, pull it gently in the opposite
direction.
10
4. Install the battery
Insert the top of the battery first into the top
edge of the battery compartment. Ensure
that the battery contacts align with the
terminals on the phone. Press the bottom of
the battery down until it clips into place.
Page 9

5. Charging your phone
Unfasten the cover of the charger socket
on the side of your LG GU290f. Insert the
charger connector to the phone (‘B’ side
of the connector has to be facing up when
connecting to the phone) and then plug
into the wall socket. Your LG GU290f will
need to be charged until a message reading
“Battery full. Please unplug charger to save
energy” appears on the screen.
Getting Started
Important!
You should insert the battery before charging.
Warning
Use of unauthorized accessories could damage
your phone and void your warranty.
To use the travel charger provided with your
phone.
11
Page 10

Getting Started
Installing a memory card
You can expand the memory available on your
phone by using a microSD™ memory card.
Tip
A memory card is an optional accessory.
Remove the battery cover as before.
1.
Unlock the microSD™ compartment by
2.
sliding it into the ‘Open’ position (as printed
on the microSD™ compartment cover). This
will allow the cover to open so that you can
add a microSD™ card to your phone. Insert
a microSD™ card with the gold contact
area facing downwards. Close the memory
card cover so that it clicks shut.
Replace the phone cover back on to the
3.
phone.
Note
If your memory card has existing content it
will automatically be filed in the correct folder.
For example, videos will be accessible from the
Videos folder.
12
Page 11

Getting Started
On-Screen Icons
The table below describes various display
indicators or icons that appear on the phone’s
display screen.
ICON/
INDICATOR
DESCRIPTION
Multitasking
Network signal strength
(number of bars will vary)
No network signal
Low Battery
New text message
New email
An alarm is set
Ring profile in use
Silent All profile in use
EDGE available
Bluetooth® is active
3G available
ICON/
INDICATOR
DESCRIPTION
The browser is active
Vibrating Mode On
Speakerphone
Call in Progress
Voicemail
Battery Full
Battery Charging
Flight Mode On
13
Page 12

General Functions
Making a Call
Make sure your phone is powered on.
1.
Enter a phone number including the area
2.
code. To edit a number on the display
screen, simply press the
erase one digit at a time.
►
Press and hold the key to erase
the entire number.
3.
Press the
number.
When finished, press the [END] key.
4.
[SEND] key to call the
14
key to
Making a Call with the Send Key
Press the [SEND] key, and the most
1.
recent missed, dialed and received call
histories will be displayed.
Select the desired number by using the
2.
navigation keys.
Press the
3.
[SEND] key.
Making International Calls
Press and hold the key and the
1.
international access character ‘+’ will
appear.
Enter the country code, area code and the
2.
phone number.
Press the [SEND] key.
3.
Page 13

General Functions
Ending a Call
To finish a call, press the [END] key.
Making a Call from the Contacts
You can store frequently called names and
phone numbers in the SIM card as well as in
the phone memory known as the Contacts.
You can dial a number by simply selecting a
name in the contacts and pressing the
[SEND] key.
1.
Press the
Contact List.
Highlight the Contact and press the
2.
[SEND] key.
[Down] key to access the
Adjusting the Volume
During a call, if you want to adjust the earpiece
volume, use the side volume keys of the
phone.
In idle mode, you can adjust the ring volume
using the side volume keys.
Answering a Call
When you receive a call, the phone displays an
icon on the screen and rings and/or vibrates. If
the caller can be identified, the caller’s phone
number (or name if stored in your Address
Book) is displayed.
Press the [SEND] key or the left soft
1.
key to answer an incoming call.
If the Answer Mode has been set as Any
Key (Menu > 9 > 4 > 4), any key press will
answer a call, except for the [END]
key or the right soft key or side key.
15
Page 14

General Functions
End the call by pressing the
2.
[END] key.
Note
You can answer a call while using other menu
features.
Vibrating Mode (Quick)
Vibrating Mode can be activated by pressing
and holding down the [Pound] key.
Signal Strength
If you are inside a building, being near a
window may give you better reception. You can
see the strength of your signal by the signal
indicator on your phone’s display screen.
Entering Text
You can enter alphanumeric characters by
using the phone’s keypad. For example, storing
names in the Address Book, writing a message
or scheduling events in the calendar all require
text to be entered.
Changing the Text Input Mode
Change the text input mode by holding down
when in a text entry field.
You can check the current text input mode in
the upper right corner of the screen.
The following text input modes are available
on the phone.
T9 Mode
This mode allows you to enter words with only
one keystroke per letter.
Each key on the keypad has more than one
letter. The T9 mode automatically compares
your keystrokes with an internal linguistic
dictionary to determine the correct word,
thus requiring far fewer keystrokes than the
traditional ABC mode.
16
Page 15

General Functions
Note
You can select a different T9 language from the
Options menu (Right soft key Options > Text
Entry Settings > Text Entry Language).
ABC Mode
This mode allows you to enter letters by
pressing the key labeled with the required
letter once, twice, three or four times until the
letter is displayed.
123 Mode (Numbers Mode)
Type numbers using one keystroke per number.
To change to 123 mode in a text entry field,
press the key until 123 mode is
displayed in the upper right corner.
Symbol Mode
The Symbol Mode enables you to enter various
symbols or special characters. To enter a
symbol, press the [Pound] key. Use the
navigation touch pad to select the desired
symbol and press the [OK] key.
Using the T9 Mode
The T9 predictive text input mode allows you to
enter words easily with a minimum number of
key presses. As you press each key, the phone
begins to display the characters that it thinks
you are typing based on a built-in dictionary.
As new letters are added, the word changes
to reflect the most likely candidate from the
dictionary.
17
Page 16

General Functions
When you are in the T9 predictive text input
1.
mode, begin entering a word by pressing
keys to . Press one key per
letter.
►
The word changes as letters are typed
- ignore what is displayed on the screen
until the word is typed completely.
►
If the word is still incorrect after typing
completely, press the key or the
right soft key [Next] once, or more if
needed, to cycle through the other word
options.
► If the desired word is missing from the
word choices list, add it by using the
ABC mode.
2.
Enter the whole word before editing or
deleting any keystrokes.
3.
Complete each word with a space by
pressing the
navigation key.
To delete letters, press . Press and hold
down to erase all of the entered text.
key or the right
Using the ABC Mode
Use the keypad keys to enter your text.
1.
Press the key labeled with the required
letter:
►
Once for the first letter
►
Twice for the second letter
► And so on
2.
To insert a space, press the key
once. To delete letters, press the
key. Press and hold down the key
to erase all of the entered text.
Note
Refer to the table below for more information on
the characters available using the keys.
18
Page 17

General Functions
Characters in the Order Displayed
Key
Upper Case Lower Case
1 . , ’ @ ? ! - : / 1 . , ’ @ ? ! - : / 1
2 A B C 2 a b c 2
3 D E F 3 d e f 3
4 G H I 4 g h i 4
5 J K L 5 j k l 5
6 M N O 6 m n o 6
7 P Q R S 7 p q r s 7
8 T U V 8 t u v 8
9 W X Y Z 9 w x y z 9
0
Space Key,
0 (Long press)
Space Key,
0 (Long press)
Using the 123 (Numbers) Mode
The 123 Mode enables you to enter numbers
in a text message (a telephone number,
for example) more quickly. Press the keys
corresponding to the required digits before
manually switching back to the appropriate text
entry mode.
T9 dictionary
The T9 dictionary is a feature that allows the
user to add any unique or personal words to
the T9 standard language database. The T9
dictionary function can be found in the Options
menu (Options > Text Entry Settings > T9
Dictionary). Within the T9 dictionary function,
the user can add, modify, delete or reset
personal words.
19
Page 18

General Functions
Using the Korean Mode
Allows you to type in Korean when you set the
language to Korean.
Key Characters in the Order Display
20
Key Characters in the Order Display
 Loading...