

Page 1
Page 2
2
Entry
Important safety instruction
Identification of parts
Where to install
Door removal
Door replacement
F
Height adjustment
eed water pipe installation
when the freezer door does not align with the height of the refrigerator door
Starting
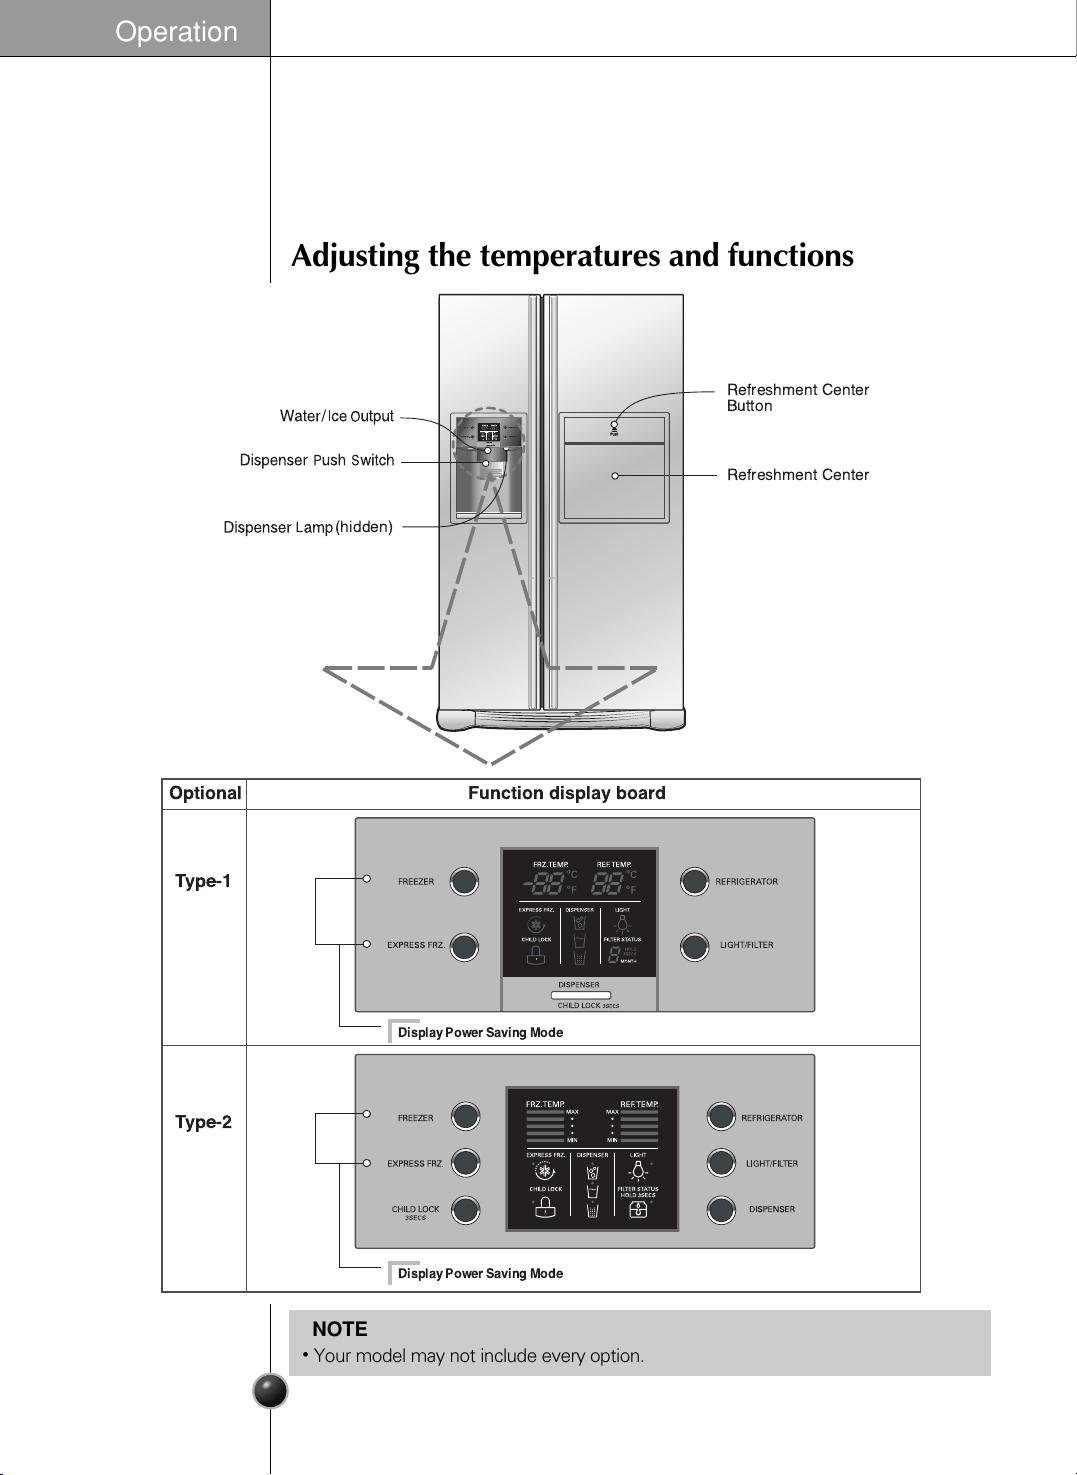
Adjusting the temperatures and functions
Refreshment center (Applicable to some models only)
Shelf (Applicable to some models only)
Wine holder (Applicable to some models only)
Egg box (Applicable to some models only)
Humidity control in the vegetable compartment
Convert into a vegetable or meat compartment (Applicable to some models only)
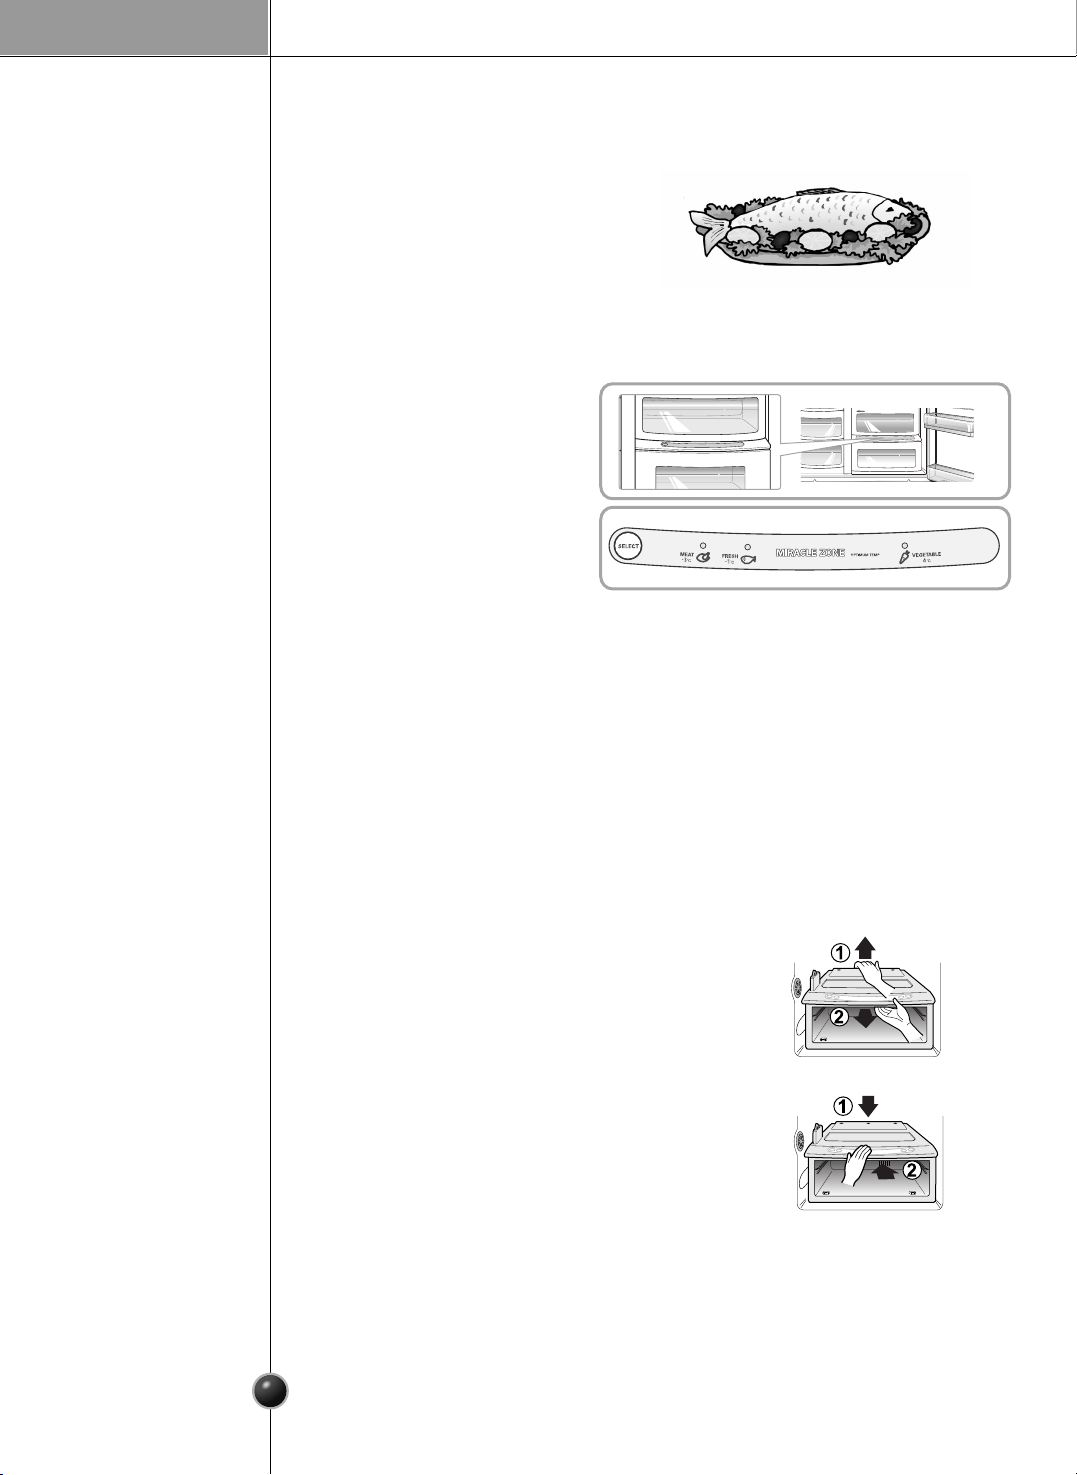
Miracle Zone(Applicable to some models only)
17
Temerature Change at Miracle Zone (Applicable to some models only)
17
Miracle Zone Temperature Transition Corner(Applicable to some models only)
17
Deodorizer(Applicable to some models only)
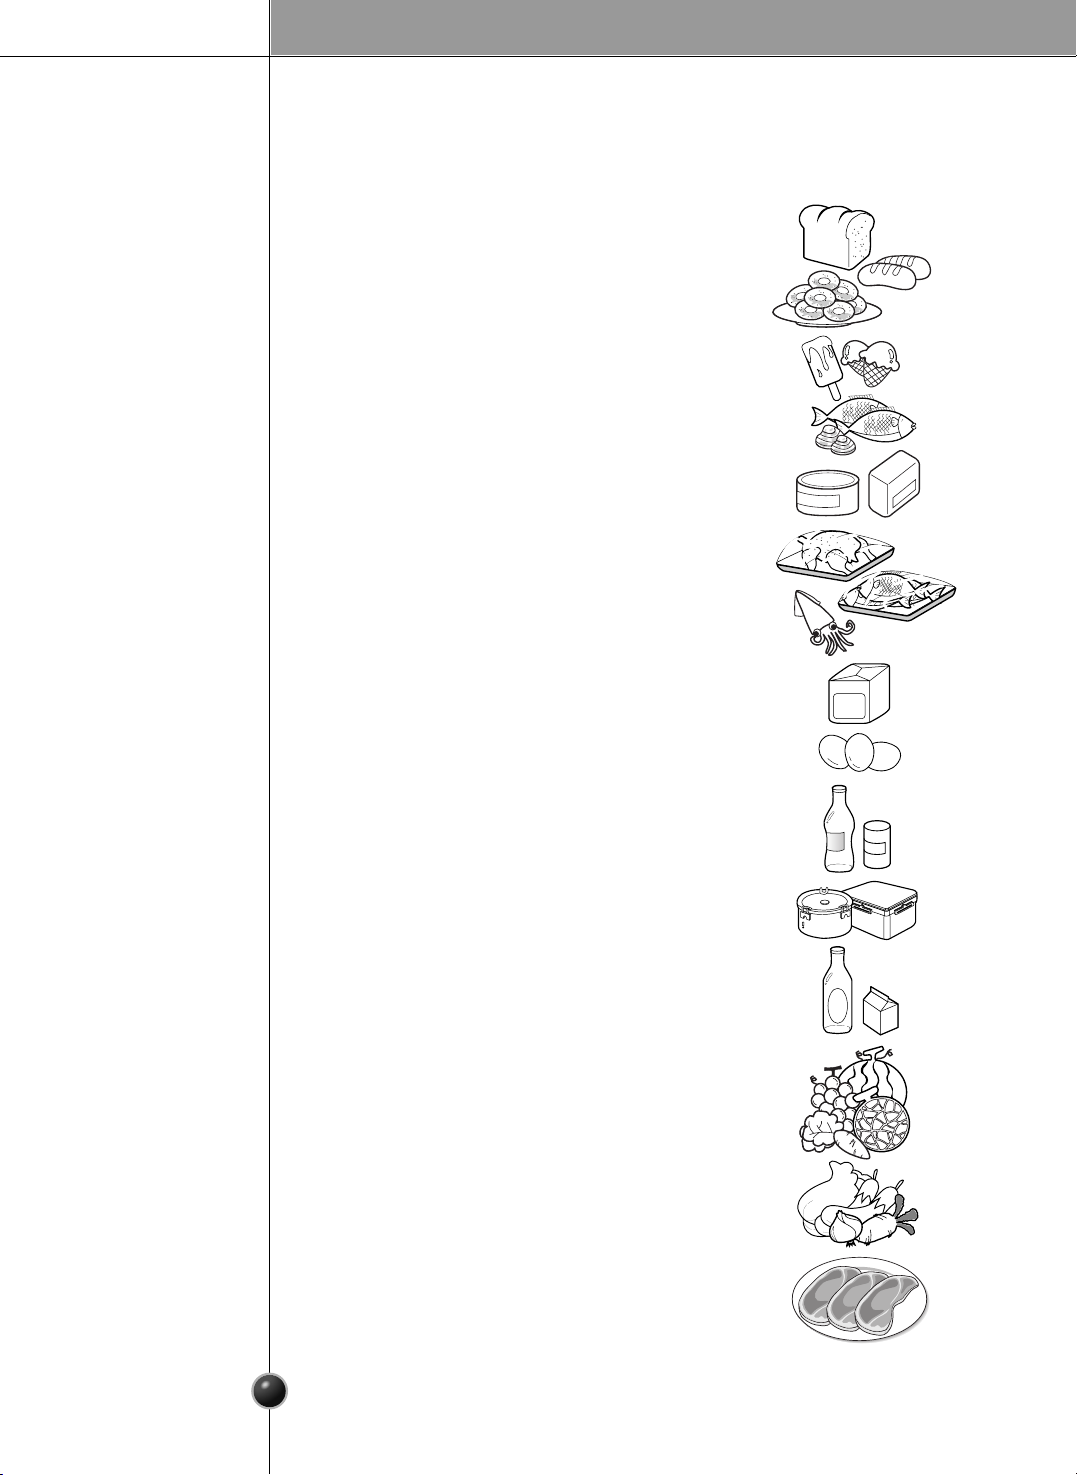
Location of foods
Storing foods
How to dismantle parts
General information
Cleaning
Trouble shooting
Table of contents
Introduction
Installation
Operation
Suggestion on
food storage
Care and
maintenance
3
3
4
5
6
7
7
8
9
9
14
15
15
15
16
16
16
18
19
20
22
22
23
8
Page 3
Entry
The model and serial numbers are found on the inner case or back of refrigerator
compartment of this unit. These numbers are unique to this unit and not
available to others. You should record requested information here and retain
this guide as a permanent record of your purchase. Staple your receipt here.
Date of purchase :
Dealer purchased from :
Dealer address :
Dealer phone no. :
Model no. :
Serial no. :
Before it is used, this refrigerator must be properly installed and located in accordance
with the installation instructions in this document.
Never unplug your refrigerator by pulling on the power cord. Always grip plug firmly and
pull it straight out from the outlet.
When moving your appliance away from the wall, be careful not to roll over the power
cord or to damage it in any way.
After your refrigerator is in operation, do not touch the cold surfaces in the freezer
compartment
, particularly when your hands are damp or wet. Skin could adhere to
these extremely cold surfaces.
Unplug the power cord from the power outlet for cleaning or other requirements. Never
touch it with wet hands because you can get an electric shock or be hurt.
Never damage, process, severely bend, pull out, or twist the power cord because
damage the power cord may cause a fire or electric shock. You have doubts on whether
the appliance is properly grounded.
Never place glass products in the freezer because they may be broken due to expansion
when their contents are frozen.
Never allow your hands within the ice storage bin of the automatic ice maker. You could
be hurt by the operation of the automatic ice maker.
The appliance is not intended for use by young children or infirm persons without
supervision.
Young children should be supervised to ensure that they do not play with the appliance.
Never allow anyone to climb, sit, stand or hang on the refreshment center door. These
actions may damage the refrigerator and even tip it over, causing severe personal injury.
If possible, connect the refrigerator to its own individual electrical outlet to prevent it and
other appliances or household lights from causing an overload that could cause a power
outage.
The refrigerator-freezer should be so positioned that the supply plug is accessible for
quick disconnection when accident happens.
If the supply cord is damaged, it must be replaced by the manufacturer or its service
agent or a similarly qualified person in order to avoid a hazard.
Do not modify or extend the Power Cord length.
It will cause electric shock or fire.
Introduction
Important safety instruction
Don’t use an
extension cord
Accessibility of
Supply Plug
Supply Cord
Replacement
Warning
3
Page 4
4
Introduction
DANGER: Risk of child entrapment.
Before you throw away your old refrigerator or freezer:
Take off the doors but leave the shelves in place so that children may not easily climb
inside.
The appliance is not intended for use by young children or infirm persons without
supervision.
Young children should be supervised to ensure that they do not play with the appliance.
Don’t store or use gasoline or other flammable vapor and liquids in the vicinity of this or
any other appliance.
In the event of an electric short circuit, grounding (earthing) reduces the risk of electric
shock by providing an escape wire for the electric current.
In order to prevent possible electric shock, this appliance must be grounded
improper use of the grounding plug can result in an electric shock. Consult a qualified
electrician or service person if the grounding instructions are not completely
understood, or if you have doubts on whether the appliance is properly grounded.
Child entrapment
warning
Don’t store
Grounding (Earthing)
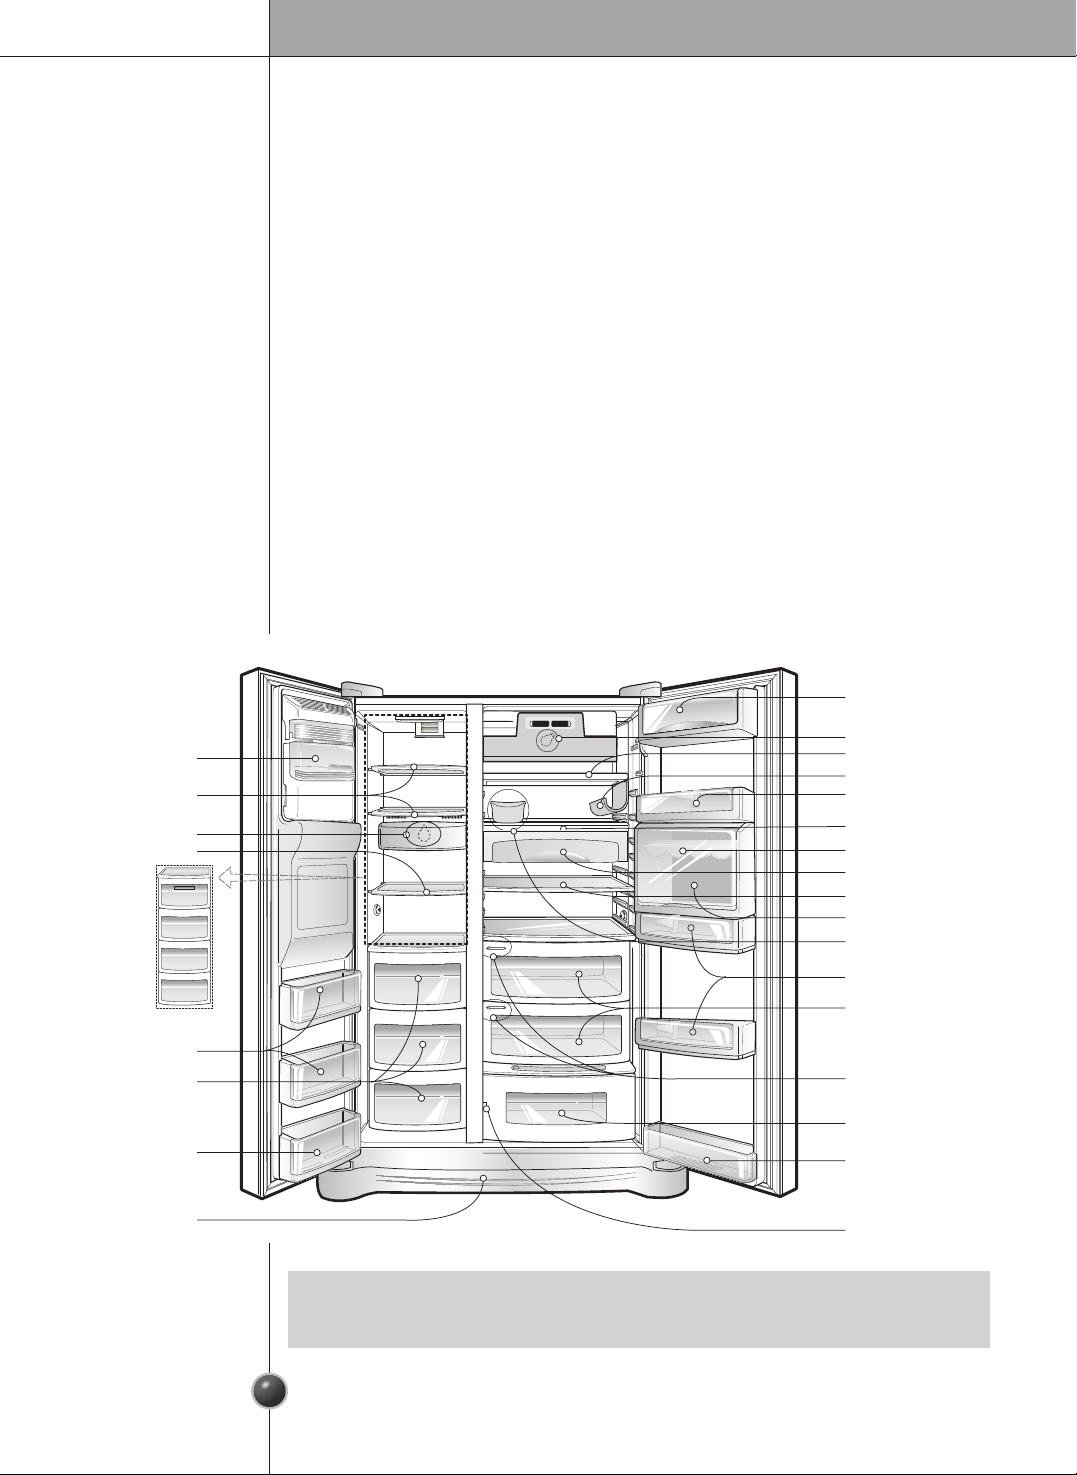
Identification of parts
•
Parts, features, and options vary by model. Your model may not include every option.
NOTE
Freezer
Compartment
Refrigerator
Compartment
Milk product corner
Lamp
Shelf
Lamp
Automatic
Icemaker
Shelf or Drawer
Door Rack
(1piece or 2pieces)
Drawer (2 or 3)
Lower Cover
Shelf
Refreshment center (Optional)
Can Server
(Optional)
Egg Box
Vegetable Drawer
(1 or 2)
Door Rack(1piece or 2pieces)
Wine holder (Plastic or wire)
Door Rack(1piece or 2pieces)
Conversion switch
(Meats/Vegetables)
(Optional)
Drawer
Snack drawer
Shelf (Folding or Normal)
Miracle Zone (Optional)
Fresh compartment
(Optional)
Humidity switch
Shelf or Drawer
Door Rack
(1piece or 2pieces)
Door Rack(1piece or 2pieces)
(Optional)
Page 5
1. Place your appliance where it is easy to
use.
2. Avoid placing the unit near heat sources,
direct sunlight or moisture.
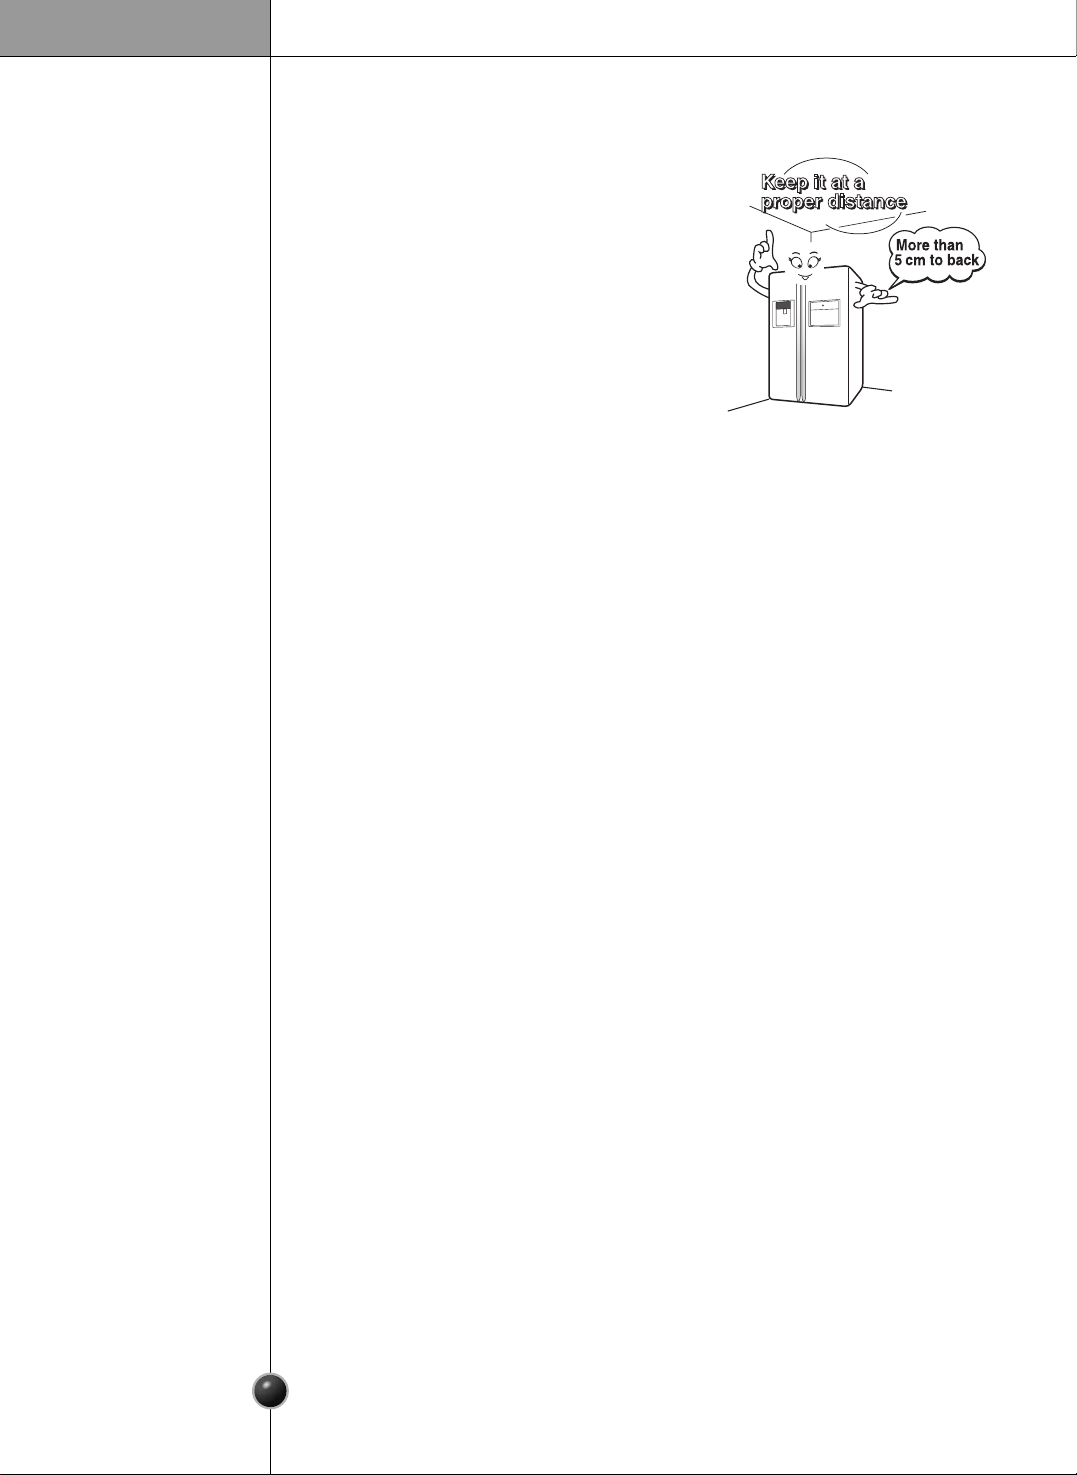
3. To ensure proper air circulation around the
fridge -freezer, please maintain sufficient
space on both the sides as well as top and
maintain at least 2 inches (5 cm) from the
rear wall.
4. To avoid vibrations, the appliance must
be leveled.
5. Don't install the appliance below 5°C. It may cause affect the performance.
5
Select a good
location
Where to Install
Disposal of the
old appliance
This appliance contains fluid (refrigerant, lubricant)and is made of parts and materials
which are reusable and/or recyclable.
All the important materials should be sent to the collection center of waste material
and can be reused after rework (recycling). For take back, please contact with the
local agency.
Installation
Page 6
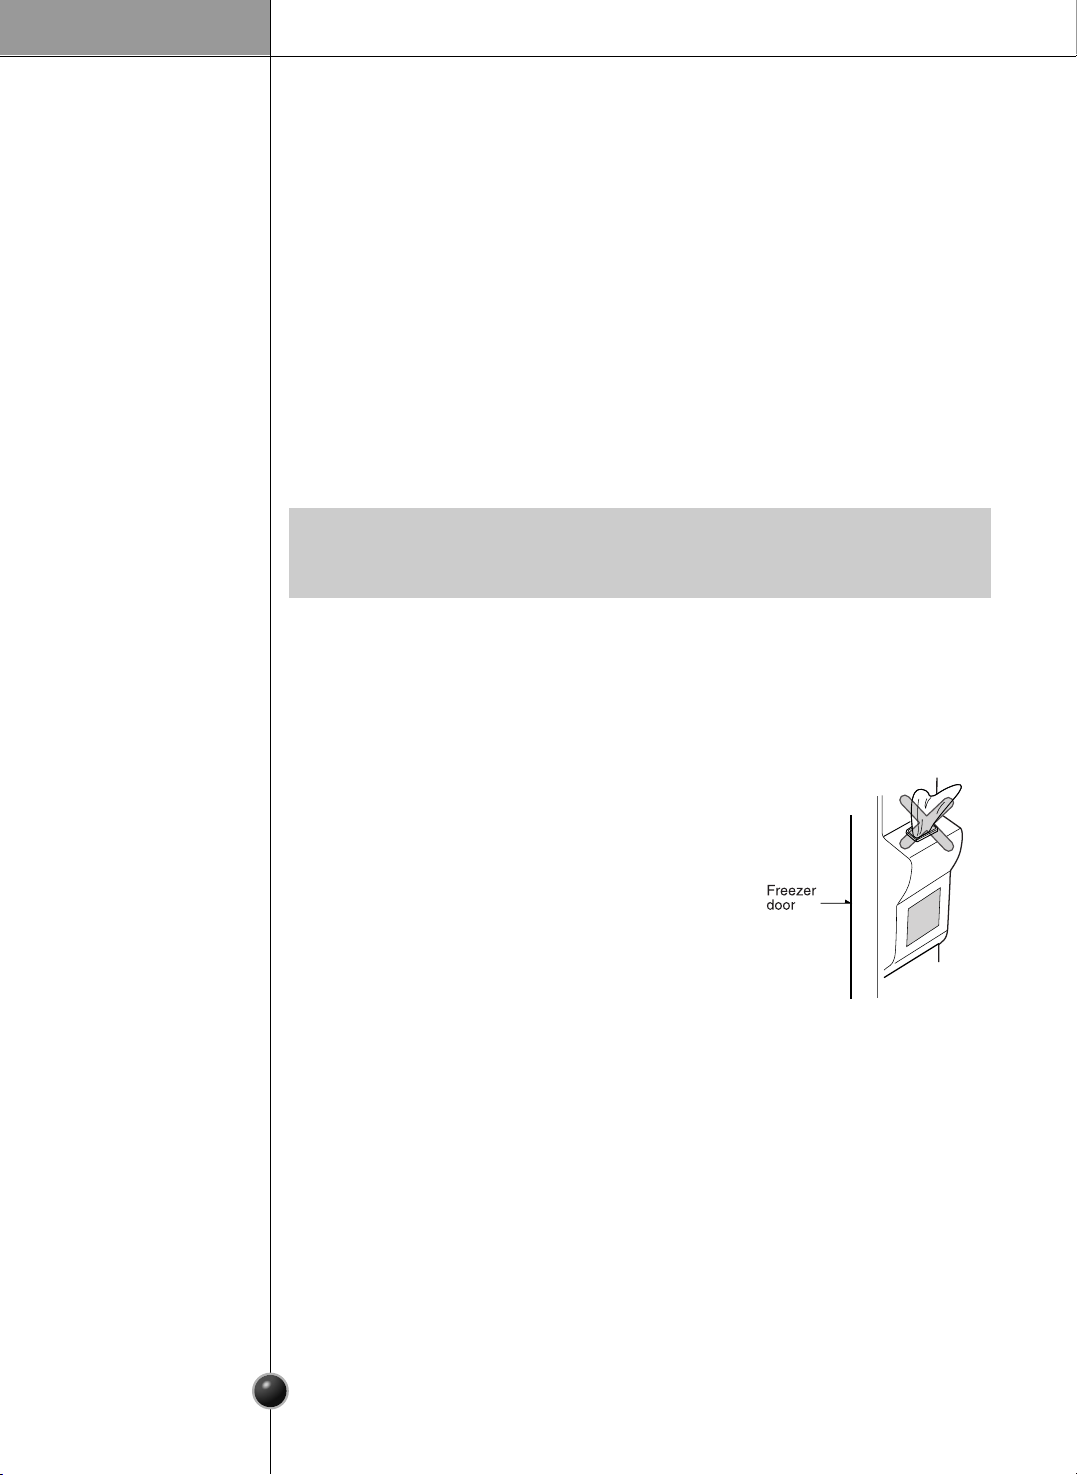
Door removal
Failure to do so could result in death or serious injury.
If your access door is too narrow for the
refrigerator to pass through, remove the
refrigerator door and pass the refrigerator laterally.
Electric Shock Hazard
Disconnect electrical supply to refrigerator before installing.
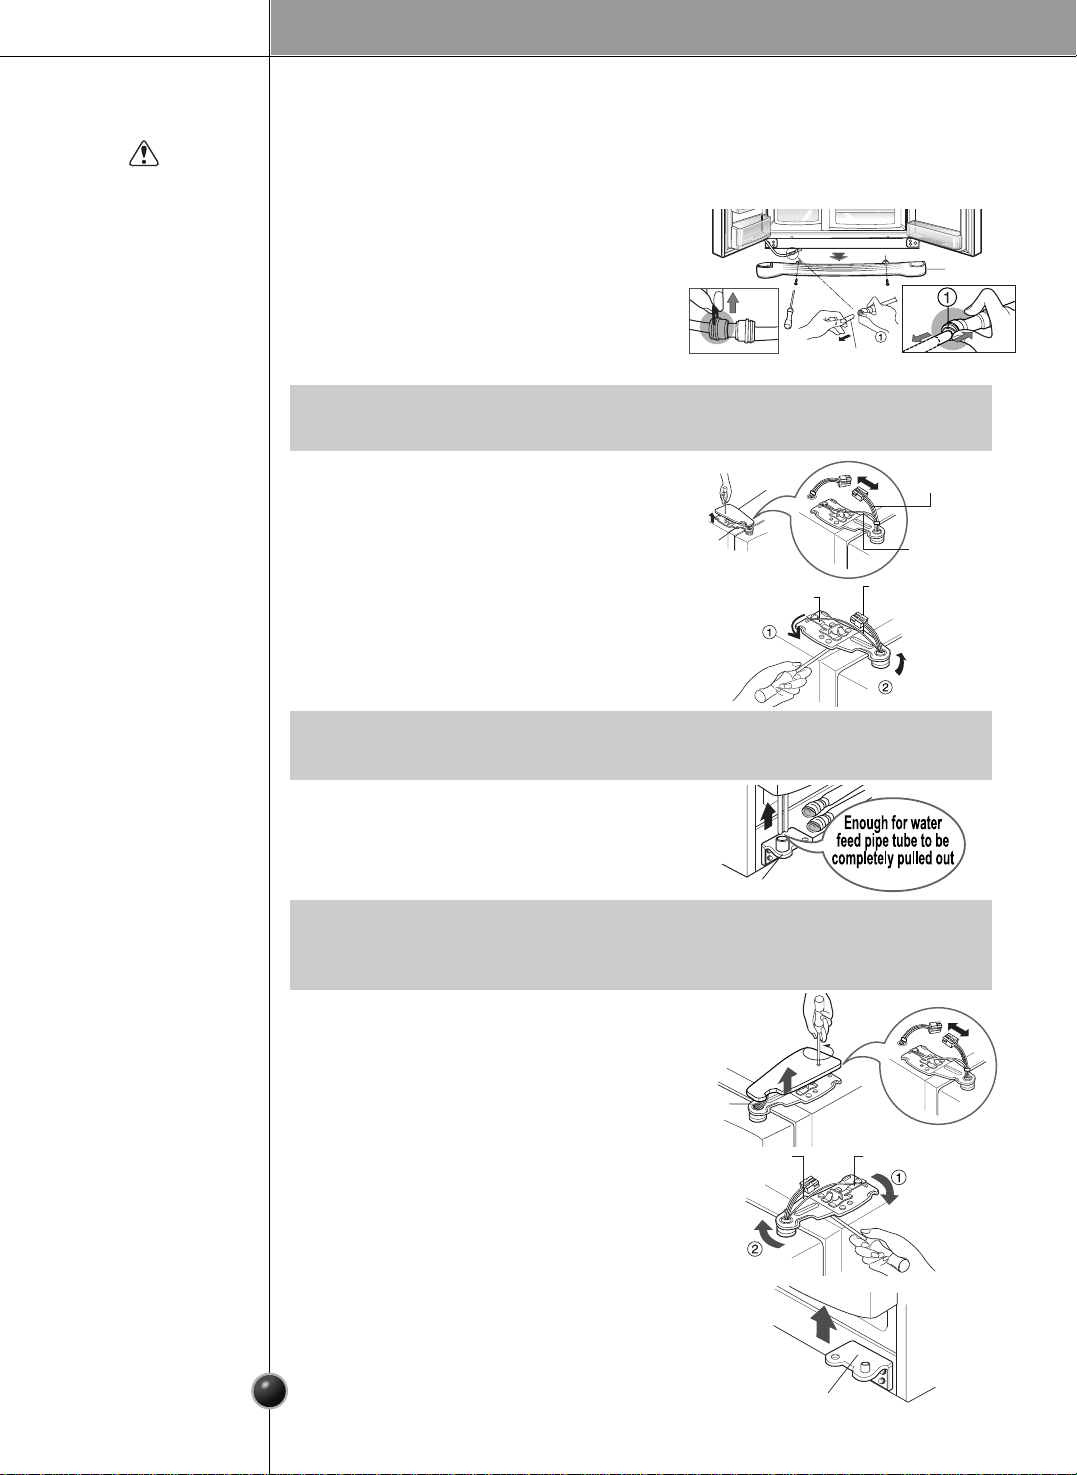
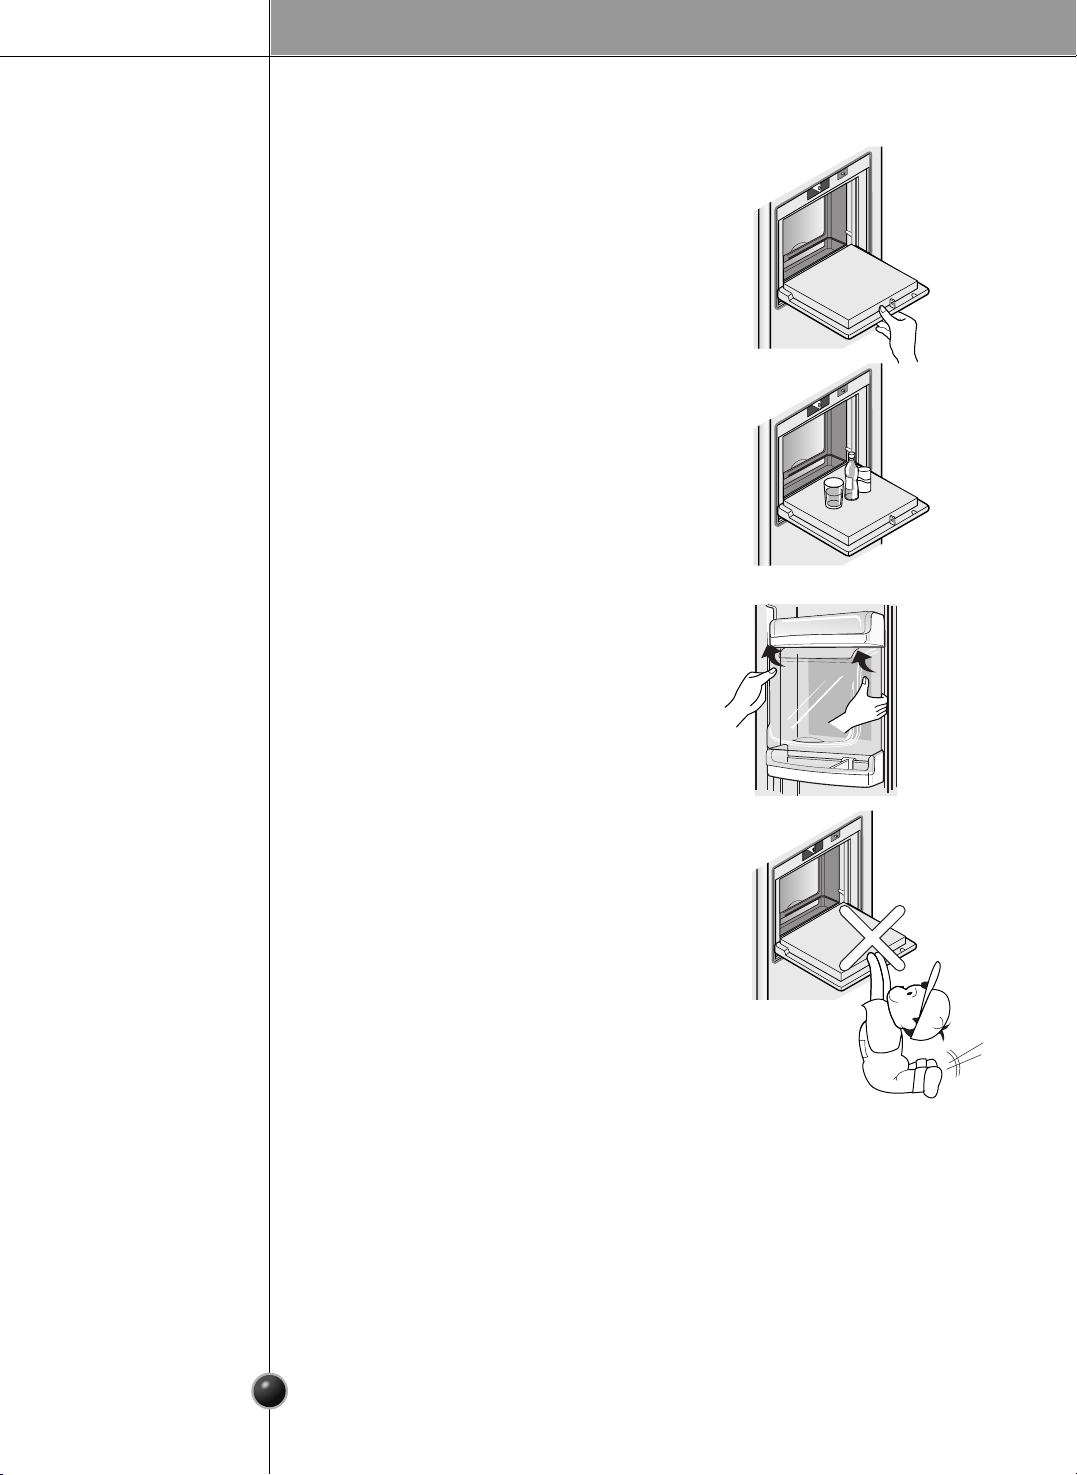
Remove the lower cover by lifting upward, and
remove clip, and then pull up the feed water tube
while pressing area shown in the figure to the
right.
Remove lower
cover and
then feed water
tube
Warning
Remove the
freezer
compartment
door
Remove the
refrigerator
door
1) Removing the hinge cover by loosening the
screws. Separate all connection wires except
for the earth line after.
2) Remove the keeper by rotating it counter
clockwise (
)
and then lifting the upper
hinge up(
).
3) Remove the freezer compartment door by
lifting it upward. This time, the door should
be lifted enough for the feed water pipe tube
to be completely pulled out.
1) Loosen the hinge cover screws and remove
the cover. Remove connection wire, if any,
except for the earth line.
2) Remove keeper by rotating it clockwise ()
and then remove the upper hinge by lifting
it up ().
3) Remove the refrigerator compartment door
by lifting it up.
•
If a tube end is deformed or abraded, cut the part away.
NOTE
•
When removing the upper hinge, be careful that the door does not fall forwards .
NOTE
•
Move the refrigerator compartment door passing through the access door and lay
it down, but be careful not to damage the feed water pipe tube.
NOTE
Lower cover
Lower hinge
Lower hinge
Keeper
Feed water tube
Connection
wires
Hinge
cover
Upper hinge
Keeper
Upper hinge
Earth line
Upper hinge
Connection
wires
Installation
6
Page 7
Door replacement
Feed water pipe installation
Pass the refrigerator laterally through the access
door as shown in the right figure.
Automatic ice maker operation needs water pressure of 147~834 kPa (1.5~8.5
kgf/cm2) (That is, an instant paper cup (180 cc) will be fully filled within 3 sec.).
If water pressure does not reach the rating 147 kPa (1.5 kgf/cm2) or below, it is
necessary to purchase a separate pressure pump for normal automatic icing and
cool water feed.
Keep the total length of the feed water pipe tube within 8 m and be careful for the
tube not be bent. If the tube is 8 m or longer it may cause trouble in water feed
owing to the drain water pressure.
Install the feed water pipe tube at a place free from heat.
Connect to potable water supply only.
Refer to instructions with water filter kit for installation.
Mount them in the reverse sequence of removal after they pass through the access
door.
Pass the
refrigerator
Before
installation
Warning
1
2
34
5
M
a
x
F
R
Z
T
E
M
P
R
E
F
T
E
M
P
M
i
n
5
4
32
1
M
a
x
Installation
7
Page 8
8
Installation
Height adjustment
The refrigerator doors will close smoothly by heightening the front side by adjusting
the height adjusting screw. If the doors do not close correctly, performance may be
affected.
After leveling the
door height
Next
1. Wipe off all dust accumulated during shipping and clean your appliance thoroughly.
2. Install accessories such as the ice cube box, cover evaporating tray, etc., in their
proper places. They are packed together to prevent possible damage during shipping.
3. Connect the power supply cord (or plug) to the outlet. Don't double up with other
appliances on the same outlet.
If the height of
freezer compart
ment door is
different from the
height of Refrig
erator compart
ment door
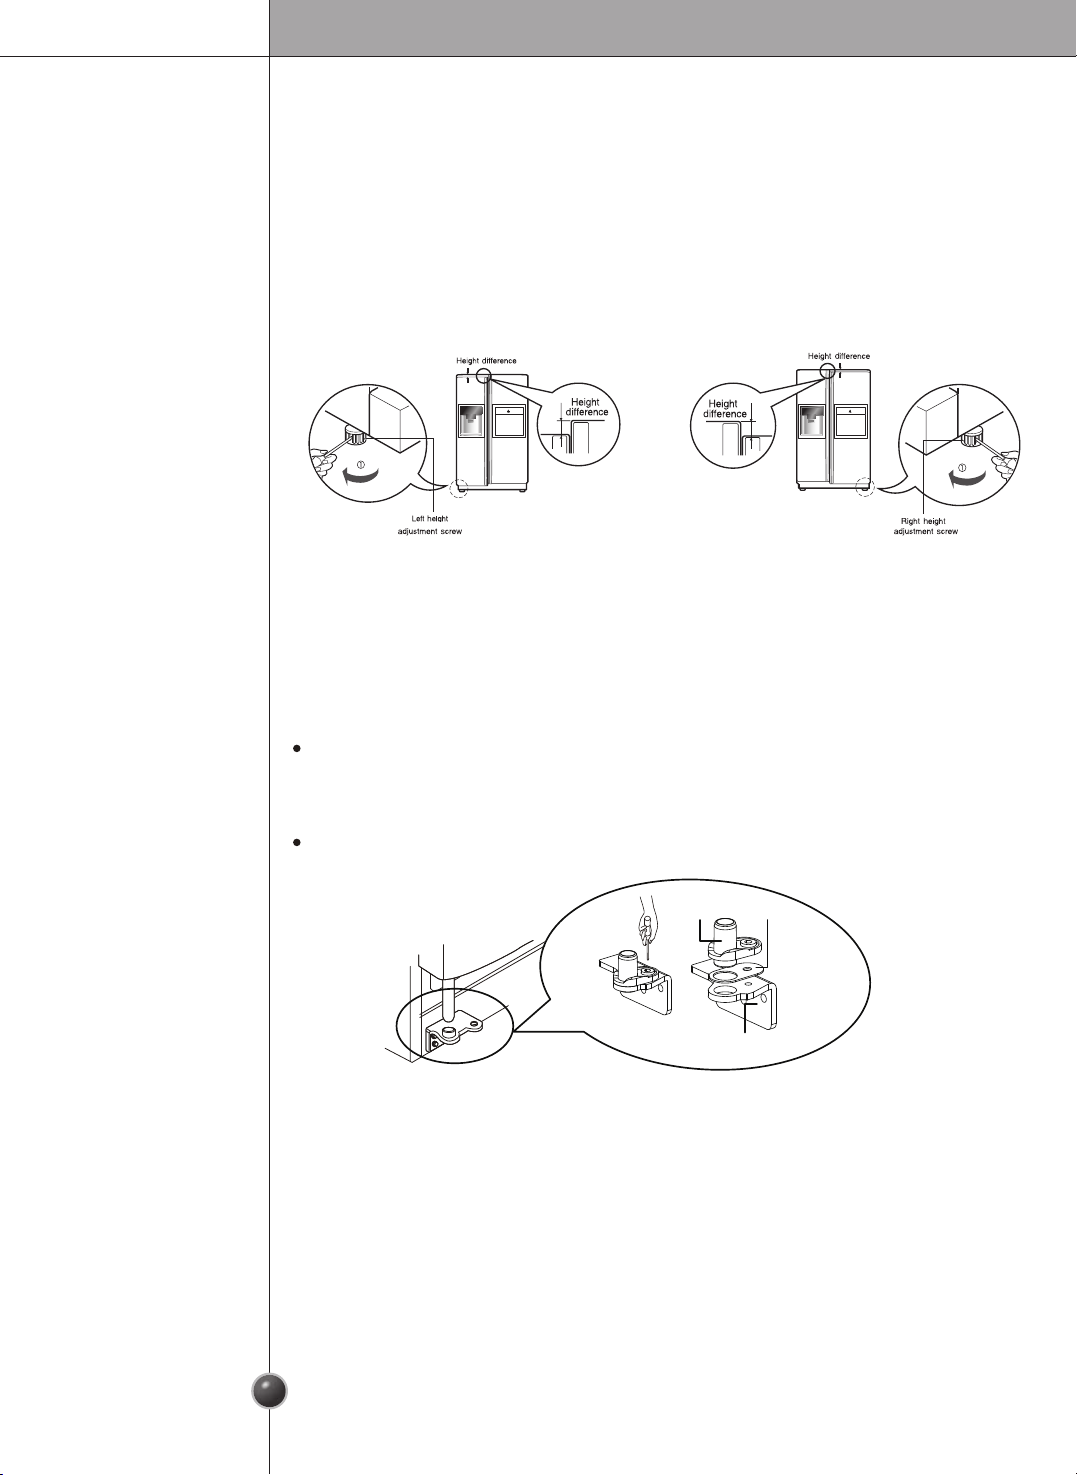
If the freezer compartment
door is lower than the refrigerator compartment door
Level the door by inserting flat(-type)
driver into the groove of the left
height adjusting screw and rotate it
clockwise (①).
If the freezer compartment
door is higher than the refrigerator compartment door
Level the door by inserting flat(-type)
driver into the groove of the right
height adjusting screw and rotate it
clockwise (①).
When the freezer door does not align with
the height of the refrigerator door
Even if the height can not be aligned by using the height adjustment
screw, insert the transparent sheet supplied with the product.
Separate the door with the lower height, use the (+) type screwdriver to unscrew the
screw at the bottom hinge as shown at Figure
the bottom hinge and the bottom bracket, and then fix it with the screw as shown at
Figure ②
Insert more transparent sheets enough to align the height. (4 sheets are supplied in total.)
Bottom hinge
Transparent sheet
①
②
Bottom bracket
Page 9
9
Starting
When your refrigerator is first installed, allow it to stabilize at normal operating
temperatures for 2-3 hours prior to filling it with fresh or frozen foods.
If operation is interrupted, wait 5 minutes before restarting.
Adjusting the temperatures and functions
•
Your model may not include every option.
NOTE
Operation
Page 10
10
Operation
Display Power Saving Mode
This function places the display into power saving mode until the next time the door
is opened.
Press the FREEZER and EXPRESS FRZ. buttons simultaneously and hold them for 5
seconds until the Ding sounds. All LED/LCDs will then turn ON, then OFF. When the
power saving mode is activated, the display will remain off until the next time the
door is opened. Then, it will come on whenever a door is opened or a button is
pressed and remain on for 20 seconds after the last door opening or button selection.
To deactivate the power saving mode, press the FREEZER and EXPRESS FRZ.
buttons simultaneously and hold them for 5 seconds until the Ding sounds.
❇ Whenever pressing button, setting is repeated in the order of (Weak)
➔
(Middle Weak) ➔(Middle)➔(Middle Strong)➔(Strong).
The actual inner temperature varies depending on the food status, as the
indicated setting temperature is a target temperature, not actual temperature
within refrigerator.
Refrigeration function is weak in the initial time. Please adjust temperature as
above after using refrigerator for minimum 2~3 days.
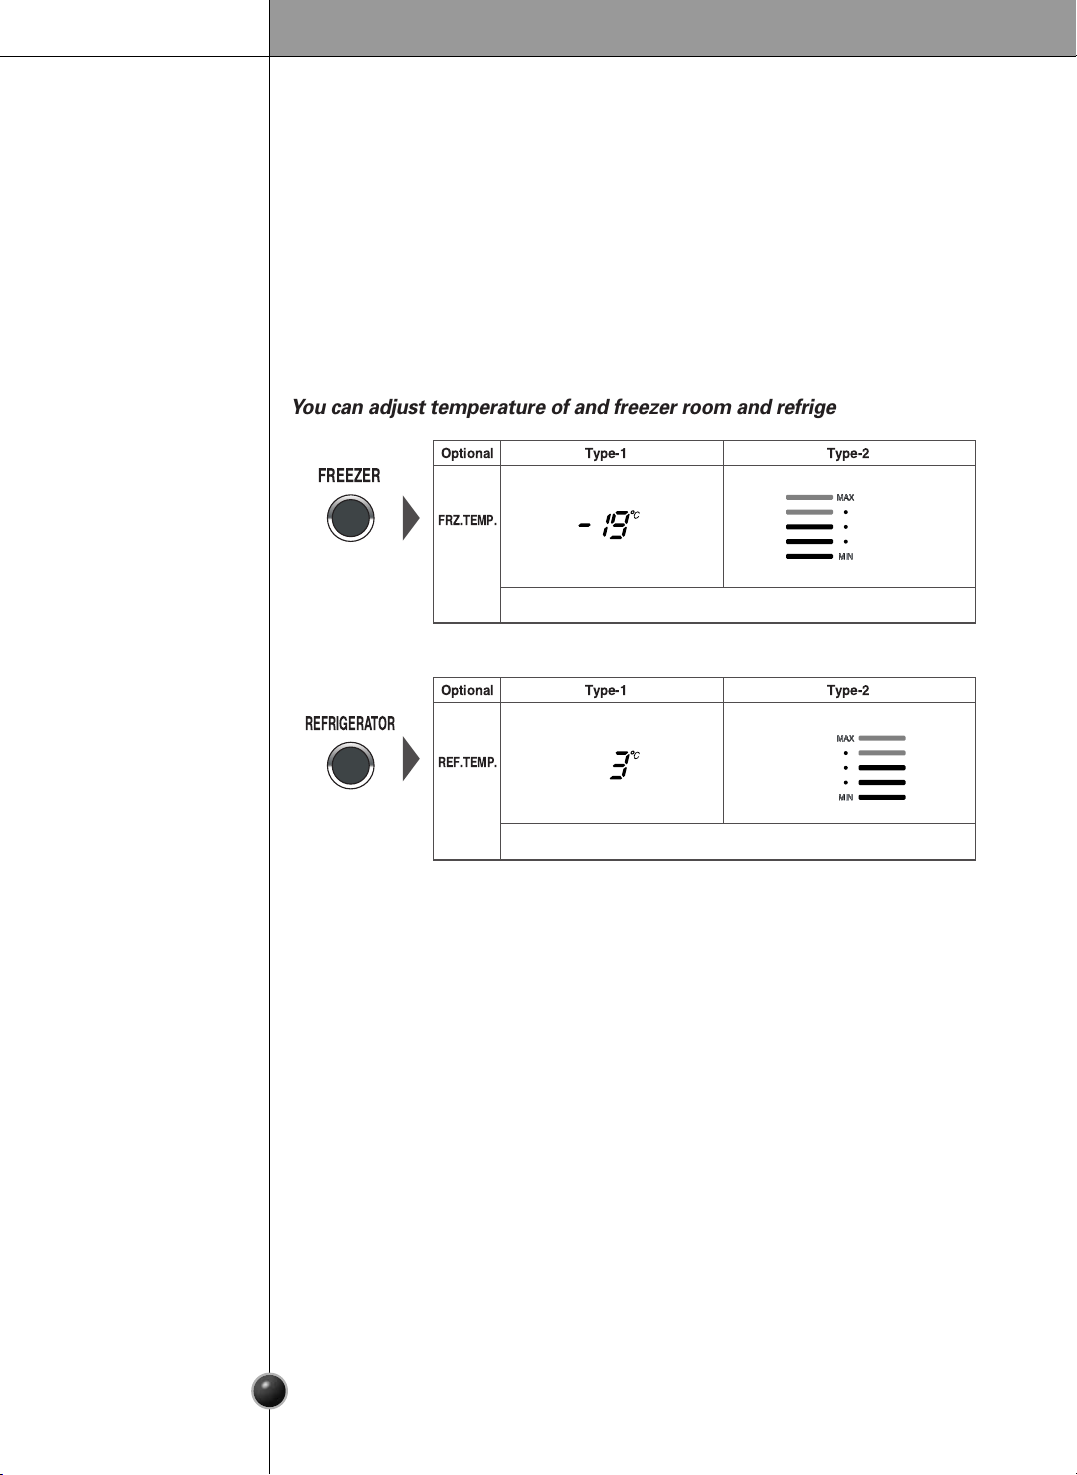
Optional Type-1 Type-2
FRZ.TEMP.
REF.TEMP.
Optional Type-1 Type-2
You can adjust temperature of and freezer room and refrigerator room.
How to adjust the
temperature in
the freezer
compartment
How to adjust the
temperature in
the refrigerator
compartment
Middle(-190C)➔Middle strong(-220C)➔Strong(-230C)➔Weak(-150C)➔Middle weak(-170C)
Middle(3
0
C)➔Middle strong(20C)➔Strong(00C)➔Weak(60C)➔Middle weak(40C)
FREEZER
REFRIGERATOR
Page 11
11
Operation
•
Reference : Hold your cup in place for a couple of seconds after dispensing ice or water so
the last few drops go in to your cup instead of the floor.
How to use
dispenser
Select among crushed ice, water, and cubed ice and press the push switch with a
glass or other container.
Water
Light the water lamp by
pressing the selection
button.
•
Water will be dispensed
by pressing the push
switch with a glass.
Cubed Ice
Light the cubed ice
lamp by pressing the
selection button.
•
Cubed ice will be
dispensed by pressing the
push switch with a glass.
The automatic icemaker can automatically make 6 cubes at a time, 50~60 pieces
per day. This quantity may vary by circumstance, including ambient temperature,
door opening, freezer load. etc.
Icemaking stops when the ice storage bin is full.
If you don't want to use the automatic icemaker, turn the icemaker switch to OFF.
If you want to use automatic icemaker again, change the switch to ON.
Automatic
icemaker
•
It is normal that a noise is produced when ice drops into the ice storage bin.
NOTE
•
Do not insert your hands in to the Icemaker in operation. It may cause to injure you.
WARNING
Power
Switch
Feeler Arm
Crushed Ice
Light the crushed ice
lamp by pressing the
selection button.
•
C
rushed ice will be
dispensed by pressing the
push switch with a glass.
Page 12
Operation
12
Ice is lumped together
When ice is lumped together, take the ice lumps out of the ice storage bin, break
them into small pieces, and then place them into the ice storage bin again.
When the ice maker produces too small or lumped together ice, the amount of
water supplied to the ice maker need to adjusted. Contact the service center.
❈
If ice is not used frequently, it may lump together.
Power failure
Ice may drop into the freezer compartment. Take the ice storage bin out and discard
all the ice then dry it and place it back. After the machine is powered again, crushed
ice will be automatically selected.
The unit is newly installed
It takes about 12 hours for a newly installed refrigerator to make ice in the freezer
compartment.
When ice maker
does not operate
smoothly
Please select this function for
prompt freezer.
OFF➝ ON➝ OFF is repeated
whenever pressing button.
The arrow mark graphic remains at the
On status after flickering 4 times when
selecting Special Refrigeration On.
Prompt freezer function automatically turns off after a fixed time passes.
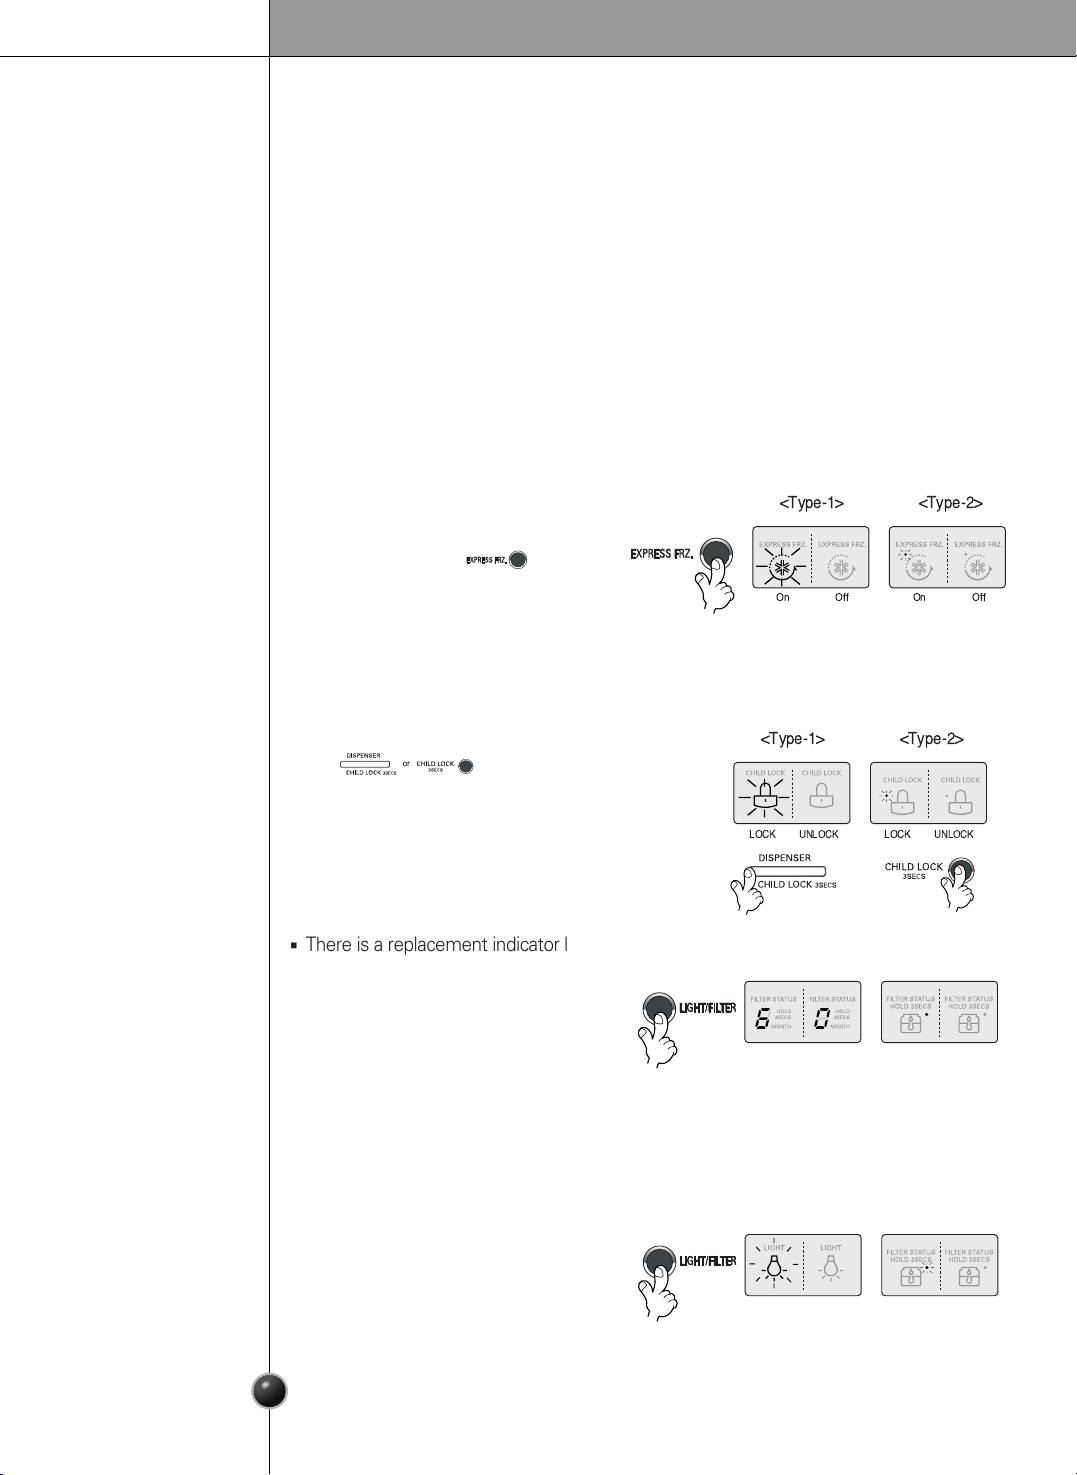
Express freezer
This button stops operation of different button.
Locking or Release is repeated whenever
the is pressed more than
3 seconds.
If you use the lock button,
none of the other buttons will work
until you unlock them.
Lock
LOCK
UNLOCK
LOCK
UNLOCK
<Type-1> <Type-2>
There is a replacement indicator light
for the water filter cartridge on the
dispenser.
The water filter should be replaced
every six months.
The filter light comes on to let you
know when to replace filter.
After replacing the filter, press and hold the filter button more than 3 seconds to reset
the indicator.
Filter condition
(filter replacement
cycle) display
function
Dispenser light
<Type-1> <Type-2>
This button turn the dispenser light
in the dispenser on an off.
The dispenser light function is turned
ON or OFF by pressing Light/Filter
button.
On Off On Off
<Type-1> <Type-2>
On Off
<Type-1> <Type-2>
On Off
Page 13
13
Diagnosis (failure detection) function
Diagnosis function automatically detects failure when failure is found in product during
the use of refrigerator.
If failure occurs at product, it does not operate though pressing any button and normal
indication is not done. In this case, do not turn power off but immediately contact with
the local service center. A lot of time are need for service engineer to detect the failed
part if turning it off.
Water is cooled while stored in the water tank in the refrigerator compartment, and
then sent to the dispenser.
Ice is made in the automatic ice maker and sent to the dispenser divided into crushed
or cubed form ice.
How ice/cold
water is supplied
•
It is normal that the water is not very cold at first. If you want colder water, add
ice into the glass.
NOTE
Throw away the ice (about 20 pieces) and water (about 7 glasses) first made after
refrigerator installation.
The first ice and water may include particles or odor from the feed water pipe or feed
water box. This is necessary in case that the refrigerator has not been used for a long
time.
Keep children away from the dispenser.
Children may push switch incorrectly bad or damage
lamps.
Be careful that food is not block the ice passage.
If foods are placed at the entrance of ice passage, ice
may not be dispensed. The ice passage may also be
covered with ice powder if splinter ice is used only. This
time, remove the ice powder accumulated.
Never store beverage cans or other foods in ice
storage bin for the purpose of rapid cooling.
Such actions may damage the automatic ice maker.
Never use thin crystal glass or crockery to collect ice.
Such glasses or containers may be broken.
Put ice first into a glass before filling water or other beverages.
Water may be splashed if ice is added to existing liquid in a glass.
Never touch a hand or other tools on ice outlet.
Touch may cause a part breakage or hand injury.
Never remove the ice maker cover.
Sometimes level the surface so that the ice storage bin is fully filled with ice.
Ice is piled up just near the ice maker. So, such status may be considered, by the ice
maker, that the ice storage bin is fully filled and ice making operation may stop.
If discolored ice is dispensed, immediately contact service center, stopping use.
Never use too narrow or deep glass.
Ice may be jammed in ice passage and, thus, the refrigerator may be failed.
Keep the glass at a proper distance from ice outlet.
A glass too close to the outlet may hinder ice from coming out.
Cautions
Operation
Door open warning
3 times of warning sounds at the interval of 30 seconds if a minute passes with the
door of refrigerator and the hombar door opened or completely closed.
Please contact with the local service center if warning continue to sound even after
closing the door.
The other
functions
Page 14
14
Refreshment center (Applicable to some models only)
Open the refreshment center door.
You can access the refreshment center
without opening refrigerator door and thus
saving electricity.
Inner lamp is lit in refrigerator compartment
when the refreshment center door opens.
Thus it is easy to identify the contents.
Never use the refreshment center door as a
chopping board and take care not to damage it
with sharp tools.
Never rest your arms or severely press on it.
The
refreshment center
can not function
normally without the cover.
Not only can the refreshment center door may
be damaged, but also children may be hurt.
How to use
Never place
heavy items on
the refreshment
center door or
allow children to
hang it on.
Never take out
the inner
refreshment
center cover
Use the
refreshment
center door as a
stand
Operation
Page 15
15
Egg box (Applicable to some models only)
•
Never use the egg box as an ice storage bin. It can be broken.
•
Never store the egg box in the freezer compartment or fresh compartment.
NOTE
Shelf (Applicable to some models only)
Wine holder (Applicable to some models only)
You can store taller items such as a gallon container or bottles by simply pushing in
front half of shelf underneath back half of shelf. Pull toward you to return to a full shelf.
Folding Shelf
In case of inserting the wine holder :
Pull the wine holder downward as in
after inserting it into the side anchoring
part of the shelf as in by catching it
upward as in .
In case of separating the wine holder :
Pull the wine holder inward as in ➃after
holding it upward as in ➂by catching it.
Bottles can be stored laterally with
this wine corner.
This can be attached to any shelf.
Wine holder
adjustment
(Type 1)
(Type 2)
3
4
1
2
[Type-1] [Type-2]
You can move the egg box to wherever you want.
Bottles can be stored laterally with this
wine rack.
Operation
Page 16
16
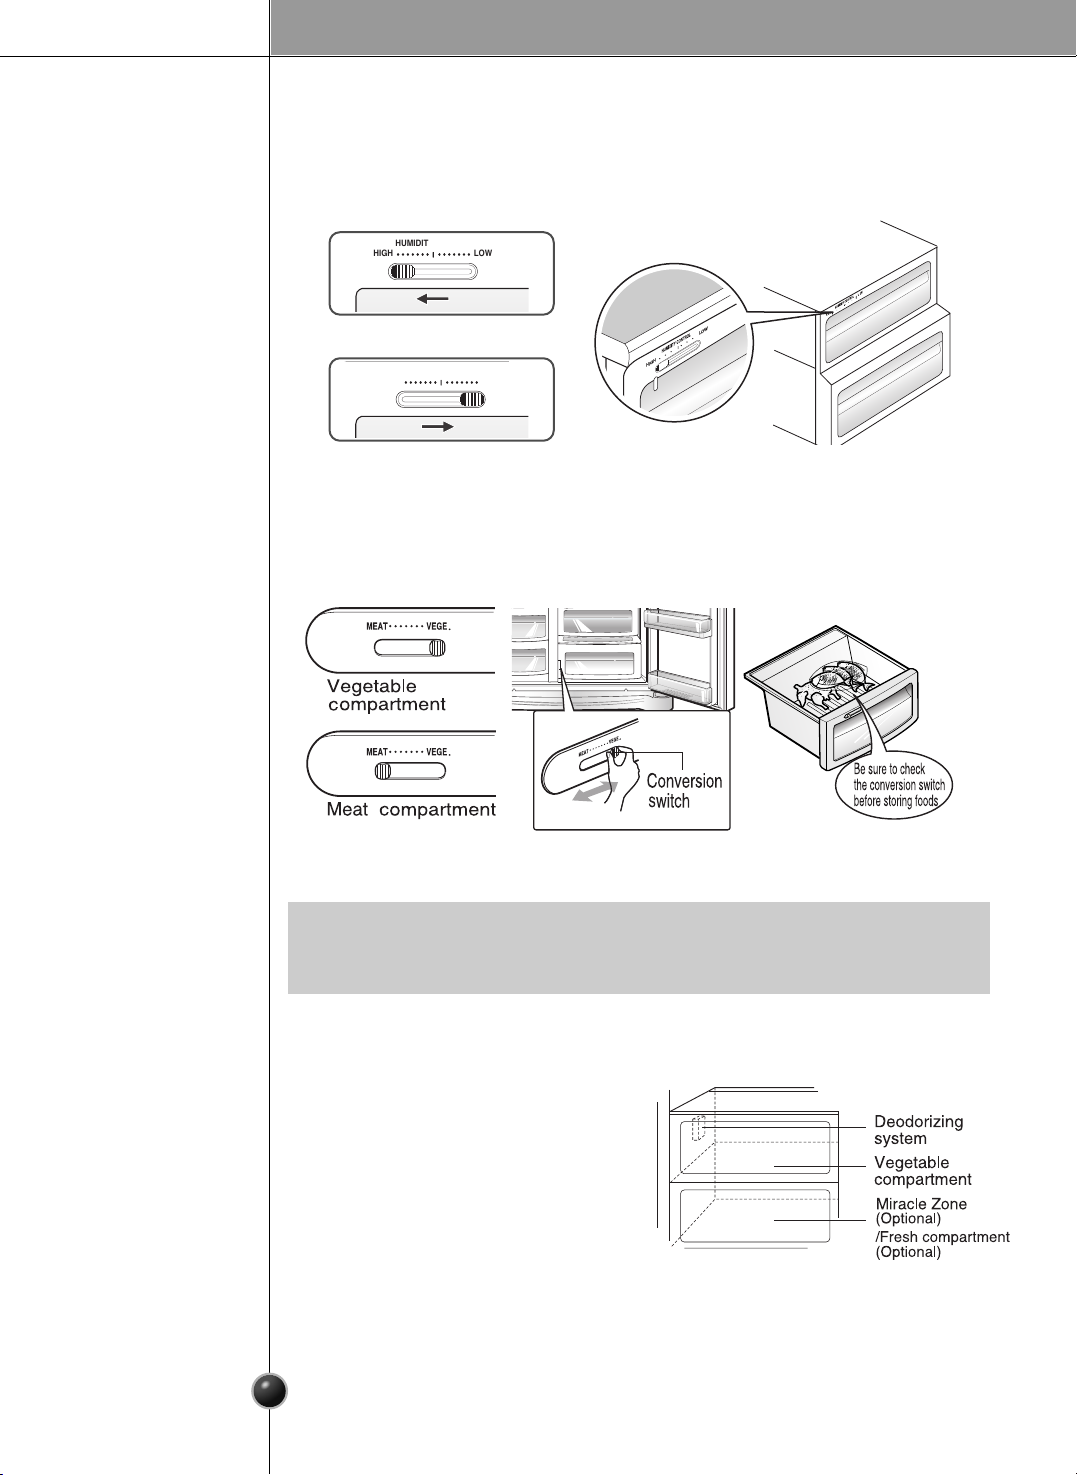
Humidity control in the vegetable compartment
The humidity can be controlled by adjusting the humidity control switch to the
left/right when storing vegetables or fruits.
HIGH
LOW
HIGH
LOW
HIGH LOW
HUMIDITY CONTROL
HIGH LOW
HUMIDITY CONTROL
High humidity
Low humidity
Convert into a vegetable or meat compartment
(Applicable to some models only)
The
meat
compartment maintains the temperature at a lower point than the
refrigerator compartment so that meat or fish can be stored fresh longer.
The bottom drawer in the refrigerator can be converted into a vegetable or meat
compartment
•
Vegetables or fruits are frozen if the conversion switch is set to meats
compartment. So, be sure to check it before storing foods.
NOTE
Deodorizer (Applicable to some models only)
This system efficiently absorbs strong
odors by using the optical catalyst. This
system does hot have any affect on
stored food.
Since it is installed already installed onto the cool air intake duct from the from
the refrigerator compartment, you need no separate installation.
Please use closed containers to store food with pungent odors.
Otherwise, this oder can be absorbed by other food in the compartment.
How to use the
deodorizing
system
Operation
Page 17
17
Miracle Zone Temperature Transition Corner
(Applicable to some models only)
Miracle Zone (Applicable to some models only)
By pressing the button, store vegetables,
fruits or other types of food such as meat to
be defrosted, raw fish, etc.
Temperature Change at Miracle Zone
(Applicable to some models only)
You can select optimum
temperature range depending on
types of foods stored.
- 3-step of temperature selection
including -3°C, -1°C and 4°C is
available. Vegetables/fruits and cold
storage foods requiring humidity
maintenance and meats/fishes can
be more freshly stored depending on type of foods stored.
First, remove the vegetable bin.
After lifting the Miracle Zone case slightly , reach
inside and pull it outward .
When using the Miracle Zone as storage room of meats, storing vegetables or fruits
may be frozen
When using the Miracle Zone as storage room of meats, keeping meats or fishes
may be spoiled and thus meats or fishes must be kept at the F-room.
If opening a door of the R-room, lamp turns on in the selected status and lamp turns
off if closing it.
(Vegetable/Fruit)➔(Cold storage while maintaining humidity)➔(Meat) is
sequentially repeated whenever pressing the "Selection" button.
When removing
Miracle Zone
Method to Use
Fit the Miracle Zone case on to the ledge and
gently slide it in .
When forced, the connecting parts can be damaged.
When installing
Miracle Zone
Operation
Page 18
18
Location of foods
(Refer to identification of parts)
Store wine.
Store small foods such as bread, snacks, etc..
Store various frozen foods such as meat, fish,
ice cream, frozen snacks, etc..
Store small packed frozen food.
Temperature is likely to increase as door
opens.
So, do not store long-term food such
ice cream, etc..
Wine holder
Snack
drawer
Freezer
compartment
shelf
Freezer
compartment
door rack
Freezer
compartment
drawer
Milk product
corner
Egg box
Refreshment
center
Refrigerator
compartment
shelf
Refrigerator
compartment
door rack
Vegetable drawer
Vegetable
drawer
/meat
drawer
conversion corner
Store meat, fish, chicken, etc.. after
wrapping them with thin foil.
Store dry
.
Store milk products such as butter, cheese,
etc..
Place this egg box in the proper location.
Store foods of frequent use such as beverage,
etc..
Store side dishes or other foods at a proper
distance.
Store small packed food or beverages such
as milk, juice, beer, etc..
Store vegetables or fruits.
Store vegetable, fruits, meat to thaw, raw
fish, etc.. setting the conversion switch as
necessary.
Be sure to check the conversion switch
setting before storing foods.
Suggestion on food storage
Page 19
19
Storing foods
Store fresh food in the refrigerator compartment. How food is frozen and thawed is an
important factor in maintaining its freshness and flavor.
Do not store food which goes bad easily at low temperatures, such as bananas, and
melons.
Allow hot food to cool prior to storing, placing hot food in the refrigerator could spoil
other food, and lead to higher energy consumption.
When storing the food, cover it with vinyl wrap or store in a container with a lid. This
prevents moisture from evaporating, and helps food to keep its taste and nutrients.
Do not block air vents with food. Smooth circulation of chilled air keeps refrigerator
temperatures even.
Do not open the door frequently. Opening the door lets warm air enter the refrigerator,
and cause temperatures to rise.
Never keep too much food in door rack because they may push against by inner racks
so that the door cannot be fully closed.
Do not store bottles in the freezer compartment - they may break when frozen.
Do not refreeze food that has been thawed. This causes loss of taste and nutrient.
When storing frozen food like ice cream for a long period, place it on the freezer
shelf, not in the door rack.
Do not touch the cold foods or containers- especially made of metallic -, with wet
hands and place glass products in the freezer compartment.
- That’s why you may have chilblains and they may be broken when their inner matters
are frozen, causing personal injury.
Avoid placing moist food in top refrigerator shelves, it could freeze from direct
contact with chilled air.
Always clean food prior to refrigeration. Vegetables and fruits should be washed and
wiped, and packed food should be wiped, to prevent adjacent food from spoiling.
When storing eggs in their storage rack or box, ensure that they are fresh, and always
store them in an upright position, which keeps them fresh longer.
Freezer
compartment
Refrigerator
compartment
•
If you keep the refrigerator in a hot and humid place, frequent openning of the door
or storing a lot of vegetables in it may cause dew to form which has no effect on its
performance. Remove the dew with dust cloth free from care.
NOTE
Suggestion on food storage
Page 20
20
Care and maintenance
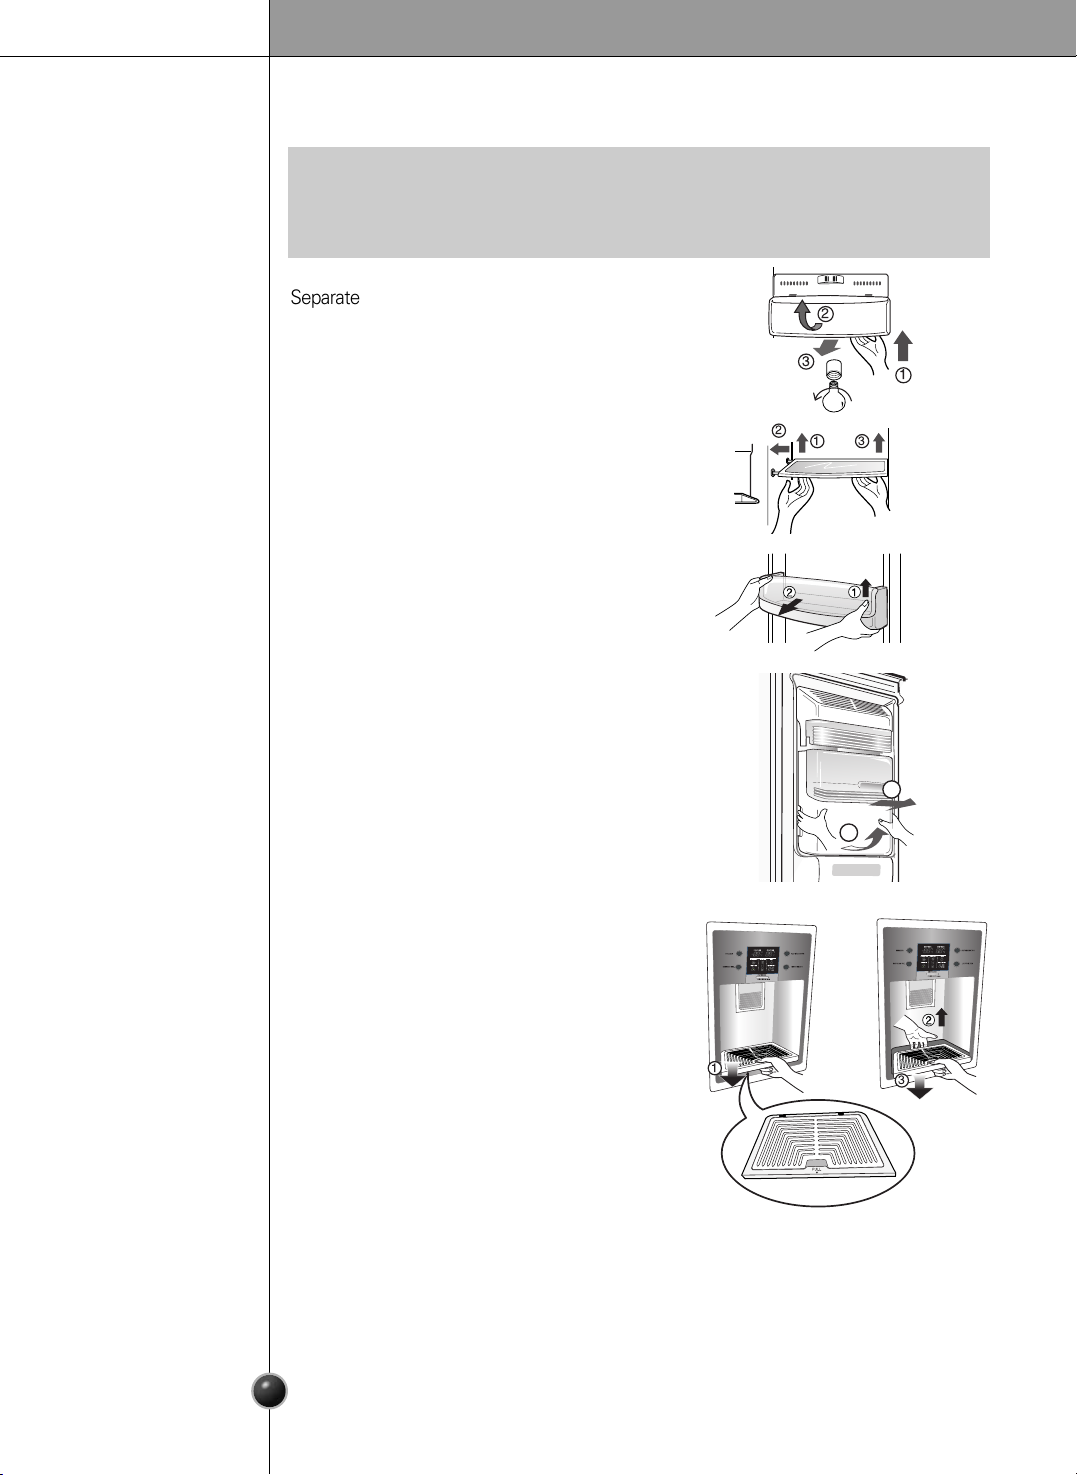
How to dismantle parts
•
Dismantling is done in the reverse sequence of assembly.
Be sure to unplug the power plug before dismantling and assembly.
Never apply severe force to dismantle parts. Parts may be damaged.
NOTE
Freezer
compartment
lamp
Freezer
compartment
shelf
Door rack and
support
Ice storage bin
After dispenser
is used
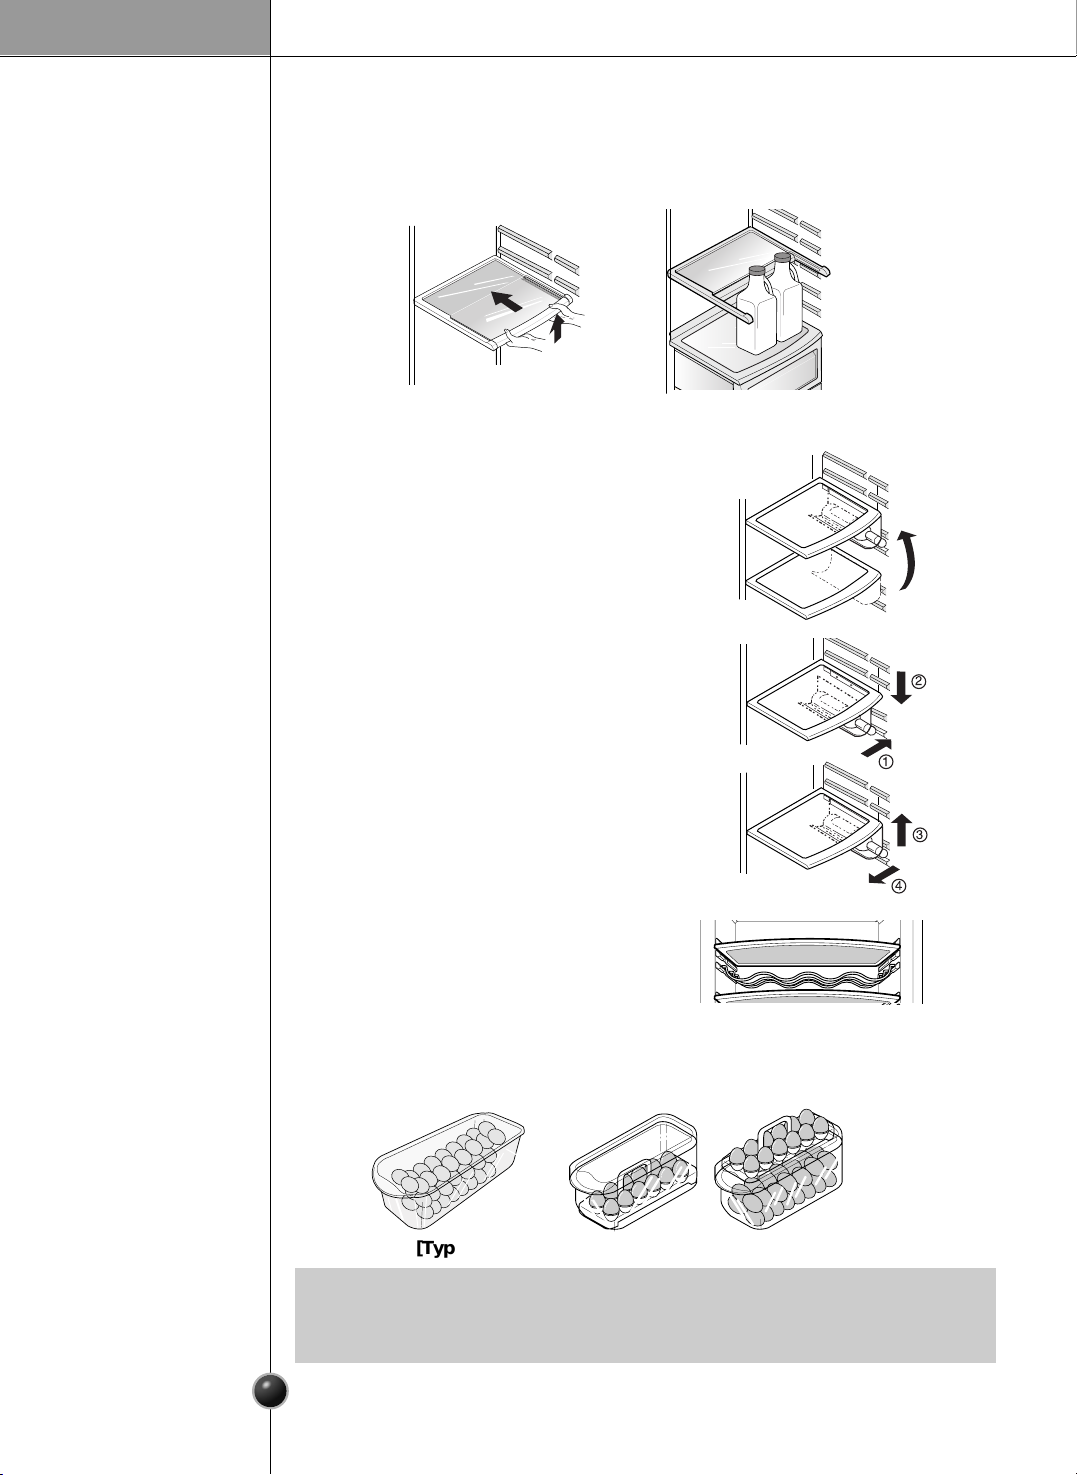
To remove a shelf, push the shelf to the left ,
lift the left part of the shelf a bit ➀, lift the right
part up ➂ , and take it out.
Lift the door rack holding both sides and
pull it out .
Hold the ice storage bin as shown in the right
figure and pull it out while slightly lifting it .
Do not dismantle the ice storage bin unless
it is necessary.
Use both hands to remove the ice bin to avoid
dropping it.
The water collector has no self-draining
function. It should be cleaned regularly.
Remove the cover by pulling the front side of
water collector cover and dry it with a cloth.
Pull the cover fully to the front ➀ and pull up
the rear end of the cover ➁ slightly to pull it out.
➂ Clean the floor and cover with a dry cloth.
!
!
!
Separate the lamp by pulling it out ➂
while slightly
pressing
➀ and rotating ➁
the lamp cover.
Turn the bulb counterclockwise. Use a 40-watt bulb
(max.) which
can be purchased at a service
center.
1
2
Page 21

21
Separate the bin ()to upward.
Separate the upper rack of the refreshment
center and then pull out the refreshment
center cover
()
.
The refreshment center can be removed
by pulling it upwards.
Refreshment
center
To remove the vegetable compartment
cover, pull out the vegetable compartment
a bit to the front , lift the front part of the
vegetable compartment cover as shown by
, and take it out.
Vegetable
compartment
cover
1
2
•
Be sure to remove parts from the refrigerator door when removing the vegetable
compartment,
snack drawer and refreshment center cover.
NOTE
Care and maintenance
Insert the tool into the marked area () and
push the tool to disconnect.
Use the tool with the flat tip such as ( - ) screw
driver.
Turn the bulb counterclockwise. Max. 40 W
bulb for refrigerator is used and can be
purchased at a service center.
Lamp in
refrigerator
compartment
Page 22
22
General information
During average length vacations, you will probably find it best to leave the refrigerator
in operation. Place freezable items in freezer for longer life.
When you plan not to operate, remove all food, disconnect the power cord, clean the
interior thoroughly, and leave each door OPEN to prevent odor formation.
Vacation time
Power failure
If you move
Anti
condensation
pipe
Most power failures that are corrected in an hour or two will not affect your
refrigerator temperatures.
However, you should minimize the number of door openings while the power is off.
Remove or securely fasten down all loose items inside the refrigerator.
To avoid damaging the height adjusting screws, turn them all the way into the base.
The outside wall of the refrigerator cabinet may sometimes get warm, especially just
after installation.
Don’t be alarmed. This is due to the anti-condensation pipe, which pumps hot
refrigerator to prevent “sweating” on the outer cabinet wall.
Cleaning
Regular cleaning is recommended. Wash all compartments a baking soda solution or a
mild detergent and warm water. Rinse and dry.
Please verify that the power cord is not damaged, power plug is not overheated, or
power plug is well inserted into the power consent.
Always remove power cord from the wall outlet prior to cleaning in the vicinity of
electrical parts (lamps, switches, controls, etc.).
Wipe up excess moisture with a sponge or cloth to prevent water or liquid from
getting into any electrical part and causing an electric shock.
Never use metallic scouring pads, brushes, coarse abrasive cleaners, strong alkaline
solutions, flammable or toxic cleaning liquids on any surface.
Do not touch frozen surfaces with wet or damp hands, because damp object will stick
or adhere to extremely cold surfaces.
It is important that your refrigerator be kept clean to prevent undesirable odors. Spilled
food should be wiped up immediately, since it may acidify and stain plastic surfaces if
allowed to settle.
Use a lukewarm solution of mild soap or detergent to clean the durable finish of your
refrigerator.
Wipe with a clean damp cloth and then dry.
Exterior
Interior
After cleaning
Warning
Care and maintenance
Page 23
23
Trouble shooting
Before calling for service, review this list. It may save you both time and expense.
This list includes common occurrences that are not the result of defective
workmanship or materials in this appliance.
Possible cause
Refrigerator control is off.
Refrigerator is in defrost cycle.
Plug at wall outlet is disconnected.
Power outage. Check house lights.
Refrigerator is larger than the previous
one you owned.
Room or outside weather is hot.
Refrigerator has recently been
disconnected for a period of time.
Large amounts of warm or hot food
may have been stored recently.
Doors are opened too frequently or too
long.
Refrigerator or freezer door may be
slightly open.
Refrigerator control is set too cold.
Refrigerator or freezer gasket is dirty,
worn, cracked, or poorly fitted.
Thermostat is keeping the refrigerator
at a constant temperature.
Solution
Set refrigerator control. See setting the
controls.
This is normal for a fully automatic
defrosting refrigerator. The defrost
cycle occurs periodically.
Make sure plug is tightly pushed into
outlet.
Call local electric company.
This is normal. Larger, more efficient
units run longer in these conditions.
It is normal for the refrigerator to work
longer under these conditions.
It takes some hours for the refrigerator
to cool down completely.
Warm food will cause the refrigerator to
run longer until the desired temperature
is reached.
Warm air entering the refrigerator
causes it to run longer. Open the door
less often.
Make sure the refrigerator is level.
Keep food and containers from
blocking door. See problem section.
OPENING/CLOSING of doors.
Set the refrigerator control to a
warmer setting until the refrigerator
temperature is satisfactory.
Clean or change gasket. Leaks in the
door seal will cause refrigerator to run
longer in order to maintain desired
temperatures.
This is normal. Refrigerator goes on
and
off to keep the temperature constant.
Runing of
refrigerator
Refrigerator
compressor
does not run.
Refrigerator
runs too much
or too long
Occurrence
Care and maintenance
Page 24
0 0 Suggestion on food storage
24
Refrigerator
compressor
does not run.
Occurrence
Temperatures are
too cold
Temperature in the
freezer is too cold
but the refrigerator
temperature is
satisfactory.
Temperature in the
refrigerator
is too warm but
the freezer
temperature is
satisfactory.
Temperatures in
the refrigerator
or freezer are
too warm.
Temperatures
are too warm
Meat stored in
fresh meat
drawer freezes.
Food stored in
drawers freezes.
Possible cause
Thermostat is keeping the refrigerator
at a constant temperature.
Freezer control is set too cold
Doors are opened too frequently or too
long.
Door is slightly open.
Large amounts of warm or hot food
may have been stored recently.
Refrigerator has recently been
disconnected for a period of time.
Refrigerator control is set too warm.
Refrigerator control is set too warm.
Refrigerator control has some effect on
freezer temperature.
Freezer control is set too warm.
Refrigerator control is set too cold.
Refrigerator control is set too cold.
Meat should be stored at a temperature
just below the freezing point of water
(32˚F,
0˚C) for maximum fresh storage time.
Solution
This is normal. The refrigerator goes on
and off to keep the temperature constant.
Set the refrigerator control to a colder
setting.
A refrigerator requires some hours to
cool down completely.
Wait until the refrigerator or freezer
has a chance to reach its selected
temperature.
Warm air enters the refrigerator/ freezer
whenever the door is opened.
Open the door less often.
Set the freezer or refrigerator control to a
colder setting until the freezer or
refrigerator temperature is satisfactory.
Set the freezer or refrigerator control to
a colder setting until the freezer or
refrigerator temperature is satisfactory.
It is normal for ice crystals to form due
to the moisture content of meat.
Set the refrigerator control to a
warmer setting
See above solution.
Set the freezer control to a warmer
setting until the freezer temperature is
satisfactory.
Close the door completely.
Temperature in the
refrigerator is too
cold and the
freezer
temperature
is satisfactory.
Care and maintenance
Page 25

25
Sound and noise
Occurrence
Louder sound
levels when
refrigerator is on.
Louder sound
levels when
compressor
comes on.
Moisture collects
on the inside walls
of the refrigerator.
Water/Moisture
/Ice outside
refrigerator
Moisture forms
on the outside of
the refrigerator
or between doors.
Vibrating or
rattling noise.
Water/Moisture
/Ice inside
refrigerator
Possible cause
Today’s refrigerators have increased
storage capacity and maintain more
even temperatures.
Refrigerator is touching wall or cabinets.
The weather is hot and humid which
increases the rate of frost buildup
and internal sweating.
Door is slightly open.
Door is opened too often or too long.
Weather is humid.
Door is slightly open,causing cold air
from the inside the refrigerator to meet
warm air from the outside.
Floor is uneven or weak.
Refrigerator rocks on the floor when it is
moved slightly.
Refrigerator operates at higher pressures
during the start of the ON cycle.
Items placed on the top of the refrigerator
are vibrating.
Dishes are vibrating on the shelves in
the refrigerator.
Solution
This time, close the door completely.
This is normal in humid weather.
When humidity is lower, the moisture
should disappear.
See problem section opening/closing of
doors.
Move refrigerator so that it does not
touch the wall or refrigerator.
This is normal.
It is normal for dishes to vibrate slightly.
Move dishes slightly.
Make sure refrigerator is level and firmly
set on floor.
Be sure floor is level and solid and can
adequately support refrigerator.
Remove items.
It is normal for sound levels to be higher.
This is normal. The sound will level off as
the refrigerator continues to run.
Open the door less often.
Care and maintenance
Page 26

26
Odors in refrigerator
Occurrence
Door(s) will not
close.
Door(s) will not
close.
Drawers are
difficult to move.
Dispenser
Dispenser will not
dispense ice
Opening/Closing of
doors/Drawers
Possible cause
Food is touching shelf on top of the
drawer
Track that drawer slides on is dirty.
Ice storage bin is empty.
Freezer temperature is set too warm.
Household water line valve is not open.
Refrigerator or freezer door is not
closed.
Refrigerator is not level. It rocks on the
floor when it is moved slightly.
Floor is uneven or weak.
Refrigerator rocks on the floor when it
is moved slightly.
Refrigerator is touching wall or cabinets.
Interior needs to be cleaned.
Food with strong odor is in the refrigerator.
Some containers and wrapping materials
produce odors.
Food package is keeping door open.
Door was closed too hard, causing other
door to open slightly.
Solution
Be sure both doors are closed.
Open household water line valve and
allow sufficient time for ice to be made.
When ice is made, dispenser should
operate.
Turn the freezer control to a higher
setting so that ice cubes will be made.
When the first supply of ice is made,
the dispenser should operate.
Clean drawer and track.
Be sure floor is level and can adequately
support refrigerator.
Contact carpenter to correct sagging or
sloping floor.
Move refrigerator.
.
Keep less food in drawer.
Adjust the height adjusting screw.
Use a different container or brand of
wrapping
materials
.
Move packages that keep door from
closing.
Close both doors gently.
Cover food completely.
Clean interior with sponge,warm water
and baking soda.
When the first supply of ice is dropped
into the bin, the dispenser should operate.
Care and maintenance
Page 27

27
Dispenser will
not
dispense
ice.
Ice dispenser
is jammed.
Occurrence
Water has an
odd taste
and/or odor.
Dispenser will
not dispense
water.
Possible cause
Water has been in the tank for too long.
Unit not properly connected to cold
water line.
This sound is normally made when automatically made ice is dropped into ice storage
bin. Volume may vary according to refrigerator’s location.
This sound is normally made when ice maker is supplied with water after dropping
the automatically made ice.
Please thoroughly read ‘Automatic ice maker and dispenser’ in this manual.
Ice cubes are frozen together.
Ice has melted and frozen around auger
due to infrequent use, temperature
fluctuations and/or power outrages.
Ice cubes are jammed between the ice
maker arm and back of the bin.
Ice cubes that have been purchased or
made in some other way have been
used in the dispenser.
Household water line valve is not open.
See problem “Ice maker is not making
any ice.”
Refrigerator or freezer door is not closed.
Solution
Be sure both doors are closed.
Draw and discard 7 glasses of water
to freshen the supply. Draw and discard
an additional 7 glasses to completely rinse
out tank.
Connect unit to cold water line which
supplies water to kitchen faucet.
Open household water line valve.
Use the dispenser often so that cubes do
not freeze together.
Only the ice cubes made by the ice maker
should be used with the dispenser.
Remove the ice cubes that are jamming
the dispenser.
Remove ice storage bin, and thaw and
the contents. Clean bin, wipe dry and
replace in proper position.
When new ice is made, dispenser should
operate.
Sound of ice
dropping
Sound of water
supply
Other
DISPOSAL OF YOUR OLD APPLIANCE
1. When this crossed-out wheeled bin symbol is attached to a
product it means the product is covered by the European Directive
2002/96/EC.
2.
All electrical and electronic products should be disposed of separately
from the municipal waste stream via designated collection facilities
appointed by the government or the local authorities.
3. The correct disposal of your old appliance will help prevent potential
negative consequences for the environment and human health.
4. For more detailed information about disposal of your old appliance,
please contact your city office, waste disposal service or the shop
where you purchased the product.
Care and maintenance
Page 28

Contenidos
Datos Preliminares
Instrucciones de seguridad
Identificación de las partes
Seleccione una ubicación adecuada
Desmontaje de la puerta
Colocación de la puerta
Instalación del tubo de suministro de agua
Instalación
Puesta en marcha
Ajuste de las temperaturas y funciones
Compartimento para refrescos (aplicable sólo a algunos modelos)
Baldas (aplicable sólo a algunos modelos)
Soporte para el vino (aplicable sólo a algunos modelos)
Compartimiento para huevos (aplicable sólo a algunos modelos)
Control de humedad en el compartimento para verduras
Conversión a compartimento de verduras o carnes (aplicable sólo a algunos modelos)
Desodorizante (aplicable sólo a algunos modelos)
Esquina de transición de temperatura en la zona Miracle (aplicable sólo a algunos modelos)
Cambios de temperatura en la zona Miracle (aplicable sólo a algunos modelos)
Zona Miracle (aplicable sólo a algunos modelos)
Ubicación de los alimentos
Guardar alimentos
Cómo desmontar las diferentes partes
Información general
Limpieza
Solución de problemas
Introducción
Instalación
Funcionamiento
Sugerencias para
la organización de
los alimentos
Cuidados y
mantenimiento
29
29
30
31
32
33
33
34
35
35
40
41
41
41
42
42
42
43
43
43
44
45
46
48
48
49
28
Cuando la puerta del congelador no esté alineada
con la altura de la puerta del frigorífico
34
Page 29

Datos Preliminares
El modelo y número de serie se encuentran en el interior o parte posterior del
frigorífico de esta unidad. Estos números son únicos para este frigorífico. Debe
tomar nota de esta información y guardar está guía como prueba permanente de
su compra. Grape aquí su factura.
Fecha de compra :
Lugar de venta :
Dirección del vendedor :
No. de teléfono del vendedor :
No. de modelo :
No. de serie :
Antes de su utilización, instale correctamente este frigorífico y colóquelo de acuerdo
con las instrucciones de instalación de este documento.
No desenchufe el frigorífico tirando el cable. Hágalo siempre tirando con fuerza del
enchufe y sacándolo de la toma de pared.
Al separar el frigorífico de la pared, tenga cuidado de no pisar el cable con el frigorífico o
dañarlo de cualquier otro modo.
Tras poner en funcionamiento el frigorífico, no toque las superficies frías del compartimento
congelador, particularmente con las manos húmedas o mojadas. La piel puede
adherirse a estas superficies extremadamente frías.
Desenchufe el cable tirando del enchufe para fines de limpieza o de otro tipo. No lo toque
con las manos mojadas porque podría recibir una descarga eléctrica o resultado herido.
No dañe, cambie, retuerza o estire el cable para evitar posibles descargas eléctricas o
incendios. Asegúrese de que el frigorífico está correctamente puesto a tierra.
No coloque productos de vidrio en el congelador porque pueden romperse debido a la
expansión al congelarse sus contenidos.
No introduzca las manos en el interior del depósito del fabricador de hielo automático.
Podría resultar herido por el funcionamiento del fabricador de hielo automático.
No permita que los niños o personas discapacitadas hagan uso del frigorífico sin
supervisión.
No deje desatendidos a los niños pequeños cuando estén jugando con el frigorífico.
No permita que nadie suba, se siente, permanezca de pie o se siente sobre la puerta del
compartimento para refrescos. Estas acciones pueden dañar el frigorífico e incluso
hacerlo caer, con el consiguiente peligro de lesiones.
Por favor, no manche el área cerca al conmutador de la puerta con cualquier alimento
azucarado de forma que las hormigas no interfieran la operación normal del conmutador de
la puerta.
Si es posible, conecte el frigorífico a su propia toma de pared individual y evite compartirla
con otros aparatos para que no se produzcan sobrecargas con los consiguientes cortes
de corriente.
El refrigerador debe poner cerca de donde se pueda quitar el borne fácilmente para
desconectar por si acaso.
Si el flexible hizo daño, debe consultar a la agencia de servicios o a la productora para
evitar el peligro.
No modifique ni prolongue el largo del cable de alimentación.
Esto podría provocar una descarga eléctrica o un incendio.
No utilice una
alargadera
Accesibilidad de
suministro borne
Substitución de
suministro flexible
Precaución
29
Instrucciones de seguridad
Instalación
Page 30

30
Identificación de las partes
•
Instalación
Riesgos de que
los niños queden
encerrados
No guardar
Toma de tierra
Fabricador de
hielo automático
Balda / Cajón
Lámpara
Balda / Cajón
Cajón
Estante de puerta
(1 pieza o 2 piezas)
Cajón (2 o 3)
Estante de puerta
(1 pieza o 2 piezas)
PELIGRO: riesgo de que los niños queden encerrados.
Antes de deshacerse de su viejo frigorífico o congelador:
Desmonte las puertas pero deje en su lugar las baldas para que los niños no entrar al
interior con facilidad.
Un frigorífico no debe ser usado como juguete por los niños o personas discapacitadas
sin la debida supervisión.
Asegúrese de que los niños no juegan con el frigorífico.
No guarde o use gasolina u otros líquidos o vapores inflamables cerca del frigorífico o
cualquier otro aparato eléctrico.
Si se produce un cortocircuito, la toma de tierra reduce el riesgo de descargas eléctricas
proporcionando un hilo de escape para la corriente eléctrica.
Para evitar posibles descargas eléctricas, este aparato debe estar conectado a tierra.
Un uso inadecuado de la toma de tierra puede producir descargas eléctricas. Consulte a
un técnico o electricista cualificados si no entiende correctamente las instrucciones de
puesta a tierra, o si tiene dudas sobre si la puesta a tierra se ha realizado correctamente.
Compartimento
de congelador
Compartiment
o de frigorífico
Esquina de
productos lácteos
Lámpara
Balda
Soporte para vino
(Plástico o cable)
Estante de puerta
(1pieza o 2 piezas)
Balda
Dispensadorde latas
Cajón para tentempiés
(opcional)
Balda (abatable o normal)
Compartimento para
refrescos (opcional)
Huevera
Estante de puerta
(1 pieza o 2 piezas)
Cajón para verduras
(1 o 2)
Interruptor de humedad
Zona despensa (opcional)
Cajón para verdura
(opcional)
Estante de puerta
(1pieza o 2 piezas)
(opcional)
Tapa inferior
NOTA
Si falta alguno de los componentes de la unidad, puede tratarse de componentes que
se usan solamente en otros modelos (por ejemplo, el compartimento para refrescos
no se incluye en todos los modelos).
Interruptor de conversión
(carnes/verduras)
(opcional)
Page 31

Instalación
31
Dónde colocar el
frigorífico
Seleccione una ubicación adecuada
1. Colóquelo en un lugar donde se facilite
su uso.
2. Evite colocarlo cerca de fuentes de calor,
luz solar directa o humedad.
3.
5. No instale el frigorífico donde se produzcan temperaturas inferiores a 5˚ C. Puede
afectar a su funcionamiento.
4. Para evitar vibraciones, el frigorífico debe estar nivelado.
Este electrodoméstico contiene líquidos (refrigerantes, lubricantes) y está
fabricado con piezas y materiales que pueden ser reutilizados y/o recicables.
Todos los materiales importantes deberían ser enviados al centro de recogida de
materiales reciclables para poder ser utilizados después de un reprocesamiento
(reciclaje). Para el envío, póngase en contacto con su agencia local.
Eliminar su viejo
electrodoméstico
Para asegurar la correcta circulación del
aire alrededor del frigorífico/congelador,
mantenga el espacio libre suficiente en
ambos lados, así como en la parte superior,
y mantenga la unidad a al menos
2 pulgadas (5 cm.) de la pared posterior.
Page 32

Desmontaje de la puerta
Si la puerta de acceso es demasiado estrecha
para hacer pasar el frigorífico, desmonte la
puerta y pase el frigorífico lateralmente.
Peligrode descarga eléctrica
Desconecte el frigorífico de la red antes de su instalación.
En caso contrario, podría producirse un peligro de muerte o lesiones graves.
Retire la cubierta inferior levantándola, y retire el
pasador. A continuación, extraiga el tubo de
suministro de agua mientras presiona el área 1
mostrada a la derecha en la figura.
Suelte la tapa
inferior y el tubo
de agua
Precaución
Suelte la
puerta del
compartimento
del congelador.
Suelte la puerta
del frigorífico.
Instalación
32
1) Suelte la tapa de la bisagra aflojando los
tornillos. Separe todos los hilos de conexión
con la excepción de la línea de tierra, más
tarde.
2) Desmonte la protección haciéndola girar en
sentido antihorario () y eleve la bisagra
().
3) Desmonte la puerta del compartimento del
congelador elevándola. Levante la puerta lo
suficiente para soltar completamente el tubo
de agua.
1) Afloje los tornillos de la tapa de la bisagra y
suelte la tapa. Suelte el hilo de conexión, si
lo hay, con la excepción del hilo de tierra.
2) Suelte la protección girando en sentido
horario () y suelte la bisagra superior
elevándola ().
3) Suelte la puerta del compartimento del
frigorífico elevándola.
•
Si el extremo del tubo está deformado, corte esa parte.
NOTA
•
Al soltar la bisagra superior, tenga cuidado de no dejar caer la puerta.
NOTA
•
Mueva la puerta del compartimento del frigorífico de modo que pase por la puerta
de acceso e inclínela, pero tenga cuidado de no dañar el tubo de agua.
NOTA
Tapa inferior
Bisagra inferior
Bisagra
inferior
Protección
Tubo de suministro de agua
Hilos de
conexión
Hilos de
conexión
Tapa de
bisagra
Bisagra superior
Bisagra
superior
Protección
Bisagra
superior
Línea de tierra
Page 33

33
Colocación de las puertas
Instalación del tubo de suministro de agua
Pase el frigorífico lateralmente por la puerta de
acceso según se muestra en la figura de la
derecha.
El funcionamiento del fabricador de hielo automático necesita una presión de agua
de 147 – 834 kPa (1,5 – 8,5 kgf/cm2) (Es decir, se llenará un vaso de papel de 180 cc
completamente en 3 segundos.)
Si la presión del agua no alcanza un valor de 147 kPa (1,5 kgf/cm2), es necesario
comprar una bomba de presión aparte para la formación normal del hielo y el
suministro de agua fría.
La longitud total del tubo de agua no podrá ser superior a 8 m y tenga cuidado de no
retorcer el tubo. Si el tubo es de 8 m o más largo, puede causar problemas en el
suministro de agua debido a la presión del agua de desagüe.
Instale el tubo de agua en un lugar sin calor.
Conecte solamente a una red de agua potable.
Consulte las instrucciones para la instalación del filtro de agua.
Siga el proceso inverso para montar las puertas tras haber superado la puerta de
acceso.
Paso del
frigorífico.
Antes de la
instalación
Precaución
1
2
34
5
M
a
x
F
R
Z
T
E
M
P
R
E
F
T
E
M
P
M
i
n5
4
3
2
1
M
a
x
Instalación
Page 34

Instalación
Las puertas del frigorífico se cerrarán con suavidad al levantar el lado frontal ajustando
el tornillo de ajuste de altura. Si las puertas no se cierran correctamente, puede verse
afectado el funcionamiento del frigorífico.
1. Limpie el polvo acumulado durante el transporte y limpie el frigorífico
cuidadosamente.
2. Instale los accesorios del tubo de la cubitera, bandeja de recogida de agua, etc,
en sus lugares adecuados. Están embalados juntos para evitar posibles daños
durante el transporte.
3. Conecte el cable de alimentación (o enchufe) en la toma de pared. No
conecte junto con otros electrodomésticos en la misma toma.
34
Instalación
Si la altura de
la puerta del
compartimento del
congelador es
diferente de la altura
de la puerta del
compartimento
del frigorífico
Si la puerta del compartimento del
congelador está más baja que la
puerta del compartimento del
frigorífico.
Nivele la puerta insertando un destornillador
de tipo plano en la ranura del tornillo
izquierdo
en sentido horario(①).
de ajuste de la altura y gírelo
Si la puerta del compartimento del
congelador está más alta que la
puerta del compartimento del
frigorífico.
Nivele la puerta insertando un destornillador
de tipo plano en la ranura del tornillo
derecho de ajuste de la altura y gírelo
en sentido horario(①).
Cuando la puerta del congelador no esté alineada
con la altura de la puerta del frigorífico.
En caso de que la altura no se pueda alinear mediante el tornillo de ajuste
de altura, inserte la lámina transparente que se facilita con el producto.
Tras nivelar la
altura de la puerta.
Siguiente
Separe la puerta de menoraltura, utilice un destornillador de (+) para desatornillar el tornillo
situado en la bisagra inferior, como muestra la Figura ①; inserte la lámina transparente entre
la bisagra inferior y la abrazadera inferior. A continuación, fíjela con los tornillos como
muestra la Figura ②.
Coloque más láminas transparentes según estime oportuno hasta obtener una alineación
adecuada. (En total se facilitan 4 láminas transparentes).
Bisagra
inferior
Lámina
transparente
①
②
Abrazadera inferior
Page 35

35
•
Funcionamiento
Puesta en marcha
Ajuste de las temperaturas y funciones.
Cuando haya instalado el frigorífico por primera vez, permita que se estabilice en las
temperaturas operativas normales durante 2-3 horas antes de llenarlo con alimentos
frescos o congelados. Si se interrumpe el funcionamiento, espere cinco minutos
antes de volver a ponerlo en marcha.
Botón del centro de refrescos
Luz del dispensador
Opcional
Tipo-1
(oculta)
Mostrar modo ahorro de energía
Tipo-2
Mostrar modo ahorro de energía
NOTE
Su modelo puede no incluir todas las opciones.
Page 36

36
Funcionamiento
Puede ajustar la temperatura del congelador y del refrigerador.
Cada vez que se oprime el botón se repite el proceso de establecer en el siguiente
orden:(débil) (mediano débil) (mediano) (mediano fuerte) (fuerte).
La temperatura interior real varía, dependiendo del estado de los alimentos.
La temperatura que se establece es un objetivo de temperatura no la real dentro
del refrigerador.
La función del refrigerador es débil en el tiempo inicial. Tenga a bien ajustar la
temperatura como se indica más arriba luego de usar el refrigerador por lo menos
durante 2 o 3 días.
Mostrar modo ahorro de energía
Esta función convierte la pantalla al modo ahorro de energía hasta la próxima vez que
se abra la puerta.
Mantenga presionados simultáneamente los botones FREEZER (congelador) e
EXPRESS FRZ. durante 5 segundos, hasta que se emita el sonido ‘ding’. Todos los
LED/LCDs se iluminarán y, a continuación, se apagarán. Cuando el modo de ahorro de
energía es activado, la pantalla permanecerá apagada hasta la próxima vez que se
abra la puerta. A continuación, se encenderá siempre que se abra una puerta o se
presione un botón, y permanecerá encendida durante 20 segundos después de la
última apertura de la puerta o selección del botón. Mantenga presionados
simultáneamente los botones FREEZER (congelador) e EXPRESS FRZ. (más hielo)
durante 5 segundos para desactivar el modo de ahorro de energía, hasta que se
emita el sonido ‘ding’.
Como ajustar la
temperatura en el
compartimiento
del freezer.
Como ajustar la
temperatura en el
compartimiento
del refrigerador
FREEZER
REFRIGERATOR
Opcional
Medio(-190C) Medio-fuerte(-220C) fuerte(-230C) débil(-150C) medio-débil(-170C)
Opcional
Medio(30C) Medio-fuerte(20C) fuerte(00C) débil(60C) medio-débil(40C)
Tipo-1
Tipo-1
Tipo-2
Tipo-2
Page 37

Funcionamiento
37
Uso del
dispensador
Seleccione entre hielo picado, agua o cubitos de hielo y presione ligeramente el
pulsador con un vaso u otro recipiente.
Cubitos de hielo
Pulse el botón de
selección de cubitos de
hielo y se iluminará
el
indicador.
•
Obtendrá cubitos de hielo
presionando ligeramente el
pulsador con un vaso.
•
Referencia : Mantenga el vaso en posición durante un par de segundos tras la dispensación
de hielo o agua, a fin de que las últimas gotas caigan en el vaso, y no en el
suelo.
La máquina automática de de hielo puede elaborar 6 cubitos a la vez, 50~60 al día.
Esta cantidad puede variar según las circunstancias, incluyendo la temperatura
ambiente, apertura de la puerta, carga del congelador, etc.
La producción de hielo cesará cuando el recipiente de almacenamiento de cubitos
esté lleno.
Si no desea utilizar la máquina automática de elaboración de hielo, coloque el
interruptor en APAGADO. Si desea volver a utilizar la máquina automática de
elaboración de hielo, coloque el interruptor en ENCENDIDO.
Máquina
automática de
elaboración de
hielo
Hielo picado
Pulse el botón de
selección de hielo
picado y se iluminará
el indicador.
•
Obtendrá hielo picado
presionando ligeramente
el pulsador con un vaso.
Agua
Pulse el botón de
selección de agua y
se iluminará el
indicador.
•
Obtendrá agua
presionando ligeramente
el pulsador con un vaso.
•
No introduzca las manos en la máquina de cubitos de hielo en funcionamiento.
Puede sufrir daños.
ADVERTENCIA:
•
Es normal que se escuche un ruido cuando los hielos caen dentro del recipiente.
NOTE
Page 38

Funcionamiento
38
<
Tipo-1
> <
Tipo-2
>
Cuando el
fabricador de
hielo no
funciona
correctamente
Congelación
exprés
El hielo forma bloques
Cuando el hielo forme un bloque, sáquelo del depósito de hielo, rómpalo en trozos
más pequeños y vuelva a introducirlos en el depósito.
Cuando el fabricador de hielo produzca cubos de hielo muy pequeños o unidos, es
necesario ajustar la cantidad de agua que se introduce. Póngase en contacto con el
servicio técnico.
Si no se usa el hielo con frecuencia, pueden formarse bloques.
Fallo de corriente
El hielo puede caer en el compartimento del congelador. Saque el depósito del
hielo, deshágase del hielo y vuelva a colocar el depósito en su lugar. Tras volver a
poner en funcionamiento el frigorífico, se seleccionará automáticamente hielo
picado.
El frigorífico se acaba de instalar por primera vez
Son necesarias aproximadamente 12 horas para que un frigorífico instalado por
primera vez produzca hielo en el compartimento del congelador.
Por favor, seleccione ésta función para lograr una congelación rápida.
APAGADO -> ENCENDIDO -> APAGADO
Tipo-1 Tipo-2
se repetirá cada vez que presione el
botón( )
El gráfico de la marca de flecha continúa en
estado Encendido tras parpadear 4 veces, al
seleccionar el encendido de la refrigeración
especial.
La función de congelación rápida se apagará
automáticamente una vez finalizado el tiempo establecido.
Bloquear
Función de
visualización del
estado del filtro
(ciclo de
sustitución del
filtro)
Luz del
dispensador
Este botón cesará el funcionamiento de
otros botones.
Tipo-1 Tipo-2
El bloqueo y el desbloqueo se repetirán
siempre que presione ( )
durante más de 3 segundos.
Si utiliza el botón “LOCK”,
ningún otro botón funcionará hasta que los
desbloquee.
Existe un indicador luminoso de sustitución
del filtro de agua del dispensador.
El filtro de agua debe ser sustituido
cada seis meses.
La luz del filtro se iluminará para
indicarle la necesidad de sustituir
el filtro.
Una vez sustituido el filtro, mantenga
pulsado el botón del filtro durante más de 3 segundos para restablecer el indicador.
Este botón enciende y apaga la luz
del dispensador.
<
Tipo-1
> <
Tipo-2
La función de la luz del dispensador
de ENCIENDE y APAGA pulsando
el botón Luz/Filtro.
>
Page 39

39
Funcionamiento
Deshágase del hielo (alrededor de 20 cubitos) y el agua (aproximadamente 7
vasos) producidos por primera vez tras la instalación del frigorífico.
El primer hielo y agua incluyen partículas u olores del tubo de suministro de agua o el
depósito de agua. Esto es necesario en caso de que el frigorífico no se haya usado
durante mucho tiempo.
No permita que los niños manipulen el
compensador
Los niños pueden apretar el compensador
incorrectamente o dañar las lámparas.
Asegúrese de que los alimentos no bloquean
el paso del hielo.
Si los alimentos se colocan en la entrada del paso del
hielo, quizás se bloquee el paso del hielo. También
puede cubrirse con hielo en
polvo si se utiliza
solamente hielo fragmentado.
En este caso,
elimine el hielo acumulado.
No guarde latas de bebida u otros alimentos en
el depósito del hielo para que se enfríen con
mayor rapidez.
Se puede dañar el fabricador de hielo automático.
No utilice vasos de vidrio delgado o loza para recoger el hielo.
Estos vasos o envases pueden romperse.
Ponga el hielo en un vaso en primer lugar antes de llenarlo con agua u otras
bebidas.
El agua puede salpicar si se añade hielo al líquido existente en un vaso.
No toque con la mano u otras herramientas la salida del hielo.
Puede romperse la herramienta o sufrir lesiones en la mano.
No quite la tapa del fabricador de hielo.
En algunas ocasiones, nivele la superficie de modo que el depósito del hielo
pueda llenarse con más hielo.
El hielo se acumula cerca del fabricador de hielo. Por ello, el fabricador de hielo puede
detectar que el depósito está lleno y dejar de fabricar hielo.
Si se obtiene hielo decolorado, deje de usar el fabricador de hielo y póngase
inmediatamente en contacto con el servicio técnico.
No utilice vasos estrechos o profundos
El hielo puede atascarse en el paso del hielo y puede producir un fallo del frigorífico.
Mantenga el vaso a una distancia adecuada de la salida del hielo
Un vaso demasiado cercano a la salida del hielo puede evitar la salida del hielo.
Precauciones
Las otras
funciones
Cómo se obtiene
hielo/agua fría
Advertencia sobre apertura de puerta.
Se produce un sonido de advertencia repetido tres veces con intervalos de treinta
segundos si se pasa un minuto con la puerta del refrigerador y el Compartmento para
refrescos abierto o completamente cerrado.
Tenga a bien contactar al centro de servicio local si la advertencia continúa sonando
aún después que se ha cerrado la puerta.
Función de diagnóstico (detección de fallos)
La función de diagnóstico detecta automáticamente el fallo cuando éste se produce
en el producto durante el uso del refrigerador.
Si el fallo se produce en una pieza del producto, éste no funciona aunque se oprima
cualquier botón y no hace ninguna indicación normal. En este caso no desconecte la
energía eléctrica sino contacte inmediatamente al centro de servicios locales. Toma
mucho tiempo a los técnicos del servicio detectar la parte fallada si el refrigerador ha
sido apagado.
El agua se enfría en el depósito de agua del compartimento del frigorífico, y se envía
al dispensador.
El hielo se forma en el fabricador de hielo automático y se envía al dispensador picado
o en cubitos.
NOTA
•
Es normal que el agua no esté muy fría al principio. Si desea agua más fría, ponga
hielo en el vaso.
Page 40

40
Compartimento para refrescos
(aplicable sólo a algunos modelos)
Funcionamiento
Abra la puerta del compartimento para
refrescos
Se puede acceder al compartimento para
refrescos sin abrir la puerta del frigorífico y
ahorrar electricidad.
Se ilumina la lámpara interna del
compartimento del frigorífico cuando se abre
la puerta del compartimento para refrescos,
haciendo más fácil reconocer los contenidos.
No utilice la puerta del compartimento para
refrescos como tabla para cortar y tenga
cuidado de no dañarla con herramientas
cortantes.
No apoye los brazos ni presione con fuerza
sobre la puerta.
El compartimento para refrescos no puede
funcionar con normalidad sin la tapa.
No sólo se puede dañar la puerta del
compartimento para refrescos, sino que el
niño puede sufrir lesiones.
Modo de uso
No coloque
objetos pesados
sobre la puerta del
compartimento
para refrescos ni
deje que los niños
se cuelguen de
ella.
No saque la tapa
del interior del
compartimento
para refrescos.
Use la puerta del
compartimento
para bebidas
sólo como
apoyo.
Page 41

Funcionamiento
41
Soporte para el vino
(aplicable sólo a algunos modelos)
Botellero para vino :
Estire hacia abajo del botellero como verá
en después de insertarlo en la parte de
anclaje a la estantería como ve en
encajándolo hacia arriba como en .
Separación del botellero :
Empuje el botellero hacia adentro como
en ➃después de sostenerlo hacia arriba
como en ➂encajándolo.
Las botellas se pueden guardar lateralmente en
la esquina para el vino, que se puede fijar a
cualquier balda.
Las botellas pueden almacenarse lateralmente
dentro de la bodeguilla.
Ajuste del
soporte para
botellas de vino.
(Tipo 1)
(Tipo 2)
Baldas
(aplicable sólo a algunos modelos)
Puede almacenar piezas más altas como un envase o botellas, simplemente subiendo
levemente el estante y después empujándolo hacia delante quedando solapadas las
dos mitades. Tire del estante hacia usted para que éste vuelva a su estado original.
Balda abatible
Compartimiento para huevos
(aplicable sólo a algunos modelos)
Puede mover el compartimiento para huevos al lugar adecuado que desee y
seleccionar y elegir otro modelo de compartimiento según el número de huevos.
•
Nunca utilice el compartimiento para huevos como almacenaje de hielo. Se
puede romper.
•
Nunca almacene el compartimiento para huevos en la cámara congeladora o el
compartimiento para productos frescos.
NOTA
[Tipo-1] [Tipo-2]
3
4
1
2
Page 42

42
Funcionamiento
Control de humedad en el compartimento para verduras
La humedad se puede controlar ajustando el interruptor de control de humedad a
la izquierda/derecha cuando se guardan verduras o fruta.
HIGH
LOW
HIGH
LOW
HIGH LOW
HUMIDITY CONTROL
HIGH LOW
HUMIDITY CONTROL
Humedad elevada
Humedad baja
Conversión a compartimento de verduras o carnes
(aplicable sólo a algunos modelos)
El compartimento para carnes mantiene la temperatura en un punto inferior al del
frigorífico de modo que las carnes o pescados se mantienen frescos más tiempo.
El cajón inferior del frigorífico puede convertirse en compartimento para verduras o
carnes.
•
Las verduras o frutas se congelan si el interruptor de conversión se coloca en la
posición para carnes. Por ello, compruébelo antes de guardar los alimentos.
NOTA
Desodorizante (aplicable sólo a algunos modelos)
Este sistema absorbe de forma eficaz los
olores fuertes usando el catalizador óptico.
No tiene ningún efecto sobre los alimentos.
Al estar ya instalado en el conducto de entrada de aire frío, no es necesaria su
instalación adicional.
Utilice sólo envases cerrados para guardar alimentos con olores fuertes.
De otro modo, otros alimentos guardados en el mismo compartimento pueden
absorber esos olores.
Cómo usar el
sistema
desodorizante
Sistema
desodorizante
Compartimento
para verduras
Zona Miracle
(Opcional)
Compartimento
para alimentos
frescos (Opcional)
Page 43

Funcionamiento
43
Esquina de transición de temperatura en la zona Miracle
(aplicable sólo a algunos modelos)
Zona Miracle (aplicable sólo a algunos modelos)
Pulse el botón para almacenar verduras,
frutas u otro tipo de alimentos como carne
para descongelar o pescado crudo, etc.
Cambios de temperatura en la zona Miracle
(aplicable sólo a algunos modelos)
Puede seleccionar el nivel óptimo de
temperatura según el tipo de
alimento almacenado.
- Selección de temperatura en tres
pasos, está disponible 4° C
incluyendo -3° C, -1° C. Verduras y
frutas y otros alimentos que
necesitan cierto grado de humedad
para su conservación; y carnes y
pescados; pueden conservarse más frescos según la selección de tipo de alimento.
En primer lugar, retire el depósito de las verduras.
Acceda luego al interior levantando ligeramente la
carcasa de la zona Miracle, y tire hacia fuera.
Al utilizar la zona Miracle como espacio de conservación de carnes, las verduras o
frutas almacenadas pueden congelarse.
Al utilizar la zona Miracle como espacio de conservación de carnes, mantener las
carnes y pescados allí pueden estropearse, por lo que se recomienda conservarlos
en la sección F.
Si abre una puerta de la sección R, se encenderá una lámpara marcando la posición
seleccionada y se apagará al cerrarse.
(Verduras /Frutas) ➔(Conservación en frío sin pérdida de humedad) ➔(Carne): esta
secuencia se repetirá cada vez que presiones el botón de "Selección".
Cuando retire la
Zona Miracle
Modo de empleo
Adapte la carcasa de la zona Miracle al saliente e
introdúzcala con suavidad.
Si la fuerza, las partes en contacto pueden resultar
dañadas.
Cuando vaya a
instalar la Zona
Miracle
Page 44

Sugerencias para guardar los alimentos
44
Ubicación de los alimentos
(Identificación de las Partes)
Para guardar vino
Para guardar alimentos pequeños del tipo de
pan, tentempiés, etc.
Store various frozen foods such as meat, fish,
Para guardar diferentes alimentos congelados,
por ejemplo, carne, pescado, helado,
tentempiés congelados, etc.
Para alimentos pequeños envasados y
congelados.
Es probable que la temperatura se
incremente al abrir la puerta. Por ello, no
lo utilice para alimentos que permanecen
congelados a largo plazo, como puede ser
el caso del helado.
Soporte para
vino
Cajón para
tentempiés
Balda del
compartimento
del congelador
Estante de la
puerta del
congelador
Cajón del
congelador
Esquina de
productos
lácteos
Huevera
Compartimento
para refrescos
Balda del
frigorífico
Estante de la
puerta del
frigorífico
Cajón para
verduras
Esquina de
conversión de
cajón para
verdura/cajón
para carne
Para carne, pescado, pollo, etc, tras
envolverlos con film.
Alimentos secos.
Para productos lácteos, tales como
mantequilla,
queso, etc.
Coloque esta caja donde lo considere más
adecuado
Para guardar alimentos de uso frecuente, por
ejemplo, bebidas, etc.
Para guardar alimentos del tipo de guarniciones
u otros alimentos a una distancia adecuada.
Para alimentos pequeños envasados o
bebidas del tipo de leche, zumo, cerveza, etc.
Para guardar verduras o frutas.
Para guardar verdura, fruta, carne para
descongelar, pescado fresco, etc, poniendo
el interruptor de conversión en la posición
correcta.
Asegúrese de poner el interruptor en la
posición correcta antes de guardar los
alimentos.
Page 45

45
Guardar alimentos
Guarde los alimentos frescos en el compartimento del frigorífico. El modo en que los
alimentos se congelen y se descongelen es un factor importante para mantener su
frescura y sabor.
No guarde alimentos que se deterioran con facilidad a bajas temperaturas, del tipo de
plátanos y melones.
Deje enfriar los alimentos calientes antes de guardarlos en el frigorífico, ya que de otro
modo, dañará otros alimentos, y será mayor el consumo de energía.
Al guardar los alimentos, cúbralos con film de vinilo o guárdelos en envases con tapa.
De este modo, se evita la humedad de la evaporación y los alimentos mantienen su
sabor y poder nutritivo.
No bloquee las tomas de aire con alimentos. La correcta circulación del aire frío
mantiene constantes las temperaturas del frigorífico.
No abra la puerta con frecuencia, para evitar la entrada de aire caliente que eleva la
temperatura.
No guarde demasiados alimentos en el estante de la puerta porque puede presionar
contra las baldas interiores y no permitir que la puerta se cierre correctamente.
No guarde botellas en el congelador, pueden romperse al congelarse.
No vuelva a congelar alimentos ya descongelados. Perderán su sabor y nutrientes.
Cuando guarde alimentos congelados del tipo de helado, durante periodos
prolongados de tiempo, colóquelos en la balda del congelador, no en el estante de
la puerta.
No toque alimentos o envases fríos – especialmente los metálicos - con las manos
mojadas, ni coloque recipientes de cristal en los cajones del congelador.
- Esto podría producirle lesiones en la piel, ya que estos envases pueden llegar a
romperse si se congelan y causar daños personales.
No coloque alimentos húmedos en las baldas superiores, pueden congelarse por el
contacto directo con el aire frío.
Limpie los alimentos antes de guardarlos en el frigorífico. Lave y seque las verduras
y frutas, y limpie los alimentos envasados para evitar que se deterioren los
alimentos adyacentes.
Cuando guarde huevos en un estante o en la huevera, asegúrese de que son
frescos, y guárdelos siempre en posición vertical, con lo cual se mantendrán frescos
más tiempo.
Congelador
Frigorífico
Sugerencias para guardar los alimentos
•
Si coloca el frigorífico en un lugar con humedad y altas temperaturas, la apertura
frecuente de la puerta, o si guarda muchas verduras, puede hacer que se forme
escarcha, que no tiene efecto sobre el funcionamiento del frigorífico. Elimine la
escarcha con un paño.
NOTA
Page 46

46
Cómo desmontar las diferentes partes
•
Para desmontar siga el procedimiento inverso al montaje.
Asegúrese de hacer desenchufado el frigorífico de la red antes de montar y
desmontar.
No apriete con excesiva fuerza para desmontar. Podría dañar alguna pieza.
NOTA
Cuidados y mantenimiento
Retire la bombilla tirando de ella hacia fuera ( ) mientras
aprieta con cuidado (
) y gira el protector de la luz ( ).
Gire la bombilla hacia la izquierda.
Utilice una bombilla de 40 vatios (máx.) que podrá adquirir
en un centro de servicio.
Lámpara del
congelado
r
Balda de
l
compartiment
o
del congelado
r
Estante de l
a
puerta y soport
e
Depósito de
almacenamient
o
de hiel
o
Tras usar el
dispensado
r
Para retirar una repisa, muévala primero hacia la
izquierda (
); después, levante un poco la parte
desplazada hacia la izquierda (
), levante el lado
derecho (
) y tire de ella hacia fuera.
Levante
el estante sujetando ambos lados
()y extráigalo en la dirección ().
El colector de agua no dispone de una función
de auto-drenaje, por lo que debe limpiarse con
regularidad. Retire la cubierta tirando de la parte
frontal del colector de agua, después proceda
a su secado con un paño.
Tire completamente de la cubierta hacia fuera
(
) y levante la parte trasera de la cubierta ( )
con cuidado hasta que ésta salga.
(
) Limpie el suelo y protéjalo con un paño seco.
Sujet
e el depósito de almacenamiento de hielo
como muestra la figura derecha y extráigalo ( )
mientras lo eleva ligeramente ().
No desmonte el recipiente de
almacenamiento de hielo a menos que sea
necesario.
Utilice ambas manos para desmontar el
depósito de almacenamiento de hielo para
evitar que se caiga.
2
1
Page 47

Cuidados y mantenimiento
47
Inserte la herramienta en el área marcada (①)
y empuje la herramienta para desconectarlo.
Utilice la herramienta de punta plana como
(-) un destornillador.
Gire la bombilla en sentido antihorario.
Utilice una bombilla Máx. 40W que puede
adquirir en su servicio técnico.
Lámpara del
frigorífico
Separe el depósito ( ) hacia arriba.
Separe la estantería superior del centro de
refresco y, a continuación, jale de la tapa ( ).
El centro de refresco puede extraerse jalando
hacia arriba.
Compartimento
de refrescos
Para quitar la tapa del compartimento de
verduras, tire ligeramente del compartimento
hacia usted ( ), levante la parte frontal de
la tapa según se muestra en la figura ( ) y
saque la tapa.
Tapa del
compartimento
de verduras
•
Asegúrese de desmontar las partes de la puerta del frigorífico para desmontar el
compartimento de verduras, el cajón para tentempiés y la tapa central del
compartimento de refrescos.
NOTA
Page 48

48
Cuidados y mantenimiento
Información general
Limpieza
Durante las vacaciones, probablemente preferirá dejar el frigorífico en funcionamiento.
Coloque en el congelador aquellos alimentos que se puedan congelar.
Cuando no quiera dejar el frigorífico en funcionamiento, saque todos los alimentos,
desconecte el enchufe de la red, limpie el interior y deje todas las puertas para evitar la
formación de olores.
Vacaciones
Fallo de corriente
Si se traslada
Tubo
anticondensación
La mayor parte de los fallos de corriente que se corrigen antes de una hora o dos no
tienen efecto sobre las temperaturas del frigorífico.
Sin embargo, evite abrir las puertas mientras el frigorífico no reciba corriente.
Saque o sujete todas las partes que puedan moverse en el interior del frigorífico.
Para evitar daños a los tornillos de ajuste de altura, gírelos hasta el fondo en la base.
El panel exterior del frigorífico puede calentarse en ocasiones, especialmente
después de la instalación.
No se alarme. Se debe al tubo anticondensación, que bombea aire caliente para evitar
la condensación en los paneles externos.
Se recomienda una limpieza regular del interior. Lave todos los compartimentos con
una solución de bicarbonato de sodio o un detergente suave y agua templada.
Enjuague y seque.
Compruebe que el cable no está dañado, que el enchufe no se recalienta y que está
correctamente enchufado en la toma de pared.
Desenchufe el cable de la red antes de limpiar alrededor de aparatos eléctricos
(lámparas, interruptores, controles, etc.)
Limpie la humedad con una esponja o paño para evitar que los líquidos o agua entren
en contacto con cualquier aparato eléctrico, produciendo así descargas eléctricas.
No utilice raspadores metálicos, cepillos, limpiadores abrasivos, soluciones alcalinas
fuertes, líquidos de limpieza inflamables o tóxicos.
No toque las superficies congeladas con las manos mojadas o húmedas, ya que se
adhieren a las superficies muy frías.
Es importante mantener el frigorífico limpio para evitar olores no deseados. Limpie
inmediatamente los alimentos derramados ya que, en caso contrario, pueden acidificar
y manchar las superficies plásticas.
Utilice una solución de jabón suave o detergente para limpiar el acabado del frigorífico.
Limpie con un paño y seque.
Exterior
Interior
Tras la limpieza
Precaución
Page 49

49
Cuidados y mantenimiento
Solución de problemas
Antes de acudir al servicio técnico, revise esta lista. Quizás pueda ahorrar tiempo y
dinero. Incluye problemas comunes que no son resultado de defectos de mano de
obra o materiales.
Causa Posible
El control del frigorífico está
desconectado
El frigorífico está en ciclo de
desescarchado
El enchufe no está conectado a la toma
de pared
Corte de corriente. Compruebe la
electricidad de la casa.
El frigorífico es de mayor tamaño que el
anterior que usted tenía.
Hace calor en la habitación o en el
exterior.
Se han guardado recientemente grandes
cantidades de alimentos templados o
calientes.
Las puertas se abren con demasiada
frecuencia o durante demasiado tiempo.
La puerta del congelador o el frigorífico
puede estar ligeramente abierta.
El control del frigorífico está configurado
a una temperatura demasiado fría.
La junta del frigorífico o congelador
está sucia, desgastada, rota o mal
colocada.
El termostato mantiene el frigorífico a
una temperatura constante.
Solución
Configure el control del frigorífico.
Consulte la sección de los controles.
Es normal en un frigorífico de
desescarchado totalmente automático.
El ciclo se realiza periódicamente.
Asegúrese de que el enchufe está
correctamente insertado en la toma de
pared.
Llame a la compañía de electricidad.
Es normal. Las unidades de mayor
tamaño y mayor eficacia funcionan en
estas condiciones durante más tiempo.
Transcurren algunas horas hasta que el
frigorífico se enfría completamente.
Los alimentos calientes hacen que el
frigorífico funcione durante más tiempo
hasta que se alcanza la temperatura
deseada.
El aire caliente que entra en el frigorífico
hace que funcione más tiempo. Abra la
puerta con menos frecuencia.
Asegúrese de que el frigorífico está a
nivel. Evite que los alimentos o
envases bloqueen las puertas.
Consulte la sección de problemas.
APERTURA/CIERRE de las puertas.
Ponga el control de frigorífico en un valor
de temperatura más elevado hasta que la
temperatura sea satisfactoria.
Limpie o cambie la junta. Las fugas en
el cierre hermético de la puerta harán
que el frigorífico funcione más tiempo
para mantener las temperaturas
deseadas.
Esto es normal. El frigorífico se
enciende y se apaga para mantener la
temperatura constante.
Funcionamiento
del frigorífico
El compresor
del frigorífico
no funciona
El frigorífico
funciona
demasiado o
demasiado
tiempo
Problema
Page 50

El compresor no
funciona
Problema
Las temperaturas
son demasiado bajas
La temperatura del
congelador es
demasiado baja
pero la del frigorífico
es satisfactoria
La temperatura en
el frigorífico es
demasiado alta
pero la temperatura
del congelador es
satisfactoria.
Las temperaturas
del congelador o
el frigorífico son
demasiado altas
Las temperaturas
son demasiado altas.
La carne guardada
en el cajón de
carnes frescas se
congela
Los alimentos
guardados en los
cajones se congelan
Causa Posible
El termostato está manteniendo el
frigorífico a temperatura constante
El controlador del congelador se ha
configurado demasiado bajo
Las puertas se abren con demasiada
frecuencia o durante demasiado
tiempo.
La puerta está ligeramente abierta.
Se han guardado recientemente grandes
cantidades de alimentos calientes.
El frigorífico ha estado desconectado
durante un periodo de tiempo.
El controlador del frigorífico se ha
configurado demasiado alto.
El controlador del frigorífico se ha
configurado demasiado alto.
El control del frigorífico tiene algún efecto
sobre la temperatura del congelador.
El controlador del congelador se ha
configurado demasiado alto
El controlador del frigorífico se ha
configurado demasiado bajo
El controlador del frigorífico se ha
configurado demasiado bajo
La carne debe guardarse a una
temperatura ligeramente superior al punto
de congelación del agua (32˚F, 0˚C) para
lograr el mayor tiempo de conservación
Solución
Es normal. El frigorífico se enciende y se
apaga para mantener la temperatura
constante.
Ponga el control del frigorífico en una
temperatura más baja.
Un frigorífico requiere algunas horas
para enfriarse completamente.
Espera hasta que el frigorífico o
congelador puedan alcanzar la
temperatura deseada.
Entra aire caliente en el frigorífico/
congelador cada vez que se abre la puerta.
Abra la puerta con menos frecuencia.
Ponga el control del congelador o
frigorífico a una temperatura más baja
hasta que la temperatura del congelador
o el frigorífico sea satisfactoria.
Ponga el control del congelador o
frigorífico a una temperatura más baja
hasta que la temperatura del congelador
o el frigorífico sea satisfactoria.
Es normal que se formen cristales de
hielo debido a la humedad que contiene
la carne.
Ponga el controlador del frigorífico en un
valor más alto
Ponga el controlador del frigorífico en un
valor más alto
Ponga el controlador del congelador en
un valor más alto hasta que se alcance la
temperatura satisfactoria
Cierre la puerta completamente.
La temperatura del
frigorífico es
demasiado baja pero
la del congelador es
satisfactoria
50
Cuidados y mantenimiento
Page 51

Sonido y ruidos
Problema
Niveles altos de
sonido cuando se
pone en
funcionamiento el
frigorífico
Niveles altos de
sonido cuando se
pone en marcha
el compresor.
Se acumula la
humedad en las
paredes interiores
del frigorífico
Agua/humedad/hi
elo fuera del
frigorífico
Se forma
humedad en el
exterior del
frigorífico o entre
las puertas
Vibraciones o
traqueteos
Agua/humedad/
hielo dentro del
frigorífico
Causa Posible
Los frigoríficos actuales han aumentado
su capacidad y mantienen temperaturas
más uniformes
El frigorífico toda la pared o los armarios.
La temperatura ambiente es elevada y
hay humedad, lo cual incrementa la
acumulación de escarcha y
condensación interna.
La puerta está ligeramente abierta.
La puerta se abre con demasiada
frecuencia o demasiado tiempo.
El tiempo es húmedo
La puerta está ligeramente abierta,
haciendo que el aire frío del interior del
frigorífico choque con el aire caliente
del exterior.
El suelo no es uniforme o es débil.
El frigorífico golpea en el suelo cuando
se mueve ligeramente.
El frigorífico funciona con presiones más
elevadas durante la puesta en marcha del
ciclo ON
Vibran los objetos colocados sobre el
frigorífico.
Vibran los recipientes en las baldas del
frigorífico.
Solución
Esta vez, cierre la puerta
completamente.
Es normal con tiempo húmedo.
Cuando la humedad sea más baja,
desaparecerá la humedad del frigorífico.
Vea en la sección de problemas
apertura/cierre de las puertas.
Mueva el frigorífico para que no toque
la pared o los armarios.
Esto es normal.
Es normal que los recipientes vibren.
Mueva los recipientes ligeramente.
Asegúrese de que el frigorífico está
colocado a nivel y firme sobre el suelo.
Asegúrese de que el suelo está a nivel y
es sólido y puede soportar correctamente
el frigorífico.
Quite los objetos.
Es normal que los niveles de sonido
sean más elevados.
Es normal. El sonido se nivelará según el
frigorífico siga funcionando.
Abra las puertas con menos frecuencia.
51
Cuidados y mantenimiento
Page 52

Olores en el frigorífico
Problema
Las puertas no
cierran
Las puertas no
cierran
Los cajones se
mueven con
dificultad.
Dispensador
El dispensador no
da hielo.
Apertura/cierre de
las puertas/cajones
Causa Posible
Los alimentos tocan la balda en la parte
superior del cajón.
La guía sobre la que se desliza el cajón
está sucia.
La cubitera está vacía.
La temperatura del congelador es
demasiado elevada.
La toma del suministro de agua no está
abierta.
La puerta del frigorífico o del congelador
no está cerrada.
El frigorífico no está nivelado. Golpea en
el suelo cuando se mueve ligeramente.
El suelo no es uniforme o es débil.
El frigorífico golpea el suelo cuando se
mueve ligeramente.
El frigorífico toca las paredes o armarios.
Es necesario limpiar el interior
Alimentos de olor fuerte en el frigorífico
Algunos envases y materiales para
envolver producen olores.
Los envases de alimentos mantienen la
puerta abierta.
La puerta se ha cerrado con demasiada
fuerza, haciendo que la otra puerta se
abra ligeramente.
Solución
Asegúrese de que las dos puertas están
cerradas.
Abra la toma y permita el tiempo
suficiente para que se forme el hielo.
Una vez formado el hielo, debería
funcionar el dispensador.
Cambie el control del congelador a un
valor de temperatura más bajo para
que se formen los cubitos de hielo.
Cuando se forman los cubitos de hielo,
debería funcionar el dispensador.
Limpie el cajón y la guía.
Asegúrese de que el suelo está nivelado
y puede soportar de forma correcta el
frigorífico. Póngase en contacto con un
carpintero para corregir el suelo.
Mueva el frigorífico.
Ponga menos alimentos en el cajón.
Ajuste el tornillo de ajuste de altura
Use una marca de envases o
materiales de envoltura diferente.
Cierre ambas puertas con suavidad
Mueva los envases para que se pueda
cerrar la puerta
Cubra los alimentos completamente
Limpie el interior con una esponja,
agua tibia y bicarbonato de sodio
Cuando cae el primer hielo en la cubitera,
el dispensador debería funcionar.
52
Cuidados y mantenimiento
Page 53

El dispensador
no produce
hielo
El dispensador
de hielo está
atascado
Problema
El agua tiene
un sabor y olor
extraños
El dispensador
no produce
agua
Causa Posible
El agua ha permanecido en el depósito
durante mucho tiempo.
El frigorífico no se ha conectado
correctamente al suministro de agua.
Este sonido se produce normalmente cuando el hielo fabricado automáticamente cae
en la cubitera. El volumen puede variar de dependiendo de la ubicación del frigorífico.
Este sonido se produce normalmente cuando entra agua en el fabricador de hielo tras
caer automáticamente el hielo producido.
Lea detenidamente "fabricador automático de hielo y dispensador" en este manual.
Los cubitos de hielo se adhieren
El hielo se funde y se congela debido a
un uso poco frecuente, fluctuaciones
de temperatura y/o cortes de
suministro eléctrico.
Los cubitos de hielo se atascan entre el
fabricador de hielo y la parte posterior de
la cubitera.
Se han usado en el dispensador cubitos
de hielo comprados o fabricados en otro
lugar.
No está abierta la toma de agua
doméstica. Ver problema: el fabricador
de hielo no produce hielo.
La puerta del congelador o el frigorífico
no está cerrada.
Solución
Asegúrese de que las puertas están
cerradas.
Llene y vacíe 7 vasos de agua para
renovar el suministro. Llene y vacíe otros
7 vasos para limpiar el depósito.
Conecte el frigorífico a un suministro de
agua que suministre agua al grifo de la
cocina.
Abra la toma de agua.
Use el dispensador con frecuencia para
que no se adhieran los cubitos.
Utilice con el dispensador sólo los cubitos
de hielos fabricados en este frigorífico.
Quite los cubitos de hielos que atascan el
dispensador.
Quite la cubitera y el hielo derretido y los
contenidos. Limpie la cubitera, séquela y
vuelva a colocarla.
Cuando se forme hielo de nuevo,
funcionará el dispensador.
53
Cuidados y mantenimiento
Sonido de
caída de hielo
Sonido de
suministro de
agua
Otros
CÓMO DESHACERSE DE APARATOS ELÉCTRICOS Y ELECTRÓNICOS VIEJOS
1. Si en un producto aparece el símbolo de un contenedor de basura
tachado, significa que éste se acoge a la Directiva 2002/96/CE.
2.
Todos los aparatos eléctricos o electrónicos se deben desechar de forma
distinta del servicio municipal de recogida de basura, a través de puntos
de recogida designados por el gobierno o las autoridades locales.
3.
La correcta recogida y tratamiento de los dispositivos inservibles contribuye
a evitar riesgos potenciales para el medio ambiente y la salud pública.
4. Para obtener más información sobre cómo deshacerse de sus
aparatos eléctricos y electrónicos viejos, póngase en contacto con
su ayuntamiento, el servicio de recogida de basuras o el
establecimiento donde adquirió el producto.
Page 54

1
Índice
Entrada
Importantes instruções de segurança
Identificação das peças
Local de instalação
Retirar a porta
Colocar novamente a porta
Instalação da mangueira de alimentação
Ajuste da altura
Início
Ajuste das temperaturas e funcionamento
Central de refrigeração (Disponível somente em alguns modelo)
Prateleira(Disponível somente em alguns modelo)
Cacifo para vinho (Disponível somente em alguns modelo)
Caixa de ovos(Disponível somente em alguns modelo)
Controlo da humidade do compartimento para verduras (Disponível somente em alguns modelos)
Conversão em compartimento para verduras ou carne
(Disponível somente em alguns modelos)
Desodorante (Disponível somente em alguns modelos)
Compartimento de conversão da temperatura Zona milagrosa
(Disponível somente em alguns modelos)
Comutação da temperatura em Zona milagrosa
(Disponível somente em alguns modelos)
Zona milagrosa (Disponível somente em alguns modelos)
Posição dos alimentos
Guardar alimentos
Como desmontar as peças
Informações gerais
Limpeza
Solução de problemas
Introdução
Instalação
Funcionamento
Sugestões para
guardar alimentos
Cuidados e
manutenção
55
55
56
57
58
59
59
60
61
61
66
67
67
67
69
69
68
68
68
69
70
71
72
74
74
75
54
Se a porta do congelador não alinhar com a altura da porta do frigorífico
61
Page 55

Entrada
Os números do modelo e de série estão indicados na estrutura interna ou na parte
traseira do compartimento frigorífero do aparelho. Estes números são únicos e
não estão a disposição de outros. É preciso preencher as seguintes informações e
guardar este manual como um registo permanente da aquisição. Prenda aqui o
recibo com um grafo.
Data da aquisição :
Comprado do revendedor :
Endereço do revendedor :
N.° de telefone do revendedor :
N.° do modelo :
N.° de série :
Antes de ser utilizado, este frigorífico precisa ser apropriadamente instalado e
localizado de acordo com as instruções de instalação deste documento.
Nunca puxe a ficha da tomada pelo cabo eléctrico. Segure firme sempre a ficha e
puxe-a para fora da tomada.
Ao afastar o aparelho da parede, tome cuidado para não passar por cima do cabo
eléctrico nem danificá-lo de qualquer modo.
Depois que o aparelho estiver a funcionar, não toque as superfícies frias do
compartimento congelador, especialmente com as mãos molhadas ou húmidas. A
pele poderá grudar nestas superfícies extremamente frias.
Tire a ficha da tomada eléctrica para realizar limpeza ou outras necessidades. Nunca
toque-a com as mãos húmidas, porque poderá causar choque eléctrico ou ferir-se.
Nunca estrague, altere, dobre severamente, puxe para fora, nem torça o cabo
eléctrico, porque um dano ao cabo poderá causar incêndio ou choque eléctrico. Se
tiver dúvidas como realizar a ligação à terra, consulte um técnico qualificado.
Nunca coloque recipientes de vidro dentro do congelador porque poderão partirem-se
por causa da dilatação do congelamento.
Nunca coloque as mãos dentro do recipiente para guardar gelo da produção
automática. O dispositivo de produção automática de gelo poderá causar feridas.
Este aparelho não foi projectado para uso por crianças pequenas nem pessoas
incapazes, sem supervisão.
É preciso vigiar que as crianças não brinquem com este aparelho.
Nunca permita que ninguém suba em cima, sente-se ou pendure-se na porta da
central de refrigeração. Estas acções podem causar danos ao frigorífico ou mesmo
tombá-lo, e causar danos pessoais sérios.
Se for possível, ligue o frigorífico numa tomada eléctrica exclusiva para evitar uma
sobrecarrega que poderá causar interrupções.
O refrigerador - congelador tem que ser posicionado que o ficha de fornecimento é
acessível para rápida desligção quando acontecer o accidente.
Se o fio de fornecimento for danado, tem que ser substituido por fabricador ou seu
agente de serviço ou outra pessoa qualificada para evitar o risco.
Não modifique ou alongue o comprimento do Cabo Eléctrico.
Tal pode causar um choque ou um incêndio.
Não use extensões
eléctricas
Acessibilidade de
Ficha de
Fornecimento
Reposição de Fio de
Fornecimento
Advertência
Introdução
55
Importantes instruções de segurança
Page 56

56
•
Introdução
Cuidado para
crianças não
ficarem presas
Não guarde
Ligação à Terra
PERIGO: Risco de crianças ficarem presas dentro.
Antes de jogar fora um frigorífico ou congelador velho :
Tire as portas mas deixe as prateleiras para dificultar a entrada de crianças.
Este aparelho não foi projectado para uso por crianças pequenas nem pessoas
incapazes, sem supervisão.
É preciso vigiar que as crianças não brinquem com este aparelho.
Não guarde nem use gasolina ou outros gases ou líquidos inflamáveis nas proximidades
deste aparelho.
No caso de curto-circuito, uma ligação à terra reduz o risco de choque eléctrico ao
fornecer um percurso de escape para a corrente eléctrica.
Para evitar possíveis choques eléctricos, este aparelho precisa possuir uma ligação à terra.
A utilização imprópria da tomada de ligação à terra pode causar choque eléctrico.
Consulte um electricista qualificado ou pessoal de assistência técnica, se as instruções
para a ligação eléctrica à terra não forem inteiramente compreendidas, ou se tiver
quaisquer dúvidas se a ligação à terra do aparelho é apropriada.
Identificação das peças
Compartimento
congelador
Compartimento
frigorífero
Canto lacticínios
Produtor automático
Prateleira / Gaveta
Prateleira / Gaveta
Prateleira da porta
(1 peça ou 2 peças)
Prateleira da porta
(1 peça ou 2 peças)
de gelo
Lâmpada
Gaveta
Gaveta (2 ou 3)
Rodapé
Lâmpada
Prateleira
Cacifo vinho
(Plástico ou arame)
Prateleira da porta
(1 peça ou 2 peças)
Prateleira
Dispensador de Latas (Opcional)
Gaveta merenda
(Opcional)
Prateleira (Estensível ou normal)
Central refresco (Opcional)
Caixa de ovos
Prateleira da porta
(1 peça ou 2 peças)
Gaveta de verdura
(1 ou 2)
Comutador de humidade
Zona Miracle (Opcional)
/Gaveta das verduras
(Opcional)
Prateleira da porta
(1 peça ou 2 peças)
Comutador de conversão
(Carnes/Verdura)
(Opcional)
OBSERVAÇÃO
Se estiver a faltar qualquer peça do aparelho, podem ser que sejam peças usadas
somente em outros modelos. (p. ex. a "Central de refrigeração" não está incluída em
todos os modelos).
Page 57

Instalação
57
Escolha uma boa
localização
Local de instalação
1. Coloque o aparelho num lugar de fácil
utilização.
2. Evite colocar o aparelho perto de fontes de
calor, à luz directa do sol ou exposto à
humidade.
3.
5. Não instale o aparelho em temperaturas inferiores a 5° C. Poderá perturbar o
desempenho.
4. Para evitar vibrações, o aparelho precisa estar nivelado.
Eliminação do
aparelho antigo
Este aparelho contém fluidos (líquido de refrigeração, lubrificante) e é feito de
componentes e materiais que são reutilizáveis e/ou recicláveis.
Todos os materiais importantes devem ser enviados para o centro de recolha de
materiais para eliminar e podem ser reutilizados após terem sido processados
(reciclagem). Para os recuperar, por favor contacte a agência local.
Para garantir uma circulação de ar
adequada em redor do combinado, por
favor mantenha livre um espaço
suficiente de ambos os lados, bem
como na parte superior, e mantenha
livres pelo menos 2 polegadas
(5cm) de espaço entre o combinado
e a parede posterior.
Page 58

58
Retirar a porta
Se a porta da entrada for estreita demais para
passar o frigorífico, tire a porta do aparelho e
passe-o de lado.
Perigo de Choque Eléctrico
Desligue a alimentação eléctrica do frigorífico antes de instalá-lo.
A desobediência desta regra poderá causar morte ou dano sério.
Remova a cobertura inferior, elevando-a e puxando-a
para frente. Remova o clipe e puxe para cima o tubo
de alimentação de água enquanto prime na zona
(), conforme demonstrado na figura do lado direito.
Tire o rodapé e
solte a mangueira
de alimentação de
água
Advertência
Tire a porta do
compartiment
o congelador
Tire a porta
do frigorífico
1)
Para tirar a tampa da dobradiça, desatarraxe
os parafusos. Solte em seguida todos os
fios de ligação, excepto o da terra.
2) Para tirar o grampo, gire-o na direcção
horária () levante em seguida a dobradiça
superior ().
3) Para tirar a porta do compartimento
congelador, levante-a. Neste caso, será
preciso levantar a porta o suficiente para
puxar inteiramente para fora a mangueira de
alimentação de água.
1) Desatarraxe os parafusos da tampa da
dobradiça e tire a tampa. Solte os fios de
ligação que houver, excepto o da terra.
2) Para tirar o grampo, gire-o na direcção
horária () e em seguida, levante a
dobradiça superior para tirá-la ()
3) Para tirar a porta do compartimento
frigorífero levante-a .
•
Se a ponta da mangueira estiver deformada ou larga, corte a parte estragada.
OBSERVAÇÃO
•
Ao tirar a dobradiça superior, tome cuidado para que a porta não caia para a frente.
OBSERVAÇÃO
•
Leve a porta do compartimento frigorífero para o local de instalação e encoste-a no
chão, tome cuidado para não danificar a mangueira de alimentação de água.
OBSERVAÇÃO
Rodapé
Dobradiça inferior
Dobradiça inferior
Grampo
Mangueira alimentação de água
Fios de ligação
Fios de ligação
Tampa da
dobradiça
Dobradiça
superior
Dobradiça superior
Grampo
Dobradiça superior
Ligação à terra
Instalação
Page 59

Instalação
59
Colocar novamente a porta
Instalação da mangueira de alimentação de água
Passe o frigorífico de lado através da porta de
entrada da maneira indicada na figura da direita.
A operação de produção automática de gelo precisa de pressão de água de 147 ~
834 kPa (1,5 ~8.5 kgf/cm2) (Isto significa que um copinho de papel (180 cc) será
enchido em 3 seg.).
Se a pressão da água não chegar à potência de 147 kPa (1,5 kgf/cm2), será preciso
comprar uma bomba de pressão separada para a normal produção de gelo e o
suprimento de água fresca.
Mantenha o comprimento total da mangueira de alimentação de água no máximo
em 8 m. e tome cuidado para não dobrar a mangueira. Mangueiras de mais de 8 m.
podem causar problemas na alimentação da água por causa da pressão de
escoamento.
Instale a mangueira de alimentação de água num lugar isento de calor.
Ligue somente no fornecimento de água potável.
Consulte as instruções da instalação do jogo de filtro de água.
Para instalar novamente as portas realize em ordem inversa as operações realizadas
para retirá-las, depois de ter passado pela porta de entrada.
Passe o frigorífico
Antes da
instalação
Advertência
1
2
3
45
M
a
x
F
R
Z
T
E
M
P
R
E
F
T
E
M
P
M
i
n
5
4
3
2
1
M
a
x
Page 60

60
Instalação
Ajuste da altura
Para as portas do frigorífico fecharem-se suavemente, regule os parafusos de ajuste
da altura. Se as portas não fecharem-se correctamente, o desempenho poderá ser
influenciado.
Depois de nivelar
a altura da porta
Em seguida
1. Tire toda a poeira acumulada no transporte e limpe inteiramente o aparelho. .
2. Instale os acessórios tais como a caixa dos cubos de gelo, tabuleiro tampa de
evaporação etc., nos lugares certos. Estão embalados juntos para evitar possíveis
danos durante o transporte.
3. Ligue o cabo de alimentação eléctrica (a ficha) na tomada. Não instale outros
aparelhos na mesma tomada.
Se a altura da porta
do compartimento do
congelador for
diferente da altura da
porta do compartimento
do frigorífico
Se a porta do compartimento
congelador estiver mais baixa que
a porta do compartimento frigorífero
Para nivelar a porta, coloque a ponta de uma
chave de fenda normal na fenda do parafuso
da esquerda de ajuste da altura e gire na
direcção horária (
).
Se a porta do compartimento
congelador estiver mais alta que a
porta do compartimento frigorífero
Para nivelar a porta, coloque a ponta de uma
chave de fenda normal na fenda do parafuso
da direita de ajuste da altura e gire na direcção
horária (
).
Se a porta do congelador não alinhar com a altura da
porta do frigorífico.
Mesmo se a altura não puder ser alinhada, utilizando o parafuso de
ajustamento da altura, insira a folha transparente fornecida com o produto.
Separe a porta com a altura inferior, use a chave de parafusos tipo (+) para desapertar
o parafuso na dobradiça inferior, conforme indicado na Figura , insira a folha
transparente entre a dobradiça inferior e o suporte inferior, e fixe com o parafuso,
conforme indicado na Figura .
Insira mais folhas transparentes, suficientes para alinhar a altura.
(são fornecidas 4 folhas no total.)
2
Dobradiça inferior
Folha transparente
①
②
Suporte inferior
Page 61

61
Funcionamento
Início
A primeira vez que ligar o frigorífico depois de instalá-lo, deixe o funcionamento
normal estabilizar-se nas temperaturas de funcionamento 2 ou 3 horas antes de
guardar alimentos frescos ou congelados.
Se o funcionamento interromper-se, aguarde 5 minutos antes de reiniciar.
Ajuste das temperaturas e funcionamento
Botão Central de
Refrigeração
Lâmpada do Dispensador
(oculta)
Opcional
Tipo-1
Modo de Poupança de Energia do Visor
Tipo-2
Modo de Poupança de Energia do Visor
OBSERVAÇÃO
•
O seu modelo pode não incluir todas as opções.
Page 62

62
Funcionamento
Pode regular a temperatura do compartimento do congelador e do
compartimento do frigorífico
Todas as vezes que pressionar o botão, o ajuste é repetido na seguinte ordem:
(Fraco) (Médio fraco) (Médio) (Médio forte) (Forte).
A temperatura interna actual varia dependendo do estado do alimento assim
como a temperatura de ajuste indicada é a temperatura final e não a temperatura
actual dentro do frigorífico.
A função de refrigeração é fraca no momento inicial. Por favor, ajuste a
temperatura como descrito acima, após usar o frigorífico por no mínimo 2 a 3
dias.
Modo de Poupança de Energia do Visor
Esta função regula o visor para o modo de poupança de energia, até à próxima vez
em que a porta for aberta.
Prima simultaneamente os botões FREEZER e EXPRESS FRZ., e mantenha premidos
durante 5 segundos até escutar um sinal sonoro. Todos os LED/LCDs acendem e depois
apagam. Se o modo de poupança de energia estiver activado, o visor continua
desligado até a porta ser aberta. Assim, este acende-se quando uma porta for aberta
ou se um botão for premido, e continua aceso durante 20 segundos após ter sido
aberta a última porta ou seleccionado um botão.
Para desactivar o modo de poupança de energia, prima simultaneamente os botões
FREEZER e EXPRESS FRZ. e mantenha premidos durante 5 segundos até escutar
um sinal sonoro.
Como ajustar a
temperatura na
unidade do
congelador
Como ajustar a
temperatura na
unidade do
frigorífico
Opcional Tipo-1 Tipo-2
TEMP.
CONGELADOR
Médio(-190C) Médio forte(-220C) Forte(-230C) Fraco(-150C) Médio fraco(-170C)
Opcional Tipo-1 Tipo-2
TEMP.
FRIGORÍFICO
Médio(30C) Médio forte(20C) Forte(00C) Fraco(60C) Médio fraco(40C)
Page 63

Como usar a
distribuição
Seleccione uma opção : gelo picado, água ou cubos de gelo e carregue ligeiramente o
botão de fornecimento com um copo ou recipiente qualquer.
Gelo picado
Carregue o botão de
selecção e acende-se
a luz indicadora de
gelo picado.
•
Será distribuído gelo
picado se empurrar o
botão de fornecimento
com um copo.
63
Funcionamento
•
Referência :Mantenha o seu recipiente no lugar durante alguns segundos após dispensar
gelo ou água, para que as últimas gotas caiam no recipiente, em vez de caírem
no chão.
A máquina de gelo automática pode fazer automaticamente 6 cubos de uma só vez,
50~60 cubos por dia. Esta quantidade pode variar consoante as circunstâncias,
incluindo a temperatura ambiente, a abertura da porta, a carga do congelador, etc.
A preparação de gelo termina quando a caixa de armazenamento de gelo estiver
cheia.
Se não desejar usar a máquina de gelo automática, mova o interruptor da máquina
de gelo para OFF. Se desejar usar novamente a máquina de gelo automática, mude
o interruptor para ON.
Máquina de gelo
automática
•
É normal se for produzido um ruído quando o gelo cai no recipiente de
armazenamento.
NOTE
Água
Carregue o botão de
selecção e acende-se
a luz indicadora de
água.
•
Será distribuída água
fresca se empurrar o
botão de fornecimento
com um copo
Cubos de gelo
Carregue o botão de
selecção e acendese a luz indicadora
de cubos de gelo.
•
Serão distribuídos cubos
de gelo se empurrar o
botão de fornecimento
com um copo.
AVISO
•
Não introduza as mãos dentro da máquina de fazer gelo a funciona.Poderá magoar-se.
Page 64

Operation
64
<Tipo-1> <Tipo-2>
Se o
funcionamento
da produção de
gelo não for
perfeito
Congelador
Expresso
Bloquear
O gelo gruda-se
Quando o gelo grudar-se, tire os blocos de gelo do recipiente, parta-os em pedaços
pequenos e coloque-os de volta no recipiente.
Se estiver a produzir pedaços de gelo pequenos demais ou blocos de gelo grudado,
será preciso regular a quantidade de água fornecida para a produção de gelo.
Contacte o centro de assistência técnica.
Se o gelo não for usado frequentemente, poderá grudar-se.
Interrupção eléctrica
Pode ser que gelo caia no compartimento congelador. Tire o recipiente de gelo e jogue
fora todo o gelo, enxugue-o e coloque-o de novo no lugar. Quando a electricidade voltar,
gelo picado será seleccionado automaticamente.
Aparelho recém instalado
Leva aproximadamente 12 horas para um frigorífico recém instalado produzir gelo
no compartimento congelador.
Por favor, seleccione esta função para
uma congelação rápida.
A sequência
DESLIGADO
prime o botão ( ).
O símbolo com a seta permanece no estado
On após piscar 4 vezes, ao seleccionar Special Refrigeration On (Activar
Refrigeração Especial).
A função de congelação rápida é automaticamente desligada após passar um
período de tempo fixo.
DESLIGADO LIGADO
é repetida sempre que
Este botão suspende o funcionamento de
botões diferentes.
Bloquear ou Libertar é repetido sempre que
( ) é premido durante
mais de 3 segundos.
Se utilizar o botão "LOCK", nenhum
dos outros botões funcionará antes de os
desbloquear.
<Tipo-1> <Tipo-2>
Função de
indicação do
estado do filtro
Luz do
dispensador
Existe uma luz indicadora de substituição
para o cartucho do filtro de água no
dispensador.
O filtro de água tem de ser
substituído a cada seis meses.
A luz do filtro acende-se para avisar
de que tem de substituir o filtro.
Após substituir o filtro, prima e mantenha premido o botão do filtro durante
mais de 3 segundos para reiniciar o indicador.
<Tipo-1> <Tipo-2>
Este botão liga e desliga a luz do
dispensador no dispensador.
A função de luz do dispensador é
ligada e desligada, premindo o
botão Light/Filter.
Page 65

65
Funcionamento
Jogue fora o primeiro gelo (aproximadamente 20 peças) e água
(aproximadamente 7 copos) distribuídos logo após a instalação do frigorífico.
O primeiro gelo e água poderão conter partículas ou odores da mangueira de alimentação
de água ou do tanque de alimentação de água. Isto também será necessário se o
frigorífico não for usado durante muito tempo.
Mantenha as crianças afastadas do distribuidor.
As crianças podem carregar os botões errados ou estragar
as lâmpadas.
Cuidado para não tapar a passagem do gelo com
alimentos guardados.
Se alimentos forem colocados na entrada da passagem do
gelo, não será possível fornecer
gelo. A passagem do gelo
também pode entupir-se de pó de gelo se somente gelo
picado for usado. Neste caso tire o pó de gelo acumulado.
Nunca guarde latas de bebidas ou de outros
alimentos no recipiente do gelo para resfriá-las
rapidamente.
Esta acção poderá estragar a produção
automática de gelo.
Nunca use copos nem recipientes de cristal fino ou frágeis.
Estes copos ou recipientes podem partirem-se.
Primeiro coloque o gelo num copo, antes de enchê-lo
de água ou qualquer bebida.
Senão pode ser que água vaze quando colocar gelo num copo já com líquido dentro.
Nunca use a mão nem qualquer ferramenta no botão de distribuição de gelo.
Isto poderá causar estrago nas peças ou feridas nas mãos.
Nunca tire a tampa do dispositivo de produção de gelo.
Se for preciso, nivele o gelo para poder encher o compartimento de gelo.
O gelo empilha-se até perto do dispositivo de produção de gelo. Portanto a produção de
gelo pode parar quando chegar a este nível.
Se for fornecido gelo descolorido, contacte imediatamente um centro de
assistência técnica, pare de usar o gelo.
Nunca use copos estreitos ou profundos demais.
O gelo pode bloquear-se na passagem e portanto causar uma falha no frigorífico.
Mantenha o copo a uma distância apropriada da saída de gelo.
Cuidados
No compartimento frigorífero há um tanque para água fresca que é fornecida para
distribuição.
Também há produção automática de gelo que pode ser fornecido picado ou na forma
de cubos de gelo.
Como é o
fornecimento de
gelo/água fresca
Outras funções
Função (detecção de avaria) de diagnóstico
A função de diagnóstico detecta automaticamente avarias quando ela é encontrada no
produto durante o uso do frigorífico.
Se a avaria referir-se ao produto, ele não operará através da pressão de nenhum dos
botões e as indicações normais não serão fornecidas. Neste caso, não desligue a energia,
contacte imediatamente o centro de serviços local. Será necessário muito mais tempo
para o engenheiro de serviços detectar a peça avariada se o aparelho for desligado.
•
É normal que a água não esteja muito fria no começo. Se desejar água mais fria,
coloque gelo na água.
OBSERVAÇÃO
Aviso de Porta aberta
É ouvido por 3 vezes um som de aviso, no intervalo de 30 segundos, se deixar-se um
minuto a porta do frigorífico aberta ou completamente fechada.
Por favor, contactar o centro de serviços se o som de aviso continuar sempre após o
fechamento da porta.
Page 66

66
Funcionamento
Central de refrigeração (Disponível somente em alguns modelos)
Abra a porta da central de refrigeração.
É possível o acesso à central de refrigeração
sem precisar abrir a porta do frigorífico e
portanto com economia de electricidade.
A lâmpada interna acende-se no
compartimento frigorífero quando a porta
da central de refrigeração for aberta.
Deste modo é fácil identificar o conteúdo.
Nunca use a porta da central de refrigeração
como tábua de cortar e tome cuidado para
não estragá-la com utensílios agudos.
Nunca apoie os braços na porta nem exerça
fortes pressões.
A central de refrigeração não pode funcionar
normalmente sem tampa.
Não só a porta da central de refrigeração
pode estragar-se, mas também as
crianças podem ferirem-se.
Como usar
Nunca coloque
objectos pesados
na porta da central
de refrigeração nem
permita que
crianças pendurem-
se na porta.
Nunca tire a
tampa interna da
central de
refrigeração
Uso da porta da
central de
refrigeração
como suporte
Page 67

Caixa de ovos
(Disponível somente em alguns modelos)
É possível colocar a caixa de ovos na parte do frigorífico que desejar.
•
Nunca use a caixa de ovos como recipiente para gelo. Pode partir-se.
•
Nunca guarde a caixa de ovos no compartimento congelador nem no
compartimento fresco.
OBSERVAÇÃO
67
Funcionamento
Prateleira
(Disponível somente em alguns modelos)
Cacifo para vinho
(Disponível somente em alguns modelos)
Pode armazenar itens mais altos, como baldes ou garrafas, empurrando simplesmente
para a frente e para baixo metade da prateleira. Puxe-a para si para voltar a ter a
prateleira toda.
Para inserir o suporte para garrafa de vinho :
Puxe o suporte para garrafa de vinho para baixo,
conforme indicado em e insira-o na parte de
encastrar lateral da prateleira, como em ,
segurando-o para cima, como em .
Para retirar o suporte para garrafa de vinho :
Empurre o suporte para garrafa de vinho para
dentro, conforme indicado em ➃, e puxe-o para
cima, como em ➂, retirando-o.
É possível guardar garrafas nos lados mediante este
sistema. É possível prendê-lo em qualquer prateleira.
As garrafas podem ser guardadas lateralmente com
esta prateleira para vinhos.
Ajuste do cacifo
para vinho
(Tipo 1)
(Tipo 2)
Prateleira
extensível
[Tipo-1] [Tipo-2]
3
4
1
2
Page 68

68
Funcionamento
Controlo da humidade do compartimento para verduras
(Disponível somente em alguns modelos)
Para controlar a humidade coloque o comutador de controlo da humidade a
esquerda/direita se guardar verduras frutas.
HIGH
LOW
HIGH
LOW
HIGH LOW
HUMIDITY CONTROL
HIGH LOW
HUMIDITY CONTROL
Alta humidade
Baixa humidade
Desodorante (Disponível somente em alguns modelos)
Este sistema absorve eficientemente
os odores fortes mediante um
catalítico óptico. Este sistema não
exerce nenhum efeito sobre a comida
guardada.
Como já está instalado no condutor de entrada de ar do compartimento
frigorífero, não é necessária uma instalação especial.
Guarde as comidas com odores pungentes em recipientes fechados.
Senão este odor poderá ser absorvido pelos outros alimentos no compartimento.
Como usar o
sistema
desodorante
Conversão em compartimento para verduras ou carne
(Disponível somente em alguns modelos)
A gaveta para carne mantém uma temperatura inferior ao compartimento frigorífero
para guardar carne e peixe frescos durante mais tempo
A gaveta de baixo do frigorífico pode ser convertida em compartimento para verduras
ou carne
•
As verduras ou frutas vão se congelar se o comutador de conversão estiver regulado
como compartimento para carne. Portanto, não deixe de verificá-lo antes de guardar os
alimentos.
OBSERVAÇÃO
Page 69

69
Funcionamento
Compartimento de conversão da temperatura Zona milagrosa
(Disponível somente em alguns modelos)
Zona milagrosa
(Disponível somente em alguns modelos)
Pressionando o botão, podem ser
conservadas verduras, frutas ou outros
produtos alimentícios, como por ex. carne a
descongelar, peixe cru etc.
Comutação da temperatura em Zona milagrosa
(Disponível somente em alguns modelos)
Pode seleccionar o diapasão de
temperatura mais apropriado, em
função do tipo dos alimentos
guardados.
- Está disponível a selecção da
temperatura em 3 níveis, -3°C, -1°C
Ë 4°C inclusive. Em fun_ão do tipo
dos alimentos guardados, podem
ser conservados em estado mais
fresco: verduras/frutas e alimentos
guardados em frio, necessitando o controlo da humidade, assim como carne/peixe.
Retirar primeiro a caixa para verduras.
Depois de levantar levemente a caixa da Zona
milagrosa , segurá-la na parte de trás e puxá-la para
fora .
Ao utilizar a Zona milagrosa como compartimento para guardar carne, se forem
guardados dentro também verduras ou frutas, éstas poderão ficar congeladas.
Ao utilizar a Zona milagrosa como compartimento para guardar carne, a carne ou
peixe podem estragar-se, eis porque têm que ser conservados no compartimento
de congelação.
Ao abrir a porta do compartimento de refrigeração, a luz da lâmpada acende-se no
estado seleccionado, e apaga-se ao fechar a porta
Ao pressionar o botão de selecção, pode seleccionar consecutivamente
(Verduras/frutas) ➔(Compartimento de refrigeração com humidade controlada)
➔
(Carne).
Retirar a
Zona milagrosa
Método de
utilização
Introduzir a caixa da Zona milagrosa no respectivo
lugar fazendo-a deslizar cuidadosamente para
dentro .
Se for introduzida à força, os elementos de
acoplagem podem ficar estragados.
Montar a
Zona milagrosa
Page 70

70
Sugestões para guardar alimentos
Posição dos alimentos
(Consulte a identificação das peças)
Para guardar vinho.
Para guardar alimentos em pequenos
pacotes.
A temperatura tende a subir ao abrir a
porta. Portanto não guarde alimentos
para longo prazo como gelados etc. ...
Para guardar pequenos alimentos como pão,
merendas etc. ...
Para guardar vários alimentos congelados
como carne, peixe, gelado, merendas
congeladas etc. …
Prateleira da
porta do
compartimento
frigorífero
Gaveta das
verduras
Canto de
conversão
gaveta de
verduras/gaveta
de carme
Caixa dos ovos
Central de
refrigeração
Prateleira do
compartimento
frigorífero
Prateleira da
porta do
compartimento
congelador
Gaveta do
compartimento
congelador
Canto dos
laticínios
Cacifo para vinho
Gaveta da
merenda
Prateleira
compartimento
frigorífico
Para guardar carne, peixe, frango etc. ...
depois de embrulhado em película fina.
Guarde os alimentos enxutos.
Para guardar lacticínios como manteiga,
queijo etc. ...
Coloque a caixa de ovos num lugar apropriado.
Para guardar alimentos de uso frequente
como bebidas etc. ...
Para guardar pratos de acompanhamento ou
outros alimentos com uma distância
apropriada.
Para guardar pequenos pacotes de alimentos
ou bebidas como leite, sumo, cerveja etc. ...
Para guardar verduras ou frutas.
Para guardar verduras, frutas, carne a
descongelar, peixe cru etc. ... regule o
comutador de conversão da maneira
necessária.
Não deixe de controlar o comutador de
conversão antes de guardar alimentos.
Page 71

Sugestões para guardar alimentos
7171
Guardar alimentos
Guarde os alimentos frescos no compartimento frigorífero. A maneira como os
alimentos são congelados e descongelados é um factor importante na manutenção da
frescura e do sabor.
Não guarde alimentos que estragam-se facilmente com baixas temperaturas, tais
como bananas e melões.
Deixe os alimentos quentes arrefecerem-se antes de guardá-los, colocar alimentos
quentes no frigorífico poderá estragar outros alimentos e causam um maior consumo
de electricidade.
Ao guardar alimentos, cubra-os com película plástica ou guarde-os dentro de um
recipiente com tampa. Deste modo evita-se a evaporação da humidade e ajuda-se os
alimentos a manterem o sabor e os nutrientes.
Não tape as aberturas de ventilação com alimentos. Uma suave circulação de ar
fresco mantém a temperatura do frigorífico uniforme.
Não abra frequentemente a porta. Ao abrir a porta, entra ar quente no frigorífico e a
temperatura aumenta.
Nunca coloque alimentos demais numa prateleira da porta, porque poderá chegar até
às prateleiras internas e a porta não poderá fechar-se perfeitamente.
Não guarde garrafas no compartimento congelador – poderão partirem-se ao
congelarem-se.
Não congele novamente alimentos descongelados. Isto causará perda de sabor e
de valor nutritivo.
Ao guardar alimentos congelados como gelados durante longos prazos, coloqueos numa prateleira interna do congelador, não numa prateleira da porta.
Não toque nos alimentos frios ou nos recipientes – especialmente nos de metal , com as mãos húmidas e não coloque produtos de vidro no compartimento do
congelador.
- Se tiver frieiras, estas podem abrir ao entrarem em contacto com produtos
congelados, causando danos pessoais.
Evitez de placer des aliments humides sur l'étagère supérieure du réfrigérateur. Ils
risquent de geler au contact direct de l'air froid.
Lavez toujours les aliments avant de les placer dans le réfrigérateur. Les légumes et
les fruits seront lavés et essuyés, les aliments emballés seront essuyés, afin
d'éviter de gâter les autres aliments.
Lorsque vous conservez des œufs dans leur boîte ou carton, assurez-vous qu'ils sont
frais, et conservez-les toujours en position verticale. Ils resteront frais plus longtemps.
Compartimento
congelador
Compartimento
frigorífico
•
Se o frigorífico estiver num lugar quente e húmido, abrir frequentemente a porta ou
guardar muitas verduras podem causar formação de condensação, que não exerce
nenhuma influência nos desempenhos. Enxugue a condensação com um pano
isento de poeira, com cuidado.
OBSERVAÇÃO
Page 72

72
Cuidados e manutenção
Como desmontar as peças
Separe a lâmpada retirando-a ( ), enquanto prima ligeiramente
( ) e roda a ( ) tampa da lâmpada. Rode a lâmpada no sentido
oposto ao dos ponteiros do relógio.
Utilize uma lâmpada de 40 watts (máximo), que pode ser
adquirida num centro de apoio técnico.
Caixa de
armazenament
o
de gel
o
Depois de usar
o
recipient
e
Prateleira d
a
porta e suport
e
Prateleira d
o
compartiment
o
do congelado
r
Lâmpada d
o
compartiment
o
congelado
r
Para retirar uma prateleira, desloque a prateleira para a
esquerda, levante um pouco a parte esquerda da
prateleira ( ), levante a parte direita para cima ( )
e retire-a.
Segure
em ambos os lados ( ) e levante a
prateleira, puxe-a para fona na direcção ( ).
O colector de água não tem uma função de
drenagem automática.
Deverá ser limpo regularmente.
Retire a tampa puxando o lado frontal da
tampa do colector de água e seque-o com um
pano. Desloque a tampa totalmente para a
frente ( ) e retire a extremidade final da tampa
( ) ligeiramente para a retirar. ( ) Limpe o chão
e a tampa com um pano seco.
Segure na caixa de armazenamento de gelo,
conforme indicado na figura à direita, e puxe-o
( ) para fora, à medida que o levanta ( ).
Não desmonte a caixa de armazenamento de
gelo, a menos que seja necessári
o
Use ambas as mãos para retirar a caixa de
gelo, para evitar deixá-la cair.
•
Para desmontar, realize na ordem inversa a sequência das operações de
montagem. Certifique-se que a ficha foi retirada da tomada eléctrica antes de
desmontar ou montar. Nunca exerça grande força para soltar peças. As peças
podem estragarem-se.
OBSERVAÇÃO
Page 73

73
Cuidados e manutenção
Introduza a ferramenta na área assinalda (①)
e prima a ferramenta para desligar.
Utilize a ferramenta com a ponta plana,
como (-) chave de parafusos.
Gire a lâmpada na direcção antiorária. Use
uma lâmpada de no máx. 40 W. para
frigorífico que há a venda nos centros
de assistência técnica.
Lâmpada do
compartimento
frigorífero
Separe o contentor ( ), puxando-o para cima
Separe a prateleira superior do centro de
refrescamento e, depois, puxe para fora a
respectiva tampa ( ).
O centro de refrescamento pode ser removido,
puxando-o para cima.
Central de
refrigeração
Para tirar a tampa do compartimento para
verduras, puxe um pouco para a frente ( )
o compartimento para verduras, levante a
parte frontal da tampa do compartimento
para verduras do modo mostrado em ( )e
tire-a.
Tampa do
compartimento
das verduras
•
Não se esqueça de tirar as peças da porta do frigorífico para tirar o compartimento
para verduras, a gaveta da merenda e a tampa da central de refrigeração.
OBSERVAÇÃO
Page 74

74
Cuidados e manutenção
Informações gerais
Limpeza
Durante férias de duração média, provavelmente é melhor deixar o frigorífico a funcionar.
Coloque os itens que puderem ser congelados no congelador para maior durabilidade.
Se planear desligar o aparelho, tire todos os alimentos, tire a ficha da tomada eléctrica,
limpe inteiramente o interior e deixe a porta ABERTA para evitar formação de odores.
Mudança
Tubo anti-
condensação
Temporada de
férias
Interrupção de
electricidade
A maioria das interrupções de electricidade corrigidas dentro de umas duas horas não
influem nas temperaturas do frigorífico.
Entretanto é preciso minimizar o número de vezes que a porta é aberta enquanto a
electricidade estiver interrompida.
Tire e prenda bem todos os itens soltos dentro do frigorífico.
Para evitar danos aos parafusos de ajuste da altura, atarraxe-os até o fundo, dentro
da base.
A superfície externa do frigorífico poderá às vezes esquentar-se, especialmente logo
depois da instalação.
Não se alarme. Isto é por causa do tubo anti-condensação, que bombeia líquido
refrigerante quente para evitar formação de "suor" na superfície externa do aparelho.
É recomendável uma limpeza regular. Lave todos os compartimentos com uma
solução de bicarbonato de sódio ou um detergente suave e água quente. Enxagúe e
enxugue.
Verifique se o cabo eléctrico não está estragado, se a ficha não está excessivamente
aquecida e se a ficha está bem colocada na tomada eléctrica.
Desligue sempre o cabo de alimentação da tomada da parede antes de realizar limpeza
nas proximidades das peças eléctricas (lâmpadas, comutadores, controlos etc.).
Tire a humidade excessiva com uma esponja ou pano para evitar que água ou outro
líquido entre em contacto com quaisquer peças eléctricas e cause choque eléctrico.
Nunca use esponjas abrasivas metálicas, escovas, produtos de limpeza abrasivos
agressivos, soluções alcalinas fortes, líquidos de limpeza inflamáveis ou tóxicos em
qualquer superfície.
Não toque as superfícies congeladas com as mãos molhadas ou húmidas, porque os
objectos húmidos grudam-se em superfícies extremamente frias.
É importante manter limpo o frigorífico para evitar odores desagradáveis. É preciso
limpar imediatamente os alimentos que caírem, porque poderão acidificar ou manchar
as superfícies de matéria plástica, se forem deixados a agir.
Use uma solução morna de sabão ou detergente suave para limpar o acabamento
durável do frigorífico.
Passe em seguida um pano limpo húmido e finalmente enxugue.
Depois da limpeza
Advertência
Exterior
Interior
Page 75

75
Solução de Problemas
Antes de chamar a assistência técnica, consulte esta lista. Deste modo poderá
economizar tempo e dinheiro. Esta lista inclui acontecimentos comuns que não são
resultado de defeito de fabricação nem dos materiais deste aparelho.
Possível causa
Controlo do frigorífico desligado.
Frigorífico em ciclo de
descongelamento.
Ficha fora da tomada eléctrica.
Interrupção da electricidade.
Verifique as luzes do prédio.
Frigorífico maior que o anterior.
Temperatura ambiente ou externa está
quente.
O frigorífico esteve desligado
recentemente durante um longo tempo.
Grandes quantidades de alimentos
quentes ou mornos podem ter sido
guardadas recentemente.
As portas têm estado abertas
frequentemente demais ou durante
tempo demais.
A porta do frigorífico ou do congelador
podem não estar perfeitamente
fechadas.
O comando do frigorífico está regulado
para frio demais.
As guarnições do frigorífico ou do
congelador estão sujas, desgastadas,
rachadas ou mal instaladas.
O termostato está a manter o frigorífico
numa temperatura constante.
Isto é normal. Os aparelhos maiores,
mais eficientes, funcionam mais
tempo nestas condições.
É normal que o frigorífico funcione
mais nestas condições.
Leva algumas horas para o frigorífico
refrigerar-se inteiramente.
Alimentos quentes causam que o
frigorífico funcione mais tempo até
chegar à temperatura desejada.
O ar quente ao entrar no frigorífico causa
que o mesmo funcione mais tempo.
Abra a porta menos vezes.
Certifique-se que o aparelho está
nivelado. Não bloqueie as portas com
alimentos ou recipientes. Veja a secção
dos problemas, ABERTURA/FECHO das
portas.
Regule o comando do frigorífico numa
posição mais quente até a temperatura
ser satisfatória.
Limpe o troque a guarnição.
Vazamentos na guarnição da porta fazem
o frigorífico funcionar mais tempo para
manter as temperaturas desejadas.
Isto é normal. O frigorífico liga-se e
desliga-se para manter a temperatura
constante.
Solução
Ligue o controlo do frigorífico.
Veja regulação dos comandos.
Isto é normal num frigorífico com
descongelamento inteiramente
automático. Há periodicamente ciclos
de descongelamento.
Certifique-se que a ficha está firme na
tomada eléctrica.
Contacte a empresa de electricidade.
Funcionamento
do refrigerador
Compressor do
refrigerador não
funciona.
Frigorífico a
funcionar
demais ou
durante tempo
demais
Acontecimento
Cuidados e manutenção
Page 76

76
Cuidados e manutenção
O compressor do
frigorífico não
funciona.
Acontecimento
Temperaturas frias
demais
A temperatura do
congelador é fria demais
mas a temperatura do
frigorífico é satisfatória.
A temperatura do
frigorífico é quente
demais mas a
temperatura do
congelador é
satisfatória.
As temperaturas do
frigorífico ou do
congelador estão
quentes demais
Temperaturas
quentes demais
Carne guardada na
gaveta para carnes
frescas está a
congelar
Alimentos guardados
nas gavetas estão a
congelar
Possível causa
O termostato está a manter o frigorífico
numa temperatura constante.
O comando do congelador está regulado
para frio demais.
As portas têm estado abertas
frequentemente demais ou durante
tempo demais.
O frigorífico esteve desligado
recentemente durante um longo tempo.
A porta pode não estar perfeitamente
fechada.
Grandes quantidades de alimentos
quentes ou mornos podem ter sido
guardadas recentemente.
O comando do refrigerador está
regulado para quente demais.
O comando do frigorífico está regulado
para quente demais. O comando do
frigorífico exerce uma certa influência
sobre a temperatura do congelador.
O comando do congelador está regulado
para quente demais.
O comando do refrigerador está regulado
para frio demais.
O comando do refrigerador está regulado
para frio demais.
É preciso guardar a carne numa
temperatura um pouco inferior ao ponto
de congelamento da água (32° F, 0° C)
para ser guardada fresca o tempo máximo.
Solução
Isto é normal. O frigorífico liga-se e
desliga-se para manter a temperatura
constante.
Coloque o comando do frigorífico numa
posição mais fria.
Leva algumas horas para o frigorífico
refrigerar-se inteiramente.
Aguarde que o frigorífico ou congelador
tenha podido chegar à temperatura
desejada.
Ar quente entra no frigorífico/congelador
todas as vezes que a porta é aberta.
Abra a porta menos vezes.
Coloque o comando do frigorífico numa
posição mais fria até a temperatura do
congelador ou do frigorífico passar a ser
satisfatória.
Coloque o comando do congelador ou
do frigorífico numa posição mais fria até
a temperatura do congelador ou do
frigorífico passar a ser satisfatória.
É normal formarem-se cristais de gelo
por causa da humidade da carme.
Coloque o comando do frigorífico numa
posição mais quente.
Veja a secção acima.
Coloque o comando do congelador numa
posição mais quente até a temperatura
do congelador passar a ser satisfatória.
Feche perfeitamente a porta
A temperatura do
frigorífico é fria demais
mas a temperatura do
congelador é
satisfatória.
Page 77

77
Cuidados e manutenção
Sons e ruídos
Acontecimento
Nível de ruído mais alto
quando o frigorífico
está a funcionar.
Nível de ruído mais
alto quando o
compressor liga-se.
Acumula-se
humidade nas
laterais internas
do frigorífico.
Água/Humidade/
Gelo fora do
frigorífico
Forma-se
condensação fora
do frigorífico ou
entre as portas.
Ruído de
vibração ou
batidas
Água/Humidade/
Gelo dentro do
frigorífico
Possível causa
Os frigoríficos actuais possuem mais
lugar para guardar alimentos e mantêm
temperaturas mais equilibradas.
O frigorífico está a tocar na parede ou
em armários.
O tempo está quente e húmido e
portanto aumenta a taxa de acumulação
de gelo e condensação interna.
Porta não perfeitamente fechada.
As portas têm estado abertas
frequentemente demais ou durante
tempo demais.
O tempo está húmido.
Porta não fecha perfeitamente, portanto
ar frio de dentro do frigorífico encontrase com o ar quente de fora.
Chão não nivelado ou fraco.
Frigorífico a balançar no chão quando
move-se ligeiramente.
O frigorífico funciona com pressões mais
altas durante o funcionamento do ciclo.
Objectos colocados em cima do frigorífico
a vibrar.
Pratos a vibrar nas prateleiras do
frigorífico.
Solução
Feche inteiramente a porta desta vez.
Isto é normal com tempo húmido. Quando
a humidade diminuir, a condensação deve
desaparecer.
Veja a secção dos problemas,
abertura/fecho das portas.
Desloque o frigorífico para que não toque
mais na parede nem nos armários.
Isto é normal.
É normal que os pratos vibrem um pouco.
Desloque os pratos ligeiramente.
Certifique-se se o frigorífico está nivelado
e colocado firme no chão.
Certifique-se se o chão é nivelado e
sólido e pode adequadamente suportar o
frigorífico.
Tire os objectos
É normal que o nível de som seja mais
alto.
Isto é normal. O nível do ruído abaixa-se
ao continuar a funcionar o frigorífico.
Abra a porta menos vezes.
Page 78

78
Cuidados e manutenção
Odores no frigorífico
Acontecimento
A(s) porta(s) não
se fecham.
É difícil mover as
gavetas.
Distribuidor
O distribuidor não
fornece gelo
Abertura/Fecho de
portas/gavetas
Possível causa
Há alimentos a tocar a prateleira
superior da gaveta.
Os carris onde desliza a gaveta estão
sujos.
O compartimento de gelo está vazio.
A temperatura do congelador está
regulada quente demais.
A válvula de alimentação de água
doméstica não está aberta.
A porta do frigorífico ou do congelador
não está fechada.
O frigorífico não está nivelado. Balança
no chão ao ser movido ligeiramente.
O chão não é nivelado ou é fraco.
O frigorífico balança no chão quando
move-se ligeiramente.
O frigorífico está a tocar na parede ou
em armários.
É preciso limpar por dentro
Há alimentos com odores fortes no
frigorífico.
Alguns recipientes ou materiais de
embalagem possuem odores.
Embalagem de alimento está a impedir
que a porta feche-se.
A porta foi fechada com força demais, e
causou que a outra porta se abrisse um
pouco.
Solução
Certifique-se que as portas estejam bem
fechadas.
Abra a válvula de alimentação de água
doméstica e aguarde o tempo necessário
para a produção de gelo.
Quando gelo for produzido, o distribuidor
deve funcionar.
Coloque o comando do congelador
numa regulação mais alta para poder
produzir cubos de gelo. Assim que
gelo for produzido, o distribuidor deve
funcionar.
Limpe as gavetas e os carris.
Certifique-se se o chão é nivelado e sólido
e pode adequadamente suportar o
frigorífico.
Contacte um carpinteiro para regular ou
inclinar o chão.
Desloque o frigorífico.
Guarde menos alimentos na gaveta.
Ajuste o parafuso de regulação da altura.
Use um recipiente ou marca de
material de embalagem diferente.
Desloque as embalagens que
impedirem a porta fechar.
Feche ambas portas delicadamente.
Cubra inteiramente estes alimentos.
Limpe por dentro com esponja, água
quente e bicarbonato de sódio.
Assim que gelo for produzido, o
distribuidor funcionará.
Page 79

Cuidados e manutenção
79
Distribuidor
não fornece
gelo.
Distribuidor
está entupido.
Acontecimento
A água possui
um sabor e/ou
odor
desagradável.
O distribuidor
não fornece
água.
Possível causa
A água está a demasiado tempo no
tanque.
O aparelho não está perfeitamente ligado
à alimentação de água.
Este ruído é normal quando gelo produzido automaticamente cair no recipiente para
gelo. O volume pode variar em função da localização do frigorífico.
Este ruído é normal quando água for fornecida para a produção automática de gelo,
depois de ter fornecido gelo.
Leia inteiramente a secção ‘Produção automática e distribuição de gelo’ neste manual.
Os cubos de gelo se congelam juntos.
Gelo derreteu e congelou-se ao redor
do bocal por causa de uso infrequente,
flutuações de temperatura e/ou
interrupção de electricidade.
Cubos de gelo estão bloqueados entre o
braço de produção de gelo e a parte de
trás do recipiente.
Cubos de gelo comprados ou feitos de
outra maneira podem ter sido colocados
no distribuidor.
A válvula de alimentação de água
doméstica não está aberta.
Veja o problema "O distribuidor não
fornece gelo".
A porta do frigorífico ou do congelador
não está fechada.
Solução
Certifique-se que as portas estejam bem
fechadas.
Tire e jogue fora 7 copos de água para
mudar o suprimento. Tire e jogue fora
mais 7 copos para enxaguar inteiramente
o tanque.
Ligue a alimentação de água fria que
fornece água para a torneira da cozinha.
Abra a válvula de alimentação de água
doméstica.
Use frequentemente o distribuidor para
os cubos de gelo não se congelarem.
Somente os cubos de gelo produzidos pelo
aparelho devem ser usados no distribuidor.
Tire os cubos de gelo que estão a
bloquear o distribuidor.
Tire o recipiente de gelo e descongele o
conteúdo. Limpe o recipiente, enxugue e
coloque no lugar.
Quando mais gelo for produzido, o
distribuidor deve funcionar.
Ruído de gelo a
cair
Ruído da
alimentação de
água
Outros
ELIMINAÇÃO DO SEU ANTIGO APARELHO
1. Quando este símbolo de latão cruzado estiver afixado a um produto,
significa que o produto é abrangido pela Directiva Europeia
2002/96/EC.
2. Todos os produtos eléctricos e electrónicos devem ser eliminados
separadamente do lixo doméstico através de pontos de recolha
designados, facilitados pelo governo ou autoridades locais.
3.
A eliminação correcta do seu aparelho antigo ajuda a evitar potenciais
consequências negativas para o ambiente e para a saúde humana.
4.
Para obter informaçõs mais detalhadas acerca da eliminação do seu
aparelho antigo, contacte as autoridades locais, um serviço de
eliminação de resíduos ou a loja onde comprou o produto.
Page 80

MFL38263801
 Loading...