

Page 1

FRIDGE-FREEZER
USER'S GUIDE
Please read this User's Guide carefully before
operating and keep it handy for reference at all times.
COMBIN√ FRIGORIFIC√
INSTRUCfiIUNI DE UTILIZARE
V„ rug„m s„ citi˛i cu aten˛ie aceste instruc˛iuni Ónainte de
a utiliza aparatul. P„stra˛i aceste instruc˛iuni pentru a le
putea consulta la nevoie.
Page 2
Table of Contents
Introduction
Installation
Operation
Registration
Important Safety Instruction
Identification of Parts
Installation
Starting
Temperature Control
Refrigerator
Freezer
Function
Super Freezer
Vacation
Lock
Self Test
Ice Making
Defrosting
Water Dispenser
4
4
7
8
8
9
9
9
11
11
11
12
12
12
12
13
Suggestion On
Food storage
Care and
Maintenance
Trouble Shooting
To Reverse
the Doors
Storing Food
General Information
Lamp Replacement
Cleaning
Trouble Shooting
To Reverse the Doors
3
15
16
16
17
19
21
Page 3
Introduction
Registration
Introduction
Precaution
The model and serial number are found on the rear of
this unit. This number is unique to this unit and not
available to others. You should record requested
information here and retain this guide as a permanent
record of your purchase. Staple your receipt here.
Date of Purchase
Dealer Purchased From
Dealer Address
Dealer Phone No.
Model No. :
Serial No.
:
:
:
:
:
Important Safety Instruction
This fridge-freezer must be properly installed and
located in accordance with the Installation
Instruction before it is used.
Never unplug your fridge-freezer by pulling on the
power cord. Always grip plug firmly and pull straight
out from the outlet.
When moving your appliance away from the wall,
be careful not to roll over or damage the power
cord.
After your fridge-freezer is in operation, do not
touch the cold surfaces in the freezer compartment,
particularly when hands are damp or wet. Skin may
adhere to these extremely cold surfaces.
Children should be supervised to ensure that they do
not play with the appliance.
4
Page 4
Introduction
Important Safety Instruction
Precaution
Do not modify or
extend the Powe
Cord length
Don't Use an
Extension Cord
Accessibility of
Supply Plug
Supply Cord
Replacement
Danger
Pull out the power plug prior to cleaning the fridgefreezer.
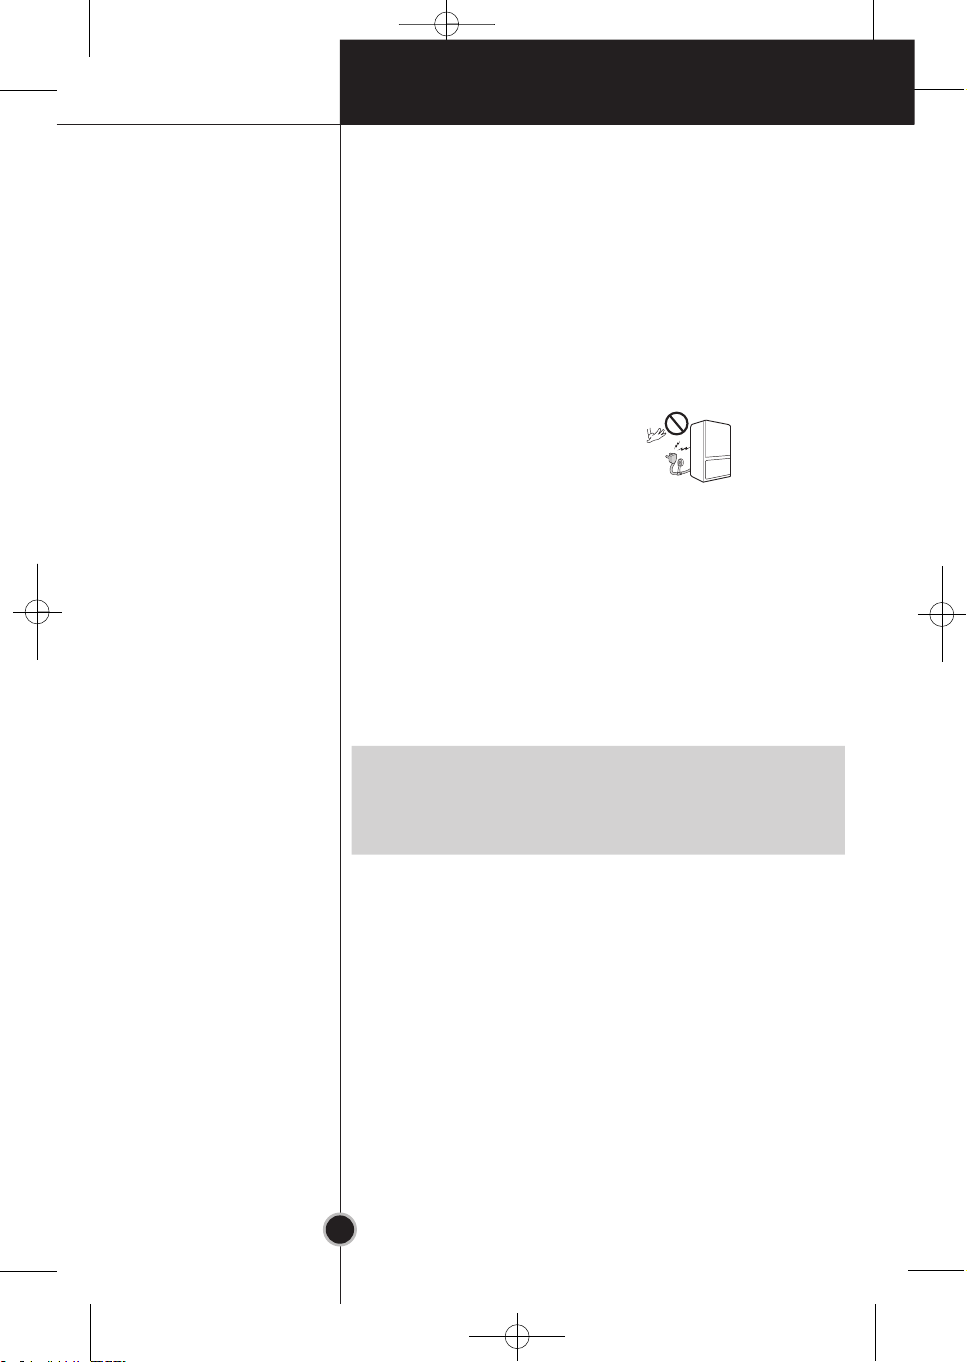
Never damage, serverely bend, pull out, or twist the
power cord because power cord damage may cause a
fire or electronic shock. Never place glass products in the
freezer because they may be broken when their inner
contents are frozen.
cause electric shock or fire.
It will
r
If possible, connect the fridge-freezer to its own individual
electrical outlet to prevent it and other appliances or household
lights from causing an overload.
The supply plug of the refrigerator-freezer should be placed in
easy accessible position for quick disconnection in emergency.
If the supply cord is damaged, it must be replaced by the
manufacturer or its service agent or a similarly qualified person
in order to avoid a hazard.
Risk of child entrapment. Before you throw away your old
igerator or freezer: Take off the doors.
refr
Leave the shelves in place so that children may not easily
inside.
climb
Don't store
Grounding
(Earthing)
Don't store or use gasoline or other flammable vapors and
liquids in t
In the event of an electric short circuit, grounding (earthing)
reduces the risk of electric shock by providing an escape wire for
the electric current. In order to prevent possible electric shock,
this appliance must be grounded. Improper use of the
grounding plug can result in an electric shock. Consult a
qualified electrician or service person if the grounding
instructions are not completely understood, or if you have
doubts on whether the appliance is properly grounded.
5
he vicinity of this or any other appliance.
Page 5
I
ww
ww
ww
ww
ww
ww
m
p
o
t
n
noi
cud
or
I
tn
u
t
t
a
r
n
e
yt
f
S
a
I
n
r
t
s
o
t
i
c
Warning
e
li
v p
a
K
o
D
a
D
D
s
t
a
T
a
d
s
r
e
moc
a
p
R
2
m1
d
n
t
e
e
ub
t
r
i
n
o
l
e
c
c
mocer
o
o
r
a
o
o
er
h
e
il
p
p
s
i
p
o
mi
i
ppa sihT
girfe
norivn
b
i
h
e
e
on
t
u
s
a
t
e
et
h
r
nem
d
e
on
t
d
a
e
on
e
t
u
s
e
moc
g
f
a
are
m
p
e
t
h
t
r
i
eg
fer
e
c
n
p
,l
s
a
au
ylral
l
q
n
rac
,ecnailpp
.ecnailppa
e
i
o
-
tl
e
d
l
e
a
epy
nar
uqer
f
i
hW .elbitsu
.setunim lareves
n
o n
cur
i
s n
t
a
cem
n
ci
h
s
e
orf
t
d
eht
yb
r
e
egam
eht
ac
rtc
i
mtr
r
e
moc
ni
a t
n
d
e
i
r
n
esael
oc
e
d
i
n
atnoc ecnail
i
ni ,sg
e
a
,er
r
l
t
c
u
e
a
ni
lus
osrep
s
s
ived l
c
g
ecorp
cafunam
cn
ailppa l
e
eht fo stne
e
d
dnem
i
l
no
a
t
us
s
d
psi
o
laiceps
tiw t
n
.
llams a
larutan ,)a006R( t
sag
,yti
ibitapmoc latne
ub
l
at eb dluohs e
iucric gnitaregirfer eht fo stra
egirfer fo tnuoma ehT .ecnailppa
ruoy tlusnoc ,tbuod ni fI .egama
il
a
pa eht
cn
p
s
fo
r
bo
t
h
re
o ro
t
.rerut
u
ti
.
ric tnaregirf
c
f
di
ni s
yb
a
ma
m ecnailppa eht hcihw ni moor eht fo
nar
eht e
s
o
ot nek
pip eht fo tuo gnitriuqs tnaregirfe
malf a fo noitaerc eht diova ot redro nI
girfer a006R fo g8 yreve rof ezis ni
laed
eht
ag
niwolb
g
co
rp l
rude
tnega ecivres h
t
o
nu
gih htiw
h
sla si ti t
o
tsni dna gnitropsnart ne
sne
eru
a
m
d era t
lu
oc se
,
detceted si kael a fI .yrujni eye na esuac
m
ya
ni tnare
.re
u
cne e
r
l
e
so
.noitcu
t snaem
o
naht rehto ,ss
esoht
o
do
y
eh
t sselnu ,ecnailppa
.rerutcafunam
i
u s
ro
lla
d
ova
noitingi fo secruos laitnetop ro semalf dekan
ht n
es
.se
a
ni
i
fo sngis yna gniwohs ecnailppa na pu trats reveN
d
W
bosi f
g
disni etalp noitacifitnedi eht no nwohs si ecnailppa
e
n
eh
tu
ena
eht
on taht
.dega
r
o
ng
eti
yna
di
ria
dna
rof gnidnats si ecnailppa eht hcihw ni moor eht
ria sag elba
ezis eht ,srucco tiucric gnitaregirfer eht ni kael a fi erutxim
sdneped detis eb
eb tsum moor ehT .desu tnaregirfer fo tnuoma eht no
eht edis
ralucitrap ruoy ni t
eht e
ni
p
t
6
Page 6
Introduction
7
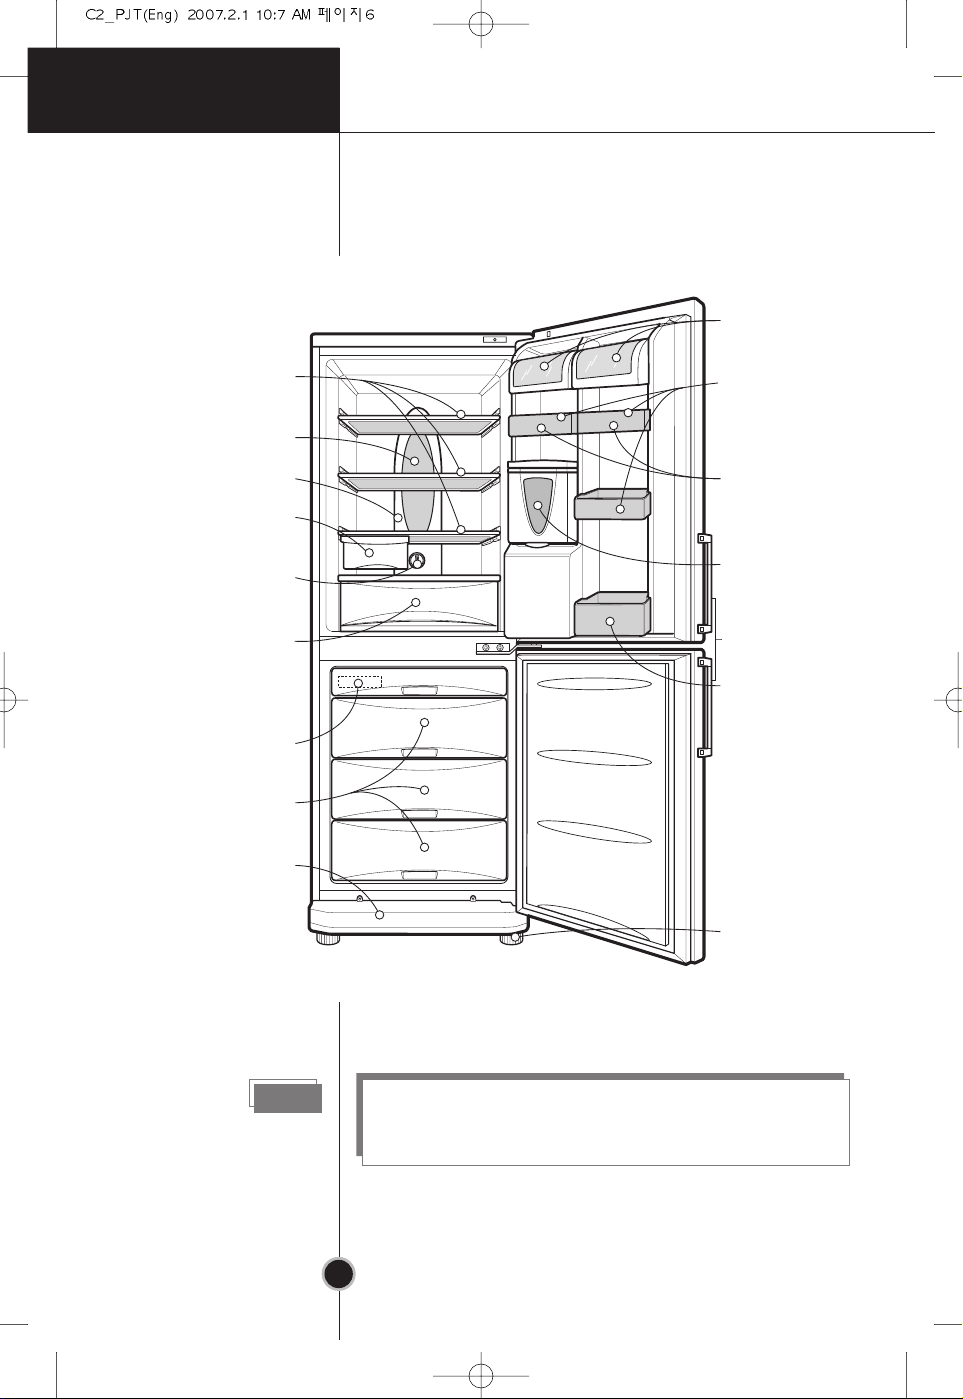
Identification of Parts
Utility Corner
(movable)
Removable Glass
Shelf
Lamp
Multi-air Flow Duct
Fresh Zone (Optional)
Refrigerator
Temperature Control
Vegetable Drawer
Used to keep fruits and
vegetables, etc. fresh
and crisp.
(1 or 2)
Ice Cube Tray
Freezer Compartment
Removable Plinth
Door Basket
Egg Tray(1 or 2)
Water Tank
Handle (Optional)
2
Bottle Door
Basket
Leveling Screw
Note
If you find some parts missing from your unit, they
may be parts only used in other models.
Page 7
Installation
8
7
1.
Select a good location.
Place your fridge-freezer where it is easy to use.
2.
Avoid placing the unit near heat sources,
direct sunlight or moisture.
3.
There must be proper air circulation around your
fridge-freezer to keep it operating efficiently.
4.
To avoid vibration, the unit must be leveled.
If required, adjust the leveling screws to compensate
for the uneven floor.
The front should be slightly higher than the rear to aid
in door closing.
Leveling screws can be turned easily by tipping the
cabinet slightly.
Turn the leveling screws counterclockwise( ) to
raise the unit, clockwise( ) to lower it.
5.
Clean your fridge-freezer thoroughly and wipe off all
dust accumulated during shipping.
6.
Install accessories such as ice cube box, etc., in their
proper places.They are packed together to prevent
possible damage during shipment.
7.
Connect the power supply cord (or plug) to the outlet.
Don't double up with other appliances on the same
outlet.
8.
To ensure proper air circulation around the fridge freezer, please maintain sufficient space on both the
sides as well as top and maintain at least 2 inches (5
cm) from the rear wall.
When your fridge-freezer is installed, allow it 2-3 hours to
stabilize at normal operating temperature prior to filling
it with fresh or frozen foods.
If power plug is disconnected, allow 5 minutes delay
before restarting.
Your fridge-freezer is now ready for use.
Installation
Starting
Page 8
Operation
9
Temperature Control
Your fridge-freezer has two controls that let you regulate
the temperature in the fridge and freezer compartments.
Refrigerator
Freezer
• Initially set the TEMP. CONTROL at
"4". Then adjust the compartment
temperature according to your
desire.
• If you want an inside temperature
slightly less cold or colder, turn the
MAX MIN
7
6
5
3
4
TEMP. CONTROL
knob towards MIN or MAX,
respectively. When the surrounding
temperature is low, adjust the TEMP. CONTROL 'MIN'.
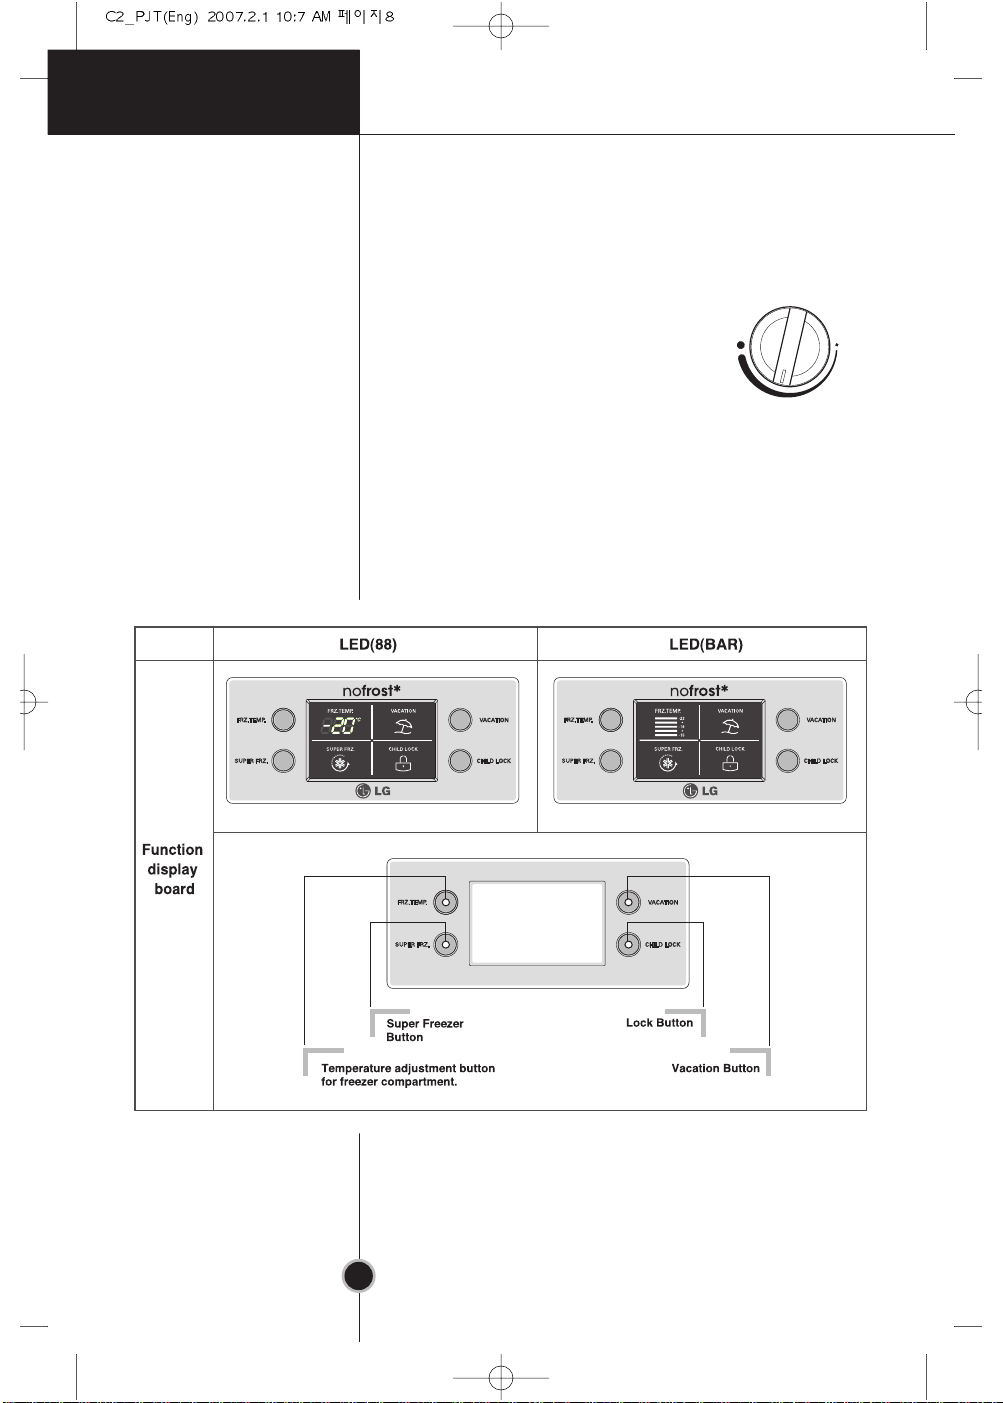
Display Panel For Temperature Control
1
2
Page 9
Operation
10
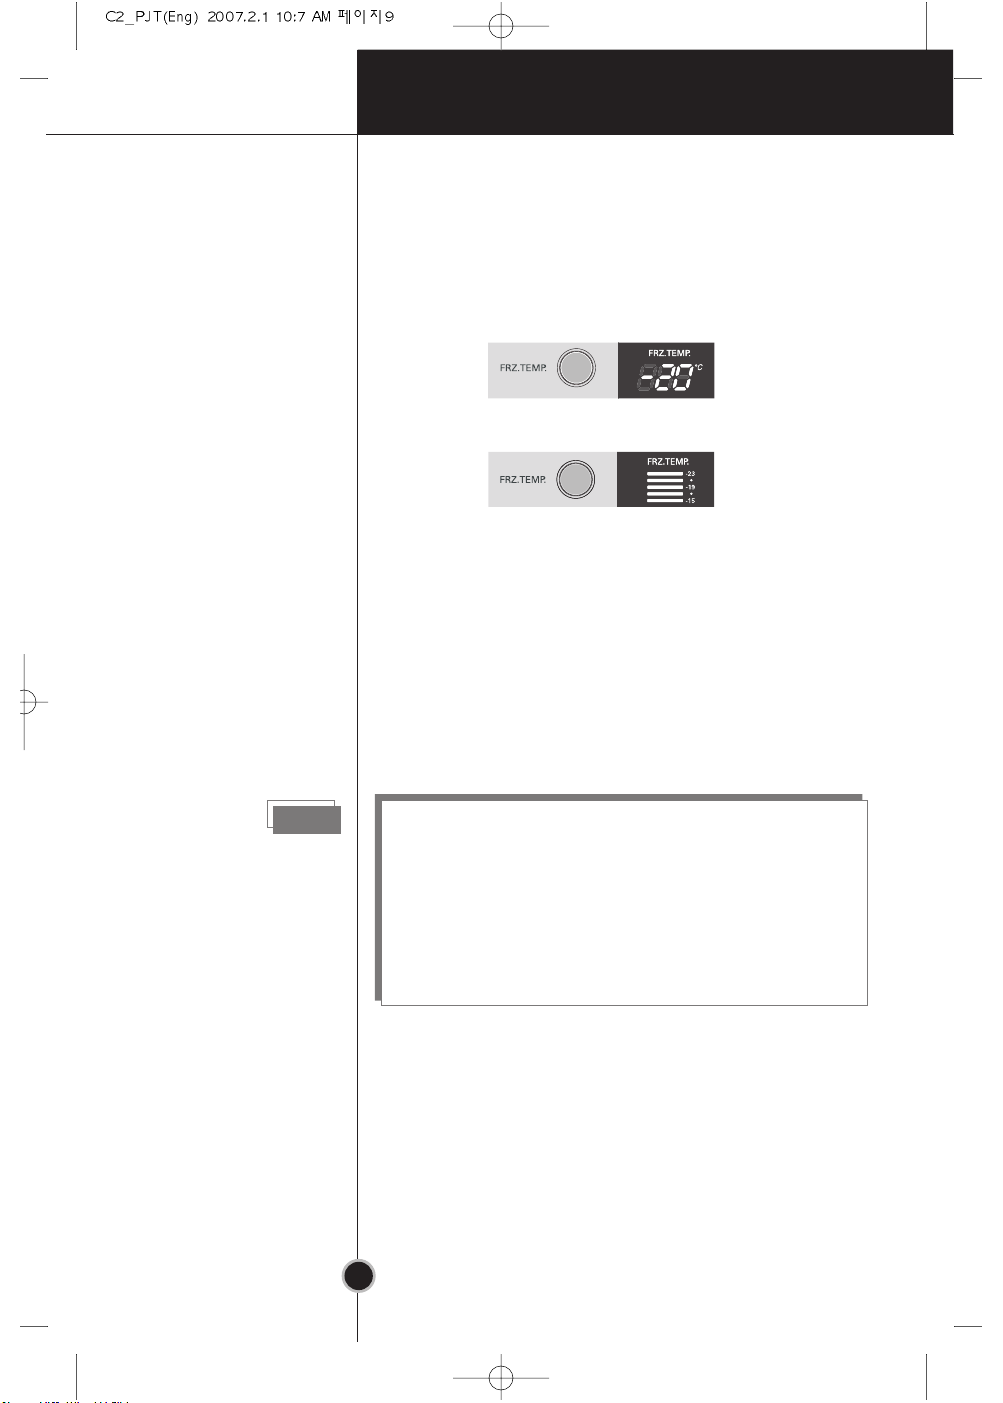
• The initial Temperature of the Freezer Compartment is
-18°C . You can now adjust the temperature of the
compartment as you want.
< LED 88 Type >
< LED BAR Type >
• When you press the temperature control buttons, the
temperature of Freezer compartment is repeated in the
following order.
LED 88 Type Freezer Compartment :
-18°C → -19°C → -20°C → -21°C → -22°C → -23°C
→ -15°C → -16°C → -17°C
Note
LED BAR Type Freezer Compartment :
-19°C → -21°C→ -23°C → -15°C → -17°C
The actual inner temperature varies depending on the
food status, as the indicated setting temperature is a
target temperature, not actual temperature within
refrigerator.
Refrigeration function is weak in the initial time.
Please adjust temperature as above after using
refrigerator for minimum 2~3 days.
Page 10
Operation
11
Function
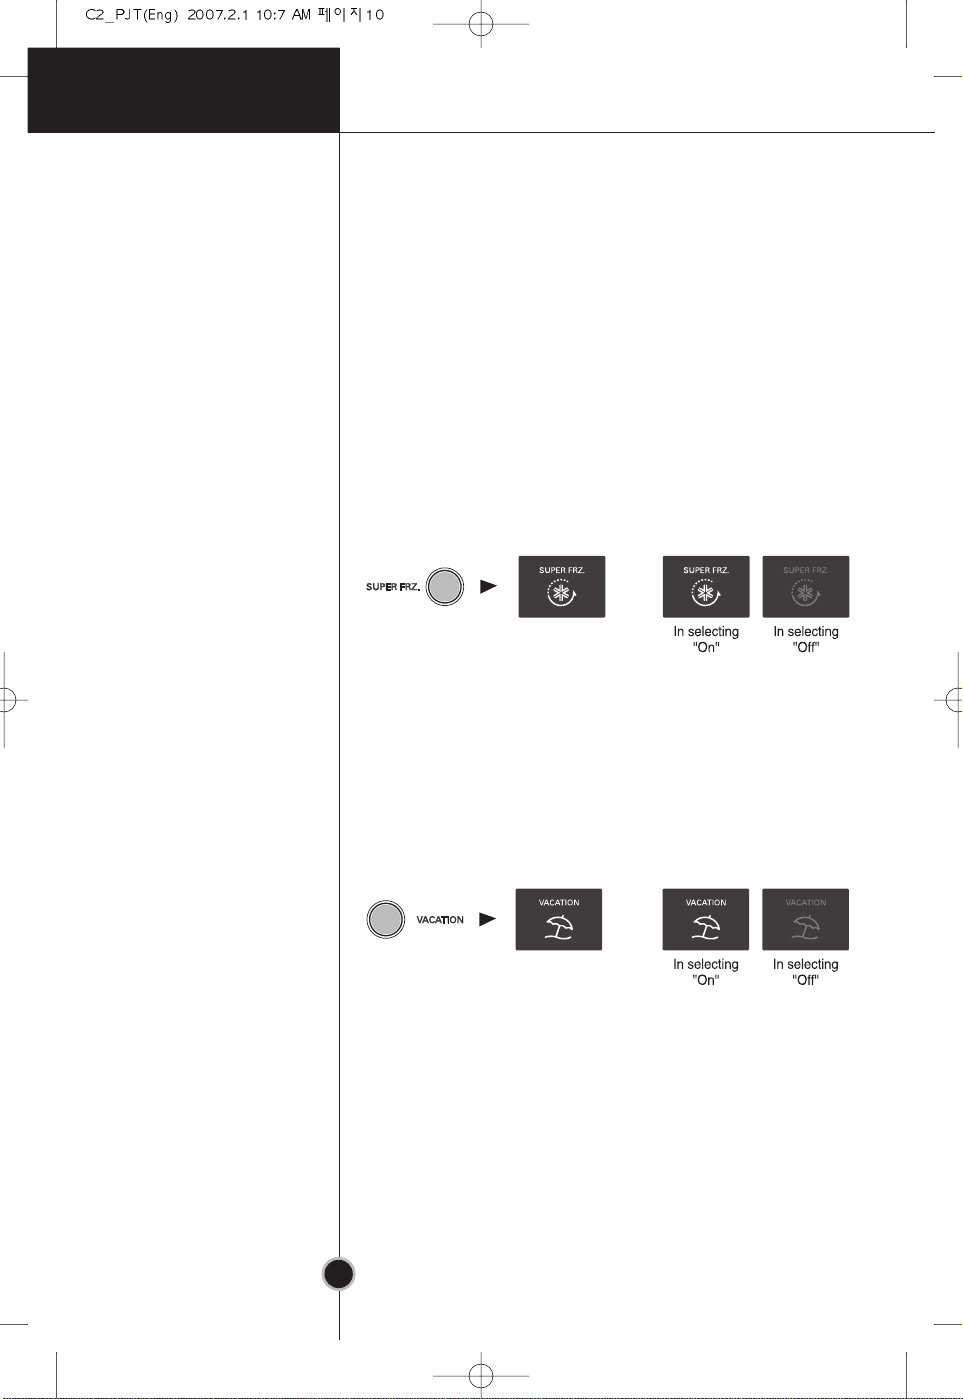
Super Freezer
Vacation
• Please select this function for prompt freezer.
• This function is used when you want to freeze the
foods quickly. Press the ‘SUPER FRZ.’ (Super Freezer)
button once, and then the quick freeze operation starts
with the lamp on.
• The Super Freeze operation takes about 3 hours. When
its operation ends, it automatically returns to the
previous temperature setting. If you want to stop the
quick freeze operation, press the ‘SUPER FRZ.’ button
once more, the lamp goes out, and the Super Freeze
operation stops and the refrigerator returns to the
previous temperature setting.
• This function makes the fridge-freezer work in a power
saving mode which is useful for when you are away on
holiday, by reducing energy consumption as much as
possible.
Pressing ‘VACATION’ starts operation with lamp on
and pressing it again stops the operation.
Page 11
Operation
12
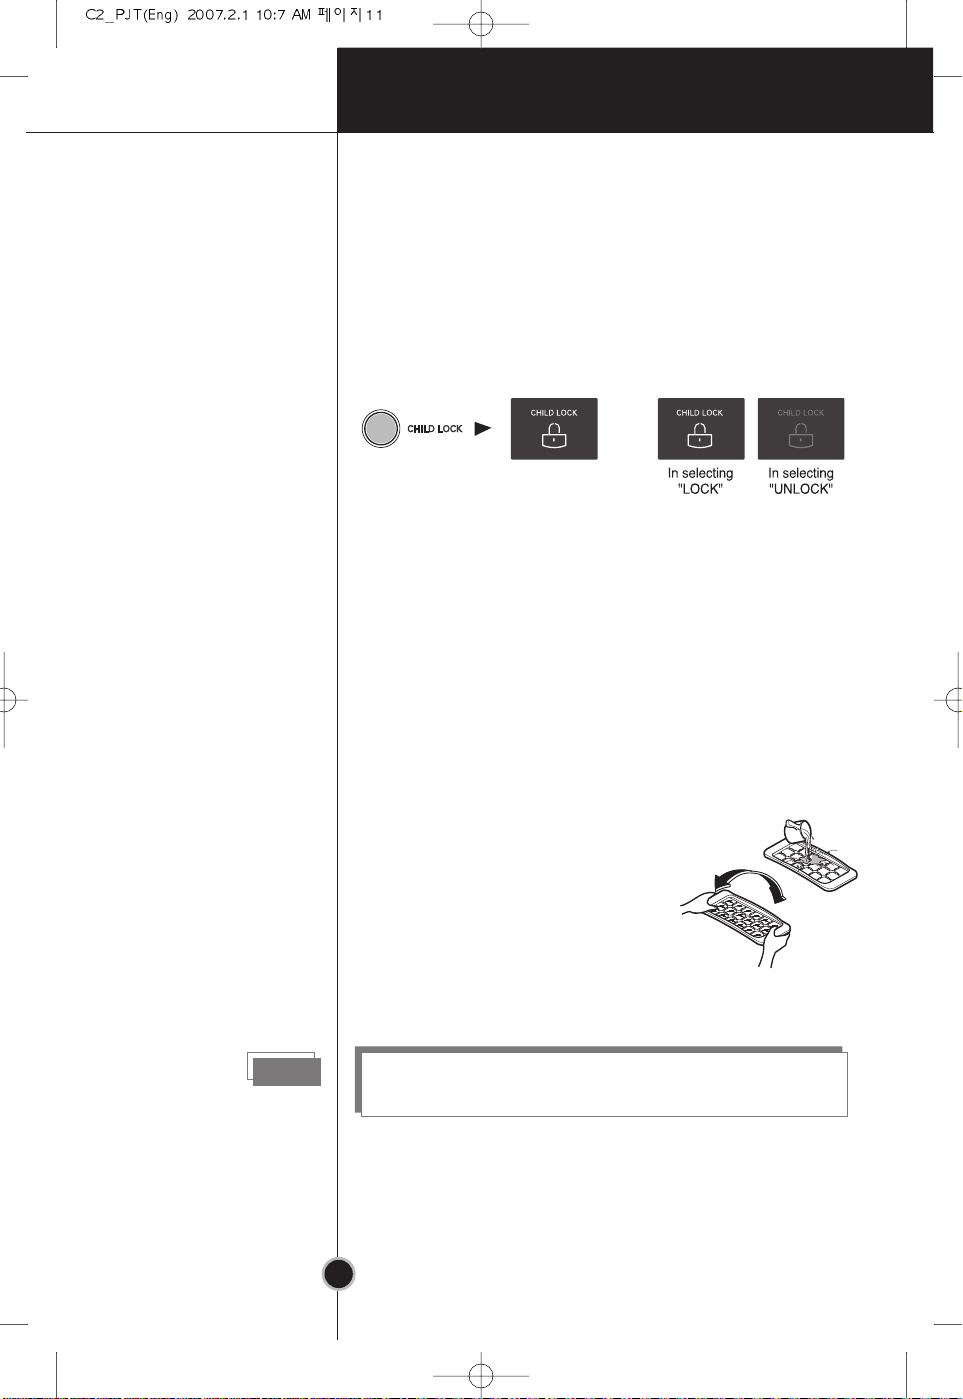
Lock
Self Test
Ice Making
• Pressing this button stops operation of other buttons.
• ”Locking” or “Un-Locking” is repeated whenever
pressing the ‘CHILD LOCK’ button. (For “Locking” or
“Un-Locking” press the ‘CHILD LOCK’ button for 2 secs.)
• When ‘CHILD LOCK’ is activated, pressing the other
buttons would not work.
This function allows you to check for operational
problems. If you think you have a problem with your
fridge-freezer, then press the temperature control
button:
- If the indicate lights move up or down, then there is no
problem with your fridge-freezer.
- If the indicate lights do not move up or down, then
please leave the power connected and call your nearest
service agent.
• To make ice cubes, fill the ice
tray to the water level and place
it in the freezer.
• If ice cubes are required fast,
press the ‘SUPER FRZ.’ button.
• To remove ice cubes, hold the
tray at its ends and twist gently.
Tip
Defrosting
To remove ice cubes easily, run water on the tray
before twisting.
Defrosting takes place automatically.
The defrosting water flows down to the evaporating tray
and is evaporated automatically.
Page 12
Operation
13
Features
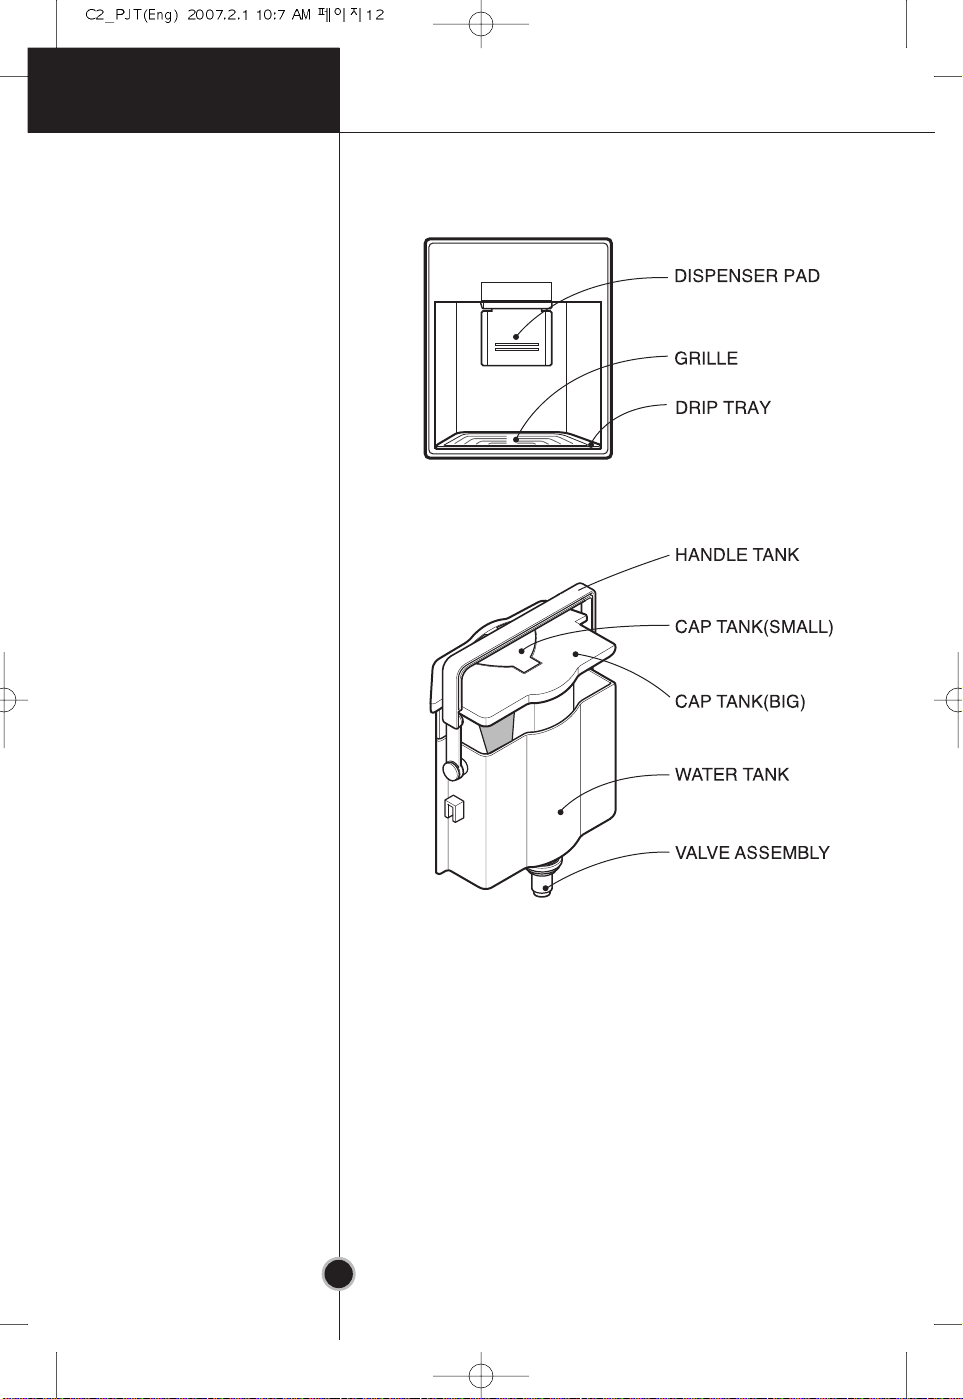
Water Dispenser
Install
• Please assemble the VALVE ASSEMBLY after correctly
adjusting it with a DOOR HOLE.
Page 13
Operation
14
Filling of
WATER TANK
Drinking
ww
Caution
1.After turning the HANDLE Tank backward with the
WATER TANK installed at the DOOR, Open the CAP
TANK (SMALL) and then fill water using a kettle etc.
* Fill water while watching a sight glass on the front
of the WATER TANK.
* Water up to 4.5l can be filled.
2.Press and fix the CAP TANK(SMALL).
3.After filling spring water, fix the HANDLE TANK at a
proper position.
1.Press the Dispenser Pad with a cup.
2.If pressing the Pad, water inside of the Dispenser is
supplied.
3.If slowly removing a cup from the Pad, water will not
fall down.
Do not use other beverage (milk, juice, carbonated
beverage etc) than spring water. Especially beverage
including grain must not be used (may result in failure).
Page 14

Suggestions on food storage
15
Storing Food
Storing Food
• Do not store food which goes bad easily at low
temperature, such as banana, and melon.
• Allow hot food to cool prior to storing. Placing hot
food in the fridge-freezer could spoil other food, and
lead to higher electric bills.
• When storing the food, use a container with a lid. This
prevents moisture from evaporating, and helps food to
keep its taste and nutrients.
• Do not block air vents with food. Smooth circulation of
cold air keeps fridge-freezer temperature even.
• Do not open the door frequently. Opening the door
lets warm air enter the fridge-freezer, and cause
temperature to rise.
• To adjust the temperature control easily, do not store
food near the temperature control dial.
• Never keep too many foods in door rack, as this may
stop the door from fully closing.
• Do not store bottles in the freezer compartment - they
may break when frozen.
Note
• Do not refreeze food that has been thawed. This
causes loss of taste and nutrition.
If you keep the fridge-freezer in a hot, and humid
place, frequently open its door or put a lot of
vegetables in it, dew may form in it, which has no
effect on its performance.
Remove the dew with dust cloth free from care.
Page 15

Care and Maintenance
Anti-Condensation
Pipe
16
General Information
Power Failure
If You Move
Anti
Condensation
Pipe
• 1~2 hour power failure does no harm to the foods
stores. Try to avoid opening and closing the door too
frequently.
• Take out foods from the fridge-freezer and firmly fix
the loose items with tape.
• Turn the leveling screws until they stop before moving
the fridge-freezer. Otherwise the screw may scratch
the floor or the fridge-freezer cannot move.
• The Anti-Condensation
pipe is installed around the
front side of fridge-freezer
as well as on the partition
between fridge
compartment and freezer
compartment to prevent
dewing.
• Especially after installation
or when ambient
temperature is high, the fridge-freezer may feel hot,
which is quite normal.
Lamp Replacement
1.Unplug the power cord from the
outlet.
2.Remove fridge shelves.
3.To remove the lamp cover, insert
type driver in the underside of
the lamp cover and pull it out
forwards.
4.Turn the lamp counterclockwise.
5.Assemble in reverse order of
disassembly.
Replacement lamp must be the same specification as
original.
• You must check the O-RING, which is made by
rubber and prevent electric spark.
Page 16

Care and Maintenance
17
Cleaning
Before Cleaning
Exterior
Interior
After Cleaning
ww
Warning
Be sure to unplug the power.
Clean the outside of the fridge-freezer with a soft cloth
soaked with hot water or liquid detergent. If you use a
detergent, be sure to wipe it with a clean wet cloth.
As above.
Check that the power cord is not damaged, power plug
has not overheated, and that the power plug is tightly
inserted into the outlet.
Be sure to dry the appliance with a cloth after washing
it with water.
Do not use abrasive, petroleum, benzene, thinner,
hydrochloride acid, boiling water, rough brush, etc, as
they may damage parts of the fridge-freezer.
Page 17

Care and Maintenance
18
GRILLE and DRIP
TRAY
Exterior Dispenser
WATER TAN
CAP TANK
(Big & Small)
VALVE ASSEMBLY
Remove the GRILLE , wipe moisture out around the DOOR
part and the DRIP TRAY using a clean cloth.
Wipe moisture etc out outside of Dispenser and on the
DISPENSER PAD using a cloth.
K
1. Lift the WATER TANK up by pressing the fixing LEVER
on the bottom of WATER TANK and then remove it.
2. After removing the CAP TANK (BIG), clean and fully
rinse the inside/outside part of the WATER TANK by
using neutral cleansing agent.
Clean and fully rinse the CAP TANK (Big & Small) by using
neutral cleansing agent.
Especially for the groove part of the CAP TANK, it is
convenient to cleanse it by using a small brush.
Clean and fully rinse the VALVE ASSEMBLY by using a
small brush. Rinse it while operating the bottom part of
the valve assembly. Always fix the Sealing Rubber
separated for cleansing at the existing position
(may result in water leakage).
Page 18

Trouble Shooting
19
Trouble Shooting
Before calling for service, check this list.
It may save you both time and expense.
This list includes common occur
the result of defective workmanship or materials in
this appliance.
rences that are not
Problem
Fridge-Freezer
does not operate
Fridge or Freezer
Compartment
Temperature too
warm
Vibration or
Rattling or
Abnormal Noise
Possible Causes
• Power plug may be unplugged from the electric
outlet.
Plug it in securely.
• House fuse has blown or circuit breaker has
tripped.
Check and/or replace fuse and reset circuit breaker.
• Power cut.
Check house lights.
• Temperature control not set on proper position.
Refer to Temperature Control section.
• Appliance is placed close to heat source.
• Warm weather-frequent door openings.
• Door left open for a long time.
• Package holding door open or blocking air duct in
freezer compartment.
• The floor on which the fridge-freezer is installed
may be uneven or the fridge-freezer may be
unstable.
Make it even by rotating the leveling screw.
• Unnecessary objects placed in the back side of the
fridge-freezer.
Frost or Ice
Crystals on frozen
Food
Moisture forms on
Cabinet Surface
• Door may have been left ajar or package holding
door open.
• Too frequent or too long door openings.
• Frost within package is normal.
• This phenomenon is likely to occur in a wet space.
Wipe it with a dry towel.
Page 19

Problem Possible Causes
1. When this crossed-out wheeled bin symbol is attached to a
product it means the product is covered by the European Directiv
e
2002/96/EC
.
2.
All electrical and electronic products should be disposed of separately
from the municipal waste stream via designated collection facilitie
s
appointed by the government or the local authorities
.
3. The correct disposal of your old appliance will help prevent potential
negative consequences for the environment and human health
.
4.
For more detailed information about disposal of your old appliance,
please contact your city office, waste disposal service or the sho
p
where you purchased the product
.
20
Trouble Shooting
Moisture collects
inside
Fridge has odor
Door not closing
properly
Interior light does
not work
• Too frequent or too long door openings.
• In humid weather, air carries moisture into fridge when
doors are opened.
• Foods with strong odors should be tightly covered or
wrapped.
• Check for spoiled food.
• Interior needs cleaning.
Refer to CLEANING section
• Food package is keeping door open.
Move packages that keep door from closing.
• Fridge-freezer is not level.
Adjust the leveling screws.
• The floor on which the fridge-freezer is installed
may be uneven or the fridge-freezer may be
unstable.
Slightly raise the front side with the leveling screw.
• No power at outlet.
• Light lamp needs replacing.
Refer to the Lamp Replacement section
DISPOSAL OF YOUR OLD APPLIANCE
Page 20

To Reverse the Doors
21
Your fridge-freezer is designed with reversible doors, so that they may open from either
the left of right hand side to suit your kitchen design.
Precaution
1.
Before reversing the door, first of all, you should take out food and accessories like
shel
ves or trays which are not fixed in the fridge-freezer.
2.
Use Torque Wrench or Spanner to fix or remove the bolt.
3.
Do not lay the fridge-freezer down. This will cause problems.
4.
Be careful not to drop the doors in disassembling or assenbling.
How to Reverse the Door
1. Separate the screw after separating the nut on the
left of the refrigerator door handle , then separate
refrigerator door handle . Separate the freezer
4
in the order in which you separating the refriger
door handle . (The hidden handle does not need t
procedu
re)
2. Separate the screw and bottom cover , then separate
the cap of bottom cover and install it on the
7
3
1
1
1
5
corresponding position on the right side. Separate the
hinge lower right and the pin after separating the
screw . Install the pin into the corresponding left hole
8
9
10
10
on the hinge lower. Separate the freezer door , then
remove t
12
he cpa on the door and install it on the
corresponding position on the right side. Separate the door
4
1
stop after your separating the screw , then install the
13
door stop on the corresponding position on the left.
3. Separate the cover of hinge upper , separate the two
16
wire . Separate the screw , separate the hinge middle
18
, then separate the refrigerator door .Separate cap
15
17
19
and install it on the corresponding position on the right.
Separate the door stop after your separating the screw
21
, then install the door stop on the corresponding position
on the left. Separate the screw , then separate the hinge
upper right .
24
22
23
2
the
door handle
at
or
his
6
11
20
3
2
2
2
7
6
5
19
20
1
3
4
12
11
14
13
15
23
24
18
17
10
9
8
16
22
21
Page 21

4. Destroy the two small caps on the front of the cover front
22
with a screw driver, then separate the screw and . Separate
2
the cover front . Move the wire to left, install the c
front and the screw. Take the small caps out of the alter
23
23
bag, then install the small c
6
aps.
24
23
2
5
over
nate
25
26
34
23
24
28
29
5. Remove the small cap of the refrigerator door , then
separate the small cap . Move the cable 29 from left to
27
28
corresponding position on the right. Install the small cap
then install the small cap on the corresponding positio
the ri
ght.
6. Install the hinge lower and the freezer door , then install
the hinge middle . Separate the cap on the upper le
tall the refrigerator door , take the hinge upper out of the
Ins
alte
rnate bag and install it on upper left. Pull out the wire
fro
small
caps. Ins
the individual holes and connect these cables. Take the
m
31
caps out of the alternate bag, then install the small
32
tall base cover .
7. Separate the cap on the right side of the door, then install it
27
9
18
19
6
33
34
19
the
28
,
n on
11
ft.
30
26 29
into the left screw hole (you can see this hole after the left ha
is removed). Install the handle and the screw which previo
separated on the corresponding position on the right.
hidden handle does not need this procedure) Then Install
compl
eted.
usly
(The
atio
n
ndle
27
19
17
18
11
9
6
31
30
2
2
32
26
3
3
5
29
33
33
Note
Reversing the doors is not covered by the warranty.
Page 22

Cuprins
Introducere
Instalare Instalare
Funcţionare
Înregistrare
Instrucţiuni legate de siguranţă
Identificarea componentelor
Punerea în funcţiune
Controlul temperaturii
Frigider
Congelator
Funcţie
Super congelator
Vacanţă
Blocare
Auto-testare
Cuburi de gheaţă
Dezgheţare
24
24
27
28
28
29
29
29
31
31
31
32
32
32
32
Sugestii de depozitare
a alimentelor
Întreţinere
Remedierea
problemelor
Pentru a inversa
orientarea uşilor
Dispozitivul pentru apă
Depozitarea alimentelor
Informaţii generale
Înlocuirea lămpii
Curăţare
Remedierea problemelor
Precauţii
Cum inversaţi orientarea uşii
23
33
35
36
36
37
39
41
41
Page 23

Introducere
Înregistrare
Introducere
Precauţii
Numărul de serie este unic şi corespunde numai acestui
aparat. Vă recomandăm să completaţi informaţiile cerute
mai jos şi să Păstraţi acest manual ca dovadă de cumpărare
Ataşaţi aici chitanţa.
Data achiziţionării :
Reprezentanţa :
Adresa reprezentan
Nr.de telefon al reprezentanţei :
Model nr. :
Nr.de serie :
ţei :
Instrucţiuni legate de siguranţă
Înainte de a fi utilizată, combina frigorifică trebuie
instalată şi amplasată în conformitate cu instrucţiunile
de instalare.
Nu scoateţi din priză combina frigorifică trăgând de
cablul de alimentare . Prindeţi ştecherul şi trageţi-I afară
din priză.
Când mutaţi aparatul de lângă perete,aveţi grijă să nu
striviţi sau să deterioraţi cablul de alimentare.
Când combina frigorifică funcţionează,nu atingeţi
suprafeţele reci din compartimentul de congelare,mai
ales când aveţi mâinile umede.Este posibil ca pielea să
se lipească de aceste suprafeţe reci.
Copiii trebuie supravegheaţi pentru a vă asigura că
nu se joacă cu aparatul.
24
Page 24

25
Page 25

26
Acest aparat con˛ine o cantitate mic„ de agent
frigorific cu izobutan (R600a), un gaz natural cu
compatibilitate ridicat„ de mediu, care este Óns„ ∫i
inflamabil. C‚nd transporta˛i ∫i instala˛i aparatul, ave˛i
grij„ s„ v„ asigura˛i c„ nu se deterioreaz„ nici o
component„ a circuitului frigorific.
Agentul frigorific care ˛‚∫ne∫te din ˛evi se poate
aprinde sau poate cauza v„t„m„ri la nivelul ochilor.
Dac„ se detecteaz„ o scurgere, evita˛i flac„ra deschis„
ori posibile surse de aprindere ∫i aerisi˛i Ónc„perea Ón
care se afl„ aparatul, timp de c‚teva minute.
Pentru a evita crearea unui amestec de gaz inflamabil Ón
cazul apari˛iei unei scurgeri Ón circuitul frigorific,
dimensiunea Ónc„perii Ón care se afl„ aparatul depinde de
cantitatea de agent frigorific folosit„. Œnc„perea trebuie s„
aib„ c‚te 1 m
2
pentru fiecare 8 g de agent frigorific R600a
din interiorul aparatului. Cantitatea de agent frigorific din
aparatul dvs. este ar„tat„ pe pl„cu˛a de identificare din
interiorul acestuia.
Nu porni˛i aparatul dac„ d„ semne de deteriorare. Dac„
ave˛i dubii, consulta˛i dealerul.
w
Aten˛ie
w
Ave˛i grij„ ca orificiile de ventilare ale aparatului sau
Óncastrate Ón acesta s„ nu fie obstruc˛ionate.
w
Nu folosi˛i instrumente mecanice sau alte mijloace de
accelerare a procesului de dezghe˛are, altele dec‚t
cele recomandate de produc„tor.
w
Nu deteriora˛i circuitul frigorific.
w
Nu folosi˛i aparate electrice Ón interiorul
compartimentelor de p„strare a alimentelor, dec‚t
dac„ sunt de tipul recomandat de produc„tor.
w
Agentul frigorific ∫i gazul de refulare folosite la aparat
necesit„ proceduri speciale de evacuare. Pentru
evacuare, consulta˛i agentul de service sau o
persoan„ cu calific„ri similare.
Introducere
Page 26

27
Introducere
Identificarea componentelor
Colţ pentru utilităţi
(detaşabil)
Raft de sticlă detaşabil
(2 sau 3)
Lampă
Duză cu fluxuri
multiple de aer
Zona proaspătă
(opţional)
Controlul temperaturii
frigiderului
Compartiment pentru
legume
Pentru păstrarea în stare
proaspătă a fructelor,
legumelor etc.
(1 sau 2)
Tavă pentru cuburi
de gheaţă
Compartiment
de congelare
Plintă detaşabilă
Rafturi de uşă
(2,3,5)
Tavă pentru ouă
(1 sau 2)
Rezervor pentru
apă
Mânere
(opţional)
Raft pentru
sticle de 2l.
Picior rotativ
pentru echilibrare
Not
ă
Dacă unele componente lipsesc din combina
frigorifică, acestea corespund altor modele.
Page 27

28
Page 28

Panou de
afişare a
funcţiilor
MAX MIN
7
6
5
4
TEMP. CONTROL
Panou de afişaj pentru controlul temperaturii
1
2
3
Buton Super
congelator
Buton de reglare a temperaturii pentru
compartimentul congelatorului
29
Buton blocare
Buton Vacation (Vacanţă)
Page 29

• Temperatura iniţială din compartimentul congelatorului
30
este -18°C. Acum puteţi regla temperatura din
compartiment, după dorinţă.
< Tip LED 88 >
<Tip LED BAR >
• Când apăsaţi butoanele de control al temperaturii,
temperatura din compartimentul congelatorului se
schimbă în următoarea ordine:
Compartimentul congelatorului la Tipul LED 88:
-18°C → -19°C → -20°C → -21°C → -22°C → -23°C
→ -15°C → -16°C → -17°C
Compartimentul congelatorului la Tipul LED BAR:
-19°C → -21°C→ -23°C → -15°C → -17°C
Notă
Temperatura interioară reală variază în funcţie de
starea alimentelor, deoarece temperatura indicată
este o temperatură ţintă, nu cea reală din frigider.
Funcţia de refrigerare este slabă la început.
Reglaţi temperatura ca mai sus, după ce aţi folosit
frigiderul cel puţin 2-3 zile.
Page 30

Funcţie
Super congelator
nţă
Vaca
• Vă rugăm, selectaţi această funcţie pentru o congelare rapidă.
• Această funcţie se foloseşte dacă doriţi să congelaţi rapid
alimentele. Apăsaţi butonul ‘SUPER FRZ.’(Super congelator)
o dată; funcţia de congelare rapidă este pornită, iar becul se
aprinde.
• Funcţia de super congelare durează circa 3 ore. Când ia sfârşit,
se revine automat la setarea de temperatură anterioară. Dacă
doriţi să opriţi funcţia de congelare rapidă, apăsaţi încă o dată
butonul ‘SUPER FRZ.’, becul se stinge, iar funcţia de Super
congelare se opreşte şi frigiderul revine la setarea de
temperatură anterioară.
Dacă se selectează
“On”
Dacă se selectează
“Off”
• Această funcţie introduce frigiderul cu congelator într-un
mod de funcţionare cu economisire a energiei, care este util
dacă plecaţi în vacanţă, consumul de curent reducându-se
la maxim.
Prin apăsarea butonului ‘VACATION’, funcţia este activată iar
becul se aprinde; la încă o apăsare, funcţia este oprită.
31
Dacă se selectează
“On”
Dacă se selectează
“Off”
Page 31

Blocare
• Prin apăsarea acestui buton se opreşte funcţionarea celorlalte
butoane.
• La fiecare apăsare a butonului ‘CHILD LOCK’ se repetă
secvenţa “Locking” (“Blocare”) şi “Un-Locking” (“Deblocare”).
(Pentru “Blocare” sau “Deblocare” apăsaţi butonul ‘CHILD
LOCK’ timp de 2 secunde.)
• Când este activată funcţia ‘CHILD LOCK’, celelalte butoane
nu vor reacţiona la apăsare.
Dacă se selectează
“LOCK”
Dacă se selectează
“UNLOCK”
32
Page 32

Caracteristici
Dispozitivul pentru apă
CLAPETĂ
GRĂTAR
TAVĂ PENTRU
PICĂTURI
MĂNER RECIPIENT
CAPAC RECIPIENT
(MIC)
CAPAC RECIPIENT
(MARE)
Instalare
RECIPIENT PENTRU
APĂ
ASAMBLU SUPAPĂ
• Montaţi ASAMBLU SUPAPĂ după ce l-aţi îmbinat corect
cu ORIFICIUL UŞII.
33
Page 33

34
Page 34

35
Page 35

36
Page 36

37
Page 37

GRĂTAR şi a TAVĂ
PENTRU PICĂTURI
Scoateţi GRĂTAR, ştergeţi umezeala formată în zona
UŞII şi a
cârpe curate.
Ştergeţi umezeala formată în exteriorul Dozatorului şi de
pe CLAPETĂ cu o cârpă.
TAVĂ PENTRU PICĂTURI
cu ajutorul unei
38
Page 38

39
Page 39

40
Page 40

Pentru a inversa orientarea uşilor
Frigiderul dvs. cu congelator este proiectat cu uşi reversibile, astfel încât acestea
se pot deschide fie pe stânga, fie pe dreapta, în funcţie de bucătăria dvs.
Precauţii
1. Înainte de schimbarea orientării uşii, trebuie ca mai întâi să scoateţi alimentele
şi accesoriile precum rafturile sau tăvile, care nu sunt fixate în frigiderul cu
congelator.
2. Folosiţi şurubelniţa în cruce sau o cheie de piuliţe pentru a fixa sau a scoate
şuruburile.
3. Nu culcaţi frigiderul cu congelator la orizontală. Pot apărea probleme.
4. Aveţi grijă să nu lăsaţi uşile să cadă în timpul demontării sau montării.
Cum inversaţi orientarea uşii
1. Separaţi şurubul după ce aţi detaşat piuliţa
2
din partea stângă a mânerului uşii frigiderului
1
, apoi separaţi mânerul uşii frigiderului .
Separaţi mânerul uşii congelatorului în
aceeaşi ordine în care aţi separat mânerul uşii
frigiderului . (Mânerul ascuns nu necesită
această procedură).
2. Separaţi şurubul şi apărătoarea inferioară
, apoi detaşaţi capacul al apărătorii
6
inferioare şi instalaţi-l în poziţia
corespunzătoare pe partea dreaptă.
Separaţi balamaua inferioară din partea
dreaptă şi bolţul , după ce aţi separat
şurubul . Instalaţi bolţul în orificiul
9
8
corespunzător din partea stângă a
balamalei inferioare. Separaţi uşa
congelatorului şi apoi scoateţi
căpăcelul al uşii şi instalaţi-l în poziţia
12
corespunzătoare pe partea dreaptă.
Detaşaţi opritorul uşii , după ce aţi
separat şurubul , apoi instalaţi-l în poziţia
corespunzătoare pe partea stângă.
3. Separaţi apărătoarea balamalei superioare
15
, detaşaţi cele două fire . Separaţi
şurubul , balamaua din mijloc şi apoi
detaşaţi uşa frigiderului . Separaţi capacul
20
şi instalaţi-l în poziţia corespunzătoare pe
partea dreaptă. Detaşaţi opritorul uşii ,
după ce aţi separat şurubul , apoi instalaţi-l
în poziţia corespunzătoare pe partea stângă.
Separaţi şurubul şi apoi detaşaţi balamaua
superioară din dreapta .
17
3
1
4
1
5
7
10
10
6
11
4
1
13
16
18
19
22
21
23
24
3
2
2
2
7
5
19
20
1
3
4
12
11
14
13
15
23
24
18
17
10
9
8
16
22
21
41
Page 41

4.
Distrugeţi cele două căpăcele din partea din faţă
a apărătorii frontale cu o şurubelniţă, apoi
separaţi şuruburile şi . Separaţi apărătoarea
frontală . Mutaţi firul la stânga, instalaţi
23
apărătoarea frontală şi şurubul. Scoateţi
23
2
5
24
2
6
23
căpăcelele din punga cu piese şi instalaţi-le.
25
26
34
23
24
28
27
29
5.
Scoateţi căpăcelul de la uşa frigiderului şi
separaţi căpăcelul . Mutaţi cablul din stânga
27
28
19
29
în poziţia corespunzătoare de pe partea dreaptă.
Instalaţi căpăcelul şi apoi căpăcelul în poziţia
28
27
corespunzătoare de pe partea dreaptă.
6.
Instalaţi balamaua inferioară şi uşa congelatorului
11 18
, apoi instalaţi balamaua inferioară . Separaţi
capacul de la frigiderul. Instalaţi uşa frigiderului
19
, scoateţi balamaua superioară din punga cu piese
34
9
30
şi instalaţi-o în partea din stânga sus. Trageţi afară firele
26 29
din orificiile individuale şi conectaţi aceste cabluri.
31
32
6
33
Scoateţi căpăcelele din punga cu piese şi
instalaţi-le. Instalaţi apărătoarea bazei .
7.
Separaţi capacul din partea dreaptă a uşii şi
instalaţi-l în orificiul filetat din partea stângă (puteţi
vedea acest orificiu după ce aţi scos mânerul din
stânga). Instalaţi mânerul şi şurubul care a fost separat
anterior în poziţia corespunzătoare de pe partea dreaptă.
(Mânerul ascuns nu necesită această procedură).
Instalarea este acum completă.
19
17
18
11
9
6
31
30
2
2
32
26
3
3
5
29
33
33
Notă
Inversarea uşilor nu este acoperită de garanţie
Page 42

P/No. MFL37432216
 Loading...