

Lg GR-409GLPA User Manual

FRIDGE-FREEZER
User's Guide
Please read this User's Guide carefully before
operating and keep it handy for reference at all times.
CHLADNI»KA-MRAZNI»KA
N¡VOD K POUÆITÂ
P¯ed pouæitÌm spot¯ebiËe si peËlivÏ p¯eËtÏte tento
n·vod a uschovejte jej pro pozdÏjπÌ pouæitÌ.
KOMBINOVAN¡
CHLADNI»KA S
MRAZNI»KOU
N¡VOD PRE UÆÂVATE•A
Pozorne si, prosÌm, preËÌtajte tento n·vod pre uæÌvateµa
pred prev·dzkou a majte ho vædy poruke pre prÌpad
potreby.
FAGYASZT” …S H¤T’G…P
HASZN¡LATI ⁄TMUTAT”
A berendezÈs elindÌt·sa elıtt kÈrj¸k ismerkedjen meg
rÈszletesen az al·bbi ˙tmutatÛval Ès ırizze meg az
esetleges kÈsıbbi felhaszn·l·s cÈlj·bÛl.
LOD”WKAZAMRAØARKA
INSTRUKCJA UØYTKOWNIKA
Przed uruchomieniem zestawu prosimy dok≥adnie
zapoznaÊ siÍ z niniejsz± instrukcj±. i zachowaÊ j± do
wykorzystania w przysz≥o∂ci.

3
Registration
Important Safety Instruction
Identification of Parts
Installation
Starting
Temperature Control
Quick Freeze
Vacation
Self Test
Door Alarm
Ice Making
Defrosting
Water Dispenser
Storing Food
General Information
Lamp Replacement
Cleaning
Trouble Shooting
Precaution
How to Reverse the Doors
Table of Contents
Introduction
Installation
Operation
Suggestion On
Food storage
Care and
Maintenance
Trouble Shooting
To Reverse the
Doors
4
4
6
7
7
8
8
9
9
9
9
9
10
12
13
14
16
18
18
13
Introduction
4
The model and serial number are found on the rear of
this unit. This number is unique to this unit and not
available to others. You should record requested
information here and retain this guide as a permanent
record of your purchase. Staple your receipt here.
Date of Purchase :
Dealer Purchased From :
Dealer Address :
Dealer Phone No. :
Model No. :
Serial No. :
Important Safety Instruction
This fridge-freezer must be properly installed and
located in accordance with the Installation
Instruction before it is used.
Never unplug your fridge-freezer by pulling on the
power cord. Always grip plug firmly and pull straight out
from the outlet.
When moving your appliance away from the wall,
be careful not to roll over or damage the power
cord.
After your fridge-freezer is in operation, do not
touch the cold surfaces in the freezer compartment,
particularly when hands are damp or wet. Skin may
adhere to these extremely cold surfaces.
Registration
Introduction
Precaution

Introduction
5
Pull out the power plug prior to cleaning the fridge-freezer.
Never damage, serverely bend, pull out, or twist the power cord because
power cord damage may cause a fire or electronic shock.
Never place glass products in the freezer because they may be
broken when their inner contents are frozen.
It will cause electric shock or fire.
If possible, connect the fridge-freezer to its own individual
electrical outlet to prevent it and other appliances or household
lights from causing an overload.
The supply plug of the refrigerator-freezer should be placed in
easy accessible position for quick disconnection in emergency.
If the supply cord is damaged, it must be replaced by the
manufacturer or its service agent or a similarly qualified person
in order to avoid a hazard.
Don't store or use gasoline or other flammable vapors and
liquids in the vicinity of this or any other appliance.
In the event of an electric short circuit, grounding (earthing) reduces
the risk of electric shock by providing an escape wire for the electric
current. In order to prevent possible electric shock, this appliance
must be grounded. Improper use of the grounding plug can result in
an electric shock. Consult a qualified electrician or service person if
the grounding instructions are not completely understood, or if you
have doubts on whether the appliance is properly grounded.
Important Safety Instruction
Precaution
Do not modify or
extend the Power
Cord length
Don't Use an
Extension Cord
Accessibility of
Supply Plug
Supply Cord
Replacement
Danger
Don't store
Grounding
(Earthing)
ww
Warning
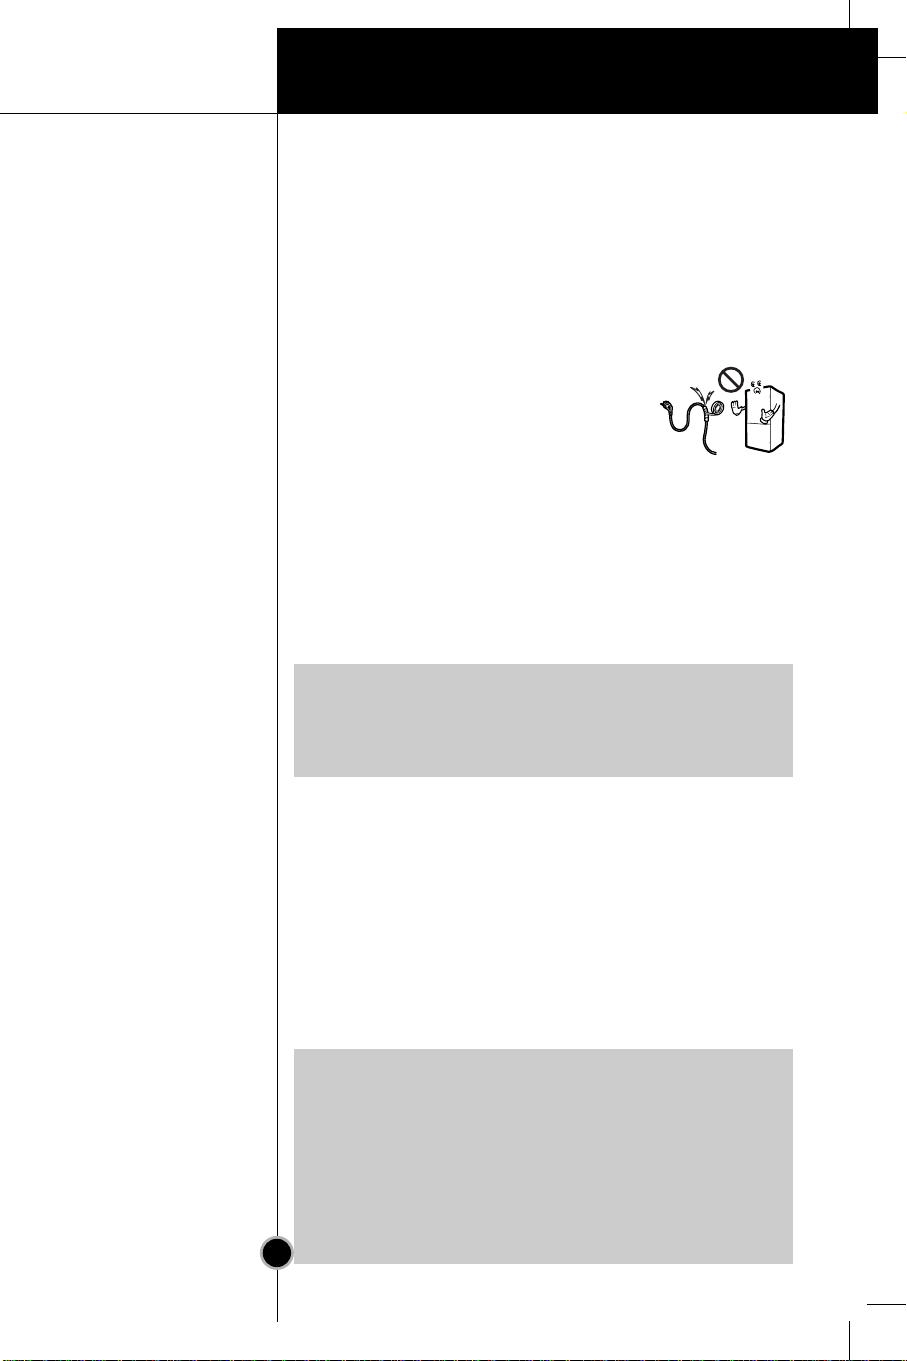
Risk of child entrapment.
Before you throw away your old refrigerator or freezer:
Take off the doors.
Leave the shelves in place so that children may not easily
climb inside.
ww
Keep ventilation openings, in the appliance enclosure or in
the built-in structure, clear of obstruction.
ww
Do not use mechanical devices or other means to accelerate
the defrosting process, other than those recommended by
the manufacturer.
ww
Do not damage the refrigerant circuit.
ww
Do not use electrical appliances inside the food storage
compartments of the appliance, unless they are of the type
recommended by the manufacturer.
ww
The refrigerant and insulation blowing gas used in the
appliance require special disposal procedures. When disposal,
please consult with service agent or a similarly qualified person.
Introduction
6
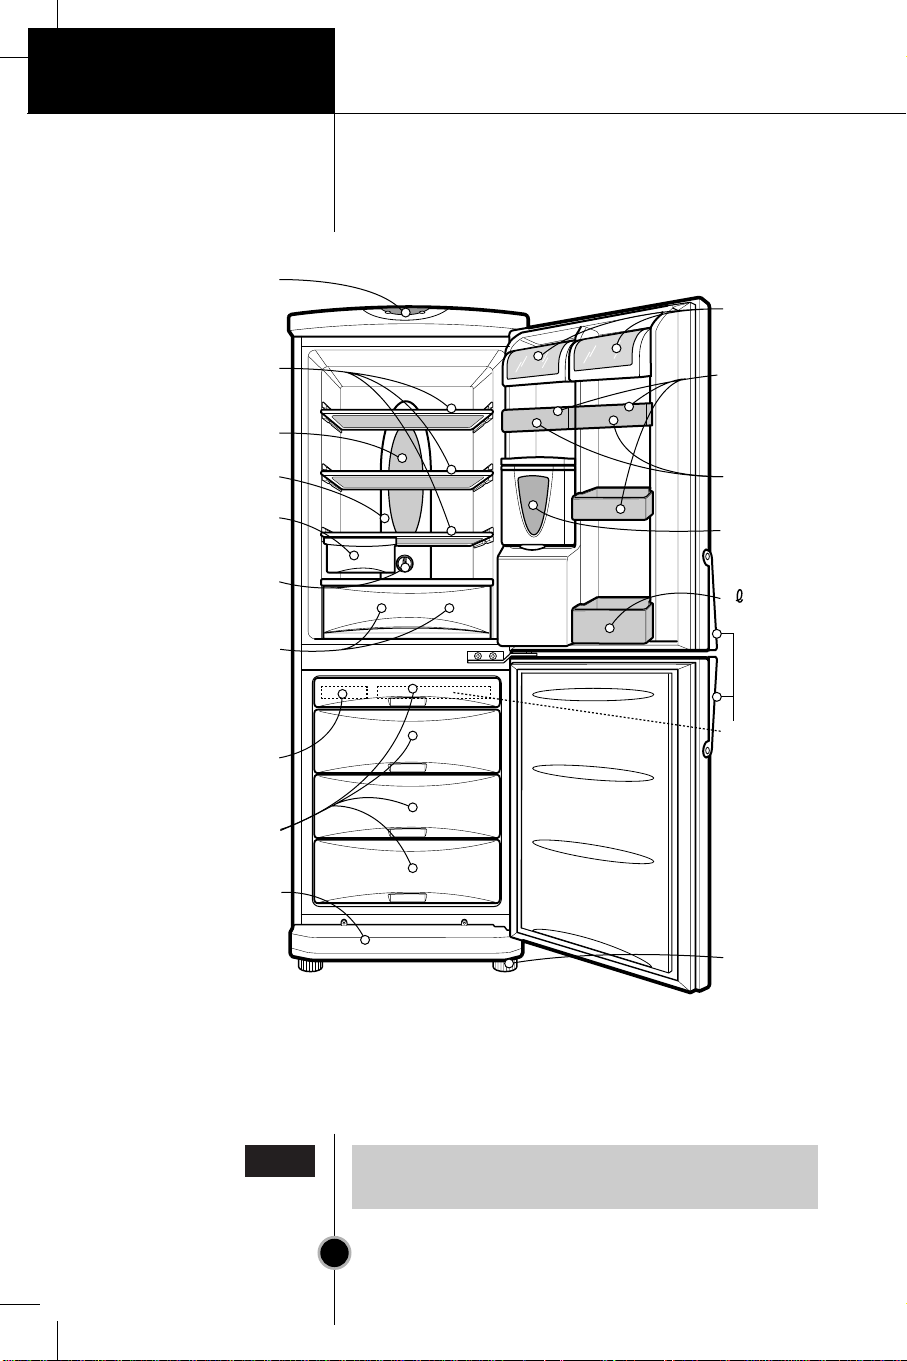
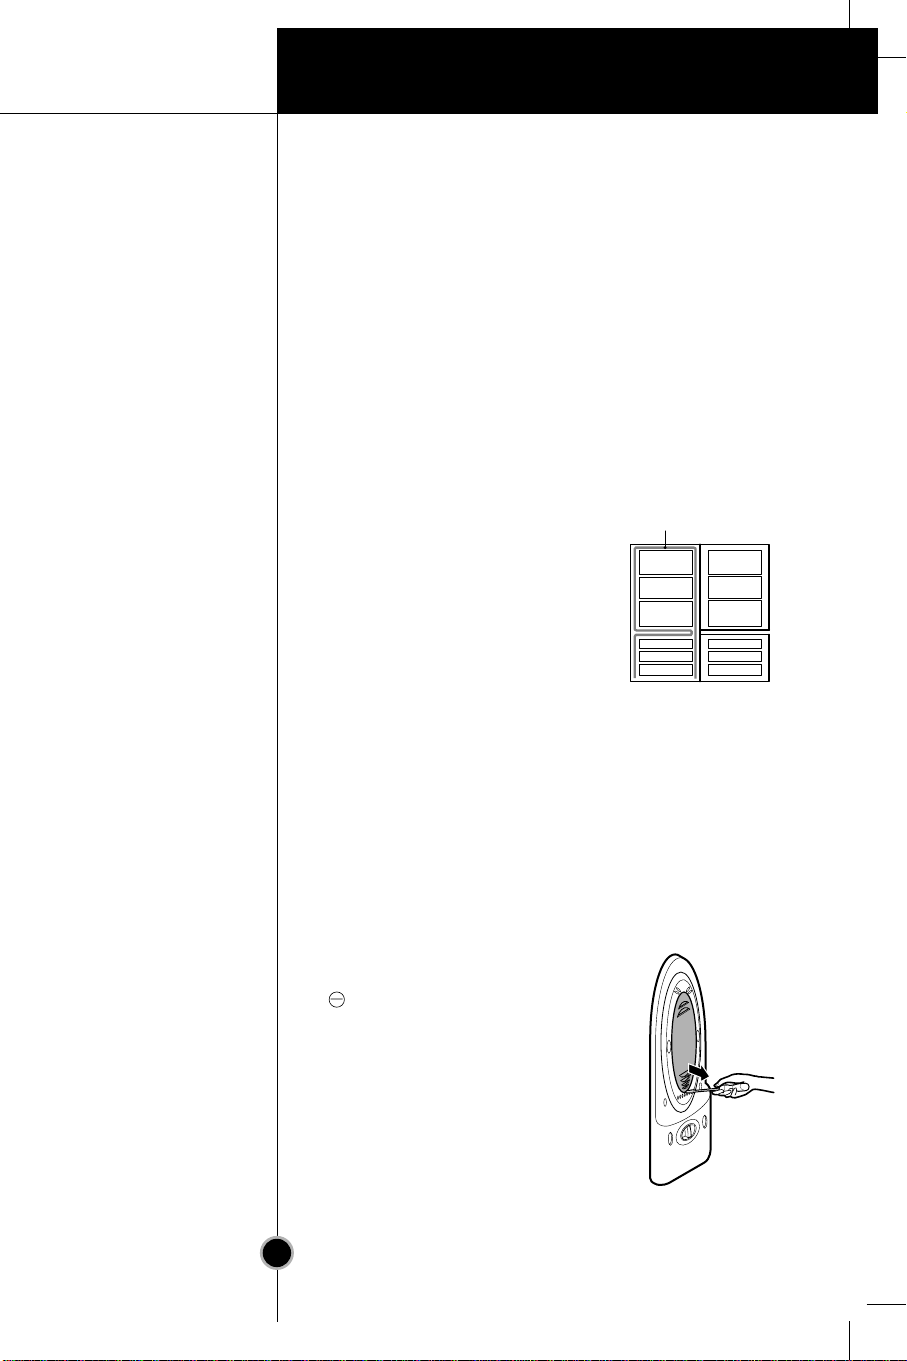
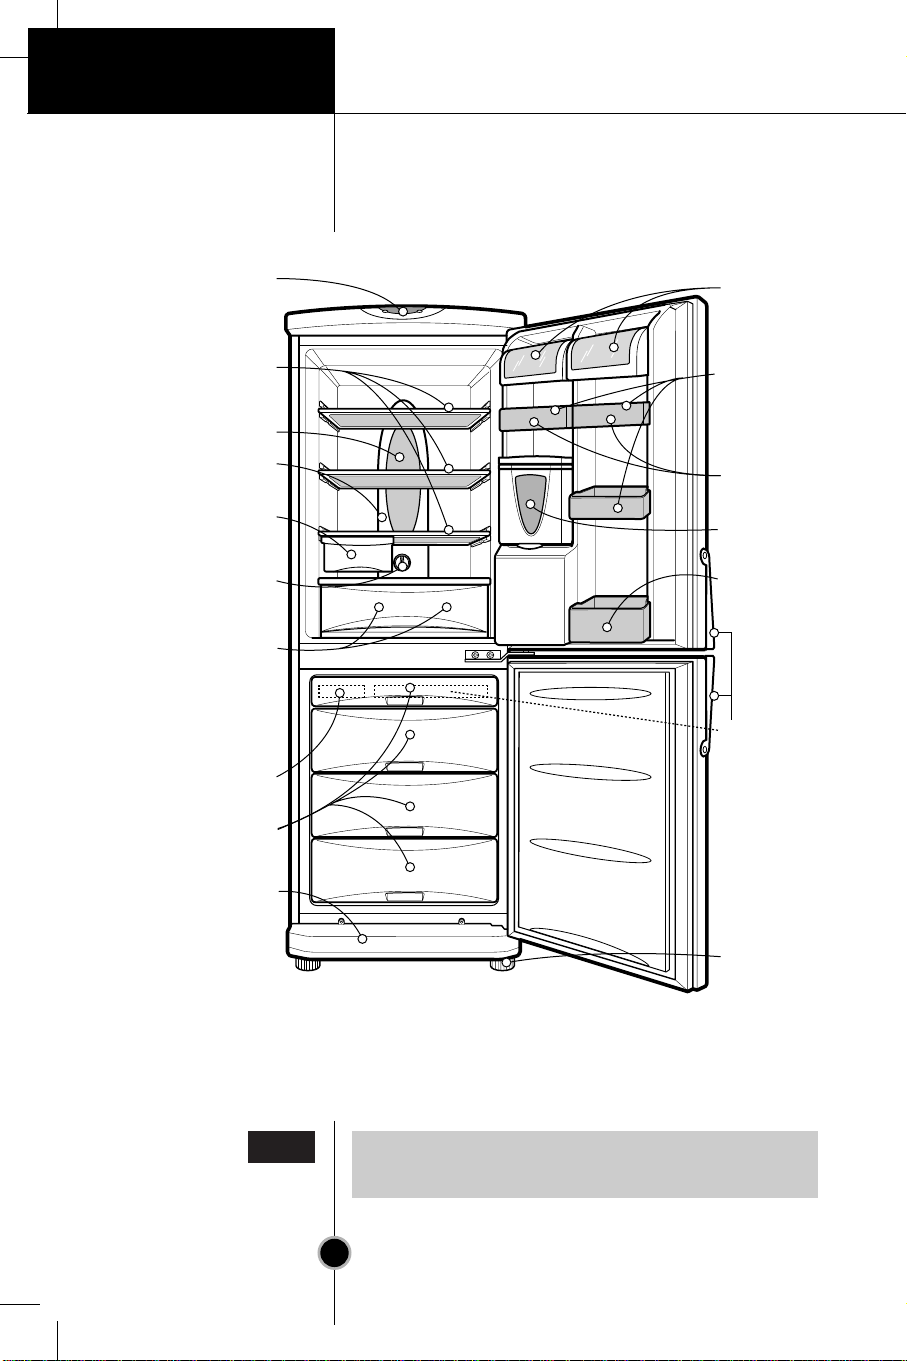
Identification of Parts
If you found some parts missing from your unit,
they may be parts only used in other models.
Door Basket
(2, 3, 4)
Utility Corner
(movable, 1 or 2)
Egg Tray(1 or 2)
Freezer Temperature
Control
Removable
Glass Shelf(2 or 3)
Lamp
Multi-air Flow Duct
Fresh Zone
(Optional)
Refrigerator
Temperature Control
Vegetable Drawer
Used to keep fruits
and vegetables, etc.
fresh and crisp.
Ice Cube Tray
Freezer
Compartment
Removable
Plinth
2 Bottle
Door Basket
Leveling Screw
Handle
(user install)
Water Tank
(optional)
Note
Installation
7
1.
Select a good location.
Place your fridge-freezer where it is easy to use.
2.
Avoid placing the unit near heat sources,
direct sunlight or moisture.
3.
There must be proper air circulation around your
fridge-freezer to keep it operating efficiently.
4.
To avoid vibration, the unit must be leveled.
If required, adjust the leveling screws to compensate
for the uneven floor.
The front should be slightly higher than the rear to aid
in door closing.
Leveling screws can be turned easily by tipping the
cabinet slightly.
Turn the leveling screws counterclockwise( ) to
raise the unit, clockwise( ) to lower it.
5.
Clean your fridge-freezer thoroughly and wipe off all
dust accumulated during shipping.
6.
Install accessories such as ice cube box, etc., in their
proper places.They are packed together to prevent
possible damage during shipment.
7.
Connect the power supply cord (or plug) to the outlet.
Don't double up with other appliances on the same
outlet.
8.
To ensure proper air circulation around the fridge freezer, please maintain sufficient space on both the
sides as well as top and maintain at least 2 inches (5
cm) from the rear wall.
When your fridge-freezer is installed, allow it 2-3 hours to
stabilize at normal operating temperature prior to filling
it with fresh or frozen foods.
If power plug is disconnected, allow 5 minutes delay
before restarting.
Your fridge-freezer is now ready for use.
Installation
Starting
Operation
8
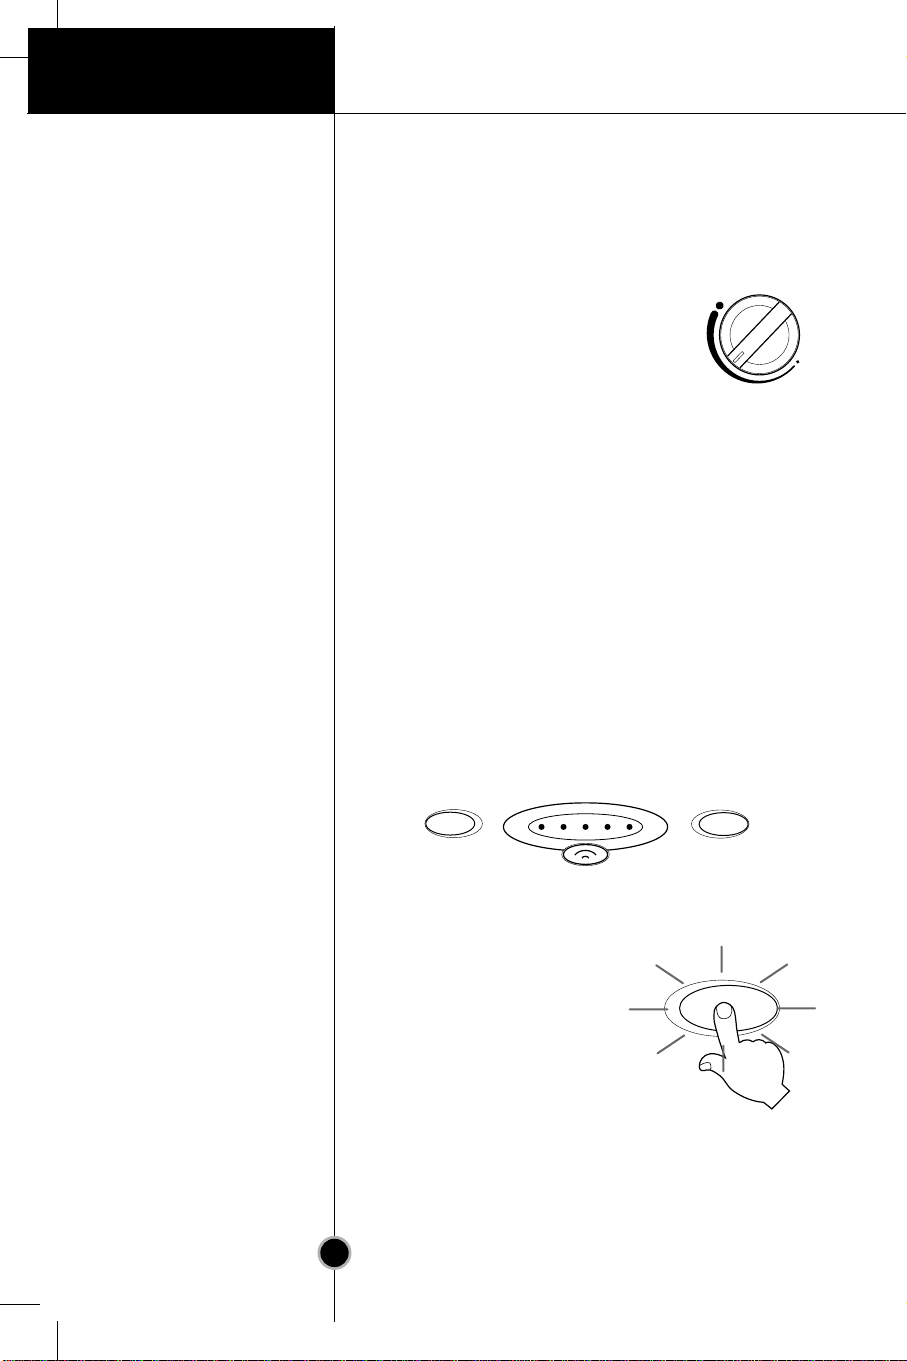
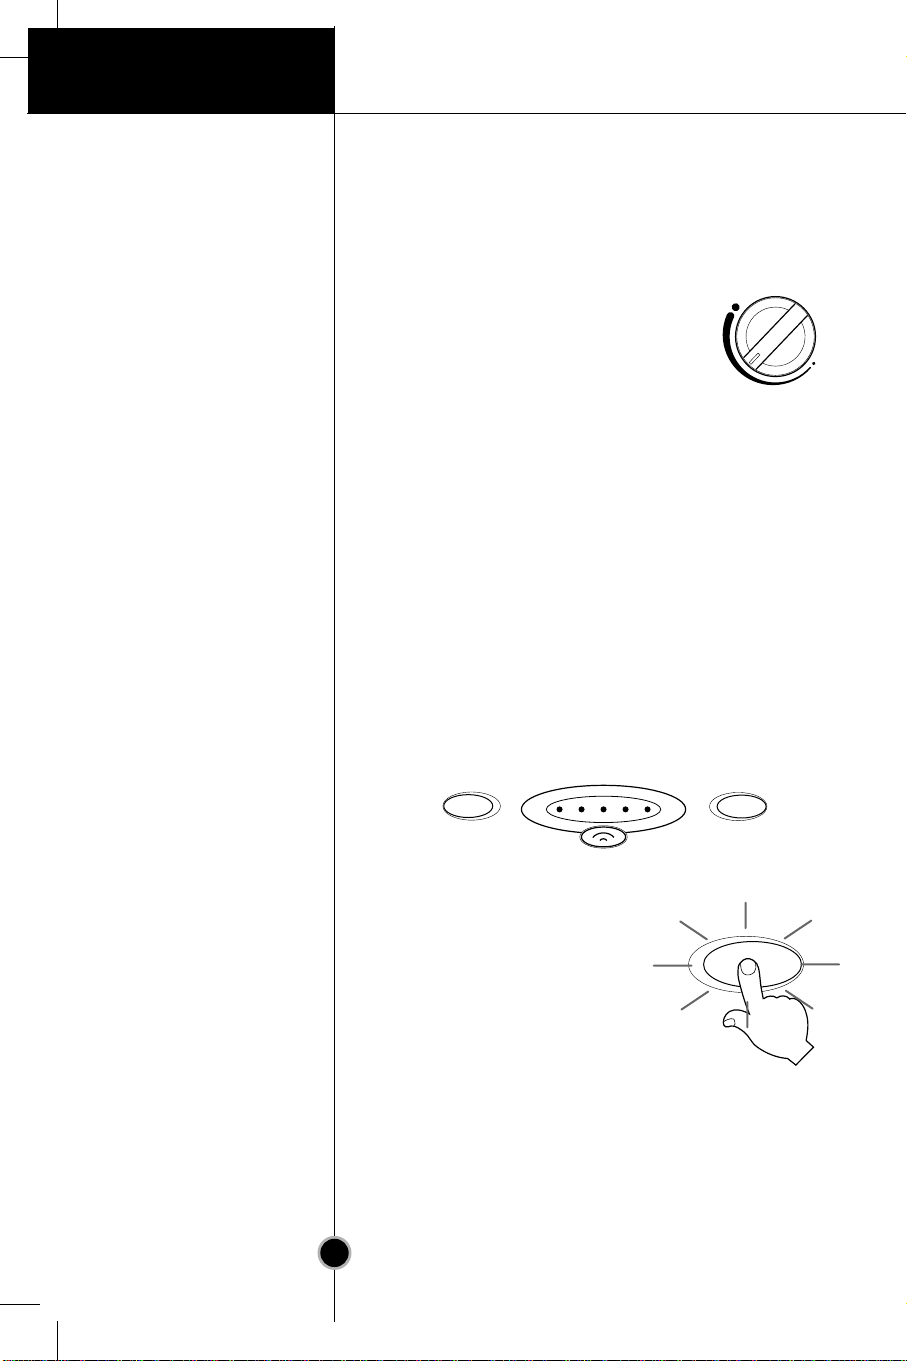
Your fridge-freezer has two controls that let you regulate
the temperature in the fridge and freezer compartments.
• Initially set the TEMP. CONTROL
at "4". Then adjust the
compartment temperature
according to your desire.
• If you want an inside temperature
slightly less cold or colder, turn the
knob towards MIN or MAX, respectively.
When the surrounding temperature is low, adjust the
TEMP. CONTROL 'MIN'.
• Freezer temperature control is on the top of the fridgefreezer. Initially set the Freeze Temp at mid-point. By
pressing the Freezer Temp button, you can adjust the
temperature of the Freezer as indicated by the numbers
of lamps lit.(the setting is composed of five steps,
5 lamps lit indicates coldest.)
• When you starting the Fridge-Freezer or connecting the
power plug to the outlet, temperature setting is
automatically set to the mid-point.
• This function is used when
you want to freeze the foods
quickly. Press the 'QUICK
FREEZE' button once, and
then the quick freeze
operation starts with the
lamp lit.
The quick freeze operation
takes about 3 hours.
When its operation ends,
it automatically returns to the normal state.
If you want to stop the quick freeze operation, press
the 'QUICK FREEZE' button once more, the lamp goes
out, and the quick freeze operation stops and the
refrigerator returns to the normal state.
Temperature Control
Fridge
Freezer
Quick Freeze
TEMP. CONTROL
7
MAX
MIN
1
6
5
4
2
3
FREEZE TEMP
VACATION QUICK FREEZE
QUICK FREEZE
Operation
9
This function makes the fridge-freezer
work in a power saving mode which is
useful for when you are away on
holiday, by reducing energey
consumption as much as possible.
Pressing 'VACATION' starts operation
with lamp ON and pressing it again
stops the operation.
For better functioning, you should set
the TEMP. CONTROL to "MIN".
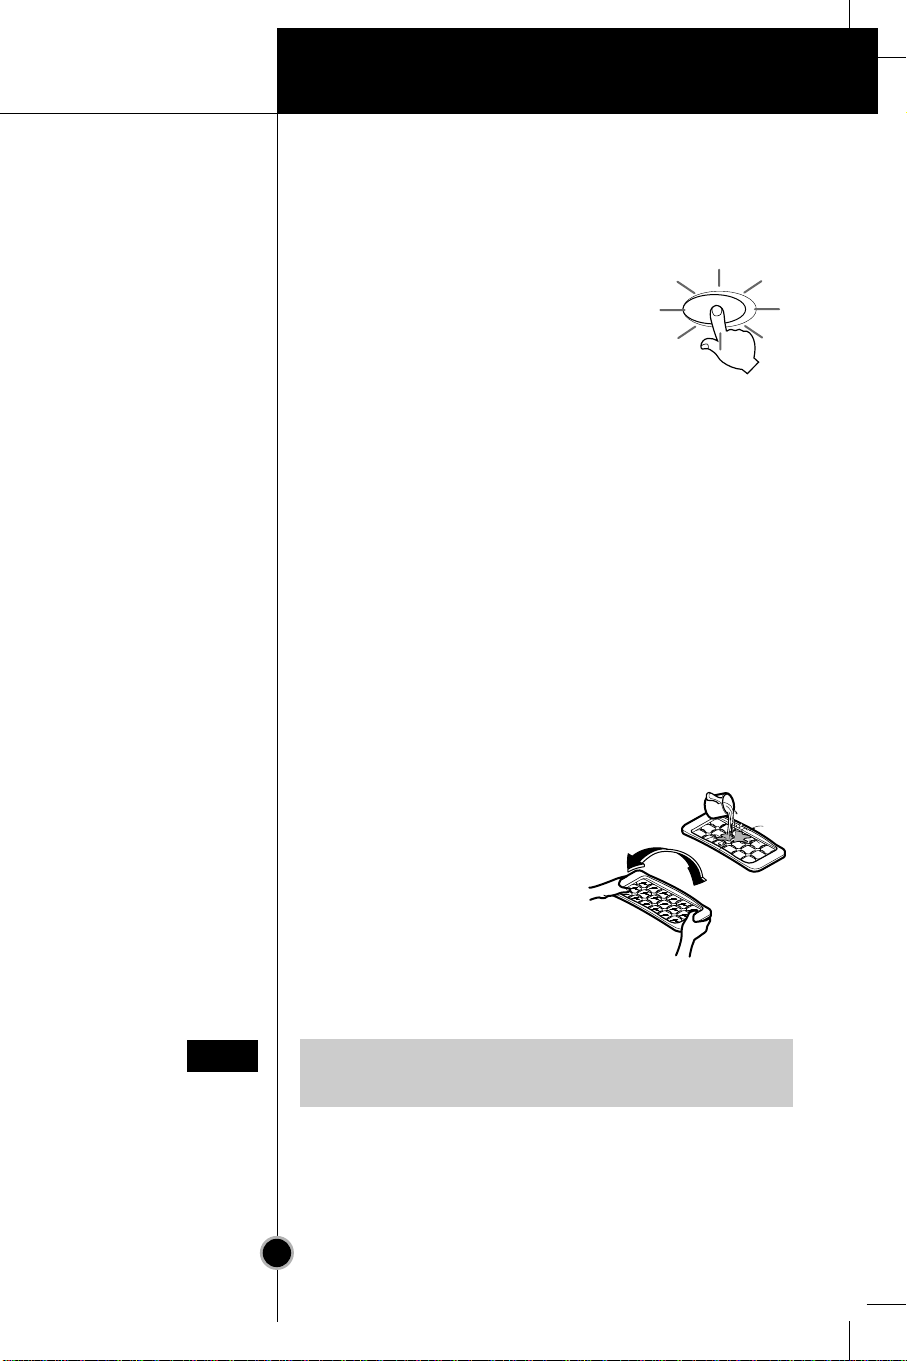
This function allows you to check for operational
problems. If you think you have a problem with your
fridge-freezer, then press the temperature control button:
- If the indicate lights move up or down, then there is no
problem with your fridge-freezer.
- If the indicate lights do not move up or down, then
please leave the power connected and call your nearest
service agent.
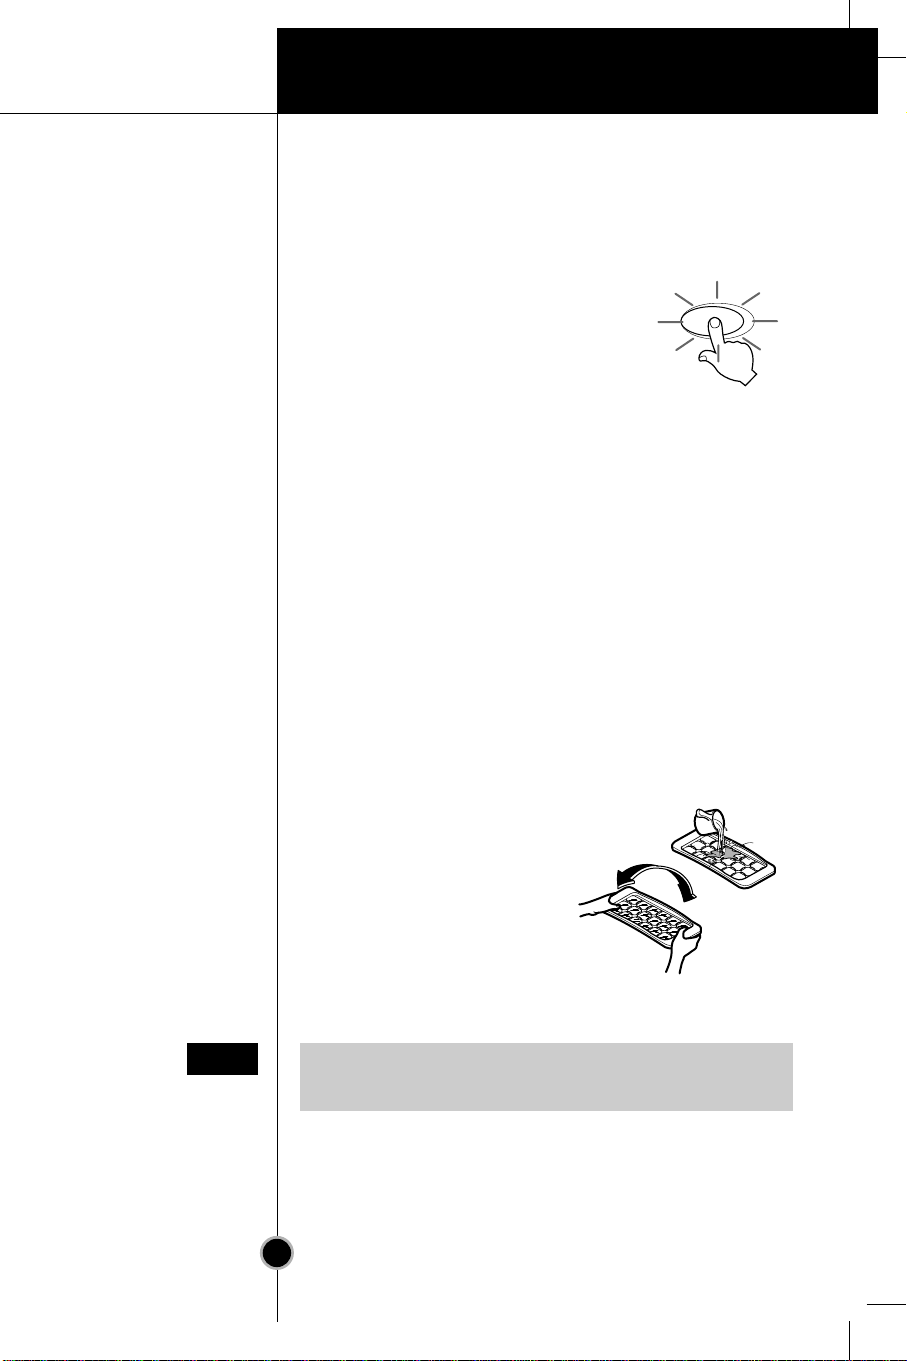
When the door of the fridge is left opened for a while,
the alarm sounds.
• To make ice cubes, fill the
ice tray to the water level
and place it in the freezer.
• If ice cubes are required
fast, press the 'QUICK
FREEZE' button.
• To remove ice cubes,
hold the tray at its ends and twist gently.
Defrosting takes place automatically.
The defrosting water flows down to the evaporating tray
and is evaporated automatically.
Vacation
Self Test
Door Alarm
Ice Making
Defrosting
VACATION
To remove ice cubes easily, run water on the tray
before twisting.
Tip
Please assemble the VALVE ASSEMBLY after correctly
adjusting it with a DOOR HOLE.
Operation
10
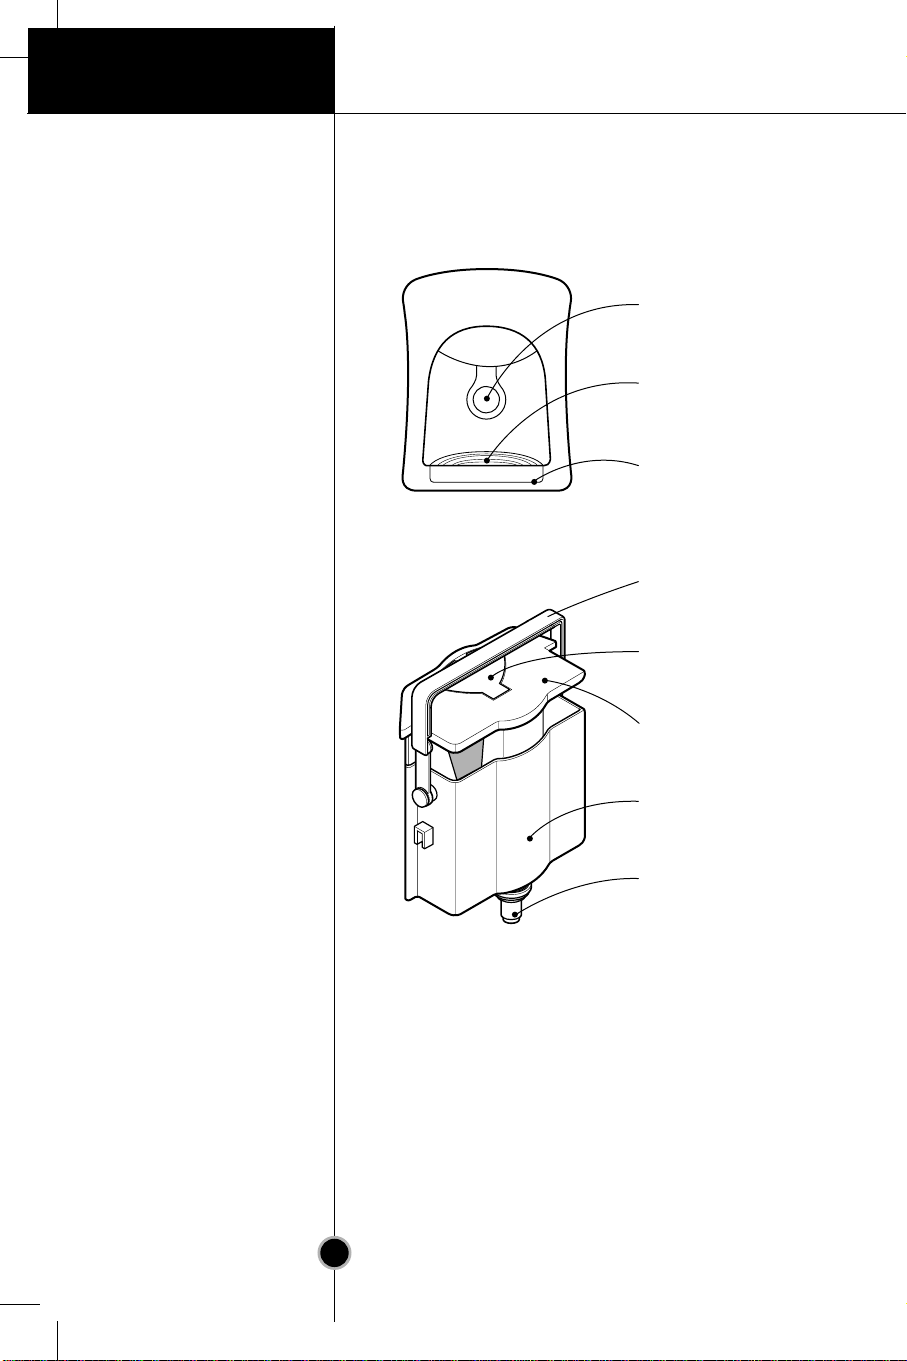
Water Dispenser (optional)
Features
Install
DISPENSER PAD
GRILLE
DRIP TRAY
HANDLE TANK
CAP TANK(SMALL)
CAP TANK(BIG)
WATER TANK
VALVE ASSEMBLY
Operation
11
Filling of
WATER TANK
Drinking
Caution
Do not use other beverage (milk, juice, carbonated
beverage etc) than spring water. Especially beverage
including grain must not be used (may result in failure).
1.
After turning the HANDLE Tank backward with the
WATER TANK installed at the DOOR, Open the CAP
TANK (SMALL) and then fill water using a kettle etc.
* Fill water while watching a sight glass on the front of
the WATER TANK.
* Water up to 4.5lcan be filled.
2.
Press and fix the CAP TANK(SMALL).
3.
After filling spring water, fix the HANDLE TANK at a
proper position.
1.
Press the Dispenser Pad with a cup.
2.
If pressing the Pad, water inside of the Dispenser is
supplied.
3.
If slowly removing a cup from the Pad, water will not
fall down.

Suggestions on food storage
12
Storing Food
If you keep the fridge-freezer in a hot, and humid place,
frequently open its door or put a lot of vegetables in it,
dew may form in it, which has no effect on its
performance.
Remove the dew with dust cloth free from care.
Note
• Do not store food which goes bad easily at low
temperature, such as banana, and melon.
• Allow hot food to cool prior to storing. Placing hot food
in the fridge-freezer could spoil other food, and lead to
higher electric bills.
• When storing the food, use a container with a lid. This
prevents moisture from evaporating, and helps food to
keep its taste and nutrients.
• Do not block air vents with food. Smooth circulation of
cold air keeps fridge-freezer temperature even.
• Do not open the door frequently. Opening the door lets
warm air enter the fridge-freezer, and cause
temperature to rise.
• To adjust the temperature control easily, do not store
food near the temperature control dial.
• Never keep too many foods in door rack, as this may
stop the door from fully closing.
• Do not store bottles in the freezer compartment - they
may break when frozen.
• Do not refreeze food that has been thawed. This causes
loss of taste and nutrition.
13
Care and Maintenance
• 1~2 hour power failure does no harm to the foods
stores. Try to avoid opening and closing the door too
frequently.
• Take out foods from the fridge-freezer and firmly fix the
loose items with tape.
• Turn the leveling screws until they stop before moving
the fridge-freezer. Otherwise the screw may scratch the
floor or the fridge-freezer cannot move.
• The Anti-Condensation pipe
is installed around the front
side of fridge-freezer as well
as on the partition between
fridge compartment and
freezer compartment to
prevent dewing.
• Especially after installation or
when ambient temperature is high, the fridge-freezer
may feel hot, which is quite normal.
Lamp Replacement
1.
Unplug the power cord from the outlet.
2.
Remove fridge shelves.
3.
To remove the lamp cover, insert
type driver in the underside
of the lamp cover and pull it out
forwards.
4.
Turn the lamp counterclockwise.
5.
Assemble in reverse order of
disassembly.
Replacement lamp must be the
same specification as original.
• You must check the O-RING,
which is made by rubber and prevent electric spark.
General Information
Power Failure
If You Move
Anti Condensation
Pipe
Anti-Condensation
Pipe
14
Care and Maintenance
Be sure to unplug the power.
Clean the outside of the fridge-freezer with a soft cloth
soaked with hot water or liquid detergent. If you use a
detergent, be sure to wipe it with a clean wet cloth.
As above.
Check that the power cord is not damaged, power plug
has not overheated, and that the power plug is tightly
inserted into the outlet.
Cleaning
Before Cleaning
Exterior
Interior
After Cleaning
w
Warning
Be sure to dry the appliance with a cloth after washing
it with water.
Do not use abrasive, petroleum, benzene, thinner,
hydrochloride acid, boiling water, rough brush, etc,
as they may damage parts of the fridge-freezer.

Care and Maintenance
15
1.
After removing the HOLE part of the GRILLE with the
finger, slowly pull the DRIP TRAY out.
2.
A fter discharging Drip Water inside of the DRIP TRAY,
clean and fully rinse the GRILLE and the DRIP TRAY.
3.
Wipe moisture out around the DOOR part and the
DRIP TRAY using a clean cloth.
Wipe moisture etc out outside of Dispenser and on the
Dispenser Pad using a cloth.
1.
Lift the WATER TANK up by pressing the fixing LEVER
on the bottom of WATER TANK and then remove it.
2.
After removing the CAP TANK (BIG), clean and fully
rinse the inside/outside part of the WATER TANK by
using neutral cleansing agent.
Clean and fully rinse the Cap Tank (Big & Small) by using
neutral cleansing agent.
Especially for the groove part of the CAP TANK, it is
convenient to cleanse it by using a small brush.
Clean and fully rinse the VALVE ASSEMBLY by using a
small brush. Rinse it while operating the bottom part of
the valve assembly. Always fix the Sealing Rubber
separated for cleansing at the existing position (may
result in water leakage).
GRILLE and DRIP
TRAY
Exterior Dispenser
Water Tank
Cap Tank(Big &
Small)
Valve Assembly

Trouble Shooting
16
Possible Causes
• Power plug may be unplugged from the electric
outlet.
Plug it in securely.
• House fuse has blown or circuit breaker has
tripped.
Check and/or replace fuse and reset circuit breaker.
• Power cut.
Check house lights.
• Temperature control not set on proper position.
Refer to Temperature Control section.
• Appliance is placed close to heat source.
• Warm weather-frequent door openings.
• Door left open for a long time.
• Package holding door open or blocking air duct in
freezer compartment.
• The floor on which the fridge-freezer is installed
may be uneven or the fridge-freezer may be
unstable.
Make it even by rotating the leveling screw.
• Unnecessary objects placed in the back side of the
fridge-freezer.
• Door may have been left ajar or package holding
door open.
• Too frequent or too long door openings.
• Frost within package is normal.
• This phenomenon is likely to occur in a wet space.
Wipe it with a dry towel.
Before calling for service, check this list.
It may save you both time and expense.
This list includes common occurrences that are not
the result of defective workmanship or materials in
this appliance.
Problem
Fridge-Freezer
does not operate
Fridge or Freezer
Compartment
Temperature too
warm
Vibration or
Rattling or
Abnormal Noise
Frost or Ice
Crystals on frozen
Food
Moisture forms on
Cabinet Surface
Trouble Shooting
17
Possible Causes
• Too frequent or too long door openings.
• In humid weather, air carries moisture into fridge when
doors are opened.
• Foods with strong odors should be tightly covered or
wrapped.
• Check for spoiled food.
• Interior needs cleaning.
Refer to CLEANING section
• Food package is keeping door open.
Move packages that keep door from closing.
• Fridge-freezer is not level.
Adjust the leveling screws.
• The floor on which the fridge-freezer is installed
may be uneven or the fridge-freezer may be
unstable.
Slightly raise the front side with the leveling screw.
• No power at outlet.
• Light lamp needs replacing.
Refer to the Lamp Replacement section
Problem
Moisture collects
inside
Fridge has odor
Door not closing
properly
Interior light does
not work
DISPOSAL OF YOUR OLD APPLIANCE
1. When this crossed-out wheeled bin symbol is attached to a product it
means the product is covered by the European Directive 2002/96/EC.
2. All electrical and electronic products should be disposed of separately
from the municipal waste stream via designated collection facilities
appointed by the government or the local authorities.
3. The correct disposal of your old appliance will help prevent potential
negative consequences for the environment and human health.
4. For more detailed information about disposal of your old appliance,
please contact your city office, waste disposal service or the shop
where you purchased the product.
18
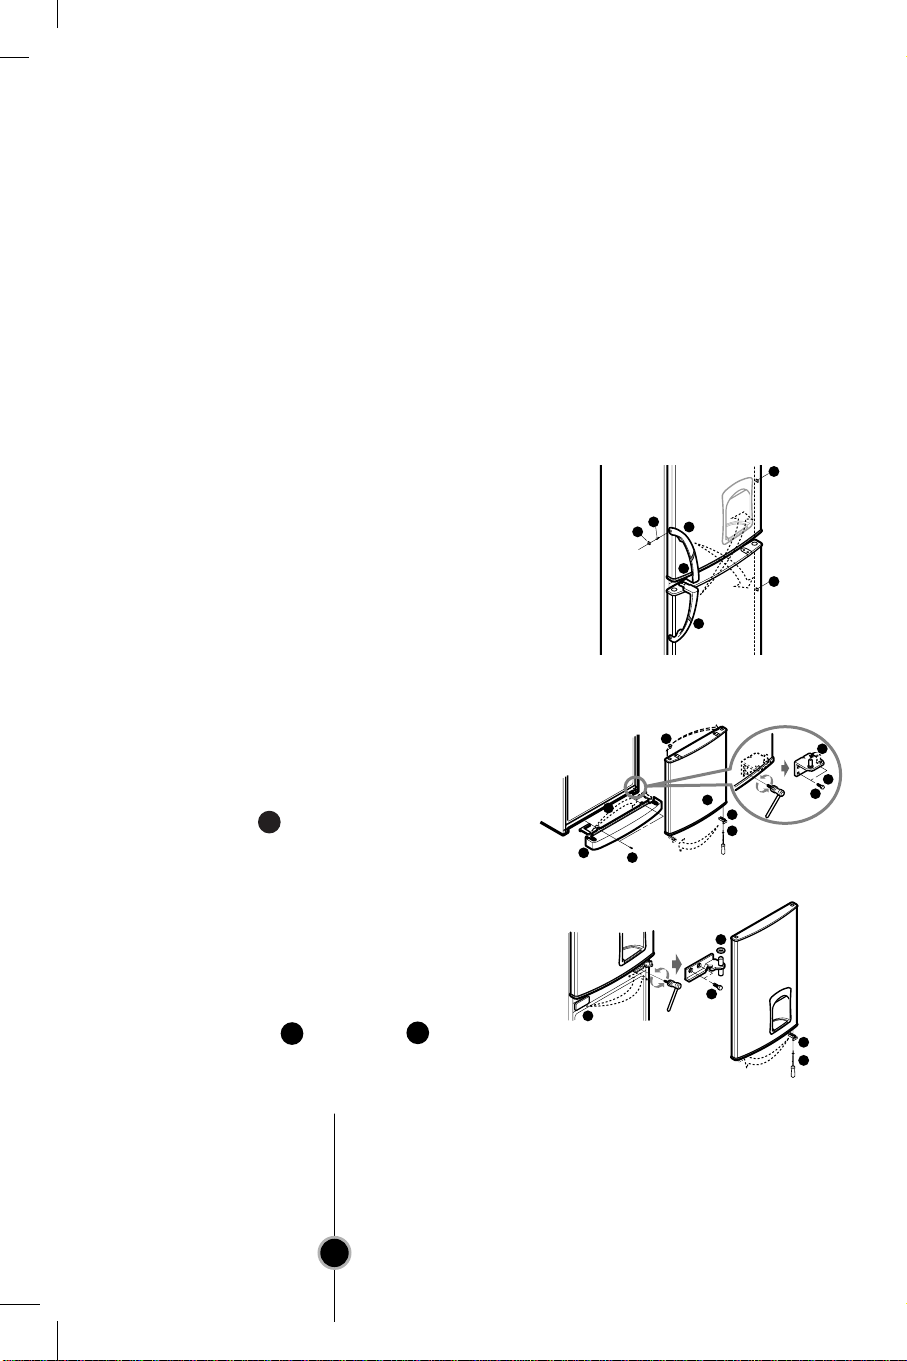
To Reverse the Doors
Your fridge-freezer is designed with reversible doors, so that they may open from either
the left of right hand side to suit your kitchen design.
Precaution
1.
Before reversing the door, first of all, you should take out food and accessories
like shelves or trays which are not fixed in the fridge-freezer.
2.
Use Torque Wrench or Spanner to fix or remove the bolt.
3.
Do not lay the fridge-freezer down. This will cause problems.
4.
Be careful not to drop the doors in disassembling or assembling.
How to Reverse the Doors
1.
Remove SCREWS after removing a
CAP from the right part of the
refrigerator room HANDLE . Remove 2
SCREWS on the bottom part of the
refrigerator room HANDLE . The freezer
room HANDLE may be also separated in
the same sequence as in the refrigerator
room HANDLE .
2.
Remove screw and remove Cover and
move Cap Cover . And, remove screw ,
Hinge-L , and remove pin . Remove the
Freezer Door , and move the position of
the cap . Move the position of bracket
door and screw .
3.
Remove bolt and remove the Hinge-C
and the Fridge Door . Move the
position of the cap . Move the position
of bracket door and screw .
12
7
8
6
26
9
11
10
13
14
12
18
15
16
21
22
1
2
3
3
5
4
4
26
21
22
19
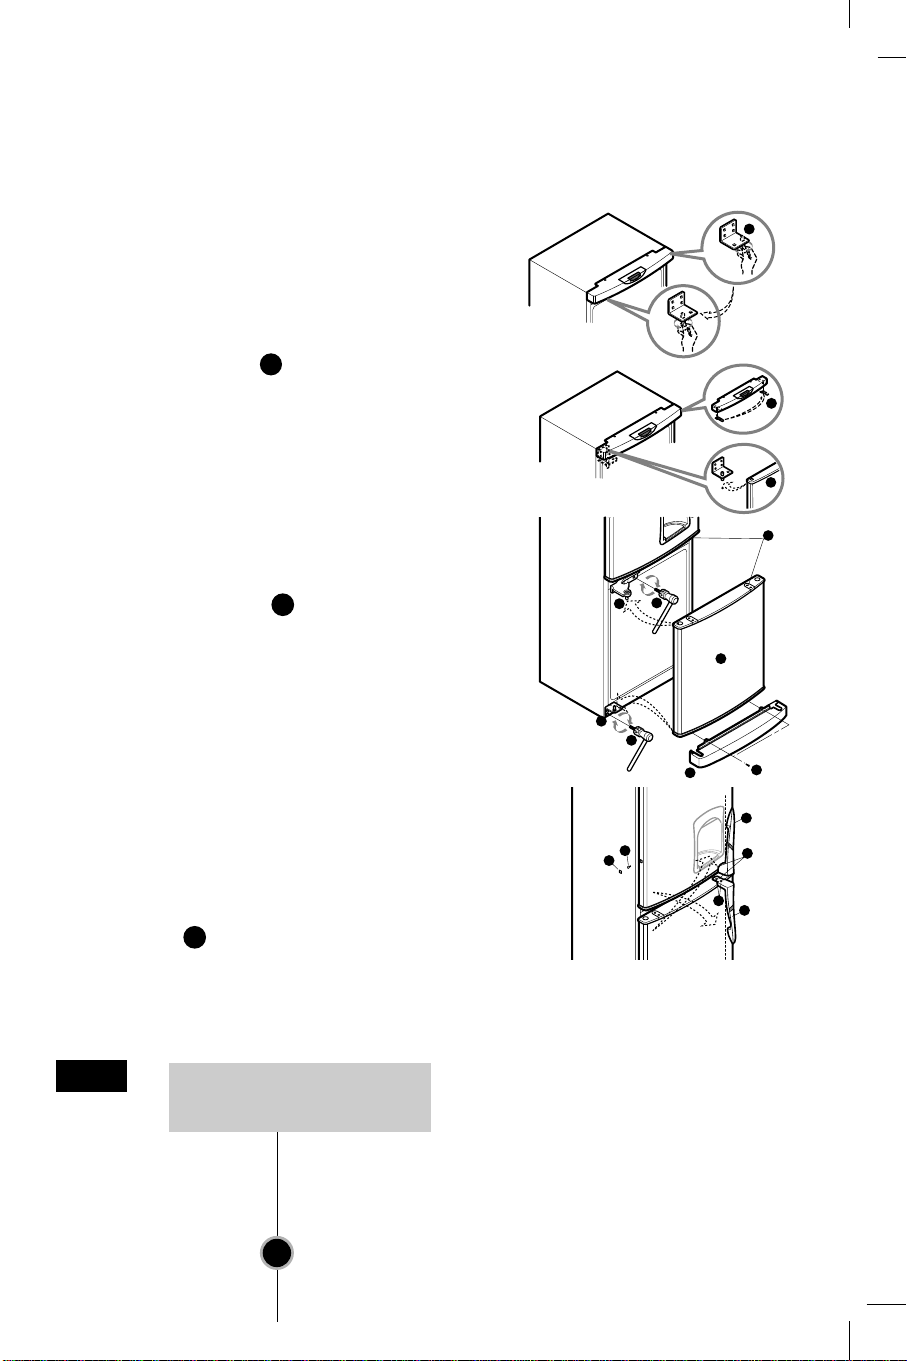
4.
Move the position of Hinge-U pin , and
Cap, Top cover Assemble the Fridge
Door Assemble Hinge-C and bolt
Assemble F-Door . Assemble the Hinge-L
and bolt . Assemble Low Cover
and screw .
5.
Install HANDLES installed at the existing
freezer room, at the refrigerator room.
Adjust the bottom part of HANDLES to the
groove and then fasten 2 screws after
removing the CAP . After bolting
SCREWS in the side of the refrigerator
room DOOR, press and insert the CAP .
Insert the CAP to hole which the
HANDLE was installed previous.
The freezer room HANDLES are
assembled in the same manner as above
using the existing.
6.
Stop the groom where the existing
HANDLE , was installed at by using
the CAP removed in the initial
installation.
Note
Reversing the doors is not
covered by the warranty.
16
10
9
15
7
6
26
19
20
17
27
26
27
27
5
3
2
27
3
1

Memo
20
21
RReeggiissttrraaccee
DD˘˘lleeææiittÈÈ bbeezzppeeËËnnoossttnnÌÌ ppookkyynnyy
»»··ssttii ssppoott¯¯eebbiiËËee
IInnssttaallaaccee
SSppuuππttÏÏnnÌÌ
RReegguullaaccee tteepplloottyy
RRyycchhllÈÈ mmrraazzeennÌÌ
DDoovvoolleenn··
AAuuttootteesstt
SSiiggnnaalliizzaaccee ootteevv¯¯eenn˝˝cchh ddvvÌ̯¯eekk
VV˝˝rroobbaa lleedduu
OOddmmrraazzeennÌÌ
CChhllaaddiiËË nnaa vvoodduu
SSkkllaaddoovv··nnÌÌ ppoottrraavviinn
VVππeeoobbeeccnnÈÈ iinnffoorrmmaaccee
VV˝˝mmÏÏnnaa ææ··rroovvkkyy
»»iiππttÏÏnnÌÌ
OOddssttrraaÚÚoovv··nnÌÌ zz··vvaadd
VVaarroovv··nnÌÌ
JJaakk oottooËËiitt ddvvee¯¯ee
OObbssaahh
⁄⁄vvoodd
IInnssttaallaaccee
OObbsslluuhhaa
TTiippyy pprroo sskkllaaddoovv··nnÌÌ
ppoottrraavviinn
PPÈÈËËee aa ˙˙ddrrææbbaa
OOddssttrraaÚÚoovv··nnÌÌ zz··vvaadd
OOttooËËeennÌÌ ddvvee¯¯ÌÌ
22
22
24
25
25
26
26
27
27
27
27
27
28
30
31
32
34
36
36
31

⁄vod
22
OznaËenÌ modelu a sÈriovÈ ËÌslo se nach·zejÌ na zadnÌ
»·sti za¯ÌzenÌ. Toto ËÌslo se vztahuje v˝hradnÏ na tento
spot¯ebiË. Zde vyplÚte poæadovanÈ informace a tento
n·vod uschovejte jako doklad o koupi. P¯iloæte k nÏmu
takÈ pokladnÌ doklad.
DDaattuumm nn··kkuuppuu ::
PPrrooddeejjccee ::
AAddrreessaa pprrooddeejjccee ::
TTeell.. pprrooddeejjccee ::
OOzznnaaËËeennÌÌ mmooddeelluu ::
SSÈÈrriioovvÈÈ ËËÌÌsslloo ::
DD˘˘lleeææiittÈÈ bbeezzppeeËËnnoossttnnÌÌ ppookkyynnyy
PP¯¯eedd ppoouuææiittiimm ssppoott¯¯eebbiiËË sspprr··vvnnÏÏ aa vv ssoouullaadduu ss ppookkyynnyy
uuvveeddeenn˝˝mmii vv ttoommttoo nn··vvoodduu iinnssttaalluujjttee aa uummÌÌssttÏÏttee..
NNiikkddyy nneevvyyttaahhuujjttee zz··ssttrrËËkkuu zzee zz··ssuuvvkkyy ttaahheemm zzaa pp¯¯ÌÌvvooddnnÌÌ
kkaabbeell..
Z·strËku vædy pevnÏ uchopte a p¯Ìm˝m pohybem
vyt·hnÏte ze z·suvky.
PP¯¯ii ooddssuunnuuttÌÌ cchhllaaddnniiËËkkyy oodd ssttÏÏnnyy ddbbeejjttee,, aabbyy ssee pp¯¯ÌÌvvooddnnÌÌ
kkaabbeell nneeddoossttaall ppoodd ssppoott¯¯eebbiiËË nneebboo nneebbyyll jjiinnaakk ppooππkkoozzeenn..
PP¯¯ii pprroovvoozzuu lleeddnniiËËkkyy ssee nneeddoott˝˝kkeejjttee nnaammrrzzllÈÈhhoo ppoovvrrcchhuu
uuvvnniitt¯¯ mmrraazznniiËËkk,, zzeejjmmÈÈnnaa mm··ttee--llii mmookkrrÈÈ nneebboo vvllhhkkÈÈ rruuccee..
M˘æe dojÌt k p¯imrznutÌ k˘æe k tomuto povrchu.
RReeggiissttrraaccee
⁄⁄vvoodd
UUppoozzoorrnnÏÏnnÌÌ
⁄vod
23
P¯ed ËiπtÏnÌm chladniËky odpojte p¯ÌvodnÌ kabel ze z·suvky.
SilnÈ poπkozenÌ p¯ÌvodnÌ πÚ˘ry m˘æe mÌt za n·sledek
poæ·r nebo ˙raz elektrick˝m proudem. Proto zabraÚte
poπkozenÌ, ˙prav·m, silnÈmu oh˝b·nÌ, vytahov·nÌ nebo
zkroucenÌ p¯ÌvodnÌ πÚ˘ry.
Do mrazniËky nikdy nevkl·dejte sklenÏnÈ l·hve, kterou
mohou prasknout vlivem zmrazenÌ jejich obsahu.
To m˘æe b˝t p¯ÌËinou ˙razu elektrick˝m
proudem nebo poæ·ru.
Je-li to moænÈ, zapojte ledniËku do samostatnÈ z·suvky.
P¯edejdete tak p¯etÌæenÌ zp˘sobÈnemu ledniËkou, dalπÌmi
dom·cÌmi spot¯ebiËi.
Elektrick· z·strËka spot¯ebiËe by mÏla b˝t umÌstÏna tak, aby
bylo moæno p¯ÌvodnÌ πÚ˘ru v p¯ÌpadÏ nehody rychle odpojit.
V z·jmu bezpeËnosti musÌ v˝mÏnu p¯ÌvodnÌho kabelu v
p¯ÌpadÏ pot¯eby provÈst v˝robce, autorizovan˝ servis
nebo podobnÏ kvalifikovan· osoba.
V blizkosti tohoto spot¯ebiËe neskladujte ani nepouæÌvejte
benzin nebo jinÈ ho¯lavÈ kapaliny Ëi v˝pary.
V p¯ÌpadÏ elektrickÈho zkratu sniæuje uzemnÏnÌ riziko ˙razu
elektrick˝m proudem tak, æe vytv·¯Ì svod elektrickÈho
proudu. Pro ochranu P¯ed ˙razem elektrick˝m proudem
musÌ b˝t tento spot¯ebiË uzemnÏn. Nespr·vnÈ pouæitÌ
zemnÌcÌho kabelu m˘æe mÌt za n·sledek ˙raz elektrick˝m
proudem. Jestliæe n·vodu na uzemnÏnÌ zcela neporozumÌte
nebo jestliæe m·te o uzemnÏnÌ spot¯ebiËe jakÈkoli
pochybnosti, kontaktujte kvalifikovanÈho elektromechanika
nebo servisnÌho technika.
DD˘˘lleeææiittÈÈ bbeezzppeeËËnnoossttnnÌÌ ppookkyynnyy
UUppoozzoorrnnÏÏnnÌÌ
ww
UUppoozzoorrnnÏÏnnÌÌ
NNeeppoouuææÌÌvveejjttee
pprrooddlluuææoovvaaccÌÌ ππÚÚ˘˘rruu
NNeessnnaaæættee ssee jjaakkkkoolliivv
uupprraavvoovvaatt ddÈÈllkkuu
nnaapp··jjeeccÌÌhhoo kkaabbeelluu
PP¯¯ÌÌssttuuppnnoosstt
pp¯¯ÌÌvvooddnnÌÌhhoo kkaabbeelluu
VV˝˝mmÏÏnnaa pp¯¯ÌÌvvooddnnÌÌhhoo
kkaabbeelluu
NNeebbeezzppeeËËii
NNeesskkllaadduujjttee
UUzzeemmnnÏÏnnÌÌ
Riziko uvÏznÏnÌ dÌtÏte uvnit¯ spot¯ebiËe.
Neæ vyhodÌte starou chladniËku Ëi mrazniËku:
Odmontujte vπechna dv̯ka.
P¯ihr·dky ponechte na mÌstÏ, aby dovnit¯ nemohly
snadno vlÈzt dÏti.
ww
VentilaËnÌ otvory v pl·πti spot¯ebiËe Ëi v jeho vnit¯nÌ »·sti je
t¯eba ponechat nezakrytÈ.
ww
Pro uspÌπenÌ odmrazenÌ nepouæÌvejte jinÈ neæ v˝robcem
doporuËenÈ mechanickÈ pom˘cky a jinÈ prost¯edky.
ww
ZabraÚte poπkozenÌ chladÌcÌho okruhu.
ww
Uvnit¯ ˙loænÌho prostoru na potraviny nepouæÌvejte jinÈ
elektrickÈ spot¯ebiËe, nejsou-li doporuËeny v˝robcem.
ww
P¯i likvidaci chladÌcÌch a izolaËnÌch plyn˘ je t¯eba pouæÌt zvl·πtnÌch
postup˘. V p¯ÌpadÏ likvidace se poraÔte s pracovnÌkem
autorizovanÈho servisu nebo podobnÏ kvalifikovanou osobou.
⁄vod
24
»»··ssttii ssppoott¯¯eebbiiËËee
Pokud na vaπem spot¯ebiËi nÏkterÈ Ë·sti chybÌ,
m˘æe jÌt o p¯ÌsluπenstvÌ pouæitÈ u jin˝ch model˘.
KoπÌk na dv̯k·ch
(2, 3, 4)
VÌce˙Ëelov˝
z·sobnÌk
Z·sobnÌk na vejce
(1 nebo 2)
Regul·tor teploty
mrazniËky
V˝mÏnnÈ sklenÏnÈ
p¯ihr·dky (2 nebo 3)
Æ·rovka
VedenÌ chladÌcÌho
vzduchu
Z·sobnÌk na ËerstvÈ
potraviny (fakultativnÌ)
Regul·tor teploty
chladniËky
Miska na led
MrazÌcÌ box
OdnÌmacÌ liπta
Dræ·k na 2L l·hve
Vyrovn·vacÌ πroub
Madlo
(instaluje uæivatel)
N·dræka na vodu
(fakultativnÌ)
V˝suvn˝ box na
zeleninu
(slouæÌ k uchov·nÌ
ovoce a zeleniny v
k¯upavÈm a ËerstvÈm
stavu)
PPoozzoorr
Instalace
43
11..
Vyberte vhodnÈ umÌstÏni.
Postavte spot¯ebiË na mÌsto, kde jej bude snadnÈ
pouæivat.
22..
Spot¯ebiË neumÌsªujte do blÌzkosti zdroj˘ tepla,
p¯ÌmÈho slunce Ëi vlhkosti.
33..
Aby mohl p¯Ìstroj spr·vnÏ fungovat, zajistÏte, aby
kolem nÏj mohl spr·vnÏ cirkulovat vzduch.
44..
V z·jmu zabr·nÏnÌ chvÏnÌ musÌ b˝t chladniËka ve
vodorovnÈ poloze.
V p¯ÌpadÏ nerovnostÌ podlahy p¯Ìstroj srovnejte do
vodorovnÈ polohy pomocÌ vyrovn·vacÌch πroub˘.
Aby πly dve¯e snadno zavÌrat, mÏla by p¯edni Ë·st
chladniËky b˝t o nÏco v˝πe neæ Ë·st zadnÌ.
Vyrovnav·cÌmi πrouby jde snadno ot·Ëet tak, æe p¯Ìstroj
lehce naklonÌte.
OtoËenÌm vyrovn·vacÌho πroubu ve smÏru hodinov˝ch
ruËiËek( ) chladniËku zv˝πÌte, otoËenÌm proti
smÏru hodinov˝ch ruËiËek( ) ji snÌæÌte.
55..
ChladniËku peËlivÏ oËistÏte a ot¯ete vπechen prach
nashrom·ædÏn˝ p¯i dopravÏ.
66..
Instalujte na spr·vnÈ mÌsto p¯ÌsluπenstvÌ jako nap¯. box
na v˝robu ledu apod. Aby se zabr·nilo poπkozenÌ p¯i
dopravÏ, nach·zÌ se toto p¯ÌsluπenstvÌ v jednom obalu.
77..
P¯ipojte nap·jecÌ πÚ˘ru do z·suvky. Do jednÈ z·suvky
by nemÏlo b˝t zapojeno vÌce spot¯ebiˢ.
88..
Pro zajitπtÏnÌ spr·vnÈ cirkulace vzduchu okolo
chladniËky prosÌm udræujte z obou stran i shora
dostateËnou mezeru a zachovejte vzd·lenost alespoÚ 5
cm od zadnÌ stÏny.
Pro dosa¯enÌ stabilni provoznÌ teploty uvnit¯ spot¯ebiËe
nechte p¯ed pouæitÌm chladniËku 2-3 hodiny bÏæet. Aæ po
tÈto dobÏ ji naplÚte Ëerstv˝mi nebo zmrazen˝mi
potravinami.
Dojde-li k odpojenÌ p¯ÌvodnÌho kabelu ze z·suvky, vyËkejte
SSppuuππttÏÏnnÌÌ
IInnssttaallaaccee
Obsluha
26
Spot¯ebiË obsahuje dva regul·tor teploty, jejichæ pomocÌ
lze nastavit teplotu uvnit¯ chladniËky i mrazniËk.
●
Regul·tor TEMP. CONTROL
zpoË·tku natavte na hodnotu "4".
PotÈ zvolte poæadovanou teplotu
uvnit¯ chladniËky.
●
Chcete-li teplotu zv˝πÌt nebo snÌæit,
otoËte regul·tor buÔ smÏrem k "MIN"
nebo k "MAX". Je-li teplota okoli nÌzk·, nastavte
TEMP.CONTROL (regul·tor teploty) na "MIN".
●
Regul·tor teploty uvnit¯ mrazniËk se nach·zÌ na horni
stranÏ spot¯ebiËe. ZpoË·tku nastavte regul·tor Freeze
temp. (teplota mrazniËk) na st¯ednÌ hodnotu. Stiskem
tlaËÌtka m˘æete teplotu nastavit, p¯iËemæ stav je indikov·n
poËtem rozsvÌcen˝ch kontrolek (maxim·lnÌ poËet pÏti
rozsvÌcen˝ch kontrolek oznaËuje nejchladnÏjπÌ teplotu).
●
P¯i spuπtÏnÌ ledniËky s mrazniËkou nebo p¯i zapojenÌ
p¯ÌvodnÌ πÚ˘ry do z·suvky se teplota automaticky nastavÌ
na st¯ednÌ hodnotu.
●
Tato funkce se pouæÌv·,
chcete-li rychlÈ zmrazit
potraviny. JednÌm stiskem
tlaËÌtka se spustÌ systÈm
rychlomrazenÌ QUICK
FREEZE (RychlÈ mrazenÌ) a
rozsvÌtÌ se kontrolka.
Pr˘bÏh rychlomrazenÌ trv·
p¯ibliænÏ 3 hodiny.
Po ukonËenÌ funkce p¯ejde spot¯ebiË do bÏænÈho
reæimu.
Chcete-li funkci rychlÈho mrazenÌ ukonËit, stisknÏte
znovu tlaËÌtko QUICK FREEZE a kontrolka zhasne,
proces se ukonËÌ a spot¯ebiË p¯ejde do bÏænÈho reæimu.
RReegguullaaccee tteepplloottyy
CChhllaaddnniiËËkkaa
MMrraazznniiËËkkaa
RRyycchhllÈÈ mmrraazzeennÌÌ
TEMP. CONTROL
7
MAX
MIN
1
6
5
4
2
3
FREEZE TEMP
VACATION QUICK FREEZE
QUICK FREEZE
Obsluha
27
PomocÌ tÈto funkce funguje spot¯ebiË v
˙spornÈm reæimu, kter˝ je vhodny
zejmÈna v dobÏ, kdy je uæivatel na
dovolenÈ. Spot¯ebiË maxim·lnÏ omezÌ
spot¯ebu elektrickÈ energie. Funkci
spustÌte stiskem tlaËÌtka VACATION,
p¯iËemæ se rozsvÌtÌ kontrolka. ⁄sporn˝
reæim vypnete dalπÌm stiskem tlaËÌtka
VACATION.
V z·jmu dosaæenÌ lepπÌch v˝sledk˘ nastavte regul·tor
TEMP.CONTROL na "MIN".
PomocÌ tÈto funkce probÌh· kontrola provoznÌch z·vad.
DomnÌv·te-li se, æe se na spot¯ebiËi vyskytla z·vada,
stisknÏte tlaËÌtko nastavenÌ teploty:
- Jestliæe se svÏtla kontrolek pohybujÌ, spot¯ebiË funguje
spr·vnÏ.
- Jestliæe se svÏtla kontrolek nepohnou smÏrem nahoru a
dol˘, nechte spot¯ebiË p¯ipojeny do sÌtÏ a p¯ivolejte
servisnÌho technika.
Z˘stanou-li dve¯e chladniËky chvÌli otev¯enÈ, ozve se
zvukov˝ sign·l.
●
Chcete-li vyrobit kostky ledu,
naplÚte misku na led vodou a
vloæte ji do mrazniËk.
●
Chcete-li led vyrobit rychlÈ,
stisknÏte tlaËÌtko "QUICK
FREEZE" (RychlÈ mrazenÌ).
●
P¯i vyjmutÌ kostek ledu uchopte
misku za oba konce a lehce jimi zakruªte.
OdmrazenÌ spot¯ebiËe je automatickÈ.
Voda p¯i odmrazenÌ stÈk· do odpa¯ovacÌho t·cu, odkud se
automaticky odpa¯uje.
DDoovvoolleenn··
AAuuttootteesstt
SSiiggnnaalliizzaaccee
ootteevv¯¯eenn˝˝cchh ddvvee¯¯ÌÌ
VV˝˝rroobbaa lleedduu
OOddmmrraazzeennÌÌ
VACATION
Chcete-li kostky ledu vyndat snadno, vloæte misku pod
tekoucÌ vodu.
TTiipp

Po spr·vnÈm nastavenÌ VENTILU na OTVOR V
DVÂÿK¡CH ventil spr·vnÏ se¯iÔte.
Obsluha
28
CChhllaaddiiËË nnaa vvoodduu ((ffaakkuullttaattiivvnnÌÌ))
PPooppiiss
IInnssttaallaaccee
TLA»ÂTKO CHLADI»E
MÿÂÆKA
ODKAP¡VACÂ MISKA
RUKOJE´ N¡DRÆE
UZ¡VÃR N¡DRÆE
(MAL›)
UZ¡VÃR N¡DRÆE
(VELK›)
N¡DRÆ NA VODU
VENTIL
Obsluha
29
NNaappllnnÏÏnnÌÌ CCHHLLAADDII»»EE
NNAA VVOODDUU
VVyyuuææiittÌÌ vvooddyy
PPoozzoorr
NepouæÌvejte jinÈ tekutiny (nap¯. dæus, πumivÈ n·poje
atd.) neæ vodu. Nelze pouæÌt zejmÈna tekutiny obsahujÌcÌ
krystalky (m˘æe dojÌt k poπkozenÌ)
11..
Je-li N¡DRÆ NA VODU usazena na DVÂÿK¡CH,
otoËte RUKOJE´ n·dræe smÏrem vzad, otev¯ete
UZ¡VÃR N¡DRÆE (MAL›) a n·dræ naplÚte nap¯.
pomocÌ konvice.
* P¯i doplÚov·nÌ vody sledujte hladinu pr˘hledov˝m
okÈnkem na p¯ednÌ stranÏ N¡DRÆE NA VODU.
* N·dræ pojme maxim·lnÏ 4,5 l vody.
22..
ZatlaËte UZ¡VÃR N¡DRÆE (MAL›) a upevnÏte jej.
33..
Po doplnÏnÌ vody nastavte do spr·vnÈ polohy
RUKOJE´ N¡DRÆE.
11..
SklenicÌ stisknÏte TLA»ÂTKO chladiËe.
22..
Po stisknutÌ tlaËÌtka zaËne CHLADI» do sklenice
napouπtÏt vodu.
33..
Odt·hnete-li sklenici pomalu, nebude voda kapat na
m¯Ìæku.
 Loading...