

Page 1
FRIDGE-LARDER
User's Guide
Please read this User's Guide carefully
before operating and keep it handy for
reference at all times.
Refrigerador-alacena
Guí a Del Usuario
Lea por favor la guía de usuario cuidadosamente
antes de funcionar y manténgala práctica para la
referencia siempre.
FRIGORÍFIGO-DESPENSA
Guia dos Consumidores
Por favor, leia este Guia com muita atenção
antes de operar, e guarde-o sempre num
lugar conveniente para referência.
Page 2
3
Introduction
Installation
Operation
Suggestion on
food storage
Care and
maintenance
Trouble shooting
To Reverse the
Doors
Table of Contents
Important safety Instruction
Disposal of the old appliance &
packing of new appliance
Identification of Parts
Location
Installation with/without top table
Electrical Connection
Door Handle
Starting
Controlling the Temperature
Switching Off
Storing food
Defrosting
Cleaning
General Information
Lamp Replacing
Tips for saving Energy
Trouble shooting
How to Reverse the Door
4
6
7
8
9
9
9
10
10
11
13
14
14
15
18
10
12
Door handle(option)
199
16
Page 3

Introduction
Precaution
This fridge-larder must be properly installed and
located in accordance with the Installation
Instruction before it is used.
Never unplug your fridge-larder by pulling on the
power cord. Always grip plug firmly and pull straight
out from the outlet.
When moving your appliance away from the wall,
be careful not to roll over or damage the power
cord.
4
Accessibility of
Supply Plug
Supply Cord
Replacement
The supply plug of the refrigerator-larder should be
placed in easy accessible position for quick disconnection
in emergency.
If the supply cord is damaged, it must be replaced by the
manufacturer or its service agent or a similarly qualified
person in order to avoid a hazard.
Important Safety Instruction
Pull out the power plug prior to cleaning the fridge-
larder
Never damage, severely bend, pull out, or twist the
power cord because power cord damage may cause a
fire or electronic shock.
Don't use an
extension cord
If possible, connect the fridge-larder to its own
individual electrical outlet to prevent it and other
appliances or household lights from causing an overload.
Page 4
Introduction
5
Important Safety Instruction
Risk of child entrapment.
Before you throw away your old refrigerator :
Take off the doors.
Leave the shelves in place so that children may not easily
climb inside.
Grounding
(Earthing)
WARNING
In the event of an electric short circuit, grounding (earthing)
reduces the risk of electric shock by providing an escape
wire for the electric current. In order to prevent possible
electric shock, this appliance must be grounded. Improper
use of the grounding plug can result in an electric shock.
Consult a qualified electrician or service person if the
grounding instructions are not completely understood, or if
you have doubts on whether the appliance is properly
grounded.
Keep ventilation openings, in the appliance enclosure
or in the built-in structure, clear of obstruction
Do not use mechanical devices or other means t
accelerate the defrosting process, other than thos
recommended by the manufacturer.
Do not damage the refrigerant circuit
Do not use electrical appliances inside the food storag
compartments of the appliance, unless they are of th
type recommended by the manufacturer.
The refrigerant and insulation blowing gas used in
appliance require special disposal procedures.
At disposal, please consult with service agent or a
similarly qualified person.
.
.
o
e
e
e
the
This appliance is not intended for use by persons (including
children) with reduced physical, sensory or mental capabilities,
or lack of experience and knowledge, unless they have been
given supervision or instruction concerning use of the
appliance by a person responsible for their safety.
Children should be supervised to ensure that they do not
play with the appliance.
Page 5
Introduction
6
Disposal of the old appliance &
packing of new applianc
e
Disposal of the old
appliance
Disposal of
packing of new
appliance
Take back offer
The old appliance whose life has expired should be
destroyed in order to make it safe prior to disposal. Take
out power plugs, separate connection wires and remove
or destroy all springs, latches or bolting, to prevent
children from being trapped during play.
For environmental protection, old refrigerators should be
disposed off by a professional disposition agency. If you
have any question, please consult with the local sale
agency or local authority.
All packing materials used for this appliance are
environment-friendly.
Matters concerning material are as follows:
PE : Polyethylene – Foil or pocket for packing
Formed objects made of foamed
PS :
CFC-FREE polystyrene
PP : Strapping tape made of polypropylene
This appliance contains fluid (refrigerant, lubricant) and is
made of parts and materials which are reusable and/or
recyclable.
All the important materials should be sent to the
collection center of waste material and can be reused
after rework (recycling). For take back, please contact
with the local agency.
Disposal of your old appliance
1. When this crossed-out wheeled bin symbol is attached
to a product it means the product is covered by the
European Directive 2002/96/EC.
2. All electrical and electronic products should be disposed
of separately from the municipal waste stream via
designated collection facilities appointed by the
government or the local authorities.
3. The correct disposal of your old appliance will help
prevent potential negative consequences for the
environment and human health.
4. For more detailed information about disposal of your
old appliance, please contact your city office, waste
disposal service or the shop where you purchased the
product.
Page 6

Introduction
Identification of Parts
NOTE
This is a basic model. The shape of refrigerator is
subject to change.
7
Page 7
We recommend that the refrigerator be installed at a dry
and well ventilated place. Make sure that the appliance is
not exposed to direct sunlight or placed in vicinity of a
heat source such as stove, heaters, radiator.
To ensure proper air circulation around the fridge -freezer,
please maintain sufficient space on both the sides as well
as top and maintain at least 2 inches (5 cm) from the rear
wall.
8
NOTE
Place on a flat and firm flooring. If the floor is not
even, adjust the feet by using the leveling screw
at the front edge of the cabinet.
If the front is slightly higher than the rear, the door
can close more easily.
Installation
Location
Page 8

Check that the hot air caused to warm air from the rear
of the appliance circulates without obstruction. If not, it
could cause the output of the refrigerating unit to
increase and this will result in a higher rate of energy
consumption. Therefore, confirm that ventilation grill is
never covered or blocked.
1. when installing with top
table(free standing),
push the refrigerator
until the air
circulating hole of top
table nearly reaches
the wall.
2. when installing without
top table, align the door
front edge to the front edge of
kitchen furniture.
How to Remove Top Table
1. Unscrew 2 bolts at
the rear of top table.
2. Hold the rear of top
table and push
forwards by lifting up
top table slightly.
Installation with/
without top table
Installation
1
2
Electrical connection
This appliance should be connected to the mains AC
220~240V , 50 Hz. You must connect this appliance only
to the power socket with grounding complying with the
related regulations and only an approved expert should
install this appliance.
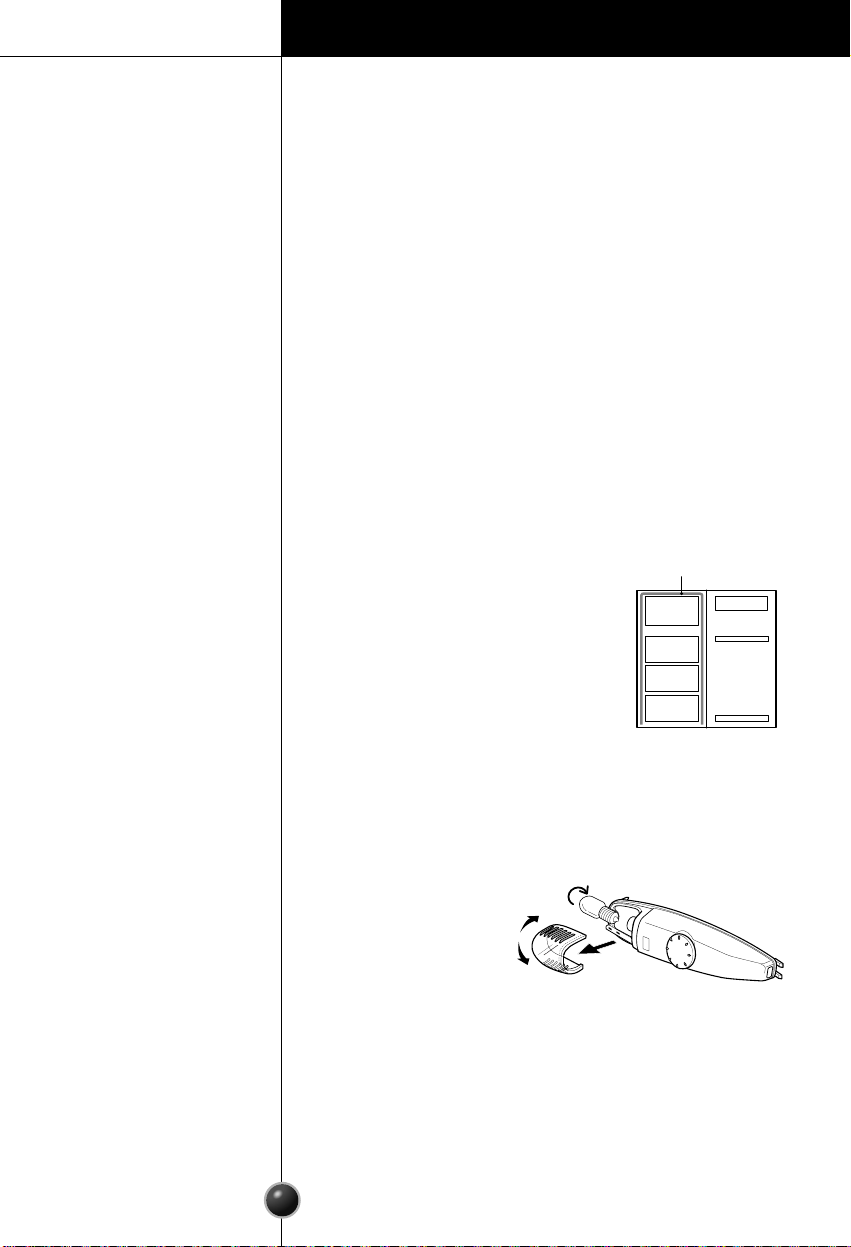
Door Handle
In case of installing the door handle, refer to a figure
enclosed with it in a product package.
9
Page 9
Operation
Starting
Before switching it on, leave the appliance standing for
at least 2 hours, so that the circulation of the refrigerant
stabilizes and no operating problems occur.
Turn the temperature control dial from the position "0".
The refrigerating process begins and the lamp inside
refrigerator goes on when the door is opened.
Controlling the temperature
We recommend to set the dial "4" for normal.
Too warm : Turning the
temperature control
dial clockwise will set
to a colder setting
(higher number
setting).
Too cool : Turning the
temperature control
dial counterclockwise
will set to a warmer setting
(lower number setting).
The temperature setting depends on ambient
temperature, the quantity of foods, how often the door
is opened. So the temperature setting should be checked
by using an appropriate thermometer and following the
Switching off
Turn the temperature control dial counterclockwise until
set to "0". The refrigerating process stops and the lamp
inside refrigerator goes off.
10
4
W
a
r
m
2
3
5
1
0
7
6
d
l
o
C
Page 10
Suggestion on food storage
Storing food
Opening the door often or keeping the door opened a
long time, increases the inside temperature. This causes
the storage life and flavor of the foods to reduce, and
increases the energy consumption.
Arranging food
- Store the food products that give off odor in closed
containers and wrap.
- Use aluminum foil, plastic foil and metal or glass
containers as the packing material for foods.
- Allow warm foods to cool down sufficiently before
placing inside the appliance.
- Keep high-proof alcoholic beverages in airtight bottles
and upright position.
- Do not store the products (melon, banana, pineapple
etc) which are likely to go bad at low temperature.
<Refer to the Figure of page 7>
Bread, ready-cooked meals.
Meat, Sausages, Slice products.
Vegetables, Fruit, Salad produce.
Butter, Cheese.
Small glasses or bottles, cans, spices.
Eggs.
Large beverage bottles.
Make sure the door is closed properly.
11
Page 11
Care and Maintenance
Defrosting
Defrosting the fridge compartment
When the refrigerator is working, frost is formed at the
rear wall of the fridge compartment and melts
automatically when the compressor stops. The thawed
water is collected in the discharge gutter and evaporates
by heat of the compressor.
Never place electrical devices in the refrigerator
for defrost. Take care when using defrosting sprays
for assisting defrosting. These sprays include
substances containing explosive gas, or harmful for
synthesis or human health.
NOTE
12
Page 12

Care and Maintenance
13
ww
Warning
Cleaning
Always remove plugs or Switch off supply before
cleaning.
Do not use sharp objects (such as knife, screwdriver)
which could break refrigerant circuit resulting in
environmental and health risks.
Never use steam cleaner or steam pressure cleaner since
hot steam may damage refrigerator surface and electrical
devices. Never use sand, abrasive detergent, acid or
chemical solvent.
• Care should be taken that cleaning water does not
enter the inside of the thermostat Enclosure or lamp.
• Clean refrigerator including inside devices with clothes
or lukewarm water. You may use commercial
detergent for tableware.
Regularly clean the heat exchanger on the rear side of
refrigerator using a smooth brush so that accumulations
of dusts and residues. Do not disrupt expansion from the
inside and cause increased energy consumption.
Any damage to the heat exchanger or other events
leading to the exposure of the refrigerant to the
environment, should be avoided because of
potential environment and health risks.
Page 13
Care and Maintenance
Going away
General information
Lamp Replacing
When you plan to be away for an extended period,
remove all food, disconnect the power cord, clean the
interior thoroughly, and leave the door OPEN to prevent
odor formation.
Power failure
Most power failures are corrected in an hour or two and
will not affect your refrigerator temperatures. However,
you should minimize the number of door openings while
the power is OFF.
If you move
Remove all items inside the refrigerator or securely fasten
all loose items. To avoid damaging the leveling screw,
turn them all the way into the base.
Unplug the power cord from the AC outlet.
1. Take the shelves out
to make access
easier.
2. Hold the cover lamp,
take it out softly from
the thermostat
enclosure with twisting up and down.
3. Turn the lamp counterclockwise, and replace it
(max 15W, 220~240V)
4. Assemble in reverse order of disassembly.
Replacement bulb must be the same specification as
original.
Anti-condensation
pipe
• The Anti-condensation pipe is
installed around the front side
of fridge-larder to prevent
dewing.
• Especially after installation or
when ambient temperature is
high, the fridge-larder may
feel hot, which is quite normal.
Anti-Condensation
Pipe
0
4
2
6
1
5
3
7
14
Page 14
Care and Maintenance
Tips for saving Energy
15
- After moving the appliance, allow 2 hours to turn
on again.
- Do not place the appliance near radiator, stove,
and heat sources. If ambient temperature is high,
the compressor will run longer.
- Place the appliance on a cool and well ventilated
room. Do not expose to direct sunlight.
- Do not keep the door opened too long.
- Do not place warm food and beverages in
appliance. Please cool down first otherwise
the steam from hot foodstuffs would contribute
to the icing up of the evaporator unit; and the
cooling period should be as short as possible, for
health and hygiene reasons.
- Do not set the temperature of appliance lower than
needed.
- Replace magnetic door gasket of the door if it is
not properly functioning.
Page 15
Trouble Shooting
Before calling for service, check this list.
It may save you both time and expense.
This list includes common occurrences that are not
the result of defective workmanship or materials in
this appliance.
Problem Possible Causes
Fridge-Larder
does not operate
• Power plug may be unplugged from the electric
outlet.
Plug it in securely.
• House fuse has blown or circuit breaker has
tripped.
Check and/or replace fuse and reset circuit breaker.
• Power cut.
Check house lights.
Vibration or
Rattling or
Abnormal Noise
• The floor on which the fridge-larder is installed
may be uneven or the fridge-larder may be
unstable.
Make it even by rotating the leveling screw.
• Unnecessary objects placed in the back side of the
fridge-larder.
Temperature of foods
inside refrigerator is
not cold enough
• Too frequent or too long door openings.
There is a heat source near Fridge-larder.
A large quantity of food was placed inside the
fridge compartment.
The inner light
does not work
• The temperature controller is on setting "O".
The bulb is defective.
Refer to "Section of Lamp Replacing"
The temperature
inside the refrigerator
is too cold
• The temperature controller is setting to extremely
high figure.
16
Page 16
Trouble Shooting
17
Problem Possible Causes
Fridge has odor
• Foods with strong odors should be tightly
covered or wrapped
• Check for spoiled food
• Interior needs cleaning
• Refer to "Cleaning Section"
Moisture forms on
cabinet surface
• This phenomenon is likely to occur in a wet space.
Wipe it with a dry towel
Interior light does
not work
• No power at outlet.
• Light lamp needs replacing.
Refer to the Lamp Replacement section.
Saque el enchufe de energía antes de limpiar el congeladorrefrigerador. Nunca dañe, seriamente doble, saque, o tuerze
el cable eléctrico porque el daños del cable eléctrico pueden
causar un fuego o un choque electrónico.
Si es posible, conecte el refrigerador-congelador con su propio
enchufe eléctrico individual para evitar que él y otras aplicaciones o luces de la casa causen una sobrecarga.
Don’t use an
extension cord
Page 17
To Reverse the Doors
Precaution
How to Reverse the Door
Your refrigerator is designed with a reversible door, so
you may open from either left or right. It is best to
reposition the door hinge as necessary at the outset since
it is inconvenient to do so later.
To change the door hinge please refer to the diagram
below and proceed as follows.
1. First unplug the appliance.
2. Remove foods and accessories like shelves or trays
which are not fixed in the refrigerator.
3. Carefully lay the appliance on a cushion like packing
material to avoid the damage of refrigeration circuit.
4. Use ‘+’ driver or spanner to fix or remove the bolts.
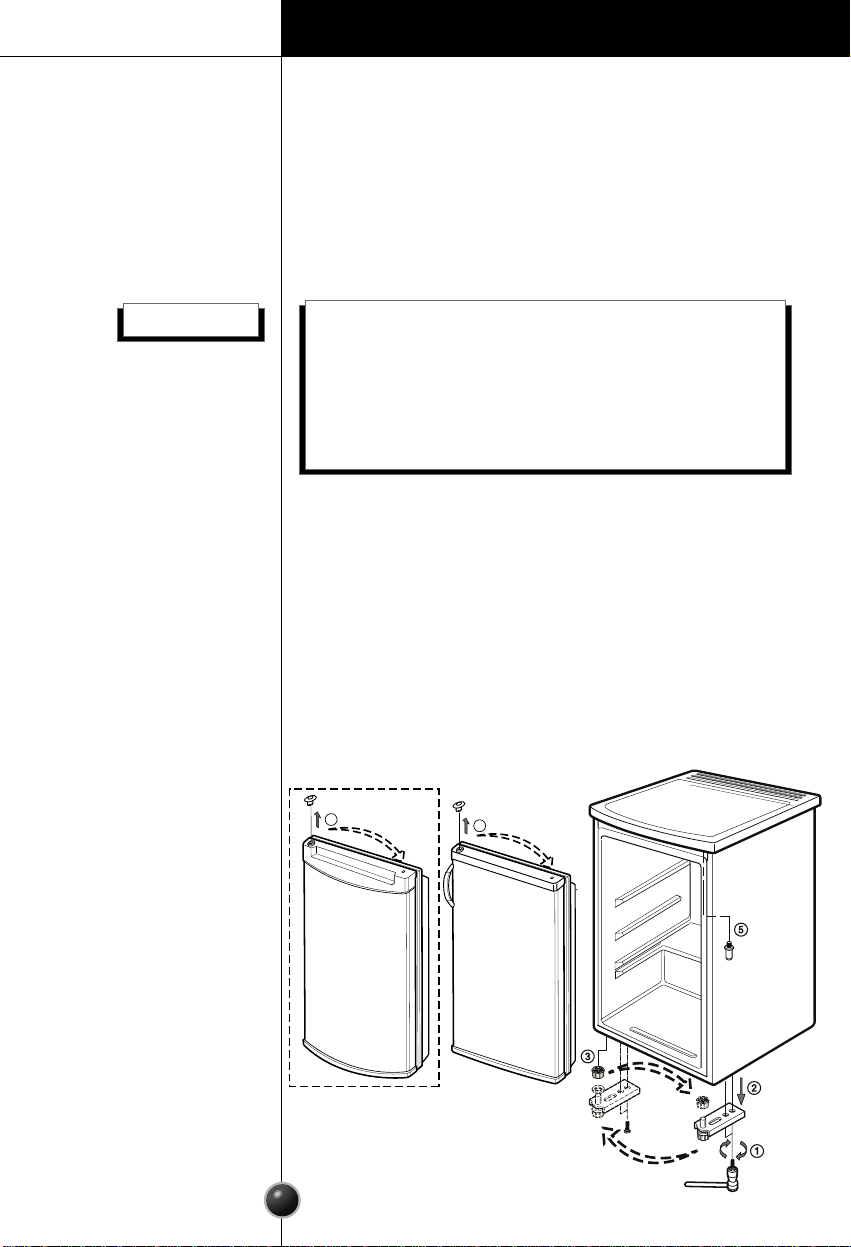
1. Unscrew the 2xBOLTS , then remove the hinge (L) .
2. Remove the LEG .
3. Gently pull the door downwards to remove it.
4. Before refitting the door, swap the Hinge Cap by pulling
it out from its current location and repositioning it on the
other side of the door. Care should be taken not to damage
the adjacent surfaces when removing the Hinge Cap.
5. Unscrew the Upper Hinge pin (U) and screw it into the
opposite side hole.
18
4
4
Page 18

To Reverse the Doors
How to Reverse the Door
6. After refitting the door, fix the Lower Hinge(L) in the
opposite side by using 2xBOLTS.
7. Fix the Leg.
8. Carefully place the appliance in an upright position.
Adjust the Leveling screw to make sure the appliance
is steady and check that the door opens and closes
properly.
NOTE
In case of applying Reversible door, when you close
the door with excessive force, there could be the case
that the door doesn
force. Please ascertain if the door closes properly.
’t close because of Reaction
Door handle(Option)
NOTE
Reversing the doors is not covered by the warranty.
19
Page 19

Contenido
Instrucción de seguridad importante
Disposición de viejo producto y
embalaje de la nueva
Identificación de piezas
Localización
Instalación con/sin la mesa superior
Conexión Eléctrica
Manija de la puerta
El comenzar
Controlar la temperatura
Apagar
Almacenar alimento
Fabricación Del Hielo
Limpieza
Información general
Substituir la Lámpara
Puntos para ahorro de energía
Investigación de averías
Cómo invertir la puerta
Introducción
Manija de la puerta
Instalación
Operación
Sugerencia en el alma
-cenaje del alimento
Cuidado y man
-tenimiento
Investigación de averías
Para invertir las puertas
21
23
24
25
26
26
26
27
27
27
28
29
30
31
31
32
33
35
36
20
Page 20

Instrucción de seguridad Importante
El enchufe de la fuente del refrigerador-alacena se debe
colocar en la posición accesible fácil para la desconexión
rápida en emergencia.
Si se daña el cable de la fuente, debe ser substituida por
el fabricante o su agente del servicio o una persona semejantemente cualificada para evitar un peligro.
Este refrigerador-congelador se debe instalar y establecer correctamente de acuerdo con la instrucción
de instalación antes de que se utilice.
Nunca desenchufe su refrigerador-congelador tirando en
el cable eléctrico. Agarre siempre el enchufe firmemente y
Al mover su aplicación lejos desde la pared, teng
hale recto hacia fuera del enchufe.
a cuidado
Saque el enchufe de energía antes de limpiar el congelado
de no rodar sobre o de no dañar el cable eléctrico.
rrefrigerador. Nunca dañe, seriamente doble, saque, o tuerze
el cable eléctrico porque el daños del cable eléctrico pueden
causar un fuego o un choque electrónico.
Si es posible, conecte el refrigerador-congelador con su propio
enchufe eléctrico individual para evitar que él y otras aplica
-
ciones o luces de la casa causen una sobrecarga.
Accesibilidad del
enchufe de la fuente
Reemplazo Del
cable De la Fuente
Precaución
Don’t use an
extension cord
21
Introduccion
Page 21

Introduccion
Instrucción de seguridad Importante
PELIGRO
Poner a tierra
ADVERTENCIA
Riesgo de atrapa del niño.
Antes de usted lance lejos su viejo refrigerador o congelador:
Quite las puertas.
Deje los estantes en lugar de modo que los niños no puedan
subir fácilmente adentro.
I En el acontecimiento de un corto circuito eléctrico, el poner a tierra reduce el riesgo de la descarga eléctrica proporcionando un alambre del escape para la corriente eléctrica.
Para prevenir descarga eléctrica posible, esta aplicación debe
ser puesta a tierra. El uso incorrecto del enchufe que pone a
tierra puede dar lugar a una descarga eléctrica.
Consulte a un electricista o a persona cualificado del servicio si las instrucciones que ponen a tierra no se entienden
totalmente, o si usted tiene dudas en si la aplicación está
puesta a tierra correctamente.
Mantenga las aberturas de la ventilación, en el recinto
de la aplicación o la estructura incorporada, lejos de la
obstrucción.
No utilice los dispositivos mecánicos u otros medios
para acelerar el proceso de descongelación, con
excepción de ésos recomendados por el
No dañe el circuito refrigerante.
No utilice las aplicaciones eléctricas dentro de los
compartimientos del almacenaje del alimento de la
aplicación, a menos que estén del tipo recomendado
por el fabricante.
El gas que sopla del refrigerante y del aislamiento
usado en la aplicación requiere procedimientos especiales de la disposición.
En la disposición, consulte por favor con el agente del
servicio o una persona semejantemente cualificada.
fabricante.
PRECAUCIÓN
Este dispositivo no está destinado para ser utilizado por personas
(incluyendo a niños) disminuidas físicas, mentales o sensoriales,
o sin experiencia o conocimiento, a menos que lo hagan bajo
supervisión o hayan recibido instrucciones sobre el uso del
dispositivo por parte de una persona responsable de su seguridad.
Los niños deben estar siempre supervisados para garantizar que
no jueguen con el electrodoméstico.
22
Page 22

Introduccion
Disposición de viejo producto
& embalaje de la nueva
Disposición del
viejo producto
Disposición del
embalaje de la
aplicación nueva
La toma detrás
La vieja aplicación que ha expirado vida se debe destruir para
hacerlo seguro antes de la disposición. Tome hacia fuera los
enchufes de energía, separe los alambres de la conexión y
quite o destruya todos los resortes, cierres o empernarse, para
evitar que atrapen a los niños durante juego.
Para la protección del medio ambiente, los viejos refrigeradores se deben disponer apagado por una agencia profesional
de la disposición. Si usted tiene cualquier pregunta, consulte
por favor con la agencia local de la venta o la autoridad local.
Todos los materiales de embalaje usados para esta
aplicación son favorables al medio ambiente.
Las materias referentes al material son como sigue:
PE : Polietileno -- Hoja o bolsillo para el embalaje
PS : Objetos formados hechos de espuma
Poliestireno LIBRE-CFC
PP : Atando con correa hecha del polipropileno
Esta aplicación contiene el líquido (refrigerante,
lubricante) y se hace de las piezas y de los materiales que son reutilizables y/o reciclables.
Todos los materiales importantes se deben enviar
al centro de la colección del material de desecho
y se pueden reutilizar después de la reanudación
(reciclaje). Para la toma detrás, entre en contacto
con por favor con la agencia local.
Cómo deshacerse de aparatos eléctricos y electrónicos viejos
1. Si en un producto aparece el símbolo de un contenedor de
basura tachado, significa que éste se acoge a la Directiva
2002/96/CE.
2. Todos los aparatos eléctricos o electrónicos se deben desechar
de forma distinta del servicio municipal de recogida de basura,
a través de puntos de recogida designados por el gobierno o
las autoridades locales.
3.
La correcta recogida y tratamiento de los dispositivos inservibles
contribuye a evitar riesgos potenciales para el medio ambiente
y la salud pública.
4. Para obtener más información sobre cómo deshacerse de sus
aparatos eléctricos y electrónicos viejos, póngase en contacto
con su ayuntamiento, el servicio de recogida de basuras o el
establecimiento donde adquirió el producto.
23
Page 23

Introduccion
Identificación de piezas
Dial de control
del termóstato
Estantes de
la materia
Bandeja del
huevo
Sello de puerta
magnética
Estante
de botella
Tornillos de
nivelación
Cajón de
vegetales
Estan-
NOTA
Esto es un modelo básico. La forma del refrigerador está conforme a cambio.
21
24
Page 24

Instalacion
Localización
Coloque en un suelo plano y firme. Si el piso no es
uniforme, ajuste los pies usando el tornillo de nivelación
en el borde delantero del gabinete.
Si el frente es levemente más alto que la parte posterior,
la puerta puede cerrarse más fácilmente.
NOTA
Recomendamos que el refrigerador esté instalado en un
lugar seco y bien ventilado. Cerciórese de que la aplicación no esté expuesta a la luz del sol directa ni esté
colocada en vecindad de una fuente de calor tal como
estufa, calentadores, radiador.
Para asegurar la correcta circulación del aire alrededor del
frigorífico/congelador, mantenga el espacio libre suficiente
en ambos lados, así como en la parte superior, y mantenga
la unidad a al menos 2 pulgadas (5 cm.) de la pared posterior.
Page 25

Instalacion
Instalación con/sin
la mesa superior
Compruebe que el aire caliente hecho para calentar el aire de la
parte posterior de la aplicación circule sin la obstrucción. Si no,
podría causar la salida de la unidad de la refrigeración al aumento
y éste dará lugar a un índice más alto de la consumo de energía.
Por lo tanto, confirme que la parrilla de la ventilación nunca está
cubierta o bloqueada.
1. al instalar con la tapa
mesa (Sin estando), empuje el re-
frigerador hasta que el agujero que
circula del aire de la tabla superior
alcanza casi la pared.
2. al instalar sin la mesa superior,
alinee el borde del frente de la
puerta con el borde delantero de
los muebles de la cocina.
Cómo quitar la mesa superior
1. Desatornille 2 pernos en
la parte posterior de la
mesa superior
2. Lleve a cabo la parte posterior
de la mesa superior y el em
puje remite levantando enc
ima de la mesa superior
levemente.
Conexión eléctrica
Esta aplicación se debe conectar con fuentes AC 220~240V ,
50 Hz. Usted debe conectar esta aplicación solamente con el
zócalo de energía con poner a tierra la conformación con las
regulaciones relacionadas y solamente un experto aprobado
debe instalar esta aplicación.
Manija de la puerta
En caso de instalar la manija de la puerta, refiera a una
figura incluida con ella en un paquete del producto.
26
1
2
Page 26

Operacion
El comenzar
Antes de encendido, deje la aplicación que está parada por lo
menos 2 horas, de modo que la circulación del refrigerante se
estabilice y no ocurran ningunos problemas de funcionamiento.
Dé vuelta al dial del control de la temperatura de la posición
“0”. El proceso de la refrigeración comienza y la lámpara
dentro del refrigerador se enciende cuando se abre la puerta.
Controlar la temperatura
Recomendamos fijar el dial “4” para el normal.
Muy caliente: Dar vuelta al dial del
control de la tempera
tura a la derecha fijará
a un ajuste más frío
(un ajuste más alto del
número).
Muy frio : Dar vuelta a la izquierda
del dial del control de la
temperatura a un ajuste
del caliente(un ajuste más
bajo del número).
El ajuste de la temperatura depende de la temperatura ambiente, la cantidad de alimentos, cómo la puerta se abre a menudo.
El ajuste de la temperatura debe ser comprobado usando un
termómetro apropiado y después de las instrucciones en él.
Apagar
Dé vuelta al dial del control de la temperatura a la izquierda
hasta sistema a “0”. El proceso de la refrigeración para y la
lámpara dentro del refrigerador se apaga.
27
4
W
a
r
m
2
3
5
1
OFF
7
6
d
l
o
C
Page 27

Sugerencia en el almacenaje del alimento
Almacenar el alimento
Abrir la puerta a menudo o guardar la puerta abierta por un
tiempo largo, aumenta la temperatura interior. Esto reduce la
vida de almacenaje y el sabor de los alimentos, y aumenta el
consumo de energía.
Arreglo del alimento
- Almacene los productos alimenticios que emiten olor
en envases y abrigo cerrados.
- Utilice el papel de aluminio, los envases plásticos de
la hoja y del metal o de cristal como el material de
embalaje para los alimentos.
- Permita que los alimentos calientes se refresquen
suficientemente antes de colocar dentro de la aplicación.
- Mantenga las bebidas alcohólicas de la graduación
elevada en botellas herméticas y posición vertical.
- No almacene los productos (melón, plátano, piña etc)
que son probables a dañarses en la baja temperatura.
< Refiera a la figura de la página 24>
Pan, comidas guisadas.
Carne, salchichas, productos de la rebanada.
Vejetales, fruta, producto de ensalada.
Mantequilla, Queso.
Cristales o botellas pequeños, latas, especias.
Huevos.
Botellas grandes de la bebida.
Cerciórese de que la puerta esté cerrada correctamente.
28
Page 28

Cuidado y mantenimiento
Descongelación
Descongelación del compartimiento del
refrigerador
Cuando el congelador está funcionando, la helada se
forma en la pared posterior del compartimiento del
refrigerador y derrite automáticamente el compresor
se detiene. El agua deshelada se recoge en el canal de
la descarga y se evapora por el calor del compresor.
Nunca ponga los dispositivos eléctricos en el
refrigerador
para descongelar. Tome el cuidado al
usar la descongelación rocían para asistir a la descongelación. Estos aerosoles incluyen las sustancias que
contienen el gas explosivo, o dañosos para la síntesis o
la salud humana.
NOTA
29
Page 29

Cuidado y mantenimiento
Limpieza
Advertencia
Quite siempre los enchufes o el interruptor de
fuente antes de limpiar.
No utilice los objetos agudos (tales como cuchillo, destornillador) que podrían romper el circuito refrigerante dando por
resultado riesgos ambientales y de salud.
Nunca utilice el limpiador del vapor o el limpiador de la
presión del vapor puesto que el vapor caliente puede dañar
la superficie del refrigerador y los dispositivos eléctricos.
Nunca utilice la arena, el solvente abrasivo del detergente, del
ácido o del producto químico.
• El cuidado debe ser tomado que el agua de limpieza no
entre al interior del recinto o la lámpara del termóstato.
• Limpie el refrigerador que incluye los dispositivos
interiores con ropas o agua tibia. Usted puede
utilizar el detergente comercial para los artículos
de mesa.
Limpie regularmente el cambiador de calor en el lado trasero
del refrigerador usando un cepillo liso de modo que las acumulaciones de saquen el polvo y los residuos. No interrumpa
la extensión del interior y no cause el consumo de energía
creciente.
Cualquier daño al cambiador de calor u otros acontecimientos que conducen a la exposición del refrigerante al ambiente, se deben evitar debido a riesgos
potenciales del ambiente y de salud.
30
ww
Page 30

Cuidado y mantenimiento
Información general
Cuando usted planea estar ausente por un período
extendido, quitar todo el alimento, desconectar el
cable eléctrico, limpiar el interior a fondo, y dejar
la puerta ABIERTA para prevenir la formación del
olor.
La mayoría de los apagones se corrigen sobre una
hora o dos y no afectarán sus temperaturas del
refrigerador. Sin embargo, usted debe reducir al
mínimo el número de las aberturas de la puerta
mientras que la energía está.
Quite todos los artículos dentro del refrigerador o
sujete con seguridad todos los artículos flojos. Para
evitar de dañar el tornillo de nivelación, déles vuelta
a toda la manera en la base.
• La pipa de anti-condensación está
instalada alrededor de la parte delantera
del refrigerador-congelador para evitar
el rocío.
• Especialmente después de la instalación
o cuando la temperatura ambiente es
alta, el refrigerador-congela dor puede
sentirse caliente, de el cual es absoluta
mente normal.
Substituir la Lámpara
Desenchufe el cable eléctrico del enchufe de la AC.
1. Tome los estantes hacia fuera
para hacer el acceso más fácil.
2. Sostenga la lámpara de la cubierta,
tómela hacia fuera suavemente
del recinto del termóstato con
torcer hacia arriba y hacia abajo.
3. Dé vuelta a la lámpara a la izquierda, y substitúyala
(max 15W, 220~240V)
4. Monte en la orden reversa del desmontaje. La bobilla del
reemplazo debe ser la misma especificación que original.
El salir
Apagón
Si usted mueve
Pipa anti-condensación
31
0
4
2
6
1
5
3
7
Pipa anti-condensación
Page 31

Cuidado y mantenimiento
Puntos para ahorro de energía
-After moving the appliance, allow 2 hours to turn on again.
- No coloque la aplicación cerca del radiador, de la estufa,
y de fuentes de calor. Si la temperatura ambiente es alta,
el compresor funcionará más largo.
- Coloque la aplicación en un cuarto fresco y bien ventilado.
No exponga a la luz del sol directa.
- No mantenga la puerta abierta demasiado de largo.
- No coloque el alimento y las bebidas calientes en la
aplicación. Refresque por favor abajo primero el vapor
de comestibles calientes contribuiría de otra manera a la
congelación de la unidad del evaporador; y el período
que se refresca debe ser tan corto como sea posible, por
razones de la salud y de la higiene.
- No fije la temperatura de la aplicación más bajo que
necesitada.
- Coloque los alimentos congelados para deshelar en el
refrigerador. Pueden ser utilizados para refrescar el
refrigerador.
- Substituya la junta magnética de la puerta si no está
funcionando correctamente.
32
Page 32

Investigación de averías
Antes de llamar para el servicio, compruebe
esta lista. Puede ahorrarle tiempo y costo.
Esta lista incluye las ocurrencias comunes que
no son el resultado de la ejecución defectuosa
o materiales en esta aplicación.
Problema Causas Posibles
El Refrigerador-Conge
-lador no funciona
• El enchufe de energía se puede desenchufar del
enchufe eléctrico.
Enchúfelo con seguridad.
• El fusible de la casa ha soplado o el interruptor
ha disparado.
Compruebe y/o substituya el fusible y reajuste el
interruptor.
• Corte de energía.
Compruebe las luces de la casa.
• El piso en el cual el refrigerador-congelador
está instalado puede ser desigual o el refrig erador-congelador puede ser inestable.
Haga uniforme rotando el tornillo de nivelación.
• Objetos innecesarios puestos en el lado
trasero del refrigerador-congelador.
• Muy frecuente o las aberturas demasiado
largas de la puerta. Hay una fuente de calor
cerca de Refrigerador-Congelador.
Una cantidad grande de alimento fue colocada
dentro del compartimiento del refrigerador.
• El regulador de temperatura está en “O”.
La bombilla es defectuosa.
Refiera a la “Sección de substituir la lámpara”
• El regulador de temperatura está fijando
a la cifra extremadamente elevada.
Vibración o confundir
o ruido anormal
La temperatura de
alimentos dentro
del refrigerador no
es bastante fría
La luz interna no
trabaja
La temperatura dentro
del refrigerador es
demasiado fría
33
Page 33

Investigación de averías
Problema Causas Posibles
• Los alimentos con olores fuertes deben ser
cubiertos o ser envueltos firmemente
• Compruebe si hay el alimento estropeado
• El interior necesita limpiar
• Refiera a la “sección de la limpieza”
• Este fenómeno es probable ocurrir en un espa
cio mojado.
Limpíelo con una toalla seca
• Ninguna energía en el enchufe.
• La lámpara de luz necesita substituir.
Refiera a la sección del reemplazo de la lámpara.
El refrigerador tiene olor
Formas de humedad en
superficie del gabinete
La luz interior no trabaja
34
Page 34

Para invertir las puertas
Cómo invertir la puerta
Su refrigerador se diseña con una puerta reversible, así que
usted puede abrirse de izquierdo o de derecho. Es mejor
colocar la bisagra de la puerta de nuevo como necesaria en
el principio puesto que es incómodo hacerlo más tarde.
Para cambiar la bisagra de la puerta refiera por favor al diagrama abajo y siga de la forma siguiente.
1. Primero desenchufe la aplicación.
2. Quite los alimentos y los accesorios como los estantes o
las bandejas que no están fijados en el refrigerador.
3. Ponga cuidadosamente la aplicación en un amortiguador
como material de embalaje para evitar el daño del circuito
de la refrigeración.
4. Use “+” conductor o llave de tuercas para fijar o para
quitar los pernos.
1. Desatornille los PERNOS 2x, después quite la bisagra (l).
2. Quite la PIERNA.
3. Tire suavemente de la puerta hacia abajo para quitarla.
4. Antes de reinstalar la puerta, intercambie el casquillo de
la bisagra tirando de él hacia fuera de su localización
actual y colocándolo de nuevo en el otro lado de la
puerta. El cuidado se debe tomar para no dañar las
superficies adyacentes al quitar el casquillo de la bisagra
5. Desatornille el perno de bisagra superior (U) y atorníllelo
en el agujero lateral opuesto.
Precaution
35
4
4
Page 35

Para invertir las puertas
Cómo invertir la puerta
6. Después de reinstalar la puerta, fije la bisagra más
baja (l) en el lado opuesto usando los PERNOS 2x.
7. Fije la pierna.
8. Coloque cuidadosamente la aplicación en una
posición vertical. Ajuste el tornillo de nivelación
para cerciorarse de que la aplicación es constante
y comprobar que la puerta se abre y se cierra
correctamente.
NOTA
En caso de que de aplicar la puerta reversible, cuando
usted cierra la puerta con la fuerza excesiva, podría
haber el caso que la puerta no cierra debido a fuerza
de la reacción. Compruebe por favor si la puerta se
cierra correctamente.
Manija de la puerta (Opción)
NOTA
El cambio del sentido de apertura de las puertas no está
cubierto por la garantía.
36
Page 36

NOMBRE Y APELLIDOS:
Nº DE SERIE:
TARJETA DE GARANTÍA
1.-Guarde durante todo el período de garantía
esta tarjeta debidamente cumplimentada y
sellada por la tienda junto con la factura de
compra.
2.-Cuando requiera cualquier servicio de
reparación deberá mostrar esta tarjeta de
garantía.
3.- Para cualquier información sobre nuestros
productos, nuestra compañía, o si tiene
cualquier duda o quiere hacer alguna consulta puede hacerlo a través de nuestras web o
SELLO DEL
ESTABLECIMIENTO:
nuestra línea de atención al cliente.
4.- Lea detenidamente el contenido de esta tarjeta de garantía.
PRODUCTO
MOMENTO DE LA COMPRA
DATOS DEL USUARIO Y DEL
DOMICILIO:
C. POSTAL: POBLACIÓN:
PROVINCIA: TELÉFONO:
FECHA DE COMPRA: MODELO:
ESTABLECIMIENTO O TIENDA EN EL
RELLENAR TODOS LOS DATOS POR EL
Page 37

Page 38

Índice
Importantes Instruções de Segurança
Disposição do aparelho velho e a
Embalagem do aparelho novo
Identficação das Partes
Local
Instalação com ou sem Mesa de Cima
Conexão Elétrica
Maçaneta
Como Ligar
Controlo de Temperatura
Como Desligar
Armazenar Os Alimentos
Desconge-lação
Limpeza
Informação Geral
Substituição da Luz
Truques para a Poupança de Energia
Reparação das Avariias
Como Abrir a Porta numa direcção Contrária
Introdução
Instalação
Operação
Sugestões sobre a
Armazenagem dos
Alimentos
Cuidado e Manutenção
Reparação das Avarias
Como Abrir a Porta numa
Direcção Contrária
Maçaneta (Opção)
38777
41
42
43
43
43
44
44
44
45
46
47
48
48
49
50
52
53
37
40
Page 39

Introdução
Importantes Instruções de Segurança
A tomada da rede eléctrica deste frigorífigo-despensa
deve ser localizada numa posição facilmente acessível
para a desconexão rápida no caso de emergência.
O fio da rede eléctrica danificado tem de ser substituído
pelo manufactor, o seu agente de serviço ou pessoal
qualificado para evitar perigo.
Este frigorífigo-Despensa tem de ser instalado e localizado
correctamente de acordo com o guia de instalação antes de
ser usado.
É proibido desligar o frigorífigo-despensa atravéz de
puxar o fio da rede eléctrica. Agarre sempre com força a
tomada para puxar.
Quando se muda o aparelho duma parede, tome cuidado
que o aparelho não rolasse em cima do fio da rede eléc
-
trica ou o danificasse.
Acessibilidade da Tomada
da Rede Eléctrica
Substituição da Tomada
da Rede Eléctrica
Precaução
38
Antes de limpar o frigorífigo-despensa, puxe para fora a tomada
da rede eléctrica. Não danifique, dobre severamente, puxe para
fora ou retorça o fio da rede eléctrica porque um dano no fio da
rede eléctrica pode causar incêndio ou choque eléctrico.
Quando possível, ligue sempre o frigorífigo-despensa com uma
tomada individual com o objectivo de prevenir sobrecarregação do
frigorífigo-despensa, outros aparelhos ou iluminações familiares.
Não utilize um fio
de extensão
Page 40

Introdução
Importantes Instruções de Segurança
PERIGO
Conexão com a Terra
Advertência
Risco de encurralamento das crianças
Antes de jogar fora o seu frigorífigo ou congelador
velho, desmantele a porta e guarde as prateleiras nas suas
posições para que as crianças não entrem facilmente.
No caso de curto-circuito, conexão com a terra reduz a possibilidade de choque eléctrico atravéz de fornecer uma fuga para
corrente eléctrica. Para evitar choque eléctrico possível, este
aparelho tem de ser ligado à terra. Uso impróprio da tomada de
terra pode levar a um choque eléctrico.
Consulte um electricista qualificado ou pessoal de serviço
se não entender completamente as instrução da conexão
com a terra, ou se tiver qualquer dúvida se o aparelho é
ligado correctamente à terra ou não.
As aberturas de ventilação, quer do cercado do frigorífigo
quer da estrutura interior, têm de ser livres de obstáculos
Não utilize aparelhos mecánicos ou outras maneiras para
acelerar o processo de descongelação, excepto as recomen
-dadas pelo manufactor.
Não danifique o circuito de refrigerante.
Não utilize aparelhos eléctricos dentro do compartimento
da armazenagem dos alimentos deste aparelho, excepto os
modelos recomendados pelo manufactor.
O refrigerante e gás queimante de insulação utilizado neste
aparelho requere métodos especiais de disposição. Consulte
por favor o agente de serviço ou pessoal qualificado em
relação à disposição.
CUIDADO
Este aparelho não está destinado para ser usado por pessoas
(incluindo crianças) com capacidades físicas, sensoriais ou
mentais reduzidas, ou com falta de experiência e conhecimento,
excepto se tiverem recebido supervisão ou instruções
relativamente ao uso do aparelho, por uma pessoa responsável
para sua segurança.
As crianças deverão ser vigiadas para assegurar de que não
brincam com o aparelho.
39
Page 41

Introdução
Disposição do Aparelho Velho e a
Disposição do
Aparelho Velho
Disposição da Embalagem do Aparelho Novo
Reciclagem
Embalagem do
O aparelho que expirou deve ser danificado com o objectivo de
segurança antes de disposição. Puxe para fora a tomada da rede
eléctrica, sepere fios de conexão, tire ou danifique todas as molas,
trancas, ou parafusos, para que as crianças não entrem e sejam
encerradas quando brincam.
Para a protecção ambiental, o frigorífigo velho tem de ser desfeito pela agência de disposição profissional. Consulte por favor
a agência local de venda ou autoridades locais se tiver qualquer
dúvida.
Todos materiais usados na embalagem deste aparelho são
preferidos pela protecção ambiental.
Problemas acerca de material são os seguintes:
PE : Polietileno – papel ou saco de alumínio para a embalagem
PS : Objectos feitos com polystyrene espumado sem CFC
PP : Fita de polipropileno
Este aparelho contém fluido (refrigerante, lubrificante) e é
feito de partes e materiais que são reus
receclados.
Todos os materiais importantes devem ser enviados para centro
de reciclagem para ser usados de novo depois de elaboração
(reciclagem). Em relação a este problema, tome contacto com
a agência local.
Eliminação do seu antigo aparelho
1. Quando este símbolo de latão cruzado estiver afixado a um
produto, significa que o produto é abrangido pela Directiva
Europeia 2002/96/EC.
2. Todos os produtos eléctricos e electrónicos devem ser
eliminados separadamente do lixo doméstico através de
pontos de recolha designados, facilitados pelo governo ou
autoridades locais.
3. A eliminação correcta do seu aparelho antigo ajuda a evitar
potenciais consequências negativas para o ambiente e para a
saúde humana.
4. Para obter informaçõs mais detalhadas acerca da eliminação
do seu aparelho antigo, contacte as autoridades locais, um
serviço de eliminação de resíduos ou a loja onde comprou o
produto.
40
Aparelho Novo
áveis e/ou podem ser
Page 42

Introdução
Controlo Térmico
Estantes de
Mercadorias
Bandeja de Ovo
Selo Magnético
da Porta
Estante de
Garrafa
Parafusos de
Equilíbrio
Gaveta de
Legume
Prateleiras
Identificação das Partes
ObservaçãoEste é um modelo básico. A figura do frigorífigo é
sujeita a mudança.
41
Page 43

Instalação
Local
Recomendamos que se instala o frigorífigo num local seco e
bem ventilado. Assegura-se de que o aparelho não é exposto
ao raio solar directamente ou é colocado perto de uma fonte
de calor como fogão, aquecedor, radiador.
Para garantir uma circulação de ar adequada em redor do
combinado, por favor mantenha livre um espaço suficiente de
ambos os lados, bem como na parte superior, e mantenha livres
pelo menos 2 polegadas (5cm) de espaço entre o combinado e
a parede posterior.
Coloque no chão plano e firme. Se o chão não for
plano, ajuste o pé atravéz do parafuso de equilíbrio
na frente do armário.
Se a frente for um pouco mais alta do que traseira,
a porta fecha-se mais facilmente.
Observação
42
Page 44

Instalação com ou sem Mesa de Cima
Assegura-se de que o ar quente que aquece o ar da traseira do
aparelho circula sem obstáculos. Se não, o consumo de energia
da unidade refrigerante vai aumentar. Por isso, confirme que a
grelha de ventilação não é coberta ou bloqueada.
1. Quando instalar com a mesa
de cima (posição livre),
empurre o frigorífigo até que
o buraco da circulação do ar
chega a parede.
2. Quando instalar sem a mesa
de cima, alinhe a borda frente
da porta com a mobília de
cozinha.
Como Desmantelar a Mesa de Cima
1. Tire os dois parafusos na
traseira da mesa de cima.
2. Segure a traseira da mesa,
levante para cima um pouco
e espurre para frente.
Conexão Eléctrica
Este aparelho deve ser ligado à artéria de electricidade de corrente alternativa 220~240V�50Hz. Tem de ligar este aparelho à
tomada de acordo com os regulamentos relacionados e só um
especialista aprovado pode instalar este aparelho.�
Maçaneta
Para instalar a macaneta, veja uma imagem de explicação
anexada na embalagem deste produto.
Instalação
43
1
2
Page 45

Operação
Como Ligar
Antes de o ligar, deixa o aparelho ficar de pé por pelo menos
duas horas, para que a circulação de refrigerante estabilize e
não exista qualquer problema de operação.
Gire o controlo de temperatura da posição “0”. O processo de
regrigerar começa e a luz dentro de frigorífigo liga-se quando
a porta se abre.
Controlo de Temperatura
Recomendamos o grau 4 para situação normal.
Demasiadamente
quente: Gire o controlo
de temperatura no
sentido horário
para uma temperatura
mais baixa. (número
maior)
Demasiadamente
frio: Gire o controlo
de temperatura
no sentido contrário
horário para uma
temperatura mais alta.
(número menor)
A temperatura depende da temperatura ambiental, a quantidade de alimentos, a frequência da abertura da porta. Por iss,
a temperatura deve ser examinada com termômetro apróprio
seguindo as instruções nele.
Como Desligar
Gire o controlo de temperatura até a posição “0” no sentido
contrário horário. O processo de refrigerar pára e a luz dentro
de frigorífigo desliga-se.
44
4
W
a
r
m
2
3
5
1
OFF
7
6
C
d
l
o
Page 46

Sugestões sobre a Armazenagem dos Alimentos
Armazenagem dos Alimentos
Abrir a porta frequentamente ou mantê-la aberta por um
longo tempo deixa a temperatura interior subir. Isso vai encurtar o tempo da conservação do alimento, danificar o sabor
do alimento e aumentar o comsumo de energia.
Organizar Alimentos
- Coloque alimentos com odor em utensílios fechados e os
embrulhe.
- Use papel de alumínio ou papel plástico de alumínio, e
recipientes de metal, vidro como matelrial de embalagem
de alimentos.
- Deixe alimentos quentes esfriar-se antes de ser colocador
no aparelho.
- Guarde bebidas alcoólicas em garrafas herméticas e posições
de cima.
- Não coloque produtos (melão, banana, ananás etc) que
tornar-se podre numa temperatur baixa.
vão
<Veja a Imagem na página 41>
Pão, Alimentos feitos.
Carne, Salsicha, Fatia de alimentos.
Legume, Frita. Salada.
Copos de vidro ou garrafas pequenos, Latas.
Especiarias, Ovos.
Garrafas de bebida grandes.
Assegura-se de que a porta é fechada apropriamente.
45
Page 47

Cuidado e Manutenção
Descongelação
Descongelação do frigorífigo
Quando o congelador trabalha, forma-se geada na traseira
do frigorífigo. E a geada descongela-se automaticamente
quando o compressor pára de trabalhar. A água descongelada
é recolhida em calha de despejar e vaporiza com o calor de
compressor.
Nunca coloque aparelhos eléctricos no
frigorífigo para descongelar-se. Tome cuidado
com borrifo de descongelação. Estes borrifos incluem substâncias que contêm gás explosivo ou que
é prejudical para materiais sintéticos ou saúde.
Observação
46
Page 48

Cuidado e Manutenção
Informação Geral
Quando tem o plano de sair de casa por um período
longo,tire para fora todos os alimentos, desligue o
fio da rede eléctrica, limpe completamente o interior, mantenha a porta aberta para prevenir fedor.
A maior parte das faltas de electricidade recupera-se dentro
de uma ou duas horas, o que não afecta a temperatura do seu
frigorífigo. Mas durante a falta de electricidade, abre a porta
quanto menos possível. Se a falta de electricidade demorar,
ponha gelo seco em cima da embalagem de congelação.
Tire para fora todas as coisas no frigorífigo ou fixe todos os
objectos soltos. Para não danificar o parafuso de equilíbrio,
retorne-os completamente dentro de base.
• Tome cuidade de que a água de limpeza não entra no
interior do cercado do termostato ou luz.
• Limpe o frigorífigo incluindo aparelhos interiores com pano
ou água morna. Pode usar detergente comercial para o pano.
Limpe regularmente com uma escova plana a máquina de
intercâmbio de calor que fica na traseira do frigorífigo para
que a acumulação de pó e resíduo não perturbe a expansão
do interior ou aumente o consumo de energia.
Qualquer dano à máquina de intercâmbio de calor
ou outros eventos que deixam o refrigerante expor
ao ar devem ser evitados, por causa de risco po
-
tencial de ambiente e saúde.
Advertência
47
ww
Page 49

Cuidado e Manutenção
Informação Geral
Quando tem o plano de sair de casa por um período longo,tire
para fora todos os alimentos, desligue o fio da rede eléctrica,
limpe completamente o interior, mantenha a porta aberta para
prevenir fedor.
A maior parte das faltas de electricidade recupera-se dentro
de uma ou duas horas, o que não afecta a temperatura do seu
frigorífigo. Mas durante a falta de electricidade, abre a porta
quanto menos possível. Se a falta de electricidade demorar,
ponha gelo seco em cima da embalagem de congelação.
Tire para fora todas as coisas no frigorífigo ou fixe todos os
objectos soltos. Para não danificar o parafuso de equilíbrio,
retorne-os completamente dentro de base.
• O cano de anti-condensação é insta
lado na frente de frigorífiro-despensa
para prevenir orvalho.
• Especialmente depois de instalação
ou quando a temperatura ambiental
é alta, o frigorífigo-despensa pode
ser muito quente, o que é normal.
Substituição de Luz
Desligue o fio da rede eléctrica da tomada AC..
1. Tire para fora as
prateleiras para
acesso mais fácil.
2. Segure a luz de
cobertura e tire-a
ligeiramente do cercado
de termostato retorcendo para cima e baixo.
3. Gire a luz no sentido contrório horário e substiua-a. (max
15W, 220~240V)
4. Monte na ordem contrário de desmontar. A lâmpada para a
substituição deve ser o mesmo tipo da lâmpada original.
Saída de Casa
Falta de Electricidade
Se se mudar de posição
Cano de Anti-Con
- densação
48
0
4
2
6
1
5
3
7
Cano de
Anti-Condensação
Page 50

Cuidado e Manutenção
Truques para a Poupança de Energia
- Depois de mudar o frigorífigo, liga outra vez depois de
duas horas.
- Não coloque o frigorífigo perto de radiador, fogão e
fontes de calor. Se a temperatura ambiental for alta, o
compressor vai trabalhar por mais tempo.
- A porta não deve ficar aberta por um longo tempo.
- Não ponha comida e bebida quentes no frigorífigo. Res friam-se primeiro, se não, o vapor do alimentos quentes
pode contribuir para a congelação do evaporatório. Por
causa de saúde e higiene, o período de resfriamento d
eve
ser o mais curto possível.
- Não marque a temperatura do aparelho mais baixa do que
necessário.
- Se o cixum magnético não funcionar bem, mude-o.
- Coloque o frigorífigo num quarto fresco e bem ven
tilado. Não o deixe expor ao raio solar directamente.
49
Page 51

Reparação de Avarias
Antes de chamar serviço, examine esta lista.
Isso vai poupar-lhe tempo e dinheiro.
Esta lista inclue occorências comuns que não
são resultados de fabricação ou mateiral
Problemas Causas Possíveis
Frigorífigo-Despensa
não Trabalha
Vibração, chocalhar ou
barulho abnormal
A temperatura dos
alimentos congelados
no frigorífigo não é
bastante baixa
A luz interior não
trabalha
A temperatura do
aparelho é muito baixa
• É possível que a tomada fosse puxada para fora.
Ligue-a seguramente
• O fusível familiar partiu ou o parador do circuito
tropeçou.
Examine e/ou mude de fusível e comece de novo o parador
do circuito.
• Curto-Circuito.
Examine iluminações familiares.
• O chão em cima do qual o aparelho é instalado não
é plano ou o aparelho não é estável.
Faça girar o parafuso de equilíbrio para mantê-lo horizontal.
• Objectos não necessários são colocados atrás do
aparelho.
• A porta abre-se frequentemente ou por um longo
tempo.
Há uma fonte de calor perto do aparelho.
Uma grande quantidade de alimentos são colocados
no compartimento de frigorífigo.
• O controlo de temperatura está na posição “0”.
A Lâmpada avariou-se.
Veja o capítulo “Substituição de Luz”.
• O controlo electrónico é marcado com um número
extremamente baixo.
50
Page 52

Reparação de Avarias
Problemas Causas Possíveis
Odor abnormal no
frigorífigo
Humidade forma-se na
superfície do armário
A luz interior não
trabalha
• Alimentos com odor forte têm de ser cobertos ou
embrulhados firmemente.
• Procura-se alimento podre
• O interior precisa de limpeza
• Consulte o capítulo“Limpeza”
• Este fenómeno é possível num ambiente húmido.
Limpe com uma toalha seca.
• Não há elctricidade na tomada.
• A lâmpada prcisa de substituição.
Veja o capítulo Substituição de Lâmpada.
51
Page 53

Como Abrir a Porta numa
Direcção Contrária
O seu frigorífigo é desenhado com uma porta que se pode
abrir numa direcção contrária, quer dizer pode abri-la quer
da direita quer da esquerda. É melhor colocar a dobradiça
da porta no início, porque é inconveniente fazê-lo depois.
Para mudar de dobradiça, veja o diagrama seguinte e faça
seguindo as instruções.
1. Primeiro, desligue o aparelho.
2. Tire para fora todos os alimentos e acessórios
como prateleiras ou bandejas que não são
fixados no frigorífigo.
3. Coloque cuidadosamente o frigorífigo numa
almofada como o material de embalagem
para não danificar o circuito dele.
4. Utilize + chave de fenda ou chave inglesa para
fixar ou tirar parafusos.
1. Tire dois parafusos e depois a dobradiça (L).
2. Tire LEG.
3. Puxe a porta ligeiramente para baixo para tirá-la.
4. Antes de instalar a porta de novo, troque a dobradiça
atravéz de puxar da sua posição corrente e ponha-a no
outro lado da porta. Tome cuidado de que não dani fique a superfície adjacente quando tirar a dobradiça.
5. Tire o alfinete de dobridiça de cima�U��coloque-o no
buraco no lado oposto.
Precaução
Como Abrir a Porta numa
Direcção Contrária
52
4
4
Page 54

Como Abrir a Porta numa Direcção Contrária
Como Abrir a Porta numa
Direcção Contrária
6. Depois de instalar a porta de novo, fixe a dobradiça de
baixo (L) no lado oposto usando dois parafusos.
7. Fixe a perna.
8. Retorne o aparelho numa posição vertical.
Ajuste o parafuso de equilíbrio para ass
que o frigorífigo é estável e examine se a porta abre
e fecha normalmente.
egurar-se de
Observação
No caso duma porta que abre numa direcção
contrária,quando fecha a porta com força
é possível que a porta não feche por causa da força
de reacção. Por favor verifique se a porta abre e fecha
normalmente.
excessiva,
Maçaneta (Opção)
Observação
Reverter as portas não está coberto pela garantia.
53
Page 55

NO.12 Ying Bin Road,Hai Ling District,Tai Zhou,Jiang Su,China
http://www.lg.com
P/NO.3828JS8034R
 Loading...