

ENGLISH RUSSIAN
Owner’s Manual
G*-A702H***
G*-C702H***
G*-C702S***
P/No. : MFL69844959_Rev.01
G*-F702H***
G*-H702H***
G*-C602H***
G*-F602H***
G*-H602H***
G*-C432H***
G*-H432H***
G*-B422S***
G*-C422S***
G*-F422S***
www.lg.com
Copyright © LG Electronics Inc. All Rights Reserved
2020
CONTENTS
IMPORTANT SAFETY INFORMATION ................
INSTALLATION ........................................................
3
12
INNER PARTS
...........................................................
OPERATIONS ..........................................................
Starting
Before Setting The Temperature
Door Alarm
Self Test
Controls For Refrigerator Compartment
Express Freeze
Lock
Wi-Fi (Optional)
Hygiene Fresh (Optional)
Vegetable Drawer
Defrosting
Controls For Freezer Compartment
Ice Making
Door Cooling
Fresh Zone (Optional)
Deodorizer (Optional)
Water Dispenser
Home Bar
(Optional)
(Optional)
(Optional)
(Optional)
(Optional)
13
22
SUGGESTIONS ON FOOD STORAGE ...............
CLEANING .................................................................
GENERAL INFORMATION ...................................
LAMP REPLACEMENT ..........................................
IMPORTANT WARNINGS .....................................
BEFORE CALLING FOR SERVICE
......................
EARTH (GROUNDING) CONSTRUCTION
(OPTIONAL)
SMART FUNCTION
SMART DIAGNOSIS
...............................................................
.................................................
.................................................
2
29
30
32
32
33
34
35
36
38
IMPORTANT SAFETY INFORMATION
BASIC SAFETY PRECAUTIONS
This guide contains many important safety messages. Always read and obey all safety
messages.
This is the safety alert symbol. It alerts you to safety messages that inform you of hazard
that can hurt you or others or cause damage to the product. All safety messages
by the safety alert symbol and the hazard signal word WARNING or CAUTION.
These words mean:
WARNING
CAUTION
All safety messages will identify the hazard, tell you how to reduce the chance of injury, and tell
you what can happen if the instructions are not followed.
You will be hurt or seriously injured if you don't follow instructions.
indicates an imminently hazardous situation which, if not avoided, may
result in minor or moderate injury, or product damage only.
will be preceded
WARNING
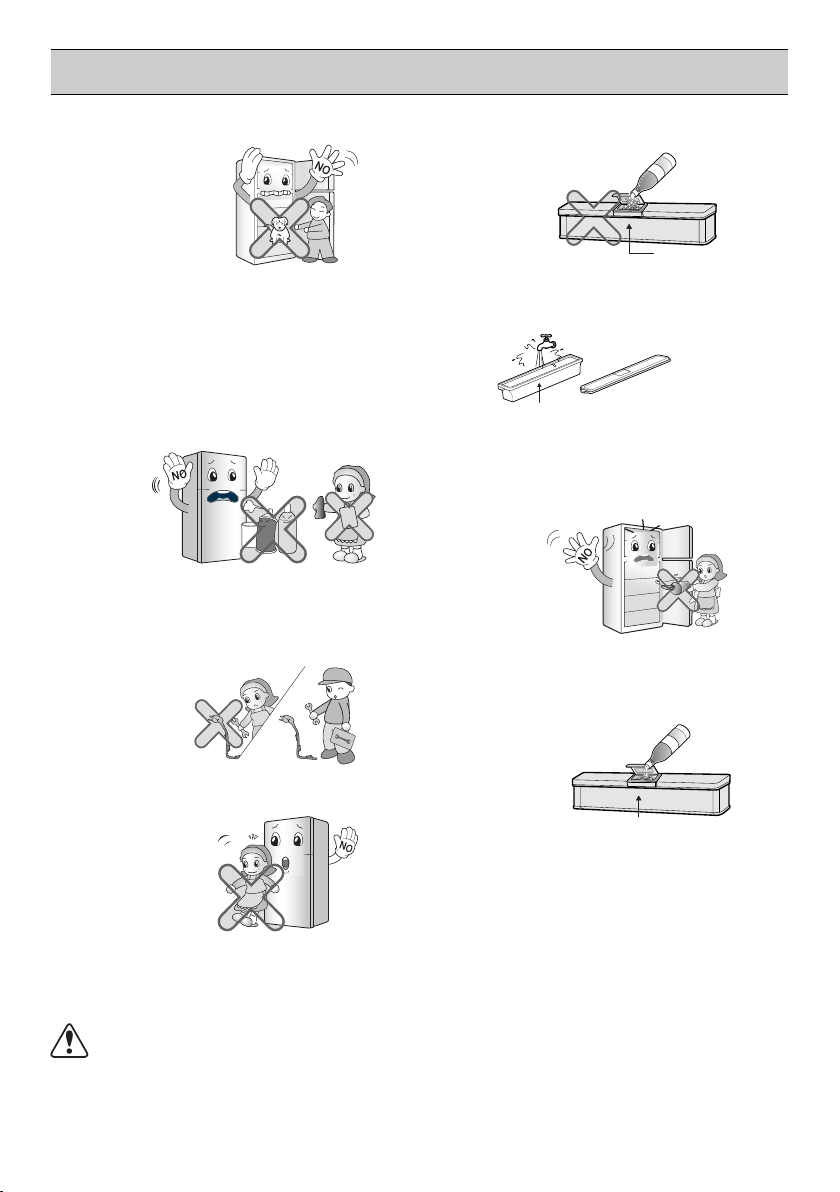
Keep ventilation openings, in the appliance enclosure or in the built-in
clear of obstruction.
Do not use mechanical devices or other means to accelerate the defrosting
process, other than those recommended by the manufacturer.
Do not damage the refrigerant circuit.
Do not use electrical appliances inside the food storage compartment of the
appliance, unless they are of the type recommended by the manufacturer.
The refrigerant and insulation blowing gas used in the appliance require
disposal procedures. When disposal, please consult with services
qualified person.
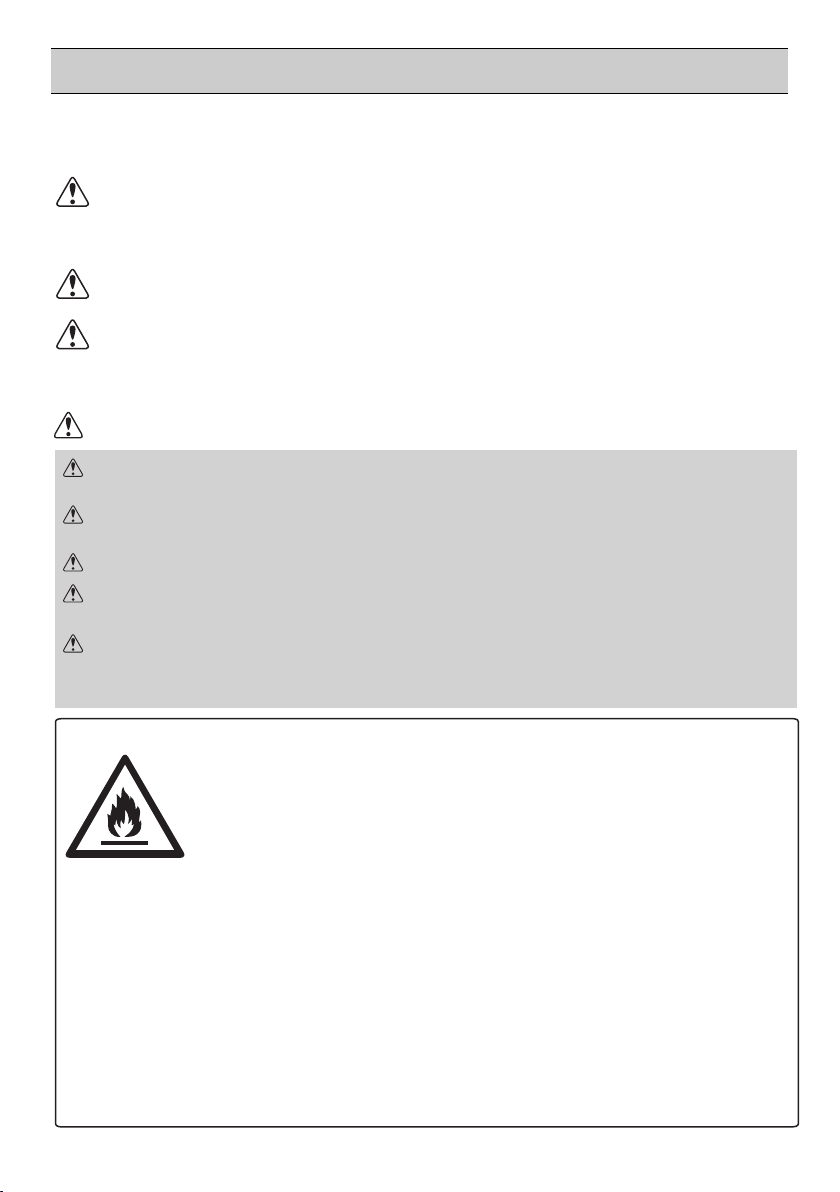
Risk of Fire and Flammable Materials
structure,
special
agent or a similarly
This symbol alerts you to flammable materials that can ignite and cause
a fire if you do not take care.
•
This appliance contains a small amount of isobutane refrigerant (R600a), but it is also
combustible. When transporting and installing the appliance, care should be taken to
ensure that no parts of the refrigerating circuit are damaged.
•
If a leak is detected, avoid any naked flames or potential sources of ignition and air the
room in which the appliance is standing for several minutes. In order to avoid the creation
of a flammable gas air mixture if a leak in the refrigerating circuit occurs, the size of the
room in which the appliance is used should correspond to the amount of refrigerant used.
The room must be 1 m² in size for every 8 g of R600a refrigerant inside the appliance.
•
When positioning the appliance, ensure the supply cord is not trapped or damaged.
•
Do not locate multiple portable socket-outlets or portable power supplies at the rear of
the appliance.
3
IMPORTANT SAFETY INFORMATION
•
This appliance is not intended for use by persons (including children) with reduced physical,
sensory or mental capabilities, or lack of experience and knowledge, unless they have been
given supervision or instruction concerning use of the appliance by a person responsible
for their safety.
•
Children should be supervised to ensure that they do not play with the appliance.
If the supply cord is damaged, it must be replaced by LG Electronics Service Agent in
•
order
to avoid a hazard
This product uses an LED Lamp which can not be replaced by the user. Please contact
•
authorized service centre for the lamp replacement.
•
Children aged from 3 to 8 years are allowed to load and unload refrigerating appliances.
•
Do not store explosive substances such as aerosol cans with a flammable propellant in
this appliance.
•
This appliance is intended to be used in household and similar applications such as:
- Staff kitchen areas in shops, offices and other working environments.
- Farm houses and by clients in hotels, motels and other residential type environments.
- Bed and breakfast type environments.
- Catering and similar non-retail applications.
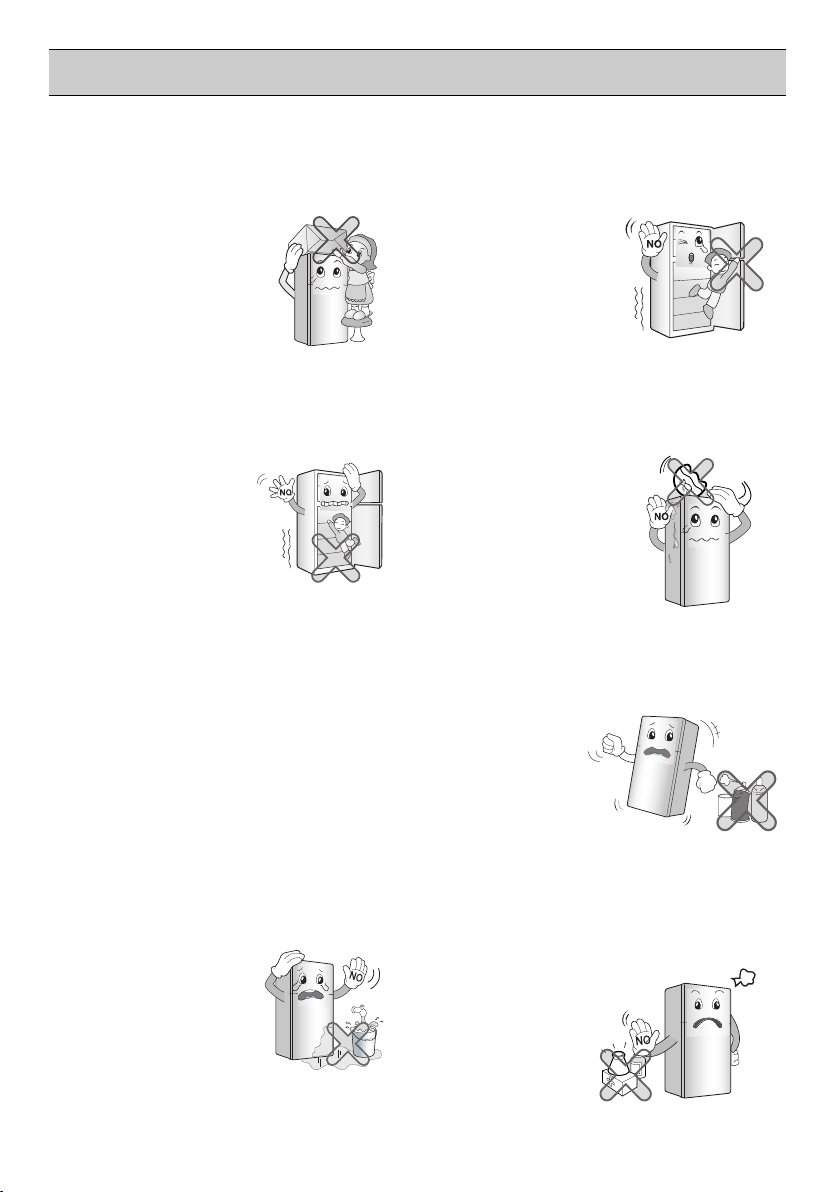
WARNING
To reduce the risk of fire, electric shock, or injury to persons when using your product, basic safety
precautions should be followed, including the following.
Read all instructions before using this appliance.
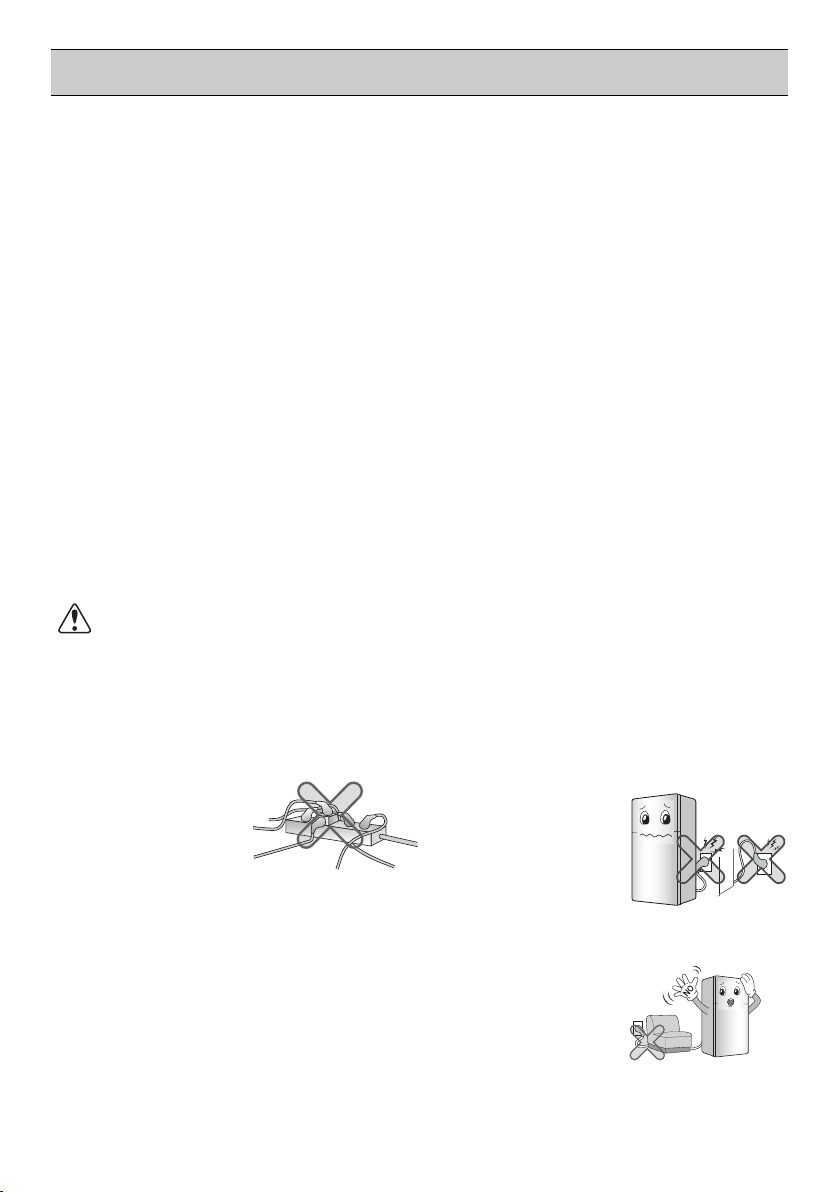
1. When connecting the power
Do not use many power outlets.
• Using several devices at
one outlet may cause fire.
• The electric leakage
breaker may damage food
and the dispenser may be
leaked.
Do not allow the power plug to face upward
or to be squeezed at
the back of the
refrigerator.
Water may be flown into
or the plug may be
damaged, which causes
fire or electric shock.
Prevent the power cord from being
squeezed or imprinted if the refrigerator is
pushed in after the power plug is extracted
during the installation.
It becomes the cause of fire or electric shock.
Do not allow the power cord bent or pressed
by the heavy object to
be damaged.
It may damage the power
cord to cause fire or
electric shock.
4

IMPORTANT SAFETY INFORMATION
1. When connecting the power
Do not extend or modify the length of the
power plug.
It causes electric shock or fire
by the electric damage of the
power cord or others.
Pull out the power plug not by grasping the
cord but the plug of its
end.
It may cause electric shock or
short circuit to fire.
o not pull out the cord or touch the power
D
plug with wet hands.
• It may cause electric
shock or injury.
Unplug the power plug when cleaning or
handling the refrigerator.
• It may cause electric shock or injury.
Remove water or dust from the power plug
and insert it with the ends of the pins
securely connected.
Dust, water or unsta
ble
connection may fire or
electric shock.
Wait for 5 minutes or longer when
reconnecting the plug.
It may cause the operation
of the freezer to fail.
After
5minutes
Make sure of grounding.
The incorrect grounding
may cause breakdown
and electric shock.
Ground
Wire
Copper
Flat
Be sure to use grounded exclusive proper
voltage consent for the power plug.
Be sure to use grounded extension consents
when extension consents are used.
may cause breakdown
It becomes the cause of fire.
When the power cord or the power plug is
damaged or the holes of
the outlet are loosed, do
not use them.
It may cause electric shock or
short circuit to make fire.
More than
30 inches
5
IMPORTANT SAFETY INFORMATION
2. When using the refrigerator
Do not place the heavy object or the
dangerous object
(container with liquid) on
the refrigerator.
It may be dropped to cause
injury, fire or electric shock when
opening or closing the door.
Prevent children from entering the product.
It may endanger the life of a
child if the child enters the
refrigerator.
Opening and closing the door of the
refrigerator vigorously may cause the stored
food in the refrigerator basket to fall by
shock and hurt the foot, so take
precautions.
Do not cling to the door or the shelves of the
door or the cool chamber.
It may make the refrigerator
fallen down or damage the
hands. Especially, do not
allow the children to do the
above.
Do not place flower vase, cup, cosmetics,
medicine or any container
with water on the
refrigerator.
It may cause fire, electric shock
or injury by dropping down.
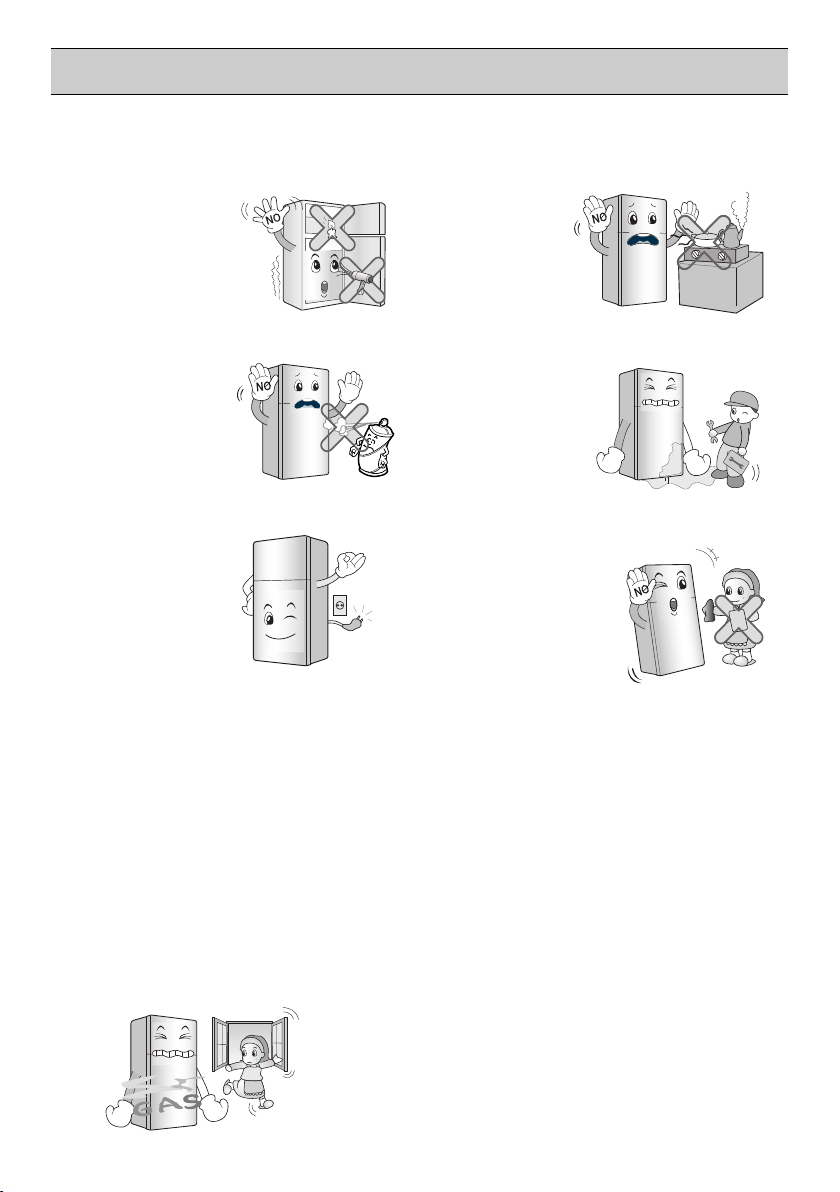
Do not use or store inflammable materials
ether, benzene, alcohol, medicine, LP gas,
spray or cosmetics
near or in the
refrigerator.
It may cause explosion
or fire.
Benzene
Ether
Thinner
Do not install the refrigerator in the wet
place or the place which
water or rain splashes.
Deterioration of insulation of
electric parts may cause
electric leakage.
Do not store the medicine or the academic
materials at the refrigerator.
When the material with
the strict temperature
control is stored, it may be
deteriorated or it may
make an unexpected
reaction to cause any risk.
The Academic
Medicine
The Medicine
6
IMPORTANT SAFETY INFORMATION
2. When using the refrigerator
Do not use drier to dry the inside, nor light a
candle to remove odor.
It may cause explosion or
fire.
Install in places away from the fire such as
the place where
flammable gas is
leaked.
It may cause fire.
Do not use the combustible spray near the
refrigerator.
It may cause fire.
In case of thunder and lightning, or not in
use for a long
period of time,
detach the power
plug.
There is a danger of
electric shock or fire.
When gas is leaked, do not touch the
refrigerator or the air outlet and ventilate the
room immediately.
- The explosion by spark may cause fire or burn.
-
If there is a gas leakage (isobutane,
propane, natural gas, etc.), do not touch
the appliance or power plug and ventilate
the area immediately. This appliance
uses a refrigerant gas (isobutane,R600a).
Although it uses a small amount of the
gas, it is still combustible gas. Gas
leakage during appliance transport,
installation or operation can cause fire,
explosion or injury if sparks are caused.
Do not use the refrigerator if it has been
submerged in water
without having it checked
by a qualified electrician.
It may cause electric
shock or fire.
Do not spray water at the outside or the
inside of the refrigerator or do not clean it
with benzene or
thinner.
Deterioration of insulation of
electric parts may cause
electric shock or fire.
Tempered glass is applied at the front door
(optional). It can be damaged by general
impact. Do not touch the broken part.
It may cause injury.
ThinnerThinner
7
IMPORTANT SAFETY INFORMATION
2. When using the refrigerator
Do not allow any person except the qualified
engineer to disassemble, repair or alter the
refrigerator.
It may cause injury,
electric shock or fire.
When disposing the refrigerator, remove the
packing materials from
the door.
It may cause to lock
child.
out the
Install the refrigerator on the solid and level
floor.
Installing it on the unstable
place may cause death by
falling down the refrigerator
when opening or closing the
door.
When any strange smell or smoke is
detected from the refrigerator, disconnect
the power plug
immediately and
Down-block
office
Service
center
contact to the
service center.
It may cause fire.
Do not use the refrigerator for non-domestic
purpose (storing medicine or testing
material, using at the ship, etc.).
It may cause an unexpected
risk such as fire,
shock, deterioration of
stored material or chemical
reaction.
electric
What to do with your old refrigerator,
Your refrigerator contain liquid (refrigerant,
lubricant) made of recylable
materials. All these materials
must bes sent to a recycling
waste disposal site as they can
be reused after a specific
recycling process. Refrigerator
Contact local authoritie.
Do not insert the hands or the metal stick
into the exit of cool air, the cover, the bottom
of the refrigerator, the heatproof grill
(exhaust hole) at the
backside. It may
cause electric
shock or injury.
Completely empty inside before taking out
the container from the door.
8
IMPORTANT SAFETY INFORMATION
2. When using the refrigerator
Do not remove the cover
on the back.
Place all the components in the right places
before connecting the power.
OK
Do not use an Adapter
on the back.
Never leave lit candles or incense on the
fridge, at risk of
causing fire or
product damage.
CAUTION
Violating this direction may cause injury or damage house or furniture. Always be careful, please.
Do not touch food or containers at the
freezer with wet
hands.
It may cause frostbite
Do not put bottle in the freezer.
It may freeze the contents
to break the bottle to cause
injury.
Carry the refrigerator with the handle bar at
the bottom of the front and the top of the
rear.
Otherwise, your hands
may be slipped to cause
injury.
Because the product is
heavy, carrying it alone
may hurt people or
accidents may occur.
Do not place the food in disorder inside the
refrigerator.
The food may fall during opening and closing the door
of the refrigerator and hurt people.
Do not insert the hands into the bottom of
the refrigerator.
The iron plate of the bottom
may cause injury.
Because opening or closing the door of the
refrigerator may cause injury to the person
around it, be careful, please.
Opening or closing the
door may cause feet or
hands to be caught in
the chink
child to be get hurt by
the corner.
in door or the
9
ProductsProducts
for steelfor steel
Strong
Chemicals
IMPORTANT SAFETY INFORMATION
Do not put any living animal in the
refrigerator.
It may cause the animal
died.
Do not use products such as grinding
sponge, brush, iron, or even special
products to clean stainless steel, soap
products such as alcohol, kerosene,
gasoline, wax, or solvent, or strong
chemicals such as chlorine, detergent, or
vinegar, for the purpose of gloss. These
products may damage the protective
lacquer, and
they may
cause risk or
stain on the
surface of the
refrigerator.
Avoid the contact of oil or fat on the plastic
parts. They may cause damage.
When the power cord is damaged, let a
technician to replace
it to remove the
danger of an
accident.
Technician
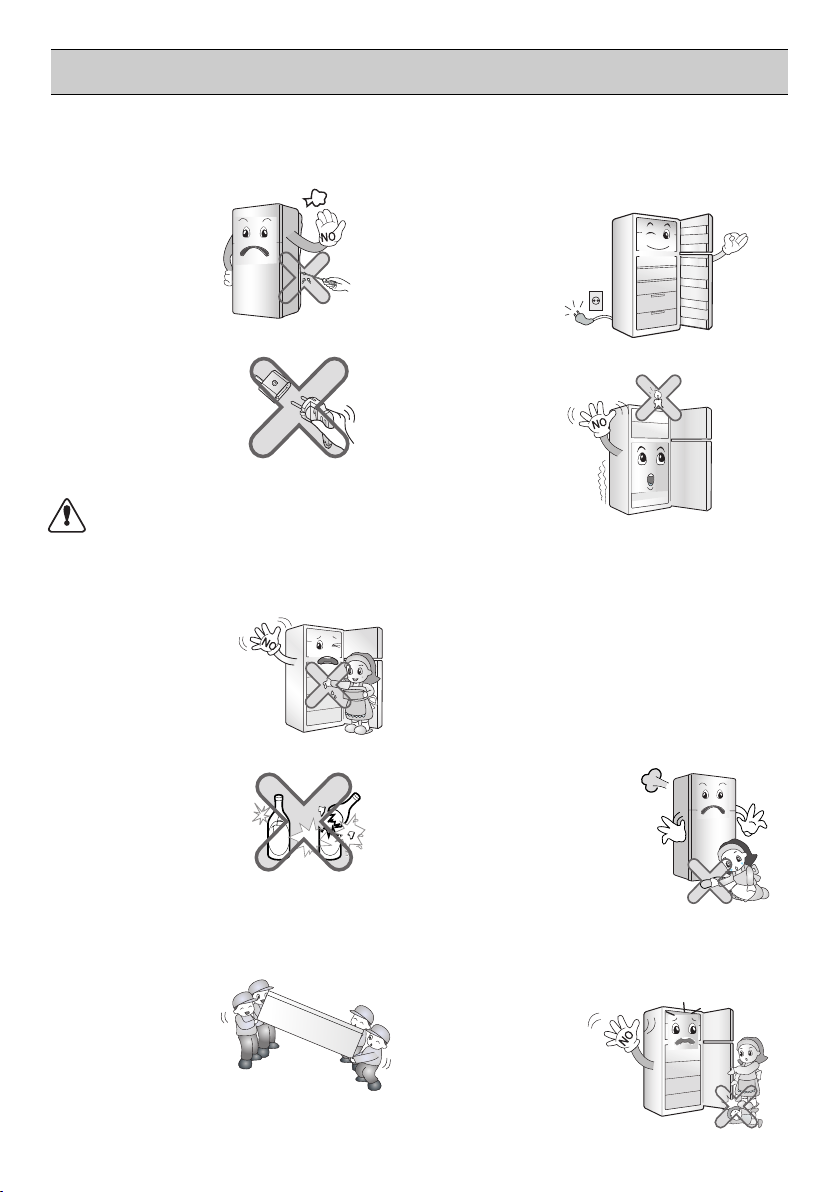
Do not lean on the doors, Hinges may
deregulate
Themselves, harming
seal cooler and
compromising
performance.
Do not use the carbonated water. The gas
pressure may cause
leakage.
Clean the water tank according to the
instruction before using the Water Dispenser
Water Tank
Water
Carbonated
Water Tank
Fill with potable water only.
Do not apply oil in the door connection part
in any circumstances. It may cause damage
to the plastic
parts.
oiloiloil
Use only water. If any other liquid is used,
the operation of the system may be
deteriorated. If a problem occurs by using
any liquid other than
water, the
manufacturer will not
Only water
be responsible.
Water Tank
Do not store excessive water bottle or side
dish container, etc. in the door basket.
It will make you put excessive force to take
out the water bottle or side dish container
from the basket, and it may damage the
basket or it may cause injury of your hand
hitting the surrounding structure.
WARNING
Please do not use a dishwasher to clean the lower drawers; the high temperature may cause
damage to the baskets which make them unusable.
10
THIS REFRIGERATOR IS MANUFACTURED WITH GREAT CARE, AND UTILIZES THE
LATEST IN TECHNOLOGY.
WE ARE CONFIDENT THAT YOU WILL BE FULLY SATISFIED WITH IT'S PERFORMANCE
AND RELIABILITY.
BEFORE YOU START YOUR REFRIGERATOR, PLEASE READ THIS BOOKLET CAREFULLY
IT PROVIDES EXACT INSTRUCTIONS FOR INSTALLATION, OPERATION AND
MAINTENANCE, AND ALSO SUPPLIES SOME USEFUL HINTS.
INSTALLATION
.
1. Select a good location.
Place your refrigerator where it is easy to
use.
2.Avoid placing the unit near heat sources,
direct sunlight or moisture.
3. Air must circulate properly around your
refrigerator to ensure efficient operation.
If your refrigerator is placed in a recessed area
in the wall, allow at least 10 inches (25 cm) or
greater clearance above the refrigerator and 2
inches (5 cm) or more from the wall.
The refrigerator should be elevated 1 inch
(2.5 cm) from the floor, especially if the floor is
carpeted.
4. To avoid vibrations, the unit must be level.
If required, adjust the leveling screws to
compensate for unevenness of the floor.
The front should be slightly higher than the
rear to aid in door closing.
Leveling screws can be turned easily by
tipping the cabinet slightly.
Turn the leveling screws clockwise( ) to
raise the unit, counterclockwise( ) to
lower it.
5. Don't install this appliance below 5°C. It may
cause the debasement of the refrigerator.
NEXT
1. Clean your refrigerator thoroughly and wipe
off all dust accumulated during shipping.
2. Install accessories such as ice cube box, etc.,
in their proper places. They are packed
together to prevent possible damage during
shipment.
3. Connect the power supply cord (or plug) to
the outlet. Don't double up with other
appliances on the same outlet.
4. Prior to storing food, leave your refrigerator
on for 2 or 3 hours.
Check the flow of cold air in the freezer
compartment to ensure proper cooling.
Your refrigerator is now ready for use.
11
INSTALLATION
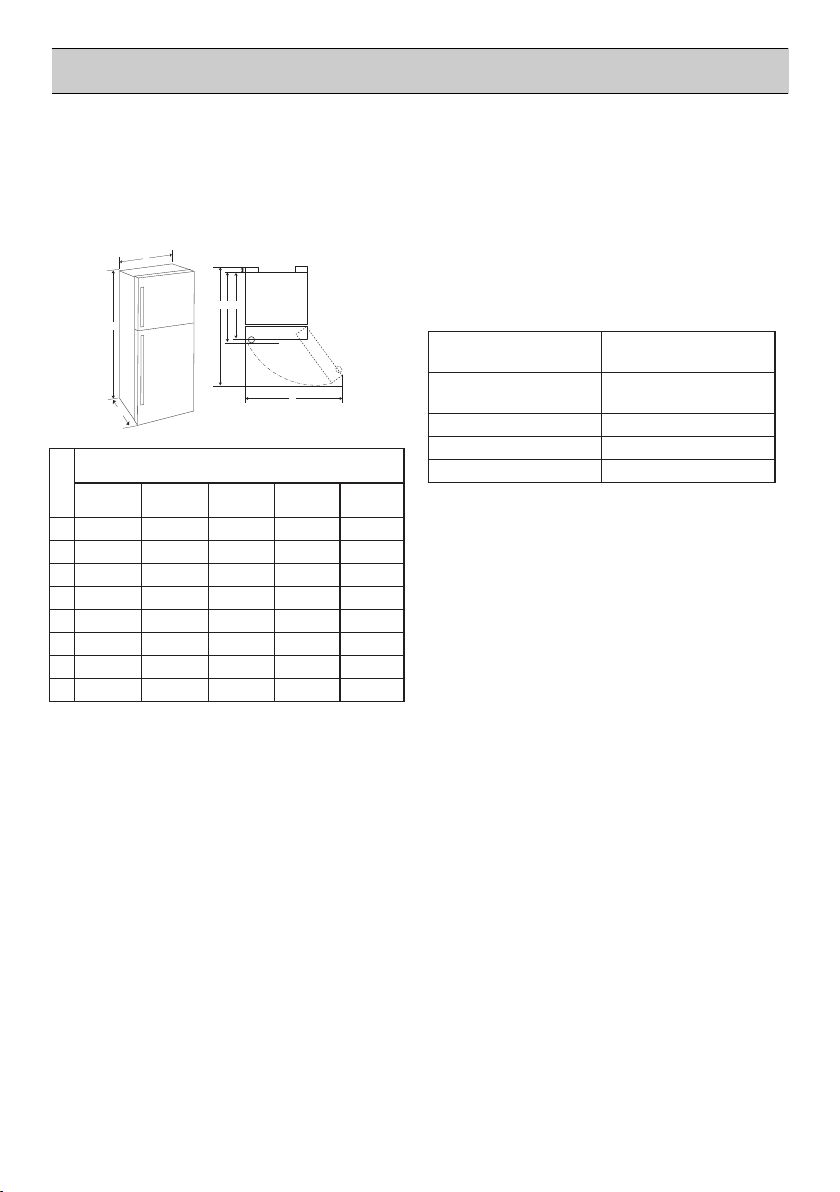
Dimensions and Clearances
Too small of a distance from adjacent items
may result in the degradation of freezing
capability and increased electricity costs. Allow
over 50 mm of clearance from each adjacent
wall when installing the appliance.
A
B
C
Type (b)Type (a) Type (c)
A
780
B
1800
C
730
D
27
E
673
F
703
G
1420
H
1390
780
1800
700
27
673
1420
1340
D
EFG
Size (mm)
780
1720
730
27
673
703
1420
1390
H
Type (d) Type (e)
700
1680
730
27
673
703
1340
1250
700
1680
700
27
673
1340
1210
Ambient Temperature
The appliance is designed to operate within a
limited range of ambient temperatures,
depending on the climate zone. Do not use the
appliance at a temperature exceeding the limit.
The internal temperature could be affected by
the location of the appliance, the ambient
temperature, the frequency of door opening and
so on.
The climate class can be found on the rating
label.
Climate Class
SN (Extended
Temperate)
N (Temperate) +16 - +32
ST (Subtropical) +16 - +38
T (Tropical) +16 - +43 / +10 - +43*
*Australia, India, Kenya
NOTE
• The appliances rated from SN to T are
intended to be used at an ambient
temperature between 10 ºC and 43 ºC.
Ambient Temperature
Range ºC
+10 - +32
NOTE
• You can determine what type of appliance it is
by looking at the label inside the fridge
compartment.
12

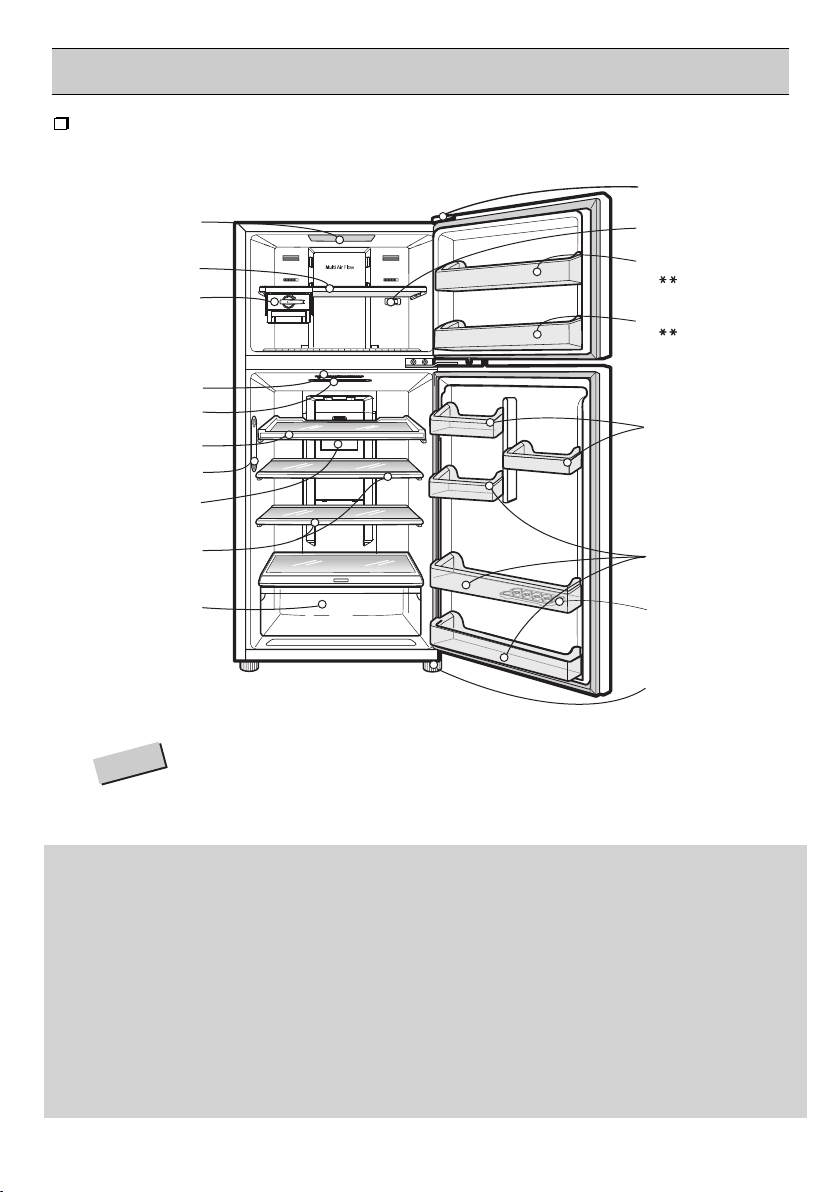
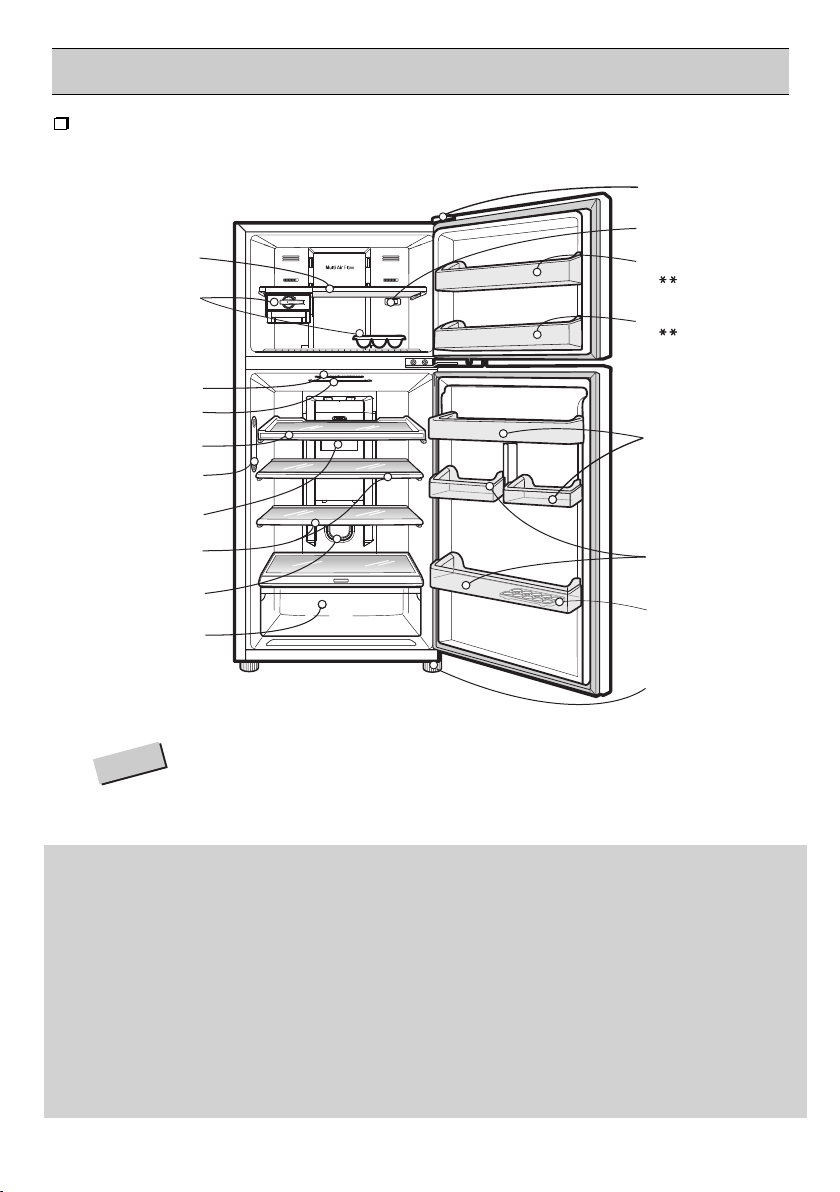
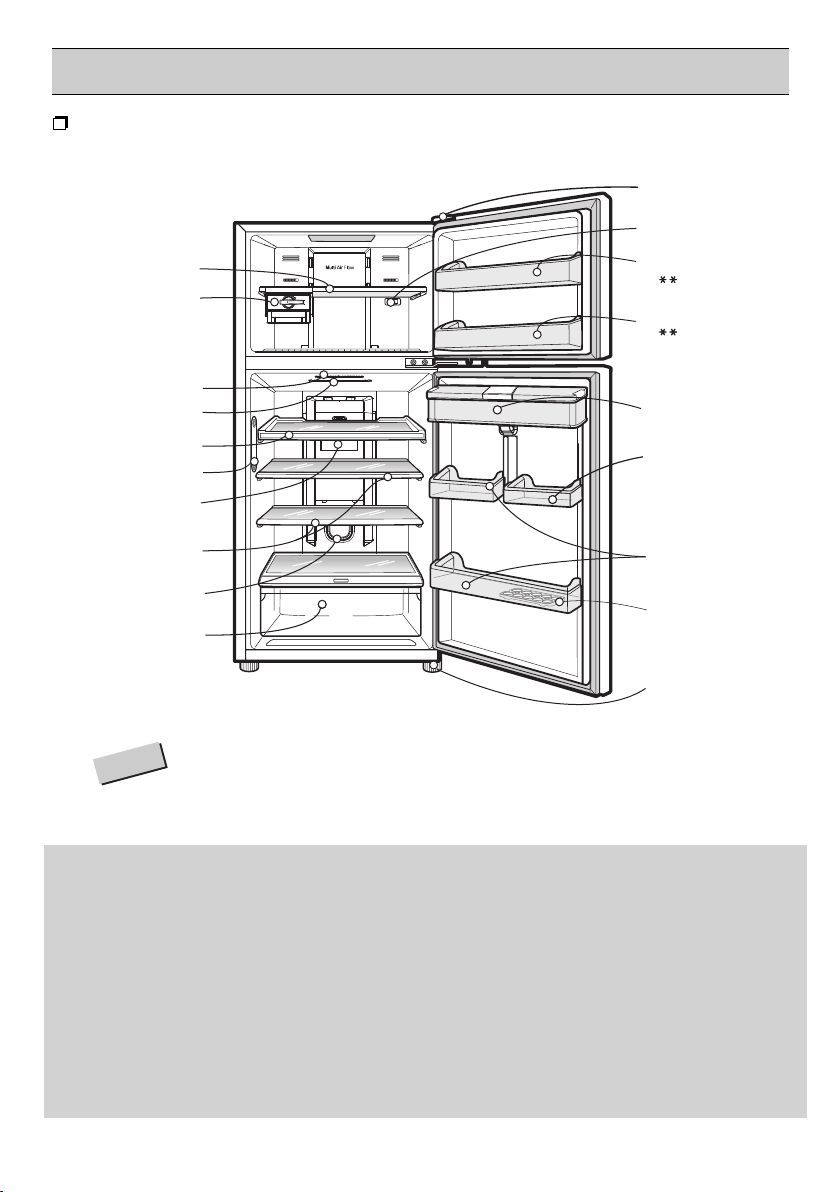
INNER PARTS
INTERNAL CONTROLLER MODEL TYPE A
FREEZER
COMPARTMENT
Lamp
Twisting Ice Serve
Type Ice Making
Shelf
REFRIGERATOR
COMPARTMENT
Lamp
Deodorizer
(Optional)
Door Cooling
Temperature
Refrigerator
Control
Shelves
(Optional)
Vegetable Drawer
NOTE
Smart Diagnosis
Freezer Temperature
Control Dial
Freezer Door Rack
( )
Freezer Door Rack
Refrigerator Door
Rack
Egg Tray
Refrigerator Door
Rack
(Optional)
Levelling Screw
- This guide covers several different models. The refrigerator you have
purchased may have some or all of the features shown above.
- To keep a position of inner parts like as baskets, drawers and shelves
supplied by manufacturer
s the most efficient usage for energy saving.
Optional)
(
SUGGESTION FOR ENERGY SAVING
- Please do not keep the door open for a long time, close door in the shortest time.
- Too much food are not advised to be put in. Enough space should be kept for cool air circulating freely.
- Do not set the temperature of refrigerator lower than needed. Do not put the food near the temperature
sensor.
- Allow hot food to cool prior to storing. Placing hot food in the fridge-freezer could spoil other food, and
lead to higher electric bills.
- Do not block air vents with food. Smooth circulation of cold air keeps fridge-freezer temperature even.
-
Do not open the door frequently. Opening the door lets warm air enter the fridge-freezer, and cause
temperature to rise.
13

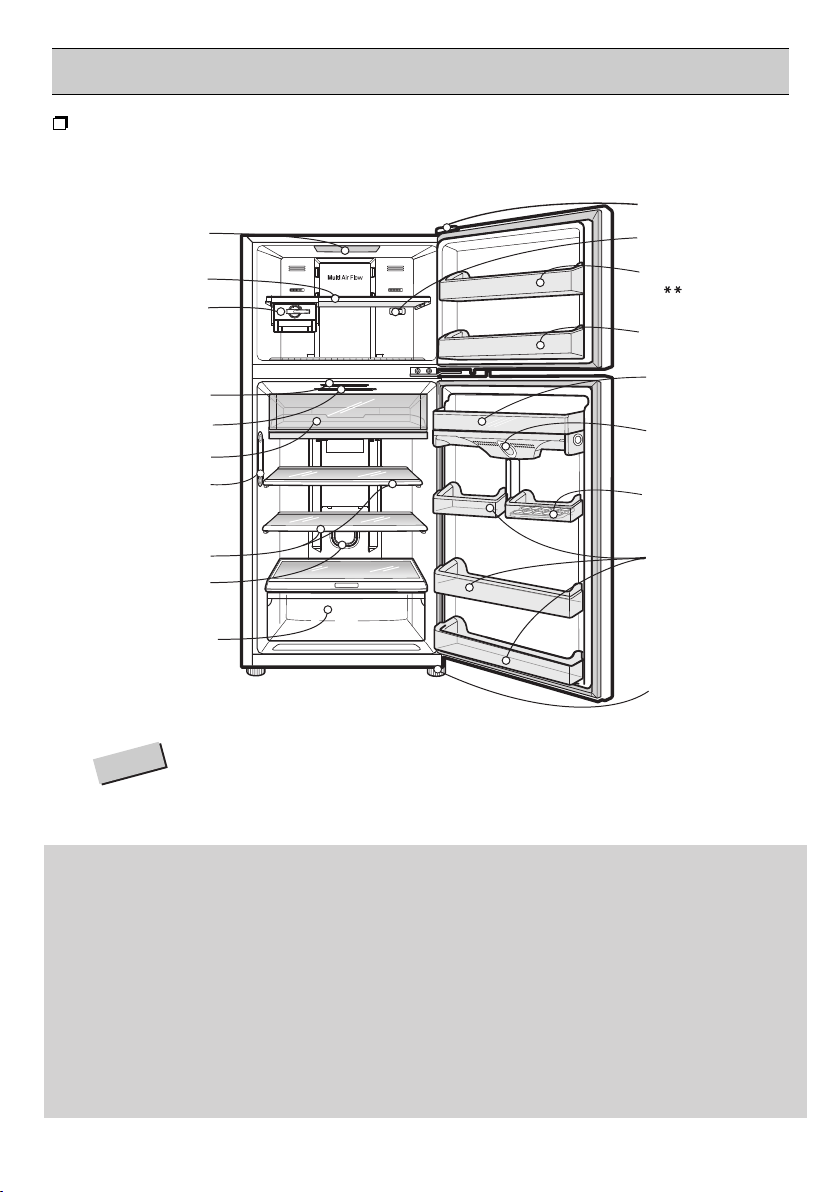
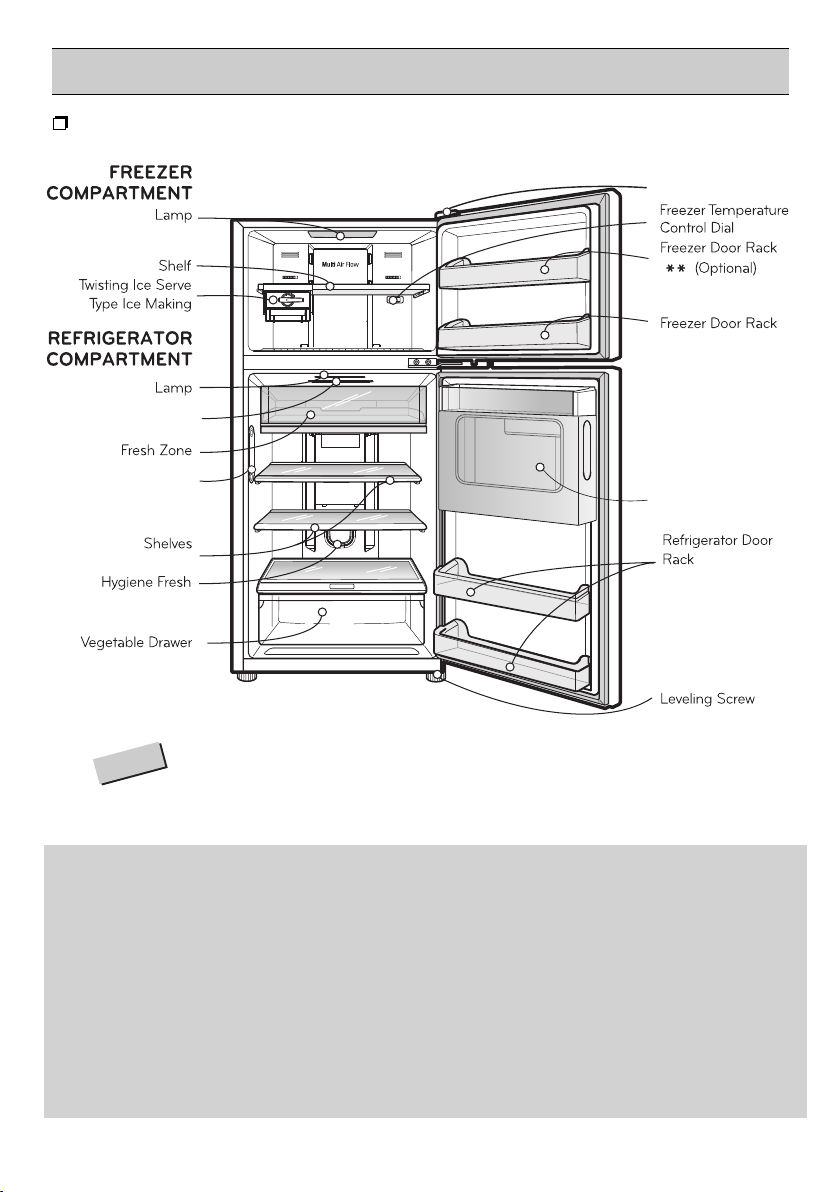
INNER PARTS
INTERNAL CONTROLLER MODEL TYPE B
FREEZER
COMPARTMENT
Lamp
Twisting Ice Serve
Type Ice Making
REFRIGERATOR
COMPARTMENT
Temperature
Hygiene Fresh
Vegetable Drawer
Shelf
Lamp
Deodorizer
(Optional)
Fresh Zone
Door Cooling
Refrigerator
Control
Shelves
(Optional)
(Optional)
Smart Diagnosis
Freezer Temperature
Control Dial
Freezer Door Rack
(Optional)
( )
Freezer Door Rack
Refrigerator Door
Rack
Door Cooling
Egg Tray
Refrigerator Door
Rack
(Optional)
Levelling Screw
- This guide covers several different models. The refrigerator you have
NOTE
purchased may have some or all of the features shown above.
- To keep a position of inner parts like as baskets, drawers and shelves
supplied by manufacturer
s the most efficient usage for energy saving.
SUGGESTION FOR ENERGY SAVING
- Please do not keep the door open for a long time, close door in the shortest time.
- Too much food are not advised to be put in. Enough space should be kept for cool air circulating freely.
- Do not set the temperature of refrigerator lower than needed. Do not put the food near the temperature
sensor.
- Allow hot food to cool prior to storing. Placing hot food in the fridge-freezer could spoil other food, and
lead to higher electric bills.
- Do not block air vents with food. Smooth circulation of cold air keeps fridge-freezer temperature even.
-
Do not open the door frequently. Opening the door lets warm air enter the fridge-freezer, and cause
temperature to rise.
14
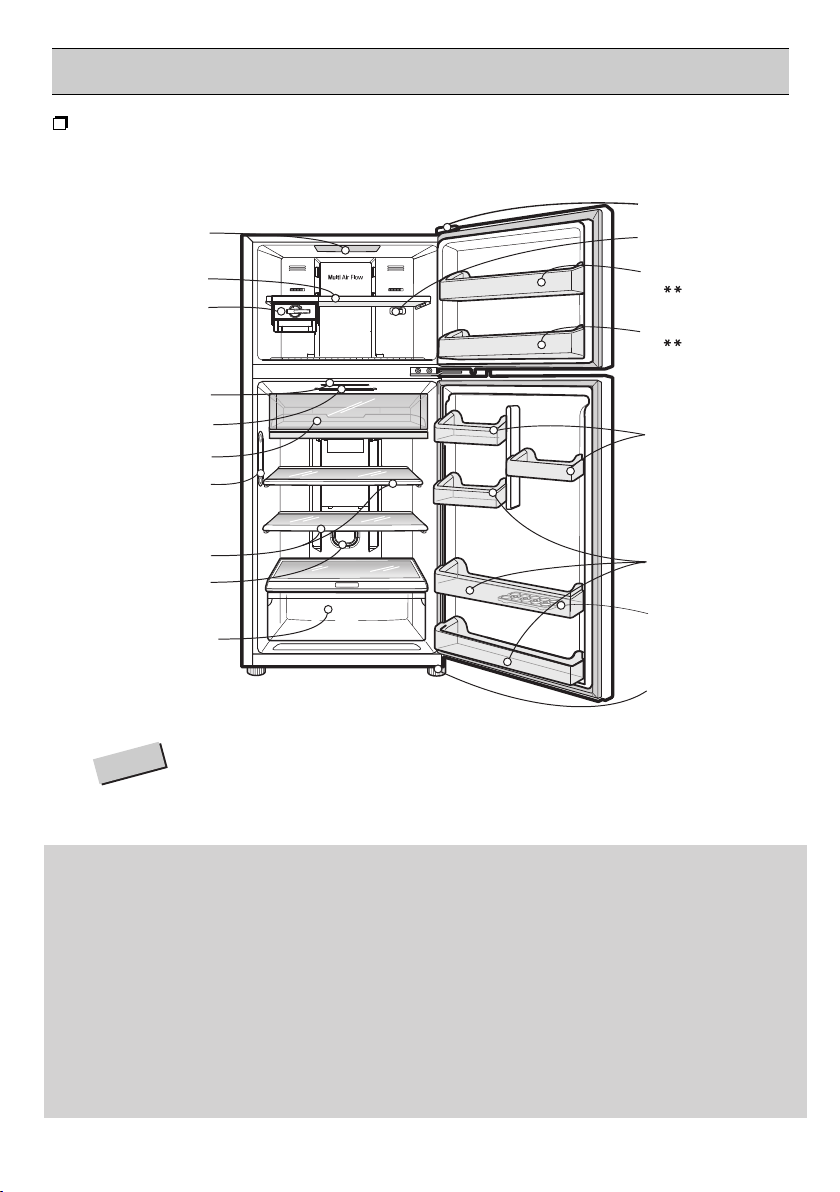
INNER PARTS
INTERNAL CONTROLLER MODEL TYPE
FREEZER
COMPARTMENT
Lamp
Twisting Ice Serve
Type Ice Making
Shelf
REFRIGERATOR
COMPARTMENT
Lamp
Deodorizer
(Optional)
Pull Out Tray
Door Cooling
Temperature
Refrigerator
Control
Shelves
(Optional)
Vegetable Drawer
C
Smart Diagnosis
Freezer Temperature
Control Dial
Freezer Door Rack
Optional)
(
( )
Freezer Door Rack
Optional)
(
( )
Refrigerator Door
Rack
Refrigerator Door
Rack
(Optional)
Egg Tray
Levelling Screw
- This guide covers several different models. The refrigerator you have
NOTE
purchased may have some or all of the features shown above.
- To keep a position of inner parts like as baskets, drawers and shelves
supplied by manufacturer
s the most efficient usage for energy saving.
SUGGESTION FOR ENERGY SAVING
- Please do not keep the door open for a long time, close door in the shortest time.
- Too much food are not advised to be put in. Enough space should be kept for cool air circulating freely.
- Do not set the temperature of refrigerator lower than needed. Do not put the food near the temperature
sensor.
- Allow hot food to cool prior to storing. Placing hot food in the fridge-freezer could spoil other food, and
lead to higher electric bills.
- Do not block air vents with food. Smooth circulation of cold air keeps fridge-freezer temperature even.
-
Do not open the door frequently. Opening the door lets warm air enter the fridge-freezer, and cause
temperature to rise.
15
INNER PARTS
INTERNAL CONTROLLER MODEL TYPE
FREEZER
COMPARTMENT
Shelf
Twisting Ice Serve
(Optional) or General
Type Ice Tray
REFRIGERATOR
COMPARTMENT
Lamp
Deodorizer
(Optional)
Pull Out Tray
Door Cooling
Optional)
(
Temperature
Refrigerator
Control
Shelves
(Optional)
Hygiene Fresh
(Optional)
Vegetable Dr
awer
D
Smart Diagnosis
Freezer Temperature
Control Dial
Freezer Door Rack
Optional)
(
( )
Freezer Door Rack
Optional)
(
( )
Refrigerator Door
Rack
Refrigerator Door
Rack
(Optional)
Egg Tray
(
Optional)
Levelling Screw
- This guide covers several different models. The refrigerator you have
NOTE
purchased may have some or all of the features shown above.
- To keep a position of inner parts like as baskets, drawers and shelves
supplied by manufacturer
s the most efficient usage for energy saving.
SUGGESTION FOR ENERGY SAVING
- Please do not keep the door open for a long time, close door in the shortest time.
- Too much food are not advised to be put in. Enough space should be kept for cool air circulating freely.
- Do not set the temperature of refrigerator lower than needed. Do not put the food near the temperature
sensor.
- Allow hot food to cool prior to storing. Placing hot food in the fridge-freezer could spoil other food, and
lead to higher electric bills.
- Do not block air vents with food. Smooth circulation of cold air keeps fridge-freezer temperature even.
-
Do not open the door frequently. Opening the door lets warm air enter the fridge-freezer, and cause
temperature to rise.
16
INNER PARTS
EXTERNAL CONTROLLER MODEL TYPE A
FREEZER
COMPARTMENT
Lamp
Twisting Ice Serve
Type Ice Making
REFRIGERATOR
COMPARTMENT
Shelf
Lamp
Deodorizer
(Optional)
Fresh Zone
Door Cooling
Smart Diagnosis
Freezer Temperature
Control Dial
Freezer Door Rack
(Optional)
( )
Freezer Door Rack
Refrigerator Door
Rack
Door Cooling
Egg Tray
Shelves
(Optional)
Hygiene Fresh
(Optional)
Vegetable Drawer
NOTE
- This guide covers several different models. The refrigerator you have
purchased may have some or all of the features shown above.
- To keep a position of inner parts like as baskets, drawers and shelves
supplied by manufacturer
s the most efficient usage for energy saving.
Refrigerator Door
Rack
(Optional)
Levelling Screw
SUGGESTION FOR ENERGY SAVING
- Please do not keep the door open for a long time, close door in the shortest time.
- Too much food are not advised to be put in. Enough space should be kept for cool air circulating freely.
- Do not set the temperature of refrigerator lower than needed. Do not put the food near the temperature
sensor.
- Allow hot food to cool prior to storing. Placing hot food in the fridge-freezer could spoil other food, and
lead to higher electric bills.
- Do not block air vents with food. Smooth circulation of cold air keeps fridge-freezer temperature even.
-
Do not open the door frequently. Opening the door lets warm air enter the fridge-freezer, and cause
temperature to rise.
17
INNER PARTS
EXTERNAL CONTROLLER MODEL TYPE
FREEZER
COMPARTMENT
Lamp
Twisting Ice Serve
Type Ice Making
Shelf
REFRIGERATOR
COMPARTMENT
Lamp
Deodorizer
(Optional)
Fresh Zone
Door Cooling
Shelves
(Optional)
Hygiene Fresh
(Optional)
Vegetable Drawer
C
Smart Diagnosis
Freezer Temperature
Control Dial
Freezer Door Rack
(Optional)
( )
Freezer Door Rack
Optional)
(
( )
Refrigerator Door
Rack
Refrigerator Door
Rack
(Optional)
Egg Tray
Levelling Screw
- This guide covers several different models. The refrigerator you have
NOTE
purchased may have some or all of the features shown above.
- To keep a position of inner parts like as baskets, drawers and shelves
supplied by manufacturer
s the most efficient usage for energy saving.
SUGGESTION FOR ENERGY SAVING
- Please do not keep the door open for a long time, close door in the shortest time.
- Too much food are not advised to be put in. Enough space should be kept for cool air circulating freely.
- Do not set the temperature of refrigerator lower than needed. Do not put the food near the temperature
sensor.
- Allow hot food to cool prior to storing. Placing hot food in the fridge-freezer could spoil other food, and
lead to higher electric bills.
- Do not block air vents with food. Smooth circulation of cold air keeps fridge-freezer temperature even.
-
Do not open the door frequently. Opening the door lets warm air enter the fridge-freezer, and cause
temperature to rise.
18
INNER PARTS
DISPENSER MODEL
FREEZER
COMPAR
TMENT
Lamp
Shelf
Twisting Ice Serve
Type Ice Making
REFRIGERATOR
COMPARTMENT
Lamp
Deodorizer
(Optional)
Fresh Zone
Door Cooling
Shelves
(Optional)
Hygiene Fresh
(Optional)
Vegetable Drawer
TYPE A
Smart Diagnosis
Freezer Temperature
Control Dia
Freezer Door Rack
( )
Freezer Door Rack
Wat
Egg Tray
Refrigerator Door
Rack
(Optional)
Levelling Screw
l
(Optional)
er Tank
- This guide covers several different models. The refrigerator you have
NOTE
purchased may have some or all of the features shown above.
- To keep a position of inner parts like as baskets, drawers and shelves
supplied by manufacturer
s the most efficient usage for energy saving.
SUGGESTION FOR ENERGY SAVING
- Please do not keep the door open for a long time, close door in the shortest time.
- Too much food are not advised to be put in. Enough space should be kept for cool air circulating freely.
- Do not set the temperature of refrigerator lower than needed. Do not put the food near the temperature
sensor.
- Allow hot food to cool prior to storing. Placing hot food in the fridge-freezer could spoil other food, and
lead to higher electric bills.
- Do not block air vents with food. Smooth circulation of cold air keeps fridge-freezer temperature even.
-
Do not open the door frequently. Opening the door lets warm air enter the fridge-freezer, and cause
temperature to rise.
19
INNER PARTS
DISPENSER MODEL TYPE
FREEZER
COMPARTMENT
Twisting Ice Serve
Type Ice Making
Shelf
REFRIGERATOR
COMPARTMENT
Lamp
Deodorizer
(Optional)
Pull Out Tray
Door Cooling
Temperature
Refrigerator
Control
Shelves
(Optional)
Hygiene Fresh
(Optional)
Vegetable Drawer
D
Smart Diagnosis
Freezer Temperature
Control Dial
Freezer Door Rack
Optional)
(
( )
Freezer Door Rack
Optional)
(
( )
er Tank
Wat
Refrigerator Door
Rack
Refrigerator Door
Rack
(Optional)
Egg Tray
Levelling Screw
- This guide covers several different models. The refrigerator you have
NOTE
purchased may have some or all of the features shown above.
- To keep a position of inner parts like as baskets, drawers and shelves
supplied by manufacturer
s the most efficient usage for energy saving.
SUGGESTION FOR ENERGY SAVING
- Please do not keep the door open for a long time, close door in the shortest time.
- Too much food are not advised to be put in. Enough space should be kept for cool air circulating freely.
- Do not set the temperature of refrigerator lower than needed. Do not put the food near the temperature
sensor.
- Allow hot food to cool prior to storing. Placing hot food in the fridge-freezer could spoil other food, and
lead to higher electric bills.
- Do not block air vents with food. Smooth circulation of cold air keeps fridge-freezer temperature even.
-
Do not open the door frequently. Opening the door lets warm air enter the fridge-freezer, and cause
temperature to rise.
20
INNER PARTS
DOOR IN DOOR MODEL
Deodorizer
(Optional)
Door Cooling
(Optional)
TYPE A
Smart Diagnosis
( )
Home Bar
(Optional)
- This guide covers several different models. The refrigerator you have
NOTE
purchased may have some or all of the features shown above.
- To keep a position of inner parts like as baskets, drawers and shelves
supplied by manufacturer
s the most efficient usage for energy saving.
SUGGESTION FOR ENERGY SAVING
- Please do not keep the door open for a long time, close door in the shortest time.
- Too much food are not advised to be put in. Enough space should be kept for cool air circulating freely.
- Do not set the temperature of refrigerator lower than needed. Do not put the food near the temperature
sensor.
- Allow hot food to cool prior to storing. Placing hot food in the fridge-freezer could spoil other food, and
lead to higher electric bills.
- Do not block air vents with food. Smooth circulation of cold air keeps fridge-freezer temperature even.
-
Do not open the door frequently. Opening the door lets warm air enter the fridge-freezer, and cause
temperature to rise.
21
OPERATIONS
STARTING
When your refrigerator is first installed, allow it 2-3 hours to stabilize at normal operating temperatures
prior to filling it with fresh or frozen foods.
If operation is interrupted, wait 5 minutes before restarting.
BEFORE SETTING THE TEMPERATURE
●
The temperature of the refrigerator is kept constant regardless of changes in room temperature.
It is recommended that, once set, the temperature settings(the controls for the refrigerator and
freezer compartments) not be changed unless necessary.
●
This refrigerator has one temperature control button for the refrigerator compartment and one
temperature control dial for the freezer compartment.
●
The default setting of the temperature control button for the refrigerator compartment is ‘3°C’.
(for external controller model),
●
The default setting of the temperature control dial for the freezer compartment is ‘3’ for model
type A & B or ‘5’ for model type C & D.
●
This refrigerator has a temperature sensor in the refrigerator compartment. It will start and stop
the compressor automatically as needed.
DOOR ALARM
(OPTIONAL)
When the door of the refrigerator or the freezer is open for 1 minute, an alarm will sound three times
It the door remains open, the alarm will repeat every 30 seconds.
SELF TEST
●
Your refrigerator contains a built in diagnostic capability. If it develops a malfunction in certain areas,
it will display an error code to assist the repair technician. While an error code is displayed, other
control and display functions will not operate.
●
If an error code is displayed, contact a service center. Do not disconnect the power cord from
the outlet.
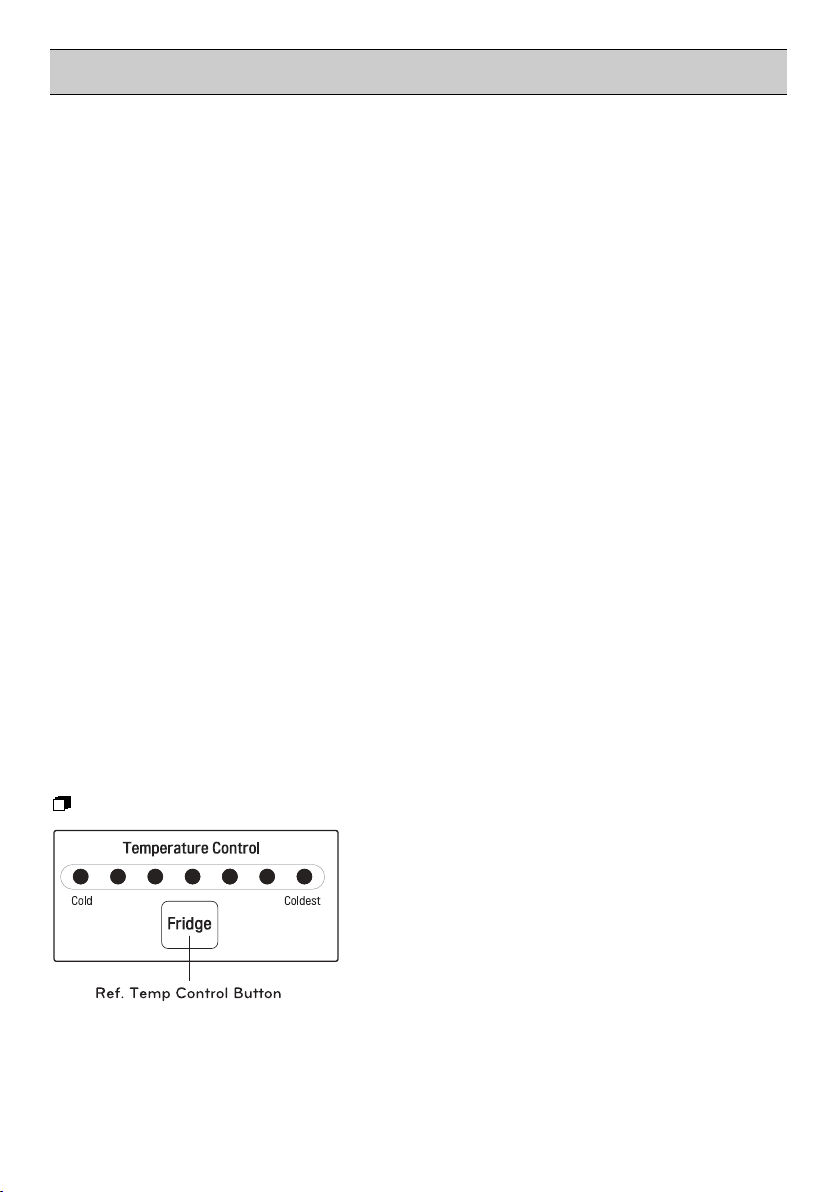
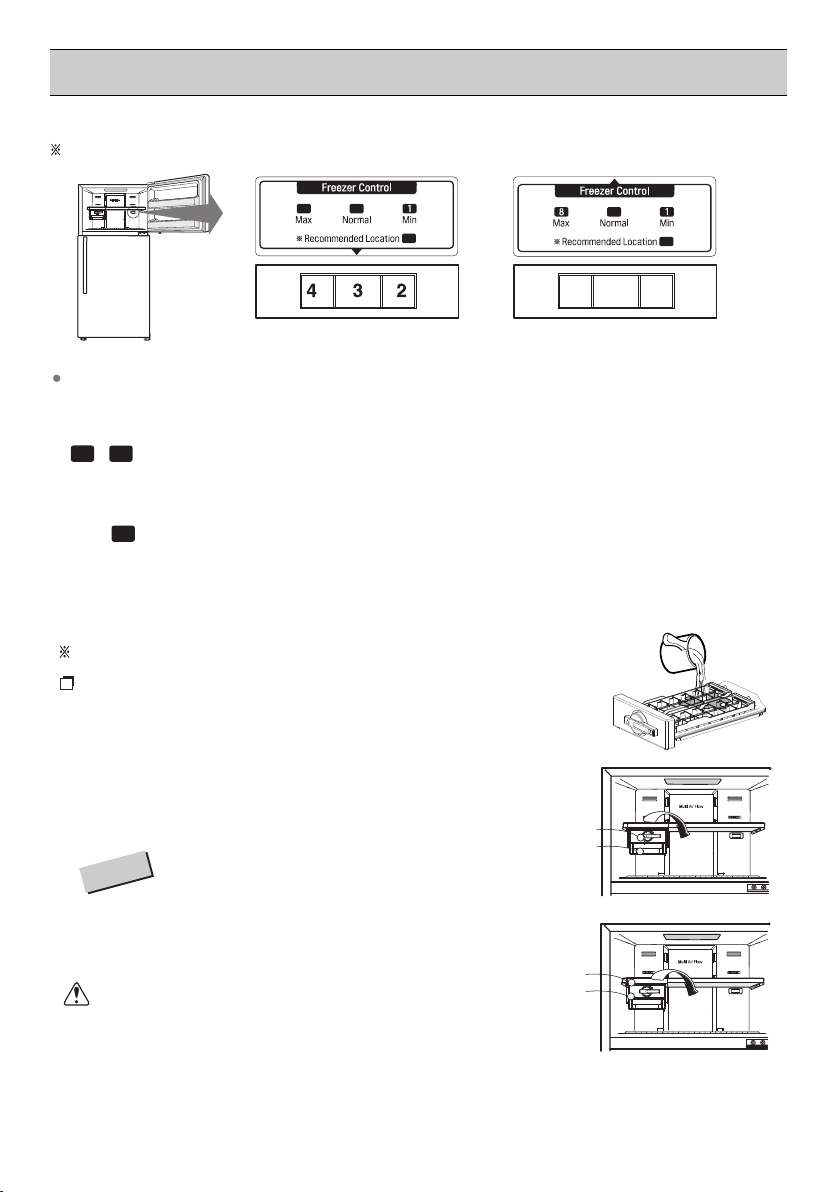
CONTROLS FOR REFRIGERATOR COMPARTMENT
FOR INTERNAL CONTROLLER MODEL
The default setting of the temperature control button for
the refrigerator compartment is NORMAL.
To control the refrigerator temperature, press the REF.
TEMP CONTROL button.
Whenever pressing the button, LED emitting the light.
The temperature is set in 7 steps, from Cold to Coldest
cooling.
.
22
OPERATIONS
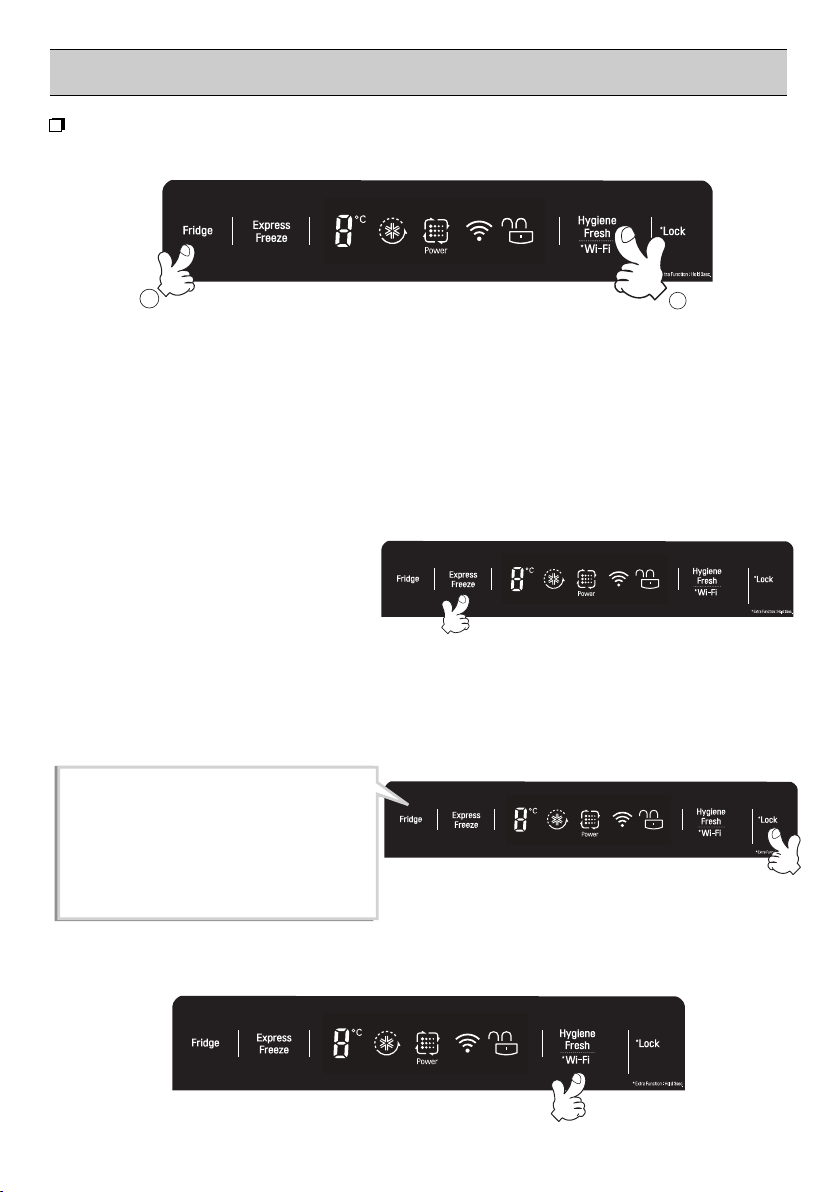
FOR EXTERNAL CONTROLLER MODEL
Display graphic can be different, depend on the type of your refrigerator.
a
●
Touch
'Fridge' button to control refrigerator temperature.
●
Whenever the button, the LED emits light.
●
Touch
● The number showing up on the LED luminesce indicate the temperature of refrigerator compartment.
●
You can select the desired setting point seven steps, from '0 C' to '6oC'.
-
-
touching
‘Hygiene Fresh’ button to operate hygiene motor (optional).
Touch
Touch
button, Fridge temperature will be down each 1 C.
ⓐ
button, Hygiene Fresh motor will be on, power mode, off .
ⓑ
o
o
(optional)
b
EXPRESS FREEZE
●
The Express Freeze
when the refrigerator first turn on.
The compressor and circulating fan
operate at maximum cooling capacity to
quickly lower the refrigerator temperature.
It shuts off automatically.
●
If warm food is placed into the refrigerator, Express Freeze can be started with the button
on the control panel. Express Freeze will shut off when the temperature reaches
the proper level or it can be shut off manually by the Express Freeze button.
feature operates
touching
LOCK (OPTIONAL)
●
LOCK
Touch
and hold the Lock button
for 3 seconds to lock the Lock.
When it is locked, the Lock LED will be on
and the other button will not operate. To
touch
unlock, and hold the Lock button
for 3 seconds again.
(OPTIONAL)
Wi-Fi
This sets the refrigerator to connect to your home's Wi-Fi network.
23

OPERATIONS
HYGIENE FRESH (OPTIONAL)
CAUTION
ww
Before installing or using the product, make sure to read the owner's manual carefully to use the product
accurately as intended. This HYGIENE FRESH filter has the antibacterial function of removing the virus
or bacteria inside the refrigerator and the deodorizer function to remove the scent.
●
Switch over to use mode
Switch over to use mode.
To use the HYGIENE FRESH filter,
•
of the door and switch over to the AUTO or POWER mode.
(Whenever you press the button, the HYGIENE FRESH filter will be switched to AUTO
OFF .)
AUTO
AUTO POWER OFF AUTO
CAUTION
ww
When the user switches to AUTO or POWER mode, the LED around the filter is also turned on. Open
door to check whether the LED around the filter is also turned on. Do not put in your finger or alien
the
particles inside the fan. It can be caused of an injury or malfunction.
CAUTION
ww
Do not wash the HYGIENE FRESH filter by using water because It can be caused of malfunction.
•
This filter may not be effective for all types of bacteria and virus.
•
This is effective to remove the bacteria which is not on the food in the refrigerator.
•
touch
the
VEGETABLE DRAWER
How to use
●
Vegetable drawer can be used through the control of knob.
●
Check the position of knob prior to store the food.
●
Do not locate the knob on the middle point.
button on the display panel on the front side
POWER
DEFROSTING
●
Defrosting takes place automatically.
●
The defrosted water flows down to the evaporating tray which located in
the lower back side of the refrigerator and is evaporated automatically.
24
OPERATIONS
CONTROLS FOR FREEZER COMPARTMENT
Depend on your product
5 3
3
<Type A & B> <Type C & D>
To lower the temperature in the freezer, turn the knob
To raise the temperature in the freezer, turn the knob
●
When the freezer compartment is not cold enough in
(6~ ).
8
●
Refrigerator temperature would be warmer when the Freezer temperature set to be colder
●
For type A & B:
7
Knob is for quick freezing in the freezer compartment.
continuously or the
refrigerator compartment can be warmer. When the quick
right and set to a higher number.
left and set to a smaller number.
winter, adjust the control for the freezer to High
The refrigerator can be operated
5
6 5
freezing is finished,
5
4
please return to set the Knob at Normal.
ICE MAKING
Determine which type ice-making system you have.
Twisting Ice Serve Type
●
To make ice cubes, fill the ice tray with water and
insert in its position.
●
To remove ice cubes, hold the lever of the tray and
pull turn gently. Then, ice cubes drop in to the ice
cube box.
Ice Trays
Ice Cube Box
NOTE
You can disassemble the Ice Maker to
secure space in the freezer.
.
• Twisting Ice Serve Type:
Remove 1 and 2.
1. Ice Tray
2. Ice Cube Box.
WARNING
• Do not use anything other than water.
• Fill the water up to the marked line..
1
2
<Twisting Ice Serve Type>
25
OPERATIONS
General Type
●
To make ice cubes, fill the ice tray with water and
insert in its position.
●
To remove ice cubes, hold the tray at its ends and
twist gently.
DOOR COOLING
(OPTIONAL)
The anion coating in the duct cover purifies the air
and helps stored foods remain fresh longer.
If water of foreign substances enter the cool air vent
while cleaning, efficiency will be lowered. In addition,
if gasket is damaged, efficiency may be lowered owing to
the escape of cool air.
FRESH ZONE (OPTIONAL)
●
When the door is opened, the warmer air doesn't influence
in the fresh zone. So you can keep food fresher in it.
DEODORIZER (OPTIONAL)
●
Unpleasant odor of food in fresh food
compartment is deodorized with no harm to
you and the food.
How to use
• As Deodorizer is located in cooling air inlet for circulating air in fresh food compartment, there is
no need for any handling.
• Do not prick the cooling air inlet with a sharp tip because Deodorizer may be damaged.
• When storing food with a strong odor, wrap it or store it in a container with a lid because odor may be
passed on to other foods.
Re-Using of Deodorizer
• Used some length and the odor is strong,
Deodorizer can be revived and re-used.
• Separate Deodorizer in ceiling of refrigerator
compartment, using hair drier to remove
moisture or malodor and oxidize under sunlight
to decomposing malodor by ultraviolet.
REF. TEMP. CONTROL
MIN MAX
26
OPERATIONS
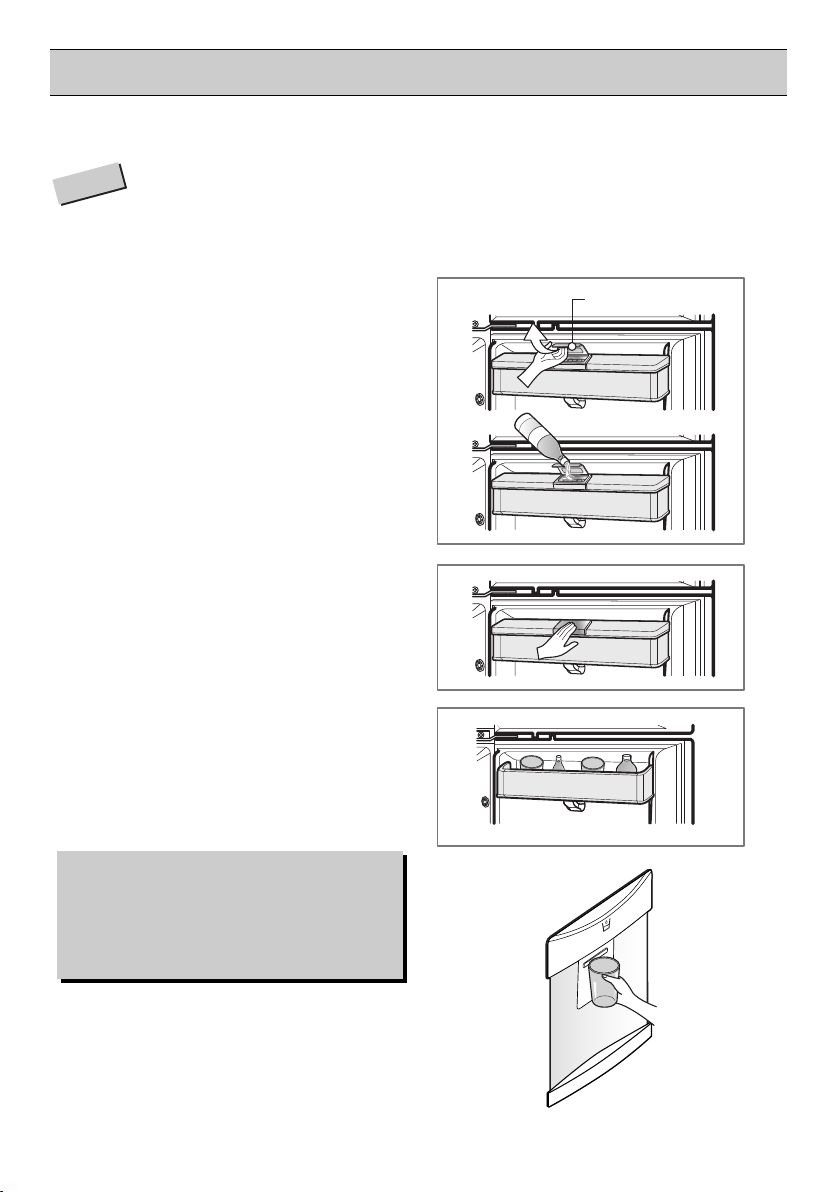
WATER DISPENSER (OPTIONAL)
●
Put water after the water tank being in position. Necessarilly separate the water tank to
NOTE
clean it or not use it.
●
When the water tank is not position after filling it with water, water can leak out by the
valve pushed.
●
Putting water in the water tank
1. Open the cover cap and pour water into the
water tank.
2. Close the cover cap.
3. The water tank is optional removable part
which can be applied to enlarge the storage
capacity.
You can store food, drinks after removing
the water tank cover.
Caution
Do not use anything other than water including.
Hot water needs to be cooled before being put
in the water tank.
Cover Cap
WATER
PUSH
●
Drinking
1. Press the dispenser pad with cup.
2. The water is released when the dispenser pad is
pressed. The pad returns to its original position when
the cup is removed and the water stops its flow.
27

OPERATIONS
HOME BAR
How to use Home Bar
(OPTIONAL)
Press the button at the top left side of Home Bar
until “click” sounds.
You can use various storage spaces inside Home
Bar to systematically store food.
Do not use the button to close Home Bar.
Store food that is frequently taken out and used.
You don’t have to open the door and it saves
electricity.
LED lamp is turned on for easy taking out of the
contents when Home Bar is open.
Do not hang on Home Bar for safety reasons.
How to disassemble Home Bar basket
1. If you lightly lift and take out the basket,
the basket is hooked into the grooves at
the left and right side of the drawer.
How to assemble Home Bar basket
Press until
“click” sounds
1
2
2. At this time, hold the both ends of the
basket, lift with force to separate one side,
and separate the other side.
1. Place the basket on the guide and push
in to be hooked into the wide groove.
2. At this time, hold both ends of the basket,
insert one side with force, and assemble
the other side.
Caution
How to disassemble Home Bar cover
Please follow the guidelines. Otherwise, it may be damaged.
Lift Home Bar cover upward and pull to separate and take out.
Caution
Before the disassembly, take out all food to
empty inside the refrigerator.
28
2
1
SUGGESTIONS ON FOOD STORAGE
STORING FOOD
●
Store fresh food in the refrigerator compartment. How food is frozen and thawed is an
important factor in maintaining its freshness and flavor.
●
Do not store food which goes bad easily at low temperatures, such as bananas, pineapples,
and melons.
●
Allow hot food to cool prior to storing. Placing hot food in the refrigerator could spoil other
food, and lead to higher electric bills!
●
When storing the food, cover it with vinyl wrap or store in a container with a lid. This prevents
moisture from evaporating, and helps food to keep its taste and nutrients.
●
Do not block air vents with food. Smooth circulation of chilled air keeps refrigerator temperatures
even.
●
Do not open the door frequently. Opening the door lets warm air enter the refrigerator, and
cause temperatures to rise.
FREEZER COMPARTMENT
●
Do not store bottles in the freezer compartment - they may break when frozen.
●
Do not refreeze food that has been thawed. This causes loss of taste and nutrition.
●
When storing frozen food like ice cream for a long period, place it on the freezer shelf, not in
the door rack.
●
Loading for Freezing - It is recommended to load newly introduced foods on the following
position for freezing:
Newly Introduced Food
●
Freezer Door Basket, marked (
) is -12°C that is suitable for short term
section,
storage of
frozen food (optional).
●
Two star frozen food compartments are suitable for storing pre-frozen food, storing or
making ice cream and making ice cubes (optional).
●
Two star compartments are not suitable for the freezing of fresh food (optional).
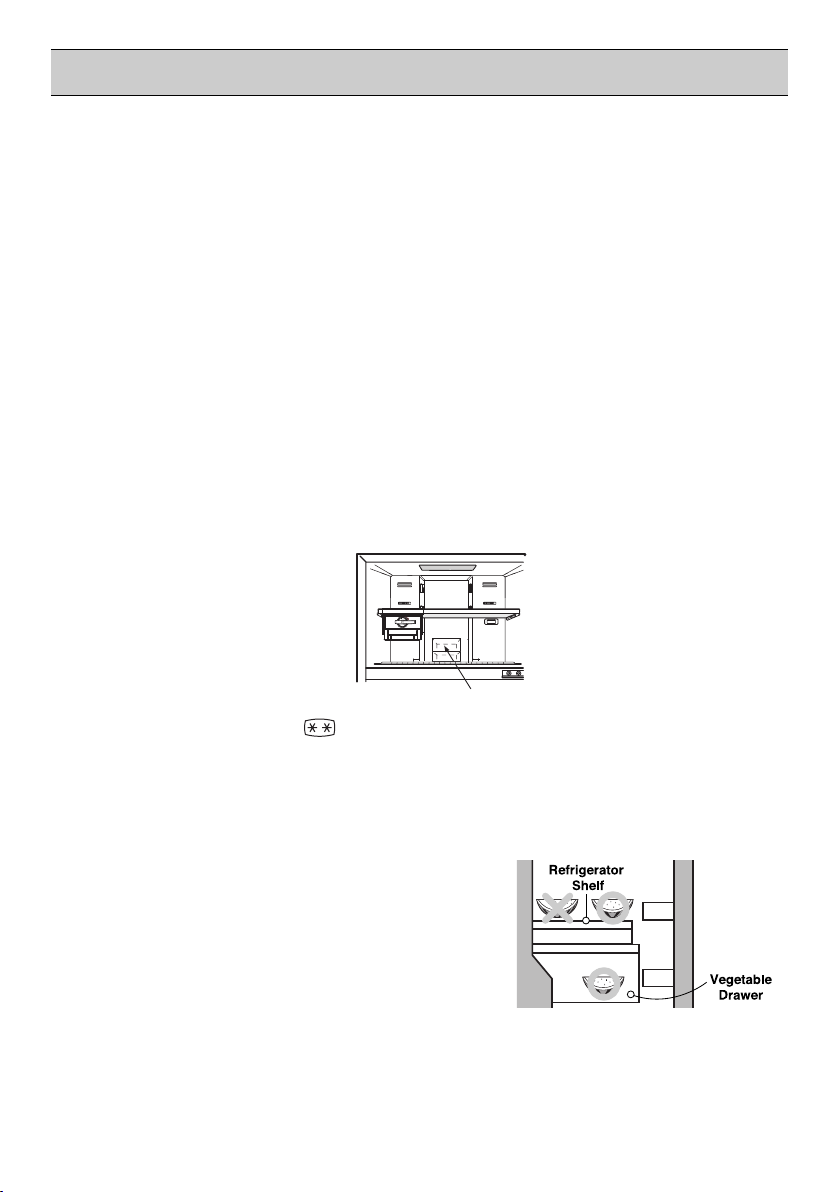
REFRIGERATOR COMPARTMENT
●
Avoid placing moist food on deep interior refrigerator
shelves, it could freeze upon direct contact with chilled
air. To avoid this it is better to store food in the covered
container.
●
It is desirable to store moist food (especially vegetable
and fruit) in the vegetable storage compartment. If it is
necessary to store on a shelf of the refrigerator, put it
close to the door away from the back wall of the
refrigerator to avoid being frozen by the cool circulating in the refrigerator.
●
Always clean food prior to refrigeration. Vegetables and fruits should be washed and wiped,
and packed food should be wiped clean, to prevent adjacent food from spoiling.
●
When storing eggs in their storage rack, ensure that they are fresh, and always store them
in a up-right position, which keeps them fresh longer.
29
CLEANING
SUGGESTIONS ON FOOD STORAGE
●
Opening the door for long periods can cause a significant increase of the temperature in
the compartments of the appliance.
●
If the refrigerating appliance is left empty for long periods, switch off, defrost, clean, dry,
and leave the door open to prevent mould developing within the appliance.
●
Store raw meat and fish in suitable containers in the refrigerator, so that it is not in contact
with or drip onto other food.
It is important that your refrigerator be kept clean
to prevent undesirable odors. Spilled food should
be wipe up immediately, since it may acidify and
stain plastic surfaces if allowed to settle.
Never use metallic scouring pads, brushes,
coarse abrasive cleaners or strong alkaline
solutions on any surface.
Before you clean, however, remember that damp
objects will stick or adhere to extremely cold
surfaces. Do not touch frozen surfaces with wet
or damp hands.
EXTERIOR - Use a lukewarm solution of mild
soap or dish washable solution to clean the
durable finish of your refrigerator. Wipe with a
clean, damp cloth and then dry.
For products with a stainless steel exterior, use a clean
sponge or soft cloth and a mild Detergent in warm water.
Do not use abrasive or harsh cleaners. Dry thoroughly
with a Soft cloth. Do not use appliance wax, bleach, or
other products containing chlorine on stainless steel.
INTERIOR - Regular cleaning of the interior and
interior parts is recommended. Use a lukewarm
solution of mild soap or dish washable solution to
clean the durable finish of your refrigerator. Wipe
with a clean, damp cloth and then dry.
INTERIOR PARTS - Wash compartment shelves,
door racks, storage trays and magnetic door
seals etc. Use a lukewarm solution of mild
soap or dish washable solution to clean
the inner lining of your refrigerator. Wipe with
a clean damp cloth and then dry.
WARNING
Always remove power cord from the wall
outlet prior to cleaning in the vicinity of
electrical parts(lamps, switches, controls, etc.).
Wipe up excess moisture with a sponge or
cloth to prevent water or liquid from getting
into any electrical part and causing electric
shock. Do not use flammable or toxic cleaning
liquids.
• Do not use : Surface
active agents, Car wax, Anticorrosive, or any kind
of oil, Gasoline, Acids, Wax.
• Only use dish washable
solution, and soapy water when cleaning.
• Using harsh cleaning chemicals will cause the
external finishes to change colour.
30

CLEANING
WATER DISPENSER
(OPTIONAL)
Grille -
Wipe with a wet cloth, and dry with a dry cloth.
Water Tank -
1. Putting the Water
Is not necessary to remove the water tank in order to supply
it (it could be filled like shows fig. 1 pulling the tank gate).
NOTE
- Before closing door, close the cap and clamp tightly.
- Do not use liquids containing sugar or carbonated drinks like soda
2. Disassembly
Lift the water tank, gripping a side and bottom of water tank.
NOTE
When disassemble Water Tank, use all water
3. Assembly
If by some cause removes the water tank, place again the water
tank on its original position. Verify that the valve assembly
correctly in the hole of the door (fig. 3,4). Once assembled push
down and check the tank position with line.
Water Tank -
1. Remove the tank cover.
inside dispenser first.
3. Clean the inside and outside of the cap
with diswashing detergent and rinse
throughly under running water. Dry the water
with a cloth.
WATER
PUSH
2. Clean the inside and outside of the water tank
with diswashing detergent and rinse
throughly under running water. Dry the water
with a cloth.
Caution
1. Use lukewarm water when cleaning.
2. Do not use anything other than water. If it is
used with soft drinks,put water in the water
tank and discharge three or four cups of
water shortly.
31

GENERAL INFORMATION
VACATION TIME
During average length vacations, you will probably
find it best to leave the refrigerator in operation.
Place freezable items in freezer for longer life.
When you plan to be away for an extended period,
remove all food, disconnect the power cord, clean
the interior thoroughly, and leave each door OPEN
to prevent odor formation.
POWER FAILURE
Most power failures are corrected in an hour or two
and will not affect your refrigerator temperatures.
However, you should minimize the number of door
openings while the power is off. During power
failures of longer duration, place a block of dry ice on
top of your frozen packages.
IF YOU MOVE
Remove or securely fasten down all loose items
inside the refrigerator.
To avoid damaging the leveling screw(s), turn them
all the way into the base.
This appliance is intended to be used in
household and similar applications such as:
- Staff kitchen areas in shops, offices and
workin
other
- Farm houses
and other residential type environments.
- Bed and breakfast
- Catering and
g environments.
and by clients in hotels, motels
type environmen
similar non-retail applications.
ts.
ANTI-CONDENSATION PIPE
The outside wall of the refrigerator cabinet may
sometimes get warm,
especially just after
installation.
Don't be alarmed.
This is due to the anticondensation pipe, which
pumps hot refrigerant to
prevent "sweating" on the
outer cabinet wall.
LAMP REPLACEMENT
NOTE
● This product applies LED Lamp which can not be replaced by the user.
Please contact authorized service centre for the lamp replacement.
32

IMPORTANT WARNINGS
DO NOT USE AN EXTENSION CORD
If possible, connect the refrigerator to its own
individual electrical outlet to prevent it and other
appliances or household lights from causing an
overload that could cause a power outage.
ACCESSIBILITY OF SUPPLY PLUG
The refrigerator-freezer should be so positioned that
the supply plug is accessible for quick disconnection
when accident happens.
SUPPLY CORD REPLACEMENT
If the supply cord is damaged, it must be replaced
by the manufacturer or its service agent or a
similarly qualified person in order to avoid a hazard.
VERY DANGEROUS ATTRACTION
An empty refrigerator can be a dangerous
attraction to children. Remove either gaskets,
latches, lids or the entire door from your
unused appliance, or take some other action
to make it harmless.
ABOUT GROUNDING (EARTHING)
In the event of an electric short circuit, grounding
(earthing) reduces the risk of electric shock by
providing an escape wire for the electric current.
In order to prevent possible electric shock, this
appliance must be grounded.
Improper use of the grounding plug can result in
an electric shock. Consult a qualified electrician
or service person if the grounding instructions
are not completely understood, or if you have
doubts on whether the appliance is properly
grounded.
DO NOT MODIFY OR EXTEND THE
POWER CORD LENGTH.
It will cause electric shock
or fire.
This appliance must be grounded (earthed).
DON'T WAIT! DO IT NOW!
Do not store inflammable materials, explosives
or chemicals in the refrigerator.
Do not store explosive substances such as aerosol cans with a flammable propellant in this
appliance.
WARNING
This appliance is not intended for use by person (including children) with reduced physical, sensory
or mental capabilities, or lack of experience and knowledge, unless they have been given supervision
or instruction concerning use of the appliance by a person responsible for their safety.
Children should be supervised to ensure that they do not play with the appliance.
DISPOSAL OF THE OLD APPLIANCE
This appliance contains fluid (refrigerant, lubricant) and is made of parts and materials which are
reusable and/or recyclable.
All the important materials should be sent to the collection center of waste material and can be
reused after rework (recycling). For take back, please contact with the local agency.
“The equipment complies with requirements of the Technical Regulation, in terms of restrictions for
the use of certain dangerous substances in electrical and electronic equipment.”
33

BEFORE CALLING FOR SERVICE
SERVICE CALLS CAN OFTEN BE AVOIDED!
IF YOU FEEL YOUR REFRIGERATOR IS NOT OPERATING PROPERLY, CHECK THESE
POSSIBLE CAUSES FIRST :
PROBLEM POSSIBLE CAUSES
THERE IS NO REFRIGERATION
OR FREEZING
REFRIGERATOR OR FREEZER
COMPARTMENT TEMPERATURE
TOO WARM
ABNORMAL NOISE(S)
REFRIGERATOR
HAS ODOR
● Has the power cord plug been removed or loosened
from the electrical wall outlet?
●
A fuse in your home may be blown or the circuit
breaker tripped. Or the appliance is connected to
a GFCI (Ground Fault Circuit Interrupter) outlet, and
t
he outlet's circuit breaker has tripped.
-
Check the main electrical box and replace the fuse
r reset the circuit breaker. Do not increase fuse
o
capacity. If the problem is a circuit overload, have
it corrected by
-
Reset the circuit breaker on the GFCI. If the
a qualied electrician.
problem persists, contact an electrician
●
Temperature control not set on proper position.
●
Appliance is placed close to wall or heat source.
●
Warm weather-frequent door openings.
●
Door left open for a long time.
●
Large amount of foods are kept in the refrigerator.
●
Refrigerator is installed in a weak or uneven place, or
leveling screw needs adjusting.
●
Unnecessary objects placed in the back side of the
refrigerator.
●
Foods with strong odors should be tightly covered or
wrapped.
●
Interior needs cleaning.
DEW FORMS ON THE
CABINET SURFACE
●
Not unusual during periods of high humidity.
●
Door may have been left ajar.
34

EARTH (GROUNDING) CONSTRUCTION (OPTIONAL)
It is recommended to install the earth wire to prevent electric shock
in case of electricity leakage.
How to connect the earth wire:
• Connect the earth wire's metal ring end to the earth screw
on the back of the refrigerator.
• Peel off the cable sheath/insulation at the other end of the earth wire. Attach the peeled wire
to a metal screw/nail and then drive it through the wall or ground.
Do not connect the earth wire to the following locations.
• Gas pipe
It could produce sparks which lead to fire and explosion.
• Telephone earth wire and lightning rod
It is dangerous during lightning.
• Water pipe and water tap
The earth wire connection will not work when the middle of the water pipe is made of plastic.
If it is connected to a metal water pipe, it could cause someone to be electrocuted.
When installing the product in a humid or wet location, you must install the earth wire.
Ex) • Unfloored or dirt floored room (Room with dirt and no floor), concrete floor
• Location where it can get wet such as near the sink
• Location where water can leak or is humid such as basement
• Other wet or humid location
Especially, for locations where it always get wet such as near the restaurant sink, you are obligated by
the law to install a circuit breaker in addition to the earth wire.
After consulting with your retailer or electric construction company, you must do the earth wire
construction (Type 3 earth construction). Please note that earth construction could incur extra fees.
35

SMART FUNCTION
(Only for applied models)
LG ThinQ Application
This feature is only available on models with the f
or logo.
The LG ThinQ application allows you to
communicate with the appliance using a
smartphone.
LG ThinQ Application Features
Communicate with the appliance from a
smartphone using the convenient smart features.
Smart Diagnosis
• If you experience a problem while using the
appliance, this smart diagnosis feature will help
you diagnose the problem.
Settings
• Allows you to set various options on the
appliance and in the application.
NOTE
• If you change your wireless router, internet
service provider, or password, delete the
registered appliance from the LG ThinQ
application and register it again.
• The application is subject to change for
appliance improvement purposes without
notice to users.
• Functions may var y by model.
Before Using LG ThinQ
Application
Check the distance between the appliance
1
and the wireless router (Wi-Fi network).
• If the distance between the appliance and
the wireless router is too far, the signal
strength becomes weak. It may take a long
time to register or installation may fail.
Turn off the Mobile data or Cellular Data on
2
your smartphone.
Connect your smartphone to the wireless
3
router.
NOTE
• To verify the Wi-Fi connection, check that the
f icon on the control panel is lit.
• The appliance supports 2.4 GHz Wi-Fi
networks only. To check your network
frequency, contact your Internet service
provider or refer to your wireless router manual.
• LG ThinQ is not responsible for any
network connection problems or any faults,
malfunctions, or errors caused by network
connection.
• If the appliance is having trouble connecting
to the Wi- Fi network, it may be too far from
the router. Purchase a Wi-Fi repeater (range
extender) to improve the Wi-Fi signal strength.
• The Wi-Fi connection may not connect or may
be interrupted because of the home network
environment.
• The network connection may not work properly
depending on the Internet service provider.
• The surrounding wireless environment can
make the wireless network ser vice run slowly.
• The appliance cannot be registered due to
problems with the wireless signal transmission.
Unplug the appliance and wait about a minute
before trying again.
• If the firewall on your wireless router is enabled,
disable the firewall or add an exception to it.
• The wireless network name (SSID) should be
a combination of English letters and numbers.
(Do not use special characters.)
• Smartphone user interface (UI) may vary
depending on the mobile operating system
(OS) and the manufacturer.
• If the security protocol of the router is set
to WEP, you may fail to set up the network.
Please change it to other security protocols
(WPA2 is recommended) and register the
product again.
36

SMART FUNCTION
(Only for applied models)
Installing the LG ThinQ
Application
Search for the LG ThinQ application from the
Google Play Store or Apple App Store on a smart
phone. Follow instructions to download and install
the application.
Connecting to Wi-Fi
The Wi-Fi button, when used with the LG ThinQ
application, allows the appliance to connect to a
home Wi-Fi network. The f icon shows the status
of the appliance’s network connection. The icon
illuminates when the appliance is connected to the
Wi-Fi network.
Initial Appliance Registration
• Run the LG ThinQ application and follow the
instructions in the application to register the
appliance.
Re-registering the Appliance or Registering
Another User
• Press and hold the Wi-Fi button for 3 seconds
to temporarily turn it off. Run the LG ThinQ
application and follow the instructions in the
application to register the appliance.
Symptoms Reason Solution
The password for the Wi-Fi
that you are trying to connect
to is incorrect.
Mobile data for your
smartphone is turned on.
The wireless network name
(SSID) is set incorrectly.
Your home appliance
and smartphone is
not connected to the
Wi-Fi network.
The router frequency is not 2.4
GHz.
The distance between the
appliance and the router is too
far.
NOTE
• To disable the Wi-Fi function, press and hold
the Wi- Fi button for 3 seconds. f icon will be
turned of f.
Open Source Software Notice
Information
To obtain the source code under GPL, LGPL, MPL,
and other open source licenses, that is contained
in this product, please visit http://opensource.lge.
com.
In addition to the source code, all referred license
terms, warranty disclaimers and copyright notices
are available for download.
LG Electronics will also provide open source code
to you on CD-ROM for a charge covering the cost
of performing such distribution (such as the cost of
media, shipping, and handling) upon email request
to opensource@lge.com. This offer is valid for a
period of three years after our last shipment of this
product. This offer is valid to anyone in receipt of
this information.
• Find the Wi-Fi network connected to
your smartphone and remove it, then
register your appliance on LG
• Turn off the Mobile data of your
smartphone and register the
appliance using the Wi-Fi network.
• The wireless network name (SSID)
should be a combination of English
letters and numbers. (Do not use
special characters.)
• Only a 2.4 GHz router frequency is
supported. Set the wireless router to
2.4 GHz and connect the appliance
to the wireless router. To check the
router frequency, check with your
Internet service provider or the
router manufacturer.
• If the distance between the
appliance and the router is too far,
the signal may be weak and the
connection may not be configured
correctly. Move the location of the
router so that it is closer to the
appliance.
ThinQ
.
37

SMART DIAGNOSIS (Only for applied models)
This feature is only available on models with the c
or d logo.
Use this feature to help you diagnose and solve
problems with your appliance.
NOTE
• For reasons not attributable to LGE’s
negligence, the service may not operate due to
external factors such as, but not limited to, WiFi unavailability, Wi-Fi disconnection, local app
store policy, or app unavailability.
• The feature may be subject to change without
prior notice and may have a different form
depending on where you are located.
Installing the LG ThinQ
Application
Search for the LG ThinQ application from the
Google Play Store or Apple App Store on a smart
phone.
• Follow instructions to download and install the
application.
• Run the LG ThinQ application and follow the
instructions in the application to register the
appliance.
Using LG ThinQ to Diagnose
Issues
If you experience a problem with your Wi-Fi
equipped appliance, it can transmit troubleshooting
data to a smartphone using the LG ThinQ
application.
• Launch the LG ThinQ application and select
the Smart Diagnosis feature in the menu.
Follow the instructions provided in the
LG ThinQ application.
Using Audible Diagnosis to
Diagnose Issues
Follow the instructions below to use the audible
diagnosis method.
• Launch the LG ThinQ application and select
the Smart Diagnosis feature in the menu.
Follow the instructions for audible diagnosis
provided in the LG ThinQ application.
INTERNAL CONTROLLER MODEL
Open the fridge door.
1
Press and hold the Fridge button for 3
2
seconds or longer.
If the buzzer sounds 4 times, open the
3
freezer door and hold the phone near the
speaker hole.
After the data transfer is complete, the
4
diagnosis will be displayed in the application.
NOTE
•For best results, do not move the phone while
the tones are being transmitted.
EXTERNAL CONTROLLER MODEL
Close the freezer and fridge doors, then press
1
and hold the Lock button to activate the lock
function.
• If the display has been locked for over 5
minutes, you must deactivate the lock and
then reactivate it.
Press and hold the Fridge button for 3
2
seconds or longer.
• The control panel will be turned off, and
then ‘3’ will be displayed on the fridge
temperature display part.
Open the freezer and fridge door, and then
3
hold the phone on the upper right speaker
hole.
After the data transfer is complete, the
4
diagnosis will be displayed in the application.
NOTE
•For best results, do not move the phone while
the tones are being transmitted.
38

MEMO


G*-A702H***
G*-F702H***
G*-F602H***
G*-H432H***
G*-F422S***
G*-C702H***
G*-C702S***
G*-H702H***
G*-C602H***
G*-H602H***
G*-C432H***
G*-B422S***
G*-C422S***
www.lg.com
Copyright © LG Electronics Inc. Все права защищены
2020

43
52
53
62
(ОПЦИЯ)
БЫСТРАЯ ЗАМОРОЗКА
ЗАКРЫТИЕ
Wi-Fi
HYGIENE FRESH (НЕ ВО ВСЕХ МОДЕЛЯХ)
ЯЩИК ДЛЯ ОВОЩЕЙ
РАЗМОРАЖИВАНИЕ
УПРАВЛЕНИЕ МОРОЗИЛЬНОЕ ОТДЕЛЕНИЕ
ПРИГОТОВЛЕНИЕ ЛЬДА
СИСТЕМА ОХЛАЖДЕНИЯ
ЗОНА СВЕЖЕСТИ (ОПЦИЯ)
ПОГЛОТИТЕЛЬ ЗАПАХОВ (НЕ ВО ВСЕХ МОДЕЛЯХ)
ДИСПЕНСЕР ВОДЫ (ОПЦИЯ)
МИНИ-БАР
(ОПЦИЯ)
(ОПЦИЯ)
(ОПЦИЯ)
ДВЕРИ
(ОПЦИЯ)
ИНТЕЛЛЕКТУАЛЬНЫЕ ФУНКЦИИИНТЕЛЛЕКТУАЛЬНЫЕ ФУНКЦИИИНТЕЛЛЕКТУАЛЬНЫЕ ФУНКЦИИ
42
...............
69
70
72
72
73
74
75
76
78

Несоблюдение
безопасности.
Легковоспламеняемые материалы и риск
Данный символ предупреждает о наличии
материалов, которые при
стать причиной
возникновения пожара.
• Данное устройство содержит небольшое количество
(R600a), который является горючим
устройства соблюдайте
хлаждающего
о
контура устройства.
осторожность, чтобы не повредить элементы
• При обнаружении утечки не допускайте использования открытого
потенциальных источников воспламенения,
проветрите комнату, в которой
образования
контуре,
огнеопасной смеси газа и воздуха при утечке в охлаждающем
размер комнаты, в которой установлено устройство,
установлено устройство. целях предотвращения
соответствовать количеству используемого хладагента.
ненадлежащем обращении могут
газом. При транспортировке и установке
возникновения пожара
легковоспламеняемых
изобутанового хладагента
пламени или
в течение нескольких минут
В
должен
Площадь комнаты должна
составлять 1 кв. м на каждые 8 грамм хладагента R600а внутри устройства.
• У
станавливая устройство убедитесь, что кабель питания не
пережат и не
поврежден.
• Запрещается размещать переносные розетки или переносные
источники питания
вблизи данного устройства.
43

•
Данный прибор не предназначен для использования людьми (включая детей) с ограниченными
физическими, сенсорными или умственными способностями или с недостаточным опытом или
знаниями. Если только им были даны инструкции по использованию прибора человеком,
ответственным за их безопасность.
•
Необходимо контролировать детей, чтобы они не играли с
•
•
•
Детям в возрасте от 3 до 8 лет разрешается загружать и разгружать продукты из холодильного устройства.
•
•
прибором.
44

Отключите кабель питания от сети при
чистке и обслуживании холодильника.
45

46

В некоторых случаях в качестве отделки
передней дверцы может использоваться
закаленное стекло. В результате ударов и
других силовых воздействий оно может
треснуть или разбиться. Не прикасайтесь
к поврежденной части изделия.
Если выявлена утечка газа (изобутан, пропан,
•
природный газ и т. п.), не касайтесь устройства
или вилки электропитания и немедленно
проветрите помещение. В этом устройстве
используется хладагент изобутан (R600a). Также
используется небольшое
количество
легковоспламеняющегося
газа. Утечка газа во
время транспортировки,
установки или
эксплуатации
прибора может привести
к пожару,
если возникнут искры.
взрыву или
травме,
Это может привести к травме.
474849


Не используйте газированную воду.
ение газа может
Давл
привести к протечке.
вода
Газированная
Водяной бак
Перед применением диспенсера воды
очистите резе
рвуар с водой по инструкции.
Водяной бак
Используйте только питьевую воду.
Используйте исключительно воду. При
использовании любой другой жидкости
работа системы может быть нарушена.
Производитель не несет ответственности за
использовании жидкости,
отличной от воды.
Только вода
Водяной бак
Не храните в корзине бутылки большого
объема и контейнеры.
В противном это может привести к повреждению
корзины или к травмам руки, поскольку для
извлечения бутылок и контейнеров из корзины
необходимо будет применить большое усилие.
50

Воздух должен свободно циркулировать
по холодильнику для обеспечения его
надежной работы.
Если холодильник помещен в стенную
нишу, расстояние между верхней панелью
холодильника и потолком ниши должно
составлять не менее 25 см, а также не
менее 5 см от стены.
Холодильник должен находиться на высоте
не менее 2,5 см от пола, особенно в том
случае, если пол покрыт ковром.
51

Размеры и зазоры
Слишком малое расстояние между прибором и
расположенными рядом предметами может
привести к ухудшению охлаждающих
возможностей и повышению энергопотребления.
Обеспечьте расстояние не менее 50 мм до
ближайших стен и иных предметов при
установке изделия.
A
B
C
Габаритные размеры
-
Тип (a) Тип (b) Тип
A
780
B
1800
C
730
D
27
E
673
F
703
G
1420
H
1390
780
1800
700
27
673
1420
1340
D
EFG
780
1720
730
27
673
703
1420
1390
(c)
H
Тип
700
1680
730
673
703
1340
1250
(мм)
(d)
27
Тип
700
1680
700
27
673
1340
1210
Температура окружающей
среды
Устройство предназначено для работы в
ограниченном диапазоне температур
окружающей среды в зависимости от
климатической зоны. Не используйте прибор при
температуре, выходящей за допустимые
пределы.
Температура внутри прибора может меняться в
зависимости от расположения прибора,
температуры окружающей среды, частоты
открывания двери и так далее.
Климатический класс можно найти на этикетке.
Климатический класс
SN (Субнормальный) +10 - +32
N (Нормальный) +16 - +32
ST (Субтропический) +16 - +38
T (Тропический) +16 - +43 / +10 - +43*
(e)
*Австралия, Индия, Кения
ПРИМЕЧАНИЕ
• Использование приборов,
классифицированных в группы от SN до T,
предусмотрено при температуре 10-43ºC.
Диапазон температур
окружающей среды,
°С
ПРИМЕЧАНИЕ
• Вы можете определить тип устройства, посмотрев
на этикетку внутри
холодильной камеры.
52

ТТТТТТТТипипипипипипипип AAAAAAAA
Smart Diagnosis
СИСТЕМА ОХЛАЖДЕНИЯ
ДВЕРИ
Регулирование
температуры
53

Òèï Òèï Òèï Òèï Òèï Òèï Òèï Тип ББББББББ
Smart Diagnosis
СИСТЕМА ОХЛАЖДЕНИЯ
ДВЕРИ
Регулирование
температуры
СИСТЕМА ОХЛАЖДЕНИЯ
ДВЕРИ
54

Pull Out Tray
СИСТЕМА ОХЛАЖДЕНИЯ
ДВЕРИ
Регулирование
температуры
ТТТТТТТТипипипипипипипип
ÖÖÖ
Smart Diagnosis
55

производства льда
или устройство
(дополнительно
льда общего
для производства
типа
ТТТТТТТТипипипипипипипип
Smart Diagnosis
)
Pull Out Tray
СИСТЕМА ОХЛАЖДЕНИЯ
ДВЕРИ
Регулирование
температуры
56

ТТТТТТТТипипипипипипипип AAAAAAAA
Smart Diagnosis
СИСТЕМА ОХЛАЖДЕНИЯ
ДВЕРИ
СИСТЕМА ОХЛАЖДЕНИЯ
ДВЕРИ
57

ТТТТТТТТипипипипипипипип
ÖÖÖ
Smart Diagnosis
СИСТЕМА ОХЛАЖДЕНИЯ
ДВЕРИ
58

МОДЕЛЬ ДИСПЕНСЕРА ВОДЫ A
ТТТТТТТТипипипипипипипип
Smart Diagnosis
Водяной бак
СИСТЕМА ОХЛАЖДЕНИЯ
ДВЕРИ
59

МОДЕЛЬ ДИСПЕНСЕРА ВОДЫ D
ТТТТТТТТипипипипипипипип
Smart Diagnosis
Водяной бак
Pull Out Tray
СИСТЕМА ОХЛАЖДЕНИЯ
ДВЕРИ
Регулирование
температуры
60

ТТТТТТТТипипипипипипипип AAAAAAAA
Smart Diagnosis
СИСТЕМА ОХЛАЖДЕНИЯ
ДВЕРИ
МИНИ-БАР
61

(Модель с внешним управлением)
Температура холодильной камеры по умолчанию установлена
Для регулировки температуры холодильной камеры нажимать
A &
Á
ÖÖÖ
Òèï
Обнаружение
на средний уровень
кнопку “Fridge” (Ref. Temp Control Button)
При каждом нажатии кнопки будет загораться светодиод.
Регулировка состоит из 7 уровней, от “Cold”( холодный) до
“Coldest” (Очень холодный).
62

a
b
Коснитесь кнопки Fridge (Холодильник) для регулировки температуры холодильника.
При любом касании кнопки загорается светодиодный индикатор.
Коснитесь кнопки Hygiene Fresh (Гигиеническая свежесть) для управления мотором этого
режима (дополнительно).
Цифра, отображающаяся на светодиодном экране, показывает температуру в холодильной
камере.
Можно выбрать желаемую настройку с шагом в один градус в диапазоне от 0˚C до 6˚C.
Коснитесь кнопки ⓐ , и температура холодильника опустится на один градус (1˚C).
Коснитесь кнопки ⓑ , и мотор режима Hygiene Fresh (Гигиеническая свежесть) начнет
работать, режим питания выключается. (дополнительно).
БЫСТРАЯ ЗАМОРОЗКА
При помещении в холодильник горячих продуктов можно включить режим Express Freeze
(Ускоренн
ое замораживание) с помощью соответствующей кнопки на панели управления.
Режим Express Freeze (Ускоренное замораживание) отключается, когда температура
достигнет требуемого уровня; он также может быть отключен вручную при нажатии кнопки
Express Freeze.
ЗАКРЫТИЕ (ОПЦИЯ)
Для блокировки нажмите и удерживайте в
течение 3 секунд кнопку блокировки Lock. После
блокировки загорится светодиодный индикатор
блокировки, и другие кнопки будут недоступны.
Для разблокировки повторно нажмите и удерживайте
кнопку блокировки Lock в течение 3 секунд.
(ОПЦИЯ)
Wi-Fi
Позволяет подключить холодильник к домашней сети Wi-Fi.
63

AUTO
OFF .)
POWER
AUTO
AUTO POWER OFF AUTO
64

Зависит от модели
5 3
3
< A & >
AA
AA
A &
äëÿ òèï :
7
ТТТТТТТТипипипипипипипип
).
8
6 ~
ББББББББ
ББББББББ
Определите, какая у вас система производства льда.
5
6 5
ÖÖÖ
< >
ТТТТТТТТипипипипипипипип
5
4
65

Обычного типа
�
Чтобы сделать кубики льда, заполните емкость для кубиков
льда водой до уровня чуть ниже ободка и поместите ее в
низкая температура
�
Чтобы удалить кубики льда, слегка скрутите лоток, удерживая
его за торцы.
камеру.
СИСТЕМА ОХЛАЖДЕНИЯ ДВЕРИ
66
REF. TEMP. CONTROL
MIN MAX

ДИСПЕНСЕР ВОДЫ (ОПЦИЯ)
Вы можете хранить еду, напитки после
Перед заполнением водяного бака горячую
●
Налейте воду после размещения бака для воды. Необходимо отсоединить
ПРИМЕЧАНИЕ
●
Наполнение бака водой
1. Откройте крышку и налейте воду в бак
2. Закройте крышку.
3. Водяной бак является опциональной
съемной деталью, которую можно
установить для увеличения емкости.
водяной бак для его очистки или чтобы прекратить его использование.
●
Если водяной бак не на месте после заполнения его водой, вода может вытекать
при
нажатии на клапан.
.
Крышка
снятия крышки водяного бака.
Осторожно!
Не используйте ничего другого, кроме воды.
воду следует охладить.
●
Питьевая вода
1. Нажмите кружкой на педаль диспенсера.
2. Вода начинает течь при нажатии педали
диспенсера. Если убрать кружку, педаль
возвращается в исходное положение, после
чего вода перестает течь.
WATER
PUSH
67

МИНИ-БАР
Использование мини- бара
Нажмите кнопку в верхнем левом углу мини-бара
до щелчка.
Отделения мини-бара можно использовать для
хранения продуктов.
Не используйте кнопку, чтобы закрыть мини-бар.
Храните в мини-баре продукты, которыми вы
часто пользуетесь.
В этом случае вам не придется открывать дверцы
холодильника и экономить элек тричество.
После открытия дверцы мини-бара загорается
светодиодная лампа для удобства.
В целях безопасности не вешайте ничего на мини-
бар.
Демонтаж корзины мини- бара
Нажмите до
щелчка
1
1. Корзина крепится на двух направляющих,
расположенных справа и слева; нужно
слегка приподнять и вытащить корзину.
Монтаж корзины мини-бара
1. Разместите корзину на направляющей
и
задвиньте ее, чтобы зафиксировать ее на
желобах.
Осторож Соблюдайте инструкции. В противном случае вы можете п
Демонтаж крышки мини- бара
2. После этого возьмитесь обеими руками за
края корзины и приподнимите сперва один
край, а затем второй.
2
2. После этого возьмитесь обеими руками за
края корзины, надавите сперва на один край, а
затем на второй.
Приподнимите крышку вверх и потяните, чтобы освободить
Осторож
Перед демонтажом освободите камеру
холодильника от продуктов.
2
1
68

Отсеки морозильной камеры, отмеченные двумя звездочками, подходят для хранения предварительно
замороженных продуктов, хранения или изготовления мороженного и заморозки кубиков льда
Отсеки морозильной камеры, отмеченные двумя звездочками, не подходят для заморозки свежих продуктов.
69

Длительное открытие дверцы может вызвать существенное повышение температуры в отсеках устройства.
Если холодильное устройство долгое время стоит пустым, его необходимо выключить, разморозить и оставить
дверцу открытой для предотвращения появления плесени внутри устройства.
Храните сырое мясо и рыбу в соответствующих контейнерах в холодильнике, чтобы они не соприкасались с
другими продуктами и не капали на них.
70

ДИСПЕНСЕР ВОДЫ (ОПЦИЯ)
Для наполнения водяного бака нет нужды извлекать его
Поднимите водяной бак, удерживая его за нижнюю и
Решетка
Вытирайте влажной тканью, затем вытирайте насухо.
Водяной бак
1. Наполнение водой
(его можно наполнить, как показано на рис. 1, потянув
затвор бака).
ПРИМЕЧАНИЕ
- Прежде чем закрыть дверцу, п
- Не используйте жидкости с
газированные напитки типа содовой.
2. Разборка
боковую части.
ПРИМЕЧАНИЕ
При разборке водяного бака используйте сначала всю
воду в диспенсере.
3. Сборка
Есл
и по какой бы то ни было причине вы извлекли
водяной бак, поместите ег
положение. Проверьте правильность установки
клапанного блока в отверстие дверцы (рис. 3, 4). После
сборки проверьте правильность установки бака.
Водяной бак
нимите крышку бака.
1. С
2. Очистите внутреннюю и внешнюю поверхности
водяного бака с помощью средства для мытья
посуды и тщательно ополосните проточной
водой.
Высушите с помощью сухой ткани.
лотно закройте крышку.
содержанием сахара или
о обратно в исходное
WATER
PUSH
3. Очистите внутреннюю и внешнюю
поверхности крышки с помощью средства
для мытья посуды и тщательно
ополосните проточной водой. Высушите с
помощью сухой ткани.
71
Осторожно!
1. При очистке используйте теплую воду.
2. Используйте только воду. При
использовании воды для газированных
напитков налейте воду в водяной бак и
сразу же выпустите три-четыре кружки
воды.

72

ОЧЕНЬ ОПАСНАЯ ИГРУШКА ДЛЯ ДЕТЕЙ
Пустой холодильник является очень
опасной игрушкой для детей. Не забудьте
снять у неиспользуемого холодильника
прокладки, замки, крышки или дверцу
целиком или примите другие меры, чтобы
сделать холодильник безопасным.
Холодильник необходимо заземлить
НЕ ОТКЛАДЫВАЙТЕ! СДЕЛАЙТЕ ЭТО
СРАЗУ!
Не храните в холодильнике
легковоспламеняющиеся и взрывчатые
вещества, а также химикаты.
ПРЕДУПРЕЖДЕНИЕ
Данный прибор не предназначен для использования людьми (включая детей) с ограниченными
физическими, сенсорными или умственными способностями или с недостаточным опытом или
знаниями. Если только им были даны инструкции по использованию прибора человеком,
ответственным за их безопасность. Необходимо контролировать детей, чтобы они не играли с
прибором.
Утилизация отслужившей техники
В этом устройстве содержатся жидкости (хладоагент, смазочные материалы), допускается
восстановление и повторное использование деталей и материалов.
Все основные материалы необходимо отправлять на сборный пункт утилизации, где
производится их переработка или восстановление. По поводу возврата утилизируемых
материалов обращайтесь в соответствующую местную службу.
"Данное оборудование соответствует требованиям технического регламента, с точки зрения
ограничения на использование определенных опасных веществ в электрическом и
электронном оборудовании".
73

ОХЛАЖДЕНИЕ ИЛИ ЗАМОРОЗКА
ПРОДУКТОВ НЕ ПРОИСХОДИТ.
Возможно, в вашем доме перегорел
предохранитель или сработал автоматический
выключатель. Или же прибор подключен к
розетке ВКЗЗ (выключатель системы короткого
замыкания на землю), и сработ
автоматический вык
-
Проверьте главный
лючатель розетки.
ал
электрораспределительный щиток и замените
предохранитель или снова включите
автоматический выключатель. Не используйте
предохранитель с увеличенным номиналом.
Если проблема заключается в перегрузке цепи,
обратитесь к квалифицированному электрику
для ее устранения.
-
Снова включите автоматический выключатель
на ВКЗЗ. Если проблему не удается устранить,
обратитесь к электрику.
74

75

ИНТЕЛЛЕКТУАЛЬНЫЕ ФУНКЦИИ
Приложение LG ThinQ
Данная функция доступна только в моделях с
логотипом f или .
Приложение LG ThinQ позволяет управлять
данным устройством с помощью смартфона.
Функции приложения LG ThinQ
Подключайтесь к устройству со смартфона при
помощи удобных интеллектуальных функций.
Smart Diagnosis
• Если у вас возникли проблемы при
использовании устройства, функция Smart
Diagnosis поможет вам выявить ее причину.
Настройки
• Позволяет задавать различные параметры
на устройстве и в приложении.
ПРИМЕЧАНИЕ
• При изменении маршрутизатора
беспроводной сети, поставщика
услуг Интернета или пароля удалите
зарегистрированное устройство из
приложения LG ThinQ и зарегистрируйте его
снова.
• В целях улучшения продукта в
приложение могут вноситься изменения
без предварительного уведомления
пользователя.
• Характеристики могут меняться в
зависимости от модели.
Перед использованием
приложения LG ThinQ
Проверьте расстояние между прибором
1
и беспроводным маршрутизатором (сеть
Wi-Fi).
• Если расстояние между прибором
и беспроводным маршрутизатором
слишком большое, сила сигнала
ослабляется. Регистрация может занять
много времени или возможен сбой
установки.
Выключите на своем смартфоне функции
2
Мобильные данные или Сотовые
данные.
Подключите свой смартфон к
3
беспроводному маршрутизатору.
ПРИМЕЧАНИЕ
• Чтобы проверить Wi-Fi соединение,
убедитесь, что значок f на панели
управления светится.
• Прибор поддерживает только сети Wi-Fi 2,4
ГГц. Чтобы проверить частоту вашей сети,
обратитесь к поставщику услуг Интернет
или см. инструкции к беспроводному
маршрутизатору.
• Приложение LG ThinQ не предназначено для
решения проблем с подключением к сети, а
также неполадками и ошибками, вызванными
сетевым подключением.
• Если возникли какие-либо проблемы при
подключении устройства к сети Wi-Fi, это
может быть вызвано тем, что устройство
находится слишком далеко от маршрутизатора.
Приобретите ретранслятор (усилитель сигнала)
Wi-Fi, чтобы улучшить сигнал Wi-Fi.
• Подключение Wi-Fi может быть не
установлено или прервано из-за
особенностей домашней сети.
• В зависимости от Интернет-провайдера с
сетевым соединением могут возникать те или
иные проблемы.
• Окружающая беспроводная среда может
замедлить работу беспроводной сети.
• Устройство может не пройти регистрацию
в связи с проблемами с беспроводной
передачей сигнала. Отключите устройство
от сети и подождите примерно минуту перед
тем, как повторить попытку.
• Если на вашем беспроводном маршрутизаторе
включен брандмауэр, отключите брандмауэр
или добавьте к нему исключение.
• Имя беспроводной сети (SSID) должно
содержать английские буквы и цифры. (Не
используйте специальные символы)
• Пользовательский интерфейс смартфона
(ПИ) может отличаться в зависимости от
операционной системы (ОС) и производителя.
• Если протокол безопасности маршрутизатора
настроен на WEP, возможен сбой настройки
сети. Измените его на другой протокол
безопасности (рекомендуется WPA2) и снова
зарегистрируйте изделие.
76

ИНТЕЛЛЕКТУАЛЬНЫЕ ФУНКЦИИ
Установка приложения LG ThinQ
Найдите приложение LG ThinQ в Google Play
Store & Apple App Store с помощью смартфона.
Следуйте инструкциям по загрузке и установке
приложения.
Подключение к Wi-Fi
При использовании приложения LG ThinQ
кнопка Wi-Fi позволяет подключить устройство
к домашней сети Wi-Fi. Значок f показывает
состояние подключения холодильника к сети.
Значок светится, когда холодильник подключен
к сети Wi-Fi.
Начальная регистрация устройства
• Запустите приложение LG ThinQ и следуйте
инструкциям в приложении для регистрации
устройства.
Повторная регистрация устройства или
регистрация другого пользователя
• Нажмите и удерживайте кнопку Wi-Fi в
течение 3 секунд, чтобы временно отключить
функцию. Запустите приложение LG ThinQ
и следуйте инструкциям в приложении для
регистрации устройства.
ПРИМЕЧАНИЕ
• Для отключения функции Wi-Fi нажмите и
удерживайте кнопку Wi-Fi в течение 3 секунд.
Значок f погаснет.
Уведомление о программном
обеспечении с открытым
исходным кодом
Для получения исходного кода по условиям
лицензий GPL, LGPL, MPL и других лицензий
с открытым исходным кодом, который
содержится в данном продукте, посетите вебсайт: http://opensource.lge.com.
Кроме исходного кода для загрузки доступны
все соответствующие условия лицензии,
отказ от гарантий и уведомления об авторских
правах.
Компания LG Electronics также может
предоставить открытый исходный код на
компакт-диске за плату, покрывающую
связанные с этим расходы (стоимость
носителя, пересылки и обработки), по
запросу, который следует отправить по адресу
электронной почты opensource@lge.com. Это
предложение действительно в течение трех лет
с момента последней поставки нами данного
продукта. Это предложение актуально для
любого получателя данной информации.
Признаки Возможная причина Способ устранения
• Найдите сеть Wi-Fi, подключенную к
вашему смартфону, и удалите ее,
потом зарегистрируйте свой прибор в
LG ThinQ.
• Выключите Мобильные данные
своего смартфона и зарегистрируйте
прибор, используя сеть Wi-Fi.
• Имя беспроводной сети (SSID)
должно содержать английские буквы
и цифры. (Не используйте
специальные символы)
• Поддерживается только частота
маршрутизатора 2,4 ГГц. Настройте
беспроводной маршрутизатор на 2,4
ГГц и подключите прибор к
беспроводному маршрутизатору.
Чтобы проверить частоту
маршрутизатора, обратитесь к
своему поставщику Интернет-услуг
или производителю маршрутизатора.
• Если расстояние между прибором и
маршрутизатором слишком большое,
сигнал может быть слабым и
подключение может не настраиваться
правильно. Измените место
нахождения маршрутизатора, чтобы
он находился ближе к прибору.
Ваш домашний
прибор и смартфон не
подключены к сети
Wi-Fi.
Пароль для Wi-Fi, к которой вы
пытаетесь подключиться,
неправильный.
Передача мобильных данных
для вашего смартфона
включена.
Имя беспроводной сети (SSID)
настроено неправильно.
Частота маршрутизатора не 2,4
ГГц.
Расстояние между прибором и
маршрутизатором слишком
большое.
77

ИНТЕЛЛЕКТУАЛЬНАЯ ДИАГНОСТИКА
Данная функция доступна только в моделях с
логотипом c или d.
Данная функция служит для поиска и решения
проблем с вашим устройством.
ПРИМЕЧАНИЕ
• По причинам, не связанным с LGE, служба
может не работать из-за внешних факторов,
таких как, например, недоступность
Wi-Fi, сбой соединения Wi-Fi, политика
используемого магазина приложений или
недоступность приложения.
• Функция может подвергаться изменениям
без предварительного уведомления и может
быть реализована по-разному в зависимости
от местоположения пользователя.
Установка приложения LG
ThinQ
Найдите приложение LG ThinQ в Google Play
Store & Apple App Store с помощью смартфона.
• Следуйте инструкциям по загрузке и
установке приложения.
• Запустите приложение LG ThinQ и следуйте
инструкциям в приложении для регистрации
устройства.
Использование функции LG
ThinQ для выявления
неисправностей
Если с вашим устройством, поддерживающим
Wi-Fi, возникла проблема, оно может передать
данные о неисправности на смартфон через
приложение LG ThinQ.
• Запустите приложение LG ThinQ и выберите
функцию Smart Diagnosis в открывшемся
меню. Следуйте инструкциям в приложении
LG ThinQ.
Использование звуковой
диагностики для выявления
неисправностей
Чтобы использовать функцию звуковой
диагностики, следуйте инструкциям,
приведенным ниже.
• Запустите приложение LG ThinQ и выберите
функцию Smart Diagnosis в открывшемся
меню. Следуйте инструкциям по выполнению
звуковой диагностики в приложении
LG ThinQ.
ДЛЯ МОДЕЛИ С ВНУТРЕННИМ
Ɉɬɤɪɨɣɬɟɞɜɟɪɰɭ
1
ɇɚɠɦɢɬɟɤɧɨɩɤɭɪɟɝɭɥɢɪɨɜɤɢ
2
ɯɨɥɨɞɢɥɶɧɢɤɚɢ
ɫɟɤɭɧɞ
ɢɥɢɛɨɥɟɟ
ɯɨɥɨɞɢɥɶɧɨɣ
ɭɞɟɪɠɢɜɚɣɬɟɧɟɦɟɧɟɟ
КОНТРОЛЛЕРОМ
ɤɚɦɟɪɵ
ɬɟɦɩɟɪɚɬɭɪɵ
ȿɫɥɢɡɜɭɤɨɜɨɣɫɢɝɧɚɥɩɨɜɬɨɪɢɬɫɹ
3
ɪɚɡɚɨɬɤɪɨɣɬɟDɞɜɟɪɰɭ
ɦɨɪɨɡɢɥɶɧɨɣɤɚɦɟɪɵ
ɬɟɥɟɮɨɧɧɭɸɬɪɭɛɤɭ
ɨɬɜɟɪɫɬɢɟɦɞɢɧɚɦɢɤɚ
После окончания передачи данных данные
4
о неисправности будут отображены в
приложении.
ПРИМЕЧАНИЕ
• Не перемещайте телефон в процессе
передачи.
ДЛЯ МОДЕЛИ С ВНЕШНИМ
Закройте двери Морозильная камера и
1
Холодильная камера, затем нажмите и
удерживайте кнопку Lock для активации
функции блокировки.
• Если экран был заблокирован более 5
минут, его необходимо разблокировать, а
затем заблокировать снова.
Нажмите кнопку Fridge и удерживайте ее в
2
течение 3 секунд или дольше.
• Панель управления выключится, и
в области дисплея, отображающей
температуру в холодильнике, появится
цифра «3».
Откройте дверцу морозильной и
3
холодильной камеры и поднесите телефон
к динамику в верхнем правом углу.
После окончания передачи данных данные
4
о неисправности будут отображены в
приложении.
ПРИМЕЧАНИЕ
• Не перемещайте телефон в процессе
78
передачи.
ɢɩɨɦɟɫɬɢɬɟ
ɪɹɞɨɦɫ
КОНТРОЛЛЕРОМ

MEMO


MUZLATISH
BO'LINMALI SOVUTGICH
Iltimos, avval ushbu qo’llanma va
ehtiyot choralarini diqqat bilan o’qib chiqing va kelajakda
foydalanish uchun uni saqlab qo’ying.
G*-A702H***
G*-C702H***
G*-C702S***
sovutgichdan foydalanishdan
G*-F702H***
G*-H702H***
G*-C602H***
G*-F602H***
G*-H602H***
G*-C432H***
Copyright ©
G*-H432H***
G*-B422S***
G*-C422S***
LG Electronics Inc. All Rights Reserved
2020
G*-F422S***
www.lg.com

83
92
93
102
ISHGA TUSHIRISH
HARORATNI O’RNATISHDAN AVVAL
ESHIK SIGNALI
O’ZINI-O’ZI TEKSHIRISH
SOVUTISH KAMERASI UCHUN BOSHQARUV TUGMALARI
TEZKOR MUZLATISH
QULFLASH
Wi-Fi
(IXTIYORIY)
HYGIENE FRESH [Gigiyenalik sof] (IXTIYORIY)
SABZAVOTLAR SURILMA QUTISI
MUZDAN TUSHIRISH
MUZLATISH KAMERASI UCHUN BOSHQARUVLAR
MUZ TAYYORLASH
ESHIKNI SOVUTISH
SARINLIK HUDUDI (IXTIYORIY)
HIDLARNI KETKAZUVCHI (IXTIYORIY)
SUV DISPENSERI (IXTIYORIY)
UY
BARI (HOME BAR)
(IXTIYORIY)
(IXTIYORIY)
(IXTIYORIY)
(IXTIYORIY)
XIZMAT KO’RSATISH MARKAZIGA QO’NG’IROQ
AQLLI FUNKSIYALAR
SMART DIAGNOSIS
82
109
110
112
112
113
114
115
116
118

ASOSIY EHTIYOT CHORALARI
Ushbu yo’riqnomada xavfsizlik bo’yicha muhim ma'lumotlar beriladi. Barcha xavfsizlik
ma'lumotlarini o’qib chiqing va ularga amal qiling.
Bu xavfsizlik to’g’risida ogohlantirish belgisi. U sizni yoki boshqalarni jarohatlashi yoki mah-
sulotni shikastlashi mumkin bo’lgan xatarlar tog’risida ogohlantiradi. Barcha xavfsizlik xabarlaridan
avval xavfni bildiruvchi belgi va xavfni bildiruvchi OGOHLANTIRISH yoki DIQQAT signal so’zlari
keladi. Bu so’zlar quyidagi ma’nolarni bildiradi:
OGOHLANTIRISH
DIQQAT
Barcha xavfsizlik ma'lumotlari xatarlarni ko’rsatadi, jarohatlanish xavfi ni qanday kamaytirish
mumkinligi va ko’rsatmalarga amal qilinmagan hollarda nimalar bo’lishi mumkinligini aytib beradi.
Jihoz korpusidagi yoki ichidagi ventilyatsiya teshiklari bekilib qolmasin.
Muzdan eritish jarayonini tezlashtirish uchun ishlab chiqaruvchi tomonidan tavsiya
etilmagan mexanik qurilmalar yoki boshqa vositalardan foydalanmang.
Sovutuvchi konturga shikast yetkazmang.
Jihozning oziq ovqat saqlanadigan bo'linmalari ichida ishlab chiqaruvchi tomonidan
tavsiya etilmagan elektr qurilmalarini ishlatmang.
Jihozda sovutuvchi agent va izolyatsiyalovchi purkovchi gaz qo’llanilganligi bois, uni
alohida belgilangan tartibda chiqindiga chiqarish talab etiladi. Chiqindiga chiqarish
vaqti kelganda, texnik xizmat ko’rsatuvchi agent yoki boshqa shunga o’xshash
texnik bilan bog’laning.
Agar oldi olinmasa, yengil yoki o’rtacha jarohatlanishga yoki mahsulotning
shikastlanishiga olib kelishi mumkin bo’lgan xavfl i holatni ko’rsatadi.
Ko’rsatmalarga amal qilmaslik o’limga yoki jiddiy
jarohatlanishga olib kelishi mumkin.
Yong‘in va yonuvchan materiallar xavfi
Bu belgi e’tiborsiz qoldirilgan hollarda uchqunlashi va yong‘inga sabab bo‘lishi mumkin
bo‘lgan yonuvchan materiallar haqida ogohlantiradi.
• Bu jihoz tarkinida oz miqdordagi izobutan sovutish vositasi (R600a) mavjud, biroq u yonuvchan
hamdir. Jihozni tashishda yoki o‘rnatishda uning sovitish sxemasiga shikast yetkazmaslik uchun
ehtiyotkorlikka rioya qilish talab etiladi.
• Agar shunday oqish holati yuzaga kelgan bo‘lsa, jihoz atrofida ochiq alanga yoki ehtimoliy isitish
manbalari bo‘lishiga yo‘l qo‘ymang va jihoz turgan xonani bir necha daqiqa davomida shamollating.
Agar sovituvchi modda oqishi kuzatilsa, yonuvchan gazlarning havodagi aralashmasi yuzaga
kelishining oldini olish uchun, jihoz foydalanilayotgan xona o‘lchamlari undagi sovituvchi modda
miqdoriga mos bo‘lishi zarur. Jihoz ichidagi R600a sovituvchi moddasining har 8 grammiga xonada
1 m² joy bo‘lishi zarur.
•Jihozni joylashtirganda elektr shnurining tiqilib qolmaganligi yoki shikastlanmaganligiga ishonch
hosil qiling.
•Jihozning orqa korpusiga ko‘chma ko‘p tirqishli rozetkalar yoki ko‘chma elektr ta’minot jihozlarini
joylashtirmang.
83

•
Agar ular nazorat ostida bo'lmasalar yoki ularga xavfsizlik uchun javobgar shaxs tomonidan ushbu mashinadan
foydalanish to'g'risida ko'rsatmalar berilmasa, bu qurilmadan jismoniy yoki aqliy qobiliyatlari cheklangan yoki bilimi
va tajribasi yetarli bo’lmagan shaxslar (jumladan bolalar) foydalanishlari mumkin emas.
•
Bolalarning ushbu qurilmani o'ynamasliklariga ishonch hosil qilish uchun nazorat ostida bo’lishlari kerak.
•
•
•
3 yoshdan 8 yoshgacha bo‘lgan bolalarga sovutuvchi jihozlarni yuklash va tushirishga ruxsat berilmaydi.
•
•
OGOHLANTIRISH
Qurilmadan foydalanganda yong’in chiqishi, elektr toki urishi yoki shaxslarning jarohatlanishi xavfining
oldini olish uchun ehtiyot choralariga, jumladan quyidagilarga amal qilish lozim.
Ushbu qurilmadan foydalanishdan avval barcha ko’rsatmalarni o’qib chiqing.
Elektr tarmog’iga ulash kabelining bukilishi yoki
og’ir obyektlar tomonidan bosib qolinishiga yo’l
qo’ymang.
84

Muzlatgichni tozalaganda yoki ko'targanda
quvvat shnurini rozetkadan uzing.
85

2. Sovutgichdan foydalanganda
86

2. Sovutgichdan foydalanganda
Agar gaz (izobutan, propan, tabiiy gaz va h.k.)
chiqayotgan bo‘lsa, jihozga yoki elektr kabeli
sanchqisiga tegmang va darhol xonani
shamollating. Bu jihoz sovutuvchi gazdan
(izobutan, R600a)
foydalanadi. Garchi
undagi
gaz miqdori juda
oz bo‘lsa-da, u baribir
yonuvchandir. Jihozni
tashish, o‘rnatish yoki
undan foydalanish paytida undan gaz chiqsa va
uchqun chiqishi kuzatilsa, bu yong‘in, portlash
yoki tan jarohatlariga olib kelishi mumkin.
Old eshikka toblangan shisha qoplangan
(ixtiyoriy). Unga zarba tegsa, shikastlanishi
mumkin. Singan qismiga qo‘l tekkizmang.
Jarohat yetkazishi mumkin.
87

2. Sovutgichdan foydalanganda
88

2. Sovutgichdan foydalanganda
89

Gazlangan suvdan foydalanmang. Gaz bosimi
oqib ketishni yuzaga
keltirishi mumkin.
suv
Gazlangan
Suv baki
Suv dispenseridan foydalanishdan avval suv
bakini ko‘rsatmalarga ko‘ra tozalang.
Suv baki
Faqat ichimlik suvini quying.
Faqat suvdan foydalaning. Agar boshqa har
y suyuqlikdan foydalanilsa, tizimning
qanda
ishlashi buzilishi mumkin. Agar suvdan
boshqa
suyuqlikdan
foydalanilishi tufayli
r qanday
ha
Faqat suv
muammo yuz bersa,
buning uchun ishlab
chiqaruvchi javobgarlikni
Suv baki
o‘z zimmasiga olmaydi.
Eshik savatchasida ortiqcha suv butilkasi yoki
garnir konteyneri kabilarni saqlamang.
Bu suv butilkasi yoki garnir konteynerini
savatchadan olish uchun ortiqcha kuch
ishlatishingizga olib keladi va atrofdagi
buyumlarga urilgan holda savatchani shikastlashi
yoki qo'lingizga jarohat yetkazishi mumkin.
90

Samarali ishlashi uchun sovutgich atrofi
bo’ylab tegishli ravishda havo aylanishini
ta’minlash kerak
Agar sovutgich devordagi o’yiq joyga
qo’yiladigan bo’lsa, sovutgich tepasida
kamida 10 dyuym (25 sm) yoki undan ortiq
bo’shliq va devor bilan sovutgich o’rtasida
2 dyuym (5 sm) yoki undan ortiq bo’shliq
bo’lishini ta’minlang.
Sovutgich poldan 1 dyuym (2,5 sm)
ko’tarilgan bo’lishi kerak, ayniqsa, polga
gilam to’shalgan bo’lsa.
91

O‘lchamlar va oraliqlar
Tegishli buyumlar bilan oralig‘i juda kichkina bo‘lsa,
muzlatish samarasi pasayishi va elektr xarajati
ortishi mumkin. Jihozni o‘rnatishda har tomondagi
devordan kamida 50 mm oraliq qoldiring.
A
B
C
-
Tur- Tur- Tur- Tur- Tur-
A
780
B
1800
C
730
D
27
E
673
F
703
G
1420
H
1390
(b)(a) (c)
780
1800
700
27
673
1420
1340
Izoh
•
Sovutgich ichidagi yorliqqa qarab, uning
qaysi turini aniqlash mumkin.
D
EFG
Size (mm)
780
1720
730
27
673
703
1420
1390
H
(d) (e)
700
1680
730
27
673
703
1340
1250
700
1680
700
27
673
1340
1210
Atrof-muhit harorati
Bu jihoz iqlim zonasiga qarab, cheklangan
diapazondagi haroratda ishlashga mo‘ljallangan.
Limitdan ortiq haroratda jihozni ishlatmang.
Ichki haroratga jihoz o‘rnatilgan joyi, atrof-muhitdagi
harorat, eshikning qancha ochilib-yopilishi va
boshqalar ta’sir ko‘rsatadi.
Iqlim sinfini pasport taxtachasida ko‘rish mumkin.
Iqlim sinfi
SN (Me'yordan past
iqlim)
N (O'rtacha iqlim) +16 - +32
ST (Subtropikal) +16 - +38
T (Tropik) +16 - +43 / +10 - +43*
*Avstraliya, Hindiston, Kenya
Izoh
• SN dan T gacha ko‘rsatilgan moslamalar 10 ºC
- 43 ºC atrof haroratida foydalanishga
mo‘ljallangan.
Atrof-muhit harorati
diapazoni ºC
+10 - +32
92

Buralib chiquvchi
muz qutisi
A TURIDAGI
Smart Diagnosis
Eshikni Sovutish
Muzlatgich haroratini
boshqarish
93

Buralib chiquvchi
muz qutisi
B
TURIDAGI
Smart Diagnosis
Eshikni Sovutish
Muzlatgich haroratini
boshqarish
Eshikni Sovutish
94

Buralib chiquvchi
muz qutisi
Pull Out Tray
Eshikni Sovutish
Muzlatgich haroratini
boshqarish
C
TURIDAGI
Smart Diagnosis
95

Burama Muz Qolipi
(Ayrim rusumlar uchun)
yoki Umumiy Turi
Pull Out Tray
Eshikni Sovutish
Muzlatgich haroratini
boshqarish
D
TURIDAGI
Smart Diagnosis
96

Buralib chiquvchi
muz qutisi
A TURIDAGI
Smart Diagnosis
Eshikni Sovutish
Eshikni Sovutish
97

Buralib chiquvchi
muz qutisi
TURIDAGI C
Smart Diagnosis
Eshikni Sovutish
Eshikni Sovutish
98

DISPENSER MODELI A
Buralib chiquvchi
muz qutisi
Eshikni Sovutish
TURIDAGI
Smart Diagnosis
Suv baki
99

DISPENSER MODELI D
Buralib chiquvchi
muz qutisi
TURIDAGI
Smart Diagnosis
Pull Out Tray
Eshikni Sovutish
Muzlatgich haroratini
boshqarish
Suv baki
100
 Loading...