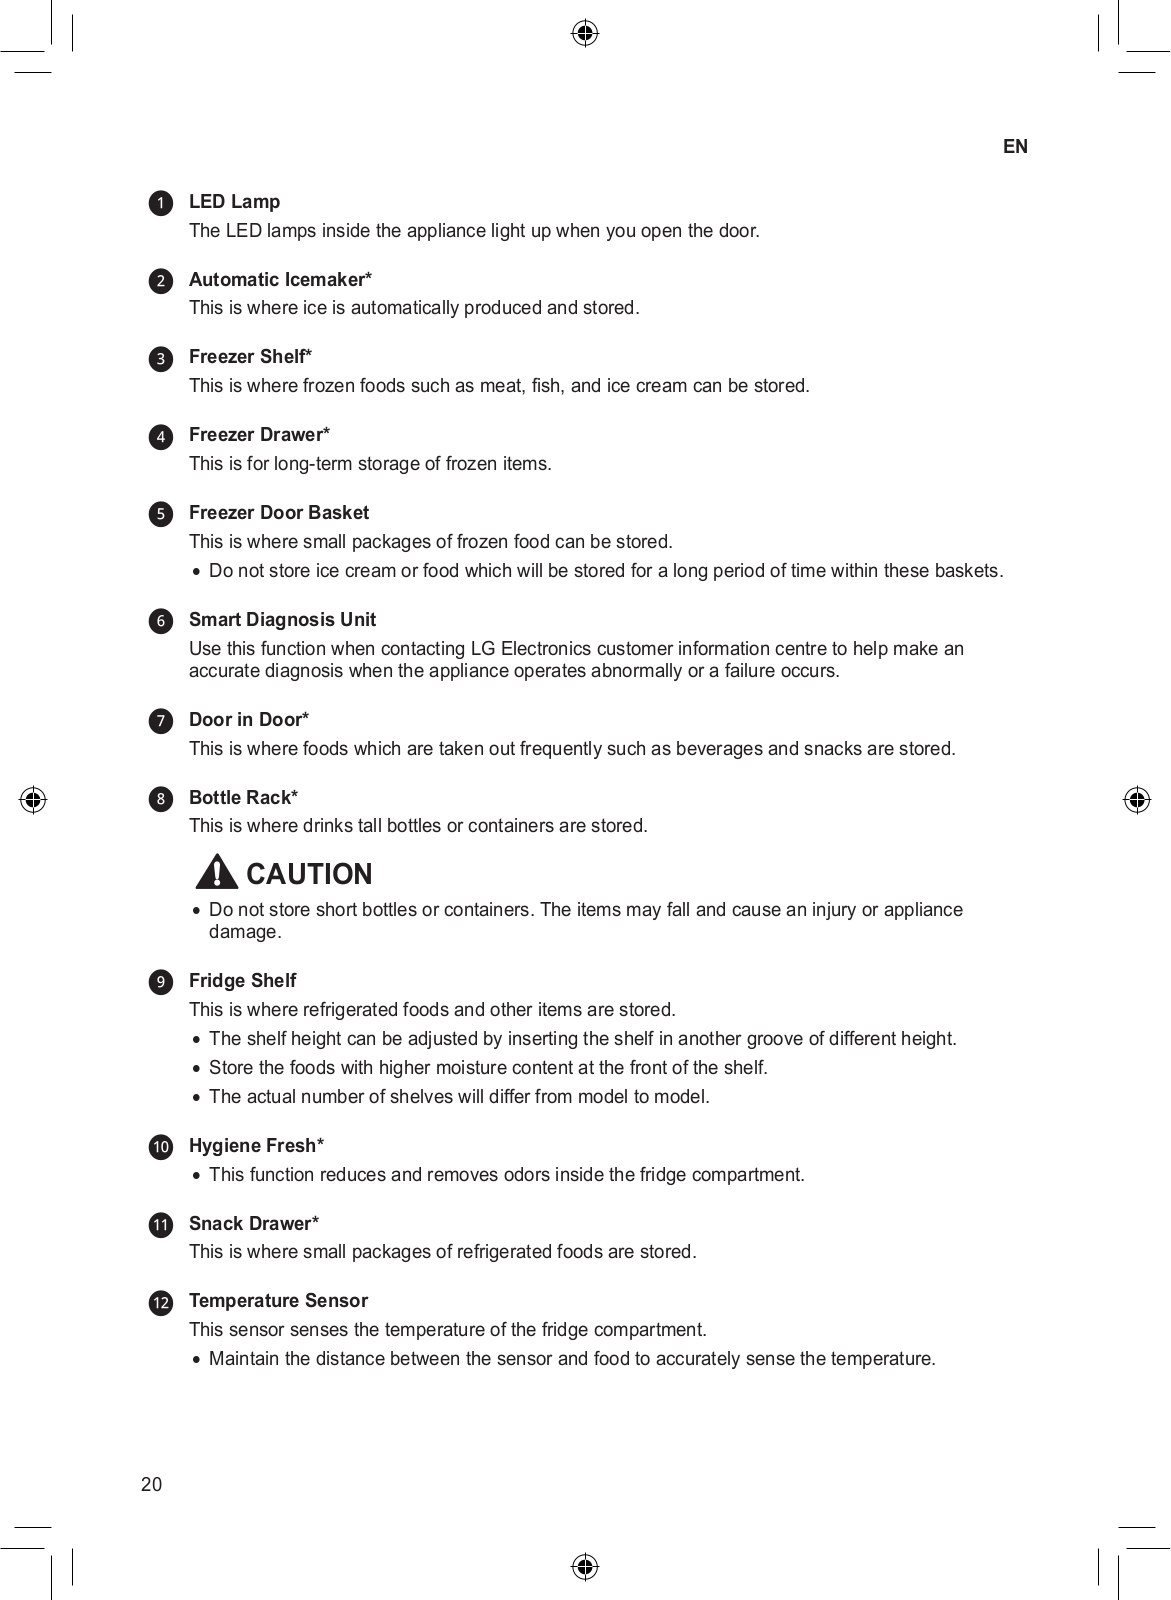
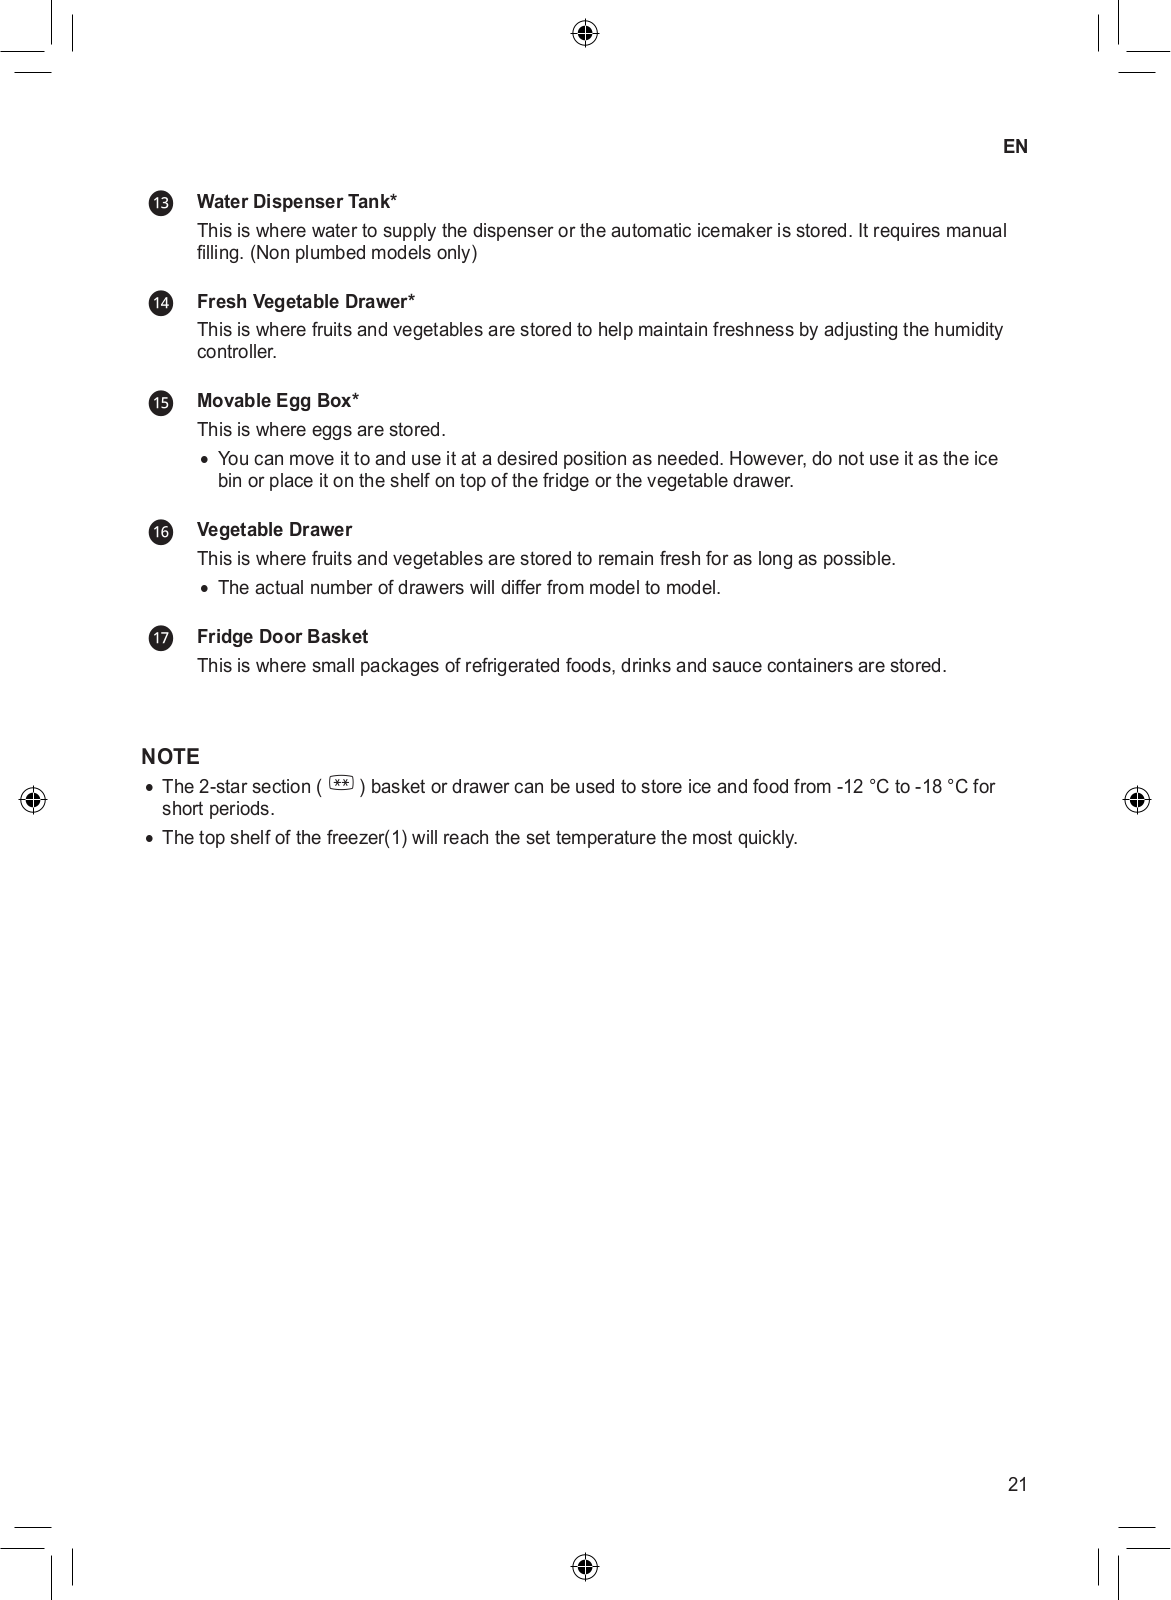
LG GC-J247CSBV Owner’s Manual

ةيبرعلا

TABLE OF CONTENTS

This manual may contain images or content different from the model you purchased.

This manual is subject to revision by the manufacturer.

SAFETY INSTRUCTIONS ..............................................................

3

IMPORTANT SAFETY INSTRUCTIONS ..........................................................

3

INSTALLATION.............................................................................

11

Compartments.................................................................................................

11

Dimensions and Clearances ...........................................................................

12

Ambient Temperature......................................................................................

12

Removing the Doors .......................................................................................

13

Adjusting the Height of the Door .....................................................................

15

Connecting the Water Line (For Plumbed models Only).................................

15

Connecting the Appliance ...............................................................................

17

Moving the Appliance......................................................................................

17

OPERATION .................................................................................

18

Parts and Functions ........................................................................................

18

Notes for Operation.........................................................................................

22

Using Control Panel ........................................................................................

24

Water Dispenser Tank (Non plumbed models only)........................................

25

Water and Ice Dispenser.................................................................................

27

Automatic Icemaker ........................................................................................

27

Door in Door* ..................................................................................................

29

Fresh Vegetable Drawer*................................................................................

30

InstaView Function* ........................................................................................

30

Other Functions...............................................................................................

30

SMART FUNCTIONS....................................................................

31

Using LG SmartThinQ Application ..................................................................

31

Using Smart DiagnosisTM.......................................................................................................................................

33

MAINTENANCE............................................................................

34

Notes for Cleaning ..........................................................................................

34

Cleaning the Condenser Cover.......................................................................

34

Cleaning the Door Basket ...............................................................................

35

Cleaning the Shelf...........................................................................................

35

Cleaning the Vegetable Drawer ......................................................................

35

Cleaning the Water Dispenser ........................................................................

36

Replacing the Water Filter (For Plumbed models Only)..................................

37

TROUBLESHOOTING..................................................................

38

SAFETY INSTRUCTIONS

EN

The following safety guidelines are intended to prevent unforeseen risks or damage from unsafe or incorrect operation of the appliance.

The guidelines are separated into ‘WARNING’ and ‘CAUTION’ as described below.

This symbol is displayed to indicate matters and operations that can cause risk. Read the part with this symbol carefully and follow the instructions in order to avoid risk.

WARNING

This indicates that the failure to follow the instructions can cause serious injury or death.

CAUTION

This indicates that the failure to follow the instructions can cause the minor injury or damage to the product.

IMPORTANT SAFETY INSTRUCTIONS

WARNING

To reduce the risk of explosion, fire, death, electric shock, injury or scalding to persons when using this product, follow basic precautions, including the following:

Children in the Household

•• This appliance is not intended for use by persons (including children) with reduced physical, sensory or mental capabilities, or lack of experience and knowledge, unless they have been given supervision or instruction concerning use of the appliance by a person responsible for their safety. Children should be supervised to ensure that they do not play with the appliance.

3

EN

•• If the appliance is equipped with a lock (some models only), keep the key out of reach of children.

Installation

•• This appliance should only be transported by two or more people holding the appliance securely.

•• Ensure that the socket outlet is properly grounded, and that the earth pin on the power cord is not damaged or removed from the power plug. For more details on grounding, inquire at an LG Electronics customer information centre.

•• This appliance is equipped with a power cord having an equipmentgrounding conductor and a grounding power plug. The power plug must be plugged into an appropriate socket outlet that is installed and grounded in accordance with all local codes and ordinances.

•• If the power cord is damaged or the hole of the socket outlet is loose, do not use the power cord and contact an authorized service centre.

•• Do not plug the appliance into a multi socket adapter which does not have a power cable (mounted).

•• Do not modify or extend the power cable.

•• The appliance should be connected to a dedicated power line which is separately fused.

•• Do not use a multi socket outlet which is not properly grounded (portable). In case of using a properly-grounded multi socket outlet (portable), use the multi socket outlet with the current capacity of the power code rating or higher and use the multi socket outlet only for the appliance.

•• Install the appliance in a place where is easy to unplug the power plug of the appliance.

•• Be careful not to point the power plug up or let the appliance lean against the power plug.

•• Install the appliance on a firm and level floor.

4

EN

•• Do not install the appliance in a damp and dusty place. Do not install or store the appliance in any outdoor area, or any area that is

subject to weathering conditions such as direct sunlight, wind, rain, or temperatures below freezing.

•• Do not place the appliance in direct sunlight or expose it to the heat from heating appliances such as stoves or heaters.

•• Be careful not to expose the rear of the appliance when installing.

•• Be careful not to let the appliance door fall during assembly or disassembly.

•• Be careful not to pinch, crush, or damage the power cable during assembly or disassembly of the appliance door.

•• Do not connect a plug adapter or other accessories to the power plug.

Operation

•• Do not use the appliance for any purpose (storage of medical or experimental materials or shipping) other than any domestic household food storage use.

•• Unplug the power plug during a severe thunderstorm or lightening or when not in use for a long period of time.

•• Do not touch the power plug or the appliance controls with wet hands.

•• Do not bend the power cable excessively or place a heavy object on it.

•• If water penetrates electrical parts of the appliance, disconnect power plug and contact an LG Electronics customer information centre.

•• Do not place hands or metallic objects inside the area emitting the cold air, cover or heat releasing grille on the back.

•• Do not apply excessive force or impact to the back cover of the appliance.

•• Do not put animals, such as pets into the appliance.

•• Be careful of nearby children when you open or close the appliance door. The door may bump the child and cause injury.

5

EN

•• Avoid the danger of children getting trapped inside the appliance. A child trapped inside the appliance can cause suffocation.

•• Do not place heavy or fragile objects, containers filled with liquid, combustible substances, flammable objects (such candles, lamps, etc.), or heating devices (such as stoves, heaters, etc.) on the appliance.

•• If there is a gas leakage (isobutane, propane, natural gas, etc.), do not touch the appliance or power plug and ventilate the area immediately. This appliance uses a refrigerant gas

(isobutane,R600a). Although it uses a small amount of the gas, it is still combustible gas. Gas leakage during appliance transport, installation or operation can cause fire, explosion or injury if sparks are caused.

•• Do not use or store flammable or combustible substances (ether, benzene, alcohol, chemical, LPG, combustible spray, insecticide, air freshener, cosmetics, etc.) near the appliance.

•• Immediately unplug the power plug and contact an LG Electronics customer information centre if you detect a strange sound, odour, or smoke coming from the appliance.

•• Fill with potable water only into icemaker or dispenser water tank.

•• Do not damage the refrigerant circuit.

•• Do not place any electronic appliance (such as heater and mobile phone) inside the appliance.

Maintenance

•• Disconnect the power cord before cleaning the appliance or replacing the inside lamp (where fitted).

•• Securely plug the power plug in the socket outlet after completely removing any moisture and dust.

•• Never unplug the appliance by pulling on the power cable. Always grip the power plug firmly and pull straight out from the socket outlet.

•• Do not spray water or inflammable substances (toothpaste, alcohol, thinner, benzene, flammable liquid, abrasive, etc.) over the interior or exterior of the appliance to clean it.

6

EN

•• Do not clean the appliance with brushes, cloths or sponges with rough surfaces or which are made of metallic material.

•• Only qualified service personnel from LG Electronics service centre should disassemble, repair, or modify the appliance. Contact an LG

Electronics customer information centre if you move and install the appliance in a different location.

•• Do not use a hair drier to dry the inside of the appliance or place a candle inside to remove the odours.

•• Do not use mechanical devices or other means to accelerate the defrosting process.

•• Connect the water supply line (for plumbed models only) to a potable water source only. Otherwise, impurities in the water may cause illness.

Disposal

•• When discarding the appliance, remove the door gasket while leaving the shelves and baskets in place and keep children away from the appliance.

•• Dispose of all packaging materials (such as plastic bags and styrofoam) away from children. The packaging materials can cause suffocation.

Technical Safety

•• Keep ventilation openings, in the appliance enclosure or in the built-in structure, clear of obstruction.

•• Do not use electrical appliances inside the refrigerator.

•• The refrigerant and insulation blowing gas used in the appliance require special disposal procedures. Consult with service agent or a similarly qualified person before disposing of them.

•• Refrigerant leaking out of the pipes could ignite or cause an explosion.

•• The amount of refrigerant in your particular appliance is shown on the identification plate inside the appliance.

7

EN

•• Never start up an appliance showing any signs of damage. If in doubt, consult your dealer.

•• This appliance is intended to be used in household and similar applications only. It should not be used for commercial, or catering purposes, or in any mobile application such as a caravan or boat.

•• Do not store explosive substances such as aerosol cans with a flammable propellant in this appliance.

Risk of Fire and Flammable Materials

This symbol alerts you to flammable materials that can ignite and cause a fire if you do not take care.

•• This appliance contains a small amount of isobutane refrigerant (R600a), but it is also combustible. When transporting and installing the appliance, care should be taken to ensure that no parts of the refrigerating circuit are damaged.

•• If a leak is detected, avoid any naked flames or potential sources of ignition and air the room in which the appliance is standing for several minutes. In order to avoid the creation of a flammable gas air mixture if a leak in the refrigerating circuit occurs, the size of the

room in which the appliance is used should correspond to the amount of refrigerant used. The room must be 1 m² in size for every 8 g of R600a refrigerant inside the appliance.

•• When positioning the appliance, ensure the supply cord is not trapped or damaged.

•• Do not locate multiple portable socket-outlets or portable power supplies at the rear of the appliance.

8

EN

CAUTION

To reduce the risk of minor injury to persons, malfunction, or damage to the product or property when using this product, follow basic precautions, including the following:

Installation

•• Do not tilt the appliance to pull or push it when transporting.

•• Make sure not to get a body part such as a hand or foot stuck while moving the appliance.

Operation

•• Do not touch frozen food or the metal parts in the freezer compartment with wet or damp hands. It may cause frostbite.

•• Do not place glass containers, bottles or cans (especially those containing carbonated drinks) in the freezer compartment, shelves or ice bin that will be exposed to temperatures below freezing.

•• The tempered glass on the front side of the appliance door or the shelves can be damaged by an impact. If it is broken, do not touch it with hands.

•• Do not place heavy objects on top of the door in door.

•• Do not use the door in door as a chopping board and ensure it is not scratched by a sharp tool, as this may cause appliance damage.

•• Do not hang from the appliance door, storage room, shelf or fridge door in door or climb up into it.

•• Do not store an excessive amount of water bottles or containers for side dishes on the door baskets.

•• Prevent animals from nibbling on the power cable or water hose.

•• Do not open or close the appliance door with excessive force.

•• If the hinge of the appliance door is damaged or operates improperly, stop using the appliance and contact an authorized service centre.

•• Do not clean glass shelves or covers with warm water when they are cold.

•• Never eat frozen foods immediately after they have been taken out in the freezer compartment.

9

EN

•• Do not insert your hands into the mechanical part of the automatic icemaker such as the ice bin or the ice dispenser.

•• Do not use a thin crystal cup or chinaware when dispensing.

•• Do not remove the cover of the automatic icemaker. Touching any mechanical part of the automatic icemaker. It may result in injury.

•• Make sure not to get a hand or foot stuck upon opening or closing the appliance door or door in door.

•• Do not open the door of the appliance with the door in door open, or do not open the door in door while the door of the appliance is open. The door in door may be struck by the edge of the appliance and damaged.

Maintenance

•• Do not insert the shelves upside down. The shelves may fall.

•• To remove frost from the appliance, contact an LG Electronics customer information centre.

•• Dispose of the ice inside the ice bin in the freezer compartment during an extended power outage.

10

INSTALLATION

Compartments

EN

* means that this feature varies depending on the model purchased.

Water Filter*

Water Tube*

Owner’s Manual

Spanner

•• The appearance or components of the appliance may differ from model to model.

11

Dimensions and Clearances

Too small of a distance from adjacent items may result in the degradation of freezing capability and increased electricity costs. Allow over 50 mm of clearance from each adjacent wall when installing the appliance.

A

D

F E

B

G

C

-

Size


A

912 mm

B

1790 mm

C

738 mm

D

10 mm


E

728 mm


F

1180 mm


G

1750 mm


EN

Ambient Temperature

•• The appliance is designed to operate within a limited range of ambient temperatures, depending on the climate zone.

•• The internal temperature could be affected by the location of the appliance, the ambient

temperature, the frequency of door opening and so on.

•• The climate class can be found on the rating label.

Climate Class

Ambient Temperature

Range ºC


SN (Extended

+10

- +32

Temperate)


N (Temperate)

+16

- +32

ST (Subtropical)

+16

- +38


T (Tropical)

+16

- +43 / +10 - +43*


*Australia, India, Kenya

NOTE

•• The appliances rated from SN to T are intended to be used at an ambient temperature between 10 ºC and 43 ºC.

12

Removing the Doors

If your entrance door is too narrow for the appliance to pass through, remove the appliance doors and pass the appliance laterally.

WARNING

•• Disconnect the power cord, house fuse or circuit breaker before installing or servicing the appliance. Failure to follow these instructions may result in death, fire or electric shock.

Removing the Freezer Door

1 The water supply line is connected to the top right part in the back of the appliance.

Remove the connected water tube by pressing the collet towards the tube connector.

2 Remove the screw of the hinge cover on top of the appliance by rotating it counterclockwise.

3 Pull out the water supply line A. Disconnect all wire harnesses B. Unscrew the ground

wire C.

EN

4 Rotate the hinge lever D counterclockwise.

Lift the top hinge E free of the hinge lever latch F.

CAUTION

••When lifting the hinge free of the latch, be careful that the door does not fall forward. It is recommended that two or more people carry out the door removal and refitting.

5

Remove the door by lifting it off the bottom


hinge pin.

CAUTION

••Place the door on a non-scratching surface with the inner side facing up.

Removing the Fridge Door

1 Disconnect all wire harnesses A.

13

EN

2

Rotate the hinge lever B clockwise. Lift the

NOTE

top hinge C free of the hinge lever latch D.

••Disassembling/Assembling the water lines.


CAUTION

••When lifting the hinge free of the latch, be careful that the door does not fall forward. It is recommended that two or more people carry out the door removal and refitting.

3

Remove the door by lifting it off the bottom


hinge pin.

CAUTION

••Place the door on a non-scratching surface with the inner side facing up.

Refitting the Fridge and Freezer Doors

Mount the doors in the reverse sequence of their removal once the appliance has been passed through all access doors.

CAUTION

••Install the right fridge door first.

A Collet B Water supply line C Insert line D Clip

••Gently insert the water supply line until only one of the line’s insert lines is visible. Pull on the line to make sure that it is tightly fastened.

Correct

Incorrect

••If the end of the water supply line is damaged, it should be trimmed to ensure it does not leak when refitted.

••E Not straight F Damaged G Stretched

14

Adjusting the Height of the Door

If the door of the appliance is not level, adjust the difference in the height of appliance door using the following method.

NOTE

•• Because the hinge pin may fall out, do not adjust the height of the appliance door more than 5 mm.

*Reference


Keeper nut


Adjustment hinge pin

1

Turn the keeper nut clockwise using the


spanner.


To loosen the nut

2

Adjust the difference in the height of the


appliance door by rotating the adjustment

hinge pin clockwise or counterclockwise with an 8 mm spanner.

Down

Up

EN

3

Fasten the keeper nut by turning it


counterclockwise.

To tighten the nut

Connecting the Water Line (For Plumbed models Only)

Water Supply Requirements

A cold water supply with water pressure between 138 kPa and 827 kPa (1.4-8.4 kgf/ cm²) is required to operate the water dispenser. If the refrigerator is installed in an area with low water pressure (below 138 kPa), you can install a booster pump to compensate for the low pressure.

If a reverse osmosis water filtration system is connected to your cold water supply, the water pressure to the reverse osmosis system needs to be a minimum of 138 kPa to 827 kPa (1.4-8.4 kgf/cm²)

WARNING

•• Unplug the appliance before carrying out any work on connecting the water line. Failure to do so may cause electric shock.

•• Only connect the water line to a cold water supply. Failure to do so may cause the water filter to malfunction. Water hammer (water banging in the pipes) in house plumbing can cause damage to appliance parts and can lead to water leakage or flooding.

•• Connecting the water line must only be installed by a qualified plumber and in accordance with local legislation and regulations governing water quality.

15

NOTE

•• This water line installation is not covered by the appliance warranty.

Connecting to the Appliance

1

Unscrew the metal threaded collar nut at the


back of the appliance and place it over one


end of the water tube.

2

Firmly push the water tube onto the water


inlet valve and tighten up the collar nut.

Connecting to the Water Filter

There are two types of filters. The methods of connection are different. One has a threaded plastic nut fitting and the other uses a self locking push fit connectors. The filter is marked with the direction of the water flow from the water tap to the appliance.

<Type 1>

1 Unscrew the threaded connector and place it over the end of the cut section of pipe coming from the appliance. Push the pipe over the end of the filter that the flow arrow points to and tighten up the threaded connector.


EN

<Type 2>

1

Cut the tubing end squarely, then check for


and remove any burrs. Push the fitting onto


the end of tubing, making sure the end is fully


sealed.


(1)


(2)


Colored line in the water filter

2

Tighten the screw cap until the colored line in


the water filter is no longer visible.


<Type 3>

1 Firmly push the water tube connected from the appliance into the end that has the arrow pointing outward. Push the tube all the way in

(approx. 10-12 mm).

2 After inserting the tube securely into the filter, fit the locking clip into position under the pull up collar.

2

Repeat the same process on the other end


of the filter using the remainder of the water

3


tube.

Repeat on the other end of the filter using the


remainder of the water tube.

16

Connecting to the Water Tap*

* means that this feature varies depending on the model purchased.

1 Push the water tube into the hole of the tap connector supplied in the accessories.

The pipe should be held firmly whilst the connector is pushed onto the pipe.

2

Ensure that the rubber washer is fitted inside


to the inside of the tap connector before

screwing it onto the tap.

Checking the Water Connection

1

Turn on the water supply and switch on the


appliance. Carefully check all fittings for


possible leaks due to poorly fitted hoses.

2

Press and hold the Water Filter button


for three seconds. That resets the


Replacement Filter icon. The new water filter


has been activated.

3

Place a cup under the water dispenser


to verify that water is flowing through the


appliance.

4

Check the connecting tube and joints for


leaks once again.

5

The water filter should be fixed at a


appropriate place where it is easy to reach for

replacement purposes.

EN

Connecting the Appliance

After installing the appliance, connect the power plug into a socket outlet.

NOTE

•• After connecting the power supply cord (or plug) to the outlet, wait 2 or 3 hours before you put food into the appliance. If you add food before the appliance has cooled completely, your food may spoil.

Moving the Appliance

1

Remove all food from inside the appliance.

2

Pull the power plug out, insert and fix it into


the power plug hook at the rear or on top of


the appliance.

3

Tape parts such as shelves and the door


handle to prevent from falling off while moving


the appliance.

4

Move the appliance with more than two


people carefully. When transporting the


appliance over a long distance, keep the


appliance upright.

5

After installing the appliance, connect the


power plug into a socket out to switch on the

appliance.

17

OPERATION

Parts and Functions

EN

* means that this feature varies depending on the model purchased.

Exterior

1

2

1

4


3


3

AControl Panel

Displays the ice maker and dispenser modes the water filter status.

BDoor in Door*

The Door in Door is a double layered door system. It can be opened individually or together with the main door. You can conveniently locate and access your favourite snacks or food items.

CDoor-in-Door Lever*

This lever opens Door in Door.

DInstaView Door-in-Door*

The InstaView Door in Door compartment allows for easy access to commonly used food items.

NOTE

•• The appearance or components of the appliance may differ from model to model.

18

LG GC-J247CSBV Owner’s Manual

Interior

* means that this feature varies depending on the model purchased.

1

2

(1)


3

4

5

1

2

(1)

3

4

5

EN

6

7

8

9

10

11

12

13

14

15

16

17

6

7

8

9

10

11

12

13

14

15

16

17

19

EN

ALED Lamp

The LED lamps inside the appliance light up when you open the door.

BAutomatic Icemaker*

This is where ice is automatically produced and stored.

CFreezer Shelf*

This is where frozen foods such as meat, fish, and ice cream can be stored.

DFreezer Drawer*

This is for long-term storage of frozen items.

EFreezer Door Basket

This is where small packages of frozen food can be stored.

•• Do not store ice cream or food which will be stored for a long period of time within these baskets.

FSmart Diagnosis Unit

Use this function when contacting LG Electronics customer information centre to help make an accurate diagnosis when the appliance operates abnormally or a failure occurs.

GDoor in Door*

This is where foods which are taken out frequently such as beverages and snacks are stored.

HBottle Rack*

This is where drinks tall bottles or containers are stored.

CAUTION

•• Do not store short bottles or containers. The items may fall and cause an injury or appliance damage.

IFridge Shelf

This is where refrigerated foods and other items are stored.

•• The shelf height can be adjusted by inserting the shelf in another groove of different height.

•• Store the foods with higher moisture content at the front of the shelf.

•• The actual number of shelves will differ from model to model.

JHygiene Fresh*

•• This function reduces and removes odors inside the fridge compartment.

KSnack Drawer*

This is where small packages of refrigerated foods are stored.

LTemperature Sensor

This sensor senses the temperature of the fridge compartment.

•• Maintain the distance between the sensor and food to accurately sense the temperature.

20

EN

MWater Dispenser Tank*

This is where water to supply the dispenser or the automatic icemaker is stored. It requires manual filling. (Non plumbed models only)

NFresh Vegetable Drawer*

This is where fruits and vegetables are stored to help maintain freshness by adjusting the humidity controller.

OMovable Egg Box*

This is where eggs are stored.

•• You can move it to and use it at a desired position as needed. However, do not use it as the ice bin or place it on the shelf on top of the fridge or the vegetable drawer.

PVegetable Drawer

This is where fruits and vegetables are stored to remain fresh for as long as possible.

•• The actual number of drawers will differ from model to model.

QFridge Door Basket

This is where small packages of refrigerated foods, drinks and sauce containers are stored.

NOTE

•• The 2-star section ( a) basket or drawer can be used to store ice and food from -12 °C to -18 °C for short periods.

•• The top shelf of the freezer(1) will reach the set temperature the most quickly.

21

Notes for Operation

•• Do not use the ice water dispenser tank for beverages other than drinking water.

•• Users should keep in mind that frost can form. If the door is not closed completely, if the humidity is high during the summer, or if the freezer door is opened frequently.

•• Ensure there is sufficient space between food stored on the shelf or door basket to allow the door to close completely.

•• Opening the door lets warm air enter the appliance, and may cause the internal temperature to rise.

•• If you are leaving the appliance turned off for an extended period of time, remove all food and unplug the power cord. Clean the interior, and leave the doors slightly ajar to prevent mold from growing in the appliance.

EN

Suggestion for Energy Saving

•• Ensure there is sufficient space between stored foods. This allows cold air to be circulated evenly and lowers electricity bills.

•• Store hot food only after it has cooled in order to prevent dew or frost.

•• When storing food in the freezer compartment, set the freezer temperature lower than the temperature indicated on the food.

•• Do not put food near the temperature sensor of the fridge compartment. Keep a distance of at least 3 cm from the sensor.

•• Note that a temperature rise after defrosting has a permissible range in the appliance specifications. If you wish to minimise the impact this may have on the food storage due to a temperature rise, seal or wrap the stored food in several layers.

•• The automatic defrosting system in the appliance ensures that the compartment remains free of ice buildup under normal operating conditions.

22

Storing Foods Effectively

•• Store frozen food or refrigerated food inside sealed containers.

•• Check the expiration date and label (storage instructions) before storing food in the appliance.

•• Do not store food for a long period of time (more than four weeks) if it spoils easily at a low temperature.

•• Place the refrigerated food or frozen food in each fridge or freezer compartment immediately after purchasing.

•• Avoid refreezing any food which has been completely thawed. Freezing any food which has been completely thawed again will lower its taste and nutrition.

•• Do not wrap and store vegetables with newspaper. Printing material of newspaper or other foreign substances may smear and contaminate food.

•• Do not overfill the appliance. Cold air can not circulate properly if the appliance is overfilled.

•• If you set an excessively low temperature for food, it may become frozen. Do not set a temperature lower than the required

temperature for the food to be stored correctly.

•• If there are chill compartments in the appliance, do not store vegetables and fruits with higher moisture content in the chill compartments as they may freeze due to the lower temperature.

EN

Max Freezing Capacity

•• The Express Freeze function will set the freezer to its maximum freezing capacity.

•• This generally takes up to 24 hours and automatically switches off.

•• If the maximum freezing capacity is to be used,

Express Freeze must be switched on for seven hours before fresh produce is placed in the freezer compartment.

Maximum Storage

•• To get better air circulation, insert all drawers.

•• If large quantities of food are to be stored, all the freezer drawers shall be taken out of the appliance except the bottom one and the food shall be stacked directly on the freezer shelves in the freezer compartment.

NOTE

•• To remove the drawers, first pick the food out of drawers. Then use the handle of drawers, pull out the drawers carefully. It may cause injury.

•• The shape of each drawer may be different, insert in the right position.

23

EN

Using Control Panel

Units and Functions

* means that this feature varies depending on the model purchased.

<Type 1>


<Type 2>


5

6

9

6

7


7


8


8


<Type 3>


<Type 4>


2

7

3

4

5

6

2

7

3

4

9

6


8


8


Hygiene Fresh*

•• This sets the Hygiene Fresh function.

Express Freeze

•• This sets Express Freeze functions.

Freezer Temperature

•• This sets the freezer target temperature.

Fridge Temperature

•• This sets the fridge target temperature.

Non Plumbing*

•• This Non Plumbing icon is illuminated when the water dispenser tank is installed correctly.

NOTE

* Lock

•• This locks the buttons on the control panel.

* Wi-Fi

•• This sets the appliance to connect to your home’s Wi-Fi network.

Water Dispenser

•• This sets the function of Cubed ice, Water, Crushed ice.

Water Filter*

•• This shows the replacement period of the water filter automatically (plumbed models only).

•• The actual control panel may differ from model to model.

•• The control panel will turn off automatically for energy saving.

•• If there is any finger or skin contacts to the control panel while cleaning it, the button function may operate.

24

Setting the Temperature

This sets the fridge temperature or freezer temperature.

•• Press the Fridge button or Freezer button to adjust the temperature.

•• The temperature can be adjusted.

−− Fridge : from 1 °C to 7 °C

−− Freezer : from -14 °C to -24 °C

NOTE

•• The default temperature setting may vary depending on the appliance.

•• Wait until two or three hours have passed after connecting the appliance to the outlet before storing food in the appliance.

•• For ice making in normal climates, the freezer temperature should be set to -19 °C or colder.

Setting Express Freeze

The function can quickly freeze a large amount of ice or frozen foods.

•• When you press the Express Freeze button, the Express Freeze icon lights on the control panel.

•• The function is enabled and disabled in turn each time you press the button.

•• The Express Freeze function automatically terminates after a specific period has passed.

Setting Hygiene Fresh

Bacteria and odor inside the appliance can be minimized with the Hygiene Fresh function. However, the function is only effective for bacteria floating in the appliance, not bacteria adsorbed onto food.

•• Each time you press the Hygiene Fresh button, the Hygiene Fresh function mode will change to

Auto Power Off Auto alternatively.

EN

Setting and Resetting Lock

This locks the buttons on the control panel.

•• Press and hold the Lock button for 3 seconds

. When the Lock function is set, all buttons are locked.

•• When you press the Lock button for 3 seconds, the Lock/Unlock icon on the control panel lights. The function is enabled and disabled in turn each time you press the button.

•• If you press a button other than lock when the lock is set, the button will not function.

•• When you press a button other than lock when the lock is set, the Lock/Unlock icon on the control panel will flash 3 times.

•• To change a setting, first press the Lock button for three seconds to disable the function.

Water Dispenser Tank (Non plumbed models only)

The water tank holds the water in which is to be dispensed or used by the automatic ice maker to make ice. Do not fill this tank with any other liquid other than water. Doing so can damage the water dispensing system.

1

Remove the water dispenser tank by pulling it


out while holding the handle.

25

2

Open the cover or cap of the water dispenser


tank.


3 Fill with bottle filtered or clean filtered water up to the reference line indicated inside the water dispenser tank. (Total capacity: 4 ℓ)

4

After filling with water, close the cover or cap


of the water dispenser tank.

5

Refit the water dispenser tank on the fridge


shelf.

EN

WARNING

•• Children should not be allowed near the dispenser tank.

•• Do not fill the water tank with drinks other than water or fill with hot water.

CAUTION

•• Do not apply excessive force or impact when removing or assembling the water dispenser tank. Doing so can cause appliance damage or injury.

NOTE

•• Before using the water dispenser tank after installing the appliance, it should be washed before filling it with water.

•• Check if the water dispenser tank has been placed on the appliance correctly. If it is not assembled correctly, water may leak from the tank into the appliance.

•• If there is an insufficient amount of water in the water dispenser tank, ice cube size and quantity may be affected and may result in no ice being made.

•• If there is no water in the water dispenser tank, the cold water and ice dispensing function of the dispenser cannot be used. Check if there is water in the water dispenser tank and then fill it with water if there is not.

•• Wait at least 15 seconds before removing the water tank after having dispensed water or ice from the dispenser.

•• Sound from the water tank will be normal when supplying water to the dispenser and the Automatic Ice Maker. It is not a sign of malfunction.

26

Loading...
+ 58 hidden pages