

Lg GC-B399BVQA User Manual [no]

FRIDGE-FREEZER
User's Guide
Please read this User's Guide carefully
before operating and keep it handy for
reference at all times.
BRUKSANVISNING
KJØL/FRYS SKAP
Vennligst les bruksanvisningen nøye
før kjøl/frys skapet tas i bruk, og ta
vare på den for senere bruk.
KYL/FRYS
Användarhandbok
Läs igenom denna användarhandbok innan du börjar
använda kylen/frysen och spara den sedan för att kunna ta
fram den vid behov.
KOMBISKAB
Brugervejledning
Læs venligst vejledningen grundigt, inden kombiskabet
tages i brug, og gem den til fremtidig reference.
JÄÄKAAPPIPAKASTIN
Käyttöohje
Lukekaa nämä ohjeet huolellisesti ennen käyttöä ja
säilyttäkää ne tulevaa tarvetta varten.
Table of Contents
3
Introduction
Installation
Operation
Suggestion On
Food storage
Registration
Important Safety Instruction
Identification of Parts
Installation
Starting
Temperature Control
Refrigerator
Freezer
Function
Super Freezer
Vacation
Lock
Self Test
Ice Making
Defrosting
Storing Food
4
4
7
8
8
9
9
9
11
11
11
12
12
12
12
13
Care and
Maintenance
Trouble Shooting
To Reverse
the Doors
General Information
Lamp Replacement
Cleaning
Trouble Shooting
To Reverse the Doors
14
14
15
16
18

Introduction
4
Registration
Introduction
Precaution
The model and serial number are found on the rear of
this unit. This number is unique to this unit and not
available to others. You should record requested
information here and retain this guide as a permanent
record of your purchase. Staple your receipt here.
Date of Purchase
Dealer Purchased From
Dealer Address
Dealer Phone No.
Model No. :
Serial No.
:
:
:
:
:
Important Safety Instruction
This fridge-freezer must be properly installed and
located in accordance with the Installation
Instruction before it is used.
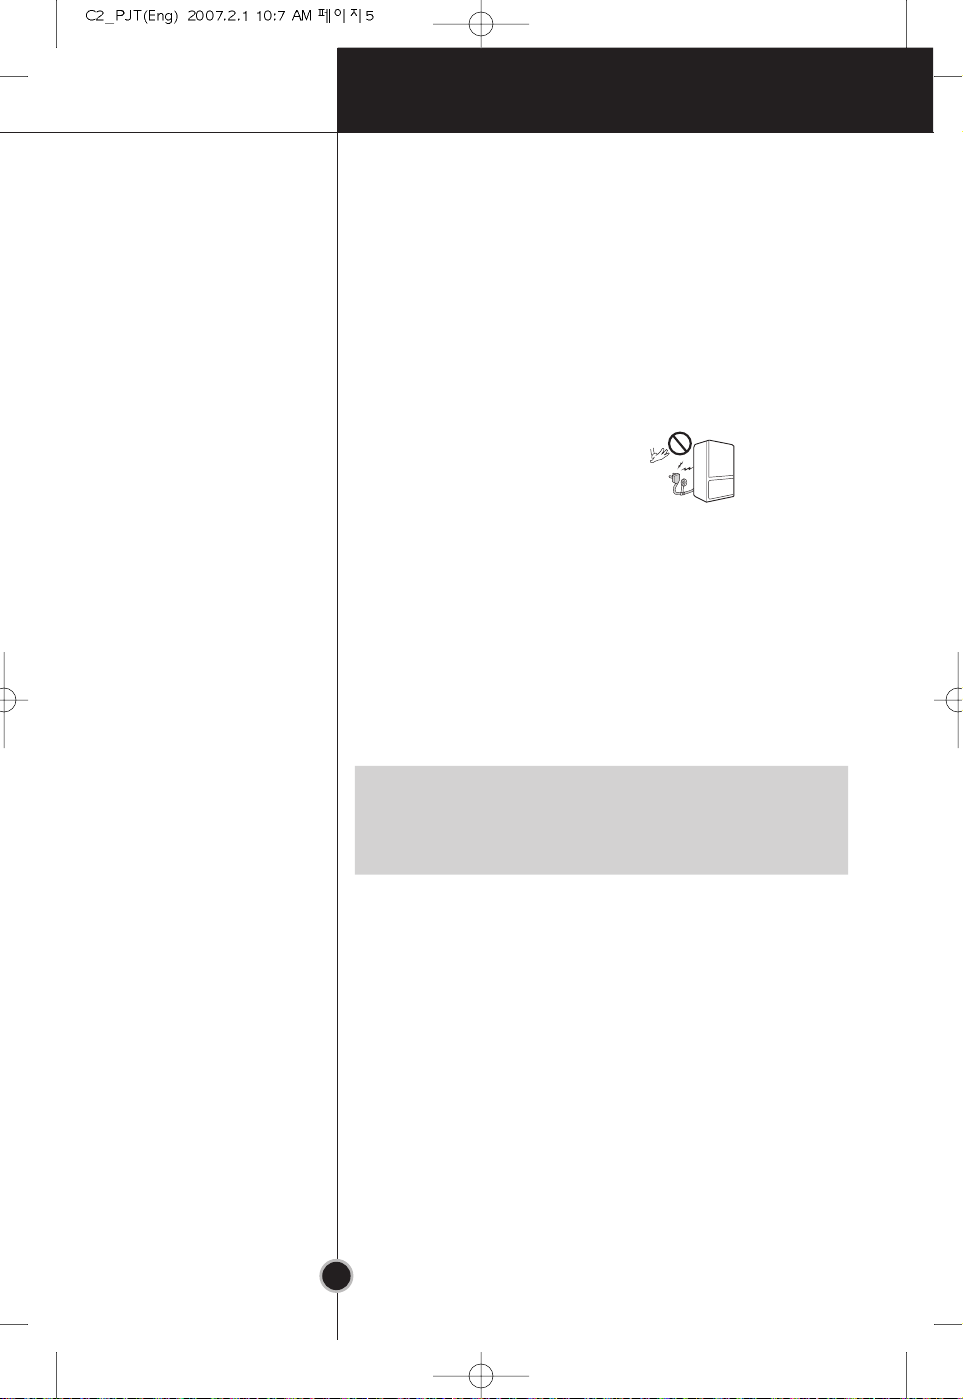
Never unplug your fridge-freezer by pulling on the
power cord. Always grip plug firmly and pull straight
out from the outlet.
When moving your appliance away from the wall,
be careful not to roll over or damage the power
cord.
After your fridge-freezer is in operation, do not
touch the cold surfaces in the freezer compartment,
particularly when hands are damp or wet. Skin may
adhere to these extremely cold surfaces.
Children should be supervised to ensure that they do
not play with the appliance.
Introduction
Important Safety Instruction
Don't Use an
Extension Cord
If possible, connect the fridge-freezer to its own individual
electrical outlet to prevent it and other appliances or household
lights from causing an overload.
Accessibility of
Supply Plug
The supply plug of the refrigerator-freezer should be placed in
easy accessible position for quick disconnection in emergency.
Supply Cord
Replacement
If the supply cord is damaged, it must be replaced by the
manufacturer or its service agent or a similarly qualified person
in order to avoid a hazard.
Don't store
Don't store or use gasoline or other flammable vapors and
liquids in t
he vicinity of this or any other appliance.
Grounding
(Earthing)
In the event of an electric short circuit, grounding (earthing)
reduces the risk of electric shock by providing an escape wire for
the electric current. In order to prevent possible electric shock,
this appliance must be grounded. Improper use of the
grounding plug can result in an electric shock. Consult a
qualified electrician or service person if the grounding
instructions are not completely understood, or if you have
doubts on whether the appliance is properly grounded.
Danger
Risk of child entrapment. Before you throw away your old
refrigerator or freezer: Take off the doors.
Leave the shelves in place so that children may not easily
climb inside.
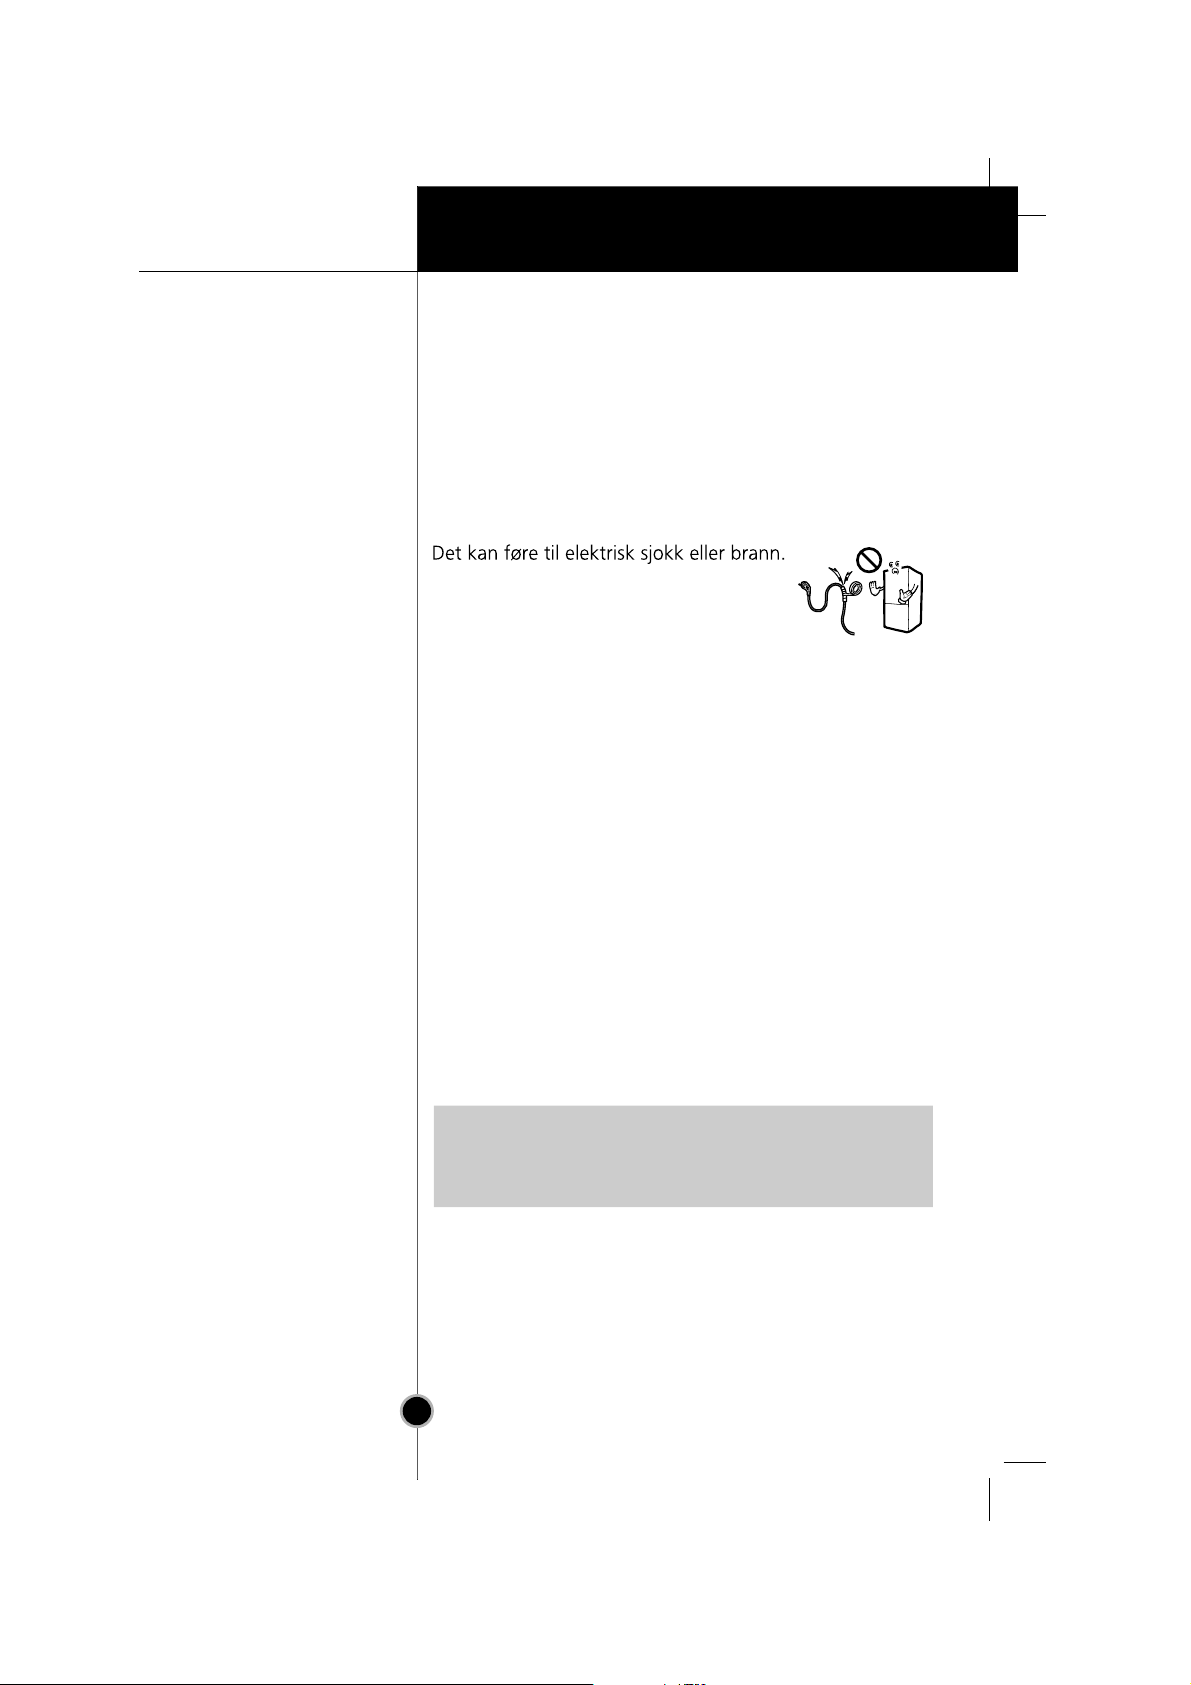
It will cause electric shock or fire.
Do not modify or
extend the Powe
r
Cord lengt
h
5
Precaution
Pull out the power plug prior to cleaning the fridgefreezer.
Never damage, serverely bend, pull out, or twist the
power cord because power cord damage may cause a
fire or electronic shock. Never place glass products in the
freezer because they may be broken when their inner
contents are frozen.
6
Introduction
ww
ww
ww
ww
ww
ww
I
m
p
o
t
n
noi
cud
or
I
tn
u
t
t
a
r
n
e
yt
f
S
a
I
n
r
t
s
o
t
i
c
Warning
ni
p
e
p
K
e
e
eht ni
ro
su ton oD
cca
su ton oD
r
a
ts
g
o
e
f
h
o era
t
T
eh
ail
n
a
pp
asops
id
al
r
mis
i
ppa sihT
n
girfe
r
e
a
p
R
m1
d
are
m
norivn
b
moc
,ecnailpp
2
.ecnailppa
o noitalitnev
s ni-
t
tliub
ahcem e
n
ci
s
ed eht etarele
orf
eht
yb d
ednemmocer
r
eg
eht
amad ton oD
moc e
p
auq yl
rac
ac
ele e
rtc
i
mtra
r
e
epyt
moc
ni
a tnaregirfer
n
d
e
riuqer ec
n
esaelp ,l
oc
e
d
f
i
il
n
atnoc ecnail
i
hW .elbitsu
.setunim lareves
ni ,sg
n
e
a
,er
cur
t
u
a
g
ni
t
e
us
lus
n
osrep
s
r
l
c
e
s
ived l
c
ecorp
cafunam
cn
ailppa l
e
eht fo stne
e
d
dnem
i
l
no
a
t
s
d
psi
o
laiceps
tiw t
.
llams a
larutan ,)a006R( t
sag
,yti
ibitapmoc latne
ub
l
at eb dluohs e
iucric gnitaregirfer eht fo stra
egirfer fo tnuoma ehT .ecnailppa
ruoy tlusnoc ,tbuod ni fI .egama
il
a
pa eht
cn
p
s
fo
r
bo
a
nar
t
h
re
o ro
t
.rerut
u
ti
.
ric tnaregirf
c
niwolb
m
ya
f
eht e
eht
ag
g
co
rude
tnega ecivres h
t
o
nu
gih htiw
h
sla si ti t
o
tsni dna gnitropsnart ne
sne
eru
a
m
d era t
lu
oc se
,
detceted si kael a fI .yrujni eye na esuac
ni tnare
.re
di
ni s
s
yb
rp l
ma
o
ot nek
pip eht fo tuo gnitriuqs tnaregirfe
malf a fo noitaerc eht diova ot redro nI
m ecnailppa eht hcihw ni moor eht fo
girfer a006R fo g8 yreve rof ezis ni
laed
u
cne e
r
l
e
so
.noitcu
t snaem
o
naht rehto ,ss
esoht
o
do
y
eh
t sselnu ,ecnailppa
.rerutcafunam
i
u s
ro
lla
d
ova
noitingi fo secruos laitnetop ro semalf dekan
ht n
es
.se
a
ni
i
disni etalp noitacifitnedi eht no nwohs si ecnailppa
fo sngis yna gniwohs ecnailppa na pu trats reveN
d
W
bosi f
g
e
n
eh
tu
ena
eht
on taht
.dega
r
o
ng
eti
yna
di
ria
dna
rof gnidnats si ecnailppa eht hcihw ni moor eht
ria sag elba
ezis eht ,srucco tiucric gnitaregirfer eht ni kael a fi erutxim
sdneped detis eb
eb tsum moor ehT .desu tnaregirfer fo tnuoma eht no
eht edis
ralucitrap ruoy ni t
eht e
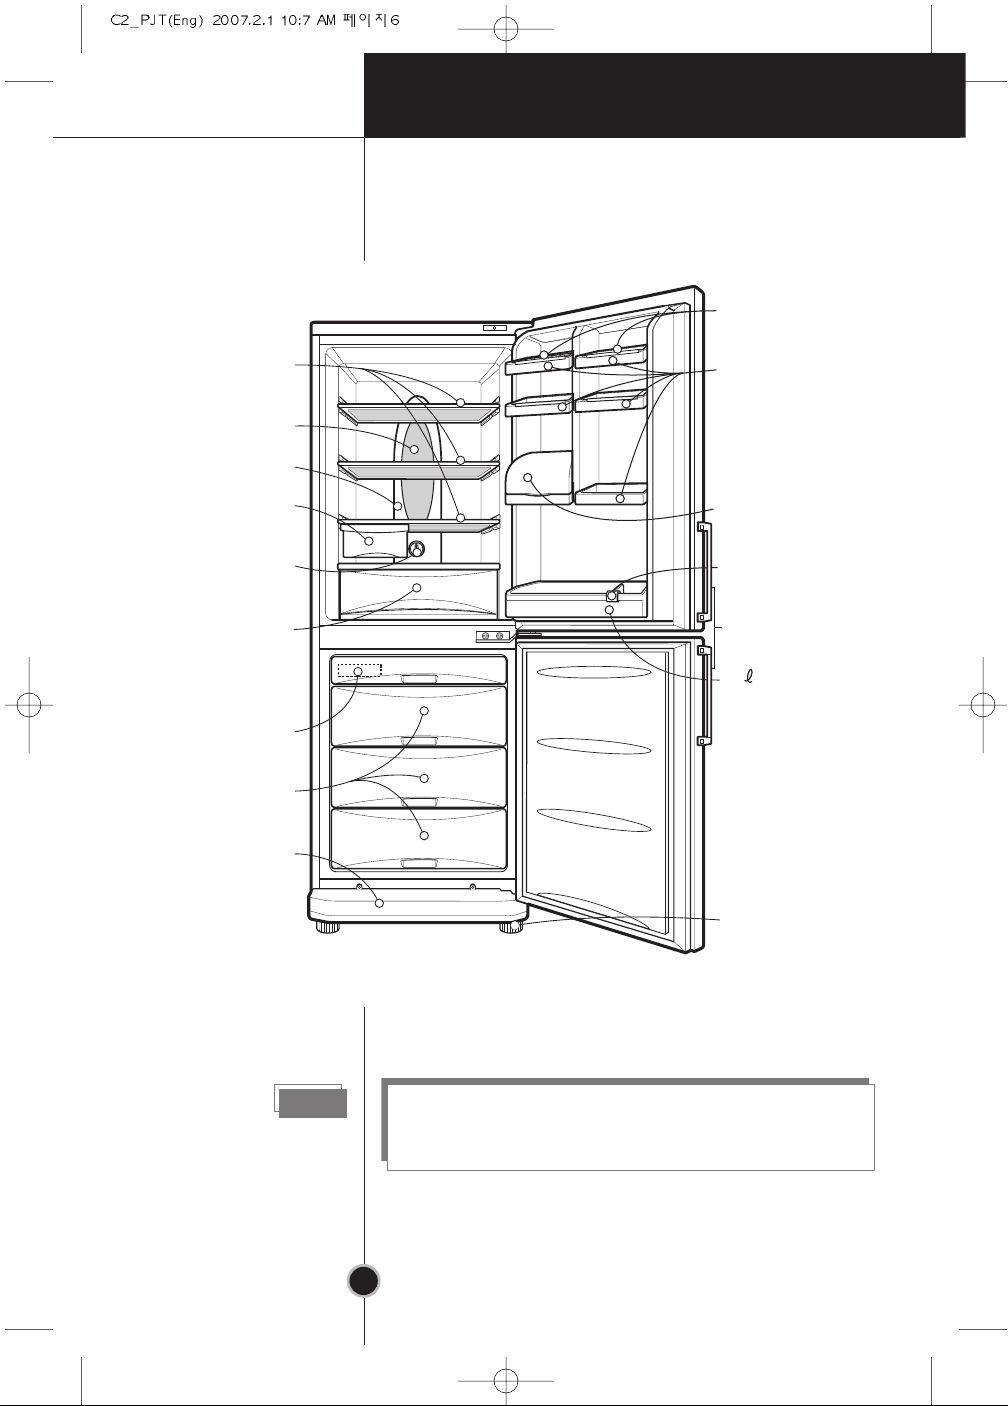
Identification of Parts
Note
If you find some parts missing from your unit, they
may be parts only used in other models.
7
Introduction
Egg Tray(1 or 2)
Removable
Glass Shelf(2 or 3)
Lamp
Multi-air Flow Duct
Fresh Zone (Optional)
Refrigerator
Temperatur
Vegetable Drawer
Used to keep fruits
and vegetables, etc.
e Control
fresh and crisp.
(1 or 2)
Ice Cube Tray
Freezer
Compartment
Removable
Plinth
Rotatable
Door Basket
(3 or 5)
Utility Corner
(movable)
Bottle Holder
Handle
(Optional)
2
Bottle
Door Basket
Leveling Screw
8
1.
Select a good location.
Place your fridge-freezer where it is easy to use.
2.
Avoid placing the unit near heat sources,
direct sunlight or moisture.
3.
There must be proper air circulation around your
fridge-freezer to keep it operating efficiently.
4.
To avoid vibration, the unit must be leveled.
If required, adjust the leveling screws to compensate
for the uneven floor.
The front should be slightly higher than the rear to aid
in door closing.
Leveling screws can be turned easily by tipping the
cabinet slightly.
Turn the leveling screws counterclockwise( ) to
raise the unit, clockwise( ) to lower it.
5.
Clean your fridge-freezer thoroughly and wipe off all
dust accumulated during shipping.
6.
Install accessories such as ice cube box, etc., in their
proper places.They are packed together to prevent
possible damage during shipment.
7.
Connect the power supply cord (or plug) to the outlet.
Don't double up with other appliances on the same
outlet.
8.
To ensure proper air circulation around the fridge freezer, please maintain sufficient space on both the
sides as well as top and maintain at least 2 inches (5
cm) from the rear wall.
When your fridge-freezer is installed, allow it 2-3 hours to
stabilize at normal operating temperature prior to filling
it with fresh or frozen foods.
If power plug is disconnected, allow 5 minutes delay
before restarting.
Your fridge-freezer is now ready for use.
Installation
Starting
Installation
9
Operation
Temperature Control
Your fridge-freezer has two controls that let you regulate
the temperature in the fridge and freezer compartments.
Refrigerator
Freezer
• Initially set the TEMP. CONTROL at
"4". Then adjust the compartment
temperature according to your
desire.
• If you want an inside temperature
slightly less cold or colder, turn the
knob towards MIN or MAX,
MAX MIN
7
6
5
3
4
TEMP. CONTROL
respectively. When the surrounding
temperature is low, adjust the TEMP. CONTROL 'MIN'.
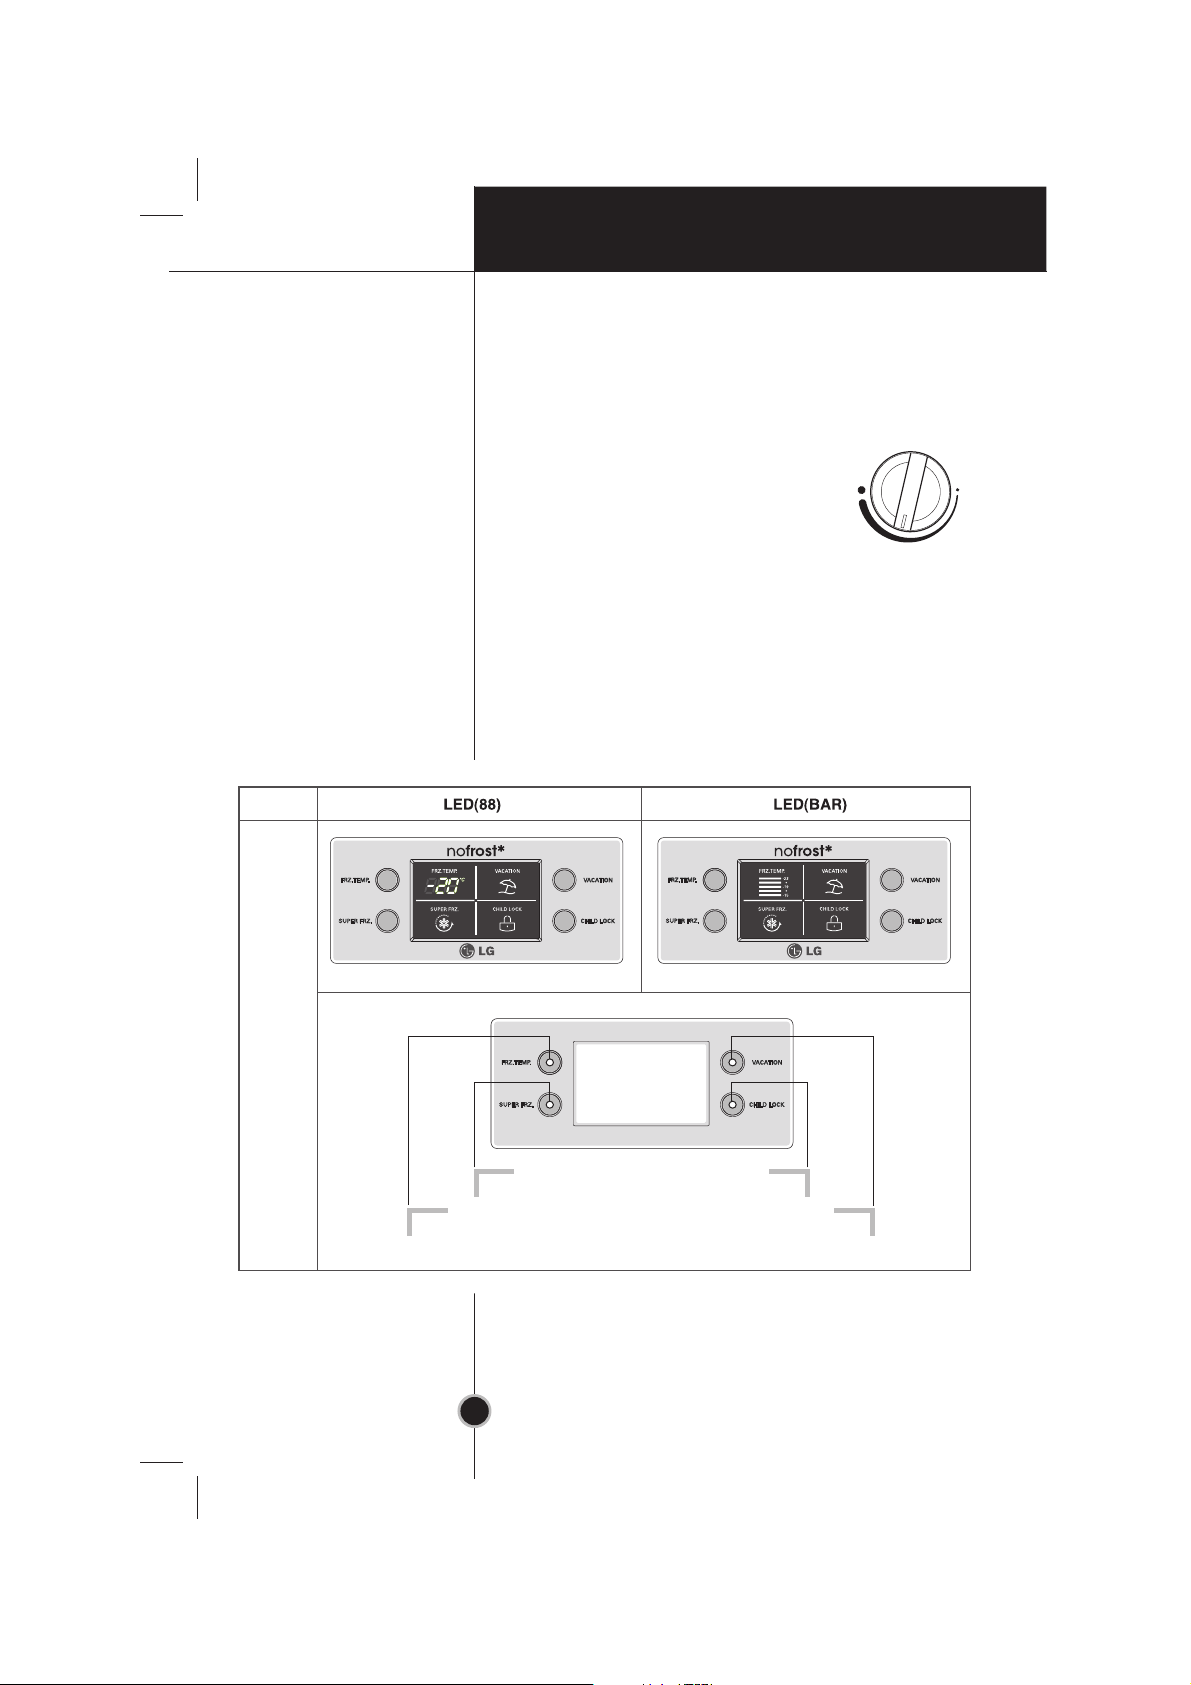
Display Panel For Temperature Control
1
2
10
Operation
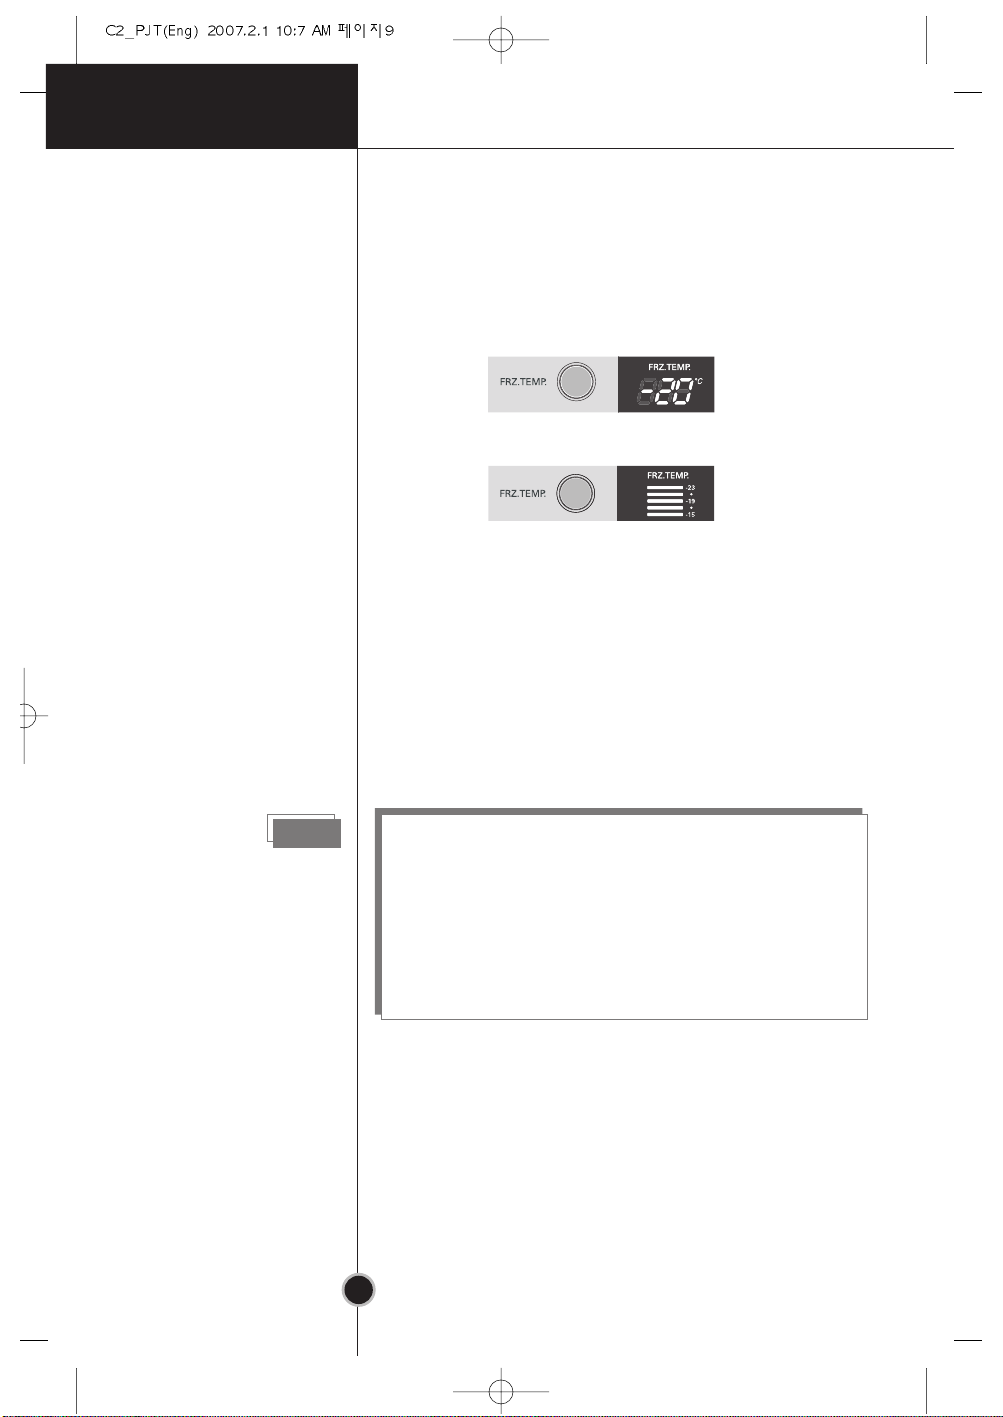
• The initial Temperature of the Freezer Compartment is
-18°C . You can now adjust the temperature of the
compartment as you want.
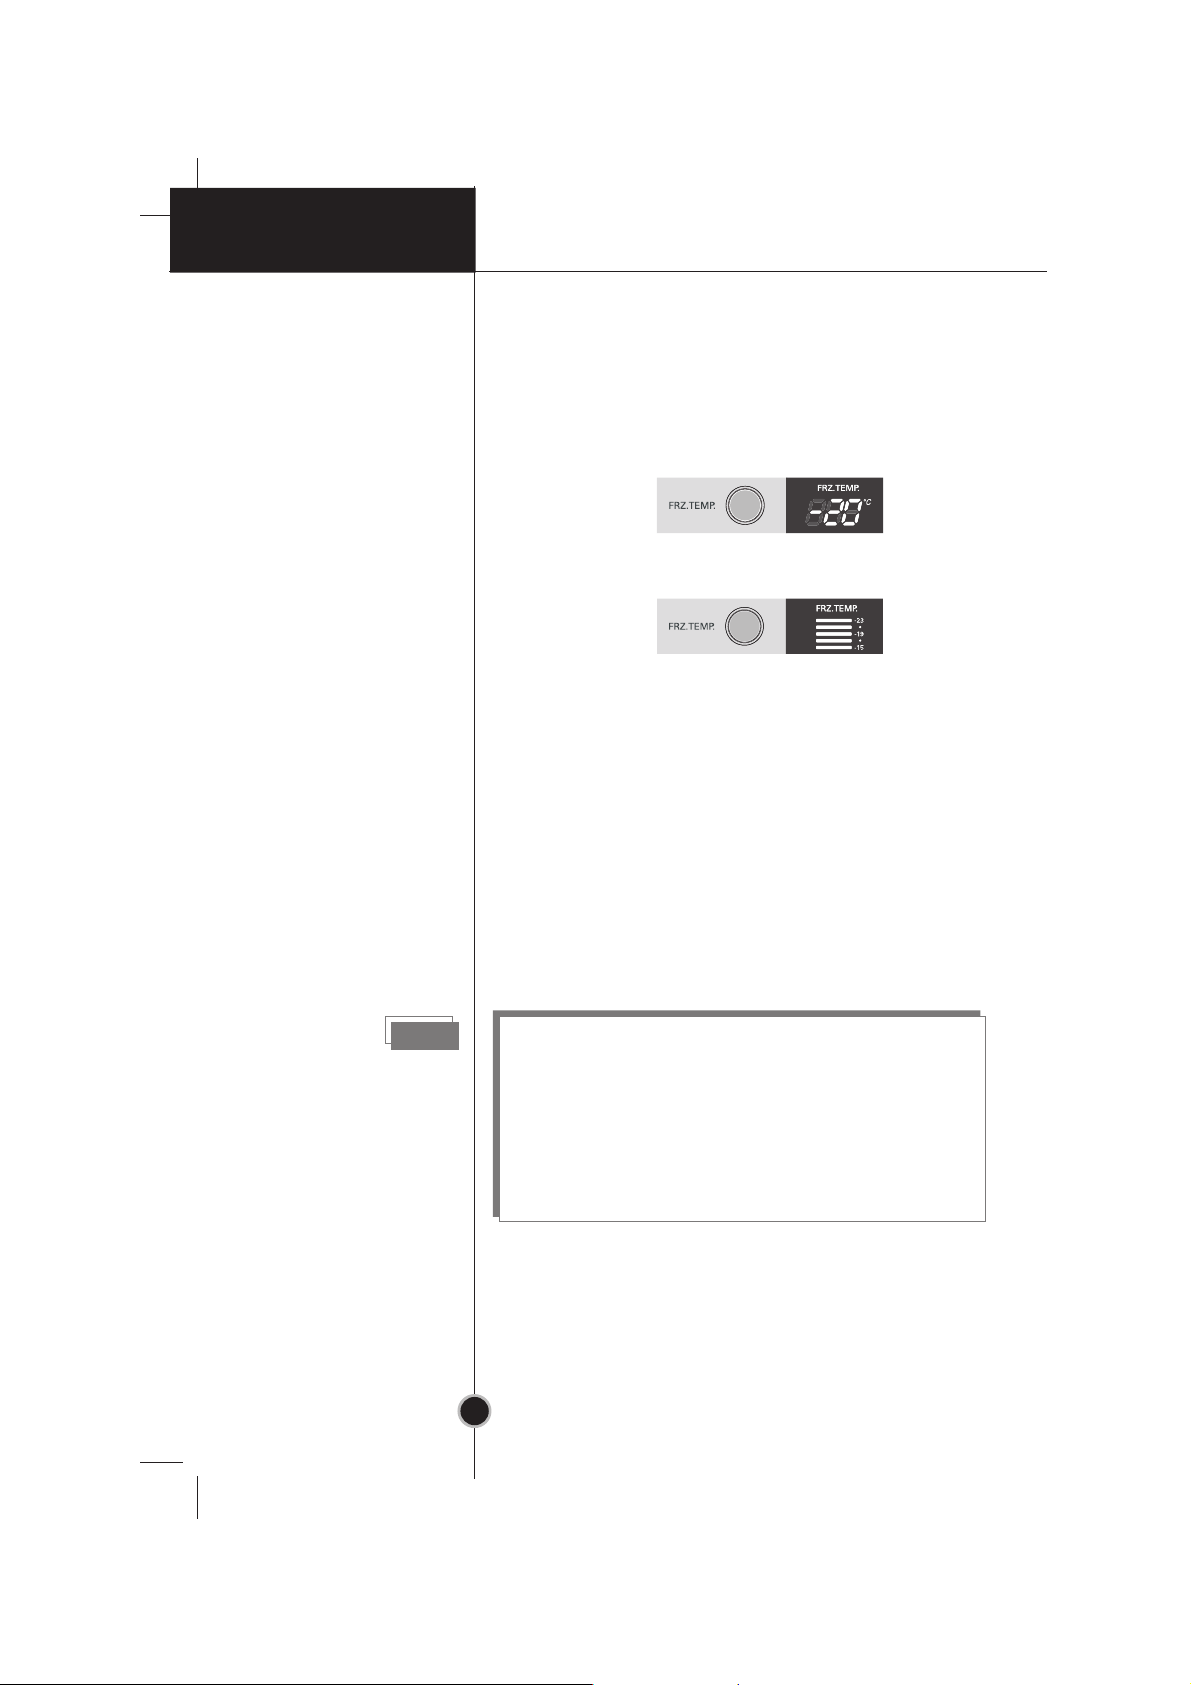
< LED 88 Type >
< LED BAR Type >
• When you press the temperature control buttons, the
temperature of Freezer compartment is repeated in the
following order.
LED 88 Type Freezer Compartment :
→ -19°C → -20°C → -21°C → -22°C → -23°C
-18°C
→ -15°C → -16°C → -17°C
Note
LED BAR Type Freezer Compartment :
-19°C
→ -21°C→ -23°C → -15°C → -17°C
The actual inner temperature varies depending on the
food status, as the indicated setting temperature is a
target temperature, not actual temperature within
refrigerator.
Refrigeration function is weak in the initial time.
Please adjust temperature as above after using
refrigerator for minimum 2~3 days.
11
Operation
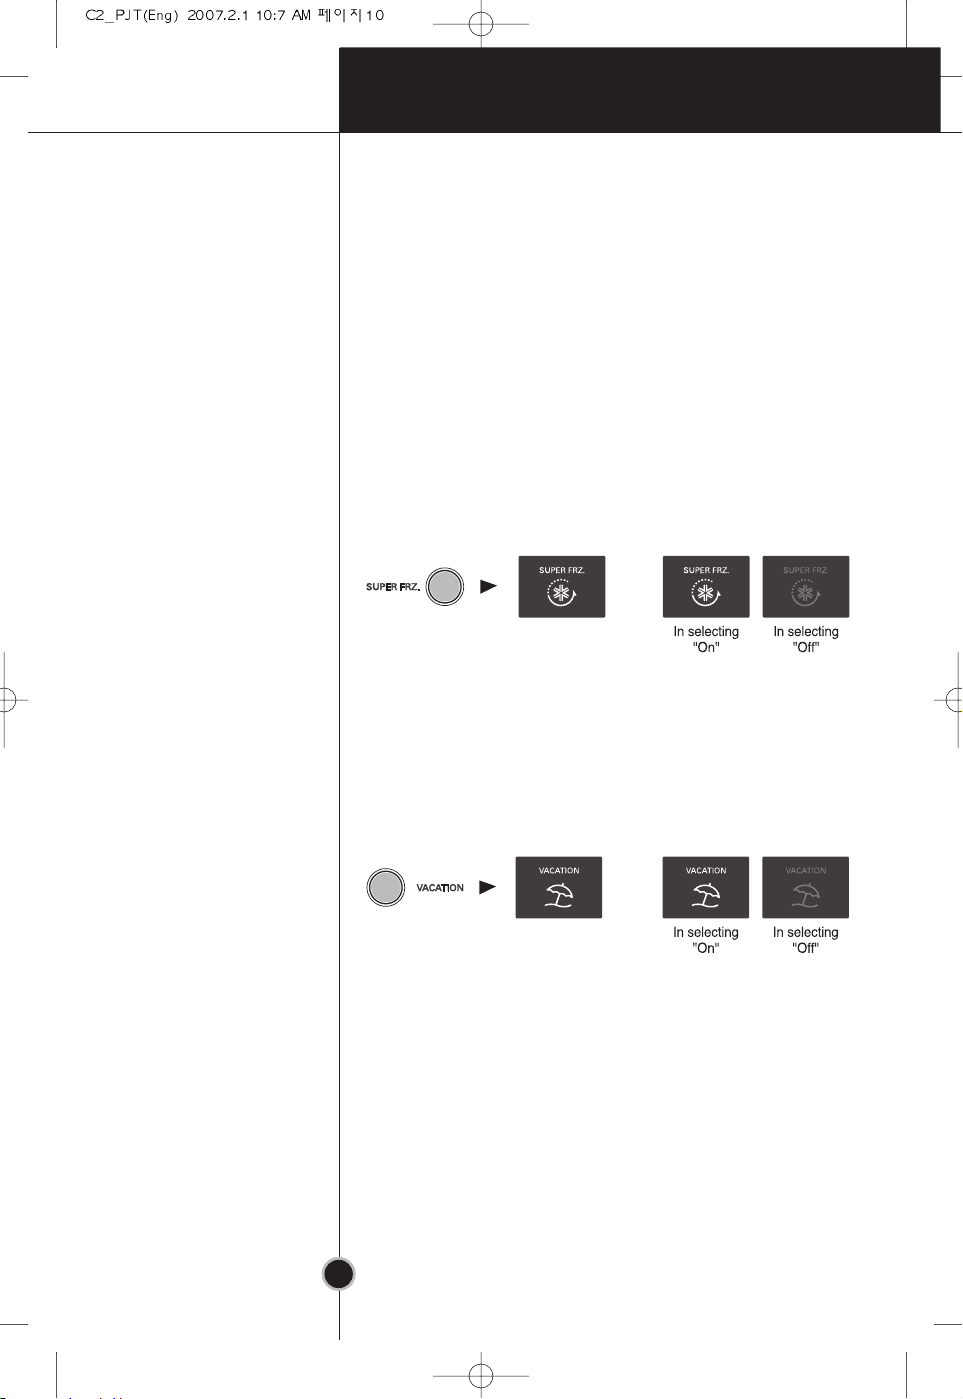
Function
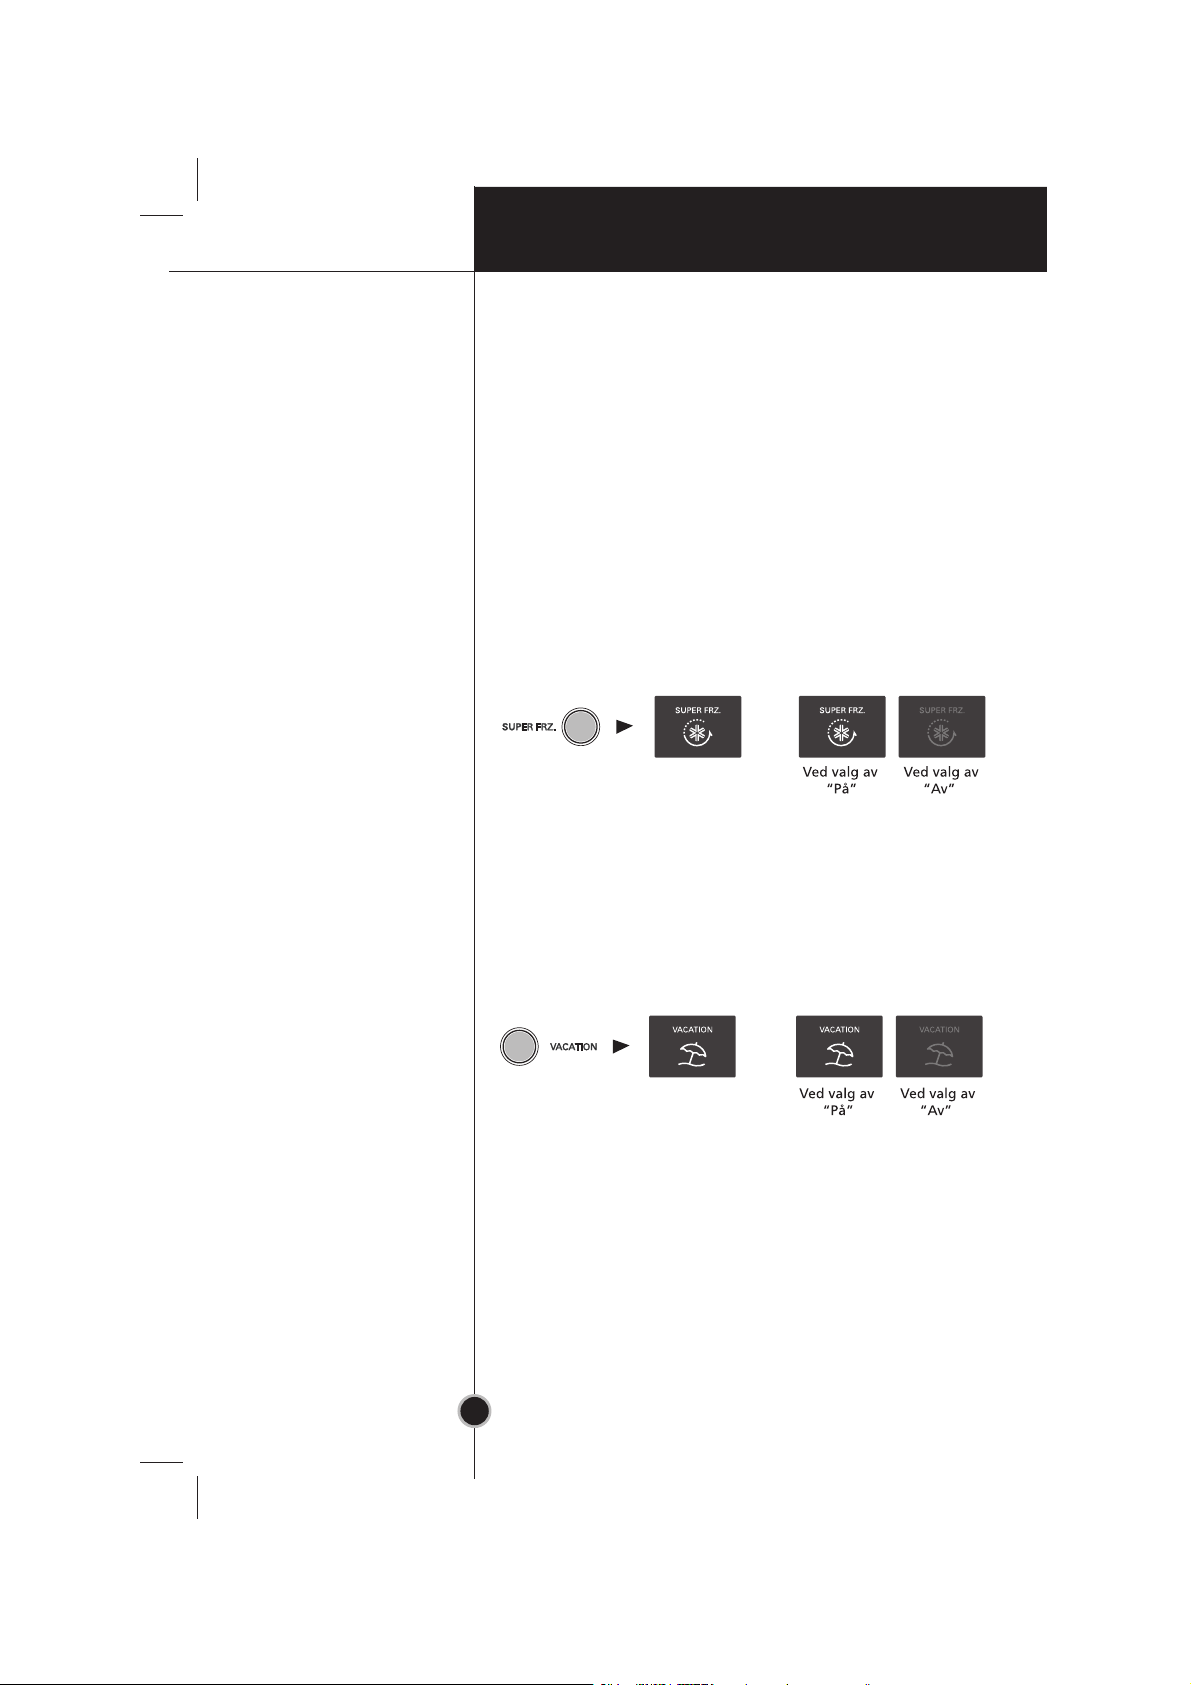
Super Freezer
Vacation
• Please select this function for prompt freezer.
• This function is used when you want to freeze the
foods quickly. Press the ‘SUPER FRZ’ (Super Freezer)
button once, and then the quick freeze operation starts
with the lamp on.
• The Super Freeze operation takes about 3 hours. When
its operation ends, it automatically returns to the
previous temperature setting. If you want to stop the
quick freeze operation, press the ‘SUPER FRZ’ button
once more, the lamp goes out, and the Super Freeze
operation stops and the refrigerator returns to the
previous temperature setting.
• This function makes the fridge-freezer work in a power
saving mode which is useful for when you are away on
holiday, by reducing energy consumption as much as
possible.
Pressing ‘VACATION’ starts operation with lamp on
and pressing it again stops the operation.
12
Operation
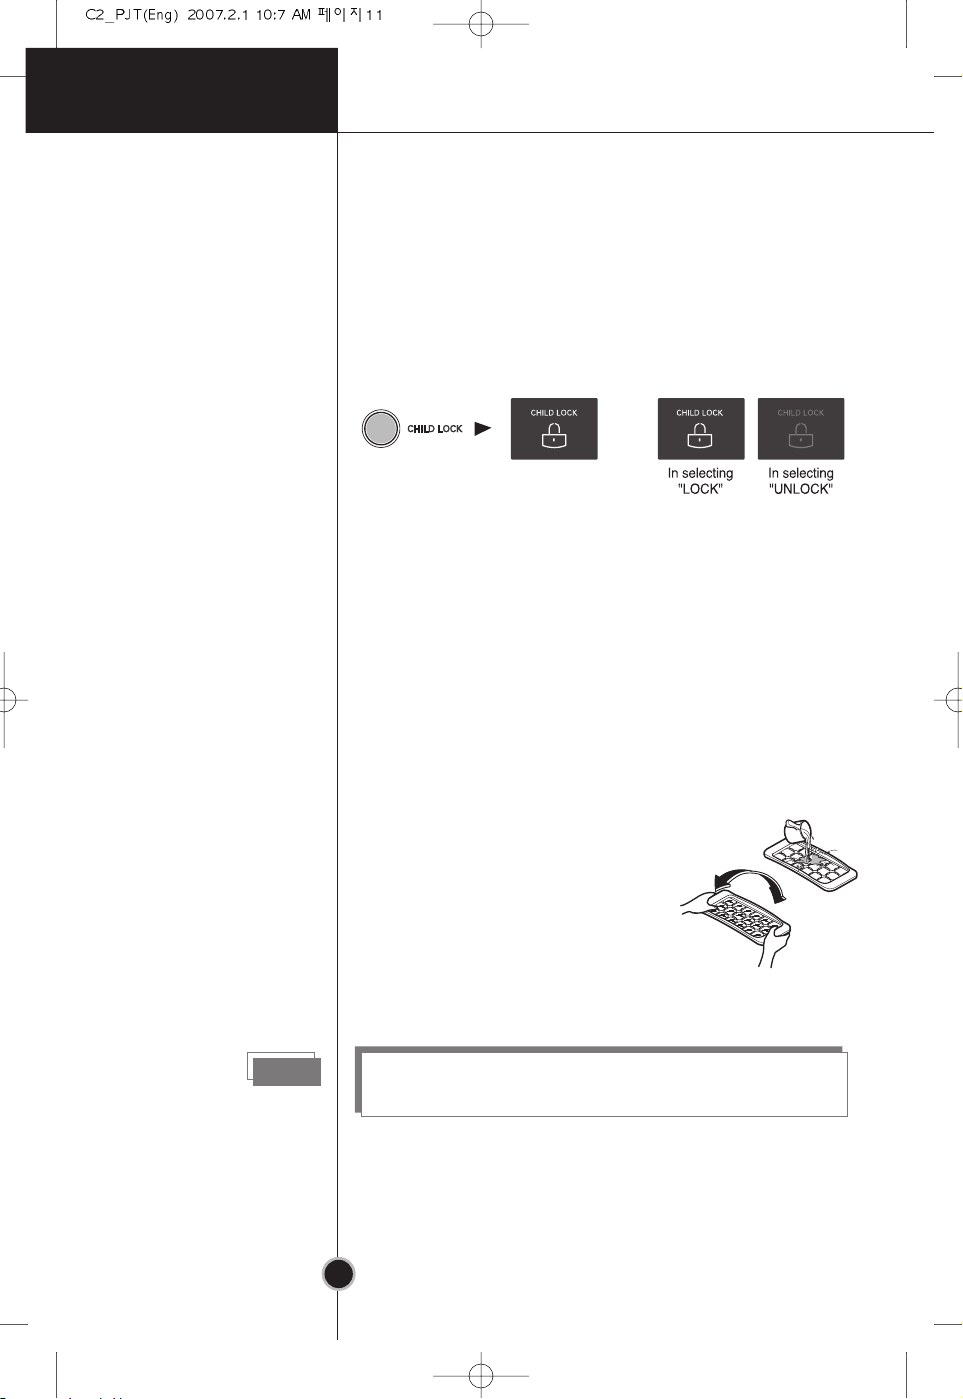
Lock
Self Test
Ice Making
• Pressing this button stops operation of other buttons.
• ”Locking” or “Un-Locking” is repeated whenever
pressing the ‘CHILD LOCK’ button. (For “Locking” or
“Un-Locking” press the ‘CHILD LOCK’ button for 2 secs.)
• When ‘CHILD LOCK’ is activated, pressing the other
buttons would not work.
This function allows you to check for operational
problems. If you think you have a problem with your
fridge-freezer, then press the temperature control
button:
- If the indicate lights move up or down, then there is no
problem with your fridge-freezer.
- If the indicate lights do not move up or down, then
please leave the power connected and call your nearest
service agent.
• To make ice cubes, fill the ice
tray to the water level and place
it in the freezer.
• If ice cubes are required fast,
press the ‘SUPER FRZ.’button.
• To remove ice cubes, hold the
tray at its ends and twist gently.
Tip
Defrosting
To remove ice cubes easily, run water on the tray
before twisting.
Defrosting takes place automatically.
The defrosting water flows down to the evaporating tray
and is evaporated automatically.
Suggestions on food storage
Note
If you keep the fridge-freezer in a hot, and humid
place, frequently open its door or put a lot of
vegetables in it, dew may form in it, which has no
effect on its performance.
Remove the dew with dust cloth free from care.
13
Storing Food
Storing Food
• Do not store food which goes bad easily at low
temperature, such as banana, and melon.
• Allow hot food to cool prior to storing. Placing hot
food in the fridge-freezer could spoil other food, and
lead to higher electric bills.
• When storing the food, use a container with a lid. This
prevents moisture from evaporating, and helps food to
keep its taste and nutrients.
• Do not block air vents with food. Smooth circulation of
cold air keeps fridge-freezer temperature even.
• Do not open the door frequently. Opening the door
lets warm air enter the fridge-freezer, and cause
temperature to rise.
• To adjust the temperature control easily, do not store
food near the temperature control dial.
• Never keep too many foods in door rack, as this may
stop the door from fully closing.
• Do not store bottles in the freezer compartment - they
may break when frozen.
• Do not refreeze food that has been thawed. This
causes loss of taste and nutrition.

Anti-Condensation
Pipe
14
Care and Maintenance
General Information
Power Failure
If You Move
Anti
Condensation
Pipe
• 1~2 hour power failure does no harm to the foods
stores. Try to avoid opening and closing the door too
frequently.
• Take out foods from the fridge-freezer and firmly fix
the loose items with tape.
• Turn the leveling screws until they stop before moving
the fridge-freezer. Otherwise the screw may scratch
the floor or the fridge-freezer cannot move.
• The Anti-Condensation
pipe is installed around the
front side of fridge-freezer
as well as on the partition
between fridge
compartment and freezer
compartment to prevent
dewing.
• Especially after installation
or when ambient
temperature is high, the fridge-freezer may feel hot,
which is quite normal.
Lamp Replacement
1. Unplug the power cord from the
outlet.
2. Remove fridge shelves.
3. To remove the lamp cover, insert
type driver in the underside of
the lamp cover and pull it out
forwards.
4. Turn the lamp counterclockwise.
5. Assemble in reverse order of
disassembly.
Replacement lamp must be the same specification as
original.
• You must check the O-RING, which is made by
rubber and prevent electric spark.
Cleaning
15
ww
Care and Maintenance
Before Cleaning
Exterior
Interior
After Cleaning
Warning
Be sure to unplug the power.
Clean the outside of the fridge-freezer with a soft cloth
soaked with hot water or liquid detergent. If you use a
detergent, be sure to wipe it with a clean wet cloth.
As above.
Check that the power cord is not damaged, power plug
has not overheated, and that the power plug is tightly
inserted into the outlet.
Be sure to dry the appliance with a cloth after washing
it with water.
Do not use abrasive, petroleum, benzene, thinner,
hydrochloride acid, boiling water, rough brush, etc, as
they may damage parts of the fridge-freezer.
Trouble Shooting
16
Trouble Shooting
Before calling for service, check this list.
It may save you both time and expense.
This list includes common occur
the result of defective workmanship or materials in
this appliance.
rences that are not
Problem
Fridge-Freezer
does not operate
Fridge or Freezer
Compartment
Temperature too
warm
Vibration or
Rattling or
Abnormal Noise
Possible Causes
• Power plug may be unplugged from the electric
outlet.
Plug it in securely.
• House fuse has blown or circuit breaker has
tripped.
Check and/or replace fuse and reset circuit breaker.
• Power cut.
Check house lights.
• Temperature control not set on proper position.
Refer to Temperature Control section.
• Appliance is placed close to heat source.
• Warm weather-frequent door openings.
• Door left open for a long time.
• Package holding door open or blocking air duct in
freezer compartment.
• The floor on which the fridge-freezer is installed
may be uneven or the fridge-freezer may be
unstable.
Make it even by rotating the leveling screw.
• Unnecessary objects placed in the back side of the
fridge-freezer.
Frost or Ice
Crystals on frozen
Food
Moisture forms on
Cabinet Surface
• Door may have been left ajar or package holding
door open.
• Too frequent or too long door openings.
• Frost within package is normal.
• This phenomenon is likely to occur in a wet space.
Wipe it with a dry towel.
Problem Possible Causes
17
Trouble Shooting
Moisture collects
inside
Fridge has odor
Door not closing
properly
Interior light does
not work
• Too frequent or too long door openings.
• In humid weather, air carries moisture into fridge when
doors are opened.
• Foods with strong odors should be tightly covered or
wrapped.
• Check for spoiled food.
• Interior needs cleaning.
Refer to CLEANING section
• Food package is keeping door open.
Move packages that keep door from closing.
• Fridge-freezer is not level.
Adjust the leveling screws.
• The floor on which the fridge-freezer is installed
may be uneven or the fridge-freezer may be
unstable.
Slightly raise the front side with the leveling screw.
• No power at outlet.
• Light lamp needs replacing.
Refer to the Lamp Replacement section
Disposal of your old appliance
1. When this crossed-out wheeled bin symbol is attached to a
product it means the product is covered by the European
Directive 2002/96/EC.
2. All electrical and electronic products should be disposed of
separately from the municipal waste stream via designated
collection facilities appointed by the government or the local
authorities.
3. The correct disposal of your old appliance will help prevent
potential negative consequences for the environment and
human health.
4. For more detailed information about disposal of your old
appliance, please contact your city office, waste disposal
service or the shop where you purchased the product.
To Reverse the Doors
18
Your fridge-freezer is designed with reversible doors, so that they may open from either
the left or right hand side to suit your kitchen design.
Precaution
1.
Before reversing the door, first of all, you should take out food and accessories like
shelves or trays which are not fixed in the fridge-freezer.
2.
Use Torque Wrench or Spanner to fix or remove the bolt.
3.
Do not lay the fridge-freezer down. This will
cause problems.
4.
Be careful not to drop the doors in disassembling
or assembling.
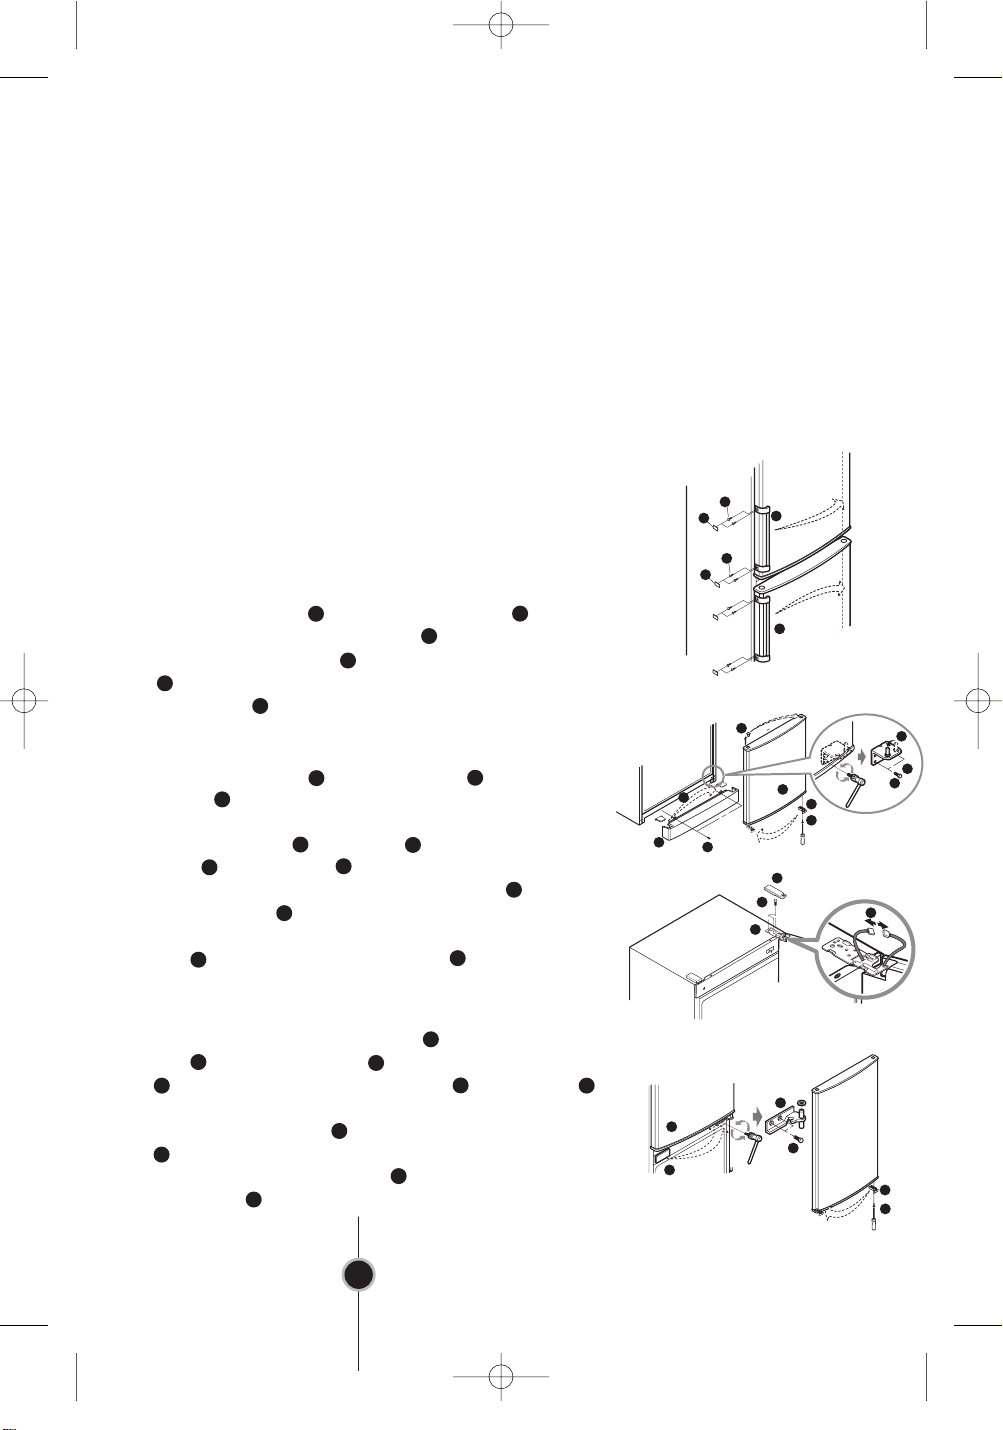
How to Reverse the Door
1. Separate the screw after separating the nut on the
left of the refrigerator door handle , then separate t
refrigerator door handle . Separate the freezer do
4
in the order in which you separating the refrigerat
door handle . (The hidden handle does not need thi
procedure
)
2. Separate the screw and bottom cover , then separate
the cap of bottom cover and install it on th
7
3
1
1
1
5
corresponding position on the right side. Separate th
hinge lower right and the pin after separating the
screw . Install the pin into the corresponding left hol
8
9
10
10
on the hinge lower. Separate the freezer door , the
remove the cap on the door and install it on the
12
corresponding position on the right side. Separate the doo
4
1
stop after your separating the screw , then install the
13
door stop on the corresponding position on the left
2
he
or handle
or
s
6
e
e
11
n
.
6
e
r
3
2
2
2
7
5
1
3
12
15
23
24
4
10
9
11
14
13
8
16
3. Separate the cover of hinge upper , separate the two
16
wire . Separate the screw , separate the hinge middl
18
, then separate the refrigerator door .Separate cap
and install it on the corresponding position on the right
Separate the door stop after your separating the scre
21
, then install the door stop on the corresponding positio
on the left. Separate the screw , then separate the hing
upper right .
24
22
15
17
19
20
.
w
23
e
19
n
e
20
18
17
22
21
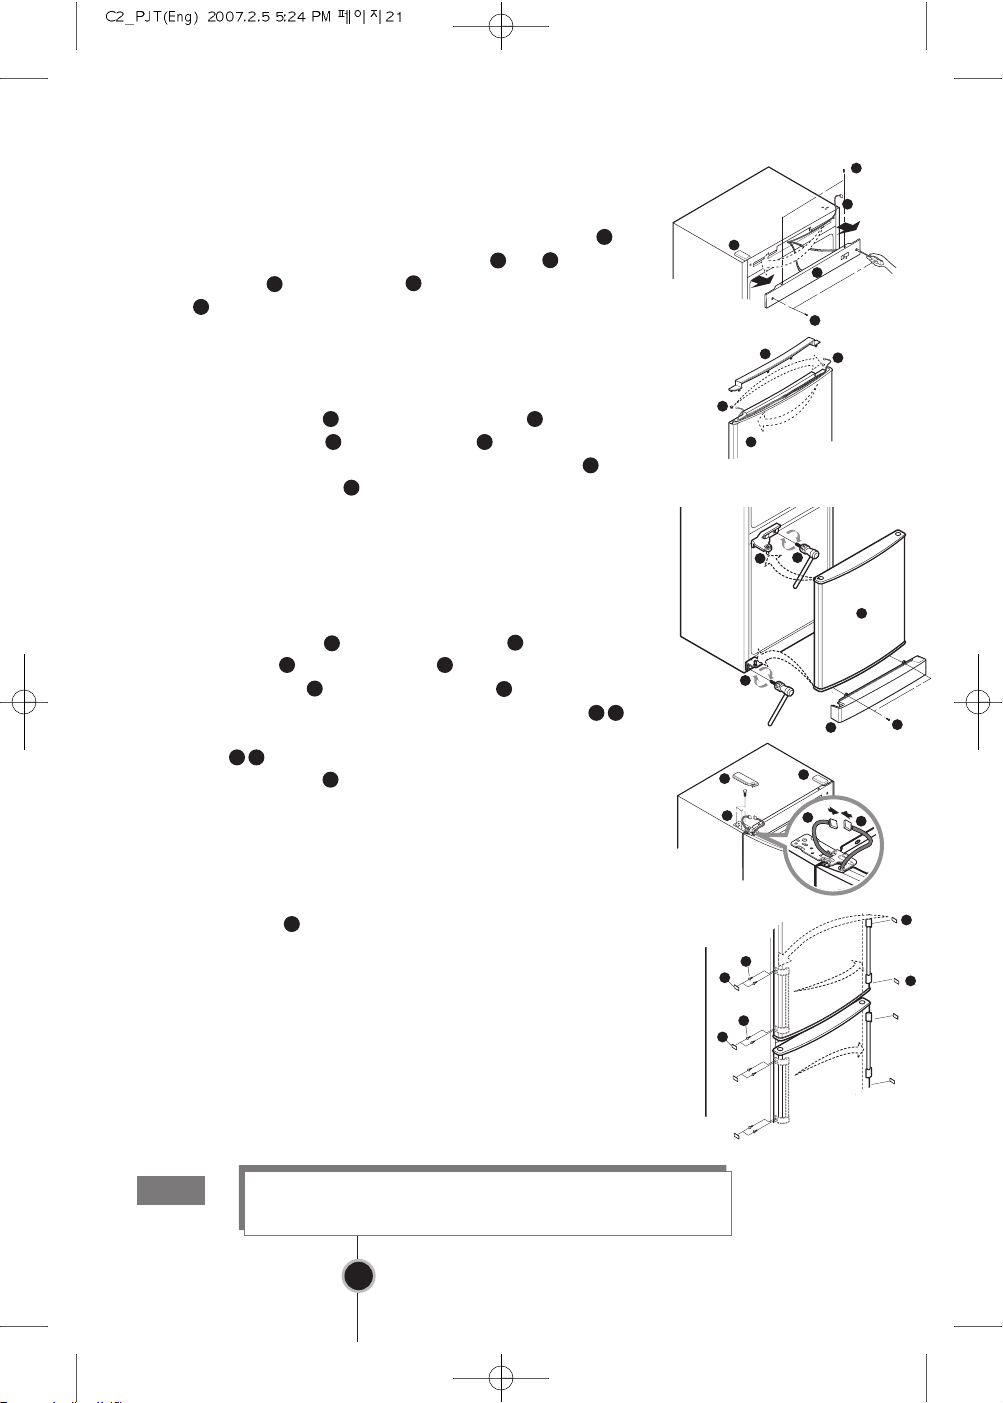
4. Destroy the two small caps on the front of the cover front
19
with a screw driver, then separate the screw and . Separate
2
the cover front . Move the wire to left, install the cov
front and the screw. Take the small caps out of the alterna
23
23
bag, then install the small cap
6
s.
24
23
2
5
er
te
25
26
34
23
24
28
29
5. Remove the small cap of the refrigerator door , then
separate the small cap . Move the cable from left to t
27
28
corresponding position on the right. Install the small cap
then install the small cap on the corresponding position
the righ
6.
Install the hinge lower and the freezer door , then install
the hinge middle . Separate the cap on upper left. Install
t.
18 34
the refrigerator door , take the hinge upper out of the
27
9
19
alternate bag and install it on upper left. Pull out the wire
from the individual holes and connect these cables. Take the
31
small caps out of the alternate bag, then install the small
caps. Install base cover
7. Separate the cap on the right side of the door, then install it
32
6
.
33
19
29
he
28
,
on
11
30
26 29
into the left screw hole (you can see this hole after the left hand
he
i
on
y
l
is removed). Install the handle and the screw which previous
separated on the corresponding position on the right. (T
hidden handle does not need this procedure) Then Installat
complet
ed.
27
19
17
18
11
9
6
31
30
le
2
2
32
26
3
3
5
29
33
33
Note
Reversing the doors is not covered by the warranty.
Memo
20

Innholdsfortegnelse
Innledning
Installering
Betjening
Råd om
Registrering
Viktig sikkerhetsinformasjon
Beskrivelse av skapets deler
Installering
Ta i bruk
Temperaturkontroll
Kjøledel
Frysedel
Funksjon
Hurtiginnfrysing
Vacation (Ferie)
Lock (Tastesperre)
Selvtest
Lage isbiter
Avriming
Oppbevare mat
22
22
25
26
26
27
27
27
29
29
29
30
30
30
30
31
oppb
evaring av mat
Vedlikehold
Feilsøking
Omhengsling
av
dører
Generell informasjon
Skifte lyspære
Rengjøring
Feilsøking
Forholdsregler
Hvordan hengsle om dører
21
32
32
33
34
36
36
Innledning
22
Modell- og serienummer står på skapets bakside.
Nummeret er unikt for dette skapet og finnes ikke på
andre. Du anmodes om å notere nyttige opplysninger på
linjene under, og ta vare på bruksanvisningen med disse
opplysninger for senere bruk.
Kvitteringen kan også stiftes her.
Kjøpsdato :
Kjøpt av forhandler :
Adresse :
Telefon :
Modellnummer :
Serienummer :
Viktig sikkerhetsinformasjon
Før dette kjøl/frys skapet tas i bruk, må det plasseres
og installeres som forklart under avsnittet
“Installering”.
Skapet må ikke frakobles strømmen ved å dra i
strømkabelen. Ta alltid i støpselet og trekk det rett
ut av stikkontakten.
Hvis skapet skal flyttes, vær forsiktig så det ikke
ruller over eller skader strømkabelen.
Etter at skapet er satt i drift, må du ikke ta på de
kalde flatene i fryserommet, spesielt ikke med
fuktige eller våte hender. Huden kan feste seg til
disse svært kalde flater.
Barn bør overvåkes for å sikre at de ikke leker med
apparatet.
Registrering
Innledning
Forholdsregler
Innledning
Viktig sikkerhetsinformasjon
Forholdsregler
Ikke forkorte eller
forlenge
nettkabelen
Bruk ikke
skjøteledning
Elektrisk jo
Tilgjen
nettplu
rding
gelighet til
ggen
Før rengjøring av skapet, skal strømkabelen frakobles ved
å ta i støpselet og trekke det rett ut av stikkontakten.
Strømkabelen må ikke komme i klem, bøyes hardt,
strekkes eller vris slik at den kan skades.
Skadet kabel kan medføre brann eller kortslutning.
Sett aldri noe med glassemballasje inn i fryseren.
Når innholdet fryser, kan glasset sprekke og bli ødelagt.
Skapet leveres med jordet strømkabel og støpsel,
som skal tilkobles direkte i en jordet stikkontakt.
Påse at sikringskursen ikke overbelastes.
I tilfelle elektrisk kortslutning, vil strømkabelens
jordingsleder redusere risikoen for elektrisk støt, såfremt
den er tilkoblet en jordet stikkontakt.
For å hindre mulig elektrisk støt, må dette skapet kun
tilkobles en jordet stikkontakt.
Hvis det er tvil om kontakten er jordet og i orden, ta
kontakt med en autorisert elektriker.
Kjøleskapet/fryseren bør plasseres slik at t
tilkoplingspluggen til strømnettet er tilgjengelig, for at d
raskt skal kunne trekkes ut dersom en ulykke skulle inntreff
il
en
e.
Utskifting
nettkabel
ADVARSEL
Ikke oppb
av
evar
Hvis nettkabelen er skadet må den byttes ut av produsenten ell
dennes serviceleverandør, eller en annen person med tilsvaren
kvalifikasjoner, for å unngå at farlige situasjoner oppstå
Fare for at barn kan sperres inne.
Før du kasserer et gammelt skap:
Ta av begge dører, og la hyller og skuffer sitte på plass,
så barn ikke kan komme inn i skapet.
Det må ikke oppbevares eller brukes brannfarlig og lett
antennelig væske, kjemikalie, sprayboks, gassbeholder
osv. i nærheten av skapet eller andre elektriske apparater.
23
r.
er
de
Inledning
24
Viktig säkerhetsinformation
Varning
Dette apparatet inneholder et mindre kvantum
isobutan kjølemiddel (R600a), en naturvennlig
naturgass, men også brennbar. Under transport og
installering av apparatet er det viktig å påse at
ingen av delene i kjølekretsløpet skades. Kjølevæske
som sprøyter ut av rørene kan antennes eller
forårsake øyeskader. Hvis et utslipp konstateres, bør
en unngå åpen ild og mulige antenningskilder og
rommet apparatet befinner seg i, bør luftes.
For å unngå at det skapes en blanding av antennbar gass
og luft hvis det forekommer lekkasjer i kjølekretsløpet, er
størrelsen på rommet der apparatet er plassert avhengig
av mengden kjølemiddel som anvendes. Rommet skal
være 1m2for hver 8 g R600a-kjølevæske inne i apparatet.
Mengden kjølemiddel i hvert apparat vises på
identifikasjonsplaten på inne i apparatet.
Apparat som viser tegn på å være skadet må ikke settes i
drift. Kontakt forhandleren hvis du er i tvil.
Ventilasjonsåpningene både inne i apparatet og i den
innebygde strukturen, må ikke tildekkes.
Det må ikke brukes mekanisk instrumenter eller andre
midler enn de som anbefales av produsenten for å
fremskynde avisingsprosessen.
Avkjølingskrestsløpet må ikke skades.
Bruk ikke elektriske apparater der matvarene
oppbevares, med mindre de er av den typen som
anbefales av fabrikanten.
Kjølemidlet og isoleringsgassen som er brukt i
apparatet må behandles som spesialavfall. Vennligst
kontakt en serviceperson eller en annen spesialist i
dette tilfellet.
ww
ww
ww
ww
ww
ww
Innledning
25
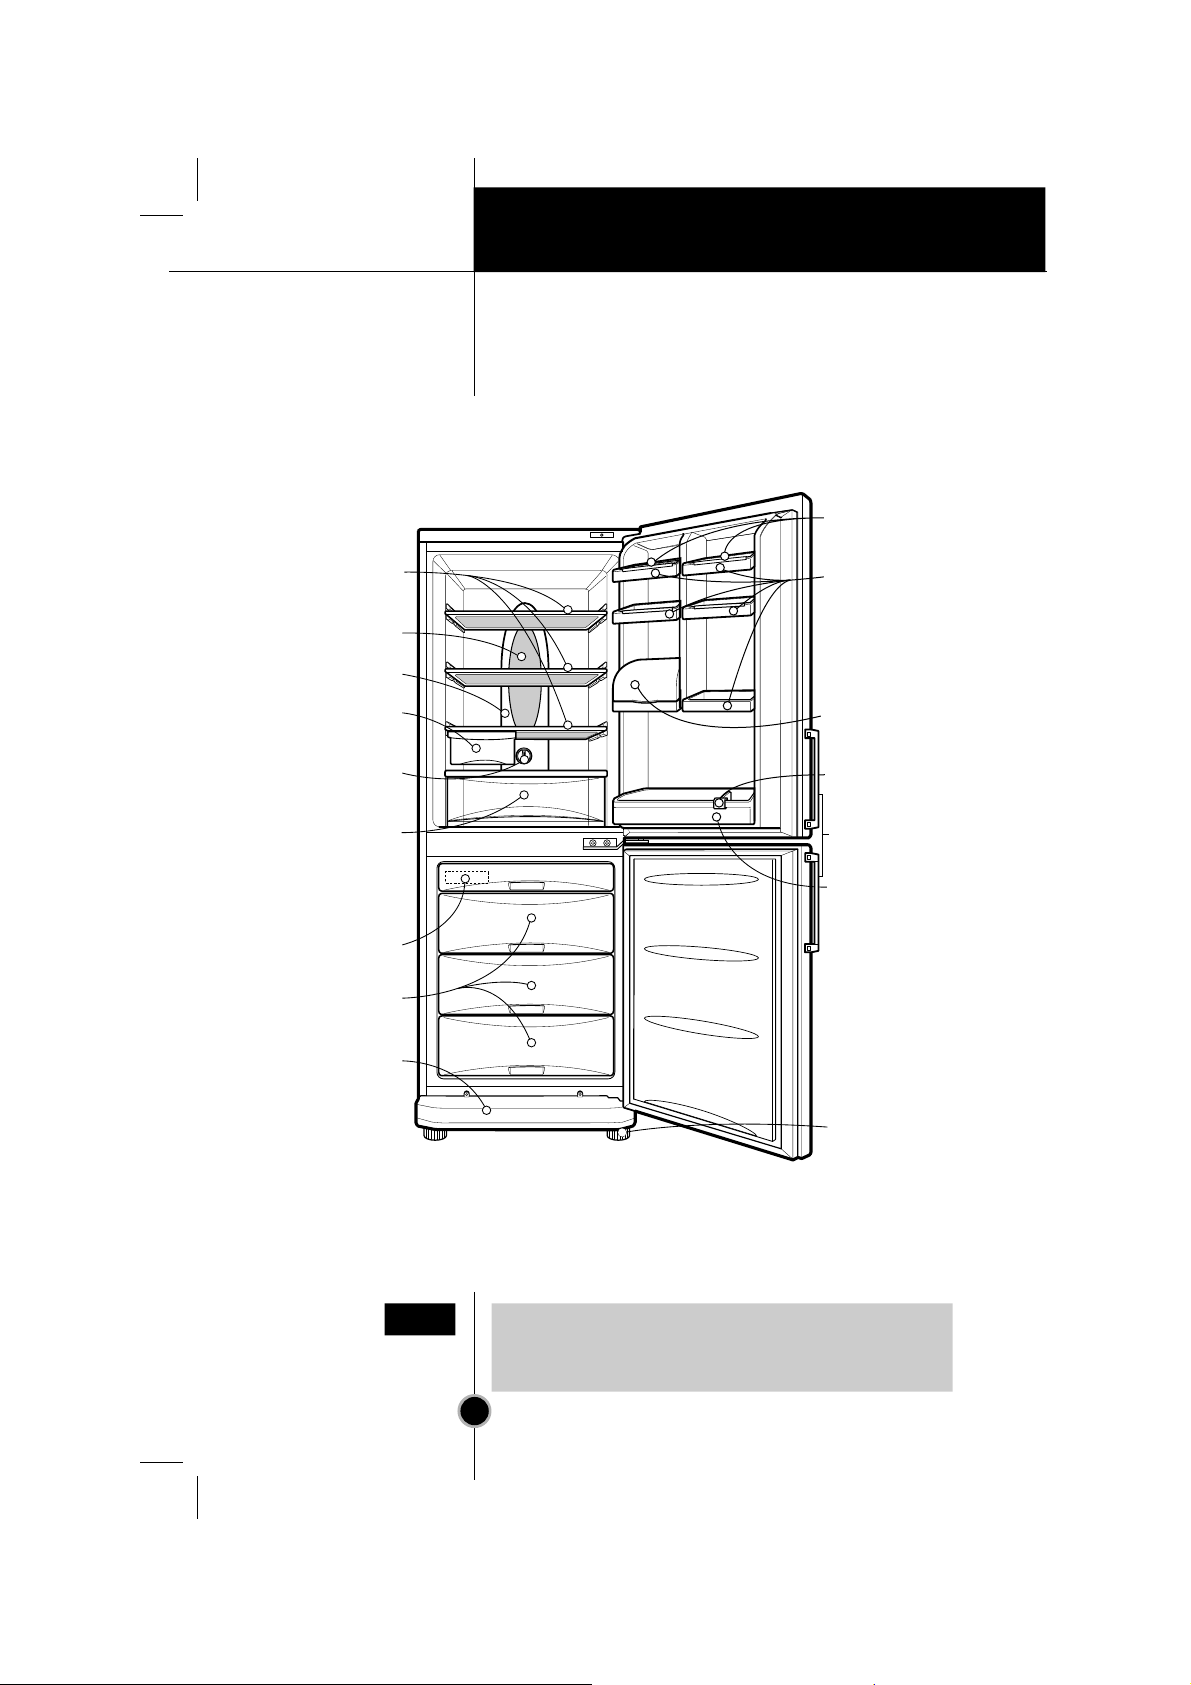
Beskrivelse av skapets deler
Hvis du finner deler oppført over, som ikke er på
ditt skap, er det deler som kun er brukt på andre
modeller eller modellvarianter.
Flyttbare
NB
glasshyller (2 eller 3)
Lampe
Eggeholder
(1 eller 2)
Flyttbare
dørhyller
(3 eller 5)
Multikanal luftstr
Ferskvaresone
(valgfritt)
Kj
temperaturkontroll
Gr
ønnsaksskuffer
For å holde frukt,
grønnsaker osv.
friskt og sprøtt.
(1 eller 2)
Isbitbrett
Fryseskuffer
Avtagbart
sokkeldeksel
øm
øl
Dørboks
(flyttbar)
Flaskeholder
Håndtak
(valgfritt)
Dørhylle for flasker
opptil 1,5~2 liter
Justerbart skruben
Installering
Installering
1.
Velg en god plassering.
Sett kjøl/frys skapet der det er velegnet å bruke.
2.
Unngå plassering på sted hvor skapet kan utsettes for
varmekilder, direkte sollys eller høy fuktighet.
3.
Det må være god luftsirkulasjon rundt skapet for at
det skal fungere effektivt.
4.
For å unngå vibrasjoner, må skapet settes på et rett,
jevnt gulv.
Hvis nødvendig, det kan korrigeres for skjevheter i
gulvet med de justerbare benene foran. Skapet bør
justeres så det er i vater - ikke helle mot .
Fronten på skapet bør være litt høyere enn baksiden
for at døren skal lukke seg lettere.
Tippes skapet forsiktig litt bakover, blir det enklere å
justere benene ved å skru de opp eller ned for hånd.
Skru benene mot venstre ( ) for å heve skapets
front, og mot høyre ( ) for å senke.
Hvis ikke sokkeldekselet allerede er på, festes det med
to skruer.
Ta i bruk
5.
Vask skapet inn- og utvendig for støv som kan ha
samlet seg under lagring og transport.
6.
Fjern teip og sett tilbehør, som isbitbrett osv., på riktig
plass. Tilbehør er pakket samlet for å hindre mulig
skade under transport.
7.
Skapet må stå oppreist i minst én time før strøm
tilkobles.
Strømkabelen tilkobles så en jordet stikkontakt.
8.
For å sikre tilstrekkelig luftsirkulasjon rundt fryse/kjøleskapet,
må det være tilstrekkelig klaring på begge sider sant på oversiden,
og avstanden til veggen bak kjøleskapet skal minst være 5 cm.
Når skapet er installert, vent 2 - 3 timer for å la det
stabilisere seg og oppnå brukstemperatur, før du setter
inn matvarer i kjøle- og frysedelen.
Hvis strømkabelen frakobles, vent minst 5 minutter før
den tilkobles igjen.
Skapet er nå klart til bruk.
26
Betjening
27
Kjøl/frys skapet har to kontrollknapper som lar deg
regulere temperaturen i kjøle- og frysedel.
• Start med å stille TEMP. CONTROL
på “4”. Temperaturen i i kjøledelen
kan senere justeres etter eget ønske.
• Hvis du ønsker innvendig temperatur
mindre kaldt eller kaldere, drei
knappen henholdsvis mot MIN eller
MAX.
Temperaturkontroll
Kjøledel
Frysedel
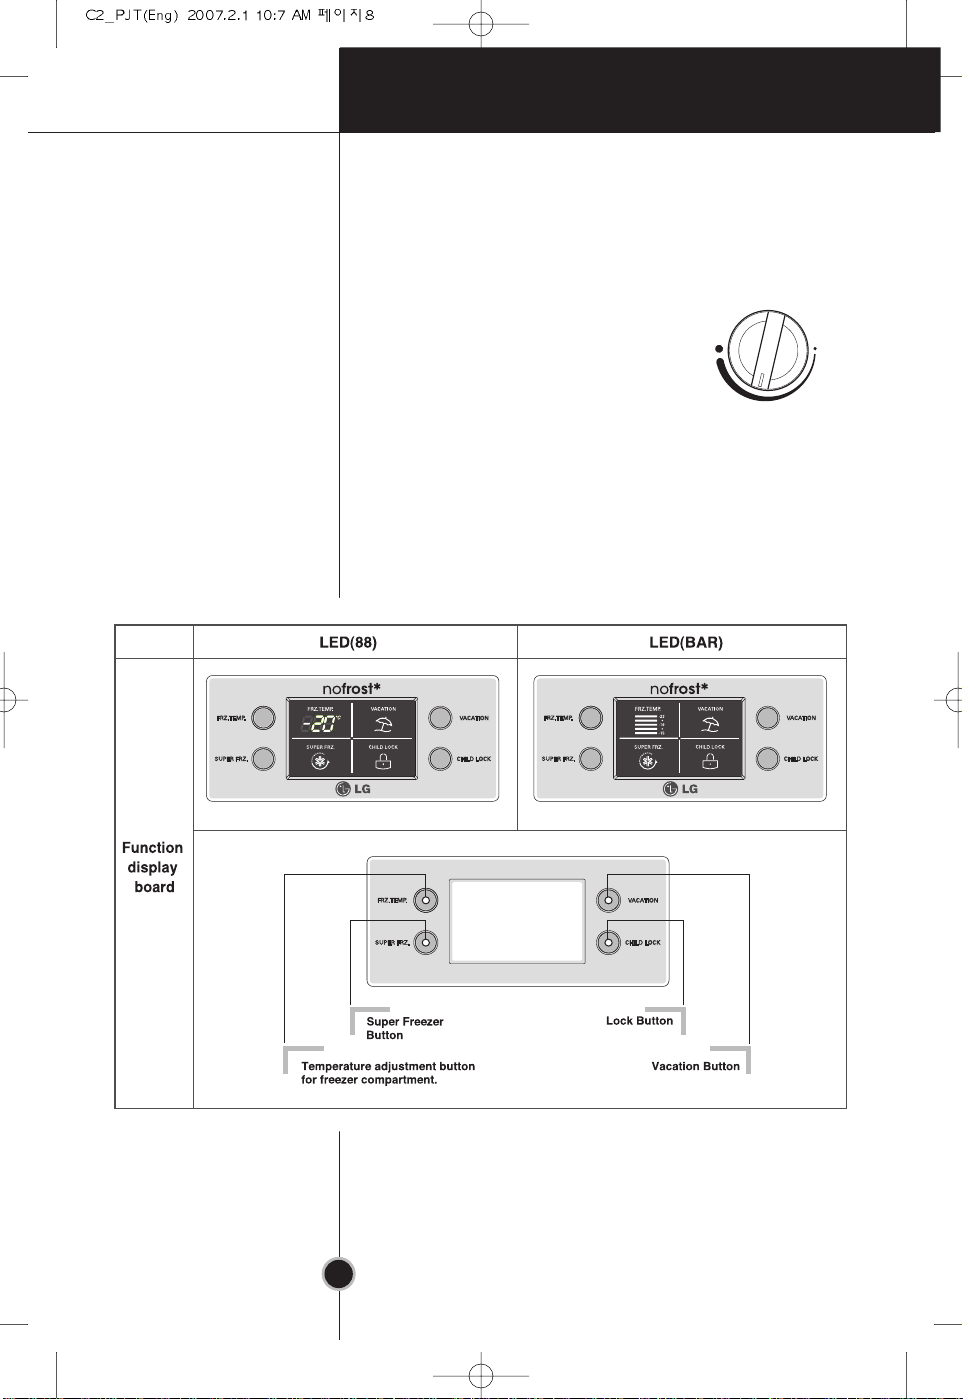
Funksjonsdisplay
Displaypanel for temperaturkontroll
MAX
7
6
5
4
TEMP. CONTROL
MIN
1
2
3
Knapp for
hurtiginnfrysing
Knapp for justering av
temperatu
ren i fryseren
Tastesperre
Ferieknapp
Betjening
• Den initielle temperaturen i fryseren er -18 °C . Du kan justere
temperaturen i frysedelen etter ønske.
< Type LED 88 >
< Type LED BAR >
• Når du trykker på temperaturkontrollknappene angis
temperaturinnstillingen for frysedelen i denne sekvensen.
Type LED 88 frysedel:
-18°C → -19°C → -20°C → -21°C → -22°C → -23°C
→ -15°C → -16°C → -17°C
Merk!
Type LED BAR frysedel:
-19°C → -21°C→ -23°C → -15°C → -17°C
Den faktiske innvendige temperaturen vil variere
avhengig av matvarenes tilstand.
Temperaturinnstillingen setter ønsket temperatur, og
angir ikke kjøleskapets faktiske temperatur.
Kjøleeffekten er begrenset i oppstartsfasen.Juster
temperaturen som angitt ovenfor etter at kjøleskapet
har vært i drift i minimum 2~3 dager.
28
Funksjon
Betjening
Hurtiginnfrysing
Vacation (Ferie)
• Velg denne funksjonen for hurtig innfrysning.
• Denne funksjonen brukes til å fryse ned matvarer hurtig.
Trykk én gang på knappen ‘SUPER FRZ.’ (Super Freezer).
Deretter starter hurtiginnfrysingen og lampen lyser.
• Hurtiginnfrysingen tar ca. 3 timer. Når hurtiginnfrysingen
avsluttes, settes temperaturen automatisk til forrige
innstilling. Vil du avbryte hurtiginnfrysingen, trykker du p
knappen ‘SUPER FRZ.’ en gang til. Lampen slukker,
hurtiginnfrysingen avbrytes og kjøleskapet går tilbake til
forrige temperaturinnstilling.
• Denne funksjonen gjør at kombiskapet jobber i en
strømsparingsmodus gjennom å redusere energiforbruket så
mye som mulig. Dette er nyttig når du reiser på ferie.Ved å
trykke på knappen ‘VACATION’ (Ferie) starter funksjonen og
lampen lyser. Ved å trykke en gang til, avbrytes funksjonen.
å
29
 Loading...