

global_main.book.book Page 1 Thursday, April 2, 2020 3:20 PM
OWNER'S MANUAL
FRIDGE & FREEZER
Before beginning installation, read these instructions
carefully. This will simplify installation and ensure that the
product is installed correctly and safely. Leave these
instructions near the product after installation for future
reference.
EN ENGLISH FR FRANÇAIS AR ARABIC
Copyright © 2019 - 2020 LG Electronics Inc. All Rights Reserved.
www.lg.com

global_main.book.book Page 2 Wednesday, April 1, 2020 3:23 PM
TABLE OF CONTENTS
SAFETY INSTRUCTIONS ................................. 3
READ ALL INSTRUCTIONS BEFORE USE............................3
WARNING.............................................................................3
CAUTION..............................................................................8
INSTALLATION ............................................. 10
Before Installation ............................................................10
Removing the Fridge and Freezer Door.........................11
Levelling and Door Alignment ........................................12
Turning on the Power ......................................................14
Moving the Appliance for Relocation .............................14
OPERATION .................................................. 15
Before Use .........................................................................15
Product Features...............................................................17
Control Panel.....................................................................20
InstaView............................................................................21
Door in Door......................................................................21
Drawer................................................................................22
Icemaker ............................................................................23
Shelf....................................................................................24
Door Basket .......................................................................25
This manual may contain images or
content that may be different from the
model you purchased.
This manual is subject to revision by the
manufacturer.
SMART FUNCTIONS...................................... 26
LG ThinQ Application........................................................26
Smart Diagnosis................................................................27
MAINTENANCE............................................. 29
Cleaning .............................................................................29
TROUBLESHOOTING .................................... 30
Before Calling for Service ................................................30
WARNING
global_main.book.book Page 3 Wednesday, April 1, 2020 3:23 PM
SAFETY INSTRUCTIONS
3
SAFETY INSTRUCTIONS
READ ALL INSTRUCTIONS BEFORE USE
The following safety guidelines are intended to prevent unforeseen
risks or damage from unsafe or incorrect operation of the appliance.
The guidelines are separated into
described below.
Safety Messages
This symbol is displayed to indicate matters and operations
that can cause risk. Read the part with this symbol carefully
and follow the instructions in order to avoid risk.
WARNING
This indicates that the failure to follow the instructions can
cause serious injury or death.
‘WARNING’
and
‘CAUTION’
as
EN
CAUTION
This indicates that the failure to follow the instructions can
cause the minor injury or damage to the product.
WARNING
To reduce the risk of explosion, fire, death, electric shock, injury or
scalding to persons when using this product, follow basic precautions,
including the following:
Technical Safety
• This appliance is not intended for use by persons (including children)
with reduced physical, sensory or mental capabilities, or lack of
experience and knowledge, unless they have been given supervision
or instruction concerning use of the appliance by a person
global_main.book.book Page 4 Wednesday, April 1, 2020 3:23 PM
4
EN
SAFETY INSTRUCTIONS
responsible for their safety. Children should be supervised to ensure
that they do not play with the appliance.
• This appliance is intended to be used in household and similar
applications such as:
- staff kitchen areas in shops, offices and other working
environments;
- farm houses and by clients in hotels, motels and other residential
type environments;
- bed and breakfast type environments;
- catering and similar non-retail applications.
•
This symbol alerts you to flammable materials that can
ignite and cause a fire if you do not take care.
• This appliance contains a small amount of isobutane refrigerant
(R600a), but it is also combustible. When transporting and installing
the appliance, care should be taken to ensure that no parts of the
refrigerating circuit are damaged.
• The refrigerant and insulation blowing gas used in the appliance
require special disposal procedures. Consult with service agent or a
similarly qualified person before disposing of them.
• Do not damage the refrigerant circuit.
• If the power cord is damaged or the hole of the outlet socket is loose,
do not use the power cord and contact an authorized service centre.
• Do not locate multiple portable outlet sockets or portable power
supplies at the rear of the appliance.
• Securely plug the power plug in the outlet socket after completely
removing any moisture and dust.
• Never unplug the appliance by pulling on the power cable. Always
grip the power plug firmly and pull straight out from the outlet
socket.
• Keep ventilation openings, in the appliance enclosure or in the builtin structure, clear of obstruction.

global_main.book.book Page 5 Wednesday, April 1, 2020 3:23 PM
SAFETY INSTRUCTIONS
5
EN
• Do not store explosive substances such as aerosol cans with a
flammable propellant in this appliance.
• Do not tilt the appliance to pull or push it when transporting.
• When positioning the appliance, ensure the supply cord is not
trapped or damaged.
• Do not use mechanical devices or other means to accelerate the
defrosting process.
• Do not use a hair drier to dry the inside of the appliance or place a
candle inside to remove the odours.
• Do not use electrical appliances inside the refrigerator.
• Make sure not to get a body part such as a hand or foot stuck while
moving the appliance.
• Disconnect the power cord before cleaning the appliance or
replacing the inside lamp (where fitted).
• Do not spray water or inflammable substances (toothpaste, alcohol,
thinner, benzene, flammable liquid, abrasive, etc.) over the interior or
exterior of the appliance to clean it.
• Do not clean the appliance with brushes, cloths or sponges with
rough surfaces or which are made of metallic material.
• Only qualified service personnel from LG Electronics service centre
should disassemble, repair, or modify the appliance. Contact an LG
Electronics customer information centre if you move and install the
appliance in a different location.
Risk of Fire and Flammable Materials
• If a leak is detected, avoid any naked flames or potential sources of
ignition and air the room in which the appliance is standing for
several minutes. In order to avoid the creation of a flammable gas air
mixture if a leak in the refrigerating circuit occurs, the size of the
room in which the appliance is used should correspond to the
amount of refrigerant used. The room must be 1 m² in size for every
8 g of R600a refrigerant inside the appliance.
• Refrigerant leaking out of the pipes could ignite or cause an
explosion.

global_main.book.book Page 6 Wednesday, April 1, 2020 3:23 PM
6
EN
SAFETY INSTRUCTIONS
• The amount of refrigerant in your particular appliance is shown on
the identification plate inside the appliance.
Installation
• This appliance should only be transported by two or more people
holding the appliance securely.
• Install the appliance on a firm and level floor.
• Do not install the appliance in a damp and dusty place. Do not install
or store the appliance in any outdoor area, or any area that is subject
to weathering conditions such as direct sunlight, wind, rain, or
temperatures below freezing.
• Do not place the appliance in direct sunlight or expose it to the heat
from heating appliances such as stoves or heaters.
• Be careful not to expose the rear of the appliance when installing.
• Install the appliance in a place where it is easy to unplug the power
plug of the appliance.
• Be careful not to let the appliance door fall during assembly or
disassembly.
• Be careful not to pinch, crush, or damage the power cable during
assembly or disassembly of the appliance door.
• Be careful not to point the power plug up or let the appliance lean
against the power plug.
• Do not connect a plug adapter or other accessories to the power
plug.
• Do not modify or extend the power cable.
• Ensure that the outlet socket is properly grounded, and that the earth
pin on the power cord is not damaged or removed from the power
plug. For more details on grounding, inquire at an LG Electronics
customer information centre.
• This appliance is equipped with a power cord having an equipmentgrounding conductor and a grounding power plug. The power plug
must be plugged into an appropriate outlet socket that is installed
and grounded in accordance with all local codes and ordinances.
global_main.book.book Page 7 Wednesday, April 1, 2020 3:23 PM
SAFETY INSTRUCTIONS
7
EN
• Never start up an appliance showing any signs of damage. If in doubt,
consult your dealer.
• Dispose of all packaging materials (such as plastic bags and
styrofoam) away from children. The packaging materials can cause
suffocation.
• Do not plug the appliance into a multi socket adapter which does not
have a power cable (mounted).
• The appliance should be connected to a dedicated power line which
is separately fused.
• Do not use a multi socket outlet which is not properly grounded
(portable). In case of using a properly-grounded multi socket outlet
(portable), use the multi socket outlet with the current capacity of the
power cord rating or higher and use the multi socket outlet only for
the appliance.
Operation
• Do not use the appliance for any purpose (storage of medical or
experimental materials or shipping) other than any domestic
household food storage use.
• If water penetrates electrical parts of the appliance, disconnect
power plug and contact an LG Electronics customer information
centre.
• Unplug the power plug during a severe thunderstorm or lightening
or when not in use for a long period of time.
• Do not touch the power plug or the appliance controls with wet
hands.
• Do not bend the power cable excessively or place a heavy object on it.
• Immediately unplug the power plug and contact an LG Electronics
customer information centre if you detect a strange sound, odour, or
smoke coming from the appliance.
• Do not place hands or metallic objects inside the area emitting the
cold air, cover or heat releasing grille on the back.
• Do not apply excessive force or impact to the back cover of the
appliance.
CAUTION
global_main.book.book Page 8 Wednesday, April 1, 2020 3:23 PM
8
EN
SAFETY INSTRUCTIONS
• Be careful of nearby children when you open or close the appliance
door. The door may bump the child and cause injury.
• Avoid the danger of children getting trapped inside the appliance. A
child trapped inside the appliance can cause suffocation.
• Do not put animals, such as pets into the appliance.
• Do not place heavy or fragile objects, containers filled with liquid,
combustible substances, flammable objects (such as candles, lamps,
etc.), or heating devices (such as stoves, heaters, etc.) on the
appliance.
• Do not place any electronic appliance (such as heater and mobile
phone) inside the appliance.
• If there is a gas leakage (isobutane, propane, natural gas, etc.), do not
touch the appliance or power plug and ventilate the area
immediately. This appliance uses a refrigerant gas (isobutane,
R600a). Although it uses a small amount of the gas, it is still
combustible gas. Gas leakage during appliance transport, installation
or operation can cause fire, explosion or injury if sparks are caused.
• Do not use or store flammable or combustible substances (ether,
benzene, alcohol, chemical, LPG, combustible spray, insecticide, air
freshener, cosmetics, etc.) near the appliance.
Disposal
• When discarding the appliance, remove the door gasket while leaving
the shelves and baskets in place and keep children away from the
appliance.
CAUTION
To reduce the risk of minor injury to persons, malfunction, or damage
to the product or property when using this product, follow basic
precautions, including the following:

global_main.book.book Page 9 Wednesday, April 1, 2020 3:23 PM
SAFETY INSTRUCTIONS
9
EN
Operation
• Do not touch frozen food or the metal parts in the freezer
compartment with wet or damp hands. It may cause frostbite.
• Do not place glass containers, bottles or cans (especially those
containing carbonated drinks) in the freezer compartment, shelves or
ice bin that will be exposed to temperatures below freezing.
• The tempered glass on the front side of the appliance door or the
shelves can be damaged by an impact. If it is broken, do not touch it
with hands.
• Do not hang from the appliance doors, storage room, shelf or climb
up into it.
• Do not store an excessive amount of water bottles or containers for
side dishes on the door baskets.
• Do not open or close the appliance door with excessive force.
• If the hinge of the appliance door is damaged or operates
improperly, stop using the appliance and contact an authorized
service centre.
• Prevent animals from nibbling on the power cable or water hose.
• Never eat frozen foods immediately after they have been taken out in
the freezer compartment.
• Do not use a thin crystal cup or chinaware when dispensing.
• Make sure not to get a hand or foot stuck upon opening or closing the
appliance door or door in door.
Maintenance
• Do not clean glass shelves or covers with warm water when they are
cold. They may shatter if exposed to sudden temperature changes.
• Do not insert the shelves upside down. The shelves may fall.
• To remove frost from the appliance, contact an LG Electronics
customer information centre.
• Dispose of the ice inside the ice bin in the freezer compartment
during an extended power outage.
NOTE
NOTE
global_main.book.book Page 10 Wednesday, April 1, 2020 3:23 PM
10
EN
INSTALLATION
INSTALLATION
Before Installation
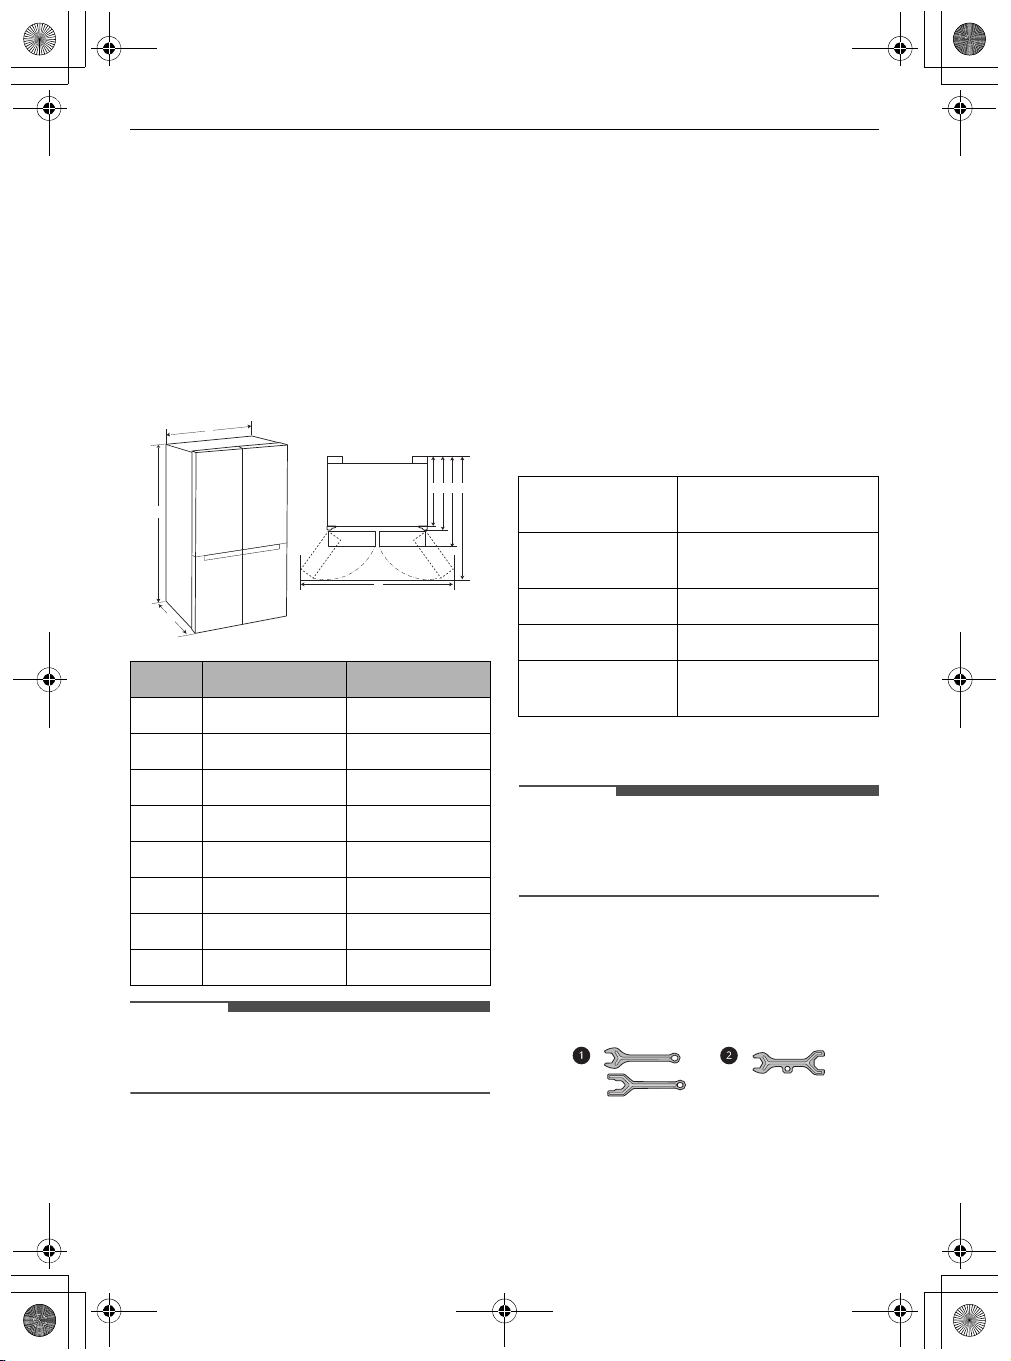
Dimensions and Clearances
Too small of a distance from adjacent items may
result in the degradation of freezing capability and
increased electricity costs. Allow over 50 mm of
clearance between the back of the appliance and
the wall when installing the appliance.
A
D E
G
F
B
H
C
- Type A (mm) Type B (mm)
A912 912
B 1790 1790
C927 738
Ambient Temperature
• The appliance is designed to operate within a
limited range of ambient temperatures,
depending on the climate zone.
• The internal temperatures could be affected by
the location of the appliance, the ambient
temperature, the frequency of door opening and
so on.
• The climate class can be found on the rating
label.
Climate Class Ambient Temperature
Range ºC
SN (Extended
Temperate)
N (Temperate) +16 - +32
ST (Subtropical) +16 - +38 / +18 - +38**
T (Tropical) +10 - +43* / +16 - +43 /
* Australia, India, Kenya
** Argentina, Ecuador
+10 - +32
+18 - +43**
D797 615
E877 690
F927 738
G 1384 1180
H 1713 1750
• You can determine what type of appliance it is by
looking at the label inside the appliance.
• The appliances rated from SN to T are intended
to be used at an ambient temperature between
10 ºC and 43 ºC.
Accessories
*1:This feature is only available on some models.
a
Spanner A*1
b
Spanner B*1
WARNING
CAUTION
CAUTION
global_main.book.book Page 11 Wednesday, April 1, 2020 3:23 PM
Removing the Fridge and
Freezer Door
If your entrance door is too narrow for the
appliance to pass through, remove the appliance
doors and pass the appliance laterally.
• Disconnect the power cord, house fuse or circuit
breaker before installing, removing the doors, or
cleaning the appliance. Failure to follow these
instructions may result in death, fire or electric
shock.
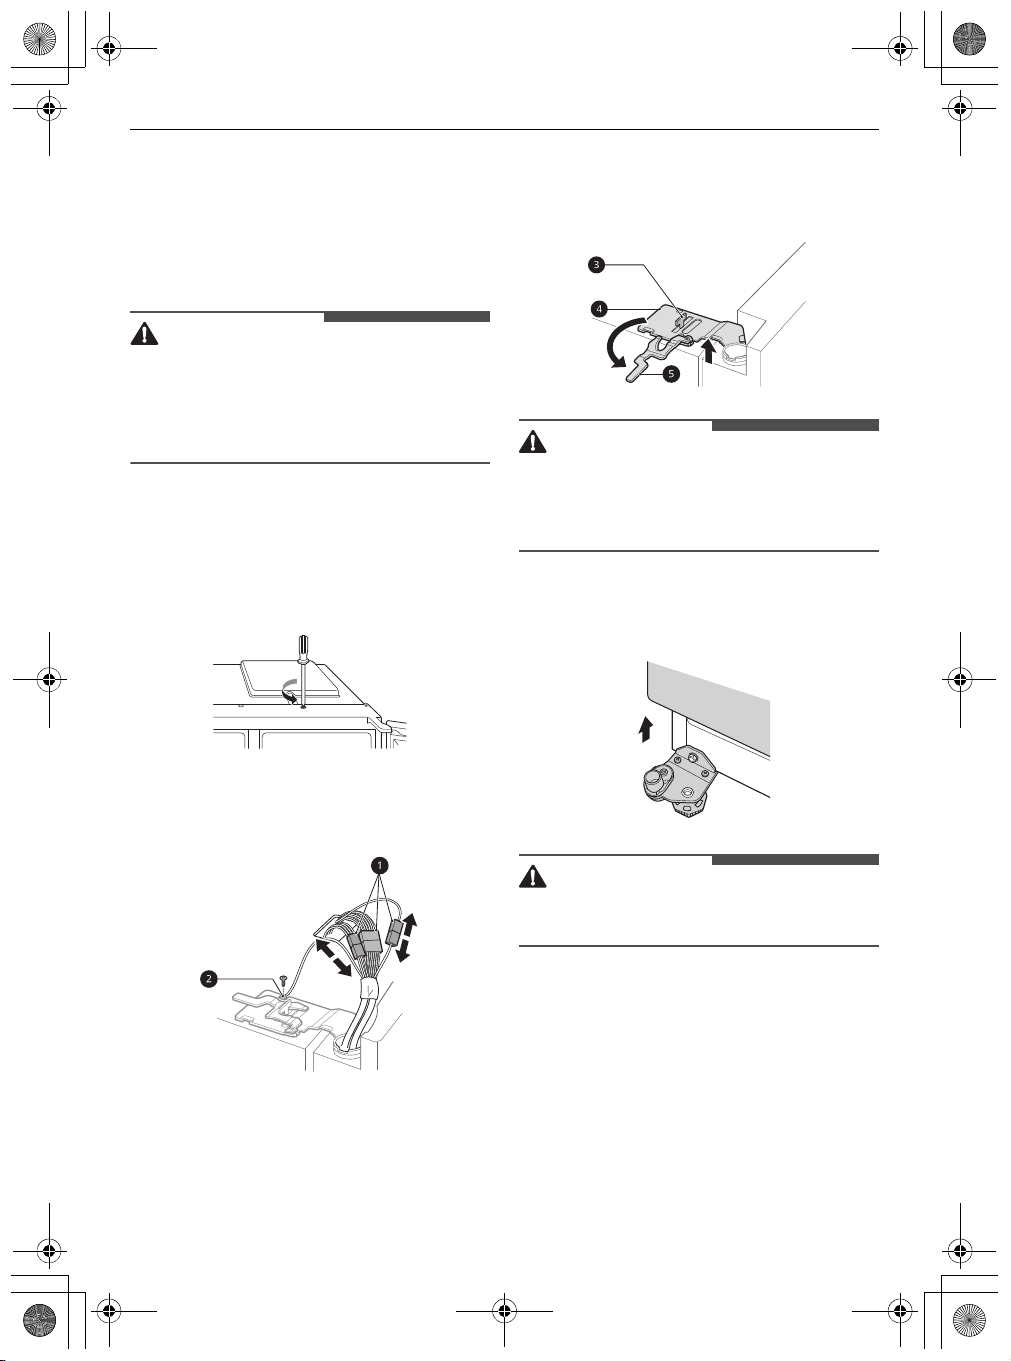
Removing the Freezer Door
1
Remove the screw from the hinge cover at the
top of the appliance. Lift the hook, located at
the bottom of the front side of the cover, with
a flat-head screwdriver.
INSTALLATION
3
Rotate the hinge lever e counterclockwise. Lift
the top hinge
.
• When lifting the hinge free of the latch, be
careful that the door does not fall forward. It is
recommended that two or more people carry
out the door removal and refitting.
4
Lift the freezer door until it is free of the
bottom hinge assembly.
d
free of the hinge lever latch c
11
EN
2
Disconnect all wire harnesses a. Unscrew the
ground wire
b
.
• Place the door on a non-scratching surface with
the inner side facing up.
CAUTION
CAUTION
NOTE
global_main.book.book Page 12 Wednesday, April 1, 2020 3:23 PM
12
EN
INSTALLATION
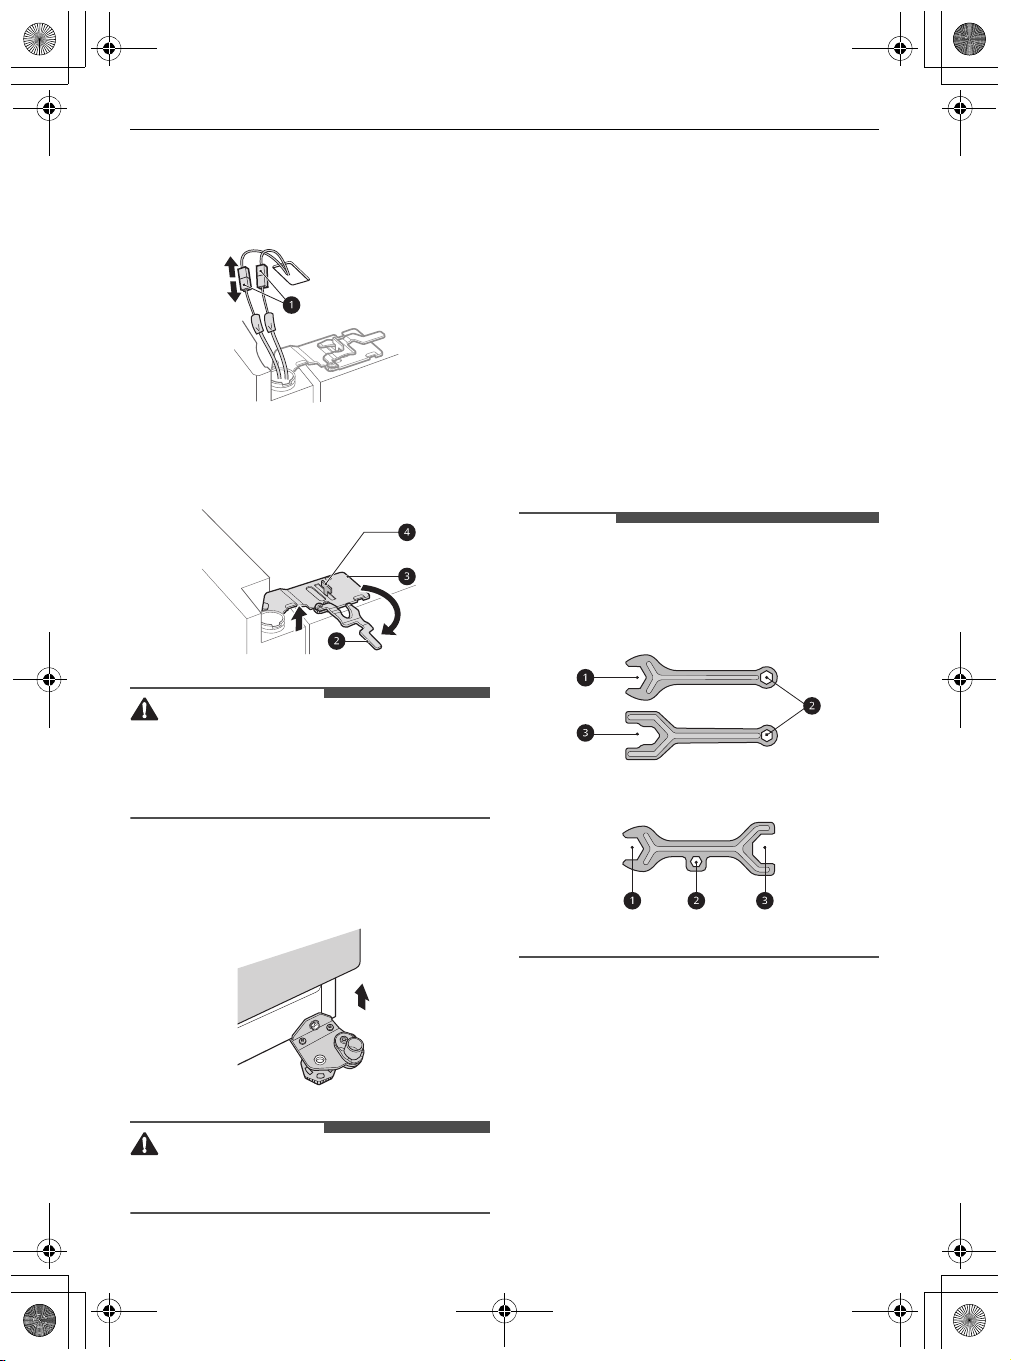
Removing the Fridge Door
1
Disconnect all wire harnesses a.
2
Rotate the hinge lever b clockwise. Lift the top
hinge
c
free of the hinge lever latch d .
• When lifting the hinge free of the hinge lever
latch, be careful that the door does not fall
forward. It is recommended that two or more
people carry out the door removal and refitting.
Refitting the Fridge and Freezer
Door
Refit the doors in the reverse sequence of their
removal once the appliance has been passed
through all access doors.
Levelling and Door
Alignment
Before Beginning
When the appliance doors appear to be uneven,
follow the instructions below to align the doors.
• The spanner may differ depending on the model.
You will be provided with either spanner type A
or B.
- Spanner Type A
- Spanner Type B
3
Lift the fridge door until it is free of the bottom
hinge assembly.
• Place the door on a non-scratching surface with
the inner side facing up.
Levelling the Appliance
The appliance has two front levelling legs. Adjust
the legs to alter the tilt from front to back or side to
side. If the appliance seems unsteady, or the doors
do not close easily, adjust the appliance’s tilt using
the instructions below.

CAUTION
NOTE
global_main.book.book Page 13 Wednesday, April 1, 2020 3:23 PM
Use the spanner a to adjust the height by turning
the levelling leg to the left to raise it or to the right
to lower it.
Door Alignment for Freezer and
Fridge Door
If the door of the appliance is not level, adjust the
difference in the height of appliance door.
INSTALLATION
2
Use the spanner b to adjust the height by
turning the adjustment hinge pin to the left or
to the right.
• Do not adjust the height of the appliance door
more than 3 mm.
3
Use the spanner a to fasten the keeper nut by
turning it to the right.
13
EN
1
Open the door and use the spanner a to
loosen the keeper nut by turning it to the left.
• Leveling the doors may not be possible when the
floor is not leveled, or is of weak or poor
construction.
• The refrigerator is heavy and should be installed
on a rigid and solid surface.
• Some timber flooring may cause levelling
difficulties if it flexes excessively.
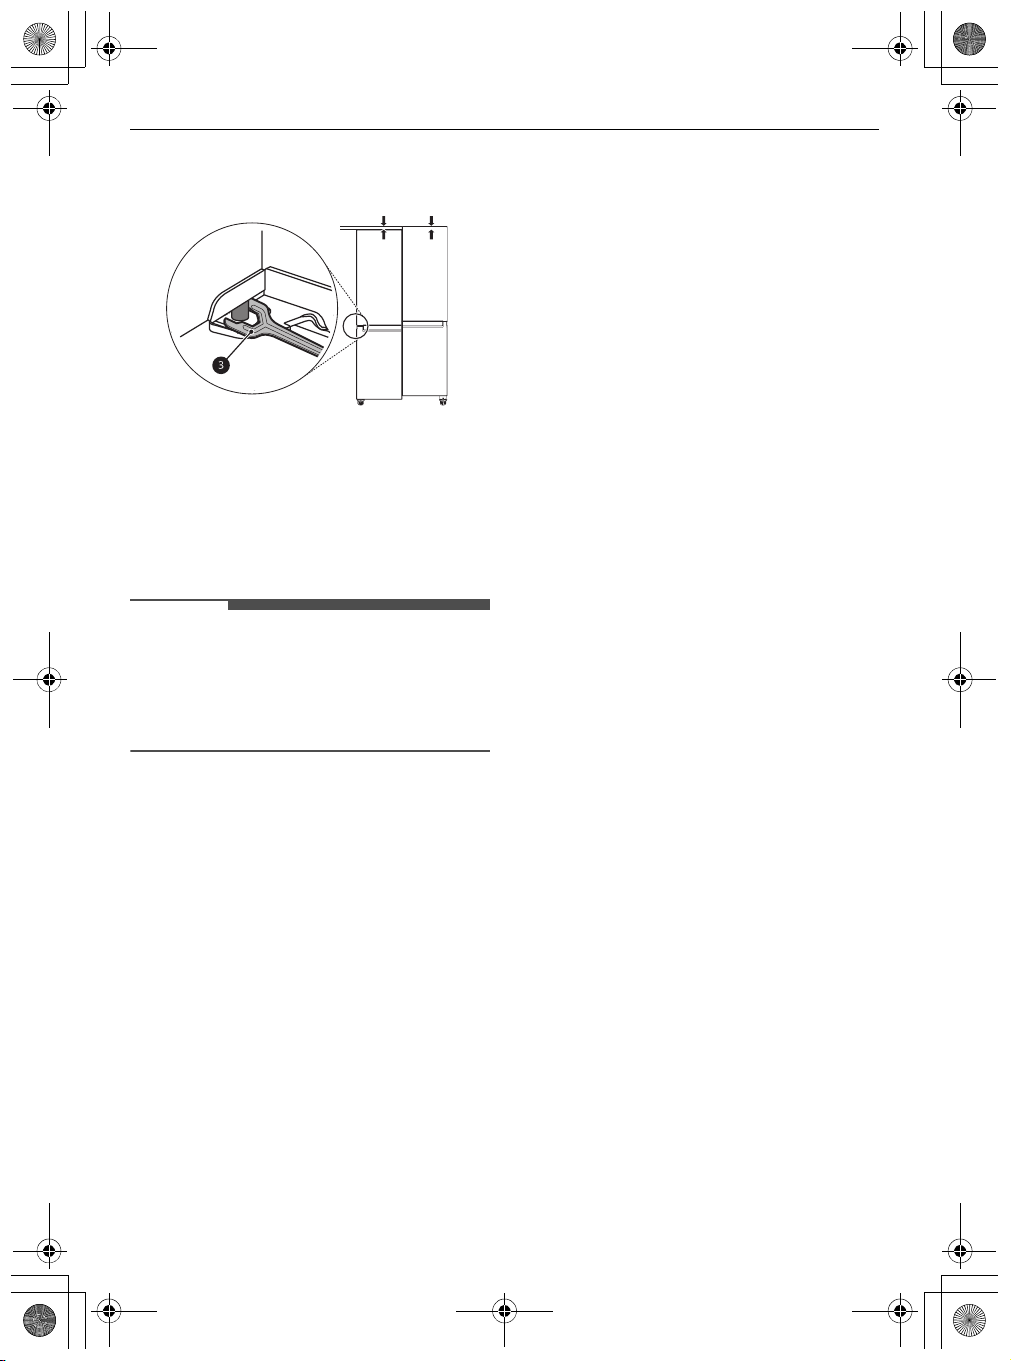
Door Alignment for Upper
Freezer Door
The upper freezer door is only available on some
models.
NOTE
global_main.book.book Page 14 Wednesday, April 1, 2020 3:23 PM
14
EN
INSTALLATION
Open the upper freezer door and use the spanner
c
to rotate the door hinge bolt.
Turning on the Power
Connecting the Appliance
After installing the appliance, connect the power
plug into the outlet socket.
• After connecting the power supply cord (or plug)
to the outlet, wait 3 or 4 hours before you put
food into the appliance. If you add food before
the appliance has cooled completely, your food
may spoil.
over a long distance, keep the appliance
upright.
5
After installing the appliance, connect the
power plug into a mains outlet socket and
switch it on.
Moving the Appliance for
Relocation
Preparing for Relocation
1
Remove all food from inside the appliance.
2
Pull the power plug out, insert and fix it into the
power plug hook at the rear or on top of the
appliance.
3
Tape parts such as shelves and the door handle
to prevent from falling off while moving the
appliance.
4
Move the appliance with more than two people
carefully. When transporting the appliance
NOTE
NOTE
global_main.book.book Page 15 Wednesday, April 1, 2020 3:23 PM
OPERATION
Before Use
Notes for Operation
• Users should keep in mind that frost can form if
the door is not closed completely or if the
humidity is high during the summer.
• Ensure there is sufficient space between food
stored on the shelf or door basket to allow the
door to close completely.
• Opening the door for long periods can cause a
significant increase of the temperature in the
compartments of the appliance.
• If the refrigerating appliance is left empty for
long periods, switch off, defrost, clean, dry, and
leave the door open to prevent mould
developing within the appliance.
Door Open Alarm
The alarm sounds 3 times in 30 second intervals if
the door is left open or not completely closed for 1
minute.
• Contact the LG Electronics customer information
centre if the alarm sound continues after 30
seconds even after closing all doors.
OPERATION
the repair technician from the our information
centre may have difficulty finding the problem.
15
EN
Suggestion for Energy Saving
• Ensure there is sufficient space between stored
foods. This allows cold air to be circulated evenly
and lowers electricity bills.
• Store hot food only after it has cooled in order to
prevent dew or frost.
• When storing food in the freezer compartment,
set the freezer temperature lower than the
temperature indicated on the food.
• Do not set the temperature of the appliance
lower than needed.
• Do not put food near the temperature sensor of
the fridge compartment. Keep a distance of at
least 3 cm from the sensor.
• Note that a temperature rise after defrosting has
a permissible range in the appliance
specifications. If you wish to minimise the impact
on the food storage due to a temperature rise,
seal or wrap the stored food in several layers.
• The automatic defrosting system in the
appliance ensures that the compartment
remains free of ice buildup under normal
operating conditions.
Failure Detection
The appliance can automatically detect problems
during the operation.
• If a problem is detected, the appliance may not
operate and an error code is displayed even
when any button is pressed.
• If an error code is indicated on the display, do
not turn off the power. Immediately contact the
LG Electronics customer information centre and
report the error code. If you turn off the power,
Storing Foods Effectively
• Store frozen food or refrigerated food inside
sealed containers.
• Check the expiration date and label (storage
instructions) before storing food in the
appliance.
• Do not store food for a long period of time (more
than 4 weeks) if it spoils easily at a low
temperature.
• Place the refrigerated food or frozen food in
each fridge or freezer compartment
immediately after purchasing.
CAUTION
NOTE
global_main.book.book Page 16 Wednesday, April 1, 2020 3:23 PM
16
EN
OPERATION
• Store raw meat and fish in suitable containers in
the refrigerator, so that it is not in contact with or
drip onto other food.
• Refrigerated foods and other food items can be
stored on top of the vegetable drawer.
• Avoid refreezing any food which has been
completely thawed. Freezing any food which has
been completely thawed again will lower its taste
and nutrition.
• Do not overfill the appliance. Cold air can not
circulate properly if the appliance is overfilled.
• Cool hot food before storing. If too much hot
food is placed inside, the internal temperature of
the appliance can increase and negatively affect
other foods stored in the appliance.
• If you set an excessively low temperature for
food, it may become frozen. Do not set a
temperature lower than the required
temperature for the food to be stored correctly.
• If there are chill compartments in the appliance,
do not store vegetables and fruits with higher
moisture content in the chill compartments as
they may freeze due to the lower temperature.
• In the event of a blackout, call the electricity
company and ask how long it is going to last.
- You should avoid door openings while the
power is off.
- When the power supply gets back to normal,
check the condition of the food.
Freezing the Maximum Amount
of Food
If large quantities of food are to be stored, all the
freezer drawers should be taken out of the
appliance and the food should be stacked directly
on the freezer shelves in the freezer compartment.
• To remove the drawers, first remove the food
from drawers and then pull out the drawers
carefully. Not doing so could cause injury or
damage to the drawers.
• The shape of each drawer may be different,
insert in the right position.
Two Star Compartment
• Two star (a) basket or drawer can be used to
store ice and food from -12 °C to -18 °C for short
periods.
• Two star frozen food compartments are suitable
for storing pre-frozen food, storing or making
icecream and making ice cubes.
• Two star compartments are not suitable for the
freezing of fresh food.
Max Freezing Capacity
•
Express Freeze
reach its maximum freezing capacity. This
generally takes up to 24 hours and automatically
switches off.
•
Express Freeze
before fresh products are placed in the freezer
compartment.
• To get better air circulation, insert all inner parts
like baskets, drawers, and shelves.
function will allow the freezer to
must be switched on for 2 hours
global_main.book.book Page 17 Wednesday, April 1, 2020 3:23 PM
OPERATION
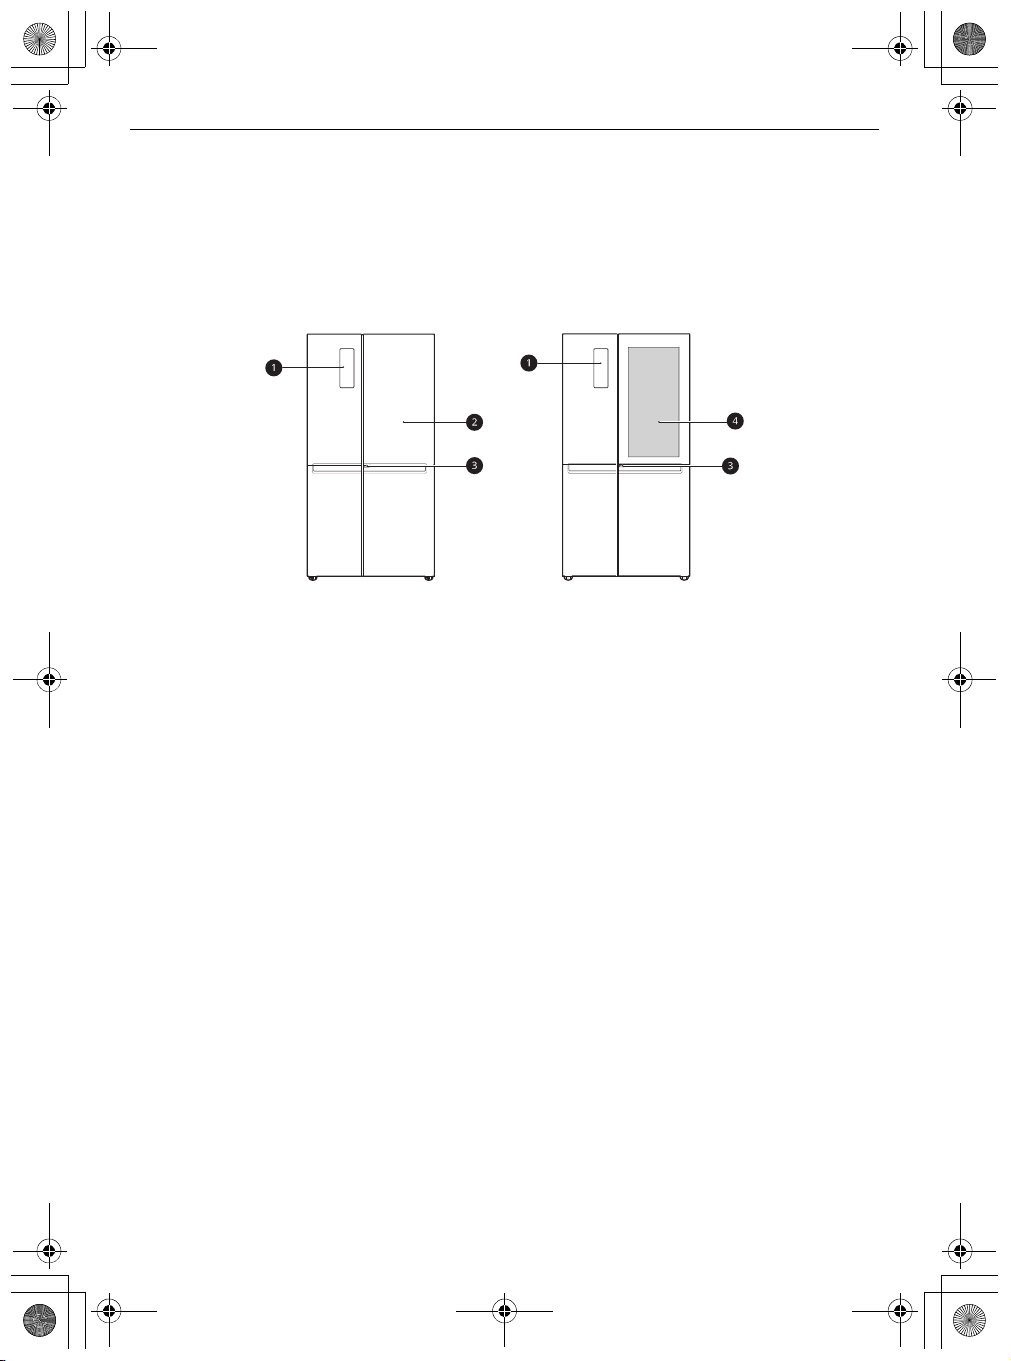
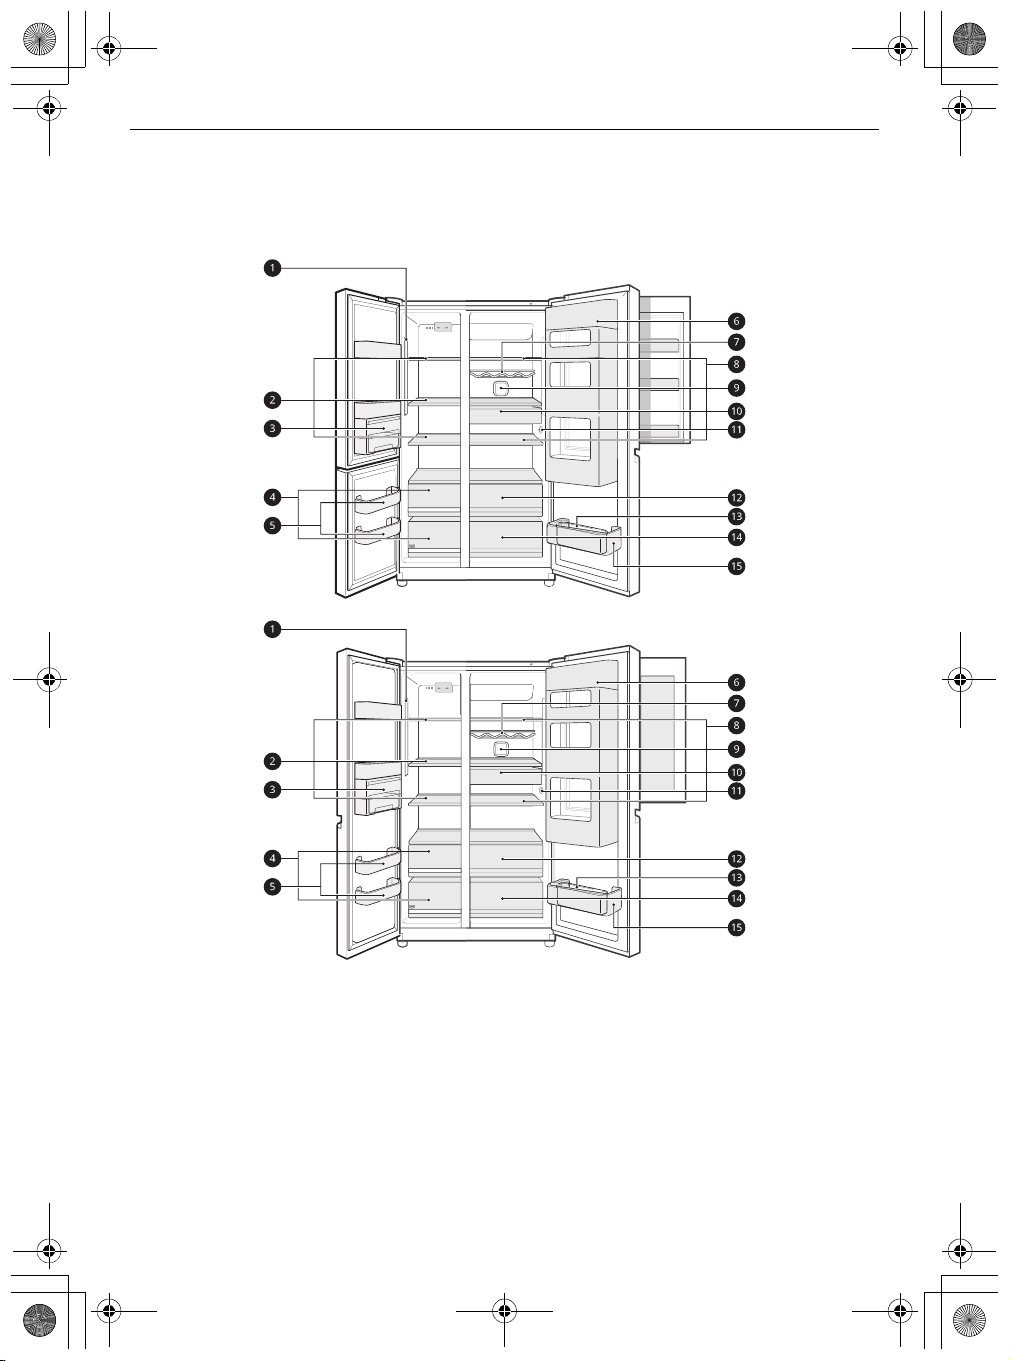
Product Features
The appearance or components of the appliance may differ from model to model.
Exterior
*1:This feature is only available on some models.
a
Control Panel
Sets the refrigerator temperature and freezer temperature.
b
Door in Door
This is a convenient storage area for frequently-used items that require easy access.
c
Door in Door Lever
Opens Door-in-Door.
d
InstaView Door in Door
The InstaView Door-in-Door compartment allows for easy access to commonly used food items.
*1
*1
*1
17
EN
global_main.book.book Page 18 Wednesday, April 1, 2020 3:23 PM
18
EN
OPERATION
Interior (Two Star a)
*1:This feature is only available on some models.
a
LED Lamp
The LED lamps inside the appliance light up when you open the door.
b
Freezer Shelf
This is where frozen foods such as meat, fish, and ice cream can be stored.
c
Icemaker
This is where ice is manually produced and stored.
d
Freezer Drawer
This is for long-term storage of frozen items.
e
Freezer Door Basket
*1
*1
*1
CAUTION
global_main.book.book Page 19 Wednesday, April 1, 2020 3:23 PM
OPERATION
This is where small packaged frozen food or frequently used foods can be stored.
f
Door in Door Compartment
This is where foods which are taken out frequently such as beverages and snacks are stored.
g
Bottle Rack
This is where drinks tall bottles or containers are stored.
• Do not store short bottles or containers. The items may fall and cause an injury or appliance damage.
h
Fridge Shelf
This is where refrigerated foods and other items are stored. Store the foods with higher moisture
content at the front of the shelf.
The shelf height can be adjusted by inserting the shelf in another groove of different height.
The actual number of shelves will differ from model to model.
i
Air Filter
This reduces odours inside the fridge compartment.
j
Snack Drawer
This is where small packages of refrigerated foods are stored.
k
Temperature Sensor
This sensor senses the temperature of the fridge compartment.
• Maintain the distance between the sensor and food to accurately sense the temperature.
l
Fresh Vegetable Drawer
This is where fruits and vegetables are stored to help maintain freshness by adjusting the humidity
controller.
m
Egg Box
This is where eggs are stored.
• Do not use it as the ice bin or place it on the shelf on top of the fridge or the vegetable drawer.
n
Vegetable Drawer
This is where fruits and vegetables are stored to remain fresh for as long as possible.
o
Fridge Door Basket
This is where small packages of refrigerated foods, drinks and sauce containers are stored.
*1
*1
*1
*1
*1
*1
*1
19
EN

NOTE
Power
Hygiene
Fresh
global_main.book.book Page 20 Wednesday, April 1, 2020 3:23 PM
20
EN
OPERATION
Control Panel
The actual control panel may differ from model to model.
Control Panel and Functions
*1:This control panel is only available on some models.
a
Fridge
Press this button repeatedly to select a desired temperature between 1 °C and 7 °C.
• The initial fridge temperature is 4 °C.
• The actual inner temperature varies depending on the food status, as the indicated setting temperature
is a target temperature, not actual temperature within the appliance.
b
Freezer
Press this button repeatedly to select a desired temperature between -24 °C and -14 °C.
• The initial freezer temperature is -19 °C.
c
Hygiene Fresh
This function reduces odours inside the fridge.
d
Express Freeze
This function can quickly freeze a large amount of ice or frozen foods.
• This function is enabled and disabled in turn each time you press the button.
• This function automatically terminates after a specific period has passed.
e
Wi-Fi
This button allows the appliance to connect to a home Wi-Fi network. Refer to Smart Functions for
information on the initial setup of the
f
Lock
*1
LG ThinQ
application.

NOTE
NOTE
global_main.book.book Page 21 Wednesday, April 1, 2020 3:23 PM
OPERATION
This locks the buttons on the control panel.
• To lock the control panel buttons, press and hold the
appears and the function is activated.
• To disable the function, press and hold the
the function is deactivated.
• The control panel automatically turns off for energy saving.
• If there is any finger or skin contacts to the control panel while cleaning it, the button function may
operate.
Lock
InstaView
This feature is only available on some models.
Using the InstaView Door in
Door
The InstaView function on the Door in Door lets you
see if you’re running low on frequently used items
like beverages and snacks, without opening the
refrigerator door.
Lock
button for 3 seconds until the k icon
button for 3 seconds until the l icon appears and
freezer door, and momentarily disabled whilst
the ice dispenser is in use.
• Knock near the center of the glass. Knocking
near the edges of the glass may not activate the
InstaView Door in Door function.
• Knock hard enough so that the knocking sound
is audible.
• The InstaView Door in Door function may
activate if a loud noise occurs near the
refrigerator.
• Clean the glass door with a dry cloth. To remove
stubborn stains, slightly moisten a clean cloth
with lukewarm water or a glass cleaner. Do not
spray glass cleaner directly at the glass door.
21
EN
1
Knock twice on the glass to turn the LED light
inside the Door in Door on or off.
2
The LED light turns off automatically after ten
seconds.
• The InstaView Door in Door function is disabled
for 2 seconds after closing the left or right
Door in Door
This feature is only available on some models.
Using the Door in Door
Pull the lever at the bottom of the door upwards
until the door in door opens.

CAUTION
CAUTION
CAUTION
global_main.book.book Page 22 Wednesday, April 1, 2020 3:23 PM
22
EN
OPERATION
There is plenty of storage space inside the door in
door and its surrounding baskets, allowing you to
store food in an organized manner.
• Do not open the door of the appliance with the
door in door open, or do not open the door in
door while the door of the appliance is open. The
door in door may be struck by the edge of the
appliance and damaged.
Removing/Refitting the Door in
Door Case
2
Mount them in the reverse order of the
removal process.
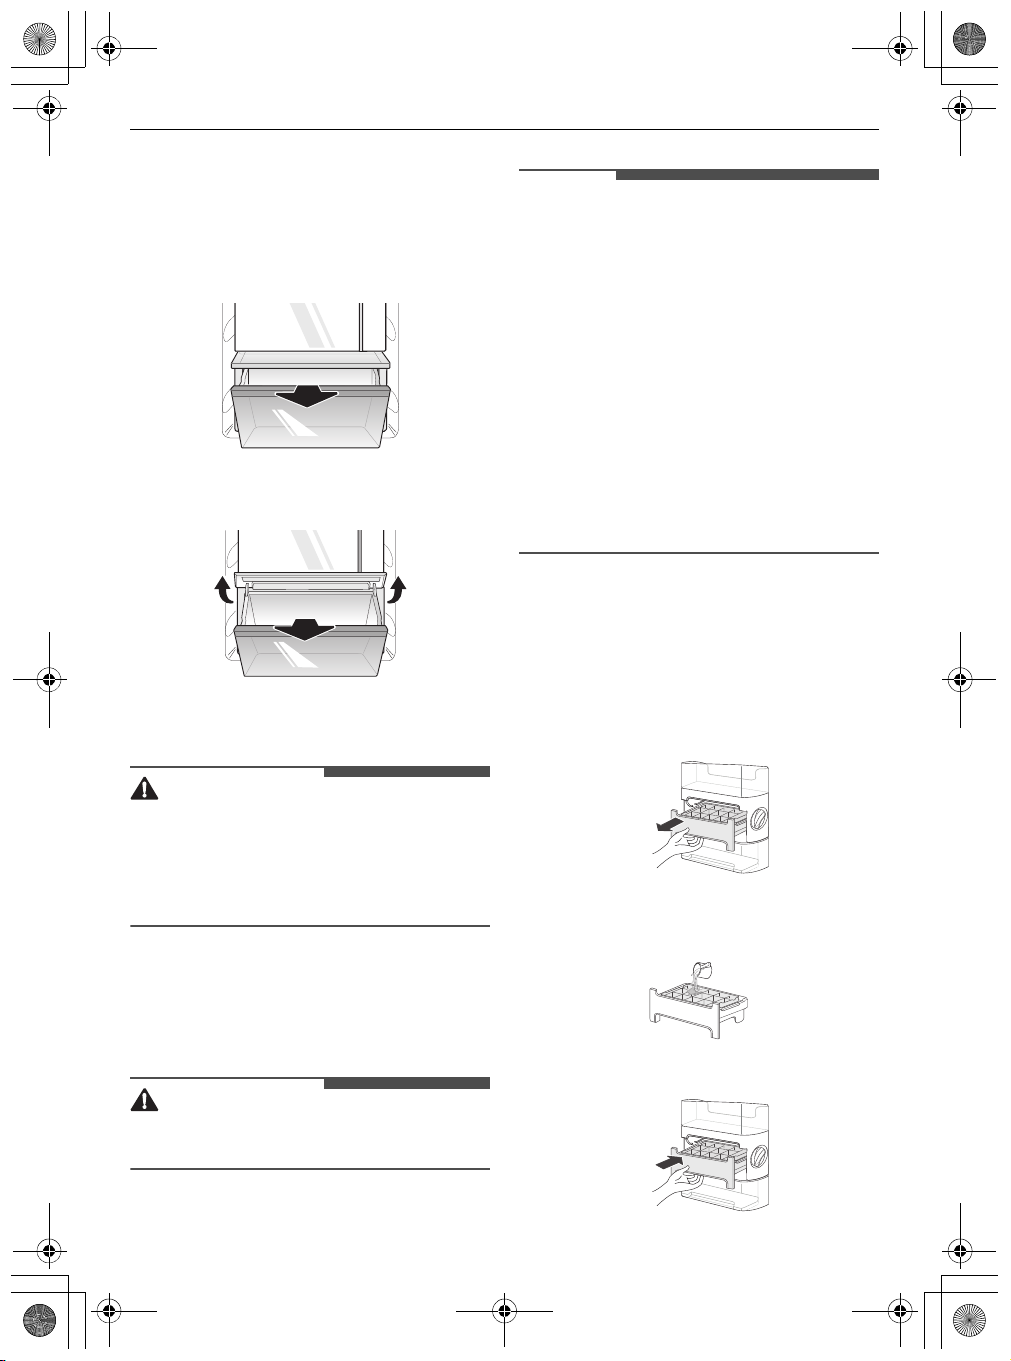
Drawer
• Always empty the drawers before removing
them, and use both hands when removing and
refitting them.
• Make sure that the fridge doors are fully open
before removing and refitting the drawers.
Using the Vegetable Drawer
*1:This feature is only available on some models.
The humidity in the vegetable crisper drawer can
be controlled by sliding the lever in either direction.
• If moved to the left side, the air guide will be
open and allow air to circulate through the
drawer for reduced humidity.
• If moved to the right side, the air guide will be
closed and will maintain any humidity that is
currently in the crisper drawer.
• Remove contents from the Door in Door
compartment before removal.
1
Open the doors completely and remove the
contents of the Door in Door case. Lift up and
pull out the Door in Door case.
Type A*1
Type B*1
CAUTION
WARNING
NOTE
global_main.book.book Page 23 Wednesday, April 1, 2020 3:23 PM
Removing/Refitting the
Drawers
1
Remove the contents of the drawer. Hold the
handle of the vegetable drawers and gently
pull them out.
2
Lift the vegetable drawer up and remove it by
pulling it out.
OPERATION
• The icemaker produces ice normally once
approximately 48 hours have passed after the
appliance is initially installed.
• If half-frozen ice is put into the ice storage bin, it
will cause the exiting ice cubes to lump together.
It takes about 4 hours at - 20 °C for ice
production.
• If the freezer door is frequently opened, warm
air enters the freezer compartment. It may take
a longer time to freeze ice.
• Be careful not to twist the ice maker with force
since it can break.
• Do not freeze the ice in the ice storage bin. This
could break it and cause appliance damage or
injury.
23
EN
Using the Icemaker
*1:This feature is only available on some models.
3
Mount them in the reverse order of the
removal process.
• Always empty the drawers before removing
them, and use both hands when removing and
refitting them.
• Make sure that the fridge doors are fully open
before removing and assembling the drawers.
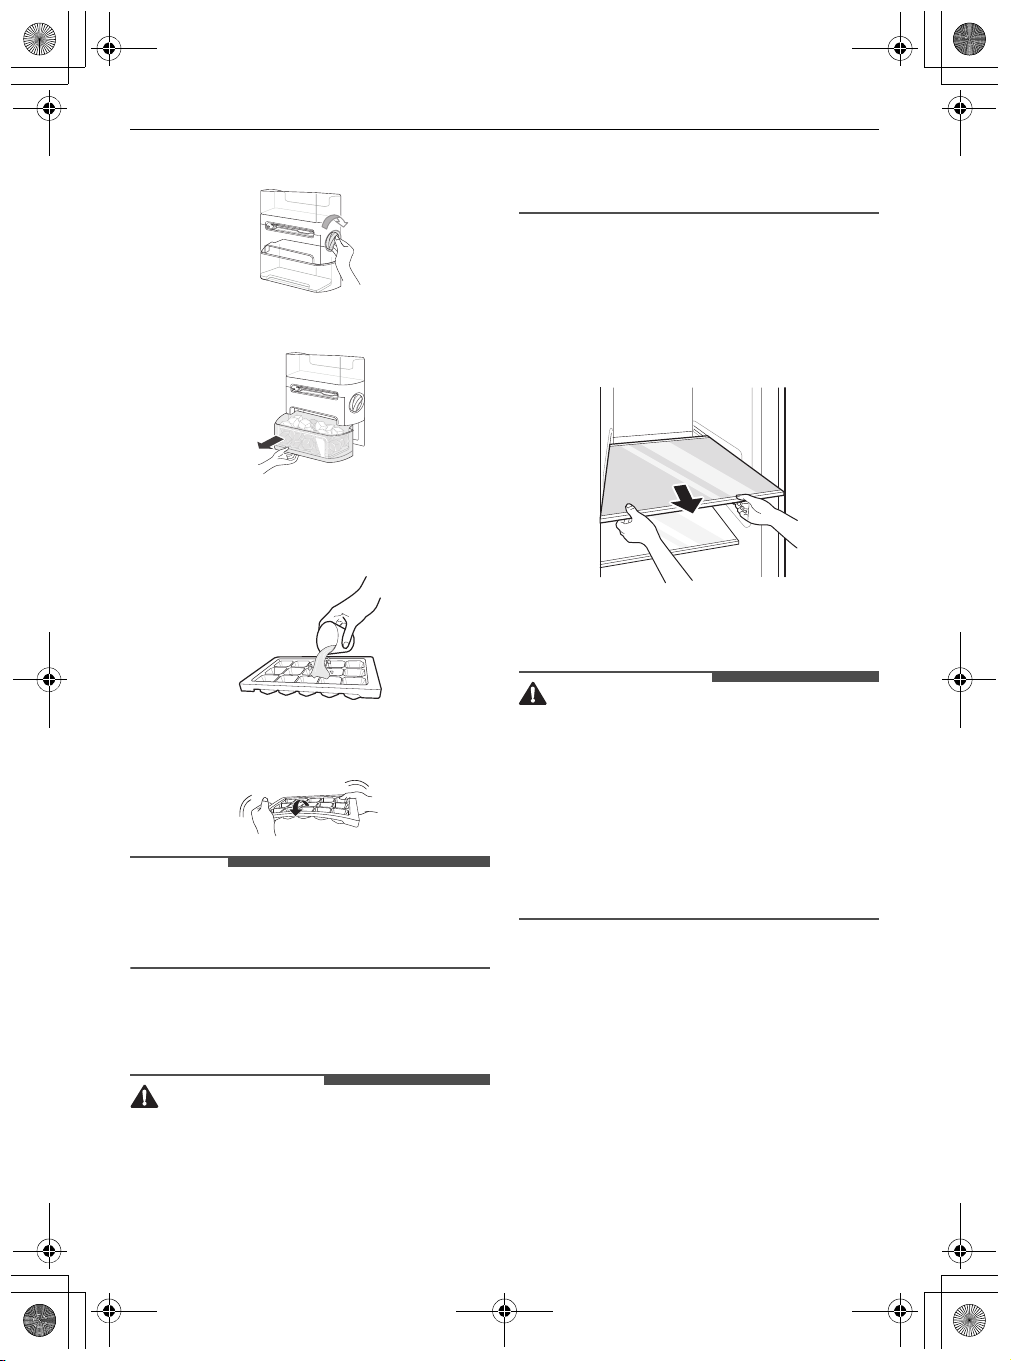
Icemaker
Before Using the Icemaker
• Fill with potable water only into icemaker or
dispenser water tank.
Icemaker Type A*1
1
Hold the handle of ice tray and pull it out.
2
Fill the ice tray with potable water up to the
water line.
3
Place the ice tray back to its position carefully.
NOTE
CAUTION
CAUTION
global_main.book.book Page 24 Wednesday, April 1, 2020 3:23 PM
24
EN
OPERATION
4
Rotate the icemaker handle clockwisely.
5
Lift and remover the ice storage bin slightly.
Icemaker Type B*1
1
Fill the ice tray with potable waterand place it in
the freezer compartment.
2
After the water is frozen, hold theice tray at its
ends and twist gently.
• You can remove the icemaker or ice storage bin
to create more space inside the freezer if you do
not use it.
exposed to sudden temperature changes or
impact.
Removing/Refitting the Shelf
1
Tilt up the front of the shelf and then lift the
shelf straight up.
2
Pull the shelf out.
3
Mount them in the reverse order of the
removal process.
• Glass shelves are heavy. Use special care when
removing them.
• Do not clean glass shelves with warm water
while they are cold. Shelves may break if
exposed to sudden temperature changes or
impact.
• Make sure that shelves are level from one side to
the other. Failure to do so may result in the shelf
falling or food spilling.
Shelf
• Glass shelves are heavy. Use special care when
removing them.
• Do not clean glass shelves with warm water
while they are cold. Shelves may break if
global_main.book.book Page 25 Wednesday, April 1, 2020 3:23 PM
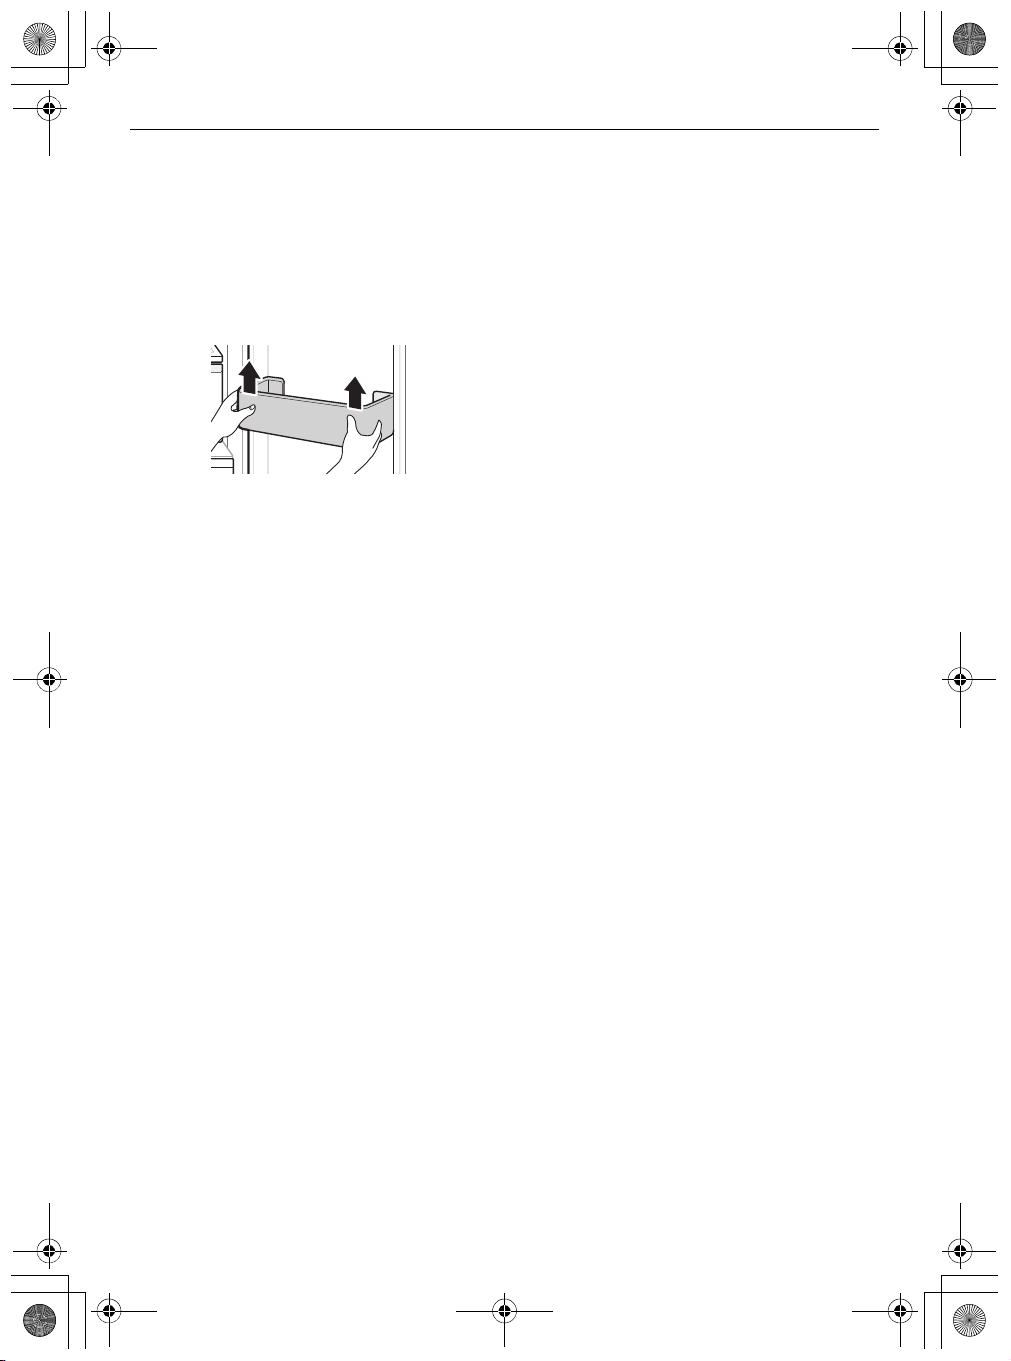
Door Basket
Removing/Refitting the Door
Basket
1
Hold both edges of the basket and remove it by
lifting it upward.
2
Refit the door baskets in the reverse order of
the removal process.
3
Mount them in the reverse order of the
removal process.
OPERATION
25
EN
NOTE
NOTE
global_main.book.book Page 26 Wednesday, April 1, 2020 3:23 PM
26
EN
SMART FUNCTIONS
SMART FUNCTIONS
2
LG ThinQ Application
This feature is only available on models with Wi-Fi.
LG ThinQ
The
communicate with the appliance using a
smartphone.
LG ThinQ Application Features
Communicate with the appliance from a
smartphone using the convenient smart features.
Smart Diagnosis
• If you experience a problem while using the
appliance, this smart diagnosis feature will help
you diagnose the problem.
Settings
• Allows you to set various options on the
appliance and in the application.
application allows you to
Turn off the
your smartphone.
3
Connect your smartphone to the wireless
router.
Mobile data
or
Cellular Data
on
• If you change your wireless router, internet
service provider, or password, delete the
registered appliance from the
application and register it again.
• The application is subject to change for
appliance improvement purposes without notice
to users.
• Functions may vary by model.
LG ThinQ
Before Using LG ThinQ
Application
1
Check the distance between the appliance and
the wireless router (Wi-Fi network).
• If the distance between the appliance and
the wireless router is too far, the signal
strength becomes weak. It may take a long
time to register or installation may fail.
• To verify the Wi-Fi connection, check that f icon
on the control panel is lit.
• The appliance supports 2.4 GHz Wi-Fi networks
only. To check your network frequency, contact
your Internet service provider or refer to your
wireless router manual.
•
LG ThinQ
connection problems or any faults,
malfunctions, or errors caused by network
connection.
• If the appliance is having trouble connecting to
the Wi-Fi network, it may be too far from the
router. Purchase a Wi-Fi repeater (range
extender) to improve the Wi-Fi signal strength.
• The Wi-Fi connection may not connect or may be
interrupted because of the home network
environment.
• The network connection may not work properly
depending on the Internet service provider.
• The surrounding wireless environment can
make the wireless network service run slowly.
• The appliance cannot be registered due to
problems with the wireless signal transmission.
Unplug the appliance and wait about a minute
before trying again.
is not responsible for any network
NOTE
NOTE
global_main.book.book Page 27 Wednesday, April 1, 2020 3:23 PM
• If the firewall on your wireless router is enabled,
disable the firewall or add an exception to it.
• The wireless network name (SSID) should be a
combination of English letters and numbers. (Do
not use special characters.)
• Smartphone user interface (UI) may vary
depending on the mobile operating system (OS)
and the manufacturer.
• If the security protocol of the router is set to
WEP
, you may fail to set up the network. Please
change it to other security protocols (
recommended) and register the product again.
WPA2
is
Installing the LG ThinQ
Application
Search for the
Google Play Store or Apple App Store on a
smartphone. Follow instructions to download and
install the application.
LG ThinQ
application from the
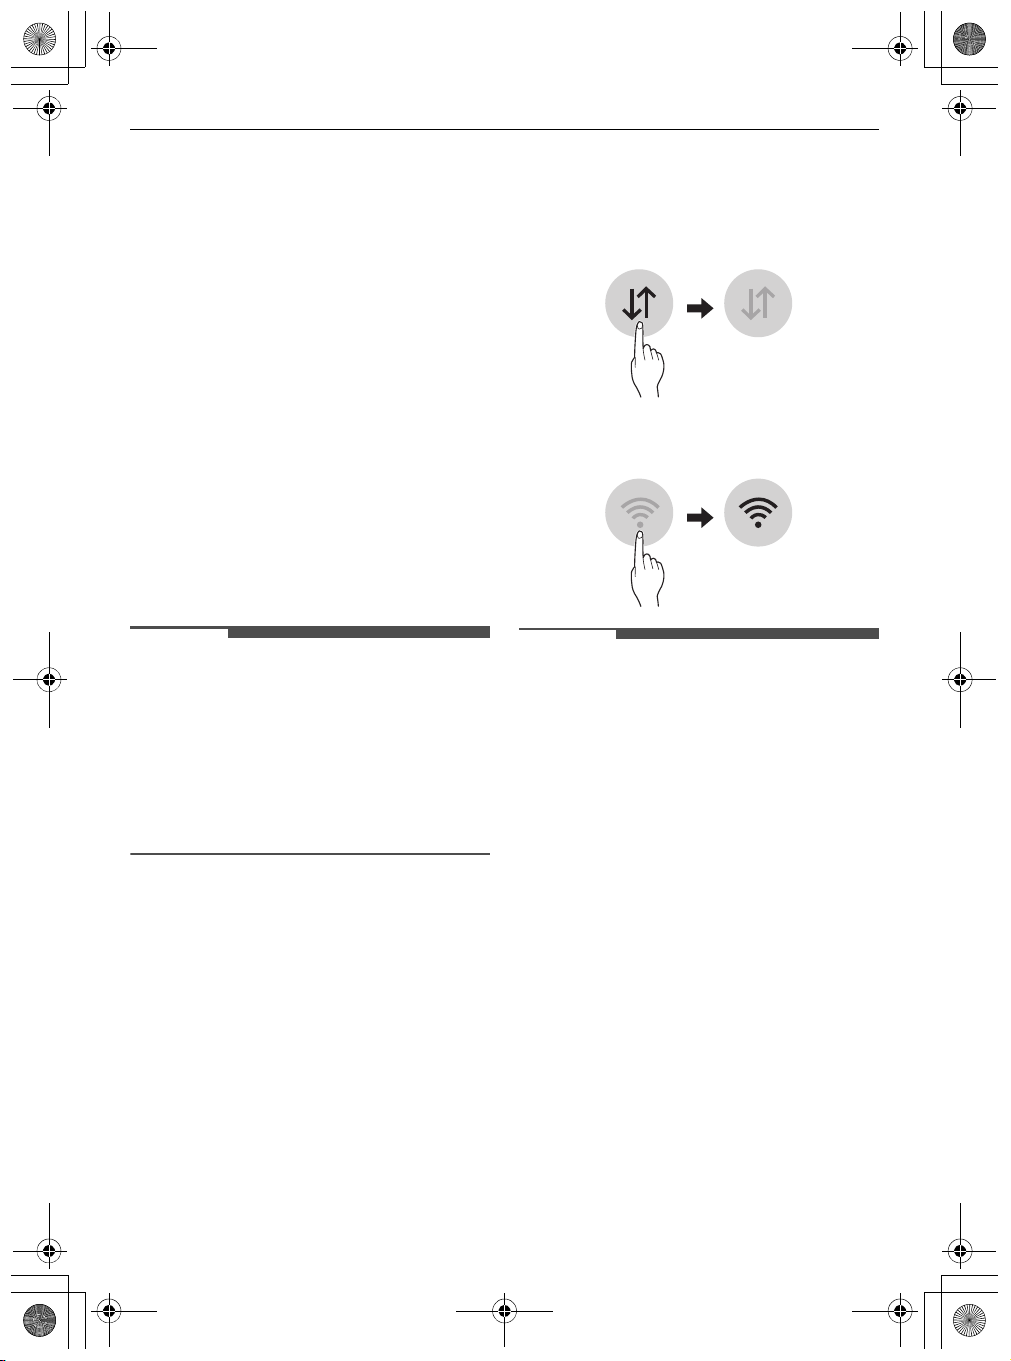
Connecting to Wi-Fi
The
Wi-Fi
application, allows the appliance to connect to a
home Wi-Fi network. The
of the appliance’s network connection. The icon
illuminates when the appliance is connected to the
Wi-Fi network.
•
•
• To disable the Wi-Fi function, press and hold the
button, when used with the
f
icon shows the status
Initial Appliance Registration
Run the
LG ThinQ
instructions in the application to register the
appliance.
Re-registering the Appliance or Registering
Another User
Press and hold the
temporarily turn it off. Run the
application and follow the instructions in the
application to register the appliance.
Wi-Fi
button for 3 seconds. The f icon will be
turned off.
application and follow the
Wi-Fi
button for 3 seconds to
LG ThinQ
LG ThinQ
SMART FUNCTIONS
27
EN
Open Source Software Notice
Information
To obtain the source code under GPL, LGPL, MPL,
and other open source licenses, that is contained in
this product, please visit http://
opensource.lge.com.
In addition to the source code, all referred license
terms, warranty disclaimers and copyright notices
are available for download.
LG Electronics will also provide open source code to
you on CD-ROM for a charge covering the cost of
performing such distribution (such as the cost of
media, shipping, and handling) upon email request
to opensource@lge.com. This offer is valid for a
period of three years after our last shipment of this
product. This offer is valid to anyone in receipt of
this information.
Smart Diagnosis
This feature is only available on models with the c
d
logo.
or
Use this feature to help you diagnose and solve
problems with your appliance.
• For reasons not attributable to LGE’s negligence,
the service may not operate due to external
factors such as, but not limited to, Wi-Fi
unavailability, Wi-Fi disconnection, local app
store policy, or app unavailability.
• The feature may be subject to change without
prior notice and may have a different form
depending on where you are located.
Using LG ThinQ to Diagnose
Issues
If you experience a problem with your Wi-Fi
equipped appliance, it can transmit
troubleshooting data to a smartphone using the
LG ThinQ
• Launch the
application.
Smart Diagnosis
LG ThinQ
the instructions provided in the
application.
application and select the
feature in the menu. Follow
LG ThinQ
NOTE
global_main.book.book Page 28 Wednesday, April 1, 2020 3:23 PM
28
EN
SMART FUNCTIONS
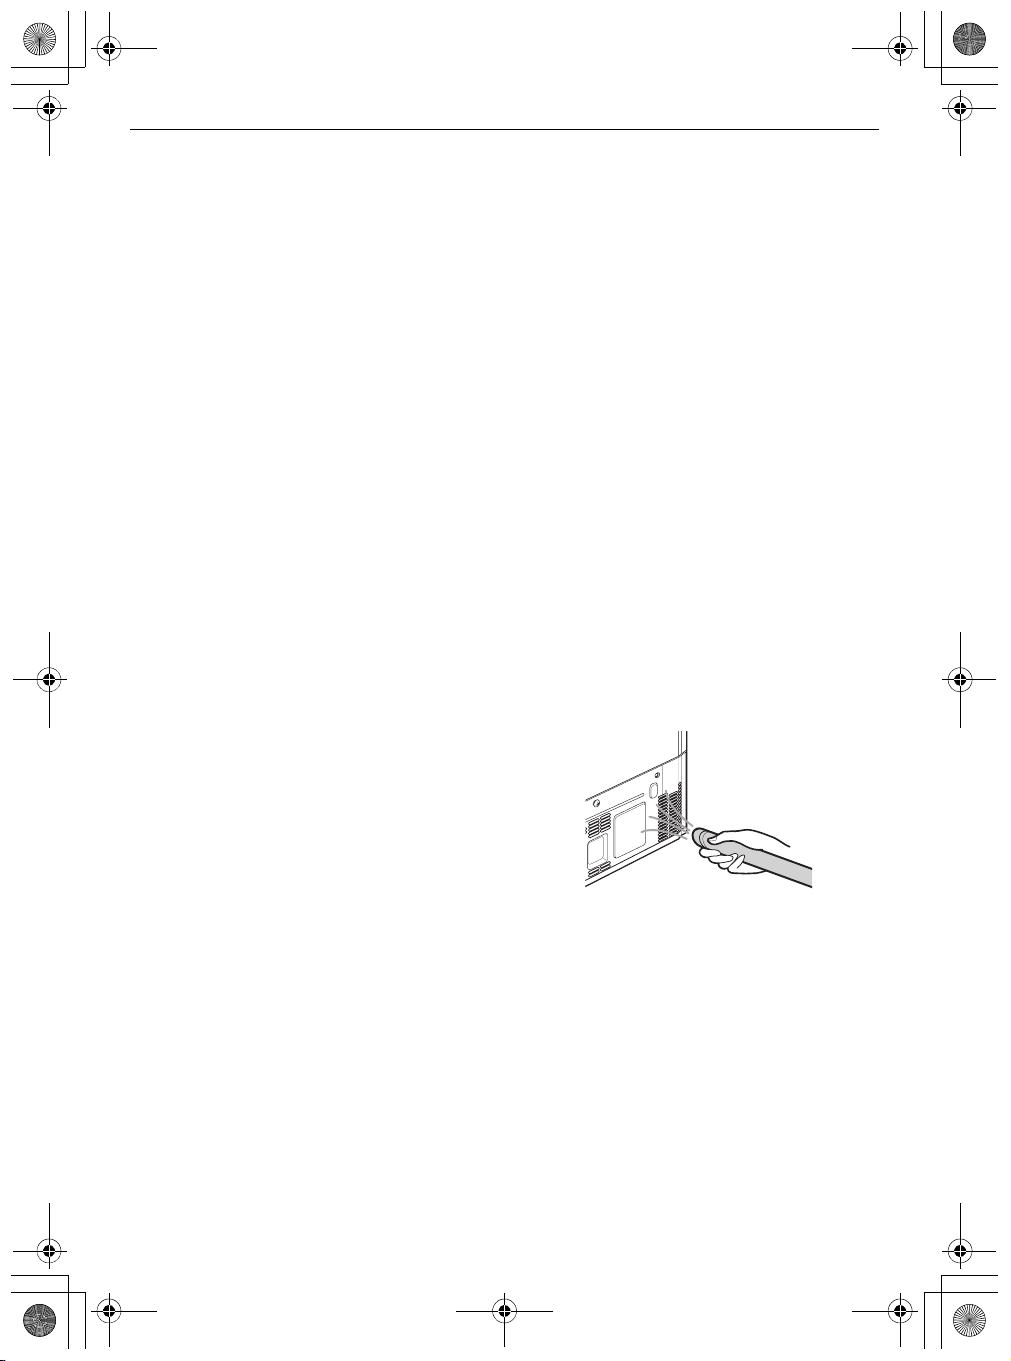
Using Audible Diagnosis to
Diagnose Issues
Follow the instructions below to use the audible
diagnosis method.
• Launch the
Smart Diagnosis
the instructions for audible diagnosis provided
in the
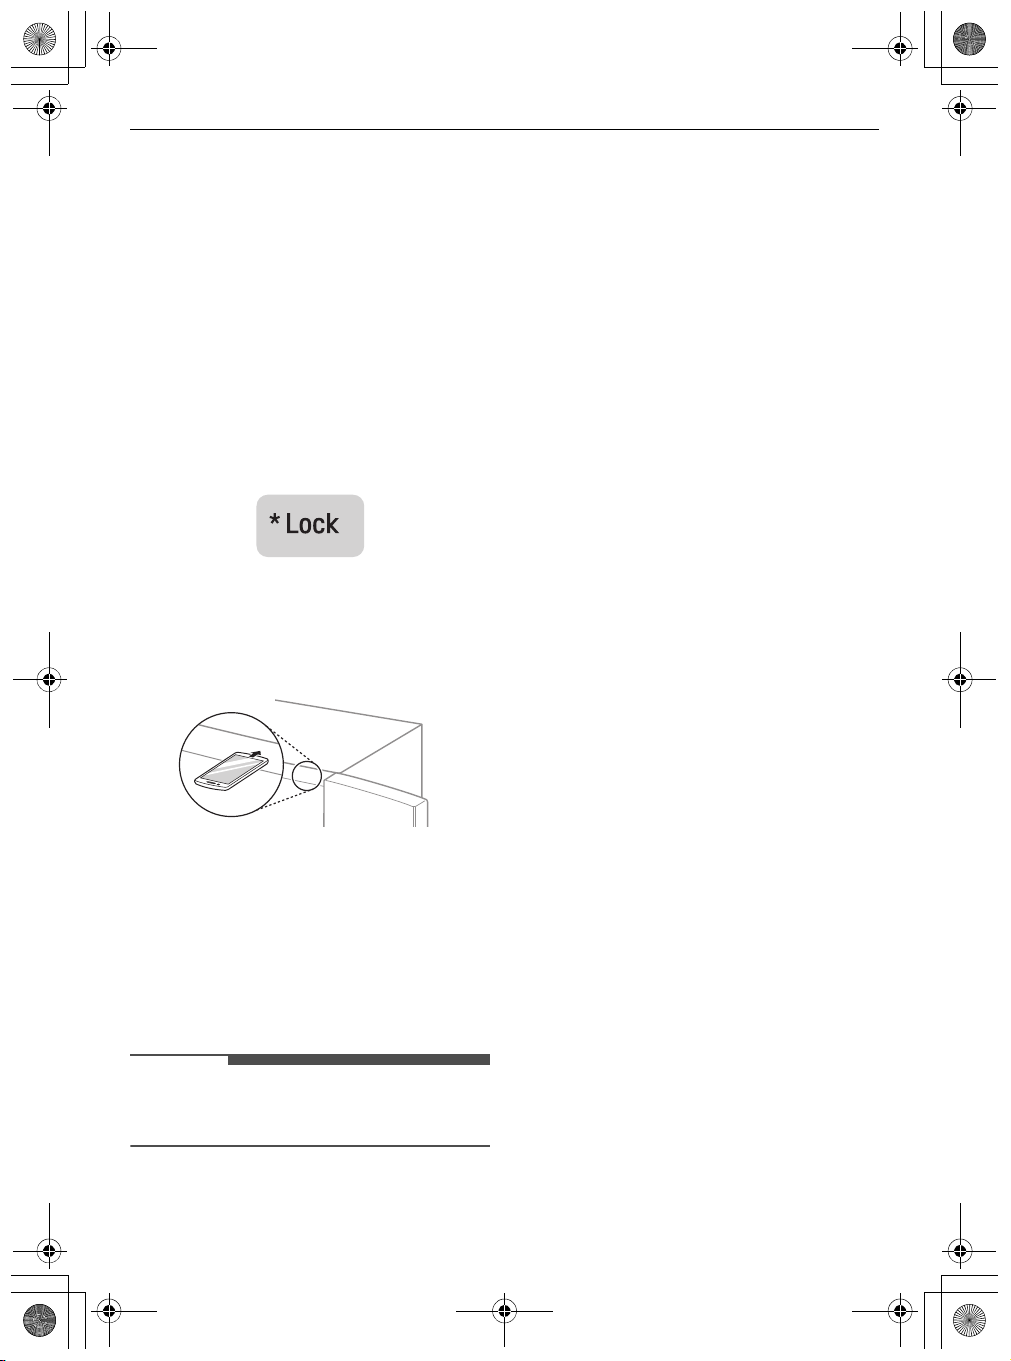
1
Press the
function.
• If the display has been locked for over 5
2
Open the fridge door and then hold the phone
on the upper right speaker hole.
• Position the phone so that its microphone is
LG ThinQ
LG ThinQ
Lock
minutes, you must deactivate the lock and
then reactivate it.
aligned with the speaker hole.
application and select the
feature in the menu. Follow
application.
button to activate the lock
3
Press and hold the
seconds or longer while holding your phone to
the speaker until the data transfer is complete.
• The diagnosis sound is generated after
around 3 seconds.
4
After the data transfer is complete, the
diagnosis will be displayed in the application.
• For best results, do not move the phone while
the tones are being transmitted.
Freezer
button for three
global_main.book.book Page 29 Wednesday, April 1, 2020 3:23 PM
MAINTENANCE
Cleaning
General Cleaning Tips
• When cleaning the inside or outside of the
appliance, do not wipe it with a rough brush,
toothpaste, or flammable materials. Do not use
cleaning agents containing flammable
substances. This may cause discolouration or
damage to the appliance.
- Flammable substances: alcohol (ethanol,
methanol, isopropyl alcohol, isobutyl alcohol,
etc.), thinner, bleach, benzene, flammable
liquid, abrasive, etc.
• After cleaning, check if the power cable is
damaged.
Cleaning the Exterior
• When cleaning the outside air vents of the
appliance by means of vacuuming, then the
power cord should be unplugged from the outlet
to avoid any static discharge that can damage
the electronics or cause an electric shock.
Regular cleaning of the rear and side ventilation
covers is recommended to maintain reliable and
economical operation of the unit.
• Keep the air vents on the exterior of the
appliance clean. Blocked air vents can cause fire
or appliance damage.
• For the appliance exterior, use a clean sponge or
soft cloth and a mild detergent in warm water.
Do not use abrasive or harsh cleaners. Dry
thoroughly with a soft cloth. Do not use
contaminated cloths when cleaning the stainless
steel doors. Always use a dedicated cloth and
wipe in the same direction as the grain. This
helps reduce surface staining and tarnishing.
MAINTENANCE
the appliance. Otherwise, injury may occur due
to the weight of stored foods.
• Detach the shelves and drawers and clean them
with water, and then dry them sufficiently,
before replacing them.
• Regularly wipe the door gaskets with a wet soft
towel.
• Door basket spills and stains should be cleaned
as they can compromise storage ability of the
basket and could even be damaged.
• Never clean the shelves or containers in the
dishwasher. The parts may become deformed
due to the heat.
29
EN
Cleaning the Condenser Cover
Use a vacuum cleaner with a brush to clean the
condenser cover and vents. Do not remove the
panel covering the condenser coil area.
We recommend that this be done every 12 months
to maintain operating efficiency.
Cleaning the Interior
• When removing a shelf or drawer from inside
the appliance, remove all stored foods from the
shelf or drawer to prevent injury or damage to
global_main.book.book Page 30 Wednesday, April 1, 2020 3:23 PM
30
EN
TROUBLESHOOTING
TROUBLESHOOTING
Before Calling for Service
Cooling
Symptoms Possible Cause & Solution
There is no
refrigeration or
freezing.
There is poor
refrigeration or
freezing.
The appliance contains
a bad smell.
Is there a power interruption?
• Check the power of other appliances.
Check the power of other appliances.
• Plug the power plug in the outlet properly.
Is the fridge or freezer temperature set to its warmest setting?
• Set the fridge or freezer temperature to a colder setting.
Is the appliance in direct sunlight, or is it near a heat generating object
such as cooking oven or heater?
• Check the installation area and reinstall it away from heat generating
objects.
Did you store hot food without cooling it first?
• Cool the hot food first before putting it in the fridge or freezer
compartment.
Did you put in too much food?
• Maintain an appropriate space between food.
Are the appliance doors completely closed?
• Completely close the door and make sure that stored food is not
obstructing in the door.
Is there enough space around the appliance?
• Adjust the installation position to make enough space around the
appliance.
Is the fridge or freezer temperature set to 'Warm'?
• Set the fridge or freezer temperature to a colder setting.
Did you put in food with a strong smell?
• Store foods with strong smells in sealed containers.
Vegetables or fruit may have spoiled in the drawer.
• Throw away rotten vegetables and clean the vegetable drawer. Do not
store vegetables too long in the vegetable drawer.

global_main.book.book Page 31 Wednesday, April 1, 2020 3:23 PM
Condensation & Frost
Symptoms Possible Cause & Solution
There is condensation
inside the appliance or
on the bottom of the
vegetable drawer
cover.
Frost has formed in the
freezer compartment.
Frost or condensation
has formed inside or
outside the appliance.
The side or front of the
appliance is warm.
Did you store hot food without cooling it first?
• Cool the hot food first before putting it inside the fridge or freezer.
Did you leave the appliance door open?
• Although the condensation will disappear soon after you close the
appliance door, you can wipe it with a dry cloth.
Do you open and close the appliance door too frequently?
• Condensation can form due to the temperature difference from the
outside. Wipe out the dampness with a dry cloth.
Did you put warm or moist food inside without sealing it in a container?
• Store food in a covered or sealed container.
Doors may not be closed properly.
• Check if the food item inside the appliance is blocking the door and make
sure that the door is tightly closed.
Did you store hot food without cooling it first?
• Cool the hot food first before putting it in the fridge or freezer
compartment.
Is the air entry or exit of the freezer compartment blocked?
• Make sure that air entry or exit is not blocked so that the air can circulate
inside.
Is the freezer compartment overfilled?
• Maintain an appropriate space between items.
Did you open and close the appliance door frequently or is the appliance
door improperly closed?
• Frosts or condensation can form if the outside air penetrates inside the
appliance.
Is the installation environment humid?
• Condensation can appear on the exterior of the appliance if the installation
area is too humid or on a humid day such as a rainy day. Wipe off any
moisture with a dry cloth.
There are anti condensation pipes fitted to these areas of the appliance
to reduce condensation forming from around the door area.
• The heat releasing pipe to prevent condensation is installed on the front
and side of the appliance. You may feel it particularly hot right after the
appliance is installed or during the summer. You can be assured that this
is not a problem and is quite normal.
TROUBLESHOOTING
31
EN

global_main.book.book Page 32 Wednesday, April 1, 2020 3:23 PM
32
EN
There is water inside or
outside of the
appliance.
TROUBLESHOOTING
Symptoms Possible Cause & Solution
Is there water leakage around the appliance?
• Check if the water has leaked from a sink or another place.
Is there water on the bottom of the appliance?
• Check if the water is from the thawed frozen food or a broken or dropped
container.
Parts & Features
Symptoms Possible Cause & Solution
The appliance door is
not closed tightly.
It is difficult to open
the appliance door.
Door mullion does not
fold in and out
properly.
The inside lamp in the
appliance does not
turn on.
Is the appliance leaning forward?
• Adjust the front feet to raise the front side slightly.
Were the shelves properly assembled?
• Refit the shelves if needed.
Did you close the door with excessive force?
• If you apply too much force or speed when closing the door, it may remain
briefly open before closing. Make sure that you do not slam the door
closed. Close the door gently.
Did you open the door right after you closed it?
• If you try to open the appliance door within one minute after you closed it,
you may have difficulties because of the pressure inside the appliance. Try
to open the appliance door again in a few minutes so that the internal
pressure stabilizes.
Are front levelling legs extended, the appliance level, and doors aligned?
• Once the door baskets are filled, the doors may become misaligned,
preventing the door mullion or the Auto Open Door function from working
properly. Extend both front levelling legs fully so they are in firm contact
with the floor. Follow the instruction in the Door Alignment section to raise
the left fridge door until the door mullion is once again working properly.
Adjust the right fridge door so it aligns with the left fridge door.
Lamp failure
• Close the door and re-open. If the lamp does not turn on, please contact
the LG Electronics customer information centre. Do not attempt removal
of the lamp.

global_main.book.book Page 33 Wednesday, April 1, 2020 3:23 PM
TROUBLESHOOTING
33
Noises
Symptoms Possible Cause & Solution
The appliance is noisy
and generates
abnormal sounds.
Clicking noises The defrost control will click when the automatic defrost cycle begins
Rattling noises Rattling noises may come from the flow of appliance, the water line on
Whooshing noises Evaporator fan motor is circulating air through the fridge and freezer
Gurgling noises Appliance flowing through the cooling system.
Popping noises Contraction and expansion of the inside walls due to changes in
Is the appliance installed on a weak floor or improperly levelled?
• Install the appliance on a solid and flat area.
Does the rear of the appliance touch the wall?
• Adjust the installation position to allow enough clearance around the
appliance.
Are objects scattered behind the appliance?
• Remove the scattered objects from behind the appliance.
Is there an object on top of the appliance?
• Remove the object on top of the appliance.
and ends. The thermostat control (or appliance control on some models)
will also click when cycling on and off.
• Normal Operation
the back of the unit (for plumbed models only), or items stored on top of
or around the appliance.
• Normal Operation
Appliance is not resting evenly on the floor.
• Floor is weak or uneven or levelling legs need to be adjusted. See the Door
Alignment section.
Appliance with linear compressor was moved while operating.
• Normal operation. If the compressor does not stop rattling after three
minutes, turn the power to the appliance off and then on again.
compartments.
• Normal Operation
Air is being forced over the condenser by the condenser fan.
• Normal Operation
• Normal Operation
temperature.
• Normal Operation
EN

global_main.book.book Page 34 Wednesday, April 1, 2020 3:23 PM
34
EN
Vibrating If the side or back of the appliance is touching a cabinet or wall, some of
TROUBLESHOOTING
Symptoms Possible Cause & Solution
the normal vibrations may make an audible sound.
• To eliminate the noise, make sure that the sides and back do not make any
contact with any wall or cabinet.
Wi-Fi
Symptoms Possible Cause & Solution
Your home appliance
and smartphone are
not connected to the
Wi-Fi network.
The password for the Wi-Fi that you are trying to connect to is incorrect.
• Find the Wi-Fi network connected to your smartphone and remove it, then
register your appliance on
Mobile data for your smartphone is turned on.
• Turn off the
using the Wi-Fi network.
The wireless network name (SSID) is set incorrectly.
• The wireless network name (SSID) should be a combination of English
letters and numbers. (Do not use special characters.)
The router frequency is not 2.4 GHz.
• Only a 2.4 GHz router frequency is supported. Set the wireless router to 2.4
GHz and connect the appliance to the wireless router. To check the router
frequency, check with your Internet service provider or the router
manufacturer.
The distance between the appliance and the router is too far.
• If the distance between the appliance and the router is too far, the signal
may be weak and the connection may not be configured correctly. Move
the location of the router so that it is closer to the appliance.
Mobile data
LG ThinQ
of your smartphone and register the appliance
.

global_main.book.book Page 35 Wednesday, April 1, 2020 3:23 PM
Memo

global_main.book.book Page 35 Wednesday, April 1, 2020 3:23 PM
Memo

fr_main.book.book Page 1 Thursday, April 2, 2020 3:21 PM
MANUEL DU PROPRIÉTAIRE
RÉFRIGÉRATEUR
ET CONGÉLATEUR
Avant de commencer l’installation, lire attentivement ces
instructions. Cela simplifiera l’installation et assurera que le
produit soit installé correctement et en toute sécurité.
Conserver ces instructions à proximité du produit après
installation pour référence ultérieure.
www.lg.com
Copyright © 2019 - 2020 LG Electronics Inc. Tous droits réservés

fr_main.book.book Page 2 Wednesday, April 1, 2020 2:53 PM
TABLE DES MATIÈRES
CONSIGNES DE SÉCURITÉ.............................. 4
LISEZ TOUTES LES INSTRUCTIONS AVANT UTILISATION4
AVERTISSEMENT..................................................................4
ATTENTION........................................................................10
INSTALLATION ............................................. 12
Avant l'installation ............................................................12
Remonter les portes du réfrigérateur et du congélateur
13
Mise à niveau et alignement de la porte .......................14
Mettre l’alimentation sous tension.................................16
Déplacer l’appareil pour un déménagement ................16
UTILISATION ................................................ 17
Avant utilisation ................................................................17
Caractéristiques du produit.............................................20
Panneau de commande...................................................23
InstaView............................................................................24
Door in Door......................................................................25
Tiroir ...................................................................................25
Machine à glaçons............................................................26
Tablette ..............................................................................27
Panier de porte .................................................................28
Ce manuel peut contenir des images ou
un contenu différent du modèle que vous
avez acheté.
Ce manuel est sujet à révision par le
fabricant.
FONCTIONS SMART...................................... 29
Application LG ThinQ........................................................29
Smart Diagnosis................................................................30
MAINTENANCE............................................. 32
Nettoyage ..........................................................................32

fr_main.book.book Page 3 Wednesday, April 1, 2020 2:53 PM
DÉPANNAGE ................................................. 33
Avant d'appeler le service................................................33

AVERTISSEMENT
fr_main.book.book Page 4 Wednesday, April 1, 2020 2:53 PM
4
FR
CONSIGNES DE SÉCURITÉ
CONSIGNES DE SÉCURITÉ
LISEZ TOUTES LES INSTRUCTIONS AVANT UTILISATION
Les consignes de sécurité suivantes sont destinées à éviter les risques
ou dommages imprévus issus d'une utilisation dangereuse ou
incorrecte de l'appareil.
Les consignes sont séparées en '
comme décrit ci-dessous.
Messages de sécurité
Ce symbole s'affiche pour indiquer des problèmes et des
utilisations qui peuvent présenter des risques. Lire
attentivement la partie qui comporte ce symbole et suivre
les instructions afin d'éviter tout risque.
AVERTISSEMENT
AVERTISSEMENT
' et '
ATTENTION
'
Cela indique que tout manquement à suivre les instructions
peut entraîner des blessures graves ou la mort.
ATTENTION
Cela indique que tout manquement à suivre les instructions
peut entraîner des blessures légères ou endommager
l'appareil.
AVERTISSEMENT
Pour réduire le risque d'explosion, d'incendie, de décès, de choc
électrique, de blessure ou d'ébouillantage de personnes lors de
l'utilisation de cet appareil, suivez les précautions de base, y compris
les suivantes :

fr_main.book.book Page 5 Wednesday, April 1, 2020 2:53 PM
CONSIGNES DE SÉCURITÉ
5
Sécurité technique
• Cet appareil n'est pas destiné à être utilisé par des personnes (y
compris des enfants) ayant des capacités physiques, sensorielles ou
mentales réduites, ou manquant d'expérience et de connaissances, à
moins qu'elles ne soient supervisées ou aient reçu des instructions
quant à l'utilisation de l'appareil par une personne responsable de
leur sécurité. Les enfants doivent être surveillés pour s'assurer qu'ils
ne jouent pas avec l'appareil.
• Cet appareil est destiné à être utilisé uniquement dans des
applications de ménage ou similaires, telles que :
- les cuisines du personnel dans les magasins, bureaux et autres
environnements de travail ;
- les maisons rurales et par les clients d’hôtels, motels et d’autres
environnements résidentiels ;
- les gîtes touristiques ;
- les applications de restauration et hors détail similaires.
•
Ce symbole vous avertit de matériaux inflammables qui
peuvent s’enflammer et provoquer un incendie si vous ne
prenez pas de précautions.
FR
• Cet appareil contient une petite quantité de réfrigérant isobutane
(R600a), mais il est également combustible. Lors du transport et de
l'installation de l'appareil, veillez à ce qu'aucune pièce du circuit
frigorifique ne soit endommagée.
• Le réfrigérant et le gaz d'isolation utilisés dans l'appareil nécessitent
des procédures d'élimination particulières. Consultez un agent de
service ou une personne qualifiée avant de les éliminer.
• Ne pas endommager le circuit frigorifique.
• Si le câble d'alimentation est endommagé ou si les trous de la prise
sont lâches, ne pas utiliser le cordon d'alimentation et contacter un
centre de service agréé.
• Ne pas placer plusieurs prises de courant portables ou alimentations
portables à l’arrière de l’appareil.

fr_main.book.book Page 6 Wednesday, April 1, 2020 2:53 PM
6
FR
CONSIGNES DE SÉCURITÉ
• Brancher correctement le cordon d'alimentation dans la prise de
courant après avoir enlevé complètement toute humidité et
poussière.
• Ne jamais débrancher l'appareil en tirant sur le câble d'alimentation.
Toujours saisir fermement la prise électrique et la tirer tout droit pour
la sortir de la prise de courant.
• Gardez les ouvertures de ventilation, dans l'enceinte de l'appareil ou
dans la structure intégrée, exemptes d'obstruction.
• Ne pas stocker dans cet appareil de substances explosives comme
des aérosols avec un propulseur inflammable.
• Ne pas incliner l'appareil pour le tirer ou le pousser lors de son
transport.
• Lors du positionnement de l’appareil, assurez-vous que le cordon
d’alimentation ne soit pas coincé ou endommagé.
• Ne pas utiliser de dispositifs mécaniques ou d'autres moyens pour
accélérer le processus de dégivrage.
• Ne pas utiliser de sèche-cheveux pour sécher l'intérieur de l'appareil
ni placer de bougie à l'intérieur pour éliminer les odeurs.
• N'utilisez pas d'appareils électriques à l'intérieur du réfrigérateur.
• Assurez-vous de ne pas vous coincer une partie du corps, comme la
main ou un pied en déplaçant l'appareil.
• Débrancher le cordon d'alimentation avant de nettoyer l'appareil ou
de remplacer la lampe à l'intérieur (le cas échéant).
• Ne pas pulvériser d’eau ou de substances inflammables (dentifrice,
alcool, diluant, liquide inflammable, abrasif, etc.) sur l’intérieur ou
l’extérieur de l’appareil pour le nettoyer.
• Ne pas nettoyer l'appareil avec des brosses, chiffons ou éponges avec
des surfaces rugueuses ou à base de matériau métallique.
• Le démontage, la réparation ou la modification de l'appareil ne doit
être effectuée que par un personnel de service qualifié du centre de
service LG Electronics. Si vous déplacez et installez l'appareil dans un
endroit différent, veuillez contacter un centre d'information client LG
Electronics.

fr_main.book.book Page 7 Wednesday, April 1, 2020 2:53 PM
CONSIGNES DE SÉCURITÉ
7
FR
Risque d’incendie et matériaux inflammables
• Si une fuite est détectée, éviter toutes flammes ou sources
potentielles d'inflammation et aérer la pièce où se trouve l'appareil
pendant plusieurs minutes. Afin d'éviter l'accumulation d'un mélange
de gaz-air inflammable si une fuite se produit dans le circuit
réfrigérant, la taille de la pièce dans laquelle l'appareil est utilisé doit
correspondre à la quantité de réfrigérant utilisée. La pièce doit faire
1 m² par 8 g de réfrigérant R600a à l'intérieur de l'appareil.
• Tout réfrigérant fuyant des tuyaux peut provoquer un incendie ou
une explosion.
• La quantité de réfrigérant dans votre appareil est indiquée sur la
plaque signalétique à l'intérieur de l'appareil.
Installation
• Cet appareil ne doit être transporté que par deux personnes ou plus
tenant l'appareil en toute sécurité.
• Installer l'appareil sur un sol ferme et de niveau.
• Ne pas installer l'appareil dans un endroit humide et poussiéreux. Ne
pas installer ou ranger l'appareil dans une zone en plein air, ou toute
autre zone soumise à des conditions telles que la lumière du soleil, le
vent ou la pluie ou à des températures inférieures à zéro.
• Ne pas placer l'appareil en plein soleil ni l'exposer à la chaleur
d'appareils de chauffage tels que poêles ou des radiateurs.
• Veiller à ne pas exposer l'arrière de l'appareil lors de l'installation.
• Installer l'appareil dans un endroit où il est facile de débrancher le
cordon d'alimentation de l'appareil.
• Attention à ne pas laisser tomber la porte de l'appareil lors du
montage ou du démontage.
• Attention à ne pas pincer, écraser ou endommager le câble
d'alimentation pendant le montage ou le démontage de la porte de
l'appareil.
• Veiller à ne pas faire pointer la fiche d'alimentation vers le haut ni à
laisser l'appareil appuyer sur la fiche électrique.

fr_main.book.book Page 8 Wednesday, April 1, 2020 2:53 PM
8
FR
CONSIGNES DE SÉCURITÉ
• Ne pas brancher un adaptateur ou d'autres accessoires à la prise
d'alimentation.
• Ne pas modifier ou étendre le cordon d'alimentation.
• S'assurer que la prise de courant soit correctement mise à la terre, et
que la broche de terre du cordon d'alimentation ne soit pas
endommagée ou retirée de la prise d'alimentation. Pour plus de
détails sur la mise à la terre, renseignez-vous auprès d'un centre
d'information client LG Electronics.
• Cet appareil est équipé d'un cordon d'alimentation doté d'un
conducteur de terre et d'une fiche de terre. La fiche doit être
branchée dans une prise appropriée, installée et mise à la terre
conformément à tous les codes et règlements locaux.
• Ne jamais mettre en marche un appareil montrant des signes de
dommages. En cas de doute, consultez votre revendeur.
• Éliminer tous les matériaux d'emballage (comme les sacs en
plastique et le polystyrène) loin des enfants. Les matériaux
d'emballage peuvent provoquer une suffocation.
• Ne pas brancher l'appareil à un adaptateur multi-supports ne
disposant pas d'un câble d'alimentation (monté). L'omission de se
conformer à cette consigne pourrait entraîner un incendie.
• L'appareil doit être connecté à une ligne électrique dédiée qui est sur
un fusible séparé.
• N'utilisez pas une multiprise qui n'est pas correctement mise à la
terre (portable). Si vous utilisez une multiprise (portable)
correctement mise à la terre, utilisez la multiprise avec la capacité du
cordon d’alimentation actuelle ou supérieure et utilisez uniquement
la multiprise pour l'appareil.
Utilisation
• Ne pas utiliser l'appareil à des fins (stockage de matériel médical ou
expérimental ou expédition) autres qu'un usage domestique de
stockage d'aliments.
• Si de l'eau pénètre dans les pièces électriques de l'appareil,
débrancher la fiche d'alimentation et contacter un centre
d'information client LG Electronics.

fr_main.book.book Page 9 Wednesday, April 1, 2020 2:53 PM
CONSIGNES DE SÉCURITÉ
9
FR
• Débrancher la prise d'alimentation en cas d'orage violent ou d'éclairs,
ou lorsque l'appareil n'est pas utilisé pendant une longue période.
• Ne pas toucher la fiche d'alimentation ou les commandes de
l'appareil avec des mains mouillées.
• Ne pas plier excessivement le câble d'alimentation ou placer un objet
lourd sur celui-ci.
• Débrancher immédiatement la fiche d'alimentation et contacter un
centre d'information client LG Electronics si vous détectez tout bruit
anormal, odeur ou fumée sortant de l'appareil.
• Ne pas mettre les mains ou des objets métalliques dans la zone
émettant l'air froid, le carter ou la grille de dégagement de la chaleur
à l'arrière.
• Ne pas appliquer de force excessive ou frapper le carter arrière de
l'appareil.
• Attention aux enfants qui se trouvent à proximité lorsque vous
ouvrez ou fermez la porte de l'appareil. La porte peut heurter l'enfant
et causer des blessures. Ne pas laisser les personnes se balancer sur
les portes, car cela peut provoquer la chute de l'appareil et causer des
blessures graves.
• Eviter qu'un enfant se retrouve piégé à l'intérieur de l'appareil. Un
enfant coincé à l'intérieur de l'appareil peut souffrir de suffocation.
• Ne pas mettre d'animaux vivants dans l'appareil, comme des
animaux domestiques.
• Ne pas placer d’objets lourds ou fragiles, de récipients remplis de
liquide, de combustibles, d’objets inflammables (comme des bougies,
lampes, etc.), ou de dispositifs de chauffage (tels que des poêles,
radiateurs, etc.) sur l’appareil.
• Ne pas placer un autre appareil électronique (tels qu'un chauffage et
un téléphone mobile) à l'intérieur de l'appareil.
• En cas de fuite de gaz (isobutane, propane, gaz naturel, etc.), ne pas
toucher l’appareil ni la fiche d’alimentation et ventiler
immédiatement la zone. Cet appareil utilise un gaz réfrigérant
(isobutane R600a). Bien qu’il n’utilise qu’une petite quantité de ce gaz,
cela demeure un gaz inflammable. Toute fuite de gaz pendant le

ATTENTION
fr_main.book.book Page 10 Wednesday, April 1, 2020 2:53 PM
10
FR
CONSIGNES DE SÉCURITÉ
transport, l’installation ou l’utilisation de l’appareil peut provoquer un
incendie, une explosion ou des blessures en cas d’étincelles.
• Ne pas utiliser ou stocker de substances inflammables ou
combustibles (éther, benzène, alcool, produits chimiques, GPL,
pulvérisateur combustible, insecticide, désodorisant, cosmétique,
etc.) à proximité de l'appareil.
Élimination
• Avant de jeter l'appareil, retirer le joint de la porte tout en laissant les
tablettes et les paniers en place et garder les enfants éloignés de
l'appareil.
ATTENTION
Pour réduire le risque de blessures légères à une personne,
dysfonctionnement ou dommages au produit ou à la propriété lors de
l'utilisation de cet appareil, suivre les précautions de base, notamment
les suivantes :
Utilisation
• Ne pas toucher d'aliments surgelés ou de pièces métalliques dans le
compartiment congélateur avec des mains mouillées ou humides.
Cela peut causer des gelures.
• Ne pas placer de récipients, de bouteilles ou de boîtes en verre (en
particulier celles contenant des boissons gazeuses) dans le
compartiment congélateur, les étagères ou le bac à glaçons qui
seront exposés à des températures au-delà du point de congélation.
• Le verre trempé sur le devant de la porte de l'appareil ou sur les
étagères peut être endommagé par un choc. S'il est cassé, ne le
touchez pas avec les mains.
• Ne pas s'accrocher aux portes de l'appareil, dans l'espace de
stockage, sur une tablette ni monter dessus.

fr_main.book.book Page 11 Wednesday, April 1, 2020 2:53 PM
CONSIGNES DE SÉCURITÉ
11
• Ne pas stocker une quantité excessive de bouteilles d'eau ou de
récipients pour des plats d'accompagnement sur les paniers de la
porte.
• Ne pas ouvrir ou fermer la porte de l'appareil avec une force
excessive.
• Si la charnière de la porte de l'appareil est endommagée ou
fonctionne mal, cesser l'utilisation et contacter un centre de service
LG Electronics.
• Empêcher les animaux de grignoter le câble d'alimentation ou le
tuyau d'eau.
• Ne jamais manger d'aliments congelés immédiatement après les
avoir sortis du congélateur.
• Lors de la distribution, ne pas utiliser de coupe en cristal fin ou de
porcelaine.
• Assurez-vous de ne pas coincer une main ou un pied lors de
l’ouverture ou de la fermeture de la porte de l’appareil ou de la porte
dans la porte.
FR
Maintenance
• Ne pas nettoyer les tablettes en verre ou les couvrir d'eau chaude
quand elles sont froides. Elles peuvent exploser si elles sont exposées
à des changements brusques de température.
• N'insérez pas les étagères à l'envers. Les étagères peuvent tomber.
• Pour enlever le givre de l'appareil, contacter un centre d'information
client LG Electronics.
• Jeter la glace contenue dans le bac à glaçons du congélateur en cas
de panne électrique prolongée.

REMARQUE
REMARQUE
A
C
H
D E
F
G
B
fr_main.book.book Page 12 Wednesday, April 1, 2020 2:53 PM
12
FR
INSTALLATION
INSTALLATION
Avant l'installation
Dimensions et espaces
Une distance trop faible avec les éléments
adjacents peut entraîner une dégradation de la
capacité de congélation et des coûts d’électricité
élevés. Laisser plus de 50 mm d'espaces entre
l’arrière de l’appareil et le mur lors de l’installation
de l’appareil.
- Type A (mm) Type B (mm)
A912 912
B 1790 1790
C927 738
D797 615
E877 690
Température ambiante
• L'appareil est conçu pour fonctionner dans une
gamme limitée de températures ambiantes, en
fonction de la zone climatique.
• Les températures internes peuvent être
affectées par l'emplacement de l'appareil, la
température ambiante, la fréquence de
l'ouverture de la porte, etc.
• La classe climatique se trouve sur l'étiquette de
classement.
Classe climatique Plage de température
ambiante °C
SN (Tempérée
étendue)
N (Tempérée) +16 - +32
ST (Subtropicale) +16 - +38 / +18 - +38**
T (Tropicale) +10 - +43* / +16 - +43 /
* Australie, Inde, Kenya
** Argentine, Équateur
• Les dispositifs classés de SN à T sont destinés à
être utilisés à une température ambiante entre
10°C et 43°C.
+10 - +32
+18 - +43**
F927 738
G 1384 1180
H 1713 1750
• Vous pouvez déterminer le type de l'appareil en
consultant l'étiquette à l'intérieur de l’appareil.
Accessoires
*1:Cette fonctionnalité n'est disponible que sur
certains modèles.
a
Clé A*1
b
Clé B*1

AVERTISSEMENT
ATTENTION
ATTENTION
fr_main.book.book Page 13 Wednesday, April 1, 2020 2:53 PM
Remonter les portes du
réfrigérateur et du
congélateur
Si votre porte d'entrée est trop étroite pour laisser
passer l'appareil, retirer les portes de l'appareil et
passer l'appareil de côté.
• Déconnecter le cordon d'alimentation, le fusible
ou le disjoncteur avant d'installer ou de
démonter les portes ou bien de nettoyer
l'appareil. Le non-respect de ces instructions
peut entraîner la mort, un incendie ou un choc
électrique.
Retrait de la Porte du
Congélateur
1
Retirez la vis du cache de la charnière en haut
de l’appareil. Soulevez le crochet situé en bas à
l’avant du cache avec un tournevis à tête plate.
INSTALLATION
charnière supérieure
charnière
• Lors du levage de la charnière dégagée du pêne,
s’assurer que la porte ne tombe pas en avant. Il
est recommandé que deux personnes ou plus
procèdent au retrait et au remontage de la
porte.
4
Soulevez la porte du congélateur jusqu’à ce
qu’elle soit dégagée de la charnière inférieure.
c
.
d
du verrou du levier de
13
FR
2
Débranchez tous les faisceaux de câbles a.
Dévissez le fil de masse
3
Tourner le levier de charnière e dans le sens
inverse des aiguilles d'une montre. Soulever la
b
.
• Placer la porte sur une surface ne provocant pas
d'égratignures avec la face intérieure tournée
vers le haut.

ATTENTION
ATTENTION
REMARQUE
fr_main.book.book Page 14 Wednesday, April 1, 2020 2:53 PM
14
FR
INSTALLATION
Retrait de la porte du
réfrigérateur
1
Débranchez tous les faisceaux de câbles a.
• Placer la porte sur une surface ne provocant pas
d'égratignures avec la face intérieure tournée
vers le haut.
Remontage de la porte du
réfrigérateur et du congélateur
Remonter les portes dans l'ordre inverse du retrait
après avoir passé l'appareil à travers la porte
d'accès.
2
Tourner le levier de charnière b dans le sens
des aiguilles d'une montre. Soulever la
charnière supérieure
charnière
d
.
c
du verrou du levier de
Mise à niveau et
alignement de la porte
Avant de commencer
• Lors du levage de la charnière dégagée du
verrou du levier de charnière, s’assurer que la
porte ne tombe pas en avant. Il est recommandé
que deux personnes ou plus procèdent au retrait
et au remontage de la porte.
3
Soulevez la porte du réfrigérateur jusqu’à ce
qu’elle soit dégagée de la charnière inférieure.
Lorsque les portes de l’appareil sont inégales,
suivez les instructions ci-dessous afin d’aligner les
portes.
• La clé peut différer selon le modèle. Une clé de
type A ou B vous sera fournie.
- Clé de type A
- Clé de type B

ATTENTION
REMARQUE
fr_main.book.book Page 15 Wednesday, April 1, 2020 2:53 PM
Mise à niveau de l’appareil
L’appareil a deux pieds de mise à niveau à l’avant.
Ajustez les pieds pour modifier l’inclinaison de
l’avant vers l’arrière ou d’un côté à l’autre. Si
l’appareil semble instable ou si les portes ne se
ferment pas facilement, réglez l’inclinaison de
l’appareil en suivant les instructions ci-dessous.
Utiliser la clé
le pied de mise à niveau vers la gauche afin de le
relever ou vers la droite pour l’abaisser.
a
pour régler la hauteur en tournant
INSTALLATION
2
Utiliser la clé b pour régler la hauteur en
tournant l'axe de la charnière de réglage vers
la gauche ou vers la droite.
• Ne pas régler la hauteur de la porte de l’appareil
à plus de 3 mm.
3
Utiliser la clé a pour serrer l’écrou de blocage
en le tournant à droite.
15
FR
Alignement de la porte du
congélateur et du réfrigérateur
Si la porte de l'appareil n'est pas de niveau, régler
la différence de hauteur de porte de l'appareil.
1
Ouvrir la porte et utiliser la clé a pour
desserrer l’écrou de blocage en le tournant à
gauche.
• Il se peut que la mise à niveau des portes ne soit
pas possible lorsque le sol n'est pas de niveau,
ou de construction faible ou médiocre.
• Le réfrigérateur est lourd et doit être installé sur
une surface rigide et solide.
• Certains revêtements de sol en bois peuvent
poser des problèmes de mise à niveau s'ils
présentent une flexion excessive.
Alignement de la porte
supérieure du congélateur
La porte supérieure du congélateur est
uniquement disponible sur certains modèles.

REMARQUE
fr_main.book.book Page 16 Wednesday, April 1, 2020 2:53 PM
16
FR
INSTALLATION
Ouvrir la porte supérieure du congélateur et
utiliser la clé
charnière de la porte.
c
pour tourner le boulon de
Mettre l’alimentation sous
tension
Raccorder l’appareil
Après avoir installé l’appareil, brancher la fiche
d’alimentation dans une prise de courant.
• Après avoir branché le cordon d'alimentation (ou
la fiche) dans la prise, attendre 3 à 4 heures
avant de mettre des aliments dans l’appareil. Si
vous ajoutez des aliments avant que l’appareil
n’ait complètement refroidi, vos aliments
peuvent s’abîmer.
d’éviter qu’elles ne tombent lors du
déplacement de l’appareil.
4
Déplacez l’appareil avec précaution avec plus
de deux personnes. Lorsque vous transportez
l’appareil sur une longue distance, maintenez
l’appareil à la verticale.
5
Après avoir installé l’appareil, branchez la fiche
d’alimentation dans une prise de courant et
mettez-le sous tension.
Déplacer l’appareil pour un
déménagement
Préparer le déménagement
1
Retirer tous les aliments à l'intérieur de
l'appareil.
2
Débrancher la fiche électrique, l'insérer et la
fixer dans le crochet de fiche d'alimentation à
l'arrière ou sur le dessus de l'appareil.
3
Fixer les pièces telles que les étagères et la
poignée de la porte avec du ruban adhésif afin

REMARQUE
REMARQUE
fr_main.book.book Page 17 Wednesday, April 1, 2020 2:53 PM
UTILISATION
Avant utilisation
Notes pour l'utilisation
• Les utilisateurs doivent garder à l'esprit que du
givre peut se former si la porte n'est pas
complètement fermée ou si l'humidité est élevée
pendant l'été.
• S'assurer qu'il y a suffisamment d'espace entre
les aliments stockés sur la tablette ou le panier
de la porte pour permettre à la porte de se
fermer complètement.
• L'ouverture prolongée de la porte peut entraîner
une augmentation significative de la
température dans les compartiments de
l'appareil.
• Si l'appareil de réfrigération reste vide pendant
de longues périodes, mettez-le hors tension,
décongelez-le, nettoyez-le, séchez-le et laissez la
porte ouverte afin d’éviter le développement de
moisissure dans l'appareil.
Alarme de porte ouverte
L'alarme retentit 3 fois par intervalles de 30
secondes si la porte est laissée ouverte ou n'est pas
complètement fermée pendant 1 minute.
• Contacter un centre d'information client LG
Electronics si l'alarme continue de sonner après
30 secondes même après la fermeture de toutes
les portes.
Détection de pannes
L'appareil peut détecter automatiquement des
problèmes lors de l'utilisation.
UTILISATION
• Si un code d'erreur est indiqué sur l’écran, ne pas
mettre l'appareil hors tension. Contacter
immédiatement un centre d'information client
LG Electronics et lui signaler le code d’erreur. Si
vous mettez l'appareil hors tension, le technicien
de réparation de notre centre d'information
peut avoir des difficultés à identifier le problème.
17
FR
Suggestions relatives à
l'économie d'énergie
• S'assurer qu'il y ait suffisamment d'espace entre
les aliments stockés. Cela permet à l'air froid de
circuler uniformément et réduit les factures
d'électricité.
• Conserver les aliments chauds seulement après
qu'ils ont refroidi afin d'éviter une formation de
condensation ou de givre.
• Lors du stockage d’aliments dans le congélateur,
régler la température du congélateur à une
valeur inférieure à la température indiquée sur
l’aliment.
• Ne pas régler la température de l'appareil en
dessous de ce qui est nécessaire.
• Ne pas mettre d'aliments à proximité du capteur
de température du réfrigérateur. Garder une
distance d'au moins 3 cm autour du capteur.
• Noter que les spécifications de l’appareil
permettent une certaine augmentation de la
température après le dégivrage. Si l'on souhaite
réduire l’impact d’une élévation de la
température sur le stockage des aliments,
sceller ou envelopper dans plusieurs couches la
nourriture stockée.
• Le système de dégivrage automatique dans
l'appareil garantit que le compartiment reste
exempt d'accumulation de glace dans des
conditions de fonctionnement normales.
• Si un problème est détecté, l'appareil ne
fonctionne pas et un code d'erreur s'affiche,
même lorsqu'un bouton est pressé.

ATTENTION
REMARQUE
fr_main.book.book Page 18 Wednesday, April 1, 2020 2:53 PM
18
FR
UTILISATION
Conservation efficace des
aliments
• Conservez les aliments surgelés ou réfrigérés à
l'intérieur de récipients hermétiques.
• Vérifier la date d'expiration et l'étiquette
(instructions de stockage) avant de stocker de la
nourriture dans l'appareil.
• Ne pas stocker de nourriture pendant une
longue période (plus de 4 semaines) si elle se
détériore facilement à basse température.
• Mettre les aliments réfrigérés ou surgelés à
l'intérieur de chaque compartiment
réfrigérateur ou congélateur immédiatement
après l'achat.
• Conserver la viande et le poisson crus dans des
récipients appropriés au réfrigérateur, de
manière à ce qu'ils ne soient pas en contact avec
d'autres aliments ni ne gouttent dessus.
• Les aliments réfrigérés et autres aliments
peuvent être rangés sur le dessus du bac à
légumes.
• Éviter de recongeler tout aliment qui a été
complètement décongelé. La recongélation d'un
aliment qui a été complètement décongelé
réduit son goût et ses propriétés nutritives.
• Ne pas remplir l’appareil en excès. L’air froid ne
peut pas circuler correctement si l’appareil est
trop rempli.
• Refroidir les aliments chauds avant de les
stocker. Si trop d'aliments chauds sont stockés à
l'intérieur, la température interne de l'appareil
peut augmenter et affecter négativement
d'autres aliments stockés dans l'appareil.
• Si vous réglez une température trop basse pour
la nourriture, elle peut geler. Ne pas régler une
température inférieure à la température requise
pour un stockage correct de la nourriture.
• S'il existe des compartiments fraîcheur dans
l'appareil, ne pas stocker les légumes et les fruits
avec une teneur en humidité plus élevée dans les
compartiments fraîcheur car ils peuvent geler en
raison de la température plus basse.
• En cas de panne de courant, appeler la
compagnie d'électricité et demander combien
de temps cela durera.
- Vous devriez éviter les ouvertures de porte
lorsque l'alimentation est éteinte.
- Lorsque l'alimentation est rétablie, vérifier
l'état de la nourriture.
Capacité maximale de
congélation
• La fonction
congélateur d’atteindre sa capacité de
congélation maximale. Elle prend généralement
jusqu’à 24 heures et s’arrête automatiquement.
•
Express Freeze
heures avant que les produits frais ne soient
placés dans le compartiment congélateur.
• Pour une meilleure circulation de l'air, insérer
toutes les parties intérieures comme les paniers,
tiroirs et tablettes.
Express Freeze
doit être activé pendant 2
permettra au
Congeler la quantité maximale
d’aliments
Si de grandes quantités d’aliments doivent être
stockées, tous les tiroirs du congélateur doivent
être retirés de l’appareil et les aliments doivent être
empilés directement sur les étagères du
congélateur dans le compartiment congélateur.
• Pour retirer les tiroirs, commencez par retirer les
aliments des tiroirs, puis retirez-les
délicatement. Ne pas le faire pourrait causer des
blessures ou des dommages aux tiroirs.
• La forme de chaque tiroir peut être différente,
les insérer dans la bonne position.
Compartiment deux étoiles
• Un panier ou tiroir 2 étoiles (a) peut être utilisé
pour stocker de la glace et des aliments de -12°C
à -18°C pendant de courtes périodes.
• Les compartiments à aliments congelés deux
étoiles sont adaptés au stockage d’aliments pré-

fr_main.book.book Page 19 Wednesday, April 1, 2020 2:53 PM
congelés, au stockage ou à la fabrication de
glaces et à la fabrication de glaçons.
• Les compartiments deux étoiles ne sont pas
adaptés à la congélation d'aliments frais.
UTILISATION
19
FR

fr_main.book.book Page 20 Wednesday, April 1, 2020 2:53 PM
20
FR
UTILISATION
Caractéristiques du produit
L'aspect des composants de l'appareil peuvent varier d'un modèle à l'autre.
Extérieur
*1:Cette fonctionnalité n'est disponible que sur certains modèles.
a
Panneau de commande
Règle la température du réfrigérateur et la température du congélateur.
b
Door in Door
Il s'agit d’une zone de stockage pratique pour les articles fréquemment utilisés qui nécessitent un accès
facile.
c
Levier du Door in Door
Ouvre la Door in Door.
d
InstaView Door in Door
Le compartiment InstaView Door-in-Door permet un accès facile aux aliments les plus utilisés.
*1
*1
*1

fr_main.book.book Page 21 Wednesday, April 1, 2020 2:53 PM
Intérieur (deux étoiles a)
*1:Cette fonctionnalité n'est disponible que sur certains modèles.
UTILISATION
21
FR
a
Lampe LED
Les lampes LED à l'intérieur de l'appareil s'allument lorsque vous ouvrez la porte.
b
Étagère du congélateur
Vous pouvez y stocker les aliments congelés tels que la viande, le poisson et la crème glacée.
c
Machine à glaçons
C'est ici que la glace est manuellement produite et stockée .
d
Tiroir du congélateur
Il est destiné au stockage à long terme de produits congelés.
e
Panier de porte du congélateur
*1
*1
*1

ATTENTION
fr_main.book.book Page 22 Wednesday, April 1, 2020 2:53 PM
22
FR
f
g
• Ne stockez pas de bouteilles courtes ou des récipients. Les articles peuvent tomber et vous blessez ou
provoquer un dommage à l'appareil.
h
i
j
k
l
m
n
o
UTILISATION
C'est là où de petits paquets d'aliments congelés ou fréquemment utilisés peuvent être stockés.
Compartiment Door in Door
C'est là où sont stockés les aliments qui sont fréquemment sortis tels que les boissons et les collations.
Porte-bouteilles
C'est là que les grandes bouteilles à boire ou des récipients sont stockés.
Tablette du réfrigérateur
C’est là que sont entreposés les aliments réfrigérés et autres. Conservez les aliments à forte teneur en
humidité à l'avant de la tablette.
La hauteur d'étagère peut être ajustée en insérant l'étagère dans une autre rainure de hauteur
différente.
Le nombre réel de tablettes diffère d'un modèle à l'autre.
Filtre à Air
Cela réduit les odeurs à l'intérieur du compartiment réfrigérateur.
Tiroir à collations
C'est là que les petits emballages d'aliments réfrigérés sont stockés.
Capteur de température
Ce capteur règle la température du réfrigérateur.
• Maintenir la distance entre le capteur et la nourriture pour détecter la température avec précision.
Bac à légumes frais
Il s'agit de l'endroit où les fruits et légumes sont stockés pour aider à conserver leur fraîcheur en
ajustant le régulateur d'humidité.
Boîte à œufs
C'est là où sont stockés les œufs.
• Ne l'utilisez pas comme bac à glaçons et ne la placez pas sur la tablette située au-dessus du
réfrigérateur ou du bac à légumes.
Bac à légumes
C'est là où les fruits et légumes sont stockés pour rester frais aussi longtemps que possible.
Panier de porte du réfrigérateur
C'est là que les petits aliments, boissons et récipients de sauce réfrigérés sont stockés.
*1
*1
*1
*1
*1
*1
*1

REMARQUE
Power
Hygiene
Fresh
fr_main.book.book Page 23 Wednesday, April 1, 2020 2:53 PM
UTILISATION
Panneau de commande
Le panneau de commande peut différer d'un modèle à l'autre.
Panneau de commande et fonctions
*1:Ce panneau de commande n'est disponible que sur certains modèles.
a
Fridge
Appuyez à plusieurs reprises sur ce bouton pour sélectionner la température souhaitée entre 1°C et
7°C.
• La température initiale du réfrigérateur est de 4 °C.
23
FR
• La température interne réelle varie en fonction de l'état des aliments, étant donné que la température
de réglage indiquée est une température cible, non la température réelle à l'intérieur de l'appareil.
b
Freezer
Appuyez à plusieurs reprises sur ce bouton pour sélectionner la température souhaitée entre -24 °C et
-14 °C.
• La température initiale du congélateur est de -19 °C.
c
Hygiene Fresh
Cette fonction réduit les odeurs à l'intérieur du réfrigérateur.
d
Express Freeze
Cette fonction permet de congeler rapidement une grande quantité de glace ou d'aliments surgelés.
• Cette fonction est activée et désactivée à chaque fois que vous appuyez sur le bouton.
• Cette fonction s’arrête automatiquement après un délai spécifique.
e
Wi-Fi
*1

REMARQUE
REMARQUE
fr_main.book.book Page 24 Wednesday, April 1, 2020 2:53 PM
24
FR
f
• Le panneau de commande s’éteint automatiquement pour économiser l’énergie.
• S’il y a un doigt ou un contact avec la peau sur le panneau de commande pendant le nettoyage, la
fonction du bouton peut être déclenchée.
InstaView
Cette fonctionnalité n'est disponible que sur
certains modèles.
UTILISATION
Ce bouton permet à l'appareil de se connecter à un réseau Wi-Fi domestique. Reportez-vous aux
Fonctions Intelligentes pour obtenir des informations sur la configuration initiale de l’application
ThinQ
.
Lock
Verrouille les boutons du panneau de commande.
• Pour verrouiller les boutons du panneau de commande, appuyer et maintenir le bouton
pendant 3 secondes jusqu'à ce que l'icône
• Pour désactiver la fonction, appuyer et maintenir le bouton
l
l’icône
apparaisse et que la fonction soit désactivée.
k
apparaisse et que la fonction soit activée.
Lock
pendant 3 secondes jusqu’à ce que
2
Le voyant à LED s'éteint automatiquement
après dix secondes.
Lock
LG
Utiliser l’InstaView Door in Door
La fonction InstaView du compartiment Door in
Door vous permet de voir si votre stock d'aliments
fréquemment consommés (boissons et snack, par
exemple), a diminué ou non, sans avoir à ouvrir la
porte du réfrigérateur.
1
Tapotez deux fois sur la vitre pour allumer ou
éteindre l'éclairage à DEL à l'intérieur du
compartiment Door in Door.
• La fonction InstaView Door-in-Door est
désactivée pendant 2 secondes après avoir
fermé la porte gauche ou droite du congélateur,
et momentanément lorsque le distributeur de
glaçons est utilisé.
• Tapotez près du centre de la vitre. Tapotez près
des extrémités de la vitre risque de ne pas
activer correctement la fonction InstaView Door
in Door.
• Frappez suffisamment fort pour que le bruit soit
audible.
• La fonction InstaView Door in Door peut
s'enclencher si un bruit fort se produit à
proximité du réfrigérateur.
• Nettoyer la porte vitrée avec un chiffon sec. Pour
enlever les taches tenaces, légèrement
humidifier un chiffon propre avec de l’eau tiède
ou un nettoyant pour vitres. Ne pas vaporiser de
nettoyant pour vitres directement sur la porte
vitrée.

ATTENTION
ATTENTION
ATTENTION
fr_main.book.book Page 25 Wednesday, April 1, 2020 2:53 PM
Door in Door
Cette fonctionnalité n'est disponible que sur
certains modèles.
Utilisation de la porte Door in
Door
Tirer le levier en bas de la porte vers le haut jusqu'à
ce que la porte Door-in-Door s'ouvre.
Il y a beaucoup d'espace de rangement à l'intérieur
de la porte Door-in-Door et ses paniers
environnants, vous permettant de stocker la
nourriture d'une manière organisée.
UTILISATION
1
Ouvrir complètement les portes et retirer le
contenu du casier Doorin-Door. Le soulever et
tirer le casier Door-in-Door.
2
Les monter dans l'ordre inverse du processus
de retrait.
Tiroir
25
FR
• Ne pas ouvrir la porte de l'appareil avec le Door
In Door ouvert, ou ne pas ouvrir le Door In Door
si la porte de l'appareil est ouverte. Le Door In
Door peut être heurté par le bord de l'appareil et
ainsi endommagé.
Déposer / Remonter le casier de
la porte Door in Door
• Retirer le contenu du compartiment Door in
Door avant sa dépose.
• Toujours vider les tiroirs avant de les retirer et
utiliser les deux mains pour les retirer et les
remonter.
• S’assurer que les portes du réfrigérateur soient
complètement ouvertes avant de retirer et de
remonter les tiroirs.
Utilisation du bac à légumes
*1:Cette fonctionnalité n'est disponible que sur
certains modèles.
L'humidité dans le bac à légumes peut être
contrôlée en faisant glisser le levier dans un sens
ou dans l'autre.
• S'il est déplacé du côté gauche, le guide d'air
sera ouvert et permettra à l'air de circuler dans le
bac pour réduire l'humidité.
• S'il est déplacé du côté droit, le guide d'air sera
fermé et maintiendra l'humidité qui se trouve
actuellement dans le bac à légumes.

ATTENTION
AVERTISSEMENT
REMARQUE
fr_main.book.book Page 26 Wednesday, April 1, 2020 2:53 PM
26
FR
Type A*1
Type B*1
UTILISATION
• Toujours vider les tiroirs avant de les retirer et
utiliser les deux mains pour les retirer et les
remonter.
• S’assurer que les portes du réfrigérateur soient
complètement ouvertes avant de retirer et de
monter les tiroirs.
Machine à glaçons
Avant d'utiliser la machine à
glaçons
Retrait / Remontage des tiroirs
1
Retirer le contenu du tiroir. Tenir la poignée
des bacs à légumes et les tirer doucement vers
l’extérieur.
2
Soulever le bac à légumes et le sortir en le
tirant.
3
Les monter dans l'ordre inverse du processus
de retrait.
• Remplir d'eau potable uniquement le réservoir
d'eau de la machine à glaçons ou du
distributeur.
• La machine à glaçons produit normalement de la
glace lorsqu’ environ 48 heures se sont écoulées
après que l'appareil a été initialement installé.
• Si de la glace à moitié congelée est placée dans
le bac à glaçons, les glaçons qui sortent vont
agglomérer. Il faut environ 4 heures à - 20° C
pour produire des glaçons.
• Si la porte du congélateur est fréquemment
ouverte, l'air chaud pénètre dans le
compartiment congélateur. La congélation de la
glace peut prendre plus de temps.
• Veiller à ne pas tordre le générateur de glace
avec force car il peut se casser.
• Ne pas congeler la glace dans le compartiment à
glaçons. Cela pourrait le casser et causer des
dommages ou des blessures.
Utiliser la machine à glaçons
*1:Cette fonctionnalité n'est disponible que sur
certains modèles.

REMARQUE
ATTENTION
fr_main.book.book Page 27 Wednesday, April 1, 2020 2:53 PM
Machine à glaçons type A*1
1
Tenir la poignée du bac à glaçons et le tirer
pour le sortir.
2
Remplir le bac à glaçons avec de l’eau potable
jusqu’au repère d’eau.
3
Remettre le bac à glaçons dans sa position avec
précaution.
UTILISATION
Machine à glaçons type B*1
1
Remplir le bac à glaçons avec de l'eau potable
et le placer dans le compartiment congélateur.
2
Une fois l'eau gelée, tenir le plateau à ses
extrémités et le faire tourner doucement.
• Vous pouvez retirer la machine à glaçons ou le
compartiment à glaçons pour créer plus
d'espace à l'intérieur du congélateur si vous ne
l'utilisez pas.
27
FR
4
Tourner la poignée de la machine à glaçons
dans le sens des aiguilles d’une montre.
5
Soulever et retirer légèrement le bac de
stockage des glaçons.
Tablette
• Les étagères en verre sont lourdes. Faire
attention lorsque vous les retirez
• Ne pas nettoyer les étagères en verre avec de
l'eau chaude si elles sont froides. Les étagères
peuvent se casser si elles sont exposées à des
changements brusques de température ou à un
impact.
Retrait / Remontage de
l’étagère
1
Incliner vers le haut l'avant de l’étagère et
soulever l'étagère.

ATTENTION
fr_main.book.book Page 28 Wednesday, April 1, 2020 2:53 PM
28
FR
2
3
• Les étagères en verre sont lourdes. Faire
attention lorsque vous les retirez
• Ne pas nettoyer les étagères en verre avec de
l'eau chaude si elles sont froides. Les étagères
peuvent se casser si elles sont exposées à des
changements brusques de température ou à un
impact.
• Assurez-vous que les étagères sont à niveau d’un
côté à l’autre. Le manquement à cette instruction
peut provoquer la chute de l’étagère ou le
renversement des aliments.
UTILISATION
Tirer l'étagère.
Les monter dans l'ordre inverse du processus
de retrait.
3
Les monter dans l'ordre inverse du processus
de retrait.
Panier de porte
Retrait / Remise en place du
panier de porte
1
Tenir les deux bords du panier et le retirer en le
soulevant vers le haut.
2
Remonter les paniers de porte dans l’ordre
inverse du processus de retrait.

REMARQUE
REMARQUE
fr_main.book.book Page 29 Wednesday, April 1, 2020 2:53 PM
FONCTIONS SMART
Application LG ThinQ
Cette fonctionnalité est uniquement disponible sur
les modèles avec le Wi-Fi.
L’application
communiquer avec l’appareil à l’aide d’un
smartphone.
LG ThinQ
Caractéristiques de
l'application LG ThinQ
Communiquez avec le dispositif depuis un
SmartPhone au moyen de fonctions intelligentes.
Smart Diagnosis
• Si vous rencontrez un problème lors de
l’utilisation de l’appareil, cette fonction de
diagnostic intelligent vous aidera à
diagnostiquer le problème.
Réglages
• Vous permet de régler plusieurs options dans
l'appareil et dans l'application.
• Si vous changez le routeur sans fil, le fournisseur
de services Internet ou le mot de passe,
supprimer l'appareil enregistré de l'application
LG ThinQ
• L'application peut changer, dans le but
d'améliorer le produit, sans que les utilisateurs
n'en soient informés.
• Les caractéristiques peuvent varier selon le
modèle.
et l'enregistrer à nouveau.
Avant d’utiliser l’application LG
ThinQ
1
Vérifier la distance entre l'appareil et le routeur
sans fil (Réseau Wi-Fi),
• Si la distance entre l'appareil et le routeur
sans fil est trop éloignée, la puissance du
signal devient faible. L'installation peut
prendre trop de temps ou l'installation peut
échouer.
vous permet de
ou les
29
FR
FONCTIONS SMART
2
Désactiver les
données cellulaires
3
Connectez votre smartphone au routeur sans
fil.
• Pour vérifier la connexion Wi-Fi, vérifiez que
f
l’icône
commande.
• L'appareil prend en charge les réseaux Wi-Fi 2,4
GHz uniquement. Pour vérifier la fréquence de
votre réseau, contacter votre fournisseur de
services Internet ou consulter le manuel de votre
routeur sans fil.
•
LG ThinQ
cas de problèmes de connexion au réseau, ou de
problèmes/dysfonctionnements/erreurs
provoqués par la connexion réseau.
• Si l'appareil a du mal à se connecter au Wi-Fi, il se
peut qu'il soit trop éloigné du routeur. Achetez
un amplificateur de signal WIFI pour améliorer la
force du signal.
• La connexion Wi-Fi peut avoir du mal à s'établir,
ou peut être coupée à cause d'un
environnement gênant.
• La connexion réseau peut avoir du mal à
fonctionner, en fonction du fournisseur d'accès
choisi.
• L'environnement sans fil peut entraîner un
ralentissement du réseau.
Données mobiles
sur votre smartphone.
s'allume sur le panneau de
ne saurait être tenu responsable en

REMARQUE
REMARQUE
REMARQUE
fr_main.book.book Page 30 Wednesday, April 1, 2020 2:53 PM
30
FR
FONCTIONS SMART
• L'appareil ne peut pas être enregistré en raison
de problèmes liés à la transmission du signal
sans fil. Débranchez l'appareil et attendez
environ une minute avant de réessayer.
• Si le pare-feu de votre routeur sans fil est activé,
désactivez le pare-feu ou ajoutez une exception
à ce dernier.
• Le nom du réseau sans fil (SSID) doit être
composé d'une combinaison de chiffres et de
lettres anglais. (Les caractères spéciaux ne sont
pas autorisés)
• L'interface d'utilisateur du Smartphone (IU) peut
varier en fonction du système d'exploitation du
téléphone (SE) et du fabricant.
• Si le protocole de sécurité du routeur est
configuré sur
puissiez pas configurer le réseau. Veuillez le
modifier par d'autres protocoles de sécurité
(
WPA2
produit à nouveau.
WEP
, il est possible que vous ne
est recommandé) et enregistrer le
Installation de l’application LG
ThinQ
Chercher l’application
Store & Apple App Store sur un smartphone. Suivez
les instructions pour télécharger et installer
l’application.
LG ThinQ
dans Google Play
Maintenir le bouton
secondes pour le désactiver temporairement.
Lancer l'application
instructions dans l'application pour enregistrer
l'appareil.
• Pour désactiver la fonction Wi-Fi, maintenir le
bouton
Wi-Fi
L’icône f sera éteinte.
Wi-Fi
appuyé pendant 3
LG ThinQ
appuyé pendant 3 secondes.
et suivre les
Informations sur les logiciels
libres
Pour obtenir le code source sous la licence
publique générale, la licence publique générale
limitée, la licence publique Mozilla ou les autres
licences libres de ce produit, rendez-vous sur http:/
/opensource.lge.com.
En plus du code source, tous les termes de la
licence, ainsi que les exclusions de garantie et les
droits d’auteur, sont disponibles au
téléchargement.
LG Electronics peut aussi vous fournir le code
source sur CD-ROM moyennant le paiement des
frais de distribution (support, envoi et
manutention) sur simple demande adressée par email à opensource@lge.com. Cette offre est valable
pour une période de trois ans à compter de la date
de la dernière distribution de ce produit. Cette
offre est valable pour toute personne possédant
cette information.
Connexion à un réseau Wi-Fi
La touche
l'application
se connecter au réseau Wi-Fi du foyer. L'icône
affiche le statut de la connexion au réseau du
réfrigérateur. L'icône s'allume lorsque le
réfrigérateur est connecté au réseau Wi-Fi.
•
•
Wi-Fi
, lorsqu'elle est utilisée avec
LG ThinQ
Enregistrement initial de l’appareil
Lancer l'application
instructions dans l'application pour enregistrer
l'appareil.
Réenregistrer l'appareil ou enregistrer un
autre utilisateur
, permet au réfrigérateur de
LG ThinQ
et suivre les
Smart Diagnosis
Cette fonctionnalité est uniquement disponible sur
f
les modèles avec le logo
Utilisez cette fonctionnalité pour vous aider à
diagnostiquer et à résoudre des problèmes liés à
votre appareil.
• Pour des raisons qui ne sont pas imputables à la
négligence de LGE, le service peut ne pas
fonctionner en raison de facteurs externes tels
que, notamment, l’indisponibilité du Wi-Fi, la
c
ou d.

REMARQUE
fr_main.book.book Page 31 Wednesday, April 1, 2020 2:53 PM
déconnexion du Wi-Fi, la politique du service
d’applications local ou la non-disponibilité de
l’application.
• La fonctionnalité peut être sujette à modification
sans préavis et peut avoir une forme différente
en fonction de l’endroit où vous vous trouvez.
Utiliser LG ThinQ pour
diagnostiquer des problèmes
Si vous rencontrez un problème avec votre appareil
équipé Wi-Fi, il peut transmettre des données de
dépannage à un smartphone à l’aide de
l’application
• Lancez l’application
fonction
les instructions fournies dans l’application
ThinQ
LG ThinQ
Smart Diagnosis
.
.
LG ThinQ
et sélectionnez la
dans le menu. Suivez
LG
Utiliser le diagnostic sonore
pour diagnostiquer des
problèmes
Pour utiliser la méthode de diagnostic sonore,
suivre les instructions ci-dessous.
• Lancez l’application
fonction
les instructions de diagnostic sonore fournies
dans l’application
Smart Diagnosis
LG ThinQ
dans le menu. Suivez
LG ThinQ
.
et sélectionnez la
FONCTIONS SMART
• Placer le téléphone de sorte que le micro soit
aligné avec le trou du haut-parleur.
3
Appuyez et maintenez le bouton
pendant au moins trois secondes tout en
tenant votre téléphone sur le haut-parleur
jusqu’à ce que le transfert des données soit
terminé.
• Le son du diagnostic est généré au bout
d’environ 3 secondes.
4
Une fois le transfert des données terminé, le
diagnostic s’affiche dans l’application.
• Pour de meilleurs résultats, ne pas déplacer le
téléphone pendant la transmission des tonalités.
31
Freezer
FR
1
Appuyer sur le bouton
fonction de verrouillage.
• Si l'affichage a été verrouillé pendant plus de
5 minutes, vous devez désactiver le
verrouillage, puis le réactiver.
2
Ouvrez la porte du réfrigérateur, puis
maintenez le téléphone sur le trou supérieur
droit du haut-parleur.
Lock
pour activer la

fr_main.book.book Page 32 Wednesday, April 1, 2020 2:53 PM
32
FR
MAINTENANCE
MAINTENANCE
Nettoyage
Conseils de nettoyage
généraux
• Lors du nettoyage intérieur ou extérieur de
l'appareil, ne pas l'essuyer avec une brosse dure,
du dentifrice ou des matériaux inflammables. Ne
pas utiliser de produits de nettoyage contenant
des substances inflammables. Cela peut
provoquer une décoloration ou des dommages
à l'appareil.
- Substances inflammables : alcool (éthanol,
méthanol, alcool isopropylique, alcool
isobutylique, etc.), diluant, eau de javel,
benzène, liquide inflammable, abrasif, etc.
• Après le nettoyage, vérifier si le câble
d’alimentation est endommagé.
Nettoyage de l'extérieur
• En cas de nettoyage des bouches d’aération à
l’extérieur de l’appareil au moyen d’un
aspirateur, le cordon d’alimentation doit être
débranché de la prise afin d’éviter toute
décharge statique qui peut endommager les
composants électroniques ou provoquer un
choc électrique. Un nettoyage régulier des
capots de ventilation arrière et latéraux est
recommandé pour maintenir un
fonctionnement fiable et économique de
l’appareil.
• Veiller à la propreté des bouches d'aération à
l'extérieur de l'appareil. Des bouches d'aération
obstruées peuvent provoquer un incendie ou
endommager l'appareil.
• Pour l'extérieur de l'appareil, utiliser une éponge
propre ou un chiffon doux et un détergent doux
dans de l'eau tiède. Ne pas utiliser de nettoyants
abrasifs ou corrosifs. Sécher soigneusement
avec un chiffon doux. Ne pas utiliser de chiffons
contaminés lors du nettoyage des portes en
acier inoxydable. Toujours utiliser un chiffon
dédié et essuyer dans le même sens que le grain.
Cela aide à réduire les taches et le ternissement
de la surface.
Nettoyage de l'intérieur
• Lorsque vous retirez une tablette ou un tiroir
dans l'appareil, enlever tous les aliments stockés
sur la tablette ou le tiroir afin d'éviter des
blessures ou des dommages à l'appareil. Dans le
cas contraire, des blessures peuvent survenir en
raison du poids des aliments stockés.
• Détacher les tablettes et les tiroirs et les nettoyer
avec de l'eau, puis les sécher suffisamment
avant de les replacer.
• Essuyer régulièrement les joints de la porte avec
un chiffon doux et humide.
• Le panier de porte fuit et les taches doivent être
nettoyées car elles peuvent compromettre la
capacité de stockage du panier et même
l'endommager.
• Ne jamais nettoyer les tablettes ou les récipients
au lave-vaisselle. Les parties peuvent se
déformer en raison de la chaleur.
Nettoyage du couvercle du
condenseur
Utilisez un aspirateur avec une brosse pour
nettoyer le couvercle du condenseur et les trous
d'aération. Ne retirez pas le panneau couvrant la
zone de la bobine du condenseur.
Nous recommandons de le faire tous les 12 mois
pour maintenir l'efficacité opérationnelle.

fr_main.book.book Page 33 Wednesday, April 1, 2020 2:53 PM
DÉPANNAGE
Avant d'appeler le service
Refroidissement
Symptômes Cause possible et solution
Il n'y a pas de
réfrigération ou de
congélation.
La réfrigération ou la
congélation est
mauvaise.
Y a-t-il une coupure de courant ?
• Vérifier l'alimentation électrique d'autres appareils.
Vérifier l'alimentation électrique d'autres appareils.
• Brancher correctement la fiche d'alimentation dans la prise.
La température du réfrigérateur ou du congélateur est-elle réglée au
plus chaud ?
• Régler la température du réfrigérateur ou du congélateur à un réglage
plus froid.
L'appareil se trouve-t-il en plein soleil, ou est-il près d'un objet générant
de la chaleur, tel qu'un four ou un radiateur ?
• Vérifier la zone d'installation et le réinstaller loin d'objets produisant de la
chaleur.
Avez-vous stocké de la nourriture chaude sans la refroidir au préalable ?
• Refroidir la nourriture chaude avant de la mettre dans le compartiment
réfrigérateur ou le congélateur.
Avez-vous mis trop de nourriture ?
• Maintenir un espace approprié entre les aliments.
Les portes de l'appareil sont-elles complètement fermées ?
• Fermer complètement la porte et s'assurer que la nourriture stockée ne
coince pas la porte.
Y a-t-il suffisamment d'espace autour de l'appareil ?
• Ajuster la position de l'installation pour qu'il y ait suffisamment d'espace
autour de l'appareil.
DÉPANNAGE
33
FR

fr_main.book.book Page 34 Wednesday, April 1, 2020 2:53 PM
34
FR
L'appareil a une
mauvaise odeur.
DÉPANNAGE
Symptômes Cause possible et solution
La température du réfrigérateur ou du congélateur est-elle réglée sur
« Chaud » ?
• Régler la température du réfrigérateur ou du congélateur à un réglage
plus froid.
Avez-vous mis des aliments avec une forte odeur ?
• Conserver les aliments ayant de fortes odeurs dans des récipients
hermétiques.
Il se peut que des légumes ou des fruits se soient gâtés dans le tiroir.
• Jeter les légumes pourris et nettoyer le bac à légumes. Ne pas stocker de
légumes trop longtemps dans le bac à légumes.
Condensation et givre
Symptômes Cause possible et solution
Il y a de la
condensation à
l'intérieur de l'appareil
ou sur le fond du capot
du bac à légumes.
Du givre s'est formé
dans le compartiment
congélateur.
Avez-vous stocké de la nourriture chaude sans la refroidir au préalable ?
• Laissez refroidir les aliments chauds avant de les placer au congélateur.
Avez-vous laissé la porte de l'appareil ouverte ?
• Bien que la condensation disparaisse lorsque vous fermez la porte de
l'appareil, vous pouvez l'essuyer avec un chiffon sec.
Avez-vous ouvert et fermé la porte de l'appareil trop fréquemment ?
• Il se peut que de la condensation se forme en raison de la différence de
température avec l'extérieur. Essuyer l'humidité avec un chiffon sec.
Avez-vous mis des aliments chauds ou humides à l'intérieur sans les
sceller dans un récipient ?
• Conserver les aliments dans un récipient couvert ou hermétique.
Les portes ne sont peut-être pas bien fermées.
• Vérifier qu'aucun aliment à l'intérieur de l'appareil ne bloque la porte et
s'assurer que la porte soit bien fermée.
Avez-vous stocké de la nourriture chaude sans la refroidir au préalable ?
• Refroidir la nourriture chaude avant de la mettre dans le compartiment
réfrigérateur ou le congélateur.
L'entrée ou la sortie d'air du congélateur est-elle obstruée ?
• S'assurer que l'entrée ou la sortie d'air ne soit pas obstruée afin que l'air
puisse circuler à l'intérieur.
Le congélateur est-il trop rempli ?
• Maintenir un espace approprié entre les articles.

fr_main.book.book Page 35 Wednesday, April 1, 2020 2:53 PM
Symptômes Cause possible et solution
Du givre ou de la
condensation s'est
formé à l'intérieur ou à
l'extérieur de
l'appareil.
Le côté ou l'avant de
l'appareil est chaud.
Il y a de l'eau à
l'intérieur ou à
l'extérieur de
l'appareil.
Avez-vous ouvert et fermé la porte de l'appareil trop fréquemment ou la
porte de l'appareil est-elle mal fermée ?
• Du givre ou de la condensation peuvent se former si l'air extérieur pénètre
à l'intérieur de l'appareil.
L'environnement d'installation est-il humide ?
• De la condensation peut apparaître sur l'extérieur de l'appareil si la zone
d'installation est trop humide ou lors d'une journée humide comme un
jour de pluie. Essuyer l'humidité avec un chiffon sec.
Des tuyaux anti-condensation sont installés sur ces zones de l'appareil
afin de réduire la formation de condensation autour de la zone de la
porte.
• Le tuyau de dégagement de la chaleur pour empêcher la condensation est
installé sur l'avant et le côté de l'appareil. Vous pouvez le trouver
particulièrement chaud juste après l'installation de l'appareil ou pendant
l'été. Vous pouvez être assuré qu'il ne s'agit pas d'un problème et que c'est
normal.
Y a-t-il une fuite d'eau autour de l'appareil ?
• Vérifier si de l'eau a fui d'un évier ou d'un autre endroit.
Y a-t-il de l'eau sur le fond de l'appareil ?
• Vérifier si l'eau provient d'aliments congelés qui se sont décongelés ou
d'un récipient cassé ou tombé.
DÉPANNAGE
35
FR
Pièces et caractéristiques
Symptômes Cause possible et solution
La porte de l'appareil
n'est pas bien fermée.
La porte de l'appareil
est difficile à ouvrir.
L'appareil est-il penché vers l'avant ?
• Régler le pied avant afin de soulever légèrement la face avant.
Les tablettes ont-elles été correctement montées ?
• Remonter les tablettes si nécessaire.
Avez-vous fermé la porte avec une force excessive ?
• Si vous appliquez trop de force ou de vitesse lors de la fermeture de la
porte, elle peut rester légèrement ouverte. S'assurer de ne pas pousser la
porte trop violemment. Fermer doucement la porte.
Avez-vous ouvert la porte juste après l'avoir fermée ?
• Si vous essayez d'ouvrir la porte de l'appareil moins de 1 minute après
l'avoir fermée, vous pouvez avoir des difficultés en raison de la pression
qui se trouve à l'intérieur de l'appareil. Essayer d'ouvrir à nouveau la porte
de l'appareil au bout de quelques minutes afin que la pression interne se
stabilise.

fr_main.book.book Page 36 Wednesday, April 1, 2020 2:53 PM
36
FR
Le meneau de porte ne
se plie ni ne se déplie
correctement.
La lampe à l'intérieur
de l'appareil ne
s'allume pas.
DÉPANNAGE
Symptômes Cause possible et solution
Les pieds avant de mise à niveau sont-ils déployés, l’appareil de niveau
et les portes alignées ?
• Une fois les paniers de porte remplis, les portes risquent de ne plus être
alignées, ce qui empêchera le fonctionnement correct du meneau de porte
ou de la fonction Auto Open Door. Étendre complètement les deux pieds
de mise à niveau avant afin qu’ils soient en contact ferme avec le sol. Suivre
les instructions de la section Alignement de la Porte pour soulever la porte
gauche du réfrigérateur jusqu’à ce que le meneau de la porte fonctionne
de nouveau correctement. Ajuster la porte droite du réfrigérateur pour
l’aligner avec la porte gauche du réfrigérateur.
Défaillance de la lampe
• Fermez la porte et rouvrez-la. Si la lampe ne s'allume pas, veuillez
contacter le centre d'informations client de LG Electronics. Ne tentez pas
de retirer la lampe.
Bruits
Symptômes Cause possible et solution
L'appareil est bruyant
et génère des sons
anormaux.
Bruits de clics Le contrôle de dégivrage émet un clic lorsque le cycle de dégivrage
L'appareil est-il installé sur un sol faible ou qui n'est pas de niveau ?
• Installer l'appareil sur un sol ferme et de niveau.
L'arrière de l'appareil touche-t-il le mur ?
• Ajuster la position de l'installation pour qu'il y ait suffisamment d'espace
autour de l'appareil.
Y a-t-il des objets éparpillés derrière l'appareil ?
• Retirer les objets éparpillés derrière l'appareil.
Y a-t-il un objet sur le dessus de l'appareil ?
• Enlever l'objet sur le dessus de l'appareil.
automatique commence et se termine. La commande du thermostat (ou
la commande de l'appareil sur certains modèles) émet également un clic
lorsque le cycle démarre et s'arrête.
• Fonctionnement normal

fr_main.book.book Page 37 Wednesday, April 1, 2020 2:53 PM
DÉPANNAGE
37
FR
Symptômes Cause possible et solution
Bruits de cliquetis Des vibrations sonores peuvent provenir de l'écoulement de l'appareil,
de la conduite d'eau à l'arrière de l'appareil (modèles à raccordement
seulement) ou d'objets posés sur ou autour de l'appareil.
• Fonctionnement normal
L'appareil ne repose pas de manière égale au sol.
• Le sol est fragile ou irrégulier les jambes de mise à niveau nécessitent un
ajustement. Voir la section d’Alignement des Portes.
L'appareil avec un compresseur linéaire a été déplacé pendant son
fonctionnement.
• Fonctionnement normal. Si le cliquetis du compresseur ne s'arrête pas au
bout de 3 minutes, mettre l'alimentation de l'appareil hors tension, puis à
nouveau sous tension.
Crissements Le moteur du ventilateur de l'évaporateur fait circuler l'air à travers les
compartiments du réfrigérateur et du congélateur.
• Fonctionnement normal
L'air est forcé sur le condenseur par le ventilateur du condenseur.
• Fonctionnement normal
Gargouillements Débit de l'appareil à travers le système de refroidissement.
• Fonctionnement normal
Claquements Contraction et expansion des parois internes du fait de changements de
température.
• Fonctionnement normal
Vibrations Si le côté ou l'arrière de l'appareil touche un meuble ou un mur, une
partie des vibrations normales peut devenir audible.
• Pour éliminer le bruit, s'assurer que les côtés et l'arrière ne puissent pas
toucher un mur ou une armoire.

fr_main.book.book Page 38 Wednesday, April 1, 2020 2:53 PM
38
FR
DÉPANNAGE
Wi-Fi
Symptômes Cause possible et solution
Votre appareil
ménager et votre
smartphone ne sont
pas connectés au
réseau Wi-Fi.
Le mot de passe du Wi-Fi auquel vous essayez de vous connecter est
incorrect.
• Trouvez le réseau Wi-Fi connecté à votre smartphone et supprimez-le, puis
enregistrez votre appareil sur
Les Données mobiles sont activées sur votre smartphone.
• Désactiver les
l'appareil à l'aide du réseau Wi-Fi.
Le nom du réseau sans fil (SSID) est défini de manière incorrecte.
• Le nom du réseau sans fil (SSID) doit être composé d'une combinaison de
chiffres et de lettres anglais. (Les caractères spéciaux ne sont pas
autorisés)
La fréquence du routeur n'est pas de 2,4 GHz.
• Seule une fréquence de routeur de 2,4 GHz est prise en charge. Réglez le
routeur sans fil sur 2,4 GHz et connectez l'appareil au routeur sans fil. Pour
vérifier la fréquence du routeur, consultez votre fournisseur de services
Internet ou le fabricant du routeur.
La distance entre l'appareil et le routeur est trop éloignée.
• Si la distance entre l'appareil et le routeur est trop éloignée, le signal peut
être faible et la connexion peut ne pas être configurée correctement.
Déplacez le routeur de manière qu'il soit plus proche de l'appareil.
Données Mobiles
LG ThinQ
de votre smartphone et enregistrer
.

fr_main.book.book Page 43 Wednesday, April 1, 2020 2:53 PM
Note

fr_main.book.book Page 43 Wednesday, April 1, 2020 2:53 PM
Note

ar_main.book.book Page 35 Thursday, April 2, 2020 1:01 PM
ةرﻛذﻣ

ar_main.book.book Page 35 Thursday, April 2, 2020 1:01 PM
ةرﻛذﻣ

ar_main.book.book Page 30 Thursday, April 2, 2020 1:01 PM
ﺔﻛﺑﺷﺑ لﺎﺻﺗﻼﻟ رورﻣﻟا ﺔﻣﻠﻛWi-Fi.ﺔﺣﯾﺣﺻ رﯾﻏ ﺎﮭﺑ لﺎﺻﺗﻻا لوﺎﺣﺗ ﻲﺗﻟا
LG ThinQ
.
.ﺔّﻠﻌﻔُﻣ ﻲﻛذﻟا كﻔﺗﺎھ ﻲﻓ لوﻣﺣﻣﻟا فﺗﺎﮭﻟا تﺎﻧﺎﯾﺑ
ﺔﻛﺑﺷ مادﺧﺗﺳﺎﺑ زﺎﮭﺟﻟا لﺟﺳو ﻲﻛذﻟا كﻔﺗﺎھ ﻰﻠﻋ Wi-Fi.
وأ كﺑ صﺎﺧﻟا تﻧرﺗﻧﻹا ﺔﻣدﺧ ودوزﻣ ﻊﺟار ،ﮫﯾﺟوﺗﻟا زﺎﮭﺟ ددرﺗ نﻣ ﻖﻘﺣﺗﻠﻟ .ﻲﻛﻠﺳﻼﻟا ﮫﯾﺟوﺗﻟا زﺎﮭﺟﺑ زﺎﮭﺟﻟا
.مزﻼﻟا نﻣ دﻌﺑأ ﮫﯾﺟوﺗﻟا زﺎﮭﺟو زﺎﮭﺟﻟا نﯾﺑ ﺔﻓﺎﺳﻣﻟا
.زﺎﮭﺟﻟا ﻰﻟإ برﻗأ ﺢﺑﺻﯾ ﻰﺗﺣ ﮫﻧﺎﻛﻣ نﻣ ﮫﯾﺟوﺗﻟا زﺎﮭﺟ لﻘﻧا .ﺢﯾﺣﺻ
لوﻣﺣﻣﻟا فﺗﺎﮭﻟا تﺎﻧﺎﯾﺑ
) ﺔﯾﻛﻠﺳﻼﻟا ﺔﻛﺑﺷﻟا مﺳا دادﻋإ مﺗﯾ مﻟSSID.ﺢﯾﺣﺻ لﻛﺷﺑ (
(ﺔﺻﺎﺧ
سﯾﻟ ﮫﯾﺟوﺗﻟا زﺎﮭﺟ ددرﺗ2.4.زﺗرھ ﺎﻐﯾﻏ
.ﮫﯾﺟوﺗﻟا زﺎﮭﺟ ﻊّﻧﺻﻣ
ﺎﮭﺣﻼﺻإو لﺎطﻋﻷا فﺎﺷﻛﺗﺳا
ضارﻋﻷالﺣﻟاو لﻣﺗﺣﻣﻟا بﺑﺳﻟا
رﯾﻏ ﻲﻛذﻟا كﻔﺗﺎھ وأ ﻲﻟزﻧﻣﻟا كزﺎﮭﺟ
• ﺔﻛﺑﺷ ﻰﻠﻋ رﺛﻋاWi-Fi ﻰﻠﻋ كزﺎﮭﺟ لﺟﺳ مﺛ ،ﺎﮭﺗﻟازﺈﺑ مﻗ مﺛ ﻲﻛذﻟا كﻔﺗﺎﮭﺑ ﺔﻠﺻﺗﻣﻟا
• فﻗوأ
•) ﺔﯾﻛﻠﺳﻼﻟا ﺔﻛﺑﺷﻟا مﺳا نوﻛﯾ نأ بﺟﯾSSID ًازوﻣر مدﺧﺗﺳﺗ ﻻ) .ﺔﯾزﯾﻠﺟﻧﻹا ﺔﻐﻠﻟﺎﺑ مﺎﻗرأو فرﺣأ نﻣ ًﺎﻧوﻛﻣ (
• ددرﺗﺑ ﮫﯾﺟوﺗﻟا زﺎﮭﺟ مﻋد مﺗﯾ2.4 ﻰﻠﻋ ﻲﻛﻠﺳﻼﻟا ﮫﯾﺟوﺗﻟا زﺎﮭﺟ طﺑﺿا .طﻘﻓ زﺗرھ ﺎﻐﯾﻏ 2.4 لﺻو مﺛ زﺗرھ ﺎﻐﯾﻏ
• لﻛﺷﺑ ﮫﻧﯾوﻛﺗ رذﻌﺗﯾ دﻗو ﺔﻔﯾﻌﺿ ةرﺎﺷﻹا نوﻛﺗ دﻗ ،مزﻼﻟا نﻣ دﻌﺑأ ﮫﯾﺟوﺗﻟا زﺎﮭﺟو زﺎﮭﺟﻟا نﯾﺑ ﺔﻓﺎﺳﻣﻟا تﻧﺎﻛ اذإ
30
AR
Wi-Fi(يﺎﻓ ياو)
ﺔﻛﺑﺷﺑ نﯾﻠﺻﺗﻣWi-Fi.

ar_main.book.book Page 29 Thursday, April 2, 2020 1:01 PM
29
AR
ﺎﮭﺣﻼﺻإو لﺎطﻋﻷا فﺎﺷﻛﺗﺳا
.زﺎﮭﺟﻟا لوﺣ وأ يوﻠﻌﻟا ءزﺟﻟا ﻲﻓ ﺔﻧّزﺧﻣﻟا رﺻﺎﻧﻌﻟا
.ﺔﯾﺿرﻷا ﻰﻠﻋ ٍوﺎﺳﺗﻣ لﻛﺷﺑ رﻘﺗﺳﻣ رﯾﻏ زﺎﮭﺟﻟا
.لﯾﻐﺷﺗﻟا ءﺎﻧﺛأ كرﺣﺗﯾ دﻗ ﻲﻟوط طﻏﺎﺿﺑ دوزﻣﻟا زﺎﮭﺟﻟا
.ىرﺧأ ةرﻣ ﺎﮭﻠﯾﻐﺷﺗ مﻗ مﺛ زﺎﮭﺟﻠﻟ
.فﺛﻛﻣﻟا ﺔﺣورﻣ ﺔطﺳاوﺑ فﺛﻛﻣﻟا رﺑﻋ ءاوﮭﻟا ﻊﻓد مﺗﯾ
ضارﻋﻷالﺣﻟاو لﻣﺗﺣﻣﻟا بﺑﺳﻟا
ﺔﻌﻘﻌﻗ تاوﺻأ وأ ،(طﻘﻓ ﺔﯾﺳأرﻟا زرطﻠﻟ) ةدﺣوﻟا نﻣ ﻲﻔﻠﺧﻟا ءزﺟﻟا ﻲﻓ هﺎﯾﻣﻟا طﺧ وأ ،زﺎﮭﺟﻟا ﻖﻓدﺗ نﻣ ﺔﻌﻘﻌﻘﻟا تاوﺻأ ردﺻﺗ دﻗ
•يدﺎﻋ لﯾﻐﺷﺗ
•.بﺎﺑﻟا ةاذﺎﺣﻣ مﺳﻗ رظﻧا .لﯾدﻌﺗ ﻰﻟإ جﺎﺗﺣﺗ ﺔﯾوﺳﺗﻟا لﺟرأ وأ ﺔﯾوﺗﺳﻣ رﯾﻏ وأ ﺔﻔﯾﻌﺿ ﺔﯾﺿرﻷا
• ﺔﻗﺎطﻟا لﯾﻐﺷﺗ فﺎﻘﯾﺈﺑ مﻗ ،ٍناوﺛ ثﻼﺛ دﻌﺑ ﺔﻌﻘﻌﻘﻟا نﻋ فﻗوﺗﯾ ﻻ طﻏﺎﺿﻟا نﺎﻛ لﺎﺣ ﻲﻓ .ﺔﯾﻌﯾﺑطﻟا لﯾﻐﺷﺗﻟا ﺔﯾﻠﻣﻋ
زﯾزأ تاوﺻأ.ﺔﺟﻼﺛﻟاو دﻣﺟُﻣﻟا تادﺣو لﺧاد ءاوﮭﻟا رﺧﺑُﻣﻟا ﺔﺣورﻣ كرﺣﻣ رﺷﻧﯾ
•يدﺎﻋ لﯾﻐﺷﺗ
•يدﺎﻋ لﯾﻐﺷﺗ
ةرﻏرﻏ تاوﺻأ.دﯾرﺑﺗﻟا مﺎظﻧ لﻼﺧ زﺎﮭﺟﻟا ﻖﻓدﺗ
•يدﺎﻋ لﯾﻐﺷﺗ
ﺔﻌﻗرﻓ تاوﺻأ.ةرارﺣﻟا ﺔﺟرد ﻲﻓ تارﯾﻐﺗﻟا بﺑﺳﺑ ﺎﮭﻌﺳوﺗو ﺔﯾﻠﺧادﻟا ناردﺟﻟا شﺎﻣﻛﻧا
•يدﺎﻋ لﯾﻐﺷﺗ
زازﺗھﻻا ﺎًﺗوﺻ ﺔﯾدﺎﻌﻟا تازازﺗھﻻا ضﻌﺑ ردﺻُﺗ دﻗ ،طﺋﺎﺣ وأ ﺔﻧازﺧ سﻣﻼﯾ زﺎﮭﺟﻟا نﻣ ﻲﻔﻠﺧﻟا وأ ﻲﺑﻧﺎﺟﻟا ءزﺟﻟا نﺎﻛ لﺎﺣ ﻲﻓ
.ﺎًﻋوﻣﺳﻣ
•.ﺔﻧازﺧ وأ طﺋﺎﺣ يأ سﻣﻼﯾ ﻻ ﻲﻔﻠﺧﻟا ءزﺟﻟاو ﺔﯾﺑﻧﺎﺟﻟا ءازﺟﻷا نأ نﻣ دﻛﺄﺗ ،توﺻﻟا ﻰﻠﻋ ءﺎﺿﻘﻠﻟ

ar_main.book.book Page 28 Thursday, April 2, 2020 1:01 PM
؟مﯾﻠﺳ لﻛﺷﺑ فﻓرﻷا بﯾﻛرﺗ مﺗ لھ
؟ﺔطرﻔﻣ ةوﻘﺑ بﺎﺑﻟا تﻘﻠﻏأ لھ
.ﻖﻓرﺑ بﺎﺑﻟا ﻖﻠﻏأ .فﻧﻌﺑ بﺎﺑﻟا ﻖﻠﻐﺗ ﻻ كﻧأ نﻣ دﻛﺄﺗ
.ﻲﻠﺧادﻟا طﻐﺿﻟا رﻘﺗﺳﯾ ﻰﺗﺣ ﺔﻠﯾﻠﻗ ﻖﺋﺎﻗد نوﺿﻏ ﻲﻓ ىرﺧأ ةرﻣ زﺎﮭﺟﻟا بﺎﺑ ﺢﺗﻔﺗ نأ لوﺎﺣ .زﺎﮭﺟﻟا لﺧاد
؟ﺔﯾذﺎﺣﺗﻣ باوﺑﻷاو ،ﺔﯾوﺗﺳﻣ ﺔﺟﻼﺛﻟاو ،ةدﺗﻣﻣ ﺔﯾﻣﺎﻣﻷا لﺟرﻷا لھ
لﺎﺻﺗا ﻲﻓ نﺎﻧوﻛﺗ ثﯾﺣﺑ لﻣﺎﻛﻟﺎﺑ نﯾﺗﯾﻣﺎﻣﻷا ىوﺗﺳﻣﻟا طﺑﺿ ﻲﻣدﻗ دﻣﺑ مﻗ .ﺢﯾﺣﺻ لﻛﺷﺑ لﻣﻌﻟا نﻣ ﺎًﯾﺋﺎﻘﻠﺗ بﺎﺑﻟا ﺢﺗﻓ
بﺎﺑﻟا دﺎﻣِﻋ ﺢﺑﺻﯾ ﻰﺗﺣ رﺳﯾﻷا ﺔﺟﻼﺛﻟا بﺎﺑ ﻊﻓرﻟ بﺎﺑﻟا ةاذﺎﺣﻣ
.رﺳﯾﻷا ﺔﺟﻼﺛﻟا بﺎﺑ ﻊﻣ ﮫﺗاذﺎﺣﻣ مﺗﯾﻟ نﻣﯾﻷا ﺔﺟﻼﺛﻟا بﺎﺑ طﺑﺿﺑ مﻗ .ىرﺧأ ةرﻣ ﺢﯾﺣﺻ لﻛﺷﺑ لﻣﻌﯾ
مﺳﻗ ﻲﻓ ةدوﺟوﻣﻟا تﺎﻣﯾﻠﻌﺗﻟا ﻊﺑﺗا .ضرﻷﺎﺑ تﺑﺎﺛ
حﺎﺑﺻﻣﻟا ﻲﻓ لطﻋ
Electronics.حﺎﺑﺻﻣﻟا كﻓ لوﺎﺣﺗ ﻻ .
ﺎﮭﺣﻼﺻإو لﺎطﻋﻷا فﺎﺷﻛﺗﺳا
صاوﺧﻟاو ءازﺟﻷا
ضارﻋﻷالﺣﻟاو لﻣﺗﺣﻣﻟا بﺑﺳﻟا
.مﺎﻛﺣﺈﺑ ﻖﻠﻐﻣ رﯾﻏ زﺎﮭﺟﻟا بﺎﺑ؟مﺎﻣﻸﻟ لﺋﺎﻣ زﺎﮭﺟﻟا لھ
•.ًﻼﯾﻠﻗ ﻲﻣﺎﻣﻷا بﻧﺎﺟﻟا ﻊﻓرﻟ ﺔﯾﻣﺎﻣﻷا مدﻘﻟا طﺑﺿا
•.رﻣﻷا مزﻟ اذإ فﻓرﻷا بﯾﻛرﺗ دﻋأ
• .قﻼﻏﻹا لﺑﻗ ةزﯾﺟو ةرﺗﻔﻟ ﺎًﺣوﺗﻔﻣ لظﯾ دﻗ ،بﺎﺑﻟا ﻖﻠﻏ دﻧﻋ مزﻼﻟا نﻣ رﺛﻛأ ﺔﻋرﺳ وأ ةوﻗ مدﺧﺗﺳﺗ تﻧﻛ لﺎﺣ ﻲﻓ
.زﺎﮭﺟﻟا بﺎﺑ ﺢﺗﻓ بﻌﺻﻟا نﻣ؟ًةرﺷﺎﺑﻣ ﮫﻗﻼﻏإ دﻌﺑ بﺎﺑﻟا تﺣﺗﻓ لھ
• دوﺟوﻣﻟا طﻐﺿﻟا بﺑﺳﺑ تﺎﺑوﻌﺻ ﮫﺟاوﺗ دﻗ ،ﮫﻗﻼﻏإ دﻌﺑ ﺔﻘﯾﻗد نوﺿﻏ ﻲﻓ زﺎﮭﺟﻟا بﺎﺑ ﺢﺗﻓ لوﺎﺣﺗ تﻧﻛ لﺎﺣ ﻲﻓ
جرﺎﺧﻟاو لﺧادﻠﻟ يوطﻧﯾ ﻻ بﺎﺑﻟا دﺎﻣِﻋ
• ﺔﻔﯾظو وأ بﺎﺑﻟا دﺎﻣِﻋ ﺔﻔﯾظو ﻊﻧﻣﯾ ﺎﻣﻣ ،ﺔﺣﯾﺣﺻ رﯾﻏ ﺔﻘﯾرطﺑ ﺔﯾذﺎﺣﺗﻣ باوﺑﻷا ﺢﺑﺻﺗ دﻗ ،بﺎﺑﻟا تّﻼﺳ ءلﻣ درﺟﻣﺑ
ﻻ زﺎﮭﺟﻟا ﻲﻓ ﻲﻠﺧادﻟا حﺎﺑﺻﻣﻟا
• ﺔﻛرﺷ ﻲﻓ ءﻼﻣﻌﻟا تﺎﻣوﻠﻌﻣ زﻛرﻣﺑ لﺎﺻﺗﻻا ﻰﺟرُﯾﻓ ،حﺎﺑﺻﻣﻟا لﯾﻐﺷﺗ مﺗﯾ مﻟ اذإ .ﮫﺣﺗﻓ دﻋأو بﺎﺑﻟا ﻖﻠﻏأLG
28
AR
.ﺢﯾﺣﺻ ٍلﻛﺷﺑ
.ءﻲﺿﯾ
؟ﺢﯾﺣﺻ لﻛﺷﺑ ﺔﯾوﺗﺳﻣ رﯾﻏ وأ ﺔﻔﯾﻌﺿ ﺔﯾﺿرأ ﻰﻠﻋ زﺎﮭﺟﻟا تﯾﺑﺛﺗ مﺗ لھ
؟طﺋﺎﺣﻟا زﺎﮭﺟﻟا نﻣ ﺔﯾﻔﻠﺧﻟا ﺔﮭﺟﻟا سﻣﻼﺗ لھ
؟زﺎﮭﺟﻟا فﻠﺧ ةرﺛﻌﺑﻣ ءﺎﯾﺷﻷا لھ
؟زﺎﮭﺟﻟا نﻣ يوﻠﻌﻟا ءزﺟﻟا ﻰﻠﻋ نﺋﺎﻛ دﺟوﯾ لھ
.ﺎﮭﻓﺎﻘﯾإو ةرودﻟا لﯾﻐﺷﺗ دﻧﻋ ﺔﻘطﻘط ﺎًﺿﯾأ (زرطﻟا ضﻌﺑ ﻲﻓ زﺎﮭﺟﻟا ﻲﻓ مﻛﺣﺗﻟا وأ) تﺎﺗﺳوﻣرﺗﻟا
ضارﻋﻷالﺣﻟاو لﻣﺗﺣﻣﻟا بﺑﺳﻟا
رﯾﻏ ﺎًﺗاوﺻأ ردﺻﯾو بﺧﺎﺻ زﺎﮭﺟﻟا
•.ﺔﯾوﺗﺳﻣو ﺔﺑﻠﺻ ﺔﯾﺿرأ ﻰﻠﻋ زﺎﮭﺟﻟا بﯾﻛرﺗﺑ مﻗ
•.زﺎﮭﺟﻟا لوﺣ ﺔﯾﻓﺎﻛ ﺔطﯾﺣﻣ ﺔﺣﺎﺳﻣﺑ حﺎﻣﺳﻠﻟ تﯾﺑﺛﺗﻟا ﻊﺿو طﺑﺿا
•.زﺎﮭﺟﻟا فﻠﺧ نﻣ ةرﺛﻌﺑﻣﻟا ءﺎﯾﺷﻷا لزأ
•.زﺎﮭﺟﻟا نﻣ يوﻠﻌﻟا ءزﺟﻟا ﻰﻠﻋ دوﺟوﻣﻟا نﺋﺎﻛﻟا لزأ
•يدﺎﻋ لﯾﻐﺷﺗ
ﺞﯾﺟﺿﻟا
.ﺔﯾﻌﯾﺑط
ﺔﻘطﻘطﻟا تاوﺻأ ﻲﻓ مﻛﺣﺗﻟا ردﺻﯾﺳ .ةرودﻟا ءﺎﮭﺗﻧاو ﻲﺋﺎﻘﻠﺗﻟا ﻊﯾﻘﺻﻟا ﺔﻟازإ ةرود ءدﺑ دﻧﻋ ﺔﻘطﻘط ﻊﯾﻘﺻﻟا ﺔﻟازإ ﻲﻓ مﻛﺣﺗﻟا ردﺻﯾﺳ

ar_main.book.book Page 27 Thursday, April 2, 2020 1:01 PM
27
AR
ﻲﻌﯾﺑط رﻣﻷا اذھ نأو ﺔﻠﻛﺷﻣ تﺳﯾﻟ هذھ نﺄﺑ دﻛﺄﺗﺗ نأ كﻧﻛﻣﯾ .فﯾﺻﻟا ءﺎﻧﺛأ وأ زﺎﮭﺟﻟا تﯾﺑﺛﺗ دﻌﺑ ةرﺷﺎﺑﻣ صﺧﻷﺎﺑ
ﺎﮭﺣﻼﺻإو لﺎطﻋﻷا فﺎﺷﻛﺗﺳا
؟ًﻻوأ هدﯾرﺑﺗ نود نﺧﺎﺳﻟا مﺎﻌطﻟا نﯾزﺧﺗﺑ تﻣﻗ لھ
؟ﺎًﺣوﺗﻔﻣ زﺎﮭﺟﻟا بﺎﺑ كرﺗﺗ لھ
؟اًدﺟ اًرﯾﺛﻛ ﮫﻘﻠﻐﺗو زﺎﮭﺟﻟا بﺎﺑ ﺢﺗﻔﺗ لھ
؟ﺔﯾوﺎﺣ ﻲﻓ ﮫﻟزﻋ نودﺑ لﺧادﻟﺎﺑ ﺎًﺋﻓاد وأ ﺎًﺑطر ﺎًﻣﺎﻌط ﻊﺿﺗ لھ
؟ًﻻوأ هدﯾرﺑﺗ نود نﺧﺎﺳﻟا مﺎﻌطﻟا نﯾزﺧﺗﺑ تﻣﻗ لھ
؟دودﺳﻣ دﻣﺟُﻣﻟﺎﺑ صﺎﺧﻟا ءاوﮭﻟا جرﺧﻣ وأ لﺧدﻣ لھ
؟دﻣﺟُﻣﻟا ءلﻣ ﻲﻓ طارﻓﻹا مﺗ لھ
؟ﺢﯾﺣﺻ رﯾﻏ لﻛﺷﺑ ﻖﻠﻐﻣ زﺎﮭﺟﻟا بﺎﺑ لھ وأ اًرﯾﺛﻛ ﮫﻘﻠﻐﺗو زﺎﮭﺟﻟا بﺎﺑ ﺢﺗﻔﺗ لھ
؟ﺔﺑطر تﯾﺑﺛﺗﻟا ﺔﺋﯾﺑ لھ
.ﺔﻓﺎﺟ شﺎﻣﻗ ﺔﻌطﻗ مادﺧﺗﺳﺎﺑ ﺔﺑوطر ﺔﯾأ ﺢﺳﻣا .رطﻣُﻣ
.بﺎﺑﻟا ﺔﻘطﻧﻣ لوﺣ نوﻛﺗﻣﻟا فﯾﺛﻛﺗﻟا لﯾﻠﻘﺗﻟ زﺎﮭﺟﻟا نﻣ ﻖطﺎﻧﻣﻟا هذﮭﺑ ﺔﺗﺑﺛﻣ فﯾﺛﻛﺗﻟا نﻣ صﻠﺧﺗﻟا بﯾﺑﺎﻧأ دﺟوﺗ
؟زﺎﮭﺟﻟا نﻣ ﻲﻠﻔﺳﻟا ءزﺟﻟا ﻰﻠﻋ هﺎﯾﻣ دﺟوﺗ لھ
ﻰﻠﻋ وأ زﺎﮭﺟﻟا لﺧاد فﯾﺛﻛﺗ دﺟوﯾ
.تاوارﺿﺧﻟا جرد ءﺎطﻏ لﻔﺳأ
•.دﻣﺟُﻣﻟا وأ ﺔﺟﻼﺛﻟا لﺧاد ﮫﻌﺿو لﺑﻗ ًﻻوأ نﺧﺎﺳﻟا مﺎﻌطﻟا دﯾرﺑﺗﺑ مﻗ
•.ﺔﻓﺎﺟ شﺎﻣﻗ ﺔﻌطﻗ مادﺧﺗﺳﺎﺑ ﮫﺣﺳﻣ كﻧﻛﻣﯾ ،زﺎﮭﺟﻟا بﺎﺑﻟ كﻘﻠﻏ دﻌﺑ ةرﺷﺎﺑﻣ ﻲﻔﺗﺧﯾﺳ فﯾﺛﻛﺗﻟا نأ نﻣ مﻏرﻟا ﻰﻠﻋ
•.ﺔﻓﺎﺟ شﺎﻣﻗ ﺔﻌطﻗ مادﺧﺗﺳﺎﺑ ﺔﺑوطرﻟا ﺢﺳﻣا .جرﺎﺧﻟا نﻋ ﺔﻔﻠﺗﺧﻣﻟا ةرارﺣﻟا بﺑﺳﺑ فﯾﺛﻛﺗﻟا نوﻛﺗﯾ نأ نﻛﻣﯾ
ّ
•.ﻖﻠﻐﻟا مﻛﺣﻣ وأ ﻰطﻐﻣ ءﺎﻋو ﻲﻓ مﺎﻌطﻟا ن
زﺧ
ِ
•.مﺎﻛﺣﺈﺑ ﻖﻠﻐﻣ بﺎﺑﻟا نأ نﻣ دﻛﺄﺗو بﺎﺑﻟا ﻖﯾﻌﯾ زﺎﮭﺟﻟا لﺧاد دوﺟوﻣﻟا مﺎﻌطﻟا رﺻﻧﻋ نﺎﻛ اذإ ﺎﻣ صﺣﻓا
•.دﻣﺟُﻣﻟا وأ ﺔﺟﻼﺛﻟا لﺧاد ﮫﻌﺿو لﺑﻗ ًﻻوأ نﺧﺎﺳﻟا مﺎﻌطﻟا د
رﺑ
ّ
ِ
•.لﺧادﻟﺎﺑ ءاوﮭﻟا رﯾودﺗ نﻛﻣﯾ ﻰﺗﺣ ءاوﮭﻟا جرﺧﻣ وأ لﺧدﻣ دادﺳﻧا مدﻋ نﻣ دﻛﺄﺗ
•.داوﻣﻟا نﯾﺑ ﺔﺑﺳﺎﻧﻣ ﺔﻓﺎﺳﻣ دوﺟو ﻰﻠﻋ ظﻓﺎﺣ
لﺧاد نّوﻛﺗ فﯾﺛﻛﺗﻟا وأ ﻊﯾﻘﺻﻟا
•.زﺎﮭﺟﻟا لﺧاد قرﺗﺧﯾ ﻲﺟرﺎﺧﻟا ءاوﮭﻟا نﺎﻛ لﺎﺣ ﻲﻓ فﯾﺛﻛﺗﻟا وأ ﻊﯾﻘﺻﻟا لﻛﺷﺗﯾ نأ نﻛﻣﯾ
• موﯾ لﺛﻣ بطر موﯾ ﻲﻓ وأ اًدﺟ ﺔﺑطر تﯾﺑﺛﺗﻟا ﺔﻘطﻧﻣ تﻧﺎﻛ لﺎﺣ ﻲﻓ زﺎﮭﺟﻟا ﺢطﺳ ﻰﻠﻋ فﯾﺛﻛﺗﻟا رﮭظﯾ نأ نﻛﻣﯾ
زﺎﮭﺟﻟا نﻣ ﻲﻣﺎﻣﻷا وأ ﻲﺑﻧﺎﺟﻟا ءزﺟﻟا
• نﺧﺎﺳ ﮫﻧﺄﺑ رﻌﺷﺗ دﻗ .فﯾﺛﻛﺗﻟا ﻊﻧﻣﻟ زﺎﮭﺟﻟا نﻣ ﻲﺑﻧﺎﺟﻟاو ﻲﻣﺎﻣﻷا بﻧﺎﺟﻟا ﻰﻠﻋ ةرارﺣﻟا رﯾرﺣﺗ بوﺑﻧأ تﯾﺑﺛﺗ مﺗﯾ
.اًدﺟ
.ﮫﺟرﺎﺧو زﺎﮭﺟﻟا لﺧاد هﺎﯾﻣ دﺟوﺗ؟زﺎﮭﺟﻟا لوﺣ هﺎﯾﻣ برﺳﺗ دﺟوﯾ لھ
•.رﺧآ نﺎﻛﻣ نﻣ وأ ضاوﺣﻷا دﺣأ نﻣ هﺎﯾﻣﻟا تﺑرﺳﺗ اذإ ﺎﻣﻣ ﻖﻘﺣﺗ
•.ﺔطﻗﺎﺳ وأ ةروﺳﻛﻣ ﺔﯾوﺎﺣ نﻣ وأ بﺋاذﻟا دﻣﺟﻣﻟا مﺎﻌطﻟا نﻋ ﺔﺟﺗﺎﻧ هﺎﯾﻣﻟا تﻧﺎﻛ اذإ ﺎﻣﻣ ﻖﻘﺣﺗ
ﻊﯾﻘﺻﻟاو فﯾﺛﻛﺗﻟا
ضارﻋﻷالﺣﻟاو لﻣﺗﺣﻣﻟا بﺑﺳﻟا
.دﻣﺟُﻣﻟﺎﺑ ﻊﯾﻘﺻﻟا نّوﻛﺗ.ﺢﯾﺣﺻ لﻛﺷﺑ ﺔﻘﻠﻐﻣ باوﺑﻷا نوﻛﺗ ﻻ دﻗ
.ﮫﺟرﺎﺧ وأ زﺎﮭﺟﻟا
.ﺊﻓاد

ar_main.book.book Page 26 Thursday, April 2, 2020 1:01 PM
ﺎﮭﺣﻼﺻإو لﺎطﻋﻷا فﺎﺷﻛﺗﺳا
ﺎﮭﺣﻼﺻإو لﺎطﻋﻷا فﺎﺷﻛﺗﺳا
ﺔﻣدﺧﻟا ﻰﻠﻋ لوﺻﺣﻠﻟ لﺎﺻﺗﻻا لﺑﻗ
.ىرﺧﻷا ةزﮭﺟﻷا ﺔﻗﺎط صﺣﻓا
؟نﺎﺧﺳ وأ ﻲﮭط نرﻓ لﺛﻣ ةرارﺣﻠﻟ دﻟوُﻣ نﺋﺎﻛ نﻣ بﯾرﻗ وھ لھ وأ ،رﺷﺎﺑﻣ سﻣﺷ ءوﺿﻟ ضرﻌﻣ زﺎﮭﺟﻟا لھ
؟ًﻻوأ هدﯾرﺑﺗ نود نﺧﺎﺳﻟا مﺎﻌطﻟا نﯾزﺧﺗﺑ تﻣﻗ لھ
رﺑ
ّ
ِ
؟ﺔﻣﻌطﻷا نﻣ اًدﺟ رﯾﺛﻛﻟا ﻊﺿﺗ لھ
؟لﻣﺎﻛﻟﺎﺑ ﺔﻠﻔﻘﻣ زﺎﮭﺟﻟا باوﺑأ لھ
؟زﺎﮭﺟﻟا لوﺣ ﺔﯾﻓﺎﻛ ﺔﺣﺎﺳﻣ دﺟوﺗ لھ
؟ﺔﯾوﻗ ﺔﺣﺋار اذ ﺎًﻣﺎﻌط تﻌﺿو لھ
.جردﻟا ﻲﻓ ﺔﮭﻛﺎﻔﻟا وأ تاورﺿﺧﻟا دﺳﻔﺗ دﻗ
ّ
ظﻧو ﺔﻧﻔﻌﺗﻣﻟا تاورﺿﺧﻟا نﻣ صﻠﺧﺗ
ِ
.تاورﺿﺧﻟا
26
AR
دﯾرﺑﺗﻟا
ضارﻋﻷالﺣﻟاو لﻣﺗﺣﻣﻟا بﺑﺳﻟا
.دﯾﻣﺟﺗ وأ دﯾرﺑﺗ دﺟوﯾ ﻻ؟ﻲﺑرﮭﻛﻟا رﺎﯾﺗﻟا ﻲﻓ عﺎطﻘﻧا كﺎﻧھ لھ
•.ىرﺧﻷا ةزﮭﺟﻷا ﺔﻗﺎط صﺣﻓا
•.مﯾﻠﺳ لﻛﺷﺑ ﻲﺑرﮭﻛﻟا رﺎﯾﺗﻟا ذﺧﺄﻣ ﻲﻓ ﺔﻗﺎطﻟا سﺑﺎﻗ لﯾﺻوﺗﺑ مﻗ
.ءيدر دﯾﻣﺟﺗ وأ دﯾرﺑﺗ دﺟوﯾ؟ﺎﮭﺑ صﺎﺧﻟا ﺎًﺋﻓد رﺛﻛﻷا دادﻋﻹا ﻰﻟإ دﻣﺟُﻣﻟا ةرارﺣ ﺔﺟرد طﺑﺿ مﺗ لھ
•.ةدورﺑ رﺛﻛأ دادﻋإ ﻰﻠﻋ دﻣﺟُﻣﻟا وأ ﺔﺟﻼﺛﻟا ةرارﺣ ﺔﺟرد نﯾﯾﻌﺗﺑ مﻗ
•.ةرارﺣﻟا ردﺻﺗ ﻲﺗﻟا ءﺎﯾﺷﻷا نﻋ اًدﯾﻌﺑ ﺞﺗﻧﻣﻟا بﯾﻛرﺗ دﻋأو بﯾﻛرﺗﻟا ﺔﻘطﻧﻣ نﻣ ﻖﻘﺣﺗ
•.دﻣﺟُﻣﻟا وأ ﺔﺟﻼﺛﻟا لﺧاد ﮫﻌﺿو لﺑﻗ ًﻻوأ نﺧﺎﺳﻟا مﺎﻌطﻟا د
•.ﺔﻣﻌطﻷا نﯾﺑ ﺔﺑﺳﺎﻧﻣ ﺔﻓﺎﺳﻣ دوﺟو ﻰﻠﻋ ظﻓﺎﺣ
•.بﺎﺑﻟا ﻖﯾﻌﯾ ﻻ نزﺧُﻣﻟا مﺎﻌطﻟا نأ نﻣ دﻛﺄﺗو لﻣﺎﻛ لﻛﺷﺑ بﺎﺑﻟا قﻼﻏﺈﺑ مﻗ
•.زﺎﮭﺟﻟا لوﺣ ﺔﯾﻓﺎﻛ ﺔﺣﺎﺳﻣ رﯾﻓوﺗﻟ تﯾﺑﺛﺗﻟا ﻊﺿو طﺑﺿا
.ﺔﺋﯾﺳ ﺔﺣﺋار ﻰﻠﻋ زﺎﮭﺟﻟا يوﺗﺣﯾ؟"ﺊﻓاد" ﻊﺿو ﻰﻠﻋ دﻣﺟُﻣﻟا ةرارﺣ ﺔﺟرد طﺑﺿ مﺗ لھ
•.ةدورﺑ رﺛﻛأ دادﻋإ ﻰﻠﻋ دﻣﺟُﻣﻟا وأ ﺔﺟﻼﺛﻟا ةرارﺣ ﺔﺟرد نﯾﯾﻌﺗﺑ مﻗ
•.ﺔﻘﻠﻐﻣ تﺎﯾوﺎﺣ ﻲﻓ ﺔﯾوﻗ ﺢﺋاور ﻰﻠﻋ يوﺗﺣﺗ ﻲﺗﻟا ﺔﻣﻌطﻷا نﯾزﺧﺗﺑ مﻗ
• جرد ﻲﻓ اًدﺟ ﺔﻠﯾوط ةرﺗﻔﻟ تاورﺿﺧﻟا نﯾزﺧﺗﺑ مﻘﺗ ﻻ .تاورﺿﺧﻟا جرد ف

ar_main.book.book Page 25 Thursday, April 2, 2020 1:01 PM
25
AR
ﺔﻧﺎﯾﺻﻟا
ﺔﻧﺎﯾﺻﻟا
فﺛﻛﻣﻟا ءﺎطﻏ فﯾظﻧﺗ
.ﺔﯾوﮭﺗﻟا تﺎﺣﺗﻓو فﺛﻛﻣﻟا ءﺎطﻏ فﯾظﻧﺗﻟ ةﺎﺷرﻔﻟا ﻊﻣ ﺔﯾﺋﺎﺑرﮭﻛﻟا ﺔﺳﻧﻛﻣﻟا مدﺧﺗﺳا
.فﺛﻛﻣﻟا فﺋﺎﻔﻟ ﺔﻘطﻧﻣ ﻲطﻐﺗ ﻲﺗﻟا ﺔﺣوﻠﻟا ﺔﻟازإ بﻧﺟﺗ
لﻛ ءارﺟﻹا اذﮭﺑ مﺎﯾﻘﻟا ﻲﺻوﻧ12.لﯾﻐﺷﺗﻟا ةءﺎﻔﻛ ﻰﻠﻋ ﺔظﻓﺎﺣﻣﻠﻟ اًرﮭﺷ
فﯾظﻧﺗﻟا
فﯾظﻧﺗﻟا لوﺣ ﺔﻣﺎﻋ ﺢﺋﺎﺻﻧ
ﻲﺗﻟا فﯾظﻧﺗﻟا داوﻣ مادﺧﺗﺳا بﻧﺟﺗ .لﺎﻌﺗﺷﻼﻟ ﺔﻠﺑﺎﻗ داوﻣ وأ ،نﺎﻧﺳأ نوﺟﻌﻣ
وأ ناوﻟﻷا رﯾﯾﻐﺗ ﻲﻓ كﻟذ بﺑﺳﺗﯾ دﻗ .لﺎﻌﺗﺷﻼﻟ ﺔﻠﺑﺎﻗ تﺎﻧوﻛﻣ ﻰﻠﻋ يوﺗﺣﺗ
.زﺎﮭﺟﻟا فﻼﺗإ
،(رﻧﺗﻟا) ﺔﻔﻔﺧﻣﻟا داوﻣﻟا ،(
.ﺦﻟا ،ﺔطﺷﺎﻛﻟا داوﻣﻟا ،لﺎﻌﺗﺷﻼﻟ لﺑﺎﻘﻟا لﺋﺎﺳﻟا ،نﯾزﻧﺑﻟا ،ضﯾﺑﻣﻟا
بﻧﺟﺗﻟ ذﺧﺄﻣﻟا نﻣ لﺻوﻣ رﯾﻏ ﺔﻗﺎطﻟا لﺑﻛ نوﻛﯾ نأ بﺟﯾ ٍذﺋدﻧﻋ ،ﺔﯾﺋﺎﺑرﮭﻛﻟا
ﺔﻣدﺻ بﺑﺳﯾ دﻗ وأ ﺔﯾﻧورﺗﻛﻟﻹا ةزﮭﺟﻷا فﻠﺗﯾ دﻗ تﺎﻧﺣﺷ ﻎﯾرﻔﺗ يأ
ﺔﯾﺟرﺎﺧﻟا ﺔﯾوﮭﺗﻟا تﺎﺣﺗﻓ ﺔﯾطﻏﻷ مظﺗﻧﻣ فﯾظﻧﺗ ءارﺟﺈﺑ ﻰﺻوُﯾ .ﺔﯾﺋﺎﺑرﮭﻛ
.زﺎﮭﺟﻠﻟ يدﺎﺻﺗﻗاو ﮫﺑ قوﺛوﻣ لﯾﻐﺷﺗ
.زﺎﮭﺟﻟا فﻠﺗ وأ ﻖﯾرﺣ بوﺷﻧ ﺔﯾوﮭﺗﻟا تﺎﺣﺗﻓ دادﺳﻧا نﻋ مﺟﻧﯾ ثﯾﺣ .زﺎﮭﺟﻟا
بﺟﯾ ﺎﻣﻛ .ﺔﻧﺷﺧ وأ ﺔﻓﺎﺟ تﺎﻔظﻧﻣ مدﺧﺗﺳﺗ ﻻو .ﺔﺋﻓاد هﺎﯾﻣ ﻲﻓ ﺎًﻔﯾﻔﺧ ﺎ
بﻠﺻﻟا نﻣ ﺔﻋوﻧﺻﻣﻟا باوﺑﻷا فﯾظﻧﺗ دﻧﻋ ﺔﺛوﻠﻣﻟا شﺎﻣﻘﻟا ﻊطﻗ مدﺧﺗﺳﺗ ﻻأ
ﺔﺣﺳﻣو ﺔﺻﺻﺧﻣ شﺎﻣﻗ ﺔﻌطﻗ مادﺧﺗﺳا ﻰﻠﻋ ﺎًﻣﺋاد صرﺣا .أدﺻﻠﻟ موﺎﻘﻣﻟا
ﺢطﺳﻟا ﻰﻠﻋ ﻊﻘﺑﻟا ثودﺣ لﯾﻠﻘﺗ ﻲﻓ كﻟذ مھﺎﺳﯾ ثﯾﺣ .ﺢطﺳﻟا هﺎﺟﺗا سﻔﻧ ﻲﻓ
ﺦﻟا ،لﯾﺗوﯾﺑوزﯾﻷا لوﺣﻛﻟا ،ﻲﻠﯾﺑورﺑوزﯾﻷا
ﻲﺟرﺎﺧﻟا لﻛﯾﮭﻟا فﯾظﻧﺗ
ﻰﻠﻋ ﺔظﻓﺎﺣﻣﻠﻟ ﺔﯾﺑﻧﺎﺟﻟاو
.ﮫﻧﺎﻌﻣﻟ نادﻘﻓ وأ
ً
ﻔظﻧﻣو
• وأ ،ﺔﻧﺷﺧ ةﺎﺷرﻔﺑ ﮫﺣﺳﻣ بﻧﺟﺗ ،جرﺎﺧﻟا وأ لﺧادﻟا نﻣ زﺎﮭﺟﻟا فﯾظﻧﺗ دﻧﻋ
- لوﺣﻛﻟا ،لوﻧﺎﺛﯾﻣﻟا ،لوﻧﺎﺛﯾﻹا) لوﺣﻛﻟا :لﺎﻌﺗﺷﻼﻟ ﺔﻠﺑﺎﻘﻟا داوﻣﻟا
•.ًﺎﻔﻟﺎﺗ ﺔﻗﺎطﻟا لﺑﺎﻛ نﺎﻛ اذإ دﻛﺄﺗ ،فﯾظﻧﺗﻟا دﻌﺑ
• ﺔﺳﻧﻛﻣﻟا ﻖﯾرط نﻋ زﺎﮭﺟﻟا نﻣ ﺔﯾﺟرﺎﺧﻟا ﺔﯾوﮭﺗﻟا تﺎﺣﺗﻓ فﯾظﻧﺗ لﺎﺣ ﻲﻓ
• ﺢطﺳ ﻰﻠﻋ ةدوﺟوﻣﻟا ﺔﯾﺟرﺎﺧﻟا ﺔﯾوﮭﺗﻟا تﺎﺣﺗﻓ ﺔﻓﺎظﻧ ﻰﻠﻋ ﺔظﻓﺎﺣﻣﻟا بﺟﯾ
• ﺔﻣﻋﺎﻧ شﺎﻣﻗ ﺔﻌطﻗ وأ ﺔﻔﯾظﻧ ﺔﺟﻧﻔﺳإ زﺎﮭﺟﻟا ﺢطﺳ فﯾظﻧﺗ ﻲﻓ مدﺧﺗﺳا
ﻲﻠﺧاد فﯾظﻧﺗ
،كﻟذ فﻼﺧﺑ .زﺎﮭﺟﻟﺎﺑ فﻠﺗ وأ ﺔﺑﺎﺻﻹ ضرﻌﺗﻟا ﻊﻧﻣﻟ جردﻟا وأ فرﻟا نﻣ
.ﺔﻧزﺧﻣﻟا ﺔﻣﻌطﻷا نزو بﺑﺳﺑ ﺔﺑﺎﺻﻹا ثدﺣﺗ دﻗ
.ﺎﮭﻧﺎﻛﻣ ﻰﻟإ ﺎﮭﺗدﺎﻋإ لﺑﻗ ،ﺔﯾﺎﻔﻛﻟا ﮫﯾﻓ
.ﺔﻠﻠﺑﻣ ﺔﻣﻋﺎﻧ ﺔﻔﺷﻧﻣ مادﺧﺗﺳﺎﺑ بﺎﺑﻟا ﺔﯾﺷﺣ ﺢﺳﻣﺑ مﻗ مظﺗﻧﻣ لﻛﺷﺑ
.فﻠﺗﺗ نأ ﻰﺗﺣ ﺎﮭﻧﻛﻣﯾو ﺔﻠﺳﻟﺎﺑ ﺔﺻﺎﺧﻟا نﯾزﺧﺗﻟا ةردﻗ لﻠﻘﺗ
.ةرارﺣﻟا بﺑﺳﺑ ﺔھوﺷﻣ
ﻊطﻘﻟا
• ﺔﻧزﺧﻣﻟا ﺔﻣﻌطﻷا ﻊﯾﻣﺟ ﺔﻟازﺈﺑ مﻗ ،زﺎﮭﺟﻟا لﺧاد نﻣ جرد وأ فر ﺔﻟازإ دﻧﻋ
• ﺎﻣﺑ ﺎﮭﻔﯾﻔﺟﺗﺑ مﻗ مﺛ ،هﺎﯾﻣﻟا مادﺧﺗﺳﺎﺑ ﺎﮭﻔﯾظﻧﺗﺑ مﻗو جاردﻷاو فوﻓرﻟا لﺻﻓا
•
• نأ نﻛﻣﯾ ﺎﮭﻧﻷ ﻊﻘﺑﻟاو بﺎﺑﻟا ﺔﻠﺳ نﻣ ﺔﺑﻛﺳﻧﻣﻟا تﺎﯾﻣﻛﻟا فﯾظﻧﺗ مﺗﯾ نأ بﺟﯾ
• ﺢﺑﺻﺗ دﻗ .قﺎﺑطﻷا ﺔﻟﺎﺳﻏ ﻲﻓ ﺔﯾﻋوﻷا وأ فﻓرﻷا فﯾظﻧﺗ ﻰﻟإ ﺎًﻘﻠطﻣ دﻣﻌﺗ ﻻ

ﺔظﺣﻼﻣ
ﺔظﺣﻼﻣ
ﺔظﺣﻼﻣ
ar_main.book.book Page 24 Thursday, April 2, 2020 1:01 PM
ﻖﯾﺑطﺗ مادﺧﺗﺳاLG ThinQ صﯾﺧﺷﺗ ضرﻐﺑ
تﻼﻛﺷﻣﻟا
ﺔﻛﺑﺷﺑ دوزﻣﻟا زﺎﮭﺟﻟا مادﺧﺗﺳا ءﺎﻧﺛأ ﺔﻠﻛﺷﻣ تﮭﺟاو اذإWi-Fi نﻛﻣﯾ ﺎﮭﻧﯾﺣﻓ ،
ﻖﯾﺑطﺗ مادﺧﺗﺳﺎﺑ ﻲﻛذ فﺗﺎھ ﻰﻟإ ﺎﮭﺣﻼﺻإو ءﺎطﺧﻷا فﺎﺷﻛﺗﺳا تﺎﻧﺎﯾﺑ لﻘﻧ
LG
Smart Diagnosis
LG ThinQ
.
ةزﯾﻣ رﺗﺧاو
LG ThinQ
ﻖﯾﺑطﺗ ﻲﻓ ةدراوﻟا تﺎﻣﯾﻠﻌﺗﻟا ﻊﺑﺗا .ﺔﻣﺋﺎﻘﻟا نﻣ
ThinQ
.
صﯾﺧﺷﺗ ضرﻐﺑ "عوﻣﺳﻣﻟا صﯾﺧﺷﺗﻟا" مادﺧﺗﺳا
تﻼﻛﺷﻣﻟا
.عوﻣﺳﻣﻟا صﯾﺧﺷﺗﻟا ﺔﻘﯾرطﺑ ﺔﻧﺎﻌﺗﺳﻼﻟ هﺎﻧدأ تﺎﻣﯾﻠﻌﺗﻟا ﻊﺑﺗا
Smart Diagnosis
ﻖﯾﺑطﺗ ﻲﻓ ةدراوﻟا عوﻣﺳﻣﻟا صﯾﺧﺷﺗﻟا مادﺧﺗﺳا تﺎﻣﯾﻠﻌﺗ ﻊﺑﺗا .ﺔﻣﺋﺎﻘﻟا نﻣ
.ﺔﯾوﻠﻌﻟا ﻰﻧﻣﯾﻟا ﺔﻋﺎﻣﺳﻟا ﺔﺣﺗﻓ ﻰﻠﻋ فﺗﺎﮭﻟا كﺳﻣأ مﺛ ﺔﺟﻼﺛﻟا بﺎﺑ ﺢﺗﻓا
ةزﯾﻣ رﺗﺧاو
.لﻔﻘﻟا ﺔﻔﯾظو طﯾﺷﻧﺗﻟ
LG ThinQ
رز ﻰﻠﻋ طﻐﺿا
Lock
.ﮫﻠﯾﻌﻔﺗ ةدﺎﻋإ مﺛ لﯾﻌﻔﺗﻟا
LG ThinQ
.
.ﺔﻋﺎﻣﺳﻟا
• نﻋ دﯾزﺗ ةدﻣﻟ ضرﻌﻟا ﺔﺷﺎﺷ لﻔﻗ مﺗ اذإ٥ ءﺎﻐﻟﺎﺑ موﻘﺗ نا بﺟﯾ ، ﻖﺋﺎﻗد
• ﺔﺣﺗﻔﻟ ﺎًﯾذﺎﺣﻣ ﮫﺑ صﺎﺧﻟا نوﻓورﻛﯾﻣﻟا نوﻛﯾ ثﯾﺣﺑ فﺗﺎﮭﻟا ﻊﺿ
ﺔﯾﻛذﻟا فﺋﺎظوﻟا
ﺔﻛﺑﺷﺑ لﺎﺻﺗﻻاWi-Fi
Wi-Fi
زﺎﮭﺟﻟا لﯾﺻوﺗ ﺔﯾﻧﺎﻛﻣإ
ثﯾﺣ .زﺎﮭﺟﻟا ﺔﻛﺑﺷ لﺎﺻﺗا ﺔﻟﺎﺣ
• ﻖﯾﺑطﺗ لﯾﻐﺷﺗﺑ مﻗ
.زﺎﮭﺟﻟا لﯾﺟﺳﺗﻟ ﻖﯾﺑطﺗﻟا ﻲﻓ تﺎﻣﯾﻠﻌﺗﻟا ﻊﺑﺗاو
.زﺎﮭﺟﻟا لﯾﺟﺳﺗﻟ ﻖﯾﺑطﺗﻟا ﻲﻓ تﺎﻣﯾﻠﻌﺗﻟا ﻊﺑﺗاو
Wi-Fi
ةدﻣﻟ 3
• ﻖﯾﺑطﺗ لﯾﻐﺷﺗﺑ مﻗ
1
ردﺻﻣﻟا ﺔﺣوﺗﻔﻣﻟا ﺞﻣارﺑﻟا رﺎﻌﺷإ لوﺣ تﺎﻣوﻠﻌﻣ
صﯾﺧرﺗﻟا مﺎﻛﺣأ لﻛ رﻓوﺗﺗ ،ردﺻﻣﻟا ﺔﯾﺟﻣرﺑﻟا تﺎﻣﯾﻠﻌﺗﻟا ﻰﻟإ ﺔﻓﺎﺿﻹﺎﺑ
2
ﻲﻧورﺗﻛﻟﻹا دﯾرﺑﻟا رﺑﻋ لﺳرُﯾ بﻠط ﻰﻠﻋ ًءﺎﻧﺑ (مﯾﻠﺳﺗﻟاو نﺣﺷﻟاو لﻘﻧﻟا لﺋﺎﺳو
ﻰﻘﻠﺗﯾ صﺧﺷ يﻷ ضرﻌﻟا اذھ رﻓوﺗﯾ .ﺞﺗﻧﻣﻟا اذﮭﻟ ةرﯾﺧﻷا نﺣﺷﻟا ﺔﯾﻠﻣﻋ دﻌﺑ
LG ThinQ
بﺟوﻣﺑ ردﺻﻣﻟا ﺔﯾﺟﻣرﺑﻟا تﺎﻣﯾﻠﻌﺗﻟا ﻰﻠﻋ لوﺻﺣﻠﻟGPL و LGPL و
.لﯾزﻧﺗﻠﻟ رﺷﻧﻟا قوﻘﺣ تارﺎﻌﺷإو ﺔﯾﻟوؤﺳﻣﻟا ءﻼﺧإ تارﺎﻌﺷإو
ﻊﯾزوﺗﻟا اذﮭﺑ مﺎﯾﻘﻟا ﺔﻔﻠﻛﺗ ﻲطﻐﯾ مﺳر لﺑﺎﻘﻣ
ﻖﯾﺑطﺗ ﻊﻣ
f
ﺔﻛﺑﺷﺑ لﺻﺗﻣ زﺎﮭﺟﻟا نوﻛﯾ ﺎﻣدﻧﻋ ﺔﻧوﻘﯾﻷا ءﻲﺿﺗWi-Fi.
زﺎﮭﺟﻠﻟ ﻲﻟوﻷا لﯾﺟﺳﺗﻟا
LG ThinQ
.رﺧآ مدﺧﺗﺳﻣ لﯾﺟﺳﺗ وأ زﺎﮭﺟﻟا لﯾﺟﺳﺗ ةدﺎﻋإ
رز ﻰﻠﻋ رارﻣﺗﺳﻻا ﻊﻣ طﻐﺿا
Wi-Fi
ةدﻣﻟ 3 لّﻐﺷ .ًﺎﺗﻗؤﻣ ﮫﻓﺎﻘﯾﻹ ٍناوﺛ
LG ThinQ
ﺔﻧوﻘﯾأ لﯾﻐﺷﺗ فﺎﻘﯾإ مﺗﯾ فوﺳ .ٍناوﺛ
f
.
24
AR
رز مادﺧﺗﺳا ﺢﯾﺗﯾ
ﺔﻛﺑﺷﺑWi-Fi ﺔﻧوﻘﯾأ ﺢﺿوﺗ .ﺔﯾﻟزﻧﻣ
ﻖﯾﺑطﺗ لّﻐﺷ
ﻖﯾﺑطﺗ
MPL ةرﺎﯾز ﻰﺟرﯾ ،ﺞﺗﻧﻣﻟا اذھ ﺎﮭﻧﻣﺿﺗﯾ ىرﺧأ ردﺻﻣﻟا ﺔﺣوﺗﻔﻣ صﯾﺧارﺗو
ﻊﻗوﻣﻟاhttp://opensource.lge.com.
رﻓوﺗﺳLG Electronics ﻰﻠﻋ ردﺻﻣﻟا ﺔﺣوﺗﻔﻣﻟا ﺔﯾﺟﻣرﺑﻟا تﺎﻣﯾﻠﻌﺗﻟا ًﺎﺿﯾأ
صرﻗCD-ROM ﺔﻔﻠﻛﺗ لﺛﻣ)
ﻰﻟإopensource@lge.com تاوﻧﺳ ثﻼﺛ ةرﺗﻔﻟ ٍرﺎﺳ ضرﻌﻟا اذھ نإ .
.تﺎﻣوﻠﻌﻣﻟا هذھ
•
•
• ﺔﻔﯾظو لﯾطﻌﺗﻟWi-Fi رز ﻰﻠﻋ رارﻣﺗﺳﻻا ﻊﻣ طﻐﺿا ،
رزﻟا ﻰﻠﻋ رارﻣﺗﺳﻻا ﻊﻣ طﻐﺿا
رﺛﻛأ وأ ٍناوﺛ ثﻼﺛ ةدﻣﻟ
.ﻖﯾﺑطﺗﻟا ﺔﺷﺎﺷ ﻰﻠﻋ صﯾﺧﺷﺗﻟا رﮭظﯾﺳ ،تﺎﻧﺎﯾﺑﻟا لﻘﻧ مﺎﻣﺗإ دﻌﺑ
Freezer
.تﺎﻧﺎﯾﺑﻟا لﻘﻧ مﺗﯾ ﻰﺗﺣ ﺔﻋﺎﻣﺳﻟا ﺔﯾﺣﺎﻧ كﻔﺗﺎھ كﺳﻣﺗ ﺎﻣﻧﯾﺑ
• دﻌﺑ صﯾﺧﺷﺗﻟا توﺻ رَدﺻُﯾ3.ﺎًﺑﯾرﻘﺗ ٍناوﺛ
.تاوﺻﻷا
ﻲﻛذﻟا صﯾﺧﺷﺗﻟا
ﺔﻣﻼﻌﻟا لﻣﺣﺗ ﻲﺗﻟا زرطﻟا ﻲﻓ طﻘﻓ ةزﯾﻣﻟا هذھ رﻓوﺗﺗ
c
وأ
d
.
مادﺧﺗﺳا ءﺎﻧﺛأ كﮭﺟاوﺗ ﻲﺗﻟا تﻼﻛﺷﻣﻟا صﯾﺧﺷﺗﻟ ةزﯾﻣﻟا هذﮭﺑ ﺔﻧﺎﻌﺗﺳﻻا كﻧﻛﻣﯾ
3
4
مﻧﺗ ﻻ بﺎﺑﺳأ هذھو ﻖﯾﺑطﺗﻟا رﻓوﺗ مدﻋ وأ تﺎﻘﯾﺑطﺗﻟا رﺟﺗﻣﻟ ﺔﯾﻠﺣﻣﻟا ﺔﺳﺎﯾﺳﻟا
• رادﺻإ مﺗﯾ ﺎﻣﻧﯾﺑ فﺗﺎﮭﻟا كﯾرﺣﺗ بﻧﺟﺗ ،ﺞﺋﺎﺗﻧ لﺿﻓأ ﻰﻠﻋ لوﺻﺣﻠﻟ
ﺔﻛﺑﺷ رﻓوﺗ مدﻋ ،رﺻﺣﻟاWi-Fi ﺔﻛﺑﺷﺑ لﺎﺻﺗﻻا عﺎطﻘﻧا وأ Wi-Fi وأ
ةزﯾﻣﻟا هذھ ضرﻌﺗﺗ دﻗ
.ﺎﮭﯾﻓ نﻛﺳﺗ ﻲﺗﻟا ﺔﻘطﻧﻣﻠﻟ
.ﺎﮭﻠﺣو زﺎﮭﺟﻟا
• ﻻ لﺎﺛﻣﻟا لﯾﺑﺳ ﻰﻠﻋ ﺔﯾﺟرﺎﺧ لﻣاوﻌﻟ دوﻌﯾ كﻟذو ﺔﻣدﺧﻟا هذھ لﻣﻌﺗ ﻻ دﻗ
نﻣ رﯾﺻﻘﺗ نﻋLGE.
• ﺎًﻘﻓو ﺎﮭﻠﻛﺷ فﻠﺗﺧﯾ دﻗو راذﻧإ ﻖﺑﺎﺳ نود تارﯾﻐﺗﻟ

ﺔظﺣﻼﻣ
ﺔظﺣﻼﻣ
ar_main.book.book Page 23 Thursday, April 2, 2020 1:01 PM
23
AR
ﺔﯾﻛذﻟا فﺋﺎظوﻟا
ﺔﯾﻛذﻟا فﺋﺎظوﻟا
.ﻲﻛﻠﺳﻼﻟا ﮫﯾﺟوﺗﻟا زﺎﮭﺟﺑ ﻲﻛذﻟا كﻔﺗﺎھ لّﺻو
نﺎﻛ اذإ ﺎﻣ مﻛﺣﺗﻟا ﺔﺣوﻟ ﻰﻠﻋ
زﺎﮭﺟ لﯾﻟد ﻊﺟار وأ تﻧرﺗﻧﻹا ﺔﻣدﺧ دوزﻣﺑ لﺻﺗا ،كﺑ ﺔﺻﺎﺧﻟا ﺔﻛﺑﺷﻟا
يأ وأ ﺔﻛﺑﺷﻟﺎﺑ لﺎﺻﺗﻻا لﻛﺎﺷﻣ يأ نﻋ ًﻻوؤﺳﻣ سﯾﻟ
.ﺔﻛﺑﺷﻟﺎﺑ لﺎﺻﺗﻻا ﻖﯾرط نﻋ تﺟﺗﻧ ءﺎطﺧأ وأ ،لﻠﺧ وأ ،لﺎطﻋأ
.ًاددﺟﻣ
فﺗﺎﮭﻟا لﯾﻐﺷﺗ مﺎظﻧ بﺳﺣ ﻲﻛذﻟا فﺗﺎﮭﻟا مادﺧﺗﺳا ﺔﮭﺟاو فﻠﺗﺧﺗ دﻗ
WEP
،
رﺧآ نﺎﻣأ لوﻛوﺗورﺑ ﻰﻟإ هرﯾﯾﻐﺗ ءﺎﺟرﻟا .ﺔﻛﺑﺷﻟا دادﻋإ كﯾﻠﻋ رذﻌﺗﯾ دﻘﻓ
f
.ﻲﻛﻠﺳﻼﻟا ﮫﯾﺟوﺗﻟا
LG ThinQ
ﺔﯾوﻘﺗ زﺎﮭﺟ ِرﺗﺷا .ﮫﯾﺟوﺗﻟا زﺎﮭﺟ نﻋWi-Fi ةوﻗ نﯾﺳﺣﺗﻟ (ىدﻣﻟا ﻊﺳوﻣ)
.ﺔﯾﻠﺣﻣﻟا ﺔﻛﺑﺷﻟا
لوﺎﺣﺗ نأ لﺑﻗ ﺔﻘﯾﻗد ةدﻣﻟ رظﺗﻧاو ﺔﻗﺎطﻟا نﻋ زﺎﮭﺟﻟا سﺑﺎﻗ
.ًءﺎﻧﺛﺗﺳا ﮫﯾﻟإ فﺿا وأ ﮫﻠﯾطﻌﺗﺑ
(ﺔﺻﺎﺧ ًازوﻣر مدﺧﺗﺳﺗ ﻻ) .ﺔﯾزﯾﻠﺟﻧﻹا ﺔﻐﻠﻟﺎﺑ
.ﺔﻌﻧﺻﻣﻟا ﺔﻛرﺷﻟا
رﺎﯾﺗﺧﺎﺑ ﺢﺻﻧُﯾ)
.ﺞﺗﻧﻣﻟا لﯾﺟﺳﺗ دﻋأ مﺛ (
WPA2
.ﺎًﺋﯾﺿﻣ
ةرﺎﺷإWi-Fi.
مﺗﯾ ﻻ دﻗWi-Fi ﺔﺋﯾﺑ ةدوﺟ بﺳﺣ لﺎﺻﺗﻻا ﻊطﻗ مﺗﯾ دﻗ وأ
3
ﺔﻛﺑﺷﺑ ةدوزﻣﻟا زرطﻟا ﻲﻓ طﻘﻓ ةزﯾﻣﻟا هذھ رﻓوﺗﺗWi-Fi.
.ﻲﻛذ فﺗﺎھ مادﺧﺗﺳﺎﺑ زﺎﮭﺟﻟا ﻊﻣ لﺻاوﺗﻟﺎﺑ كﻟ
.ﺔﺣﯾرﻣﻟا ﺔﯾﻛذﻟا تازﯾﻣﻟا مادﺧﺗﺳﺎﺑ ﻲﻛذ فﺗﺎھ نﻣ زﺎﮭﺟﻟا ﻊﻣ لﺻاوﺗ
• لﺎﺻﺗا نﻣ ﻖﻘﺣﺗﻠﻟWi-Fi زﻣر صﺣﻓا ،
• تﺎﻛﺑﺷ زﺎﮭﺟﻟا مﻋدﯾWi-Fi ددرﺗﺑ 2.4 ددرﺗ ﺔﻓرﻌﻣﻟ .طﻘﻓ زﺗرھ ﺎﻐﯾﻏ
• ﻖﯾﺑطﺗ
LG ThinQ
• ﺔﻛﺑﺷﺑ لﺎﺻﺗا ﺔﻠﻛﺷﻣ زﺎﮭﺟﻟا ىدﻟ نﺎﻛ اذإWi-Fi دﻌﺑﻟا لﻛ ةدﯾﻌﺑ نوﻛﺗ دﻗ ،
• ﺔﻛﺑﺷﺑ لﺎﺻﺗﻻا
•.تﻧرﺗﻧﻹا ﺔﻣدﺧ دوزﻣﻟ ﺎًﻘﻓو ﺢﯾﺣﺻ لﻛﺷﺑ ﺔﻛﺑﺷﻟﺎﺑ لﺎﺻﺗﻻا لﻣﻌﯾ ﻻ دﻗ
•.ءطﺑﺑ لﻣﻌﺗ ﺔﯾﻛﻠﺳﻼﻟا ﺔﻛﺑﺷﻟا ﺔﻣدﺧ ﺔطﯾﺣﻣﻟا ﺔﯾﻛﻠﺳﻼﻟا ﺔﺋﯾﺑﻟا لﻌﺟﺗ نأ نﻛﻣﯾ
• لﺻﻓا .ًﺎﯾﻛﻠﺳﻻ ةرﺎﺷﻹا لﺎﺳرإ ﻲﻓ تﻼﻛﺷﻣ بﺑﺳﺑ زﺎﮭﺟﻟا لﯾﺟﺳﺗ رذﻌﺗ
• مﻗ ،ًﺎﻧّﻛﻣُﻣ كﺑ صﺎﺧﻟا ﮫﯾﺟوﺗﻟا زﺎﮭﺟ ﻰﻠﻋ دوﺟوﻣﻟا ﺔﯾﺎﻣﺣﻟا رادﺟ نﺎﻛ اذإ
ًﻼﯾوط ﺎًﺗﻗو لﯾﺟﺳﺗﻟا قرﻐﺗﺳﯾ دﻗ . ﺔﻔﯾﻌﺿ ةرﺎﺷﻹا ةوﻗ ﺢﺑﺻﺗﺳ ،مزﻼﻟا
•) ﺔﯾﻛﻠﺳﻼﻟا ﺔﻛﺑﺷﻟا مﺳا نوﻛﯾ نأ بﺟﯾSSID مﺎﻗرأو فرﺣأ نﻣ ًﺎﻧوﻛﻣ (
كﻔﺗﺎھ ﻰﻠﻋ
• بﺳﺣو
• ﻰﻠﻋ ﺎًطوﺑﺿﻣ ﮫﯾﺟوﺗﻟا زﺎﮭﺟﺑ صﺎﺧﻟا نﺎﻣﻷا لوﻛوﺗورﺑ نﺎﻛ اذإ
ﻖﯾﺑطﺗ نﻣ لﺟﺳﻣﻟا زﺎﮭﺟﻟا ﺢﺳﻣﺑ مﻘﻓ ،رورﻣﻟا ﺔﻣﻠﻛ وأ
ﺔﻛﺑﺷ) ﻲﻛﻠﺳﻼﻟا ﮫﯾﺟوﺗﻟا زﺎﮭﺟو زﺎﮭﺟﻟا نﯾﺑ ﺔﻓﺎﺳﻣﻟا نﻣ دﻛﺄﺗWi-Fi.(
لوﻣﺣﻣﻟا فﺗﺎﮭﻟا تﺎﻧﺎﯾﺑ
ﺔﯾوﻠﺧﻟا تﺎﻧﺎﯾﺑﻟا
وأ
LG ThinQ
ﻖﯾﺑطﺗ ﺎﯾازﻣLG ThinQ
Smart Diagnosis
.زﺎﮭﺟﻟا مادﺧﺗﺳا
.دﯾدﺟ نﻣ ﮫﻠﺟﺳو
ﻖﯾﺑطﺗ مادﺧﺗﺳا لﺑﻗLG ThinQ
.تﯾﺑﺛﺗﻟا لﺷﻔﯾ دﻗ وأ
قﻼﻏﺈﺑ مﻗ
ﻖﯾﺑطﺗLG ThinQ
ﻖﯾﺑطﺗ ﺢﻣﺳﯾ
• ءﺎﻧﺛأ كﮭﺟاوﺗ ﺔﻠﻛﺷﻣ يأ صﯾﺧﺷﺗ ﻰﻠﻋ ﻲﻛذﻟا صﯾﺧﺷﺗﻟا ةزﯾﻣ كدﻋﺎﺳﺗ
تادادﻋﻹا
•.ﻖﯾﺑطﺗﻟا ﻲﻓو زﺎﮭﺟﻟا ﻰﻠﻋ ةددﻌﺗﻣ تارﺎﯾﺧ نﯾﯾﻌﺗﺑ كﻟ ﺢﻣﺳﯾ
• ،تﻧرﺗﻧﻹا ﺔﻣدﺧ دوزﻣ وأ ،كﺑ صﺎﺧﻟا ﻲﻛﻠﺳﻼﻟا ﮫﯾﺟوﺗﻟا زﺎﮭﺟ ترﯾﻏ اذإ
•.نﯾﻣدﺧﺗﺳﻣﻟا رﺎﻌﺷإ نودﺑ زﺎﮭﺟﻟا نﯾﺳﺣﺗ ضارﻏﻷ رﯾﯾﻐﺗﻠﻟ ﻖﯾﺑطﺗﻟا ﻊﺿﺧﯾ
•.زارطﻟا بﺳﺣ تازﯾﻣﻟا رﯾﯾﻐﺗﺗ دﻗ
1
• نﻣ رﺛﻛأ ةدﯾﻌﺑ ﻲﻛﻠﺳﻼﻟا ﮫﯾﺟوﺗﻟا زﺎﮭﺟو زﺎﮭﺟﻟا نﯾﺑ ﺔﻓﺎﺳﻣﻟا تﻧﺎﻛ اذإ
2
.ﻲﻛذﻟا
LG ThinQ
ﻰﻠﻋ Apple App Store & Google
ﻖﯾﺑطﺗ تﯾﺑﺛﺗLG ThinQ
ﻖﯾﺑطﺗ نﻋ ثﺣﺑا
Play Store.ﮫﺗﯾﺑﺛﺗو ﻖﯾﺑطﺗﻟا لﯾزﻧﺗﻟ تﺎﻣﯾﻠﻌﺗﻟا ﻊﺑﺗا .ﻲﻛذ فﺗﺎھ ﻰﻠﻋ نﻣ

ﮫﯾﺑﻧﺗ
ﮫﯾﺑﻧﺗ
ar_main.book.book Page 22 Thursday, April 2, 2020 1:01 PM
لﯾﻐﺷﺗﻟا
22
AR
بﺎﺑﻟا ﺔﻠﺳ
بﺎﺑﻟا ﺔﻠﺳ بﯾﻛرﺗ ةدﺎﻋإ/ﺔﻟازإ
.ﻰﻠﻋﻷ ﺎﮭﻌﻓرﺑ ﺎﮭﺗﻟازﺈﺑ مﻗو ﺔﻠﺳﻟا ﻲﻓرط نﻣ ًﻼﻛ كﺳﻣأ
.جارﺧﻹا ﺔﯾﻠﻣﻋ بﯾﺗرﺗ سﻛﻌﺑ ﺔﺟﻼﺛﻟا بﺎﺑ تﻼﺳ بﯾﻛرﺗ ةدﺎﻋﺈﺑ مﻗ
.جارﺧﻹا ﺔﯾﻠﻣﻋ بﯾﺗرﺗ سﻛﻋ بﯾﺗرﺗﺑ ﺎﮭﺑﯾﻛرﺗﺑ مﻗ
فرﻟا
1
.ﺎﮭﺟارﺧإ دﻧﻋ
.ةرارﺣﻟا تﺎﺟرد ﻲﻓ ﺊﺟﺎﻔﻣ رﯾﻐﺗﻟ تﺿرﻌﺗ لﺎﺣ ﻲﻓ فوﻓرﻟا
فرﻟا ةدﺎﻋإ/ﺔﻟازإ
.ﻰﻠﻋﻷ ﺔﻣﺎﻘﺗﺳﺎﺑ ﮫﻌﻓراو فرﻟا ﺔﻣدﻘﻣ ﺔﻟﺎﻣﺈﺑ مﻗ
2
.جرﺎﺧﻠﻟ فرﻟا بﺣﺳا
• صﺎﺧ لﻛﺷﺑ رذﺣﻟا ﻰﺧوﺗ .نزوﻟا ﺔﻠﯾﻘﺛ ﺔﯾﺟﺎﺟزﻟا فوﻓرﻟا نأ رﻛذﻟﺎﺑ رﯾدﺟ
• رﺳﻛﻧﺗ دﻗ .ةدرﺎﺑ نوﻛﺗ ﺎﻣدﻧﻋ ﺔﺋﻓادﻟا هﺎﯾﻣﻟﺎﺑ ﺔﯾﺟﺎﺟزﻟا فوﻓرﻟا فظﻧﺗ ﻻ
1
2
3
.جارﺧﻹا ﺔﯾﻠﻣﻋ بﯾﺗرﺗ سﻛﻋ بﯾﺗرﺗﺑ ﺎﮭﺑﯾﻛرﺗﺑ مﻗ
3
• صﺎﺧ لﻛﺷﺑ رذﺣﻟا ﻰﺧوﺗ .نزوﻟا ﺔﻠﯾﻘﺛ ﺔﯾﺟﺎﺟزﻟا فوﻓرﻟا نأ رﻛذﻟﺎﺑ رﯾدﺟ
.ﺎﮭﺟارﺧإ دﻧﻋ
• رﺳﻛﻧﺗ دﻗ .ةدرﺎﺑ نوﻛﺗ ﺎﻣدﻧﻋ ﺔﺋﻓادﻟا هﺎﯾﻣﻟﺎﺑ ﺔﯾﺟﺎﺟزﻟا فوﻓرﻟا فظﻧﺗ ﻻ
.ةرارﺣﻟا تﺎﺟرد ﻲﻓ ﺊﺟﺎﻔﻣ رﯾﻐﺗﻟ تﺿرﻌﺗ لﺎﺣ ﻲﻓ فوﻓرﻟا
• طوﻘﺳ ﻰﻟإ اذﮭﺑ مﺎﯾﻘﻟا مدﻋ يدؤﯾ دﻗ .نﯾﺑﻧﺎﺟﻟا ﻰﻠﻋ ﺔﯾوﺗﺳﻣ فﻓرﻷا نأ دﻛﺄﺗ
.مﺎﻌطﻟا بﺎﻛﺳﻧا وأ فرﻟا

رﯾذﺣﺗ
ﺔظﺣﻼﻣ
ﺔظﺣﻼﻣ
ar_main.book.book Page 21 Thursday, April 2, 2020 1:01 PM
21
AR
لﯾﻐﺷﺗﻟا
.ﺔﯾﺎﻧﻌﺑ ﺎﮭﻧﺎﻛﻣ ﻲﻓ ﺞﻠﺛﻟا ﺔﯾﻧﯾﺻ ﻊﺿ
.ﺔﻋﺎﺳﻟا برﺎﻘﻋ هﺎﺟﺗﺎﺑ ﺞﻠﺛﻟا ﻊﻧﺎﺻ ضﺑﻘﻣ رﯾودﺗﺑ مﻗ
.ﮫﻌﻠﺧا مﺛ ًﻼﯾﻠﻗ ﺞﻠﺛﻟا نﯾزﺧﺗ قودﻧﺻ ﻊﻓرا
ب عوﻧﻟا ﺞﻠﺛﻟا ﻊﻧﺎﺻ*1
.دﻣﺟﻣﻟا ةدﺣو ﻲﻓ ﺎﮭﻌﺿ مﺛ ،برﺷﻟا هﺎﯾﻣﻟﺎﺑ ﺞﻠﺛﻟا ﺔﯾﻧﯾﺻ ﻸﻣا
3
ﺞﻠﺛﻟا ﻊﻧﺎﺻ مادﺧﺗﺳا لﺑﻗ
4
.زﺎﮭﺟﻠﻟ ﻲﻟوﻷا تﯾﺑﺛﻟا دﻌﺑ
قرﻐﺗﺳﯾ .ضﻌﺑﻟا ﺎﮭﺿﻌﺑ ﻊﻣ ﮫﯾﻓ ةدوﺟوﻣﻟا ﺞﻠﺛﻟا تﺎﺑﻌﻛﻣ قﺎﺻﺗﻟا بﺑﺳﯾ
ﺔﺟرد -
5
.لوطأ ًﺎﺗﻗو دﯾﻣﺟﺗﻟا قرﻐﺗﺳﯾ ﺎﻣﻣ
.زﺎﮭﺟﻟا ﻲﻓ ًاررﺿ وأ ًﺎﻔﻠﺗ ثدﺣﯾ
1
ﺞﻠﺛﻟا ﻊﻧﺎﺻ مادﺧﺗﺳا
ﺞﻠﺛﻟا ﻊﻧﺎﺻ
•.برﺷﻠﻟ ﺔﺣﻟﺎﺻ هﺎﯾﻣﺑ طﻘﻓ هﺎﯾﻣﻟا عزوﻣ نازﺧ وأ ﺞﻠﺛﻟا ﻊﻧﺎﺻ ﺊﻠﻣأ
• رورﻣ دﻌﺑ ﻲﻌﯾﺑط لﻛﺷﺑ ﺞﻠﺛﻟا ﺔﻋﺎﻧﺻﺑ ﺞﻠﺛﻟا ﻊﻧﺎﺻ موﻘﯾ48 ﺎًﺑﯾرﻘﺗ ﺔﻋﺎﺳ
• فوﺳﻓ ،ﺞﻠﺛﻟا نﯾزﺧﺗ قودﻧﺻ ﻲﻓ لﻣﺎﻛ لﻛﺷﺑ دﻣﺟﺗﻣ رﯾﻏ ﺞﻠﺛ طﻘﺳ اذإ
ﻲﻟاوﺣ رﻣﻷا4 ةرارﺣ ﺔﺟرد دﻧﻋ تﺎﻋﺎﺳ 20.ﺞﻠﺛﻟا جﺎﺗﻧﻹ ﺔﯾوﺋﻣ
• ،دﻣﺟُﻣﻟا ةدﺣو ﻰﻟإ ﺊﻓادﻟا ءاوﮭﻟا لﺧدﯾ فوﺳ ،دﻣﺟُﻣﻟا بﺎﺑ ﺢﺗﻓ ررﻛﺗ اذإ
•.ﺎﮭﻣطﺣﺗ ﮫﯾﻧﺎﻛﻣﻹ اًرظﻧ ةوﻘﺑ ﺞﻠﺛﻟا ﺔﻋﺎﻧﺻ ةدﺣو يوﻠﺗ ﻻ ﻲﻛ رذﺣﻟا خوﺗ
• وأ هرﺳﻛ ﻰﻟإ كﻟذ يدؤﯾ دﻘﻓ .ﺞﻠﺛﻟا نﯾزﺧﺗ قودﻧﺻ لﺧاد ﺞﻠﺛﻟا دﯾﻣﺟﺗ بﻧﺟﺗ
.ﻖﻓرﺑ ﺎﮭﻔﻟ مﺛ ،لﻣﺎﻛﻟﺎﺑ ﺞﻠﺛﻟا ﺔﯾﻧﯾﺻ كﺳﻣأ ،هﺎﯾﻣﻟا دﻣﺟﺗ دﻌﺑ
.دﻣﺟُﻣﻟا لﺧاد ﺔﺣﺎﺳﻣﻟا نﻣ دﯾزﻣﻟا
*1:.زرُطﻟا ضﻌﺑ ﻲﻓ ﻻإ ﺔﯾﺻﺎﺧﻟا هذھ رﻓوﺗﺗ ﻻ
أ عوﻧﻟا ﺞﻠﺛﻟا ﻊﻧﺎﺻ*1
.جرﺎﺧﻟا وﺣﻧ ﺎﮭﺑﺣﺳاو ﺞﻠﺛﻟا ﺔﯾﻧﯾﺻ ضﺑﻘﻣﺑ كﺳﻣأ
1
2
.ءﺎﻣﻟا ىوﺗﺳﻣ طﺧ ﻰﺗﺣ برﺷﻟا هﺎﯾﻣﺑ ﺞﻠﺛﻟا ﺔﯾﻧﯾﺻ ﻸﻣا
• رﯾﻓوﺗﻟ ﮫﻣدﺧﺗﺳﺗ ﻻ يذﻟا ﺞﻠﺛﻟا نﯾزﺧﺗ قودﻧﺻ وأ ﺞﻠﺛﻟا ﻊﻧﺎﺻ جارﺧإ كﻧﻛﻣﯾ
2

ﮫﯾﺑﻧﺗ
ﮫﯾﺑﻧﺗ
ﮫﯾﺑﻧﺗ
ar_main.book.book Page 20 Thursday, April 2, 2020 1:01 PM
20
لﯾﻐﺷﺗﻟا
AR
ﻲﻠﺧادﻟا بﺎﺑﻟا ﺔظﻓﺎﺣ بﯾﻛرﺗ ةدﺎﻋإ/كﻓ
ب عوﻧﻟا*1
جاردﻷا بﯾﻛرﺗ ةدﺎﻋإ/كﻓ
وﺣﻧ ﮫﺑﺣﺳأو تاورﺿﺧﻟا جرد ضﺑﻘﻣﺑ كﺳﻣأو .جردﻟا تﺎﯾوﺗﺣﻣ غرﻓأ
.ﻖﻓرﺑ جرﺎﺧﻟا
أ عوﻧﻟا*1
ﻊﻓراو .ﻲﻠﺧادﻟا بﺎﺑﻟا ﺔظﻓﺎﺣ تﺎﯾوﺗﺣﻣ ﺔﻟازﺈﺑ مﻗو لﻣﺎﻛﻟﺎﺑ باوﺑﻷا ﺢﺗﻓا
.ﻲﻠﺧادﻟا بﺎﺑﻟا ﺔظﻓﺎﺣ بﺣﺳاو
•.كﻔﻟا لﺑﻗ ﻲﻠﺧادﻟا بﺎﺑﻟا ةدﺣو نﻣ تﺎﯾوﺗﺣﻣﻟا غرﻓأ
1
1
.جارﺧﻹا ﺔﯾﻠﻣﻋ بﯾﺗرﺗ سﻛﻋ بﯾﺗرﺗﺑ ﺎﮭﺑﯾﻛرﺗﺑ مﻗ
2
جردﻟا
.جرﺎﺧﻠﻟ ﮫﺑﺣﺳ ﻖﯾرط نﻋ ﮫﺗﻟازﺈﺑ مﻗو ﻰﻠﻋﻷ تاوارﺿﺧﻟا جرد ﻊﻓرا
.جارﺧﻹا ﺔﯾﻠﻣﻋ بﯾﺗرﺗ سﻛﻋ بﯾﺗرﺗﺑ ﺎﮭﺑﯾﻛرﺗﺑ مﻗ
.ﺎﮭﺑﯾﻛرﺗ ةدﺎﻋإو ﺎﮭﻛﯾرﺣﺗ
2
.ﺎﮭﺑﯾﻛرﺗ ةدﺎﻋإو ﺎﮭﻛﯾرﺣﺗ
تاورﺿﺧﻟا جرد مادﺧﺗﺳﺎﺑ
كﯾرﺣﺗ ﻖﯾرط نﻋ ﺔﺟزﺎطﻟا تاوارﺿﺧﻟا جرد ﻲﻓ ﺔﺑوطرﻟا ﻲﻓ مﻛﺣﺗﻟا نﻛﻣﯾ
3
• ءﺎﻧﺛأ نﯾدﯾﻟا ﺎﺗﻠﻛ مدﺧﺗﺳاو ﺎﮭﻛﯾرﺣﺗ لﺑﻗ جاردﻷا ﻎﯾرﻔﺗ ﻰﻠﻋ ﺎًﻣﺋاد صرﺣا
•.ﺎﮭﻌﯾﻣﺟﺗ ةدﺎﻋإو جاردﻷا ﺔﻟازإ لﺑﻗ لﻣﺎﻛﻟﺎﺑ نﺎﺣوﺗﻔﻣ ﺔﺟﻼﺛﻟا ﻲﺑﺎﺑ نأ دﻛﺄﺗ
ﻖﻠﻏ مﺗﯾﺳ ،نﻣﯾﻷا بﻧﺎﺟﻠﻟ ﺎﮭﻛﯾرﺣﺗ مﺗ اذإو
.جردﻟا ﻲﻓ ةدوﺟوﻣ نوﻛﺗ ﺔﺑوطر يأ ﻰﻠﻋ
.نﯾھﺎﺟﺗﻻا نﻣ يأ ﻲﻓ ﺔﻌﻓارﻟا
.ﺔﺑوطرﻟا لﯾﻠﻘﺗﻟ جردﻟا لﻼﺧ رﺎﺷﺗﻧﻻﺎﺑ
• ءﺎﻧﺛأ نﯾدﯾﻟا ﺎﺗﻠﻛ مدﺧﺗﺳاو ﺎﮭﻛﯾرﺣﺗ لﺑﻗ جاردﻷا ﻎﯾرﻔﺗ ﻰﻠﻋ ﺎًﻣﺋاد صرﺣا
•.ﺎﮭﺑﯾﻛرﺗ ةدﺎﻋإو جاردﻷا ﺔﻟازإ لﺑﻗ لﻣﺎﻛﻟﺎﺑ نﺎﺣوﺗﻔﻣ ﺔﺟﻼﺛﻟا ﻲﺑﺎﺑ نأ دﻛﺄﺗ
*1:.زرُطﻟا ضﻌﺑ ﻲﻓ ﻻإ ﺔﯾﺻﺎﺧﻟا هذھ رﻓوﺗﺗ ﻻ
• ءاوﮭﻠﻟ ﺢﻣﺳﯾ ﺎﻣﻣ ءاوﮭﻟا طﺑﺿ ةادأ ﺢﺗﻓ مﺗﯾﺳ ،رﺳﯾﻷا بﻧﺎﺟﻠﻟ ﺎﮭﻛﯾرﺣﺗ مﺗ اذإ
• ظﻓﺎﺣﯾﺳ ﺎﻣﻣ ءاوﮭﻟا طﺑﺿ ةادأ

ﺔظﺣﻼﻣ
ﺔظﺣﻼﻣ
ﮫﯾﺑﻧﺗ
ar_main.book.book Page 19 Thursday, April 2, 2020 1:01 PM
19
AR
لﯾﻐﺷﺗﻟا
زﻣرﻟا رﮭظﯾ ﻰﺗﺣ ٍناوﺛ ثﻼﺛ ةدﻣﻟ
.ﺔﻔﯾظوﻟا لﯾﻌﻔﺗ مﺗﯾو
.ﺔﻔﯾظوﻟا لﯾﻌﻔﺗ ءﺎﻐﻟإ مﺗﯾو
شرﺑ مﻘﺗ ﻻ .جﺎﺟز فظﻧﻣ وأ ةرﺗﺎﻓ هﺎﯾﻣﺑ ﺔﻔﯾظﻧ شﺎﻣﻗ ﺔﻌطﻗ بﯾطرﺗﺑ
.ًةرﺷﺎﺑﻣ ﻲﺟﺎﺟزﻟا بﺎﺑﻟا ﻰﻠﻋ جﺎﺟز فظﻧﻣ
k
زﻣرﻟا رﮭظﯾ ﻰﺗﺣ ٍناوﺛ ثﻼﺛ ةدﻣﻟ
l
InstaView
.زرُطﻟا ضﻌﺑ ﻲﻓ ﻻإ ﺔﯾﺻﺎﺧﻟا هذھ رﻓوﺗﺗ ﻻ
ﻲﻠﺧادﻟا بﺎﺑﻟا مادﺧﺗﺳا
ﻰﻟإ ﻰﻠﻋﻷا وﺣﻧ ﻲﻠﺧادﻟا بﺎﺑﻟا نﻣ ﺔﯾﻠﻔﺳﻟا ﺔﻓﺎﺣﻟا ﻰﻠﻋ ةدوﺟوﻣﻟا ﺔﻌﻓارﻟا بذﺟا
.ﺢﺗﻔﻧﺗ نأ
ﺢﻣﺳﯾ ﺎﻣﻣ ،ﺔطﯾﺣﻣﻟا لﻼﺳﻟاو ﻲﻠﺧادﻟا بﺎﺑﻟا لﺧاد ةرﯾﺑﻛ نﯾزﺧﺗ ﺔﺣﺎﺳﻣ دﺟوﺗ
.ﺔﻣظﻧﻣ ﺔﻘﯾرطﺑ مﺎﻌطﻟا نﯾزﺧﺗﺑ كﻟ
Lock
Lock
• مﻗ ،ةدﯾدﺷﻟا ﻊﻘﺑﻟا ﺔﻟازﻹ .ﺔﻓﺎﺟ شﺎﻣﻗ ﺔﻌطﻘﺑ ﻲﺟﺎﺟزﻟا بﺎﺑﻟا فﯾظﻧﺗﺑ مﻗ
.زرُطﻟا ضﻌﺑ ﻲﻓ ﻻإ ﺔﯾﺻﺎﺧﻟا هذھ رﻓوﺗﺗ ﻻ
ﻲﻠﺧادﻟا بﺎﺑﻟا
ﻲﻠﺧادﻟا بﺎﺑﻟا ﺔﯾﺻﺎﺧ مادﺧﺗﺳاInstaView
كﯾدﻟ دﺟوﯾ نﺎﻛ اذإ ﺎﻣ ﺔﯾؤر ﻲﻠﺧادﻟا بﺎﺑﻟا ﻲﻓ ﻊﯾرﺳﻟا ضرﻌﻟا ﺔﻔﯾظو كﻟ ﺢﻣﺳﺗ
تﺎﺑﺟوﻟاو تﺎﺑورﺷﻣﻟا لﺛﻣ ﺎﮭﻣادﺧﺗﺳا رﺛﻛﯾ ﻲﺗﻟا رﺻﺎﻧﻌﻟا نﻣ ﺔﻠﯾﻠﻗ تﺎﯾﻣﻛ
.ﺔﺟﻼﺛﻟا بﺎﺑ ﺢﺗﻓ نودﺑ ،ﺔﻔﯾﻔﺧﻟا
• رزﻟا ﻰﻠﻋ رارﻣﺗﺳﻻا ﻊﻣ طﻐﺿا ،مﻛﺣﺗﻟا ﺔﺣوﻟ رارزأ لﻔﻘﻟ
• رزﻟا ﻰﻠﻋ رارﻣﺗﺳﻻا ﻊﻣ طﻐﺿا ،ﺔﻔﯾظوﻟا لﯾطﻌﺗﻟ
•.ﺔﻗﺎطﻟا رﯾﻓوﺗﻟ ﺎًﯾﺋﺎﻘﻠﺗ مﻛﺣﺗﻟا ﺔﺣوﻟ لﯾﻐﺷﺗ فﺎﻘﯾإ مﺗﯾ
•.رزﻟا ﺔﻔﯾظو لﻣﻌﺗ دﻘﻓ ،ﺎﮭﻔﯾظﻧﺗ ءﺎﻧﺛأ مﻛﺣﺗﻟا ﺔﺣوﻟ ﻊﻣ مﺳﺟﻟا وأ ﻊﺑﺎﺻﻷﺎﺑ لﺎﺻﺗا يأ كﺎﻧھ نﺎﻛ اذإ
جودزﻣﻟا بﺎﺑﻟا مدطﺻﯾ دﻗ .ﺎًﺣوﺗﻔﻣ زﺎﮭﺟﻟا بﺎﺑ نوﻛﯾ ﺎﻣدﻧﻋ جودزﻣﻟا بﺎﺑﻟا
.فﻠﺗﯾو زﺎﮭﺟﻟا ﺔﻓﺎﺣﺑ
حﺎﺑﺻﻣﻟا لﯾﻐﺷﺗﻟ جﺎﺟزﻟا ﻰﻠﻋ نﯾﺗرﻣ رﻘﻧﻟﺎﺑ مﻗLED ﮫﻠﯾﻐﺷﺗ فﺎﻘﯾإ وأ
.ﻲﻠﺧادﻟا بﺎﺑﻟا لﺧاد
حﺎﺑﺻﻣ لﯾﻐﺷﺗ فﺎﻘﯾإ مﺗﯾLED.ٍناوﺛ ةرﺷﻋ دﻌﺑ ﻲﺋﺎﻘﻠﺗ لﻛﺷﺑ
• ﺢﺗﻔﺑ مﻘﺗ ﻻ وأ ،ﺎًﺣوﺗﻔﻣ جودزﻣﻟا بﺎﺑﻟا نوﻛﯾ ﺎﻣدﻧﻋ زﺎﮭﺟﻟا بﺎﺑ ﺢﺗﻔﺑ مﻘﺗ ﻻ
دﯾﻗ ﺞﻠﺛﻟا عزوﻣ نوﻛﯾ ﺎﻣدﻧﻋ تﺎظﺣﻠﻟ لطﻌُﺗ ﺎﻣﻛ ،رﺳﯾﻷا وأ نﻣﯾﻷا دﻣﺟُﻣﻟا
.ﻲﻠﺧادﻟا بﺎﺑﻠﻟ ﻊﯾرﺳﻟا ضرﻌﻟا ﺔﻔﯾظو لّﻌﻔُﯾ
توﺻ ﺎﮭﺑ نوﻛﯾ ﺔﯾﻓﺎﻛ ةوﻘﺑ رﻘﻧا
.ﺔﺟﻼﺛﻟا نﻣ برﻘﻟﺎﺑ
1
2
• بﺎﺑ ﻖﻠﻏ دﻌﺑ نﯾﺗﯾﻧﺎﺛ ةدﻣﻟ ﻲﻠﺧادﻟا بﺎﺑﻠﻟ ﻊﯾرﺳﻟا ضرﻌﻟا ﺔﻔﯾظو لﯾطﻌﺗ مﺗﯾ
.مادﺧﺗﺳﻻا
• ﻻ دﻗ جﺎﺟزﻟا فاوﺣ نﻣ برﻘﻟﺎﺑ رﻘﻧﻟﺎﻓ .جﺎﺟزﻟا فﺻﺗﻧﻣ نﻣ برﻘﻟﺎﺑ رﻘﻧا
•.عوﻣﺳﻣ رﻘﻧﻟا
• ٍلﺎﻋ توﺻ رودﺻ دﻧﻋ ﻲﻠﺧادﻟا بﺎﺑﻠﻟ ﻊﯾرﺳﻟا ضرﻌﻟا ﺔﻔﯾظو لﻣﻌﺗ ﺎﻣﺑر

ﺔظﺣﻼﻣ
Power
Hygiene
Fresh
ar_main.book.book Page 18 Thursday, April 2, 2020 1:01 PM
18
لﯾﻐﺷﺗﻟا
AR
مﻛﺣﺗﻟا ﺔﺣوﻟ
.رﺧﻵ زارط نﻣ ﺔﯾﻠﻌﻔﻟا مﻛﺣﺗﻟا ﺔﺣوﻟ فﻠﺗﺧﺗ دﻗ
فﺋﺎظوﻟاو مﻛﺣﺗﻟا ﺔﺣوﻟ
*1:.زرُطﻟا ضﻌﺑ ﻲﻓ ﻻإ هذھ مﻛﺣﺗﻟا ﺔﺣوﻟ رﻓوﺗﺗ ﻻ
LG ThinQ
.
ﻰﻠﻋ ﺎﮭطﺑﺿ بوﻏرﻣﻟا ةرارﺣﻟا ﺔﺟرد دﯾدﺣﺗﻟ ررﻛﺗﻣ لﻛﺷﺑ رزﻟا اذھ ﻰﻠﻋ طﻐﺿا1 و ﺔﯾوﺋﻣ ﺔﺟرد 7.ﺔﯾوﺋﻣ ﺔﺟرد
.زﺎﮭﺟﻟا لﺧاد ﺔﯾﻠﻌﻔﻟا
- نﻣ ﺎﮭطﺑﺿ بوﻏرﻣﻟا ةرارﺣﻟا ﺔﺟرد دﯾدﺣﺗﻟ ررﻛﺗﻣ لﻛﺷﺑ رزﻟا اذھ ﻰﻠﻋ طﻐﺿا24- ﻰﺗﺣ ﺔﯾوﺋﻣ ﺔﺟرد 14.ﺔﯾوﺋﻣ ﺔﺟرد
Hygiene Fresh
*1
.ﺔﺟﻼﺛﻟا لﺧاد ﺔﮭﯾرﻛﻟا ﺢﺋاورﻟا نﻣ ﺔﻔﯾظوﻟا هذھ لﻠﻘﺗ
Express Freeze
.ﺔﻋرﺳﺑ ﺔﺟﻠﺛﻣﻟا وأ ةدﻣﺟﻣﻟا ﺔﻣﻌطﻷا نﻣ ةرﯾﺑﻛ ﺔﯾﻣﻛ دﯾﻣﺟﺗ ﺔﻔﯾظوﻟا هذﮭﻟ نﻛﻣﯾ
ﺔﻛﺑﺷﺑ زﺎﮭﺟﻟا لﯾﺻوﺗﺑ رزﻟا اذھ ﺢﻣﺳﯾWi-Fi ﻖﯾﺑطﺗﻟ ﺔﯾﻟوﻷا تادادﻋﻹا لوﺣ تﺎﻣوﻠﻌﻣ ﻰﻠﻋ لوﺻﺣﻠﻟ ﺔﯾﻛذﻟا فﺋﺎظوﻟا ﻊﺟار .ﺔﯾﻟزﻧﻣ
.مﻛﺣﺗﻟا ﺔﺣوﻟ ﻰﻠﻋ ةدوﺟوﻣﻟا رارزﻷا لﻔﻗ ﻰﻠﻋ لﻣﻌﯾ
Fridge
Freezer
Wi-Fi
Lock
a
• ﻲھ ﺔﺟﻼﺛﻠﻟ ﺔﯾﻟوﻷا ةرارﺣﻟا ﺔﺟرد4.ﺔﯾوﺋﻣ ﺔﺟرد
• ةرارﺣﻟا ﺔﺟرد تﺳﯾﻟو ،ﺔﻓدﮭﺗﺳﻣﻟا ةرارﺣﻟا ﺔﺟرد ﻲھ ﺎﮭﯾﻟإ رﺎﺷﻣﻟا ةرارﺣﻟا ﺔﺟرد دادﻋإ نإ ثﯾﺣ ،مﺎﻌطﻟا ﺔﻟﺎﺣﻟ ﺎًﻘﻓو ﺔﯾﻠﺧادﻟا ﺔﯾﻠﻌﻔﻟا ةرارﺣﻟا ﺔﺟرد فﻠﺗﺧﺗ
b
• ﻲھ دﻣﺟُﻣﻠﻟ ﺔﯾﻟوﻷا ةرارﺣﻟا ﺔﺟرد19.ﺔﯾوﺋﻣ ﺔﺟرد -
c
d
•.رزﻟا ﻰﻠﻋ ﺎﮭﯾﻓ طﻐﺿﺗ ةرﻣ لﻛ ﻲﻓ ﺎﮭﻠﯾطﻌﺗو ﺔﻔﯾظوﻟا هذھ نﯾﻛﻣﺗ مﺗﯾ
•.ﺔﻧﯾﻌﻣ ةرﺗﻓ رورﻣ دﻌﺑ ﻲﺋﺎﻘﻠﺗ لﻛﺷﺑ ﺔﻔﯾظوﻟا هذھ فﻗوﺗﺗ
e
f

ﮫﯾﺑﻧﺗ
ar_main.book.book Page 17 Thursday, April 2, 2020 1:01 PM
17
AR
لﯾﻐﺷﺗﻟا
.ﺎﮭﻣادﺧﺗﺳا ررﻛﺗﯾ ﻲﺗﻟا ﺔﻣﻌطﻷا وأ فﻠﻐﻣﻟا دﻣﺟُﻣﻟا مﺎﻌطﻟا نﻣ ةرﯾﻐﺻ تﺎﻋوﻣﺟﻣ نﯾزﺧﺗ نﻛﻣﯾ ثﯾﺣ
.ﺔﻔﯾﻔﺧﻟا تﺎﺑﺟوﻟاو تﺎﺑورﺷﻣﻟا لﺛﻣ ررﻛﺗﻣ ٍلﻛﺷﺑ ﮫﺟارﺧإ مﺗﯾ يذﻟا مﺎﻌطﻟا ظﻔﺣُﯾ ثﯾﺣ
ﻲﻠﺧادﻟا بﺎﺑﻟا ةرﯾﺟﺣ
*1
تﺎﺟﺎﺟزﻟا فر
*1
.ﺎﮭﯾﻓ تﺎﯾوﺎﺣﻟا وأ ﺔﻠﯾوطﻟا تﺎﺑورﺷﻣﻟا تﺎﺟﺎﺟز نﯾزﺧﺗ مﺗﯾ
f
g
•.زﺎﮭﺟﻟا ﻲﻓ فﻠﺗ وأ ﺔﺑﺎﺻإ يأ بﺑﺳﯾ ﺎﻣﻣ رﺻﺎﻧﻌﻟا طﻘﺳﺗ دﻘﻓ .ةرﯾﺻﻗ تﺎﯾوﺎﺣ وأ تﺎﺟﺎﺟز ﺔﯾأ نﯾزﺧﺗﺑ مﻘﺗ ﻻ
.فرﻟا نﻣ ﻲﻣﺎﻣﻷا ءزﺟﻟا ﻲﻓ ﺔﯾﻟﺎﻌﻟا ﺔﺑوطرﻟا تاذ ﺔﻣﻌطﻷا ن
.فﻠﺗﺧﻣ عﺎﻔﺗرﺎﺑ رﺧآ ىرﺟﻣ ﻲﻓ فرﻟا لﺎﺧدإ ﻖﯾرط نﻋ فرﻟا عﺎﻔﺗرا لﯾدﻌﺗ نﻛﻣﯾ
.ﺔﺑوطرﻟﺎﺑ مﻛﺣﺗﻟا زﺎﮭﺟ طﺑﺿﺑ ﺎﮭﺗرﺎﺿﻧ ﻰﻠﻋ ظﺎﻔﺣﻟا ﻲﻓ ةدﻋﺎﺳﻣﻠﻟ تاورﺿﺧﻟاو ﺔﮭﻛﺎﻔﻟا ظﻔﺣُﺗ ثﯾﺣ
.نﻛﻣﻣ ٍتﻗو لوطﻷ ﺔﺟزﺎط ﻰﻘﺑﺗﻟ تاورﺿﺧﻟاو ﺔﮭﻛﺎﻔﻟا ظﻔﺣُﺗ ثﯾﺣ
.ةدرﺑﻣﻟا ﺔﺻﻠﺻﻟا ﺔﯾﻋوأو تﺎﺑورﺷﻣﻟاو ﺔﻣﻌطﻷا نﻣ ةرﯾﻐﺻﻟا مزﺣﻟا نﯾزﺧﺗ نﺎﻛﻣ نﻋ ةرﺎﺑﻋ
ﺔﺟﻼﺛﻟا فر
ّ
زﺧ .ىرﺧﻷا داوﻣﻟاو ةدرﺑﻣﻟا ﺔﻣﻌطﻷا نﯾزﺧﺗ نﺎﻛﻣ وھ اذھ
ِ
.رﺧﻵ زارط نﻣ فﻓرﻸﻟ ﻲﻠﻌﻔﻟا ددﻌﻟا فﻠﺗﺧﯾ فوﺳ
ءاوﮭﻟا رﺗﻠﻓ
*1
.ﺔﺟﻼﺛﻟا ةرﺟﺣ لﺧاد ﺔﮭﯾرﻛﻟا ﺢﺋاورﻟا نﻣ ﺔﻔﯾظوﻟا هذھ لﻠﻘﺗ
ﺔﻔﯾﻔﺧﻟا تﺎﺑﺟوﻟا جرد
*1
.ةدرﺑُﻣﻟا ﺔﻣﻌطﻷا نﻣ ةرﯾﻐﺻ تﺎﻋوﻣﺟﻣ نﯾزﺧﺗ نﻛﻣﯾ ثﯾﺣ
ةرارﺣﻟا رﻌﺷﺗﺳُﻣ
*1
.ﺔﺟﻼﺛﻟا ةدﺣو ةرارﺣ ﺔﺟرد رﺎﻌﺷﺗﺳا ﮫﻧﻛﻣﯾ رﻌﺷﺗﺳُﻣﻟا اذھ
ﺔﺟزﺎطﻟا تاوارﺿﺧﻟا جرد
*1
ضﯾﺑﻟا قودﻧﺻ
*1
.ضﯾﺑﻟا ظﻔﺣُﯾ ثﯾﺣ
تاورﺿﺧﻟا جرد
ﺔﺟﻼﺛﻟا ةدﺣو بﺎﺑ ﺔﻠﺳ
h
i
j
k
•.ﺔﻗدﺑ ةرارﺣﻟا ﺔﺟرد رﻌﺷﺗﺳﯾﻟ مﺎﻌطﻟاو رﻌﺷﺗﺳُﻣﻟا نﯾﺑ ﺔﻓﺎﺳﻣﻟا ﻰﻠﻋ ظﺎﻔﺣﻟا
l
m
•.تاورﺿﺧﻟا جرد ﻲﻓ وأ ﺔﺟﻼﺛﻟا ﻰﻠﻋأ فرﻟا ﻰﻠﻋ ﮫﻌﺿﺗ وأ ﺞﻠﺛ قودﻧﺻﻛ نﺎﻛﻣﻟا اذھ مدﺧﺗﺳﺗ ﻻ
n
o

ar_main.book.book Page 16 Thursday, April 2, 2020 1:01 PM
لﯾﻐﺷﺗﻟا
نﺎﺗﻣﺟﻧ) ﻲﻠﺧادﻟا ءزﺟﻟا
a
(
16
AR
*1:.زرُطﻟا ضﻌﺑ ﻲﻓ ﻻإ ﺔﯾﺻﺎﺧﻟا هذھ رﻓوﺗﺗ ﻻ
حﺎﺑﺻﻣLED
ﺢﯾﺑﺎﺻﻣ ءﻲﺿُﺗLED.بﺎﺑﻟا ﺢﺗﻔﺗ ﺎﻣدﻧﻋ زﺎﮭﺟﻟا لﺧاد
دﻣﺟُﻣﻟا فر
*1
.مﯾرﻛ سﯾﻵاو كﺎﻣﺳﻷاو موﺣﻠﻟﺎﻛ ةدﻣﺟﻣﻟا ﺔﻣﻌطﻷا نﯾزﺧﺗ نﺎﻛﻣ نﻋ ةرﺎﺑﻋ
ﺞﻠﺛﻟا ﻊﻧﺎﺻ
*1
.ﮫﻧﯾزﺧﺗو ﺎًﯾودﯾ ﺞﻠﺛﻟا جﺎﺗﻧإ ﮫﯾﻓ مﺗﯾ يذﻟا نﺎﻛﻣﻟا وھ اذھ
دﻣﺟُﻣﻟا جرد
*1
.لﯾوطﻟا ىدﻣﻟا ﻰﻠﻋ ةدﻣﺟﻣﻟا داوﻣﻟا نﯾزﺧﺗﻟ صﺻﺧﻣﻟا نﺎﻛﻣﻟا نﻋ ةرﺎﺑﻋ
رزﯾرﻔﻟا ةدﺣو بﺎﺑ ﺔﻠﺳ
a
b
c
d
e

ar_main.book.book Page 15 Thursday, April 2, 2020 1:01 PM
15
AR
لﯾﻐﺷﺗﻟا
ﺞﺗﻧﻣﻟا صاوﺧ
.رﺧﻵ زارط نﻣ ﮫﺗﺎﻧوﻛﻣ وأ زﺎﮭﺟﻠﻟ ﻲﺟرﺎﺧﻟا لﻛﺷﻟا فﻠﺗﺧﯾ دﻗ
ﺔﯾﺟرﺎﺧﻟا ﺔﮭﺟﻟا
*1:.زرُطﻟا ضﻌﺑ ﻲﻓ ﻻإ ﺔﯾﺻﺎﺧﻟا هذھ رﻓوﺗﺗ ﻻ
مﻛﺣﺗﻟا ﺔﺣوﻟ
.دﻣﺟُﻣﻟا ةرارﺣ ﺔﺟردو ﺔﺟﻼﺛﻟا ةرارﺣ ﺔﺟرد طﺑﺿﺗ
ﻲﻠﺧادﻟا بﺎﺑﻟا
*1
.ﺔﻟوﮭﺳﺑ ﺎﮭﯾﻟإ لوﺻوﻟا ﻰﻟإ جﺎﺗﺣﺗو ﺎﮭﻣادﺧﺗﺳا رﺛﻛﯾ ﻲﺗﻟا ضارﻏﻸﻟ ﺔﺑﺳﺎﻧﻣ نﯾزﺧﺗ ﺔﺣﺎﺳﻣ هذھ
ﻲﻠﺧادﻟا بﺎﺑﻟا ﺔﻌﻓار
*1
ﻲﻠﺧادﻟا بﺎﺑﻟا ﺢﺗﻔﺗ
ﻲﻠﺧادﻟا بﺎﺑﻟاInstaView
*1
.ًةدﺎﻋ ﺔﻣدﺧﺗﺳﻣﻟا مﺎﻌطﻟا رﺻﺎﻧﻋ ﻰﻟإ ﻊﯾرﺳﻟا لوﺻوﻟﺎﺑ بﺎﺑﻟا ةدﺣو ﻲﻓ ﻊﯾرﺳﻟا ضرﻌﻟا بﺎﺑ ﺢﯾﺗﯾ
a
b
c
d

ﮫﯾﺑﻧﺗ
ﺔظﺣﻼﻣ
ar_main.book.book Page 14 Thursday, April 2, 2020 1:01 PM
14
لﯾﻐﺷﺗﻟا
AR
دﯾﻣﺟﺗ ﺔﻌﺳ ﻰﺻﻗأ
.ﮫﻟ دﯾﻣﺟﺗ ةءﺎﻔﻛ ﻰﺻﻗﺄﺑ مﺎﯾﻘﻠﻟ دﻣﺟُﻣﻟا
ﻊﺿو لﺑﻗ نﯾﺗﻋﺎﺳ ةدﻣﻟ
Express Freeze
ﻰﻟإ لﺻﺗ ةدﻣ ﺔﻔﯾظوﻟا هذھ قرﻐﺗﺳﺗ ،مﺎﻋ لﻛﺷﺑ24 فﺎﻘﯾإ مﺗﯾﺳو ﺔﻋﺎﺳ
.ﻲﺋﺎﻘﻠﺗ لﻛﺷﺑ ﺎﮭﻠﯾﻐﺷﺗ
Express Freeze
.دﻣﺟﻣﻟا ةدﺣو ﻲﻓ ﺔﺟزﺎطﻟا ﺔﻣﻌطﻷا
.فوﻓرﻟاو ،جاردﻷاو ،لﻼﺳﻟا
مﺎﻌطﻟا ﺔﯾﻣﻛﻟ ﻲﺻﻗﻷا دﺣﻟا دﯾﻣﺟﺗ
جاردأ لﻛ جارﺧإ بﺟﯾ ،ﺎﮭﻧﯾزﺧﺗ دارﯾ ﺔﻣﻌطﻷا نﻣ ةرﯾﺑﻛ تﺎﯾﻣﻛ دوﺟو ﺔﻟﺎﺣ ﻲﻓ
ةدﺣو ﻲﻓ جاردﻷا ﻰﻠﻋ ًةرﺷﺎﺑﻣ ﺔﻣﻌطﻷا صر بﺟﯾو زﺎﮭﺟﻟا جرﺎﺧ دﻣﺟﻣﻟا
فﻠﺗ وأ ﺔﺑﺎﺻإ ﻲﻓ كﻟذ بﺑﺳﺗﯾ نأ نﻛﻣﯾ تاءارﺟﻹا هذھ ﻊﺑﺗﺗ مﻟ اذإ .ﺔﯾﺎﻧﻌﺑ
.دﻣﺟﻣﻟا
.جاردﻷا
• ﺔﻔﯾظو ﺢﯾﺗﺗ
• ﺔﻔﯾظو لﯾﻐﺷﺗ بﺟﯾ
• لﺛﻣ ﺔﯾﻠﺧادﻟا ءازﺟﻷا ﻊﯾﻣﺟ لﺎﺧدﺈﺑ مﻗ ،لﺿﻓأ ءاوھ ﻊﯾزوﺗ ﻰﻠﻋ لوﺻﺣﻠﻟ
• جاردﻷا بﺣﺳا مﺛ ًﻻوأ جاردﻷا ﻲﻓ دوﺟوﻣﻟا مﺎﻌطﻟا ﺔﻟازﺈﺑ مﻗ،جاردﻷا كﻔﻟ
•.ﺔﺣﯾﺣﺻﻟا ﺎﮭﻌﺿاوﻣ ﻲﻓ ﺎﮭﻠﺧدأ اذﻟ ،ﺎًﻔﻠﺗﺧﻣ جرد لﻛ لﻛﺷ نوﻛﯾ دﻗ
نﯾﺗﻣﺟﻧ تاذ ورﺟﺣ
ﺞﻠﺛﻟا نﯾزﺧﺗﻟ نﯾﺗﻣﺟﻧﻟا تاذ (
.ﺞﻠﺛﻟا تﺎﺑﻌﻛﻣ ﺔﻋﺎﻧﺻﻟ وأ ،ﺎﮭﺗﻋﺎﻧﺻ وأ تﺎﺟﻠﺛﻣﻟا نﯾزﺧﺗﻟ وأ ،ﺎًﻘﺑﺳﻣ ﺔﺟﻠﺛﻣﻟا
a
- نﻣ مﺎﻌطﻟاو12- ﻰﻟإ ﺔﯾوﺋﻣ ﺔﺟرد 18.ةرﯾﺻﻗ تارﺗﻔﻟ ﺔﯾوﺋﻣ ﺔﺟرد
•) نﯾزﺧﺗﻟا ﺔﻠﺳ وأ جردﻟا مادﺧﺗﺳا نﻛﻣﯾ
• ﺔﻣﻌطﻷا نﯾزﺧﺗﻟ ﺔﺑﺳﺎﻧﻣ نﯾﺗﻣﺟﻧﻟا تاذ ﺔﺟﻠﺛﻣﻟا ﺔﻣﻌطﻷا تارﯾﺟﺣ دﻌُﺗ
•.ﺔﺟزﺎطﻟا ﺔﻣﻌطﻷا دﯾﻣﺟﺗﻟ ﺔﺑﺳﺎﻧﻣ رﯾﻏ نﯾﺗﻣﺟﻧﻟا تاذ تارﯾﺟﺣﻟا دﻌُﺗ

ﺔظﺣﻼﻣ
ﺔظﺣﻼﻣ
ar_main.book.book Page 13 Thursday, April 2, 2020 1:01 PM
13
AR
لﯾﻐﺷﺗﻟا
لﯾﻐﺷﺗﻟا
.مﺎﻌطﻟا ﻰﻠﻋ ﺔﺣﺿوﻣﻟا نﻣ لﻗأ ةرارﺣ
مﺎﻌطﻟا نﯾزﺧﺗ ﻰﻠﻋ
ةدﻋ ﻲﻓ نزﺧﻣﻟا مﺎﻌطﻟا ظﻔﺣ وأ قﻼﻏﺈﺑ مﻘﻓ ،ةرارﺣﻟا ﺔﺟرد عﺎﻔﺗرا بﺑﺳﺑ
رﯾﺛﺄﺗﻟا لﯾﻠﻘﺗ ﻲﻓ بﻏرﺗ تﻧﻛ اذإ .زﺎﮭﺟﻟا تﺎﻔﺻاوﻣ
.ﺔﯾدﺎﻌﻟا لﯾﻐﺷﺗﻟا فورظ ﻲﻓ ﺞﻠﺛﻟا
ﺔﺟرد
ﺔﻓﺎﺳﻣ ﻰﻠﻋ3.رﻌﺷﺗﺳﻣﻟا نﻣ لﻗﻷا ﻰﻠﻋ مﺳ
.تﺎﻘﺑط
ةءﺎﻔﻛﺑ ﺔﻣﻌطﻷا نﯾزﺧﺗ
.زﺎﮭﺟﻟا ﻲﻓ مﺎﻌطﻟا
.ﺔﺿﻔﺧﻧﻣ ةرارﺣ ﺔﺟرد دﻧﻋ ﺔﻟوﮭﺳﺑ
نﻣ يأ لﺧاد دﻣﺟﻣﻟا مﺎﻌطﻟا وأ ةدرﺑﻣﻟا ﺔﻣﻌطﻷا ﻊﺿ
.ﮫﺋارﺷ روﻓ
.ﺎﮭﯾﻠﻋ رطﻘُﺗ وأ ىرﺧﻷا ﺔﻣﻌطﻷا سﻣﻼﺗ ﻻ ﻰﺗﺣ
.تاوارﺿﺧﻟا
مﺎﻌط يأ دﯾﻣﺟﺗ ةدﺎﻋإ بﻧﺟﺗ
.ﮫﺗﯾذﻐﺗو ﮫﻗاذﻣ نﻣ لﻠﻘﯾ فوﺳ لﻣﺎﻛ لﻛﺷﺑ هدﯾﻣﺟﺗ نﺎﺑوذ مﺗ دﻗ نﺎﻛ مﺎﻌط يأ
.مزﻼﻟا دﺣﻟا نﻣ رﺛﻛأ اًءوﻠﻣﻣ زﺎﮭﺟﻟا نﺎﻛ
نﯾزﺧﺗﻟا لﺑﻗ نﺧﺎﺳﻟا مﺎﻌطﻟا دّرﺑ
بﻠﺳﻟﺎﺑ رﺛؤﯾ ﺎﻣﻣ زﺎﮭﺟﻠﻟ ﺔﯾﻠﺧادﻟا ةرارﺣﻟا ﺔﺟرد دادزﺗ نأ نﻛﻣﯾ ،لﺧادﻟا
.زﺎﮭﺟﻟا ﻲﻓ ﺔﻧزﺧﻣﻟا ىرﺧﻷا ﺔﻣﻌطﻷا ﻰﻠﻋ
ﮫﻧﯾزﺧﺗ مﺗﯾﻟ مﺎﻌطﻠﻟ ﺔﺑوﻠطﻣﻟا ةرارﺣﻟا ﺔﺟرد نﻣ لﻗأ ةرارﺣ ﺔﺟرد طﺑﺿﺑ مﻘﺗ
تاورﺿﺧﻟا نزﺧﺗ ﻻ ،زﺎﮭﺟﻟا ﻲﻓ دﯾرﺑﺗ تارﯾﺟﺣ دوﺟو لﺎﺣ ﻲﻓ
دﻗ ﺎﮭﻧﻷ دﯾرﺑﺗﻟا ةرﯾﺟﺣ ﻲﻓ ﺔﯾﻟﺎﻋ ﺔﺑوطر يذ ىوﺗﺣﻣ ﻰﻠﻋ يوﺗﺣﺗ ﻲﺗﻟا
.ةرارﺣﻟا ﺔﺟرد ضﺎﻔﺧﻧا بﺑﺳﺑ دﻣﺟﺗﺗ
.ﺢﯾﺣﺻ لﻛﺷﺑ
.عﺎطﻘﻧﻻا ةدﻣ نﻋ
بﺟﯾ
• ﻰﻠﻋ دﻣﺟُﻣﻟا ةرارﺣ ﺔﺟرد طﺑﺿﺑ مﻗ ،دﻣﺟُﻣﻟا ةدﺣو ﻲﻓ مﺎﻌطﻟا نﯾزﺧﺗ دﻧﻋ
•.مزﻼﻟا نﻣ لﻗأ ﺔﺟرد ﻰﻠﻋ ﺞﺗﻧُﻣﻟا ةرارﺣ ﺔﺟرد نﯾﯾﻌﺗﺑ مﻘﺗ ﻻ
• ظﻓﺎﺣ . ﺔﺟﻼﺛﻟا ةدﺣو ﻲﻓ ةرارﺣﻟا ﺔﺟرد رﻌﺷﺗﺳﻣ نﻣ برﻘﻟﺎﺑ مﺎﻌطﻟا ﻊﺿﺗ ﻻ
• ﻲﻓ ﮫﺑ حوﻣﺳﻣ قﺎطﻧ ﮫﻟ ﺞﻠﺛﻟا ﺔﻟازإ دﻌﺑ ةرارﺣﻟا ﺔﺟرد عﺎﻔﺗرا نأ ظﺣﻻ
• مﻛارﺗ نﻣ دﻣﺟُﻣﻟا ةرﯾﺟﺣ وﻠﺧ زﺎﮭﺟﻟا ﻲﻓ ًﺎﯾﺋﺎﻘﻠﺗ ﺞﻠﺛﻟا ﺔﻟازإ مﺎظﻧ نﻣﺿﯾ
ّ
•.ﻖﻠﻐﻟا ﺔﻣﻛﺣﻣ ﺔﯾﻋوأ لﺧاد ةدرﺑﻣﻟا ﺔﻣﻌطﻷا وأ دﻣﺟﻣﻟا مﺎﻌطﻟا ن
زﺧ
ِ
• نﯾزﺧﺗ لﺑﻗ (نﯾزﺧﺗﻟا تﺎﻣﯾﻠﻌﺗ) ﻖﺻﻠُﻣﻟاو ﺔﯾﺣﻼﺻﻟا ءﺎﮭﺗﻧا ﺦﯾرﺎﺗ نﻣ ﻖﻘﺣﺗ
• نﻣ رﺛﻛأ) تﻗوﻟا نﻣ ﺔﻠﯾوط ةرﺗﻔﻟ مﺎﻌطﻟا نزﺧﺗ ﻻ4 دﺳﻔﯾ نﺎﻛ اذإ (ﻊﯾﺑﺎﺳأ
• دﻣﺟُﻣﻟا وأ ﺔﺟﻼﺛﻟا
• ،داّرﺑﻟا لﺧاد ﺔﺑﺳﺎﻧﻣ تﺎﯾوﺎﺣ ﻲﻓ ﺔﺟزﺎطﻟا كﺎﻣﺳﻷاو موﺣﻠﻟا نﯾزﺧﺗﺑ مﻗ
• جرد ﻰﻠﻋأ ﺔﻣﻌطﻷا نﻣ ﺎھرﯾﻏو ةدرﺑﻣﻟا ﺔﻣﻌطﻷا نﯾزﺧﺗ نﻛﻣﯾ
.فﯾﺻﻟا لﻼﺧ ﺔﻌﻔﺗرﻣ ﺔﺑوطرﻟا تﻧﺎﻛ لﺎﺣ ﻲﻓ وأ ،لﻣﺎﻛﻟﺎﺑ بﺎﺑﻟا
لﺧاد نﻔﻌﻟا نوﻛﺗ ﻊﻧﻣﻟ ﺎًﺣوﺗﻔﻣ بﺎﺑﻟا عدو ،ﮫﻔﻔﺟو ،ﮫﻔظﻧو ،ﮫﯾﻓ مﻛارﺗﻣﻟا
كرﺗ ﺔﻟﺎﺣ ﻲﻓ ﺔﯾﻧﺎﺛ نﯾﺛﻼﺛ ﮫﺗدﻣ ﻲﻧﻣز لﺻﺎﻔﺑ تارﻣ ثﻼﺛ ﺎًﺗوﺻ راذﻧﻹا ردﺻﯾ
.ةدﺣاو ﺔﻘﯾﻗد لﻼﺧ ﻲﻓ مﺎﻛﺣﺈﺑ ﮫﻗﻼﻏإ مﺗﯾ مﻟ وأ ﺎًﺣوﺗﻔﻣ بﺎﺑﻟا
.باوﺑﻷا لﻛ لﻔﻗ دﻌﺑ ﻰﺗﺣ ﺔﯾﻧﺎﺛ نﯾﺛﻼﺛ نﻣ رﺛﻛأ ﻲﻧﻣز لﺻﺎﻔﺑ ﮫﺑﻧﻣﻟا توﺻ
مادﺧﺗﺳﻻا لﺑﻗ
لﯾﻐﺷﺗﻟا تﺎظﺣﻼﻣ
.لﻣﺎﻛﻟﺎﺑ بﺎﺑﻟا قﻼﻏﺈﺑ ﺢﻣﺳﯾﻟ
بﺎﺑﻟا ﺢﺗﻓ بﺑﺳﺗﯾ دﻗ
.زﺎﮭﺟﻟا تارﯾﺟﺣ لﺧاد ﺔظوﺣﻠﻣ
.زﺎﮭﺟﻟا
بﺎﺑﻟا ﺢﺗﻓ راذﻧإ
• ﻖﻠﻐُﯾ مﻟ اذإ نوﻛﺗﯾ دﻗ ﻊﯾﻘﺻﻟا نأ مھرﺎﺑﺗﻋا ﻲﻓ نوﻣدﺧﺗﺳﻣﻟا ﻊﺿﯾ نأ بﺟﯾ
• بﺎﺑﻟا ﺔﻠﺳ وأ فرﻟا ﻰﻠﻋ نزﺧُﻣﻟا مﺎﻌطﻟا نﯾﺑ ﺔﯾﻓﺎﻛ ﺔﻓﺎﺳﻣ دوﺟو نﻣ دﻛﺄﺗ
• ةروﺻﺑ ةرارﺣﻟا ﺔﺟرد ةدﺎﯾز ﻲﻓ ﺔﻠﯾوط تارﺗﻔﻟ
• ﺞﻠﺛﻟا ﺔﺑاذﺈﺑ مﻗو ،ﮫﻘﻠﻏﺄﻓ ،ﺔﻠﯾوط تارﺗﻔﻟ ﺎًﻏرﺎﻓ دﯾرﺑﺗﻟا زﺎﮭﺟ كرُﺗ اذإ
• ﺔﻛرﺷﻟ ءﻼﻣﻌﻟا تﺎﻣوﻠﻌﻣ زﻛرﻣﺑ لﺻﺗاLG Electronics رﻣﺗﺳا اذإ
لﺎطﻋﻷا فﺷﻛ
• دﯾﻣﺟﺗ .لﻣﺎﻛ لﻛﺷﺑ هدﯾﻣﺟﺗ نﺎﺑوذ مﺗ دﻗ نﺎﻛ
• اذإ ﺢﯾﺣﺻ لﻛﺷﺑ رﻣﯾ نأ درﺎﺑﻟا ءاوﮭﻠﻟ نﻛﻣﯾ ﻻ .زﺎﮭﺟﻟا ءلﻣ ﻲﻓ طرﻔﺗ ﻻ
• ﻲﻓ اًدﺟ نﺧﺎﺳ مﺎﻌط ﻊﺿو لﺎﺣ ﻲﻓ .
• ﻻ .دﻣﺟﺗﯾ ﺎﻣﺑر ،مﺎﻌطﻠﻟ رﯾﺑﻛ لﻛﺷﺑ ﺔﺿﻔﺧﻧﻣ ةرارﺣ ﺔﺟرد طﺑﺿﺑ تﻣﻗ اذإ
تﺎﻣوﻠﻌﻣﻟا زﻛرﻣ نﻣ ﺢﯾﻠﺻﺗﻟا ﻲﻧﻓ ﮫﺟاوﯾ دﻘﻓ ،ﺔﻗﺎطﻟا لﯾﻐﺷﺗ
• ﮫﻛاوﻔﻟاو
• لﺄﺳاو ءﺎﺑرﮭﻛﻟا ﺔﻛرﺷﺑ لﺻﺗا ،ﻲﺋﺎﺑرﮭﻛﻟا رﺎﯾﺗﻟا عﺎطﻘﻧا ثودﺣ ﺔﻟﺎﺣ ﻲﻓ
-.زﺎﮭﺟﻟا نﻋ ﺔﻗﺎطﻟا لﺻﻓ ءﺎﻧﺛأ باوﺑﻷا ﺢﺗﻓ بﻧﺟﺗﺗ نأ
-.مﺎﻌطﻟا ﺔﻟﺎﺣ نﻣ ﻖﻘﺣﺗ ،ﻲﻌﯾﺑطﻟا ﮫﻌﺿو ﻰﻟإ ﺔﻗﺎطﻟا ردﺻﻣ دوﻌﯾ ﺎﻣدﻧﻋ
.لﯾﻐﺷﺗﻟا ءﺎﻧﺛأ ﻲﺋﺎﻘﻠﺗ لﻛﺷﺑ لﻛﺎﺷﻣﻟا نﻋ فﺷﻛﻟا زﺎﮭﺟﻠﻟ نﻛﻣﯾ
• دﻧﻋ ﻰﺗﺣ ﺄطﺧ زﻣر ضرﻋ مﺗﯾو زﺎﮭﺟﻟا لﻣﻌﯾ ﻻ ،ﺔﻠﻛﺷﻣ نﻋ فﺷﻛﻟا مﺗ اذإ
.رز يأ ﻰﻠﻋ طﻐﺿﻟا
• اًروﻓ لﺻﺗاو .ﺔﻗﺎطﻟا لﯾﻐﺷﺗ فﺎﻘﯾﺈﺑ مﻘﺗ ﻻ ،ﺔﺷﺎﺷﻟا ﻰﻠﻋ ﺄطﺧ رﮭظ اذإ
ﺔﻛرﺷ ءﻼﻣﻋ تﺎﻣوﻠﻌﻣ زﻛرﻣﺑLG Electronics اذإ .ﺄطﺧﻟا نﻋ ﻎﻠﺑأو
فﺎﻘﯾﺈﺑ تﻣﻗ
.ﺔﻠﻛﺷﻣﻟا فﺎﺷﺗﻛا ﻲﻓ ﺔﺑوﻌﺻ
ﺔﻗﺎطﻟا رﯾﻓوﺗ حارﺗﻗا
• درﺎﺑﻟا ءاوﮭﻠﻟ اذھ ﺢﻣﺳﯾ .ﺔﻧزﺧﻣﻟا ﺔﻣﻌطﻷا نﯾﺑ ﺔﯾﻓﺎﻛ ﺔﻓﺎﺳﻣ دوﺟو نﻣ دﻛﺄﺗ
.ءﺎﺑرﮭﻛﻟا رﯾﺗاوﻓ نﻣ ضﻔﺧﯾو يوﺎﺳﺗﻟﺎﺑ رﺎﺷﺗﻧﻻﺎﺑ
•.دﻣﺟﺗﻟا وأ فﺛﻛﺗﻟا ﻊﻧﻣﻟ درﺑﺗ نأ دﻌﺑ طﻘﻓ ﺔﻧﺧﺎﺳﻟا ﺔﻣﻌطﻷا نزﺧ

ﮫﯾﺑﻧﺗ
ﺔظﺣﻼﻣ
ﺔظﺣﻼﻣ
ar_main.book.book Page 12 Thursday, April 2, 2020 1:01 PM
بﯾﻛرﺗﻟا
12
AR
عوﻧﻟا نﻣ طﺑرﻟا حﺎﺗﻔﻣ مدﺧﺗﺳاو يوﻠﻌﻟا دﻣﺟُﻣﻟا بﺎﺑ ﺢﺗﻓا
ﻲﻏرﺑ رﯾودﺗﻟ
c
.بﺎﺑﻟا ﺔَﻠﱠﺻﻔﻣ
ﺔﻗﺎطﻟا لﯾﻐﺷﺗ
زﺎﮭﺟﻟا لﯾﺻوﺗ
.جرﺧ سﺑﻘﻣ ﻲﻓ ﺔﻗﺎطﻟا سﺑﺎﻗ لﯾﺻوﺗﺑ مﻗ ،زﺎﮭﺟﻟا بﯾﻛرﺗ دﻌﺑ
لﺑﻗ مﺎﻌطﻟا ﺔﻓﺎﺿﺈﺑ تﻣﻗ اذإ .زﺎﮭﺟﻟا ﻲﻓ مﺎﻌطﻟا ﻊﺿو لﺑﻗ تﺎﻋﺎﺳ ﻊﺑرأ
.مﺎﻌطﻟا دﺳﻔﯾ دﻘﻓ ،لﻣﺎﻛﻟﺎﺑ زﺎﮭﺟﻟا دﯾرﺑﺗ
ﺔﻟوﻣﺎﺻ ءﺎﺧرإ نﻣ نﻛﻣﺗﺗﻟ
ﻖﯾرط نﻋ زﺎﮭﺟﻟا عﺎﻔﺗرا لﯾدﻌﺗ نﻣ نﻛﻣﺗﺗﻟ
• وأ ثﻼﺛ ةدﻣﻟ رظﺗﻧا ،سﺑﻘﻣﺑ (سﺑﺎﻘﻟا وأ) ﻲﺋﺎﺑرﮭﻛﻟا رﺎﯾﺗﻟا كﻠﺳ لﯾﺻوﺗ دﻌﺑ
ﺎھرﯾودﺗ لﻼﺧ نﻣ تﯾﺑﺛﺗﻟا ﺔﻟوﻣﺎﺻ تﯾﺑﺛﺗﻟ
ﺔﻟوﻣﺎﺻﻟا حﺎﺗﻔﻣ مدﺧﺗﺳاو بﺎﺑﻟا ﺢﺗﻓا
a
.اًرﺎﺳﯾ ﺎھرﯾودﺗ لﻼﺧ نﻣ تﯾﺑﺛﺗﻟا
ﺔﻟوﻣﺎﺻﻟا حﺎﺗﻔﻣ مدﺧﺗﺳا
b
.ﺎًﻧﯾﻣﯾ وأ اًرﺎﺳﯾ طﺑﺿﻟا ﺔﻠﺻﻔﻣ نﺳ رﯾودﺗ
ﺔﻟوﻣﺎﺻﻟا حﺎﺗﻔﻣ مدﺧﺗﺳا
a
.ﺎًﻧﯾﻣﯾ
1
2
• نﻣ ﻰﻠﻋﻷ زﺎﮭﺟﻟا بﺎﺑ عﺎﻔﺗرا طﺑﺿﺗ ﻻ3.مﻣ
3
رﺧآ نﺎﻛﻣ ﻰﻟإ ﮫﻠﻘﻧﻟ زﺎﮭﺟﻟا كﯾرﺣﺗ
زﺎﮭﺟﻟا لﻘﻧﻟ زﯾﮭﺟﺗﻟا
.زﺎﮭﺟﻟا لﺧاد نﻣ مﺎﻌطﻟا جارﺧﺈﺑ مﻗ
ﻲﻓ ﺔﻗﺎطﻟا سﺑﺎﻗ ﺔﻠﺻو ﻲﻓ ﮫﺗﯾﺑﺛﺗو ﮫﻟﺎﺧدإو ءﺎﺑرﮭﻛﻟا سﺑﺎﻗ بﺣﺳﺑ مﻗ
ءﺎﻧﺛأ طوﻘﺳﻟا ﻊﻧﻣﻟ طﯾرﺷﺑ بﺎﺑﻟا ضﺑﻘﻣو فﻓرﻷا لﺛﻣ ءازﺟﻷا تﯾﺑﺛﺗﺑ مﻗ
زﺎﮭﺟﻟا ﻞﻘﻧ ﺪﻨﻋ .ﺔﯾﺎﻧﻌﺑ نﯾﺻﺧﺷ نﻣ رﺛﻛأ ﺔطﺳاوﺑ زﺎﮭﺟﻟا كﯾرﺣﺗﺑ مﻗ
.ﻲﺳأر ﻊﺿو ﻲﻓ زﺎﮭﺟﻟا ﻖﺑا ،ﺔﻠﯾﻮﻃ ﺔﻓﺎﺳﻣﻟ
سﺑﻘﻣﻟ ﻲﺳﯾﺋرﻟا ذﺧﺄﻣﻟا ﻲﻓ ﺔﻗﺎطﻟا سﺑﺎﻗ لﯾﺻوﺗﺑ مﻗ ،زﺎﮭﺟﻟا بﯾﻛرﺗ دﻌﺑ
.زﺎﮭﺟﻟا ﻰﻠﻋأ وأ ﻲﻔﻠﺧﻟا ءزﺟﻟا
.ﮫﻠﯾﻐﺷﺗﺑ مﻗو ،جرﺧﻟا
.زﺎﮭﺟﻟا كﯾرﺣﺗ
1
• ﺔﯾوﺗﺳﻣ رﯾﻏ ﺔﯾﺿرﻷا تﻧﺎﻛ ﺔﻟﺎﺣ ﻲﻓ ﺔﺟﻼﺛﻟا ﻲﺑﺎﺑ ءاوﺗﺳا طﺑﺿ نﻛﻣﯾ ﻻ دﻗ
2
3
4
.يوﻗ رﯾﻏ وأ فﯾﻌﺿ ءﺎﻧﺑﻟا نﺎﻛ وأ
•.ﺔﯾوﺗﺳﻣو ﺔﺑﻠﺻ ﺔﯾﺿرأ ﻰﻠﻋ ﺎﮭﺑﯾﻛرﺗﺑ مﻘﻓ ،ﺔﺟﻼﺛﻟا مﺟﺣ لﻘﺛﻟ اًرظﻧ
• ةدﯾدﺷ تﻧﺎﻛ اذإ زﺎﮭﺟﻟا ﺔﯾوﺳﺗ ﺔﺑوﻌﺻ ﻲﻓ ﺔﯾﺑﺷﺧﻟا تﺎﯾﺿرﻷا بﺑﺳﺗﺗ دﻗ
.ءﺎﻧﺛﻧﻻا
يوﻠﻌﻟا دﻣﺟُﻣﻟا بﺎﺑ ةاذﺎﺣﻣ
.زرُطﻟا ضﻌﺑ ﻲﻓ ﻻإ يوﻠﻌﻟا دﻣﺟُﻣﻟا بﺎﺑ رﻓوﺗﯾ ﻻ
5

ﮫﯾﺑﻧﺗ
ﺔظﺣﻼﻣ
ar_main.book.book Page 11 Thursday, April 2, 2020 1:01 PM
11
AR
بﯾﻛرﺗﻟا
- عوﻧﻟا ﻲﻏارﺑﻟا حﺎﺗﻔﻣB
زﺎﮭﺟﻟا ىوﺗﺳﻣ طﺑﺿ
لﯾﻣﻟا رﯾﯾﻐﺗﻟ مادﻗﻷا هذھ طﺑﺿا .نﯾﯾوﺗﺳﻣ نﯾﯾﻣﺎﻣأ نﯾﻣدﻗ ﻰﻠﻋ زﺎﮭﺟﻟا يوﺗﺣﯾ
،زﺎﮭﺟﻟا ءاوﺗﺳا مدﻋ ﺔﻟﺎﺣ ﻲﻓ .رﺧآ ﻰﻟإ بﻧﺎﺟ نﻣ وأ ًﻼﺛﻣ فﻠﺧﻟا ﻰﻟإ مﺎﻣﻷا نﻣ
مادﺧﺗﺳﺎﺑ زﺎﮭﺟﻟا لﯾﻣ طﺑﺿﺑ مﻗ ،باوﺑﻷا ﻖﻠﻏ ﻲﻓ ﺔﺑوﻌﺻ دوﺟو دﻧﻋ وأ
.هﺎﻧدأ ةدراوﻟا تﺎﻣﯾﻠﻌﺗﻟا
طﺑرﻟا حﺎﺗﻔﻣ مدﺧﺗﺳا
رﺎﺳﯾﻠﻟ ءاوﺗﺳﻹا لﺟر ةرادإ لﻼﺧ نﻣ عﺎﻔﺗرﻻا طﺑﺿﻟ
a
.ﺎﮭﺿﻔﺧﻟ نﯾﻣﯾﻠﻟ وأ ﺎﮭﻌﻓرﻟ
.ﺔﯾﻠﻔﺳﻟا ﺔﯾﻠﺻﻔﻣﻟا ﺔﻋوﻣﺟﻣﻟا نﻋ لﺻﻔﻧﯾ ﻰﺗﺣ ﺔﺟﻼﺛﻟا بﺎﺑ ﻊﻓرا
.ﻰﻠﻋﻷ ﺎًﮭﺟﺗﻣ
دﻣﺟُﻣﻟاو ﺔﺟﻼﺛﻟا بﺎﺑ بﯾﻛرﺗ ةدﺎﻋإ
لﻼﺧ نﻣ زﺎﮭﺟﻟا رورﻣ درﺟﻣﺑ كﻔﻟا تاءارﺟإ بﯾﺗرﺗ سﻛﻋ باوﺑﻷا بﯾﻛرﺗﺑ مﻗ
.لﺧدﻣﻟا باوﺑأ لﻛ
بﺎﺑﻟا ةاذﺎﺣﻣو زﺎﮭﺟﻟا ءاوﺗﺳا طﺑﺿ
ءدﺑﻟا لﺑﻗ
3
• ﻲﻠﺧادﻟا بﻧﺎﺟﻟا لﻌﺟ ﻊﻣ شودﺧﻟا بﺑﺳﯾ ﻻ ﺢطﺳ ﻰﻠﻋ بﺎﺑﻟا ﻊﺿوﺑ مﻗ
ﺔﺟﻼﺛﻟاو دﻣﺟﻣﻟا ﻲﺑﺎﺑ ةاذﺎﺣﻣ
.زﺎﮭﺟﻟا بﺎﺑﺑ صﺎﺧﻟا عﺎﻔﺗرﻻا قرﻓ طﺑﺿا ،ٍوﺗﺳﻣ زﺎﮭﺟﻟا بﺎﺑ نﻛﯾ مﻟ لﺎﺣ ﻲﻓ
هﺎﻧدأ ةدراوﻟا تﺎﻣﯾﻠﻌﺗﻟا ﻊﺑﺗﺎﻓ ،ﺔﯾوﺎﺳﺗﻣ رﯾﻏ باوﺑﻷا نﯾﺑ ﺔﻓﺎﺳﻣﻟا تﻧﺎﻛ اذإ
.باوﺑﻷا ةاذﺎﺣﻣﻟ
• كدﯾوزﺗ مﺗﯾ فوﺳ .كﺑ صﺎﺧﻟا زارطﻟا بﺳﺣ طﺑرﻟا حﺎﺗﻔﻣ فﻠﺗﺧﯾ نأ نﻛﻣﯾ
عوﻧ نﻣ ﺎﻣإ طﺑر حﺎﺗﻔﻣﺑA وأ B.
- عوﻧﻟا ﻲﻏارﺑﻟا حﺎﺗﻔﻣA

ﮫﯾﺑﻧﺗ
ﮫﯾﺑﻧﺗ
ﮫﯾﺑﻧﺗ
ar_main.book.book Page 10 Thursday, April 2, 2020 1:01 PM
بﯾﻛرﺗﻟا
10
AR
.ﺔﯾﻠﻔﺳﻟا ﺔﯾﻠﺻﻔﻣﻟا ﺔﻋوﻣﺟﻣﻟا نﻋ لﺻﻔﻧﯾ ﻰﺗﺣ دﻣﺟُﻣﻟا بﺎﺑ ﻊﻓرا
.ﻰﻠﻋﻷ ﺎًﮭﺟﺗﻣ
ﺔﺟﻼﺛﻟا بﺎﺑ ﺔﻟازإ
ﺔﯾﻛﻠﺳﻟا تﻼﯾﺻوﺗﻟا ﻊﯾﻣﺟ لﺻﻔﺑ مﻗ
a
.
4
.ﺔﺟﻼﺛﻟا نﻣ يوﻠﻌﻟا ءزﺟﻟا ﻲﻓ ﻲﻠﺻﻔﻣﻟا ءﺎطﻐﻟا نﻣ ﻲﻏرﺑﻟا ﺔﻟازﺈﺑ مﻗ
كﻔﻣ مادﺧﺗﺳﺎﺑ ،ءﺎطﻐﻠﻟ ﻲﻣﺎﻣﻷا بﻧﺎﺟﻟا لﻔﺳأ دوﺟوﻣﻟا ،فﺎطﺧﻟا ﻊﻓرا
• ﻲﻠﺧادﻟا بﻧﺎﺟﻟا لﻌﺟ ﻊﻣ شودﺧﻟا بﺑﺳﯾ ﻻ ﺢطﺳ ﻰﻠﻋ بﺎﺑﻟا ﻊﺿوﺑ مﻗ
ﻲﺿرﻷا كﻠﺳﻟا كﻔﺑ مﻗ .
b
.
ﺔﯾﺋﺎﺑرﮭﻛﻟا تﻼﺻوﻟا ﻊﯾﻣﺟ لﺻﻓا
a
1
دﻣﺟُﻣﻟا بﺎﺑ ﺔﻟازإ
1
.سأرﻟا ﺢطﺳُﻣ ﻲﻏارﺑ
2
ﺔﻠﺻَﻔﻣﻟا عارذ رﯾودﺗﺑ مﻗ
ﺔَﻠّﺻَﻔﻣﻟا ﻊﻓرا مﺛ .ﺔﻋﺎﺳﻟا برﺎﻘﻋ هﺎﺟﺗا ﻲﻓ
ﺔﻠﺻﻔﻣﻟا عارذ جﻻزﻣ نﻣ ﺎھرﯾرﺣﺗﻟ
d
.
ﺔﻟازﺈﺑ رﺛﻛأ وأ نﯾﺻﺧﺷ موﻘﯾ نأ ﮫﺑ ﻲﺻوﻣﻟا نﻣ .مﺎﻣﻷا ﻰﻟإ بﺎﺑﻟا طوﻘﺳ
b
ﺔﯾوﻠﻌﻟا
c
.ﮫﺑﯾﻛرﺗ ةدﺎﻋإو بﺎﺑﻟا
ﺔﯾﻠﺻﻔﻣﻟا ﺔﻌﻓارﻟا رﯾودﺗﺑ مﻗ
ﻊﻓرا .ﺔﻋﺎﺳﻟا برﺎﻘﻋ هﺎﺟﺗا سﻛﻌﺑ
ﻲﻠﺻﻔﻣﻟا تﯾﺑﺛﺗﻟا عارذ نﻋ ﺎﮭﻠﺻﻔﺗﻟ
c
.
e
2
ةدﺎﻋإو بﺎﺑﻟا ﺔﻟازﺈﺑ رﺛﻛأ وأ نﯾﺻﺧﺷ موﻘﯾ نأ ﮫﺑ ﻲﺻوﻣﻟا نﻣ .مﺎﻣﻷا
• مدﻋ نﻣ دﻛﺄﺗ ،ﻲﻠﺻﻔﻣﻟا تﯾﺑﺛﺗﻟا عارذ نﻣ ﺎھرﯾرﺣﺗو ﺔﻠﺻﻔﻣﻟا ﻊﻓر دﻧﻋ
ﺔﯾوﻠﻌﻟا ﺔﻠﺻﻔﻣﻟا
d
3
• ﻰﻟإ بﺎﺑﻟا طوﻘﺳ مدﻋ نﻣ دﻛﺄﺗ ،جﻻْزِﻣﻟا نﻣ ﺎھرﯾرﺣﺗو ﺔﻠﺻﻔﻣﻟا ﻊﻓر دﻧﻋ
.ﮫﺑﯾﻛرﺗ

ﺔظﺣﻼﻣ
ﺔظﺣﻼﻣ
رﯾذﺣﺗ
A
C
H
D E
F
G
B
ar_main.book.book Page 9 Thursday, April 2, 2020 1:01 PM
9
AR
بﯾﻛرﺗﻟا
بﯾﻛرﺗﻟا
"ﺔﯾوﺋﻣ
+ -43**
خﺎﻧﻣﻟا ﺔﺋﻓ ﺔﺟرد" ﺔطﯾﺣﻣﻟا ةرارﺣﻟا ﺔﺟرد قﺎطﻧ
ﺎﯾﻧﯾﻛ ،دﻧﮭﻟا ،ﺎﯾﻟارﺗﺳأ *
روداوﻛإ ،نﯾﺗﻧﺟرﻷا **
) "ﺔﯾﺋاوﺗﺳﻻا" ةرارﺣﻟاT ﺔطﯾﺣﻣ ةرارﺣ ﺔﺟرد ﻲﻓ مادﺧﺗﺳﻼﻟ ﺔﻣﻣﺻُﻣ (
نﯾﺑ حوارﺗﺗ10 و 43.ﺔﯾوﺋﻣ ﺔﺟرد
تﺎﻘﺣﻠﻣﻟا
•.فﯾﻧﺻﺗﻟا ﻖﺻﻠﻣ ﻲﻓ خﺎﻧﻣﻟا ﺔﺋﻓ ﻰﻠﻋ روﺛﻌﻟا كﻧﻛﻣﯾ
بﯾﻛرﺗﻟا ءارﺟإ لﺑﻗ
تﺎﺻوﻠﺧﻟاو دﺎﻌﺑﻷا
SN(ةدﺗﻣﻣﻟا ةرارﺣﻟا ﺔﺟرد) +10+ - 32
ST(ﻲﺋاوﺗﺳا ﮫﺑﺷ) +16+ - 38+ / 18+ - 38**
ﻲﻧدﺗ ﻰﻟإ ﮫﻟ ةروﺎﺟﻣﻟا رﺻﺎﻧﻌﻟاو زﺎﮭﺟﻟا نﯾﺑ اًدﺟ ةرﯾﻐﺻﻟا ﺔﻓﺎﺳﻣﻟا يدؤﺗ دﻗ
رﮭظ نﯾﺑ ﺔﻓﺎﺳﻣﻟا نوﻛﺗ نأ ﻰﻋارُﯾ .ءﺎﺑرﮭﻛﻟا فﯾﻟﺎﻛﺗ ةدﺎﯾزو دﯾﻣﺟﺗﻟا ﻰﻠﻋ ﮫﺗردﻗ
N(ةرارﺣﻟا ﺔﺟرد) +16+ - 32
T(ﻲﺋاوﺗﺳا) +10+ - 43+ / *16+ - 43+ / 18
•) "ةدﺗﻣﻣﻟا ةرارﺣﻟا ﺔﺟرد" ﺔﺋﻓ نﻣﺿ جردﻧﺗ ﻲﺗﻟا ةزﮭﺟﻷاSN ﺔﺟرد ﻰﻟإ (
*1:.زرُطﻟا ضﻌﺑ ﻲﻓ ﻻإ ﺔﯾﺻﺎﺧﻟا هذھ رﻓوﺗﺗ ﻻ
نﻣ رﺛﻛأ طﺋﺎﺣ يأو زﺎﮭﺟﻟا50.زﺎﮭﺟﻟا بﯾﻛرﺗ دﻧﻋ مﻠﻣ
-(مﻠﻣ) أ عوﻧﻟا(مﻠﻣ) ب عوﻧﻟا
A912912
B17901790
C927738
D797615
E877690
F927738
ﻲﻏارﺑﻟا حﺎﺗﻔﻣA*1
ﻲﻏارﺑﻟا حﺎﺗﻔﻣB*1
a
b
G13841180
H17131750
دﻣﺟُﻣﻟاو ﺔﺟﻼﺛﻟا بﺎﺑ ﺔﻟازإ
باوﺑأ ﺔﻟازﺈﺑ مﻗ ،ﮫﻟﻼﺧ نﻣ زﺎﮭﺟﻟا رورﻣﻟ ﺎًﻘﯾﺿ كﯾدﻟ لﺧدﻣﻟا بﺎﺑ نﺎﻛ لﺎﺣ ﻲﻓ
.ﺎًﯾﻘﻓأ زﺎﮭﺟﻟا ررﻣو زﺎﮭﺟﻟا
ﺔطﯾﺣﻣﻟا ةرارﺣﻟا ﺔﺟرد
• بﯾﻛرﺗ لﺑﻗ ةرﺋادﻟا ﻊطﺎﻗ وأ ،ﻲﻟزﻧﻣﻟا رﮭﺻﻧﻣﻟا وأ ،ﺔﻗﺎطﻟا كﻠﺳ لﺻﻓا
تﺎﻣﯾﻠﻌﺗﻟا هذھ عﺎﺑﺗا لﺷﻓ بﺑﺳﺗﯾ دﻗ .زﺎﮭﺟﻟا فﯾظﻧﺗ وأ ﺎﮭﺗﻟازإ وأ باوﺑﻷا
.ﺔﯾﺋﺎﺑرﮭﻛ ﺔﻣدﺻ وأ ﻖﯾرﺣ ثودﺣ وأ ةﺎﻓوﻟا ﻲﻓ
.ﺔﯾﺧﺎﻧﻣﻟا ﺔﻘطﻧﻣﻟا بﺳﺣ كﻟذو
.كﻟذ ﻰﻟإ ﺎﻣو ،بﺎﺑﻟا ﺢﺗﻓ ةرﯾﺗوو ،ﺔطﯾﺣﻣﻟا
•.ﮫﻠﺧاد ةدوﺟوﻣﻟا ﺔﻗﺎطﺑﻟا ﺔﻌﺟارﻣ دﻧﻋ زﺎﮭﺟﻟا عوﻧ دﯾدﺣﺗ كﻧﻛﻣﯾ
• ،ﺔطﯾﺣﻣﻟا ةرارﺣﻟا تﺎﺟرد نﻣ دودﺣﻣ قﺎطﻧ نﻣﺿ لﻣﻌﻠﻟ زﺎﮭﺟﻟا مﯾﻣﺻﺗ مﺗ
• ةرارﺣﻟا ﺔﺟردو ،زﺎﮭﺟﻟا ﻊﻗوﻣ بﺑﺳﺑ ﺔﯾﻠﺧادﻟا ةرارﺣﻟا تﺎﺟرد رﺛﺄﺗﺗ دﻗ
 Loading...