

Page 1
Printed in China
P/N : MFL67080702 (1.0)
E N G L I S H
services.
votre téléphone ou votre fournisseur de
de votre téléphone, selon le logiciel de
de ce guide soient différents de ceux
Il est possible que certains éléments
l’utilisateur
Guide de
GB255g
GB255g
User Guide
Some of the contents in this manual
may differ from your phone depending
on the software of the phone or your
service provider.
FRANÇAIS
P/N : MFL67080702 (1.0)
Printed in China
Page 2

Bluetooth QD ID B015097
Page 3

-
GB255g User Guide
This guide will help you understand your new mobile phone. It will provide
you with useful explanations of features on your phone.
Some of the contents in this manual may differ from your phone depending
on the software of the phone or your service provider.
English
1
Page 4
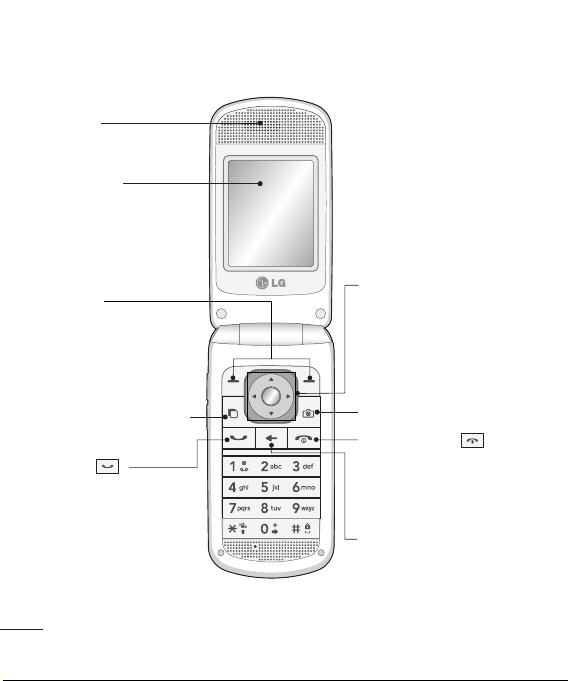
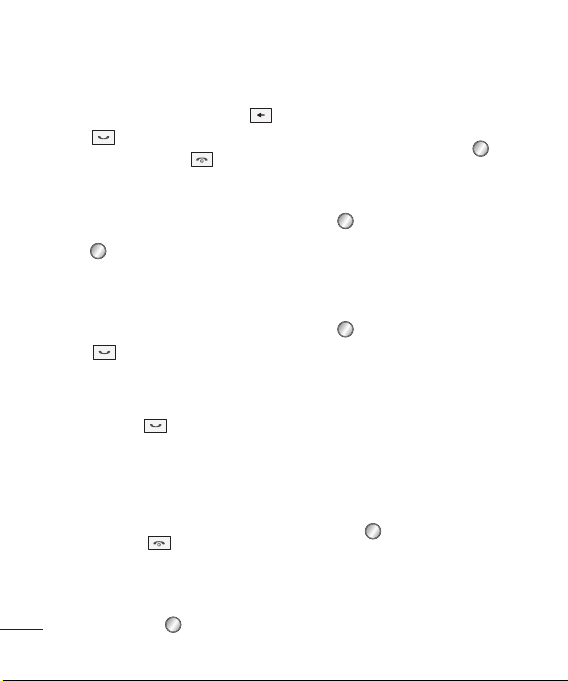
Getting to know your phone
Earpiece
Main screen
Soft keys
Each of these keys
performs the functions
indicated by the text on
the display.
Opens the multitasking
menu.
Call key
Dials a phone
number and answers
incoming calls.
2
Navigation keys
Use for quick access to phone
functions.
OK key
Selects menu options and
confirms actions.
Camera key
End/Power key
Ends or rejects a call. Turns
the phone on/off. Returns to
the standby screen when you
use the menu.
Clear key
Deletes a character with each
press. Use this key to go back
to the previous screen.
Page 5

Headset/ Charger /
USB Cable connector
Volume key
• When the screen is
idle: Controls the
volume of Ring tone.
• During a call: Controls
the volume of the
earpiece.
• When playing a BGM
track: Controls the
volume of music.
microSD/memory/
card slot
Installing a memory card
Lift the memory card cover
and insert a micro SD card with
the golden contact area facing
downwards. Close the memory card
cover so that it clicks shut.
To remove the memory card, gently
push it as shown in the diagram.
Note: A memory card is an optional
accessory.
Formatting the memory card
Press and select Settings. Choose
Memory Manager select External
memory and press Format.
WARNING: When you format your
memory card, all the content will be
wiped. If you do not want to lose the
data on your memory card, back it up
rst.
3
Page 6
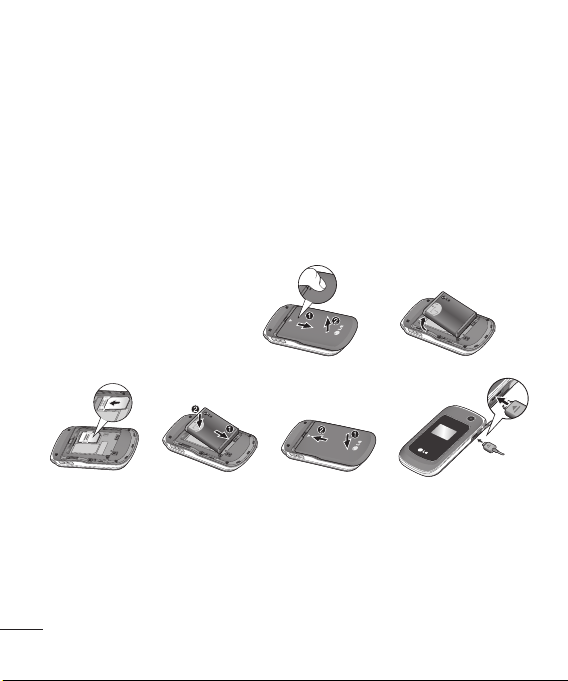
Installing the SIM Card and Charging the Battery
Installing the SIM Card
When you subscribe to a cellular network, you are provided with a SIM card
loaded with your subscription details, such as your PIN, any optional services
available and many others.
Important! ›
Illustrations
1 Open battery cover
2 Remove the battery
3 Insert your SIM
4 Install the battery
5 Close the battery cover
6 Charge your battery
3564
WARNING: Do not remove the battery when the phone is switched on, as this may
damage the phone.
The SIM card and its contacts can be easily damaged by scratches or
bending, so be careful when handling, inserting or removing the card.
Keep all SIM cards out of the reach of small children.
12
4
Page 7
Menu map
Games & apps
1. Games & apps.
2. Settings
Calling
1. Call logs
2. Call durations
3. Data volume
4. Call costs
5. Call divert
6. Call barring
7. Fixed dial
numbers
8. Call waiting
9. Common
settings
Organizer
1. Calendar
2. To do
3. Memo
4. Secret memo
5. Date nder
6. Settings
Multimedia
1. Camera
2. Video camera
3. Music
4. Radio
5. Voice recorder
Messaging
1. Create new
message
2. Inbox
3. Drafts
4. Outbox
5. Sent items
6. My folders
7. Templates
8. Emoticons
9. Settings
Tools
1. Quick menu
2. Alarms
3. Calculator
4. Stopwatch
5. Converter
6. World time
7. Koodo Menu
My Stu
1. My images
2. My sounds
3. My videos
4. My games &
apps
5. SVG content
6. Others
7. My memory card
* This option only
available when an
external memory
inserted.
Wireless Web
1. Home
2. Enter address
3. Bookmarks
4. RSS Reader
5. Saved Pages
6. History
7. Settings
Pro les
1.
Normal
2. Silent
3.
Outdoor
4. Flight mode
5. Customised 1
6. Customised 2
7. Customised 3
Connectivity
1. Bluetooth
2. USB connection
mode
Contacts
1. Add new
2. Search
3. Speed dials
4. Groups
5. Service dial
numbers
6. Own number
7. My business
card
8. Settings
Settings
1. Phone
2. Screen
3. Date & Time
4. Network
5. Internet pro les
6. Access points
7.
Packet data conn.
8. Security
9.
Memory Manager
0 .
Streaming
settings
* Reset settings
5
Page 8
Calls
Making a call
1 Key in the number using the
keypad. To delete a digit press
2 Press to initiate the call.
3 To end the call, press
TIP! To enter + when making an
international call, press and hold 0.
Making a call from your contacts
1 Press and select Contacts, then
choose Search.
2 Using the keypad, enter the name
of the contact you want to call.
3 Select Make call from Options or
press
to initiate the call.
Answering and rejecting a call
When your phone rings, press
Accept or press
call.
To mute your phone while it is
ringing, simply select Silent. This is
useful if you have forgotten to
change your profile to Silent for
a meeting. Press
to reject the incoming call.
TIP! You can change the settings on
your phone to answer your calls in
different ways. Press select Calling.
6
.
to answer the
or select Reject
Choose Common settings and Answer
mode. Choose from Press send key,
Open ip and Press any key.
Using the speakerphone
.
During a call, you can activate
speakerphone by pressing
and you can use the speaker.
Speed dialling
Press and select Contacts, then
choose Speed dials.
You can assign a speed dial number
to a contact you call frequently.
Viewing your call logs
Press and select Calling. Choose
Call logs.
You can check the record of All
calls, Missed calls, Dialed calls
and Received calls only if the
network supports the Calling Line
Identification (CLI) within the service
area.
Changing the call settings
You can set the menu relevant to a
call. Press
• Call durations - View details of how
select Calling.
long you have spent on your calls
from Last call, Dialed calls, Received
calls and All calls.
key
Page 9

• Data volume - View the amount
of all your sent and received data
for web or all data, measured in
kilobytes.
• Call costs - View the charges
applied to your last call or all calls.
This service is network dependent,
some operators are unable to
support this.
• Call divert - Choose to divert your
calls.
• Call barring – Select when you
would like calls to be barred.
• Fixed dial numbers – Choose a
list of numbers that can be called
from your phone. You’ll need your
PIN2 code from your operator. Only
numbers included in the fixed dial
list can be called from your phone.
• Call waiting - Be alerted when you
have a call waiting. (Depends on
your network provider.)
• Common settings
Call reject - You can set whether to
reject incoming calls.
Send my number - Choose
whether your number will be
displayed when you call someone.
(Depends on your network
provider.)
Auto redial - Allows you to set the
auto redial function when a call
attempt has failed.
Answer mode - Allows you to set
the answering method. You can
choose between Press send key,
Open flip and Press any key.
Minute minder - Determines
whether to play a sound every 1
minute when you are on the phone.
BT answer mode - Choose how
to answer a call while using a
Bluetooth device. Select Hands-
free or Handset.
Save new number - Selecting this
option will save numbers that are
not saved in your contacts upon
ending the call.
Contacts
Searching for a contact
1 Press and select Contacts, then
choose Search.
2 Using the keypad enter the first
letter of the contact you want to
call.
3 To scroll through the contacts and
their different numbers use the
navigation arrows.
7
Page 10

Adding a new contact
1 Press and select Contacts, then
choose Add new.
2 Choose whether to store your new
contact on your Handset or USIM
card.
3 Enter all the information you have
in the fields provided and select
Done.
Adding a contact to a group
You can save your contacts into
groups, for example, keeping
your work colleagues and family
separate. There are a number of
groups including Family, Friends,
Colleagues, School and VIP already
set up in the phone.
Adding a picture to a contact
You can change the appearance of
your contacts in your address book
to include a picture.
1 Press
2 Select Contact list settings and
3 Then return to the address book
8
and select Contacts, then
choose Settings.
choose Show picture and select
On.
and select the contact you want to
add a picture to.
4 Choose Options and select Edit.
5 Scroll down to the Image section.
Choose Edit and select No image,
Avatar, Take a picture or Use
existing image. If you select Use
existing image, you can choose
an image that is saved in your
phone memory. If you select Take
a picture, your camera viewfinder
will open, so you can take a picture
of your contact. Take the picture
then press OK.
6 Select Done.
Messaging
Your GB255g includes functions
related to SMS (Short Message
Service), MMS (Multimedia Message
Service) as well as the network’s
service messages.
Sending a message
1 Press , select Messaging, and
choose Create new message in
order to send an SMS or MMS.
2 A message editor will open. The
message editor combines SMS and
MMS into one intuitive and easy to
switch between mode. The default
setting of the message editor is
SMS mode.
Page 11

3 Enter your message using either
the T9 mode or Abc mode.
4 Select Options and choose Insert
to add an Image, Video, Sound,
Symbols, Template, Emoticon,
Name & Number, New slide, Subject,
or More.
5 Choose Send.
6 Choose a contact from the list
of contacts or enter the phone
number from Options.
7 Select Send.
TIP! You can select your message type
as SMS or MMS when you enter a text
longer than 1page in the message field.
If you want to change the type of
message to send, press >
Messaging > Settings > Text Message,
and choose Send long text as.
WARNING: If an Image, Video, Sound,
New slide or Subject is added to the
message editor, it will be automatically
converted to MMS mode and you will
be charged accordingly.
Entering text
You can enter alphanumeric
characters using the phone’s keypad.
The following text input methods are
available in the phone: T9 mode, Abc
mode and 123 mode.
Note: Some elds may allow only
one text input mode (e.g. telephone
number in address book elds).
T9 mode
T9 mode uses a built-in dictionary
to recognise words you’re writing
based on the key sequences you
press. Simply press the number
key associated with the letter you
want to enter, and the dictionary
will recognize the word once all the
letters are entered.
Abc mode
This mode allows you to enter
letters by pressing the key labeled
with the required letter once, twice,
three or four times until the letter is
displayed.
123 mode
Type numbers using one keystroke per
number. You can also add numbers
while remaining in letter modes by
pressing and holding the desired key.
Message folders
Press , select Messaging. The
folder structure used on your GB255g
is fairly self explanatory.
Inbox - All the messages you received
are placed in your Inbox.
9
Page 12

Drafts - If you don’t have time to finish
writing a message, you can save what
you have done so far here.
Outbox - This is a temporary storage
folder while messages are being sent.
Sent items - All the messages you
send are placed into your Sent items.
My folders - You can move messages
from Inbox or Sent items into My
folders. In addition, you can move
those messages from My folders into
the original message box.
Templates - A list of pre written
messages, useful for a quick reply.
Emoticons - You can add, edit and
delete emoticons. You can insert the
emoticon which you prefer when
writing a message.
Settings - Your GB255g message
settings are pre-de ned so that you
can send messages immediately.
If you would like to change the
settings, you can do this using the
Settings options.
Multimedia
Camera
Taking a picture
1 Press and select Multimedia.
10
Choose Camera to open the
viewfinder.
2 Holding the phone and point the
lens towards the subject of you
want to shot.
3 Position the phone so you can see
the subject from viewfinder.
4 Press
to take a picture.
Video camera
Shooting a video
1 Press and select Multimedia.
2 Choose Video camera.
3 Point the video camera towards
the subject of you want to record.
4 Press
5 Rec will appear in the middle of
6 Select Stop to stop recording.
to start recording.
bottom screen and a timer will
show the length of your video.
Music
Your GB255g has a built-in music player
so you can play all your favourite music.
Playing a song
1 Press and select Multimedia.
Choose Music.
2 Choose All tracks then select the
song you want to play. Select Play.
Page 13
3 Select to pause the song.
Select
4
to skip to the next song.
5 Select to skip to the previous
song.
6 Select Back to stop the music and
return to the MP3 player menu.
Creating a playlist
You can create your own playlist by
choosing a selection of songs from
the All tracks folder.
1 Press
and select Multimedia.
Choose Music.
2 Choose Playlists.
3 Press Add to enter the playlist
name and press Save.
4 The All tracks folder will show.
Select all of the songs that you
would like to include in your
playlist by scrolling to them and
selecting
.
5 Select Done to store the playlist.
Note: Music is copyright protected
in international treaties and national
copyright laws. It may be necessary
to obtain permission or licence to
reproduce or copy music. In some
countries national law prohibits private
copying of copyrighted material. Please
check the national legislation of the
applicable country concerning the use
of such materials.
Radio
Your GB255g has an FM radio feature
so you can tune into your favourite
radio stations to listen on the move.
Note: You will need to insert your
headset in order to listen to the radio.
Insert the plug into the headset socket
(this is the same socket that you plug
your charger into).
Listening to the radio
1 Press and select Multimedia,
then choose Radio.
2 Select frequency of the station you
would like to listen to.
TIP! You can listen to the radio via
built-in speaker. Press Options, select
Listen via speaker.
Voice recorder
Use your Voice recorder to record
voice memos or other sounds.
Recording your voice memo
1 Press and select Multimedia,
then choose Voice recorder.
2 Press
3 Choose Stop to end the recording.
4 Press Options and choose Play to
to begin recording.
listen to the voice memo.
11
Page 14

My Stuff
You can save your files to a memory
card. The advantage of using a
memory card is that you can free up
space on your phone’s memory. All
your multimedia files will be saved
in My Stuff. Press
Stuff then choose the folder to open a
list of folders.
My images
My images folder contains a folder
of default images on your phone,
images downloaded by you, and
images taken by your phone’s
camera.
Sounds
My sounds folder contains
the default sounds, your voice
recordings, and sound files
downloaded by you. From here you
can manage, send, or set sounds as
ringtones.
Videos
My videos folder shows the list of
downloaded videos and videos you
have recorded by your phone.
12
and select My
My games & apps
You can keep downloaded games
and applications into this folder.
SVG contents
The SVG contents folder contains all
of your downloaded SVG files.
Others
From the Others menu, you can view
the files that are not saved to the
Images, Sounds or Videos folders.
My memory card
If you’ve inserted a memory card, it
will be displayed the status of the
external microSD card memory.
Games & apps
If you choose to download any
additional games or applications
they will be saved into this folder.
Press
and select Games & apps.
Organizer
Using the calendar
> Organizer > Calendar)
(
When you enter this menu, a
calendar will appear. A square cursor
is located on the current date. You
can move the cursor to another date
using the navigation keys.
Page 15

Adding items to your to do list
> Organizer > To do)
(
You can view, edit and add tasks to
do.
Adding a memo
> Organizer > Memo)
(
You can register your own memos
here.
Secret memo
> Organizer > Secret memo)
(
You can write the private memo to
protect your privacy. You enter the
security code to use this menu.
Date finder
> Organizer > Date finder)
(
Date finder is a handy tool to help
you calculate what the date will be
after a certain amount of days.
Settings
> Organizer > Settings )
(
Calendar - You can set the
configurations to view the calendar.
Send all schedules & To do via
Bluetooth - You can send all the data
in your calendar and/or to do list
from your phone to other phones by
using Bluetooth.
Backup calendar & To do - You
can create the backup files of the
calendar or to do list saved in the
phone when you insert an external
memory.
Restore calendar & To do - You can
reset the backup files of calendar or
tasks when you insert an external
memory.
Memory Info. - You can view the
information of available memory
regarding calendar, to do, memo,
secret memo.
Clear all - You can delete all data
regarding calendar, to do, memo,
secret memo.
Tools
Setting your alarm
> Tools > Alarms)
(
You can set up to 5 alarm clocks.
Using your calculator
> Tools > Calculator)
(
The calculator provides the basic
arithmetic functions: addition,
subtraction, multiplication and
division.
13
Page 16

Using the stopwatch
> Tools > Stopwatch)
(
This option allows you to use the
function of a stopwatch.
Converting a unit
> Tools > Converter)
(
This converts many measurements
into a unit you want.
Adding a city to your world time
> Tools > World time)
(
You can add a required city to the
list of world time. You can also check
the current time of Greenwich Mean
Time (GMT) and major cities around
the world.
Koodo Menu
> Tools > Koodo Menu)
(
This feature depends on SIM and
the network services. In case the
SIM card supports SAT (i.e. SIM
Application Toolkit) services, this
menu will be the operator specific
service name stored on the SIM card.
Wireless Web
Accessing the wireless web
You can launch the wireless web
and access the homepage of the
activated profile on browser settings.
14
You can also manually enter an URL
address and access the associated
wireless web page.
1 Press
2 To access the wireless web directly,
Note: An additional cost will be
collected when connecting to this
service and downloading content.
Check your data charges with your
network provider.
and select Wireless Web.
select Home. Alternately, select
Enter address and type in your
desired URL.
Connectivity
Changing your connectivity
settings (
Your connectivity settings have
already been set up by your network
operator, so you can enjoy your new
phone from switch on. If you want to
change any settings, use this menu.
You can configure the network
setting and data access profiles in
this menu.
• Bluetooth - Setup your GB255g for
> Connectivity )
Bluetooth® use. You can adapt your
visibility to other devices or search
other bluetooth devices.
Page 17

• USB connection Mode - Choose
from PC Internet, Mass storage,
PC suite or Always ask. Choose PC
suite and synchronise your GB255g
using the LG PC Suite software to
copy files from your phone. If you
have a memory card inserted, select
Mass storage to use your phone
in the same way as you would
use a USB stick. Connect to your
computer and drag and drop files
to the GB255g removable device
folder.
Note: To use the USB mass storage
function, you will need to insert an
external memory card in your phone.
Changing your Bluetooth settings
1 Press and select Connectivity,
Choose Bluetooth.
2 Choose Settings. From here you
can amend the settings for:
• My device visibility - Choose
whether Visible, Hidden or Visible
for 1 min to other devices.
• My Device Name - Enter a name for
your LG GB255g.
• Supported Services - You can view
the list of devices such as headsets
and handsfree kits supported by
this Bluetooth enabled phone.
• My address - View your Bluetooth
address.
Pairing with another Bluetooth
device
By pairing your GB255g and another
device, you can set up a passcode for
protected connection. This means
your pairing is more secure.
1 Check your Bluetooth is On and
Visible. You can change your
visibility in the Settings menu, by
selecting My device visibility, then
Visible.
2 From Bluetooth, choose Turn on
and select Search new device.
3 Your GB255g will search for
devices. When the search is
completed Add and Refresh will
appear on screen.
4 Choose the device you want to be
paired with, select Add and enter a
passcode then choose OK.
5 Your phone will then connect to
the other device, on which you
should enter the same passcode.
6 Your passcode protects the
Bluetooth connection is now
ready.
15
Page 18

Profiles
Personalising your profiles
You can personalise each profile
setting.
1 Press
2 Choose the profile you want and
and select Profiles.
select Options and choose Edit.
Settings
Changing the language
> Settings > Phone >
(
Language)
You can change the language for
the display texts on your phone. This
change will also affect the language
input mode.
Power save
> Settings > Phone > Power
(
save)
If you set Auto, you can save the
battery power. Choose to switch the
power save settings Auto, On or Off.
Phone Information ( > Settings
> Phone > Information )
View the technical information for
your GB255g.
Changing your display settings
> Settings > Screen)
(
You can change the settings for
the phone display. Choose from
Screen theme, Menu style, Dialing,
Backlight, Handset theme and
Greeting message.
Changing your date & time
( > Settings > Date & Time)
You can set functions relating to the
date and time.
Changing your security settings
( > Settings > Security)
Change your security settings and
keep your GB255g and the important
information it holds protected.
• PIN code request - Choose a PIN
code to be requested when you
turn your phone on.
• Handset lock - Set the phone lock
to avoid unauthorised use. Choose
from When switching on, If USIM
changed, Immediate or None. You
will need a security code.
• Change codes - Change your PIN
code, PIN2 code or Security code.
16
Page 19

Viewing memory status
( > Settings > Memory Manager)
Your GB255g has three memories
available: the phone, the SIM card
and an external memory card (you
may need to purchase the memory
card separately). You can use the
memory manager to determine how
each memory is used and see how
much space is available.
Resetting your phone
> Settings > Reset settings)
(
Use Reset settings to reset all the
settings to their initial definitions.
You need the security code to
activate this function. The default
code is “0000”.
Changing your connectivity
settings
• Network - Select network and
Network mode settings using
this menu. Also you can add a
preferable network to be connected
to Preferred lists.
• Internet profiles - This menu shows
the Internet pro les. You can create
new pro les, delete or edit them
using the options menu. However,
you cannot delete or edit default
con gurations.
• Access points - This menu shows
the access points list. You can create
new pro les, delete or edit them by
using the options menu. However,
you cannot delete or edit default
con gurations.
• Packet data conn. - If you select
the “When available” , your phone
is automatically registered to a
GPRS network when you switch
the phone on. If you select “When
needed”, the GPRS connection is
established for the duration of a
WAP or application connection.
• Streaming settings - If you want
to set di erent network setting to
play streaming content, you can set
di erent network settings by using
Streaming settings.
17
Page 20

Guidelines for safe and e cient use
Please read these simple guidelines
Not following these guidelines may
be dangerous or illegal.
Exposure to radio frequency
energy
Radio wave exposure and Specific
Absorption Rate (SAR) information
This mobile phone model GB255g
has been designed to comply with
applicable safety requirements for
exposure to radio waves. These
requirements are based on scientific
guidelines that include safety
margins designed to assure the
safety of all persons, regardless of
age and health.
• The radio wave exposure guidelines
employ a unit of measurement
known as the Specific Absorption
Rate, or SAR. Tests for SAR are
conducted using standardised
methods with the phone
transmitting at its highest certified
power level in all used frequency
bands.
• While there may be differences
between the SAR levels of various
LG phone models, they are all
18
designed to meet the relevant
guidelines for exposure to radio
waves.
• The highest SAR value for this
model phone when tested for use at
the ear is 1.19 W/kg (1g) and when
worn on the body as described in
this users manual, is 1.21 W/kg (1g).
• In Canada, the SAR limit for mobile
phones used by the public is 1.6
watts/kg (W/kg) averaged over
one gram of tissue. The standard
incorporates a substantial margin of
safety to give additional protection
for the public and to account for
any variations in measurements.
• Product meets current FCC &
IC Radio Frequency Exposure
Guidelines.
FCC ID BEJGB250G
IC ID: 2703C-GB250
Body on Operation
This device has been tested for
typical body-worn operations with
the distance of 2.0cm from the
user’s body. To comply with FCC RF
exposure requirements, a minimum
separation distance of 2.0cm must
Page 21

Guidelines for safe and e cient use (Continued)
be maintained from the user’s body.
Additionally, belt clips, holsters &
other body-worn accessories may
not contain metallic components.
Caution & Notice
Operation is subject to the following
two conditions:
(1) this device may not cause
interference, and
(2) this device must accept
any interference, including
interference that may cause
undesired operation of the
device.
Product care and maintenance
WARNING
Only use batteries, chargers and
accessories approved for use with this
particular phone model. The use of
any other types may invalidate any
approval or warranty applying to the
phone, and may be dangerous.
• Do not disassemble this unit. Take
it to a qualified service technician
when repair work is required.
• Keep away from electrical
appliances such as TVs, radios, and
personal computers.
• The unit should be kept away from
heat sources such as radiators or
cookers.
• Do not drop.
• Do not subject this unit to
mechanical vibration or shock.
• Switch off the phone in any area
where you are required by special
regulations. For example, do not
use your phone in hospitals as
it may affect sensitive medical
equipment.
• Do not handle the phone with wet
hands while it is being charged. It
may cause an electric shock and can
seriously damage your phone.
• Do not to charge a handset near
flammable material as the handset
can become hot and create a fire
hazard.
• Use a dry cloth to clean the exterior
of the unit (do not use solvents such
as benzene, thinner or alcohol).
• Do not charge the phone when it is
on soft furnishings.
19
Page 22

Guidelines for safe and e cient use (Continued) Gui
• The phone should be charged in a
well ventilated area.
• Do not subject this unit to excessive
smoke or dust.
• Do not keep the phone next to
credit cards or transport tickets; it
can affect the information on the
magnetic strips.
• Do not tap the screen with a sharp
object as it may damage the phone.
• Do not expose the phone to liquid
or moisture.
• Use the accessories like earphones
cautiously. Do not touch the
antenna unnecessarily.
Efficient phone operation
Electronics devices
All mobile phones may get
interference, which could affect
performance.
• Do not use your mobile phone
near medical equipment without
requesting permission. Avoid
placing the phone over pacemakers,
for example, in your breast pocket.
• Some hearing aids might be
disturbed by mobile phones.
20
• Minor interference may affect TVs,
radios, PCs, etc.
Road safety
Check the laws and regulations on
the use of mobile phones in the area
when you drive.
• Do not use a hand-held phone
while driving.
• Give full attention to driving.
• Use a hands-free kit, if available.
• Pull off the road and park before
making or answering a call if driving
conditions so require.
• RF energy may affect some
electronic systems in your vehicle
such as car stereos and safety
equipment.
• When your vehicle is equipped
with an air bag, do not obstruct
with installed or portable wireless
equipment. It can cause the air bag
to fail or cause serious injury due to
improper performance.
Page 23

Guidelines for safe and e cient use (Continued)
• If you are listening to music whilst
out and about, please ensure that
the volume is at a reasonable
level so that you are aware of your
surroundings. This is particularly
imperative when near roads.
Avoid damage to your hearing
Damage to your hearing can occur
if you are exposed to loud sound for
long periods of time. We therefore
recommend that you do not turn on
or off the handset close to your ear.
We also recommend that music and
call volumes are set to a reasonable
level.
Blasting area
Do not use the phone where blasting
is in progress. Observe restrictions,
and follow any regulations or rules.
Potentially explosive
atmospheres
• Do not use the phone at a refueling
point.
• Do not use near fuel or chemicals.
• Do not transport or store flammable
gas, liquid, or explosives in the
same compartment of your
vehicle as your mobile phone and
accessories.
In aircraft
Wireless devices can cause
interference in aircraft.
• Turn your mobile phone off before
boarding any aircraft.
• Do not use it on the ground without
permission from the crew.
Children
Keep the phone in a safe place out
of the reach of small children. It
includes small parts which may cause
a choking hazard if detached.
Emergency calls
Emergency calls may not be
available under all mobile networks.
Therefore, you should never depend
solely on the phone for emergency
calls. Check with your local service
provider.
21
Page 24

Guidelines for safe and e cient use (Continued)
1
L
2
3
4
5
6
2
2
3
4
5
6
7
Battery information and care
• You do not need to completely
discharge the battery before
recharging. Unlike other battery
systems, there is no memory effect
that could compromise the battery’s
performance.
• Use only LG batteries and chargers.
LG chargers are designed to
maximize the battery life.
• Do not disassemble or short-circuit
the battery pack.
• Keep the metal contacts of the
battery pack clean.
• Replace the battery when it
no longer provides acceptable
performance. The battery pack
maybe recharged hundreds of
times until it needs replacing.
• Recharge the battery if it has
not been used for a long time to
maximize usability.
• Do not expose the battery charger
to direct sunlight or use it in high
humidity, such as in the bathroom.
• Do not leave the battery in hot or
cold places, this may deteriorate the
battery performance.
22
• There is risk of explosion if the
battery is replaced by an incorrect
type.
• Dispose of used batteries according
to the manufacturer’s instructions.
Please recycle when possible. Do
not dispose as household waste.
• If you need to replace the battery,
take it to the nearest authorized LG
Electronics service point or dealer
for assistance.
• Always unplug the charger from the
wall socket after the phone is fully
charged to save unnecessary power
consumption of the charger.
• Actual battery life will depend on
network configuration, product
settings, usage patterns, battery
and environmental conditions.
Technical data
Ambient Temperatures
Max.: +55°C (discharging)
+45°C (charging)
Min.: -10°C
Page 25

LIMITED WARRANTY STATEMENT
1. WHAT THIS WARRANTY COVERS:
LG offers you a limited warranty that the enclosed subscriber unit and its enclosed accessories will be
free from defects in material and workmanship, according to the following terms and conditions:
1. The limited warranty for the product extends for ONE (1) year beginning on the date of purchase of the
product by the original end user.
2. The limited warranty extends only to the original end user of the product and is not assignable or
transferable to any subsequent purchaser/end user.
3. This warranty is good only to the original end user of the product during the warranty period as long
as it is in Canada.
4. Upon request from LG, the consumer must provide information to reasonably prove the date of
purchase.
5. During the applicable warranty period, LG will repair or replace at LG’s sole option, without charge to
the original end user, any defective component part of the phone or accessory.
6. LG may use rebuilt, reconditioned or new parts or components when repairing any product or replace a
product with a rebuilt, reconditioned or new product.
2. WHAT THIS WARRANTY DOES NOT COVER:
1. Defects or damages resulting from use of the product in other than its normal and customary manner.
2. Defects or damages from abnormal use, abnormal conditions, improper storage, exposure to moisture or
dampness, unauthorized modifications, unauthorized connections, unauthorized repair, misuse, neglect,
abuse, accident, alteration, improper installation or other acts which are not the fault of LG, including
damage caused by spills of food or liquids.
3. Breakage or damage to antennas unless caused directly by defects in material or workmanship.
4. The fact that the Customer Service Department at LG was not notified by the original end user of the
alleged defect or malfunction of the product, during the warranty period.
5. Products which have had their serial numbers removed or made illegible.
6. Damage resulting from use of non-LG approved accessories.
7. All plastic surfaces and all other externally exposed parts that are scratched or damaged due to normal
customer use.
Page 26

8. Products serviced by non-authorized persons or companies.
Notes:
1. This limited warranty supersedes all other warranties, expressed or implied either in fact or by opera-
tions of law, statutory or otherwise, including, but not limited to any implied warranty of merchantability or fitness for a particular purpose.
2. Shipping damage is the sole responsibility of the shipping company.
3. EXCLUSION OF LIABILITY:
No other express warranty is applicable to this product.
THE DURATION OF ANY IMPLIED WARRANTIES, INCLUDING THE IMPLIED WARRANTY OF MARKETABIL-
ITY, IS LIMITED TO THE DURATION OF THE EXPRESS WARRANTY HEREIN. LG ELECTRONICS CANADA,
INC. SHALL NOT BE LIABLE FOR THE LOSS OF THE USE OF THE PRODUCT, INCONVENIENCE, LOSS OR
ANY OTHER DAMAGES, DIRECT OR CONSEQUENTIAL, ARISING OUT OF THE USE OF, OR INABILITY TO
USE, THIS PRODUCT OR FOR ANY BREACH OF ANY EXPRESS OR IMPLIED WARRANTY, INCLUDING THE
IMPLIED WARRANTY OF MARKETABILITY APPLICABLE TO THIS PRODUCT.
4. HOW TO GET WARRANTY SERVICE:
To obtain warranty service, please call the following telephone number from anywhere in Canada:
LG Electronics Canada, Inc.
Tel. 1-888-LG-Canada (1-888-542-2623)
http://www.lg.com/ca_en (see links to “Support > Mobile Phone Support”)
Electronics Canada Inc.
Mississauga, Ontario
Page 27

-
GB255g Guide de l’utilisateur
Ce guide vise à vous présenter votre nouveau téléphone portable. Vous y trouverez les descriptions des diverses fonctionnalités de votre appareil.
Il est possible que certains éléments de ce guide soient différents de ceux de
votre téléphone, selon le logiciel de votre téléphone ou votre fournisseur de
services.
Français
1
Page 28

Connaître votre téléphone
Écouteur
Écran principal
Touches programmables
Chacune de ces touches
permet d’exécuter les
fonctions indiquées à
l’écran.
Menu multitâche
Touche d’appel
Permet de composer un
numéro et de répondre
aux appels entrants.
2
Touches de navigation
Permettent d’accéder
rapidement aux fonctions de
l’appareil.
Touche OK
Permet de sélectionner
des options de menu et de
confirmer des opérations.
Touche appareil photo
Touche de fin d’appel et de
mise en marche
Permet de terminer ou de
rejeter un appel.
Permet de mettre le téléphone
sous tension ou hors tension.
Permet de revenir à l’écran de
veille à partir du menu.
Touche Effacer
Permet de supprimer un
caractère chaque fois qu’on
appuie sur la touche. Utilisez
cette touche pour retourner à
l’écran précédent.
Page 29

Casque d’écoute /
Chargeur /
Connecteur USB
Touche de volume
• Lorsque l’écran est
inactif : contrôle le
volume de la sonnerie.
• Pendant un appel : règle
le volume de l’écouteur.
• Pendant la lecture d’une
piste BGM : règle le
volume de la musique.
Logement de carte
mémoire/microSD
Installation d’une carte mémoire
Soulevez le couvercle du logement de
carte mémoire et insérez-y une carte
microSD. Assurez-vous que les contacts
or de la carte sont tournés vers le bas.
Refermez le couvercle du logement de
carte mémoire en le glissant jusqu’à ce
que vous entendiez un clic.
Pour retirer la carte mémoire,
enfoncez-la délicatement puis relâchez
aussitôt la pression pour l’éjecter, tel
qu’illustré ci-dessous.
Remarque : La carte mémoire est un
accessoire en option.
Formatage de la carte mémoire
Appuyez sur et sélectionnez
Paramètres. Choisissez Gestionnaire
de mémoire, sélectionnez Mémoire
externe et appuyez sur Format.
AVERTISSEMENT : Lorsque vous formatez
la carte mémoire, tout son contenu
est supprimé. Si vous ne voulez pas
perdre les données stockées sur la carte
mémoire, e ectuez d’abord une copie de
sauvegarde.
3
Page 30

Installation de la carte SIM et chargement de la pile
Installation de la carte SIM
Lorsque vous vous abonnez à un réseau cellulaire, vous recevez une carte SIM contenant
les détails relatifs à votre abonnement, comme votre code PIN, les services facultatifs
disponibles et bien d’autres.
Important! › La carte SIM et ses contacts peuvent être facilement endommagés s’ils
Illustrations
1 Retirer le couvercle du compartiment de la pile
2 Retirer la pile
3 Insérer la carte SIM
4 Installer la pile
5 Remettre le couvercle en place
6 Charger la pile
3564
AVERTISSEMENT : Ne retirez pas la pile pendant que le téléphone est en marche car
vous risquez d’endommager le téléphone.
sont égratignés ou pliés. Faites attention lorsque vous manipulez, insérez
ou retirez la carte. Conservez la carte SIM hors de portée des jeunes
enfants.
12
4
Page 31

Navigation dans les menus
Jeux et apps
1. Mes
applications
2. Paramètres
Messages
1. Nouveau
message
2. Boîte réception
3. Brouillons
4. Boîte d’envoi
5. Envoyés
6. Mes dossiers
7. Modèles
8. Émoticônes
9. Paramètres
Outils
1. Raccourcis
2. Alarmes
3. Calculette
4. Chronom.
5. Convertisseur
6. Fuseaux horaires
7. Koodo Menu
Appel
1. Journal appels
2. Durée d’appel
3. Volume données
4. Coûts d’appel
5. Transfert d’appel
6. Interdictions
d’appel
7. FDN
8. Appel en attente
9. Paramètres
communs
Mes a aires
1. Mes images
2. Mes sons
3. Mes vidéos
4. Mes jeux et
applications
5. SVG contenu
6. Autres
7. Ma carte
mémoire
* Cette option n’est
disponible que lorsque
une mémoire externe
inséré.
Wireless Web
1. Domicile
2. Entrez Adresse
3. Favoris
4. Lecteur RSS
5. Pages
enregistrées
6. Historique
7. Paramètres
Agenda
1. Calendrier
2. Tâches à faire
3. Mémo
4. Mémo secret
5. Chercheur de
dates
6. Paramètres
Pro ls
1. Normal
2. Muet
3. Extérieur
4. Mode vol
5. Personnalisé 1
6. Personnalisé 2
7. Personnalisé 3
Connectivité
1. Bluetooth
2. Mode
connexion USB
Multimédia
1. Appareil photo
2. Caméra vidéo
3. Msq.
4. Radio
5. Enregistreur
Vocal
Contacts
1. Nouveau
2. Recher.
3. Numéros
abrégés
4. Groupes
5.
Numéros d’appels
de services
6. Mes numéros
7.
Ma carte d’a aires
8. Paramètres
Paramètres
1. Téléph
2. Écran
3. Date et heure
4. Réseau
5. Pro ls Internet
6. Points d’accès
7.
Connexion par paquet
8. Sécurité
9.
Gest. de mémoire
0.
Paramètres de
di usion en continu
*.
Rétablir param. défaut
5
Page 32

Appels
Établissement d’un appel
1 Entrez le numéro de téléphone au
clavier. Pour supprimer un chiffre,
appuyez sur
2
Appuyez sur pour établir
l’appel.
Pour mettre fin à l’appel, appuyez
3
sur
CONSEIL! Pour entrer le caractère
+ associé à un appel international,
maintenez enfoncée la touche 0.
Établissement d’un appel à partir
du répertoire
1 Appuyez sur et sélectionnez
Contacts, puis Recher.
Utilisez le clavier pour entrer la
2
première lettre du contact que vous
souhaitez joindre.
Sélectionnez Appeler dans les
3
options ou appuyez sur
établir l’appel.
Réponse à un appel et rejet d’un
appel
Quand votre téléphone sonne,
appuyez sur Accepter ou sur
répondre à l’appel.
Pour arrêter la sonnerie lorsque vous
recevez un appel, sélectionnez
6
.
.
pour
pour
simplement Muet. Cette fonction est
très utile si par exemple vous avez
oublié de régler votre profil à Muet
pour une réunion.
Appuyez sur
ou sélectionnez
Rejeter pour rejeter l’appel entrant.
CONSEIL! Vous pouvez modifier les
paramètres de votre téléphone pour
répondre à vos appels de plusieurs
façons. Appuyez sur
Appel. Sélectionnez Paramètres
communs, puis Mode Réponse. Vous
pouvez sélectionner le mode Touche
décrocher, Ouvrir rabat ou Appuyer sur
une touche.
et sélectionnez
Utilisation du haut-parleur
Vous pouvez activer le haut-parleur
pendant un appel en appuyant sur la
. Cette fonction permet
touche
d’utiliser l’appareil en mode mains
libres.
Composition abrégée
Appuyez sur et sélectionnez
Contacts, puis Numéros abrégés.
Vous pouvez attribuer un numéro de
composition abrégée à un contact
avec lequel vous communiquez
fréquemment.
Page 33

Affichage du registre des appels
Appuyez sur et sélectionnez Appel.
Sélectionnez Journal appels.
Choisissez Tous appels, Appels
manqués, Numéros composés ou
Appels reçus.
Vous ne pouvez vérifier le registre des
appels en absence, des appels reçus et
des appels émis que si le réseau prend
en charge la fonction d’identification
de la ligne appelante pour votre zone
de service.
Modification des réglages d’appel
Vous pouvez définir le menu associé
à un appel. Appuyez sur
sélectionnez Appel.
• Durée d’appel - Permet d’afficher la
durée des appels reçus et émis.
• Volume données - Faites afficher le
volume en kilo-octets de toutes les
données reçues ou envoyées pour le
Web, les données ou tout.
• Coûts d’appel - Faites afficher les frais
imposés pour votre dernier appel ou
tous appels. Ce service est tributaire
du réseau. Certains distributeurs sont
incapables de le prendre en charge.
• Transfert d’appel - Choisissez de
renvoyer vos appels ou pas.
et
• Interdictions d’appel - Permet de
sélectionner les périodes pendant
lesquelles vous souhaitez bloquer des
appels.
• FDN - Permet de choisir une liste des
numéros qui peuvent être composés
à partir de votre téléphone. Vous
devrez obtenir votre code PUK2
auprès de l’opérateur. Seuls les
numéros qui figurent dans la liste
des numéros FDN pourront être
composés à partir de votre appareil.
• Appel en attente - Permet de recevoir
une alerte lorsque vous avez un appel
en attente. (Cette fonction dépend de
votre fournisseur de services réseau.)
• Paramètres communs
Rejet d’appel - Permet de rejeter des
appels entrants.
Envoyer Mon numéro - Permet
d’indiquer si votre numéro doit
être affiché lorsque vous appelez
quelqu’un. (Cette fonction dépend de
votre fournisseur de services réseau.)
Rappel auto - Permet de définir la
fonction de rappel automatique
quand un premier appel ne reçoit pas
de réponse.
7
Page 34

Mode Réponse - Permet de définir la
méthode de réponse. Vous pouvez
sélectionner le mode Touche
décrocher, Ouvrir rabat ou Appuyer
sur une touche.
Bip minute - Permet de diffuser une
tonalité chaque minute durant un
appel.
Rép appel Bluetooth - Permet de définir
la façon de répondre à un appel lors
de l’utilisation d’un casque d’écoute
Bluetooth. Vous pouvez sélectionner le
mode Mains libres ou Combiné.
Enregistrer nouveau numéro
- Permet de sauvegarder les numéros
qui ne figurent pas déjà dans votre
liste des contacts à la fin d’un appel.
Contacts
Recherche d’un contact
1 Appuyez sur et sélectionnez
Contacts, puis Recher.
Utilisez le clavier pour entrer la
2
première lettre du contact que vous
souhaitez appeler.
Utilisez les flèches de navigation
3
pour parcourir les divers contacts et
leurs numéros.
8
Ajout d’un contact
1 Appuyez sur et sélectionnez
Contacts, puis Nouveau.
2 Sélectionnez l’emplacement de
sauvegarde des données sur le
nouveau contact (Combiné ou
carte USIM).
3 Entrez toutes les informations
pertinentes dans les champs à cet
effet, puis sélectionnez Terminé.
Ajout d’un contact à un groupe
Vous pouvez associer vos contacts à
des groupes distincts et séparer par
exemple vos collègues et les membres
de votre famille. Votre téléphone
comprend déjà divers groupes,
notamment Famile, Amis, Collègues,
École et VIP.
Ajout d’une photo à un contact
Vous pouvez modifier l’apparence
des contacts de votre répertoire en
ajoutant des photos.
1 Appuyez sur
Contacts, puis Paramètres.
2 Choisissez Paramètres liste contacts
et sélectionnez Afficher photo, puis
Activer.
3 Retournez ensuite au répertoire et
sélectionnez le contact auquel vous
souhaitez associer la photo.
et sélectionnez
Page 35

4 Choisissez Options et sélectionnez
Modifier.
5 Naviguez vers le bas jusqu’à la
section Image. Choisissez Modifier
et sélectionnez l’option Aucune
image, Prendre une photo ou
Utiliser une image existante. Si vous
sélectionnez Utiliser une image
existante, vous pouvez choisir
une image sauvegardée dans la
mémoire de votre téléphone. Si vous
sélectionnez Prendre une photo, le
viseur de l’appareil photo s’ouvrira
pour que vous puissiez prendre une
photo du contact. Prenez la photo
puis appuyez sur OK.
6 Sélectionnez Terminé.
Messages
Votre appareil GB255g comporte des
fonctions liées au SMS (service de
messages courts), au MMS (service
de messages multimédias) et aux
messages de service du réseau.
Envoi d’un message
1 Appuyez sur , sélectionnez
Messages, puis Nouveau message
pour envoyer un SMS ou un MMS.
Un éditeur de nouveau message
2
s’ouvre. L’éditeur de message
combine les modes SMS et MMS
dans un mode intuitif permettant
de passer facilement d’un mode
à l’autre. Par défaut, l’éditeur de
message s’ouvre en mode SMS.
Tapez votre message au moyen du
3
mode T9 ou du mode Abc.
4 Sélectionnez Options et choisissez
Insérer afin de sélectionner une des
options d’ajout suivantes : Image,
Vidéo, Son, Symboles, Modèle,
Binette, Nom et numéro, Nouvelle
diapo, Objet ou Autres.
5 Sélectionnez Envoyer.
6 Choisissez un contact dans le
répertoire ou entrez un numéro de
téléphone à partir du menu Option.
7 Sélectionnez Envoyer.
CONSEIL! Vous pouvez sélectionner le
type de message (SMS ou MMS) lorsque
vous entrez un texte de plus d’une page
dans le champ de message. Pour modifier
le type de message à envoyer,
sélectionnez
Paramètres > SMS, puis choisissez
l’option Envoyer txt long par.
AVERTISSEMENT : Si vous ajoutez un
élément Image, Vidéo, Son, Nouvelle
diapo ou Objet dans l’éditeur de
message, le message sera
automatiquement converti en MMS et
vous sera facturé en conséquence.
> Messages >
9
Page 36

Saisie de texte
Vous pouvez entrer des caractères
alphanumériques à l’aide du clavier
du téléphone. Les modes de saisie de
texte suivants sont disponibles sur le
téléphone : mode T9, mode Abc et
mode 123.
Remarque : Certains champs n’acceptent
qu’un seul mode de saisie de texte
(notamment les champs de numéro de
téléphone du répertoire).
Mode T9
Le mode T9 se base sur un dictionnaire
intégré pour reconnaître les mots que
vous entrez en fonction des séquences
de touches activées. Appuyez
simplement sur la touche de numéro
associée à la lettre que vous souhaitez
entrer; le dictionnaire reconnaît le mot
une fois toutes les lettres entrées.
Mode Abc
Ce mode permet d’entrer des lettres
en appuyant une, deux, trois ou quatre
fois sur la touche correspondant à la
lettre voulue, jusqu’à ce que celle-ci
soit affichée.
Mode 123
Ce mode permet d’entrer des nombres
à raison d’une frappe par chiffre.
Vous pouvez également ajouter des
10
nombres en demeurant en mode
lettres en appuyant et en maintenant
enfoncée la touche visée.
Dossiers de messages
Appuyez sur et sélectionnez
Messages. La structure des dossiers de
votre GB255g est très explicite.
Boîte réception
que vous recevez sont stockés dans
votre Boîte réception.
Brouillons - Si vous n’avez pas fini de
rédiger votre message, vous pouvez le
sauvegarder afin de le finaliser plus tard.
Boîte d’envoi - Ce dossier sert à stocker
temporairement les messages en cours
d’envoi.
Envoyés - Une copie de chaque message
que vous transmettez est sauvegardée
dans votre dossier Envoyés.
Mes dossiers - Vous pouvez déplacer
des messages des dossiers Boîte
réception et Envoyés dans votre
dossier Mes dossiers. Vous pouvez
également renvoyer les messages
déplacés dans leur dossier d’origine.
Modèles - Vous accéderez à une
liste de modèles de messages que
vous pouvez utiliser pour formuler
rapidement une réponse.
- Tous les messages
Page 37

Émoticônes - Vous pouvez ajouter,
modifier ou supprimer des émoticônes.
Vous pouvez également insérer
l’émoticône visée dans un message
que vous rédigez.
Paramètres - Les paramètres de
message du GB255g sont prédé nis de
manière à vous permettre d’envoyer
immédiatement des messages.
Si vous souhaitez modi er ces réglages,
vous pouvez le faire à l’aide des options
du sous-menu Paramètres.
Multimédia
Appareil photo
Prise de photos
1 Appuyez sur et sélectionnez
Multimédia.
photo pour ouvrir le viseur.
2 Tenez le téléphone et pointez
l’objectif vers le sujet de la photo.
3 Placez le téléphone de manière à
bien voir le sujet.
4 Appuyez
Sélectionnez Appareil
pour prendre la photo.
Caméra vidéo
Enregistrement d’une séquence
vidéo
1 Appuyez sur et sélectionnez
Multimédia.
2 Sélectionnez
3 Pointez l’objectif sur le sujet de la
vidéo.
4 Appuyez sur
l’enregistrement.
5 Les lettres Rec (enregistrement)
s’affichent dans le milieu du viseur
et une minuterie indique la durée de
votre vidéo.
6 Sélectionnez
l’enregistrement.
Caméra vidéo.
pour démarrer
Fin pour interrompre
Musique
Votre téléphone GB255g est doté
d’un lecteur MP3 intégré pour vous
permettre d’écouter votre musique
favorite.
Lecture d’une chanson
1 Appuyez sur et sélectionnez
Multimédia. Sélectionnez Msq.
Choisissez Toutes les pistes puis
2
sélectionnez la chanson que vous
voulez entendre. Sélectionnez Lire.
Sélectionnez pour mettre la
3
chanson en pause.
11
Page 38

4 Sélectionnez
pour passer à la
chanson suivante.
Sélectionnez pour passer à la
5
chanson précédente.
6
Sélectionnez Préc pour arrêter
la lecture et revenir au menu du
musique.
Création d’une liste d’écoute
Vous pouvez créer vos propres
listes d’écoute en sélectionnant des
chansons dans le dossier
pistes
.
1 Appuyez sur
Toutes les
et sélectionnez
Multimédia. Sélectionnez Msq.
2 Choisissez Listes d’écoute.
3 Appuyez sur Ajouter, entrez le nom
de la liste d’écoute et appuyez sur
Sauvegarder.
4 Le dossier
Toutes les pistes s’affiche
à l’écran. Naviguez jusqu’à chacune
des chansons que vous voulez
inclure dans la liste d’écoute et
sélectionnez
5 Sélectionnez
.
Terminé pour
enregistrer la liste d’écoute.
Remarque : Les chiers de musique
peuvent être protégés par les lois sur
le droit d’auteur et sur la propriété
intellectuelle. Avant de télécharger ou de
copier des chiers, assurez-vous que vous
respectez les lois en vigueur relativement
12
aux conditions d’utilisation du matériel.
Radio
Votre GB255g est doté d’une radio FM
qui vous permet d’écouter vos chaînes
radio préférées où que vous soyez.
Remarque : Vous devez brancher votre
casque d’écoute pour écouter la radio.
Insérez la che dans la prise de casque
d’écoute (même prise que celle dans
laquelle vous branchez le chargeur).
Écoute de la radio
1 Appuyez sur et sélectionnez
Multimédia, puis Radio.
Sélectionnez le numéro du poste
2
que vous souhaitez écouter.
CONSEIL! Vous pouvez écouter la radio
avec le haut-parleur intégré. Appuyez sur
Options et sélectionnez Écouter via hautparleur.
Enregistreur Vocal
Vous pouvez utiliser l’enregistreur
vocal pour enregistrer des mémos
vocaux ou tout autre son.
Enregistrement d’un mémo vocal
1 Appuyez sur et sélectionnez
Multimédia, puis choisissez
Enregistreur Vocal.
Appuyez sur pour démarrer
2
Page 39

l’enregistrement.
Sélectionnez Fin pour mettre fin à
3
l’enregistrement.
Appuyez sur Options et sélectionnez
4
Lire pour écouter le mémo vocal.
Mes affaires
Vous pouvez enregistrer vos fichiers
sur une carte mémoire. Le stockage des
fichiers sur une carte mémoire offre
l’avantage de libérer de l’espace dans
la mémoire du téléphone. Tous vos
fichiers multimédias seront enregistrés
dans le dossier Mes affaires. Appuyez
, sélectionnez Mes affaires puis
sur
choisissez le dossier visé pour accéder
aux fichiers qu’il contient.
Mes images
Le dossier Mes images contient les
images par défaut de votre appareil,
les images que vous téléchargez et les
photos prises au moyen de l’appareil
photo du téléphone.
Mes sons
Le dossier Mes sons comprend les
sons par défaut, vos enregistrements
vocaux et les fichiers audio que vous
téléchargez. Vous pouvez utiliser ce
dossier pour gérer, envoyer ou définir
des sons à titre de sonnerie.
Mes vidéos
Le dossier Mes vidéos comprend la
liste des vidéos téléchargées et des
vidéos enregistrées par l’entremise de
votre téléphone.
Mes jeux et applications
Vous pouvez conserver les jeux et les
applications téléchargées dans ce
dossier.
SVG contenu
Le dossier SVG contenu comprend tous
vos SVG chiers par téléchargés.
Autres
Le dossier Autres vous permet
d’accéder aux chiers qui ne sont
pas enregistrés dans les dossiers Mes
images, Mes sons ou Mes vidéos.
Ma carte mémoire
Si vous avez inséré une carte mémoire,
ce dossier affichera l’état de la carte
mémoire externe microSD.
Jeux et applications
Si vous décidez de télécharger des jeux
ou des applications supplémentaires,
ces éléments seront sauvegardés
dans ce dossier. Appuyez sur
sélectionnez Jeux et apps.
et
13
Page 40

Agenda
Utilisation du calendrier
> Agenda > Calendrier)
(
Lorsque vous ouvrez ce menu, un
calendrier s’affiche. La date courante
est indiquée par un curseur carré.
Vous pouvez déplacer ce curseur au
moyen des touches de navigation pour
sélectionner une autre date.
Ajout d’une tâche à votre liste
Tâches à faire
> Agenda > Tâches à faire)
(
Vous pouvez visualiser, modifier et
ajouter des tâches à faire.
Ajout d’un mémo
> Agenda > Mémo)
(
Ce dossier vous permet d’enregistrer
vos mémos.
Mémo secret
> Agenda > Mémo secret)
(
Vous pouvez rédiger des mémos
privés pour protéger vos données
confidentielles. Vous devez entrer un
code de sécurité pour utiliser ce menu.
14
Chercheur de dates
> Agenda > Chercheur de
(
dates)
Le chercheur de dates est un outil
pratique qui vous aide à calculer la date
associée à un nombre donné de jours.
Paramètres
> Agenda > Paramètres )
(
Calendrier : permet de configurer
l’affichage du calendrier.
Envoyer tous les agendas et tâches
par Bluetooth : permet d’envoyer
toutes les données de votre calendrier
et/ou de votre liste des tâches
depuis votre téléphone vers d’autres
téléphones à l’aide de Bluetooth.
Sauvegarde Calendrier et Tâches
: permet de créer des fichiers de
sauvegarde des entrées du calendrier
ou des entrées de tâches enregistrées
dans le téléphone en insérant une
mémoire externe.
Restaurer Calendrier et Tâches :
permet de réinitialiser les fichiers de
sauvegarde du calendrier ou des tâches
en insérant une mémoire externe.
Info. mémoire : permet d’afficher les
informations concernant la mémoire
disponible de calendrier, tâches, mémo
et mémo secret.
Page 41

Supprimer Tout : permet de supprimer
toutes les données relatives au
calendrier, tâches, mémo et mémo
secret.
Outils
Réglage de l’alarme
> Outils > Alarmes)
(
Vous pouvez régler jusqu’à 5 alarmes
qui se déclenchent aux heures définies.
Utilisation de la calculette
> Outils > Calculette)
(
Cette calculatrice assure les fonctions
arithmétiques de base, c’est-à
dire l’addition, la soustraction, la
multiplication et la division.
Utilisation du chronomètre
> Outils > Chronom.)
(
Cette option vous permet d’utiliser
votre téléphone comme chronomètre.
Convertisseur
> Outils > Convertisseur)
(
Cette fonction permet de convertir les
mesures en unités de votre choix.
Ajout d’une ville aux fuseaux
horaires
> Outils > Fuseaux horaires)
(
Vous pouvez ajouter une ville à votre
liste de fuseaux horaires. Vous pouvez
également vérifier l’heure du méridien
de Greenwich (H.M.G. ou GMT) ainsi
que l’heure des grandes villes du
monde.
Koodo Menu
> Outils > Koodo Menu)
(
Cette fonction dépend de votre carte
SIM et de vos services réseau. Si votre
carte SIM prend les services SAT
(trousse d’applications SIM) en charge,
ce menu affichera le nom de service
propre à l’opérateur qui figure sur la
carte SIM.
Wireless Web
Accéder au Web sans fil
Vous pouvez lancer le Web sans fil et
accéder à la page d’accueil du profil
activé dans les paramètres de ce
navigateur. Vous pouvez également
entrer une adresse URL manuellement
pour accéder à la page Web sans fil
associée.
Appuyez sur et sélectionnez
1
Wireless Web.
Pour accéder directement à la page
2
d’accueil du navigateur, sélectionnez
Domicile. Pour accéder à une autre
page, sélectionnez Entrez Adresse et
tapez l’adresse URL visée.
15
Page 42

Remarque : La connexion à ce service et
le téléchargement de contenu entraînent
des frais supplémentaires. Véri ez vos
frais de transmission de données auprès
de votre fournisseur de services réseau.
Connectivité
Modification des paramètres de
connectivité
(
> Connectivité)
Vos paramètres de connectivité ont
déjà été configurés par l’exploitant de
réseau pour vous permettre d’utiliser
immédiatement votre nouveau
téléphone. Vous pouvez utiliser ce
menu pour modifier ces paramètres.
Vous pouvez configurer les paramètres
réseau et les profils d’accès aux
données.
• Bluetooth - Vous pouvez configurer
votre GB255g pour les liaisons
Bluetooth®. Vous pouvez régler votre
visibilité pour les autres périphériques
ou rechercher les périphériques qui
sont associés ou couplés à votre
téléphone.
• Mode connexion USB - Choisissez
PC Internet, Mémoire, PC Suite ou
Toujours demander. Pour copier
des fichiers de votre téléphone,
choisissez PC Suite et synchronisez
16
votre GB255g à l’aide du logiciel
LG Suite. Si une carte mémoire
est insérée dans le téléphone,
sélectionnez Mémoire pour utiliser
votre téléphone comme s’il s’agissait
d’une clé USB. Établissez la connexion
avec votre ordinateur et faites
glisser les fichiers dans le dossier de
périphérique amovible du GB255g.
Remarque : Vous devez insérer une carte
mémoire externe dans votre téléphone
pour pouvoir utiliser la fonction de
stockage de masse USB.
Modification des paramètres
Bluetooth
1 Appuyez sur et sélectionnez
Connectivité, puis Bluetooth.
2 Choisissez Paramètres. À partir de
là, vous pouvez modifier les réglages
d’appel suivants :
• Visibilité de mes dispositifs - Ce
réglage définit la visibilité de votre
appareil aux autres dispositifs.
Vous pouvez sélectionner l’option
Visible, Masqué ou Visible pendant
1 minute.
• Nom dispositif - Ce réglage vous
permet d’attribuer un nom à votre
téléphone LG GB255g.
• Services compatibles - Vous pouvez
accéder à la liste des dispositifs
Page 43

compatibles avec votre appareil,
notamment les casques d’écoute et
les trousses mains libres Bluetooth.
• Mon adresse - Ce réglage permet
d’afficher votre adresse Bluetooth.
5 Votre téléphone se connectera à
6 Votre connexion Bluetooth protégée
Couplage à un autre périphérique
Bluetooth
En couplant votre GB255g, c’est-à-dire en
l’associant à un autre périphérique, vous
pouvez établir une connexion protégée
par mot de passe. Ce type de connexion
procure un couplage plus sécuritaire.
1 Vérifiez si la liaison Bluetooth est
Activer et si votre périphérique est
Visible. Vous pouvez modifier votre
visibilité dans le menu Paramètres
en sélectionnant Visibilité de mes
dispositifs, puis Visible.
2 À partir du menu Bluetooth,
choisissez Activer, puis Rechercher
nouveau dispositif.
3 Votre GB255g recherche des
périphériques. Une fois la recherche
terminée, les options Ajouter et
Actualiser s’affichent à l’écran.
4 Choisissez le périphérique que
vous voulez associer au téléphone,
sélectionnez Ajouter puis entrez le
mot de passe et choisissez OK.
Profils
Personnalisation de vos profils
Vous pouvez personnaliser les
paramètres de chaque profil.
1 Appuyez sur
2 Choisissez le profil visé et
Paramètres
Changement de langue
> Paramètres > Téléph >
(
Langue)
Vous pouvez changer la langue des
textes affichés par votre téléphone.
Ceci modifiera aussi le mode de la
langue de saisie.
Mode Économiseur d’énergie
(
> Paramètres > Téléph >
Économie d’énergie)
L’option Auto permet de prolonger la
durée de vie de la pile. Vous pouvez
l’autre périphérique, sur lequel vous
devez entrer le même mot de passe.
par mot de passe est maintenant
fonctionnelle.
et sélectionnez
Profils.
sélectionnez Options, puis Modifier.
17
Page 44

régler l’économie d’énergie à Auto,
Activer ou Désactiver.
Information ( > Paramètres >
Téléph > Information )
Permet d’afficher les informations
techniques de votre GB255g.
Modification des paramètres
d’affichage
(
> Paramètres > Écran)
Vous pouvez modifier les paramètres
d’affichage du téléphone. Choisissez
Thème écran, Style de menu,
Composition, Rétroéclairage, Thème
du téléphone ou Message d’accueil.
Réglage de la date et de l’heure
> Paramètres > Date et heure)
(
Vous pouvez régler les fonctions liées à
la date et à l’heure.
Modification des paramètres de
sécurité
( > Paramètres > Sécurité)
Modifiez vos paramètres de sécurité
et protégez votre appareil GB255g
ainsi que l’information importante qu’il
contient.
• Demande de code PIN - Choisissez un
code PIN devant être fourni chaque
fois que vous allumez le téléphone.
18
• Verrouillage tél - Permet de
verrouiller le téléphone pour éviter
toute utilisation interdite. Choisissez
À la mise en marche, Si USIM est
modifiée, Immédiat ou Aucun. Vous
aurez besoin d’un code de sécurité.
• Changer les codes - Vous pouvez
modi er votre Code PIN, votre Code
PIN2 ou votre Code de sécurité.
Affichage de l’état de mémoire
(
> Paramètres > Gest. de
mémoire)
Votre GB255g offre trois dispositifs
mémoire : la mémoire interne du
téléphone, la carte USIM et une carte
mémoire externe (fournie ou vendue
séparément). Vous pouvez utiliser
le gestionnaire de mémoire pour
préciser la façon dont chaque dispositif
de mémoire doit être utilisé et pour
vérifier la quantité de mémoire encore
disponible sur chacun.
Réinitialisation du téléphone
(
> Paramètres > Rétablir
param. défaut)
Vous pouvez utiliser l’option
Réinitialiser pour rétablir tous les
paramètres par défaut réglés en usine.
Vous devez entrer le code de sécurité
pour pouvoir activer cette fonction. Le
code par défaut est « 0000 ».
Page 45

Modification des paramètres de
connectivité
• Réseau - Ce menu vous permet
Sélectionner un réseau et
de
votre Mode réseau. Vous pouvez
également ajouter un réseau favori à
vos Listes préférées.
• Profils Internet - Ce menu affiche les
profils Internet. Vous pouvez créer,
supprimer et modifier des profils à
partir du menu options. Il vous sera
toutefois interdit de supprimer ou de
modifier les configurations par défaut.
• Points d’accès - Ce menu affiche
la liste des points d’accès. Vous
pouvez créer, supprimer et modifier
des points d’accès à partir du menu
options. Il vous sera toutefois interdit
de supprimer ou de modifier les
configurations par défaut.
• Connexion par paquet - Si
vous sélectionnez l’option « Si
disponible », votre téléphone sera
automatiquement inscrit sur un
réseau GPRS lorsque vous l’allumez.
Si vous sélectionnez l’option « Au
besoin », la connexion GPRS sera
établie pour la durée de la connexion
WAP ou de la connexion de
l’application.
• Paramètres de diffusion en continu
Ce menu vous permet de définir et
de modifier différents paramètres de
diffusion de contenu en continu.
-
19
Page 46

Directives pour une utilisation sécuritaire et e cace
Veuillez lire ces directives simples. Il peut
être dangereux, voire illégal de ne pas
suivre les directives.
Exposition aux signaux de
radiofréquence
Renseignements sur l’exposition
aux ondes radioélectriques et sur le
débit d’absorption spécifique (SAR).
Ce téléphone portable GB255g a été
conçu en conformité avec les exigences
applicables en matière d’exposition
sécuritaire aux ondes radioélectriques.
Ces exigences sont basées sur des
directives scientifiques qui comprennent
des marges de sûreté visant à assurer la
sécurité de toutes les personnes, quels
que soient leur âge et leur état de santé.
• Les directives en matière d’exposition
aux ondes radioélectriques utilisent
une unité de mesure appelée « débit
d’absorption spécifique » ou SAR.
Les essais portant sur le SAR sont
effectués en utilisant des méthodes
standardisées; le téléphone transmet
au niveau de puissance homologuée
le plus élevé sur toutes les bandes de
fréquences testées.
• Bien que les niveaux de SAR puissent
varier selon les différents téléphones LG,
tous les modèles sont conçus de façon
20
à respecter les directives applicables
en matière d’exposition aux ondes
radioélectriques.
• Les valeurs SAR les plus élevées
obtenues pour ce modèle lors des
essais ont été de 1.19 W/kg, lors d’une
utilisation près de l’oreille, et de 1.21
W/kg, lorsque l’appareil est porté sur
soi, selon la description donnée dans le
guide d’utilisation.
• Aux États-Unis et au Canada, la limite
SAR applicable aux téléphones portatifs
utilisés par le public est de 1,6 watts/
kilogramme (W/kg) en moyenne sur un
tissu d’un gramme. Cette norme intègre
une marge de sécurité importante
afin de fournir une protection
supplémentaire pour le public et de
tenir compte des variations obtenues
dans les mesures.
• Ce produit satisfait les directives
d’exposition aux radiofréquences de la
FCC et d’IC.
ID FCC : BEJGB250G
IC : 2703C-GB250
Utilisation près du corps
Cet appareil a été testé dans le cadre d’un
fonctionnement normal à une distance
de 2 cm du corps de l’utilisateur. Pour
satisfaire aux exigences de la FCC en
Page 47

matière d’exposition aux radiofréquences,
une distance d’au moins 2 cm doit être
maintenue entre l’appareil et le corps
de l’utilisateur. De plus, les pinces de
ceinture, les étuis et les autres accessoires
portés sur le corps doivent être exempts
de composants métalliques.
Mise en garde
Son fonctionnement est sujet aux deux
conditions suivantes :
(1) Cet appareil ne doit pas provoquer
d’interférences; et
(2) Cet appareil doit accepter toutes
les interférences, y compris
celles pouvant entraîner son
dysfonctionnement.
Entretien et réparation du produit
AVERTISSEMENT
Utilisez uniquement les piles, les chargeurs
et les accessoires approuvés pour ce modèle
de téléphone particulier. L’utilisation de
tout autre article pourrait invalider toute
approbation ou garantie applicable au
téléphone et pourrait s’avérer dangereuse.
• Ne démontez pas le téléphone. S’il doit
être réparé, faites appel à un technicien
en entretien et réparation compétent.
• Gardez le téléphone à l’écart des
appareils électroniques tels que les
téléviseurs, les postes radio et les
ordinateurs personnels.
• Gardez le téléphone loin des sources
de chaleur comme les radiateurs et les
appareils de cuisson.
• Évitez de laisser tomber le téléphone.
• Ne soumettez pas le téléphone à des
vibrations mécaniques ou à des chocs.
• Éteignez votre appareil dans les endroits
où des règlements particuliers vous
dictent de le faire. Par exemple, n’utilisez
pas votre téléphone dans un hôpital car
cela pourrait nuire au fonctionnement
de l’équipement médical.
• Ne manipulez pas votre téléphone avec
des mains mouillées pendant qu’il se
charge. Cela pourrait causer un choc
électrique et endommager gravement
votre téléphone.
• Ne chargez pas le combiné à proximité
de matériaux inflammables car le
combiné peut devenir chaud et risquer
de causer un incendie.
• Utilisez un chiffon sec pour nettoyer
l’extérieur de l’appareil (n’utilisez pas de
solvants comme du benzène, du diluant
ou de l’alcool).
• Ne chargez pas le téléphone en le
posant sur un meuble rembourré ou sur
un quelconque tissu d’ameublement.
• Le téléphone devrait être chargé dans
un endroit bien aéré.
21
Page 48

Directives pour une utilisation sécuritaire et e cace
• N’exposez pas le téléphone à une
quantité excessive de fumée ou de
poussière.
• Ne gardez pas le téléphone à côté
de cartes de crédit ou de billets
de transport, car il peut altérer les
renseignements contenus sur les
bandes magnétiques.
• Ne tapez pas sur l’écran avec un objet
pointu car cela peut endommager le
téléphone.
• N’exposez pas le téléphone à du liquide
ou à l’humidité.
• Utilisez les accessoires, tels que le
casque d’écoute, avec prudence. Ne
touchez pas inutilement l’antenne.
Fonctionnement efficace du
téléphone
Appareils électroniques
Tous les téléphones cellulaires sont sujets
aux interférences, ce qui peut nuire à leur
performance.
• N’utilisez pas votre téléphone cellulaire
près d’équipement médical sans
demander une autorisation préalable.
Évitez de placer le téléphone à
proximité d’un stimulateur cardiaque,
par exemple dans votre poche poitrine.
• Les téléphones cellulaires peuvent
22
causer des interférences avec certains
appareils auditifs.
• Des interférences mineures peuvent
affecter les téléviseurs, les radios, les
ordinateurs personnels, etc.
Sécurité routière
Vérifiez les lois et la réglementation en ce
qui concerne l’utilisation d’un téléphone
cellulaire au volant d’un véhicule.
• Ne tenez pas le combiné en conduisant.
• Accordez toute votre attention à la
conduite de votre véhicule.
• Utilisez un système mains libres, si vous
en avez un.
• Si les conditions routières l’exigent,
arrêtez-vous et stationnez votre
véhicule avant d’effectuer ou de
répondre à un appel.
• L’énergie de radiofréquences peut nuire
à certains systèmes électroniques dans
un véhicule, notamment l’autoradio et
l’équipement de sécurité.
• Si votre véhicule est doté d’un coussin
gonflable, assurez-vous que la zone
de déploiement du coussin n’est pas
obstruée par des appareils sans fil fixes
ou portatifs. Cela pourrait entraîner une
défaillance du coussin gonflable ou
causer des blessures graves résultant
Page 49

d’un mauvais fonctionnement de
celui-ci.
• Si vous écoutez de la musique pendant
que vous vaquez à d’autres occupations,
assurez-vous que le volume soit réglé
à un niveau raisonnable afin que
vous puissiez demeurer conscient
de votre environnement. Cela est
particulièrement important quand vous
êtes près d’une rue.
Évitez d’endommager votre ouïe.
Votre acuité auditive peut être
endommagée si vous êtes exposé à un
son fort pendant de longues périodes
de temps. Par conséquent, nous vous
recommandons de ne pas allumer ou
éteindre le combiné près de votre oreille.
Nous vous recommandons aussi de régler
le volume de la musique et des appels à
un niveau raisonnable.
Zones de dynamitage
N’utilisez pas votre téléphone lors
d’opérations de dynamitage. Suivez les
consignes ainsi que toute réglementation
ou directive applicable.
Atmosphères potentiellement
explosives
• N’utilisez pas l’appareil à un poste de
ravitaillement en carburant.
• Ne l’utilisez pas près de combustibles
• Ne transportez ni stockez de liquides
Dans les avions
Les appareils sans fil peuvent causer des
interférences dans un avion.
• Éteignez toujours votre appareil portatif
• N’utilisez pas votre appareil au sol sans
Enfants
Rangez votre téléphone en lieu sûr, hors
de la portée des jeunes enfants. Cet
appareil contient de petites pièces qui
peuvent se détacher et présenter un
risque de suffocation.
Appels d’urgence
Les appels d’urgence pourraient ne pas
être pris en charge par certains réseaux
de téléphonie mobile. Par conséquent,
ne comptez jamais uniquement sur
cet appareil pour les appels d’urgence.
Contactez votre fournisseur de services
local.
ou de produits chimiques.
ou gaz inflammables ou d’explosifs
dans le même compartiment de votre
véhicule que votre appareil portatif ou
ses accessoires.
avant de monter à bord d’un avion.
la permission de l’équipage.
23
Page 50

Directives pour une utilisation sécuritaire et e cace
Information sur la pile et entretien
de la pile
• Il n’est pas nécessaire que la pile soit
complètement déchargée avant
de la recharger. Contrairement à
d’autres systèmes de pile, aucun
effet de mémoire ne peut réduire la
performance de la pile.
• Utilisez uniquement des piles et des
chargeurs de marque LG. Les chargeurs
LG sont conçus pour maximiser la durée
de vie de la pile.
• Ne démontez pas la pile et ne la courtcircuitez pas.
• Veuillez à ce que les contacts
métalliques de la pile demeurent
propres.
• Lorsque la pile n’offre plus un
rendement acceptable, remplacez-la. La
pile peut être rechargée des centaines
de fois avant de devoir être remplacée.
• Pour en maximiser la durée d’utilisation,
rechargez la pile si vous ne l’avez pas
utilisée pendant une longue période
de temps.
• N’exposez pas le chargeur à la lumière
directe du soleil et ne l’utilisez pas dans
les endroits très humides comme les
salles de bain.
24
• Ne laissez pas la pile dans des endroits
très chauds ou très froids car cela
pourrait en réduire la performance.
• Un risque d’explosion existe lorsqu’on
remplace la pile par un type de pile
incorrect.
• Jetez les piles usagées conformément
aux instructions du fabricant. Dans la
mesure du possible, recyclez-les. Ne les
jetez pas dans les déchets domestiques.
• Si vous devez remplacer la pile, faites
effectuer le remplacement chez votre
revendeur ou à un point de service LG
Electronics agréé.
• Débranchez toujours le chargeur de la
prise murale une fois que le téléphone
est entièrement chargé, afin d’éviter de
gaspiller inutilement l’électricité.
• La durée de vie réelle de la pile dépend
de la configuration du réseau, des
paramètres du produit, de l’utilisation,
de la pile et des conditions extérieures.
Données techniques
Température ambiante
Maximum : +55 °C (décharge),
+45 °C (charge)
Minimum : -10 °C
Page 51

GARANTIE LIMITÉE LG
1. CE QUI EST COUVERT PAR CETTE GARANTIE
LG garantit que l’unité et les accessoires inclus sont exempts de toute défectuosité de matériel et de
fabrication, conformément aux modalités suivantes:
1. Cette garantie limitée est valable pendant UN (1) an à partir de la date d’achat de ce produit par
l’utilisateur initial.
2. Cette garantie limitée s’adresse à l’utilisateur initial du produit et ne peut être cédée ou transmise aux
acheteurs/utilisateurs subséquents.
3. Cette garantie n’est valable que pour l’utilisateur initial du produit pendant la période de garantie, pour
autant que l’appareil soit utilisé au Canada.
4. Sur demande de LG, le consommateur doit fournir une preuve de la date d’achat.
5. Pendant la période de garantie applicable, LG réparera ou remplacera, à sa seule discrétion, sans frais
pour l’utilisateur initial, toute pièce du téléphone et tout accessoire défectueux.
6. LG peut utiliser des pièces ou composantes remises à neuf ou neuves pour réparer le produit, ou
décider de remplacer le produit par un produit remis à neuf ou neuf.
2. CE QUI N’EST PAS COUVERT PAR CETTE GARANTIE
1. Les défectuosités ou les dommages résultant de l’utilisation anormale ou inhabituelle du produit.
2. Les défectuosités ou les dommages provenant d’un usage anormal, de conditions anormales, d’un
entreposage inapproprié, d’une exposition à l’humidité ou d’un contact avec l’eau, de modifications
non autorisées, de connexions non autorisées, de réparations non autorisées, d’un mauvais usage, de
négligence, d’abus, d’un accident, d’altérations, d’une installation inappropriée ou de tout autre acte
dont la faute ne peut être attribuée à LG, y compris les dommages causés par un contact avec de la
nourriture ou des liquides.
3. Les bris ou dommages à l’antenne, à moins qu’ils ne soient directement causés par des défectuosités
de matériel ou de fabrication.
4. Les défectuosités ou anomalies présumées si le Service à la clientèle chez LG n’a pas été avisé par
l’utilisateur initial durant la période de la garantie limitée en vigueur.
5. Les produits dont le numéro de série aurait été retiré ou rendu illisible.
6. Les dommages résultant de l’usage d’accessoires non approuvés par LG.
Page 52

7. Toutes les surfaces en plastique et toutes les autres pièces extérieures exposées qui sont griffées ou
endommagées suite à un usage normal.
8. Les produits réparés par du personnel ou une entreprise non autorisés.
Remarques:
1. Cette garantie limitée remplace toutes les autres garanties, expresses et implicites au sens le plus
large autorisé par la loi, des actes législatifs ou autres, y compris, mais sans s’y limiter, toute garantie
implicite de qualité marchande et d’adaptation à un usage particulier.
2. Le transporteur est responsable des dommages que peuvent subir les marchandises en cours
d’expédition.
3. EXCLUSION DE RESPONSABILITÉ
Aucune autre garantie expresse n’est offerte avec ce produit. LA DURÉE DE TOUTE GARANTIE IMPLICITE,
Y COMPRIS LA GARANTIE IMPLICITE DE VENDABILITÉ, SE LIMITE À LA DURÉE DE LA PRÉSENTE
GARANTIE EXPRESSE. LG ELECTRONICS CANADA, INC. NE SERA PAS TENU RESPONSABLE DE LA PERTE
D’USAGE DE CE PRODUIT, DE TOUS INCONVÉNIENTS, PERTES OU AUTRES DOMMAGES, DIRECTS OU
CONSÉCUTIFS, SURVENANT DE L’UTILISATION OU DE L’INAPTITUDE À UTILISER CE PRODUIT, AINSI
QUE DE TOUTE AUTRE VIOLATION D’UNE GARANTIE EXPRESSE OU IMPLICITE QUELLE QU’ELLE SOIT, Y
COMPRIS LA GARANTIE IMPLICITE DE VENDABILITÉ APPLICABLE À CE PRODUIT.
4. POUR OBTENIR UN SERVICE SOUS GARANTIE
Pour obtenir un service sous garantie, composez le numéro de téléphone suivant à partir de n’importe quel
endroit au Canada:
LG Electronics Canada, Inc.
Tél. 1-888-LG-Canada (1-888-542-2623)
http://www.lg.com/ca_fr (voir les liens à « Assistance > Assistance téléphone portable »)
Electronics Canada Inc.
Mississauga (Ontario)
 Loading...