

Page 1
OWNER’S MANUAL
BOTTOM FREEZER
REFRIGERATOR
Please read this owner's manual thoroughly before
operating and keep it handy for reference at all times.
GR-J31DID
www.lg.com
Page 2

2
TABLE OF CONTENTS
TABLE OF CONTENTS
3 PRODUCT FEATURES
4
IMPORTANT SAFETY
INSTRUCTIONS
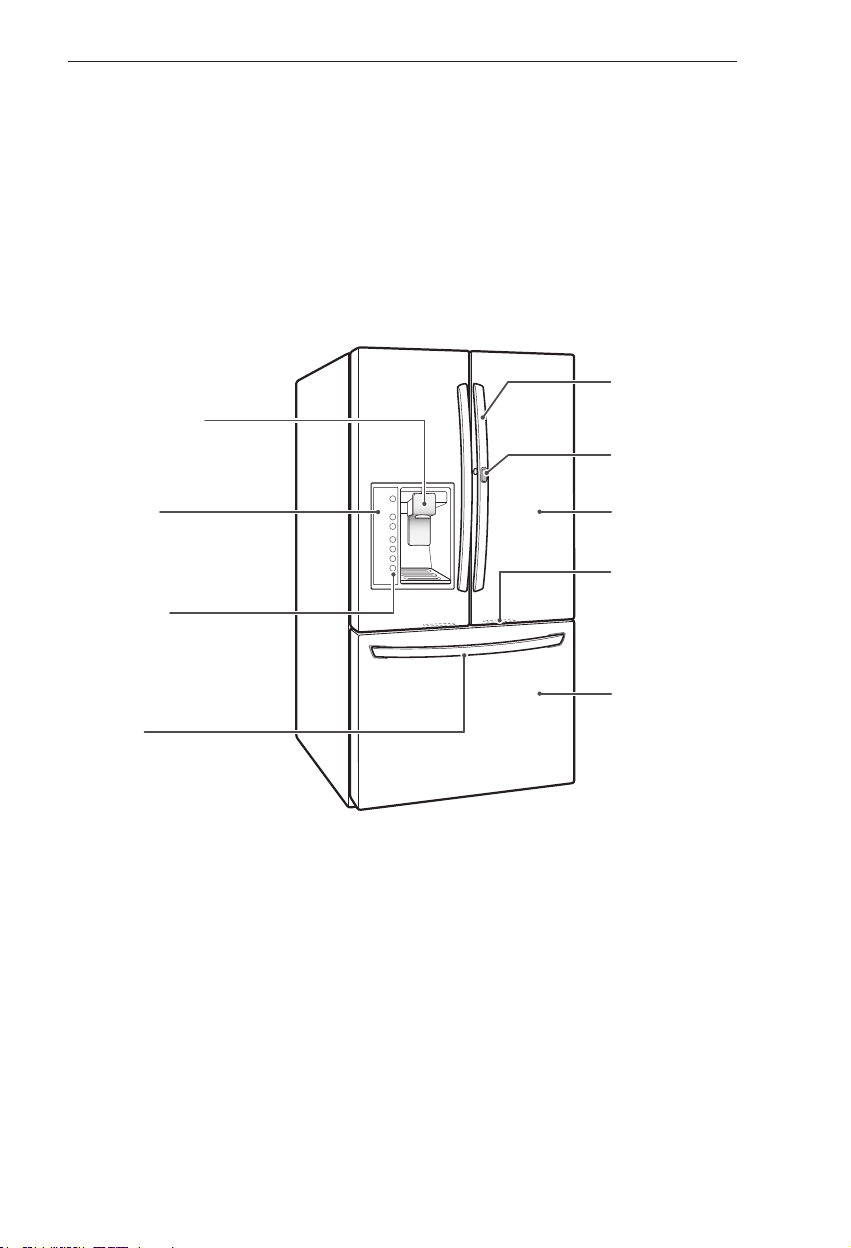
7 COMPONENTS
7 Refrigerator Exterior
8 Refrigerator Interior
9 INSTALLATION
9 Installation Overview
10 Unpacking Your Refrigerator
10 Choosing the Proper Location
10 - Flooring
11 - Ambient Temperature
11 - Measuring the Clearances
11 Removing/Assembling the Refrigerator
Door Handles
12 Removing/Assembling the Freezer
Drawer Handle
12 Removing/Assembling the Doors and
Drawers
12 - Removing the Left Refrigerator Door
14 - Removing the Right Refrigerator Door
15 - Assembling the Right Refrigerator Door
16 - Assembling the Left Refrigerator Door
17 - Removing the Freezer Drawers
19 - Assembling the Freezer Drawers
20 Connecting the Water Line
20 - Before You Begin
20 - Water Pressure
20 - What You Will Need
21 - Water Line Installation Instructions
23 Turning On the Power
24 Leveling and Door Alignment
24 - Leveling
24 - Door Alignment
25 HOW TO USE
25 Before Use
26 Control Panel
26 - Control Panel Features
28 In-Door Ice Bin
28 - Detaching the In-Door Ice Bin
28 - Assembling the In-Door Ice Bin
29 Automatic Icemaker
29
- Turning the Automatic Icemaker On or Off
30 - When You Should Turn the Icemaker Off
30 - Normal Sounds You May Hear
30 - Preparing for Vacation
31 Ice and Water Dispenser
31 - Dispenser
31 - Using the Dispenser
31 - Locking the Dispenser
31 - Cleaning the Dispenser Stand
32 Storing Food
32 - Food Preservation Location
33 - Food Storage Tips
33 - Storing Frozen Food
34 Humidity Controlled Crisper and
Glide’N’Serve
35
Detaching and Assembling the Storage Bins
36
Door-In-Door
38 Adjusting the Refrigerator Shelves
39 MAINTENANCE
39 Cleaning
40 Replacing the Hygiene Fresh
40 Replacing the Water Filter
42 SMART DIAGNOSIS
42 Using Smart Diagnosis
43 TROUBLESHOOTING
• This product is exclusive use at 220V/50Hz.
• You should purchase transformer of more than 2.0KVA when you want to use it at the 110V area.
• You can’t use it anywhere except 50Hz area.
Page 3

PRODUCT FEATURES
PRODUCT FEATURES
* Depending on the model, some of the following functions may not be available.
FILTERED WATER AND ICE DISPENSER
The water dispenser dispenses fresh, chilled water.
The ice dispenser dispenses cubed and crushed ice.
DOOR ALARM
The Door Alarm function is designed to prevent refrigerator malfunctioning
that could occur if a refrigerator door or freezer drawer remains open. If a
refrigerator door or freezer drawer is left open for more than 60 seconds, a
warning alarm sounds in 30 second intervals.
HUMIDITY CONTROLLED CRISPER
The Humidity Controlled Crisper is designed to help keep your fruits and
vegetables fresh and crisp. You can control the amount of humidity in the
crisper by adjusting the setting between Low and High.
3
GLIDE‘N’SERVE
Glide‘N’Serve provides storage space with a variable temperature control
that keeps the compartment colder than the refrigerator. It is a convenient
place to store sandwiches or meat to be cooked.
EXPRESS FREEZING
The freezer section is maintained at the coldest temperature for a 24-hour
period. It will also enhance ice production whilst it is on.
Page 4

4
IMPORTANT SAFETY INSTRUCTIONS
IMPORTANT SAFETY INSTRUCTIONS
READ ALL INSTRUCTIONS BEFORE USING THE APPLIANCE.
This guide contains many important safety messages. Always
This is the safety alert symbol. It alerts you to safety messages that inform you of
hazards that can kill or hurt you or others, or cause damage to the product.
All safety messages will be preceded by the safety alert symbol and the hazard
signal word WARNING or CAUTION. These words mean:
WARNING
DANGER
CAUTION
You can be killed or seriously injured if you do not follow instructions.
You might be killed or seriously injured if you don’t follow instructions.
Indicates an imminently hazardous situation which, if not avoided, may result
in minor or moderate injury, or product damage.
read and obey
all safety messages.
WARNING
To reduce the risk of fire, electric shock, or personal injury when using your product, basic safety
precautions should be followed, including the following.
Power
NEVER unplug your refrigerator by pulling on the power cord. Always grip the plug firmly and
y
pull it straight out from the outlet.
If the supply cord is damaged, it must be replaced by the manufacturer or its service agent or
y
a similarly qualified person in order to avoid a hazard. Do not use a cord that shows cracks or
abrasion damage along its length or at either the plug or connector end.
Do not use an uncertified power outlet.
y
Unplug the power plug immediately in the event of a blackout or thunderstorm.
y
Plug in the power plug with the power cord facing downward.
y
Installation
Contact an authorized service center when you install or relocate the refrigerator.
y
When moving your refrigerator away from the wall, be careful not to roll over or damage the
y
power cord.
Connect this product to a dedicated grounded electric outlet conforming with the rating prior
y
to use. It is the user’s responsibility to replace a standard 2-prong wall outlet with a standard
3-prong wall outlet.
Do not install the refrigerator where there may be a danger of falling.
y
Connect to potable water supply only.
y
Use
DO NOT allow children to climb, stand, or hang on the refrigerator doors or shelves in the
y
refrigerator. They could damage the refrigerator and seriously injure themselves.
Do not place heavy objects on the dispenser of the refrigerator or hang onto it.
y
Do not place heavy or dangerous objects (bottles with liquid) on the refrigerator.
y
Do not put live animals inside of the refrigerator.
y
Do not allow children to climb into the product when it is in use.
y
In the event of a gas leak (propane/LPG), ventilate sufficiently and contact an authorized service
y
center before use. Do not touch or disassemble the electric outlet of the refrigerator.
Page 5

IMPORTANT SAFETY INSTRUCTIONS
READ ALL INSTRUCTIONS BEFORE USING THE APPLIANCE.
To reduce the risk of fire, electric shock, or personal injury when using your product, basic safety
precautions should be followed, including the following.
In the event of a refrigerant leak, move flammable objects away from the refrigerator.
y
Ventilate sufficiently and contact an authorized service center.
Do not use or place flammable substances (chemicals, medicine, cosmetics, etc) near the refrigerator
y
or store them inside the refrigerator. Do not place the refrigerator in the vicinity of flammable gas.
This appliance is intended to be used in household and similar applications such as
y
- staff kitchen areas in shops, offices and other working environments;
- farm houses and by clients in hotels, motels and other residential type environments;
- bed and breakfast type environments;
- catering and similar non-retail applications.
Do not use this product for special purposes (storage of medicine or test materials or for ships, etc).
y
Unplug the power plug before cleaning or repairing the refrigerator.
y
When you replace the light bulb in the refrigerator, unplug the refrigerator or turn off the power.
y
Do not modify or extend the power cord.
y
Do not use a dryer to dry the interior. Do not light a candle to remove the interior odor.
y
For your safety, this appliance must be properly grounded. Have the wall outlet and the circuit checked
y
by a qualified electrician to make sure the outlet is properly grounded.
Do not use an outlet that can be turned off with a switch. Do not use an extension cord. It is the user’s
y
responsibility to replace a standard 2-prong wall outlet with a standard 3-prong wall outlet.
Do not, under any circumstances, cut or remove the third (ground) prong from the power cord.
y
Do not use an adapter plug and plug the power plug into a multi-outlet extension cord.
y
Disconnect the power cord immediately if you hear a noise, smell a strange odor or detect smoke.
y
Turn the power off if water or dust penetrates into the refrigerator. Call a service agent.
y
Do not disassemble or modify the refrigerator.
y
Do not put hands, feet, or metal objects below or behind the refrigerator.
y
Do not operate the refrigerator or touch the power cord with wet hands.
y
In refrigerators with automatic icemakers, avoid contact with the moving parts of the ejector
y
mechanism or with the heating element that releases the cubes. Do not place fingers or hands on the
automatic ice-making mechanism while the refrigerator is plugged in.
When dispensing ice from the dispenser, do not use crystal ceramics.
y
Do not touch the cold surfaces in the freezer compartment with wet or damp hands, when your
y
refrigerator is in operation.
Do not put glass containers, glass bottles or soda in the freezer.
y
Do not store explosive substances such as aerosol cans with a flammable propellant in this appliance.
y
This appliance is not intended for use by persons (including children) with reduced physical, sensory or
y
mental capabilities, or lack of experience and knowledge, unless they have been given supervision or
instruction concerning the use of the appliance by a person responsible for their safety.
Do not refreeze frozen food that have thawed completely. It may result in a serious health issue.
y
If you are throwing away your old refrigerator, make sure the CFC coolant is removed for proper
y
disposal by a qualified servicer. If you release CFC coolant, you may be fined or imprisoned in
accordance with the relevant environmental law.
Junked or abandoned refrigerators are dangerous, even if they are sitting for only a few days. When
y
disposing the refrigerator, remove the packing materials from the door or take off the doors but leave
the shelves in place so that children may not easily climb inside.
If the refrigerant gas has leaked, do not touch the refrigerator or the outlet and ventilate the room
y
immediately. A spark could trigger an explosion causing a fire or burns. Because this refrigerator uses
natural gas (isobutene, R600a) as the environment-friendly refrigerant, even a small amount (50~60g)
is combustible. If gas leaks from severe damage during delivering, installing or using the refrigerator,
any spark may cause fire or burns.
5
Page 6

6
IMPORTANT SAFETY INSTRUCTIONS
READ ALL INSTRUCTIONS BEFORE USING THE APPLIANCE.
To reduce the risk of fire, electric shock, or personal injury when using your product, basic safety
precautions should be followed, including the following.
WARNING
Keep ventilation openings, in the appliance enclosure or in the built-in structure, clear of obstruction.
y
Do not use mechanical devices or other means to accelerate the defrosting process, other than those
y
recommended by the manufacturer.
Do not damage the refrigerant circuit.
y
Do not use electrical appliances inside the food storage compartments of the appliance, unless they
y
are of the type recommended by the manufacturer.
The refrigerant and insulation blowing gas used in the appliance require special disposal procedures.
y
When disposal, please consult with service agent or a similarly qualified person.
This appliance contains a small amount of isobutane refrigerant (R600a), natural gas with high
environmental compatibility, but it is also combustible. When transporting and installing the
appliance, care should be taken to ensure that no parts of the refrigerating circuit are damaged.
Refrigerant squirting out of the pipes could ignite or cause an eye injury. If a leak is detected,
avoid any naked flames or potential sources of ignition and air the room in which the appliance is
standing for several minutes.
In order to avoid the creation of a flammable gas air mixture if a leak in the refrigerating circuit
occurs, the size of the room in which the appliance may be sited depends on the amount of
refrigerant used. The room must be 1m
appliance. The amount of refrigerant in your particular appliance is shown on the identification
plate inside the appliance. Never start up an appliance showing any signs of damage. If in doubt,
consult your dealer.
2
in size for every 8g of R600a refrigerant inside the
CAUTION
Installation
The refrigerator must be properly installed in accordance with the Installer Instructions that were
y
taped to the front of the refrigerator.
Be careful when you unpack and install the refrigerator. Immediately dispose of packing
y
materials (plastic) out of reach of children.
Use
Close the door carefully when children are around.
y
Keep fingers out of pinch point areas; clearances between the doors and cabinets are
y
necessarily small. Be careful closing doors when children are in the area.
If you store food properly, beware that it may fall and cause injury.
y
Maintenance
Do not use strong detergents like wax or thinners for cleaning. Clean with a soft fabric.
y
Wipe foreign objects (dust, water, etc) off the prongs of the power plug and contact areas
y
regularly.
SAVE THESE INSTRUCTIONS
Page 7
COMPONENTS
COMPONENTS
Use this page to become more familiar with the parts and features of your refrigerator.
Page references are included for your convenience.
*The appearance and specifications of the actual product may differ depending on the model.
Refrigerator Exterior
Handle
Opens and closes
Filtered Water and
Ice Dispenser
Dispenses purified water and ice.
the door.
Button
7
LED Display
Displays the refrigerator and
freezer temperature, the water
filter condition and the dispenser
status.
Control Panel
Sets the refrigerator and freezer
temperatures, the water filter
condition and the dispenser mode.
Ez Handle
Easily opens the freezer
door.
Refrigerator
Preserves food.
LED Light
LED lights up under
the refrigerator door.
Freezer
Preserves frozen food.
Page 8

8
COMPONENTS
Refrigerator Interior
LED interior lamps
The interior lamps light up
the inside of the refrigerator.
Water filter
Purifies water.
NOTE
The filter should be replaced every
6 months. Please refer to the “Replacing
the filter” section in this
manual for details.
* This function may
not be available,
depending on the
model.
Indoor Ice Bin
Ice cubes are
automatically produced.
Crisper
Controls humidity and
helps vegetables and
fruit to stay crisp.
Fixed Door Bin
Used to preserve
chilled food or drinks.
Pullout Drawer
Used for extra storage within
the freezer compartment.
Adjustable Refrigerator Shelf
The shelves in your refrigerator are
adjustable to meet your individual
storage needs.
Door-In-Door Case
The convenience of a “soft cool”
storage area and ease in spreading
product stored in this area.
Cheese & Butter Bin
Cheese & Butter and
Condiment bins, that
are specially designed
for food that can be
stored at a warmer
temperature. This makes
spreading butter and
slicing cheese easier.
Condiment Bin
Glide‘N’Serve
Allows you to store food
items at a different
temperature than the
regular refrigerator area.
F-Basket
Area in the freezer that
allows you to fill smaller
items for quick cooling.
Durabase® and Durabase® Divider
The Durabase is a storage space
recommended for the preservation of large
food items. The Durabase Divider is used
to organize the Durabase area into sections.
It can be adjusted from side to side to
accommodate items of different sizes.
Page 9

INSTALLATION
INSTALLATION
Installation Overview
Please read the following installation instructions first after purchasing this product or transporting
it to another location.
9
1 Unpacking your
refrigerator
4 Connecting the water
supply and water line
2 Choosing the proper
5 Leveling and Door
NOTE
Connect to potable water supply only.
location
3 Disassembling/Assembling
Alignment
Page 10

10
INSTALLATION
Unpacking Your Refrigerator
WARNING
Use two or more people to move and
y
install the refrigerator. Failure to do so
can result in back or other injury.
Your refrigerator is heavy. When moving
y
the refrigerator for cleaning or service,
be sure to protect the floor. Always pull
the refrigerator straight out when moving
it. Do not wiggle or walk the refrigerator
when trying to move it, as floor damage
could occur.
Keep flammable materials and vapors,
y
such as gasoline, away from the
refrigerator. Failure to do so can result in
fire, explosion, or death.
Remove tape and any temporary labels from your
refrigerator before using. Do not remove any
warning-type labels, the model and serial number
label, or the Tech Sheet that is located under the
front of the refrigerator.
To remove any remaining tape or glue, rub the
area briskly with your thumb. Tape or glue residue
can also be easily removed by rubbing a small
amount of liquid dish soap over the adhesive with
your fingers. Wipe with warm water and dry.
Choosing the Proper Location
Select a place where a water supply can
y
be easily connected for the automatic
icemaker.
NOTE
The water pressure must be between 20
and 120 psi (140 and 830 kPa) on models
without a water filter and between 40 and
120 psi (280 and 830 kPa) on models with
a water filter.
The refrigerator should always be plugged
y
into its own individual properly grounded
electrical outlet rated for 230 Volts, 50 Hz,
AC only, and fused at 15 or 20 amperes.
This provides the best performance
and also prevents overloading house
wiring circuits which could cause a fire
hazard from overheated wires. It is
recommended that a separate circuit
serving only this appliance be provided.
WARNING
To reduce the risk of electric shock, do not
install the refrigerator in a wet or damp
area.
Do not use sharp instruments, rubbing alcohol,
flammable fluids, or abrasive cleaners to remove
tape or glue. These products can damage the
surface of your refrigerator.
Refrigerator shelves are installed in the shipping
position. Please reinstall shelves according to
your individual storage needs.
Flooring
To avoid noise and vibration, the unit must be
leveled and installed on a solidly constructed
floor. If required, adjust the leveling legs to
compensate for unevenness of the floor. The
front should be slightly higher than the rear to
aid in door closing. Leveling legs can be turned
easily by tipping the cabinet slightly. Turn the
leveling legs to the left to raise the unit or to
the right to lower it. (See Leveling and door
AlIgnment.)
NOTE
Installing on carpeting, soft tile surfaces,
a platform or weakly supported structure
is not recommended.
Page 11

INSTALLATION
11
Ambient Temperature
Install this appliance in an area where the
temperature is between 55°F (13°C) and 110°F
(43°C). If the temperature around the appliance
is too low or high, cooling ability may be
adversely affected.
Do not store the refrigerator in Direct Sunlight
or sheltered outdoor areas.
Measuring the Clearances
Too small of a distance from adjacent items
may result in lowered freezing capability and
increased electricity consumption charges.
Allow at least 24 inches (61 cm) in front of the
refrigerator to open the doors, and at least
2.8 inches (7 cm) between the back of the
refrigerator and the wall.
24” (61 cm)
Removing/Assembling the
Refrigerator Door Handles
NOTE
Removing the doors is always
recommended when it is necessary to
move the refrigerator through a narrow
opening. If it is necessary to remove the
handles, follow the directions below.
Removing the Handles
Loosen the set screws with a 3/32 in.
1
Allen wrench and remove the handle.
Only if required, loosen the mounting
2
fasteners
door and handle using a
wrench, remove the mounting fasteners.
that connect to the refrigerator
1
/4 in. Allen
2.8” (7 cm)
Assembling the Handles
If already removed, assemble the
1
mounting fasteners at both ends of the
handle using a 1/4 in. Allen wrench.
Place the handle on the door by fitting
2
the handle footprints over the mounting
fasteners and tightening the set screws
with a 3/32 in. Allen wrench.
Page 12

12
INSTALLATION
Removing/Assembling the
Freezer Drawer Handle
Removing the Handles
Loosen the set screws located on the
1
lower side of the handle with a 1/8 in. Allen
wrench and remove the handle.
Loosen the mounting fasteners that
2
connect to the
freezer drawer
and handle
using a 1/4 in.
Allen wrench,
and remove
the mounting
fasteners.
Assembling the Handles
Assemble the mounting fasteners at
1
both ends of the handle using a 1/4 in. Allen
wrench.
Place the handle on the door by fitting
2
the handle
footprints over
the mounting
fasteners and
tightening the
set screws
with a 1/8 in.
Allen wrench.
WARNING
When the customer takes apart the handle
or assemble it from a refrigerator, please be
cautious of following things.
Hold the handle with your own hand to
y
make sure not to drop the handle to the
floor or instep while taking apart the handle
from a refrigerator.
Do not swing the handle towards people or
y
animals after taking apart the handle.
Insert the bracket hole of the handle into
y
the stopper bolt of the door exactly, and
then assemble the set screws to fix the
handle.
Check if there’s any gap between the door
y
and handle after fixing the handle.
Removing/Assembling the
Doors and Drawers
Removing the doors is always recommended
when it is necessary to move the refrigerator
through a narrow opening.
WARNING
If your entrance door is too narrow for the
y
refrigerator to pass through, remove the
refrigerator doors and move the refrigerator
sideways through the doorway.
Use two or more people to remove and
y
install the refrigerator doors. Failure to do
so can result in back or other injury.
Disconnect the electrical supply to the
y
refrigerator before installing. Failure to do
so could result in serious injury or death.
Do not put hands, feet or other objects into
y
the air vents or bottom of the refrigerator.
You may be injured or receive an electrical
shock.
Be careful when handling the hinge and
y
stopper. It may result in injury.
Remove food and bins from the doors and
y
drawers before detaching.
Removing the Left Refrigerator Door
Turn off water supply & disconnect the joiner
as per the diagram below.
The water supply is connected to the
1
upper right part of the rear surface of the
refrigerator. Remove the ring in the joint
area. Hold the water supply connection
and gently push the Collet to detach the
water supply line as shown in and .
Collet
NOTE
Detachment of the water supply line
is applicable and essential only when
detaching the left refrigerator door.
Page 13

INSTALLATION
13
After disconnecting the water feed tube,
2
open the left door. Remove the screw
from the hinge cover at the top of the
refrigerator. Lift the hook (not visible),
located at the bottom of the front side of
the cover with a flat-head screwdriver.
Remove the cover and pull out the tube .
3
Disconnect all wire harnesses
.
Lift the door from the middle hinge pin and
5
remove the door.
CAUTION
Place the door, inside facing up, on a
non-scratching surface.
Rotate the hinge lever counterclockwise
4
. Lift the top hinge free of the hinge
lever latch.
Hinge Lever Latch
CAUTION
When lifting the hinge free of the latch, be
careful that the door does not fall forward.
Page 14

14
INSTALLATION
Removing the Right Refrigerator
Door
Open the door. Remove the top hinge
1
cover screw
located at the bottom of the front side of
the cover , with a flat-head screwdriver.
Detach the wire harness .
2
. Lift the hook (not visible),
Lift the door from the middle hinge pin and
4
remove the door.
CAUTION
Place the door on the floor, inside
facing up, on a non-scratching surface.
Rotate the hinge lever clockwise.
3
Lift the top hinge
lever latch.
CAUTION
When lifting the hinge free of the latch, be
careful that the door does not fall forward.
free of the hinge
Hinge Lever Latch
Page 15

Assembling the Right Refrigerator Door
INSTALLATION
15
Install the right-side door first.
Make sure that the plastic sleeve is
1
inserted in the bottom of the door. Lower
the door onto the middle hinge pin as
shown in the figure.
Fit the top hinge over the hinge lever
2
latch and slot it into place. Rotate the lever
counterclockwise to secure the hinge.
Hinge Lever Latch
Make sure that the door-switch located
4
inside the cover is tightly connected.
Position the cover in its place. Insert and
tighten the cover screw
.
Install the grounding screw and connect
3
the wire harness
.
Page 16

16
INSTALLATION
Assembling the Left Refrigerator
Door
Install the left refrigerator door after the right
door is installed.
Make sure that the plastic sleeve is
1
inserted in the bottom of the door. Install
the refrigerator door onto the middle hinge.
Fit the hinge over the hinge lever latch
2
and slot it into place. Rotate the lever
clockwise
and fasten the hinge.
Push the water supply tube into the hole
4
on the top case and pull it through the
backplate.
Hold the water supply connection and
5
gently push in the collet to connect the
water supply line as shown in
. Insert the tube at least 5/8 inch (15 mm)
into the connector. Assemble the clip to
the joint part for fastening.
and
Hinge Lever Latch
Install the grounding screw and connect all
3
the wire harnesses.
Collet
Make sure that the door-switch located
6
inside the cover is tightly connected. Place
the cover in its position and tighten the
cover screw .
Page 17
INSTALLATION
17
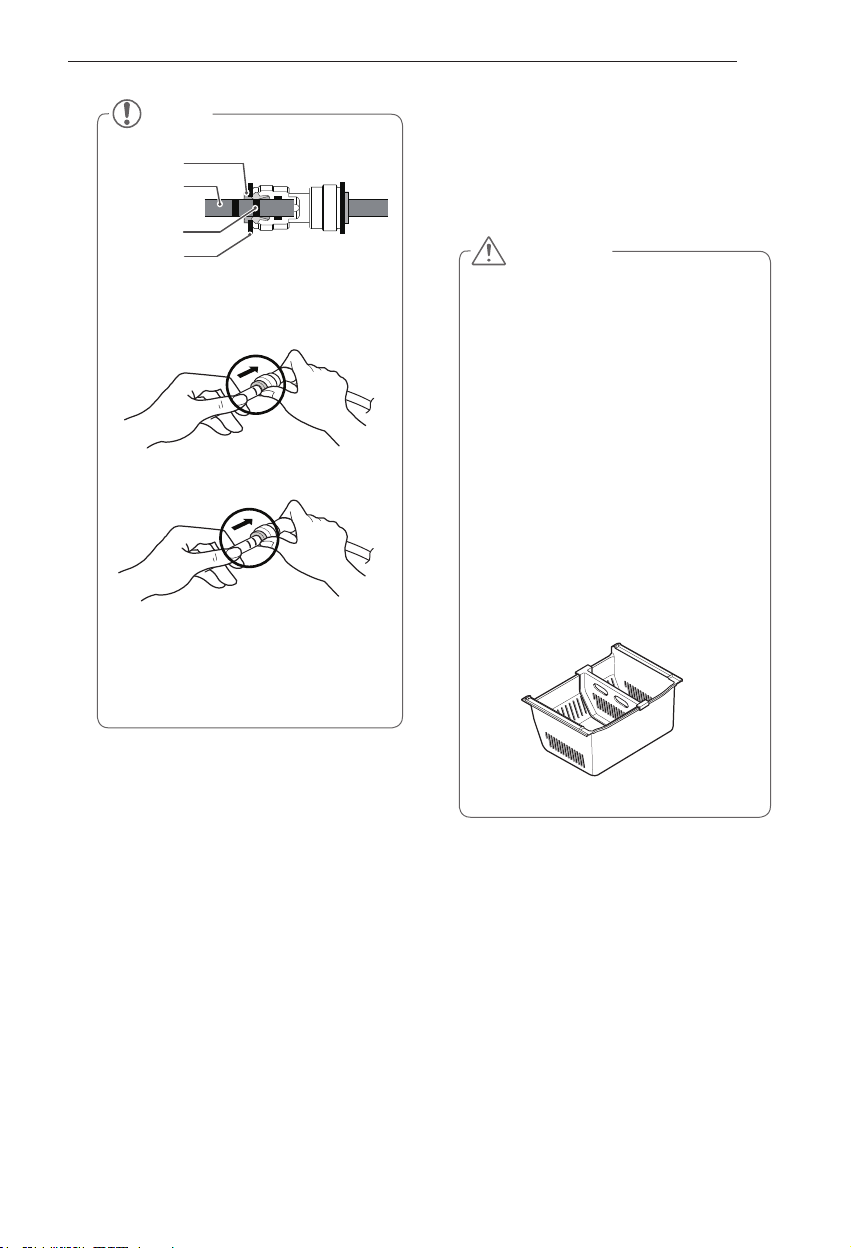
NOTE
Collet
Tube
Insert Line
Clip
1) Gently press the Collet and insert the
tube until only one line shows on the
tube.
(Correct)
(Incorrect)
2) Pull the tube to make sure that the
tube is tightly fastened and then insert
the clip.
Removing the Freezer Drawers
The top, middle and bottom drawers are all
removed in the same way. In the following
figures, the Pullout Drawer located above the
freezer drawer is not shown for clarity.
CAUTION
Use two or more people to remove and
y
install the freezer drawer. Failure to do so
can result in back or other injury.
Do not hold the handle when removing
y
or replacing the drawer. The handle may
come off and it could cause personal
injury.
Be careful of sharp hinges on both sides
y
of the drawer.
When you lay the drawer down, be
y
careful not to damage the floor.
Do not sit or stand on the freezer drawer.
y
To prevent accidents, keep children
y
and pets away from the drawer. Do not
leave the drawer open. If the Durabase
storage bin is removed from the freezer
drawer, there is sufficient space inside
for a small child or a pet to get into.
®
(Durabase®)
Page 18
18
INSTALLATION
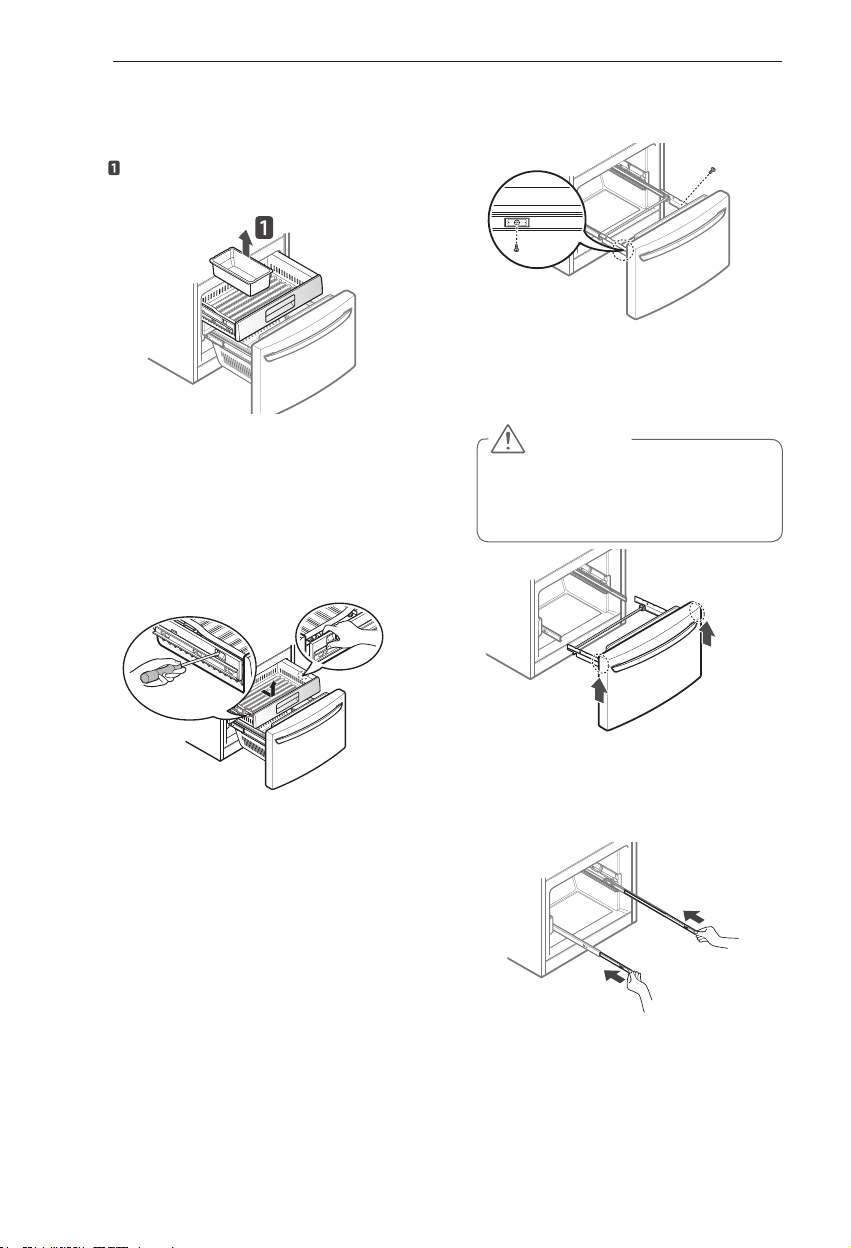
Pull the drawer open to full extension.
1
Gently lift and pull out the ice bin. (Images
2
in the figure below may differ from the
actual drawers of the refrigerator.)
On the left rail, use a flat blade screwdriver
to push in on the tab to release the drawer
from the rail, as shown below. Once the
left side is loose, push the tab on the right
side with your finger to release the drawer.
Lift the front of the drawer up, then pull it
straight out.
Remove the screws from the rails at both
3
ends.
With both hands, grip both sides of the
4
drawer and pull it up to remove it from the
rails.
CAUTION
Do not hold the handle when removing
or replacing the drawer. The handle may
come off and it could cause personal
injury.
With both hands, hold each rail and push it in
5
to allow both rails to slide in simultaneously.
Page 19
INSTALLATION
19
Assembling the Freezer Drawers
The top, middle and bottom drawers are all
assembled in the same way.
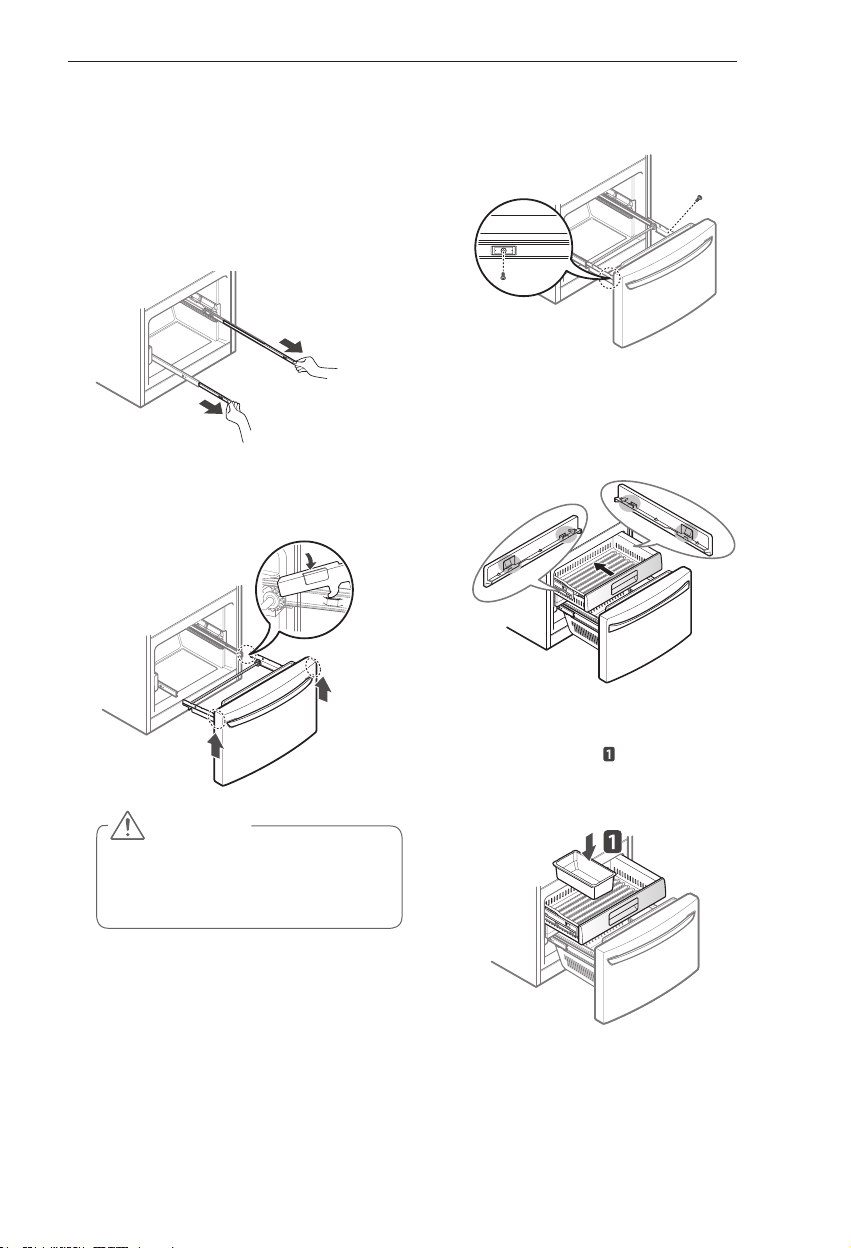
With both hands, pull out each rail
1
simultaneously until both rails are fully
extended.
Grasp the drawer on each side and hook the
2
drawer supports into the rail tabs located on
both sides.
Lower the door into final position and
3
tighten the screws located on both sides.
Insert drawer into the frame, and push
4
drawer back into place until you hear a
click.
CAUTION
Do not hold the handle when removing
or replacing the drawer. The handle
may come off and it could cause
personal injury.
Insert the lower basket in the rail
5
assembly. (Images in the figure below
may differ from the actual drawers of the
refrigerator.)
Page 20
20
INSTALLATION
Connecting the Water Line
Before You Begin
This water line installation is not covered by the
refrigerator warranty. Follow these instructions
carefully to minimize the risk of expensive water
damage.
Water hammer (water banging in the pipes) in
house plumbing can cause damage to refrigerator
parts and can lead to water leakage or flooding.
Call a qualified plumber to correct water hammer
before installing the water supply line to the
refrigerator.
CAUTION
To prevent burns and product damange,
only connect the refrigerator water line to
a cold water supply.
If you use your refrigerator before connecting
the water line, make sure the icemaker power
switch is in the OFF (O) position.
CAUTION
Do not install the icemaker tubing in
areas where temperatures fall below
freezing.
Water Pressure
A cold water supply. The water pressure must
be between 20 and 120 psi (140 and 830 kPa) on
models without a water filter and between 40 and
120 psi (280 and 830 kPa) on models with a water
filter.
If a reverse osmosis water filtration system is
connected to your cold water supply, this water
line installation is not covered by the refrigerator
warranty. Follow the following instructions
carefully to minimize the risk of expensive water
damage.
If a reverse osmosis water filtration system is
connected to your cold water supply, the water
pressure to the reverse osmosis system needs to
be a minimum of 40 and 60 psi (280 and 420 kPa),
less than 2.0~3.0 sec. to fill a cup of 7 oz (200 cc)
capacity.
CAUTION
Wear eye protection during installation
to prevent injury.
If the water pressure from the reverse osmosis
system is less than 21 psi (145 kPa) (takes more
than 4.0 sec to fill a cup of 7 oz (200 cc) capacity):
Check to see if the sediment filter in
y
the reverse osmosis system is blocked.
Replace the filter if necessary.
Allow the storage tank on the reverse
y
usage.
If the issue concerning water pressure
y
from reverse osmosis remains, call a
licensed, qualified plumber.
All installations must be in accordance
y
with local plumbing code requirements.
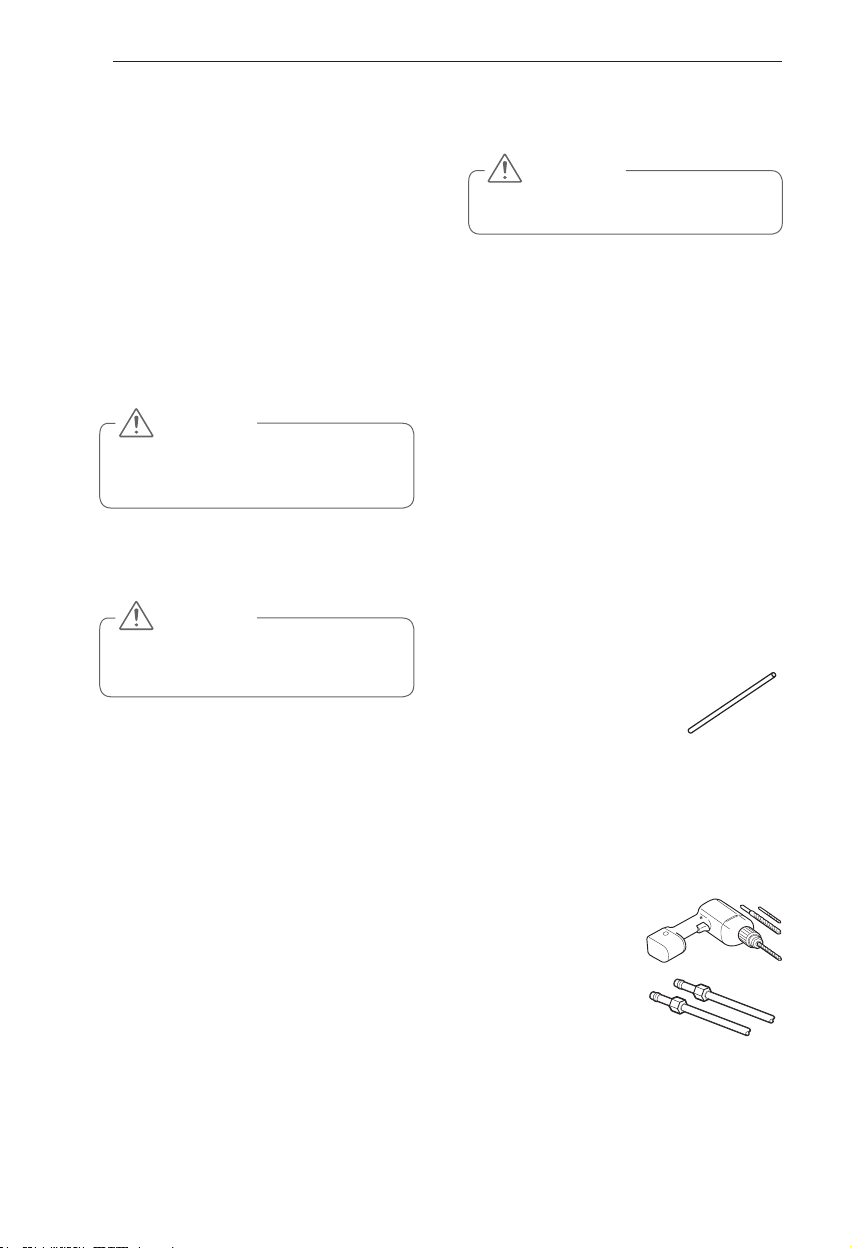
What You Will Need
Copper Tubing,
y
connect the refrigerator to the water
supply. Be sure both ends of the tubing
are cut square.
To determine how
y
much tubing you need:
measure the distance
from the water valve on the back of the
refrigerator to the water supply pipe.
Then, add 8 feet
(2.4 m). Be sure there is sufficient extra
tubing (about 8 feet [2.4 m] coiled into 3
turns of about 10 in. [25 cm] diameter)
to allow the refrigerator to move out
from the wall after installation.
Power drill.
y
½ in. or adjustable
y
wrench.
Flat blade and Phillips
y
head screwdrivers.
Two ¼ in. outer
y
diameter compression
nuts and 2 ferrules (sleeves)
copper tubing to the shutoff valve and
the refrigerator water valve.
¼ in. outer diameter, to
to connect the
Page 21
INSTALLATION
21
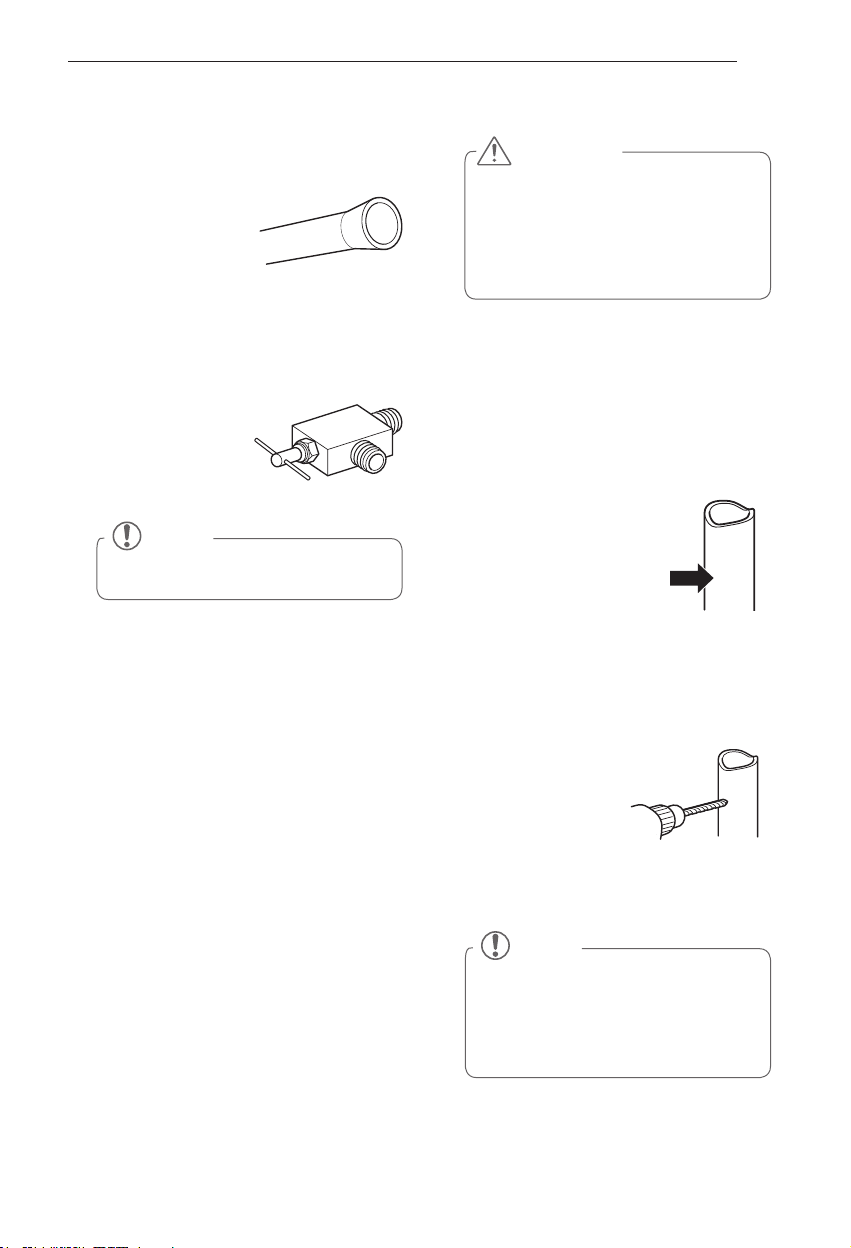
If your existing copper water line has a
y
flared fitting at the end, you will need
adapter
an
stores) to connect the water line to the
refrigerator OR you can cut off the flared
fitting with a tube
cutter and then use a
compression fitting.
Shutoff valve to
y
connect to the cold water line.
valve should have a water inlet with a
minimum inside diameter of 5/32 in. at
the point of connection to the COLD
WATER LINE. Saddle-type shutoff valves
are included in many water supply kits.
Before purchasing,
make sure a saddletype valve complies
with your local
plumbing codes.
A self piercing saddle type water valve
should not be used.
(available at plumbing supply
The shutoff
NOTE
Water Line Installation Instructions
WARNING
When using any electrical device
(such as a power drill) during
installation, be sure the device is
battery powered, double insulated
or grounded in a manner that will
prevent the hazard of electric shock.
Install the shutoff valve on the nearest
frequently used drinking water line.
SHUT OFF THE MAIN WATER SUPPLY
1
Turn on the nearest faucet to relieve the
pressure on the line.
CHOOSE THE VALVE LOCATION
2
Choose a location for
the valve that is easily
accessible. It is best to
connect into the side of a
vertical water pipe. When
it is necessary to connect
into a horizontal water
pipe, make the connection to the top or
side, rather than at the bottom, to avoid
drawing off any sediment from the water
pipe.
DRILL THE HOLE FOR THE VALVE
3
Drill a ¼ in. hole in
the water pipe using
a sharp bit. Remove
any burrs resulting
from drilling the hole
in the pipe. Be careful
not to allow water
to drain into the drill. Failure to drill a ¼ in.
hole may result in reduced ice production
or smaller cubes.
NOTE
The hookup line cannot be white, plastic
tubing. Licensed plumbers must use
only copper tubing NDA tubing #49595
or 49599 or Cross Link Polyethylene
(PEX) tubing.
Page 22
22
INSTALLATION
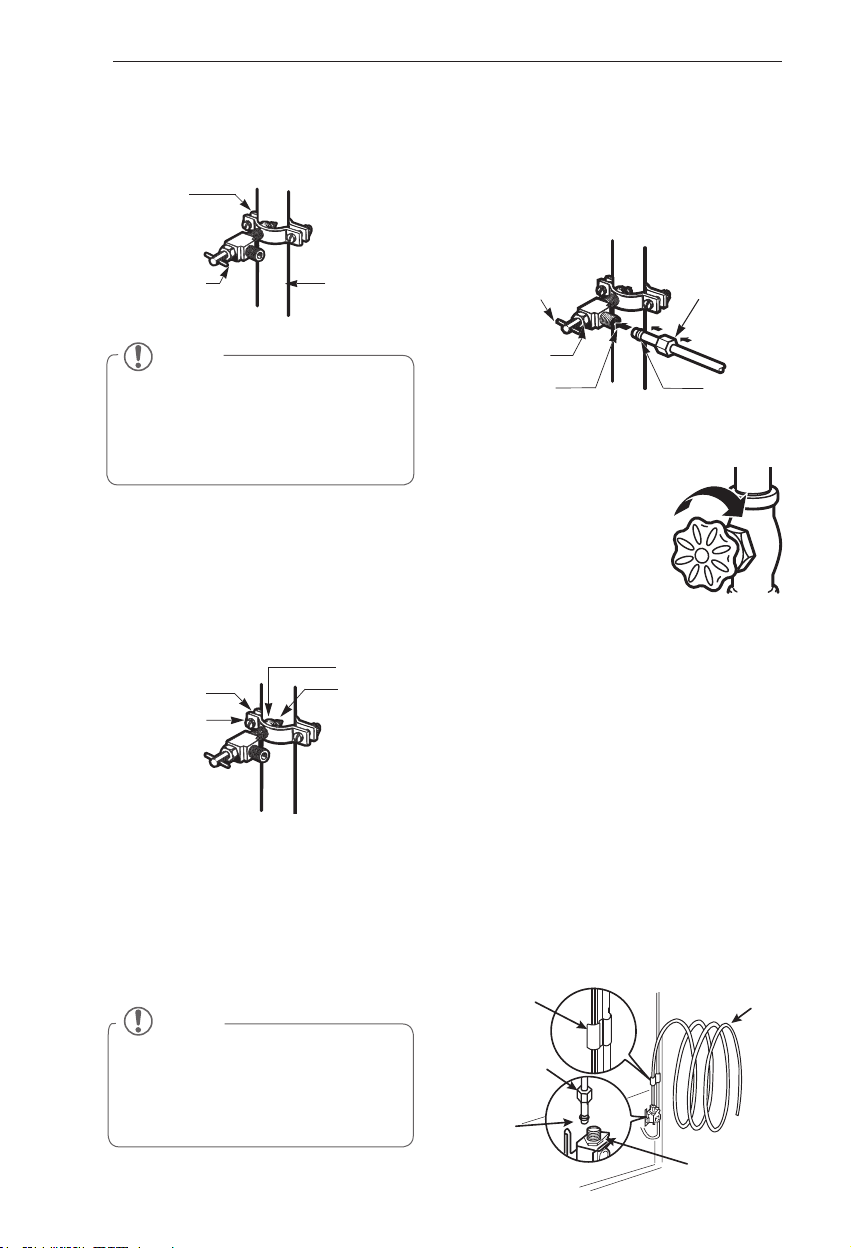
FASTEN THE SHUTOFF VALVE
4
Fasten the shutoff valve to the cold water
pipe with the pipe clamp.
Pipe Clamp
Saddle-Type
Shutoff Valve
Vertical Cold
Water Pipe
NOTE
Commonwealth of Massachusetts
Plumbing Codes 248CMR shall be
adhered to. Saddle valves are illegal and
use is not permitted in Massachusetts.
Consult with your licensed plumber.
TIGHTEN THE PIPE CLAMP
5
Tighten the clamp screws until the sealing
washer begins to swell.
NOTE: Do not overtighten clamp or
you may crush the tubing.
Washer
Pipe Clamp
Clamp Screw
ROUTE THE TUBING
6
Route the tubing between the cold water
line and the refrigerator.
Route the tubing through a hole drilled in
the wall or floor (behind the refrigerator or
adjacent base cabinet) as close to the wall
as possible.
NOTE
Be sure there is sufficient extra tubing
(about 8 feet coiled into 3 turns of
about 10 in. diameter) to allow the
refrigerator to move out from the wall
after installation.
Inlet End
CONNECT THE TUBING TO THE VALVE
7
Place the compression nut and ferrule
(sleeve) for copper tubing onto the end of
the tubing and connect it to the shutoff
valve. Make sure the tubing is fully inserted
into the valve. Tighten the compression
nut securely.
Saddle-Type
Shutoff Valve
Packing Nut
Outlet Valve
FLUSH OUT THE TUBING
8
Compression
Nut
Ferrule (sleeve)
Turn the main water
supply on and flush out
the tubing until the water
is clear.
Shut the water off at the
water valve after about
one quart of water has
been flushed through the tubing.
CONNECT THE TUBING TO THE
9
REFRIGERATOR
Before making the connection
NOTE:
to the refrigerator, be sure that the
refrigerator power cord is not plugged into
the wall outlet.
a. Remove the plastic flexible cap from
the water valve.
b. Place the compression nut and ferrule
(sleeve) onto the end of the tubing as
shown.
c. Insert the end of the copper tubing into
the connection as far as possible. While
holding the tubing, tighten the fitting.
Tubing Clamp
¼ in.
Compression
Nut
Ferrule
(sleeve)
¼ in. Tubing
Refrigerator
Connection
Page 23
INSTALLATION
23
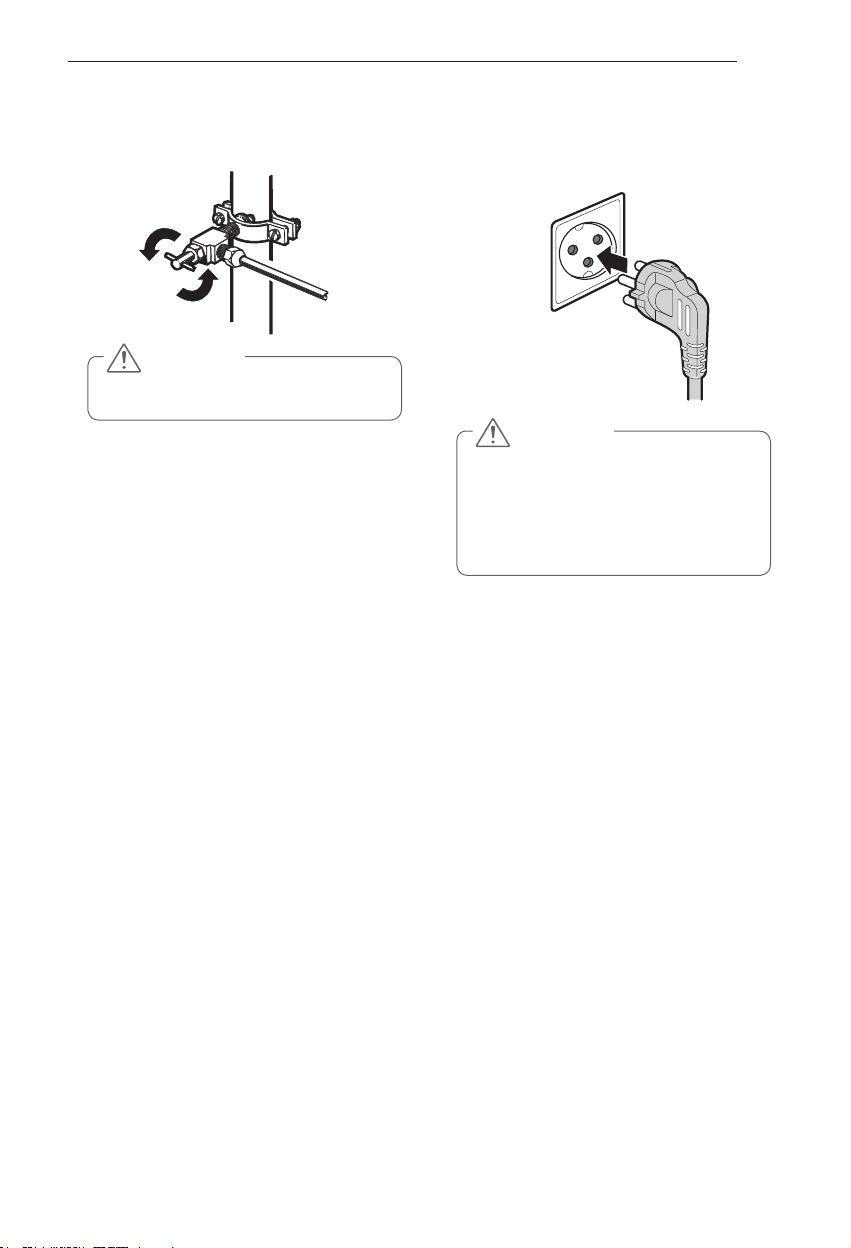
TURN THE WATER ON AT THE SHUTOFF
10
VALVE
Tighten any connections that leak.
CAUTION
Check to see if leaks occur at the water
line connections.
PLUG IN THE REFRIGERATOR
11
Arrange the coil of tubing so that it
does not vibrate against the back of the
refrigerator or against the wall. Push the
refrigerator back to the wall.
START THE ICEMAKER
12
Set the icemaker power switch to the ON
position.
The icemaker will not begin to operate
until it reaches its operating temperature
of 16°F (-9°C) or below. It will then begin
operation automatically if the icemaker
power switch is in the
ON (I)
position.
Turning On The Power
Plug in the refrigerator.
1
CAUTION
Connect to a rated power outlet.
y
Have a certified electrician check
y
the wall outlet and wiring for proper
grounding.
Do not damage or cut off the ground
y
terminal of the power plug.
Page 24
24
INSTALLATION
Leveling and Door Alignment
Leveling
After installing, plug the refrigerator’s power
cord into a 3-prong grounded outlet and push
the refrigerator into the final position.
Your refrigerator has two front leveling legs—
one on the right and one on the left. Adjust the
legs to alter the tilt from front-to-back or sideto-side. If your refrigerator seems unsteady, or
you want the doors to close more easily, adjust
the refrigerator’s tilt using the instructions
below:
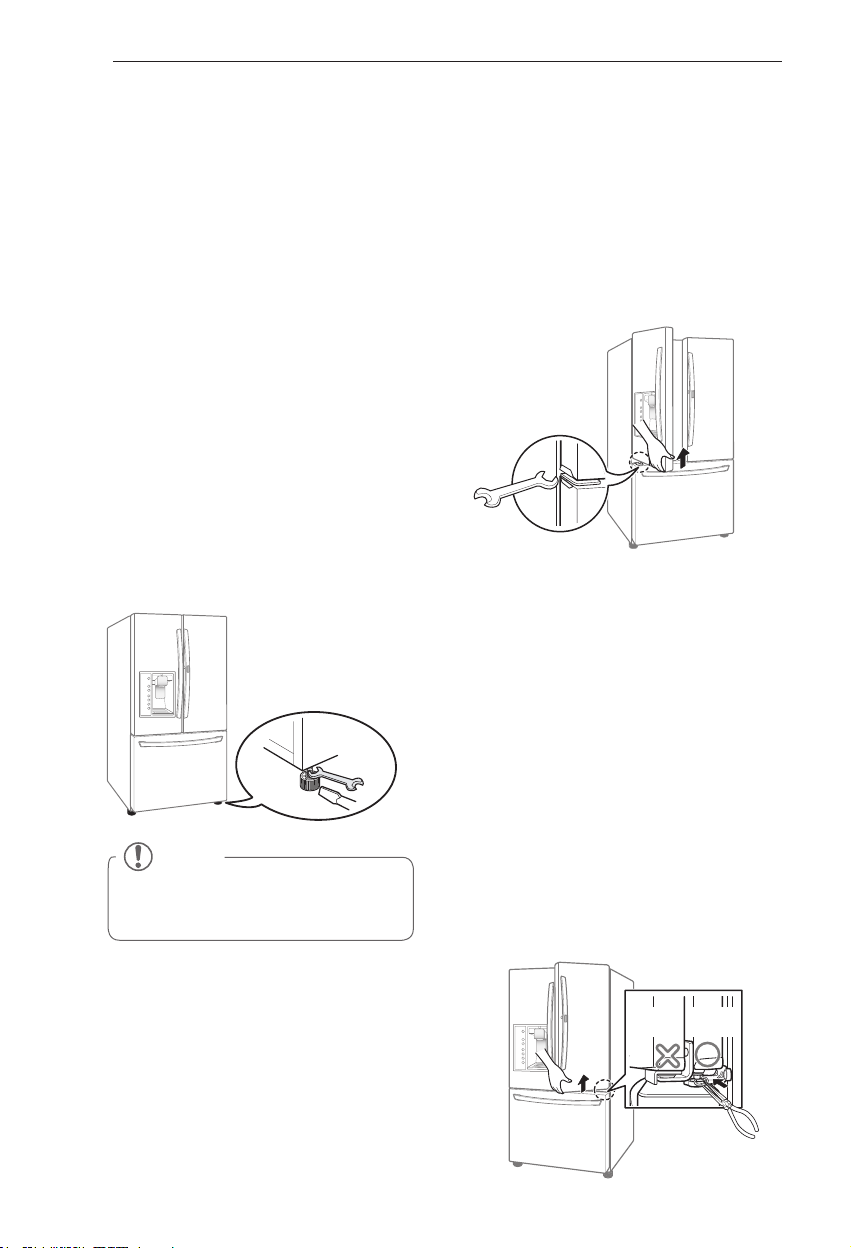
Remove the base grille. Refer to the Base
1
Grille Installation section.
Turn the leveling leg to the left to raise
2
that side of the refrigerator or to the right
to lower it. It may take several turns of the
leveling leg to adjust the tilt of the
refrigerator.
NOTE
A flare nut wrench works best, but an
open-end wrench will suffice.
Do not over-tighten.
Door Alignment
The left refrigerator door has an adjustable nut,
located on the bottom hinge, to raise and lower
the door for proper alignment.
If the space between your doors is uneven, follow
the instructions below to align the doors evenly:
Use the wrench (included with the Use & Care
Guide) to turn the nut in the door hinge to adjust
the height. To the right to raise or to the left to
lower the height.
The right refrigerator door does not have an
adjustable nut.
If the space between your doors is uneven, follow
the instructions below to align the right door:
With one hand, lift up both the inner and
1
outer door sections of the right door to raise
them at the middle hinge. (Opening the door
may make lifting it easier)
With the other hand, use pliers to insert the
2
snap ring on the middle hinge of the inner
door section as shown. Do not insert the ring
on the hinge of the outer door section.
Insert additional snap rings until the right door
3
is aligned. (Two snap rings are provided with
the unit.)
Open both doors again and check to make
3
sure that they close easily. If the doors do
not close easily, tilt the refrigerator slightly
more to the rear by turning both leveling
legs to the left. It may take several more
turns, and you should turn both leveling
legs the same mount.
Refit the front base grille.
4
Outer
Door
Inner
Door
Page 25
HOW TO USE
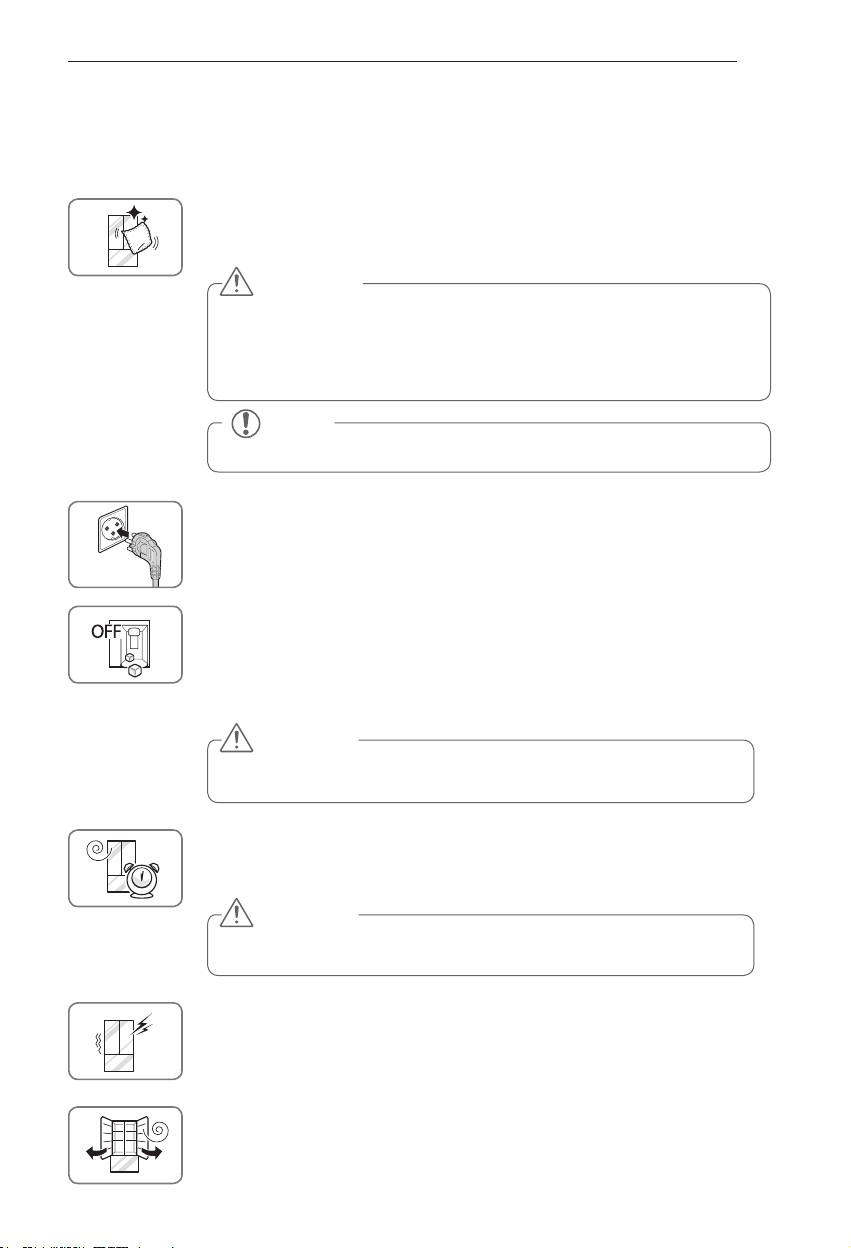
Before use
Clean the refrigerator.
Clean your refrigerator thoroughly and wipe off all dust that accumulated during
shipping.
Do not scratch the refrigerator with a sharp object or use a detergent that
y
contains alcohol, a flammable liquid or an abrasive when removing any tape
or adhesive from the refrigerator,.
Do not peel off the model or serial number label or the technical information
y
on the rear surface of the refrigerator.
Remove adhesive residue by wiping it off with your thumb or dish detergent.
Connect the power supply.
Check if the power supply is connected before use.
Read the “Turning On The Power” section.
Turn off the icemaker if the refrigerator is not yet connected to the
water supply.
Turn off the automatic icemaker and then plug the power plug of the refrigerator
into the grounded electric outlet.
* This is applicable only to certain models.
CAUTION
NOTE
HOW TO USE
25
CAUTION
Running the automatic icemaker before connecting it to the water
supply may cause the refrigerator to malfunction.
Wait for the refrigerator to cool.
Allow your refrigerator to run for at least two to three hours before putting food in
it. Check the flow of cold air in the freezer compartment to ensure proper cooling.
CAUTION
Putting food in the refrigerator before it has cooled could cause the
food to spoil, or a bad odor could remain inside the refrigerator.
The refrigerator makes a loud noise after initial operation.
This is normal. The loudness will decrease as the temperature lowers.
Open refrigerator doors and freezer drawers to ventilate the interior.
The inside of the refrigerator may smell like plastic at first. Remove any adhesive
tape from inside the refrigerator and open the refrigerator doors and the freezer
drawers for ventilation.
Page 26
26
HOW TO USE
Control Panel
* Depending on the model, some of the following functions may not be available.
Control Panel Features
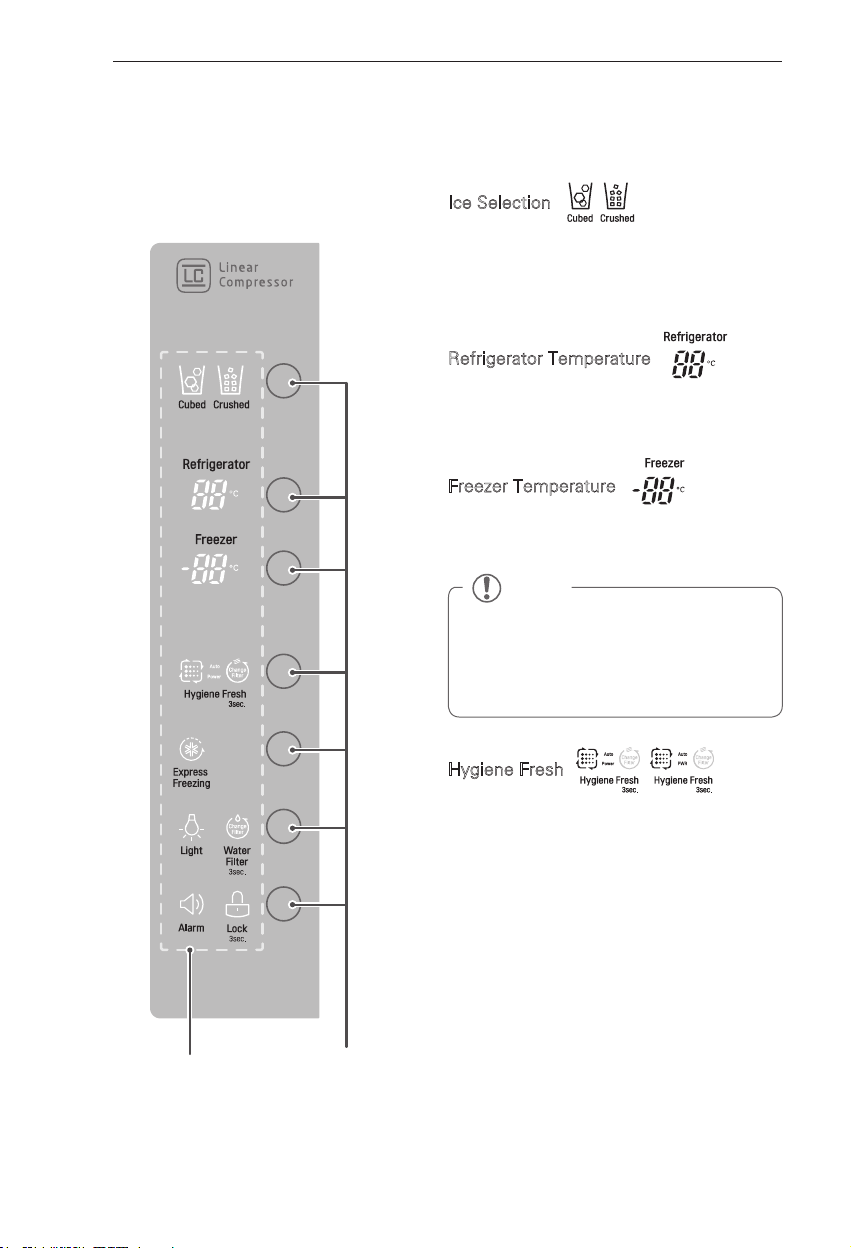
LED Display
Indicator
Control
Button
Ice Selection
Press the ice selection button to choose either
cubed or crushed ice. The cubed or crushed ice
icon will illuminate.
Refrigerator Temperature
Indicates the set temperature of the refrigerator
compartment in Celsius (°C).
Freezer Temperature
Indicates the set temperature of the freezer
compartment in Celsius (°C).
NOTE
The displayed temperature is the target
temperature, and not the actual temperature
of the refrigerator. The actual refrigerator
temperature depends on the food inside the
refrigerator.
( On some
Hygiene Fresh
The Hygiene Fresh helps remove odors from the
refrigerator. The Hygiene Fresh has two settings,
Auto and Power(PWR). In Auto mode, the
Hygiene Fresh will cycle on and off in increments
of ten minutes on and one hundred ten minutes
off. If set to the Power(PWR) mode, the Hygiene
Fresh will stay on continuously for four hours,
cycling on and off in increments of ten minutes
on and five minutes off. After four hours, the
Hygiene Fresh will switch back to Auto mode.
The Press the Hygiene Fresh button once
y
for Power(PWR) mode.
Press the Hygiene Fresh button again to
y
switch back to Auto mode.
[
models)
]
Page 27
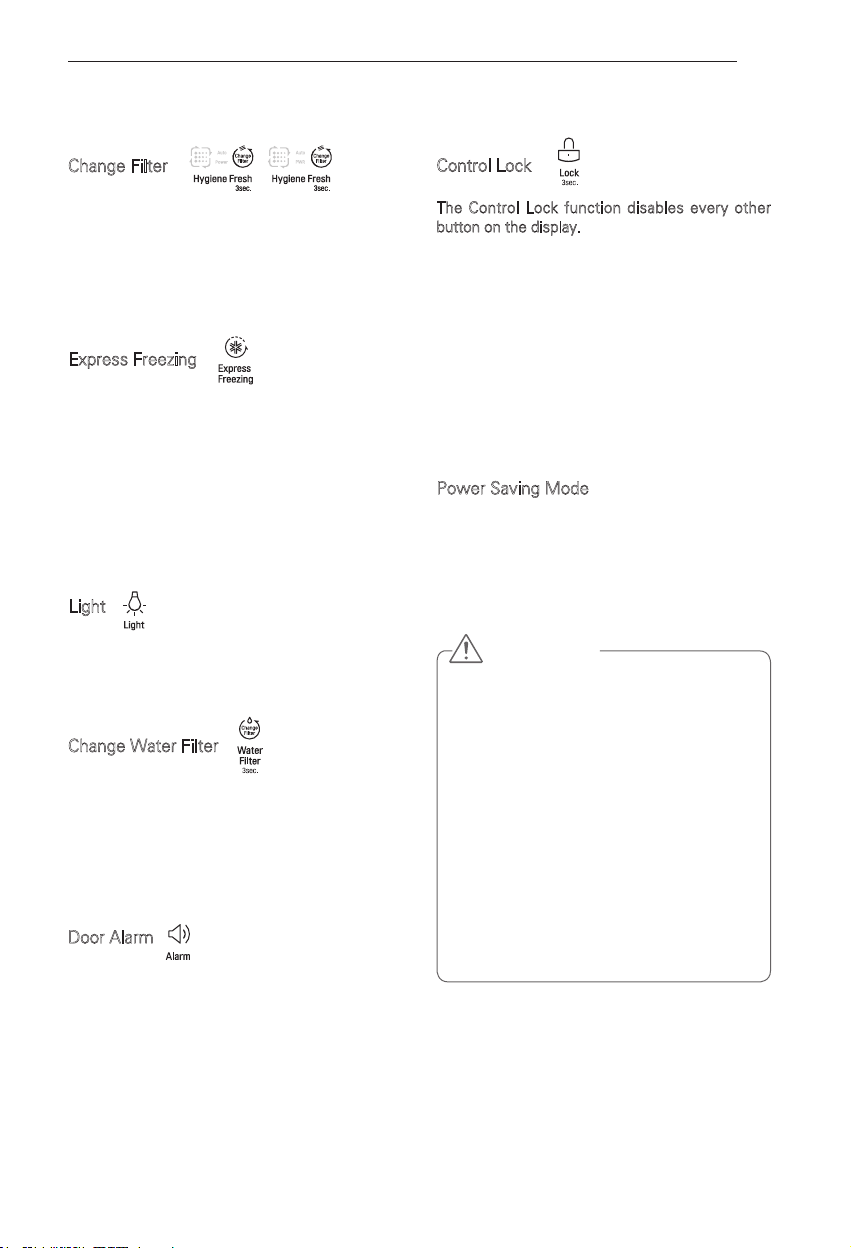
Control Panel Features (continued)
HOW TO USE
27
Change Filter
When the Change Filter icon turns on, the air
filter needs to be replaced. After replacing the
air filter, press and hold the Hygiene Fresh
button for three seconds to turn the icon light
off. It is recommended to change the air filter
approximately every 6 months.
[
( On some
models)
]
Express Freezing
This function increases both ice making and
freezing capabilities.
When you touch the
y
the graphic will illuminate in the display and
will continue for 24 hours. The function will
automatically shut off after 24 hours.
You can stop this function manually by touching
y
the button one more time.
Express Freezing
button,
Light
When you press the Light button, the dispenser
light will turn on and the indicator will appear on
the LED display.
Change Water Filter
When the water filter indicator turns on, you have
to change the water filter. After changing the water
filter, press and hold the Change Filter button for
three seconds to turn the indicator light off. You
need to change the water filter approximately
every six months.
Door Alarm
When power is connected to the refrigerator,
y
the door alarm is initially set to ON. When you
press the Door Alarm button, the display will
change to OFF and the Door Alarm function will
deactivate.
When either the refrigerator or the freezer
y
door is left open for more than 60 seconds, the
alarm tone will sound to let you know that the
door is open.
When you close the door, the door alarm will
y
stop.
Control Lock
The Control Lock function disables every other
button on the display.
When power is initially connected to the
y
refrigerator, the
If you want to activate the
y
other buttons, press and hold the
for three seconds or more. The
display and the
To disable the
y
Lock
button for approximately three seconds.
Lock
function is off.
Lock
function to lock
Lock
button
Lock
Lock
function is now enabled.
Lock
function, press and hold the
icon will
Power Saving Mode
When the refrigerator is in the
y
Mode
, the display will remain off until a door is
opened or a button is pressed. Once on, the
display will remain on for 20 seconds.
Power Saving
CAUTION
Display Mode (For Store Use Only)
The Display Mode disables all cooling in the
refrigerator and freezer sections to conserve
energy while on display in a retail store. When
activated OFF will display on the control panel
and the display will remain on for 20 seconds.
To deactivate / activate:
With either refrigerator door opened, press
and hold the Refrigerator and Ice Plus buttons
at the same time for five seconds. The control
panel will beep and the temperature settings
will display to confirm that Display Mode
is deactivated. Use the same procedure to
activate the Display Mode.
Page 28
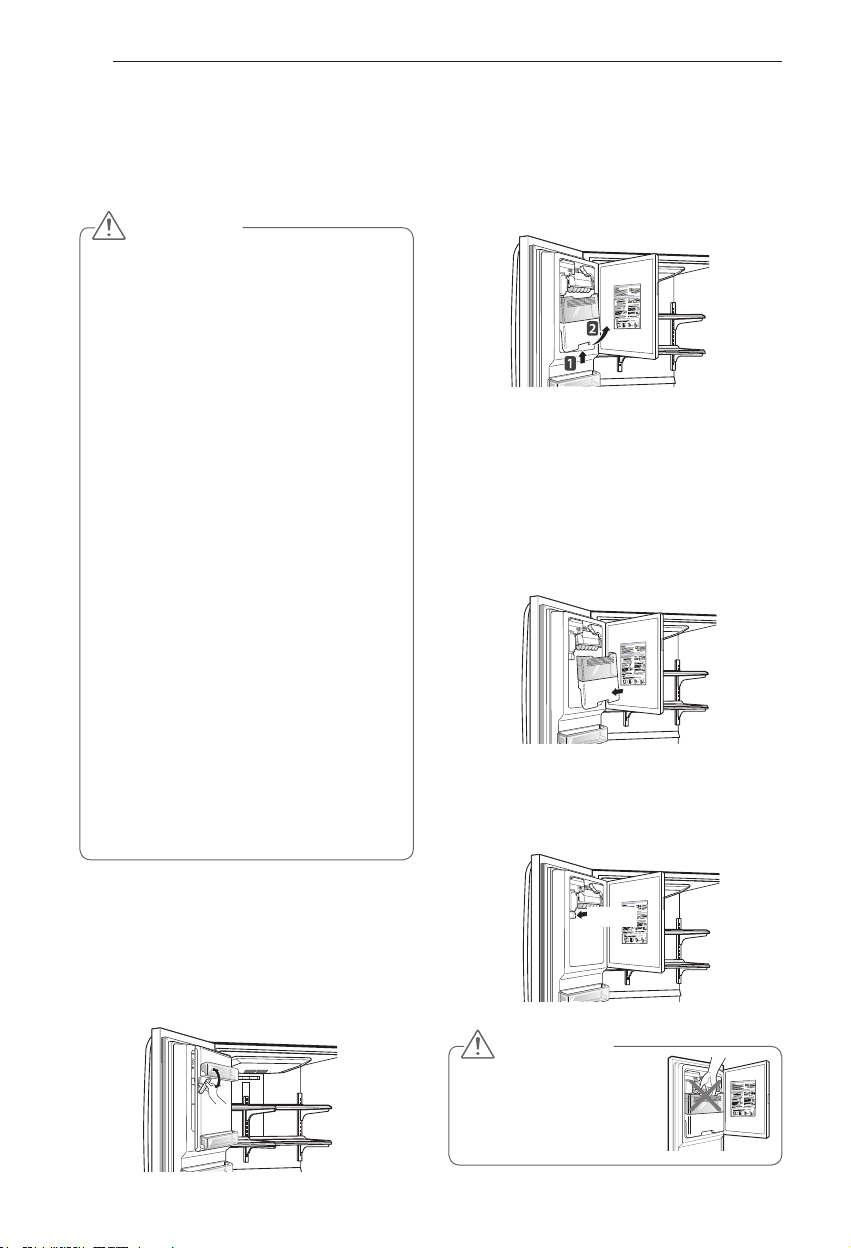
28
HOW TO USE
In-Door Ice Bin
* Depending on the model, some of the
following functions may not be available.
CAUTION
Keep hands and tools out of the ice
y
compartment door and dispenser chute.
Failure to do so may result in damage or
personal injury.
The icemaker will stop producing ice when
y
the in-door ice bin is full. If you need more
ice, empty the ice bin into the extra ice bin
in the freezer compartment. During use,
the ice can become uneven causing the
icemaker to misread the amount of ice
cubes and stop producing ice. Shaking the
ice bin to level the ice within it can reduce
this problem.
Storing cans or other items in the ice bin will
y
damage the icemaker.
Keep the ice compartment door closed
y
tightly. If the ice compartment door is not
closed tightly, the cold air in the ice bin will
freeze food in the refrigerator compartment.
This could also cause the icemaker to stop
producing ice.
If the O
y
N/OFF switch on the icemaker is
set to OFF for an extended period of time,
the ice compartment will gradually warm
up to the temperature of the refrigerator
compartment. To prevent ice cubes from
melting and leaking from the dispenser,
ALWAYS empty the ice bin when the
icemaker is set to OFF for more than a few
hours.
To remove the in-door ice bin, grip the
2
front handle, slightly lift the lower part,
and slowly pull out the bin as shown.
Assembling the In-Door Ice Bin
Carefully insert the in-door ice bin while
1
slightly slanting it to avoid contact with the
icemaker.
Avoid touching the ice-detecting sensor
2
when replacing the ice bin. See the label
on the ice compartment door for details.
Detaching the In-Door Ice Bin
Gently pull the handle to open the ice
1
compartment.
Ice-detecting
sensor
CAUTION
When handling the ice bin,
keep hands away from the
icemaker tray area to avoid
personal injury.
Page 29
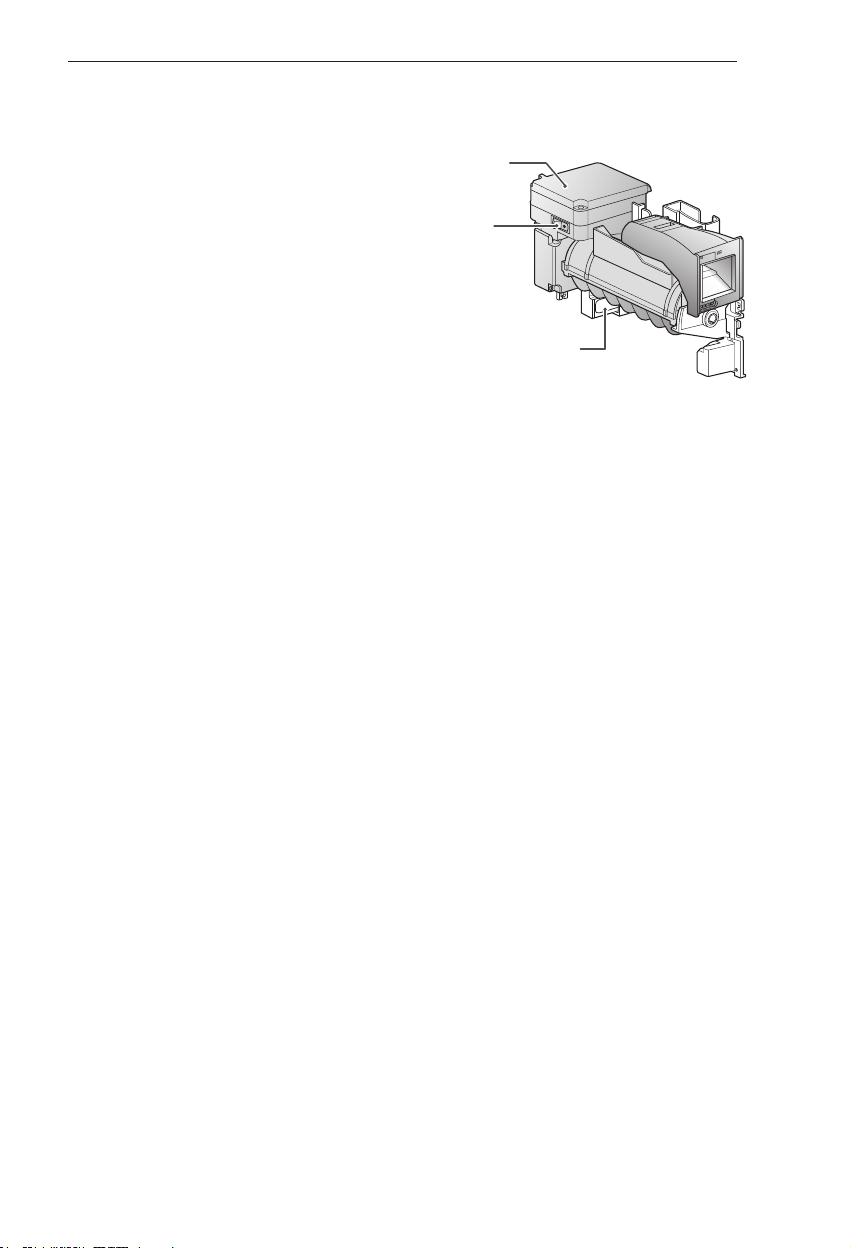
Automatic Icemaker
HOW TO USE
29
* Depending on the model, some of the
following functions may not be available.
Ice is made in the automatic icemaker and sent
to the dispenser. The icemaker will produce
70~210 cubes in a 24-hour period, depending
on freezer compartment temperature, room
temperature, number of door openings and
other operating conditions.
It takes about 12 to 24 hours for a newly
y
installed refrigerator to begin making ice. Wait
72 hours for full ice production to occur.
Ice making stops when the in-door ice bin
y
is full. When full, the in-door ice bin holds
approximately 6 to 8 (12~16 oz or 340~455 cc)
glasses of ice.
The water pressure must be between 20 and
y
120 psi (140 and 830 kPa) on models without
a water filter and between 40 and 120 psi (280
and 830 kPa) on models with a water filter to
produce the normal amount and size of ice
cubes.
Foreign substances or frost on the ice-
y
detecting sensor can interrupt ice production.
Make sure the sensor area is clean at all times
for proper operation.
Icemaker
Power
Switch
Ice-detecting
Sensor
Turning the Automatic Icekamer
On or Off
To turn off the automatic icemaker, set the
icemaker switch to
automatic icemaker, set the switch to
OFF (O)
. To turn on the
ON (I)
.
Page 30
30
HOW TO USE
Automatic Icemaker
(continued)
CAUTION
The first ice and water dispensed may
y
include particles or odor from the water
supply line or the water tank.
Throw away the first few batches of ice.
y
This is also necessary if the refrigerator has
not been used for a long time.
Never store beverage cans or other items in
y
the ice bin for the purpose of rapid cooling.
Doing so may damage the icemaker or the
containers may burst.
If discolored ice is dispensed, check the
y
water filter and water supply. If the problem
continues, contact a Sears or other qualified
service center. Do not use the ice or water
until the problem is corrected.
Keep children away from the dispenser.
y
Children may play with or damage the
controls.
The ice passage may become blocked with
y
frost if only crushed ice is used. Remove the
frost that accumulates by removing the ice
bin and clearing the passage with a rubber
spatula. Dispensing cubed ice can also help
prevent frost buildup.
Never use thin crystal glass or crockery to
y
collect ice. Such containers may chip or
break resulting in glass fragments in the ice.
Dispense ice into a glass before filling it
y
with water or other beverages. Splashing
may occur if ice is dispensed into a glass
that already contains liquid.
Never use a glass that is exceptionally
y
narrow or deep. Ice may jam in the ice
passage and refrigerator performance may
be affected.
Keep the glass at a proper distance from
y
the ice outlet. A glass held too close to the
outlet may prevent ice from dispensing.
To avoid personal injury, keep hands out of
y
the ice door and passage.
Never remove the dispenser cover.
y
If ice or water dispenses unexpectedly, turn
y
off the water supply and contact a qualified
service center.
When You Should Turn the
Icemaker Off
When the water supply will be shut off
y
for several hours.
When the ice bin is removed for more
y
than one or two minutes.
When the refrigerator will not be used
y
for several days.
NOTE
The ice bin should be emptied when the
icemaker on/off switch is turned to the
position.
OFF
Normal Sounds You May Hear
The icemaker water valve will buzz as
y
the icemaker fills with water. If the
power switch is in the ON (I) position,
it will buzz even if it has not yet been
hooked up to water. To stop the buzzing,
move the power switch to OFF (O).
NOTE
Keeping the power switch in the ON
(I) position before the water line is
connected can damage the icemaker.
You will hear the sound of cubes
y
dropping into the bin and water running
in the pipes as the icemaker refills.
Preparing For Vacation
Set the icemaker power switch to OFF (O) and
shut off the water supply to the refrigerator.
NOTE
The ice bin should be emptied anytime
the icemaker on/off switch is turned to
the OFF (O) position.
If the ambient temperature will drop below
freezing, have a qualified technician drain
the water supply system to prevent serious
property damage due to flooding caused by
ruptured water lines or connections.
Page 31
HOW TO USE
31
Ice and Water Dispenser
* Depending on the model, some of the
following functions may not be available.
CAUTION
Keep children away from the dispenser.
Children may play with or damage the
controls.
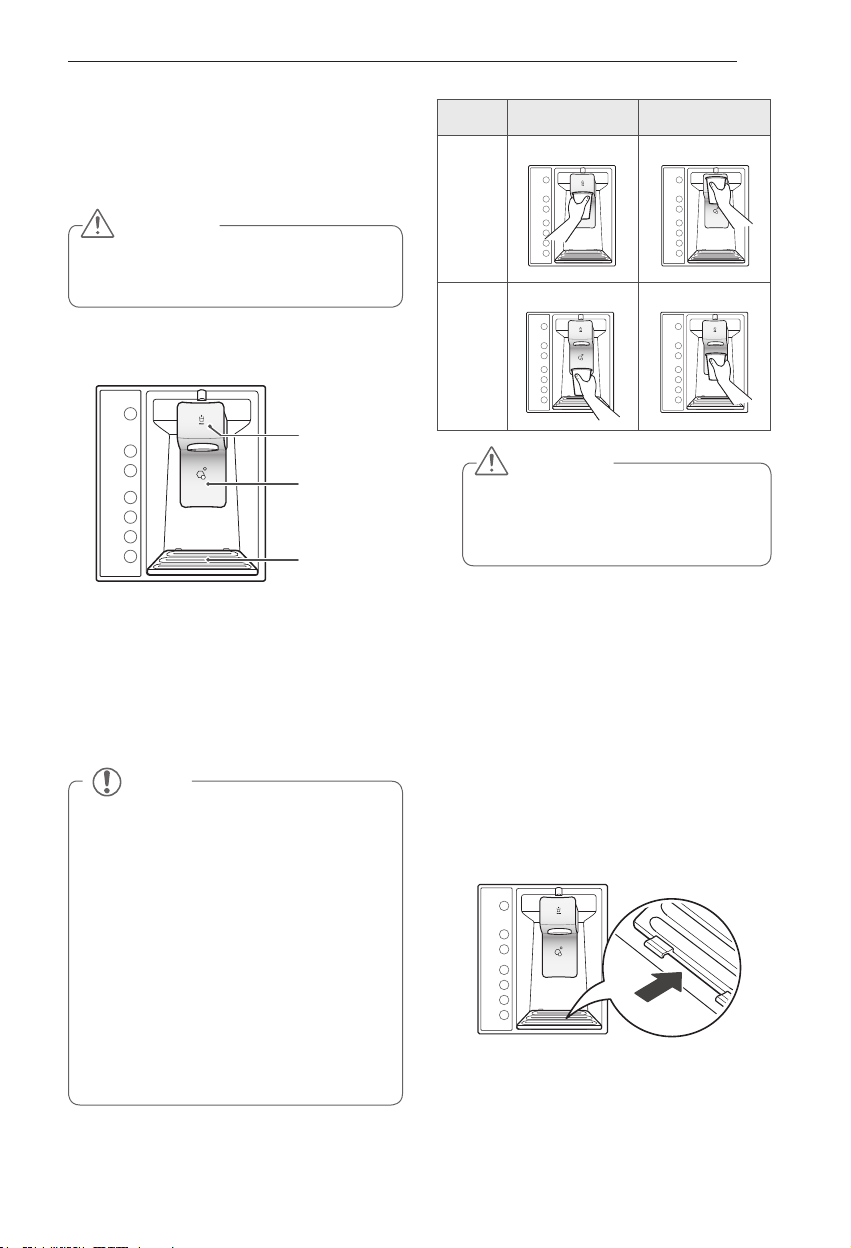
Dispenser
Water switch
Ice switch
Stand
Using the Dispenser
To dispense
y
water switch with a glass.
To dispense
y
with a glass.
cold water
ice
, push on the
, push on the ice switch
Incorrect Way Correct Way
Water
Ice
CAUTION
Throw away the first few batches of ice
(about 24 cubes). This is also necessary
if the refrigerator has not been used for
a long time.
Locking the Dispenser
Press and hold the Alarm and Lock button
simultainously for 3 seconds to lock the
dispenser and all the control panel functions.
Follow the same instructions to unlock.
NOTE
If discolored ice is dispensed, check
y
the water filter and water supply. If the
problem continues, contact a qualified
service center. Do not use the ice or
water until the problem is corrected.
The dispenser will not operate when
y
either of the refrigerator doors are open.
If dispensing water or ice into a container
y
with a small opening, place it as close to
the dispenser as possible.
Some dripping may occur after
y
dispensing. Hold your cup beneath
the dispenser for a few seconds after
dispensing to catch all of the drops.
Cleaning the Dispenser Stand
Grip the stand with both hands and pull it
1
out.
Wipe out dirty areas with a clean cloth.
2
Page 32
32
HOW TO USE
Storing Food
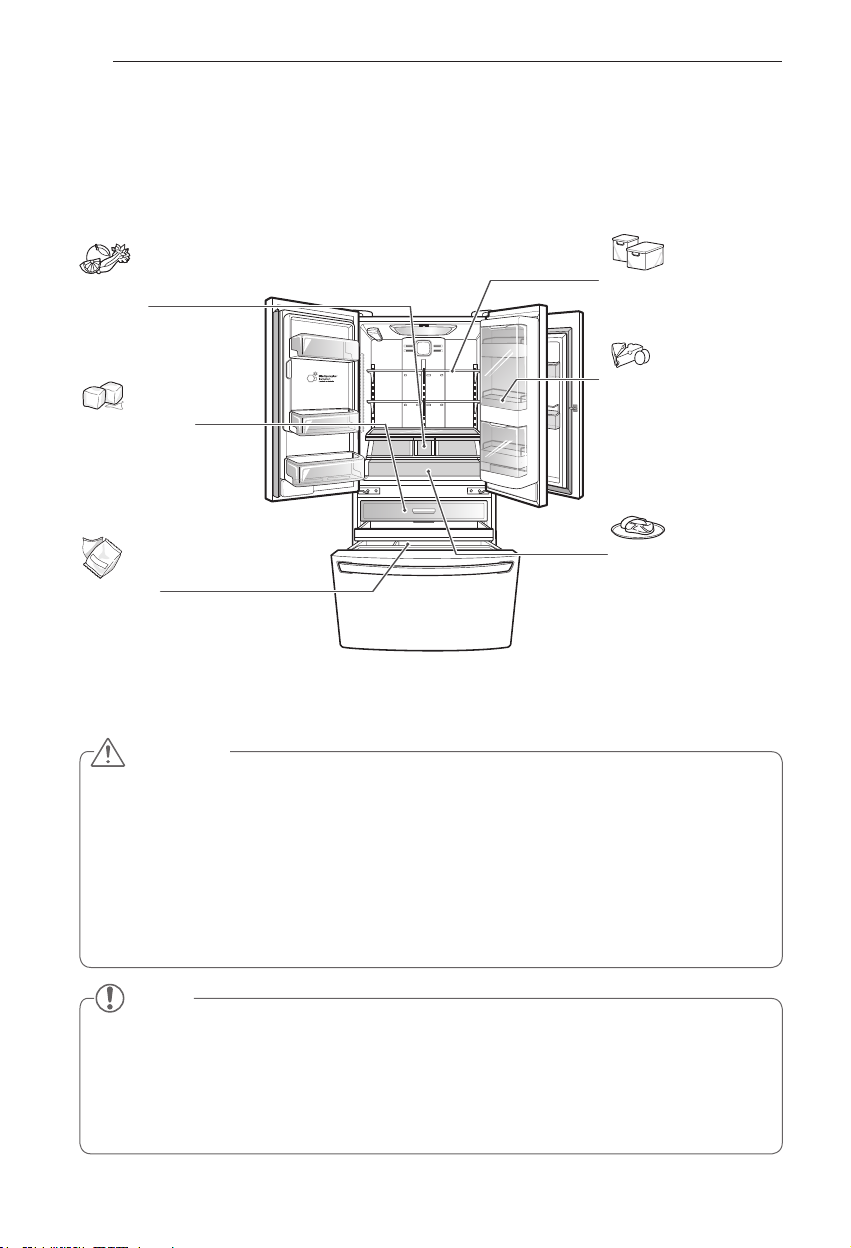
Food Preservation Location
Each compartment inside the refrigerator is designed to store different types of food.
Store your food in the optimal space to enjoy the freshest taste.
Vegetable storage
(Crisper)
Preserves vegetables and
fruit.
Ice storage bin
If a large amount of ice is
needed, transfer the ice in
the in-door ice bin to the ice
storage bin.
Durabase
Largest storage space in
the freezer.
®
Adjustable refrigerator shelf
Adjustable shelves to meet
your individual storage needs.
Recommended types of
foods to store in Door-In-Door
section. Foods like Butter,
Margarine, Cream Cheese,
Peanut Butter, Ketchup,
Mustard, Relish etc.
Glide‘N’Serve
Provides storage space
with a variable temperature
control that keeps the
compartment at a different
temperature than the
refrigerator. It is a convenient
place to store sandwiches or
meat to be cooked.
CaUTiOn
Do not store food with high moisture content towards the top of the refrigerator. The moisture
y
could come in direct contact with the cold air and freeze.
Wash food before storing it in the refrigerator. Vegetables and fruit should be washed, and food
y
packaging should be wiped down to prevent adjacent foods from being contaminated.
If the refrigerator is kept in a hot and humid place, frequent opening of the door or storing a lot of
y
vegetables in the refrigerator may cause condensation to form. Wipe off the condensation with a
clean cloth or a paper towel.
If the refrigerator door or freezer drawer is opened or closed too often, warm air may penetrate
y
the refrigerator and raise its temperature. It can also increase the cost of electricity.
nOTE
If you are leaving home for a short period of time, like a short vacation, the refrigerator should
y
be left on. Refrigerated foods that are able to be frozen will stay preserved longer if stored in the
freezer.
If you are leaving the refrigerator turned off for an extended period of time, remove all food and
y
unplug the power cord. Clean the interior, and leave the door open to prevent fungi from growing
in the refrigerator.
Page 33
HOW TO USE
33
Food Storage Tips
* The following tips may not be applicable
depending on the model.
Wrap or store food in the refrigerator in airtight
and moisture-proof material unless otherwise
noted. This prevents food odor and taste transfer
throughout the refrigerator. For dated products,
check date code to ensure freshness.
Food How to
Butter or
Margarine
Cheese
Milk Wipe milk cartons. For best
Eggs Store in original carton on
Fruit Do not wash or hull the fruit
Leafy
Vegetables
Vegetables
with skins
(carrots,
peppers)
Fish Store fresh fish and shellfish
Leftovers
Keep opened butter in a covered
dish or closed compartment.
When storing an extra supply,
wrap in freezer packaging and
freeze.
Store in the original wrapping
until you are ready to use it.
Once opened, rewrap tightly in
plastic wrap or aluminum foil.
storage, place milk on interior
shelf, not on door shelf.
interior shelf, not on door shelf.
until it is ready to be used. Sort
and keep fruit in its original
container, in a crisper, or store
in a completely closed paper
bag on a refrigerator shelf.
Remove store wrapping and
trim or tear off bruised and
discolored areas. Wash in cold
water and drain. Place in plastic
bag or plastic container and
store in crisper.
Place in plastic bags or plastic
container and store in crisper.
in the freezer section if they
are not being consumed the
same day of purchase. It is
recommended to consume
fresh fish and shellfish the
same day purchased.
Cover leftovers with plastic
wrap, aluminum foil, or plastic
containers with tight lids.
Storing Frozen Food
NOTE
Check a freezer guide or a reliable cookbook
for further information about preparing food
for freezing or food storage times.
Freezing
Your freezer will not quick-freeze a large
quantity of food. Do not put more unfrozen
food into the freezer than will freeze within
24 hours (no more than 2 to 3 lbs. of food per
cubic foot of freezer space). Leave enough
space in the freezer for air to circulate around
packages. Be careful to leave enough room at
the front so the door can close tightly.
Storage times will vary according to the quality
and type of food, the type of packaging or wrap
used (how airtight and moisture-proof) and
the storage temperature. Ice crystals inside a
sealed package are normal. This simply means
that moisture in the food and air inside the
package have condensed, creating ice crystals.
NOTE
Allow hot foods to cool at room temperature
for 30 minutes, then package and freeze.
Cooling hot foods before freezing saves
energy.
Page 34
34
HOW TO USE
Storing Frozen Food (continued)
Packaging
Successful freezing depends on correct
packaging. When you close and seal the
package, it must not allow air or moisture in or
out. If it does, you could have food odor and
taste transfer throughout the refrigerator and
could also dry out frozen food.
Packaging recommendations:
Rigid plastic containers with tight-fitting
y
lids
Straight-sided canning/freezing jars
y
Heavy-duty aluminum foil
y
Plastic-coated paper
y
Non-permeable plastic wraps
y
Specified freezer-grade self-sealing plastic
y
bags
Follow package or container instructions for
proper freezing methods.
Do not use
Bread wrappers
y
Non-polyethylene plastic containers
y
Containers without tight lids
y
Wax paper or wax-coated freezer wrap
y
Thin, semi-permeable wrap
y
Humidity Controlled Crisper
and Glide’N’Serve
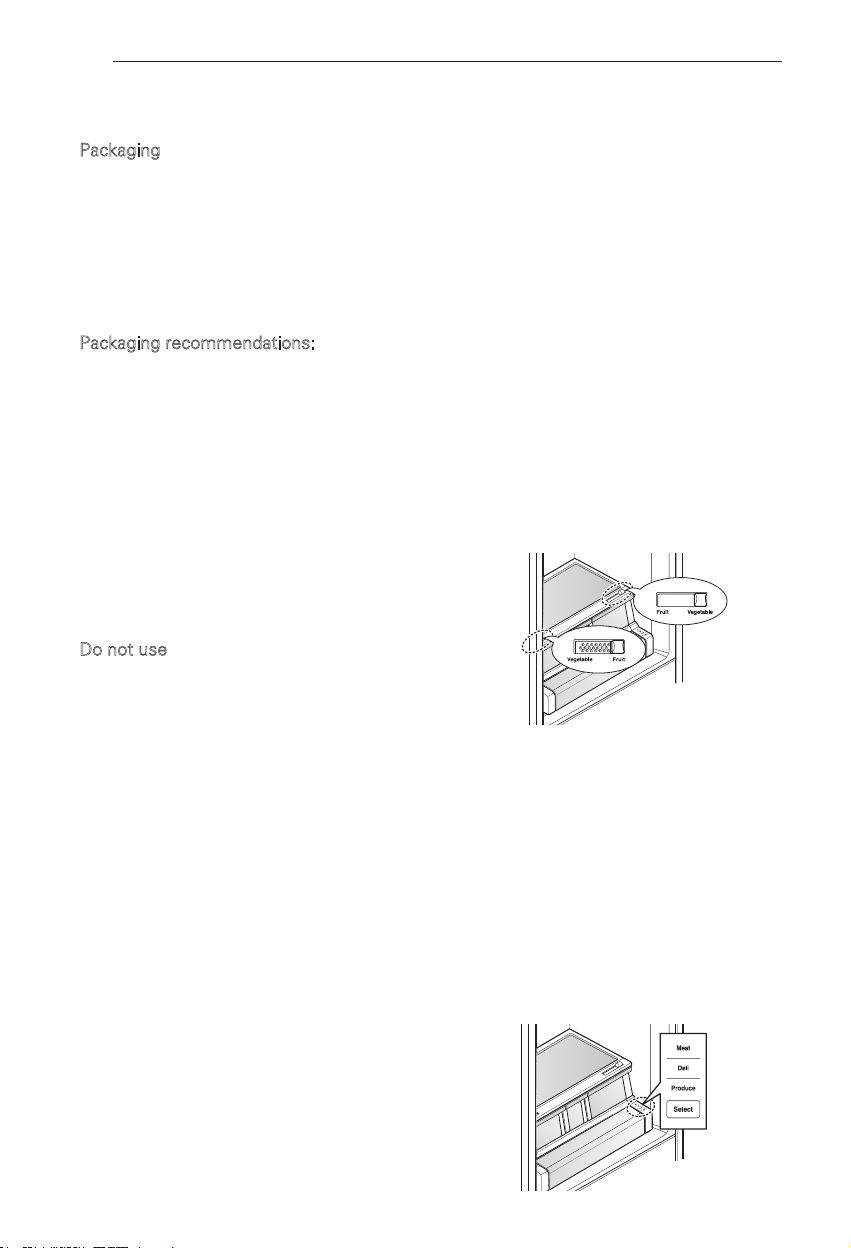
Humidity Controlled Crisper
* Depending on the model, some of the
following functions may not be available.
The crispers provide fresher tasting fruit
and vegetables by letting you easily control
humidity inside the drawer.
You can control the amount of humidity in
the moisture-sealed crispers by adjusting the
control to any setting between
Fruit.
Vegetable
y
crisper for best storage of fresh, leafy
vegetables.
Fruit
y
best storage of fruit.
keeps moist air in the
lets moist air out of the crisper for
Vegetable
Glide’N’Serve
The Glide’N’Serve provides storage space
with a variable temperature control that can
keep the compartment at a slightly different
temperature than the refrigerator section. This
drawer can be used for large party trays, deli
items and beverages. (This drawer should
not be used for vegetables that require high
humidity.)
and
Press the
Meat (Coldest), Deli (Colder) and Produce
(Cold).
button to choose between
Select
Page 35
HOW TO USE
35
Detaching and Assembling the
Storage Bins
Glide’N’Serve and Humidity
Controlled Crisper
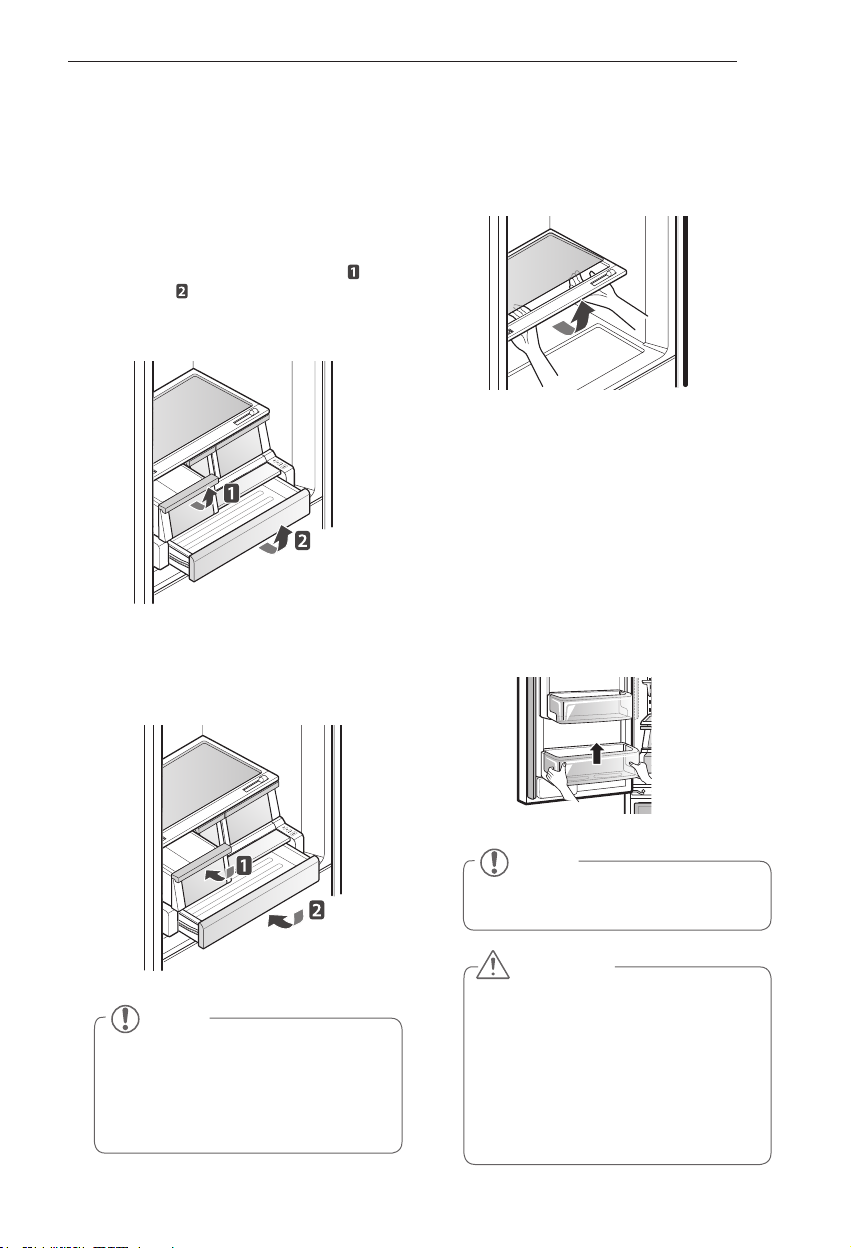
To remove the Humidity Controlled Crisper and
the Glide’N’Server, pull out the Crisper and
Glide’N’Server to full extension, lift the front
up, and pull straight out.
To install, slightly tilt up the front, insert the
drawer into the frame and push it back into
place.
To Remove the Glass
(Pantry drawer not shown for clarity)
Lift up the glass under the crisper cover, and
pull up and out.
Fixed Door Bins
The door bins are removable for easy cleaning
and adjustment.
To remove the bin, simply lift the bin up and
1
pull straight out.
To replace the bin, slide it in above the
2
desired support and push down until it snaps
into place.
NOTE
In order to remove or replace the
rightmost crisper, you must first remove
the Door in Door case. (For instructions
on removing the Door in Door case, see
the next page.)
NOTE
Some bins may vary in appearance and
will only fit in one location.
CAUTION
Do not apply excessive force while
y
detatching or
assembling the storage bins.
Do not use the dishwasher to clean
y
the storage bins and shelves.
Regularly detach and wash the
y
storage bins and shelves; they can
become easily contaminated by the
food.
Page 36
36
HOW TO USE
Door-In-Door
The Door-In-Door compartment allows for easy
access of commonly used food items.
The outer Door-In-Door door includes two door
bins, the Cheese & Butter and Condiment bins,
that are specially designed for food that can be
stored at a warmer temperature. This makes
spreading butter and slicing cheese easier.
NOTE
The Cheese & Butter and Condiment
bins are not recommended for storing
items that spoil easily such as milk and
mayonnaise.
Cheese & Butter
Bin
Condiment Bin
Door-In-Door Case
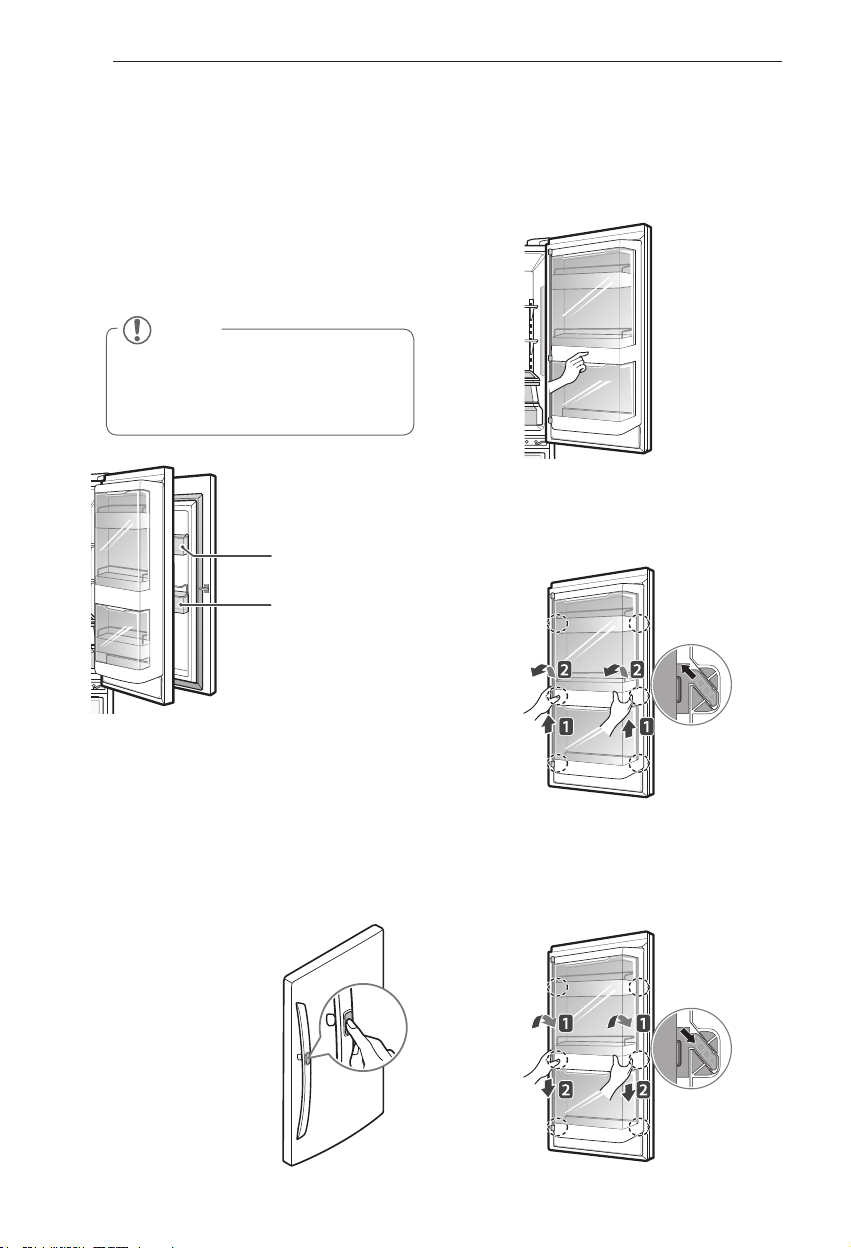
To open the Door-In-Door case, slightly push
the marked area to pop it open. The Door-InDoor Case is removable for easy cleaning and
adjustment.
To remove the Door-In-Door case, lift up and
1
pull out.
Door-In-Door Compartment
To access the Door-in-Door compartment, ligthly
press the button on the right refrigerator door
handle to open the door.
There is no need to grip the handle when opening
the Door-in-door door.
If the handle is gripped
when the button is pressed
you may hear a clicking
noise. This is Normal.
To replace the Door-In-Door case, line the
2
tabs on the Door-In-Door Case with the slots
on the door and push down until it snaps
into place.
Page 37
HOW TO USE
1
2
3
37
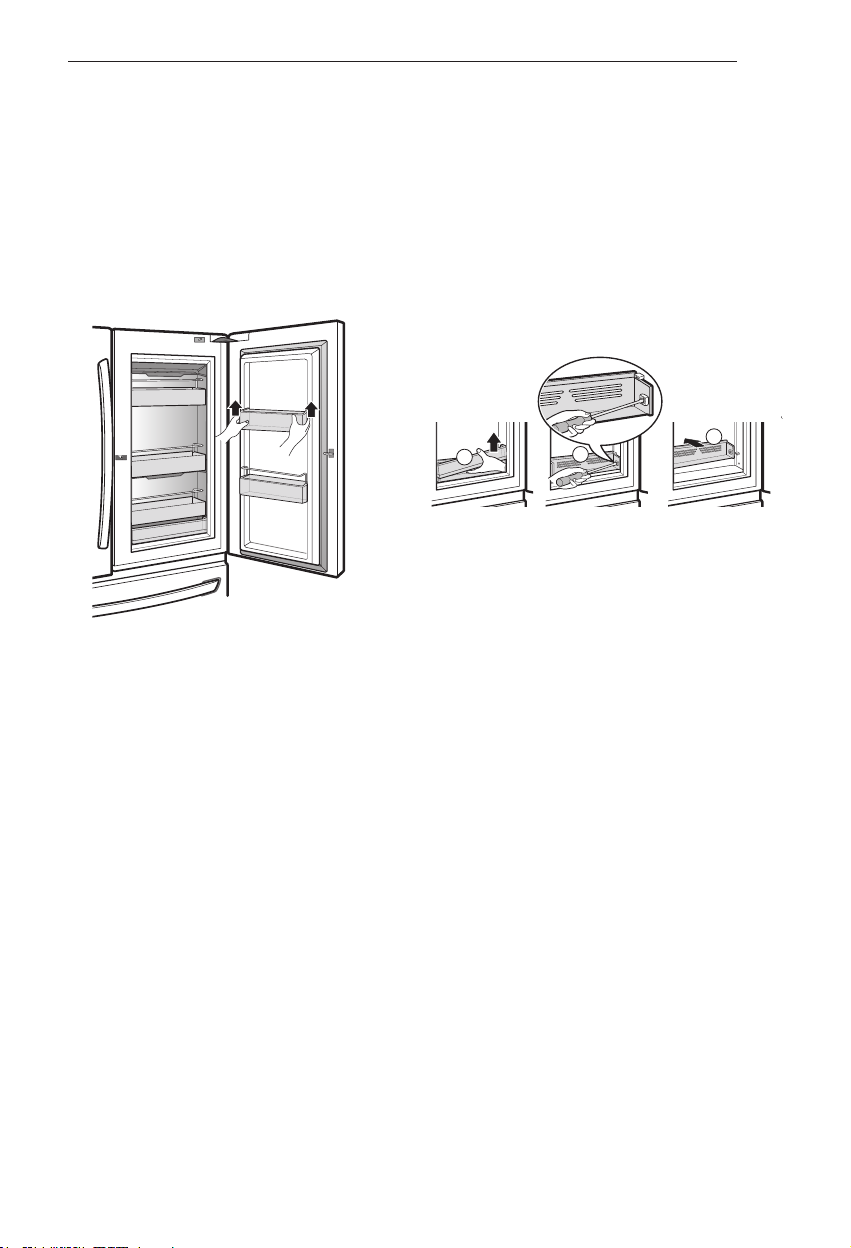
Door-In-Door Door Bins
The Door-In-Door inner and outer door bins are
removable for easy cleaning.
To remove the door bins, lift up and pull out.
1
To replace the door bins, slide the door bin
2
in above the desired support and push down
until it snaps into place.
Door-In-Door Lower Shelf
The Door-In-Door lower shelf is removable for
easy cleaning.
To remove the lower shelf, lift the shelf
1
retainer up and out.
Remove the two screws from the shelf and
2
pull it straight out.
Reverse procedure to replace.
3
Page 38
38
HOW TO USE
Adjusting the Refrigerator
Shelves
The shelves in your refrigerator are adjustable
to meet your individual storage needs. Your
model may have glass or wire shelves.
Adjusting the shelves to fit different heights
of items will make finding the exact item you
want easier. Doing so will also reduce the
amount of time the refrigerator door is open
which will save energy.
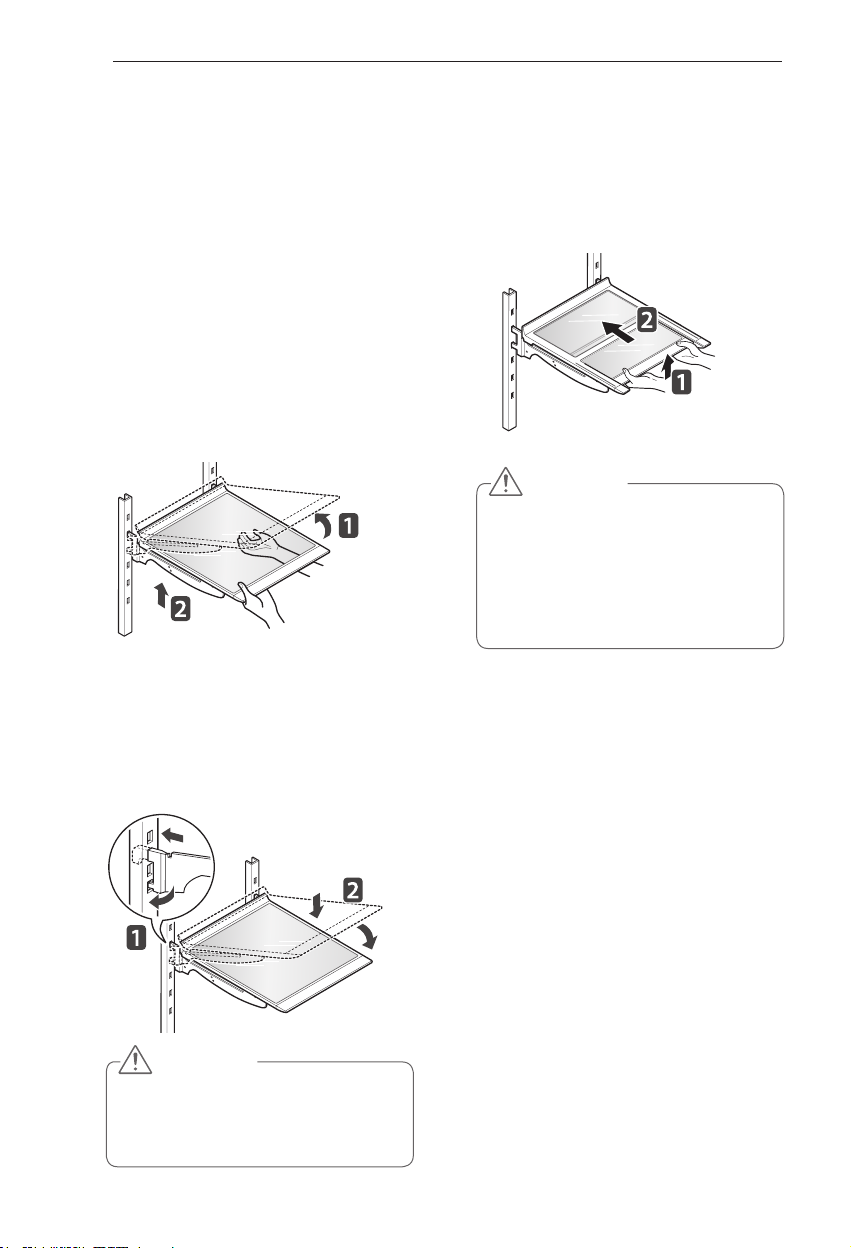
Detaching the Shelf
Tilt up the front of the shelf and lift it straight
up. Pull the shelf out.
Assembling the Shelf
Using the Folding Shelf
You can store taller items, such as a gallon
container or bottles, by simply pushing the
front half of the shelf underneath the back half
of the shelf. Pull the front of the shelf toward
you to return to a full shelf.
CAUTION
Do not clean glass shelves with
y
warm water while they are cold.
Shelves may break if exposed to
sudden temperature changes or
impact.
Glass shelves are heavy. Use special
y
care when removing them.
Tilt the front of the shelf up and guide the shelf
hooks into the slots at a desired height. Then,
lower the front of the shelf so that the hooks
drop into the slots.
CAUTION
Make sure that shelves are level from
one side to the other. Failure to do so
may result in the shelf falling or spilling
food.
Page 39
MAINTENANCE
Cleaning
Both the refrigerator and freezer sections defrost automatically; however, clean both
y
sections about once a month to prevent odors.
Wipe up spills immediately.
y
Always unplug the refrigeration before cleaning.
y
MAINTENANCE
39
General Cleaning Tips
Unplug refrigerator or disconnect power.
y
Remove all removable parts, such as
y
shelves, crispers, etc.
Use a clean sponge or soft cloth and a
y
mild detergent in warm water. Do not
use abrasive or harsh cleaners.
Hand wash, rinse and dry all surfaces
y
thoroughly.
Exterior
Waxing external painted metal surfaces helps
provide rust protection. Do not wax plastic
parts. Wax painted metal surfaces at least
twice a year using appliance wax (or auto paste
wax). Apply wax with a clean, soft cloth.
For products with a stainless steel exterior,
use a clean sponge or soft cloth and a mild
detergent in warm water. Do not use abrasive
or harsh cleaners. Dry thoroughly with a soft
cloth.
CAUTION
Do not use a rough cloth or sponge
y
when cleaning the interior and exterior
of the refrigerator.
Do not place your hand on the bottom
y
surface of the refrigerator when
opening and closing.
Inside Walls (allow freezer to warm
up so the cloth will not stick)
To help remove odors, you can wash the inside
of the refrigerator with a mixture of baking
soda and warm water. Mix 2 tablespoons of
baking soda to 1 quart of water (26 g soda
to 1 liter water.) Be sure the baking soda is
completely dissolved so it does not scratch the
surfaces of the refrigerator.
Door Liners and Gaskets
Use a clean sponge or soft cloth and a mild
detergent in warm water. Do not use cleaning
waxes, concentrated detergents, bleaches,
or cleaners containing petroleum on plastic
refrigerator parts.
Plastic Parts (covers and panels)
Use a clean sponge or soft cloth and a mild
detergent in warm water. Do not use window
sprays, abrasive cleansers, or flammable fluids.
These can scratch or damage the material.
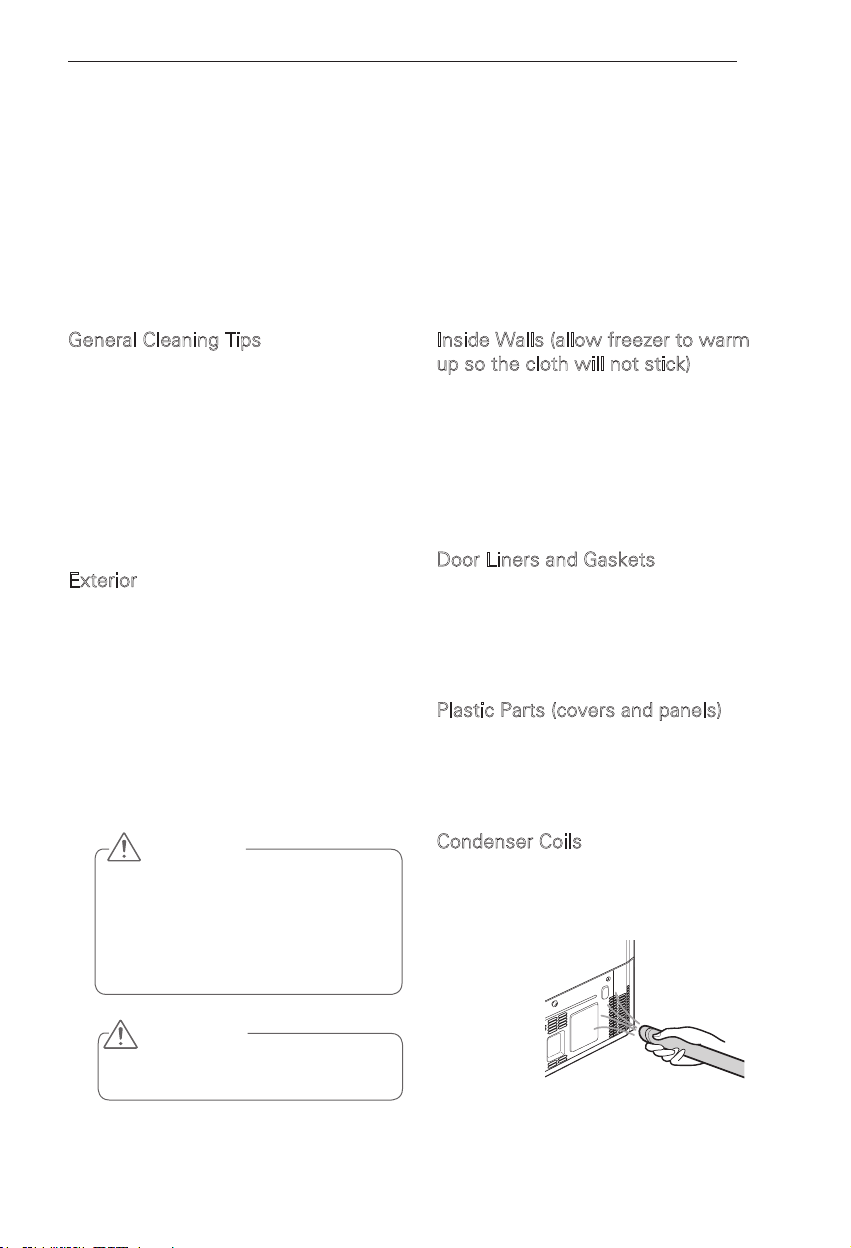
Condenser Coils
Use a vacuum cleaner with an attachment to
clean the condenser cover and vents. Do not
remove the panel covering the condenser coil
area.
WARNING
Use non-flammable cleaner. Failure to do
so can result in fire, explosion, or death.
Page 40
40
MAINTENANCE
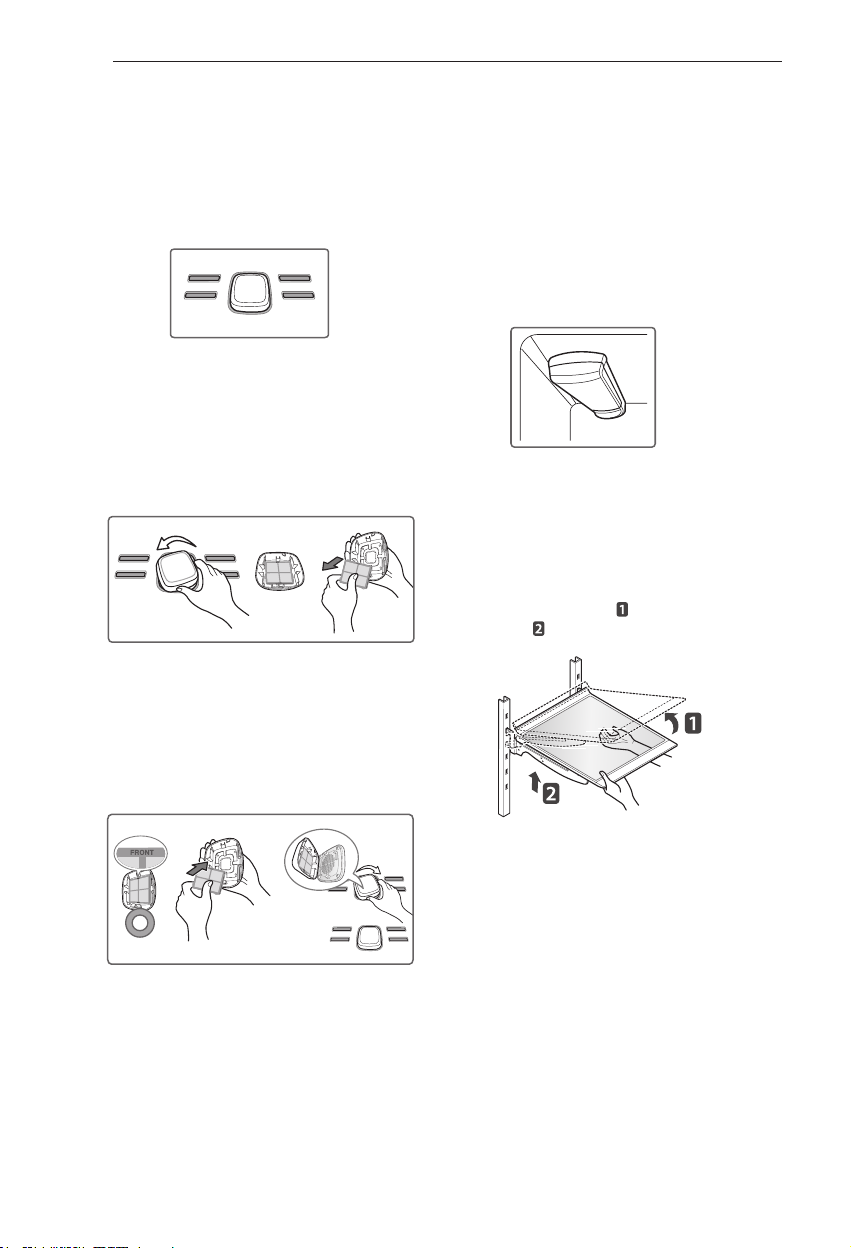
Replacing the Hygiene Fresh
It is recommended that you replace the air filter:
Approximately every six months.
y
When the CHANGE FILTER light turns on.
y
1 Remove the Old Filter
Turn the filter cover to the left to detach
from the refrigerator wall. The filter is
located on the inside of the filter cover.
Remove the filter from the cover and
replace it with a new filter.
Replacing the Water Filter
It is recommended that you replace the water
filter:
Ap yproximately every six months.
When the water filter indicator turns on.
y
When the water dispenser output
y
decreases.
When the ice cubes are smaller than
y
normal.
Before Replacing the Water Filter:
If the top shelf, located below the water filter,
is in the highest position, it will need to be
removed prior to replacing the water filter.
To remove any shelf—Tilt up the front of the
shelf in the direction of
direction of . Pull the shelf out.
and lift it in the
Install a New Air Filter.
2
Place the new filter inside of the cover
with the side that says “Front” facing
outward. Turn the filter cover to the right
to attach to the refrigerator wall.
After changing the filter, push and hold the
Hygiene Fresh button for three seconds to
reset the filter sensor.
Page 41
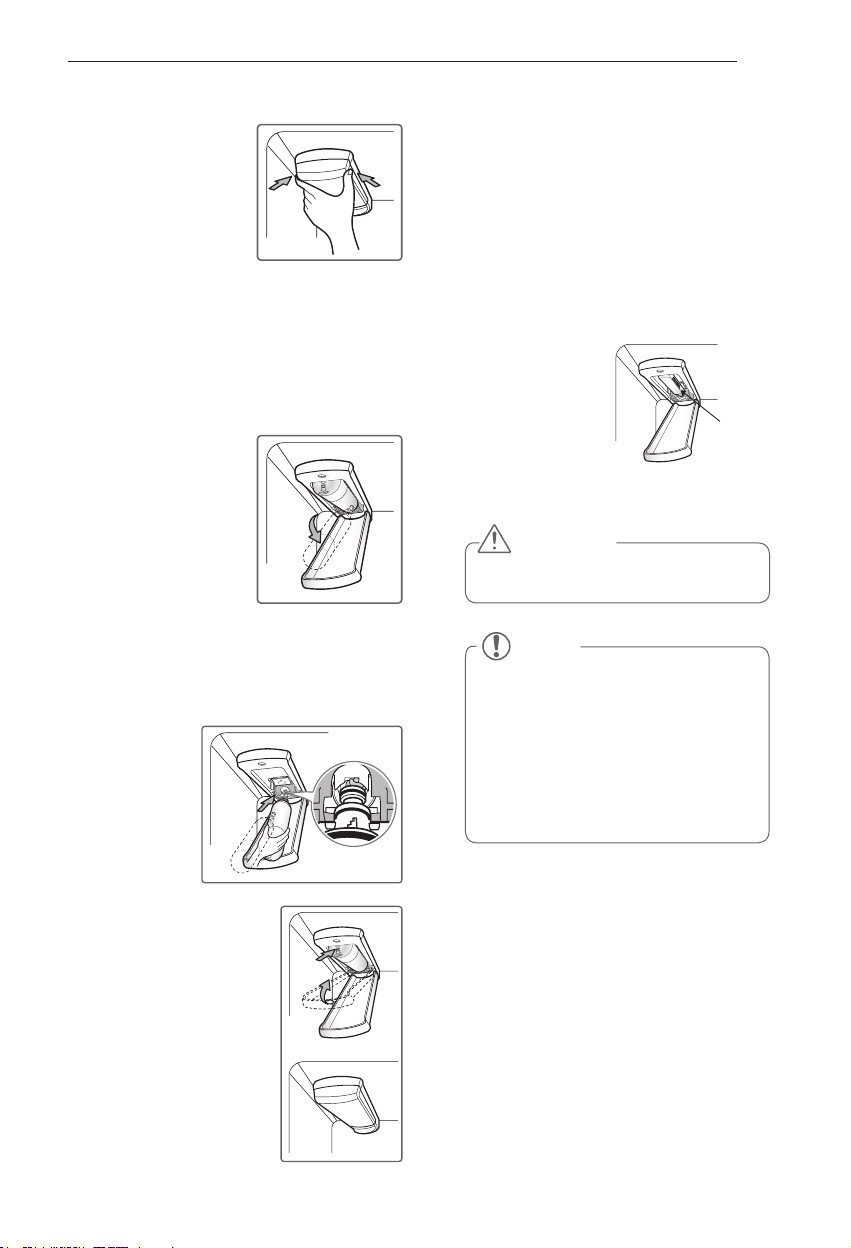
Remove the old water filter.
1
Lower or remove the
y
top left shelf to allow the
water filter to rotate all
the way down.
Press the push button
y
to open the water filter
cover.
Replacing the water lter causes a small
NOTE:
amount of water (around 1 oz. or 25 cc) to drain.
Place a cup under the front end of the water
lter cover to collect any leaking water. Hold the
water lter upright, once it is removed, to prevent
any remaining water from spilling out
of the water lter.
Pull the water
y
filter downward and
pull out. Make sure to
rotate the filter down
completely before pulling
it out of the manifold
hole.
MAINTENANCE
After the water filter is replaced, dispense
3
2.5 gallons (9 litters) of water (flush for
approximately 5 minutes) to remove
trapped air and contaminates from the
system. Do not dispense the entire 2.5
gallons (9 litters) amount continuously.
Depress and release the dispenser pad for
cycles of 30 seconds ON and 60 seconds
OFF.
Water Filter Bypass Plug
4
Keep the water
filter bypass plug.
You MUST use
the water filter
bypass plug when a
replacement water
filter cartridge is not
available.
Water Filter
Bypass Plug
CAUTION
DO NOT operate refrigerator without
water filter or water filter plug installed.
41
Replace with a new water filter.
2
Take the new water filter out of its packing
y
and remove the protective cover from the
o-rings. With
water filter tabs
in the horizontal
position, push
the new water
filter into the
manifold hole
until it stops.
Rotate the water filter up
y
into position and close the
cover. The cover will click
when closed correctly.
NOTE
To purchase a replacement water
y
filter:
- Visit your local dealer or distributor
- Web: Find Parts & Accessories from
Support section of lg.com
- Call : 1700-5060-54
Part number of the replacement water
y
filter: ADQ36006101
Page 42
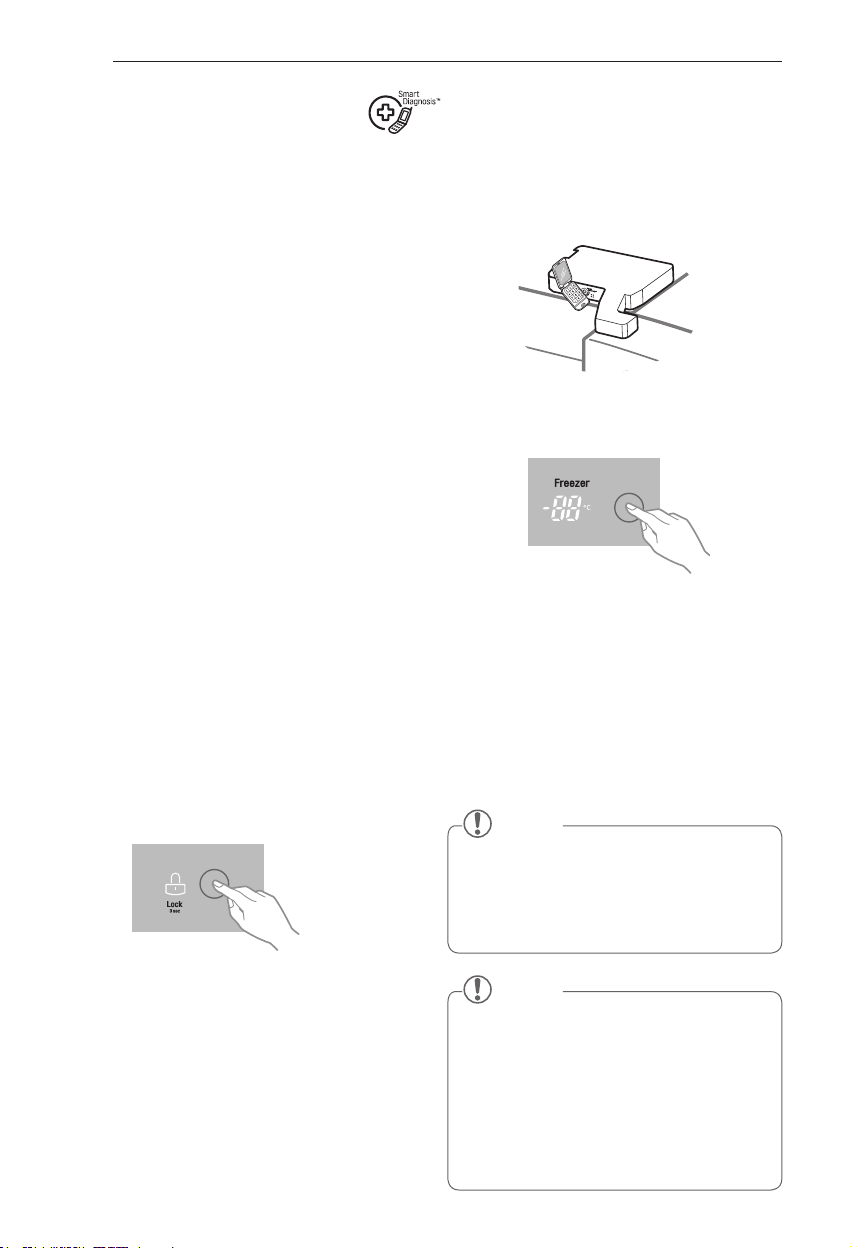
42
SMART DIAGNOSIS
SMART DIAGNOSIS
Should you experience any problems with
your refrigerator, it has the capability of
transmitting data via your telephone to the LG
service center. This gives you the capability of
speaking directly to our trained specialists. The
specialist records the data transmitted from
your machine and uses it to analyze the issue,
providing a fast and effective diagnosis.
If you experience problems with your
refrigerator, call 84733. Only use the Smart
Diagnosis feature when instructed to do so
by the LG call center agent. The transmission
sounds that you will hear are normal and sound
similar to a fax machine.
Smart Diagnosis cannot be activated unless
your refrigerator is connected to power. If
your refrigerator is unable to turn on, then
troubleshooting must be done without using
Smart Diagnosis.
Using Smart Diagnosis
First, call 84733. Only use the Smart Diagnosis
feature when instructed to do so by the LG call
center agent.
Lock the display. To lock the display,
1
press and hold the Lock button for three
seconds. (If the display has been locked
for over five minutes, you must deactivate
the lock and then reactivate it.)
Hold the mouthpiece of your phone in
3
front of the speaker that is located on the
right hinge of the refrigerator door, when
instructed to do so by the call center.
Press and hold the Freezer Temperature
4
button for three seconds while continuing
to hold your phone to the speaker.
After you hear three beeps, release the
5
Freezer Temperature button.
Keep the phone in place until the tone
6
transmission has finished. This takes about
15 seconds, and the display will count
down the time. Once the countdown is
over and the tones have stopped, resume
your conversation with the specialist, who
will then be able to assist you in using the
information transmitted for analysis.
NOTE
For best results, do not move the phone
y
while the tones are being transmitted.
If the call center agent is not able to get
y
an accurate recording of the data, you
may be asked to try again.
Open the right refrigerator door.
2
NOTE
Call quality differences by region may
y
affect the function.
Use the home telephone for better
y
communication performance, resulting
in better service.
Bad call quality may result in poor data
y
transmission from your phone to the
machine, which could cause Smart
Diagnosis to not work properly.
Page 43
TROUBLESHOOTING
TROUBLESHOOTING
Review the Troubleshooting section before calling for service; doing so will save you both time
and money.
Problem Possible Causes Solutions
Refrigerator and
Freezer section
are not cooling.
Cooling System
runs too much.
The refrigerator control is set to
OFF (some models).
Refrigerator is in the defrost
cycle.
Refrigerator was recently
installed.
Refrigerator was recently
relocated.
Refrigerator is replacing an
older model.
Refrigerator was recently
plugged in or power restored.
Door opened often or a large
amount of food / hot food was
added.
Doors are not closed
completely.
Refrigerator is installed in a hot
location.
Condenser / back cover is
clogged.
Turn the control ON. Refer to the Setting the
Controls section for proper temperature settings.
During the defrost cycle, the temperature of
each compartment may raise slightly. Wait 30
minutes and confirm the proper temperature
has been restored once the defrost cycle has
completed.
It may take up to 24 hours for each compartment
to reach the desired temperature.
If the refrigerator was stored for a long period of
time or moved on its side, it is necessary for the
refrigerator to stand upright for 24 hours before
connecting it to power.
Modern refrigerators require more operating
time but use less energy due to more efficient
technology.
The refrigerator will take up to 24 hours to cool
completely.
Adding food and opening the door warms the
refrigerator, requiring the compressor to run
longer in order to cool the refrigerator back
down. In order to conserve energy, try to get
everything you need out of the refrigerator
at once, keep food organized so it is easy to
find, and close the door as soon as the food is
removed. (Refer to the Food Storage Guide.)
Firmly push the doors shut. If they will not
shut all the way, see the Doors will not close
completely or pop open section in Parts &
Features Troubleshooting.
The compressor will run longer under warm
conditions. At normal room temperatures 70°F
(21°C) expect your compressor to run about 40%
to 80% of the time. Under warmer conditions,
expect it to run even more often. The refrigerator
should not be operated above 110°F (43°C).
Use a vacuum cleaner with an attachment to
clean the condenser cover and vents. Do not
remove the panel covering the condenser coil
area.
43
Page 44
44
TROUBLESHOOTING
Problem Possible Causes Solutions
Refrigerator or
Freezer section is
too warm.
Refrigerator was recently
installed.
Air vents are blocked. Rearrange items to allow air to flow throughout
Doors are opened often or for
long periods of time.
Unit is installed in a hot location. The refrigerator should not be operated in
A large amount of food or
hot food was added to either
compartment.
Doors not closed correctly. See the Doors will not close correctly or pop open
Temperature control is not set
correctly.
It may take up to 24 hours for each compartment
to reach the desired temperature.
the compartment. Refer to the Airflow diagram in
the Using Your Refrigerator section.
When the doors are opened often or for long
periods of time, warm, humid air enters the
compartment. This raises the temperature and
moisture level within the compartment. To lessen
the effect, reduce the frequency and duration of
door openings.
temperatures above 110°F (43°C).
Adding food warms the compartment requiring
the cooling system to run. Allowing hot food to
cool to room temperature before putting it in the
refrigerator will reduce this effect.
section in Parts & Features Troubleshooting.
If the temperature is too warm, adjust the
control one increment at a time and wait for the
temperature to stabilize. Refer to the Setting the
Controls section for more information.
Defrost cycle has recently
completed.
During the defrost cycle, the temperature of each
compartment may raise slightly and condensation
may form on the back wall. Wait 30 minutes
and confirm the proper temperature has been
restored once the defrost cycle has completed.
Page 45
Problem Possible Causes Solutions
Interior moisture
buildup.
Food is freezing
in the refrigerator
compartment.
Frost or ice
crystals form
on frozen food
(outside of
package).
Refrigerator or
Freezer section is
too cold.
Doors are opened often or for
long periods of time.
Doors not closed correctly. See the Doors will not close correctly section in
Weather is humid. Humid weather allows additional moisture
Defrost cycle recently
completed.
Food is not packaged correctly. Food stored uncovered or unwrapped, and damp
Food with high water content
was placed near an air vent.
Refrigerator temperature control
is set incorrectly.
Refrigerator is installed in a cold
location.
Door is opened frequently or for
long periods of time.
Door is not closing properly. Refer to the Doors will not close correctly or pop
Incorrect temperature control
settings.
When the doors are opened often or for long
periods of time, warm, humid air enters the
compartment. This raises the temperature and
moisture level within the compartment. To
lessen the effect, reduce the frequency and
duration of door openings.
the Troubleshooting section.
to enter the compartments when the doors
are opened leading to condensation or frost.
Maintaining a reasonable level of humidity in the
home will help to control the amount of moisture
that can enter the compartments.
During the defrost cycle, the temperature
of each compartment may raise slightly and
condensation may form on the back wall.
Wait 30 minutes and confirm that the proper
temperature has been restored once the defrost
cycle has completed.
containers can lead to moisture accumulation
within each compartment. Wipe all containers
dry and store food in sealed packaging to prevent
condensation and frost.
Rearrange items with high water content away
from air vents.
If the temperature is too cold, adjust the control
one increment at a time and wait for the
temperature to stabilize. Refer to the Setting the
Controls section for more information.
When the refrigerator is operated in temperature
below 41°F (5°C), food can freeze in the
refrigerator compartment. The refrigerator should
not be operated in temperature below 55°F (13°C).
When the doors are opened often or for long
periods of time, warm, humid air enters the
compartment. This raises the temperature and
moisture level within the compartment. Increased
moisture will lead to frost and condensation.
To lessen the effect, reduce the frequency and
duration of door openings.
open section in the Troubleshooting section.
If the temperature is too cold, adjust the control
one increment at a time and wait for the
temperature to stabilize. Refer to the Setting the
Controls section for more information.
TROUBLESHOOTING
45
Page 46
46
TROUBLESHOOTING
Problem Possible Causes Solutions
Frost or ice
crystals on frozen
food (inside of
sealed package).
Condensation from food with a
high water content has frozen
inside of the food package.
Food has been left in the freezer
for a long period of time.
This is normal for food items with a high water
content.
Do not store food items with high water content
in the freezer for a long period of time.
Icemaker is not
making enough
ice.
Demand exceeds ice storage
capacity.
House water supply is not
connected, valve is not turned
on fully, or valve is clogged.
Water filter has been
exhausted.
Low house water supply
pressure.
Reverse Osmosis filtration
system is used.
Tubing connecting refrigerator
to house supply valve is kinked.
The icemaker will produce approximately 70~210
cubes in a 24 hour period.
Connect the refrigerator to a cold water supply
with adequate pressure and turn the water
shutoff valve fully open.
If the problem persists, it may be necessary to
contact a plumber.
It is recommended that you replace the water
filter:
Approximately every six months.•
When the water filter indicator turns on.•
When the water dispenser output decreases. •
When the ice cubes are smaller than normal.•
The water pressure must be between 20 and
120 psi (140 and 830 kPa) on models without a
water filter and between 40 and 120 psi (280 and
830 kPa) on models with a water filter.
If the problem persists, it may be necessary to
contact a plumber.
Reverse osmosis filtration systems can reduce
the water pressure below the minimum amount
and result in icemaker issues.
(Refer to Water Pressure section.)
The tubing can kink when the refrigerator is
moved during installation or cleaning resulting
in reduced water flow. Straighten or repair the
water supply line and arrange it to prevent future
kinks.
Page 47
Problem Possible Causes Solutions
Icemaker is not
making enough
ice (continued).
Doors are opened often or for
long periods of time.
If the doors of the unit are opened often, ambient
air will warm the refrigerator which will prevent
the unit from maintaining the set temperature.
Lowering the refrigerator temperature can help,
as well as not opening the doors as frequently.
TROUBLESHOOTING
47
Dispensing water
slowly.
Doors are not closed
completely.
The temperature setting for the
freezer is too warm.
Water filter has been exhausted. It is recommended that you replace the water
Reverse osmosis filtration
system is used.
Low house water supply
pressure.
If the doors are not properly closed, ice
production will be affected. See the Doors will
not close completely or pop open section in Parts
& Features Troubleshooting for more information.
The recommended temperature for the freezer
compartment for normal ice production is 0°F
(-18°C). If the freezer temperature is warmer, ice
production will be affected.
filter:
Approximately every six months.•
When the water filter indicator turns on.•
When the water dispenser output decreases. •
When the ice cubes are smaller than normal.•
Reverse osmosis filtration systems can reduce
the water pressure below the minimum amount
and result in icemaker issues.
If the problem persists, it may be necessary to
contact a plumber.
The water pressure must be between 20 and 120
psi (140 and 830 kPa) on models without a water
filter and between 40 and 120 psi (280 and 830
kPa) on models with a water filter.
If the problem persists, it may be necessary to
contact a plumber.
Page 48
48
TROUBLESHOOTING
Problem Possible Causes Solutions
Not dispensing
ice.
Doors are not closed
completely.
Ice will not dispense if any of the refrigerator
doors are left open.
Icemaker is not
making ice.
Infrequent use of the dispenser. Infrequent use of the ice dispenser will cause
The delivery chute is clogged
with frost or ice fragments.
The dispenser display is locked. Press and hold the Lock button for three seconds
Ice bin is empty. It may take up to 24 hours for each compartment
Refrigerator was recently
installed or icemaker recently
connected.
Icemaker not turned on. Locate the icemaker ON/OFF switch and confirm
The ice detecting sensor is
obstructed.
The refrigerator is not connected
to a water supply or the supply
shutoff valve is not turned on.
Icemaker shutoff (arm or
sensor) obstructed.
Reverse osmosis water filtration
system is connected to your
cold water supply.
the cubes to stick together over time, which
will prevent them from properly dispensing.
Check the ice bin for ice cubes clumping/sticking
together. If they are, break up the ice cubes to
allow for proper operation.
Eliminate the frost or ice fragments by removing
the ice bin and clearing the chute with a plastic
utensil. Dispensing cubed ice can also help
prevent frost or ice fragment buildup.
to unlock the control panel and dispenser.
to reach the desired temperature and for the
icemaker to begin making ice. Make sure that the
shutoff
(arm/sensor) is not obstructed.
Once the ice supply in the bin has been
completely exhausted, it my take up to 90
minutes before additional ice is available, and
approximately 24 hours to completely refill the
bin.
It may take up to 24 hours for each compartment
to reach the desired temperature and for the
icemaker to begin making ice.
that it is in the ON (I) position.
Foreign substances or frost on the ice-detecting
sensor can interrupt ice production. Make sure
that the sensor area is clean at all times for proper
operation.
Connect refrigerator to the water supply and turn
the water shutoff valve fully open.
If your icemaker is equipped with an ice shutoff
arm, make sure that the arm moves freely. If
your icemaker is equipped with the electronic ice
shutoff sensor, make sure that there is a clear
path between the two sensors.
Reverse osmosis filtration systems can reduce
the water pressure below the minimum amount
and result in icemaker issues.
(Refer to the Water Pressure section.)
Page 49
TROUBLESHOOTING
Problem Possible Causes Solutions
49
Not dispensing
water.
New installation or water line
recently connected.
The dispenser panel is locked. Press and hold the Lock button for three seconds
The dispenser is not set for
water dispensing.
Refrigerator or freezer doors are
not closed properly.
Water filter has been recently
removed or replaced.
Tubing connecting refrigerator
to house supply valve is kinked.
Dispense 2.5 gallons (9 litters) of water (flush for
approximately 5 minutes) to remove trapped air
and contaminates from the system.
Do not dispense the entire 2.5 gallons (9 litters)
amount continuously. Depress and release the
dispenser pad for cycles of 30 seconds ON and
60 seconds OFF.
to unlock the control panel and dispenser.
The dispenser can be set for ice or water. Make
certain that the control panel is set for the proper
operation. Press the Water button on the control
panel to dispense water.
Water will not dispense if any of the refrigerator
doors are left open.
After the water filter is replaced, dispense
2.5 gallons (9 litters) of water (flush for
approximately 5 minutes) to remove trapped
air and contaminates from the system. Do not
dispense the entire 2.5 gallons (9 litters) amount
continuously. Depress and release the dispenser
pad for cycles of 30 seconds ON and 60 seconds
OFF.
The tubing can kink when the refrigerator is
moved during installation or cleaning resulting in
reduced water flow. Straighten or repair the water
supply line and arrange it to prevent future kinks.
The house water supply is not
connected, the valve is not
turned on fully, or the valve is
clogged.
Connect refrigerator to the water supply and turn
the water shutoff valve fully open.
If the problem persists, it may be necessary to
contact a plumber.
Page 50
50
TROUBLESHOOTING
Problem Possible Causes Solutions
Ice has bad taste
or odor.
Dispensing warm
water.
Water supply contains minerals
such as sulfur.
Icemaker was recently installed. Discard the first few batches of ice to avoid
Ice has been stored for too
long.
The food has not been stored
properly in either compartment.
The interior of the refrigerator
needs to be cleaned.
The ice storage bin needs to be
cleaned.
Refrigerator was recently
installed.
The water dispenser has been
used recently and the storage
tank was exhausted.
Dispenser has not been used
for several hours.
Refrigerator is connected to the
hot water supply.
A water filter may need to be installed to
eliminate taste and odor problems.
NOTE: In some cases, a filter may not help. It
may not be possible to remove all minerals / odor
/ taste in all water supplies.
discolored or bad tasting ice.
Ice that has been stored for too long will shrink,
become cloudy, and may develop a stale taste.
Throw away old ice and make a new supply.
Rewrap the food. Odors may migrate to the ice if
food is not wrapped properly.
See the Care and Cleaning section for more
information.
Empty and wash the bin (discard old cubes).
Make sure that the bin is completely dry before
reinstalling it.
Allow 24 hours after installation for the water
storage tank to cool completely.
Depending on your specific model, the water
storage capacity will range from approximately
20 to 30 oz (570 to 850 cc).
If the dispenser has not been used for several
hours, the first glass dispensed may be warm.
Discard the first 10 oz (280 cc).
Make sure that the refrigerator is connected to a
cold water pipe.
Water has bad
taste or odor.
WARNING: Connecting the refrigerator to a
hot water line may damage the icemaker.
Water supply contains minerals
such as sulfur.
Water filter has been exhausted. It is recommended that you replace the water
Refrigerator was recently
installed.
A water filter may need to be installed to
eliminate taste and odor problems.
filter:
Approximately every 6 months.•
When the water filter indicator turns on.•
When the water dispenser output decreases. •
When the ice cubes are smaller than normal.•
Dispense 2.5 gallons (9 litters) of water (flush
for approximately 5 minutes) to remove trapped
air and contaminates from the system. Do not
dispense the entire 2.5 gallons (9 litters) amount
continuously. Depress and release the dispenser
pad for cycles of 30 seconds ON and 60 seconds
OFF.
Page 51
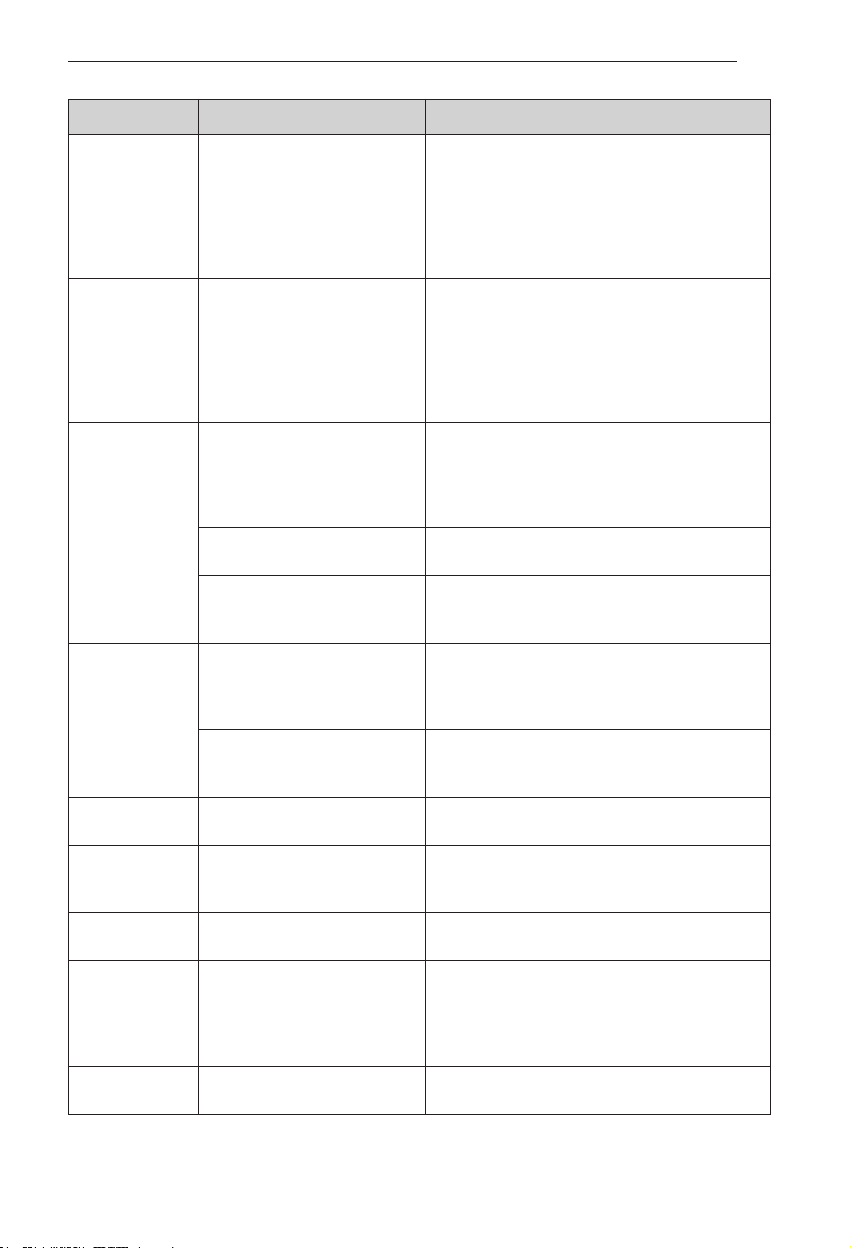
Problem Possible Causes Solutions
Icemaker is
making too much
ice.
Clicking The defrost control will click
Rattling Rattling noises may come from
Whooshing Evaporator fan motor is
Gurgling Refrigerant flowing through the
Popping Contraction and expansion of
Sizzling Water dripping on the defrost
Vibrating If the side or back of the
Dripping Water running into the drain pan
Icemaker shutoff (arm/sensor)
is obstructed.
when the automatic defrost
cycle begins and ends.
The thermostat control (or
refrigerator control on some
models) will also click when
cycling on and off.
the flow of refrigerant, the
water line on the back of the
unit, or items stored on top of
or around the refrigerator.
Refrigerator is not resting solidly
on the floor.
Refrigerator with linear
compressor was jarred while
running.
circulating air through the
refrigerator and freezer
compartments.
Air is being forced over the
condenser by the condenser
fan.
cooling system.
the inside walls due to changes
in temperature.
heater during a defrost cycle.
refrigerator is touching a cabinet
or wall, some of the normal
vibrations may make an audible
sound.
during the defrost cycle.
Empty the ice bin. If your icemaker is equipped
with an ice shutoff arm, make sure that the arm
moves freely. If your icemaker is equipped with
the electronic ice shutoff sensor, make sure that
there is a clear path between the two sensors.
Reinstall the ice bin and wait 24 hours to confirm
proper operation.
Normal Operation
If the rattling continues for more than 15 seconds
after the refrigerator was moved, turn the power
off and then back on again.
Floor is weak or uneven or leveling legs need to
be adjusted. See the Door Alignment section.
Normal Operation
Normal Operation
Normal Operation
Normal Operation
Normal Operation
Normal Operation
To eliminate the noise, make sure that the sides
and back cannot vibrate against any wall or
cabinet.
Normal Operation
TROUBLESHOOTING
51
Page 52
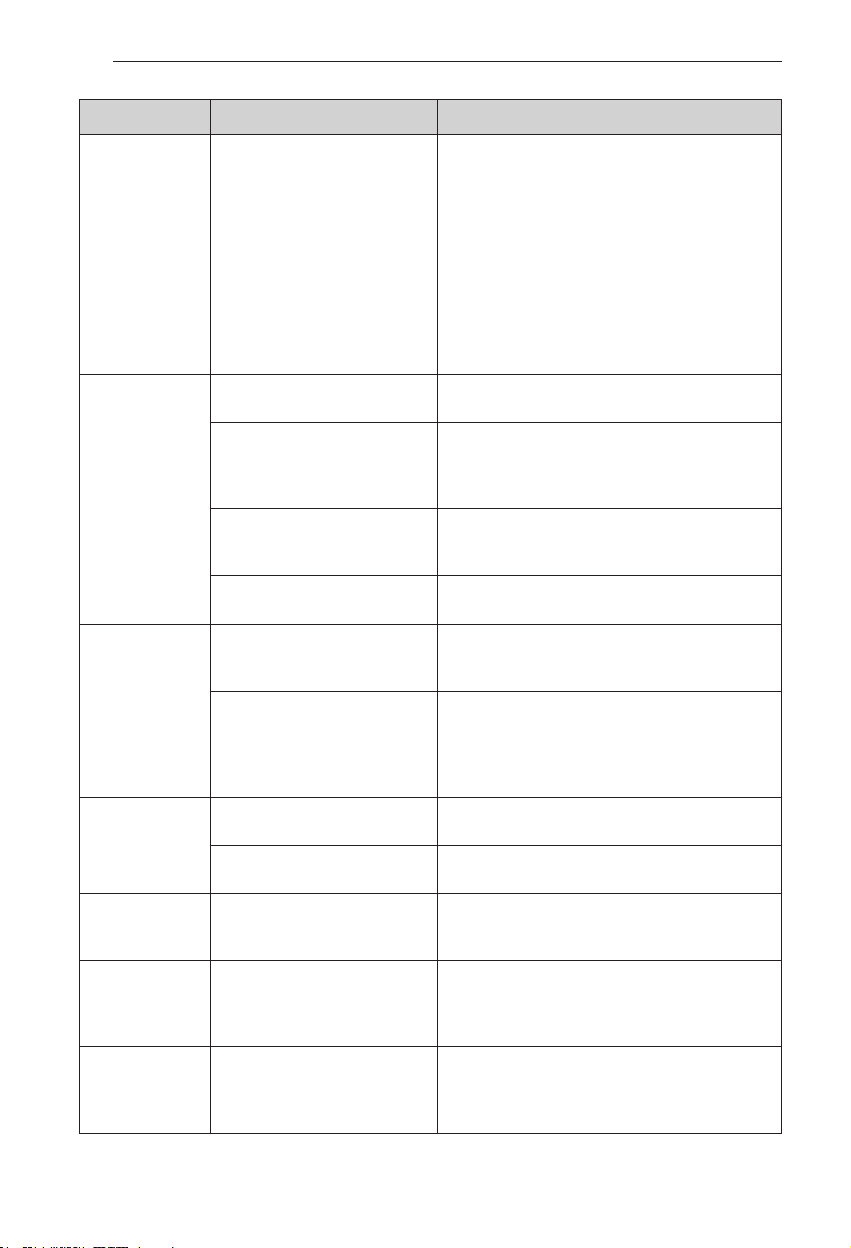
52
TROUBLESHOOTING
Problem Possible Causes Solutions
Pulsating or
High-Pitched
Sound
Doors will not
close correctly or
pop open.
Doors are difficult
to open.
Refrigerator
wobbles or
seems unstable.
Lights do not
work.
Refrigerator has
an unusual odor.
The interior of
the refrigerator
is covered with
dust or soot.
Your refrigerator is designed
to run more efficiently to keep
your food items at the desired
temperature. The high efficiency
compressor may cause your
new refrigerator to run longer
than your old one, but it is still
more energy efficient than
previous models. While the
refrigerator is running, it is
normal to hear a pulsating or
high-pitched sound.
Food packages are blocking the
door open.
Ice bin, crisper cover, pans,
shelves, door bins, or baskets
are out of position.
The doors were removed during
product installation and not
properly replaced.
Refrigerator is not leveled
properly.
The gaskets are dirty or sticky. Clean the gaskets and the surfaces that they
Door was recently closed. When you open the door, warmer air enters the
Leveling legs are not adjusted
properly.
Floor is not level. It may be necessary to add shims under the
LED interior lighting failure. The refrigerator compartment lamp is LED interior
The Air Filter may need to
be set to the MAX setting or
replaced.
The refrigerator is located near a
fire source, such as a fireplace,
chimney or candle.
Normal Operation
Rearrange food containers to clear the door and
door shelves.
Push bins all the way in and put crisper cover,
pans, shelves and baskets into their correct
positions. See the Using Your Refrigerator section
for more information.
Remove and replace the doors according to the
Removing and Replacing Refrigerator Handles
and Doors section.
See Door Alignment in the Refrigeration
Installation section to level refrigerator.
touch. Rub a thin coat of appliance polish or
kitchen wax on the gaskets after cleaning.
refrigerator. As the warm air cools, it can create
a vacuum. If the door is hard to open, wait one
minute to allow the air pressure to equalize, then
see if it opens more easily.
Refer to the Leveling and Door Alignment section.
leveling legs or rollers to complete installation.
lighting, and service should be performed by a
qualified technician.
Set the Air Filter to the MAX setting. If the odor
does not go away within 24 hours, the filter may
need to be replaced. See the Replacing the Air
Filter section for replacement instructions.
Make sure that the refrigerator is not located
near a fire source, such as a fireplace, chimney or
candle.
 Loading...