

Page 1

MFL69495505
RELEASING THIS DRAWING
WITHOUT PERMISSION LG
Electronics SHOULD BE
ACCUSED ACCORDING TO THE
LAWS AND COMPANY RULES.
WORK
01
SEC.
210
BRAND
LG
MODEL
F84U2TDH0N
P/NO.
MFL69495505
LANGUAGE
A**QCZK
1
OFFSET WHITE 80 g
F H/1 4U2TDH(W)(0~9)(N)
A**QWCZ
A**QWSK
ENGLISH
CZECH
SLOVAK
PAGE
142
Titan Classic Hybrid
Washing Machine
REMARK
1. Material, printing and exterier size are refer to work tables.
148 148
2. Printing, text size and line are based on LG design film.
3. Exterier size on the drawing is cutting line.
4. Before product controlled by criteria sample.
should comply with LG standard of LG(63)-A-5501-34
DR COMPLETED
PDF
ILLUSTRATOR
TRIG.
MODELING
1
2
3
4
APPROVEDPREPAREDDATEREF. NO.REV. NO. REVISION DESCRIPTION
A.Walaszczyk
25.08.2016
LGEWR
LG Electronics Inc.
UNIT SCALE
REVIEWEDDESIGNED
M.Grabek S.Kozłowski N.Kim
25.08.2016 25.08.2016 25.08.2016
mm
CHECKED APPROVED
RELATED DWG.
N
S
T
I
MANUAL,OWNER’S
T
L
E
DRUM-EXPORT1/1
DWG.
No.
MFL69495505
Page 2

OWNER’S MANUAL
WASHING
MACHINE
Before beginning installation, read these instructions carefully.
This will simplify installation and ensure that the product is installed
correctly and safely. Leave these instructions near the product after
installation for future reference.
EN ENGLISH CZ CZECH SK SLOVAK
F H/1 4U2TDH(W)(0~9)(N)
F84U2TDH0N
MFL69495505
Rev.00_01082016
www.lg.com
Page 3

TABLE OF CONTENTS
SAFETY INSTRUCTIONS ......................................03
Important Safety Instructions .......................................................04
Disposal of Your Old Appliance ...................................................07
INSTALLATION .......................................................08
Parts ............................................................................................08
Accessories .................................................................................08
Specifications ..............................................................................09
Installation Place Requirements .............
Unpacking and Removing Transit Bolts ....................................... 11
Using Anti-Slip Sheets (Optional) .............
Wooden Floors (Suspended Floors) ............................................12
Leveling the Appliance .................................................................13
Connecting the Supply Hose .............
Installing the Drain Hose .............................................................16
Electrical Connections (In the UK Only) ......................................16
This manual may contain images or content
different from the model you purchased.
This manual is subject to revision by the
manufacturer.
.....................................10
...................................12
..........................................13
OPERATION ...........................................................17
Using the Washing Machine ........................................................17
Sorting Laundry ...........................................................................18
Adding Cleaning Products ...........................................................19
Control Panel ...............................................................................21
Programme Table ........................................................................22
Option Programme ......................................................................27
Dry (Optional) .............................................................................
Using Smart Function (Optional) .................................................30
29
MAINTENANCE ......................................................31
Cleaning Your Washing Machine ................................................. 31
Cleaning the Water Inlet Filter .....................................................31
Cleaning the Drain Pump Filter ...................................................32
Cleaning the Dispenser Drawer ...................................................33
Tub Clean (Optional) ...................................................................33
Caution on Freezing During Winter .............
Using the Smart Diagnosis™ Function .......................................36
................................34
TROUBLESHOOTING ............................................37
Diagnosing Problems ..................................................................37
Error Messages ...........................................................................40
WARRANTY ............................................................42
OPERATING DATA .................................................45
Page 4
SAFETY INSTRUCTIONS
The following safety guidelines are intended to prevent unforeseen risks or
damage from unsafe or incorrect operation of the product.
The guidelines are separated into ‘WARNING’ and ‘CAUTION’ as described
below.
This symbol is displayed to the indicate matters and operations that
can cause risk. Read the part with this symbol carefully and follow the
instructions in order to avoid risk.
EN
WARNING
can cause serious injury or death.
CAUTION
can cause the minor injury or damage the product.
- This indicates that the failure to follow the instructions
- This indicates that the failure to follow the instructions
WARNING
To reduce the risk of re, electric shock, or injury to persons when using
your product, basic safety precautions should be followed, including the
following:
Children in the Household
This appliance is not intended for use by persons (including children) with reduced
physical, sensory or mental capabilities, or lack of experience and knowledge,
unless they have been given supervision or instruction concerning use of the
appliance by a person responsible for their safety. Children should be supervised to
ensure that they do not play with the appliance.
For Use in Europe:
This appliance can be used by children aged from 8 years and above and persons
with reduced physical, sensory or mental capabilities or lack of experience and
knowledge if they have been given supervision or instruction concerning use of
the appliance in a safe way and understand the hazards involved. Children shall
not play with the appliance. Cleaning and user maintenance shall not be made by
children without supervision.
Children of less than 3 years should be kept away unless continuously supervised.
03
Page 5

Important Safety Instructions
WARNING
To reduce the risk of re, electric shock, or injury to persons when using
your product, basic safety precautions should be followed, including the
following:
Installation
•Never attempt to operate this appliance if it is damaged, malfunctioning, partially
disassembled, or has missing or broken parts, including a damaged cord or plug.
•This appliance should only be transported by two or more people holding the
appliance securely.
•Do not install the appliance in a damp and dusty place. Do not install or store the
appliance in any outdoor area, or any area that is subject to weathering conditions
such as direct sunlight, wind, rain, or temperatures below freezing.
•Tighten the drain hose to avoid separation.
•If the power cord is damaged or the hole of the socket outlet is loose, do not use
the power cord and contact an authorized service centre.
•This appliance must not be installed behind a lockable door, a sliding door or a
door with a hinge on the opposite side to that of the appliance, in such a way that
a full opening of the appliance door is restricted.
•Do not plug multiple socket outlets, an extension power cable or adapter with this
appliance.
•This appliance must be grounded. In the event of malfunction or breakdown,
grounding will reduce the risk of electric shock by providing a path of least
resistance for electric current.
•This appliance is equipped with a power cord having an equipment-grounding
conductor and a grounding power plug. The power plug must be plugged into an
appropriate socket outlet that is installed and grounded in accordance with all local
codes and ordinances.
•Improper connection of the equipment-grounding conductor can result in risk of
electric shock. Check with a qualied electrician or service personnel if you are in
doubt as to whether the appliance is properly grounded.
•Do not modify the power cord provided with the appliance.If it does not t the
outlet, have a proper outlet installed by a qualied electrician.
EN
04
Page 6

EN
Operation
Do not use a sharp object like drill or pin to press or separate an operation unit.
•
Do not repair or replace any part of the appliance. All repairs and servicing must
•
be performed by qualied service personnel unless specically recommended in
this Owner’s Manual. Use only authorized factory parts.
Keep the area underneath and around your appliances free of combustible
•
materials such as lint, paper, rags, chemicals, etc.
Do not put animals, such as pets into the appliance.
•
Do not leave the appliance door open. Children may hang on the door or crawl
•
inside the appliance, causing damage or injury.
Use new hose or hose-set supplied with the appliance. Reusing old hoses can
•
cause a water leak and subsequent property damage.
Never reach into this appliance while it is operating. Wait until the drum has
•
completely stopped.
Do not put in, wash or dry articles that have been cleaned in, washed in, soaked
•
in, or spotted with combustible or explosive substances (such as wax, oil, paint,
gasoline, degreasers, drycleaning solvents, kerosene, vegetable oil, cooking oil,
etc.). Improper use can cause re or an explosion.
In case of ood, disconnect the power plug and contact the LG Electronics
•
customer information centre.
Do not push down on the door excessively, when the appliance door is open.
•
Do not touch the door during steam or drying programmes.
•
Do not use ammable gas and combustible substances (benzene, gasoline,
•
thinner, petroleum, alcohol, etc.) near the appliance.
If the drain hose or supply hose is frozen during winter, use it only after thawing.
•
Keep all washing detergents, softener and bleach away from children.
•
Do not touch the power plug or the appliance controls with wet hands.
•
When pulling out the power plug from an outlet, hold the power plug, not the cable.
•
Do not bend the power cable excessively or place a heavy object on it.
•
Do not wash rugs, mats, shoes or pet blankets, or any other items other than
•
clothes or sheets, in this machine.
05
Page 7

This appliance must only be used for domestic household purposes and should
•
not be used in mobile applications.
If there is a gas leakage (isobutane, propane, natural gas, etc.), do not touch the
•
appliance or power plug and ventilate the area immediately.
Maintenance
Securely plug the power plug in the socket outlet after completely removing any
•
moisture and dust.
Disconnect the power cord before cleaning the appliance.
•
Never unplug the appliance by pulling on the power cable. Always grip the power
•
plug rmly and pull straight out from the socket outlet.
Do not spray the water inside or outside the appliance to clean it.
•
Disposal
•Before discarding an old appliance, unplug it. Cut off the cable directly behind the
appliance to prevent misuse.
•Dispose of all packaging materials (such as plastic bags and styrofoam) away from
children. The packaging material can cause suffocatoions.
•Remove the door before disposing of or discarding this appliance to avoid the
danger of children or small animals getting trapped inside.
EN
06
Page 8

Disposal of Your Old Appliance
This crossed-out wheeled bin symbol indicates that waste electrical and
•
electronic products (WEEE) should be disposed of separately from the
municipal waste stream.
Old electrical products can contain hazardous substances so correct
•
disposal of your old appliance will help prevent potential negative
consequences for the environment and human health. Your old appliance
may contain reusable parts that could be used to repair other products,
and other valuable materials that can be recycled to conserve limited
resources.
You can take your appliance either to the shop where you purchased
•
the product, or contact your local government waste ofce for details of
your nearest authorised WEEE collection point. For the most up to date
information for your country please see www.lg.com/global/recycling.
EN
07
Page 9
INSTALLATION
Parts
EN
Transit bolts
Power plug
Drawer
Control panel
Drum
Door
Drain hose
Drain plug
Drain pump lter
Cover cap
(Location may
vary depending on
products)
Adjustable feet
Accessories
Cold supply hose (1EA)
(Option: Hot (1EA))
Spanner Anti–slip sheets (Optional)
08
Page 10
EN
Model
F H/1 4U2TDH(W)(0~9)(N)
F84U2TDH0N
Wash Capacity 8 kg (Wash)/ 5kg (Dry)
Power Supply 220 - 240 V~, 50 Hz
Size 600 mm (W) x 560 mm (D) x 850 mm (H)
Product Weight 68 kg
Permissible Water pressure 0.1 - 1.0 MPa (1.0 - 10.0 kgf / cm²)
•
•
ve the quality of the product.
ter supply.
09
Page 11
Installation Place Requirements
Location
cm
10
Level Floor :
is 1°.
Power Outlet : Must be within 1.5 meters of either side
of the location of the appliance.
Do not overload the outlet with more than one
•
appliance.
Additional Clearance : For the wall, 10 cm: rear
/2 cm: right & left side
Do not place or store laundry products on top of the
•
appliance at any time.
These products may damage the nish or controls.
•
Allowable slope under the entire appliance
cm
2
cm
2
EN
Do not install your appliance in rooms where freezing
•
temperatures may occur. Frozen hoses may burst
under pressure. The reliability of the electronic control
unit may be impaired at temperatures below freezing
point.
Ensure that when the appliance is installed, it is
•
easily accessible for an engineer in the event of a
breakdown.
With the appliance installed, adjust all four feet
•
using the transit bolt spanner provided to ensure the
appliance is stable, and a clearance of approximately
20 mm is left between the top of the appliance and the
underside of any work-top.
If the appliance is delivered in winter and temperatures
•
are below freezing, place the appliance at room
temperature for a few hours before putting it into
operation.
WARNING
This equipment is not designed for maritime use or for
•
use in mobile installations such as caravans, aircraft
etc.
WARNING
The plug must be plugged into an appropriate outlet
•
that is properly installed and grounded in accordance
with all local codes and ordinances.
Positioning
Install the appliance on a at hard oor.
•
Make sure that air circulation around the appliance is
•
not impeded by carpets, rugs, etc.
Never try to correct any unevenness in the oor with
•
pieces of wood, cardboard or similar materials under
the appliance.
If it is impossible to avoid positioning the appliance
•
next to a gas cooker or coal burning stove, an
insulation (85x60 cm) covered with aluminum foil on
the side facing the cooker or stove must be inserted
between the two appliances.
Electrical Connection
Do not use an extension cord or double adapter.
•
Always unplug the appliance and turn off the water
•
supply after use.
Connect the appliance to an earthed socket in
•
accordance with the current wiring regulations.
The appliance must be positioned so that the plug is
•
easily accessible.
Repairs to the appliance must only be carried out
•
by qualied personnel. Repairs carried out by
inexperienced persons may cause injury or serious
malfunctioning. Contact your local service centre.
10
Page 12
EN
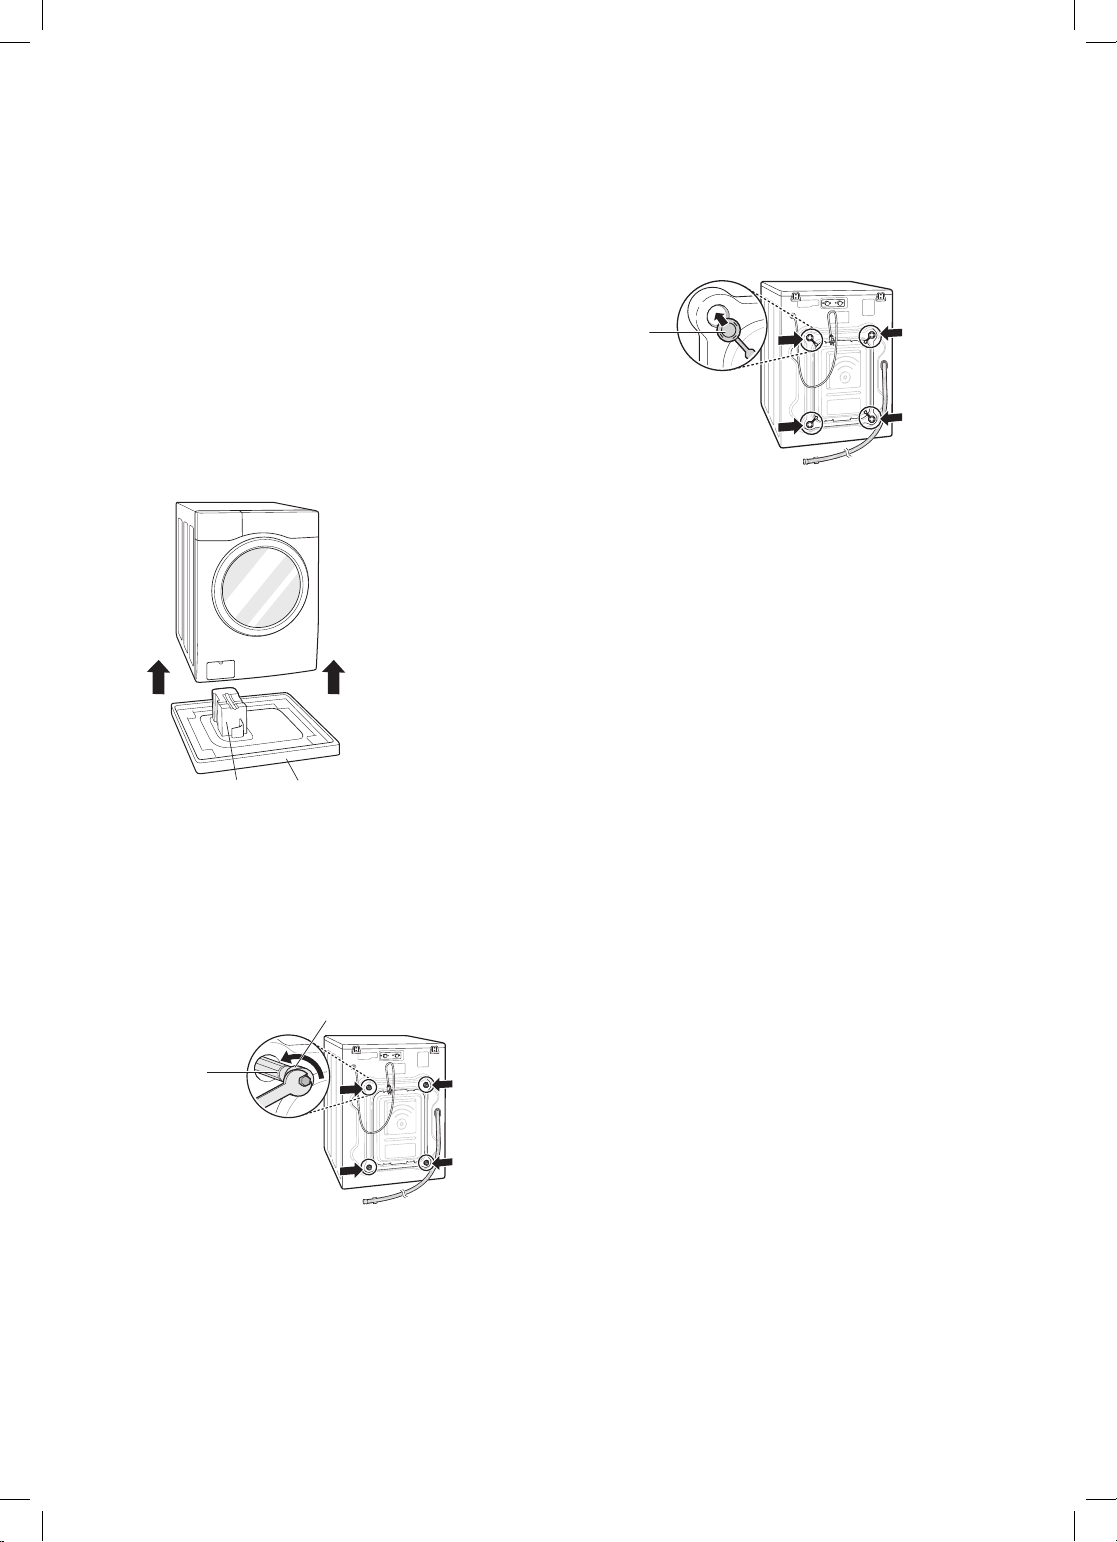
Unpacking and Removing Transit
Bolts
Lift the appliance off the foam base.
1
After removing the carton and shipping material,
•
lift the appliance off the foam base. Make sure
the tub support comes off with the base and is
not stuck to the bottom of the appliance.
If you must lay the appliance down to remove
•
the carton base, always protect the side of the
appliance and lay it carefully on its side. Do not
lay the appliance on its front or back.
Tub support
(Optional)
Carton base
Install the hole caps.
3
Locate the hole caps included in the accessory
•
pack and install them in the shipping bolt holes.
Cap
NOTE
Save the bolt assemblies for future use. To prevent
•
damage to internal components, Do not transport the
washing machine without reinstalling the transit bolts.
Failure to remove transit bolts and retainers may
•
cause severe vibration and noise, which can lead to
permanent damage to the washing machine. The cord
is secured to the back of the washing machine with
a shipping bolt to help prevent operation with transit
bolts in place.
Remove the bolt assemblies.
2
Starting with the bottom two transit bolts, use the
•
spanner (included) to fully loosen all transit bolts
by turning them counterclockwise. Remove the
bolt assemblies by wiggling them slightly while
pulling them out.
Retainer
Shipping
bolt
11
Page 13
EN
Using Anti-Slip Sheets (Optional)
If you install the appliance on a slippery surface, it may
move because of excessive vibration. Incorrect leveling
may cause malfunction through noise and vibration. If
this occurs, install the anti-slip sheets under the leveling
feet and adjust the level.
Clean the oor to attach the anti-slip sheets.
1
Use a dry rag to remove and clean foreign
•
objects and moisture. If moisture remains, the
anti-slip sheets may slip.
Adjust the level after placing the appliance in the
2
installation area.
Place the adhesive side of the anti-slip sheets on
3
the oor.
It is most effective to install the anti-slip sheets
•
under the front legs. If it is difcult to place the
pads under the front legs, place them under the
back legs.
This side up
Wooden Floors (Suspended
Floors)
Wooden oors are particularly susceptible to vibration.
•
To reduce vibration we recommend you place rubber
•
cups at least 15 mm thick under each foot of the
appliance, secured to at least two oor beams with
screws.
Rubber cup
If possible install the appliance in one of the corners of
•
the room, where the oor is more stable.
Fit the rubber cups to reduce vibration.
•
NOTE
•Proper placement and leveling of the washing machine
will ensure long, regular, and reliable operation.
•The washing machine must be 100% horizontal and
Adhesive side
Ensure the appliance is level.
4
Push or rock the top edges of the appliance
•
gently to make sure that the appliance does not
rock. If the appliance rocks, level the appliance
again.
NOTE
You can obtain anti-slip sheets from the LG Service
•
Centre.
•It must not ‘Seesaw’ across corners under the load.
•
wax and other lubricant coatings.
•Do not let the feet of the washing machine get wet.
Failure to do so may cause vibration or noise.
•You can obtain rubber cups from
the LG Service Centre.
12
Page 14

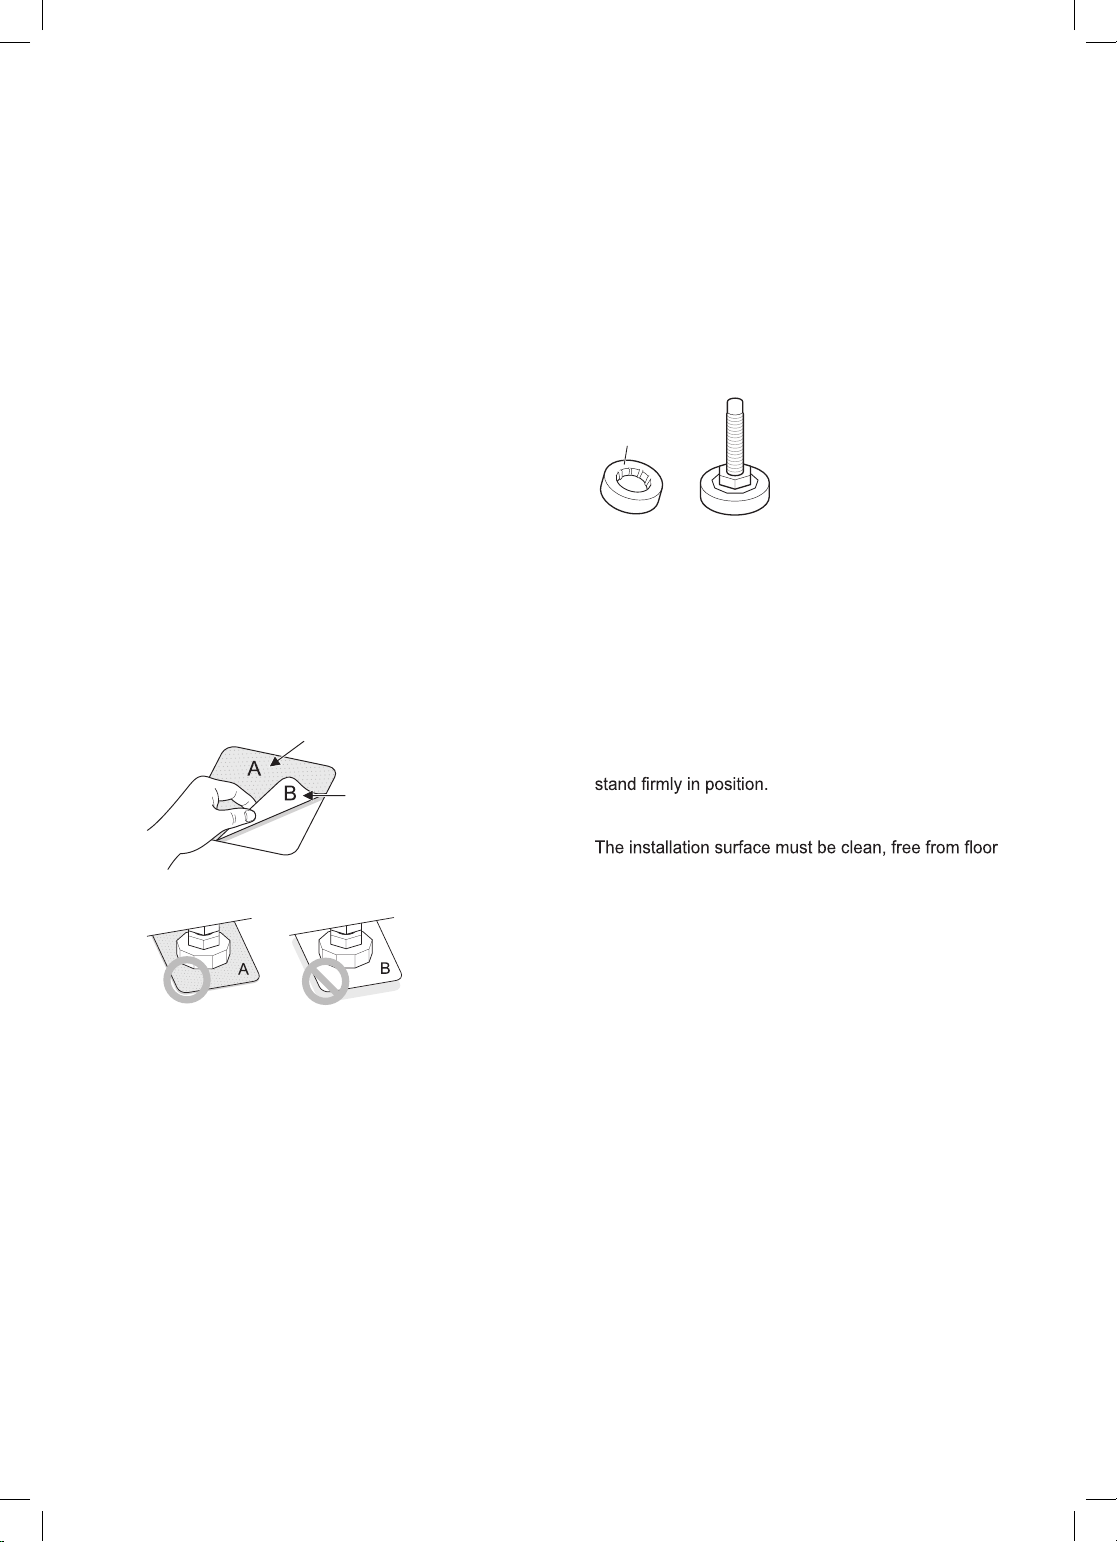
EN
Leveling the Appliance
If the oor is uneven, turn the adjustable feet as required
(Do not insert pieces of wood etc. under the feet). Make
sure that all four feet are stable and resting on the oor
and then check that the appliance is perfectly level (Use
a spirit level).
Once the appliance is level, tighten the lock nuts up
•
towards the base of the appliance. All lock nuts must
be tightened.
Raise
Lock nut
Diagonal Check
When pushing down the edges of the top plate
•
diagonally, the appliance should not move up and
down at all (Check both directions). If the appliance
rocks when pushing the machine top plate diagonally,
adjust the feet again.
Lower
Tighten all 4
lock nuts securely
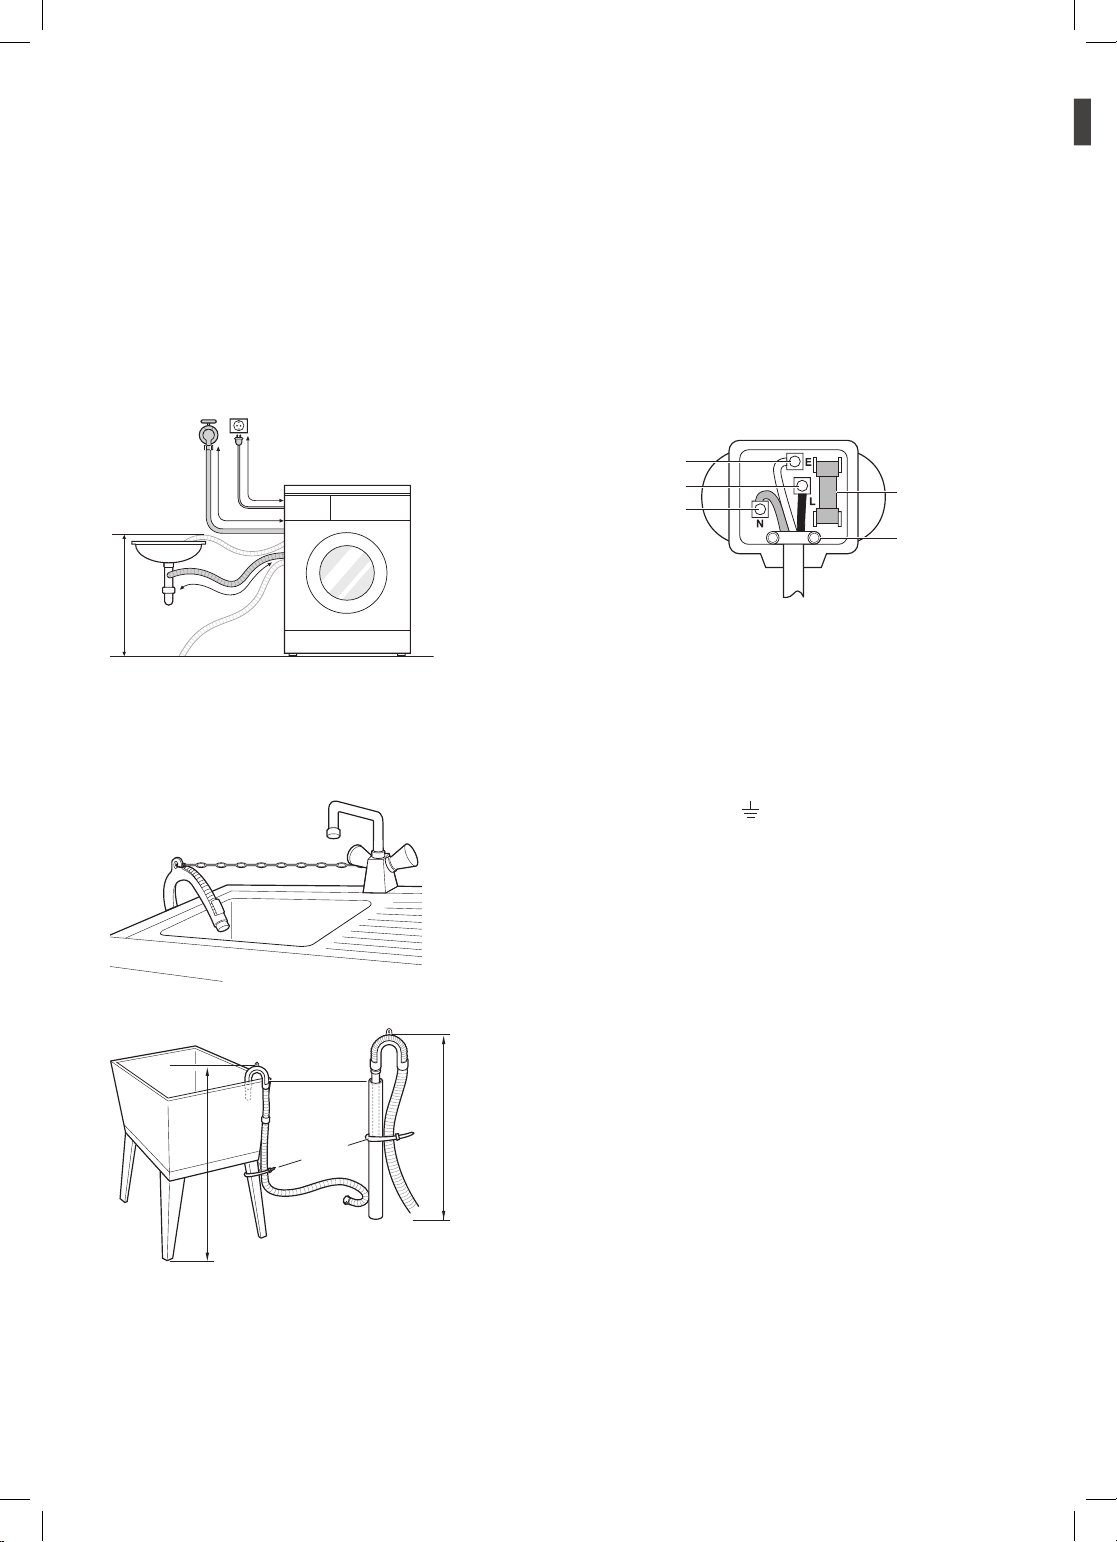
Connecting the Supply Hose
Water supply pressure must be between 0.1 MPa and
•
1.0 MPa (1.0‒10.0 kgf/cm
Do not strip or crossthread when connecting supply
•
hose to the valve.
If the water supply pressure is more than 1.0 MPa, a
•
decompression device should be installed.
Periodically check the condition of the hose and
•
replace the hose if necessary.
Checking the Rubber Seal on the Supply
Hose
Two rubber seals are supplied with the water supply
hoses.
They are used for preventing water leaks. Make sure the
connection to taps is sufciently tight.
Hose connector
Rubber seal
2
).
NOTE
Timber or suspended type ooring may contribute to
•
excessive vibration and unbalance.
If the washing machine is installed on a raised
•
platform, it must be securely fastened in order to
eliminate the risk of falling off.
Hose connector
Rubber seal
13
Page 15
EN
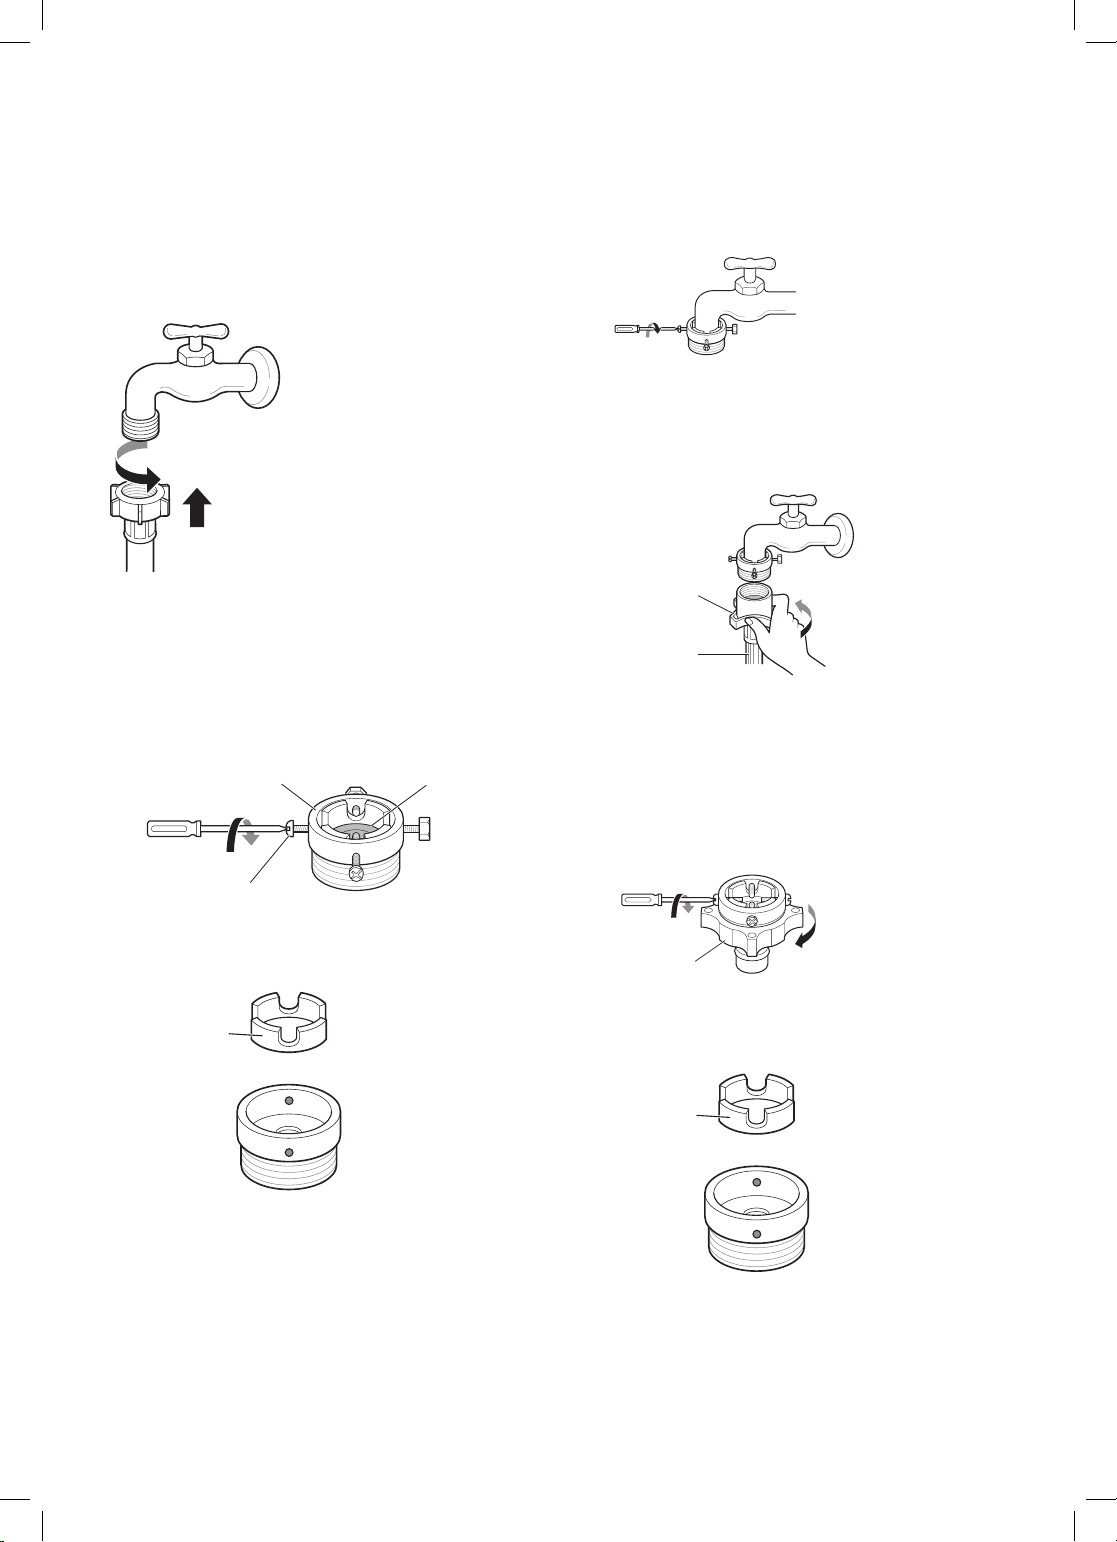
Connecting Hose to Water Tap
Connecting Screw-Type Hose to Tap with
Thread
Screw the hose connector onto the water supply tap.
Connecting Screw-Type Hose to Tap Without
Thread
Loose the four xing screws.
1
Upper
connector
Rubber
seal
Push the adapter onto the end of the tap so that
3
the rubber seal forms a watertight connection.
Tighten the four xing screws.
Push the supply hose vertically upwards so that the
4
rubber seal within the hose can adhere completely
to the tap and then tighten it by screwing it to the
right.
Plate
Supply
hose
Connecting One Touch Type Hose to Tap
Without Thread
Fixing screw
Remove the guide plate if the tap is too large to t
2
the adapter.
Guide plate
Unscrew the adapter ring plate and loose the four
1
xing screws.
Ring plate
Remove the guide plate if the tap is too large to t
2
the adapter.
Guide plate
14
Page 16
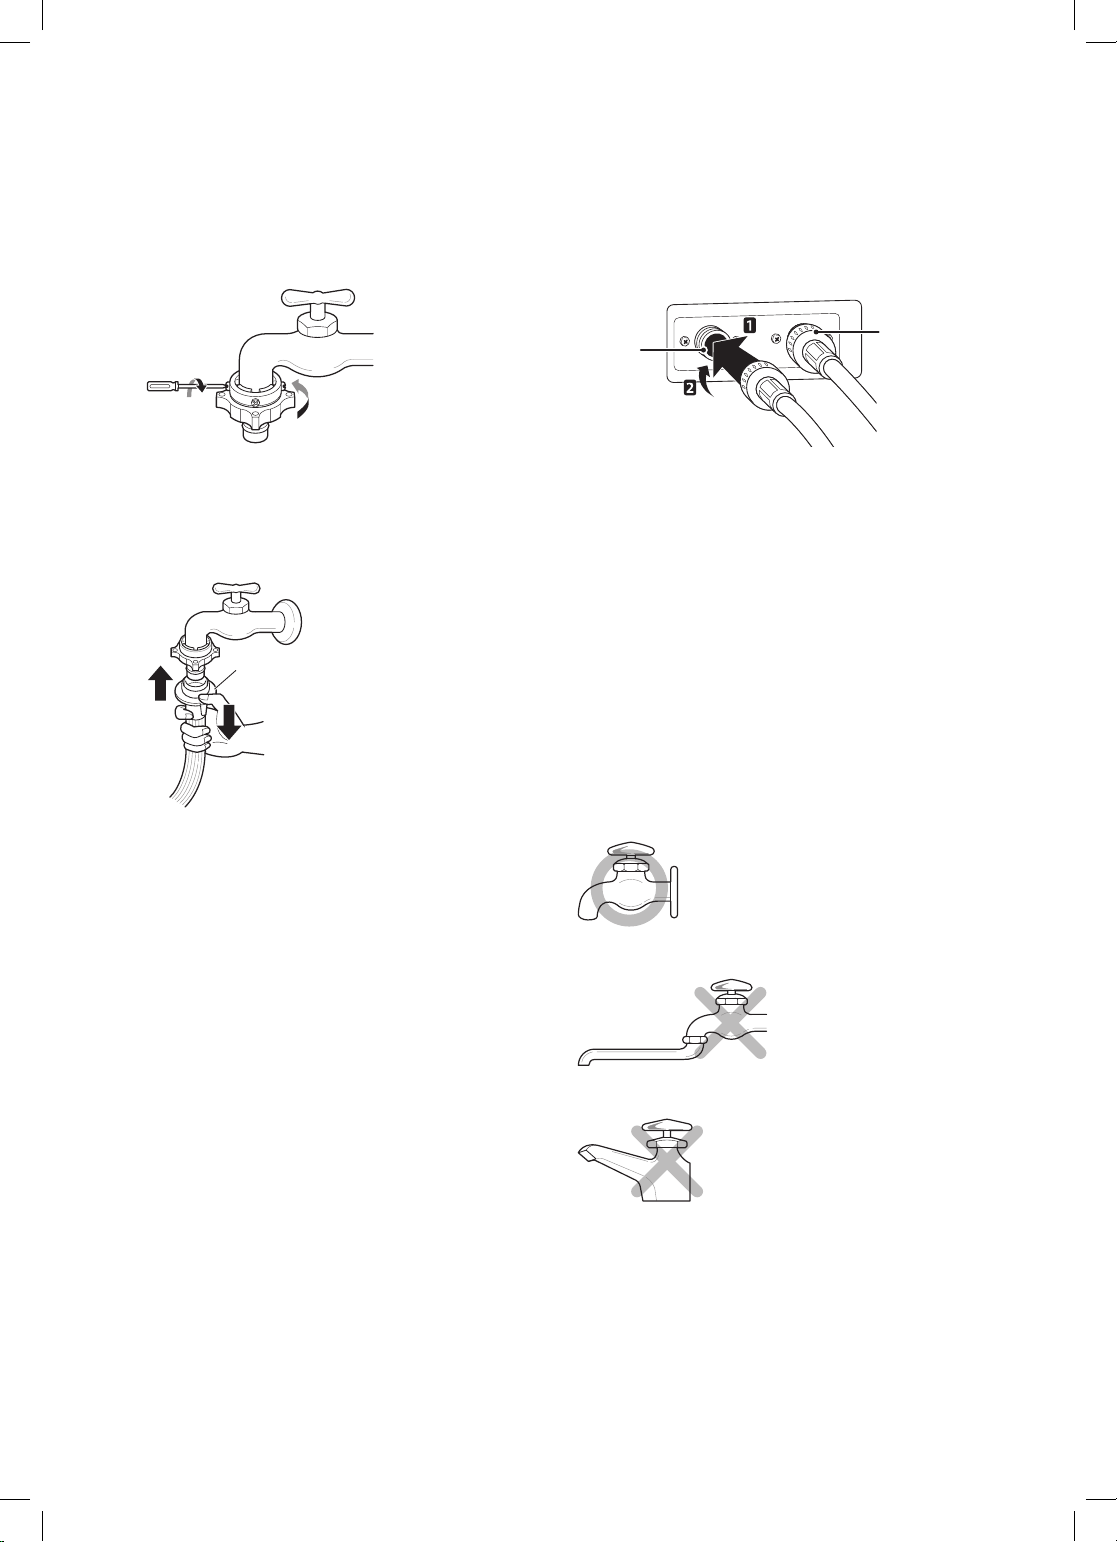
EN
Push the adapter onto the end of the tap so that
3
the rubber seal forms a watertight connection.
Tighten the four xing screws and the adapter ring
plate .
Pull the connector latch plate down, push the
4
supply hose onto the adapter, and release the
connector latch plate. Make sure the adapter locks
into place.
Latch plate
Connecting Hose to Appliance
Attach the hot water line to the hot water supply on the
back of the washer. Attach the cold water line to the cold
water supply on the back of the washer.
Cold
water
supply
NOTE
After completing connection, if water leaks from the
•
hose, repeat the same steps.
Use the most conventional type of tap for the water
supply. In case the tap is square or too big, remove
the guide plate before inserting the tap into the
adaptor.
Hot
water
supply
NOTE
After connecting the supply hose to the water tap,
•
turn on the water tap to ush out foreign substances
(dirt, sand, sawdust, and etc.) in the water lines. Let
the water drain into a bucket, and check the water
temperature.
Using the Horizontal Tap
Horizontal tap
Extension tap
Square tap
15
Page 17
EN
Installing the Drain Hose
The drain hose should not be placed higher than 100
•
cm above the oor. Water in the appliance may not
drain or may drain slowly.
Securing the drain hose correctly will protect the oor
•
from damage due to water leakage.
If the drain hose is too long, do not force it back into
•
the appliance. This will cause abnormal noise.
about 100 cm
about 145 cm
about 105 cm
max. 100 cm
When installing the drain hose to a sink, secure it
•
tightly with string.
Securing the drain hose correctly will protect the oor
•
from damage due to water leakage.
Laundry tub
Hose
retainer
Electrical Connections (In the UK
Only)
The wires in the mains lead are coloured in accordance
with the following code:
Green and Yellow: Earth
Blue: Neutral
Brown: Live
This appliance must be earthed.
Green and
Yellow (Earth)
Brown (Live)
Blue (Neutral)
As the colours of the wires in the mains lead of this
apparatus may not correspond with the coloured
markings identifying the terminals in your plug, proceed
as follows:
The green and yellow wire must be connected to the
terminal in the plug which is marked with the letter E or
by the earth symbol (
) or coloured Green or Green
and Yellow.
The blue wire must be connected to the terminal which
is marked with the letter N or coloured Black.
The brown wire must be connected to the terminal which
is marked with the letter L or coloured Red.
If a 13 amp (BS 1363) plug is used, t a 13 amp BS
1362 fuse.
Fuse
Cord grip
16
max. 100 cm
T
ie strap
max. 100 cm
Page 18
OPERATION
EN
Using the Washing Machine
Before the rst wash, select a washing programme,
allow the washing machine to wash without clothing.
This will remove residue and water from the drum that
may have been left during manufacturing.
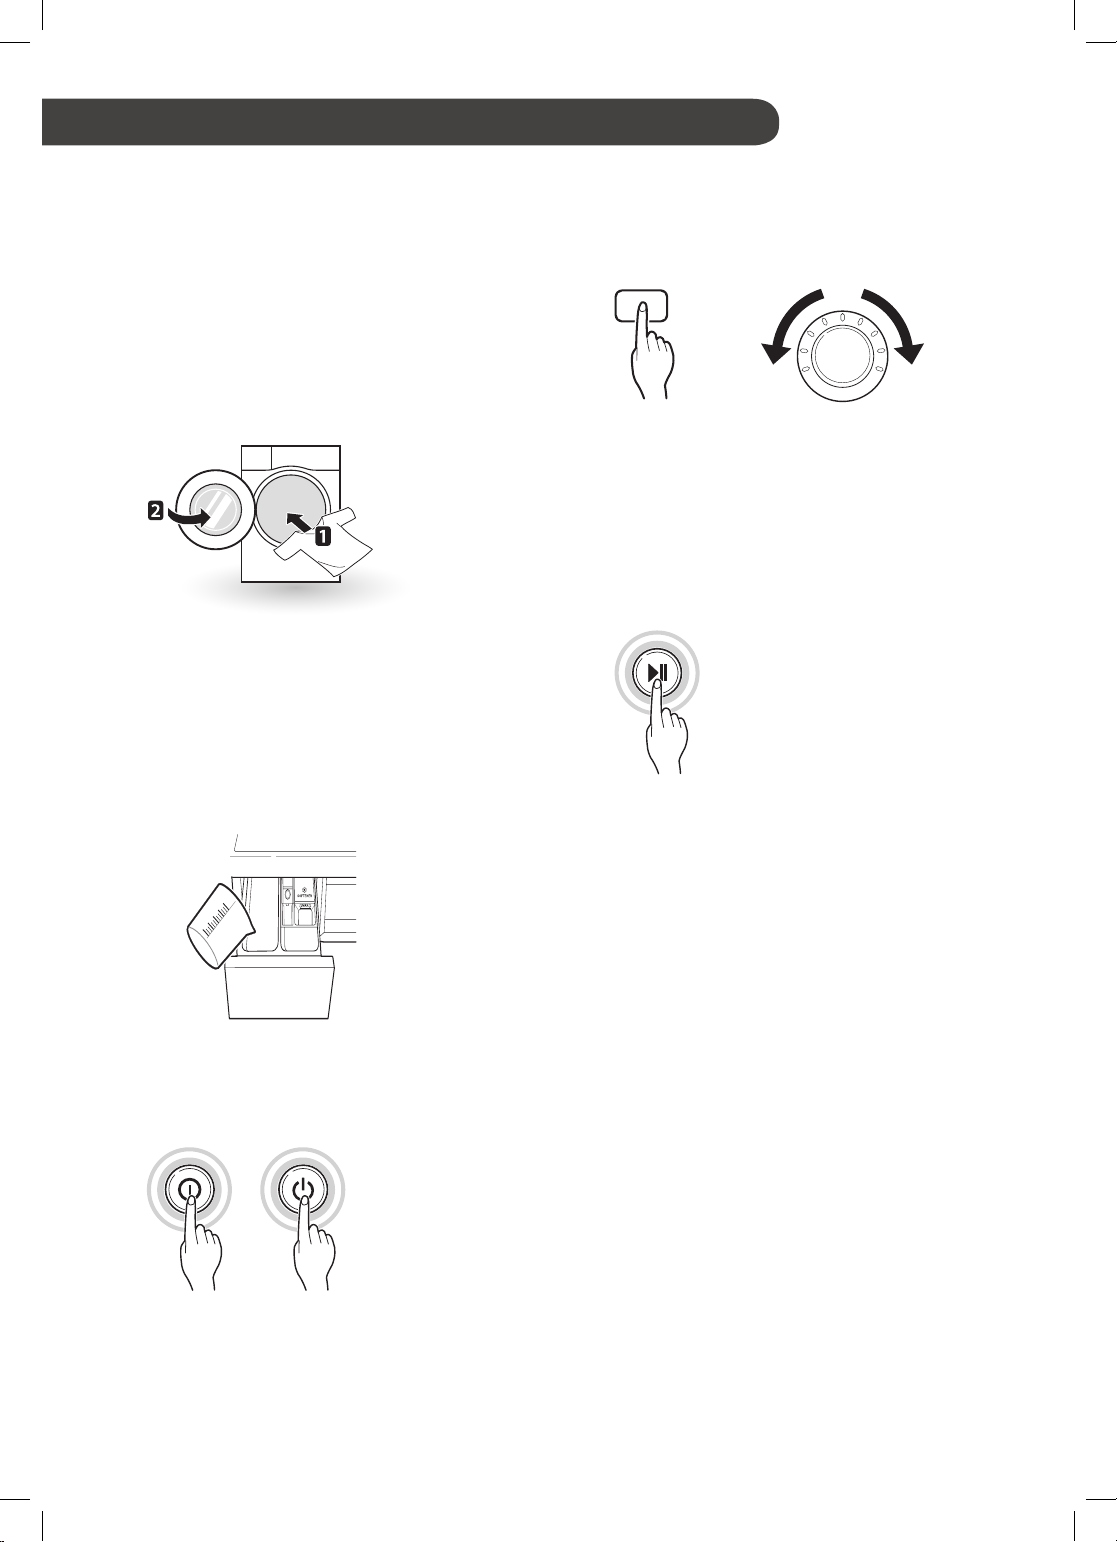
Sort laundry and load items.
1
Sort laundry by fabric type, soil level, colour and
•
load size as needed. Open the door and load
items into the washing machine.
Add cleaning products and/or detergent and
2
softener.
Add the proper amount of detergent to the
•
detergent dispenser drawer. If desired, add
bleach or fabric softener to the appropriate areas
of the dispenser.
Choose the desired washing cycle.
4
Press the cycle button repeatedly or turn the
•
cycle selector knob until the desired cycle is
selected.
Begin cycle.
5
Press the Start/Pause button to begin the cycle.
•
The washing machine will agitate briey without
water to measure the weight of the load. If the
Start/Pause button is not pressed within 5
minutes, the washing machine will shut off and
all settings will be lost.
End of cycle.
6
When the cycle is nished, a melody will sound.
•
Immediately remove your clothing from the
washing machine to reduce wrinkling. Check
around the door seal when removing the load for
small items that may be caught in the seal.
Turn on the washing machine.
3
Press the Power button to turn on the washing
•
machine.
17
Page 19
EN
Sorting Laundry
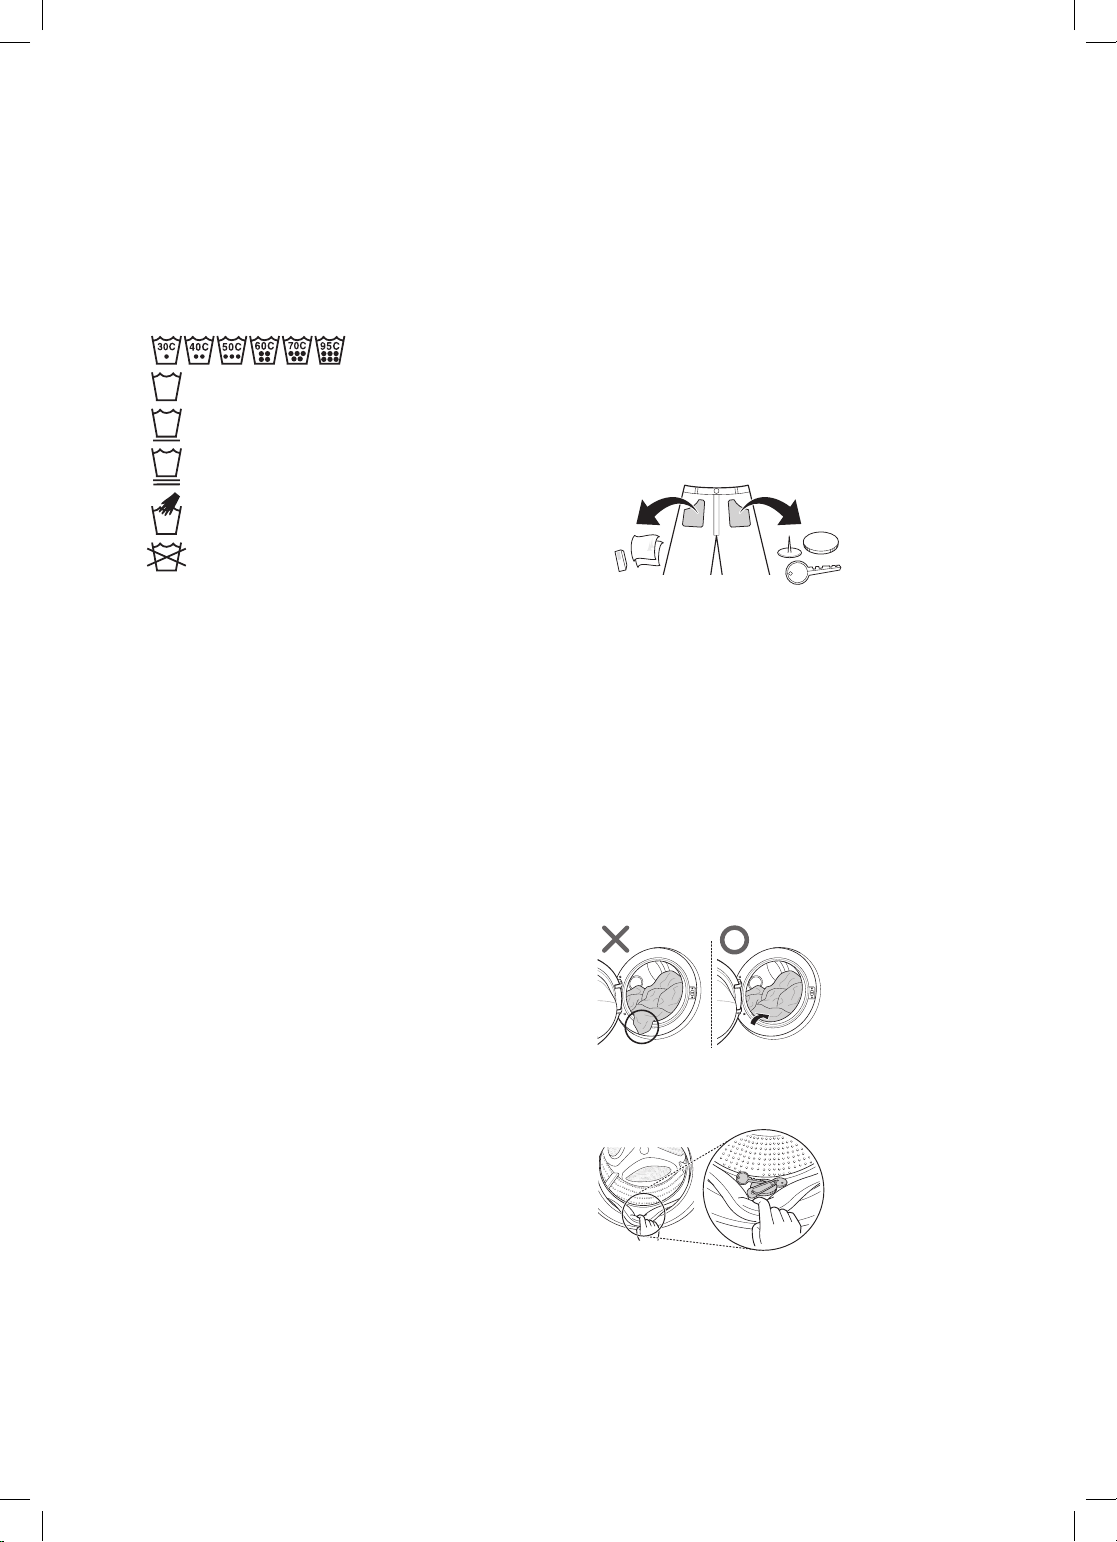
Look for a care label on your clothes.
1
This will tell you about the fabric content of your
•
garment and how it should be washed.
Symbols on the care labels.
•
Wash temperature
Normal machine wash
Permanent press
Delicate
Hand wash
Do not wash
Sorting laundry.
2
To get the best results, sort clothes into loads
•
that can be washed with the same wash cycle.
Different fabrics need to be washed at varying
•
temperatures and spin speeds.
Always sort dark colours from pale colours and
•
whites. Wash separately as dye and lint transfer
can occur causing discolouration of white and
pale garments. If possible, do not wash heavily
soiled items with lightly soiled ones.
– Soil (Heavy, Normal, Light) :
Separate clothes according to amount of soil.
– Colour (White, Lights, Darks):
Separate white fabrics from coloured fabrics.
– Lint (Lint producers, Collectors):
Wash lint producers and lint collectors
separately.
Caring before loading.
3
Combine large and small items in a load. Load
•
large items rst.
Large items should not be more than half the
•
total wash load. Do not wash single items. This
may cause an unbalanced load. Add one or two
similar items.
Check all pockets to make sure that they are
•
empty. Items such as nails, hair clips, matches,
pens, coins and keys can damage both your
washing machine and your clothes.
Close zippers, hooks and strings to make sure
•
that these items don’t snag on other clothes.
Pre-treat dirt and stains by brushing a small
•
amount of detergent dissolved water onto stains
to help lift dirt.
Check the folds of the exible gasket (gray) and
•
remove any small articles.
CAUTION
Check inside the drum and remove any items from a
•
previous wash.
Remove any clothing or items from the exible gasket
•
to prevent clothing and gasket damage.
18
Page 20
EN
Adding Cleaning Products
Detergent Dosage
Detergent should be used according to the instruction
•
of the detergent manufacturer and selected according
to type, colour, soiling of the fabric and washing
temperature.
If too much detergent is used, too many suds can
•
occur and this will result in poor washing results or
cause heavy load to the motor.
If you wish to use liquid detergent follow the guidelines
•
provided by the detergent manufacturer.
You can pour liquid detergent directly into the
•
main detergent drawer if you are starting the cycle
immediately.
Do not use liquid detergent if you are using Time
•
delay, or if you have selected Pre Wash, as the liquid
may harden.
If too many suds occur, reduce the detergent amount.
•
Detergent usage may need to be adjusted for water
•
temperature, water hardness, size and soil level of the
load. For best results, avoid oversudsing.
Refer to the label of the clothes, before chooseing the
•
detergent and water temperature.
When using the washing machine, use designated
•
detergent for each type of clothing only:
– General powdered detergents for all types of fabric
– Powdered detergents for delicate fabric
– Liquid detergents for all types of fabric or
designated detergents only for wool
For better washing performance and whitening, use
•
detergent with the general powdered bleach.
Detergent is ushed from the dispenser at the
•
beginning of the cycle.
NOTE
Do not let the detergent harden. Doing so may lead to
•
blockages, poor rinse performance or odour.
Full load : According to manufacturer’s
•
recommendation.
Part load : 3/4 of the normal amount
•
Minimum load : 1/2 of full load
•
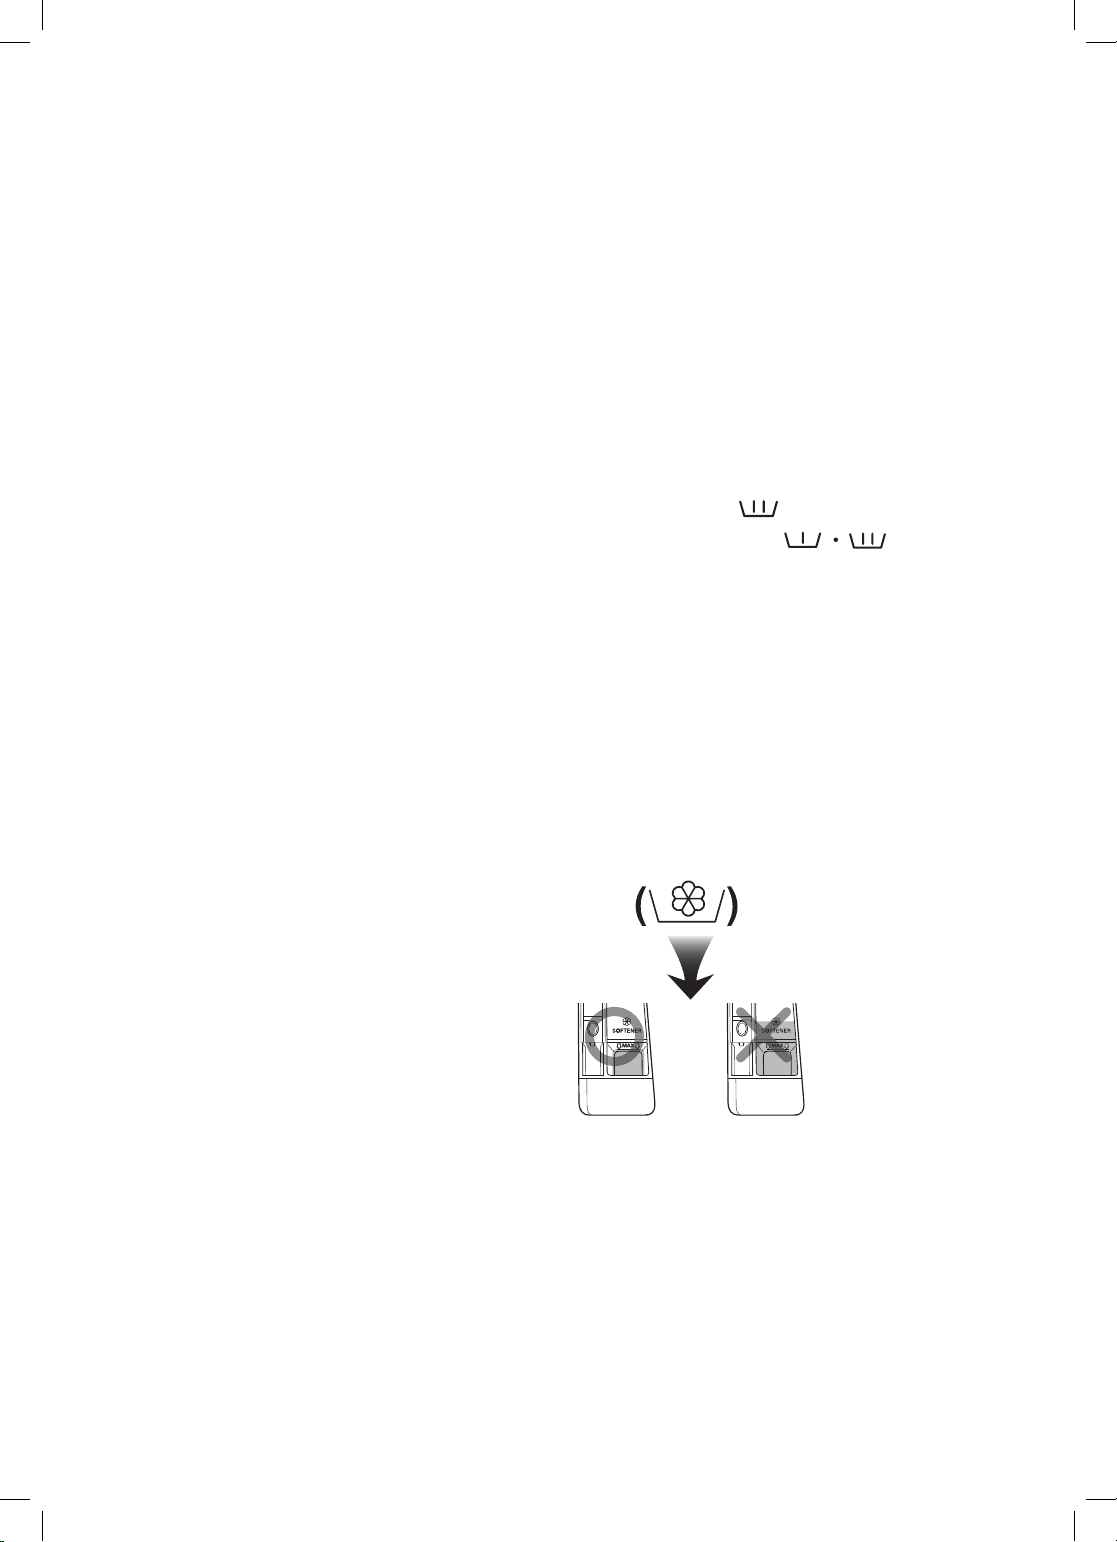
Adding Detergent and Fabric Softener
Adding Detergent
Main wash only →
•
Pre wash+Main wash →
•
NOTE
Too much detergent, bleach or softener may cause an
•
overow.
Be sure to use the appropriate amount of detergent.
•
Adding Fabric Softener
Do not exceed the maximum ll line. Overlling can
•
cause early dispensing of the fabric softener, which
may stain clothes. Close the dispenser drawer slowly.
19
Page 21
Do not leave the fabric softener in the detergent
•
drawer for more than 2 days (Fabric softener may
harden).
Softener will automatically be added during the last
•
rinse cycle.
Do not open the drawer when water is being supplied.
•
Solvents (benzene, etc.) must not be used.
•
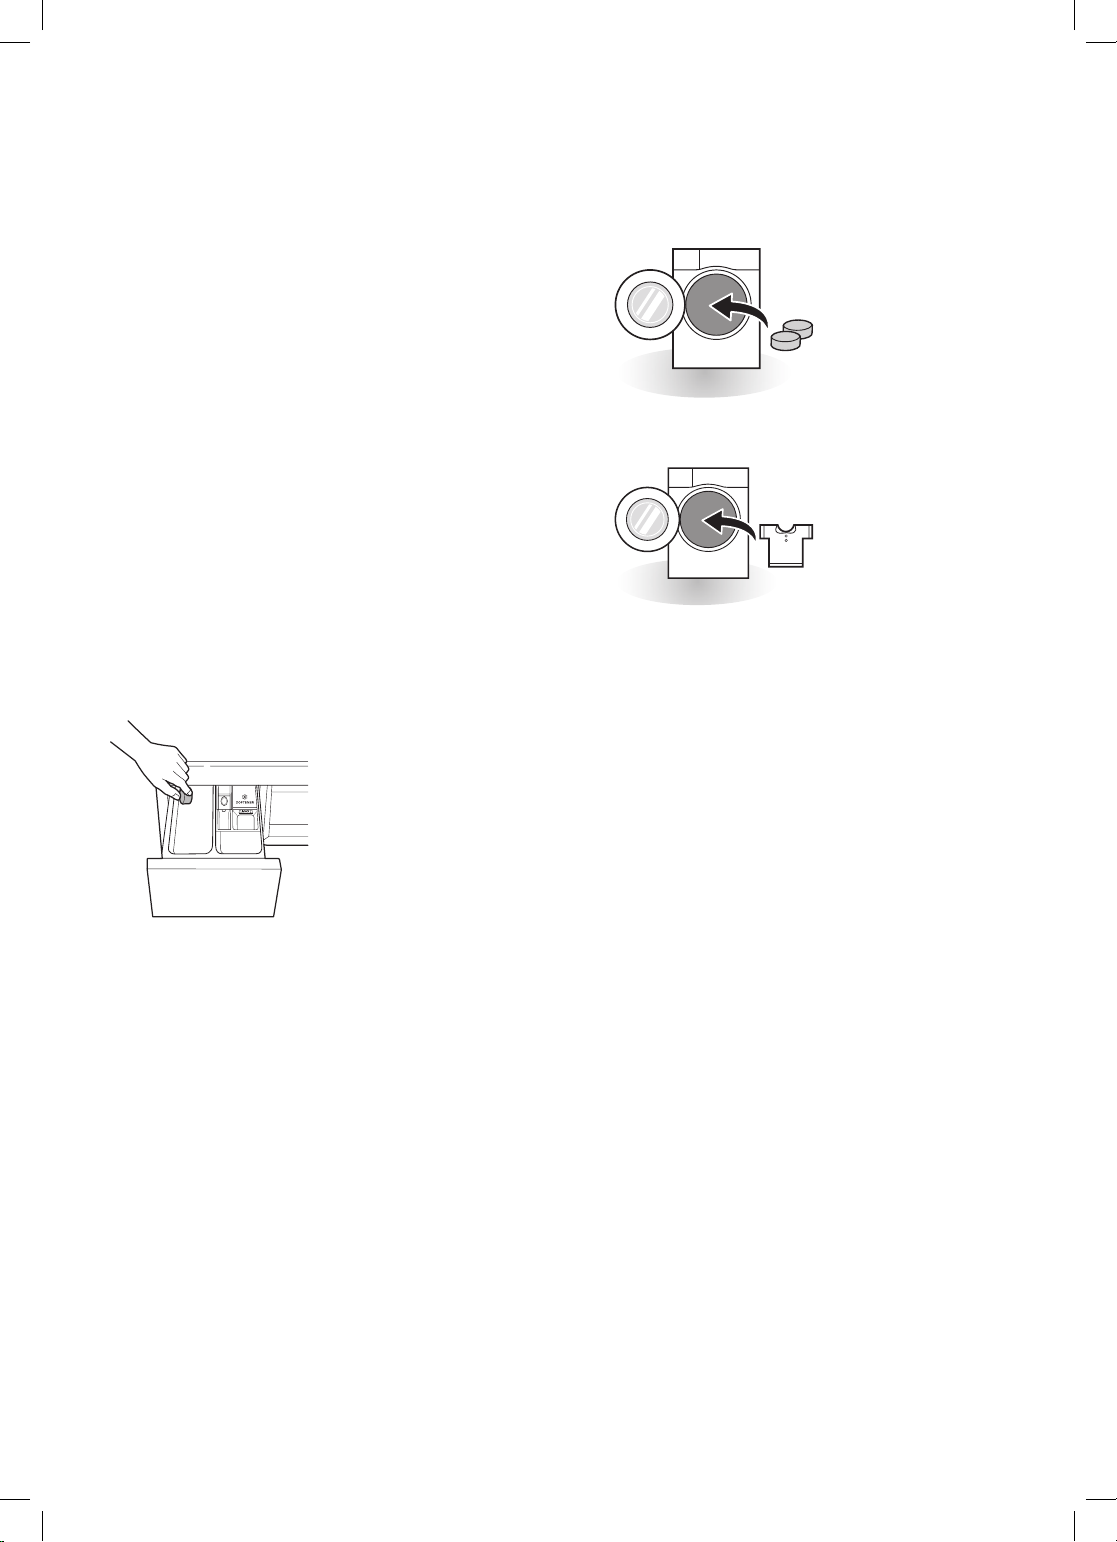
Using Tablet
Open the door and put tablets into the drum.
1
EN
NOTE
Do not pour fabric softener directly on the clothes.
•
Adding Water Softener
A water softener, such as anti-limescale (e.g. Calgon)
•
can be used to cut down on the use of detergent in
extremely hard water areas. Dispense according to
the amount specied on the packaging. First add
detergent and then the water softener.
Use the quantity of detergent required for soft water.
•
Load the laundry into the drum and close the door.
2
20
Page 22
Control Panel
EN
Power Button
Press the Power button to turn the washing
•
machine on.
Start/Pause Button
This Start/Pause button is used to start the
•
wash cycle or pause the wash cycle.
If a temporary stop of the wash cycle is needed,
•
press the Start/Pause button.
Display
The display shows the settings, estimated
•
time remaining, options, and status messages.
When the product is turned on, the default
settings in the display will illuminate.
The display shows estimate time remaining.
•
While the size of the load is being calculated
automatically, blinking
appears.
or ‘Detecting’
Dry Steam
Programme Knob
Programmes are available according to laundry
•
type.
Lamp will light up to indicate the selected
•
programme.
Options
This allows you to select an additional
•
programme and will light when selected.
Use these buttons to select the desired
•
programme options for the selected cycle.
Rinse+
21
Page 23
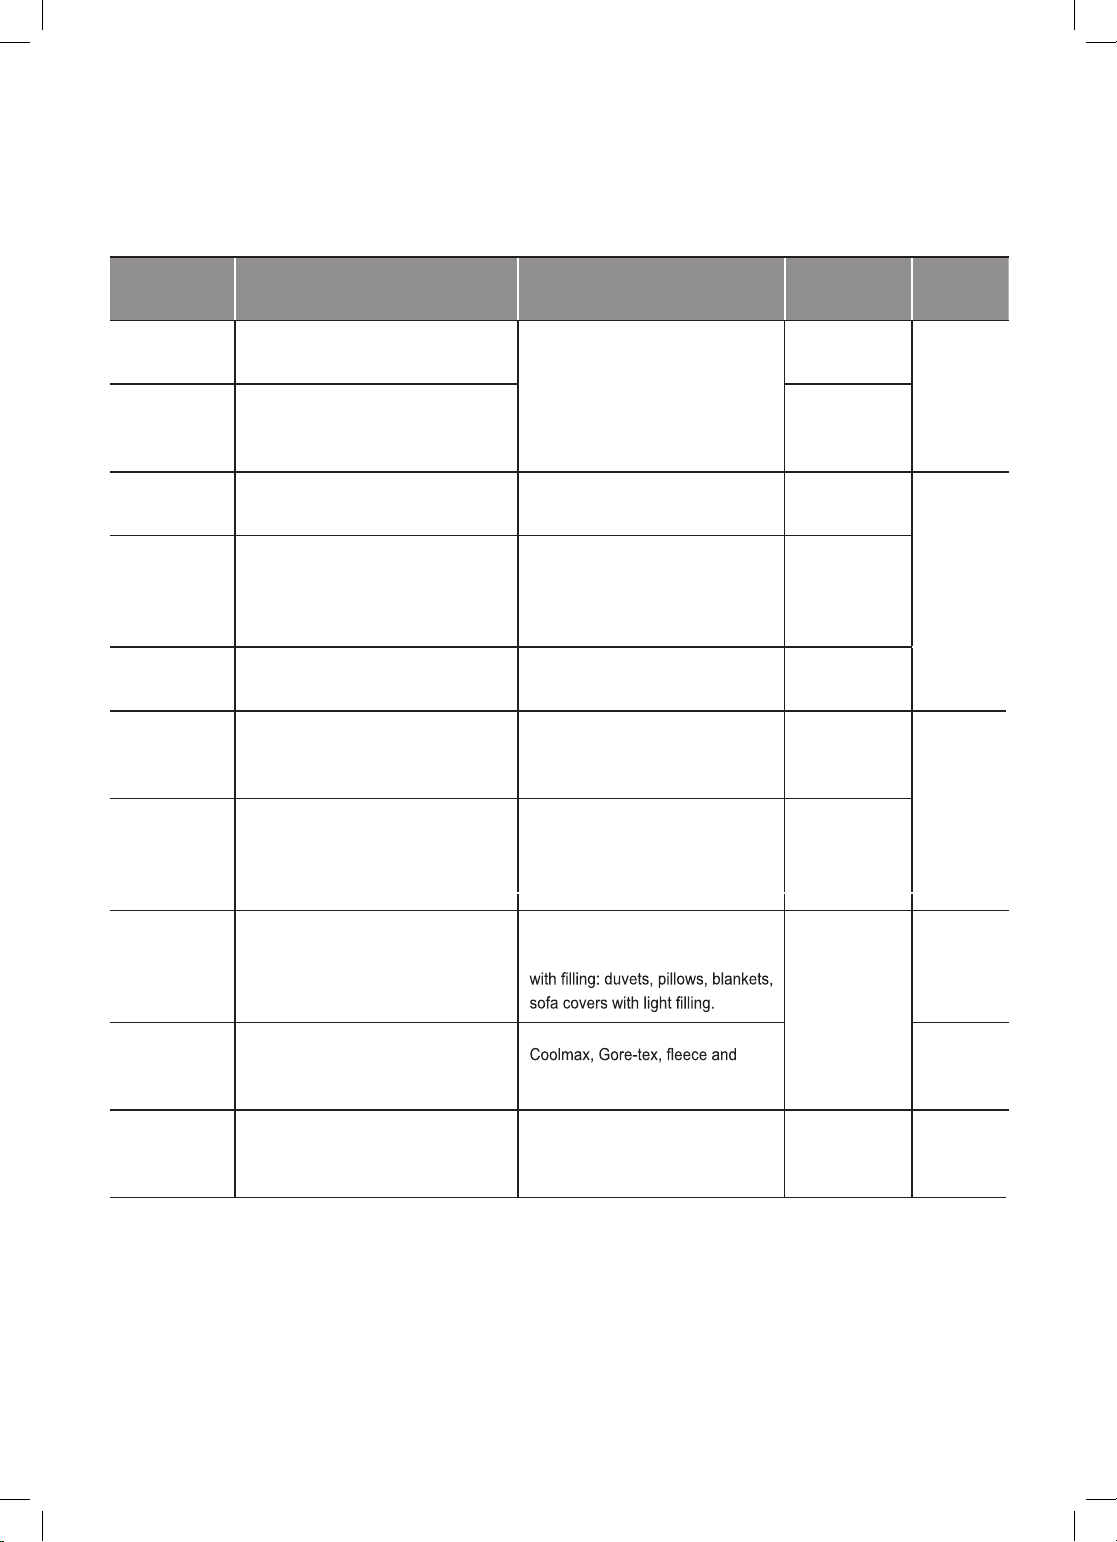
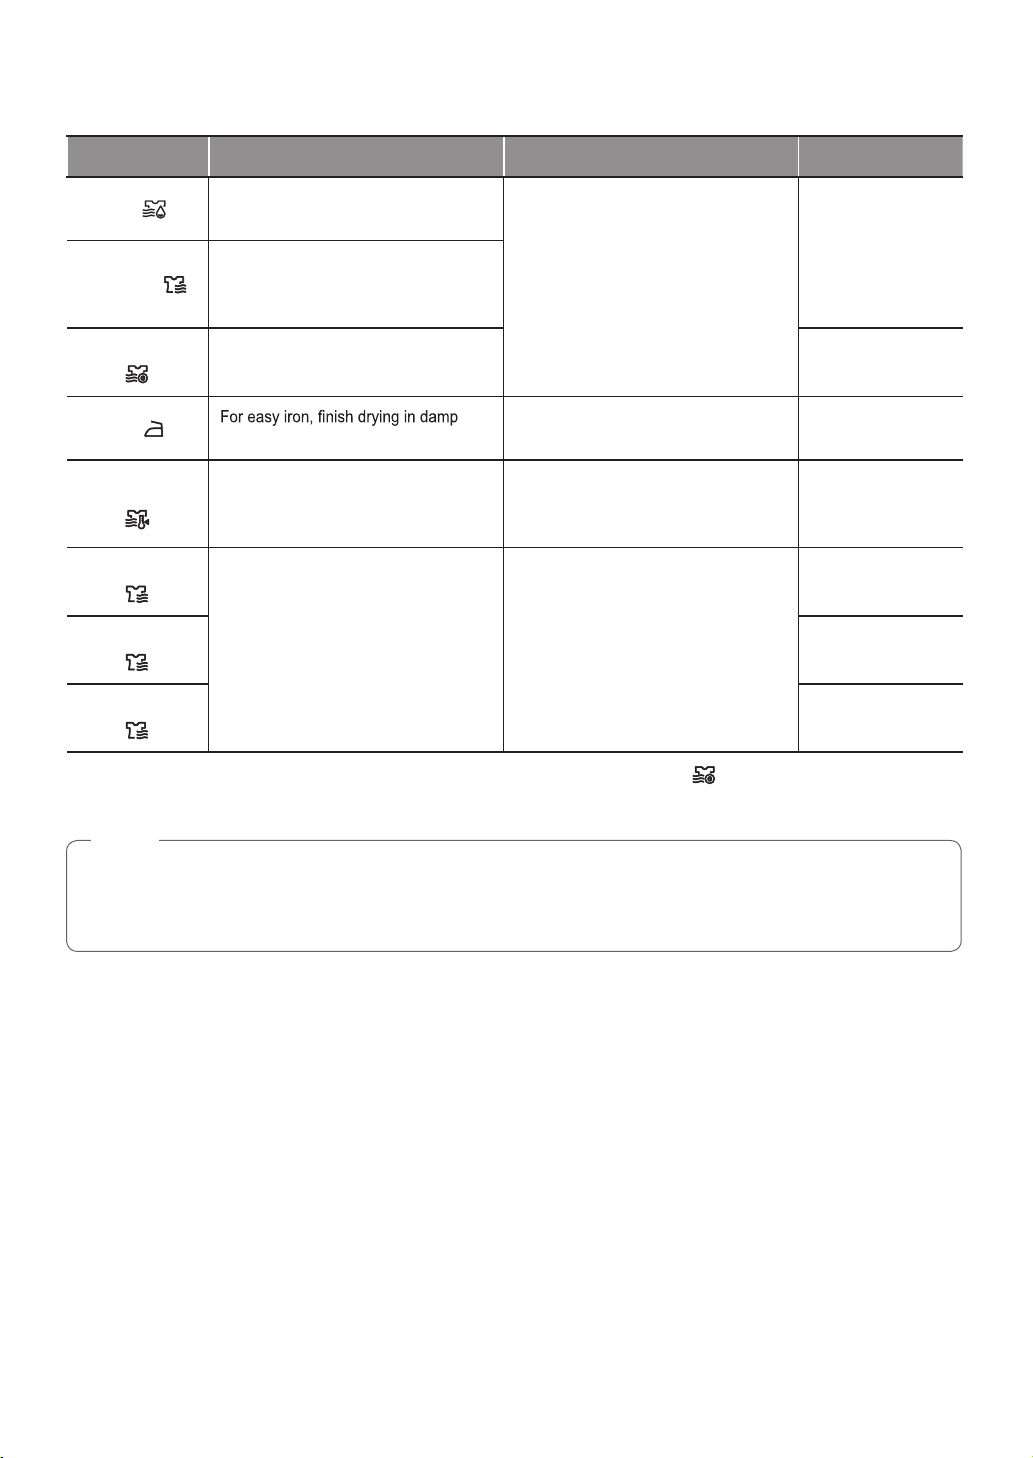
Programme Table
Washing Programme
EN
Programme Description Fabric Type Proper Temp.
Cotton
Cotton Large
Easy Care
Mix
Allergy Care
Direct Wear
Steam
Refresh
Provides better performance by
combining various drum motions.
Provides optimised washing
performance for large amount of
laundry with less energy consumption.
Suitable for casual shirts that do not
need ironing after washing.
Enables various fabrics to be washed
simultaneously.
Helps to remove allergens such as
house mites, pollen, and cat fur.
This cycle provides washing to drying
within 80mins at once for light soiled
1‒3 shirts.
Helps to remove wrinkles within 20mins
with steam (Clothes may be wet. You
can put them on after hang out to dry
for 10‒30min).
Coloured fast garments (shirts,
nightdresses, pajamas, etc)
and normally soiled cotton load
(underwear).
Polyamide, acrylic, polyester
Various kind of fabrics except
special garments (silk/delicate,
sports wear, dark clothes, wool,
duvet/curtains).
cotton, underwear, pillow covers, bed
sheets, baby wear
cotton mixed, polyester mixed dress
shirts, blouses
cotton mixed, polyester mixed dress
shirts, blouses
40 °C
(Cold to 95 °C)
60 °C
(Cold to 60 °C)
40 °C
(Cold to 60 °C)
40 °C
(Cold to 40 °C)
60 °C
20 °C
No
choice
Maximum
Load
Rating
3.0 kg
3 items
Duvet
Sports Wear
Quick 30
22
Cotton bedding except special
For large items such as bed cover,
pillows, sofa covers, etc.
Suitable for sports wear such as
jogging clothes and running wear. Sympatex.
This cycle provides a fast washing
time for small loads and lightly soiled
clothes.
garments (delicates, wool, silk, etc.)
Lightly soiled colour laundry.
40 °C
(Cold to 40 °C)
20°C
(Cold to
40°C)
1 single
size
2.0 kg
3.0 kg
Page 24
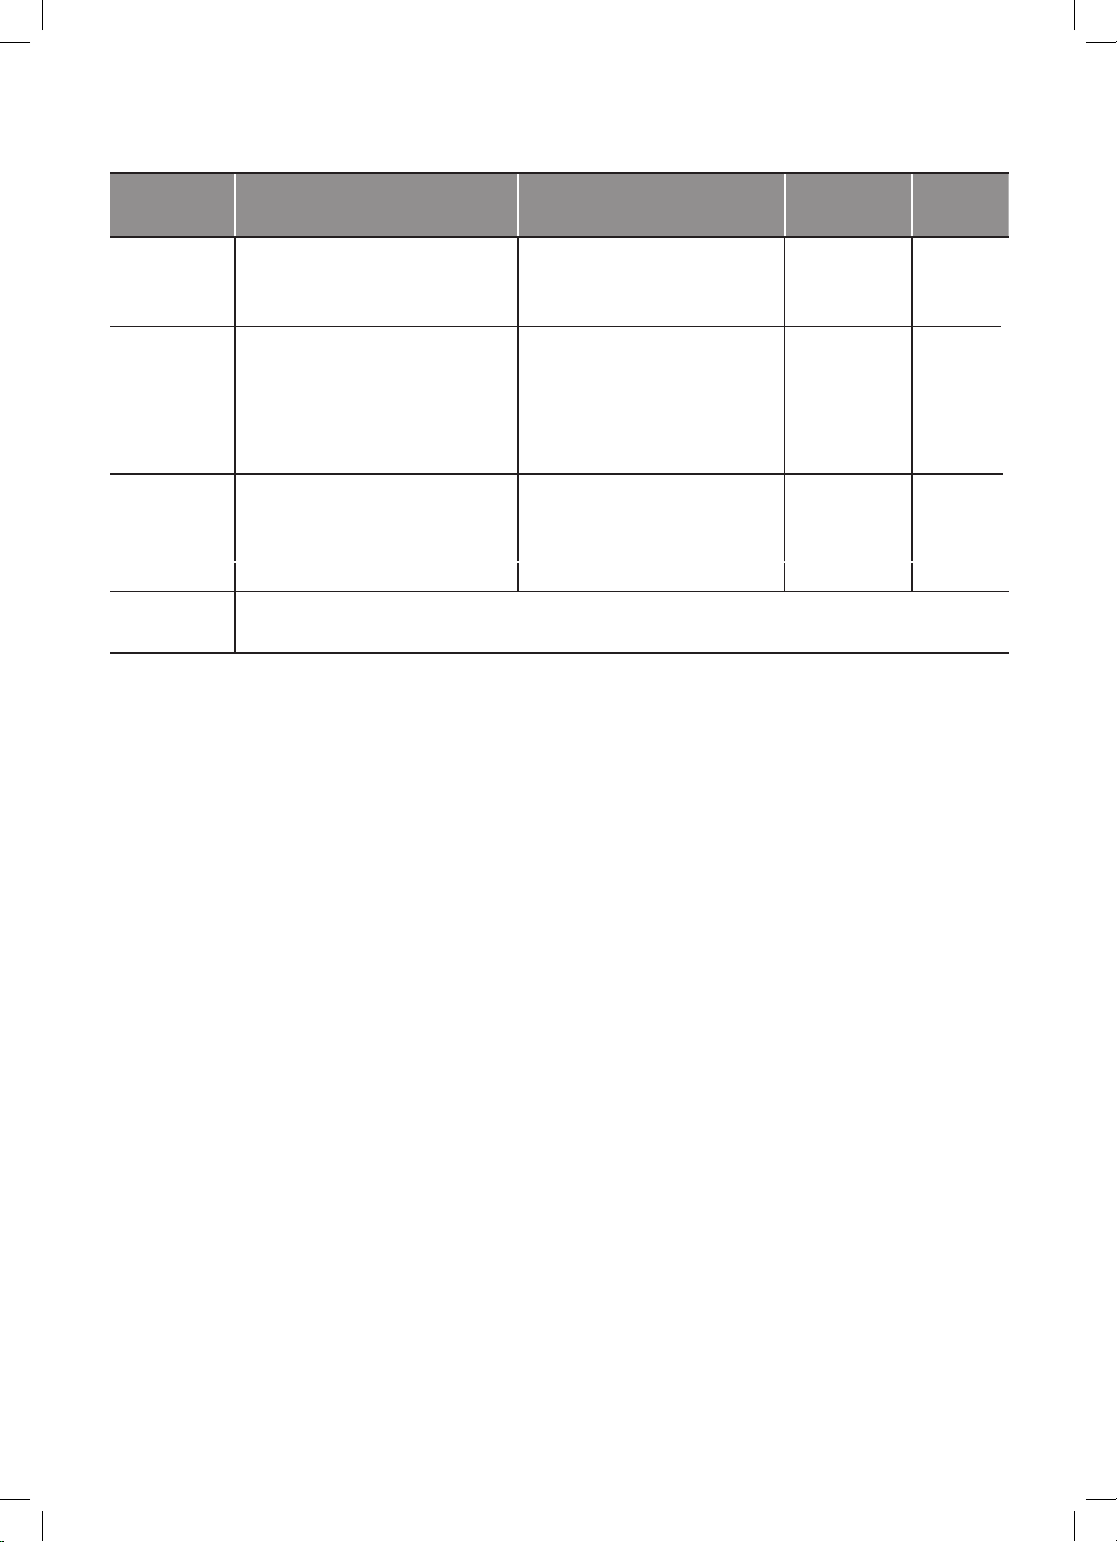
EN
Programme Description Fabric Type Proper Temp.
Wash+Dry (5kg)
Gentle Care
Stain Care
Download
Cycle
This cycle provides a nonstop process
of washing and drying in the same
cycle.
This cycle is for hand and machine
washable delicate clothes such as
washable wool, lingerie, dresses etc.
(Use detergent for machine washable
woolens).
Wash off several kinds of stain
such as wine, juice, dirt, etc. (Water
temperature is increased step by step
for washing various stains.)
For downloadable cycles. If you did not download any cycles, the default is Rinse+Spin.
A small amount of laundry which can
be dried.
wool, hand washable clothes, delicate,
easily damaged laundry
cotton blended fabrics, NO delicate
clothes
40°C
(Cold to
95°C)
20°C
(Cold to
30°C)
40°C
(30°C to
60°C)
Maximum
•Water Temperature: Select the appropriate water temperature for chosen wash cycle. Always follow garment
manufacturer’s care label or instructions when washing.
NOTE
•Neutral detergent is recommended.
Load
5.0 kg
1.5 kg
3.0 kg
23
Page 25
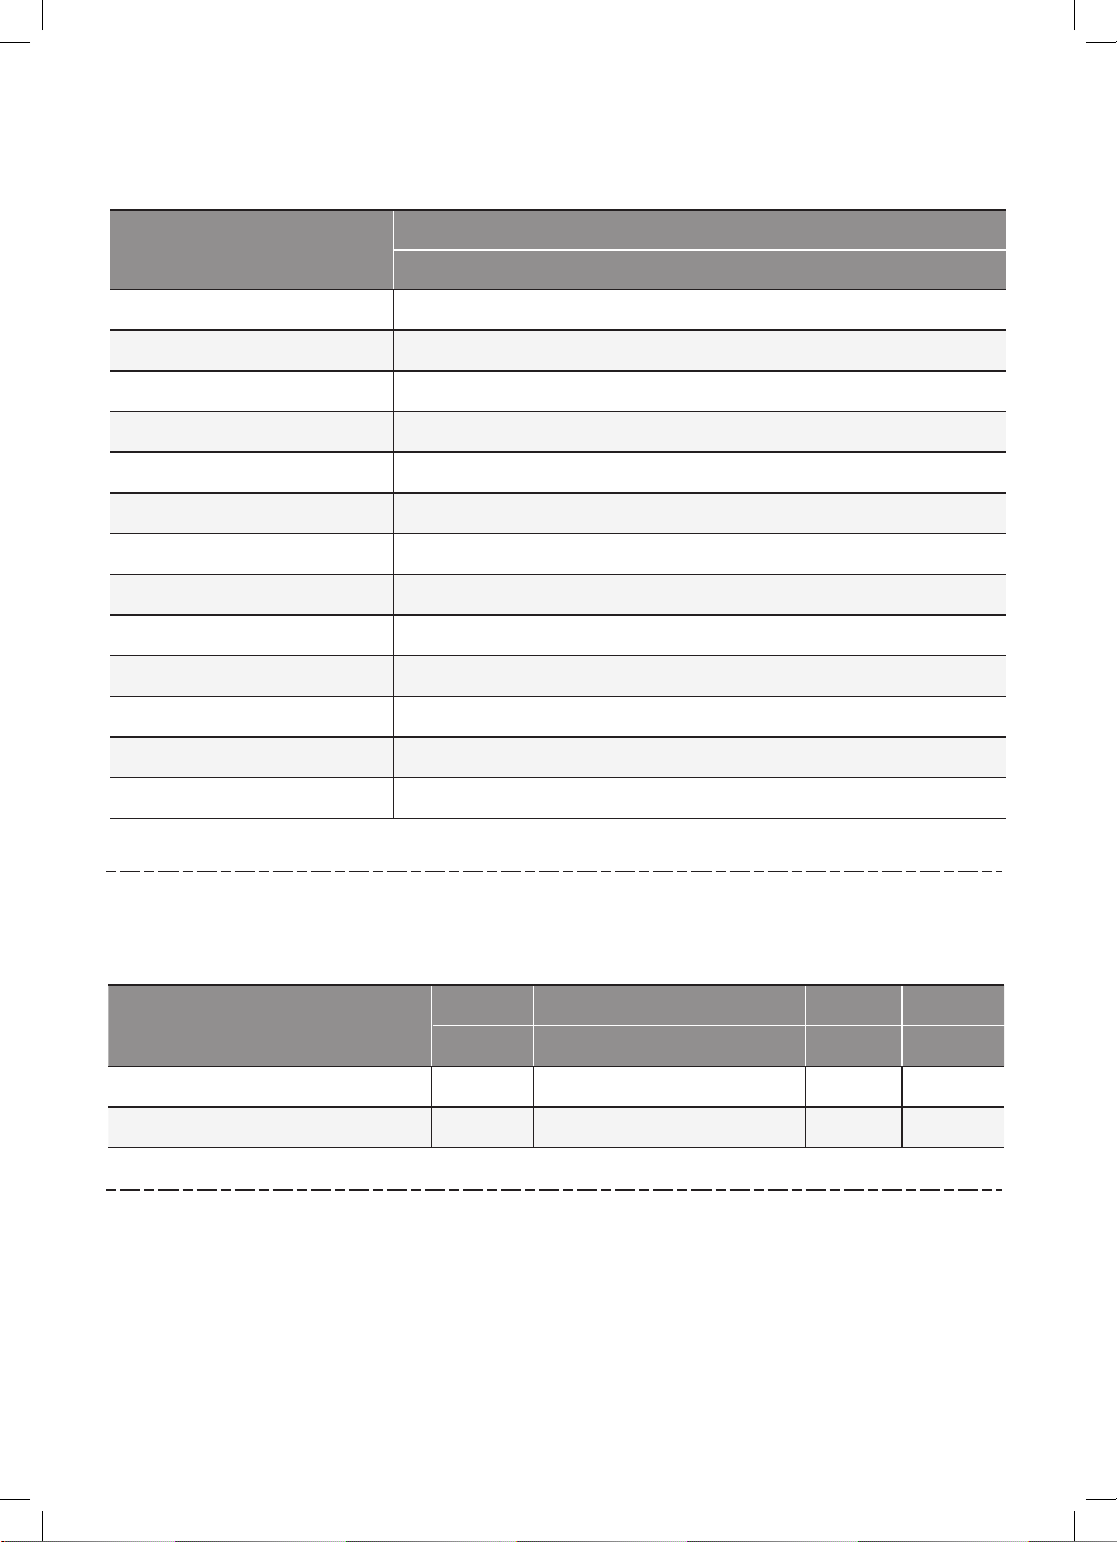
Drying Programme
Programme Description Fabric Type Maximum Load
Eco (
)
A special cycle to reduce water usage
during the dry cycle.
Cotton or linen fabrics such as cotton
towels, t-shirts, and linen laundries.
Rating
Cupboard (
)
For cottons. Select this cycle to reduce
cycle time and energy usage during the
dry cycle.
Normal Eco
(
)
For energy dry cycle.
Iron (
)
condition.
Cotton or linen fabrics, ready to iron at
the end of cycle.
Rating
Low Temp.
(
)
For less clothes damage, it dries in low
temperature.
easy care textiles, synthetic fabrics
suitable for Easy Care, Mix programme
washable clothes
Rating
Time 30 min.
(
)
You can change the drying time
according to the maximum load.
cotton, towel
0.5 kg
Time 60 min.
(
)
1.5 kg
Time 120 min.
(
)
3.0 kg
•Set programme at ‘Wash: Cotton Large 60 °C+1400 rpm’ and ‘Dry: Normal Eco
( )
(First drying cycle load: 4.0 kg,
Second drying cycle load: 4.0 kg)’ to test in accordance with EN50229.
NOTE
•Select maximum selectable spin speed of washing programme to ensure drying results.
•Where the amount of laundry to be washed and dried in one programme does not exceed the maximum weight
permitted for the drying programme, washing and drying in one continuous sequence is recommended.
24
EN
4.0 kg
Page 26

Extra Options
EN
Programme Time Delay
Cotton
Cotton Large
Easy Care
Mix
Allergy Care
Direct Wear
Steam Refresh
Duvet
Sports Wear
Quick 30
Gentle Care
Wash+Dry (5kg)
● ● ● ● ●
● ● ● ● ●
● ● ● ● ●
● ● ● ● ●
● ●* ●
●
● ●
● ●
● ●
●
● ● ●*
Steam Pre Wash Rinse+ Dry
●
●*
●*
●
●
●
●
●
●
Stain Care
•*: This option is automatically included in the cycle and can not be deleted.
● ●
●*
●
25
Page 27
Operating Data
EN
Programme
Cotton
Cotton Large
Easy Care
Mix
Allergy Care
Direct Wear
Steam Refresh
Duvet
Sports Wear
Quick 30
Gentle Care
Wash+Dry (5kg)
Stain Care
Max RPM
1400
1400
1400
1000
1400
1400
1000
---
1000
800
1400
800
1400
1400
NOTE
Information of main washing programmes at half load.
•
Time in
Program
Cotton (40 °C)
Cotton Large (60 °C)
minutes
8 kg
96 40 %
244 44 %
26
Remaining moisture content
1400 rpm
Water in
Liter
8 kg 8 kg
65
35
Energy in
kWh
0,55
0,45
Page 28
Option Programme
EN
Time Delay
You can set a time delay so that the washing machine
interval.
Press the Power button.
1
Select a washing programme.
2
Press the Time Delay button to set time required.
3
Press the Start/Pause button.
4
NOTE
•The delay time is the time to the end of the
programme, not the start. The actual running time may
vary due to water temperature, wash load and other
factors.
•To cancel the Time Delay function, the power button
should be pressed.
•Avoid using liquid detergent for this option.
Steam (Optional)
Steam Wash features enhanced washing performance
with low energy consumption. Steam Softener sprays
steam after a spinning cycle to reduce creases and
Press the Power button.
1
For Steam Wash option, select steam cycles.
2
For Steam Softener option, select Cotton, Cotton
Large, Mix, Easy Care.
The following cycle is selected depending on the
3
number of times you press the Steam button.
•Once: Steam Wash
•Twice: Steam Softener
•Three times: Steam Wash and Steam Softener
Press the Start/Pause button.
4
Rinse
Pre Wash
If the laundry is heavily soiled, the Pre Wash programme
is recommended.
Press the Power button.
1
Select a washing programme.
2
Press the Pre Wash button.
3
Press the Start/Pause button.
4
Rinse Hold
The programme is paused until start button is pressed
Rinse+
Add rinse once.
Spin
•Spin speed level can be selected by pressing the Spin
button repeatedly.
•Spin Only
Press the Power button.
1
Press the Spin button to select RPM.
2
Press the Start/Pause button.
3
NOTE
•When you select No Spin, it will still rotate for a short
time to drain quickly.
27
Page 29
EN
Temp.
The Temp. button selects the wash and rinse
temperature combination for the selected programme.
Press this button until the desired setting is lit. All rinses
use cold tap water.
•Select the water temperature suitable for the type of
load you are washing. Follow the garment fabric care
labels for best results.
Child Lock ( )
Use this option to disable the controls. This feature can
prevent children from changing cycles or operating the
appliance
Locking the Control Panel
Press and hold the Child Lock
1
for three seconds.
A beeper will sound, and will appear on the
2
display.
When the Child Lock is set, all buttons are locked
except the
Power button.
NOTE
•Turning off the power will not reset the child lock
function. You must deactivate child lock before you
can access any other functions.
Unlocking the Control Panel
Press and hold the Child Lock button for three
seconds.
•A beeper will sound and the remaining time for the
current programme will reappear on the display.
button
Beep On / Off
Press the Power button.
1
Press the Start/Pause button.
2
Press and hold the Temp. and Steam
3
button simultaneously for 3 seconds to set the
Beep on/off function.
NOTE
•Once the Beep on/off function is set, the setting is
memorized even after the power is turned off.
•If you want to turn the Beeper off, simply repeat this
process.
Drying Time Guide
•The drying time can be selected by pressing the Dry
button.
•Drying cycle can last up to 430 min.
•These drying times are given as a guide to help you
set your washing machine for manual drying.
NOTE
•The estimated drying time varies from the actual
drying time during the Automatic cycle. The
type of fabric, size of the load, and the dryness
selected affect drying time.
•When you select drying only, spinning runs
28
Page 30
EN
Dry (Optional) ( )
Use the your Automatic cycles to dry most loads.
Electronic sensors measure the temperature of the
exhaust to increase or decrease drying temperatures for
faster reaction time and tighter temperature control.
•Cold water tap must be left on during drying cycles.
•This washing machine’s automatic process from
washing to drying can be selected easily.
•For most even drying, make sure all articles in the
clothes load are similar in material and thickness.
•
many articles into the drum. Items must be able to
tumble freely.
•If you open the door and remove the load before the
press the Start/Pause button.
•By pressing the Dry button, you can select: CupboardTime (30-60-120)-Eco-Iron-Low Temp.-Normal Eco
•After the end of dry, ‘
crease decreasing. The drying cycle is already done.
Press any buttons and take out clothes. If you do not
press the Start/Pause button, the programme ends
after about 4 hours.
NOTE
•When you turn the washing machine off of the
drying cycle, the drying fan motor can be operated
to save itself for 30 seconds. Then the washing
machine will display ‘
cooling fan.
•Be careful when removing your clothing from the
washing machine, as the clothing or washing
machine may be hot.
’ is displayed. ‘ ’ means
’ on the panel. ‘ ’ means
Woolen Articles
•Do not tumble dry woolen articles. Pull them to their
Woven and Loopknit Materials
•Some woven and loopknit materials may shrink, by
varying amounts, depending on their quality.
•Always stretch these materials out immediately after
drying.
Permanent Press and Synthetics
•Do not overload your washing machine
•Take out permanent press articles as soon as the
washing machine stops to reduce wrinkles.
Baby clothes and Night Gowns
•Always check the manufacturer’s instructions.
Rubber and Plastics
•Do not dry any items made from or containing rubber
or plastics, such as:
– aprons, bibs, chair covers
– curtains and table cloths
– bathmats
Fiber glass
•
Glass particles left in the washing machine may be
picked up by your clothes the next time you use the
washing machine and cause skin irritation.
29
Page 31

Using Smart Function (Optional)
EN
Using the Application
Using the Tag On Function
The Tag On function allows you to conveniently use the
LG Smart Diagnosis™ and Cycle Download features to
communicate with your appliance right from your own
smart phone.
The Tag On function can only be used with most smart
•
phones equipped with the NFC function and based on
the Android operating system (OS).
Installation of the application
Search "LG Smart Laundry" on the Google Play Store
•
from your smart phone.
-(ᜅษ✙
LG Smart
LG Smart Laundry application allows you to use various
features for your convenience.
Cycle Download
•
Smart Diagnosis™
•
Tag On Cycle Set
•
Laundry Stats
•
NOTE
•Press in the LG Smart Laundry application for
a more detailed guide on how to use the Tag On
function.
•Depending on the smart phone manufacturer and
Android OS version, the NFC activation process
may differ. Refer to the manual of your smart
phone for details.
•Because of the characteristics of NFC, if the
transmission distance is too far, or if there is a
metal sticker or a protective case on the phone,
transmission will not be good. In some cases,
NFC-equipped phones may be unable to transmit
successfully.
•The content found in this manual may differ
depending on the version of "LG Smart Laundry"
application, and it may be modied without
informing customers.
30
EU Conformity Notice
Hereby, LG Electronics European Shared Service
Center B.V., declares that this Washing machine is
compliant with the essential requirements and other
relevant provisions of Directive 1999/5/EC. The complete
Declaration of Conformity may be requested through the
following postal address:
LG Electronics European Shar ed Service Center B.V.
Krijgsman 1
1186 DM Amstelveen
T he Netherlands
or can be requested at our dedicated DoC website:
http ://www.lg.com/global/support/cedoc/cedoc#
Page 32

MAINTENANCE
EN
WARNING
Unplug the washing machine before cleaning to avoid
•
the risk of electric shock. Failure to follow this warning
may result in serious injury, re, electric shock, or
death.
Never use harsh chemicals, abrasive cleaners, or
•
solvents to clean the washing machine. They may
damage the nish.
Cleaning Your Washing Machine
Care After Wash
After the cycle is nished, wipe the door and the inside
•
of the door seal to remove any moisture.
Leave the door open to dry the drum interior.
•
Wipe the body of the washing machine with a dry cloth
•
to remove any moisture.
Cleaning the Interior
Use a towel or soft cloth to wipe around the washing
•
machine door opening and door glass.
Always remove items from the washing machine as
•
soon as the cycle is complete. Leaving damp items
in the washing machine can cause wrinkling, colour
transfer, and odour.
Run the Tub Clean programme once a month (or more
•
often if needed) to remove detergent buildup and
other residue.
Cleaning the Water Inlet Filter
Turn off the supply taps to the machine if the washing
•
machine is to be left for any length of time (e.g.
holiday), especially if there is no oor drain (gully) in
the immediate vicinity.
• icon will be displayed on the control panel when
water is not entering the detergent drawer.
If water is very hard or contains traces of lime deposit,
•
the water inlet lter may become clogged. It is
therefore a good idea to clean it occasionally.
Cleaning the Exterior
Proper care of your washing machine can extend its life.
Door:
Wash with a damp cloth on the outside and inside and
•
then dry with a soft cloth.
Exterior:
Immediately wipe off any spills.
•
Wipe with a damp cloth.
•
Do not press the surface or the display with sharp
•
objects.
Turn off the water tap and unscrew the water
1
supply hose.
Clean the lter using a hard bristle brush.
2
31
Page 33

EN
Cleaning the Drain Pump Filter
The drain lter collects threads and small objects left
•
in the laundry. Check regularly that the lter is clean to
ensure smooth running of your washing machine.
Allow the water to cool down before cleaning the drain
•
pump, carrying out emergency emptying, or opening
the door in an emergency.
Open the cover cap and pull out the hose.
1
Unplug the drain plug and open the lter by turning
2
it to the left.
2
Container to
collect the
drained water.
After cleaning, turn the pump lter and insert the
4
drain plug.
Close the cover cap.
5
CAUTION
First drain using the drain hose and then open the
•
pump lter to remove any threads or objects.
Be careful when draining, as the water may be hot.
•
1
Remove any extraneous matter from the pump
3
lter.
32
Page 34

Cleaning the Dispenser Drawer
Tub Clean (Optional)
Detergent and fabric softener may build up in the
dispenser drawer. Remove the drawer and inserts and
check for buildup once or twice a month.
Remove the detergent dispenser drawer by pulling
1
it straight out until it stops.
•Press down hard on the disengage button and
remove the drawer.
Remove the inserts from the drawer.
2
•Rinse the inserts and the drawer with warm
water to remove buildup from laundry products.
Use only water to clean the dispenser drawer.
Dry the inserts and drawer with a soft cloth or
towel.
To clean the drawer opening, use a cloth or small,
3
non-metal brush to clean the recess.
•Remove all residue from the upper and lower
parts of the recess.
Wipe any moisture off the recess with a soft cloth
4
or towel.
Tub Clean is a special programme to clean the inside of
the washing machine.
A higher water level is used in this programme at higher
spin speed. Perform this programme regularly.
Remove any clothing or items from the washing
1
machine and close the door.
Open the dispenser drawer and add anti-limescale
2
(e.g. Calgon) to the main wash compartment.
•For tablets put into the drum.
Close the dispenser drawer slowly.
3
Power on and then press and hold Tub Clean
4
button for 3 seconds. Then
be displayed on the display.
Press the Start/Pause button to start.
5
After the programme is complete, leave the door
6
open to allow the washing machine door opening,
CAUTION
•If there is a child, be careful not to leave the door open
for too long.
will
Return the inserts to the proper compartments and
5
NOTE
•Do not add any detergent to the detergent
compartments. Excessive suds may generate and
leak from the washing machine.
33
Page 35

Caution on Freezing During
Winter
When frozen, the product does not operate normally.
•
Make sure to install the product where it will not freeze
during winter.
In case the product must be installed outside on a
•
porch or in other outdoor conditions, make sure to
check the following.
How to Keep the Product from Freezing
After washing, remove water remaining inside the
•
pump completely with the opening hose plug used for
removal of residual water. When the water is removed
completely, close the hose plug used for removal of
residual water and cover cap.
EN
After closing the tap, disconnect the cold supply hose
•
from the tap, and remove water while keeping the
hose facing downwards.
Supply
hose
Check for Freezing
If water does not drain when opening the hose plug
•
used for removal of residual water, check the drainage
unit.
Drain plug
Drain plug
Hang down drain hose to pull out water inside the
•
hose completely.
Drain hose
Cover cap
CAUTION
When the drain hose is installed in a curved shape,
•
the inner hose may freeze.
Cover cap
Turn the power on, choose a washing programme,
•
and press the Start/Pause button.
Detergent drawer
When
•
product is in operation, check water supply unit and
drainage unit (Some models do not have an alarm
function that indicates freezing).
is shown in display window while the
Drain hose
NOTE
Check that water is coming into the detergent drawer
•
while rinsing, and water is draining through the drain
hose while spinning.
34
Page 36

How to Handle Freezing
Make sure to empty the drum, pour warm water of
•
50–60 °C up to the rubber part inside the drum, close
the door, and wait for 1–2 hours.
When water is removed completely from the drum,
•
close the hose plug used for removal of residual
water, choose a washing programme, and press the
Start/Pause button.
EN
50‒60 °C
CAUTION
When the drain hose is installed in a curved shape,
•
the inner hose may freeze.
Open the cover cap and hose plug used for removal
•
of residual water to extract water completely.
Drain plug
Cover cap
NOTE
If water does not drain, this means the ice is not
•
melted completely. Wait more.
Detergent drawer
Drain hose
NOTE
Check that water is coming into the detergent drawer
•
while rinsing, and water is draining through the drain
hose while spinning.
When water supply problems occur, take the following
•
measures.
– Turn off the tap, and thaw out the tap and both
connection areas of supply hose of the product
using a hot water cloth.
– Take out supply hose and immerse in warm water
below 50–60 °C.
Supply
hose
50‒60 °C
35
Page 37

Using the Smart Diagnosis™
Function
Use this function if you need an accurate diagnosis
by an LG Electronics service centre when the product
malfunctions or fails. Use this function only to contact
the service representative, not during normal operation.
Press the Power button to turn on the washing
1
machine. Do not press any other buttons or turn
the cycle selector knob.
When instructed to do so by the call centre, place
2
the mouthpiece of your phone close to the Power
button.
Max
10 mm
Once the countdown is over and the tones have
5
stopped, resume your conversation with the call
centre agent, who will then be able to assist you
using the information transmitted for analysis.
NOTE
•The Smart Diagnosis™ function depends on the
local call quality.
•The communication performance will improve and
you can receive better service if you use the home
phone.
•If the Smart Diagnosis™ data transfer is poor due
to poor call quality, you may not receive the best
Smart Diagnosis™ service.
EN
Press and hold the Temp. button for 3 seconds,
3
while holding the phone mouthpiece to the icon or
Power button.
Keep the phone in place until the tone transmission
4
has nished. Time remaining for data transfer is
displayed.
For best results, do not move the phone while
•
the tones are being transmitted.
If the call centre agent is not able to get an
•
accurate recording of the data, you may be
asked to try again.
LG Electronics
service centre
36
Page 38

TROUBLESHOOTING
Your washing machine is equipped with an automatic error-monitoring system to detect and diagnose problems at
•
an early stage. If your washing machine does not function properly or does not function at all, check the following
before you call for service:
EN
Diagnosing Problems
Symptoms Reason Solution
Check all pockets to make sure that they
•
are empty. Items such as clips, matches,
Rattling and clanking
noise
Thumping sound
Vibrating noise
Foreign objects such as coins
or safety pins may be in drum or
pump.
Heavy wash loads may produce a
thumping sound. This is usually
normal.
Have all the transit bolts and tub
support been removed?
Are all the feet resting rmly on
the ground?
pens, coins, and keys can damage both
your washer and your clothes.
Close zippers, hooks, and drawstrings
•
to prevent these items from snagging or
tangling on other clothes.
If sound continues, washing machine
•
is probably out of balance. Stop and
redistribute wash load.
If not removed during installation, refer
•
to Installation guide for removing transit
bolts.
Check that the appliance is perfectly level
•
(Use a spirit level).
Water leaks
Oversudsing
Supply hoses or drain hose are
loose at tap or washing machine.
House drain pipes are clogged.
Too much detergent or unsuitable
detergent may cause excessive
foaming which may result in
water leaks.
Check and tighten hose connections.
•
Unclog drain pipe. Contact plumber if
•
necessary.
Make sure that the suggested amount of
•
detergent is used per the manufacturer's
recommendations.
37
Page 39

Symptoms Reason Solution
EN
Water does not enter
washing machine or it
enters slowly
Water in the washing
machine does not drain
or drains slowly
Washing machine does
not start
Washing machine will
not spin
Water supply is not adequate in
that location.
Water supply tap is not
completely open.
Water supply hose(s) are kinked.
The lter of the supply hose(s)
clogged.
Drain hose is kinked or clogged.
The drain lter is clogged.
Electrical power cord may not be
plugged in or connection may be
loose.
House fuse blown, circuit breaker
tripped,or a power outage has
occurred.
Water supply tap is not turned on.
Check that the door is rmly shut.
Check another tap in the house.
•
Fully open tap.
•
Straighten hose.
•
Check the lter of the supply hose.
•
Clean and straighten the drain hose.
•
Clean the drain lter.
•
Make sure plug ts tightly in wall outlet.
•
Reset circuit breaker or replace fuse. Do
•
not increase fuse capacity. If problem is
a circuit overload, have it corrected by a
qualied electrician.
Turn on water supply tap.
•
Close the door and press the Start/Pause
•
button. After pressing the Start/Pause
button, it may take a few moments before
the washing machine begins to spin. The
door must be locked before spin can be
achieved. Add 1 or 2 similar items to help
balance the load. Rearrange load to allow
proper spinning.
38
Page 40

Symptoms Reason Solution
EN
Once washing machine has
Door does not open
Wash cycle time
delayed
Fabric softener
overow
Softeners dispensed
too early
Dry problem Check water supply tap.
started, the door cannot be
opened for safety reasons.
If an imbalance is detected or if
the suds removing programme is
on, the wash time will increase.
Too much softener may cause an
overow.
Too much softener may cause an
premature dispensing.
Check if the ‘Door Lock’ icon is
•
illuminated. You can safely open the door
after the ‘Door Lock’ icon turns off.
This is normal. The time remaining shown
•
in the display is only an estimate. Actual
time may vary.
Follow softener guidelines to ensure
•
appropriate amount is used. Do not
exceed the maximum ll line.
Follow the guidelines provided by the
•
detergent manufacturer.
Close the dispenser drawer slowly. Do not
•
open the drawer during the wash cycle.
Do not overload. Check that the washing
•
machine is draining properly to extract
adequate water from the load. Clothes
load is too small to tumble properly. Add a
few towels.
Turn off water supply tap.
•
39
Page 41

Error Messages
Symptoms Reason Solution
EN
Water supply is not adequate in
area.
Water supply taps are not
completely open.
Water supply hose(s) are kinked.
are clogged.
If water leakage occurred in Aqua
stop supply hose indicator
will become red.
•May vary depending on the model.
Load is too small.
•Check another tap in the house.
•Fully open tap.
•Straighten hose(s).
•
•Use the new Aqua stop supply hose.
•Add 1 or 2 similar items to help balance
the load.
Load is out of balance.
The appliance has an imbalance
detection and correction system.
If individual heavy articles are
loaded (e.g. bath mat, bath
robe, etc.) this system may stop
spinning or even interrupt the
spin cycle altogether.
If the laundry is still too wet at
the end of the cycle, add smaller
articles of laundry to balance the
load and repeat the spin cycle.
•Add 1 or 2 similar items to help balance
the load.
•Rearrange load to allow proper spinning.
•Rearrange load to allow proper spinning.
40
Page 42

Symptoms Reason Solution
EN
Drain hose is kinked or clogged.
The drain lter is clogged.
Ensure door is not open.
Control error.
Water overlls due to the faulty
water valve.
Malfunction of water level sensor.
Over load in motor.
Clean and straighten the drain hose.
•
Clean the drain lter.
•
Close the door completely.
•
,
If
, is not released, call for
service.
Unplug the power plug and call for
•
service.
Close the water tap.
•
Unplug the power plug.
•
Call for service.
•
Close the water tap.
•
Unplug the power plug.
•
Call for service.
•
Allow the washing machine to stand for
•
30 minutes to allow the motor to cool,
then restart the cycle.
Water leaks.
Does not dry
Call for service.
•
Call for service.
•
41
Page 43

WARRANTY
This limited warranty does not cover:
Service trips to deliver, pick up, or install or repair the product; instruction to the customer on operation of the
•
product; repair or replacement of fuses or correction of wiring or plumbing, or correction of unauthorized repairs/
installation.
Failure of the product to perform during power failures and interruptions or inadequate electrical service.
•
Damage caused by leaky or broken water pipes, frozen water pipes, restricted drain lines, inadequate or interrupted
•
water supply or inadequate supply of air.
Damage resulting from operating the Product in a corrosive atmosphere or contrary to the instructions outlined in the
•
Product’s owner’s manual.
Damage to the Product caused by accidents, pests and vermin, lightning, wind, re, oods, or acts of God.
•
Damage or failure caused by unauthorized modication or alteration, or if it is used for other than the intended
•
purpose, or any water leakage where the product was not properly installed.
Damage or failure caused by incorrect electrical current, voltage, or plumbing codes, commercial or industrial use,
•
or use of accessories, components, or consumable cleaning products that are not approved by LG.
Damage caused by transportation and handling, including scratches, dents, chips, and/or other damage to the nish
•
of your product, unless such damage results from defects in materials or workmanship.
Damage or missing items to any display, open box, discounted, or refurbished Product.
•
Products with original serial numbers that have been removed, altered, or cannot be readily determined. Model and
•
Serial numbers, along with original retail sales receipt, are required for warranty validation.
Increases in utility costs and additional utility expenses.
•
Repairs when your Product is used in other than normal and usual household use or contrary to the instructions
•
outlined in the Product’s owner’s manual.
Costs associated with removal of your Product from your home for repairs.
•
The removal and reinstallation of the Product if it is installed in an inaccessible location or is not installed in
•
accordance with published installation instructions, including LG’s owner’s and installation manuals.
Damage resulting from misuse, abuse, improper installation, repair, or maintenance. Improper repair includes use of
•
parts not approved or specied by LG.
EN
42
Page 44

EN
Strange vibration or noise
caused by not removing transit
bolts or tub support.
Leakage caused by dirt (hair,
lint) on gasket and door glass.
Not draining caused by clogging
of pump lter.
Water is not coming because
water inlet valve lters are
clogged or water supply hoses
are kinked.
Tub
support
Carton
base
Transit
bolt
Inlet lter
Remove the transit bolts &
tub support.
Clean the gasket & door
glass.
Clean the pump lter.
Clean the inlet valve
lter or reinstall the water
supply hoses.
Water is not coming because too
much detergent use.
Laundry is hot or warm after
nished washing because the
supply hoses are installed in
reverse.
Water is not supplied because
the water tap is not turned on.
Cold
water
supply
Dispenser
Water tap
Cold
Hot
Hot
water
supply
Clean the detergent
disperser drawer.
Reinstall the supply hoses.
Turn on the water tap.
43
Page 45

Leakage caused by improper
installation of drain hose or
clogged drain hose.
Leakage caused by improper
installation of water supply hose
or using other brand supply
hoses.
Elbow
bracket
Tie strap
EN
Reinstall the drain hose.
Reinstall the supply hose.
No power problem caused by
loose connection of power cord
or electrical outlet problem.
Service trips to deliver, pick
up, install the product or for
instruction on product use. The
removal and reinstallation of the
Product.
If all screws are not installed
properly, it may cause excessive
vibration (Pedestal model only).
Water hammering (banging)
noise when washing machine is
lling with water.
High
pressure
water
Hit!!
Level
Loud noise
1°
Natural
water ow
Sudden
stopping
water ow
Reconnect the power cord
or change the electrical
outlet.
The warranty covers
manufacturing defects
only. Service resulting from
improper Installation is not
covered.
Install 4 screws at each
corner (Total 16EA).
Adjust the water pressure
by turning down the water
valve or water tap in the
home.
44
Page 46

Supplier’s trade mark LG
expressed by other means providing it is clear that the scale i
A
Where the information is provided in a table, and where some of the appliances listed in the table have been granted
a ‘Community Eco-label’ pursuant to Regulation (EEC) No 880/92, this information may be included here. In this case
the row heading shall state ‘Community Eco-label’, and the entry shall consist of a copy of the Eco-label mark. This
provision is without prejudice to any requirements under the EU Eco-label scheme.
No
5,44 kWh / cycle
1,52 kWh / cycle
Washing performance class determined in accordance with Annex IV. Expressed as ‘Washing performance class … on
a scale of A (higher) to G (lower)’. This may be expressed by other means provided it is clear that the scale is from A
(higher) to G (lower).
A
procedures of the harmonised standards referred to in Article 1 (2). Expressed as ‘Water remaining after spin … % (as
proportion of dry weight of the wash)’.
44 %
1400 rpm
8,0 kg
5,0 kg
XI.
litres / cycle
Water consumption for washing and spinning only, in litres, per standard 60 °C cotton washing (and spinning) cycle
determined in accordance with the test procedures of the harmonized standards referred to in Article 1 (2).
56 litres / cycle
Washing and drying time. Programme time for complete operating cycle (60 °C cotton washing and ‘dry cotton’ drying).
For rated washing capacity, determined in accordance with the test procedures of the harmonised standards referred to
in Artlicle 1 (2).
min.
The consumption of energy and water equal to 200 times the consumption expressed in points 5 (energy) and 12 (water).
This shall be expressed as ‘estimated annual consumption for a four-person household, always using the drier (200
cycles)’.
1088 kWh / year
18200 litres / year
The consumption of energy and water equal to 200 times the consumption expressed in points 6 (energy) and 13 (water).
This shall be expressed as ‘estimated annual consumption for a four-person household, never using the drier (200
cycles)’.
304 kWh / year
11200 litres / year
F H/1 4U2TDH(W)(0~9)(N)
OPERATING DATA
45
EN
91
746
F84U2TDH0N
Page 47

Page 48

PŘÍRUČKA UŽIVATELE
AUTOMATICKÁ
PRAČKA
Před začátkem montáže si pečlivě přečtěte tyto pokyny. To montáž
usnadní a zajistí, že je výrobek správně a bezpečně nainstalován. Po
provedení montáže tyto pokyny ponechejte v blízkosti výrobku pro
budoucí nahlédnutí.
F H/1 4U2TDH(W)(0~9)(N)
F84U2TDH0N
www.lg.com
Page 49

OBSAH
Tato příručka může zahrnovat vyobrazení
nebo obsah, které se liší od vámi
zakoupeného typu.
Tato příručka podléhá revizím ze strany
výrobce.
BEZPEČNOSTNÍ POKYNY ................................................ 3
Důležité bezpečnostní pokyny ............................................................... 3
Likvidace starého přístroje .................................................................... 8
INSTALACE ..................................................................... 9
Součásti .............................................................................................. 9
Příslušenství.........................................................................................9
Technické údaje ................................................................................. 10
Požadavky na místo instalace .............................................................. 11
Rozbalení a demontáž transportních šroubů ......................................... 12
Použití protiskluzových podložek (volitelně) .......................................... 13
Dřevěné podlahy (dutinové podlahy) ................................................... 13
Vyrovnání zařízení .............................................................................. 14
Připojení hadice přívodu vody ............................................................. 14
Instalace odtokové hadice .................................................................. 17
OBSLUHA ...................................................................... 18
Používání pračky ................................................................................ 18
Třídění prádla .................................................................................... 19
Přidávání pracích prostředků ............................................................... 20
Ovládací panel ................................................................................... 22
Tabulka programů .............................................................................. 23
Možnosti programu ............................................................................ 28
Používání funkce Smart (volitelně) .......................................................32
ÚDRŽBA ........................................................................ 33
Čištění pračky .................................................................................... 33
Čištění filtru přívodu vody ................................................................... 33
Čištění filtru odtokového čerpadla ........................................................ 34
Čištění výsuvného zásobníku ............................................................... 35
Čištění bubnu (volitelně) ..................................................................... 35
Pokyny k zazimování pračky ................................................................ 36
Používání funkce inteligentní diagnostiky Smart Diagnosis™ .................. 38
ODSTRAŇOVÁNÍ ZÁVAD ............................................... 39
Diagnostika problémů ......................................................................... 39
Chybová hlášení ................................................................................. 42
ZÁRUKA ........................................................................ 44
PROVOZNÍ ÚDAJE......................................................... 47
Page 50

BEZPEČNOSTNÍ POKYNY
Následující bezpečnostní pokyny jsou určeny pro předcházení
nepředvídaným nebezpečím, poškozením nebo nesprávné
obsluze zařízení.
Pokyny jsou rozděleny na ‚VAROVÁNÍ‘ a ‚UPOZORNĚNÍ‘, viz
podrobný popis níže.
Tento symbol označuje události a obsluhu, které mohou
mít za následek vznik rizika. Podrobně si přečtěte text
označený tímto symbolem a postupujte podle pokynů,
abyste předešli vzniku rizika.
VAROVÁNÍ
Tento symbol označuje situace, kdy může mít nedodržení
pokynů za následek závažné zranění nebo usmrcení osob.
UPOZORNĚNÍ
Tento symbol označuje situace, kdy může mít nedodržení
pokynů za následek lehké zranění nebo poškození zařízení.
DŮLEŽITÉ BEZPEČNOSTNÍ POKYNY
CZ
VAROVÁNÍ
Abyste při používání tohoto výrobku snížili riziko vzniku
požáru, úmrtí, zasažení elektrickým proudem nebo zranění
či popálení osob, dodržujte základní bezpečnostní opatření,
včetně následujících:
Děti v domácnosti
Toto zařízení není určeno pro používání osobami (včetně
dětí) se sníženými fyzickými, senzorickými nebo mentálními
schopnostmi nebo nedostatečnými zkušenostmi a znalostmi
bez přiměřeného dozoru nebo bez seznámení s pokyny pro
používání zařízení osobou odpovědnou za jejich bezpečnost. Je
nutné zajistit, aby si děti s přístrojem nehrály.
3
Page 51

Pro používání v Evropě:
Toto zařízení mohou děti starší 8 let a osoby se sníženými
fyzickými, senzorickými nebo mentálními schopnostmi nebo
nedostatečnými zkušenostmi a znalostmi používat pod
přiměřeným dozorem nebo pokud byly obeznámeny s pokyny
pro bezpečné používání zařízení a porozuměly možným
nebezpečím. Dohlížejte na děti, aby si s přístrojem nehrály. Děti
nesmí bez dozoru provádět čištění a uživatelskou údržbu.
Děti mladší 3 let by se bez stálého dozoru neměly v blízkosti
zařízení pohybovat.
Instalace
•Nikdy neuvádějte zařízení do provozu, pokud je poškozené,
vadné, částečně demontované nebo pokud chybí či jsou
poškozené některé součásti včetně poškozeného napájecího
kabelu nebo zástrčky.
•Toto zařízení by mělo být přepravováno dvěma nebo více
osobami, které jej bezpečně drží.
•Neinstalujte zařízení ve vlhkém a prašném prostředí. Zařízení
neinstalujte ani neskladujte v exteriéru nebo na jakémkoliv
místě, které může být vystaveno povětrnostním vlivům, např.
přímému slunečnímu světlu, větru, dešti nebo teplotám pod
bodem mrazu.
•Utáhněte odtokovou hadici, abyste předešli jejímu uvolnění.
•Pokud je napájecí kabel poškozen nebo je otvor elektrické
zásuvky uvolněný, zástrčku nepoužívejte a obraťte se na
autorizované servisní středisko.
•V kombinaci s tímto zařízením nepoužívejte vícezdířkové
zásuvky, prodlužovací napájecí kabel nebo adaptér.
CZ
4
Page 52

•Toto zařízení nesmí být instalováno za uzamykatelnými dveřmi,
posuvnými dveřmi nebo dveřmi se závěsy na opačné straně
než je umístěn spotřebič, aby nedocházelo k blokování úplného
otevření dvířek zařízení.
•Toto zařízení musí být uzemněno. V případě poruchy nebo
selhání snižuje uzemnění riziko zasažení elektrickým proudem
tím, že elektrickému proudu umožňuje projít cestou nejmenšího
odporu.
•Tento spotřebič je vybaven síťovým kabelem se zemnicím
vodičem a ochranným kolíkem. Zástrčka musí být připojena do
vhodné zásuvky, která je nainstalována a uzemněna v souladu
s veškerými místními zákony a předpisy.
•Nesprávné připojení zemnicího vodiče může mít za následek
riziko zasažení elektrickým proudem. Pokud si nejste jisti,
zda je zařízení správně uzemněno, obraťte se na odborného
elektrikáře nebo servisního technika.
•Napájecí zástrčku dodávanou se zařízením neupravujte. Pokud
neodpovídá dostupné zásuvce, zajistěte provedení montáže
vhodné zásuvky odborným elektrikářem.
Obsluha
•Nepokoušejte se oddělovat žádné panely nebo rozebírat
zařízení. Nepoužívejte při ovládání zařízení přes ovládací panel
žádné ostré předměty.
•Neopravujte ani nevyměňujte žádné díly zařízení. Veškeré
opravy a servis musí provádět kvalikovaní servisní pracovníci,
není-li v této příručce uživatele doporučeno jinak. Používejte
pouze schválené tovární díly.
CZ
5
Page 53

•Nevkládejte do zařízení zvířata, např. domácí mazlíčky.
•V bezprostřední blízkosti pod zařízením a v jeho okolí
neskladujte hořlavé materiály, např. cupaninu, papír, hadry,
chemikálie atd.
•Nenechávejte otevřená dvířka zařízení. Otevřená dvířka lákají
děti, aby se na nich houpaly nebo aby lezly do zařízení, což by
mohlo mít za následek poškození zařízení nebo zranění osob.
•Použijte novou hadici nebo sadu hadic dodávanou se
zařízením. Opětovné použití starých hadic může mít za
následek únik vody a následné poškození majetku.
•Nikdy nesahejte do zařízení, pokud je v provozu. Vyčkejte,
dokud nedojde k úplnému zastavení bubnu.
•Do zařízení nevkládejte ani v něm neperte nebo nesušte
textilie, které byly čištěny, nasáknuty nebo potřísněny hořlavými
nebo výbušnými látkami (jako je vosk, oleje, barvy, benzin,
odmašťovací kapaliny, roztoky pro suché čištění, petrolej,
rostlinný olej, kuchyňský olej atd.). Při nesprávném použití by
mohlo dojít k požáru nebo výbuchu.
•V případě zaplavení odpojte elektrickou zástrčku a obraťte
se na informační středisko pro zákazníky společnosti LG
Electronics.
•Když jsou dvířka plnicího otvoru otevřená, netlačte na ně shora
nadměrnou silou.
•Nedotýkejte se dvířek během programů využívajících vysokou
teplotu.
•V blízkosti zařízení nepoužívejte vznětlivé plyny a hořlavé látky
(benzen, benzín, ředidla, petrolej, alkohol atd.).
CZ
6
Page 54

•Pokud dojde v zimním období ke zmrznutí odtokové hadice
nebo hadice přívodu vody, používejte sušičku výhradně po jejím
rozmrazení.
•Všechny prací prostředky, aviváže a bělicí prostředky udržujte
mimo dosah dětí.
•Nedotýkejte se zástrčky ani ovládacích prvků zařízení vlhkýma
rukama.
•Napájecí kabel nadměrně neohýbejte ani na něj nepokládejte
těžké předměty.
•Neperte v zařízení koberečky, rohožky, deky domácích mazlíčků
nebo boty ani žádné jiné věci kromě oblečení či prostěradel.
•Toto zařízení je určeno pouze pro použití v domácnosti a nesmí
se používat v mobilních prostředích.
•Pokud dojde k úniku plynu (izobutan, propan, zemní plyn atd.),
nedotýkejte se zařízení ani zástrčky a ihned místnost vyvětrejte.
Údržba
•Po úplném odstranění vlhkosti a prachu bezpečně zapojte
elektrickou zástrčku do zásuvky.
•Před čištěním zařízení odpojte od zdroje napájení. Nastavení
ovládacích prvků na hodnotu VYPNUTO nebo přechod do
pohotovostního režimu neodpojí zařízení od zdroje napájení.
•Při čištění nestříkejte vodu dovnitř ani na vnější povrch zařízení.
•Nikdy nevypojujte spotřebič tahem za síťový kabel. Vždy pevně
uchopte elektrickou zástrčku a vytáhněte ji přímo ze zásuvky.
CZ
7
Page 55

Likvidace
•Před vyřazením starého přístroje jej odpojte od elektrické sítě.
Abyste zamezili nesprávnému použití přístroje, odřízněte přímo
za přístrojem síťový kabel.
•Veškeré obalové materiály (např. plastové pytle nebo
polystyren) odstraňte z dosahu dětí. Obalové materiály mohou
způsobit udušení.
•Před likvidací zařízení nebo jeho vyhozením demontujte dvířka,
abyste zamezili nebezpečí uvíznutí dětí nebo malých zvířat
uvnitř sušičky.
Likvidace starého přístroje
• Tento symbol přeškrtnutého koše značí, že odpad z elektrických a elektronických
výrobků (WEEE) je nutné likvidovat odděleně od linky komunálního odpadu.
• Staré elektrické produkty mohou obsahovat škodlivé látky, tudíž správný způsob
likvidace starého elektrického spotřebiče pomáhá zamezit možným negativním
dopadům na životní prostředí a zdraví osob. Vaše staré zařízení může obsahovat
opakovaně použitelné součásti, které by mohly být použity na opravu dalších
produktů a další hodnotné materiály, které mohou být za účelem zachování
omezených zdrojů recyklovány.
• Zařízení můžete buď vzít do obchodu, kde jste produkt zakoupili, nebo se ohledně
informací o nejbližším schváleném sběrném místě WEEE můžete obrátit na místní
vládní úřad pro nakládání s odpady. Nejaktuálnější informace platné pro vaši zemi
naleznete na stránkách www.lg.com/global/recycling.
CZ
8
Page 56

INSTALACE
CZ
Součásti
1
Transportní šrouby
2
Síťová zástrčka
3
Zásuvka
4
Ovládací panel
5
Buben
6
Dveře
7
Odtoková hadice
8
Vypouštěcí zátka
9
Filtr odtokového čerpadla
10
Spodní víko (umístění se
může u různých praček lišit)
11
Polohovatelná nožka
Příslušenství
Hadice přívodu studené
vody (1EA) (volitelně:
horká (1EA))
Montážní klíč Protiskluzové podložky
(volitelně)
9
Page 57

Technické údaje
Model
F H/1 4U2TDH(W)(0~9)(N)
F84U2TDH0N
Kapacita pračky 8 kg (praní) / 5 kg (sušení)
Napájení 220–240 V, 50 Hz
Velikost 600 mm (š) 560 mm (h) 850 mm (v)
Hmotnost 68 kg
Povolený tlak vody 0,1‒1,0 MPa (1‒10 kgf/cm²)
• Vzhled a technické údaje zařízení se mohou v rámci zvyšování kvality bez předchozího upozornění
změnit.
• Pro připojení ke zdroji vody není potřeba žádná další ochrana před zpětným tokem.
CZ
10
Page 58

CZ
10 cm 2 cm 2 cm
Požadavky na místo instalace
Umístění
Sklon podlahy : Povolený sklon podlahy pod
celým zařízením je 1°.
Elektrická zásuvka : Musí se nacházet ve
vzdálenosti do 1,5 m od jedné ze stran zařízení.
• Nepřetěžujte zásuvku připojením více než
jednoho spotřebiče.
Další vzdálenosti : Vzdálenost od stěny 10 cm:
zadní strana /2 cm: levá a pravá strana
• Nikdy nepokládejte prací prostředky na vrchní
stranu zařízení.
• Tyto prostředky by mohly poškodit povrchovou
úpravu a ovládací prvky.
VAROVÁNÍ
• Zástrčka musí být připojena do vhodné
zásuvky, která je odborně nainstalována a
uzemněna v souladu s veškerými místními
zákony a předpisy.
Umístění
• Usaďte spotřebič na rovné pevné podlaze.
• Ujistěte se, že proudění vzduchu okolo
zařízení není narušováno koberci, rohožkami
atd.
• Nikdy se nepokoušejte vyrovnávat nerovnosti
podlahy pod spotřebičem dřevěnými špalíky,
kartónem nebo podobnými materiály.
• Nelze-li se vyhnout instalaci zařízení v blízkosti
plynového sporáku nebo běžných kamen, musí
být mezi pračku a zdroj tepla vložena izolační
deska (85 × 60 cm) s povrchem u topného
tělesa potaženým hliníkovou fólií.
• Neinstalujte zařízení v místnostech, kde
by mohla teplota klesnout pod bod mrazu.
Zmrzlé hadice mohou pod tlakem prasknout.
Spolehlivost elektronické řídicí jednotky může
být při teplotách pod bodem mrazu snížena.
• Zajistěte, aby bylo zařízení po instalaci snadno
přístupné technikovi pro případ opravy.
• Po instalaci zařízení upravte dodaným
montážním klíčem výšku všech čtyř nožek
tak, aby bylo zařízení pevně usazeno a aby
mezi horní deskou spotřebiče a spodní hranou
pracovní desky zůstal volný prostor přibližně
20 mm.
• Pokud je dodávka zařízení realizována
v zimním období a teplota se pohybuje
pod bodem mrazu, umístěte spotřebič před
uvedením do provozu na několik hodin do
místnosti s pokojovou teplotou.
VAROVÁNÍ
• Toto zařízení není určeno pro používání na
moři ani pro instalaci v mobilních prostředcích,
jako jsou např. karavany, letadla atd.
Elektrické připojení
• Nepoužívejte prodlužovací přívod ani
rozbočovací zásuvku.
• Po ukončení provozu vždy odpojte zařízení od
elektrické sítě a vypněte přívod vody.
• Zařízení připojujte k uzemněné zásuvce
zapojené podle platných předpisů pro
elektrickou instalaci.
• Zařízení musí být umístěno tak, aby byla
zástrčka snadno přístupná.
• Opravy zařízení mohou provádět pouze
prováděny nezkušenými osobami, může to
mít za následek zranění osob nebo závažnou
poruchu. Obraťte se na své místní servisní
středisko.
11
Page 59

CZ
Rozbalení a demontáž
transportních šroubů
Zvedněte zařízení z polystyrenové podložky.
1
• Po odstranění lepenkové krabice a
obalového materiálu zvedněte zařízení z
polystyrenové podložky. Ujistěte se, že se
spolu s podložkou uvolnila také plastová
vana a že se nezachytila za spodní část
zařízení.
• Pokud je pro odstranění lepenkové spodní
části obalu nutné zařízení položit, vždy
chraňte stranu zařízení a položte jej
opatrně na bok. Nepokládejte zařízení na
přední nebo zadní stranu.
Plastová vana
(volitelně)
Lepenková
spodní část obalu
Nasaďte krytky otvorů.
3
• Připravte si krytky otvorů, které jsou
součástí sady příslušenství, a nasaďte je do
otvorů transportních šroubů.
Krytka
POZNÁMKA
• Ponechejte si transportní šrouby pro budoucí
použití. Abyste předešli poškození vnitřních
součástí, nepřepravujte pračku bez opětovné
instalace transportních šroubů.
• Nejsou-li použity transportní šrouby včetně
pojistných kroužků, může dojít k závažným
vibracím a hluku, což může mít za následek
trvalé poškození pračky. Napájecí kabel je
upevněn na zadní straně pračky pomocí
transportního šroubu, aby bylo zamezeno
případnému provozu se zašroubovanými
transportními šrouby.
Vyšroubujte transportní šrouby.
2
• Pomocí dodaného montážního klíče zcela
uvolněte všechny transportní šrouby
otáčením doleva, nejprve demontujte
dva spodní transportní šrouby. S pomocí
lehkého viklání vytáhněte šrouby.
Transportní
šroub
12
Pojistný
kroužek
Page 60

CZ
Použití protiskluzových
podložek (volitelně)
Pokud instalujete zařízení na kluzký povrch,
může dojít z důvodu nadměrných vibrací k
jejímu posunutí. Nesprávné vyrovnání může
mít za následek hluk a vibrace. Pokud dojde
k této situaci, vložte pod polohovatelné nožky
protiskluzové podložky a vyrovnejte výšku.
Očistěte podlahu, aby bylo možné připevnit
1
protiskluzové podložky.
• Suchým hadříkem odstraňte cizí předměty
a vlhkost. Při výskytu vlhkosti by mohlo dojít
k uklouznutí protiskluzových podložek.
Po umístění zařízení do prostoru instalace
2
vyrovnejte výšku.
Protiskluzovou podložku umístěte přilnavou
3
stranou na podlahu.
• Nejúčinnějším způsobem je instalovat
protiskluzové podložky pod přední nožky.
Pokud je umístění podložek pod přední
nožky obtížné, umístěte je pod zadní nožky.
Touto stranou
nahoru
Přilnavá strana
Ujistěte se, že je zařízení v rovině.
4
• Abyste se ujistili, že se zařízení nekývá,
lehce zatlačte na horní okraj zařízení nebo
s ním zkuste zakývat. Pokud se zařízení
kývá, vyrovnejte spotřebič znovu.
Dřevěné podlahy (dutinové
podlahy)
• Dřevěné podlahy jsou na vibrace zvláště
citlivé.
• Abyste vibracím předešli, doporučujeme u
všechny nožek pračky použít pryžové misky
s minimální tloušťkou 15 mm, které budou
přišroubovány nejméně ke dvěma podlahovým
nosníkům.
Pryžová miska
• Pokud je to možné, nainstalujte zařízení do
některého z rohů místnosti, kde je podlaha
nejstabilnější.
• Pro snížení vibrací nasaďte pryžové misky.
POZNÁMKA
• Správné umístění a vyrovnání pračky umožní
zajistit dlouhodobý, správný a spolehlivý
provoz.
• Pračka musí být 100% vodorovná a musí být
pevně usazena.
• Při zátěži nesmí docházet ke „kývání“ přes
rohy.
• Povrch pro instalaci musí být čistý, bez
vosku na podlahy a jiných vrstev mazacích
prostředků.
• Zamezte namočení nožek pračky. V opačném
případě může dojít k výskytu vibrací nebo
hluku.
• Pryžové misky je možné získat v
servisním středisku LG.
POZNÁMKA
• Protiskluzové podložky je možné získat v
servisním středisku LG.
13
Page 61

CZ
Vyrovnání zařízení
Není-li podlaha rovná, seřiďte polohu pračky
do roviny pomocí polohovatelných nožek (pod
nožky nevkládejte žádné další podložky, kousky
dřeva apod.). Ujistěte se, že jsou všechny čtyři
nožky stabilní a spočívají na podlaze, a potom
zkontrolujte, zda je zařízení dokonale vyrovnané
(pomocí vodováhy).
• Po vyrovnání zařízení utáhněte pojistné matice
směrem ke spodní části zařízení. Všechny
pojistné matice musí být utažené.
Zvýšení Snížení
Pojistná matice
Pevně utáhněte všechny 4
pojistné matice
Kontrola protilehlého směru
• Po zatlačení na horní část zařízení
v protilehlých rozích (úhlopříčně) se zařízení
nesmí vůbec pohybovat nahoru a dolů
(zkontrolujte v obou směrech). Pokud se
zařízení při zatlačení na úhlopříčně protilehlé
rohy kývá, seřiďte znovu výšku nožek.
Připojení hadice přívodu vody
• Tlak v přívodu vody musí být v rozsahu 0,1
MPa až 1 MPa (1‒10 kgf/cm2).
• Při připojování hadice přívodu vody ji
nestahujte ani ji k přívodnímu kohoutu
nešroubujte přes závit.
• Převyšuje-li tlak v přívodu vody 1,0 MPa,
je nutné namontovat před přívod k pračce
redukční zařízení.
• Pravidelně kontrolujte stav hadice a v případě
nutnosti ji vyměňte.
Kontrola pryžového těsnění na
hadici přívodu vody
S hadicemi přívodu vody se dodávají dvě
pryžová těsnění. Používají se k tomu, aby se
zabránilo vytékání vody. Ověřte, zda je připojení
ke kohoutům dostatečně těsné.
Přípojka hadice
Pryžové těsnění
POZNÁMKA
• Při umístění na dřevěných nebo dutinových
podlahách může docházet k nadměrným
vibracím a nevyváženosti.
• Pokud je pračka instalována na vyvýšeném
místě, je nutné ji bezpečně upevnit, aby se
zamezilo riziku jejího pádu.
14
Přípojka hadice
Pryžové těsnění
Page 62

CZ
Připojení hadice k vodovodnímu
kohoutu
Připojení šroubovací hadice ke kohoutu
se závitem
Našroubujte přípojku hadice na přívodní kohout
vody.
Připojení šroubovací hadice ke kohoutu
bez závitu
Uvolněte čtyři upevňovací šrouby.
1
Horní část
přechodky
Upevňovací šroub
Pryžové
těsnění
Nasaďte adaptér na konec kohoutu, aby
3
pryžové těsnění vytvořilo vodotěsnou
přípojku. Utáhněte čtyři upevňovací šrouby.
Nasaďte hadici přívodu vody svisle nahoru,
4
aby mohlo pryžové těsnění v hadici zcela
přiléhat na kohout, a poté ji šroubováním
doprava utáhněte.
Matice
Hadice přívodu
vody
Připojení hadice s rychlospojkou ke
kohoutu bez závitu
Odšroubujte kruhovou desku adaptéru a
1
uvolněte čtyři upevňovací šrouby.
Pokud je pro umístění adaptéru kohout příliš
2
velký, sejměte redukci.
Redukce
Kruhová deska
Pokud je pro umístění adaptéru kohout příliš
2
velký, sejměte redukci.
Redukce
15
Page 63

CZ
Nasaďte adaptér na konec kohoutu, aby
3
pryžové těsnění vytvořilo vodotěsnou
přípojku. Utáhněte čtyři upevňovací šrouby a
kruhovou desku adaptéru.
Stáhněte západkovou desku přípojky
4
dolů, nasaďte přívodní hadici na adaptér a
uvolněte západku. Ujistěte se, že došlo
k zajištění adaptéru.
Západka
Připojení hadice k zařízení
Připevněte potrubí horké vody k přívodu horké
vody v zadní části pračky. Připevněte potrubí
studené vody k přívodu studené vody v zadní
části pračky.
Přívod studené
vody
POZNÁMKA
• Pokud po připojení voda z hadice uniká,
opakujte stejné kroky. Pro přívod vody použijte
nejstandardnější typ kohoutu. V případě, že
je kohout hranatý nebo příliš velký, odstraňte
před instalací kohoutu na adaptér vodicí desku.
Použití vodorovného kohoutu
Vodorovný kohout
Přívod horké
vody
POZNÁMKA
• Před připojením přívodní hadice k
vodovodnímu kohoutu pusťte vodu a
vypláchněte cizí látky (nečistoty, písek, piliny
atd.) z vodovodního potrubí. Napusťte vodu do
nádoby a zkontrolujte její teplotu.
16
Kohout s prodloužením
Kohout se čtvercovým ústím
Page 64

Instalace odtokové hadice
• Odtoková hadice nesmí být připojená výše než
100 cm nad podlahou. Nemusel by pak být
zajištěn odtok vody ze zařízení nebo by mohla
voda vytékat pomalu.
• Správné upevnění odtokové hadice umožní
zamezit poškození podlahy z důvodu úniku
vody.
• Pokud je odtoková hadice příliš dlouhá,
nesnažte se ji zatlačit zpět do zařízení. Mohlo
by to mít za následek abnormální hluk.
~ 100 cm
~ 145 cm
~ 105 cm
max. 100 cm
• Při instalaci odtokové hadice do umyvadla
zajistěte její koncovku lankem.
• Správné upevnění odtokové hadice umožní
zamezit poškození podlahy z důvodu úniku
vody.
CZ
Vana
max. 100 cm
Držák hadice
max. 100 cm
Upevňovací páska
17
Page 65

18
OBSLUHA
CZ
Používání pračky
Před prvním praním zvolte prací program a
nechejte jej proběhnout bez toho, aby v pračce
bylo prádlo. Tak lze z bubnu odstranit usazeniny
a vodu, které mohly v pračce zůstat z výroby.
1
Roztřiďte prádlo a vložte ho do pračky.
• Roztřiďte prádlo podle typu textilie, míry
znečištění, barvy a velikosti. Otevřete
dvířka a vložte prádlo do pračky.
2
Přidejte čisticí prostředky a/nebo prací
prostředky a aviváž.
• Přidejte odpovídající množství pracího
prostředku do výsuvného zásobníku na
prací prostředky. V případě potřeby přidejte
do příslušných částí zásobníku bělidlo nebo
aviváž.
3
Zapněte pračku.
• Stisknutím tlačítka Napájení zapněte pračku.
4
Vyberte požadovaný prací program.
• Stiskněte opakovaně tlačítko programu
nebo otáčejte voličem programů, dokud
není vybrán požadovaný program.
5
Spusťte program.
• Pro spuštění programu stiskněte
tlačítko Start/Pauza. Buben pračky
se zatřese bez vody, aby bylo
možné zjistit hmotnost náplně. Pokud
nebude do 5 minut stisknuto tlačítko Start
/Pauza, dojde k vypnutí pračky a všechna
nastavení budou vymazána.
6
Konec programu.
• Po dokončení programu zazní melodie.
Abyste snížili míru pomačkání, ihned
vyjměte prádlo z pračky. Po vyjmutí prádla
zkontrolujte, zda nedošlo k zachycení
drobných předmětů v těsnění dvířek.
Page 66

CZ
Třídění prádla
Na textiliích vyhledejte štítky pro péči o
1
prádlo.
• Tyto štítky obsahují informace o složení
textilu a doporučeném způsobu praní nebo
čištění.
• Symboly na nášivkách.
Teplota praní
Normální praní
Šetrné praní
Jemné prádlo
Ruční praní
Neperte
Třídění prádla.
2
• Nejlepších výsledků lze dosáhnout
rozdělením prádla na dávky, které lze prát s
použitím stejného pracího programu.
• Různé druhy textilií vyžadují praní při
různé teplotě vody a s různou rychlostí
odstřeďování.
• Prádlo rozdělte vždy podle barev na tmavé
a světlé s bílým. Perte je odděleně, protože
by uvolněné barvivo a vlákna mohly
způsobit zabarvení bílých a světlých oděvů.
Pokud je to možné, neperte společně
více znečištěné prádlo a méně znečištěné
prádlo.
− Znečištění (silné, běžné, mírné):
Rozdělte prádlo podle stupně znečištění.
− Barva (bílá, světlá, tmavá):
Rozdělte prádlo na bílé a barevné.
− Vlákna (uvolňování vláken, zachycování
vláken):
Textilie, které uvolňují vlákna, perte
odděleně od těch, které je zachycují.
Péče o prádlo před vložením do pračky.
3
• V jedné dávce kombinujte velké a malé
kusy prádla. Nejdříve vkládejte velké kusy.
• Velké kusy by měly tvořit maximálně
polovinu celkové dávky prádla. Neperte
jednotlivé kusy prádla. To by mohlo
způsobit nerovnoměrné vyvážení náplně.
Přidejte jeden nebo dva podobné kusy
prádla.
• Zkontrolujte všechny kapsy, abyste se
ujistili, že jsou skutečně prázdné. Předměty
jako hřebíky, vlasové sponky, zápalky,
pera, mince nebo klíče mohou vaši pračku i
prádlo poškodit.
• Zapněte zipy, zapněte háčky a zavažte
šňůrky, aby nedošlo k jejich zatrhnutí s
ostatním prádlem.
• Předběžně ošetřete znečištěná místa a
skvrny pomocí vody s rozpuštěným malým
množstvím pracího prostředku, abyste
usnadnili uvolňování nečistot.
• Zkontrolujte záhyby na pružné manžetě
(šedá) a odstraňte všechny menší části.
UPOZORNĚNÍ
• Zkontrolujte vnitřní prostor bubnu a vyjměte
veškeré prádlo z předchozího pracího cyklu.
• Odstraňte veškeré prádlo nebo předměty z
pružné manžety (těsnění), abyste předešli
poškození prádla nebo manžety.
19
Page 67

CZ
Přidávání pracích prostředků
Dávkování pracího prostředku
• Prací prostředek je nutné používat podle
pokynů jeho výrobce a musí být zvolen podle
typu, barvy, znečištění nebo druhu tkaniny a
teploty praní.
• Pokud použijete příliš velké množství pracího
prostředku, vytváří se příliš mnoho pěny, což
zhoršuje kvalitu praní nebo způsobuje velké
zatížení motoru.
• Při používání tekutých pracích prostředků
postupujte podle pokynů výrobce.
• Pokud chcete program spustit okamžitě,
můžete tekutý prací prostředek nalít přímo do
hlavního oddílu výsuvného zásobníku.
• Tekutý prací prostředek nepoužívejte při volbě
[Odložený start] nebo pokud jste vybrali volbu
Předpírka, protože by mohlo dojít ke ztuhnutí
kapaliny.
• Pokud se vytváří příliš velké množství pěny,
omezte množství pracího prostředku.
• Dávkování pracího prostředku může být nutné
přizpůsobit podle teploty vody, tvrdosti vody,
objemu a míry znečištění náplně. Pro dosažení
nejlepších výsledků zamezte nadměrnému
pěnění.
• Před volbou pracího prostředku a teploty vody
si přečtěte údaje na štítku oděvu.
• Při používání pračky používejte prací
prostředky určené pro jednotlivé typy oděvů:
− univerzální prací prášky pro všechny typy
látek
− prací prášky pro jemné tkaniny
− tekuté prací prostředky pro všechny typy
tkanin nebo speciální prací prostředky pouze
pro vlnu.
• Pro lepší výsledky praní a bělení používejte
prací prostředek s univerzálním práškovým
bělidlem.
• Prací prostředek je vyplachován ze zásobníku
na začátku pracího cyklu.
POZNÁMKA
• Nenechejte prací prostředek ztvrdnout. To
by mohlo mít za následek ucpání pračky,
nedostatečné máchání nebo zápach.
• Maximální množství prádla: podle doporučení
výrobce
• Částečné množství prádla: 3/4 obvyklého
množství
• Minimální množství prádla: 1/2 maximálního
množství prádla
Přidávání pracího prostředku a
aviváže
Přidávání pracího prostředku
• Pouze hlavní praní →
• Předpírka + hlavní praní →
POZNÁMKA
• Příliš velké množství pracího prostředku,
bělidla nebo aviváže může mít za následek
přeplnění.
• Ujistěte se, že používáte správné množství
pracího prostředku.
Přidávání aviváže
• Nepřekračujte hranici maximálního naplnění.
Přeplnění aviváží může způsobit rychlé
spotřebování aviváže a vznik skvrny na prádle.
Pomalu zavřete výsuvný zásobník.
20
Page 68

CZ
• Neponechávejte aviváž v zásobníku na prací
prostředky déle než 2 dny (mohlo by dojít k
jejímu ztuhnutí).
• Aviváž se automaticky přidává do praní v
posledním cyklu máchání.
• Neotvírejte výsuvný zásobník při napouštění
vody.
• Nesmí se používat rozpouštědla (benzen
apod.)
POZNÁMKA
• Nenalévejte aviváž přímo na prádlo.
Přidávání změkčovače vody
• V oblastech s velmi tvrdou vodou lze pro
snížení spotřeby pracího prostředku použít
změkčovač vody, např. prostředek pro
zamezení tvorby vodního kamene (např.
Calgon). Dávkujte podle množství uvedeného
na obalu. Nejprve přidejte prací prostředek,
potom změkčovač vody.
• Použijte množství pracího prostředku určené
pro měkkou vodu.
Použití tablet
Otevřete dvířka a vložte tablety do bubnu.
1
Do bubnu vložte prádlo a zavřete dvířka.
2
21
Page 69

Ovládací panel
3
CZ
Bavlna
Bavlna Smart
Smíšené prádlo
Syntetika
Pokrývky
Program pro alergiky
Osvěžení prádla
Tlačítko Napájení
1
Sportovn
• Pro zapnutí pračky stiskněte tlačítko
Napájení.
Tlačítko Start/Pauza
2
• Toto tlačítko Start/Pauza se používá
pro spuštění pracího cyklu nebo jeho
pozastavení.
• Pokud je nutné dočasně zastavit prací
cyklus, stiskněte tlačítko Start/Pauza.
Displej
• Na displeji je zobrazeno nastavení,
odhadovaný zbývající čas, volby a stavová
hlášení. Po zapnutí přístroje se na displeji
rozsvítí výchozí nastavení.
• Na displeji je zobrazen odhadovaný
zbývající čas. Při automatickém výpočtu
objemu náplně bliká symbol
zobrazí hlášení „Vážení“.
í oblečení
Jemn
Skvrny
Rovnou na sebe
Rychl
Pran
í+sušení (5kg)
Načíst program
nebo se
á péče
ý 30
Stisknout na 3 sekundy pro Extra funkce.
Předp
Sušen
í
č
ištění bubnu
Volič programů
4
írka
Máchán
Dětská pojistka
Studená
í+
Parní
praní
Teplota
Odstředění
Odložený start
• Programy jsou k dispozici podle typu
prádla.
• Zvolený program signalizuje příslušná
kontrolka.
Volby
5
• Tato funkce vám umožňuje vybrat
doplňující program, při aktivaci se rozsvítí.
• Tato tlačítka můžete použít pro výběr
požadovaných voleb programů zvoleného
programu.
22
Page 70

Tabulka programů
Prací program
CZ
Program Popis Druh tkaniny
Bavlna
Bavlna Smart
Syntetika
Smíšené prádlo
Program pro
alergiky
Rovnou na
sebe
Osvěžení
prádla
Pokrývky
Sportovní
oblečení
Dosahuje lepšího
výkonu kombinací
různých pohybů bubnu.
Zajišťuje
optimalizovaný prací
účinek pro větší
množství prádla s nižší
spotřebou energie.
Vhodné pro košile
určené k běžnému
nošení, které není
nutné po vyprání žehlit.
Umožňuje současné
praní různých druhů
tkanin.
Napomáhá odstranovat
alergeny, jako jsou např.
domácí roztoči, pyl nebo
kočičí srst.
Tento program umožnuje
sušení během 80 minut,
je určený pro 1 - 3 minut
lehce znečištěné košile.
B
ěhem 20 minut pom
árou odstranit záhyby
p
ádlo může b
(Pr
žete jej n
Mů
dobu 10-30 minut vyvěsit
a nechat uschnout).
Pro velké kusy prádla,
jako např. ložní
přehozy, polštáře,
přehozy pohovek apod.
Vhodné pro sportovní
oblečení, jako např.
běžecké oblečení.
ýt mokré.
ásledn
Stálobarevné oděvy
(košile, noční košile,
pyžama atd.) a běžně
znečištěné bavlněné
prádlo (spodní prádlo).
Polyamid, akryl, polyester
Různé druhy tkanin
kromě speciálních oděvů
(hedvábí / jemné prádlo,
sportovní oděvy, tmavé
oděvy, vlna, pokrývky/
závěsy).
Bavlna, spodní prádlo,
povlečení, prostěradlo,
dětské prádlo
Smíšená bavlna, vycházkové
košile ze sm
polyesteru, halenky
Smíšená bavlna, vycházkové
áhá
košile ze sm
polyesteru, halenky
ě na
Bavlněné povlečení
vyjma speciálních látek
(jemných, vlněných,
hedvábných atd.) s
výplní: prošívané peřiny,
polštáře, přikrývky, potahy
na pohovky s lehkou
výplní.
Sympatex
íšen
íšen
ého
ého
Správná
teplota
40 °C
(studená až 95
°C)
60 °C
(studená až 60
°C)
40 °C
(studená až 60
°C)
40 °C
(studená až 40
°C)
60 °C
20 °C
Bez volby
40 °C
(studená až 40
°C)
Maximální
náplň
Kapacita
3,0 kg
3 kusy
1 velký kus
2,0 kg
23
Page 71

CZ
Program Popis Druh tkaniny
Praní+sušení (5kg)
Rychlý 30
Skvrny
Načíst program
• Teplota vody: Pro zvolený prací program vyberte vhodnou teplotu vody. Při praní vždy postupujte
podle pokynů výrobce oděvu nebo symbolů na štítku.
Tento program poskytuje
praní a sušení v jednom
nepřetržitém cyklu.
Tento program je určen pro
jemné prádlo s možností
ručního a automatického
praní, např. pro pratelnou
vlnu, spodní prádlo, šaty
apod. (Použijite prací
prostředek určený pro vlněné
prádlo, které lze prát v pračce.)
Poskytuje krátkou dobu
praní pro malé množství
prádla a lehce znečištěné
oděvy.
Umožnuje odstranit různé
druhy skvrn, např. od vína,
džusu, nečistot apod. (Teplota
vody se p
postupn
Pro programy s možností na
výchozím programem Máchání + Odstředění
ři praní skvrn
ě zvyšuje.)
Malé množství prádla,
které je možné sušit.
Vlna, oděvy určené pro
ruční praní, jemné
prádlo, choulostivé
prádlo.
Barevné prádlo, které
je lehce znečištěné.
Smíšené bavlněné
tkaniny, žádné jemné
prádlo
čten
í. Pokud jste nena
Správná
teplota
40 °C
(studená až
95 °C)
20 °C
(studená až
30 °C)
20 °C
(studená až
40 °C)
40 °C
(30 °C až
60 °C)
četli
žádné programy, je
Maximální
náplň
5,0 kg
1,5 kgJemná péče
3,0 kg
POZNÁMKA
• Je doporučeno použití neutrálního pracího prostředku.
24
Page 72

4.0 kg
CZ
4,5
,0
25
Page 73

Doplňkové volby
CZ
Parní
Předpírka
praní
Program
Odložený
start
Bavlna ● ● ● ● ●
Bavlna Smart
● ● ● ● ●
● ● ● ● ●Syntetika
Smíšené prádlo
Program pro
alergiky
Rovnou na
sebe
Osvěžení prádla
Pokrývky
Sportovní oblečení
● ● ● ● ●
● ●
*
●
●*
● ●
●
● ●
Rychlý 30
Jemná péče
Praní+sušení (5kg)
●
● ●
●
Skvrny
*
: Tato volba je automaticky součástí programu a nelze ji odstranit.
● ●
Máchání+
Sušení
● ●
●*
●
●● ●
●
●
●*
●
●*
26
Page 74

Provozní údaje
CZ
Program
Maximální ot./min.
Bavlna
Bavlna Smart
Syntetika
Smíšené prádlo
Program pro alergiky
Rovnou na sebe
Osvěžení prádla
Pokrývky
Sportovní oblečení
Rychlý 30
Jemná péče
Praní+sušení (5kg)
Skvrny
POZNÁMKA
• Informace o hlavních pracích programech při polovičním množství prádla.
Program
Bavlna (40°C)
Bavlna Smart (60°C)
Doba v minutách
8 kg
96 65 0.55
244 44%
Zbývající vlhkost
1000 rpm
1400 ot./min.
40%
1400
1400
1400
1000
1400
1400
1000
-
1000
800
1400
800
1400
1400
Voda v litrech Energie v kWh
8 kg
35
8 kg
0.45
27
Page 75

Možnosti programu
CZ
Odložený start
Můžete nastavit časovou prodlevu tak, aby došlo
k automatickému zapnutí pračky a dokončení
programu po zadaném časovém intervalu.
Stiskněte tlačítko Napájení.
1
Zvolte prací program.
2
Stiskněte tlačítko
3
požadovaný čas.
Stiskněte tlačítko Start/Pauza.
4
POZNÁMKA
• Čas prodlevy představuje dobu do dokončení
programu, ne do jeho spuštění. Aktuální doba
provozu se může lišit podle teploty vody,
náplně prádla a dalších faktorů.
• Zrušení funkce Odložený start se provádí
stisknutím tlačítka Napájení.
• V kombinaci s touto volbou nepoužívejte tekuté
prací prostředky.
Odložený start
a nastavte
Předpírka
Pokud je prádlo silně znečištěné, je doporučeno
použít program Předpírka.
Stiskněte tlačítko Napájení.
1
Zvolte prací program.
2
Stisknete tlačítko
3
Stiskněte tlačítko Start/Pauza.
4
Předpírka
.
Parní praní (volitelně)
Parní praní poskytuje zvýšený prací účinek s
nízkou spotřebou energie. Parní změkčování
(Parní aviváž) rozprašuje po dokončení cyklu
odstřed'ování páru, která zajišt'uje menší
mačkání a větší nadýchanost prádla.
Stiskněte tlačítko Napájení.
1
Pro volbu Parní praní vyberte parní cykly.
2
Pro volbu Parní změkčování vyberte z cyklů
Bavlna, Bavlna Smart, Smíšené prádlo,
Syntetika.
28
Volba následujícího cyklu závisí na počtu
3
stisknutí tlačtíka Parní praní.
•
Jednou: Parní praní
•
Dvakrát: Parní změkčování
•
Třikrát: Parní praní a Parní změkčování
Stiskněte tlačítko Start/Pauza.
4
Page 76

CZ
Teplota
Pomocí tlačítka Teplota můžete zvolit kombinaci
teploty praní a máchání u vybraného programu.
Stiskněte opakovaně toto tlačítko, dokud nebude
svítit požadovaná volba. U všech cyklů máchání
se používá studená voda z vodovodu.
• Zvolte teplotu vody vhodnou pro druh prádla.
Pro dosažení nejlepších výsledků postupujte
podle symbolů na štítku pro péči o tkaniny.
Máchání
Máchání s přidržením
Program bude přerušen, dokud nedojde po
dokončení máchání k opětovnému stisknutí
tlačítka Start/Pauza.
Máchání+
Přidá jeden cyklus máchání.
Odstředění
• Stupeň rychlosti odstřeďování lze zvolit
opakovaným stisknutím tlačítka
• Pouze odstředění
Stiskněte tlačítko Napájení.
1
Odstředění.
Uzamknutí ovládacího panelu
Stiskněte a přidržte tlačítko
1
po dobu tří sekund.
Zazní akustický signál a na displeji se
2
zobrazí hlášení .
Když je aktivní dětská pojistka, jsou
zablokována všechna tlačítka kromě tlačítka
Napájení.
Dětská pojistka
POZNÁMKA
• Vypnutím napájení nedojde k deaktivaci funkce
dětské pojistky. Abyste měli přístup k dalším
funkcím, je nutné dětskou pojistku deaktivovat.
Odemknutí ovládacího panelu
Stiskněte a přidržte tlačítko
po dobu tří sekund.
• Zazní akustický signál a na displeji bude znovu
zobrazen zbývající čas aktuálního programu.
Dětská pojistka
Zapnutí/vypnutí akustického signálu
Stiskněte tlačítko Napájení.
1
Pro volbu počtu otáček za minutu stiskněte
2
tlačítko
Odstředění.
.
Stiskněte tlačítko Start/Pauza.
3
POZNÁMKA
• Pokud zvolíte Bez odstředění, bude se přesto
buben určitou dobu rychle otáčet za účelem
vypuštění vody.
Dětská pojistka ( )
Tuto možnost použijte k vypnutí ovládacích
prvků. Tato funkce umožňuje zabránit dětem,
aby měnily programy nebo ovládaly zařízení
Stiskněte tlačítko Start/Pauza.
2
Pro zapnutí/vypnutí funkce akustického
3
signálu současně stiskněte a přidržte tlačítka
Teplota
a
Parní praní
po dobu 3 sekund.
POZNÁMKA
• Po volbě zapnutí/vypnutí akustického signálu
je toto nastavení uloženo v paměti i po vypnutí
napájení.
• Pokud chcete akustický signál vypnout,
opakujte tento postup.
29
Page 77

CZCZCZ
Page 78

Page 79

Page 80

ÚDRŽBA
CZ
VAROVÁNÍ
• Před čištěním odpojte pračku od elektrické
sítě, abyste zamezili riziku zasažení
elektrickým proudem. Při nerespektování
tohoto varování může dojít k závažnému
poranění, požáru, zasažení elektrickým
proudem nebo smrtelnému poranění.
• Pro čištění pračky nikdy nepoužívejte agresivní
chemikálie, abrazivní čisticí prostředky nebo
rozpouštědla. Mohlo by dojít k poškození
povrchové úpravy.
Čištění pračky
Péče po čištění
• Po dokončení programu očistěte dvířka a
vnitřní část těsnění dvířek, abyste odstranili
veškerou vlhkost.
• Pro vysušení vnitřního prostoru bubnu
ponechte dvířka otevřená.
• Pro odstranění případné vlhkosti otřete vnější
plášť pračky suchým hadříkem.
Čištění vnitřku pračky
• Okolí otvoru dvířek pračky a sklo dvířek otírejte
pomocí utěrky nebo měkkého hadříku.
• Po dokončení programu vždy ihned vyjměte
prádlo z pračky. Je-li vlhké prádlo ponecháno
v pračce, může dojít k zmačkání, obarvení a
tvorbě zápachu.
• Jednou za měsíc (nebo v případě potřeby
častěji) spusťte program Čištění bubnu za
účelem odstranění zbytků pracích prostředků a
dalších usazenin.
Čištění ltru přívodu vody
• Pokud bude pračka ponechána delší dobu
bez dozoru (např. během dovolené), uzavřete
kohouty přívodu vody, zvláště pokud se v její
přímé blízkosti nenachází odtokový kanálek
(odtok).
• Pokud není možný přítok vody do výsuvného
zásobníku na prací prostředky, na displeji
ovládacího panelu se zobrazí symbol
• Pokud je voda velmi tvrdá, nebo obsahuje
usazeniny vodního kamene, může dojít k
zanesení ltru přívodu vody. Z toho důvodu je
vhodné jej jednou za čas vyčistit.
Zavřete vodovodní kohout a odšroubujte
1
přívodní hadici vody.
.
Čištění vnějšího pláště pračky
Správná péče o pračku prodlouží její životnost.
Dvířka:
• Otřete je z vnější a vnitřní strany vlhkým
hadříkem, potom je měkkým hadříkem osušte.
Vnější povrch:
• Okamžitě osušte veškerou vylitou kapalinu.
• Setřete ji měkkým hadříkem.
• Netlačte na povrch nebo na displej ostrými
předměty.
Vyčistěte ltr pomocí tvrdého štětinového
2
kartáče.
33
Page 81

CZ
2
Čištění ltru odtokového
čerpadla
• Filtr odtokového čerpadla zachycuje vlákna
a drobné předměty ponechané v prádle. Aby
byl zajištěn bezporuchový provoz pračky,
pravidelně kontrolujte, zda je ltr čistý.
• Před čištěním ltru odtokového čerpadla
vyčkejte, až dojde k vychladnutí vody, a
následně nouzově vyprázdněte pračku nebo v
případě nouze otevřete dvířka.
Otevřete spodní víko a vytáhněte hadici.
1
Vytáhněte vypouštěcí zátku a otočením
2
směrem doleva otevřete ltr.
Nádoba na pojmutí
vypuštěné vody.
Po vyčištění zašroubujte ltr čerpadla a
4
vložte vypouštěcí zátku.
Zavřete spodní víko.
5
UPOZORNĚNÍ
• Nejprve vypusťte vodu pomocí odtokové
hadice, potom otevřete ltr čerpadla, abyste
odstranili vlákna nebo předměty.
• Při vypouštění postupujte opatrně, voda může
být horká.
1
Odstraňte veškeré cizí předměty z ltru
3
čerpadla.
34
Page 82

CZ
Čištění výsuvného zásobníku
Při používání pracích prostředků a aviváže se ve
výsuvném zásobníku mohou vytvářet usazeniny.
Jedno nebo dvakrát měsíčně zásobník
vytáhněte, vyjměte vložky a zkontrolujte, zda
nedochází k usazování zbytků.
Výsuvný zásobník pracích prostředků
1
vytáhněte až na maximum.
• Silně zatlačte na uvolňovací tlačítko a
vyjměte zásobník.
Vyjměte vložky ze zásobníku.
2
• Vypláchněte vnitřek zásobníku teplou
vodou, abyste odstranili usazeniny pracích
prostředků. Výsuvný zásobník čistěte pouze
vodou. Vložky a zásobník osušte měkkým
hadříkem nebo utěrkou.
Pro čištění ústí a otvoru zásobníku používejte
3
hadřík nebo malý nekovový kartáček.
• Z horní i spodní části otvoru odstraňte
veškeré zbytky pracích prostředků.
Čištění bubnu (volitelně)
Čištění bubnu je speciální program pro vyčištění
vnitřního prostoru pračky.
Během tohoto programu se používá větší
množství vody a vyšší rychlost odstřeďování.
Tento program používejte pravidelně.
Z pračky vyjměte veškeré prádlo nebo
1
předměty a zavřete dvířka.
Otevřete výsuvný zásobník a přihrádku
2
pro hlavní praní naplňte prostředkem pro
zamezení tvorby vodního kamene (např.
Calgon).
• Tablety vkládejte do bubnu.
Pomalu zavřete výsuvný zásobník.
3
Zapněte pračku a stiskněte a přidržte tlačítko
4
Čištění bubnu po dobu 3 sekund.
Následně se na displeji zobrazí .
Stiskněte tlačítko Start/Pauza.
5
Po dokončení programu nechejte dvířka
6
otevřená, aby otvor dvířek pračky, pružné
manžety a skla dvířek mohly vyschnout.
Vlhkost v místě otvoru otřete měkkým
4
hadříkem nebo utěrkou.
Umístěte vložky do odpovídajících přihrádek
5
a zasuňte zásobník.
UPOZORNĚNÍ
• Pokud se ve vaší domácnosti pohybují děti,
nenechávejte dvířka otevřená dlouhou dobu.
POZNÁMKA
• Přihrádky pro prací prostředky nenaplňujte
žádnými pracími prostředky. Může se tvořit
nadměrné množství pěny a docházet k
vytékání vody z pračky.
35
Page 83

CZ
Pokyny k zazimování pračky
• Při teplotách pod bodem mrazu není možný
obvyklý provoz pračky. Při instalaci pračky se
ujistěte, že v daném místě během zimního
období nedochází k poklesu teploty pod bod
mrazu.
• V případě, že je nutné pračku instalovat v
předsíni nebo na jiném místě, kde je stejná
teplota jako v exteriéru, zajistěte následující
podmínky.
Jak předcházet zamrznutí pračky
• Po dokončení pracího cyklu pomocí hadicové
přípojky pod víkem spodního krytu pro
vypuštění zbytkové vody zcela vypusťte vodu,
která se nachází uvnitř čerpadla. Po úplném
vypuštění vody uzavřete hadicovou přípojku
sloužící k vypuštění zbytkové vody a spodní
víko.
Vypouštěcí
zátka
• Pro úplné vypuštění vody nasměrujte
odtokovou hadici dolů.
Spodní víko
• Po uzavření kohoutu od něj odpojte hadici
přívodu studené vody, přidržte hadici směrem
dolů a vodu vylijte.
Hadice přívodu
vody
Kontrola zamrznutí
• Pokud po otevření hadicové přípojky, sloužící
k vypuštění zbytkové vody, nedojde k jejímu
vypuštění, zkontrolujte systém odvodu vody.
Vypouštěcí
zátka
Spodní víko
• Zapněte napájení, zvolte prací program
Máchání+Odstředění a stiskněte tlačítko
Start/Pauza
.
Odtoková
hadice
UPOZORNĚNÍ
• Pokud je odtoková hadice při instalaci
zakřivená, může dojít ke zmrznutí jejího
obsahu.
36
Výsuvný zásobník na prací
prostředky
Odtoková
hadice
• Pokud se během provozu pračky na displeji
zobrazí „ “, zkontrolujte systém přívodu a
odvodu vody (některé modely nejsou vybaveny
funkcí alarmu při zamrznutí).
POZNÁMKA
• Zkontrolujte, zda při máchání do výsuvného
zásobníku na prací prostředky natéká voda a
zda se při odstřeďování vypouští odtokovou
hadicí.
Page 84

CZ
Jak postupovat v případě zamrznutí
• Vyprázdněte buben, napusťte jej teplou vodu
o teplotě 50–60 °C až po pryžovou část uvnitř
bubnu, zavřete dvířka a vyčkejte po dobu 1–2
hodin.
50–60 °C
UPOZORNĚNÍ
• Pokud je odtoková hadice při instalaci
zakřivená, může dojít ke zmrznutí jejího
obsahu.
• Otevřete spodní víko a pomocí hadicové
přípojky pro vypuštění zbytkové vody zcela
vypusťte vodu.
Vypouštěcí zátka
• Po úplném vypuštění vody z bubnu uzavřete
hadicovou přípojku pro vypuštění zbytkové
vody, zvolte prací program Máchání+Odstředění
a stiskněte tlačítko
Výsuvný zásobník na
prací prostředky
Start/Pauza.
Odtoková hadice
POZNÁMKA
• Zkontrolujte, zda při máchání do výsuvného
zásobníku na prací prostředky natéká voda a
zda se při odstřeďování vypouští odtokovou
hadicí.
• Pokud nastanou problémy s přívodem vody,
postupujte podle následujících kroků.
− Uzavřete kohout přívodu vody a pomocí
hadříku namočeného do horké vody
rozmrazte kohout a obě místa připojení
hadice přívodu vody do pračky.
− Odpojte hadici přívodu vody a ponořte ji do
teplé vody o teplotě nižší než 50–60 °C.
Spodní víko
POZNÁMKA
• Pokud nedojde k vypuštění vody, znamená to,
že se led zcela nerozpustil. Ještě vyčkejte.
Hadice přívodu vody
50–60 °C
37
Page 85

INTELIGENTNÍ FUNKCE
CZ
Používání funkce inteligentní
diagnostiky Smart Diagnosis™
Tuto funkci můžete použít v případě, že
potřebujete přesnou diagnostiku od servisního
střediska společnosti LG Electronics při poruše
nebo havárii zařízení. Tuto funkci používejte,
pouze pokud se chcete obrátit na zástupce
servisu, ne při běžném provozu.
Stisknutím tlačítka Napájení zapněte pračku.
1
Netiskněte žádná jiná tlačítka ani neotáčejte
voličem programů.
Po vyzvání ze střediska podpory přiložte
2
mikrofon svého telefonu do blízkosti tlačítka
Napájení.
Max.
10 mm
Stiskněte a přidržte tlačítko Teplota po
3
dobu 3 sekund a současně přidržujte mikrofon
tlačítka Napájení.
Přidržujte telefon na místě až do dokončení
4
přenosu tónu. Bude zobrazen zbývající čas
pro přenos dat.
• Pro dosažení nejlepších výsledků nehýbejte
s telefonem, dokud je přenos tónů aktivní.
• Pokud se pracovníkovi střediska podpory
nepodařilo získat přesný záznam dat,
můžete být požádáni o opakování postupu.
. oben sisongaiD tramS ulobmys u unofelet
Po uplynutí odpočtu a utichnutí tónů se vraťte
5
k hovoru s pracovníkem střediska podpory,
který vám následně na základě přenesených
informací pro analýzu bude mít možnost
pomoci.
POZNÁMKA
• Funkce inteligentní diagnostiky Smart
Diagnosis™ závisí na kvalitě místního hovoru.
• Kvalita komunikace bude vyšší a vy získáte
kvalitnější služby, pokud použijete pevnou
linku.
• Pokud nebude zajištěna dobrá kvalita přenosu
dat inteligentní diagnostiky Smart Diagnosis™,
například z důvodu nízké kvality hovoru,
nedostane se vám těch nejlepších služeb
inteligentní diagnostiky Smart Diagnosis™.
LG Electronics European Shared Service Center B.V
prohlašuje, že tato pračka je v souladu se základními
požadavky a dalšími
1999/5 / ES.
vyžádat na níže uvedené
LG Electronics European Shared Service Center B.V
Krijgsman 1
1186 DM Amstelveen
Holandsko
anebo na internetové stránce:
http://www.lg.com/global/support/cedoc/cedoc#
příslušnými ustanoveními směrnice
Kompletní prohlášení o shodě je možné
poštovní adrese:
38
Servisní středisko
LG Electronics
Page 86

ODSTRAŇOVÁNÍ ZÁVAD
• Vaše pračka je vybavena systémem automatického monitorování chyb, který pomáhá rozpoznat a
diagnostikovat problémy v počátečním stadiu. Pokud není provoz pračky bezproblémový nebo pokud
pračka vůbec nefunguje, zkontrolujte před žádostí servisního střediska o pomoc následující situace:
Diagnostika problémů
Příznaky Možná příčina Řešení
• Zkontrolujte všechny kapsy, abyste
se ujistili, že jsou skutečně prázdné.
Předměty jako sponky, zápalky, pera,
mince nebo klíče mohou vaši pračku i
prádlo poškodit.
• Zapněte zipy, zapněte háčky a zavažte
šňůrky, aby nedošlo k jejich zatrhnutí či
zachycení s ostatním prádlem.
• Pokud hluk přetrvává, pravděpodobně
je pračka nevyvážená. Zastavte pračku
a znovu uvnitř rozmístěte prádlo.
• Pokud nedošlo během instalace k
úplnému odstranění transportních
šroubů, demontujte je podle pokynů v
části „Instalace“.
• Zkontrolujte, zda je zařízení dokonale v
rovině (použijte vodováhu).
• Zkontrolujte přípojky hadic a utáhněte
je.
• Uvolněte odpadní potrubí. V případě
nutnosti se obraťte na instalatéra.
• Ujistěte se, že použijete doporučované
množství pracího prostředku podle
instrukcí výrobce.
Chřestivý a řinčivý
hluk
Bušivý hluk
Hlučné vibrace
Vytéká voda
Nadměrné pěnění
V bubnu nebo v odtokovém
čerpadle se mohou nacházet
cizí kovové předměty jako
mince nebo spínací špendlíky
apod.
Těžká náplň může produkovat
bušivý hluk. To je obvykle
normální.
Byly demontovány všechny
transportní šrouby a plastová
vana?
Jsou všechny nožky pevně
usazeny na podlaze?
Hadice přívodu vody nebo
odtoková hadice jsou na straně
kohoutu nebo pračky uvolněné.
Domovní odpadní potrubí je
zanesené.
Příliš velké množství pracího
prostředku nebo nevhodný
typ pracího prostředku mohou
způsobit nadměrné pěnění,
které může mít za následek
vytékání vody.
CZ
39
Page 87

Příznaky Možná příčina Řešení
Nedostatečný zdroj (tlak) vody. • Zkuste v domě použít jiný kohout.
Voda do pračky
nenatéká nebo
natéká pomalu
Není zajištěn odtok
vody z pračky
nebo voda vytéká
pomalu.
Pračku nelze spustit
Pračka
neodstřeďuje
Kohout přívodu vody není zcela
otevřen.
Hadice přívodu vody je
zalomená.
Filtr hadice přívodu vody je
zanesený.
Odtoková hadice je zalomená
nebo zanesená.
Napájecí šňůra nemusí být
zapojena do zásuvky nebo
může být připojení uvolněno.
Vadná pojistka nebo vypnutý
jistič v domovním rozvaděči,
případně přerušená dodávka
elektrické energie.
Není otevřen kohout přívodu
vody.
Zkontrolujte, zda jsou dvířka
pevně zavřená.
• Zcela otevřete kohout.
• Zajistěte přímé vedení hadice.
•
• Zkontrolujte a napřimte odtokovou
hadici.
•
• Ujistěte se, že je zástrčka pevně
zapojena do elektrické zásuvky.
• Zapněte jistič nebo vyměňte pojistku.
Nezvyšujte proudovou hodnotu pojistky.
Pokud představuje problém přetížení
obvodu, nechte jej opravit odborným
elektrikářem.
• Otevřete kohout přívodu vody.
• Zavřete dvířka a stiskněte tlačítko
Start/Pauza. Po stisknutí tlačítka
Start/Pauza může chvíli trvat, než
začne pračka odstřeďovat prádlo.
Před spuštěním odstřeďování musí být
dvířka zajištěna. Přidejte 1 nebo 2 kusy
podobného prádla pro lepší vyvážení
náplně v bubnu. Pro zajištění správné
funkce odstřeďování v pračce znovu
rozmístěte prádlo.
CZ
40
Page 88

Příznaky Možná příčina Řešení
• Zkontrolujte, zda symbol „Zámek
dvířek“ svítí. Po zhasnutí symbolu
„Zámek dvířek“ můžete dvířka
bezpečně otevřít.
• To je normální stav. Zbývající čas
zobrazený na displeji je pouze odhad.
Skutečný čas se může lišit.
• Abyste se ujistili, že je používáno
odpovídající množství aviváže,
postupujte podle pokynů jejího výrobce.
Nepřekračujte hranici maximálního
naplnění.
• Řiďte se pokyny výrobce pracího
prostředku.
• Pomalu zavřete výsuvný zásobník.
Neotvírejte výsuvný zásobník během
pracího cyklu.
• Nepřeplňujte pračku. Zkontrolujte, zda
dochází ke správnému vypouštění
pračky, aby bylo možné z náplně
vypustit odpovídající množství vody.
Náplň prádla je pro správné sušení
příliš malá. Přidejte několik ručníků.
• Zavřete kohout přívodu vody.
Dvířka nelze otevřít
Doba cyklu praní se
prodlužuje
Přeplnění při
použití nadměrného
množství aviváže
Změkčovač byl
přidán příliš brzy
Problémy při sušení
Po spuštění pračky nelze dvířka
z bezpečnostních důvodů
otevírat.
Při zjištění nevyváženosti
náplně nebo při činnosti
programu k odstranění
nadměrného pěnění může dojít
k prodloužení doby praní.
Použití příliš velkého množství
aviváže může mít za následek
přeplnění.
Použití příliš velkého množství
aviváže může mít za následek
předčasné dávkování.
Zkontrolujte kohout přívodu
vody.
CZ
41
Page 89

Chybová hlášení
Příznaky Možná příčina Řešení
Nedostatečný zdroj (tlak) vody v místě. • Zkuste v domě použít jiný kohout.
Kohouty přívodu vody nejsou zcela
otevřeny.
Hadice přívodu vody je zalomená. • Zajistěte přímé vedení hadice/hadic.
Filtr hadice přívodu vody je zanesený. • Zkontrolujte ltr hadice přívodu vody.
Pokud dojde k vytékání vody u hadice
přívodu vody, bude kontrolka
červeně svítit.
Může se lišit v závislosti na modelu.
Náplň je příliš malá.
Náplň je nevyvážená.
Zařízení je vybaveno systémem pro
rozpoznání a opravy nevyváženosti.
Pokud náplň obsahuje pouze těžké
kusy prádla (např. koupelnové
předložky, župany atd.) může tento
systém zastavit odstřeďování nebo
zcela přerušit cyklus odstřeďování.
Pokud je prádlo na konci cyklu
odstřeďování příliš vlhké, přidejte do
náplně několik menších kusů prádla
pro vyvážení náplně a opakujte cyklus
odstředění.
• Zcela otevřete kohout.
• Použijte hadici přívodu vody.
• Přidejte 1 nebo 2 kusy podobného
prádla pro lepší vyvážení náplně v
bubnu.
• Přidejte 1 nebo 2 kusy podobného
prádla pro lepší vyvážení náplně v
bubnu.
• Pro zajištění správné funkce
odstřeďování v pračce znovu
rozmístěte prádlo.
• Pro zajištění správné funkce
odstřeďování v pračce znovu
rozmístěte prádlo.
CZ
42
Page 90

Příznaky Možná příčina Řešení
Odtoková hadice je zalomená nebo
zanesená.
Odtokový ltr je zanesený. • Vyčistěte odtokový ltr.
• Zkontrolujte a napřimte odtokovou
hadici.
CZ
Zkontrolujte, zda nejsou dvířka
otevřená.
Chyba ovládání.
Došlo k přeplnění pračky vodou z
důvodu vadného vodního ventilu.
Porucha senzoru množství vody.
Přetížení motoru.
Vytéká voda. • Obraťte se na servisní středisko.
Sušení nefunguje • Obraťte se na servisní středisko.
• Zcela zavřete dvířka. Pokud
nezhasnou, obraťte se na servisní
středisko.
• Vytáhněte elektrickou zástrčku a
obraťte se na servisní středisko.
• Zavřete vodovodní kohout.
• Vytáhněte síťovou zástrčku.
• Obraťte se na servisní středisko.
• Zavřete vodovodní kohout.
• Vytáhněte síťovou zástrčku.
• Obraťte se na servisní středisko.
• Nechejte pračku po dobu 30 minut v
klidu, aby bylo zajištěno vychladnutí
motoru, a potom znovu spusťte
program.
, ,
43
Page 91

ZÁRUKA
TATO OMEZENÁ ZÁRUKA SE NEVZTAHUJE NA NÁSLEDUJÍCÍ:
• Výjezdy servisních techniků za účelem dodání, vyzvednutí nebo instalace zařízení, pokyny pro
zákazníky týkající se používání výrobku, oprava nebo výměna pojistek nebo oprava kabelového
zapojení nebo instalatérské práce, případně náprava neautorizovaných oprav/instalace.
• Nefunkčnost výrobku během výpadků a přerušení elektrického napájení nebo při nedostatečné
dostupnosti elektrotechnických služeb.
• Poškození způsobené netěsným nebo poškozeným vodovodním potrubím, zamrznutím vodovodního
potrubí, omezeným průtokem odpadního potrubí, nedostatečným nebo přerušovaným přívodem
vody nebo nedostatečným přívodem vzduchu.
• Poškození vyplývající z používání výrobku v korozivním prostředí nebo navzdory pokynům
uvedeným v příručce uživatele výrobku.
• Poškození výrobku způsobené nehodami, hmyzem a škůdci, bleskem, větrem, ohněm, záplavami
nebo vyšší mocí.
• Poškození nebo poruchy způsobené prováděním neoprávněných úprav či změn, pokud je výrobek
používán pro jiné než určené účely nebo v případě jakéhokoliv vytékání vody, pokud nebylo zařízení
správně nainstalováno.
• Poškození nebo porucha způsobená použitím nesprávného elektrického proudu, napětí nebo
instalačních kódů, komerčním nebo průmyslovým používáním nebo používáním příslušenství,
součástí či spotřebních čisticích prostředků neschválených společností LG.
• Poškození způsobené během přepravy a manipulace, včetně škrábanců, rýh, odření a/nebo jiných
poškození povrchu výrobku, pokud takové poškození nevyplývá z vad materiálu nebo nesprávného
dílenského zpracování.
• Poškození nebo chybějící součásti u vystaveného, rozbaleného, zlevněného nebo repasovaného
výrobku.
• Výrobky s odstraněnými, pozměněnými nebo nečitelnými originálními sériovými čísly. Pro zajištění
platnosti záruky je vyžadováno číslo modelu, sériové číslo a originální maloobchodní prodejní
doklad.
• Zvýšení provozních nákladů a dodatečné provozní výdaje.
• Opravy v případě, že je váš výrobek používán jiným než normálním a obvyklým způsobem v
domácnosti nebo navzdory pokynům uvedeným v příručce uživatele výrobku.
• Náklady spojené s odvozem vašeho výrobku z vaší domácnosti za účelem oprav.
• Odvoz a opětovná instalace výrobku, pokud je nainstalován na nepřístupném místě nebo není
nainstalován v souladu s vydanými pokyny pro instalaci, včetně příručky uživatele a příručky pro
instalaci společnosti LG.
• Poškození vyplývající z nesprávného používání, zneužití, nesprávné instalace, oprav nebo údržby.
Nesprávná oprava se týká i případu použití neschválených nebo nevhodných dílů dle rozhodnutí
společnosti LG.
CZ
44
Page 92

CZ
Neobvyklé vibrace nebo hluk
způsobené nedostatečným
odstraněním transportních
šroubů nebo plastové vany.
Vytékání vody způsobené
nečistotami (vlasy, vlákna) na
manžetě a skle dvířek.
Problémy s vypouštěním
čerpadla.
Voda se nenapouští, protože
zanesené nebo jsou hadice
přívodu vody zalomené.
Nedochází z vypouštění vody
z důvodu použití nadměrného
množství pracího prostředku.
Plastová
vana
Zásobník
Lepenková
spodní část obalu
Filtr přívodu vody
Transportní
šroub
Demontujte transportní
šrouby a plastovou
vanu.
Očistěte manžetu a sklo
dvířek.
přívodu vody nebo
znovu nainstalujte
hadice přívodu vody.
Vyčistěte výsuvný
zásobník na prací
prostředky.
Prádlo je po dokončení
pracího programu horké nebo
teplé protože hadice přívodu
vody jsou nainstalovány
obráceně.
Voda se nenapouští, protože
vodovodní kohout je zavřený.
Přívod
studené
vody
Vodovodní
kohout
Studená Horká
Přívod horké
vody
Znovu nainstalujte
hadice přívodu vody.
Otevřete vodovodní
kohout.
45
Page 93

CZ
Vytékání vody způsobené
nesprávnou instalací
odtokové hadice nebo
zanesením odtokové hadice.
Vytékání vody způsobené
nesprávnou instalací
hadice přívodu vody nebo
používáním hadic přívodu
vody jiné značky.
Nefunkční napájení z
důvodu uvolněného připojení
elektrického kabelu nebo
problém s elektrickou
zásuvkou.
Výjezdy servisních techniků
za účelem dodání, vyzvednutí
nebo instalace zařízení nebo
pokyny ohledně používání
výrobku. Odvoz a opětovná
instalace výrobku.
Pokud nejsou správně
zašroubovány všechny
šrouby, může docházet k
výskytu nadměrných vibrací
(pouze model na podstavci).
Obloukový držák
Upevňovací
páska
Rovina
Znovu nainstalujte
odvodní hadici.
Znovu nainstalujte hadici
přívodu vody.
Znovu připojte napájecí
kabel nebo vyměňte
elektrickou zásuvku.
Záruka se vztahuje
pouze na výrobní
vady. Servisní úkony
vyplývající z nesprávné
instalace nejsou zárukou
kryty.
Do každého rohu
zašroubujte 4 šrouby
(celkem 16 kusů).
Hluk vodních rázů (bouchání)
při napouštění vody do
pračky.
46
Vysoký
tlak vody
Bum
Hlasitý hluk
Přirozený
proud vody
Náhlé
zastavení
proudu vody
Upravte tlak vody
přivřením vodovodního
ventilu nebo kohoutu ve
vaší domácnosti.
Page 94

PROVOZNÍ ÚDAJE
CZ
F H/1 4U2TDH(W)(0~9)(N)
F84U2TDH0N
47
Page 95

Poznámky
Page 96

NÁVOD NA POUŽÍVANIE
PRÁČKA
Pred inštaláciou si pozorne prečítajte tieto pokyny. Inštalácia tak
bude jednoduchšia a bude zaručené, že produkt je nainštalovaný
správne a bezpečne. Uschovajte si tieto pokyny v blízkosti produktu
na budúce použitie.
F H/1 4U2TDH(W)(0~9)(N)
F84U2TDH0N
www.lg.com
Page 97

OBSAH
Tento návod na používanie môže
obsahovať obrazový materiál a obsah, ktoré
sa líšia od modelu, ktorý ste si zakúpili.
Môže obsahovať obrazový materiál a obsah,
ktoré sa líšia od modelu, ktorý ste si zakúpili.
BEZPEČNOSTNÉ POKYNY ................................................3
DÔLEŽITÉ BEZPEČNOSTNÉ POKYNY .......................................................3
Zneškodnenie starého spotrebiča ...........................................................8
INŠTALÁCIA ....................................................................9
Diely ....................................................................................................9
Príslušenstvo ........................................................................................9
Technické údaje ..................................................................................10
Požiadavky na miesto inštalácie ............................................................ 11
Vybalenie a odstránenie prepravných skrutiek ....................................... 12
Použitie protišmykových podložiek (voliteľné) ........................................13
Drevené podlahy (plávajúce podlahy) ...................................................13
Vyrovnanie spotrebiča .........................................................................14
Pripojenie prívodnej hadice ..................................................................14
Namontovanie odtokovej hadice ...........................................................17
PREVÁDZKA ...................................................................18
Používanie práčky ...............................................................................18
Triedenie bielizne ................................................................................19
Pridanie čistiacich prostriedkov .............................................................20
Ovládací panel .................................................................................... 22
Tabuľka programov .............................................................................23
Voliteľný program ............................................................................... 28
Používanie inteligentnej funkcie (voliteľné) ............................................32
ÚDRŽBA .........................................................................33
Čistenie práčky ...................................................................................33
Čistenie filtra prívodnej hadice .............................................................33
Čistenie filtra odtokového čerpadla .......................................................34
Čistenie zásuvky dávkovača ................................................................. 35
Čistenie bubna (voliteľné) ....................................................................35
Upozornenie na zamrznutie v zime ....................................................... 36
Používanie funkcie inteligentnej diagnostiky Smart Diagnosis™ ............... 38
RIEŠENIE PROBLÉMOV .................................................39
Diagnostikovanie problémov ................................................................39
Chybové hlásenia ................................................................................42
ZÁRUKA .........................................................................44
PREVÁDKOVÉ ÚDAJE ..................................................... 47
Page 98

BEZPEČNOSTNÉ POKYNY
Cieľom týchto bezpečnostných pravidiel je predchádzať
nepredvídaným rizikám a škodám spôsobeným nebezpečným
alebo nesprávnym používaním produktu.
Tieto pravidlá sú rozdelené do skupín „VAROVANIA" a
„UPOZORNENIA", ktoré sú podrobnejšie vysvetlené nižšie.
Tento symbol označuje situácie a činnosti, ktoré môžu
predstavovať riziko. Text označený týmto symbolom si
dôkladne prečítajte a postupuje podľa pokynov, aby ste
týmto rizikám predišli.
VAROVANIE
označuje situácie, v ktorých môže mať nedodržanie pokynov
za následok závažné zranenie alebo smrť.
UPOZORNENIE
označuje situácie, v ktorých môže nedodržanie pokynov
spôsobiť menej závažné zranenie alebo poškodenie
produktu.
DÔLEŽITÉ BEZPEČNOSTNÉ POKYNY
SK
VAROVANIE
Aby ste pri používaní tohto výrobku znížili riziko výbuchu,
vzniku požiaru, usmrtenia, zásahu elektrickým prúdom,
poranenia alebo obarenia osôb, dodržiavajte základné
bezpečnostné opatrenia vrátane opatrení, ktoré sa uvádzajú
nižšie:
Deti v domácnosti
Tento spotrebič nie je určený na používanie osobami (vrátane
detí) so zníženými fyzickými, zmyslovými alebo duševnými
schopnosťami, či s nedostatkom skúseností a znalostí, pokiaľ
nie sú pod dozorom alebo ich osoba zodpovedná za ich
bezpečnosť nepoučila o používaní spotrebiča. Deti musia byť
pod dozorom, aby sa so spotrebičom nehrali.
3
Page 99

Použitie v Európe:
Toto zariadenie smú deti vo veku aspoň 8 rokov a osoby
so zníženými fyzickými, zmyslovými alebo duševnými
schopnosťami či s nedostatkom skúseností a znalostí používať
pod dozorom alebo po poučení o bezpečnom používaní
spotrebiča a za predpokladu, že prípadným rizikám porozumeli.
Deťom nedovoľte hrať sa so spotrebičom. Deti nesmú bez
dozoru spotrebič čistiť ani vykonávať jeho používateľskú
údržbu.
Deti mladšie ako 3 roky musia byť v dostatočnej vzdialenosti od
spotrebiča, ak nie sú pod neustálym dozorom.
Inštalácia
•Nikdy sa nesnažte používať spotrebič, ak je poškodený,
nefunguje správne, je čiastočne rozobratý, alebo niektoré jeho
časti chýbajú alebo sú porušené vrátane poškodeného kábla
alebo zástrčky.
•Tento spotrebič by mali prepravovať aspoň dve osoby, ktoré ho
budú bezpečne držať.
•Spotrebič neinštalujte na vlhkom a prašnom mieste.
Spotrebič neinštalujte ani neskladujte vonku, ani na miestach
podliehajúcim vplyvom počasia ako je priame slnečné svetlo,
vietor, dážď alebo teploty pod bodom mrazu.
•Upevnite odtokovú hadicu, aby sa neuvoľnila.
•Ak je napájací kábel alebo zástrčka poškodená alebo otvory
v zásuvke sú uvoľnené, kábel nepoužívajte a kontaktujte
autorizované servisné stredisko.
•Nepoužívajte na zapojenie tohto spotrebiča rozbočovacie
zásuvky, predlžovací napájací kábel ani adaptér.
SK
4
Page 100

•Spotrebič sa nesmie nainštalovať za uzamykateľnými dverami,
posuvnými dverami alebo dverami so závesmi, ktoré sa
nachádzajú oproti dvierkam spotrebiča, aby nebránili úplnému
otvoreniu dvierok spotrebiča.
•Tento spotrebič sa musí uzemniť. V prípade poruchy alebo
poškodenia sa uzemnením zníži riziko úrazu elektrickým
prúdom zabezpečením odvodu elektrického prúdu dráhou
s najnižším odporom.
•Spotrebič je vybavený napájacím káblom s ochranným vodičom
a uzemňovacou zástrčkou. Zástrčka musí byť zapojená
do zodpovedajúcej elektrickej zásuvky, ktorá je správne
nainštalovaná a uzemnená v súlade so všetkými miestnymi
predpismi a nariadeniami.
•Nesprávne pripojenie ochranného vodiča môže mať za
následok riziko zásahu elektrickým prúdom. Ak máte
pochybnosti o správnom uzemnení spotrebiča, poraďte sa
s kvalikovaným elektrikárom alebo servisným pracovníkom.
•Sieťovú zástrčku dodanú so spotrebičom nijako neupravujte.
Ak sa nedá zapojiť do zásuvky, zavolajte kvalikovaného
elektrikára, ktorý nainštaluje správnu zásuvku.
SK
Prevádzka
•Nepokúšajte sa oddeľovať žiadne panely ani rozoberať
spotrebič. Na ovládanie spotrebiča pomocou ovládacieho
panela nepoužívajte ostré predmety.
•Nevykonávajte opravu ani výmenu žiadneho dielu spotrebiča.
Pokiaľ sa v návode na použitie výslovne neodporúča inak,
všetky opravy a servis musia vykonávať kvalikovaní servisní
pracovníci. Používajte iba výrobcom schválené náhradné diely.
5
 Loading...