

Page 1
OWNER'S MANUAL
WASHING MACHINE
Before beginning installation, read these instructions carefully. This will simplify
installation and ensure that the product is installed correctly and safely. Leave
these instructions near the product after installation for future reference.
EN ENGLISH
F*WN*, F*ZN*
MFL71445708
Rev.03_042820
CZ ČEŠTINA
SK SLOVENČINA
www.lg.com
Copyright © 2019 - 2020 LG Electronics Inc. All Rights Reserved
Page 2

TABLE OF CONTENTS
This manual may contain images or content
different from the model you purchased.
This manual is subject to revision by the
manufacturer.
IMPORTANT SAFETY INSTRUCTIONS ........................................3
READ ALL INSTRUCTIONS BEFORE USE .....................................................3
WARNING
CARING FOR THE ENVIRONMENT
Disposal of Your Old Appliance
.........................................................................................................3
................................................................8
.........................................................................8
INSTALLATION ............................................................................... 9
Parts and Specifications....................................................................................9
Installation Place Requirements......................................................................10
Unpacking the Appliance.................................................................................12
Levelling the Appliance
Connecting the Water Inlet Hose
Installing the Drain Hose
...................................................................................12
....................................................................13
.................................................................................14
OPERATION .................................................................................15
Operation Overview ........................................................................................15
Preparing the Laundry.....................................................................................15
Adding Detergents and Softeners
Control Panel
Programme Table
Consumption Data
Extra Options and Functions
..................................................................................................18
............................................................................................19
..........................................................................................22
...................................................................16
...........................................................................23
SMART FUNCTIONS .................................................................... 25
Using LG SmartThinQ Application ..................................................................25
Using Smart Diagnosis....................................................................................28
MAINTENANCE ............................................................................ 29
Cleaning After Every Wash .............................................................................29
Cleaning the Appliance Periodically
TROUBLESHOOTING .................................................................. 32
Before Calling for Service ...............................................................................32
OPERATING DATA .......................................................................39
Product Fiche ..................................................................................................39
................................................................30
Page 3

EN
IMPORTANT SAFETY INSTRUCTIONS
READ ALL INSTRUCTIONS BEFORE USE
The following safety guidelines are intended to prevent unforeseen
risks or damage from unsafe or incorrect operation of the
appliance.
The guidelines are separated into ‘WARNING’ and ‘CAUTION’ as
described below.
Safety Messages
This symbol is displayed to indicate matters and operations
that can cause risk. Read the part with this symbol carefully
and follow the instructions in order to avoid risk.
WARNING
This indicates that the failure to follow the instructions can cause
serious injury or death.
CAUTION
This indicates that the failure to follow the instructions can cause the
minor injury or damage to the product.
WARNING
WARNING
To reduce the risk of explosion, fire, death, electric shock,
injury or scalding to persons when using this product, follow
basic precautions, including the following:
3
Page 4

EN
Technical Safety
• This appliance can be used by children aged from 8 years and above
and persons with reduced physical, sensory or mental capabilities
or lack of experience and knowledge if they have been given
supervision or instruction concerning use of the appliance in a safe
way and understand the hazards involved. Children shall not play
with the appliance. Cleaning and user maintenance shall not be made
by children without supervision.
• Children of less than 3 years should be kept away unless
continuously supervised.
• If the power cord is damaged, it must be replaced by the
manufacturer, its service agent or similarly qualified persons in order
to avoid a hazard.
• Ventilation openings must not be obstructed by a carpet.
• This appliance is intended to be used in household only and not in
applications such as;
− Staff kitchen areas in shops, offices and other working
environments;
− Farm houses;
− By clients in hotels, motels and other residential type environments;
Installation
4
− Bed and breakfast type environments;
− Areas for communal use in blocks of flats or in launderettes
• Use a new hose or hose-set supplied with the appliance. Reusing old
hoses can cause a water leak and subsequent property damage.
• The water pressure must be between 100 and 1000 kPa.
• The maximum capacity in some cycles for dry clothes to be washed
is 8 kg.
• Never attempt to operate the appliance if it is damaged,
malfunctioning, partially disassembled, or has missing or broken
parts, including a damaged cord or plug.
• This appliance should only be transported by two or more people
holding the appliance securely.
Page 5

EN
• Do not install the appliance in a damp and dusty place. Do not install
or store the appliance in any outdoor area, or any area that is subject
to weathering conditions such as direct sunlight, wind, or rain or
temperatures below freezing.
• Tighten the drain hose to avoid separation.
• If the power cord is damaged or the hole of the socket outlet is loose,
do not use the power cord and contact an authorized service centre.
• Do not plug the appliance into multiple outlet sockets, power boards,
or an extension power cable.
• This appliance must not be installed behind a lockable door, a
sliding door or a door with a hinge on the opposite side to that of the
appliance, in such a way that a full opening of the appliance door is
restricted.
• This appliance must be grounded. In the event of malfunction or
breakdown, grounding will reduce the risk of electric shock by
providing a path of least resistance for electric current.
• This appliance is equipped with a power cord having an equipment
grounding conductor and a grounding power plug. The power plug
must be plugged into an appropriate socket outlet that is installed and
grounded in accordance with all local codes and ordinances.
• Improper connection of the equipment-grounding conductor can
result in risk of electric shock. Check with a qualified electrician or
service personnel if you are in doubt as to whether the appliance is
properly grounded.
• Do not modify the power plug provided with the appliance. If it
does not fit the outlet, have a proper outlet installed by a qualified
electrician.
Operation
• Do not attempt to separate any panels or disassemble the appliance.
• Do not apply any sharp objects to the control panel in order to
operate the appliance.
5
Page 6

EN
• Do not repair or replace any part of the appliance. All repairs
and servicing must be performed by qualified service personnel
unless specifically recommended in this Owner’s Manual. Use only
authorized factory parts.
• Do not put animals, such as pets into the appliance.
• Keep the area underneath and around the appliance free of
combustible materials such as lint, paper, rags, chemicals, etc.
• Do not leave the appliance door open. Children may hang on the
door or crawl inside the appliance, causing damage or injury.
• Use new hose or hose-set supplied with the appliance. Reusing old
hoses can cause a water leak and subsequent property damage.
• Do not put in, wash or dry articles that have been cleaned in, washed
in, soaked in, or spotted with combustible or explosive substances
(such as waxes, wax removers, oil, paint, gasoline, degreasers,
drycleaning solvents, kerosene, petrol, spot removers, turpentine,
vegetable oil, cooking oil, acetone, alcohol, etc.). Improper use can
cause fire or explosion.
• Never reach into the appliance while it is operating. Wait until the
drum has completely stopped.
• In case of flood, disconnect the power plug and contact the LG
Electronics customer information centre.
• Do not push down the door excessively, when the appliance door is
open.
• Do not touch the door during a high temperature programme.
• Do not use flammable gas and combustible substances (benzene,
gasoline, thinner, petroleum, alcohol, etc.) near the appliance.
• If the drain hose or inlet hose is frozen during winter, use it only after
thawing.
• Keep all washing detergents, softener and bleach away from children.
• Do not touch the power plug or the appliance controls with wet hands.
• Do not bend the power cable excessively or place a heavy object on
it.
• Do not wash rugs, mats, shoes or pet blankets, or any other items
other than clothes or sheets, in this machine.
6
Page 7

EN
• This appliance must only be used for domestic household purposes
and should not be used in mobile applications.
• If there is a gas leakage (isobutane, propane, natural gas, etc.),
do not touch the appliance or power plug and ventilate the area
immediately.
Maintenance
• Securely plug the power plug in the socket outlet after completely
removing any moisture and dust.
• Disconnect the appliance from the power supply before cleaning the
appliance. Setting the controls to the OFF or stand by position does
not disconnect this appliance from the power supply.
• Do not spray water inside or outside the appliance to clean it.
• Never unplug the appliance by pulling on the power cable. Always
grip the power plug firmly and pull straight out from the socket outlet.
Disposal
• Before discarding an old appliance, unplug it. Cut off the cable
directly behind the appliance to prevent misuse.
• Dispose of all packaging materials (such as plastic bags and
styrofoam) away from children. The packaging materials can cause
suffocation.
• Remove the door before disposing of or discarding this appliance to
avoid the danger of children or small animals getting trapped inside.
7
Page 8

EN
CARING FOR THE ENVIRONMENT
Disposal of Your Old Appliance
• This crossed-out wheeled bin symbol indicates that waste electrical and electronic
products (WEEE) should be disposed of separately from the municipal waste
stream.
• Old electrical products can contain hazardous substances so correct disposal
of your old appliance will help prevent potential negative consequences for the
environment and human health. Your old appliance may contain reusable parts that
could be used to repair other products, and other valuable materials that can be
recycled to conserve limited resources.
• You can take your appliance either to the shop where you purchased the product,
or contact your local government waste office for details of your nearest authorised
WEEE collection point. For the most up to date information for your country, please
see www.lg.com/global/recycling.
8
Page 9
EN
INSTALLATION
Parts and Specifications
NOTE
• Appearance and specifications may change without notice to improve the quality of the appliance.
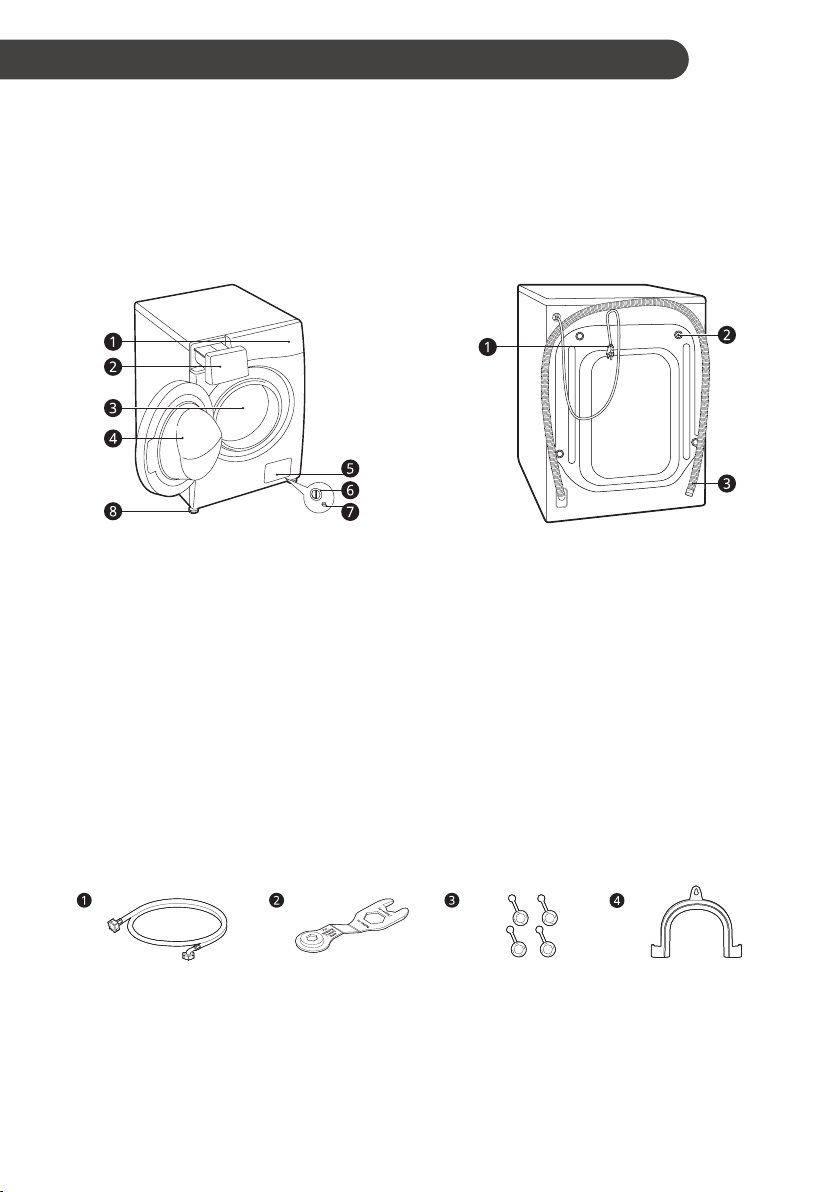
Front View
a Control panel
b Detergent dispenser drawer
c Drum
d Door
e Cover cap
f Drain pump filter
g Drain plug
h Adjustable feet
Rear View
a Power plug
b Transit bolts
c Drain hose
Accessories
* This feature is only available on some models.
a Cold water inlet hose*
b Spanner
c Caps for covering transit bolt holes*
d Elbow bracket for securing drain hose*
9
Page 10
EN
Specifications
Model
Power Supply 220 - 240 V~, 50 Hz
Dimension
(Width x Depth x Height)
Product Weight 63 kg
• No further backflow protection required for connection to the water inlet.
F*WN*, F*ZN*
600 mm X 560 mm X 850 mm
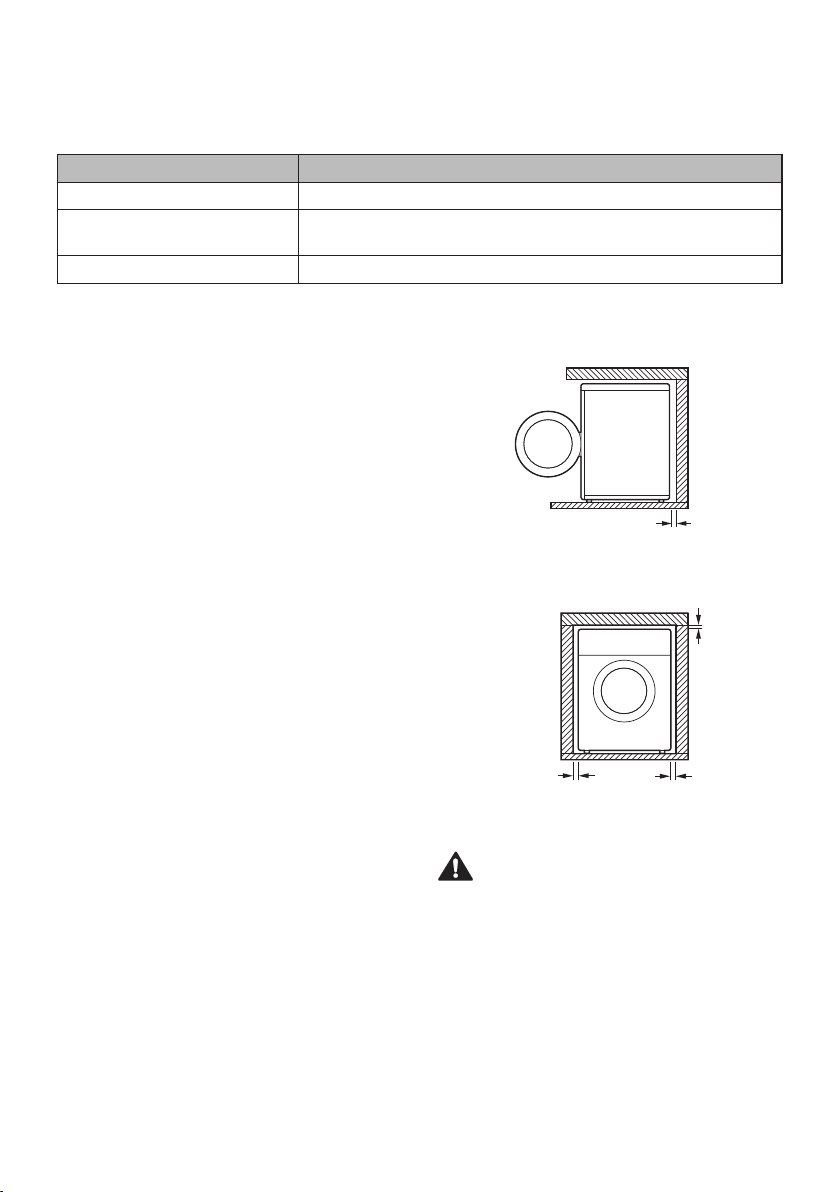
Installation Place Requirements
Before installing the appliance, check the following
information to make sure that the appliance should
be installed in a correct place.
Installation Location
• Install the appliance on a flat floor. (Allowable
slope under the appliance: 1°)
• Never try to level any uneven floor by putting
pieces of wood, cardboard or similar materials
under the appliance.
• If it is impossible to avoid positioning the
appliance next to a gas cooker or coal burning
stove, an insulation (850 X 600 mm) covered
with aluminium foil on the side facing the cooker
or stove must be inserted between the two
appliances.
• Ensure that when the appliance is installed, it is
easily accessible for an engineer in the event of
a breakdown.
• When installing the appliance, adjust all four feet
using the transit bolt spanner which makes the
appliance stable, and leave approximate 5 mm
for a clearance between the top of the appliance
and the underside of any worktop.
• Additional clearance should have 100 mm for
the wall and 20 mm for rear, right and left side.
WARNING
• This appliance must only be used for domestic
household purposes and should not be used in
mobile applications.
20 mm
100 mm
5 mm
20 mm
NOTE
• If the appliance is installed on a raised platform,
it must be securely fastened in order to eliminate
the risk of falling off.
10
Page 11
EN
Wooden Floors (Suspended
Floors)
When installing the appliance on wooden floors,
use rubber cups to prevent the appliance from
excessive vibration and unbalance.
• To prevent vibration, we recommend you to
place rubber cups a at least 15 mm thick of the
each foot of the appliance, secured to at least
two floor beams with screws.
• If possible, install the appliance in one of the
corners of the room, where the floor is more
stable.
• Fit the rubber cups to reduce vibration.
CAUTION
• This appliance must only be used for domestic
household purposes and should not be used in
mobile applications.
• If the appliance is installed on the unstable
floor (e.g. wooden floor), the warranty does not
cover any damages and cost occured due to the
installation on the unstable floor.
NOTE
• You can purchase rubber cups (Part No.
4620ER4002B) from the LG Electronics service
centre.
Ambient Temperature
• Do not install the appliance in rooms where
freezing temperatures may occur. Frozen hoses
may burst under pressure. The reliability of
the electronic control unit may be impaired at
temperatures below freezing point.
• If the appliance is delivered in winter and
temperatures are below freezing, place the
appliance at room temperature for a few hours
before putting it into operation.
Electrical Connection
• Do not use an extension cord or double adapter.
• Always unplug the appliance and turn off the
water inlet after use.
• Connect the appliance to an earthed socket in
accordance with current wiring regulations.
• The appliance must be positioned so that the
plug is easily accessible.
• Power outlet must be at least 1 meter of either
side of the appliance.
WARNING
• Repairs to the appliance must only be carried
out by the qualified personnel. Repairs carried
out by inexperienced persons may cause injury
or serious malfunctioning. Contact your LG
Electronics service centre.
• The power plug must be plugged into an
appropriate socket outlet that is installed and
grounded in accordance with all local codes and
ordinances.
Ventilation
• Make sure that air circulation around the
appliance should not be impeded by carpets,
rugs, etc.
11
Page 12
EN
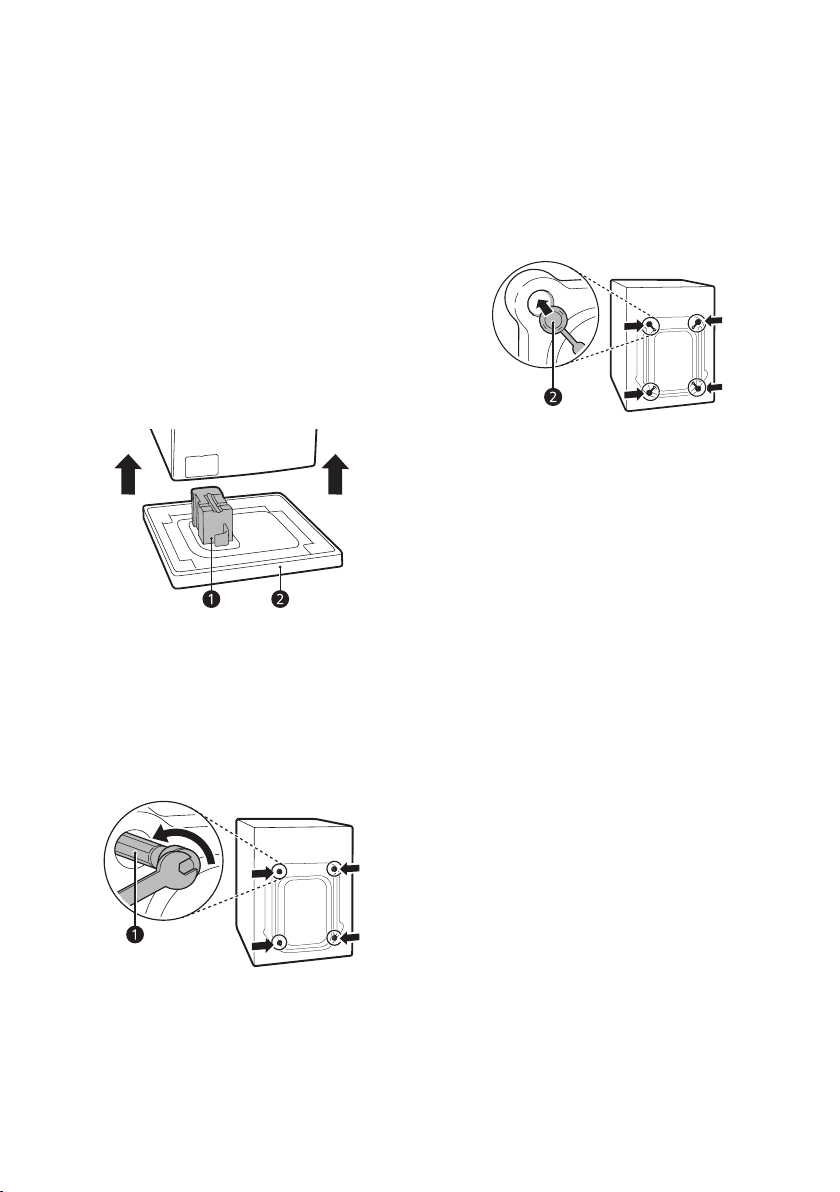
Unpacking the Appliance
Remove the bolt assemblies by wiggling them
2
slightly while pulling them out.
Lifting the Appliance Off the Foam
Base
* This feature is only available on some models.
After removing the carton and shipping material, lift
the appliance off the foam base.
• Make sure the tub support a* comes of f with
the base and is not stuck to the bottom of the
appliance.
• If you must lay the appliance down to remove
the carton base b, always protect the side of
the appliance and lay it carefully on its side. Do
not lay the appliance on its front or back.
*
Removing the Bolt Assemblies
Starting with the bottom transit bolts a, use
1
the spanner (included) to fully loosen all transit
bolts by turning them counterclockwise.
Install the hole caps.
3
• Locate the hole caps b included in the
accessory pack or attached on the back.
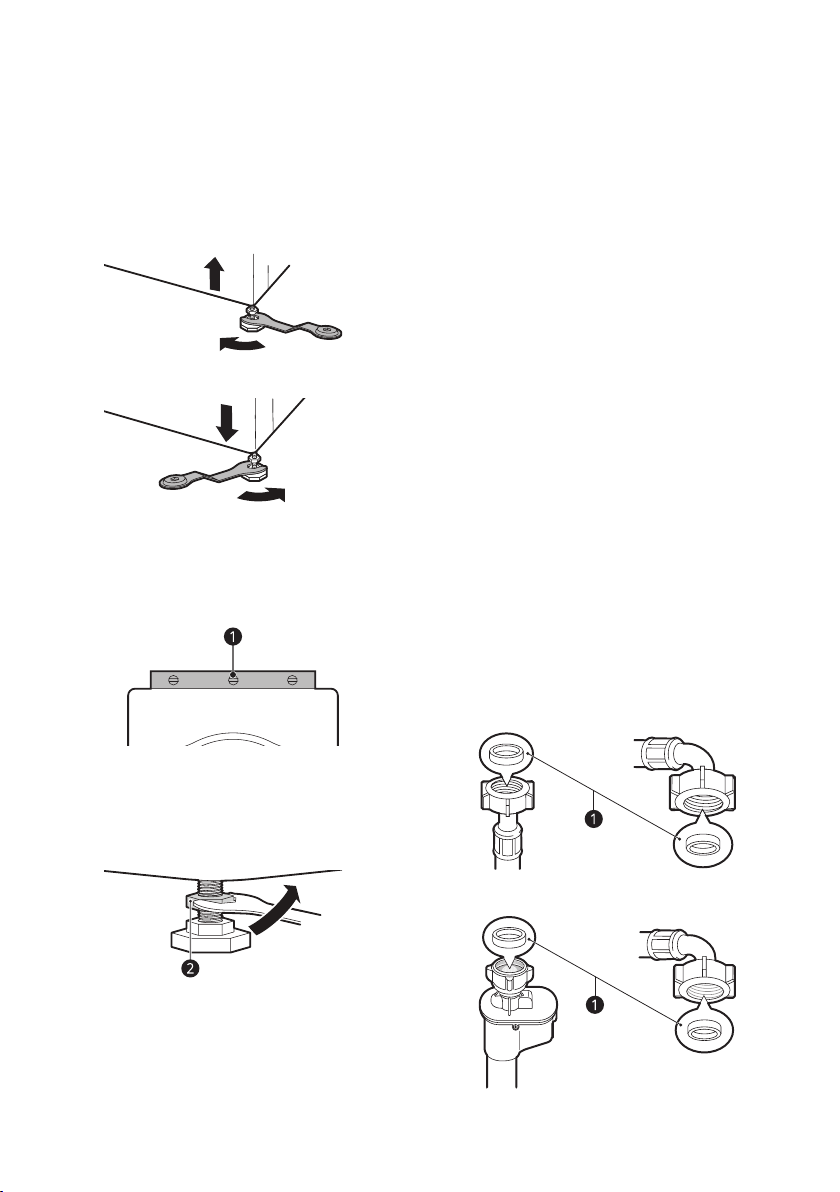
Levelling the Appliance
Checking the Level
Levelling the appliance prevents unnecessary
noise and vibration. Check whether the appliance is
perfectly level after installation.
• If the appliance rocks when pushing the top
plate of the appliance diagonally, adjust the feet
again.
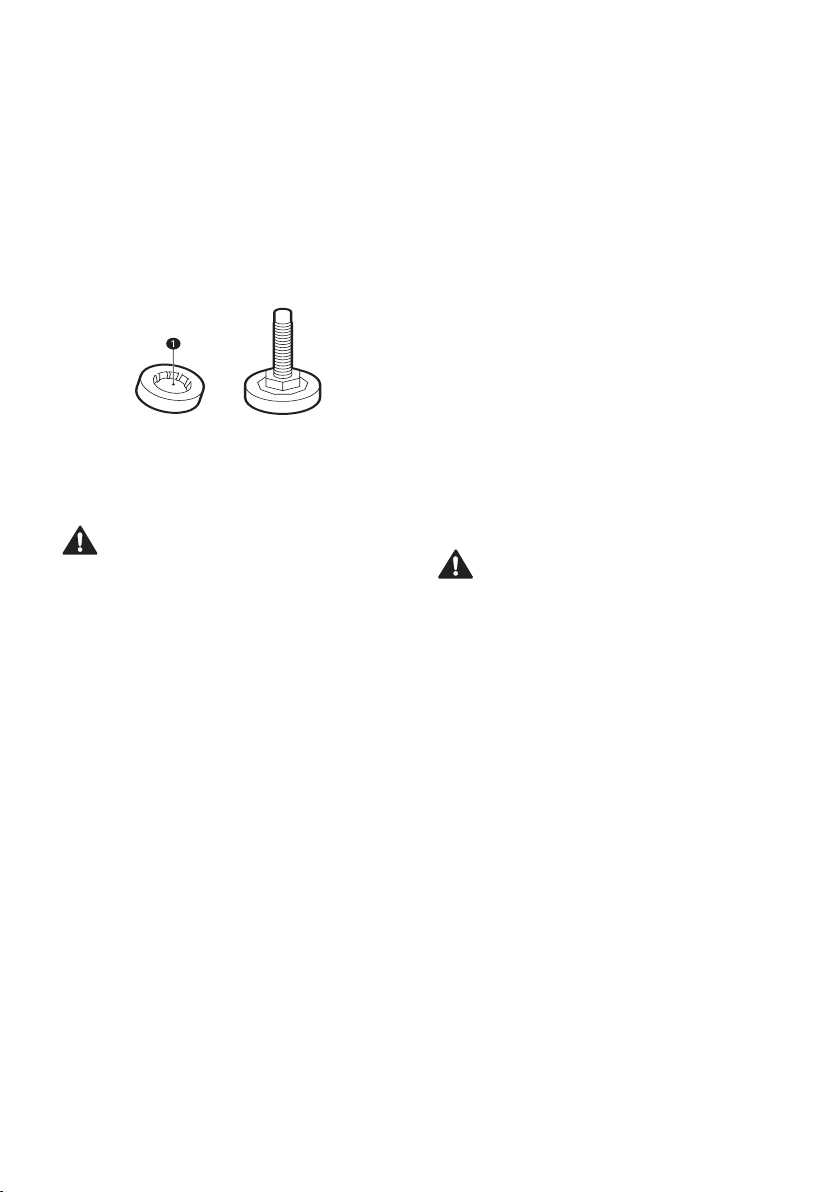
Adjusting and Levelling the Feet
When installing the appliance, the appliance should
be aligned and perfectly level.
• If the appliance is not aligned and level properly,
the appliance may be damaged or may not
operate properly.
12
Page 13
EN
Turn the adjustable feet as required if the floor
1
is uneven.
• Do not insert pieces of wood etc. under the
feet.
• Make sure that all four feet should be stable
and resting on the floor.
Check if the appliance is perfectly level using a
2
spirit level a.
NOTE
• Proper placement and levelling of the appliance
will ensure long, regular, and reliable operation.
• The appliance must be level and stand firmly in
position.
• It must not ‘Seesaw’ across corners under the
load.
• Do not let the feet of the appliance get wet.
Failure to do so may cause vibration or noise.
Connecting the Water Inlet Hose
Note for Connection
• Water pressure must be between 100 kPa
and 1000 kPa (1.0 - 10.0 kgf/cm²). If the
water pressure is more than 1000 kPa, a
decompression device should be installed.
• Do not overtighten the water inlet hose to all
valves.
• Periodically check the condition of the hose and
replace the hose if necessary.
Checking the Rubber Seal on the
Water Inlet Hose
Two rubber seals a are supplied with the water
inlet hoses. They are used to prevent water leaks.
Make sure that the connection to taps should be
sufficiently tight.
Secure the adjusting feet with the lock nuts b
3
by turning counterclockwise against the bottom
of the appliance.
Check if all lock nuts at the bottom of the
4
appliance are secured properly.
13
Page 14
EN
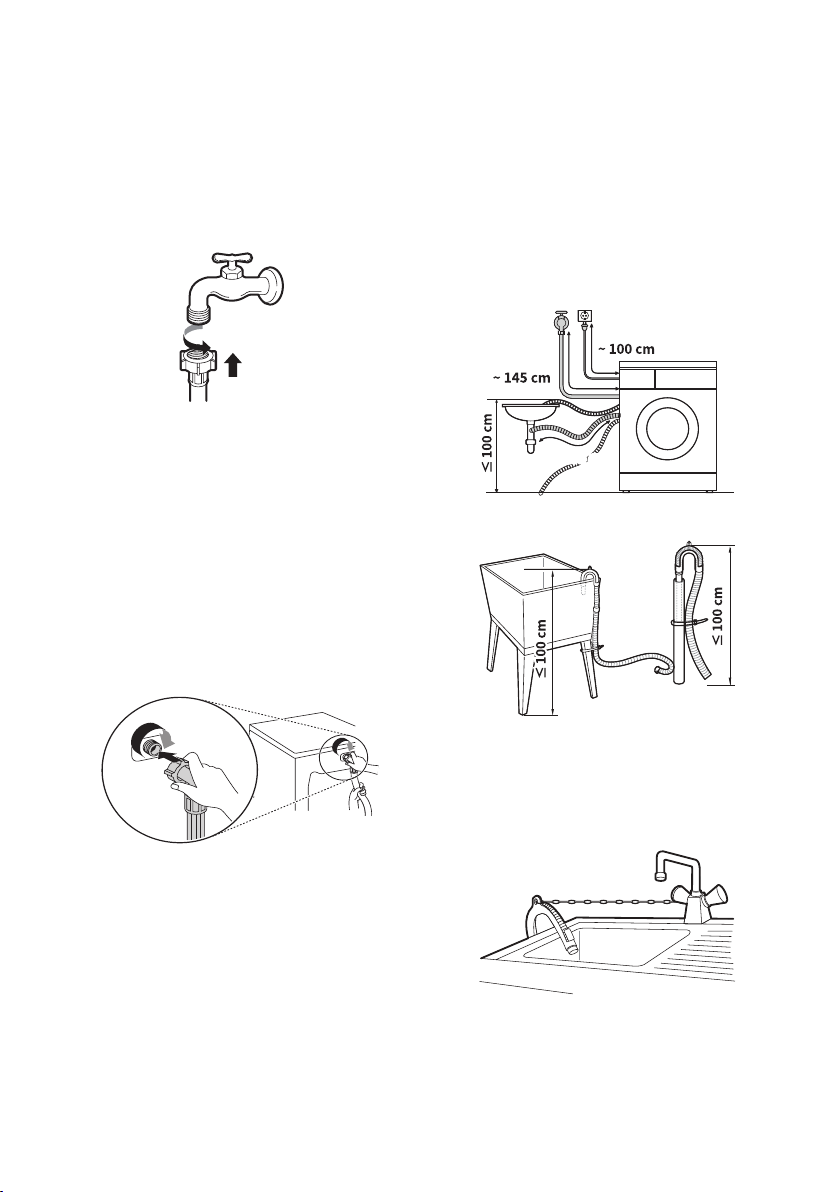
Connecting Hose to Water Tap
Installing the Drain Hose
Screw - Type Hose to Tap with Thread
Screw the hose connector to the water supply,
which has ¾” threaded union.
NOTE
• Before connecting the inlet hose to the water
tap, turn on the water tap to flush out foreign
substances (dirt, sand, sawdust, and etc.) in the
water lines. Let the water drain into a bucket,
and check the water temperature.
Connecting Hose to the Appliance
Screw the water line to the water supply on the
back of the appliance.
For Model with Drain Pump
The drain hose should not be placed higher than
100 cm above the floor. Water in the appliance may
not drain or may drain slowly.
• Securing the drain hose correctly will protect the
floor from damage due to water leakage.
_DN
• If the drain hose is too long, do not force it back
into the appliance. This will cause abnormal
noise.
• When installing the drain hose to a sink, secure
it tightly with string.
NOTE
• After completing connection, if water leaks from
the hose, repeat the same steps. Use the most
conventional type of tap for the water supply. If
the tap is square or too big, remove the guide
plate before inserting the tap into the adaptor.
• Make sure that the hose should not be kinked or
trapped.
14
Page 15
EN
OPERATION
Operation Overview
Using the Appliance
Before the first wash, select the Cotton wash
programme and add a half amount of the detergent.
Start the appliance without laundry. This will remove
possible residues and water from the drum that may
have been left during manufacturing.
Sort laundry and load items.
1
• Sort laundry by fabric type, soil level, colour
and load size as needed. Open the door and
load items into the appliance.
Add detergent or softener.
2
• Add the proper amount of detergent to the
detergent dispenser drawer. If desired, add
bleach or fabric softener to the appropriate
areas of the dispenser.
Turn on the appliance.
3
• Press the Power button to turn on the
appliance.
Choose the desired cycle.
4
• Press the cycle button repeatedly or turn the
cycle selector knob until the desired cycle is
selected.
• Now select a wash temperature and spin
speed. Pay attention to a fabric care label of
your clothes.
Begin cycle.
5
• Press the Start/Pause button to begin the
cycle. The appliance will agitate briefly
without water to measure the weight of the
load. If the Start/Pause button is not pressed
within 15 minutes, the appliance will shut off
and all settings will be lost.
End of cycle.
6
• When the cycle is finished, a melody will
sound. Immediately remove your clothing
from the appliance to reduce wrinkling.
Check around the door seal when removing
the load for small items that may be caught
in the seal.
Preparing the Laundry
Sort laundry for best washing results, and then
prepare laundry according to the symbols on the
care labels.
Sorting the Clothes
• For best washing results, sort your clothes
according to a care label stating fabric type and
washing temperature. Adjust the spin speed to
wash them.
• Soil level (Heavy, Normal, Light): Separate
clothes according to soil level. If possible, do
not wash heavily soiled items with lightly soiled
ones.
• Colour (White, Lights, Darks): Wash separately
dark or dyed clothes from whites or light colours.
Mixing dyed clothes with light clothes can
result in dye transfer or discolouration of lighter
clothes.
• Lint (Lint producers, Collectors): Wash
separately lint producing fabrics from lint
collecting fabrics. Lint producers can result in
pilling and linting on the lint collectors.
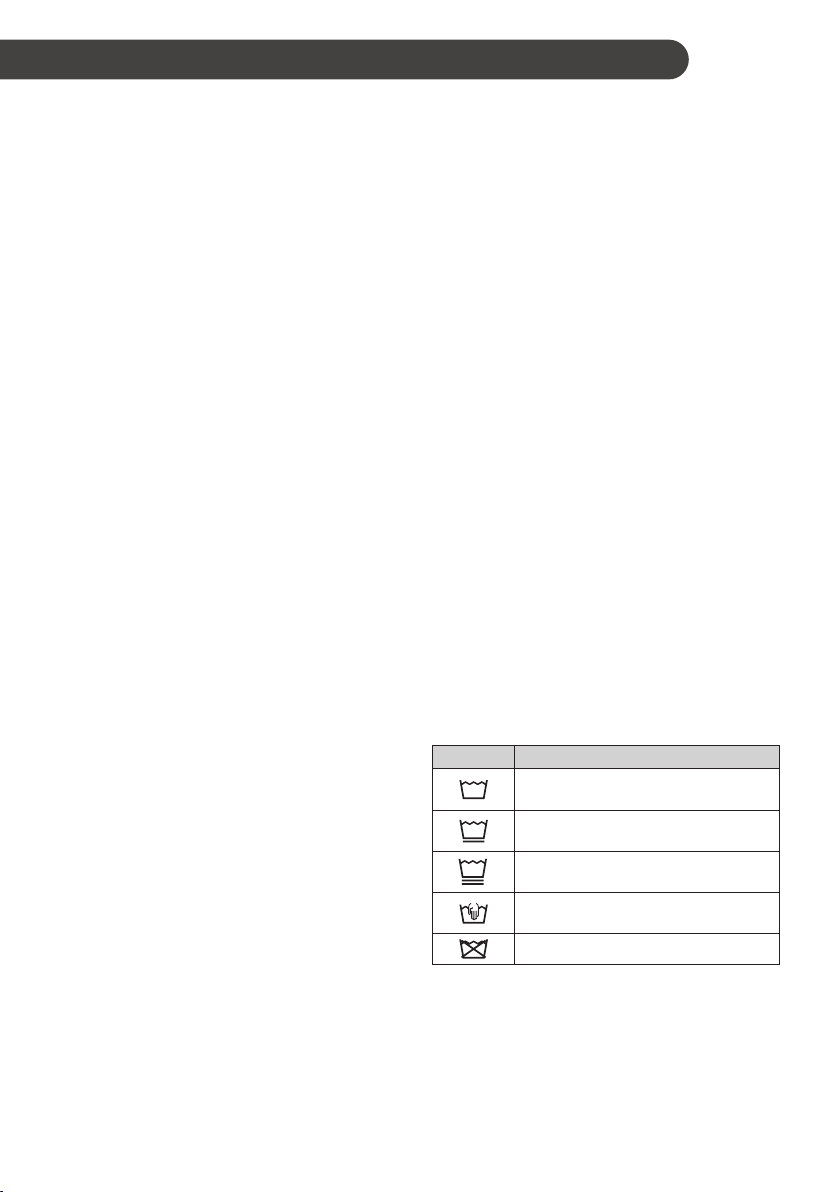
Checking the Fabric Care Label
Symbols on the care labels
The symbols tell you about the fabric content of
your clothes and how it should be washed.
Symbol Wash / Fabric type
• Normal Wash
• Cotton, Mixed Fabrics
• Easy Care
• Synthetic, Mixed Fabrics
• Special Delicate Wash
• Delicates
• Hand Wash Only
• Wool, Silk
• Do not wash
NOTE
• The dashes under the symbol give you
information about the type of fabric and the
maximum allowance of mechanical stress.
15
Page 16
EN
Checking the Clothes before
Loading
• Combine large and small items in a load. Load
large items first. Large items should not be more
than half of total load.
• Do not wash single small items. Add 1-2 similar
items to the load to prevent an out- of-balance
load.
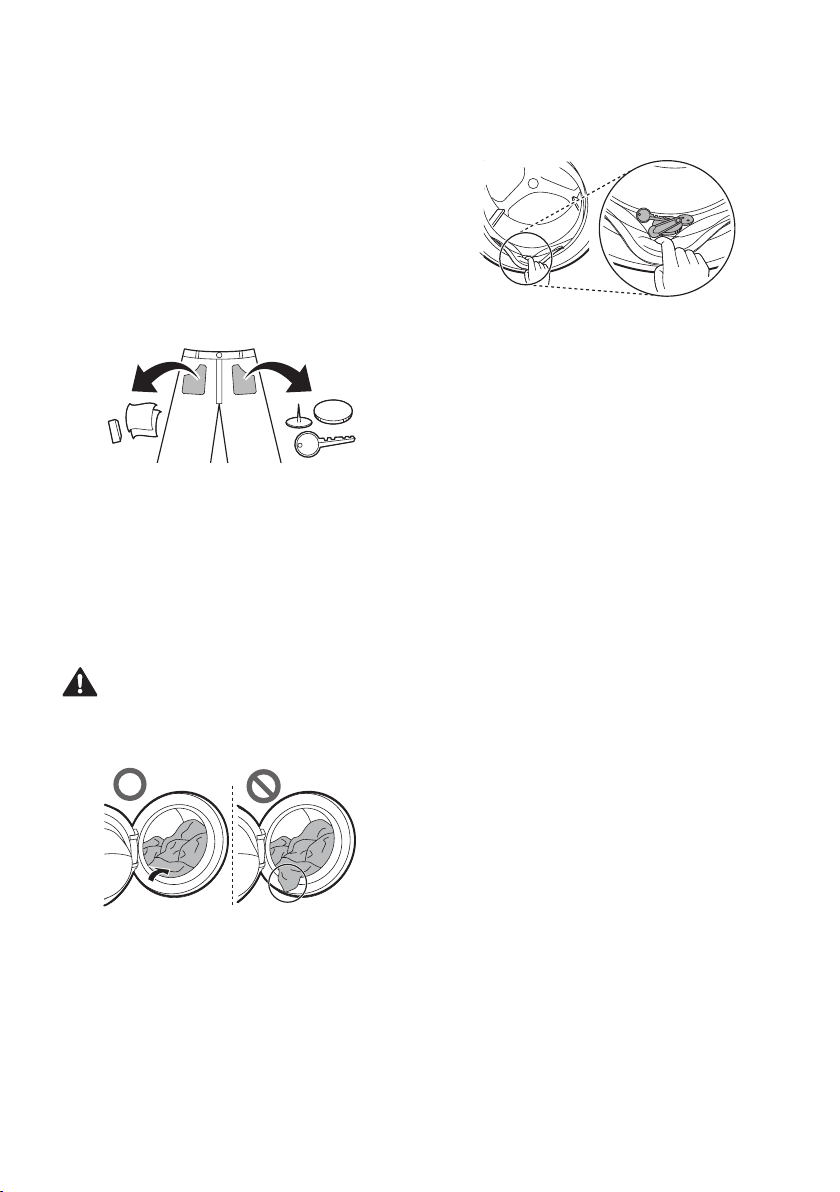
• Make sure to empty all pockets. Items such as
nails, hair clips, matches, pens, coins and keys
can damage both your appliance and clothes.
• Wash delicates (stockings, underwired bras) in
a wash net.
• Close zippers, hooks and strings to make sure
that these items do not snag other clothes.
• Pre-treat dirt and stains by saturating the
dirt and stains with dissolved detergent and
brushing them in order to remove dirt.
• Check the folds of the flexible gasket (gray) and
remove any small items.
CAUTION
• Check if the laundry gets stuck between the
door and the seal, other wise the laundry may
get damaged while washing.
• Remove items from the flexible gasket to prevent
clothing and door seal damage.
Adding Detergents and Softeners
Detergent Dosage
• Detergent should be used according to the
instruction of the detergent manufacturer and
selected according to type, colour, soiling of the
fabric and the washing temperature.
• Reduce the amount of detergent if too many
suds are formed.
• Too much detergent results in excessive suds
which cause poor washing.
• When you use liquid detergent, follow
the guidelines provided by the detergent
manufacturer.
• You can pour liquid detergent directly into the
main detergent drawer if you are starting the
wash cycle immediately.
• Do not use liquid detergent if you are using
Delay End function, or if you have selected
Pre Wash option, as the liquid may harden.
• Detergent usage may need to be adjusted for
water temperature, water hardness, size and
soil level of the laundry. For best results, avoid
oversudsing.
• Refer to the label of the clothes, before choosing
the detergent and water temperature.
• Use only suitable detergents for the respective
type of clothing:
− Liquid detergent is often designed for special
applications, e.g. for coloured fabric, wool,
delicate or dark laundry.
− Powdered detergent is suitable for all types
of fabric.
− For better washing results of white and pale
clothes, use powdered detergent with bleach.
− Detergent is dispensed from the dispenser at
the beginning of the wash cycle.
16
Page 17
EN
NOTE
• Do not let the detergent harden. Doing so may
lead to blockages, poor rinse per formance or
odour.
• Full load: According to manufacturer’s
recommendation
• Part load: ¾ of the normal amount
• Minimum load: ½ of full load
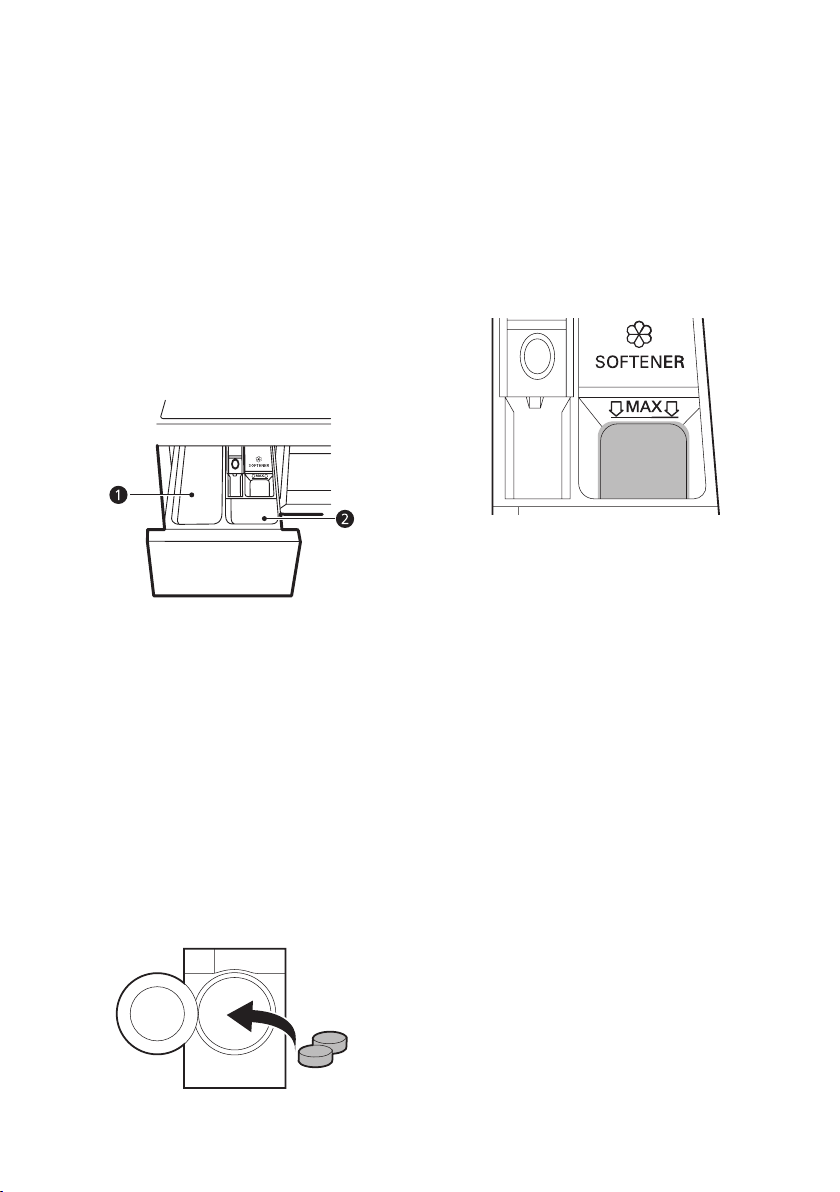
Adding Detergent
• Detergent for main wash a only ~ J
• Detergent for pre wash b and main wash a ~
d # J
NOTE
• Use the appropriate amount of detergent. Too
much detergent, bleach or softener may cause
an overflow.
• When selecting Pre Wash, divide the dosage
into ⅓ for pre wash and ⅔ for main wash.
Adding Detergent Tablet
Detergent tablet is also available when washing
laundry.
Open the door and put detergent tablets into
1
the drum.
Load the laundry into the drum and close the
2
door.
NOTE
• Do not put tablets into the drawer.
Adding Fabric Softener
• Add a fabric softener to the maximum fill line.
• Close the dispenser drawer gently.
• Do not leave the fabric softener in the detergent
drawer for more than 2 days. Fabric softener
may harden.
• Softener will automatically be added during the
last rinse cycle.
• Do not open the drawer when water is being
supplied.
• Solvents (e.g. benzene, etc.) must not be used.
NOTE
• Pouring excessive fabric softener over the
maximum fill line can cause it to dispense too
early, which may stain clothes.
• Do not pour fabric softener directly onto the
laundry, which may stain the laundry.
Adding Water Softener
A water softener, such as anti-limescale can be
used to cut down on the use of detergent in areas
with high water hardness level.
• First add detergent, and then the water softener.
Dispense according to the amount specified on
the packaging.
17
Page 18
EN
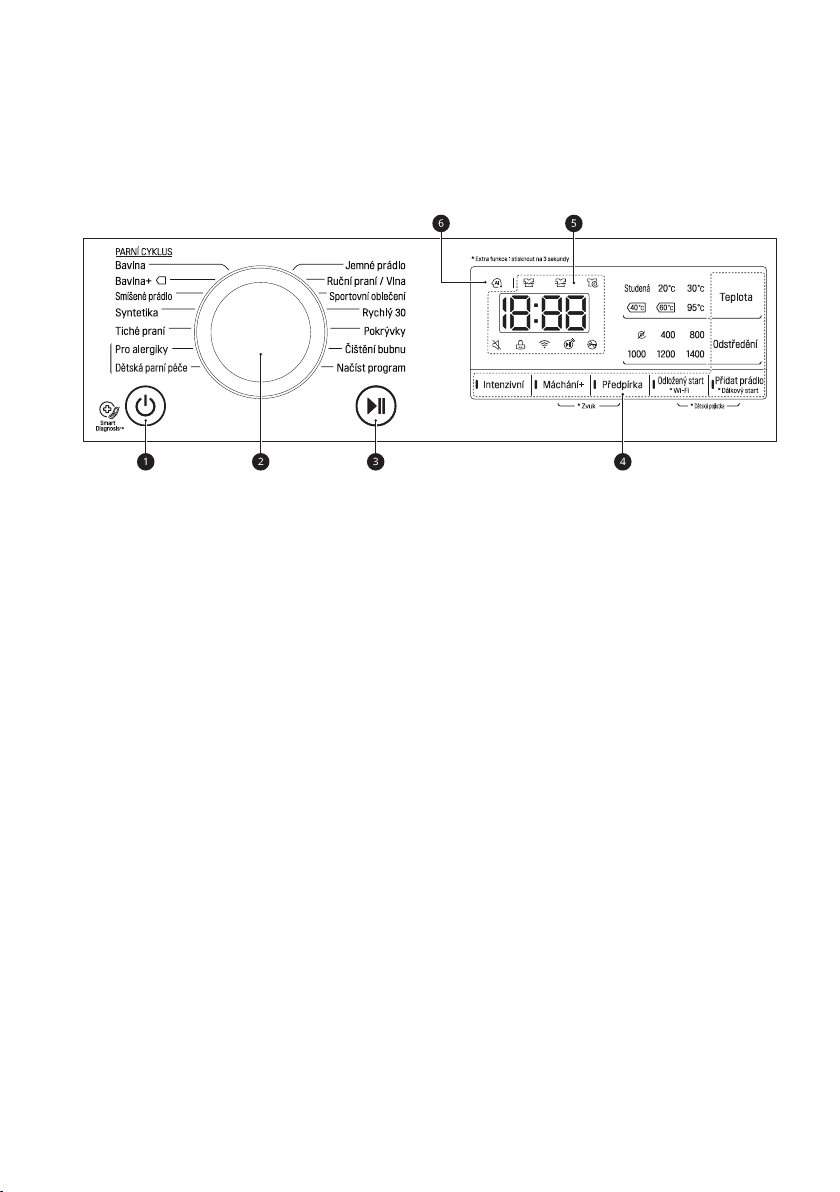
Control Panel
Control Panel Features
a Power Button
• Press the Power button to turn on or off the appliance.
b Programme Knob
• Programmes are available according to the laundry type.
• The lamp will light up to indicate the selected programme.
c Start/Pause Button
• Press the Start/Pause button to start or pause a wash cycle.
• Press the Start/Pause button to stop a wash cycle temporarily.
d Extra Options and Functions
• You can use the extra options and functions to customize the programmes.
• To use the extra functions, press and hold the corresponding button for 3 seconds. The
corresponding symbol lights up in the display.
• In order to use the Dálkový štart (Remote Start) function, refer to SMART FUNCTIONS.
• This allows you to select an additional programmes and will light when selected.
− f : This icon turns on when the appliance is connected to Wi-Fi network at home.
e Display
• The display shows the settings, remaining estimated time, options, and status messages. When the
appliance is turned on, the default settings in the display will light up.
− 18:88: When a programme is selected, the default time for that programme is displayed. The default
time can be changed according to the selected option.
− k : When the laundry is being washed, this icon is illuminated.
− l : When the laundry is being rinsed after completion of washing programme, this icon is
illuminated.
− p : When the laundry is spun to remove the water in the laundry, this icon is illuminated.
− H : When this icon is illuminated, the door cannot be opened.
18
Page 19
EN
a AI DD
• AI DD M provides the desired washing and spinning.
• M is activated when Bavlna (Cotton), Smíšené prádlo (Mixed Fabric) and Syntetika (Easy Care)
programmes are selected and operated.
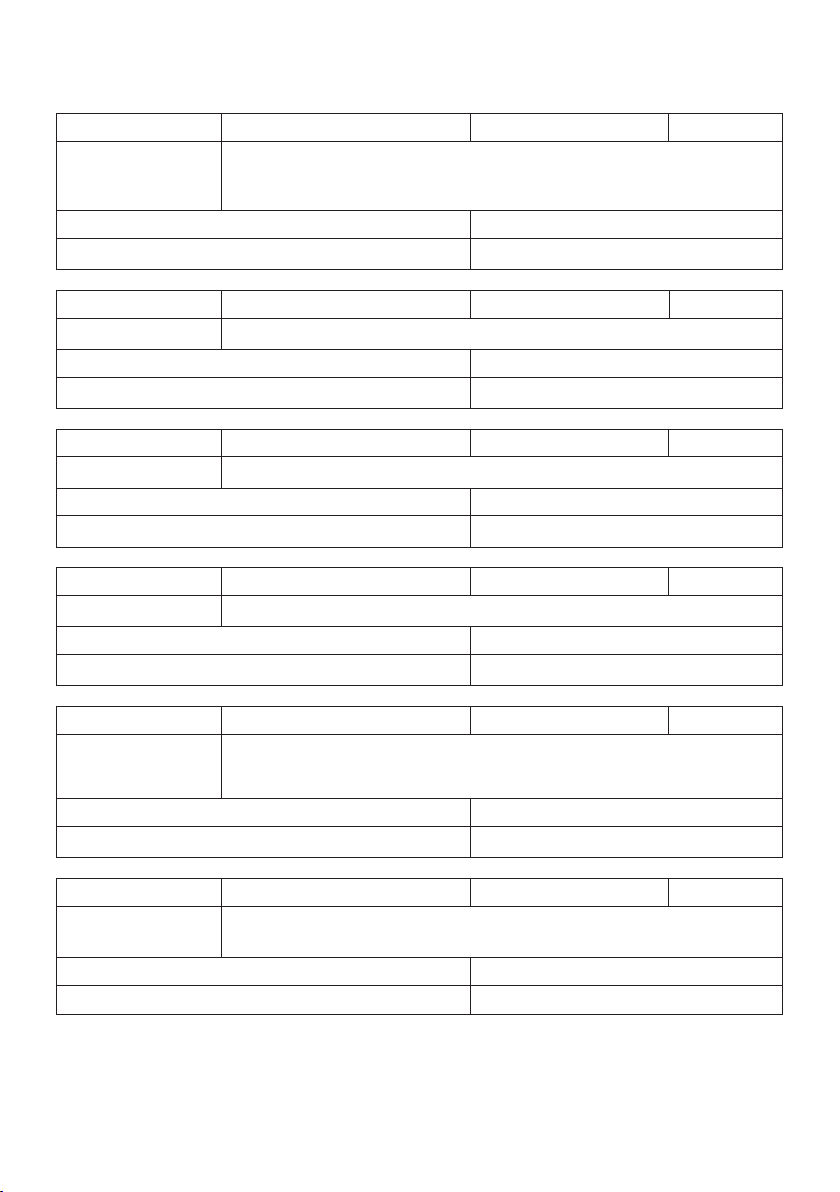
Programme Table
Washing Programme
Programme
Description Provides better performance by combining various drum motions.
Proper Temperature 40 °C (Cold to 95 °C)
Max. Spin Speed 1400 rpm
Programme
Description Provides optimised washing performance for large amount of laundry with less
Proper Temperature 60 °C (Cold to 60 °C)
Max. Spin Speed 1400 rpm
Programme
Description Enables various fabrics to be washed simultaneously.
Proper Temperature 40 °C (Cold to 60 °C)
Max. Spin Speed 1400 rpm
Programme
Description Suitable for casual shirts that do not need ironing after washing.
Proper Temperature 40 °C (cold to 60 °C)
Max. Spin Speed 1400 rpm
Bavlna (Cotton)
Use for coloured fast items (shirts, nightdresses, pajamas, etc.) and normally
soiled cotton load (underwear).
Bavlna+ (Cotton+)
energy consumption.
Use for coloured fast items (shirts, nightdresses, pajamas, etc.) and normally
soiled cotton items (underwear).
Smíšené prádlo (Mixed Fabric)
Use for various kind of fabrics except special items (silk/delicate, sports wear,
dark clothes, wool, duvet/curtains).
Syntetika (Easy Care)
Use for Polyamide, acrylic, polyester.
Max. Load Rating
Max. Load Rating
Max. Load 3 kg
Max. Load 3 kg
19
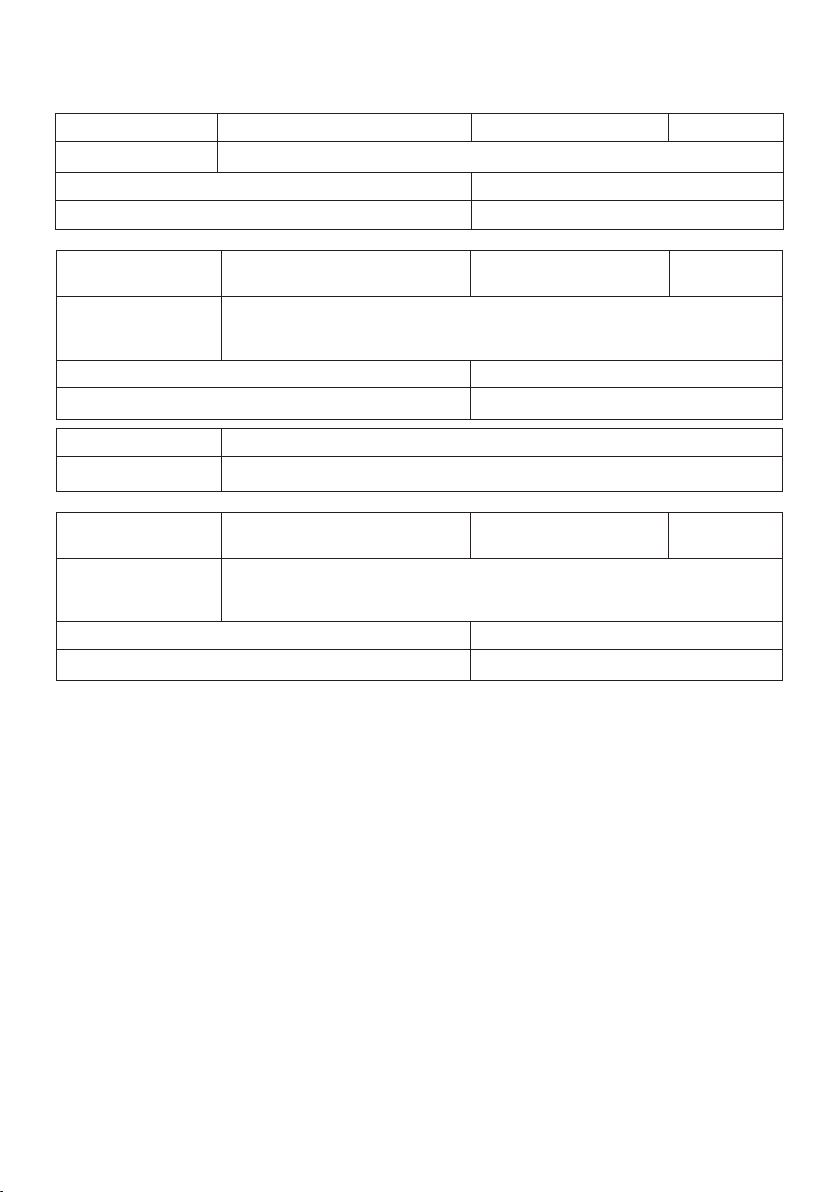
Page 20
EN
Programme
Tiché praní (Silent Wash)
Max. Load 4.5 kg
Description Provides less noise and vibration and saves money by using overnight electricity.
Use for coloured fast garments (shirts, nightdresses, pajamas, etc.) and lightly
soiled white cotton (underwear).
Proper Temperature 40 °C (Cold to 60 °C)
Max. Spin Speed 1000 rpm
Programme
Pro alergiky (Allergy Care)
Max. Load 3.0 kg
Description Helps to remove allergens such as house mites, pollen and fur.
Proper Temperature 60 °C
Max. Spin Speed 1400 rpm
Programme
Dětská parní péče (Baby Steam Care)
Max. Load 4.5 kg
Description Provides clothes care with gentle motion and better performance by steam.
Proper Temperature 60 °C
Max. Spin Speed 1000 rpm
Programme
Jemné prádlo (Delicates)
Max. Load 2 kg
Description Suitable for delicate clothes such as underwear, blouse, etc
Proper Temperature 20 °C (Cold to 40 °C)
Max. Spin Speed 800 rpm
Programme
Ruční praní/Vlna (Hand/Wool)
Max. Load
1.5 kg
Description For hand and machine washable delicate clothes such as washable wool,
lingerie, dresses etc. (Use detergent for machine washable woolens).Use for
Wool, Silk, hand washable clothes, delicate, easily damaged laundry.
Proper Temperature 30 °C (Cold to 40 °C)
Max. Spin Speed 800 rpm
Programme
Sportovní oblečení (Sportswear)
Max. Load
Description Suitable for special items like sports and outdoor wear.
Use for Coolmax, gore-tex, fleece and sympatex.
Proper Temperature 40 °C (Cold to 40 °C)
Max. Spin Speed 800 rpm
20
2 kg
Page 21
EN
Programme
Description Provides fast washing time for small loads and lightly soiled clothes.
Proper Temperature 20 °C (Cold to 40 °C)
Max. Spin Speed 1400 rpm
Rychlý 30 (Quick 30)
Max. Load 2 kg
Programme
Description For large items such as bed covers, pillows, sofa covers, etc. Use for cotton
Proper Temperature Cold (Cold to 40 °C)
Max. Spin Speed 1000 rpm
Programme
Description This is a special function to clean inside of your appliance.
Programme
Description
Proper Temperature Max. Spin Speed 1400 rpm
Pokrývky (Duvet)
bedding except special items (delicates, wool, silk, etc.) with filling: duvets,
pillows, blankets, sofa covers with light filling.
Čištění bubnu (Tub Clean)
Načíst program
(Download Cycle)
The Načíst program (Download Cycle) programme allows you to download
new and special washing programs to your washing machine with a
smartphone. The default program is on Máchání + Odstředění (Rinse + Spin).
Max. Load 1 piece of
laundry
Max. Load 1 piece of
laundry
NOTE
• Select the proper wash temperature and spin speed for the desired programmes.
• When washing, always pay attention to the care label of your clothes.
• Actual maximum spin speed may vary depending on the model, programme, and load conditions.
21
Page 22
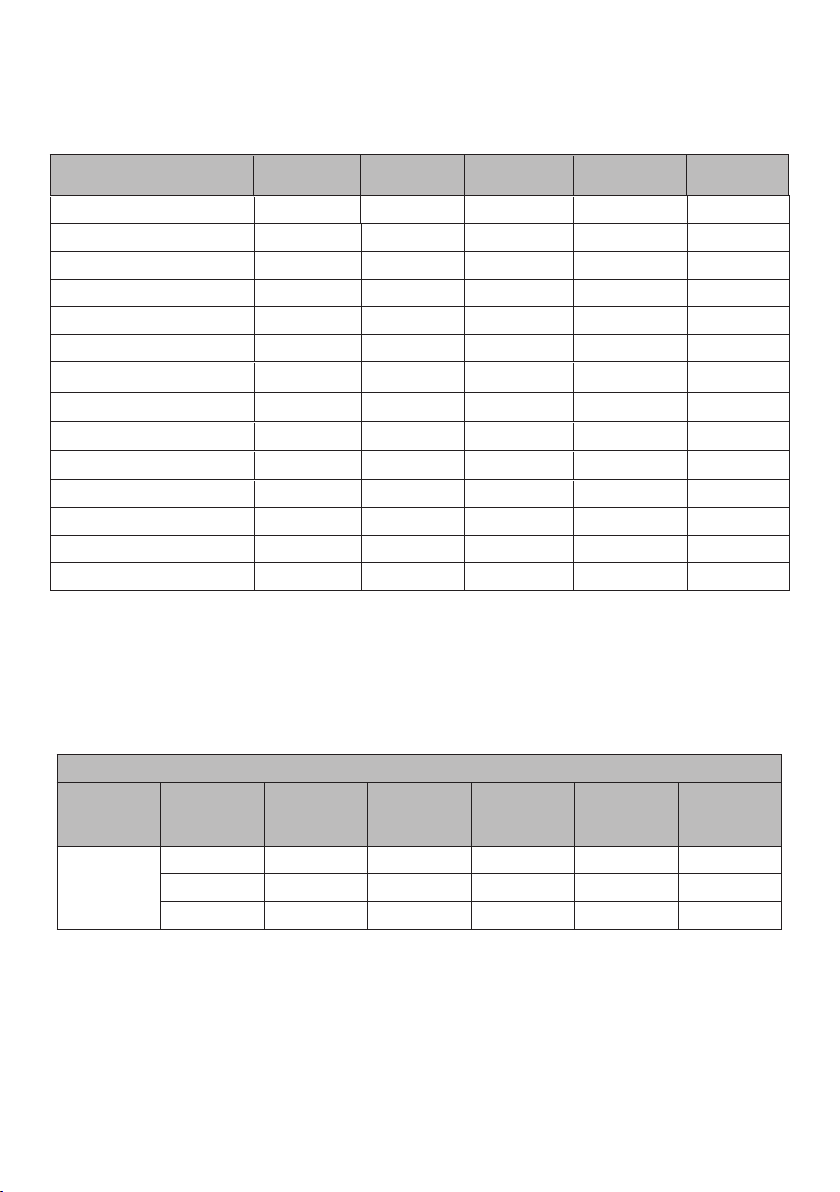
Extra Options
EN
Programme
Bavlna ( Cotton )
Bavlna+ ( Cotton+ )
Smíšené prádlo ( Mixed Fabric )
Syntetika ( Easy Care )
Tiché prání ( Silent Wash )
Pro alergiky ( Allergy Care )
Jemné prádlo ( Delicates )
Ruční praní/Vlna ( Hand/Wool )
Sportovní oblečení ( Sportswear )
Dětská parní péče ( Baby Steam Care )
Quick 30 (Rychlý 30)
Duvet (Pokrývky)
Tub Clean (Čišťení bubnu)
ownload Cycle (Načíst program)
D
Předpírka
(Pre Wash )
#
Odložený start
(Delay End )
#
# # #
# #
# #
# #
#
#
#
#
# # # #
#
# #
#
#
Přidat prádlo
(Add Item )
# #
# #
#
# # #
# # #
#
#
# # #
# #
Máchání+
(Rinse+ )
* This option is automatically inserted in the programme and cannot be deselected.
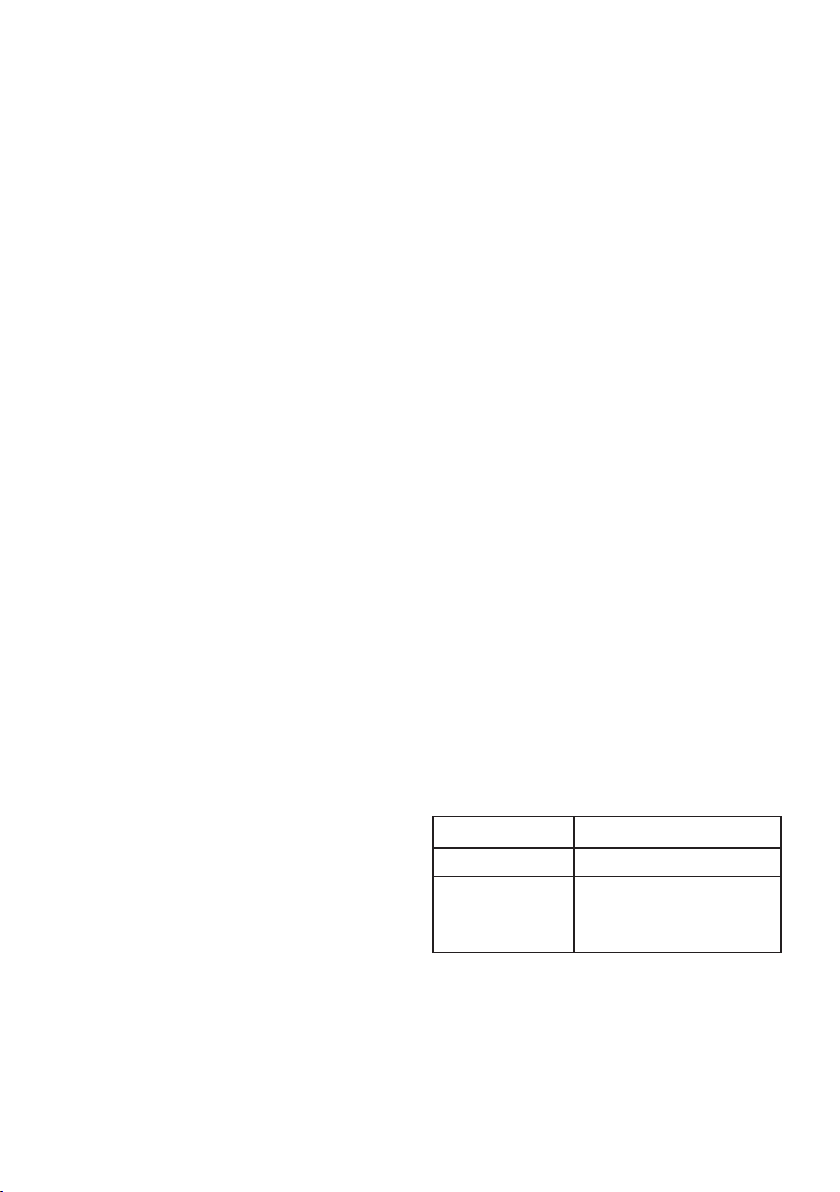
Consumption Data
Main Washing Programmes
Intenzivní
(Intensive )
#
#
# #
# #
# #
#
#
#
#
#
F* WN*, F*ZN*
Programme Temp. (°C) Load (kg)
Cotton+
R*
T
T
S
8 05:03 40 0.57 44
4 04:11 30 0.48 44
4
Duration
(h:mm)
04:09
Water (L)
Energy
(kWh)
30 0.45 44
Residual
moisture
(%)
* The standard cotton programme is Cotton+ R, T full load, Cotton+ R, T half load, and Cotton+ S
half load in accordance with Regulations (EU) No. 1061/2010 and EN 60456 .
NOTE
• The test results depend on water pressure, water hardness, water inlet temperature, room temperature,
type and amount of laundry, type and amount of detergent and fluctuations in the main electricity supply
and chosen additional options.
• Neutral detergent is recommended.
• The actual washing temperature may differ from the temperature of washing programmes stated in the
table.
22
Page 23

EN
Extra Options and Functions
You can use the extra options and functions to
customize the programmes.
Máchání (Rinse) l
Use this option to select the number of rinse
by pressing the Máchání+ (Rinse+) button. This
option is recommended for people with detergent
allergies.
Máchání+ (Rinse+) G
Use this option to add rinse once.
Předpírka (Pre Wash
Use this option to wash the heavily soiled laundry.
Press the Power button.
1
Select a washing programme.
2
Press the Předpírka (Pre Wash) button.
3
)
Press the Odložený start (Delay End) button to
3
set a required time.
Press the Start/Pause button.
4
NOTE
• The delay time is the time to the end of the
programme, not the star t. The actual running
time may vary due to water temperature,
laundry and other factors.
• To cancel the function, the Power button
should be pressed.
• Avoid using liquid detergent for this function.
Wi-Fi f
When WLAN is connected, the Wi-Fi icon on the
control panel is lit.
Přidat prádlo (Add Item)
Use this option to add or remove the laundry after
the washing programme is started.
Press the Přidat prádlo (Add Item) button
1
when the LED is turned on.
Press the Start/Pause button.
4
Intenzivní (Intensive)
Use this option to wash normally and heavily soiled
laundry.
Press the Power button.
1
Select a washing programme.
2
Press the Intenzivní (Intensive) button for 3
3
seconds.
Press the Start/Pause button.
4
Odložený start (Delay End)
Use this function to automatically start and finish
the appliance after a specified time interval.
Press the Power button.
1
Select a washing programme.
2
Open the door after it unlocks itself.
2
Add or remove laundry.
3
Close the door and press the Start/Pause
4
button.NOTE
• For safety reasons, the door remains locked
when the water level or temperature inside
of the drum is high. It is not possible to add
laundry at this time.
Temp.
Use this option to select the wash and rinse
temperature in combination for the selected
programme. Press this button until the desired
setting is lit. Cold tap water is used for all rinses.
• Select the water temperature suitable for the
type of laundry you are washing. Follow the
fabric care labels for best results.
23
Page 24

EN
Odstředění (Spin) p
Use this option to change the spin strength.
Press the Odstředění (Spin) button repeatedly to
change the speed level.
Press the Power button.
1
Select a washing programme.
2
Press the Odstředění (Spin) button to select
3
spin speed.
Press the Start/Pause button.
4
NOTE
• When you select No, it will still rotate for a shor t
time to drain quickly.
Beep On/Off q
This function operates only when the appliance is
in operation.
• Press and hold the Máchání+ (Rinse+) and
Předpírka (Pre Wash) button simultaneously
for 3 seconds to set the this function.
Dětská pojistka (Child Lock) i
Use this function to disable the controls. This
function can prevent children from changing cycles
or operating this appliance.
NOTE
• Once this function is set, all buttons are locked
except the POWER button.
• When the controls are locked, CL and the
remaining time are alternatively shown on the
display during the wash while the child lock is
engaged.
• Turning off the power will not reset this
function. You must deactivate this function
before you can access any other functions.
Locking the Control Panel
Turn on the power.
1
Press and hold the Odložený start (Delay
2
End) and Přidat prádlo (Add Item)
seconds to activate this function.
• A beeper will sound, and CL will appear on the
display.
button for 3
NOTE
• Once this function is set, the setting is
memorized even after the power is turned off.
• If you want to turn the beeper of f, simply repeat
this process.
24
Unlocking the Control Panel
Turn on the power.
1
Press and hold the Odložený start (Delay
2
End) and Přidat prádlo (Add Item)
button for 3 seconds to deactivate this
function.
Page 25

EN
SMART FUNCTIONS
Using LG SmartThinQ Application
This feature is only available on the model with a
or b logo.
Before Using LG SmartThinQ
Check the distance between the appliance and
1
the wireless router (WLAN network).
• If the distance between the appliance and
the wireless router is too far, the signal
strength becomes weak. It takes long time to
register or fails to install the application.
Turn off the Mobile data or Cellular Data on
2
your smartphone.
Connect your smartphone to the wireless
3
router.
• If the appliance is having trouble connecting
to the Wi- Fi network, it may be too far from
the router. Purchase a Wi-Fi repeater (range
extender) to improve the Wi- Fi signal strength.
• The Wi-Fi may not connect or the connection
may be interrupted because of the home
network environment.
• The network connection may not work properly
depending on the Internet service provider.
• The surrounding wireless environment can make
the wireless network service run slowly.
• The appliance cannot be registered due to
problems with the wireless signal transmission.
Unplug the appliance and wait about a minute
before trying again.
• If the firewall on your wireless router is enabled,
disable the firewall or add an exception to it.
• The wireless network name (SSID) should be a
combination of English letters and numbers. (Do
not use special characters.)
• Smartphone user interface (UI) may vary
depending on the mobile operating system (OS)
and the manufacturer.
• If the security protocol of the router is set to
WEP, you may fail to set up the network. Please
change it to other security protocols (WPA2 is
recommended.) and register the product again.
Installing LG SmartThinQ
Search for the LG SmartThinQ application from
the Google Play Store or Apple App Store on a
smartphone. Follow instructions to download and
install the application.
NOTE
• To verify the Wi-Fi connection, check that Wi-Fi
f icon on the control panel is lit.
• The appliance suppor ts 2.4 GHz Wi-Fi networks
only. To check your network frequency, contact
your internet service provider or refer to your
wireless router manual.
• LG SmartThinQ is not responsible for any
network connection problems or any faults,
malfunctions, or errors caused by network
connection.
Wi-Fi Function
Communicate with the appliance from a
smartphone using the convenient smart features.
Washer Cycle
(Remote Start, Download Cycle)
Set or download any preferred cycle and operate by
remote control.
25
Page 26
EN
Čišťení bubnu (Tub Clean) Coach
This function shows how many cycles remain before
running the Čišťení bubnu (Tub Clean) cycle.
Energy Monitoring
Check the energy consumption of the recently used
cycles and monthly average.
Smart Diagnosis
This function provides useful information for
diagnosing and solving issues with the appliance
based on the pattern of use.
Settings
Various functions are available.
Push Alert
This function is to inform the status notification
so that the user can recognize the appliance status.
The notifications are triggered even if the LG
SmartThinQ application is off.
NOTE
• If you change your wireless router, internet
service provider, or password, delete the
registered appliance from the LG SmartThinQ
application and register it again.
• The application is subject to change for the
purpose of improving the appliance without
notice to users.
• Functions may vary by model.
Using the Appliance Remotely
Dálkový štart (Remote Start)
Use a smartphone to control your appliance
remotely. You can also monitor your cycle operation
so you know how much time is left in the cycle.
Using this function
Press the Power button.
1
Put the laundry into the drum.
2
Start a cycle from the LG SmartThinQ
4
application on your smartphone.
NOTE
• Once this function is enabled, you can start a
cycle from the LG SmartThinQ smartphone
application. If the cycle is not star ted, the
appliance will wait to start the cycle until it is
turned of f remotely from the application or this
function is disabled.
• When this function is turned on, the door is
automatically locked.
Disabling This Function
When this function is activated, press and hold
Dálkový štart (Remote Start) button for 3 seconds
to disable this function. This function must be turned
off, so that the appliance can be used manually.
Download Cycle
Download a new and special cycle that is not
included in the basic cycles on the appliance.
Appliances that have been successfully registered
can download from a variety of specialty cycles
specific to the appliance.
Only one cycle can be stored on the appliance at a
time.
Once cycle download is completed in the appliance,
the product keeps the downloaded cycle until a new
cycle is downloaded.
Wireless LAN Module
Specifications
Model LCW-004
Frequency Range 2412 to 2472 MHz
Output Power
(Max)
Wireless function S/W version: V 1.0
For consideration of the user, this device should be
installed and operated with a minimum distance of
20 cm between the device and the body.
IEEE 802.11b:17.82 dBm
IEEE 802.11g:17.72 dBm
IEEE 802.11n:16.61 dBm
Press and hold Dálkový štart (Remote Start)
3
button for 3 seconds to enable this function.
26
Page 27
EN
Declaration of Conformity
Hereby, LG Electronics declares that the radio
equipment type Washing Machine is in compliance
with Directive 2014/53/EU. The full text of the
EU declaration of conformity is available at the
following internet address:
http://www.lg.com/global/support/cedoc/cedoc#
LG Electronics European Shared Service Centre
B.V
Krijgsman 1
1186 DM Amstelveen
The Netherlands
Standby Power Consumption
Standby power consumption 0.5 W
Network standby power
consumption
The period of time after which
the power management function,
or a similar function, switches
the equipment automatically into
standby and/or off mode and/or
the condition providing networked
standby
2.0 W
20 min.
Smart Diagnosis Using a
Smartphone
This feature is only available on the model with c
or d logo.
Use this function if you need an accurate diagnosis
by an LG Electronics customer information centre
when the appliance malfunctions or fails.
This function cannot be activated unless the
appliance is connected to power. If the appliance
is unable to turn on, then troubleshooting must be
done without using this function.
Open Source Software Notice
Information
To obtain the source code under GPL, LGPL, MPL,
and other open source licenses, that is contained in
this product, please visit http://opensource.lge.com.
In addition to the source code, all referred license
terms, warranty disclaimers and copyright notices
are available for download.
LG Electronics will also provide open source code
to you on CD-ROM for a charge covering the cost
of performing such distribution (such as the cost of
media, shipping, and handling) upon email request
to opensource@lge.com.
This offer is valid for a period of three years after
our last shipment of this product. This offer is valid
to anyone in receipt of this information.
27
Page 28
EN
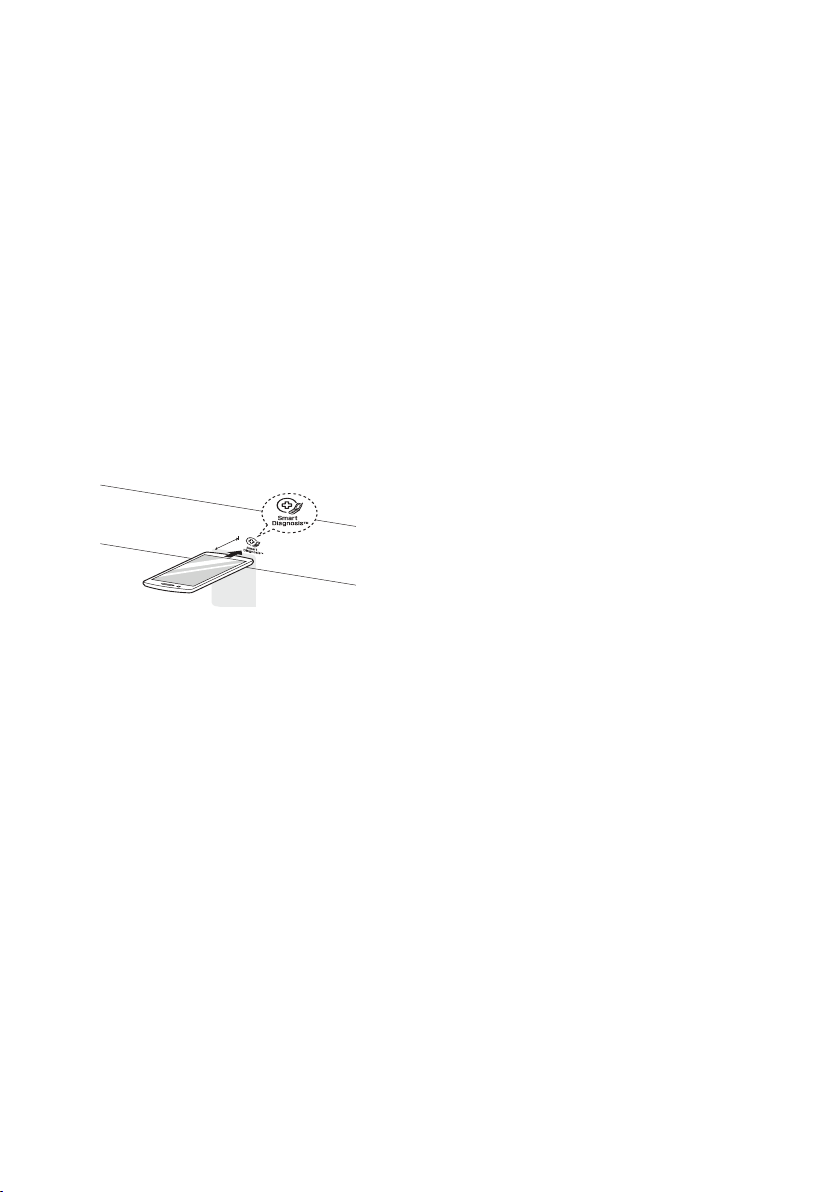
Using Smart Diagnosis
Max.
10 mm
Smart Diagnosis Through the
Customer Information Centre
Use this function if you need an accurate diagnosis
by an LG Electronics customer information centre
when the appliance malfunctions or fails. Use this
function only to contact the service representative,
not during the normal operation.
Press the Power button to turn on the
1
appliance.
• Do not press any other buttons.
When instructed to do so by the call centre,
2
place the mouthpiece of your phone close to
the Smart Diagnosis
Press and hold the Temp. button for 3
3
seconds.
icon.
• If the data transfer is poor due to poor call
quality, you may not receive the best diagnosis
service.
Keep the phone in place until the tone
4
transmission has finished. Time remaining for
data transfer is displayed.
• For best results, do not move the phone
while the tones are being transmitted.
• If the call centre agent is not able to get an
accurate recording of the data, you may be
asked to try again.
Once the countdown is over and the tones
5
have stopped, resume your conversation with
the call centre agent, who will then be able to
assist you using the information transmitted for
analysis.
NOTE
• This function depends on the local call quality.
• The communication performance will improve
and you can receive better service if you use
the home phone.
28
Page 29
EN
MAINTENANCE
WARNING
• Unplug the appliance before cleaning to avoid the risk of electric shock. Failure to follow this warning
may result in serious injur y, fire, electric shock, or death.
• Never use harsh chemicals, abrasive cleaners, or solvents to clean the appliance. They may damage
the finish.
Cleaning After Every Wash
Care After Wash
• After the wash cycle is finished, wipe the door
and door seal to remove any moisture.
• Leave the door slightly open to dry the drum.
• Wipe the appliance with a dry cloth to remove
any moisture.
WARNING
• Leave the door open to dry the drum interior but
only if it is safe and any children are supervised.
Cleaning the Exterior
Proper care of the appliance can extend the service
life.
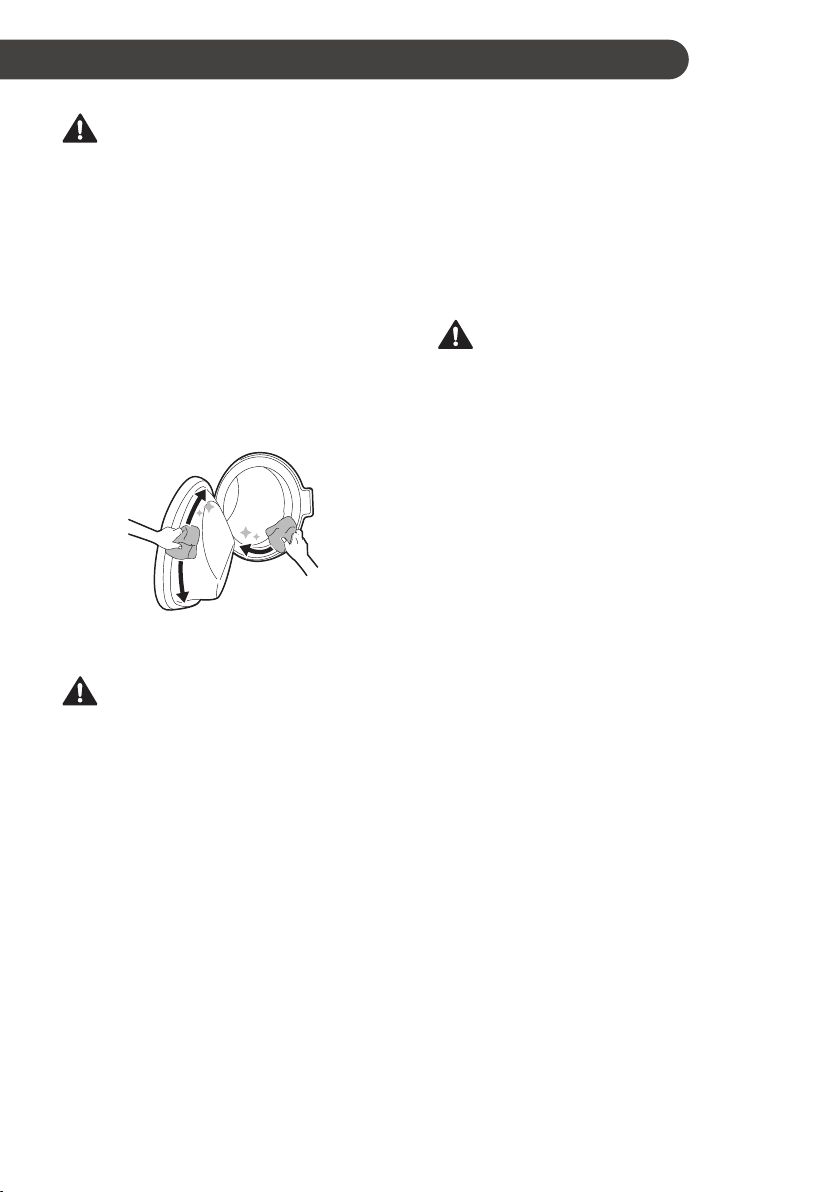
Door
• Wash with a damp cloth on the outside and
inside and then dry with a soft cloth.
WARNING
• Do not attempt to separate any panels or
disassemble the appliance. Do not apply any
sharp objects to the control panel in order to
operate the appliance.
Cleaning the Interior
• Use a towel or sof t cloth to wipe around the door
opening and door glass.
• Always remove items from the appliance as
soon as the cycle is complete. Leaving damp
items in the appliance can cause wrinkling,
colour transfer, and odour.
Exterior
• Immediately wipe off any spills. Wipe with a
damp cloth.
• Wipe with a damp cloth and then again with a
dry cloth ensuring there is no moisture in cabinet
joints or crevices.
• Do not press on the surface on the display with
sharp objects.
29
Page 30

EN
Cleaning the Appliance Periodically
Čišťení bubnu (Tub Clean)
Use this function to clean inside of the appliance.
A higher water level is used in this programme at
higher spin speed. Run this function once a month
(or more often if needed) to remove detergent
buildup and other residue.
Remove any clothing or items from the
1
appliance and close the door.
Open the dispenser drawer and add
2
anti-limescale powder to the main wash
compartment.
• Put tablets into the drum.
Close the dispenser drawer slowly.
3
Turn on the power, and then select the
4
Čišťení bubnu (Tub Clean).
• tcL will be displayed on the display.
Press the Start/Pause button to start.
5
After the programme is complete, leave the
6
door open to dry the door opening, gasket, and
door glass.
WARNING
• Leave the door open to dry inside of the
appliance only if the children are supervised at
home.
Cleaning the Water Inlet Filter
Water inlet filter collects lime or any small objects
that may be in water supplied to the appliance.
Clean the water inlet filter regularly.
NOTE
• Turn off the supply tap to the appliance if the
appliance is to be left for a certain period of time
(e.g. holiday), especially if there is no floor drain
(gully) in the immediate vicinity.
• 1E error message will be displayed on the
control panel when water is not entering the
detergent drawer.
• If the water is very hard or contains traces of
limescale, the filter on the water inlet may be
clogged.
Turn off the water tap and unscrew the water
1
inlet hose.
30
Clean the filter using a medium bristle tooth
2
brush.
Page 31

EN
Cleaning the Drain Pump Filter
The drain filter collects threads and small objects
left in the laundry. Check regularly that the filter is
clean to ensure smooth running of your appliance.
Allow the water to cool before cleaning the drain
pump filter. Open the door in an emergency or
perform a emergency evacuation.
Unplug the appliance.
1
Open the cover cap and pull out the hose.
2
Unscrew the drain plug a , and then drain the
3
water. Slowly unscrew the drain pump filter b
to drain the water and remove small objects.
Cleaning the Dispenser Drawer
Detergent and fabric softener may build up in the
dispenser drawer. Remove the drawer and the
components of the drawer in the drawer and check
for build-up of detergents or softeners once or twice
a month.
Remove the detergent dispenser drawer by
1
pulling the drawer straight out until the drawer
stops.
• Remove the drawer while pressing the
release button on the inside of the detergent
drawer.
Remove the build-up of detergent and softener.
2
• Rinse the drawer and the components of the
drawer with warm water to remove the buildup from detergent and softener. Use only
water to clean the dispenser drawer. Dry the
drawer and the components of the drawer
with a soft cloth or towel.
After cleaning the drain pump filter, take the
4
drain pump filter out and insert the drain plug.
Close the cover cap.
5
CAUTION
• Be careful when draining, as the water may be
hot.
• Run the drum cleaning programme once a
month (or more often, as needed) to remove
excess detergent and other debris.
To clean the drawer opening, use a cloth or
3
small, non-metal brush to clean the recess.
• Remove all residue from the upper and lower
parts of the recess.
Wipe any moisture off the detergent drawer
4
recess with a soft cloth or towel.
Re-assemble the components of the drawer to
5
the proper compartments and insert the drawer.
31
Page 32

EN
TROUBLESHOOTING
Before Calling for Service
Operation of the appliance can lead to errors and malfunctions. The following tables contain possible
causes and notes for resolving an error message or malfunction. You can remedy most of the problems by
yourself, consequently save time and money, since you do not need to call LG Electronics service centre.
The following table should assist you by troubleshooting.
Error Messages
The appliance is equipped with an automatic error-monitoring system to detect and diagnose problems at
an early stage. If this appliance does not function properly or does not function at all, check the following
before you call LG Electronics service centre.
Symptoms Possible Cause & Solution
1E
INLET ERROR
OE
WATER OUTLET
ERROR
UE
UNBALANCE ERROR
Water supply is not adequate in that location. Water does not enter
appliance or it enters slowly.
• Check another tap in the house.
Water supply tap is not completely open. Water does not enter the
appliance or it enters slowly.
• Open fully tap.
Water supply hose(s) are kinked.
• Straighten hose or reinstall the water inlet hose
The filter of the supply hose(s) are clogged.
• Check and clean the filter of the inlet hose.
If water leakage occurs in the aqua stop supply hose, indicator will
become red.
• Replace the aqua stop supply hose.
Drain hose is kinked or clogged. Water in the appliance does not drain
or drains slowly.
• Clean and straighten the drain hose.
The drain filter is clogged.
• Check and clean the drain filter.
The appliance has a system which detects and corrects the unbalance
of the appliance.
• The laundr y may be too wet at the end of the cycle, rearrange the laundry
to allow proper spinning. Close the door and press Start/Pause button.
It may take a few moments before the appliance begins to spin. The door
must be locked before spin can be achieved.
Load is too small. This system may stop spinning or even interrupt the
spin cycle altogether if individual heavy items (e.g. bath mat, bath robe,
etc.) are loaded.
• Add 1 or 2 similar items or items to help balance the laundry. Close the
door and press Start/Pause button. It may take a few moments before
the appliance begins to spin. The door must be locked before spin can be
achieved.
32
Page 33

EN
Symptoms Possible Cause & Solution
dE dE1 dEz dE4
DOOR ERROR
tE
CONTROL ERROR
LE
MOTOR LOCKED
ERROR
FE
OVERFLOW ERROR
PE
PRESSURE SENSOR
ERROR
vs
VIBRATION SENSOR
ERROR
FF
FROZEN FAILURE
AE
WATER LEAKAGE
PF
POWER FAILURE
Door sensor malfunctions.
• Please call LG Electronics service centre. You can find your local LG
Electronics service centre phone number in the warranty card.
This is a control error.
• Unplug the power plug and call for service.
Over load in motor
• Let the appliance wait for 30 minutes until the motor is cooled down and
then, restart the cycle
Water overfills due to the faulty water valve.
• Close the water tap.
• Unplug the power plug.
• Call for service.
Water level sensor malfunctions.
• Close the water tap.
• Unplug the power plug.
• Call for service.
Vibration sensor malfunctions.
• Call for service.
Is supply/drain hose or drain pump frozen?
• Supply warm water into the drum in order to unfreeze the drain hose and
the drain pump. Cover the supply hose with wet and warm towel.
Water leaks.
• Call for service.
The appliance experienced a power failure.
• Restart the cycle.
Noises You Might Hear
Symptoms Possible Cause & Solution
Rattling and clanking
noise
Thumping sound Heavy laundry may produce a thumping sound. This is usually normal.
Vibrating noise Package materials are not removed.
Foreign objects, such as keys, coins, or safety pins may be in the drum.
• Stop the appliance, check the drum for foreign objects. If the noise
continues after the appliance is restarted, call for service.
• If the sound continues, the appliance is probably out of balance. Stop and
redistribute the laundry.
The laundry may be out of balance.
• Pause the cycle and redistribute the laundry after the door unlocks.
• Remove package materials.
33
Page 34

EN
Symptoms Possible Cause & Solution
The laundry may be unevenly distributed in the drum.
• Pause the cycle and redistribute the laundry after the door unlocks.
Not all leveling feet are resting firmly and evenly on the floor.
• See the Leveling the Appliance to adjust the leveling of the appliance.
Floor not rigid enough.
• Check if the floor is sold and does not flex. See the Installation Place
Requirements to select the proper location.
Operation
Symptoms Possible Cause & Solution
Water is leaking. House drain pipes are clogged.
• Unclog the drain pipe. Contact plumber if necessary.
Leakage is caused by improper installation of drain hose or clogged
drain hose.
• Clean and straighten the drain hose. Check and clean the drain filter
regularly.
Appliance does not
operate.
Control panel has powered off due to inactivity.
• This is normal. Press the Power button to turn the appliance on.
Appliance is unplugged.
• Make sure that the cord should be plugged securely into a working outlet.
Water supply is turned off.
• Turn the water supply tap completely.
34
Page 35

EN
Symptoms Possible Cause & Solution
Appliance does not
operate.
Buttons may not
function properly.
Door does not open. The door cannot be opened for safety reasons once the appliance starts.
Appliance is not filling
properly.
Controls are not set properly.
• Make sure that the cycle should be correctly set. Close the door and press
the Start/Pause button.
Door is open.
• Close the door and make sure that nothing should be caught under the
door preventing it from closing completely.
Circuit breaker/fuse is tripped/blown.
• Check house circuit breakers/fuses. Replace fuses or reset breaker. The
appliance should be on a dedicated branch circuit. The appliance will
resume the cycle where it stopped once power is restored.
Control needs to be reset.
• Press the Power button, then reselect the desired programme and press
the Start/Pause button.
Start/Pause was not pressed after a cycle was set.
• Press the Power button, then reselect the desired programme and press
the Start/Pause button. The appliance is turned off if the Start/Pause
button is not pressed within 15 minutes.
Extremely low water pressure.
• Check another tap in the house to make sure that household water
pressure should be adequate.
Appliance is heating the water or making steam.
• The drum may stop operating temporarily during certain cycles, while
water is safely heated to a set temperature.
The door cannot be opened for safety reasons once the appliance starts.
• Check if the CL is illuminated. You can safely open the door after the
Door Lock icon turns off.
• Check if the H icon is illuminated. You can safely open the door after the
H icon turns off.
Filter clogged.
• Make sure the inlet filters on the fill valves are not clogged.
Inlet hoses may be kinked.
• Check that inlet hoses are not kinked or clogged.
Insufficient water supply.
• Make sure that both hot and cold water taps should be turned on all the
way.
Hot and cold inlet hoses are reversed.
• Check inlet hose connections.
35
Page 36

EN
Symptoms Possible Cause & Solution
Appliance does not
drain water.
Detergent is
not dispensed
incompletely or not
dispensed at all.
Cycle time is longer
than usual.
Duration is delayed Unbalance is detected or suds removing programme is on.
Kinked drain hose.
• Ensure that the drain hose is not kinked.
Drain located higher than 1.2 m above the floor.
• Make sure that the drain hose should not be higher than 1.2 m above the
bottom of the appliance.
Too much detergent is used.
• Follow the guidelines provided by the detergent manufacturer.
The load is too small.
• Add more items to allow the appliance to balance the laundry.
Heavy items are mixed with lighter items.
• Always try to wash items with similar weight in order to allow the appliance
to evenly distribute the weight of the laundry for spinning.
The load is out of balance.
• Manually redistribute the laundry if items have become tangled.
• This is normal. The time remaining shown on the display is only an
estimated duration. Actual time may vary.
Performance
Symptoms Possible Cause & Solution
Poor stain removal Previously set stains.
• Items that have been previously washed may have stains which have
been set. These stains may be difficult to remove and may require hand
washing or pre-treating to aid in stain removal.
Staining Bleach or softener is dispensed too soon.
• Dispenser compartment is overfilled. It makes bleach or softer dispensed
rapidly. Always measure bleach or softener to prevent overfilling.
• Close the dispenser drawer gently.
Bleach or softener was added directly to the laundry in the drum.
• Always use the dispensers to ensure that laundry products are properly
dispensed at the right time in the cycle.
Clothes were not properly sorted.
• Always wash dark colours separately from light colours and whites to
prevent discolouration.
• Never wash heavily soiled items with lightly soiled items.
36
Page 37

EN
Symptoms Possible Cause & Solution
Wrinkling Appliance is not unloaded promptly.
• Always remove items from the appliance as soon as the cycle is complete.
Appliance is overloaded.
• The appliance can be fully loaded, but the drum should not be tightly
packed with items. The door of the appliance should be closed easily.
Hot and cold water inlet hoses are reversed.
• Hot water rinse can set wrinkles in garments. Check the inlet hose
connections.
Musty or mildewy
odour in appliance
Inside of drum is not cleaned properly.
• Run the Tub Clean function regularly.
The drain hose is not properly installed, causing siphoning (water
flowing back inside of the appliance).
• When installing the drain hose, make sure that it does not get kinked or
blocked.
The detergent dispenser drawer is not cleaned regularly.
• Clean the detergent dispenser drawer, especially the top and the bottom of
the drawer’s opening.
Odours can occur if the drain hose is not properly installed, causing
siphoning (water flowing back inside of the appliance).
• When installing the drain hose, make sure that it does not get kinked or
blocked.
If the detergent dispenser drawer is not cleaned regularly, odours can
occur from mold or foreign substances.
• Clean the detergent dispenser drawer, especially the top and bottom of the
drawer’s opening.
37
Page 38

EN
Wi-Fi
Symptoms Possible Cause & Solution
Your home appliance
and smart phone is
not connected to the
Wi-Fi network.
The password for the Wi-Fi that you are trying to connect to is incorrect.
• Find the Wi-Fi network connected to your smartphone and remove it, then
register your appliance on LG SmartThinQ.
Mobile data for your smartphone is turned on.
• Turn off the Mobile data of your smartphone and register the appliance
using the Wi-Fi network.
The wireless network name (SSID) is set incorrectly.
• The wireless network name (SSID) should be a combination of English
letters and numbers. (Do not use special characters).
The router frequency is not 2.4 GHz.
• Only a 2.4 GHz router frequency is supported. Set the wireless router to
2.4 GHz and connect the appliance to the wireless router. To check the
router frequency, check with your internet service provider or the router
manufacturer.
The distance between the appliance and the router is too far.
• If the distance between the appliance and the router is too far, the signal
may be weak and the connection may not be configured correctly. Move
the location of the router so that it is closer to the appliance.
38
Page 39

OPERATING DATA
Product Fiche
Commission Delegated Regulation (EU) No 1061/2010
Supplier’s name or trade mark LG
Supplier’s model
Rated capacity kg 8
Energy efficiency class A+++
Awarded an “EU Ecolabel award” under
regulation [(EC) No 66/2010]
Weighted annual energy consumption (AEC)
kWh per year
*1
kWh/year 117
Energy consumption
The standard 60 ºC cotton programme at full
load
The standard 60 ºC cotton programme at partial
load
The standard 40 ºC cotton programme at partial
load
Weighted power consumption of the off-mode
and of the left-on mode
Weighted annual water consumption (AWC) in
litres per year
*2
kWh 0.57
kWh 0.48
kWh 0.45
W 0.45
litres/year 8800
Spin-drying efficiency class on a scale from G
(least efficient) to A (most efficient).
Maximum spin speed
Remaining moisture
*3
*3
The standard cotton programmes
*4
rpm 1360
% 44
Cotton+R, 60 °C / 40 °C
The programme time
The standard 60 ºC cotton programme at full
*5
load
The standard 60 ºC cotton programme at partial
*5
load
The standard 40 ºC cotton programme at partial
*5
load
min. 303
min. 251
min. 249
The duration of the left-on mode (TI) min. 10
Airborne acoustical noise emissions
Washing phase
Spinning phase
*6
*6
dB(A) 52
dB(A) 74
Free-Standing
F*WN*, F*ZN*
EN
No
A
39
Page 40

EN
*1: Based on 220 standard washing cycles for cotton programmes at 60 ºC and 40 ºC at full and partial
load, and the consumption of the low-power modes. Actual energy consumption will depend on how the
appliance is used.
*2: Based on 220 standard washing cycles for cotton programmes at 60 ºC and 40 ºC at full and partial
load. Actual water consumption will depend on how the appliance is used.
*3: Attained for the standard 60 ºC cotton programme at full load or the standard 40 ºC cotton programme
at partial load, whichever is the lower, and remaining moisture content attained for the standard 60 ºC
cotton programme at full load or the standard 40 ºC cotton programme at partial load, whichever is the
greater.
*4: To which the information in the label and in the fiche relates, that these programmes are suitable
to clean normally soiled cotton laundry and that they are the most efficient programmes in terms of
combined energy and water consumption.
*5: The standard cotton programme is Cotton+ R , T full load, Cotton+ R , T half load, and Cotton+
half load in accordance with Regulations (EU) No. 1061/2010 and EN 60456.
*6: Expressed in dB(A) re 1 pW and rounded to the nearest integer during the washing and spinning
phases for the standard 60 ºC cotton programme at full load.
40
Page 41

PŘÍRUČKA UŽIVATELE
AUTOMATICKÁ PRAČKA
Před začátkem instalace si pečlivě přečtěte tyto pokyny. To instalaci usnadní a
zajistí, že je výrobek správně a bezpečně nainstalován. Po provedení instalace
tyto pokyny ponechejte v blízkosti výrobku pro budoucí nahlédnutí.
F*WN*, F*ZN*
www.lg.com
Copyright © 2019 - 2020 LG Electronics Inc. Všechna práva vyhrazena
Page 42

OBSAH
Tato příručka může zahrnovat vyobrazení
nebo obsah, které se liší od vámi
zakoupeného typu.
Tato příručka podléhá revizím ze strany
výrobce.
DŮLEŽITÉ BEZPEČNOSTNÍ POKYNY .......................................... 3
PŘED POUŽITÍM SI PŘEČTĚTE VŠECHNY POKYNY ...................................3
VAROVÁNÍ ........................................................................................................3
PÉČE O ŽIVOTNÍ PROSTŘEDÍ .......................................................................8
Likvidace starého přístroje ................................................................................8
INSTALACE ....................................................................................9
Díly a specifikace ..............................................................................................9
Požadavky na místo instalace.........................................................................10
Rozbalení spotřebiče ......................................................................................12
Vyrovnání zařízení ..........................................................................................12
Připojení hadice přítoku vody ..........................................................................13
Instalace odtokové hadice...............................................................................14
OBSLUHA .....................................................................................15
Přehled návodu k obsluze ...............................................................................15
Příprava prádla................................................................................................15
Přidávání pracích prostředků a aviváží ...........................................................16
Ovládací panel ................................................................................................18
Tabulka programů ...........................................................................................19
Data o spotřebě...............................................................................................22
Možnosti a funkce ...........................................................................................23
INTELIGENTNÍ FUNKCE ..............................................................25
Používání aplikace LG SmartThinQ ................................................................25
Používání funkce Smart Diagnosis .................................................................28
ÚDRŽBA .......................................................................................29
Čištění po každém praní .................................................................................29
Čištění spotřebiče v pravidelných intervalech .................................................30
ODSTRAŇOVÁNÍ ZÁVAD ............................................................32
Před volání servisu..........................................................................................32
PROVOZNÍ ÚDAJE .......................................................................39
Produktový list .................................................................................................39
Page 43

CZ
DŮLEŽITÉ BEZPEČNOSTNÍ POKYNY
PŘED POUŽITÍM SI PŘEČTĚTE VŠECHNY POKYNY
Následující bezpečnostní pokyny jsou určeny pro předcházení
nepředvídaným nebezpečím, poškozením nebo nesprávné obsluze
zařízení.
Pokyny jsou rozděleny na ‚VAROVÁNÍ‘ a ‚UPOZORNĚNÍ‘, viz
podrobný popis níže.
Bezpečnostní hlášky
Tento symbol označuje události a obsluhu, které mohou mít
za následek vznik rizika. Podrobně si přečtěte text označený
tímto symbolem a postupujte podle pokynů, abyste předešli
vzniku rizika.
VAROVÁNÍ
Tento symbol označuje situace, kdy může mít nedodržení pokynů
za následek závažné zranění nebo usmrcení osob.
UPOZORNĚNÍ
Tento symbol označuje situace, kdy může mít nedodržení pokynů
za následek lehké zranění nebo poškození zařízení.
VAROVÁNÍ
VAROVÁNÍ
Abyste při používání tohoto výrobku snížili riziko vzniku
požáru, úmrtí, zasažení elektrickým proudem nebo zranění
či popálení osob, dodržujte základní bezpečnostní opatření,
včetně následujících:
3
Page 44

CZ
Technická bezpečnost
• Toto zařízení mohou děti starší 8 let a osoby se sníženými fyzickými,
senzorickými nebo mentálními schopnostmi nebo nedostatečnými
zkušenostmi a znalostmi používat pod přiměřeným dozorem nebo
pokud byly obeznámeny s pokyny pro bezpečné používání zařízení a
porozuměly možným nebezpečím. Dohlížejte na děti, aby si
s přístrojem nehrály. Děti nesmí bez dozoru provádět čištění a
uživatelskou údržbu.
• Děti mladší 3 let by se bez stálého dozoru neměly v blízkosti zařízení
pohybovat.
• Je-li napájecí kabel poškozen, musí být nahrazen výrobcem,
opravářem nebo podobně kvalifikovanými osobami, abyste předešli
ohrožení.
• Větrací otvory nesmí být blokovány kobercem.
• Tento spotřebič je určen pouze pro použití v domácnosti a ne pro
použití jako:
− Zaměstnanecké koutky v obchodech, kancelářích a ostatních
pracovištích;
− Farmy;
− Klienty v hotelích, motelích a ostatních zařízení podobného typu;− V
zařízeních typu nocleh se snídaní;
− Místa pro komunální využití v bytových domech nebo prádelnách
• Použijte novou hadici nebo sadu hadic dodávanou se zařízením.
Opětovné použití starých hadic může mít za následek únik vody a
následné poškození majetku.
• Tlak vody musí být mezi 100 a 1000 kPa.
• Maximální kapacita při některých cyklech pro suché prádlo, které se
má prát, je 8 kg.
Instalace
• Nikdy neuvádějte zařízení do provozu, pokud je poškozené, vadné,
částečně demontované nebo pokud chybí či jsou poškozené některé
součásti včetně poškozeného napájecího kabelu nebo zástrčky.
4
Page 45

CZ
• Toto zařízení by mělo být přepravováno dvěma nebo více osobami,
které jej bezpečně drží.
• Zařízení neinstalujte ve vlhkém a prašném prostředí. Zařízení
neinstalujte ani neskladujte v exteriéru nebo na jakémkoliv místě,
které může být vystaveno povětrnostním vlivům, např. přímému
slunečnímu světlu, větru, dešti nebo teplotám pod bodem mrazu.
• Utáhněte odtokovou hadici, abyste předešli jejímu uvolnění.
• Pokud je napájecí kabel poškozen nebo je otvor elektrické zásuvky
uvolněný, zástrčku nepoužívejte a obraťte se na autorizované
servisní středisko.
• Spotřebič nezapojujte do více zásuvek, napájecích desek nebo k
prodlužovacímu kabelu.
• Toto zařízení nesmí být instalováno za uzamykatelnými dveřmi,
posuvnými dveřmi nebo dveřmi se závěsy na opačné straně než je
umístěn spotřebič, aby nedocházelo k blokování úplného otevření
dvířek zařízení.
• Toto zařízení musí být uzemněno. V případě poruchy nebo selhání
snižuje uzemnění riziko zasažení elektrickým proudem tím, že
elektrickému proudu umožňuje projít cestou nejmenšího odporu.
• Tento spotřebič je vybaven síťovým kabelem se zemnícím vodičem a
ochranným kolíkem. Zástrčka musí být připojena do vhodné zásuvky,
která je nainstalována a uzemněna v souladu s veškerými místními
zákony a předpisy.
• Nesprávné připojení zemnícího vodiče může mít za následek riziko
zasažení elektrickým proudem. Pokud si nejste jisti, zda je zařízení
správně uzemněno, obraťte se na odborného elektrikáře nebo
servisního technika.
• Napájecí zástrčku dodávanou se zařízením neupravujte. Pokud
neodpovídá dostupné zásuvce, zajistěte provedení montáže vhodné
zásuvky odborným elektrikářem.
Obsluha
• Nepokoušejte se oddělit žádné panely nebo rozmontovat spotřebič.
• Nepoužívejte žádné ostré objekty na ovládací panel k obsluze
spotřebiče.
5
Page 46

CZ
• Neopravujte ani nevyměňujte žádné díly zařízení. Veškeré opravy a
servis musí provádět kvalifikovaní servisní pracovníci, není-li v této
příručce uživatele uvedeno jinak. Používejte pouze schválené tovární
díly.
• Nevkládejte do zařízení zvířata, např. domácí mazlíčky.
• V bezprostřední blízkosti pod zařízením a v jeho okolí neskladujte
hořlavé materiály, např. cupaninu, papír, hadry, chemikálie atd.
• Nenechávejte otevřená dvířka zařízení. Otevřená dvířka lákají děti,
aby se na nich houpaly nebo aby lezly do zařízení, což by mohlo mít
za následek poškození zařízení nebo zranění osob.
• Použijte novou hadici nebo sadu hadic dodávanou se zařízením.
Opětovné použití starých hadic může mít za následek únik vody a
následné poškození majetku.
• Do zařízení nevkládejte ani v něm neperte nebo nesušte textilie,
které byly čištěny, nasáknuty nebo potřísněny hořlavými nebo
výbušnými látkami (jako jsou vosky, odstraňovače vosků, oleje, barvy,
benzin, odmašťovací kapaliny, roztoky pro suché čištění, petrolej,
benzín, odstraňovače skvrn, terpentýn, rostlinný olej, kuchyňský olej,
aceton, alkohol atd.). Při nesprávném použití by mohlo dojít k požáru
nebo výbuchu.
• Nikdy nesahejte do zařízení, pokud je v provozu. Vyčkejte, dokud
nedojde k úplnému zastavení bubnu.
• V případě zaplavení odpojte elektrickou zástrčku a obraťte se na
informační středisko pro zákazníky společnosti LG Electronics.
• Když jsou dvířka plnicího otvoru otevřená, netlačte na ně shora
nadměrnou silou.
• Nedotýkejte se dvířek během programů využívajících vysokou
teplotu.
• V blízkosti zařízení nepoužívejte vznětlivé plyny a hořlavé látky
(benzen, benzín, ředidla, petrolej, alkohol atd.).
• Pokud dojde v zimním období ke zmrznutí odtokové hadice
nebo hadice přívodu vody, používejte pračku výhradně po jejím
rozmrazení.
• Všechny prací prostředky, aviváže a bělicí prostředky udržujte mimo
dosah dětí.
6
Page 47

CZ
• Nedotýkejte se zástrčky ani ovládacích prvků zařízení vlhkýma
rukama.
• Napájecí kabel nadměrně neohýbejte ani na něj nepokládejte těžké
předměty.
• Neperte v zařízení koberečky, rohožky, deky domácích mazlíčků
nebo boty ani žádné jiné věci kromě oblečení či prostěradel.
• Toto zařízení je určeno pouze pro použití v domácnosti a nesmí se
používat v mobilních prostředích.
• Pokud dojde k úniku plynu (izobutan, propan, zemní plyn atd.),
nedotýkejte se zařízení ani zástrčky a ihned místnost vyvětrejte.
Údržba
• Po úplném odstranění vlhkosti a prachu bezpečně zapojte elektrickou
zástrčku do zásuvky.
• Před čištěním zařízení odpojte od zdroje napájení. Nastavení
ovládacích prvků na hodnotu VYPNUTO nebo přechod do
pohotovostního režimu neodpojí zařízení od zdroje napájení.
• Při čištění nestříkejte vodu dovnitř ani na vnější povrch zařízení.
• Nikdy nevypojujte spotřebič tahem za síťový kabel. Vždy pevně
uchopte elektrickou zástrčku a vytáhněte ji přímo ze zásuvky.
Likvidace
• Před vyřazením starého přístroje jej odpojte od elektrické sítě. Abyste
zamezili nesprávnému použití přístroje, odřízněte přímo za přístrojem
síťový kabel.
• Veškeré obalové materiály (např. plastové pytle nebo polystyren)
odstraňte z dosahu dětí. Obalové materiály mohou způsobit udušení.
• Před likvidací zařízení nebo jeho vyhozením demontujte dvířka,
abyste zamezili nebezpečí uvíznutí dětí nebo malých zvířat uvnitř
pračky.
7
Page 48

CZ
PÉČE O ŽIVOTNÍ PROSTŘEDÍ
Likvidace starého přístroje
• Tento symbol přeškrtnutého koše značí, že odpad z elektrických a elektronických
výrobků (WEEE) je nutné likvidovat odděleně od linky komunálního odpadu.
• Staré elektrické výrobky mohou obsahovat nebezpečné látky, takže správná
likvidace starých přístrojů pomůže zabránit potenciálním negativním důsledkům
pro životní prostředí a lidské zdraví. Staré přístroje mohou obsahovat znovu
použitelné díly, které lze použít k opravě dalších výrobků a další cenné materiály,
které lze recyklovat a šetřit tak omezené zdroje.
• Přístroj můžete zanést buď do obchodu, kde jste ho zakoupili, nebo se obrátit
na místní správu komunálních odpadů, kde získáte podrobné informace o
autorizovaném sběrném místě WEEE. Pro poslední aktuální informace z vaší
země si prosím prostudujte web www.lg.com/global/recycling.
8
Page 49

CZ
INSTALACE
Díly a specifikace
POZNÁMKA
• Vzhled a technické údaje spotřebiče se mohou v rámci zvyšování kvality bez předchozího upozornění
změnit.
Pohled zepředu
a Ovládací panel
b Výsuvná zásuvka na prací prostředek
c Buben
d Dveře
e Spodní víko
f Filtr odtokového čerpadla
g Vypouštěcí zátka
h Polohovatelná nožka
Pohled zezadu
a Síťová zástrčka
b Transportní šrouby
c Odtoková hadice
Příslušenství
*Dodávané příslušenství se může lišit v závislosti na zakoupeném modelu.
a Hadice pro přívod studené vody*
b Montážní klíč
c Krytky pro zakrytí otvorů pro transportní šrouby*
d Obloukový držák pro upevnění odtokové hadice*
9
Page 50

CZ
Technické údaje
Model
Napájení 220–240 V, 50 Hz
Rozměry
(Šířka X Hloubka X Výška)
Hmotnost 63 kg
• Pro připojení k přívodu vody není potřeba žádná další ochrana před zpětným tokem.
F*WN*, F*ZN*
600 mm X 560 mm X 850 mm
Požadavky na místo
instalace
Před instalací spotřebiče zkontrolujte následující
informace a ujistěte se, zda je spotřebič instalován
na správném místě.
Místo instalace
• Usaďte spotřebič na rovné pevné podlaze.
(Povolený sklon podlahy pod celým zařízením
je 1°)
• Nikdy se nepokoušejte zarovnat veškerou
nerovnou podlahu pod spotřebičem podkládáním
dřevěnými špalíky, kartonem nebo podobnými
materiály.
• Nelze-li se vyhnout instalaci zařízení v blízkosti
plynového sporáku nebo běžných kamen, musí
být mezi pračku a zdroj tepla vložena izolační
deska (850 × 600 mm), jejíž povrch musí být na
straně u topného tělesa potažen hliníkovou fólií.
• Zajistěte, aby bylo zařízení po instalaci snadno
přístupné technikovi pro případ opravy.
• Při instalaci spotřebiče upravte dodaným
montážním klíčem výšku všech čtyř nožek, což
učiní spotřebič stabilním a nechte přibližně 5 mm
volného prostoru mezi horní deskou spotřebiče a
spodní hranou pracovní desky.
• Další volný prostor by měl mít 100 mm pro zeď a
20 mm pro zadní, levou a pravou stranu.
VAROVÁNÍ
• Toto zařízení je určeno pouze pro použití v
domácnosti a nesmí se používat v mobilních
prostředích.
20 mm
100 mm
5 mm
20 mm
POZNÁMKA
• Pokud je spotřebič instalován na vyvýšeném
místě, je nutné hobezpečně upevnit, aby se
zamezilo riziku jejího pádu.
10
Page 51

CZ
Dřevěné podlahy (dutinové
podlahy)
Při instalaci spotřebiče na dřevěné podlahy použijte
pryžové misky, abyste zabránili nadměrnému
vibracím a nevyváženosti spotřebiče.
• Abyste vibracím předešli, doporučujeme u
všechny nožek pračky použít pryžové misky
a s minimální tloušťkou 15 mm, které budou
přišroubovány nejméně ke dvěma podlahovým
nosníkům.
• Pokud je to možné, nainstalujte zařízení do
některého z rohů místnosti, kde je podlaha
stabilnější.
• Pro snížení vibrací nasaďte pryžové misky.
UPOZORNĚNÍ
• Toto zařízení je určeno pouze pro použití v
domácnosti a nesmí se používat v mobilních
prostředích.
• Pokud je spotřebič instalován na nerovné
podlaze (např. dřevěná podlaha), záruka
nepokrývá žádné škody a náklady vzniklé kvůli
instalaci na takové nerovné podlaze.
POZNÁMKA
• Pryžové misky (Díl č. 4620ER4002B) můžete
zakoupit v servisním středisku LG Electronics.
Teplota prostředí
• Neinstalujte zařízení v místnostech, kde
by mohla teplota klesnout pod bod mrazu.
Zmrzlé hadice mohou pod tlakem prasknout.
Spolehlivost elektronické řídicí jednotky může být
při teplotách pod bodem mrazu snížena.
• Pokud je dodávka zařízení realizována v zimním
období a teplota se pohybuje pod bodem mrazu,
umístěte spotřebič před uvedením do provozu na
několik hodin do místnosti s pokojovou teplotou.
Elektrické připojení
• Nepoužívejte prodlužovací přívod ani
rozbočovací zásuvku.
• Po ukončení provozu vždy odpojte zařízení od
elektrické sítě a vypněte přívod vody.
• Zařízení připojujte k uzemněné zásuvce
zapojené podle platných předpisů pro elektrickou
instalaci.
• Zařízení musí být umístěno tak, aby byla
zástrčka snadno přístupná.
• Zásuvka elektrické energie se musí nacházet
alespoň 1 m od jedné ze stran spotřebiče.
VAROVÁNÍ
• Opravy zařízení mohou provádět pouze
kvalifikované osoby. Pokud jsou opravy
prováděny nezkušenými osobami, může to
mít za následek zranění osob nebo závažnou
poruchu. Obraťte se na své servisní středisko.
• Zástrčka elektrického napájení musí být
připojena do vhodné zásuvky, která je odborně
nainstalována a uzemněna v souladu s
veškerými místními zákony a předpisy.
Větrání
• Ujistěte se, že proudění vzduchu okolo zařízení
nebude narušováno koberci, rohožkami atd.
11
Page 52

CZ
Rozbalení spotřebiče
Demontujte sestavy šroubů mírným
2
protáčením, zatímco je vytahujete ven.
Zvednutí zařízení z polystyrenové
podložky
*Tato funkce je dostupná u některých modelů.
Po odstranění krabice a dopravního materiálu
vyzvedněte spotřebič z pěnové základny.
• Ujistěte se, že podpěra bubnu a* vychází
společně se základnou a není zaseklá ke dnu
spotřebiče.
• Pokud je pro odstranění lepenkové spodní části
obalu nutné zařízení položit b, vždy chraňte
stranu zařízení a položte jej opatrně na bok.
Nepokládejte zařízení na přední nebo zadní
stranu.
*
Vyšroubování transportních
šroubů
Počínaje spodními dvěma přepravními šrouby
1
a, použijte klíč (je součástí dodávky), abyste
plně uvolnili všechny přechodové šrouby
otočením proti směru hodinových ručiček.
Nasaďte krytky otvorů.
3
• Vyhledejte kryty otvorů b přiložené v balíčku
s příslušenstvím nebo připevněné k zadní
části.
Vyrovnání zařízení
Kontrola polohy
Vyrovnání spotřebiče zabraňuje zbytečnému
hluku a vibracím. Po instalaci zkontrolujte, zda je
spotřebič dokonale vyrovnaný.
• Pokud se přístroj při šikmém zatlačení horní
desky spotřebiče kymácí, znovu nastavte nohy.
Nastavení a úprava polohy nohou
Při instalaci spotřebiče by měl být přístroj zarovnán
a dokonale vyrovnán.
• Pokud není spotřebič správně zarovnaný a
vyrovnaný, může dojít k jeho poškození nebo
nesprávnému fungování.
12
Page 53

CZ
Když je podlaha nerovnoměrná, otáčejte
1
nastavitelnými nohami.
• Nevkládejte pod nohy kusy dřeva atd.
• Zajistěte, aby všechny čtyři nohy byly stabilní
a spočívaly na podlaze.
Zkontrolujte, zda je spotřebič perfektně umístěn
2
pomocí vodováhy a.
POZNÁMKA
• Správné umístění a vyrovnání spotřebiče zajistí
dlouhodobý, správný a spolehlivý provoz.
• Spotřebič musí být ve vodorovné poloze a musí
být pevně usazen.
• Při zátěži nesmí docházet ke „kývání“ přes rohy.
• Zamezte namočení nožek spotřebiče. V
opačném případě může dojít k výskytu vibrací
nebo hluku.
Připojení hadice přítoku
vody
Poznámka k připojení
• Tlak vody se musí nacházet mezi hodnotami
100 a 1000 kPa (1,0 ‒ 10,0 kgf/cm²). Je-li tlak
vody větší než 1000 kPa, mělo by být
nainstalováno dekompresní zařízení.
• Přívodní hadici nepřipojujte příliš těsně ke všem
ventilům.
• Pravidelně kontrolujte stav hadice a v případě
nutnosti ji vyměňte.
Kontrola pryžového těsnění na
hadici přívodu vody
S hadicemi přívodu vody se dodávají dvě pryžová
těsnění a. Používají se k tomu, aby se zabránilo
vytékání vody. Ověřte, zda je připojení ke kohoutům
dostatečně těsné.
Upevňovací nohy zajistěte pojistnými maticemi
3
b otočením proti směru hodinových ručiček
dolů na spodní část spotřebiče.
Zkontrolujte, zda jsou všechny pojistné matice
4
ve spodní části spotřebiče řádně zajištěny.
13
Page 54

CZ
Připojení hadice k vodovodnímu
kohoutu
Připojení šroubovací hadice ke kohoutu se
závitem
Našroubujte přípojku hadice na přívodní kohout
vody.
Instalace odtokové hadice
Pro modely s odtokovým
čerpadlem
Odtoková hadice nesmí být připojená výše než 100
cm nad podlahou. Nemusel by pak být zajištěn
odtok vody ze zařízení nebo by mohla voda vytékat
pomalu.
• Správné upevnění odtokové hadice umožní
zamezit poškození podlahy z důvodu úniku vody.
POZNÁMKA
• Před připojením přítokové hadice k vodovodnímu
kohoutu pusťte vodu a vypláchněte cizí látky
(nečistoty, písek, piliny atd.) z vodovodního
potrubí. Napusťte vodu do nádoby a zkontrolujte
její teplotu.
Připojení hadice k zařízení
Na vodní přípojku našroubujte přívod vody na zadní
straně spotřebiče.
POZNÁMKA
• Pokud po připojení voda z hadice uniká, opakujte
stejné kroky. Pro přívod vody použijte standardní
typ kohoutu. Pokud je kohout hranatý nebo
příliš velký, odstraňte před instalací kohoutu na
adaptér vodicí desku.
• Zajistěte, aby hadice nebyla zalomená nebo
zachycena.
_DN
• Pokud je odtoková hadice příliš dlouhá, nesnažte
se ji zatlačit zpět do zařízení. Mohlo by to mít za
následek abnormální hluk.
• Při instalaci odtokové hadice do umyvadla
zajistěte její koncovku lankem.
14
Page 55

CZ
OBSLUHA
Přehled návodu k obsluze
Použití spotřebiče
Před prvním praním zvolte prací program Bavlna
a přidejte polovinu prášku. Spusťte spotřebič bez
toho, aby v pračce bylo prádlo. Tak lze z bubnu
odstranit usazeniny a vodu, které mohly v pračce
zůstat z výroby.
Roztřiďte prádlo a vložte ho do pračky.
1
• Roztřiďte prádlo, jak je potřeba, podle
typu textilie, míry znečištění, barvy a
velikosti. Otevřete dvířka a vložte prádlo do
spotřebiče.
Přidejte prací prostředek nebo aviváž.
2
• Přidejte odpovídající množství pracího
prostředku do výsuvného zásobníku na
prací prostředky. V případě potřeby přidejte
do příslušných částí zásobníku bělidlo nebo
aviváž.
Zapněte spotřebič.
3
• Stiskněte tlačítko Napájení a zapněte
spotřebič.
Zvolte požadovaný prací program.
4
• Stiskněte opakovaně tlačítko programu
nebo otáčejte voličem programů, dokud není
vybrán požadovaný program.
• Nyní zvolte teplotu praní a rychlost
odstřeďování. Věnujte pozornost štítkům
péče na vašem oblečení.
Spusťte program.
5
• Pro dočasné pozastavení programu stiskněte
tlačítko Start/Pauza. Spotřebič se zatřese
krátce bez vody, aby bylo možné zjistit
hmotnost náplně. Pokud nebude stisknuto
tlačítko Start/Pauza do 15 minut, dojde k
vypnutí pračky a všechna nastavení budou
vymazána.
Příprava prádla
Třiďte prádlo pro nejlepší výsledky praní a poté
připravte prádlo podle značek na štítcích péče.
Třídění oblečení
• Pro nejlepší výsledky praní třiďte oblečení podle
štítku s údaji o typu tkaniny a teplotě praní.
Nastavte rychlost odstřeďování a vyperte prádlo.
• Úroveň znečištění (Silné, Normální Lehké):
Oddělte oděv podle úrovně znečištění. Pokud
je to možné, neperte silně znečištěné kousky
s lehce znečištěnými.
• Barva (Bílá, Světla, Tmavá): Perte tmavé nebo
obarvené oblečení odděleně od bílých nebo
světlých barev. Míchání barveného oblečení se
světlým oblečením může mít za následek přenos
barvy nebo změnu barvy světlejšího oblečení.
• Cupanina (Zdroje cupaniny, Sběrače cupaniny):
Perte tkaniny produkující cupaninu odděleně od
tkanin, které sbírají cupaninu. Zdroje cupaniny
mohou způsobit žmolkování a chlupatění na
sběračích cupaniny.
Kontrola štítků s informacemi o
péči o tkaninu
Symboly na štítcích oblečení
Tyto symboly obsahují informace o složení textilu a
doporučeném způsobu praní nebo čištění.
Symbol Druh praní/tkaniny
• Normální praní
• Bavlna, smíšené tkaniny
• Easy Care (Syntetika)
• Syntetika, smíšené tkaniny
• Speciální jemné praní
• Delicates (Jemné prádlo)
• Pouze ruční praní
• Vlna, hedvábí
• Neperte
Konec programu.
6
• Po dokončení programu zazní melodie.
Abyste snížili míru pomačkání, ihned
vyjměte prádlo ze spotřebiče. Po vyjmutí
prádla zkontrolujte, zda nedošlo k zachycení
drobných předmětů v těsnění dvířek.
POZNÁMKA
• U pomlček pod symbolem jsou uvedeny
informace o typu tkaniny a maximální povolené
mechanické zátěži.
15
Page 56

CZ
Kontrola oblečení před naložením
do pračky
• V dávce na praní kombinujte velké a malé
kousky. Nejdříve naložte velké kousky. Velké
kousky by neměly být větší než polovina celkové
dávky na praní.
• Neperte samostatně malé kousky. Přidejte 1 - 2
podobné kousky do dávky na praní a zabraňte
tak nevyvážené zátěži.
• Zkontrolujte všechny kapsy, zda jsou skutečně
prázdné. Předměty jako hřebíky, vlasové sponky,
zápalky, pera, mince nebo klíče mohou váš
spotřebič i prádlo poškodit.
• Perte jemné prádlo (punčochy, podprsenky s
kosticemi) v prací síťce.
• Zapněte zipy, háčky a šňůrky, aby nedošlo k
jejich zatrhnutí s ostatním prádlem.
• Nečistoty a skvrny předběžně očistěte
nasycením nečistot a skvrn rozpuštěným pracím
prostředkem a kartáčováním je odstraňte.
• Zkontrolujte záhyby na pružné manžetě (šedá) a
odstraňte všechny malé části.
UPOZORNĚNÍ
• Zkontrolujte, zda mezi prádlem a těsněním
neuvízlo prádlo, jinak by se prádlo během praní
mohlo poškodit.
• Odstraňte předměty z pružné manžety, abyste
předešli poškození prádla nebo těsnění dveří.
Přidávání pracích
prostředků a aviváží
Dávkování pracího prostředku
• Prací prostředek je nutné používat podle pokynů
jeho výrobce a musí být zvolen podle typu, barvy,
znečištění nebo druhu tkaniny a teploty praní.
• Snižte množství pracího prostředku, pokud se
tvoří příliš mnoho pěny.
• Příliš velké množství pracího prostředku
vede k nadměrnému pěnění, a to způsobuje
nedostatečné praní.
• Při používání tekutého pracího prostředku
postupujte podle pokynů výrobce pracího
prostředku.
• Pokud chcete prací program spustit okamžitě,
můžete tekutý prací prostředek nalít přímo do
hlavního oddílu výsuvného zásobníku.
• Nepoužívejte tekutý prací prostředek, pokud
používáte funkci Odložený start, nebo pokud
jste zvolili funkci Předpírka, jelikož kapalina
může ztuhnout.
• Dávkování pracího prostředku může být nutné
přizpůsobit podle teploty vody, tvrdosti vody,
objemu a míry znečištění náplně. Pro dosažení
nejlepších výsledků zamezte nadměrnému pěnění.
• Před volbou pracího prostředku a teploty vody si
přečtěte údaje na štítku oděvu.
• Použijte pouze vhodné čistící prostředky pro
určité typy oblečení:
− Kapalný prací prostředek je často určen pro
speciální použití, např. pro barevnou látku,
vlnu, jemné nebo tmavé prádlo.
− Práškový prací prostředek je vhodný pro
všechny typy tkanin.
− Pro lepší výsledky praní bílých a světlých
oděvů použijte práškový prací prostředek s
bělícím prostředkem.
− Prací prostředek je šířen ze zásobníku na
začátku pracího cyklu.
16
Page 57

CZ
POZNÁMKA
• Nenechejte prací prostředek ztvrdnout. To
by mohlo mít za následek ucpání pračky,
nedostatečné máchání nebo zápach.
• Maximální množství prádla: podle doporučení
výrobce.
• Částečné množství prádla: ¾ obvyklého
množství
• Minimální množství prádla: ½ maximálního
množství prádla
Přidávání pracího prostředku
• Pouze prací prostředek pro hlavní praní a ~ J
• Prací prostředek pro předpírku b a hlavní praní
a ~ d # J
POZNÁMKA
• Použijte příslušné množství pracího prostředku.
Příliš mnoho pracího prostředku, bělidla nebo
aviváže může mít za následek přeplnění.
• Při výběru funkce Předpírka rozdělte dávkování
na ⅓ na předpírku a ⅔ na hlavní praní.
Přidávání tablety pracího prostředku
Při praní prádla je rovněž k dispozici tableta
s pracím prostředkem.
Otevřete dvířka a vložte tablety pracího
1
prostředku do bubnu.
Do bubnu vložte prádlo a zavřete dvířka.
2
POZNÁMKA
• Nepokládejte tablety do zásobníku.
Přidávání aviváže
• Přidejte aviváž až k lince maximální náplně.
• Zásobník pracího prostředku opatrně zavřete.
• Neponechávejte aviváž v zásobníku na prací
prostředky déle než 2 dny. Mohlo by dojít k jejímu
ztuhnutí.
• Aviváž se automaticky přidává do praní v
posledním cyklu máchání.
• Neotvírejte výsuvný zásobník při napouštění
vody.
• Nelze používat rozpouštědla (benzen apod.)
POZNÁMKA
• Vlití nadbytečného avivážního prostředku nad
linku maximálního plnění může způsobit, že
dojde k jeho předčasnému rozšíření, což může
poškodit oděv.
• Nelijte aviváž na prádlo přímo na prádlo, jelikož
to může způsobit vznik skvrn na vašem oblečení.
Přidávání změkčovače vody
Změkčovač vody, jako je odvápňovač, může být
použit ke snížení množství používaného pracího
prostředku v oblastech s vysokou tvrdostí vody.
• Nejprve přidejte prací prostředek a potom
změkčovač vody. Dávkujte podle množství
uvedeného na obalu.
17
Page 58

CZ
Ovládací panel
Funkce na ovládacím panelu
a Tlačítko Napájení
• Stiskněte tlačítko Napájení a zapněte nebo vypněte spotřebič.
b Volič programů
• Programy jsou k dispozici podle typu prádla.
• Zvolený program signalizuje příslušná kontrolka.
c Tlačítko Start/Pauza
• Stiskněte tlačítko Start/Pauza a spusťte nebo zastavte prací cyklus.
• Stiskněte tlačítko Start/Pauza a dočasně zastavte prací cyklus.
d Možnosti a funkce
• K přizpůsobení programů můžete použít další možnosti a funkce.
• Chcete-li použít další funkce, stiskněte a přidržte odpovídající tlačítko po dobu 3 sekund. Na displeji
se rozsvítí odpovídající symbol.
• Chcete-li použít funkci Dálkový start, podívejte se na CHYTRÉ FUNKCE (SMART FUNCTIONS).
• To vám umožní vybrat doplňující program, který se při aktivaci rozsvítí.
− f : Tato ikonka se rozsvítí, když je spotřebič připojen k domácí síti Wi-Fi.
e Displej
• Na displeji je zobrazeno nastavení, odhadovaný zbývající čas, volby a stavová hlášení. Po zapnutí
spotřebiče se na displeji rozsvítí výchozí nastavení.
− 18:88: Když je vybrán program, zobrazí se výchozí doba zvoleného programu. Výchozí čas lze
změnit podle vybrané možnosti.
− Praní (k ): Tato ikona se rozsvítí při praní prádla.
− Máchání (l ): Po vymáchání prádla po ukončení pracího programu se tato ikona rozsvítí.
− Odstřeďování (p ): Tato ikona se rozsvítí, když je prádlo odstřeďováno, aby z něj byla odstraněna
voda.
− H : Když se rozsvítí tato ikona, dveře nelze otevřít.
f AI DD
• AI DD M Poskytuje inteligentní praní a odstřeďování.
• M se aktivuje, když jsou zvoleny a spuštěny tyto programy Bavlna, Smíšené prádlo a Syntetika.
18
Page 59

CZ
Tabulka programů
Prací program
Program Bavlna Maximální zátěž Kapacita
Popis Dosahuje lepšího výkonu kombinací různých pohybů bubnu.
Použijte pro stálobarevné kousky prádla (košile, noční košile, pyžama atd.) a
běžně znečištěné bavlněné prádlo (spodní prádlo).
Správná teplota 40 °C (studená až 95 °C)
Maximální rychlost odstřeďování 1 400 rpm
Program Bavlna+ Maximální zátěž Kapacita
Popis Zajišťuje optimalizovaný prací účinek pro větší množství prádla s nižší spotřebou
Správná teplota 60 °C (studená až 60 °C)
Maximální rychlost odstřeďování 1 400 rpm
Program Smíšené prádlo Maximální zátěž 3 kg
Popis Umožňuje současné praní různých druhů tkanin.
Správná teplota 40 °C (studená až 60 °C)
Maximální rychlost odstřeďování 1 400 rpm
energie.
Použijte pro stálobarevné kousky prádla (košile, noční košile, pyžama atd.) a
běžně znečištěné bavlněné prádlo (spodní prádlo).
Použijte pro různé druhy tkanin kromě speciálních oděvů (hedvábí/jemné prádlo,
sportovní oděvy, tmavé oděvy, vlna, pokrývky/závěsy).
Program Syntetika Maximální zátěž 3 kg
Popis Vhodné pro košile určené k běžnému nošení, které není nutné po vyprání žehlit.
Použijte pro Polyamid, akryl, polyester.
Správná teplota 40 °C (studená až 60 °C)
Maximální rychlost odstřeďování 1 400 rpm
19
Page 60

CZ
Program Tiché praní Maximální zátěž 4,5 kg
Popis Toto praní je méně hlučné, nedochází při něm k hlučným vibracím. Díky využití
Správná teplota 40 °C (studená až 60 °C)
Maximální rychlost odstřeďování 1000 rpm
Program Pro alergiky Maximální zátěž 3,0 kg
Popis Napomáhá odstraňovat alergeny, jako jsou např. prachoví roztoči, pyl nebo srst.
Správná teplota 60 °C
Maximální rychlost odstřeďování 1 400 rpm
Program Dětská parní péče Maximální zátěž 4,5 kg
Popis Poskytuje péči o oblečení pomocí jemného pohybu a lepšího výkonu pomocí
Správná teplota 60 °C
Maximální rychlost odstřeďování 1000 rpm
Program Jemné prádlo Maximální zátěž 2 kg
Popis Vhodné pro jemné oblečení, jako jsou například spodní prádlo, halenky atd.
Správná teplota 20 °C (studená až 40 °C)
Maximální rychlost odstřeďování 800 rpm
nočního proudu šetří peníze.
Použijte pro stálobarevné oděvy (košile, noční košile, pyžama atd.) a lehce
znečištěné bavlněné prádlo (spodní prádlo).
páry.
Program Ruční praní/Vlna Maximální zátěž
Popis Pro ručně pratelné prádlo a prádlo, které lze prát v pračce, jako je např. pratelná
vlna, spodní prádlo, šaty atd. (Použijte čisticí prostředek pro vlnu pratelnou
v pračce). Používejte pro vlnu, hedvábí, prádlo pratelné v ruce, jemné a snadno
poškoditelné prádlo.
Správná teplota 30 °C (studená až 40 °C)
Maximální rychlost odstřeďování 800 rpm
Program Sportovní oblečení Maximální zátěž
Popis Vhodné pro speciální kousky jako například sportovní a outdoorové oblečení.
Použijte pro značky Coolmax, gore-tex, fleece a sympatex
Správná teplota 40 °C (studená až 40 °C)
Maximální rychlost odstřeďování 800 rpm
20
1,5 kg
2 kg
Page 61

CZ
Program Rychlý 30 Maximální zátěž 2 kg
Popis Umožňuje vyprat malé množství prádla a lehce znečištěné oděvy.
Správná teplota 20 °C (studená až 40 °C)
Maximální rychlost odstřeďování 1 400 rpm
Program Pokrývky Maximální zátěž 1 kus prádla
Popis U velkých předmětů, jako jsou například pokrývky postelí, polštáře, přehozy na
Správná teplota studená (studená až 40 °C)
Maximální rychlost odstřeďování 1000 rpm
Program Čištění bubnu
Popis Toto je speciální funkce pro čištění vnitřku spotřebiče.
Program Načíst program Maximální zátěž 1 kus prádla
Popis Program Načíst program vám umožňuje stáhnout nové a speciální prací
Správná teplota Maximální rychlost odstřeďování 1 400 rpm
pohovky, atd. Použijte pro bavlněné ložní prádlo s výjimkou speciálních oděvů
(jemné oblečení, vlna, hedvábí apod.) S náplní: přikrývky, polštáře, pokrývky,
potahy na pohovku s lehkým plněním.
programy pomocí smartphonu do vaší pračky. Výchozí program je nastaven na
Máchání + Odstředění.
POZNÁMKA
• Zvolte správnou teplotu praní a rychlost odstředění pro požadované programy.
• Při praní dávejte vždy pozor na štítky pro péči o prádlo na vašem oblečení.
• Skutečná maximální rychlost odstředění se může lišit v závislosti na modelu, programu a podmínkách
zatížení.
21
Page 62

Doplňkové volby
Program Předpírka Odložený start Přidat prádlo Máchání+ Intenzivní
Bavlna
Bavlna+
Smíšené prádlo
Syntetika
Tiché praní
Pro alergiky
Jemné prádlo
Ruční praní/Vlna
Sportovní oblečení
Dětská parní péče
Rychlý 30
Pokrývky
Čištění bubnu
Načíst program
* Tato možnost se automaticky vloží do programu a nemůže být zrušena.
# # # # #
# # # #
# # # # #
# # # # #
# # # #
# # # #
# # # #
# # # #
# # # #
# # # #
#
# # # #
# # # #
# # #
CZ
Data o spotřebě
Hlavní prací programy
F*WN*, F*ZN*
Program
Bavlna+
R*
* Standardní program pro bavlnu je Bavlna+ R, T plná náplň, Bavlna+ R, T poloviční náplň a
Bavlna+ S poloviční náplň v
Temp.
(Teplota)
(°C)
T
T
S
Zátěž (kg)
8 5:03 40 0,57 44
4
4 4:09 30 0,45 44
souladu s Nařízeními (EU) No. 1061/2010 a EN 60456.
Trvání
(h:mm)
4:11 30 0,48 44
Voda (L)
Energie
(kWh)
POZNÁMKA
• Výsledky zkoušek závisí na tlaku vody, tvrdosti vody, teplotě přívodu vody, teplotě místnosti, druhu a
množství prádla, druhu a množství použitého čisticího prostředku a kolísání hlavního přívodu elektřiny a
vybraných doplňkových možnostech.
• Doporučujeme neutrální prací prostředek.
• Aktuální teplota praní se může lišit od teploty pracích programů uvedených v tabulce.
22
Reziduální
vlhkost
(%)
Page 63

CZ
Možnosti a funkce
K přizpůsobení programů můžete použít další
možnosti a funkce.
Máchání l
Můžete si zvolit četnost této funkce stisknutím
tlačítka Máchání+. Tato možnost je doporučena
pro osoby s alergiemi na prací prostředky.
Máchání+ G
Použijte tuto funkci pro jednorázové přidání
máchání.
Předpírka
Použijte tuto funkci pro praní silně znečištěného
prádla.
Stiskněte tlačítko Napájení.
1
Zvolte prací program.
2
Stiskněte tlačítko Předpírka.
3
Stiskněte tlačítko Start/Pauza.
4
Zvolte prací program.
2
Stiskněte tlačítko Odložený start a nastavte
3
požadovaný čas.
Stiskněte tlačítko Start/Pauza.
4
POZNÁMKA
• Čas odloženého konce praní představuje dobu
do dokončení programu, ne do jeho spuštění.
Aktuální doba provozu se může lišit podle
teploty vody, prádla a dalších faktorů.
• Pro zrušení funkce by mělo být stisknuto tlačítko
Napájení.
• Pro tuto funkci se vyhněte tekutému pracímu
prostředku.
Wi-Fi f
Když je připojeno Wi-Fi, ikonka Wi-Fi se rozsvítí
na ovládacím panelu.
Přidat prádlo
Tuto volbu použijte pro přidání nebo vyjmutí prádla
po spuštění pracího programu.
Stiskněte tlačítko Přidat prádlo při rozsvícení
1
kontrolky LED.
Intenzivní
Použijte tuto funkci pro praní normálně a silně
znečištěného prádla.
Stiskněte tlačítko Napájení.
1
Zvolte prací program.
2
Stiskněte tlačítko Intenzivní na 3 sekundy.
3
Stiskněte tlačítko Start/Pauza.
4
Odložený start
Tuto funkci použijte k automatickému spuštění
a zastavení spotřebiče po určitém časovém
intervalu.
Stiskněte tlačítko Napájení.
1
Otevřete dvířka, jakmile se sama odemknou.
2
Přidejte nebo odeberte prádlo.
3
Zavřete dvířka a stiskněte tlačítko
4
Start/Pauza.
POZNÁMKA
• Z bezpečnostních důvodů zůstanou dvířka
zavřená, pokud je hladina vody, nebo teplota
uvnitř bubnu příliš vysoká. Tou dobou není
možné přidat prádlo.
23
Page 64

CZ
Teplota
Tuto volbu můžete použít, abyste zvolili kombinaci
teploty pro praní a máchání u vybraného
programu. Tiskněte toto tlačítko, dokud se
nerozsvítí požadované nastavení. Pro všechno
máchání se používá studená voda z vodovodu.
• Zvolte teplotu vody vhodnou pro druh prádla.
Pro dosažení nejlepších výsledků postupujte
podle symbolů na štítku pro péči o tkaniny.
Odstředění p
Tato volba slouží ke změně intenzity odstředění.
Mačkejte opakovaně tlačítko Odstředění a změňte
úroveň rychlosti.
Stiskněte tlačítko Napájení.
1
Zvolte prací program.
2
Pro volbu rychlosti otáček stiskněte tlačítko
3
Odstředění.
Stiskněte tlačítko Start/Pauza.
4
POZNÁMKA
• Když zvolíte tlačítko Ne, bude se přesto buben
určitou dobu rychle otáčet za účelem vypuštění
vody.
Zvuk q
Tato funkce funguje pouze v době, kdy je spotřebič
v provozu.
• Pro zapnutí/vypnutí této funkce současně
stiskněte a přidržte tlačítka Máchání+ a
Předpírka po dobu 3 sekund.
Dětská pojistka i
Tuto možnost použijte k vypnutí ovládacích prvků.
Tato funkce umožňuje zabránit dětem, aby měnily
cykly nebo ovládaly tento spotřebič.
POZNÁMKA
• Když je tato funkce nastavena, jsou
zablokována všechna tlačítka kromě tlačítka
NAPÁJENÍ.
• Když jsou ovladače uzamčeny, na displeji se
během praní střídavě zobrazují CL a zbývající
čas, příčemž je zapnuta dětská pojistka.
• Vypnutím napájení nedojde k deaktivaci této
funkce. Abyste měli přístup k dalším funkcím, je
nutné tuto funkci deaktivovat.
Uzamknutí ovládacího panelu
Zapněte napájení.
1
Stiskněte a podržte na 3 sekundy tlačítka
2
Odložený start a Přidat prádlo a aktivujte
tuto funkci.
• Zazní zvukový signál a na displeji se objeví
zkratka CL.
Odemknutí ovládacího panelu
Zapněte napájení.
1
Stiskněte a podržte na 3 sekundy tlačítka
2
Odložený start a Přidat prádlo a deaktivujte
tuto funkci.
POZNÁMKA
• Jakmile je nastavena tato funkce, nastavení je
uloženo do paměti dokonce poté, co je napájení
vypnuto.
• Pokud chcete akustický signál vypnout, opakujte
tento postup.
24
Page 65

CZ
INTELIGENTNÍ FUNKCE
Používání aplikace LG
SmartThinQ
Tato funkce je k dispozici pouze u modelu s logem
a nebo b.
Před použitím funkce LG
SmartThinQ
Zkontrolujte vzdálenost mezi spotřebičem a
1
WiFi routerem (WLAN síť).
• Pokud je vzdálenost mezi přístrojem a
bezdrátovým routerem příliš vysoká, síla
signálu bude slabá. Registrace nebo
instalace aplikace trvá dlouho.
Vypněte Mobilní data nebo Data telefonu ve
2
vašem chytrém telefonu.
Připojte smartphone k bezdrátovému routeru.
3
• Aplikace LG SmartThinQ není odpovědná
za žádné potíže se síťovým připojením ani
za případné poruchy, závady nebo chyby
způsobené síťovým připojením.
• Pokud má přístroj potíže s připojením k síti Wi-Fi,
může být příliš daleko od routeru. Sílu signálu
Wi-Fi zlepšíte zakoupením Wi-Fi extenderu
(prodlužovače dosahu).
• Wi-Fi nemusí být připojena nebo může být
připojení přerušeno kvůli prostředí domácí sítě.
• Síťové připojení nemusí fungovat správně
v závislosti na poskytovateli internetových
služeb.
• Okolní bezdrátové prostředí může zpomalit
služby bezdrátové sítě.
• Přístroj nemusí být zaregistrován v důsledku
problémů s přenosem bezdrátového signálu.
Odpojte přístroj ze sítě, počkejte asi minutu a
zkuste to znovu.
• Pokud je na vašem bezdrátovém routeru
povolena firewall brána, zakažte ji nebo přidejte
výjimku.
• Název bezdrátové sítě (SSID) musí být
kombinace anglických písmen a čísel
(nepoužívejte speciální znaky).
• Uživatelské rozhraní (UI) smartphonu se může
lišit v závislosti na operačním systému (OS) a
výrobci.
• Je-li bezpečnostní protokol routeru nastaven na
hodnotu WEP, nemusí se vám podařit nastavit
síť. Změňte ho na jiné bezpečnostní protokoly
(doporučujeme WPA2) a znovu výrobek
zaregistrujte.
POZNÁMKA
• Chcete-li ověřit připojení Wi-Fi, zkontrolujte,
zda je ikonka Wi-Fi f na ovládacím panelu
rozsvícená.
• Zařízení podporuje pouze WiFi sítě o frekvenci
2,4 GHz. Pokud si chcete ověřit frekvenci své
sítě, kontaktujte poskytovatele internetových
služeb nebo nahlédněte do návodu k vašemu
routeru.
Instalace aplikace LG SmartThinQ
Na chytrém telefonu přejděte do obchodu Google
Play Store & Apple App Store a vyhledejte aplikaci
LG SmartThinQ. Podle pokynů si aplikaci stáhněte
a nainstalujte.
Funkce Wi-Fi
Se spotřebičem komunikujte pomocí smart phonu a
použijte příslušné chytré funkce.
Prací program
(Dálkový start, Načíst program)
Nastavte nebo stáhněte některý z vybraných
programů a ovládejte ho na dálku.
25
Page 66

CZ
Čištění bubnu Coach (Kouč)
Tato funkce ukazuje, kolik cyklů zbývá před
spuštěním cyklu Čištění bubnu.
Sledování energie
Kontroluje spotřebu energie nedávno použitých
programů a průměr za měsíc.
Smart Diagnosis
Tato funkce poskytuje užitečné informace pro
zjištění a vyřešení potíží se spotřebičem na základě
vzorce jeho používání.
Nastavení
K dispozici jsou různá nastavení a funkce.
Upozornění na zprávy Push
Tato funkce je stavovým upozorněním, aby uživatel
mohl rozpoznat stav spotřebiče. Oznámení jsou
spuštěna, i když je aplikace LG SmartThinQ
vypnutá.
POZNÁMKA
• Pokud změníte bezdrátový router,
poskytovatele internetových služeb nebo
heslo, smažte registrovaný spotřebič z aplikace
LG SmartThinQ a znovu ji zaregistrujte.
• Aplikace podléhá změnám za účelem zlepšení
funkcí spotřebiče bez upozornění uživatele.
• Funkce se mohou lišit v závislosti na modelu.
Spusťte cyklus z aplikace LG SmartThinQ na
4
vašem chytrém telefonu.
POZNÁMKA
• Jakmile je funkce Dálkový start aktivována,
můžete spustit prací program z aplikace
LG SmartThinQ ve vašem smartphonu. Pokud
spotřebič nespustíte, bude čekat na spuštění
programu, dokud spotřebič pomocí aplikace
nevypnete nebo dokud nevypnete funkci Dálkový
start.
• Je-li tato funkce zapnuta, jsou dvířka automaticky
zamknuta.
Zablokování této funkce
Po aktivaci této funkce stiskněte a podržte tlačítko
Dálkový start na 3 sekundy a blokujte tuto funkci.
Tato funkce musí být vypnuta proto, aby bylo
možno spotřebič používat ručně.
Načíst program
Stáhněte si nový a speciální cyklus, který není
zahrnut v základních cyklech spotřebiče.
Spotřebiče, které byly úspěšně zaregistrovány,
mohou stahovat řadu speciálních cyklů specifických
pro dané zařízení.
Ve spotřebiči může být současně uložen pouze
jeden program.
Jakmile je v pračce funkce Načíst (stáhnout)
program dokončena, spotřebič uloží stažený
program, dokud jej nezměníte na jiný stažený
program.
Dálkové používání spotřebiče
Dálkový start
K ovládání zařízení můžete používat svůj chytrý
telefon. Můžete také sledovat průběh programu,
takže víte, kolik času zbývá do konce programu.
Pro použití této funkce
Stiskněte tlačítko Napájení.
1
Dejte prádlo do bubnu.
2
Stiskněte a podržte tlačítko Dálkový start po
3
dobu 3 sekund a povolte tuto funkci.
26
Technické parametry modulu pro
bezdrátovou síť LAN
Model LCW-004
Frekvenční
rozsah
Výstupní výkon
(max.)
Verze softwaru bezdrátové funkce: V 1.0
S ohledem na zákazníka by toto zařízení mělo být
instalováno a provozováno s minimální vzdáleností
20 cm mezi přístrojem a tělem.
2412 až 2472 MHz
IEEE 802.11b:17,82 dBm
IEEE 802.11g:17,72 dBm
IEEE 802.11n:16,61 dBm
Page 67

CZ
Prohlášení o shodě
Tímto společnost LG Electronics prohlašuje, že typ
radiového zařízení Pračka je v souladu se směrnicí
2014/53/EU. Úplné znění prohlášení o shodě EU je
k dispozici na této internetové adrese:
http://www.lg.com/global/support/cedoc/cedoc#
LG Electronics European Shared Service Centre
B.V
Krijgsman 1
1186 DM Amstelveen
Nizozemí
Spotřeba energie v pohotovostním
režimu
Smart Diagnosis s použitím
Smartphonu
Tato funkce je k dispozici pouze u modelu s logem
c nebo d.
Tuto funkci můžete použít v případě, že potřebujete
přesnou diagnostiku od informačního střediska pro
zákazníky společnosti LG Electronics při poruše
zařízení.
Tuto funkci nelze aktivovat, dokud není zařízení
připojeno k napájení. Pokud zařízení nelze zapnout,
je nutné provést odstraňování závad bez použití
této funkce.
Spotřeba energie v pohotovostním
režimu
Spotřeba energie v pohotovostním
režimu a s připojením na síť
Doba, po jejímž uplynutí přepne
funkce řízení spotřeby anebo
podobná funkce zařízení
automaticky do pohotovostního
režimu anebo režimu vypnutí
s podmínkou, že síť zůstane v
pohotovostním režimu.
0,5 W
2,0 W
20 min.
Informační upozornění k softwaru
s otevřeným zdrojovým kódem
Chcete-li získat zdrojový kód na základě licence
GPL, LGPL, MPL a dalších licencí k softwaru
s otevřeným zdrojovým kódem, který tento
výrobek obsahuje, navštivte webový server http://
opensource.lge.com.
Kromě zdrojového kódu si lze stáhnout všechny
zmiňované licenční podmínky, vyloučení záruky a
upozornění na autorská práva.
Společnost LG Electronics vám na CD-ROM
poskytne také zdrojový kód, který vám zašle oproti
e-mailu s žádostí za náklady na provedení takové
distribuce (například náklady na média, přepravu
a manipulaci) na adresu opensource@lge.com.
Tato nabídka platí po dobu tří let od poslední
dodávky tohoto produktu. Tato nabídka je platná pro
každého, kdo obdrží tyto informace.
27
Page 68

CZ
Používání funkce Smart
Max.
10 mm
Diagnosis
Funkce Smart Diagnosis
prostřednictvím informačního
střediska pro zákazníky
Tuto funkci můžete použít v případě, že při
poruše nebo havárii zařízení potřebujete přesnou
diagnostiku od informačního střediska pro
zákazníky společnosti LG Electronics. Tuto funkci
používejte, pouze pokud se chcete obrátit na
zástupce servisu, nikoli při běžném provozu.
Stiskněte tlačítko Napájení a zapněte
1
spotřebič.
• Nemačkejte žádná jiná tlačítka.
Pokud vám to poradí telefonické centrum,
2
umístěte náústek telefonu do blízkosti ikony
Smart Diagnosis.
Po uplynutí odpočtu a utichnutí tónů se vraťte
5
k hovoru s pracovníkem střediska podpory,
který vám následně na základě přenesených
informací pro analýzu bude mít možnost
pomoci.
POZNÁMKA
• Tato funkce závisí na kvalitě místního hovoru.
• Kvalita komunikace bude vyšší a vy získáte
kvalitnější služby, pokud použijete pevnou linku.
• Pokud bude kvalita přenosu dat slabá z důvodu
nízké kvality hovoru, nedostane se vám těch
nejlepších diagnostických služeb.
Stiskněte a podržte tlačítko Teplota na
3
3 vteřiny.
Přidržujte telefon na místě až do dokončení
4
přenosu tónu. Bude zobrazen zbývající čas
pro přenos dat.
• Pro dosažení nejlepších výsledků nehýbejte
s telefonem, dokud je přenos tónů aktivní.
• Pokud se pracovníkovi střediska podpory
nepodařilo získat přesný záznam dat,
můžete být požádáni o opakování postupu.
28
Page 69

CZ
ÚDRŽBA
VAROVÁNÍ
• Před čištěním odpojte spotřebič od elektrické sítě, abyste zamezili riziku zasažení elektrickým proudem.
Při nerespektování tohoto varování může dojít k závažnému poranění, požáru, zasažení elektrickým
proudem nebo smrtelnému poranění.
• Pro čištění spotřebiče nikdy nepoužívejte agresivní chemikálie, abrazivní čisticí prostředky nebo
rozpouštědla. Mohlo by dojít k poškození povrchové úpravy.
Čištění po každém praní
Péče po praní
• Po dokončení programu očistěte dvířka a vnitřní
část těsnění dvířek, abyste odstranili veškerou
vlhkost.
• Pro vysušení bubnu ponechte dvířka lehce
otevřená.
• Pro odstranění případné vlhkosti otřete spotřebič
suchým hadříkem.
VAROVÁNÍ
• Nechte dvířka otevřená, aby vyschnul vnitřek
bubnu, ale pouze pokud je to bezpečné a
všechny děti jsou pod dohledem.
Dveře
• Otřete je z vnější a vnitřní strany vlhkým
hadříkem, potom je měkkým hadříkem osušte.
VAROVÁNÍ
• Nepokoušejte se oddělovat žádné panely nebo
rozebírat zařízení. Nepoužívejte při ovládání
zařízení přes ovládací panel žádné ostré
předměty.
Čištění vnitřku pračky
• Okolí otvoru dvířek a sklo dvířek otírejte pomocí
utěrky nebo měkkého hadříku.
• Po dokončení programu vždy ihned vyjměte
prádlo z pračky. Je-li vlhké prádlo ponecháno v
pračce, může dojít k zmačkání, obarvení a tvorbě
zápachu.
Čištění vnějšího pláště pračky
Správná péče o vaše zařízení může prodloužit jeho
životnost.
Vnější povrch
• Okamžitě osušte veškerou vylitou kapalinu.
Setřete ji měkkým hadříkem.
• Otřete vlhkým hadříkem a pak opět suchým
hadříkem, který zajistí, že ve spojích nebo
štěrbinách skříně nebude vlhkost.
• Netlačte na povrch nebo na displej ostrými
předměty.
29
Page 70

CZ
Čištění spotřebiče
v pravidelných intervalech
Čištění bubnu
Tuto funkci použijte pro čištění vnitřku spotřebiče.
V tomto programu se používá vyšší hladina vody
při vyšší rychlosti odstřeďování. Spusťte tuto funkci
jednou měsíčně (nebo častěji v případě potřeby),
abyste odstranili nahromadění pracího prostředku a
další zbytky.
Ze spotřebiče vyjměte veškeré prádlo nebo
1
předměty a zavřete dvířka.
Otevřete výsuvnou zásuvku a přihrádku pro
2
hlavní praní naplňte práškem pro zamezení
tvorby vodního kamene.
• Vložte tablety do bubnu.
Pomalu zavřete výsuvnou zásuvku.
3
Zapněte přívod energie a poté zvolte možnost
4
Čištění bubnu.
• tcL se zobrazí na displeji.
Stiskněte tlačítko Start/Pauza a spusťte
5
program.
VAROVÁNÍ
• Ponechte dvířka otevřená, aby vnitřek spotřebiče
vyschnul, a to pouze tehdy, pokud jsou doma děti
pod dohledem.
Čištění filtru přívodu vody
Filtr přívodu vody sbírá vápno nebo veškeré malé
předměty, které mohou být vodou přenášeny do
spotřebiče. Pravidelně čistěte filtr přívodu vody.
POZNÁMKA
• Pokud bude spotřebič ponechán delší dobu bez
dozoru (např. během dovolené), uzavřete kohout
přívodu vody spotřebiče, zvláště pokud se v
její přímé blízkosti nenachází odtokový kanálek
(odtok).
• Pokud se do zásuvky na prací prostředek
nedostane voda, chybové hlášení 1E se zobrazí
na ovládacím panelu.
• Pokud je voda příliš tvrdá nebo obsahuje
částečky vápna, filtr na přívodu vody se může
zanést.
Zavřete vodovodní kohout a odšroubujte
1
přívodní hadici vody.
Jakmile je program dokončen, nechte dvířka
6
otevřená, aby mohl vyschnout otvor pračky,
těsnění a sklo dvířek.
30
Vyčistěte filtr pomocí zubního kartáčku se
2
středně tvrdými štětinami.
Page 71

CZ
Čištění filtru odtokového čerpadla
Filtr odtokového čerpadla zachycuje vlákna
a drobné předměty ponechané v prádle. Aby
byl zajištěn bezporuchový provoz spotřebiče,
pravidelně kontrolujte, zda je filtr čistý.
Před čištěním filtru odtokového čerpadla nechte
vodu vychladnout. Otevřete dvířka v případě nouze
nebo proveďte nouzovou evakuaci.
Vytáhněte spotřebič ze zásuvky.
1
Otevřete spodní víko a vytáhněte hadici.
2
Odšroubujte odtokovou zátku a, a poté
3
vypouštějte vodu. Pomalu odšroubujte filtr
odpadního čerpadla b a vypusťte vodu a
odstraňte malé částečky.
Čištění výsuvné zásuvky
Čisticí prostředek a aviváž se mohou usazovat
ve výsuvném zásobníku. Vyjměte zásobník a
jeho součásti a jednou nebo dvakrát měsíčně
zkontrolujte, zda v něm nejsou usazené mycí
prostředky nebo změkčovadla.
Vytáhněte výsuvnou zásuvku pracích
1
prostředků vytažením zásobníku nadoraz,
dokud zásobník nezastaví.
• Vyjměte výsuvnou zásuvku a současně
stiskněte uvolňovací tlačítko na vnitřní straně
zásuvky na prací prostředek.
Odstraňte usazeninu pracího prášku nebo
2
změkčovadla.
• Vypláchněte zásuvku a jeho součásti teplou
vodou, abyste odstranili usazeniny pracích
prostředků. výsuvnou zásuvku čistěte pouze
vodou. Součásti a zásuvku osušte měkkým
hadříkem nebo utěrkou.
Po vyčištění filtru odtokového čerpadla sejměte
4
filtr odtokového čerpadla a vložte odtokovou
zátku.
Zavřete spodní víko.
5
UPOZORNĚNÍ
• Při vypouštění postupujte opatrně, voda může
být horká.
• Jednou za měsíc (nebo v případě potřeby častěji)
spusťte program Čištění bubnu za účelem
odstranění přemíry pracích prostředků a dalších
nečistot.
Pro čištění ústí a otvoru zásuvky používejte
3
hadřík nebo malý nekovový kartáček.
• Z horní i spodní části otvoru odstraňte
veškeré zbytky pracích prostředků.
Vlhkost v místě otvoru zásuvky na prací
4
prostředek otřete měkkým hadříkem nebo
utěrkou.
Znovu smontujte díly zásuvky do správných
5
oddílů a vložte výsuvnou zásuvku.
31
Page 72

CZ
ODSTRAŇOVÁNÍ ZÁVAD
Před volání servisu
Provoz přístroje může vést k chybám a poruchám. Následující tabulky obsahují možné příčiny a poznámky
k řešení chybového hlášení nebo poruchy. Většinu problémů můžete napravit sami, a tím ušetřit čas a
peníze, protože nemusíte kontaktovat servisní středisko společnosti LG Electronics. Následující tabulka by
vám měla pomoci při odstraňování problémů.
Chybová hlášení
Spotřebič je vybaven systémem automatického monitorování chyb, který pomáhá rozpoznat a
diagnostikovat problémy v počátečním stadiu. Pokud není provoz vašeho spotřebiče bezproblémový nebo
pokud spotřebič vůbec nefunguje, zkontrolujte před voláním servisního střediska LG Electronics následující
tabulky:
Příznaky Možné příčiny & Řešení
1E
CHYBA PŘÍVODU
OE
CHYBA ODTOKU
UE
CHYBA
NEROVNOVÁHY
Přívod vody není v tomto místě dostatečný. Voda nevstupuje do
spotřebiče nebo vtéká pomalu.
• Zkuste v domě použít jiný kohout.
Vodovodní kohoutek není zcela otevřený. Voda nevtéká do spotřebiče
nebo vtéká pomalu.
• Otevřete naplno kohoutek.
Hadice přívodu vody je zalomená.
• Narovnejte hadici nebo přeinstalujte hadici přívodu vody
Filtr hadice přívodu vody je zanesený.
• Zkontrolujte a vyčistěte filtr hadice přívodu vody.
Pokud dojde k vytékání vody u hadice pro kontrolu přívodu vody, bude
kontrolka svítit červeně.
• Vyměňte hadici kontroly přívodu vody.
Odpadní hadice je ohnutá nebo zanesená. Není zajištěn odtok vody ze
spotřebiče nebo voda vytéká pomalu.
• Zkontrolujte a napřimte odtokovou hadici.
Odtokový filtr je zanesený.
• Zkontrolujte a vyčistěte odtokový filtr.
Spotřebič má systém, který detekuje a opravuje nerovnováhu
spotřebiče.
• Prádlo může být na konci programu příliš mokré, přeuspořádejte náplň
a umožněte správné odstřeďování. Zavřete dvířka a stiskněte tlačítko
Start/Pauza. Může trvat nějakou dobu, než spotřebič začne odstřeďovat.
Předtím, než může být dosaženo odstřeďování, musí být dvířka
uzamčena.
Náplň je příliš malá. Tento systém může přestat odstřeďovat nebo
dokonce přerušit cyklus odstřeďování, pokud jsou naloženy jednotlivé
těžké kousky (například rohož, župan atd.).
• Přidejte 1 - 2 podobné kousky nebo kousky k vylepšení vyváženosti prací
dávky. Zavřete dvířka a stiskněte tlačítko Start/Pauza. Může trvat nějakou
dobu, než spotřebič začne odstřeďovat. Předtím, než může být dosaženo
odstřeďování, musí být dvířka uzamčena.
32
Page 73

CZ
Příznaky Možné příčiny & Řešení
dE dE1 dEz dE4
CHYBA DVEŘÍ
tE
CHYBA OVLÁDÁNÍ
LE
CHYBA
ZABLOKOVANÝ
MOTOR
FE
CHYBA PŘETEČENÍ
PE
CHYBA SENZORU
TLAKU
vs
CHYBA SENZORU
VIBRACÍ
FF
ZAMRZNUTÍ
AE
ÚNIK VODY
PF
CHYBA NAPÁJENÍ
Závady senzoru dvířek.
• Zavolejte prosím servisní středisko LG Electronics. Na záruční kartě
najdete místní telefonní číslo střediska služby LG Electronics.
Toto je chyba ovládání.
• Vytáhněte elektrickou zástrčku a obraťte se na servisní středisko.
Přetížení v motoru
• Nechte přístroj čekat po dobu 30 minut, dokud není motor ochlazen, a poté
restartujte cyklus.
Došlo k přeplnění pračky vodou z důvodu vadného vodního ventilu.
• Zavřete vodovodní kohout.
• Vytáhněte síťovou zástrčku.
• Obraťte se na servisní středisko.
Chybné funkce čidla hladiny vody.
• Zavřete vodovodní kohout.
• Vytáhněte síťovou zástrčku.
• Obraťte se na servisní středisko.
Závady senzoru vibrací.
• Obraťte se na servisní středisko.
Jsou přívodní/odtoková hadice nebo odtokové čerpadlo zamrzlé?
• Přivádějte teplou vodu do bubnu, aby byla rozmrazena odpadní hadice a
odpadní čerpadlo. Přívodní hadici zakryjte mokrou a teplou utěrkou.
Vytéká voda.
• Obraťte se na servisní středisko.
Spotřebič zaznamenal selhání proudu.
• Restartujte cyklus.
Hluky, které byste mohli slyšet
Příznaky Možné příčiny & Řešení
Chřestivý a řinčivý
hluk
Bušivý hluk Těžké prádlo může produkovat bušivý hluk. To je obvykle normální.
V bubnu se mohou nacházet cizí kovové předměty jako klíče, mince
nebo spínací špendlíky apod.
• Zastavte spotřebič, zkontrolujte buben, zda v něm nejsou cizí předměty.
Pokud hluk pokračuje po restartu spotřebiče, zavolejte servis.
• Pokud hluk přetrvává, pravděpodobně je spotřebič nevyvážený. Zastavte jej
a prádlo uvnitř znovu rozprostřete.
Prádlo může být nevyvážené.
• Zastavte cyklus a poté, co se dveře odemknou, znovu rozprostřete prádlo.
33
Page 74

CZ
Příznaky Možné příčiny & Řešení
Hlučné vibrace Obalové materiály nejsou odstraněny.
• Odstraňte obalové materiály.
Prádlo bude možná nerovnoměrně rozprostřené v bubnu.
• Zastavte cyklus a poté, co se dveře odemknou, znovu rozprostřete prádlo.
Ne všechny polohovací nožky spočívají pevně a rovnoměrně na podlaze.
• Viz kapitola Nastavení polohy spotřebiče pro nastavení polohy
spotřebiče.
Podlaha není dost konzistentní.
• Zkontrolujte, zda je podlaha pevná a neprohýbá se. Pro výběr vhodného
místa viz kapitola Požadavky na místo instalace.
Obsluha
Příznaky Možné příčiny & Řešení
Prosakuje voda. Domovní odpadní potrubí je zanesené.
• Uvolněte odpadní potrubí. V případě nutnosti se obraťte na instalatéra.
Prosakování vody je způsobené nesprávnou instalací odtokové hadice
nebo zanesením odtokové hadice.
• Vyčistěte a narovnejte odtokovou hadici. Pravidelně kontrolujte a čistěte
odpadní filtr.
Spotřebič nefunguje. Ovládací panel se vypnul kvůli neaktivitě.
• Toto je normální. Stiskněte tlačítko Napájení a zapněte spotřebič.
Spotřebič je vypojen ze zásuvky.
• Zajistěte, aby byl kabel bezpečně zasunut do fungující zásuvky.
Přívod vody je vypnutý.
• Zavřete zcela kohout přívodu vody.
34
Page 75

CZ
Příznaky Možné příčiny & Řešení
Spotřebič nefunguje. Kontroly nejsou pořádně nastaveny.
• Ujistěte se, zda je správně nastaven prací program. Zavřete dvířka a
stiskněte tlačítko Start/Pauza.
Dvířka jsou otevřená.
• Zavřete dvířka a zajistěte, aby se pod dveřmi nezachytilo nic, čím by bylo
zabráněno úplnému zavření dveří.
Jistič/pojistka je vypnutá/spálená.
• Zkontrolujte jističe/pojistky. Vyměňte pojistky nebo resetujte jistič. Přístroj by
měl být napojen na samostatné proudové odbočce. Po obnovení napájení
pokračuje spotřebič v té fázi cyklu, ve které byl provoz přerušen.
Ovládání je třeba obnovit.
• Stiskněte tlačítko Napájení, poté znovu zvolte požadovaný program a
stiskněte tlačítko Start/Pauza.
Start/Pauza nebylo stisknuto poté, co byl nastaven cyklus.
• Stiskněte tlačítko Napájení, poté znovu zvolte požadovaný program a
stiskněte tlačítko Start/Pauza. Spotřebič je vypnut, pokud není tlačítko
Start/Pauza stisknuto po dobu 15 minut.
Extrémně nízký tlak vody.
• Zkontrolujte jiný kohout v domě, abyste se ujistili, zda tlak vody v
domácnosti bude přiměřený.
Zařízení zahřívá vodu nebo vyrábí páru.
• Buben může během určitých cyklů dočasně přestat pracovat, zatímco voda
je bezpečně ohřívána na nastavenou teplotu.
Tlačítka možná
nefungují správně.
Dvířka nelze otevřít. Dveře nelze otevřít z bezpečnostních důvodů po spuštění spotřebiče.
Spotřebič nelze
naplnit pořádně.
Dveře nelze otevřít z bezpečnostních důvodů po spuštění spotřebiče.
• Zkontrolujte, zda je rozsvícená ikona CL. Můžete bezpečně otevřít dvířka
poté, co zhasne ikona Door Lock.
• Zkontrolujte, zda je rozsvícená ikona H. Můžete bezpečně otevřít dvířka
poté, co zhasne ikona H .
Filtr je zanesený.
• Ujistěte se, zda nejsou přítokové filtry na plnících ventilech zanesené.
Přítokové hadice mohou být zprohýbané.
• Zkontrolujte, zda přívodní hadice nejsou zprohýbané nebo ucpané.
Nedostatečný přívod vody.
• Ujistěte se, zda jsou kohouty teplé i studené vody zapnuté po celou dobu.
Hadice pro přívod horké a studené vody jsou obráceny.
• Zkontrolujte připojení přívodní hadice.
35
Page 76

CZ
Příznaky Možné příčiny & Řešení
Spotřebič nevypouští
vodu.
Prací prostředek není
dávkován zcela nebo
není dávkován vůbec.
Doba pracího
programu je delší než
je obvyklé.
Zprohýbaná vypouštěcí hadice.
• Zajistěte, aby vypouštěcí hadice nebyla zprohýbaná.
Vypouštění umístěné výše než 1,2 m nad podlahou.
• Zajistěte, že odtoková hadice nebude položena výše než 1,2 m nad dnem
spotřebiče.
Je použito příliš mnoho pracího prostředku.
• Řiďte se pokyny výrobce pracího prostředku.
Náplň je příliš malá.
• Přidejte další položky, které zařízení umožní vyrovnat prádlo.
Těžké kousky se mísí s lehčími kousky.
• Vždy se snažte prát předměty s podobnou hmotností, abyste umožnili
spotřebiči rovnoměrně rozložit hmotnost prádla pro odstřeďování.
Náplň je nevyvážená.
• Pokud se kousky zapletly do sebe, prádlo znovu ručně rozprostřete.
Prodlužuje se délka
trvání
Zobrazuje se nerovnováha nebo je zapnutý program pro odstranění
pěny.
• To je normální stav. Zbývající čas zobrazený na displeji je pouze
odhadované trvání. Skutečný čas se může lišit.
Výkon
Příznaky Možné příčiny & Řešení
Špatné odstraňování
skvrn
Tvorba skvrn Bělidlo nebo aviváž je uvolňováno příliš brzy.
Dříve usazené skvrny.
• Předem vyprané kousky mohou mít skvrny, které jsou usazené. Tyto skvrny
mohou být obtížně odstranitelné a mohou vyžadovat ruční praní nebo
předběžné ošetření, které napomáhá odstranění skvrn.
• Zásobník na prací prostředky je přeplněný. To způsobuje rychlý výdej
bělidla nebo aviváže. Vždy odměřujte bělidlo nebo změkčovadlo, abyste
předešli přeplnění.
• Zásobník pracího prostředku opatrně zavřete.
Bělidlo nebo aviváž bylo přidáno přímo do prádla v bubnu.
• Vždy používejte zásobníky, abyste zajistili, že produkty na prádlo budou
správně dávkovány ve správný čas pracího programu.
Oblečení nebylo správně vytříděno.
• Vždy perte tmavé barvy odděleně od světlých barev a bílých odstínů, aby
nedocházelo k obarvení.
• Neperte nikdy silně znečištěné kousky s lehce znečistěnými.
36
Page 77

CZ
Příznaky Možné příčiny & Řešení
Mačkání Spotřebič není okamžitě vyprázdněn.
• Vždy odstraňte položky ze spotřebiče, jakmile skončí prací cyklus.
Spotřebič je přeplněný.
• Zařízení může být zcela naplněno, ale buben by neměl být napěchován
prádlem. Dvířka spotřebiče by měla být snadno uzavíratelná.
Hadice pro přívod horké a studené vody jsou umístěny obráceně.
• Máchání v horké vodě může v oděvech vytvářet pomačkaniny. Zkontrolujte
připojení přívodní hadice.
Zatuchlý nebo
plesnivý zápach
spotřebiče
Vnitřek bubnu není pořádně vyčištěn.
• Spouštějte pravidelně funkci Čištění bubnu.
Odpadní hadice není správně nainstalována a vznikne sifon (voda uvnitř
pračky proudí zpět).
• Při instalaci vypouštěcí hadice zajistěte, aby nedošlo k jejímu skřípnutí nebo
zablokování.
Zásobník pro dávkování pracích prostředků není pravidelně čištěn.
• Vyčistěte zásobník pro dávkování pracích prostředků, zejména vršek a
spodek otvoru zásobníku.
Zápachy se mohou objevit, pokud odpadní hadice není správně
nainstalována a vznikne sifon (voda uvnitř pračky proudí zpět).
• Při instalaci vypouštěcí hadice zajistěte, aby nedošlo k jejímu skřípnutí nebo
zablokování.
Pokud není zásobník pro dávkování pracích prostředků pravidelně
čištěn, může docházet ke vzniku zápachu v důsledku plísně nebo cizích
látek.
• Vyčistěte zásobník pro dávkování pracích prostředků, zejména vršek a
spodek otvoru zásobníku.
37
Page 78

CZ
Wi-Fi
Příznaky Možné příčiny & Řešení
Váš domácí spotřebič
a smartphone není
připojen k síti Wi-Fi.
Nesprávné heslo k síti Wi-Fi, ke které se pokoušíte připojit.
• Najděte síť Wi-Fi připojenou k vašemu smartphonu a odeberte ji, poté
zaregistrujte své zařízení na LG SmartThinQ.
Mobilní data vašeho smartphonu jsou zapnuta.
• Vypněte Mobilní data a zaregistrujte přístroj pomocí sítě Wi-Fi.
Název bezdrátové sítě (SSID) je nesprávně nastaven.
• Název bezdrátové sítě (SSID) musí být kombinace anglických písmen a
čísel (nepoužívejte speciální znaky).
Frekvence routeru není 2,4 GHz.
• Je podporována pouze frekvence routeru 2,4 GHz. Nastavte bezdrátový
router na 2,4 GHz a připojte přístroj k bezdrátovému routeru. Zkontrolujte
frekvenci routeru, ověřte ji u svého poskytovatele internetových služeb nebo
u výrobce routeru.
Přístroj a bezdrátový router jsou od sebe příliš daleko.
• Pokud jsou přístroj a bezdrátový router od sebe příliš daleko, signál může
být slabý a připojení nemusí být správně nastaveno. Přemístěte router tak,
aby byl blíže k přístroji.
38
Page 79

PROVOZNÍ ÚDAJE
Produktový list
Delegované nařízení Komise (EU) č. 1061/2010
Jméno ochranné známky dodavatele LG
Model dodavatele
Jmenovitý výkon kg 8
Třída energetické účinnosti A+++
Uděleno ocenění „EU Ecolabel award“ podle
nařízení [(EC) No 66/2010]
Vážená roční spotřeba energie (AEC) kWh za
*1
rok
kWh/rok 117
Energetická spotřeba
Standardní program na bavlnu na 60 ºC při plné
zátěži
Standardní program na bavlnu na 60 ºC při
částečné zátěži
Standardní program na bavlnu na 40 ºC při
částečné zátěži
kWh 0,57
kWh 0,48
kWh 0,45
Vážená spotřeba energie režimu off a left-on W 0,45
Vážená roční spotřeba vody (AWC) v litrech za
*2
rok
litrů/rok 8800
Třída účinnosti schnutí po odstředění
na stupnici od G (nejméně účinná) do A
(nejúčinnější).
Maximální rychlost odstřeďování
Zbytková vlhkost
*3
Standardní programy pro bavlnu
*3
*4
ot./min. 1360
% 44
Bavlna+R, , 60 °C / 40 °C
Doba programu
Standardní program na bavlnu na 60 ºC při plné
*5
zátěži
Standardní program na bavlnu na 60 ºC při
částečné zátěži
Standardní program na bavlnu na 40 ºC při
částečné zátěži
*5
*5
min. 303
min. 251
min. 249
Trvání režimu left-on (TI) min. 10
Akustické hlukové emise ze vzduchu
Fáze praní
*6
Fáze odstřeďování
*6
dB(A) 52
dB(A) 74
Volně stojící
F*WN*, F*ZN*
CZ
Ne
A
39
Page 80

CZ
*1: Na základě 220 standardních pracích cyklů pro bavlněné programy při 60 ºC a 40 ºC při plném a
částečném zatížení a spotřebě režimů s nízkým výkonem. Skutečná spotřeba energie závisí na tom, jak
je spotřebič používán.
*2: Na základě 220 standardních pracích cyklů pro bavlněné programy při 60 ºC a 40 ºC při plném a
částečném zatížení. Skutečná spotřeba vody závisí na tom, jak je spotřebič používán.
*3: Dosaženo pro standardní program pro bavlnu při teplotě 60 ºC při plném zatížení nebo standardní
program pro bavlnu o při teplotě 40 ºC při částečném zatížení, podle toho, co je nižší, a zbývající
obsah vlhkosti dosažené pro standardní program pro bavlnu při teplotě 60 ºC při plném zatížení nebo
standardní program pro bavlnu při teplotě 40 ºC a částečném zatížení, podle toho, co je větší.
*4: K tomuto se vztahují informace uvedené na štítku a v informačním listu, že tyto programy jsou vhodné
k čištění normálně znečištěného bavlněného prádla a že jsou nejúčinnějšími programy z hlediska
kombinované spotřeby energie a vody.
*5: Standardní program na bavlnu je Bavlna+ R , T plná náplň, Bavlna+ R , T poloviční náplň a
Bavlna+ poloviční náplň v souladu s Nařízeními (EU) No. 1061/2010 a EN 60456.
*6: Vyjádřeno v dB (A) re 1 pW a zaokrouhleno na nejbližší celé číslo během fáze praní a odstředění pro
standardní program pro bavlnu při 60 ºC při plném zatížení.
40
Page 81

NÁVOD NA POUŽÍVANIE
PRÁČKA
Pred inštaláciou si pozorne prečítajte tieto pokyny. Inštalácia tak bude
jednoduchšia a bude zaručené, že produkt je nainštalovaný správne a bezpečne.
Uschovajte si tieto pokyny v blízkosti produktu na budúce použitie.
SK SLOVENČINA
F*WN*, F*ZN*
www.lg.com
Copyright © 2019 - 2020 LG Electronics Inc. Všetky práva vyhradené
Page 82

OBSAH
Tento návod na používanie môže obsahovať
obrazový materiál a obsah, ktoré sa líšia od
modelu, ktorý ste si zakúpili.
Tento návod podlieha revízii vykonanej
výrobcom.
DÔLEŽITÉ BEZPEČNOSTNÉ POKYNY ........................................3
PRED POUŽITÍM SI PREČÍTAJTE VŠETKY POKYNY ....................................3
VAROVANIE ...................................................................................................... 3
OCHRANA ŽIVOTNÉHO PROSTREDIA ..........................................................8
Likvidácia starého spotrebiča ............................................................................8
INŠTALÁCIA ...................................................................................9
Časti a špecifikácie ...........................................................................................9
Požiadavky na miesto inštalácie .....................................................................10
Vybalenie spotrebiča .......................................................................................12
Uvedenie spotrebiča do vodorovnej polohy ....................................................12
Pripojenie prívodnej hadice .............................................................................13
Namontovanie odtokovej hadice .....................................................................14
PREVÁDZKA ................................................................................ 15
Prevádzka – prehľad .......................................................................................15
Príprava bielizne .............................................................................................15
Pridanie pracieho prostriedku a aviváže .........................................................16
ovládací panel .................................................................................................18
Tabuľka programov .........................................................................................19
Tabuľka spotreby .............................................................................................23
Ďalšie možnosti a funkcie ...............................................................................24
INTELIGENTNÉ FUNKCIE ........................................................... 26
Používanie aplikácie LG SmartThinQ .............................................................26
Používanie funkcie Smart Diagnosis...............................................................29
ÚDRŽBA .......................................................................................30
Čistenie po každom praní ...............................................................................30
Pravidelné čistenie spotrebiča ........................................................................31
RIEŠENIE PROBLÉMOV ..............................................................33
Skôr ako zavoláte servis .................................................................................33
PREVÁDZKOVÉ ÚDAJE ..............................................................40
Produktový štítok.............................................................................................40
Page 83

SK
DÔLEŽITÉ BEZPEČNOSTNÉ POKYNY
PRED POUŽITÍM SI PREČÍTAJTE VŠETKY POKYNY
Cieľom týchto bezpečnostných pravidiel je predchádzať
nepredvídaným rizikám a škodám spôsobeným nebezpečným
alebo nesprávnym používaním produktu.
Tieto pravidlá sú rozdelené do skupín „VAROVANIA" a
„UPOZORNENIA", ktoré sú podrobnejšie vysvetlené nižšie.
Bezpečnostné upozornenia
Tento symbol označuje situácie a činnosti, ktoré môžu
predstavovať riziko. Text označený týmto symbolom si
dôkladne prečítajte a postupuje podľa pokynov, aby ste týmto
rizikám predišli.
VAROVANIE
označuje situácie, v ktorých môže mať nedodržanie pokynov za
následok závažné zranenie alebo smrť.
UPOZORNENIE
označuje situácie, v ktorých môže nedodržanie pokynov spôsobiť
menej závažné zranenie alebo poškodenie výrobku.
VAROVANIE
VAROVANIE
Aby ste pri používaní tohto výrobku znížili riziko výbuchu,
vzniku požiaru, usmrtenia, zásahu elektrickým prúdom,
poranenia alebo obarenia osôb, dodržiavajte základné
bezpečnostné opatrenia vrátane opatrení, ktoré sa uvádzajú
nižšie:
3
Page 84

SK
Technická bezpečnosť
• Toto zariadenie smú používať deti vo veku aspoň 8 rokov a osoby
so zníženými fyzickými, zmyslovými alebo duševnými schopnosťami
či s nedostatkom skúseností a znalostí len pod dozorom alebo po
poučení o bezpečnom používaní spotrebiča a za predpokladu,
že prípadným rizikám porozumeli. Deťom nedovoľte hrať sa so
spotrebičom. Deti nesmú bez dozoru spotrebič čistiť ani vykonávať
jeho používateľskú údržbu.
• Deti mladšie ako 3 roky musia byť v dostatočnej vzdialenosti od
spotrebiča, ak nie sú pod neustálym dozorom.
• Ak dôjde k poškodeniu napájacieho kábla, musí ho vymeniť výrobca,
jeho servisný zástupca alebo podobne kvalifikovaná osoba, aby sa
zabránilo riziku.
• Vetracie otvory nesmie zakrývať koberec.
• Tento spotrebič je určený len na použitie v domácnosti a nie v rámci
nasledujúcich aplikácií:
− Kuchynské priestory pre personál v obchodoch, kanceláriách a
pracovných prostrediach;
− Domy na farme;
− Použitie klientmi v hoteloch, moteloch a iných prostrediach
obytného typu;
− Prostredia typu nocľah s raňajkami;
− Prostredia na verejné používanie v bytovkách alebo
samoobslužných práčovniach
• Použite novú hadicu alebo súpravu hadíc dodanú so spotrebičom.
Opätovné použitie starých hadíc môže spôsobiť únik vody a následné
majetkové škody.
• Tlak vody musí byť od 100 do 1000 kPa.
• Maximálna kapacita pri niektorých cykloch pre suchú bielizeň, ktorá
sa má prať, je 8 kg.
4
Page 85

SK
Inštalácia
• Nikdy sa nesnažte používať spotrebič, ak je poškodený, nefunguje
správne, je čiastočne rozobratý, alebo niektoré jeho časti chýbajú
alebo sú pokazené vrátane poškodeného kábla alebo zástrčky.
• Tento spotrebič by mali prepravovať aspoň dve osoby, ktoré ho budú
bezpečne držať.
• Spotrebič neinštalujte na vlhkom a prašnom mieste. Spotrebič
neinštalujte ani neskladujte vonku, ani na miestach podliehajúcim
vplyvom počasia ako je priame slnečné svetlo, vietor, dážď alebo
teploty pod bodom mrazu.
• Upevnite odtokovú hadicu, aby sa neuvoľnila.
• Ak je napájací kábel alebo zástrčka poškodená alebo otvory
v zásuvke sú uvoľnené, kábel nepoužívajte a kontaktujte
autorizované servisné stredisko.
• Spotrebič nezapájajte do viacerých zásuviek, napájacích dosiek
alebo predlžovacieho kábla.
• Spotrebič sa nesmie nainštalovať za uzamykateľnými dverami, posuvnými
dverami alebo dverami so závesmi, ktoré sa nachádzajú oproti dvierkam
spotrebiča, aby nebránili úplnému otvoreniu dvierok spotrebiča.
• Tento spotrebič sa musí uzemniť. V prípade poruchy alebo
poškodenia sa uzemnením zníži riziko úrazu elektrickým prúdom
zabezpečením odvodu elektrického prúdu dráhou s najnižším
odporom.
• Spotrebič je vybavený napájacím káblom s ochranným vodičom
a uzemňovacou zástrčkou. Zástrčka musí byť zapojená do
zodpovedajúcej elektrickej zásuvky, ktorá je správne nainštalovaná
a uzemnená v súlade so všetkými miestnymi predpismi
a nariadeniami.
• Nesprávne pripojenie ochranného vodiča môže mať za následok
riziko zásahu elektrickým prúdom. Ak máte pochybnosti o správnom
uzemnení spotrebiča, poraďte sa s kvalifikovaným elektrikárom alebo
servisným pracovníkom.
• Sieťovú zástrčku dodanú so spotrebičom nijako neupravujte. Ak sa
nedá zapojiť do zásuvky, zavolajte kvalifikovaného elektrikára, ktorý
nainštaluje správnu zásuvku.
5
Page 86

SK
Prevádzka
• Nepokúšajte sa oddeľovať žiadne panely alebo demontovať
spotrebič.
• Za účelom prevádzkovania spotrebiča nevystavujte ovládací panel
žiadnym ostrým objektom.
• Nevykonávajte opravu ani výmenu žiadneho dielu spotrebiča. Pokiaľ
sa v návode na použitie výslovne neodporúča inak, všetky opravy a
servis musia vykonávať kvalifikovaní servisní pracovníci. Používajte
iba výrobcom schválené náhradné diely.
• Do spotrebiča nevkladajte zvieratá, napríklad domácich miláčikov.
• V okolí spotrebiča a pod spotrebičom sa nesmú nachádzať horľavé
materiály, ako napríklad vlákna tkanín, papier, handry, chemikálie
a podobne.
• Dvierka spotrebiča nenechávajte otvorené. Deti by sa mohli vešať na
dvierka alebo vliezť dovnútra spotrebiča a zraniť sa alebo poškodiť
spotrebič.
• Použite novú hadicu alebo súpravu hadíc dodané so spotrebičom.
Opätovné použitie starých hadíc môže spôsobiť únik vody a následné
majetkové škody.
• Textílie, ktoré boli čistené, prané, namočené alebo sú znečistené
horľavými alebo výbušnými látkami (napríklad vosky, odstraňovače
voskov, olej, farba, benzín, odmasťovacie prostriedky, prostriedky
na suché čistenie, petrolej, odstraňovače škvŕn, terpentín, rastlinný
olej, kuchynský olej, acetón, alkohol atď.), nevkladajte do spotrebiča,
neperte ani nesušte v spotrebiči. Nesprávne používanie môže
spôsobiť požiar alebo výbuch.
• Do spotrebiča nikdy nesiahajte, keď je spustený. Počkajte, kým sa
bubon úplne zastaví.
• V prípade vytopenia odpojte napájací kábel a obráťte sa na
zákaznícke informačné centrum spoločnosti LG Electronics.
• Keď sú dvierka spotrebiča otvorené, netlačte na ne nadmernou silou.
• Nedotýkajte sa dvierok v priebehu programu s vysokou teplotou.
• V blízkosti spotrebiča nepoužívajte horľavé plyny ani zápalné látky
(benzén, benzín, riedidlo, naftu, alkohol atď.).
6
Page 87

SK
• Ak odtoková alebo prívodná hadica v zime zamrznú, používajte ich
až po rozmrazení.
• Všetky pracie prostriedky, aviváže a bielidlá uschovajte mimo dosahu
detí.
• Elektrickej zástrčky a ovládačov spotrebiča sa nedotýkajte mokrými
rukami.
• Napájací kábel nadmerne neohýbajte, ani naň neklaďte ťažké
predmety.
• Neperte v tejto práčke koberce, rohože, topánky, deky pre domáce
zvieratá ani žiadne iné predmety okrem oblečenia alebo posteľnej
bielizne.
• Tento spotrebič je určený len na domáce použitie. Nie je určený na
používanie v mobilných zariadeniach, napr. vozidlách.
• V prípade úniku plynu (izobutánu, propánu, zemného plynu a pod.)
sa spotrebiča ani zástrčky nedotýkajte a miestnosť okamžite
vyvetrajte.
Údržba
• Po úplnom odstránení všetkej vlhkosti a prachu elektrickú zástrčku
bezpečne zapojte do zásuvky.
• Pred čistením spotrebiča je potrebné, aby ste ho odpojili od
napájania. Nastavením ovládacích prvkov do polohy VYP. alebo
pohotovostného režimu sa spotrebič neodpojí od napájania.
• Počas čistenia spotrebiča nestriekajte vodu na jeho vnútorný ani
vonkajší povrch.
• Pri odpájaní spotrebiča od zásuvky nikdy neťahajte za napájací
kábel. Zástrčku vždy pevne uchopte a vytiahnite ju priamo
z elektrickej zásuvky.
Likvidácia
• Starý spotrebič pred jeho likvidáciou odpojte od elektrickej siete.
Odrežte kábel čo najbližšie k spotrebiču, aby sa zabránilo jeho
ďalšiemu použitiu.
7
Page 88

SK
• Zlikvidujte všetok obalový materiál (ako plastové vrecia a polystyrén)
mimo dosahu detí. Obalový materiál môže spôsobiť udusenie.
• Pred likvidáciou alebo vyhodením spotrebiča odmontujte dvierka, aby
vnútri neuviazli deti alebo malé zvieratá.
OCHRANA ŽIVOTNÉHO PROSTREDIA
Likvidácia starého spotrebiča
• Tento symbol prečiarknutého odpadkového koša na kolieskach znamená, že
odpad z elektrických a elektronických zariadení (WEEE) musí byť zneškodnený
oddelene od komunálneho odpadu.
• Staré elektrické výrobky môžu obsahovať nebezpečné latky, preto správne
zneškodnenie vášho starého spotrebiča pomôže zabrániť potenciálnym
negatívnym dopadom na životné prostredie a ľudské zdravie. Váš starý spotrebič
môže obsahovať diely, ktoré možno opätovne použiť na opravu iných produktov, a
iné cenné materiály, ktoré možno recyklovať s cieľom chrániť obmedzené zdroje.
• Svoj spotrebič môžete zaniesť do predajne, kde ste výrobok zakúpili, alebo
sa môžete obrátiť na oddelenie odpadov miestnej samosprávy a požiadať o
informácie o najbližšom zbernom mieste odpadu z elektrických a elektronických
zariadení (WEEE). Najnovšie informácie platné pre vašu krajinu nájdete na stránke
www.lg.com/global/recycling.
8
Page 89

SK
INŠTALÁCIA
Časti a špecifikácie
POZNÁMKA
• Vzhľad a technické údaje sa môžu bez predchádzajúceho upozornenia zmeniť z dôvodu zvýšenia kvality
spotrebiča.
Pohľad z prednej strany
a Ovládací panel
b zásuvka dávkovača pracieho prostriedku
c bubon
d dvierka
e kryt
f filter odtokového čerpadla
g zátka odtokovej hadičky čerpadla
h nastaviteľná nožička
Príslušenstvo
* Táto funkcia je dostupná len na niektorých modeloch.
Pohľad zozadu
a sieťová zástrčka
b prepravné skrutky
c odtoková hadica
a prívodná hadica studenej vody*
b kľúč
c kryty otvorov na prepravné skrutky*
d kolenový držiak na upevnenie odtokovej hadice*
9
Page 90

SK
Technické údaje
Model
Napájanie 220 – 240 V~, 50 Hz
Rozmery
(šírka x hĺbka x výška)
Hmotnosť produktu 63 kg
• Na pripojenie k prívodu vody nie je potrebná žiadna ďalšia ochrana proti spätnému prúdeniu.
F*WN*, F*ZN*
600 mm x 560 mm x 850 mm
Požiadavky na miesto
inštalácie
Pred inštaláciou spotrebiča si prečítajte nasledujúce
informácie, aby sa zabezpečilo, že spotrebič sa
nainštaluje na správne miesto.
Umiestnenie inštalácie
• Spotrebič nainštalujte na rovnú podlahu.
(Povolený sklon pod spotrebičom: 1°)
• Nikdy sa nepokúšajte vyrovnať nerovnú podlahu
podkladaním kúskov dreva, lepenky alebo
podobných materiálov pod spotrebič.
• Ak nie je možné vyhnúť sa umiestneniu
spotrebiča vedľa plynového sporáka alebo
kachieľ na uhlie, medzi oba spotrebiče musíte
vložiť izolačný panel (85 x 60 cm) pokrytý
hliníkovou fóliou na strane smerom k sporáku
alebo kachliam.
• Spotrebič nainštalujte na také miesto, aby
k nemu mal technik v prípade poruchy
jednoduchý prístup.
• Pri inštalovaní spotrebiča nastavte všetky štyri
nožičky pomocou dodaného kľúča na prepravné
skrutky, aby bol spotrebič stabilný, pričom
ponechajte približne 5 mm voľného priestoru
medzi vrchom spotrebiča a spodnou stranou
akejkoľvek pracovnej dosky nad spotrebičom.
• Dodatočný voľný priestor by mal byť 100 mm pre
stenu a 20 mm pre zadnú, pravú a ľavú stranu.
20 mm
VAROVANIE
• Tento spotrebič je určený len na domáce
použitie. Nie je určený na používanie v mobilných
zariadeniach, napr. vozidlách.
100 mm
20 mm
5 mm
POZNÁMKA
• Ak je spotrebič nainštalovaný na vyvýšenom
mieste, musí byť poriadne a bezpečne
pripevnený, aby nespadol.
10
Page 91

SK
Drevené podlahy (plávajúce
podlahy)
Pri inštalácii spotrebiča na drevené podlahy použite
gumené podložky na zabránenie nadmerným
vibráciám a nerovnováhe zariadenia.
• Odporúčame, aby ste na každú nožičku
spotrebiča a umiestnili aspoň 15 mm hrubé
gumené podložky a zaistili ich aspoň na dvoch
podlahových trámoch pomocou skrutiek, vďaka
čomu predídete vzniku vibrácií.
• Ak je to možné, nainštalujte spotrebič do jedného
z rohov miestnosti, kde je podlaha stabilnejšia.
• Pripevnite gumené podložky, aby sa znížili
vibrácie.
UPOZORNENIE
• Tento spotrebič je určený len na domáce
použitie. Nie je určený na používanie v mobilných
zariadeniach, napr. vozidlách.
• Ak sa spotrebič nainštaluje na nestabilnú
podlahu (napr. drevenú podlahu), záruka sa
nebude vzťahovať na žiadne spôsobené škody
a náklady v dôsledku inštalácie na nestabilnej
podlahe.
POZNÁMKA
• Gumené podložky si môžete zakúpiť (č. dielu
4620ER4002B) v servisnom stredisku LG
Electronics.
Okolitá teplota
• Spotrebič neinštalujte do miestností, v ktorých
môže teplota klesnúť pod bod mrazu. Zamrznuté
hadice môžu z dôvodu vysokého tlaku prasknúť.
Spoľahlivosť elektronickej ovládacej jednotky
môže byť pri teplotách pod bodom mrazu
znížená.
• Ak je spotrebič dodaný v zime a teploty sú
pod bodom mrazu, pred uvedením do prevádzky
ho umiestnite na niekoľko hodín na miesto
s izbovou teplotou.
Zapojenie do elektrickej siete
• Nepoužívajte predlžovací kábel ani rozdvojku.
• Po použití spotrebič vždy odpojte od elektrickej
siete a vypnite prívod vody.
• Spotrebič zapojte do uzemnenej sieťovej
zásuvky, ktorá spĺňa požiadavky platných
predpisov o elektrickom zapojení.
• Spotrebič musí byť umiestnený tak, aby bol
zabezpečený voľný prístup k zástrčke.
• Elektrická zásuvka musí byť od každej strany
spotrebiča vzdialená minimálne 1 meter.
VAROVANIE
• Opravu spotrebiča smie vykonávať len
kvalifikovaný personál. Opravy vykonávané
neskúsenými osobami môžu viesť k zraneniu
alebo závažnému poškodeniu spotrebiča.
Obráťte sa na svoje miestne servisné stredisko
spoločnosti LG Electronics.
• Zástrčka musí byť zapojená do zodpovedajúcej
elektrickej zásuvky, ktorá je nainštalovaná
a uzemnená v súlade so všetkými miestnymi
predpismi a nariadeniami.
Vetranie
• Prúdeniu vzduchu okolo spotrebiča nesmú brániť
koberce, predložky atď.
11
Page 92

SK
Vybalenie spotrebiča
Odstráňte súpravy skrutiek miernym kývaním
2
skrutiek, zatiaľ čo skrutky vyťahujete.
Vybratie spotrebiča z penového
podstavca
* Táto funkcia je dostupná len na niektorých
modeloch.
Po odstránení kartónu a prepravného materiálu
nadvihnite spotrebič z penovej základne.
• Uistite sa, že sa podpera a* oddelila spolu so
základňou a nie je prilepená k spodnej časti
spotrebiča.
• Ak musíte spotrebič položiť, aby ste odstránili
kartónový podstavec b, vždy chráňte boky
spotrebiča a opatrne ho položte na bok.
Spotrebič neklaďte na prednú ani zadnú stranu.
*
Odobratie súprav skrutiek
Počnúc spodnými prepravnými skrutkami a,
1
pomocou kľúča (súčasť balenia) úplne povoľte
všetky prepravné skrutky otočením proti smeru
hodinových ručičiek.
Pripevnite kryty otvorov.
3
• Nájdite uzávery otvorov b, ktoré sú
súčasťou balíka príslušenstva alebo sa
nachádzajú na zadnej časti spotrebiča.
Uvedenie spotrebiča do
vodorovnej polohy
Kontrola vyrovnania
Uvedením spotrebiča do vodorovnej polohy sa
zabráni zbytočnému hluku a vibráciám. Po inštalácii
skontrolujte, či je spotrebič v dokonale vodorovnej
polohe.
• Ak sa spotrebič kýva pri potlačení hornej
dosky spotrebiča v uhlopriečnom smere, znova
nastavte nožičky.
Nastavenie a vyrovnanie nožičiek
Pri inštalácii spotrebiča by mal byť spotrebič
zarovnaný a v dokonale vodorovnej polohe.
• Ak sa spotrebič nezarovná a neuvedie do
vodorovnej polohy správnym spôsobom, môže
sa poškodiť alebo nemusí fungovať správne.
12
Page 93

SK
Ak je podlaha nerovná otočte nastaviteľnú
1
nožičku tak, ako sa to vyžaduje.
• Pod nožičky neklaďte kusy dreva atď.
• Zabezpečte, aby boli všetky štyri nožičky
stabilné a dotýkali sa podlahy.
Použitím vodováhy skontrolujte, či je spotrebič
2
dokonale vyrovnaný a.
POZNÁMKA
• Správne umiestnenie a uvedenie spotrebiča
do vodorovnej polohy zaručí dlhodobé, plynulé
a spoľahlivé fungovanie.
• Spotrebič musí byť vo vodorovnej polohe a musí
pevne stáť na svojom mieste.
• Pri záťaži sa nesmie kolísať od jedného rohu k
druhému.
• Zabráňte navlhnutiu nožičiek spotrebiča.
V opačnom prípade môže dôjsť k vibráciám
alebo hluku.
Pripojenie prívodnej hadice
Poznámka k pripojeniu
• Tlak vody musí byť od 100 do 1000 kPa
(1,0 - 10,0 kgf/cm²). Ak je tlak vody viac ako
1000 kPa, musí sa nainštalovať dekompresné
zariadenie.
• Prívodnú hadicu neuťahujte ku všetkým ventilom
nadmieru.
• Stav hadice pravidelne kontrolujte a v prípade
potreby ju vymeňte.
Kontrola gumeného tesnenia na
prívodnej hadici
S prívodnými hadicami sa dodávajú dve gumené
tesnenia a. Slúžia na zabránenie úniku vody.
Skontrolujte, či je pripojenie k prívodom vody
dostatočne tesné.
Zaistite nastavovaciu nožičku pomocou poistnej
3
matice b otočením v protismere hodinových
ručičiek oproti spodku spotrebiča.
Skontrolujte, či sú uzamykacie matice na
4
spodku spotrebiča správne zaistené.
13
Page 94

SK
Pripojenie hadice k prívodu vody
Pripojenie hadice skrutkovacieho typu
k prívodu vody so závitom
Priskrutkujte pripojovací prvok hadice k prívodu
vody, ktorý má závit ¾”.
POZNÁMKA
• Pred pripojením prívodnej hadice k prívodu vody
pustite vodu, aby sa z vodovodného potrubia
vypláchli cudzie predmety (nečistoty, piesok,
piliny atď.). Nechajte vodu odtiecť do vedra a
skontrolujte teplotu vody.
Pripojenie hadice k spotrebiču
Vodné vedenie naskrutkujte na prívod vody na
zadnej strane spotrebiča.
Namontovanie odtokovej
hadice
Modely s odtokovým čerpadlom
Odtoková hadica by nemala byť namontovaná viac
ako 100 cm nad zemou. Voda by zo spotrebiča
nemusela odtekať alebo by odtekala pomaly.
• Správnym upevnením odtokovej hadice ochránite
podlahu pred poškodením spôsobeným únikom
vody.
_DN
• Ak je odtoková hadica príliš dlhá, nesnažte
sa ju zatlačiť do spotrebiča. Spôsobí to vznik
nadmerného hluku.
• Ak montujete odtokovú hadicu do umývadla,
pevne ju zaistite lankom.
POZNÁMKA
• Ak po dokončení pripojenia z hadice uniká voda,
postup zopakujte. Ako prívod vody používajte
najbežnejší typ kohútika prívodu. Ak má kohútik
prívodu štvorcový tvar alebo je príliš široký, pred
umiestnením do adaptéra vyberte redukciu.
• Uistite sa, že hadica nie je zalomená alebo
stlačená.
14
Page 95

SK
PREVÁDZKA
Prevádzka – prehľad
Používanie spotrebiča
Pred prvým praním vyberte prací program Bavlna
a pridajte polovičnú dávku pracieho prostriedku.
Spustite spotrebič bez bielizne. Týmto sa z bubna
odstránia možné usadeniny a voda, ktoré tam
mohli zostať počas výroby.
Roztrieďte bielizeň a vložte ju do práčky.
1
• Roztrieďte bielizeň podľa typu textílie, stupňa
znečistenia, farby a veľkosti náplne, pričom
vezmite do úvahy aj objem práčky. Otvorte
dvierka a bielizeň vložte do spotrebiča.
Pridajte prací prostriedok alebo zmäkčovací
2
prostriedok.
• Do zásuvky dávkovača pracieho prostriedku
pridajte správne množstvo pracieho
prostriedku. V prípade potreby pridajte do
príslušných priehradiek zásuvky bielidlo
alebo aviváž.
Spotrebič zapnite.
3
• Stlačte tlačidlo Napájanie na zapnutie
spotrebiča.
Vyberte požadovaný cyklus.
4
• Požadovaný cyklus vyberte opakovaným
stláčaním tlačidla cyklov alebo otáčaním
voliča cyklov.
• Teraz vyberte teplotu prania a rýchlosť
odstreďovania. Venujte pozornosť
informáciám o starostlivosti o textil
uvedeným na štítku vašej bielizne.
Spustite cyklus.
5
• Stlačením tlačidla Štart/Pauza sa cyklus
spustí. Krátkym premiešaním bielizne bez
vody spotrebič odváži hmotnosť náplne. Ak
do 15 minút nestlačíte tlačidlo Štart/Pauza
spotrebič sa vypne a všetky nastavenia sa
vymažú.
Koniec cyklu.
6
• Po dokončení cyklu zaznie melódia. Bielizeň
ihneď vyberte z práčky, aby sa veľmi
nepokrčila. Pri vyberaní náplne zo spotrebiča
skontrolujte, či sa v tesnení okolo dvierok
nezachytili malé kusy bielizne.
Príprava bielizne
Na dosiahnutie najlepších výsledkov pri praní
bielizeň roztrieďte a potom pripravte v súlade so
symbolmi na štítkoch bielizne.
Triedenie bielizne
• Na dosiahnutie čo najlepších výsledkov prania
roztrieďte bielizeň podľa štítka so spôsobom
starostlivosti, na ktorom sú uvedené typ textilu a
teplota prania. Nastavte rýchlosť odstreďovania
na ich vypratie.
• Stupeň znečistenia (vysoký, normálny, nízky):
Oddeľte bielizeň podľa stupňa znečistenia. Ak
je to možné, neperte značne znečistené veci s
mierne znečistenými vecami.
• Farba (biele, svetlé, tmavé): Perte osobitne
tmavú alebo farbenú bielizeň oddelene od bielej
alebo svetlej bielizne. Zmiešanie farbenej bielizne
so svetlou bielizňou môže viesť k zafarbeniu
alebo strate farieb svetlej bielizne
• Vyzrnená bavlna (látky uvoľňujúce vlákna,
látky zbierajúce vlákna): Perte osobitne látky
z vyzrnenej bavlny, ktoré uvoľňujú vlákna,
oddelene od látok z vyzrnenej bavlny, ktoré
zbierajú vlákna. Látky, ktoré uvoľňujú vlákna,
môžu spôsobiť nahromadenie vlákien v látkach,
ktoré zbierajú vlákna.
Kontrola štítkov s informáciami o
starostlivosti o textil
Symboly na štítkoch starostlivosti o odev
Tieto symboly poskytujú informácie o textilnom
zložení bielizne a pokyny na pranie.
Symbol Pranie/typ textílie
• Normálne pranie
• Bavlna, zmiešaná textília
• Easy Care (Syntetika)
• Syntetika, zmiešaná textília
• Špeciálne jemné pranie
• Delicates (Jemná bielizeň)
• Pranie iba ručne
• Vlna, hodváb
• Neprať
POZNÁMKA
• Pod symbolmi sú uvedené informácie o type
textílie a maximálne povolenej mechanickej záťaži.
15
Page 96

SK
Kontrola bielizne pred naložením
• V jednej dávke kombinujte veľké a malé veci.
Najprv vložte veľké veci. Veľké veci by nemali
tvoriť viac ako polovicu celkovej náplne.
• Neperte osobitne malé veci. Pridajte 1 - 2
podobné veci do dávky, aby sa zabránilo
nevyváženej dávke.
• Nezabudnite vyprázdniť všetky vrecká. Predmety
ako klince, vlasové sponky, zápalky, perá, mince
a kľúče môžu poškodiť spotrebič aj bielizeň.
• Jemnú bielizeň (pančuchy, podprsenky s
kosticami) perte v sieťke na pranie.
• Zapnite zipsy aj háčiky a zviažte šnúrky, aby sa
tieto kusy bielizne nezachytili o ostatné kusy.
• Vopred odstráňte znečistenie a škvrny
namočením bielizne s nečistotou a škvrnami
do rozpusteného pracieho prostriedku a jej
vykefovaním.
• Skontrolujte záhyby pružného tesnenia (sivé)
a vyberte z neho všetky malé predmety.
UPOZORNENIE
• Skontrolujte, či nedošlo k uviaznutiu bielizne
medzi dvierkami a tesnením, v opačnom prípade
sa bielizeň môže počas prania poškodiť.
16
• Vyberte oblečenie alebo iné predmety z pružného
tesnenia, aby ste zabránili poškodeniu oblečenia
a tesnenia dvierok.
Pridanie pracieho
prostriedku a aviváže
Dávkovanie pracieho prostriedku
• Prací prostriedok používajte podľa pokynov
výrobcu pracieho prostriedku a vyberte ho podľa
typu, farby, stupňa znečistenia textílie a teploty
vody pri praní.
• Zmenšite množstvo pracieho prostriedku, ak sa
vytvára príliš vedľa mydlín.
• Príliš veľké množstvo pracieho prostriedku
vedie k nadmernému peneniu a to spôsobuje
nedostatočné pranie.
• Keď používate tekutý prací prostriedok, dodržujte
pokyny výrobcu pracieho prostriedku.
• Ak spustíte cyklus ihneď, môžete naliať tekutý
prací prostriedok priamo do hlavnej zásuvky na
prací prostriedok.
• Tekutý prací prostriedok nepoužívajte, ak chcete
použiť funkciu Odložený start (Odložený štart)
alebo ak ste vybrali funkciu Předpírka
(Predpierka), pretože tekutina môže stuhnúť.
• Používanie pracieho prostriedku by sa malo
prispôsobiť teplote a tvrdosti vody, ako aj
veľkosti a stupňu znečistenia bielizne. Ak chcete
dosiahnuť najlepšie výsledky, zabráňte vzniku
nadmerného množstva mydlín.
• Pred výberom pracieho prostriedku a teploty
vody si pozrite štítky na oblečení.
• Používajte iba prací prostriedok vhodný pre
príslušný typ odevu:
− Tekutý prací prostriedok je často navrhnutý a
určený na špeciálne použitia, napr. na farebné
textílie, vlnu, jemnú alebo tmavú bielizeň.
− Práškový prací prostriedok je vhodný na
všetky typy textílií.
− Na dosiahnutie lepších výsledkov pri praní
bielej a svetlej bielizne používajte práškový
prací prostriedok s bielidlom.
− Prací prostriedok sa na začiatku cyklu prania
uvoľní zo zásuvky.
Page 97

SK
POZNÁMKA
• Nenechajte prací prostriedok stuhnúť. Môže
to spôsobiť upchatie, nedostatočný výsledok
pláchania alebo neželaný zápach.
• Plná náplň: podľa odporúčaní výrobcu.
• Čiastočná náplň: ¾ bežného množstva
• Minimálna náplň: ½ plnej náplne
Pridanie pracieho prostriedku
• Prací prostriedok iba pre hlavné pranie a ~ J
• Prací prostriedok pre predpierku b a hlavné
pranie a ~ d # J
POZNÁMKA
• Používajte správne množstvo pracieho
prostriedku. Príliš veľa pracieho prostriedku,
bielidla alebo aviváže môže spôsobiť pretečenie.
• Pri voľbe Předpírka (Predpierka), rozdeľte
dávkovanie na ⅓ pre predpierku a ⅔ pre hlavné
pranie.
Pridanie pracieho prostriedku
Pri praní bielizne je takisto dostupný prací
prostriedok vo forme tablety.
Otvorte dvierka a vložte tablety pracieho
1
prostriedku do bubna.
Vložte bielizeň do bubna a zatvorte dvierka.
2
POZNÁMKA
• Tablety nevkladajte do zásuvky.
Pridanie aviváže
• Pridajte aviváž po rysku maximálnej náplne.
• Jemne zatvorte dávkovaciu zásuvku.
• Aviváž nenechávajte v zásuvke na prací
prostriedok dlhšie ako 2 dni. Aviváž môže
stuhnúť.
• Aviváž sa použije automaticky v poslednom cykle
pláchania.
• Zásuvku neotvárajte, keď priteká voda do práčky.
• Nesmú sa používať rozpúšťadlá (napr. benzén
atď.).
POZNÁMKA
• Naliatie nadmerného množstva aviváže nad
rysku maximálnej náplne môže spôsobiť jej príliš
skoré uvoľnenie, čo môže spôsobiť vznik škvŕn
na bielizni.
• Nelejte aviváž priamo na bielizeň, pretože to
môže spôsobiť vznik škvŕn na bielizni.
Pridanie zmäkčovača vody
Zmäkčovač vody ako prostriedok proti tvorbe
vodného kameňa sa môže použiť na zníženie
použitého množstva pracieho prostriedku v
oblastiach s vysokou tvrdosťou vody.
• Najskôr pridajte prací prostriedok a potom
pridajte zmäkčovač vody. Dávkujte v súlade s
množstvom uvedeným na obale.
17
Page 98

SK
ovládací panel
Ovládací panel – funkcie
a Tlačidlo Napájanie
• Stlačte tlačidlo Napájanie na zapnutie alebo vypnutie spotrebiča.
b Volič programov
• Programy sú k dispozícii podľa typu bielizne.
• Pri zvolenom programe sa rozsvieti indikátor.
c Tlačidlo Štart/Pauza
• Stlačením tlačidla Štart/Pauza spustíte alebo pozastavíte cyklus prania.
• Stlačením tlačidla Štart/Pauza dočasne zastavíte cyklus prania.
d Ďalšie možnosti a funkcie
• Ďalšie možnosti a funkcie môžete použiť na prispôsobenie programov.
• Na použitie ďalších funkcií stlačte a držte stlačené príslušné tlačidlo po dobu 3 sekúnd. Na displeji sa
rozsvieti príslušný symbol.
• Na použitie funkcie Dálkový štart (Diaľkový štart), pozri časť INTELIGENTNÉ FUNKCIE.
• Tu môžete vybrať dodatočné programy a pri vybranej možnosti sa rozsvieti indikátor.
− f : Tento symbol sa rozsvieti, keď sa spotrebič pripojí k domácej sieti Wi-Fi.
e Displej
• Displej zobrazuje nastavenia, odhadovaný zostávajúci čas, možnosti a stavové hlásenia. Keď sa
spotrebič zapne, na displeji sa rozsvietia predvolené nastavenia.
− 18:88: Keď sa vyberie program, zobrazí sa predvolený čas vybratého programu. Predvolený čas je
možné zmeniť v súlade s vybratou možnosťou.
− k : Keď je bielizeň perie, rozsvieti sa tento symbol.
− l : Keď sa odstreďuje bielizeň po dokončení pracieho programu, rozsvieti sa tento symbol.
− p : Keď sa odstreďuje bielizeň za účelom odstránenia vody, rozsvieti sa tento symbol.
− H : Keď svieti tento symbol, dvierka nie je možné otvoriť.
f AI DD
• AI DD M poskytuje požadované pranie a odstreďovanie.
• M sa aktivuje, keď sú zvolené a spustené programy Bavlna, Smíšené prádlo (Zmiešaná bielizeň)
a Syntetika.
18
Page 99

SK
Tabuľka programov
Program prania
Program Bavlna Max. náplň podľa typu
Opis Poskytuje lepší výsledok prania kombináciou rôznych pohybov bubna.
Použite pre stálofarebné oblečenie (košele, nočné košele, pyžamá atď.) a náplň
s bežne znečistenou bavlnenou bielizňou (spodná bielizeň).
Správna teplota 40 °C (studená až 95 °C)
Max. rýchlosť odstreďovania 1400 ot./min.
Program Bavlna+ Max. náplň podľa typu
Opis Poskytuje optimálny výsledok prania pre veľké množstvo bielizne s nižšou
Správna teplota 60 °C (studená až 60 °C)
Max. rýchlosť odstreďovania 1400 ot./min.
spotrebou energie.
Použite pre stálofarebné oblečenie (košele, nočné košele, pyžamá atď.) a bežne
znečistenú bavlnenú bielizeň (spodná bielizeň).
Program Smíšené prádlo
(Zmiešaná bielizeň)
Opis Umožňuje pranie rôznych druhov textílií súčasne.
Použitie pre rôzne druhy textílií okrem špeciálnych kusov bielizne (hodváb/jemná
bielizeň, športové oblečenie, tmavé oblečenie, vlna, prikrývky/záclony).
Správna teplota 40 °C (studená až 60 °C)
Max. rýchlosť odstreďovania 1400 ot./min.
Program Syntetika Max. náplň 3 kg
Opis Vhodný na bežné tričká, ktoré po praní nepotrebujú žehlenie.
Použitie pre polyamid, akryl, polyester.
Správna teplota 40 °C (studená až 60 °C)
Max. rýchlosť odstreďovania 1400 ot./min.
Max. náplň 3 kg
19
Page 100

SK
Program Tiché prání (Tiché pranie) Max. náplň 4,5 kg
Opis Produkuje menej hluku a vibrácií a šetrí peniaze využívaním nočného
Správna teplota 40 °C (studená až 60 °C)
Max. rýchlosť odstreďovania 1000 ot./min.
Program Pro alergiky (Pre alergikov) Max. náplň 3,0 kg
Opis Pomáha odstrániť alergény, ako napríklad roztoče, peľ a srsť.
Správna teplota 60 °C
Max. rýchlosť odstreďovania 1400 ot./min.
elektrického prúdu.
Použitie pre stálofarebnú bielizeň (košele, nočné košele, pyžamá atď.) a mierne
znečistenú bielu bavlnenú bielizeň (spodná bielizeň).
Program Dětská parní péče
(Detská parná starostlivosť)
Opis Poskytuje starostlivosť o bielizeň pomocou jemného pohybu a lepšieho účinku
pôsobením pary.
Správna teplota 60 °C
Max. rýchlosť odstreďovania 1000 ot./min.
Program Jemné prádlo (Jemná bielizeň) Max. náplň 2 kg
Opis Vhodný pre jemné oblečenie, ako spodná bielizeň, blúzky atď.
Správna teplota 20 °C (studená až 40 °C)
Max. rýchlosť odstreďovania 800 ot./min.
Program Ruční praní/Vlna
(Ručné pranie/Vlna)
Opis Pre ručne a v práčke prateľné jemné oblečenie, ako prateľná vlna, dámske
spodná bielizeň, šaty, atď. (Použite prací prostriedok pre v práčke prateľné
vlnené oblečenia). Použitie pre vlnu, hodváb, ručne prateľné oblečenie, jemnú
bielizeň, ktorá sa môže ľahko poškodiť.
Správna teplota 30 °C (studená až 40 °C)
Max. rýchlosť odstreďovania 800 ot./min.
Program Sportovní oblečení
(Športové oblečenie)
Opis Vhodné pre špeciálne kusy bielizne ako športové a outdoorové odevy.
Použitie pre Coolmax, gore-tex, flísový materiál a sympatex.
Správna teplota 40 °C (studená až 40 °C)
Max. rýchlosť odstreďovania 800 ot./min.
Max. náplň 4,5 kg
Max. náplň
Max. náplň
1,5 kg
2 kg
20
 Loading...