

Page 1
OWNER’S MANUAL
WASHING
ENGLISH
BAHASA INDONESIA
MACHINE
Before beginning installation, read these instructions carefully.
This will simplify installation and ensure that the product is installed
correctly and safely. Leave these instructions near the product after
installation for future reference.
F2721STWV
Registration No. : I.14.LG1.00402.0316
MFL69283945
Rev.06_052019
www.lg.com
Copyright © 2016-2019 LG Electronics Inc. All Rights Reserved
Page 2

TABLE OF CONTENTS
SAFETY INSTRUCTIONS ......................................03
Important Safety Instructions ............................................................... 05
INSTALLATION .......................................................08
Parts ....................................................................................................08
Accessories .........................................................................................08
Specifications ......................................................................................09
Installation Place Requirements .......................................................... 10
Unpacking and Removing Transit Bolts...............................................11
Using Anti-Slip Sheets (Optional) ........................................................12
Wooden Floors (Suspended Floors) .................................................... 12
Leveling the Washing Machine ............................................................13
Connecting Inlet Hose .........................................................................13
Installation of Drain Hose ....................................................................16
This manual is produced for a group of products
and may contain images or content different from
the model you purchased.
This manual is subject to revision by the
manufacturer.
OPERATION ...........................................................17
Using the Washing Machine ................................................................17
Sorting Iaundry ....................................................................................18
Adding Cleaning Products ................................................................... 19
Control Panel ....................................................................................... 21
Program Table .....................................................................................22
Option Cycle ........................................................................................ 25
SMART FUNCTIONS ..............................................29
Using LG SmartThinQ Application. ......................................................29
Using Smart Diagnosis™ ....................................................................30
MAINTENANCE ......................................................31
Cleaning your Washing Machine .........................................................31
Cleaning the Water Inlet Filter .............................................................31
Cleaning the Drain Pump Filter ...........................................................32
Cleaning the Dispenser ....................................................................... 33
Tub Clean ............................................................................................33
Caution on Freezing During Winter ..................................................... 34
TROUBLESHOOTING ............................................36
Diagnosing Problems ..........................................................................36
Error Messages ...................................................................................39
WARRANTY ............................................................41
Page 3
SAFETY INSTRUCTIONS
The following safety guidelines are intended to prevent unforeseen risks or
damage from unsafe or incorrect operation of the product.
The guidelines are separated into ‘WARNING’ and ‘CAUTION’ as described
below.
This symbol is displayed to indicate matters and operations that can
cause risk. Read the part with this symbol carefully and follow the
instructions in order to avoid risk.
ENGLISH
WARNING
can cause serious injury or death.
CAUTION
can cause the minor injury or damage the product.
- This indicates that the failure to follow the instructions
- This indicates that the failure to follow the instructions
WARNING
To reduce the risk of re, electric shock, or injury to persons when using
your product, basic safety precautions should be followed, including the
following.
CHILDREN IN THE HOUSEHOLD
This appliance is not intended for use by persons (including children) with reduced
physical, sensory or mental capabilities, or lack of experience and knowledge, unless
they have been given supervision or instruction concerning use of the appliance by a
person responsible for their safety. Children should be supervised to ensure that they do
not play with the appliance.
For use in Europe:
This appliance can be used by children aged from 8 years and above and persons with
reduced physical, sensory or mental capabilities or lack of experience and knowledge if
they have been given supervision or instruction concerning use of the appliance in a safe
way and understand the hazards involved. Children shall not play with the appliance.
Cleaning and user maintenance shall not be made by children without supervision.
Children of less than 3 years should be kept away unless continuously supervised.
03
Page 4

GROUNDING REQUIREMENTS
WARNING
For your safety, the information in this manual must be followed to
minimize the risk of re, explosion, or electric shock, or to prevent
property damage, injury to persons, or death.
•This appliance must be grounded. In the event of malfunction or breakdown, grounding
will reduce the risk of electric shock by providing a path of least resistance for electric
current.
•This appliance is equipped with a cord having an equipment-grounding conductor and
grounding plug. The plug must be plugged into an appropriate outlet that is properly
installed and grounded in accordance with all local codes and ordinances.
•Improper connection of the equipment-grounding conductor can result in risk of electric
shock. Check with a qualied electrician or service person if you are in doubt as to
whether the appliance is properly grounded.
•Do not modify the plug provided with the appliance. If it does not t the outlet, have a
proper outlet installed by a qualied electrician.
04
Page 5

Important Safety Instructions
WARNING
To reduce the risk of re, electric shock, or injury to persons when using
your product, basic safety precautions should be followed, including the
following.
ENGLISH
Installation
•Never attempt to operate this appliance
if it is damaged, malfunctioning, partially
disassembled, or has missing or broken
parts, including a damaged cord or plug.
It can cause electric shock or injury.
•This appliance is heavy. Two or more
people may be needed to install and
move the appliance. Failure to do so
can result in injury.
•Store and install this appliance where
it will not be exposed to temperatures
below freezing or exposed to outdoor
weather conditions. Failure to do so can
result in leakage.
•Tighten the drain hose to avoid
separation. Splashing of water may
cause electric shock.
Operation
•Do not use a sharp object like drill or pin
to press or separate an operation unit. It
can cause the electric shock or injury.
•Only an authorized repair person from
LG Electronics service centre should
disassemble, repair, or modify the
product. Improper service may cause
injury, electric shock or re.
•Do not spray the water inside or outside
the product to clean it. Water can
damage the insulation, causing electric
shock or re.
•Keep the area underneath and around
your appliances free of combustible
materials such as lint, paper, rags,
chemicals, etc. Improper use can cause
re or explosion.
•If the supply cord is damaged, it must
be replaced by the manufacturer or
its service agents or similarly qualied
person in order to avoid a hazard.
•The appliance must not be installed
behind a lockable door, a sliding door
or a door with a hinge on the opposite
side to that of the tumble dryer, in such
a way that a full opening of the tumble
dryer door is restricted.
•Do not put living animals, such as pets
into the product. It may cause injury.
•Do not leave this appliance door open.
Children may hang on the door or crawl
inside the appliance, causing damage
or injury.
05
Page 6

•Never reach into this appliance while
it is operating. Wait until the drum has
completely stopped. Failure to do so
may result in injury.
•Do not put in, wash or dry articles that
have been cleaned in, washed in,
soaked in, or spotted with combustible
or explosive substances (such as
wax, oil, paint, gasoline, degreasers,
drycleaning solvents, kerosene,
vegetable oil, cooking oil, etc.). Improper
use can cause re or explosion.
•In case of ood, stop using the product
and contact the LG Electronics service
centre. Contact with water can cause
electric shock.
•If the drain hose or inlet hose is frozen
during winter, use it only after thawing.
Freezing may cause re or electric
shock, and frozen parts may cause
product malfunction or reduction in
product life span.
•Keep all washing detergents, softener
and bleach away from children. These
products contain poisonous materials.
•Do not plug multiple products into
multiple socket-outlets or extension
cords. This can cause re.
•Remove the power plug when you clean
the product. Not removing the plug may
result in electric shock or injury.
•Do not push down the door excessively,
when the appliance door is open. Doing
so may topple over the appliance and it
can cause the injury.
•Use new hose-sets supplied with the
appliance. Old hose-sets should not
be reused. Water leakage may cause
property damage.
•Do not touch the door during steam
cycles, drying or high-temperature
washing. The door surface can become
very hot. Allow the door lock to release
before opening the door. Failure to do
so may result in injury.
•Do not use inammable gas and
combustible substances (benzene,
gasoline, thinner, petroleum, alcohol,
etc.) around the product. It may cause
explosion or re.
•Do not touch the power plug with wet
hands. It can cause the electric shock
or injury.
•When pulling out the power plug from
an outlet, hold the power plug, not the
cable. Damage of the cable can cause
the electric shock or injury.
•Do not bend the power cable
excessively or place a heavy object on
top of it. Damage of the power cable
can cause electric shock or re.
06
Page 7

Disposal
•Before discarding an old appliance,
unplug it. Render the plug useless.
Cut off the cable directly behind the
appliance to prevent misuse.
•Dispose of the packaging material (such
as vinyl and styrofoam) away from
children. The packaging material can
suffocate a child.
•Remove the door to the washing
compartment before this appliance is
removed from service or discarded to
avoid the danger of children or small
animals getting trapped inside. Failure
to do so can result in serious injury to
persons or death.
ENGLISH
07
Page 8
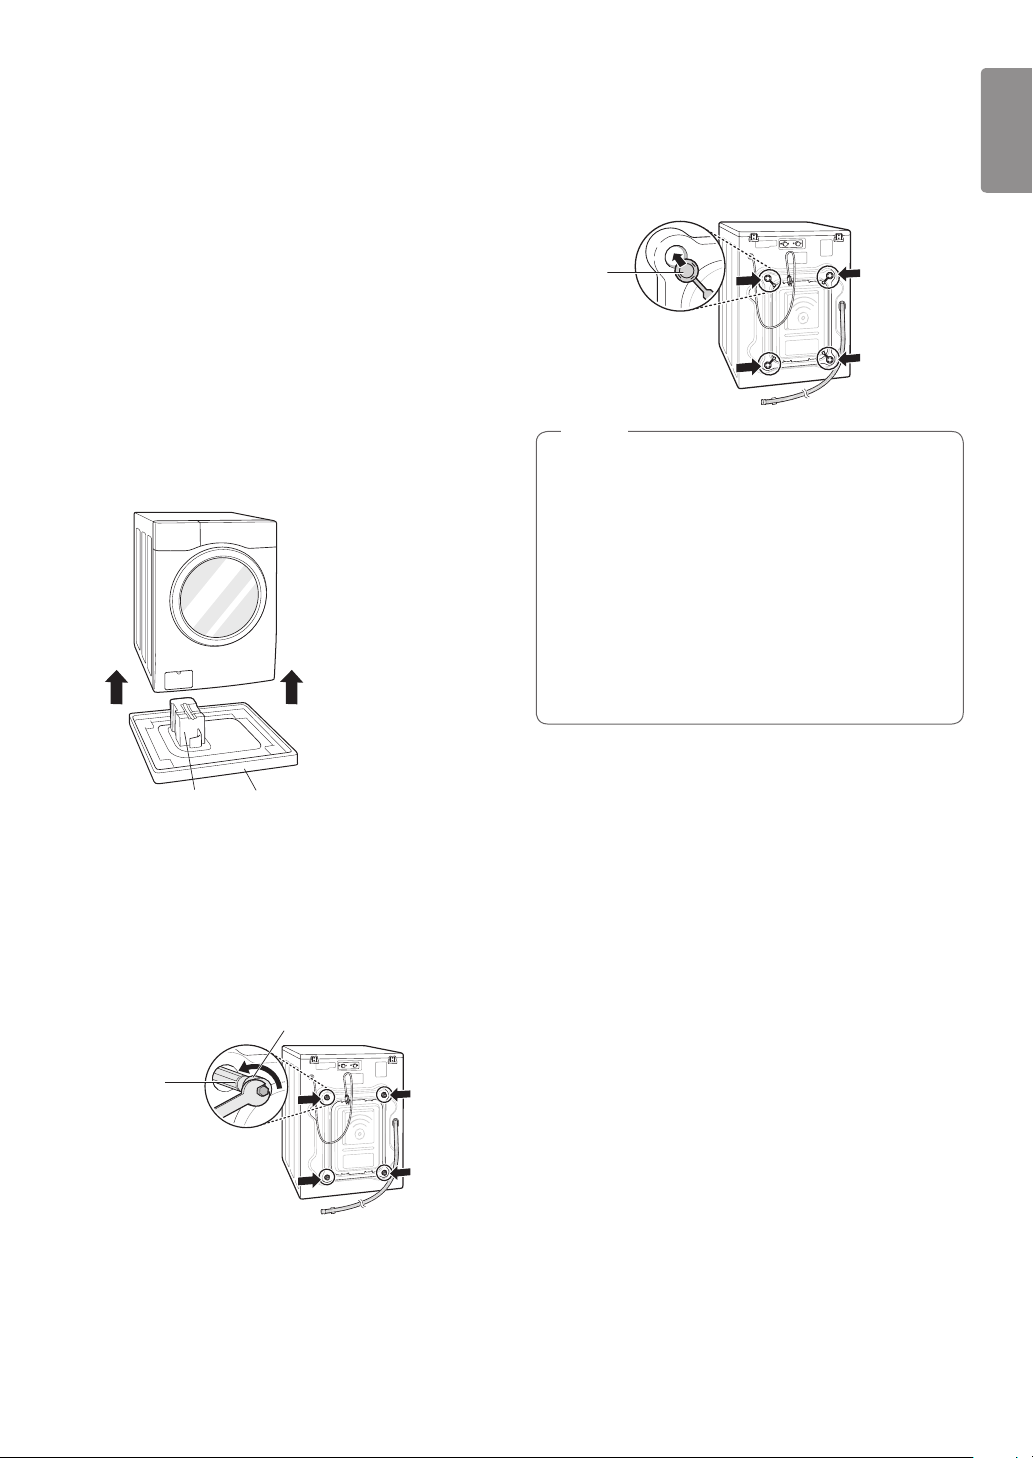
INSTALLATION
Parts
Transit bolts
Power plug
Detergent
dispenser
Control panel
Drum
Door
Drain hose
Drain plug
Drain pump lter
Cover cap
(Location may
vary depending on
products)
Accessories
Inlet hose (1EA)
(Option : Hot (1EA))
Caps for covering shipping
bolt holes
Spanner Elbow Bracket
(for securing drain hose)
Tie strap Grounding conductor
Adjustable feet
Anti–slip sheets
(2EA)
08
Page 9

Specications
Model F2721STWV
Wash Capacity 21 kg
Power Supply 220 V~, 50 Hz
Size 700 mm (W) x 835 mm (D) x 990 mm (H)
Product Weight 100 kg
Max. Watt 2200 W
Permissible Water pressure 0.1 - 1.0 MPa (1.0 - 10.0 kgf/cm²)
•Appearance and specications may change without notice to improve the quality of the product.
•Capacity is the maximum mass of dry cloth in kilograms.
ENGLISH
09
Page 10
Installation Place Requirements
2.5 cm
15 cm
Location
59.4 cm
10 cm80.2 cm
139.6 cm
Level oor : Allowable slope under the entire washing
machine is 1°.
Power outlet : Must be within 1.5 meters of either side
of the location of the washing machine.
•Do not overload the outlet with more than one
appliance.
Additional Clearance : For the wall, 10 cm: rear
/2.5 cm: right & left side
•Do not place or store laundry products on top of the
washing machine at any time.
•These products may damage the nish or controls.
Positioning
•Install the washing machine on a at hard oor.
•Make sure that air circulation around the washing
machine is not impeded by carpets, rugs, etc.
•Never try to correct any unevenness in the oor with
pieces of wood, cardboard or similar materials under
the washing machine.
•If it is impossible to avoid positioning the washing
machine next to a gas cooker or coal burning
insulation (85x60 cm) covered with aluminum foil on
the side facing the cooker or stove must be inserted
between the two appliances.
2.5 cm
•Do not install your washing machine in rooms where
freezing temperatures may occur. Frozen hoses may
burst under pressure. The reliability of the electronic
control unit may be impaired at temperatures below
freezing point.
•Please ensure that when the washing machine is
installed, it is easily accessible for an engineer in the
event of a breakdown.
•With the washing machine installed, adjust all four feet
using the transit bolt spanner provided to ensure the
appliance is stable, and a clearance of approximately
15 cm is left between the top of the washing machine
and the underside of any work-top.
•This equipment is not designed for maritime use or for
use in mobile installations such as caravans, aircraft
etc.
Electrical Connection
•Do not use an extension cord or double adapter.
•Always unplug the washing machine and turn off the
water supply after use.
•Connect the washing machine to an earthed socket in
accordance with current wiring regulations.
•The washing machine must be positioned so that the
plug is easily accessible.
•Repairs to the washing machine must only be carried
out by qualied personnel. Repairs carried out by
inexperienced persons may cause injury or serious
malfunctioning. Contact your local service centre.
•If the washing machine is delivered in winter and
temperatures are below freezing, place the washing
machine at room temperature for a few hours before
putting it into operation.
10
Page 11
ENGLISH
Unpacking and Removing Transit
Bolts
Lift the washing machine off the foam base.
1
•After removing the carton and shipping material,
lift the washing machine off the foam base. Make
sure the tub support comes off with the base
and is not stuck to the bottom of the washing
machine.
•If you must lay the washing machine down to
remove the carton base, always protect the side
of the washing machine and lay it carefully on
its side. DO NOT lay the washing machine on its
front or back.
Install the hole caps.
3
•Locate the hole caps included in the accessory
pack and install them in the transit bolt holes.
Cap
NOTE
•Save the bolt assemblies for future use. To
prevent damage to internal components, DO NOT
transport the washing machine without reinstalling
the transit bolts.
•Failure to remove transit bolts and retainers may
cause severe vibration and noise, which can lead
to permanent damage to the washing machine.
The cord is secured to the back of the washing
machine with a transit bolt to help prevent
operation with transit bolts in place.
Tub Support
(Optional)
Remove the bolt assemblies.
2
•Starting with the bottom two transit bolts, use the
spanner (included) to fully loosen all transit bolts
by turning them counterclockwise. Remove the
bolt assemblies by wiggling them slightly while
pulling them out.
Transit
bolt
Carton base
Retainer
11
Page 12
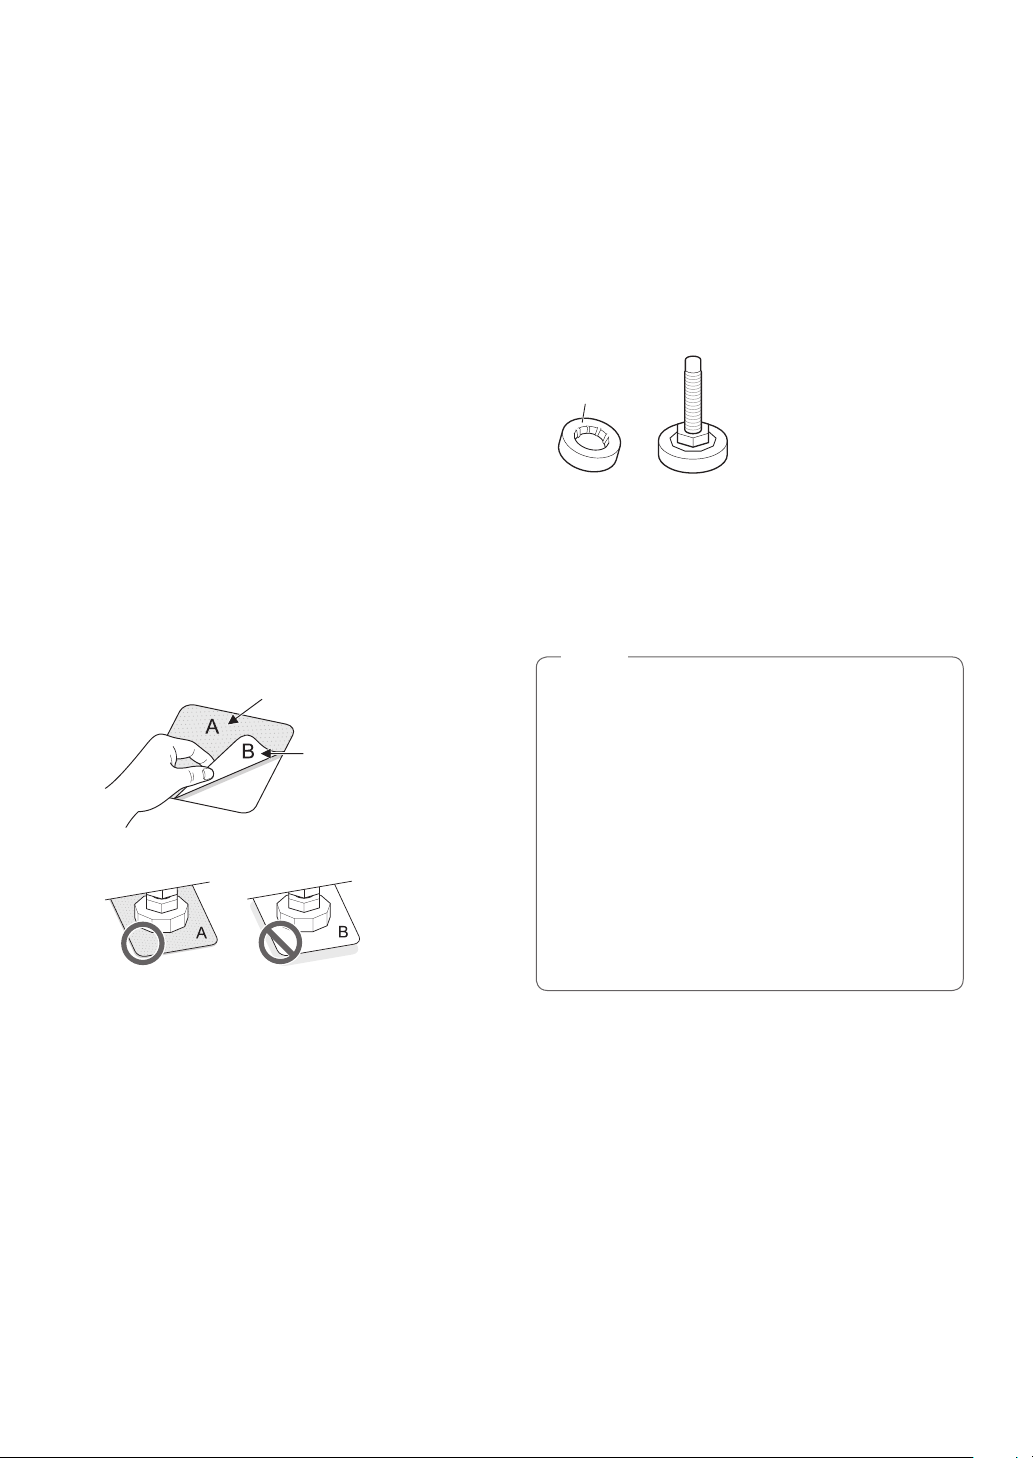
Using Anti-Slip Sheets (Optional)
Wooden Floors (Suspended
If you install the washing machine on a slippery surface,
it may move because of excessive vibration. Incorrect
leveling may cause malfunction through noise and
vibration. If this occurs, install the anti-slip sheets under
the leveling feet and adjust the level.
Clean the oor to attach the anti-slip sheets.
1
•Use a dry rag to remove and clean foreign
objects and moisture. If moisture remains, the
anti-slip sheets may slip.
Adjust the level after placing the washing machine
2
in the installation area.
Place the adhesive side of the anti-slip sheet on
3
the oor.
•It is most effective to install the anti-slip sheets
under the front legs. If it is difcult to place the
pads under the front legs, place them under the
back legs.
This side up
Adhesive side
Floors)
•Wooden oors are particularly susceptible to vibration.
•To prevent vibration we recommend you place rubber
cups at least 15 mm thick of the each foot of the
washing machine, secured to at least two oor beams
with screws.
Rubber Cup
•If possible install the washing machine in one of the
corners of the room, where the oor is more stable.
•Fit the rubber cups to reduce vibration.
•You can obtain rubber cups (p/no.4620ER4002B) from
the LG Service Centre.
NOTE
•Proper placement and leveling of the washing
machine will ensure long, regular, and reliable
operation.
•The washing machine must be 100% horizontal
and stand rmly in position.
•It must not ‘Seesaw’ across corners under the
load.
•The installation surface must be clean, free from
oor wax and other lubricant coatings.
•Do not let the feet of the washing machine get
wet. Failure to do so may cause vibration or noise.
Ensure the washing machine is level.
4
•Push or rock the top edges of the washing
machine gently to make sure that the washing
machine does not rock. If the washing machine
rocks, level the washing machine again.
12
Page 13
ENGLISH
Leveling the Washing Machine
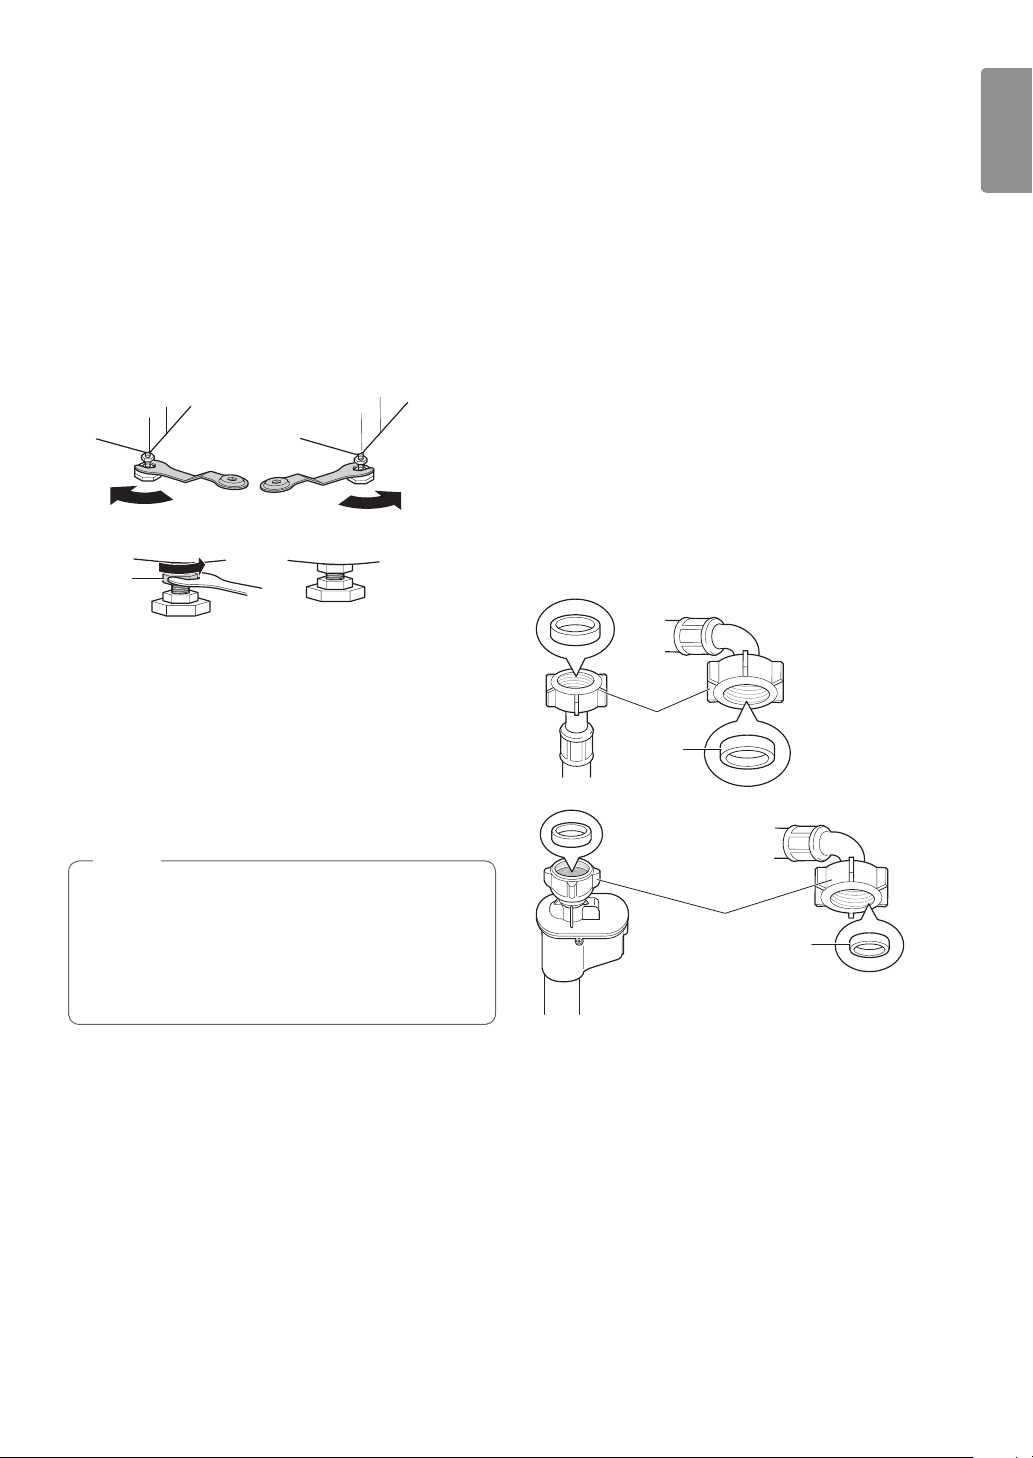
If the oor is uneven, turn the adjustable feet as required
(Do not insert pieces of wood etc. under the feet). Make
sure that all four feet are stable and resting on the oor
and then check that the appliance is perfectly level (Use
a spirit level).
•Once the washing machine is level, tighten the lock
nuts up towards the base of the washing machine. All
lock nuts must be tightened.
Raise
Lock Nut
•Diagonal Check
When pushing down the edges of the washing
machine top plate diagonally, the washing machine
should not move up and down at all (Check both
directions). If the washing machine rocks when
pushing the machine top plate diagonally, adjust the
feet again.
Lower
Tighten all 4
locknuts securely
Connecting Inlet Hose
•Water supply pressure must be between 0.1 MPa and
1.0 MPa (1.0‒10.0 kgf/cm
•Do not strip or crossthread when connecting inlet hose
to the valve.
•If the water supply pressure is more than 1.0 MPa, a
decompression device should be installed.
•Periodically check the condition of the hose and
replace the hose if necessary.
Checking Rubber Seal Inlet Hose
Two rubber seals are supplied with the water inlet hoses.
They are used for preventing water leaks. Make sure the
connection to taps is sufciently tight.
Hose connector
Rubber seal
2
).
NOTE
•Timber or suspended type ooring may contribute
to excessive vibration and unbalance.
•If the washing machine is installed on a raised
platform, it must be securely fastened in order to
eliminate the risk of falling off.
Hose connector
Rubber seal
13
Page 14
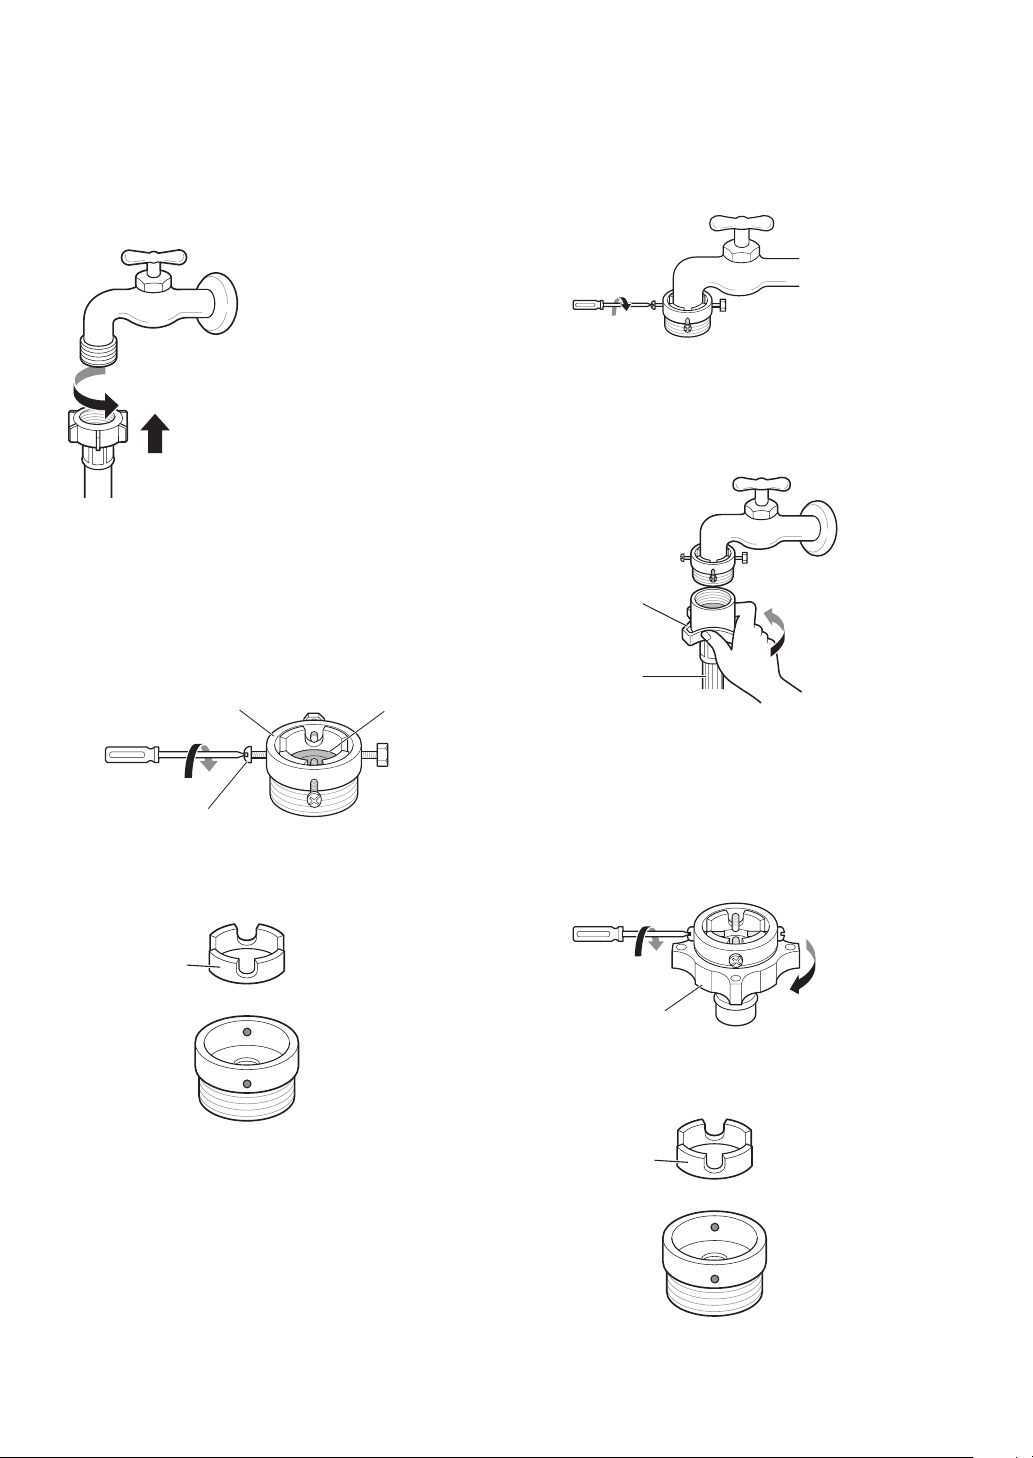
Connecting Hose to Water Tap
Connecting screw-type hose to tap with thread
Screw the hose connector onto the water supply tap.
Push the adapter onto the end of the tap so that
3
the rubber seal forms a watertight connection.
Tighten the four xing screws.
Push the inlet hose vertically upwards so that the
4
rubber seal within the hose can adhere completely
to the tap and then tighten it by screwing it to the
right.
Connecting screw-type hose to tap without
thread
Loose the four xing screws.
1
Upper
connector
Fixing screw
Remove the guide plate if the tap is too large to t
2
the adapter.
Guide plate
Rubber
seal
Plate
Inlet hose
Connecting one touch type hose to tap without
thread
Unscrew the adapter ring plate and loose the four
1
xing screws.
Ring plate
Remove the guide plate if the tap is too large to t
2
the adapter.
Guide plate
14
Page 15
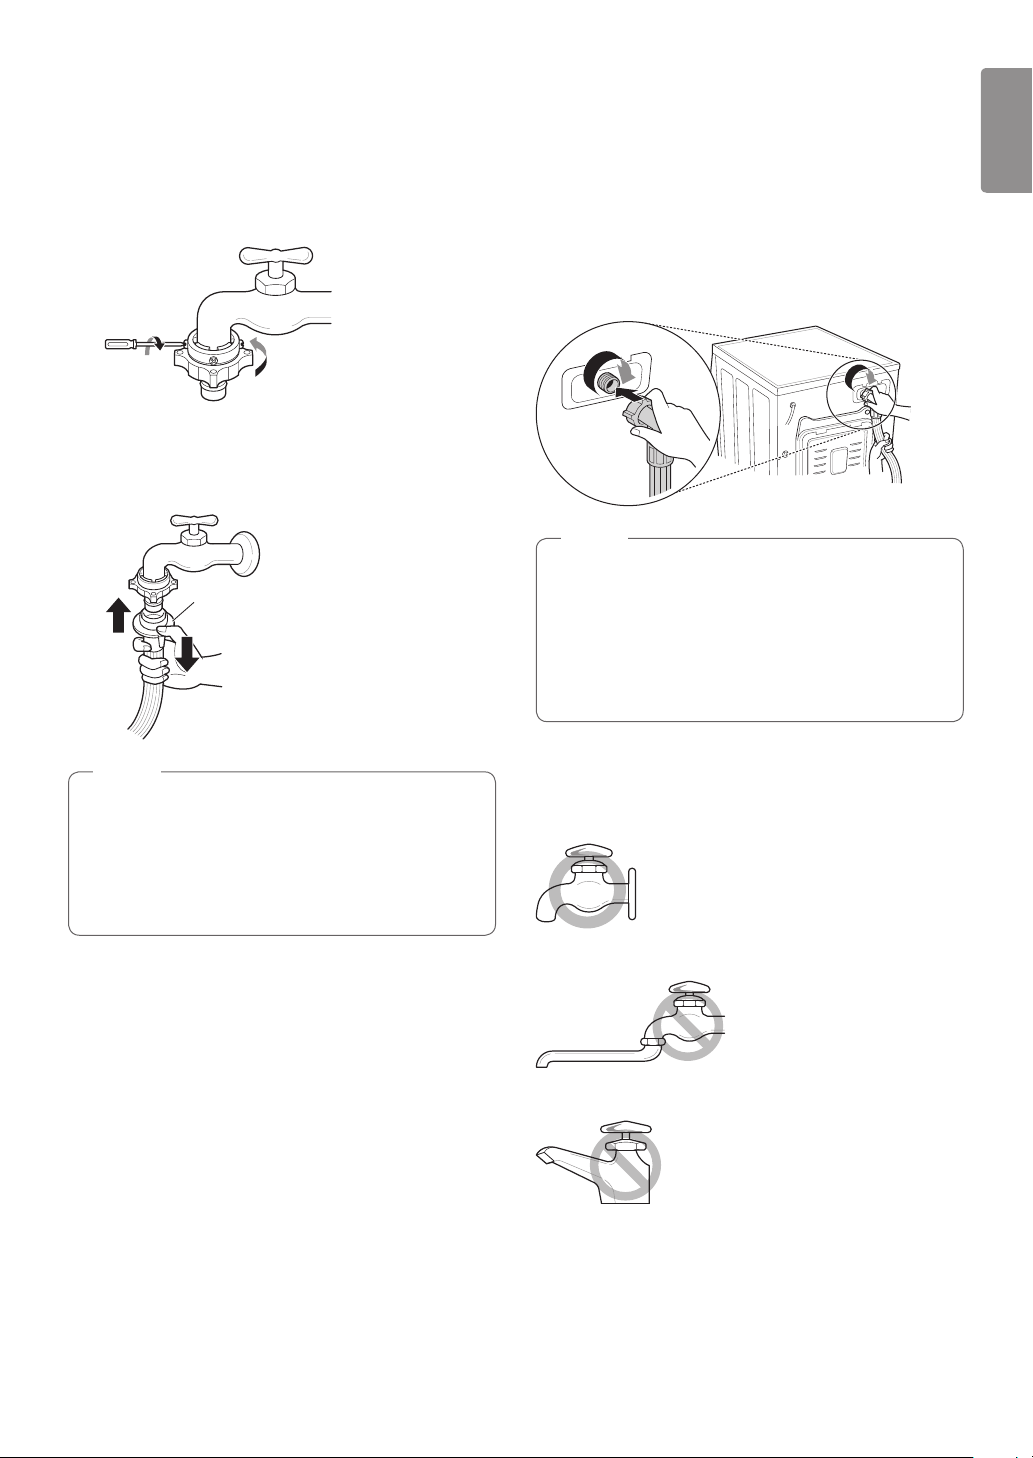
ENGLISH
Push the adapter onto the end of the tap so that
3
the rubber seal forms a watertight connection.
Tighten the adapter ring plate and the four xing
screws.
Pull the connector latch plate down, push the inlet
4
hose onto the adapter, and release the connector
latch plate. Make sure the adapter locks into place.
Latch plate
Connecting Hose to Washing Machine
Make sure that there are no kinks in the hose and that
they are not crushed.
When your washing machine has two valves.
•The Inlet hose with the red connector is for the hot
water tap.
NOTE
•After completing connection, if water leaks from
the hose, repeat the same steps.
Use the most conventional type of tap for the
water supply. In case the tap is square or too big,
remove the guide plate before inserting the tap
into the adaptor.
NOTE
•After connecting the inlet hose to the water
tap, turn on the water tap to ush out foreign
substances (dirt, sand, sawdust, etc.) in the water
lines. Let the water drain into a bucket, and check
the water temperature.
Using the horizontal tap
Horizontal tap
Extension tap
Square tap
15
Page 16
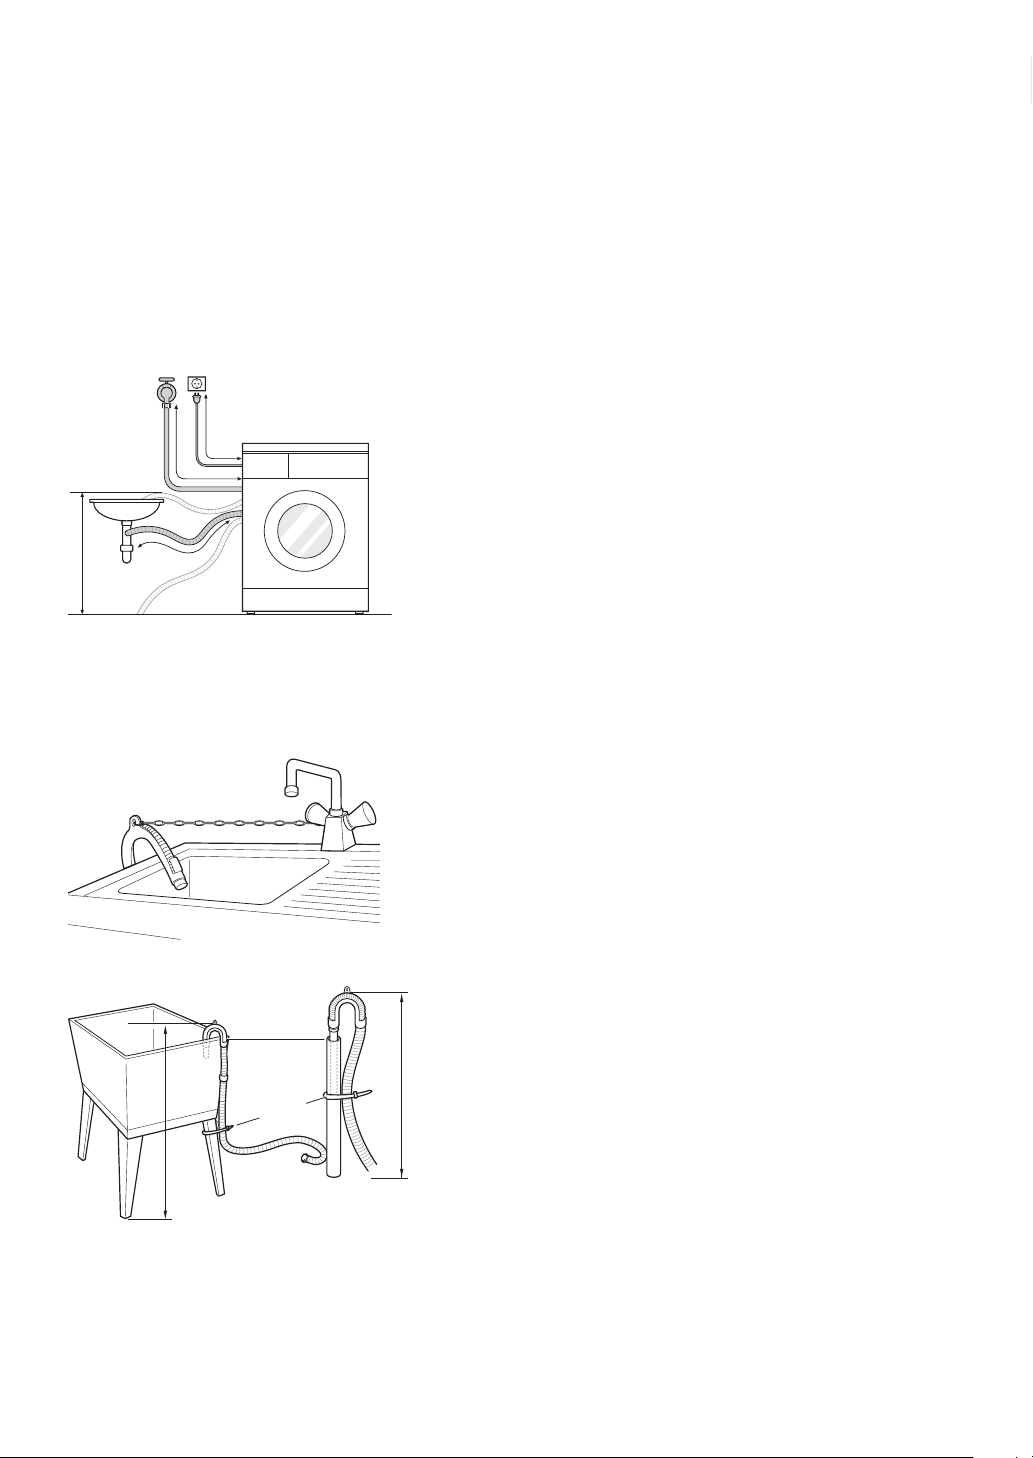
Installation of Drain Hose
•The drain hose should not be placed higher than 100
cm above the oor. Water in the washing machine
may not drain or may drain slowly.
•Securing the drain hose correctly will protect the oor
from damage due to water leakage.
•If the drain hose is too long, do not force it back into
the washing machine. This will cause abnormal noise.
about 100 cm
about 145 cm
max. 100 cm
about 105 cm
•When installing the drain hose to a sink, secure it
tightly with string.
•Securing the drain hose correctly will protect the oor
from damage due to water leakage.
Laundry tub
Hose
retainer
Tie strap
max. 100 cm
max. 100 cm
16
Page 17
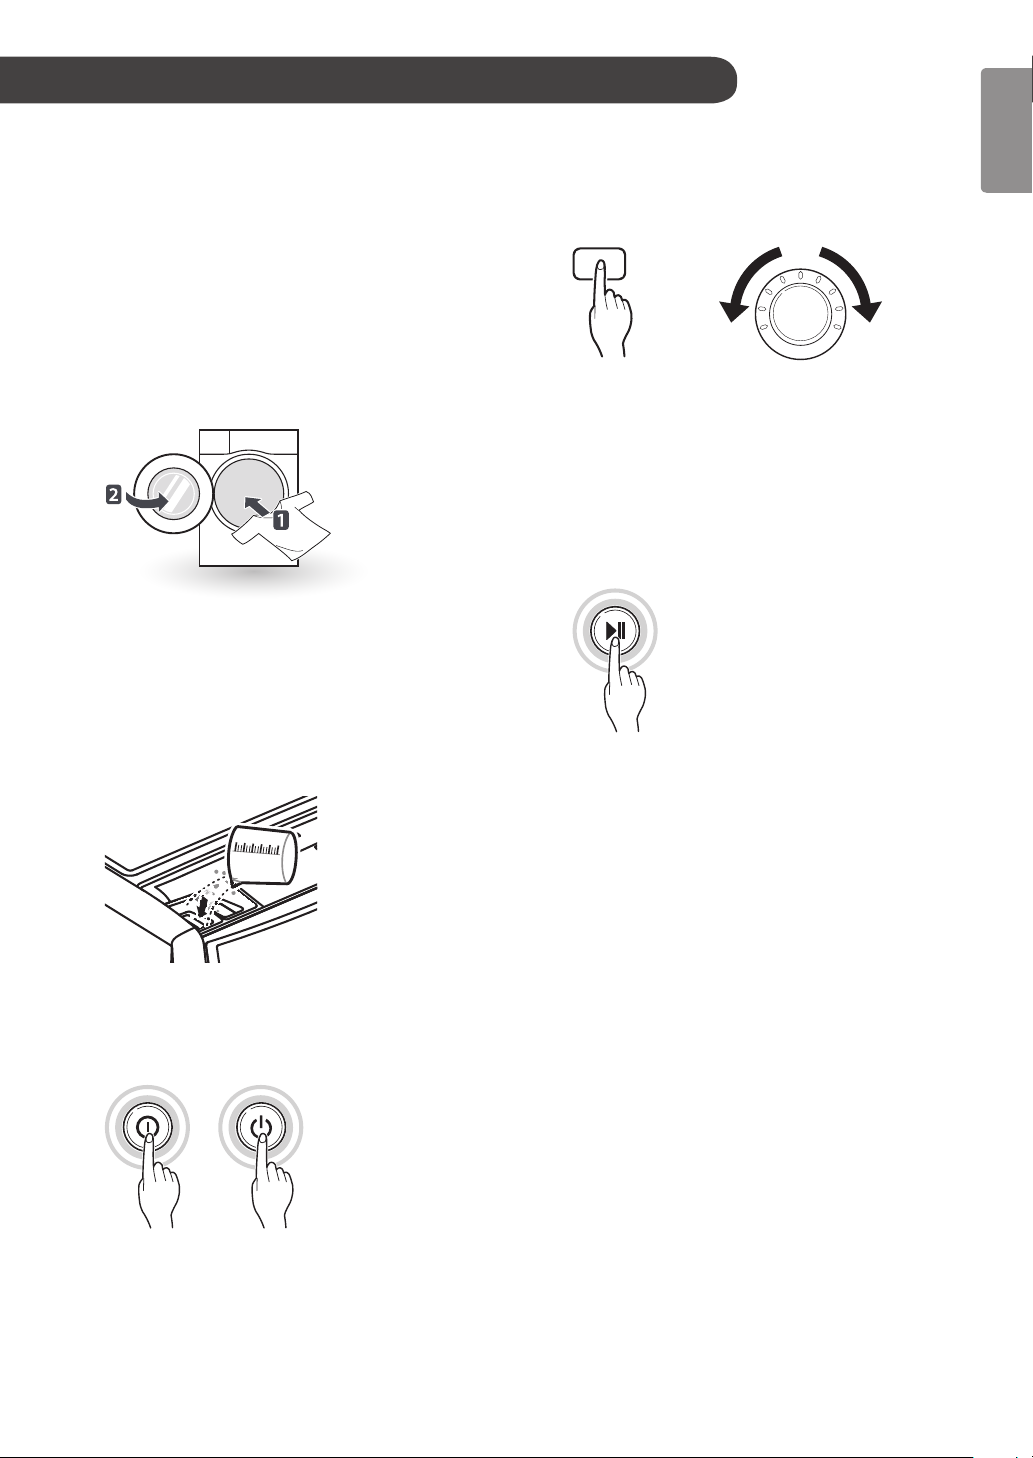
OPERATION
ENGLISH
Using the Washing Machine
Before the rst wash, select a cycle (Cotton 60 °C, add
a half load of detergent), allow the washing machine
to wash without clothing. This will remove residue and
water from the drum that may have been left during
manufacturing.
Sort laundry and load items.
1
•Sort laundry by fabric type, soil level, colour and
load size as needed. Open the door and load
items into the washing machine.
Add cleaning products and/or detergent and
2
softener.
•Add the proper amount of detergent to the
detergent dispenser. If desired, add bleach or
fabric softener to the appropriate areas of the
dispenser.
Choose the desired washing cycle.
4
•Press the Cycle button repeatedly or turn the
cycle selector knob until the desired cycle is
selected.
Begin cycle.
5
•Press the Start/Pause button to begin the cycle.
The washing machine will agitate briey without
water to measure the weight of the load. If the
Start/Pause button is not pressed within 60
minutes, the washing machine will shut off and
all settings will be lost.
End of cycle.
6
•When the cycle is nished, a melody will sound.
Immediately remove your clothing from the
washing machine to reduce wrinkling. Check
around the door seal when removing the load for
small items that may be caught in the seal.
Turn on the washing machine.
3
•Press the Power button to turn ON the washing
machine.
17
Page 18
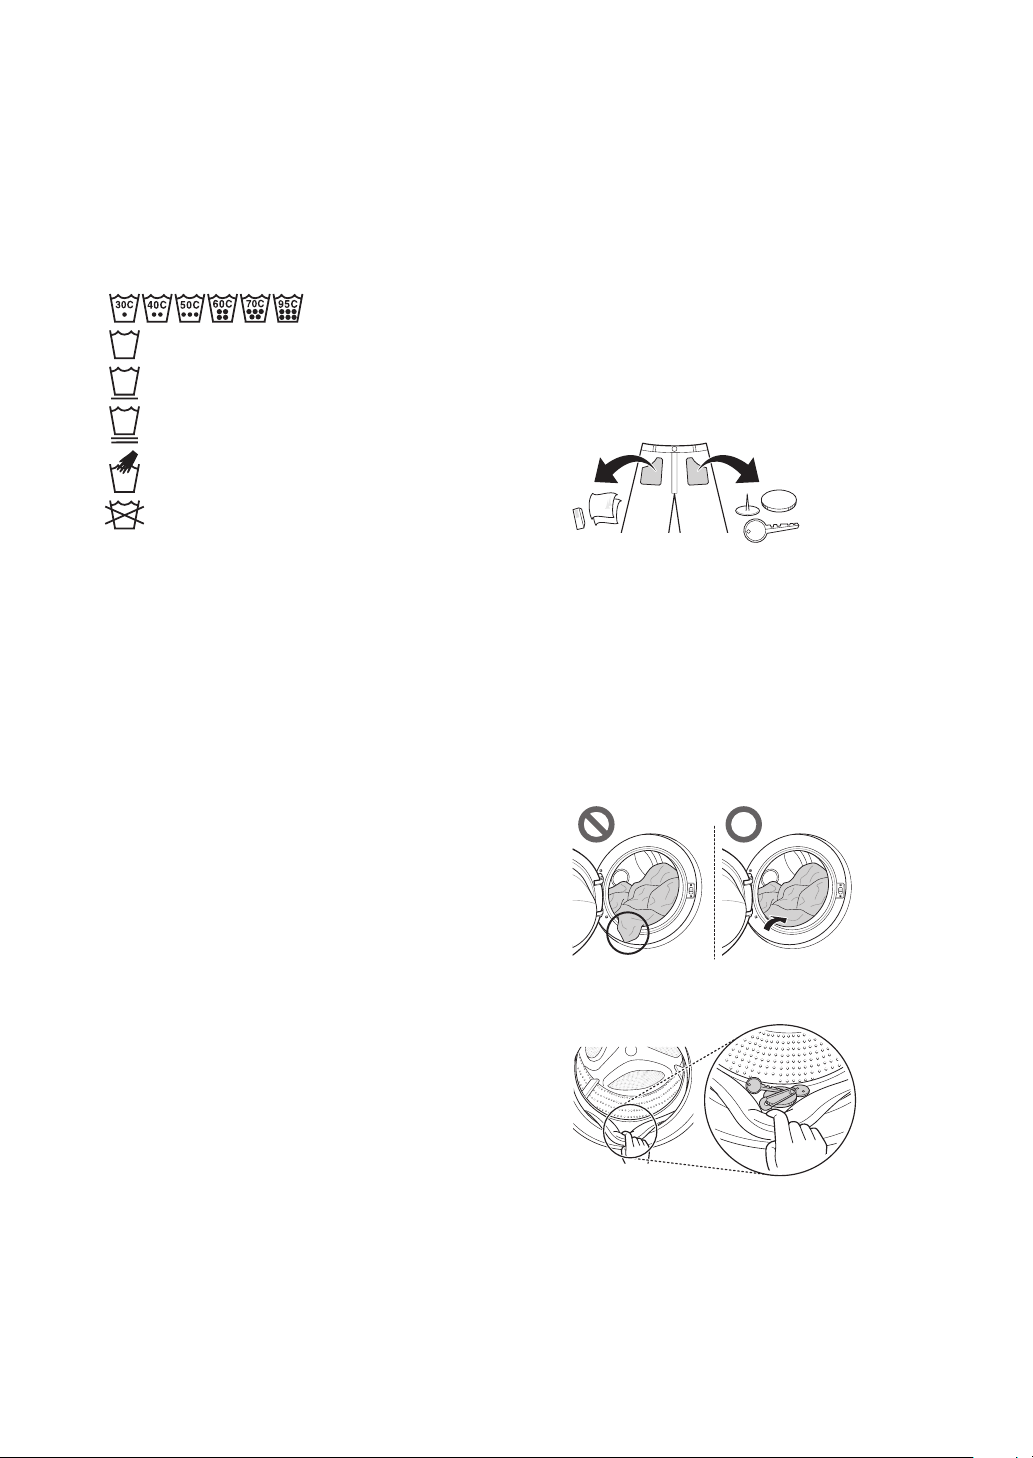
Sorting Iaundry
Look for a care label on your clothes.
1
•This will tell you about the fabric content of your
garment and how it should be washed.
•Symbols on the care labels.
Wash temperature
Normal machine wash
Permanent press
Delicate
Hand wash
Do not wash
Caring before loading.
3
•Combine large and small items in a load. Load
large items rst.
•Large items should not be more than half the
total wash load. Do not wash single items. This
may cause an unbalanced load. Add one or two
similar items.
•Check all pockets to make sure that they are
empty. Items such as nails, hair clips, matches,
pens, coins and keys can damage both your
washing machine and your clothes.
Sorting laundry.
2
•To get the best results, sort clothes into loads
that can be washed with the same wash cycle.
•Different fabrics need to be washed at varying
temperatures and spin speeds.
•Always sort dark colours from pale colours and
whites. Wash separately as dye and lint transfer
can occur causing discolouration of white and
pale garments. If possible, do not wash heavily
soiled items with lightly soiled ones.
– Soil (Heavy, Normal, Light)
Separate clothes according to amount of soil.
– Colour (White, Lights, Darks)
Separate white fabrics from coloured fabrics.
– Lint (Lint producers, Collectors)
Wash lint producers and lint collectors
separately.
•Close zippers, hooks and strings to make sure
that these items don’t snag on other clothes.
•Pre-treat dirt and stains by brushing a small
amount of detergent dissolved water onto stains
to help lift dirt.
•Check the folds of the exible gasket (gray) and
remove any small articles.
•Check inside the drum and remove any items
from a previous wash.
•Remove any clothing or items from the exible
gasket to prevent clothing and gasket damage.
18
Page 19
ENGLISH
Adding Cleaning Products
Detergent Dosage
•Detergent should be used according to the instruction
of the detergent manufacturer and selected according
to type, colour, soiling of the fabric and washing
temperature.
•If too much detergent is used, too many suds can
occur and this will result in poor washing results or
cause heavy load to the motor.
•If you wish to use liquid detergent follow the guidelines
provided by the detergent manufacturer.
•You can pour liquid detergent directly into the main
detergent dispenser if you are starting the cycle
immediately.
•Do not use liquid detergent if you are using Time
delay, or if you have selected Pre Wash, as the liquid
may harden.
•If too many suds occur, reduce the detergent amount.
•Detergent usage may need to be adjusted for water
temperature, water hardness, size and soil level of the
load. For best results, avoid oversudsing.
•Refer to the label of the clothes, before chooseing the
detergent and water temperature:
•When using the washing machine, use designated
detergent for each type of clothing only:
– General powdered detergents for all types of fabric
– Powdered detergents for delicate fabric
– Liquid detergents for all types of fabric or
designated detergents only for wool
•For better washing performance and whitening, use
detergent with the general powdered bleach.
•Detergent is ushed from the dispenser at the
beginning of the cycle.
•Do not place or store laundry products, such as
detergent, bleach, or liquid fabric softener, on top of
your washer or dryer. Wipe up any spills immediately.
These products can damage the machine's nish and
controls.
NOTE
•Do not let the detergent harden.
Doing so may lead to blockages, poor rinse
performance or odour.
•Full load : According to manufacturer’s
recommendation.
•Part load : 3/4 of the normal amount
•Minimum load : 1/2 of full load
Adding Detergent and Fabric Softener
Adding detergent
•Main wash only →
•Pre wash+Main wash →
NOTE
•Too much detergent, bleach or softener may
cause an overow.
•Be sure to use the appropriate amount of
detergent.
Adding fabric softener
•Do not exceed the maximum ll line. Overlling can
cause early dispensing of the fabric softener, which
may stain clothes. Close the dispenser lid slowly.
NORMAL NORMAL
19
Page 20
•Do not leave the fabric softener in the detergent
dispenser for more than 2 days (Fabric softener may
harden).
•Softener will automatically be added during the last
rinse cycle.
•Do not open the dispenser lid when water is being
supplied.
•Solvents (benzene, etc) should not be used.
NOTE
•Do not pour fabric softener directly on the clothes.
Adding water softener
A water softener, such as anti-limescale can be used
to cut down on the use of detergent in areas with high
water hardness level.
•Dispense according to the amount specied on the
packaging. First add detergent and then the water
softener.
CAUTION
•To avoid injury, do not place ngers under the lid
or between the lid and the top plate when pressing
or sliding the detergent dispenser lid open or
closed.
MAX
NORMAL
Using tablet
Open the door and put tablets into the drum.
1
Load the laundry into the drum and close the door.
2
20
Page 21
Control Panel
ENGLISH
Power button
•Press the Power button to turn the washing
machine on.
•Press and hold the Power button for 1 second
to turn the washing machine off.
Start/Pause button
•This Start/Pause button is used to start the
wash cycle or pause the wash cycle.
•If a temporary stop of the wash cycle is needed,
press the Start/Pause button.
Display
•The display shows the settings, estimated
time remaining, options, and status messages.
When the product is turned on, the default
settings in the display will illuminate.
•The display shows estimate time remaining.
While the size of the load is being calculated
automatically, blinking
appears.
or ‘Detecting’
Program dial
•Programs are available according to laundry
type.
•Lamp will light up to indicate the selected
program.
Options
•This allows you to select an additional cycle
and will light when selected.
•Use these buttons to select the desired cycle
options for the selected cycle.
21
Page 22
Program Table
Washing Program
Program Description Fabric Type
Coloured fast garments (shirts,
Cotton
Allergy Care
Hot Wash Washes laundry in a hot cycle. 95°C
Refresh
Baby Care
Duvet
Sports Wear
Wool
Provides better performance by
combining various drum motions.
Removes pet hair and allergens such
as house mite and pollen.
Helps to remove wrinkles within 20
mins with steam.
Removes solid and protein stains,
provides better rinse performance.
This cycle is for large items such as
bed cover, pillows, sofa covers, etc.
This cycle is suitable for sports wear
such as jogging clothes and running
wear.
Enables to wash wool fabrics.
(Please use detergent for
machinewashable woolens).
nightdresses, pajamas, etc)
and normally soiled cotton load
(underwear).
Cotton, underwear, pillow covers,
bed sheets, baby wear.
Cotton mixed, Polyester mixed Dress
shirts, blouses.
Lightly soiled baby wear. 5.0 kg
Cotton bedding except special
garments (delicates, wool, silk, etc.)
with lling: duvets, pillows, blankets,
sofa covers with light lling.
Coolmax, Gore-tex, Fleece and
Sympatex.
Machine washable woolens with
pure now wool only
Proper
Temp.
40°C
(Cold to
60°C)
choice
choice
(Cold to
40°C)
*30°C
(Cold to
30°C)
40°C
(Cold to
40°C)
No
No
Cold
Maximum
Load
Rating
3.0 kg
3 items
1 king size
3.0 kg
Speed Wash
22
This cycle provides fast washing
time for small loads and lightly soiled
clothes.
Coloured laundry which is lightly
soiled.
CAUTION : Use less than 20 g of
detergent (for 2.0 kg load) otherwise
detergent may remain on the clothes.
*40°C
(Cold to
40°C)
2.0 kg
Page 23
ENGLISH
Program Description Fabric Type
This cycle is for washing heavily
Heavy Duty
Silent
Color Care
Rinse+Spin
Downloaded For downloadable cycles. If you did not download any cycles, the default is Cold Wash.
•* : Proper temperature can be selected after deleting the steam option, automatically-included in the cycle.
•Water Temperature: Select the appropriate water temperature for chosen wash cycle. Always follow garment
manufacturer’s care label or instructions when washing.
soiled laundry though more powerful
tub rotation.
Provides less noise and vibration
and saves money by using overnight
electricity.
If it's possible for clothes to
decolourate, please use this cycle.
The cycle prevent decolorization.
(Please use detergent for colored
fabrics.)
Use for laundry that need rinsing only
of to add rinse-added fabric softener
to laundry.
Heavily soiled Cotton Fabrics
Color fast garments (shirts,
nightdresses, pajamas, etc.) and
lightly soiled white cotton(underwear).
Dark garments made from cotton or
mixed fabrics.
Normal fabrics which can be
washable.
Proper
Temp.
60°C
(40°C to
60°C)
40°C
(Cold to
60°C)
30°C
(Cold to
40°C)
No
choice
Maximum
Load
3.0 kg
3.0 kg
5.0 kg
Rating
NOTE
•Neutral detergent is recommended.
23
Page 24

Extra Options
Program Delay Wash Steam Add Load
Cotton
Allergy Care
Hot Wash
Refresh
Baby Care
Duvet
Sports Wear
Wool
Speed Wash
Heavy Duty
Silent
● ● ● ●** ● ●
● ●* ● ● ● ●
● ● ● ● ● ●
● ●* ●
● ●* ● ● ● ●
● ● ● ●
● ●** ● ● ● ●
● ● ●
● ●** ● ●** ●
● ● ● ● ● ●
● ● ● ●
Turbo
Wash
TM
Favorite Crease Care
Color Care
Rinse+Spin
Downloaded
* : This option is automatically included in the cycle and can not be deleted.
** : This option is automatically included in the cycle and can be deleted.
● ● ● ● ●
● ● ● ●
● ● ● ●
24
Page 25

ENGLISH
Option Cycle
Delay Wash
You can set a time delay so that the washing machine
will start automatically and nish after a specied time
interval.
Press the Power button.
1
Select a washing program.
2
Press the Delay Wash button and set time
3
required.
Press the Start/Pause button.
4
NOTE
•The delay time is the time to the end of the
program, not the start. The actual running time
may vary due to water temperature, wash load
and other factors.
Turbo Wash™
Wash cycle in under 1 hour with energy and water
saving. (based on half of laundry)
Press the Power button.
1
Add Load
Use this function to add loads or remove the foreign
material.
Press the Add Load button.
1
Close the door after add loads or remove the
2
foreign material (e.g. coin or pin etc.)
Press the Start/Pause button.
3
•Results when choosing Add Load during cycles.
- When the tub is spinning : Tub stops and Door Lock
is off.
- When water temperature in the tub is higher than
45°C : Add Load is not available with short warning
sound for safety.
- When lots of water is in the tub : Door Lock is off
after draining by safe water level.
NOTE
•Open the door when Door Lock is off after
checking the safety.
•Add Load doesn't work when Tub Cleaning
course is in progress for safety.
•Put the laundry into the tub completely. Laundry
caught in between door closing part can damage
door packing (rubber part) and might cause failure.
Select a washing program.
2
Press the Turbo Wash™ button..
3
Press the Start/Pause button.
4
NOTE
•Turbo Wash™ function of some courses is
selected automatically.
25
Page 26

Favorite
Steam
Favorite program allows you to store a customized wash
cycle for future use.
Press the Power button.
1
Select a washing program.
2
Select the cycle (Washing method, number of
3
rinses, spin speed, water temperature etc.).
Press and hold the Favorite button for 3 seconds.
4
The favorite program is stored for future use. To reuse
th program, select favorite program and press the Start/
Pause button.
Crease Care
If you want to prevent creasing, select Crease Care
option.
Press the Power button.
1
Steam Wash features enhance washing performance
with low energy consumption.
Refresh cycle reduces creases in clothes.
Press the Power button.
1
Select steam course.
2
Press the Steam button.
3
Press the Start/Pause button.
4
Steam Wash
•For heavily stained clothes, underwear, or baby
clothes.
•Refresh cycle is always Steam Wash.
•Do not use Steam Wash for delicates such as wool,
silk, and easily discoloured clothes.
Select a washing program.
2
Press the Crease Care button.
3
Press the Start/Pause button.
4
26
Page 27

ENGLISH
Wash
Soak
Use this mode to wash normal clothes or thick and
heavy clothes which are excessively dirty.
Pre Wash
If the laundry is heavily soiled, the Pre Wash cycle is
recommended.
Intensive
If the laundry is normal and heavily soiled, the Intensive
option is effective.
Normal
This option is automatically selected in every course
except for Rinse+Spin, Baby Care.
Light
This cycle is suitable for lightly soiled clothing.
NOTE
•Selectable options will differ depending on
selected course.
Spin
•Spin speed level can be selected by pressing the Spin
button repeatedly.
- Extra High / High / Medium / Low / Extra Low
•Spin Only
Press the Power button.
1
Press the Spin button to select spin speed.
2
Press the Start/Pause button.
3
Temp.
The Temp. button selects the wash and rinse
temperature combination for the selected cycle. Press
this button until the desired setting is lit. All rinses use
cold tap water.
•Select the water temperature suitable for the type of
load you are washing. Follow the garment fabric care
labels for best results.
Refresh Cycle
Rinse
By pressing the Rinse button the Rinse times can be
selected.
•1 / 2 / 3 / 4 / 5 (times)
Press the Power button.
1
Select the Refresh program.
2
Press the Start/Pause button.
3
NOTE
•For better performance load 3 items or less.
When Refresh cycle nishes, laundry will continue
to be tumbled slowly for up to 30 minutes to
prevent wrinkling.
You can open the door in this time by pressing
any button.
27
Page 28
Child Lock ( )
Beep On / Off
Select this function to lock the buttons on the control
assembly to prevent tampering.
Locking the control panel
Press and hold the Wash and Rinse button for 3
1
seconds.
A beeper will sound, and ‘ ’ will appear on the
2
display.
When the child lock is set, all buttons are locked
except the Power button.
NOTE
•Turning off the power will not reset the child lock
function. You must deactivate child lock before
you can access any other functions.
Unlocking the control panel
Press and hold the Wash and Rinse button for 3
seconds.
•A beeper will sound and the remaining time for the
current program will reappear on the display.
Press the Power button.
1
Select a washing program.
2
Press the Beep On / Off button to set the Beep on/
3
off function.
Press the Start/Pause button.
4
NOTE
•Once the Beep on/off function is set, the setting is
memorized even after the power is turned off.
•If you want to turn the Beeper off, simply repeat
this process.
28
Page 29

SMART FUNCTIONS
ENGLISH
Using LG SmartThinQ Application
Installing LG SmartThinQ
Search for the LG SmartThinQ application from the
Google Play Store on a smart phone. Follow instructions
to download and install the application.
Tag On Function
•For appliances with the logo
•The Tag On function can only be used with most
smart phones equipped with the NFC (Near Field
Communication) function and based on the Android
OS (operating system).
Downloaded
Download new and special cycles that are not included
in the basic cycles on the appliance.
Appliances that have been successfully registered can
download a variety of specialty cycles specic to the
appliance.
Only one cycle can be stored on the appliance at a time.
Once cycle download is completed in the appliance, the
product keeps the downloaded cycle until a new cycle is
downloaded.
NOTE
•Press in the LG SmartThinQ application for
a more detailed guide on how to use the Tag On
function.
•The location of the smartphone's NFC module
may vary depending on the phone, and NFC use
may be restricted on some smartphones due to
differences in transmission methods. Because
of the characteristics of NFC, if the transmission
distance is too far, or if there is a metal sticker
or a protective case on the phone, transmission
will not be good. In some cases, NFC-equipped
phones may be unable to transmit successfully.
•The content found in this manual may differ
from the current version of the LG SmartThinQ
application, and the software may be modied
without informing customers.
•NFC function would vary depending on smart
phones.
Tub Clean Coach
This function shows how many cycles remain before It is
time to run the Tub Clean cycle.
Smart Diagnosis™
This function provides useful information for diagnosing
and solving issues with the appliance based on the
pattern of use.
Settings
Set the product nickname and delete product.
29
Page 30

Smart Diagnosis™ Using a Smart Phone
•For appliances with the or logo
Use this function if you need an accurate diagnosis by
an LG Electronics customer information centre when the
appliance malfunctions or fails.
Smart Diagnosis™ can not be activated unless the
appliance is connected to power. If the appliance is
unable to turn on, then troubleshooting must be done
without using Smart Diagnosis™.
Keep the phone in place until the tone transmission
4
has nished. Time remaining for data transfer is
displayed.
•For best results, do not move the phone while
the tones are being transmitted.
•If the call centre agent is not able to get an
accurate recording of the data, you may be
asked to try again.
Once the countdown is over and the tones have
5
stopped, resume your conversation with the call
centre agent, who will then be able to assist you
using the information transmitted for analysis.
Using Smart Diagnosis™
Smart Diagnosis™ Through the
Customer Information Centre
Use this function if you need an accurate diagnosis by
an LG Electronics customer information center when the
appliance malfunctions or fails. Use this function only
to contact the service representative, not during normal
operation.
Press the Power button to turn on the washing
1
machine. Do not press any other buttons or turn
the cycle selector knob.
When instructed to do so by the call centre, place
2
the mouthpiece of your phone close to the Power
button.
Max
10 mm
NOTE
•The Smart Diagnosis™ function depends on the
local call quality.
•The communication performance will improve and
you can receive better service if you use the home
phone.
•If the Smart Diagnosis™ data transfer is poor due
to poor call quality, you may not receive the best
Smart Diagnosis™ service.
Press and hold the Temp. button for 3 seconds,
3
while holding the phone mouthpiece to the icon or
Power button.
30
Page 31

MAINTENANCE
ENGLISH
WARNING
•Unplug the washing machine before cleaning to
avoid the risk of electric shock. Failure to follow
this warning may result in serious injury, re,
electric shock, or death.
•Never use harsh chemicals, abrasive cleaners, or
solvents to clean the washing machine. They may
damage the nish.
Cleaning your Washing Machine
Care After Wash
•After the cycle is nished, wipe the door and the inside
of the door seal to remove any moisture.
•Leave the door open to dry the drum interior.
•Wipe the body of the washing machine with a dry cloth
to remove any moisture.
Cleaning the Exterior
Proper care of your washing machine can extend its life.
Care and Cleaning of the Interior
•Use a towel or soft cloth to wipe around the washing
machine door opening and door glass.
•Always remove items from the washing machine as
soon as the cycle is complete. Leaving damp items
in the washing machine can cause wrinkling, colour
transfer, and odour.
•Run the Tub Clean cycle once a month (or more often
if needed) to remove detergent buildup and other
residue.
Cleaning the Water Inlet Filter
•Turn off the stopclock if the washing machine is to be
left for any length of time (e.g. holiday), especially if
there is no oor drain (gully) in the immediate vicinity.
•‘
’ icon will be displayed on the control panel when
water is not entering the detergent dispenser.
•If water is very hard or contains traces of lime deposit,
the water inlet lter may become clogged. It is
therefore a good idea to clean it occasionally.
Door:
•Wash with a damp cloth on the outside and inside and
then dry with a soft cloth.
Exterior:
•Immediately wipe off any spills.
•Wipe with a damp cloth.
•Do not press the surface or the display with sharp
objects.
Turn off the water tap and unscrew the water inlet
1
hose.
Clean the lter using a hard bristle brush.
2
31
Page 32

Cleaning the Drain Pump Filter
2
•The drain lter collects threads and small objects left
in the laundry. Check regularly that the lter is clean to
ensure smooth running of your washing machine.
•Allow the water to cool down before cleaning the drain
pump, carrying out emergency emptying, or opening
the door in an emergency.
Open the cover cap and pull out the hose.
1
Unplug the drain plug and open the lter by turning
2
it to the left.
Container to
collect the
drained water.
After cleaning, turn the pump lter and insert the
4
drain plug.
Close the cover cap.
5
CAUTION
•First drain using the drain hose and then open the
pump lter to remove any threads or objects.
•Be careful when draining, as the water may be
hot.
1
Remove any extraneous matter from the pump
3
lter.
32
Page 33

ENGLISH
Cleaning the Dispenser
Leaving detergent in the detergent dispenser for an
extended period of time or using the washing machine
for a long period of time may cause the build-up of
scales in the detergent dispenser. Pull out and clean the
detergent dispenser once a week.
Slide the detergent dispenser lid open.
1
Remove the detergent dispenser covers and pull
2
out the detergent cup.
Clean them with warm water.
3
- Use a soft cloth or brush for cleaning and remove
any residue.
Tub Clean
Tub Clean is a special cycle to clean the inside of the
washing machine.
A higher water level is used in this cycle at higher spin
speed. Perform this cycle regularly.
Remove any clothing or items from the washing
1
machine and close the door.
Open the dispenser lid and add Anti limescale to
2
the main wash compartment.
Close the dispenser lid slowly.
3
Power On and then press the Tub Clean button.
4
Then ‘
Press the Start/Pause button to start.
5
After the cycle is complete, leave the door open to
6
allow the washing machine door opening, exible
gasket and door glass to dry.
’ will be displayed on the display.
Wipe any moisture with a dry towel or cloth after
4
cleaning.
Replace the detergent cups and detergent
5
dispenser covers.
WARNING
•Do not spray water inside the washing machine.
Doing so may cause re or electric shock.
NOTE
•Use water only when you clean the detergent
dispenser. Make sure to use Rinse + Spin to rinse
the washer tub before the wash cycle when you
use a cleaning detergent to clean the washer tub.
CAUTION
•If there is a child, be careful not to leave the door
open for too long.
NOTE
•Do not add any detergent to the detergent
compartments. Excessive suds may generate and
leak from the washing machine.
33
Page 34

Caution on Freezing During
Winter
•When frozen, the product does not operate normally.
Make sure to install the product where it will not freeze
during winter.
•In case the product must be installed outside on a
porch or in other outdoor conditions, make sure to
check the following.
How to Keep the Product from Freezing
•After closing the tap, disconnect the cold inlet hose
from the tap, and remove water while keeping the
hose facing downwards.
Cold inlet
hose
•After washing, remove water remaining inside the
pump completely with the opening hose plug used for
removal of residual water. When the water is removed
completely, close the hose plug used for removal of
residual water and cover cap.
Drain plug
Cover cap
•Hang down drain hose to pull out water inside the
hose completely.
Drain hose
CAUTION
•When the drain hose is installed in a curved
shape, the inner hose may freeze.
Check for Freezing
•If water does not drain when opening the hose plug
used for removal of residual water, check the drainage
unit.
Drain plug
Cover cap
•Turn the power on, select Rinse and Spin, and press
the Start/Pause button.
MAX
NORMAL
Dispenser
NOTE
•Check that water is coming into the dispenser
while rinsing, and water is draining through the
drain hose while spinning.
Drain hose
34
•When ‘
’ is shown in display window while the
product is in operation, check water supply unit and
drainage unit (Some models do not have an alarm
function that indicates freezing).
Page 35

ENGLISH
How to Handle Freezing
•Make sure to empty the drum, pour warm water of
50–60 °C up to the rubber part inside the drum, close
the door, and wait for 1–2 hours.
50‒60 °C
CAUTION
•Do not use boiling water. It may cause burns or
damage to the product.
•Open the cover cap and hose plug used for removal
of residual water to extract water completely.
Drain plug
•When water is removed completely from the drum,
close the hose plug used for removal of residual
water, select Rinse and Spin, and press the Start/
Pause button.
MAX
NORMAL
Dispenser
Drain hose
NOTE
•Check that water is coming into the dispenser
while rinsing, and water is draining through the
drain hose while spinning.
•When water supply problems occur, take the following
measures.
– Turn off the tap, and thaw out the tap and both
connection areas of inlet hose of the product using
a hot water cloth.
– Take out inlet hose and immerse in warm water
below 50–60 °C.
Cover cap
NOTE
•If when water does not drain, this means the ice is
not melted completely. Wait more.
Inlet hose
50‒60 °C
35
Page 36

TROUBLESHOOTING
•Your washing machine is equipped with an automatic error-monitoring system to detect and diagnose problems at
an early stage. If your washing machine does not function properly or does not function at all, check the following
before you call for service:
Diagnosing Problems
Symptoms Reason Solution
•Stop washing machine, check drum and
Rattling and
clanking noise
Foreign objects such as coins or
safety pins may be in drum or pump.
drain lter.
•If noise continues after washing machine
is restarted, call your authorised service
centre.
Thumping sound
Vibrating noise
Water leaks
Oversudsing
Water does not
enter washing
machine or it
enters slowly
Heavy wash loads may produce a
thumping sound. This is usually
normal.
Have all the transit bolts and tub
support been removed?
Are all the feet resting rmly on the
ground?
Inlet hoses or drain hose are loose at
tap or washing machine.
House drain pipes are clogged.
Water supply is not adequate in that
location.
Water supply tap is not completely
open.
Water inlet hose(s) are kinked.
•If sound continues, washing machine
is probably out of balance. Stop and
redistribute wash load.
•If not removed during installation, refer
to Installation guide for removing transit
bolts.
•Make sure the washing machine is level
and tighten the lock nuts up towards the
base of the appliance.
•Check and tighten hose connections.
•Unclog drain pipe. Contact plumber if
necessary.
•Too much detergent or unsuitable
detergent may cause excessive foaming
which may result in water leaks.
•Check another tap in the house.
•Fully open tap.
•Straighten hose.
Water in the
washing machine
does not drain or
drains slowly
36
The lter of the inlet hose(s) clogged.
Drain hose is kinked or clogged.
The drain lter is clogged.
•Check the lter of the inlet hose.
•Clean and straighten the drain hose.
•Clean the drain lter.
Page 37

Symptoms Reason Solution
Electrical power cord may not be
plugged in or connection may be
loose.
•Make sure plug ts tightly in wall outlet.
ENGLISH
Washing machine
does not start
Washing machine
will not spin
Door does not
open
Wash cycle time
delayed
House fuse blown, circuit breaker
tripped,or a power outage has
occurred.
Water supply tap is not turned on.
Check that the door is rmly shut.
•Reset circuit breaker or replace fuse. Do
not increase fuse capacity. If problem is
a circuit overload, have it corrected by a
qualied electrician.
•Turn on water supply tap.
•Close the door and press the Start/Pause
button. After pressing the Start/Pause
button, it may take a few moments before
the washing machine begins to spin. The
door must be locked before spin can be
achieved. Add 1 or 2 similar items to help
balance the load. Rearrange load to allow
proper spinning.
•Once washing machine has started,
the door cannot be opened for safety
reasons. Check if the ‘Door Lock’ icon is
illuminated. You can safely open the door
after the ‘Door Lock’ icon turns off.
•The washing time may vary by the
amount of laundry, water pressure, water
temperature and other usage conditions.
If an imbalance is detected or if the suds
removing program is on, the wash time
will increase.
Fabric softener
overow
Softeners
dispensed too
early
Dry problem Does not dry
Too much softener may cause an
overow.
•Follow softener guidelines to ensure
appropriate amount is used. Do not
exceed the maximum ll line.
•Close the dispenser lid slowly. Do not
open the lid during the wash cycle.
•Do not overload. Check that the washing
machine is draining properly to extract
adequate water from the load. Clothes
load is too small to tumble properly. Add a
few towels.
37
Page 38

Symptoms Reason Solution
Odor
This odor is caused by the rubber
attached to the washing machine.
If the rubber door gasket and door
seal area are not cleaned regularly,
odors can occur from mold or foreign
substances.
Odors can occur if foreign substances
are left in the drainage pump lter.
Odors can occur if the drainage hose
is not properly installed, causing
siphoning (water owing back inside
the washing machine).
Using the dry function, odors can
occur from lint and other laundry
matter sticking to the heater. (Dryer
model only)
A particular odor can occur from
drying wet clothes with hot air. (Dryer
model only)
•It is the normal odor of new rubber and
will disappear after the machine has been
run a few times.
•Be sure to clean the gasket and door
seal regularly and check under the door
seal for small items when unloading the
washer.
•Be sure to clean the drainage pump lter
regularly.
•When installing the drainage hose, be
sure that it doesn’t become kinked or
blocked.
•This is not a malfunction.
•The odor will disappear after a short
while.
38
Page 39

Error Messages
Symptoms Reason Solution
ENGLISH
Water supply is not adequate in
area.
Water supply taps are not
completely open.
Water inlet hose(s) are kinked.
The lter of the inlet hose(s) are
clogged.
If water leakage occurred in
the inlet hose, indicator ‘
become red.
•May vary depending on the model.
Drain hose is kinked or clogged.
The drain lter is clogged.
’ will
•Check another tap in the house.
•Fully open tap.
•Straighten hose(s).
•Check the lter of the inlet hose.
•Clean and straighten the drain hose.
•Clean the drain lter.
Load is too small.
Load is out of balance.
The appliance has an imbalance
detection and correction system.
If individual heavy articles are
loaded (e.g. bath mat, bath
robe, etc.) this system may stop
spinning or even interrupt the
spin cycle altogether.
If the laundry is still too wet at
the end of the cycle, add smaller
articles of laundry to balance the
load and repeat the spin cycle.
•Add 1 or 2 similar items to help balance
the load.
•Add 1 or 2 similar items to help balance
the load.
•Rearrange load to allow proper spinning.
•Rearrange load to allow proper spinning.
39
Page 40

Symptoms Reason Solution
•Close the door completely.
Ensure door is not open.
If ‘ , , ’ is not released, call for
service.
•Unplug the power plug and call for
service.
Water overlls due to the faulty
water valve.
Water level sensor has
malfunctioned.
Over load in motor.
Water leaks.
The washer experienced a power
failure.
Control Error
Is Inlet/outlet hose or drainage
pump frozen?
•Close the water tap.
•Unplug the power plug.
•Call for service.
•Close the water tap.
•Unplug the power plug.
•Call for service.
•Allow the washing machine to stand for
30 minutes to allow the motor to cool,
then restart the cycle.
•Call for service.
•Restart the cycle.
•Unplug the power plug and call for
service.
•Supply warm water into the tub and
unfreeze outlet hose and drainage pump.
Wet a towel in warm water and apply to
inlet hose.
40
Page 41

WARRANTY
This limited warranty does not cover:
•Service trips to deliver, pick up, or install or repair the product; instruction to the customer on operation of the
product; repair or replacement of fuses or correction of wiring or plumbing, or correction of unauthorized repairs/
installation.
•Failure of the product to perform during power failures and interruptions or inadequate electrical service.
•Damage caused by leaky or broken water pipes, frozen water pipes, restricted drain lines, inadequate or interrupted
water supply or inadequate supply of air.
•Damage resulting from operating the Product in a corrosive atmosphere or contrary to the instructions outlined in the
Product’s owner’s manual.
•Damage to the Product caused by accidents, pests and vermin, lightning, wind, re, oods, or acts of God.
•Damage or failure caused by unauthorized modication or alteration, or if it is used for other than the intended
purpose, or any water leakage where the product was not properly installed.
•Damage or failure caused by incorrect electrical current, voltage, or plumbing codes, commercial or industrial use,
or use of accessories, components, or consumable cleaning products that are not approved by LG.
•Damage caused by transportation and handling, including scratches, dents, chips, and/or other damage to the nish
of your product, unless such damage results from defects in materials or workmanship.
•Damage or missing items to any display, open box, discounted, or refurbished Product.
• Products with original serial numbers that have been removed, altered, or cannot be readily determined. Model and
Serial numbers, along with original retail sales receipt, are required for warranty validation.
•Increases in utility costs and additional utility expenses.
•Repairs when your Product is used in other than normal and usual household use or contrary to the instructions
outlined in the Product’s owner’s manual.
•Costs associated with removal of your Product from your home for repairs.
•The removal and reinstallation of the Product if it is installed in an inaccessible location or is not installed in
accordance with published installation instructions, including LG’s owner’s and installation manuals.
•Damage resulting from misuse, abuse, improper installation, repair, or maintenance. Improper repair includes use of
parts not approved or specied by LG.
ENGLISH
Strange vibration or noise
caused by not removing transit
bolts or tub support.
Leakage caused by dirt (hair,
lint) on gasket and door glass.
Tub
support
Carton
base
Transit
bolt
Remove the transit bolts &
tub support.
Clean the gasket & door
glass.
41
Page 42

Not draining caused by clogging
of pump lter.
Clean the pump lter.
Water is not coming because
water inlet valve lters are
clogged or water inlet hoses are
kinked.
Water is not coming because too
much detergent use.
Laundry is hot or warm after
nished washing because the
inlet hoses are installed in
reverse.
Water is not supplied because
the water tap is not turned on.
Leakage caused by improper
installation of drain hose or
clogged drain hose.
Dispenser
Cold
Water
Inlet
water tap
Inlet Filter
Hot
Water
Inlet
Elbow
Bracket
Tie Strap
Clean the inlet valve lter
or reinstall the water inlet
hoses.
Clean the detergent
disperser.
Reinstall the inlet hoses.
Turn on the water tap.
Reinstall the drain hose.
Leakage caused by improper
installation of water inlet hose or
using other brand inlet hoses.
No power problem caused by
loose connection of power cord
or electrical outlet problem.
42
Reinstall the inlet hose.
Reconnect the power cord
or change the electrical
outlet.
Page 43

Service trips to deliver, pick
up, install the product or for
instruction on product use. The
removal and reinstallation of the
Product.
Level
ENGLISH
The warranty covers
manufacturing defects
only. Service resulting from
improper Installation is not
1°
covered.
If all screws are not installed
properly, it may cause excessive
vibration (Pedestal model only).
Water hammering (banging)
noise when washing machine is
lling with water.
High
Pressure
Water
Hit!!
Loud noise
Natural
water ow
Sudden
stopping
water ow
Install 4 screws at each
corner (Total 16EA).
Adjust the water pressure
by turning down the water
valve or water tap in the
home.
43
Page 44

Memo
Page 45

Memo
Page 46

Memo
Page 47

BUKU PANDUAN
PEMILIK
MESIN CUCI
BAHASA INDONESIA
Sebelum mulai memasang, bacalah petunjuk ini dengan cermat.
Petunjuk ini akan memudahkan pemasangan dan memastikan produk
dipasang dengan benar dan aman. Letakkan petunjuk ini di dekat
produk setelah pemasangan untuk digunakan sebagai referensi di
waktu mendatang.
F2721STWV
Registration No. : I.14.LG1.00402.0316
www.lg.com
Hak cipta © 2016-2019 LG Elektronik. Semua hak cipta di lindungi
Page 48

DAFTAR ISI
Buku panduan ini dibuat untuk sejumlah produk
dan dapat berisi gambar atau isi yang berbeda
dengan model yang Anda beli.
Buku panduan ini dapat direvisi oleh produsen.
PETUNJUK KESELAMATAN .................................03
Petunjuk Keselamatan Penting ...........................................................05
PEMASANGAN .......................................................08
Komponen ...........................................................................................08
Aksesori ............................................................................................... 08
Spesifikasi ...........................................................................................09
Persyaratan Tempat Pemasangan ......................................................10
Membuka Kemasan dan Melepas Baut Pengiriman ........................... 11
Menggunakan Alas Penahan Selip (Opsional) ....................................12
Lantai Kayu (Lantai Gantung)..............................................................12
Meratakan Kemiringan Mesin Cuci......................................................13
Menyambungkan Selang Air................................................................ 13
Pemasangan Selang Pembuangan ..................................................... 16
PENGOPERASIAN .................................................17
Menggunakan Mesin Cuci ................................................................... 17
Menyortir cucian ..................................................................................18
Menambahkan Produk Pembersih ...................................................... 19
Panel Kontrol ....................................................................................... 21
Program Pencucian ............................................................................. 22
Siklus Opsi...........................................................................................25
FUNGSI CERDAS ...................................................29
Menggunakan Aplikasi LG SmartThinQ. .............................................29
Menggunakan Smart Diagnosis™ ....................................................... 30
PEMELIHARAAN ....................................................31
Membersihkan Mesin Cuci .................................................................. 31
Membersihkan Filter Saluran Air Masuk ..............................................31
Membersihkan Filter Pompa Pembuangan ......................................... 32
Membersihkan Laci Dispenser ............................................................ 33
Tub Clean (Tabung Bersih) .................................................................. 33
Perhatian untuk Kebekuan Selama Musim Dingin .............................. 34
PEMECAHAN MASALAH ......................................36
Diagnosis Masalah ..............................................................................36
Pesan Kesalahan ................................................................................39
GARANSI ................................................................41
Page 49

PETUNJUK KESELAMATAN
Pedoman keselamatan berikut ditujukan untuk mencegah risiko atau
kerusakan tak terduga akibat pengoperasian produk secara tidak aman atau
tidak tepat.
Pedoman ini dipisah menjadi ‘PERINGATAN’ dan ‘PERHATIAN’ sebagaimana
dijelaskan di bawah.
Simbol ini ditampilkan untuk menunjukkan hal dan pengoperasian
yang dapat menimbulkan risiko. Bacalah bagian yang mencantumkan
simbol ini dengan saksama dan patuhi petunjuknya untuk menghindari
risiko.
BAHASA INDONESIA
PERINGATAN
petunjuk dapat menyebabkan cedera parah atau kematian.
PERHATIAN
dapat menyebabkan cedera ringan atau kerusakan produk.
- Ini menunjukkan bahwa kegagalan mematuhi
- Ini menunjukkan bahwa kegagalan mematuhi petunjuk
PERINGATAN
Untuk mengurangi risiko kebakaran, sengatan listrik, atau cedera pada
orang saat menggunakan produk Anda, tindakan pencegahan dasar untuk
keselamatan harus diikuti, termasuk yang berikut.
ANAK-ANAK DI RUMAH
Peralatan ini tidak ditujukan untuk digunakan oleh orang (termasuk anak-anak) dengan
kelainan sik, sensoris, atau kemampuan mental, atau tidak memiliki pengalaman atau
pengetahuan, kecuali mendapatkan pengawasan atau instruksi terkait penggunaan
peralatan ini oleh orang yang bertanggung jawab atas keselamatannya. Anak-anak
harus diawasi untuk memastikan mereka tidak bermain-main dengan peralatan ini.
Untuk penggunaan di Eropa:
Peralatan ini dapat digunakan oleh anak berusia mulai 8 tahun ke atas dan orang
dengan kelainan sik, sensoris, atau kemampuan mental, atau tidak memiliki
pengalaman dan pengetahuan jika mereka mendapatkan pengawasan atau instruksi
terkait penggunaan perangkat ini dengan cara yang aman dan memahami bahaya
yang dapat ditimbulkan. Jangan membiarkan anak-anak bermain dengan peralatan ini.
Pembersihan dan pemeliharaan oleh pengguna tidak boleh dilakukan oleh anak-anak
tanpa pengawasan.
Jauhkan dari anak berusia kurang dari 3 tahun kecuali selalu diawasi.
03
Page 50

PERSYARATAN PENTANAHAN
PERINGATAN
Demi keselamatan Anda, informasi dalam buku panduan ini harus dipatuhi
untuk meminimalkan risiko kebakaran, ledakan, atau sengatan listrik, atau
untuk mencegah kerusakan properti, cedera pada orang, atau kematian.
•Peralatan ini harus ditanahkan. Apabila terjadi kesalahan fungsi atau kerusakan,
pentanahan akan mengurangi risiko sengatan listrik dengan memberikan jalur
resistansi minimal untuk arus listrik.
•Peralatan ini dilengkapi kabel yang memiliki konduktor pentanahan perlengkapan
dan colokan pentanahan. Colokan harus dihubungkan ke stopkontak yang sesuai
yang dipasang dan ditanahkan dengan benar sesuai dengan semua peraturan dan
ketentuan setempat.
•Sambungan konduktor pentanahan perlengkapan yang tidak benar dapat menimbulkan
risiko sengatan listrik. Tanyakan kepada ahli listrik atau petugas servis yang
berkualikasi jika Anda ragu apakah peralatan ditanahkan dengan benar.
•Jangan memodikasi colokan yang disertakan bersama peralatan. Jika tidak pas
dengan stopkontak, mintalah ahli listrik berkualikasi untuk memasang stopkontak
yang sesuai.
04
Page 51

Petunjuk Keselamatan Penting
PERINGATAN
Untuk mengurangi risiko kebakaran, sengatan listrik, atau cedera pada
orang saat menggunakan produk Anda, tindakan pencegahan dasar untuk
keselamatan harus diikuti, termasuk yang berikut.
Pemasangan
•Jangan pernah mencoba mengoperasikan
peralatan ini jika rusak, terdapat kesalahan
fungsi, dibongkar sebagian, atau ada
komponen yang hilang atau rusak,
termasuk kabel atau colokan yang rusak.
Hal ini dapat menyebabkan sengatan listrik
atau cedera.
•Peralatan ini berat. Pemasangan dan
pemindahan peralatan ini mungkin
memerlukan dua orang atau lebih.
Tidak mengikuti petunjuk ini dapat
menyebabkan cedera.
•Simpan dan pasang peralatan ini di
tempat yang tidak terpapar suhu di
bawah titik beku atau kondisi cuaca luar
ruangan. Tidak mengikuti petunjuk ini
dapat menyebabkan kebocoran.
•Eratkan selang pembuangan untuk
mencegahnya terlepas. Cipratan air
dapat menyebabkan sengatan listrik.
•Kabel listrik yang rusak harus diganti oleh
produsen atau agen servisnya atau orang
berkualikasi demi menghindari bahaya.
•Peralatan ini tidak boleh dipasang di
balik pintu yang dapat dikunci, pintu
geser, atau pintu dengan engsel di
sisi yang berhadapan dengan mesin
pengering sehingga dapat menghalangi
pintu mesin terbuka penuh.
Pengoperasian
•Jangan menggunakan benda tajam
seperti bor atau pin untuk menekan atau
memisahkan unit operasi. Hal ini dapat
menyebabkan sengatan listrik atau cedera.
•Hanya staf perbaikan resmi dari pusat
servis LG Electronics yang boleh
membongkar, memperbaiki, atau
memodikasi produk. Servis yang tidak
tepat dapat menyebabkan cedera,
sengatan listrik, atau kebakaran.
•Jangan menyemprotkan air ke
bagian dalam atau luar produk untuk
membersihkannya. Air dapat merusak
insulasi sehingga menyebabkan
sengatan listrik atau kebakaran.
•Pastikan area di bawah dan di sekitar
peralatan bebas dari bahan yang mudah
terbakar seperti kain berserat, kertas,
karpet, bahan kimia, dsb. Penggunaan
yang tidak tepat dapat menyebabkan
kebakaran atau ledakan.
•Jangan memasukkan hewan hidup,
misalnya binatang peliharaan, ke dalam
produk. Hal ini dapat menyebabkan cedera.
•Jangan membiarkan pintu
peralatan terbuka. Anak-anak
dapat bergelantungan di pintu atau
merayap ke dalam peralatan sehingga
menyebabkan kerusakan atau cedera.
BAHASA INDONESIA
05
Page 52

•Jangan menggapai ke dalam peralatan
ini ketika masih beroperasi. Tunggu
hingga tabung berhenti sepenuhnya.
Tidak mengikuti petunjuk ini dapat
menyebabkan cedera.
•Jangan memasukkan, mencuci, atau
mengeringkan benda yang pernah
dibersihkan, dicuci, direndam, atau terkena
zat yang mudah terbakar atau meledak
(contohnya lilin, minyak, cat, bensin,
pembersih oli, larutan cuci kering, minyak
tanah, minyak sayur, minyak masak,
dll.). Penggunaan yang tidak tepat dapat
menyebabkan kebakaran atau ledakan.
•Jika terjadi banjir, hentikan penggunaan
produk dan hubungi pusat servis LG
Electronics. Kontak dengan air dapat
menyebabkan sengatan listrik.
•Jangan mendorong pintu berlebihan
ketika pintu peralatan terbuka. Tindakan
tersebut dapat menyebabkan peralatan
terguling dan menimbulkan cedera.
•Gunakan rangkaian selang baru yang
disediakan bersama peralatan ini.
Rangkaian selang lama tidak boleh
digunakan ulang. Kebocoran air dapat
menyebabkan kerusakan properti.
•Jangan menyentuh pintu selama siklus
uap, pengeringan, atau pencucian bersuhu
tinggi. Permukaan pintu dapat menjadi
sangat panas. Biarkan kunci pintu terbuka
sebelum membuka pintu. Tidak mengikuti
petunjuk ini dapat menyebabkan cedera.
•Jangan menggunakan gas yang mudah
terbakar dan zat yang mudah meledak
(benzena, bensin, thinner, petroleum,
alkohol, dsb.) di dekat produk. Hal itu dapat
menyebabkan ledakan atau kebakaran.
•Jika selang pembuangan atau selang
masuknya air membeku saat musim
dingin, hanya gunakan setelah
es dicairkan. Pembekuan dapat
menyebabkan kebakaran atau sengatan
listrik, dan komponen yang membeku
dapat menyebabkan produk mengalami
kesalahan fungsi atau penurunan masa
pakai.
•Jauhkan deterjen cuci, pelembut, dan
pemutih dari jangkauan anak-anak.
Produk tersebut mengandung bahan
beracun.
•Jangan menyambungkan banyak
produk ke soket-stopkontak multipel
atau kabel sambungan. Hal ini dapat
menimbulkan kebakaran.
•Cabut colokan listrik saat membersihkan
produk. Tidak mencabut colokan dapat
menyebabkan sengatan listrik atau
cedera.
•Jangan menyentuh colokan listrik
jika tangan basah. Hal ini dapat
menyebabkan sengatan listrik atau
cedera.
•Saat mencabut colokan listrik dari
stopkontak, pegang colokannya, jangan
kabelnya. Kerusakan kabel dapat
menyebabkan sengatan listrik atau
cedera.
•Jangan menekuk kabel listrik berlebihan
atau meletakkan benda berat di
atasnya. Kerusakan kabel listrik dapat
menyebabkan sengatan listrik atau
kebakaran.
06
Page 53

Pembuangan
•Sebelum membuang peralatan lama,
cabut kabelnya. Jadikan colokan tidak
dapat digunakan. Potong kabel tepat di
belakang peralatan untuk menghindari
penyalahgunaan.
•Buang bahan pengemas (seperti vinyl
dan styrofoam) jauh dari jangkauan
anak-anak. Bahan pengemas dapat
menyebabkan anak tercekik.
•Lepas pintu kompartemen pencucian
sebelum membuang peralatan ini untuk
menghindari bahaya yang terjadi karena
anak-anak atau hewan kecil terjebak di
dalamnya. Tidak mengikuti petunjuk ini
dapat menyebabkan cedera parah atau
kematian.
BAHASA INDONESIA
07
Page 54

PEMASANGAN
Komponen
Baut transit
Colokan listrik
Laci
Panel kontrol
Tabung
Pintu
Selang pembuangan
Sumbat pembuangan
Filter pompa
pembuangan
Sumbat penutup
(Lokasi mungkin
berbeda, tergantung
produknya)
Aksesori
Selang air (1EA)
(Opsi : Panas (1EA))
Sumbat untuk menutup
lubang baut pengiriman
Kunci pas Braket siku (untuk
mengencangkan selang
pembuangan)
Kabel pengikat Kabel Grounding
Kaki yang dapat
disesuaikan
Lembaran anti-selip
(2EA)
08
Page 55

Spesikasi
Model F2721STWV
Kapasitas Pencucian 21 kg
Catu daya 220 V~, 50 Hz
Ukuran 700 mm (W) x 835 mm (D) x 990 mm (H)
Berat produk 100 kg
Watt Maks. 2200 W
Tekanan air yang
diperbolehkan
0,1–1,0 Mpa (1,0–10,0 kgf/cm
•Tampilan dan spesikasi dapat berbeda tanpa pemberitahuan untuk meningkatkan kualitas produk.
•Kapasitas yang dimaksud adalah kapasitas maksimum pakaian kering dalam satuan kilogram.
2
)
BAHASA INDONESIA
09
Page 56

Persyaratan Tempat Pemasangan
2.5 cm
15 cm
Lokasi
59.4 cm
10 cm80.2 cm
139.6 cm
Lantai rata: Kemiringan yang diperbolehkan di bawah
seluruh mesin cuci adalah 1°.
Stopkontak listrik: Harus berada dalam jarak 1,5 meter
dari sisi lokasi mesin cuci.
•Jangan membuat stopkontak kelebihan muatan
dengan lebih dari satu peralatan.
Jarak Tambahan: Untuk dinding, 10 cm: belakang
/2,5 cm: sisi kanan & kiri
•Jangan meletakkan atau menyimpan produk cucian di
atas mesin cuci kapan pun.
•Produk tersebut dapat merusak lapisan atau kontrol.
Pemosisian
•Letakkan mesin cuci di lantai keras dan rata.
•Pastikan sirkulasi udara di sekitar mesin cuci tidak
terhalang karpet, keset, dsb.
•Jangan pernah mencoba mengakali lantai yang tidak
rata dengan meletakkan sepotong kayu, karton, atau
bahan serupa di bawah mesin cuci.
•Jika tidak mungkin menghindari meletakkan mesin
cuci di sebelah kompor gas, atau pembakar batu bara,
insulasi (85x60 cm) berlapis aluminium foil di sisi yang
menghadap kompor harus disisipkan di antara kedua
peralatan.
2.5 cm
•Jangan memasang mesin cuci di ruangan tempat
suhu membeku dapat timbul. Selang yang membeku
dapat pecah di bawah tekanan. Keandalan unit kontrol
elektronik dapat terganggu pada suhu di bawah titik
beku.
•Pastikan bahwa saat mesin cuci dipasang, mesin
mudah diakses oleh teknisi apabila terjadi kerusakan.
•Setelah mesin cuci terpasang, atur keempat kakinya
menggunakan kunci pas baut transit yang disediakan
untuk memastikan peralatan stabil, dan terdapat jarak
sekitar 15 cm di antara bagian atas mesin cuci dengan
bagian bawah permukaan perabotan yang dipasang
di atasnya.
•Peralatan ini tidak dirancang untuk penggunaan
maritim atau penggunaan dengan pemasangan
bergerak, misalnya di karavan, pesawat, dsb.
Sambungan Listrik
•Jangan menggunakan kabel sambung atau adaptor
ganda.
•Selalu cabut colokan mesin cuci dan matikan pasokan
air setelah digunakan.
•Sambungkan mesin cuci ke soket yang ditanahkan
sesuai dengan regulasi sistem kabel yang berlaku.
•Posisi mesin cuci harus diatur agar colokan mudah
diakses.
•Perbaikan mesin cuci harus dilakukan oleh personel
yang berkualikasi saja. Perbaikan yang dilakukan
oleh orang tak berpengalaman dapat menyebabkan
cedera atau kesalahan fungsi berat. Hubungi pusat
servis setempat.
•Jika mesin cuci dikirim saat musim dingin dan suhu
di bawah titik beku, letakkan mesin cuci di ruangan
bersuhu kamar selama beberapa jam sebelum
mengoperasikannya.
10
Page 57

Membuka Kemasan dan Melepas
Baut Pengiriman
Angkat mesin cuci hingga terlepas dari alas
1
gabusnya.
•Setelah melepas karton dan bahan pengiriman,
angkat mesin cuci hingga terlepas dari alas
gabusnya. Pastikan penyangga tabung terlepas
dan tetap di alas serta tidak menempel di bagian
bawah mesin cuci.
•Jika Anda harus merebahkan mesin cuci untuk
melepas alas karton, selalu lindungi sisi mesin
cuci dan rebahkan perlahan di sisinya. JANGAN
merebahkan mesin cuci di bagian depan atau
belakangnya.
Pasang sumbat lubang.
3
•Temukan sumbat lubang yang disertakan dalam
paket aksesori dan pasangkan ke lubang baut
pengiriman.
Sumbat
CATATAN
•Simpan rakitan baut untuk digunakan di waktu
mendatang. Untuk mencegah kerusakan
komponen internal, JANGAN memindahkan mesin
cuci tanpa memasang kembali baut pengiriman.
•Tidak melepas baut pengiriman dan penahan
dapat menyebabkan getaran dan kebisingan
hebat, yang dapat berujung pada kerusakan
mesin cuci permanen. Kabel diikat di belakang
mesin cuci menggunakan baut pengiriman untuk
membantu mencegah pengoperasian dalam
keadaan baut pengiriman terpasang.
BAHASA INDONESIA
Penyangga
tabung
(Opsional)
Lepas rakitan bautnya.
2
•Mulai dari dua baut pengiriman paling bawah,
gunakan kunci pas (disertakan) untuk melepas
semua baut pengiriman dengan memutarnya
berlawanan arah jarum jam. Lepas rakitan baut
dengan sedikit menggoyangkannya sambil
ditarik.
Baut
pengiriman
Alas karton
Penahan
11
Page 58

Menggunakan Alas Penahan Selip
Lantai Kayu (Lantai Gantung)
(Opsional)
Jika Anda memasang mesin cuci di permukaan
licin, mesin cuci dapat bergeser karena getaran
yang berlebihan. Perataan yang tidak tepat dapat
menyebabkan kesalahan fungsi akibat bising dan
getaran. Jika hal ini terjadi, pasang alas penahan selip
di bawah kaki perataan dan atur kemiringannya.
Bersihkan lantai untuk memasang alas penahan
1
selip.
•Gunakan kain kering untuk menyingkirkan dan
membersihkan benda asing dan kelembapan.
Jika masih lembap, alas penahan selip bisa
bergeser.
Atur kemiringan setelah meletakkan mesin cuci di
2
area pemasangan.
Letakkan sisi berperekat pada alas penahan selip
3
di lantai.
•Alas penahan selip paling efektif jika dipasang
di bawah kaki depan. Jika sulit meletakkan alas
di bawah kaki depan, letakkan di bawah kaki
belakang.
Sisi ini menghadap atas
Sisi berperekat
•Lantai kayu sangat rentan terhadap getaran.
•Untuk mencegah getaran, sebaiknya letakkan
mangkok karet dengan ketebalan minimal 15 mm
pada setiap kaki mesin cuci, yang disekrup ke
setidaknya dua balok lantai.
Mangkok Karet
•Jika dimungkinkan, pasang mesin cuci di salah satu
sudut ruangan, tempat lantai lebih stabil.
•Eratkan mangkok karet untuk mengurangi getaran.
•Mangkok karet (p/no.4620ER4002B) tersedia di Pusat
Servis LG.
CATATAN
•Penempatan dan perataan mesin cuci yang benar
akan menjamin pengoperasian yang panjang,
reguler, dan andal.
•Posisi mesin cuci harus 100% horizontal dan tidak
goyah.
•Mesin cuci tidak boleh bergerak ‘zigzag’ dari sudut
ke sudut ketika berisi muatan.
•Permukaan tempat pemasangan harus bersih,
bebas dari lilin lantai dan lapisan pelumas lainnya.
•Jangan sampai kaki-kaki mesin cuci basah.
Tidak mengikuti petunjuk ini dapat menyebabkan
getaran atau kebisingan.
Pastikan mesin cuci rata.
4
•Dorong atau goyangkan tepi atas mesin cuci
secara perlahan untuk memastikan mesin cuci
tidak goyang. Jika mesin cuci goyang, atur lagi
kemiringannya.
12
Page 59

Meratakan Kemiringan Mesin
Menyambungkan Selang Air
Cuci
Jika lantai tidak rata, atur kaki yang dapat disesuaikan
seperlunya (Jangan menyisipkan sepotong kayu dsb. di
bawah kaki). Pastikan keempat kakinya stabil dan tidak
bergerak di lantai, lalu pastikan peralatan rata sempurna
(Gunakan alat pengukur kemiringan).
•Setelah posisi mesin cuci rata, kencangkan mur
pengunci di bagian dasar mesin cuci. Semua mur
pengunci harus dikencangkan.
Meninggikan
Mur
Pengunci
•Pemeriksaan Diagonal
Saat menekan tepian pelat atas mesin cuci secara
diagonal, mesin cuci seharusnya tidak bergerak ke
atas atau bawah sama sekali (Periksa kedua arah).
Jika mesin cuci goyang saat pelat atasnya ditekan
secara diagonal, atur lagi kaki-kakinya.
CATATAN
•Lantai jenis kayu atau gantung dapat menjadi
salah satu penyebab getaran yang berlebihan dan
ketidakseimbangan.
•Jika Anda memasang mesin cuci di alas yang
ditinggikan, mesin cuci harus dikencangkan
dengan aman guna menghilangkan risiko mesin
terjatuh.
Menurunkan
Kencangkan ke-4
mur pengunci
•Tekanan pasokan air harus antara 0,1 MPa dan 1,0
MPa (1,0–10,0 kgf/cm
2
).
•Jangan merusak atau memasang sekrup miring saat
menyambungkan selang air ke katup.
•Jika tekanan pasokan air lebih dari 1,0 MPa, alat
dekompresi harus dipasang.
•Periksa kondisi selang secara berkala dan ganti
selang jika diperlukan.
Memeriksa Selang Air Segel Karet
Dua segel karet disediakan bersama selang saluran air.
Segel ini digunakan untuk mencegah kebocoran air.
Pastikan sambungan ke keran cukup kencang.
Konektor selang
Segel karet
Konektor selang
Segel karet
BAHASA INDONESIA
13
Page 60

Menyambungkan Selang ke Keran Air
Menyambungkan selang jenis sekrup ke keran
berulir
Pasang sekrup sambungan selang ke keran pasokan
air.
Menyambungkan selang jenis sekrup ke keran
tanpa ulir
Lepas keempat sekrup pemasangan.
1
Konektor atas
Segel karet
Tekan adaptor ke ujung keran sehingga segel
3
karet membentuk sambungan yang kedap air.
Kencangkan keempat sekrup pemasangan.
Tekan selang air ke atas secara vertikal sehingga
4
segel karet di dalam selang dapat melekat
sepenuhnya ke keran, lalu kencangkan dengan
memutar sekrupnya ke kanan.
Plat
Selang air
Sekrup pemasangan
Lepas pelat pemandu jika keran terlalu besar untuk
2
dipasang ke adaptor.
Plat
pemandu
Menyambungkan selang jenis sekali sentuh ke
keran tanpa ulir
Lepas sekrup pelat cincin adaptor dan longgarkan
1
keempat sekrup pemasang.
Plat cincin
Lepas pelat pemandu jika keran terlalu besar untuk
2
dipasang ke adaptor.
Plat
pemandu
14
Page 61

Tekan adaptor ke ujung keran sehingga segel karet
3
membentuk sambungan yang kedap air.
Kencangkan pelat cincin adaptor dan keempat
sekrup pemasangan.
Tarik pelat kait sambungan ke bawah, tekan selang
4
air ke adaptor, dan lepas pelat kait sambungan.
Pastikan adaptor terkunci di posisinya.
Plat kait
Menyambungkan Keran ke Mesin Cuci
Pastikan tidak ada tekukan pada selang dan tidak
terjepit.
Jika mesin cuci Anda memiliki dua katup.
•Selang air dengan sambungan merah untuk keran air
panas.
CATATAN
•Setelah selesai menyambung, apabila air bocor
dari selang, ulangi langkah yang sama.
Gunakan jenis keran paling konvensional untuk
pasokan air. Bila keran berbentuk persegi atau
terlalu besar, lepas plat pemandu sebelum
memasukkan keran ke dalam adaptor.
BAHASA INDONESIA
CATATAN
•Setelah menyambungkan selang air ke keran,
buka keran untuk meluruhkan zat asing (kotoran,
pasir, serbuk gergaji, dsb.) di dalam saluran air.
Tampung air buangan di dalam baskom, dan
periksa suhu airnya.
Menggunakan keran horizontal
Keran horizontal
Keran sambung
Keran persegi
15
Page 62

Pemasangan Selang
Pembuangan
•Jangan meletakkan selang pembuangan di ketinggian
lebih dari 100 cm di atas lantai. Air di dalam mesin
cuci bisa tidak mengalir keluar atau mengalir dengan
lambat.
•Memasang selang pembuangan dengan benar akan
melindungi lantai dari kerusakan akibat kebocoran air.
•Jika selang pembuangan terlalu panjang, jangan
memasukkannya secara paksa ke dalam mesin cuci.
Hal ini dapat menyebabkan kebisingan yang tidak
wajar.
sekitar 100 cm
sekitar 145 cm
sekitar 105 cm
maks. 100 cm
•Bila memasang selang pembuangan ke wastafel,
kencangkan dengan tali.
•Memasang selang pembuangan dengan benar akan
melindungi lantai dari kerusakan akibat kebocoran air.
Tabung cuci
Penahan
selang
maks. 100 cm
Kabel
pengikat
maks. 100 cm
16
Page 63

PENGOPERASIAN
Menggunakan Mesin Cuci
Sebelum pencucian pertama, pilih siklus (Katun 60 °C,
tambahkan deterjen setengah muatan), biarkan mesin
cuci berjalan tanpa berisi pakaian. Tindakan ini akan
menghilangkan residu dan air dari tabung yang mungkin
tertinggal selama proses produksi.
Sortir cucian dan masukkan.
1
•Sortir cucian berdasarkan jenis kain, tingkat
kekotoran, warna, dan ukuran muatan
seperlunya. Buka pintu dan masukkan item ke
dalam mesin cuci.
Tambahkan produk pembersih dan/atau deterjen
2
serta pelembut.
•Tambahkan deterjen dalam jumlah yang tepat
ke dispenser deterjen. Jika ingin, tambahkan
pemutih atau pelembut kain ke area dispenser
yang sesuai.
Pilih siklus pencucian yang diinginkan.
4
•Tekan tombol siklus beberapa kali atau putar
kenop pemilih siklus sampai siklus yang
diinginkan dipilih.
Mulai siklus.
5
•Tekan tombol Start/Pause untuk memulai siklus.
Mesin cuci akan berguncang sebentar tanpa
air untuk mengukur berat muatan. Jika tombol
Start/Pause tidak ditekan dalam waktu 60 menit,
mesin cuci akan mati dan semua pengaturan
hilang.
Akhir siklus.
6
•Saat siklus selesai, akan terdengar suatu melodi.
Segera keluarkan baju dari mesin cuci untuk
mengurangi kusut. Periksa sekeliling segel pintu
ketika mengeluarkan isi untuk melihat apakah
ada benda yang mungkin tersangkut di segel.
BAHASA INDONESIA
Nyalakan mesin cuci.
3
•Tekan tombol Power untuk menyalakan mesin
cuci.
17
Page 64

Menyortir cucian
Perhatikan label perawatan di baju Anda.
1
•Label ini memberikan informasi tentang konten
kain pakaian Anda dan cara mencucinya.
•Simbol label perawatan.
Suhu pencucian
Pencucian normal dengan mesin
Pres permanen
Lembut
Cuci tangan
Jangan dicuci
Perhatikan sebelum memasukkan cucian.
3
•Kombinasikan item besar dan kecil dalam satu
muatan. Masukkan item besar lebih dulu.
•Item besar tidak boleh lebih dari setengah total
muatan cuci. Jangan mencuci satu item saja. Hal
ini dapat menyebabkan muatan tidak seimbang.
Tambahkan satu atau dua item serupa.
•Periksa semua saku untuk memastikan
semuanya kosong. Benda seperti paku, jepit
rambut, korek, pena, koin, dan kunci dapat
merusak mesin cuci dan juga baju Anda.
Menyortir cucian.
2
•Untuk mendapatkan hasil terbaik, sortir pakaian
ke dalam kelompok-kelompok yang bisa dicuci
dengan siklus pencucian yang sama.
•Kain yang berbeda perlu dicuci dengan suhu dan
kecepatan putar yang berbeda.
•Selalu pisahkan warna gelap dan terang
serta putih. Cucilah secara terpisah karena
perpindahan warna dan serat dapat terjadi
sehingga menyebabkan luntur pada kain putih
dan yang berwarna pucat. Jika mungkin, jangan
mencuci item yang sangat kotor dengan yang
hanya sedikit kotor.
– Kekotoran (Berat, Normal, Ringan)
Pisahkan baju menurut tingkat kekotorannya.
– Warna (Putih, Terang, Gelap)
Pisahkan kain putih dan berwarna.
– Serat (Penghasil serat, Pengumpul)
Cuci bahan yang menghasilkan dan
mengumpulkan serat secara terpisah.
•Tutup retsleting, pengait, dan tali untuk
memastikan item tersebut tidak tersangkut ke
baju lain.
•Lakukan penanganan awal terhadap kotoran dan
noda dengan menyikatnya menggunakan sedikit
larutan deterjen untuk membantu mengangkat
kotoran.
•Periksa lipatan gasket eksibel (abu-abu) dan
singkirkan segala benda kecil.
•Periksa bagian dalam tabung dan keluarkan
segala benda dari pencucian sebelumnya.
•Keluarkan semua pakaian atau benda dari
gasket eksibel untuk mencegah kerusakan
pada pakaian dan gasket.
18
Page 65

Menambahkan Produk Pembersih
Takaran Deterjen
•Penggunaan deterjen harus sesuai petunjuk dari
produsen deterjen dan dipilih menurut jenis, warna,
tingkat kekotoran kain dan suhu pencucian.
•Jika terlalu banyak deterjen yang digunakan,
busa yang dihasilkan bisa terlalu banyak dan
mengakibatkan hasil cuci buruk atau beban berat
terhadap motor.
•Jika Anda ingin menggunakan deterjen cair, ikuti
pedoman yang disediakan oleh produsen deterjen.
•Anda bisa menuangkan deterjen cair langsung ke
dispenser deterjen utama jika Anda akan segera
memulai siklus.
•Jangan gunakan deterjen cair jika Anda menggunakan
Waktu tunda, atau jika Anda telah memilih PraPencucian, karena cairan dapat mengeras.
•Jika terlalu banyak buih sabun yang dihasilkan,
kurangi jumlah deterjen.
•Penggunaan deterjen mungkin harus disesuaikan
untuk suhu air, kesadahan air, tingkat kekotoran dan
ukuran muatan. Untuk hasil terbaik, hindari timbulnya
buih sabun yang berlebihan.
•Baca label pada pakaian sebelum memilih deterjen
dan suhu air.
•Saat menggunakan mesin cuci, gunakan deterjen
khusus untuk tiap jenis pakaian:
– Deterjen bubuk biasa untuk semua jenis kain
– Deterjen bubuk untuk kain halus
– Deterjen cair untuk semua jenis kain atau deterjen
khusus untuk wol
•Untuk performa pencucian dan pemutihan yang lebih
baik, gunakan deterjen dengan pemutih bubuk biasa.
•Deterjen dialirkan dari dispenser pada awal siklus.
•Jangan letakan atau menyimpan peralatan mencuci
seperti, deterjen, pemutih atau cairan pelembut, di
atas mesin cuci atau pengering. Segera bersihkan
tumpahan apapun. Produk ini bisa dapat merusak
lapisan mesin & control.
CATATAN
•Jangan sampai deterjen mengeras.
Hal tersebut dapat menyebabkan sumbatan,
performa bilas buruk, dan bau.
•Muatan penuh: Sesuai dengan rekomendasi
produsen.
•Muatan sebagian: 3/4 dari jumlah normal
•Muatan minimal: 1/2 dari muatan penuh
Menambahkan Deterjen dan Pelembut
Kain
Menambahkan deterjen
•Hanya Main wash →
•Pre wash+Main wash →
CATATAN
•Terlalu banyak deterjen, pemutih, atau pelembut
dapat menyebabkan luapan.
•Pastikan Anda menggunakan deterjen dalam
jumlah yang sesuai.
Menambahkan pelembut kain
•Jangan melebihi garis isi maksimum. Kelebihan isi
dapat menyebabkan pengaliran pelembut kain yang
terlalu cepat, sehingga dapat menodai pakaian. Tutup
penutup dispenser dengan perlahan.
NORMAL NORMAL
BAHASA INDONESIA
19
Page 66

•Jangan biarkan pelembut kain tetap berada di dalam
dispenser deterjen selama lebih dari 2 hari. (Pelembut
kain dapat mengeras)
•Pelembut akan otomatis ditambahkan selama siklus
pembilasan terakhir.
•Jangan membuka dispenser ketika air sedang
dialirkan.
•Larutan (benzana, dsb.) tidak boleh digunakan.
CATATAN
•Jangan menuangkan pelembut kain langsung ke
pakaian.
Menambahkan pelembut air
Pelunak air seperti antilimescale dapat digunakan untuk
mengurangi penggunaan detergen di daerah dengan
tingkat kesadahan air yang tinggi.
•Gunakan sesuai dengan jumlah yang disebutkan
pada kemasannya. Pertama, tambahkan detergen lalu
pelunak air.
PERHATIAN
•Untuk menghindari cedera, jangan letakkan jari di
bawah penutup atau di antara penutup dan pelat
atas ketika menekan atau menggeser membuka
atau menutup tutup deterjen dispenser.
MAX
NORMAL
Menggunakan tablet
Buka pintu dan masukkan tablet ke tabung.
1
Masukkan cucian ke tabung dan tutup pintunya.
2
20
Page 67

Panel Kontrol
BAHASA INDONESIA
Tombol Power (Daya)
•Tekan tombol Power untuk menyalakan mesin
cuci.
•Tekan dan tahan tombol Power selama 1 detik
untuk mematikan mesin cuci.
Tombol Start/Pause (Mulai/Jeda)
•Tombol Start/Pause ini digunakan untuk
memulai atau menjeda siklus pencucian.
•Jika perlu menghentikan sementara siklus
pencucian, tekan tombol Start/Pause.
Layar
•Layar menampilkan pengaturan, perkiraan sisa
waktu, opsi, dan pesan status. Saat produk
dinyalakan, pengaturan default di layar akan
menyala.
•Layar menunjukkan perkiraan sisa waktu.
Saat ukuran muatan sedang dihitung secara
otomatis,
ditampilkan.
berkedip atau ‘Detecting’
Panel tombol program
•Program tersedia menurut jenis cucian.
•Lampu akan menyala untuk menunjukkan
program yang dipilih.
Opsi
•Opsi memungkinkan Anda memilih siklus
tambahan dan akan menyala bila dipilih.
•Gunakan tombol-tombol ini untuk memilih opsi
siklus yang diinginkan untuk siklus yang dipilih.
21
Page 68

Program Pencucian
Tabel program
Program Keterangan Jenis Kain
Pakaian jadi berwarna (kemeja,
gaun malam, piyama, dsb.) dan
muatan katun dengan kotoran
normal (pakaian dalam).
Katun, pakaian dalam, sarung
bantal, seprei, pakaian bayi.
Katun campuran, baju campuran
poliester, blus.
Baju bayi dengan kotoran ringan. 5,0 kg
Sprei katun kecuali kain khusus
(halus, wol, sutera, dsb.) dengan
isian: duvet, bantal, selimut,
penutup sofa dengan isian ringan
Cotton
(Katun)
Allergy Care
(Perawatan
alergi)
Hot Wash
(Pencucian
dengan air
panas)
Refresh
(Penyegaran)
Baby Care
(Perawatan
pakaian bayi)
Duvet
(Selimut)
Memberikan performa yang lebih
baik dengan memadukan berbagai
gerakan tabung.
Membersihkan pencetus alergi
seperti kutu busuk di rumah, serbuk
sari, dan bulu kucing.
Washes laundry in a hot cycle 95°C
Menghilangkan kekusutan dalam 20
menit dengan uap.
Menghilangkan noda protein dan
padat, memberikan performa bilas
lebih baik.
Siklus ini untuk item besar seperti
bed cover, bantal, penutup sofa, dsb.
Suhu
yang
Tepat
40 °C
(Dingin
sampai
60 °C)
Tanpa
pilihan
Tanpa
pilihan
Dingin
(Dingin
sampai
40 °C)
Beban
Maksimal
Peringkat
3,0 kg
3 items
Muatan
Besar
Sports Wear
(Pakaian
olahraga)
Wool
(Wool)
Speed Wash
(Pencucian
cepat)
22
Siklus ini cocok untuk pakaian
olahraga seperti baju jogging dan
baju lari.
Memungkinkan pencucian kain wol.
(Gunakan deterjen untuk bahan wol
yang bisa dicuci dengan mesin).
Siklus ini memberikan waktu
pencucian cepat untuk muatan kecil
dan baju yang sedikit kotor.
Coolmax, gore-tex, eece, dan
sympatex
Khusus bahan wol yang bisa dicuci
menggunakan mesin dengan wol
baru murni
Cucian berwarna yang sedikit
kotor.PERHATIAN: Gunakan
kurang dari 20 g deterjen (untuk
muatan 2,0 kg), jika tidak deterjen
dapat tersisa di pakaian.
*30 °C
(Dingin
sampai
30 °C)
40 °C
(Dingin
sampai
40 °C)
*40 °C
(Dingin
sampai
40 °C)
3,0 kg
2,0 kg
Page 69

Program Keterangan Jenis Kain
Suhu
yang
Tepat
Beban
Maksimal
BAHASA INDONESIA
Heavy Duty
(Noda berat)
Silent
(Tidak berisik)
Color Care
(Perawatan
warna)
Rinse+Spin
(Pembilasan +
Putaran)
Downloaded
(Pengunduhan)
•* : Suhu yang tepat dapat dipilih setelah menghapus opsi uap, dan otomatis termasuk ke dalam siklus.
•Suhu Air: Pilih suhu air yang sesuai untuk siklus pencucian yang dipilih. Selalu ikuti petunjuk atau label perawatan
dari produsen pakaian saat mencuci.
Siklus ini untuk cucian yang sangat
kotor melalui rotasi tabung yang
lebih kuat.
Memberikan lebih sedikit suara
bising dan getaran serta menghemat
uang karena menggunakan listrik
sesaat.
Jika pakaian bisa pudar, gunakan
siklus ini. Siklus ini mencegah
pemudaran. (Gunakan deterjen
untuk kain berwarna.)
Gunakan untuk cucian yang hanya
memerlukan pembilasan atau untuk
menambahkan pelembut kain yang
dimasukkan saat pembilasan
Untuk siklus yang dapat diunduh. Jika Anda tidak mengunduh siklus apa pun, pengaturan default-nya
adalah Pencucian dengan air dingin.
Kain Katun yang sangat kotor
Pakaian jadi berwarna (kemeja,
gaun malam, piyama, dsb.) dan
katun putih dengan kotoran ringan
(pakaian dalam).
Kain berwarna gelap yang terbuat
dari katun atau kain campuran.
Kain normal yang bisa dicuci
60 °C
(40 °C
sampai
60 °C)
40 °C
(Dingin
sampai
60 °C)
30 °C
(Dingin
sampai
40 °C)
Tanpa
pilihan
3,0 kg
3,0 kg
5,0 kg
Peringkat
CATATAN
•Sebaiknya gunakan deterjen netral.
23
Page 70

Opsi Ekstra
Program
Cotton
(Katun)
Allergy Care
(Perawatan alergi)
Hot Wash
(Pencucian
dengan air panas)
Refresh
(Penyegaran)
Baby Care
(Perawatan
pakaian bayi)
Duvet
(Selimut)
Sports Wear
(Pakaian olahraga)
Delay Wash
(Menunda
Pencucian)
Steam
(Uap)
Add Load
(Menambah
Muatan)
Turbo
Wash
TM
Favorite
(Favorit)
● ● ● ●** ● ●
● ●* ● ● ● ●
● ● ● ● ● ●
● ●* ●
● ●* ● ● ● ●
● ● ● ●
● ●** ● ● ● ●
Crease
Care
(Anti
Kusut)
Wool
(Wool)
Speed Wash
(Pencucian cepat)
Heavy Duty
(Noda berat)
Silent
(Tidak berisik)
Color Care
(Perawatan warna)
Rinse+Spin
(Pembilasan +
Putaran)
Downloaded
(Pengunduhan)
* : Opsi ini otomatis disertakan dalam putaran dan tidak bisa dihapus.
** : Opsi ini otomatis disertakan pada siklus dan bisa dihapus.
● ● ●
● ●** ● ●** ●
● ● ● ● ● ●
● ● ● ●
● ● ● ● ●
● ● ● ●
● ● ● ●
24
Page 71

Siklus Opsi
Add Load (Menambah Muatan)
Dealy Wash (Menunda Pencucian)
Anda dapat mengatur penundaan waktu agar mesin
cuci dimulai secara otomatis dan selesai setelah interval
waktu yang ditentukan.
Tekan tombol Power.
1
Pilih program pencucian.
2
Tekan tombol Dealy Wash dan atur waktu yang
3
dibutuhkan.
Tekan tombol Start/Pause.
4
CATATAN
•Waktu penundaan adalah waktu menuju akhir
program, bukan awal. Waktu pelaksanaan yang
sesungguhnya dapat berbeda karena suhu air,
muatan cuci, dan faktor lain.
Turbo Wash™
Siklus pencucian di bawah 1 jam dengan penghematan
energi dan air. (berdasarkan setengah cucian)
Tekan tombol Power.
1
Gunakan fungsi ini untuk menambahkan muatan atau
mengeluarkan benda asing.
Tekan tombol Add Load.
1
Tutup pintu setelah menambahkan muatan atau
2
mengeluarkan benda asing (mis. koin atau pin
dsb.)
Tekan tombol Start/Pause.
3
•Hasil bila memilih Add Load selama siklus berjalan.
– Saat tabung berputar: Tabung berhenti dan Door
Lock mati.
– Bila suhu air di dalam tabung lebih tinggi dari
45 °C: Add Load tidak tersedia dengan suara
peringatan singkat untuk keselamatan.
– Bila ada banyak air di dalam tabung: Door Lock
mati setelah air dibuang hingga tingkat aman.
CATATAN
•Buka pintu saat Door Lock mati setelah
memeriksa keamanannya.
•Demi keamanan, Add Load tidak berfungsi bila
Pembersihan Tabung sedang berlangsung.
•Pastikan cucian masuk semua ke dalam tabung.
Cucian yang tersangkut di antara bagian tutup
pintu bisa merusak bungkus pintu (bagian karet)
dan dapat menyebabkan kegagalan.
BAHASA INDONESIA
Pilih program pencucian.
2
Tekan tombol Turbo Wash™.
3
Tekan tombol Start/Pause.
4
CATATAN
•Fungsi Turbo Wash™ pada beberapa metode
dipilih secara otomatis.
25
Page 72

Favorite (Favorit)
Steam (Uap)
Favorite memungkinkan Anda menyimpan siklus
pencucian kustom untuk digunakan di lain waktu.
Tekan tombol Power.
1
Pilih program pencucian.
2
Pilih siklus (Metode pencucian, jumlah pembilasan,
3
kecepatan putaran, suhu air, dll.).
Tekan dan tahan tombol Favorite selama 3 detik.
4
Favorite kini disimpan untuk digunakan di lain waktu.
Untuk menggunakan kembali program tersebut, pilih
Favorite dan tekan tombol Start/Pause.
Crease Care (Anti Kusut)
Jika ingin mencegah kain kusut, pilih Crease Care.
Tekan tombol Power.
1
Pilih program pencucian.
2
Fitur Cuci Uap meningkatkan performa pencucian
dengan konsumsi energi rendah.
Siklus Penyegaran akan mengurangi lipatan pada
pakaian.
Tekan tombol Power.
1
Pilih program pencucian.
2
Sentuh tombol Steam.
3
Tekan tombol Start/Pause.
4
Uap cuci
•Untuk pakaian bayi, pakaian dalam, atau pakaian
yang sangat bernoda.
•Siklus Penyegaran selalu termasuk ke dalam
Pencucian Uap.
•Jangan menggunakan Uap cuci untuk pakaian yang
mudah luntur dan pakaian yang lembut seperti wol
dan sutra.
Sentuh tombol Crease Care.
3
Tekan tombol Start/Pause.
4
26
Page 73

Wash (Cuci)
Spin (Putaran)
Soak (Rendam)
Gunakan mode ini untuk mencuci pakaian normal atau
pakaian tebal dan berat yang sangat kotor.
Pre Wash (Pra-Pencucian)
Jika cucian sangat kotor, siklus Pre Wash dianjurkan.
Intensive (Intensif)
Jika tingkat kekotoran cucian normal dan berat, opsi
Intensive akan efektif.
Normal (Normal)
Opsi ini otomatis dipilih dalam setiap metode, kecuali
Rinse+Spin, Baby Care.
Light (Sedikit)
Siklus ini cocok untuk pakaian yang sedikit kotor.
CATATAN
•Opsi yang dapat dipilih akan berbeda-beda,
tergantung pada siklus yang dipilih.
•Tingkat kecepatan putaran bisa dipilih dengan
menekan tombol Spin beberapa kali.
– Sangat Tinggi / Tinggi / Sedang / Rendah / Sangat
Rendah
•Hanya Spin
Tekan tombol Power.
1
Tekan tombol Spin untuk memilih kecepatan
2
putaran.
Tekan tombol Start/Pause.
3
Temp. (Suhu)
Tombol Temp. digunakan untuk memilih kombinasi suhu
cuci dan bilas untuk siklus yang dipilih. Tekan tombol ini
sampai pengaturan yang diinginkan menyala. Semua
pembilasan menggunakan air keran dingin.
•Pilih suhu air yang cocok untuk jenis muatan yang
akan dicuci. Ikuti label perawatan kain pakaian untuk
hasil terbaik.
BAHASA INDONESIA
Rinse (Bilas)
Dengan menekan tombol Rinse, Jumlah bilasan bisa
dipilih.
•1 / 2 / 3 / 4 / 5 (kali)
Refresh Cycle (Penyegaran)
Tekan tombol Power.
1
Pilih program Refresh.
2
Tekan tombol Start/Pause.
3
CATATAN
•Untuk kinerja yang lebih baik jangan masukkan
lebih dari 3 item. Ketika siklus Penyegaran
diakhiri, laundri akan terus dibolak-balik secara
perlahan hingga 30 menit untuk mencegah
kerutan. Anda dapat membuka pintu saat ini
dengan menekan tombol apapun.
27
Page 74

Child Lock (Pengaman Anak) ( )
Beep On / Off (Bip Hidup-Mati)
Pilih fungsi ini untuk mengunci tombol pada rangkaian
kontrol guna mencegah gangguan.
Mengunci panel kontrol
Tekan dan tahan tombol Wash dan Rinse selama
1
3 detik.
Suara bip berbunyi, dan ‘ ’ akan muncul di layar.
2
Bila Child Lock diatur, semua tombol dikunci
kecuali tombol Power.
CATATAN
•Mematikan daya tidak akan mengatur ulang fungsi
Child Lock. Anda harus menonaktifkan Child Lock
agar dapat mengakses fungsi lain.
Membuka kunci panel kontrol
Tekan dan tahan tombol Wash dan Rinse selama 3
detik.
•Suara bip berbunyi dan sisa waktu untuk program
yang dipilih akan muncul lagi di layar.
Tekan tombol Power.
1
Pilih program pencucian.
2
Tekan tombol Beep On/Off untuk mengatur fungsi
3
Bunyi hidup/mati.
Tekan tombol Start/Pause.
4
CATATAN
•Begitu fungsi Beep on/off function disetel,
pengaturan akan diingat, meskipun daya
dimatikan.
•Jika Anda ingin mematikan suara bip, cukup
ulangi proses ini.this process.
28
Page 75

FUNGSI CERDAS
Menggunakan Aplikasi LG
SmartThinQ
Memasang LG SmartThinQ
Cari aplikasi LG SmartThinQ dari Google Play Store
pada ponsel cerdas. Ikuti petunjuk untuk mengunduh
dan memasang aplikasi.
Fungsi Tag On
•Untuk alat dengan logo
•Fungsi Tag On hanya dapat digunakan dengan
sebagian besar ponsel pintar yang dilengkapi dengan
fungsi NFC (Near Field Communication) dan berbasis
OS (sistem operasi) Android.
Downloaded (Pengunduhan)
Unduh siklus baru dan khusus yang tidak disertakan
dalam siklus dasar alat.
Alat yang telah berhasil didaftarkan dapat mengunduh
beragam siklus khusus untuk alat tersebut.
Hanya satu siklus yang dapat disimpan pada alat pada
satu waktu.
Setelah pengunduhan siklus pada alat selesai dilakukan,
produk akan menyimpan siklus yang diunduh sampai
ada siklus baru yang diunduh.
CATATAN
•Tekan di aplikasi LG SmartThinQ untuk
panduan yang lebih mendetail tentang cara
menggunakan fungsi Tag On.
•Posisi sensor NFC dapat berbeda tergantung
pada jenis smartphone, dan ada beberapa jenis
smartphone yang tur NFC-nya tidak dapat
digunakan dikarenakan adanya perbedaan sistem
transmisinya. Jika jarak transmisi terlalu jauh atau
terdapat sticker metal atau casing pelindung pada
smartphone, maka proses transmisi tidak dapat
berjalan dengan baik. Pada beberapa kasus, ada
kemungkinan bahwa smartphone dengan tur
NFC tidak dapat ditransmisikan.
•Isi buku panduan ini dapat berbeda tergantung
pada versi aplikasi LG SmartThinQ, dan dapat
diubah tanpa pemberitahuan kepada pelanggan.
•Fitur NFC bisa berbeda tergantung dengan jenis
smartphone yang digunakan
BAHASA INDONESIA
Penasihat Pembersihan Tabung
Fungsi ini menunjukkan berapa banyak sisa siklus
sebelum saatnya untuk menjalankan siklus Pembersihan
Tabung.
Smart Diagnosis™
Fungsi ini memberikan informasi yang berguna untuk
mendiagnosis dan menyelesaikan masalah pada alat
berdasarkan pola pemakaian.
Pengaturan
Fungsi ini untuk mengganti nama produk dan
menghapus produk.
29
Page 76

Smart Diagnosis™ Menggunakan Ponsel
Cerdas
•Untuk alat dengan logo atau
Gunakan fungsi ini jika Anda membutuhkan diagnosis
yang akurat oleh pusat informasi pelanggan LG
Electronics saat terjadi kegagalan fungsi atau kerusakan
alat.
Smart Diagnosis™ tidak dapat diaktifkan bila alat tidak
tersambung ke listrik. Jika alat tidak dapat menyala,
maka penyelesaian masalah harus dilakukan tanpa
menggunakan Smart Diagnosis™.
Menggunakan Smart Diagnosis™
Smart Diagnosis™ Melalui Pusat
Informasi Pelanggan
Gunakan fungsi ini jika Anda membutuhkan diagnosis
yang akurat oleh pusat informasi pelanggan LG
Electronics saat terjadi kegagalan fungsi atau kerusakan
alat. Hanya gunakan fungsi ini untuk menghubungi
perwakilan layanan, bukan selama pengoperasian
normal.
Tekan tombol Power untuk menyalakan mesin
1
cuci. Jangan menekan tombol lain atau memutar
kenop pemilih siklus.
Pertahankan posisi ponsel hingga transmisi nada
4
selesai. Sisa waktu transfer data akan ditampilkan.
•Untuk hasil terbaik, jangan memindahkan ponsel
saat nada sedang ditransmisikan.
•Jika agen pusat panggilan tidak bisa
mendapatkan rekaman data yang akurat, Anda
mungkin diminta untuk mencoba lagi.
Setelah hitung mundur selesai dan nada berhenti,
5
lanjutkan percakapan dengan agen pusat
panggilan, yang selanjutnya akan dapat membantu
Anda menggunakan informasi yang ditransmisikan
untuk analisis.
CATATAN
•Fungsi Smart Diagnosis™ bergantung pada
kualitas panggilan lokal.
•Performa komunikasi akan meningkat dan Anda
dapat menerima layanan yang lebih baik jika
menggunakan telepon rumah.
•Bila transfer data Smart Diagnosis™ buruk karena
kualitas panggilan yang buruk, Anda mungkin
tidak menerima layanan Smart Diagnosis™ yang
terbaik.
Saat diarahkan untuk melakukannya oleh pusat
2
panggilan, letakkan lubang bicara ponsel Anda di
dekat tombol Power.
Maks
10 mm
Tekan dan tahan tombol Temp. selama 3 detik
3
sambil mengarahkan lubang bicara ponsel ke ikon
atau tombol Power.
30
Page 77

PEMELIHARAAN
PERINGATAN
•Cabut kabel mesin cuci sebelum membersihkan
untuk menghindari risiko sengatan listrik. Tidak
mematuhi peringatan ini dapat menyebabkan
cedera parah, kebakaran, sengatan listrik, atau
kematian.
•Jangan gunakan bahan kimia keras, pembersih
yang bersifat mengikis, atau larutan untuk
membersihkan mesin cuci. Hal tersebut dapat
merusak lapisan mesin cuci.
Membersihkan Mesin Cuci
Perawatan Setelah Mencuci
•Setelah siklus selesai, bersihkan pintu dan bagian
dalam segel pintu untuk menghilangkan kelembapan.
•Biarkan pintu terbuka untuk mengeringkan interior
tabung.
•Bersihkan bodi mesin cuci dengan kain kering untuk
menghilangkan kelembapan.
Membersihkan Eksterior
Perawatan mesin cuci yang tepat bisa memperpanjang
masa pakainya.
Perawatan dan Pembersihan Interior
•Gunakan handuk atau kain lembut untuk mengelap
sekeliling lubang pintu dan kaca pintu mesin cuci.
•Selalu keluarkan benda-benda dari mesin cuci segera
setelah siklus selesai. Meninggalkan benda lembap di
dalam mesin cuci dapat menyebabkan kusut, luntur,
dan menimbulkan bau.
•Jalankan siklus Tub Clean sebulan sekali (atau lebih
sering, jika perlu) untuk menghilangkan sisa deterjen
yang menumpuk dan residu lainnya.
Membersihkan Filter Saluran Air
Masuk
•Matikan penghitung waktu jika Anda akan
meninggalkan mesin cuci dalam waktu lama (mis.
liburan), terutama jika tidak ada saluran pembuangan
di dekatnya.
•Icon '
air tidak memasuki dispenser deterjen.
•Jika air sangat sadah atau mengandung kapur,
lter saluran air masuk dapat tersumbat. Karena itu,
sebaiknya bersihkan secara berkala.
1
' akan ditampilkan pada panel kontrol ketika
Matikan keran air dan buka sekrup selang saluran
air masuk.
BAHASA INDONESIA
Pintu:
•Bersihkan dengan kain lembap di bagian luar dan
dalamnya, lalu keringkan dengan kain lembut.
Eksterior:
•Segera bersihkan segala tumpahan.
•Usap dengan kain lembap.
•Jangan menekan permukaan layar dengan benda
tajam.
Bersihkan lter menggunakan sikat keras.
2
31
Page 78

Membersihkan Filter Pompa
2
Pembuangan
•Filter pembuangan mengumpulkan benang dan benda
kecil yang tertinggal dari cucian. Periksa secara rutin
untuk memastikan lter bersih sehingga mesin cuci
bisa berjalan lancar.
•Biarkan air menjadi dingin sebelum membersihkan
pompa pembuangan, melakukan pengosongan
darurat, atau membuka pintu dalam keadaan darurat.
Buka sumbat penutup dan tarik selang.
1
Cabut sumbat pembuangan dan buka lter dengan
2
memutarnya ke kiri.
Wadah untuk
menampung air
pembuangan.
Setelah membersihkan, putar lter pompa dan
4
masukkan sumbat pembuangan.
Tutup sumbat penutup.
5
PERHATIAN
•Pertama, buang air menggunakan selang
pembuangan, lalu buka lter pompa untuk
membuang semua benang atau benda kecil
lainnya.
•Berhati-hatilah saat menguras karena air mungkin
panas.
1
Singkirkan segala benda asing dari lter pompa.
3
32
Page 79

Membersihkan Laci Dispenser
Tub Clean (Tabung Bersih)
Meninggalkan detergen dalam dispenser detergen untuk
jangka waktu yang lama atau menggunakan mesin cuci
dalam jangka waktu yang lama dapat menimbulkan
pembentukan kerak dalam dispenser detergen. Tarik
keluar dan bersihkan dispenser detergen sekali
seminggu.
Geser tutup dispenser detergen hingga terbuka.
1
Lepaskan penutup dispenser detergen dan tarik
2
keluar mangkuk detergen.
Bersihkan penutup dan mangkuk dengan air
3
hangat.
- Gunakan kain lembut atau sikat untuk
membersihkan dan menghilangkan setiap residu.
Tub Clean adalah siklus khusus untuk membersihkan
bagian dalam mesin cuci.
Level air lebih tinggi digunakan pada siklus ini dengan
kecepatan putaran yang lebih tinggi. Lakukan siklus ini
secara berkala.
Keluarkan semua pakaian atau benda dari mesin
1
cuci dan tutup pintunya.
Buka penutup dispenser dan tambahkan bahan
2
Anti kerak-kapur ke kompartemen pencucian
utama.
Tutup penutup dispenser dengan perlahan.
3
Nyalakan lalu tekan tombol Tub Clean. Lalu ‘ ’
4
akan ditampilkan di layar.
Tekan tombol Start/Pause untuk memulai.
5
Setelah siklus selesai, biarkan pintu terbuka agar
6
lubang pintu mesin cuci, gasket eksibel, dan kaca
pintu mengering.
BAHASA INDONESIA
Lap bagian yang basah dengan handuk atau kain
4
kering setelah dibersihkan.
Pasang kembali mangkuk detergen dan penutup
5
dispenser detergen.
PERINGATAN
•Jangan semprotkan air ke dalam mesin cuci.
Melakukan hal ini dapat menyebabkan kebakaran
atau kejutan listrik.
CATATAN
•Hanya gunakan air saat Anda membersihkan
dispenser detergen. Pastikan untuk menggunakan
Rinse+Spin untuk membilas tabung mesin
cuci sebelum siklus pencucian saat Anda
menggunakan detergen pembersih untuk
membersihkan tabung mesin cuci.
PERHATIAN
•Jika ada anak-anak, waspadalah agar jangan
sampai meninggalkan pintu dalam keadaan
terbuka terlalu lama.
CATATAN
•Jangan menambahkan deterjen ke kompartemen
deterjen. Busa sabun yang berlebihan dapat
timbul dan bocor dari mesin cuci.
33
Page 80

Perhatian untuk Kebekuan
Selama Musim Dingin
•Bila membeku, produk tidak dapat beroperasi secara
normal. Pastikan Anda memasang produk di tempat
yang tidak akan membuatnya membeku saat musim
dingin.
•Apabila produk harus dipasang di teras luar atau di
tempat luar ruang lainnya, pastikan Anda memeriksa
yang berikut ini.
•Setelah menutup keran, lepaskan selang air
dingin dari keran, lalu keluarkan air sambil tetap
mengarahkan selang ke bawah.
Selang air
dingin
Cara Menjaga Agar Produk Tidak
Membeku
•Setelah mencuci, keluarkan sisa air di dalam pompa
seluruhnya dengan lubang sumbat selang yang
digunakan untuk pembuangan sisa air. Setelah
air dibuang seluruhnya, tutup sumbat selang yang
digunakan untuk membuang sisa air dan sumbat
tutupnya.
Sumbat
pembuangan
•Gantung selang pembuangan untuk mengeluarkan air
di dalam selang seluruhnya.
Selang
pembuangan
PERHATIAN
•Apabila selang pembuangan dipasang dengan
bentuk yang melengkung, selang bagian dalam
dapat membeku.
Sumbat tutup
Periksa Kebekuan
•Jika air tidak terbuang saat membuka sumbat selang
yang digunakan untuk membuang sisa air, periksa
unit pembuangan.
Sumbat
pembuangan
Sumbat
tutup
•Nyalakan daya, pilih Rinse and Spin, lalu tekan tombol
Start/Pause.
MAX
NORMAL
Selang
Dispenser
CATATAN
•Periksa apakah air yang masuk ke dispenser
ketika sedang membilas, dan air keluar melalui
selang pengurasan saat tabung berputar.
•Saat ‘
beroperasi, periksa unit pasokan air dan unit
pembuangan (Beberapa model tidak memiliki fungsi
alarm yang menandakan pembekuan).
’ ditampilkan di jendela layar ketika produk
pembuangan
34
Page 81

Cara Menangani Pembekuan
•Pastikan tabung kosong, tuangkan air hangat
50–60 °C hingga mencapai bagian karet di dalam
tabung, tutup pintunya, dan tunggu selama 1–2 jam.
•Bila air telah dibuang seluruhnya dari tabung, tutup
sumbat selang yang digunakan untuk membuang
sisa air, pilih Rinse and Spin, dan tekan tombol Start/
Pause.
MAX
NORMAL
BAHASA INDONESIA
50‒60 °C
PERHATIAN
•Jangan menggunakan air mendidih. Hal ini
dapat menyebabkan luka bakar pada kulit atau
kerusakan produk.
•Buka sumbat tutup dan sumbat selang yang
digunakan untuk membuang sisa air guna
mengeluarkan air seluruhnya.
Sumbat
pembuangan
Sumbat
tutup
CATATAN
•Apabila air tidak terbuang, ini artinya es belum
mencair seluruhnya. Tunggulah lebih lama.
Selang
Dispenser
pembuangan
CATATAN
•Periksa apakah air yang masuk ke dispenser
ketika sedang membilas, dan air keluar melalui
selang pengurasan saat tabung berputar.
•Bila terjadi masalah pasokan air, lakukan tindakan
berikut.
– Matikan keran, dan cairkan kebekuan keran serta
kedua area sambungan selang air masuk pada
produk menggunakan kain yang dibasahi air
panas.
– Keluarkan selang air dan rendam dengan air
hangat bersuhu kurang dari 50–60 °C.
Selang air
50‒60 °C
35
Page 82

PEMECAHAN MASALAH
•Mesin cuci Anda dilengkapi sistem pemantauan kesalahan otomatis untuk mendeteksi dan mendiagnosis masalah
di tahap awal. Jika mesin cuci Anda tidak berfungsi dengan benar atau tidak berfungsi sama sekali, periksa yang
berikut ini sebelum menghubungi layanan:
Diagnosis Masalah
Gejala Alasan Solusi
•Hentikan mesin cuci, periksa tabung dan
Suara berderak
dan berisik
Benda asing seperti koin atau peniti
mungkin ada di dalam tabung atau
pompa.
lter pembuangan.
•Jika suara berisik masih ada setelah mesin
cuci dimulai ulang, hubungi pusat servis
resmi Anda.
Suara benturan
Suara getaran
Kebocoran air
Busa berlebihan
Air tidak masuk
ke mesin cuci
atau masuk
dengan lambat
Muatan cuci yang berat dapat
menimbulkan suara benturan. Hal ini
biasanya wajar.
Apakah semua baut transit dan
penyangga tabung sudah dilepas?
Apakah semua kaki menapak dengan
stabil di lantai?
Selang air atau selang pembuangan
longgar di bagian keran atau mesin
cuci.
Pipa pembuangan air tersumbat.
Pasokan air tidak mencukupi di lokasi
itu.
Keran pasokan air tidak terbuka
sepenuhnya.
Selang air masuk tertekuk.
•Jika suara berlanjut, mesin cuci mungkin
tidak seimbang. Hentikan dan ratakan ulang
beban cucian.
•Jika belum dilepas saat pemasangan, lihat
Panduan pemasangan untuk melepas baut
transit.
•Pastikan mesin cuci dalam posisi datar
dan kencangkan mur pengunci sampai ke
bagian dasar alat.
•Periksa dan kencangkan sambungan
selang.
•Bersihkan sumbatan pipa pembuangan.
Hubungi tukang pipa jika perlu.
•Terlalu banyak deterjen atau penggunaan
deterjen yang tidak cocok dapat
menyebabkan busa berlebih yang bisa
mengakibatkan kebocoran air.
•Periksa keran lain di rumah.
•Buka keran sepenuhnya.
•Luruskan selang.
Air di mesin cuci
tidak terbuang
atau terbuang
dengan lambat
36
Filter selang air masuk tersumbat.
Selang pembuangan tertekuk atau
tersumbat.
Filter pembuangan tersumbat.
•Periksa lter selang air masuk.
•Bersihkan dan luruskan selang
pembuangan.
•Bersihkan lter pembuangan.
Page 83

Gejala Alasan Solusi
Mesin cuci tidak
menyala
Mesin cuci tidak
berputar
Pintu tidak bisa
dibuka
Kabel listrik mungkin belum
ditancapkan atau sambungan longgar.
Sekring rumah meledak, pemutus
arus terputus, atau terjadi mati lampu.
Keran pasokan air tidak dibuka.
Pastikan pintu tertutup rapat.
•Pastikan colokan pas dengan stopkontak di
dinding.
•Atur ulang pemutus arus atau ganti
sekring. Jangan meningkatkan kapasitas
sekring. Jika masalahnya adalah kelebihan
beban, mintalah bantuan ahli listrik untuk
memperbaikinya.
•Buka keran pasokan air.
•Tutup pintu dan tekan tombol Start/Pause.
Setelah menekan tombol Start/Pause,
mungkin diperlukan waktu beberapa saat
sebelum mesin cuci mulai berputar. Pintu
harus dikunci agar mesin dapat berputar.
Tambahkan 1 atau 2 benda serupa untuk
menyeimbangkan muatan. Atur ulang
muatan untuk memungkinkan putaran yang
benar.
•Setelah mesin cuci dimulai, pintu tidak bisa
dibuka demi keamanan. Periksa apakah ikon
‘Door Lock’ menyala. Anda dapat membuka
pintu dengan aman setelah lampu ikon ‘Door
Lock’ mati.
BAHASA INDONESIA
Waktu siklus
cuci tertunda
Pelembut kain
meluber
Pelembut keluar
terlalu cepat
Masalah
pengeringan
Terlalu banyak pelembut dapat
menyebabkan luapan.
Tidak dapat mengeringkan
•Waktu pencucian dapat berbeda menurut
jumlah cucian, tekanan air, suhu air,
dan kondisi penggunaan lainnya. Jika
terdeteksi ketidakseimbangan atau program
pembuangan busa menyala, waktu
pencucian akan bertambah.
•Ikuti pedoman pelembut untuk memastikan
penggunaan takaran yang sesuai. Jangan
melebihi garis isi maksimum.
•Tutup penutup dispenser dengan perlahan.
Jangan membuka penutup selama siklus
pencucian.
•Jangan mengisi berlebihan. Pastikan mesin
cuci membuang air dengan benar untuk
mengeluarkan air secukupnya dari muatan.
Muatan pakaian terlalu sedikit untuk
bisa berputar dengan benar. Tambahkan
beberapa handuk.
37
Page 84

Gejala Alasan Solusi
Bau
Bau ini disebabkan oleh karet yang
menempel pada mesin cuci.
Jika gasket pintu yang terbuat dari
karet dan daerah segel pintu tidak
dibersihkan secara rutin, bau dapat
timbul dari jamur atau benda asing.
Bau dapat timbul jika benda
asing tertinggal di lter pompa
pembuangan.
Bau dapat timbul jika selang
pembuangan tidak dipasang dengan
baik, menyebabkan terjadinya aliran
balik (air mengalir kembali ke dalam
mesin cuci).
Saat menggunakan fungsi
pengeringan, bau dapat timbul dari
serat dan bahan cucian lainnya yang
menempel pada pemanas.
(Model pengering saja)
•Ini adalah bau biasa dari karet baru dan
akan hilang setelah mesin dijalankan
beberapa kali.
•Pastikan untuk membersihkan gasket
dan segel pintu secara rutin serta periksa
apakah ada benda-benda kecil di bagian
di bawah segel pintu saat mengeluarkan
cucian dari mesin.
•Pastikan untuk membersihkan lter pompa
pembuangan secara rutin.
•Saat memasang selang pembuangan,
pastikan bahwa selang tidak tertekuk atau
tersumbat.
•Ini bukanlah kerusakan fungsi.
Bau tertentu dapat timbul akibat
mengeringkan pakaian basah dengan
udara panas.
(Model pengering saja)
•Bau ini akan hilang setelah beberapa saat.
38
Page 85

Pesan Kesalahan
Gejala Alasan Solusi
Pasokan air tidak mencukupi di
area.
Keran pasokan air tidak terbuka
sepenuhnya.
Selang air masuk tertekuk.
Filter selang air masuk tersumbat.
Jika terjadi kebocoran air pada
selang air masuk, indikator ‘
akan berwarna merah.
•Dapat berbeda menurut model.
Selang pembuangan tertekuk
atau tersumbat.
•Periksa keran lain di rumah.
•Buka keran sepenuhnya.
•Luruskan selang.
•Periksa lter selang air masuk.
’
•Bersihkan dan luruskan selang
pembuangan.
BAHASA INDONESIA
Filter pembuangan tersumbat.
Muatan terlalu sedikit.
Muatan tidak seimbang.
Peralatan ini memiliki deteksi
ketidakseimbangan dan sistem
koreksi. Jika benda berat
dimasukkan (mis. keset kamar
mandi, jubah mandi, dsb.) sistem
ini dapat menghentikan putaran
atau bahkan memutus siklus
putaran sepenuhnya.
Jika cucian masih terlalu basah
di akhir siklus, tambahkan
cucian yang lebih kecil untuk
menyeimbangkan muatan dan
ulangi siklus putar.
•Bersihkan lter pembuangan.
•Tambahkan 1 atau 2 benda serupa untuk
menyeimbangkan muatan.
•Tambahkan 1 atau 2 benda serupa untuk
menyeimbangkan muatan.
•Atur ulang muatan untuk memungkinkan
putaran yang benar.
•Atur ulang muatan untuk memungkinkan
putaran yang benar.
39
Page 86

Gejala Alasan Solusi
•Tutup pintu sepenuhnya.
Pastikan pintu tidak terbuka.
Jika ‘ , , ’ tidak dilepas,
hubungi layanan.
•Cabut kabel listrik dan hubungi layanan.
Air berlebihan karena kesalahan
katup air.
Sensor level air mengalami
kesalahan fungsi.
Motor kelebihan muatan.
Air bocor.
Daya pencuci mati.
Kesalahan Kontrol
Apakah selang air masuk/
keluar atau pompa pembuangan
membeku?
•Tutup keran air.
•Cabut kabel listrik.
•Hubungi layanan.
•Tutup keran air.
•Cabut kabel listrik.
•Hubungi layanan.
•Biarkan mesin cuci berhenti selama 30
menit agar motor mendingin, lalu mulai
ulang siklus.
•Hubungi layanan.
•Mulai ulang siklus.
•Cabut kabel listrik dan hubungi layanan.
•Masukkan air hangat ke dalam tabung
dan cairkan kebekuan selang air keluar
serta pompa pembuangan. Basahi
handuk dengan air hangat dan letakkan
ke selang air masuk.
40
Page 87

GARANSI
Garansi terbatas ini tidak mencakup:
•Perjalanan layanan untuk mengirim, mengambil, atau memasang maupun memperbaiki produk; instruksi untuk
pelanggan mengenai pengoperasian produk; perbaikan atau penggantian sekring atau koreksi sistem kabel maupun
perpipaan, atau koreksi atas perbaikan/pemasangan tidak resmi.
•Kegagalan pengoperasian produk selama gangguan listrik dan interupsi atau layanan listrik yang tidak memadai.
•Kerusakan akibat pipa air bocor atau rusak, pipa air beku, saluran pembuangan terbatas, pasokan air tidak
memadai atau terganggu.
•Kerusakan akibat pengoperasian Produk di lingkungan yang korosif atau bertentangan dengan instruksi yang
disebutkan di buku panduan pemilik Produk.
•Kerusakan Produk karena kecelakaan, hama dan kutu, petir, angin, kebakaran, banjir, atau kuasa Tuhan.
•Kerusakan atau kegagalan karena modikasi atau pengubahan tidak resmi, atau jika mesin cuci digunakan untuk
tujuan selain dari yang dimaksudkan, atau segala kebocoran air yang mana produk tidak dipasang dengan benar.
•Kerusakan atau kegagalan karena arus listrik, tegangan, atau kode perpipaan yang tidak tepat, penggunaan
komersial atau industrial, atau penggunaan aksesori, komponen, atau produk pembersih habis pakai yang tidak
disetujui oleh LG.
•Kerusakan yang disebabkan transportasi dan penanganan, termasuk goresan, lecet, tercungkil, dan/atau kerusakan
lain terhadap lapisan produk, kecuali kerusakan tersebut diakibatkan oleh kecacatan material atau pengerjaan.
•Kerusakan atau item yang hilang pada layar, produk tidak lengkap, diskon, atau Produk daur ulang (refurbish).
•Produk dengan nomor seri asli yang telah dibuang, diubah, atau tidak bisa langsung ditentukan. Model dan Nomor
seri, beserta tanda terima ritel asli, diperlukan untuk validasi garansi.
•Peningkatan biaya utilitas dan pengeluaran utilitas tambahan.
•Perbaikan apabila Produk digunakan di luar penggunaan rumah tangga yang normal dan wajar atau bertentangan
dengan instruksi yang disebutkan dalam buku panduan pemilik Produk.
•Biaya terkait pemindahan Produk Anda dari rumah untuk diperbaiki.
•Pemindahan dan pemasangan ulang Produk apabila dipasang di lokasi yang sulit diakses atau tidak dipasang
sesuai dengan instruksi pemasangan yang diterbitkan, termasuk buku panduan pemasangan dan pemilik LG.
•Kerusakan akibat penggunaan yang tidak tepat, penyalahgunaan, pemasangan, perbaikan, atau pemeliharaan yang
tidak tepat. Perbaikan yang tidak tepat meliputi penggunaan komponen yang tidak disetujui atau disebutkan oleh
LG.
BAHASA INDONESIA
Getaran atau suara bising yang
aneh karena tidak melepaskan
baut transit atau penyangga
tabung.
Kebocoran karena kotoran
(rambut, serat pakaian) pada
gasket dan kaca pintu.
Penyangga
tabung
Alas
karton
Baut
transit
Lepas baut transit &
penyangga tabung.
Bersihkan gasket & kaca
pintu.
41
Page 88

Air tidak bisa terbuang karena
penyumbatan lter pompa.
Bersihkan lter pompa.
Air tidak mengalir karena lter
katup air masuk tersumbat atau
selang air masuk tertekuk.
Air tidak mengalir karena terlalu
banyak deterjen yang digunakan.
Cucian panas atau hangat
setelah selesai mencuci karena
selang air masuk dipasang
terbalik.
Air tidak mengalir masuk karena
keran air tidak dibuka.
Kebocoran karena pemasangan
selang pembuangan tidak
tepat atau selang pembuangan
tersumbat.
Dispenser
Saluran
Air
Dingin
keran air
Filter Air Masuk
Saluran
Air
Panas
Braket
Siku
Kabel
Pengikat
Bersihkan lter katup air
masuk atau pasang ulang
selang air masuk.
Bersihkan dispenser
deterjen.
Pasang ulang selang air
masuk.
Buka keran air.
Pasang ulang selang
pembuangan.
Kebocoran karena pemasangan
selang air masuk tidak tepat atau
menggunakan selang air masuk
merek lain.
Masalah tidak ada daya karena
sambungan kabel listrik longgar
atau masalah stopkontak listrik.
42
Pasang ulang selang air
masuk.
Sambungkan ulang kabel
listrik atau ganti stopkontak
listrik.
Page 89

Perjalanan layanan untuk
mengirim, mengambil,
memasang produk atau untuk
instruksi penggunaan produk.
Pemindahan atau pemasangan
ulang Produk.
Jika semua sekrup tidak
dipasang dengan benar, getaran
berlebihan dapat terjadi (Khusus
model pedestal).
Level
Garansi mencakup
kecacatan produksi saja.
BAHASA INDONESIA
Servis akibat Pemasangan
yang tidak tepat tidak
1°
dicakup.
Pasang 4 sekrup di tiap
sudut (Total 16EA).
Suara bising dari benturan
(tumbukan) air saat mesin cuci
diisi air.
Air
Bertekanan
Tinggi
Brak!!
Suara
bising
Aliran
air alami
Aliran air
berhenti
mendadak
Sesuaikan tekanan air
dengan mengecilkan
bukaan katup air atau
keran air di rumah.
43
Page 90

Memo
Page 91

Memo
Page 92

Memo
Page 93

Memo
Page 94

LG Electronics Indonesia
PT. LG ELECTRONICS INDONESIA
GANDARIA 8 OFFICE TOWER LT.29 BC& 31 ABCD
JL. SULTAN ISKANDAR MUDA,
KEBAYORAN LAMA UTARA-KEBAYORAN LAMA,
JAKARTA SELATAN - DKI JAKARTA RAYA,
12240, INDONESIA
LAYANAN KONSUMEN/CUSTOMER INFORMATION CENTER:
14010
TANDA PENDAFTARAN
PETUNJUK PENGGUNAAN MANUAL DAN
KARTU JAMINAN/GARANSI
DALAM BAHASA INDONESIA BAGI PRODUK ELEKTRONIK
Nomor : I.14.LG1.00402.0316
 Loading...