

Page 1
OWNER’S MANUAL
WASHING
ENGLISH
TIẾNG VIỆT
MACHINE
Before beginning installation, read these instructions carefully.
This will simplify installation and ensure that the product is installed
correctly and safely. Leave these instructions near the product after
installation for future reference.
F2514DTGW
MFL69306278
www.lg.com
Copyright © 2017 LG Electronics Inc. All Rights Reserved
Page 2

TABLE OF CONTENTS
SAFETY INSTRUCTIONS ......................................03
Important Safety Instructions ............................................................... 05
INSTALLATION .......................................................08
Parts ....................................................................................................08
Accessories .........................................................................................08
Specifications ......................................................................................09
Installation Place Requirements .......................................................... 10
Unpacking and Removing Shipping Bolts ........................................... 11
Using
Anti–Slip Sheets
Wooden Floors (Suspended Floors) .................................................... 12
Leveling the Washing Machine ............................................................13
Connecting Inlet Hose .........................................................................13
Installation of Drain Hose ....................................................................16
This manual is produced for a group of products
and may contain images or content different from
the model you purchased.
This manual is subject to revision by the
manufacturer.
(Optional) ........................................................12
OPERATION ...........................................................17
Using the Washing Machine ................................................................17
Sorting Iaundry ....................................................................................18
Adding Cleaning Products ................................................................... 19
Control Panel ....................................................................................... 21
Programme Table ................................................................................22
Option Cycle ........................................................................................ 26
Dry ....................................................................................................... 30
SMART FUNCTIONS ..............................................31
Using LG SmartThinQ Application .......................................................31
Using Smart Diagnosis™ ....................................................................33
MAINTENANCE ......................................................34
Cleaning your Washing Machine .........................................................34
Cleaning the Water Inlet Filter .............................................................34
Cleaning the Drain Pump Filter ...........................................................35
Cleaning the Dispenser Drawer...........................................................36
Tub Clean ............................................................................................36
Caution on Freezing During Winter ..................................................... 37
TROUBLESHOOTING ............................................39
Diagnosing Problems ..........................................................................39
Error Messages ...................................................................................42
WARRANTY ............................................................44
Page 3
SAFETY INSTRUCTIONS
The following safety guidelines are intended to prevent unforeseen risks or
damage from unsafe or incorrect operation of the product.
The guidelines are separated into ‘WARNING’ and ‘CAUTION’ as described
below.
This symbol is displayed to indicate matters and operations that can
cause risk. Read the part with this symbol carefully and follow the
instructions in order to avoid risk.
ENGLISH
WARNING
can cause serious injury or death.
CAUTION
can cause the minor injury or damage the product.
- This indicates that the failure to follow the instructions
- This indicates that the failure to follow the instructions
WARNING
To reduce the risk of re, electric shock, or injury to persons when using
your product, basic safety precautions should be followed, including the
following.
CHILDREN IN THE HOUSEHOLD
This appliance is not intended for use by persons (including children) with reduced
physical, sensory or mental capabilities, or lack of experience and knowledge, unless
they have been given supervision or instruction concerning use of the appliance by a
person responsible for their safety. Children should be supervised to ensure that they do
not play with the appliance.
For use in Europe:
This appliance can be used by children aged from 8 years and above and persons with
reduced physical, sensory or mental capabilities or lack of experience and knowledge if
they have been given supervision or instruction concerning use of the appliance in a safe
way and understand the hazards involved. Children shall not play with the appliance.
Cleaning and user maintenance shall not be made by children without supervision.
Children of less than 3 years should be kept away unless continuously supervised.
03
Page 4

GROUNDING REQUIREMENTS
WARNING
For your safety, the information in this manual must be followed to
minimize the risk of re, explosion, or electric shock, or to prevent
property damage, injury to persons, or death.
•This appliance must be grounded. In the event of malfunction or breakdown, grounding
will reduce the risk of electric shock by providing a path of least resistance for electric
current.
•This appliance is equipped with a cord having an equipment-grounding conductor and
grounding plug. The plug must be plugged into an appropriate outlet that is properly
installed and grounded in accordance with all local codes and ordinances.
•Improper connection of the equipment-grounding conductor can result in risk of electric
shock. Check with a qualied electrician or service person if you are in doubt as to
whether the appliance is properly grounded.
•Do not modify the plug provided with the appliance. If it does not t the outlet, have a
proper outlet installed by a qualied electrician.
04
Page 5

Important Safety Instructions
WARNING
To reduce the risk of re, electric shock, or injury to persons when using
your product, basic safety precautions should be followed, including the
following.
ENGLISH
Installation
•Never attempt to operate this appliance
if it is damaged, malfunctioning, partially
disassembled, or has missing or broken
parts, including a damaged cord or plug.
It can cause electric shock or injury.
•This appliance is heavy. Two or more
people may be needed to install and
move the appliance. Failure to do so
can result in injury.
•Store and install this appliance where
it will not be exposed to temperatures
below freezing or exposed to outdoor
weather conditions. Failure to do so can
result in leakage.
•Tighten the drain hose to avoid
separation. Splashing of water may
cause electric shock.
Operation
•Do not use a sharp object like drill or pin
to press or separate an operation unit. It
can cause the electric shock or injury.
•Only an authorized repair person from
LG Electronics service centre should
disassemble, repair, or modify the
product. Improper service may cause
injury, electric shock or re.
•Do not spray the water inside or outside
the product to clean it. Water can
damage the insulation, causing electric
shock or re.
•Keep the area underneath and around
your appliances free of combustible
materials such as lint, paper, rags,
chemicals, etc. Improper use can cause
re or explosion.
•If the supply cord is damaged, it must
be replaced by the manufacturer or
its service agents or similarly qualied
person in order to avoid a hazard.
•The appliance must not be installed
behind a lockable door, a sliding door
or a door with a hinge on the opposite
side to that of the tumble dryer, in such
a way that a full opening of the tumble
dryer door is restricted. The washing
machine shall not be installed at a
humid place.
•Do not put living animals, such as pets
into the product. It may cause injury.
•Do not leave this appliance door open.
Children may hang on the door or crawl
inside the appliance, causing damage
or injury.
•Never reach into this appliance while
it is operating. Wait until the drum has
completely stopped. Failure to do so
may result in injury.
05
Page 6

•Do not put in, wash or dry articles that
have been cleaned in, washed in,
soaked in, or spotted with combustible
or explosive substances (such as
wax, oil, paint, gasoline, degreasers,
drycleaning solvents, kerosene,
vegetable oil, cooking oil, etc.). Improper
use can cause re or explosion.
•In case of ood, stop using the product
and contact the LG Electronics service
centre. Contact with water can cause
electric shock.
•Do not push down the door excessively,
when the appliance door is open. Doing
so may topple over the appliance and it
can cause the injury.
•If the drain hose or inlet hose is frozen
during winter, use it only after thawing.
Freezing may cause re or electric
shock, and frozen parts may cause
product malfunction or reduction in
product life span.
•Keep all washing detergents, softener
and bleach away from children. These
products contain poisonous materials.
•Do not plug multiple products into
multiple socket-outlets or extension
cords. This can cause re.
•Remove the power plug when you clean
the product. Not removing the plug may
result in electric shock or injury.
•Use new hose-sets supplied with the
appliance. Old hose-sets should not
be reused. Water leakage may cause
property damage.
•Do not touch the door during steam
cycles, drying or high-temperature
washing. The door surface can become
very hot. Allow the door lock to release
before opening the door. Failure to do
so may result in injury.
•Do not use inammable gas and
combustible substances (benzene,
gasoline, thinner, petroleum, alcohol,
etc.) around the product. It may cause
explosion or re.
•Do not touch the power plug with wet
hands. It can cause the electric shock
or injury.
•When pulling out the power plug from
an outlet, hold the power plug, not the
cable. Damage of the cable can cause
the electric shock or injury.
•Do not bend the power cable
excessively or place a heavy object on
top of it. Damage of the power cable
can cause electric shock or re.
06
Page 7

ENGLISH
Technical Safety for Using the
Tumble Dryer
•Do not dry unwashed items in the
appliance.
•Items that have been soiled with
substances such as cooking oil,
vegetable oil, acetone, alcohol, petrol,
kerosene, spot removers, turpentine,
waxes and wax removers should be
washed in hot water with an extra
amount of detergent before being dried
in the appliance.
•Fabric softeners or other similar
products should be used according to
the fabric softener instructions.
•Remove all objects from pockets such
as lighters and matches.
Disposal
•Before discarding an old appliance,
unplug it. Render the plug useless.
Cut off the cable directly behind the
appliance to prevent misuse.
•Dispose of the packaging material (such
as vinyl and styrofoam) away from
children. The packaging material can
suffocate a child.
•Remove the door to the washing
compartment before this appliance is
removed from service or discarded to
avoid the danger of children or small
animals getting trapped inside. Failure
to do so can result in serious injury to
persons or death.
•Never stop this appliance before the
end of the drying cycle unless all items
are quickly removed and spread out so
that the heat is dissipated.
•This appliance is not to be used if
industrial chemicals have been used for
cleaning.
•Items such as foam rubber (latex foam),
shower caps, waterproof textiles, rubber
backed articles and clothes or pillows
tted with foam rubber pads should not
be dried in this appliance.
07
Page 8
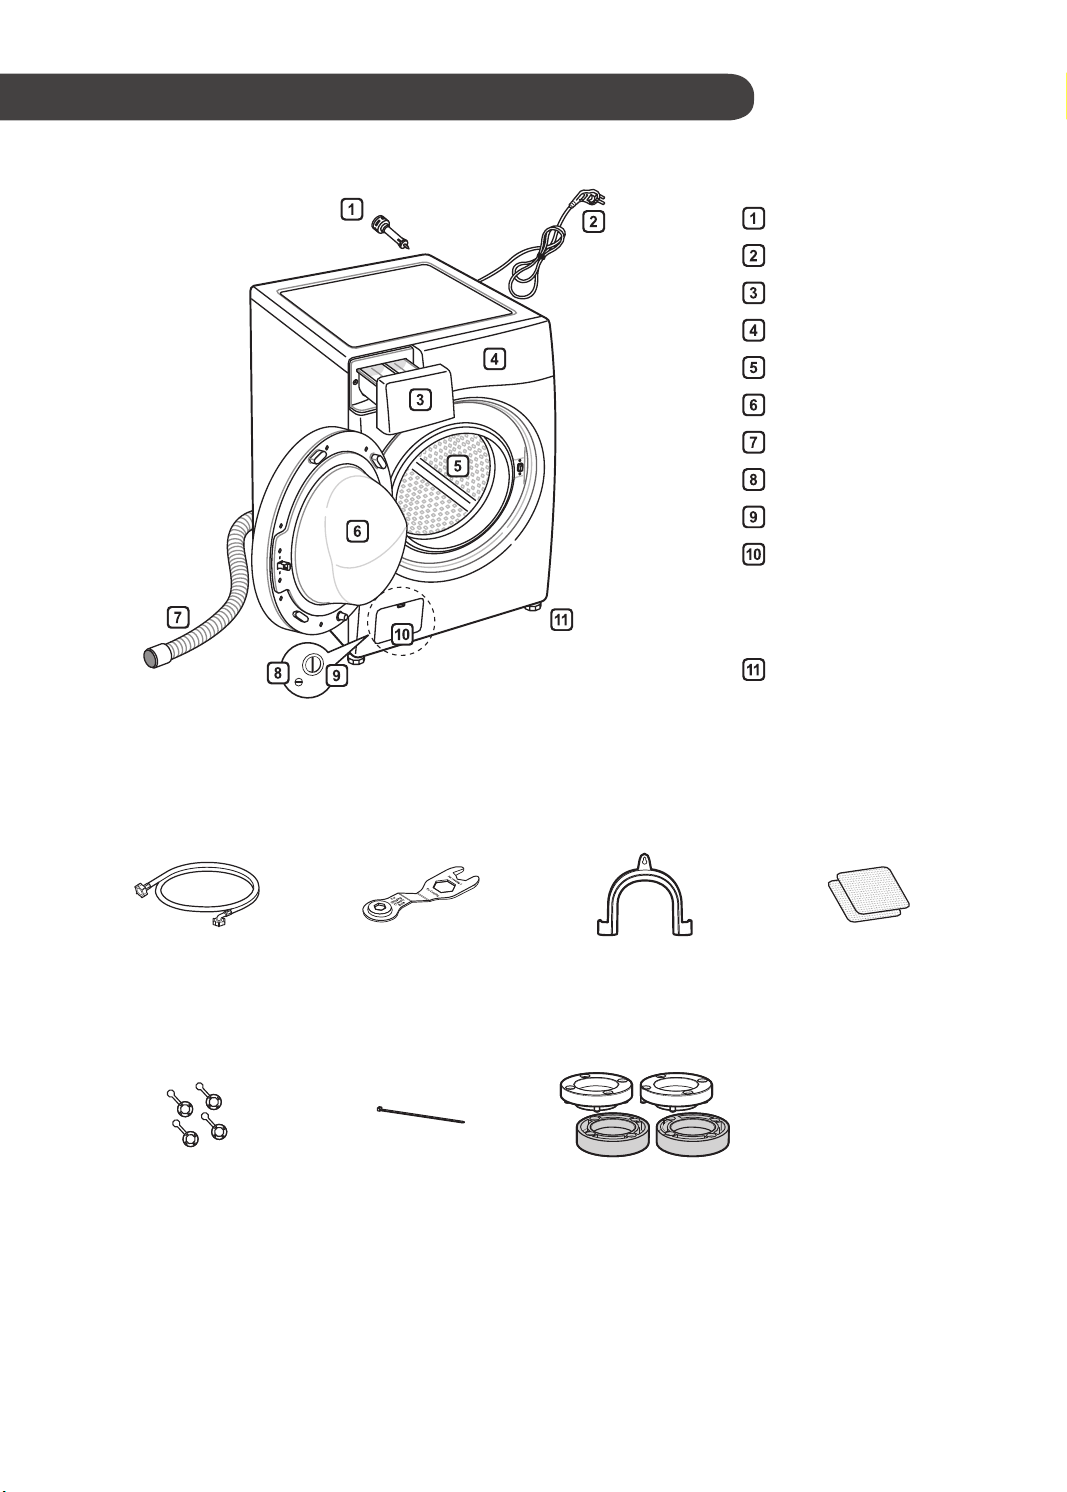
INSTALLATION
Parts
Transit bolts
Power plug
Drawer
Control panel
Drum
Door
Drain hose
Drain plug
Drain pump lter
Cover cap
(Location may
vary depending on
products)
Adjustable feet
Accessories
Inlet hose (1EA)
(Option : Hot (1EA))
Caps for covering shipping
bolt holes
Spanner Elbow bracket
(for securing drain hose)
Tie strap Rubber cup
Anti–slip sheets (2EA)
(Optional)
08
Page 9
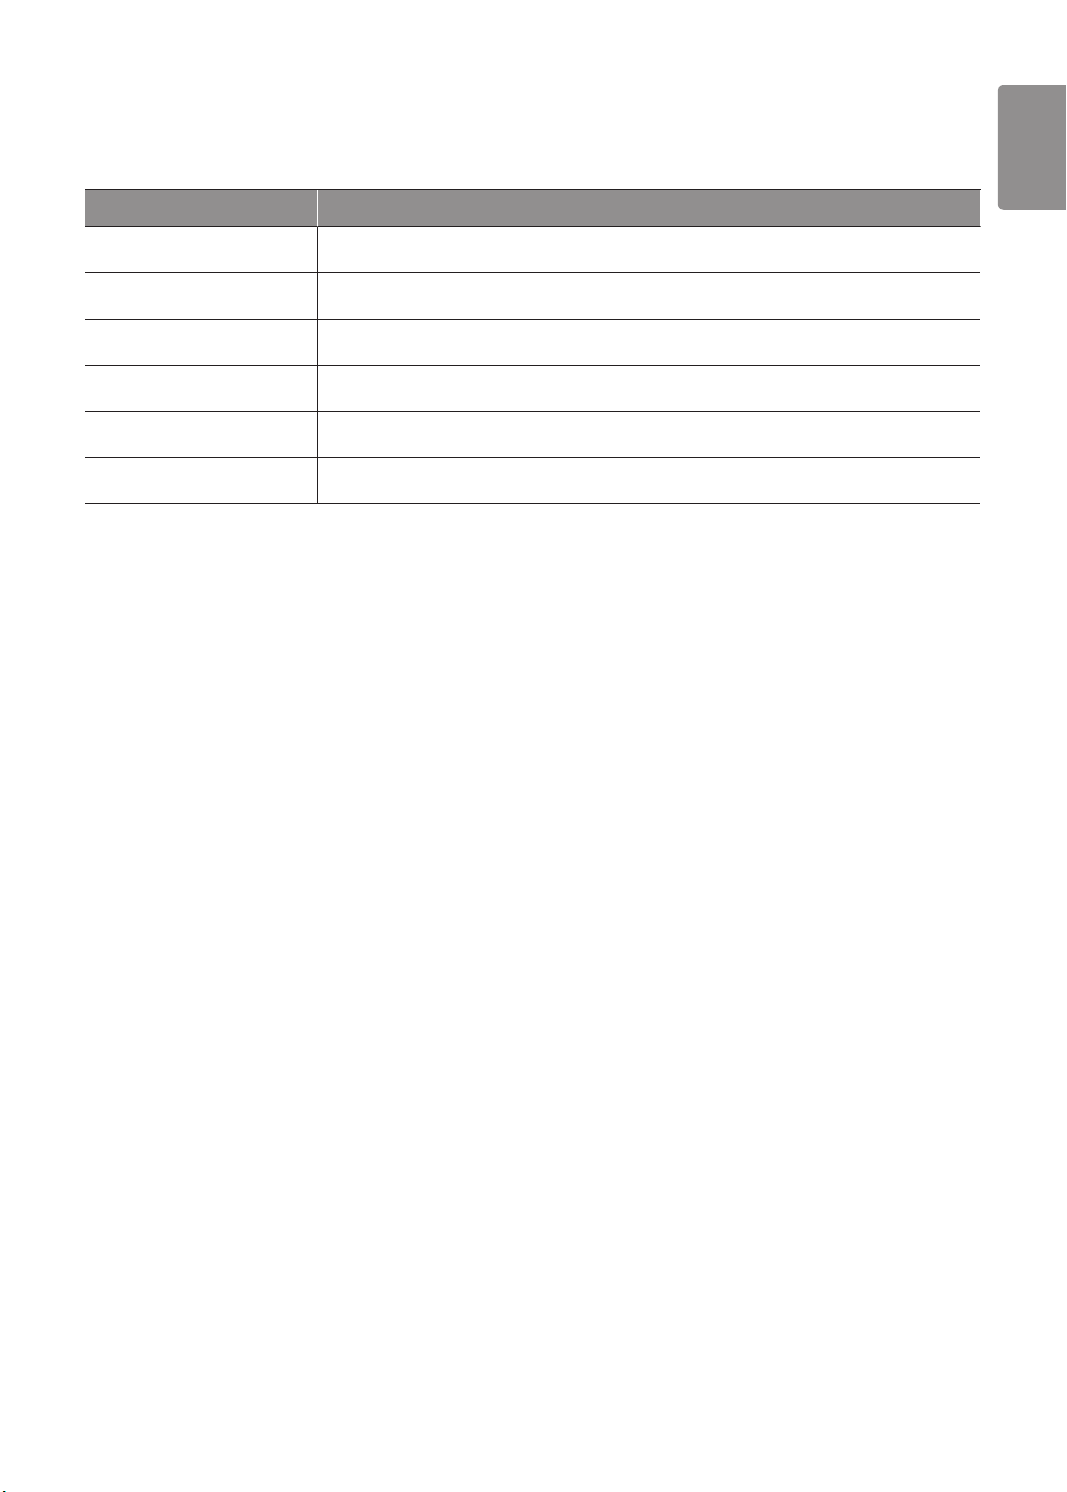
Specications
Model F2514DTGW
Wash Capacity 14 kg (Wash) / 8 kg (Dry)
Power Supply 220 - 240 V~, 50 Hz
Size 645 mm (W) x 770 mm (D) x 940 mm (H)
Product Weight 81 kg
Max. Watt 2200 W (Wash) / 2200 W (Dry)
Permissible Water pressure 0.1 - 1.0 MPa (1.0 - 10.0 kgf / cm²)
•Appearance and specications may change without notice to improve the quality of the product.
ENGLISH
09
Page 10
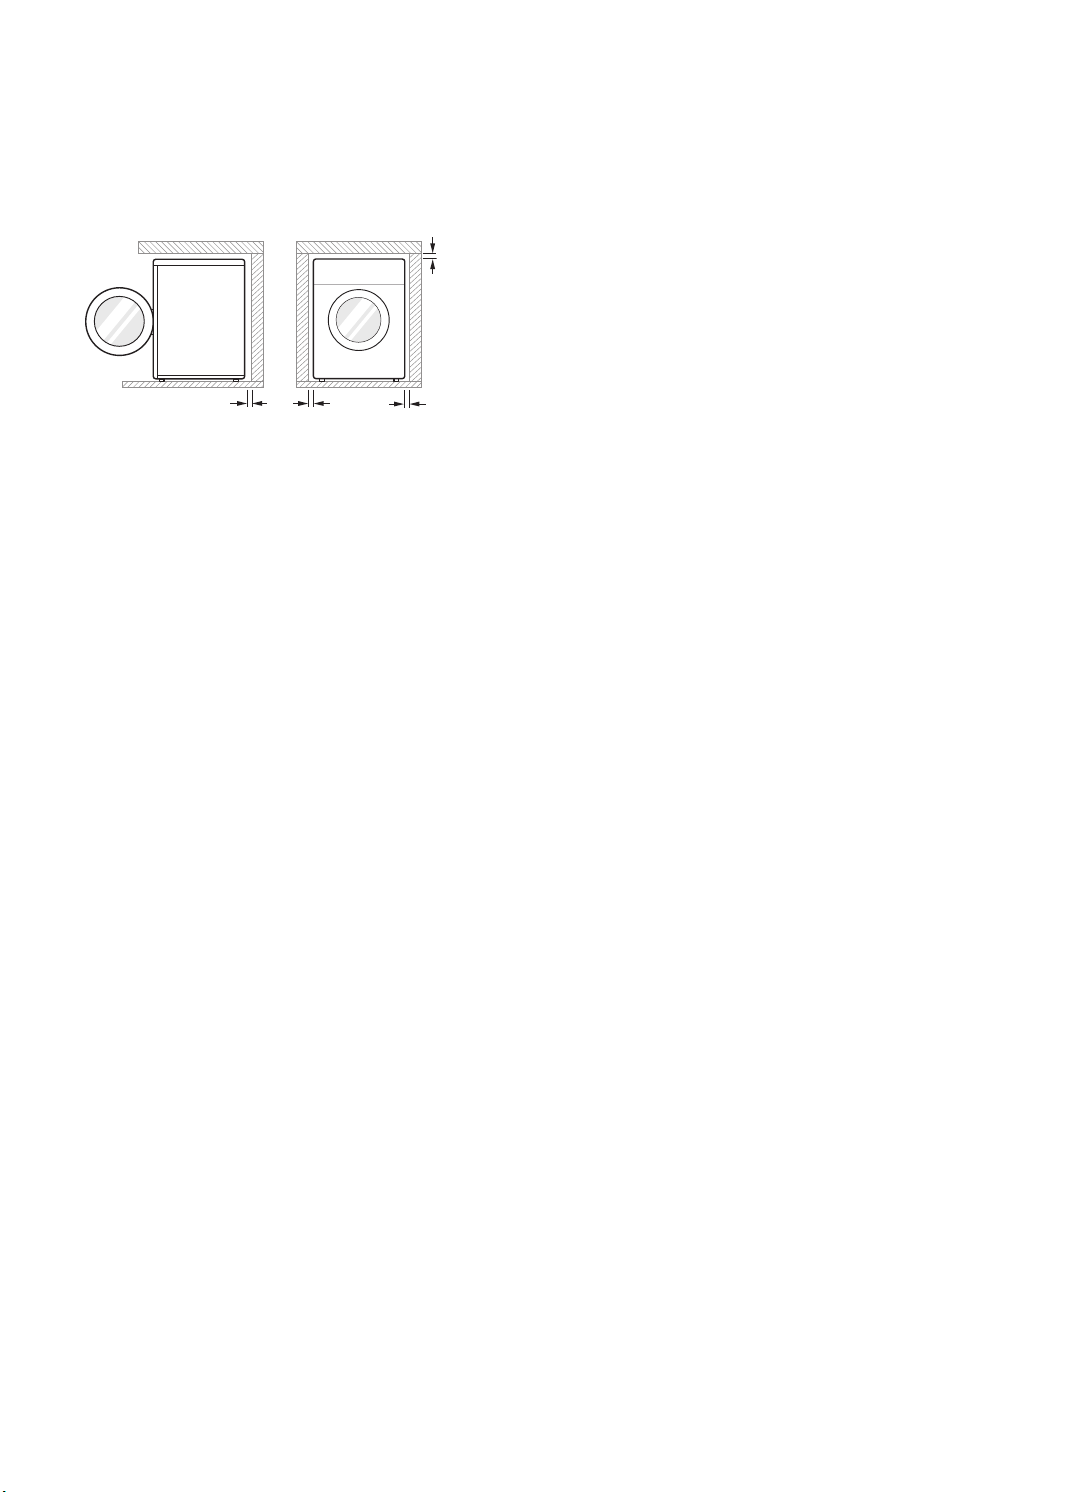
Installation Place Requirements
Location
cm
0.5
cm
cm
2
Level oor :
10
Allowable slope under the entire washing
machine is 1°.
Power outlet :
Must be within 1.5 meters of either side
of the location of the washing machine.
•Do not overload the outlet with more than one
appliance.
Additional Clearance :
For the wall, 10 cm: rear
/2 cm: right & left side
•Do not place or store laundry products on top of the
washing machine at any time.
•These products may damage the nish or controls.
Positioning
•Install the washing machine on a at hard oor.
•Make sure that air circulation around the washing
machine is not impeded by carpets, rugs, etc.
•Never try to correct any unevenness in the oor with
pieces of wood, cardboard or similar materials under
the washing machine.
•If it is impossible to avoid positioning the washing
machine next to a gas cooker or coal burning
insulation (85x60 cm) covered with aluminum foil on
the side facing the cooker or stove must be inserted
between the two appliances.
cm
2
•Do not install your washing machine in rooms where
freezing temperatures may occur. Frozen hoses may
burst under pressure. The reliability of the electronic
control unit may be impaired at temperatures below
freezing point.
•Please ensure that when the washing machine is
installed, it is easily accessible for an engineer in the
event of a breakdown.
•With the washing machine installed, adjust all four feet
using the transit bolt spanner provided to ensure the
appliance is stable, and a clearance of approximately
5 mm is left between the top of the washing machine
and the underside of any work-top.
•This equipment is not designed for maritime use or for
use in mobile installations such as caravans, aircraft
etc.
Electrical Connection
•Do not use an extension cord or double adapter.
•Always unplug the washing machine and turn off the
water supply after use.
•Connect the washing machine to an earthed socket in
accordance with current wiring regulations.
•The washing machine must be positioned so that the
plug is easily accessible.
•Repairs to the washing machine must only be carried
out by qualied personnel. Repairs carried out by
inexperienced persons may cause injury or serious
malfunctioning. Contact your local service centre.
•If the washing machine is delivered in winter and
temperatures are below freezing, place the washing
machine at room temperature for a few hours before
putting it into operation.
10
Page 11
ENGLISH
Unpacking and Removing
Shipping Bolts
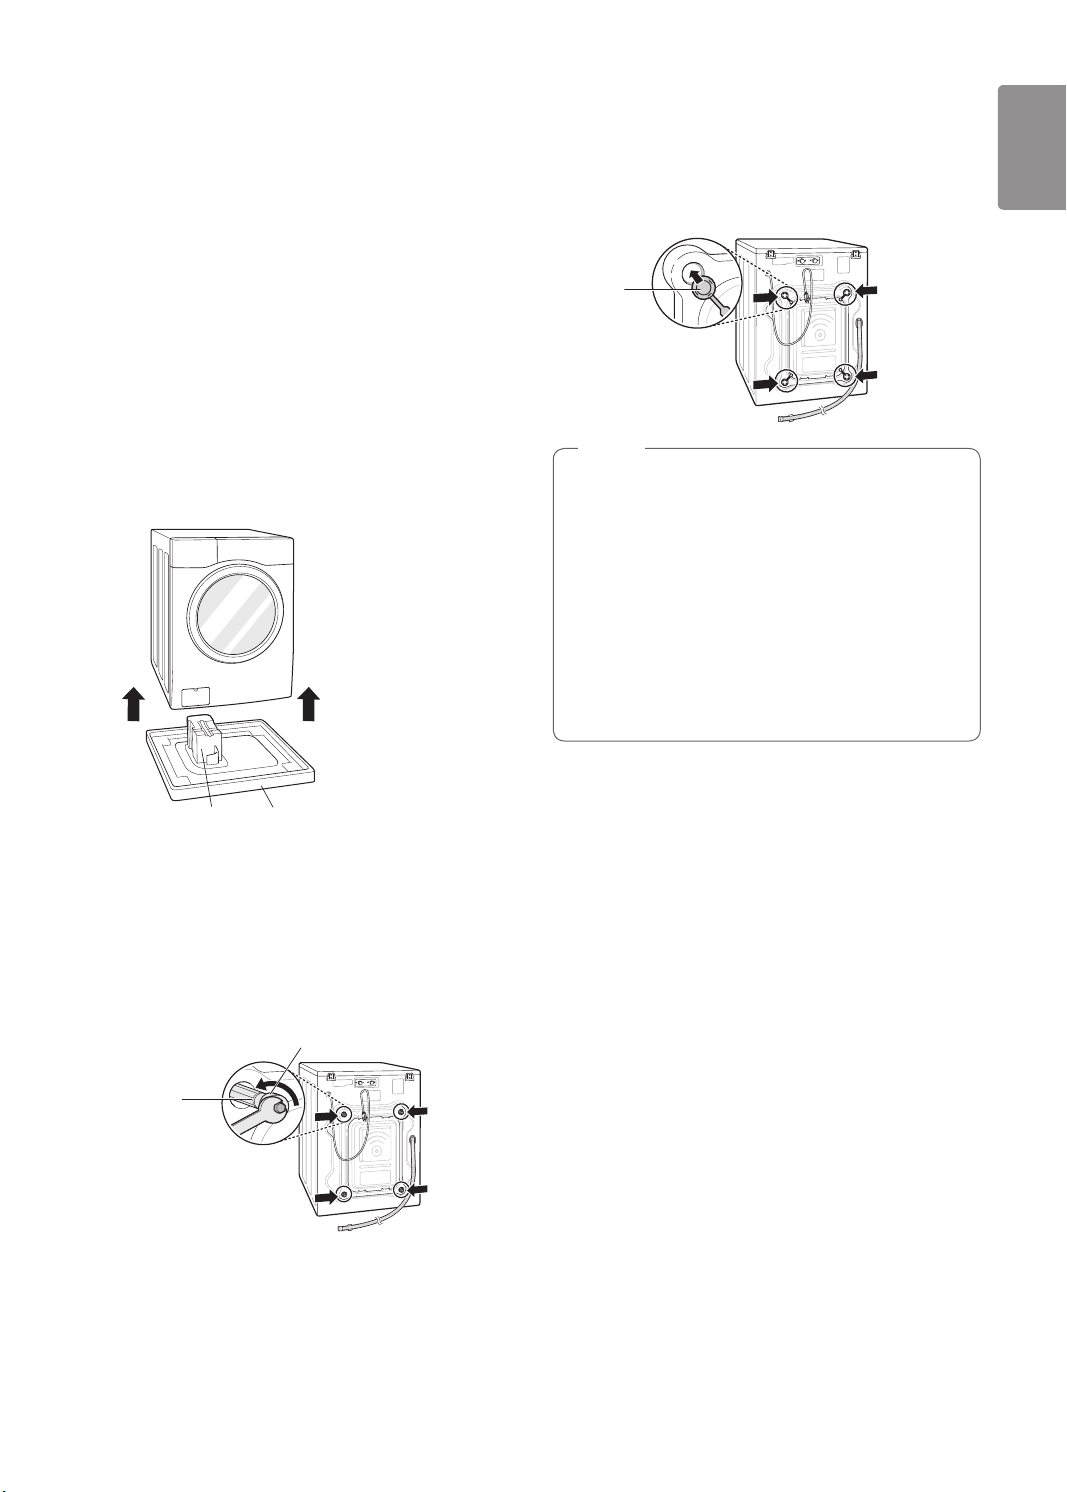
Lift the washing machine off the foam base.
1
•After removing the carton and shipping material,
lift the washing machine off the foam base. Make
sure the tub support comes off with the base
and is not stuck to the bottom of the washing
machine.
•If you must lay the washing machine down to
remove the carton base, always protect the side
of the washing machine and lay it carefully on
its side. DO NOT lay the washing machine on its
front or back.
Install the hole caps.
3
•Locate the hole caps included in the accessory
pack and install them in the shipping bolt holes.
Cap
NOTE
•Save the bolt assemblies for future use. To
prevent damage to internal components, DO NOT
transport the washing machine without reinstalling
the shipping bolts.
•Failure to remove shipping bolts and retainers
may cause severe vibration and noise, which
can lead to permanent damage to the washing
machine. The cord is secured to the back of the
washing machine with a shipping bolt to help
prevent operation with shipping bolts in place.
Tub Support
(Optional)
Remove the bolt assemblies.
2
•Starting with the bottom two shipping bolts, use
the spanner (included) to fully loosen all shipping
bolts by turning them counterclockwise. Remove
the bolt assemblies by wiggling them slightly
while pulling them out.
Shipping
bolt
Carton base
Retainer
11
Page 12
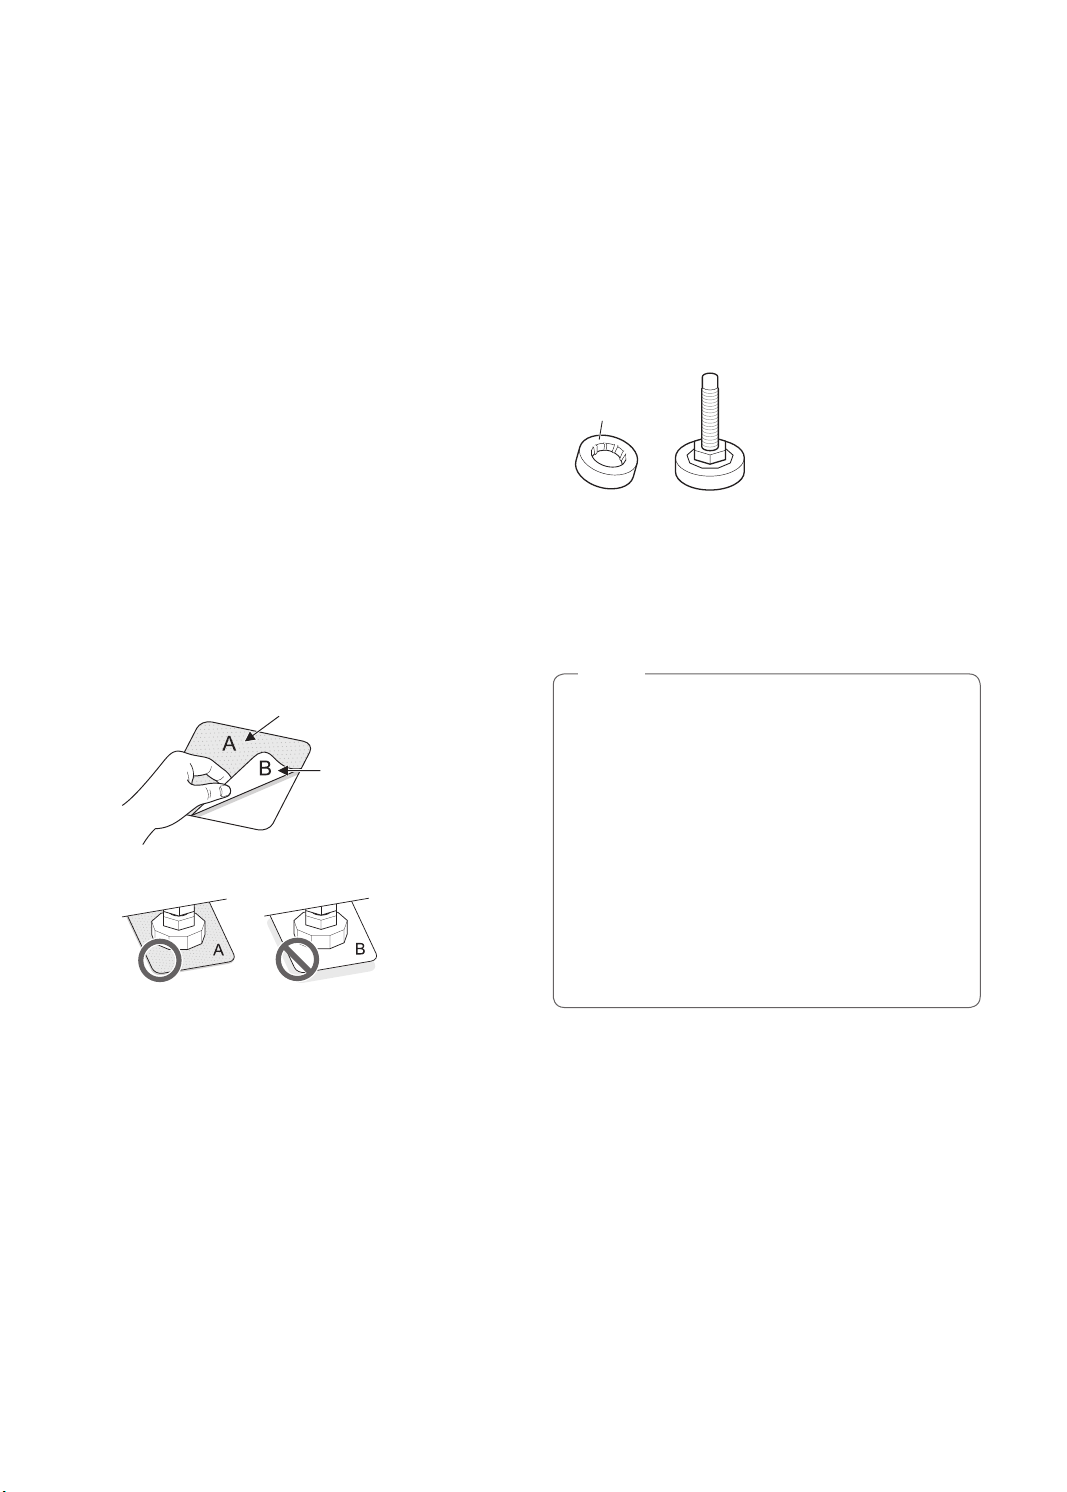
Using Anti–Slip Sheets (Optional)
Wooden Floors (Suspended
If you install the washing machine on a slippery surface,
it may move because of excessive vibration. Incorrect
leveling may cause malfunction through noise and
vibration. If this occurs, install the anti–slip sheets under
the leveling feet and adjust the level.
Clean the oor to attach the anti–slip sheets.
1
•Use a dry rag to remove and clean foreign
objects and moisture. If moisture remains, the
anti–slip sheets may slip.
Adjust the level after placing the washing machine
2
in the installation area.
Place the adhesive side of the anti–slip sheet on
3
the oor.
•It is most effective to install the anti–slip sheets
under the front legs. If it is difcult to place the
pads under the front legs, place them under the
back legs.
This side up
Adhesive side
Floors)
•Wooden oors are particularly susceptible to vibration.
•To prevent vibration we recommend you place rubber
cups at least 15 mm thick of the each foot of the
washing machine, secured to at least two oor beams
with screws.
Rubber Cup
•If possible install the washing machine in one of the
corners of the room, where the oor is more stable.
•Fit the rubber cups to reduce vibration.
•You can obtain rubber cups (p/no.4620ER4002B) from
the LG Service Centre.
NOTE
•Proper placement and leveling of the washing
machine will ensure long, regular, and reliable
operation.
•The washing machine must be 100% horizontal
and stand rmly in position.
•It must not ‘Seesaw’ across corners under the
load.
•The installation surface must be clean, free from
oor wax and other lubricant coatings.
•Do not let the feet of the washing machine get
wet. Failure to do so may cause vibration or noise.
Ensure the washing machine is level.
4
•Push or rock the top edges of the washing
machine gently to make sure that the washing
machine does not rock. If the washing machine
rocks, level the washing machine again.
12
Page 13
ENGLISH
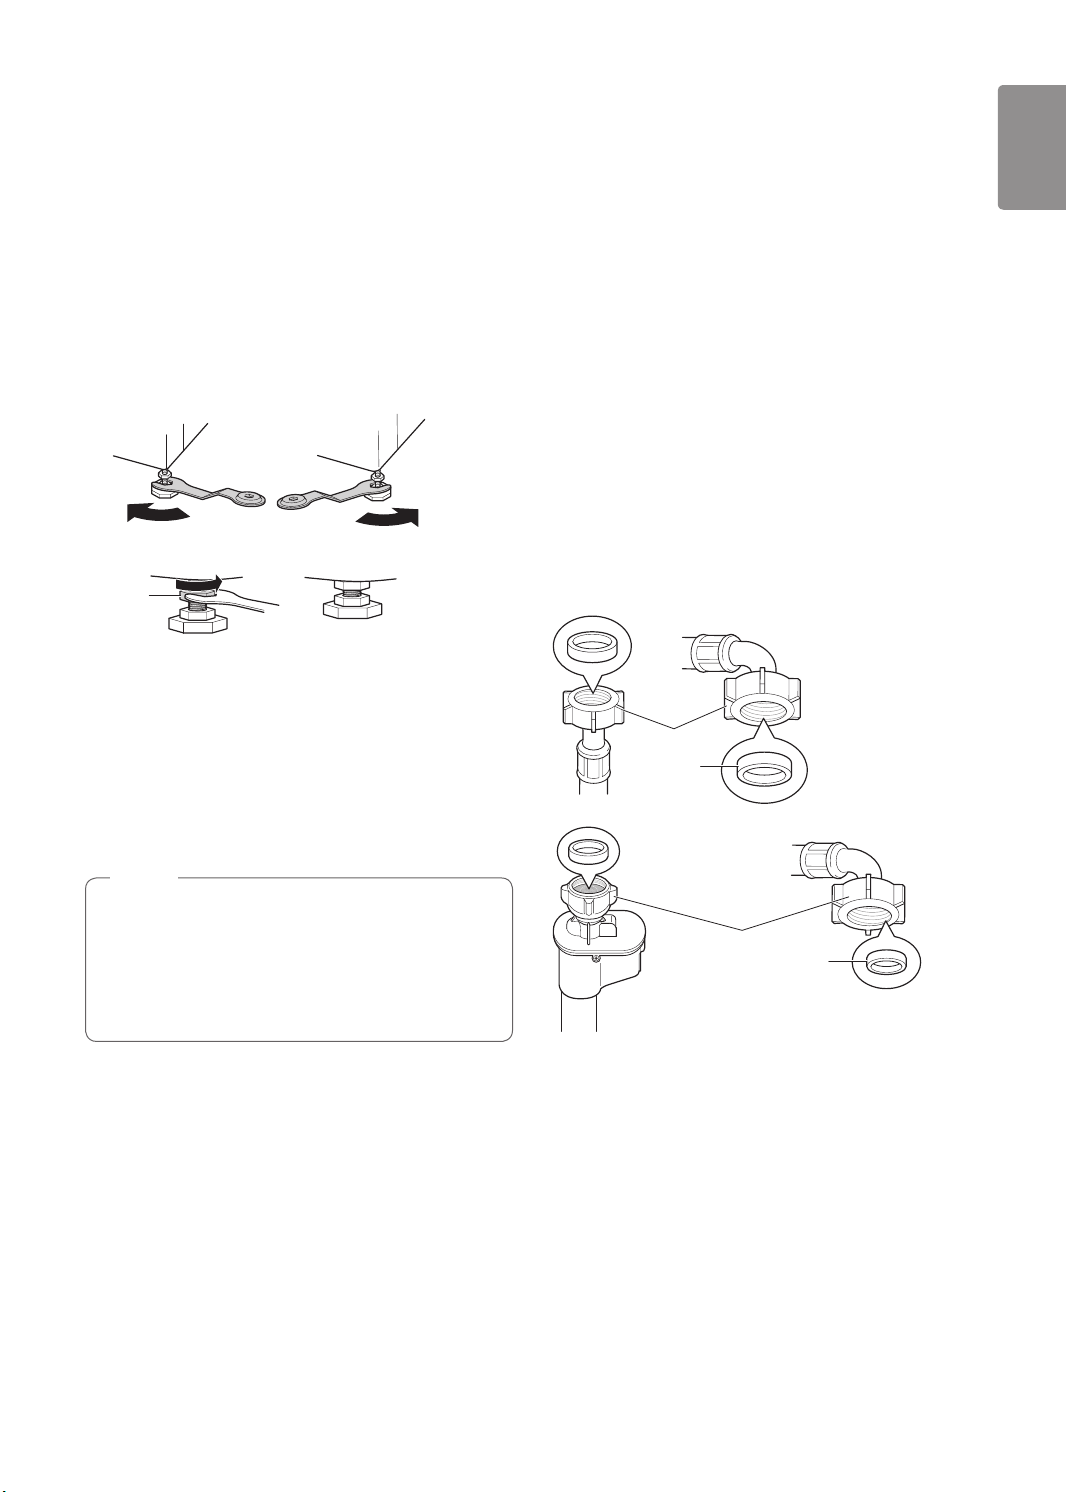
Leveling the Washing Machine
If the oor is uneven, turn the adjustable feet as required
(Do not insert pieces of wood etc. under the feet). Make
sure that all four feet are stable and resting on the oor
and then check that the appliance is perfectly level (Use
a spirit level).
•Once the washing machine is level, tighten the lock
nuts up towards the base of the washing machine. All
lock nuts must be tightened.
Raise
Lock Nut
•Diagonal Check
When pushing down the edges of the washing
machine top plate diagonally, the washing machine
should not move up and down at all (Check both
directions). If the washing machine rocks when
pushing the machine top plate diagonally, adjust the
feet again.
Lower
Tighten all 4
locknuts securely
Connecting Inlet Hose
•Water supply pressure must be between 0.1 MPa and
1.0 MPa (1.0 ‒ 10.0 kgf/cm2).
•Do not strip or crossthread when connecting inlet hose
to the valve.
•If the water supply pressure is more than 1.0 MPa, a
decompression device should be installed.
•Periodically check the condition of the hose and
replace the hose if necessary.
Checking Rubber Seal Inlet Hose
Two rubber seals are supplied with the water inlet hoses.
They are used for preventing water leaks. Make sure the
connection to taps is sufciently tight.
Hose connector
Rubber seal
NOTE
•Timber or suspended type ooring may contribute
to excessive vibration and unbalance.
•If the washing machine is installed on a raised
platform, it must be securely fastened in order to
eliminate the risk of falling off.
Hose connector
Rubber seal
13
Page 14
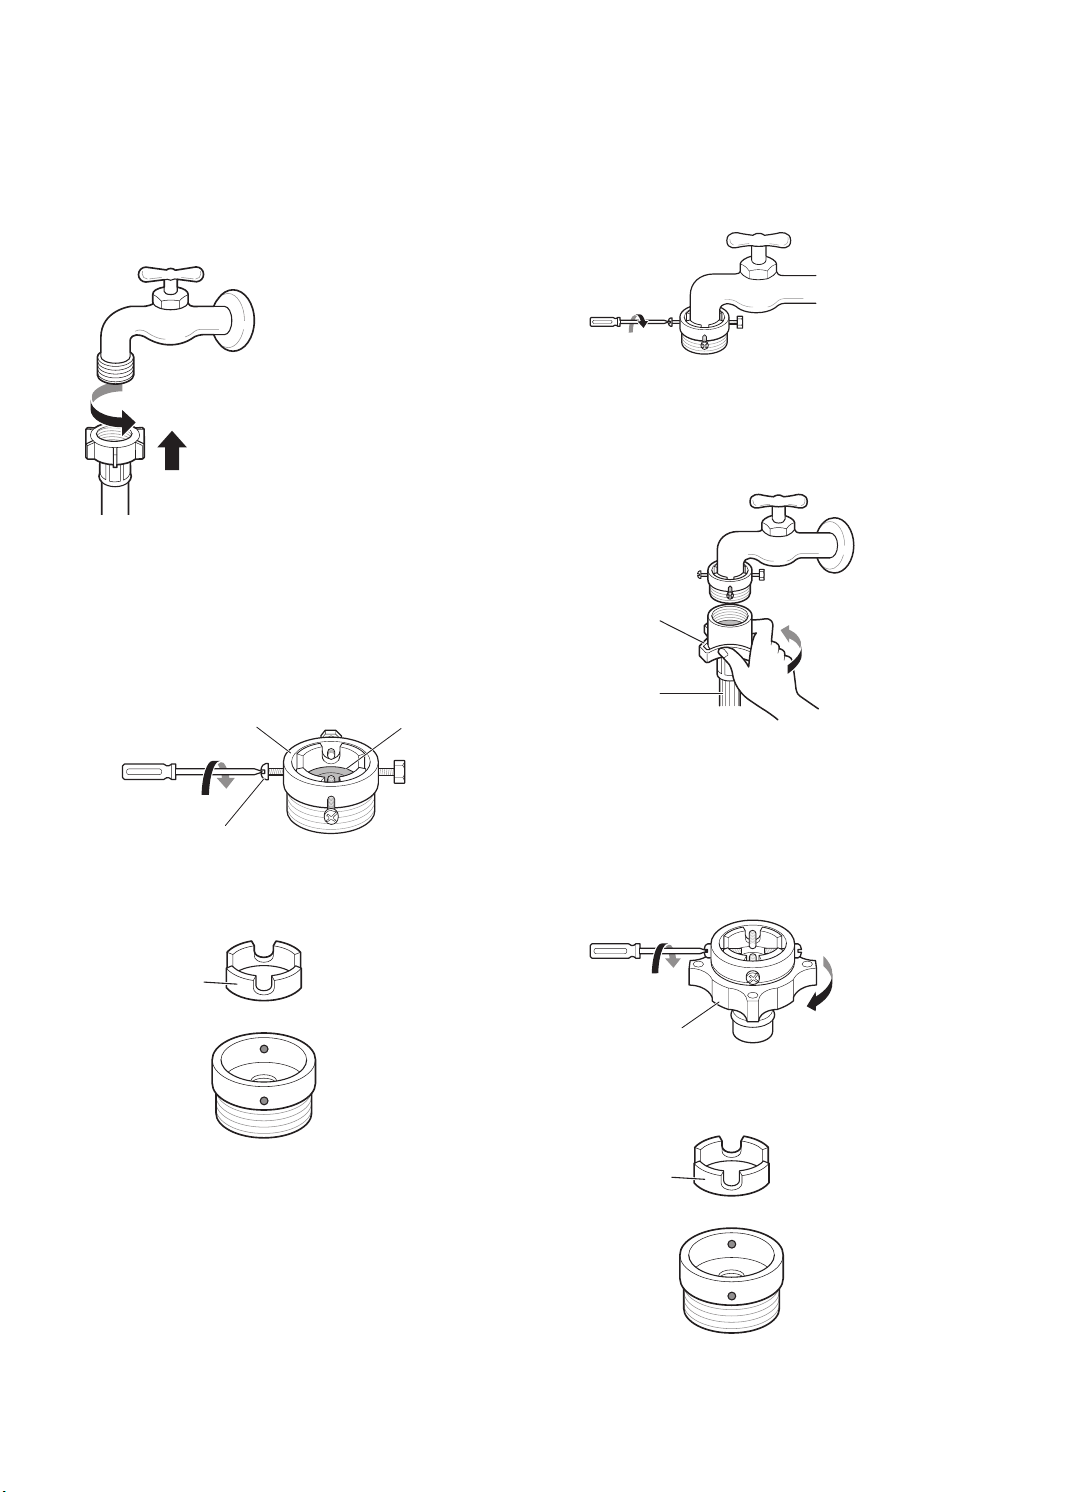
Connecting Hose to Water Tap
Connecting screw-type hose to tap with thread
Screw the hose connector onto the water supply tap.
Push the adapter onto the end of the tap so that
3
the rubber seal forms a watertight connection.
Tighten the four xing screws.
Push the inlet hose vertically upwards so that the
4
rubber seal within the hose can adhere completely
to the tap and then tighten it by screwing it to the
right.
Connecting screw-type hose to tap without
thread
Loose the four xing screws.
1
Upper
connector
Fixing screw
Remove the guide plate if the tap is too large to t
2
the adapter.
Guide plate
Rubber
seal
Plate
Inlet hose
Connecting one touch type hose to tap without
thread
Unscrew the adapter ring plate and loose the four
1
xing screws.
Ring plate
Remove the guide plate if the tap is too large to t
2
the adapter.
Guide plate
14
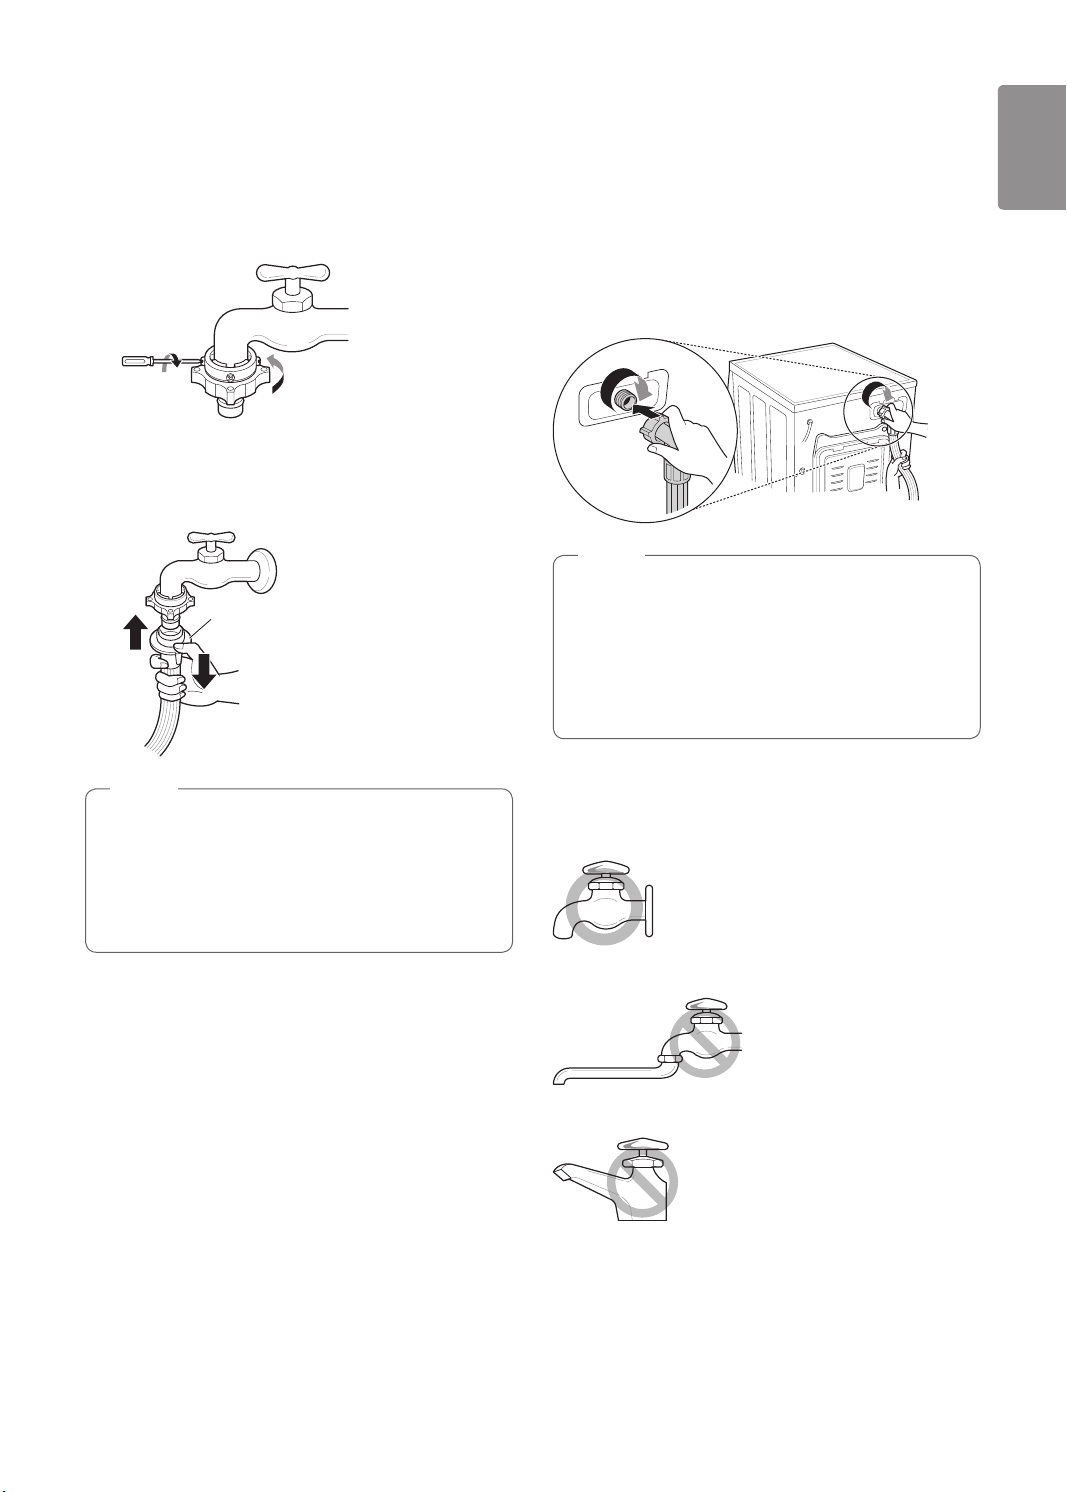
Page 15
ENGLISH
Push the adapter onto the end of the tap so that
3
the rubber seal forms a watertight connection.
Tighten the adapter ring plate and the four xing
screws.
Pull the connector latch plate down, push the inlet
4
hose onto the adapter, and release the connector
latch plate. Make sure the adapter locks into place.
Latch plate
Connecting Hose to Washing Machine
Make sure that there are no kinks in the hose and that
they are not crushed.
When your washing machine has two valves.
•The Inlet hose with the red connector is for the hot
water tap.
NOTE
•After completing connection, if water leaks from
the hose, repeat the same steps.
Use the most conventional type of tap for the
water supply. In case the tap is square or too big,
remove the guide plate before inserting the tap
into the adaptor.
NOTE
•After connecting the inlet hose to the water
tap, turn on the water tap to ush out foreign
substances (dirt, sand, sawdust, etc.) in the water
lines. Let the water drain into a bucket, and check
the water temperature.
Using the horizontal tap
Horizontal tap
Extension tap
Square tap
15
Page 16
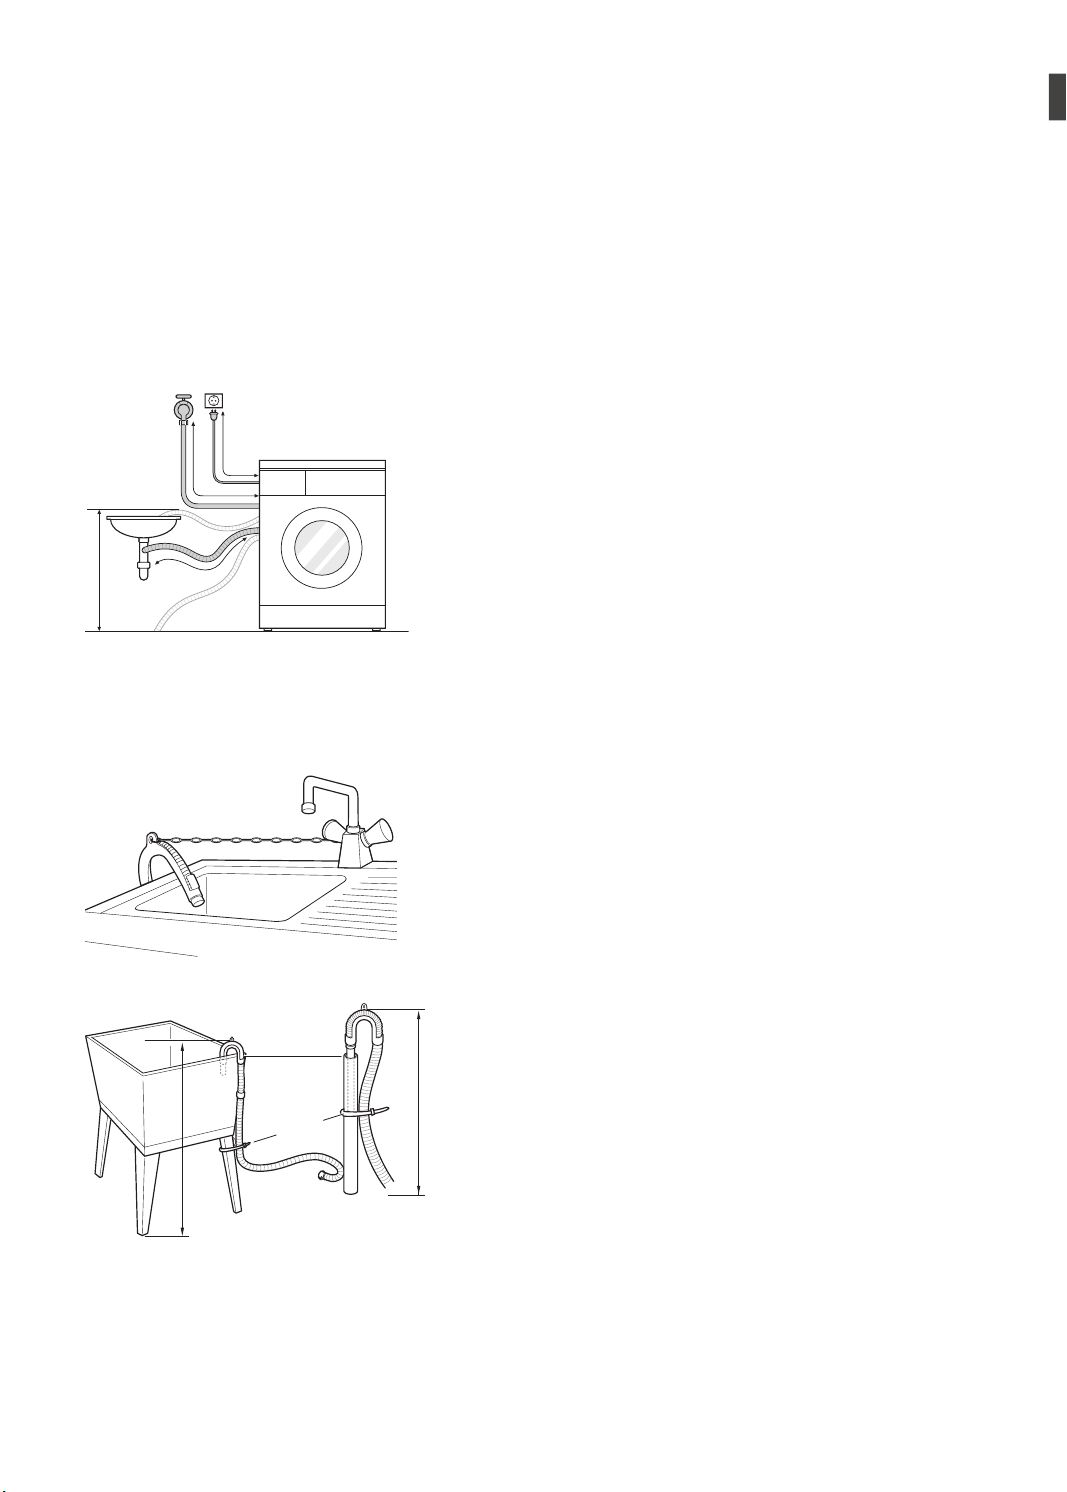
Installation of Drain Hose
•The drain hose should not be placed higher than 100
cm above the oor. Water in the washing machine
may not drain or may drain slowly.
•Securing the drain hose correctly will protect the oor
from damage due to water leakage.
•If the drain hose is too long, do not force it back into
the washing machine. This will cause abnormal noise.
about 100 cm
about 145 cm
max. 100 cm
about 105 cm
•When installing the drain hose to a sink, secure it
tightly with string.
•Securing the drain hose correctly will protect the oor
from damage due to water leakage.
Laundry tub
Hose
retainer
Tie strap
max. 100 cm
max. 100 cm
16
Page 17

OPERATION
ENGLISH
Using the Washing Machine
Before the rst wash, select a cycle (Cotton 60 °C, add
a half load of detergent), allow the washing machine
to wash without clothing. This will remove residue and
water from the drum that may have been left during
manufacturing.
Sort laundry and load items.
1
•Sort laundry by fabric type, soil level, colour and
load size as needed. Open the door and load
items into the washing machine.
Add cleaning products and/or detergent and
2
softener.
•Add the proper amount of detergent to the
detergent dispenser drawer. If desired, add
bleach or fabric softener to the appropriate areas
of the dispenser.
Choose the desired washing cycle.
4
•Press the Cycle button repeatedly or turn the
cycle selector knob until the desired cycle is
selected.
Begin cycle.
5
•Press the
The washing machine will agitate briey without
water to measure the weight of the load. If the
Start/Pause
minutes, the washing machine will shut off and
all settings will be lost.
End of cycle.
6
•When the cycle is nished, a melody will sound.
Immediately remove your clothing from the
washing machine to reduce wrinkling. Check
around the door seal when removing the load for
small items that may be caught in the seal.
Start/Pause
button is not pressed within 60
button to begin the cycle.
Turn on the washing machine.
3
•Press the
machine.
Power
button to turn ON the washing
17
Page 18
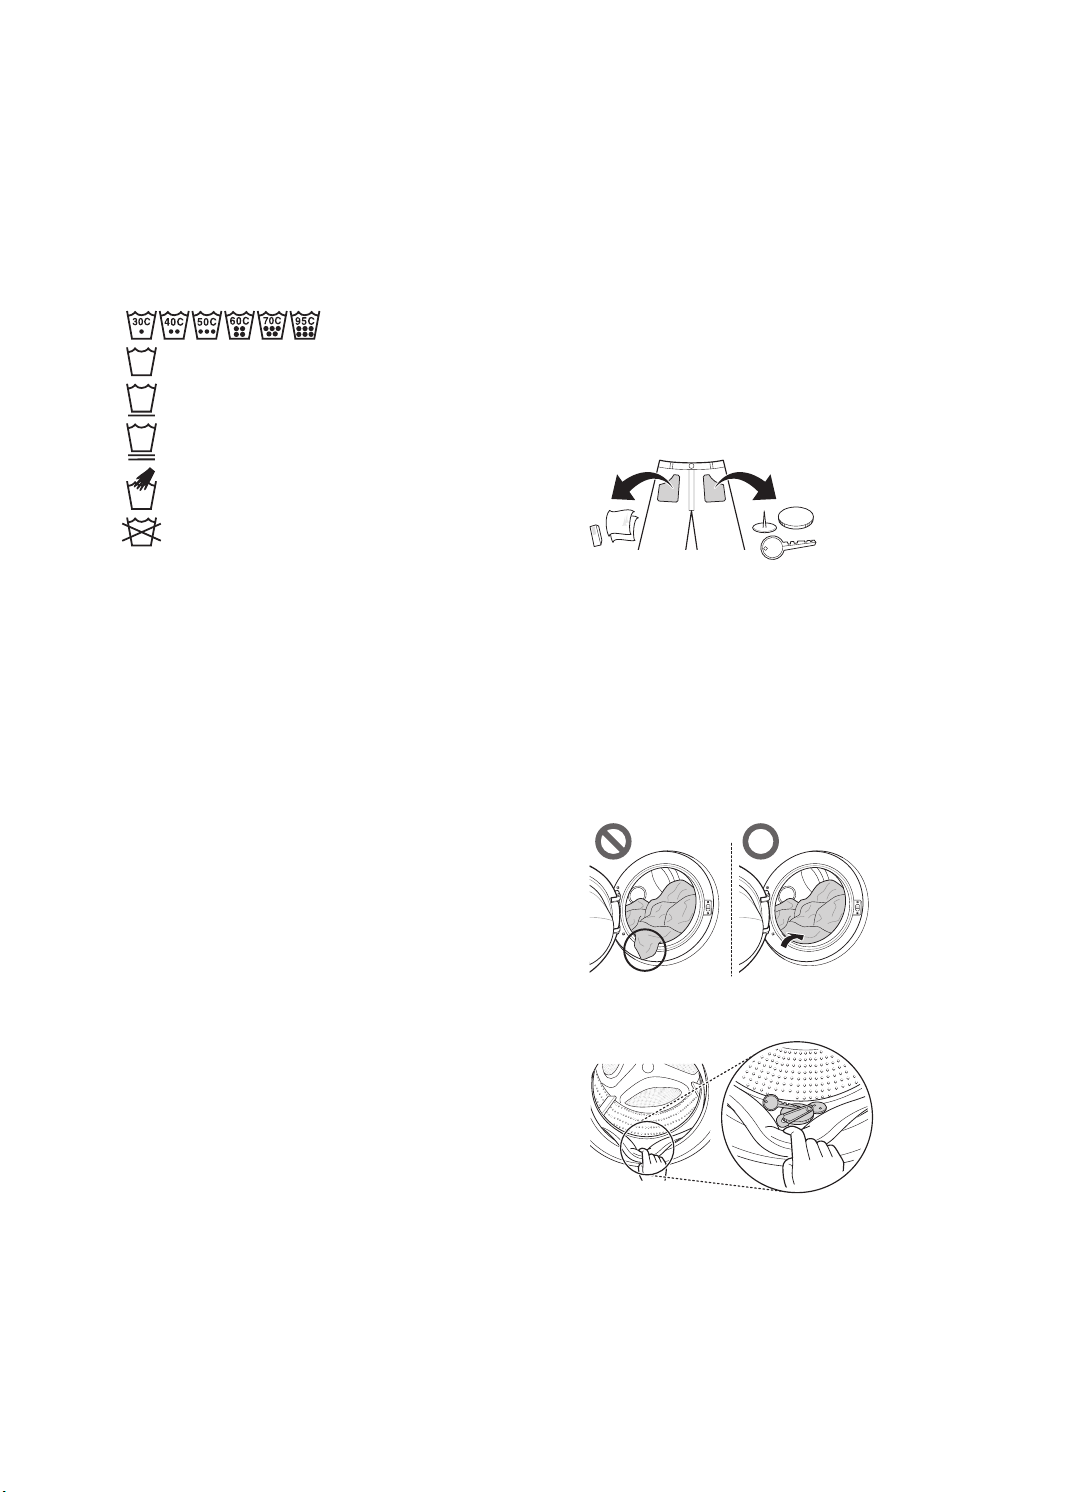
Sorting Iaundry
Look for a care label on your clothes.
1
•This will tell you about the fabric content of your
garment and how it should be washed.
•Symbols on the care labels.
Wash temperature
Normal machine wash
Permanent press
Delicate
Hand wash
Do not wash
Caring before loading.
3
•Combine large and small items in a load. Load
large items rst.
•Large items should not be more than half the
total wash load. Do not wash single items. This
may cause an unbalanced load. Add one or two
similar items.
•Check all pockets to make sure that they are
empty. Items such as nails, hair clips, matches,
pens, coins and keys can damage both your
washing machine and your clothes.
Sorting laundry.
2
•To get the best results, sort clothes into loads
that can be washed with the same wash cycle.
•Different fabrics need to be washed at varying
temperatures and spin speeds.
•Always sort dark colours from pale colours and
whites. Wash separately as dye and lint transfer
can occur causing discolouration of white and
pale garments. If possible, do not wash heavily
soiled items with lightly soiled ones.
– Soil (Heavy, Normal, Light)
Separate clothes according to amount of soil.
– Colour (White, Lights, Darks)
Separate white fabrics from coloured fabrics.
– Lint (Lint producers, Collectors)
Wash lint producers and lint collectors
separately.
•Close zippers, hooks and strings to make sure
that these items don’t snag on other clothes.
•Pre-treat dirt and stains by brushing a small
amount of detergent dissolved water onto stains
to help lift dirt.
•Check the folds of the exible gasket (gray) and
remove any small articles.
•Check inside the drum and remove any items
from a previous wash.
•Remove any clothing or items from the exible
gasket to prevent clothing and gasket damage.
18
Page 19
ENGLISH
Adding Cleaning Products
Detergent Dosage
•Detergent should be used according to the instruction
of the detergent manufacturer and selected according
to type, colour, soiling of the fabric and washing
temperature.
•If too much detergent is used, too many suds can
occur and this will result in poor washing results or
cause heavy load to the motor.
•If you wish to use liquid detergent follow the guidelines
provided by the detergent manufacturer.
•You can pour liquid detergent directly into the
main detergent drawer if you are starting the cycle
immediately.
•Do not use liquid detergent if you are using Time
delay, or if you have selected Pre Wash, as the liquid
may harden.
•If too many suds occur, reduce the detergent amount.
•Detergent usage may need to be adjusted for water
temperature, water hardness, size and soil level of the
load. For best results, avoid oversudsing.
•Refer to the label of the clothes, before choosing the
detergent and water temperature:
•When using the washing machine, use designated
detergent for each type of clothing only:
– General powdered detergents for all types of fabric
– Powdered detergents for delicate fabric
– Liquid detergents for all types of fabric or
designated detergents only for wool
•For better washing performance and whitening, use
detergent with the general powdered bleach.
•Detergent is ushed from the dispenser at the
beginning of the cycle.
NOTE
•Do not let the detergent harden.
Doing so may lead to blockages, poor rinse
performance or odour.
•Full load : According to manufacturer’s
recommendation.
•Part load : 3/4 of the normal amount
•Minimum load : 1/2 of full load
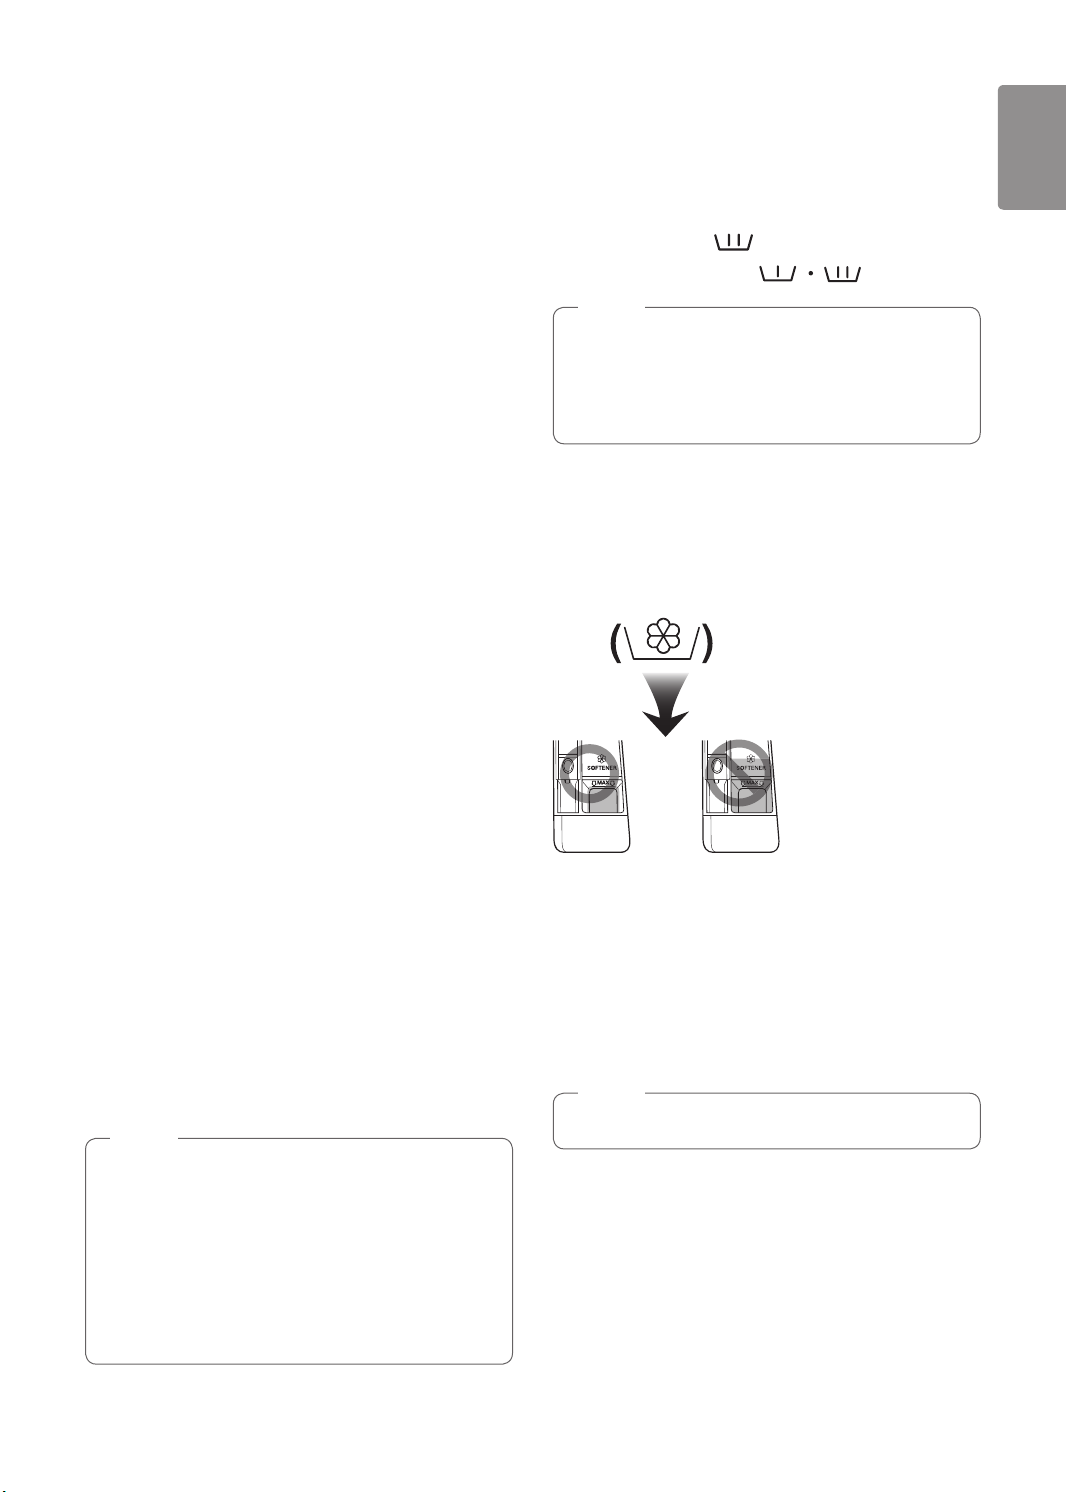
Adding Detergent and Fabric Softener
Adding detergent
•Main wash only →
•Pre wash+Main wash →
NOTE
•Too much detergent, bleach or softener may
cause an overow.
•Be sure to use the appropriate amount of
detergent.
Adding fabric softener
•Do not exceed the maximum ll line. Overlling can
cause early dispensing of the fabric softener, which
may stain clothes. Close the dispenser drawer slowly.
•Do not leave the fabric softener in the detergent
drawer for more than 2 days (Fabric softener may
harden).
•Softener will automatically be added during the last
rinse cycle.
•Do not open the drawer when water is being supplied.
•Solvents (benzene, etc) should not be used.
NOTE
•Do not pour fabric softener directly on the clothes.
19
Page 20
Adding water softener
•A water softener, such as Anti-limescale (e.g. Calgon)
can be used to cut down on the use of detergent in
extremely hard water areas. Dispense according to
the amount specied on the packaging. First add
detergent and then the water softener.
•Use the quantity of detergent required for soft water.
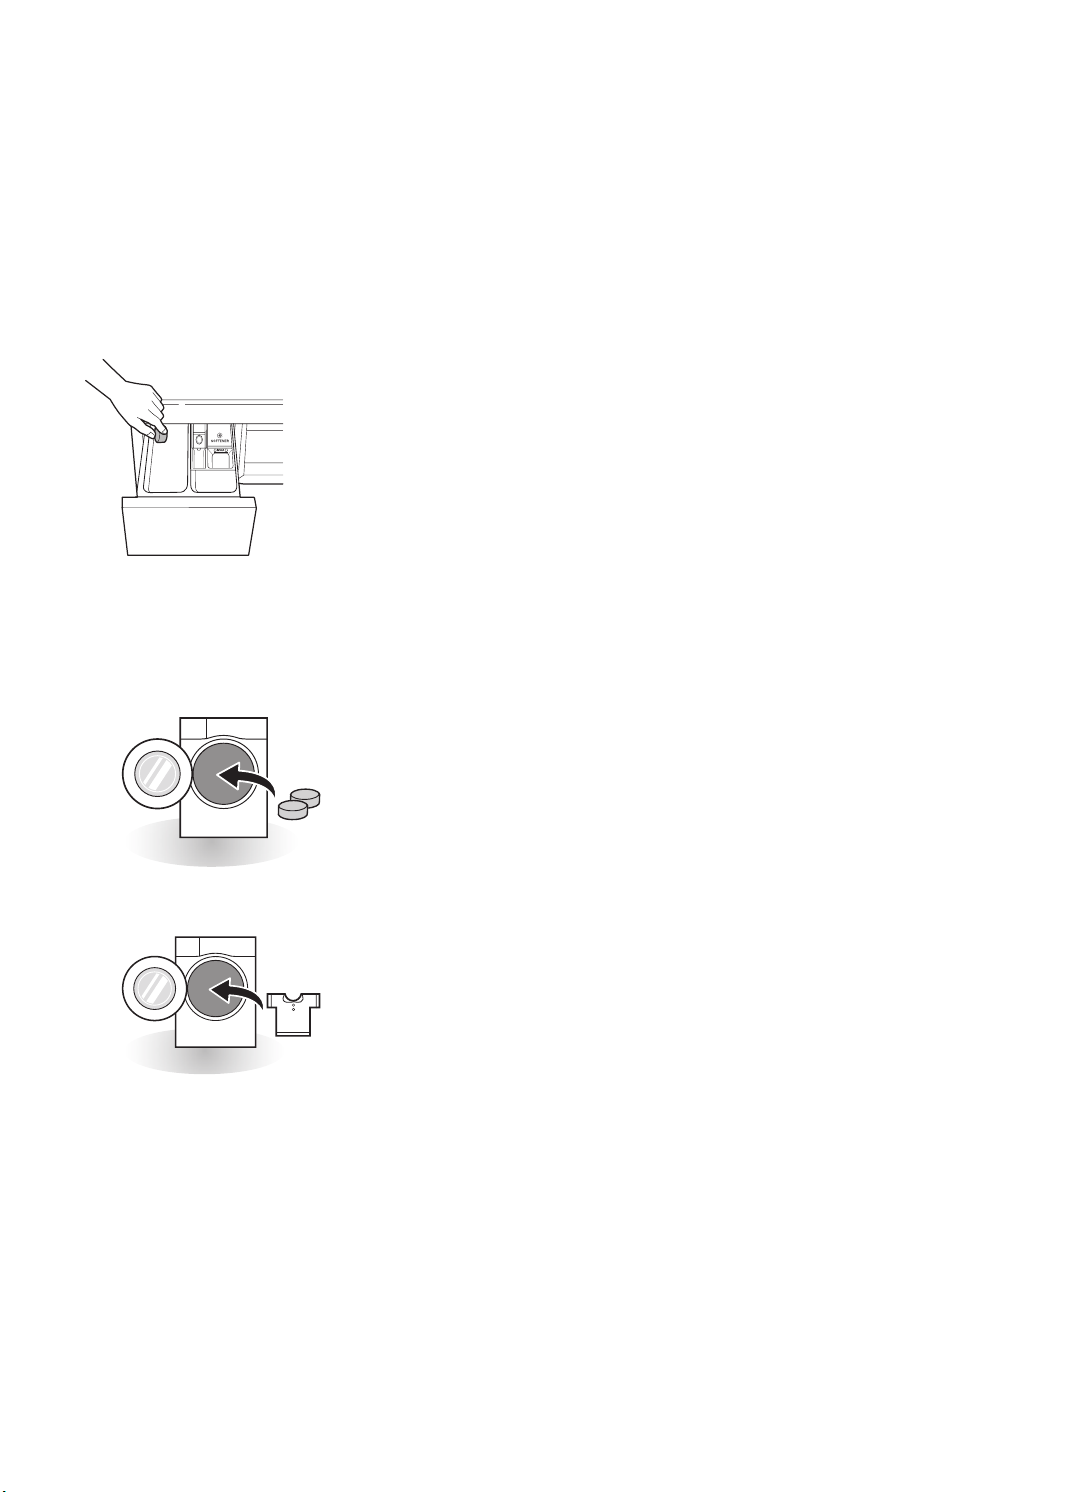
Using tablet
Open the door and put tablets into the drum.
1
Load the laundry into the drum and close the door.
2
20
Page 21
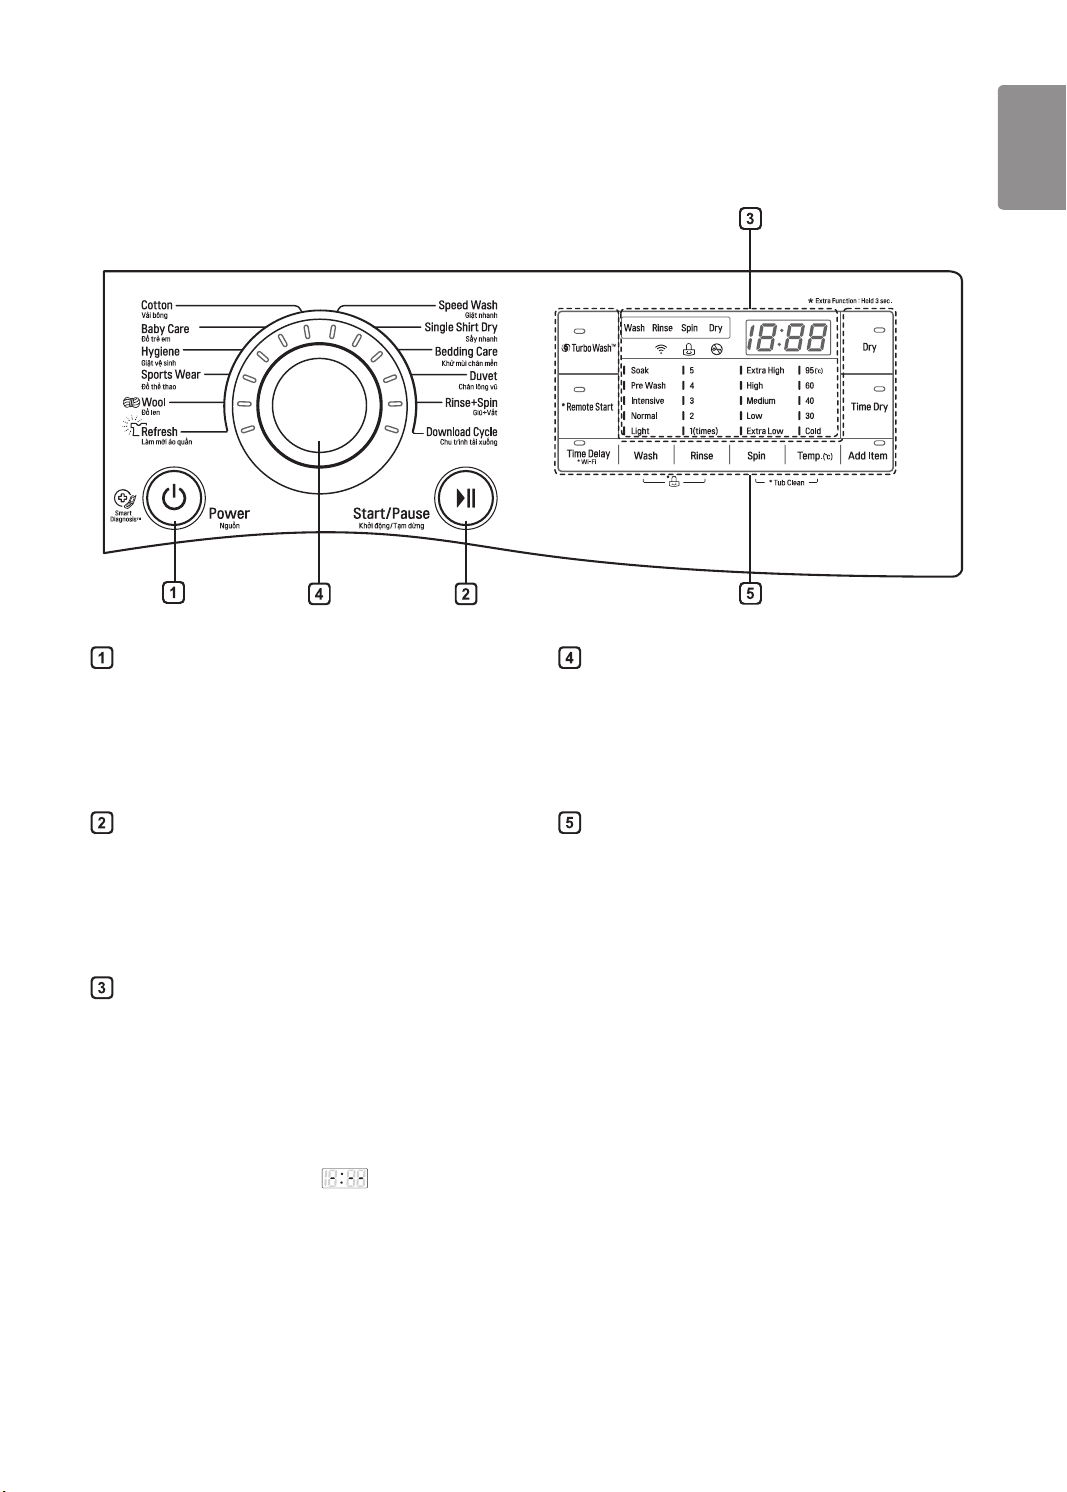
Control Panel
ENGLISH
Power button
•Press the
machine on.
•To cancel the
button should be pressed.
Start/Pause button
•This
wash cycle or pause the wash cycle.
•If a temporary stop of the wash cycle is needed,
press the
Display
•The display shows the settings, estimated
time remaining, options, and status messages.
When the product is turned on, the default
settings in the display will illuminate.
•The display shows estimate time remaining.
While the size of the load is being calculated
automatically, blinking ‘ ’ or ‘Detecting’
appears.
Power
Time Delay
Start/Pause
Start/Pause
button to turn the washing
function, the
button is used to start the
button.
Power
Programme dial
•Programmes are available according to laundry
type.
•Lamp will light up to indicate the selected
programme.
Options
•This allows you to select an additional cycle
and will light when selected.
•Use these buttons to select the desired cycle
options for the selected cycle.
21
Page 22
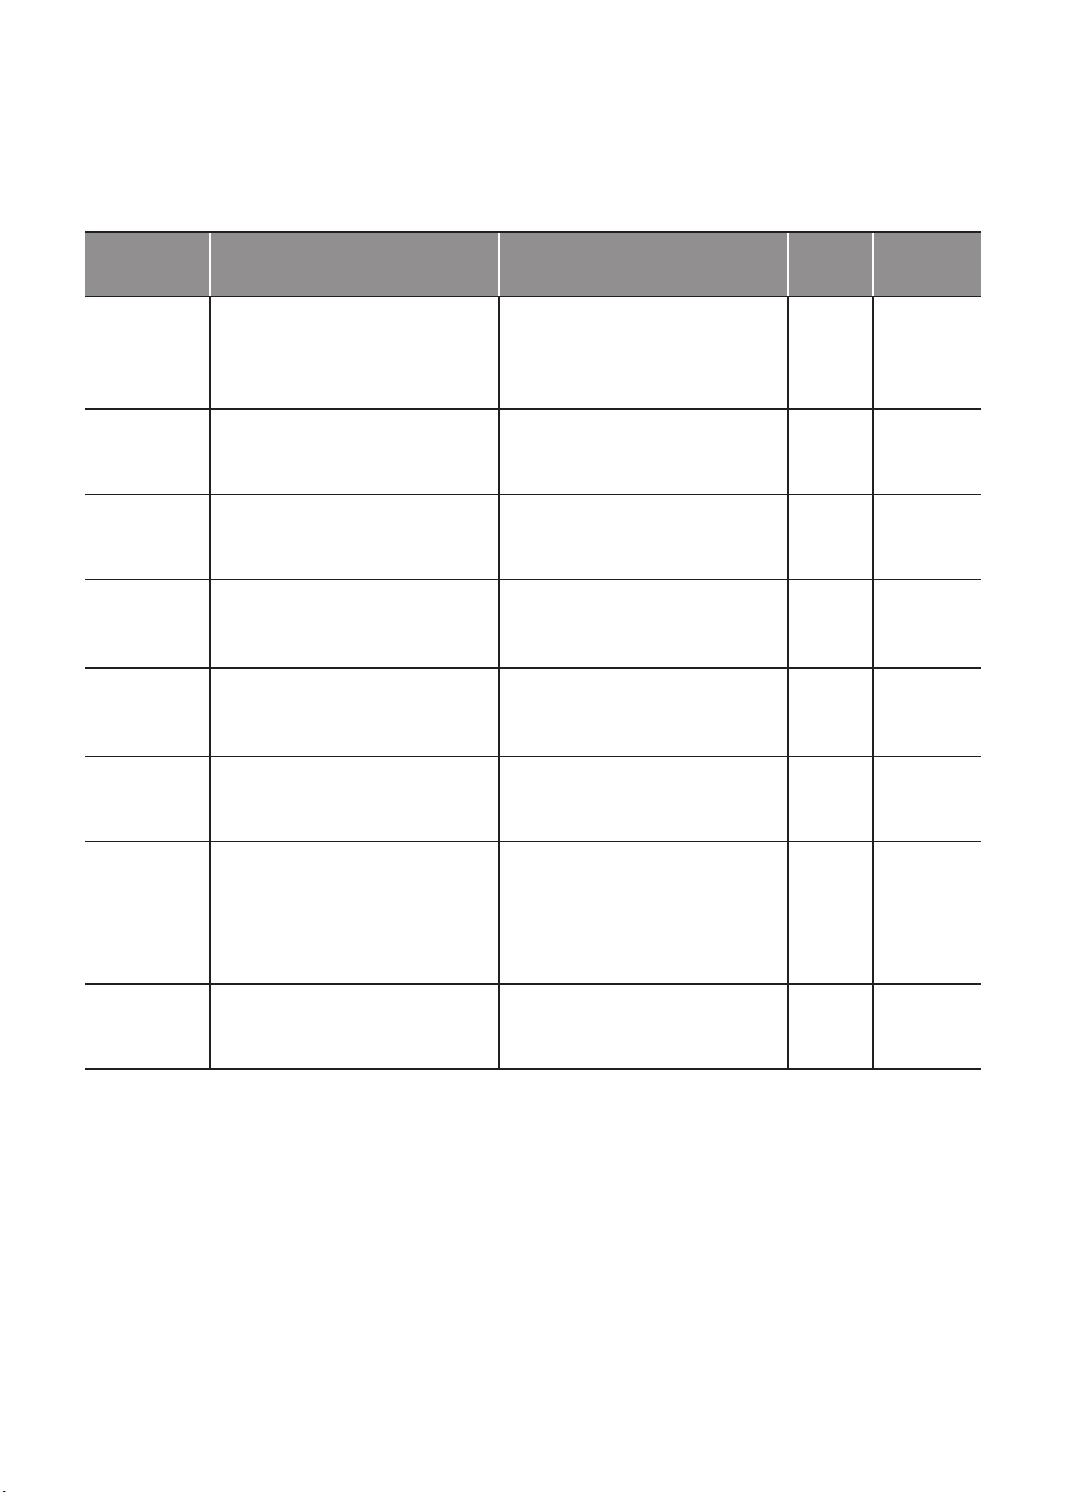
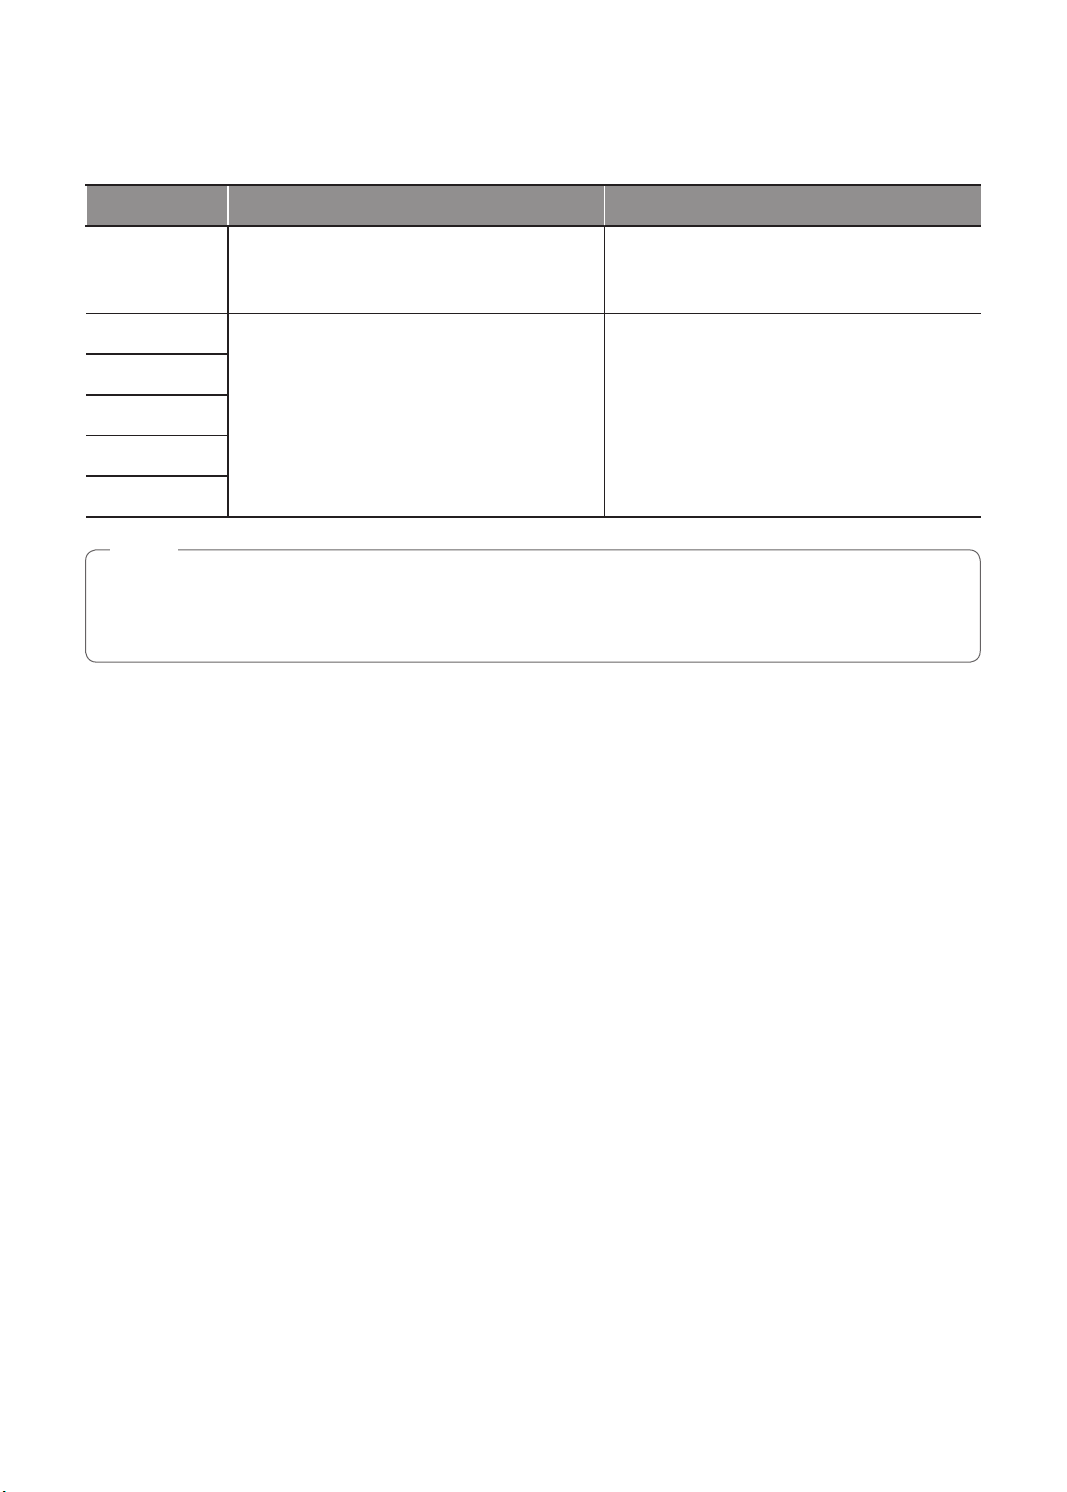
Programme Table
Washing Programme
Programme Description Fabric Type
Coloured fast garments (shirts,
Cotton
Baby Care
Hygiene
Sports Wear
Wool
Refresh
Provides better performance by
combining various drum motions.
Removes solid and protein stains,
provides better rinse performance.
Washes laundry in a hot cycle
This cycle is suitable for sports wear
such as jogging clothes and running
wear.
Enables to wash wool fabrics.
(Please use detergent for
machinewashable woolens).
Removes wrinkles within 30 mins
with dry.
nightdresses, pajamas, etc)
and normally soiled cotton load
(underwear).
Lightly soiled baby wear. 60 °C 5.0 kg
Cotton, underwear, pillow covers,
bed sheets, baby wear
Coolmax, Gore-tex, Fleece and
Sympatex.
Machine washable woolens with
pure now wool only
Cotton mixed, Polyester mixed Dress
shirts, blouses.
Proper
Temp.
40 °C
(Cold to
60 °C)
95 °C 3.0 kg
30 °C
(Cold to
30 °C)
40 °C
(Cold to
40 °C)
No
choice
Maximum
Load
Rating
5.0 kg
4.0 kg
5 items
Speed Wash
Single Shirt
Dry
22
Coloured laundry which is lightly
This cycle provides fast washing
time for small loads and lightly soiled
clothes.
Dries a small load in 19 minutes. Small load, shirts
soiled.
CAUTION : Use less than 20 g of
detergent (for 2.0 kg load) otherwise
detergent may remain on the clothes.
40 °C
(Cold to
40 °C)
No
choice
5.0 kg
1 item
Page 23

ENGLISH
Programme Description Fabric Type
Duvets, blankets, pillowcases,
shams, and other bedding.
Bedding
Care
Duvet
Rinse+Spin
Download
Cycle
•Water Temperature: Select the appropriate water temperature for chosen wash cycle. Always follow garment
manufacturer’s care label or instructions when washing.
•Set programme at ‘Wash: Cotton, Cold’ to test in accordance with TCVN 8526:2013.
Removes damp and odors from
bedding without washing.
This cycle is for large items such as
bed cover, pillows, sofa covers, etc.
Use for laundry that need rinsing only
of to add rinse-added fabric softener
to laundry
For downloadable cycles. If you did not download any cycles, the default is
CAUTION : Check fabric care labels
on blankets or duvets before using
the Bedding care programme. The
heated air of the programme may
shrink or damage some items.
Cotton bedding except special
garments (delicates, wool, silk, etc.)
with lling: duvets, pillows, blankets,
sofa covers with light lling.
Normal fabrics which can be
washable.
Proper
Temp.
No
choice
Cold
(Cold to
40 °C)
No
choice
Cold Wash
Maximum
Load
1 item
1 king size
3.0 kg
.
NOTE
•Neutral detergent is recommended.
23
Page 24
Drying Programme
Programme Description Fabric Type
Dry
Time 30 min.
Time 60 min.
Time 90 min.
Time 120 min.
Time 150 min.
For cottons. Select this cycle to reduce cycle time
and energy usage during the dry cycle.
You can change the drying time according to the
maximum load.
Cotton or linen fabrics such as cotton towels,
t-shirts, and linen laundries.
Cotton, towel
NOTE
•Select maximum selectable spin speed of washing programme to ensure drying results.
•Where the amount of laundry to be washed and dried in one programme does not exceed the maximum weight
permitted for the drying programme, washing and drying in one continuous sequence is recommended.
24
Page 25
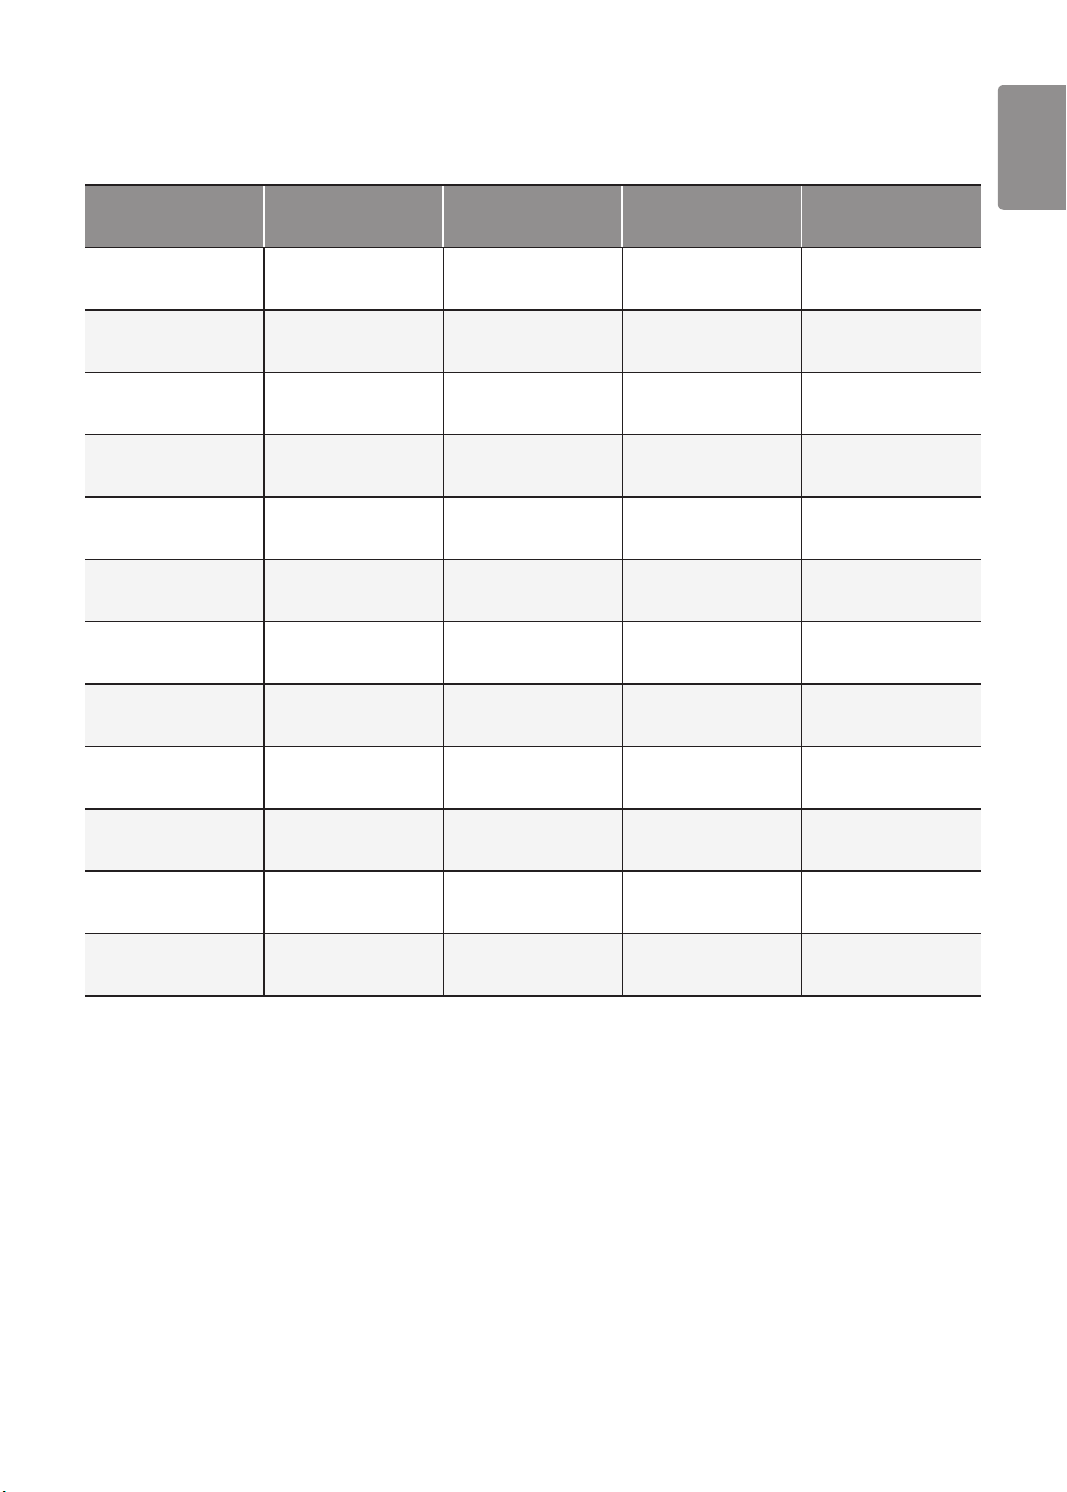
Extra Options
Programme Time Delay Turbo Wash™ Add Item Dry
ENGLISH
Cotton
Baby Care
Hygiene
Sports Wear
Wool
Refresh
Speed Wash
Single Shirt Dry
Bedding Care
Duvet
● ●** ● ●
● ● ● ●
● ● ● ●
● ● ●
● ●
● ●
● ●** ● ●
● ● ●*
● ●
● ● ●
Rinse+Spin
Download Cycle
* : This option is automatically included in the cycle and can not be deleted.
** : This option is automatically included in the cycle and can be deleted.
● ● ●
● ● ● ●
25
Page 26

Option Cycle
Add Item
Time Delay
You can set a time delay so that the washing machine
will start automatically and nish after a specied time
interval.
Press the
1
Select a washing programme.
2
Press the
3
Press the
4
Power
button.
Time Delay
Start/Pause
button and set time required.
button.
NOTE
•The delay time is the time to the end of the
programme, not the start. The actual running time
may vary due to water temperature, wash load
and other factors.
Turbo Wash™
Wash cycle in under 1 hour with energy and water
saving. (based on half of laundry)
1
Press the
Power
button.
Use this function to add loads or remove the foreign
material.
Press the
1
Close the door after add loads or remove the
2
foreign material. (e.g. coin or pin etc.)
Press the
3
•Results when choosing
- When the tub is spinning : Tub stops and
is off.
- When water temperature in the tub is higher than
45°C :
sound for safety.
- When lots of water is in the tub :
after draining by safe water level.
Add Item
Start/Pause
Add Item
button.
button.
Add Item
is not available with short warning
during cycles.
Door Lock
Door Lock
is off
NOTE
•Open the door when Door Lock is off after
checking the safety.
•Add Item doesn't work when Tub Cleaning course
is in progress for safety.
•Put the laundry into the tub completely. Laundry
caught in between door closing part can damage
door packing (rubber part) and might cause failure.
Select a washing programme.
2
3
4
Press the
Press the
Turbo Wash™
Start/Pause
button.
button.
NOTE
•Turbo Wash™ function of Some courses is
selected automatically.
26
Page 27
ENGLISH
Wash
Soak
Use this mode to wash normal clothes or thick and
heavy clothes which are excessively dirty.
Pre Wash
If the laundry is heavily soiled, the Pre Wash cycle is
recommended.
Intensive
If the laundry is normal and heavily soiled, the
option is effective.
Normal
This option is automatically selected in every course
except for
Rinse+Spin, Baby Care
.
Light
This cycle is suitable for lightly soiled clothing.
NOTE
•Selectable options will differ depending on
selected course.
Intensive
Spin
•Spin speed level can be selected by pressing the
button repeatedly.
- Extra High / High / Medium / Low / Extra Low
•Spin Only
Press the
1
Press the
2
Press the
3
Power
button.
Spin
button to select spin speed.
Start/Pause
button.
Temp.
Temp.
The
temperature combination for the selected cycle. Press
this button until the desired setting is lit. All rinses use
cold tap water.
•Select the water temperature suitable for the type of
load you are washing. Follow the garment fabric care
labels for best results.
button selects the wash and rinse
Spin
Rinse
By pressing the
selected.
•1 / 2 / 3 / 4 / 5 (times)
Rinse
button, the Rinse times can be
27
Page 28
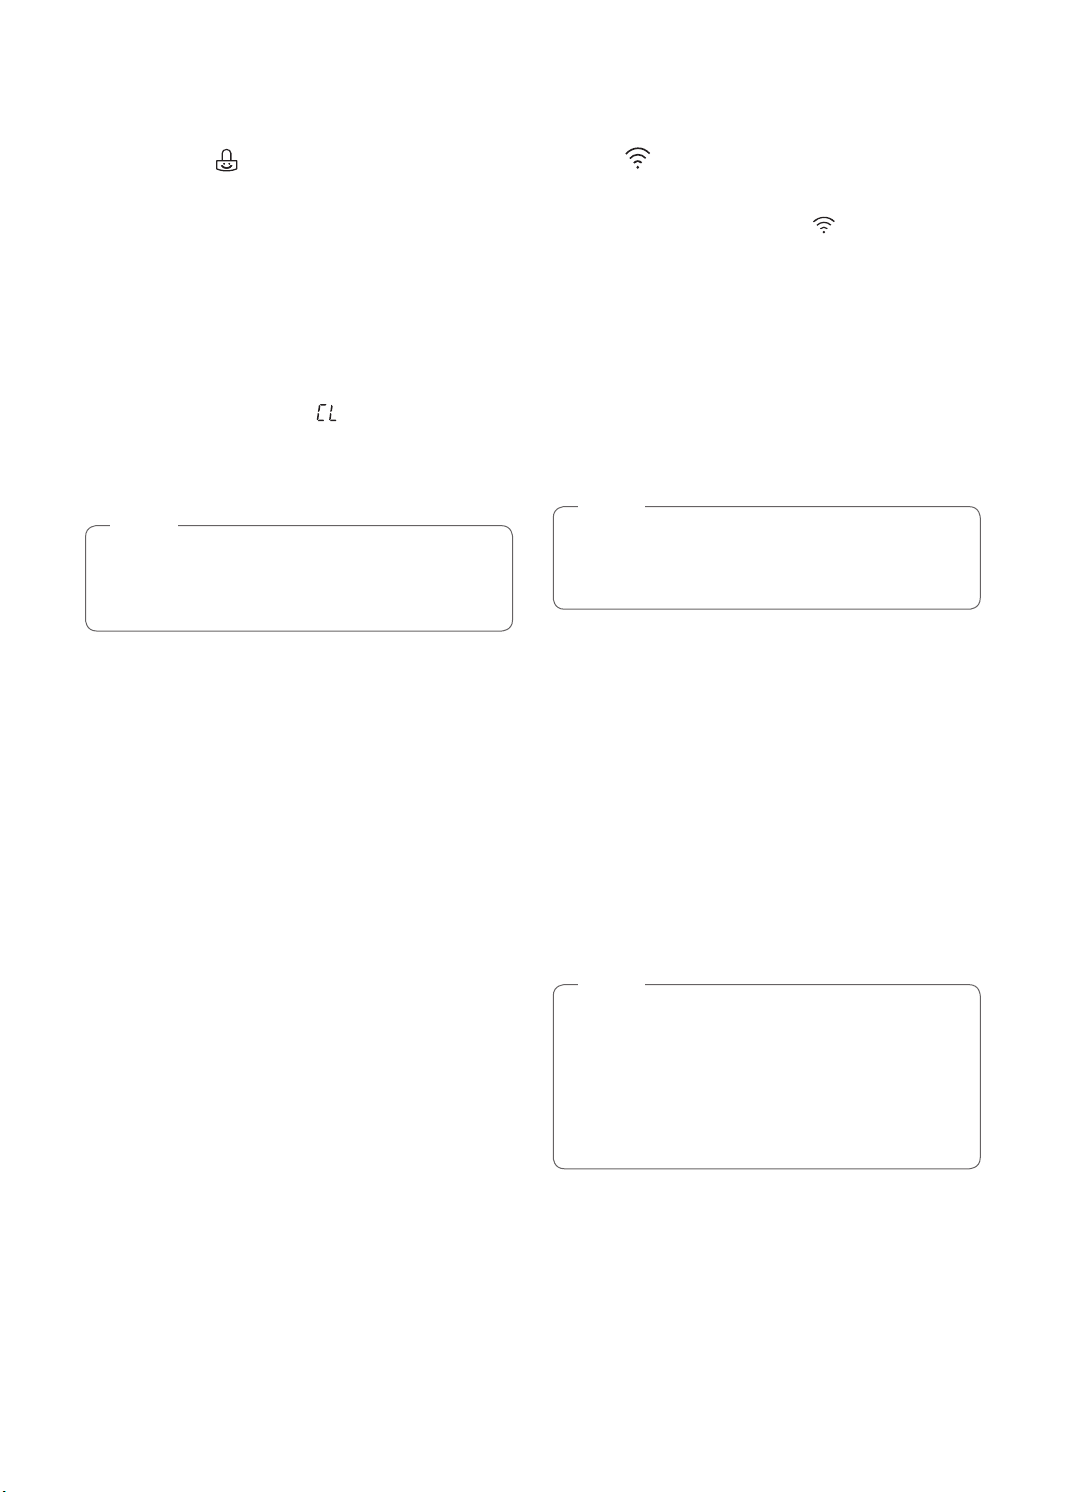
Child Lock ( )
Wi-Fi ( )
Select this function to lock the buttons on the control
assembly to prevent tampering.
Locking the control panel
Press and hold the
1
seconds.
A beeper will sound, and ‘ ’ will appear on the
2
display.
When the child lock is set, all buttons are locked
except the
Power
Wash
button.
and
Rinse
button for 3
NOTE
•Turning off the power will not reset the child lock
function. You must deactivate child lock before
you can access any other functions.
Unlocking the control panel
Press and hold the
seconds.
•A beeper will sound and the remaining time for the
current programme will reappear on the display.
Wash
and
Rinse
button for 3
Press and hold the
Wi-Fi
is turned on, the Wi-Fi icon ( ) on the control
panel is lit.
Wi-Fi
button for 3 seconds. When
Remote Start
Use a smart phone to control your appliance remotely.
You can also monitor your cycle operation so you know
how much time is left in the cycle.
NOTE
•You must rst connect to a gateway and register
your appliance in order to use the Remote Start
function.
To use Remote Start:
Press the
1
Put the laundry in the drum.
2
Press and hold
3
to enable Remote Start function.
Power
button.
Remote Start
button for 3 seconds
28
Start a cycle from the LG SmartThinQ application
4
on your smart phone.
NOTE
•If you do not start your appliance, it will wait to
start a cycle until you turn off your appliance
from the application or disable the Remote Start
function.
•When Remote Start is turned on, the door is
automatically locked.
To disable Remote Start:
When the Remote Start is activated, press and hold
Remote Start
button for 3 seconds.
Page 29

Download Cycle
Download Cycle
The
you to download new and special cycles that are not
included in the appliance's basic cycles.
Appliances that have been successfully registered
can download a variety of specialty cycles specic to
the appliance. Only one cycle can be stored on the
appliance at a time.
Once Cycle Download is completed in the washer, the
product keeps the downloaded cycle until you change it
to a new downloaded cycle.
NOTE
•You can download cycles after registering the
product and conguring the Wi-Fi connection.
•You can download a desired cycle through the 'LG
SmartThinQ' app. For more information on each
cycle, refer to the 'LG SmartThinQ' app.
•Depending on the type of washer purchased,
different cycles will be available.
•The downloaded cycles may be different
depending on the updated version of the 'LG
SmartThinQ' app.
features of this appliance allow
ENGLISH
29
Page 30
Dry
Permanent Press and Synthetics
Use the your Automatic cycles to dry most loads.
Electronic sensors measure the temperature of the
exhaust to increase or decrease drying temperatures for
faster reaction time and tighter temperature control.
•Cold water tap must be left on during drying cycles.
•This washing machine’s automatic process from
washing to drying can be selected easily.
•For most even drying, make sure all articles in the
clothes load are similar in material and thickness.
•Do not overload the washing machine by stufng too
many articles into the drum. Items must be able to
tumble freely.
•If you open the door and remove the load before the
washing machine has nished its cycle, remember to
press the
•After the end of dry, ‘ ’ is displayed. ‘ ’ means
crease decreasing. The drying cycle is already done.
Press any button and take out clothes. If you do not
press any button, the programme ends after about 4
hours.
Start/Pause
button.
NOTE
•When you turn the washing machine off of the
drying cycle, the drying fan motor can be operated
to save itself for 1 minute.
•Be careful when removing your clothing from the
washing machine, as the clothing or washing
machine may be hot.
Woolen Articles
•Do not overload your washing machine
•Take out permanent press articles as soon as the
washing machine stops to reduce wrinkles.
Baby clothes and Night Gowns
•Always check the manufacturer’s instructions.
Rubber and Plastics
•Do not dry any items made from or containing rubber
or plastics, such as:
– aprons, bibs, chair covers
– curtains and table cloths
– bathmats
Fiber glass
•Do not dry berglass articles in your washing machine.
Glass particles left in the washing machine may be
picked up by your clothes the next time you use the
washing machine and cause skin irritation.
Drying Time Guide
•The drying time can be selected by pressing the
Dry
button.
•These drying times are given as a guide to help you
set your washing machine for manual drying.
Time
•Do not tumble dry woolen articles. Pull them to their
original shape and dry them at.
Woven and Loopknit Materials
•Some woven and loopknit materials may shrink, by
varying amounts, depending on their quality.
•Always stretch these materials out immediately after
drying.
30
NOTE
•The estimated drying time varies from the actual
drying time during the Automatic cycle. The
type of fabric, size of the load, and the dryness
selected affect drying time.
•When you select drying only, spinning runs
automatically for energy efciency.
Page 31

SMART FUNCTIONS
ENGLISH
Using LG SmartThinQ Application
Things to check before using LG
SmartThinQ
•For appliances with the or logo
Check the distance between the appliance and the
1
wireless router (Wi-Fi network).
•If the distance between the appliance and the
wireless router is too far, the signal strength
becomes weak. It may take a long time to
register or installation may fail.
Turn off the
2
smartphone.
•For iPhones, turn data off by going to
Settings
Connect your smartphone to the wireless router.
3
Mobile data
Cellular
→
Cellular Data
or
Cellular Data
→
on your
.
NOTE
•To verify the Wi-Fi connection, check the Wi-Fi
icon on the control panel is lit.
•The appliance supports 2.4 GHz Wi-Fi networks
only. To check your network frequency, contact
your Internet service provider or refer to your
wireless router manual.
•LG SmartThinQ is not responsible for any network
connection problems or any faults, malfunctions,
or errors caused by network connection.
•If the appliance is having trouble connecting to the
Wi-Fi network, it may be too far from the router.
Purchase a Wi-Fi repeater (range extender) to
improve the Wi-Fi signal strength.
•The Wi-Fi connection may not connect or may
be interrupted because of the home network
environment.
•The network connection may not work properly
depending on the Internet service provider.
•The surrounding wireless environment can make
the wireless network service run slowly.
•The appliance cannot be registered due to
problems with the wireless signal transmission.
Unplug the appliance and wait about a minute
before trying again.
•If the rewall on your wireless router is enabled,
disable the rewall or add an exception to it.
•The wireless network name (SSID) should be a
combination of English letters and numbers. (Do
not use special characters.)
•Smartphone user interface (UI) may vary
depending on the mobile operating system (OS)
and the manufacturer.
•If the security protocol of the router is set to
WEP, you may fail to set up the network. Please
change it to other security protocols (WPA2 is
recommended) and register the product again.
31
Page 32

Installing LG SmartThinQ
Push Alert
Search for the LG SmartThinQ application from the
Google Play Store or Apple App Store on a smart
phone. Follow instructions to download and install the
application.
NOTE
•If you choose the simple login to access the LG
SmartThinQ application, you must go through
the appliance registration process each time
you change your smartphone or reinstall the
application.
Wi-Fi Function
•For appliances with the or logo
Communicate with the appliance from a smart phone
using the convenient smart features.
Washer Cycle
Set or download any perferred cycle and operate by
remote control.
Tub Clean Coach
Check the appropriate Tub Clean period based on the
washing frequency.
Turn on the Push Alerts to receive appliance status
notications. The notications are triggered even if the
LG SmartThinQ application is off.
NOTE
•If you change your wireless router, your Internet
service provider or your password after registering
the appliance, please delete it from the LG
SmartThinQ Settings → Edit Product and
register again.
•The application is subject to change for appliance
improvement purposes without notice to users.
•Functions may vary by model.
Open Source Software Notice Information
To obtain the source code under GPL, LGPL, MPL, and
other open source licenses, that is contained in this
product, please visit http://opensource.lge.com.
In addition to the source code, all referred license terms,
warranty disclaimers and copyright notices are available
for download.
LG Electronics will also provide open source code to you
on CD-ROM for a charge covering the cost of performing
such distribution (such as the cost of media, shipping,
and handling) upon email request to opensource@lge.
com. This offer is valid for three (3) years from the date
on which you purchased the product.
Energy Monitoring
Check the energy consumption of the recently used
cycles and monthly average.
Smart Diagnosis
If you use the Smart Diagnosis function, you will be
provided with the useful information such as a correct
way of using the appliance based on the pattern of use.
Settings
Allows you to set various options on the appliance and
in the application.
32
Page 33

ENGLISH
Smart Diagnosis™ Using a Smart Phone
•For appliances with the or logo
Use this function if you need an accurate diagnosis by
an LG Electronics customer information centre when the
appliance malfunctions or fails.
Smart Diagnosis™ can not be activated unless the
appliance is connected to power. If the appliance is
unable to turn on, then troubleshooting must be done
without using Smart Diagnosis™.
Using Smart Diagnosis™
Smart Diagnosis™ Through the
Customer Information Centre
Use this function if you need an accurate diagnosis by
an LG Electronics customer information center when the
appliance malfunctions or fails. Use this function only
to contact the service representative, not during normal
operation.
Press the
1
machine. Do not press any other buttons or turn
the cycle selector knob.
Power
button to turn on the washing
Keep the phone in place until the tone transmission
4
has nished. Time remaining for data transfer is
displayed.
•For best results, do not move the phone while
the tones are being transmitted.
•If the call centre agent is not able to get an
accurate recording of the data, you may be
asked to try again.
Once the countdown is over and the tones have
5
stopped, resume your conversation with the call
centre agent, who will then be able to assist you
using the information transmitted for analysis.
NOTE
•The Smart Diagnosis™ function depends on the
local call quality.
•The communication performance will improve and
you can receive better service if you use the home
phone.
•If the Smart Diagnosis™ data transfer is poor due
to poor call quality, you may not receive the best
Smart Diagnosis™ service.
When instructed to do so by the call centre, place
2
the mouthpiece of your phone close to the
button.
Max
10 mm
Press and hold the
3
while holding the phone mouthpiece to the icon or
Power
button.
Temp.
button for 3 seconds,
Power
33
Page 34

MAINTENANCE
WARNING
•Unplug the washing machine before cleaning to
avoid the risk of electric shock. Failure to follow
this warning may result in serious injury, re,
electric shock, or death.
•Never use harsh chemicals, abrasive cleaners, or
solvents to clean the washing machine. They may
damage the nish.
Cleaning your Washing Machine
Care After Wash
•After the cycle is nished, wipe the door and the inside
of the door seal to remove any moisture.
•Leave the door open to dry the drum interior.
•Wipe the body of the washing machine with a dry cloth
to remove any moisture.
Cleaning the Exterior
Proper care of your washing machine can extend its life.
Care and Cleaning of the Interior
•Use a towel or soft cloth to wipe around the washing
machine door opening and door glass.
•Always remove items from the washing machine as
soon as the cycle is complete. Leaving damp items
in the washing machine can cause wrinkling, colour
transfer, and odour.
•Run the Tub Clean cycle once a month (or more often
if needed) to remove detergent buildup and other
residue.
Cleaning the Water Inlet Filter
•Turn off the stopclock if the washing machine is to be
left for any length of time (e.g. holiday), especially if
there is no oor drain (gully) in the immediate vicinity.
•‘ ’ icon will be displayed on the control panel when
water is not entering the detergent drawer.
•If water is very hard or contains traces of lime deposit,
the water inlet lter may become clogged. It is
therefore a good idea to clean it occasionally.
Door:
•Wash with a damp cloth on the outside and inside and
then dry with a soft cloth.
Exterior:
•Immediately wipe off any spills.
•Wipe with a damp cloth.
•Do not press the surface or the display with sharp
objects.
Turn off the water tap and unscrew the water inlet
1
hose.
Clean the lter using a hard bristle brush.
2
34
Page 35

ENGLISH
2
Cleaning the Drain Pump Filter
•The drain lter collects threads and small objects left
in the laundry. Check regularly that the lter is clean to
ensure smooth running of your washing machine.
•Allow the water to cool down before cleaning the drain
pump, carrying out emergency emptying, or opening
the door in an emergency.
Open the cover cap and pull out the hose.
1
Unplug the drain plug and open the lter by turning
2
it to the left.
Container to
collect the
drained water.
After cleaning, turn the pump lter and insert the
4
drain plug.
Close the cover cap.
5
CAUTION
•First drain using the drain hose and then open the
pump lter to remove any threads or objects.
•Be careful when draining, as the water may be
hot.
Remove any extraneous matter from the pump
3
lter.
1
35
Page 36

Cleaning the Dispenser Drawer
Tub Clean
Detergent and fabric softener may build up in the
dispenser drawer. Remove the drawer and inserts and
check for buildup once or twice a month.
Remove the detergent dispenser drawer by pulling
1
it straight out until it stops.
•Press down hard on the disengage button and
remove the drawer.
Remove the inserts from the drawer.
2
•Rinse the inserts and the drawer with warm
water to remove buildup from laundry products.
Use only water to clean the dispenser drawer.
Dry the inserts and drawer with a soft cloth or
towel.
To clean the drawer opening, use a cloth or small,
3
non-metal brush to clean the recess.
•Remove all residue from the upper and lower
parts of the recess.
Wipe any moisture off the recess with a soft cloth
4
or towel.
Return the inserts to the proper compartments and
5
replace the drawer.
Tub Clean is a special cycle to clean the inside of the
washing machine.
A higher water level is used in this cycle at higher spin
speed. Perform this cycle regularly.
Remove any clothing or items from the washing
1
machine and close the door.
Open the dispenser drawer and add Anti limescale
2
(e.g. Calgon) to the main wash compartment.
Close the dispenser drawer slowly.
3
Power On and then press and hold the
4
Temp.
button for 3 seconds.
Then ‘ ’ will be displayed on the display.
Press the
5
After the cycle is complete, leave the door open to
6
allow the washing machine door opening, exible
gasket and door glass to dry.
•If there is a child, be careful not to leave the door
open for too long.
NOTE
•Do not add any detergent to the detergent
compartments. Excessive suds may generate and
leak from the washing machine.
Start/Pause
CAUTION
button to start.
Spin
and
36
Page 37

ENGLISH
Caution on Freezing During
Winter
•When frozen, the product does not operate normally.
Make sure to install the product where it will not freeze
during winter.
•In case the product must be installed outside on a
porch or in other outdoor conditions, make sure to
check the following.
How to Keep the Product from Freezing
•After washing, remove water remaining inside the
pump completely with the opening hose plug used for
removal of residual water. When the water is removed
completely, close the hose plug used for removal of
residual water and cover cap.
•After closing the tap, disconnect the cold inlet hose
from the tap, and remove water while keeping the
hose facing downwards.
Cold inlet
hose
Check for Freezing
•If water does not drain when opening the hose plug
used for removal of residual water, check the drainage
unit.
Drain plug
Drain plug
Cover cap
•Hang down drain hose to pull out water inside the
hose completely.
Drain hose
CAUTION
•When the drain hose is installed in a curved
shape, the inner hose may freeze.
Cover cap
•Turn the power on, select Rinse and Spin, and press
Start/Pause
the
Detergent drawer
button.
Drain hose
NOTE
•Check that water is coming into the detergent
drawer while rinsing, and water is draining through
the drain hose while spinning.
•When ‘ ’ is shown in display window while the
product is in operation, check water supply unit and
drainage unit (Some models do not have an alarm
function that indicates freezing).
37
Page 38

How to Handle Freezing
•Make sure to empty the drum, pour warm water of
50–60 °C up to the rubber part inside the drum, close
the door, and wait for 1–2 hours.
•When water is removed completely from the drum,
close the hose plug used for removal of residual
water, select Rinse and Spin, and press the
Pause
button.
Start/
50‒60 °C
CAUTION
•Do not use boiling water. It may cause burns or
damage to the product.
•Open the cover cap and hose plug used for removal
of residual water to extract water completely.
Drain plug
Cover cap
NOTE
•If when water does not drain, this means the ice is
not melted completely. Wait more.
Detergent drawer
Drain hose
NOTE
•Check that water is coming into the detergent
drawer while rinsing, and water is draining through
the drain hose while spinning.
•When water supply problems occur, take the following
measures.
– Turn off the tap, and thaw out the tap and both
connection areas of inlet hose of the product using
a hot water cloth.
– Take out inlet hose and immerse in warm water
below 50–60 °C.
Inlet hose
50‒60 °C
38
Page 39

TROUBLESHOOTING
•Your washing machine is equipped with an automatic error-monitoring system to detect and diagnose problems at
an early stage. If your washing machine does not function properly or does not function at all, check the following
before you call for service:
Diagnosing Problems
Symptoms Reason Solution
•Stop washing machine, check drum and
Rattling and
clanking noise
Foreign objects such as coins or
safety pins may be in drum or pump.
drain lter.
•If noise continues after washing machine
is restarted, call your authorised service
centre.
ENGLISH
Thumping sound
Vibrating noise
Water leaks
Oversudsing
Water does not
enter washing
machine or it
enters slowly
Heavy wash loads may produce a
thumping sound. This is usually
normal.
Have all the transit bolts and tub
support been removed?
Are all the feet resting rmly on the
ground?
Inlet hoses or drain hose are loose at
tap or washing machine.
House drain pipes are clogged.
Water supply is not adequate in that
location.
Water supply tap is not completely
open.
Water inlet hose(s) are kinked.
•If sound continues, washing machine
is probably out of balance. Stop and
redistribute wash load.
•If not removed during installation, refer to
Installation guide for removing transit bolts.
•Make sure the washing machine is level and
tighten the lock nuts up towards the base of
the appliance.
•Check and tighten hose connections.
•Unclog drain pipe. Contact plumber if
necessary.
•Too much detergent or unsuitable detergent
may cause excessive foaming which may
result in water leaks.
•Check another tap in the house.
•Fully open tap.
•Straighten hose.
Water in the
washing
machine does
not drain or
drains slowly
The lter of the inlet hose(s) clogged.
Drain hose is kinked or clogged.
The drain lter is clogged.
•Check the lter of the inlet hose.
•Clean and straighten the drain hose.
•Clean the drain lter.
39
Page 40

Symptoms Reason Solution
Electrical power cord may not be
Washing
machine does
not start
plugged in or connection may be
loose.
House fuse blown, circuit breaker
tripped,or a power outage has
occurred.
•Make sure plug ts tightly in wall outlet.
•Reset circuit breaker or replace fuse. Do not
increase fuse capacity. If problem is a circuit
overload, have it corrected by a qualied
electrician.
Washing
machine will not
spin
Door does not
open
Wash cycle time
delayed
Fabric softener
overow
Water supply tap is not turned on.
Check that the door is rmly shut.
Too much softener may cause an
overow.
•Turn on water supply tap.
•Close the door and press the
button. After pressing the
button, it may take a few moments before
the washing machine begins to spin. The
door must be locked before spin can be
achieved. Add 1 or 2 similar items to help
balance the load. Rearrange load to allow
proper spinning.
•Once washing machine has started, the
door cannot be opened for safety reasons.
Check if the ‘Door Lock’ icon is illuminated.
You can safely open the door after the ‘Door
Lock’ icon turns off.
•The washing time may vary by the
amount of laundry, water pressure, water
temperature and other usage conditions.
If an imbalance is detected or if the suds
removing programme is on, the wash time
will increase.
•Follow softener guidelines to ensure
appropriate amount is used. Do not exceed
the maximum ll line.
Start/Pause
Start/Pause
Softeners
dispensed too
early
Dry problem Does not dry
40
•Close the dispenser drawer slowly. Do not
open the drawer during the wash cycle.
•Do not overload. Check that the washing
machine is draining properly to extract
adequate water from the load. Clothes load
is too small to tumble properly. Add a few
towels.
Page 41

Symptoms Reason Solution
ENGLISH
Odor
This odor is caused by the rubber
attached to the washing machine.
If the rubber door gasket and door
seal area are not cleaned regularly,
odors can occur from mold or foreign
substances.
Odors can occur if foreign substances
are left in the drainage pump lter.
Odors can occur if the drainage hose
is not properly installed, causing
siphoning (water owing back inside
the washing machine).
Using the dry function, odors can
occur from lint and other laundry
matter sticking to the heater. (Dryer
model only)
A particular odor can occur from
drying wet clothes with hot air. (Dryer
model only)
•It is the normal odor of new rubber and will
disappear after the machine has been run a
few times.
•Be sure to clean the gasket and door seal
regularly and check under the door seal for
small items when unloading the washer.
•Be sure to clean the drainage pump lter
regularly.
•When installing the drainage hose, be sure
that it doesn’t become kinked or blocked.
•This is not a malfunction.
•The odor will disappear after a short while.
Your home
appliance and
smartphone is
not connected
to the Wi-Fi
network.
The password for the Wi-Fi that you
are trying to connect to is incorrect.
Mobile data for your smartphone is
turned on.
The wireless network name (SSID) is
set incorrectly.
The router frequency is not 2.4 GHz.
The distance between the appliance
and the router is too far.
•Find the Wi-Fi network connectedto your
smartphone and remove it,then register
your appliance on LG SmartThinQ.
•Turn off the
and register the applianceusing the Wi-Fi
network.
•The wireless network name (SSID)should
be a combination of Englishletters and
numbers. (Do not usespecial characters.)
•Only a 2.4 GHz router frequency
issupported. Set the wireless router
to2.4 GHz and connect the applianceto
the wireless router. To check therouter
frequency, check with yourInternet service
provider or the routermanufacturer.
•If the distance between the applianceand the
router is too far, the signalmay be weak and
the connection maynot be congured correctly.
Move thelocation of the router so that it is
closerto the appliance.
Mobile data
of your smartphone
41
Page 42

Error Messages
Symptoms Reason Solution
Water supply is not adequate in
area.
Water supply taps are not
completely open.
Water inlet hose(s) are kinked.
The lter of the inlet hose(s) are
clogged.
If water leakage occurred in
the inlet hose, indicator
become red.
•May vary depending on the model.
Drain hose is kinked or clogged.
The drain lter is clogged.
‘ ’
will
•Check another tap in the house.
•Fully open tap.
•Straighten hose(s).
•Check the lter of the inlet hose.
•Clean and straighten the drain hose.
•Clean the drain lter.
42
Load is too small.
Load is out of balance.
The appliance has an imbalance
detection and correction system.
If individual heavy articles are
loaded (e.g. bath mat, bath
robe, etc.) this system may stop
spinning or even interrupt the
spin cycle altogether.
If the laundry is still too wet at
the end of the cycle, add smaller
articles of laundry to balance the
load and repeat the spin cycle.
•Add 1 or 2 similar items to help balance
the load.
•Add 1 or 2 similar items to help balance
the load.
•Rearrange load to allow proper spinning.
•Rearrange load to allow proper spinning.
Page 43

Symptoms Reason Solution
ENGLISH
Door is not closed properly.
Door sensor has malfunctioned.
Water overlls due to the faulty
water valve.
Water level sensor has
malfunctioned.
Over load in motor.
Water leaks.
•Close the door completely.
If ‘ , , , ’ is not released,
call for service.
•Unplug the power plug and call for
service.
•Close the water tap.
•Unplug the power plug.
•Call for service.
•Close the water tap.
•Unplug the power plug.
•Call for service.
•Allow the washing machine to stand for
30 minutes to allow the motor to cool,
then restart the cycle.
•Call for service.
The washer experienced a power
failure.
Control Error
Is Inlet/outlet hose or drainage
pump frozen?
•Restart the cycle.
•Unplug the power plug and call for
service.
•Supply warm water into the tub and
unfreeze outlet hose and drainage pump.
Wet a towel in warm water and apply to
inlet hose.
43
Page 44

WARRANTY
This limited warranty does not cover:
•Service trips to deliver, pick up, or install or repair the product; instruction to the customer on operation of the
product; repair or replacement of fuses or correction of wiring or plumbing, or correction of unauthorized repairs/
installation.
•Failure of the product to perform during power failures and interruptions or inadequate electrical service.
•Damage caused by leaky or broken water pipes, frozen water pipes, restricted drain lines, inadequate or interrupted
water supply or inadequate supply of air.
•Damage resulting from operating the Product in a corrosive atmosphere or contrary to the instructions outlined in the
Product’s owner’s manual.
•Damage to the Product caused by accidents, pests and vermin, lightning, wind, re, oods, or acts of God.
•Damage or failure caused by unauthorized modication or alteration, or if it is used for other than the intended
purpose, or any water leakage where the product was not properly installed.
•Damage or failure caused by incorrect electrical current, voltage, or plumbing codes, commercial or industrial use,
or use of accessories, components, or consumable cleaning products that are not approved by LG.
•Damage caused by transportation and handling, including scratches, dents, chips, and/or other damage to the nish
of your product, unless such damage results from defects in materials or workmanship.
•Damage or missing items to any display, open box, discounted, or refurbished Product.
• Products with original serial numbers that have been removed, altered, or cannot be readily determined. Model and
Serial numbers, along with original retail sales receipt, are required for warranty validation.
•Increases in utility costs and additional utility expenses.
•Repairs when your Product is used in other than normal and usual household use or contrary to the instructions
outlined in the Product’s owner’s manual.
•Costs associated with removal of your Product from your home for repairs.
•The removal and reinstallation of the Product if it is installed in an inaccessible location or is not installed in
accordance with published installation instructions, including LG’s owner’s and installation manuals.
•Damage resulting from misuse, abuse, improper installation, repair, or maintenance. Improper repair includes use of
parts not approved or specied by LG.
Strange vibration or noise
caused by not removing transit
bolts or tub support.
Leakage caused by dirt (hair,
lint) on gasket and door glass.
44
Tub
support
Carton
base
Transit
bolt
Remove the transit bolts &
tub support.
Clean the gasket & door
glass.
Page 45

ENGLISH
Not draining caused by clogging
of pump lter.
Water is not coming because
water inlet valve lters are
clogged or water inlet hoses are
kinked.
Water is not coming because too
much detergent use.
Laundry is hot or warm after
nished washing because the
inlet hoses are installed in
reverse.
Water is not supplied because
the water tap is not turned on.
Dispenser
Cold
Water
Inlet
water tap
Inlet Filter
Hot
Water
Inlet
Clean the pump lter.
Clean the inlet valve lter
or reinstall the water inlet
hoses.
Clean the detergent
disperser drawer.
Reinstall the inlet hoses.
Turn on the water tap.
Leakage caused by improper
installation of drain hose or
clogged drain hose.
Leakage caused by improper
installation of water inlet hose or
using other brand inlet hoses.
No power problem caused by
loose connection of power cord
or electrical outlet problem.
Elbow
Bracket
Tie Strap
Reinstall the drain hose.
Reinstall the inlet hose.
Reconnect the power cord
or change the electrical
outlet.
45
Page 46

Service trips to deliver, pick
up, install the product or for
instruction on product use. The
removal and reinstallation of the
Product.
Level
The warranty covers
manufacturing defects
only. Service resulting from
improper Installation is not
1°
covered.
If all screws are not installed
properly, it may cause excessive
vibration (Pedestal model only).
Water hammering (banging)
noise when washing machine is
lling with water.
High
Pressure
Water
Hit!!
Loud noise
Natural
water ow
Sudden
stopping
water ow
Install 4 screws at each
corner (Total 16EA).
Adjust the water pressure
by turning down the water
valve or water tap in the
home.
46
Page 47

Memo
Page 48

Memo
Page 49

Memo
Page 50

Memo
Page 51

HƯỚNG DẪN SỬ DỤNG
NGƯỜI DÙNG
MÁY GIẶT
TIẾNG VIỆT
F2514DTGW
Trước khi bắt đầu lắp đặt, hãy đọc kỹ những hướng dẫn này.
Điều này sẽ đơn giản hoá quá trình lắp đặt và đảm bảo sản phẩm được
lắp đặt đúng cách và an toàn. Để hướng dẫn này ở gần sản phẩm sau
khi lắp đặt để sau này tham khảo.
www.lg.com
Copyright © 2017 LG Electronics Inc. All Rights Reserved
Page 52

MC LC
Hướng dẫn sử dụng này được viết dành cho một
nhóm sản phẩm và có thể có các hình ảnh hoặc nội
dung khác với model mà bạn đã mua.
Hướng dẫn sử dụng này có thể được nhà sản xuất
chỉnh sửa.
HƯỚNG DẪN AN TOÀN ........................................03
Hướng dẫn An toàn Quan trọng .......................................................... 05
LẮP ĐẶT .................................................................08
Các bộ phận ........................................................................................08
Các phụ kiện........................................................................................08
Thông số kỹ thuật ................................................................................09
Yêu cầu Không gian Lắp đặt ...............................................................10
Tháo dỡ bao bì đóng gói và Tháo bỏ Bu-lông Vận chuyển ................. 11
Sử dụng Miếng lót Chống Trượt (Tuỳ chọn) .......................................12
Sàn Gỗ (Sàn Lửng) .............................................................................12
Chỉnh thăng bằng Máy Giặt ................................................................. 13
Kết nối Ống Cấp ..................................................................................13
Lắp đặt Ống Xả ...................................................................................16
VẬN HÀNH ..............................................................17
Sử dụng Máy Giặt ...............................................................................17
Phân loại quần áo................................................................................18
Thêm Các chất Làm sạch....................................................................19
Bảng Điều khiển ..................................................................................21
Bảng Chương trình ..............................................................................22
Chu trình Tùy chọn ..............................................................................26
Dry (Sấy khô).......................................................................................30
CHỨC NĂNG THÔNG MINH ..................................31
Sử dụng Ứng dụng LG SmartThinQ ...................................................31
Sử dụng Smart Diagnosis™ ................................................................ 33
BẢO DƯỠNG .........................................................34
Vệ sinh Máy Giặt của bạn ...................................................................34
Vệ sinh Bộ lọc Ngõ vào Nước .............................................................34
Vệ sinh Bộ lọc Bơm Xả .......................................................................35
Vệ sinh Ngăn kéo Bộ phân phối ..........................................................36
Tub Clean (Làm sạch lồng giặt) ..........................................................36
Thận trọng trước hiện tượng Đóng băng Trong Mùa đông .................37
XỬ LÝ SỰ CỐ .........................................................39
Chẩn đoán Sự cố ................................................................................39
Thông báo Lỗi......................................................................................42
BẢO HÀNH .............................................................44
Page 53

HƯỚNG DẪN AN TOÀN
Các nguyên tắc an toàn sau đây được dùng để phòng ngừa các rủi ro hoặc hư
hỏng bất ngờ do vận hành sản phẩm không an toàn hoặc không đúng cách.
Các nguyên tắc được phân chia thành “CẢNH BÁO” và “THẬN TRỌNG” như
mô tả bên dưới.
Biểu tượng này được hiển thị để chỉ báo các vấn đề và thao tác có thể
gây ra rủi ro. Đọc kỹ phần có biểu tượng này và làm theo các hướng
dẫn để tránh rủi ro.
TIẾNG VIỆT
CẢNH BÁO
hướng dẫn có thể gây thương tích nặng hoặc tử vong.
THẬN TRỌNG
các hướng dẫn có thể khiến gây thương tích nhẹ hoặc gây hư hỏng
sản phẩm.
- Biểu tượng này cho biết rằng không thực hiện theo các
- Biểu tượng này cho biết rằng không thực hiện theo
CẢNH BÁO
Để giảm rủi ro cháy, giật điện hoặc thương tích cho người khi sử dụng
sản phẩm của bạn, phải thực hiện theo các phòng ngừa an toàn cơ bản,
bao gồm những điều sau đây.
TRẺ EM TRONG GIA ĐÌNH
Những người (bao gồm trẻ em) có thể chất, năng lực giác quan hoặc tinh thần suy giảm
hoặc thiếu kinh nghiệm và kiến thức không nên sử dụng thiết bị này nếu không có sự
giám sát hoặc hướng dẫn sử dụng thiết bị từ người chịu trách nhiệm về vấn đề an toàn
của họ. Phải giám sát trẻ em để đảm bảo bé không đùa nghịch với thiết bị.
Sử dụng ở châu Âu:
Trẻ em từ 8 tuổi trở lên và những người có thể chất, năng lực giác quan hoặc tinh thần
suy giảm hoặc thiếu kinh nghiệm và kiến thức có thể sử dụng thiết bị này, nếu họ có sự
giám sát hoặc hướng dẫn sử dụng thiết bị một cách an toàn và hiểu được các mối
nguy hiểm liên quan. Không để trẻ em đùa nghịch với thiết bị. Không để trẻ em thực hiện
quy trình vệ sinh và bảo dưỡng người dùng mà không có sự giám sát.
Cần giữ trẻ em dưới 3 tuổi tránh xa thiết bị nếu không giám sát được bé liên tục.
03
Page 54

YÊU CẦU NỐI ĐẤT
CẢNH BÁO
Vì sự an toàn của bạn, các thông tin trong hướng dẫn sử dụng này phải
được tuân thủ để giảm thiểu rủi ro cháy, nổ, điện giật hoặc để phòng ngừa
thiệt hại về tài sản, thương tích cho người hoặc tử vong.
•Thiết bị này phải được nối đất. Trong trường hợp xảy ra trục trặc hoặc hỏng máy, việc
nối đất sẽ giảm thiểu rủi ro điện giật bằng cách tạo ra đường đi cản trở dòng điện ít
nhất.
•Thiết bị này được lắp dây có dây dẫn nối đất thiết bị và phích cắm nối đất. Phích cắm
phải được cắm vào ổ cắm phù hợp được lắp đặt và nối đất đúng cách theo các quy tắc
và quy định địa phương.
•Việc kết nối dây dẫn nối đất thiết bị không đúng cách có thể gây ra rủi ro điện giật. Xác
nhận lại với thợ điện hoặc nhân viên dịch vụ có đủ trình độ chuyên môn nếu bạn nghi
ngại không biết thiết bị được nối đất đúng cách hay không.
•Không sửa đổi phích cắm được cung cấp kèm theo thiết bị. Nếu phích cắm không phù
hợp với ổ cắm, hãy yêu cầu thợ điện có đủ trình độ chuyên môn lắp đặt ổ cắm đúng.
04
Page 55

Hướng dẫn An toàn Quan trọng
CẢNH BÁO
Để giảm rủi ro cháy, giật điện hoặc thương tích cho người khi sử dụng
sản phẩm của bạn, phải thực hiện theo các phòng ngừa an toàn cơ bản,
bao gồm những điều sau đây.
TIẾNG VIỆT
Lắp đặt
•Đừng bao giờ cố gắng vận hành thiết
bị này nếu thiết bị hư hỏng, trục trặc,
bị tháo rời từng phần, thiếu hoặc gãy
các bộ phận, kể cả dây hoặc phích cắm
bị hỏng. Điều đó có thể gây điện giật
hoặc thương tích.
•Thiết bị này khá nặng. Có thể cần hai
người trở lên để lắp đặt và di chuyển
thiết bị. Không thực hiện theo như vậy
có thể dẫn đến thương tích.
•Bảo quản và lắp đặt thiết bị này ở
những nơi không tiếp xúc với nhiệt độ
dưới nhiệt độ đóng băng hoặc các điều
kiện thời tiết ngoài trời. Không thực
hiện theo như vậy có thể dẫn đến hiện
tượng rò rỉ.
•Siết chặt ống xả để tránh bị bật ra.
Nước bắn ra có thể gây điện giật.
•Nếu dây cấp điện bị hỏng, nhà sản
xuất hoặc các đại lý dịch vụ hoặc nhân
viên có đủ trình độ chuyên môn tương
đương phải thay dây để tránh nguy
hiểm.
Vận hành
•Không sử dụng đồ vật sắc nhọn như
máy khoan hoặc đinh ghim để nhấn
hoặc tách rời một đơn vị vận hành.
Điều đó có thể gây giật điện hoặc
thương tích.
•Chỉ có nhân viên sửa chữa được
uỷ quyền từ trung tâm dịch vụ LG
Electronics mới được tháo rời,
sửa chữa hoặc sửa đổi sản phẩm.
Thao tác không đúng có thể gây ra
thương tích, giật điện hoặc cháy.
•Không phun nước vào bên trong hoặc
bên ngoài sản phẩm để vệ sinh thiết bị.
Nước có thể làm hỏng chất cách điện,
gây điện giật hoặc hỏa hoạn.
•Giữ khu vực bên dưới và xung quanh
các thiết bị của bạn tránh các vật liệu
dễ cháy chẳng hạn như xơ vải, giấy, giẻ
lau, hoá chất v.v. Sử dụng không đúng
cách có thể gây cháy nổ.
•Không đặt các loài động vật, chẳng hạn
như thú cưng vào trong sản phẩm. Điều
đó có thể gây thương tích.
•Không được lắp đặt thiết bị phía sau
cửa có khoá, cửa trượt hoặc cửa có
bản lề ở phía đối diện cửa máy sấy khô
quần áo, làm hạn chế thao tác mở hẳn
cửa của máy sấy khô quần áo.
•Không để hở cửa thiết bị. Trẻ em có thể
trèo lên cửa hoặc bò vào trong thiết bị,
gây hư hỏng hoặc thương tích.
05
Page 56

•Không bao giờ đưa tay vào bên trong
thiết bị này khi thiết bị đang hoạt động.
Đợi cho đến khi lồng giặt hoàn toàn
dừng hẳn. Không thực hiện theo như
vậy có thể dẫn đến thương tích.
•Không bỏ thêm, giặt hoặc sấy những
đồ dùng đã được rửa, giặt, ngâm hoặc
chấm các chất dễ cháy hoặc dễ nổ
(chẳng hạn như sáp, dầu, sơn, xăng,
các chất tẩy nhờn, dung môi tẩy khô,
dầu hoả, dầu thực vật, dầu ăn v.v.). Sử
dụng không đúng cách có thể gây cháy
nổ.
•Trong trường hợp lũ lụt, hãy dừng sử
dụng sản phẩm và liên hệ trung tâm
dịch vụ LG Electronics. Tiếp xúc với
nước có thể gây điện giật.
•Không đè cửa xuống quá mạnh khi cửa
thiết bị hở. Làm như vậy có thể ngã lên
thiết bị và có thể gây thương tích.
•Sử dụng bộ ống mới được cung cấp
kèm theo thiết bị. Không nên tái sử
dụng bộ ống cũ. Rò rỉ nước có thể gây
hư hỏng tài sản.
•Không chạm vào cửa trong các chu
trình hơi nước, sấy hoặc giặt nhiệt độ
cao. Bề mặt cửa có thể trở nên rất
nóng. Để khoá cửa nhả khớp trước khi
mở cửa. Không thực hiện theo như vậy
có thể dẫn đến thương tích.
•Nếu ống xả hoặc ống cấp bị đóng băng
trong mùa đông, chỉ sử dụng thiết bị sau
khi tan tuyết. Hiện tượng đóng băng có
thể gây hỏa hoạn hoặc điện giật và các
bộ phận bị đóng băng có thể gây trục
trặc sản phẩm hoặc giảm tuổi thọ của
sản phẩm.
•Giữ tất cả các chất tẩy giặt, chất làm
mềm và chất tẩy trắng tránh xa trẻ em.
Các sản phẩm này có chứa những vật
liệu độc hại.
•Không được cắm nhiều sản phẩm vào ổ
cắm nhiều ổ hoặc dây kéo dài. Việc này
có thể gây hỏa hoạn.
•Rút phích cắm điện khi bạn vệ sinh sản
phẩm. Không rút phích cắm có thể dẫn
đến điện giật hoặc thương tích.
•Không được chạm vào phích cắm điện
khi tay ướt. Điều đó có thể gây giật điện
hoặc thương tích.
•Khi kéo phích cắm điện ra khỏi ổ cắm,
hãy cầm phích cắm điện, không phải
dây điện. Làm hư hỏng dây điện có thể
gây giật điện hoặc thương tích.
•Không được gập cong dây điện quá
mức hoặc đặt một vật nặng lên trên
dây. Làm hư hỏng dây điện có thể gây
giật điện hoặc cháy.
•Không sử dụng khí dễ cháy và các chất
dễ bắt lửa (ben-zen, xăng, chất pha
loãng, dầu mỏ, cồn, v.v.) xung quanh
sản phẩm. Điều đó có thể gây nổ hoặc
cháy.
06
Page 57

An toàn Kỹ thuật khi Sử dụng
Máy sấy khô Quần áo
•Không sấy khô các đồ chưa giặt trong
thiết bị.
•Các đồ bị vấy bẩn do các chất chẳng
hạn như dầu ăn, dầu thực vật,
a-xê-tôn, cồn, xăng, dầu hoả, chất tẩy
vết ố, nhựa thông, sáp và chất tẩy sáp
phải được giặt bằng nước nóng với một
lượng chất tẩy phụ thêm trước khi sấy
khô trong thiết bị.
•Các chất làm mềm sợi hoặc các sản
phẩm tương tự khác phải được sử
dụng tuân theo những hướng dẫn chất
làm mềm sợi.
•Lấy tất cả các đồ vật ra khỏi các túi
chẳng hạn như bật lửa và que diêm.
Tiêu hủy
•Trước khi vứt bỏ thiết bị cũ, rút phích
cắm. Hoàn trả phích cắm không còn sử
dụng được. Cắt bỏ dây cáp ngay phía
sau thiết bị để phòng ngừa sử dụng
nhầm.
•Tiêu hủy vật liệu đóng gói (chẳng hạn
như nhựa vinyl và styrofoam) tránh xa
trẻ em. Vật liệu đóng gói có thể làm trẻ
bị ngạt thở.
•Tháo rời cửa buồng giặt trước khi
ngừng sử dụng hoặc vứt bỏ thiết bị này
để tránh gây nguy hiểm cho trẻ nhỏ
hoặc các động vật nhỏ bị mắc kẹt bên
trong. Không thực hiện như vậy có thể
dẫn đến bị thương nặng hoặc tử vong.
TIẾNG VIỆT
•Không bao giờ dừng thiết bị này trước
khi kết thúc chu trình sấy khô trừ phi tất
cả các đồ được lấy ra và trải ra nhanh
sao cho hơi nóng được tiêu tan.
•Không sử dụng thiết bị này nếu vừa sử
dụng các hoá chất công nghiệp để vệ
sinh.
•Không nên sấy khô các đồ như cao
su bọt (bọt cao su), mũ tắm, vải không
thấm nước, đồ dùng và quần áo được
bồi cao su hoặc gối độn miếng lót cao
su bọt trong thiết bị này.
07
Page 58

LẮP ĐẶT
Các bộ phận
Bu-lông vận chuyển
Phích cắm điện
Ngăn kéo
Bảng điều khiển
Lồng giặt
Cửa
Ống xả
Ốc xả nước
Bộ lọc bơm xả
Nắp đậy (Vị trí có
thể thay đổi tùy vào
các sản phẩm)
Chân có thể điều
chỉnh
Các phụ kiện
Ống cấp (1EA)
(Tùy chọn : Nóng (1EA))
Nắp để đậy các lỗ bu-lông
vận chuyển
Cờ-lê Công-xôn Khuỷu
(để siết chặt ống xả)
Dây rút Vòng đệm cao su
Giấy chống trượt (2EA)
(Tuỳ chọn)
08
Page 59

Thông số kỹ thuật
Model F2514DTGW
Khối lượng Giặt 14 kg (Giặt) / 8 kg (Sấy)
Nguồn điện 220-240 V~, 50 Hz
Kích thước 645 mm (W) x 770 mm (D) x 940 mm (H)
Trọng lượng sản phẩm 81 kg
Công suất Tối đa 2200 W (Giặt) / 2200 W (Sấy)
Áp lực nước cho phép 0,1 - 1,0 MPa (1,0 - 10,0 kgf / cm²)
•Hình dạng bên ngoài và các thông số kỹ thuật có thể thay đổi mà không báo trước để cải thiện chất
lượng sản phẩm.
TIẾNG VIỆT
09
Page 60

Yêu cầu Không gian Lắp đặt
Vị trí
0,5 cm
10 cm 2 cm 2 cm
Độ thăng bằng sàn:
bộ máy giặt là 1°.
Ổ cắm điện:
trí của máy giặt.
•Không làm quá tải ổ cắm do sử dụng nhiều hơn một
thiết bị.
Khoảng hở Thêm:
/2 cm: bên phải & trái
•Không đặt hoặc để các sản phẩm giặt bên trên máy
giặt vào bất cứ lúc nào.
•Các sản phẩm này có thể làm hư hỏng bề mặt sơn
hoặc các phần điều khiển.
Phải trong vòng 1,5 mét mỗi bên tính từ vị
Bố trí
•Lắp đặt máy giặt trên sàn cứng phẳng.
•Đảm bảo sự tuần hoàn không khí xung quanh máy
giặt không bị cản trở bởi các loại thảm, mền, v.v.
•Không cố chỉnh sửa bất kỳ tình trạng không bằng
phẳng nào của sàn bằng các miếng gỗ, bìa cứng
hoặc vật liệu tương tự bên dưới máy giặt.
•Nếu không thể tránh bố trí máy giặt kế bên bếp ga
hoặc bếp than thì phải đặt một lớp cách nhiệt (85x60
cm) phủ lá nhôm ở bên phía đối diện bếp ga hoặc bếp
lò giữa hai thiết bị.
Độ dốc cho phép bên dưới toàn
Cách tường, 10 cm: phía sau
•Không lắp đặt máy giặt của bạn trong các phòng có
thể xảy ra nhiệt độ đóng băng. Các ống đóng băng có
thể bị cháy dưới áp suất. Độ tin cậy của bộ điều khiển
điện tử có thể bị ảnh hưởng ở nhiệt độ dưới điểm
đóng băng.
•Vui lòng đảm bảo rằng khi lắp đặt máy giặt, kỹ sư có
thể dễ dàng tiếp cận được thiết bị trong trường hợp
hỏng máy.
•Với máy giặt đã được lắp đặt, điều chỉnh tất cả bốn
chân bằng cách sử dụng cờ-lê bu-lông vận chuyển
được cung cấp để đảm bảo thiết bị được vững chắc,
có khoảng hở xấp xỉ 5 mm giữa phần bên trên máy
giặt và phần bên dưới chỗ bày thức ăn để nấu nướng.
•Thiết bị này không được thiết kế để sử dụng trên biển
hoặc trong những hệ thống lắp đặt di động chẳng hạn
như nhà lưu động, máy bay, v.v.
Nối Điện
•Không sử dụng dây kéo dài hoặc bộ nắn điện đôi.
•Luôn rút phích cắm máy giặt và tắt nguồn cấp nước
sau khi sử dụng.
•Kết nối máy giặt với ổ cắm được nối đất phù hợp theo
các quy định đi dây hiện hành.
•Máy giặt phải được bố trí sao cho có thể dễ dàng tiếp
cận được phích cắm.
•Việc sửa chữa máy giặt chỉ được phép thực hiện
bởi nhân viên có đủ trình độ chuyên môn. Việc sửa
chữa được thực hiện bởi những người không có kinh
nghiệm có thể gây thương tích hoặc trục trặc nghiêm
trọng. Hãy liên hệ trung tâm dịch vụ địa phương của
bạn.
•Nếu máy giặt được giao trong mùa đông và nhiệt độ
dưới nhiệt độ đóng băng, hãy đặt máy giặt ở nhiệt độ
phòng trong vài giờ trước khi tiến hành vận hành thiết
bị.
10
Page 61

Tháo dỡ bao bì đóng gói và Tháo
bỏ Bu-lông Vận chuyển
Nhấc máy giặt khỏi bệ bọt xốp.
1
•Sau khi tháo bỏ bìa cứng và vật liệu vận chuyển,
nhấc máy giặt khỏi bệ bọt xốp. Đảm bảo goòng
chống rời ra cùng đế đỡ và không bị kẹt vào bên
dưới đáy máy giặt.
•Nếu bạn phải đặt máy giặt nằm xuống để tháo
bỏ đế bìa cứng thì phải luôn luôn bảo vệ phần
mặt bên của máy giặt và đặt cẩn thận thiết bị
nằm trên mặt bên của máy. KHÔNG ĐƯỢC đặt
máy giặt nằm trên mặt trước hoặc mặt sau của
máy.
Lắp đặt các nắp che lỗ.
3
•Định vị các nắp che lỗ kèm theo trong gói phụ
kiện và lắp đặt các nắp trong các lỗ bu-lông vận
chuyển.
Nắp
LƯU Ý
•Lưu giữ các bộ phận lắp ráp bu-lông để sau này
sử dụng. Để phòng ngừa hư hỏng cho các thành
phần bên trong, KHÔNG ĐƯỢC vận chuyển máy
giặt mà không lắp đặt lại các bu-lông vận chuyển.
•Không tháo rời các bu-lông vận chuyển và vòng
kẹp có thể gây rung và tiếng ồn nghiêm trọng,
có thể dẫn đến hư hỏng máy giặt vĩnh viễn. Dây
điện được buộc chặt phía sau máy giặt bằng một
bu-lông vận chuyển để giúp phòng ngừa việc
vận hành thiết bị mà vẫn còn để các bu-lông vận
chuyển ở chỗ cũ.
TIẾNG VIỆT
Goòng Chống
(Tùy chọn)
Tháo rời các bộ phận lắp ráp bu-lông.
2
•Bắt đầu từ hai bu-lông vận chuyển bên dưới,
sử dụng cờ-lê (kèm theo) để nới lỏng hoàn toàn
tất cả các bu-lông vận chuyển bằng cách xoay
ngược chiều kim đồng hồ. Tháo rời các bộ phận
lắp ráp bu-lông bằng cách lắc nhẹ trong lúc kéo
ra ngoài.
Bu-lông
vận chuyển
Đế bìa cứng
Vòng kẹp
11
Page 62

Sử dụng Miếng lót Chống Trượt
Sàn Gỗ (Sàn Lửng)
(Tuỳ chọn)
Nếu bạn lắp đặt máy giặt trên một bề mặt trơn trượt,
thiết bị có thể di chuyển do sự rung lắc quá mức. Việc
chỉnh thăng bằng không đúng có thể gây trục trặc thông
qua tiếng ồn và độ rung. Nếu xảy ra trường hợp này thì
lắp đặt các miếng lót chống trượt bên dưới các chân
chỉnh thăng bằng và điều chỉnh độ thăng bằng.
Vệ sinh sàn để dán các miếng lót chống trượt.
1
•Sử dụng một miếng giẻ khô để loại bỏ và lau
sạch các vật thể lạ và hơi ẩm. Nếu vẫn còn hơi
ẩm, các miếng chống trượt có thể bị trượt.
Điều chỉnh độ thăng bằng sau khi đặt máy giặt
2
trong khu vực lắp đặt.
Đặt mặt dính của miếng lót chống trượt lên sàn.
3
•Lắp đặt các miếng lót chống trượt bên dưới các
chân trước là hiệu quả nhất. Nếu khó đặt miếng
lót bên dưới các chân trước thì đặt miếng lót bên
dưới các chân sau.
Mặt này hướng lên trên
Mặt dính
•Các sàn gỗ rất dễ bị rung.
•Để tránh rung, chúng tôi khuyến cáo bạn đặt các vòng
đệm cao su có độ dày tối thiểu 15 mm ở mỗi chân của
máy giặt, được siết chặt bằng đinh vít vào tối thiểu hai
dầm ngang.
Vòng đệm cao su
•Nếu có thể thì lắp đặt máy giặt ở một trong các góc
phòng, là nơi mà sàn vững chắc hơn.
•Lắp các vòng đệm cao su để giảm rung.
•Bạn có thể mua các vòng đệm cao su (số hiệu bộ
phận 4620ER4002B) ở Trung tâm Dịch vụ LG.
LƯU Ý
•Việc đặt và chỉnh độ thăng bằng máy giặt đúng
cách sẽ đảm bảo máy vận hành được lâu dài,
thường xuyên và đáng tin cậy.
•Máy giặt phải 100% nằm ngang và đứng vững tại
chỗ.
•Máy giặt không được “Bập bênh” các góc khi có
tải.
•Bề mặt lắp đặt phải sạch sẽ, không dính sáp đánh
bóng sàn và các lớp phủ bôi trơn khác.
•Không để các chân máy giặt bị ướt. Không thực
hiện như vậy có thể gây rung hoặc tiếng ồn.
Đảm bảo máy giặt được thăng bằng.
4
•Đẩy hoặc lắc nhẹ các cạnh bên trên của máy
giặt để đảm bảo rằng máy giặt không bị rung
chuyển. Nếu máy giặt rung chuyển, chỉnh lại độ
thăng bằng máy giặt một lần nữa.
12
Page 63

Chỉnh thăng bằng Máy Giặt
Kết nối Ống Cấp
Nếu sàn không bằng phẳng, hãy vặn các chân có thể
điều chỉnh được nếu cần (Không chèn các miếng gỗ v.v.
bên dưới các chân). Đảm bảo rằng tất cả bốn chân đều
vững chắc và chống trên sàn, sau đó kiểm tra xem thiết
bị đã thăng bằng hoàn hảo chưa (Sử dụng ống ni-vô).
•Khi máy giặt đã thăng bằng, siết chặt ốc hãm lên trên
sát bệ máy giặt. Tất cả các ốc hãm phải được siết
chặt.
Nâng lên
Ốc Hãm
Hạ xuống
Siết chặt tất cả 4
ốc hãm
•Kiểm tra Đường chéo
Khi đẩy các cạnh của tấm trên máy giặt xuống theo
đường chéo, máy giặt không hề di chuyển lên xuống
(Kiểm tra cả hai chiều). Nếu máy giặt rung chuyển khi
đẩy tấm trên máy theo đường chéo, hãy điều chỉnh lại
các chân.
•Áp lực cấp nước phải nằm trong khoảng 0,1 MPa và
1,0 MPa (1,0‒10,0 kgf/cm2).
•Không làm trờn ren hoặc hư ren khi kết nối ống cấp
với van.
•Nếu áp lực cấp nước lớn hơn 1,0 MPa, phải lắp đặt
thiết bị giảm áp.
•Kiểm tra định kỳ tình trạng của ống và thay ống nếu
cần thiết.
Kiểm tra Gioăng Cao su Ống Cấp
Hai gioăng cao su được cung cấp kèm theo các ống cấp
nước.
Chúng được sử dụng để phòng ngừa rò rỉ nước. Đảm
bảo kết nối với vòi nước máy đủ chặt.
Đầu nối ống
Gioăng
cao su
TIẾNG VIỆT
LƯU Ý
•Sàn làm bằng gỗ hoặc dạng lửng có thể góp phần
gây rung mạnh và mất thăng bằng.
•Nếu máy giặt được lắp đặt trên một bệ nâng, thiết
bị phải được buộc chặt chắc chắn để loại trừ rủi
ro rơi đổ.
Đầu nối ống
Gioăng cao su
13
Page 64

Kết nối Ống với Vòi Nước máy
Kết nối ống kiểu vặn vít với vòi nước máy có ren
Vặn đầu nối ống lên trên vòi cấp nước.
Đẩy ống nối lên trên phần đầu của vòi nước máy
3
sao cho gioăng cao su tạo thành kết nối kín nước.
Siết chặt bốn vít cố định.
Đẩy ống cấp theo chiều thẳng đứng lên phía trên
4
sao cho gioăng cao su bên trong ống có thể dính
chặt hoàn toàn vào vòi nước máy rồi sau đó siết
chặt bằng cách vặn ống về phía bên phải.
Kết nối ống kiểu vặn vít với vòi nước máy
không có ren
Nới lỏng bốn vít cố định.
1
Đầu nối bên
trên
Vít cố định
Tháo bỏ vành dẫn hướng nếu vòi nước máy quá
2
lớn để lắp với ống nối.
Vành dẫn
hướng
Gioăng cao
su
Vành
Ống cấp
Kết nối ống loại chạm một lần với
vòi nước máy không có ren
Vặn nới vành đai ống nối và nới lỏng bốn vít cố
1
định.
Vành đai
Tháo bỏ vành dẫn hướng nếu vòi nước máy quá
2
lớn để lắp với ống nối.
Vành dẫn
hướng
14
Page 65

Đẩy ống nối lên trên phần đầu của vòi nước máy
3
sao cho gioăng cao su tạo thành kết nối kín nước.
Siết chặt vành đai ống nối và bốn vít cố định.
Kéo vành khoá rập đầu nối xuống, đẩy ống cấp lên
4
ống nối và nhả vành khoá rập đầu nối. Đảm bảo
ống nối khoá vào đúng chỗ.
Vành khóa rập
Kết nối Ống với Máy Giặt
Đảm bảo rằng không có chỗ nào trong ống bị thắt nút và
chúng không bị vỡ.
Khi máy giặt của bạn có hai van.
•Ống cấp có đầu nối màu đỏ dành cho vòi nước nóng.
LƯU Ý
•Sau khi hoàn tất kết nối, nếu nước rò rỉ ra từ ống
thì lặp lại các bước tương tự.
Sử dụng kiểu vòi nước máy thông dụng nhất để
cấp nguồn nước. Trong trường hợp vòi nước
máy là đầu vuông hoặc quá to, tháo bỏ vành dẫn
hướng trước khi lắp vòi nước máy vào trong ống
nối.
TIẾNG VIỆT
LƯU Ý
•Sau khi kết nối ống cấp với vòi nước máy, mở vòi
nước máy để xả sạch các chất lạ (chất dơ, cát,
mùn cưa v.v.) trong các đường nước. Hứng nước
xả vào xô và kiểm tra nhiệt độ nước.
Sử dụng vòi nước nằm ngang
Vòi nước nằm ngang
Vòi nước kéo dài
Vòi nước đầu vuông
15
Page 66

Lắp đặt Ống Xả
•Ống xả không nên đặt cao hơn 100 cm so với sàn.
Nước trong máy giặt không thể xả hoặc có thể xả
chậm.
•Siết chặt ống xả đúng cách sẽ bảo vệ sàn khỏi hư
hỏng do rò rỉ nước.
•Nếu ống xả quá dài, không nhét ống ngược vào trong
máy giặt. Điều này sẽ gây tiếng ồn bất thường.
khoảng 100 cm
khoảng 145 cm
khoảng 105 cm
tối đa 100 cm
•Khi lắp đặt ống xả với bồn rửa, buộc chặt vòi bằng sợi
dây.
•Siết chặt ống xả đúng cách sẽ bảo vệ sàn khỏi hư
hỏng do rò rỉ nước.
16
Bồn giặt
tối đa 100 cm
Vòng kẹp
ống
Dây rút
tối đa 100 cm
Page 67

VẬN HÀNH
Sử dụng Máy Giặt
Trước khi giặt lần đầu tiên, chọn chu trình (Vải bông
60 °C, thêm một nửa lượng chất tẩy), để máy giặt giặt
không tải. Quá trình này sẽ thải bỏ chất cặn và nước mà
có thể còn sót lại trong lúc sản xuất ra khỏi lồng giặt.
Phân loại quần áo và cho đồ vào máy.
1
•Phân loại quần áo theo loại vải, mức độ bẩn,
màu sắc và kích thước mẻ giặt nếu cần. Mở cửa
và cho đồ vào trong máy giặt.
Thêm các sản phẩm làm sạch và/hoặc chất tẩy,
2
chất làm mềm.
•Thêm lượng chất tẩy thích hợp vào ngăn kéo
bộ phân phối chất tẩy. Thêm chất tẩy trắng hoặc
chất làm mềm vải vào khu vực thích hợp của bộ
phân phối nếu muốn.
Chọn chu trình giặt mong muốn.
4
•Nhấn nút chu trình nhiều lần hoặc vặn núm chọn
chu trình cho đến khi chọn được chu trình mong
muốn.
Bắt đầu chu trình.
5
•Nhấn nút
giặt sẽ khuấy trộn nhanh không nước để đo khối
lượng mẻ giặt. Nếu không nhấn nút
trong vòng 60 phút, máy giặt sẽ tắt nguồn và tất
cả các cài đặt sẽ bị mất.
Kết thúc chu trình.
6
•Khi chu trình hoàn tất, máy sẽ phát ra một giai
điệu. Lấy ngay quần áo của bạn ra khỏi máy giặt
để hạn chế nhăn. Kiểm tra xung quanh gioăng
cửa khi lấy các đồ có kích thước nhỏ ra do có
thể bị vướng lại trong gioăng.
Start/Pause
để bắt đầu chu trình. Máy
Start/Pause
TIẾNG VIỆT
Bật máy giặt.
3
•Nhấn
Power
để BẬT máy giặt.
17
Page 68

Phân loại quần áo
Tìm nhãn sử dụng trên quần áo của bạn.
1
•Nhãn này sẽ thông tin cho bạn về hàm lượng sợi
vải của quần áo và cách giặt.
•Các biểu tượng trên nhãn sử dụng.
Nhiệt độ giặt
Giặt máy thông thường
Đồ dễ nhăn
Đồ mềm mịn
Giặt tay
Không giặt
Phân loại quần áo.
2
•Để đạt hiệu quả tốt nhất, phân loại quần áo
thành các mẻ mà có thể giặt trong cùng một chu
trình giặt.
•Các loại vải khác nhau cần được giặt ở các nhiệt
độ và tốc độ vắt khác nhau.
•Luôn luôn phân loại các đồ tối màu với đồ màu
nhạt và màu trắng. Giặt riêng chúng ra do có thể
xảy ra hiện tượng nhuộm màu hoặc phai màu
sợi vải làm đổi màu quần áo trắng và nhạt màu.
Nếu có thể, không giặt các đồ bị bẩn nhiều cùng
với các đồ bị bẩn ít.
– Vết bẩn (Nhiều, Vừa, Ít)
Tách riêng quần áo tùy vào lượng vết bẩn.
– Màu (Trắng, Sáng, Tối)
Tách riêng vải trắng với vải màu.
– Sợi vải (Sợi vải nhân tạo, Tổng hợp)
Giặt riêng sợi vải nhân tạo và sợi vải tổng
hợp.
Thận trọng trước khi bỏ đồ vào máy.
3
•Kết hợp các đồ kích thước lớn và nhỏ trong
một mẻ giặt. Bỏ các đồ kích thước lớn vào máy
trước.
•Các đồ kích thước lớn không nên nhiều hơn một
nửa tổng khối lượng mẻ giặt. Không giặt riêng
từng đồ. Điều này có thể gây mất cân bằng mẻ
giặt. Thêm vào một hoặc hai đồ tương tự.
•Kiểm tra tất cả các túi để đảm bảo không có gì
trong túi. Các đồ vật chẳng hạn như đinh, kẹp
tóc, que diêm, bút, tiền xu và chìa khóa có thể
làm hư hỏng cả máy giặt lẫn quần áo của bạn.
•Đóng phéc-mơ-tuya, móc cài áo và dây thắt để
đảm bảo các đồ vật này không làm rách những
quần áo khác.
•Xử lý trước vết bẩn và vết màu khó sạch bằng
cách chải một lượng nhỏ chất tẩy đã pha loãng
nước lên các vết màu khó sạch để giúp làm
bong vết bẩn.
•Kiểm tra khe của vòng đệm mềm (màu xám) và
lấy ra bất kỳ đồ vật nhỏ nào.
•Kiểm tra bên trong lồng giặt và lấy ra bất kỳ đồ
nào còn sót ở lần giặt trước đó.
•Lấy quần áo hoặc các đồ vật ra khỏi vòng đệm
mềm để phòng ngừa quần áo và vòng đệm bị hư
hỏng.
18
Page 69

Thêm Các chất Làm sạch
Thêm Chất tẩy và Chất làm mềm Vải
Liều lượng Chất tẩy
•Chất tẩy cần được sử dụng theo hướng dẫn của nhà
sản xuất chất tẩy đó và được lựa chọn phù hợp với
loại, màu, vết bẩn của sợi vải và nhiệt độ giặt.
•Nếu sử dụng quá nhiều chất tẩy thì có thể xuất hiện
quá nhiều bọt xà phòng và điều này sẽ dẫn đến hiệu
quả giặt kém hoặc gây tải nặng cho động cơ.
•Nếu bạn muốn sử dụng chất tẩy dạng lỏng, hãy làm
theo những chỉ dẫn do nhà sản xuất chất tẩy cung
cấp.
•Bạn có thể rót trực tiếp chất tẩy dạng lỏng vào trong
ngăn kéo chất tẩy chính nếu bạn dự định bắt đầu chu
trình ngay lập tức.
•Không sử dụng chất tẩy dạng lỏng nếu bạn dự định
sử dụng chế độ Hẹn giờ hoặc nếu bạn đã lựa chọn
chế độ Pre Wash, vì chất lỏng có thể cô đặc lại.
•Nếu xuất hiện quá nhiều bọt xà phòng thì giảm bớt
lượng chất tẩy.
•Có thể cần phải điều chỉnh cách sử dụng chất tẩy theo
nhiệt độ nước, độ cứng nước, kích thước và mức độ
bẩn của mẻ giặt. Để đạt hiệu quả tốt nhất, tránh tạo
quá nhiều bọt xà phòng.
•Tham khảo nhãn trên quần áo trước khi chọn chất tẩy
và nhiệt độ nước:
•Khi sử dụng máy giặt, sử dụng chất tẩy được chỉ định
dành riêng đối với từng loại quần áo:
– Các chất tẩy dạng bột chung cho tất cả các loại vải
– Các chất tẩy dạng bột dành cho vải mềm mịn
– Chất tẩy dạng lỏng dành cho tất cả các loại vải
hoặc các chất tẩy được chỉ định dành riêng cho vải
len
•Để hiệu quả giặt và tẩy trắng tốt hơn, hãy sử dụng
chất tẩy có thành phần tẩy trắng dạng bột phổ biến.
•Chất tẩy được xả từ bộ phân phối ngay lúc bắt đầu
chu trình.
Thêm chất tẩy
•Chỉ giặt chính →
•Giặt sơ + Giặt chính →
LƯU Ý
•Quá nhiều chất tẩy, chất tẩy trắng hoặc chất làm
mềm có thể gây chảy tràn ra.
•Nhớ sử dụng lượng chất tẩy thích hợp.
Thêm chất làm mềm vải
•Không vượt quá vạch đổ đầy tối đa. Đổ quá đầy có
thể dẫn đến phân phối sớm chất làm mềm vải, như
vậy có thể làm đổi màu quần áo. Đóng từ từ ngăn kéo
bộ phân phối.
•Không trữ chất làm mềm vải trong ngăn kéo chất tẩy
quá 2 ngày (Chất làm mềm vải có thể cô đặc lại).
•Chất làm mềm sẽ được tự động thêm vào trong chu
trình xả cuối cùng.
•Không mở ngăn kéo khi đang cấp nước vào.
•Không nên sử dụng các dung môi (ben-zen v.v.).
LƯU Ý
•Không rót chất làm mềm vải trực tiếp lên quần áo.
TIẾNG VIỆT
LƯU Ý
•Không để chất tẩy cô đặc lại.
Làm như vậy có thể dẫn đến vón cục, hiệu năng
xả kém hoặc có mùi.
•Tải đầy: Dựa theo khuyến cáo của nhà sản xuất.
•Tải một phần: 3/4 lượng bình thường
•Tải tối thiểu: 1/2 tải đầy
19
Page 70

Thêm chất làm mềm nước
•Có thể sử dụng chất làm mềm nước, chẳng hạn như
Chất chống cặn vôi (ví dụ than hoạt tính Calgon), để
giảm bớt việc sử dụng chất tẩy trong các khu vực có
nước quá cứng. Phân phối tùy theo lượng được ghi
rõ trên bao bì đóng gói. Trước tiên thêm chất tẩy rồi
đến chất làm mềm nước.
•Sử dụng lượng chất tẩy cần thiết đối với nước mềm.
Sử dụng viên nén
Mở cửa và đặt các viên nén vào trong lồng giặt.
1
Cho quần áo vào trong lồng giặt và đóng cửa.
2
20
Page 71

Bảng Điều khiển
TIẾNG VIỆT
Power (Nguồn)
Power
•Nhấn
•Để huỷ Hẹn giờ giặt, nhấn
Start/Pause (Khởi động/Tạm dừng)
•Sử dụng nút
tạm ngừng chu trình giặt.
•Nếu cần dừng tạm thời chu trình giặt, nhấn
Start/Pause
nút
Màn hình
•Màn hình hiển thị các cài đặt, thời gian còn lại
ước tính, các tùy chọn và thông báo tình trạng.
Khi bật nguồn sản phẩm, các cài đặt mặc định
trên màn hình sẽ sáng lên.
•Màn hình hiển thị thời gian còn lại ước tính.
Trong lúc đang tự động tính toán kích thước
mẻ giặt, màn hình nhấp nháy hoặc hiện
chữ “Đang dò”.
để bật máy giặt.
Power
Start/Pause
này để bắt đầu hoặc
.
Đĩa quay chọn chương trình
•Các chương trình có thể sử dụng theo loại
quần áo.
•Đèn sẽ bật sáng chỉ báo chương trình đã lựa
chọn.
Lựa chọn
•Phần này cho phép bạn chọn một chu trình bổ
sung và sẽ sáng đèn khi được chọn.
•Sử dụng các nút này để lựa chọn các tùy chọn
chu trình mong muốn đối với chu trình đã chọn.
21
Page 72

Bảng Chương trình
Chương trình Giặt
Chương trình Mô tả Loại Vải
Cotton
(Vải bông)
Baby Care
(Đồ trẻ em)
Hygiene
(Giặt vệ sinh)
Sports Wear
(Đồ thể thao)
Wool
(Đồ len)
Cho hiệu năng tốt hơn bằng cách
kết hợp các chuyển động lồng giặt
khác nhau.
Loại bỏ các vết bẩn rắn và vết bẩn
protein, giúp hiệu năng giũ tốt hơn.
Chu trình nước nóng
Chu trình này thích hợp cho đồ thể
thao như quần áo chạy bộ và đồ
tập thể thao.
Cho phép giặt các loại vải len. (Vui
lòng sử dụng chất tẩy dành cho đồ
len có thể giặt máy).
Quần áo không phai màu (áo sơ mi,
đầm ngủ, đồ pyjama, v.v.) và đồ cotton
bẩn bình thường (đồ lót).
Đồ em bé bị bẩn nhẹ. 60 °C 5,0 kg
Cotton, đồ lót, bao gối, ga giường, đồ
em bé
Coolmax, Gore-tex, Fleece và
Sympatex.
Đồ len có thể giặt máy chỉ gồm chất
liệu len nguyên chất
Nhiệt độ
Phù hợp
40 °C
(Lạnh
đến
60 °C)
95 °C 3,0 kg
30 °C
(Lạnh
đến
30 °C)
40 °C
(Lạnh
đến
40 °C)
Tải trọng
Tối đa
Định mức
5,0 kg
4,0 kg
Refresh
(Làm mới áo
quần)
Speed Wash
(Giặt nhanh)
Single Shirt
Dry
(Sấy nhanh)
22
Giúp loại bỏ các nếp nhăn trong
vòng 30 phút bằng sấy khô.
Chu trình này cho phép chọn thời
gian giặt nhanh dành cho các mẻ
giặt ít và quần áo bị bẩn nhẹ.
Sấy một mẻ giặt nhỏ trong 19 phút. Mẻ giặt nhỏ, áo sơ-mi
Áo sơ-mi, áo cánh pha Cotton, pha
Polyester.
Quần áo màu bị bẩn nhẹ không phai.
THẬN TRỌNG : Sử dụng dưới 20 g
chất tẩy (đối với mẻ giặt 2,0 kg) nếu
không thì chất tẩy có thể còn lưu lại
trên quần áo.
Không
lựa chọn
40 °C
(Lạnh
đến
40 °C)
Không
lựa chọn
5 đồ
5,0 kg
1 đồ
Page 73

Chương trình Mô tả Loại Vải
Nhiệt độ
Phù hợp
Tải trọng
Tối đa
Chăn lông, mền, áo gối, khăn phủ và
các đồ dùng phòng ngủ khác.
Bedding
Care
(Khử mùi
chăn mền)
Loại bỏ sự ẩm ướt và các mùi của
đồ dùng phòng ngủ mà không cần
giặt.
THẬN TRỌNG : Kiểm tra nhãn hướng
dẫn giặt là trên chăn hoặc chăn lông
vũ trước khi sử dụng Chương trình
giặt đồ dùng phòng ngủ. Khí nóng của
Không
lựa chọn
1 đồ
chương trình có thể khiến một số món
đồ bị hỏng hoặc co lại.
Duvet
(Chăn lông
vũ)
Rinse+Spin
(Giũ+Vắt)
Chu trình này dành cho các đồ
kích thước lớn chẳng hạn như ga
giường, gối, áo ghế sofa, v.v.
Sử dụng cho quần áo chỉ cần giũ
để thêm chất làm mềm vải trong
chu trình giũ vào quần áo
Đồ dùng phòng ngủ sợi cotton ngoại
trừ hàng may đặc biệt (vải mềm mịn,
len, lụa, v.v.) được nhồi đầy: chăn
lông, gối, mền, áo ghế sofa nhồi ít.
Các loại vải thông thường có thể giặt
được.
Lạnh
(Lạnh
đến
40 °C)
Không
lựa chọn
1 cỡ lớn
3,0 kg
Download
Cycle
(Chu trình tải
Dành cho các chu trình có thể tải xuống. Nếu bạn không tải xuống bất kỳ chu trình nào, mặc định là
Giặt nước lạnh
.
xuống)
•Nhiệt độ Nước: Lựa chọn nhiệt độ nước thích hợp đối với chu trình giặt đã chọn. Luôn tuân theo nhãn sử dụng
hoặc các hướng dẫn của nhà sản xuất quần áo khi giặt.
•Đặt chương trình ở chế độ 'Wash (Giặt): Cotton (Vải bông), Nước Lạnh' vòng/phút’ để kiểm tra phù hợp với quy
chuẩn TCVN 8526:2013.
TIẾNG VIỆT
LƯU Ý
•Khuyến cáo sử dụng chất tẩy trung tính.
23
Page 74

Chu trình Sấy
Chương trình Mô tả Loại Vải
Dry
(Sấy khô)
Thời gian 30 phút
Thời gian 60 phút
Thời gian 90 phút
Thời gian 120 phút
Thời gian 150 phút
Dành cho vải cotton. Lựa chọn chu trình này
để giảm thời gian chu trình và mức tiêu thụ
năng lượng trong chu trình sấy.
Bạn có thể thay đổi thời gian sấy tùy theo tải
trọng tối đa.
Vải cotton hoặc vải lanh như khăn mặt, áo
phông và đồ vải lanh
vải cotton, khăn tắm
LƯU Ý
•Lựa chọn tốc độ vắt có thể chọn tối đa của chương trình giặt để đảm bảo hiệu quả sấy.
•Ở những mẻ giặt mà lượng quần áo được giặt và sấy trong một chương trình không vượt quá khối lượng tối đa
cho phép đối với chương trình sấy, khuyến cáo giặt và sấy theo một trình tự liên tục.
24
Page 75

Tùy chọn Thêm
Chương trình
Cotton
(Vải bông)
Baby Care
(Đồ trẻ em)
Hygiene
(Giặt vệ sinh)
Sports Wear
(Đồ thể thao)
Wool
(Đồ len)
Refresh
(Làm mới áo quần)
Speed Wash
(Giặt nhanh)
Single Shirt Dry
(Sấy nhanh)
Time Delay
(Hẹn giờ)
Turbo Wash
™
Add Item
(Thêm đồ giặt)
● ●** ● ●
● ● ● ●
● ● ● ●
● ● ●
● ●
● ●
● ●** ● ●
● ● ●*
Dry
(Sấy khô)
TIẾNG VIỆT
Bedding Care
(Khử mùi chăn mền)
Duvet
(Chăn lông vũ)
Rinse+Spin
(Giũ+Vắt)
Download Cycle
(Chu trình tải xuống)
* Tùy chọn này được tự động đưa vào chu kỳ và không thể bị xóa.
**: Tùy chọn này là tự động được đưa vào chu kỳ và có thể bị xóa.
● ●
● ● ●
● ● ●
● ● ● ●
25
Page 76

Chu trình Tùy chọn
Add Item (Thêm đồ giặt)
Time Delay (Hẹn giờ)
Bạn có thể đặt hẹn giờ sao cho máy giặt sẽ tự động bắt
đầu và hoàn tất sau một khoảng thời gian cụ thể.
Power
Nhấn
1
Lựa chọn một chương trình giặt.
2
Nhấn nút
3
Nhấn
4
.
Time Delay
Start/Pause
và đặt thời gian mong muốn.
.
LƯU Ý
•Giờ hẹn là thời điểm kết thúc chương trình, không
phải bắt đầu. Thời gian hoạt động thật sự có thể
thay đổi do nhiệt độ nước, khối lượng giặt và các
nhân tố khác.
Turbo Wash™
Chu trình giặt trong vòng 1 giờ với chức năng tiết kiệm
năng lượng và nước. (dựa trên một nửa lượng quần áo)
Power
Nhấn
1
Lựa chọn một chương trình giặt.
2
Nhấn nút
3
.
Turbo Wash™
.
Sử dụng chức năng này để thêm đồ hoặc lấy ra các vật
lạ.
Nhấn nút
1
Đóng cửa sau khi thêm đồ hoặc lấy ra các vật lạ (ví
2
dụ: tiền xu hoặc đinh ghim, v.v.)
Nhấn
3
•Kết quả khi chọn
– Khi lồng giặt đang vắt : Lồng giặt dừng và cơ cấu
Khóa cửa
– Khi nhiệt độ nước trong lồng giặt cao hơn 45
Chức năng
thanh cảnh báo an toàn ngắn.
– Khi có nhiều nước trong lồng giặt : Cơ cấu
cửa
Add Item
Start/Pause
tắt.
tắt sau khi xả đến mức nước an toàn.
.
.
Add Item
Add Item
trong các chu trình.
không khả dụng kèm theo âm
°C :
Khóa
LƯU Ý
•Mở cửa khi cơ cấu Khóa cửa tắt sau khi kiểm tra
an toàn.
•Chức năng Add Item
trình Làm sạch lồng giặt đang được tiến hành vì lý do
an toàn.
•Cho quần áo vào trong lồng giặt hoàn toàn. Quần
áo bị vướng lại giữa bộ phận đóng cửa có thể làm
hư hỏng vòng đệm cửa (bộ phận cao su) và có
thể gây ra lỗi.
không hoạt động khi tiến
4
Nhấn
.
Start/Pause
LƯU Ý
•Chức năng Turbowash ở một vài chu trình giặt
được tự động lựa chọn
26
Page 77

Wash (Giặt)
Spin (Vắt)
Soak (Ngâm)
Sử dụng chế độ này để giặt quần áo thường hoặc quần
áo dày và nặng bị bẩn nhiều.
Pre Wash (Giặt sơ)
Nếu quần áo bị bẩn nhiều, khuyến cáo dùng chu trình
Pre Wash.
Intensive (Giặt mạnh)
Nếu quần áo là loại thường và bị bẩn nhiều, tùy chọn
Intensive
là hiệu quả.
Normal (Giặt thường)
Tùy chọn này tự động được chọn trong mỗi lần giặt
ngoại trừ chế độ
Rinse+Spin, Baby Care
.
Light (Giặt nhẹ)
Chu trình này phù hợp cho quần áo bị bẩn nhẹ.
LƯU Ý
•Các tùy chọn có thể lựa chọn sẽ khác nhau tùy
thuộc vào chu trình đã chọn.
•Mức tốc độ vắt có thể được lựa chọn bằng cách nhấn
Spin
nút
•Chỉ Spin
1
2
3
nhiều lần.
– Rất Cao / Cao / Trung Bình / Thấp / Rất Thấp
Power
Nhấn
Nhấn nút
Nhấn
.
Spin
để lựa chọn tốc độ.
Start/Pause
.
Temp. (Nhiệt độ)
Temp.
Nút
trình đã chọn. Nhấn nút này cho đến khi cài đặt mong
muốn sáng lên. Tất cả chu trình xả đều sử dụng nước
vòi lạnh.
•Chọn nhiệt độ nước phù hợp với loại đồ mà bạn định
giặt. Tuân theo nhãn sử dụng vải quần áo để đạt kết
quả tốt nhất.
lựa chọn kết hợp nhiệt độ giặt và giũ cho chu
TIẾNG VIỆT
Rinse (Giũ)
Có thể lựa chọn số lần Xả bằng cách nhấn nút
•1 / 2 / 3 / 4 / 5 (lần)
Rinse
.
27
Page 78

Khóa Trẻ em ( )
Wi-Fi ( )
Lựa chọn chức năng này để khóa các nút trên bộ phận
lắp ráp điều khiển để đề phòng trẻ nghịch vào.
Khóa bảng điều khiển
Nhấn và giữ nút
1
Một tiếng bíp phát ra và chữ “ ” sẽ xuất hiện trên
2
màn hình.
Khi chế độ khóa trẻ em được đặt, tất cả các nút
đều bị khóa ngoại trừ
Wash
Rinse
và
Power
trong vòng 3 giây.
.
LƯU Ý
•Tắt nguồn điện sẽ không xóa trạng thái chức
năng khóa trẻ em. Bạn phải vô hiệu hóa chức
năng khóa trẻ em trước khi có thể truy cập bất kỳ
chức năng nào khác.
Mở khóa bảng điều khiển
Nhấn và giữ nút
•Một tiếng bíp sẽ phát ra và thời gian còn lại đối với
chương trình hiện hành sẽ xuất hiện lại trên màn hình.
Wash
và
Rinse
trong vòng 3 giây.
Nhấn và giữ nút
bật, biểu tượng Wi-Fi ( ) trên bảng điều khiển sẽ sáng.
Wi-Fi
trong vòng 3 giây. Khi
Wi-Fi
được
Remote Start (Khởi động từ xa)
Sử dụng một chiếc điện thoại thông minh để điều khiển
thiết bị của bạn từ xa. Bạn cũng có thể giám sát sự vận
hành chương trình để biết bao nhiêu thời gian còn lại
trong chương trình.
LƯU Ý
•Trước tiên bạn phải kết nối tới một cổng đăng ký
và đăng ký thiết bị của bạn để sử dụng chức năng
Khởi động từ xa.
Để sử dụng Khởi động từ xa:
Power
Nhấn
1
Đặt đồ giặt vào trong lồng giặt.
2
Bấm và giữ nút
3
hoạt chức năng Khởi động từ xa.
.
Remote Start
trong 3 giây để kích
28
Bắt đầu một chương trình từ ứng dụng LG
4
SmartThinQ trên điện thoại thông minh của bạn.
LƯU Ý
•Nếu bạn không khởi động thiết bị, thiết bị sẽ chờ
để bắt đầu một chu trình cho đến khi bạn ngắt
thiết bị khỏi ứng dụng hoặc tắt chức năng Khởi
động từ xa.
•Khi Khởi động từ xa được bật, cánh cửa sẽ tự
động khóa.
Để vô hiệu hóa Khởi động từ xa:
Khi Khởi động từ xa được kích hoạt, bấm và giữ nút
Remote Start
trong 3 giây.
Page 79

Download Cycle (Chu trình tải xuống)
Các tính năng Chu trình tải xuống của thiết bị này cho
phép bạn tải về các chu trình mới và đặc biệt không có
trong các chu trình cơ bản của thiết bị.
Thiết bị đã được đăng ký thành công có thể tải về một
loạt các chương trình đặc biệt dành riêng cho thiết bị.
Chỉ có một chương trình có thể được lưu trữ trên thiết bị
cùng một lúc..
Khi tải về chương trình được hoàn thành trên thiết bị,
sản phẩm sẽ lưu giữ chương trình được tải cho đến khi
một chương trình mới được tải về.
LƯU Ý
•Bạn có thể tải về các chu trình sau khi đăng ký
sản phẩm và cấu hình kết nối Wi-Fi.
•Bạn có thể tải về một chu trình mong muốn thông
qua ứng dụng 'LG SmartThinQ'. Để biết thêm
thông tin về từng chu trình, tham khảo phần ứng
dụng 'LG SmartThinQ'.
•Có nhiều chu trình khác nhau tùy thuộc vào loại
máy giặt bạn mua.
•Các chu trình được tải về có thể khác nhau
tùy theo phiên bản cập nhật của ứng dụng 'LG
SmartThinQ'.
TIẾNG VIỆT
29
Page 80

Dry (Sấy khô)
Vải dễ nhăn và Sợi tổng hợp
Sử dụng các chu trình Tự động để sấy hầu hết các đồ.
Các cảm biến điện tử đo nhiệt độ khí xả để tăng hoặc
giảm nhiệt độ sấy cho thời gian phản ứng nhanh hơn và
điều khiển nhiệt độ chặt chẽ hơn.
•Phải mở vòi nước lạnh trong suốt các chu trình sấy.
•Có thể dễ dàng lựa chọn quy trình tự động từ giặt
sang sấy trên máy giặt này.
•Để sấy đồng đều nhất, hãy đảm bảo tất cả các đồ
trong mẻ quần áo đều tương tự nhau về chất liệu và
độ dày.
•Không làm quá tải máy giặt bằng cách nhồi quá nhiều
đồ vào trong lồng giặt. Các đồ phải nhào trộn được
thoải mái.
•Nếu bạn mở cửa và lấy đồ ra trước khi máy giặt hoàn
tất chu trình, hãy nhớ nhấn
•Sau khi kết thúc sấy, máy hiển thị chữ ' '. ' ' có
nghĩa là giảm nhăn. Chu trình sấy đã được hoàn
thành. Nhấn một nút bất kỳ và lấy quần áo ra. Nếu
bạn không nhấn nút nào, chương trình sẽ kết thúc sau
khoảng 4 giờ.
Start/Pause
.
LƯU Ý
•Khi bật máy giặt tắt của chu trình sấy, các động
cơ quạt sấy có thể được vận hành để tiết kiệm
bản thân trong 1 phút.
•Hãy cẩn thận khi lấy quần áo ra khỏi máy giặt, vì
quần áo hoặc máy giặt có thể nóng.
Đồ Len
•Không cho đồ len vào máy giặt để sấy. Kéo đồ len về
hình dạng ban đầu và phơi khô thẳng chúng.
Vải Đan và Dệt kim
•Một số vải đan và dệt kim có thể co ngắn, do thay đổi
số lượng, tùy thuộc vào chất lượng vải.
•Luôn kéo căng các đồ vải này ra ngay sau khi sấy.
•Không làm quá tải máy giặt của bạn
•Lấy quần áo dễ nhăn ra ngoài ngay khi máy giặt dừng
để hạn chế nhăn.
Quần áo Trẻ em và Áo Ngủ
•Luôn luôn kiểm tra các hướng dẫn của nhà sản xuất.
Cao su và Chất dẻo
•Không sấy bất kỳ đồ nào được làm từ hoặc có chứa
cao su hoặc chất dẻo, chẳng hạn như:
– tạp dề, yếm, vải bọc ghế
– màn cửa và khăn trải bàn
– thảm trong buồng tắm
Sợi thủy tinh
•Không sấy các đồ sợi thủy tinh trong máy giặt. Các
hạt thủy tinh bị sót lại trong máy giặt có thể dính lên
quần áo trong lần giặt kế tiếp và gây kích ứng da.
Hướng dẫn Thời gian Sấy
•Có thể lựa chọn thời gian sấy bằng cách nhấn nút
Time Dry
•Những thời lượng sấy này được đưa ra như là một
hướng dẫn để giúp bạn cài đặt máy giặt cho chế độ
sấy thủ công.
•Thời gian sấy ước tính khác với thời gian sấy
•Khi bạn lựa chọn chỉ sấy, máy tự động vắt để đạt
.
LƯU Ý
thực tế trong chu trình Tự động. Loại vải, kích
thước mẻ giặt và độ khô đã lựa chọn ảnh hưởng
đến thời gian sấy.
hiệu quả năng lượng.
30
Page 81

CHỨC NĂNG THÔNG MINH
Sử dụng Ứng dụng LG
SmartThinQ
Những điều cần kiểm tra trước khi sử
dụng LG SmartThinQ
•Đối với thiết bị có logo hoặc
Kiểm tra khoảng cách giữa thiết bị và bộ định tuyến
1
không dây (mạng Wi-Fi).
•Nếu khoảng cách giữa thiết bị và bộ định tuyến
không dây quá xa, cường độ tín hiệu sẽ trở nên
yếu. Có thể mất một thời gian dài để đăng ký
hoặc sự cài đặt có thể không thành công.
Tắt Dữ liệu di động hoặc Dữ liệu Cellular trên điện
2
thoại thông minh của bạn.
•Đối với iPhone, hãy tắt dữ liệu bằng cách vào
Cài đặt
Kết nối điện thoại thông minh của bạn với bộ định
3
tuyến không dây.
Mạng di động
→
Dữ liệu di động
→
.
LƯU Ý
•Để xác nhận kết nối Wi-Fi, kiểm tra biểu tượng
Wi-Fi
không.
•Thiết bị này chỉ hỗ trợ mạng Wi-Fi 2,4 GHz. Để
kiểm tra tần số mạng của bạn, hãy liên hệ với nhà
cung cấp dịch vụ Internet hoặc xem hướng dẫn
sử dụng bộ định tuyến không dây của bạn.
•LG SmartThinQ không chịu trách nhiệm cho bất
kỳ vấn đề kết nối mạng hay bất kỳ lỗi, trục trặc,
hoặc các lỗi gây ra do kết nối mạng.
•Nếu thiết bị gặp khó khăn trong việc kết nối với
mạng Wi-Fi, có thể là do nó nằm quá xa Bộ định
tuyến. Mua một Bộ lặp tín hiệu Wi-Fi (thiết bị mở
rộng phạm vi) để nâng cao cường độ tín hiệu
Wi-Fi.
•Wi-Fi có thể không thể kết nối hoặc có thể bị gián
đoạn do môi trường mạng của gia đình.
•Kết nối mạng có thể không hoạt động đúng phụ
thuộc vào nhà cung cấp dịch vụ internet.
•Môi trường không dây xung quanh có thể làm cho
dịch vụ mạng không dây chạy chậm.
•Không thể đăng ký thiết bị do các sự cố truyền tín
hiệu không dây. Rút phích cắm của thiết bị và chờ
khoảng một phút trước khi thử lại.
•Nếu tường lửa trên bộ định tuyến không dây của
bạn được bật, hãy vô hiệu hóa tường lửa hoặc
thêm một ngoại lệ cho nó.
•Tên mạng không dây (SSID) phải là sự kết hợp
giữa chữ và số tiếng Anh. (Không sử dụng ký tự
đặc biệt)
•Giao diện người sử dụng trên điện thoại thông
minh có thể khác nhau tùy thuộc vào hệ điều
hạnh của điện thoại (OS) và nhà sản xuất.
•Nếu giao thức bảo mật của bộ định tuyến được
đặt thành WEP, bạn có thể không thể thiết lập
mạng. Vui lòng thay đổi sáng các giao thức bảo
mật khác (khuyến khích dùng WPA2) và đăng ký
lại sản phẩm.
trên bảng điều khiển có sáng đèn
TIẾNG VIỆT
31
Page 82

Cài đặt LG SmartThinQ
Cảnh báo đẩy
Tìm ứng dụng LG SmartThinQ trên Google Play Store &
Apple App Store trong điện thoại thông minh. Thực hiện
theo hướng dẫn để tải về và cài đặt ứng dụng.
LƯU Ý
•Nếu bạn chọn đăng nhập đơn giản để truy cập
vào ứng dụng LG SmartThinQ, bạn phải trải qua
quá trình đăng ký thiết bị mỗi lần bạn thay đổi
điện thoại thông minh hoặc cài đặt lại ứng dụng.
Chức năng Wi-Fi
•Đối với thiết bị có logo hoặc
Giao tiếp với thiết bị qua điện thoại thông minh bằng
cách sử dụng các tính năng thông minh.
Chu trình Giặt
Cài đặt hoặc tải về bất kỳ chương trình ưa thích và khởi
động bằng cách điều khiển từ xa.
Trạng thái Vệ sinh Lồng giặt
Kiểm tra thời gian Làm sạch lồng giặt phù hợp dựa trên
tần suất giặt.
Giám sát năng lượng
Kiểm tra sự tiêu thụ năng lượng của các chương trình
được sử dụng trong thời gian gần đây và trung bình
hàng tháng.
Bật Push Alert để nhận thông báo về tình trạng thiết bị.
Các thông báo được kích hoạt ngay cả khi ứng dụng LG
SmartThinQ tắt.
LƯU Ý
•Nếu bạn thay đổi bộ định tuyến không dây, nhà
cung cấp dịch vụ Internet hoặc mật khẩu của bạn
sau khi đăng ký thiết bị, vui lòng xóa nó khỏi LG
SmartThinQ Cài đặt → Chỉnh sửa sản phẩm và
đăng ký lại.
•Ứng dụng có thể được thay đổi vì mục đích cải
tiến thiết bị mà không cần thông báo cho người
dùng.
•Cấu hình có thể khác nhau tùy theo model.
Thông tin thông báo Phần mềm nguồn mở
Để lấy mã nguồn dưới dạng GPL, LGPL, MPL, và giấy
phép mã nguồn mở khác chứa trong sản phẩm này, vui
lòng truy cập http://opensource.lge.com
Ngoài mã nguồn, tất cả các điều khoản giấy phép có
liên quan, từ chối bảo hành và thông báo bản quyền có
đều sẵn để tải về.
LG Electronics cũng sẽ cung cấp mã nguồn mở cho
bạn trên đĩa CD-ROM với một khoản phí bao gồm các
chi phí phân phối (chẳng hạn như chi phí truyền thông,
vận chuyển và xử lý) theo yêu cầu email gửi đến địa chỉ
opensource@lge.com. Việc cung cấp này có giá trị trong
ba (3) năm kể từ ngày mà bạn mua sản phẩm.
Smart Diagnosis
Nếu bạn sử dụng chức năng Smart Diagnosis, bạn sẽ
được cung cấp các thông tin hữu ích chẳng hạn như
cách sử dụng thiết bị chính xác dựa trên mô hình sử
dụng.
Cài đặt
Cho phép bạn cài đặt các tùy chọn khác nhau trên thiết
bị và trong ứng dụng.
32
Page 83

Cần có điện thoại thông minh để sử
dụng Smart Diagnosis™
•Đối với thiết bị có logo hoặc
Sử dụng chức năng này nếu bạn cần chẩn đoán chính
xác được thực hiện bởi một trung tâm thông tin khách
hàng LG Electronics khi thiết bị gặp trục trặc hoặc sự
cố.
Smart Diagnosis™ không thể được kích hoạt trừ khi
thiết bị đã được cắm điện. Nếu thiết bị không thể
bật được, cần xử lý sự cố mà không sử dụng Smart
Diagnosis™.
Sử dụng Smart Diagnosis™
Kết nối với Trung tâm thông tin khách
hàng qua Smart Diagnosis™
Sử dụng chức năng này nếu bạn cần chẩn đoán chính
xác thông qua tổng đài dành cho khách hàng LG
Electronics khi thiết bị gặp trục trặc hoặc sự cố. Sử dụng
chức năng này chỉ để liên lạc với đại lý dịch vụ, không
phải trong lúc thiết bị vận hành bình thường.
Giữ điện thoại ở đúng vị trí cho đến khi quá trình
4
truyền âm hoàn tất. Thời gian còn lại của quá trình
truyền dữ liệu được hiển thị.
•Để đạt kết quả tốt nhất, không di chuyển điện
thoại trong khi đang truyền âm.
•Nếu nhân viên trung tâm tổng đài không thể
nhận được bản ghi dữ liệu chính xác, bạn có thể
được yêu cầu thử lại lần nữa.
Khi hết thời gian đếm ngược và âm thanh chấm
5
dứt, tiếp tục cuộc nói chuyện với nhân viên trung
tâm tổng đài - là người sẽ có thể hỗ trợ bạn sử
dụng các thông tin đã truyền để phân tích.
LƯU Ý
•Chức năng Smart Diagnosis™ phụ thuộc vào chất
lượng cuộc gọi địa phương.
•Hiệu quả giao tiếp sẽ cải thiện và bạn có thể nhận
được dịch vụ tốt hơn nếu sử dụng điện thoại bàn.
•Nếu quá trình truyền dữ liệu Smart Diagnosis™
kém do chất lượng cuộc gọi kém, bạn có thể
không nhận được dịch vụ Smart Diagnosis™ tốt
nhất.
TIẾNG VIỆT
.
Power
để bật máy giặt. Không nhấn bất
Tối đa
10 mm
Temp.
trong 3 giây, trong khi
Power
Nhấn nút
1
kỳ nút nào khác hoặc vặn núm chọn chu trình.
Khi được hướng dẫn thực hiện như vậy từ trung
2
tâm tổng đài, đặt loa điện thoại gần nút
Nhấn và giữ nút
3
đó vẫn giữ loa điện thoại ở biểu tượng hoặc nút
Power
.
33
Page 84

BẢO DƯỠNG
CẢNH BÁO
•Rút phích cắm máy giặt trước khi vệ sinh để tránh
rủi ro điện giật. Không tuân theo cảnh báo này có
thể dẫn đến thương tích nặng, hỏa hoạn, điện giật
hoặc tử vong.
•Không bao giờ sử dụng các hóa chất mạnh, chất
tẩy rửa có tính mài mòn hoặc dung môi để vệ sinh
máy giặt. Chúng có thể làm hư hỏng bề mặt sơn.
Vệ sinh Máy Giặt của bạn
Chăm sóc Sau khi Giặt
•Sau khi chu trình hoàn tất, lau khô cửa và mặt trong
gioăng cửa để loại bỏ hơi ẩm.
•Mở cửa để làm khô phần bên trong lồng giặt.
•Lau khô thân máy giặt bằng vải khô để loại bỏ hơi ẩm.
Vệ sinh Phần bên ngoài
Chăm sóc máy giặt đúng cách có thể kéo dài tuổi thọ
sản phẩm.
Chăm sóc và Vệ sinh Phần bên trong
•Sử dụng khăn lau hoặc vải mềm để lau khô xung
quanh ô cửa và kính cửa máy giặt.
•Luôn lấy đồ ra khỏi máy giặt ngay khi chu trình hoàn
tất. Để đồ ẩm ướt trong máy giặt có thể khiến đồ bị
nhăn, chuyển màu và có mùi.
•Chạy chu trình Tub Clean một lần một tháng (hoặc
thường xuyên hơn nếu cần) để loại bỏ việc tích tụ
chất tẩy và các chất cặn khác.
Vệ sinh Bộ lọc Ngõ vào Nước
•Tắt đồng hồ tính giờ nếu không sử dụng máy giặt
trong một khoảng thời gian bất kỳ (ví dụ: nghỉ lễ), đặc
biệt nếu không có đường thoát nước sàn (rãnh tháo)
ở ngay xung quanh.
•Biểu tượng “ ” sẽ được hiển thị trên bảng điều khiển
khi nước không vào ngăn kéo chất tẩy.
•Nếu nước quá cứng hoặc chứa một chút ít trầm tích
vôi, bộ lọc ngõ vào nước có thể bị tắc. Do đó thỉnh
thoảng vệ sinh bộ lọc là một ý tưởng tốt.
Cửa:
•Rửa bằng vải ẩm ở mặt ngoài và mặt trong, sau đó
lau khô bằng vải mềm.
Phần bên ngoài:
•Lau khô ngay lập tức mọi chỗ bị tràn.
•Lau khô bằng vải ẩm.
•Không ấn các vật thể sắc nhọn lên bề mặt hoặc màn
hình.
Tắt vòi nước máy và vặn nới ống cấp nước.
1
Vệ sinh bộ lọc bằng cách sử dụng bàn chải lông
2
cứng.
34
Page 85

Vệ sinh Bộ lọc Bơm Xả
2
•Bộ lọc xả thu gom chỉ và các vật thể nhỏ trong quần
áo. Thường xuyên kiểm tra bộ lọc còn sạch để đảm
bảo sự vận hành trơn tru của máy giặt.
•Chờ nước làm mát nhiệt độ xuống trước khi vệ sinh
bơm xả, thực hiện làm rỗng khẩn cấp hoặc mở cửa
khẩn cấp.
Mở nắp đậy và kéo ống ra ngoài.
1
Tháo ốc xả nước và mở bộ lọc bằng cách xoay bộ
2
lọc sang trái.
Vật chứa để
đựng nước xả.
Sau khi vệ sinh, xoay bộ lọc bơm và lắp ốc xả
4
nước.
Đóng nắp đậy.
5
THẬN TRỌNG
•Trước tiên xả nước bằng cách sử dụng ống xả,
sau đó mở bộ lọc bơm để lấy chỉ hoặc các vật thể
ra.
•Cẩn thận khi xả, vì nước có thể nóng.
TIẾNG VIỆT
Lấy mọi vật lạ ra khỏi bộ lọc bơm.
3
1
35
Page 86

Vệ sinh Ngăn kéo Bộ phân phối
Tub Clean (Làm sạch lồng giặt)
Chất tẩy và chất làm mềm vải có thể tích tụ trong ngăn
kéo bộ phân phối. Tháo rời ngăn kéo và các khay lồng,
kiểm tra độ tích tụ một hoặc hai lần một tháng.
Tháo rời ngăn kéo bộ phân phối chất tẩy bằng
1
cách kéo thẳng ra ngoài đến khi dừng.
•Ấn mạnh xuống nút nhả ly hợp và tháo rời ngăn
kéo.
Tháo rời các khay lồng khỏi ngăn kéo.
2
•Rửa các khay lồng và ngăn kéo bằng nước ấm
để loại bỏ chất tích tụ từ các sản phẩm quần áo.
Chỉ sử dụng nước để vệ sinh ngăn kéo bộ phân
phối. Làm khô các khay lồng và ngăn kéo bằng
vải mềm hoặc khăn lau.
Để vệ sinh hốc ngăn kéo, sử dụng vải hoặc bàn
3
chải nhỏ, không kim loại để vệ sinh hốc.
•Loại bỏ tất cả chất cặn khỏi các phần bên trên
và bên dưới hốc.
Tub Clean là một chu trình đặc biệt để vệ sinh phần bên
trong máy giặt.
Chu trình này sử dụng mức nước cao hơn với tốc độ vắt
nhanh hơn. Thực hiện chu trình này thường xuyên.
Lấy hết quần áo hoặc các đồ ra khỏi máy giặt và
1
đóng cửa.
Mở ngăn kéo bộ phân phối và thêm Chất chống
2
cặn vôi (ví dụ: than hoạt tính Calgon) vào ngăn giặt
chính.
Đóng từ từ ngăn kéo bộ phân phối.
3
Bật nguồn và sau đó nhấn và giữ nút
4
Temp.
trong vòng 3 giây.
Khi đó chữ “ ” sẽ được hiển thị trên màn hình.
Nhấn nút
5
Sau khi chu trình hoàn tất, mở cửa để ô cửa, vòng
6
đệm mềm và kính cửa máy giặt được khô ráo.
•Nếu có trẻ em, lưu ý không để cửa mở quá lâu.
Start/Pause
THẬN TRỌNG
để bắt đầu.
Spin
và
Lau sạch hơi ẩm ở hốc bằng vải mềm hoặc khăn
4
lau.
Gắn các khay lồng vào đúng các ngăn và đặt lại
5
ngăn kéo vào trong máy.
36
LƯU Ý
•Không thêm bất kỳ chất tẩy nào vào các ngăn
chất tẩy. Nhiều bọt xà phòng có thể hình thành và
rò rỉ ra từ máy giặt.
Page 87

Thận trọng trước hiện tượng
Đóng băng Trong Mùa đông
•Khi bị đóng băng, sản phẩm không hoạt động bình
thường. Đảm bảo lắp đặt sản phẩm ở vị trí sẽ không
bị đóng băng trong mùa đông.
•Trong trường hợp phải lắp đặt sản phẩm bên ngoài
trên ban công hoặc trong các điều kiện ngoài trời
khác, đảm bảo kiểm tra như sau đây.
Làm thế nào để Giữ Sản phẩm không bị
Đóng băng
•Sau khi giặt, xả bỏ toàn bộ nước còn lại bên trong
bơm bằng cách mở nút bịt ống dùng cho xả bỏ nước
tồn dư. Khi nước được xả bỏ hoàn toàn, đóng nút bịt
ống dùng cho xả bỏ nước tồn dư và nắp đậy.
•Sau khi khóa vòi nước máy, ngắt kết nối ống cấp
nước lạnh với vòi nước máy và xả bỏ nước trong lúc
giữ ống hướng xuống dưới.
Ống cấp
nước lạnh
Kiểm tra Đóng băng
•Nếu nước không xả khi mở nút bịt ống dùng cho xả
bỏ nước tồn dư, kiểm tra bộ thoát nước.
Ốc xả nước
TIẾNG VIỆT
Ốc xả nước
•Bỏ ống xả thõng xuống để xả toàn bộ nước bên trong
ống ra ngoài.
Ống xả
Nắp đậy
THẬN TRỌNG
•Khi ống xả được lắp đặt theo hình cong, ống bên
trong có thể đóng băng.
Nắp đậy
•Bật nguồn điện, chọn Rinse và Spin, rồi nhấn
Start/Pause
nút
Ngăn kéo chất tẩy
.
Ống xả
LƯU Ý
•Kiểm tra nước chảy vào trong ngăn kéo chất tẩy
trong lúc xả và nước xả qua ống xả trong lúc vắt.
•Khi máy hiện chữ “ ” trên cửa sổ màn hình trong
lúc sản phẩm đang hoạt động, kiểm tra bộ cấp nước
và bộ thoát nước (Một số model không có chức năng
báo động cho biết đóng băng).
37
Page 88

Làm cách nào để Xử lý Đóng băng
•Đảm bảo lồng giặt trống rỗng, dội nước ấm 50–60 °C
lên bộ phận cao su bên trong lồng giặt, đóng cửa và
đợi khoảng 1–2 giờ.
•Khi nước được xả bỏ hoàn toàn khỏi lồng giặt, đóng
nút bịt ống dùng cho xả bỏ nước tồn dư, chọn Rinse
và Spin, rồi nhấn nút
Start/Pause
.
50‒60 °C
THẬN TRỌNG
•Không sử dụng nước sôi. Nó có thể gây phỏng
hoặc hư hỏng cho sản phẩm.
•Mở nắp đậy và nút bịt ống dùng cho xả bỏ nước tồn
dư để tháo toàn bộ nước.
Ốc xả nước
Nắp đậy
LƯU Ý
•Nếu nước không xả ra, điều này có nghĩa là băng
không tan hoàn toàn. Đợi thêm chút nữa.
Ngăn kéo chất tẩy
Ống xả
LƯU Ý
•Kiểm tra nước chảy vào trong ngăn kéo chất tẩy
trong lúc xả và nước xả qua ống xả trong lúc vắt.
•Khi xảy ra các sự cố cấp nước, thực hiện các biện
pháp sau đây.
– Khóa vòi nước máy, rã đông vòi nước máy và cả
hai khu vực kết nối ống cấp của sản phẩm bằng
cách sử dụng vải thấm nước nóng.
– Tháo ống cấp và ngâm ngập trong nước ấm dưới
50–60 °C.
Ống cấp
50‒60 °C
38
Page 89

XỬ LÝ SỰ CỐ
•Máy giặt của bạn được trang bị hệ thống giám sát lỗi tự động để phát hiện và chẩn đoán các sự cố ở giai đoạn
sớm. Nếu máy giặt của bạn không hoạt động đúng chức năng hoặc không hoạt động gì cả, hãy kiểm tra như sau
đây trước khi gọi cho bộ phận dịch vụ:
Chẩn đoán Sự cố
Triệu chứng Nguyên nhân Giải pháp
•Dừng máy giặt, kiểm tra lồng giặt và bộ lọc
Tiếng ồn lạch
cạch lách cách
Các vật thể lạ chẳng hạn như tiền xu
hoặc kim băng có thể nằm trong lồng
giặt hoặc bơm.
xả.
•Nếu vẫn còn tiếng ồn sau khi khởi động lại
máy giặt, hãy gọi trung tâm dịch vụ được ủy
quyền.
TIẾNG VIỆT
Âm thanh to
Tiếng ồn rung
Rò rỉ nước
Quá nhiều bọt xà
phòng
Nước không
chảy vào máy
giặt hoặc chảy
chậm
Tải giặt nặng có thể tạo ra âm thanh
to. Điều này là bình thường.
Tất cả các bu-lông vận chuyển và
goòng chống đã được tháo ra chưa?
Tất cả các chân đều chống vững chắc
trên đất?
Các ống cấp hoặc ống xả bị lỏng ở vòi
nước máy hoặc máy giặt.
Các đường ống xả trong nhà bị tắc.
Nguồn nước yếu ở vị trí đó.
Vòi cấp nước máy không mở hoàn
toàn.
(Các) ống cấp nước bị gập.
Bộ lọc của (các) ống cấp bị tắc.
•Nếu âm thanh vẫn tiếp tục, máy giặt có thể
bị mất cân bằng. Dừng và phân phối lại mẻ
giặt.
•Nếu chưa được tháo ra khi lắp đặt, hãy
tham khảo Hướng dẫn lắp đặt để tháo các
bu-lông vận chuyển.
•Hãy chắc chắn rằng máy giặt được
để thăng bằng và thắt chặt các đai ốc lên
trên hướng về thân của thiết bị.
•Kiểm tra và siết chặt các kết nối ống.
•Thông đường ống xả. Liên hệ thợ sửa ống
nước nếu cần thiết.
•Quá nhiều chất tẩy hoặc chất tẩy không
thích hợp có thể gây bọt nhiều có thể dẫn
đến rò rỉ nước.
•Kiểm tra vòi nước máy khác trong nhà.
•Mở hết mức vòi nước máy.
•Làm thẳng ống.
•Kiểm tra bộ lọc của ống cấp.
Nước trong máy
giặt không xả
hoặc xả chậm
Ống xả bị gập hoặc tắc.
Bộ lọc xả bị tắc.
•Vệ sinh và làm thẳng ống xả.
•Vệ sinh bộ lọc xả.
39
Page 90

Triệu chứng Nguyên nhân Giải pháp
Máy giặt không
khởi động
Máy giặt không
vắt
Cửa không mở
Thời gian chu
trình giặt bị kéo
dài
Có thể chưa cắm dây nguồn điện
hoặc lỏng kết nối.
Nổ cầu chì, nhảy cầu dao hoặc mất
điện.
Chưa mở vòi cấp nước máy.
Kiểm tra xem cửa đã đóng chặt chưa.
•Đảm bảo phích cắm lắp chặt trong ổ cắm
tường.
•Bật lại cầu dao hoặc thay cầu chì. Không
tăng công suất cầu chì. Nếu sự cố là quá tải
mạch, phải yêu cầu thợ điện có đủ trình độ
chuyên môn sửa chữa.
•Mở vòi cấp nước máy.
•Đóng cửa và nhấn nút
nhấn nút
lúc trước khi máy giặt bắt đầu vắt. Cửa phải
được khóa trước khi có thể thực hiện vắt.
Thêm 1 hoặc 2 đồ tương tự để giúp cân
bằng tải. Sắp xếp lại đồ để máy vắt đúng.
•Khi máy giặt đã hoạt động, không thể mở
cửa vì các lý do an toàn. Kiểm tra xem biểu
tượng “Khóa cửa” có bật sáng hay không.
Bạn có thể mở cửa an toàn sau khi biểu
tượng “Khóa cửa” tắt.
•Thời gian giặt có thể thay đổi bởi số lượng
quần áo, áp lực nước, nhiệt độ nước và các
điều kiện sử dụng khác. Nếu phát hiện mất
cân bằng hoặc nếu chương trình xả bỏ bọt
xà phòng được bật, thời gian giặt sẽ tăng
lên.
Start/Pause
Start/Pause
, có thể sẽ mất một
. Sau khi
Chất làm mềm
vải chảy tràn
Các chất làm
mềm được phân
phối quá sớm
Sự cố sấy Không sấy
Quá nhiều chất làm mềm có thể gây
chảy tràn.
40
•Làm theo chỉ dẫn đối với chất làm mềm để
đảm bảo sử dụng lượng thích hợp. Không
vượt quá vạch đổ đầy tối đa.
•Đóng từ từ ngăn kéo bộ phân phối. Không
mở ngăn kéo trong chu trình giặt.
•Không làm quá tải. Kiểm tra xem máy giặt
có đang xả đúng cách để rút đủ nước từ mẻ
giặt. Mẻ quần áo quá ít để nhào trộn đúng
cách. Bỏ thêm vài khăn lau.
Page 91

Triệu chứng Nguyên nhân Giải pháp
Mùi Khó Chịu
Mùi này bị gây ra bởi cao su gắn vào
máy giặt.
Nếu gioăng cao su cửa và khu vực
mép cửa không được lau thường
xuyên thì mùi có thể sinh ra bởi nấm
mốc và các chất bên ngoài.
Mùi có thể sinh ra nếu các chất lạ còn
lại trong bộ lọc bơm thoát nước.
Mùi có thể sinh ra nếu các ống thoát
nước không được lắp đúng cách, gây
trào ngược (nước chảy ngược trở lại
vào trong máy giặt).
Khi sử dụng chức năng sấy, mùi có
thể sinh ra từ xơ vải và các đồ giặt
khác khi bị dính vào máy sưởi. (Chỉ ở
máy có sấy)
Một mùi đặc biệt có thể sinh ra khi
sấy khô quần áo ướt bằng không khí
nóng. (Chỉ ở máy có sấy)
•Đó là mùi bình thường của cao su mới và
sẽ biến mất sau khi máy đã được chạy một
vài lần.
•Hãy chắc chắn làm sạch gioăng và mép
cửa thường xuyên và kiểm tra bên dưới
mép cửa xem có các món đồ nhỏ còn sót
khi lấy ra khỏi máy giặt.
•Hãy chắc chắn để làm sạch các bộ lọc bơm
thoát nước thường xuyên.
•Khi lắp đặt ống thoát nước, hãy chắc chắn
rằng nó không trở nên gấp khúc hoặc bị
chặn.
•Đây không phải là một sự cố.
•Mùi sẽ biến mất sau một thời gian ngắn.
TIẾNG VIỆT
Thiết bị gia đình
và điện thoại
thông minh của
bạn không được
kết nối với mạng
Wi-Fi.
Mật khẩu Wi-Fi mà bạn đang cố gắng
kết nối không chính xác.
Dữ liệu di động cho điện thoại thông
minh của bạn đang bật.
Tên mạng không dây (SSID) được cài
đặt không chính xác.
Tần số của bộ định tuyến không phải
là 2,4 GHz.
Khoảng cách giữa thiết bị và bộ định
tuyến quá xa.
•Tìm mạng Wi-Fi được kết nối với điện thoại
thông minh của bạn và xóa nó, sau đó đăng
ký thiết bị của bạn trên LG SmartThinQ.
dữ liệu di động
•Tắt
minh của bạn và đăng ký thiết bị bằng mạng
Wi-Fi.
•Tên mạng không dây (SSID) phải là sự kết
hợp giữa chữ và số tiếng Anh. (Không sử
dụng ký tự đặc biệt)
•Chỉ hỗ trợ tần số của bộ định tuyến 2,4
GHz. Đặt bộ định tuyến không dây là 2,4
GHz và kết nối thiết bị với bộ định tuyến
không dây. Để kiểm tra tần số bộ định
tuyến, kiểm tra qua nhà cung cấp dịch vụ
Internet hoặc nhà sản xuất bộ định tuyến.
•Nếu khoảng cách giữa thiết bị và bộ định
tuyến quá xa, tín hiệu có thể yếu và sự kết
nối có thể không được định cấu hình chính
xác. Di chuyển vị trí của bộ định tuyến để
gần với thiết bị.
của điện thoại thông
41
Page 92

Thông báo Lỗi
Triệu chứng Nguyên nhân Giải pháp
Nguồn nước trong khu vực bị
yếu.
Các vòi cấp nước máy không mở
hoàn toàn.
(Các) ống cấp nước bị gập.
Bộ lọc của (các) ống cấp bị tắc.
Nếu xảy ra rò rỉ nước trong ống
cấp, bộ chỉ báo
•Có thể thay đổi tùy theo model.
Ống xả bị gập hoặc tắc.
Bộ lọc xả bị tắc.
Mẻ giặt quá ít.
“ ”
sẽ đỏ.
•Kiểm tra vòi nước máy khác trong nhà.
•Mở hết mức vòi nước máy.
•Làm thẳng (các) ống.
•Kiểm tra bộ lọc của ống cấp.
•Vệ sinh và làm thẳng ống xả.
•Vệ sinh bộ lọc xả.
•Thêm 1 hoặc 2 đồ tương tự để giúp cân
bằng tải.
42
Mẻ giặt bị mất cân bằng.
Thiết bị có hệ thống phát hiện
và hiệu chỉnh mất cân bằng.
Nếu giặt riêng lẻ các đồ có trọng
lượng nặng (ví dụ: thảm trong
buồng tắm, áo choàng mặc sau
khi tắm, v.v.) hệ thống này có thể
dừng vắt hoặc thậm chí dừng
hẳn chu trình vắt.
Nếu quần áo vẫn còn quá ướt khi
kết thúc chu trình, hãy bỏ thêm
các đồ kích thước nhỏ hơn để
cân bằng tải và lặp lại chu trình
vắt.
•Thêm 1 hoặc 2 đồ tương tự để giúp cân
bằng tải.
•Sắp xếp lại đồ để máy vắt đúng.
•Sắp xếp lại đồ để máy vắt đúng.
Page 93

Triệu chứng Nguyên nhân Giải pháp
TIẾNG VIỆT
Đảm bảo cửa không mở.
Cảm biến cửa bị hỏng.
Nước đầy tràn do van nước
hỏng.
Cảm biến mức nước bị trục trặc.
Quá tải động cơ.
Nước rò rỉ.
•Đóng cửa hoàn toàn.
Nếu chữ “ , , , ” không
biến mất, hãy gọi cho bộ phận dịch vụ.
•Rút phích cắm điện và gọi cho bộ phận
dịch vụ.
•Đóng vòi nước máy.
•Tháo phích cắm điện.
•Gọi cho bộ phận dịch vụ.
•Đóng vòi nước máy.
•Tháo phích cắm điện.
•Gọi cho bộ phận dịch vụ.
•Cho máy giặt dừng khoảng 30 phút để
động cơ nguội mát, sau đó khởi động lại
chu trình.
•Gọi cho bộ phận dịch vụ.
Máy giặt bị sự cố mất điện.
Lỗi Điều khiển
Ống Cấp/xả hoặc bơm thoát
nước bị đóng băng?
•Khởi động lại chu trình.
•Rút phích cắm điện và gọi cho bộ phận
dịch vụ.
•Đổ nước ấm vào trong lồng giặt và rã
đông ống xả cũng như bơm thoát nước.
Làm ướt khăn lau bằng nước ấm và
chườm lên ống cấp.
43
Page 94

BẢO HÀNH
Việc bảo hành có giới hạn này không bao gồm:
•Các chuyến dịch vụ phân phối, thu gom, lắp đặt hoặc sửa chữa sản phẩm; hướng dẫn khách hàng vận hành sản
phẩm; sửa chữa hoặc thay cầu chì, chỉnh sửa dây điện hoặc ống nước hoặc hiệu chỉnh những hoạt động sửa
chữa/lắp đặt không được ủy quyền.
•Lỗi sản phẩm hoạt động trong các trường hợp mất hoặc gián đoạn nguồn điện hoặc dịch vụ cung cấp điện không
đủ.
•Hư hỏng gây ra bởi các đường ống nước rò rỉ hoặc gãy vỡ, đường ống nước đóng băng, đường xả bị hạn chế,
nguồn cấp nước yếu hoặc gián đoạn hoặc nguồn cấp khí không đủ.
•Hư hỏng do vận hành Sản phẩm trong môi trường ăn mòn hoặc trái ngược với các hướng dẫn đã nêu trong Hướng
dẫn sử dụng người dùng sản phẩm.
•Hư hỏng cho Sản phẩm do tai nạn, vật phá hoại và sâu bọ, sét, gió, lửa, lũ lụt hoặc thiên tai.
•Hư hỏng hoặc lỗi gây ra bởi hoạt động sửa đổi hoặc thay đổi không được ủy quyền hoặc nếu thiết bị được sử dụng
ngoài mục đích dự định hoặc rò rỉ nước ở những nơi mà sản phẩm không được lắp đặt đúng cách.
•Hư hỏng hoặc lỗi gây ra do dòng điện, điện áp hoặc mã ống nước, mục đích sử dụng trong thương mại hay công
nghiệp không đúng hoặc sử dụng các phụ kiện, thành phần hoặc sản phẩm vệ sinh có thể bị cháy không được LG
phê chuẩn.
•Hư hỏng gây ra do vận chuyển và bốc dỡ, bao gồm các vết trầy xước, lõm, sứt mẻ và/hoặc hư hỏng khác đối với
bề mặt sơn của sản phẩm, ngoại trừ hư hỏng do lỗi vật liệu hoặc chất lượng chế tạo.
•Hư hỏng hoặc thiếu đồ đối với mọi Sản phẩm trưng bày, hàng bị mở thùng, giảm giá hoặc tân trang lại.
•Các sản phẩm có số sê-ri gốc đã bị gỡ bỏ, thay đổi hoặc không thể đọc ra. Model và số Sê-ri, cùng với hóa đơn bán
lẻ gốc là bắt buộc để xác nhận bảo hành.
•Tăng phí tổn hiệu dụng và thêm chi phí tiện ích.
•Những sửa chữa khi Sản phẩm của bạn được sử dụng ngoài mục đích sử dụng trong gia đình thông thường hoặc
trái ngược với các hướng dẫn được nêu trong Hướng dẫn sử dụng người dùng sản phẩm.
•Các chi phí liên quan đến việc vận chuyển Sản phẩm khỏi nhà để sửa chữa.
•Việc tháo dỡ và lắp đặt lại Sản phẩm nếu thiết bị được lắp đặt ở địa điểm không tiếp cận được hoặc không được
lắp đặt tuân theo các hướng dẫn lắp đặt đã phát hành, bao gồm các hướng dẫn người dùng và lắp đặt của LG.
•Hư hỏng do sử dụng sai, lạm dụng, lắp đặt, sửa chữa hoặc bảo dưỡng không đúng cách. Sửa chữa không đúng
cách bao gồm việc sử dụng các bộ phận không được phê chuẩn hoặc chỉ định bởi LG.
Rung hoặc tiếng ồn lạ gây ra do
không tháo bỏ các bu-lông vận
chuyển hoặc goòng chống.
Rò rỉ gây ra do dơ bẩn (tóc, xơ
vải) trên vòng đệm và kính cửa.
44
Goòng
chống
Đế bìa
cứng
Tháo bỏ các bu-lông vận
chuyển & goòng chống.
Bu-lông
vận
chuyển
Vệ sinh vòng đệm & kính
cửa.
Page 95

Không xả do tắc nghẽn bộ lọc
bơm.
Vệ sinh bộ lọc bơm.
TIẾNG VIỆT
Nước không chảy vào do các
bộ lọc van cấp nước bị tắc hoặc
các ống cấp nước bị gập.
Nước không chảy vào vì sử
dụng quá nhiều chất tẩy.
Quần áo nóng hoặc ấm sau khi
giặt hoàn tất do các ống cấp bị
lắp đặt ngược.
Nước không được cấp đến do
chưa mở vòi nước máy.
Rò rỉ gây ra do lắp đặt ống xả
không đúng cách hoặc ống xả bị
tắc.
Ngõ vào
Nước
Lạnh
vòi nước
Bộ phân
phối
máy
Bộ lọc Cấp nước
Ngõ vào
Nước
Nóng
Công-xôn
Khuỷu
Dây rút
Vệ sinh bộ lọc van cấp
nước hoặc lắp đặt lại các
ống cấp nước.
Vệ sinh ngăn kéo bộ phân
phối chất tẩy.
Lắp đặt lại các ống cấp.
Mở vòi nước máy.
Lắp đặt lại ống xả.
Rò rỉ gây ra do lắp đặt ống cấp
nước không đúng cách hoặc
sử dụng các ống cấp nhãn hiệu
khác.
Sự cố không có điện gây ra do
kết nối dây điện lỏng hoặc sự cố
ổ cắm điện.
Lắp đặt lại ống cấp.
Kết nối lại dây điện hoặc
thay ổ cắm điện.
45
Page 96

Các chuyến dịch vụ phân phối,
thu gom, lắp đặt sản phẩm hoặc
hướng dẫn sử dụng sản phẩm.
Tháo dỡ và lắp đặt lại Sản
phẩm.
Nếu tất cả các vít không được
lắp đặt đúng cách, có thể gây
rung quá mức (Chỉ với model bệ
đôn).
Ngang bằng
Việc bảo hành chỉ bao
gồm các lỗi trong quá trình
sản xuất. Không bao gồm
dịch vụ do Lắp đặt không
1°
đúng cách.
Lắp đặt 4 vít ở từng góc
(Tổng cộng 16EA).
Tiếng ồn thủy kích (va đập) khi
máy giặt đang đổ đầy nước.
Nước Áp
lực Cao
Va đập!!
Tiếng ồn
lớn
Dòng nước
tự nhiên
Dòng nước
dừng đột
ngột
Điều chỉnh áp lực nước
bằng cách giảm van nước
hoặc vòi nước máy trong
nhà.
46
Page 97

Ghi nhớ
Page 98

Ghi nhớ
Page 99

Ghi nhớ
Page 100

 Loading...