

Page 1
MFL69515315
RELEASING THIS DRAWING
WITHOUT PERMISSION LG
Electronics SHOULD BE
ACCUSED ACCORDING TO THE
LAWS AND COMPANY RULES.
WORK
01
SEC.
210
BRAND
LG
MODEL
F14G7QDN0H
F14W7QDN1H
F14W8TDN0H
F14G6QDN2H
F14G6TDN2H
P/NO.
MFL69515315
LANGUAGE
ENGLISH
A**QEDG
1
OFFSET WHITE 80 g
F H/1 *G6/G7 Q/T D(N)(W)(0~9)(H)
A**QWDG
GERMAN
SLOVENIAN
FRENCH
ITALIAN
PAGE
220
Mega Touch
Washing Machine
REMARK
1. Material, printing and exterier size are refer to work tables.
148 148
2. Printing, text size and line are based on LG design film.
3. Exterier size on the drawing is cutting line.
4. Before product controlled by criteria sample.
should comply with LG standard of LG(63)-A-5501-34
DR COMPLETED
PDF
ILLUSTRATOR
TRIG.
MODELING
1
2
3
4
APPROVEDPREPAREDDATEREF. NO.REV. NO. REVISION DESCRIPTION
A.Walaszczyk
24.06.2016
LGEWR
LG Electronics Inc.
UNIT SCALE
REVIEWEDDESIGNED
M.Grabek S.Kozłowski N.Kim
24.06.2016 24.06.2016 24.06.2016
mm
CHECKED APPROVED
RELATED DWG.
N
S
T
I
MANUAL,OWNER’S
T
L
E
DRUM-EXPORT 1/1
DWG.
No.
MFL69515315
Page 2

OWNER’S MANUAL
WASHING
MACHINE
Before beginning installation, read these instructions carefully.
This will simplify installation and ensure that the product is installed
correctly and safely. Leave these instructions near the product after
installation for future reference.
EN ENGLISH DE GERMAN SL SLOVENIAN FR FRENCH IT ITALIAN
F H/1 4 G6/G7 T/Q D(N)(W)(0~9)(H)
F H/1 2 G6/G7 T/Q D(N)(W)(0~9)(H)
F H/1 0 G6/G7 T/Q D(N)(W)(0~9)(H)
F14W7QDN1H, F14W8TDN0H
MFL69515315
Rev.00_09062016
www.lg.com
Page 3

TABLE OF CONTENTS
SAFETY INSTRUCTIONS ......................................03
Important Safety Instructions ....................................................... 04
Disposal of Your Old Appliance ...................................................07
INSTALLATION .......................................................08
Parts ............................................................................................08
Accessories .................................................................................08
Specifications ..............................................................................09
Installation Place Requirements .................................................. 10
Unpacking and Removing Transit Bolts .......................................11
Using Anti-Slip Sheets (Optional) ................................................12
Wooden Floors (Suspended Floors) ............................................ 12
Leveling the Appliance ................................................................. 13
Connecting the Supply Hose ....................................................... 13
Installing the Drain Hose .............................................................16
Electrical Connections (In the UK Only) ......................................16
This manual may contain images or content
different from the model you purchased.
This manual is subject to revision by the
manufacturer.
OPERATION ...........................................................17
Using the Washing Machine ........................................................17
Sorting Laundry ...........................................................................18
Adding Cleaning Products ........................................................... 19
Control Panel ............................................................................... 21
Programme Table ........................................................................22
Option Programme ......................................................................26
SMART FUNCTION ................................................28
Using the Smart Diagnosis™ Function .......................................28
MAINTENANCE ......................................................29
Cleaning Your Washing Machine .................................................29
Cleaning the Water Inlet Filter .....................................................29
Cleaning the Drain Pump Filter ...................................................30
Cleaning the Dispenser Drawer ...................................................31
Tub Clean (Optional) ...................................................................31
Caution on Freezing During Winter .............................................32
TROUBLESHOOTING ............................................34
Diagnosing Problems ..................................................................34
Error Messages ...........................................................................37
WARRANTY ............................................................39
OPERATING DATA .................................................42
Page 4
SAFETY INSTRUCTIONS
The following safety guidelines are intended to prevent unforeseen risks or
damage from unsafe or incorrect operation of the product.
The guidelines are separated into ‘WARNING’ and ‘CAUTION’ as described
below.
This symbol is displayed to the indicate matters and operations that
can cause risk. Read the part with this symbol carefully and follow the
instructions in order to avoid risk.
EN
WARNING
can cause serious injury or death.
CAUTION
can cause the minor injury or damage the product.
- This indicates that the failure to follow the instructions
- This indicates that the failure to follow the instructions
WARNING
To reduce the risk of re, electric shock, or injury to persons when using
your product, basic safety precautions should be followed, including the
following:
Children in the Household
This appliance is not intended for use by persons (including children) with reduced
physical, sensory or mental capabilities, or lack of experience and knowledge,
unless they have been given supervision or instruction concerning use of the
appliance by a person responsible for their safety. Children should be supervised to
ensure that they do not play with the appliance.
For Use in Europe:
This appliance can be used by children aged from 8 years and above and persons
with reduced physical, sensory or mental capabilities or lack of experience and
knowledge if they have been given supervision or instruction concerning use of
the appliance in a safe way and understand the hazards involved. Children shall
not play with the appliance. Cleaning and user maintenance shall not be made by
children without supervision.
Children of less than 3 years should be kept away unless continuously supervised.
03
Page 5

Important Safety Instructions
WARNING
To reduce the risk of re, electric shock, or injury to persons when using
your product, basic safety precautions should be followed, including the
following:
Installation
•Never attempt to operate this appliance if it is damaged, malfunctioning, partially
disassembled, or has missing or broken parts, including a damaged cord or plug.
•This appliance should only be transported by two or more people holding the
appliance securely.
•Do not install the appliance in a damp and dusty place. Do not install or store the
appliance in any outdoor area, or any area that is subject to weathering conditions
such as direct sunlight, wind, rain, or temperatures below freezing.
•Tighten the drain hose to avoid separation.
•If the power cord is damaged or the hole of the socket outlet is loose, do not use
the power cord and contact an authorized service centre.
•This appliance must not be installed behind a lockable door, a sliding door or a
door with a hinge on the opposite side to that of the appliance, in such a way that
a full opening of the appliance door is restricted.
•Do not plug multiple socket outlets, an extension power cable or adapter with this
appliance.
•This appliance must be grounded. In the event of malfunction or breakdown,
grounding will reduce the risk of electric shock by providing a path of least
resistance for electric current.
•This appliance is equipped with a power cord having an equipment-grounding
conductor and a grounding power plug. The power plug must be plugged into an
appropriate socket outlet that is installed and grounded in accordance with all local
codes and ordinances.
•Improper connection of the equipment-grounding conductor can result in risk of
electric shock. Check with a qualied electrician or service personnel if you are in
doubt as to whether the appliance is properly grounded.
•Do not modify the power cord provided with the appliance.If it does not t the
outlet, have a proper outlet installed by a qualied electrician.
EN
04
Page 6

EN
Operation
Do not use a sharp object like drill or pin to press or separate an operation unit.
•
Do not repair or replace any part of the appliance. All repairs and servicing must
•
be performed by qualied service personnel unless specically recommended in
this Owner’s Manual. Use only authorized factory parts.
Keep the area underneath and around your appliances free of combustible
•
materials such as lint, paper, rags, chemicals, etc.
Do not put animals, such as pets into the appliance.
•
Do not leave the appliance door open. Children may hang on the door or crawl
•
inside the appliance, causing damage or injury.
Use new hose or hose-set supplied with the appliance. Reusing old hoses can
•
cause a water leak and subsequent property damage.
Never reach into this appliance while it is operating. Wait until the drum has
•
completely stopped.
Do not put in, wash or dry articles that have been cleaned in, washed in, soaked
•
in, or spotted with combustible or explosive substances (such as wax, oil, paint,
gasoline, degreasers, drycleaning solvents, kerosene, vegetable oil, cooking oil,
etc.). Improper use can cause re or an explosion.
In case of ood, disconnect the power plug and contact the LG Electronics
•
customer information centre.
Do not push down on the door excessively, when the appliance door is open.
•
Do not touch the door during steam or drying programmes.
•
Do not use ammable gas and combustible substances (benzene, gasoline,
•
thinner, petroleum, alcohol, etc.) near the appliance.
If the drain hose or supply hose is frozen during winter, use it only after thawing.
•
Keep all washing detergents, softener and bleach away from children.
•
Do not touch the power plug or the appliance controls with wet hands.
•
When pulling out the power plug from an outlet, hold the power plug, not the cable.
•
Do not bend the power cable excessively or place a heavy object on it.
•
Do not wash rugs, mats, shoes or pet blankets, or any other items other than
•
clothes or sheets, in this machine.
05
Page 7

This appliance must only be used for domestic household purposes and should
•
not be used in mobile applications.
If there is a gas leakage (isobutane, propane, natural gas, etc.), do not touch the
•
appliance or power plug and ventilate the area immediately.
Maintenance
Securely plug the power plug in the socket outlet after completely removing any
•
moisture and dust.
Disconnect the power cord before cleaning the appliance.
•
Never unplug the appliance by pulling on the power cable. Always grip the power
•
plug rmly and pull straight out from the socket outlet.
Do not spray the water inside or outside the appliance to clean it.
•
Disposal
•Before discarding an old appliance, unplug it. Cut off the cable directly behind the
appliance to prevent misuse.
•Dispose of all packaging materials (such as plastic bags and styrofoam) away from
children. The packaging material can cause suffocatoions.
•Remove the door before disposing of or discarding this appliance to avoid the
danger of children or small animals getting trapped inside.
EN
06
Page 8

Disposal of Your Old Appliance
This crossed-out wheeled bin symbol indicates that waste electrical and
•
electronic products (WEEE) should be disposed of separately from the
municipal waste stream.
Old electrical products can contain hazardous substances so correct
•
disposal of your old appliance will help prevent potential negative
consequences for the environment and human health. Your old appliance
may contain reusable parts that could be used to repair other products,
and other valuable materials that can be recycled to conserve limited
resources.
You can take your appliance either to the shop where you purchased
•
the product, or contact your local government waste ofce for details of
your nearest authorised WEEE collection point. For the most up to date
information for your country please see www.lg.com/global/recycling.
EN
07
Page 9
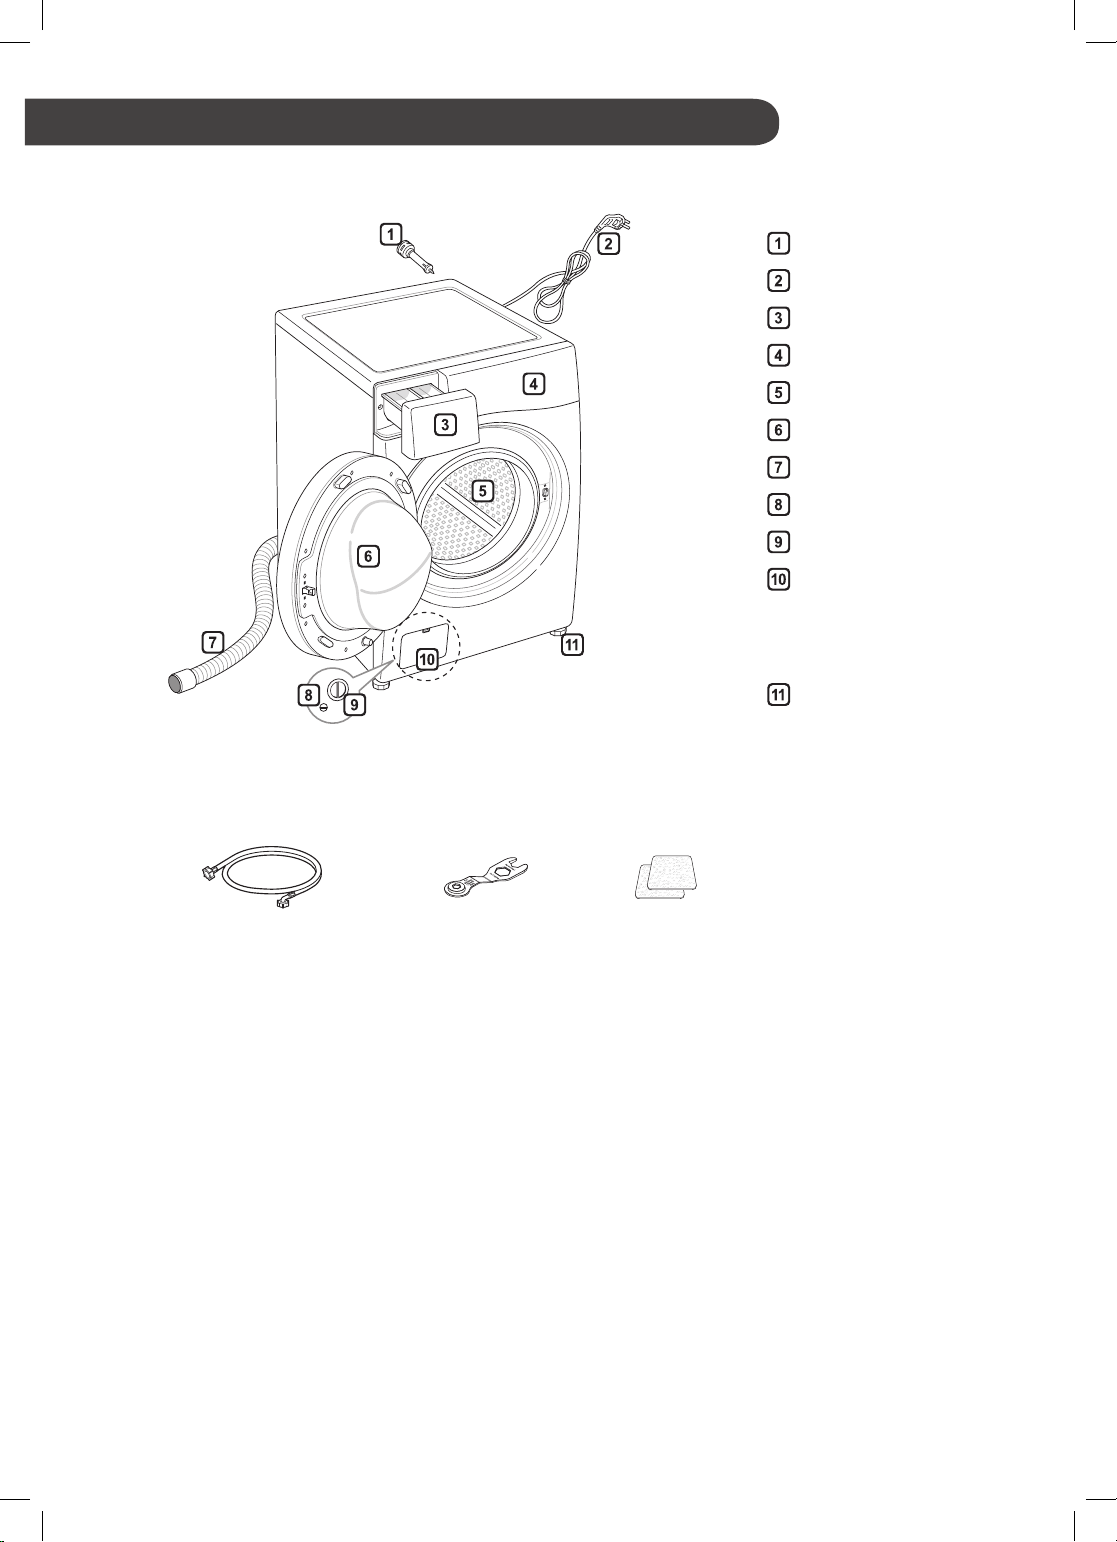
INSTALLATION
Parts
EN
Transit bolts
Power plug
Drawer
Control panel
Drum
Door
Drain hose
Drain plug
Drain pump lter
Cover cap
(Location may
vary depending on
products)
Adjustable feet
Accessories
Cold supply hose (1EA)
(Option: Hot (1EA))
Spanner Anti–slip sheets (Optional)
08
Page 10
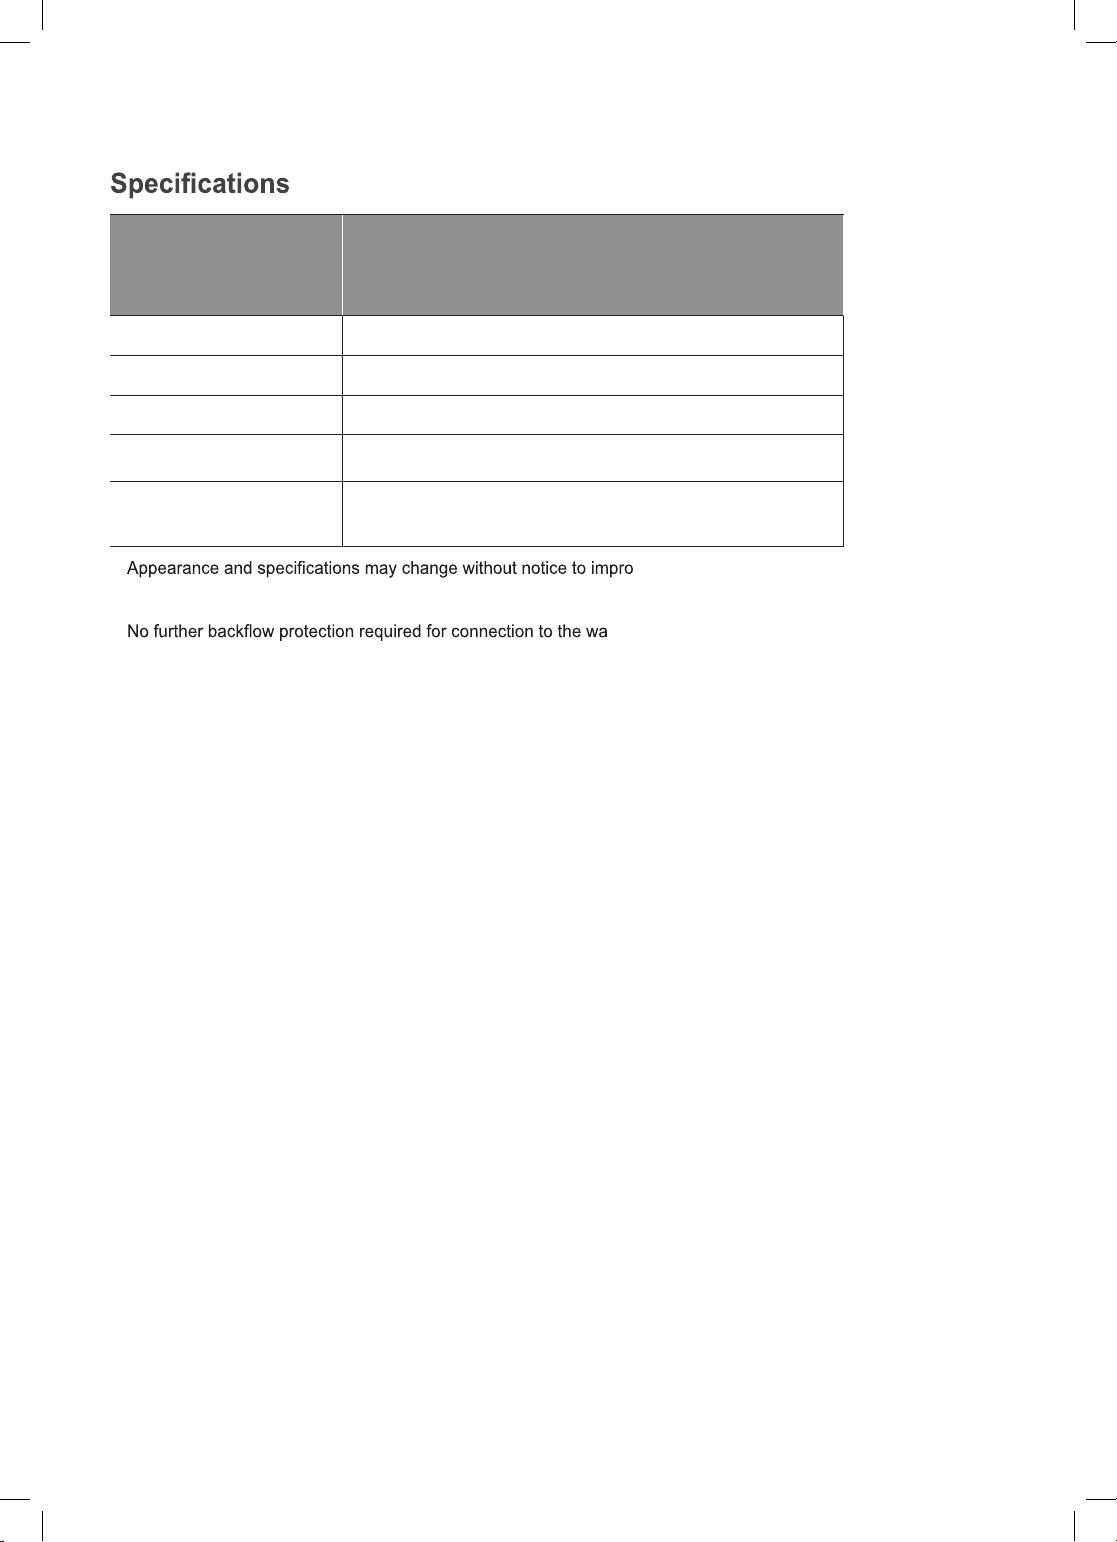
EN
Model
F H/1 4 G6/G7 Q/T D(N)(W)(0~9)(H)
F H/1 2 G6/G7 Q/T D(N)(W)(0~9)(H)
F H/1 0 G6/G7 Q/T D(N)(W)(0~9)(H)
F14W7QDN1H, F14W8TDN0H
Wash Capacity 7/8 kg
Power Supply 220 - 240 V~, 50 Hz
Size 600 mm (W) x 550 mm (D) x 850 mm (H)
Product Weight 60 kg
Permissible Water pressure 0.1 - 1.0 MPa (1.0 - 10.0 kgf / cm²)
•
•The external hot water supply MUST NOT exceed 65°C
•
ve the quality of the product.
ter supply.
09
Page 11
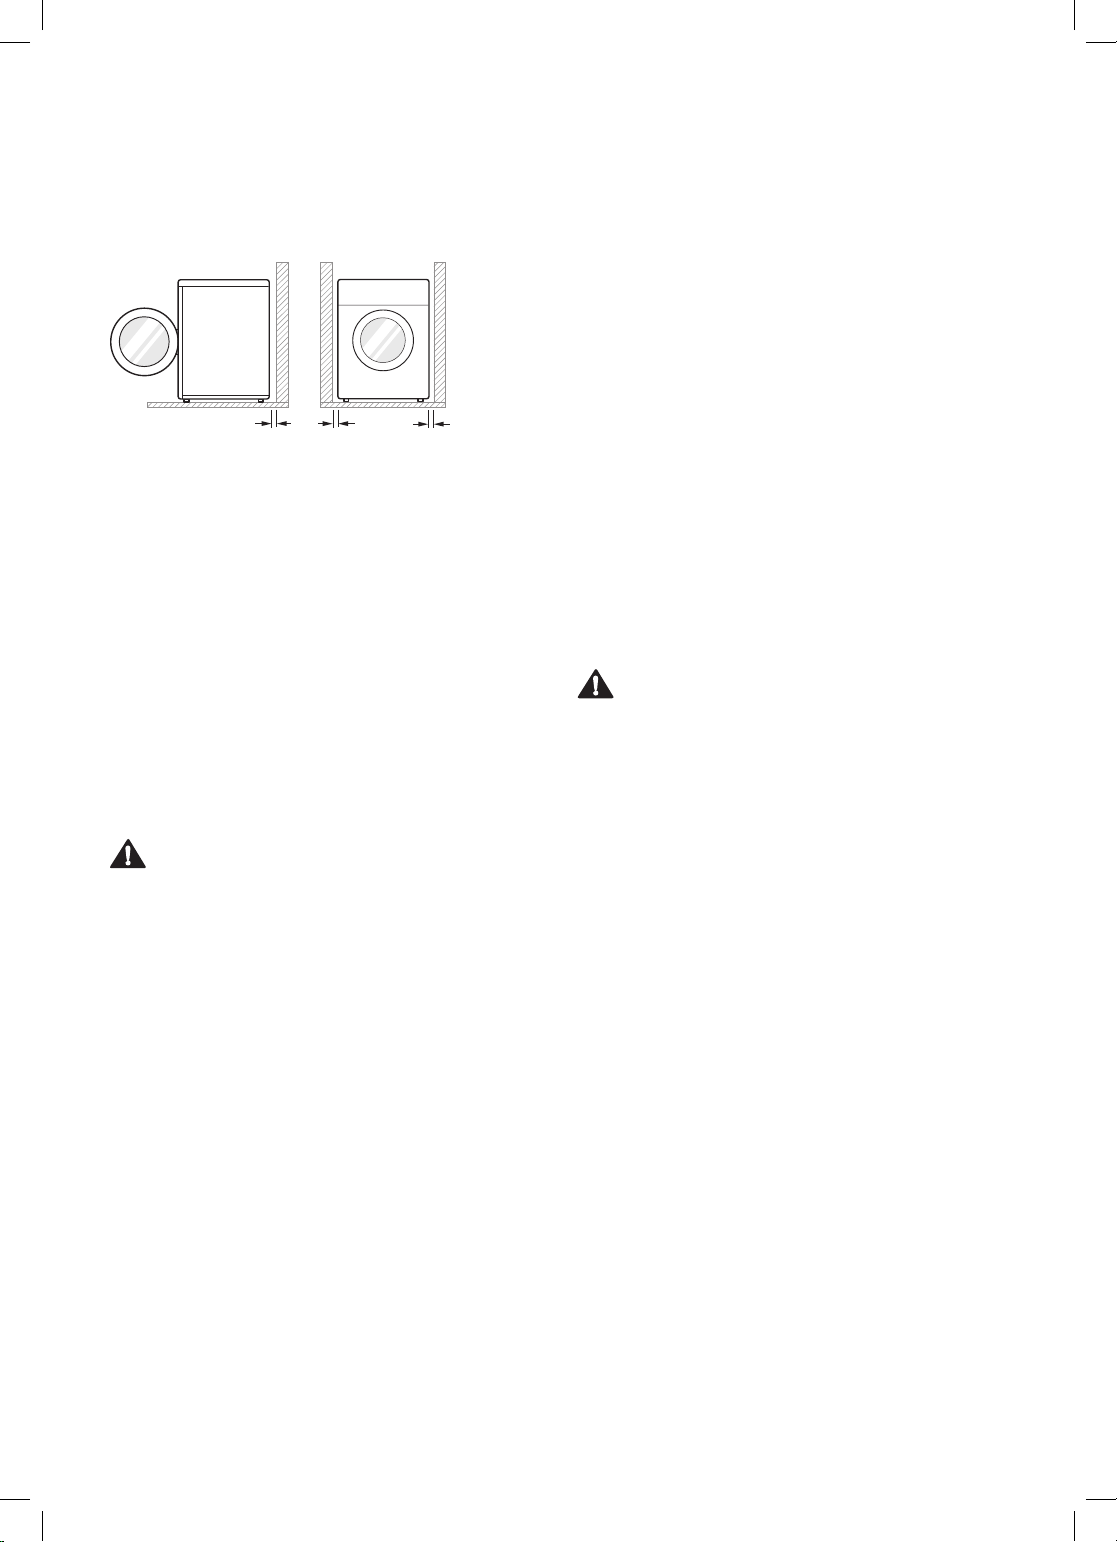
Installation Place Requirements
Location
cm
10
Level Floor :
is 1°.
Power Outlet : Must be within 1.5 meters of either side
of the location of the appliance.
Do not overload the outlet with more than one
•
appliance.
Additional Clearance : For the wall, 10 cm: rear
/2 cm: right & left side
Do not place or store laundry products on top of the
•
appliance at any time.
These products may damage the nish or controls.
•
Allowable slope under the entire appliance
cm
2
cm
2
EN
Do not install your appliance in rooms where freezing
•
temperatures may occur. Frozen hoses may burst
under pressure. The reliability of the electronic control
unit may be impaired at temperatures below freezing
point.
Ensure that when the appliance is installed, it is
•
easily accessible for an engineer in the event of a
breakdown.
With the appliance installed, adjust all four feet
•
using the transit bolt spanner provided to ensure the
appliance is stable, and a clearance of approximately
20 mm is left between the top of the appliance and the
underside of any work-top.
If the appliance is delivered in winter and temperatures
•
are below freezing, place the appliance at room
temperature for a few hours before putting it into
operation.
WARNING
This equipment is not designed for maritime use or for
•
use in mobile installations such as caravans, aircraft
etc.
WARNING
The plug must be plugged into an appropriate outlet
•
that is properly installed and grounded in accordance
with all local codes and ordinances.
Positioning
Install the appliance on a at hard oor.
•
Make sure that air circulation around the appliance is
•
not impeded by carpets, rugs, etc.
Never try to correct any unevenness in the oor with
•
pieces of wood, cardboard or similar materials under
the appliance.
If it is impossible to avoid positioning the appliance
•
next to a gas cooker or coal burning stove, an
insulation (85x60 cm) covered with aluminum foil on
the side facing the cooker or stove must be inserted
between the two appliances.
Electrical Connection
Do not use an extension cord or double adapter.
•
Always unplug the appliance and turn off the water
•
supply after use.
Connect the appliance to an earthed socket in
•
accordance with the current wiring regulations.
The appliance must be positioned so that the plug is
•
easily accessible.
Repairs to the appliance must only be carried out
•
by qualied personnel. Repairs carried out by
inexperienced persons may cause injury or serious
malfunctioning. Contact your local service centre.
10
Page 12
EN
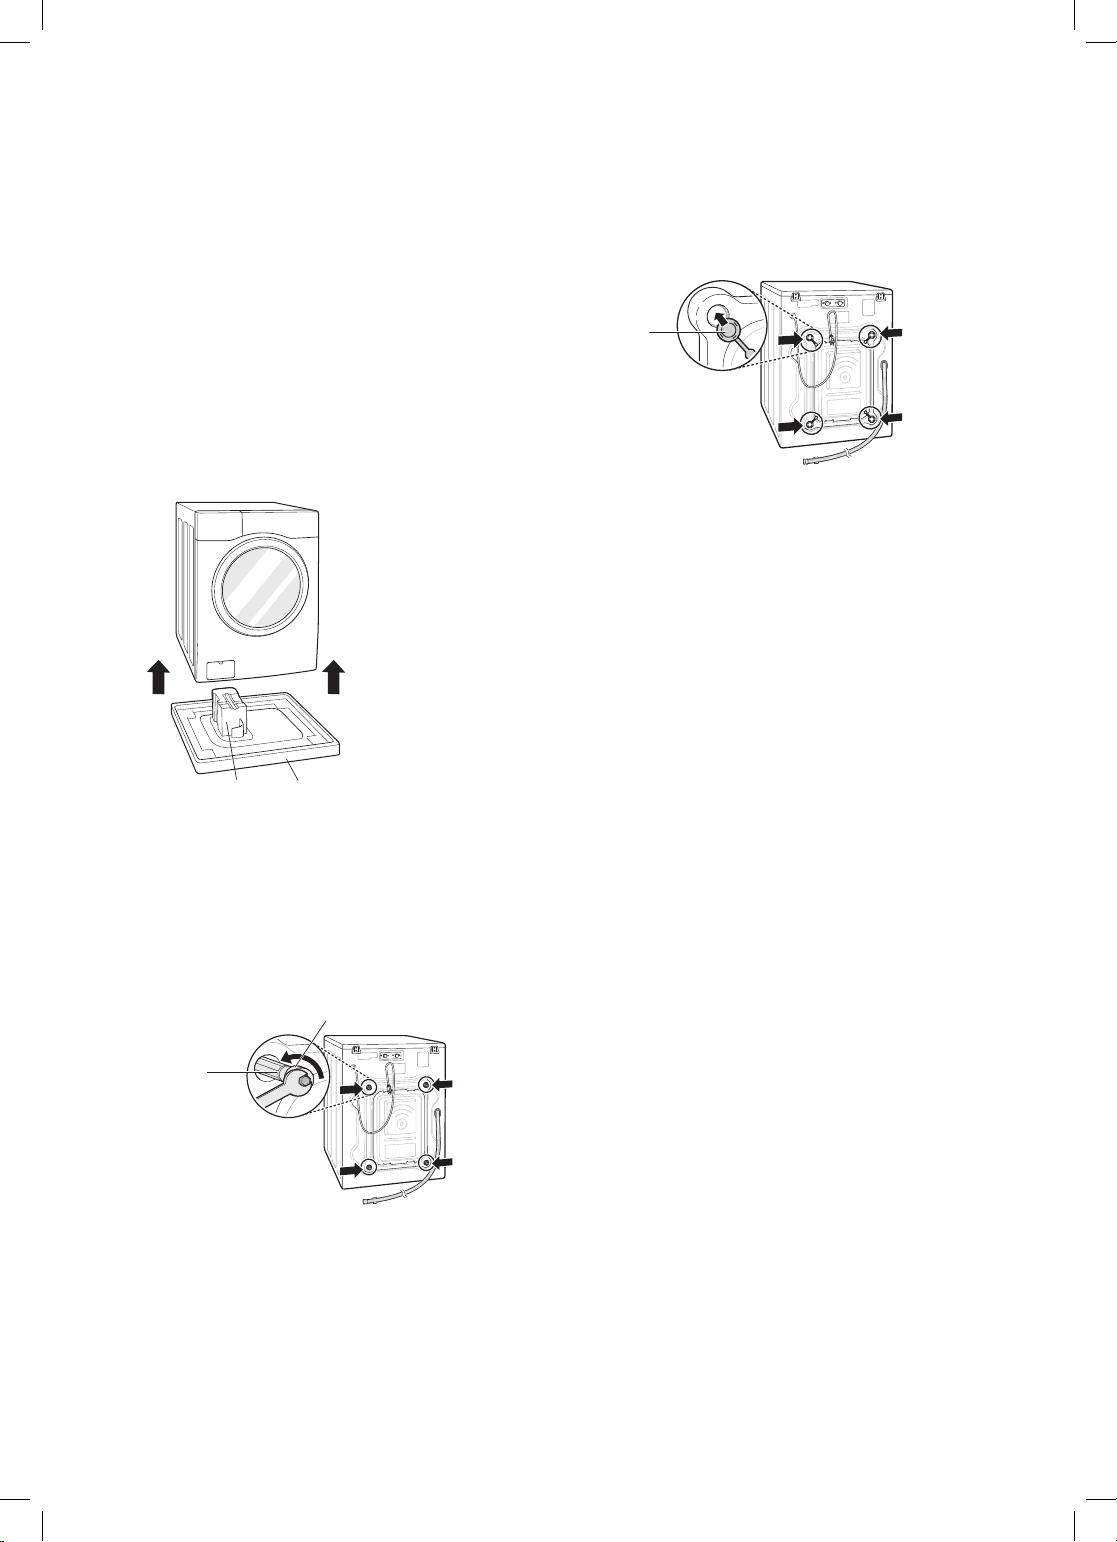
Unpacking and Removing Transit
Bolts
Lift the appliance off the foam base.
1
After removing the carton and shipping material,
•
lift the appliance off the foam base. Make sure
the tub support comes off with the base and is
not stuck to the bottom of the appliance.
If you must lay the appliance down to remove
•
the carton base, always protect the side of the
appliance and lay it carefully on its side. Do not
lay the appliance on its front or back.
Tub support
(Optional)
Carton base
Install the hole caps.
3
Locate the hole caps included in the accessory
•
pack and install them in the shipping bolt holes.
Cap
NOTE
Save the bolt assemblies for future use. To prevent
•
damage to internal components, Do not transport the
washing machine without reinstalling the transit bolts.
Failure to remove transit bolts and retainers may
•
cause severe vibration and noise, which can lead to
permanent damage to the washing machine. The cord
is secured to the back of the washing machine with
a shipping bolt to help prevent operation with transit
bolts in place.
Remove the bolt assemblies.
2
Starting with the bottom two transit bolts, use the
•
spanner (included) to fully loosen all transit bolts
by turning them counterclockwise. Remove the
bolt assemblies by wiggling them slightly while
pulling them out.
Retainer
Shipping
bolt
11
Page 13
EN
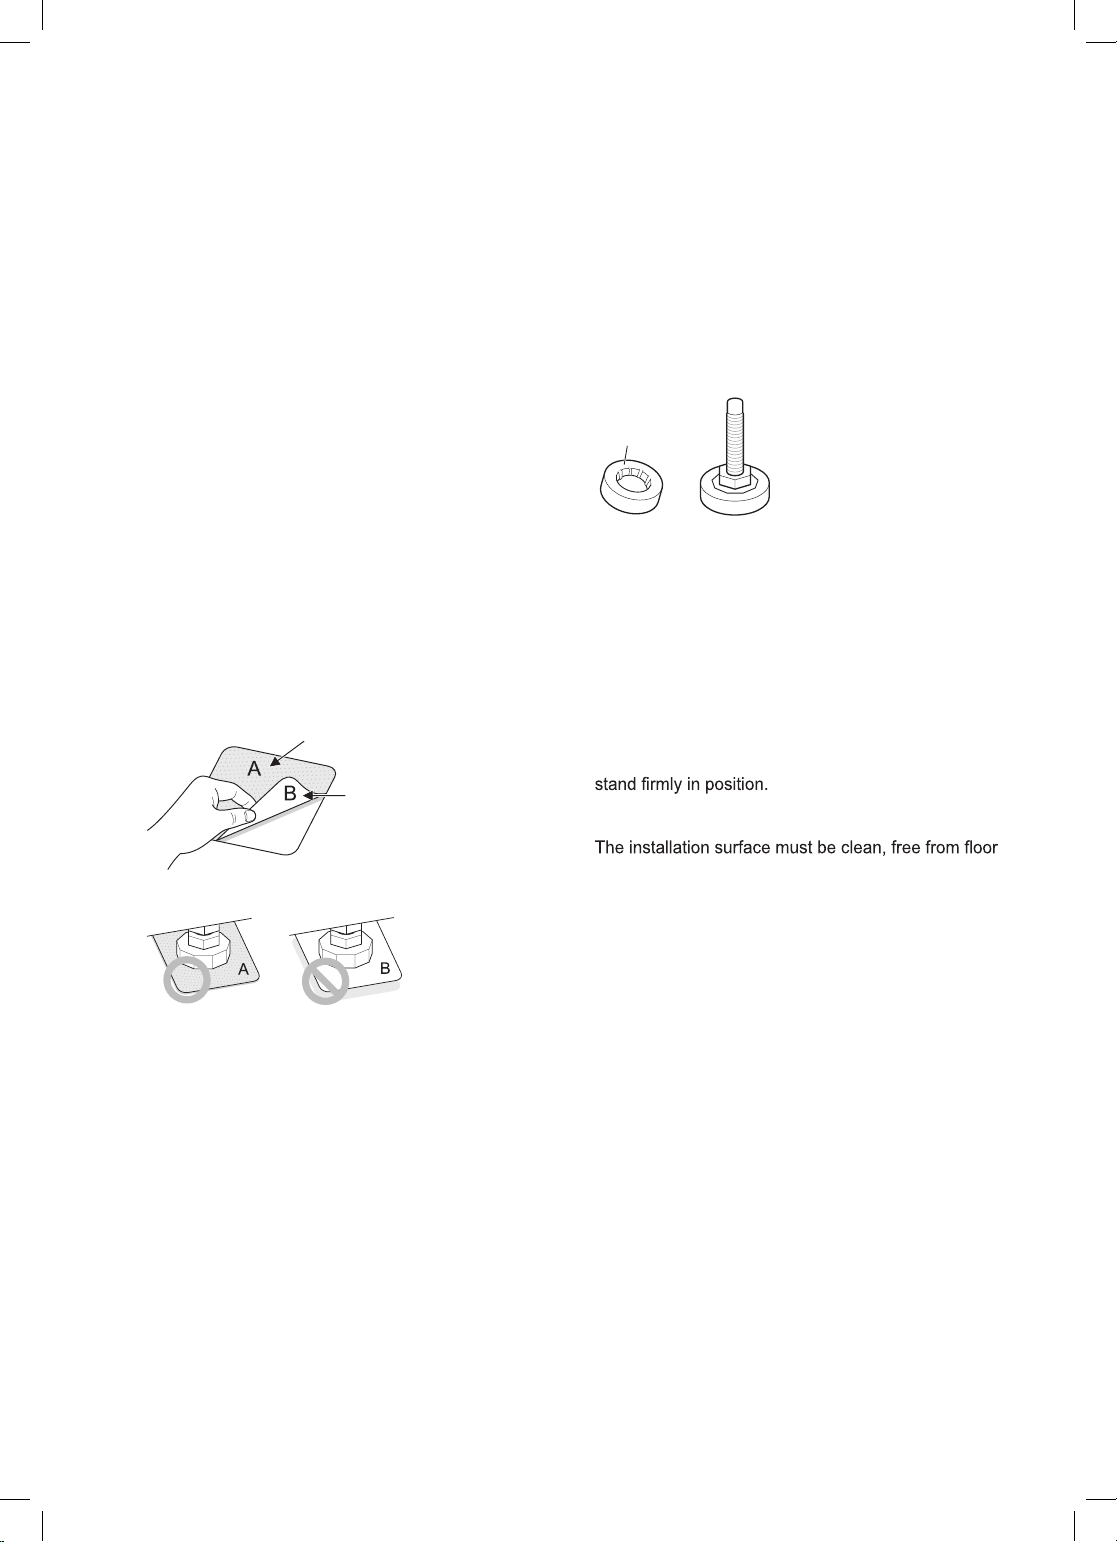
Using Anti-Slip Sheets (Optional)
If you install the appliance on a slippery surface, it may
move because of excessive vibration. Incorrect leveling
may cause malfunction through noise and vibration. If
this occurs, install the anti-slip sheets under the leveling
feet and adjust the level.
Clean the oor to attach the anti-slip sheets.
1
Use a dry rag to remove and clean foreign
•
objects and moisture. If moisture remains, the
anti-slip sheets may slip.
Adjust the level after placing the appliance in the
2
installation area.
Place the adhesive side of the anti-slip sheets on
3
the oor.
It is most effective to install the anti-slip sheets
•
under the front legs. If it is difcult to place the
pads under the front legs, place them under the
back legs.
This side up
Wooden Floors (Suspended
Floors)
Wooden oors are particularly susceptible to vibration.
•
To reduce vibration we recommend you place rubber
•
cups at least 15 mm thick under each foot of the
appliance, secured to at least two oor beams with
screws.
Rubber cup
If possible install the appliance in one of the corners of
•
the room, where the oor is more stable.
Fit the rubber cups to reduce vibration.
•
NOTE
•Proper placement and leveling of the washing machine
will ensure long, regular, and reliable operation.
•The washing machine must be 100% horizontal and
Adhesive side
Ensure the appliance is level.
4
Push or rock the top edges of the appliance
•
gently to make sure that the appliance does not
rock. If the appliance rocks, level the appliance
again.
NOTE
You can obtain anti-slip sheets from the LG Service
•
Centre.
•It must not ‘Seesaw’ across corners under the load.
•
wax and other lubricant coatings.
•Do not let the feet of the washing machine get wet.
Failure to do so may cause vibration or noise.
•You can obtain rubber cups from
the LG Service Centre.
12
Page 14
EN
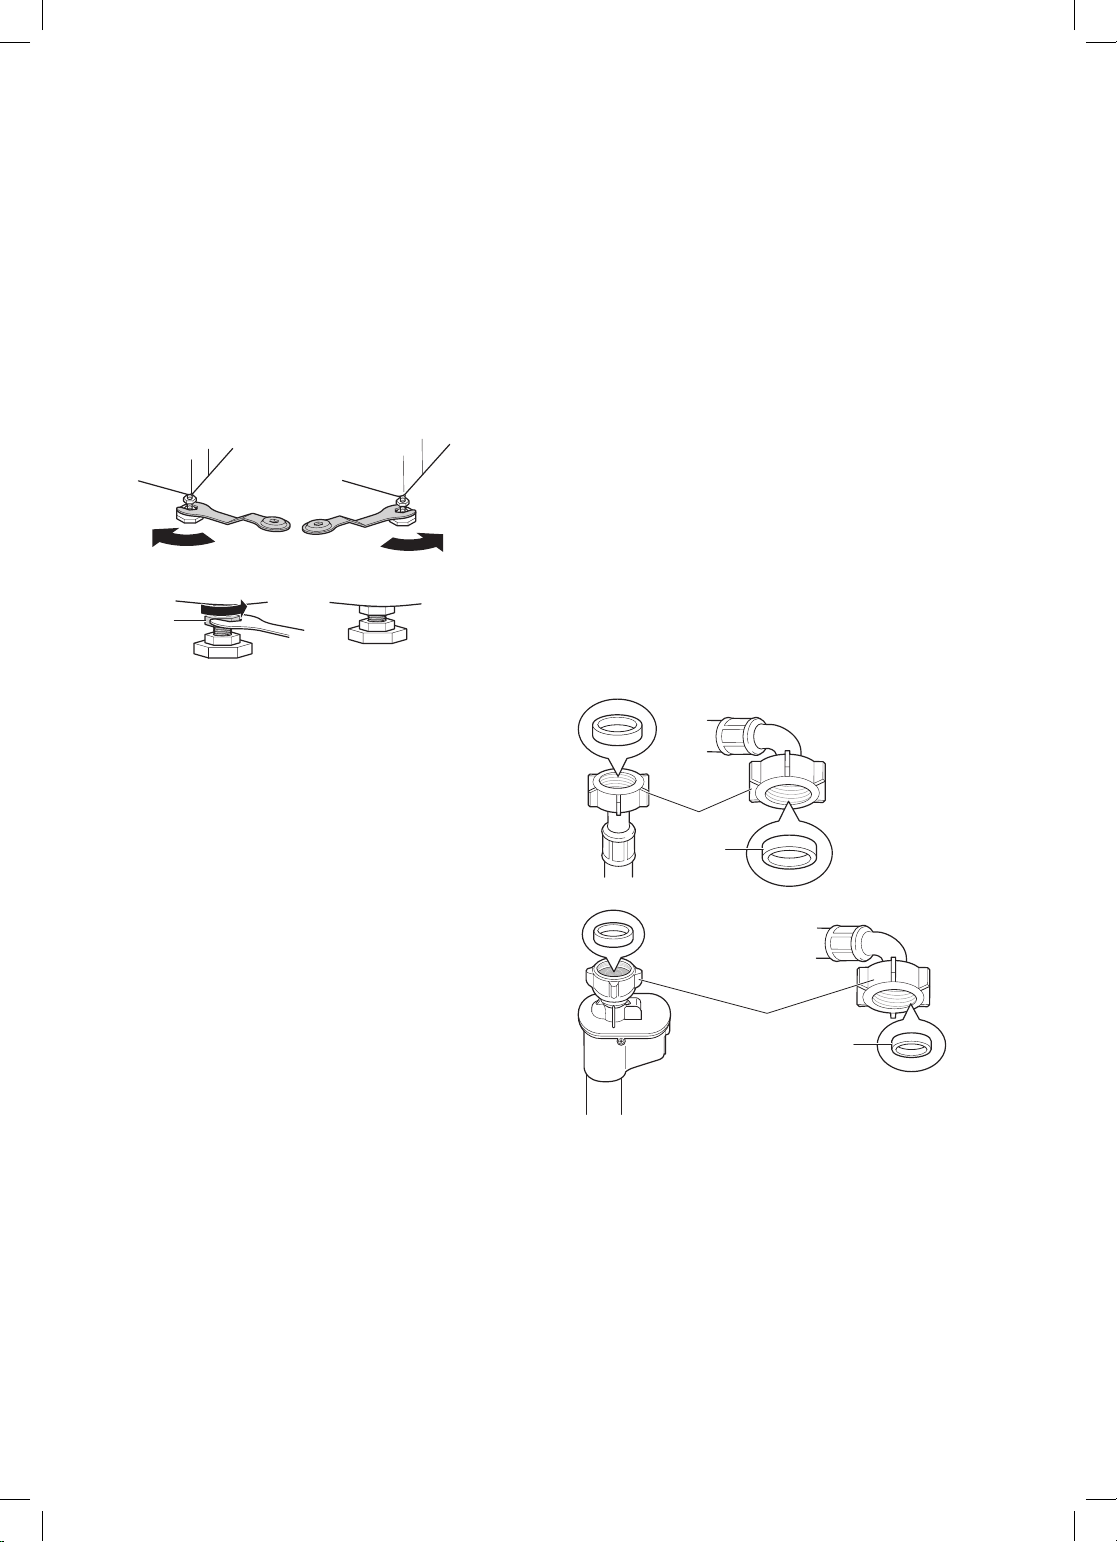
Leveling the Appliance
If the oor is uneven, turn the adjustable feet as required
(Do not insert pieces of wood etc. under the feet). Make
sure that all four feet are stable and resting on the oor
and then check that the appliance is perfectly level (Use
a spirit level).
Once the appliance is level, tighten the lock nuts up
•
towards the base of the appliance. All lock nuts must
be tightened.
Raise
Lock nut
Diagonal Check
When pushing down the edges of the top plate
•
diagonally, the appliance should not move up and
down at all (Check both directions). If the appliance
rocks when pushing the machine top plate diagonally,
adjust the feet again.
Lower
Tighten all 4
lock nuts securely
Connecting the Supply Hose
Water supply pressure must be between 0.1 MPa and
•
1.0 MPa (1.0‒10.0 kgf/cm
Do not strip or crossthread when connecting supply
•
hose to the valve.
If the water supply pressure is more than 1.0 MPa, a
•
decompression device should be installed.
Periodically check the condition of the hose and
•
replace the hose if necessary.
Checking the Rubber Seal on the Supply
Hose
Two rubber seals are supplied with the water supply
hoses.
They are used for preventing water leaks. Make sure the
connection to taps is sufciently tight.
Hose connector
Rubber seal
2
).
NOTE
Timber or suspended type ooring may contribute to
•
excessive vibration and unbalance.
If the washing machine is installed on a raised
•
platform, it must be securely fastened in order to
eliminate the risk of falling off.
Hose connector
Rubber seal
13
Page 15
EN
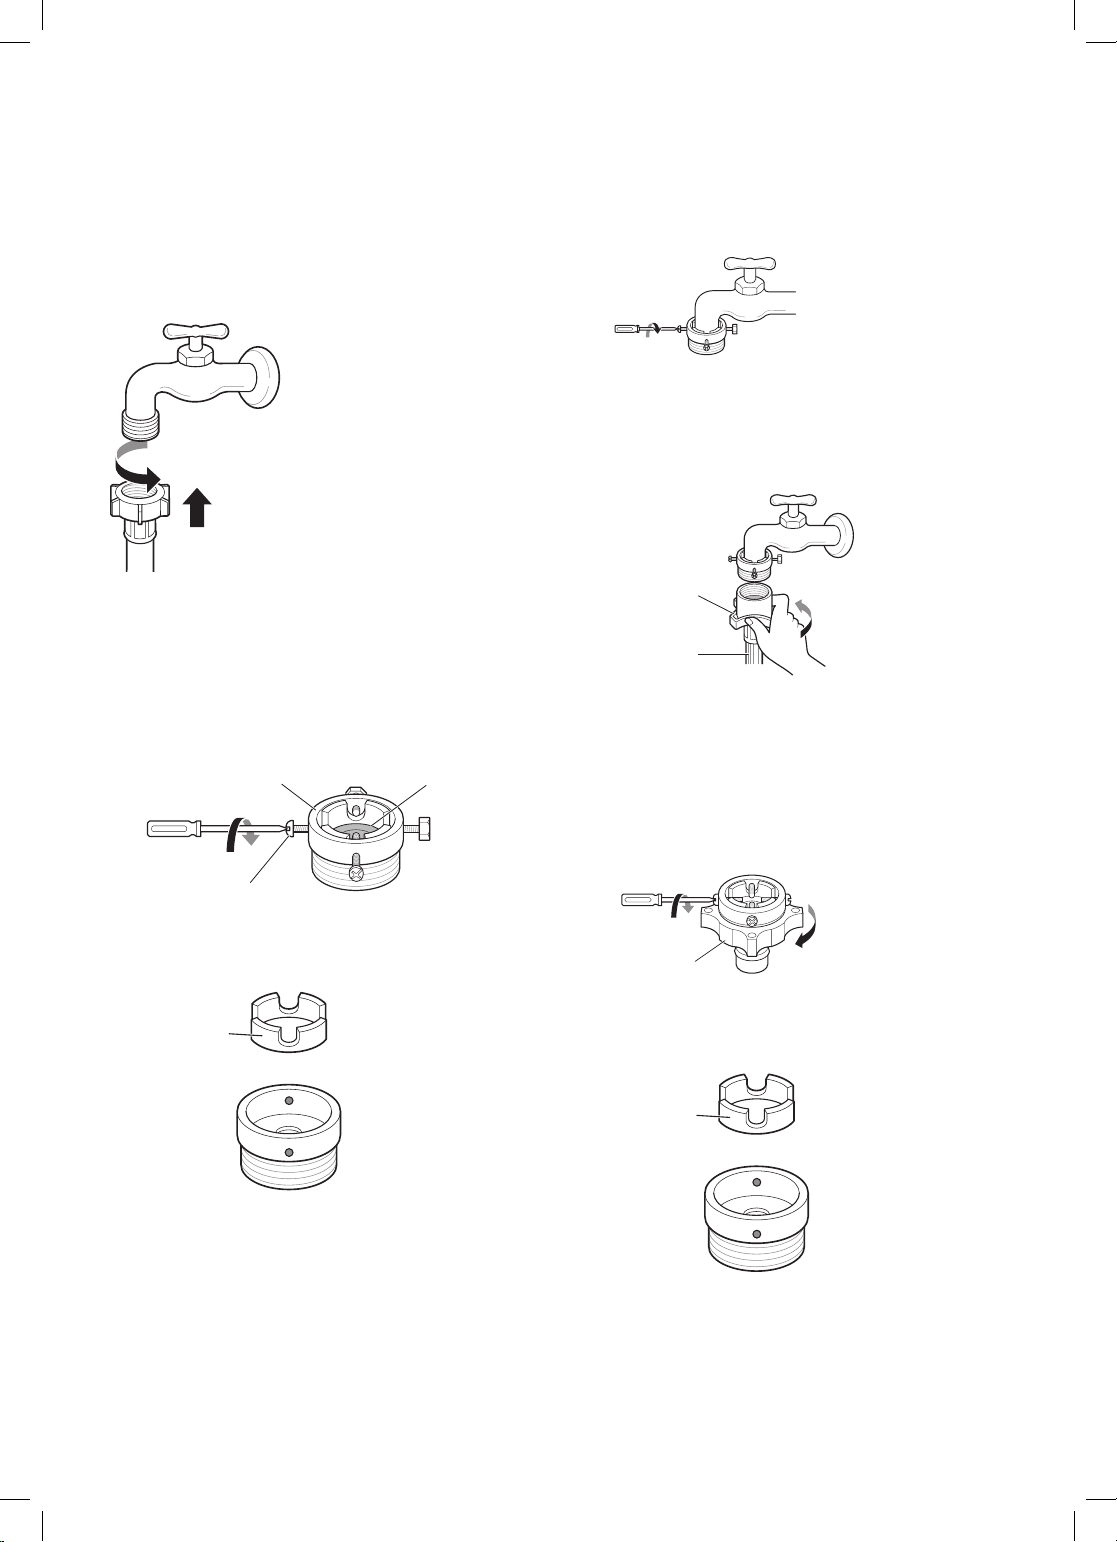
Connecting Hose to Water Tap
Connecting Screw-Type Hose to Tap with
Thread
Screw the hose connector onto the water supply tap.
Connecting Screw-Type Hose to Tap Without
Thread
Loose the four xing screws.
1
Upper
connector
Rubber
seal
Push the adapter onto the end of the tap so that
3
the rubber seal forms a watertight connection.
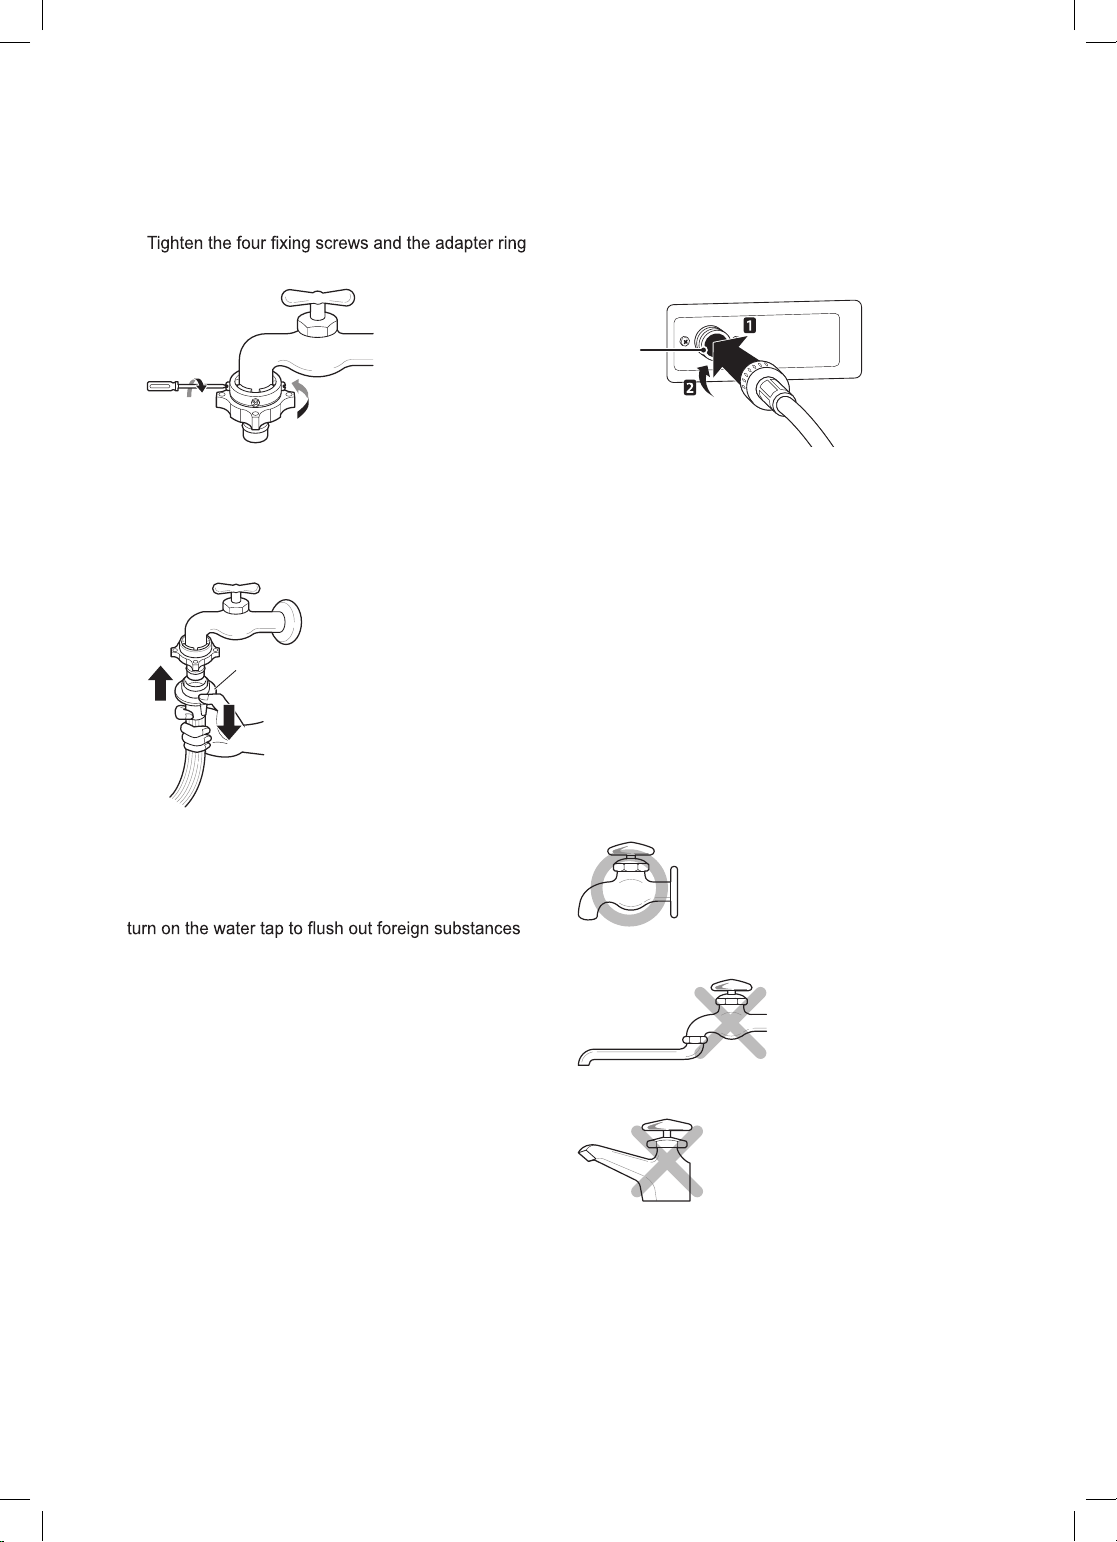
Tighten the four xing screws.
Push the supply hose vertically upwards so that the
4
rubber seal within the hose can adhere completely
to the tap and then tighten it by screwing it to the
right.
Plate
Supply
hose
Connecting One Touch Type Hose to Tap
Without Thread
Fixing screw
Remove the guide plate if the tap is too large to t
2
the adapter.
Guide plate
Unscrew the adapter ring plate and loose the four
1
xing screws.
Ring plate
Remove the guide plate if the tap is too large to t
2
the adapter.
Guide plate
14
Page 16
EN
Push the adapter onto the end of the tap so that
3
the rubber seal forms a watertight connection.
plate .
Pull the connector latch plate down, push the
4
supply hose onto the adapter, and release the
connector latch plate. Make sure the adapter locks
into place.
Latch plate
Connecting Hose to Appliance
Attach the cold water line to the cold
water supply on the back of the washer.
Cold
water
supply
NOTE
•After completing connection, if water leaks from the
hose, repeat the same steps.
Use the most conventional type of tap for the water
supply. In case the tap is square or too big, remove
the guide plate before inserting the tap into the
adaptor.
NOTE
•After connecting the supply hose to the water tap,
(dirt, sand, sawdust, and etc.) in the water lines. Let
the water drain into a bucket, and check the water
temperature.
Using the Horizontal Tap
Horizontal tap
Extension tap
Square tap
15
Page 17
EN
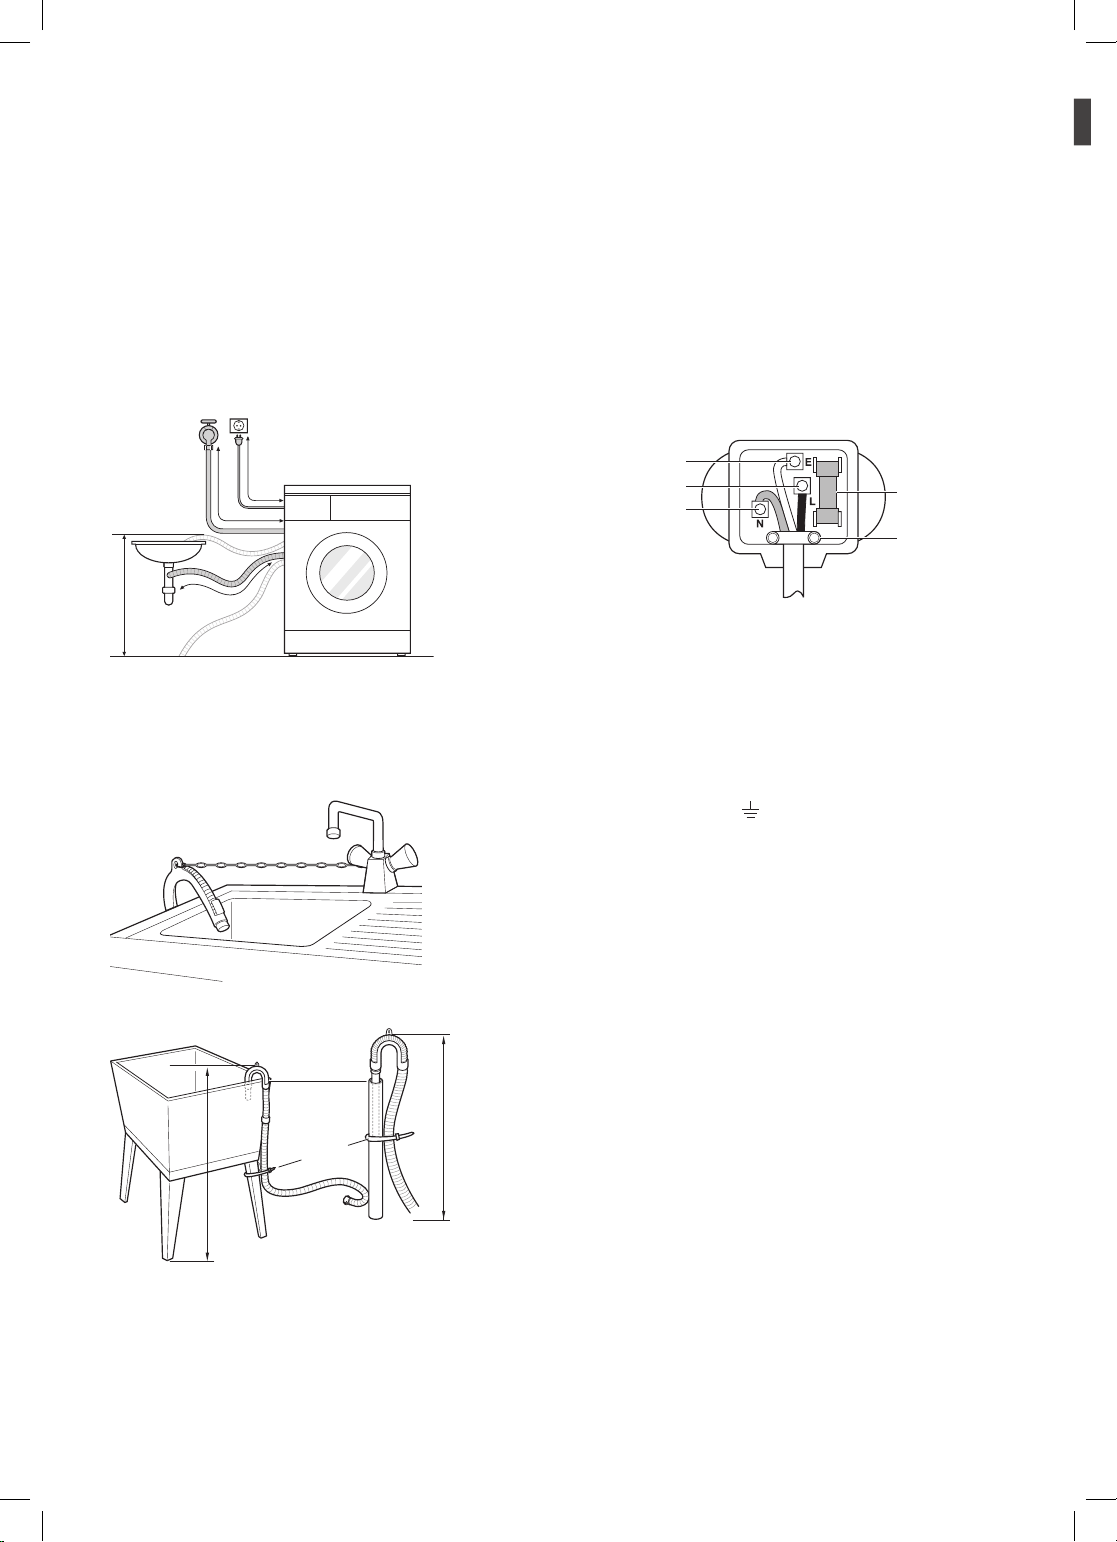
Installing the Drain Hose
The drain hose should not be placed higher than 100
•
cm above the oor. Water in the appliance may not
drain or may drain slowly.
Securing the drain hose correctly will protect the oor
•
from damage due to water leakage.
If the drain hose is too long, do not force it back into
•
the appliance. This will cause abnormal noise.
about 100 cm
about 145 cm
about 105 cm
max. 100 cm
When installing the drain hose to a sink, secure it
•
tightly with string.
Securing the drain hose correctly will protect the oor
•
from damage due to water leakage.
Laundry tub
Hose
retainer
Electrical Connections (In the UK
Only)
The wires in the mains lead are coloured in accordance
with the following code:
Green and Yellow: Earth
Blue: Neutral
Brown: Live
This appliance must be earthed.
Green and
Yellow (Earth)
Brown (Live)
Blue (Neutral)
As the colours of the wires in the mains lead of this
apparatus may not correspond with the coloured
markings identifying the terminals in your plug, proceed
as follows:
The green and yellow wire must be connected to the
terminal in the plug which is marked with the letter E or
by the earth symbol (
) or coloured Green or Green
and Yellow.
The blue wire must be connected to the terminal which
is marked with the letter N or coloured Black.
The brown wire must be connected to the terminal which
is marked with the letter L or coloured Red.
If a 13 amp (BS 1363) plug is used, t a 13 amp BS
1362 fuse.
Fuse
Cord grip
16
max. 100 cm
T
ie strap
max. 100 cm
Page 18
OPERATION
EN
Using the Washing Machine
Before the rst wash, select a washing programme,
allow the washing machine to wash without clothing.
This will remove residue and water from the drum that
may have been left during manufacturing.
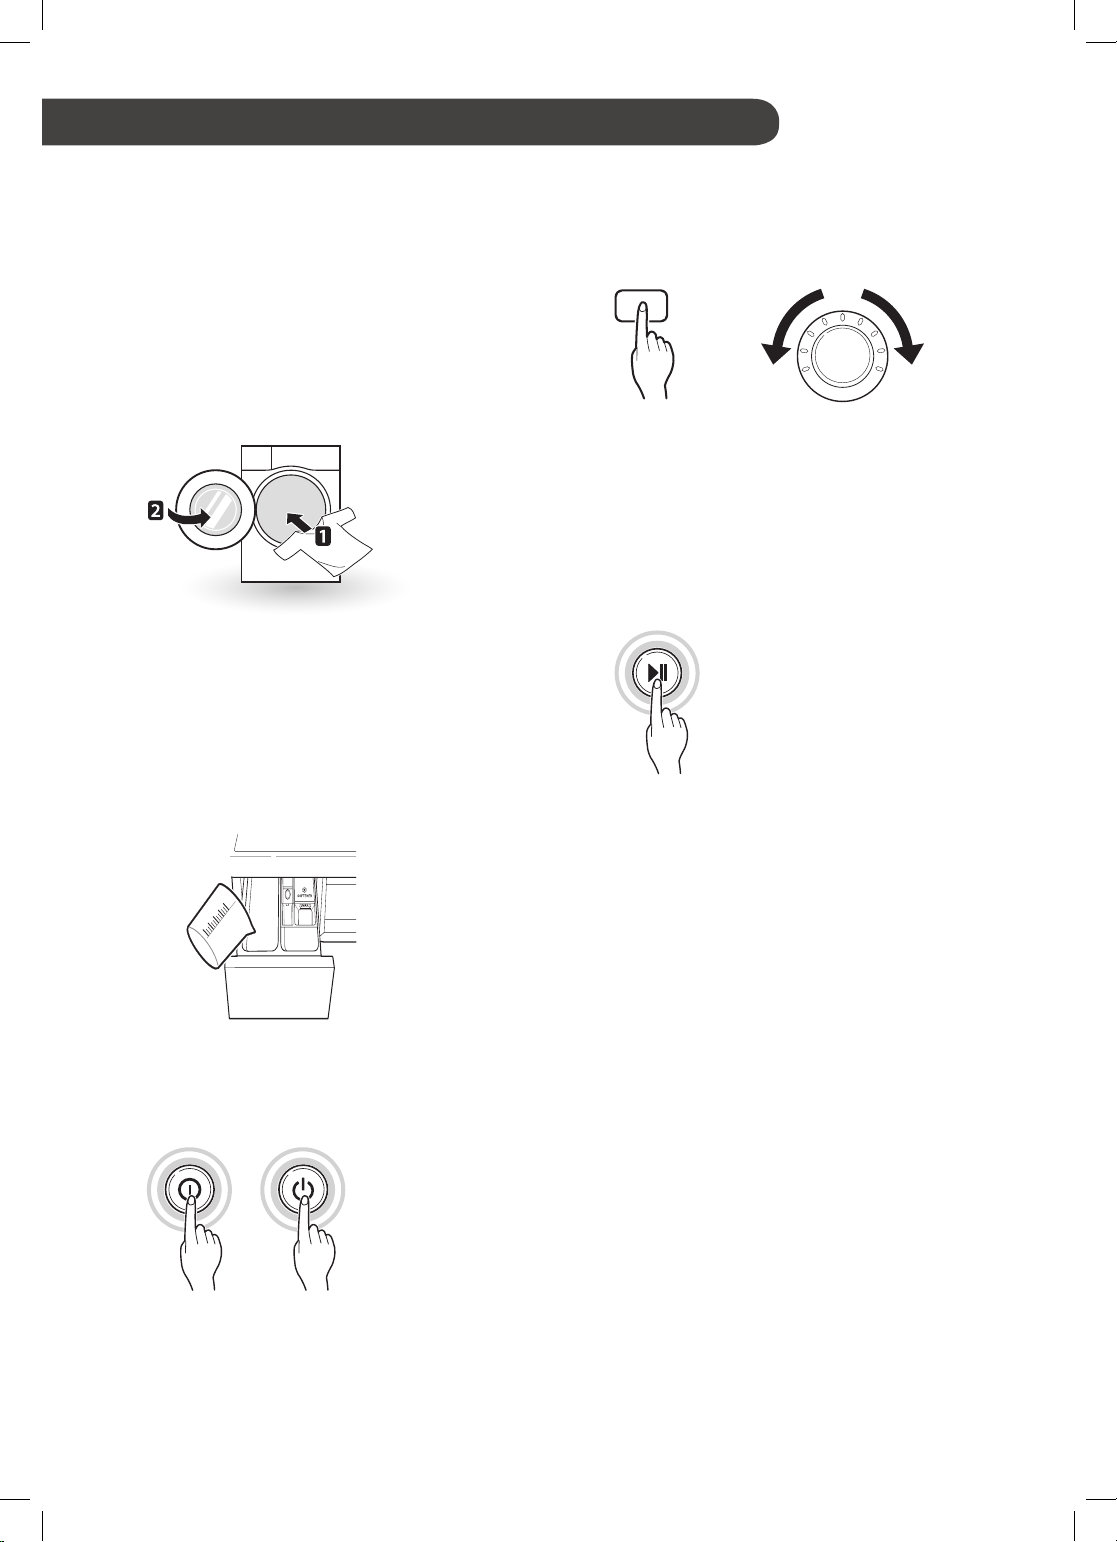
Sort laundry and load items.
1
Sort laundry by fabric type, soil level, colour and
•
load size as needed. Open the door and load
items into the washing machine.
Add cleaning products and/or detergent and
2
softener.
Add the proper amount of detergent to the
•
detergent dispenser drawer. If desired, add
bleach or fabric softener to the appropriate areas
of the dispenser.
Choose the desired washing cycle.
4
Press the cycle button repeatedly or turn the
•
cycle selector knob until the desired cycle is
selected.
Begin cycle.
5
Press the Start/Pause button to begin the cycle.
•
The washing machine will agitate briey without
water to measure the weight of the load. If the
Start/Pause button is not pressed within 5
minutes, the washing machine will shut off and
all settings will be lost.
End of cycle.
6
When the cycle is nished, a melody will sound.
•
Immediately remove your clothing from the
washing machine to reduce wrinkling. Check
around the door seal when removing the load for
small items that may be caught in the seal.
Turn on the washing machine.
3
Press the Power button to turn on the washing
•
machine.
17
Page 19
EN
Sorting Laundry
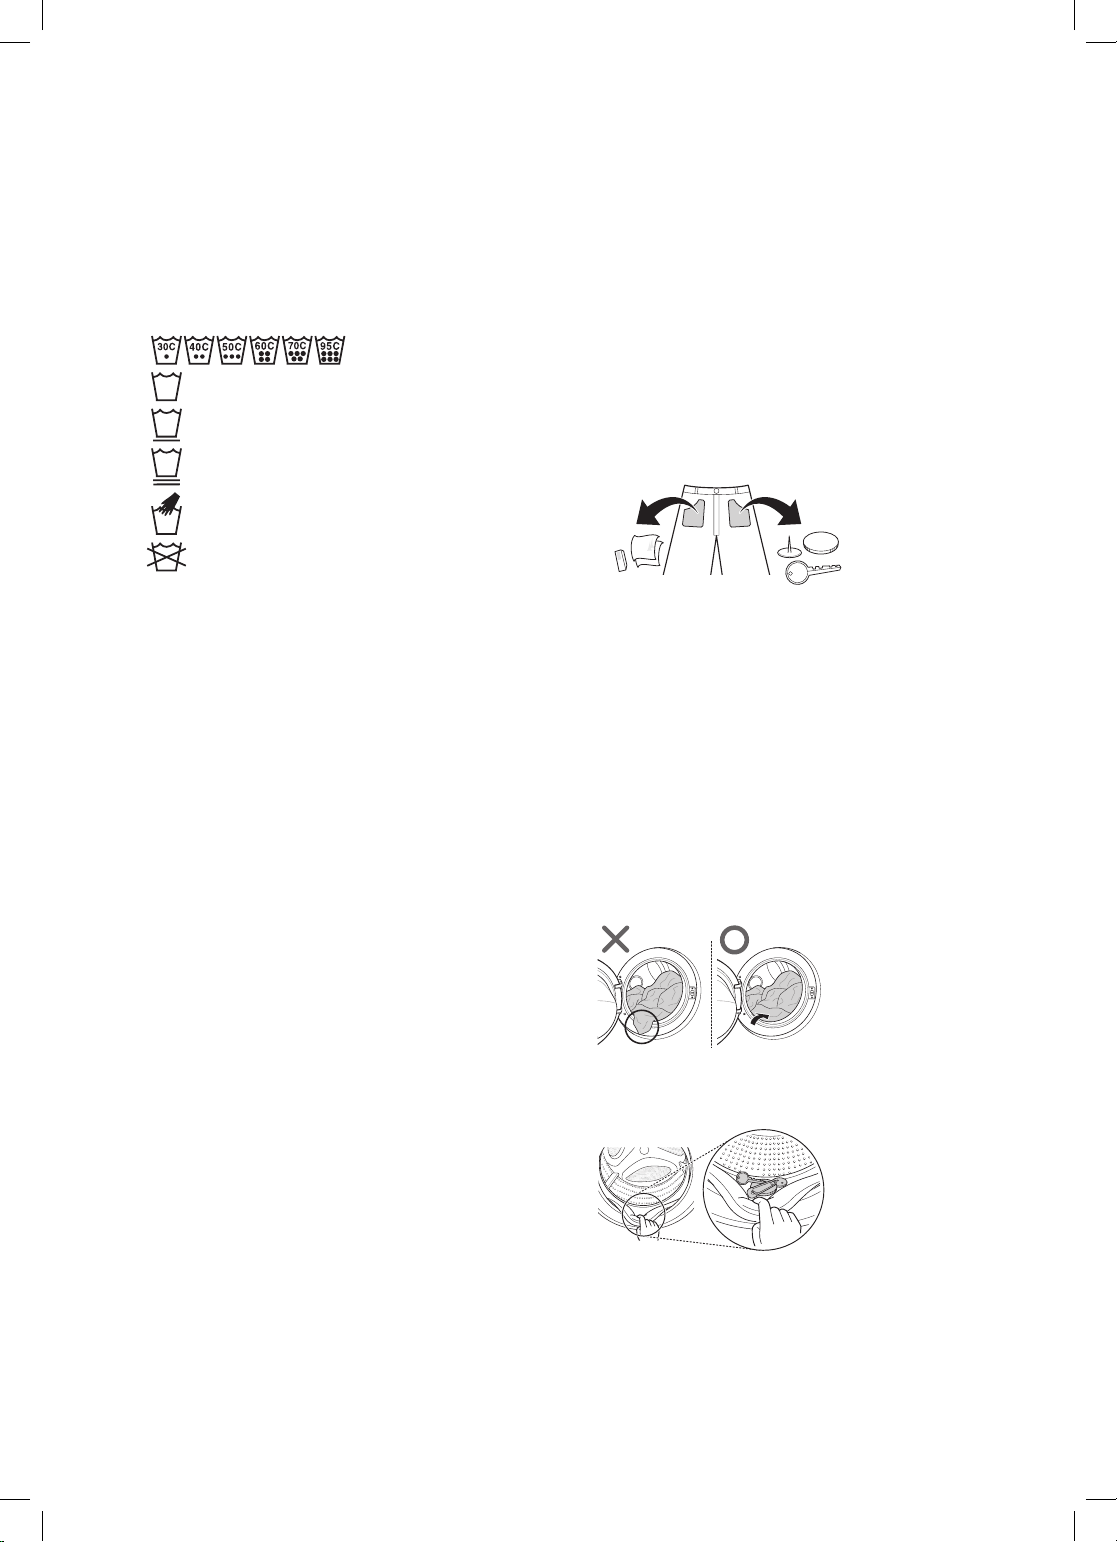
Look for a care label on your clothes.
1
This will tell you about the fabric content of your
•
garment and how it should be washed.
Symbols on the care labels.
•
Wash temperature
Normal machine wash
Permanent press
Delicate
Hand wash
Do not wash
Sorting laundry.
2
To get the best results, sort clothes into loads
•
that can be washed with the same wash cycle.
Different fabrics need to be washed at varying
•
temperatures and spin speeds.
Always sort dark colours from pale colours and
•
whites. Wash separately as dye and lint transfer
can occur causing discolouration of white and
pale garments. If possible, do not wash heavily
soiled items with lightly soiled ones.
– Soil (Heavy, Normal, Light) :
Separate clothes according to amount of soil.
– Colour (White, Lights, Darks):
Separate white fabrics from coloured fabrics.
– Lint (Lint producers, Collectors):
Wash lint producers and lint collectors
separately.
Caring before loading.
3
Combine large and small items in a load. Load
•
large items rst.
Large items should not be more than half the
•
total wash load. Do not wash single items. This
may cause an unbalanced load. Add one or two
similar items.
Check all pockets to make sure that they are
•
empty. Items such as nails, hair clips, matches,
pens, coins and keys can damage both your
washing machine and your clothes.
Close zippers, hooks and strings to make sure
•
that these items don’t snag on other clothes.
Pre-treat dirt and stains by brushing a small
•
amount of detergent dissolved water onto stains
to help lift dirt.
Check the folds of the exible gasket (gray) and
•
remove any small articles.
CAUTION
Check inside the drum and remove any items from a
•
previous wash.
Remove any clothing or items from the exible gasket
•
to prevent clothing and gasket damage.
18
Page 20
EN
Adding Cleaning Products
Detergent Dosage
Detergent should be used according to the instruction
•
of the detergent manufacturer and selected according
to type, colour, soiling of the fabric and washing
temperature.
If too much detergent is used, too many suds can
•
occur and this will result in poor washing results or
cause heavy load to the motor.
If you wish to use liquid detergent follow the guidelines
•
provided by the detergent manufacturer.
You can pour liquid detergent directly into the
•
main detergent drawer if you are starting the cycle
immediately.
Do not use liquid detergent if you are using Time
•
delay, or if you have selected Pre Wash, as the liquid
may harden.
If too many suds occur, reduce the detergent amount.
•
Detergent usage may need to be adjusted for water
•
temperature, water hardness, size and soil level of the
load. For best results, avoid oversudsing.
Refer to the label of the clothes, before chooseing the
•
detergent and water temperature.
When using the washing machine, use designated
•
detergent for each type of clothing only:
– General powdered detergents for all types of fabric
– Powdered detergents for delicate fabric
– Liquid detergents for all types of fabric or
designated detergents only for wool
For better washing performance and whitening, use
•
detergent with the general powdered bleach.
Detergent is ushed from the dispenser at the
•
beginning of the cycle.
NOTE
Do not let the detergent harden. Doing so may lead to
•
blockages, poor rinse performance or odour.
Full load : According to manufacturer’s
•
recommendation.
Part load : 3/4 of the normal amount
•
Minimum load : 1/2 of full load
•
Adding Detergent and Fabric Softener
Adding Detergent
Main wash only →
•
Pre wash+Main wash →
•
NOTE
Too much detergent, bleach or softener may cause an
•
overow.
Be sure to use the appropriate amount of detergent.
•
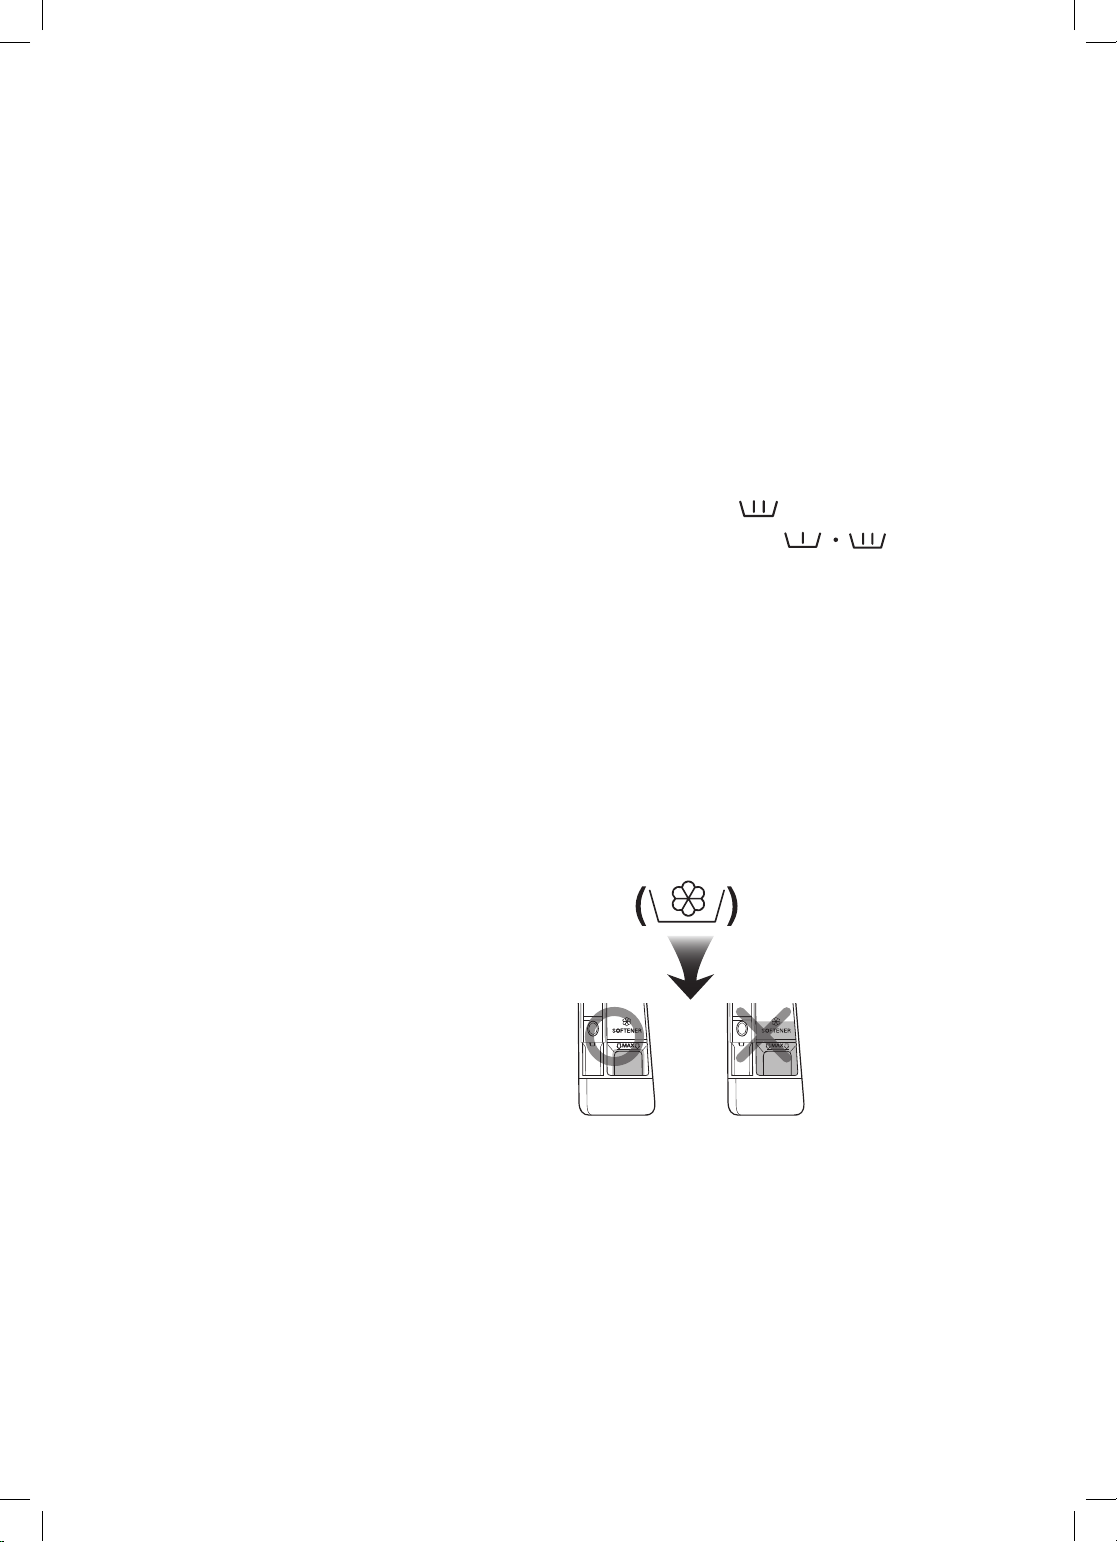
Adding Fabric Softener
Do not exceed the maximum ll line. Overlling can
•
cause early dispensing of the fabric softener, which
may stain clothes. Close the dispenser drawer slowly.
19
Page 21
Do not leave the fabric softener in the detergent
•
drawer for more than 2 days (Fabric softener may
harden).
Softener will automatically be added during the last
•
rinse cycle.
Do not open the drawer when water is being supplied.
•
Solvents (benzene, etc.) must not be used.
•
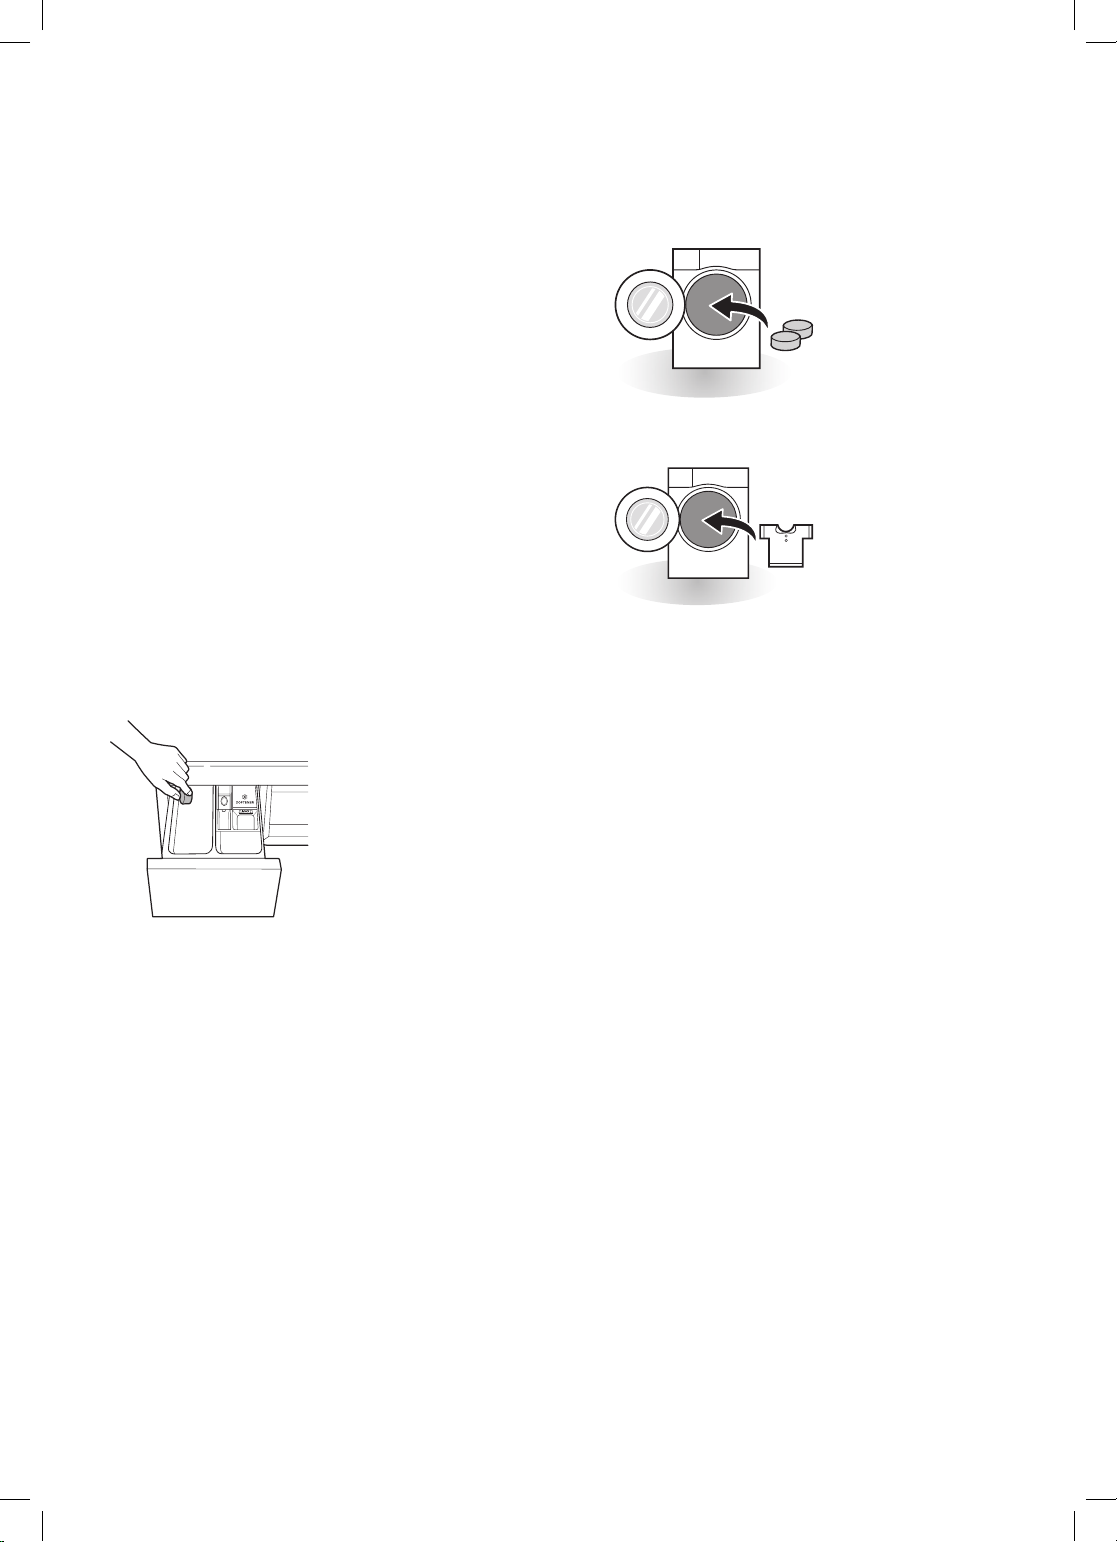
Using Tablet
Open the door and put tablets into the drum.
1
EN
NOTE
Do not pour fabric softener directly on the clothes.
•
Adding Water Softener
A water softener, such as anti-limescale (e.g. Calgon)
•
can be used to cut down on the use of detergent in
extremely hard water areas. Dispense according to
the amount specied on the packaging. First add
detergent and then the water softener.
Use the quantity of detergent required for soft water.
•
Load the laundry into the drum and close the door.
2
20
Page 22
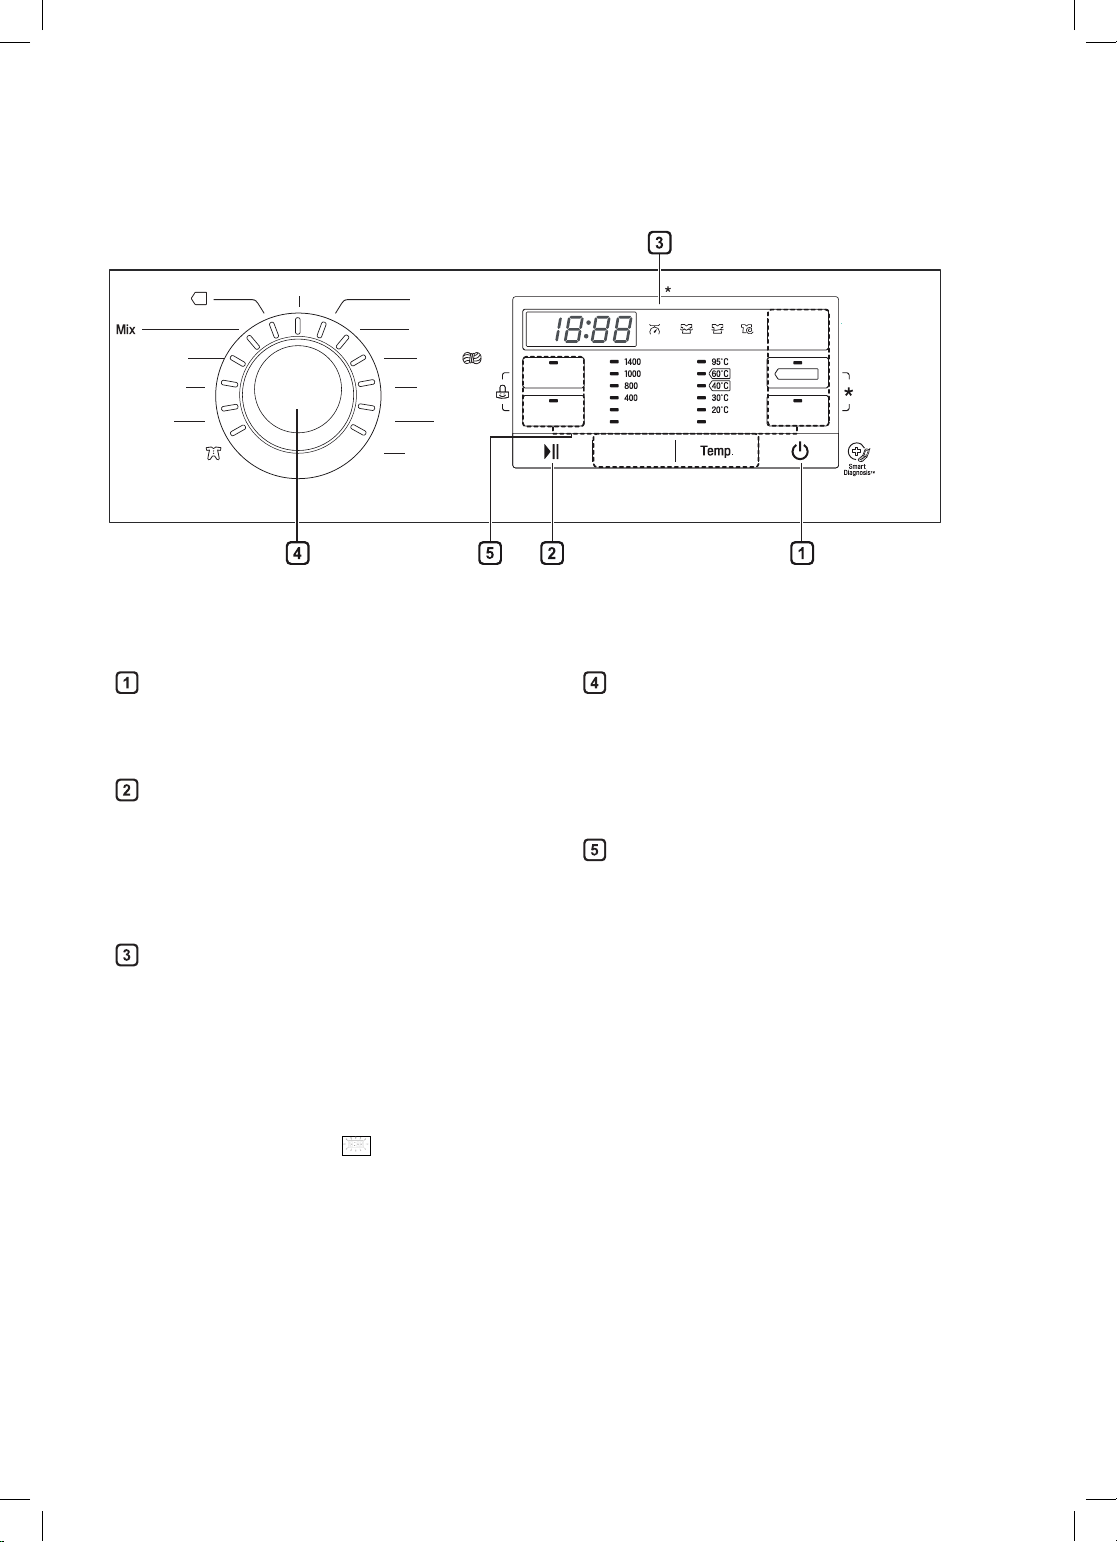
Control Panel
EN
Baumwolle+
Pflegeleicht
Bettdecken
Skin Care
Babybekleidung
Koch-/Buntwäsche
Sportswear
Feinwäsche
+Schleudern
Power Button
Press the Power button to turn the washing
•
machine on.
Start/Pause Button
This Start/Pause button is used to start the
•
wash cycle or pause the wash cycle.
If a temporary stop of the wash cycle is needed,
•
press the Start/Pause button.
Display
The display shows the settings, estimated
•
time remaining, options, and status messages.
When the product is turned on, the default
settings in the display will illuminate.
The display shows estimate time remaining.
•
While the size of the load is being calculated
automatically, blinking
or ‘Detecting’
appears.
Wolle
Intensiv 60
Kurz 30
Spülen
Intensiv Spülen
Vorwäsche
Für Trommel-Reinigung: 3 Sek. gedrückt halten
Startzeitvorwahl
Intensiv
Ohne Schleudern
Spülstop
Schleudern
Kalt
Knitterschutz
Programme Knob
Programmes are available according to laundry
•
type.
Lamp will light up to indicate the selected
•
programme.
Options
This allows you to select an additional
•
programme and will light when selected.
Use these buttons to select the desired
•
programme options for the selected cycle.
21
Page 23
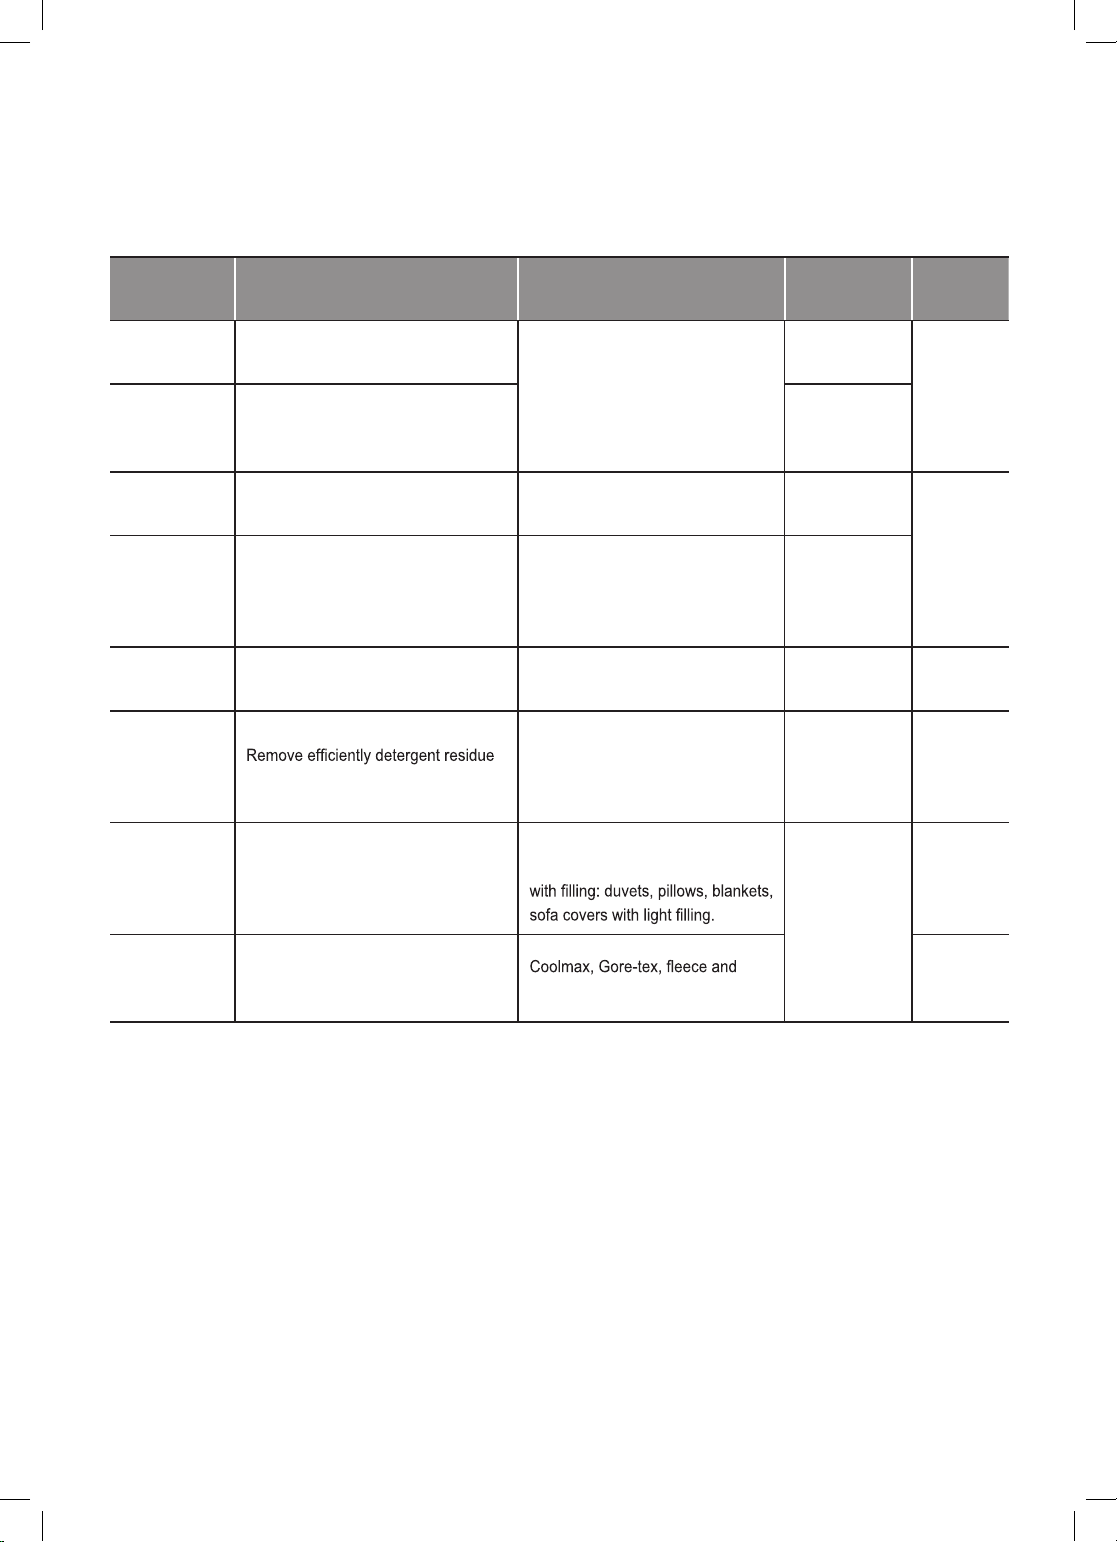
Programme Table
Washing Programme
EN
Programme Description Fabric Type Proper Temp.
Cotton
(Koch-/
Buntwäsche)
Cotton Large
(Baumwolle+)
Easy Care Suitable for casual shirts that do not
(Pflegeleicht)
Mix
(Mix)
Baby Care Remove solid and protein stain and
(Babybekleidung)
Skin Care
(Skin Care)
Duvet For large items such as bed cover,
(Bettdecken)
Sports Wear Suitable for sports wear such as
(Sportswear)
Provides better performance by
combining various drum motions.
Provides optimised washing
performance for large amount of
laundry with less energy consumption.
need ironing after washing.
Enables various fabrics to be washed
simultaneously.
provide better rinse performance
in clothes
pillows, sofa covers, etc.
jogging clothes and running wear. Sympatex.
Coloured fast garments (shirts,
nightdresses, pajamas, etc)
and normally soiled cotton load
(underwear).
Polyamide, acrylic, polyester
Various kind of fabrics except
special garments (silk/delicate,
sports wear, dark clothes, wool,
duvet/curtains).
Lightly soiled baby wear
Fabrics which will be in direct
contact with the skin, e.g.
underwear, nappies, towelling, bed
linen, pillow and mattress covers
Cotton bedding except special
garments (delicates, wool, silk, etc.)
40 °C
(Cold to 95 °C)
60 °C
(Cold to 60 °C)
40 °C
(Cold to 60 °C)
40 °C
(Cold to 40 °C)
60 °C
(60 °C to 95 °C)
40 °C
(Cold to 60 °C)
40 °C
(Cold to 40 °C)
Maximum
Load
Rating
3.0 kg
6.0 kg
Rating
1 single
size
2.0 kg
22
Page 24
EN
Programme Description Fabric Type Proper Temp.
Delicate
(Feinwäsche)
Wool
(Wolle)
Quick 30
(Kurz 30)
Intensive 60
(Intensiv 60)
Rinse+Spin
(Spülen +
Schleudern)
For delicate clothes such as
underwear, blouse, etc.
Enables to wash wool fabrics.
(Please use detergent for
machine washable woolens).
Provides fast washing time for small
loads and lightly soiled clothes.
Within 60mins provide better washing
Use for laundry that need rinsing only
or to add rinse-added fabric softener
to laundry.
Delicate, easily damaged laundry.
Machine washable woolens with
pure new wool only.
Colored laundry which is lightly
soiled fast.
Cotton and mix fabrics.
(Special programme within 60 mins
for normally soiled laundry).
Normal fabrics which can be
washable.
20 °C
(Cold to 40 °C)
40 °C
(Cold to 40 °C)
20 °C
(Cold to 40 °C)
60 °C
(Cold to 60 °C)
- Rating
Maximum
Load
2.0 kg
4.0 kg
•Water Temperature: Select the appropriate water temperature for chosen wash cycle. Always follow garment
manufacturer’s care label or instructions when washing.
Set program at "
•
"
Baumwolle+
- Standard 60°C cotton program :
- Standard 60°C cotton program :
- Standard 40°C cotton program :
Baumwolle+
40°C + Intensiv (Half Load)", "
Baumwolle+
60°C + Intensiv (Half Load)",
60°C + Intensiv (Full Load)" option for test in conformity with EN60456 and Regulation 1015/2010.
Baumwolle+
Baumwolle+
Baumwolle+
60 °C
+
+
+
+ Intensiv (Full Load)
60 °C
+ Intensiv (Half Load)
40 °C
+ Intensiv (Half Load)
•The test results depend on water pressure, water hardness, water inlet temperature, room temperature, type and
options.
NOTE
•Neutral detergent is recommended.
23
Page 25

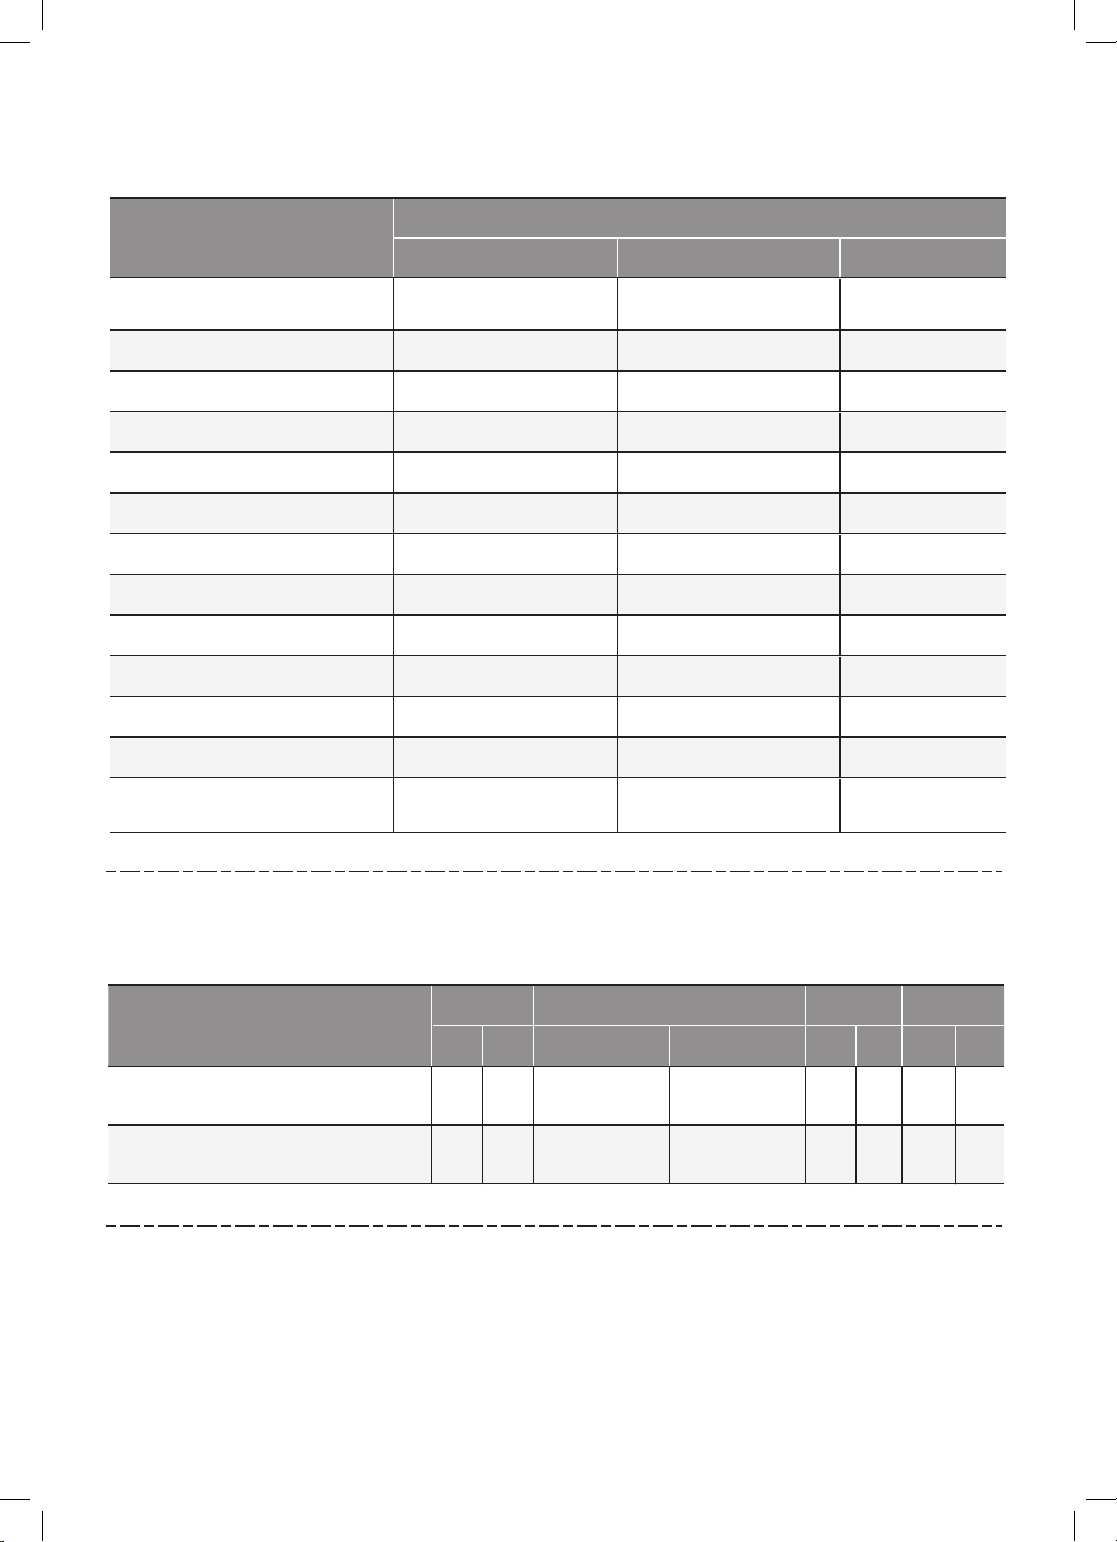
Extra Options
Programme Time Delay Medic Rinse Pre Wash Intensive Crease Care
(Startzeitvorwahl)
Cotton
(Koch-/
Buntwäsche)
Cotton Large
(Baumwolle+)
Easy Care
(Pflegeleicht)
Mix
(Mix)
Baby Care
(Babybekleidung)
Skin Care
(Skin Care)
Duvet
(Bettdecken)
Sports Wear
(Sportswear)
Delicate
(Feinwäsche)
Wool
(Wolle)
Quick 30
(Kurz 30)
Intensive 60
(Intensiv 60)
Rinse+Spin
(Spülen +
Schleudern)
•*: This option is automatically included in the cycle and can not be deleted.
•**: This option is automatically included in the cycle and can be deleted.
● ● ● ● ●
● ● ● ● ●
● ● ● ● ●
● ● ● ● ●
● ●** ●** ● ●
● ● ● ● ●
● ● ●
● ● ●
● ● ●
● ●
● ● ●
● ●* ●
● ●
(Intensiv Spülen)
(Intensiv)(Vorwäsche)
(Knitterschutz)
EN
24
Page 26
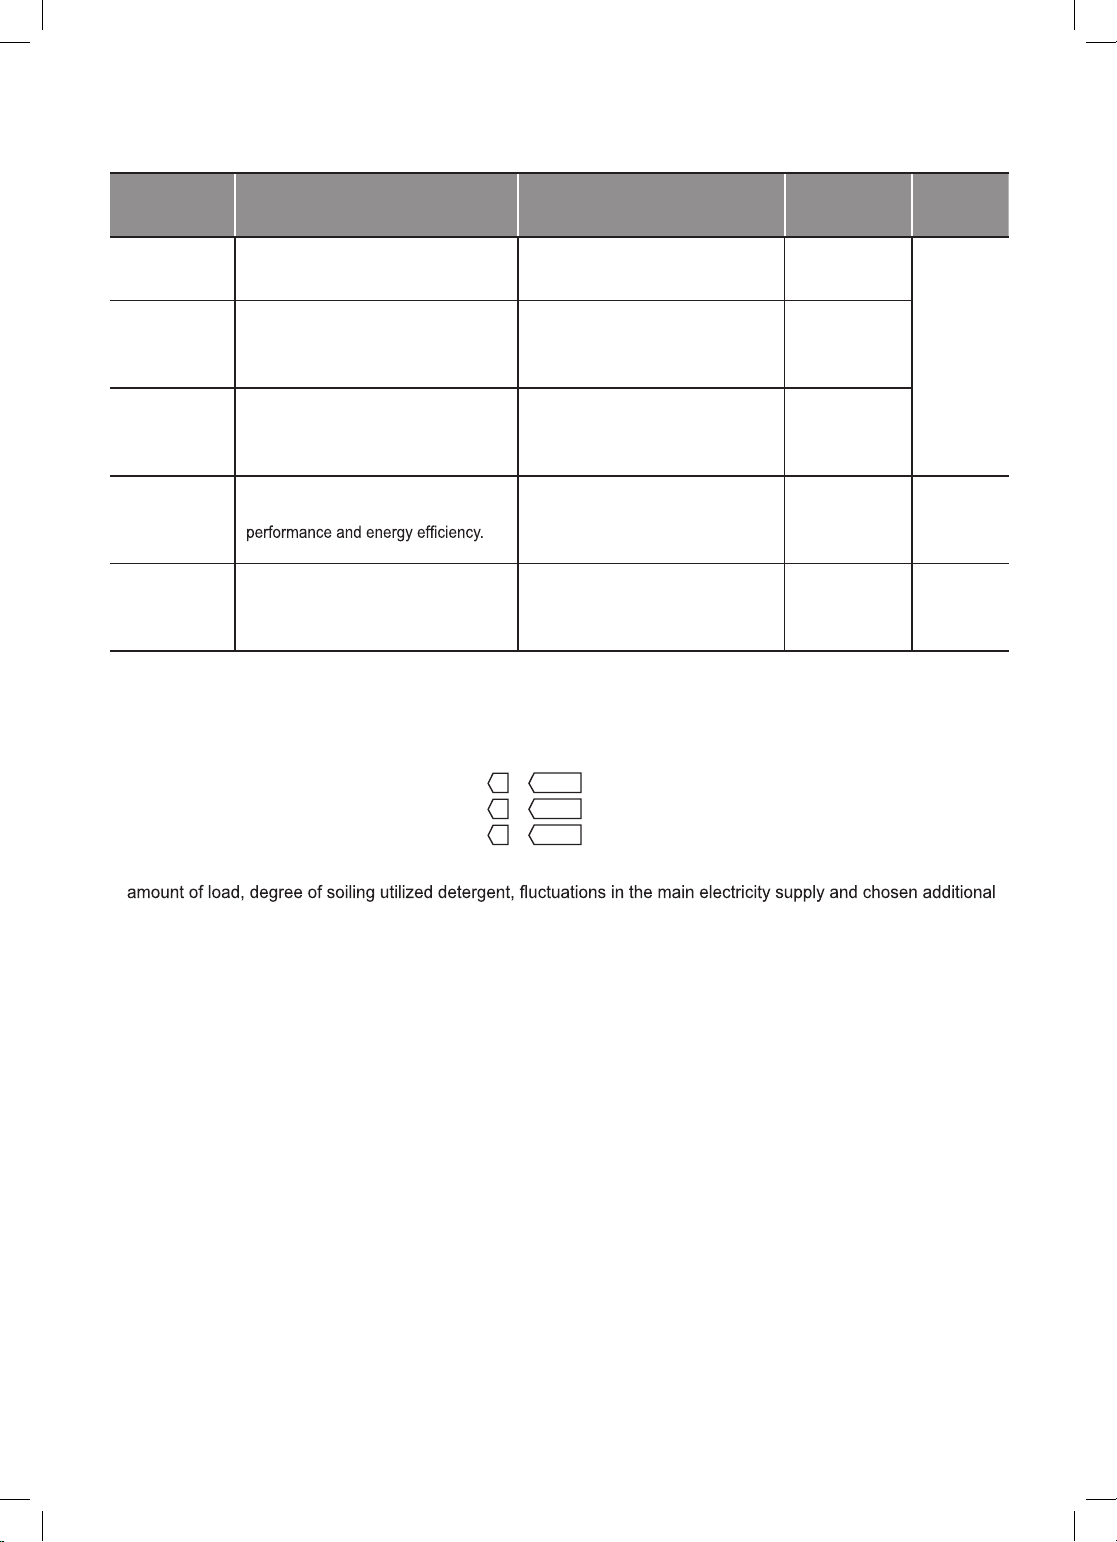
Operating Data
EN
Programme
Cotton
(Koch-/
Buntwäsche)
Cotton Large
(Baumwolle+)
Easy Care
(Pflegeleicht)
Mix
(Mix)
Baby Care
(Babybekleidung)
Skin Care
(Skin Care)
Duvet
(Bettdecken)
Sports Wear
(Sportswear)
Delicate
(Feinwäsche)
Wool
(Wolle)
Quick 30
(Kurz 30)
Intensive 60
(Intensiv 60)
Rinse+Spin
(Spülen +
Schleudern)
Max RPM
1400 1200
1400 1200
1400 1200
800 800
1400 1200
800 800
1400 1200
800 800
800 800
800 800
800 800
1400 1200
1400 1200
1400 1200
1000
1000
1000
800
1000
800
1000
800
800
800
800
1000
1000
1000
NOTE
Information of main washing programmes at half load.
•
Time in
Program
Cotton (40 °C)
(Koch-/ Buntwäsche
Cotton Large (60 °C)
(Baumwolle+
60 °C)
40 °C)
minutes
8 kg
7 kg
96 40 % 53 % 65
96
259 44 % 53 % 43
239
Remaining moisture content
1400 rpm
1200/1000 rpm
Water in
Energy in
Liter
8 kg 8 kg
7 kg 7 kg
0,55
65
0,52
41
kWh
0,55
0,48
25
Page 27

EN
Option Programme
Time Delay (
You can set a time delay so that the washing machine
interval.
Press the Power button.
1
Select a washing programme.
2
Press the
3
button to set time required.
Press the Start/Pause button.
4
NOTE
•The delay time is the time to the end of the
programme, not the start. The actual running time may
vary due to water temperature, wash load and other
factors.
•To cancel the Time Delay function, the power button
should be pressed.
•Avoid using liquid detergent for this option.
Startzeitvorwahl)
Startzeitvorwahl
Medic Rinse (
For best results or for cleaner rinsing. This allows the
Press the Power button.
1
Select a washing programme.
2
Press the
3
required.
Press the Start/Pause button.
4
Pre Wash (
If the laundry is heavily soiled, the Pre Wash programme
is recommended.
Press the Power button.
1
Select a washing programme.
2
Press the
3
Press the Start/Pause button.
4
Intensiv Spülen)
Intensiv Spülen
Vorwäsche)
Vorwäsche
button.
button and set time
Crease Care (
If you want to prevent creasing, the Crease Care
programme is recommended.
Press the Power button.
1
Select a washing programme.
2
Press the
3
Press the Start/Pause button.
4
26
Knitterschutz)
Knitterschutz
button.
Intensive (
If the laundry is normal and heavily soiled, Intensiv
option is effective.
Press the Power button.
1
Select a cycle.
2
Press the Intensiv button.
3
Press the Start/Pause button.
4
Intensiv)
Page 28

EN
Temp.(Temp.)
The Temp. button selects the wash and rinse
temperature combination for the selected programme.
Press this button until the desired setting is lit. All rinses
use cold tap water.
•Select the water temperature suitable for the type of
load you are washing. Follow the garment fabric care
labels for best results.
Rinse
Rinse Hold (
The programme is paused until start button is pressed
Spin (
•Spin speed level can be selected by pressing the
Schleudern
•Spin Only
Press the Power button.
1
Spülen)
Schleudern)
button repeatedly.
Child Lock
Use this option to disable the controls. This feature can
prevent children from changing cycles or operating the
appliance
(Kindersicherung)
( )
Locking the Control Panel
Press and hold the
1
Vorwäsche
A beeper will sound, and will appear on the
2
display.
When the Child Lock is set, all buttons are locked
except the
Power button.
Intensiv Spülen
button for three seconds.
and
NOTE
•Turning off the power will not reset the child lock
function. You must deactivate child lock before you
can access any other functions.
Unlocking the Control Panel
Press and hold the
button for three seconds.
•A beeper will sound and the remaining time for the
current programme will reappear on the display.
Intensiv Spülen
and
Vorwäsche
Press the
2
Press the Start/Pause button.
3
Schleudern
button to select RPM.
NOTE
•When you select No Spin, it will still rotate for a short
time to drain quickly.
Beep On / Off
Press the Power button.
1
Press the Start/Pause button.
2
Press and hold the
3
Knitterschutz
seconds to set the Beep on/off function.
NOTE
•Once the Beep on/off function is set, the setting is
memorized even after the power is turned off.
•If you want to turn the Beeper off, simply repeat this
process.
Startzeitvorwahl
button simultaneously for 3
and
27
Page 29
SMART FUNCTION
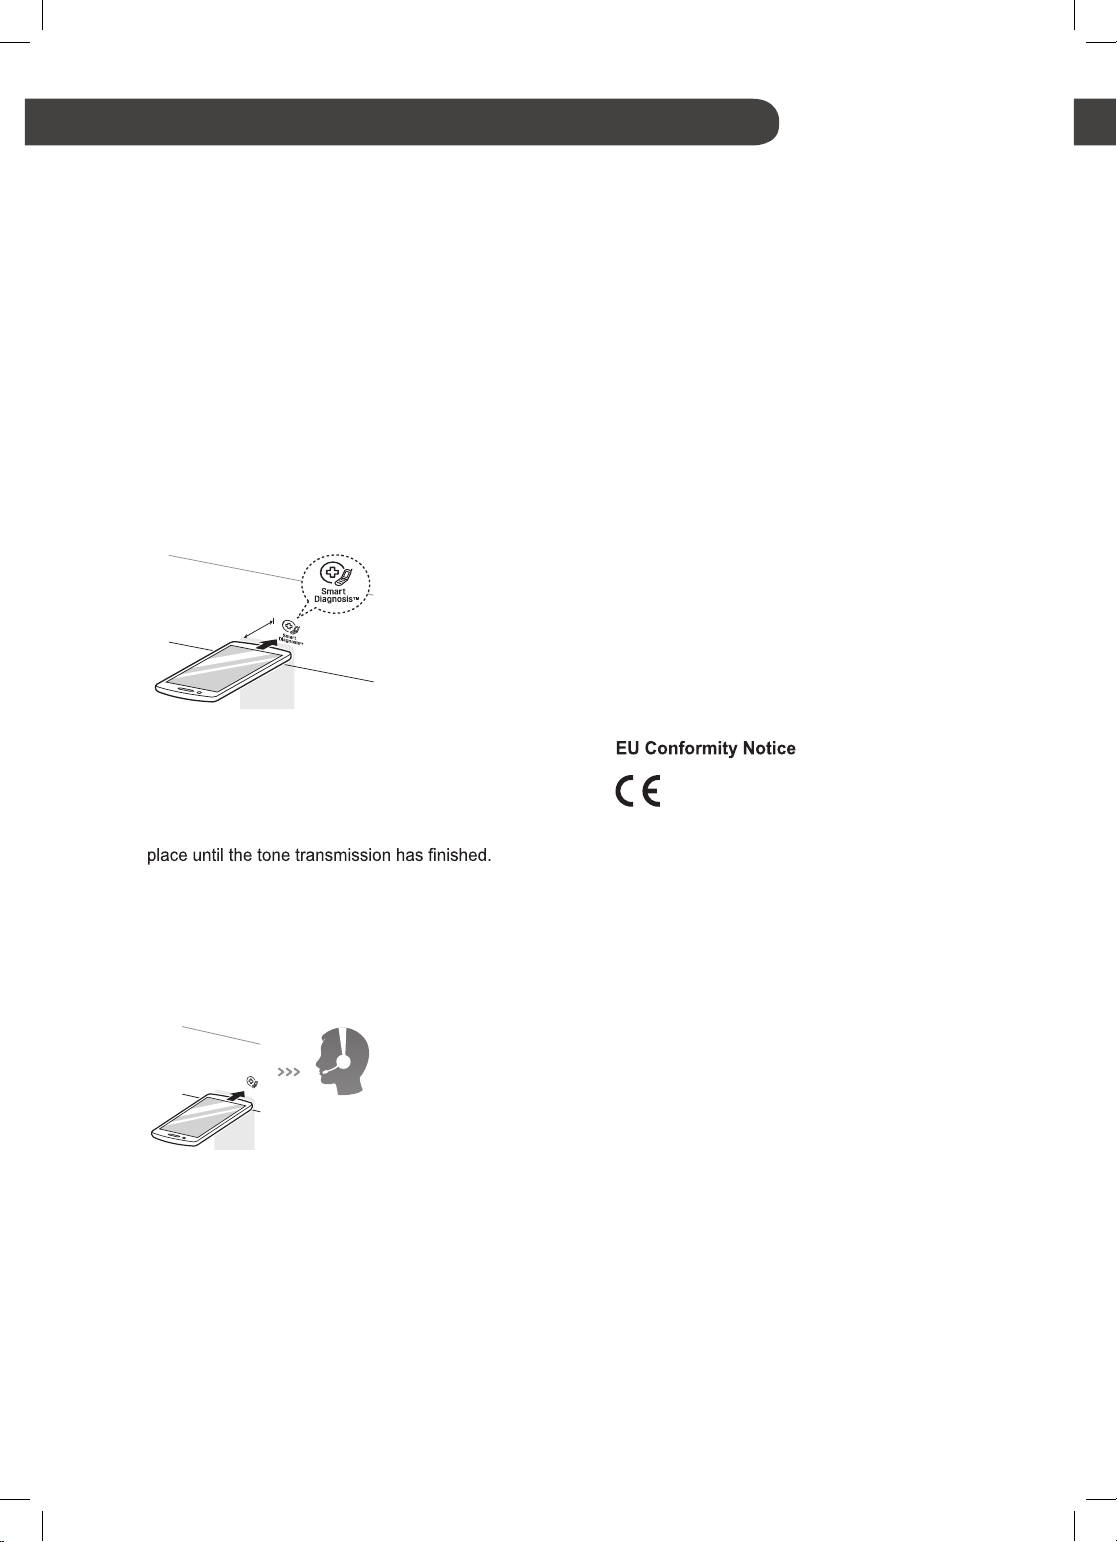
Using the Smart Diagnosis™
Function
Use this function if you need an accurate diagnosis
by an LG Electronics service centre when the product
malfunctions or fails. Use this function only to contact
the service representative, not during normal operation.
1
Press the Power button to turn on the washing
machine. Do not press any other buttons or turn
the programme selector knob.
2
When instructed to do so by the call centre, place
the mouthpiece of your phone close to the Power
button.
Max.
10 mm
3
Press and hold the Temp. button for three seconds,
while holding the phone mouthpiece to the icon or
Power button.
4
The display is turned off and keep the phone in
•For best results, do not move the phone while
the tones are being transmitted.
•If the call centre agent is not able to get an
accurate recording of the data, you may be
asked to try again.
LG Electronics
service centre
5
Once the tones have stopped, resume your
conversation with the call centre agent, who will
then be able to assist you using the information
transmitted for analysis.
NOTE
•The Smart Diagnosis™ function depends on the local
call quality.
•The communication performance will improve and you
can receive better service if you use the home phone.
•If the Smart Diagnosis™ data transfer is poor due to
poor call quality, you may not receive the best Smart
Diagnosis™ service.
Hereby, LG Electronics European Shared Service
Center B.V., declares that this Washing machine is
compliant with the essential requirements and other
relevant provisions of Directive 1999/5/EC. The complete
Declaration of Conformity may be requested through the
following postal address:
LG Electronics European Shar ed Service Center B.V.
Krijgsman 1
1186 DM Amstelveen
T he Netherlands
or can be requested at our dedicated DoC website:
http ://www.lg.com/global/support/cedoc/cedoc#
EN
28
Page 30
MAINTENANCE
EN
WARNING
Unplug the washing machine before cleaning to avoid
•
the risk of electric shock. Failure to follow this warning
may result in serious injury, re, electric shock, or
death.
Never use harsh chemicals, abrasive cleaners, or
•
solvents to clean the washing machine. They may
damage the nish.
Cleaning Your Washing Machine
Care After Wash
After the cycle is nished, wipe the door and the inside
•
of the door seal to remove any moisture.
Leave the door open to dry the drum interior.
•
Wipe the body of the washing machine with a dry cloth
•
to remove any moisture.
Cleaning the Interior
Use a towel or soft cloth to wipe around the washing
•
machine door opening and door glass.
Always remove items from the washing machine as
•
soon as the cycle is complete. Leaving damp items
in the washing machine can cause wrinkling, colour
transfer, and odour.
Run the Tub Clean programme once a month (or more
•
often if needed) to remove detergent buildup and
other residue.
Cleaning the Water Inlet Filter
Turn off the supply taps to the machine if the washing
•
machine is to be left for any length of time (e.g.
holiday), especially if there is no oor drain (gully) in
the immediate vicinity.
• icon will be displayed on the control panel when
water is not entering the detergent drawer.
If water is very hard or contains traces of lime deposit,
•
the water inlet lter may become clogged. It is
therefore a good idea to clean it occasionally.
Cleaning the Exterior
Proper care of your washing machine can extend its life.
Door:
Wash with a damp cloth on the outside and inside and
•
then dry with a soft cloth.
Exterior:
Immediately wipe off any spills.
•
Wipe with a damp cloth.
•
Do not press the surface or the display with sharp
•
objects.
Turn off the water tap and unscrew the water
1
supply hose.
Clean the lter using a hard bristle brush.
2
29
Page 31

EN
Cleaning the Drain Pump Filter
The drain lter collects threads and small objects left
•
in the laundry. Check regularly that the lter is clean to
ensure smooth running of your washing machine.
Allow the water to cool down before cleaning the drain
•
pump, carrying out emergency emptying, or opening
the door in an emergency.
Open the cover cap and pull out the hose.
1
Unplug the drain plug and open the lter by turning
2
it to the left.
2
Container to
collect the
drained water.
After cleaning, turn the pump lter and insert the
4
drain plug.
Close the cover cap.
5
CAUTION
First drain using the drain hose and then open the
•
pump lter to remove any threads or objects.
Be careful when draining, as the water may be hot.
•
1
Remove any extraneous matter from the pump
3
lter.
30
Page 32

EN
Cleaning the Dispenser Drawer
Detergent and fabric softener may build up in the
dispenser drawer. Remove the drawer and inserts and
check for buildup once or twice a month.
Remove the detergent dispenser drawer by pulling
1
it straight out until it stops.
Press down hard on the disengage button and
•
remove the drawer.
Remove the inserts from the drawer.
2
Rinse the inserts and the drawer with warm
•
water to remove buildup from laundry products.
Use only water to clean the dispenser drawer.
Dry the inserts and drawer with a soft cloth or
towel.
To clean the drawer opening, use a cloth or small,
3
non-metal brush to clean the recess.
Remove all residue from the upper and lower
•
parts of the recess.
Wipe any moisture off the recess with a soft cloth
4
or towel.
Tub Clean (Optional)
Tub Clean is a special programme to clean the inside of
the washing machine.
A higher water level is used in this programme at higher
spin speed. Perform this programme regularly.
Remove any clothing or items from the washing
1
machine and close the door.
Open the dispenser drawer and add anti-limescale
2
(e.g. Calgon) to the main wash compartment.
For tablets put into the drum.
•
Close the dispenser drawer slowly.
3
Power on and then press and hold Intensive and
4
Crease Care button for 3 seconds. Then
be displayed on the display.
Press the Start/Pause button to start.
5
After the programme is complete, leave the door
6
open to allow the washing machine door opening,
exible gasket and door glass to dry.
CAUTION
If there is a child, be careful not to leave the door open
•
for too long.
will
Return the inserts to the proper compartments and
5
ret the drawer.
NOTE
Do not add any detergent to the detergent
•
compartments. Excessive suds may generate and
leak from the washing machine.
31
Page 33

Caution on Freezing During
Winter
When frozen, the product does not operate normally.
•
Make sure to install the product where it will not freeze
during winter.
In case the product must be installed outside on a
•
porch or in other outdoor conditions, make sure to
check the following.
How to Keep the Product from Freezing
After washing, remove water remaining inside the
•
pump completely with the opening hose plug used for
removal of residual water. When the water is removed
completely, close the hose plug used for removal of
residual water and cover cap.
EN
After closing the tap, disconnect the cold supply hose
•
from the tap, and remove water while keeping the
hose facing downwards.
Supply
hose
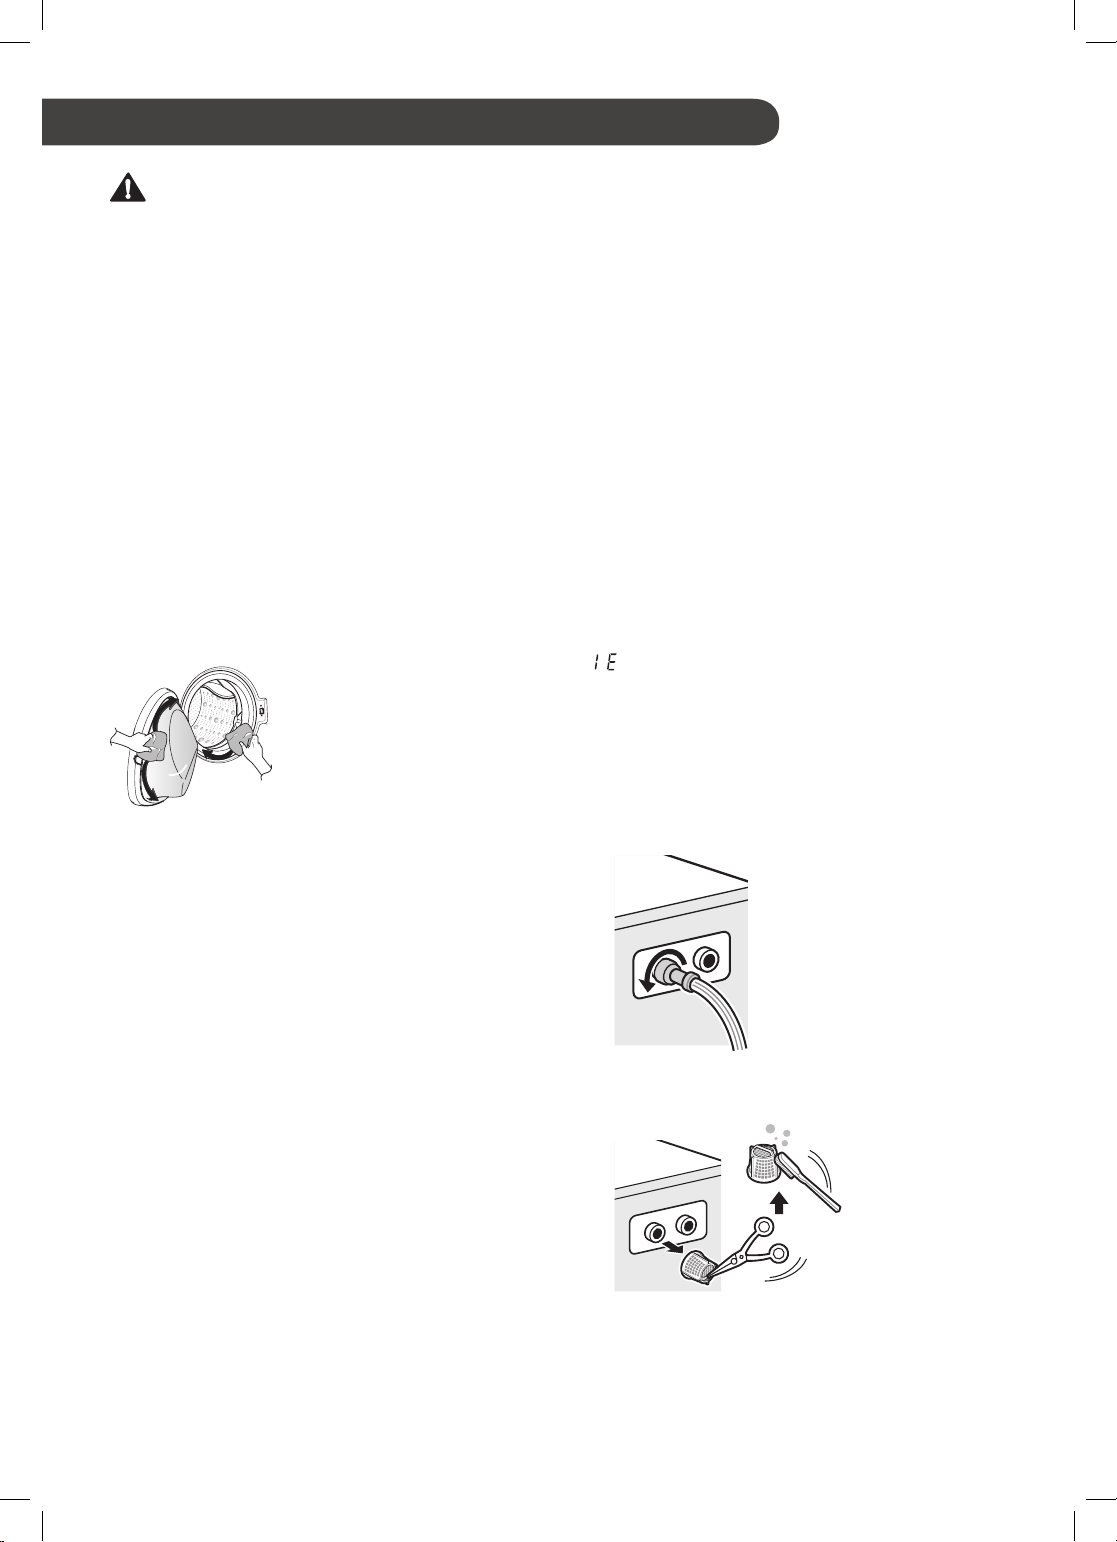
Check for Freezing
If water does not drain when opening the hose plug
•
used for removal of residual water, check the drainage
unit.
Drain plug
Drain plug
Hang down drain hose to pull out water inside the
•
hose completely.
Drain hose
Cover cap
CAUTION
When the drain hose is installed in a curved shape,
•
the inner hose may freeze.
Cover cap
Turn the power on, choose a washing programme,
•
and press the Start/Pause button.
Detergent drawer
When
•
product is in operation, check water supply unit and
drainage unit (Some models do not have an alarm
function that indicates freezing).
is shown in display window while the
Drain hose
NOTE
Check that water is coming into the detergent drawer
•
while rinsing, and water is draining through the drain
hose while spinning.
32
Page 34

How to Handle Freezing
Make sure to empty the drum, pour warm water of
•
50–60 °C up to the rubber part inside the drum, close
the door, and wait for 1–2 hours.
When water is removed completely from the drum,
•
close the hose plug used for removal of residual
water, choose a washing programme, and press the
Start/Pause button.
EN
50‒60 °C
CAUTION
When the drain hose is installed in a curved shape,
•
the inner hose may freeze.
Open the cover cap and hose plug used for removal
•
of residual water to extract water completely.
Drain plug
Cover cap
NOTE
If water does not drain, this means the ice is not
•
melted completely. Wait more.
Detergent drawer
Drain hose
NOTE
Check that water is coming into the detergent drawer
•
while rinsing, and water is draining through the drain
hose while spinning.
When water supply problems occur, take the following
•
measures.
– Turn off the tap, and thaw out the tap and both
connection areas of supply hose of the product
using a hot water cloth.
– Take out supply hose and immerse in warm water
below 50–60 °C.
Supply
hose
50‒60 °C
33
Page 35

TROUBLESHOOTING
Your washing machine is equipped with an automatic error-monitoring system to detect and diagnose problems at
•
an early stage. If your washing machine does not function properly or does not function at all, check the following
before you call for service:
EN
Diagnosing Problems
Symptoms Reason Solution
Check all pockets to make sure that they
•
are empty. Items such as clips, matches,
Rattling and clanking
noise
Thumping sound
Vibrating noise
Foreign objects such as coins
or safety pins may be in drum or
pump.
Heavy wash loads may produce a
thumping sound. This is usually
normal.
Have all the transit bolts and tub
support been removed?
Are all the feet resting rmly on
the ground?
pens, coins, and keys can damage both
your washer and your clothes.
Close zippers, hooks, and drawstrings
•
to prevent these items from snagging or
tangling on other clothes.
If sound continues, washing machine
•
is probably out of balance. Stop and
redistribute wash load.
If not removed during installation, refer
•
to Installation guide for removing transit
bolts.
Check that the appliance is perfectly level
•
(Use a spirit level).
Water leaks
Oversudsing
Supply hoses or drain hose are
loose at tap or washing machine.
House drain pipes are clogged.
Too much detergent or unsuitable
detergent may cause excessive
foaming which may result in
water leaks.
Check and tighten hose connections.
•
Unclog drain pipe. Contact plumber if
•
necessary.
Make sure that the suggested amount of
•
detergent is used per the manufacturer's
recommendations.
34
Page 36

Symptoms Reason Solution
EN
Water does not enter
washing machine or it
enters slowly
Water in the washing
machine does not drain
or drains slowly
Washing machine does
not start
Washing machine will
not spin
Water supply is not adequate in
that location.
Water supply tap is not
completely open.
Water supply hose(s) are kinked.
The lter of the supply hose(s)
clogged.
Drain hose is kinked or clogged.
The drain lter is clogged.
Electrical power cord may not be
plugged in or connection may be
loose.
House fuse blown, circuit breaker
tripped,or a power outage has
occurred.
Water supply tap is not turned on.
Check that the door is rmly shut.
Check another tap in the house.
•
Fully open tap.
•
Straighten hose.
•
Check the lter of the supply hose.
•
Clean and straighten the drain hose.
•
Clean the drain lter.
•
Make sure plug ts tightly in wall outlet.
•
Reset circuit breaker or replace fuse. Do
•
not increase fuse capacity. If problem is
a circuit overload, have it corrected by a
qualied electrician.
Turn on water supply tap.
•
Close the door and press the Start/Pause
•
button. After pressing the Start/Pause
button, it may take a few moments before
the washing machine begins to spin. The
door must be locked before spin can be
achieved. Add 1 or 2 similar items to help
balance the load. Rearrange load to allow
proper spinning.
35
Page 37

Symptoms Reason Solution
EN
Once washing machine has
Door does not open
Wash cycle time
delayed
Fabric softener
overow
Softeners dispensed
too early
Dry problem Check water supply tap.
started, the door cannot be
opened for safety reasons.
If an imbalance is detected or if
the suds removing programme is
on, the wash time will increase.
Too much softener may cause an
overow.
Too much softener may cause an
premature dispensing.
Check if the ‘Door Lock’ icon is
•
illuminated. You can safely open the door
after the ‘Door Lock’ icon turns off.
This is normal. The time remaining shown
•
in the display is only an estimate. Actual
time may vary.
Follow softener guidelines to ensure
•
appropriate amount is used. Do not
exceed the maximum ll line.
Follow the guidelines provided by the
•
detergent manufacturer.
Close the dispenser drawer slowly. Do not
•
open the drawer during the wash cycle.
Do not overload. Check that the washing
•
machine is draining properly to extract
adequate water from the load. Clothes
load is too small to tumble properly. Add a
few towels.
Turn off water supply tap.
•
36
Page 38

Error Messages
Symptoms Reason Solution
EN
Water supply is not adequate in
area.
Water supply taps are not
completely open.
Water supply hose(s) are kinked.
are clogged.
If water leakage occurred in Aqua
stop supply hose indicator
will become red.
•May vary depending on the model.
Load is too small.
•Check another tap in the house.
•Fully open tap.
•Straighten hose(s).
•
•Use the new Aqua stop supply hose.
•Add 1 or 2 similar items to help balance
the load.
Load is out of balance.
The appliance has an imbalance
detection and correction system.
If individual heavy articles are
loaded (e.g. bath mat, bath
robe, etc.) this system may stop
spinning or even interrupt the
spin cycle altogether.
If the laundry is still too wet at
the end of the cycle, add smaller
articles of laundry to balance the
load and repeat the spin cycle.
•Add 1 or 2 similar items to help balance
the load.
•Rearrange load to allow proper spinning.
•Rearrange load to allow proper spinning.
37
Page 39

Symptoms Reason Solution
EN
Drain hose is kinked or clogged.
The drain lter is clogged.
Ensure door is not open.
Control error.
Water overlls due to the faulty
water valve.
Malfunction of water level sensor.
Over load in motor.
Clean and straighten the drain hose.
•
Clean the drain lter.
•
Close the door completely.
•
,
If
, is not released, call for
service.
Unplug the power plug and call for
•
service.
Close the water tap.
•
Unplug the power plug.
•
Call for service.
•
Close the water tap.
•
Unplug the power plug.
•
Call for service.
•
Allow the washing machine to stand for
•
30 minutes to allow the motor to cool,
then restart the cycle.
Water leaks.
Does not dry
Call for service.
•
Call for service.
•
38
Page 40

WARRANTY
This limited warranty does not cover:
Service trips to deliver, pick up, or install or repair the product; instruction to the customer on operation of the
•
product; repair or replacement of fuses or correction of wiring or plumbing, or correction of unauthorized repairs/
installation.
Failure of the product to perform during power failures and interruptions or inadequate electrical service.
•
Damage caused by leaky or broken water pipes, frozen water pipes, restricted drain lines, inadequate or interrupted
•
water supply or inadequate supply of air.
Damage resulting from operating the Product in a corrosive atmosphere or contrary to the instructions outlined in the
•
Product’s owner’s manual.
Damage to the Product caused by accidents, pests and vermin, lightning, wind, re, oods, or acts of God.
•
Damage or failure caused by unauthorized modication or alteration, or if it is used for other than the intended
•
purpose, or any water leakage where the product was not properly installed.
Damage or failure caused by incorrect electrical current, voltage, or plumbing codes, commercial or industrial use,
•
or use of accessories, components, or consumable cleaning products that are not approved by LG.
Damage caused by transportation and handling, including scratches, dents, chips, and/or other damage to the nish
•
of your product, unless such damage results from defects in materials or workmanship.
Damage or missing items to any display, open box, discounted, or refurbished Product.
•
Products with original serial numbers that have been removed, altered, or cannot be readily determined. Model and
•
Serial numbers, along with original retail sales receipt, are required for warranty validation.
Increases in utility costs and additional utility expenses.
•
Repairs when your Product is used in other than normal and usual household use or contrary to the instructions
•
outlined in the Product’s owner’s manual.
Costs associated with removal of your Product from your home for repairs.
•
The removal and reinstallation of the Product if it is installed in an inaccessible location or is not installed in
•
accordance with published installation instructions, including LG’s owner’s and installation manuals.
Damage resulting from misuse, abuse, improper installation, repair, or maintenance. Improper repair includes use of
•
parts not approved or specied by LG.
EN
39
Page 41

EN
Strange vibration or noise
caused by not removing transit
bolts or tub support.
Leakage caused by dirt (hair,
lint) on gasket and door glass.
Not draining caused by clogging
of pump lter.
Water is not coming because
water inlet valve lters are
clogged or water supply hoses
are kinked.
Tub
support
Carton
base
Transit
bolt
Inlet lter
Remove the transit bolts &
tub support.
Clean the gasket & door
glass.
Clean the pump lter.
Clean the inlet valve
lter or reinstall the water
supply hoses.
Water is not coming because too
much detergent use.
Laundry is hot or warm after
nished washing because the
supply hoses are installed in
reverse.
Water is not supplied because
the water tap is not turned on.
Cold
water
supply
Dispenser
Water tap
Cold
Hot
Hot
water
supply
Clean the detergent
disperser drawer.
Reinstall the supply hoses.
Turn on the water tap.
40
Page 42

Leakage caused by improper
installation of drain hose or
clogged drain hose.
Leakage caused by improper
installation of water supply hose
or using other brand supply
hoses.
Elbow
bracket
Tie strap
EN
Reinstall the drain hose.
Reinstall the supply hose.
No power problem caused by
loose connection of power cord
or electrical outlet problem.
Service trips to deliver, pick
up, install the product or for
instruction on product use. The
removal and reinstallation of the
Product.
If all screws are not installed
properly, it may cause excessive
vibration (Pedestal model only).
Water hammering (banging)
noise when washing machine is
lling with water.
High
pressure
water
Hit!!
Level
Loud noise
1°
Natural
water ow
Sudden
stopping
water ow
Reconnect the power cord
or change the electrical
outlet.
The warranty covers
manufacturing defects
only. Service resulting from
improper Installation is not
covered.
Install 4 screws at each
corner (Total 16EA).
Adjust the water pressure
by turning down the water
valve or water tap in the
home.
41
Page 43

Supplier’s trade mark LG
Rated capacity 8/7 kg
10
10500/9300
B
1200
53
8/7
A+++
No
137/122
0.70/0.60
0.52/0.48
0.42/0.39
0.45
312/292
259/239
254/234
A+++
Awarded an “EU Ecolabel award” under Regulation (EC) No 66/2010 No
Weighted annual energy consumption (AEC) in kWh per year based on 220 standard washing cycles for cotton
programmemes at 60 °C and 40 °C at full and partial load, and the consumption of the low-power modes. Actual
energy consumption will depend on how the appliance is used.
137/122 kWh/year
The energy consumption
the standard 60 °C cotton programme at full load 0.70/0.60 kWh
the standard 60 °C cotton programme at partial load 0.52/0.48 kWh
the standard 40 °C cotton programme at partial load. 0.42/0.39 kWh
Weighted power consumption of the off-mode and of the left-on mode. 0.45 W
Weighted annual water consumption (AWC) in litres per year based on 220 standard washing cycles for cotton
programmemes at 60 °C and 40 °C at full and partial load. Actual water consumption will depend on how the
appliance is used.
10500/9300
litres/year
A
Maximum spin speed attained for the standard 60 °C cotton programme at full load or the standard 40 °C cotton
programme at partial load, whichever is the lower, and remaining moisture content attained for the standard
60 °C cotton programme at full load or the standard 40 °C cotton programme at partial load, whichever is the
greater.
1400 rpm
44 %
Standard washing programmemes to which the information in the l
programmemes are suitable to clean normally soiled cotton laund
programmemes in terms of combined energy and water consumption;
"Cotton Large 60 °C/40 °C + Intensiv"
The programme time
the standard 60 °C cotton programme at full load 312/292 min.
the standard 60 °C cotton programme at partial load 259/239 min.
the standard 40 °C cotton programme at partial load. 254/234 min.
The duration of the left-on mode (Tl) 10 min.
Airborne acoustical noise emissions expressed in dB(A) re 1 pW and rounded to the nearest integer during the
washing and spinning phases for the standard 60 °C cotton programme at full load 75
dB(A)
Free-Standing
OPERATING DATA
EN
10
10500/9300
B
1000
53
8/7
A+++
No
137/122
0.70/0.60
0.52/0.48
0.42/0.39
0.45
312/292
259/239
254/234
52
74
52
74
52
F H/1 4 G6/G7
T/Q D(N)(W)
(0~9)(H)
F H/1 2 G6/G7
T/Q D(N)(W)
(0~9)(H)
F H/1 0 G6/G7
T/Q D(N)(W)
(0~9)(H)
F14W7QDN1H
F14W8TDN0H
42
Page 44

Memo
Page 45

Memo
Page 46

BEDIENUNGSANLEITUNG
Waschmaschine
Bitte lesen Sie diese Anleitung vor der Montage aufmerksam durch. Auf
diese Weise wird die Montage erleichtert und der korrekte und sichere
Anschluss der Waschmaschine wird gewährleistet. Bewahren Sie diese
Anleitung zum schnellen Nachschlagen in der Nähe der Waschmaschine
auf.
F H/1 4 G6/G7 T/Q D(N)(W)(0~9)(H)
F H/1 2 G6/G7 T/Q D(N)(W)(0~9)(H)
F H/1 0 G6/G7 T/Q D(N)(W)(0~9)(H)
F14W7QDN1H, F14W8TDN0H
www.lg.com
Page 47

INHALT
Diese Bedienungsanleitung kann
Abbildungen oder Inhalte enthalten, die sich
von Ihrem Modell unterscheiden.
Änderungen an dieser Bedienungsanleitung
durch den Hersteller bleiben vorbehalten.
SICHERHEITSANWEISUNGEN ................................................ 3
Wichtige Sicherheitsanweisungen ...............................................................3
Entsorgung Ihrer Altgeräte ...........................................................................8
AUFSTELLEN- ...........................................................................9
Einzelteile ....................................................................................................9
Zubehör .......................................................................................................9
Spezifikationen ..........................................................................................10
Voraussetzungen für den Aufstellort .......................................................... 11
Auspacken und Entnehmen der Transportschrauben ............................... 12
Verwendung von Gleitschutzplatten (optional) .......................................... 13
Holzböden (Laminatböden) .......................................................................13
Ausrichten des Geräts ............................................................................... 14
Anschluss des Wasserzulaufschlauchs .....................................................14
Anschluss des Ablaufschlauchs ................................................................17
BETRIEB .................................................................................. 18
Verwendung der Waschmaschine .............................................................18
Sortieren der Wäsche ................................................................................19
Zugabe von Reinigungsmitteln .................................................................. 20
Bedienfeld ..................................................................................................22
Programmtabelle .......................................................................................23
Programmoptionen ....................................................................................27
INTELLIGENTE FUNKTIONEN ............................................... 29
Verwendung der Smart Diagnosis™ .........................................................29
WARTUNG ............................................................................... 30
Reinigung Ihrer Waschmaschine ...............................................................30
Reinigung des Filters am Wasserzulauf .................................................... 30
Reinigung des Filters der Ablaufpumpe .....................................................31
Reinigung der Waschmittelschublade .......................................................32
Trommelreinigung (optional) ......................................................................32
Achten Sie auf das Einfrieren im Winter ....................................................33
FEHLERBEHEBUNG ............................................................... 35
Diagnoseprobleme ....................................................................................35
Fehlermeldungen .......................................................................................38
GARANTIE ............................................................................... 40
BETRIEBSDATEN ................................................................... 43
Page 48

3
SICHERHEITSANWEISUNGEN
DE
Die folgenden Sicherheitsrichtlinien dienen dazu,
unvorhergesehene Risiken oder Beschädigungen durch unsicheren
oder nicht ordnungsgemäßen Betrieb des Geräts zu vermeiden.
Die Richtlinien sind unterteilt in die Hinweise 'WARNUNG' und
'ACHTUNG', wie nachfolgend beschrieben.
Dieses Symbol wird angezeigt, um auf Punkte
und Bedienvorgänge hinzuweisen, die ein Risiko
bergen können. Lesen Sie den mit diesem Symbol
gekennzeichneten Teil sorgfältig und befolgen Sie die
Anweisungen, um Risiken zu vermeiden.
WARNUNG
Damit wird angezeigt, dass die Nichtbeachtung der
Anweisung zu ernsthaften Verletzungen oder zum Tod
führen kann.
ACHTUNG
Damit wird angezeigt, dass die Nichtbeachtung der
Anweisungen zu leichten Verletzungen oder einer
Beschädigung des Geräts führen kann.
Wichtige Sicherheitsanweisungen
WARNUNG
Befolgen Sie grundlegende Vorsichtsmaßnahmen, um
Explosionen, Brandgefahren, Stromschläge, Verbrühungen
oder sonstige Personenschäden zu vermeiden. Dazu gehört
Folgendes:
Kinder im Haushalt
Dieses Haushaltsgerät ist nicht für die Verwendung durch
Personen (einschließlich Kindern) mit eingeschränkten körperlichen,
sensorischen oder geistigen Fähigkeiten oder mangelnder
Erfahrung oder Kenntnis geeignet, es sei denn, sie werden bei
der Nutzung des Geräts beaufsichtigt oder haben dafür eine
Einweisung von jemandem erhalten, der für ihre Sicherheit
verantwortlich ist. Kinder sollten beaufsichtigt werden, um
sicherzustellen, dass sie mit dem Haushaltsgerät nicht spielen.
Page 49

DE
Für die Verwendung in Europa:
Dieses Haushaltsgerät kann von Kindern ab 8 Jahren benutzt
werden sowie von Personen mit eingeschränkten körperlichen,
sensorischen oder geistigen Fähigkeiten oder mit mangelnder
Erfahrung und Kenntnis, wenn sie bei der Nutzung des Geräts
beaufsichtigt werden oder eine Einweisung zur sicheren Nutzung
des Geräts und den damit verbundenen Gefahren erhalten haben.
Kinder dürfen mit dem Haushaltsgerät nicht spielen. Die Reinigung
und Wartung seitens des Benutzers darf von Kindern nicht ohne
Beaufsichtigung vorgenommen werden.
Kinder unter 3 Jahren sollten von dem Gerät fern gehalten werden,
es sei denn, sie werden kontinuierlich beaufsichtigt.
Installation
•Versuchen Sie niemals, das Gerät einzuschalten, wenn es
beschädigt ist, eine Störung hat, es teilweise zerlegt ist oder
fehlende oder kaputte Teile aufweist, einschließlich einem
beschädigten Netzkabel oder Stecker.
•Das Gerät darf nur von zwei oder mehr Personen transportiert
werden, die das Gerät sicher halten.
•Installieren Sie das Gerät nicht an einer Stelle, an der Dampf
oder Staub entsteht. Installieren Sie das Gerät nicht in einem
Bereich unter freiem Himmel oder einem Bereich, an dem es
Witterungseinflüssen, wie direkter Sonneneinstrahlung, Wind,
Regen oder Temperaturen unterhalb des Gefrierpunktes,
ausgesetzt ist.
•Ziehen Sie den Ablaufschlauch fest an, damit sich dieser nicht
lösen kann.
•Wenn das Einspeisekabel für Strom beschädigt oder die Öffnung
für den Stecker locker ist, verwenden Sie das Stromkabel nicht und
nehmen Kontakt mit dem Kundendienst auf.
•Schließen Sie das Gerät nicht an eine Steckdosenleiste, ein
Verlängerungskabel oder einen Adapter an.
4
Page 50

DE
•Dieses Gerät darf nicht hinter einer verschließbaren Tür,
einer Schiebetür oder einer Tür, deren Scharnier sich auf der
entgegengesetzten Seite des Trockners befindet, so aufgestellt
werden, dass dadurch die Tür des Geräts nicht vollständig geöffnet
werden kann.
•Dieses Haushaltsgerät muss geerdet werden. Bei einer Störung
oder einem Ausfall wird durch die Erdung das Risiko eines
Stromschlags gesenkt, da dem elektrischen Strom der Weg des
geringsten Widerstands ermöglicht wird.
•Dieses Gerät ist mit einem Stromeinspeisungskabel ausgerüstet,
das über einen Geräte-Erdungsleiter und einen ErdungsNetzstecker verfügt. Der Netzstecker muss in einen geeigneten
Stecker gesteckt werden, der mit allen gemäß der lokalen
Vorschriften und Anordnungen vorgeschriebenen Ausrüstungen
versehen ist.
•Ein falscher Anschluss der Geräte-Erdungsleitung kann zu
einem Stromschlag führen. Falls Sie Zweifel haben, ob das
Haushaltsgerät ordnungsgemäß geerdet ist, lassen Sie es von
einem qualifizierten Elektriker oder Servicetechniker überprüfen.
•Modifizieren Sie den Stecker, der mit dem Haushaltsgerät
ausgeliefert wird, nicht. Falls er nicht in die Steckdose passt, lassen
Sie von einem qualifizierten Elektriker eine ordnungsgemäße
Steckdose installieren.
Betrieb
•Versuchen Sie nicht, die Verkleidung abzubauen oder das Gerät
zu demontieren. Bedienen Sie das Bedienfeld nicht mit scharfen
Gegenständen.
•Reparieren oder ersetzen Sie keinen Teil des Geräts. Alle
Reparatur- und Wartungsarbeiten müssen von qualifiziertem
Fachpersonal durchgeführt werden, sofern nicht ausdrücklich in
dieser Bedienungsanleitung anders angegeben. Verwenden Sie
nur autorisierte Originalersatzteile.
5
Page 51

DE
•Keine lebenden Tiere, wie etwa Haustiere, in das Gerät legen.
•Halten Sie den Bereich unter und neben Ihrem Haushaltsgerät
frei von brennbaren Materialien, wie etwa Mull, Papier, Lappen,
Chemikalien usw.
•Die Tür des Haushaltsgeräts nicht offen lassen. Kinder könnten
sich an die Tür hängen oder in das Haushaltsgerät klettern, was zu
Beschädigungen oder Verletzungen führen kann.
•Verwenden Sie neue Schläuche oder die Schläuche, die
zusammen mit dem Gerät geliefert wurden. Die Wiederverwendung
alter Schläuche kann zum Austritt von Wasser und zu
nachfolgenden Sachschäden führen.
•Niemals in das Haushaltsgerät greifen während es in Betrieb ist.
Warten Sie, bis die Trommel vollständig zum Stillstand gekommen
ist.
•Keine Gegenstände beladen, waschen oder trocknen, die mit
brennbaren oder explosiven Stoffen gereinigt, gewaschen,
eingeweicht oder befleckt wurden (wie etwa Wachs, Öl, Farbe,
Benzin, Ölentferner, Lösungsmittel für die chemische Reinigung,
Kerosin, Pflanzenöl, Speiseöl usw.). Eine falsche Verwendung kann
einen Brand oder eine Explosion verursachen.
•Im Falle von Überschwemmungen, ziehen Sie den Stromstecker
heraus und nehmen Sie Kontakt mit dem Kundendienst der LG
Electronics auf.
•Die Tür des Geräts nicht zu sehr nach unten drücken, wenn diese
geöffnet ist.
•Berühren Sie nicht die Tür während eines Programms mit hohen
Temperaturen.
•Verwenden Sie in der Nähe des Geräts keine entzündlichen Gase
oder brennbaren Stoffe (Benzol, Benzin, Verdünner, Rohbenzin,
Alkohol usw.).
6
Page 52

DE
•Falls der Ablaufschlauch oder der Zulaufschlauch im Winter
eingefroren sein sollte, das Gerät erst verwenden, wenn dieser
wieder aufgetaut ist.
•Sämtliche Waschmittel, Weichspüler und Bleichmittel außerhalb
der Reichweite von Kindern aufbewahren.
•Berühren Sie nie die Stecker oder die Gerätesteuerung mit
feuchten Händen.
•Biegen Sie das Stromkabel nicht übermäßig und stellen Sie keine
schweren Gegenstände auf dasselbe.
•Waschen Sie keine Teppiche, Matten, Schuhe oder Haustierdecken
oder andere Gegenstände außer Kleidung oder Bettwäsche in
dieser Maschine.
•Dieses Gerät darf nur für Haushaltszwecke und nur stationär
verwendet werden.
•Falls es zu einem Gasleck kommt (Isobutan, Propan, Erdgas usw.),
berühren Sie das Gerät oder den Netzstecker nicht und lüften Sie
den Bereich sofort.
Wartung
•Stecken Sie den Stromstecker sicher in die Steckdose, nachdem
Sie die gesamte Feuchtigkeit und den Staub beseitigt haben.
•Trennen Sie das Gerät vor der Reinigung von der
Stromversorgung. Die Bedienelemente auszuschalten oder in den
Standby Modus zu schalten, trennt das Gerät nicht von der
Stromversorgung.
•Sprühen Sie kein Wasser auf die Innen- oder Außenseite des
Gerätes, um dieses zu reinigen.
•Schalten Sie das Gerät niemals aus, indem Sie am Stromkabel
ziehen. Nehmen Sie immer den Stromstecker fest in die Hand und
ziehen Sie ihn gerade aus der Steckdose.
7
Page 53

Entsorgung
•Vor der Entsorgung eines alten Geräts, den Netzstecker aus der
Steckdose ziehen. Schneiden Sie das Kabel unmittelbar am Austritt
aus dem Haushaltsgerät ab, um Missbrauch zu verhindern.
•Entsorgen Sie die gesamten Verpackungsmaterialien (wie zum
Beispiel Plastiktüten und Styropor) außerhalb der Reichweite
von Kindern. Die Verpackungsmaterialien können Erstickungen
verursachen.
•Entfernen Sie die Tür, bevor das Gerät entsorgt oder außer Betrieb
genommen wird, um zu vermeiden, dass Kinder oder Kleintiere
darin eingeschlossen werden.
Entsorgung Ihrer Altgeräte
• Das durchgestrichene Symbol eines fahrbaren Abfallbehälters weist darauf hin, dass
Elektro- und Elektronik-Produkte (WEEE) getrennt vom Hausmüll entsorgt werden
müssen.
• Alte elektrische Produkte können gefährliche Substanzen enthalten, die eine korrekte
Entsorgung dieser Altgeräte erforderlich machen, um schädliche Auswirkungen auf
die Umwelt und die menschliche Gesundheit zu vermeiden. Ihre ausgedienten Geräte
können wiederverwendbare Teile enthalten, mit denen möglicherweise andere Produkte
repariert werden können, aber auch sonstige wertvolle Materialien enthalten, die zur
Schonung knapper Ressourcen recycelt werden können.
• Sie können Ihr Gerät entweder in den Laden zurückbringen, in dem Sie das Produkt
ursprünglich erworben haben oder Sie kontaktieren Ihre Gemeindeabfallstelle
für Informationen über die nächstgelegene autorisierte WEEE Sammelstelle. Die
aktuellsten Informationen für Ihr Land finden Sie unter www.lg.com/global/recycling
DE
8
Page 54

AUFSTELLEN-
DE
Einzelteile
1
Transportschrauben
2
Netzstecker
3
Waschmittelschublade
4
Bedienfeld
5
Trommel
6
Tür
7
Ablaufschlauch
8
Verschlussstopfen
9
Filter der Ablaufpumpe
10
Abdeckklappe (der Einbauort
kann je nach Gerät variieren)
11
Einstellbare Füße
Zubehör
Kaltwasserzulaufschlauch
(1 Stk.) (optional:
Warmwasser (1 Stk.))
Schraubenschlüssel
Gleitschutzplatten
(optional)
9
Page 55

Spezifikationen
Modell
F H/1 4 G6/G7 T/Q D(N)(W)(0~9)(H)
F H/1 2 G6/G7 T/Q D(N)(W)(0~9)(H)
F H/1 0 G6/G7 T/Q D(N)(W)(0~9)(H)
F14W7QDN1H, F14W8TDN0H
Waschkapazität 8/7 kg
Stromversorgung 220‒240 V~, 50 Hz
Größe 600 mm (B) x 550 mm (T) x 850 mm (H)
Produktgewicht 60 kg
Zulässiger Wasserdruck 0,1‒1,0 MPa (1,0‒10,0 kgf / cm2)
• Zur Verbesserung der Qualität des Produkts können Aussehen und Spezifikationen ohne Vorankündigung
geändert werden.
• Für den Anschluss an die Wasserversorgung ist kein weiterer Rücklaufschutz erforderlich.
DE
10
Page 56

DE
10 cm 2 cm 2 cm
Voraussetzungen für den
Aufstellort
Aufstellort
Ebener Boden : Das zulässige Gesamtgefälle unter
dem Haushaltsgerät beträgt 1°.
Netzsteckdose : Muss sich innerhalb von 1,5 Meter
auf einer Seite des Aufstellorts des Haushaltsgeräts
befinden.
• Die Steckdose nicht mit mehr als einem
Haushaltsgerät belasten.
Zusätzlicher Abstand : an der Rückseite 10cm;
an der linken und rechten Seite je 2cm
• Niemals Waschmittel auf dem
Hausahltsgerät lagern.
• Diese Mittel können die Oberfläche oder die
Bedienelemente beschädigen.
WARNUNG
• Der Stecker muss in eine Steckdose eingesteckt
werden, welche korrekt montiert und geerdet ist
(in Übereinstimmung mit allen lokalen Normen und
Verordnungen).
Aufstellen
• Das Haushaltsgerät auf einem ebenen, stabilen
Untergrund aufstellen.
• Achten Sie darauf, dass die Luftzirkulation um das
Haushaltsgerät nicht durch Teppiche, Vorleger
usw. eingeschränkt wird.
• Versuchen Sie niemals, Unebenheiten im Boden
auszugleichen, indem Sie Holzstücke, Pappe oder
ähnliche Materialien unter das Haushaltsgerät
legen.
• Falls es sich nicht vermeiden lässt, das
Haushaltsgerät neben einem Gasherd oder
Kohleofen zu platzieren, muss eine Isolationsplatte
(85 x 60 cm) zwischen die beiden Haushaltsgeräten
geschoben werden. Die mit der Alufolie beschichtete
Seite sollte dem Herd oder Ofen zugewandt sein.
• Stellen Sie das Haushaltsgerät nicht in Räumen
auf, in denen die Temperatur unter den Gefrierpunkt
fallen kann. Gefrorene Schläuche können unter
Druck platzen. Die Zuverlässigkeit der elektronischen
Steuerung kann bei Temperaturen unter dem
Gefrierpunkt beeinträchtigt werden.
• Bitte achten Sie bei der Installation des
Haushaltsgeräts darauf, dass ein Servicetechniker
im Fall einer Störung leichten Zugang haben muss.
• Wenn das Haushaltsgerät aufgestellt ist, alle vier
Füße mit dem zum Lösen der Transportschrauben
mitgelieferten Schraubenschlüssel einstellen, um
sicherzustellen, dass das Hausha
steht und ein Abstand von ca. 20 mm zwischen
der Oberseite des Geräts und der Unterseite einer
eventuell darüber liegenden Arbeitsplatte vorhanden
ist.
• Falls das Haushaltsgerät im Winter ausgeliefert wird
und die Temperaturen unter Null liegen, lassen Sie
das Gerät erst einige Stunden bei Raumtemperatur
stehen, bevor Sie es in Betrieb nehmen.
ltsgerät sicher
WARNUNG
• Dieses Gerät ist nicht für die Verwendung auf
Schiffen oder in mobilen Einrichtungen wie etwa
Wohnwagen, Flugzeugen usw. vorgesehen.
Elektrischer Anschluss
• Verwenden Sie kein Verlängerungskabel und keinen
Doppelstecker.
• Ziehen Sie nac
immer den Netzstecker aus der Steckdose und
drehen Sie den Wasserzulauf ab.
• Schließen Sie das Haushaltsgerät unter
Berücksichtigung der gültigen Anschlussvorschriften
an eine geerdete Steckdose an.
• Das Haushaltsgerät muss so aufgestellt werden,
dass der Stecker leicht zugänglich ist.
• Reparaturen am Haushaltsgerät dürfen nur von
qualifizierten Mitarbeitern durchgeführt werden.
Reparaturen, die von unerfahrenen Personen
durchgeführt werden, können zu Verletzungen
oder ernsthaften Störungen führen. Setzen Sie sich
diesbezüglich bitte mit Ihrem Servicecenter vor Ort in
Verbindung.
h Gebrauch des Haushaltsgeräts
11
Page 57

DE
Auspacken und Entnehmen der
Transportschrauben
Heben Sie das Haushaltsgerät von der
1
Schaumstoffplatte der Verpackung ab.
• Nachdem Sie den Karton und das
Verpackungsmaterial abgenommen haben,
heben Sie das Haushaltsgerät von der
Schaumstoffplatte ab. Achten Sie darauf, dass
die Trommelhalterung zusammen mit der
Schaumstoffplatte abgenommen wird und nicht
an der Unterseite des Haushaltsgeräts hängen
bleibt.
• Falls Sie das Haushaltsgerät legen müssen,
um die Unterlage aus Karton an der Unterseite
abzunehmen, decken Sie die Seitenfläche des
Haushaltsgeräts immer ab und legen Sie es
vorsichtig um. Legen Sie das Haushaltsgerät
NICHT auf die Vorder- oder Rückseite.
Trommelhalterung
(optional)
Unterlage
aus Karton
Setzen Sie die Abdeckkappen auf.
3
• Sie finden die Löcherabdeckkappen im
Zubehörbeutel oder an der Rückseite
angebracht.
Kappe
HINWEIS
• Bewahren Sie die Schrauben für zukünftige
Verwendung auf. Um eine Beschädigung
interner Bauteile zu vermeiden, transportieren
Sie die Waschmaschine nicht, ohne die
Transportschrauben wieder eingesetzt zu haben.
• Wenn die Transportschrauben und die Feststeller
nicht entfernt werden, kann dies intensive
Vibrationen und Geräusche hervorrufen,
die zu einer dauerhaften Beschädigung der
Waschmaschine führen können. Das Kabel ist
mit einer Transportschraube an der Rückseite der
Waschmaschine gesichert, wodurch ein Betrieb
verhindert wird, wenn die Transportschrauben
nicht entnommen wurden.
Entfernen der Schrauben.
2
• Lösen Sie mit dem (mitgelieferten)
Schraubenschlüssel alle Transportschrauben
vollständig, indem Sie diese gegen den
Uhrzeigersinn drehen. Beginnen Sie mit
den unteren beiden Transportschrauben.
Entnehmen Sie die Schrauben durch leichtes
Wackeln, während Sie diese herausziehen.
Transport-
schraube
Feststeller
12
Page 58

DE
Verwendung von
Gleitschutzplatten (optional)
Falls Sie das Haushaltsgerät auf rutschigem
Untergrund aufstellen, kann es sich aufgrund
der starken Vibrationen bewegen. Eine falsche
Ausrichtung kann zu Störungen durch Lärm und
Vibrationen führen. Falls dies der Fall ist, montieren
Sie die Gleitschutzplatten unter den Einstellfüßen
und stellen Sie die Höhe richtig ein.
Reinigen Sie den Fußboden, bevor Sie die
1
Gleitschutzplatten anbringen.
• Entfernen Sie Fremdkörper und Feuchtigkeit
mit einem trockenen Tuch. Falls der
Untergrund feucht bleibt, verrutschen die
Gleitschutzplatten möglicherweise.
Stellen Sie die Höhe ein, nachdem Sie das
2
Haushaltsgerät an den Aufstellort gebracht
haben.
Legen Sie die Gleitschutzplatte mit der
3
Klebeseite auf den Boden.
• Am effektivsten ist es, wenn man die
Gleitschutzplatten unter den vorderen Füßen
installiert. Wenn es schwierig ist, die Platten
unter die Vorderfüße zu setzen, bringen Sie
diese unter den hinteren Füßen an.
Diese Seite
nach oben
Klebeseite
Holzböden (Laminatböden)
• Holzböden sind besonders anfällig für Vibrationen.
• Um Vibrationen zu verhindern, empfehlen wir,
Gummischeiben mit einer Dicke von mindestens
15 mm unter jeden Fuß des Haushaltsgeräts zu
setzen. Diese sollten in mindestens zwei Balken
des Bodens geschraubt sein.
Gummischeibe
• Stellen Sie das Haushaltsgerät wenn möglich in
einer Ecke des Raumes auf. Dort ist der Boden
stabiler.
• Setzen Sie die Gummischeiben auf, um die
Vibrationen zu reduzieren.
HINWEIS
• Ein ordnungsgemäßes Aufstellen und Ausrichten
der Waschmaschine gewährleistet einen langen,
ordentlichen und zuverlässigen Betrieb.
• Die Waschmaschine muss 100 % waagerecht
ausgerichtet sein und fest auf dem Boden stehen.
• Sie darf unter Last nicht über den Boden
‚wandern‘.
• Die Aufstellfläche muss sauber sein und darf
nicht gewachst oder mit anderen gleitenden
Beschichtungen behandelt sein.
• Achten Sie darauf, dass die Füße der
Waschmaschine nicht nass werden. Eine
Nichtbeachtung kann Vibrationen oder Geräusche
verursachen.
• Sie erhalten die Gummischeiben vom
LG Servicecenter.
Achten Sie darauf, dass das Haushaltsgerät
4
waagerecht steht.
• Wackeln Sie sanft an der oberen Kante des
Haushaltsgeräts, um sicherzustellen, dass sich
das Haushaltsgerät nicht bewegt. Wenn sich
das Haushaltsgerät doch noch bewegt, richten
Sie es erneut aus.
HINWEIS
• Sie erhalten die Gleitschutzplatten vom LG
Servicecenter.
13
Page 59

DE
Ausrichten des Geräts
Falls der Boden uneben ist, drehen Sie die
Einstellfüße entsprechend (legen Sie keine
Holzstückchen usw. unter die Füße). Stellen Sie
sicher, dass alle vier Füße stabil sind und ordentlich
auf dem Boden sitzen. Kontrollieren Sie dann, ob
das Haushaltsgerät komplett waagerecht steht (mit
einer Wasserwaage).
• Nachdem das Haushaltsgerät ausgerichtet
ist, sichern Sie die Kontermuttern gegen
die Unterseite des Haushaltsgeräts. Alle
Kontermuttern müssen gesichert werden.
Anheben Absenken
Kontermutter
Ziehen Sie alle 4
Feststellmuttern fest an
Diagonalüberprüfung
• Wenn Sie das Haushaltsgerät an den
gegenüberliegenden Ecken der Oberseite
nach unten drücken, sollte es sich überhaupt
nicht nach oben oder unten bewegen (beide
Diagonalrichtungen kontrollieren). Falls die
Waschmaschine wackelt, wenn Sie auf die
gegenüberliegenden Ecken der Oberseite
drücken, stellen Sie die Füße erneut ein.
Anschluss des
Wasserzulaufschlauchs
• Der Wasserdruck muss zwischen 0,1 MPa und
1,0 MPa liegen (1,0‒10,0 kgf/cm
• Den Wasserzulaufschlauch beim Anschließen am
Wasserhahn nicht abziehen oder überkreuzen.
• Falls der Wasserdruck über 1,0 MPa liegt, muss
ein Druckminderer installiert werden.
• Kontrollieren Sie den Zustand des Schlauchs von
Zeit zu Zeit und ersetzen Sie ihn gegebenenfalls.
Überprüfen der Gummidichtung am
Wasserzulaufschlauch
Zusammen mit den Zulaufschläuchen werden
zwei Gummidichtungen geliefert. Sie dienen
zur Vermeidung von Wasserundichtigkeiten.
Vergewissern Sie sich, dass der Anschluss am
Wasserhahn fest genug ist.
Schlauchanschluss
Gummidichtung
2
).
HINWEIS
• Holz- oder Laminatböden können zu einer
Verstärkung von Vibrationen und Unwucht
beitragen.
• Falls die Waschmaschine auf einem Sockel
aufgestellt wird, muss sie sicher befestigt werden,
damit das Risiko auszuschliessen ist, dass sie
herunterfällt.
14
Schlauchanschluss
Gummidichtung
Page 60

DE
Anschluss des Schlauchs an den
Wasserhahn
Anschluss des anschraubbaren Schlauchs
an einen Wasserhahn mit Gewinde
Schrauben Sie den Schlauchanschluss an den
Wasserhahn des Zulaufs.
Anschluss eines anschraubbaren
Schlauchs an einen Wasserhahn ohne
Gewinde
Lösen Sie die vier Befestigungsschrauben.
1
Oberer
Anschluss
Befestigungsschraube
Gummidichtung
Schieben Sie den Anschluss auf das Ende des
3
Wasserhahns, so dass mit der Gummidichtung
eine wasserdichte Verbindung gebildet wird.
Ziehen Sie die vier Befestigungsschrauben an.
Drücken Sie den Zulaufschlauch senkrecht
4
nach oben, sodass die Gummidichtung im
Schlauch vollständig am Hahn anliegen
kann, und schrauben Sie ihn anschließend im
Uhrzeigersinn fest.
Anschlussstück
Zulauf-
schlauch
Anschluss eines Schlauchs mit
Schnellverschluss an einen Wasserhahn
ohne Gewinde
Schrauben Sie den Adapterring ab und lösen Sie
1
die vier Befestigungsschrauben.
Nehmen Sie den Führungsring heraus, falls der
2
Wasserhahn zu groß für den Adapter ist.
Führungsring
Adapterring
Nehmen Sie den Führungsring heraus, falls der
2
Wasserhahn zu groß für den Adapter ist.
Führungsring
15
Page 61

DE
Schieben Sie den Anschluss auf das Ende des
3
Wasserhahns, sodass mit der Gummidichtung
eine wasserdichte Verbindung gebildet wird.
Ziehen Sie die vier Befestigungsschrauben und
die Adapter-Ringplatte fest.
Ziehen Sie den Verschlussring nach unten,
4
drücken Sie den Zulaufschlauch auf den Adapter
und lassen Sie den Verschlussring anschließend
los. Stellen Sie sicher, dass der Anschluss richtig
verriegelt ist.
Verschlussring
Anschluss des Schlauchs an das
Haushaltsgerät
Befestigen Sie den Kaltwasserzulaufschlauch
am Kaltwasseranschluss an der
Rückseite der Waschmaschine.
Kaltwasseranschluss
HINWEIS
• Wenn Wasser aus dem Schlauch austritt,
nachdem dieser angeschlossen wurde, die
o.g. Schritte wiederholen. Verwenden Sie für
die Wasserversorgung den gängigsten Typ
Wasserhahn. Falls der Wasserhahn quadratisch
oder zu groß ist, nehmen Sie den Führungsring
heraus, bevor Sie den Schlauchanschluss mit dem
Wasserhahn verbinden.
Verwendung eines horizontalen Hahns
Horizontaler Hahn
HINWEIS
• Drehen Sie, bevor der Zulaufschlauch an
den Wasserhahn angeschlossen wird, den
Wasserhahn auf, um Fremdkörper (Schmutz,
Sand, Sägespäne usw.) aus der Wasserleitung
auszuspülen. Lassen Sie das Wasser in einem
Eimer ablaufen und kontrollieren Sie die
Wassertemperatur.
16
Wasserhahnverlängerung
Quadratischer Hahn
Page 62

Anschluss des Ablaufschlauchs
• Der Ablaufschlauch sollte nicht höher als 100 cm
über dem Boden verlaufen. Das Wasser im
Haushaltsgerät läuft sonst nicht ab oder läuft nur
langsam ab.
• Durch einen ordnungsgemäßen Anschluss
des Ablaufschlauchs wird der Boden vor einer
Beschädigung durch Wasserundichtigkeiten
geschützt.
• Falls der Ablaufschlauch zu lang ist, diesen nicht
mit Gewalt in das Haushaltsgerät zurück drücken.
Dadurch entsteht störender Lärm.
~ 100 cm
~ 145 cm
~ 105 cm
max. 100 cm
• Wenn der Ablaufschlauch in ein Waschbecken
eingehakt wird, diesen mit einem Band sicher
befestigen.
• Durch einen ordnungsgemäßen Anschluss
des Ablaufschlauchs wird der Boden vor einer
Beschädigung durch Wasserundichtigkeiten
geschützt.
DE
Waschwanne
max. 100 cm
Schlauch-
halter
max. 100 cm
Befestigungsband
17
Page 63

18
BETRIEB
DE
Verwendung der
Waschmaschine
Wählen Sie vor der ersten Wäsche ein
Waschprogramm und lassen Sie die Maschine das
Programm ohne Wäsche durchführen. Dadurch
werden Rückstände und Wasser aus der Trommel
entfernt, die bei der Produktion hinterlassen wurden.
1
Wäsche sortieren und die Wäschestücke in die
Trommel laden.
• Sortieren Sie die Wäsche nach Gewebeart,
Verschmutzungsgrad, Farbe und befüllen Sie
die Trommel entsprechend. Öffnen Sie die
Tür und legen Sie die Wäschestücke in die
Waschmaschine.
2
Fügen Sie die Reinigungsmittel und/oder
Waschmittel und Weichspüler hinzu.
• Geben Sie die richtige Menge an Waschmittel
in die Waschmittelschublade. Falls
gewünscht, Bleichmittel oder Weichspüler
in die entsprechenden Bereiche der
Waschmittelschublade geben.
3
Schalten Sie die Waschmaschine ein.
• Drücken Sie die Taste An/Aus, um die
Waschmaschine einzuschalten.
4
Wählen Sie das gewünschte Waschprogramm.
• Drücken Sie die Taste Programm mehrmals
oder drehen Sie den Wählknopf, bis das
gewünschte Waschprogramm angezeigt wird.
5
Starten des Waschganges.
• Drücken Sie die Taste Start/Pause, um das
Waschprogramm zu starten. Die Waschmaschine
dreht sich daraufhin kurz ohne Wasser, um
das Gewicht der Füllmenge zu messen. Falls
die Taste Start/Pause nicht innerhalb von
5 Minuten gedrückt wird, schaltet sich die
Waschmaschine ab und alle Einstellungen
werden gelöscht.
6
Ende des Waschganges.
• Wenn der Waschgang beendet ist, ertönt eine
Melodie. Entnehmen Sie die Wäsche sofort
aus der Waschmaschine, damit sie weniger
verknittert. Kontrollieren Sie die Türdichtung
beim Herausnehmen der Wäsche. Dort
könnten sich kleinere Gegenstände verfangen
haben.
Page 64

DE
Sortieren der Wäsche
Beachten Sie die Pflegehinweise an Ihrer
1
Kleidung.
• Diese geben Ihnen Auskunft über die
Zusammensetzung des Stoffes und wie dieser
gewaschen werden sollte.
• Symbole auf den Pflegehinweisen.
Waschtemperatur
Normale Maschinenwäsche
Bügelfrei
Delicate (Feinwäsche)
Handwäsche
Nicht waschen
Sortieren der Wäsche.
2
• Für die besten Waschergebnisse, sortieren
Sie die Kleidungsstücke die im gleichen
Waschgang gewaschen werden können.
• Unterschiedliche Stoffe müssen bei
verschiedenen Temperaturen und
Schleuderdrehzahlen gewaschen werden.
• Dunkle Farben immer getrennt von hellen
Farben und Weißwäsche waschen. Getrennt
waschen, da es zu einem Auswaschen von
Farbstoffen kommen kann, die Verfärbungen
bei weißen oder hellen Geweben verursachen
können. Nach Möglichkeit, sehr schmutzige
Kleidungsstücke nicht mit solchen waschen,
die nur leicht verunreinigt sind.
− Verschmutzung (schwer, normal, leicht):
Trennen Sie die Kleidungsstücke
entsprechend ihrem Verschmutzungsgrad.
− Farbe (weiß, hell, dunkel):
Trennen Sie Weißwäsche von Buntwäsche.
− Fusseln (Gewebe, die Fusseln erzeugen und
solche, die Fusseln aufnehmen):
Waschen Sie Gewebe, die Fusseln
erzeugen und solche, die Fusseln
aufnehmen, getrennt voneinander.
Kontrollieren Sie die Kleidungsstücke vor dem
3
Befüllen der Trommel.
• Kombinieren Sie große und kleine
Gegenstände in einer Ladung. Geben Sie die
großen Gegenstände zuerst in die Trommel.
• Große Gegenstände sollten nicht mehr als
die Hälfte der gesamten Wäschemenge
ausmachen. Waschen Sie Kleidungsstücke
nicht einzeln. Dies kann zu einer Unwucht
der Trommel führen. Geben Sie ein oder zwei
ähnliche Kleidungsstücke hinzu.
• Kontrollieren Sie alle Taschen, um
sicherzustellen, dass sie alle leer sind.
Gegenstände wie etwa Nägel, Haarspangen,
Streichhölzer, Stifte, Münzen und Schlüssel
können sowohl die Waschmaschine als auch
Ihre Kleidung selbst beschädigen.
• Reißverschlüsse, Haken und Bänder
schließen, um sicherzustellen, dass sie sich
nicht in anderen Kleidungsstücken verfangen.
• Schmutz und Flecken durch Abbürsten mit
einer kleinen Menge in Wasser gelöstem
Waschmittel vorbehandeln.
• Kontrollieren Sie die Wulste der flexiblen
Dichtung (grau) und nehmen Sie alle kleinen
Gegenstände heraus.
ACHTUNG
• Kontrollieren Sie das Innere der Trommel und
nehmen Sie alle Gegenstände aus früheren
Waschvorgängen heraus.
• Sämtliche Kleidungsstücke oder Gegenstände
aus der flexiblen Dichtung entfernen, damit
die Kleidungsstücke und die Dichtung nicht
beschädigt werden.
19
Page 65

DE
Zugabe von Reinigungsmitteln
Waschmitteldosierung
• Das Waschmittel sollte entsprechend den
Anweisungen des Waschmittelherstellers
verwendet werden und entsprechend der Art,
Farbe und Verschmutzung des Gewebes und der
Waschtemperatur ausgewählt werden.
• Wenn zu viel Waschmittel verwendet wird, kann
sich zu viel Schaum bilden, was zu schlechten
Waschergebnissen führt oder den Motor
übermäßig belastet.
• Falls Sie ein flüssiges Waschmittel verwenden
möchten, beachten Sie die Richtlinien des
Waschmittelherstellers.
• Sie können das flüssige Waschmittel direkt in die
Schublade für das Hauptwaschmittel eingießen,
wenn Sie den Waschvorgang sofort starten.
• Falls Sie Startzeitvorwahl oder Vorwäsche
ausgewählt haben, kein flüssiges Waschmittel
verwenden, da dieses aushärten kann.
• Falls es zu einer übermäßigen Schaumbildung
kommt, weniger Waschmittel verwenden.
• Die Waschmittelmenge muss eventuell an
die Wassertemperatur, Wasserhärte, Menge
und den Verschmutzungsgrad der Wäsche
angepasst werden. Damit die besten Ergebnisse
erzielt werden können, muss eine übermäßige
Schaumbildung vermieden werden.
• Beachten Sie den Pflegehinweis der
Kleidungsstücke, bevor Sie das Waschmittel und
die Wassertemperatur wählen.
• Für den Betrieb der Waschmaschine nur
das zulässige Waschmittel für die jeweilige
Kleidungsart verwenden:
− Allgemeine, pulverförmige Waschmittel für alle
Arten von Geweben
− Pulverförmige Waschmittel für empfindliche
Gewebe
− Flüssige Waschmittel für alle Arten von Gewebe
oder Spezial-Waschmittel nur für Wolle
• Für bessere Waschergebnisse und Aufhellung,
Waschmittel mit allgemeinem, pulverförmigem
Bleichmittel verwenden.
• Das Waschmittel wird zu Beginn des Waschgangs
aus dem Ausgabefach der Schublade gespült.
HINWEIS
• Waschmittel nicht aushärten lassen. Dies kann
zu Verstopfungen, schlechter Spülleistung oder
Geruchsbildung führen.
• Volle Beladung: Entsprechend den Empfehlungen
des Herstellers.
• Teilladung: 3/4 der normalen Menge
• Minimale Beladung: 1/2 der vollen Beladung
Hinzugabe von Waschmittel und
Weichspüler
Hinzugabe von Waschmittel
• Nur Hauptwäsche →
• Vorwäsche + Hauptwäsche →
HINWEIS
• Zu viel Waschmittel, Bleichmittel oder Weichspüler
kann ein Überlaufen verursachen.
• Achten Sie darauf, dass Sie die richtige Menge an
Waschmittel verwenden.
Hinzugabe von Weichspüler
• Den maximalen Füllstand nicht überschreiten.
Eine Überfüllung kann dazu führen, dass der
Weichspüler zu früh ausgegeben wird, was
Flecken auf der Kleidung verursachen kann.
Schließen Sie die Waschmittelschublade langsam.
20
Page 66

DE
• Lassen Sie den Weichspüler nicht länger
als 2 Tage in der Waschmittelschublade (der
Weichspüler kann aushärten).
• Der Weichspüler wird während des letzten
Spülgangs automatisch hinzugegeben.
• Die Waschmittelschublade nicht öffnen während
diese mit Wasser ausgespült wird.
• Es dürfen keine Lösungsmittel (Benzol usw.)
verwendet werden.
HINWEIS
• Weichspüler nicht direkt auf die Kleidungsstücke
gießen.
Hinzugabe von Wasserenthärter
• Ein Wasserenthärter, etwa zur Vermeidung von
Kalkablagerungen (z. B. Calgon), kann verwendet
werden, um die benötigte Waschmittelmenge in
Regionen mit extrem hartem Wasser zu senken.
Die Dosierung erfolgt entsprechend der auf der
Verpackung angegebenen Menge. Geben Sie
zuerst das Waschmittel und anschließend den
Wasserenthärter hinzu.
• Verwenden Sie dann die Waschmittelmenge, die
für weiches Wasser erforderlich ist.
Verwendung von Waschmitteltabletten
Öffnen Sie die Tür und geben Sie die Tabletten
1
in die Trommel.
Beladen Sie die Trommel mit Wäsche und
2
schließen Sie die Tür.
21
Page 67

Bedienfeld
3
DE
Baumwolle+
Pflegeleicht
Bettdecken
Skin Care
Babybekleidung
Taste An/Aus
1
Koch-/Buntwäsche
Sportswear
Feinwäsche
+Schleudern
• Drücken Sie die Taste An/Aus, um die
Waschmaschine einzuschalten.
Taste Start/Pause
2
• Mit der Taste Start/Pause wird der
Waschgang gestartet oder unterbrochen.
• Falls ein vorübergehender Stopp des
Waschprogrammes erforderlich ist, drücken
Sie dieTaste Start/Pause.
Anzeige
• Auf der Anzeige werden die Einstellungen, die
geschätzte, noch verbleibende Zeit, Optionen
und Statusanzeigen angezeigt. Wenn die
Maschine eingeschaltet wird, leuchten die
Standardeinstellungen in der Anzeige auf.
• Die Anzeige zeigt die geschätzte,
noch verbleibende Zeit an. Während
die Wäschemenge automatisch
berechnet wird, blinkt
oder ‚Detecting
(Programmanpassung)‘.
Wolle
Intensiv 60
Kurz 30
Spülen
Für Trommel-Reinigung: 3 Sek. gedrückt halten
Startzeitvorwahl
Intensiv Spülen
Vorwäsche
Ohne Schleudern
Spülstop
Kalt
Schleudern
Programmknopf
4
• Entsprechend der Art der Wäsche stehen
verschiedene Programme zur Verfügung.
• Die Kontrollleuchte zeigt an, welches
Programm ausgewählt wurde.
Optionen
5
• Damit können Sie eine Zusatzoption
auswählen. Nach Auswahl leuchtet diese
dann auf.
• Mit diesen Tasten können Sie die
gewünschten Programmoptionen für den
gewählten Waschgang auswählen.
Intensiv
Knitterschutz
22
Page 68

Programmtabelle
Waschprogramm
DE
Programm Beschreibung Gewebeart Korrekte Temp.
Sorgt für eine bessere
Koch-/
Buntwäsche
Baumwolle+
Pflegeleicht
Mix
Babybekleidung
Skin Care
Bettdecken
Sportswear
Waschleistung durch
die Kombination
verschiedener
Trommelbewegungen.
Sorgt für optimierte
aschleistung bei
W
großer Wäschemenge
mit weniger
Energieverbrauch.
Geeignet für
Freizeithemden, die
nach dem W
nicht gebügelt werden
müssen.
Damit können
verschiedene Gewebe
gleichzeitig gewaschen
werden.
Entfernt feste und
eiweißhaltige Flecken,
bietet eine bessere
Spülleistung.
Entfernt ef
Waschmittelrückstände
aus Kleidung.
Große Wäschestücke wie
etwa Bettdecken, Kissen,
Sofadecken usw.
Geeignet für Sportswear
wie etwa Laufbekleidung.
aschen
fizient
Schnelle Buntwäsche
(Hemden, Nachthemden,
Schlafanzüge usw.) und
normal verschmutzte
Koch-/Buntwäsche
(Unterwäsche).
Polyamid, Acryl, Polyester
Verschiedene Arten von
Gewebe außer spezielle
Kleidungsstücke (Seide/
empfindliche Kleidung,
Sportswear, dunkle
Bekleidung, Wolle,
Bettdecken/Vorhänge).
Leicht verschmutzte
Babykleidung.
Gewebe mit direktem
Hautkontakt, z.
B. Unterwäsche,
Windeln, Handtücher,
Bettzeug, Kissen- und
Matratzenbezüge.
Baumwollbettwäsche,
außer speziellen Stoffen
(empfindliche Gewebe,
Wolle, Seide usw.), mit
Füllung: Bettdecken,
Kissen, Decken,
Sofadecken mit leichter
Füllung.
Coolmax, Goretex, Fleece
und Sympatex
40 °C
(Kalt bis 95 °C)
60 °C
(Kalt bis 60 °C)
40 °C
(Kalt bis 60 °C)
40 °C
(Kalt bis 40 °C)
60 °C
(95 °C)
40 °C
(Kalt bis 60 °C)
40 °C
(Kalt bis 40 °C)
Maximale
Beladung
Nennkapazität
3,0 kg
6,0 kg
Nennkapazität
nur 1 Teil
2,0 kg
23
Page 69

DE
60°C
60°C
40°C
Programm Beschreibung Gewebeart Korrekte Temp.
Feinwäsche
Wolle
Kurz 30
Intensiv 60
Spülen +
Schleudern
• Wassertemperatur: Wählen Sie die entsprechende Wassertemperatur für den ausgewählten Waschgang.
Beachten Sie beim Waschen immer die Pflegehinweise oder -anweisungen des Bekleidungsherstellers.
• visnetnI+ C° 06 ellowmuaB„ ,“)gnudaleB eblaH(visnetnI+ C° 04 ellowmuaB„ mmargorP sad eiS nelhäW
(Halbe Beladung)“, „Baumwolle 60 °C +Intensiv(Volle Beladung)“ für den Test gemäß EN60456 und
Richtlinie 1015/2010.
− Standard Baumwollprogramm 60 °C: Baumwolle
− Standard Baumwollprogramm 60 °C: Baumwolle
− Standard Baumwollprogramm 40 °C: Baumwolle
− (Diese sind geeignet, um normal verschmutzte Baumwollwäsche zu waschen.)
− (Dies sind die effizientesten Programme bei kombiniertem Energie- und Wasserverbrauch für das
Waschen von Baumwollwäsche dieses Typs.)
• Die tatsächliche Wassertemperatur kann von der angegebenen Waschgangtemperatur abweichen.
• Die Testergebnisse hängen von Wasserdruck, Wasserhärte, Wasserzulauftemperatur, Raumtemperatur,
Art und Menge der Beladung, Grad der Verschmutzung, verwendetem Waschmittel, Schwankungen in der
Energieversorgung und den gewählten zusätzlichen Optionen ab.
Empfindliche Kleidung
wie Unterwäsche, Blusen
etc.
Zum Waschen von
Wollgewebe. (Bitte
Waschmittel für
maschinenwaschbare
Kleidungsstücke aus
Wolle verwenden).
Sorgt für eine schnelle
Waschzeit für kleine
Ladungen und leicht
verschmutzte Kleidung.
Bietet bessere
aschleistung und
W
Energieeffizienz in 60
Minuten.
Verwenden Sie dieses
Programm , wenn Sie nur
Spülen und Schleudern
benötigen. Geben Sie
Weichspüler hinzu, falls
nötig.
Empfindliche, leicht zu
beschädigende Wäsche
Nur für
maschinenwaschbare
Kleidungsstücke aus reiner
Schurwolle.
Schnell leicht verschmutzte
Buntwäsche.
Baumwolle und
Mischgewebe. (Spezielles
Programm in 60 Minuten
für normal verschmutzte
Wäsche).
Normale, waschbare
Gewebe.
+
+Intensiv(Volle Beladung)
+
+Intensiv(Halbe Beladung)
+
+Intensiv(Halbe Beladung)
(Kalt bis 40 °C)
(Kalt bis 40 °C)
(Kalt bis 40 °C)
(Kalt bis 60 °C)
20 °C
40 °C
20 °C
60 °C
-
Maximale
Beladung
2,0 kg
4,0 kg
Nennkapazität
HINWEIS
• Es wird ein neutrales Waschmittel empfohlen.
24
Page 70

Zusätzliche Optionen
DE
Programm
Startzeitvorwahl
Intensiv
Spülen
Vorwäsche Intensiv
Koch-/Buntwäsche ● ● ● ● ●
Baumwolle+ ● ● ● ● ●
Pflegeleicht ● ● ● ● ●
Mix ● ● ● ● ●
Babybekleidung ● ●
**
**
●
● ●
Skin Care ● ● ● ● ●
Bettdecken ● ● ●
Sportswear ● ● ●
Feinwäsche ● ● ●
Wolle ● ●
Kurz 30 ● ● ●
Intensiv 60 ● ●
*
Spülen + Schleudern ● ●
*
: Diese Option wird automatisch zum Programm hinzugefügt und kann nicht gelöscht werden.
**
: Diese Option wird automatisch zum Programm hinzugefügt und kann gelöscht werden.
Knitterschutz
●
25
Page 71

Betriebsdaten
DE
Programm
1400 1200
Koch-/Buntwäsche 1400 1200
Baumwolle+ 1400 1200
Pflegeleicht 800 800
Mix 1400 1200
Babybekleidung 800 800
Skin Care 1400 1200
Bettdecken 800 800
Sportswear 800 800
Feinwäsche 800 800
Wolle 800 800
Kurz 30 1400 1200
Intensiv 60 1400 1200
Spülen + Schleudern 1400 1200
HINWEIS
•Informationen zu den Hauptwaschprogrammen bei halber Beladung.
Programm
Koch-/Buntwäsche (40 °C)
Baumwolle+ (60 °C)
Zeit in
Minuten
8 kg 7 kg 8 kg 7 kg 8 kg 7 kg
96 53 % 53 % 65 0,55
259 53 % 53 % 43 0,52
Verbleibender Feuchtigkeitsgehalt
1400 U/min 1000 U/min
96
40 %
239
44 %
1200 U/min
Max. U/min
Wasser in
Litern
65
41
1000
1000
1000
800
1000
800
1000
800
800
800
800
1000
1000
1000
Energie in
kWh
0,55
0,48
26
Page 72

DE
Programmoptionen
Startzeitvorwahl
Sie können eine Zeit vorwählen, zu der die
Waschmaschine automatisch startet und nach
einem vorgegebenen Zeitintervall endet.
Drücken Sie die Taste An/Aus.
1
Wählen Sie ein Waschprogramm aus.
2
Drücken Sie die Taste Startzeitvorwahl und
3
stellen Sie die gewünschte Zeit ein.
Drücken Sie die Taste Start/Pause.
4
HINWEIS
• Die Verzögerungszeit ist die Zeit bis zum Ende des
Programms, nicht bis zum Start. Die tatsächliche
Laufzeit kann aufgrund der Wassertemperatur, der
Wäschemenge und anderer Faktoren variieren.
• Um die Funktion "Startzeitvorwahl" abzubrechen,
müssen Sie die Taste "An/Aus" drücken.
• Verwenden Sie kein Flüssigwaschmittel mit dieser
Option.
Knitterschutz
Wenn Sie Knittern reduzieren möchten, empfehlen
wir die Option Knitterschutz.
Drücken Sie die Taste An/Aus.
1
Wählen Sie ein Waschprogramm aus.
2
Drücken Sie die Taste Knitterschutz.
3
Drücken Sie die Taste Start/Pause.
4
Intensiv Spülen
Diese Option sorgt für ein besonders
gründliches Spülergebnis. Die abschließende Spülung
wird dabei auf 40 Grad erhitzt.
Drücken Sie die Taste An/Aus.
1
Wählen Sie ein Waschprogramm aus.
2
Drücken Sie die Taste Intensiv Spülen und
3
stellen Sie die gewünschte Zeit ein.
Drücken Sie die Taste Start/Pause.
4
Vorwäsche
Falls die Wäsche stark verschmutzt ist, wird die
Option „Vorwäsche“ empfohlen.
Drücken Sie die Taste An/Aus.
1
Wählen Sie ein Waschprogramm aus.
2
Drücken Sie die Taste Vorwäsche.
3
Drücken Sie die Taste Start/Pause.
4
Intensiv
Wenn die Wäsche normal bis stark verschmutzt ist,
ist die Option Intensiv effektiv.
Drücken Sie die Taste An/Aus.
1
Wählen Sie ein Waschprogramm aus.
2
Drücken Sie die Taste Intensiv.
3
Drücken Sie die Taste Start/Pause.
4
27
Page 73

DE
Temp.
Mit der Taste Temp. kann die Kombination der
Wasch- und Spültemperatur für das ausgewählte
Programm ausgewählt werden. Drücken Sie diese
Taste bis die gewünschte Einstellung aufleuchtet.
Für alle Spülvorgänge wird kaltes Leitungswasser
verwendet.
• Wählen Sie die geeignete Wassertemperatur
für die Art der Wäsche, die gewaschen werden
soll. Um die besten Ergebnisse zu erzielen,
beachten Sie bitte die Pflegehinweise für die
Kleidungsstücke.
Spülen
Spülstop
Das Programm wird angehalten, bis nach dem
Spülen erneut die Starttaste gedrückt wird.
Schleudern
• Die Schleuderdrehzahl kann durch wiederholtes
Drücken der Taste Schleudern eingestellt werden.
• Nur Schleudern
Drücken Sie die Taste An/Aus.
1
Drücken Sie die Taste Schleudern, um die
2
gewünschte Schleuderdrehzahl auszuwählen.
Drücken Sie die Taste Start/Pause.
3
Sperren des Bedienfelds
Drücken Sie die Taste Intensiv Spülen sowie
1
die Taste Vorwäsche und halten Sie sie 3
Sekunden lang gedrückt.
Es ertönt ein Signalton und erscheint auf der
2
Anzeige.
Wenn die Kindersicherung eingestellt ist, sind
alle Tasten außer der Taste An/Aus gesperrt.
HINWEIS
• Durch Abschalten der Waschmaschine wird die
Kindersicherungsfunktion nicht zurückgesetzt. Sie
müssen die Kindersicherung deaktivieren, bevor
Sie auf andere Funktionen zugreifen können.
Entsperren des Bedienfelds
Drücken Sie die Taste Intensiv Spülen sowie die
Taste Vorwäsche und halten Sie sie 3 Sekunden
lang gedrückt.
• Es ertönt ein Signalton und die verbleibende Zeit
für das aktuelle Programm erscheint wieder auf
der Anzeige.
Signalton Ein / Aus
Drücken Sie die Taste An/Aus.
1
HINWEIS
• Auch wenn Sie ohne Schleudern wählen, wird
sich die Trommel für kurze Zeit drehen, damit
ein schnelles Abpumpen gewährleistet ist.
Kindersicherung ( )
Verwenden Sie diese Option, um die
Bedienelemente zu deaktivieren. Diese Funktion
kann verhindern, dass Kinder Programme ändern
oder das Haushaltsgerät starten.
28
Drücken Sie die Taste Start/Pause.
2
Drücken Sie gleichzeitig die Tasten
3
Startzeitvorwahl und Knitterschutz und halten
Sie sie 3 Sekunden lang gedrückt, um die
Signaltöne an-oder auszuschalten.
HINWEIS
• Sobald die Signaltöne ausgeschaltet sind,
bleibt diese Einstellung gespeichert, auch wenn
das Gerät ausgeschaltet wird.
• Wenn Sie die Signaltöne wieder einschalten
möchten, wiederholen Sie das angegebene
Verfahren.
Page 74

29
INTELLIGENTE FUNKTIONEN
DE
Verwendung der Smart
Diagnosis™
Verwenden Sie diese Funktion, wenn Sie eine
genaue Diagnose für das Servicecenter von
LG Electronics benötigen, weil das Gerät eine
Störung hat oder ausgefallen ist. Verwenden Sie
diese Funktion erst, nachdem Sie sich mit einem
Servicemitarbeiter in Verbindung gesetzt haben,
nicht während des normalen Betriebs.
1
Drücken Sie die Taste An/Aus, um die
Waschmaschine einzuschalten. Drücken
Sie keine anderen Tasten oder drehen den
Programmwahlknopf.
2
Wenn Sie vom Mitarbeiter des Servicecenters
dazu aufgefordert werden, halten Sie die
Sprechmuschel Ihres Telefons neben die Taste
An/Aus.
Max.
10 mm
3
Drücken Sie die Taste Temp. und halten Sie
diese 3 Sekunden lang gedrückt, während Sie
die Sprechmuschel an das Symbol oder die
Taste An/Aus halten.
4
Halten Sie das Telefon an dieser Stelle bis die
Tonübertragung abgeschlossen ist. Die Restzeit
für die Datenübertragung wird angezeigt.
• Um die besten Ergebnisse zu erzielen, das
Telefon nicht bewegen, während die Töne
übertragen werden.
• Wenn der Mitarbeiter des Servicecenters keine
genaue Aufzeichnung der Daten erhalten hat,
bittet er Sie möglicherweise, den Vorgang zu
wiederholen.
LG Electronics
Servicecenter
5
Wenn die Übertragung beendet ist und
keine Töne mehr zu hören sind, können
Sie das Gespräch mit dem Mitarbeiter des
Servicecenters wieder aufnehmen. Er ist dann
in der Lage, Ihnen mit den Informationen
weiterzuhelfen, die zur Analyse der Störung
übertragen wurden.
HINWEIS
• Die Smart Diagnosis™ ist abhängig von der
Gesprächsqualität vor Ort.
• Die Kommunikationsleistung wird verbessert und
Sie können besseren Service erhalten, wenn Sie
das Festnetztelefon verwenden.
• Wenn die Übertragung der Daten für die
Smart Diagnosis™ aufgrund der schlechten
Gesprächsqualität unzureichend ist, kann Ihnen
unter Umständen nicht der bestmögliche Service
für eine Smart Diagnosis™ zur Verfügung gestellt
werden.
EU-Konformitätserklärung
Hiermit erklärt das LG Electronics European Shared Service
diese Waschmaschine den grundlegenden
anderen relevanten Vorschriften der
Die vollständige Konformitätserklärung kann über die folgende
LG Electronics European Shared Service Center B.V.
Krijgsman 1
1186 DM Amstelveen
The Netherlands
oder kann auch auf unserer speziellen DoC Website angefordert
h p://www.lg.com/global/support/cedoc/cedoc#
Center BV, dass
Anforderungen und den
Richtlinie 1999/5 / EG entspricht.
Adresse angefordert werden:
werden:
Page 75

WARTUNG
DE
WARNUNG
• Ziehen Sie den Netzstecker vor dem Reinigen aus
der Steckdose, um das Risiko eines Stromschlags
zu vermeiden. Das Nichtbefolgen dieser Warnung
kann zu ernsthaften Verletzungen, Brand,
Stromschlag oder Tod führen.
• Niemals scharfe Chemikalien, scheuernde
Reinigungsmittel oder Lösungsmittel zur
Reinigung der Waschmaschine verwenden. Diese
können die Oberfläche beschädigen.
Reinigung Ihrer Waschmaschine
Pflege nach dem Waschvorgang
• Nachdem der Waschvorgang beendet ist, die Tür
und die Innenseite der Türdichtung abwischen, um
sämtliche Feuchtigkeit zu entfernen.
• Lassen Sie die Tür offen, damit das Innere der
Trommel trocknen kann.
• Wischen Sie das Gehäuse der Waschmaschine
mit einem trockenen Tuch ab, um sämtliche
Feuchtigkeit zu entfernen.
Reinigung der Außenseite
Eine ordnungsgemäße Pflege Ihrer Waschmaschine
kann die Lebensdauer verlängern.
Reinigung der Innenseite
• Wischen Sie mit einem Handtuch oder einem
weichen Tuch die Türöffnung der Waschmaschine
und das Türglas ab.
• Entnehmen Sie die Wäsche immer aus der
Waschmaschine, sobald der Waschvorgang
beendet ist. Wenn feuchte Kleidungsstücke in
der Waschmaschine belassen werden, können
diese verknittern, sich verfärben oder zu riechen
beginnen.
• Lassen Sie einmal im Monat das
Trommelreinigungsprogramm laufen (oder öfter,
je nach Bedarf), um überschüssiges Waschmittel
und andere Rückstände zu entfernen.
Reinigung des Filters am
Wasserzulauf
• Drehen Sie die Zulaufhähne zu, wenn die
Waschmaschine für einen längeren Zeitraum (z. B.
Urlaub) nicht benutzt wird, besonders wenn in der
Nähe kein Bodenauslass (Gully) vorhanden ist.
• Das Symbol
angezeigt, wenn kein Wasser in die
Waschmittelschublade gelangt.
• Wenn das Wasser sehr hart ist oder Spuren
von Kalkrückständen enthält, wird der Filter am
Wasserzulauf möglicherweise verstopft. Daher ist
es angebracht, diesen gelegentlich zu reinigen.
Drehen Sie den Wasserhahn zu und schrauben
1
Sie den Wasserzulaufschlauch ab.
wird auf dem Bedienfeld
Tür:
• Wischen Sie mit einem feuchten Tuch über die
Außen- und Innenseite und anschließend zum
Trocknen mit einem weichen Tuch.
Außen:
• Falls etwas verschüttet wird, sofort aufwischen.
• Mit einem feuchten Tuch abwischen.
• Keine scharfen Gegenstände auf die Oberfläche
oder die Anzeige drücken.
30
Reinigen Sie den Filter mit einer harten Bürste.
2
Page 76

DE
2
Reinigung des Filters der
Ablaufpumpe
• Im Ablauffilter sammeln sich Fusseln und kleinere
Gegenstände, die in der Wäsche vergessen
wurden. Kontrollieren Sie regelmäßig, dass der
Filter sauber ist, damit Ihre Waschmaschine
leichtgängig läuft.
• Lassen Sie das Wasser abkühlen, bevor Sie
die Ablaufpumpe reinigen, eine Notentleerung
durchführen oder die Tür im Notfall öffnen.
Öffnen Sie die Abdeckklappe und ziehen Sie den
1
Schlauch heraus.
Schrauben Sie den Verschlussstopfen heraus
2
und öffnen Sie den Filter durch Drehen nach
links.
Behälter zur
Aufnahme des
auslaufenden
Wassers.
Setzen Sie den Pumpenfilter nach der
4
Reinigung wieder ein und schrauben Sie den
Verschlussstopfen ein.
Schließen Sie die Abdeckklappe.
5
ACHTUNG
• Lassen Sie das Wasser zuerst aus dem
Ablaufschlauch laufen und öffnen Sie
anschließend den Pumpenfilter, um die Fusseln
oder Fremdkörper zu entfernen.
• Seien Sie beim Ablassen des Wassers vorsichtig,
denn es kann heiß sein.
1
Alle Fremdkörper aus dem Pumpenfilter
3
entfernen.
31
Page 77

DE
Reinigung der
Waschmittelschublade
In der Waschmittelschublade können sich
Waschmittel und Weichspüler ablagern. Nehmen
Sie die Schublade heraus und kontrollieren Sie
ein bis zwei Mal pro Monat, ob dort Ablagerungen
vorhanden sind.
Zum Herausnehmen der Waschmittelschublade,
1
diese gerade bis zum Anschlag herausziehen.
• Dann fest auf den Entriegelungsknopf drücken
und die Schublade herausziehen.
Nehmen Sie die Einsätze aus der Schublade
2
heraus.
• Spülen Sie die Einsätze und die Schublade
mit warmem Wasser aus, um die
Waschmittelablagerungen zu entfernen.
Reinigen Sie die Waschmittelschublade nur
mit Wasser. Trocknen Sie die Einsätze und
die Schublade mit einem weichen Tuch oder
Handtuch.
Für die Reinigung der Schubladenöffnung
3
verwenden Sie ein Tuch oder eine kleine
Bürste ohne Metallborsten. Damit lässt sich die
Aussparung reinigen.
• Entfernen Sie alle Rückstände oben und unten
an der Aussparung.
Wischen Sie sämtliche Feuchtigkeit an der
4
Aussparung mit einem weichen Tuch oder
Handtuch ab.
Setzen Sie die Einsätze wieder an die richtige
5
Stelle ein und schieben Sie die Schublade
wieder in die Waschmaschine.
Trommelreinigung (optional)
Trommelreinigung ist ein spezielles Programm zur
Reinigung des Inneren der Waschmaschine.
Für dieses Programm werden ein höherer
Wasserstand und höhere Schleuderdrehzahlen
verwendet. Führen Sie dieses Programm
regelmäßig durch.
Sämtliche Wäsche oder Gegenstände aus
1
der Waschmaschine entfernen und die Tür
schließen.
Öffnen Sie die Waschmittelschublade und
2
geben Sie ein Mittel zur Vermeidung von
Kalkablagerungen (z. B. Calgon) in den Bereich
für den Hauptwaschgang.
• Tabletten in die Trommel geben.
Schließen Sie die Waschmittelschublade
3
langsam.
Schalten Sie die Waschmaschine ein, drücken
4
Sie dann die Tasten Intensiv und Knitterschutz
und halten Sie sie 3 Sekunden lang gedrückt.
Dann erscheint
Drücken Sie die Taste Start/Pause, um das
5
Programm zu starten.
Nachdem das Programm beendet ist, lassen
6
Sie die Waschmaschinentür offen, damit diese,
die flexible Dichtung und das Türglas trocknen
können.
ACHTUNG
• Falls sich ein Kind in der Nähe befindet, sollten
Sie die Tür aus Sicherheitsgründen nicht zu lange
offen lassen.
HINWEIS
• Geben Sie kein Waschmittel in die
Waschmittelkammer. Es kann zu viel
Schaum erzeugt werden, der dann aus der
Waschmaschine austritt.
auf der Anzeige.
32
Page 78

DE
Achten Sie auf das Einfrieren im
Winter
• Wenn die Waschmaschine eingefroren ist, arbeitet
sie nicht ordnungsgemäß. Stellen Sie sicher, dass
die Waschmaschine an einem Ort aufgestellt wird,
an dem sie im Winter nicht gefrieren kann.
• Falls die Waschmaschine draußen auf einer
Veranda oder anderweitig im Außenbereich
aufgestellt werden muss, beachten Sie bitte die
folgenden Hinweise.
So vermeiden Sie das Einfrieren des
Geräts
• Lassen Sie das restliche Wasser, das nach
dem Waschen noch in der Pumpe bleibt, über
den Ablaufschlauch vollständig ab. Nachdem
das Wasser vollständig abgelassen wurde,
verschließen Sie den Ablaufschlauch und die
Abdeckklappe wieder.
Verschlussstopfen
• Lassen Sie den Ablaufschlauch nach unten
hängen, damit das Wasser im Schlauch
vollständig ablaufen kann.
Abdeckklappe
• Nachdem der Wasserhahn geschlossen wurde,
schrauben Sie den Kaltwasserzulaufschlauch
vom Wasserhahn ab, und lassen Sie das Wasser
herauslaufen, indem Sie den Schlauch nach unten
halten.
Zulaufschlauch
Kontrolle bei Frostgefahr
• Wenn nach dem Öffnen des
Ablaufschlauchstopfens kein Restwasser ausläuft,
den Ablauf überprüfen.
Verschlussstopfen
Abdeckklappe
• Zum Einschalten wählen Sie ein Waschprogramm
und drücken Sie die Taste Start/Pause.
Ablaufschlauch
ACHTUNG
• Wenn der Ablaufschlauch nicht gerade verlegt ist,
so dass das komplette Wasser auslaufen kann,
kann das im Schlauch zurückgebliebene Wasser
einfrieren.
Waschmittelschublade
• Wenn ‚ ‘ auf der Anzeige erscheint während die
Waschmaschine läuft, kontrollieren Sie den Zulauf
und den Ablauf (einige Modelle verfügen nicht
über eine Alarmfunktion, mit der die Frostgefahr
angezeigt wird).
Ablaufschlauch
HINWEIS
• Kontrollieren Sie, ob während des Spülvorgangs
Wasser in die Waschmittelschublade gelangt ist
und während des Schleudervorgangs Wasser aus
dem Ablaufschlauch gepumpt wird.
33
Page 79

DE
So gehen Sie vor, wenn die
Waschmaschine eingefroren ist
• Vergewissern Sie sich, dass sämtliche Wäsche
aus der Trommel entfernt wurde, schütten Sie
50-60°C heißes Wasser auf die Gummiteile in der
Trommel, schließen Sie die Tür und warten Sie
1 - 2 Stunden.
50 -60 °C
ACHTUNG
• Wenn der Ablaufschlauch nicht gerade verlegt ist,
so dass das komplette Wasser auslaufen kann,
kann das im Schlauch zurückgebliebene Wasser
einfrieren.
• Öffnen Sie die Abdeckklappe und ziehen Sie
den Stopfen vom Ablaufschlauch ab, damit das
restliche Wasser jetzt vollständig ablaufen kann.
• Nachdem das Wasser vollständig aus der
Trommel abgelassen wurde, verschließen Sie den
Ablaufschlauch für Restwasser wieder mit dem
Stopfen, wählen Sie ein Waschprogramm und
drücken Sie die Taste Start/Pause.
Waschmittelschublade
Ablaufschlauch
HINWEIS
• Kontrollieren Sie, ob während des Spülvorgangs
Wasser in die Waschmittelschublade gelangt ist
und während des Schleudervorgangs Wasser aus
dem Ablaufschlauch gepumpt wird.
• Bei Problemen mit dem Wasserzulauf, gehen Sie
wie folgt vor.
− Schließen Sie den Wasserhahn und tauen
Sie den Wasserhahn und die beiden
Anschlussbereiche des Zulaufschlauchs mit
einem mit heißem Wasser getränkten Tuch auf.
− Schrauben Sie den Zulaufschlauch ab und
tauchen Sie ihn in warmes Wasser, das eine
Temperatur von ca. 50–60 °C hat.
Verschlussstopfen
Abdeckklappe
HINWEIS
• Falls das Wasser nicht abläuft, bedeutet dies, dass
das Eis noch nicht vollständig geschmolzen ist. In
diesem Fall müssen Sie noch weiter warten.
34
Zulaufschlauch
50 -60 °C
Page 80

35
FEHLERBEHEBUNG
DE
• Ihre Waschmaschine ist mit einem automatischen Fehlerüberwachungssystem zur Erkennung und Diagnose
von Problemen in einem frühen Stadium ausgestattet. Falls Ihre Waschmaschine nicht ordnungsgemäß
oder überhaupt nicht funktioniert, prüfen Sie die folgenden Punkte, bevor Sie das Servicecenter anrufen:
Diagnoseprobleme
Symptome Ursache Lösung
Klapperndes und
klirrendes Geräusch
Möglicherweise befinden sich
Fremdkörper, wie etwa Münzen
oder Sicherheitsnadeln, in der
Trommel oder der Pumpe.
• Kontrollieren Sie alle Taschen, um
sicherzustellen, dass sie alle leer sind.
Elemente wie Laschen, Streichhölzer,
Münzen und Schlüssel können Ihre
Waschmaschine und Ihre Kleidung
beschädigen.
• Schließen Sie Reißverschlüsse, Haken
und Kordelzüge, um zu verhindern,
dass diese Elemente an anderen
Kleidungsstücken hängenbleiben oder
sich darin verwickeln.
Klopfendes Geräusch
Eine zu schwer beladene Trommel
kann ein klopfendes Geräusch
verursachen. Das ist normal.
• Wenn das Geräusch weiterhin vorkommt,
ist die Waschmaschine eventuell nicht
richtig ausgewuchtet. Halten Sie das Gerät
an und verteilen Sie die Wäsche in der
Trommel neu.
Vibrierendes
Geräusch
Wurden alle Transportschrauben
und die Trommelhalterung
entfernt?
• Falls dies nicht während des
Aufstellvorgangs geschehen ist, schlagen
Sie in der Installationsanweisung nach,
wie man die Transportschrauben entfernt.
Stehen alle Füße fest auf dem
Boden?
• Stellen Sie sicher, dass das
Haushaltsgerät komplett waagerecht steht
(mit einer Wasserwaage).
Wasser tritt aus
Die Zulaufschläuche oder der
Ablaufschlauch am Wasserhahn
oder an der Waschmaschine sind
locker.
• Schlauchanschlüsse kontrollieren und ggf.
festziehen.
Die Ablaufrohre im Haus sind
verstopft.
• Verstopfung in den Ablaufrohren
beseitigen. Wenden Sie sich ggf. an einen
Klempner.
Übermäßige
Schaumbildung
Zu viel Waschmittel oder
nicht geeignetes Waschmittel
kann übermäßiges Schäumen
verursachen, das zum Austreten
von Wasser führt.
• Stellen Sie sicher, dass die vom Hersteller
empfohlene Menge Waschmittel
verwendet wird.
Page 81

Symptome Ursache Lösung
Es gelangt kein
Wasser in die
Waschmaschine
oder es kommt nur
langsam an
Wasser in der
Waschmaschine läuft
nicht ab oder läuft
nur langsam ab
Waschmaschine
startet nicht
Waschmaschine
schleudert nicht
Der Wasserdruck am Aufstellort
ist unzureichend.
Der Wasserhahn für den Zulauf ist
nicht vollständig geöffnet.
Wasserzulaufschlauch oder
-schläuche hat (haben)
Knickstellen.
Der Filter des Zulaufschlauchs
(der Zulaufschläuche) ist
verstopft.
Ablaufschlauch ist geknickt oder
verstopft.
Der Filter am Ablauf ist verstopft. • Reinigen Sie den Filter am Ablauf.
Möglicherweise ist das Netzkabel
nicht eingesteckt oder die
Verbindung ist locker.
Haussicherung
herausgesprungen, Trennschalter
ausgelöst oder es kam zu einem
Stromausfall.
Der Wasserhahn für den Zulauf ist
nicht geöffnet.
Kontrollieren Sie, ob die Tür
richtig geschlossen ist.
• Versuchen Sie es an einem anderen
Wasserhahn im Haus.
• Öffnen Sie den Wasserhahn vollständig.
• Schlauch gerade verlegen.
• Kontrollieren Sie den Filter des
Zulaufschlauchs.
• Ablaufschlauch reinigen und gerade
verlegen.
• Achten Sie darauf, dass der Stecker
genau in die Wandsteckdose passt.
• Trennschalter wieder zurücksetzen
oder Sicherung auswechseln. Kapazität
der Sicherung nicht erhöhen. Falls
das Problem eine Überlastung des
Stromkreises ist, lassen Sie dies von
einem qualifizierten Elektriker beheben.
• Drehen Sie den Wasserhahn für den
Zulauf auf.
• Schließen Sie die Tür und drücken Sie
die Taste Start/Pause. Nach Drücken
der Taste Start/Pause kann es kurze
Zeit dauern, bis die Waschmaschine
mit dem Schleudern beginnt. Die Tür
muss geschlossen sein, bevor der
Schleudervorgang beginnen kann.
Legen Sie noch 1 oder 2 gleichartige
Kleidungsstücke in die Trommel, damit die
Last besser ausgeglichen wird. Ordnen
Sie die Wäsche in der Trommel neu an,
damit ein ordnungsgemäßes Schleudern
ermöglicht wird.
DE
36
Page 82

Symptome Ursache Lösung
• Kontrollieren Sie, ob das Symbol
‘Türsicherung’ aufleuchtet. Nachdem
das Symbol ‘Türsicherung’ erloschen ist,
können Sie die Tür sicher öffnen.
• Dies ist normal. Die auf der Anzeige
angezeigte Zeit ist nur ein Schätzwert. Die
tatsächliche Zeit kann variieren.
• Beachten Sie die Anweisungen des
Weichspülerherstellers damit die richtige
Menge verwendet wird. Den maximalen
Füllstand nicht überschreiten.
• Befolgen Sie die Anleitungen des
Waschmittelherstellers.
• Schließen Sie die Waschmittelschublade
langsam. Öffnen Sie die Schublade
während des Waschgangs nicht.
• Gerät nicht überladen. Kontrollieren Sie,
ob die Waschmaschine ordnungsgemäß
abpumpt, damit sie der Wäsche die
entsprechende Wassermenge entziehen
kann. Es sind zu wenig Kleidungsstücke
in der Trommel damit sie sich ordentlich
drehen kann. Ein paar Handtücher dazu
geben.
• Drehen Sie den Wasserzulaufhahn zu.
Tür öffnet sich nicht
Dauer des
Waschgangs
verzögert
Überlaufen von
Weichspüler
Weichspüler wurde
zu früh ausgegeben
Probleme beim
Trocknen
Sobald die Waschmaschine
gestartet hat, kann die Tür aus
Sicherheitsgründen nicht geöffnet
werden.
Wenn eine Unwucht
erkannt wird oder wenn das
Schaumbeseitigungsprogramm
läuft, verlängert sich die
Waschdauer.
Zu viel Weichspüler kann zum
Überlaufen führen.
Zu viel Weichspüler kann
dazu führen, dass er zu früh
ausgegeben wird.
Kontrollieren Sie den
Wasserzulaufhahn.
DE
37
Page 83

Fehlermeldungen
Symptome Ursache Lösung
Der Wasserdruck am Aufstellort ist
unzureichend.
Die Wasserhähne für den Zulauf sind
nicht vollständig geöffnet.
Wasserzulaufschlauch oder -schläuche
hat (haben) Knickstellen.
Der Filter des Zulaufschlauchs (der
Zulaufschläuche) ist verstopft.
Falls es am Aqua Stop-Zulaufschlauch
zu einer Leckage kommt, leuchtet die
Anzeige
Dies kann je nach Modell variieren.
Zu wenig Wäsche in der Trommel.
Die Trommel läuft unrund.
Das Haushaltsgerät verfügt über ein
Erkennungs- und Ausgleichssystem
für Unwucht. Wenn einzelne, schwere
Gegenstände in die Trommel gegeben
werden (z. B. Badvorleger, Bademantel
usw.) kann das Gerät den Schleudergang
anhalten oder den Schleudergang sogar
komplett unterbrechen.
Falls die Wäsche am Ende des
Programms immer noch zu nass ist,
geben Sie kleinere Wäschestücke hinzu,
um die Beladung auszugleichen, und
wiederholen Sie den Schleudergang.
rot auf.
• Versuchen Sie es an einem anderen
Wasserhahn im Haus.
• Öffnen Sie den Wasserhahn vollständig.
• Schlauch (Schläuche) gerade verlegen.
• Kontrollieren Sie den Filter des
Zulaufschlauchs.
• Verwenden Sie den Aqua Stop-
Zulaufschlauch.
• Legen Sie noch 1 oder 2 gleichartige
Kleidungsstücke in die Trommel, damit die
Last besser ausgeglichen wird.
• Legen Sie noch 1 oder 2 gleichartige
Kleidungsstücke in die Trommel, damit die
Last besser ausgeglichen wird.
• Ordnen Sie die Wäsche in der Trommel
neu an, damit ein ordnungsgemäßes
Schleudern ermöglicht wird.
• Ordnen Sie die Wäsche in der Trommel
neu an, damit ein ordnungsgemäßes
Schleudern ermöglicht wird.
DE
38
Page 84

Symptome Ursache Lösung
Ablaufschlauch ist geknickt oder
verstopft.
Der Filter am Ablauf ist verstopft. • Reinigen Sie den Filter am Ablauf.
• Ablaufschlauch reinigen und gerade
verlegen.
DE
Stellen Sie sicher, dass die Tür nicht
geöffnet ist.
Steuerungsfehler.
Aufgrund eines fehlerhaften Wasserhahns
ist zu viel Wasser eingelaufen.
Störung am Wasserfüllstandsensor.
Überlastung des Motors.
Wasser tritt aus. • Wenden Sie sich an den Kundendienst.
Maschine trocknet nicht • Wenden Sie sich an den Kundendienst.
• Schließen Sie die Tür vollständig. Falls
, , nicht erlischt, wenden Sie sich
an den Kundendienst.
• Ziehen Sie den Netzstecker aus der
Steckdose und wenden Sie sich an den
Kundendienst.
• Schließen Sie den Wasserhahn.
• Ziehen Sie den Netzstecker aus der
Steckdose.
• Wenden Sie sich an den Kundendienst.
• Schließen Sie den Wasserhahn.
• Ziehen Sie den Netzstecker aus der
Steckdose.
• Wenden Sie sich an den Kundendienst.
• Lassen Sie die Waschmaschine
30 Minuten lang stehen und den Motor
abkühlen. Starten Sie anschließend das
Programm neu.
39
Page 85

GARANTIE
DIESE EINGESCHRÄNKTE GARANTIE GILT NICHT FÜR FOLGENDES:
• Kundendienstfahrten zur Auslieferung, Abholung, Installation oder Reparatur des Geräts; Unterweisung
des Kunden in der Bedienung des Geräts; Reparatur oder Ersatz von Sicherungen oder Korrekturen an der
Verkabelung oder den Rohrleitungen oder Korrektur nach nicht autorisierten Reparaturen/Installationen.
• Ausfall des Geräts während Stromausfällen und Unterbrechungen oder unangemessener Stromversorgung.
• Beschädigung aufgrund von leckenden oder geborstenen Wasserrohren, eingefrorenen Wasserrohren,
verengten Zuleitungen, nicht angemessener oder unterbrochener Wasserversorgung oder nicht
angemessener Versorgung mit Luft.
• Beschädigung aufgrund des Betriebs des Geräts in korrodierender Umgebung oder entgegen den
Anweisungen, die in der Bedienungsanleitung für das Gerät aufgeführt sind.
• Beschädigung des Geräts durch Unfälle, Schädlinge und Ungeziefer, Blitzschlag, Wind, Brand,
Überflutungen oder durch Höhere Gewalt.
• Beschädigung oder Ausfall, die durch eine nicht autorisierte Änderung oder Abwandlung verursacht
werden, oder falls es anderweitig als für den dafür vorgesehenen Zweck eingesetzt wird, oder eventuelle
Wasserundichtigkeiten, wenn das Gerät nicht ordnungsgemäß angeschlossen wurde.
• Beschädigung oder Ausfall durch falsche Strom-, Spannungs- oder Rohrleitungswerte, kommerzieller oder
industrieller Einsatz, oder die Verwendung von Zubehör, Bauteilen oder verbrauchbaren Reinigungsmitteln,
die von LG nicht genehmigt sind.
• Beschädigungen, die durch Transport und Handhabung verursacht werden, einschließlich Kratzer, Beulen,
Späne und/oder Beschädigung der Oberfläche Ihres Geräts, es sei denn, eine solche Beschädigung ist auf
Fehler im Material oder in der Verarbeitung zurückzuführen.
• Beschädigung oder fehlende Teile an einem Ausstellungsstück, einem Gerät ohne Verpackung, einem mit
Rabatt verkauften oder aufbereiteten Gerät.
• Geräte, an denen die Original-Seriennummern entfernt oder verändert wurden oder die nicht einwandfrei
zuzuordnen sind. Die Modell- und Seriennummern sind zusammen mit dem originalen Kaufbeleg für die
Überprüfung der Garantie erforderlich.
• Anstieg des Strom- und Wasserverbrauchs und zusätzliche Kosten seitens des Versorgungsunternehmens.
• Reparaturen, wenn Ihr Gerät nicht für den normalen Gebrauch im Haushalt oder abweichend von den
Anweisungen, die in der Bedienungsanleitung für das Gerät aufgeführt sind, eingesetzt wird.
• Kosten in Zusammenhang mit der Abholung Ihres Geräts zuhause, wenn es repariert werden muss.
• Der Abbau und die Neuinstallation des Geräts, wenn dieses an einem nicht zugänglichen Standort
aufgestellt ist oder nicht in Übereinstimmung mit den veröffentlichten Anweisungen für die Installation,
einschließlich den Bedienungs- und Installationshandbüchern von LG, aufgestellt wurde.
• Beschädigungen aufgrund von Missbrauch, unsachgemäßem Gebrauch, nicht ordnungsgemäßer
Installation, Reparatur oder Wartung. Zu nicht ordnungsgemäßer Reparatur gehört die Verwendung von
Teilen, die nicht von LG genehmigt oder spezifiziert sind.
DE
40
Page 86

Außergewöhnliche Vibrationen
oder Geräusche, die
hervorgerufen werden, weil die
Transportschrauben oder die
Trommelhalterung nicht entfernt
wurden.
Trommelhalterung
Unterlage
aus Karton
Transport-
schraube
DE
Transportschrauben
und Trommelhalterung
entfernen.
Undichtigkeit durch Schmutz
(Haare, Fusseln) an Dichtung
und Türglas.
Kein Ablauf aufgrund von
Verstopfung des Pumpenfilters.
Kein Wasserzulauf, weil die
Filter am Wassereinlassventil
verstopft sind oder die
Wasserzulaufschläuche
Knickstellen haben.
Kein Wasserzulauf, weil zu viel
Waschmittel verwendet wird.
Nach Abschluss des
Waschvorgangs ist die Wäsche
heiß oder warm, weil die
Zulaufschläuche vertauscht
angeschlossen wurden.
Waschmittelschublade
Kaltwasseranschluss
Einlassfilter
Kalt Heiß
Warmwasseranschluss
Reinigen Sie die Dichtung
und das Türglas.
Reinigen Sie den
Pumpenfilter.
Reinigen Sie den Filter
am Einlassventil oder
installieren Sie die
Wasserzulaufschläuche
neu.
Reinigen Sie die
Waschmittelschublade.
Schließen Sie die
Zulaufschläuche korrekt
an.
Es wird kein Wasser gezogen,
weil der Wasserhahn nicht
aufgedreht ist.
Wasserhahn
Drehen Sie den
Wasserhahn auf.
41
Page 87

DE
Undichtigkeit wird verursacht
durch nicht ordnungsgemäß
angeschlossenen
Ablaufschlauch oder
verstopften Ablaufschlauch.
Leckage wird durch einen
nicht ordnungsgemäß
angeschlossenen
Wasserzulaufschlauch
oder die Verwendung von
Zulaufschläuchen anderer
Marken verursacht.
Der Fehler in der Stromzufuhr
wird durch eine lockere
Verbindung des Netzkabels
oder ein Problem in der
Steckdose verursacht.
Kundendienstfahrten zur
Anlieferung, Abholung,
Installation des Geräts oder
zur Unterweisung des Kunden
in der Bedienung des Geräts.
Abbau und Neuinstallation des
Geräts.
Wenn nicht alle Schrauben
ordnungsgemäß montiert sind,
kann dies starke Vibrationen
verursachen (nur Modell mit
Sockel).
Winkelschlauchführung
Befestigungsband
Wasserwaage
Schließen Sie den
Ablaufschlauch nochmals
an.
Schließen Sie den
Zulaufschlauch korrekt an.
Netzkabel nochmals
anschließen oder die
Steckdose auswechseln.
Die Garantie umfasst
ausschließlich Fehler
in der Herstellung.
Kundendienstarbeiten, die
auf einer unsachgemäßen
Installation basieren, sind
nicht eingeschlossen.
Montieren Sie 4
Schrauben an jeder Ecke
(insgesamt 16 Stk.).
Geräusch (pochend) durch
schwappendes Wasser, wenn
die Waschmaschine mit Wasser
gefüllt wird.
42
Wasser
mit
hohem
Druck
Schlag
Lautes
Geräusch
Natürlicher
Wasserfluss
Plötzliche
Unterbrechung des
Wasserflusses
Stellen Sie den
Wasserdruck durch
Zudrehen des
Wasserventils oder
Wasserhahns im Haus
ein.
Page 88

Betriebsdaten
DE
Produktdatenblatt Verordnung (EU) Nr. 1061/2010
Warenzeichen des Herstellers LG
Modellidentifikationsnummer des Herstellers
F H/1 4 G6/G7
Nennkapazität 8/7 kg
Energieeffizienzklasse A+++
“EU-Umweltzeichen” gemäß Verordnung (EG) Nr. 66/2010 Nein
Jährlicher Energieverbrauch (AEC) in kWh/Jahr auf der Grundlage von
220 Standard-Waschzyklen für 60 °C- und 40 °C- Koch-/Buntwäsche
bei vollständiger Befüllung und Teilbefüllung sowie dem Verbraucher
der Betriebsarten mit geringer Leistungsaufnahme. Der tatsächliche
Energieverbrauch hängt von der Art der Nutzung des Geräts ab.
137/122 kWh/
Jahr
Energieverbrauch
Für Standard 60 °C-Koch-/Buntwäsche bei vollständiger Befüllung
Für Standard 60 °C-Koch-/Buntwäsche bei Teilbefüllung
Für Standard 40 °C-Koch-/Buntwäsche bei Teilbefüllung
0.70/0.60
0.52/0.48
0.42/0.39
kWh
kWh
kWh
Gewichtete Leistungsaufnahme im Aus-Zustand und im unausgeschalteten
Zustand
0.45 W
Gewichteter jährlicher Wasserverbrauch (AWC) in Liter/Jahr auf der
Grundlage von 220 Standard-Waschzyklen für 60°C- und 40°C Koch-/
Buntwäsche bei vollständiger Befüllung und Teilbefüllung. Der tatsächliche
Wasserverbrauch hängt von der Art der Nutzung des Geräts ab.
Liter/
Jahr
Schleudereffizienzklasse auf einer Skala von G (geringste Effizienz) bis A
(höchste Effizienz)
A
Maximale Schleuderdrehzahl beim Standardprogramm „Koch-Buntwäsche
60 °C“ bei vollständiger Befüllung oder beim Standardprogramm
„Koch-/Buntwäsche 40 °C“ bei Teilbefüllung, wobei der niedrigere Wert
maßgeblich ist. Restfeuchte beim Standardprogramm „Koch-/Buntwäsche
60 °C“ bei vollständiger Befüllung oder beim Standardprogramm „Koch-/
Buntwäsche 40 °C“ bei Teilbefüllung, wobei der höhere Wert maßgeblich
ist.
1400 U/Min.
44 %
Die Standard-Waschprogramme, auf die sich die Angaben auf dem Etikett
und im Produktdatenblatt beziehen, eignen sich zur Reinigung normal
verschmutzter Baumwollwäsche. Bei diesen Waschprogrammen handelt es
sich zudem um die effizientesten Programme in Bezug auf den Strom- und
Wasserverbrauch;
„Baumwolle+ 60 °C/40 °C+Intensiv“
Programmdauer
Für Standard 60 °C-Koch-/Buntwäsche bei vollständiger Befüllung
Für Standard 60 °C-Koch-/Buntwäsche bei Teilbefüllung
Für Standard 40 °C-Koch-/Buntwäsche bei Teilbefüllung
312/292
259/239
254/234
Min.
Min.
Min.
Dauer des unausgeschalteten Zustands 10 Min.
Luftschallemissionen in dB(A) re 1 pW, auf die nächstliegende Ganzzahl
gerundet, beim Waschen und Schleudern im Standardprogramm „Koch-/
Buntwäsche 60 °C“ bei vollständiger Befüllung.
dB(A)
Freistehender Waschvollautomat
A+++
Nein
A+++
Nein
8/7 8/7
10500/9300
52
75
137/122
0.70/0.60
0.52/0.48
0.42/0.39
B
1200
53
312/292
259/239
254/234
10
10500/9300
52
74
137/122
0.70/0.60
0.52/0.48
0.42/0.39
B
1000
53
312/292
259/239
254/234
10
10500/9300
52
74
T/Q D(N)(W)
(0~9)(H)
F H/1 2 G6/G7
T/Q D(N)(W)
(0~9)(H)
F H/1 0 G6/G7
T/Q D(N)(W)
(0~9)(H)
F14W7QDN1H
F14W8TDN0H
43
Page 89

Anmerkung
Page 90

UPORABNIŠKI PRIROČNIK
PRALNI STROJ
Pred začetkom namestitve pozorno preberite ta navodila. To bo
poenostavilo namestitev in zagotovilo, da je izdelek pravilno ter
varno nameščen. Po namestitvi shranite ta navodila v bližini izdelka
za poznejšo uporabo.
F H/1 4 G6/G7 T/Q D(N)(W)(0~9)(H)
F H/1 2 G6/G7 T/Q D(N)(W)(0~9)(H)
F H/1 0 G6/G7 T/Q D(N)(W)(0~9)(H)
F14W7QDN1H, F14W8TDN0H
www.lg.com
Page 91

VSEBINSKO KAZALO
VARNOSTNA NAVODILA .......................................................... 3
Pomembna varnostna navodila ................................................................... 3
Odstranjevanje vašega starega aparata ......................................................8
NAMESTITEV ............................................................................9
Deli ..............................................................................................................9
Dodatna oprema .......................................................................................... 9
Specifikacije ............................................................................................... 10
Zahteve mesta namestitve ........................................................................ 11
Odstranjevanje embalaže in transportnih vijakov ...................................... 12
Uporaba protizdrsnih podložk (dodatna možnost) ..................................... 13
Lesena tla (viseča tla) ................................................................................ 13
Poravnava naprave ...................................................................................14
Povezovanje vodovodne cevi .................................................................... 14
Namestitev odtočne cevi ...........................................................................17
DELOVANJE ............................................................................ 18
Uporaba pralnega stroja ............................................................................ 18
Razvrščanje perila ..................................................................................... 19
Dodajanje izdelkov za čiščenje .................................................................. 20
Nadzorna plošča ........................................................................................ 22
Tabela programov ......................................................................................23
Možnost Program ......................................................................................27
Ta priročnik lahko vsebuje slike ali
vsebino, ki se razlikuje od modela, ki ste
ga kupili.
Ta priročnik lahko proizvajalec
dopolnjuje.
PAMETNE FUNKCIJE ............................................................. 29
Uporaba funkcije Smart Diagnosis™ ......................................................... 29
VZDRŽEVANJE ....................................................................... 30
Čiščenje pralnega stroja ............................................................................ 30
Čiščenje filtra dotoka vode ........................................................................30
Čiščenje filtra odtočne črpalke ................................................................... 31
Čiščenje dozirnega predala ....................................................................... 32
Čiščenje bobna (opcijsko) .........................................................................32
Pozor pri zmrzovanju pozimi .....................................................................33
ODPRAVLJANJE TEŽAV ........................................................ 35
Diagnosticiranje težav ...............................................................................35
Sporočila o napakah .................................................................................. 38
GARANCIJA ............................................................................ 40
PODATKI O DELOVANJU ....................................................... 43
Page 92

VARNOSTNA NAVODILA
Naslednja varnostna navodila so namenjena preprečevanju
nepredvidenih tveganj ali škode zaradi nevarnega ali
nepravilnega delovanja naprave.
Navodila so ločena na oznaki 'OPOZORILO' in 'POZOR', kot je
opisano v nadaljevanju.
Prikazani simboli nakazujejo stanja in dejavnosti, ki
lahko povzročijo tveganje. Da bi se izognili tveganju,
sledite navodilom in skrbno preberite del s tem
simbolom.
OPOZORILO
Označuje, da lahko zaradi neupoštevanja navodil pride do
hudih poškodb ali smrti.
POZOR
Označuje, da lahko zaradi neupoštevanja navodil pride do
lažjih poškodb ali poškodb naprave.
Pomembna varnostna navodila
SL
OPOZORILO
Da bi pri uporabi naprave zmanjšali nevarnost eksplozije,
požara, električnega udara ali opeklin, upoštevajte osnovne
varnostne ukrepe, vključno z naslednjimi:
Otroci v gospodinjstvu
Naprave ne smejo uporabljati osebe (vključno z otroki) z
zmanjšanimi telesnimi, čutnimi ali duševnimi sposobnostmi ali
osebe s pomanjkanjem izkušenj in znanja, razen če jih pri uporabi
nadzoruje ali jim svetuje oseba, odgovorna za njihovo varnost.
Nadzorujte otroke in poskrbite, da se z napravo ne bodo igrali.
3
Page 93

SL
Za uporabo v Evropi:
Napravo lahko uporabljajo otroci, stari 8 let in več, ter osebe z
zmanjšanimi telesnimi, čutnimi ali duševnimi sposobnostmi ali
osebe s pomanjkanjem izkušenj in znanja, če imajo nadzor ali
napotila glede varne uporabe ter se zavedajo nevarnosti uporabe.
Otroci se ne smejo igrati z napravo. Otroci naprave ne smejo čistiti
ali vzdrževati brez nadzora.
Otrokom, mlajšim od treh let, preprečite dostop do naprave, razen
če niso pod neprestanim nadzorom.
Namestitev
•Naprave nikoli ne uporabljajte, če je poškodovana, deluje
nepravilno, je delno razstavljena ali ima manjkajoče ali zlomljene
dele, vključno s poškodovanim kablom ali z vtičem.
•Napravo naj prenašata dve ali več oseb s trdnim oprijemom.
•Naprave ne postavljajte na vlažna in prašnata mesta. Naprave
ne namestite ali hranite zunaj ali na katerem koli mestu, kjer bi
bila podvržena vremenskih razmeram, kot so neposredna sončna
svetloba, veter, dež ali temperature pod ničlo.
•Zategnite odtočno cev, da preprečite izločanje.
•Če je napajalni kabel poškodovan ali vtikač razrahljan, napajalnega
kabla ne uporabljajte. Obrnite se na pooblaščen servisni center.
•S to napravo ne uporabljajte večdelnih vtičnic, podaljška
napajalnega kabla ali adapterja.
4
Page 94

SL
•Naprave ne namestite pred vrati, ki se zaklepajo, drsnimi vrati ali
vrati s tečajem na nasprotni strani te naprave tako, da ni možno v
celoti odpreti vrat naprave.
•Naprava mora biti ozemljena. V primeru okvare ali nepravilnega
delovanja bo ozemljitev zmanjšala nevarnost električnega udara, ki
električnemu toku zagotavlja pot najmanjšega odpora.
•Naprava je opremljena z napajalnim kablom, ki ima prevodnik
ozemljitve in ozemljitveni vtič. Vtič priključite v ustrezno vtičnico, ki
je nameščena in ozemljena v skladu z vsemi lokalnimi predpisi ter
odloki.
•Nepravilna povezava prevodnika ozemljitve lahko povzroči
nevarnost električnega udara. Kadar dvomite v pravilno ozemljitev
naprave, se posvetujte z usposobljenim električarjem ali s
servisnim osebjem.
•Ne spreminjajte napajalnega vtiča, ki je priložen napravi. Če se
vtič ne prilega vtičnici, naj usposobljeni električar namesti ustrezno
vtičnico.
Delovanje
•Ne poskušajte ločiti plošč ali razstaviti naprave. Pri upravljanju
naprave s pomočjo nadzorne plošče ne uporabljajte nobenih ostrih
predmetov.
•Ne popravljajte ali menjajte katerih koli delov naprave. Vsa
popravila in vzdrževanje mora opraviti usposobljeno servisno
osebje, razen če je drugače priporočeno v pričujočih Navodilih za
uporabo. Uporabljajte le odobrene tovarniške dele.
5
Page 95

•Živih živali, kot so hišni ljubljenčki, ne postavljajte v napravo.
•Območje pod napravo in okrog nje ne sme biti v bližini gorljivih
materialov, kot so gaza, papir, krpe, kemikalije itn.
•Vrat naprave ne puščajte odprtih. Otroci se lahko obesijo na vrata
ali splezajo v napravo, kar lahko povzroči škodo ali poškodbe.
•Uporabite novo cev ali komplet cevi, ki je priložen napravi. Ponovna
uporaba starih cevi lahko povzroči puščanje vode in posledično
materialno škodo.
•Med delovanjem naprave nikoli ne segajte vanjo. Počakajte, da se
boben popolnoma ustavi.
•V napravi ne perite ali sušite oblačil, ki so bila čiščena, oprana,
namočena ali popackana z vnetljivimi ali eksplozivnimi snovmi (kot
so vosek, olje, barve, bencin, razmaščevalci, topila za kemično
čiščenje, kerozin, rastlinsko olje, jedilno olje itn.). Zaradi neustrezne
uporabe lahko pride do požara ali eksplozije.
•V primeru poplave izključite vtič in se obrnite na informacijski center
za stranke LG Electronics.
•Vrat ne potiskajte pretirano navzdol, ko so vrata naprave odprta.
•Med programom, ki uporablja visoke temperature, se ne dotikajte
vrat.
•V bližini naprave ne uporabljajte vnetljivih plinov in gorljivih snovi
(benzena, bencina, razredčila, nafte, alkohola itn.).
SL
6
Page 96

SL
•Če odtočna ali dovodna cev v zimskem času zmrzne, jo uporabite
šele, ko se odmrzne.
•Vsa pralna sredstva, mehčalce in belila hranite zunaj dosega otrok.
•Vtiča ali kontrolnikov naprave se ne dotikajte z mokrimi rokami.
•Napajalnega kabla ne upogibajte in nanj ne odlagajte težkih
predmetov.
•V tem stroju ne perite preprog, predpražnikov, čevljev ali odej za
hišne ljubljenčke ali drugih izdelkov, razen oblačil ali rjuh.
•Naprava je namenjena samo uporabi v gospodinjstvu in se ne sme
uporabljati kot prenosna naprava.
•V primeru uhajanja plina (izobutan, propan, zemeljski plin itd.) se
ne dotikajte naprave ali vtiča ter takoj prezračite prostor.
Vzdrževanje
•Po odstranitvi vlage ali prahu vtič previdno priključite v vtičnico.
•Pred čiščenjem odklopite napravo iz vira napajanja. S postavitvijo
nadzorne plošče na OFF ali v položaj stanja pripravljenosti ne
boste odklopili naprave iz vira napajanja.
•Pri čiščenju zunanjosti ali notranjosti naprave nikoli ne pršite z
vodo.
•Naprave nikoli ne izključite z vlečenjem za napajalni kabel. Vtič
vedno trdno primite in ga iztaknite iz vtičnice.
7
Page 97

Odstranjevanje
•Preden zavržete staro napravo, jo izklopite. Da preprečite zlorabe,
odrežite kabel neposredno za napravo.
•Ves embalažni material (plastične vrečke in stiropor) odložite na
mesto izven dosega otrok. Embalaža lahko povzroči zadušitev.
•Preden odstranite ali zavržete to napravo, odstranite vrata, da se
izognete nevarnosti ujetja otrok ali majhnih živali v napravo.
Odstranjevanje vašega starega aparata
• Na izdelku prečrtan simbol smetnjaka opozarja, da je treba odpadne električne in
elektronske izdelke (OEEI) odstranjevati ločeno od ostalih komunalnih odpadkov.
• Odpadni električni izdelki lahko vsebujejo nevarne snovi, zato s pravilnim
odstranjevanjem starega aparata pripomorete k preprečevanju morebitnih negativnih
vplivov na okolje in zdravje ljudi. Vaš stari aparat lahko vsebuje dele, ki bi jih bilo
mogoče uporabiti za popravilo drugih izdelkov, in druge dragocene materiale, ki jih je
mogoče reciklirati in s tem ohranjati omejene vire.
• Vaš aparat lahko odnesete bodisi v trgovino, kjer ste kupili ta izdelek, ali pa se
obrnite na lokalni urad za odstranjevanje odpadkov glede podrobnosti o najbližjem
pooblaščenem zbirnem mestu za OEEI. Za najnovejše informacije za vašo državo si
oglejte www.lg.com/global/recycling.
SL
8
Page 98

NAMESTITEV
3
10
Deli
1
Transportni vijaki
2
Napajalni vtič
Predal
4
Nadzorna plošča
5
Boben
6
Vrata
7
Odtočna cev
8
Odtočni zamašek
9
Filter odtočne črpalke
Vrhnji pokrovček (lokacija
se glede na izdelke lahko
razlikuje)
11
Nastavljive noge
SL
Dodatna oprema
Cev za mrzlo vodo
(1EA) (možnost: vroča
(1EA))
Vijačni ključ Protizdrsne podložke
(opcijsko)
9
Page 99

Specifikacije
SL
Model
F H/1 4 G6/G7 T/Q D(N)(W)(0~9)(H)
F H/1 2 G6/G7 T/Q D(N)(W)(0~9)(H)
F H/1 0 G6/G7 T/Q D(N)(W)(0~9)(H)
F14W7QDN1H, F14W8TDN0H
Zmogljivost pranja 8/7 kg
Napajanje 220‒240 V~, 50 Hz
Dimenzije 600 mm (Š) x 550 mm (G) x 850 mm (V)
Teža naprave 60 kg
Dovoljeni tlak vode 0,1‒1,0 MPa (1,0‒10,0 kgf/cm2)
• Za namene izboljšanja kakovosti naprave se videz in specifikacije lahko spremenijo brez
predhodnega obvestila.
• Za priključitev na vodovodno omrežje ni potrebna dodatna zaščita povratnega toka.
10
Page 100

SL
10 cm 2 cm 2 cm
Zahteve mesta namestitve
Lokacija
Ravna tla : Dovoljen naklon pod celotno
napravo je 1°.
Vtičnica : Biti mora znotraj 1,5 m, in sicer z obeh
strani lokacije naprave.
• Ne preobremenjujte vtičnice z več kot eno
napravo.
Dodaten prostor : Za steno, 10 cm: zadaj/2 cm:
desna in leva stran
• Na napravo nikoli ne postavljajte in na njej ne
shranjujte izdelkov za pranje.
• Ti izdelki lahko poškodujejo površino ali
nadzorno ploščo.
OPOZORILO
• Vtič priključite v ustrezno vtičnico, ki je pravilno
nameščena in ozemljena v skladu z vsemi
lokalnimi predpisi ter odloki.
Postavljanje
• Napravo namestite na ravna, trda tla.
• Prepričajte se, ali preproge, odeje itn. ne
ovirajo kroženja zraka okrog naprave.
• Neravnih tal pod napravo nikoli ne poskušajte
izravnati s kosi lesa, z lepenko ali s podobnimi
materiali.
• Če ni druge rešitve, kot da napravo namestite
poleg plinskega štedilnika ali štedilnika na
drva, morate med napravi vstaviti izolacijo (85
x 60 cm) iz alu folije, in sicer na strani, ki je
obrnjena proti štedilniku ali peči.
• Naprave ne nameščajte v prostorih, kjer lahko
temperatura pade pod ledišče. Zmrznjene
cevi lahko pod pritiskom počijo. Zanesljivost
elektronske nadzorne enote se lahko poslabša
pri temperaturah, nižjih od ledišča.
• Poskrbite, da bo naprava v primeru okvare
nameščena tako, da bo zlahka dostopna
inženirju.
• Ko napravo namestite, prilagodite vse štiri
noge z uporabo vijačnega ključa za transportne
vijake, da zagotovite stabilnost naprave in
približno 20 mm prostora med napravo ter
spodnjim delom katere koli delovne površine.
• Če je naprava dostavljena v zimskem času
in so temperature pod lediščem, jo pred
začetkom delovanja pustite nekaj ur na sobni
temperaturi.
OPOZORILO
• Naprava ni namenjena pomorski uporabi ali
uporabi v mobilnih objektih, kot so počitniške
prikolice, letala itn.
Električna povezava
• Ne uporabljajte podaljška ali dvojnega
adapterja.
• Po uporabi vedno izklopite napravo in oskrbo
z vodo.
• Napravo povežite z ozemljeno vtičnico v skladu
z veljavnimi predpisi ožičenja.
• Naprava mora biti nameščena tako, da je vtič
zlahka dostopen.
• Popravila naprave naj opravlja le usposobljeno
osebje. Popravila, ki jih izvajajo neizkušene
osebe, lahko povzročijo poškodbe ali resne
okvare. Obrnite se na lokalni servisni center.
11
 Loading...