

Page 1

OWNER’S MANUAL
WASHING MACHINE
F14A8YD(1~9)
P/No.: MFL67379124
www.lg.com
Before beginning installation, read these instructions carefully.
This will simplify installation and ensure that the washer is installed
correctly and safely. Leave these instructions near the washer
after installation for future reference.
Page 2
2
Contents....................................2
Product Features......................3
Important safety instructions
Important safety instructions .................4
Basic safety precautions .......................5
Save these instructions.........................6
Safety instructions for use.....................7
Specifications...........................8
Installation
Removing packing ................................9
Removing transit bolts ..........................9
Installation place requirements ...........10
Connecting water supply hose............12
Installation of drain hose .....................14
Leveling...............................................15
How to use washer
Operating washing machine ...............17
Care before washing...........................18
Washing program table.......................19
Drying Program Table.........................20
Extra options .......................................21
Operating data ....................................21
Control panel.......................................22
Additional program..............................23
- Time Delay........................................23
- Medic Rinse ......................................23
- Favorite.............................................23
- Pre Wash ..........................................22
Options................................................24
- Wash.................................................24
- Rinse.................................................24
- Temp.................................................24
- Spin...................................................24
Other functions....................................24
- Spin Only .........................................24
Child Lock ...........................................25
Beep On/Off ........................................25
Tub Clean ...........................................26
Door Lock & Detecting ........................26
Dry ......................................................27
Thank you for buying a LG Fully
Automatic Washing Machine.
Please read your owner’s manual
carefully, it provides instruction on safe
installation, use and maintenance.
Retain it for future reference.
Record the model and serial number of
your washing machine.
Model No.
Serial No.
Date of Purchase
Adding detergent
Adding detergent and fabric softener..29
Maintenance
The water inlet filter.............................31
The drain pump filter ...........................32
Dispenser drawer................................33
The washing drum ..............................34
Cleaning your washer .........................34
Cold conditions ...................................34
Troubleshooting guide
Diagnosing problems ..........................35
Error messages...................................37
Using SMARTDIAGNOSIS™..............38
Terms of warranty ..................39
Contents
Page 3
3
ˆ¡…–¯ˆ ¿„
Inverter Direct Drive system
The advanced Brushless DC motor directly drives the drum without
belt and pulley.
Low noise speed control system
By sensing the amount of load and balance, it evenly distributes load
to minimize the spinning noise level.
Child Lock
The Child Lock prevents children from pressing any button to change
the settings during operation.
More economical with Intelligent Wash system
Intelligent Wash System detects the size of load and water temperature,
and then determines the optimum water level and washing time to
minimize energy and water consumption.
Built-in heater
Internal heater automatically heats the water to the best temperature
on selected cycles.
Protection against creases
With the alternating rotation of the drum, creasing is minimized.
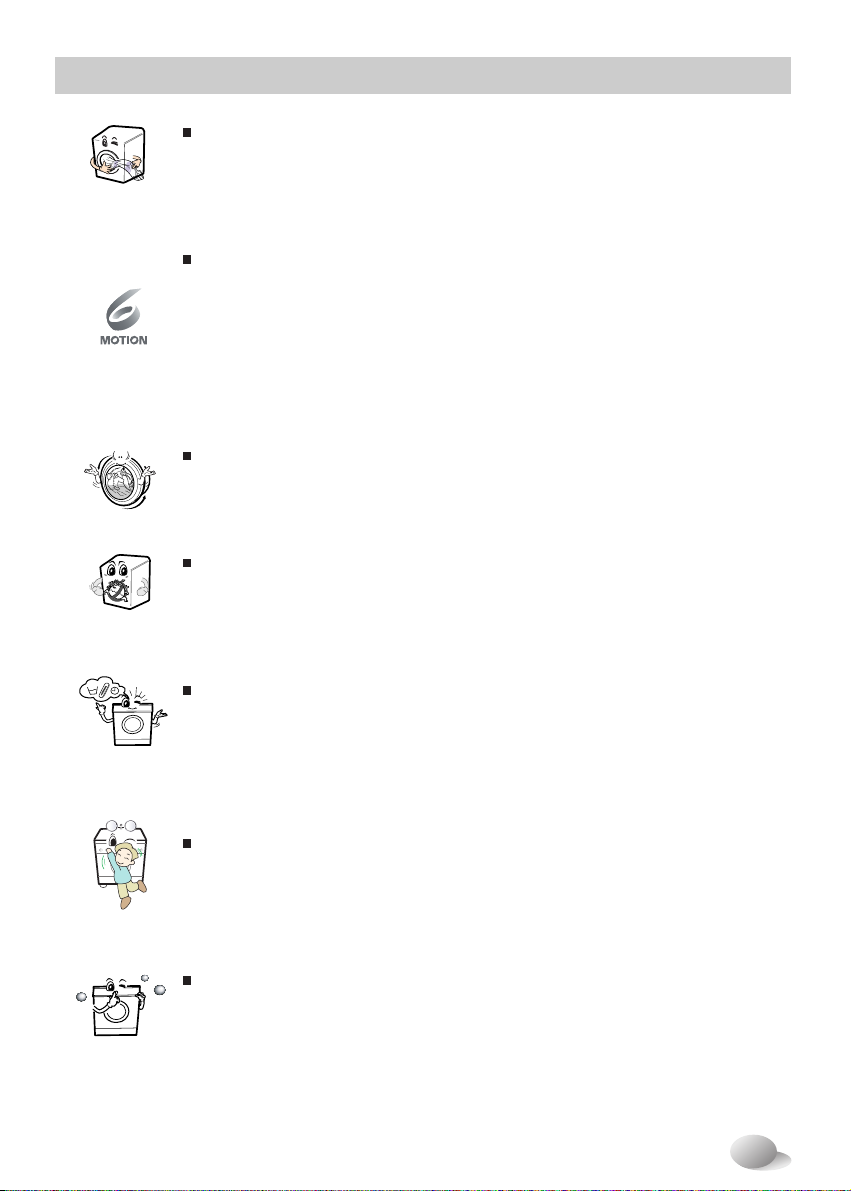
6 Motion
Washer is able to perform various drum actions or a combination of
different actions depending on the wash program selected.
Combined with a controlled spin speed and the ability of the drum to
rotate both left and right, the wash performance of the machine is greatly
improved, giving you perfect results every time.
Product Features
Page 4
4
Important safety instructions
For your safety, the information in this manual must be followed to minimize the risk of fire or
explosion, electric shock, or to prevent property damage, injury to persons, or death.
READ ALL INSTRUCTIONS AND EXPLANATION OF THE INSTALLATION
BEFORE USE.
WARNING
You can be killed or seriously injured if you don’t follow instructions.
Your Safety and the safety of others are very important.
We have provided many important safety messages in this manual and on your appliance.
Always read and obey all safety messages.
This is the safety alert symbol.
This symbol alerts you to potential hazards that can kill or hurt you and others.
All safety messages will follow the safety alert symbol and either the word DANGER,
WARNING or CAUTION.
These words mean:
WARNING
You may be slightly injured or cause damage to the product if you do not follow instructions.
All safety messages will tell you what the potential hazard is, tell you how to reduce the chance
of injury, and tell you what can happen if the instructions are not followed.
CAUTION
You will be killed or seriously injured if you don’t immediately follow instructions.
DANGER
Page 5

5
Important safety instructions
To reduce the risk of fire, electric shock, or injury to persons when using the washer, follow basic
precautions, including the following:
WARNING
• Before installation, check exterior
damages. If it has, do not install.
• Do not install or store the washer
where it will be exposed to the
weather.
• Do not tamper with controls.
• Do not repair or replace any part of
the washer or attempt any servicing
unless specifically recommended in
the user-maintenance instructions or
published user-repair instructions
that you understand and have the
skills to carry out.
• Keep the area underneath and around
your appliances free of combustible
materials such as lint, paper, rags,
chemicals, etc.
• The appliance is not intended for use
by young children or infirm persons
without supervision. Do not allow
children to play on, with, or inside this
or any other appliance.
• Keep small animals away from the
appliance.
• Do not leave the washer door open.
An open door could entice children to hang
on the door or crawl inside the washer.
• Never reach into washer while it is
moving. Wait until the drum has
completely stopped.
• The laundry process can reduce the flame
retardant of fabrics.
To avoid such a
result, carefully follow the garment
manufacturer’s wash and care
instructions.
• Do not wash or dry articles that have
been cleaned in, washed in, soaked
in, or spotted with combustible or
explosive substances (such as wax,
oil, paint, gasoline, degreasers, drycleaning solvents, kerosene, etc.)
which may ignite or explode. Oil may
remain in the tub after a whole cycle resulting
in fire during drying.
So, do not load oiled clothes.
• Do not slam the washer door closed
or try to force the door open when
locked. This could result in damage to the
washer.
• When the machine runs high
temperature, the front door may be
very hot. Don’t touch it.
• To minimize the possibility of electric
shock, unplug this appliance from the
power supply or disconnect the
washer at the household distribution
panel by removing the fuse or
switching off the circuit breaker
before attempting any maintenance or
cleaning.
• When unplugging power cord, do not
pull out by grasping the cord.
Otherwise, the power cord may be damaged.
• Never attempt to operate this
appliance if it is damaged,
malfunctioning, partially
disassembled, or has missing or
broken parts, including a damaged
cord or plug.
■ Basic safety precautions
Page 6

6
Important safety instructions
■ Basic safety precautions
To reduce the risk of fire, electric shock, or injury to persons when using the washer, follow basic
precautions, including the following:
WARNING
• Before discarding an old machine
unplug it. Render the plug useless.
Cut off the cable directly behind the
appliance to prevent misuse.
• When a product was under water,
Please call service center. There is a
risk of electric shock and fire.
• Appliance connected to the water
mains using new hose-sets. Old hosesets should not be reused.
• To reduce the risk of personal injury,
adhere to all industry recommended
safety procedures including the use
of long sleeved gloves and safety
glasses. Failure to follow all of the safety
warnings in this manual could result in
property, personal injury or death.
• Do not push down the door
excessively, when washer door open.
This could topple over the washer.
■ Save these instructions
Improper connection of the equipment-grounding conductor can result in electric shock.
Check with a qualified electrician or serviceman if you are in doubt as to whether the appliance is
properly grounded. Do not modify the plug provided with the appliance - if it does not fit the
outlet, have a proper outlet installed by a qualified electrician.
GROUNDING INSTRUCTIONS
This appliance must be grounded. In the event of malfunction or breakdown, grounding will
reduce the risk of electric shock by providing a path of least resistance for electric current.
This appliance is equipped with a cord having an equipment-grounding conductor and
grounding plug. The plug must be plugged into an appropriate outlet that is properly installed
and grounded in accordance with all local codes and ordinance.
• Do not use an adapter this will defeat the grounding plug.
• If you don’t have the proper outlet, consult an electrician.
WARNING
Page 7

7
Important safety instructions
To minimize the risk of fire within the inner bowl, the following should be observed:
• Items that have been spotted or
soaked with vegetable or cooking oil
constitute a fire hazard and should
not be placed in a tumble dryer.
Oil-affected items can ignite spontaneously,
especially when exposed to heat sources
such as in a tumble dryer.
The items become warm, causing an
oxidation reaction in the oil. Oxidation
creates heat. If the heat cannot escape, the
items can become hot enough to catch fire.
Piling, stacking or storing oil-affected items
can prevent heat from escaping and so
create a fire hazard. If it is unavoidable that
fabrics that contain vegetable or cooking oil
or have been contaminated by hair care
products be placed in a tumble dryer they
should first be washed in hot water with
extra detergent-this will reduce, but not
eliminate, the hazard.
The ‘cool down’ cycle of tumble dryers
should be used to reduce the temperature of
the items.
They should not be removed from the tumble
dryer or piled or stacked while hot.
• Items that have been previously
cleaned in, washed in, soaked in or
spotted with petrol/gasoline, drycleaning solvents or other flammable
or explosive substances should not
be placed in a tumble dryer. Highly
flammable substances commonly used in
domestic environments include acetone,
denatured alcohol, petrol/gasoline,
kerosene, spot removers (some brands),
turpentine, waxes and wax removers.
• Items containing foam rubber (also
known as latex foam) or similarly
textured rubber like materials should
not be dried in a tumble dryer on a
heat setting. Foam rubber materials can,
when heated, produce fire by spontaneous
combustion.
• Fabric softeners or similar products
should not be used during a drying
cycle, to eliminate the effects of static
electricity unless this practice is specifically
recommended by the manufacturer of the
fabric softener or product.
• Undergarments that contain metal
reinforcements should not be placed
in a tumble dryer.
Damage to the tumble dryer can result if
metal reinforcements come loose during
drying. When available a drying rack could
be used for such items.
• Plastic articles such as shower caps
or babies waterproof napkin covers
should not be placed in a tumble
dryer.
• Rubber-backed articles, clothes fitted
with foam rubber pads, pillows,
rubber boots and rubber-coated
tennis shoes should not be placed in
a tumble dryer.
■ Safety instructions for use
Page 8
8
Specifications
■ Name : Front loading washing machine
■ Power supply : 220 - 240 V~, 50 Hz
■ Size : 600 mm (W) 640 mm (D) 850 mm (H)
■ Weight : 72 kg
■ Max.Watt : 2100 W (Wash) / 1500 W (Dry)
■ Wash capacity : 8 kg (Wash) / 6 kg (Dry)
■ Permissible water pressure : 100 - 1000 kPa (1.0 - 10.0 kgf / cm
2
)
The appearance and specifications may vary without notice to improve the quality of the unit.
(For detergent and
fabric softener)
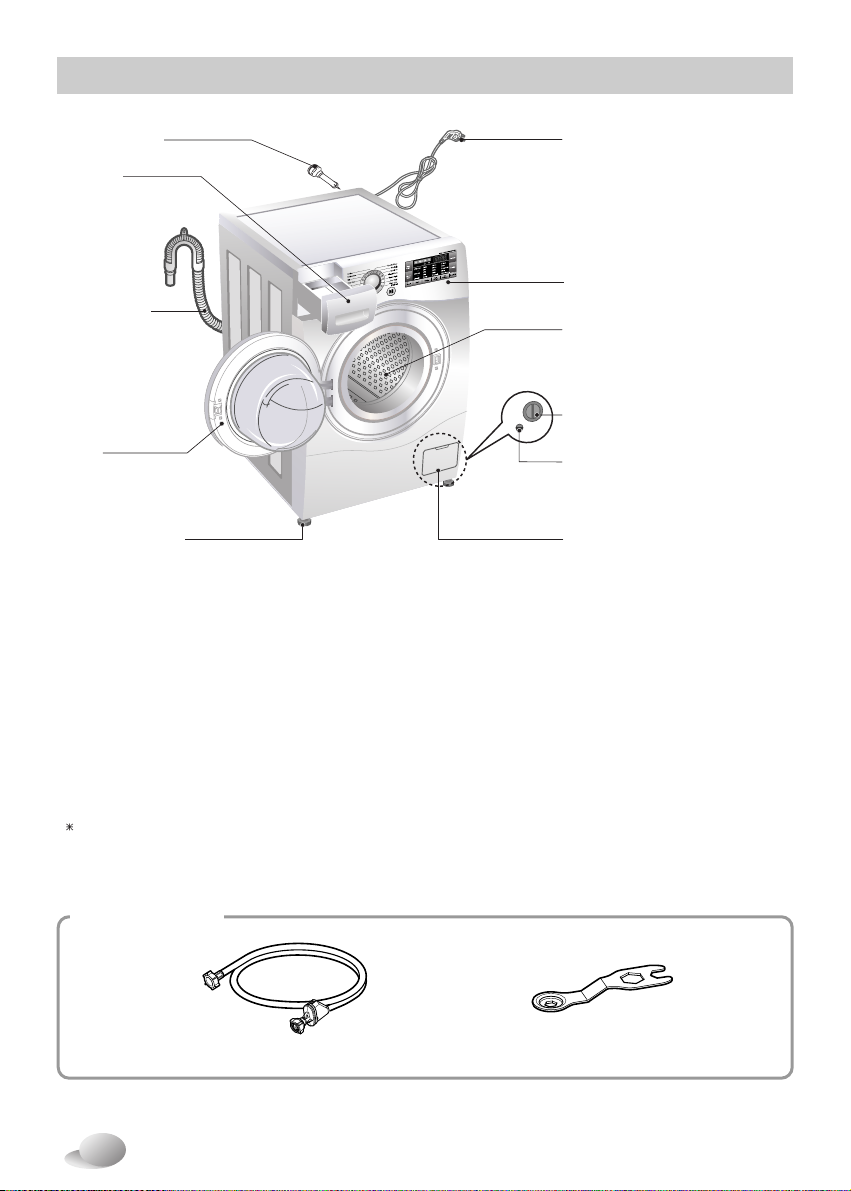
Drawer
Drain hose
Transit bolts
Power plug
Control panel
Drain pump filter
Lower cover cap
• If the supply cord is damaged,
it must be replaced by the
manufacturer or its service agents
or a similarly qualified person in
order to avoid a hazard.
Drum
Door
Drain plug
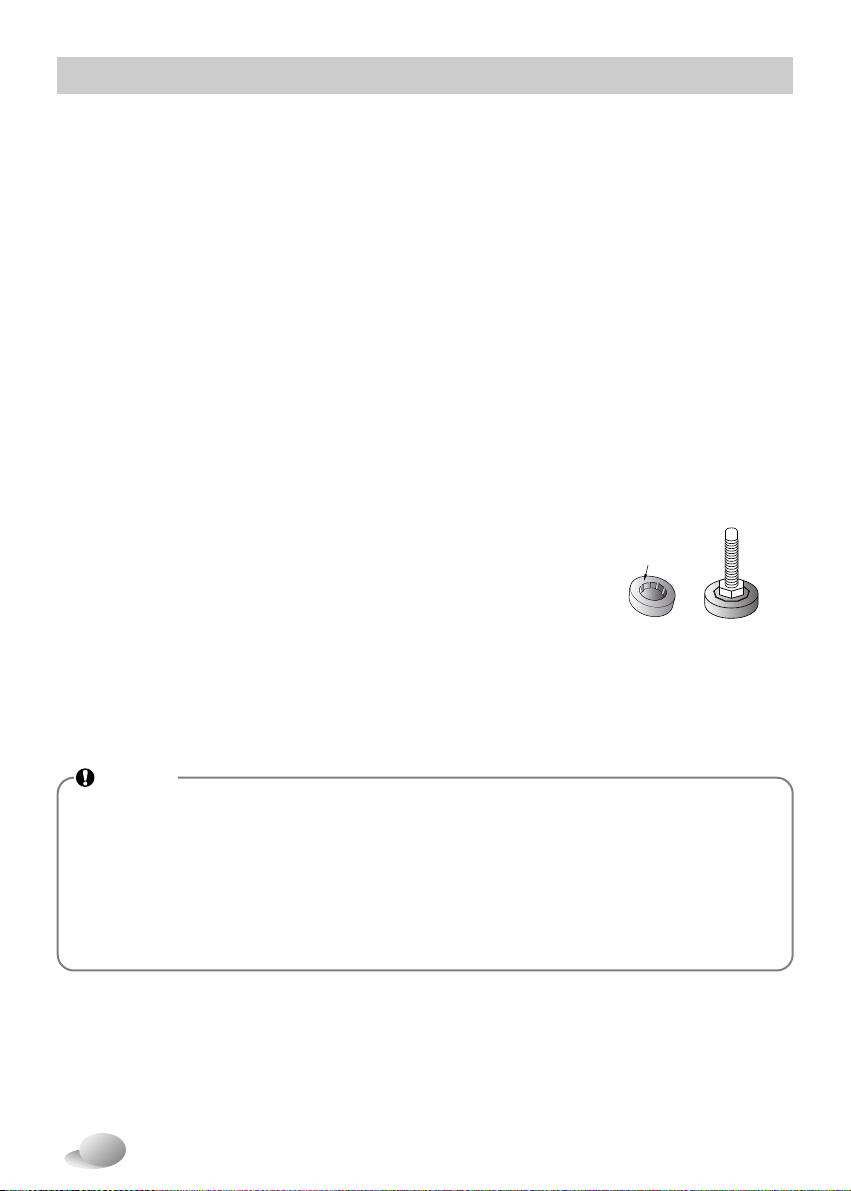
Adjustable feet
■
Accessories
Inlet hose (1EA) Spanner
Page 9
9
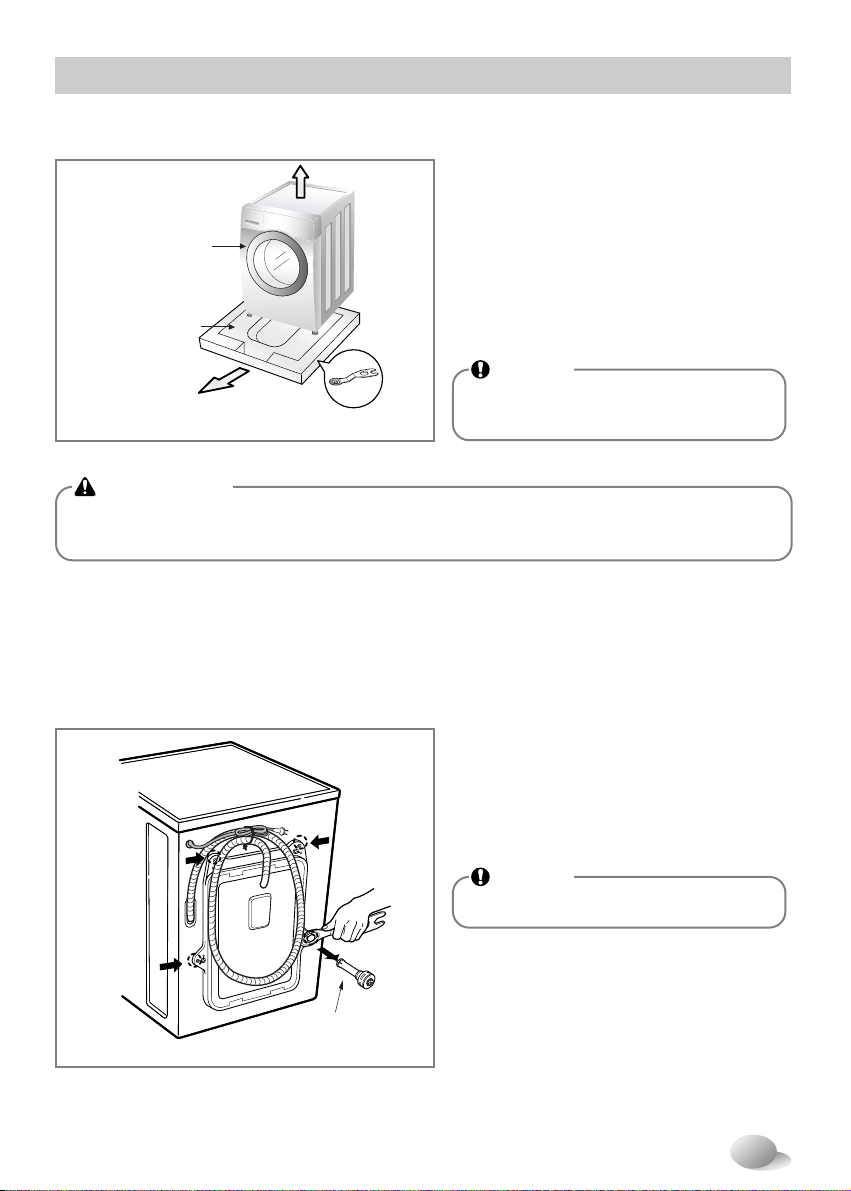
■ Removing packing
1. Remove the cardboard box and
styrofoam packing.
2. Lift the washing machine and remove
the base packing.
3. Remove the tape securing the power
supply cord and drain hose.
4. Remove the inlet hose from the drum.
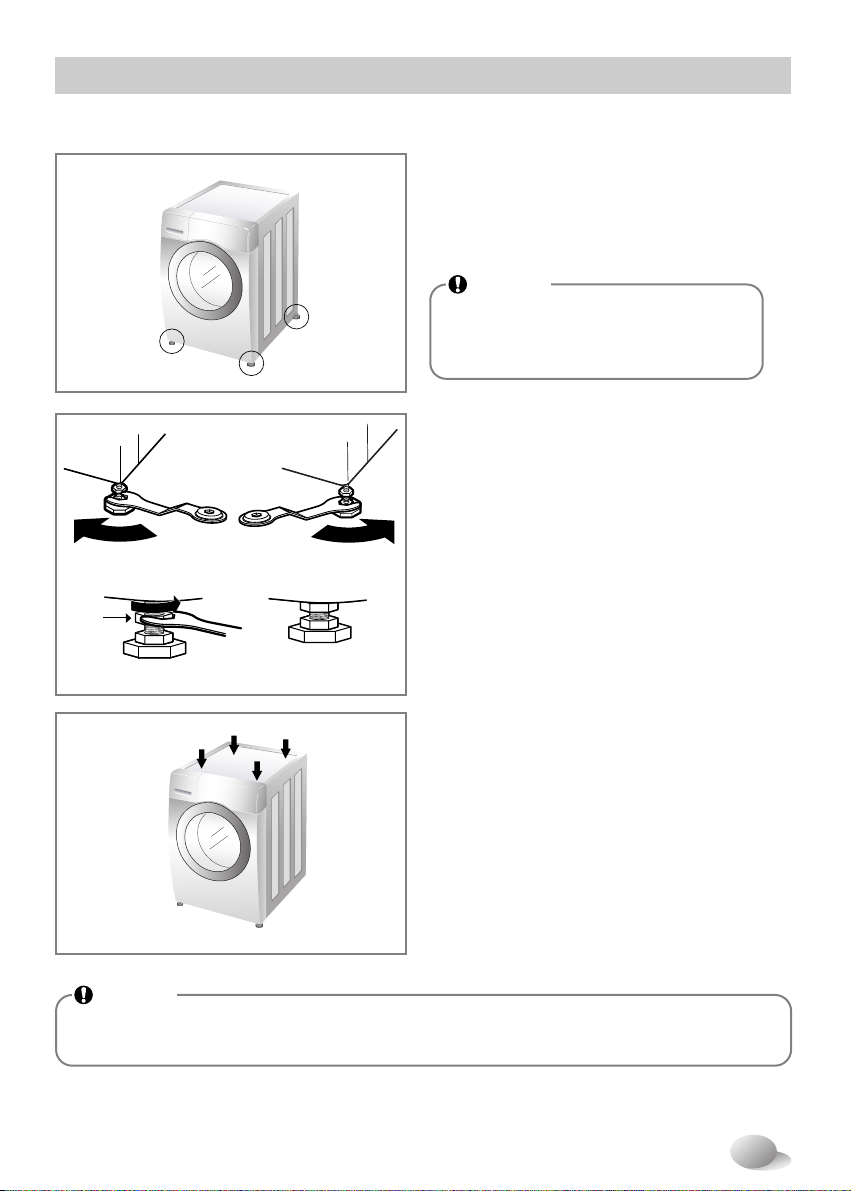
1. Unscrew the 4 bolts with
the spanner supplied.
2. Take out the 4 bolts along with the
rubber bungs by slightly twisting the
bung.
3. Close the holes with the caps supplied.
To prevent internal damage during transport, the 4 special bolts are locked.
Before operating the washer, remove the bolts along with the rubber bungs.
If they are not removed, it may cause heavy vibration, noise and malfunction.
■ Removing transit bolts
Transit bolt
Installation
WARNING
• Packaging material (e.g. Films, Styrofoam) can be dangerous for children.
There is a risk of suffocation ! Keep all packaging well away from children.
NOTE
• Keep the spanner provided for
future use.
NOTE
• Keep the transit bolts for future use.
Spanner
Washer
Base Packing
Page 10
10
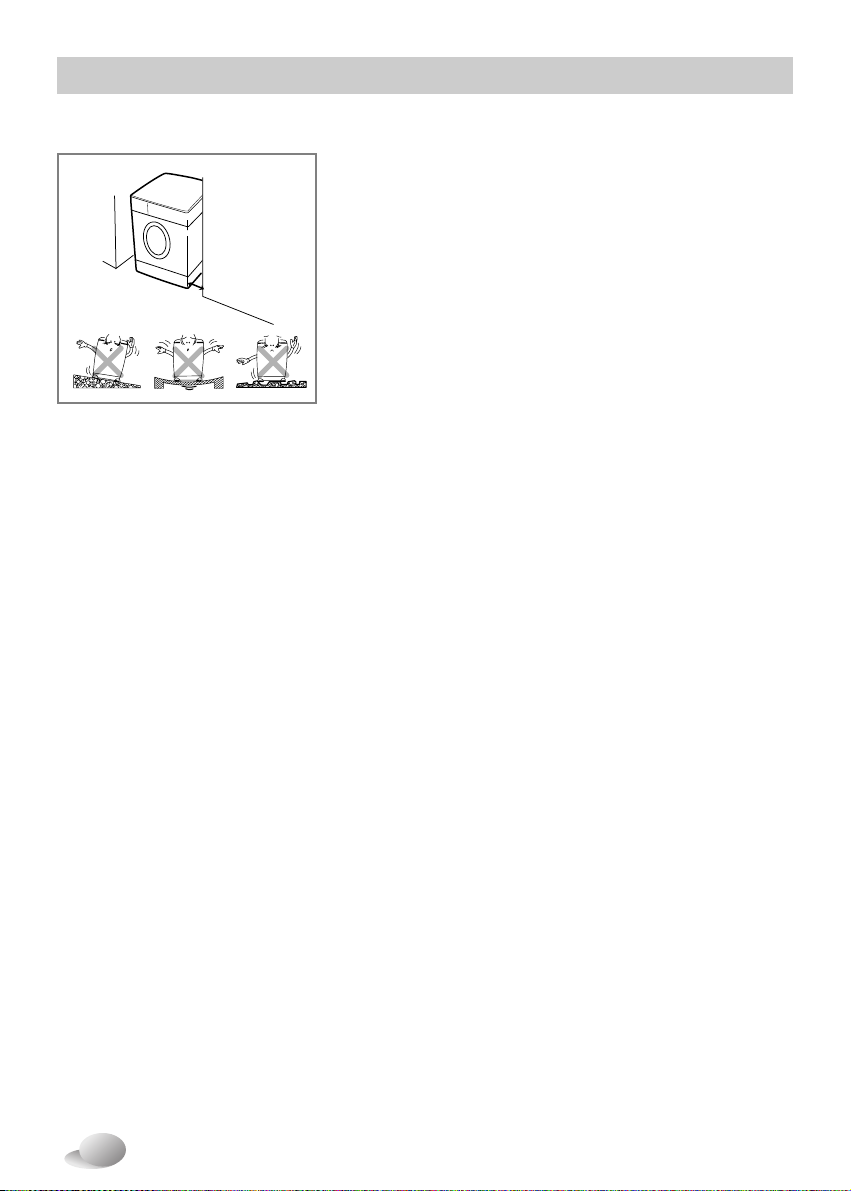
Installation
Washer
approx.
2cm
• Level floor :
Allowable slope under entire washer is 1˚
• Power outlet :
Must be within 1.5 meters of either side of location of washer.
Do not overload the outlet with more than one appliance.
• Additional Clearance :
For Wall, 10cm:rear / 2cm : right & left side
Do not place or store laundry products on top of washer at
any times.
They can damage the finish or controls.
■ Installation place requirements
Positioning
Location
• Install the washer on a flat hard floor.
• Make sure that air circulation around the washer is not impeded by carpets, rugs, etc.
• Never try to correct any unevenness in the floor with pieces of wood, cardboard or similar materials under
the washer.
• If it is impossible to avoid positioning the washer next to a gas cooker or coal burning stove,an
insulating(85x60cm) covered with aluminum foil on the side facing the cooker or stove,must be inserted
between the two appliance.
• The washer must not be installed in rooms where the temperature can drop below 0°C.
• Please ensure that when the washer is installed, it is easily accessible for the engineer in the event of a
breakdown.
• With the washer installed, adjust all four feet using the transit bolt spanner provided ensuring the appliance
is stable, and a clearance of approximately 20mm is left between the top of the washer and the underside of
any work-top.
• This equipment is not designed for maritime use or for use in a mobile installations such as caravans,
aircraft etc.
• Do not use an extension cord or double adapter.
• If the supply cord is damaged, it must be replaced by the manufacturer or its service agents or similarly
qualified person in order to avoid a hazard.
• Always unplug the machine and turn off the water supply after use.
• Connect the machine to an earthed socket in accordance with current wiring regulations.
• The appliance must be positioned so that the plug is easily accessible.
• Repairs to the washing machine must only be carried out by qualified personnel.
Repairs carried out by inexperienced persons may cause injury or serious malfunctioning. Contact your
local service center
• Do not install your washing machine in rooms where temperature below freezing may occur. Frozen
hoses may burst under pressure. The reliability of the electronic control unit may be impaired at
temperatures below freezing point.
• If the appliance is delivered in the winter months and temperatures are below freezing : Place the
washing machine at room temperature for a few hours before putting it into operation.
Electrical connection
Page 11

11
Installation
CAUTION
CAUTION concerning the Power cord
• Most appliances recommend they be placed upon a dedicated circuit; that is, a single
outlet circuit which powers only that appliance and has no additional outlets or branch
circuits. Check the specification page of this owner's manual to be certain.
• Do not overload wall outlets. Overloaded wall outlets, loose or damaged wall outlets,
extension cords, frayed power cords, or damaged or cracked wire insulation are
dangerous. Any of these conditions could result in an electric shock or fire.
• Periodically examine the cord of your appliance, and if its appearance indicates
damage or deterioration, unplug it, discontinue use of the appliance, and have the cord
replaced with an exact replacement part by an authorized servicer.
• Protect the power cord from physical or mechanical abuse, such as being twisted,
kinked, pinched, closed in a door, or walked upon. Pay particular attention to plugs,
wall outlets, and the point where the cord exits the appliance.
If the appliance is supplied from a cord extension set or an electrical portable outlet
device, The cord extension set on electrical portable outlet device must be positioned
so that it is not subject to splashing or ingress of moisture.
CAUTION
• The appliance is not intended for use by young children or infirm persons without
supervision.
• Young children should be supervised to ensure that they do not play with appliance.
Page 12

12
Installation
• Water supply pressure must be between 100 kPa and 1000 kPa (1.0 - 10.0 kgf / cm2).
• Do not strip or crossthread when connecting inlet hose to the valve.
• If the water supply pressure is more than 1000 kPa, a decompression device should be installed.
• Periodically check the condition of the hose and replace the hose if necessary.
■ Connecting water supply hose
1. Unscrew the adapter ring plate and the 4
adapter retaining screws.
2. Push the adapter onto the end of the tap
so that the rubber seal forms a watertight
connection. Tighten the adapter ring plate
and the 4 screws.
3. Push the water supply hose vertically
upwards so that the rubber packing within
the hose can adhere completely to the
tap and then tighten it by screwing it to
the right.
Upper
connector
Rubber
packing
Plate
Water supply
hose
Fixing screw
Type-B : Connecting Screw-type hose to tap without thread
Type-A : Connecting Screw-type hose to tap with thread
• Screw the hose connector onto water
supply tap.
Step1 : Check rubber seal inlet hose
Step2 : Connect hose to water tap
• Two rubber seals are supplied with the
water inlet hoses.
They are used for preventing water leaks.
Make sure the connection to taps is
sufficiently tight.
Hose connector
Hose connector
Rubber seal
Rubber seal
Page 13
13
1. Unscrew the adapter ring plate and
the 4 adapter retaining screws.
2. Remove the guide plate if the tap is
too large to fit the adapter.
3. Push the adapter onto the end of
the tap so that the rubber seal forms
a watertight connection.
Tighten the adapter ring plate and
the 4 screws.
4. Pull the connector latch plate down,
push the inlet hose onto the adapter,
and release the connector latch plate.
Make sure the adapter locks into place.
Please use the horizontal tap
Horizontal tap Extension tap Square tap
Ring plate
Guide plate
Latch plate
Type-C : Connecting one touch type hose to tap without thread
Step3: Connect hose to washer
• Make sure that there are no kinks in the
hose and that they are not crushed.
When your washer has two valves.
• The Inlet hose which has red connector is
for the hot water tap.
• If the washer has two valves, the energy is
saved by using hot valve.
Installation
NOTE
• After completing connection, if water leaks from the hose, repeat the same steps.
Use the most conventional type of faucet for water supply. In case the faucet is square or
too big, remove the spacing ring before inserting the faucet into the adaptor.
NOTE
• After connecting inlet hose to water
tap, turn on the water tap to flush
out foreign substances (dirt, sand or
sawdust) in the water lines. Let
water drain into a bucket, and
check the water temperature.
Page 14
14
Installation
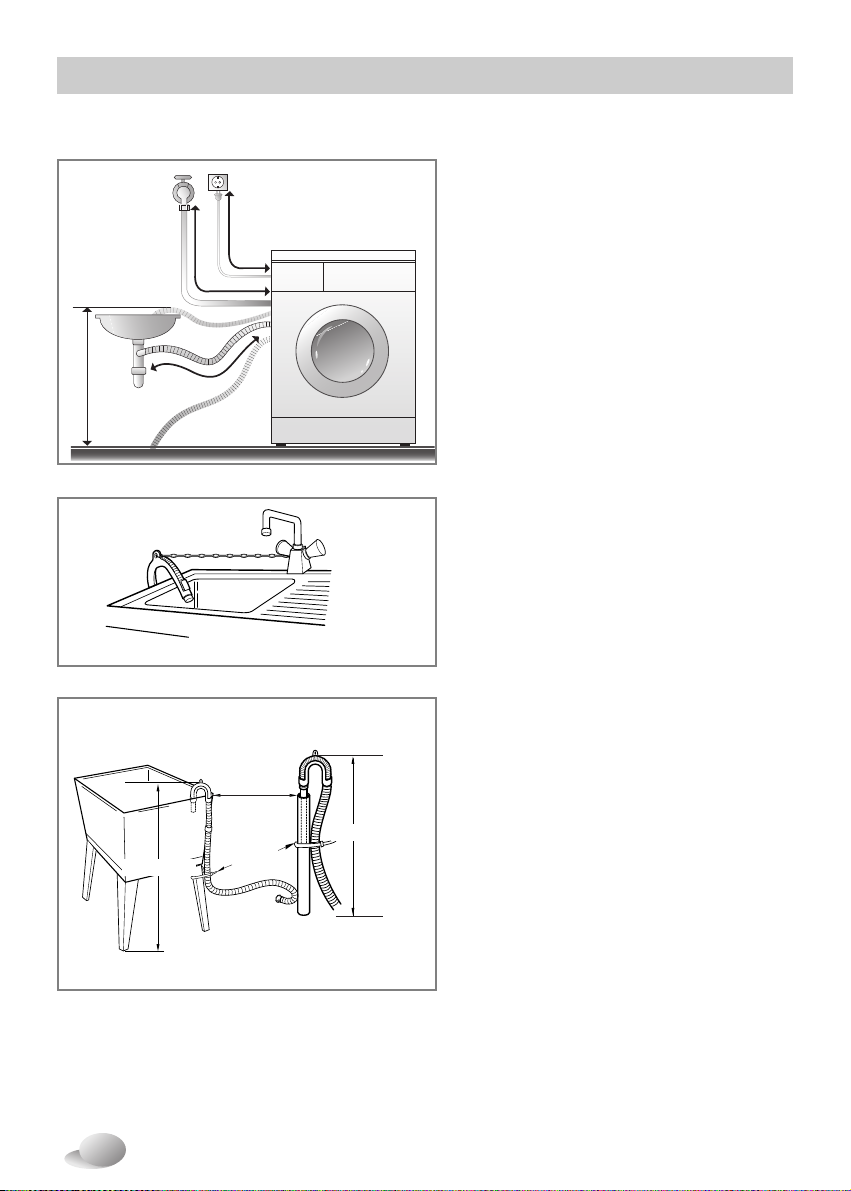
Installation of drain hose
• The drain hose should not be placed
higher than 100 cm above the floor.
Water in the washer does not drain or
drains slowly.
• Securing the drain hose correctly will
protect the floor from damage due to
water leakage.
• If the drain hose is too long, do not force
back into the washer.
This will cause abnormal noise.
• When installing the drain hose to a sink,
secure it tightly with string.
• Securing the drain hose correctly will
protect the floor from damage due to
water leakage.
about 100 cm
about 145 cm
about 105 cm
max. 100 cm
Hose
Retainer
Tie strap
Laundry tub
max. 100 cm
max. 100 cm
Page 15
15
•
Diagonal Check
When pushing down the edges of the
washing machine top plate diagonally,
the machine should not move up and down
at all (Please, check both directions). If
machine rocks when pushing the machine
top plate diagonally, adjust the feet again.
2. If the floor is uneven, turn the adjustable feet
as required. (do not insert pieces of wood
etc. under the feet)
Make sure that all four feet are stable and
resting on the floor and then check that the
appliance is perfectly level. (use a spirit
level)
1. Leveling the washing machine properly
prevents excessive noise and vibration.
Install the appliance on a solid and level
floor surface, preferably in a corner of the
room.
■ Leveling
•
Once the washer is level, tighten the lock
nuts up towards the base of the washer.
All lock nuts must be tightened.
Raise Lower
Lock
Nut
Tighten all 4
locknuts securely
Installation
NOTE
• Timber or suspended type flooring
may contribute to excessive
vibration and unbalance.
NOTE
• If the washing machine is installed on a raised platform, it must be securely fastened in
order to eliminate the risk of falling off.
Page 16
16
Installation
Concrete floors
Wooden floors (Suspended floors)
• The installation surface must be clean, dry and level.
• Install washer on a flat hard floor.
Tile floors (Slippery floors)
• Position each foot on the Tread Mate and level the machine to suit. (Cut Tread Mate into
70x70 mm sections and stick the pieces on to the dry tile where machine is to be placed.)
• Tread Mate is a self adhesive material used on ladders & steps that prevents slipping.
•
Wooden floors are particularly susceptible to vibration.
•
To prevent vibration we recommend you place rubber cups under
each foot under washer at least 15mm thick, secured to at least
2 floor beams with screws.
•
If possible install the washer in one of the corners of the room, where the floor is more stable.
•
Fit the rubber cups to reduce vibration.
•
You can obtain the rubber cups (p/no.4620ER4002B) from the LG spares dept.
Rubber Cup
NOTE
• Proper placement and leveling of the washer will ensure long, regular and reliable
operation.
• The washer must be 100% horizontal and stand firmly in position.
• It must not “Seesaw” across corners under load.
• The installation surface must be clean, free from floor wax and other lubricant coatings.
• Do not let the feet of the washer get wet. If feet of the washer get wet, slipping may occur.
Page 17
17
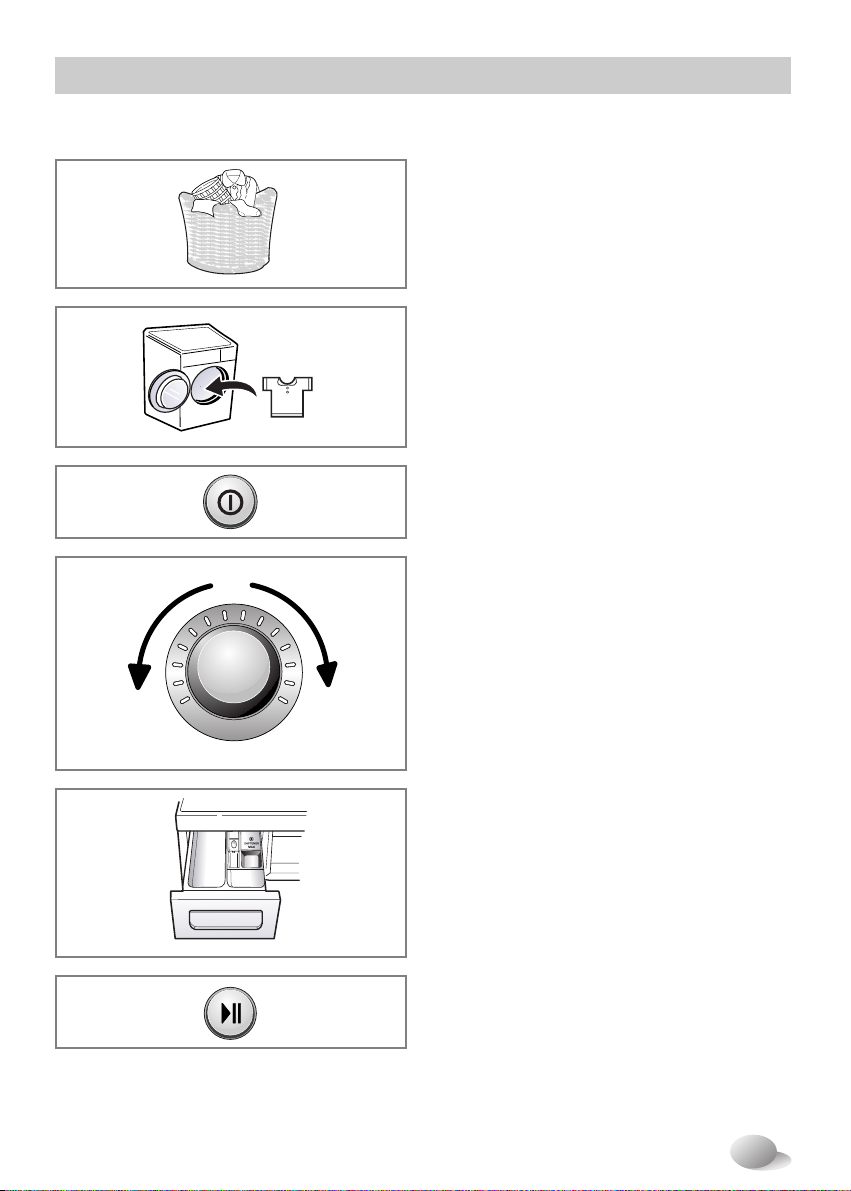
Operating washing machine
2. Open the door and load laundry.
1. Sort Laundry.
(Refer to 18 page)
3. Press the Power button.
4. Select a Program.
(Refer to 19~21 page)
5. Add detergent.
(Refer to 29~30 page)
6. Press the Start/Pause button.
Select options at this time
(Refer to 23~28 page)
■ Additional Program
■ Temperature
■ Spin Speed
■ Other functions
How to use washer
Page 18
18
How to use washer
■ Care before washing
3. Caring before loading
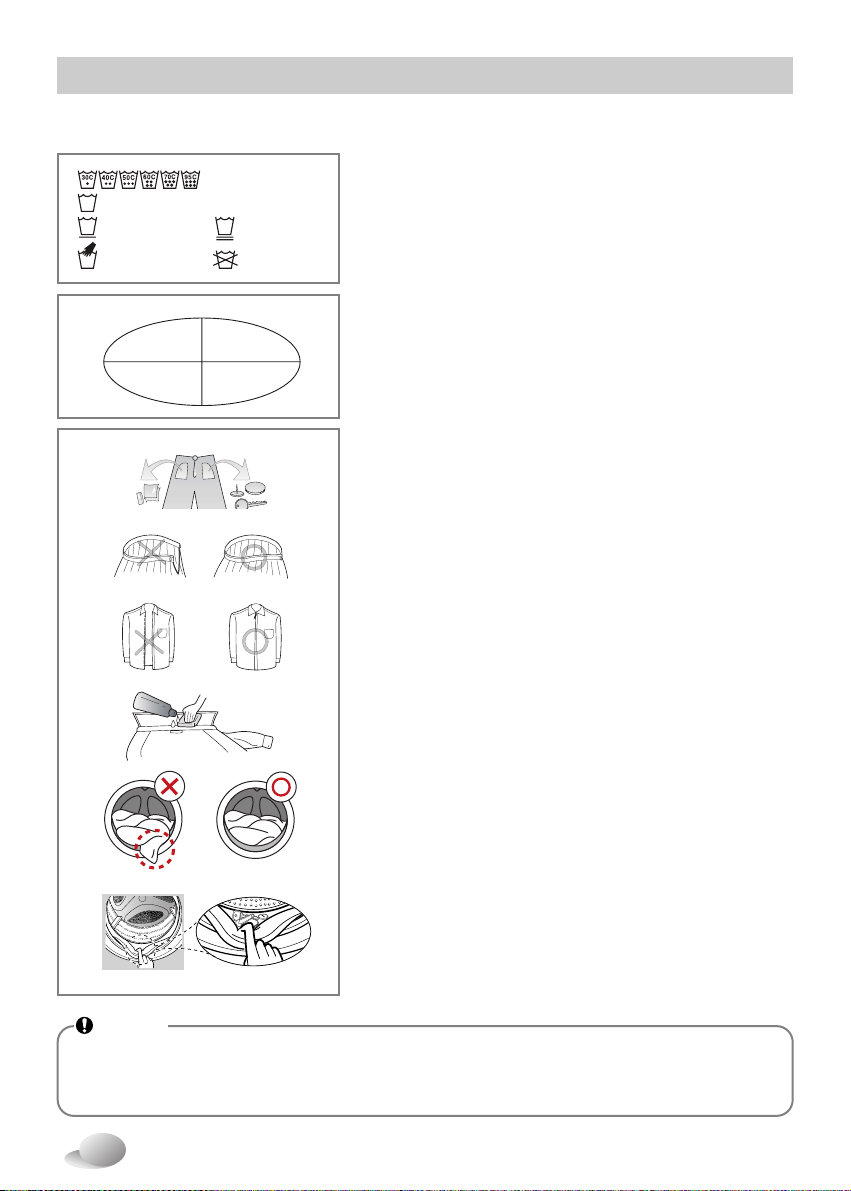
Combine large and small items in a load. Load large items first.
Large items should not be more than half the total wash load. Do
not wash single items.
This may cause an out-of-balance load. Add one or two similar
items.
• Check all pockets to make sure that they are empty. Items such
as nails, hair clip, matches, pens, coins and keys can damage
both your washer and your clothes.
• Close zippers, hooks and strings to make sure that these items
don’t snag on other clothes.
• Pre treat dirt and stains by brushing a little detergent dissolved in
water onto stains like collars and cuffs to help lift dirt.
• Check the folds of the flexible gasket (gray) and remove any
small articles.
• Check inside of the drum and remove any item from a previous
wash.
• Remove any clothing or items from the flexible gasket to prevent
clothing and gasket damage.
2. Sorting
To get the best results, sort clothes into loads that can be
washed with the same wash cycle.
Water temperature and spin speed and different fabrics need to
be washed in different ways.
Always sort dark colors from pale colors and whites. Wash
separately as dye and lint transfer can occur causing
discolouration of white etc. If possible, do not wash heavily
soiled items with lightly soiled one.
• Soil (Heavy, Normal, Light)
Separate clothes according to amount of soil.
• Color (White, Lights, Darks)
Separate white fabrics from colored fabrics.
• Lint (Lint producers, Collectors)
Wash lint producers and lint collectors separately.
1. Care Labels
Look for a care label on your clothes.
This will tell you about the fabric content of your garment and
how it should be washed.
Wash temperature
Normal machine wash
Permanent press
Hand wash
Sort laundry by...
Soiling
Colour
Wash
temperature
Fabric type
Delicate
Do not wash
NOTE
• Before the first wash, select a cycle (Cotton 60°C, add a half load of detergent) allow the unit to
wash without clothing. This will remove residues and water from the drum that may have been
left during manufacturing.
Page 19

19
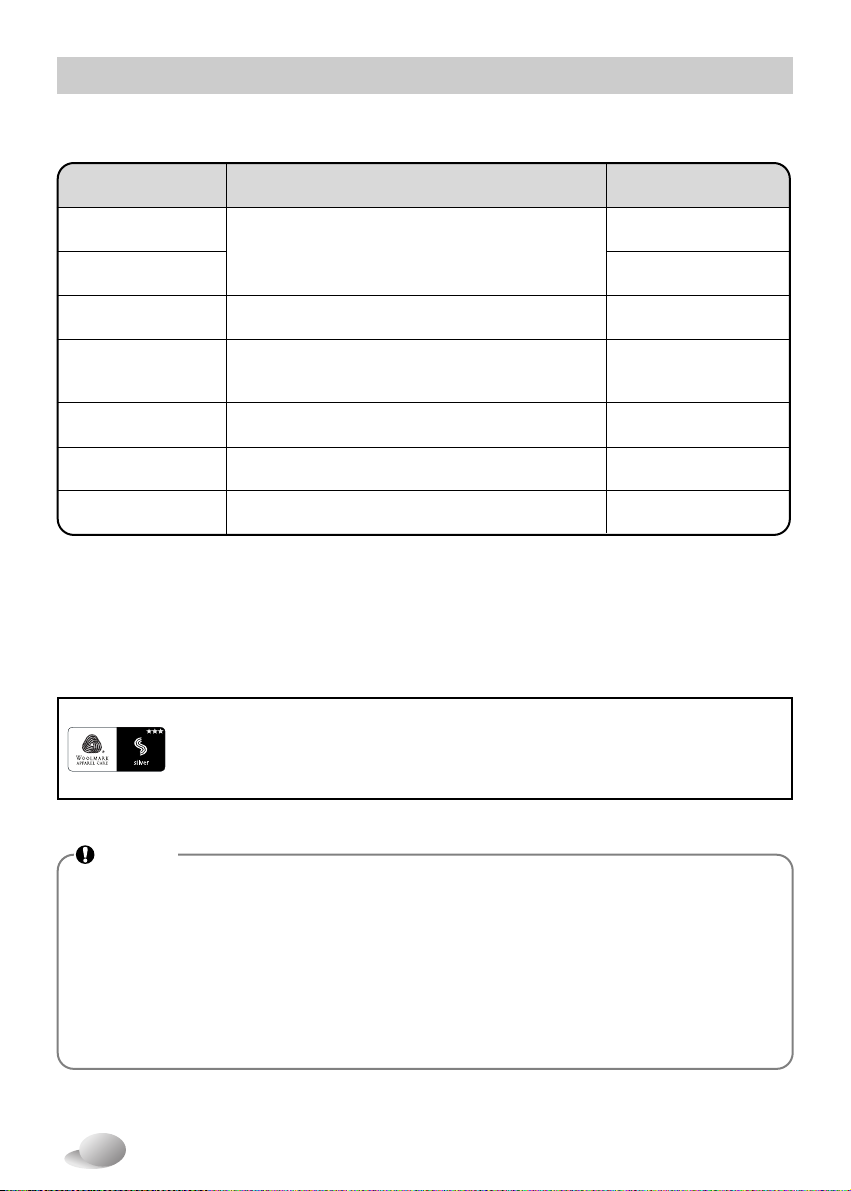
Washing program table
•
Recommended courses according to the laundry type.
How to use washer
Program
Description
Fabric type
Proper
Temp.
Maximum
Load
Cotton
Provides better performance by
combining various drum motions.
Provides optimized washing
performance with less energy
consumption.
Cotton
Eco
40°C
(Cold to 95°C)
60°C
(Cold to 60°C)
Rating
Rating
Color fast garments (shirts,
nightdresses, pajamas, etc)
and normally soiled cotton
load (underwear).
This cycle provides nonstop process
from washing to drying at once.
Use only drying cycle without
washing.
Use for laundy that need rinsing only
or to add rinse-added fabric softener
to laundry.
Rinse+
Spin
Dry Only
Wash+
Dry
This cycle is suitable for casual shirts
that do not need ironing after washing.
Polyamide, Acrylic, Polyester.
Easy
Care
40°C
(Cold to 60°C)
Less than
4.5 kg
Enables various fabrics to be
washed simultaneously.
Various kind of fabrics except
special garments.
(Silk/delicate, sports wear, dark
clothes, wool, Duvet/Curtains).
Mix
40°C
(Cold to 40°C)
Baby
Care
Removes solid and protein stain and
provide better rinse performance.
Lightly soiled baby wear.
60°C
(95°C)
Less than
5.0 kg
Provides less noise and vibration
and saves money by using overnight
electricity.
Color fast garments (shirts,
nightdresses, pajamas, etc)
and lightly soiled white cotton
(underwear).
Silent
Wash
40°C
(Cold to 60°C)
40°C
(Cold to 95°C)
Removes efficiently detergent
residue in clothes.
Skin
Care
Fabrics which will be in direct
contact with the skin, e.g.
underwear, nappies,
towelling, bed linen, pillow
and mattress covers
1 single
size
This cycle is for large items
such as bed cover, pillows,
sofa covers, etc.
Cotton bedding except
special garments (delicates,
wool, silk, etc.) with filling:
duvets, pillows, blankets,
sofa covers with light filling.
Duvet
40°C
(Cold to 40°C)
Sports
Wear
This cycle is suitable for sports
wear such as jogging clothes
and running wear.
Less than
3.0 kg
Less than
6.0 kg
Rating
Coolmax, Gore-tex, fleece
and Sympatex.
Wool
Enables to wash wool fabrics.
(Please use detergent for
machinewashable woolens).
Machine washable woolens
with pure new wool only.
Quick 30
This cycle provides fast washing time for
small loads and lightly soiled clothes.
Colored laundry which is
lightly soiled fast.
Wet laundry which need
drying only.
A small amount of laundry
which can be dried.
Normal fabrics which can
be washable.
30°C
(Cold to 40°C)
_
_
Page 20
20
How to use washer
The wool wash cycle of this machine has been approved by Woolmark for
the washing of machine washable Woolmark products provided that the
products are washed according to the instructions on the garment label and
those issued by the manufacturer of this washing machine M1008.
•
Water Temperature: Select water temperature to suit wash cycles.
Always follow garment manufacture’s care label or instructions when washing.
•
Set program at "Wash : Cotton Eco 60°C + Intensive + 1400rpm" and "Dry : Eco Dry
(First drying cycle load 4.5 kg, Second drying cycle load : 4.5 kg)" for test in accordance
with EN50229.
Drying Program Table
Program Fabric type
Maximum Load
Eco Dry
Cupboard Dry
4.5 kg
3.0 kg
6.0 kg
6.0 kg
4.0 kg
0.5 kg
1.5 kg
Cotton or Linen Fabrics
such as cotton towel, t-shirts, linen laundries.
Cotton or Linen Fabrics for ready to ironing. Iron Dry
Easy Care Textiles, Synthetic Fabrics
Suitable for Easy care, Mix programm washable clothes
Low Temp.
30 min.
60 min.
120 min.
–
–
–
NOTE
• Neutral detergent is recommended.
• The wool cycle features gentle tumbling and low-speed spin for garment care.
• Select maximun selectable spin speed of washing programme to ensure the drying
result.
• Where the amount of laundry to be washed and dried in one programme does not
exceed the maximum weight permitted for the drying programme, washing and drying
in one continuous sequence is recommended.
Page 21
21
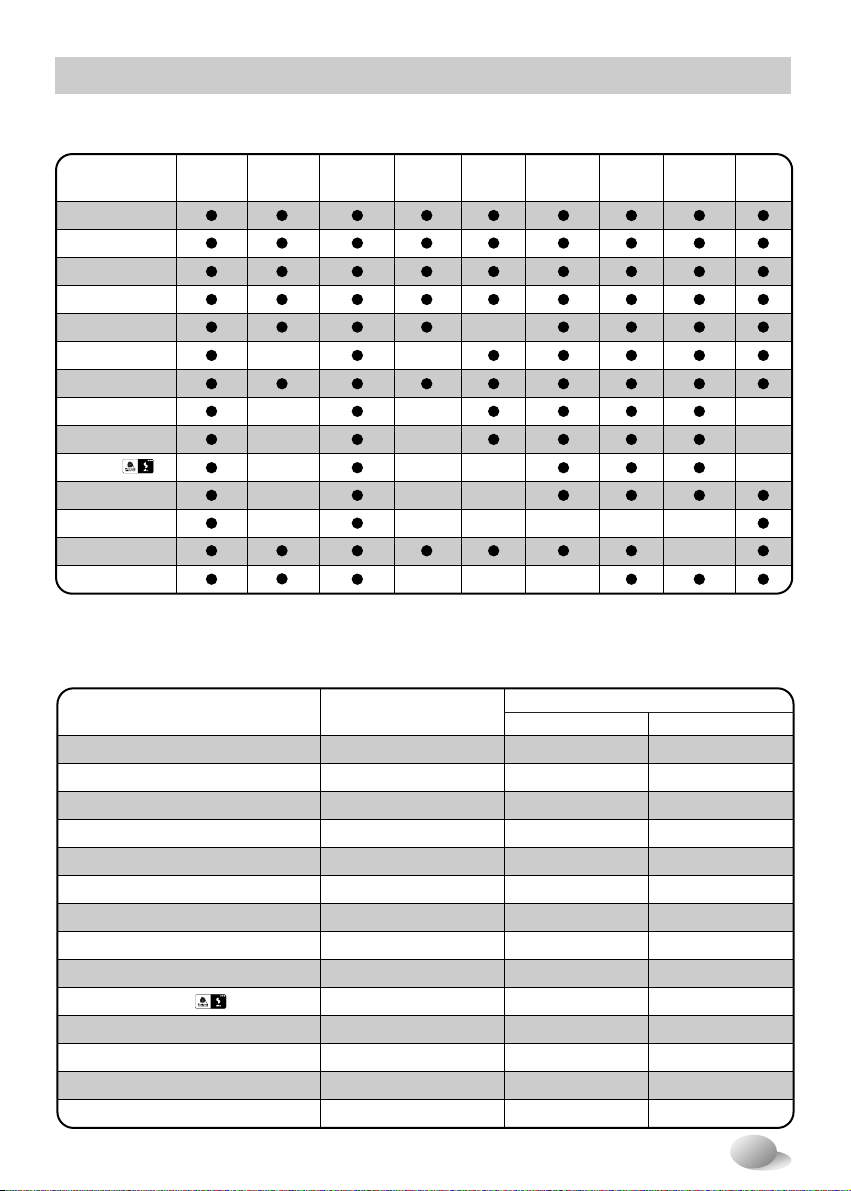
Extra options
* : This option is automatically included in the cycle and can not be deleted.
** : This option is automatically included in the cycle and can be deleted.
How to use washer
Cotton
Cotton Eco
Easy Care
Mix
Baby Care
Silent Wash
Skin Care
Duvet
Sports Wear
Wool
Quick 30
Dry Only
Wash+Dry
Rinse+Spin
Time
Delay
Medic
Rinse
Favorite IntensiveProgram
Pre
Wash
Time
Save
Rinse
+
Dry
Rinse
Hold
** **
*
*
Operating data
Cotton
Cotton Eco
Easy Care
Mix
Baby Care
Silent Wash
Skin Care
Duvet
Sports Wear
Wool
Quick 30
Dry Only
Wash+Dry
Rinse+Spin
1400
1400
1000
1400
1000
1000
1400
1000
800
800
1400
1400
1400
1400
970
1170
690
550
1650
620
950
550
360
490
220
-
-
-
85
63
70
59
125
102
105
62
47
49
45
-
-
-
Program Max RPM
Consumption data
Energy (kWh)
Water (l)
Page 22
22
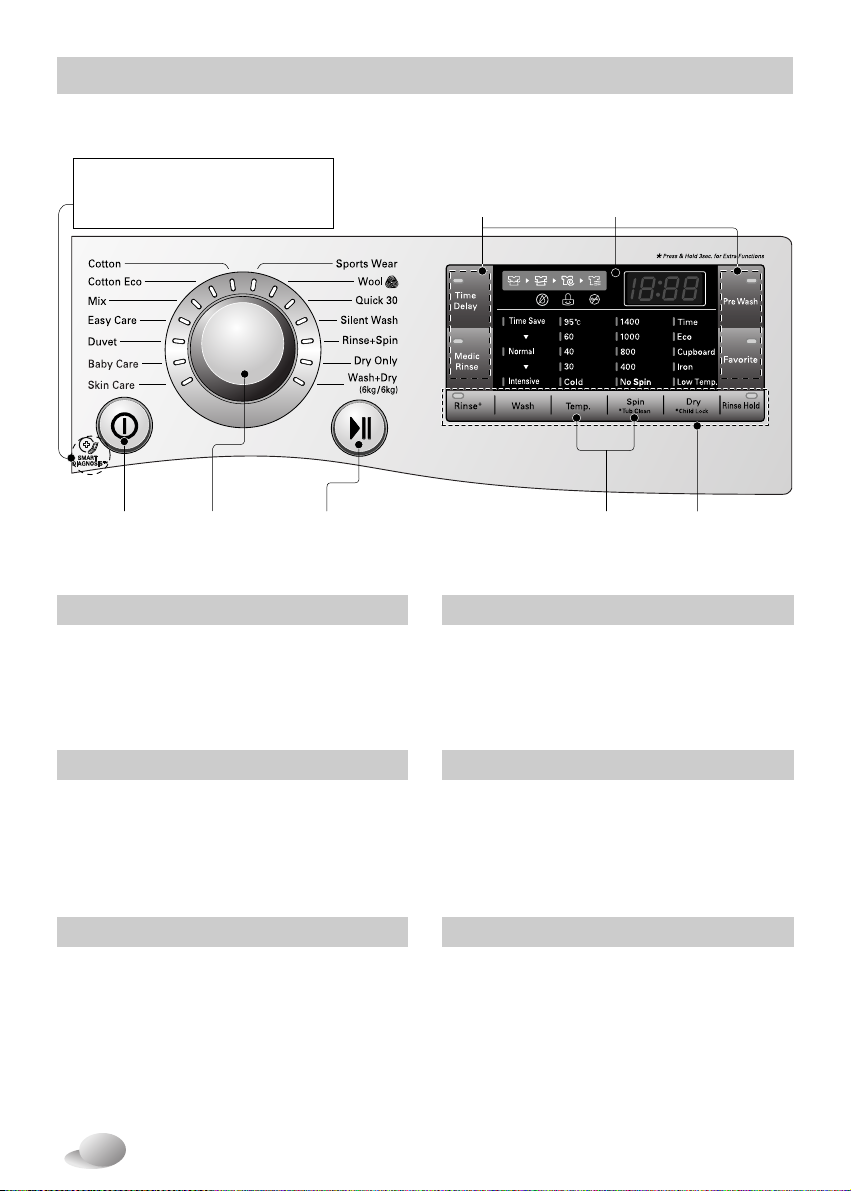
How to use washer
■ Control panel
Start/Pause
button
Beep
On/Off
Power
button
Option
buttons
Additional
program
buttons
LED
display
Program
dial
Power
• Press the Power button to turn power on
and off.
• To cancel the Time Delay function, the
power button should be pressed.
Program dial
• Programs are available according to the
laundry type.
• Lamp will light up to indicate selected
program.
Additional program
• Use these buttons to select the desired
cycle options for the selected cycle.
LED display
• The display shows the settings, estimated
time remaining, options, and status
messages for your washer.
The display will remain on through the
cycle.
Start/Pause
• This Start/Pause button is used to start
wash cycle or pause the wash cycle.
• If temporary stop of wash cycle is
needed, press the Start/Pause button.
• When in Pause, the power is turned off
automatically after 4 minutes.
Options
• This allows you to select an additional
cycle and will light when selected.
SMARTDIAGNOSIS™ function is
available only for the products with
a SMARTDIAGNOSIS™ mark.
Page 23

23
1. Press the Power button.
2. Select a cycle.
3. Touch the Time Delay button and set time
required.
4. Press the Start/Pause button.
You can set a time delay so that the washing
machine will start automatically and finish
after a specified time interval.
If the laundry is heavily soiled, “Pre Wash”
course is effective.
1. Press the Power button.
2. Select a cycle.
3. Touch the Pre Wash button.
4. Press the Start/Pause button.
Pre Wash
Time Delay
■ Additional program
Favorite program allows you to store
a customized wash cycle for future use.
1. Press the Power button.
2. Select a cycle.
3. Select the course.
(Washing method, number of rinses, spin
speed, water temperature etc.)
4. Touch and hold Favorite program button
for 3 seconds.
The Favorite program is now stored for future
use.
To reuse the program, select Favorite
program and press the Start/Pause.
Favorite
How to use washer
NOTE
• The delay time is the time to the end
of the programme, not the start.
The actual running time may vary
due to water temperature, wash load
and other factors.
For best results or for cleaner rinsing.
This allows the final rinse to be heated to 40
degrees.
1. Press the Power button.
2. Select a cycle.
3. Press the Medic Rinse button and set time
required.
4. Press the Start/Pause button.
Medic Rinse
Page 24

24
• Spin Speed level can be selected by
touching 'Spin' button repeatedly.
1. Press the Power button.
2. Touch the Spin button to select RPM.
3. Press the Start/Pause.
Spin only
• Time Save : This option can be used to
reduce the time of a wash program.
• Intensive : If the laundry is normal and
heavily soiled, “Intensive” option is effective.
Wash
• Rinse+: Add rinse once.
• Rinse Hold : The course is paused until
start button is pressed again when rinse is
finished.
Rinse
Spin
■ Options ■ Other functions
• By touching the Temp. button the water
temperature can be selected.
- Cold
- 30°C, 40°C, 60°C, 95°C
• Water temperature can be selected
according to the program.
Temp.
How to use washer
When you select "No Spin", it will still
rotate for a short time with low speed to
drain quickly.
NOTE
Page 25
25
The Beep on/off function can be set only during the washing cycle.
1. Press
the
Power button.
2. Press the Start/Pause button.
3. Touch and hold the Temp. and Spin button
simultaneously for three seconds to set Beep
on/off function.
Once the Beep on/off function is set, the setting
is memorized even after the power is turned off.
Locking the control panel
1. Touch and hold
the
Child Lock button for
3 seconds.
2. A beeper will sound, and ' ' will appear on
the LED display.
When the child lock is set, all buttons are
locked except the Power button.
Select this function to lock the buttons on the control assembly to prevent tampering.
"Child Lock" can be set only during the washing cycle.
Unlocking the control panel
1. Touch and hold
the
Child Lock button for
3 seconds.
2. A beeper will sound and the remaining time
for the current programme will reappear on
the LED display.
■ Child Lock
■ Beep On / Off
How to use washer
NOTE
•
Turning off the power will not reset the
child lock function. You must deactivate
child lock before you can access any
other functions.
NOTE
•
If you want to turn the Beeper off,
simply repeat this process.
Page 26
26
How to use washer
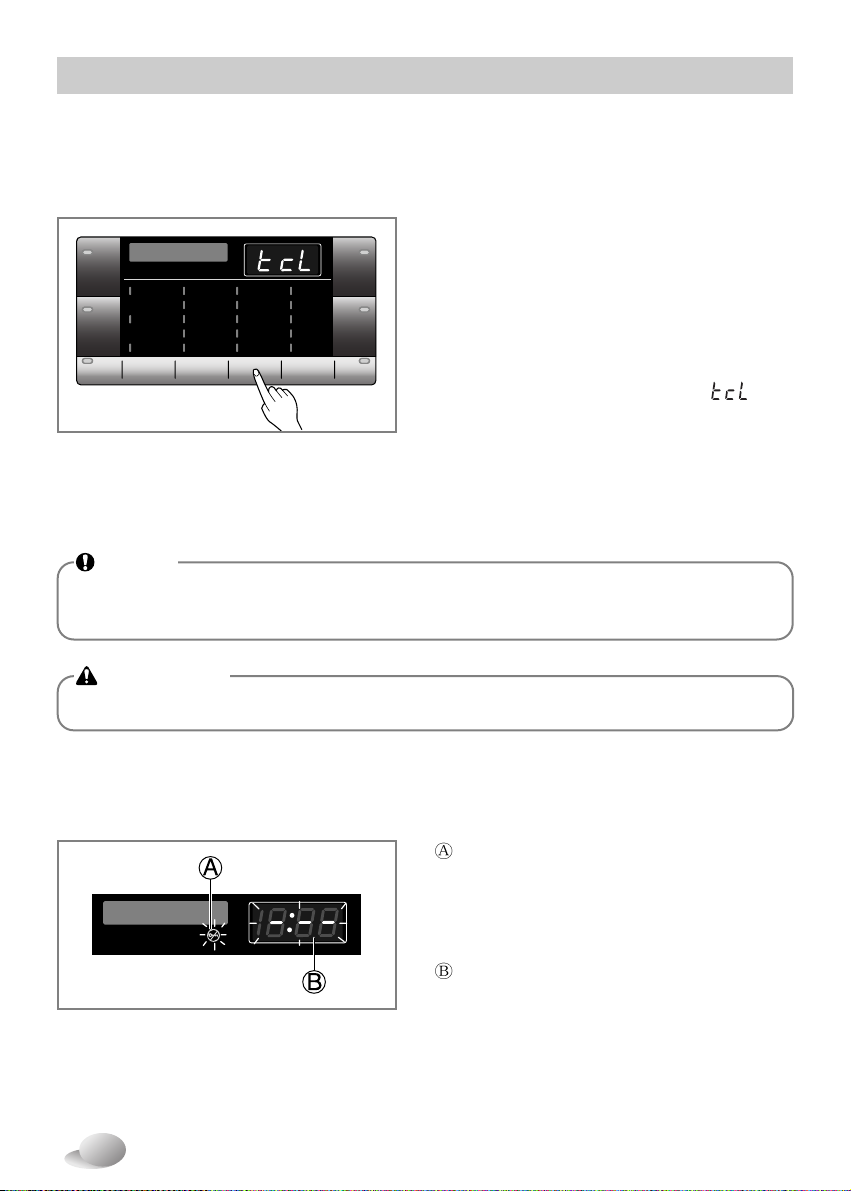
Tub Clean is a special cycle to clean the inside of the washing machine.
A higher water level is used in this cycle at higher spin speed. Perform this cycle regularly.
1. Remove any clothing or items from the
washer and close the door.
2. Open the dispenser drawer and add Anti
limescale(e.g. Calgon) to the main wash
compartment.
3. Close the dispenser drawer slowly.
4.
Power On and then touch and hold Tub
Clean button for 3 seconds. then “ ” will
be displayed on the LED display.
5. Press the Start/Pause button to start.
6. After the cycle is complete, leave the door
open to allow the washer door opening,
flexible gasket and door glass to dry.
•
“Door Lock” - For safety reasons, the
door will lock while machine is in use and the
“Door Lock” icon will light up. You can safely
open the door after the “Door Lock” icon
turns off.
•
While "Detecting" is shown on the
display the washing machine rotates slowly
and detects how much laundry is loaded in
the drum.
It will take a short time.
■ Tub Clean
■ Door Lock & Detecting
NOTE
• Do not add any detergent to the detergent compartments.
• Excessive suds may generate and leak from the washer.
CAUTION
• If there is a child, be careful not to leave the door open for too long.
Page 27

27
• Use your Automatic Cycles to dry most
loads. Electronic sensors measures the
temperature of the exhaust to increase or
decrease drying temperatures for faster
reaction time and tighter temperature control.
• Recommend Automatic drying course as a
kind of clothes.
a) Cupboard : For Cottons select
b) Eco : A special cycle to reduce water
usage during the dry cycle.
c) Time (30/60/120 minutes)
- 30 min. : Cotton/Towel 0.5 kg
- 60 min. : Cotton/Towel 1.5 kg
- 120 min. : Cotton/Towel 3.0 kg
d) Low Temp. : For Synthetics select
e) Iron : If you want to iron clothes
• This washer-dryer’s automatical process
from washing to drying can be selected
easily.
• For most even drying, make sure all articles
in the clothes load are similar in material and
thickness.
• Do not overload dryer by stuffing too many
articles into drum. Items must be able to
tumble freely
• If you open door and remove load before
dryer has finished its cycle, remember to
press the Start/Pause button.
• By touching the Dry button, you can select :
Cupboard - Eco - Time (30 - 60 - 120) Low Temp. - Iron
• After the end of dry, “ ” is displayed.
By pressing the “Start/Pause” button the
program can be ended. If you not press the
“Start/Pause” button, the program is ended
after about 4 hours. “ ” Cooling Cycle.
• Cold water tap must be left on during drying
cycles.
■ Dry
1. Drying Automatic guide
How to use washer
NOTE
•
The estimated drying time varies from
the actual drying time with an Automatic.
The type of fabric, size of the load, and
the dryness selected affect drying time.
•
The last 11 minutes of dryinng time,
A sensor(Thermistor) detects clothes
drying conditions.
When the dryness is low, cycle time will
be added by max. 10 mins with “11”
mins remaining window display.
NOTE
• When you paused the machine under
drying cycle, drying fan motor can be
operated to save itself for 30 seconds.
And then the machine displays
„ ”
on the panel.
Page 28

28
- Do not tumble dry woolen articles. Pull them to
their original shape and dry them flat.
Woolen Articles
- Some woven and loopknit materials may
shrinks, by varying amounts, depending on
their quality.
- Always stretch them out immediately after
drying.
Woven and Loopknit Materials
- Do not overload your dryer
- Take out permanent press articles as soon as
the dryer stops to reduce wrinkles.
Permanent Press and Synthetics
- Always check the manufacture’s instructions.
Fiber or Leather Materials
- Always check the manufacture’s instructions.
Baby clothes and Night Gowns
- Do not dry any items mode from or containing
rubber or plastics, such as:
a) aprons, bibs, chair covers
b) curtains and table cloths
c) bathmats
Rubber and Plastics
- Do not dry fiberglass articles in your dryer.
Glass particles left in the dryer could be picked
up by your clothes the next time you use the
dryer and irri tate your skin.
Fiber glass
• When drying cycle is completed, “ ” [Cool
Down] is displayed on the Multi display.
• The Cool Down is setting automatically when
a drying cycle is complete.
• When you are not remove a loaf of clothes
from the dryer as soon as it stops, wrinkles
can form.
• The Cool Down operating periodically tumbles,
rearranges and fluffs the load to tumbles,
rearranges and fluffs the load to hours.
• The “ ” message will continue to display
until the clothes are removed or the
Start/Pause button is pressed.
3. Completion of Drying
• By touching the Dry button, the drying time
can be selected.
• Drying course can last up to 150min.
When selecting drying only, drying course
will start after spining.
• These drying times are given as a guide to
help you set your dryer for manual drying.
Drying times can vary greatly depending on
dampness, room temperature and type of
fabric and your own experience will be your
best guide.
2. Drying time guide
How to use washer
Page 29

29
• Main wash only ➔
• Pre Wash + Main Wash ➔
• Do not exceed the maximum fill line.
Overfilling can cause early dispensing of the
fabric softener which could stain clothes.
Close the dispenser drawer slowly.
• Do not leave the fabric softener in the detergent
drawer for more than 2 days.
(Fabric softener could be harden)
• Softener will automatically be added during
the last rinse cycle.
• Do not open the drawer when water is supplied.
• Solvents(benzene, etc) should not be used.
The dispenser drawer
Adding fabric softener
■ Adding detergent and fabric softener
WARNING
• Keep all washing detergents away from
children as there is danger of poisoning.
• Too much detergent, bleach or softener
may cause an overflow.
• Be sure to use the appropriate amount of
detergent.
NOTE
• Do not pour fabric softener directly on the clothes.
Adding detergent
Page 30

30
Adding detergent
• Detergent should be used according to the instruction of the detergent manufacture.
• If too much detergent is used, too many suds can occur and this will decrease the washing
result or cause heavy load to the motor.
• It is recommended that you use powdered detergent for best results.
• If you wish to use liquid detergent follow guidelines provided by the detergent manufacturer.
• You can pour liquid detergent directly into the main detergent drawer if you are starting the
cycle immediately.
• Please do not use liquid detergent if you are using ‘Time Delay’ as the liquid may harden, or
if you have selected ‘Pre Wash’.
• If too many suds occur, please reduce the detergent amount.
• Detergent usage may need to be adjusted for water temperature, water hardness, size and
soil level of the load. For best results, avoid oversudsing.
• A water softener, such as Anti-limescale (e.g.
Calgon) can be used to cut down on the use of
detergent in extremely hard water areas.
Dispense according to the amount specified on
the packaging. First add detergent and then the
water softener.
• Use the quantity of detergent as for soft water.
• Detergent is flushed from the dispenser at the beginning of the cycle.
1. Open the door and put tablets into the drum.
Detergent dosage
Adding water softener
Using tablet
2. Load the laundry into the drum and close the
door.
• Do not let the detergent harden.
Doing so may lead to blockages, poor rinse performance or bad odor.
• Full load : according to manufacturer’s recommendation.
• Part load : 3/4 of the normal amount.
• Minimum load : 1/2 of full load.
NOTE
WARNING
Page 31

31
The water inlet filter
•
" " icon will be displayed on the control panel when water does not enter the
detergent drawer.
•
If water is very hard or contains traces of lime deposit, the water inlet filter may become
clogged.
It is therefore a good idea to clean it from time to time.
•
Before cleaning the washer interior, unplug the electrical power cord to avoid electrical
shock hazards.
•
Turn off the stopcock if the machine is to be left for any length of time (e.g. holiday),
especially if there is no floor drain(gully) in the immediate vicinity.
1. Turn off the water tap.
2. Unscrew the water inlet hose.
3. Clean the filter using a hard bristle brush.
4. Tighten up the inlet hose.
Maintenance
Page 32

32
Maintenance
•
Allow the water to cool down before cleaning the drain pump, carrying out emergency
emptying or opening the door in an emergency.
•
The drain filter collects threads and small objects left in the laundry.
Check regularly that the filter is clean to ensure smooth running of your machine.
The drain pump filter
1. Open the lower cover cap.
pull out the hose.
2. Unplug the drain plug.
Open the filter by turning to the left.
3. Remove any extraneous matter from
the pump filter.
4. After cleaning, turn the pump filter and insert
the drain plug.
5. Close the lower cover cap.
1
2
Container to
collect the
drained water.
CAUTION
•
First drain using the drain hose and then open the pump filter to remove any threads or objects.
Be careful when draining if the water is hot.
Page 33

33
Dispenser drawer
• After a while, detergents and fabric softeners leave a deposit in the drawer.
• It should be cleaned from time to time with a jet of running water.
• If necessary it can be removed completely from the machine by pressing the catch
downwards and by pulling it out.
• To facilitate cleaning, the upper part of the fabric softener compartment can be removed.
1. Pull out the dispenser drawer.
4. Insert the dispenser drawer.
2. Clean the dispenser drawer under water.
3. Clean inside the recess with an old toothbrush.
Maintenance
Page 34

34
Maintenance
• Proper care of your washer can extend its life.
• The outside of the machine can be cleaned with warm water and a neutral non abrasive
household detergent.
• Immediately wipe off any spills. Wipe with damp cloth.
• Try not to hit surface with sharp objects.
• Do not use methylated spirits, diluents or similar products.
If the washer is stored in an area where freezing may occur or moved in freezing temperatures,
follow these instructions to prevent damage to the washer:
• Turn off water supply tap.
• Disconnect hoses from water supply and drain water from hoses.
• Plug electrical cord into a properly grounded electrical outlet.
• Add 1gallon (3.8L) of nontoxic recreational vehicle(RV) antifreeze into an empty wash drum.
Close the door.
• Set spin cycle and let washer spin for 1minute to drain out all water. Not all of the RV antifreeze will
be expelled.
• Unplug electrical power cord, dry the drum interior, and close the door.
• Remove dispenser drawer, drain and dry excess water from the compartments.
• Store washer in an upright position.
• To remove antifreeze from washer after storage, run empty washer through a complete cycle
using detergent. Do not add wash load.
■ Cleaning your washer
■ Cold conditions
The washing drum
• If you live in a hard water area, limescale may build up continuously in places where it
cannot be seen and thus not easily removed. Over time the build up of scale clogs
appliances, and if it is not kept in check these may have to be replaced.
• Although the washing drum is made of Stainless steel, specks of rust can be caused by
small metal articles (paper clips, safety pins) which have been left in the drum.
• The washing drum should be cleaned from time to time.
• If you use descaling agents, dyes or bleaches, make sure they are suitable for washing
machine use.
• Descaler may contain chemicals that may damage part of your washing machine.
• Remove any spots with a stainless steel cleaning agent.
• Never use steel wool.
Exterior
• Dry around the washer door opening, flexible gasket and door glass.
• Run washer through a complete cycle using hot water.
• Repeat process if necessary.
Interior
• To remove hard water deposits, use only cleaners labelled washer safe.
NOTE
Page 35

35
• This washing machine is equipped with automatic safety functions which detect and
diagnose faults at an early stage and react appropriately.
When the machine does not function properly or does not function at all, check the
following points before you contact your service provider.
Rattling and
clanking noise
Thumping sound
Vibrating noise
Water leaks.
Oversudsing
Water does not enter
washer or it enters
slowly
Water in the washer
does not drain or
drains slowly.
• Foreign objects such as coins or
safety pins maybe in drum or
pump.
• Heavy wash loads may produce
a thumping sound. This is usually
normal.
• Have all the transit bolts and
packing been removed?
• Are all the feet resting firmly on
the ground?
• Fill hoses or drain hose are loose
at tap or washer.
• House drain pipes are clogged.
• Water supply is not adequate in
area.
• Water supply tap is not
completely open.
• Water inlet hose(s) are kinked.
• The filter of the inlet hose(s)
clogged.
• Drain hose is kinked or clogged.
• The drain filter is clogged.
Stop washer, check drum and drain
filter.
If noise continues after washer
is restarted, call your authorised
service centre.
If sound continues, washer is
probably out of balance. Stop and
redistribute wash load.
If not removed during
installation, refer to Installation guide
for removing transit bolts.
Wash load may be unevenly
distributed in drum. Stop washer and
rearrange wash load.
Check and tighten hose connections.
Unclog drain pipe. Contact plumber
if necessary.
Too much detergent or unsuitable
detergent may cause excessive
foaming which may result in water
leaks.
Check another tap in the house.
Fully open tap.
Straighten hose.
Check the filter of the inlet hose.
Clean and straighten the drain hose.
Clean the drain filter
Diagnosing Problem
Troubleshooting guide
Possible Cause SolutionSymptom
Page 36

36
Troubleshooting guide
Washer does not
start
Washer will not
spin
Door does not
open
Wash cycle time
delayed
Fabric softener
overflow
Softeners
dispensed
too early
Dry problem
• Electrical power cord may not be
plugged in or connection may be
loose.
• House fuse blown, circuit breaker
tripped,or a power outage has
occurred.
• Water supply tap is not turned on.
• Check that the door is firmly shut.
Too much softener may cause an
overflow.
• Does not dry
Make sure plug fits tightly in wall
outlet.
Reset circuit breaker or replace
fuse. Do not increase fuse capacity.
If problem is a circuit overload, have
it corrected by a qualified electrician.
Turn on water supply tap.
Close the door and press the
Start/Pause button. After pressing
the Start/Pause button, it may take a
few moments before the washer
begins to spin. The door must be
locked before spin can be achieved.
Add 1 or 2 similar items to help
balance the load. Rearrange load to
allow proper spinning.
Once machine has started, the door
cannot be opened for safety
reasons. Check if the "Door Lock"
icon is illuminated. You can safely
open the door after the "Door Lock"
icon turns off.
The washing time may vary by the
amount of laundry, water
pressure, water temperature and
other usage conditions.
If an imbalance is detected or if the
suds removing programme is on, the
wash time shall be increased.
Follow softener guidelines to ensure
appropriate amount is used.
Do not exceed the maximum fill line
Close the dispenser drawer slowly.
Do not open the drawer during the
wash cycle.
Do not overload.
Check that the washer is draining
properly to extract adequate water
from the load.
Clothes load is too small to tumble
property. Add a few towels.
Symptom Possible Cause Solution
Page 37

37
Symptom Possible Cause Solution
• Drain hose is kinked or clogged.
• The drain filter is clogged.
• Load is too small.
• Load is out of balance.
• The appliance has an imbalance detection
and correction system. If individual heavy
articles are loaded (e.g. bath mat, bath
robe, etc.) this system may stop spinning or
even interrupt the spin cycle altogether.
• If the laundry is still too wet at the end of the
cycle, add smaller articles of laundry to
balance the load and repeat the spin cycle.
• Ensure door is not open.
• Water overfills due to the faulty water
valve.
• Water level sensor has malfunctioned.
• Over load in motor.
• The washer experienced a power failure.
Check another tap in the house.
Fully open tap.
Straighten hose(s).
Check the filter of the inlet hose.
Clean and straighten the drain hose.
Clean the drain filter.
Add 1 or 2 similar items to help
balance the load.
Rearrange load to allow proper
spinning.
Close the door completely.
If “ ” is not released, call for
service.
Unplug the power plug and call for
service.
Close the water tap.
Unplug the power plug.
Call for service.
Allow the washer to stand for 30
minutes to allow the motor to cool;
then restart the cycle.
Restart the cycle.
Error Messages
• Check water supply.
Turn the tap on. If “ ” is not
released, unplug power plug and call
for service.
• Water leaks. Call for service.
Troubleshooting guide
<Fig 1>
• Water supply is not adequate
in area.
• Water supply taps are not
completely open.
• Water inlet hose(s) are kinked.
• The filter of the inlet hose(s)
are clogged.
• If water leakage occurred in
the inlet hose, indicator “
”
will be changed red color.
Page 38

38
Troubleshooting guide
• Only use this feature when instructed to do so by the call center.
The transmission sounds similar to a fax machine, and so has no meaning except to the call
center.
• SMARTDIAGNOSIS™ cannot be activated if the washer does not power up.
If this happens, then troubleshooting must be done without SMARTDIAGNOSIS™.
If you experience problems with your washer, call to Customer Information Center.
Follow the call center agent's instructions, and do the following steps when requested:
Using SMARTDIAGNOSIS™
1. Press the Power button to turn on the washer.
Do not press any other buttons or turn the cycle
selector knob.
2. When instructed to do so by the call center,
place the mouthpiece of your phone very close
to the Power button.
3. Touch and hold the “Temp.” button for three seconds, while holding the phone mouthpiece
to the icon or Power button.
4. Keep the phone in place until the tone transmission has finished.
This takes about 17 seconds, and the display will count down the time.
• For best results, do not move the phone while the tones are being transmitted.
• If the call center agent is not able to get an accurate recording of the data, you may be
asked to try again.
• Pressing the Power button during the transmission will shut off the SMARTDIAGNOSIS™.
5. Once the countdown is over and the tones have stopped, resume your conversation with
the call center agent, who will then be able to assist you using the information transmitted
for analysis at the call to Customer information center.
Max. 10 mm
NOTE
• SMARTDIAGNOSIS™ function is available only for the products with a SMARTDIAGNOSIS™ mark.
In case of a mobile phone with static option, the SMARTDIAGNOSIS™ function might not operate.
Page 39

39
What Is Not Covered:
• Service trips to your home to teach you how to use the product.
• If the product is connected to any voltage other than that shown on the rating plate.
• If the fault is caused by accident, neglect, misuse or Act of God.
• If the fault is caused by factors other than normal domestic use or use in accordance with the owner's
manual.
• Provide instruction on use of product or change the set-up of the product.
• If the fault is caused by pests for example, rats or cockroaches, etc.
• Noise or vibration that is considered normal, for example water drain sound,
spin sound, or warning beeps.
• Correcting the installation. For example, levelling the product, adjustment of drain.
• Normal maintenance which is recommended by the owner's manual.
• Removal of foreign objects / substances from the machine, including the pump and inlet hose filter, For
example, grit, nails, bra wires, buttons etc.
• Replace fuses in or correct house wiring or correct house plumbing.
• Correction of unauthorized repairs.
• Incidental or consequential damage to personal property caused by possible defects with this appliance.
• If this product is used for commercial purpose, it is not warranted.
(Example : Public places such as public bathroom, lodging house, training center, dormitory)
If the product is installed outside the normal service area, any cost of transportation involved in the repair
of the product, or the replacement of a defective part, shall be borne by the owner.
Disposal of your old appliance
1. When this crossed-out wheeled bin symbol is attached to
a product it means the product is covered by the European Directive
2002/96/EC.
2. All electrical and electronic products should be disposed of
separately from the municipal waste stream via designated collection
facilities appointed by the government or the local authorities.
3. The correct disposal of your old appliance will help prevent potential
negative consequences for the environment and human health.
4. For more detailed information about disposal of your old appliance,
please contact your city office, waste disposal service or the shop
where you purchased the product.
NOTE
• When disposing of the appliance, cut off the mains cable, destroy the plug and
disable the door lock to prevent children being trapped inside.
Terms of Warranty
Page 40

40
Page 41

Memo
Page 42

Page 43

BEDIENUNGSANLEITUNG
Waschtrockner
F14A8YD(1~9)
www.lg.com
Bitte lesen Sie diese Anleitungen vor der Montage aufmerksam durch.
Auf diese Weise wird die Montage erleichtert und der korrekte und
sichere Anschluss des Waschtrockners wird gewährleistet.
Bewahren Sie diese Anleitung zum schnellen Nachschlagen in der
Nähe des Waschtrockners auf.
Page 44

Inhalt
2
Inhalt..........................................2
Produktmerkmale.....................3
Wichtige Sicherheitshinweise
Wichtige Sicherheitshinweise ...............4
Allgemeine Sicherheitshinweise ...........5
Diese Hinweise aufbewahren ...............6
Sicherheitshinweise für die Installation......7
Technische Daten ....................8
Aufstellanweisung
Verpackung entfernen...........................9
Abnehmen der
Transportsicherungsschrauben ............9
Platzbedarf für Aufstellung..................10
Anschluss des Wasserzulaufschlauchs
.12
Anschluss des Ablaufschlauchs..........14
Ausrichtung .........................................15
Bedienung
Bedienung des Waschtrockners .........17
Vor dem ersten Waschen ...................18
Tabelle der Waschprogramme............19
Tabelle der Trockenprogramme..........20
Weitere Zusatzfunktion .......................21
Betriebsdaten......................................21
Bedienfeld ...........................................22
Programmwahlschalter .......................23
- Startzeitvorwahl ................................23
- Intensiv Spülen .................................23
- Favoriten-Programm.........................23
- Vorwäsche .......................................23
Zusatzfunktion.....................................24
- Waschen...........................................24
- Zusatzfunktion .................................24
- Temperatur ......................................24
- Schleudern........................................24
Andere Funktionen..............................24
- Nur Schleudern.................................24
Kindersicherung ..................................25
Tonsignal An/Aus................................25
Trommelreinigung ..............................26
Türverriegelung &
Programmanpassung
.........................26
Trocknen .............................................27
Danke für den Kauf eines
vollautomatischen LG Waschtrockners.
Lesen Sie bitte dieses
Benutzerhandbuch sorgfältig durch, es
enthält Anweisungen zur sicheren
Installation, Gebrauch und Wartung.
Bewahren Sie es so auf, dass Sie es in
der Zukunft bei Fragen zu dieser
Maschine zur Hand haben.
Notieren Sie sich das Modell und die
Seriennummer Ihres Waschtrockners.
Modell-Nr.:
Serien.Nr.:
Kaufdatum:
Zugabe von Waschmittel
Einfüllen von Waschmittel und
Weichspüler ........................................29
Pflege und Wartung
Wasserzulaufsfilter..............................31
Absaugpumpenfilter ............................32
Waschmittelschublade ........................33
Waschtrommel ....................................34
Reinigung............................................34
Maschine vor Frost schützen ..............34
Fehlersuche
Störungsbehebung..............................35
Fehlermeldung ....................................37
Benutzung von SMARTDIAGNOSIS™..38
Garantiebedingungen ............39
Page 45

ˆ¡…–¯ˆ ¿„
Direktantriebssystem
Der wegweisende Direct Drive Motor dreht die Trommel direkt, also ohne
Riemen und Riemenscheiben.
Geräusch- und Vibrationsminimierung
Durch Erfassung von Zuladung und Gewichtsverteilung kann das System
die Last gleichmäßig verteilen um Schleudergeräusche zu minimieren.
Kindersicherung
Mit der Kindersicherung soll verhindert werden, dass Kinder bei laufendem
Betrieb durch das Drücken einer Taste den Programmablauf ändern.
Günstigeres Waschen dank intelligentem Waschsystem
Unser intelligentes Waschsystem erfasst die Zuladung sowie die
Wassertemperatur und entscheidet über die optimale Wassermenge und
Waschzeit um Energie- und Wasserverbrauch auf ein Minimum zu
reduzieren.
Eingebaute Heizung
Die eingebaute Heizung erhitzt das Wasser automatisch für den jeweiligen
Zyklus auf die optimale Temperatur auf.
Knitterschutz
Durch die wechselnde Rotation der Trommel werden Falten in der Wäsche
vermindert.
Produktmerkmale
3
6 unterschiedliche Trommelbewegungen
Der Waschtrockner verfügt, je nach gewähltem Waschprogramm,
über unterschiedliche Trommelbewegungen bzw. einer Abfolge
unterschiedlicher Trommelbewegungen.
In Kombination mit der kontrollierten Umdrehungszahl und der
Fähigkeit des Waschtrockners rechts oder links herum zu drehen,
wurde die Waschleistung deutlich verbessert.
So erhalten Sie jederzeit perfekte Waschergebnisse.
Page 46

4
Wichtige Sicherheitshinweise
Aus Sicherheitsgründen sollten die Hinweise in dieser Bedienungsanleitung befolgt werden, um
die Gefahr von Bränden, Explosionen und Stromschlägen zu verringern und um die Gefahr von
Sachschäden, Verletzungen oder Tod zu vermeiden.
LESEN SIE ALLE ANLEITUNGEN UND BESCHREIBUNGEN VOLLSTÄNDIG UND
AUFMERKSAM DURCH.
WARNUNG
Bei Missachtung der Hinweise besteht Lebensgefahr oder die Gefahr schwerer Verletzungen.
Ihre Sicherheit und die Sicherheit anderer Personen ist oberstes
Gebot.
In dieser Bedienungsanleitung sowie auf der Maschine selbst befinden sich zahlreiche
wichtige Sicherheitshinweise. Diese Sicherheitshinweise müssen stets gelesen und beachtet
werden.
Dieses Symbol weist auf einen Sicherheitshinweis hin.
Dieses Symbol weist auf eine mögliche Lebensgefahr oder die Gefahr schwerer
Verletzungen hin.
Der Sicherheitshinweis selbst steht neben dem Warnsymbol, zusammen mit dem Begriff
GEFAHR, WARNUNG oder VORSICHTSMAßAHMEN.
Diese Begriffe haben folgende Bedeutung:
WARNUNG
Bei Missachtung der Hinweise besteht die Gefahr von Verletzungen oder Schäden am Gerät.
Jeder Sicherheitshinweis enthält den jeweiligen Gefahrenhinweis, einen Hinweis zur
Vermeidung von Verletzungen sowie die Folgen bei Missachtung der Hinweise.
VORSICHTSMAßAHMEN
Bei Missachtung der Hinweise besteht äußerste Lebensgefahr oder die Gefahr schwerster
Verletzungen.
GEFAHR
Page 47

5
Wichtige Sicherheitshinweise
Um die Gefahr von Bränden, Stromschlägen oder Verletzungen bei der Bedienung des
Waschtrockners zu vermeiden, beachten Sie bitte die folgenden Sicherheitshinweise:
WARNUNG
• Das Gerät vor der Montage auf
äußerliche Beschädigungen prüfen. Bei
Beschädigungen das Gerät nicht
aufstellen.
• Den Waschtrockner nicht ungeschützt
im Freien aufbewahren oder aufstellen.
• Die Bedienelemente dürfen nicht
unsachgemäß bedient werden.
• Teile des Waschtrockners niemals
selbst reparieren, austauschen oder
warten, es sei denn dies wird in der
Anleitungen zu Wartungsarbeiten oder
Reparaturen durch den Benutzer
ausdrücklich empfohlen, sofern Sie die
Anleitungen verstehen und über die
Kenntnisse zur Durchführung solcher
Arbeiten verfügen.
• Im Bereich unterhalb und neben den
Geräten dürfen sich keine brennbaren
Stoffe befinden, wie zum Beispiel Flusen,
Papier, Fusseln oder Chemikalien.
• Kinder und unsichere Personen sollten
bei der Bedienung des Gerätes
beaufsichtigt werden. Kinder sollten
nicht auf, mit oder in dieser und anderen
Maschinen spielen.
• Kleintiere vom Gerät fernhalten.
• Die Tür niemals geöffnet lassen.
Eine offen stehende Tür könnte Kinder dazu
verleiten, in den Waschtrockner zu kriechen.
• Greifen Sie niemals in den laufenden
Waschtrockner. Warten Sie mit dem
Öffnen der Ladeklappe, bis die
Maschine vollständig angehalten wurde.
• Der Waschvorgang kann die Feuerfestigkeit von
Kleidungsstücken vermindern.
Um dies zu
vermeiden, beachten Sie die
Pflegeanleitungen des Herstellers.
• Wäschestücke, die zuvor mit
brennbaren oder explosiven Stoffen
(z.B.: Wachs, Öl, Farbe, Benzin,
Kaltreiniger, chemische Reiniger,
Kerosin, usw.) gereinigt, gewaschen,
eingetaucht oder bespritzt wurden,
dürfen nicht gewaschen werden. Es
besteht Brand- und Explosionsgefahr.
Nach dem Waschgang können Ölrückstände in
der Trommel zurückbleiben. Die sich während
des Betriebs entzünden könnten.
Den Waschtrockner daher niemals mit
ölverschmierten Kleidungsstücken
beladen.
• Den Waschtrockner nicht zuschlagen
oder eine gesperrte Tür gewaltsam
öffnen. Ansonsten besteht die Gefahr von
Schäden an dem Waschtrockner.
• Beim Betrieb mit hoher Temperatur
kann die Glastür sehr heiß werden. Die
Tür niemals berühren.
• Um die Gefahr von Stromschlägen zu
vermeiden, den Waschtrockner vor der
Wartung und Reinigung von der
Stromversorgung trennen oder über die
Haussicherung abschalten.
• Das Netzkabel zum Abziehen niemals
am Kabel selbst festhalten. Ansonsten
könnte das Netzkabel beschädigt werden.
• Ein defektes, fehlerhaftes, teilweise
auseinandergenommenes Gerät oder
ein Gerät mit fehlenden oder defekten
Teilen, Netzkabel oder Stecker niemals
betreiben.
■ Allgemeine Sicherheitshinweise
Page 48

6
Wichtige Sicherheitshinweise
■ Allgemeine Sicherheitshinweise
■ Diese Hinweise aufbewahren
Um die Gefahr von Bränden, Stromschlägen oder Verletzungen bei der Bedienung dem
Waschtrockner zu vermeiden, beachten Sie bitte die folgenden Sicherheitshinweise:
WARNUNG
Bei unsachgemäßem Anschluss der Erdungsleitung besteht die Gefahr von Stromschlägen.
Um sicherzustellen, ob das Gerät ordnungsgemäß geerdet ist, ziehen Sie einen qualifizierten
Elektriker oder Servicetechniker zu Rate. Den mit dem Gerät gelieferten Stecker niemals
verändern - falls der Stecker nicht in die Steckdose passt, lassen Sie die Steckdose von einem
qualifizierten Elektriker austauschen.
ERDUNGSANLEITUNGEN
Dieses Gerät muss geerdet werden. Im Falle einer Fehlfunktion oder eines Ausfalls verringert
eine Erdung die Gefahr von Stromschlägen, indem für den elektrischen Strom eine Leitung
mit dem geringsten Widerstand bereitgestellt wird.
Dieses Gerät besitzt ein Stromkabel mit einem Erdleiter. Der Stecker muss an eine geeignete
Steckdose angeschlossen werden, die gemäß allen örtlichen Bestimmungen und
Verordnungen montiert und geerdet ist.
• Keinen Adapter verwenden. Ansonsten wird keine Erdung gewährleistet.
• Falls keine geeignete Steckdose vorhanden ist, wenden Sie sich an einen Elektriker.
WARNUNG
• Vor der Entsorgung der alten
Maschine den Netzstecker ziehen. Der
Stecker sollte anschließend
unbrauchbar gemacht werden.
Schneiden Sie das Kabel direkt am
Gerät ab, um einen Missbrauch zu
verhindern.
• Falls das Gerät unter Wasser stand,
verständigen Sie bitte den
Kundendienst. Es besteht Brand- und
Stromschlaggefahr.
• Verwenden Sie für den
Wasseranschluss am Gerät
ausschließlich neuwertige Schläuche.
Verwenden Sie keine gebrauchten
Schläuche.
• Um die Gefahr von Verletzungen zu
verringern, beachten Sie sämtliche
empfohlenen
Sicherheitsvorkehrungen und tragen
Sie lange Arbeitshandschuhe sowie
eine Schutzbrille. Bei Missachtung der
Sicherheitshinweise in dieser
Bedienungsanleitung besteht die Gefahr von
Lebens- und Verletzungsgefahr sowie von
Sachschäden.
• Die geöffnete Tür nicht gewaltsam
herunterdrücken. Ansonsten könnte der
Waschtrockner kippen.
Page 49

7
Wichtige Sicherheitshinweise
Beachten Sie zur Verminderung der Gefahr eines Brandes im Waschtrockner folgendes:
• Mit pflanzlichem oder tierischem Fett
verunreinigte Kleidungsstücke stellen ein
Brandrisiko dar und sollten daher nicht in
einen Waschtrockner gegeben werden.
Ölverschmutzte Kleidungsstücke können
sich spontan entzünden, insbesondere wenn
Sie Wärmequellen - wie in einem
Waschtrockner - ausgesetzt werden. Durch
das Erwärmen der Kleidungsstücke wird im
Öl ein Oxidationsvorgang ausgelöst. Die
Oxidation erzeugt Wärme. Wenn die Wärme
nicht abgeleitet werden kann, können die
Kleidungsstücke so heißwerden, dass sie
Feuer fangen. Das Stapeln oder Lagern
ölverschmutzter Kleidungsstücke kann das
Ableiten von Wärme verhindern und so ein
Brandrisiko erzeugen. Wenn es
unvermeidbar ist, dass mit tierischem bzw.
pflanzlichem Fett oder mit Haarpflegemitteln
verschmutzte Stoffe in den Waschtrockner
gegeben werden, sollten diese zunächst
unter Verwendung eines geeigneten
Reinigungsmittel in heißem Wasser
ausgewaschen werden. Hierdurch wird die
Brandgefahr verringert, jedoch nicht
ausgeschlossen. Nutzen Sie den „Abkühl”Vorgang des Waschtrockners, um die
Temperatur der Kleidungsstücke zu
verringern. Diese sollten nicht heißaus dem
Waschtrockner genommen oder gestapelt
werden.
• Kleidungsstücke, die zuvor in mineralöl- bzw.
benzinhaltigen oder
Trockenreinigungsmitteln oder anderen
brennbaren oder explosiven Stoffen
eingeweicht, gewaschen oder gereinigt
wurden, sollten nicht in einen Waschtrockner
gegeben werden. Zu leicht entflammbaren,
gemeinhin im häuslichen Umfeld
verwendeten Stoffen zählen Azeton,
denaturierter Alkohol, Benzin, Kerosin,
Fleckenentferner (einige Produkte),
Terpentin, Wachse und Wachsentferner.
• Kleidungsstücke, die Schaumstoff oder
ähnlich geartete Kunststoffe enthalten,
sollten nicht bei starker Wärme in einem
Waschtrockner getrocknet. werden.
Schaumstoffe können bei Erwärmung durch
Spontanverbrennung Feuer fangen.
• Um die Entstehung statischer Elektrizität zu
vermeiden, sollten
Weichspüler/Weichmacher oder ähnliche
Produkte nicht in einen Waschtrockner
gegeben werden, sofern dies nicht vom
Hersteller des Weichspülers/Weichmachers
oder eines anderen Produktes ausdrücklich
empfohlen wird.
• Unterwäsche mit metallischen
Verstärkungen (wie z.B. Büstenhalter) sollte
nicht in einen Waschtrockner gegeben
werden.
• Metallische Verstärkungen, die sich während
des Trocknens lösen, können eine
Beschädigung des Waschtrockners
bewirken. Verwenden Sie zur Trocknung
solcher Kleidungsstücke ein Trockengestell.
• Kunststoffartikel, wie Badekappen oder
wasserfeste Baby-Lätzchen, sollten nicht in
einen Waschtrockner gegeben werden.
• Gummikaschierte Artikel, mit
Schaumstoffpolstern versehene
Kleidungsstücke, Kissen, Galoschen und
gummibeschichtete Tennisschuhe sollten
nicht in einen Waschtrockner gegeben
werden.
■ Sicherheitshinweise für die Installation
Page 50

8
■ Bezeichnung : Frontlader - Waschtrockner
■ Stromversorgung : 220 - 240 V~, 50 Hz
■ Abmessungen : 600 mm(B)
640 mm(T) 850 mm(H)
■ Gewicht : 72 kg
■ Max. Leistungsaufnahme :
2100 W (Waschen) / 1500 W (Trocknen)
■ Max. Zuladung :
8 kg (Waschen) / 6 kg (Trocknen)
■ Zulässiger Wasserdruck : 100 - 1000 kPa (1,0 - 10,0 kgf / cm2)
Das Recht zu Änderungen an Daten und Design ohne Vorankündigung bleibt
vorbehalten.
Zubehör
Zulaufschlauch (1 EA) Schraubenschlüssel
Trommel
Pumpenfilter
Ablaufstopfen
Unterer Deckel
Tür
Ablaufschlauch
Transportsicherungsschrauben
Waschmittelschublade
(Für Waschmittel
und Weichspüler)
Bedienblende
Nivellierfuß
Netzstecker
• Falls das Netzkabel
beschädigt ist, muss es
durch den Kundendienst
bzw. Fachmann ersetzt
werden, um Gefahren zu
vermeiden.
Technische Daten
Page 51

9
■ Verpackung entfernen
1. Entfernen Sie den Verpackungskarton
und das Styropormaterial.
2. Heben Sie den Waschtrockner an und
entfernen Sie die Bodenverpackung.
3. Entfernen Sie das Klebeband, mit der
Netzkabel und Ablaufschlauch
gehalten werden.
4. Nehmen Sie den Zulaufschlauch aus
der Waschtrommel.
1. Die 4 Schrauben mit dem beiliegenden
Schraubenschlüssel herausdrehen.
2. Die 4 Schrauben lösen und die
Gummipfropfen etwas drehen, um sie
zusammen mit den Schrauben
herauszunehmen.
3.
Die Schraubenöffnungen mit den
beiliegenden Kappen verschließen.
Das Gerät ist durch 4 Spezialschrauben gesichert, um Transportschäden zu verhindern.
Vor der Inbetriebnahme die Schrauben zusammen mit den Gummipfropfen entfernen.
■ Abnehmen der Transportsicherungsschrauben
TransportSicherungen
Verpackungsboden
Schraubenschlüssel
Waschtrockner
Aufstellanweisung
ACHTUNG
• Schraubenschlüssel für späteren
Gebrauch aufbewahren.
WARNUNG
• Verpackungsmaterial (Folien, Styropor, etc.) kann für Kleinkinder gefährlich sein.
Es besteht Erstickungsgefahr! Halten Sie Verpackungsmaterial von Kleinkindern fern.
Page 52

10
• Ebener Untergrund:
Zulässige Schräge unter dem Waschtrockner: max.1°
• Steckdose:
Innerhalb von 1,5 m seitlich des Waschtrockners.
Keinesfalls andere Geräte gleichzeitig an die Steckdose
anschließen.
• Abstände:
Die vorgeschriebenen Abstände zu Wänden, Türen und
Boden einhalten.
(10cm hinten /2cm:rechts und links)
Keinesfalls Waschmittel usw. auf dem Waschtrockner
ablegen.
Sie könnten die Oberfläche oder die Bedienelemente
beschädigen.
Platzbedarf für Aufstellung
Aufstellen des Waschtrockners Standort
Standort
•
Stellen Sie den Waschtrockner auf einen flachen und harten Untergrund.
• Stellen sie sicher, daß die Luftzirkulation unter dem Waschtrockner nicht durch unebene
Bodenbeläge eingeschränkt wird.
• Gleichen Sie Bodenunebenheiten nicht durch irgendwelche Gegenstände wie Holzkeile, Pappe
oder ähnliches Material aus.
• Wenn der Waschtrockner neben einer Heizquelle stehen muß, bedecken Sie die Seitenwand
des Waschtrockners, die der Heizquelle zugewandt ist, mit einer Aluminiumfolie.
• Der Waschtrockner darf nicht in Räumen aufgestellt werden, in denen die Raumtemperatur
unter den Gefrierpunkt sinken kann.
• Der Waschtrockner sollte, z.B. für den Fall einer Betriebsstörung, gut zugänglich aufgestellt
sein.
• Wenn der Waschtrockner unter eine Arbeitsplatte gestellt wird, muß nach Ausrichtung der Füße
zwischen der Arbeitsplatte und dem Deckel des Waschtrockners noch mindestens 20 mm Luft
sein.
Aufstellanweisung
Waschmaschine
ca. 2 cm
Page 53

11
• Keinesfalls eine Verlängerungsschnur oder eine Doppelsteckdose verwenden.
• Falls das Netzkabel beschädigt ist, muss es durch den Kundendienst bzw. Fachmann ersetzt
werden, um Gefahren zu vermeiden.
• Nach dem Betrieb der Maschine den Netzstecker ziehen und den Wasserhahn schließen.
• Die Maschine vorschriftsgemäß an eine geerdete Steckdose anschließen.
• Das Gerät so positionieren, dass direkter Zugriff auf den Netzstecker besteht.
• Reparaturen an dem Waschtrockner dürfen nur von Fachleuten durchgeführt werden.
Reparaturen, die von unerfahrenen Personen durchgeführt werden, können Verletzungen
oder schwerwiegende Funktionsstörungen nach sich ziehen.
Wenden Sie sich an Ihr Service-Center vor Ort.
• Schliessen Sie Ihren Waschtrockner nicht in Räumen an, in denen möglicherweise
Temperaturen unter dem Gefrierpunkt vorherrschen. Eingefrorene Schläuche können unter
Druck platzen. Die Zuverlässigkeit der elektronischen Steuereinheit kann durch
Temperaturen unter dem Gefrierpunkt beeinträchtigt werden.
• Falls das Gerät in den Wintermonaten angeliefert wird und die Temperaturen unter dem
Gefrierpunkt liegen, sollten Sie den Waschtrockner für einige Stunden bei Zimmertemperatur
stehen lassen, bevor Sie diese in Betrieb nehmen.
Elektrischer Anschluss
Aufstellanweisung
VORSICHTSMAßNAHMEN
• Das Gerät ist für eine Bedienung durch Kinder oder körperlich behinderten Personen
ohne Aufsicht nicht geeignet.
• Kinder und körperlich behinderte Personen sollten unter Aufsicht stehen, um die
korrekte Bedienung des Gerätes zu garantieren und einen Missbrauch zu vermeiden.
VORSICHTSMAßNAHMEN
Vorsichtsmaßnahmen zur Handhabung des Spannungsversorgungskabels.
Bei den meisten Geräten wird empfohlen, diese an einen separaten Stromkreis
anzuschliessen.
Dies bedeutet, dass ausschließlich dieses Gerät an diesem Stromkreis angeschlossen ist
und keine weiteren Geräte oder Anwendungen darüber betrieben werden. Um sicher zu
gehen, lesen Sie bitte die Seite mit den Gerätespezifikationen sorgfältig durch.
Achten Sie darauf Steckdosen nicht zu überlasten. Überlastete, lose oder beschädigte
Steckdosen, sowie Verlängerungskabel, ausgefranste Stromkabel und beschädigte
Kabelisolierungen sind gefährlich. Jeder dieser Faktoren kann Feuer oder Stromschläge
verursachen. Untersuchen Sie die Versorgungskabel ihres Gerätes regelmäßig und
unterbrechen Sie die Stromzufuhr sobald die äußere Erscheinung auf Beschädigungen
schliessen lässt. Benutzen Sie das Gerät erst wieder wenn das beschädigte Kabel von einem
autorisierten Techniker durch ein entsprechendes Ersatzteil ausgetauscht wurde.
Schützen Sie das Stromversorgungskabel vor jeder möglichen Beschädigung, wie z.B.
verdrehen oder verbiegen des Kabels, einklemmen in der Tür oder darauf treten. Achten Sie
besonders auf die Stecker und Steckdosen, sowie die Verbindung des Kabels zum Gerät.
Falls am Gerät ein Verlängerungskabel oder eine tragbare Steckdose angeschlossen ist,
muss das Verlängerungskabel der tragbaren Steckdose so verlegt werden, dass es nicht mit
Wasser oder Feuchtigkeit in Berührung kommen kann.
Page 54

12
• Diese Maschine ist auf einen Wasserdruck von 100 bis 1000 kPa (1,0 - 10,0 kgf / cm2) ausgelegt.
• Beim Anschluss des Zulaufschlauchs am Ventil aufpassen, dass die Überwurfmutter korrekt auf
das Gewinde des Ventils aufgeschraubt wird.
• Bei einem Wasserdruck von mehr als 1000 kPa muss ein Druckminderer vor dem Einlass
angeordnet werden.
• Den Schlauch regelmäßig kontrollieren und ersetzen, falls notwendig.
Typ A: Installation des Wasseranschluss-Schlauches ohne Gewinde
• Schrauben Sie das Gewinde des
Schlauches gleichmässig und fest an den
Wasseranschluss
■
Anschluss des Wasserzulaufschlauchs
1. Schritt : Überprüfe Dichtung am Zulaufschlauch
2. Schritt : Schließen Sie den Schlauch am Wasseranschluß an
• Der Überwurfmutter des
Wasserzulaufschlauchs sind zwei
Dichtringe beigelegt, um Wasseraustritt zu
verhindern. Zum Prüfen der Anschlüsse
auf Dichtigkeit den Wasserhahn
vollständig aufdrehen.
Überwurtmutter
Überwurtmutter
Gummidichtung
Gummidichtung
Aufstellanweisung
Page 55

13
3. Schritt : Schließen Sie den Schlauch am Gerät an
• Sicherstellen, dass der Schlauch weder
geknickt noch gequetscht ist.
Aufstellanweisung
ACHTUNG
•
Wenn der Anschluss oder der Schlauch nach dem Anschliessen tropft, wiederholen Sie diese
Vorgänge nocheinmal. Benutzen Sie den meist gebräuchlichen Wasseranschluss. Falls der
Anschluss zu gross ist entfernen Sie den Zwischenring bevor Sie den Adapter montieren.
Page 56

14
Anschluss des Ablaufschlauchs
• Den Ablaufschlauch nicht mehr als
100cm über dem Boden platzieren.
Das Wasser könnte nur langsam oder
gar nicht mehrt abgepumt werden.
• Durch Fixieren des Ablaufschlauchs
verhindern Sie Verspritzen von Wasser.
• Falls der Ablaufschlauch zu lang ist, den
Schlauch nicht in die Maschine
hineinschieben. Dies würde abnormale
Geräusche verursachen.
• Den Ablaufschlauch mit einer Schnur
o.ä. am Waschbecken befestigen.
• Durch Fixieren des Ablaufschlauchs
verhindern Sie Verspritzen von Wasser.
ca. 100 cm
ca. 145 cm
ca. 105 cm
max. 100 cm
Schlauchhalter
Schlauchbinder
Waschbecken
max.100 cm
max.100 cm
Aufstellanweisung
Page 57

15
•
Stabilitätsprüfung
Auf die Ecken des Waschtrockners drücken
und sicherstellen, dass sie sich dadurch
nicht nach oben oder unten bewegt.
(In beiden Richtungen prüfen) Falls die
Maschine sich bewegt oder wackelt, die
Nivellierfüße erneut einstellen.
2.
Bodenunebenheiten durch Drehen der
Nivellierfüße ausgleichen (keinesfalls Holz
usw. unter die Füße schieben).
Sicherstellen, dass alle vier Füße den Boden
berühren. Dann mit einer Wasserwaage
sicherstellen, dass das Gerät waagrecht
steht.
1.
Das korrekte Nivellieren oder Ausrichten des
Waschtrockners verhindert übermäßiges
Geräusch und starke Vibration. Das Gerät
auf festem, flachem Untergrund stellen - am
besten in eine Ecke.
■ Ausrichtung
•
Nach Ausrichtung werden die Muttern im
Uhrzeigersinn festgedreht.
Aufstellanweisung
ACHTUNG
• Bei Auslegeware oder Holzböden
kann es zu extremen Vibrationen
und Fehlern bei der
Unwuchtkontrolle kommen.
ACHTUNG
Wenn der Waschtrockner auf einer erhöhten Plattform aufgestellt wird, muss sie fixiert
werden um das Risiko des Herunterfallens zu verhindern.
Page 58

16
Hinweise zum Aufstellort:
Holzböden
• Der Boden muß sauber, trocken und eben sein.
• Stellen Sie den Waschtrockner auf einen harten und glatten Untergrund.
Gefliesste Fußböden ( Glatte, rutschige Fußböden )
• Stellen Sie jeden Fuß des Waschtrockners auf eine rutschfeste Unterlage.
(Schneiden Sie die rutschfeste Matte in 70 x 70 mm große Stücke und fixieren Sie diese
auf die trockenen Fliesen, dort wo die Maschine aufgestellt werden soll.)
• Rutschfeste Unterlagen bestehen aus haftenden Materialien, wie sie auf Leitern und
Treppenstufen verwendet werden, um das Ausrutschen zu verhindern
• Holzböden können für unerwünschte Vibrationen sorgen.
• Zur Vermeidung solcher Vibrationen befestigen Sie Gummikappen
auf den Füßen oder schrauben Sie Holzleisten in den Boden
zur Fixierung des Gerätes.
• Wenn möglich, stellen Sie den Waschtrockner in einer Raumecke auf.
• Befestigen sie Gummikappen zur Vermeidung unerwünschter Vibrationen.
• Sie können die Gummikappen mit dieser Teilenummer (p/no 4620ER4002B) als Ersatzteil
beim LG-Kundendienst bestellen.
Gummikappe
Aufstellanweisung
ACHTUNG
• Ordentliches Aufstellen garantiert Langlebigkeit Ihres Waschtrockners.
• Der Waschtrockners muss waagerecht stehen.
• Er darf unter Last nicht wippen.
• Der Boden, auf dem der Waschtrockner steht, muss absolut sauber sein.
• Die Füße des Waschtrockners dürfen nicht nass werden, da sonst Rutschgefahr besteht.
Page 59

17
Bedienung des Waschtrockners
2. Tür öffnen und Wäsche einfüllen
1. Sortieren der Wäsche
(siehe auch S.18)
3. Die An/Aus-Taste drücken.
4. Wählen des Programms
(siehe auch S.19-21)
5. Einfüllen des Waschmittels
(siehe auch S.29-30)
6. Die Pause/Start-Taste drücken.
Wählen der Zusatzoptionen
(siehe auch S.23-28)
■ Zusatzprogramme
■ Temperatur
■ Schleuderdrehzahl
■ Zusatzfunktionen
Bedienung
Page 60

18
■ Vor dem ersten Waschen
3. Vorbereiten der Wäsche
Kombinieren Sie grosse und kleinere Waschestücke. Beladen
Sie den Waschtrockner zuerst mit den grossen
Wäschestücken, welche mehr als die Hälfte der Ladung
beinhalten sollten. Waschen Sie bitte keinen EinzelWäschestücke. Das könnte eine Unwicht hervorrufen. Fügen
Sie dann 1-2 Wäschestücke hinzu.
• Sicherstellen, dass alle Taschen entleert sind. Gegenstände
wie Nägel, Haarspangen, Streichhölzer, Kugelschreiber,
Münzen, Schlüssel usw. können Ihren Waschtrockner und
Ihre Wäsche beschädigen.
• Reißverschlüsse, Haken und Bänder schließen, damit sie
sich nicht an anderen Wäschestücken verfangen.
• Schmutzstellen und Flecken auf Kragen, Manschetten usw.
mit etwas in Wasser gelöstem Waschmittel vorbehandeln,
damit sich der Schmutz leichter löst.
• Prüfen Sie, ob sich im Inneren der Trommel noch
Gegenstände oder Wäschestücke befinden und entfernen
Sie diese vor dem nächsten Waschgang.
• Entfernen Sie alle Kleidungsstücke und Gegenstände aus
dem Faltenbalg um zu verhindern, dass weder
Kleidungsstücke noch Faltenbalg beschädigt werden.
2. Sortieren
Sortieren Sie Kleidungsstücke nach Waschprogramm und
Wäscheart. Für die verschiedenen Gewebe werden
unterschiedliche Wassertemperaturen und
Schleuderdrehzahlen benötigt. Trennen Sie stets dunkle
Wäsche von hellen oder weißen Kleidungsstücken. Dunkle
und helle Wäsche separat waschen um Verfärbungen von
weißen Wäschestücken zu vermeiden. Nach Möglichkeit stark
verschmutzte Wäsche getrennt von leicht verschmutzter
waschen.
• Verschmutzungsgrad
Kleidungsstücke nach Verschmutzungsgrad
(hoch, normal, gering) trennen.
• Fussel (fusselnd, Fussel sammelnd)
Fusselnde Kleidungsstücke nicht zusammen mit Kleidung
waschen, an der sich leicht Fusseln absetzen.
• Fusselnde Gewebe: Plüsch, Chenille, Handtücher, Frottee
Fusselsammelndes Gewebe : Synthetisches Gewebe, Cord,
bügelfreies Gewebe, Socken
1. Wäscheetiketten mit Pflegeanweisungen
Achten Sie auf die Etiketten mit Pflegeanweisungen an Ihren
Wäschestücken. Diese Etiketten zeigen die Gewebeart und
geben Waschanweisungen.
ACHTUNG
•
Vor dem 1.Waschgang, wählen Sie Programm Koch-/Buntwäsche 60°C mit halber Menge Waschmittel
und führen Sie einen Waschgang ohne Wäsche durch. Das entfernt Rückstände aus dem Waschtrockner,
die bei der Herstellung enstanden sein könnten.
Bedienung
Page 61

19
Tabelle der Waschprogramme
Empfohlene Waschprogramme abhängig von Wäschematerial.
Bedienung
Eco
Pflegeleicht
Mix
Bietet optimierte Waschleistung bei
geringem Energieverbrauch
Dieses Programm ist speziell für
Hemden gedacht, die nach dem
Waschgang nicht gebügelt werden
müssen.
Ermöglicht das gemeinsame
Waschen von unterschiedlichsten
Textilien in einem Waschgang
Programm
Beschreibung Gewebeart
Waschtemp.
Höchstladung
Koch-/
Buntwäsche
Sorgt für bessere Waschleistung durch
die Kombination von unterschiedlichen
Trommelbewegungen
Farbechte Bekleidung (Hemden,
Nachtwäsche, Pyjamas…) und
leicht verschmutze, weiße Koch-/
Buntwäsche (z.B. Unterwäsche)
Polyamid, Acryl, Polyester
Verschiedene Arten von Textilien.
Ausnahme: Seide/Feinwäsche,
Sportbekleidung, dunkle Textilien,
Wolle, Bettdecken/Vorhänge
Babybekleidung
Entfernt Verschmutzungen sowie
proteinhaltige Rückstande und sorgt
für eine bessere Leistung beim Spülen
Leicht verschmutzte Babykleidung
Nacht-
programm
Ermöglicht besonders leises,
Waschen mit äußerst geringen
Vibrationen. Energieersparniss durch
die Nutzung von Nachtstrom möglich.
Farbechte Bekleidung (Hemden,
Nachtwäsche, Pyjamas…) und leicht
verschmutze, weiße Koch-/
Buntwäsche (z.B. Unterwäsche)
Skin Care
Entfernt Waschmittelrückstände
besonders effektiv aus den Textilien.
Gewebe mit direktem Hautkontakt,
wie z.B. Unterwäsche, Handtücher,
Bettbezüge, Kissen und
Spannbettlaken.
Bettdecken
Dieses Programm ist speziell für
grosse Wäschestücke wie Bettbezüge,
Bettdecken, Kissen und etc. gedacht.
Baumwollbettdecken mit Füllung,
Decken, Überwürfe mit leichter
Füllung
Sports Wear
Dieses Waschgang ist speziell für
Sportbekleidung aus modernen
Mikrofasern geeignet.
z.B. Coolmax, Goretex, Fleece und
Sympatex
Wolle
Ermöglicht das Waschen von Wolle.
Nur für maschinenwaschbare
Wollwäsche aus reiner Wolle.
Kurzwaschgang
Diese Schnellprogramm ist für eine
geringe Füllmenge mit leicht
verschmutzten Textilien.
Leicht verschmutzte Buntwäsche,
schnell
Nur
Trocknen
Nur Trockenvorgang ohne zu
waschen.
Für nasse Wäsche, die nur getrocknet
werden muss.
40°C
(Kalt bis 95°C)
60°C
(Kalt bis 60°C)
40°C
(Kalt bis 60°C)
40°C
(Kalt bis 40°C)
60°C
(95°C)
40°C
(Kalt bis 60°C)
40°C
(Kalt bis 40°C)
30°C
(Kalt bis 40°C)
–
Waschen+
Trocknen
Dieses Programm wäscht und trocknet
in einem Vorgang durch.
Eine kleine Menge an Wäsche kann
getrocknet werden.
40°C
(Kalt bis 95°C)
Spülen+
Schleudern
Geeignet für Wäsche, die nur einen
Spülgang benötigt.
Normale waschbare Kleidung.
–
Nennladung
Unter
4.5 kg
Unter
5.0 kg
Nennladung
1
Wäschestück
Unter
3.0 kg
Unter
6.0 kg
Nennladung
Page 62

20
Bedienung
ACHTUNG
• Neutrales Waschmittel wird empfohlen.
• Das Programm Handwäsche/Wolle beinhaltet leichtes drehen und Schleudern mit
niedrigen Drehzahlen.
• Wählen Sie die maximale Schleuderdrehzahl des Waschprogramms, um ein gutes
Trockenergebnis zu erhalten.
• Sollte die in einem Programm zu waschende und zu trocknende Wäschemenge das
maximal zulässige Gewicht für das Trockenprogramm nicht überschreiten, wird für den
Wasch- und Trockengang ein einziger Durchgang empfohlen.
Woolmark bestätigt die Wollwaschtauglichkeit dieser Waschmaschine bei
waschmaschinentauglicher Wollkleidung unter Einhaltung der auf dem
Kleidungsetikett angeführten Vorgehensweise und der vom Hersteller der
Waschmaschine M1008 vorgeschriebenen Bedienung.
•
Wassertemperatur : Die Wassertemperatur für den Waschgang wählen.Stets die
Anweisungen auf dem Pflegeetikett im Wäschestück beachten.
•
Programm einstellen auf “Waschen : Eco 60°C + Intensiv + 1400 rpm” „Trocknen : Eco Trocknen
(Erster Trockenvorgang : 4.5 kg, zweiter Trockenvorgang : 4.5 kg)“ für Test in Übereinstimmung mit
EN50229.
Tabelle der Trockenprogramme
Programm Gewebeart
Höchstladung
Eco Trocknen
Schranktrocken
4.5 kg
3.0 kg
6.0 kg
6.0 kg
4.0 kg
0.5 kg
1.5 kg
Baumwolle oder Leinen, wie z. B.
Baumwollhandtücher, T-Shirts, Bettwäsche.
Bügelfertige Baumwolle oder Leinen.Bügeltrocken
Pflegeleichte Textilien, Pflegeleichte synthetische
Kleidungsstücke, Kleidungsstücke für Mischprogramm
Niedrige
Temperatur
Zeit 30 min.
Zeit 60 min.
Zeit 120 min.
–
–
–
Page 63

21
Bedienung
Weitere Zusatzfunktion
(*) Diese Zusatzfunktion ist Teil des Frische-Waschgangs und kann nicht deaktiviert werden.
(**) Diese Option ist automatisch in den Waschvorgang integriert und kann gelöscht werden.
Koch-/Buntwäsche
Eco
Pflegeleicht
Mix
Babybekleidung
Nachtprogramm
Skin Care
Bettdecken
Sports Wear
Kurzwaschgang
Nur Trocknen
Waschen+Trocknen
Spülen+Schleudern
Intensiv
Spülen
Favoriten-
Programm
Intensiv
Program
Vorwäsche
Zeit
sparen
Spülen
+
Trocknen
Spülstop
** **
*
*
Startzeit-
vorwahl
Betriebsdaten
Koch-/Buntwäsche
Eco
Pflegeleicht
Mix
Babybekleidung
Nachtprogramm
Skin Care
Bettdecken
Sports Wear
Wolle
Kurzwaschgang
Nur Trocknen
Waschen+Trocknen
Spülen+Schleudern
1400
1400
1000
1400
1000
1000
1400
1000
800
800
1400
1400
1400
1400
970
1170
690
550
1650
620
950
550
360
490
220
-
-
-
85
63
70
59
125
102
105
62
47
49
45
-
-
-
Programm Max Schleuderdrehzahl
Verbrauchswerte
Energie in kWh Wasser in Liter
Wolle
Page 64

22
■ Bedienfeld
An/Aus
• Die Taste An/Aus zum Ein- und
Ausschalten drücken.
• Sie kann auch zum Ausschalten der
Zeitvorwahl verwendet werden.
LED-Anzeige
• In dieser Anzeige können die
Einstellungen, die voraussichtliche
verbleibende Programmdauer, die
Zusatzfunktionen und Meldungen des
Waschtrockners abgelesen werden.
Programmwahlschalter
• Der Waschtrockner stellt
Waschprogramme für die verschiedenen
Wäschearten zur Wahl.
• Die Lampe leuchtet auf und zeigt das
gewählte Programm an.
Zusatzprogramme
• Über diese Tasten können die
gewünschten Zusatz-Waschprogramme
für den gewählten Waschgang eingestellt
werden.
Zusatzfunktion
• Über diese Taste können zusätzliche
Einstellungen festgelegt werden. Diese
leuchten bei Auswahl auf.
Start/Pause
• Die Taste Start/Pause dient zum Starten
und Unterbrechen von Waschgängen.
• Falls eine kurzzeitige Unterbrechung eines
Waschvorgangs notwendig ist, die Taste
"Start/Pause" drücken.
• Vier Minuten nach Schalten auf Pause
schaltet sich die Maschine automatisch aus.
Bedienung
Start/PauseAn/Aus Tonsignal
An/Aus
Zusatz-
funktion
Zusatz-
Programme
LED-
Anzeige
Programm-
wahlschalter
Die intelligente Ferndiagnose
(SMARTDIAGNOSISTM) ist nur bei
Modellen mit dem Logo
„SMARTDIAGNOSISTM“ möglich.
22
Page 65

23
1. Die An/Aus-Taste drücken.
2. Das Waschprogramm durch Drehen des
Programmwählers einstellen.
3. Drücken Sie auf Startzeitvorwahl und
stellen Sie die gewünschte Zeit ein.
4. Drücken Sie auf Start/Pause.
Die Verzögerung des Waschtrockners kann
so eingestellt werden, dass der
Waschgang automatisch nach einer
festgelegten Zeit gestartet wird.
Startzeitvorwahl
■ Programmwahlschalter
Das Favoriten-Programm ermöglicht
Ihnen das Speichern von
Benutzereinstellungen:
1.
Die An/Aus-Taste drücken.
2.
Drücken Sie die Taste FavoritenProgramm
3.
Wählen Sie: Waschprogramm, Anzahl
der Spühlgänge Schleuderdrehzahl,
Temperatur, etc.
4.
Halten Sie die Favoriten-Programm
Taste für 3 Sekunden gedrückt
(2 Signal-Töne).
Das Favoriten-Programm ist nun
gespeichert.
Zur Anwendung des Programms wählen
Sie Favoriten-Programm und drücken Sie
die Start/Pause Taste.
Favoriten-Programm
Bei starker Verschmutzung den Vor- und
Hauptwaschgang wählen.
1.
Die An/Aus-Taste drücken.
2.
Wählen Sie einen Waschgang.
3.
Die Taste Vorwäsche drücken.
4.
Die Taste Start/Pause drücken.
Vorwäsche
Bedienung
ACHTUNG
• Diese Verzögerung gibt die Dauer bis
zum Ende und nicht bis zum Start des
Waschgangs an. Die tatsächliche
Dauer des Waschgangs richtet sich
nach der Wassertemperatur, der
Waschladung und anderen Einflüssen.
Beste Ergebnisse für einen intensiven
Spülgang. Ermöglicht einen letzten
Spülgang mit 40°C Wassertemperatur.
1. Die An/Aus-Taste drücken.
2. Wählen Sie ein Programm.
3. Drücken Sie die Intensiv Spülen-Taste
und wählen Sie die gewünschte Zeit.
4. Die Taste Start/Pause drücken.
Intensiv Spülen
Page 66

24
1. Die An/Aus-Taste drücken.
2. Die gewünschte Schleuderdrehzahl
auswählen
3. Die Taste Start/Pause drücken.
Nur Schleudern
■ Zusatzfunktion ■ Andere Funktionen
• Zeit sparen : Diese Option kann gewählt
werden um die Zeit eines Programms zu
reduzieren. Um diese Option zu wählen
betätigen Sie die Taste OPTION bevor
Sie das Programm starten.
• Intensiv : Bei normal und stark
verschmutzter Wäsche empfehlen wir die
Option „Intensiv“ zu wählen.
Waschen
• Die Temperatur wird durch Drücken der
Taste Temp. gewählt.
- Kalt
- 30°C, 40°C, 60°C, 95°C
Temperatur
Bedienung
ACHTUNG
• Wenn "Ohne Schleudern" gewählt
wurde, dreht die Maschine eine kurze
Zeit danach um schneller abzupumpen.
• Spülen+ : 1 Spüldurchgang mehr.
• Spülstop :
Der Waschgang ist gestoppt bis
der Verbraucher nach dem Spülvorgang die
Start-Taste noch einmal betätigt.
Zusatzfunktion
• Schleuderdrehzahl kann durch betätigen der
Taste “Schleudern” gewählt werden.
Schleudern
Page 67

25
Das akustische Signal kann nur während des Betriebes ein /aus geschaltet werden.
1. Gerät einschalten (EIN-Taste betätigen)
2. START/Pause-Taste betätigen
3. Drücken und halten Sie die Temp. und
Schleudern-Tasten gleichzeitig für drei
Sekunden, um die Funktion an/aus zu schalten.
Ertönt ein akustisches Signal ist die Einstellung
auch nach dem Ausschalten des
Gerätes gespeichert.
Wählen Sie diese Funktion um die Tasten zu sperren. "Kindersicherung" kann nur während
eines Waschgangs aktiviert werden.
■ Kindersicherung
■ Tonsignal An/Aus
Tastensperre aktivieren
1. Drücken Sie die
Kindersicherung
für
3 Sekunden.
2. Daraufhin ertönt ein Signal und das Symbol
“ ” erscheint kurz in der LED-Anzeige.
Bei aktivierter Tastensperre werden sämtliche
Tasten mit Ausnahme des Netzschalters
deaktiviert.
Tastensperre aufheben
1. Drücken Sie die
Kindersicherung
für
3 Sekunden.
2. Daraufhin ertönt ein Signal und die
verbleibende Dauer des laufenden
Waschgangs erscheint in der LED-Anzeige.
Bedienung
ACHTUNG
•
Durch das Ausschalten des Gerätes mittels
der Ein-Aus-Taste wird die Kindersicherung
nicht deaktiviert.
Diese Funktion muss vor weiteren
Einstellungen deaktiviert werden.
ACHTUNG
•
Wenn sie den Bestätigungston wieder
einschalten möchten, wiederholen Sie
diesen Vorgang.
Page 68

26
Die TROMMELREINIGUNG ist ein spezieller Waschgang zur Säuberung des Innenraums
des Waschtrockners. Bei diesem Waschgang werden ein höheres Wasserniveau und eine
höhere Schleuderdrehzahl benutzt. Führen Sie diesen Waschgang regelmäßig durch.
1. Trommel vollständig leeren und Türe
schliessen.
2. Füllen Sie Entkalker in das
Hauptwaschmittelfach.
3. Schließen Sie das Waschmittelfach.
4. Anschalten und dann Trommelreinigung-
Knopf drücken und halten.
5.
Start/Pause drücken, um Trommelreinigung
zu starten.
6. Nach Beendigung des Programms lassen
Sie zur Trocknung die Tür und das
Waschmittelfach geöffnet.
■ Trommelreinigung
• "Türverriegelung" - Zu Ihrer Sicherheit
verriegelt das Türschloss während eines
Waschgangs und das Symbol für
Türverriegelung leuchtet auf. Die Tür lässt
sich ohne Bedenken öffnen, wenn das
Symbol erlischt ist.
•
Das Symbol "Programmanpassung"
leuchtet auf, wenn die Trommel auf geringer
Stufe rotiert und ermittelt, wie viel Wäsche
sich in der Trommel befindet.
Dieser Vorgang dauert einige Sekunden.
■ Türverriegelung & Programmanpassung
Bedienung
ACHTUNG
•
Kein zusätzliches Waschmittel in die Waschmittelschublade füllen.
•
Das könnte zu einem Überlauf des Gerätes führen.
VORSICHTSMAßNAHMEN
• Wenn ein Kleinkind in der Nähe ist, lassen Sie die Tür nicht zu lange offen.
Page 69

27
Bedienung
• Automatik-Trockengänge eignen sich für die
meisten Trockenladungen. Elektronische
Sensoren messen die Temperatur der Abluft
und gewährleisten so eine schnellere und
genauere Regelung der Trockentemperatur
• Wählen Sie den Automatik-Trockengang
entsprechend der Textilart:
a) Schranktrocken : Für Koch-/Buntwäsche
wählen
b) Eco Trocknen : Ein spezielles Programm
um den Wasserverbrauch während des
Trockenvorgangs zu reduzieren
c) Zeit (30/60/120 Minuten)
- 30 Min: Koch-/Buntwäsche /
Handtücher 0.5 kg
- 60 Min: Koch-/Buntwäsche /
Handtücher 1.5 kg
- 120 Min: Koch-/Buntwäsche /
Handtücher 3.0 kg
d) Niedrige Temperatur : Für Synthetik wählen
e) Bügeltrocken : Wenn Sie Wäsche bügeln
möchten
• Die Programmwahl des Waschtrockners
enthält die Kombination des Wasch-und
Trockenzyklus, so dass automatisch nach
dem Waschen der Trockenzyklus startet.
• Es sollte nur gleichartige Wäsche in einem
Trockengang getrocknet werden.
• Die Trommel darf nicht zu voll sein, damit
sich die trocknende Wäsche locker
ausdehnen kann.
• Wenn die Wäsche vor dem Programmende
entnommen wird, muß unbedingt die
Start/Pause-Taste gedrückt werden.
• Durch Drücken der Taste Trocknen wählen
Sie zwischen. Schranktrocken
Eco
Trocknen Zeit (30 60 120)
Niedrige Temperatur Bügeltrocken.
• Nach dem Trockengang zeigt das
Programm-Display „ ”. Das Programm
kann durch Drücken der Start/Pause-Taste
beendet werden. Wenn das Programm nicht
mit der Start/Pause-Taste beendet wird, läuft
der Trockenngang ca. 4 Stunden. „ ” zeigt
die Abkühlphase an.
• Der Wasseranschluss muss während des
Trockenvorgangs geöffnet bleiben.
■ Trocknen
1. Trockenautomatik
ACHTUNG
• Die voraussichtliche Trockendauer
weicht von der tatsächlichen Dauer
eines Automatik-Trockengangs ab.
Die Gewebeart, das Gewicht der
Ladung und der gewählte
Trocknungsgrad beeinflussen die
Trockendauer.
• Während der letzten 11 Minuten der
Trockenzeit ermittelt ein Sensor
(Thermistor) die Trockenheit der
Kleidungsstücke. Bei geringer
Trockenheit wird der Trockengang um
bis zu 10 weitere Minuten verlängert
und die Anzeige “11” erscheint.
ACHTUNG
• Wenn Sie den Trockenvorgang
unterbrechen oder die Pause-Taste
betätigen, läuft der Lüfter noch bis zu
30 Sekunden zur Kühlung nach. Das
Gerät zeigt auf dem Display
„ ”
.
Page 70

28
- Auf keinen Fall Wollsachen im Trockner
trocknen; besser zur Normalgrösse
auseinanderziehen und flach ausgebreitet an
der Luft trocknen.
Wolle
- Gewebte oder gestickte Wäschestücke
könnten je nach Materialqualität einlaufen
- Daher nach dem Trocknen sofort
auseinanderziehen.
Gewebte oder gestickte Wäschestücke
- Die max. Füllmenge darf nicht überschritten
werden.
- Bügelfreies Gewebe mu
ß
sofort nach dem
Trockenprozess entnommen werden, auf
jeden Fall bevor der der Knitterschutz-Zyklus
beginnt.
Bügelfreies und Synthetik-Gewebe
- Beachten Sie unbedingt die Herstellerhinweise
auf dem Wäscheetikett.
(Fasergewebe) oder Leder
- Bitte immer die Herstellerangaben in den
Wäscheetiketten beachten.
Babysachen und Nachtwäsche
- Folgende Gegenstände aus oder mit Anteil
von Kunststoff oder Gummi dürfen auf keinen
Fall im Trockner getrocknet werden
(beispielhafte Aufzählung)
a) Schürzen, Lätzchen, Sitzüberzüge etc.
b) Umhänge, Tischdecken etc.
c) Badematten
Gummierte Gewebe und Kunststoffe
- Trocknen Sie keine Gegenstände aus
Fiberglas. Glaspartikel könnten sich lösen, in
der Trommel absetzen und beim nächsten
Trockenzyklus in der Wäsche verfangen;
Reizungen der Haut wären nicht
auszuschließen.
Fiberglas
• Nach dem Trockenzyklus erscheint „ ”
[COOL DOWN] im Multi-Display.
• Die Anzeige [COOL DOWN] erlischt
automatisch am Ende des kompletten
Trocken-Zyklus.
• Wenn die getrocknete Wäsche nicht nach dem
Trockenzyklus heraus geholt wird, kann sie
verknittern.
• Während der Anzeige [COOL DOWN] wird die
Wäsche regelmäßig hin- und herbewegt um
sie zu entknittern und Flusenbildung zu
vermeiden; der Prozess verläuft ohne Heizung
und kann bis zu 4 Stunden andauern.
• Die Anzeige bleibt auf dem Display bis
entweder die Wäsche herausgenommen
wurde (Trommel geöffnet wurde) oder die
Start/Pause-Taste gedrückt wurde.
3. Trocknungsende
• Durch Drücken der Trocknen-Taste kann die
Trockenzeit eingestellt werden.
• Ein Trockengang kann bis zu 150 Minuten
dauern. Bei Auswahl von Nur Trocknen
startet der Trockengang nach dem
Schleudern.
• Die einstellbaren Trockenzeiten sind eine
Hilfe, um die Zeit manuell einstellen zu
können; die tatsächliche Trockenzeit hängt
sehr ab vom Feuchtigkeitsgrad der zu
trocknenden Wäsche, der
Umgebungstemperatur und der Wäscheart.
Der beste Ratgeber ist die eigene Erfahrung
mit dem Trockner.
2. Einstellung der Trockenzeit
Bedienung
Page 71

29
• Nur Hauptwaschgang ➔
• Vorwaschgang +
Hauptwaschgang ➔
• Keinesfalls über die Höchststandlinie füllen.
Durch Überfüllen kann zu früh Weichspüler
zugeführt werden, wodurch Flecken entstehen
könnten.
• Keinesfalls Weichspüler mehr als 2 Tage in der
Waschmittelschublade lassen.
(Weichspüler kann hart werden)
• Der Weichspüler wird beim letzten Spülgang
automatisch zugegeben.
• Während der Wasserzufuhr die
Waschmittelschublade nicht öffnen.
• Keinesfalls Verdünner (Benzin usw.) einfüllen.
Waschmittelschublade
Zugabe von Weichspüler
■
Einfüllen von Waschmittel und Weichspüler
Zugabe von Waschmittel
WARNUNG
• Lagern Sie alle Waschmittel ausserhalb der
Reichweite von Kleinkindern, da
Vergiftungsgefahr besteht.
• Zuviel Waschmittel, zuviel Weichspüler oder
zuviel Bleiche könnte das Gerät zum
Überlaufen bringen.
• Bitte versichern Sie sich, das Sie eine
angemessene Menge an Waschmittel
benutzen.
ACHTUNG
• Keinesfalls Weichspüler direkt auf Kleidung gießen.
Page 72

30
• Bei besonders kalkhaltigem Wasser kann der
Waschmittelverbrauch durch Einsatz eines
Wasserenthärters erheblich verringert werden. Die zu
verwendende Menge an Wasserenthärter entnehmen
Sie bitte den Hinweisen auf der Verpackung. Füllen
Sie zuerst das Waschmittel und danach den
Wasserenthärter in den Waschtrockner.
• Verwenden Sie die angegebene Waschmittelmenge
für weiches Wasser.
• Das Waschmittel wird am Anfang des Waschgangs aus der Schublade gespült.
1. Öffnen Sie die Tür und legen Sie die Tabs in die
Trommel.
Waschmittelmenge
Wasserenthärter
Benutzung von Waschmittel-Tabs
2. Füllen Sie die Wäsche in die Trommel.
• Waschmittel entsprechend den Herstelleranweisungen verwenden.
• Wenn zu viel Waschmittel eingefüllt wird, kann es zu Schaumbildung und Überlastung des Motors kommen,
wodurch die Waschleistung beeinträchtigt wird (bewirkt Störung).
• Es wird empfohlen Pulver-Waschmittel für beste Waschergebnisse zu nutzen.
• Wenn Sie Flüssigwaschmittel verwenden möchten, beachten Sie die Anweisungen auf der Verpackung des
jeweiligen Waschmittelherstellers.
• Wenn Sie den Waschtrockner direkt starten, können auch Flüssigwaschmittel in die Waschmittelschublade geben.
• Bitte verwenden Sie kein Flüssigwaschmittel, wenn Sie die Starzeitvorwahl nutzen -das Flüssigwaschmittel
könnte aushärten- oder Sie die Option Vorwäsche wählen wollen.
• Waschpulver nur für Frontlader Waschmaschinen verwenden. Wenn zuviel Schaum entsteht, bitte
Waschmittel reduzieren.
• Die Waschmittelmenge hängt von der Wassertemperatur, Wasserhärte, Umfang und Verschmutzungsgrad
der Wäsche ab. Für ein optimales Waschergebnis sollte Schaumbildung verhindert werden.
Zugabe von Waschmittel
ACHTUNG
• Volle Zuladung: entsprechend den Herstelleranweisungen.
• Teilfüllung: 3/4 der normalen Menge
• Mindestzuladung: 1/2 der normalen Menge.
WARNUNG
• Lassen Sie das Waschmittel nicht hart werden. Verhärtetes Waschmittel kann Schläuche
in dem Waschtrockner blockieren und schlechte Spülergebnisse oder Gerüche verursachen.
Page 73

31
Wasserzulaufsfilter
•
Wenn kein Wasser in die Waschmittellade strömen kann, erscheint die Fehlermeldung
" " auf dem Display.
•
Bei sehr hartem Wasser und Sediment kann der Wasserzulaufsfilter verstopfen.
Daher sollte er von Zeit zu Zeit gereinigt werden.
•
Wäsche aus der Maschine entfernen, sobald das Programm beendet ist.
Anderenfalls kann die Wäsche verknittern, sich verfärben oder Geruch könnte entstehen.
•
Vor dem Reinigen der Trommel das Netzkabel ziehen, um Gefahr von elektrischen
Schlägen auszuschließen.
1. Den Wasserhahn schließen.
2. Den Wasserzulaufschlauch
abschrauben.
3. Den Filter mit einer harten Bürste
reinigen.
4. Den Wasserzulaufschlauch
anschrauben.
Pflege und Wartung
Page 74

32
Ablaufpumpenfilter
•
Der Ablaufpumpenfilter fängt Fäden, Fusseln und kleine Fremdkörper in der Wäsche
auf. Er sollte regelmäßig kontrolliert werden, um einen einwandfreien Betrieb der
Maschine zu gewährleisten.
•
Lassen Sie das Wasser abkühlen, bevor Sie die Abwasserpumpe reinigen, eine
Notentleerung vornehmen oder die Tür in einem Notfall öffnen.
1. - Abdeckkappe öffnen.
- Ablassschraube lösen.
- Schlauch herausziehen.
2. Öffnen Sie dann den Filter, indem Sie
ihn nach links drehen.
3. Entfernen Sie alle Fremdkörper aus dem
Pumpenfilter.
4. Nach der Säuberung drehen Sie den
Pumpenfilter wieder ein.
5. Schließen Sie die untere Abdeckkappe.
1
2
Behälter zum
auffangen des
Wassers.
Pflege und Wartung
VORSICHTSMAßNAHMEN
• Zuerst die Maschine über den Ablaufschlauch entleeren. Dann den Deckel öffnen und
Fremdkörper entfernen.
Page 75

33
Waschmittelschublade
• Mit der Zeit lagern sich Waschmittel- und Weichspülerrückstände in der
Waschmittelschublade ab.
• Daher die Waschmittelschublade von Zeit zu Zeit mit fließendem Wasser spülen.
• Falls erforderlich, kann die Schublade ganz entfernt werden. Dazu die Zunge
herunterdrücken und die Schublade herausziehen.
• Zum Vereinfachen der Reinigung kann das Oberteil des Weichspülerbehälters
herausgenommen werden.
1. Ziehen Sie das Waschmittelfach heraus.
4. Waschmittelfach wieder einsetzten.
2. Säubern Sie das Waschmittelfach unter
fließendem Wasser.
3. Schubladen-Fach reinigen (z.B. mit Zahnbürste).
Pflege und Wartung
Page 76

34
■ Reinigung
Gehäuse
• Angemessene Pflege verlängert die Lebensdauer des Geräts.
• Das Gehäuse des Waschtrockners kann mit warmem Wasser und Haushaltreiniger ohne
Scheuermittel gereinigt werden.
• Danach mit frischem Wasser abwischen und trocknen.
• ACHTUNG: Keinesfalls Alkohol, Lösungsmittel o. ä. verwenden.
Trommel
• Zum Reinigen der Trommel eine Tasse (250 ml) Chlorbleichmittel mit 2 Tassen (500 ml)
Waschmittel vermischen.
• Den Waschtrockner einen Waschvorgang mit heißem Wasser ausführen lassen.
• Den Vorgang erforderlichenfalls wiederholen.
■ Maschine vor Frost schützen
Falls die Maschine an einem Ort aufgestellt wird, an dem Temperaturen um den Gefrierpunkt
auftreten können, das Gerät entsprechend den nachfolgenden Anweisungen vor Frost schützen,
um Schäden zu verhindern.
• Den Wasserhahn vollständig schließen.
• Schläuche vom Wasserhahn und von der Spüle lösen und Wasser ablassen.
• Den Netzstecker an eine ordnungsgemäß geerdete Steckdose anschließen.
• 3,8 Liter ungiftige Frostschutzmittellösung für Freizeitfahrzeuge in die leere Trommel füllen. Die
Tür schließen.
• Die Maschine für 1 Minute auf Schleudern schalten und das Wasser komplett ablaufen lassen.
Ein kleiner Rest vom Frostschutzmittel bleibt in der Maschine.
• Den Netzstecker ziehen, die Trommel trocknen und die Tür schließen.
• Die Waschmittelschublade entfernen. Wasser aus der Schublade abgießen und die Schublade
trocknen. Die Schublade wieder einsetzen.
• Den Waschtrockner aufrecht lagern.
• Zur Inbetriebnahme des Waschtrockners einen kompletten Waschgang mit Waschmittel ohne
Wäsche durchführen, um das Frostschutzmittel zu entfernen. Keinesfalls Wäsche laden.
Waschtrommel
• Bei richtiger Waschmitteldosierung ist ein Entkalken im allgemeinen nicht erforderlich.
Falls Sie doch entkalken möchten, verwenden Sie hierzu ausschließlich
Markenentkalkungsmittel mit Korrosionsschutz für Waschmaschinen. Dosieren Sie nach
Herstellerangaben.
• Die Waschtrommel Ihres Gerätes besteht aus rostfreiem Edelstahl und ist damit
weitgehend korrosionsfest.
• Treten trotzdem Rostansätze auf, so ist das stets auf eisenhaltige Fremdkörper
(Büroklammern, Sicherheitsnadeln) zurückzuführen, die mit der Wäsche eingebracht
wurden. Fremdrost ist auch bei rostfreiem Edelstahl möglich.
• Entfernen Sie Flecken in der Trommel mit Edelstahlreiniger.
• Benutzen Sie nie Stahlwolle.
Pflege und Wartung
ACHTUNG
• Kalkablagerungen usw. nur mit Mitteln entfernen, die für Waschmaschinen geeignet sind.
Page 77

35
• Dieser Waschtrockner verfügt über eine automatische Selbstdiagnose und
Sicherheitsfunktion, die Störungen im Frühstadium erkennen und entsprechend reagieren.
Falls die Maschine nicht korrekt oder überhaupt nicht funktioniert, die nachfolgenden
Punkte vor Verständigen des Kundendiensts prüfen.
Störungsbehebung
Symptom Mögliche Ursache Abhilfe
Klapper- und
Klingelgeräusche
Dumpfes
Klopfgeräusch
Vibrationsgeräusch
Wasserlecks
Übermäßige
Schaumbildung
Wasser strömt nicht
oder zu langsam in
die Maschine.
Wasser wird nicht
oder zu langsam
abgepumpt.
• Fremdkörper wie Münzen oder
Sicherheitsnadeln befinden sich
in der Trommel oder Pumpe.
• Klopfgeräusch kann bei hoher
Zuladung entstehen. Dies ist
normal.
• Sind alle
Transportsicherungsschrauben
und Verpackungsteile entfernt?
• Haben die Füße ordnungsgemäß
Bodenkontakt?
• Zulaufschlauch am Wasserhahn
oder an der Maschine ist locker.
• Ablaufleitungen/-schläuche
verstopft
• Zuviel oder ungeeignetes
Waschmittel?
• Wasserdruck unzureichend.
• Wasserhahn nicht vollständig
geöffnet.
• Wasserzulaufschlauch geknickt.
• Wasserzulaufsfilter verstopft.
• Ablaufschlauch geknickt oder
verstopft.
• Ablauffilter verstopft.
Waschtrockner stoppen, Trommel und
Ablauffilter kontrollieren.
Falls das Geräusch danach weiter
auftritt, den Kundendienst
verständigen.
Falls das Geräusch anhält, hat der
Waschtrockner evtl. Unwucht.
Stoppen und die Wäsche neu verteilen.
Falls sie bei der Installation nicht
entfernt wurden (siehe
"Aufstellanweisung" zwecks Entfernen
der Transportsicherungsschrauben),
wird die Wäsche in der Trommel
gleichmäßig verteilt.
Den Waschtrockner stoppen, und die
Wäsche in der Trommel neu verteilen.
Schlauchanschlüsse kontrollieren und
festziehen.
Ablaufleitung reinigen.
Falls erforderlich, Installateur
beauftragen.
Zu starke Schaumbildung kann
Wasserlecks verursachen.
Anderen Hahn im Haus ausprobieren.
Den Hahn ganz öffnen.
Den Schlauch ausrichten.
Wasserzulaufsfilter kontrollieren.
Ablaufschlauch reinigen und
ausrichten.
Ablauffilter reinigen.
Fehlersuche
Page 78

36
Fehlersuche
Waschtrockner
startet nicht.
Waschtrockner
schleudert nicht.
Tür lässt sich nicht
öffnen.
Waschzykluszeit zu
lang.
Weichspüler läuft
über.
Weichspüler zu früh
eingefüllt.
Trocknen Problem
• Netzkabel nicht angeschlossen
oder Netzstecker locker.
• Sicherung durchgebrannt,
Überlastschalter hat
angesprochen oder Stromausfall.
• Wasserhahn nicht vollständig
geöffnet.
• Darauf achten, dass die Tür fest
geschlossen ist.
Zuviel Weichspüler könnte das
Gerät zum Überlaufen bringen.
Trocknet nicht
Sicherstellen, dass der Stecker in die
Steckdose passt.
Den Überlastschalter zurücksetzen oder
die Sicherung austauschen.
Keinesfalls eine Sicherung mit höherer
Kapazität einsetzen.
Bei Netzüberlastung einen Elektriker zu
Rate ziehen.
Den Wasserhahn öffnen.
Die Tür schließen und die Taste
Start/Pause drücken. Nach Drücken der
Taste Start/Pause dauert es u. U. einige
Sekunden, bis der Waschtrockner zu
schleudern beginnt. Die Tür muss
einrasten, bevor die Maschine auf
Schleudern schalten kann.
1 oder 2 ähnliche Wäschestücke laden,
um das Gewicht besser zu verteilen.
Die Wäsche besser verteilen, damit
geschleudert werden kann.
Bei laufender Maschine kann die
Trommeltür aus Sicherheitsgründen nicht
geöffnet werden.
Ein bis zwei Minuten warten, bis die
elektrische Türentriegelung die Tür freigibt.
Die Waschzeit hängt von der Zuladung,
dem Wasserleitungsdruck, der
Wassertemperatur und anderen Faktoren
ab.
Falls Unwucht erkannt wird oder das
Schaum-Absorbierprogramm sich aktiviert,
kann sich die Waschzeit verlängern.
Befolgen Sie die Anweisung zur korrekten
Dosierung des Weichspülers. Bitte nur bis
zu maximalen Befüllungsgrenze auffüllen.
Schließen Sie die Waschmittelschublade
vorsichtig. Öffnen Sie die
Waschmittelschublade nicht während des
Waschvorgangs.
Bitte nicht überladen Überprüfen Sie das
korrekte Abpumpen des Wassers aus der
Trommel. Die Beladung ist zu gering,
fügen Sie noch einige Handtücher hinzu.
Symptom Mögliche Ursache Abhilfe
Page 79

37
Fehlermeldung
• Wasserdruck unzureichend.
• Wasserhahn nicht vollständig
geöffnet.
• Wasserzulaufschlauch geknickt.
• Wasserzulauffilter verstopft.
• Bei einer Wasserundichtigkeit im
oder am Zulaufschlauch leuchtet
die Anzeige “
” rot auf.
• Ablaufschlauch geknickt oder verstopft.
• Ablauffilter verstopft.
• Zuladung zu klein.
• Zuladung nicht gleichmäßig verteilt.
• Das Gerät verfügt über eine Funktion zur
Erfassung und Korrektur von Unwucht. Bei
schweren Wäschestücken wie Badematten,
Bademänteln kann das System den
Schleudervorgang wiederholt abbrechen,
wenn die Unwucht einen Festwert
überschreitet.
• Falls die Wäsche am Ende des
Schleuderzyklusses noch zu nass ist,
kleinere Wäschestücke hinzufügen, um die
Last besser zu verteilen.
• Ist die Tür geöffnet?
• Falls aufgrund eines defekten Wasserventils
zuviel Wasser einströmt, erscheint " " auf
dem Display.
• " " zeigt eine Störung des
Wasserstandsensors an.
• Überlastung des Motors
• Wasserleck.
• Der Waschtrockner stellte einen
Leistungsfehler fest.
• Überprüfen Sie den Wasserzulauf.
Anderen Wasserhahn im Haus
ausprobieren.
Den Wasserhahn ganz öffnen.
Den Schlauch gerade verlegen.
Wasserzulauffilter kontrollieren.
In diesem Fall den
Zulaufschlauch wechseln.
Ablaufschlauch reinigen und ausrichten.
Ablauffilter reinigen.
1 oder 2 ähnliche Wäschestücke laden,
um das Gewicht besser zu verteilen.
Die Wäsche besser verteilen, damit
geschleudert werden kann.
Die Tür schließen.
❋ Falls " " nicht erlischt, den
Kundendienst kontaktieren.
Den Netzstecker ziehen und den
Kundendienst verständigen.
Den Wasserhahn schließen.
Den Netzstecker ziehen.
Kundendienst verständigen.
Rufen Sie den Kundendienst.
Sarten Sie den Vorgang neu.
Drehen Sie den Wasserhahn auf.
❋ Erlischt die Anzeige “ ” trotzdem
nicht, ziehen Sie den Netzstecker aus
der Steckdose und rufen Sie den
Kundendienst.
<Fig 1>
Symptom Mögliche Ursache Abhilfe
Fehlersuche
Page 80

38
Benutzung von SMARTDIAGNOSIS™
1. Betätigen Sie die Power Taste um den
Waschtrockner einzuschalten. Betätigen Sie keine
anderen Tasten oder drehen am
Programmwahlschalter.
2. Plazieren Sie das Mikrofone Ihres Telefons ganz nah
an der Power Taste, wenn Sie der Mitarbeiter des
Call Centers darum bittet.
3. Betätigen und halten Sie die Temperatur-Taste für mindestens 3 Sekunden während Sie das Mikrofon
Ihres Telefons ganz nah an der Power Taste bzw. am Symbol halten.
4. Halten Sie Ihr Telefon solange vor die Power Taste bis die Übermittlung beendet wurde (Ton-Signale).
Das dauert ca. 17 Sekunden. Währendessen zählt ein Countdown auf dem Display die Zeit bis auf Null.
• Für beste Werte während der Übermittlung halten Sie Ihr Telefon ruhig bis die Übertragung (TonSignale) beendet wurde.
• Wenn der Mitarbeiter des Call Centers keine akkuraten Werte bekommen hat, wird er Sie um eine
nochmalige Übertragung bitten.
• Wenn Sie die Power Taste während der Übertragung betätigen wird SMARTDIAGNOSIS™ deaktiviert.
5. Wenn der Countdown vorbei und die Ton-Signal-Übertragung beendet ist, können Sie das Gespräch mit
dem Mitarbeiter des Call Centers weiterführen. Die übermittelten Daten werden dem Mitarbeiter
ermöglichen Ihnen bei Ihrer Anfrage weiterzuhelfen.
Max. 10 mm
Fehlersuche
ACHTUNG
• Die intelligente Ferndiagnose SMARTDIAGNOSISTMist nur bei Modellen mit dem Logo
„SMARTDIAGNOSIS
TM
“ möglich. Bei äußeren Einflüssen, die die Empfangsstärke Ihres
Mobiltelefons beeinflussen können, besteht die Möglichkeit, dass SMARTDIAGNOSIS
TM
nicht richtig ausgeführt werden kann.
• Diese Funktion bitte nur nutzen, wenn unsere Call Center Sie freigeschaltet hat. Die Übertragung
ähnelt dem Prinzip einer Faxübertragung und ausschließlich das Call Center kann damit arbeiten.
• SMARTDIAGNOSIS™ kann nicht bei ausgeschalteter Waschmaschine aktiviert werden.
Falls doch muss eine Störungsermittlung ohne SMARTDIAGNOSIS™ durchgeführt werden.
Wenn Probleme mit Ihre Waschmaschine auftreten, kontaktieren Sie bitte unser Kunden Informations
Center.
Folgen Sie den Anweisungen des Mitarbeiters und wenn notwendig führen Sie folgende Schritte durch:
Page 81

39
Unter die Garantie fallen nicht:
• Heimservice zur Einführung in die Benutzung des Geräts.
• Wenn das Gerät an eine Spannung angeschlossen ist, die nicht mit der auf dem
Nennleistungsschild angegebenen übereinstimmt.
• Wenn die Störung durch Unfälle, Vernachlässigung, Missbrauch oder höhere Gewalt
verursacht wird.
• Wenn die Störung durch unsachgemäße Benutzung des Geräts oder Nichtbeachtung
der Bedienungsanleitung verursacht wird.
• Die Gebrauchsanweisung für das Gerät zur Verfügung stellen oder die Einstellungen
des Geräts ändern.
• Wenn die Störung durch Schädlinge wie Ratten oder Kakerlaken etc. verursacht wird.
• Normale Geräusche oder Vibrationen z. B. das Geräusch von ablaufendem Wasser,
Drehgeräusche oder Pieptöne während der Erwärmung.
• Die Installation korrigieren, das Gerät nivellieren oder den Abfluss einstellen.
• Normale Wartung, wie sie im Benutzerhandbuch empfohlen wird.
• Entfernung von Fremdkörpern wie Sand, Nägeln, BH-Bügeln, Knöpfen etc. aus der
Maschine sowie aus der Pumpe und dem Einlassfilter.
• Sicherungen ersetzen oder die elektrischen Anschlüsse oder Rohrleitungen
korrigieren.
• Korrektur von unbefugten Reparaturen.
• Schäden an persönlichem Eigentum, die direkt oder indirekt durch Defekte dieses
Geräts verursacht werden.
• Wenn dieses Gerät zu kommerziellen Zwecken benutzt wird, steht es nicht unter
Garantie.
(Beispiel: öffentliche Orte wie Toiletten, Hotels, Fitness-Center, Pensionen)
Entsorgung von Altgeräten
1. Wenn dieses Symbol eines durchgestrichenen Abfalleimers
auf einem Produkt angebracht ist, unterliegt dieses Produkt
der europäischen Richtlinie 2002/96/EC.
2. Alle Elektro- und Elektronik-Altgeräte müssen getrennt vom
Hausmüll über dafür staatlich vorgesehenen Stellen entsorgt
werden.
3. Mit der ordnungsgemäßen Entsorgung des alten Geräts
vermeiden Sie Umweltschäden und eine Gefährdung der
persönlichen Gesundheit.
4. Weitere Informationen zur Entsorgung des alten Geräts
erhalten Sie bei der Stadtverwaltung, beim Entsorgungsamt
oder in dem Geschäft, wo Sie das Produkt erworben haben.
Garantiebedingungen
Page 82

40
Urkunde
10 Jahre erweiterte Garantie
Für LG Waschtrockner mit Direct Drive Motor
Vielen Dank, dass Sie sich für dieses Modell entschieden haben.
Wir sind sicher, dass Ihnen Ihr neues Gerät in den kommenden Jahren viel Freude bereiten wird.
Für diesen Waschtrockner stehen Ihnen als Verbraucher Gewährleistungsrechte gegenüber Ihrem Händler
zu.
LG Electronics Deutschland GmbH (LG) gewährt zusätzlich eine Garantie auf alle Baugruppen von 24
Monaten ab Rechnungs-/Belegdatum.
Über diese Garantie hinaus gewähren wir weitere 8 Jahre Material-Garantie auf den Direct Drive Motor
(gilt ausschließlich für Neugeräte, die ab 01.09.2008 gekauft wurden, im Übrigen gelten unsere umseitig
aufgeführten Garantiebedingungen).
Gerätetyp : Seriennummer:
Name des Käufers :
Kaufdatum : Stempel / Unterschrift des Fachhändlers
1. Die Garantiezeit beginnt mit dem Kaufdatum
und erstreckt sich über 24 Monate. Der Beginn
der Garantiezeit gilt als nachgewiesen, wenn
der Käufer den Kaufbeleg (Quittung /
Kassenzettel) zusammen mit der vom
Verkäufer ausgefüllten und unterschriebenen
Garantiekarte vorlegt. Die Seriennummer des
Produkts muß mit der eingetragenen Nummer
auf der Garantiekarte übereinstimmen!
2. Während der Garantiezeit werden für den o.g.
LG Waschtrockner alle Mängel in der
nachfolgend beschriebenen Art und Weise
kostenlos behoben, sofern sie nachweislich
auf Fabrikations- oder Materialfehler
zurückzuführen sind. In den ersten 2 Jahren
wird Ihr Gerät auf Kosten von LG repariert,
oder falls nötig durch ein gleichwertiges LG
Produkt kostenlos ersetzt. Nach Ablauf dieser
2 Jahre werden Ihnen für die anschließenden
8 Jahre im Reparaturfall folgende Ersatzteile
kostenlos zur Verfügung gestellt:
Stator, Rotor und Motorsensor.
Reparaturbedingte Nebenkosten
(Arbeits-, Wege-, Transportkosten oder weitere
Ersatzteile) sind ausgeschlossen.
3. Ausgeschlossen von der Garantie sind u.a.,
aber nicht ausschließlich Schäden, die durch
unsachgemäße Behandlung, Nichtbeachtung
der Anleitung und betriebsbedingte Abnutzung
auftreten. Ebenso erstreckt sich die Garantie
nicht auf Verschleißteile und leicht
zerbrechliche Produktteile (wie z.B.
Sichtscheiben, Glimm- oder Glühlampen).
Schäden, die auf dem Transport entstehen,
gehen ebenso wie Versand- und
Verpackungskosten zu Lasten des Käufers.
4. Die Entscheidung über Reparatur,
Austausch oder Ersatz bleibt bei uns.
Ausgetauschte oder ersetzte Teile gehen in
unser Eigentum über. Durch Reparatur oder
Teileersatz wird die ursprüngliche Garantiezeit
nicht verlängert!
5. Diese Garantie gilt für den Erstbenutzer
des Gerätes.
Diese Garantie ist eine persönliche Garantie
und nicht auf andere
Personen übertragbar.
6. Heben Sie unbedingt die
Originalverpackung auf, damit das Gerät im
Servicefall ohne Beschädigungen transportiert
werden kann.
Garantiebedingungen für Waschtrockner
Page 83

Memo
Page 84

 Loading...