

Page 1

F1406TDS(1~9)
F1406TDSA
F1406TDSE
Page 2

roduct Feature
2
P
ontents
C
Warnings ....................................................................................................................3
Specification ................................................................................................................4
Installation ...................................................................................................................5
Care before washing .................................................................................................11
Adding detergent .......................................................................................................12
Function ..................................................................................................................14
How to use washer ....................................................................................................15
Maintenance ..............................................................................................................23
Troubleshooting guide ...............................................................................................27
Terms of Warranty.....................................................................................................30
Direct Drive System
The advanced Brushless DC motor directly drives the drum without
belt and pulley.
Water Circulation
Spray detergent solution and water onto the load continuously.
Clothes are soaked more quickly and thoroughly during wash cycle.
The detergent suds can be removed more easily by the water shower during rinse
cycle. The water circulation system uses both water and detergent more efficiently.
Built-in Heater
Internal heater automatically heats the water to the best temperature on selected
cycles.
Child Lock
The Child lock prevents children from pressing any button to change the settings
during operation.
More economical by Intelligent Wash System
Intelligent Wash System detects the amount of load and water temperature, and then
determines the optimum water level and washing time to minimize energy and water
consumption.
Low noise speed control system
By sensing the amount of load and balance, it evenly distributes load to minimize the
spinning noise level.
Safety device (Aqua lock)
Aqua lock System is designed for detecting water leak during operation to prevent
water from flooding over the floor.
Steam Washing and Refresh
Steam Washing features upgraded washing performance with low energy
consumption. Refresh cycle reduces wrinkles from dry clothes.
Automatic Wash Load Detection
Automatically detects the load and optimizes the washing time.
추가선택, 예약,
Page 3
4
pecification
S
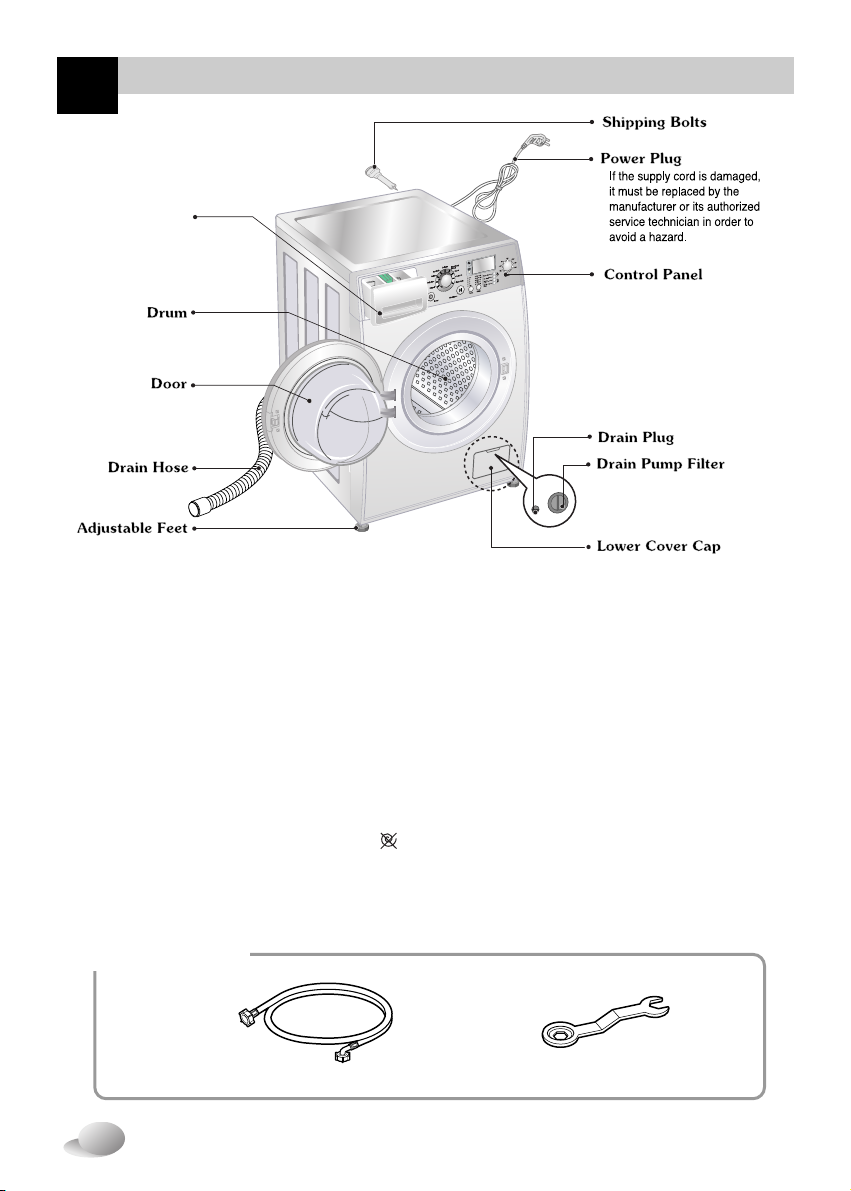
Drawer
Spanner
Inlet hose(1EA)
Accessories
❋ The appearance and specifications may be varied without notice to raise the units
quality.
Name : Front loading washing machine
Power supply : 220-240V~, 50Hz
Size : 600mm(W)x 590mm(D) x 850mm(H)
Weight : 63kg
Max.Watt : 2100W (Wash) / 1100W (Steam)
Wash capacity : 8,0kg
Water consumption : 52ℓ( 6,5ℓ/ kg )
Permissible water pressure : 0,3-10kgf/cm
2
(30-1000 kPa)
Spin speed : /400/600/800/1000/1200/1400
Page 4
6
nstallation
I
Level floor :
Allowable slope under entire washer is 1˚
Power outlet :
Must be within 1.5 meters of either side of location of
washer. Do not overload the outlet with more than one
appliance.
Additional Clearance :
For wall, door and floor modeling is required.
(10cm : rear /2cm:right & left side)
Do not place or store laundry products on top of washer at
any times.
They can damage the finish or controls.
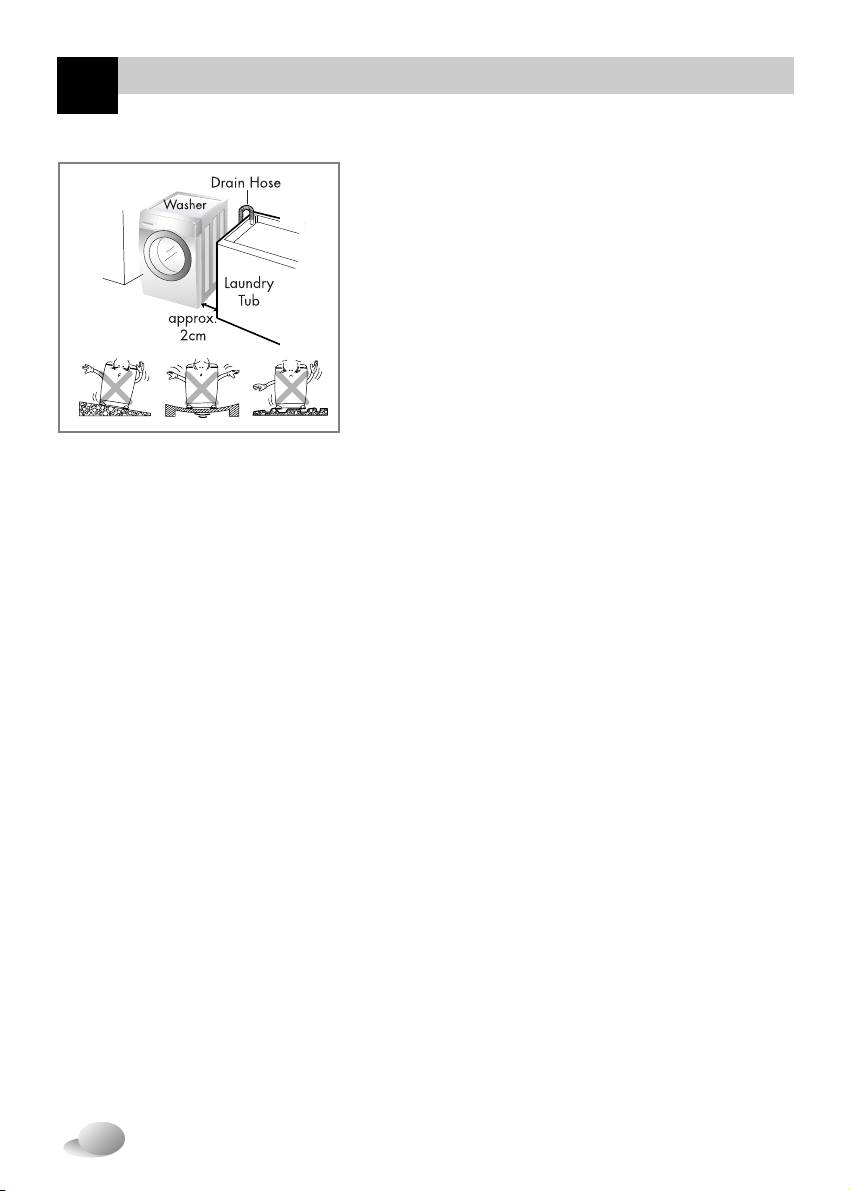
Installation place requirement
Positioning
Install the washer on a flat hard floor.
Make sure that air circulation around the washer is not impeded by carpets, rug etc.
• Never try to correct any unevenness in the floor with pieces of wood, cardboard or similar
materials under the washer.
• If it is impossible to avoid positioning the washer next to a gas cooker or coal burning stove,
an insulation(85x60cm) covered with aluminum foil on the side facing the cooker or stove,
must be inserted between the two appliance.
• The washer must not be installed in rooms where the temperature can drop below 0°C.
• Please ensure that when the washer is installed, it is easily accessible for the engineer in the
event of a breakdown.
• Adjust all four feet using the transit bolt spanner provided ensuring the appliance is stable,
and a clearance of approximately 20mm is left between the top of the washer and the
underside of the work-top.
Page 5
nstallation
8
I
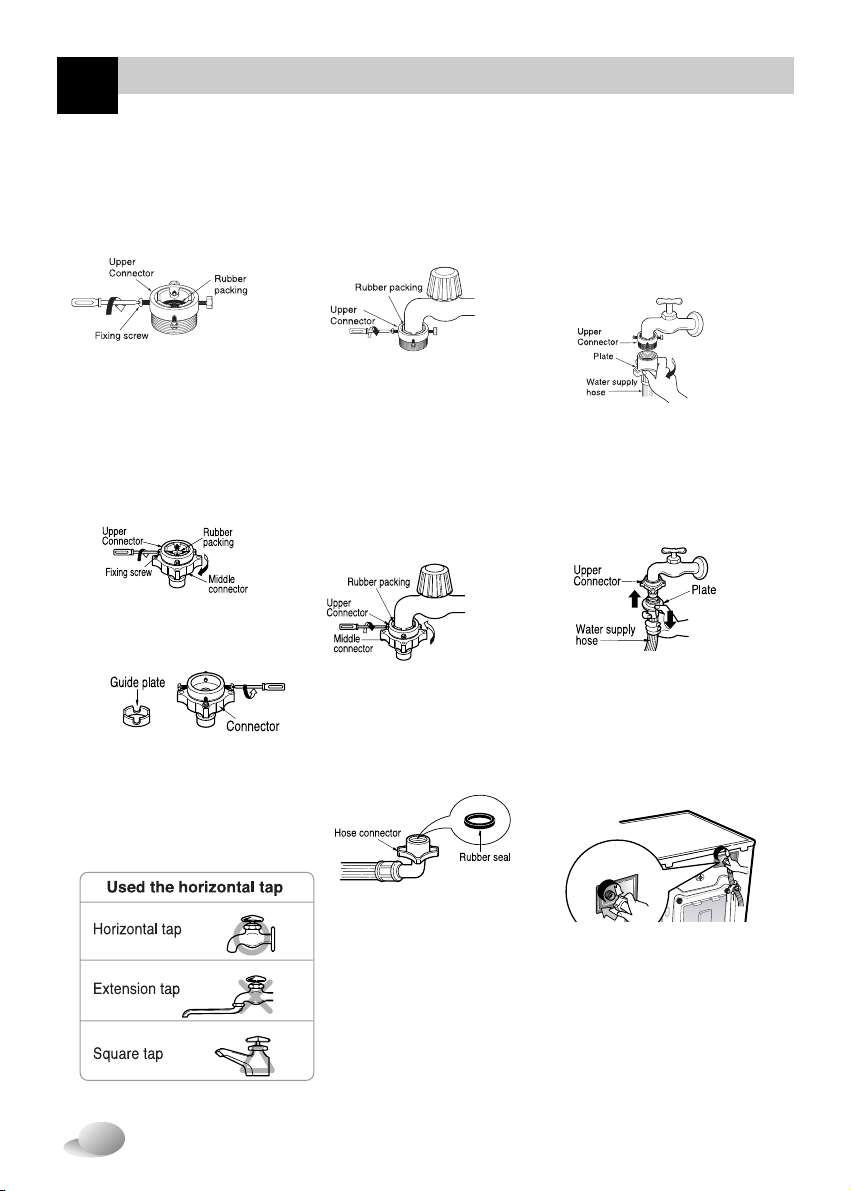
Normal Tap without thread & screw type inlet hose
Normal Tap without thread & one touch type inlet hose
1. Unscrew the fixing screw to
attach the tap.
2. Push the connector up till the
rubber packing is in tight contact
with the tap. Then tighten the 4
screws.
3. Push the water supply hose
vertically upwards so that the
rubber packing within in the
hose can adhere completely to
the tap and then tighten it by
screwing it to the right.
1. Untighten the upper connector
screw.
2. Push the upper connector up till
the rubber packing is in tight
contact with the tap. Then
tighten the 4 screws.
3. Connect the water supply hose
to the middle connector,
pushing the plate down.
• Make sure that there are no
kinks in the hose and that it is
not crushed.
• Make sure that the rubber seal
is inside the hose connector.
• In case the diameter of the tap is
large remove the guide plate.
• Unable water Tap for connectoring
hose.
• Turn the middle connector not
to have water leaked.
• To separate the water supply
hose from the middle connector
shut off the tap. Then pull the
inlet hose down, pushing the
plate down.
Page 6

10
nstallation
I
Level adjustment
Concrete floors
Wooden floors (Suspended floors)
1. Adjusting the washing machine level properly prevents excessive
noise and vibration.
Install the appliance on a solid and level floor surface, preferably in a
corner of the room.
2. If the floor is uneven, adjust the adjustable feet as required.
(do not insert pieces of wood etc. under the feet)
Make sure that all four feet are stable and resting on the floor and
then check that the appliance is perfectly level. (use a spirit level)
※※
After the washer is level, tighten the lock nuts up towards of the base of
the washer. All lock nuts must be tightened.
❊ Diagonal Check
When pushing down the edges of the washing machine top plate diagonally, the machine
should not move up and down at all. (Please, check both of two directions)
If machine rocks when pushing the machine top plate diagonally, adjust the feet again.
• The installation surface must be clean, dry and level.
• Install washer on a flat hard floor.
Tile floors (Slippery floors)
• Position each foot on the Tread Mate and level the machine to suit. (Cut Tread Mate into 70x70 mm
sections and stick the pieces on to the dry tile where machine is to be placed.)
※※
Tread Mate is a self adhesive material used on ladders & steps that prevents slipping.
• Wooden floors are particularly susceptible to vibration.
• To prevent vibration we recommend you place rubber cups under each foot,
at least 15mm thick under the washer, secured to at least 2 floor beams with screws.
• If possible install the washer in one of the corners of the room, where the floor is more stable.
※※
Insert the rubber cups to reduce vibration.
※※
You can obtain the rubber cups (p/no.4620ER4002B) from the LG svc dept.
Important!
• Proper placement and levelling of the washer ensure long, regular and reliable operation.
• The washer must be absolutely horizontal and stand firmly in position.
• It must not “Seesaw” across corners under load.
• The installation surface must be clean, free from floor wax and other lubricant coatings.
• Do not let the feet of the washer get wet. If feet of the washer get wet, slipping may occur.
Timber or suspended type flooring may contribute to
excessive vibration and unbalance errors.
In the case that the washing machine is installed on a raised
platform, it must be securely fastened in order
to eliminate the risk that it might fall off.
NOTE
NOTE
Page 7

12
dding detergent
A
• Main wash only
➔
• Pre Wash + Main Wash
➔
• Do not exceed the maximum fill line.
Close the dispenser drawer slowly.
Overfilling can cause early dispensing
of the fabric softener which could stain
clothes.
• Do not leave the fabric softener in the
detergent drawer for more than 2 days.
(Fabric softener could harden)
• Softener will automatically be added
during the last rinse cycle.
• Do not open the drawer when water is
supplied.
• Solvents(benzene, etc) are not
allowable.
1. The Dispenser Drawer
2. Adding Fabric Softener
Adding detergent and fabric softener
Do not pour fabric softener
directly on the cloths
NOTE
Page 8

14
unction
F
Recommended courses according to the laundry type
Cotton
Synthetic
Cotton
Quick
Allergy
Care
Delicate
Quick 30
Refresh
Hand Wash
/Wool
Color fast garments (shirts, night
dresses, pajamas...)and lightly
soiled white cotton(underwear)
Polyamide, Acrylic, Polyester
Cotton which is lightly soiled
Cotton, underwear, pillow covers,
bed sheets, baby wear
Baby Care
Delicate laundry easily damaged
“Hand wash” marked delicate and
wool laundry
Cotton mixed, Polyeter mixed
Dress shirts, blouses
- Intensive
- Pre Wash
- Crease Care
- Medic Rinse
- Intensive
- Crease Care
- Intensive
- Crease Care
- Medic Rinse
- Steam Default
❋ Water Temperature : Select the water temperature to the wash cycles.
Always follow garment manufacture’s care label or instructions when laundering.
❋ Medic Rinse : For high effectiveness or more purity in rinse operation you can choose Medic Rinse option. Medic
Rinse is default in Baby Care program.
❋ Intensive : If the laundry is heavily soiled “Intensive” option is effective.
❋ Program setting with “Cotton 60°C + Steam Wash + Intensive” option for test in accordance or in conformity with
EN60456 and IEC60456.
❋ Pre Wash : If the laundry is heavily soiled, “Pre Wash” Cotton is recommended.
Pre Wash is available in Cotton, Cotton Quick, Synthetic and Baby Care program.
❋ Crease Care : If you want to prevent crease, select Crease Care button.
❋ Allergy Care : This program helps to reduce allergic reactions caused by house dust mite, and it does it by killing
and removing the mite in the laundry with the help of high temperature steam and powerful rinse.
60°C
(Cold, 30°C,
40°C, 95°C)
40°C (Cold,
30°C, 60°C)
40°C
(Cold, 30°C)
30°C
(Cold, 40°C)
No Choose
60°C
(40°C, 95°C)
Rating
Less than 7.0kg
Less than 4.0kg
Less than 3.0kg
Less than 2.0kg
Less than 2.0kg
3 items
Maximum Load
Option
Water
Temp.
(Option)
Fabric Type
Program
60°C
Colored laundry which is lightly
soiled fast
Lightly soiled baby wear
❋ Notes : Neutral detergent is recommended.
The wool cycle features gentle tumbling and low-speed spin for garment care.
The wool wash cycle of this machine has been approved by Woolmark for the washing of machine
washable Woolmark products provided that the products are washed according to the instructions
on the garment label and those issued by the manufacturer of this washing machine M0708.
Page 9

16
ow to use washer
H
Program
• 9 programs are available according to the
laundry type.
• Lamp will light up to indicate selected program.
• When Start/Pause button is pressed, the
Cotton program is automatically selected.
- By turning the Program dial, the program is
selected in order of “ Cotton – Cotton Quick –
Synthetic – Delicate – Hand Wash/Wool –
Quick 30 – Refresh – Allergy Care – Baby Care”.
Regarding to the laundry type for each program
Please refer to the page14.
1. Power
2. Initial Program
Power
• Press the Power button to turn power on and
off.
• To cancel the Time Delay function, the
Power button should be pressed.
• When the Power button is pressed, the
washer is ready for Cotton program. And
the other initial conditions as follows.
• So, if you want to advance into the
washing cycle without changing the
program, just press Start/Pause button
and then the washer will proceed.
■
Initial program
- Cotton Program / Main Wash /
Normal Rinse / 1400 rpm / 60˚C
(1) (2) (3) (6) (7) (8) (9) (10) (11)(4) (5)
20%
Temp. Rinse 360°C
Washing
1:42
Time Left
(1) Button : Power
(2) Dial : Program
(3) Button : Start/Pause
(4) Button : Time Delay
(5) Button : Steam Wash
(6) Button : Temperature
(7) Button : Rinse
(8) Button : Option
(9) Child Lock
(10) Tub Clean
(11) Dial : Spin
Page 10

18
ow to use washer
H
Steam Wash
By pressing the Steam Wash button, Steam
Function Can be selected.
When Steam Function is selected, Steam wash
( ) LED lights on.
Steam Wash is
• For tough stained clothes, underwear, or baby
clothes.
• Steam Wash is available with Cotton, Cotton
Quick, Synthetic, Allergy Care, Baby Care,
Refresh program. Refresh cycle is fixed Steam
wash.
• This option features upgraded washing
performance with low energy.
• Do not load delicates such as wool, silk, and
easily discolored clothes.
NOTE:
- Steam wash is a highly concentrated and
efficient.
It may seem there is no water inside the
drum(normal condition).
- During the steam cycle the strong steam
spray may not be seen through the door
(normal condition).
- During the steam operation, a spraying sound
will be heard. (normal condition)
- Do not try to open the door while operating.
Steam can cause severe burns.
CAUTION:
- Do not reach into the washer while operating.
Steam can cause severe burns.
Refresh
■ Refresh cycle
• For slightly wrinkled clothes which have
been stored for an extended time.
It just makes wrinkled clothes easy to iron
(Do not load wet clothes).
• Wrinkles will be reduced.
■ How to use Refresh cycle
1. Turn on the washer and select the Refresh program.
2. Load 3 items or less and close the door.
3. Press the Steam Wash button repeatedly until the
desired and correct number of items is displayed.
Initial display is 2 items
4. Press the Start/Pause button.
CAUTION:
- Do not reach into the washer while operating.
Steam can cause severe burns.
- Keep pets away from the washer.
[Precautionary Notes]
- The Refresh cycle is not like other washing or
drying cycles.
- Due to the characteristic of cotton fibers, this cycle
is not recommended for 100% cotton clothing.
- Remove stains from clothing before using the
Refresh cycle to prevent permanently setting the
stains by high heat.
- Be sure that the faucet is open. This cycle uses a
little water to produce steam.
- Be careful not to touch the door. It can be very hot.
- Do not open the door while operating.
Steam can cause severe burns.
- After removing clothes from the Refresh cycle they
may feel slightly damp wait at least 10 minutes
before putting the clothes on.
- Best result are achieved when articles are of similar
size and fabric type. Do not overload
(Load less than 3 dress shirtes)
1:42
Time Left
Steam
Use on tough stained clothes.
Press the
Steam Wash button
0:19
Time Left
Steam
0:19
Time Left
Steam
Load 3 items.
Refresh
!
!
Program
Cotton
Cotton Quick
Synthetic
Allergy Care
Baby Care
Refresh
Temperature
60°c (30°c, 40°c, 95°c)
40°c (30°c, 60°c)
40°c (30°c, 60°c)
60°c
60°c (40°c, 95°c)
No Choose
Page 11

20
ow to use washer
H
Option
By pressing each the button, each function
will be selected.
2. Pre Wash
• Use this option for load that need
pretreatment. Add 16 minutes pre wash and
drain.
- When using Pre Wash option, do not use
liquid detergent in the main wash
comportment. Use powder for the main
wash.
• Available in Cotton, Cotton Quick, Synthetic
and Baby Care program.
3. Crease Care
• If you want to prevent crease, select this
button with spin speed.
4. Medic Rinse
• For high effectiveness or more purity in rinse
operation you can choose Medic Rinse option.
• Available in Cotton,
Cotton Quick,
Synthetic,
Allergy Care and Baby Care program.
• Medic Rinse is default in Baby Care program.
The required temperature lamp will light up for
identification.
1. Intensive
• If the laundry is heavily soiled “Intensive”
option is effective.
• By selecting the Intensive option, the wash
time may be extended, depending on the
program selected.
• To use this option, press the intensive button
once before the wash program is started.
Child lock
If you choose to lock the buttons on the
control assembly to prevent tampering, this
function may be selected.
• Child lock can be set by pressing and
holding the Crease Care and Medic Rinse
button simultaneously.
(About three seconds)
• To deactivate Child lock system, press and
hold the Crease Care and Medic Rinse
button simultaneously again.
(About three seconds)
• To change to the desired program, whilst in
child lock mode.
1. Press and hold both Crease Care and
Medic Rinse button together once again.
(About three seconds)
2. Press the Start/Pause button.
3. Select the desired program and press the
Start/Pause button again.
• The child lock can be set at any time and it
can be deactivated only by using child lock
cancel process. Turning the power off and
operational errors will not affect child lock.
20%
Child Lock is on.
Temp. Rinse 360°C
Child Lock is off.
Temp. Rinse 360°C
Time Left
1:42
20%
Time Left
1:42
Page 12

22
ow to use washer
H
Display
• When Child lock is selected, the
“ ” lamp is on.
• When time delay is selected, it shows
the remaining times to finish the selected
program.
• When washing cycle is completed,
“ ” is displayed on the “Multi display”.
• During washing cycle, the remaining washing
time is displayed.
• Recommended program by manufacturer.
- Cotton : around 1 hour and 51 minutes
- Cotton Quick : around 1 hour and 26 minutes
- Synthetic : around 1 hour and 24 minutes
- Baby Care : around 2 hours and 27 minutes
- Delicate : around 1 hour and 7 minutes
- Hand Wash/Wool : around 48 minutes
- Quick 30 : around 30 minutes
- Refresh : around 18 minutes
- Allergy Care : around 2 hours and 1 minutes
• The washing time may vary by the amount
of laundry, water pressure, water
temperature and other washing conditions.
• If an unbalanced load is detected or if the
suds removing program operates, the wash
time may be extended.
(Max. increasing time is 45 minutes.)
1. Special function display
3. Completion of washing
4. Time left
2. Self diagnose display
20%
Temp. Rinse 360°C
Washing
1:42
Time Left
Est. Time Remaining
Status Indicator
• This display shows the estimated time
remaining in the cycle when operating.
• This washer automatically detects the
wash load (weight) and optimizes the
washing time. After detecting, the display
will show the adjusted time remaining.
• It shows elapsed time of the cycle the
washer is operating.
• If the washer encounters a fault during
operation, the associated fault will be
displayed.
“ ” : Water pressure sensing error
“ ” : Problem of overfilling water
“ ” : Door is not closed
“ ” : Over load in motor
“ ” : Water inlet trouble
“ ” : Drainage trouble
“ ” : Unbalanced load
“ ” : Water temperature trouble
“ ” : Water leaks
“ ” : The washer experienced a
power failure.
If these error letters are displayed, please
refer to the troubleshooting page27 and
follow the guide.
AE
PF
Page 13

aintenance
24
M
3
2
The drain pump filter
❋ The drain filter collects threads and small objects left in the laundry.
Check regularly that the filter is clean to ensure smooth running of your machine.
CAUTION First drain using the drain hose and then open the pump filter to
remove whatever any threads or objects.
Be careful when draining if the water is hot.
❋ Allow the water to cool down before cleaning the drain pump, carrying out
emergency emptying or opening the door in an emergency.
!
1. Open the lower cover cap () by using
a coin.
Drain plug () to pull out the hose.
2. Unplug the drain plug (), allowing the
water to flow out. At this time use a
vessel to prevent water flowing on to the
floor. When water does not flow any
more, turn the pump filter () open to
the left.
3. Remove out any foreign material from
the pump filter.
4. After cleaning, turn the pump filter ()
clockwise and insert the drain plug ()to
the original place. close the lower cover
cap.
100
1
3
2
Page 14

26
aintenance
M
The water circulation nozzle & Steam nozzle
• Clean the water circulation nozzle and Steam nozzle, if clogged.
Cleaning your washer
1. Exterior
Proper care of your washer can extend its life.
The outside of the machine can be cleaned with warm water and a neutral non abrasive
household detergent.
Immediately wipe off any spills. Wipe with damp cloth.
Try not to hit surface with sharp objects.
❋
IMPORTANT: Do not use methylated spirits, diluents or similar products.
2. Interior
Dry around the washer door opening, flexible gasket and door glass.
Run washer through a complete cycle using hot water.
Repeat process if necessary.
Winterizing instructions
If the washer is stored in an area where freezing may occur or moved in freezing
temperatures, follow these instructions to prevent damage to the washer:
1. Turn off water supply tap.
2. Disconnect hoses from water supply and drain water from hoses.
3. Plug electrical cord into a properly grounded electrical outlet.
4. Add 1gallon(3.8L) of nontoxic recreational vehicle(RV) antifreeze into an empty wash drum.
Close the door.
5. Set spin cycle and let washer spin for 1minute to drain out all water.
Not all of the RV antifreeze will be expelled.
6. Unplug electrical power cord, dry the drum interior, and close the door.
7. Remove dispenser drawer, drain and dry excessive water from the compartments.
8. Store washer in an upright position.
9. To remove antifreeze from washer after storage, run empty washer
through a complete cycle using detergent. Do not add wash load.
Remove hard water deposits using only cleaners labeled as safe for washing
machine.
NOTE
Page 15

28
roubleshooting guide
Washer does not start
Washer won’t spin
Door does not open
Wash cycle time
delayed
• Electrical power cord may not
be plugged in or connection
may be loose.
• House fuse blown, circuit
breaker tripped, or a power
outage has occurred.
• Water supply tap is not turned
on.
❋ Check that the door is firmly
shut.
Make sure plug fits tightly in wall
outlet.
Reset circuit breaker or replace fuse.
Do not increase fuse capacity.
If problem is a circuit overload, have
it corrected by a qualified electrician.
Turn on water supply tap.
Close the door and press the
Start/Pause button. After pressing
the Start/Pause button, it may take
a few moments before the washer
begins to spin. The door must lock
before spin can be achieved.
Once started, the door can not be
opened for safety reasons.
Wait one or two minutes before
opening the door to give the electric
locking mechanism time to release.
The washing time may vary by the
amount of laundry, water
pressure, water temperature and
other using conditions.
If the imbalance is detected or if the
suds removing program works, the
wash time shall be increased.
Symptom Possible Cause Solution
T
Page 16

30
erms of Warranty
What Is Not Covered:
• Service trips to your home to teach you how to use the product.
• If the product is connected to any voltage other than that shown on the rating plate.
• If the fault is caused by accident, neglect, misuse or Act of God.
• If the fault is caused by factors other than normal domestic use or use in accordance
with the owner's manual.
• Provide instruction on use of product or change the set-up of the product.
• If the fault is caused by pests for example, rats or cockroaches etc..
• Noise or vibration that is considered normal for example water drain sound, spin
sound, or warming beeps.
• Correcting the installation for example, levelling the product, adjustment of drain.
• Normal maintenance which recommended by the owner's manual.
• Removal of foreign objects / substances from the machine, including the pump and
inlet hose filter for example, grit, nails, bra wires, buttons etc.
• Replace fuses in or correct house wiring or correct house plumbing.
• Correction of unauthorized repairs.
• Incidental or consequential damage to personal property caused by possible defects
with this appliance.
• If this product is used for commercial purpose, it is not warranted.
(Example : Public places such as public bathroom, lodging house, training
center, dormitory)
If the product is installed outside the normal service area, any cost of
transportation involved in the repair of the product, or the replacement of a
defective part, shall be borne by the owner.
Disposal of your old appliance
1. When this crossed-out wheeled bin symbol is attached to a
product it means the product is covered by the European
Directive 2002/96/EC.
2. All electrical and electronic products should be disposed of
separately from the municipal waste stream via designated
collection facilities appointed by the government or the local
authorities.
3. The correct disposal of your old appliance will help prevent
potential negative consequences for the environment and
human health.
4. For more detailed information about disposal of your old
appliance, please contact your city office, waste disposal
service or the shop where you purchased the product.
T
 Loading...