

Page 1

INSTALLER MANUAL
EnerVu
ESS Web Monitoring
System
ENGLISH
Please read this manual carefully and retain it for
future reference.
www.lg.com
Page 2
Getting Started
2
Getting Started
LG ESS Products are designed to collect information of ESS status and send it to EnerVu
server. So that user can monitor the ESS status not only in the LCD display of the power
conditioning system but also web browser on your PC or Mobile device through the
internet.
How to connect the EnerVu web site
On your internet-connected PC or Mobile device, open a browser such as Google
1
Chrome.
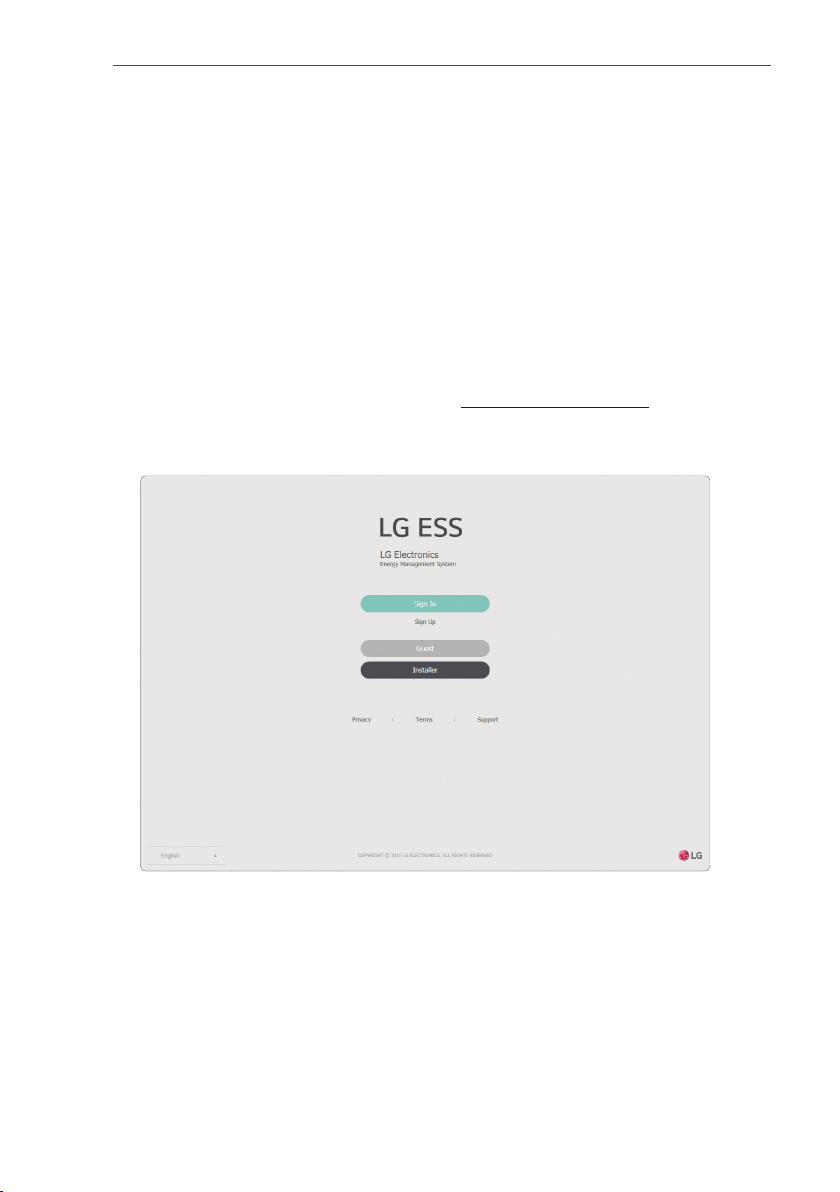
On your browser, visit LG EnerVu page at http://enervu.lg-ess.com.
2
The EnerVu main page appears on the screen as below.
Page 3

Table of Contents
Table of Contents
Getting Started .................................................2
How to connect the EnerVu web site ................................................2
LCD touch panel Settings .........................................4
Internet Connection ............................................................... 4
Web data upload setting ...........................................................6
Sign In Page ....................................................7
Creating an installer account. . . . . . . . . . . . . . . . . . . . . . . . . . . . . . . . . . . . . . . . . . . . . . . . . . . . . . . . 8
Creating an owner account ........................................................11
Main Page .....................................................14
Dashboard page ................................................15
Show/Hide widgets ...............................................................15
Activation List ...................................................................16
Event List ........................................................................16
Send Mail ........................................................................17
Total Product ....................................................................17
System Find .....................................................................17
3
System Page ...................................................18
System Tab ......................................................................19
Analysis Tab ......................................................................22
Report Tab .......................................................................25
Event Tab ........................................................................26
User View Tab ....................................................................27
Activation Page ................................................28
Activating a new system ..........................................................29
Account Page ..................................................31
My Account Tab ..................................................................31
Company Information Tab .........................................................34
Users Tab ........................................................................36
Page 4
LCD touch panel Settings
4
LCD touch panel Settings
To monitor the ESS information through the EnerVu web monitoring system, the installer
must set several settings on the LCD touch panel when installing the ESS system.
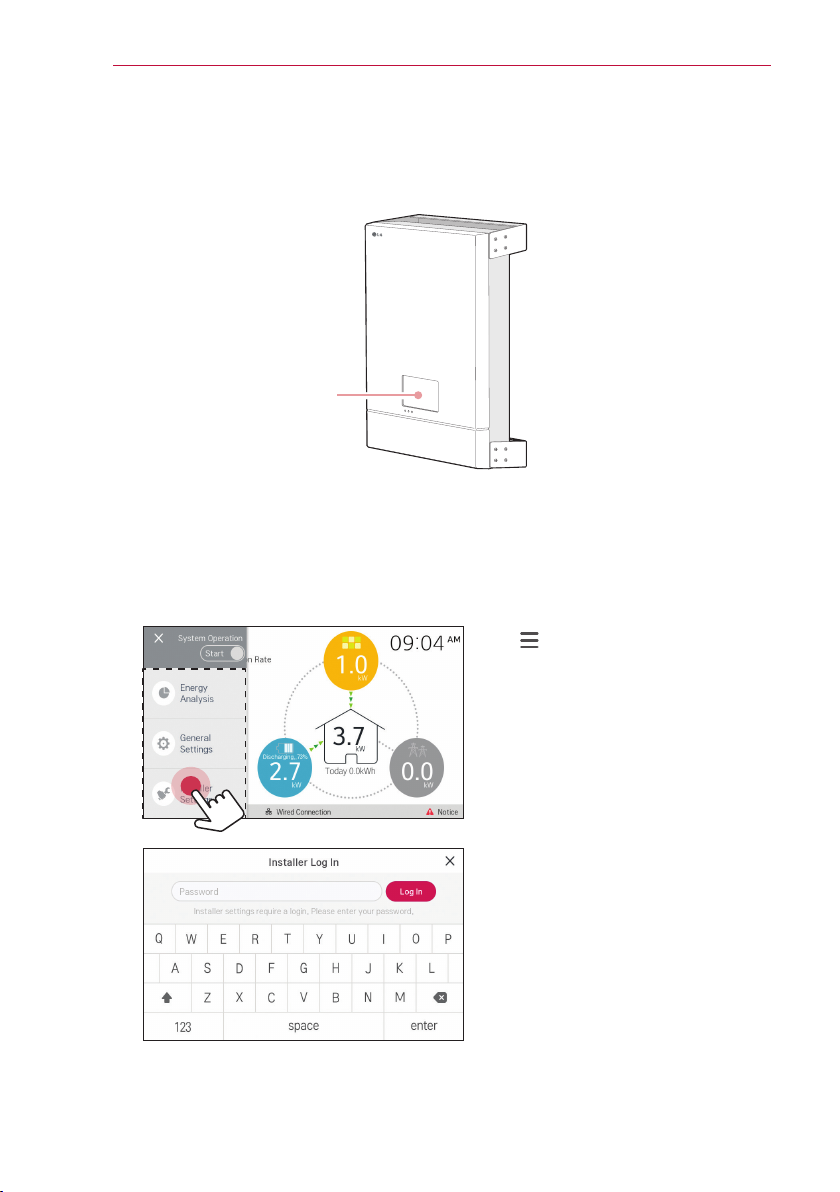
LCD touch panel
Internet Connection
If there is a DHCP server on the local area network (LAN) via wired connection, the
system will be automatically allocated an IP address. After making the physical connection,
a small number of home networks may require the network setting to be adjusted.
1
2
Tab [ ] on the main screen and
tab [Installer Settings] option.
[Installer Log In] menu appears on
the screen.
Input installer password and tab
[LOG IN] to enter [Installer Settings]
menu.
Page 5
LCD touch panel Settings
5
3
4
5
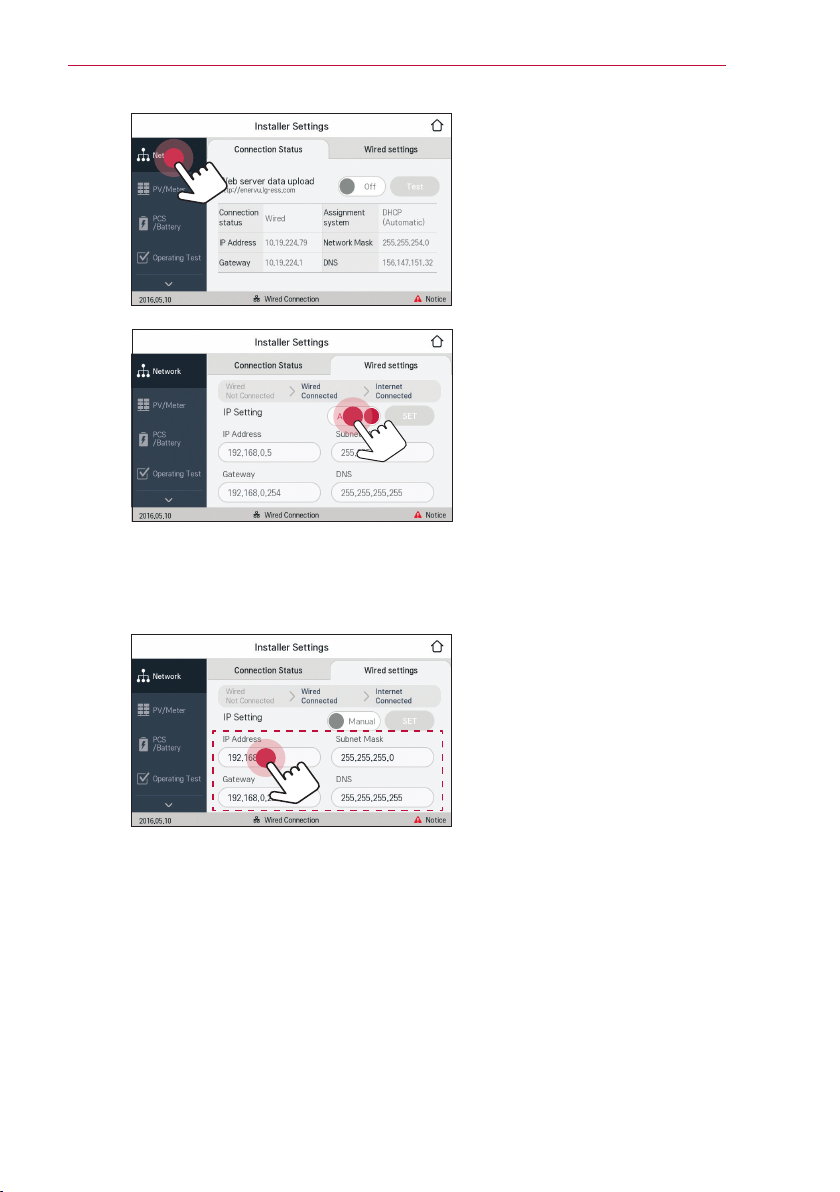
Tab [NETWORK] on
Settings]. Current status of the
network connection is displayed.
Tab [Wired Settings]. Wired
connection options are displayed.
If [IP Setting] option in [Wired
Settings] tab is set to [Auto],
this product will be automatically
allocated an IP address from local
area network (LAN) via wired
connection. You may need to set
network connection manually
depending on the network
conditions. In this case, tab [Auto]
to change to [Manual].
Fill in [PMS IP address],
[Subnetmask], [Basic gateway] and
[DNS address] option manually.
[Installer
Page 6
LCD touch panel Settings
6
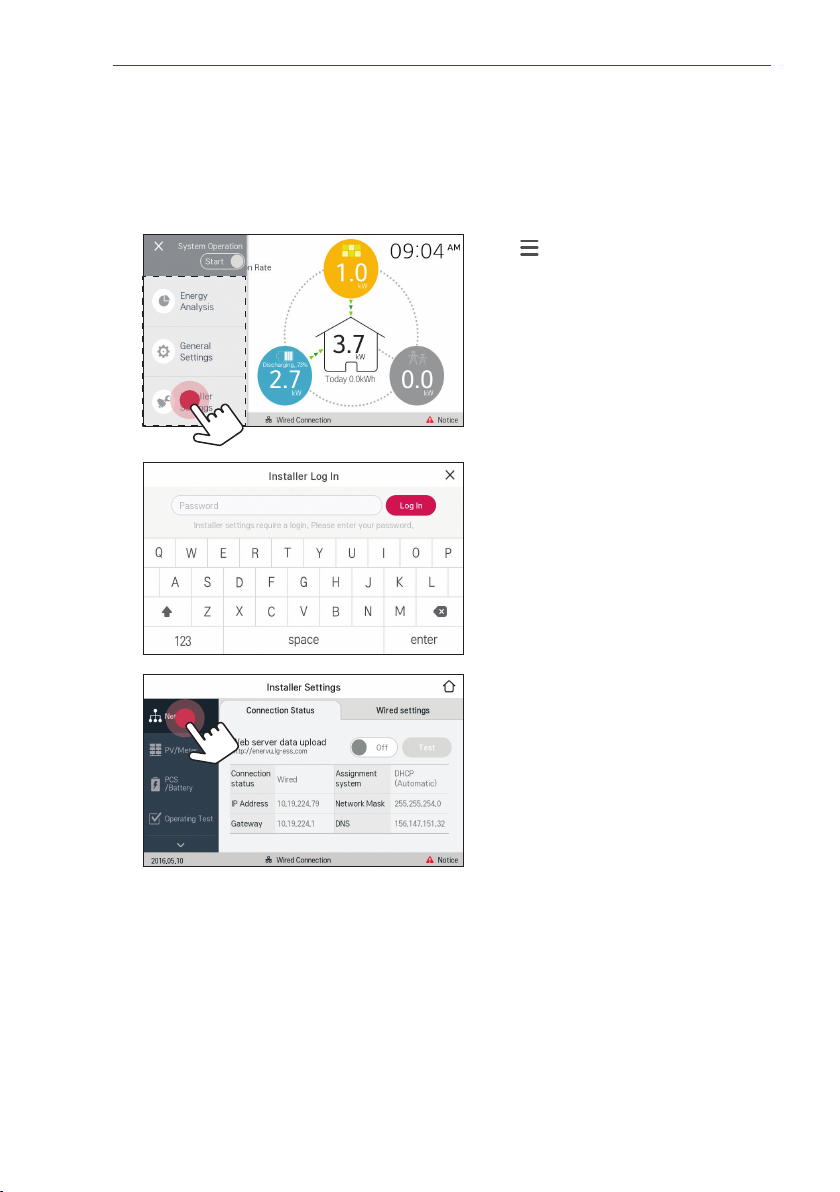
Web data upload setting
When the internet connection is completed, installer need to set the [Web server data
upload] option in the LCD display panel. To monitor the ESS in EnerVu web monitoring
system, the [Web server data upload] setting must be set to [On].
1
2
3
Tab [ ] on the main screen and
tab [Installer Settings] option.
[Installer Log In] menu appears on
the screen.
Input installer password and tab
[LOG IN] to enter [Installer Settings]
menu.
Tab [NETWORK] on
Settings]. Current status of the
network connection is displayed.
If you wa
server, tab [Web server connection]
to change to [On].
Tab [Web server connection] again
for turning off the option.
Tab [Test] to check the server
connection.
nt to connect the EnerVu
[Installer
Page 7
Sign In Page
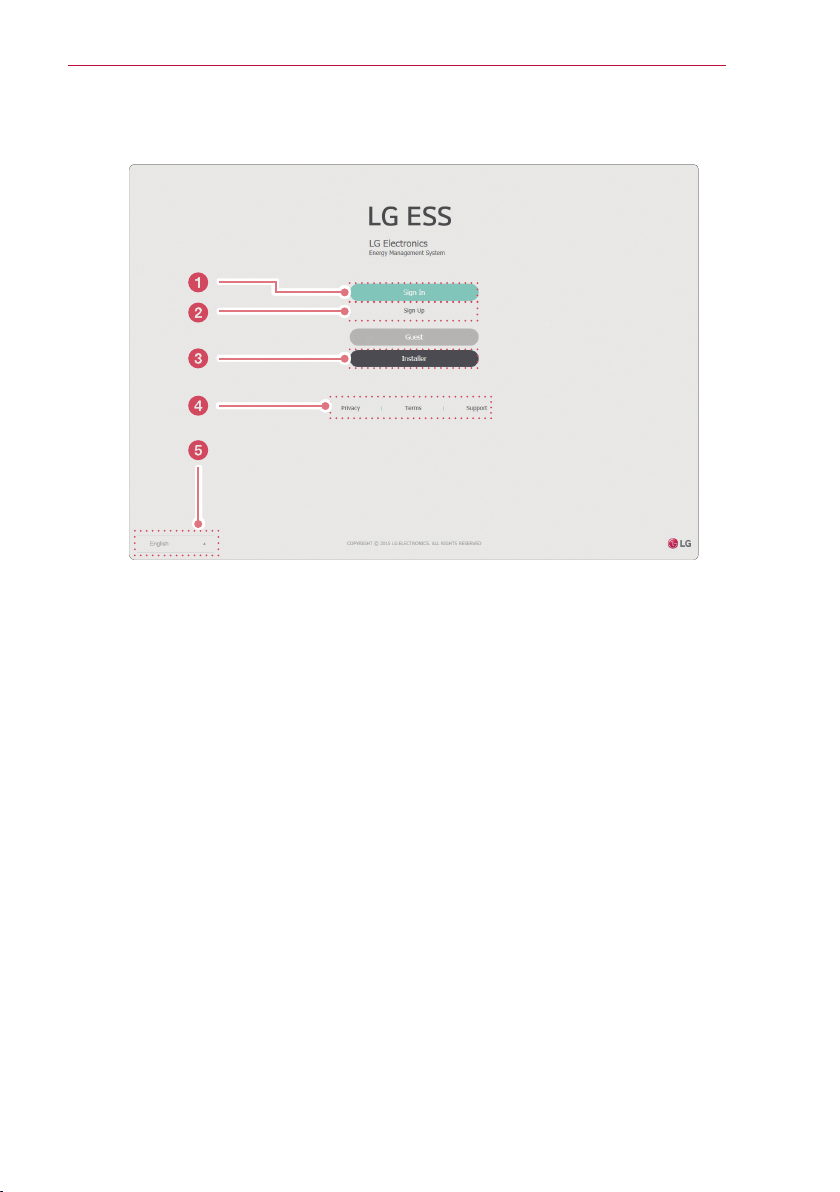
Select this button to move to the owner sign in page.
a
Sign In Page
7
Moves to the new owner account creation page. Refer to page 11 for more
b
information of owner account creation.
Moves to the [Installer Sign In] page. If you do not have an installer account,
c
select [Sign Up] button in the [Installer Sign In] page.
Refer to page 8 for more information of installer account creation.
Select [Privacy], [Terms] or [Support] to show corresponding page in a new
d
browser.
Select a language. [English] and [Deutsch] are available for the selection.
e
The default language is [English].
Page 8

Sign In Page
8
Creating an installer account
To monitor and manage ESS systems, installer need to create an EnerVu installer account.
On your browser, visit LG EnerVu
1
2
Enter the installer’s rst name and last name and ll your mail address in [Email]
3
eld and select [Check].
And then ll the [First Name] and [Last Name] elds.
page at http://enervu.lg-ess.com.
Select [Installer]. The [Installer Sign
In] page appears.
Select [Sign Up]. The [Sign Up] page
appears.
Page 9
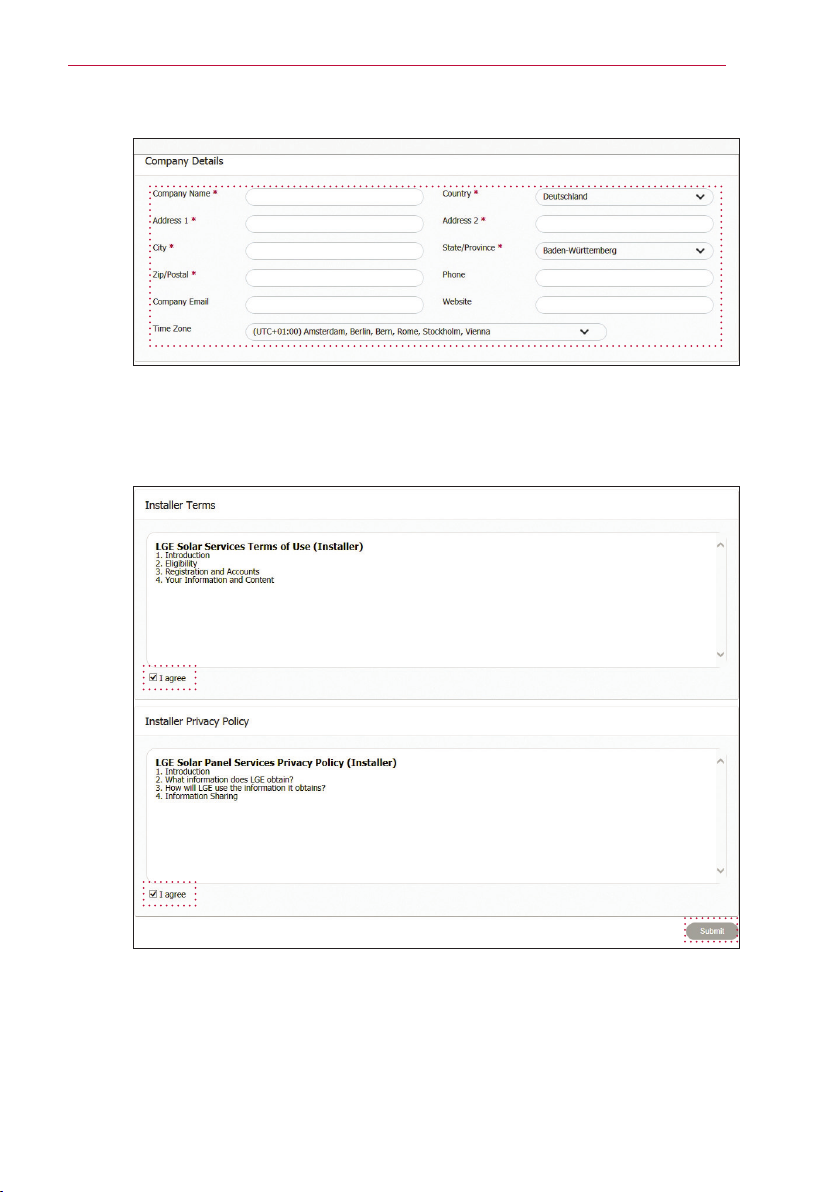
Fill the required information on [Company Detail] section.
4
And then read the [Installer terms] and [Installer Privacy Policy] carefully. If you
5
agree with every terms and policies, click [I Agree] check box in each section.
[Submit] button appears on the screen.
Select [Submit] to complete creating an installer account.
Sign In Page
9
Page 10
Sign In Page
10
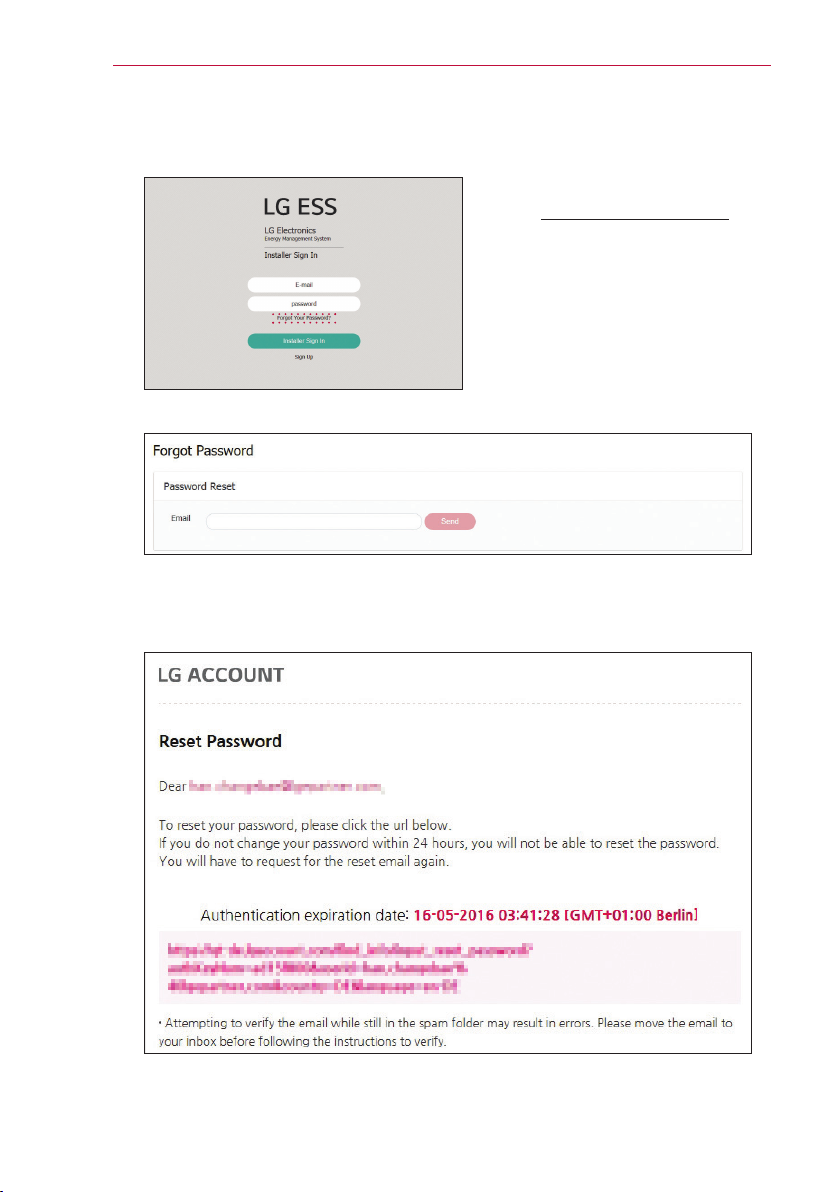
When you forgot your password
If you forgot your password, proceed the password reset steps described as below.
On your browser, visit LG EnerVu
1
Select [Forgot your Password?]. The [Password Reset] page appears.
page at http://enervu.lg-ess.com.
Select [Installer]. The [Installer Sign
In] page appears.
2
Enter your account e-mail address in the [Email] eld. The instructions of
3
password reset will be sent to your e-mail address.
Follow the instructions of reset password.
Page 11
Sign In Page
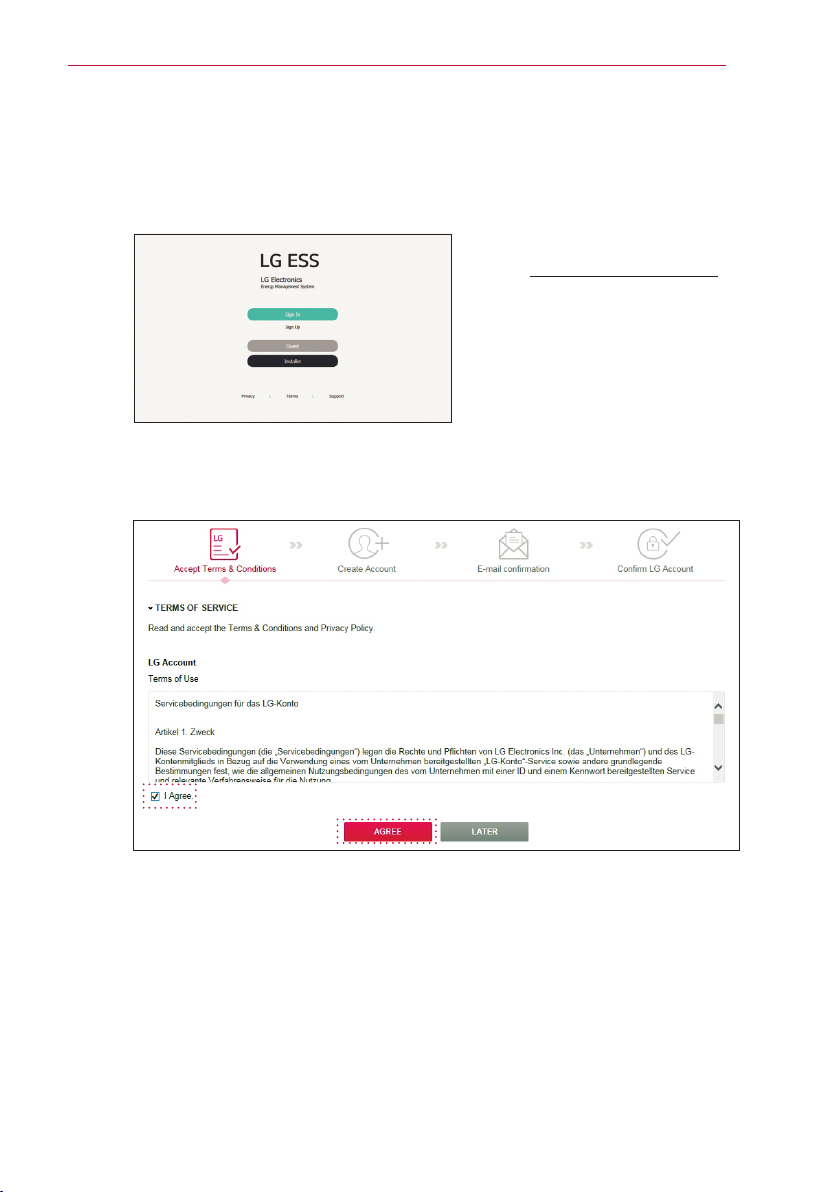
Creating an owner account
To activate an ESS on EnerVu web monitoring system, ESS owner must create an owner
account. Installer need to guide how to create an owner account and the owner’s e-mail
address is needed for system activating.
On your browser, visit LG EnerVu
1
Read the terms, conditions and privacy policy carefully.
2
If you agree with every term and condition, click the [I Agree] check box and
select [AGREE]. The account creation page appears.
page at http://enervu.lg-ess.com.
Select [Sign Up]. The service
agreement page appears.
11
Page 12
12
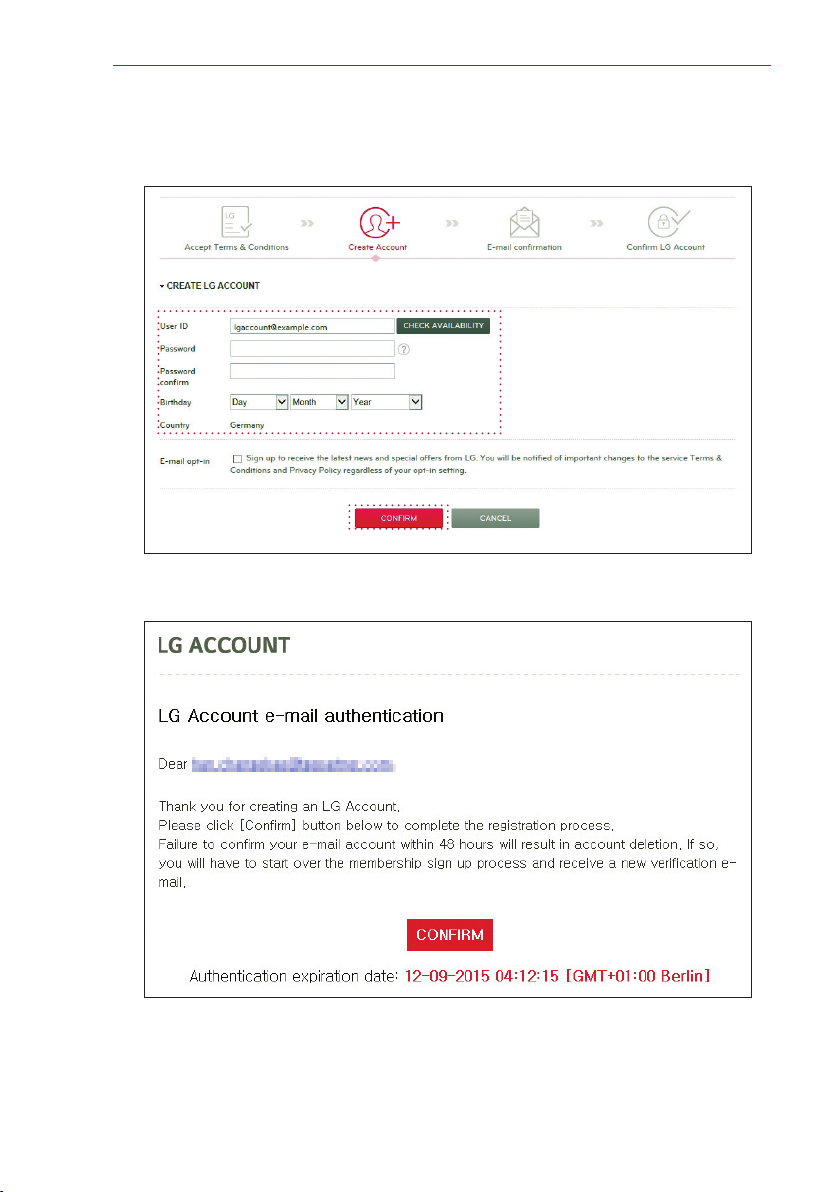
3
4
Sign In Page
Fill your mail address in [User ID] eld and select [CHECK AVAILABILITY].
Fill in [Password], [Password conrm] and [Birthday] elds and select
[CONFIRM]. The e-mail conrmation page appears.
A conrmation e-mail will be sent to your e-mail address. On your e-mail, select
[CONFIRM] to complete the e-mail conrmation.
Page 13

On the account creation page, select [CONFIRM] to complete creating your
5
account.
Select [SIGN IN] to go to the [SIGN IN WITH LG ACCOUNT] page.
6
Input your [User ID] and [Password] and select [SIGN IN].
7
Available LG account services are displayed on the screen.
Sign In Page
13
Page 14

Main Page
14
Main Page
Location and weather information
a
Installer and company information
b
Main menu tabs
c
Select [Privacy], [Terms] or [Support] to show corresponding page in a new
d
browser.
Select a language. [English] and [Deutsch] are available for the selection.
e
The default language is [English].
Page 15

Dashboard page
Dashboard page
15
Add a widget
a
Activation List
b
Event List
c
Show/Hide widgets
Select the [Add a widget] button to show all the widget name.
1
You can show or hide specic widget by selecting [Add] or [Eject] button.
2
Send Mail
d
Total Product
e
System Find
f
Page 16

Dashboard page
16
Activation List
Shows a list of system activations that are in process.
Add a New System : Directly goes to the [Add a New System] page. (page 29)
Go to Activating List : Directly goes to the [In Process] page. (page 28)
: Minimize or Restore widget size.
: Displays the widget setup.
Event List
Shows a list of system logs such as warnings and faults.
View all System : Directly goes to the [System] page. (page 18)
: Minimize or Restore widget size.
: Displays the widget setup.
Page 17

Dashboard page
Send Mail
Send an e-mail of EnerVu web monitoring service guide to an ESS owner.
Input an e-mail address of ESS owner and select [Send] to send the guide Email.
Total Product
Shows various information of all systems activated in my account.
17
View all System : Directly goes to the [System] page. (page 18)
System Find
Input a system name and select [Find] to nd the system.
The system will be displayed on the widget. Select the system name to move to the
system state page directly.
Page 18

System Page
18
System Page
When you select the [System] in the main page. Goes to the system page and display a
list of every system that are activated in your installer account.
Select a system name on the list to goes to the system state page of the selected system.
System Tab
a
Analysis Tab
b
Report Tab
c
Event Tab
d
User View Tab
e
Page 19

System Page
System Tab
Checking the current state
When you select [Current State] in the [System] tab, you can nd and check various
information related to your system.
19
Weather
a
Displays the weather of the location the
system has been installed.
Location
b
Displays the location the system has
been installed on the map.
System Log
c
Displays the system fault.
System Overview
d
Displays the status of the system in real
time. This page provides you with system
information such as current power
generated from PV, power purchased from
grid, power charged/discharged from the
battery. ALL the information is renewed
every 15 minutes.
Page 20

System Page
20
Editing a system prole
When you select [Prole] in the [System] tab, [System Prole] page appears on the
screen. The System Prole page shows you the system information registered when the
system was activated.
On the [System Prole] page, you can nd the [Edit Prole] button at the end
1
of the page. Select the [Edit Prole] button. The button will be changed to
[SAVE] button.
After selecting [Edit Prole] button, every elds on this page can be editable.
2
Select a eld you want to change information and input a new value in the eld.
When you nish editing information select the [SAVE] button to conrm prole
3
editing.
NOTE
Information of [PV Info] section can not be edited in the EnerVu web monitoring system.
Those can only be edited in the LCD touch panel of the system. When you change the
PV information in the LCD panel of the system, information on [PV Info] section will
automatically be changed.
Page 21

System Page
21
Forecast the energy generation
The EnerVu web monitoring system provide you the energy forecast function. Select
[Forecast] in the [System] tab, [Forecast] page appears on the screen.
EnerVu system will automatically show you the expected generation this year by graph
and table.
There are several graph options below the graph. Select an option to toggle display on the
graph.
Page 22

System Page
22
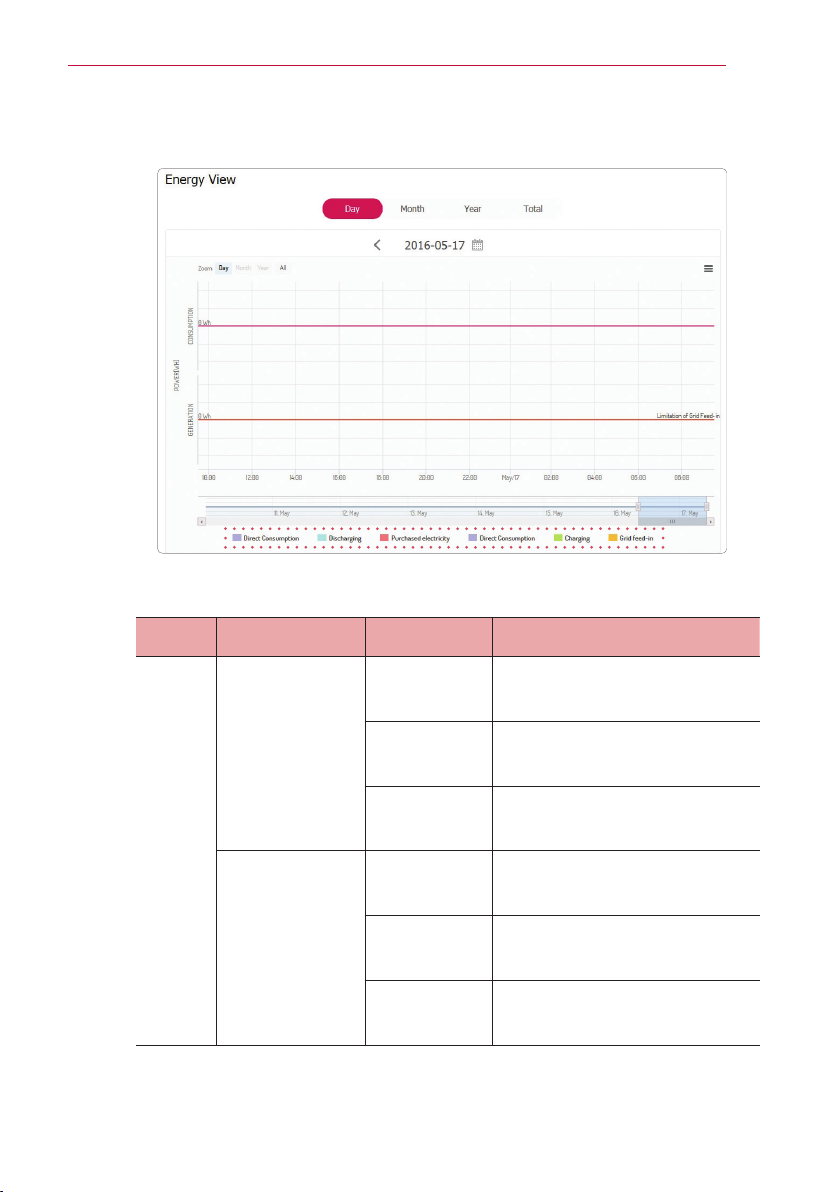
Analysis Tab
Making a statistical graph
When you select the [Analysis] tab, [Energy View] page appears on the screen. The page
shows you graph of statistical data for energy state of your system
You can make a daily, monthly or an yearly graph of statistical data for energy state.
Select a tab on the left side of the screen.
1
Energy View
PV Graph
ESS Graph
Load Graph
Select a duration option among [Day], [Month], [Year] or [Total].
Makes an overall graph of statistical data.
Makes a graph of statistical data on PV. (Generation and Grid
feed-in)
Makes a graph of statistical data on ESS (Charging,
Discharging and SOC)
Makes a graph of statistical data on household load.
(Consumption and Purchase)
2
Select a date, month or year to make a statistical graph. After the selection, the
3
graph will be displayed in a short time.
Page 23
There are several options at the bottom of a graph, click each option to show or
4
hide the statistical information on the graph.
Available options are differ depending on the graph. Refer to table described
below for more information of graph options.
System Page
23
Tab Graph Options Description
Energy
View
CONSUMPTION
GENERATION
Direct
Consumption
Discharging Amount of energy that used
Purchased
electricity
Direct
Consumption
Charging Amount of energy that charged
Grid feed-in Amount of sold energy through
Amount of directly used energy
from PV.
from the battery.
Purchased energy through the
power grid.
Amount of directly used energy
from PV.
to the battery.
the power grid.
Page 24

24
5
System Page
Tab Graph Options Description
Generation Amount of generated energy from PV.
PV
Graph
ESS
Graph
Load
Graph
Select [ ] to print a graph or download as an image le.
Energy
Energy
Energy
Grid feed-in Amount of sold energy through the
power grid.
Charging Amount of energy that charged to the
battery.
Discharging Amount of used energy from the
battery.
SOC State of charge
Consumption Amount of used energy from ESS
system.
Purchase Amount of purchased energy from the
power grid.
Page 25
System Page
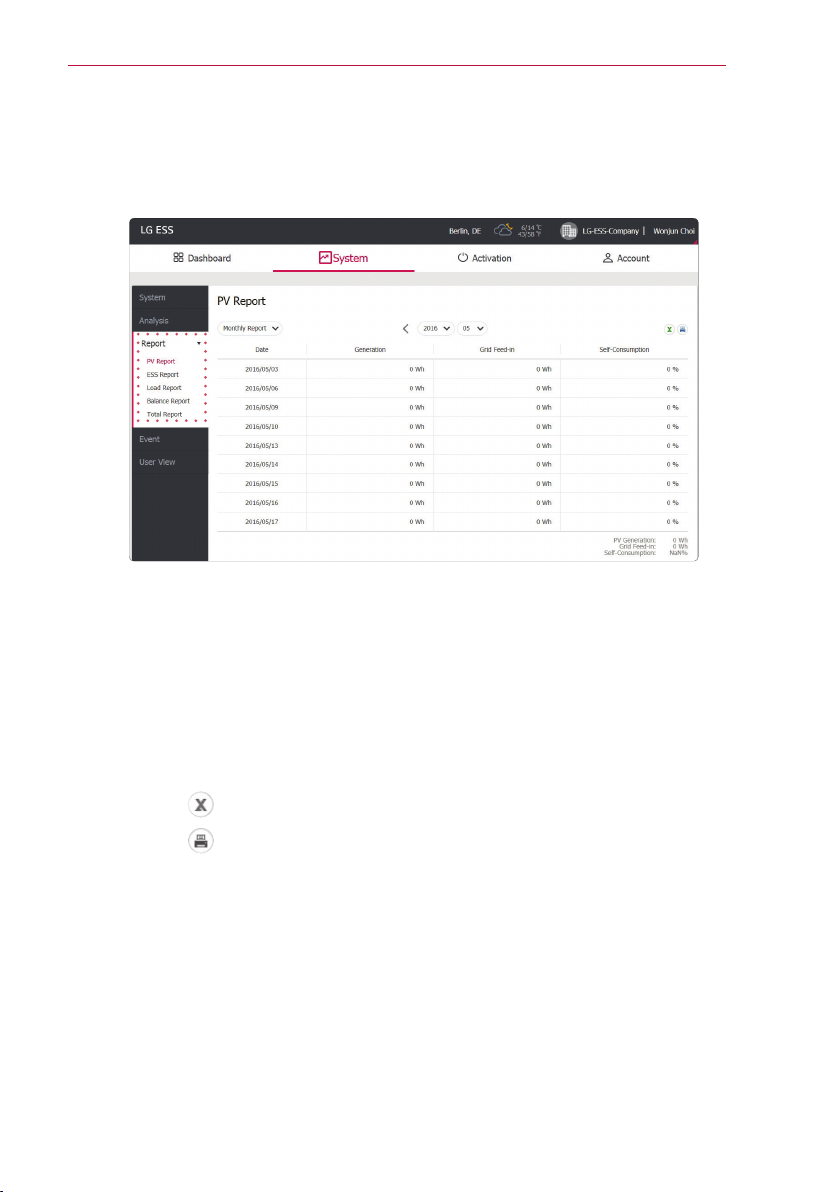
Report Tab
Making a statistical report
You can make a monthly or an yearly report of statistical data for energy on your system.
Select a report option among [PV Report], [ESS Report], [Load Report],
1
[Balance Report] or [Total Report].
25
Select a reporting period option between [Yearly report] or [Monthly report].
2
Select desired month or year to display a report.
3
Select to download the statistical data as an Excel le.
4
Select
to print the statistical data.
Page 26

System Page
26
Event Tab
Checking the system event
When you select the [Event] tab, the [Event] page appears on the screen. The page shows
a list of issues occurred such as system fault, warning.
Select a period option among [Current issues], [Past 7 days] and [Custom
1
Range].
When you select the [Custom Range], select the start date and the end date.
Select the [Type] option among [All], [Fault] and [Warning].
2
The event list will be ltered by selected type option.
Select desired month or year to display a report.
3
Select to download the statistical data as an Excel le.
4
Select
to print the statistical data.
Page 27

System Page
User View Tab
When you select the [User View] tab, the owner version of EnerVu web monitoring
system is displayed in a new browser.
27
Page 28

Activation Page
28
Activation Page
This page is intended to activate a new system to my account. Refer to page 29 for
more information of system activation.
When you select the [In Process] tab in the System page, a list of system registrations
that are in process. Select a system on the list to continue system activation.
Page 29

Activation Page
Activating a new system
In order to monitor and manage a new system, the system should be activated in EnerVu
web monitoring system by installer.
On your browser, visit LG EnerVu
1
2
page at http://enervu.lg-ess.com.
Select [Installer]. The [Installer Sign
In] page appears.
And then input the installer’s e-mail
address and the password and
select [Installer Sign In].
If the installer does not have an
account, select [Sign Up] and make
a new installer account.
29
Select [Activation] tab. The [Add a New System] screen appears.
3
Page 30

Activation Page
30
4
5
Fill every information in the [System Info] eld and select [Save] to save the
information.
In the [ESS Info] eld, ll the product registration number and select [Check].
The ESS information will automatically be lled.
Select [Save] to go to the next step.
Fill the every information In the [Owner] eld and select [Save] to save the
6
information.
And Select [Activation] at the bottom of the page to nish the activation
process.
Page 31

Activation Page
31
Account Page
The [Account] page shows you the account information. On the [My Account] tab, you
can modify your account detail, reset password or secession your account.
On the [Company Information] tab, you can check and modify your company information.
On the [User] tab, you can check all the installers in your company. You can also add a new
installer if you are a administrator.
If your role is not an administrator, you can only check the installers belonging to your
branch ofce and you can not add a new installer.
My Account Tab
Modifying your account detail
Select the [Account] on the main page. [My Account] page appears on the
1
screen.
Change your information in the [Account Detail] section and then select
2
[Modify] to conrm changes.
Page 32

Account Page
32
Changing your password
Select the [Account] on the main page. [My Account] page appears on the
1
screen.
Select [Reset Password]. [Reset Password] page appears on the screen.
2
Fill [Current password], [Enter new password] and [Conrm new password]
3
elds and then select [Modify] to change your password.
Deleting your account
Select the [Account] on the main page. [My Account] page appears on the
1
screen.
Select [Secession]. A pop-up message appears on the screen.
2
Select [Yes] to conrm account secession.
Page 33

Setting the notication preference
Select the [Account] on the main page. [My Account] page appears on the
1
screen.
In the [Notication Preference] section, there are several options for notifying
2
events and reports to an owner.
ySend me Transfer notication :
Send me a mail when an owner transfer the system to the other owner.
ySend me monthly system performance summaries :
Send me a monthly mail of system performance summaries.
yAlert email preference :
You can select a notication option when there is a warning or a fault on the
system.
Select [Modify] to conrm changes of [Notication Preference] settings.
3
Account Page
33
Page 34

Account Page
34
Company Information Tab
The installation company can have several branch ofces and each branch ofce may have
several installers.
On the [Company Information] tab, you can check or modify your company information.
And also you can add a new branch ofce in your company. If your role is not an
administrator, modifying your company information and adding a new branch ofce are
unavailable.
Modifying company information
Select the [Company Information] tab on the [Account] page.
1
Change the company information in each eld. You can also register or change
2
company logo in [Logo url] eld.
Select [Modify] button to conrm changes.
3
Page 35

Account Page
Adding a branch ofce
In the [Ofce] section, you can check the every branch ofce and add more branch ofce.
Select the [Company Information] tab on the [Account] page.
1
In the [Ofce] section, select [Add Branch Ofce] button to open a new
2
company information input page.
Fill the company information in each eld. You can also register company logo in
3
[Logo url] eld.
35
Select [Submit] button to register a new branch ofce.
4
Page 36

Account Page
36
Users Tab
You can check all the installers in your company. And also you can add a new installer
if your role is administrator. If your role is not an administrator, you can only check the
installers belonging to your branch ofce and you can not add a new installer.
Adding a new installer
Select the [Users] tab on the [Account] page.
1
Select [Add New User] button to open a new user input page.
2
Fill the user information in each eld.
3
Select [AddUser] button to register a new installer.
4
Page 37

Page 38

 Loading...