

LG DV587H-P User manual

OWNER'S MANUAL
DVD Player
Please read this manual carefully before operating
your set and retain it for future reference.
MODEL
DV587H
ENGLISH
P/NO : MFL63266732
Safety Precaution
CAUTION
RISK OF ELECTRIC SHOCK
DO NOT OPEN
CAUTION: TO REDUCE THE RISK OF ELECTRIC SHOCK. DO NOT
REMOVE COVER (OR BACK). NO USER-SERVICEABLE PARTS INSIDE.
REFER SERVICING TO QUALIFIED SERVICE PERSONNEL.
This lightning flash with arrowhead symbol within an equilateral triangle
is intended to alert the user to the presence of uninsulated dangerous
voltage within the product’s enclosure that may be of sufficient
magnitude to constitute a risk of electric shock to persons.
The exclamation point within an equilateral triangle is intended to alert
the user to the presence of important operating and maintenance
(servicing) instructions in the literature accompanying the product.
WARNING: TO PREVENT FIRE OR ELECTRIC SHOCK HAZARD, DO NOT
EXPOSE THIS PRODUCT TO RAIN OR MOISTURE.
WARNING: Do not install this equipment in a confined space such as a book
case or similar unit.
CAUTION: Do not block any ventilation openings. Install in accordance with the
manufacturer's instructions. Slots and openings in the cabinet are provided for
ventilation and to ensure reliable operation of the product and to protect it from
over heating. The openings shall be never be blocked by placing the product on
a bed, sofa, rug or other similar surface. This product shall not be placed in a
built-in installation such as a bookcase or rack unless proper ventilation is
provided or the manufacturer's instruction has been adhered to.
CAUTION: This product employs a Laser System.
To ensure proper use of this product, please read this
owner’s manual carefully and retain it for future reference.
Shall the unit require maintenance, contact an authorized
service center.
Use of controls, adjustments or the performance of procedures other than those specified herein may result in hazardous radiation
exposure.
To prevent direct exposure to laser beam, do not try to open the enclosure.
Visible laser radiation when open. DO NOT STARE INTO BEAM.
CAUTION: The apparatus shall not be exposed to water (dripping or splashing)
and no objects filled with liquids, such as vases, shall be placed on the
apparatus.
CAUTION concerning the Power Cord
Most appliances recommend they be placed upon a dedicated circuit;
That is, a single outlet circuit which powers only that appliance and has no
additional outlets or branch circuits. Check the specification page of this owner's
manual to be certain. Do not overload wall outlets. Overloaded wall outlets,
loose or damaged wall outlets, extension cords, frayed power cords, or
damaged or cracked wire insulation are dangerous. Any of these conditions
could result in electric shock or fire. Periodically examine the cord of your
appliance, and if its appearance indicates damage or deterioration, unplug it,
discontinue use of the appliance, and have the cord replaced with an exact
replacement part by an authorized service center. Protect the power cord from
physical or mechanical abuse, such as being twisted, kinked, pinched, closed
in a door, or walked upon. Pay particular attention to plugs, wall outlets, and the
point where the cord exits the appliance.
To disconnect power from the mains, pull out the mains cord plug. When installing the product, ensure that the plug is easily accessible.
This device is equipped with a portable battery or accumulator.
Safe way to remove the battery or the battery from the equipment:
Remove the old battery or battery pack, follow the steps in reverse order than
the assembly. To prevent contamination of the environment and bring on possible threat to human and animal health, the old battery or the battery put it in
the appropriate container at designated collection points. Do not dispose of
batteries or battery together with other waste. It is recommended that you use
local, free reimbursement systems batteries and accumulators.
The battery shall not be exposed to excessived heat such as sunshine, fire or
the like.
Manufactured under license from Dolby Laboratories. Dolby and the
double-D symbol are trademarks of Dolby Laboratories.
“DVD Logo” is a trademark of DVD Format/Logo Licensing Corporation.
HDMI, the HDMI logo and High-Definition Multimedia Interface are
trademarks or registered trademarks of HDMI licensing LLC.
2

Safety Precaution . . . . . . . . . . . . . . . . . . . . . . . . . . . . . . . . . . . . . . . .2
Types of Playable Discs . . . . . . . . . . . . . . . . . . . . . . . . . . . . . . . . . . .3
Hooking up the unit . . . . . . . . . . . . . . . . . . . . . . . . . . . . . . . . . . . . 4-5
Remote Control . . . . . . . . . . . . . . . . . . . . . . . . . . . . . . . . . . . . . . . . . .6
Main Unit . . . . . . . . . . . . . . . . . . . . . . . . . . . . . . . . . . . . . . . . . . . . . . .7
Adjust the settings . . . . . . . . . . . . . . . . . . . . . . . . . . . . . . . . . . . . . . 8-9
Displaying Disc Information . . . . . . . . . . . . . . . . . . . . . . . . . . . . . . . . .9
Playing a Disc . . . . . . . . . . . . . . . . . . . . . . . . . . . . . . . . . . . . . . . 10-11
Playing a DivX movie file. . . . . . . . . . . . . . . . . . . . . . . . . . . . . . . 11-12
Listening to Music Disc or files . . . . . . . . . . . . . . . . . . . . . . . . . . . . .12
Viewing photo files . . . . . . . . . . . . . . . . . . . . . . . . . . . . . . . . . . . 12-13
Using the Karaoke . . . . . . . . . . . . . . . . . . . . . . . . . . . . . . . . . . . . . . .13
USB Direct Recording . . . . . . . . . . . . . . . . . . . . . . . . . . . . . . . . . . . .14
Using an USB Flash Drive . . . . . . . . . . . . . . . . . . . . . . . . . . . . . . . .14
Language Codes- . . . . . . . . . . . . . . . . . . . . . . . . . . . . . . . . . . . . . . .15
Table of Contents
Area Codes- . . . . . . . . . . . . . . . . . . . . . . . . . . . . . . . . . . . . . . . . . . .15
Troubleshooting- . . . . . . . . . . . . . . . . . . . . . . . . . . . . . . . . . . . . . . . .16
Specifications . . . . . . . . . . . . . . . . . . . . . . . . . . . . . . . . . . . . . . . . . .16
Types of Playable Discs
Typ e
DVD-VIDEO: Discs such as movies that can be
purchased or rented.
DVD-R: Video mode and finalized only
DVD-RW: VR mode, Video mode and finalized only
DVD+R: Video mode only
Logo
About the Symbol Display
“ ” may appear on your TV display during operation and indicates that the
function explained in this owner’s manual is not available on that disc.
Regional Codes
This unit has a regional code printed on the rear of the unit. This unit can play
only DVD discs labeled same as the rear of the unit or “ALL”.
• Most DVD discs have a globe with one or more numbers in it clearly visible
on the cover. This number must match your unit’s regional code or the disc
cannot play.
• If you try to play a DVD with a different regional code from your player, the
message “Check Regional Code” appears on the TV screen.
Copyrights
It is forbidden by law to copy, broadcast, show, broadcast via cable, play in
public, or rent copyrighted material without permission. This product features
the copy protection function developed by Macrovision. Copy protection signals are recorded on some discs. When recording and playing the pictures
of these discs picture noise will appear. This product incorporates copyright
protection technology that is protected by U.S. patents and other intellectual
property rights. Use of this copyright protection technology must be authorized
by Macrovision, and is intended for home and other limited viewing uses only
unless otherwise authorized by Macrovision. Reverse engineering or disassembly is prohibited.
CONSUMERS SHOULD NOTE THAT NOT ALL HIGH DEFINITION
TELEVISION SETS ARE FULLY COMPATIBLE WITH THIS PRODUCT AND
MAY CAUSE ARTIFACTS TO BE DISPLAYED IN THE PICTURE. IN CASE OF
525 OR 625 PROGRESSIVE SCAN PICTURE PROBLEMS, IT IS
RECOMMENDED THAT THE USER SWITCH THE CONNECTION TO THE
‘STANDARD DEFINITION’ OUTPUT. IF THERE ARE QUESTIONS
REGARDING OUR TV SET COMPATIBILITY WITH THIS MODEL 525p AND
625p UNIT, PLEASE CONTACT OUR CUSTOMER SERVICE CENTER.
DVD+RW: Video mode only
Audio CD: Music CDs or CD-R/CD-RW in music CD
format that can be purchased.
This unit plays DVD±R/RW and CD-R/RW that contains audio titles, DivX, MP3,
WMA and/or JPEG files. Some DVD±RW/DVD±R or CD-RW/CD-R cannot be
played on this unit due to the recording quality or physical condition of the disc,
or the characteristics of the recording device and authoring software.
3
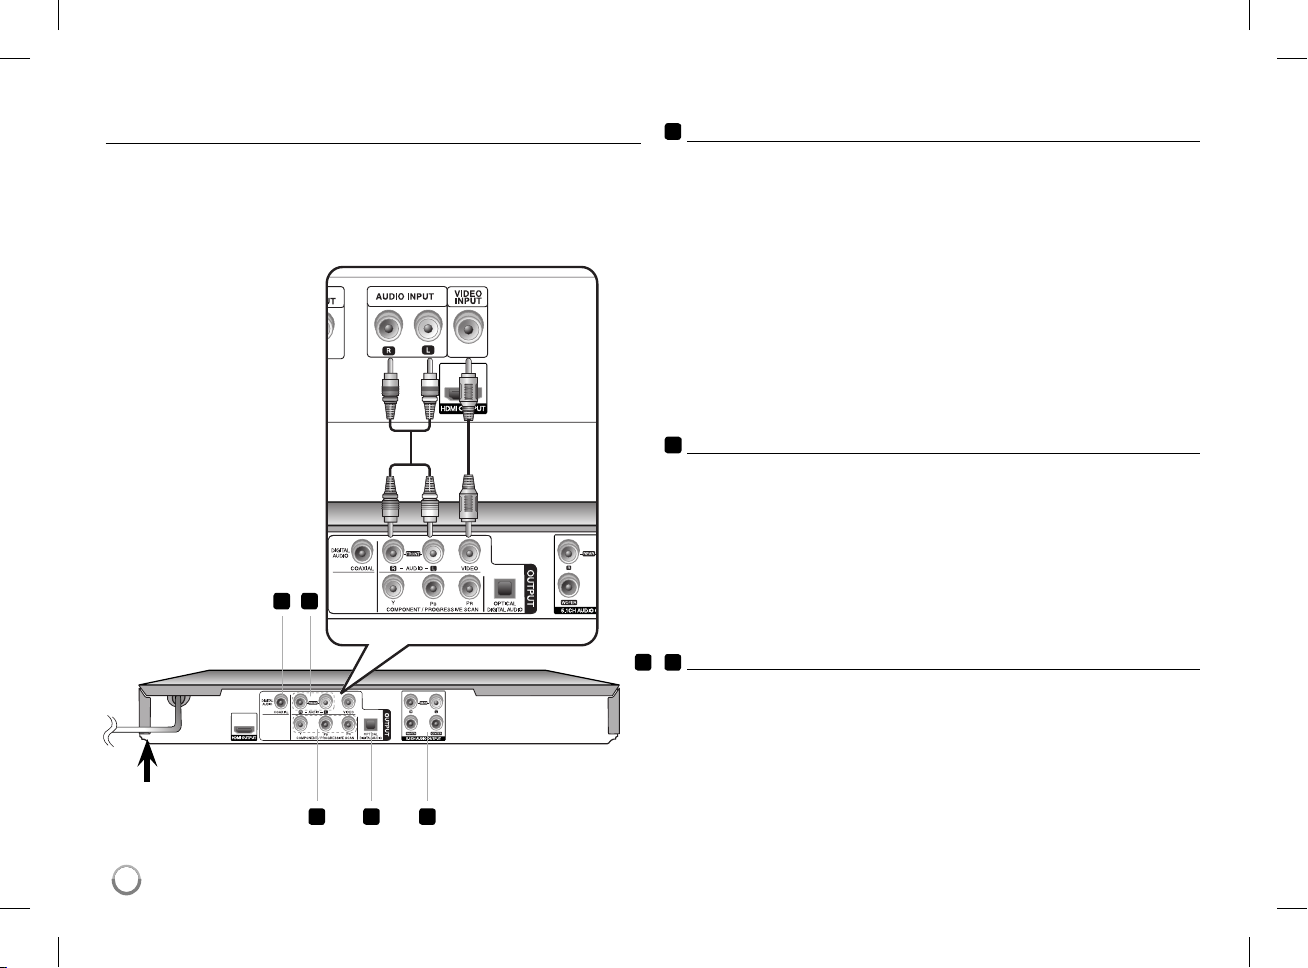
Hooking up the unit
Audio and Video ConnectionAudio and Video Connection
The unit Audio/Video jacks are color coded (yellow for video, red for right audio
and white for left audio). If your TV has only one input for audio (mono),
connect it to the left (white) audio jack on the unit.
Rear of TV
B
D
Rear of DVD player
Hooking up the unit - more you can do
A
Component Video Connections
Connect the COMPONENT(VIDEO)/PROGRESSIVE SCAN(YPBPR)
OUTPUT jacks on the unit to the corresponding input jacks on your TV using
a Video/YPbPr cable.
• You will still need to connect the left and right audio cables to the TV, or
digital audio cable to your stereo.
Resolution Setting
• You can change the resolution for component video output. Press
RESOLUTION repeatedly to select the desired resolution - 576i(480i),
576p(480p), 720p, 1080i, 1080p.
• For 720p, 1080p and 1080i resolution on the component video output,
only non-copy protected discs can be played back. If the disc is copy
proteced,it will be displayed at the 576p(480p) resolution.
• Depending on your TV, some of the resolution settings may result in the
picture disappearing or an abnormal picture appearing. In this case, press
RESOLUTION repeatedly unit the picture re-appears.
Digital Audio Output Connection
B
Connect one of the unit’s DIGITAL AUDIO OUTPUT (OPTICAL or COAXIAL)
jacks to the corresponding jack on your amplifier.
• If the audio format of the digital output does not match the capabilities of
your amplifier, the amplifier will produce a strong, distorted sound or no
sound at all.
• To see the audio format of the current disc in the on-screen display, press
AUDIO.
• This unit does not perform internal (2 channel) decoding of a DTS sound
track. To enjoy DTS multi channel surround, you must connect this unit to
a DTS compatible amplifier via one of this unit’s digital audio outputs
+
5.1CH Audio Output Connections
C
D
Connect a amplifer with analog 6 channel input jacks.
• Make the appropriate sound setting using [5.1 Speaker Setup] option on
the setup menu. (See page 8)
Connect the AC
power cord into the
power outlet.
4
A
B
C
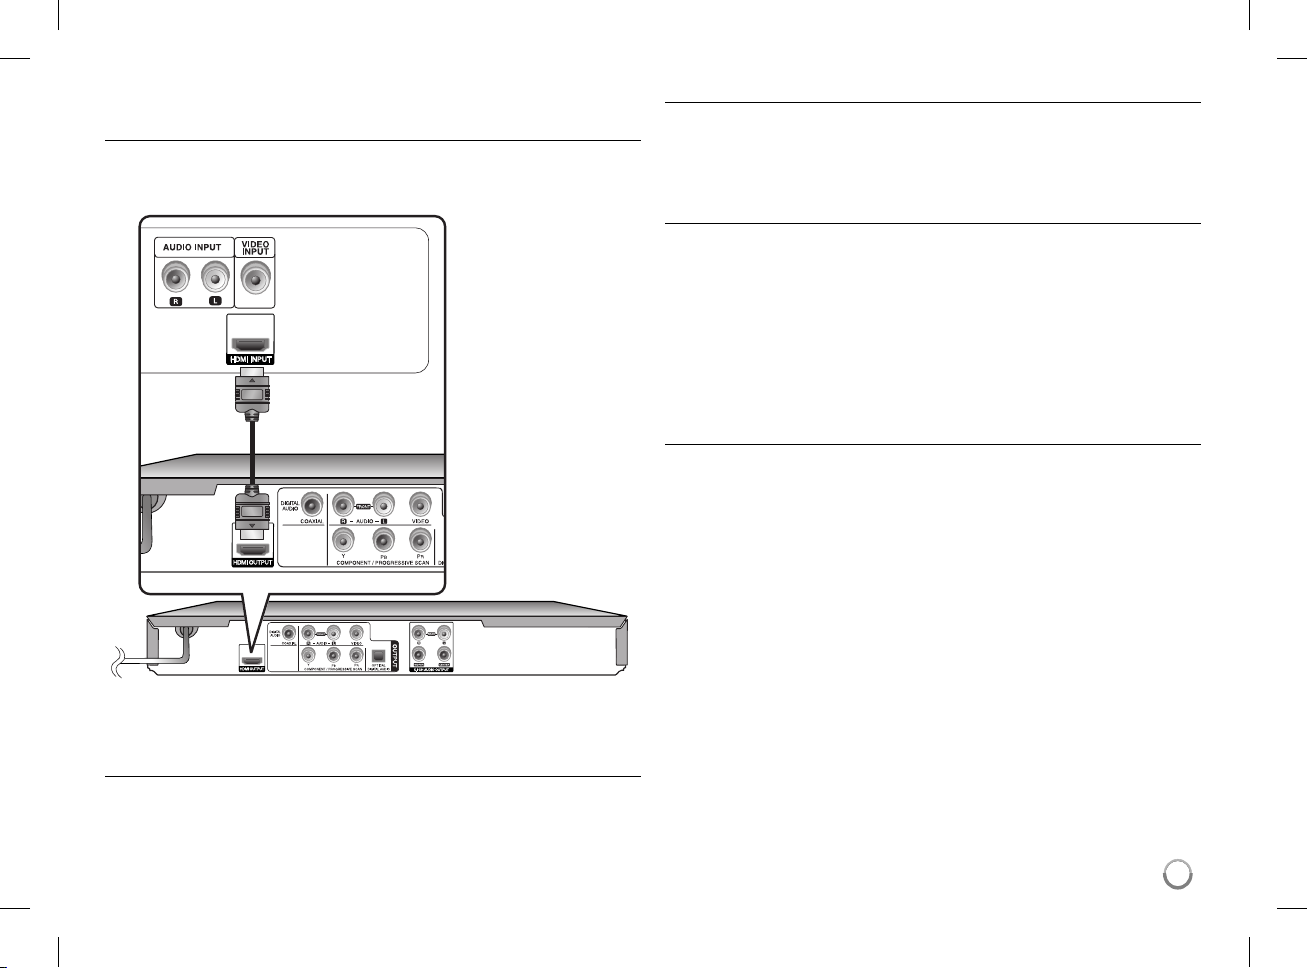
Hooking up the unit
HDMI Connection
Connect the HDMI OUTPUT jack on the unit to the HDMI input jack on an HDMI
compatible TV using an HDMI cable (Version 1.2).
Rear of TV
Rear of DVD player
Hooking up the unit - more you can do
Resolution Setting
You can change the resolution for HDMI output. Press RESOLUTION repeatedly to select the desired resolution - 576i(480i), 576p(480p), 720p, 1080i, 1080p.
The resolution may not be selected depending on the connection or TV.
Note for 1080p resolution
The unit is able to provide a 1080p full HD image to most 1080p-capable TVs
in the market today. However, there are some 1080p TVs available from certain
companies that are limited in the types of 1080p images that can be accepted.
Specifically, 1080p-capable TVs that don’t accept images in 60Hz can’t display
an image from this unit.
About HDMI
HDMI (High Definition Multimedia Interface) supports both video and audio on a
single digital connection for use with DVD Players, Set-Top Boxes, and other AV
devices. HDMI was developed to provide the technologies of HDCP (High-bandwidth Digital Content Protection). HDCP is used to protect digital content
transmitted and received.
HDMI has the capability to support standard, enhanced or high-definition video
plus standard to multi-channel surround-sound audio, HDMI features include
uncompressed digital video, a bandwidth of up to 5 gigabytes per second, one
connector (instead of several cables and connectors), and communication
between the AV source and AV devices such as DTVs.
Notes on HDMI connection
• If your TV is not capable of handling 96 kHz sampling frequency, set the
[Sampling Freq.] option to [48 kHz] on the setup menu (See page 8).
• If your TV is not equipped with Dolby Digital and MPEG decoder, set the
[Dolby Digital] and [MPEG] options to [PCM] on the setup menu
(See page 8).
• Depending on your TV, some of the resolution settings may result in the
picture disappearing or an abnormal picture appearing. In this case, press
RESOLUTION repeatedly unit the picture re-appears.
• Changing the resolution when the unit is connected with HDMI connector
may result in malfunctions. To solve the problem, turn off the unit and then
turn it on again.
• When you connect a HDMI or DVI compatible device make sure of the
following:
- Try switching off the HDMI/DVI device and this unit. Next, switch on the
HDMI/DVI device and leave it for around 30 seconds, then switch on this
unit.
- The connected device’s video input is set correctly for this unit.
- The connected device is compatible with 720X576i(480i), 720X576p(480p),
1280X720p, 1920X1080i or 1920X1080p video input.
- The 1080p, 720p and 576p(480p) resolutions are the progressive scan
applied resolution.
• Not all HDCP-compatible DVI devices will work with this unit.
- The picture will not be displayed properly with non-HDCP device.
5
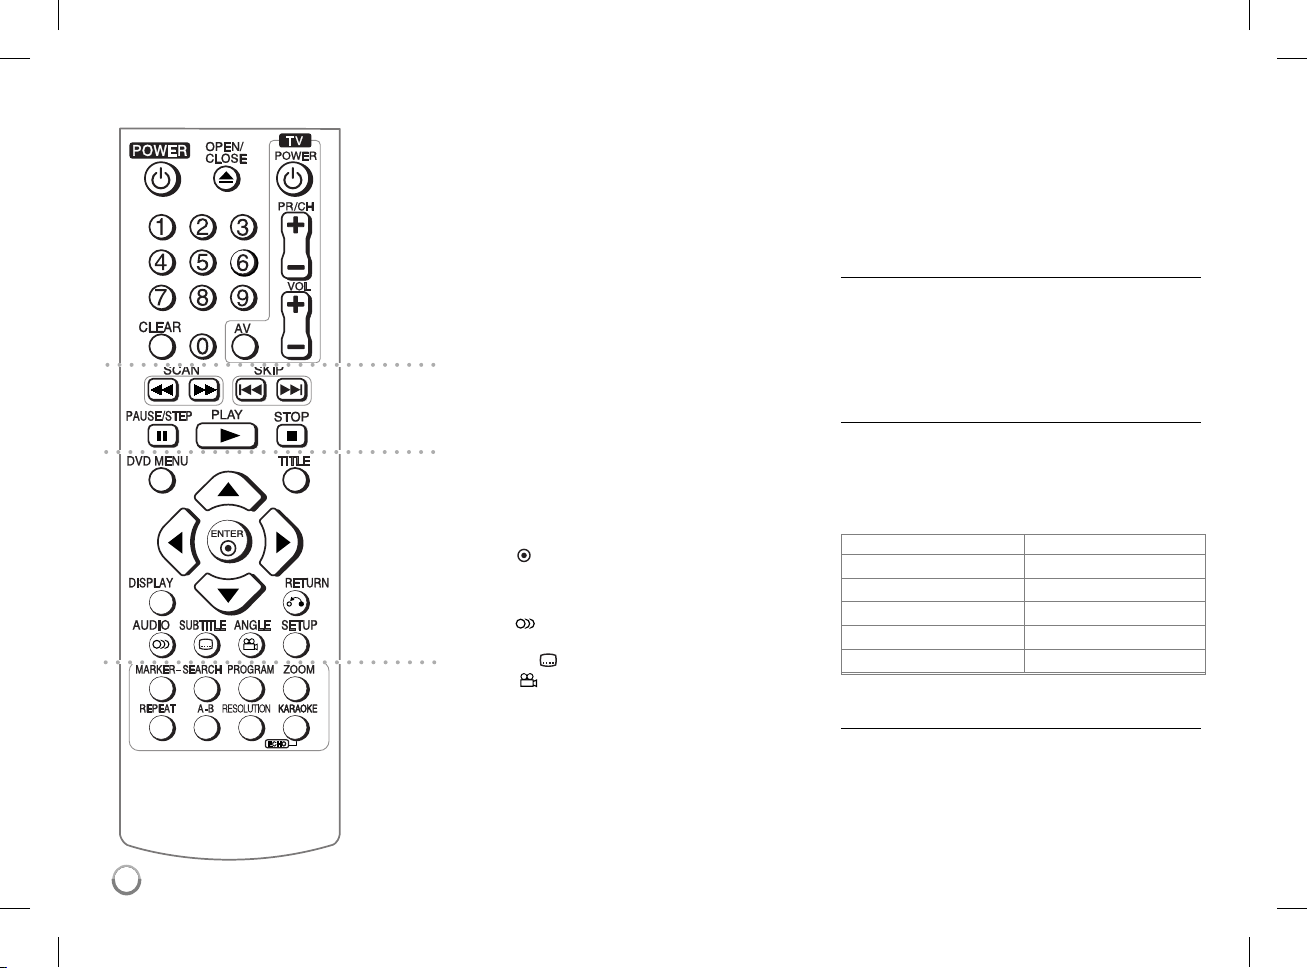
Remote control
a
b
c
d
l l l l l l l a l l l l l l l
POWER (1): Switches the unit ON or OFF.
OPEN/CLOSE (Z): Opens and closes the disc tray.
Numerical buttons: Selects numbered items in a
menu.
CLEAR: Removes a track number on the program
List or a mark on the Marker Search menu.
TV: TV control buttons.
l l l l l l l b l l l l l l l
SCAN (m / M): Search backward or forward.
SKIP (. / >): Go to next or previous chapter/
track/file.
PAUSE/STEP (X): Pauses playback temporarily/
press repeatedly for frame-by-frame
playback.
PLAY (N): Starts playback.
STOP (x): Stops playback.
l l l l l l l c l l l l l l l
DVD MENU: Accesses or exits the DVD menu.
TITLE: Accesses the disc’s title menu, if available.
vV b B: Navigates the menus.
ENTER (
DISPLAY: Accesses or exits On-Screen Display.
RETURN (O): Returns to menu or exits the menu.
Changes to the USB mode.
AUDIO ( ): Selects an audio language or audio
channel.
SUBTITLE (
ANGLE (
available.
SETUP: Accesses or exits the setup menu.
l l l l l l l d l l l l l l l
MARKER: Marks any point during playback.
SEARCH: Displays MARKER SEARCH menu.
PROGRAM: Enters the program edit mode.
ZOOM: Enlarges video image.
): Confirms menu selection.
): Selects a subtitle language.
): Selects a DVD camera angle, if
REPEAT: Repeats a chapter, track, title or all.
A-B: Repeats a section.
RESOLUTION: Sets the output resolution for HDMI
and COMPONENT/PROGRESSIVE SCAN OUTPUT
jack.
KARAOKE (ECHO) : Accesses or exits KARAOKE
menu.
Controlling other TV’s with the remote control
You can control the sound level, input source, and
power switch of your LG TV with the supplied remote
control. While holding down TV POWER button,
press the number buttons to select the manufacturer
code for your TV (see the table below). Release TV
POWER button.
Code numbers of controllable TVs
If more than one code number is listed, try entering
them one at a time until you find the one that works
with your TV. Depending on your TV, some or all
buttons may not function on the TV, even after
entering the correct manufacturer code.
Manufacturer Code Number
LG/GoldStar 1 (Default), 2
Zenith 1, 3, 4
Samsung 6, 7
Sony 8, 9
Hitachi 4
Put the battery into the Remote Control
Remove the battery cover on the rear of Remote
Control, and insert battery (size AAA) with + and
– matched correctly.
6
 Loading...