

LG DSP9YA Instruction manual
OWNER’S MANUAL
Wi-Fi
SOUND BAR
Please read this manual carefully before operating your set and retain it for future reference.
Model
DSP9YA (DSP9YA, SPP8-W)
2104_Rev02 |
www.lg.com |
Copyright © 2021 LG Electronics Inc. All Rights Reserved. |
Sound Bar Quick Guide
Installing and using the Product
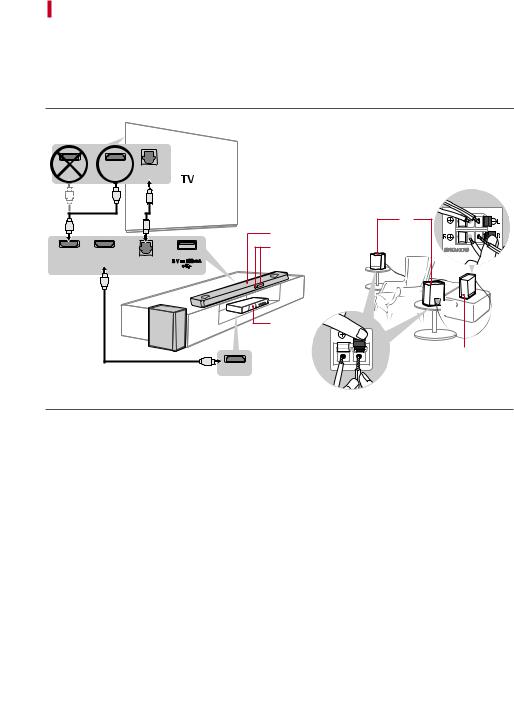
A Connect the sound bar to your TV via an optical cable or an HDMI cable.
|
OPTICAL |
|
|
OUT |
|
A |
A |
|
|
|
C |
|
|
A |
|
|
B |
(TV eARC/ARC) |
|
C |
HDMI OUT IN |
OPTICAL IN |
|
|
|
C |
B |
|
C |
|
|
|
|
D |
E |
|
|
|
|
|
C |
|
|
HDMI OUT |
ASound bar
BRemote Control Receiver / Status Display
CRear Speakers / Wireless Receiver (Sold separately, SPK8-S)
DWireless Subwoofer - Install it close to the sound bar.
EExternal Device - (Blu-ray player, game console, etc.)
2

BIf you are using an external device (ex. Blu-ray player, game console, etc.), connect it to the sound bar via an HDMI cable.
CIf you purchased the rear speakers and wireless receiver separately, connect the rear speakers to the wireless receiver via a speaker cable. When connecting the rear speakers to the wireless receiver, connect the black striped cable to the negative terminal of each speaker and the remaining cable to the positive terminal of each speaker.
DConnect to power in the following order: wireless subwoofer [wireless receiver [sound bar. Then, turn on the sound bar. When the connection is automatically established with the sound bar, the LEDs on the wireless subwoofer and the wireless receiver will light up in green. ([See “Connecting the Product” on page 6.)
EUsing the product with your TV ([See “Connecting to the TV”
on page 30.)
APress the Function  button repeatedly until “OPT/HDMI ARC” appears on the status display.
BOn your TV's settings, set the output speaker to [HDMI ARC], [Optical], or [External Speaker].
CWhen the TV is properly connected to the product, “OPT”, “ARC”, or “E-ARC” will appear on the status display with a sound.
F Connecting the product to your smartphone via Wi-Fi ([See
“Connecting with a Smartphone via Wi-Fi” on page 16.)
AConnect your smartphone to Wi-Fi.
BInstall the LG Sound Bar app on Google Play or the App Store.
CRun the LG Sound Bar app and follow the instructions.
DThe product will connect to your smartphone and you can control the product with LG Sound Bar app.
G Connecting the product to your smartphone via Bluetooth ([
See “Connecting via Bluetooth” on page 38.)
ATap the Settings  button on your smartphone and select
  Bluetooth. Turn on the Bluetooth function. (
 Off >
Off >  On)
On)
BPress the Bluetooth pair  button. After a moment, you will see “BT READY” on the status display.
CFind and tap “LG_Speaker_DSP9YA_XXXX” or the name you registered on the Google Home app.
DWhen the product is connected to your smartphone via Bluetooth, you can see the status display change from “PAIRED” [“Connected Bluetooth device name” [“BT”.
3

Manually connecting the sound bar to the wireless subwoofer or wireless receiver ([See “Connecting the wireless subwoofer manually”, “Manual connection” on page 8, 10.)
If you see a red LED on the back of the wireless subwoofer or on the front of the wireless receiver, it means that the sound bar is not connected to the speakers. If this is the case, connect them in the following order.
APress the Power  button on the sound bar to turn it off.
BPress the PAIRING (Pairing) button on the back of the disconnected wireless subwoofer or wireless receiver. Check if each LED blinks green.
-- If you still see a red LED on the back of the wireless subwoofer, press and hold the button on the back of the subwoofer again.
CPress the Power  button on the sound bar to turn it on.
DWhen the connection is established, you will see a green LED light on the back of the wireless subwoofer or on the front of the wireless receiver light up in green.
4

Table of Contents
Sound Bar Quick Guide
2 Installing and using the Product
Installation
6 Connecting the Product
16 Connecting with a Smartphone via Wi-Fi
19 Resetting the Product
Exploring the Product
20 Front
22Back
23Exploring Remote Control
Connecting to the TV
30 Connecting with an Optical Cable
32 Connecting with an HDMI Cable
34 Connecting via Bluetooth
Connecting to an External Device
35 Connecting with an HDMI Cable
37 Connecting with an Optical Cable
Using the Product as an Audio
System
38 Connecting via Bluetooth
41 Connecting to a USB Storage Device
43Using the LG Sound Bar app
44Compatible with Google Assistant
45Works with Apple AirPlay
46Spotify Connect
47Works with Alexa
Mounting the Product to a Wall
50 Mounting the Product to a Wall
Safety Precautions
52 Safety and Regulatory
Before Reporting Product
Malfunction
55 Troubleshooting
Appendix
59 Specifications
61Registered Trademarks and Licenses
62What You Need to Know about Network Services
62Open Source Software Notice Information
63Handling the Product
5

Installation
Connecting the Product
You can enjoy a richer sound by connecting the sound bar to the wireless subwoofer.
Connecting the wireless subwoofer automatically
After completing installation, the wireless subwoofer will automatically be connected to the sound bar. Connect the sound bar to the subwoofer in the following order.
APlug the power cable into the wireless subwoofer.
BPlug the power cable connected to the wireless subwoofer into an outlet.
CPlug the sound bar power cable into an outlet.
DWhen the connection is automatically established, you will see the LED on the back of the wireless subwoofer light up in green.
6

Checking the connection with the LED on the back of the wireless subwoofer
You can check the connection status by looking at the LED on the back of the wireless subwoofer.
LED Colour |
Status |
|
|
Blinking green |
Connecting in progress |
|
|
Green |
Connected successfully |
|
|
Red |
Bad connection, or the subwoofer is in standby |
|
|
Off |
Power cable not connected |
|
|
7
Connecting the wireless subwoofer manually
If you see a red LED on the back of the wireless subwoofer, it means that the sound bar is not connected to the subwoofer. If this is the case, connect them in the following order.
APress the Power  button on the sound bar to turn it off.
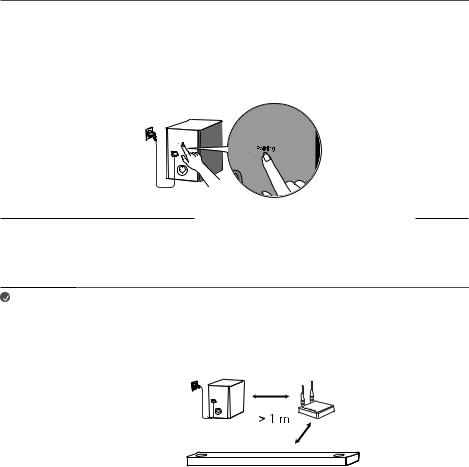
BPress the Pairing button on the back of the wireless subwoofer. Check if the LED on the back of the subwoofer is blinking green. If you still see a red LED on the wireless subwoofer, press and hold the button on the back of the subwoofer again.
CPress the Power  button on the sound bar to turn it on.
DWhen the connection is established, you will see the LED light on the back of the wireless subwoofer light up in green.
Note |
• Install the sound bar as close to the wireless subwoofer as possible. The closer the distance |
|
between the sound bar and the wireless subwoofer, the better the sound quality. |
•Please ensure there are no obstacles between the sound bar and the wireless subwoofer.
•To prevent wireless interference, maintain a distance of at least 1 m between the sound bar or the wireless subwoofer and any peripheral devices that generate strong electromagnetic waves (ex. wireless routers, microwave ovens, etc.).
8

Connecting the rear speakers to the wireless receiver (SPK8-S, sold separately)
Automatic connection
After completing installation, the wireless receiver will automatically be connected to the sound bar. Connect the sound bar to the wireless receiver in the following order.
AConnect the speaker cables to the corresponding terminals on the rear speakers (left, right). Connect the black striped cable to the negative terminal and the other cable to the positive terminal.
BConnect the speaker cables on the rear speakers (left, right) to the wireless receiver.
Receiver Terminal Colour |
Speaker Position |
|||||||||||||||||
|
|
|
|
|
|
|
|
|
|
|
|
|
|
|
|
|
|
|
Blue |
LLeft rear |
|||||||||||||||||
|
|
|
|
|
|
|
|
|
|
|
|
|
|
|
|
|
|
|
Grey |
RRight rear |
|||||||||||||||||
|
|
|
|
|
|
|
|
|
|
|
|
|
|
|
|
|
|
|
|
|
|
|
|
|
|
|
|
|
|
|
|
|
|
|
|
|
|
|
|
|
|
|
|
|
|
|
|
|
|
|
|
|
|
|
|
|
|
|
|
|
|
|
|
|
|
|
|
|
|
|
|
|
|
|
|
|
|
|
|
|
|
|
|
|
|
|
|
|
|
|
|
|
|
|
|
|
|
|
|
|
|
|
|
|
|
|
|
|
|
|
|
|
|
|
|
|
|
|
|
|
|
|
|
|
|
|
|
|
|
|
|
|
|
|
|
|
|
|
|
|
|
|
|
|
|
|
|
|
|
|
|
|
|
|
|
|
|
|
|
|
|
|
|
|
|
|
|
|
|
|
|
|
|
|
|
|
|
|
|
|
|
|
|
|
|
|
|
|
|
|
|
|
|
|
|
|
|
|
|
|
|
|
|
|
|
|
|
|
|
|
|
|
|
|
|
|
|
|
|
|
|
|
|
|
|
|
|
CPlug the wireless receiver power cable into an outlet.
DPress the Power  button on the sound bar to turn it on.
EWhen the connection is automatically established, you will see the LED on the front of the wireless receiver light up in green.
Note |
• Please only use the speakers provided with the product. Using other speakers may cause |
|
malfunction. |
•Connect the speaker cables to the corresponding terminals. Connect to the positive cable to the positive terminal and the negative cable to the negative terminal. An incorrectly connected cable will distort the sound or produce no bass.
9
Checking connection status with the LED colour
You can check the connection status with the LED on the front of the wireless receiver.
LED Colour |
Status |
|
|
Blinking green |
Connecting In progress |
|
|
Green |
Connected successfully |
|
|
Red |
Bad connection, or the receiver is in standby |
|
|
Off |
Power cable not connected |
|
|
Manual connection
If you see a red LED on the front of the wireless receiver, it means that the sound bar is not connected to the receiver. If this is the case, connect them in the following order.
APress the Power  button on the sound bar to turn it off.
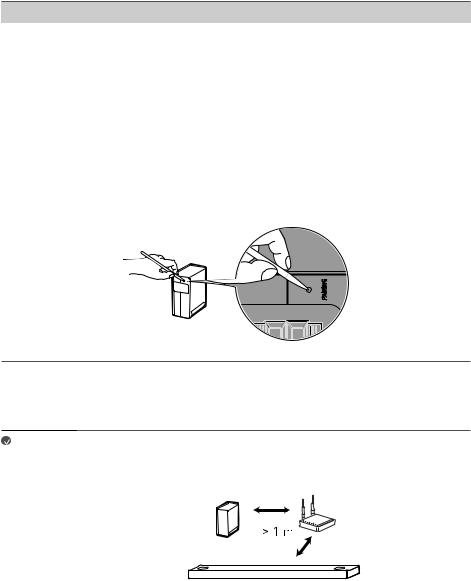
BPress the PAIRING button on the back of the wireless receiver. Check if the LED on the front of the wireless receiver is blinking green.
CPress the Power  button on the sound bar to turn it on.
DWhen the connection is established, you will see the LED light on the front of the wireless receiver light up in green.
Note |
• Keep the rear speakers at least 30 cm away from the TV or monitor. |
•To prevent wireless interference, maintain a distance of at least 1 m between the sound bar or the wireless receiver and any peripheral devices that generate strong electromagnetic waves (ex. wireless routers, microwave ovens, etc.).
10
Attaching the ferrite core (optional)
A ferrite core may not be provided depending on national standards.
Attaching the ferrite core to the speaker cables
Attach the ferrite core to the cables to reduce radio noise.
APull Part [a] to open the ferrite core.
BWind the wireless receiver's speaker cables twice around the ferrite core.
CClose the ferrite core until you hear a click.
11

Setting up surround sound
The surround sound function allows you to hear immersive 3D sound produced by multiple audio channels from the speakers, regardless of the channels in the originally recorded content.
For example, if you listen to music recorded in 2.0 channels with standard sound effects while the wireless rear speakers are connected, you can hear the following difference.
When the surround sound is off
When the surround sound is on
Note |
• Speaker positions are as follows. |
|
|
|
|
|
|
|
|
|
A |
Front speakers |
D |
Side speakers |
|
|
|
|
|
|
B |
Centre speaker |
E |
Subwoofer |
|
|
|
|
|
|
C |
Top speakers |
F |
Rear speakers |
|
|
|
|
|
12

Turning surround sound on/off
APress Settings  button. The product enters the setting mode and you can see “OFF-AUTO POWER” or “ON-AUTO POWER”.
OFF-AUTO POWER
BWhile the “OFF-AUTO POWER” or “ON-AUTO POWER” is scrolling in the status display, press Left/ Right button to select the surround sound setting. You can see the status of the surround sound, “OFFSURROUND” or “ON-SURROUND”.
OFF-AUTO POWER |
OFF-SURROUND |
OFF-NIGHT TIME |
OFF-TV REMOTE |
CWhile the “OFF-SURROUND” or “ON-SURROUND” is scrolling in the status display, press Up/Down button to turn on or off the surround sound.
OFF-SURROUND ON-SURROUND
13
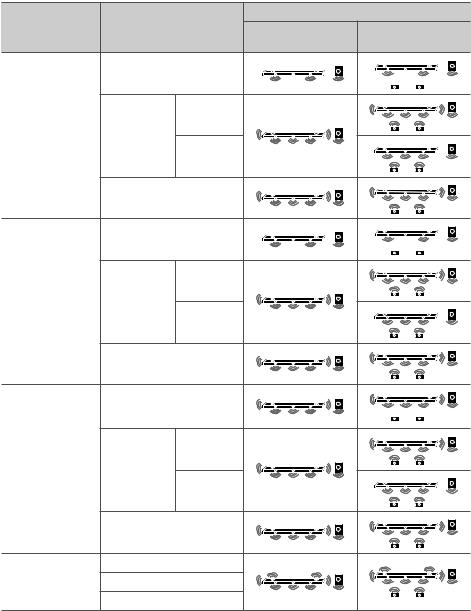
Speaker sound based on input channels |
|
|
|
|
|
|
Output |
Sound Effects |
Input |
Rear speakers not |
Rear speakers |
|
|
connected |
connected |
|
2.0 channels |
|
|
AI SOUND PRO |
DTS |
|
|
Sound customised |
5.1 channels |
|
|
with artificial |
|
|
|
|
|
|
|
intelligence |
Other |
|
|
|
7.1 channels or more |
|
|
|
2.0 channels |
|
|
STANDARD |
DTS |
|
|
|
|
|
|
You can enjoy |
5.1 channels |
|
|
optimised sound. |
Other |
|
|
|
|
|
|
|
7.1 channels or more |
|
|
|
2.0 channels |
|
|
MUSIC |
DTS |
|
|
Sound enriched |
5.1 channels |
|
|
with MERIDIAN |
|
|
|
|
|
|
|
technology |
Other |
|
|
|
7.1 channels or more |
|
|
CINEMA |
2.0 channels |
|
|
|
|
|
|
Cinematic 3D |
5.1 channels |
|
|
sound |
7.1 channels or more |
|
|
|
|
|
|
14

|
|
|
Output |
Sound Effects |
Input |
Rear speakers not |
Rear speakers |
|
|
connected |
connected |
|
2.0 channels |
|
|
CLEAR VOICE |
DTS |
|
|
Voice sound clear, |
|
|
|
5.1 channels |
|
|
|
improving the |
|
|
|
quality of voice |
Other |
|
|
sound |
|
|
|
|
|
|
|
|
7.1 channels or more |
|
|
|
2.0 channels |
|
|
SPORTS |
DTS |
|
|
|
|
|
|
Realistic sound like |
5.1 channels |
|
|
in a stadium |
Other |
|
|
|
|
|
|
|
7.1 channels or more |
|
|
|
2.0 channels |
|
|
GAME |
DTS |
|
|
|
|
|
|
Optimised sound |
5.1 channels |
|
|
for game |
Other |
|
|
|
|
|
|
|
7.1 channels or more |
|
|
BASS BLAST |
2.0 channels |
|
|
(BASS BLAST+) |
5.1 channels |
|
|
Sound with |
|
|
|
7.1 channels or more |
|
|
|
reinforced bass |
|
|
15

Connecting with a Smartphone via Wi-Fi
LG Sound Bar app allows you to connect the product to the network and to control the product.
Please check the following first.
•Do you have a wireless router?
-- To connect your smartphone and the product via Wi-Fi, you must have a wireless router. -- Make sure that they are both connected to the same Wi-Fi network.
•Does your smartphone have Bluetooth enabled? -- Enable Bluetooth on your smartphone.
-- If Bluetooth is enabled, you can easily connect to Wi-Fi. If Bluetooth is disabled, the product may not be registered on the LG Sound Bar app.
•The LG Sound Bar app is available in the versions listed below. -- Android™ OS: Version 5.0 or higher
-- iOS OS: Version 10 or higher
16

Installing the app
Install the LG Sound Bar app on your smartphone. To install the LG Sound Bar app, you can scan the QR code with a QR code scan app or download on Google Play or the App Store.
Downloading with a QR code
AScan the QR code below with a QR code scan app.
BYou will be directed to a page where you can download the LG Sound Bar app. Tap the app to install it.
(Android Phone OS) |
(iPhone OS) |
Downloading on Google Play or App Store
Go to the Google Play or the App Store on your smartphone and search for the LG Sound Bar app to install it.
|
Android™ Phone |
|
iPhone |
|
|
|
|
||
|
|
|
|
|
|
|
|
||
Note |
• Settings menu items may vary depending on the smartphone manufacturer and OS. |
|
||
•Google, Android, Google Play, Google Home and Chromecast built-in are trademarks of Google LLC.
17
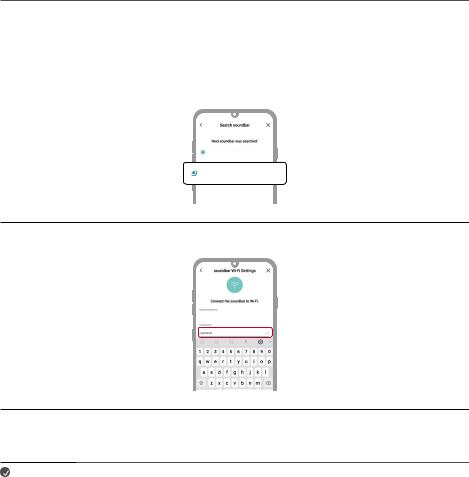
Connecting with a Smartphone via LG Sound Bar app
You must connect the product to the smartphone via Wi-Fi on the LG Sound Bar app to use network services. The app installation method differs depending on the smartphone.
AFind and tap the LG Sound Bar app installed on your smartphone.
BFollow the instructions on the LG Sound Bar app. You will need to agree to the terms of service, Chromecast guide screen, and location permission settings. Turn on Wi-Fi and Bluetooth.
CSelect the product to connect. This product will be indicated as “LG_Speaker_DSP9YA_XXXX”.
LG_Speaker_DSP9YA_XXXX
LG_Speaker_DSP9YA_XXXX
D Select a Wi-Fi network and enter the password.
Wi-Fi Network
EAfter completing product connection on the LG Sound Bar app, you will see “CONNECTED” appear on the status display on the product.
Note |
• You can register the product on Google Home app. For more information, please visit http:// |
|
www.google.com/cast/setup/. |
•You can create a speaker group with Google Home app and add up to 4 devices as a speaker group. Adding too many devices may become inconvenient when listening to music.
•If you want to check or change the registered home’s nickname or the product name, connect to the Google Home app and tap the Device Settings  button.
•You cannot configure or control the product with the LG ThinQ app.
18

Resetting the Product
If the product is frozen and does not work, or if the network connection is unstable, you will need to reset it. If the Wi-Fi network has been changed, you will need to reset the product and connect it to your smartphone again.
How to reset
APress and hold the Wi-Fi  button on the top of the product until you hear a sound signal.
BYou will see “RESET” appear on the status display, and all wireless network settings on the product will be cleared.
Note |
• Once you reset the product, you will also need to reconnect the product to the smartphone |
|
via Wi-Fi on the LG Sound Bar app. |
How to disconnect the wireless network connection or the wireless device
Press and hold the Power  button for 3 seconds or longer to turn off the product.
19

Exploring the Product
Front
APower 
Function 
Volume 

Play/Pause 
Bluetooth pair 
Wi-Fi 
BBuilt-in microphone
CRemote Control Receiver
This turns the product on/off.
•If you press and hold the Power  button for longer than 3 seconds, Wi-Fi will disconnect and the product will no longer emit sound. Press the Power
  button quickly to maintain the Wi-Fi connection for future use.
Press the button repeatedly to select the desired function or input mode.
|
Status Display |
Description |
|
|
WI-FI |
Connects the product via Wi-Fi |
|
|
BT |
Connects the product via Bluetooth |
|
|
OPT/HDMI ARC |
Connects the product to a TV that supports an optical |
|
|
cable, ARC, E-ARC, or LG Sound Sync |
|
|
|
|
|
|
|
HDMI |
Connects the product to an HDMI input port |
|
|
USB |
Connects the product to a USB storage device |
|
|
|
|
|
This adjusts the speaker volume with levels 0 to 40.
This allows you to pause or play music.
It allows you to pair your Bluetooth device such as a smartphone to this product for three minutes. ([See “Connecting via Bluetooth” on page 38.)
It goes to the Wi-Fi function directly.
This uses when operating the AI room calibration on LG Sound Bar app.
This receives wireless signals from the remote control.
20
 Loading...