

LG DSH7 Owner’s Manual
OWNER’S MANUAL


 DSH7
DSH7
SMART Hi-Fi
AUDIO
Wireless Multi-room Sound Bar
To view the instructions of advanced features, visit
http://www.lg.com and then download Owner’s Manual.
Some of the content in this manual may differ from your unit.
MODEL
DSH7
www.lg.com
Copyright © 2016-2017 LG Electronics. All Rights Reserved

1
<![if ! IE]><![endif]>Started Getting
2 |
|
Getting Started |
|
|||
|
|
|
|
|
||
Safety Information |
product identification and supply ratings, please refer |
|||||
|
|
|
|
|
NOTICE: For safety marking information including |
|
|
|
|
|
|
to the main label on the bottom or the other surface |
|
|
|
|
|
|
of the product. |
|
|
|
|
CAUTION |
|
||
|
|
|
|
CAUTION |
||
|
|
|
RISK OF ELECTRIC SHOCK |
|
||
|
|
|
DO NOT OPEN |
|
Only use the AC adapter supplied with this device. |
|
|
CAUTION: TO REDUCE THE RISK OF ELECTRIC |
Do not use a power supply from another device or |
||||
|
SHOCK DO NOT REMOVE COVER (OR BACK) |
another manufacturer. Using any other power cable |
||||
|
NO USER-SERVICEABLE PARTS INSIDE REFER |
or power supply may cause damage to the device and |
||||
|
SERVICING TO QUALIFIED SERVICE PERSONNEL. |
void your warranty. |
||||
|
|
|
This lightning flash with arrowhead |
|
||
|
|
|
symbol within an equilateral triangle |
CAUTION concerning the Power Cord |
||
|
|
|
is intended to alert the user to the |
The Power Plug is the disconnecting device.In case |
||
|
|
|
presence of uninsulated dangerous |
|||
|
|
|
of an emergency, the Power Plug must remain readily |
|||
|
|
|
voltage within the product’s |
|||
|
|
|
accessible. |
|||
|
|
|
enclosure that may be of sufficient |
|||
|
|
|
Check the specification page of this owner’s manual |
|||
magnitude to constitute a risk of electric shock to |
||||||
to be certain of the current requirements. |
||||||
persons. |
||||||
|
||||||
|
|
|
The exclamation point within an |
Do not overload wall outlets. Overloaded wall outlets, |
||
|
|
|
loose or damaged wall outlets, extension cords, frayed |
|||
|
|
|
equilateral triangle is intended |
|||
|
|
|
power cords, or damaged or cracked wire insulation |
|||
|
|
|
to alert the user to the presence |
|||
|
|
|
are dangerous. Any of these conditions could result |
|||
|
|
|
of important operating and |
|||
|
|
|
in electric shock or fire. Periodically examine the |
|||
|
|
|
maintenance (servicing) instructions |
|||
|
|
|
cord of your device, and if its appearance indicates |
|||
in the literature accompanying the product. |
||||||
damage or deterioration, unplug it, discontinue use of |
||||||
WARNING: TO PREVENT FIRE OR ELECTRIC SHOCK |
||||||
the device, and have the cord replaced with an exact |
||||||
HAZARD, DO NOT EXPOSE THIS PRODUCT TO RAIN |
||||||
replacement part by an authorized service center. |
||||||
OR MOISTURE. |
||||||
Protect the power cord from physical or mechanical |
||||||
WARNING: Do not install this equipment in a |
||||||
abuse, such as being twisted, kinked, pinched, closed |
||||||
confined space such as a book case or similar unit. |
in a door, or walked upon. Pay particular attention to |
|||||
CAUTION: Do not use high voltage products around |
plugs, wall outlets, and the point where the cord exits |
|||||
this product. (ex. Electrical swatter)This product may |
the device. |
|||||
malfunction due to electrical shock.
CAUTION: The apparatus should not be exposed to water (dripping or splashing) and no objects filled with liquids, such as vases, should be placed on the apparatus.
CAUTION: Do not block any ventilation openings. Install in accordance with the manufacturer’s instructions.
Slots and openings in the cabinet are provided for ventilation and to ensure reliable operation of the product and to protect it from over heating. The openings shall be never be blocked by placing the product on a bed, sofa, rug or other similar surface.This product shall not be placed in a builtin installation such as a bookcase or rack unless
proper ventilation is provided or the manufacturer’s instruction has been adhered to.
CAUTION: No naked flame sources, such as lighted candles, should be placed on the apparatus.

This device is equipped with a portable battery or accumulator.
Safety way to remove the battery from the equipment: Remove the old battery or battery pack, follow the steps in reverse order than the assembly. To prevent contamination of the environment and bring on possible threat to human and animal health, the old battery or the battery put it in the appropriate container at designated collection points. Do not dispose of batteries or battery together with other waste.It is recommended that you use local, free reimbursement systems batteries and accumulators. The battery should not be exposed to excessive heat such as sunshine, fire or the like.
Getting Started |
3 |
1
<![if ! IE]><![endif]>Started Getting

4 Table of Contents
Table of Contents
1Getting Started
2Safety Information
6 Main Features
6Introduction
7Front panel
7Rear panel
8Remote control
9Installing the sound bar
9 Mounting the main unit on a wall
26 – Connecting the speaker to your Network via the Wi-Fi Setup Method (iOS)
29Connecting the speakers to your Home Network (Additional)
29 – Connecting the additional speaker to your network with a LAN cable
31 – Connecting the additional speaker to your network via the Wi-Fi Setup Method
33 Using the Bridge
33 – Use as a root device (wired to the home router)
35– Use as a wireless extender
36Using Media Server for PC
36– Music Flow PC Software for windows
37– Nero MediaHome 4 Essentials for Mac OS
2 |
Connecting |
3 |
Operating |
||
11 |
Organizing cables |
||||
|
|
|
|||
39 |
Enjoying the Music with Music Flow Player app |
||||
11 |
Connecting the AC Adapter |
||||
11 |
Connecting to your TV |
39 |
– Overview of Home menu |
||
11 |
– Using an OPTICAL cable |
40 |
– Overview of the side menu |
||
12 |
– LG Sound Sync |
41 |
– Playing a song |
||
13 |
– Using an HDMI cable |
42 |
– Overview of Playback |
||
13 |
– Enjoy rich sound broadcast of the channel |
44 |
Different ways of listening to music |
||
|
with the sound bar |
44 |
– Group Playback |
||
14 |
– What is SIMPLINK? |
45 |
– Surround Sound Mode (Home Cinema |
||
14 |
– ARC (Audio Return Channel) function |
|
|
Mode) |
|
15 |
– Additional information for HDMI |
47 |
– Seamless playback |
||
15 |
Optional equipment connection |
48 |
Setting the Speaker with Music Flow Player |
||
15 |
– HDMI connection |
|
|
app |
|
16 |
– PORTABLE IN connection |
48 |
– Overview of setting menu |
||
17 |
– OPTICAL IN connection |
48 |
– [General] Menu |
||
17 |
– Connecting IR REPEATER |
49 |
– [Speakers] Menu |
||
18 |
Initial Multi-Room Setup |
50 |
– [Alarms/Sleep Timer] Menu |
||
18 |
– Wired connection (MUSICflow Mesh |
50 |
– [Account management] Menu |
||
|
Network Connection) |
50 |
– [Time Zone] Menu |
||
18 |
– Wireless connection (Standard Wireless |
51 |
– [Advanced Settings] Menu |
||
|
Connection) |
53 |
– [Chromecast] Menu |
||
18 |
Installing “Music Flow Player” App |
53 |
– [Version Info.] Menu |
||
19 |
– Starting with Music Flow Player app |
53 |
– [Open source licenses] Menu |
||
20 |
Connecting the speaker to your Home |
54 |
Using a Bluetooth Wireless Technology |
||
|
Network |
54 |
– About Bluetooth |
||
20 |
– Simple Connection (EZ Setup) |
54 |
– Bluetooth profiles |
||
21 |
– Connecting the speaker to your network |
54 |
– Listening to Music of a Bluetooth Device |
||
|
with a LAN cable |
55 |
Other operations |
||
23 |
– Connecting the speaker to your Network |
55 |
– DRC (Dynamic Range Control) |
||
|
via the Wi-Fi Setup Method (Android) |
55 |
– AV Sync |
||

|
|
|
|
Table of Contents |
5 |
|
||
|
|
|
|
|
|
|
|
|
55 |
– Using your TV remote control |
5 |
Appendix |
|
|
|||
56 |
– Turn off the sound temporarily |
|
|
|
|
|
|
|
63 |
File requirement |
|
|
|||||
56 |
– Sleep timer setting |
|
|
|||||
63 |
Trademarks and licenses |
|
|
|||||
56 |
– Auto power down |
1 |
||||||
64 |
Specifications |
|||||||
57 |
– AUTO POWER On/Off |
|||||||
57 |
– Auto Display Off / Dimmer |
65 About Status LED’s Condition |
|
|
||||
66 |
Handling the Speaker |
|
|
|||||
58 |
Sound adjustment |
|
|
|||||
66 Important Information Relating to Network |
|
|
||||||
58 |
– Adjust volume level automatically |
|
|
|||||
|
|
Services |
|
|
||||
58 |
– Adjust the Bass |
|
|
2 |
||||
67 |
TERMS OF USE |
|||||||
58 |
– Night mode |
|||||||
|
|
|
|
|
|
|||
58 |
Standby mode |
|
|
|
|
|
|
|
58 |
– Standby mode |
|
|
|
|
|
|
|
58 |
– Network standby mode |
|
|
|
|
|
|
|
59 |
– Bluetooth standby mode |
|
|
|
|
3 |
||
59 |
Reset the Speaker |
|
|
|
|
|||
|
|
|
|
|
|
|||
59 |
– Resetting the speaker |
|
|
|
|
|
|
|
4 |
Troubleshooting |
|
|
|
|
4 |
||
60 |
Troubleshooting |
|
|
|
|
|||
|
|
|
|
|
|
|||
60 |
– General |
|
|
|
|
|
|
|
61 |
– Network |
|
|
|
|
|
|
|
62 |
– Application and PC Software |
|
|
|
|
|
|
|
62 |
– NOTES to use wireless |
|
|
|
|
5 |
||
Some of the content in this manual may differ from Music Flow Player app depending on the application’s version.
1
<![if ! IE]><![endif]>Started Getting
6 Getting Started
Main Features
Made for iPod/iPhone/iPad or Android device
Enjoys music from iPod/iPhone/iPad or Android device with simple connection.
LG Sound Sync
Controls volume level of this unit by the remote control of your LGTV that is compatible with LG Sound Sync.
Portable In
Listens to music from your portable device.
Music Flow Player application
Listens to music stored on your smart device.
You can control this speaker with your iPod touch/ iPhone/iPad or Android device via Music Flow Player app.This speaker and your smart device must be connected to the same network. Visit Apple “App Store” or Google “Play Store” or use the QR code shown below to search for “Music Flow Player” app. For detailed information, refer to page 18.
Introduction
Symbol used in this manual
,,Note
Indicates special notes and operating features.
>>Caution
Indicates cautions for preventing possible damages from abuse.
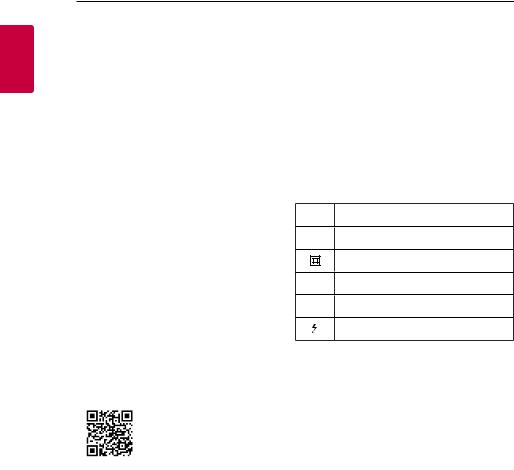
Symbols
~Refers to alternating current(AC).
0 Refers to direct current(DC).
Refers to class II equipment.
1 Refers to stand-by.
!Refers to “ON” (power).
Refers to dangerous voltage.
(Android OS) |
(Apple iOS) |
yy Depending on the application’s version and the settings of smart device, Music Flow Player app may not be operated normally.
yy Some smart devices may not be compatible with this speaker.

Getting Started |
7 |
|
|
Front panel
ATouch Sensors 1/! (Standby/On)
F (Function): Selects the function and input source. (OPTICAL / HDMIIN / WI-FI / BT READY / LGTV / PORTABLE)
-/+ (Volume)
 (Wi-Fi): Connects initial MUSICflow product to your network wirelessly.
 (Add): Adds the additional MUSICflow
product to your network.
(In case that one or more MUSICflow product is connected.)
Rear panel
1
<![if ! IE]><![endif]>Started Getting
BRemote sensor
CLED indicator
(Works when installed in standing way.) Shows connection status.
DDisplay window
ELED indicator
(Works when installed in wall mounting way.) Shows connection status.
ADC IN (AC adapter input) |
GHDMI IN |
BIR REPEATER |
HLAN port |
CPORTABLE IN connectors |
|
DUSB (Service only) : S/W download connector |
|
EOPTICAL IN connectors |
|
FHDMI OUT (TV ARC) : Connect to HDMIIN |
|
(ARC) onTV. |
|
1
<![if ! IE]><![endif]>Started Getting
8 Getting Started
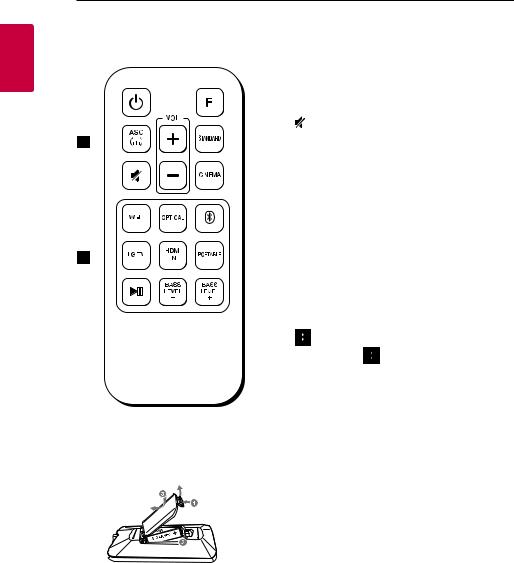
Remote control |
• • • • • • • • • • • • • •A• |
||||||||||
|
|
|
|
|
|
|
|
||||
|
|
|
|
|
|
|
|
1 (Power) : Switches the unit ON or OFF. / Switches |
|||
|
|
|
|
|
|
|
|
to the standby mode. |
|||
|
|
|
|
|
|
|
|
F : Selects the function and the input source. |
|||
|
|
|
|
|
|
|
|
ASC : Analyzes the property of input sound and |
|||
|
|
|
|
|
|
|
|
||||
|
|
|
|
|
|
|
|
provides the sound optimized for the content. |
|||
|
|
|
|
|
|
|
|
(Mute) : Mutes the sound. |
|||
|
|
|
|
|
|
|
|
VOL o/p: Adjusts speaker volume. |
|||
|
|
|
|
|
|
|
|
||||
|
|
|
|
|
|
|
|
||||
|
|
|
|
|
|
|
|
STANDARD : Selects the standardized sound. |
|||
|
|
|
|
|
|
|
|
||||
|
|
|
|
|
|
|
|
CINEMA : Selects the cinematic surround sound. |
|||
|
|
|
|
|
|
|
|
• • • • • • • • • • • • • •B• |
|||
|
|
|
|
|
|
|
|
||||
|
|
|
|
|
|
|
|
WI-FI : Selects the WI-FI function. |
|||
|
|
|
|
|
|
|
|
||||
|
|
|
|
|
|
|
|
- Press and hold WI-FI on the remote control for |
|||
|
|
|
|
|
|
|
|
||||
|
|
|
|
|
|
|
|
about 3 seconds, “ON - AUTO POWER” appears and |
|||
|
|
|
|
|
|
|
|
AUTO POWER on function is turned on. (Page 57.) |
|||
|
|
|
|
|
|
|
|
||||
|
|
|
|
|
|
|
|
OPTICAL : Selects the OPTICAL function. |
|||
|
|
|
|
|
|
|
|
||||
|
|
|
|
|
|
|
|
- Press and hold OPTICAL on the remote control for |
|||
|
|
|
|
|
|
|
|
about 3 seconds. “ON -TV REMOTE” appears and |
|||
|
|
|
|
|
|
|
|
||||
|
|
|
|
|
|
|
|
you can control this unit by yourTV remote control. |
|||
|
|
|
|
|
|
|
|
(Page |
57.) |
|
|
|
|
|
|
|
|
|
|
: |
|
||
|
|
|
|
|
|
|
|
Selects |
the Bluetooth function. |
||
|
|
|
|
|
|
|
|
- Press |
and hold |
on the remote control for about |
|
|
|
|
|
|
|
|
|
3 seconds, “ON - AUTO DISPLAY” appears and Auto |
|||
|
|
|
|
|
|
|
|
Display off function is turned on. (Page 57.) |
|||
|
|
|
|
|
|
|
|
LG TV : Selects the LGTV function. |
|||
Replacement of Battery |
|
- Press and hold LG TV on the remote control for |
|||||||||
|
about 3 seconds, “OFF - AUTO POWER” is displayed. |
||||||||||
Remove the battery cover on the |
rear of the remote |
HDMI IN : Selects the HDMIIN function. |
|||||||||
control, and insert the battery with 4 and 5 |
- Press and hold HDMI IN on the remote control for |
||||||||||
matched correctly. |
about 3 seconds. “OFF -TV REMOTE” is displayed. |
||||||||||
PORTABLE : Selects the PORTABLE function.
- Press and hold PORTABLE on the remote control for about 3 seconds, “OFF - AUTO DISPLAY” is displayed.
dM (Play/Pause) : Starts playback. / Pauses playback. BASS LEVEL o/p: Adjusts sound level of Bass.
Getting Started |
9 |
|
|
Installing the sound bar
You can hear the sound by connecting the unit to the other device :TV, Blu-ray disc player, DVD player, etc.
Place the unit in front of theTV and connect it to the device you want. (Refer to 11 - 17)
>>Caution
yy For best performance of wireless connection such as Bluetooth, do not install the unit on Metallic furniture because wireless connection communicates through a module positioned on the bottom of the unit.
yy Be careful not to make scratches on the surface of the Unit when installing or moving them.
,,Note
For the convenient button usage, it is recommended to take some distance between the soundbar and yourTV when you install the sound bar.
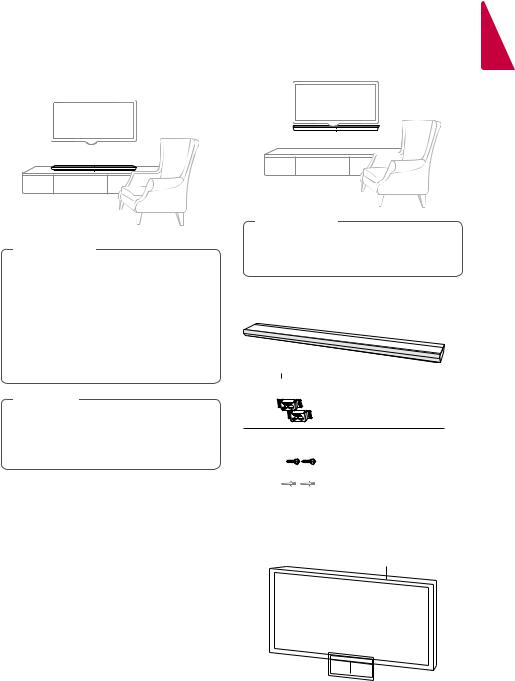
Mounting the main unit on a wall
You can mount the main unit on a wall.
>>Caution
Because it is difficult to make a connection after installing this unit, you should connect the cables before installation.
Preparation materials
Unit
 Wall bracket install guide Wall bracket
(Not supplied)

 Screws (A)


 Wall plug
1.Match theTV’s BOTTOM EDGE of Wall bracket install guide with the bottom ofTV and attach to the position.
TV
1
<![if ! IE]><![endif]>Started Getting

10 Getting Started
2. When you mount it on a wall (concrete), use the |
6. Fix the hooks of the unit on the brackets as |
wall plugs. You should drill some holes. A guide |
shown below. |
sheet (Wall bracket install guide) is supplied to |
|
drill. Use the sheet to check the point to drill. |
|
1
<![if ! IE]><![endif]>Started Getting
7. If you want to protective inflow of foreign substance, insert foreign substance-protective sponge as shown below (optional).
3.Remove the Wall bracket install guide.
4.Fix the brackets with screws (A) as shown in the illustration below.
,,Note
Screws (A) and Wall Plugs are not supplied for mounting the unit. We recommend the Hilti (HUD-1 6 x 30) for the mounting.
5.Connect the botton of the unit faced with the brackets on the wall.
,,Note
To detach the unit, perform it in reverse order.
>>Caution
yy Do not install this unit upside down.It can damage the parts of this unit or be the cause of personal injury.
yy Do not hang onto the installed unit and avoid any impact to the unit.
yy Secure the unit firmly to the wall so that it does not fall off.If the unit falls off, it may result in an injury or damage to the product.
yy When the unit is installed on a wall, please make sure that a child does not pull any of connecting cables, as it may cause it to fall.
Connecting 11
Organizing cables
Organize the cable with cable holder.
1.Remove the protective vinyl of the sticker.
2.Attach and fix the cable holder as shown below.
3.Insert cables to the cable holder and lock the cable holder.
Connecting the AC
Adapter
Connecting to your TV
Please connect with this unit andTV using the optical digital cable or HDMI cable considering the state of the TV.
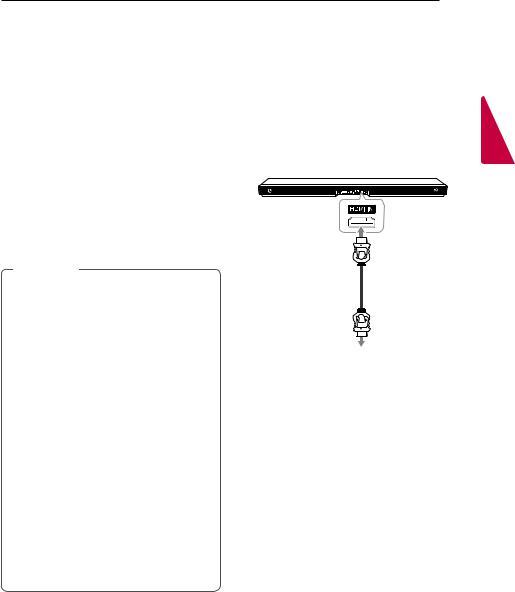
Using an OPTICAL cable
1.Connect the OPTICALIN jack on the back of the unit to OPTICAL OUT jack on theTV using an
OPTICAL cable.
Optical cable
Connect the speaker to the power supply with the supplied AC adapter.
1.Connect the supplied AC power cord to the AC adapter.
2.Connect the AC adapter cable to DCIN adapter input.
3.Plug the AC power cord into an AC outlet.
>>Caution
Only use the AC adapter supplied with this device. Do not use a power supply from another device or manufacturer. Using any other power cable or power supply may cause damage to the device and void your warranty.
2.Set the input source to OPTICAL. Press repeatedly F on the remote control or F on the unit until the function is selected.
,,Note
yy You can enjoy theTV audio through the speakers of this unit. In the case of someTV models, you must select the external speaker option from theTV menu. (For details, reference yourTV user manual.)
yy Set up the sound output of TV to listen to the sound through this unit :
TV setting menu [[Sound] [[TV Sound output] [[External speaker (Optical)]
yy Details of TV setting menu vary depending on the manufacturers or models of yourTV.
2
<![if ! IE]><![endif]>Connecting

2
<![if ! IE]><![endif]>Connecting
12 Connecting
LG Sound Sync With wired connection
You can control some functions of this unit by yourTV’s remote control with LG Sound Sync.It is compatible with the LGTV that is supported LG
Sound Sync. Make sure of the LG Sound Sync logo on yourTV.
Controllable function by LGTV’s remote control : Volume up/down, mute
Refer to theTV’s instruction manual for the details of LG Sound Sync.
Make one of the following connections, depending on the capabilities of your equipment.
,,Note
yy You can also use the remote control of this unit while using LG Sound Sync.If you useTV's remote control again, the unit synchronizes with theTV.
yy When the connection fails, make sure of the condition of theTV and power.
yy Make sure of the condition of this unit and the connection in the cases below when using LG Sound Sync.
-- turn off the unit.
-- Changing the function to the others. -- Disconnecting the optical cable.
yy The amount of time to turn off this unit is different depending on yourTV when you set AUTO POWER function to ON.
1.Connect your LGTV to the unit by using an optical cable.
Optical cable
2.Set up the sound output ofTV to listen to the sound through this unit :
TV setting menu [[Sound] [[TV Sound output] [[LG Sound Sync (Optical)]
3.Turn on the unit by pressing 1 (Power) on the remote control.
4.Select OPTICAL function by using F on the remote control or F on the unit until the function is selected.
You can see “LG OPT” on the display window if connecting normally between this unit and your
TV.
,,Note
Details ofTV setting menu vary depending on the manufacturers or models of yourTV.
With wireless connection
1.Turn on the unit by pressing 1 (Power) on the remote control.
2.Select LGTV function by using F on the remote control or F on the unit until the function is selected.
3.Set up LG Sound Sync (Wireless) on theTV. Refer to theTV’s instruction manual.
“PAIRED” appears on the display window for about 3 seconds and then you can see “LGTV” on the display window if connecting normally between this unit and yourTV.
,,Note
If you turned off the unit directly by pressing 1 (Power), LG Sound Sync (Wireless) will be disconnected.

Connecting 13
Using an HDMI cable |
HDMI cable Checklist |
If you connect this unit to aTV that supports HDMI CEC and ARC (Audio Return Channel), you can enjoy theTV audio through the speakers of this unit without connecting the optical cable.
Connect the HDMI OUT (TV ARC) jack on the back of the unit to ARC jack on theTV using an HDMI cable.
HDMI cable
,,Note
yy HDMI CEC (Consumer Electronics Control): Using a single remote control, you have the ability to operate CEC compatible devices (TV, Sound Bar, Blue-ray player, etc.)
yy You can also enjoy extra functions such as Bluetooth with F on remote control or F on this unit. When you go back to liveTV channel after using the extra functions (Bluetooth) of this audio system, you should choose your preferred speaker onTV to enjoy the sound from this audio system again.
Some HDMI cables do not support the ARC function, this can result in no sound output.
When connecting this unit to theTV, if there is no sound, there might be a problem with the HDMI cable. Therefore connect this unit to theTV and check whether theType A, High speed HDMI™ Cable with Ethernet.
STANDARD HDMI CABLE WITH ETHERNET |
(X) |
2 |
|
| <![if ! IE]> <![endif]>Connecting |
|||
HIGH SPEED HDMI CABLE |
(X) |
||
HIGH SPEED HDMI CABLE WITH ETHERNET |
(O) |
|
Enjoy rich sound broadcast of the channel with the sound bar
Connection through HDMI Cable*
Your television must support the newest HDMI features (HDMI CEC1) / ARC (Audio Return Channel)) to fully enjoy the Live broadcasting channel with audio system through an HDMI cable. Unless your TV supports these HDMI features, the audio system should be connected through an OPTICAL cable.
1) HDMI CEC (High-Definition MultimediaInterface Consumer Electronics Control)
Consumer Electronics Control (CEC) is an HDMI feature designed to allow the user to command and control the CEC-enabled devices, that are connected through HDMI by using only one of their remote controls.
* Trade names for CEC are SimpLink (LG) , Anynet+ (Samsung), BRAVIA Sync (Sony), EasyLink (Philips), etc.

2
<![if ! IE]><![endif]>Connecting
14 Connecting
What is SIMPLINK?
Some functions of this unit are controlled by the TV’s remote control when this unit and LGTV’s with SIMPLINK are connected through HDMI connection.
Controllable functions by LGTV’s remote control : Power on/off, volume up/down, etc.
Refer to theTV owner’s manual for the details of SIMPLINK function.
LGTV’s with SIMPLINK function has the logo as shown above.
,,Note
yy Depending on the state of the unit, some SIMPLINK operation may differ from your purpose or not work.
yy Depending on aTV or a player which is connected with this unit, SIMPLINK operation may differ from your purpose.
ARC (Audio Return Channel) function
The ARC function enables an HDMI capableTV to send the audio stream to HDMI OUT of the unit.
To use this function :
-- YourTV must support the HDMI-CEC and ARC function and the HDMI-CEC and ARC must be set to On.
-- The setting method of HDMI-CEC and ARC may differ depending on theTV. For details about ARC function, refer to yourTV manual.
-- You must use the HDMI cable (Type A, High Speed HDMI™ cable with Ethernet).
-- You must connect the HDMI OUT (TV ARC) on the unit with HDMIIN of theTV that supports ARC function using an HDMI cable.
-- You can connect only one Sound bar toTV compatible with ARC.
,,Note
yy ARC function is automatically selected when ARC signal comes in fromTV, no matter what kind of the function you are using.
yy You can enjoy theTV audio through the speakers of this unit. In the case of someTV models, you must select the external speaker option from theTV menu. (For details, reference yourTV user manual.)
yy Set up the sound output of TV to listen to the sound through this unit :
TV setting menu [[Sound] [[TV Sound output] [[External speaker (HDMI ARC)]
yy Details of TV setting menu vary depending on the manufacturers or models of yourTV.
Connecting 15
Additional information for HDMI
yy When you connect an HDMI or DVI compatible device make sure of the following:
-Try switching off the HDMI/DVI device and this player. Next, switch on the HDMI/DVI device and leave it for around 30 seconds, then switch on this player.
-The connected device’s video input is set correctly for this unit.
-The connected device is compatible with
720 x 576p, 1280 x 720p, 1920 x 1080i or 1920 x 1080p video input.
yy Not all HDCP-compatible HDMI or DVI devices will work with this player.
-The picture will not be displayed properly with non-HDCP device.
,,Note
yy If a connected HDMI device does not accept the audio output of the player, the HDMI device’s audio sound may be distorted or may not output.
yy Changing the resolution when the connection has already been established may result in malfunctions.To solve the problem, turn off the player and then turn it on again.
yy When the HDMI connection with HDCP is not verified,TV screen is changed to black screen. In this case, check the HDMI connection, or disconnect the HDMI cable.
yy If there are noises or lines on the screen, please check the HDMI cable (length is generally limited to 4.5 m.
yy You cannot change the video resolution in the HDMIIN mode. Change the video resolution of the connected component.
yy If the video output signal is abnormal when your personal computer is connected to HDMI IN jack, change the resolution of your personal computer to 576p, 720p, 1080i or 1080p.
Optional equipment connection
HDMI connection
For enjoying sound only
You can enjoy the sound from the external device you connect.
To the Blu-ray disc player,
DVD player, etc.
1.Connect HDMIIN jack on the back of the unit to HDMI OUT jack on the audio device such as Bluray disc player, DVD player, etc.
2.Set the input source to HDMIIN. Press repeatedly F on the remote control or F on the unit until the function is selected.
2
<![if ! IE]><![endif]>Connecting

16 Connecting
For enjoying both sound and picture PORTABLE IN connection
You can enjoy both sound and picture from the external device you connect.
2
<![if ! IE]><![endif]>Connecting
1.Connect HDMIIN jack on the back of the unit to HDMI OUT jack on the external device such as Blu-ray disc player, DVD player, etc.
2.Connect HDMI OUT (TV ARC) jack on the back of the unit to HDMIIN jack on theTV.
3.Set the input source to HDMIIN. Press repeatedly F on the remote control or F on the unit until the function is selected.
,,Note
HDMI OUT jack is forTV connection. Even though PCM multi channel is inputted to the unit through an HDMI cable, the unit can only output 2 channel toTV.
Listening to music from your portable player
The unit can be used to play the music from many types of portable players or external devices.
1.Connect the portable player to the PORTABLEIN connector of the unit.
2.Turn the power on by pressing 1 (Power).
3.Select the PORTABLE function by pressing F on the remote control or F on the unit until the function is selected.
4.Turn on the portable player or external device and start playing it.

Connecting 17
OPTICAL IN connection |
Connecting IR REPEATER |
Connect an optical output jack of external devices to the OPTICALIN jack.
Optical cable
To the optical output jack of external device
1.Connect the OPTICAL IN jack on the back of the unit to optical out jack of yourTV (or digital device etc.)
2.Select the input source to OPTICAL by pressing F on the unit repeatedly, or pressing OPTICAL on the remote control or until the function is selected.
3.Listen to sound from the connected device.
IR Repeater is supplied as an accessory with the unit in order to communicate well with the remote control and the TV.
Remote control of yourTV may not be operated if the unit hides the remote sensor of theTV.
You can solve the problem by connectingIR Repeater with LGTV.
1.Remove the protective vinyl ofIR Repeater.
2.PutIR Repeater on the back of the unit with the sensor ofIR Repeater facing the remote sensor of theTV.
3.Connect the end ofIR Repeater toIR REPEATER jack.
>>Caution
yy Do not block ventilation when you putIR Repeater on the unit.
yy Do not disconnect the power cord.If you want to useIR Repeater, keep the unit on standby mode.
,,Note
yy Depending on yourTV, some or all buttons may not be function on theTV.
yy It is recommended to attach anIR Repeater sensor on the rear panel of the unit.
2
<![if ! IE]><![endif]>Connecting
2
<![if ! IE]><![endif]>Connecting
18 Connecting
Initial Multi-Room Setup
When installing the MUSICflow product for the first time, you can choose two types of connection as below.
Wired connection (MUSICflow Mesh Network Connection)
Connect your speaker to the home router using LAN cable.
Then you can connect the additional MUSICflow products (Optional) to your home network wirelessly. Refer to “Connecting the speakers to your Home Network (Additional)” on page 29.
 LAN Cable
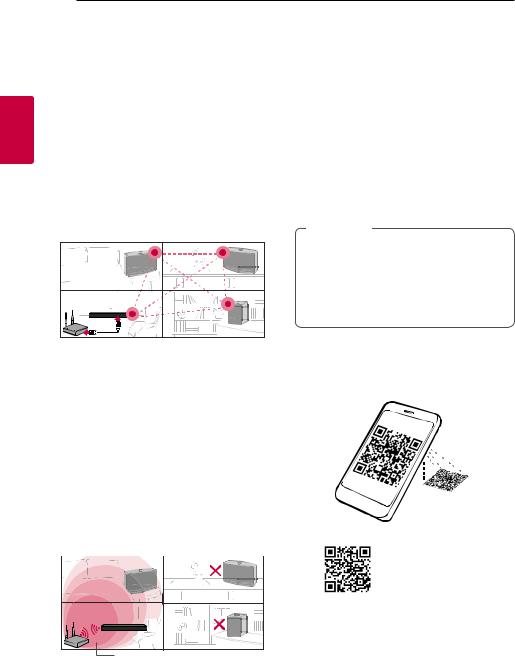
Wireless connection (Standard Wireless Connection)
When the wired connection is unavailable between your speaker and home router, this unit offers music streaming service within home router’s Wi-Fi coverage.
Connect one of the your speaker to the home router wirelessly.
Then you can connect the additional MUSICflow products (Optional) to your home network wirelessly. Refer to “Connecting the speakers to your Home Network (Additional)” on page 29.
Wireless signal |
Installing “Music Flow
Player” App
Through Apple “App Store” or Google “Play Store”
1.Tap the Apple “App Store” icon or Google “Play Store” icon.
2.Type in “Music Flow Player” in the search bar and tap “Search”.
3.Select “Music Flow Player” in the search result list to download.
,,Note
yy Music Flow Player app will be available in version of the software as follow; Android OS : Ver 4.0 (ICS) (or later) iOS O/S : Ver 6.0 (or later)
yy Depending on the device, “Music Flow Player” app may not work.
Through QR code
Install “Music Flow Player” app through QR code. Scan the QR code using the scanning application.
(Android OS) |
(Apple iOS) |

Connecting 19
,,Note
yy Make sure that your smart device is connected to the internet.
yy Make sure that your smart device has a scanning application.If you don’t have, download it from Apple “App Store” icon or Google “Play Store”.
Starting with Music Flow Player app
When you launch Music Flow Player app for the first time, the terms of use and Chromecast Service appear on the screen.
1.Check the contents of terms of use and select [Accept].
3.Select [Connect product] to install the speaker you’ve purchased.
Refer to “Connecting the speaker to your Home Network” on page 21.
,,Note
If you want to return to the terms of use screen, initialize the Music Flow Player app on the smart device’s setting menu.
2.Check the contents of Chromecast Service and select [Accept].
2
<![if ! IE]><![endif]>Connecting

2
<![if ! IE]><![endif]>Connecting
20 Connecting
Connecting the speaker to your Home Network
Using a wired network provides the best performance, because the attached devices connect directly to the network without radio frequency interference.
Please refer to the documentation for your network device for further instructions.
Preparation
yy Make sure that wireless network environment using a router is installed at your home.
yy Make sure that the speaker and the smart device are connected to the same router.
Requirements
yy Wireless router
yy Smart device (Android or iOS)
,,Note
yy Make sure that DHCP’s server is activated on wireless router.
yy If you cannot connect the speaker with your router, go to setting of the router and then make sure that “Allow wireless client to see each other and access my local network” box is unchecked.
Simple Connection (EZ Setup)
Preparation
yy For Simple Connection, Wi-Fi network condition is needed.
yy Make sure that the Bluetooth setting on your smart device in on.
,,Note
yy Simple Connection is supported by Bluetooth Ver 4.0 (or higher).
yy If Simple Connection screen is not displayed on the screen, connect the unit by the other way. Please refer to “Connecting the speaker to your network with a LAN cable” (page 21) or “Connecting the speaker to your Network via the Wi-Fi Setup Method” (page 23 or page 26)
1. Plug in the desired device, and tap [Next].
2.App searches for the speaker and connects it automatically,Tap [Next].
3.If the network password is set, security screen is displayed.Type the password.
Connecting 21
Connecting the speaker to your network with a LAN cable
Connection overview
Broadband service
4. After typing password, tap [Next]. |
Router |
|
LAN
5. Tap [Finish] to finish making the connection.
After finishing,TV connection screen is displayed.
Follow the direction on the screen.
2
<![if ! IE]><![endif]>Connecting
 Loading...