

LG DSC-F828 Service Manual
DSC-F828
SERVICE MANUAL
Ver 1.0 2003. 12
Revision History
Revision History
Link
Link
SELF DIAGNOSIS FUNCTION
SELF DIAGNOSIS FUNCTION
LEVEL 1
US Model
Canadian Model
AEP Model
UK Model
E Model
Hong Kong Model
Australian Model
Korea Model
Tourist Model
Chinese Model
Japanese Model
ORNAMENTAL PARTSSPECIFICATIONS
ORNAMENTAL PARTSSPECIFICATIONS
• INSTRUCTION MANUAL is shown at the end of this document.
DIGITAL STILL CAMERA

DSC-F828
x Camera
[System]
Image device 11 mm (2/3 type) color
Total pixels number of camera
Effective pixels number of camera
Lens Carl Zeiss Vario-Sonnar T*
Exposure control
White balance
File format (DCF compliant)
Recording medium
Flash Recommended distance (when ISO
Viewfinder Electric viewfinder (color)
[Output connectors]
A/V OUT (MONO) jack (Monaural)
Accessory jack
USB jack mini-B
USB communication
CCD
4-color filter (RGBE)
Approx. 8 314 000 pixels
Approx. 8 068 000 pixels
7.1× zoom lens
f=7.1 to 51 mm
(35 mm camera conversion: 28 to
200 mm)
F2.0-2.8
Filter diameter: 58 mm (2
Automatic, Shutter speed priority,
Aperture priority, Manual exposure,
Scene selection (4 modes)
Automatic, Daylight, Cloudy,
Fluorescent, Incandescent, Flash,
One-push
Still images: Exif Ver. 2.2, JPEG
compliant, RAW, TIFF, DPOF
compatible
Audio with still image: MPEG1
compliant (Monaural)
Movies: MPEG1 compliant
(Monaural)
“Memory Stick”, Microdrive,
CompactFlash card (TypeI/TypeII)
sensitiv i ty is set to Aut o)
0.5 to 4.5 m (19
1
14 feet 9
/4inches) (W)
0.6 to 3.3 m (23
10 feet 10 inches) (T)
Minijack
Video: 1 Vp-p, 75 Ω, unba lanced,
sync negative
Audio: 327 mV (at a 47 kΩ load)
Output impedance 2.2 kΩ
Mini-minijack (ø 2.5 mm)
Hi-Speed USB (USB 2.0 HighSpeed compliant)
3
/4inches to
5
/8inches to
3
/8inches)
SPECIFICATIONS
[LCD screen]
LCD panel used
Total number of dots
[Finder]
LCD panel used
Total number of dots
[Power, general]
Used battery pack
Power requirements
Power consumption (during shooting with LCD
Operating temperature range
Storage temperature range
Dimensions (lens: W-end)
Mass Approx. 95 5 g (33.7 oz) (battery
Microphone Electret condenser microphone
Speaker Dynamic speaker
Exif Print Compatible
PRINT Image Matching II
PictBridge Compatible
4.6 cm (1.8 type) TFT drive
134 400 (560×240) dots
1.1 cm (0.44 type) TFT drive
235 200 (980×240) dots
NP-FM50
7.2 V
screen on)
2.2 W
0° to+40°C (32° to +104°F)
(When using the Microdrive: +5° to
+40°C (41° to +104°F))
−20° to +60°C (−4° to +140°F)
134.4 91.1 157.2 mm
××
3
(5
/8 3×5/8× 6 1/4inches)
(W/H/D, protruding portions not
included)
pack NP-FM50, “Memory Stic k,”
shoulder strap, lens cap, and so on
included)
Compatible
x AC-L15A/L15B AC Adaptor
Power requirements
Current consumption
Power consumption
Output voltage
Operating temperature range
Storage temperature range
Maximum dimensions
Mass Approx. 190 g (6.7 oz) excluding
AC 100 − 240 V, 50/60 Hz
0.35 − 0.18 A
18 W
8.4 V DC, 1.5 A
0° to +40°C (32° to +104°F)
−20° to +60°C (−4° to +140°F)
Approx. 56 × 31 × 100 mm
1
(2
/4 × 1 1/4 × 4inches) (W/H/D),
excluding projecting parts
power cord (mains lead)
x NP-FM50 battery pack
Used battery
Maximum voltage
Nominal voltage
Capacity 8.5 Wh (1 180 mAh)
Lithium-ion battery
DC 8.4 V
DC 7.2 V
Accessories
• AC Adaptor (1)
• Power cord (mains lead) (1)
• USB cable (1)
• Battery pack NP-FM50 (1)
• A/V connecting cable (1)
• Shoulder strap (1)
• Lens cap (1)
• Lens cap strap (1)
• Lens hood (1)
• CD-ROM (USB driver: SPVD-013) (1)
• CD-ROM (Image Data Converter) (1)
• Operating Instructions (1)
Design and specifications are subject to change
without notice.
— 2 —

DSC-F828
CAUTION
Use of controls or adjustments or performance
procedures other than those specified herein may
result in hazardous radiation exposure.
CAUTION :
Danger of explosion if battery is incorrectly replaced.
Replace only with the same or equivalent type.
SAFETY-RELATED COMPONENT WARNING!!
COMPONENTS IDENTIFIED BY MARK 0 OR DOTTED LINE WITH
MARK 0 ON THE SCHEMATIC DIAGRAMS AND IN THE PARTS
LIST ARE CRITICAL TO SAFE OPERATION. REPLACE THESE
COMPONENTS WITH SONY PARTS WHOSE PART NUMBERS
APPEAR AS SHOWN IN THIS MANUAL OR IN SUPPLEMENTS
PUBLISHED BY SONY.
SAFETY CHECK-OUT
After correcting the original service problem, perform the following
safety checks before releasing the set to the customer.
ATTENTION AU COMPOSANT AYANT RAPPORT
À LA SÉCURITÉ!
LES COMPOSANTS IDENTIFÉS PAR UNE MARQUE 0 SUR LES
DIAGRAMMES SCHÉMATIQUES ET LA LISTE DES PIÈCES SONT
CRITIQUES POUR LA SÉCURITÉ DE FONCTIONNEMENT. NE
REMPLACER CES COMPOSANTS QUE PAR DES PIÈSES SONY
DONT LES NUMÉROS SONT DONNÉS DANS CE MANUEL OU
DANS LES SUPPÉMENTS PUBLIÉS PAR SONY.
1. Check the area of your repair for unsoldered or poorly-soldered
connections. Check the entire board surface for solder splashes
and bridges.
2. Check the interboard wiring to ensure that no wires are
"pinched" or contact high-wattage resistors.
3. Look for unauthorized replacement parts, particularly
transistors, that were installed during a previous repair. Point
them out to the customer and recommend their replacement.
4. Look for parts which, through functioning, show obvious signs
of deterioration. Point them out to the customer and
recommend their replacement.
5. Check the B+ voltage to see it is at the values specified.
6. Flexible Circuit Board Repairing
• Keep the temperature of the soldering iron around 270˚C
during repairing.
• Do not touch the soldering iron on the same conductor of the
circuit board (within 3 times).
• Be careful not to apply force on the conductor when soldering
or unsoldering.
— 3 —

DSC-F828
[Description on Self-diagnosis Display]
Self-diagnosis display
• C: ss: ss
• E: ss: ss
The contents which can be handled
by customer, are displayed.
The contents which can be handled
by engineer, are displayed.
Display Code
C:32:01
C:13:01
E:91:01
E:61:00 *1
E61:10 *1
Note : The error code is cleared if the battery is removed, except defective flash unit.
*1: The error display is given in two ways.
Turn off the main power then back on.
Replace the memory stick.
Format the memory stick with the DSC-F828.
Checking of flash unit or replacement of
flash unit.
Checking of lens drive circuit
Countermeasure
Trouble with hardware.
• The type of memory stick that cannot be
used by this machine, is inserted.
• Data is damaged.
• Unformatted memory stick is inserted.
Abnormality when flash is being
charged.
When failed in the focus initialization.
Cause
Caution Display During Error
SYSTEM ERROR
MEDIA ERROR
Flash LED
Flash display
Flashing at 3.2 Hz
—
— 4 —
MAIN PARTS
t
Note:
• Follow the disassembly procedure in the numerical order given.
• Items marked “*” are not stocked since they are seldom required for routine service.
Some delay should be anticipated when ordering these items.
• The parts numbers of such as a cabinet are also appeared in this section.
Refer to the parts number mentioned below the name of parts to order.
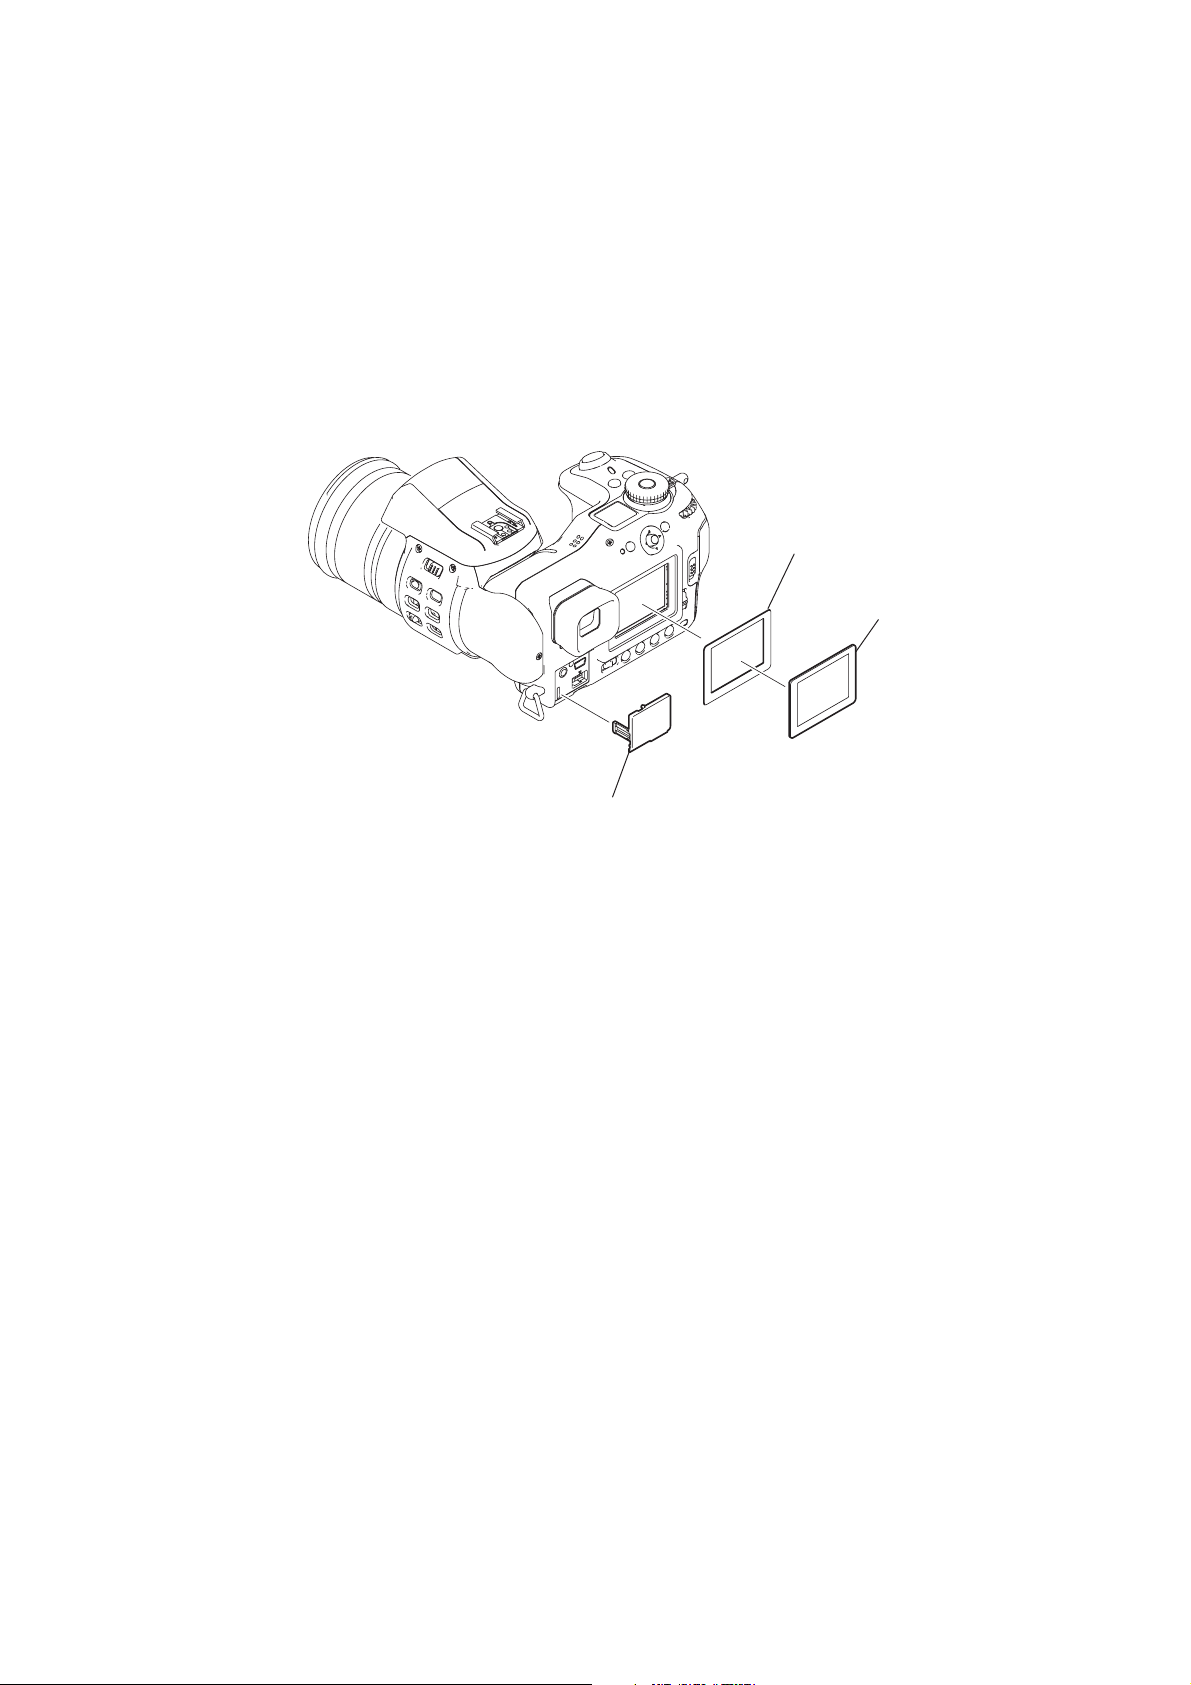
1. ORNAMENTAL PARTS
DSC-F828
LCD window adhesive shee
3-087-155-01
LCD window
3-086-480-01
Jack cover
3-087-153-01
— 5 —
DSC-F828
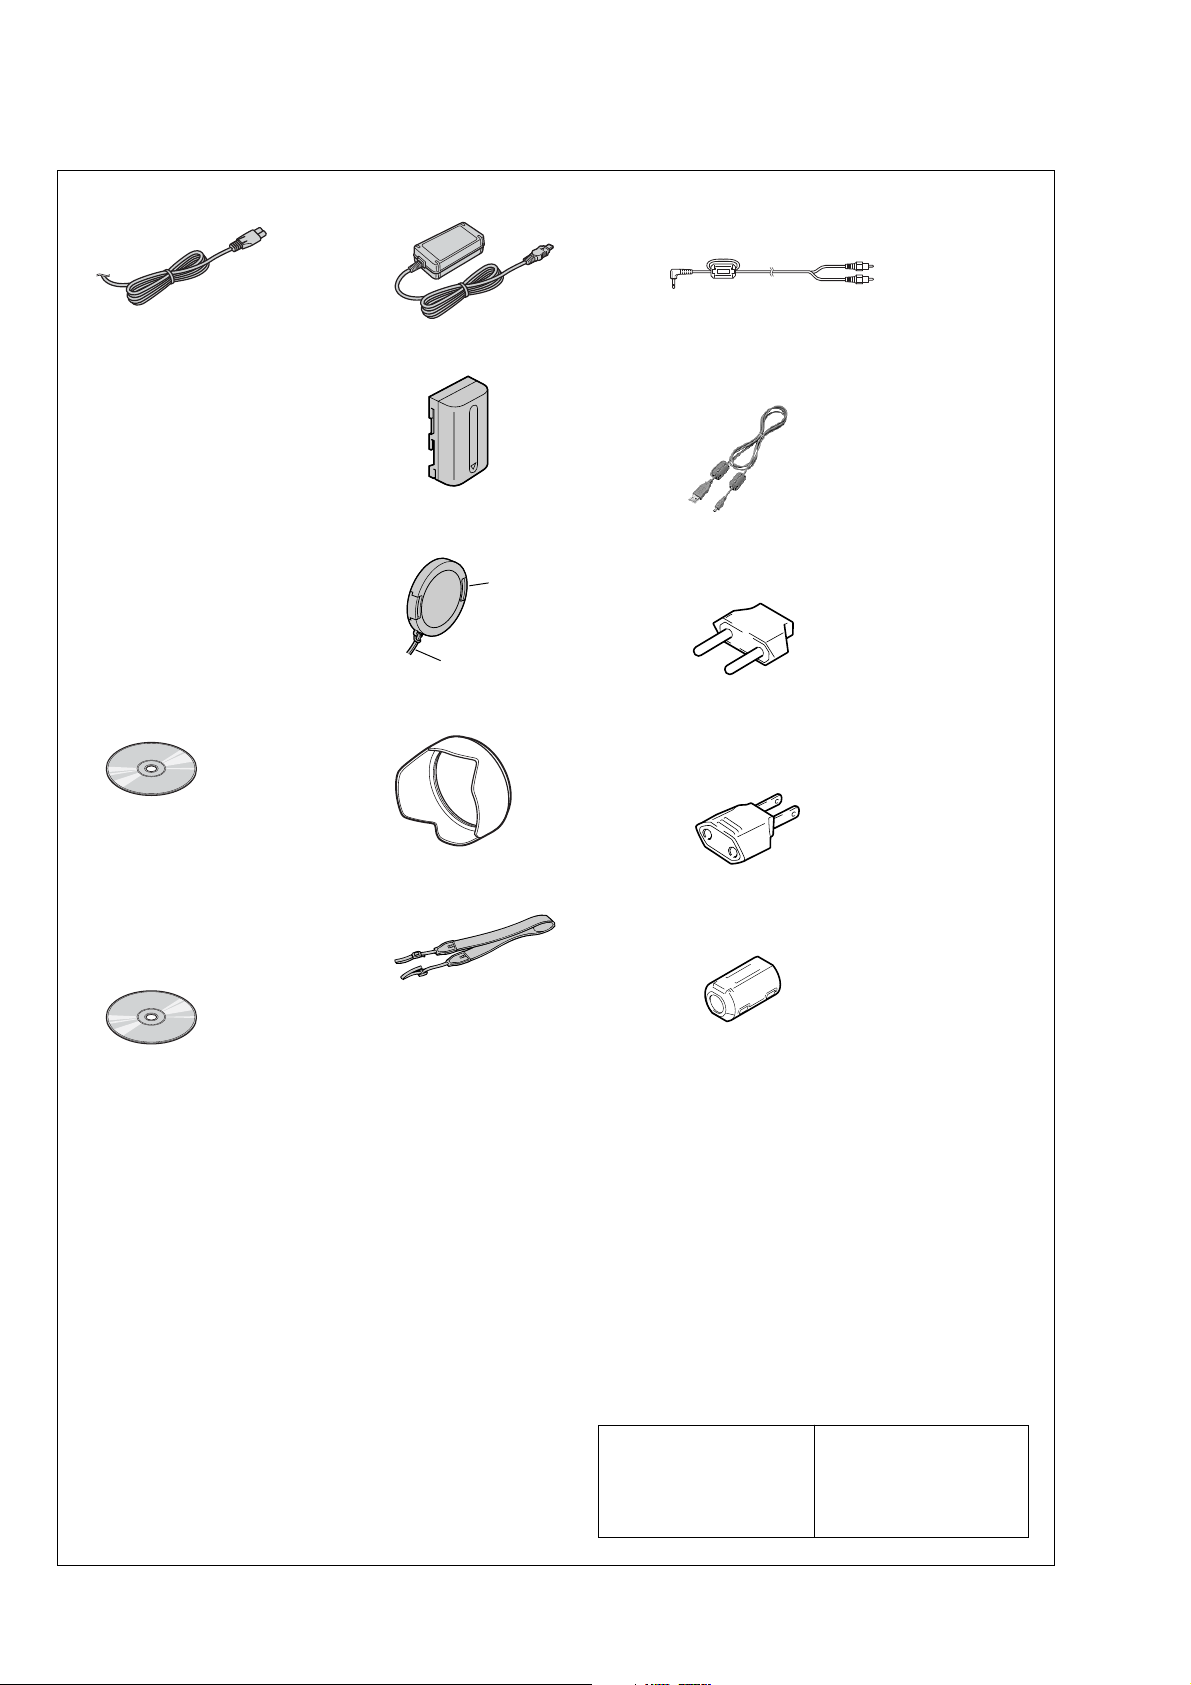
Checking supplied accessories.
Make sure that the following accessories are supplied with your digital still camera.
Power cord (Main lead) (1)
(AEP, E model)
0
1-769-608-11
Power cord (Main lead) (1)
(AUS model)
0
1-696-819-11
Power cord (Main lead) (1)
(UK, HK model)
0
1-783-374-11
Power cord (Main lead) (1)
(US, CND model)
0
1-790-107-22
Power cord (Main lead) (1)
(JE, J model)
0
1-790-732-12
Power cord (Main lead) (1)
(KR model)
0
1-776-985-11
Power cord (Main lead) (1)
(CH model)
0
1-782-476-13
CD-ROM
(SPVD-013 (I) USB Driver) (1)
(US, CND, J model)
3-087-331-01
CD-ROM
(SPVD-013 USB Driver) (1)
(AEP, UK, E, HK, JE, KR, AUS,
CH model)
3-087-330-01
AC adaptor (1) (AC-L15A)
0
1-477-533-51
NP-FM50 battery pack (1)
(not supplied)
Lens cap (1)
X-3952-016-1
String assy cap
X-3953-980-1
Lens hood (1)
3-086-481-01
A/V connecting cable (1)
1-824-111-11
USB cable (1)
1-827-038-11
2-pin conversion adaptor (1)
(JE model)
1-569-007-12
2-pin conversion adaptor (1)
(E model)
1-569-008-12
S-houlder strap (1)
3-071-638-11
CD-ROM
(Image Data Converter) (1)
3-087-661-01
Other accessories
3-084-996-01 MANUAL, INSTRUCTION (JAPANESE)(J)
3-084-996-11 MANUAL, INSTRUCTION(ENGLISH)
(US,CND,AEP,UK,E,AUS,CH,JE,HK)
3-084-996-21 MANUAL, INSTRUCTION (FRENCH/GERMAN)(CND,AEP)
3-084-996-31 MANUAL, INSTRUCTION (SPANISH/PORTUGUESE)
(AEP,E,JE)
3-084-996-41 MANUAL, INSTRUCTION (ITALIAN/DUTCH)(AEP)
3-084-996-51 MANUAL, INSTRUCTION (TRADITIONALCHINESE)
(E,CH,JE,HK)
3-084-996-61 MANUAL, INSTRUCTION (RUSSIAN/SWEDISH)(AEP)
3-084-996-71 MANUAL, INSTRUCTION (ARABIC)(E)
3-084-996-81 MANUAL, INSTRUCTION (KOREAN)(JE,KR)
3-084-997-01 MANUAL, INSTRUCTION (JAPANESE)(J)
3-087-904-01 MANUAL INSTRUCTION, RAW (JAPANESE)(J)
3-087-904-11 MANUAL INSTRUCTION, RAW
(ENGLISH/FRENCH/GERMAN/SPANISH/ITALIAN/DUTCH/
PORTUGUESE/TRADITIONAL CHINESE/
SIMPLIFIED CHINESE)(EXCEPT J)
Clamp filter (Ferrite core) (for AC-L15A)
1-543-798-21
Note :
The components identified by
mark 0 or dotted line with mark
0 are critical for safety.
Replace only with part number
specified.
• Abbreviation
CND : Canadian model
AUS : Australian model
CH : Chinese model
HK : Hong Kong model
KR : Korea model
JE : Tourist model
J : Japanese model
Note :
Les composants identifiés par
une marque 0 sont critiques
pour la sécurité.
Ne les remplacer que par une
pièce portant le numéro spécifié.
— 6 —

DSC-F828
9-876-279-41
Sony EMCS Co.
— 8 —
2003L1600-1
©2003.12
Published by DI CS Strategy Div.
3-084-996-11(1)
_
_
_
_
_
_
_
_
_
_
_
_
_
_
Getting started _______________________
Shooting still images _________________
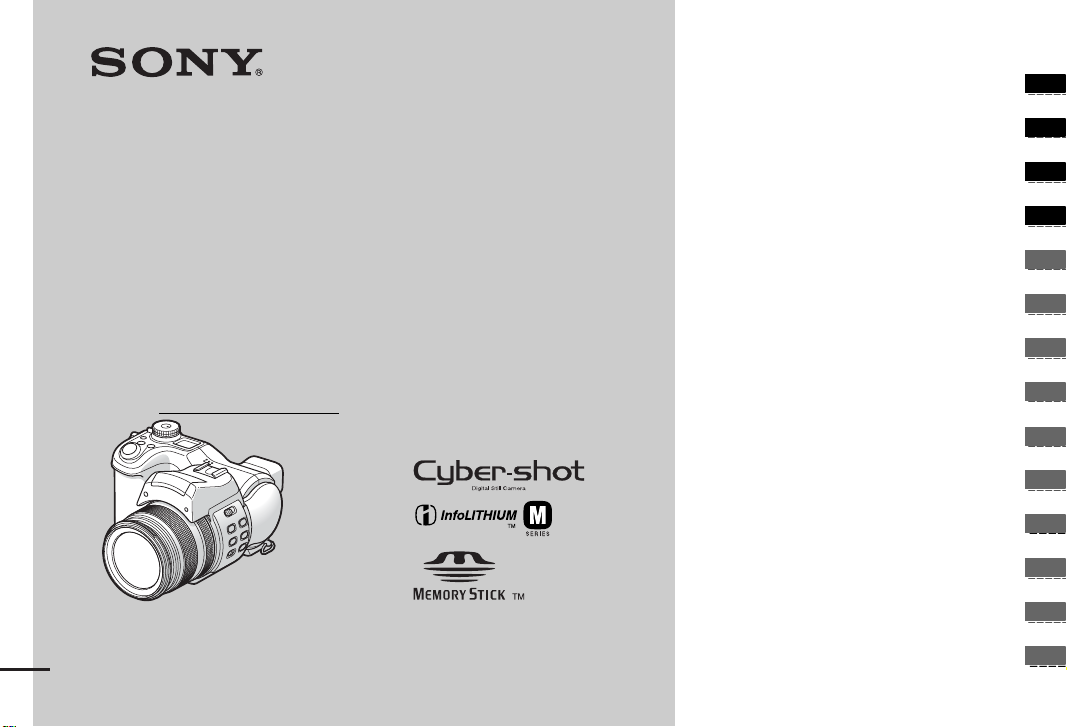
Digital Still Camera
Operating Instructions
Before operating the unit, please read this manual thoroug hl y, a nd
retain it for future referen ce .
Owner’s Record
The model and serial numbers are located on the bottom. Record the
serial number in the space pr ovi de d below. Refer to these numbers
whenever you call upon your Sony dea le r regarding this product.
Model No. DSC-F828
Serial No.
DSC-F828
© 2003 Sony Corporation
Viewing still images __________________
Deleting still images__________________
Before advanced operations ____________
Advanced still image shooting___________
Advanced still image viewing____________
Still image editing _____________________
Still image printing_____________________
(PictBridge printer)
Enjoying movies_______________________
Enjoying images on y our com puter_____
Troubleshooting _______________________
Additional informati on __________________
Index_____________________________
WARNING
To prevent fire or shock hazard, do
not expose the unit to rain or
moisture.
CAUTION
The use of optical instruments with this
product will increase ey e hazard .
Use of controls or adjustments or performance
of procedures other than those specified
herein may result in hazardous radia ti on
exposure.
For the Customers in the U.S.A.
This symbol is intended to
alert the user to the presence
of uninsulated “dangerous
voltage” withi n the p r o duct’s
enclosure that may be of
sufficient magnitude to
constitute a risk of electric
shock to persons.
This symbol is intended to
alert the user to the presence
of important operating and
maintenance (servici ng)
instructions in the literature
accompanying the appliance.
If you have any questions about this product,
you may call:
Sony Customer Information Services Center
1-800-222-SONY (7669)
The number below is for the FCC related
matters only.
Regulatory Information
Declaration of Conformity
Trade Name: SONY
Model No.: DSC-F828
Responsible Party:Sony Electronics Inc.
Address: 680 Kinderkamack
Road, Oradell, NJ
07649 U.S.A.
Telephone No.: 201-930-6972
This device complies with Part 15 of the
FCC Rules. Operation is subject to the
following two conditions: (1) This device
may not cause harmful interfe rence, a nd (2)
this device mus t acce pt an y in t erference
received, including interference that may
cause undesired operation.
CAUTION
You are cautioned that any changes or
modifications not expressly approved in this
manual could void you r au thority to operate
this equipment.
Note:
This equipment has been tested and found to
comply with the limits for a Class B digital
device, pursuant to Part 15 of the FCC Rules.
These limits are des igne d to provide
reasonable protection aga ins t harmful
interference in a re sidential install at ion. This
equipment generates, uses, and can r ad iate
radio frequency energy and, if not installed
and used in accordance with the instructions,
may cause harmful interference to radio
communications. However, there is no
guarantee that interference will not occur in a
particular installation. If this equipment does
cause harmful interference to radio or
television reception, which can be determined
by turning the equipment off and on, the user
is encouraged to try to corre ct the int erferen ce
by one or more of the following measures:
—Reorient or relocate the receiving antenna.
—Increase the separation betw een the
equipment and receiver.
—Connect the equipment into an outlet on a
circuit different from tha t to wh ich the
receiver is connected.
—Consult the dealer or an experienced
radio/TV technician for help.
The supplied interface cable mus t be used
with the equipment in order to comply with
the limits for a digital device pur sua n t to
Subpart B of Part 15 of FCC Rules.
2

For the Customers in the U .S.A.
and Canada
RECYCLING LITHIUM-ION
BATTERIES
Lithium-Ion b a tteries are
recyclable.
You can help preserve our
environment by returning your
used rechargeable batteries to
the collection and recycling location nearest
you.
For more information regarding recycling of
rechargeable batteries, call toll free
1-800-822-8837, or visit
http://www.rbrc.org/
Caution: Do not handle damaged or leaking
Lithium-Io n batteries.
CAUTION
TO PREVENT ELECTRIC SHOCK,
MATCH WIDE BLADE OF PLUG TO
WIDE SLOT, FULLY INSERT.
Notice for the customers in the
United Kingdom
A moulded plug complying with BS 1363 is
fitted to this equipment for your safety a nd
convenience.
Should the fuse in the plug supplied need to be
replaced, a fuse of the same rating as the
supplied one and approved by ASTA or BSI to
BS 1362, (i.e., marked with or mark)
must be used.
If the plug supplied with this equipm e nt ha s a
detachable fuse cover, be sure to attach the
fuse cover after you change the fuse. Never
use the plug without the fuse cover. If you
should lose the fuse cover, please contact your
nearest Sony service station.
For the Customers in Europe
This product has been tested and found
compliant with the limits sets out in the EM C
Directive for using connection cables shorter
than 3 meters (9.8 feet).
Attention
The electromagnetic fields at the specif ic
frequencies may influen ce the pic tur e an d
sound of this digital camera.
Notice
If static electricity or electromagnetism causes
data transfer to discontinue midway (fail),
restart the application or disc onnect and
connect the USB cable again.
Certain countries or regions may regulate
disposal of the battery used to power this
product. Please consult with your loca l
authority.
3

Before using your camera
Trial recording
Before you record one-time events, you may
want to make a trial recording to make sure
that the camera is working correctly.
No compensation for contents of the
recording
Contents of the recording cannot be
compensated for if recording or playback is
not possible due to a malfunction of your
camera or recording medium, etc.
Back up recommendation
To av oid the potential risk of data loss, always
copy (back up) data to a disk.
Notes on image data compatibility
• This camera conforms with the Design rule
for Camera File system universal standard
established by the JEITA (Japan Electronics
and Information Technology Industries
Association).
• Playback of images recorded with your
camera on other equipment and playbac k of
images recorded or edite d with other
equipment on your camera are not
guaranteed.
Precaution on copyright
Television programs, films, video tapes, and
other materials may be copyrighted.
Unauthorized recording of such materials may
be contrary to the provision of the copyright
laws.
4
Do not shake or strike the camera
In addition to malfunctions a nd ina bility to
record images, this may render the recording
medium unusable or image data brea kdown,
damage or loss may occur.
LCD screen, LCD finder (onl y models
with an LCD finder) and lens
• The LCD screen and the LCD fi nder are
manufactured using extremely highprecision technology so over 99.99% of the
pixels are operational for effective use.
However, there may be some tiny black
points and/or bright points (whit e , red, blue
or green in color) that constantly appear on
the LCD screen and the LCD finder. These
points are normal in the manufacturing
process and do not affect the recording in
any way.
• Be careful when placing the camer a near a
window or outdoors. Exposing the LCD
screen, the finder or the lens to direct
sunlight for long periods may cause
malfunctions.
• Do not press the LCD screen hardly. The
screen may be uneven and that may cause a
malfunction.
• Images may be trailed on the LCD screen in
a cold location. This is not a malfunctio n.
The zoom lens
This camera is equipped with zoom lens. Be
careful not to bump the lens, and be careful
not to apply force to it.
Remove dirt from the surface of the
flash
If the dirt changes color or sticks to the
surface of the flash du e to the heat of the fla sh,
sufficient light may not be emitted.
Do not get the camera wet
When taking pictures outdoor s in the rain or
under similar conditions, be care f ul not to get
the camera wet. If wate r ge ts inside of the
camera, it may cause the camera to
malfunction, sometimes beyond repair. If
moisture condensation occurs, see page 143
and follow the instructions on how to remove
it before using the camera.
Do not expose the camera to sand or
dust
Using the camera in sandy or dusty locations
may cause a malfunction .
Do not aim the camera at the sun or
other bright light
This may cause irrecoverable damage to your
eyes or the malfunction of your camera.
Note on locations where you can
use the camera
Do not use the camera near a location that
generates strong radio waves or emits
radiation. The camera may not be able to
record or play back properly.
The pictures used in this manual
The photographs used as examples of pictures
in this manual are reproduced images, and are
not actual images shot using this camera.
About the Carl Zeiss lens
This camera is equipped with a Carl Zeiss
lens which is capable of reproducing fine
images. The le ns f o r t his camera uses the
#
measurement system for cameras
MTF
developed jointly by Carl Zeiss, in
Germany, and Sony Corporation, and offers
the same quality as other Carl Zei ss le nse s.
The lens for your camera is also T*-coated
to suppress unwanted reflection and
faithfully reproduce colors.
#
MTF is an abbreviation of Modulation
Transfer Function, a numeric value
indicating the amount of light from a
specific part of the subject gathered at the
corresponding position in the image.
Trademarks
• “Memory Stick,” , and “MagicGate
Memory Stick” are trademar ks of Sony
Corporation.
• “Memory Stick Duo” and
are tradem arks of Sony
Corporation.
• “Memory Stick PRO” and
are trademarks of Sony
Corporation.
• “MagicGate” and are
trademarks of Sony Corporation.
• “InfoLITHIUM” is a trademark of Sony
Corporation.
• Microsoft and Windows are registered
trademarks of the U.S. Microsoft
Corporation in the United States and other
countries.
• Macintosh, Mac OS and QuickTime are
trademarks or registered trademarks of
Apple Computer, Inc.
• Pentium is a trademark or a registered
trademark of Intel Cor por ation.
• CompactFlash is a trademark of SanDisk
Corporation.
• Microdrive is a registered trademark of
Hitachi Global Stor age Technologies in the
United States and/or other countries.
• In addition, system and product names used
in this manual are, in general, trad e mar ks or
registered trademarks of their respective
developers or manufacturers. However, the
™
or ® marks are not used in all cases in this
manual.
5

Table of contents
Before using your camera............... ..........4
Identifying the parts..................................9
Getting started
Charging the battery pack.......................14
Using the AC Adaptor............................17
Using your camera abroad......................17
Turning your camera on/off....................18
How to use the multi-selector.................18
Setting the date and time.........................19
Shooting still images
Inserting and removing a recording medium
........................................................21
Switching the recording m edium.. ......21
Inserting and removing a “Memory
Stick”..............................................22
Inserting and removin g a Microdrive/
CF card...........................................23
Setting the still image size......................24
Image size and quality ............................25
Basic still image shooting
– Using auto mode..........................27
Checking the last image shot
– Quick Review..............................29
Shooting images with the finder.........29
Indicators on the screen during shooting
........................................................30
Using the zoom feature....................... 30
6
Changing the lens orientation............. 32
Shooting close-ups – Macro............... 33
Using the self-timer............................34
Using the flash.................................... 34
Inserting the date and time on a still
image.............................................. 36
Shooting according to scene conditions
– Scene Selection...........................37
Viewing still images
Viewing images on the scree n of your
camera............................................ 39
Viewing images on a TV screen.............41
Deleting still images
Deleting images.............................. ........ 43
Formatting a recording medium............. 45
Before advanced operations
How to setup and operat e your camera
........................................................ 47
Changing menu settings..................... 47
Changing item s in the SET UP screen
........................................................ 48
How to use the command dial............ 48
Deciding the still image quality.............. 49
Creating or selecting a folder................. 50
Creating a new folder.........................50
Selecting the recording folder.............51
Advanced still image
shooting
Manual features to photo-shooting
situations .....................................52
Exposure (shutter speed, aperture, and
ISO sensitivity)
Shooting with Program auto ................ ...54
Program Shift......................................54
Shooting with shutter speed priority mode
........................................................55
Shooting with aperture priority mode.....56
Shooting with manual exposure mode ....57
Selecting the metering mode...................58
Adjusting the exposure
– EV adjustment.............................59
Displaying a histogram.......................60
Shooting w ith the exposure fixed
– AE LOCK ....................................62
Shooting three images with the exposure
shifted – Exposure Bracket.............63
Selecting the ISO sensitivity – ISO.........64
Focus
Choosing an auto focus method..............65
Choosing a focus range finder frame
– AF range finder............................65

Choosing a focus operation
– AF Mode......................................66
Focusing manually..................................67
Flash
Selecting a flash mode ............. ...............68
Adjusting the flash level – Flash Level...70
Using an external flash............................71
Using the Sony Flash..........................72
Using a commercially available external
flash ................................................72
Color
Adjusting color tones – White Balance...73
Selecting color reproduction – Color......74
Burst
Shooting images in succession................75
Shooting in Multi Burst m o d e
– Multi Burst...................................76
Others
Shooting in the dark................................77
NightShot............................................77
NightFraming......................................78
Shooting with special effects
– Picture Effect ...............................79
Shooting still images in RAW mode
– RAW ............................................79
Shooting still images in TIFF mode
– TIFF.............................................80
Shooting still images for e-mail
– E-Mail..........................................81
Shooting still images with audio files
– Voice...........................................81
Advanced still image viewing
Selecting the folder and playing back
images – Folder..................... .........83
Enlarging a portion of a stil l im age ........84
Enlarging an image
– Playback zoom............................84
Recording an enlarged image
– Trimming.....................................85
Playing back successive images
– Slide show...................................85
Rotating still images – Rotate................. 86
Playing back images shot in Multi Burst
mode...............................................87
Playing back continuously......... .........87
Playing back frame by frame .............87
Still image editing
Protecting images – Protect....................89
Changing image size – Resize................90
Choosing images to print
– Print (DPOF) mark......................91
Still image printing
(PictBridge printer)
Connecting to a PictBri dge printer ..........93
Preparing the camera...........................93
Connecting the came ra to the printer
........................................................93
Printing images........................................94
Printing index-images.............................96
Enjoying movies
Shooting movies............................ ........100
Viewing movies on the screen ..............101
Deleting movies........... ..........................102
Editing movies.......................................103
Cutting movies..................................104
Deleting unnecessary portions of mov ies
......................................................104
Enjoying images on your
computer
Copying images to your computer
– For Windows users....................105
Installing the USB driver..................106
Installing “Image Transf er ”..............107
Installing “ImageMixe r ”...................108
Connecting the camera to your computer
......................................................109
7

Copying images using “Image Tra nsfer”
......................................................110
Changing “Image Transfer” settings
......................................................111
Copying images without using
“Image Transfer”..........................111
Viewing the images on yo ur computer
......................................................113
Image file storage destinations and file
names............................................114
Viewing an image previously copied to a
computer.......................................116
Copying images to your comput er
– For Macintosh users..................117
Troubleshooting
Troubleshooting ....................................119
Warnings and messages........................130
Self-diagnosis displ ay – If a code start ing
with an alphabet lette r appears.....133
Additional information
The number of images that can be saved/
shooting time..................... ...........134
Menu items ....................... ................. ...137
SET UP items.................................. ......140
Precautions............................................143
The “Memory Stick”.............................144
The Microdrive.....................................145
8
On “InfoLITHIUM” battery pack ........ 146
Specifications....................................... 147
Display window....................................149
The LCD/finder screen.........................150
Quick reference chart...........................155
Index
Index.....................................................158
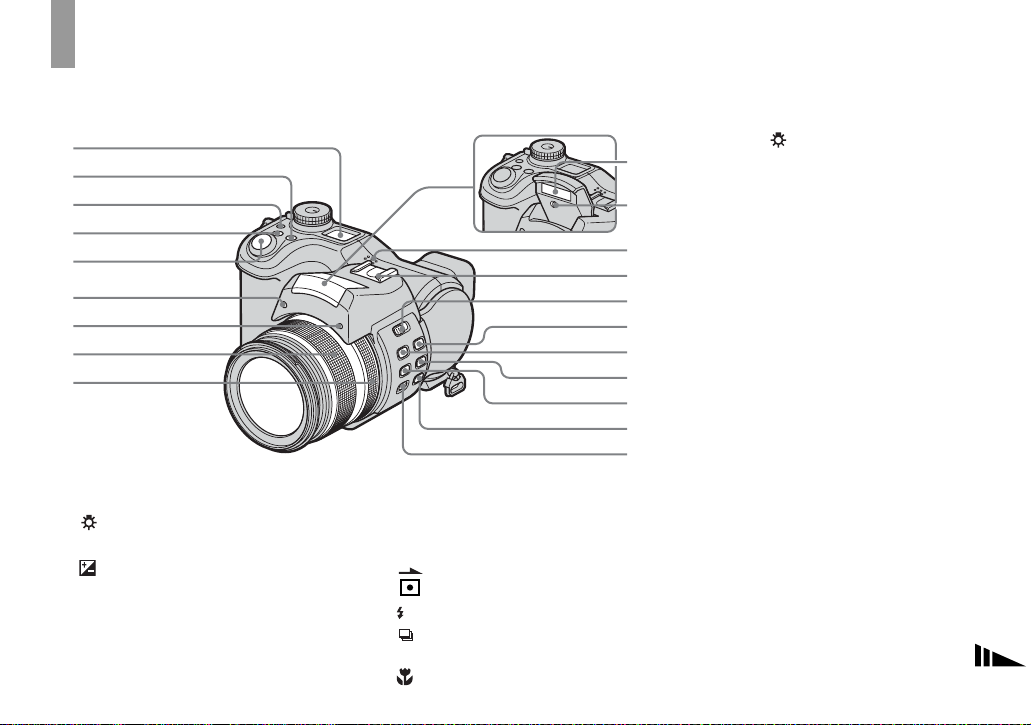
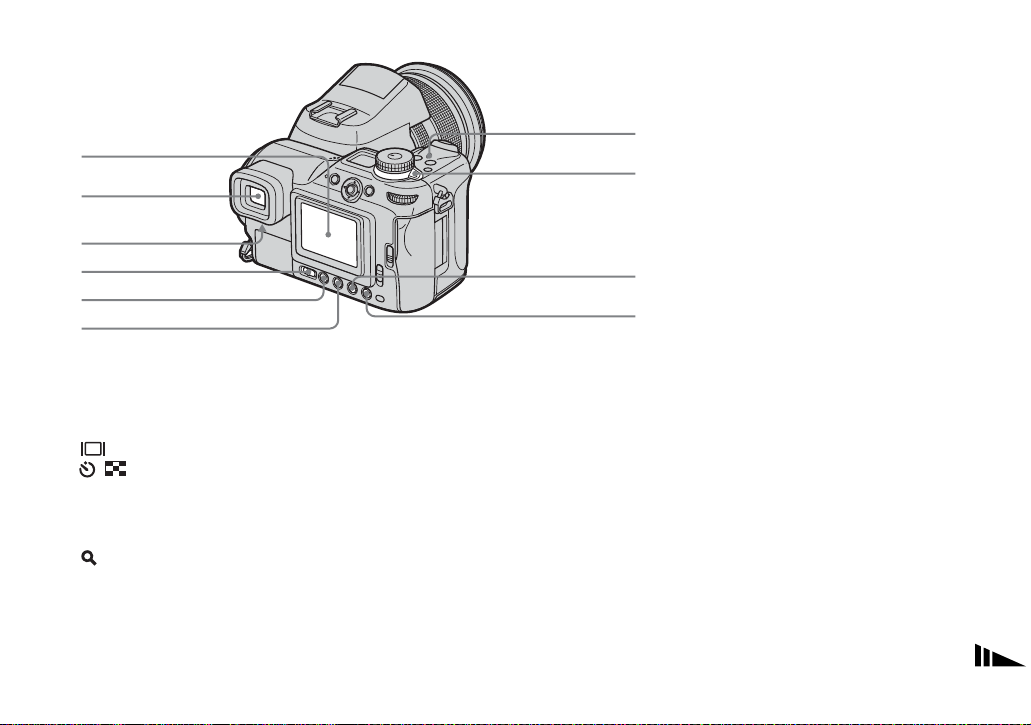
Identifying the parts
See the pages in parentheses for details of
operation.
1
2
3
4
5
6
7
8
9
A D isplay window
B WB (White balance) button (73)
C (Display window backlight)
button
D (Exposure) button (57, 59)
E Shutter button (27)
F H ologram AF emitter (35, 140)
G Self-timer lamp (34)
H Zoom ring (30)
I M anual focus ring (67)
J Flash emitter (34 )
K Infrared ray emitter (77)
L Speaker
M Advanced accessory shoe (71)
N OPEN (FLASH) switch (69)
O (Metering mode) button (58)
P (Flas h) button (68)
Q /BRK (Burst/Bracket) button
(63, 75, 76)
R (Macro) butt o n (33)
q;
qa
qs
qd
qf
qg
qh
qj
qk
ql
w;
S NIGHTSHOT/NIGHTFRAMING
button (77)
T FOCUS (AUTO/MANUAL) switch
(67)
• Pressing the (Display window backlight)
button turns on the backlight in the display
window for about seven seconds.
9
1
2
3
4
5
6
7
8
9
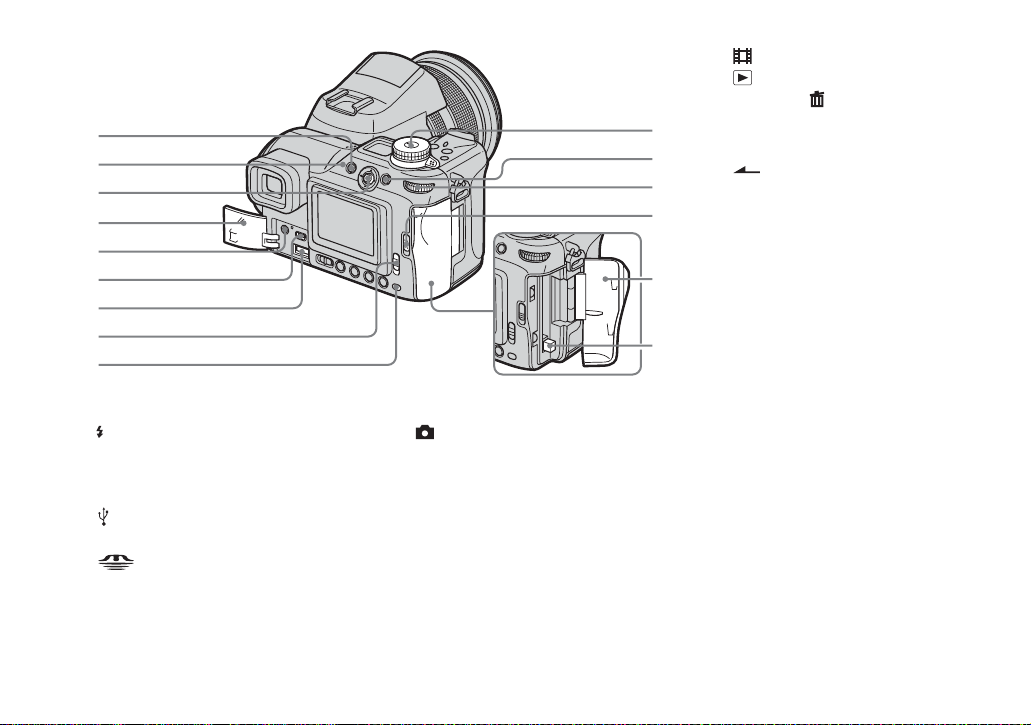
SET UP: To set the SET UP items
:To shoot movies
:To view or edit images
K AE LOCK/ (Delete) button (43,
q;
qa
qs
qd
62)
L Command dial (48)
M OPEN (CF) lever (23)
N CF card cover (23)
O CF card eject lever (24)
qf
qg
A MENU button (47, 137)
B (Flash) lamp (68)
C Multi-selector (v /V/b/B) (18)
D Jack cover (14, 17)
E A/V OUT (MONO) jack (41)
F
(USB) jack (109)
G DC IN jack (14, 17)
H /CF (“Memory Stick”/CF
card) switch (21)
I Access lamp (22)
10
J Mode dial (27)
:T o s hoot still images in auto
adjustment mode
P: To shoot still images in
program auto mode
S: To shoot in shutter speed
priority mode
A: To shoot in aper tu re priority
mode
M: To shoot in manual exposure
mode
SCN: To shoot in Scene
Selection mode
1
6
2
3
4
5
A LCD screen
B Finder (29)
C Fi nder adjustment lever (29)
D FINDER/LCD switch (29)
E (Screen statu s) button (30)
F / (Self-timer/Index) button
(34, 40)
G POWER lamp (18)
H POWER switch (18)
I (Digital zoom/Playback z oom)
button (30, 84)
J 7 (Quick review) button (29)
7
8
9
q;
11
1
2
3
4
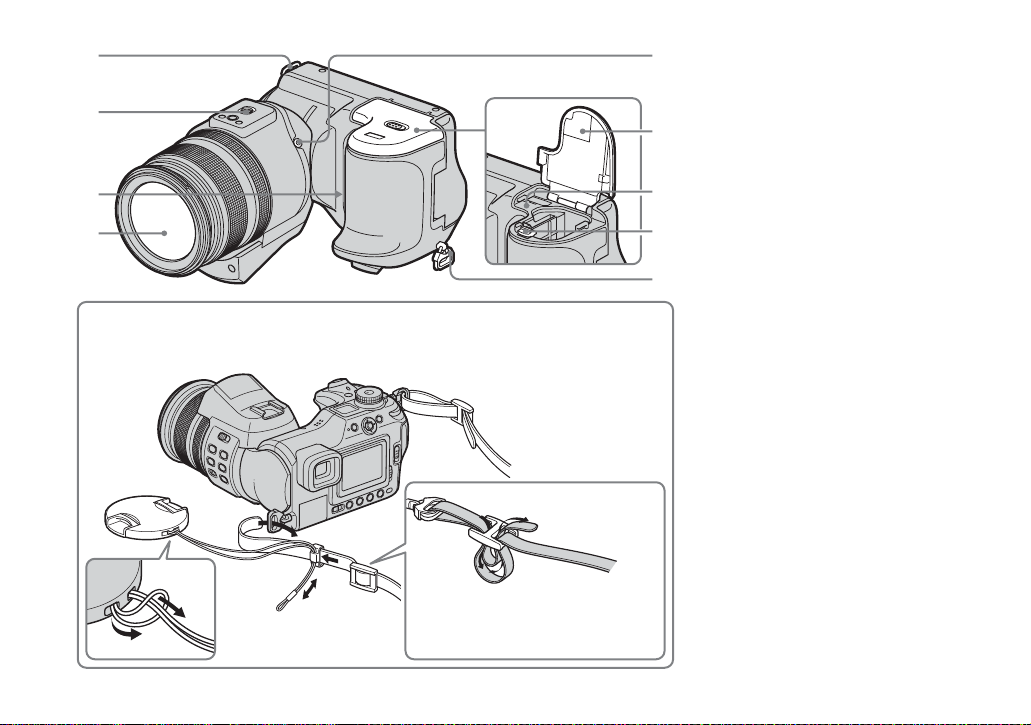
Attaching the lens cap and the shoulder strap
Lens cap
Shoulder strap
A Hook for shoulder strap
B Tripod receptacle
5
C Microphone
D Lens
E ACC (Accessory) jack
6
F Battery/“M emo ry Sti ck” cover
(14)
G RESET button (119)
7
H Battery eject lever (15)
I Hook for shoulder strap
8
• Use the ACC (accessory) jack to connect an
9
external flash or the remote control tripod.
• Use a tripod with a screw length of less than
7
5.5 mm (
/32 inch). You will be unable to firmly
secure the camera to tripods having longer
screws, and may damage the camera.
12
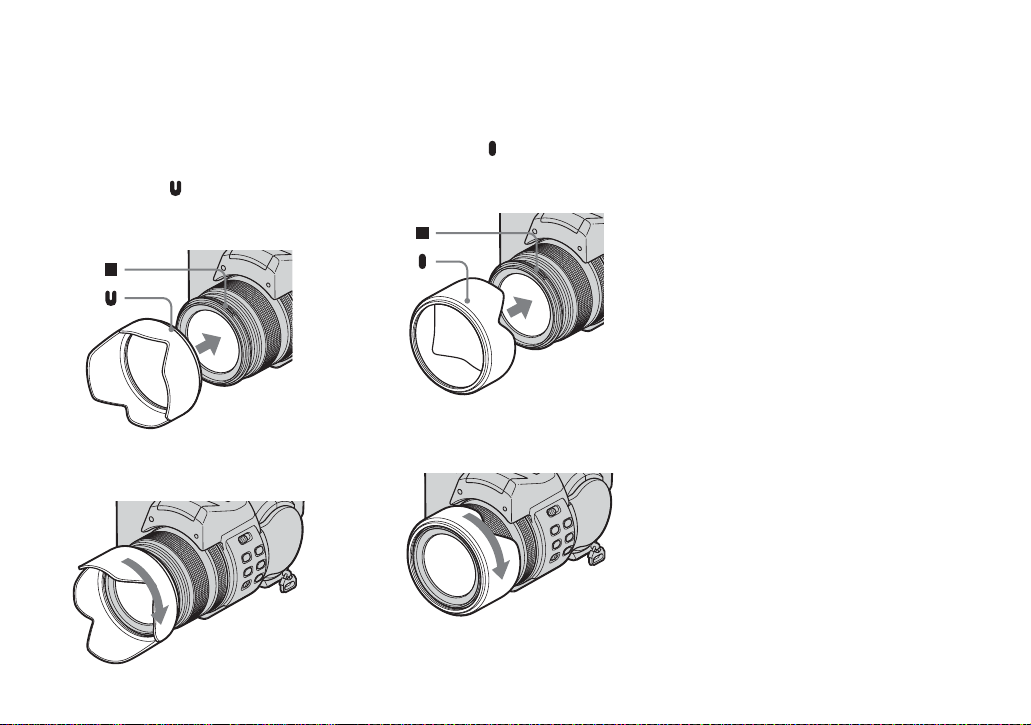
Attaching the lens hood
When you shoot in bright ligh ting
conditions, such as outdoors, we
recommend that you use the le ns ho o d to
reduce the image qual it y deterioration
caused by unnecessary light.
1 Position the lens hood as shown below,
by aligning the mark on the lens hood
and the x mark on the lens, and attach
the hood to the lens.
2 Turn the lens hood clockwise until it
clicks.
Storing the lens hood
The lens hood can b e attached in the reverse
direction to store it with the ca mera when it
is not in use.
1 Position t he l ens hood as shown below,
by aligning the mark on the lens hood
and the x mark on the lens, and attach
the hood to the lens.
2 Turn the lens hood clockwise until it
clicks.
• You can attach the lens cap with the lens hood
attached.
13
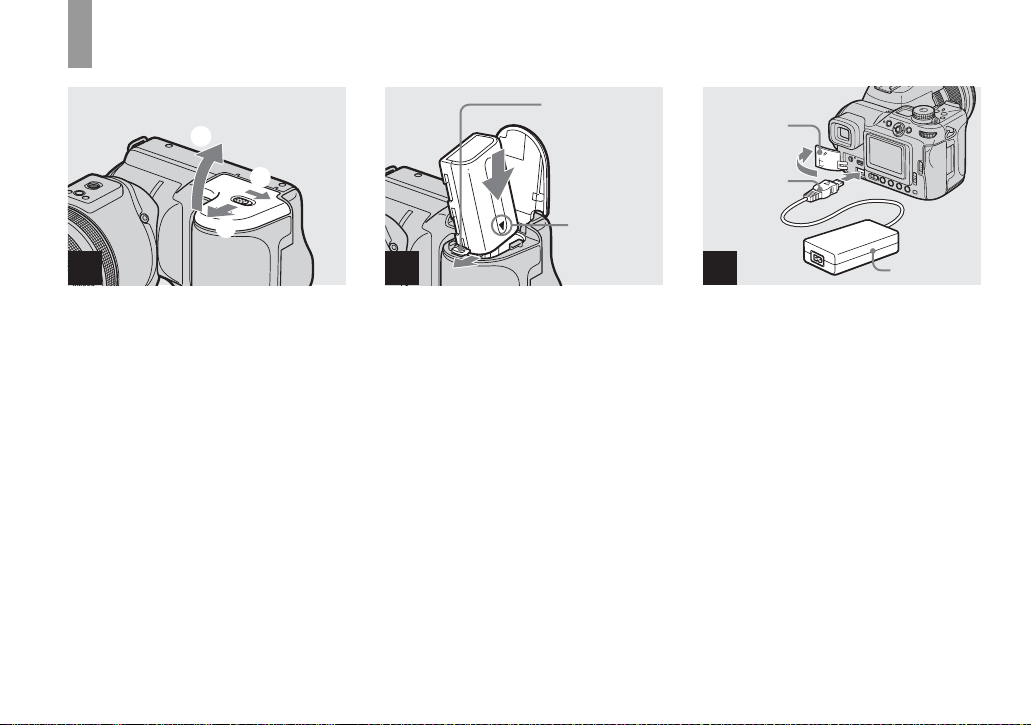
Charging the batter y pack
Getti
d
3
Battery eje ct
lever
ng starte
Jack cover
1
2
21
, Open the battery/“Me m ory
Stick” cover.
Slide the cover in the direction of the arrow.
• Be sure to turn off your camera when
charging the battery pack (page 18).
• Your camera operates with the
“InfoLITHIUM” NP-FM50 battery pack (M
Series) (supplied). You can use only M Series
battery pack (page 146).
14
b mark
2
, Install the battery pack, then
close the battery/“Memory
Stick” cover.
Insert the battery pack with the b mark
facing toward the battery compartment as
illustrated.
Make sure the battery pack is firmly
inserted all the way, then close the cover.
• The battery pack is easily inserted by pushing
the battery eject lever at the front of the battery
compartment to the front side.
DC plug
3
AC Adaptor
, Open the jack cover an d
connect the AC Adaptor
(supplied) to the DC IN jack of
your camera.
Open the cover in the arrow direction as
illustrated above. Connect the plug with the
v mark facing up.
• Do not short the DC plug of the AC Adaptor
with a metallic object, as this may cause a
malfunction.
• Clean the DC plug of the AC Adaptor with a
dry cotton bud. Do not use the dirty plug. Use
of the dirty plug may not properly charge the
battery pack.
2 To a wall outlet (wall socket)
Power cord
(mains lead)
1
– [LCD Backlight] or [EVF Backlight] is set to
[Normal]
– Using a “Memory Stick”
– Not using the NightShot or NightFraming
function.
• After charging the battery pack, disconnect the
AC Adaptor from the DC IN jack of your
camera and the wall outlet (wall socket).
Battery remaining indicators
The battery remaining indicators on the screen or
on the display window show the remaining
shooting or viewing time.
80
min
Getting started
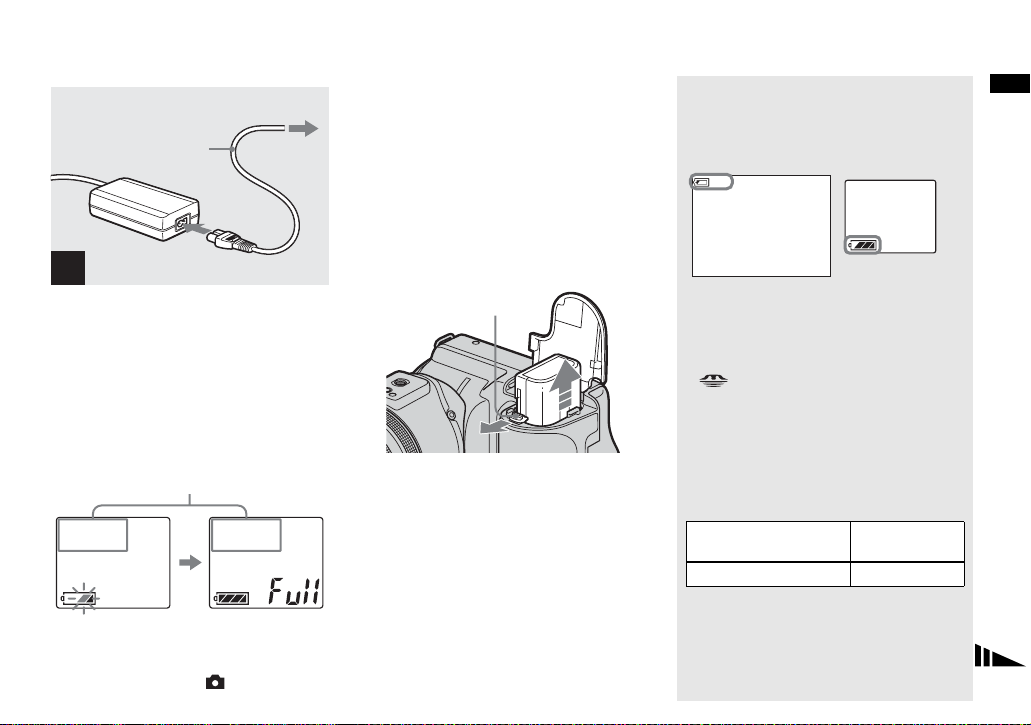
4
, Connect the power cord (mains
lead) to the AC Adaptor and
then to a wall outlet (wall
socket).
During charging, the battery mark in the
display window flashes, and after charging
is completed, “Full” appears.
The available shooting time is indicated
• The available shooting time on the display
window is calculated as if the camera were used
under the following conditions:
– The mode dial is set to
To remove the battery pack
Battery eject lever
Open the battery/“Memory Stick” cover.
Slide the battery eject lever in the direction
of the arrow, and remove the battery pack.
• Be careful not to drop the battery pack when
removing it.
LCD screen/Finder
• The battery remaining time on the screen or on
the display window may not be correct under
certain circumstances or conditions.
• When you switch the FINDER/LCD switch or
/CF switch, it takes about one minute for
the correct battery remaining time to appear.
Display window
Charging time
Approximate time to charge a completely
discharged battery pac k usin g the A C
Adaptor at a temperature of 25°C (77°F).
Battery pack Charging time
NP-FM50 (supplied)
(min.)
Approx. 150
15

Number of images and battery
life that can be recorded/
viewed
The tables show the approximate number of
images and the battery life that can be recorded/
viewed when you shoot images in normal mode
with a fully charged battery pack at a temperature
of 25°C (77°F). The numbers of images that can
be recorded or viewed take into account changing
the optional “Memory Stick” or Microdrive as
necessary. Note that the actual numbers may be
less than indicated depending on the conditions of
use.
Shooting still images
Under the average conditions
NP-FM50 (supplied)
Recording
medium
No. of
images
“Memory Stick” Approx. 370 Approx. 185
Microdrive
1)
Shooting in the following situations:
– (P. Quality) is set to [Fine]
– [AF Mode] is set to [Monitor]
– Shooting one time every 30 seconds
– The zoom is switched alternately between the
W and T ends
– The flash strobes once every two times
– The power turns on and off once every ten
times
Approx. 350 Approx. 175
16
1)
Battery life
(min.)
Viewing still images
2)
NP-FM50 (supplied)
Recording
medium
No. of
images
Battery life
(min.)
“Memory Stick” Approx. 9400 Approx. 470
Microdrive
2)
Viewing single images in order at about three
second intervals
Shooting movies
Approx. 5800 Approx. 290
3)
NP-FM50 (supplied)
“Memory Stick”
Continuous
shooting
3)
Shooting continuously at [160] image size
• The number of images and the battery life that
can be recorded/viewed are decreased under the
following conditions:
– The surrounding temperature is low
– The flash is used
– The camera has been turned on and off many
times
– The zoom is used frequently
– The NightShot or NightFraming function is
activated
– [LCD Backlight] or [EVF Backlight] is set to
[Bright] in the SET UP settings
– The battery power is low.
The battery capacity decreases as you use it
more and more and as time passes
(page 147).
Approx. 200 Approx. 160
Microdrive
• The battery life and the number of images
recordable or viewable does not depend on the
image size setting.
• The number of images is almost the same
whether you use the finder or the LCD screen
for shooting/viewing images.
• When using a CF card, the battery life and the
number of images recordable or viewable may
differ.
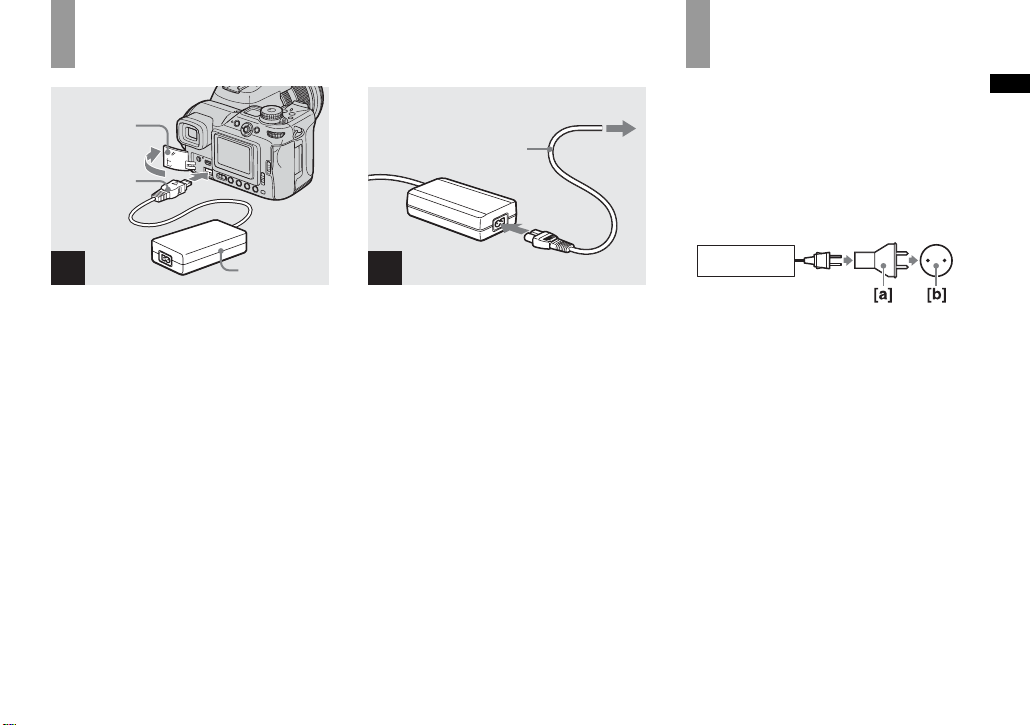
Using the AC Ada pt or
Jack cover
DC plug
2 To a wall outlet
(wall socket)
Power cord
(mains lead)
1
Using your camera
abroad
Power sources
You can use your camera in any country or
region with the supplied AC Adaptor within
100 V to 240 V AC, 50/60 Hz. U se a
commercially available AC plug adaptor
[a], if necessary, depending on the design of
the wall out let (wall sock et) [b].
Getting started
1
AC Adaptor
, Open the jack cover , then
connect the AC Adaptor
(supplied) to the DC IN jack of
the camera.
Open the jack cover in the arrow direction
as illustrated above. Connect the plug with
the v mark facing up.
• Connect the AC Adaptor to an easily accessi ble
wall outlet (wall socket) close by. I f any trouble
occurs while using the adaptor, immediately
shut off the power by disconnecting the plug
from the wall outlet (wall socket).
2
, Connect th e power cord ( mains
lead) to the AC Adaptor and to
a wall outlet (wall socket).
• When you have finished using the AC Adaptor,
disconnect it from the DC IN jack of the
camera and the wall outlet (wall socket).
• The set is not disconnected from the AC power
source (mains) as long as it is connected to the
wall outlet (wall socket), even if the unit itself
has been turned off.
AC-L15A/L15B
• Do not use an electrical transformer (travel
converter), as this may cause a malfunction.
17
Turning your camer a on/off
POWER
switch
POWER
lamp
, Slide the POWER switch in the
direction of the arrow.
The POWER lamp lights in gree n an d the
power is on. When you turn on t he camera
for the first time, the Clock Set screen
appears (page19).
To turn off the power
Slide the POWER switch in the direction of
the arrow again, the POWER lamp goes out,
and the camera turns off.
The Auto Power Off function
If no tasks are performed for about thr ee
minutes when shootin g, view ing images, or
setting up the camera while using the
battery pack, power is automatically shut
off to preserve battery power.
However, in the following circumstances,
even if the battery pack is bei ng use d to
power the camera, the Auto Power Off
function will not work.
• Movies are being played back
• A slide show is being shown
• A cable is connected to th e (USB) jack
or the A/V OUT (MONO) jack
How to use the
multi-selector
Camera 1
AF Mode:
Monitor
Digital Zoom:
Precision
Date/Time:
Off
Off
Red Eye Reduction
:
Hologram AF:
Auto
Auto Review: Off
SELECT
Setup 2
File Number:
USB Connect:
Video Out:
Clock Set:
To change the curre nt settings of the
camera, bring up the menu or the SET UP
screen (pages 47 , 48), and use the multiselector to make the changes.
When settin g up the menu, move the multiselector to v/V/b/B to select th e item or
the setting and make the setting.
When setting up the SET UP, move the
multi-selector to v/V/b/B to select the
item or the setting and press the center of
the multi-selector to make the setting.
OK
Cancel
18
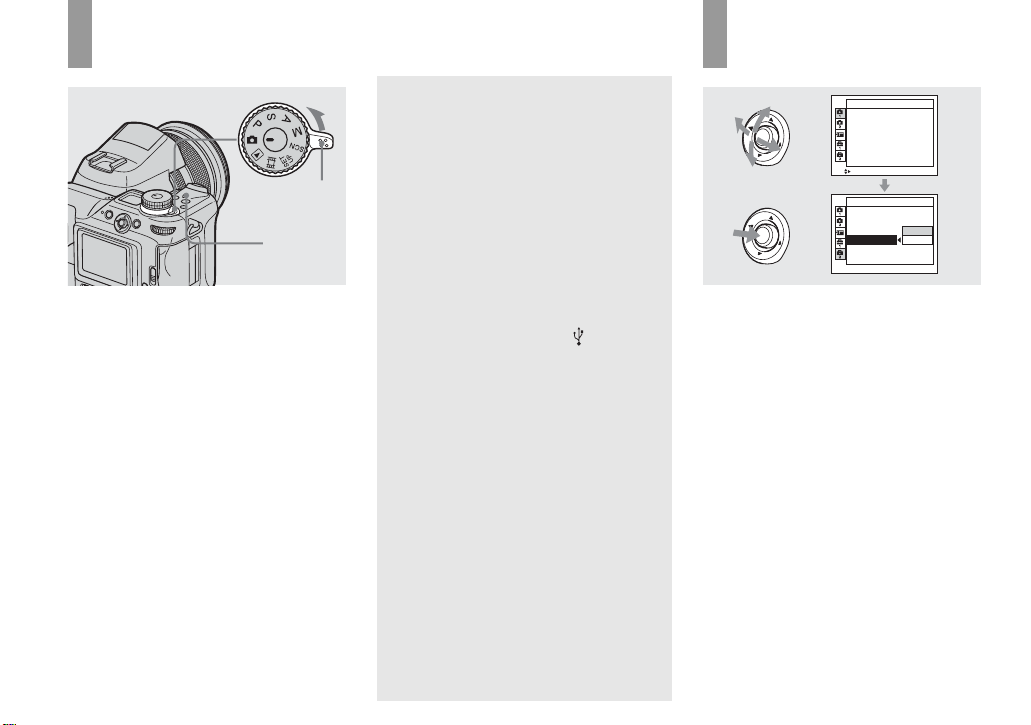
Setting the date a nd time
Mode dial
1
, Set the mode dial to .
• You can carry out this operation even when the
mode dial is set to P
.
• To set the time and the date again, set the mode
dial to SET UP, select [Clock Set] in (Setup
2) (pages 48, 142), then proceed from Step 3.
, S, A, M, SCN, or
POWER
switch
Clock Set
2003 11//
12 :
Y/M/D
M/D/Y
D/M/Y
00
OK
AM
Cancel
2
, Slide the POWER switch in the
direction of the arrow to turn
on the power.
The POWER lamp lights in green and the
Clock Set screen appears on the screen.
Clock Set
2003 11// 00
12 :
AM
Y/M/D
M/D/Y
D/M/Y
OK
Cancel
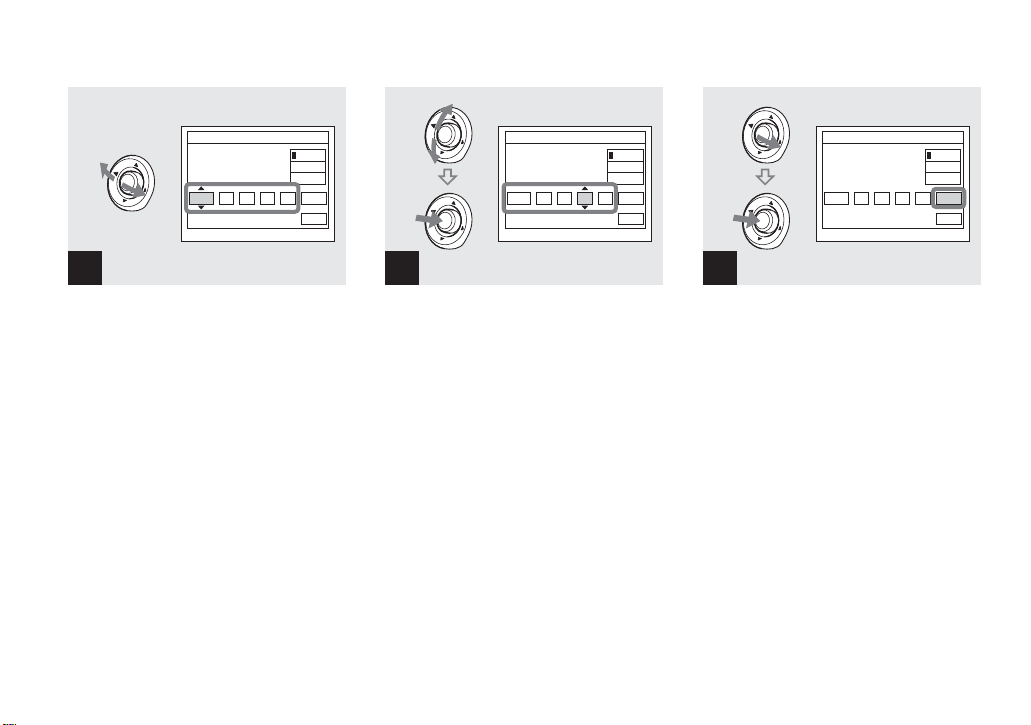
3
, Select the desired date format
by moving the multi-selector to
v/V, then press th e center.
You can select from [Y/M/D] (ye ar/month/
day), [M/D/Y], and [D/M/Y].
• If the rechargeable button battery, which
provides the power for saving the time data, is
ever fully discharged (page 144) , the Clock Set
screen will appear again. When this happens,
reset the date and time by starting from Step 3
above.
Getting started
19
Clock Set
2003 11// 00
12 :
AM
Y/M/D
M/D/Y
D/M/Y
OK
Cancel
Clock Set
2004 11// 00
10 :
AM
Y/M/D
M/D/Y
D/M/Y
OK
Cancel
Clock Set
2004 11// 30
10 :
AM
Y/M/D
M/D/Y
D/M/Y
OK
Cancel
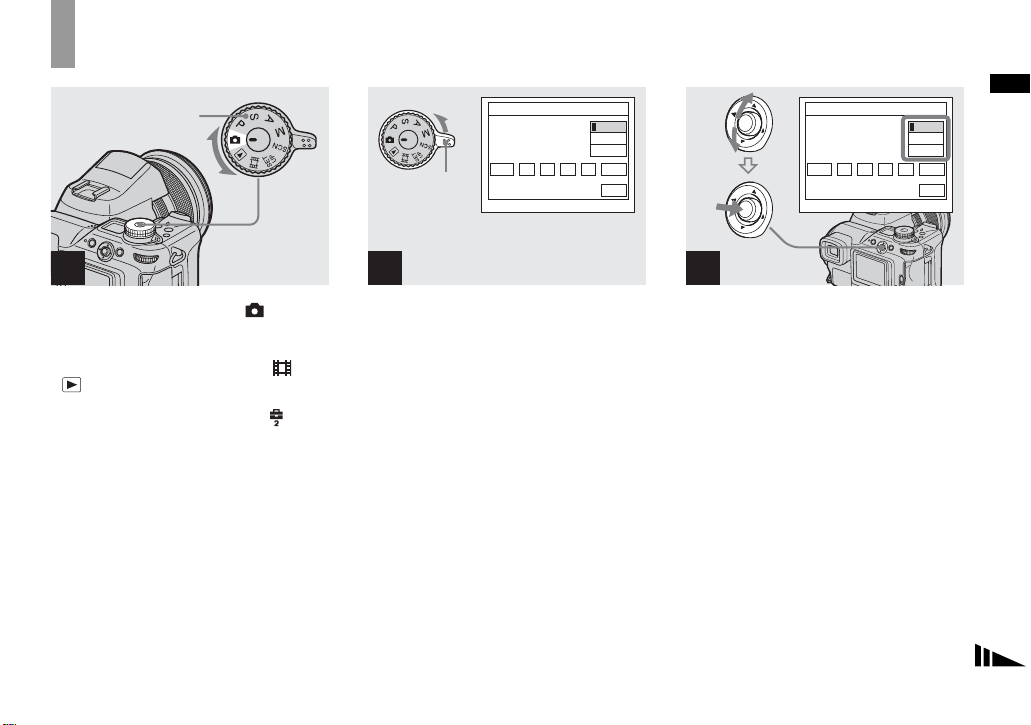
4
, Select the year, month, day,
hour, or minute item you want
to set by moving the multiselector to b/B.
v is shown above and V is shown below the
selected it em.
20
5
, Set the desired numerical
value by moving the multiselector to v/V, then press the
center.
After setting the current nume rical value,
set the next item. Repeat Steps 4 and 5
until all of the items have been set.
• If you select [D/M/Y] in Step 3, set the time
on a 24- hour cycle.
• 12:00 AM stands for midnight and 12:00 PM
stands for noon.
6
, Move the multi-selector to B to
select [OK], then press the
center.
The date and ti me are set and t he cl oc k wil l
start to keep time.
• To cancel the setting process, select [Cancel],
then press the center.
Inserting and removing a recor ding medium
Shooti
till i
s
ng s
mage
Switching the recording
medium
/CF switch
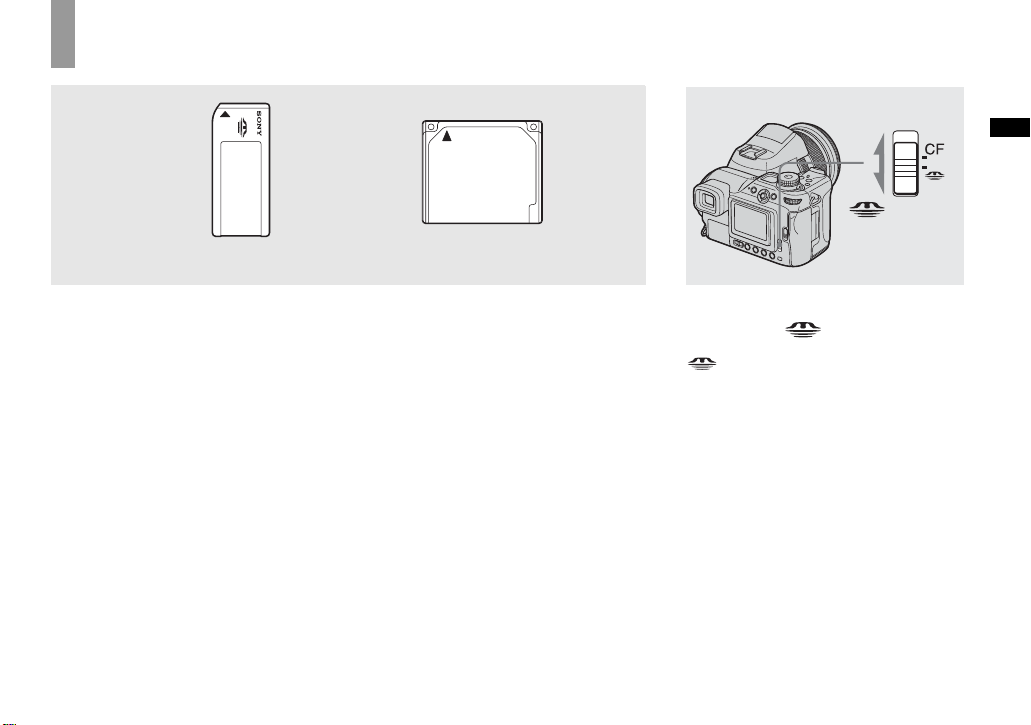
Shooting still imag e s
“Memory Stick” Microdrive/
You can use a “Memory Stick,”
Microdrive
, or CompactFlash card (CF
card) as a recording medium.
Microdrive
Hitachi Global Storage Technologies, Inc.
DSCM-11000 (1 GB)
We have checked th e compatibility of CF
cards compliant with CompactFlash Type I
and Type II, however, we cannot guarantee
proper operation of all CF cards.
CompactFlash
• Copying between media cannot be done with
this camera.
• For more information about the “Memory
Stick,” see page 144.
• The Microdrive is a compact and lightweight
hard disk drive that complies with
CompactFlash Type II standards. For more
information about the Microdrive, see page
145.
• Before using a Microdrive/CF card, be sure to
format it using this camera. Otherwise,
satisfactory performance may not be obtained
(page 45).
, Select the recording medium
with the /CF switch.
: When recording images onto a
“Memory Stick” or playi ng ba ck
images from a “Memory Stick.”
CF : When recording images onto a
Microdrive/CF card or playing back
images from a Microdrive/CF card.
21
Inserting and removing a “Memory Stick”
3
1
2
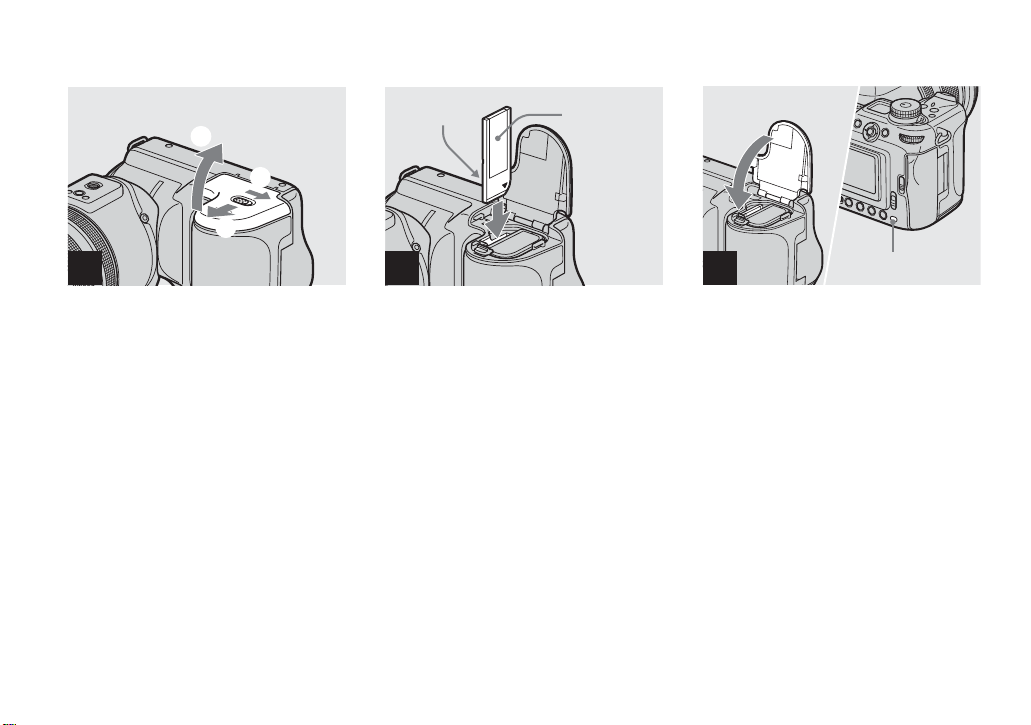
21
, Open the battery/“Me m ory
Stick” cover.
Slide the cover in the direction of the arrow.
Terminal side
Label side
2
, Insert the “Memory Stick.”
Insert the “M emory Stick ” all the way in
until it clic ks as shown in t h e illustration.
• Whenever you insert a “Memory Stick,” push it
as far as it can go. If you do not insert it
correctly, a proper recording or playback may
not be carried out.
3
, Close the battery/“Memory
Stick” cove r.
To remove the “Memory Stick”
Open the battery/“Mem ory Stick” cover,
then push the “Memory Stick” to pop it out.
• Whenever the access lamp is lit, the
camera is recording or r eading out an
image. Never remove the “Memory
Stick” or turn off the power at this time.
The data may be corrupted.
Access lamp
22
Inserting and removing a Microdrive/CF card
Shooting still imag e s
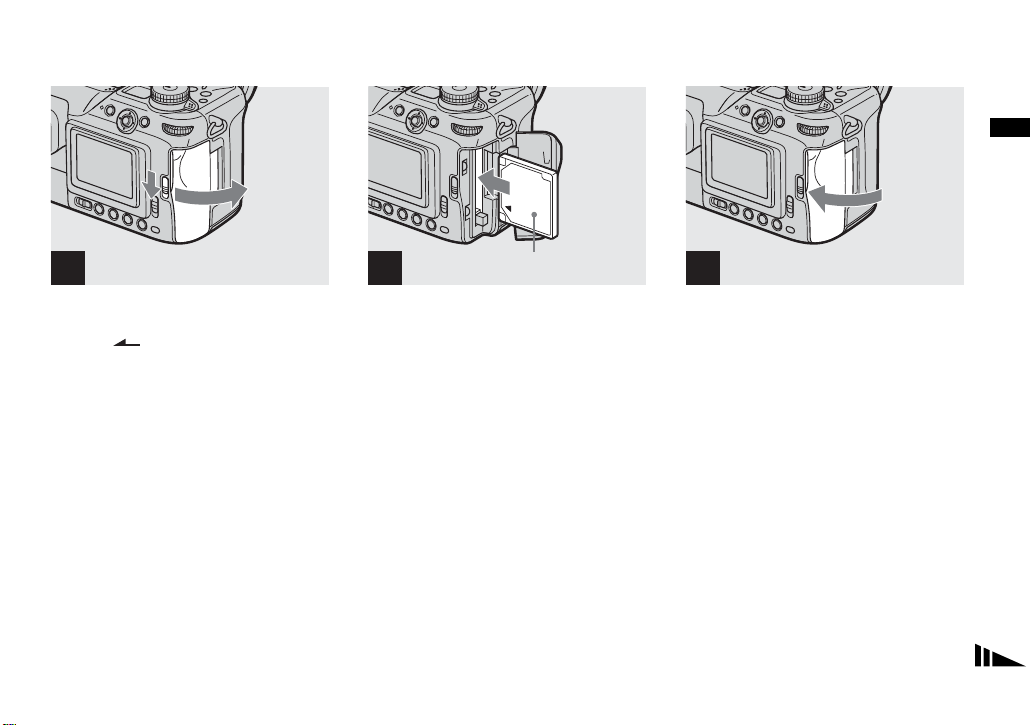
1 2
, Open the CF card cover.
Slide the OPEN (CF) lever in the
direction of the arrow.
Front (The v markprinted side)
, Insert the Microdriv e/ C F card.
Insert the Microd rive/CF ca rd all the way in
as shown i n th e illustra tion.
• Whenever you insert a Microdrive/CF card,
push it as far as it can go. If you do not insert it
correctly, a proper recording or playback may
not be carried out.
3
, Close the CF card cove r.
• Close the CF card cover properly, otherwise
you cannot record or play back images using
the Microdrive/CF card.
23
 Loading...