

Page 1

DP450 / DP450P / DP450R
ENGLISH
P/NO : MFL61857016
DP450-P_AROMLLK_eng_MFL61857016 1DP450-P_AROMLLK_eng_MFL61857016 1 2/23/09 3:33:39 PM2/23/09 3:33:39 PM
Page 2
CAUTION
RISK OF ELECTRIC SHOCK
DO NOT OPEN
CAUTION: TO REDUCE THE RISK OF ELECTRIC
SHOCK. DO NOT REMOVE COVER (OR BACK).
NO USER-SERVICEABLE PARTS INSIDE. REFER
SERVICING TO QUALIFIED SERVICE PERSONNEL.
This lightning flash with arrowhead symbol
within an equilateral triangle is intended to
alert the user to the presence of uninsulated
dangerous voltage within the productʼs enclosure that may be of sufficient magnitude to
constitute a risk of electric shock to persons.
The exclamation point within an equilateral
triangle is intended to alert the user to the
presence of important operating and maintenance (servicing) instructions in the literature
accompanying the product.
WARNING: TO PREVENT FIRE OR ELECTRIC
SHOCK HAZARD, DO NOT EXPOSE THIS PRODUCT
TO RAIN OR MOISTURE.
WARNING: Do not install this equipment in a confined
space such as a book case or similar unit.
CAUTION: Do not block any ventilation openings.
Install in accordance with the manufacturer's instructions. Slots and openings in the cabinet are provided for
ventilation and to ensure reliable operation of the product and to protect it from over heating. The openings
should be never be blocked by placing the product on
a bed, sofa, rug or other similar surface. This product
should not be placed in a built-in installation such as a
bookcase or rack unless proper ventilation is provided
or the manufacturer's instruction has been adhered to.
CAUTION: This product employs
a Laser System. To ensure
proper use of this product, please
read this ownerʼs manual carefully and retain it for future reference. Should the unit require maintenance, contact an
authorized service center.Use of controls, adjustments
or the performance of procedures other than those
specified herein may result in hazardous radiation
exposure. To prevent direct exposure to laser beam,
2
do not try to open the enclosure. Visible laser radiation
when open. DO NOT STARE INTO BEAM.
CAUTION: The apparatus should not be exposed to
water (dripping or splashing) and no objects filled with
liquids, such as vases, should be placed on the apparatus.
CAUTION
• The ventilation should not be impeded by covering
the ventilation openings with items, such as newspapers, table-cloth, curtains etc.
• No naked flame sources, such as lighted candles,
should be placed on the apparatus.
• Used batteries should be disposed of safely and not
incinerated. Attention should be shown to the environment aspects of battery disposal.
• Use the apparatus in tropical and moderate climates
only.
• The excessive sound pressure from earphones and
headphones can cause hearing loss.
• The battery shall not be exposed to excessive heat
such as sunshine, fire or the like.
• Do not remove the battery incorporated with product
for your safety.
If you need to replace the battery, take it to the
nearest authorized LG Electronics service point or
dealer for assistance
CAUTION concerning the Power Cord
Most appliances recommend they be placed upon a
dedicated circuit;
That is, a single outlet circuit which powers only that
appliance and has no additional outlets or branch
circuits. Check the specification page of this owner's
manual to be certain. Do not overload wall outlets.
Overloaded wall outlets, loose or damaged wall outlets, extension cords, frayed power cords, or damaged or cracked wire insulation are dangerous. Any of
these conditions could result in electric shock or fire.
Periodically examine the cord of your appliance, and
if its appearance indicates damage or deterioration,
unplug it, discontinue use of the appliance, and have
the cord replaced with an exact replacement part by an
authorized service center. Protect the power cord from
physical or mechanical abuse, such as being twisted,
kinked, pinched, closed in a door, or walked upon. Pay
particular attention to plugs, wall outlets, and the point
where the cord exits the appliance.To disconnect power
from the mains, pull out the mains cord plug. When
installing the product, ensure that the plug is easily
accessible.
Disposal of your old appliance
1. When this crossed-out wheeled bin symbol
is attached to a product it means the product is covered by the European Directive
2002/96/EC.
2. All electrical and electronic products should
be disposed of separately from the municipal waste stream via designated collection
facilities appointed by the government or the
local authorities.
3. The correct disposal of your old appliance
will help prevent potential negative consequences for the environment and human
health.
4. For more detailed information about disposal
of your old appliance, please contact your
city office, waste disposal service or the
shop where you purchased the product.
This product is manufactured to comply
with EMC Directive 2004/108/EC and Low
Voltage Directive 2006/95/EC.
European representative :
LG Electronics Service Europe B.V.
Veluwezoom 15, 1327 AE Almere,
The Netherlands (Tel : +31–036–547–8940)
DP450-P_AROMLLK_eng_MFL61857016 2DP450-P_AROMLLK_eng_MFL61857016 2 2/23/09 3:33:39 PM2/23/09 3:33:39 PM
Page 3
Types of Playable Discs ............................................................................. 3
Rechargeable battery ................................................................................. 3
Main Unit .................................................................................................... 4
Remote Control .......................................................................................... 5
Power connections ..................................................................................... 6
Hooking up the unit ................................................................................... 7
Adjust the settings .................................................................................. 8-9
Displaying Disc Information ........................................................................ 9
Playing a Disc...................................................................................... 10-11
Playing a DivX movie file...........................................................................11
Listening to Music Disc or files ................................................................. 12
Contents
Viewing photo files ................................................................................... 12
Language Codes ...................................................................................... 13
Area Codes .............................................................................................. 13
Troubleshooting ........................................................................................ 14
Specifications ........................................................................................... 14
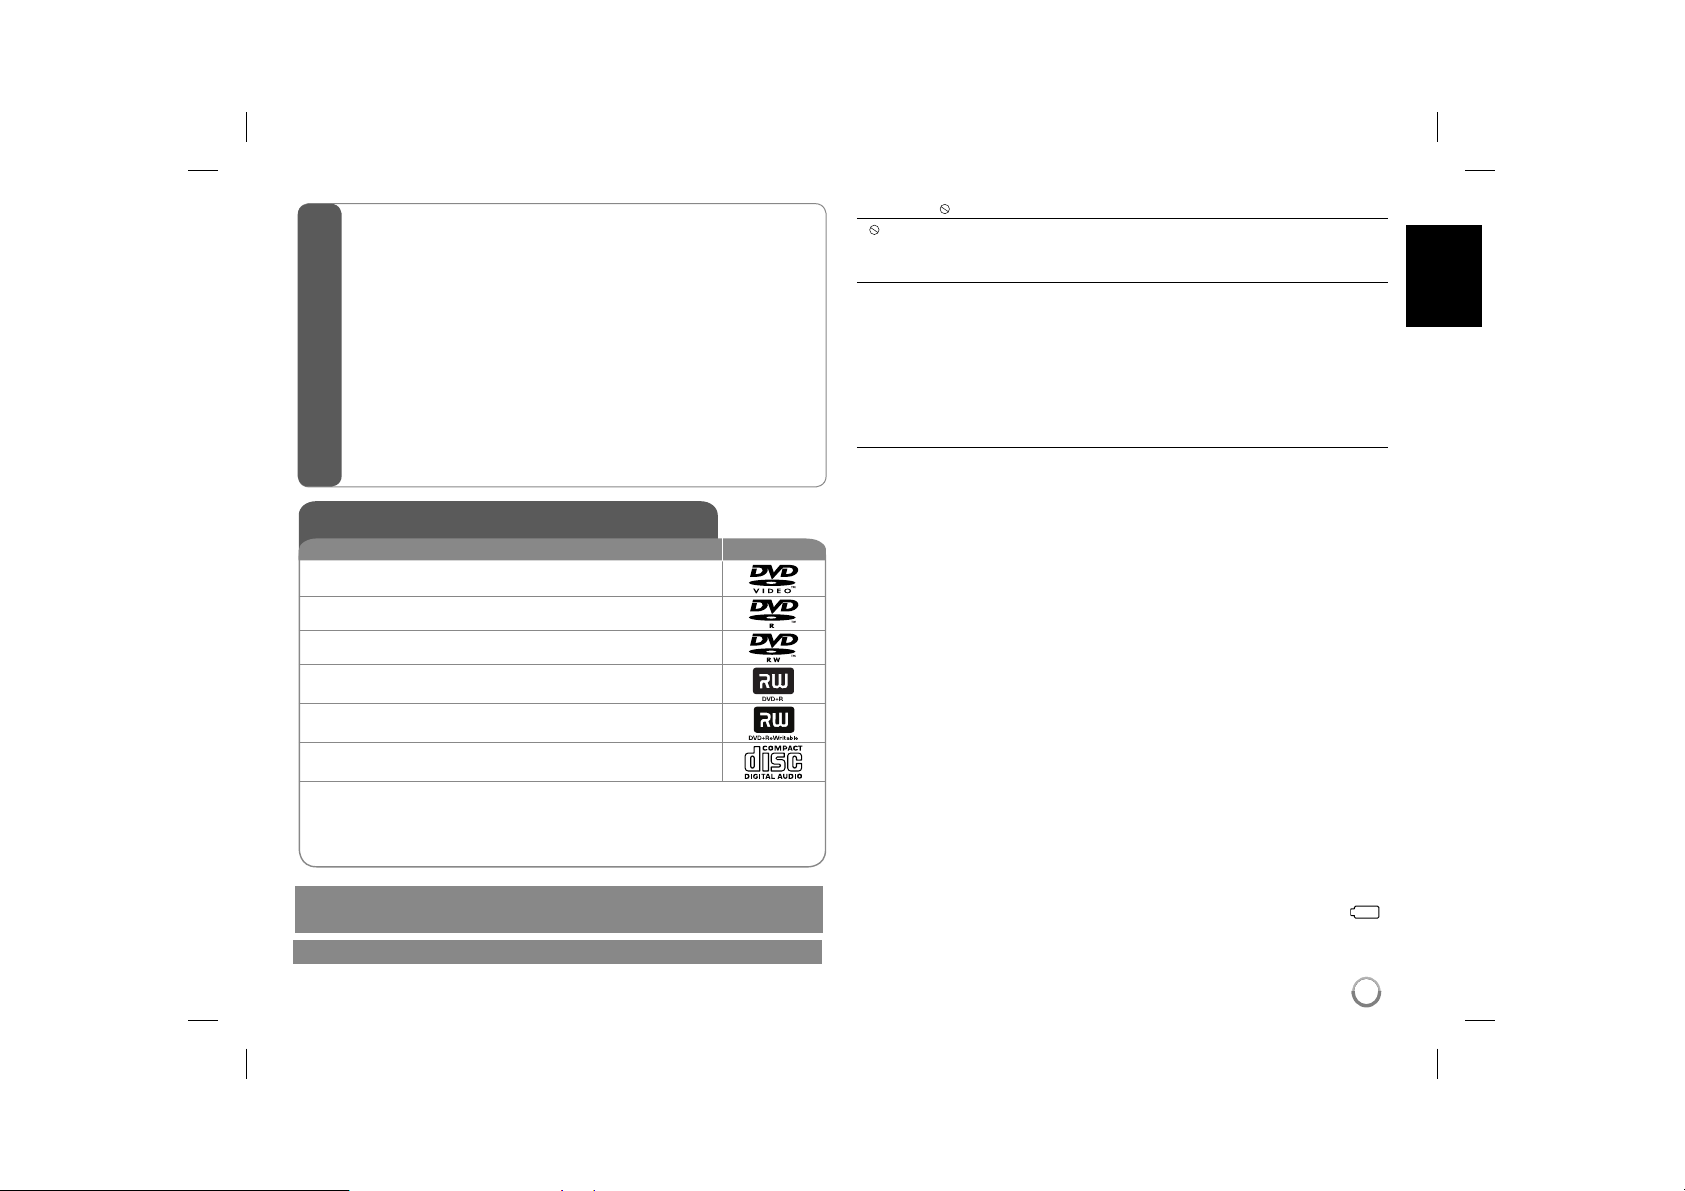
Types of Playable Discs
Type Logo
DVD-VIDEO: Discs such as movies that can be
purchased or rented.
DVD-R: Video mode and finalized only
DVD-RW: VR mode, Video mode and finalized only
DVD+R: Video mode only
DVD+RW: Video mode only
Audio CD: Music CDs or CD-R/CD-RW in music CD
format that can be purchased.
This unit plays DVD±R/RW and CD-R/RW that contains audio titles, DivX,
MP3, WMA and/or JPEG files. Some DVD±RW/DVD±R or CD-RW/CD-R cannot be played on this unit due to the recording quality or physical condition of
the disc, or the characteristics of the recording device and authoring software.
Manufactured under license from Dolby Laboratories. Dolby and the
double-D symbol are trademarks of Dolby Laboratories.
"DVD Logo" is a trademark of DVD format/Logo Licensing Corporation.
About the Symbol Display
“ ” may appear on your TV display during operation and indicates that the
function explained in this ownerʼs manual is not available on that disc.
Regional Codes
This unit has a regional code printed on the rear of the unit. This unit can play
only DVD discs labeled same as the rear of the unit or “ALL”.
• Most DVD discs have a globe with one or more numbers in it clearly visible
on the cover. This number must match your unitʼs regional code or the disc
cannot play.
• If you try to play a DVD with a different regional code from your player, the
message “Check Regional Code” appears on the TV screen.
Copyrights
It is forbidden by law to copy, broadcast, show, broadcast via cable, play in
public, or rent copyrighted material without permission. This product features
the copy protection function developed by Macrovision. Copy protection signals are recorded on some discs. When recording and playing the pictures
of these discs picture noise will appear. This product incorporates copyright
protection technology that is protected by U.S. patents and other intellectual
property rights. Use of this copyright protection technology must be authorized
by Macrovision, and is intended for home and other limited viewing uses only
unless otherwise authorized by Macrovision. Reverse engineering or disassembly is prohibited.
Rechargeable battery
• Its internal rechargeable battery provides you with the freedom to pass it
around and play the files without the power cord.
• The internal rechargeable battery will start charging only when the unit is
turned off and the AC adapter is connected to a power outlet.
• The charging stops if you turn on the unit.
• The charging will take approximately 2 hours and 30 minutes.
• Operating time on battery: approximately 2 hours and 30 minutes.
The operating time on battery may vary depending on the battery status,
operational status and environment conditions, and the maximum playing
time is possible up to 3 hours.
• The battery indicator will turn red while charging. Once the charging is complete, the indicator light changes to green.
• When the remaining time of the battery power is under a few minutes, “
will blink on the screen.
”
3
3
DP450-P_AROMLLK_eng_MFL61857016 3DP450-P_AROMLLK_eng_MFL61857016 3 2/23/09 3:33:40 PM2/23/09 3:33:40 PM
Page 4
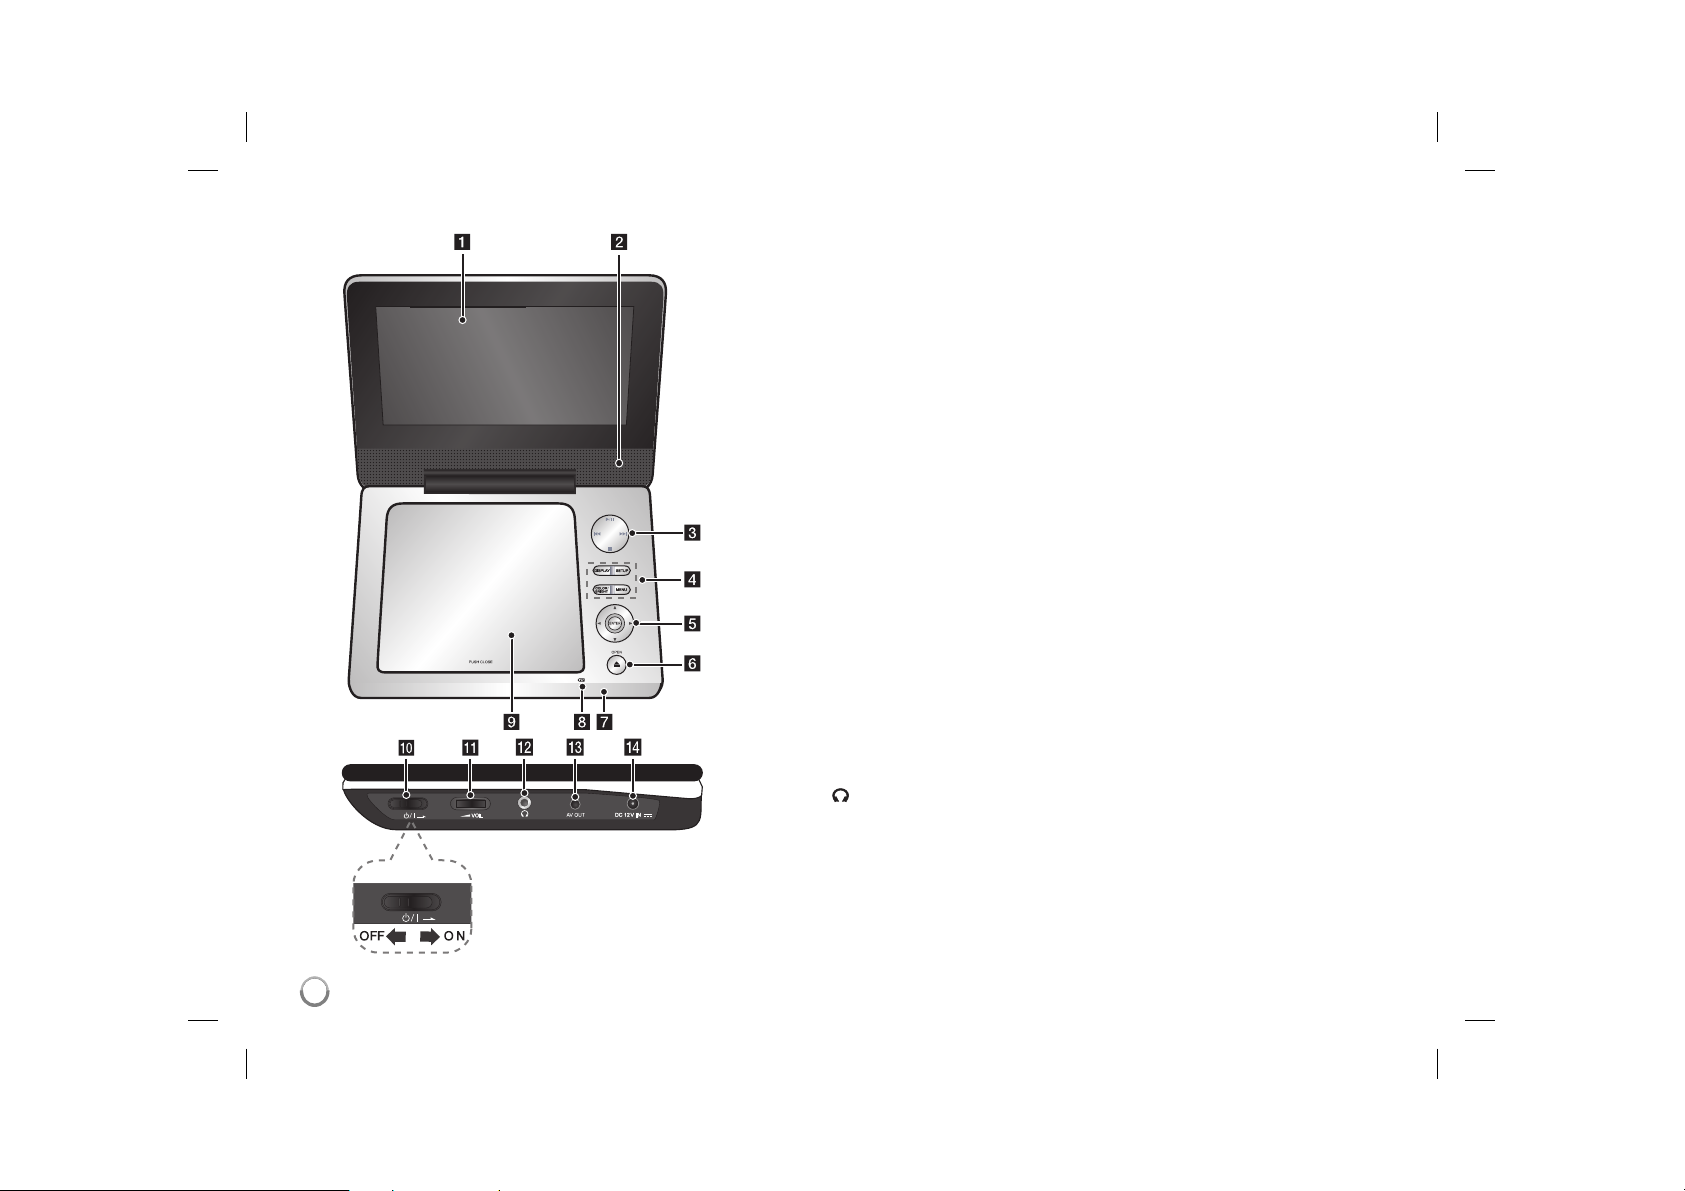
Main Unit
a LCD screen
b Speakers
c Playback control buttons
• N (Play) / X (Pause):
again to exit pause mode.
• x (Stop): Stops playback.
• . (Skip): Searches backward* or returns to the beginning of current chapters/
tracks/ files or goes to the previous chapters/ tracks/ files.
• > (Skip): Searches forward* or goes to next hapters/ tracks/ files.
* Press and hold button for about two seconds.
d Funtion buttons
• DISPLAY: Accesses On-Screen Display.
• SETUP: Accesses or exits the setup menu.
• COLOR/BRIGHT*: Displays the Brightness or Colour menu for LCD display.
• MENU: Accesses the DVD menu.
* To adjust the colour or brightness of the LCD display, press COLOR/BRIGHT
repeatedly on the main unit to display the Brightness or Colour menu then use
b / B to adjust the value. Press ENTER to confirm the adjustment.
e Menu control buttons
• b B v V (left/right/up/down): Selects an item in the menu.
• ENTER: Confirms menu selection.
f OPEN (Z): Opens the disc lid.
g Remote sensor: Point the remote control here.
h Battery charge and power indicator
• The indicator turns red in charging and changes to green colour when the charging is complete. (Refer to page 3 for details.)
• The indicator turns green for a few seconds when the unit is turned on.
i Disc lid
j 1/q (Power switch): Turn the unit ON or OFF.
Note: To operate this unit , the power switch must be located ON.
k w VOL (Volume): Adjusts the volume level of the built-in speaker and earphones.
(Earphones): Connect earphones here.
l
m AV OUT: Connect to a TV with video and audio input.
n DC 12V IN: Connect the AC adapter or automotive adapter.
Starts playback and pauses playback temporarily, press
4
DP450-P_AROMLLK_eng_MFL61857016 4DP450-P_AROMLLK_eng_MFL61857016 4 2/23/09 3:33:41 PM2/23/09 3:33:41 PM
Page 5
Remote Control
Note:
To operate this unit with remote control, the power
switch must be located ON. (Refer to 4 page)
a
b
c
d
l l l l l l l a l l l l l l l
POWER (1): Switches the unit ON or OFF.
AUDIO (
channel.
SUBTITLE (
): Selects an audio language or audio
): Selects a subtitle language.
ANGLE (
available.
SKIP/SEARCH (. / >): Searches* backward /
forward. Goes to next or previous chapter/track/file.
* Press and hold button for about two seconds.
SLOW (t / T): Reverse/ Forward slow playback.
l l l l l l l b l l l l l l l
SETUP: Accesses or exits the setup menu.
MENU: Accesses the DVD menu.
vV b B: Navigates the menus.
ENTER (
RETURN (O): Returns backwards in the menu or
exits the menu.
DISPLAY: Accesses On-Screen Display.
l l l l l l l c l l l l l l l
PAUSE/STEP (X): Pauses playback temporarily/
press repeatedly for frame-by-frame playback.
PLAY (N): Starts playback.
STOP (x): Stops playback.
Numerical buttons: Selects numbered options in
a menu.
PROG.: Enters the program edit mode.
CLEAR: Removes a track number on the Program
List.
l l l l l l l d l l l l l l l
TITLE: Accesses the discʼs title menu.
REPEAT: Repeats a chapter, track, title or all.
A-B: Repeats a section.
ZOOM: Enlarges a video image.
MARKER : Marks any point during playback.
SEARCH : Displays [Marker Search] menu.
RANDOM: Plays tracks in random order.
): Selects a DVD camera angle, if
): Confirms menu selection.
Put the battery into the Remote Control
Pinch the battery holder clip together then pull the
tab to remove the battery holder. Insert the battery
with the + facing in the same direction as the + on
the battery holder. Replace the battery holder with
battery into the Remote Control unit making sure
that it is fully inserted.
• Replace Remote Control unit battery with 3V
micro lithium cells such as CR. 2025 or its equivalent.
• Dispose of battery safety in accordance with
local laws. Do not dispose of in fire.
Warning for replaceable lithium battery
• danger of explosion if battery incorrectly replaced.
• replace only with the same type battery.
• additional warning marking close to the battery if
intended to be replaced by users.
Warning : The battery used in this device may
present a fire or chemical burn hazard if mistreated. Do not recharge, disassemble, incinerate, or heat above 100 °C (212 °F).
Replace the battery with Matsushita Elec. Ind.
Co., Ltd. (Panasonic), part no. CR. 2025 only.
Use of another battery may present a risk of fire
or explosion. Dispose of used batteries. Keep
batteries away from children. Do not disassemble or dispose of in fire.
5
DP450-P_AROMLLK_eng_MFL61857016 5DP450-P_AROMLLK_eng_MFL61857016 5 2/23/09 3:33:42 PM2/23/09 3:33:42 PM
Page 6
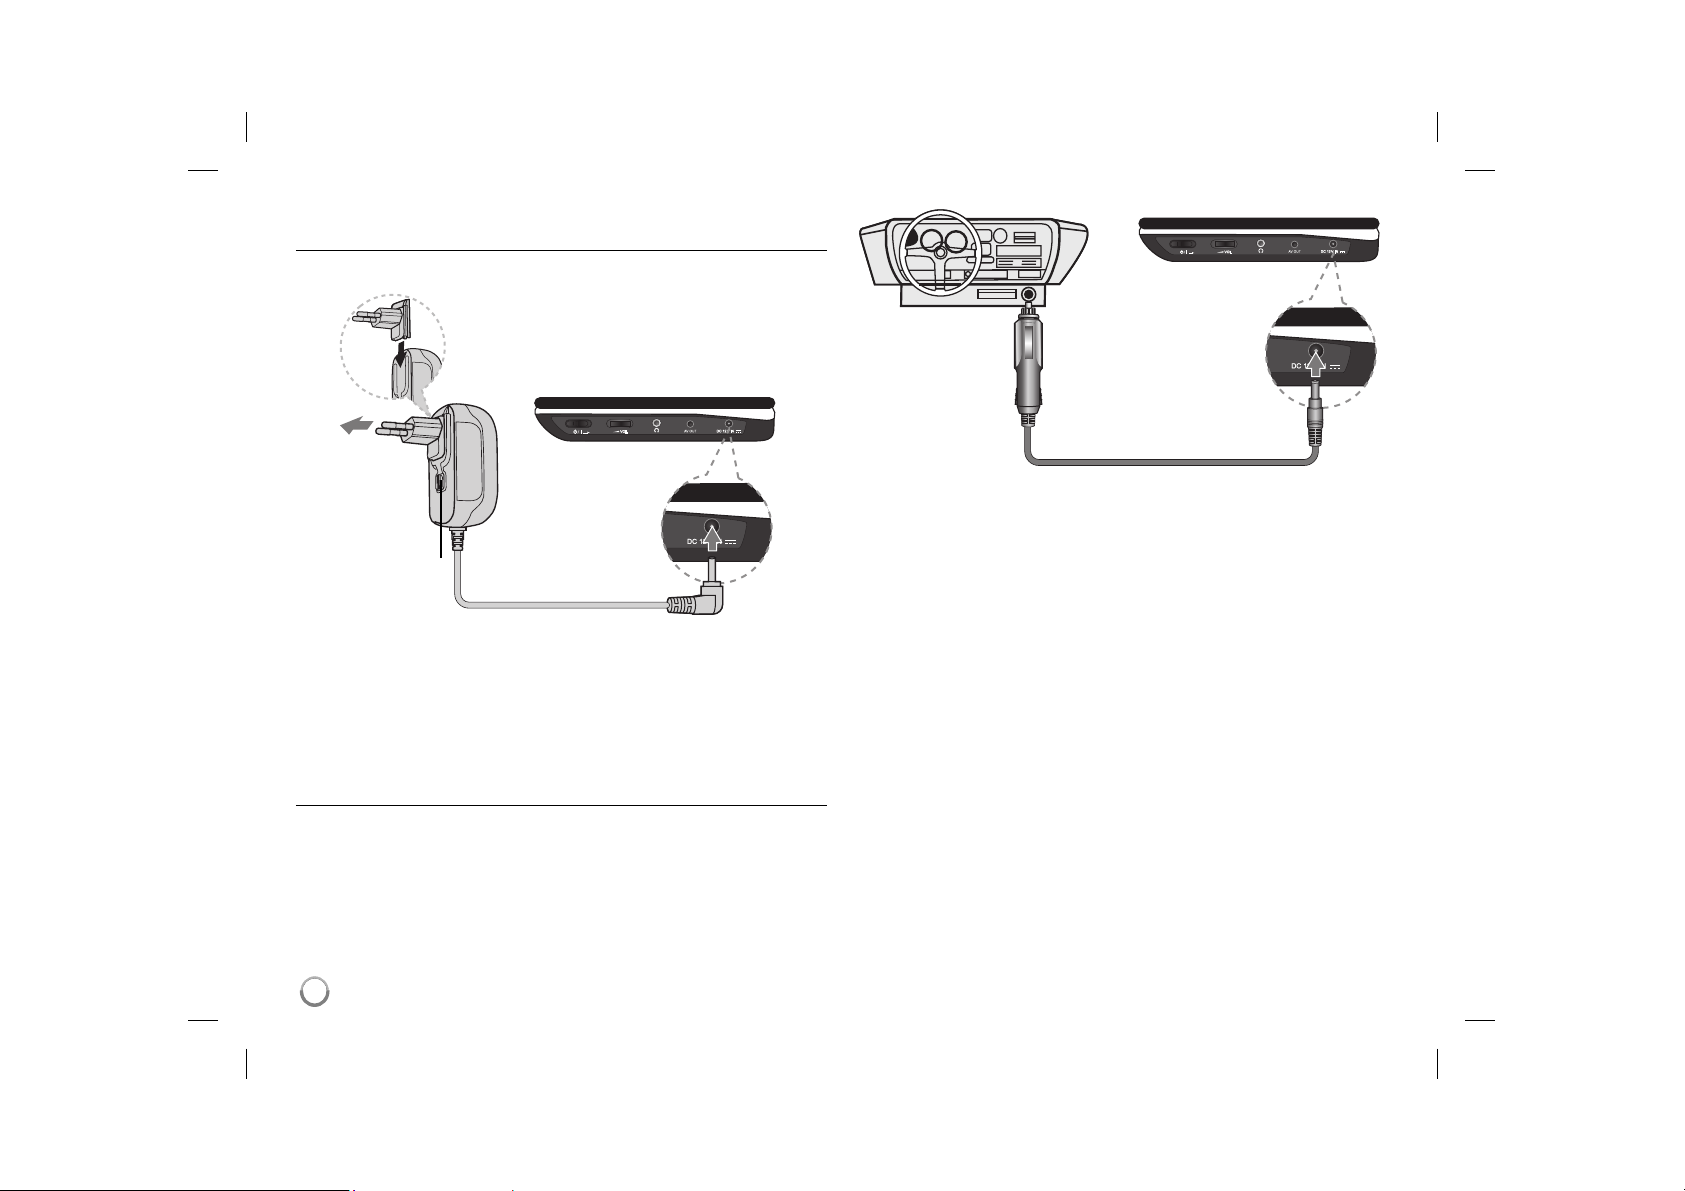
Power connections
Connecting the AC Adapter
Connect the supplied AC Adapter from the unit to a power socket.
Attach the power plug to the body of the AC adapter.
(The actual set may differ from the drawing.)
Right side of the unit
Plug into a
power source.
Power cord
release knob
Plug into the “DC 12V IN” jack.
Right side of the unit
Plug into the carʼs
cigarette lighter
socket.
Plug into the
“DC 12V IN” jack.
Automotive adapter
• This automotive adapter operates on DC 8.5-16V.
• Contact an electrical parts distributor for assistance in selecting a suitable
automotive adapter.
• Manufactured by NANJING WANLIDA TECHNOLOGY CO., LTD.
AC adapter
• This AC adapter operates on 100-240V~ 1 A 50/60Hz.
• Contact an electrical parts distributor for assistance in selecting a suitable
AC plug adapter or AC cord set.
• Manufactured by NANJING WANLIDA TECHNOLOGY CO., LTD
Connect the Automotive adapter
This unit and its automotive adapter are designed for use in vehicles that have
8.5-16 volt, negative ground electrical systems. This is standard for most vehi-
cles. If your vehicle has a different type of the electrical system, the DC power
system cannot be used.
Caution
• To prevent electrical shock and possible damage to your unit or vehicle,
always unplug the automotive adapter from the cigarette lighter socket
before you remove the plug from your unit.
• A 3 amp. 250V fuse for protection is installed in the automotive adapter.
• While the engine is being started, disconnect the automotive adapter from
the carʼs cigarette lighter socket.
• Do not operate your unit when the car battery is discharged.
Peak current from the car generator may cause the DC fuse to blow.
• If the vehicleʼs supply voltage drops below approximately 10 volts, your unit
may not work properly.
• Do not leave your unit in a place where the temperature exceeds 70°C
(158°F), or the pick-up device may be damaged.
Examples include:
- Inside a car with the windows closed and in direct sunshine.
- Near a heating appliance.
6
DP450-P_AROMLLK_eng_MFL61857016 6DP450-P_AROMLLK_eng_MFL61857016 6 2/23/09 3:33:43 PM2/23/09 3:33:43 PM
Page 7
Hooking up the unit
Audio and Video Connections to your TV
Connect the AV OUT jack on the unit to the corresponding input jacks on your
TV as shown below.
TV
Right side of the unit
Plug into the
“AV OUT” jack.
Audio/Video Cable
(not supplied)
redwhiteyellow
Audio/Video Adapter
7
DP450-P_AROMLLK_eng_MFL61857016 7DP450-P_AROMLLK_eng_MFL61857016 7 2/23/09 3:33:43 PM2/23/09 3:33:43 PM
Page 8

Adjust the settings
t
t
BUTTON
1 Display setup menu: SETUP
2 Select a desired option on the first level:
3 Move to second level:
4 Select a desired option on the second level:
5 Move to third level:
6 Change the setting:
Adjust the settings - more you can do
When you turn on for the first time (optional)
The menu for a language selection will appear when you turn on the unit for the
first time. You must select a language to use the unit. Use vV b B to select
a language then press ENTER and the confirm menu will appear. Use b B to
select [ENTER] then press ENTER.
Adjust the language settings
Menu Language – Select a language for the Setup menu and on-screen dis-
play.
Disc Audio/Subtitle/Menu – Select a language for the Disc Audio/Subtitle/
Menu.
[Original]: Refers to the original language in which the disc was recorded.
[Other]: To select another language, press number buttons then ENTER to
enter the corresponding 4-digit number according to the language code list.
(see page 13) If you make a mistake while entering number, press CLEAR to
delete numbers then correct it.
[Off] (for Disc Subtitle): Turn off Subtitle.
v V
B
v V
B
v V / ENTER
Adjust the display settings
TV Aspect – Select which screen aspect to use based on the shape of your TV
screen.
[4:3]: Select when a standard 4:3 TV is connected.
[16:9]: Select when a 16:9 wide TV is connected.
Display Mode – If you selected 4:3, youʼll need to define how you would like
widescreen programs and films to be displayed on your TV screen.
[Letterbox]: This displays a widescreen picture with black bands at the top
and bottom of the screen.
[Panscan]: This fills the entire 4:3 screen, cropping the picture as necessary.
Adjust the audio settings
DRC (Dynamic Range Control) – Make the sound clear when the volume is
turned down (Dolby Digital only). Set to [On] for this effect.
Vocal – Set to [On] only when a multi-channel karaoke DVD is playing. The
karaoke channels on the disc mix into normal stereo sound.
Adjust the lock settings
You must set the [Area Code] option to use the lock options. Select [Area Code]
option then press B. Enter a 4-digit password then press ENTER. Enter it again
then press ENTER to verify. If you make a mistake while entering number, press
CLEAR then correct it.
If you forget your password you can reset it. First, remove the disc in the unit.
Display setup menu then input the 6-digit number “210499” and the password
will be cleared.
Rating – Select a rating level. The lower the level, the stricter the rating. Select
[Unlock] to deactivate the rating.
Password – Sets or changes the password for lock settings.
[New]: Enter a new 4-digits password using the numerical buttons then press
ENTER. Enter the password again to confirm.
[Change]: Enter the new password twice after entering the current password.
Area Code – Select a code for a geographic area as the playback rating level.
This determ ines which areaʼs standards are used to rate DVDs controlled by the
parental lock. (See page 13)
8
DP450-P_AROMLLK_eng_MFL61857016 8DP450-P_AROMLLK_eng_MFL61857016 8 2/23/09 3:33:43 PM2/23/09 3:33:43 PM
Page 9
Adjust the others settings
DivX(R) VOD – We provide you with the DivX® VOD (Video On Demand) regis-
tration code that allows you to rent and purchase videos using the DivX® VOD
service. For more information, visit www.divx.com/vod.
Press ENTER when [Select] icon is highlighted and you can view the registration code of the unit.
All the downloaded videos from DivX® VOD can only be played back on this
unit.
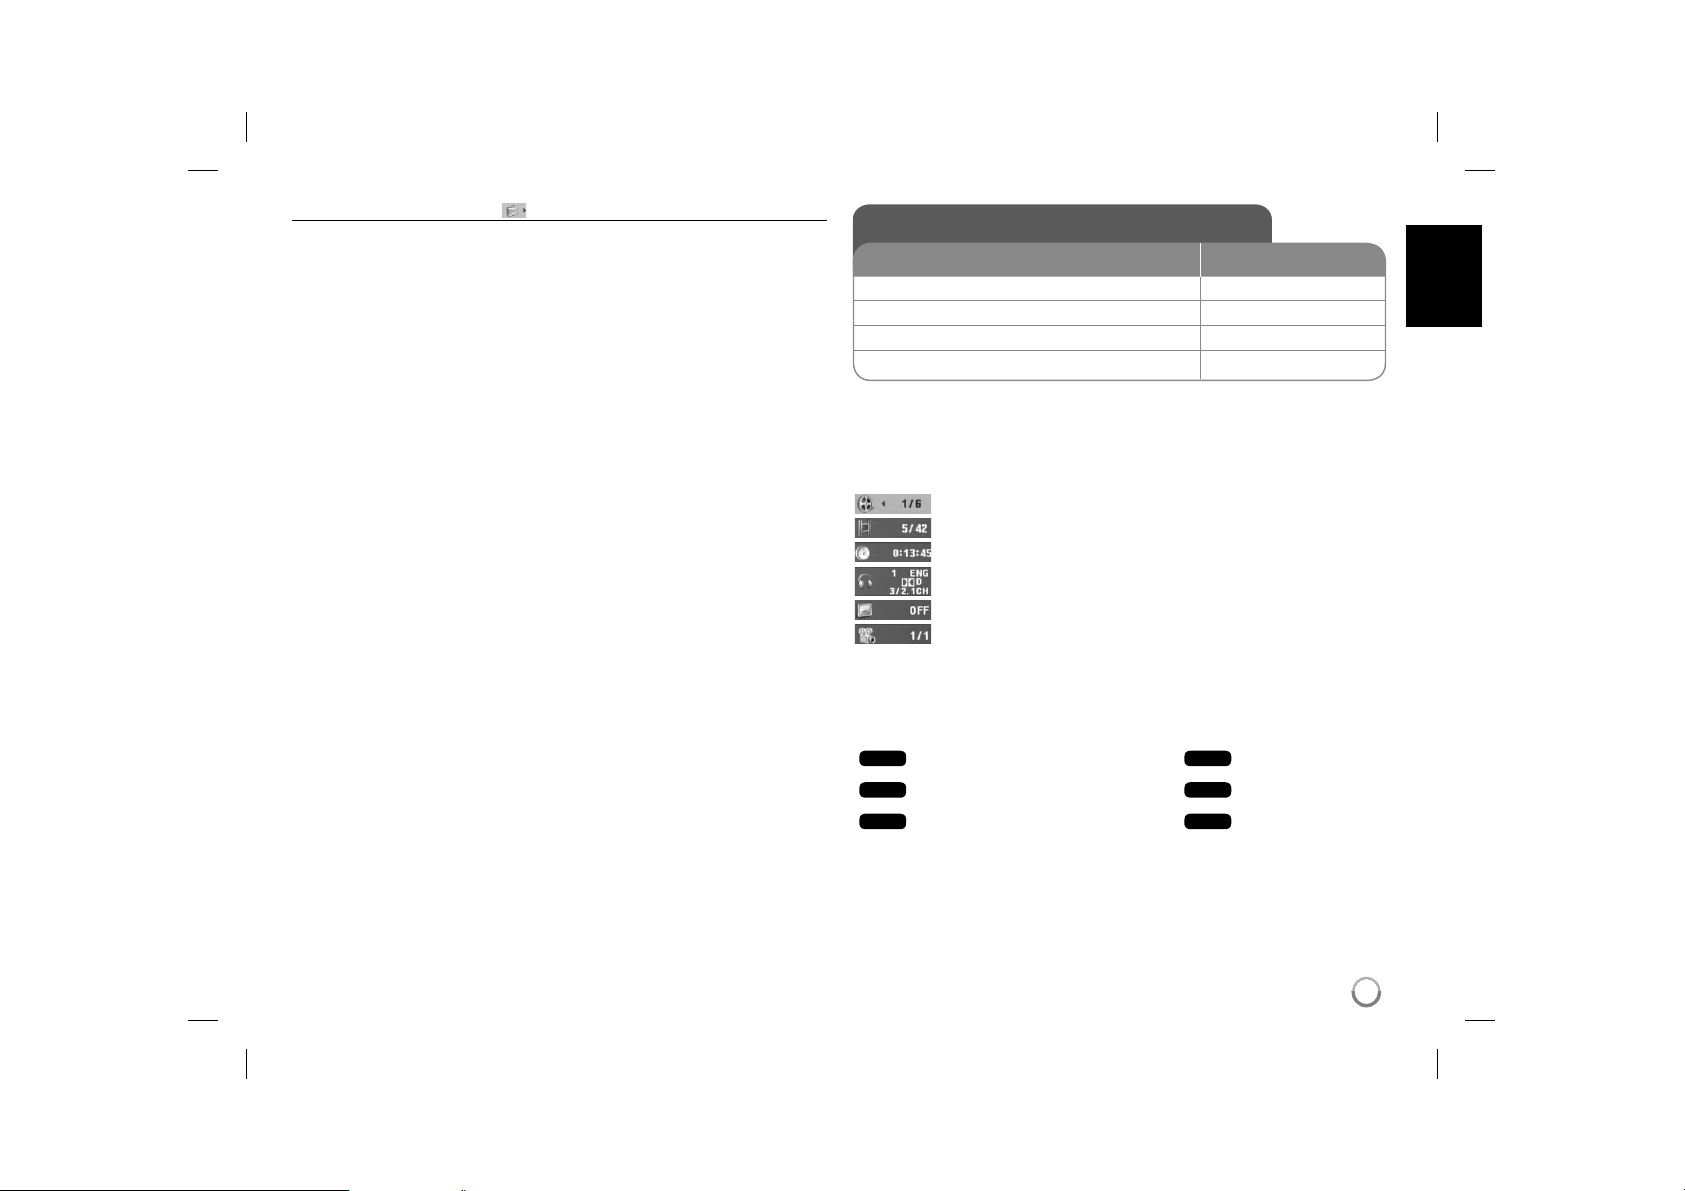
Displaying Disc Information
BUTTON
1 Press DISPLAY during playback: DISPLAY
2 Select an item:
3 Adjust the Display menu settings:
4 Exit the menu: DISPLAY
Displaying Disc Information - more you can do
You can select an item by pressing vV and change or select the setting by
pressing b B.
Current title number/total number of titles
Current chapter number/total number of chapters
Elapsed playing time
Selected audio language or channel
Selected subtitle
Selected angle/total number of angles
Symbol Used in this Manual
A section whose title has one of the following symbols are applicable only to the
disc or file represented by the symbol.
ALL
DVD
DivX
All discs and files
DVD and finalized DVD±R/RW
DivX files
v V
b B / ENTER
ACD
MP3
WMA
Audio CDs
MP3 files
WMA files
9
DP450-P_AROMLLK_eng_MFL61857016 9DP450-P_AROMLLK_eng_MFL61857016 9 2/23/09 3:33:44 PM2/23/09 3:33:44 PM
Page 10

Playing a Disc
BUTTON
1 Open the disc lid:
2 Insert a Disc: 3 Close the disc lid: 4 Start playback:
5 Adjust the volume: VOLUME
6 To stop playback:
Playing a Disc - more you can do
Stops the playback
Press STOP (x) to stop playback, the unit records the stopped point depending
on the disc. “ Xx ” appears on the screen briefly. Press PLAY ( N) to resume
playback (from the scene point). If you press STOP (x) again or unload the disc
(“ x ” appears on the screen), the unit will clear the stopped point.
(Xx =Resume Stop, x =Complete Stop) The resume point may be cleared
when a button is pressed. (for example: POWER, OPEN, etc)
Playing a DVD that has a menu
Most DVD now have menus which load first before the film begins to play. You
can navigate these menus using vV b B or number button to highlight an
option. Press ENTER to select.
Playing a DVD VR disc
This unit will play DVD-RW disc that is recorded using the Video Recording
(VR) format. When you insert a disc DVD VR disc, the menu will appear on the
screen. Use vV to select a title then press PLAY ( N). To display DVD-VR
menu, press MENU or TITLE.
Some DVD-VR disc are made with CPRM data by DVD RECORDER. The unit
does not support these kinds of discs.
Skip to the next/previous chapter/track/file
Press SKIP (>) to move to the next chapter/track/file.
Press SKIP (.) to return to the beginning of the current chapter/track/file.
Press SKIP (.) twice briefly to step back to the previous chapter/track/file.
DVD
OPEN (Z)
N PLAY
x STOP
ALL
Pause a playback
Press PAUSE/STEP (X) to pause playback. Press PLAY ( N) to continue
playback.
Frame-by-Frame playback
Press PAUSE/STEP (X) repeatedly to play Frame-by-Frame playback.
Playing repeatedly
Press REPEAT repeatedly to select an item to be repeated. The current title,
chapter track or all will be played back repeatedly. To return to normal playback,
press REPEAT repeatedly to select [Off].
Fast forward or fast reverse
Press and hold SKIP (. or >) to play fast forward or fast reverse during
playback. You can change the various playback speed by pressing and holding
SKIP (. or >) repeatedly. Press PLAY (
speed.
Repeating a specific portion (A-B)
Press A-B at the beginning of the portion you wish to repeat and again at the
end of the portion. Your selected portion will be repeated continually.
To return to normal playback, press A-B to select [Off].
Selecting a subtitle language
During playback, press SUBTITLE ( ) repeatedly to select a desired subtitle
language.
Watching from a different angle
If the angle indicator appears on the screen for a moment, you can select a different camera angle by pressing ANGLE ( ) repeatedly.
Hearing a different audio
During playback, press AUDIO ( ) repeatedly to switch between the available
audio languages, channels or encoding methods.
Slow down the playing speed
During playback, press SLOW (t or T) to slow down reverse or forward playback. You can change the various playback speed by pressing SLOW (t or T)
repeatedly. Press PLAY ( N) to continue play at normal speed.
ALL
ALL
DivX
DVD
DVD
DVD
DVD
DVD
DivX
N) to continue play at normal
DVD
DivX
DVD
DivX
DivX
(
WMA
ACD
DivX
ACD
: Forward only)
MP3
10
DP450-P_AROMLLK_eng_MFL61857016 10DP450-P_AROMLLK_eng_MFL61857016 10 2/23/09 3:33:45 PM2/23/09 3:33:45 PM
Page 11

DivX
Watching an enlarged video image
During playback or pause mode, press ZOOM repeatedly to select zoom
mode. You can move through the zoomed picture using vVb B buttons. Press
CLEAR to exit. (100% p 200 % p 300% p 400% p 100%)
Viewing the title menu
Press TITLE to display the disc's title menu, if available.
Viewing the DVD menu
Press MENU to display the disc menu, if available.
DVD
DVD
Starting play from selected time
Searches for the starting point of entered time code.
clock icon. Enter a time then press ENTER.
hour, 10 minutes, and 20 seconds, enter "11020" and press ENTER. If you
enter the wrong number, press CLEAR to enter again.
Playing in random order
During playback or in stop mode, press RANDOM for playback in random order.
Press RANDOM again to return to normal playback.
Mark a scene on a disc
You can mark a position on a disc to return to at the place. Simply press
MARKER at the desired position. The marker icon will appear on-screen briefly.
Repeat to place up to nine markers.
Also you can recall or clear the positions. Press SEARCH and [Marker Search]
menu will appear. Use b or B to select a desired marker on the menu, then
press ENTER to recall it or CLEAR to clear it.
Last Scene Memory
This unit memorizes last scene from the last disc that is viewed. The last scene
remains in memory even if you remove the disc from the player or switch off the
unit. If you load a disc that has the scene memorized, the scene is automatically recalled.
ACD
DVD
DVD ACD
DVD
DivX
DVD
For example, to find a scene at 1
WMA
DivX
Press DISPLAY then select
MP3
Screen Saver
The screen saver appears when you leave the unit in Stop mode for about five
minutes. If the Screen Saver is displayed for five minutes, the unit automatically
turns itself off.
Mixed disc – DivX, MP3/WMA and JPEG
When playing a disc contained with DivX, MP3/WMA and JPEG files together,
you can select which menu of files you would like to play by pressing TITLE.
Playing a DivX movie file
BUTTON
1 Open the disc lid:
2 Insert a disc: 3 Close the disc lid: 4 Select a movie file from the menu:
5 Start playback:
6 To stop playback:
Playing a DivX movie file - more you can do
Changing the character set to display DivX® subtitle correctly
Press and hold SUBTITLE for 3 seconds during playback. The language code
will appear. Press b B to select another language code until the subtitle is displayed properly and then press ENTER.
DivX file requirement
DivX file compatibility with this player is limited as follows:
• Available resolution size: 720x576 (W x H) pixel.
• The file names of DivX and subtitle are limited to 45 characters.
• DivX file extensions: “.avi”, “.mpg”, “.mpeg”
• Playable DivX subtitle: SubRip (.srt / .txt), SAMI (.smi),
SubStation Alpha (.ssa/.txt), MicroDVD (.sub/.txt), VobSub (.sub),
SubViewer 2.0 (.sub/.txt), TMPlayer (.txt), DVD Subtitle System (.txt)
• Playable Codec format: “DIVX3.xx”, “DIVX4.xx”, “DIVX5.xx”, “MP43”, “3IVX”.
• Only the playback function is supported with DivX 6.0 in the unit.
• Playable Audio format: “Dolby Digital”, “PCM”, “MP3”, “WMA”
• Sampling frequency: within 8 - 48 kHz (MP3), within 32 - 48 kHz (WMA)
• Bit rate: within 8 - 320 kbps (MP3), within 32 - 192 kbps (WMA),
less than 4Mbps (DivX file)
• CD-R/RW, DVD±R/RW Format: ISO 9660
• Maximum Files/Folders: Less than 600 (total number of files and folders)
OPEN (Z)
v V, MENU
N PLAY
x STOP
11
DP450-P_AROMLLK_eng_MFL61857016 11DP450-P_AROMLLK_eng_MFL61857016 11 2/23/09 3:33:46 PM2/23/09 3:33:46 PM
Page 12

Listening to Music Disc or files
BUTTON
1 Open the disc lid:
2 Insert a disc: 3 Close the disc lid: 4 Select a music from the menu:
5 Start playback:
6 To stop playback:
Listening to Music Disc or files - more you can
do
Creating your own program
You can play the contents of a disc in the order you want by arranging the order
of the musics on the disc. To add a music(s) on the program list, press PROG.
to enter the program edit mode (
Select a desired music on the [List] then press ENTER to add the music to the
program list. Select a music from the program list then press ENTER to start
programmed playback. To clear a music from the program list, select the music
you want to clear then press CLEAR in program edit mode. To clear all music
from the program list, select [Clear All] then press ENTER in program edit
mode. The program is cleared when the disc is removed or the unit is turned
off.
Displaying file information (ID3 TAG)
While playing a MP3 file containing file information, you can display the information by pressing DISPLAY repeatedly. If the file does not have ID3-Tag informa-
tion, [No ID3 TAG] appears on the screen.
MP3/WMA music file requirement
MP3/WMA compatibility with this unit is limited as follows:
• File extensions: “.mp3”, “.wma”
• Sampling frequency: within 8 - 48 kHz (MP3), within 32 - 48kHz (WMA)
• Bit rate: within 8 - 320kbps (MP3), within 32 - 192kbps (WMA)
• CD-R/RW, DVD±R/RW Format: ISO 9660
• Maximum Files/Folders: Less than 600 (total number of files and folders)
E
mark appears on the menu).
OPEN (Z)
v V, MENU
N PLAY
x STOP
Viewing photo files
BUTTON
1 Open the disc lid:
2 Insert a disc: 3 Close the disc lid: -
4 Select a photo file on the menu:
5 Display the selected file in full screen:
6 To return to the menu:
Viewing photo files - more you can do
Viewing photo files as a slide show
Use vV b B to highlight ( ) icon then press ENTER to start slide show.
You can change slide show speed using b B when ( ) icon is highlighted.
Skip to the next/previous photo
Press SKIP (. or >) to view the previous/next photo.
Rotate a photo
Use vV to rotate the photo in full screen counter clockwise or clockwise while
viewing a photo in full screen.
Pause a slide show
Press PAUSE/STEP (X) to pause a slide show. Press PLAY ( N) to continue
the slide show.
Listening to music during slide show
You can listen to music during slide show, if the disc contain music and photo
files together. Use vV b B to highlight ( ) icon then press ENTER to start
slide show.
Watching an enlarged photo image
While viewing a photo in full screen, press ZOOM repeatedly to select zoom
mode. You can move through the zoomed photo using vVb B buttons. Press
CLEAR to exit.
Photo file requirement
JPEG file compatibility with this unit is limited as follows:
• File extensions: “.jpg”
• Photo size: Less than 2MB recommended
• CD-R/RW, DVD±R/RW Format: ISO 9660
• Maximum Files/Folders: Less than 600 (total number of files and folders)
OPEN (Z)
v V, MENU
N PLAY
x STOP
12
DP450-P_AROMLLK_eng_MFL61857016 12DP450-P_AROMLLK_eng_MFL61857016 12 2/23/09 3:33:47 PM2/23/09 3:33:47 PM
Page 13

Language Codes
Use this list to input your desired language for the following initial settings: Disc Audio, Disc Subtitle, Disc Menu.
Language Code
Afar 6565
Afrikaans 6570
Albanian 8381
Ameharic 6577
Arabic 6582
Armenian 7289
Assamese 6583
Aymara 6588
Azerbaijani 6590
Bashkir 6665
Basque 6985
Bengali, Bangla 6678
Bhutani 6890
Bihari 6672
Breton 6682
Bulgarian 6671
Burmese 7789
Byelorussian 6669
Chinese 9072
Language Code
Croatian 7282
Czech 6783
Danish 6865
Dutch 7876
English 6978
Esperanto 6979
Estonian 6984
Faroese 7079
Fiji 7074
Finnish 7073
French 7082
Frisian 7089
Galician 7176
Georgian 7565
German 6869
Greek 6976
Greenlandic 7576
Guarani 7178
Gujarati 7185
Language Code
Hausa 7265
Hebrew 7387
Hindi 7273
Hungarian 7285
Icelandic 7383
Indonesian 7378
Interlingua 7365
Irish 7165
Italian 7384
Japanese 7465
Kannada 7578
Kashmiri 7583
Kazakh 7575
Kirghiz 7589
Korean 7579
Kurdish 7585
Laothian 7679
Latin 7665
Latvian, Lettish 7686
Language Code
Lingala 7678
Lithuanian 7684
Macedonian 7775
Malagasy 7771
Malay 7783
Malayalam 7776
Maori 7773
Marathi 7782
Moldavian 7779
Mongolian 7778
Nauru 7865
Nepali 7869
Norwegian 7879
Oriya 7982
Panjabi 8065
Pashto, Pushto 8083
Persian 7065
Polish 8076
Portuguese 8084
Area Codes
Choose an area code from this list.
Area Code
Afghanistan AF
Argentina AR
Australia AU
Austria AT
Belgium BE
Bhutan BT
Bolivia BO
Brazil BR
Cambodia KH
Canada CA
Chile CL
China CN
Colombia CO
Congo CG
Area Code
Costa Rica CR
Croatia HR
Czech Republic CZ
Denmark DK
Ecuador EC
Egypt EG
El Salvador SV
Ethiopia ET
Fiji FJ
Finland FI
France FR
Germany DE
Great Britain GB
Greece GR
Area Code
Greenland GL
Hong Kong HK
Hungary HU
India IN
Indonesia ID
Israel IL
Italy IT
Jamaica JM
Japan JP
Kenya KE
Kuwait KW
Libya LY
Luxembourg LU
Malaysia MY
Area Code
Maldives MV
Mexico MX
Monaco MC
Mongolia MN
Morocco MA
Nepal NP
Netherlands NL
Netherlands Antilles AN
New Zealand NZ
Nigeria NG
Norway NO
Oman OM
Pakistan PK
Panama PA
Language Code
Quechua 8185
Rhaeto-Romance 8277
Rumanian 8279
Russian 8285
Samoan 8377
Sanskrit 8365
Scots Gaelic 7168
Serbian 8382
Serbo-Croatian 8372
Shona 8378
Sindhi 8368
Singhalese 8373
Slovak 8375
Slovenian 8376
Spanish 6983
Sudanese 8385
Swahili 8387
Swedish 8386
Tagalog 8476
Area Code
Paraguay PY
Philippines PH
Poland PL
Portugal PT
Romania RO
Russian Federation RU
Saudi Arabia SA
Senegal SN
Singapore SG
Slovak Republic SK
Slovenia SI
South Africa ZA
South Korea KR
Spain ES
Language Code
Tajik 8471
Tamil 8465
Telugu 8469
Thai 8472
Tonga 8479
Turkish 8482
Turkmen 8475
Twi 8487
Ukrainian 8575
Urdu 8582
Uzbek 8590
Vietnamese 8673
Volapük 8679
Welsh 6789
Wolof 8779
Xhosa 8872
Yiddish 7473
Yoruba 8979
Zulu 9085
Area Code
Sri Lanka LK
Sweden SE
Switzerland CH
Taiwan TW
Thailand TH
Turkey TR
Uganda UG
Ukraine UA
United States US
Uruguay UY
Uzbekistan UZ
Vietnam VN
Zimbabwe ZW
13
DP450-P_AROMLLK_eng_MFL61857016 13DP450-P_AROMLLK_eng_MFL61857016 13 2/23/09 3:33:48 PM2/23/09 3:33:48 PM
Page 14

Troubleshooting
Symptom Cause Correction
No power. The power cord is disconnected. Plug the power cord into the wall
The battery is discharged. Recharge the battery.
The power is on,
but the unit does
not work.
No picture. The TV is not set to receive the
No sound. The equipment connected with
The unit does
not start playback.
The remote
control does not
work properly.
No disc is inserted. Insert a disc.
signal from the unit.
The video cable is not connected
securely.
the audio cable is not set to
receive the signal from the unit.
The volume is set to minimum. Use the volume controller to
The AUDIO options are set to the
wrong position.
An unplayable disc is inserted. Insert a playable disc. (Check the
The rating level is set. Change the rating level.
The remote control is not pointed
at the remote sensor on the unit.
The remote control is too far from
the unit.
outlet securely.
Select the appropriate video input
mode on the TV.
Connect the video cable securely.
Select the correct input mode of
the audio amplifier.
adjust the volume.
Set the AUDIO settings to the
correct position.
disc type and regional code.)
Point the remote control at the
remote sensor of the unit.
Operate the remote control closer
to the unit.
Specifications
General
Power requirements DC 12V
Power consumption 12W
External Dimensions 202 x 42.5 x 167 mm (W x H x D)
Net Weight (Approx.) 0.78kg
Operating temperature: 5 °C to 40 °C
Operating humidity 5 % to 90 %
Laser Semiconductor laser
Signal system PAL
Connectors
Audio/Video Output ø3.5mm mini jack x 1
- Video: 1.0 V (p-p), 75 Ω, sync negative
- Audio: 1.5 Vrms (1 KHz, 0 dB)
Earphone terminal ø3.5mm stereo mini jack x 1
Liquid Crystal Display
Panel size 7 inches wide (diagonal)
Projection system R.G.B. stripe
Driving system TFT active matrix
Resolution 480 x 234 (WQVGA)
Accessories
• Audio/Video adapter
• AC Adapter (MPA-630)
• Automotive Adapter (DPDC1)
• Remote Control
• Battery for Remote Control (Lithium Battery)
Designs and specifications are subject to change without
prior notice.
14
DP450-P_AROMLLK_eng_MFL61857016 14DP450-P_AROMLLK_eng_MFL61857016 14 2/23/09 3:33:49 PM2/23/09 3:33:49 PM
Page 15

DP450 / DP450P / DP450R
ROMÂNÃ
P/NO : MFL61857016
DP450-P_AROMLLK_ROM_MFL61857016 1DP450-P_AROMLLK_ROM_MFL61857016 1 2/23/09 3:33:00 PM2/23/09 3:33:00 PM
Page 16

PRECAU‰II
RISC DE ELECTROCUTARE
NU DESCHIDE‰I
PRECAU‰I: PENTRU A REDUCE RISCUL DE
ELECTROCUTARE. NU SCOATE‰I CAPACUL (SAU
PARTEA DIN SPATE). ÎN INTERIOR NU EXISTÃ
PIESE CARE POT FI MANIPULATE DE UTILIZATOR.
PENTRU LUCRÃRI DE SERVICE ADRESA‰I-VÃ
PERSONALULUI CALIFICAT
Acest fulger cu simbolul sãge—ii încadrat întrun triunghi echilateral este destinat sã alerteze
utilizatorul cu privire la prezen—a unei tensiuni
periculoase neizolate în incinta produsului,
care ar putea avea o valoare suficientã pentru
a constitui un risc de …oc electric.
Semnul de exclamare încadrat într-un triunghi
echilateral este destinat sã alerteze utilizatorul
cu privire la prezen—a unor instruc—iuni importante de operare …i între—inere (service) în
documenta—ia care înso—e…te produsul.
ATEN‰IE: PENTRU A REDUCE RISCUL DE
INCENDIU SAU ELECTROCUTARE, NU EXPUNE‰I
ACEST PRODUS INTEMPERIILOR SAU UMEZELII.
ATEN‰IE: Nu instala—i acest echipament într-un spa—iu
restrâns, cum ar fi o bi bliotecã sau un element similar.
PRECAU‰II: Nu obstruc—iona—i orificiile de ventilare. A
se instala în conformitate cu instruc—iunile producãtorului. Fantele …i orificiile din carcasã au rolul de a asigura
ventilarea …i o func—ionare optimã a produsului, precum
…i de a proteja produsul de supraîncãlzire. Orificiile nu
trebuie obstruc—ionate prin a…ezarea produsului pe un
pat, o canapea, o carpetã sau pe o altã suprafa—ã similarã. Acest produs nu trebuie amplasat într-un obiect
de mobilier, cum ar fi o bibliotecã sau un raft, decât
dacã existã o ventila—ie corespunzãtoare sau dacã se
respectã instruc—iunile producãtorului.
PRECAU‰II: Acest produs
folose…te un sistem laser. Pentru
a asigura o utilizare corectã a
acestui produs, citi—i cu aten—ie
acest manual de utilizare …i
pãstra—i-l pentru consultãri ulterioare. Dacã aparatul
necesitã lucrãri de între—inere, contacta—i un service
autorizat. Folosirea comenzilor, reglajelor sau îndeplini-
rea altor proceduri decât cele specificate aici pot provoca expuneri periculoase la radia—ii. Pentru a preveni
expunerea directã la razele laser, nu încerca—i sã deschide—i incinta. La deschidere sunt radia—ii laser vizibile.
NU PRIVI‰I DIRECT ÎNSPRE RAZE.
PRECAU‰II: Aparatul nu trebuie sã vinã în contact cu
apa (picãturi sau vãrsatã), iar pe el nu trebuie a…ezate
obiecte pline cu lichide, cum ar fi vaze de flori.
PRECAU‰II
• Aerisirea nu trebuie obstruc—ionatã prin acoperirea
orificiilor de ventilare cu diverse obiecte, cum ar fi
ziare, fe—e de masã, perdele etc.
• Pe aparat nu trebuie amplasate surse de foc, cum ar
fi lumânãri aprinse.
• Bateriile consumate trebuie evacuate în siguran—ã
…i nu aruncate în foc. Trebuie sã acorda—i aten—ie
aspectelor legate de mediu atunci când arunca—i bateriile.
• Folosi—i aparatul numai în locuri cu climã tropicalã …i
moderatâ.
• O presiune excesivã a sunetului din cã…ti poate provoca pierderea auzului.
• Bateriile nu se vor expune la cãldurã excesivã, cum
ar fi la soare, la foc sau similar.
• Nu scoateţi bateria încorporată în produs, pentru
siguranţa dvs. Dacă este necesar să înlocuiţi bateria,
duceţi aparatul la cel mai apropiat punct de service
LG Electronics autorizat sau la dealer, pentru
asistenţă
• Nu scoateţi bateria încorporată în produs, pentru
siguranţa dvs. Dacă este necesar să înlocuiţi bateria,
duceţi aparatul la cel mai apropiat punct de service
LG Electronics autorizat sau la dealer, pentru
asistenţă
PRECAU‰II cu privire la cablul de alimentare
Pentru majoritatea aparatelor, se recomandã sã fie
amplasate pe un circuit dedicat;
Aceasta înseamnã ca un circuit electric sã alimenteze doar acest aparat, fãrã alte prize sau circuite
secundare. Consulta—i pagina de specifica—ii din acest
manual de utilizare pentru mai multã siguran—ã. Nu
supraîncãrca—i prizele. Prizele cu suprasarcinã, prizele
…i cablurile slãbite sau deteriorate, cablurile de alimentare roase sau deteriorate, ori cu izola—ia ruptã, sunt
periculoase. Oricare dintre aceste situa—ii poate provoca
electrocutare sau incendiu. Examina—i periodic cablul
aparatului, iar dacã pare a fi deteriorat scoate—i-l din
prizã, nu mai utiliza—i aparatul …i înlocui—i cablul cu unul
identic, printr-un service autorizat. Proteja—i cablul de
alimentare împotriva abuzurilor de ordin fizic sau mecanic, cum ar fi rãsucirea, formarea de noduri, prinderea
la o u…ã sau cãlcarea sa. Acorda—i o aten—ie specialã
…tecãrelor, prizelor …i punctului în care cablul iese
din aparat. Pentru a întrerupe alimentarea cu curent,
scoate—i …tecãrul din prizã. Când instala—i produsul,
asigura—i-vã cã …tecãrul este u…or accesibil.
Evacuarea aparatului vechi
1. Dacã un produs poartã acest simbol cu o
pubelã tãiatã, aceasta înseamnã cã produsul
respectiv se supune Directivei europene
2002/96/EC.
2. Toate aparatele electrice …i electronice vor
fi evacuate separat de de…eurile menajere,
prin serviciile speciale de colectare desemnate de autoritã—ile guvernamentale sau
locale.
3. Evacuarea corectã a vechiului aparat va
ajuta la preîntâmpinarea unor posibile
consecin—e negative pentru mediu …i pentru
sãnãtatea omului.
4. Pentru mai multe informa—ii detaliate cu privire la evacuarea vechiului aparat, contacta—i
biroul municipal, serviciile de evacuare a de…
eurilor sau magazinul de unde a—i cumpãrat
produsul.
Acest produs este fabricat în conformitate
cu Directiva EMC 2004/108/EC …i Directiva
pentru joasã tensiune 2006/95/EC.
Reprezentant european:
LG Electronics Service Europe B.V.
Veluwezoom 15, 1327 AE Almere, OLANDA
(Tel : +31-036-547-8940)
2
DP450-P_AROMLLK_ROM_MFL61857016 2DP450-P_AROMLLK_ROM_MFL61857016 2 2/23/09 3:33:00 PM2/23/09 3:33:00 PM
Page 17

Tipuri de discuri care pot fi folosite............................................................. 3
Acumulatorul ............................................................................................... 3
Unitatea principalã ...................................................................................... 4
Telecomanda .............................................................................................. 5
Conexiuni pentru alimentare ......................................................................6
Efectuarea conexiunilor aparatului ............................................................. 7
Efectuarea setãrilor .................................................................................8-9
Afi…area informa—iilor discului ...................................................................... 9
Redarea unui disc ...............................................................................10-11
Redarea unui fi…ier de film DivX ................................................................11
Pentru a asculta discuri sau fi…iere cu muzicã ......................................... 12
Cuprins
Vizualizarea fi…ierelor foto ........................................................................ 12
Coduri de limbã ........................................................................................ 13
Coduri regionale ....................................................................................... 13
Depanare .................................................................................................. 14
Specifica—ii ................................................................................................ 14
Tipuri de discuri care pot fi folosite
Tip Logo
DVD-VIDEO: Discurile - cum ar fi filmele - care pot fi
cumpãrate sau închiriate.
DVD-R: Numai în mod video finalizat
DVD-RW: mod VR, numai în mod Video finalizat
DVD+R: Numai mod Video
DVD+RW: Numai mod Video
Audio CD: CD-uri cu muzicã sau discuri CD-R/CD-RW în
format CD muzicã, care pot fi cumpãrate
Acest aparat redã un disc DVD±R/RW …i CD-R/RW care con—ine titluri audio,
fi…iere DivX, MP3, WMA …i/sau JPEG. Unele discuri DVD±RW/DVD±R sau
CD-RW/CD-R nu pot fi redate pe acest aparat, datoritã calitã—ii înregistrãrii sau
stãrii fizice a discului respectiv, precum …i datoritã caracteristicilor aparatului pe
care s-a efectuat înregistrarea …i software-ului de realizare.
Produs sub licen—ã de la Dolby Laboratories. Dolby …i simbolul cu doi D
sunt mãrci înregistrate ale Dolby Laboratories.
"DVD Logo” este marcã înregistratã a DVD Format/Logo Licensing
Corporation.
Despre afi…area simbolului
“ ” poate apãrea pe ecranul televizorului în timpul operãrii …i înseamnã cã
func—ia explicatã în acest manual de utilizare nu este disponibilã pe discul
respectiv.
Coduri regionale
Acest aparat are un cod regional tipãrit în partea din spate. Acest aparat poate
reda numai DVD-uri care poartã aceea…i etichetã ca cea din partea din spate
sau “ALL”.
• Pe coperta majoritã—ii discurilor DVD se aflã un glob cu unul sau mai multe
numere, vizibile în mod clar. Acest numãr trebuie sã corespundã cu codul
regional al aparatului, altfel discul nu poate fi redat.
• Dacã încerca—i sã reda—i un DVD al cãrui cod regional este diferit de al
player-ului, pe ecranul televizorului va apãrea mesajul “Check Regional
Code” (Verifica—i codul regional).
Drepturi de autor
Este interzis prin lege sã copia—i, difuza—i, arãta—i, difuza—i prin cablu, reda—i în
public sau închiria—i material cu drepturi de autor fãrã permisiune. Acest
produs dispune de func—ia de protec—ie la copiere elaboratã de Macrovision.
Pe unele discuri sunt înregistrate semnale de protec—ie la copiere. Atunci când
înregistra—i …i reda—i imagini pe aceste discuri, imaginea va fi distorsionatã.
Acest produs încorporeazã tehnologie de protec—ie a drepturilor de autor care
este protejatã prin patente SUA …i alte drepturi de proprietate intelectualã.
Utilizarea acestei tehnologie de protec—ie a drepturilor de autor trebuie
autorizatã de Macrovision …i este destinatã utilizãrii casnice …i altor utilizãri
limitate, exceptând cazul în care existã o altã autorizare din partea
Macrovision. Demontarea …i dezasamblarea sunt interzise.
Acumulatorul
• Acumulatorul intern vã oferã libertatea de a circula …i de a reda fi…ierele fãrã
cablul de alimentare.
• Acumulatorul intern va începe sã se încarce numai când aparatul este oprit
…i adaptorul pentru prizã este conectat la prizã.
• Încãrcarea se opre…te dacã închide—i aparatul.
• Încãrcarea va dura aproximativ 2 ore …i 30 minute.
• Timp de func—ionare cu acumulator: aproximativ 2 ore …i 30 minute.
Timpul de operare al bateriei poate varia în func—ie de starea bateriei, de
starea de operare …i de condi—iile de mediu, iar timpul maxim de redare
poate fi de 3 ore.
• În timpul încãrcãrii, indicatorul acumulatorului va deveni ro…u. Când
încãrcarea este completã, indicatorul devine verde.
• Când acumulatorul mai poate func—iona mai pu—in de câteva minute, pe
ecran se va aprinde intermitent "
”.
3
3
DP450-P_AROMLLK_ROM_MFL61857016 3DP450-P_AROMLLK_ROM_MFL61857016 3 2/23/09 3:33:01 PM2/23/09 3:33:01 PM
Page 18

Unitatea principalã
a Ecran LCD
b Difuzoare
c Butoane de control al redãrii
• N (Play)/ X (Pause): Începe redarea. Întrerupe temporar înregistrarea; apãsa—i
din nou pentru a ie…i din modul pauzã.
• x (Stop): Opre…te redarea.
• . (Salt): Cãutare înapoi* sau trecere la începutul capitolului ori track-ului
curent sau la capitolul ori track-ul anterior.
• > (Salt): Cãutare înainte* sau trecere la urmãtorul capitol sau track.
*Apãsa—i butonul …i —ine—i-l apãsat timp de circa douã secunde.
d Butoane func—ionale
• DISPLAY: Acceseazã afi…area pe ecran.
• SETUP: Acceseazã meniul Setup sau iese din el.
• COLOR/BRIGHT*: Afi…eazã meniul Luminozitate sau Culoare pentru afi…aj LCD.
• MENU: Acceseazã meniul DVD-ului.
* Pentru a regla culoarea sau luminozitatea afi…ajului LCD, apãsa—i repetat COLOR/
BRIGHT de pe unitatea principalã pentru a afi…a meniul Luminozitate sau Culoare
…i apoi utiliza—i b / B pentru a regla valoarea. Apãsa—i ENTER pentru a confirma
reglarea.
e Butoane control meniu
• b B v V (stânga/dreapta/sus/jos): Selecteazã un element din meniu.
• ENTER: Confirmã selec—ia din meniu.
f OPEN (Z): Deschide capacul discului.
g Senzor distan—ã: Îndrepta—i telecomanda cãtre el.
h Indicator încãrcare acumulator …i alimentare
• Indicatorul devine ro…u în timpul încãrcãrii …i verde când încãrcarea este
încheiatã. (Consulta—i pagina 3 pentru detalii).
• Indicatorul devine verde timp de câteva secunde când aparatul este pornit.
i Capac disc
j
1/q (Comutator): Comutã aparatul pe deschis ON sau pe închis OFF.
Notă: Pentru a utiliza acest aparat, comutatorul trebuie să fie în poziţia ON.
k w VOL (Volume): Reglează nivelul volumului difuzorului şi căştilor încorporate.
l (Cã…ti): Conectaţi o pereche de căşti.
m AV OUT: Conectaţi la un televizor cu intrări video şi audio.
n DC 12V IN: Conecta—i adaptorul de prizã sau cel de ma…inã.
4
DP450-P_AROMLLK_ROM_MFL61857016 4DP450-P_AROMLLK_ROM_MFL61857016 4 2/23/09 3:33:02 PM2/23/09 3:33:02 PM
Page 19

Telecomanda
Notã: Pentru a utiliza acest aparat cu teleco-
manda, comutatorul trebuie să fie în poziţia ON.
(Consultaţi pagina 4)
a
b
c
d
l l l l l l l a l l l l l l l
POWER (1): Comutã aparatul pe deschis ON sau
pe închis OFF.
AUDIO (
canal audio.
SUBTITLE (
subtitrare.
): Selecteazã o limbã audio sau un
):Selecteazã o limbã pentru
ANGLE (
dacã este disponibil.
SKIP/SEARCH (. / >): Cãutare* înapoi /
înainte. Trece la urmãtorul capitol/track sau la cel
anterior.
* Apãsa—i butonul …i —ine—i-l apãsat timp de circa
douã secunde.
SLOW (t / T): Redare lentã înapoi/înainte.
l l l l l l l b l l l l l l l
SETUP: Acceseazã meniul Setup sau iese din el.
MENU: Acceseazã meniul DVD-ului.
vV b B: Navigheazã în meniuri.
ENTER (
RETURN (O): Apãsa—i pentru a va deplasa înapoi
în meniu sau pentru a ie…i din meniu.
DISPLAY: Acceseazã afi…area pe ecran.
l l l l l l l c l l l l l l l
PAUSE/STEP (X): Întrerupe temporar redarea /
apãsa—i repetat pentru redare cadru cu cadru.
PLAY (N): Începe redarea.
STOP (x): Opre…te redarea.
Butoane numerice: Selecteazã op—iunile
numerotate dintr-un meniu.
PROG.: Intrã în modul de editare program.
CLEAR: ⁄terge un numãr de track din lista
programului sau un semn din meniul Cãutare dupã
semn.
l l l l l l l d l l l l l l l
TITLE: Afi…eazã meniul titlu al discului.
REPEAT: Repetã un capitol, track, titlu sau toate.
A-B: Repetã o sec—iune.
ZOOM: Mãre…te imaginea video.
MARKER : Marcheazã un punct în timpul redãrii.
SEARCH : Afi…eazã meniul [Marker Search].
RANDOM: : Redã track-urile în ordine aleatorie.
): Selecteazã unghiul camerei la DVD,
): Confirmã selec—ia din meniu.
Pune—i bateria în telecomandã
Prinde—i clema de sus—inere a bateriei …i apoi
trage—i urechiu…a pentru a scoate suportul bateriei.
Introduce—i bateria cu semnul + în aceea…i direc—ie
ca semnul + de pe suportul bateriei. Introduce—i
suportul bateriei, cu tot cu baterie, în telecomandã,
asigurându-vã cã le-a—i fixat bine.
• Înlocui—i bateria telecomenzii cu baterii mici cu
litiu de 3V, cum este CR. 2025 sau echivalent.
• Arunca—i bateria conform legisla—iei locale. Nu o
arunca—i în foc.
Aten—ionare pentru bateria cu litiu care poate fi
înlocuitã
• Pericol de explozie dacã bateria nu este înlocuitã
corect.
• Înlocui—i numai cu acela…i tip de baterie.
• Marcaj suplimentar de aten—ionare în apropierea
bateriei dacã se inten—ioneazã a fi înlocuitã de
utilizator.
Aten—ie : Bateria folositã la acest aparat poate
prezenta risc de foc sau arsuri chimice dacã nu
este manipulatã corespunzãtor. Nu reîncãrca—i,
demonta—i, arde—i sau încãlzi—i bateria la o
temperaturã de peste 100°C (212 °F).
Înlocui—i bateria numai cu CR. 2025 Matsushita
Elec. Ind. Co., Ltd. (Panasonic). Folosirea unei
alte baterii poate prezenta risc de incendiu sau
explozie. Arunca—i bateriile folosite. Nu lãsa—i
bateriile la îndemâna copiilor. Nu le demonta—i …i
nu le arunca—i în foc.
5
DP450-P_AROMLLK_ROM_MFL61857016 5DP450-P_AROMLLK_ROM_MFL61857016 5 2/23/09 3:33:03 PM2/23/09 3:33:03 PM
Page 20

Conexiuni pentru alimentare
Conectarea adaptorului pentru prizã (AC)
Conecta—i adaptorul pentru prizã (AC) livrat de la aparat la prizã.
Partea din dreapta a aparatului
Ata…a—i …tecãrul la corpul adaptorului de prizã.
(Setul poate diferi de schemã).
Partea din dreapta a aparatului
Introduce—i-l în
sursa de
alimentare.
Buton de eliberare
a cablului de
alimentare
Adaptor pentru prizã
• Acest adaptor pentru prizã func—ioneazã la 100-240V ~1A 50/60 Hz.
• Contacta—i un distribuitor de articole electrice pentru asisten—ã cu privire la
alegerea unui adaptor de prizã sau a unui cablu de alimentare.
• Produs de cãtre NANJING WANLIDA TECHNOLOGY Co., LTD
Conecta—i la mufa de "intrare curent continuu 12 V”.
Conecta—i adaptorul de ma…inã
Acest aparat …i adaptorul sãu pentru ma…inã sunt destinate utilizãrii în vehicule
cu sisteme electrice cu împãmântare negativã de 8,5-16 vol—i. Acesta este
standardul pentru majoritatea vehiculelor. Dacã vehiculul dvs. are un tip diferit
de sistem electric, nu ve—i putea folosi sistemul DC (curent continuu).
Conecta—i la mufa
pentru brichetã a
ma…inii.
Conecta—i la mufa de
"intrare curent continuu 12 V”.
Adaptorul pentru ma…inã
• Acest adaptor pentru ma…inã func—ioneazã la curent continuu de 8,5-16V.
• Contacta—i un distribuitor de articole electrice pentru asistenã cu privire la
alegerea unui adaptor pentru ma…inã potrivit.
• Produs de cãtre NANJING WANLIDA TECHNOLOGY CO., LTD
Precau—ii
• Pentru a preveni riscul de electrocutare …i de deteriorare a aparatului sau a
ma…inii, scoate—i întotdeauna adaptorul de ma…inã din mufa pentru brichetã
înainte de a scoate mufa din aparat.
• În adaptorul pentru ma…inã este instalatã o siguran—ã de 250V A3 amp.
• Când motorul este pornit, scoate—i adaptorul pentru ma…inã din mufa pentru
brichetã.
• Nu folosi—i aparatul dacã bateria ma…inii este descãrcatã. Curentul de vârf
din generatorul ma…inii poate cauza arderea siguran—ei DC.
• Dacã voltajul ma…inii scade sub circa 10 vol—i, este posibil ca aparatul sã nu
func—ioneze la parametrii optimi.
• Nu lãsa—i DVD aparatul într-un loc în care temperatura depã…e…te 70°C, de
oarece se poate deteriora.
Câteva exemple:
- În interiorul ma…inii, cu ferestrele închise …i în plin soare.
- În apropierea unui aparat de încãlzire.
6
DP450-P_AROMLLK_ROM_MFL61857016 6DP450-P_AROMLLK_ROM_MFL61857016 6 2/23/09 3:33:04 PM2/23/09 3:33:04 PM
Page 21

Efectuarea conexiunilor aparatului
Conexiuni audio …i video la televizor
Conectaţi mufa AV OUT a aparatului la mufele de intrare corespunzătoare de la
televizor, după cum se arată mai jos.
TV
Partea din dreapta a aparatului
Conecta—i la
mufa
"AV OUT”.
Galben
Cablu audio/video
(nelivrat)
roşualb
Adaptor audio/video
7
DP450-P_AROMLLK_ROM_MFL61857016 7DP450-P_AROMLLK_ROM_MFL61857016 7 2/23/09 3:33:05 PM2/23/09 3:33:05 PM
Page 22

Efectuarea setãrilor
f
w
BUTON
1 Meniul de setare a afi…ajului: SETUP
2 Selecta—i op—iunea doritã la primul nivel:
3 Trece—i la al doilea nivel:
4 Selecta—i op—iunea doritã la al doilea nivel:
5 Trece—i la al treilea nivel:
6 Schimba—i setarea:
Efectuarea setãrilor - mai multe lucruri pe care
le pute—i face
Când porni—i aparatul pentru prima datã (op—ional)
Când porni—i aparatul pentru prima datã va apãrea meniul de selectare a limbii.
Trebuie sã selecta—i o limbã pentru a utiliza aparatul. Folosi—i vV b B pentru
a selecta o limbã …i apoi apãsa—i ENTER - va apãrea meniul de confirmare.
Folosi—i b B pentru a selecta [ENTER] …i apoi apãsa—i ENTER.
Modifica—i setãrile de limbã
Limbã meniu – Selecta—i limba pentru meniul Setup …i pentru afi…ajul de pe
ecran.
Disc Audio/Subtitle/Menu – Selecta—i o limbã pentru coloana sonorã/
subtitrarea/meniul discului.
[Original]: Se referã la limba ini—ialã în care a fost înregistrat discul.
[Other]: Pentru a selecta o alta limbã, apãsa—i butoanele numerice …i apoi
ENTER pentru a introduce numãrul corespunzãtor din 4 cifre conform listei
codurilor de limbã. (a se vedea pagina 13). Dacã a—i fãcut o gre…ealã când a—i
introdus un numãr, apãsa—i CLEAR pentru a …terge cifrele …i apoi corecta—i.
[Off] (pentru subtitrarea discului): Dezactiveazã subtitrarea.
v V
B
v V
B
v V / ENTER
Modifica—i setãrile de afi…aj
TV Aspect – Selecta—i ce aspect al ecranului ve—i utiliza, în func—ie de forma
ecranului televizorului dvs.
[4:3]: Selecta—i dacã folosi—i un televizor standard 4:3.
[16:9]: Selecta—i dacã folosi—i un televizor 16:9 cu ecran lat.
Display Mode –Dacã a—i selectat 4:3, va trebui sã defini—i modul în care dori—i sã
aparã programele …i filmele pe ecran lat pe ecranul televizorului dvs.
[Letterbox]: Imaginea este pe ecran lat, cu benzi negre în por—iunile de sus …i
de jos ale ecranului.
[Panscan]: Aceasta umple întregul ecran 4:3, decupând imaginea dupã
necesitã—i.
Modifica—i setãrile audio
DRC (Dynamic Range Control) – Face sunetul clar dacã volumul este redus
(numai Dolby Digital). Seta—i pe [On] pentru acest efect.
Vocal – Activa—i [On] numai dacã reda—i un DVD karaoke pe mai multe canale.
Canalele karaoke ale discului vor fi mixate într-un sunet stereo normal.
Modifica—i setãrile de blocare
Trebuie sã seta—i op—iunea [Area Code] pentru a utiliza op—iunile de blocare.
Selecta—i op—iunea [Area Code] …i apoi apãsa—i B. Introduce—i o parolã din 4 cifre
…i apoi apãsa—i ENTER. Introduce—i-o din nou …i apãsa—i ENTER pentru
confirmare. Dacã a—i fãcut o gre…ealã când a—i introdus numãrul, apãsa—i CLEAR
…i apoi corecta—i.
Daca a—i uitat parola, o pute—i reseta. Mai întâi, scoate—i discul din aparat. Intra—i
în meniul setup …i apoi introduce—i numãrul din 6 cifre "210499” - parola va fi
…tearsã.
Rating(Clasificare) – Selecta—i un nivel de clasificare. Cu cât nivelul este mai mic, cu
atât clasificarea este mai strictã. Selecta—i [Unlock] pentru a dezactiva clasificarea.
Password (Parolã) – Seteazã sau schimbã parola pentru setãrile de blocare.
[New]: Introduce—i o nouã parolã din 4 cifre cu ajutorul butoanelor numerice …i
apãsa—i ENTER. Introduce—i din nou parola pentru confirmare.
[Change]: Introduce—i de douã ori noua parolã, dupã ce a—i introdus parola ac
tualã.
Area Code (Cod regional) – Selecteazã un cod pentru o zonã geograficã, ca
nivel de clasificare a redãrii. Acesta stabile…te ce standarde regionale sunt utilizate pentru clasificarea DVD-urilor controlate prin blocarea pentru copii. (A se
vedea pag. 13)
8
DP450-P_AROMLLK_ROM_MFL61857016 8DP450-P_AROMLLK_ROM_MFL61857016 8 2/23/09 3:33:05 PM2/23/09 3:33:05 PM
Page 23

Modifica—i setãrile pentru altele
DivX(R) VOD – Vã punem la dispozi—ie codul de înregistrare DivX® VOD (Video
On Demand – Video la cerere) care vã permite sã închiria—i …i sã cumpãra—i
fi…iere video folosind serviciul DivX® VOD. Pentru mai multe informa—ii, vizita—i
www.divx.com/vod. Apãsa—i ENTER când este eviden—iatã iconi—a [Select] ve—i
putea vedea codul de înregistrare al aparatului.
Toate fi…ierele video descãrcate de la DivX® VOD pot fi redate numai pe acest
aparat.
Afi…area informa—iilor discului
BUTON
1 Apãsa—i DISPLAY în timpul redãrii: DISPLAY
2 Selecta—i un element:
3 Modifica—i setãrile din meniul Display:
4 Pentru a reveni la ie…ire: DISPLAY
Afi…area informa—iilor discului - mai multe
lucruri pe care le pute—i face
Pute—i selecta un element apãsând v V …i modifica sau selecta setarea
apãsând b B.
Numãrul titlului curent/numãrul total de titluri
Numãrul capitolului curent/numãrul total de capitole
Timp de redare trecut
Limba sau canalul audio selectat
Subtitrarea selectatã
Unghiul selectat/numãrul total de unghiuri
Simboluri folosite în acest manual
O sec—iune al cãrei titlu are unul dintre urmãtoarele simboluri se aplicã numai
discului sau fi…ierului reprezentat prin simbolul respectiv.
ALL
DVD
DivX
Toate discurile …i fi…ierele
DVD …i DVD±R/RW finalizat
Fi…iere DivX
v V
b B / ENTER
ACD
MP3
WMA
Audio CD-uri
Fi…iere MP3
Fi…iere WMA
9
DP450-P_AROMLLK_ROM_MFL61857016 9DP450-P_AROMLLK_ROM_MFL61857016 9 2/23/09 3:33:06 PM2/23/09 3:33:06 PM
Page 24

Redarea unui disc
BUTON
1 Deschide—i capacul discului:
2 Introduce—i un disc: -
3 Închide—i capacul discului:
4 Începe—i redarea:
5 Ajusta—i volumul: VOLUME
6 Pentru a opri redarea:
Redarea unui disc - mai multe lucruri pe care
le pute—i face
Oprirea redãrii
Apãsa—i STOP(x) pentru a opri redarea, aparatul înregistreazã punctul de
oprire, în func—ie de disc. Pe ecran apar “Xx ” scurt. Apãsa—i PLAY (
pentru a relua redarea (de la punctul scenei respective). Dacã apãsa—i STOP
(x) din nou sau scoate—i discul (pe ecran apare “ x ”), aparatul va …terge punctul de oprire.(Xx = Reluare oprire, x = Oprire completã) Punctul de reluare
poate fi …ters prin apãsarea unui buton (de exemplu: POWER, OPEN etc.)
Redarea unui DVD care are meniu
Majoritatea DVD-urilor au acum meniuri care se încarcã primele, înainte ca
filmul sã înceapã. Pute—i naviga în aceste meniuri cu ajutorul vV b B sau cu un
buton numeric, pentru eviden—ierea unei op—iuni. Apãsa—i ENTER pentru selectare.
Redarea unui disc DVD VR
Acest aparat poate reda discuri DVD-RW înregistrate cu un format Video
Recording (VR). Când introduce—i un disc DVD VR, pe ecran apare meniul.
Folosi—i vV pentru a selecta un titlu …i apoi apãsa—i PLAY (
meniul DVD-VR, apãsa—i MENU sau TITLE.
Unele discuri DVD-VR sunt înregistrate cu date CPRM de cãtre un DVD
RECORDER. Aparatul nu suportã discurile de acest tip.
Salt la capitolul/track/fi…ier-ul urmãtor/anterior
Apãsa—i SKIP (>) pentru a trece la urmãtorul capitol/track/fi…ier.
Apãsa—i SKIP (.) pentru a reveni la începutul capitolului/track/fi…ier-ului
curent.
Apãsa—i SKIP (.) de douã ori scurt pentru a trece la capitolul/track/fi…ier-ul
anterior.
DVD
OPEN (Z)
-
N PLAY
x STOP
N)
N). Pentru a afi…a
ALL
DVD
ALL
DivX
DivX
ACD
DVD
DVD
DVD
DVD
DVD
DivX
DVD
(
sau
T) pentru a reduce viteza de redare
WMA
DivX
DivX
ACD
DivX
: numai înainte)
MP3
Pentru a întrerupe redarea
Apãsa—i PAUSE/STEP (X) pentru a întrerupe redarea. Apãsa—i PLAY ( N)
pentru a continua redarea.
Redare cadru cu cadru
Apãsa—i PAUSE/STEP (X) repetat pentru redare cadru cu cadru.
Redare repetatã
Apãsa—i REPEAT repetat pentru a selecta un element pe care dori—i sã-l
repeta—i. Titlul, capitolul sau track-ul curent va fi redat repetat. Pentru a reveni la
redarea normalã, apãsa—i REPEAT repetat pentru a selecta [Off].
ALL
Derulare înainte sau înapoi
‰ine—i apãsat SKIP (. sau >) pentru derulare înainte sau înapoi în timpul
redãrii. Pute—i modifica viteza de redare apãsând repetat …i —inând apãsat SKIP
(. sau >) Apãsa—i PLAY ( N) pentru a continua redarea la vitezã normalã.
Repetarea unei anumite por—iuni (A-B)
Apãsa—i A-B la începutul por—iunii pe care dori—i s-o repeta—i …i din nou la sfâr…itul
por—iunii. Por—iunea selectatã va fi repetatã continuu. Pentru a reveni la redarea
normalã, apãsa—i A-B pentru a selecta [Off].
Selectarea unei limbi pentru subtitrare
În timpul redãrii, apãsa—i SUBTITLE ( ) repetat pentru a selecta limba de
subtitrare doritã.
Vizionare dintr-un unghi diferit
Dacã indicatorul de unghi apare pe ecran un moment, pute—i selecta un unghi
diferit al camerei apãsând repetat ANGLE ( ) .
Ascultarea unei limbi audio diferite
În timpul redãrii, apãsa—i repetat AUDIO ( ) pentru a comuta între limbile
audio, canalele sau metodele de codare disponibile.
Reducerea vitezei de redare
În timpul redãrii, apãsa—i SLOW (t
înapoi sau înainte. Pute—i modifica viteza de redare apãsând repetat SLOW
sau
T). Apãsa—i PLAY ( N) pentru a continua redarea la vitezã normalã.
(t
10
DP450-P_AROMLLK_ROM_MFL61857016 10DP450-P_AROMLLK_ROM_MFL61857016 10 2/23/09 3:33:07 PM2/23/09 3:33:07 PM
Page 25

DivX
DVD
WMA
DVD
ACD
DVD
MP3
DivX
DVD
DivX
Vizionarea unei imagini video mãrite
În timpul redãrii sau în modul pauzã, apãsa—i repetat ZOOM pentru a selecta
modul zoom. Vã pute—i deplasa în imaginea mãritã cu ajutorul butoanelor
vVb B Apãsa—i CLEAR pentru a ie…i. (100% p 200 % p 300% p 400% p 100%)
Vizualizarea meniului titlu
Apãsa—i TITLE pentru a afi…a meniul titlu al discului, dacã existã.
DVD
Vizualizarea meniului DVD-ului
Apãsa—i MENU pentru a afi…a meniul discului, dacã existã.
Începerea redãrii de la momentul selectat
Cãuta—i punctul de începere al codului timpului introdus. Apãsa—i DISPLAY …i
apoi selecta—i iconi—a ceasului. Introduce—i o orã …i apoi apãsa—i ENTER. De
exemplu, pentru a gãsi o scenã la 1 orã, 10 minute …i 20 secunde, introduce—i
"11020” …i apãsa—i ENTER. Dacã introduce—i gre…it cifrele, apãsa—i CLEAR
pentru a putea introduce din nou.
Redare în ordine aleatorie
În timpul redãrii sau în modul oprit, apãsa—i RANDOM pentru redare în ordine
aleatorie. Apãsa—i din nou RANDOM pentru reveni la viteza normalã de redare.
ACD
Marcarea unei scene preferate
Pute—i marca o pozi—ie de pe un disc pentru a reveni la locul respectiv. Este
suficient sã apãsa—i MARKER la pozi—ia doritã. Pe ecran va apãrea scurt iconi—a
markerului. Repeta—i pentru a introduce pânã la nouã markere.
De asemenea, pute—i reapela sau …terge pozi—iile. Apăsaţi SEARCH şi va
apărea meniul [Marker Search]. Utiliza—i b sau B pentru a selecta markerul
dorit în meniu …i apoi apãsa—i ENTER pentru a-l reapela sau CLEAR pentru a-l
…terge.
Memorarea ultimei scene
Acest aparat memoreazã ultima scenã de pe ultimul disc vizionat. Ultima scenã
rãmâne în memorie chiar dacã scoate—i discul din player sau dacã închide—i
aparatul. Dacã pune—i un disc care are scena memoratã, aceasta este reapelatã
automat.
DVD
Screen Saver
Imaginea de screen saver apare când a—i lãsat aparatul în modul oprit timp
de circa cinci minute. Dacã screen saver-ul este afi…at timp de cinci minute,
aparatul se opre…te automat.
Disc mixt sau USB Flash Drive – DivX, MP3/WMA …i JPEG
Când reda—i un disc sau de pe un USB Flash Drive care con—ine fi…iere DivX,
MP3/WMA …i JPEG, pute—i selecta meniul fi…ierelor pe care dori—i sã le reda—i,
apãsând TITLE.
Redarea unui fi…ier de film DivX
BUTON
1 Deschide—i capacul discului:
2 Introduce—i un disc: -
3 Închide—i capacul discului:
-
4 Selecta—i un fi…ier film din meniu:
5 Începe—i redarea:
6 Pentru a opri redarea:
Redarea unui fi…ier film DivX - mai multe
lucruri pe care le pute—i face
Schimbarea setului de caractere pentru afi…area corectã a subtitrãrii
la un DivX®
‰ine—i apãsat SUBTITLE timp de circa 3 secunde în timpul redãrii. Apare codul
de limbã. Apãsa—i b B pentru a selecta un alt cod de limbã, pânã când
subtitrarea apare corect …i apoi apãsa—i ENTER.
Cerin—e pentru fi…ierele DivX
Compatibilitatea fi…ierului DivX cu acest player este limitatã astfel:
• Rezolu—ie disponibilã: 720x576 (l x H) pixeli.
• Denumirea fi…ierului DivX …i a subtitrãrii este limitatã la 45 caractere.
• Extensii fi…iere DivX: “.avi”, “.mpg”, “.mpeg”
• Subtitrãri DivX care pot fi redate: SubRip (.srt / .txt), SAMI (.smi),
SubStation Alpha (.ssa/.txt), MicroDVD (.sub/.txt), VobSub (.sub)
SubViewer 2.0 (.sub/.txt), TMPlayer (.txt), DVD Subtitle System (.txt)
• Format de codec care poate fi redat: “DIVX3.xx”, “DIVX4.xx”, “DIVX5.xx”,
“MP43”, “3IVX”
• Numai func—ia de redare este suportatã pe aparat la DivX 6.0.
• Format audio care poate fi redat: “Dolby Digital”, “PCM”, “MP3”, “WMA”
• Frecven—a de e…antionare: în limitele a 8-48 kHz (MP3), 32-48 kHz (WMA)
• Rata de e…antionare (bit rate): în limitele a 8-320 kHz (MP3),
32-192 kHz (WMA), sub 4 Mbps (fi…ier DivX)
• Format CD-R/RW, DVD±R/RW: ISO 9660
• Numær maxim de fiøiere / folder: Sub 600 (numær total de fiøiere øi foldere)
OPEN (Z)
v V, MENU
N PLAY
x STOP
11
DP450-P_AROMLLK_ROM_MFL61857016 11DP450-P_AROMLLK_ROM_MFL61857016 11 2/23/09 3:33:09 PM2/23/09 3:33:09 PM
Page 26

Pentru a asculta discuri sau
fi…iere cu muzicã
BUTON
1 Deschide—i capacul discului:
2 Introduce—i un disc: -
3 Închide—i capacul discului: 4 Selecta—i un fi…ier muzicã din meniu:
5 Începe—i redarea:
6 Pentru a opri redarea:
Pentru a asculta discuri sau fi…iere cu muzicã
- mai multe lucruri pe care le pute—i face
Crearea propriului program
Pute—i reda con—inutul unui disc în ordinea doritã, ordonând melodiile de pe disc.
Pentru a adãuga melodii la lista programului, apãsa—i PROG. pentru a intra în
modul de editare a programului (în meniu apare semnul
doritã din listã [List], apoi apãsa—i ENTER pentru a adãuga melodia respectivã
în lista programului. Selecta—i o melodie din lista programului …i apoi apãsa—i
ENTER pentru a începe redarea programatã. Pentru a …terge o melodie din lista
programului, selecta—i melodia pe care dori—i s-o …terge—i …i apoi apãsa—i CLEAR
în modul de editare a programului. Pentru a …terge toate melodiile din lista
programului, selecta—i [Clear All] …i apoi apãsa—i ENTER în modul de editare a
programului. Programul este …ters când discul este scos sau când aparatul este
închis.
Afi…area informa—iilor despre fi…ier (ID3 TAG)
În timp ce reda—i un fi…ier MP3 care con—ine informa—ii despre fi…ier, pute—i afi…a
informa—iile apãsând repetat DISPLAY. Dacã fi…ierul nu are informa—ii ID3-Tag,
pe ecran apare [No ID3 TAG].
Cerin—e pentru fi…ierele cu muzicã MP3/WMA
Compatibilitatea fi…ierelor MP3/WMA cu acest aparat este limitatã astfel:
• Extensii de fi…iere: “.mp3”, “.wma”
• Frecven—a de e…antionare: în limitele a 8-48 kHz (MP3), 32-48 kHz (WMA)
• Rata de e…antionare (bit rate): în limitele a 8-320 kbps (MP3), 32-192 kbps
(WMA)
• Format CD-R/RW, DVD±R/RW: ISO 9660
• Numær maxim de fiøiere / folder: Sub 600 (numær total de fiøiere øi foldere)
12
OPEN (Z)
v V, MENU
N PLAY
x STOP
E
). Selecta—i melodia
Vizualizarea fi…ierelor foto
BUTON
1 Deschide—i capacul discului:
2 Introduce—i un disc: 3 Închide—i capacul discului: 4 Selecta—i un fi…ier foto din meniu:
5 Afi…a—i fi…ierul selectat pe tot ecranul:
6 Pentru a reveni la meniu:
Vizualizarea fi…ierelor foto - mai multe lucruri
pe care le pute—i face
Vizualizarea fi…ierelor foto ca slide show (diapozitive)
Folosi—i vV b B pentru a eviden—ia iconi—a ( ) …i apoi apãsa—i ENTER pentru a
începe derularea diapozitivelor.
Pute—i modifica viteza de afi…are a diapozitivelor folosind b B când este
eviden—iatã iconi—a ( ).
Salt la fotografia urmãtoare/anterioarã
Apãsa—i SKIP (. sau >) pentru a vizualiza fotografia anterioarã/urmãtoare.
Rotirea unei fotografii
Folosi—i vV pentru a roti fotografia pe tot ecranul în sensul invers al acelor de
ceasornic sau în sensul acelor de ceasornic, în timp ce vizualiza—i o fotografie
pe tot ecranul.
Întreruperea unei derulãri de diapozitive
Apãsa—i PAUSE/STEP (X) pentru a întrerupe derularea diapozitivelor. Apãsa—i
PLAY ( N) pentru a continua derularea diapozitivelor.
Pentru a asculta muzicã în timpul derulãrii diapozitivelor
Pute—i asculta muzicã în timp ce derula—i diapozitive, dacã discul con—ine atât
fi…iere cu muzicã, cât …i fi…iere cu fotografii. Folosi—i vV b B pentru a eviden—ia
iconi—a (
Vizionarea unei imagini foto mãrite
În timp ce vizualiza—i o fotografie pe tot ecranul, apãsa—i repetat ZOOM pentru a selecta modul zoom. Vã pute—i deplasa în imaginea mãritã cu ajutorul
butoanelor vVb B. Apãsa—i CLEAR pentru a ie…i.
Cerin—e pentru fi…ierele foto
Compatibilitatea fi…ierului JPEG cu acest aparat este limitatã astfel:
• Extensii de fi…iere: “.mp3”, “.wma”
• Dimensiune fotografie: Se recomandã sub 2MB
• Format CD-R/RW, DVD±R/RW: ISO 9660
• Numær maxim de fiøiere / folder: Sub 600 (numær total de fiøiere øi foldere)
) …i apoi apãasa—i ENTER pentru a începe derularea diapozitivelor.
OPEN (Z)
v V, MENU
N PLAY
x STOP
DP450-P_AROMLLK_ROM_MFL61857016 12DP450-P_AROMLLK_ROM_MFL61857016 12 2/23/09 3:33:09 PM2/23/09 3:33:09 PM
Page 27

Coduri de limbã
Folosi—i aceastã listã pentru a introduce limba doritã pentru urmãtoarele setãri ini—iale: Audio Disc, Subtitrare Disc, Meniu disc
Codul de limbã
Afar 6565
Afrikaans 6570
Albanezã 8381
Ameharic 6577
Arabã 6582
Armeanã 7289
Assamezã 6583
Aymara 6588
Azerbaijanã 6590
Bashkir 6665
Bascã 6985
Bengalezã, Bangla 6678
Bhutanezã 6890
Bihari 6672
Bretonã 6682
Bulgarã 6671
Burmezã 7789
Bielorusã 6669
Chinezã 9072
Codul de limbã
Croatã 7282
Cehã 6783
Danezã 6865
Olandezã 7876
Englezã 6978
Esperanto 6979
Estonã 6984
Feroezã 7079
Fiji 7074
Finlandezã 7073
Francezã 7082
Frisianã 7089
Galicianã 7176
Georgianã 7565
Germanã 6869
Greacã 6976
Groenlandezã 7576
Guarani 7178
Gujarati 7185
Codul de limbã
Hausa 7265
Ebraicã 7387
Hindi 7273
Maghiarã 7285
Islandezã 7383
Indonezianã 7378
Interlingua 7365
Irlandezã 7165
Italianã 7384
Japonezã 7465
Kannada 7578
Kashmiri 7583
Kazakhã 7575
Kirghizã 7589
Coreeanã 7579
Kurdã 7585
Lao—ianã 7679
Latinã 7665
Letonã, Lettish 7686
Codul de limbã
Lingala 7678
Lituanianã 7684
Macedoneanã 7775
Malga…ã 7771
Malaiezã 7783
Malayalam 7776
Maori 7773
Marathi 7782
Moldoveneascã 7779
Mongolã 7778
Nauru 7865
Nepalezã 7869
Norvegianã 7879
Oriya 7982
Panjabi 8065
Pashto, Pushto 8083
Persanã 7065
Polonã 8076
Portughezã 8084
Codul de limbã
Quechua 8185
Retoromanã 8277
Românã 8279
Rusã 8285
Samoanã 8377
Sanscritã 8365
Galezã sco—ianã 7168
Sârbã 8382
Sârbo-croatã 8372
Shona 8378
Sindhi 8368
Singalezã 8373
Slovacã 8375
Slovenã 8376
Spaniolã 6983
Sudanezã 8385
Swahili 8387
Suedezã 8386
Tagalog 8476
Coduri regionale
Alege—i un cod regional din aceastã listã.
Codul regional
Afghanistan AF
Argentina AR
Australia AU
Austria AT
Belgia BE
Bhutan BT
Bolivia BO
Brazilia BR
Cambodgia KH
Canada CA
Chile CL
China CN
Columbia CO
Congo CG
Codul regional
Costa Rica CR
Croa—ia HR
Republica Cehã CZ
Danemarca DK
Ecuador EC
Egipt EG
El Salvador SV
Etiopia ET
Fiji FJ
Finlanda FI
Fran—a FR
Germania DE
Marea Britanie GB
Grecia GR
Codul regional
Groenlanda GL
Hong Kong HK
Ungaria HU
India IN
Indonezia ID
Israel IL
Italia IT
Jamaica JM
Japonia JP
Kenya KE
Kuwait KW
Libia LY
Luxemburg LU
Malaiezia MY
Codul regional
Maldive MV
Mexic MX
Monaco MC
Mongolia MN
Maroc MA
Nepal NP
Olanda NL
Antilele Olandeze AN
Noua Zeelandã NZ
Nigeria NG
Norvegia NO
Oman OM
Pakistan PK
Panama PA
Codul regional
Paraguay PY
Filipine PH
Polonia PL
Portugalia PT
România RO
Federa—ia Rusã RU
Arabia Sauditã SA
Senegal SN
Singapore SG
Republica Slovacã SK
Slovenia SI
Africa de Sud ZA
Coreea de Sud KR
Spania ES
Codul Codul de limbã
Tajik 8471
Tamil 8465
Telugu 8469
Thailandezã 8472
Tonga 8479
Turcã 8482
Turkmenã 8475
Twi 8487
Ucraineanã 8575
Urdu 8582
Uzbekã 8590
Vietnamezã 8673
Volapük 8679
Vel…ã 6789
Wolof 8779
Xhosa 8872
Idi… 7473
Yoruba 8979
Zulu 9085
Codul regional
Sri Lanka LK
Suedia SE
Elve—ia CH
Taiwan TW
Thailanda TH
Turcia TR
Uganda UG
Ucraina UA
Statele Unite US
Uruguay UY
Uzbekistan UZ
Vietnam VN
Zimbabwe ZW
13
DP450-P_AROMLLK_ROM_MFL61857016 13DP450-P_AROMLLK_ROM_MFL61857016 13 2/23/09 3:33:10 PM2/23/09 3:33:10 PM
Page 28

Depanare
Simptom Cauzã Remediu
Nu existã curent. Cablul de alimentare este
Aparatul este
deschis, dar nu
func—ioneazã.
Nu existã
imagine.
Nu existã sunet. Echipamentul conectat cu cablul
Aparatul nu
începe redarea.
Telecomanda
nu func—ioneazã
corect.
deconectat.
Acumulatorul este descãrcat. Încãrca—i acumulatorul.
Nu a—i introdus nici un disc. Introduce—i un disc.
Televizorul nu este setat sã
primeascã semnal de la aparat.
Cablul video nu este bine
conectat.
audio nu este setat sã primeascã
semnal de la aparat.
Volumul este dat la minim.
Op—iunile AUDIO nu sunt setate
corect.
A—i introdus un disc care nu poate
fi redat.
Este setat un nivel de clasificare. Schimba—i nivelul de clasificare.
Telecomanda nu este îndreptatã
cãtre senzorul aparatului.
Telecomanda este prea departe
de aparat.
Conecta—i bine cablul de
alimentare la priza de perete.
Selecta—i modul de intrare video
corect la televizor.
Conecta—i bine cablul video.
Selecta—i modul de intrare corect
al amplificatorului audio.
Utiliza—i butonul de control al
volumului pentru a regla volumul.
Efectua—i setãrile AUDIO în pozi—ia
corectã.
Introduce—i un disc care poate fi
redat. (Verifica—i tipul discului …i
codul regional).
Îndrepta—i telecomanda cãtre
senzorul aparatului.
Folosi—i telecomanda mai aproape
de aparat.
Specifica—ii
General
Cerin—e curent electric DC 12V
Consum curent 12W
Dimensiuni (aproximative) 202 x 42.5 x 167 mm
(l x H x A)
Greutate netã (aprox.) 0.78kg
Temperatura de operare 5 °C la 40 °C
Umiditatea de operare 5 % la 90 %
Laser Laser semiconductor
Sistem semnal PAL
Conectori
Ie…ire audio/video mufã mini ø3,5 mm x 1
- Video: 1,0 V (p-p), 75 Ω, sincronizare negativã
- Audio: 1,5 Vrms (1 KHz, 0 dB)
Mufã cã…ti mufã mini stereo ø3,5 mm x 1
Display cu cristale lichide
Dimensiune panou 7 —oli lã—ime (diagonala)
Sistem proiec—ie Bandã R.G.B.
Sistem ac—ionare Matrice activã TFT
Rezolu—ie 480 x 234 (WQVGA)
Accesorii
• Adaptor audio/video
• Adaptor AC (MPA-630)
• Adaptor pentru ma…inã (DPDC1)
• Telecomandã
• Baterie pentru telecomandã (baterie cu litiu)
Designul …i specifica—iile pot fi modificate fãrã o în…tiin—are
prealabilã.
14
DP450-P_AROMLLK_ROM_MFL61857016 14DP450-P_AROMLLK_ROM_MFL61857016 14 2/23/09 3:33:11 PM2/23/09 3:33:11 PM
 Loading...