

Page 1
DP450 / DP450P / DP450R
ENGLISH
ČESKÝ
SIOVENČINA
MAGYAR
POLSKI
P/NO : MFL61857018
DP450-P.ACZELLP_ENG_MFL61857018.1 1DP450-P.ACZELLP_ENG_MFL61857018.1 1 2/23/09 2:51:21 PM2/23/09 2:51:21 PM
Page 2

CAUTION
RISK OF ELECTRIC SHOCK
DO NOT OPEN
CAUTION: TO REDUCE THE RISK OF ELECTRIC
SHOCK. DO NOT REMOVE COVER (OR BACK).
NO USER-SERVICEABLE PARTS INSIDE. REFER
SERVICING TO QUALIFIED SERVICE PERSONNEL.
This lightning flash with arrowhead symbol
within an equilateral triangle is intended to
alert the user to the presence of uninsulated
dangerous voltage within the productʼs enclosure that may be of sufficient magnitude to
constitute a risk of electric shock to persons.
The exclamation point within an equilateral
triangle is intended to alert the user to the
presence of important operating and maintenance (servicing) instructions in the literature
accompanying the product.
WARNING: TO PREVENT FIRE OR ELECTRIC
SHOCK HAZARD, DO NOT EXPOSE THIS PRODUCT
TO RAIN OR MOISTURE.
WARNING: Do not install this equipment in a confined
space such as a book case or similar unit.
CAUTION: Do not block any ventilation openings.
Install in accordance with the manufacturer's instructions. Slots and openings in the cabinet are provided for
ventilation and to ensure reliable operation of the product and to protect it from over heating. The openings
should be never be blocked by placing the product on
a bed, sofa, rug or other similar surface. This product
should not be placed in a built-in installation such as a
bookcase or rack unless proper ventilation is provided
or the manufacturer's instruction has been adhered to.
CAUTION: This product employs
a Laser System. To ensure proper
use of this product, please read
this ownerʼs manual carefully
and retain it for future reference.
Should the unit require maintenance, contact an authorized service center. Use of controls, adjustments or the
performance of procedures other than those specified
herein may result in hazardous radiation exposure. To
prevent direct exposure to laser beam, do not try to
2
2
open the enclosure. Visible laser radiation when open.
DO NOT STARE INTO BEAM.
CAUTION: The apparatus should not be exposed to
water (dripping or splashing) and no objects filled with
liquids, such as vases, should be placed on the apparatus.
CAUTION
• The ventilation should not be impeded by covering
the ventilation openings with items, such as newspapers, table-cloth, curtains etc.
• No naked flame sources, such as lighted candles,
should be placed on the apparatus.
• Used batteries should be disposed of safely and not
incinerated. Attention should be shown to the environment aspects of battery disposal.
• Use the apparatus in tropical and moderate climates
only.
• The excessive sound pressure from earphones and
headphones can cause hearing loss.
• The battery shall not be exposed to excessive heat
such as sunshine, fire or the like.
• Do not remove the battery incorporated with product
for your safety.
If you need to replace the battery, take it to the
nearest authorized LG Electronics service point or
dealer for assistance
CAUTION concerning the Power Cord
Most appliances recommend they be placed upon a
dedicated circuit;
That is, a single outlet circuit which powers only that
appliance and has no additional outlets or branch
circuits. Check the specification page of this owner's
manual to be certain. Do not overload wall outlets.
Overloaded wall outlets, loose or damaged wall outlets, extension cords, frayed power cords, or damaged or cracked wire insulation are dangerous. Any of
these conditions could result in electric shock or fire.
Periodically examine the cord of your appliance, and
if its appearance indicates damage or deterioration,
unplug it, discontinue use of the appliance, and have
the cord replaced with an exact replacement part by an
authorized service center. Protect the power cord from
physical or mechanical abuse, such as being twisted,
kinked, pinched, closed in a door, or walked upon.
Pay particular attention to plugs, wall outlets, and the
point where the cord exits the appliance. To disconnect
power from the mains, pull out the mains cord plug.
When installing the product, ensure that the plug is
easily accessible.
Disposal of your old appliance
1. When this crossed-out wheeled bin symbol
is attached to a product it means the product is covered by the European Directive
2002/96/EC.
2. All electrical and electronic products should
be disposed of separately from the municipal waste stream via designated collection
facilities appointed by the government or the
local authorities.
3. The correct disposal of your old appliance
will help prevent potential negative consequences for the environment and human
health.
4. For more detailed information about disposal
of your old appliance, please contact your
city office, waste disposal service or the
shop where you purchased the product.
This product is manufactured to comply
with EMC Directive 2004/108/EC and Low
Voltage Directive 2006/95/EC.
European representative :
LG Electronics Service Europe B.V.
Veluwezoom 15, 1327 AE Almere,
The Netherlands (Tel : +31–036–547–8940)
DP450-P.ACZELLP_ENG_MFL61857018.2 2DP450-P.ACZELLP_ENG_MFL61857018.2 2 2/23/09 2:51:21 PM2/23/09 2:51:21 PM
Page 3
Types of Playable Discs ............................................................................. 3
Rechargeable battery ................................................................................. 3
Main Unit .................................................................................................... 4
Remote Control .......................................................................................... 5
Power connections ..................................................................................... 6
Hooking up the unit ................................................................................... 7
Adjust the settings .................................................................................. 8-9
Displaying Disc Information ........................................................................ 9
Playing a Disc...................................................................................... 10-11
Playing a DivX movie file...........................................................................11
Listening to Music Disc or files ................................................................. 12
Contents
Viewing photo files ................................................................................... 12
Language Codes ...................................................................................... 13
Area Codes .............................................................................................. 13
Troubleshooting ........................................................................................ 14
Specifications ........................................................................................... 14
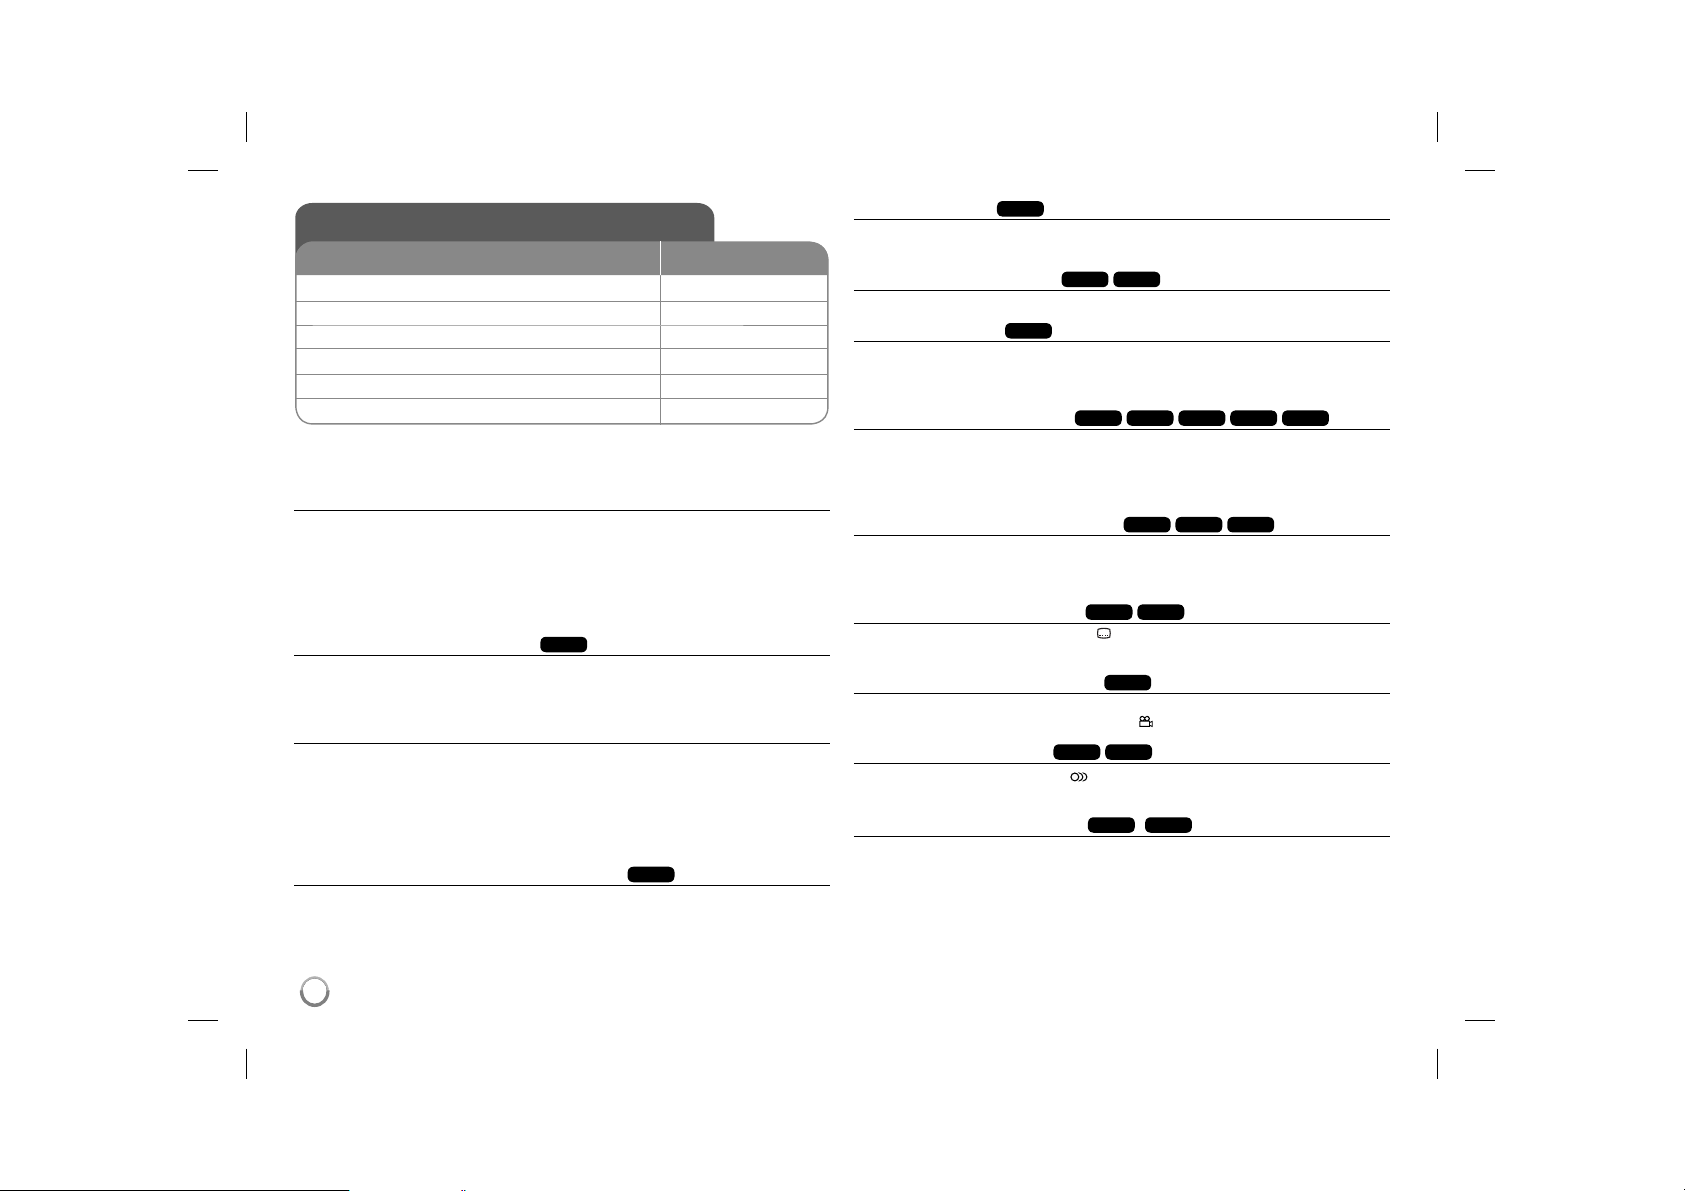
Types of Playable Discs
Type Logo
DVD-VIDEO: Discs such as movies that can be
purchased or rented.
DVD-R: Video mode and finalized only
DVD-RW: VR mode, Video mode and finalized only
DVD+R: Video mode only
DVD+RW: Video mode only
Audio CD: Music CDs or CD-R/CD-RW in music CD
format that can be purchased.
This unit plays DVD±R/RW and CD-R/RW that contains audio titles, DivX,
MP3, WMA and/or JPEG files. Some DVD±RW/DVD±R or CD-RW/CD-R cannot be played on this unit due to the recording quality or physical condition of
the disc, or the characteristics of the recording device and authoring software.
Manufactured under license from Dolby Laboratories. Dolby and the
double-D symbol are trademarks of Dolby Laboratories.
"DVD Logo" is a trademark of DVD format/Logo Licensing Corporation.
About the Symbol Display
“ ” may appear on your TV display during operation and indicates that the
function explained in this ownerʼs manual is not available on that disc.
Regional Codes
This unit has a regional code printed on the rear of the unit. This unit can play
only DVD discs labeled same as the rear of the unit or “ALL”.
• Most DVD discs have a globe with one or more numbers in it clearly visible
on the cover. This number must match your unitʼs regional code or the disc
cannot play.
• If you try to play a DVD with a different regional code from your player, the
message “Check Regional Code” appears on the TV screen.
Copyrights
It is forbidden by law to copy, broadcast, show, broadcast via cable, play in
public, or rent copyrighted material without permission. This product features
the copy protection function developed by Macrovision. Copy protection signals are recorded on some discs. When recording and playing the pictures
of these discs picture noise will appear. This product incorporates copyright
protection technology that is protected by U.S. patents and other intellectual
property rights. Use of this copyright protection technology must be authorized
by Macrovision, and is intended for home and other limited viewing uses only
unless otherwise authorized by Macrovision. Reverse engineering or disassembly is prohibited.
Rechargeable battery
• Its internal rechargeable battery provides you with the freedom to pass it
around and play the files without the power cord.
• The internal rechargeable battery will start charging only when the unit is
turned off and the AC adapter is connected to a power outlet.
• The charging stops if you turn on the unit.
• The charging will take approximately 2 hours and 30 minutes.
• Operating time on battery: approximately 2 hours and 30 minutes.
The operating time on battery may vary depending on the battery status,
operational status and environment conditions, and the maximum playing
time is possible up to 3 hours.
• The battery indicator will turn red while charging. Once the charging is complete, the indicator light changes to green.
• When the remaining time of the battery power is under a few minutes, “
will blink on the screen.
”
3
3
DP450-P.ACZELLP_ENG_MFL61857018.3 3DP450-P.ACZELLP_ENG_MFL61857018.3 3 2/23/09 2:51:22 PM2/23/09 2:51:22 PM
Page 4
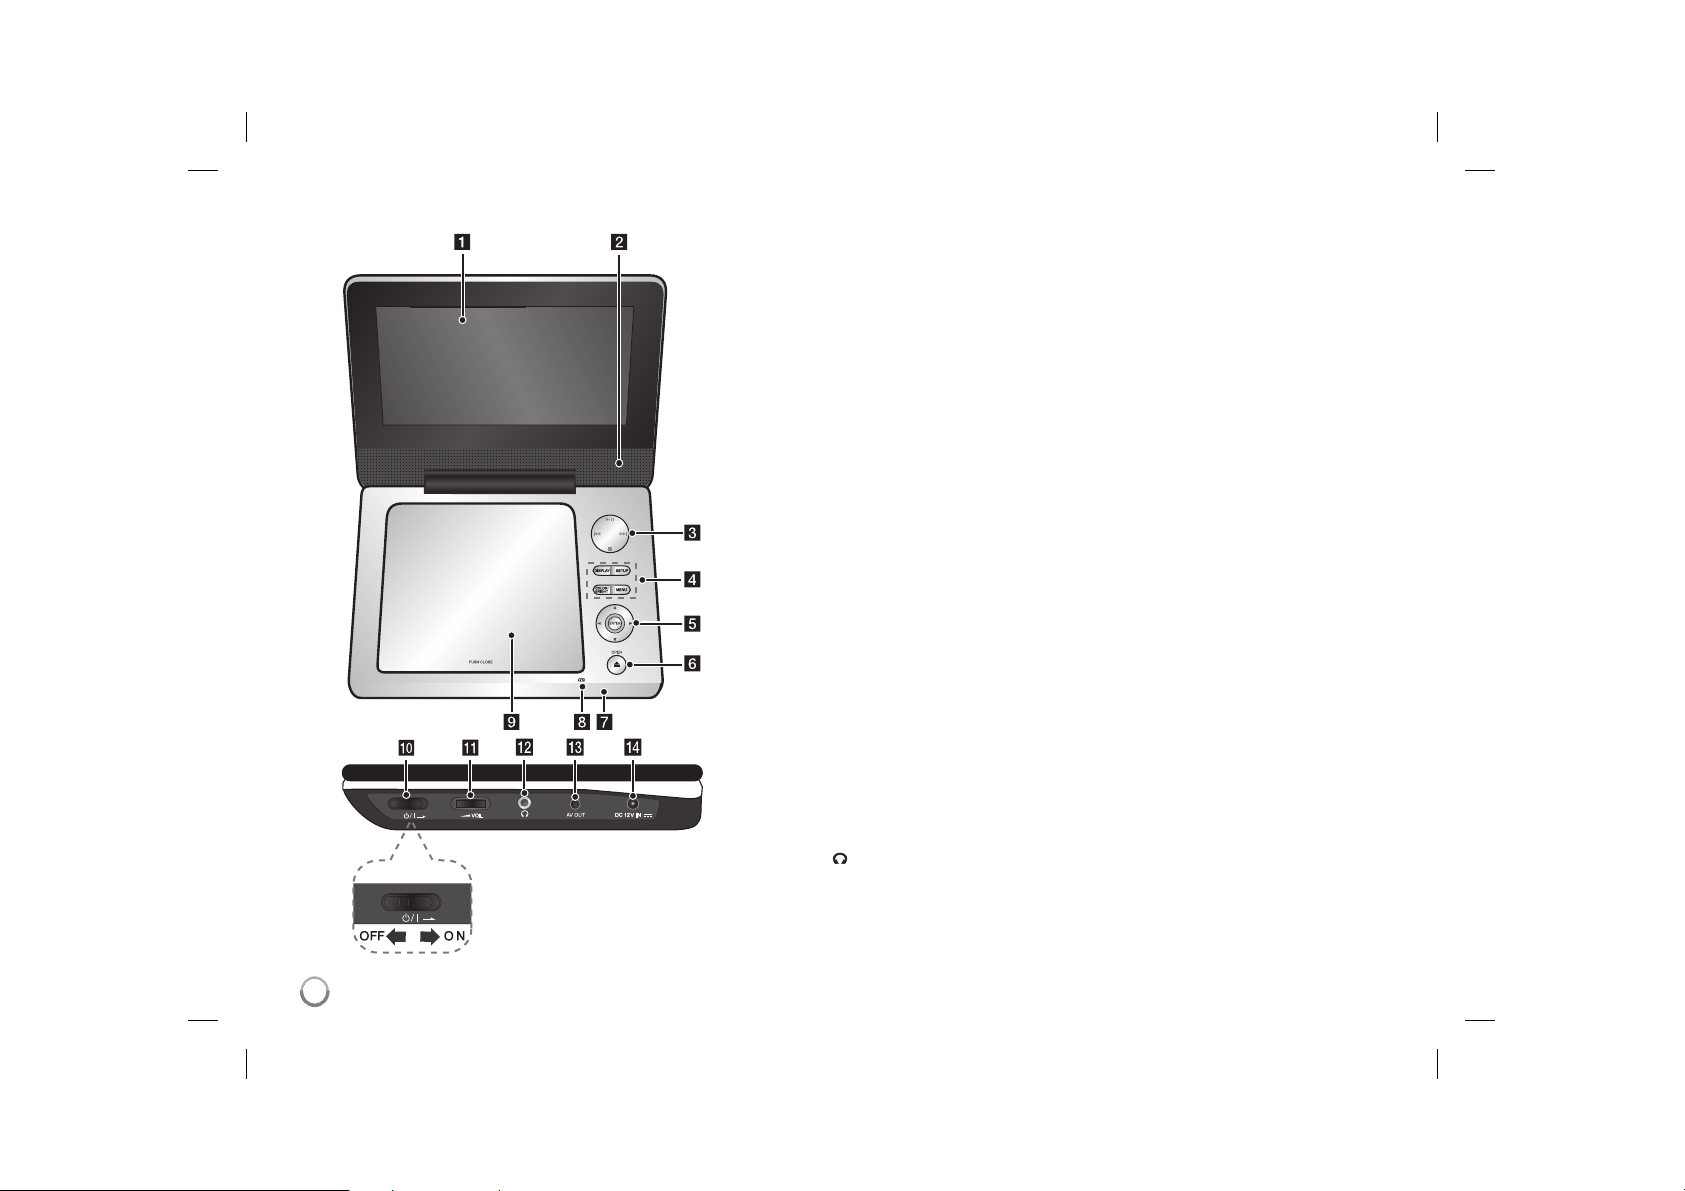
Main Unit
a LCD screen
b Speakers
c Playback control buttons
• N (Play) / X (Pause): Starts playback and pauses playback temporarily, press
again to exit pause mode.
• x (Stop): Stops playback.
• . (Skip): Searches backward* or returns to the beginning of current chapters/
tracks/ files or goes to the previous chapters/ tracks/ files.
• > (Skip): Searches forward* or goes to next chapters/ tracks/ files.
* Press and hold button for about two seconds.
d Function buttons
• DISPLAY: Accesses On-Screen Display.
• SETUP: Accesses or exits the setup menu.
• COLOR/BRIGHT*: Displays the Brightness or Colour menu for LCD display.
• MENU: Accesses the DVD menu.
* To adjust the colour or brightness of the LCD display, press COLOR/BRIGHT
repeatedly on the main unit to display the Brightness or Colour menu then use
b / B to adjust the value. Press ENTER to confirm the adjustment.
e Menu control buttons
• b B v V (left/right/up/down): Selects an item in the menu.
• ENTER: Confirms menu selection.
f OPEN (Z): Opens the disc lid.
g Remote sensor: Point the remote control here.
h Battery charge and power indicator
• The indicator turns red in charging and changes to green colour when the charging is complete. (Refer to page 3 for details.)
• The indicator turns green for a few seconds when the unit is turned on.
i Disc lid
j 1/q (Power switch): Turn the unit ON or OFF.
Note: To operate this unit , the power switch must be located ON.
k w VOL (Volume): Adjusts the volume level of the built-in speaker and earphones.
(Earphones): Connect earphones here.
l
m AV OUT: Connect to a TV with video and audio input.
n DC 12V IN: Connect the AC adapter or automotive adapter.
4
4
DP450-P.ACZELLP_ENG_MFL61857018.4 4DP450-P.ACZELLP_ENG_MFL61857018.4 4 2/23/09 2:51:22 PM2/23/09 2:51:22 PM
Page 5
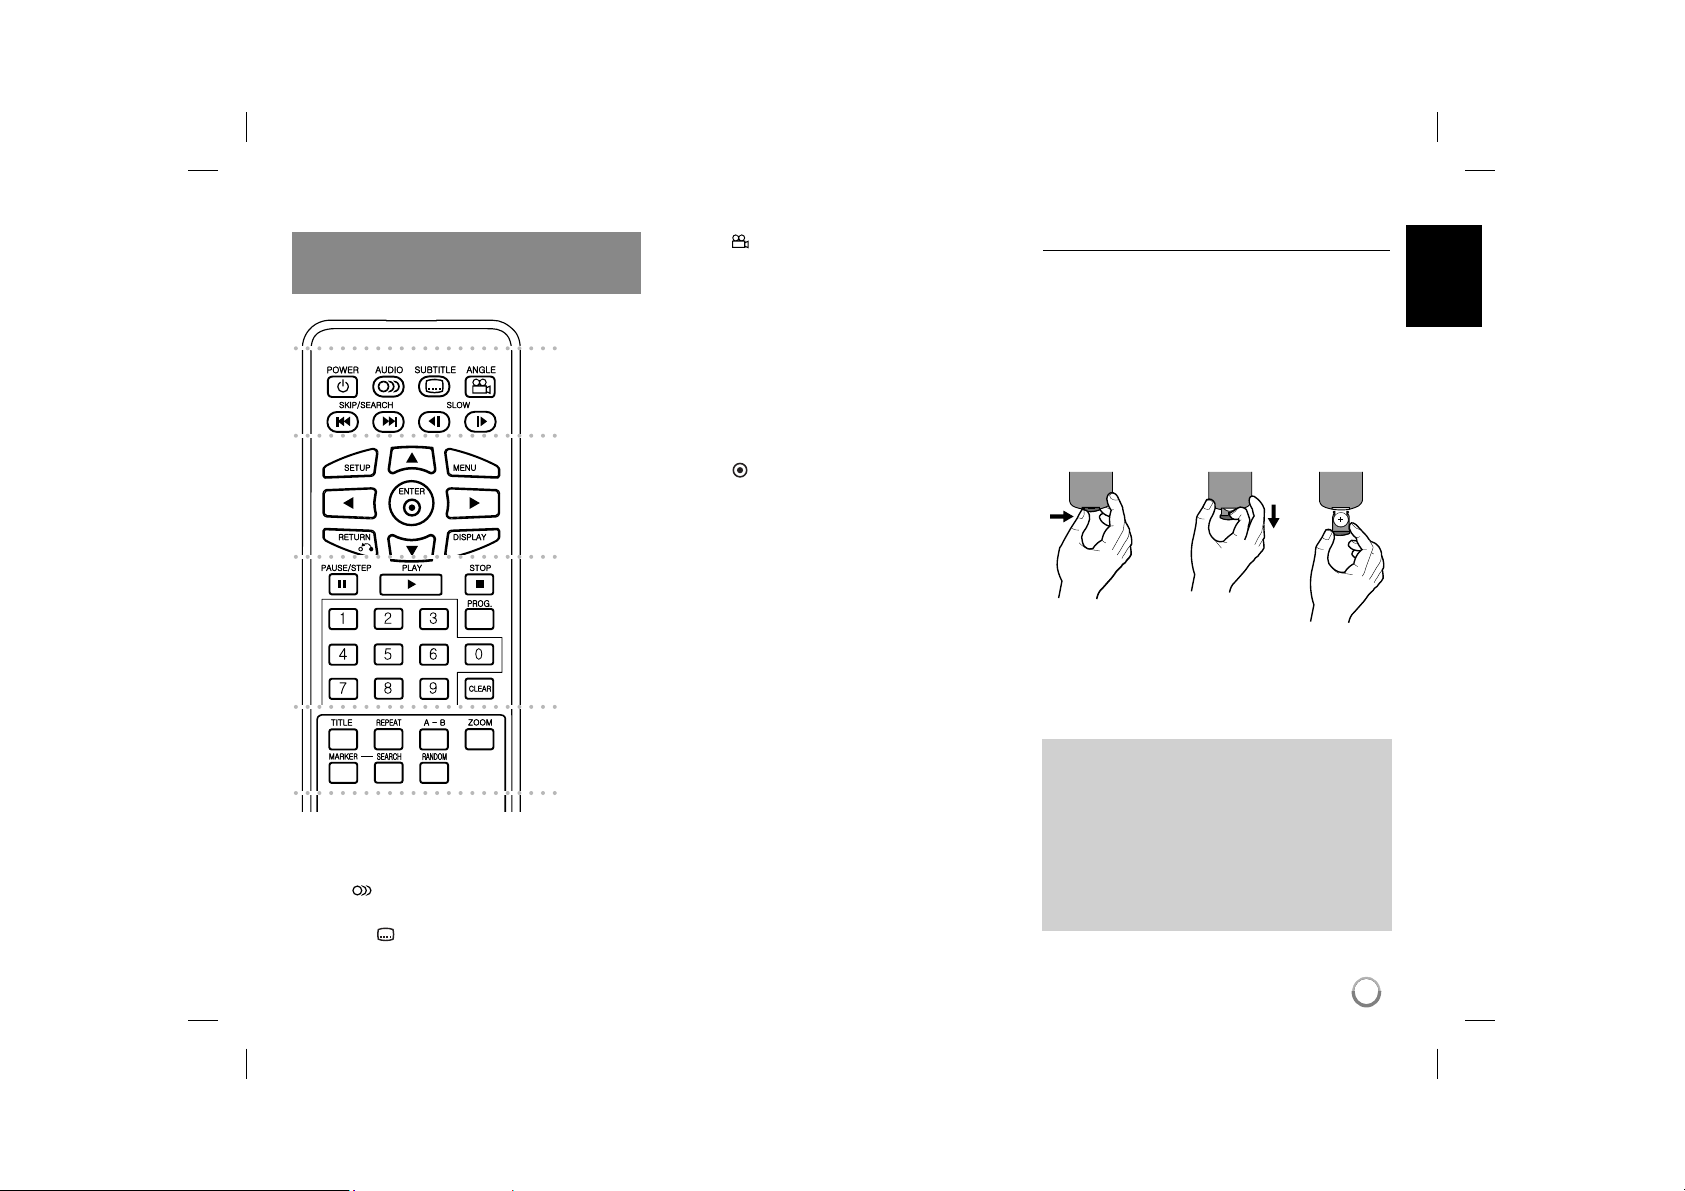
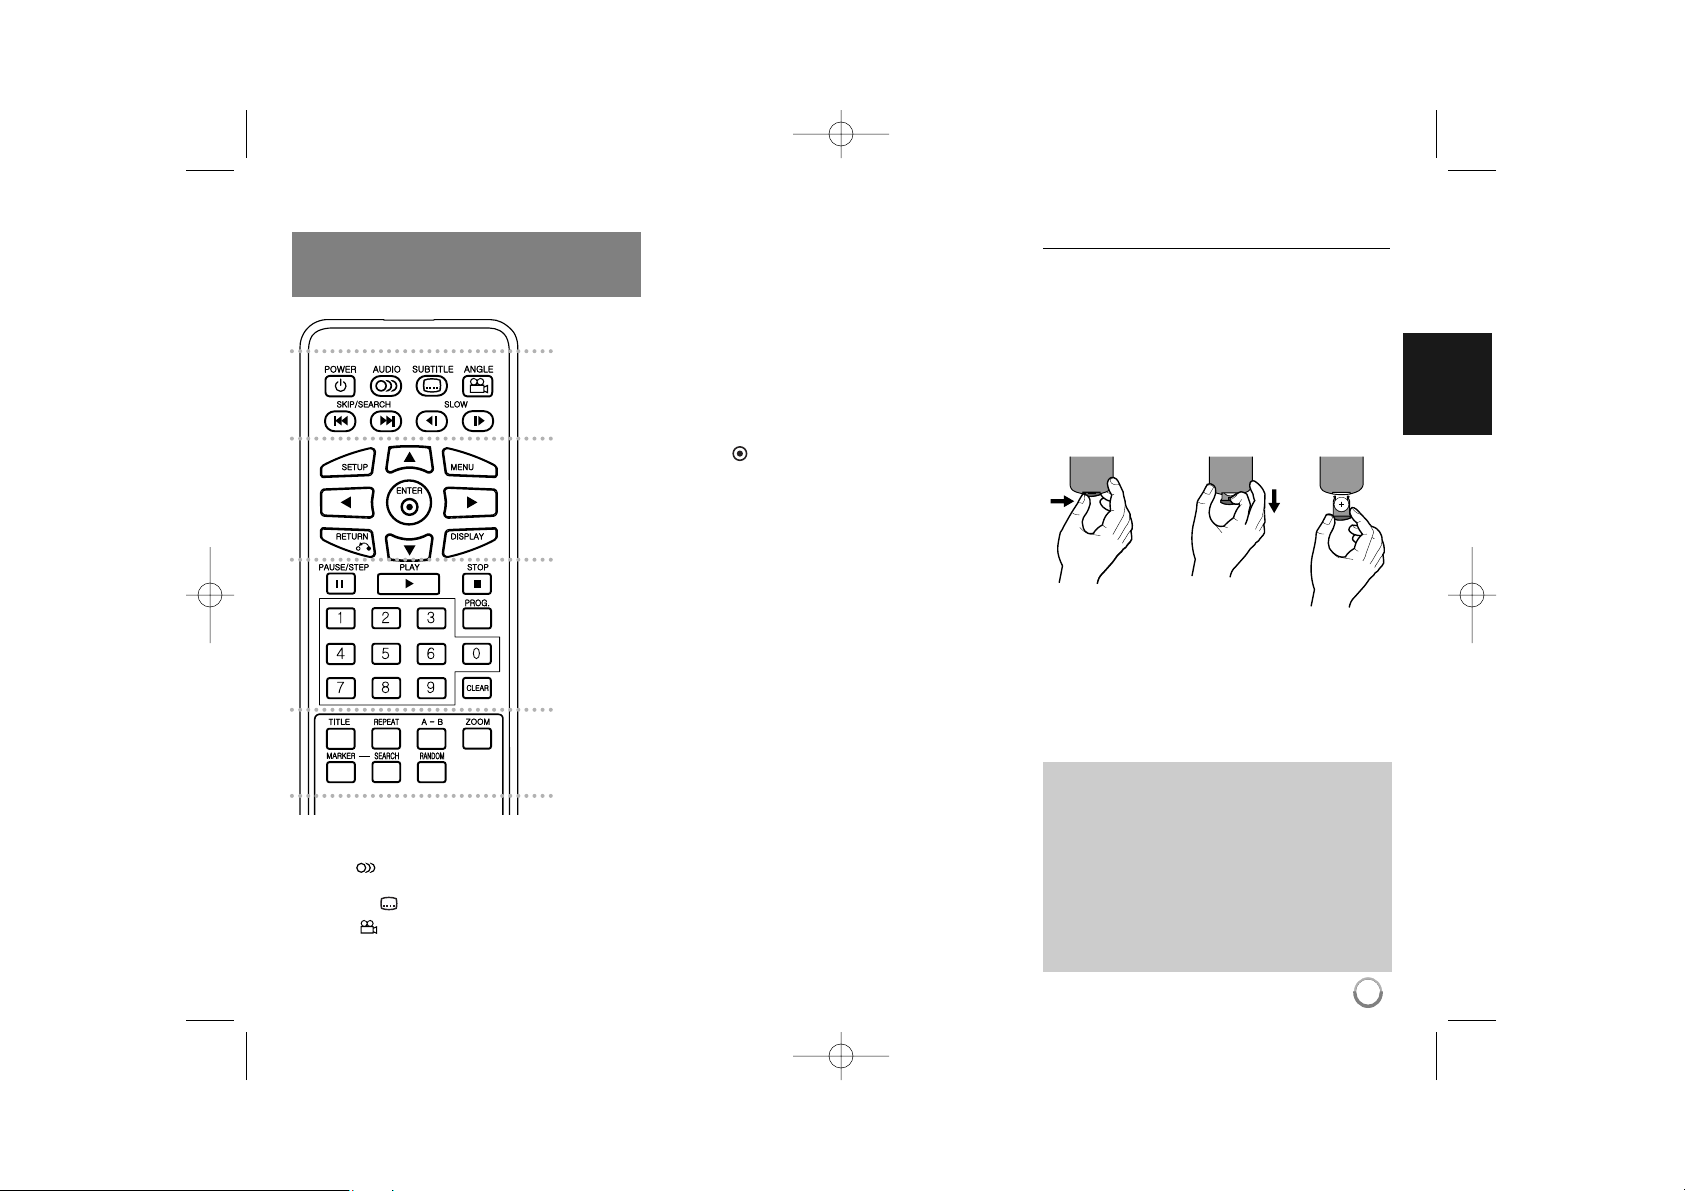
Remote Control
Note: To operate this unit with remote control,
the power switch must be located ON. (Refer to 4
page)
a
b
c
d
l l l l l l l a l l l l l l l
POWER (1): Switches the unit ON or OFF.
AUDIO (
channel.
SUBTITLE (
): Selects an audio language or audio
): Selects a subtitle language.
ANGLE (
available.
SKIP/SEARCH (. / >): Searches* backward /
forward. Goes to next or previous chapter/track/file.
* Press and hold button for about two seconds.
SLOW (t / T): Reverse/ Forward slow playback.
l l l l l l l b l l l l l l l
SETUP: Accesses or exits the setup menu.
MENU: Accesses the DVD menu.
vV b B: Navigates the menus.
ENTER (
RETURN (O): Returns backwards in the menu or
exits the menu.
DISPLAY: Accesses On-Screen Display.
l l l l l l l c l l l l l l l
PAUSE/STEP (X): Pauses playback temporarily/
press repeatedly for frame-by-frame playback.
PLAY (N): Starts playback.
STOP (x): Stops playback.
Numerical buttons: Selects numbered options in
a menu.
PROG.: Enters the program edit mode.
CLEAR: Removes a track number on the Program
List.
l l l l l l l d l l l l l l l
TITLE: Accesses the discʼs title menu.
REPEAT: Repeats a chapter, track, title or all.
A-B: Repeats a section.
ZOOM: Enlarges a video image.
MARKER : Marks any point during playback.
SEARCH : Displays [Marker Search] menu.
RANDOM: Plays tracks in random order.
): Selects a DVD camera angle, if
): Confirms menu selection.
Put the battery into the Remote Control
Pinch the battery holder clip together then pull the
tab to remove the battery holder. Insert the battery
with the + facing in the same direction as the + on
the battery holder. Replace the battery holder with
battery into the Remote Control unit making sure
that it is fully inserted.
• Replace Remote Control unit battery with 3V
micro lithium cells such as CR. 2025 or its equivalent.
• Dispose of battery safety in accordance with
local laws. Do not dispose of in fire.
Warning for replaceable lithium battery
• Danger of explosion if battery incorrectly replaced.
• Replace only with the same type battery.
• Additional warning marking close to the battery if
intended to be replaced by users.
Warning : The battery used in this device may
present a fire or chemical burn hazard if mistreated. Do not recharge, disassemble, incinerate, or heat above 100 °C (212 °F).
Replace the battery with Matsushita Elec. Ind.
Co., Ltd. (Panasonic), part no. CR. 2025 only.
Use of another battery may present a risk of fire
or explosion. Dispose of used batteries. Keep
batteries away from children. Do not disassemble or dispose of in fire.
5
DP450-P.ACZELLP_ENG_MFL61857018.5 5DP450-P.ACZELLP_ENG_MFL61857018.5 5 2/23/09 2:51:23 PM2/23/09 2:51:23 PM
Page 6
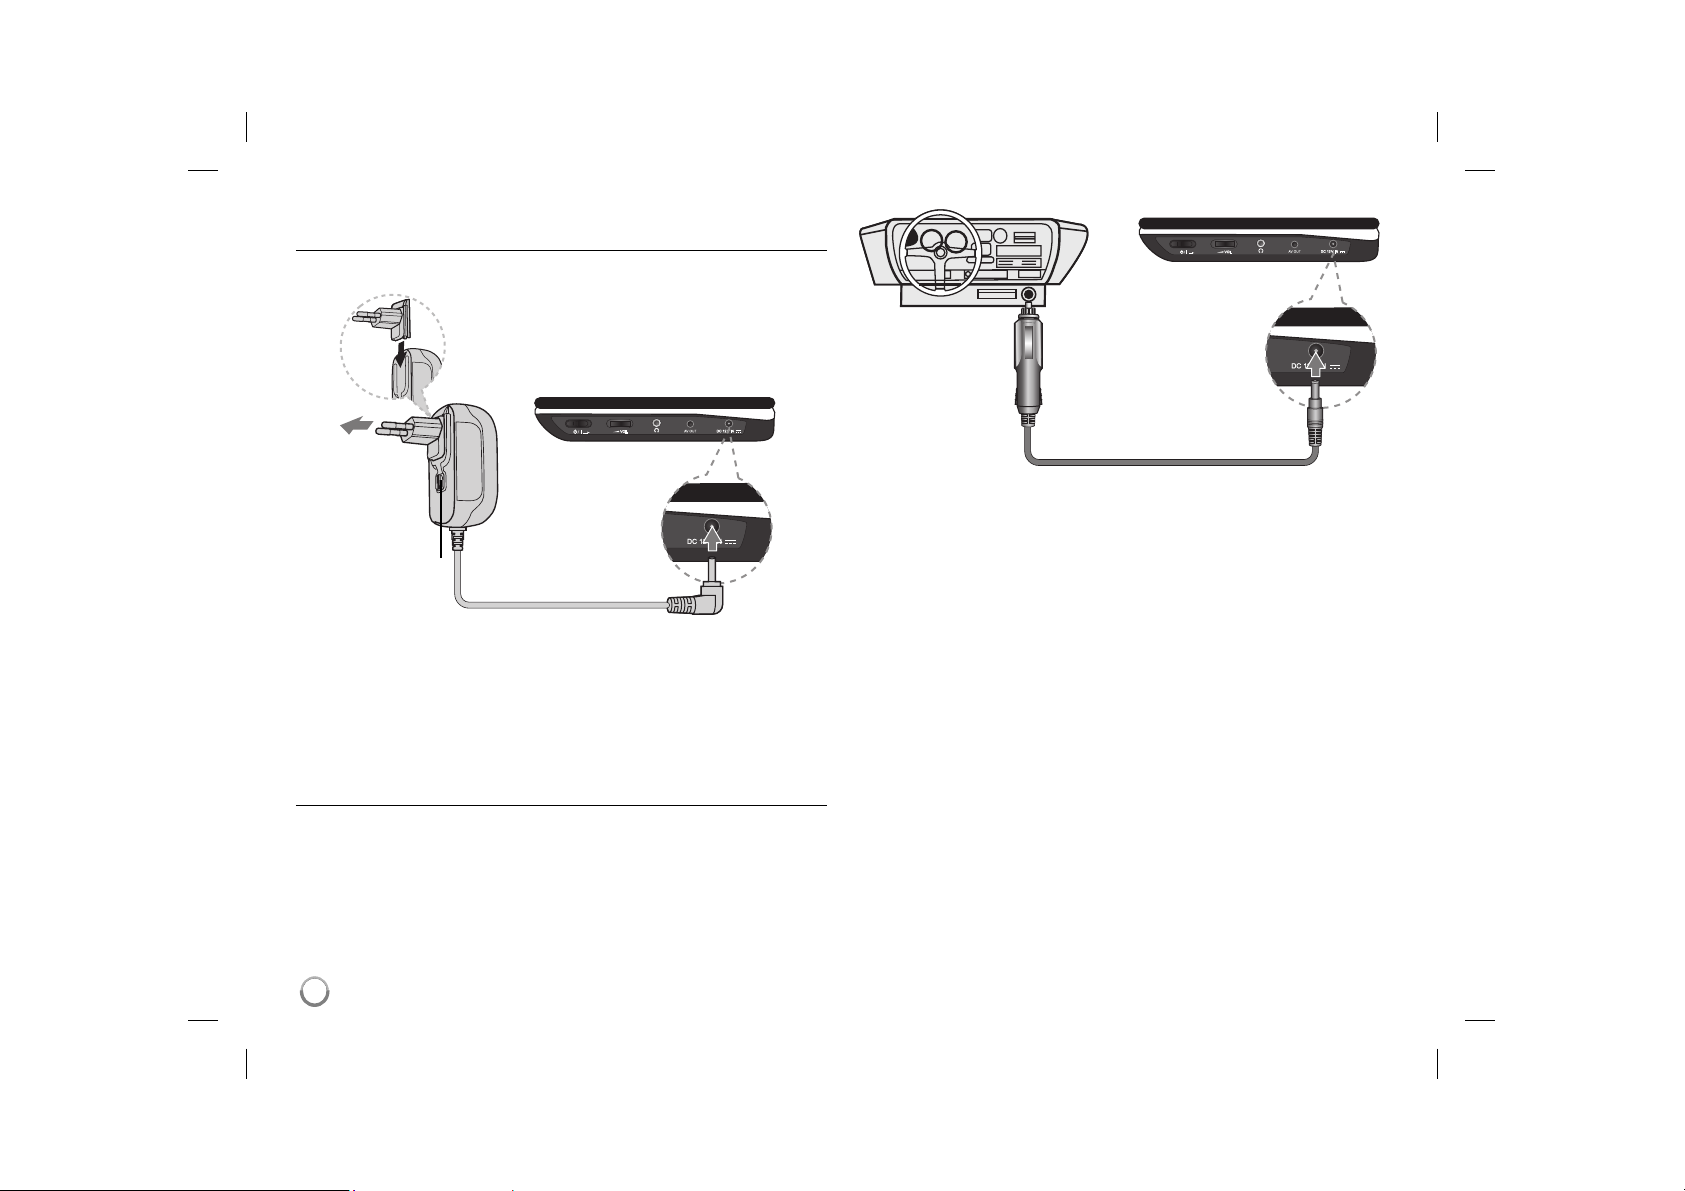
Power connections
Connecting the AC Adapter
Connect the supplied AC Adapter from the unit to a power socket.
Right side of the unit
Attach the power plug to the body of the AC adapter.
(The actual set may differ from the drawing.)
Right side of the unit
Plug into a
power source.
Power cord
release knob
Plug into the “DC 12V IN” jack.
AC adapter
• This AC adapter operates on 100-240V~ 1 A 50/60Hz.
• Contact an electrical parts distributor for assistance in selecting a suitable
AC plug adapter or AC cord set.
• Manufactured by NANJING WANLIDA TECHNOLOGY CO., LTD
Connect the Automotive adapter
This unit and its automotive adapter are designed for use in vehicles that have
8.5-16 volt, negative ground electrical systems. This is standard for most vehi-
cles. If your vehicle has a different type of the electrical system, the DC power
system cannot be used.
Plug into the carʼs
cigarette lighter
socket.
Plug into the
“DC 12V IN” jack.
Automotive adapter
• This automotive adapter operates on DC 8.5-16V.
• Contact an electrical parts distributor for assistance in selecting a suitable
automotive adapter.
• Manufactured by NANJING WANLIDA TECHNOLOGY CO., LTD.
Caution
• To prevent electrical shock and possible damage to your unit or vehicle,
always unplug the automotive adapter from the cigarette lighter socket
before you remove the plug from your unit.
• A 3 amp. 250V fuse for protection is installed in the automotive adapter.
• While the engine is being started, disconnect the automotive adapter from
the carʼs cigarette lighter socket.
• Do not operate your unit when the car battery is discharged.
Peak current from the car generator may cause the DC fuse to blow.
• If the vehicleʼs supply voltage drops below approximately 10 volts, your unit
may not work properly.
• Do not leave your unit in a place where the temperature exceeds 70°C
(158°F), or the pick-up device may be damaged.
Examples include:
- Inside a car with the windows closed and in direct sunshine.
- Near a heating appliance.
6
6
DP450-P.ACZELLP_ENG_MFL61857018.6 6DP450-P.ACZELLP_ENG_MFL61857018.6 6 2/23/09 2:51:23 PM2/23/09 2:51:23 PM
Page 7
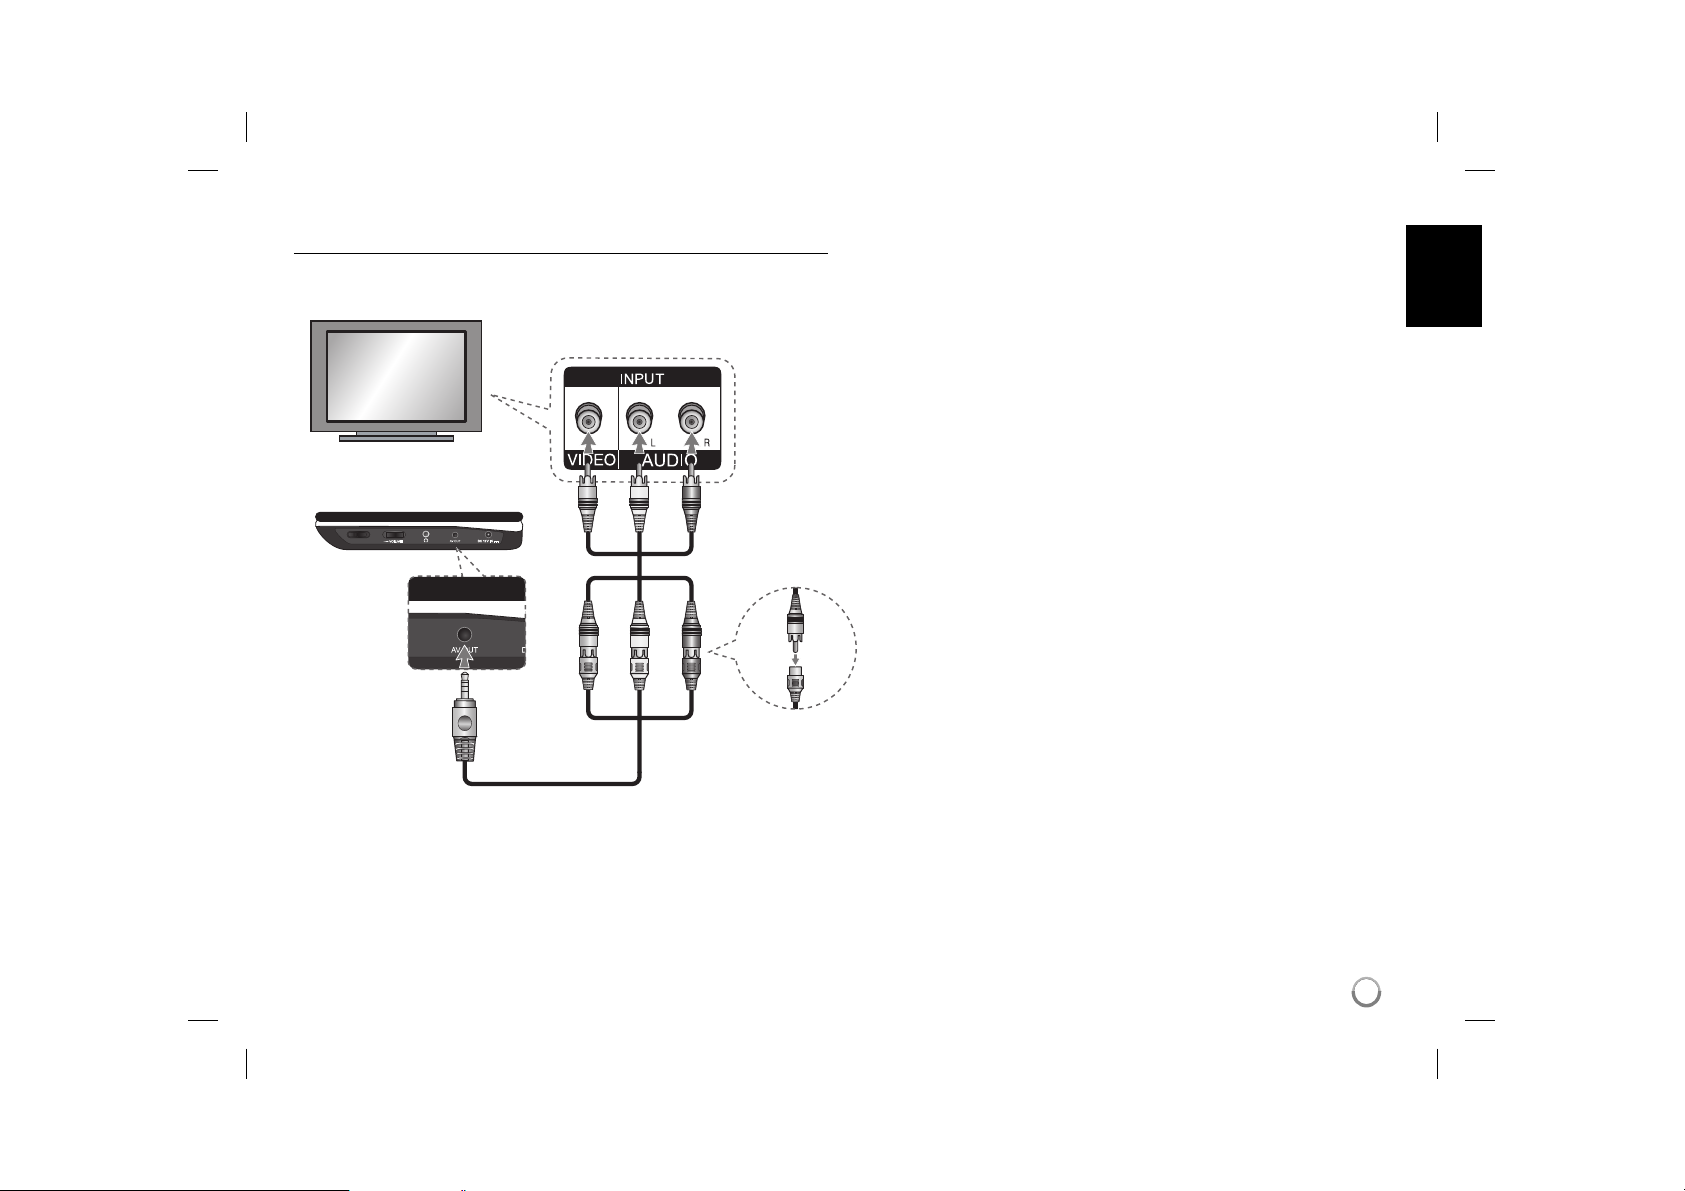
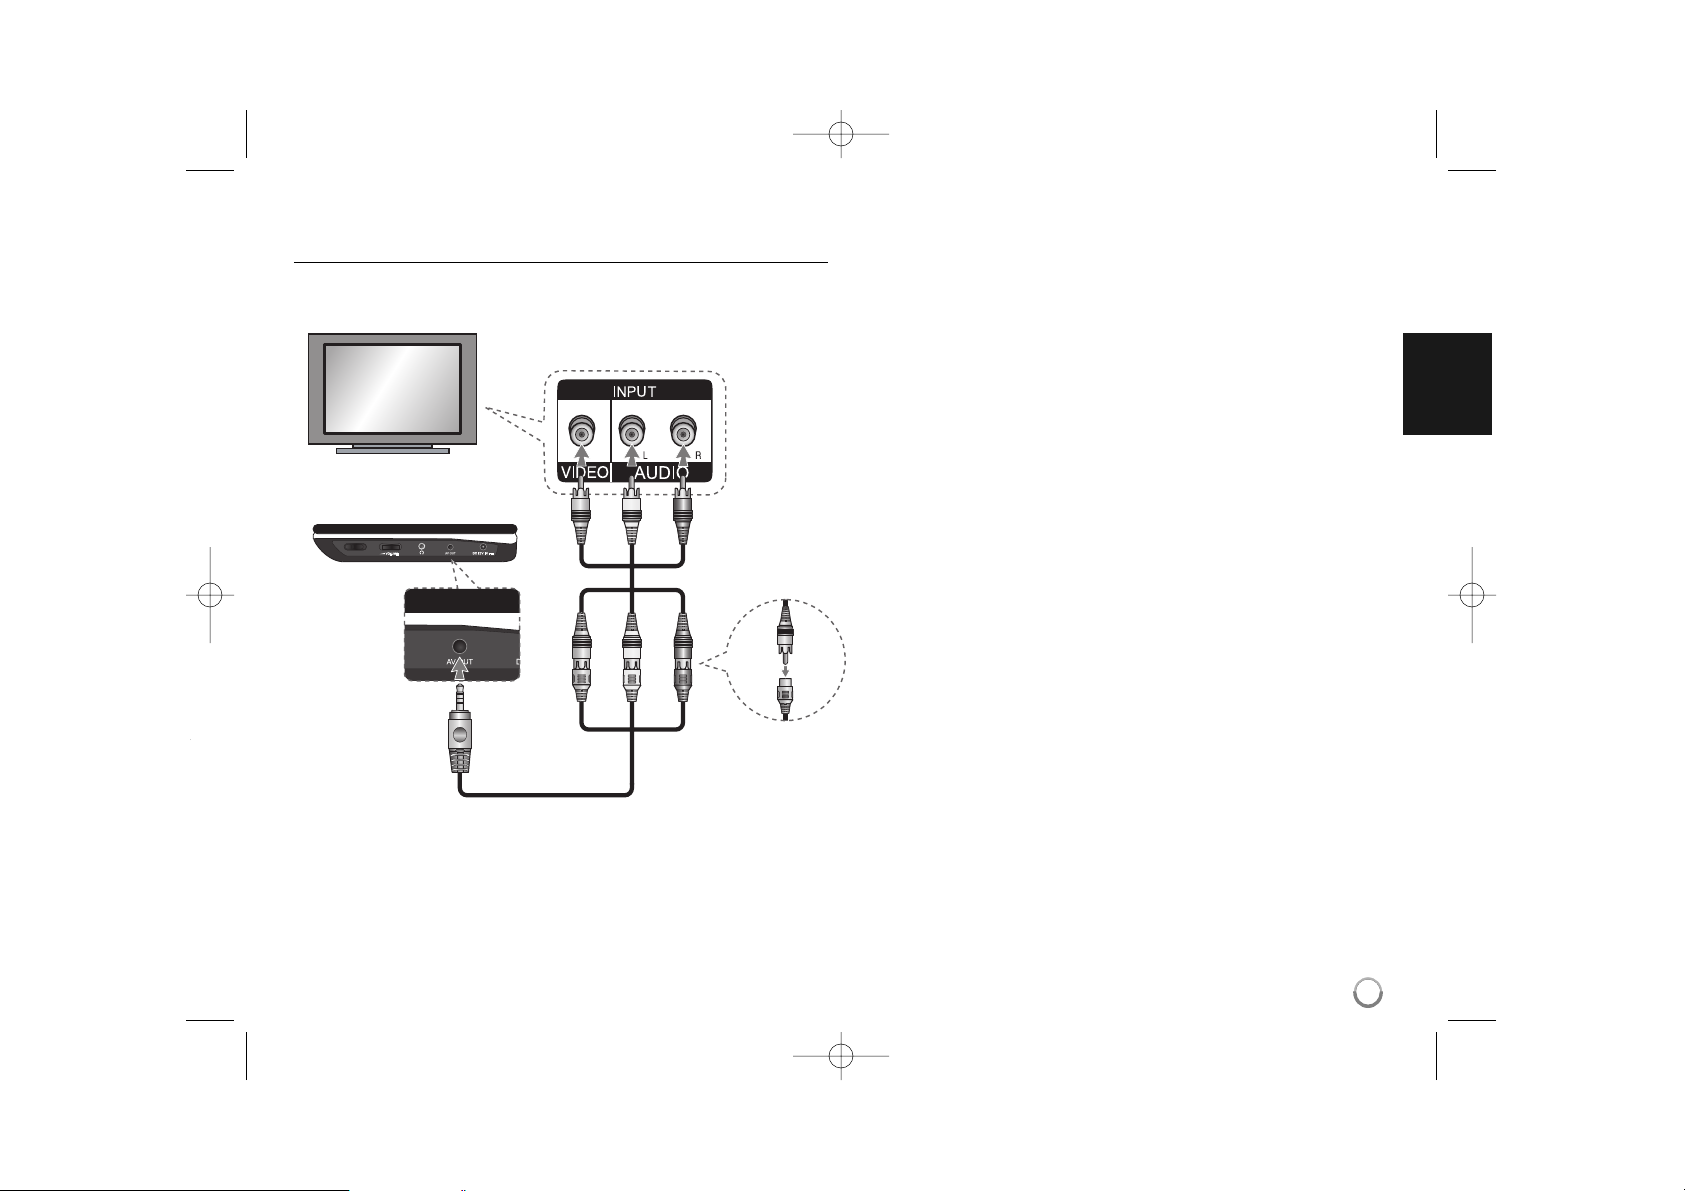
Hooking up the unit
Audio and Video Connections to your TV
Connect the AV OUT jack on the unit to the corresponding input jacks on your
TV as shown below.
TV
Right side of the unit
Plug into the
“AV OUT” jack.
yellow
white
red
Audio/Video Adapter
Audio/Video Cable
(not supplied)
7
DP450-P.ACZELLP_ENG_MFL61857018.7 7DP450-P.ACZELLP_ENG_MFL61857018.7 7 2/23/09 2:51:24 PM2/23/09 2:51:24 PM
Page 8
Adjust the settings
t
t
BUTTON
1 Display setup menu: SETUP
2 Select a desired option on the first level:
3 Move to second level:
4 Select a desired option on the second level:
5 Move to third level:
6 Change the setting:
Adjust the settings - more you can do
When you turn on for the first time (optional)
The menu for a language selection will appear when you turn on the unit for the
first time. You must select a language to use the unit. Use vV b B to select
a language then press ENTER and the confirm menu will appear. Use b B to
select [ENTER] then press ENTER.
Adjust the language settings
Menu Language – Select a language for the Setup menu and on-screen dis-
play.
Disc Audio/Subtitle/Menu – Select a language for the Disc Audio/Subtitle/
Menu.
[Original]: Refers to the original language in which the disc was recorded.
[Other]: To select another language, press number buttons then ENTER to
enter the corresponding 4-digit number according to the language code list.
(see page 13) If you make a mistake while entering number, press CLEAR to
delete numbers then correct it.
[Off] (for Disc Subtitle): Turn off Subtitle.
v V
B
v V
B
v V / ENTER
Adjust the display settings
TV Aspect – Select which screen aspect to use based on the shape of your TV
screen.
[4:3]: Select when a standard 4:3 TV is connected.
[16:9]: Select when a 16:9 wide TV is connected.
Display Mode – If you selected 4:3, youʼll need to define how you would like
widescreen programs and films to be displayed on your TV screen.
[Letterbox]: This displays a widescreen picture with black bands at the top
and bottom of the screen.
[Panscan]: This fills the entire 4:3 screen, cropping the picture as necessary.
Adjust the audio settings
DRC (Dynamic Range Control) – Make the sound clear when the volume is
turned down (Dolby Digital only). Set to [On] for this effect.
Vocal – Set to [On] only when a multi-channel karaoke DVD is playing. The
karaoke channels on the disc mix into normal stereo sound.
Adjust the lock settings
You must set the [Area Code] option to use the lock options. Select [Area Code]
option then press B. Enter a 4-digit password then press ENTER. Enter it again
then press ENTER to verify. If you make a mistake while entering number, press
CLEAR then correct it.
If you forget your password you can reset it. First, remove the disc in the unit.
Display setup menu then input the 6-digit number “210499” and the password
will be cleared.
Rating – Select a rating level. The lower the level, the stricter the rating. Select
[Unlock] to deactivate the rating.
Password – Sets or changes the password for lock settings.
[New]: Enter a new 4-digits password using the numerical buttons then press
ENTER. Enter the password again to confirm.
[Change]: Enter the new password twice after entering the current password.
Area Code – Select a code for a geographic area as the playback rating level.
This determ ines which areaʼs standards are used to rate DVDs controlled by the
parental lock. (See page 13)
8
8
DP450-P.ACZELLP_ENG_MFL61857018.8 8DP450-P.ACZELLP_ENG_MFL61857018.8 8 2/23/09 2:51:24 PM2/23/09 2:51:24 PM
Page 9
Adjust the others settings
DivX(R) VOD – We provide you with the DivX® VOD (Video On Demand) regis-
tration code that allows you to rent and purchase videos using the DivX® VOD
service. For more information, visit www.divx.com/vod.
Press ENTER when [Select] icon is highlighted and you can view the registration code of the unit.
All the downloaded videos from DivX® VOD can only be played back on this
unit.
Displaying Disc Information
BUTTON
1 Press DISPLAY during playback: DISPLAY
2 Select an item:
3 Adjust the Display menu settings:
4 Exit the menu: DISPLAY
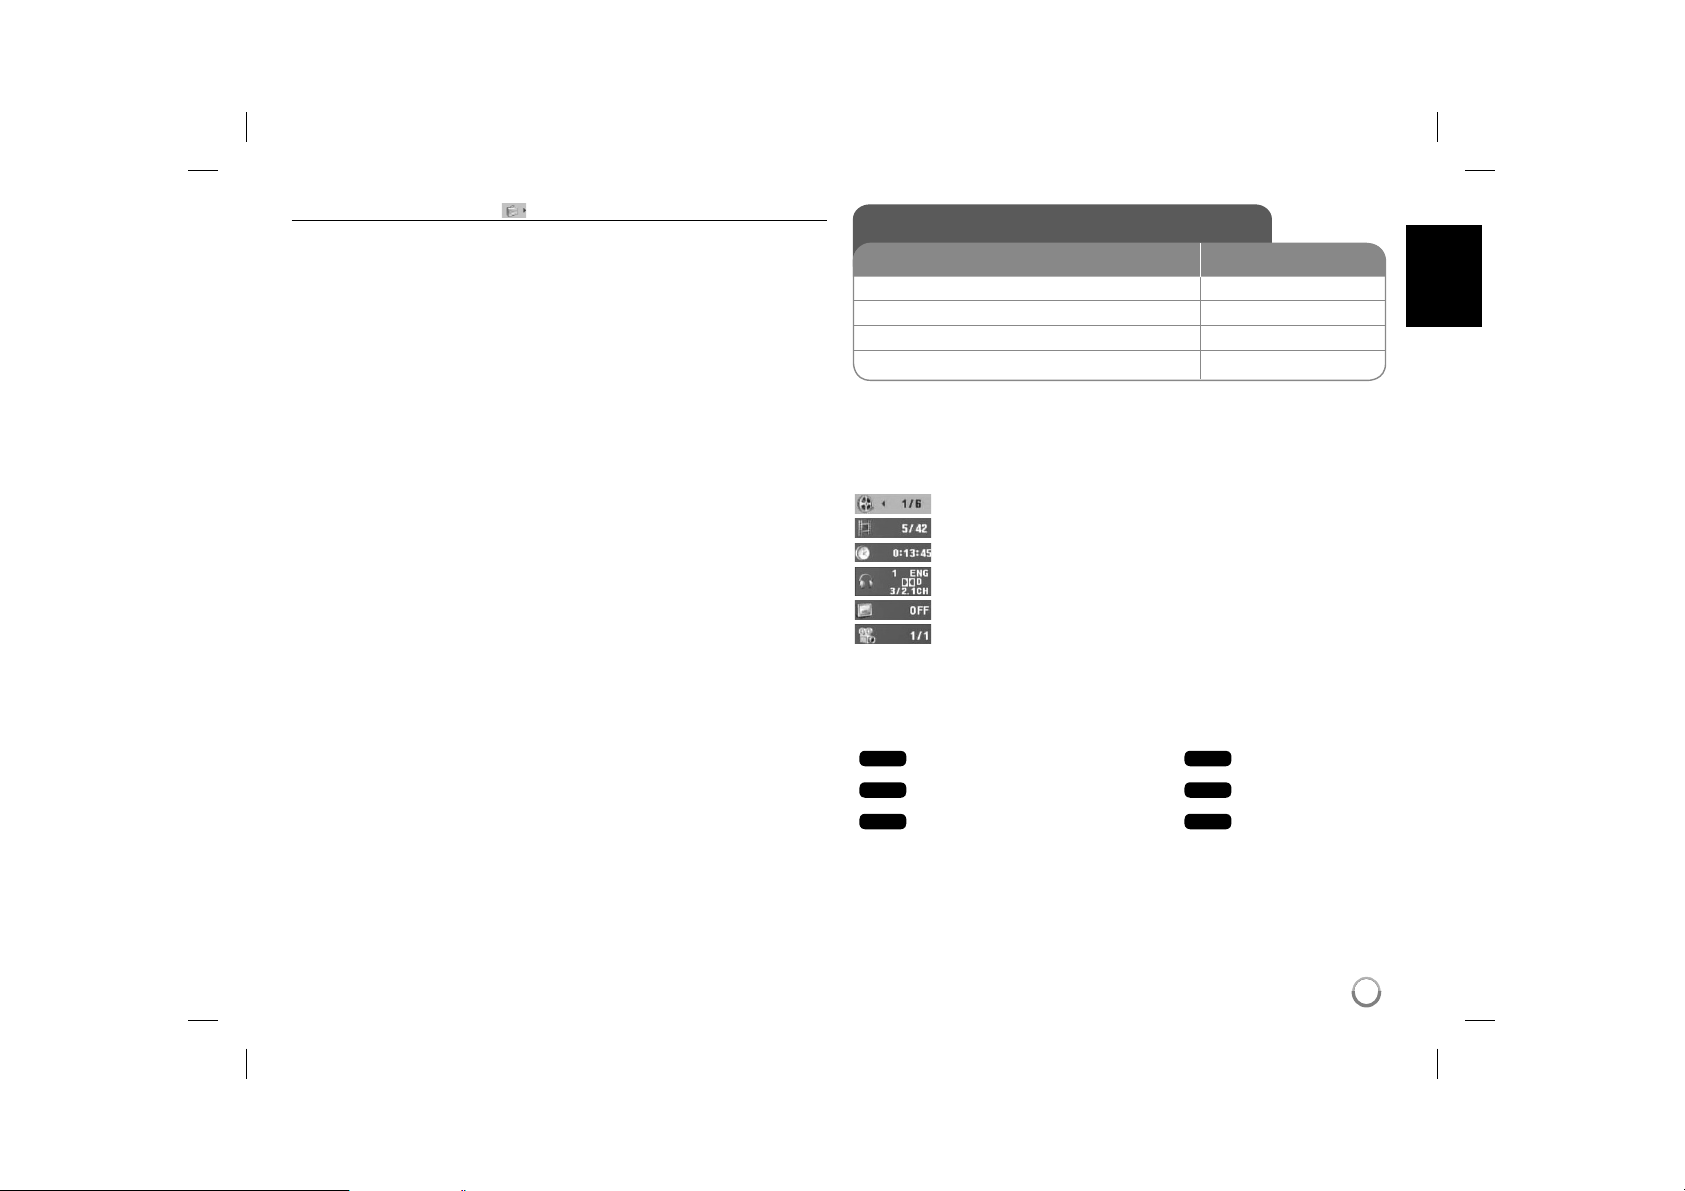
Displaying Disc Information - more you can do
You can select an item by pressing vV and change or select the setting by
pressing b B.
Current title number/total number of titles
Current chapter number/total number of chapters
Elapsed playing time
Selected audio language or channel
Selected subtitle
Selected angle/total number of angles
Symbol Used in this Manual
A section whose title has one of the following symbols are applicable only to the
disc or file represented by the symbol.
ALL
DVD
DivX
All discs and files
DVD and finalized DVD±R/RW
DivX files
v V
b B / ENTER
ACD
MP3
WMA
Audio CDs
MP3 files
WMA files
9
DP450-P.ACZELLP_ENG_MFL61857018.9 9DP450-P.ACZELLP_ENG_MFL61857018.9 9 2/23/09 2:51:25 PM2/23/09 2:51:25 PM
Page 10
Playing a Disc
BUTTON
1 Open the disc lid:
2 Insert a Disc: 3 Close the disc lid: 4 Start playback:
5 Adjust the volume: VOLUME
6 To stop playback:
Playing a Disc - more you can do
Stops the playback
Press STOP (x) to stop playback, the unit records the stopped point depending
on the disc. “ Xx ” appears on the screen briefly. Press PLAY ( N) to resume
playback (from the scene point). If you press STOP (x) again or unload the disc
(“ x ” appears on the screen), the unit will clear the stopped point.
(Xx =Resume Stop, x =Complete Stop) The resume point may be cleared
when a button is pressed. (for example: POWER, OPEN, etc)
Playing a DVD that has a menu
Most DVD now have menus which load first before the film begins to play. You
can navigate these menus using vV b B or number button to highlight an
option. Press ENTER to select.
Playing a DVD VR disc
This unit will play DVD-RW disc that is recorded using the Video Recording
(VR) format. When you insert a disc DVD VR disc, the menu will appear on the
screen. Use vV to select a title then press PLAY ( N). To display DVD-VR
menu, press MENU or TITLE.
Some DVD-VR disc are made with CPRM data by DVD RECORDER. The unit
does not support these kinds of discs.
Skip to the next/previous chapter/track/file
Press SKIP (>) to move to the next chapter/track/file.
Press SKIP (.) to return to the beginning of the current chapter/track/file.
Press SKIP (.) twice briefly to step back to the previous chapter/track/file.
DVD
OPEN (Z)
N PLAY
x STOP
ALL
Pause a playback
Press PAUSE/STEP (X) to pause playback. Press PLAY ( N) to continue
playback.
Frame-by-Frame playback
Press PAUSE/STEP (X) repeatedly to play Frame-by-Frame playback.
Playing repeatedly
Press REPEAT repeatedly to select an item to be repeated. The current title,
chapter track or all will be played back repeatedly. To return to normal playback,
press REPEAT repeatedly to select [Off].
Fast forward or fast reverse
Press and hold SKIP (. or >) to play fast forward or fast reverse during
playback. You can change the various playback speed by pressing and holding
SKIP (. or >) repeatedly. Press PLAY (
speed.
Repeating a specific portion (A-B)
Press A-B at the beginning of the portion you wish to repeat and again at the
end of the portion. Your selected portion will be repeated continually.
To return to normal playback, press A-B to select [Off].
Selecting a subtitle language
During playback, press SUBTITLE ( ) repeatedly to select a desired subtitle
language.
Watching from a different angle
If the angle indicator appears on the screen for a moment, you can select a different camera angle by pressing ANGLE ( ) repeatedly.
Hearing a different audio
During playback, press AUDIO ( ) repeatedly to switch between the available
audio languages, channels or encoding methods.
Slow down the playing speed
During playback, press SLOW (t or T) to slow down reverse or forward playback. You can change the various playback speed by pressing SLOW (t or T)
repeatedly. Press PLAY ( N) to continue play at normal speed.
ALL
ALL
DivX
DVD
DVD
DVD
DVD
DVD
DivX
N) to continue play at normal
DVD
DivX
DVD
DivX
DivX
(
WMA
ACD
DivX
ACD
: Forward only)
MP3
10
10
DP450-P.ACZELLP_ENG_MFL61857018.10 10DP450-P.ACZELLP_ENG_MFL61857018.10 10 2/23/09 2:51:25 PM2/23/09 2:51:25 PM
Page 11
DivX
Watching an enlarged video image
During playback or pause mode, press ZOOM repeatedly to select zoom
mode. You can move through the zoomed picture using vVb B buttons. Press
CLEAR to exit. (100 % p 200 % p 300 % p 400 % p 100 %)
Viewing the title menu
Press TITLE to display the disc's title menu, if available.
Viewing the DVD menu
Press MENU to display the disc menu, if available.
DVD
DVD
Starting play from selected time
Searches for the starting point of entered time code.
clock icon. Enter a time then press ENTER.
hour, 10 minutes, and 20 seconds, enter "11020" and press ENTER. If you
enter the wrong number, press CLEAR to enter again.
DVD
ACD
DVD
ACD
Playing in random order
During playback or in stop mode, press RANDOM for playback in random order.
Press RANDOM again to return to normal playback.
Mark a scene on a disc
You can mark a position on a disc to return to at the place. Simply press
MARKER at the desired position. The marker icon will appear on-screen briefly.
Repeat to place up to nine markers.
Also you can recall or clear the positions. Press SEARCH and [Marker Search]
menu will appear. Use b or B to select a desired marker on the menu, then
press ENTER to recall it or CLEAR to clear it.
Last Scene Memory
This unit memorizes last scene from the last disc that is viewed. The last scene
remains in memory even if you remove the disc from the player or switch off the
unit. If you load a disc that has the scene memorized, the scene is automatically recalled.
DVD
DivX
DVD
For example, to find a scene at 1
WMA
DivX
Press DISPLAY then select
MP3
Screen Saver
The screen saver appears when you leave the unit in Stop mode for about five
minutes. If the Screen Saver is displayed for five minutes, the unit automatically
turns itself off.
Mixed disc – DivX, MP3/WMA and JPEG
When playing a disc contained with DivX, MP3/WMA and JPEG files together,
you can select which menu of files you would like to play by pressing TITLE.
Playing a DivX movie file
BUTTON
1 Open the disc lid:
2 Insert a disc: 3 Close the disc lid: 4 Select a movie file from the menu:
5 Start playback:
6 To stop playback:
Playing a DivX movie file - more you can do
Changing the character set to display DivX® subtitle correctly
Press and hold SUBTITLE for 3 seconds during playback. The language code
will appear. Press b B to select another language code until the subtitle is displayed properly and then press ENTER.
DivX file requirement
DivX file compatibility with this player is limited as follows:
• Available resolution size: 720x576 (W x H) pixel.
• The file names of DivX and subtitle are limited to 45 characters.
• DivX file extensions: “.avi”, “.mpg”, “.mpeg”
• Playable DivX subtitle: SubRip (.srt / .txt), SAMI (.smi),
SubStation Alpha (.ssa/.txt), MicroDVD (.sub/.txt), VobSub (.sub),
SubViewer 2.0 (.sub/.txt), TMPlayer (.txt), DVD Subtitle System (.txt)
• Playable Codec format: “DIVX3.xx”, “DIVX4.xx”, “DIVX5.xx”, “MP43”, “3IVX”.
• Only the playback function is supported with DivX 6.0 in the unit.
• Playable Audio format: “Dolby Digital”, “PCM”, “MP3”, “WMA”
• Sampling frequency: within 8 - 48 kHz (MP3), within 32 - 48 kHz (WMA)
• Bit rate: within 8 - 320 kbps (MP3), within 32 - 192 kbps (WMA),
less than 4Mbps (DivX file)
• CD-R/RW, DVD±R/RW Format: ISO 9660
• Maximum Files/Folders: Less than 600 (total number of files and folders)
OPEN (Z)
v V, MENU
N PLAY
x STOP
11
DP450-P.ACZELLP_ENG_MFL61857018.11 11DP450-P.ACZELLP_ENG_MFL61857018.11 11 2/23/09 2:51:26 PM2/23/09 2:51:26 PM
Page 12
Listening to Music Disc or files
1 Open the disc lid:
2 Insert a disc: 3 Close the disc lid: 4 Select a music from the menu:
5 Start playback:
6 To stop playback:
OPEN (Z)
v V, MENU
N PLAY
x STOP
BUTTON
Viewing photo files
1 Open the disc lid:
2 Insert a disc: 3 Close the disc lid: 4 Select a photo file on the menu:
5 Display the selected file in full screen:
6 To return to the menu:
BUTTON
OPEN (Z)
v V, MENU
N PLAY
x STOP
Listening to Music Disc or files - more you can
do
Creating your own program
You can play the contents of a disc in the order you want by arranging the order
of the musics on the disc. To add a music(s) on the program list, press PROG.
to enter the program edit mode (
Select a desired music on the [List] then press ENTER to add the music to the
program list. Select a music from the program list then press ENTER to start
programmed playback. To clear a music from the program list, select the music
you want to clear then press CLEAR in program edit mode. To clear all music
from the program list, select [Clear All] then press ENTER in program edit
mode. The program is cleared when the disc is removed or the unit is turned
off.
Displaying file information (ID3 TAG)
While playing a MP3 file containing file information, you can display the information by pressing DISPLAY repeatedly. If the file does not have ID3-Tag informa-
tion, [No ID3 TAG] appears on the screen.
MP3/WMA music file requirement
MP3/WMA compatibility with this unit is limited as follows:
• File extensions: “.mp3”, “.wma”
• Sampling frequency: within 8 - 48 kHz (MP3), within 32 - 48kHz (WMA)
• Bit rate: within 8 - 320kbps (MP3), within 32 - 192kbps (WMA)
• CD-R/RW, DVD±R/RW Format: ISO 9660
• Maximum Files/Folders: Less than 600 (total number of files and folders)
12
12
E
mark appears on the menu).
Viewing photo files - more you can do
Viewing photo files as a slide show
Use vV b B to highlight ( ) icon then press ENTER to start slide show.
You can change slide show speed using b B when ( ) icon is highlighted.
Skip to the next/previous photo
Press SKIP (. or >) to view the previous/next photo.
Rotate a photo
Use vV to rotate the photo in full screen counter clockwise or clockwise while
viewing a photo in full screen.
Pause a slide show
Press PAUSE/STEP (X) to pause a slide show. Press PLAY ( N) to continue
the slide show.
Listening to music during slide show
You can listen to music during slide show, if the disc contain music and photo
files together. Use vV b B to highlight ( ) icon then press ENTER to start
slide show.
Watching an enlarged photo image
While viewing a photo in full screen, press ZOOM repeatedly to select zoom
mode. You can move through the zoomed photo using vVb B buttons. Press
CLEAR to exit.
Photo file requirement
JPEG file compatibility with this unit is limited as follows:
• File extensions: “.jpg”
• Photo size: Less than 2MB recommended
• CD-R/RW, DVD±R/RW Format: ISO 9660
• Maximum Files/Folders: Less than 600 (total number of files and folders)
DP450-P.ACZELLP_ENG_MFL61857018.12 12DP450-P.ACZELLP_ENG_MFL61857018.12 12 2/23/09 2:51:26 PM2/23/09 2:51:26 PM
Page 13
Language Codes
Use this list to input your desired language for the following initial settings: Disc Audio, Disc Subtitle, Disc Menu.
Language Code
Afar 6565
Afrikaans 6570
Albanian 8381
Ameharic 6577
Arabic 6582
Armenian 7289
Assamese 6583
Aymara 6588
Azerbaijani 6590
Bashkir 6665
Basque 6985
Bengali, Bangla 6678
Bhutani 6890
Bihari 6672
Breton 6682
Bulgarian 6671
Burmese 7789
Byelorussian 6669
Chinese 9072
Language Code
Croatian 7282
Czech 6783
Danish 6865
Dutch 7876
English 6978
Esperanto 6979
Estonian 6984
Faroese 7079
Fiji 7074
Finnish 7073
French 7082
Frisian 7089
Galician 7176
Georgian 7565
German 6869
Greek 6976
Greenlandic 7576
Guarani 7178
Gujarati 7185
Language Code
Hausa 7265
Hebrew 7387
Hindi 7273
Hungarian 7285
Icelandic 7383
Indonesian 7378
Interlingua 7365
Irish 7165
Italian 7384
Japanese 7465
Kannada 7578
Kashmiri 7583
Kazakh 7575
Kirghiz 7589
Korean 7579
Kurdish 7585
Laothian 7679
Latin 7665
Latvian, Lettish 7686
Language Code
Lingala 7678
Lithuanian 7684
Macedonian 7775
Malagasy 7771
Malay 7783
Malayalam 7776
Maori 7773
Marathi 7782
Moldavian 7779
Mongolian 7778
Nauru 7865
Nepali 7869
Norwegian 7879
Oriya 7982
Panjabi 8065
Pashto, Pushto 8083
Persian 7065
Polish 8076
Portuguese 8084
Area Codes
Choose an area code from this list.
Area Code
Afghanistan AF
Argentina AR
Australia AU
Austria AT
Belgium BE
Bhutan BT
Bolivia BO
Brazil BR
Cambodia KH
Canada CA
Chile CL
China CN
Colombia CO
Congo CG
Area Code
Costa Rica CR
Croatia HR
Czech Republic CZ
Denmark DK
Ecuador EC
Egypt EG
El Salvador SV
Ethiopia ET
Fiji FJ
Finland FI
France FR
Germany DE
Great Britain GB
Greece GR
Area Code
Greenland GL
Hong Kong HK
Hungary HU
India IN
Indonesia ID
Israel IL
Italy IT
Jamaica JM
Japan JP
Kenya KE
Kuwait KW
Libya LY
Luxembourg LU
Malaysia MY
Area Code
Maldives MV
Mexico MX
Monaco MC
Mongolia MN
Morocco MA
Nepal NP
Netherlands NL
Netherlands Antilles AN
New Zealand NZ
Nigeria NG
Norway NO
Oman OM
Pakistan PK
Panama PA
Language Code
Quechua 8185
Rhaeto-Romance 8277
Rumanian 8279
Russian 8285
Samoan 8377
Sanskrit 8365
Scots Gaelic 7168
Serbian 8382
Serbo-Croatian 8372
Shona 8378
Sindhi 8368
Singhalese 8373
Slovak 8375
Slovenian 8376
Spanish 6983
Sudanese 8385
Swahili 8387
Swedish 8386
Tagalog 8476
Area Code
Paraguay PY
Philippines PH
Poland PL
Portugal PT
Romania RO
Russian Federation RU
Saudi Arabia SA
Senegal SN
Singapore SG
Slovak Republic SK
Slovenia SI
South Africa ZA
South Korea KR
Spain ES
Language Code
Tajik 8471
Tamil 8465
Telugu 8469
Thai 8472
Tonga 8479
Turkish 8482
Turkmen 8475
Twi 8487
Ukrainian 8575
Urdu 8582
Uzbek 8590
Vietnamese 8673
Volapük 8679
Welsh 6789
Wolof 8779
Xhosa 8872
Yiddish 7473
Yoruba 8979
Zulu 9085
Area Code
Sri Lanka LK
Sweden SE
Switzerland CH
Taiwan TW
Thailand TH
Turkey TR
Uganda UG
Ukraine UA
United States US
Uruguay UY
Uzbekistan UZ
Vietnam VN
Zimbabwe ZW
13
DP450-P.ACZELLP_ENG_MFL61857018.13 13DP450-P.ACZELLP_ENG_MFL61857018.13 13 2/23/09 2:51:27 PM2/23/09 2:51:27 PM
Page 14
Troubleshooting
Symptom Cause Correction
No power. The power cord is disconnected. Plug the power cord into the wall
The battery is discharged. Recharge the battery.
The power is on,
but the unit does
not work.
No picture. The TV is not set to receive the
No sound. The equipment connected with
The unit does
not start playback.
The remote
control does not
work properly.
No disc is inserted. Insert a disc.
signal from the unit.
The video cable is not connected
securely.
the audio cable is not set to
receive the signal from the unit.
The volume is set to minimum. Use the volume controller to
The AUDIO options are set to the
wrong position.
An unplayable disc is inserted. Insert a playable disc. (Check the
The rating level is set. Change the rating level.
The remote control is not pointed
at the remote sensor on the unit.
The remote control is too far from
the unit.
outlet securely.
Select the appropriate video input
mode on the TV.
Connect the video cable securely.
Select the correct input mode of
the audio amplifier.
adjust the volume.
Set the AUDIO settings to the
correct position.
disc type and regional code.)
Point the remote control at the
remote sensor of the unit.
Operate the remote control closer
to the unit.
Specifications
General
Power requirements DC 12V
Power consumption 12W
External Dimensions 202 x 42.5 x 167 mm (W x H x D)
Net Weight (Approx.) 0.78kg
Operating temperature: 5 °C to 40 °C
Operating humidity 5 % to 90 %
Laser Semiconductor laser
Signal system PAL
Connectors
Audio/Video Output ø3.5mm mini jack x 1
- Video: 1.0 V (p-p), 75 Ω, sync negative
- Audio: 1.5 Vrms (1 KHz, 0 dB)
Earphone terminal ø3.5mm stereo mini jack x 1
Liquid Crystal Display
Panel size 7 inches wide (diagonal)
Projection system R.G.B. stripe
Driving system TFT active matrix
Resolution 480 x 234 (WQVGA)
Accessories
• Audio/Video adapter
• AC Adapter (MPA-630)
• Automotive Adapter (DPDC1)
• Remote Control
• Battery for Remote Control (Lithium Battery)
Designs and specifications are subject to change without
prior notice.
14
14
DP450-P.ACZELLP_ENG_MFL61857018.14 14DP450-P.ACZELLP_ENG_MFL61857018.14 14 2/23/09 2:51:27 PM2/23/09 2:51:27 PM
Page 15
P/NO: MFL61857018
DP450 / DP450P / DP450R
ČESKÝ
DP450-P.ACZELLP_CZE_MFL61857018 2/20/09 6:30 PM Page 1
Page 16
2
VÝSTRAHA: K OMEZENÍ RIZIKA ÚRAZU ELEK-
TRICKÝM PROUDEM. NESUNDÁVEJTE VÍKO (NEBO
ZADNÍ STĚNU). UVNITŘ NEJSOU ČÁSTI
OPRAVITELNÉ UŽIVATELEM. SE SERVISEM SE
OBRAŤTE NA KVALIFIKOVANÝ SERVISNÍ
PERSONÁL.
Tento blesk se symbolem šipky v rovnostranném trojúhelníku je určen k varování uživatele
na přítomnost neizolovaného nebezpečného
napětí uvnitř schránky přístroje, které může
mít dostatečnou velikost k vytvoření rizika
úrazu elektrickým proudem pro osoby.
Vykřičník v rovnostranném trojúhelníku je
určen k upozornění uživatele na přítomnost
důležitých instrukcí k provozu nebo údržbě v
průvodní literatuře k přístroji.
VAROVÁNÍ: ABY SE ZABRÁNILO RIZIKU POŽÁRU
NEBO ÚRAZU ELEKTRICKÝM PROUDEM, NEVYSTAVUJTE TENTO VÝROBEK DEŠTI NEBO VLHKU.
VAROVÁNÍ: Neinstalujte přístroj v těsném prostoru,
jako je knihovna nebo podobný kus nábytku.
VÝSTRAHA: Neblokujte ventilační otvory. Instalujte v
souladu s instrukcemi výrobce. Štěrbiny a otvory ve
skříni slouží k větrání a zajištění spolehlivého chodu
přístroje a jeho ochraně před přehřátím. Tyto otvory
by neměly být blokovány umisťováním přístroje na
postel, pohovku, předložku nebo podobné místo. Tento
výrobek by neměl být umisťován do vestavěného
nábytku jako je knihovna nebo polička, pokud nebude
zajištěno dobré větrání nebo pokud nebyly dodrženy
pokyny výrobce.
VÝSTRAHA: Tento výrobek
používá laserový systém. Abyste
zajistili správné používání tohoto
výrobku, čtěte, prosím, tuto
příručku uživatele pečlivě a
uchovejte ji pro pozdější nahlížení. Kdyby jednotka
vyžadovala údržbu, kontaktujte autorizované servisní
středisko. Používání ovládacích prvků, nastavení, nebo
provádění postupů jiných, než jsou zde specifikované,
může vyústit v nebezpečné vystavení se záření. Abyste
zamezili přímému vystavení se laserovému paprsku,
nepokoušejte se otevřít kryt. Viditelné laserové záření
při otevření. NEDÍVEJTE SE DO PAPRSKU.
VÝSTRAHA: Přístroj by neměl být vystaven vodě (kapající nebo stříkající) a na přístroj by neměly být
umisťovány předměty naplněné kapalinami, jako jsou
vázy.
VÝSTRAHA
• Nezhoršujte větrání zakrýváním větracích otvorů
například novinami, ubrusy, závěsy atd.
• Na přístroj nestavte zdroje otevřeného ohně,
například svíčky.
• Použité baterie likvidujte bezpečným způsobem,
nespalujte je. Při likvidaci baterií respektujte
předpisy na ochranu životního prostředí.
• Používejte přístroj pouze v tropickém nebo
mírném klimatu.
• Nadměrná hladina akustického tlaku ze sluchátek
nebo reprosoustav může poškodit sluch.
• Baterie chraňte před nadměrným horkem,
například slunečním svitem, ohněm apod.
• Z důvodu bezpečnosti neodstraňujte baterii
instalovanou v zařízení. Pokud potřebujete
vyměnit baterii, obraťte se o pomoc k
nejbližšímu servisnímu středisku LG Electronics
nebo k prodejci.
VÝSTRAHA týkající se přívodní šňůry
Pro většinu zařízení se doporučuje, aby byla zapojena do vyhrazeného obvodu;
To je obvod s jednou zásuvkou, který napájí pouze
zařízení a nemá další zásuvky nebo odbočné obvody.
Ověřte si to na stránce s technickými údaji v této
příručce uživatele, abyste si byli jisti. Nepřetěžujte
nástěnné zásuvky. Přetížené nástěnné zásuvky, uvolněné nebo poškozené nástěnné zásuvky, prodlužovací
šňůry, rozedřené přívodní šňůry nebo poškozená
nebo zlomená izolace vodičů jsou nebezpečné.
Kterákoliv z těchto podmínek může vést k úrazu elektrickým proudem nebo k požáru.
Periodicky přezkušujte šňůru vašeho zařízení, a
jestliže její vzhled vykazuje poškození nebo narušení,
odpojte ji, přerušte používání zařízení a šňůru
nechte vyměnit za identický náhradní díl autorizovaným
servisním střediskem.
Chraňte přívodní šňůru před fyzikálním nebo
mechanickým přetěžováním, jako je zkrucování, lámání,
přiskřípnutí, zavření do dveří nebo chození po ní.
Zvláštní pozornost věnujte zástrčkám, stěnovým zásuvkám, a místům, kde šňůra vystupuje ze zařízení.
Odpojení výrobku od napájení provádějte vytažením
napájecí šňůry ze zásuvky. Při instalaci výrobku se
ujistěte, že zásuvka je snadno přístupná.
Likvidace starého přístroje
1. Pokud je na zařízení tento symbol přeškrtnuté popelnice, znamená to, že produkt
podléhá směrnici Evropské unie 2002/96/ES.
2. Veškeré elektrické a elektronické přístroje
musí být likvidovány odděleně od komunálního odpadu, na sběrných místech určených
státem nebo místními úřady.
3. Správná likvidace starého přístroje pomáhá
zabránit případnému ohrožení zdraví a životního prostředí.
4. Podrobnější pokyny o likvidaci starého
přístroje vám poskytne provozovatel
sběrného systému odpadu ve vašem městě
nebo obchod, kde jste přístroj zakoupili.
Tento výrobek splňuje požadavky směrnice
2004/108/ES o elektromagnetické kompatibilitě a požadavky směrnice 2006/95/ES pro
elektrická zařízení nízkého napětí.
Zástupce pro Evropu:
LG Electronics Service Europe B.V.
Veluwezoom 15, 1327 AE Almere, The
Netherlands
(Tel : +31–036–547–8940)
VÝSTRAHA
NEBEZPEČÍ ÚRAZU ELEKTRICKÝM
PROUDEM. NEOTEVÍREJTE
DP450-P.ACZELLP_CZE_MFL61857018 2/20/09 6:30 PM Page 2
Page 17

3
í,
-
O zobrazení symbolu
Během provozu se na obrazovce vašeho televizoru může objevit symbol „ “
a oznamuje, že funkce vysvětlovaná v této uživatelské příručce není dostupná
na daném disku.
Kódy oblasti
Tento přístroj má kód oblasti vytištěn na zadní straně. Na tomto přístroji lze
přehrávat pouze disky DVD označené stejným kódem oblasti jako na zadní
straně tohoto přístroje nebo jako „ALL“.
• Většina DVD disků má na obalu viditelně umístěný globus s jedním nebo
více čísly. Toto číslo musí souhlasit s kódem oblasti vašeho zařízení, jinak
nemůže být disk přehrán.
• Pokud se na přístroji pokusíte přehrát DVD disk s jiným kódem oblasti než je
kód zařízení, na obrazovce televizoru se objeví „Check Regional Code“
(„Zkontrolujte kód oblasti“).
Autorská práva
Zákonem je zakázáno kopírovat, vysílat, předvádět, vysílat přes kabel, přehrávat na veřejnosti nebo bez povolení půjčovat materiál chráněný autorským
právem. Tento produkt obsahuje funkci ochrany proti kopírování
vyvinutou společností Macrovision. Na některých discích jsou zaznamenány
signály ochrany proti kopírování. Při nahrávání a přehrávání snímků z těchto
disků se může objevit zrnění obrazu. Na tento výrobek se vztahuje autorské
právo, které chrání technologii pomocí patentů USA, a další ochrana práv k
duševnímu vlastnictví. Použití této technologie, chráněné autorským právem,
musí schválit Macrovision, musí být uplatněna jen pro neobchodní využití v
domácnosti a podléhá dalším omezením pro použití, pokud Macrovision
neschválí jinak. Reverzní dekódování nebo disasemblace kódu jsou zakázány.
Nabíjitelný akumulátor
• Zabudovaný nabíjitelný akumulátor umožňuje přehrávání souborů a sdílení
přístroje bez překážejících kabelů.
• Zabudovaný nabíjitelný akumulátor se nabíjí, jen pokud je přístroj vypnut a
síťový adaptér je připojen k zásuvce elektrorozvodné sítě.
• Zapnutím přístroje se nabíjení přeruší.
• Plné nabití trvá přibližně 2 hodiny 30 minut.
• Provozní doba na jedno nabití: přibližně 2 hodiny 30 minut.
Provozní doba baterie závisí na stavu baterie, provozním stavu a na
podmínkách vnějšího prostředí, maximální doba přehrávání je až 3 hodiny.
• Kontrolka akumulátoru během nabíjení svítí červeně. Po nabití změní barvu
na zelenou.
• Pokud zbývá energie už jen na několik minut používání, na displeji bliká
“”.
Typy přehrávatelných disků . . . . . . . . . . . . . . . . . . . . . . . . . . . .3
Nabíjitelný akumulátor . . . . . . . . . . . . . . . . . . . . . . . . . . . . . . . .3
Hlavní jednotka . . . . . . . . . . . . . . . . . . . . . . . . . . . . . . . . . . . . .4
Dálkový ovladačí . . . . . . . . . . . . . . . . . . . . . . . . . . . . . . . . . . . .5
Připojení napájen . . . . . . . . . . . . . . . . . . . . . . . . . . . . . . . . . . .6
Připojení přístroje . . . . . . . . . . . . . . . . . . . . . . . . . . . . . . . . . . .7
Přizpůsobení nastavení . . . . . . . . . . . . . . . . . . . . . . . . . . . . .8-9
Zobrazení informací o disku
. . . . . . . . . . . . . . . . . . . . . . . . . . . . .9
Přehrávání disku . . . . . . . . . . . . . . . . . . . . . . . . . . . . . . . . .10-11
Přehrávání filmového souboru DivX . . . . . . . . . . . . . . . . . . . . .11
Poslech hudebních disků nebo souborů . . . . . . . . . . . . . . . . .12
Zobrazení souborů fotografií . . . . . . . . . . . . . . . . . . . . . . . . . .12
Kódy jazyků . . . . . . . . . . . . . . . . . . . . . . . . . . . . . . . . . . . . . .13
Kódy oblastí . . . . . . . . . . . . . . . . . . . . . . . . . . . . . . . . . . . . . .13
Řešení problém . . . . . . . . . . . . . . . . . . . . . . . . . . . . . . . . . . .14
Technické údaje . . . . . . . . . . . . . . . . . . . . . . . . . . . . . . . . . . . .14
Obsah
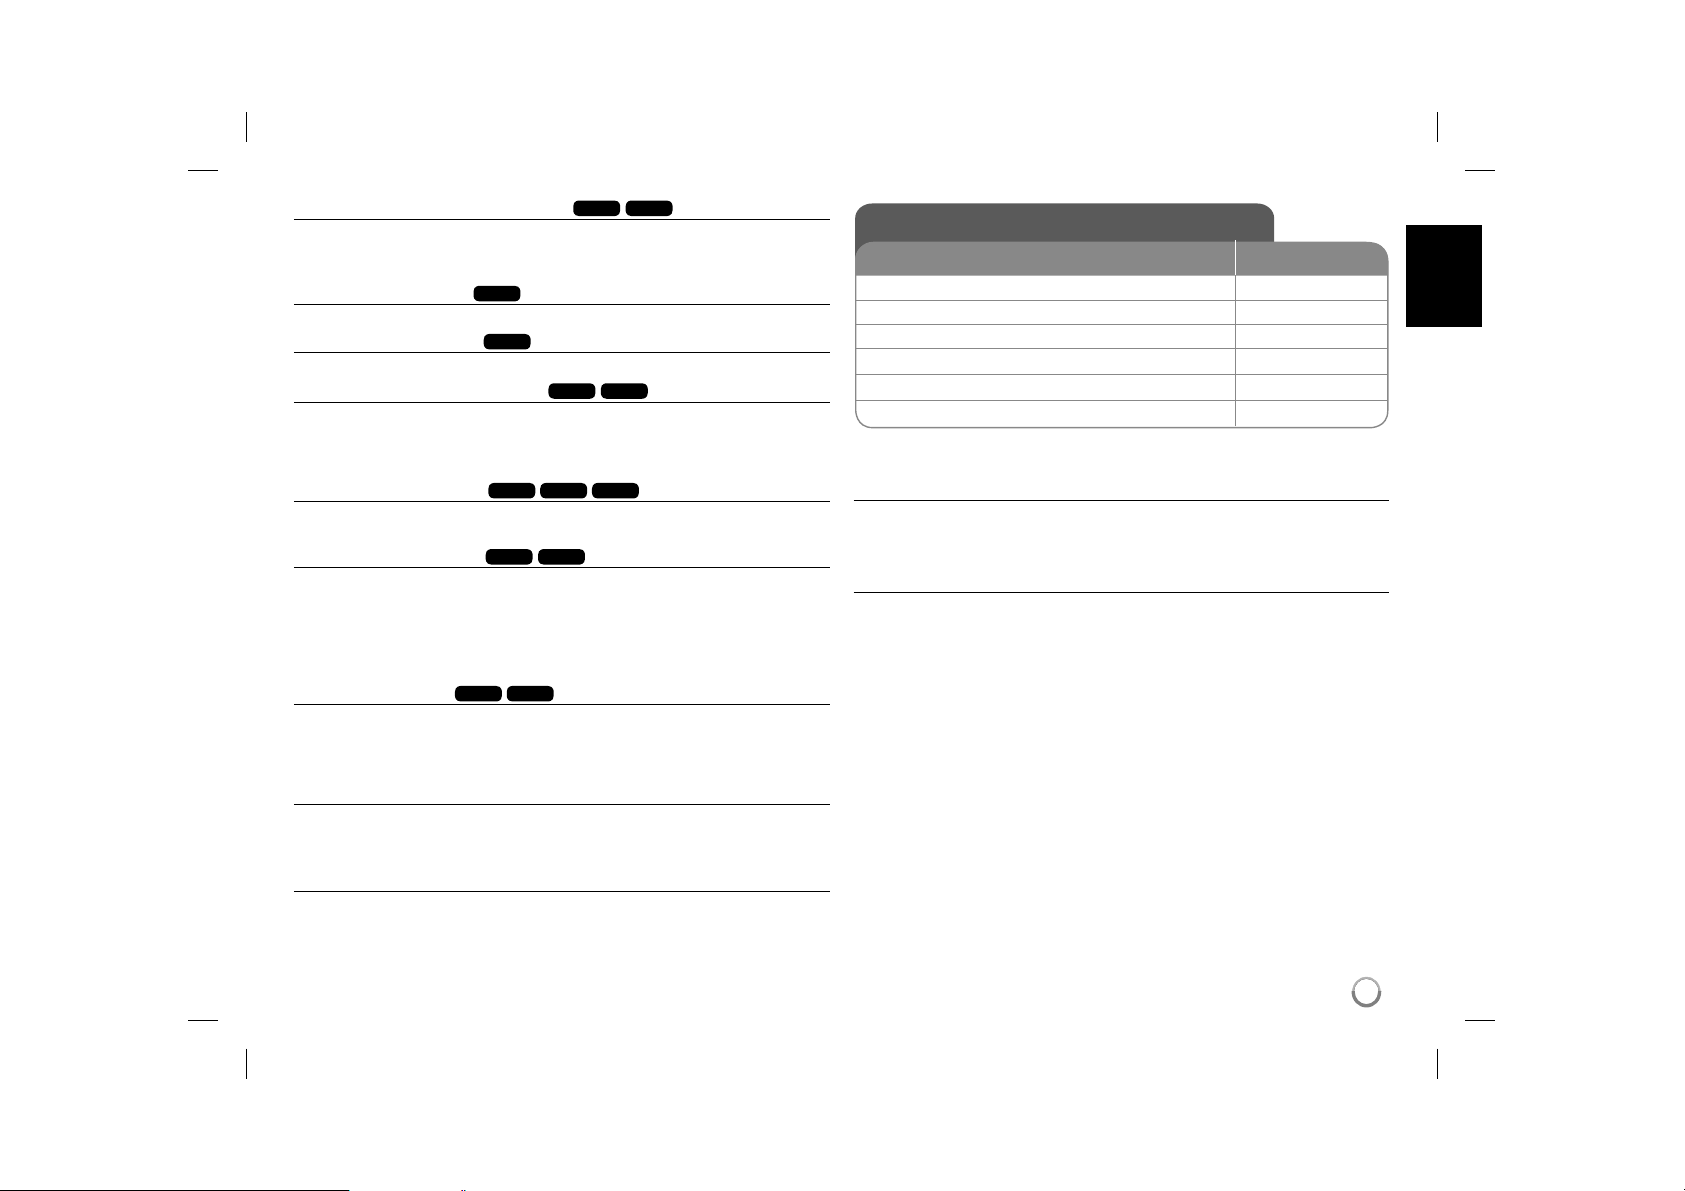
DVD-VIDEO: Disky s filmy, které mohou být zakoupeny
nebo půjčovány.
DVD-R: Pouze dokončené disky v režimu Video
DVD-RW: Pouze disky v režimu VR, Videoa
dokončené disky
DVD+R: Pouze režim Video
DVD+RW: Pouze režim Video
Audio CD: Hudební disky CD nebo CD-R/CD-RW ve
formátu hudební CD, které lze zakoupit.
Toto zařízení umožňuje přehrávat disky DVD±R/RW a CD-R/RW se zvukovými
tituly a soubory DivX, MP3, WMA nebo JPEG. Některé disky DVD±RW/DVD±R
nebo CD-RW/CD-R nelze na tomto přístroji přehrávat kvůli kvalitě záznamu
nebo fyzickému stavu disku nebo charakteristikám záznamového zařízenía softwaru použitého pro vytvoření disku.
Logo
Typy přehrávatelných disků
Typ
Vyrobeno v licenci Dolby Laboratories. Dolby a symbol dvojitého D jsou
obchodní značky Dolby Laboratories.
“DVD Logo” je obchodní značkou formátu DVD Format / Logo Licensing
Corporation.
DP450-P.ACZELLP_CZE_MFL61857018 2/20/09 6:30 PM Page 3
Page 18

4
Hlavní jednotka
a LCD displej
b Reproduktory
c Tlačítka ovládání přehrávání
• N (Play)/ X (Pause): Spustí přehrávání.Dočasně pozastavuje přehrávání,
chcete-li opustit režim pozastavení, stiskněte tlačítko znovu.
• x (Stop): Zastaví přehrávání.
• . (Skip)(Přeskočení): Stiskem tlačítka vyhledáváte směrem vzad* nebo se
vrátíte na začátek aktuální kapitoly nebo stopy nebo přejdete na předchozí kapitolu nebo stopu.
• > (Skip)(Přeskočení): Stiskem tlačítka vyhledáváte směrem vpřed* nebo
přejdete na následující kapitolu nebo stopu.
* Tlačítko stiskněte a přidržte na přibližně dvě sekundy.
d Funkční tlačítka
• DISPLAY: Zobrazí OSD.
• SETUP: Zpřístupní nebo opustí nabídku nastavení.
• COLOR (BARVA)/ BRIGHT (JAS)*: Zobrazení menu nastavení barvy/jasu LCD
displeje.
• MENU: Přístup do nabídky DVD.
* Pokud chcete nastavit barvu nebo jas LCD displeje, opakovaným stiskem tlačítka
COLOR/BRIGHT na přístroji vyvolejte menu Brightness (Jas) nebo Color (Barva)
a pak tlačítky b / B nastavte hodnotu. Stiskem ENTER nastavenou hodnotu
potvrďte..
e Tlačítka ovládání menu
• bBvV(vlevo/vpravo/nahoru/dolů): Výběr položky menu.
• ENTER: Potvrzení volby v menu.
f OPEN (Z): Otevření prostoru pro disk.
g Čidlo dálkového ovládání: Sem namiřte dálkový ovladač.
h Kontrolka nabíjení a napájení
• Tato kontrolka během nabíjení svítí červeně a při dokončení nabíjení změní barvu
na zelenou. (Podrobnosti viz strana 3.)
• Kontrolka svítí několik sekund zeleně při zapnutí přístroje.
i Víko prostoru pro disk
j 1/[ (Vypínač):
Slouží k zapnutí a vypnutí přístroje.
Poznámka: K ovládání přístroje musí být vypínač v poloze On (Zapnuto).
k w VOL (Hlasitost): Nastavení hlasitosti vestavěných reproduktorů a sluchátek.
l (Sluchátka): Připojte sluchátka.
m AV OUT: K TV připojte video a audio vstup.
n DC 12V IN: Připojte napájecí adaptér nebo autoadaptér.
P
A
ka
S
A
ka
D
P
d
O
DP450-P.ACZELLP_CZE_MFL61857018 2/20/09 6:30 PM Page 4
Page 19
5
a
POWER (1): Slouží k zapnutí a vypnutí přístroje.
AUDIO
()
: Vybere jazyk zvuku nebo audio
kanál.
SUBTITLE
()
: Vybere jazyk titulků.
ANGLE ( ): Je-li funkce dostupná, zvolí se úhel
kamery na disku DVD.
SKIP/SEARCH (. / >): Vyhledávání* směrem
vzad/vpřed. Přechod na následující nebo
předchozí kapitolu nebo stopu.
* Tlačítko stiskněte a přidržte na přibližně dvě
sekundy.
SLOW (t / T): Zpomalené přehrávání směrem
vzad/vpřed.
b
SETUP: Zpřístupní nebo opustí nabídku nastavení.
MENU: Přístup do nabídky DVD.
vV b B:
Navigace nabídkami.
ENTER ( ): Potvrzení volby nabídky.
RETURN (O): Stiskněte pro pohyb v nabídce
směrem vzad nebo pro opuštění nabídky.
DISPLAY: Zobrazí OSD.
c
PAUSE/STEP (X): Dočasně pozastaví přehrávání
stiskněte opakovaně pro přehrávání po jednotlivých
snímcích.
PLAY (N): Spustí přehrávání.
STOP (x): Zastaví přehrávání.
Numerická tlačítka: Výběr číslovaných voleb
v nabídce.
PROG.: Vstoupí do režimu úpravy programu.
CLEAR: Odstraní číslo stopy na Seznamu
programů.
d
TITLE: Navigace nabídkami.
REPEAT: Zopakuje kapitolu, stopu, titul nebo vše.
A-B: Opakování sekce.
ZOOM: Zvětší videoobraz.
MARKER: Označení libovolného místa během
přehrávání.
SEARCH: Zobrazení menu [Marker Search]
(Vyhledávání značek).
RANDOM (NÁHODNĚ): Přehrává stopy v náhod-
ném pořadí.
Do dálkového ovládání vložte baterii
Stiskněte svorku držáku baterie, potom vytáhněte
destičku,abyste odstranili držák baterie.
Vložte baterii pólem + ve stejném směru jako + na
držáku baterie. Vraťte držák baterie s baterii do
jednotky dálkového ovladače a ujistěte se, že je
zcela zastrčen.
• Nahrazujte baterie jednotky dálkového ovládání
3V mikro lithiovými články jako CR. 2025 nebo
ekvivalentními.
• Udržujte bezpečnost při použití baterií dle místních zákonů. Neodhazujte baterie do ohně.
Upozornění týkající se nabíjitelného lithiového
akumulátoru
• Nebezpečí výbuchu při nesprávně provedené
výměně akumulátoru.
• K výměně použijte jen stejný typ akumulátoru.
• Další podrobná upozornění jsou uvedena v
prostoru akumulátoru, pokud se počítá s tím, že jej
bude měnit uživatel.
a
b
c
d
Dálkový ovladač
Varování: Baterie, použité v tomto přístroji,
mohou při špatném zacházení přivodit požární
nebo chemické nebezpečí. Nedobíjejte je,
nerozebírejte, nepalte a nezahřívejte nad
100 °C.
Měňte baterie jen za Matsushita Elec. Ind. Co.,
Ltd. (Panasonic), díl č. CR. 2025. Použití jiných
baterií může vést ke vzniku požáru nebo
výbuchu. Zneškodňujte použité baterie. Udržujte
baterie z dosahu dětí. Nerozebírejte a neodhazujte do ohně.
Poznámka: K ovládání přístroje pomocí
dálkového ovládání , musí být vypínač v poloze
On (Zapnuto). (Odkaz na stranu 4)
DP450-P.ACZELLP_CZE_MFL61857018 2/20/09 6:30 PM Page 5
Page 20

Připojení napájení
Připojení AC adaptéru
Dodaný AC adaptér připojte od přístroje k elektrické zásuvce.
Síťový adaptér
• Tento síťový adaptér lze připojit na 100 - 240 V~ 1 A 50/60 Hz.
• Pokud potřebujete adaptér napájecí zásuvky nebo jiný síťový kabel, obraťte
se na prodejce elektropříslušenství.
• Výrobce: NANJING WANLIDA TECHNOLOGY CO., LTD
Připojení adaptéru do auta
Tento přístroj s autoadaptérem jsou určeny pro vozidla s ukostřeným
záporným pólem elektroinstalace a napětím 8,5-16 V. To je nejběžnější typ
elektroinstalace využívaný ve většině osobních vozů. Pokud máte vůz s jinou
elektroinstalací, nelze audoadaptér použít.
Autoadaptér
• Tento autoadaptér lze připojit na 8,5-16 Vss.
• Pokud potřebujete jiný adaptér, obraťte se na prodejce
elektropříslušenství.
• Výrobce: NANJING WANLIDA TECHNOLOGY CO., LTD.
Výstraha
• V zájmu ochrany před úrazem elektrickým proudem a před možným
poškozením vozu vždy nejprve odpojte autoadaptér od zásuvky zapalovače
cigaret a až pak jej odpojte od přístroje.
• Autoadaptér obsahuje pojistku 3 A 250 V.
• Při startování motoru odpojte autoadaptér od zásuvky zapalovače cigaret.
• Nepoužívejte přístroj, pokud je akumulátor vozu vybitý. Při dobíjení vybitého
akumulátoru může alternátor vozu vytvářet přepětí a může se spálit pojistka
v autoadaptéru.
• Pokud napětí palubní sítě vozu klesne pod 10 V, nemusí přístroj správně
fungovat.
• Nenechávejte přístroj zapnutý, pokud je teplota okolí vyšší než 70 °C ,
hrozí poškození optického snímače.
Příklady:
- V autě se zavřenými okny na přímém slunci.
- Poblíž topení.
Připojte druhý konec kabelu ke konektoru „DC 12V IN”.
Připojte koncovku síťového kabelu k síťovému
adaptéru.
(Skutečné provedení se může lišit od obrázku.)
Tlačítko uvolnění
síťového kabelu
Připojte k zásuvce
elektrorozvodné
sítě.
Pravá strana přístroje
Připojte ke konektoru
„DC 12V IN”.
Připojte do zásuvky
zapalovače v autě.
Pravá strana přístroje
6
P
A
P
T
DP450-P.ACZELLP_CZE_MFL61857018 2/20/09 6:30 PM Page 6
Page 21
7
Připojení přístroje
Audio a Video připojení k TV
Připojte AV OUT(výstupní) konektor k přístroji do odpovídajících konektorů na
TV tak, jak je uvedeno dále.
Pravá strana přístroje
Připojte ke
konektoru
„AV OUT”.
Audio/Video kabel
(nedodáno)
Žlutý
bílý
červený
Audio/Video Adaptér
DP450-P.ACZELLP_CZE_MFL61857018 2/20/09 6:30 PM Page 7
TV
Page 22

Přizpůsobení nastavení - co všechno můžete
Když přístroj zapnete poprvé (volitelné)
Když přístroj zapnete poprvé, objeví se nabídka pro výběr jazyka. Musíte vybrat
jazyk, e kterým se bude přístroj používat. Použijte tlačítka vV b B pro výběr
jazyka, potom stiskněte ENTER a objeví se nabídka potvrzení. Pomocí tlačítek
bB vyberte možnost [Vstoupit] a potom stiskněte tlačítko ENTER.
Přizpůsobení nastavení jazyka
Menu Language (Jazyk nabídky) – Vyberte jazyk pro nabídku Nastavení a
OSD.
Disc Audio/Subtitle/Menu (Zvuk disku/titulky disku/nabídka disk) – Vyberte
jazyk pro zvuk disku/titulky/nabídku.
[Original] (Originál): Přiřadí originální jazyk, ve kterém byl disk nahrán.
[Other] (Jiné): Pro výběr jiného jazyka stiskněte numerické tlačítko, potom
ENTER pro vložení odpovídajícího čtyřciferného čísla podle seznamu kódů
jazyků (viz strana 13). Pokud se při zadávání čísla zmýlíte, stiskněte tlačítko
CLEAR, smažte nesprávná čísla a pak je opravte.
[Off] (Vypnuto) (pro titulky disku): Vypnutí titulků.
Přizpůsobení nastavení pro zobrazení
TV Aspect (Poměr stran) – Vyberte, jaký poměr stran obrazovky se má použít
na základě tvaru obrazovky vašeho televizoru.
[4:3]: Vyberte, je-li připojen standardní televizor s formátem 4:3.
[16:9]: Vyberte, je-li připojen širokoúhlý televizor s formátem 16:9.
Display Mode (Režim zobrazení) – Pokud jste vybrali 4:3, budete muset definovat, jak se mají širokoúhlé programy a filmy zobrazovat na obrazovce
vašeho televizoru.
[Letterbox]: Tato volba zobrazí širokoúhlý obraz s černými pruhu v hornía
dolní části obrazovky.
[Panscan]: Tato volba vyplní celou obrazovku formátu 4:3, přičemž ořízne
obraz podle potřeby.
Přizpůsobení nastavení zvuku
DRC (Dynamic Range Control) (Řízení dynamického rozsahu) – Zvuk bude
čistý, když se sníží hlasitost (pouze Dolby Digital). Pro aktivaci nastavte volbu na
[On] (Zapnuto).
Vocal (Hlas) – Zapněte, pouze pokud se přehrává DVD s vícekanálovým
karaoke. Kanály karaoke na disku se přimíchají do normálního stereofonního
zvuku.
APřizpůsobení nastavení zámku
Chcete-li nastavit volby zámku, musíte nastavit volbu [Area Code] (Volačka).
Vyberte volbu [Area Code] (Kód oblasti) a potom stiskněte B. Zadejte čtyřciferné heslo a stiskněte tlačítko ENTER. Zadejte je pro ověření znovu a potom
stiskněte tlačítko ENTER. Pokud uděláte při zadávání čísla chybu, stiskněte
tlačítko CLEAR a číslo opravte.
Pokud zapomenete heslo, můžete jej vynulovat. Nejprve vyjměte disk z přístroje
Vyvolejte menu nastavení a pak zadejte 6místné číslo „210499” a heslo se
vymaže.
Rating (Klasifikace) – Vyberte úroveň hodnocení. Čím nižší je úroveň, tím
přísnější je hodnocení. Vyberte [Unlock] (Odemčení) pro deaktivaci hodnocení.
Password (Heslo) – Nastavení nebo změna hesla pro nastavení zámku.
[New] (Nové heslo): Zadejte nové 4ciferné heslo pomocí numerických tlačítek
a poté stiskněte tlačítko ENTER. Zadejte heslo znovu pro potvrzení.
[Change] (Změna): Po zadání aktuálního hesla zadejte dvakrát nové heslo.
Area Code (Kód oblasti) – Vyberte kód pro zeměpisnou oblast jako úroveň
hodnocení přehrávání. To určuje, které standardy oblasti se používají pro ohodnocení disků DVD kontrolovaných rodičovským zámkem (viz strana 13).
Přizpůsobení nastavení
1 Zobrazení nabídky nastavení: SETUP
2 Výběr požadované volby na první úrovni:
vv VV
3 Přechod na druhou úroveň:
BB
4 Výběr požadované volby na druhé úrovni:
vv VV
5 Přechod na třetí úroveň:
BB
6 Změna nastavení:
vv VV
/ ENTER
TLAČÍTKO
8
P
D
D
po
w
[S
Fi
DP450-P.ACZELLP_CZE_MFL61857018 2/20/09 6:30 PM Page 8
Page 23

9
-
Přizpůsobení dalších nastavení
DivX(R) VOD – Poskytujeme vám registrační kód DivX® VOD (Video On
Demand – video na požádání), který vám umožní půjčit si a zakoupit filmy
pomocí služby DivX® VOD. Více informací naleznete na stránkách
www.divx.com/vod. Stiskněte tlačítko ENTER zatímco je zvýrazněna ikona
[Select] (Volba) a můžete zobrazit registrační kód přístroje.
Filmy stažené z DivX® VOD lze přehrávat pouze na tomto přístroji.
Zobrazení informací o disku - co všechno
můžete
Položku lze zvolit pomocí tlačítek vV a změnit nebo vybrat nastavení
pomocí tlačítek bB.
Číslo aktuálního titulu /celkový počet titulů
Číslo aktuální kapitoly/celkový počet kapitol
Uplynulý čas přehrávání
Vybraný jazyk zvuku nebo kanál
Vybrané titulky
Vybraný úhel/celkový počet úhlů
Symboly použité v této příručce
Odstavce, jejíž nadpis obsahuje jeden z níže uvedených symbolů, se týkají jen
typu disku nebo souboru odpovídajícího příslušnému symbolu.
Všechny disky a soubory Zvukové disky CD
Disky DVD a dokončené disky
Soubory MP3
DVD±R/RW
Soubory WMA
Soubory DivX
DivX
WMA
MP3DVD
ACDALL
Zobrazení informací o disku
1 Během přehrávání stiskněte tlačítko DISPLAY
DISPLAY:
2 Vyberte položku:
vv VV
3 Přizpůsobte nastavení nabídky
bb BB
/ ENTER
Display (Zobrazení):
4 Pro návrat na ukončení: DISPLAY
TLAČÍTKO
DP450-P.ACZELLP_CZE_MFL61857018 2/20/09 6:30 PM Page 9
Page 24

Přehrávání disku - co všechno můžete
Zastavení přehrávání
Stiskem tlačítka STOP (xx) zastavte přehrávání; v závislosti na typu disku si
přístroj zapamatuje místo, kde bylo přehrávání zastaveno. Na obrazovce se
krátce objeví „X
xx
“. Stiskněte tlačítko PLAY ( NN) pro pokračování přehrávání
(od bodu scény). Stisknete-li znovu tlačítko STOP (xx) nebo vyjmete disk (na
obrazovce se objeví „xx“), jednotka odstraní bod zastavení. (
XXxx
=
Pokračování
pozastavení,
xx
=
Úplné zastavení) Tento bod pokračování může být vymazán,
když stisknete tlačítko (například: POWER, OPEN, atd.).
Přehrávání disku DVD, který obsahuje nabídku
Většina disků DVD má nyní nabídky, které se načtou před zahájením přehrávání
filmu. Těmito nabídkami můžete procházet pomocí tlačítek vV b B nebo číselných
tlačítek a zvýraznit volbu. Stisknutím tlačítka ENTER proveďte výběr.
Přehrávání disku DVD VR
Tento přístroj přehrává disky DVD-RW nahrané ve formátu Video Recording
(VR). Když vložíte disk DVD VR, na obrazovce se objeví nabídka. Pomocí vV
vyberte titul a pak stiskněte PLAY ( NN). Chcete-li zobrazit nabídku DVD-VR,
stiskněte tlačítko MENU nebo TITLE.
Některé disky DVD-VR jsou DVD REKORDÉREM vytvořeny s údaji CPRM.
Tyto disky nejsou přístrojem podporovány.
Přeskočení na další/předchozí kapitolu/stopu/soubor
Stiskněte tlačítko SKIP (>) pro přechod na další kapitolu/stopu/soubor.
Stiskněte tlačítko SKIP (.) pro návrat na začátek aktuální
kapitolu/stopu/soubor.
Stiskněte dvakrát krátce tlačítko SKIP (.) pro krok zpět na předchozí
kapitolu/stopu/soubor.
Pozastavení přehrávání
Stiskněte tlačítko PAUSE/STEP (X) pro pozastavení přehrávání. Stiskněte
tlačítko PLAY (
NN
) pro pokračování přehrávání.
Přehrávání po jednotlivých snímcích
Pro přehrávání po jednotlivých snímcích tiskněte tlačítko PAUSE/STEP (X)
opakovaně.
Opakované přehrávání
Opakovaně stiskněte tlačítko REPEAT pro výběr položky, která se má opakovat.
Bude se opakovaně přehrávat aktuální titul, kapitola nebo stopa. Chcete-li se
vrátit k normálnímu přehrávání, opakovaným stiskem tlačítka REPEAT vyberte
možnost [Off] (Vypnuto).
Rychlý posun vpřed nebo vzad
Stiskem a přidržením tlačítka SKIP (. nebo >) během přehrávání
převíjíte vpřed nebo vzad. Rychlost přehrávání můžete měnit opakovaným
stiskem tlačítka SKIP (. nebo >). Stiskem PLAY (
N) pokračujete v
přehrávání normální rychlostí.
Opakování určité části (A-B)
Stiskněte tlačítko A-B na začátku části, kterou chcete opakovat, a znovu je
stiskněte na konci této části. Vybraná část se bude nepřetržitě opakovat.
Chcete-li se vrátit k normálnímu přehrávání, stisknutím tlačítka A-B vyberte
možnost [Off] (Vypnuto).
Výběr jazyka titulků
Stisknutím tlačítka SUBTITLE ( ) během přehrávání vyberte požadovaný jazyk
titulků.
Sledování z různých úhlů
Pokud se na obrazovce na chvíli objeví indikátor úhlu, můžete vybrat jiný úhel
kamery opakovaným stisknutím tlačítka ANGLE ( ).
Poslech jiného zvuku
Během přehrávání opakovaně stiskněte tlačítko AUDIO ( ) pro přepínání
mezi různými jazyky zvuku, kanály nebo způsoby kódování.
Zpomalené přehrávání ( : jen směrem vpřed)
Během přehrávání stiskem tlačítka SLOW (t nebo T) aktivujete zpomalené
přehrávání vpřed nebo vzad. Rychlost přehrávání můžete měnit opakovaným
stiskem SLOW (t nebo T). Stiskem PLAY (
N
) pokračujete v přehrávání
normální rychlostí.
DivXDVD
DivXDVD
DVD
DivXDVD
ACDDivXDVD
MP3WMAACDDivXDVD
ALL
DivXDVD
ALL
ALL
DVD
Přehrávání disku
TLAČÍTKO
1 Otevření víka prostoru pro disk: OPEN (Z)
2 Vložte disk: 3 Zavření víka prostoru pro disk: 4 Spusťte přehrávání:
NN
PLAY
5 Nastavte hlasitost: VOLUME
6 Chcete-li zastavit přehrávání:
xx
STOP
10
S
B
Z
p
C
Z
S
Z
S
S
V
a
p
„1
tl
P
B
n
ry
O
L
p
z
N
S
m
o
P
Te
n
z
je
S
S
m
a
S
P
J
so
DP450-P.ACZELLP_CZE_MFL61857018 2/20/09 6:30 PM Page 10
Page 25

11
Sledování zvětšeného videoobrazu.
Během přehrávání nebo v režimu pozastavení opakovaně stiskněte tlačítko
ZOOM a vyberte režim přiblížení (zoom). Ve zvětšeném obrazu se můžete
pohybovat pomocí tlačítek vVb B. Nabídku opustíte stisknutím tlačítka
CLEAR. (100 % p 200 % p 300 % p 400 % p 100%)
Zobrazení nabídky titulů
Stisknutím tlačítka TITLE zobrazíte nabídku titulů disku, pokud existuje.
Zobrazení nabídky disku DVD
Stisknutím tlačítka MENU zobrazíte nabídku disku, pokud existuje.
Spuštění přehrávání od vybraného času
Vyhledá počáteční bod zadaného časového kódu. Stiskněte tlačítko DISPLAY
a vyberte ikonu hodin. Zadejte čas a stiskněte tlačítko ENTER. Například,
pokud chcete najít scénu v čase 1 hodina, 10 minut a 20 sekund, zadejte
„11020“ a stiskněte tlačítko ENTER. Pokud jste zadali špatné číslo, stiskněte
tlačítko CLEAR a zadejte číslo znovu.
Přehrávání stop v náhodném pořadí
Během přehrávání nebo v režimu zastavení stiskněte tlačítko RANDOM pro
náhodné přehrávání. Dalším stiskem RANDOM obnovíte přehrávání normální
rychlostí.
Označení oblíbené scény
Libovolné místo na disku si můžete označit a později se k němu vrátit. Stačí na
požadovaném místě stisknout tlačítko MARKER. Na chvíli se zobrazí ikona
značky. Dalšími stisky tlačítka můžete umístit další značky.
Na označená místa se můžete vrátit a značky také můžete vymazat. Stiskněte
SEARCH (Hledat) a objeví se menu [Zvýrazněné hledání]. Stiskem b nebo B z
menu vyberte požadovanou značku a pak se stiskem ENTER přesuňte na
označené místo nebo stiskem CLEAR vybranou značku vymažte.
Paměť poslední scény
Tento přístroj si zapamatuje poslední scénu z posledního disku, který byl na
něm přehráván. Poslední scéna zůstává v paměti, i když vyjmete disk
z přístroje nebo přístroj vypnete. Pokud vložíte disk se zapamatovanou scénou,
je tato scéna automaticky vyvolána.
Spořič obrazovky
Spořič obrazovky se objeví, když necháte přístroj v režimu zastavení asi pět
minut. Poté, co byl spořič obrazovky zobrazen po dobu pěti minut, přístroj se
automaticky vypne.
Smíšený disk – DivX, MP3/WMA a JPEG
Při přehrávání disku, který obsahuje současně soubory DivX, MP3/WMA a
JPEG, můžete stisknutím tlačítka TITLE vybrat, které
soubory chcete přehrávat.
Přehrávání filmového souboru DivX -
co všechno můžete
Změna znakové sady pro správné zobrazení titulků DivX®
Během přehrávání stiskněte a podržte tlačítko SUBTITLE po dobu asi 3
sekund. Objeví se kód jazyka. Stisknutím tlačítka bB vybírejte jiný kód jazyka,
dokud se titulky nezobrazí správně, a potom stiskněte ENTER.
Požadavky na soubory DivX
Kompatibilita tohoto přehrávače se soubory DivX je omezena následovně:
• Dostupná velikost rozlišení: 720 x 576 (Š x V) pixelů
• Názvy souborů DivX a titulků jsou omezeny na 45 znaků.
• Přípony souborů DivX: „.avi“, „.mpg“, „.mpeg“
• Přehrávatelné titulky pro DivX: SubRip (.srt / .txt), SAMI (.smi),
SubStation Alpha (.ssa/.txt), MicroDVD (.sub/.txt), VobSub (.sub),
SubViewer 2.0 (.sub/.txt), MPlayer (.txt), DVD Subtitle System (.txt)
• Přehrávatelné formáty kodeků: „DIVX3.xx“, „DIVX4.xx“, „DIVX5.xx“, „MP43“,
„3IVX“
• U formátu DivX 6.0 je v přístroji podporována pouze funkce přehrávání.
• Přehrávatelné formáty zvuku: „Dolby Digital“, „PCM“, „MP3“, „WMA“.
• Vzorkovací frekvence: 8 – 48 kHz (MP3), 32 – 48 kHz (WMA)
• Datový tok: 8 – 320 kb/s (MP3), 32 – 192 kb/s (WMA),
méně než 4 Mb/s (soubor DivX)
• Formát CD-R/RW, DVD
±R/RW: ISO 9660
• Maximum Souborů/Složek: Pod 600 (celkový počet souborů a složek)
ACDDVD
DivXDVD
MP3WMAACD
DivXDVD
DVD
DVD
DivXDVD
Přehrávání filmového souboru DivX
1 Otevření víka prostoru pro disk: OPEN(Z)
2 Vložte disk: 3 Zavření víka prostoru pro disk: 4 Vyberte filmový soubor z nabídky:
vv VV
, MENU
5 Spusťte přehrávání:
NN
PLAY
6 Chcete-li zastavit přehrávání:
xx
STOP
TLAČÍTKO
DP450-P.ACZELLP_CZE_MFL61857018 2/20/09 6:30 PM Page 11
Page 26

Poslech hudebních disků nebo souborů co všechno můžete
Vytvoření vašeho vlastního programu
Můžete přehrávat obsah disku v požadovaném pořadí uspořádáním pořadí
hudby na disku. Chcete-li přidat hudební nahrávku (nahrávky) do seznamu
programu, stiskněte tlačítko PROG. a vstupte do režimu úpravy programu
(v nabídce se objeví značka ).
Vyberte požadovanou hudbu v seznamu [Seznam] a stisknutím tlačítka ENTER
přidejte hudební nahrávku do seznamu programu. Vyberte hudební nahrávku ze
seznamu programu a stisknutím tlačítka ENTER spusťte naprogramované
přehrávání. Chcete-li vymazat hudební nahrávku ze seznamu programu, vyberte
hudební nahrávku, kterou chcete vymazat, a stiskněte tlačítko CLEAR v režimu
úpravy programu. Pokud chcete vymazat veškerou hudbu ze seznamu
programu, vyberte volbu [Clear All] (Odstr. vše) a stiskněte tlačítko ENTER
v režimu úpravy programu. Program je vymazán, pokud se disk vyjme nebo se
přístroj vypne.
Zobrazení informací o souboru (ID3 TAG)
Během přehrávání souboru MP3, který obsahuje informace o souboru, můžete
tyto informace zobrazit opakovaným stisknutím tlačítka DISPLAY. Pokud soubor
neobsahuje informace ID3-Tag, na obrazovce se zobrazí [No. ID3 TAG].
Požadavky hudebních souborů MP3/WMA
Kompatibilita tohoto přístroje se soubory MP3/WMA je omezena následovně:
• Přípony souborů: „.mp3“, „.wma“
• Vzorkovací frekvence: mezi 8 – 48 kHz (MP3), mezi 32 – 48 kHz (WMA)
• Přenosová rychlost: mezi 8 – 320 kb/s (MP3), mezi 32 – 192 kb/s (WMA)
• Formát CD-R/RW, DVD±R/RW: ISO 9660
• Maximum Souborů/Složek: Pod 600 (celkový počet souborů a složek)
Zobrazení souborů fotografií - co všechno
můžete
Zobrazení souborů fotografií jako slide show
Pomocí tlačítek vV b B zvýrazněte ikonu ( ) a stisknutím tlačítka ENTER
spusťte slide show. Rychlost slide show můžete změnit pomocí tlačítek bB,
když je zvýrazněna ikona ( ).
Přeskočení na další nebo předchozí fotografii
Stisknutím tlačítka SKIP (. nebo >) zobrazíte předchozí nebo následující
fotografii.
Otočení fotografie
Během prohlížení fotografie v celoobrazovkovém režimu pomocí tlačítek vV
otočíte fotografii v celoobrazovkovém režimu proti směru nebo ve směru hodinových ručiček.
Pozastavení slide show
Stisknutím tlačítka PAUSE/STEP (X) pozastavíte slide show. Stiskněte
PLAY (
NN
) pro pokračování slide show.
Poslech hudby během slide show
Během slide show můžete poslouchat hudbu, pokud disk obsahuje současně
hudební a fotografické soubory. Pomocí tlačítek vV b B zvýrazněte ikonu
( ) a stisknutím tlačítka ENTER spusťte slide show.
Sledování zvětšené fotografie
Během zobrazení fotografie v celoobrazovkovém režimu stiskněte opakovaně
tlačítko ZOOM a vyberte režim přiblížení. Ve zvětšené fotografii se můžete pohybovat pomocí tlačítek vVb B. Nabídku opustíte stisknutím tlačítka CLEAR.
Požadavky souborů fotografií
Kompatibilita tohoto přístroje se soubory JPEG je omezena následovně:
• Přípony souborů: „.jpg“
• Velikost fotografie: Doporučeno je méně než 2 MB
• Formát CD-R/RW, DVD
±R/RW: ISO 9660
• Maximum Souborů/Složek: Pod 600 (celkový počet souborů a složek)
Poslech hudebních disků nebo souborů
TLAČÍTKO
1 Otevření víka prostoru pro disk: OPEN(Z)
2 Vložte disk: 3 Zavření víka prostoru pro disk: 4 Vyberte hudbu z nabídky:
vv VV
, MENU
5 Spusťte přehrávání:
NN
PLAY
6 Chcete-li zastavit přehrávání:
xx
STOP
Zobrazení souborů fotografií
1 Otevření víka prostoru pro disk: OPEN(Z)
2 Vložte disk: 3 Zavření víka prostoru pro disk: 4 Vyberte soubor fotografie z nabídky:
vv VV
, MENU
5 Zobrazení vybraného souboru na
NN
PLAY
celou obrazovku:
6 Chcete-li se vrátit do nabídky:
xx
STOP
TLAČÍTKO
12
DP450-P.ACZELLP_CZE_MFL61857018 2/20/09 6:30 PM Page 12
E
Page 27

13
Kódy jazyků
Použijte tento seznam pro zadání požadovaného jazyka pro následující výchozí nastavení: Disc Audio (Zvuk disku), Disc Subtitle (Titulky disku), Disc Menu (Nabídka disku).
Kódy oblastí
Vyberte kód oblasti z tohoto seznamu.
Jazyk Kód
Afarština 6565
Afrikánština 6570
Albánština 8381
Amharština 6577
Arabština 6582
Arménština 7289
Ásámština 6583
Ajmarština 6588
Azerbajdžánština 6590
Baškirština 6665
Baskičtina 6985
Bengálština, bangladéština 6678
Bhútánština 6890
Bihár ština 6672
Bretonština 6682
Bulharština 6671
Barmština 7789
Běloruština 6669
Čínština 9072
Jazyk Kód
Chorvatština 7282
Čeština 6783
Dánština 6865
Holandština 7876
Angličtina 6978
Esperanto 6979
Estonština 6984
Faerština 7079
Fidžijština 7074
Finština 7073
Francouzština 7082
Fríština 7089
Galicijština 7176
Gruzínština 7565
Němčina 6869
Řečtina 6976
Grónština 7576
Guaraní 7178
Gudžarátí 7185
Jazyk Kód
Hauština 7265
Hebrejština 7387
Hindština 7273
Maďarština 7285
Islandština 7383
Indonéština 7378
Interlingua 7365
Irština 7165
Italština 7384
Japonština 7465
Kannadština 7578
Kašmírština 7583
Kazaština 7575
Kyrgyzština 7589
Korejština 7579
Kurdština 7585
Laoština 7679
Latina 7665
Lotyština 7686
Jazyk Kód
Lingala 7678
Litevština 7684
Makedonština 7775
Malgaština 7771
Malajština 7783
Malajálamština 7776
Maorština 7773
Maráthí 7782
Moldavština 7779
Mongolština 7778
Naurština 7865
Nepálština 7869
Norština 7879
Urijština 7982
Panžábština 8065
Paštština, paštunština8083
Perština 7065
Po lš ti na 8076
Portugalština 8084
Jazyk Kód
Kečujština 8185
Rétorománština 8277
Rumunština 8279
Ruština 8285
Samojština 8377
Sanskrt 8365
Skotská gaelština 7168
Srbština 8382
Srbochorvatština 8372
Šonština 8378
Sindhština 8368
Sinhálština 8373
Slovenština 8375
Slovinština 8376
Španělština 6983
Súdánština 8385
Svahilština 8387
Švédština 8386
Tagalog 8476
Jazyk Kód
Tádžičtina 8471
Tamilština 8465
Telugština 8469
Thajština 8472
Tonžština 8479
Turečtina 8482
Turkmenština 8475
Twiština 8487
Ukrajinština 8575
Urdština 8582
Uzbečtina 8590
Vietnamština 8673
Volapük 8679
Velština 6789
Volofština 8779
Xhoština 8872
Jidiš 7473
Jorubština 8979
Zulština 9085
Oblast Kód
Afghánistán AF
Argentina AR
Austrálie AU
Rakousko AT
Belgie BE
Bhútán BT
Bolívie BO
Brazílie BR
Kambodža KH
Kanada CA
Chile CL
Čína CN
Kolumbie CO
Kongo CG
Oblast Kód
Kostarika CR
Chorvatsko HR
Česká republika CZ
Dánsko DK
Ekvádor EC
Egypt EG
El Salvador SV
Etiopie ET
Fidži FJ
Finsko FI
Francie FR
Německo DE
Velká Británie GB
Řecko GR
Oblast Kód
Grónsko GL
Hongkong HK
Maďarsko HU
Indie IN
Indonésie ID
Izrael IL
Itálie IT
Jamajka JM
Japonsko JP
Keňa KE
Kuvajt KW
Libye LY
Lucembursko LU
Malajsie MY
Oblast Kód
Maledivy MV
Mexiko MX
Monako MC
Mongolsko MN
Maroko MA
Nepál NP
Nizozemí NL
Nizozemské Antily AN
Nový Zéland NZ
Nigérie NG
Norsko NO
Omán OM
Pákistán PK
Panama PA
Oblast Kód
Paraguay PY
Filipíny PH
Polsko PL
Portugalsko PT
Rumunsko RO
Ruská federace RU
Saudská Arábie SA
Senegal SN
Singapur SG
Slovenská republika SK
Slovinsko SI
Jižní Afrika ZA
Jižní Korea KR
Španělsko E S
Oblast Kód
Srí Lanka LK
Švédsko SE
Švýcarsko C H
Tchajwan TW
Thajsko TH
Turecko TR
Uganda UG
Ukrajina UA
Spojené státy US
Uruguay UY
Uzbekistán UZ
Vietnam VN
Zimbabwe ZW
DP450-P.ACZELLP_CZE_MFL61857018 2/20/09 6:30 PM Page 13
Page 28

14
Technické údaje
Řešení problémů
Příznak
Náprava
Je odpojená síťová šňůra.
Vybitý akumulátor.
Není vložen disk.
Televizor není nastaven na příjem
výstupního signálu z přístroje.
Video kabel není pevně zapojený.
Zařízení připojené pomocí audio
kabelu není nastaveno pro příjem
signálu z přístroje.
Je nastavena minimální hlasitost.
Možnosti AUDIO jsou špatně
nastaveny.
Je vložen disk, který nelze přehrát.
Je nastavena úroveň hodnocení.
Dálkový ovladač není namířen na
čidlo dálkového ovládání přístroje.
Dálkový ovladač je příliš daleko
od přístroje.
Zasuňte síťovou šňůru pevně do
nástěnné zásuvky.
Nabijte akumulátor.
Vložte disk.
Vyberte odpovídající režim video
vstupu na televizoru.
Připojte pevně video kabel.
Vyberte správný vstupní režim na
audio zesilovači.
Nastavte hlasitost ovladačem
hlasitosti.
Nastavte nastavení AUDIO do
správné polohy.
Vložte přehrávatelný disk.
(Zkontrolujte typ disku a kód oblasti.)
Změňte úroveň hodnocení.
Nasměrujte dálkový ovladač na
čidlo dálkového ovládání přístroje.
Provozujte dálkový ovladač blíže
k přístroji.
Není napájení.
Napájení je
zapnuto, ale
přístroj nepracuje
Není obraz
Není zvuk.
Přístroj nezačne
přehrávat.
Dálkový ovladač
nepracuje
správně.
Provedení a technické specifikace jsou předmětem změn
bez předchozího upozornění.
Příčina
Všeobecné
Požadavky na příkon DC 12V
Spotřeba 12W
Rozměry (přibližně) 202 x 42.5 x 167 mm
(Š x V x H)
Čistá hmotnost (přibl.) 0.78kg
Provozní teplota: 5 °C až 40 °C
Provozní vlhkost 5 % až 90 %
Laser Polovodičový laser
Systém signálu PAL
Konektory
Audio/Video výstup ø3,5 mm minikonektor x 1
- Video: 1,0 V (p-p), 75 Ω, záporná synchronizace
- Audio: 1,5 Vrms (1 kHz, 0 dB)
Konektor sluchátek ø3,5 mm stereo minikonektor x 1
LCD displej
Velikost Úhlopříčka 7 palců
(širokoúhlý displej)
Zobrazovací systém R.G.B. proužky
Systém budičů Aktivní matrice TFT
Rozlišení 480 x 234 (WQVGA)
Příslušenství
• Audio/Video Adaptér
• Síťový adaptér (MPA-630)
• Autoadaptér (DPDC1)
• Dálkový ovladač
• Baterie do dálkového ovladače (lithiová)
DP450-P.ACZELLP_CZE_MFL61857018 2/20/09 6:30 PM Page 14
Page 29

P/NO : MFL61857018
DP450 / DP450P / DP450R
SIOVENČINA
DP450-P.ACZELLP_SLOVAK_M#106881 2/20/09 6:27 PM Page 1
Page 30

2
UPOZORNENIE: AK CHCETE ZNÍŽIŤ RIZIKO ZÁSAHU
ELEKTRICKÝM PRÚDOM, NEVYBERAJTE KRYT
(ALEBO ZADNÚ ČASŤ). VO VNÚTRI NIE SÚ ŽIADNE
DIELY, KTORÝCH SERVIS BY MOHOL VYKONAŤ
POUŽÍVATEĽ. SERVIS ZVERTE KVALIFIKOVANÉMU
SERVISNÉMU PERSONÁLU.
Tento blesk zakončený symbolom šípky v
rovnostrannom trojuholníku
upozorňuje používateľa, že pod ochranným krytom produktu sa nachádzajú neizolované
nebezpečné časti pod napätím, ktoré môžu byť
dostatočne silné na to, aby spôsobilo osobám
zásah elektrickým prúdom.
Výkričník v rovnostrannom trojuholníku upozorňuje používateľa na prítomnosť dôležitých
pokynov týkajúcich sa prevádzky a údržby (servisu) v informačných materiáloch, ktoré sú dodávané spolu s produktom.
VAROVANIE: ABY STE ZABRÁNILI RIZIKU POŽIARU
ALEBO RIZIKU ZÁSAHU ELEKTRICKÝM PRÚDOM,
NEVYSTAVUJTE TENTO PRODUKT DAŽĎU ALEBO
VLHKOSTI.
VAROVANIE: Neinštalujte toto zariadenie do
uzavretého priestoru ako je skrinka alebo do podobných
priestorov.
UPOZORNENIE: Neblokujte žiadne ventilačné otvory.
Nainštalujte v súlade spokynmi výrobcu. Sloty a otvory
v skrinke sú určené na ventiláciu a na zabezpečenie
spoľahlivej prevádzky produktu a na ochranu pred
prehriatím. Tieto otvory by sa nemali nikdy zablokovať
položením produktu na posteľ, pohovku, handru alebo
na iný podobný povrch. Ak nie je zabezpečená vhodná
ventilácia alebo ak by sa nedodržali pokyny výrobcu,
tento produkt by sa nemal vkladať do zabudovaného
zariadenia, ako je napríklad skrinka alebo stojan.
UPOZORNENIE: Tento produkt
používa laserový systém. Ak
chcete zabezpečiť správne
používanie tohto produktu, dôkladne si prečítajte túto
užívateľskú príručku a uschovajte ju pre budúce
použitie. Ak by
zariadenie vyžadovalo údržbu kontaktujte autorizované
servisné centrum. Používanie ovládaní, nastavení alebo
postupov iných ako sú ovládania, nastavenia a postupy
uvedené v tejto príručke môžu mať za následok vystavenie nebezpečnej radiácii. Ak chcete zabrániť priamemu vystaveniu laserovému lúču, nepokúšajte sa
otvoriť kryt. Viditeľná laserová radiácia pri otvorení.
NEPOZERAJTE SA DO LÚČA.
UPOZORNENIE: Tento prístroj by nemal byť vystavený
účinkom vody (pokvapkanie alebo zašpliechanie) a na
prístroji by nemali byť umiestnené žiadne predmety
naplnené kvapalinami, ako napríklad vázy.
VÝSTRAHA
•
Nebráňte vetraniu zakrytím vetracích otvorov
použitím predmetov, ako sú napr. noviny, obrus,
záclony atď.
•
Na zariadenie nedávajte žiaden zdroj otvoreného
ohňa ako sú napr. zapálené sviečky.
•
Použité batérie nehádžte do ohňa, ale ich
bezpečne zlikvidujte. Venujte pozornosť
správnej likvidácii batérií s ohľadom na životné
prostredie.
•
Prístroj používajte len v miernych a tropických klimatických podmienkach.
•
Neprimeraný tlak zvuku zo slúchadiel môže
zapríčiniť stratu sluchu.
•
Nevystavujte batériu pôsobeniu nadmerného
tepla, ako je napr. slnečný svit, oheň a podobne.
•
Pre vašu bezpečnosť nevyberajte batériu
zabudovanú v produkte.
Ak potrebujete batériu vymeniť, odneste ho do
najbližšieho autorizovaného servisného centra
LG Electronics alebo k predajcovi, aby vám
pomohol.
UPOZORNENIE týkajúce sa napájacej šnúry
Väčšina prístrojov sa odporúča umiestniť do
samostatného okruhuu;
To znamená do okruhu s jedným výstupom, ktorý napája
len tento prístroj a nemá žiadne ďalšie výstupy alebo
vedľajšie okruhy. Pozrite si stranu so špecifikáciami v
tejto príručke pre používateľa, aby ste sa uistili.
Nepreťažujte stenové zásuvky. Preťažené stenové
zásuvky, uvoľnené alebo poškodené zásuvky,
predlžovacie káble, rozstrapkané káble alebo
poškodená či roztrhaná izolácia káblov, sú
nebezpečné. Každý z týchto stavov by mohol spôsobiť
zásah elektrickým prúdom alebo požiar.
Pravidelne kontrolujte kábel svojho prístroja. Ak javí
známky poškodenia alebo porušenia, odpojte ho,
prestaňte prístroj používať a dajte kábel vymeniť
autorizovanému servisnému centru za identický
náhradný diel.
Chráňte kábel napájania pred fyzickým alebo mechanickým poškodením, ako je ohýbanie, skrútenie,
prepichnutie, privretie do dverí alebo pošliapanie.
Venujte potrebnú pozornosť zástrčkám, stenovým
zásuvkám a miestu, kde šnúra vystupuje z prístroja.
Ak chcete odpojiť kábel z elektrickej siete, vytiahnite
zástrčku zo siete. Pri inštalácii produktu sa uistite, či
je zásuvka ľahko dostupná.
Likvidácia vášho starého prístroja
1. Keď je k produktu pripojený tento symbol
prečiarknutého koša na kolieskach, znamená to, že produkt spadá pod európsku
smernicu 2002/96/EC.
2. Všetky elektrické a elektronické produkty by
sa mali zlikvidovať oddelene od komunálneho odpadu prostredníctvom určených
zberných zariadení označených vládou alebo
miestnymi úradmi.
3. Správna likvidácia vášho starého prístroja
pomôže zabrániť potenciálnym negatívnym
následkom na životné prostredie a ľudské
zdravie.
4. Podrobnejšie informácie o likvidácii vášho
starého prístroja dostanete na svojom mestskom úrade, na oddelení likvidácie odpadov
alebo v obchode, v ktorom ste produkt
zakúpili.
Tento produkt je vyrobený v súlade so
Smernicou 2004/108/ES O elektromagnetickej kompatibilite a Smernicou 2006/95/ES O
nízkonapäťových zariadeniach.
Európsky zástupca:
LG Electronics Service Europe B.V.
Veluwezoom 15, 1327 AE Almere, The
Netherlands
(Tel : +31–036–547–8940)
UPOZORNENIE
RIZIKO ZÁSAHU ELEKTRICKÝM
PRÚDOM NEOTVÁRAJTE
D
a
D
D
D
D
A
h
T
M
s
s
DP450-P.ACZELLP_SLOVAK_M#106881 2/20/09 6:27 PM Page 2
Page 31

3
O zobrazení symbolu
“ ” sa môže objaviť na displeji vášho TV počas prevádzky a označuje, že
funkcia vysvetlená v tejto užívateľskej príručke nie je na danom disku dostupná.
Regionálne kódy
Táto jednotka má regionálny kód vytlačený na zadnej časti. Táto jednotka môže
prehrávať len DVD disky označené rovnako ako je uvedené na zadnej časti
jednotky alebo „ALL” (VŠETKY).
• Väčšina DVD diskov má guľu s jedným alebo viacerými číslami vo vnútri,
ktoré sú jasne viditeľné na kryte. Toto číslo musí súhlasiť s regionálnym
kódom vašej jednotky, inak sa disk nebude dať prehrať.
• Ak sa pokúšate prehrať DVD s regionálnym kódom, ktorý je iný ako kód
vášho prehrávača, na obrazovke TV sa objaví správa „Check Regional
Code" (Skontrolujte regionálny kód).
Autorské práva
ákon zakazuje kopírovať, šíriť, zobrazovať, vysielať cez kábel, prehrávať
na verejnosti alebo prenajímať materiál, ktorý podlieha autorskému právu, bez
povolenia. Tento produkt obsahuje funkciu ochrany proti kopírovaniu, ktorú
vyvinula spoločnosť Macrovision. Signály ochrany pred kopírovaním sú
zaznamenané na niektorých diskoch. Keď zaznamenávate a prehrávate obraz
na týchto diskoch, objaví sa rušenie obrazu. Tento produkt obsahuje ochrannú
technológiu autorských práv, ktorá je chránená americkými patentmi a inými
právami duševného vlastníctva. Použitie tejto ochrannej technológie
autorských práv musí byť autorizované spoločnosťou Macrovision a je určené
len pre domáce a iné limitované premietanie len s autorizáciou spoločnosti
Macrovision. Spätné riadenie alebo odmontovanie je zakázané.
Nabíjateľná batéria
•
Vnútorná nabíjateľná batéria vám poskytuje voľnosť používania a
prehrávania súborov bez napájacieho kábla.
•
Vnútorná nabíjateľná batéria sa začne nabíjať len vtedy, keď je zariadenie
vypnuté a AC adaptér je pripojený ku zdroju napájania.
•
Ak zariadenie zapnete, nabíjanie sa vypne.
•
Nabíjanie trvá približne 2 hodiny a 30 minút.
•
Prevádzkový čas použitím batérie: približne 2 hodiny a 30 minút.
Prevádzkový čas batérie sa môže líšiť v závislosti od stavu batérie,
prevádzkového stavu a podmienok okolia a maximálny čas prehrávania
môže byť až 3 hodiny.
•
Indikátor batérie pri nabíjaní zasvieti načerveno. Po kompletnom nabití sa
svetlo indikátora zmení na zelené.
•
Ak zostávajúci čas batérie je menej ako niekoľko minút, na obrazovke bude
blikať
“”.
DVD-VIDEO: Disky ako sú filmy, ktoré sa dajú zakúpiť
alebo zapožičať.
DVD-R: Video režim a len finalizované
DVD-RW: režim VR, Video režim a len finalizované
DVD+R: Len Video režim
DVD+RW: Len Video režim
Audio CD: Hudobné CD alebo CD-R/CD-RW v
hudobnom formáte CD, ktorý sa dá zakúpiť.
Toto zariadenie prehráva DVD±R/RW a CD-R/RW, ktoré obsahujú audio tituly, DivX,
MP3, WMA a/alebo JPEG súbory. Niektoré DVD±RW/DVD±R alebo CD-RW/CD-R
sa nedajú na tomto zariadení prehrávať kvôli kvalite záznamu alebo fyzickému
stavu disku alebo vlastnostiam záznamového zariadenia a softvéru.
Logo
Typy prehrávateľných diskov
Typ
Typy prehrávateľných diskov . . . . . . . . . . . . . . . . . . . . . . . . . . . . . . .3
Nabíjateľná batéria . . . . . . . . . . . . . . . . . . . . . . . . . . . . . . . . . . . . . .3
Hlavná jednotka . . . . . . . . . . . . . . . . . . . . . . . . . . . . . . . . . . . . . . . .4
Diaľkové ovládanie . . . . . . . . . . . . . . . . . . . . . . . . . . . . . . . . . . . . . .5
Pripojenia napájania . . . . . . . . . . . . . . . . . . . . . . . . . . . . . . . . . . . . .6
Blízko tepelného zdroja. . . . . . . . . . . . . . . . . . . . . . . . . . . . . . . . . . .7
Nastavte jazyk . . . . . . . . . . . . . . . . . . . . . . . . . . . . . . . . . . . . . . . .8-9
Zobrazenie informácií o disku . . . . . . . . . . . . . . . . . . . . . . . . . . . . . .9
Prehrávanie disku . . . . . . . . . . . . . . . . . . . . . . . . . . . . . . . . . . . .10-11
Prehrávanie filmového súboru DivX . . . . . . . . . . . . . . . . . . . . . . . . .11
Počúvanie hudobných diskov alebo súborov . . . . . . . . . . . . . . . . . . . . .12
Prezeranie fotografických súborov . . . . . . . . . . . . . . . . . . . . . . . . . .12
kódy Jazykovy . . . . . . . . . . . . . . . . . . . . . . . . . . . . . . . . . . . . . . . . .13
Kódy oblasti . . . . . . . . . . . . . . . . . . . . . . . . . . . . . . . . . . . . . . . . . .13
Riešenie problémov . . . . . . . . . . . . . . . . . . . . . . . . . . . . . . . . . . . .14
Špecifikácie . . . . . . . . . . . . . . . . . . . . . . . . . . . . . . . . . . . . . . . . . . .14
Obsah
Vyrobené v rámci licencie Dolby Laboratories. Dolby a symbol s dvomi D sú
obchodné značky spoločnosti Dolby Laboratories.
„DVD Logo” je obchodnou značkou DVD formátu a licencujúcej spoločnosti
Logo.
DP450-P.ACZELLP_SLOVAK_M#106881 2/20/09 6:27 PM Page 3
Page 32

4
Hlavná jednotka
a
LCD obrazovka
bb
Reproduktory
c
Tlačidlá kontroly prehrávania
• N (Prehrať)/ X (Pause) : Spustí prehrávanie.
• x (Zastaviť) : Zastaví prehrávanie.
• . (Skip) :
Prehľadáva vzad* alebo vracia na začiatok aktuálnej kapitoly alebo
stopy alebo skočí na predchádzajúcu kapitolu alebo stopu.
• > (Skip) :
Prehľadáva vpred* alebo skočí na nasledujúcu kapitolu alebo stopu.
*
Stlačte a podržte tlačidlo približne na dve sekundy.
dd
Tlačidlá funkcií
• DISPLAY (DISPLEJ) :
Aktivuje zobrazenie na obrazovke.
• SETUP (NASTAVENIE) :
Otvára alebo zatvára režim nastavenia.
• COLOR /BRIGHT*: Zobrazí ponuku jasu alebo farby pre displej LCD.
• MENU (PONUKA DVD) :
Otvorí ponuku DVD.
* Farbu alebo jas LCD displeja upravíte opakovaným stlačením COLOR/BRIGHT na
hlavnom zariadení, čím vyvoláte ponuku pre farbu a jas, následne použite b / B
pre úpravu ich hladiny. Stlačte ENTER pre potvrdenie nastavenia.
ee
Kontrolné tlačidlá ponuky
• bBvV
(vľavo, vpravo, hore, dole): Výber položky v ponuke.
• ENTER:
Potvrdzuje výber ponuky.
ff
OPEN
(OTVORIŤ)
(Z):
Otvára veko disku
.
g Diaľkový snímač : Sem namierte diaľkový ovládač.
h
Nabíjanie batérie a indikátor napájania
•
Indikátor pri nabíjaní zasvieti načerveno a nazeleno, keď je nabíjanie kompletné. (Viac
informácií nájdete na strane 3.)
•
Keď sa zariadenie zapne, indikátor na pár sekúnd zasvieti nazeleno .
i
Veko disku
j
1/[
(Hlavný vypínač):
Zapne alebo vypne jednotku.
Poznámka: Poznámka: Ak chcete tento prístroj obsluhovať, hlavný vypínač musí byť v
zapnutej polohe.
k
w
VOL (
Hlasitosť
):
Nastavenie úrovne hlasitosti vstavaných reproduktorov a
slúchadiel.
l (
Slúchadlá
):
Pripojenie slúchadiel.
m AV OUT: Pripojenie na TV s video a audio vstupom.
n DC 12V IN:
Pripojenie napájacieho adaptéra alebo adaptéra do auta.
P
je
A
ka
S
A
je
D
P
d
z
DP450-P.ACZELLP_SLOVAK_M#106881 2/20/09 6:27 PM Page 4
Page 33

a
POWER (NAPÁJANIE) (1) : Zapína alebo vypína
jednotku ON (ZAP) alebo OFF(VYP).
AUDIO ( ):
Zvolí jazyk pre zvuk alebo audio
kanál.
SUBTITLE (TITULKY) ( ):
Otvorí ponuku titulov.
ANGLE (UHOL) ( ) :
Zvolí uhol kamery DVD, ak
je dostupný.
SKIP/SEARCH (PRESKOČIŤ/VYHĽADÁVAŤ)
(. / >):
Vyhľadáva* vzad/vpred. Skočí na
ďalšiu alebo predchádzajúcu kapitolu/stopu.
*
Stlačte a podržte tlačidlo asi na dve sekundy.
SLOW
(POMALY)
(t / T):
Pomalé prehrávanie
vzad/vpred.
b
SETUP (NASTAVENIE):
Otvára alebo zatvára režim
nastavenia.
MENU (PONUKA DVD):
Otvorí ponuku DVD.
vV b B:
Naviguje v ponukách.
ENTER ( ):
Potvrdí výber ponuky.
RETURN (NÁVRAT) (O):
Stlačte pre pohyb vzad v
ponuke alebo pre zatvorenie ponuky.
DISPLAY (DISPLEJ):
Aktivuje zobrazenie na
obrazovke.
c
PAUSE/STEP (PAUZA/KROK) (X):
Dočasne
pozastaví prehrávanie/opakovanie stláčajte pre
prehrávanie krok po kroku.
PLAY (PREHRAŤ) (N):
Spustí prehrávanie.
STOP (ZASTAVIŤ) (x):
Zastaví prehrávanie.
Číselné tlačidlá
:
Zvolí očíslované možnosti v ponuke.
PROG.:
Vstúpi do režimu editovania programu.
CLEAR (VYMAZAŤ):
Odstráni číslo stopy zo
Zoznamu programov.
d
TITLE (TITUL):
Otvorí ponuku titulov.
REPEAT (OPAKOVAŤ):
Zopakuje kapitolu, stopu
alebo všetko.
A-B:
Zopakuje úsek.
ZOOM (LUPA):
Zväčší zobrazenie obrazu.
MARKER
(UKAZOVATEĽ): Označuje akýkoľvek bod
počas prehrávania.
SEARCH
(VYHĽADÁVAŤ): Zobrazí ponuku [Marker
Search].
RANDOM(NÁHODNÉ): Prehrá stopy v náhodnom
poradí.
Vložte batériu do diaľkového ovládania
Stlačte spony držiaka batérie dokopy a potiahnite
jazýček, aby ste vybrali držiak batérie. Vložte batériu
s označením + rovnakým smerom, ako je
označenie + v držiaku batérie. Držiak s batériou
vložte do diaľkového ovládača a ubezpečte sa, že
je vložený celkom.
• Batériu z diaľkového ovládača vymeňte za 3 V
mikro lítiové, ako sú napríklad CR. 2025 alebo
podobné.
• Batérie zlikvidujte bezpečne v súlade s
miestnymi nariadeniami. Nehádžte ich do ohňa.
Varovanie pre výmenné lítiové batérie.
•
Hrozba výbuchu pri nesprávne vymenenej batérii.
•
Vymieňajte len za rovnaký typ batérie.
•
Dodatočné varovanie je pri batérii pri výmene
používateľom.
Diaľkové ovládanie
VAROVANIE: Batérie používané v tomto zari-
adení môžu pri zlom zaobchádzaní predstavovať chemické alebo požiarne nebezpečenstvo.
Nevymieňajte, nerozoberajte ani ich nevystavuje
ich teplotám nad 100°C (212 F).
Vymeňte ich za batérie Matsushita Elec. Ind.
Co. s.r.o. (Panasonic), číslo CR. 2025. Použitie
iných batérií môže spôsobiť požiar alebo explóziu. Použité batérie zlikvidujte. Chráňte pred
deťmi. Nerozoberajte, ani ich nehádžte do
ohňa.
Poznámka: Ak chcete tento prístroj obsluhovať s
diaľkovým ovládaním, hlavný vypínač musí byť v
zapnutej polohe. (Pozrite si stranu 4)
a
b
c
d
5
DP450-P.ACZELLP_SLOVAK_M#106881 2/20/09 6:27 PM Page 5
Page 34

Pripojenia napájania
Pripojenie sieťového adaptéra
Zapojte dodaný sieťový adaptér prístroja do elektrickej zásuvky.
AC adaptér
•
Tento AC adaptér pracuje na 100-240V~ 1A 50/60Hz.
•
Pre výber vhodnej zástrčky AC adaptéra alebo súpravy AC kábla kontaktujte
predajcu elektronických súčiastok.
•
Vyrobil NANJING WANLIDA TECHNOLOGY CO., LTD
Pripojenie automobilového adaptéra
Toto zariadenie a jeho automobilový adaptér sú určené na použitie v automobiloch,
ktoré majú 8,5-16 voltové elektrické systémy so záporným uzemnením. Ide
o štandard pre väčšinu automobilov. Ak má váš automobil odlišný elektrický
systém, napájací systém DC sa nemôže použiť.
Automobilový adaptér
•
Tento automobilový adaptér pracuje na jednosmernom 8,5-16V napätí.
•
Pre výber vhodného automobilového adaptéra kontaktujte predajcu
elektronických súčiastok.
•
Vyrobil NANJING WANLIDA TECHNOLOGY CO., LTD.
Výstraha
•
Pre zabránenie elektrickému šoku a možného poškodenia vášho zariadenia
alebo automobilu, vždy odpojte automobilový adaptér z cigaretového zapaľovača
automobilu pred odpojením zástrčky z vášho zariadenia.
•
V automobilovom adaptéri je nainštalovaná 3 ampérová 250V poistka.
•
Pri štartovaní motora odpojte automobilový adaptér z cigaretového zapaľovača
automobilu.
•
Ak je automobilová batéria vybitá, vaše zariadenie nepoužívajte. Špičkový prúd
automobilového generátora môže zapríčiniť spálenie jednosmernej poistky.
•
Ak napájacie napätie automobilu klesne pod približne 10 voltov, vaše zariadenie
nemusí pracovať správne.
•
Zariadenie nenechávajte na mieste, na ktorom teplota presahuje 70°C (158°F), v
opačnom prípade sa zariadenie poškodí.
Príklady nesprávneho umiestnenia:
-
Vo vnútri automobilu so zatvorenými oknami a vystavené priamemu slnečnému žiareniu.
-
Blízko tepelného zdroja.
Zapojte do konektora
„DC 12V IN”.
Zapojte do konektora „DC 12V IN”.
Zapojte do
cigaretového
zapaľovača v
automobile.
Napájaciu zástrčku pripojte k AC adaptéru.
(Aktuálna súprava sa môže od nákresu líšiť.)
Uvoľňovacie
tlačidlo adaptéra
zásuvky
Zapojte do
zdroja
napájania.
Pravá strana zariadenia
Pravá strana zariadenia.
6
B
A
P
n
DP450-P.ACZELLP_SLOVAK_M#106881 2/20/09 6:27 PM Page 6
Page 35

7
Blízko tepelného zdroja.
Audio a video zapojenie na váš TV
Pripojte AV OUT konektor prístroja na príslušný vstupný konektor vášho TV podľa
nižšie uvedeného znázornenia.
Pravá strana zariadenia.
Zapojte do
konektora
„AV OUT”.
Audio/Video kábel
(nie je súčasť dodávky)
Žltá
Biela
červená
Audio/Video adaptér
DP450-P.ACZELLP_SLOVAK_M#106881 2/20/09 6:27 PM Page 7
TV
Page 36

Upravte nastavenia – môžete urobiť viac
Keď zapnete prístroj po prvýkrát (voliteľné)
Ponuka pre voľbu jazyka sa objaví vtedy, keď zapnete zariadenie po prvýkrát.
Musíte zvoliť jazyk, aby ste mohli používať zariadenie. Použite vV b B pre
voľbu jazyka, a potom stlačte ENTER a objaví sa ponuka potvrdenia.
Použite bB na voľbu [ENTER], a potom stlačte ENTER.
Upravte nastavenia jazyka
Ponuka jazyka – Zvoľte jazyk pre ponuku nastavenia zobrazenú na obrazovke.
Audio/Titulky/Ponuka disku – Zvoľte jazyk pre Audio/Titulky/Ponuku disku.
[Original] (Pôvodný): Vzťahuje sa na pôvodný jazyk, v ktorom bol disk
zaznamenaný
[Iné]: Pre voľbu iného jazyka stlačte číslo jazyka, stlačte číselné tlačidlá, a
potom ENTER pre zadanie príslušného 4-miestneho čísla podľa zoznamu
jazykových kódov.. (Pozrite si stranu 13) Ak urobíte chybu, pri zadávaní čísla,
stlačte CLEAR (VYMAZAŤ) pre vymazanie čísel, a potom číslo opravte.
[Off] (Vypnuté) (pre titulky disku): Vypnite titulky.
Vykonajte nastavenia zobrazovania
Aspekt – Zvoľte, ktorý vzhľad obrazovky sa má použiť, na základe tvaru
vášho televízora.
[4:3]: Zvoľte vtedy, keď je pripojený štandardný televízor 4:3.
[16:9]: Zvoľte vtedy, keď je pripojený širokouhlý televízor 16:9.
Režim zobrazenia – Ak ste si zvolili režim 4:3, budete potrebovať určiť, ako
chcete zobrazovať širokouhlé programy a filmy na svojom televízore.
[Letterbox] (Obálka): Zobrazuje širokouhlý obraz s čiernymi pásmi na
vrchnej a na spodnej časti obrazovky.
[Panscan]: Vyplní celú obrazovku 4:3, pričom podľa potreby odreže obraz.
Vykonajte nastavenia zvuku
DRC (Ovládanie dynamického rozsahu) – Vyjasnite zvuk, keď je stíšená
hlasitosť (len Dolby Digital only). Nastavte na [On] (Zapnuté) pre tento efekt.
Hlasový – Nastavte na možnosť [On] (Zapnuté) len vtedy, keď sa prehráva
viackanálové karaoke DVD. Kanály karaoke na disku sa miešajú s normálnym
stereo zvukom.
Zmena nastavenia zámku
Musíte nastaviť možnosť [Area Code] (Kódu oblasti), aby ste mohli používať
možnosti kódu. Zvoľte možnosť [Area Code] (Kód oblasti), a potom stlačte B.
Zadajte 4-miestne heslo, a potom stlačte ENTER. Zadajte ho znovu, a potom
stlačte ENTER pre overenie. Ak urobíte chybu pri zadávaní čísla, stlačte
CLEAR a chybu opravte.
Ak ste zabudli svoje heslo, môžete ho resetovať.
Najskôr vyberte disk z jednotky.
Zobrazte ponuku nastavenia a zadajte 6-číselné číslo „210499”, čím sa heslo
vymaže.
Hodnotenie – Zvoľte úroveň hodnotenia. Čím je úroveň nižšia, tým je pomer
presnejší. Zvoľte [Unlock] (Odblokovať) pre deaktiváciu hodnotenia.
Heslo – Nastaví alebo zmení heslo pre nastavenia zámku.
[New] (Nový): Zadajte nové 4-miestne heslo pomocou číselných tlačidiel, a
potom stlačte ENTER. Zadajte znova heslo pre potvrdenie.
[Change] (Zmena): Zadajte nové heslo dva krát po zadaní aktuálneho hesla.
Kód oblasti – Zvoľte kód krajiny ako úroveň hodnotenia prehrávania. Tým
určíte, ktoré normy oblasti sa použijú pre nastavenie DVD ovládaných
rodičovským zámkom. (Pozrite si stranu 13)
Nastavte jazyk
1 Ponuka nastavenia zobrazovania: SETUP
2 Nastavte želanú možnosť na prvej úrovni: v V
3 Presuňte na druhú úroveň: B
4 Zvoľte želanú možnosť na druhej úrovni: v V
5 Presuňte na tretiu úroveň: B
6 Zmeňte nastavenie: v V / ENTER
TLAČIDLO
8
Vy
D
vy
P
zv
V
DP450-P.ACZELLP_SLOVAK_M#106881 2/20/09 6:27 PM Page 8
Page 37

9
Vykonajte ostatné nastavenia
DivX(R) VOD – Poskytujeme vám registračný kód DivX® VOD (Video na
vyžiadanie), ktorý vám umožní zakúpiť si video podporujúce službu DivX® VOD.
Podrobnejšie informácie nájdete na www.divx.com/vod. Stlačte ENTER, keď je
zvýraznená ikona [Select] (Zvoliť) a môžete si pozrieť registračný kód jednotky.
Všetky stiahnuté videá z DivX® VOD sa dajú prehrať len na tejto jednotke.
Zobrazenie informácií o disku – môžete urobiť
viac
Môžete zvoliť položku stlačením vV a zmeniť alebo zvoliť nastavenie bB.
Aktuálny počet alebo celkový počet titulov
Aktuálny počet alebo celkový počet kapitol
Uplynutý čas prehrávania
Zvolený jazyk audia alebo kanálu
Zvolené titulky
Zvolený uhol/celkový počet uhlov
Symboly použité v tejto príručke
Sekcia, ktorej názov má jeden z nasledujúcich symbolov sa týkajú len disku alebo
súboru, ktorý je označený symbolom.
Všetky disky a súbory
Audio CD
DVD a finalizované DVD±R/RW MP3 súbory
DivX súbory
WMA súbory
WMA
DivX
MP3DVD
ACDALL
Zobrazenie informácií o disku
1
Počas prehrávania stlačte DISPLAY (DISPLEJ):
DISPLAY
2 Zvoľte položku:
vv VV
3 Vykonajte nastavenia v ponuke zobrazenia:
bb BB
/ ENTER
4 Pre návrat na ukončenie: DISPLAY
TLAČIDLO
DP450-P.ACZELLP_SLOVAK_M#106881 2/20/09 6:27 PM Page 9
Page 38

Prehrávanie disku – môžete urobiť viac
Zastaví prehrávanie
Prehrávanie zastavíte stlačením
STOP (xx)
. V závislosti od typu disku si zariadenie
zapamätá bod zastavenia.
Na displeji sa na chvíľu objaví „ X
xx
". Stlačte PLAY (
NN
) pre obnovenie prehrávania (od bodu scény). Ak stlačíte tlačidlo STOP (xx)
znova alebo vyberiete disk (na obrazovke sa objaví „
xx
"), zariadenie vymaže
zmiesto zastavenia. (
XXxx
=
Obnoviť zastavenie,
xx
=
Dokončiť zastavenie)
Miesto obnovenia sa môže vymazať po stlačení tlačidla (napríklad: POWER
(NAPÁJANIE), OPEN (OTVORIŤ), atď.).
Prehrávanie disku DVD s ponukou
V súčasnosti obsahuje väčšina diskov DVD ponuky, ktoré sa načítajú pred
samotným prehrávaním filmu. V týchto ponukách môžete zvýrazniť niektorú z
možností pomocou položky vV b B alebo tlačidla s číslom. Svoj výber potvrdíte
stlačením tlačidla ENTER.
Prehrávanie DVD VR disku
Táto jednotka bude prehrávať disk DVD-RW, ktorý je zaznamenaný pomocou
formátu Nahrávanie Videa (VR). Keď vložíte disk DVD VR, na obrazovke sa
objaví ponuka. Použite vV pre výber titulu, a potom stlačte tlačidlo
PLAY (
NN
). Pre zobrazenie ponuky DVD-VR stlačte MENU alebo TITLE.
Niektoré DVD-VR disky obsahujú CPRM údaje DVD rekordéra.
Zariadenie
nepodporuje takéto typy diskov.
Preskočte na nasledujúcu/predchádzajúcu kapitolu/stopu/súbor
Stlačte tlačidlo SKIP (>) pre presun na nasledujúcu kapitolu/stopu/súbor.
Stlačte tlačidlo SKIP (.) pre návrat na začiatok aktuálnej
kapitoly/stopy/
súbor.
Dvakrát krátko stlačte tlačidlo SKIP (.) pre preskočenie na predchádzajúcu
kapitolu/stopu/
súbor.
Pozastavenie prehrávania
Stlačte PAUSE/STEP (X) pre pozastavenie prehrávania. Stlačte PLAY ( NN),
aby ste mohli pokračovať v prehrávaní.
Prehrávanie krok po kroku
Opakovane stláčajte PAUSE/STEP (X), aby ste prehrávali úsek po úseku.
Opakované prehrávanie
Opakovane stláčajte REPEAT pre voľbu opakovanej položky. Aktuálny titul,
kapitola alebo stopa sa budú opakovane prehrávať. Ak sa chcete vrátiť na
bežné prehrávanie, opakovane stláčajte tlačidlo REPEAT pre voľbu možnosti
[Off] (Vypnuté).
Rýchle prehrávanie dopredu alebo dozadu
Pre rýchle prehrávanie dopredu alebo dozadu stlačte a držte SKIP (PRESKOČIŤ)
(.
alebo
r >)
. Môžete zmeniť rýchlosť prehrávania ak opakovane stlačíte a
podržíte SKIP (PRESKOČIŤ) (.alebo>). Pre pokračovanie prehrávania normálnou rýchlosťou stlačte PLAY (PREHRAŤ)
( N).
Opakovanie špecifickej časti (A-B)
Stlačte A-B na začiatku časti, ktorú chcete zopakovať, a znovu na konci tejto
časti. Vaša zvolená časť sa bude opakovať neustále. Pre návrat na normálne
prehrávanie stlačte A-B pre výber možnosti [Off] (Vypnuté).
Výber jazyka titulkov
Počas prehrávania opakovane stláčajte SUBTITLE ( ) pre výber želaného
jazyka titulkov.
Pozeranie z iného uhla
Ak sa na obrazovke na chvíľu objaví indikátor uhla, môžete zvoliť iný uhol
kamery opakovaným stláčaním tlačidla ANGLE ( ).
Počúvanie iného zvuku
Počas prehrávania opakovane stláčajte tlačidlo AUDIO ( ) ktorým môžete
prepínať medzi dostupnými audio jazykmi, kanálmi alebo metódami kódovania.
Spomalenie rýchlosti prehrávania ( : Len vpred)
Počas prehrávania stlačte SLOW (POMALY)
(t
aleboT)pre spomalenie
prehrávania dopredu alebo dozadu. Môžete zmeniť rýchlosť prehrávania ak
opakovane stlačíte SLOW (POMALY)(taleboT)Pre pokračovanie prehrávania normálnou rýchlosťou stlačte PLAY (PREHRAŤ)(N
)
Pozeranie zväčšeného video obrazu
Počas prehrávania alebo režimu pozastavenia opakovane stláčajte tlačidlo
ZOOM pre výber režimu lupy. Po zväčšenom zobrazení a môžete
posúvať pomocou tlačidiel vVb B. Stlačte CLEAR pre zatvorenie.
(100 % p 200 % p 300 % p 400 % p 100 %)
.
DivXDVD
DivXDVD
DivXDVD
DVD
DivXDVD
ACDDivXDVD
MP3WMAACDDivXDVD
ALL
DivXDVD
ALL
ALL
DVD
Prehrávanie disku
TLAČIDLO
1
Otvorte veko disku:
OPEN (ZZ)
2 Vložte disk: 3
Zatvorte veko disku:
-
4 Spustite prehrávanie:
NN
PLAY
5 Nastavenie hlasitosti: VOLUME
6 Zastavte prehrávanie:
xx
STOP
10
Preze
Stlačt
Preze
Stlačt
Spus
Vyhľa
zvoľte
nájsť
ENTE
Prehr
Počas
pre pr
návra
Ozna
Môže
stlačt
marke
Taktie
menu
ponuk
(VYM
Pamä
Toto z
preze
alebo
táto s
Šetrič
Šetrič
päť m
autom
Zmie
Pri pr
môže
TITLE
DP450-P.ACZELLP_SLOVAK_M#106881 2/20/09 6:27 PM Page 10
Page 39

11
Prezeranie ponuky titulu
Stlačte TITLE pre zobrazenie ponuky titulu disku, ak je dostupná.
Prezeranie ponuky DVD
Stlačte MENU (PONUKA DVD) pre zobrazenie ponuky disku, ak je dostupná.
Spustenie prehrávania od zvoleného času
Vyhľadá počiatočné miesto zadaného časového kódu. Stlačte DISPLAY, a potom
zvoľte ikonu hodín. Zadajte čas, a potom stlačte ENTER. Napríklad, ak chcete
nájsť scénu na 1. hodine, 10. minúte a 20. sekunde, zadajte „11020" a stlačte
ENTER. Ak zadáte nesprávne číslo, stlačte CLEAR pre opätovné zadanie.
Prehrávanie v náhodnom poradí
Počas prehrávania alebo keď je zariadenie vypnuté stlačte RANDOM (NÁHODNÉ)
pre prehrávanie v náhodnom poradí. Opäťstlačte RANDOM (NÁHODNÉ) pre
návrat k normálnemu prehrávaniu.
Označenie obľúbenej scény
Môžete označiť pozíciu na disku na ktorú sa chcete vrátiť. Na želanej pozícii
stlačte MARKER (UKAZOVATEĽ). Na obrazovke sa nakrátko zobrazí ikona
markera. Takto môžete označiť až 9 markerov.
Taktiež môžete pozície vyvolať alebo zmazať. Stlačte SEARCH a zobrazí sa
menu [Marker Search]. Použite balebo Bpre výber želaného markera v
ponuke a následne stlačte ENTER pre jeho vyvolanie alebo CLEAR
(VYMAZAŤ) pre vymazanie.
Pamäť poslednej scény
Toto zariadenie si uloží do pamäte poslednú scénu disku, ktorýste naposledy
prezerali. Posledná scéna zostane v pamäti aj keď vyberiete disk z prehrávača
alebo vypnete jzariadenie. Ak vložíte disk, ktorého posledná scéna je v pamäti,
táto sa automaticky vyvolá.
Šetrič obrazovky
Šetrič obrazovky sa objaví vtedy, keď necháte zariadenie v režime Zastavenia asi
päť minút. Ak sa Šetrič obrazovky zobrazí na päť minút, zariadenie sa
automaticky vypne.
Zmiešaný disk – DivX, MP3/WMA a JPEG
Pri prehrávaní disku, ktorý spolu zahŕňa súbory DivX, MP3/WMA a JPEG si
môžete vybrať, ktorú ponuku súborov chcete prehrávať, stlačením tlačidla
TITLE (TITUL).
Prehrávanie filmového súboru DivX –
môžete urobiť viac
Zmena súboru znakov pre správne zobrazenie titulkov DivX®
Stlačte a podržte SUBTITLE na 3 sekundy počas prehrávania. Objaví sa
jazykový kód. Stlačte bBpre výber iného jazykového kódu, kým sa titulky nezobrazia správne, a potom stlačte ENTER.
Požiadavky na súboru DivX
Kompatibilita súborov DivX s týmto prehrávačom je obmedzená nasledovne:
• Dostupné rozlíšenie: 720 x 576 (Š x V) pixelov.
• Názvy súborov DivX a titulky sú obmedzené na 45 znakov.
• Prípony súborov DivX: „.avi", „.mpg", „.mpeg"
• Prehrávateľné titulky DivX: SubRip (.srt / .txt), SAMI (.smi), SubStation Alpha
(.ssa/.txt), MicroDVD (.sub/.txt), VobSub (.sub) SubViewer 2.0 (.sub/.txt),
TMPlayer(.txt), DVD Subtitle System (.txt)
• Prehrávateľný formát kodekov: „DIVX3.xx", „DIVX4.xx", „DIVX5.xx", „MP43",
„3IVX"
• DivX 6.0 podporuje len funkciu prehrávania v jednotke.
• Prehrávateľný formát zvuku „Dolby Digital", „PCM", „MP3", „WMA"
• Vzorkovacia frekvencia: v rozmedzí 8 - 48 kHz (MP3),
v rozmedzí 32 - 48 kHz (WMA)
• Prenosová rýchlosť: v rozmedzí 8 - 320 kbps (MP3), v rozmedzí 32 - 192
kbps (WMA), menej ako 4Mbps (súbor DivX)
• CD-R/RW, DVDĪR/RW Formát: ISO 9660
• Maximálny počet súborov/diskov: menej ako 600 (celkový počet súborov a
priečinkov)
ACDDVD
DivXDVD
MP3WMAACD
DivXDVD
DVD
DVD
Prehrávanie filmového súboru DivX
1
Otvorte veko disku:
OPEN (ZZ)
2 Vložte disk: 3
Zatvorte veko disku:
-
4 Vyberte filmový súbor v ponuke:
vv VV
, MENU
5 Spustite prehrávanie:
NN
PLAY
6 Zastavte prehrávanie:
xx
STOP
TLAČIDLO
DP450-P.ACZELLP_SLOVAK_M#106881 2/20/09 6:27 PM Page 11
Page 40

Počúvanie hudobných disk alebo súborov –
môžete urobiť viac
Vytvorenie vášho vlastného programu
Môžete prehrať obsah disku v želanom poradí zoradením poradia hudby na
disku. Ak chcete pridať hudbu do zoznamu predvolen
ý
ch stôp, stlačte
PROG. pre zadanie režimu editovania programu (značka sa objaví v
ponuke). Zvoľte želanú hudbu v [List] (Zozname), a potom stlačte ENTER pre
pridanie hudby do zoznamu predvolen
ý
ch stôp. Zvoľte hudbu zo zoznamu, a
potom stlačte ENTER pre spustenie naprogramovaného prehrávania. AK chcete
vymazať hudbu ztohto zoznamu programov, zvoľte hudbu, ktorú chcete
vymazať, a potom stlačte CLEAR v režime editácie programu. Ak chcete
vymazať kompletnú hudbu z tohto zoznamu predvolených stôp, zvoľte [Clear
All] (Vymazať všetky), a potom stlačte ENTER v režime editovania. Program sa
vymaže po vybraní disku alebo po vypnutí zariadenia.
Zobrazenie informácií o súbore (ID3 TAG)
Počas prehrávania MP3 súboru, ktorý obsahuje informácie o súbore, môžete
zobraziť informácie opakovaným stláčaním tlačidla DISPLAY (DISPLEJ). Ak
súbor nemá ID3 tag informáciu, na obrazovke sa zobrazí [No ID3 TAG].
Obmedzenia hudobných súborov MP3/WMA
Kompatibilita MP3/WMA s týmto zariadením je obmedzená takto:
• Prípony súboru: „.mp3", „.wma"
• Vzorkovacia frekvencia: v rozsahu 8 - 48 kHz (MP3),
v rozsahu 32 - 48kHz (WMA)
• Prenosová rýchlosť : v rozmedzí 8 – 320 kbps (MP3),
v rozmedzí 32 – 192 kbps (WMA)
• CD-R/RW, DVDĪR/RW Formát: ISO 9660
• Maximálny počet súborov/diskov: menej ako 600 (celkový počet súborov a
priečinkov)
Prezeranie fotografických súborov –
môžete urobiť viac
Prezeranie fotografických súborov vo forme prezentácie
Použite vV b B na zvýraznenie ikony ( ), a potom stlačte ENTER pre
spustenie prezentácie.
Môžete zmeniť rýchlosť prezentácie pomocou bBkeď sa zvýrazní ikona ( ).
Preskočte na nasledujúcu/predchádzajúcu fotografiu
Stlačte SKIP (. alebo >) pre prezeranie predchádzajúcej/nasledujúcej fotografie.
Otáčanie fotografií
Použite vV na otočenie fotografie na celej obrazovke proti alebo v smere
hodinových ručičiek počas prezerania fotografie na celej obrazovke.
Pozastavenie prezentácie
Stlačte tlačidlo PAUSE/STEP (X) pre pozastavenie prezentácie. Stlačte tlačidlo
PLAY (
NN
) pre pokračovanie v prezentácii.
Počúvanie hudby počas prezentácie
Môžete počúvať hudbu počas prezentácie, ak disk obsahuje hudobné a filmové
súbory zároveň. Použite vV b B na zvýraznenie ikony ( ) a potom spustite
prezentáciu stla
č
ením tlačidla ENTER.
Prezeranie zväčšeného obrázku fotografie
Počas prezerania fotografie na celej obrazovke opakovane stláčajte ZOOM pre
výber režimu lupy. Môžete sa pohybovať cez priblíženú fotografiu pomocou
tlačidiel vVb B. Stlačte tlačidlo CLEAR pre zatvorenie.
Obmedzenia pre fotografické súbory
Kompatibilita súboru JPEG s touto jednotkou je obmedzená nasledovne:
• Prípony súborov: „.jpg"
• Veľkosť fotografie: menej ako 2MB odporúčaná
• CD-R/RW, DVD±R/RW Formát: ISO 9660
• Maximálny počet súborov/diskov: menej ako 600 (celkový počet súborov a
priečinkov)
Počúvanie hudobných diskov alebo súborov
TLAČIDLO
1
Otvorte veko disku:
OPEN (Z)
2 Vložte disk: 3
Zatvorte veko disku:
-
4 Zvoľte hudbu v ponuke:
vv VV
, MENU
5 Spustite prehrávanie:
NN
PLAY
6 Zastavte prehrávanie:
xx
STOP
Prezeranie fotografických súborov
1
Otvorte veko disku:
OPEN (Z)
2 Vložte disk: 3
Zatvorte veko disku:
-
4 Vyberte fotografický súbor v ponuke:
vv VV
, MENU
5 Zobrazte zvolený súbor na celej obrazovke:
NN
PLAY
6 Pre návrat na ponuku:
xx
STOP
TLAČIDLO
12
DP450-P.ACZELLP_SLOVAK_M#106881 2/20/09 6:27 PM Page 12
E
Page 41

13
kódy Jazykovy
Použite tento zoznam na zadanie vášho želaného jazyka pre nasledujúce pôvodné nastavenia: Audio Disk, Disk s titulkami, Ponuka disku.
Kódy oblasti
Zvoľte kód oblasti v tomto zozname.
Jazyk Kód
Afarčina 6565
Afrikánčina 6570
Albánčina 8381
Amharčina 6577
Arabčina 6582
Arménčina 7289
Ásámčina 6583
Aymarčina 6588
Azerbajdžančina 6590
Baškirčina 6665
Baskičtina 6985
Bengálčina, bangla 6678
Butánčina 6890
Bihárske jazyky 6672
Bretónčina 6682
Bulharčina 6671
Barmčina 7789
Bieloruština 6669
Čínština 9072
Jazyk Kód
Chorvátčina 7282
Čeština 6783
Dánčina 6865
Holandčina 7876
Angličtina 6978
Esperanto 6979
Estónčina 6984
Faroese 7079
Fidži 7074
Fínčina 7073
Francúzština 7082
Frízština 7089
Galícijčina 7176
Gruzínčina 7565
Nemčina 6869
Gréčtina 6976
Grónčina 7576
Guarančina 7178
Gudžaratčina 7185
Jazyk Kód
Hausa 7265
Hebrejčina 7387
Hindčina 7273
Maďarčina 7285
Islandčina 7383
Indonézština 7378
Interlingua 7365
Írčina 7165
Taliančina 7384
Japončina 7465
Kanada 7578
Kašmírčina 7583
Kazahčina 7575
Kirgizština 7589
Kórejčina 7579
Kurdština 7585
Laoština 7679
Latinčina 7665
Lotyš tina 7686
Jazyk Kód
Lingálčina 7678
Litovčina 7684
Macedónčina 7775
Malgaština 7771
Malajčina 7783
Malayalamčina 7776
Maorčina 7773
Marathi 7782
Moldavčina 7779
Mongolčina 7778
Nauruština 7865
Nepálčina 7869
Nórčina 7879
Uríjčina 7982
Pandšábčina 8065
Pašto, Pušto 8083
Perzš tina 7065
Po ľšt in a 8076
Portugalčina 8084
Jazyk Kód
Kečuánčina 8185
Rétorománčina 8277
Rumunčina 8279
Ruština 8285
Samojčina 8377
Sanskrit 8365
Škótska gálčina 7168
Srbčina 8382
Srbochorvátčina 8372
Šona 8378
Sindhčina 8368
Singálčina 8373
Slovenčina 8375
Slovinčina 8376
Španielčina 6983
Sudánčina 8385
Svahilčina 8387
Švédčina 8386
Tagalčina 8476
Jazyk Kód
Tadžičtina 8471
Tamilčina 8465
Telugčina 8469
Thajčina 8472
Tonga 8479
Turečtina 8482
Turkménčina 8475
Twi 8487
Ukrajinčina 8575
Urdčina 8582
Uzbečtina 8590
Vietnamčina 8673
Volapuk 8679
Welština 6789
Wolofština 8779
Xhosa 8872
Jidiš 7473
Yoruba 8979
Zulu 9085
Oblasť Kód
Afganistan AF
Argentína AR
Austrália AU
Rakúsko AT
Belgicko BE
Bután BT
Bolívia BO
Brazília BR
Kambodža KH
Kanada CA
Čile CL
Čína CN
Kolumbia CO
Kongo CG
Oblasť Kód
Kostarika CR
Chorvátsko HR
Česká republika CZ
Dánsko DK
Ekvádor EC
Egypt EG
El Salvador SV
Etiópia ET
Fidži FJ
Fínsko FI
Francúzsko FR
Nemecko DE
Veľká Británia GB
Grécko GR
Oblasť Kód
Grónsko GL
Hong Kong HK
Maďarsko HU
India IN
Indonézia ID
Izrael IL
Taliansko IT
Jamajka JM
Japonsko JP
Keňa KE
Kuvajt KW
Líbia LY
Luxembursko LU
Malajzia MY
Oblasť Kód
Maledivy MV
Mexiko MX
Monako MC
Mongolsko MN
Maroko MA
Nepál NP
Holandsko NL
Holandské Antily AN
Nový Zéland NZ
Nigéria NG
Nórsko NO
Omán OM
Pakistan PK
Panama PA
Oblasť Kód
Paraguaj PY
Filipíny PH
Poľsko PL
Portugalsko PT
Rumunsko RO
Ruská Federácia RU
Saudská Arábia SA
Senegal SN
Singapur SG
Slovenská republika SK
Slovinsko SI
Južná Afrika ZA
Južná Kórea KR
Španielsko ES
Oblasť Kód
Srí Lanka LK
Švédsko SE
Švajčiarsko CH
Tchaj-wan TW
Thajsko TH
Turecko TR
Uganda UG
Ukrajina UA
Spojené Štáty US
Uruguaj UY
Uzbekistan UZ
Vietnam VN
Zimbabwe ZW
DP450-P.ACZELLP_SLOVAK_M#106881 2/20/09 6:27 PM Page 13
Page 42

14
Špecifikácie
Riešenie problémov
Príznak
Náprava
Kábel napájania je odpojený.
Batéria je vybitá.
Nie je vložený žiadny disk.
Televízor nie je nastavený na
príjem signálu z jednotky.
Video kábel nie je bezpečne
pripojený.
Zariadenie pripojené pomocou
audio kábla nie je nastavené na
príjem signálu z jednotky.
Hlasitosť je na minime.
Možnosti AUDIO sú nastavené na
nesprávnu polohu.
Je vložený nepodporovaný disk.
Je nastavená úroveň hodnotenia.
Diaľkový ovládač nie je namierený
na diaľkový snímač na jednotke.
Diaľkový ovládač je príliš ďaleko
od jednotky.
Bezpečne zapojte kábel napájania
do zásuvke v stene.
Nabite batériu.
Vložte disk.
Zvoľte vhodný režim video vstupu
na televízore.
Bezpečne pripojte video kábel.
Zvoľte správny vstupný režim audio
zosilňovača.
Použite ovládač hlasitosti pre úpravu
hladiny hlasitosti.
Nastavte AUDIO do správnej polohy.
Vložte podporovaný disk.
(Skontrolujte typ disku a kód
oblasti.)
Zmeňte úroveň hodnotenia.
Namierte diaľkový ovládač na
diaľkový snímač jednotky.
Používajte diaľkový ovládač bližšie
k jednotke.
Žiadne napájanie.
Napájanie je
zapnuté, ale
jednotka nefunguje
Žiadny obraz.
Žiadny zvuk.
Jednotka
nezačne
prehrávať.
Diaľkové ovládanie
nefunguje správne.
Prevedenie a špecifikácie podliehajú zmene bez
predchádzajúceho oznámenia.
Príčina
Všeobecné informácie
Požiadavky napájania DC 12V
Spotreba energie 12W
Rozmery (Približne) 202 x 42.5 x 167 mm
(Š x V x H) bez stojanu
Čistá hmotnosť (Približne) 0.78kg
Prevádzková teplota: 5 °C až 40 °C
Prevádzková vlhkosť 5 % až 90 %
Laser Polovodičový laser
Systém signálu PAL
Konektory
Audio/Video výstup 3,5mm mini konektor x 1
-
Video: 1.0 V (p-p), 75 Ω, sync negative
-
Audio: 1.5 Vrms (1 kHz, 0 dB)
Koncovka slúchadiel 3,5mm stereo mini konektor x 1
Displej z tekutých kryštálov
Rozmer panelu Široký 7 palcov (uhlopriečka)
Premietacia sústava R.G.B. stripe
Pohon TFT active matrix (aktívna matica)
Rozlíšenie 480 x 234 (WQVGA)
Príslušenstvo
•
Audio/Video adaptér
•
AC Adaptér (MPA-630)
•
Automobilový adaptér (DPDC1)
•
Diaľkový ovládač
•
Batéria pre diaľkový ovládač (Lítiová batéria)
DP450-P.ACZELLP_SLOVAK_M#106881 2/20/09 6:27 PM Page 14
Page 43

P/NO : MFL61857018
DP450 / DP450P / DP450R
MAGYAR
DP450-P.ACZELLP_HUN_MFL61857018 2/20/09 6:28 PM Page 1
Page 44

2
VIGYÁZAT: AZ ÁRAMÜTÉS VESZÉLYÉNEK
MEGELŐZÉSE ÉRDEKÉBEN NE TÁVOLÍTSA EL A
KÉSZÜLÉK FEDELÉT (ÉS HÁTLAPJÁT)!
FELHASZNÁLÓ ÁLTAL JAVÍTHATÓ ALKATRÉSZEK A
KÉSZÜLÉKEN BELÜL NINCSENEK. BÍZZA A
JAVÍTÁST KÉPESÍTETT SZERVIZSZAKEMBERRE!
Az egyenlő oldalú háromszögben található
villám-szimbólum arra hívja fel a felhasználó
figyelmét, hogy a termék fedelén belül olyan
veszélyes, szigeteletlen feszültség van jelen,
amely emberre veszélyes áramütést okozhat.
Az egyenlő oldalú háromszögben elhelyezett
felkiáltójel a készülékhez mellökelt leírásban
található fontos kezelési és karbantartási
(javítási) utasításokra hívja fel a figyelmet.
FIGYELMEZTETÉS: A TŰZ ÉS ÁRAMÜTÉS
ELKERÜLÉSE ÉRDEKÉBEN A KÉSZÜLÉKET NE
ÉRJE ESŐ ÉS NEDVESSÉG!
FIGYELMEZTETÉS: Ne helyezze a berendezést zárt
helyre, például könyvszekrénybe vagy más hasonló
bútordarabba!
VIGYÁZAT: A szellőzőnyílásokat nem szabad elzárni.
A berendezést a gyártó utasításainak megfelelően kell
telepíteni. A készülékházon található nyílások a
szellőzést szolgálják, a megbízható működés és a
túlmelegedés elkerülése érdekében. A
szellőzőnyílásokat nem szabad elzárni azáltal, hogy a
berendezést ágyra, kanapéra, szőnyegre vagy más
hasonló felszínre helyezik. Nem szabad a berendezést
könyvszekrénybe vagy más beépített keretbe helyezni,
csak akkor, ha a megfelelő szellőzés biztosítva van,
illetve ha az elhelyezés megfelel a gyártó utasításainak.
VIGYÁZAT: Ebben a
készülékben lézerrendszer
működik. A készülék
rendeltetésszerű használatának
érdekében olvassa el
figyelmesen ezt a használati útmutatót, és tartsa meg
referenciaképpen. Amennyiben a készülék
karbantartást igényel, forduljon szakszervizhez. Az
ellenőrzéseket,
beállításokat és egyéb eljárásokat az itt leírt módon kell
elvégezni, máskülönben veszélyes sugárzás
keletkezhet. A lézersugár közvetlen hatásának
elkerülése érdekében ne nyissa fel a készülék fedelét.
Nyitott állapotban a lézersugárzás látható. NE NÉZZEN
A LÉZERSUGÁRBA!
VIGYÁZAT: A készüléket ne érje (csöpögő vagy
fröccsenő) víz, eső, nedvesség, továbbá ne
helyezzen a készülékre vízzel töltött tárgyakat, például
vázát.
VIGYÁZAT
• A szellőzőnyílásokat ne takarja el újsággal,
terítővel, függönnyel stb.!
• A készülékre ne helyezzen nyílt lánggal égő
eszközt, pl. égő gyertyát!
• A használt akkumulátorokat nem szabad elégetni! Ezeket a környezet védelme érdekében a
kijelölt hulladékgyűjtőben kell elhelyezni!.
• A készüléket csak trópusi vagy enyhe éghajlaton
használja.
• Ha a fülhallgatót vagy fejhallgatót nagy
hangerővel használja, az halláskárosodást
okozhat!
• Az akkumulátorokat ne hagyja tűző napon,
hőforrás közelében, valamint ne dobja tűzbe!
• Biztonsági okokból ne távolítsa el a beépített
akkumulátort.
Ha cserélni kell az akkumulátort, a készüléket
vigye el a legközelebbi LG Electronics szervizbe,
vagy kérjen segítgséget a forgalmazótól.
Megjegyzések a hálózati kábellel kapcsolatban
A legtöbb készülék esetében ajánlatos, hogy olyan
áramkörre legyen rákapcsolva, amely az adott
berendezés számára van fenntartva;
Más szóval olyan aljzatba kell csatlakoztatni, amelynek
áramkörén nincsenek további csatlakozási pontok,
illetve mellékáramkörök. A biztonság kedvéért nézze
meg a használati útmutató műszaki adatokat tartalmazó
lapját. A fali dugaszolóaljakat ne terhelje túl. A fali aljzat
túlterhelése, a meglazult, sérült aljzat vagy hosszabbító
kábel, a sérült vagy törött szigetelés veszélyt jelent. Az
ilyen állapot áramütéshez vezethet, tüzet okozhat.
Rendszeresen vizsgálja meg készüléke hálózati kábelét,
és ha sérülést vagy elhasználódást tapasztal, húzza ki a
kábelt az aljzatból, a készüléket ne használja tovább, és
hozzáértő szervizszakemberrel végeztesse el a
megfelelő cserealkatrész beépítését.
A hálózati kábelt védeni kell a fizikai és mechanikai
sérülésektől: nem szabad megcsavarni, megcsomózni,
összecsípni, ajtórésbe csukni, járni rajta. Különösen
figyelni kell a dugaszra, a fali aljzatra és arra a pontra,
ahol a kábel kilép a készülékből.
A berendezést úgy kell lekapcsolni az elektromos
hálózatról, hogy a hálózati kábelt kihúzzuk a dugaszolóaljból. A készülék telepítésekor oda kell figyelni rá,
hogy a csatlakozódugó könnyen hozzáférhető helyre
kerüljön.
A használaton kívül helyezett készülék
ártalmatlanítása
1. Ha a berendezésen ez a kerekes szemetes
edényt ábrázoló áthúzott
piktogram látható, a termék a 2002/96/EC
közösségi irányelv hatálya alá
tartozik.
2. Minden elektromos és elektronikai berendezést a háztartási hulladéktól elkülönítve
kell ártalmatlanítani az országos vagy helyi
hatóságok által erre kijelölt
hulladékbegyűjtő pontok igénybevételével.
3. A régi készülék megfelelő ártalmatlanításával megelőzhetők a
környezetre és az emberek egészségére
gyakorolt esetleges káros hatások.
4. Ha további információkra van szüksége régi
készüléke ártalmatlanításával kapcsolatban,
forduljon a helyi önkormányzathoz, a hulladékok
ártalmatlanításával foglalkozó szervezethez
vagy ahhoz az üzlethez, ahol a terméket
vásárolta.
A készülék megfelel a 2004/108/EC elektromágneses kompatibilitási (EMC) és a
2006/95/EC kisfeszültségű EU-irányelv
előírásainak.
Európai képviselet
LG Electronics Service Europe B.V.
Veluwezoom 15, 1327 AE Almere, The
Netherlands
(Tel : +31–036–547–8940)
VIGYÁZAT!
ÁRAMÜTÉS VESZÉLYE
NE NYISSA FEL!
DP450-P.ACZELLP_HUN_MFL61857018 2/20/09 6:28 PM Page 2
Page 45

3
A szimbólum
A televízió képernyőjén használat közben megjelenhet a „ ” szimbólum. Ez
azt jelenti, hogy az útmutatóban leírt funkció az adott lemezen nem
használható.
Régiókódok
A berendezés hátlapján nyomtatott régiókód található. A berendezéssel csak
olyan DVD lemezt lehet lejátszani, amelyik ugyanezzel vagy az „ALL”
régiókóddal van felcímkézve.
• A legtöbb DVD lemez borítóján jól láthatóan fel van tüntetve a régiókód, egy
földgömb formájában, amely egy vagy több számot tartalmaz. A berendezés
csak akkor tudja lejátszani a lemezt, ha régiókódja megegyezik a lemezével.
• Ha eltérő régiókódú lemezt próbál lejátszani, a televízió képernyőjén a
„Check Regional Code” (Ellenőrizze a régiókódot) üzenet jelenik meg.
Szerzői jogok
A szerzői jogi védelem alatt álló anyagok engedély nélküli másolása
sugárzása, bemutatása, kábelhálózaton történő forgalmazása, nyilvános
lejátszása és kölcsönzése törvénybe ütközik. Ez a termék a Macrovision által
kifejlesztett másolásvédelmi funkcióval van ellátva. Egyes lemezekre
másolásvédelmi jeleket rögzítenek. Az ilyen lemezeken lévő filmek
rögzítésekor és lejátszásakor képzaj jelenik meg. A termék USA-szabadalmak
és más szellemi tulajdonjogok által védett szerzői jogvédelmi technológiát
tartalmaz. A szerzői jogvédelmi technológia használatát a Macrovision-nak
kell engedélyeznie és a Macrovision egyéb engedélyének hiányában csak
otthoni és más korlátozott használatra alkalmazható. A visszafejtés vagy
részekre bontás tilos.
Akkumulátor
• Az akkumulátorral is üzemelő készüléket szabadon, a hálózati kábel okozta
korlátozás nélkül hordozhatja és használhatja.
• Az akkumulátor csak akkor töltődik, ha a készüléket kikapcsolja és a
hálózati adaptert a hálózati feszültségre csatlakoztatja.
• A készülék bekapcsolásakor a töltés leáll.
• Az akkumulátor teljes feltöltéséhez kb. 2,5 óra szükséges.
• A készülék üzemideje akkumulátorral használva kb. 2,5 óra szükséges.
Az akkumulátor üzemideje az akkumulátor állapotától, az üzemállapottól és a
környezeti feltételektől függ; a leghosszabb játékidő akár 3 óra is lehet.
• A töltés során az akkumulátor-jelző pirosan világít. Az akkumulátor
feltöltésekor a jelző zöld színre vált.
• Ha az akkumulátor maradék kapacitása már csak pár percre elegendő, a
képernyőn a “ ” jelzés villog.
DVD-VIDEO: Megvásárolható vagy
kikölcsönözhető lemezek, pl. filmek.
DVD-R: Videomódban, csak lezárva (véglegesítve).
DVD-RW: VR- vagy videomódban,
csak lezárva (véglegesítve).
DVD+R: Csak videomódban.
DVD+RW: Csak videomódban.
Audio CD: Megvásárolható zenei CD-k vagy
CD-R/CD-RW lemezek zenei CD formátumban.
Ez a berendezés audiocímeket, DivX-, MP3-, WMA- és/vagy JPEG-állományokat
tartalmazó DVD
±
R/RW és CD-R/RW lemezeket képes lejátszani. Előfordulhat, hogy
egyes DVD
±
RW/DVD±R vagy CD-RW/CD-R lemezeket – a rögzítés minősége vagy
a lemez fizikai állapota miatt, illetve a rögzítésre használt készülék vagy az
alkalmazott szoftver tulajdonságai miatt – nem lehet lejátszani a berendezéssel.
Logó
Lejátszható lemezek
Típus
Lejátszható lemezek . . . . . . . . . . . . . . . . . . . . . . . . . . . . . . . . .3
Akkumulátor . . . . . . . . . . . . . . . . . . . . . . . . . . . . . . . . . . . . . . . .3
A készülék . . . . . . . . . . . . . . . . . . . . . . . . . . . . . . . . . . . . . . . . .4
A távvezérlő . . . . . . . . . . . . . . . . . . . . . . . . . . . . . . . . . . . . . . .5
A tápfeszültség csatlakoztatása . . . . . . . . . . . . . . . . . . . . . . . . .6
Csatlakoztatások . . . . . . . . . . . . . . . . . . . . . . . . . . . . . . . . . . . .7
Beállítások . . . . . . . . . . . . . . . . . . . . . . . . . . . . . . . . . . . . . . .8-9
A lemezinformációk megjelenítése . . . . . . . . . . . . . . . . . . . . . . .9
Lemezek lejátszása . . . . . . . . . . . . . . . . . . . . . . . . . . . . . . .10-11
DivX-filmfájl lejátszása . . . . . . . . . . . . . . . . . . . . . . . . . . . . . . .11
Zenei lemezek és zenei állományok hallgatása . . . . . . . . . . . .12
Fényképfájlok megtekintése . . . . . . . . . . . . . . . . . . . . . . . . . . .12
Nyelvkódok . . . . . . . . . . . . . . . . . . . . . . . . . . . . . . . . . . . . . . .13
Országkód . . . . . . . . . . . . . . . . . . . . . . . . . . . . . . . . . . . . . . .13
Hibaelhárítás . . . . . . . . . . . . . . . . . . . . . . . . . . . . . . . . . . . . . .14
Műszaki adatok . . . . . . . . . . . . . . . . . . . . . . . . . . . . . . . . . . . .14
Tartalom
Készült a Dolby Laboratories engedélyével. A Dolby és a dupla D jel a Dolby
Laboratories védjegyei.
A „DVD Logo” a DVD Format/Loge Licensing Corporation védjegye.
DP450-P.ACZELLP_HUN_MFL61857018 2/20/09 6:28 PM Page 3
Page 46

4
A készülék
a LCD-képernyő
b Hangszórók
c Lejátszás-vezérlő gombok
• N (Play)/ X (Pause): A lejátszás indítása.Lejátszás v. felvétel ideiglenes,
újraindítása.
• x (Stop): Leállítja a lejátszást.
• . (Skip): Keresés visszafelé* vagy ugrás az éppen játszott fejezet/sáv elejére,
illetve az előző fejezetre/sávra.
• > (Skip): Keresés előre* vagy ugrás a következő fejezetre/sávra.
* Kb. 2 mp-ig tartsa nyomva a gombot.
d Funkciógombok
• DISPLAY: Megjeleníti a képernyőkijelzést (OSD).
• SETUP: Megnyitja és bezárja a beállítómenüt.
• COLOR/BRIGHT*: A fényerő és a szín beállító menüjének megjelenítése.
• MENU: Megnyitja a DVD menüjét.
* A képernyő színtelítettségének vagy fényerejének beállításához a készülék
COLOR/BRIGHT gombját többször megnyomva lépjen a menübe és a b / B
gombokkal állítsa be az értéket. Ezután nyomja meg az ENTER-t.
e Menüvezérlő gombok
• bBvV(bal/jobb/fel/le): Menüpont kijelöl ése.
• ENTER: A választás nyugtázása.
f OPEN (Z): A lemezfedél felnyitása.
g A távvezérlő érzékelője: Ide kell irányítani a távvezérlőt.
h Akkumulátor- és tápfeszültség-jelző
• Töltés közben pirosan, a töltés befejezése után zölden világít (lásd 3. oldal).
• A készülék bekapcsolásakor a LED színe pár másodpercig zöldre vált.
i Lemezfedél
j 1/] (Bekapcsoló gomb): Be- és kikapcsolja a készüléket.
Figyelem: a készülék használatához a bekapcsoló gombot ON állásba kell állítani.
k w VOL (Volume): A beépített hangszórók és a fülhallgató hangerejének beállítása.
l (Fülhallgató-csatlakozók): Ide csatlakoztathatók a fülhallgatók.
m AV OUT: Csatlakozás videó és audio bemenettel ellátott TV-készülékhez.
n DC 12V IN: Ide csatlakoztatható a hálózati adapter vagy a szivargyújtó-adapter.
P
A
S
A
h
A
F
h
á
DP450-P.ACZELLP_HUN_MFL61857018 2/20/09 6:28 PM Page 4
Page 47

,
.
a
POWER (1): Be- és kikapcsolja a készüléket.
AUDIO ( ): Kiválasztja a hangcsatorna nyelvét.
SUBTITLE ( ): Kiválasztja a felirat nyelvét.
ANGLE ( ): Kiválasztja a kameraállást a DVD-n,
ha van ilyen.
SKIP/SEARCH (. / >): Keresés* előre vagy
visszafelé. Ugrás a következő vagy az előző
fejezetre/sávra.
* Kb. 2 mp-ig tartsa nyomva a gombot.
SLOW (t / T): Lassított lejátszás előre/
visszafelé.
b
SETUP: Megnyitja és bezárja a beállítómenüt.
MENU: Megnyitja a DVD menüjét.
vV b B: Navigálás a menükben.
ENTER ( ): A kiválasztás megerősítése a
menükben.
RETURN (O):
Visszafelé halad a menüben, vagy
kilép a menüből.
DISPLAY: Megjeleníti a képernyőkijelzést (OSD).
c
PAUSE/STEP (X): Ideiglenesen megállítja a lejátszást. Ismételt megnyomásával kockázva lehet
lejátszani.
PLAY (N): Elindítja a lejátszást.
STOP (x): Leállítja a lejátszást.
Számgombok: A menü számozott menüpontjainak
kiválasztása.
PROG.: Programszerkesztési üzemmódba lép.
CLEAR: Törli a program sorszámát a
programlistáról.
d
TITLE: Megnyitja a lemez címmenüjét.
REPEAT: Megismétli a fejezetet, sávot, címet vagy
mindent.
A-B: Szakaszismétlés.
ZOOM: Felnagyítja a képet.
MARKER : Bármely pont megjelölése lejátszás
közben.
SEARCH : A [Marker Search] (marker-keresés)
menü megjelenítése.
RANDOM: A sávok lejátszása véletlenszerű
sorrendben.
Helyezze be a gombelemet a távvezérlőbe
Nyomja össze az elemtartó kapcsát, majd húzza ki
az elemtartót. Tegye be az elemet, a + jel ugyanabba az irányba nézzen, mint az elemtartón látható +
jel. Az elemet tartalmazó elemtartót kattanásig tolja
vissza a távvezérlőbe.
• A távvezérlőben CR. 2025 vagy annak
megfelelő 3 V-os micro lítium elemet kell
használni.
• A kimerült elemet a helyi törvényeknek
megfelelő hulladékgyűjtőben kell elhelyezni. Ne
dobja tűzbe az elemet.
Figyelmeztetés a lítiumelemmel kapcsolatban
• A helytelen elemcsere robbanásveszélyt
okozhat!
• Csak azonos típusú elemet használjon!
• Az elemtartóban további figyelmeztetés
olvasható.
a
b
c
d
A távvezérlő
Figyelmeztetés: Az elem helytelen kezelése
esetén tűz- vagy kémiai égésveszélyt léphet fel.
Ne töltse újra, ne szedje szét, ne égesse el és
ne hevítse 100°C fölötti hőmérsékletr!
Az elemet kizárólag Matsushita Elec. Ind. Co.,
Ltd. (Panasonic) gyártmányú CR. 2025 típusú
elemmel cserélje ki. Más elem használata tűzvagy robbanásveszélyt idézhet elő. Távolítsa el
a használt elemeket. Az elemeket tartsa gyermekek elől elzárva. Az elemeket ne szedje szét
és ne dobja tűzbe.!
5
Figyelem: Ha a készüléket távirányítóval kívánja
használni, a bekapcsoló gombot ON állásba kell
állítani (lásd a 4. oldalt)
DP450-P.ACZELLP_HUN_MFL61857018 2/20/09 6:28 PM Page 5
Page 48

A tápfeszültség csatlakoztatása
Váltóáramú adapter csatlakozatása
A mellékelt váltóáramú adapter segítségével csatlakoztassa a készüléket a
hálózati feszültségre.
Hálózati adapter
• Az adapter 100-240 V~ 1 A 50/60 Hz hálózati feszültséggel működik.
• Szükség esetén a megfelelő hálózati adaptert és hálózati kábelt elektromos
szaküzletben lehet beszerezni.
• Gyártó: NANJING WANLIDA TECHNOLOGY CO., LTD
A szivargyújtó-adapter csatlakoztatása
A készülék és a szivargyújtó-adapter 8,5-16 Voltos, negatív testelésű
gépkocsi-akkumulátorral működik. A legtöbb gépjárműnél ez teljesül. Ha a
gépjármű elektromos rendszere ettől eltér, a DC-tápellátás nem használható.
Szivargyújtó-adapter
• A készülék 8,5-16 V egyenfeszültségről működik.
• Szükség esetén a megfelelő szivargyújtó-adaptert elektromos szaküzletben
lehet beszerezni.
• Gyártó: NANJING WANLIDA TECHNOLOGY CO., LTD.
Figyelem!
• Az áramütés, valamint a gépjármű illetve a készülék megrongálódásának
megelőzése érdekében először mindig a szivargyújtó-adaptert
csatlakoztassa le a szivargyújtó-csatlakozóról és a tápfeszültség-kábelt csak
ezután húzza ki a készülékből!
• A szivargyújtó-adapter 3 A/250 V olvadó biztosítót tartalmaz.
• A gépjármű indításakor csatlakoztassa le az adaptert a szivargyújtó-csatlakozóról!
• Na használja a készüléket, ha a gépjármű akkumulátora kimerült! A gépkocsi
generátorának áramfelvételi csúcsai kiolvaszthatják az adapter biztosítékát!
• Ha a gépjármű-akkumulátor feszültsége kb. 10 Volt alá esik, a készülék nem
megfelelően működhet!
• Ne hagyja a készüléket olyan helyen, ahol a hőmérséklet 70 °C fölé
emelkedhet, mert a lejátszófej meghibásodhat.
Példa:
-Bezárt gépjármű a tűző napon.
-Fűtőkészülék közelében.
A tápfeszültség-kábelt
csatlakoztassa a “DC
12V IN” csatlakozóra.
A tápfeszültség-kábelt csatlakoztassa a
“DC 12V IN” csatlakozóra.
Dugja a gépjármű
szivargyújtó-csatlakozójába.
A hálózati kábelt csatlakoztassa a hálózati adapterre.
(A tényleges kialakítás eltérő lehet.)
Hálózati kábel
kioldógombja
A adaptert
csatlakoztassa
feszültségre
A készülék jobb oldala
A készülék jobb oldala
6
C
A
A
k
la
DP450-P.ACZELLP_HUN_MFL61857018 2/20/09 6:28 PM Page 6
Page 49

7
Csatlakoztatások
Audio és video csatlakoztatás a TV-készülékhez
Az alábbi ábrának megfelelően kösse össze a készüléken található AV OUT
kimeneti csatlakozóhüvelyt a TV-készülékén található bemeneti csatlakozóhüvelyekkel.
A készülék jobb oldala
Csatlakoztassa
az “AV OUT”
csatlakozóra.
Audio/Video kábel
(nem tartozék)
Audio/Video adapter
sárga
fehér
vörös
DP450-P.ACZELLP_HUN_MFL61857018 2/20/09 6:28 PM Page 7
TV
Page 50

Beállítások – részletes tudnivalók
Első bekapcsoláskor (opcionális)
A berendezés első bekapcsolásakor megjelenik a nyelvválasztás menüje.
A berendezés használatához nyelvet kell választani. A vV b B gombokkal
válasszon nyelvet, majd nyomja meg az ENTER-t. Megjelenik a megerősítést
kérő üzenet. A bBgombokkal válassza ki a [Belépés]-t, majd nyomja meg az
ENTER-t.
Nyelvbeállítások
A menü nyelve – Válasszon nyelvet a beállítómenü és a képernyőkijelzés
számára.
Hang/Filmfelirat/Lemezmenü – Válasszon nyelvet a lemez hangja/felirata/
menüje számára.
[Eredeti]: A lemez eredeti nyelve, amelyen a rögzítés történt.
[Egyéb]: Másik nyelv kiválasztásához a számgombokkal, majd az ENTER-rel
adja meg az illető nyelv négyjegyű kódszámát a nyelvkódlistából (lásd a 13.
oldalon). Ha a szám beírását elvéti, a számokat a CLEAR gombbal törölje,
majd adja meg helyesen.
[Ki] (a lemezfelirathoz): A felirat kikapcsolása.
A megjelenítés beállítása
TV-képarány – Válassza ki a használni kívánt képarányt a televízió
képernyőjének megfelelően.
[4:3]: Akkor válassza, ha szabványos 4:3 képarányú televízió van
csatlakoztatva.
[16:9]: Akkor válassza, ha 16:9 képarányú széles képernyős televízió van
csatlakoztatva.
Megjelenítési mód – Ha 4:3-as képarányt választott, meg kell határoznia,
hogyan szeretné megjeleníteni a szélesvásznú programokat és filmeket a
televízió képernyőjén.
[Letterbox]: A szélesvásznú filmeket a képernyő felső és alsó részén fekete
csíkkal jeleníti meg.
[Panscan]: Automatikusan kitölti az egész 4:3-as képernyőt, levágva a kép
széleit.
Hangbeállítások
DRC (dinamikatartomány-vezérlés) – A hang a hangerő mérséklésekor is
érthető marad (csak Dolby Digital esetében). Ehhez a DRC-t be kell kapcsolni
[Be].
Hang – Csak akkor kapcsolja be [Be], ha többcsatornás karaoke-DVD-t játszik
le. A lemez karaokecsatornái normál sztereó hanggá keverednek.
A lezárás (szülői korlátozás) beállításai
A lezárás beállításainak használatához be kell állítani a [Területkód]-ot.
Válassza ki a [Területkód] menüpontot, és nyomja meg a B gombot.
Üsse be a négyjegyű kódot, majd nyomja meg a z ENTER-t.
Megerősítésképpen írja be ismét a kódot, majd nyomja meg az ENTER-t. Ha a
szám beírását elvéti, a számokat a CLEAR gombbal törölje, majd adja meg
helyesen.
Ha elfelejtette a jelszót, akkor azt törölni lehet. Először vegye ki a lemezt a
berendezésből .Lépjen a beállító menübe és írja be a 6-jegyű “210499” számot;
ekkor a jelszó törlődik.
Korhatár – Válassza ki a korlátozási szintet. Minél alacsonyabb a szint, annál
szigorúbb a korlátozás. A korlátozást a [Felold] menüponttal lehet feloldani.
Jelszó – Megadhatja vagy megváltoztathatja a jelszót a lezárás beállításaihoz.
[Új]: Adja meg a négy számjegyből álló új jelszót a számgombokkal, majd
nyomja meg az ENTER-t. Megerősítésképpen írja be ismét a jelszót.
[Módosít]: Miután beírta a régi jelszót, adja meg kétszer egymás után az új
jelszót.
Területkód – Válassza ki, melyik földrajzi terület kódja vonatkozzon a
korlátozási szintekre. Ez fogja meghatározni, melyik ország normái vonatkoznak
a DVD-re a szülői korlátozás során. (Lásd a13. oldalon.)
Beállítások
1 A beállítómenü megjelenítése: SETUP
2 Válassza ki a kívánt pontot az első szinten:
vv VV
3 Lépjen a második szintre:
BB
4
Válassza ki a kívánt pontot a második szinten:
vv VV
5 Lépjen a harmadik szintre:
BB
6 Változtassa meg a beállítást:
vv VV
/ ENTER
GOMB
8
E
D
Ö
sz
w
E
A
be
DP450-P.ACZELLP_HUN_MFL61857018 2/20/09 6:28 PM Page 8
Page 51

9
a
Egyéb beállítások
DivX(R) VOD – DivX® VOD (Video On Demand) regisztrációs kódot adunk
Önnek, amellyel videókat vásárolhat, ill. kölcsönözhet a DivX® VOD
szolgáltatás igénybevételével. További információkért keresse fel a
www.divx.com/vod webcímet. Lépjen a [Választ] ikonra és nyomja meg az
ENTER-t. Ekkor megjelenik a berendezés regisztrációs kódja.
A DivX® VOD szolgáltatáson keresztül letöltött videók csak ezen a
berendezésen játszhatók le.
A lemezinformációk megjelenítése – részletes
tudnivalók
A menüpontot a vV gombokkal választhatja ki, a beállítást a bBgombokkal
változtathatja meg vagy választhatja ki.
Az aktuális cím sorszáma és az összes cím száma
Az aktuális fejezet sorszáma és az összes fejezet száma
A lejátszásból eltelt idő
A hang kiválasztott nyelve vagy csatornája
A kiválasztott felirat
A kiválasztott kameraállás és az összes kameraállás száma
Az útmutatóban használt szimbólumok
Ha egy funkció mellett az alábbi szimbólumok valamelyike szerepel, akkor a
funkció csak a szimbólummal jelölt lemezzel fagy fájltípussal használható.
Minden lemez és fájl Audio-CD-k
DVD és lezárt MP3-fájlok
DVD±R/RW
DivX-fájlok
WMA-fájlok
WMA
DivX
MP3DVD
ACDALL
A lemezinformációk megjelenítése
1 Lejátszás közben nyomja meg a DISPLAY DISPLAY
gombot:
2 Válasszon menüpontot:
vv VV
3 Hajtsa végre a megjelenítés menüjének
bb BB
/ ENTER
beállításait:
4 Kilépés: DISPLAY
GOMB
DP450-P.ACZELLP_HUN_MFL61857018 2/20/09 6:28 PM Page 9
Page 52

Lemezek lejátszása – részletes tudnivalók
A lejátszás megállítása
A STOP (xx) megnyomásával meg lehet állítani a lejátszást. A lemeztől
függően a készülék megjegyzi ezt a pontot. A képernyőn rövid időre a „X
xx
”
jel jelenik meg. A PLAY (
NN
) megnyomására folytatódik a lejátszás (az adott
ponttól). Ha ismét megnyomja a STOP (xx) gombot, vagy kinyitja a lemeztálcát
(a képernyőn ilyenkor a „(xx)” jel jelenik meg), a megállítási pont a készülék
emlékezetéből törlődik.(Xx =Folytatható megállítás, x =Teljes leállítás)
A megállítási pont törlődhet, ha valamelyik gombot (pl.: POWER, OPEN stb.)
megnyomják.
Menüt tartalmazó DVD lejátszása
A legtöbb DVD-n menü található, amely a film lejátszása előtt jelenik meg.
Ebben a menüben a vV b B gombokkal vagy a számgombokkal lehet a
megfelelő lehetőségre állni. Akívánt lehetőséget az ENTER gombbal lehet
kijelölni.
VR-módú DVD lejátszása
A berendezés képes olyan DVD-RW lemezeket lejátszani, amelyeket „Video
Recording” (VR) formátumban rögzítettek. A VR-módú DVD behelyezésekor
megjelenik a menü a képernyőn. A vV gombokkal válassza ki a kívánt címet,
majd nyomja meg a PLAY (
NN
) gombot. A DVD-VR menü megjelenítéséhez
nyomja meg a MENU vagy a TITLE gombot.
Néhány DVD-FELVEVŐ a DVD-VR lemezt CPRM adatokkal írja fel. A
készülékkel ilyen típusú lemezt nem lehet lejátszani.
Ugrás a következő, ill. előző fejezetre, ill. sávra.
Nyomja meg a SKIP (>) gombot a következő fejezetre, ill. sávra történő
ugráshoz.
Nyomja meg a SKIP (.) gombot az aktuális fejezet, ill. sáv elejére történő
visszaugráshoz.
Nyomja meg kétszer röviden a SKIP (.) gombot az előző fejezetre, ill.
sávra történő visszaugráshoz.
A lejátszás pillanatmegállítása
A lejátszás pillanatmegállításához nyomja meg a PAUSE/STEP (X) gombot. A
lejátszás folytatásához nyomja meg a PLAY (
NN
) gombot.
Lejátszás kockázással
A kockázva történő lejátszáshoz nyomja meg többször egymás után a
PAUSE/STEP (X) gombot.
Ismétléses lejátszás
A REPEAT többszöri megnyomásával válassza ki az ismételni kívánt részt. A
berendezés az aktuális címet, fejezetet vagy sávot ismételve játssza le. A
rendes lejátszáshoz való visszatéréshez a REPEAT többszöri megnyomásával
kapcsolja ki a funkciót [Ki].
Gyors előre- és hátracsévélés
A SKIP (. vagy >) gombot nyomva tartva gyorsított lejátszást lehet
végezni előre vagy visszafelé. A lejátszás sebességét a SKIP (. vagy >)
ismételt megnyomásával lehet változtatni. A PLAY (
N) gombbal a normál
lejátszásra lehet visszatérni.
Szakaszismétlés (A-B)
Nyomja meg az A-B gombot annak a szakasznak a kezdőpontján, amelyet
ismételni akar, majd újra a szakasz végén. A kiválasztott rész folyamatosan
ismétlődik. A normál lejátszáshoz való visszatéréshez kapcsolja [Ki] a funkciót
az A-B gombbal.
A felirat nyelvének kiválasztása
A felirat nyelvének kiválasztásához lejátszás közben nyomja meg többször
egymás után a SUBTITLE ( ) gombot.
Másik kameraállás beállítása
Ha a képernyőn megjelenik a kameraállás jelzése, az ANGLE ( ) többszöri
megnyomásával másik kameraállást választhat.
A filmhang nyelvének megváltoztatása
A filmhang rendelkezésre álló nyelveinek, a csatornáknak és a kódolási
módoknak a megváltoztatásához lejátszás közben nyomja meg többször
egymás után az AUDIO ( ) gombot.
Lassított lejátszás ( : csak előre)
Lejátszás közben a SLOW (t vagy T) gombot megnyomva lassítani lehet a
lejátszást (előre vagy visszafelé). A lejátszási sebességet a SLOW
(t vagy T) Ismételt megnyomásával lehet beállítani. A PLAY (
N) gombbal a
normál lejátszásra lehet visszatérni.
DivXDVD
DivXDVD
DVD
DivXDVD
ACDDivXDVD
MP3WMAACDDivXDVD
ALL
DivXDVD
ALL
ALL
DVD
Lemezek lejátszása
GOMB
1 Nyissa fel a lemezfedelet: OPEN (Z)
2 Lemez behelyezése: 3 Zárja le a lemezfedelet: 4 A lejátszás megkezdése:
NN
PLAY
5 Állítsa be a hangerőt.: VOLUME
6 A lejátszás leállítása:
xx
STOP
10
A
L
k
k
C
A
A
A
A
A
K
m
A
„1
g
L
L
a
a
K
A
E
k
le
E
S
va
sz
U
A
je
k
je
K
A
p
V
D
m
DP450-P.ACZELLP_HUN_MFL61857018 2/20/09 6:28 PM Page 10
Page 53

11
a
A kép kinagyítása
Lejátszás közben, vagy amikor a lejátszás pillanatmegállításban van, a zoom
kiválasztásához nyomja meg többször egymás után a ZOOM gombot. A
kinagyított képben a vVb B gombokkal mozoghat. Kilépéshez használja a
CLEAR gombot. (100% p 200% p 300% p 400% p 100%)
A címmenü megjelenítése
A címmenüt, ha van ilyen, a TITLE gomb megnyomásával jelenítheti meg.
A DVD-menü megjelenítése
A lemezmenüt, ha van ilyen, a MENU gomb megnyomásával jelenítheti meg.
A lejátszás megkezdése a kiválasztott időponttól
Kikeresi a megadott időkód kezdőpontját. Nyomja meg a DISPLAY gombot,
majd válassza ki az óra ikonját. Írja be az időt, majd nyomja meg az ENTER-t.
Az 1 óra 10 perc 20 másodpercnél lévő jelenet megtalálásához pl. írja be:
„11020 ”, majd nyomja meg az ENTER-t. Ha elvéti a számot, a CLEAR
gombbal törölje, majd adja meg ismét.
Lejátszás véletlenszerű sorrendben
Lejátszás közben vagy leállított üzemmódban a RANDOM gombot megnyomva
a készülék véletlenszerű sorrendben játssza le a sávokat.A normál lejátszáshoz
a RANDOM ismételt megnyomásával lehet visszatérni.
Kedvenc jelenet megjelölése
A lemezen meg lehet jelölni egy kívánt helyet és vissza lehet térni erre a helyre.
Ehhez a kívánt helyen egyszerűen nyomja meg a MARKER gombot. A
képernyőn rövid időre a marker (jelölő)-ikon jelenik meg. Ilyen módon
legfeljebb kilenc jelölőt lehet elhelyezni.
Ezeket a jelölőket meg lehet jeleníteni, vagy törölni lehet. Nyomja meg a
SEARCH (Keresés) gombot, ekkor megjelenik a [Marker Search] menü. A b
vagy B gombbal jelölje ki a kívánt helyet majd nyomja meg az ENTER-t (a lejátszás a megjelölt helyen kezdődik meg) vagy a CLEAR-t (a marker törlődik).
Utoljára játszott jelenet memóriája
A berendezés eltárolja az utolsóként megtekintett lemez utoljára játszott
jelenetét. Az utolsó jelenet akkor is megőrződik a memóriában, ha a lemezt
kiveszik, vagy a készüléket kikapcsolják. Ha olyan lemezt tesz be, amelyiknek a
jelenete el van tárolva, a készülék automatikusan visszaemlékszik a jelenetre.
Képernyőkímélő
A képernyőkímélő akkor kapcsol be, ha a berendezés öt perce áll. További öt
perc képernyőkímélős működés után a berendezés automatikusan kikapcsol.
Vegyes lemez – DivX, MP3/WMA és JPEG
DivX-, MP3-/WMA- és JPEG-fájlokat is tartalmazó lemez lejátszásakor a TITLE
megnyomásával meg lehet nyitni a lejátszani kívánt fájltípus menüjét.
DivX-filmfájl lejátszása – részletes
tudnivalók
A karakterkészlet megváltoztatása a DivX® felirat helyes
megjelenítése érdekében
Nyomja le és tartsa lenyomva a SUBTITLE gombot legalább három
másodpercig lejátszás közben. Megjelenik a nyelvkód. A bB gombokkal
válasszon másik nyelvkódot. Amikor a felirat megfelelően jelenik meg, nyomja
meg az ENTER-t.
A DivX-állományokra vonatkozó követelmények
A lejátszó a következő korlátozásokkal játssza le a DivX-fájlokat:
• Rendelkezésre álló felbontás: 720 x 576 (sz x m) pixel.
• A DivX-fájlok nevének hossza legfeljebb 45 karakter lehet.
• A DivX-fájlok kiterjesztése „.avi”, „.mpg” vagy „.mpeg” lehet.
• Lejátszható DivX-feliratformátumok: SubRip (.srt / .txt), SAMI (.smi),
SubStation Alpha(.ssa/.txt), MicroDVD (.sub/.txt), VobSub (.sub),
SubViewer 2.0 (.sub/.txt), TMPlayer(.txt), és DVD Subtitle System (.txt).
• Lejátszható kódoló-dekódoló (codec) formátumok: „DIVX3.xx”, „DIVX4.xx”,
„DIVX5.xx”, „MP43”, „3IVX” .
• A DivX 6.0 esetében a berendezés csak a lejátszást támogatja.
• Lejátszható hangformátumok: „Dolby Digital”, „PCM”, „MP3” és „WMA”.
• Mintavételi frekvencia: 8–48 kHz között (MP3), 32–48 kHz között (WMA).
• Bitráta: 8–320 kbps között (MP3), 32–192 kbps között (WMA),
4 Mbps-nál kevesebb (DivX-állomány).
• CD-R/RW, DVD±R/RW, ISO 9660-as formátum
• Fájlok/mappák max. száma: Legfeljebb 600 (fájlok és mappák összesen)
ACDDVD
DivXDVD
MP3WMAACD
DivXDVD
DVD
DVD
DivXDVD
DivX-filmfájl lejátszása
1 Nyissa fel a lemezfedelet: OPEN (ZZ)
2 Lemez behelyezése: 3 Zárja le a lemezfedelet: 4 A filmfájl kiválasztása a menüből:
vv VV
, MENU
5 A lejátszás megkezdése:
NN
PLAY
6 A lejátszás leállítása:
xx
STOP
GOMB
DP450-P.ACZELLP_HUN_MFL61857018 2/20/09 6:28 PM Page 11
Page 54

Zenei lemezek és zenei állományok hallgatása
– részletes tudnivalók
Saját program létrehozása
A lemez tartalmát kívánság szerinti sorrendben lehet lejátszani, úgy, hogy a
lemezen lévő zenék sorrendjét beállítjuk. A zené(k) programlistára vételéhez
nyomja meg a PROG. gombot. A berendezés programszerkesztési módba lép
(a jelzés jelenik meg a menüben). Válassza ki a kívánt zenét a [Lista]-n,
majd nyomja meg az ENTER-t a zene vételéhez. Válassza ki valamelyik zenét a
programlistáról, majd nyomja meg az ENTER-t a programozott lejátszás
megkezdéséhez. Ha törölni akarja valamelyik zenét a programlistáról, jelölje ki a
törlendő zenét, majd nyomja meg a CLEAR-t programszerkesztési módban. Ha
az összes zenét törölni kívánja a programlistáról, válassza a [Mindent töröl]
opciót, majd nyomja meg az ENTER-t programszerkesztési módban. A program
törlődik, ha a lemezt kiveszik a készülékből, illetve ha a berendezést kikapcsolják.
Fájladatok megjelenítése (ID3-címke)
Ha olyan MP3-állományt játszik le, amelyhez fájladatok is tartoznak, a DISPLAY
többszöri megnyomásával megjelenítheti ezeket az adatokat. Ha a fájl nem rendelkezik ID3-tag információval, akkor a [No ID3 TAG] (nincs ID3 TAG) jelenik
meg a képernyőn.
Az MP3/WMA zenei állományokra vonatkozó követelmények
A készülék a következő korlátozásokkal játssza le az MP3-/WMA-fájlokat:
• Fájlkiterjesztések: „.mp3”, „.wma”.
• Mintavételi frekvencia: 8–48 kHz között (MP3), 32–48kHz között (WMA).
• Bitráta: 8–320 kbps között (MP3), 32–192 kbps között (WMA).
• CD-R/RW, DVD±R/RW, ISO 9660-as formátum.
• Fájlok/mappák max. száma: Legfeljebb 600 (fájlok és mappák összesen)
Fényképfájlok megtekintése – részletes tudnivalók
Fényképfájlok megtekintése „diavetítéssel”
A vV b B gombokkal jelölje ki a ( ) ikont, majd nyomja meg az ENTER-t a
diavetítés megkezdéséhez. A diavetítés sebessége a bBgombokkal változtatható, amikor a ( ) ikon van kijelölve.
Ugrás a következő, ill. előző fényképre
Nyomja meg a SKIP (. vagy >) gombot az előző, ill. következő
fénykép megtekintéséhez.
A fénykép elforgatása
A vV gombok segítségével teljes képernyős megjelenítésben elforgathatja a
fotót az óramutató járásával szemben, ill. megegyezően, miközben a fotó a teljes képernyőn látható.
Pozastavení slide show
Stisknutím tlačítka PAUSE/STEP (X) pozastavíte slide show. Stiskněte
PLAY (
NN
) pro pokračování slide show.
Zenehallgatás diavetítés alatt
Ha a lemez fénykép és zenei állományokat is tartalmaz, lehetséges a diavetítés
alatt zenét hallgatni. A vV b B gombokkal jelölje ki a ( ) ikont, majd nyomja
meg az ENTER-t a diavetítés megkezdéséhez.
Kinagyított fénykép megtekintése
A zoom funkció kiválasztásához nyomja meg többször egymás után a ZOOM
gombot a fénykép teljes képernyőn történő megjelenítése közben. A kinagyított képben a vVb B gombokkal mozoghat. Kilépéshez használja a CLEAR
gombot.
A fényképfájlokra vonatkozó követelmények
A JPEG-állományok kompatibilitására ezen a lejátszón az alábbi korlátozások
vonatkoznak:
• Fájlkiterjesztés: „.jpg”.
• Fénykép mérete: lehetőleg 2 MB-nál kisebb.
• CD-R/RW, DVD±R/RW, ISO 9660-as formátum.
• Fájlok/mappák max. száma: Legfeljebb 600 (fájlok és mappák összesen)
Zenei lemezek és zenei
állományok hallgatása
GOMB
1 Nyissa fel a lemezfedelet: OPEN (ZZ)
2 Lemez behelyezése: 3 Zárja le a lemezfedelet: 4 Zene kiválasztása a menüből:
vv VV
, MENU
5 A lejátszás megkezdése:
NN
PLAY
6 A lejátszás leállítása:
xx
STOP
Fényképfájlok megtekintése
1 Nyissa fel a lemezfedelet: OPEN (ZZ)
2 Lemez behelyezése: 3 Zárja le a lemezfedelet: 4 A fotófájl kiválasztása a menüből:
vv VV
, MENU
5 A kiválasztott fájl teljes képernyős
NN
PLAY
megjelenítése:
6 Visszatérés a menübe:
xx
STOP
GOMB
12
DP450-P.ACZELLP_HUN_MFL61857018 2/20/09 6:28 PM Page 12
E
Page 55

13
Nyelvkódok
Ebből a listából lehet megadni a kívánt nyelvet a következő alapbeállításokhoz: hang, filmfelirat, lemezmenü.
Országkód
Válassza ki az országkódot a listáról.
Nyelv Kódszám
afar 6565
afrikaans 6570
albán 8381
amharik 6577
arab 6582
örmény 7289
asszámi 6583
ajmara 6588
azeri 6590
baskír 6665
baszk 6985
bengáli, bangla 6678
bhutáni 6890
bihari 6672
breton 6682
bolgár 6671
burmai 7789
belarusz 6669
kínai 9072
Nyelv Kódszám
horvát 7282
cseh 6783
dán 6865
holland 7876
angol 6978
eszperantó 6979
észt 6984
feröeri 7079
fidzsi 7074
finn 7073
francia 7082
fríz 7089
gallego 7176
grúz 7565
német 6869
görög 6976
grönlandi 7576
guarani 7178
gudzsaráti 7185
Nyelv Kódszám
hausza 7265
héber 7387
hindi 7273
magyar 7285
izlandi 7383
indonéz 7378
interlingua 7365
ír 7165
olasz 7384
Japán 7465
kannada 7578
kasmíri 7583
kazah 7575
kirgiz 7589
koreai 7579
kurd 7585
laoszi 7679
latin 7665
lett 7686
Nyelv Kódszám
lingala 7678
litván 7684
macedón 7775
malagaszi 7771
maláj 7783
malajálam 7776
maori 7773
maráthi 7782
moldáv 7779
mongol 7778
naurui 7865
nepáli 7869
norvég 7879
orija 7982
pandzsábi 8065
pastu 8083
perzsa 7065
lengyel 8076
portugál 8084
Nyelv Kódszám
kecsua 8185
rétoromán 8277
román 8279
orosz 8285
szamoai 8377
szanszkrit 8365
skót gael 7168
szerb 8382
szerbhorvát 8372
sona 8378
szindhi 8368
szingaléz 8373
szlovák 8375
szlovén 8376
spanyol 6983
szudáni 8385
szuahéli 8387
svéd 8386
tagalog 8476
Nyelv Kódszám
tádzsik 8471
tamil 8465
telugu 8469
thai 8472
tonga 8479
török 8482
türkmén 8475
twi 8487
ukrán 8575
urdu 8582
üzbég 8590
vietnami 8673
volapük 8679
velszi 6789
wolof 8779
xhosa 8872
jiddis 7473
joruba 8979
zulu 9085
Ország Kód
Afganisztán AF
Argentína AR
Ausztrália AU
Ausztria AT
Belgium BE
Bhután BT
Bolívia BO
Brazília BR
Kambodzsa KH
Kanada CA
Chile CL
Kína CN
Kolumbia CO
Kongó CG
Ország Kód
Costa Rica CR
Horvátország HR
Cseh Köztársaság CZ
Dánia DK
Ecuador EC
Egyiptom EG
Salvador SV
Etiópia ET
Fidzsi-szigetek FJ
Finnország FI
Franciaország FR
Németország DE
Nagy-Britannia GB
Görögország GR
Ország Kód
Grönland GL
Hongkong HK
Magyarország HU
India IN
Indonézia ID
Izrael IL
Olaszország IT
Jamaica JM
Japán JP
Kenya KE
Kuvait KW
Líbia LY
Luxemburg LU
Malajzia MY
Ország Kód
Maldív-szigetek MV
Mexikó MX
Monaco MC
Mongólia MN
Marokkó MA
Nepál NP
Hollandia NL
Holland Antillák AN
Új-Zéland NZ
Nigéria NG
Norvégia NO
Omán OM
Pakisztán PK
Panama PA
Ország Kód
Paraguay PY
Fülöp-szigetek PH
Lengyelország PL
Portugália PT
Románia RO
Orosz Föderáció RU
Szaúd-Arábia SA
Szenegál SN
Szingapúr SG
Szlovák Köztársaság SK
Szlovénia SI
Dél-Afrika ZA
Dél-Korea KR
Spanyolország ES
Ország Kód
Sri Lanka LK
Svédország SE
Svájc CH
Tajvan TW
Thaiföld TH
Törökország TR
Uganda UG
Ukrajna UA
Amerikai Egyesült Államok
US
Uruguay UY
Üzbegisztán UZ
Vietnam VN
Zimbabwe ZW
DP450-P.ACZELLP_HUN_MFL61857018 2/20/09 6:28 PM Page 13
Page 56

14
Műszaki adatok
Hibaelhárítás
Tünet
Javítás
Nincs csatlakoztatva a
hálózati kábel.
Az akkumulátor kimerült.
Nincs lemez a készülékben.
A televízió nincs beállítva a
berendezésből érkező jel
fogadására.
A videokábel nincs megfelelően
csatlakoztatva.
z audiokábellel csatlakoztatott
készülék nincs beállítva a
berendezésből érkező jel
fogadására.
Az hangerő nullára van állítva.
Az AUDIO beállítások rossz
pozícióra vannak állítva.
A készülékben lejátszhatatlan
lemez van.
Korlátozási szint van beállítva.
A távvezérlőt nem a
berendezésen található
érzékelőre irányították.
A távvezérlő túl messze van a
berendezéstől.
Csatlakoztassa szilárdan a csatlakozódugót a fali aljzatba.
Töltse fel az akkumulátort.
Helyezzen be lemezt.
Állítsa be a megfelelő képbemeneti formátumot a televízión.
Csatlakoztassa szilárdan a
videokábelt.
Állítsa be a megfelelő
hangbemeneti formátumot az
erősítőn.
A hangerő-szabályozóval állítson
be megfelelő hangerőt
Válasszon megfelelő AUDIO
beállítást.
Helyezzen be lejátszható lemezt.
(Ellenőrizze a lemez típusát és a
régiókódot.)
Változtassa meg a korlátozási
szintet.
Irányítsa a távvezérlőt a
berendezésen található
érzékelőre.
Közelebbről használja a
távvezérlőt.
Nincs
tápfeszültség.
Van tápfeszültség,
de a berendezés
nem működik.
Nincs kép.
Nincs hang.
A berendezés
nem kezdi meg a
lejátszást.
A távvezérlő
nem működik
megfelelően.
A formaterv és a műszaki jellemzők előzetes értesítés
nélkül megváltozhatnak.
Lehetséges ok
Általános
Hálózati feszültség DC 12V
Felvett teljesítmény 12 W
Külméretek (kb.) 202 x 42.5 x 167 mm
(SZ x MA x MÉ)
Nettó tömeg (kb.) 0,78 kg
Működési hőmérséklet-tartomány
5 °C - 40 °C
Megengedett relatív páratartalom
5 % - 90 %
Lézer Félvezető lézer
Jelrendszer PAL
Csatlakozók
Audio/Video Output (kimenet) ø 3,5 mm mini jack x 1
- Video: 1,0 V (p-p), 75 Ω, negatív szinkr.
- Audio: 1,5 Vrms (1 kHz, 0 dB)
Fejhallgató-csatlakozó ø 3,5 mm sztereo mini jack x 1
LCD-képernyő
Képernyő mérete 7 coll (képátló), széles
Megjelenítési rendszer RGB
Képernyő típusa aktív mátrixos TFT
Felbontás 480 x 234 (WQVGA)
Tartozékok
• Audie/Video adapter
• AC-adapter (MPA-630)
• Szivargyújtó-adapter (DPDC1)
• Távvezérlő
• Elem a távvezérlőhöz (lítiumelem)
DP450-P.ACZELLP_HUN_MFL61857018 2/20/09 6:28 PM Page 14
Page 57

POLSKI
DP450 / DP450P / DP450R
P/NO : MFL61857018
DP450-P.ACZELLP_POL_MFL61857018.1 1DP450-P.ACZELLP_POL_MFL61857018.1 1 2/20/09 6:24:40 PM2/20/09 6:24:40 PM
Page 58

UWAGA
RYZYKO PORAŻENIA PRĄDEM
ELEKTRYCZNYM NIE OTWIERAĆ
UWAGA: ABY ZMNIEJSZYĆ RYZYKO PORAŻENIA
PRĄDEM, NIE ZDEJMOWAĆ POKRYWY (LUB
TYLNEJ ŚCIANY). WEWNĄTRZ NIE MA CZĘŚCI DO
SAMODZIELNEJ NAPRAWY. NAPRAWĘ ZLECIĆ
WYKWALIFIKOWANEMU SERWISOWI.
Symbol błyskawicy w trójkącie ostrzega o niebezpiecznym napięciu obecnym w urządzeniu,
które może narazić użytkownika na ryzyko
porażenia prądem elektrycznym.
Symbol wykrzyknika w trójkącie informuje
użytkownika o ważnej instrukcji dot. działania
i konserwacji (serwisowania) w dokumentacji
dołączonej do urządzenia.
OSTRZEŻENIE: CHRONIĆ URZĄDZENIE PRZED
DESZCZEM I WILGOCIĄ, ABY UNIKNĄĆ POŻARU
LUB PORAŻENIA PRĄDEM.
OSTRZEŻENIE: Nie instalować urządzenia w
przestrzeni zamkniętej jak np. półki z książkam, itd.
UWAGA: Nie zasłaniać
Instalować zgodnie z zaleceniami producenta.
Szczeliny i otwory wentylacyjne w obudowie zapewniają
niezawodną pracę urządzenia i chronią je przed
przegrzaniem. Nie należy kłaść urządzenia na łóżku,
sofie, dywanie lub na innej podobnej powierzchni, która
mogłaby doprowadzić do zatkania tych otworów. Nie
należy umieszczać urządzenia w zabudowie izolującej,
takiej jak półki na książki, stojaki, chyba że zostanie
zapewniona odpowiednia wentylacja lub jest to zgodne
z instrukcją producenta.
UWAGA: To urządzenie
jest wyposażone w laser.
Aby zapewnić prawidłowe
użytkowanie urządzenia, prosimy o uważne przeczytanie
niniejszej instrukcji i zachowanie jej na przyszłość.
Skontaktować się z autoryzowanym serwisem, jeżeli
zajdzie potrzeba konserwacji urządzenia. Wykonywanie
procedur sterowania, regulacji lub jakichkolwiek innych
niż tutaj podane może być przyczyną wystawienia się
na niebezpieczne promieniowanie. Nie otwiera
otworów wentylacyjnych.
ć obu-
dowy, ponieważ może to być przyczyną wystawienia
się na bezpośrednie działanie wiązki lasera. Widzialne
promieniowanie lasera po otwarciu. NIE PATRZEĆ NA
WIĄZKĘ.
UWAGA: To urządzenie nie może być wystawione
na działanie wody (kapiącej lub rozpryskiwanej) i nie
należy kłaść na nim przedmiotów wypełnionych cieczą,
takich jak wazony.
UWAGA
• Wentylacja nie może być ograniczana poprzez
przykrywanie otworów wentylacyjnych przedmiotami, takim jak gazety, obrusy, zasłony itp.
• Nie stawiać na urządzeniu źródeł otwartego
ognia, takich jak zapalone świece.
• Zużyte baterie powinny być bezpiecznie zutylizowane a nie spalone. Należy zwrócić uwagę
na względy ochrony środowiska przy utylizacji
baterii.
• Urządzenie przeznaczone jest do użytku tylko w
klimatach tropikalnych i umiarkowanych.
• Nadmierne ciśnienie akustyczne pochodzące ze
słuchawek może spowodować utratę słuchu.
• Baterie nie mogą być wystawiane na nadmierne
ciepło jak np. promienie słoneczne, ogień itp.
• Dla własnego bezpieczeństwa nie wolno
wyjmować znajdującej się w urządzeniu baterii.
Jeżeli zajdzie konieczność wymiany baterii,
należy to wykonać w najbliższym autoryzowanym
serwisie LG Electronics lub poprosić o pomoc
sprzedawcę.
UWAGA dotycząca przewodu zasilania
Dla większości urządzeń zalecane jest, aby były
podłączone do osobnego obwodu;
to znaczy do pojedynczego gniazdka, które zasila tylko
dane urządzenie i nie ma innych wyjść lub odgałęzień.
Dla pewności sprawdzić stronę ze specyfikacjami
technicznymi w niniejszej instrukcji obsługi. Nie
przeciążać gniazdek zasilających.
Przeciążone, luźne, uszkodzone lub przepalone gniazdka, kable zasilające lub przedłużające stwarzają
zagrożenie. Jakakolwiek z powyższych sytuacji może
być przyczyną porażenia prądem lub pożaru.
Raz na jakiś czas należy sprawdzać przewód zasilający
urządzenia i jeśli pojawią się oznaki uszkodzenia lub
przetarcia się, odłączyć
z urządzenia i wymienić przewód w autoryzowanym
serwisie.
Zabezpieczyć przewód zasilania przed fizycznym lub
mechanicznym, niewłaściwym użytkowaniem, tj. przed
skręcaniem, zapętleniem, zaciskaniem, przytrzaskiwaniem drzwiami lub przekraczaniem. Należy zwrócić
szczególną uwagę na wtyczki, gniazdka ścienne oraz
miejsce, w którym przewód łączy się z urządzeniem.
Wyjąć wtyczkę przewodu zasilającego, aby odłączyć od
zasilania. Podczas instalacji urządzenia upewnić się, że
wtyczka jest łatwo dostępna.
Pozbywanie się starego urządzenia
1. Jeżeli do produktu dołączony jest niniejszy
symbol przekreślonego kosza, oznacza to,
że jest on objęty Dyrektywą Europejską
2002/96/EU.
2. Wszystkie elektryczne i elektroniczne
urządzenia powinny być oddawane do specjalnych punktów zbiórki wyznaczonych przez
miejscowe lub regionalne władze.
aściwa likwidacja urządzenia pomoże
3. Wł
chronić przed negatywnymi
konsekwencjami dla środowiska naturalnego
i ludzkiego zdrowia.
4. Więcej szczegółowych informacji o likwidacji
nieużywanego urządzenia można uzyskać
w urzędzie miasta, punktach uzdatniania
odpadów lub w sklepie, gdzie produkt został
kupiony.
To urządzenie zostało wyprodukowane
zgodnie z dyrektywą EEC 2004/108/EC oraz
dyrektywą niskich napięć 2006/95/EC.
Przedstawiciel na Europe:
LG Electronics Service Europe B.V.
Veluwezoom 15, 1327 AE Almere, The
Netherlands
(Tel : +31–036–547–8940)
go, zaprzestać korzystania
2
DP450-P.ACZELLP_POL_MFL61857018.2 2DP450-P.ACZELLP_POL_MFL61857018.2 2 2/20/09 6:24:41 PM2/20/09 6:24:41 PM
Page 59

Typy odtwarzanych płyt .............................................................................. 3
Bateria akumulatorowa ............................................................................... 3
Urządzenie główne ..................................................................................... 4
Pilot zdalnego sterowania .......................................................................... 5
Podłączenie zasilania ................................................................................. 6
Podłączenie urządzenia ............................................................................ 7
Ustawienia językowe ............................................................................... 8-9
Wyświetlanie informacji o płycie ................................................................. 9
Odtwarzanie płyty ................................................................................ 10-11
Odtwarzanie plików z filmem DivX ............................................................11
Odtwarzanie płyt lub plików muzycznych ................................................. 12
Wyświetlanie zdjęć .................................................................................. 12
Spis treści
Kody języków ........................................................................................... 13
Kody obszarów ......................................................................................... 13
Rozwiązywanie problemów ...................................................................... 14
Dane techniczne ....................................................................................... 14
Typy odtwarzanych płyt
Typ Logo
DVD-VIDEO: Płyty, na których znajdują się filmy do
sprzedaży lub wypożyczania
DVD-R: Tryb video i tylko “sfinalizowane”
DVD-RW: Tryb VR, tryb Video i tylko ”sfinalizowane”
DVD+R: Tylko tryb video
DVD+RW: Tylko tryb video
Audio CD: Kupione płyty muzyczne lub CD-R/CD-RW
w formacie płyt muzycznych.
Dodatkowo, urządzenie to odtwarza płyty DVD±R/RW oraz CD-R/RW, zawierające
pliki audio, DivX, MP3, WMA i/lub JPEG. Niektórych płyt DVD
CD-RW/CD-R, nie da się odtworzyć ze względu na jakość nagrania, stan fizyczny,
właściwości urządzenia nagrywającego lub opro
Wyprodukowane na licencji Dolby Laboratories. Dolby i symbol podwójnego D
są znakami handlowymi Dolby Laboratories.
”Logo DVD” jest znakiem handlowym DVD Format/Logo Licensing Corporation.
gramowanie antypirackie.
±
RW/DVD±R lub
O wyświetlanym symbolu
Ikona “ ” pojawiająca się na ekranie telewizora oznacza, że funkcja
objaśniona w niniejszej instrukcji obsługi jest niedostępna dla danego nośnika.
Kod regionalne
Urządzenie to ma przypisany kod regionu, który jest podany na etykiecie
znajdującej się z tyłu. Urządzenie to może odtwarzać tylko płyty DVD oznaczone tym samym kodem lub “ALL”.
• Większość płyt DVD ma dobrze widoczne oznaczenie z kulą ziemską i
jedną lub kilkoma cyframi na okładce. Numer ten musi być taki sam jak kod
regionalny urządzenia, w przeciwnym wypadku płyta nie będzie odtwarzana.
• Przy próbie włączenia odtwarzania płyty DVD z innym kodem regionu, na
ekranie telewizora pojawi się komunikat “Check Regional Code” (sprawdź
kod regionu).
Prawa autorskie
Prawo zabrania kopiowania, rozpowszechniania, pokazywania, rozpowszechniania za pomocą przewodu, publicznego odtwarzania lub wypożyczania materiału
objętego prawami autorskimi bez zezwolenia. To urządzenie ma funkcję
zabezpieczającą przed kopiowaniem, dostarczoną przez Macrovision. Niektóre
płyty zawierają sygnały zabezpieczające przed kopiowaniem. Podczas nagrywania lub odtwarzania, na obrazie pojawią się zakłócenia. Urządzenie to
zawiera technologię chronioną prawami autorskimi przez patenty w USA oraz
inne prawa własności intelektualnej. Użycie tej chronionej technologii musi być
autoryzowane przez firmę Macrovision i jest ona przeznaczona tylko do użytku
domowego oraz innego ograniczonego chyba, że autoryzacja Macrovision
postanawia inaczej. Przeróbka lub demontaż są zabronione.
Bateria akumulatorowa
• Wbudowana bateria akumulatorowa, umożliwia przenoszenie urządzenia i
odtwarzanie plików, bez przewodu zasilającego.
• Wbudowana bateria akumulatorowa rozpocznie ładowanie tylko, gdy
urządzanie jest wyłączone, a przewód zasilający jest podłączony do
gniazdka zasilającego.
• Włączenie urządzenia spowoduje zatrzymanie ładowania.
• Ładowanie trwa około 2 godziny 30 minut.
• Czas pracy na zasilaniu z baterii: w przybliżeniu 2 godziny 30 minut.
Czas pracy na baterii może się różnić w zależności od stanu baterii, statusu
pracy i warunków otoczenia. Maksymalny możliwy czas odtwarzania wynosi
do 3 godzin.
• Wskaźnik baterii pozostanie czerwony w trakcie ładowania. Po zakończeniu
ładowania, wskaźnik zmieni barwę na zieloną.
• Jeżeli pozostały czas pracy na zasilaniu z baterii będzie krótszy niż pięć
minut, na wyświetlaczu będzie migać “ ”.
3
3
DP450-P.ACZELLP_POL_MFL61857018.3 3DP450-P.ACZELLP_POL_MFL61857018.3 3 2/20/09 6:24:42 PM2/20/09 6:24:42 PM
Page 60

Urządzenie główne
4
a Wyświetlacz LCD
b Głośniki
c Przyciski sterowania do odtwarzaniem
• N (Odtwarzanie)/ X (Pauza): Rozpoczyna odtwarzanie. Nacisnąć ponownie,
aby zamknąć tryb wstrzymania.
• x (Stop): Zatrzymuje odtwarzanie..
• . (Przeskocz): Przeszukiwanie wstecz* lub powrót do początku aktualnego
rozdziału lub ścieżki lub do poprzedniego rozdziału lub ścieżki.
• > (Przeskocz): Przeszukiwane do przodu* lub przejście do następnego
rozdziału lub ścieżki.
* Nacisnąć i przytrzymać przycisk przez około dwie sekundy.
d Przyciski funkcyjne
• DISPLAY: Dostęp do wyświetlania na ekranie.
• SETUP: Otwiera lub zamyka menu konfiguracji.
• COLOR/BRIGHT*: Wyświetla menu jasności lub kolorów wyświetlacza LCD.
• MENU: Dostęp do menu DVD.
* W celu ustawienia koloru lub jasności wyświetlacza LCD, należy naciska
wielokrotnie COLOR/BRIGHT, aby wyświetlić menu jasności lub koloru, po czym
ustawić żądaną wartość, używając przycisków b / B. Nacisnąć ENTER , aby
potwierdzić ustawienie.
e Przyciski sterowania w menu
• b B v V (lewo/prawo/góra/dół): Wybiera opcję w menu.
• ENTER: Potwierdza wybór menu.
f OPEN (Z): Otwiera pokrywę płyty.
g Odbiornik sygnału sterowania: Należy kierować pilota zdalnego sterowania w to
miejsce.
h Wskaźnik ładowania baterii i zasilania
• Wskaźnik zmienia się na kolor czerwony w trakcie ładowania, a po jego
zakończeniu na kolor zielony. (Szczegóły patrz strona 3).
• Wskaźnik zmienia kolor na zielony na kilka sekund po włączeniu urzadzenia.
i Pokrywa płyty
j 1/q
(Przełącznik zasilania): Włącza ON lub wyłącza OFF urządzenie.
Uwaga: Aby obsługiwać niniejsze urządzenie, przełącznik zasilania musi być w
pozycji włączonej – ON.
k w VOL (Głośność): Regulacja poziomu głośności wbudowanych głośników oraz
słuchawek.
l
(Słuchawki): Tutaj podłącz słuchawki.
m AV OUT: Podłącz do telewizora przy pomocy wejść video oraz audio.
n DC 12V IN: Podłącz zasilacz AC lub gniazdko samochodowe.
ć
DP450-P.ACZELLP_POL_MFL61857018.4 4DP450-P.ACZELLP_POL_MFL61857018.4 4 2/20/09 6:24:43 PM2/20/09 6:24:43 PM
Page 61

Pilot zdalnego sterowania
Uwaga: Aby obsługiwać niniejsze urządzenie przy
pomocy pilota zdalnego sterowania, przełącznik
zasilania musi być w pozycji włączonej – ON.
(patrz strona 4)
a
b
c
d
l l l l l l l a l l l l l l l
POWER (1): Włącza ON lub wyłącza OFF
urządzenie.
AUDIO (
SUBTITLE (
ANGLE (
jest dostępna.
): Wybiera język lub kanał audio.
): Wybiera język napisów.
): Wybiera kąt kamery DVD, jeśli opcja
SKIP/SEARCH (. / >): Przeszukuje* wstecz/
w przód, przejście do następnego lub poprzedniego
rozdziału/ ścieżki.
* Nacisnąć i przytrzymać przycisk przez około
dwie sekundy.
SLOW (t / T): Powolne odtwarzanie wstecz/ w
przód.
l l l l l l l b l l l l l l l
SETUP: Otwiera lub zamyka menu konfiguracji.
MENU: Dostęp do menu DVD.
vV b B: Poruszanie się w menu.
ENTER (
RETURN (O): Przejście o krok wstecz lub wyjście
z menu.
DISPLAY: Dostęp do wyświetlania na ekranie.
l l l l l l l c l l l l l l l
PAUSE/STEP (X): Wstrzymuje odtwarzanie
chwilowo/ naciskany wielokrotnie odtwarza obraz
klatka po klatce.
PLAY (N): Rozpoczyna odtwarzanie.
STOP (x): Zatrzymuje odtwarzanie.
Przyciski numeryczne: Wybiera ponumerowane
opcje w menu.
PROG.: Wejście do trybu edycji programu.
CLEAR: Usuwa numer ścieżki na liście programów.
l l l l l l l d l l l l l l l
TITLE: Wejście do menu tytułu płyty.
REPEAT: Powtarza rozdział, utwór, tytuł lub
wszystko.
A-B: Powtarza sekcję.
ZOOM: Powiększa obraz wideo.
MARKER: Oznacza dowolny punkt podczas odt-
warzania.
SEARCH: Wyświetla menu [Marker Search]
(Szukanie oznaczeń).
RANDOM: Odtwarza utwory w kolejności losowej.
): Potwierdza wybór menu.
Włoż
yć baterie do pilota zdalnego sterowania
Nacisnąć zaczep uchwytu baterii, następnie
pociągnąć, aby wyjąć. Włożyć baterię z biegunem + skierowanym w tą samą stronę co znak
+ znajdujący się na uchwycie baterii. Założyć z
powrotem uchwyt baterii, upewniając się, że zostały
wsunięte do końca.
• Wymienić baterię pilota na baterię litową 3V
mikro, taką jak CR. 2025 lub odpowiednią.
• Baterii należy pozbywać się zgodnie z miejscowymi przepisami. Nie wrzucać do ognia.
Ostrzeżenie dot. wymiennej baterii litowej
• Niebezpieczeństwo eksplozji w przypadku
nieprawidłowo wymienionej baterii.
• Wymieniać tylko na baterię tego samego typu.
• W pobliżu baterii znajdują się dodatkowe
ostrzeżenia na wypadek zamiaru wymiany ich
przez użytkownika.
Ostrzeżenie: Bateria znajdująca się w
urządzeniu, jeśli jest używana nieodpowiednio może być przyczyną pożaru lub oparzenia chemicznego. Nie wolno ładować,
rozmontowywać, spalać lub nagrzewać powyżej
100 °C (212 °F).
Wymieniaj tylko na baterię Matsushita Elec.
Ind. Co., Ltd. (Panasonic), nr części CR. 2025.
Użycie innej baterii może spowodować ryzyko
pożaru lub eksplozji. Pozbywać się w odpowiedni sposób zużytych baterii. Trzymać baterie z
daleka od dzieci. Nie wolno rozmontowywać ani
wrzucać do ognia.
5
DP450-P.ACZELLP_POL_MFL61857018.5 5DP450-P.ACZELLP_POL_MFL61857018.5 5 2/20/09 6:24:44 PM2/20/09 6:24:44 PM
Page 62

Podłączenie zasilania
Podłączanie zasilacza AC
Za pomocą dostarczonego zasilacza AC, podłącz urządzenie do gniazdka
zasilania.
Prawa strona urządzenia
Podłączyć zasilacz AC do przewodu zasilającego.
(Rzeczywisty zestaw może różnić się od rysunku.)
Prawa strona urządzenia
Wpiąć do
źródła
zasilania
elektrycznego.
Dźwignia
zwalniania
przewodu
zasilającego
Zasilacz AC
• Zasilacz AC działa przy napięciu 100-240V~ 1A 50/60Hz.
• Skontaktować się z dystrybutorem części elektrycznych, aby uzyskać pomoc
w wyborze odpowiedniego złącza zasilacza AC lub zestawu okablowania
AC.
• Wyprodukowane przez NANJING WANLIDA TECHNOLOGY CO., LTD
Podłączyć do gniazda “DC 12V IN”.
Podłączyć zasilacz samochodowy
To urządzenie i łącznik zapalniczki są przeznaczone dla pojazdów, które mają
instalacje elektryczne systemu ujemnego uziemienia 8,5-16V. Jest to standard w
większości pojazdów. Jeśli Twój pojazd posiada inny układ elektryczny, zasilanie DC
nie może być stosowane.
Podłączyć do gniazda
zapalniczki
samochodu.
Podłączyć do gniazda
“DC 12V IN”.
Adapter samochodowy
• Ten adapter samochodowy działa przy zasilaniu DC 8.5-16V.
• Skontaktować się z dystrybutorem części elektrycznych, aby uzyskać pomoc
w wyborze odpowiedniego adaptera samochodowego.
• Wyprodukowane przez NANJING WANLIDA TECHNOLOGY CO., LTD
Uwaga
• Aby uniknąć porażenia prądem elektrycznym i możliwego uszkodzenia
pojazdu, zawsze odłączać adapter samochodowy z gniazda zapalniczki
przed odłączeniem wtyczki zasilania z urządzenia.
• W adapterze samochodowym jest zainstalowany bezpiecznik 3 A 250V.
• Odłączyć adapter samochodowy z gniazda zapalniczki w czasie rozruchu
silnika pojazdu.
• Nie używać urządzenia, gdy akumulator samochodu jest rozładowany. Prąd
szczytowy generatora pojazdu może spowodować przepalenie bezpiecznika
DC.
• Jeżeli napięcie zasilania pojazdu spadnie poniżej 10 Voltów, urządzenie
może nie działać prawidłowo.
• Nie pozostawiać urządzenia w miejscu, gdzie temperatura może przekroczyć
70°C (158°F), lub może zostać uszkodzone urządzenie podnoszące.
Przykłady:
- Wewnątrz pojazdu, wystawionego na bezpośrednie działanie.
promieniowania słonecznego.
- W pobliżu urządzenia grzewczego.
6
DP450-P.ACZELLP_POL_MFL61857018.6 6DP450-P.ACZELLP_POL_MFL61857018.6 6 2/20/09 6:24:45 PM2/20/09 6:24:45 PM
Page 63

Podłączenie urządzenia
Podłączenie audio oraz video do telewizora
Podłącz złącze AV OUT urządzenia z odpowiednimi złączami telewizora, jak
pokazano poniżej.
TV
Prawa strona urządzenia
Wpiąć do złącza
“AV OUT”.
Żółty
biały
czerwony
Adapter audio/video
Kabel audio/video
(nie ma w zestawie)
7
DP450-P.ACZELLP_POL_MFL61857018.7 7DP450-P.ACZELLP_POL_MFL61857018.7 7 2/20/09 6:24:45 PM2/20/09 6:24:45 PM
Page 64

Ustawienia językowe
PRZYCISK
1Wyświetlić menu konfiguracji: SETUP
2
Wybrać żądaną opcję w pierwszym poziomie
3 Przejść do drugiego poziomu:
4 Wybrać żądaną opcję w drugim poziomie:
5 Przejść do trzeciego poziomu:
6 Zmienić ustawienie:
Ustawienia – więcej możliwości
W trakcie pierwszego uruchomienia (opcja)
W trakcie pierwszego uruchomienia pojawi się menu wyboru języka. Należy
wybrać język, który będzie używany w urządzeniu. Należy użyć vV b B, by
wybrać język, po czym nacisnąć ENTER, aby przejść do menu potwierdzenia.
Użyć b B , aby wybrać [ENTER] i nacisnąć ENTER.
Ustawienia językowe
Menu – wybrać język dla menu konfiguracji i informacji wyświetlanych na
ekranie.
Dysk Audio/Dysk Napisy/Dysk Menu – Wybrać język dla dźwięku/napisów/
menu płyty.
[Domyślne]: Wybiera oryginalny język, w którym została nagrana płyta.
[inny]: Aby wybrać inny język, należy wybrać odpowiedni 4-cyfrowy kod
zgodnie z listą kodów języków, przy pomocy przycisków numerycznych
potwierdzonych przyciskiem ENTER (patrz strona 13). W razie pomyłki przy
wprowadzaniu kodu nacisnąć CLEAR, aby go wymazać i poprawić.
[Wył] (dla napisów): Wyłącza napisy.
:
v V
B
v V
B
v V / ENTER
Ustawienia wyświetlania
Format wyświetlania – Wybór proporcji wyświetlanego obrazu w zależności od
kształtu ekranu telewizora.
[4:3]: Wybrać dla telewizora w standardzie 4:3.
[16:9]: Wybrać dla telewizora w standardzie 16:9.
Tryb wyświetlania – Jeżeli wybrano 4:3, należy określić w jaki sposób mają
być wyświetlane programy i filmy szeroko-obrazowe.
[Letterbox]: Obrazy szerokie będą wyświetlane na ekranie z czarnymi pasami
na dole i na górze ekranu.
[Panscan]: TPrzycina szeroki obraz po obu stronach tak, by wypełnić cały
ekran 4:3.
Ustawienia dźwięku
DRC (Dynamic Range Control) – Dzięki tej opcji dźwięk staje się czystszy po
ściszeniu (tylko Dolby Digital). Ustawić [Wł], aby włączyć ten efekt.
Vocal – Włączyć tylko wtedy, gdy odtwarzana jest wielokanałowa płyta DVD
karaoke. Kanały karaoke płyty są przetwarzane w normalny dźwięk stereo.
Ustawienia blokady
Ustawić opcję [Kod regionu], aby używać opcji blokady. Wybrać opcję [Kod
regionu] i nacisnąć B. Wprowadzić 4-cyfrowe hasło i nacisnąć ENTER.
Wprowadzić je ponownie i nacisnąć ENTER, aby zweryfikować. W razie pomyłki
w trakcie wprowadzania hasła nacisnąć CLEAR i poprawić.
Jeżeli się zapomni hasło, można je zresetować. Na początku należy wyjąć płytę
z urządzenia. Należy wyświetlić menu konfiguracji i wprowadzić 6-cyfrowy kod
“210499”, aby usunąć hasło.
Ocena – Wybrać poziom oceny kategorii. Im niższy poziom, tym surowszy
poziom oceny kategorii. Wybrać [Odblokuj], aby wyłączyć ocenę kategorii.
– Włącza lub zmienia hasło dla ustawień blokady.
Hasło
[Nowy]: Przy pomocy klawiszy numerycznych wprowadzić nowe 4-cyfrowe
hasło i nacisnąć ENTER. Wprowadź hasło ponownie dla potwierdzenia.
[Zmień]: Wprowadzić dwukrotnie nowe hasło, po wprowadzeniu bieżącego
hasła.
Kod regionu – Wybrać kod obszaru geograficznego dla poziomu oceny
kategorii odtwarzania. Funkcja ta określa obszar, którego standardy są używane
przez blokadę rodzicielską do oceny płyt DVD (patrz strona 13).
8
DP450-P.ACZELLP_POL_MFL61857018.8 8DP450-P.ACZELLP_POL_MFL61857018.8 8 2/20/09 6:24:46 PM2/20/09 6:24:46 PM
Page 65

Inne ustawienia
DivX(R) VOD – Dostarczymy kod rejestracyjny DivX® VOD (Video na
żądanie), który umożliwi wypożyczanie i kupowanie filmów, za pośrednictwem
usługi DivX® VOD. Proszę odwiedzić stronę internetową www.divx.com/vod,
aby uzyskać więcej informacji. Nacisnąć ENTER, gdy ikona [Wybierz] jest
podświetlona, aby odczytać kod rejestracyjny urządzenia.
Wszystkie filmy ściągnięte z DivX® VOD, mogą być odtwarzane tylko na tym
urządzeniu.
Wyświetlanie informacji o płycie
PRZYCISK
1 Nacisnąć DISPLAY podczas odtwarzania: DISPLAY
2 Wybrać element:
3
Zmieniać ustawienia wyświetlanego menu:
4 Aby wyjść: DISPLAY
Wyświetlanie informacji o płycie – dodatkowe
możliwości
Można wybrać element, naciskając vV i zmienić lub wybrać ustawienia,
naciskając b B.
Numer bieżącego tytułu / całkowita liczba tytułów
Numer bieżącego rozdziału/ całkowita liczba rozdziałów
Czas odtwarzania jaki upłynął
Wybrany język lub kanał audio
Wybrane napisy
Wybrany kąt/ całkowita liczba kątów
Symbole zastosowane w instrukcji
Sekcja, której tytuł ma jeden z poniższych symboli dotyczy tylko płyt lub plików
reprezentowanych przez ten symbol.
ALL
DVD
DivX
Wszystkie płyty i pliki
DVD oraz zakończone
DVD±R/RW
Pliki DivX
v V
b B / ENTER
ACD
MP3
WMA
Audio CD
Pliki MP3
Pliki WMA
9
DP450-P.ACZELLP_POL_MFL61857018.9 9DP450-P.ACZELLP_POL_MFL61857018.9 9 2/20/09 6:24:47 PM2/20/09 6:24:47 PM
Page 66

Odtwarzanie płyty
PRZYCISK
1 Otworzyć pokrywę płyty:
2Włożyć płytę: -
3 Zamknąć pokrywę płyty: 4 Rozpocząć odtwarzanie:
5 Wyregulować głośność: VOLUME
6 Aby zatrzymać odtwarzanie:
Odtwarzanie płyt – dodatkowe możliwości
Zatrzymuje odtwarzanie
Nacisnąć STOP (x), aby zatrzymać odtwarzanie. Urządzenie zapamiętuje
punkt zatrzymania dla danej płyty. Na ekranie chwilowo pojawia się “ Xx”.
Nacisnąć PLAY ( N ), aby wznowić odtwarzanie (od punktu sceny). Po
ponownym naciśnięciu STOP (x) lub wyjęciu płyty na ekranie pojawi się
(“x”), urządzenie wyczyści punkt zatrzymania. (Xx = Wstrzymanie, x =
Zatrzymanie) Punkt wznowienia może być wyczyszczony po naciśnięciu przy-
cisku (np. POWER, OPEN, itp.)
Odtwarzanie płyty DVD zawierającej menu
Obecnie większość płyt DVD ma własne menu, które jest uruchamiane przed
rozpoczęciem wyświetlania filmu. Można poruszać się po tym menu używając
vV b B lub przycisków numerycznych. Naciśnij ENTER, aby wybrać.
Odtwarzanie płyty DVD VR
Niniejsze urządzenie będzie odtwarzać płyty DVD-RW, które zostały nagrane
przy pomocy formatu Video Recording (VR). Po włożeniu płyty DVD VR, na
ekranie pojawi się menu. Użyć przycisków vV, aby wybrać tytuł i nacisnąć
PLAY ( N). Nacisnąć MENU lub TITLE, aby wyświetlić menu DVD-VR.
Niektóre płyty DVD-VR zapisane są przy pomocy danych CPRM, przy pomocy
DVD RECORDER. Odtwarzacz nie obsługuje płyt tego typu.
Należy przejść do następnego/poprzedniego rozdziału/ ścieżki/ pliku
Nacisnąć SKIP (>), aby przejść do następnego rozdziału/ ścieżki/ pliku.
Nacisnąć SKIP (.), aby cofnąć się do początku bieżącego rozdziału/ ścieżki/
pliku.
Wcisnąć szybko dwa razy przycisk SKIP (.), aby cofnąć się do
poprzedniego rozdziału/ ścieżki/ pliku.
DVD
OPEN (Z)
N PLAY
x STOP
ALL
Wstrzymanie odtwarzania
Nacisnąć PAUSE/STEP (X) aby wstrzymać odtwarzanie. Nacisnąć
PLAY ( N), aby kontynuować odtwarzanie.
Odtwarzanie klatka-po-klatce
PNacisnąć PAUSE/STEP (X), aby odtwarzać klatka-po-klatce.
Odtwarzanie wielokrotne
Nacisnąć wielokrotnie REPEAT, aby wybrać element do powtórzenia. Bieżący
tytuł, rozdział lub ścieżka będą odtwarzane wielokrotnie. Aby powrócić do normalnego odtwarzania, wybrać [Wył], naciskając wielokrotnie REPEAT.
ALL
ALL
DVD
DivX
Szybkie przewijanie do przodu lub do tyłu
DivX
ACD
DVD
Nacisnąć i przytrzymać SKIP (. lub >) w trakcie odtwarzania, aby
odtwarzać szybko do przodu lub szybko do tyłu. Naciskając przycisk
SKIP (. lub >) można wybierać różne prędkości odtwarzania. Nacisnąć
PLAY ( N), aby kontynuować odtwarzanie z normalną prędkością.
Powtarzanie wybranego fragmentu (A-B)
Nacisnąć A-B na początku i ponownie na końcu fragmentu, który chce się
powtórzyć. Wybrany fragment będzie powtarzany w sposób ciągły. Aby
powrócić do normalnego odtwarzania, wybrać [Wył], naciskając A-B.
Wybór języka napisów
Podczas odtwarzania, naciskać wielokrotnie przycisk SUBTITLE ( ), aby
wybrać odpowiedni język napisów.
Oglądane pod różnym kątem
Jeżeli na ekranie pojawia się na chwilę wskaźnik kąta, można zmieniać kąty
kamery, naciskając ANGLE ( ).
Różne warianty audio
Podczas odtwarzania naciskać wielokrotnie przycisk AUDIO ( ), aby
przełączać między dostępnymi językami audio, kanałami audio lub sposobami
kodowania.
Zwalnianie prędkości odtwarzania
Podczas odtwarzania, nacisnąć SLOW (t lub T), aby zwolnić odtwarzanie do
przodu lub do tyłu. Naciskając wielokrotnie przycisk SLOW (t lub T) można
wybierać różne prędkości odtwarzania. Nacisnąć PLAY ( N), aby kontynuować
odtwarzanie przy normalnej prędkości.
DVD
DivX
(
WMA
DVD
DVD
: tylko w przód)
MP3
DivX
DVD
DivX
DivX
DVD
ACD
10
DP450-P.ACZELLP_POL_MFL61857018.10 10DP450-P.ACZELLP_POL_MFL61857018.10 10 2/20/09 6:24:48 PM2/20/09 6:24:48 PM
Page 67

DivX
ACD
DivX
DVD
WMA
DivX
DVD
MP3
Oglądanie powiększonego obrazu wideo
Naciskać wielokrotnie ZOOM w czasie odtwarzania lub w trybie wstrzymania, aby
wybrać tryb powiększenia. Przy pomocy przycisków vVb B, można poruszać się
po powiększonym obrazie. Nacisnąć CLEAR, aby wyjść.
(100% p 200% p 300% p 400% p 100%)
Wyświetlanie menu tytułu
Nacisnąć TITLE, aby wyświetlić menu tytułu płyty, jeśli jest dostępne.
Wyświetlanie menu DVD
Nacisnąć MENU, aby wyświetlić menu płyty, jeśli jest dostępne.
DVD
DVD
Rozpoczęcie odtwarzania od wybranego momentu filmu
Wyszukuje punkt startowy, dla wprowadzonego kodu czasu. Nacisnąć DISPLAY
i wybrać ikonę zegara. Wprowadzić czas i nacisnąć ENTER. Na przykład aby
znaleźć scenę po czasie 1 godzina, 10 minut i 20 sekund, należy wprowadzić
“11020” i nacisnąć ENTER. W razie pomyłki przy wprowadzaniu numeru,
nacisnąć CLEAR by spróbować ponownie.
Odtwarzanie w kolejności losowej
Podczas odtwarzania lub w trybie zatrzymanie, nacisnąć RANDOM dla
odtwarzania w kolejności losowej.
Nacisnąć ponownie RANDOM, aby powrócić do trybu odtwarzania zwykłego.
DVD
DVD
ACD
Oznaczanie ulubionej sceny
Na płycie można zaznaczyć moment, do którego będzie można powrócić.
Wystarczy nacisnąć przycisk MARKER w żądanym momencie. Ikona
oznaczenia pojawi się na chwilę na ekranie. Procedurę można powtórzyć, aby
wprowadzić maksymalnie dziewięć znaczników. Można również przywoływać
lub kasować znaczniki. Naciśnij SERACH, a pojawi się menu [Marker Search]
(Szukanie znaczników). Użyć b lub B, aby wybrać żądany znacznik w menu po
czym nacisnąć ENTER, aby przywołać go, lub CLEAR, aby usunąć.
Pamięć ostatniej sceny
Urządzenie to zapamiętuje ostatnio oglądaną scenę z płyty. Ostatnia scena
pozostaje w pamięci nawet po wyjęciu płyty lub wyłączeniu urządzenia. Po
włożeniu płyty z zapamiętaną sceną zostaje ona automatycznie przywołana.
Wygaszacz ekranu
Wygaszacz ekranu pojawi się, jeżeli urządzenie zostanie pozostawione w
trybie zatrzymania przez około pięć minut. Po upływie pięciu minut wyświetlania
wygaszacza ekranu następuje samoczynne wyłączenie urządzenia.
Mieszane płyty – DivX, MP3/WMA i JPEG
Podczas odtwarzania płyty, zawierającej jednocześnie pliki DivX,
MP3/WMA i JPEG, naciskając TITLE mżona wybrać menu dla plików, które
chce się odtwarzać.
Odtwarzanie plików z filmem DivX
PRZYCISK
1 Otworzyć pokrywę płyty: :
2Włożyć płytę: -
3 Zamknąć pokrywę płyty: 4 Wybrać plik z filmem w menu:
5 Rozpocząć odtwarzanie:
6 Aby zatrzymać odtwarzanie:
OPEN (Z)
v V, MENU
N PLAY
x STOP
Odtwarzanie plików z filmem DivX –
dodatkowe możliwości
Zmiana czcionki, aby poprawnie wyświetlić napisy DivX®
Nacisnąć i przytrzymać podczas odtwarzania przez około 3 sekundy przycisk
SUBTITLE. Pojawi się kod języka. Naciskać b B, aby wybrać inny kod języka,
aż do momentu, kiedy napisy są poprawnie wyświetlane, po czym nacisnąć
ENTER.
Wymagania odnośnie plików DivX
Kompatybilność plików DivX z niniejszym urządzeniem ma następujące
ograniczenia:
• Dostępne rozdzielczości: 720x576 (SZ x W) pikseli.
• Nazwy plików DivX i napisów są ograniczone do 45 znaków.
• Rozszerzenia plików DivX: “.avi”, “.mpg”, “.mpeg”
• Odtwarzane napisy DivX: SubRip (.srt / .txt), SAMI (.smi),
SubStation Alpha(.ssa/.txt), MicroDVD (.sub/.txt), VobSub (.sub),
SubViewer 2.0 (.sub/.txt), TMPlayer(.txt), DVD Subtitle System (.txt)
• Odtwarzane formaty kodowania: “DIVX3.xx”, “DIVX4.xx”, “DIVX5.xx”, “MP43”,
“3IVX”
• Dla DivX 6.0 jest dostępna tylko funkcja odtwarzania.
• Odtwarzane formaty audio: “Dolby Digital”, “PCM”, “MP3”, “WMA”
• Częstotliwość próbkowania: W granicach 8 - 48 kHz (MP3),
w granicach 32 - 48kHz (WMA)
• Prędkość danych: w granicach 8 - 320 kbps (MP3),
w granicach 32 - 192 kbps (WMA), ponizej 4Mbps (pliki DivX)
• Format CD-R/RW, DVD±R/RW: ISO 9660
• Maksymalna ilość plików /folderów: Mniej niż 600 (całkowita ilość plików i
katalogów).
11
DP450-P.ACZELLP_POL_MFL61857018.11 11DP450-P.ACZELLP_POL_MFL61857018.11 11 2/20/09 6:24:50 PM2/20/09 6:24:50 PM
Page 68

Odtwarzanie płyt lub plików muzycznych
PRZYCISK
1 Otworzyć pokrywę płyty:
2Włożyć płytę: -
3 Zamknąć pokrywę płyty: 4 Wybrać plik muzyczny w menu:
5 Rozpocząć odtwarzanie:
6 Aby zatrzymać odtwarzanie:
OPEN (Z)
v V, MENU
N PLAY
x STOP
Wyświetlanie zdjęć
1 Otworzyć pokrywę płyty:
2Włożyć płytę: -
3 Zamknąć pokrywę płyty: 4 Wybierz plik ze zdjęciem w menu:
Wyświetl wybrany plik na pełnym
5
ekranie:
6 Aby zatrzymać odtwarzanie:
PRZYCISK
OPEN (Z)
v V, MENU
N PLAY
x STOP
Słuchanie płyt lub plików muzycznych –
dodatkowe możliwości
Tworzenie własnego programu
Można ustawić kolejność odtwarzania zawartości płyty zgodnie z upodobaniami.
Aby dodać muzykę do listy programu, należy wejść do trybu edycji programu,
naciskając PROG. (w menu pojawi się znak
Z [Lista] wybrać muzykę i nacisnąć ENTER, by dodać ją do listy programu.
Wybrać muzykę z listy programu i nacisnąć ENTER, by rozpocząć zaprogramowane odtwarzanie. Aby usunąć muzykę z listy programu, należy
zaznaczyć ją w trybie edycji programu i nacisnąć CLEAR. Aby usunąć całą
zawartość listy programu, należy zaznaczyć [Wyczyść wszystko] w trybie edycji
programu i nacisnąć ENTER. Program jest usuwany po wyjęciu płyty lub po
wyłączeniu urządzenia.
Wyświetlanie informacji o pliku (ID3 TAG)
Podczas odtwarzania pliku MP3 zawierającego informacje, można wyświetlić je,
naciskając wielokrotnie DISPLAY. Jeżeli plik nie ma informacji ID3-Tag, pojawia
się komunikat [No ID3 TAG].
Wymagania odnośnie plików MP3/WMA
Kompatybilność plików MP3/WMA z niniejszym urządzeniem ma następujące
ograniczenia:
• Rozszerzenia plików: “.mp3”, “.wma”.
• Częstotliwość próbkowania: 8 - 48 kHz (MP3), 32 - 48kHz (WMA)
• Prędkość danych: 8 - 320 kbps (MP3), 32 - 192kbps (WMA)
• Format CD-R/RW, DVD±R/RW: ISO 9660
• Maksymalna ilość plików /folderów: Mniej niż 600 (całkowita ilość plików i
katalogów).
12
E
).
Wyświetlanie zdjęć – dodatkowe mozliwości
Wyświetlanie zdjęć w pokazie slajdów
Użyć vV b B, aby zaznaczyć ikonę ( ), po czym nacisnąć ENTER, aby
rozpocząć pokaz slajdów. Używając b B, gdy ikona (
można zmienić szybkość pokazu slajdów.
Przejść do następnego/poprzedniego zdjęcia
Nacisnąć SKIP (. lub >), aby wyświetlić poprzednie/następne zdjęcie.
Obrót zdjęcia
Użyć vV, aby obrócić zdjęcie na pełnym ekranie, przeciwnie lub zgodnie z
ruchem wskazówek zegara, w trakcie wyświetlania zdjęcia na pełnym ekranie.
Wstrzymanie pokazu slajdów
Nacisnąć PAUSE/STEP (X), aby wstrzymać pokaz slajdów. Nacisnąć
PLAY ( N), aby kontynuować pokaz slajdów.
Słuchanie muzyki w trakcie pokazu slajdów
Jeżeli płyta zawiera zdjęcia i pliki muzyczne jednocześnie, można słuchać
muzyki w trakcie pokazu slajdów. Należy użyć vV b B, aby zaznaczyć ikonę
(
), po czym nacisnąć ENTER, aby rozpocząć pokaz slajdów.
Oglądanie powiększonego zdjęcia
Nacisnąć wielokrotnie przycisk ZOOM w trakcie wyświetlania zdjęcia, aby
przejść do trybu powiększenia. Przy pomocy przycisków vVb B można
poruszać się po powiększonym zdjęciu. Nacisnąć CLEAR, aby wyjść.
Wymagania odnośnie plików graficznych
Kompatybilność plików JPEG z niniejszym urządzeniem ma następujące
ograniczenia:
• Rozszerzenia plików: “.jpg”
• Wielkość: Zalecana mniej niż 2MB
• Format CD-R/RW, DVD±R/RW: ISO 9660
• Maksymalna ilość plików /folderów: Mniej niż 600 (całkowita ilość plików i
katalogów)
) jest podświetlona,
DP450-P.ACZELLP_POL_MFL61857018.12 12DP450-P.ACZELLP_POL_MFL61857018.12 12 2/20/09 6:24:51 PM2/20/09 6:24:51 PM
Page 69

Kody języków
Użyć tej listy, by wprowadzić odpowiedni kod dla następujących ustawień początkowych: Disc Audio, Disc Subtitle, Disc Menu.
Język Kod
Afar 6565
Afrikaans 6570
Albanian 8381
Ameharic 6577
Arabski 6582
Armeński 7289
Assamese 6583
Aymara 6588
Azerbaijani 6590
Bashkir 6665
Basque 6985
Bengali, Bangla 6678
Bhutani 6890
Bihari 6672
Breton 6682
Bułgarski 6671
Burmese 7789
Białoruski 6669
Chiński 9072
Język Kod
Chorwacki 7282
Czeski 6783
Duński 6865
Holenderski 7876
Angielski 6978
Esperanto 6979
Estoński 6984
Faroese 7079
Fiji 7074
Fiński 7073
Francuski 7082
Frisian 7089
Galician 7176
Georgian 7565
Niemiecki 6869
Grecki 6976
Greenlandic 7576
Guarani 7178
Gujarati 7185
Język Kod
Hausa 7265
Hebrajski 7387
Hindi 7273
Węgierski 7285
Icelandic 7383
Indonezyjski 7378
Interlingua 7365
Irish 7165
Włoski 7384
Japoński 7465
Kannada 7578
Kashmiri 7583
Kazahski 7575
Kirghiz 7589
Koreański 7579
Kurdish 7585
Laothian 7679
Latin 7665
Latvian, Lettish 7686
Język Kod
Lingala 7678
Lithuanian 7684
Macedonian 7775
Malagasy 7771
Malay 7783
Malayalam 7776
Maori 7773
Marathi 7782
Mołdawski 7779
Mongolski 7778
Nauru 7865
Nepali 7869
Norweski 7879
Oriya 7982
Panjabi 8065
Pashto, Pushto 8083
Perski 7065
Polski 8076
Portugalski 8084
Język Kod
Quechua 8185
Rhaeto-Romance 8277
Rumanian 8279
Rosyjski 8285
Samoan 8377
Sanskrit 8365
Scots Gaelic 7168
Serbski 8382
Serbo-Chorwacki 8372
Shona 8378
Sindhi 8368
Singhalese 8373
Słowacki 8375
Słoweński 8376
Spanish 6983
Sudanese 8385
Swahili 8387
Szwedzki 8386
Tagalog 8476
Kody obszarów
Wybrać kod obszaru z listy.
Obszar Kod
Afganistan AF
Argentina AR
Australia AU
Austria AT
Belgia BE
Bhutan BT
Bolivia BO
Brazylia BR
Kambodża KH
Kanada CA
Chile CL
Chiny CN
Kolumbia CO
Kongo CG
Obszar Kod
Costa Rica CR
Chorwacja HR
Republika Czeska CZ
Dania DK
Ekwador EC
Egipt EG
El Salvador SV
Ethiopia ET
Fiji FJ
Finlandia FI
Francja FR
Niemcy DE
Wielka Brytania GB
Grecja GR
Obszar Kod
Grenlandia GL
Hong Kong HK
Węgry HU
Indie IN
Indonezja ID
Izrael IL
Włochy IT
Jamaica JM
Japonia JP
Kenia KE
Kuwait KW
Libia LY
Luksembourg LU
Malezja MY
Obszar Kod
Malediwy MV
Maksyk MX
Monaco MC
Mongolia MN
Marok MA
Nepal NP
HOLANDIA NL
Antyle Holenderskie AN
Nowa Zelandia NZ
Nigeria NG
Norwegia NO
Oman OM
Pakistan PK
Panama PA
Obszar Kod
Paragwaj PY
Filipiny PH
Polska PL
Portugalia PT
Rumunia RO
Federacja Rosyjska RU
Arabia Saudyjska SA
Senegal SN
Singapur SG
Republika Słowacka
Słowenia SI
Południowa Afryka ZA
Korea Południowa KR
Hiszpania ES
SK
Język Kod
Tajik 8471
Tamil 8465
Telugu 8469
Tajski 8472
Tonga 8479
Turecki 8482
Turkmen 8475
Twi 8487
Ukraiński 8575
Urdu 8582
Uzbek 8590
Wietnamski 8673
Volapük 8679
Welsh 6789
Wolof 8779
Xhosa 8872
Yiddish 7473
Yoruba 8979
Zulu 9085
Obszar Kod
Sri Lanka LK
Szwecja SE
Szwajcaria CH
Tajwan TW
Tajlandia TH
Turcja TR
Uganda UG
Ukraina UA
Stany Zjednoczone US
Urugwaj UY
Uzbekistan UZ
Wietnam VN
Zimbabwe ZW
13
DP450-P.ACZELLP_POL_MFL61857018.13 13DP450-P.ACZELLP_POL_MFL61857018.13 13 2/20/09 6:24:52 PM2/20/09 6:24:52 PM
Page 70

Rozwiązywanie problemów
Objawy Przyczyna Rozwiązanie
Brak zasilania. Kabel zasilania jest odłączony. Włożyć pewnie wtyczkę do
Bateria jest rozładowana. Naładować baterię.
Zasilanie jest
włączone, ale
urządzenie nie
działa.
Brak obrazu. Telewizor nie jest ustawiony na
Brak dźwięku Sprzęt podłączony do kabla audio
Urządzenie nie
rozpoczyna
odtwarzania.
Pilot nie działa
poprawnie.
Nie włożono płyty. Włożyć płytę.
sygnał z urządzenia.
Kabel wideo jest podłączony
niedokładnie.
nie jest ustawiony na sygnał z
urządzenia.
Głośność jest ustawiona na minimum.
Opcje AUDIO są żle ustawione. Skonfigurować odpowiednio
Włożono nieodpowiednią płytę. Włożyć odtwarzalną płytę.
Wartość oceny kategorii jest
ustawiona.
Pilot zdalnego sterowania nie jest
skierowany na czujnik znajdujący
się w urządzeniu.
Pilot zdalnego sterowania
znajduje się za daleko od
urządzenia.
ściennego gniazdka zasilania.
Wybrać odpowiednie wejście
sygnału wideo w telewizorze.
Podłączyć pewnie kabel wideo.
Wybarć odpowiedni tryb wejś
audio wzmacniacza.
Użyć sterownika głośności, aby
wyregulować głośność.
ustawienia AUDIO.
(Sprawdzić typ płyty oraz kod
regionu).
Zmienić wartość oceny kategorii.
Skierować pilota na czujnik
znajdujący się na urządzeniu.
Przybliżyć pilota do urządzenia.
cia
Dane techniczne
Ogólne
Zasilanie DC 12V
Pobór mocy 12W
Wymiary (około)
Masa netto (około) 0,78kg
Temperatura robocza 5°C do 40°C
Wilgotność robocza 5% do 90%
Laser Laser półprzewodnikowy
System sygnałowy PAL
Złącza
Wyjście Audio/ Video gniazdo ø3,5mm mini x 1
- Video: 1,0 V (p-p), 75 Ω, synch. negatywna.
- Audio: 1,5 Vrms (1 KHz, 0 dB)
Gniazdo słuchawek gniazdo ø3,5mm stereo mini x 1
Wyświetlacz ciekłokrystaliczny
Wielkość wyswietlacza Szerokokątny o przekątnej 7 cali
System projekcji Paskowy R.G.B.
System prowadzący Aktywna matryca TFT
Rozdzielczość 480 x 234 (WQVGA)
Akcesoria
• Adapter audio/video
• Adapter AC (MPA-630)
• Adapter samochodowy (DPDC1)
• Pilot zdalnego sterowania
• Bateria do pilota zdalnego sterowania (bateria litowa)
202 x 42.5 x 167 mm (S x W x G)
Projekt i specyfikacje mogą ulec zmianom bez
powiadomienia.
14
DP450-P.ACZELLP_POL_MFL61857018.14 14DP450-P.ACZELLP_POL_MFL61857018.14 14 2/20/09 6:24:53 PM2/20/09 6:24:53 PM
 Loading...