

Page 1
DP450 / DP450P / DP450R
ENGLISH
DEUTSCH
FRANÇAIS
ITALIANO
NEDERLANDS
SLOVENIAN
P/NO : MFL61857019
DP450-P.ADEULLK_ENG_MFL61857019.1 1DP450-P.ADEULLK_ENG_MFL61857019.1 1 2/23/09 3:27:16 PM2/23/09 3:27:16 PM
Page 2
CAUTION
RISK OF ELECTRIC SHOCK
DO NOT OPEN
CAUTION: TO REDUCE THE RISK OF ELECTRIC
SHOCK. DO NOT REMOVE COVER (OR BACK).
NO USER-SERVICEABLE PARTS INSIDE. REFER
SERVICING TO QUALIFIED SERVICE PERSONNEL.
This lightning flash with arrowhead symbol
within an equilateral triangle is intended to
alert the user to the presence of uninsulated
dangerous voltage within the productʼs enclosure that may be of sufficient magnitude to
constitute a risk of electric shock to persons.
The exclamation point within an equilateral
triangle is intended to alert the user to the
presence of important operating and maintenance (servicing) instructions in the literature
accompanying the product.
WARNING: TO PREVENT FIRE OR ELECTRIC
SHOCK HAZARD, DO NOT EXPOSE THIS PRODUCT
TO RAIN OR MOISTURE.
WARNING: Do not install this equipment in a confined
space such as a book case or similar unit.
CAUTION: Do not block any ventilation openings.
Install in accordance with the manufacturer's instructions. Slots and openings in the cabinet are provided for
ventilation and to ensure reliable operation of the product and to protect it from over heating. The openings
should be never be blocked by placing the product on
a bed, sofa, rug or other similar surface. This product
should not be placed in a built-in installation such as a
bookcase or rack unless proper ventilation is provided
or the manufacturer's instruction has been adhered to.
CAUTION: This product employs
a Laser System. To ensure proper
use of this product, please read
this ownerʼs manual carefully
and retain it for future reference.
Should the unit require maintenance, contact an authorized service center. Use of controls, adjustments or the
performance of procedures other than those specified
herein may result in hazardous radiation exposure. To
prevent direct exposure to laser beam, do not try to
2
open the enclosure. Visible laser radiation when open.
DO NOT STARE INTO BEAM.
CAUTION: The apparatus should not be exposed to
water (dripping or splashing) and no objects filled with
liquids, such as vases, should be placed on the apparatus.
CAUTION
• The ventilation should not be impeded by covering
the ventilation openings with items, such as newspapers, table-cloth, curtains etc.
• No naked flame sources, such as lighted candles,
should be placed on the apparatus.
• Used batteries should be disposed of safely and not
incinerated. Attention should be shown to the environment aspects of battery disposal.
• Use the apparatus in tropical and moderate climates
only.
• The excessive sound pressure from earphones and
headphones can cause hearing loss.
• The battery shall not be exposed to excessive heat
such as sunshine, fire or the like.
• Do not remove the battery incorporated with product
for your safety.
If you need to replace the battery, take it to the
nearest authorized LG Electronics service point or
dealer for assistance
CAUTION concerning the Power Cord
Most appliances recommend they be placed upon a
dedicated circuit;
That is, a single outlet circuit which powers only that
appliance and has no additional outlets or branch
circuits. Check the specification page of this owner's
manual to be certain. Do not overload wall outlets.
Overloaded wall outlets, loose or damaged wall outlets, extension cords, frayed power cords, or damaged or cracked wire insulation are dangerous. Any of
these conditions could result in electric shock or fire.
Periodically examine the cord of your appliance, and
if its appearance indicates damage or deterioration,
unplug it, discontinue use of the appliance, and have
the cord replaced with an exact replacement part by an
authorized service center. Protect the power cord from
physical or mechanical abuse, such as being twisted,
kinked, pinched, closed in a door, or walked upon.
Pay particular attention to plugs, wall outlets, and the
point where the cord exits the appliance. To disconnect
power from the mains, pull out the mains cord plug.
When installing the product, ensure that the plug is
easily accessible.
Disposal of your old appliance
1. When this crossed-out wheeled bin symbol
is attached to a product it means the product is covered by the European Directive
2002/96/EC.
2. All electrical and electronic products should
be disposed of separately from the municipal waste stream via designated collection
facilities appointed by the government or the
local authorities.
3. The correct disposal of your old appliance
will help prevent potential negative consequences for the environment and human
health.
4. For more detailed information about disposal
of your old appliance, please contact your
city office, waste disposal service or the
shop where you purchased the product.
This product is manufactured to comply
with EMC Directive 2004/108/EC and Low
Voltage Directive 2006/95/EC.
European representative :
LG Electronics Service Europe B.V.
Veluwezoom 15, 1327 AE Almere,
The Netherlands (Tel : +31–036–547–8940)
DP450-P.ADEULLK_ENG_MFL61857019.2 2DP450-P.ADEULLK_ENG_MFL61857019.2 2 2/23/09 3:27:17 PM2/23/09 3:27:17 PM
Page 3
Types of Playable Discs ............................................................................. 3
Rechargeable battery ................................................................................. 3
Main Unit .................................................................................................... 4
Remote Control .......................................................................................... 5
Power connections ..................................................................................... 6
Hooking up the unit ................................................................................... 7
Adjust the settings ..................................................................................8-9
Displaying Disc Information ........................................................................ 9
Playing a Disc...................................................................................... 10-11
Playing a DivX movie file...........................................................................11
Listening to Music Disc or files ................................................................. 12
Contents
Viewing photo files ................................................................................... 12
Language Codes ...................................................................................... 13
Area Codes .............................................................................................. 13
Troubleshooting ........................................................................................ 14
Specifications ........................................................................................... 14
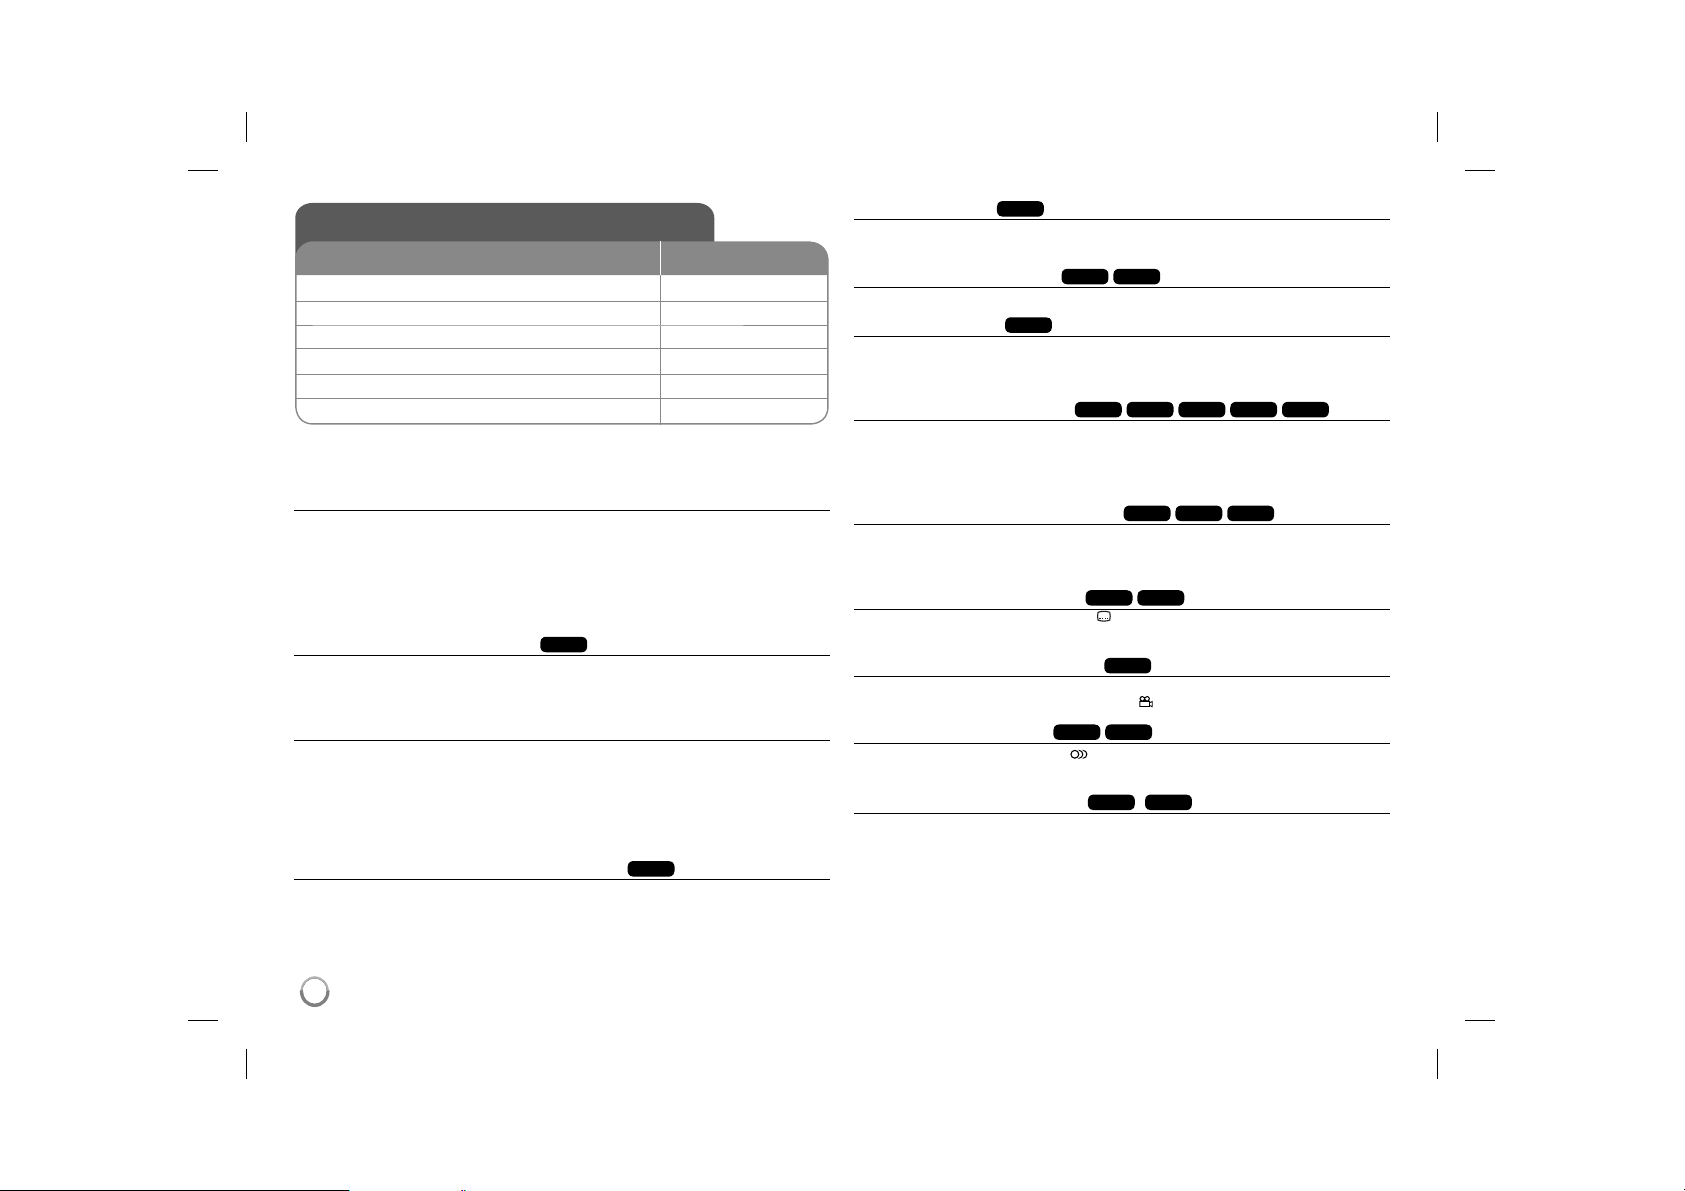
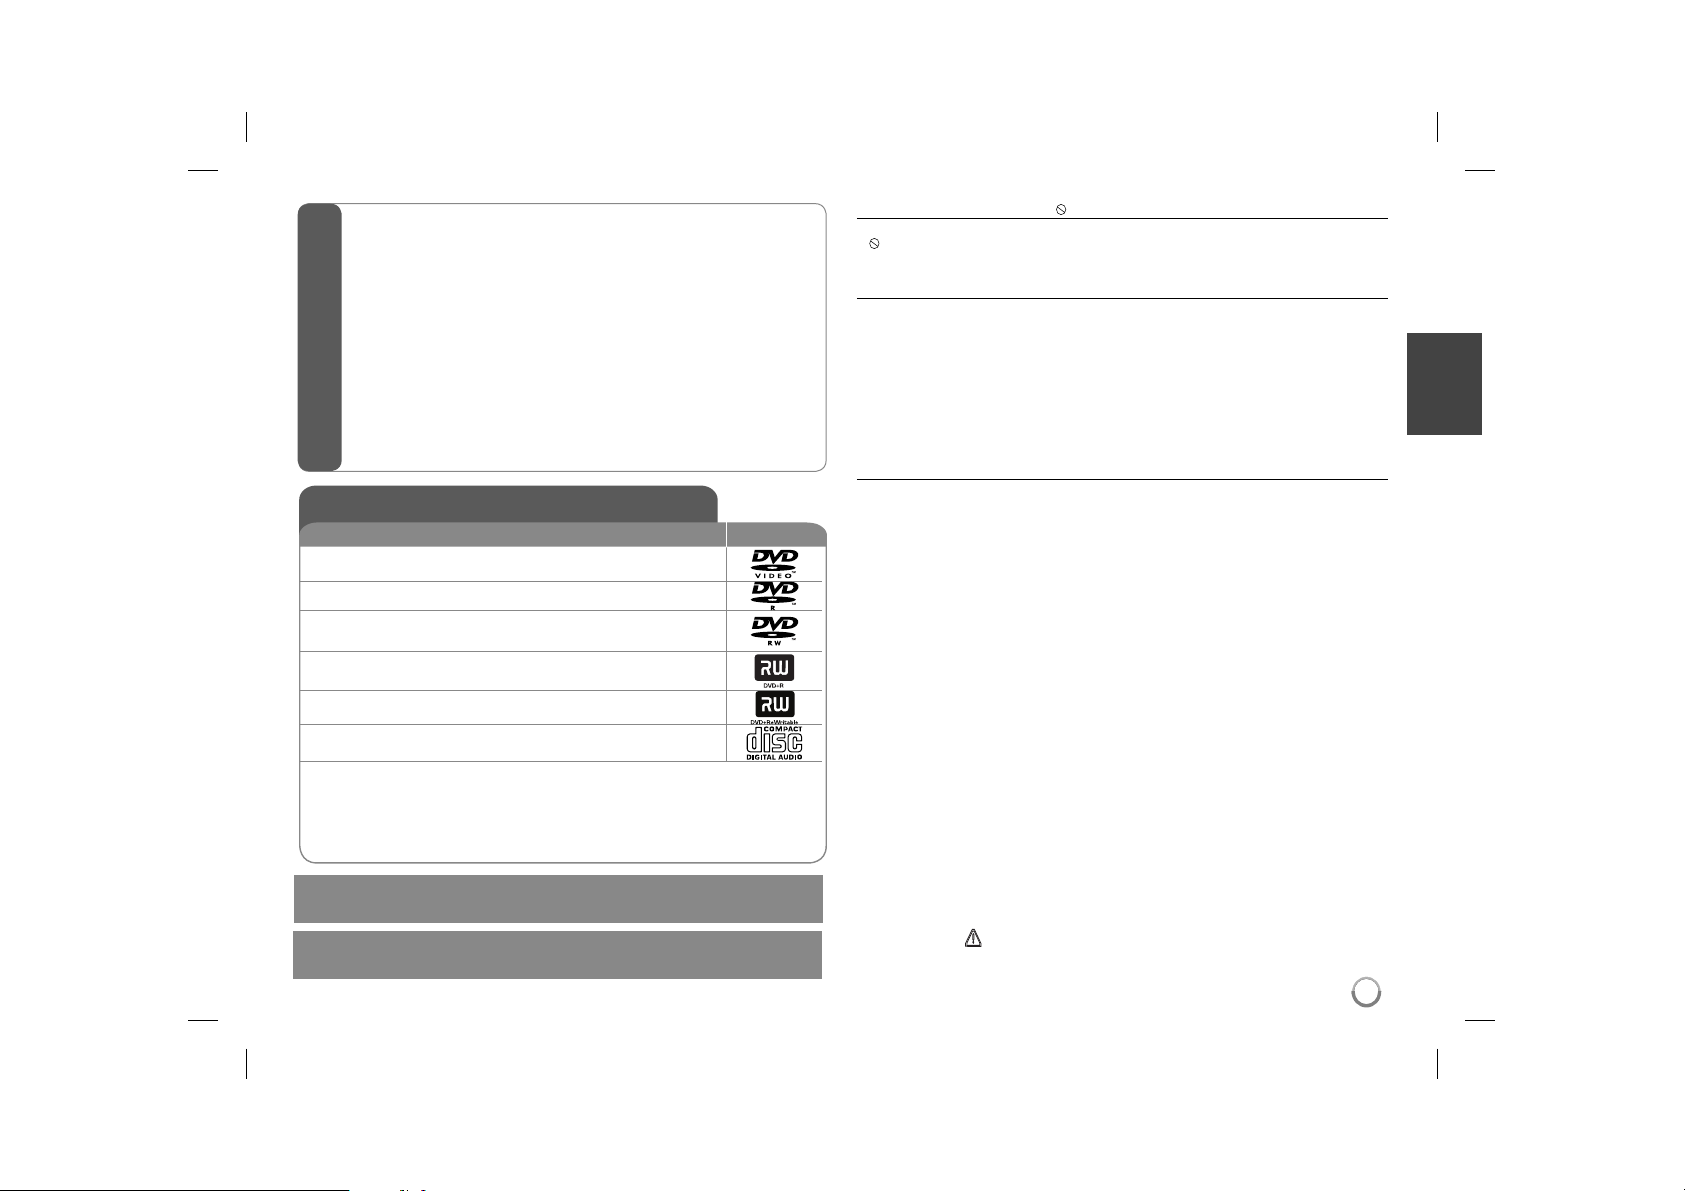
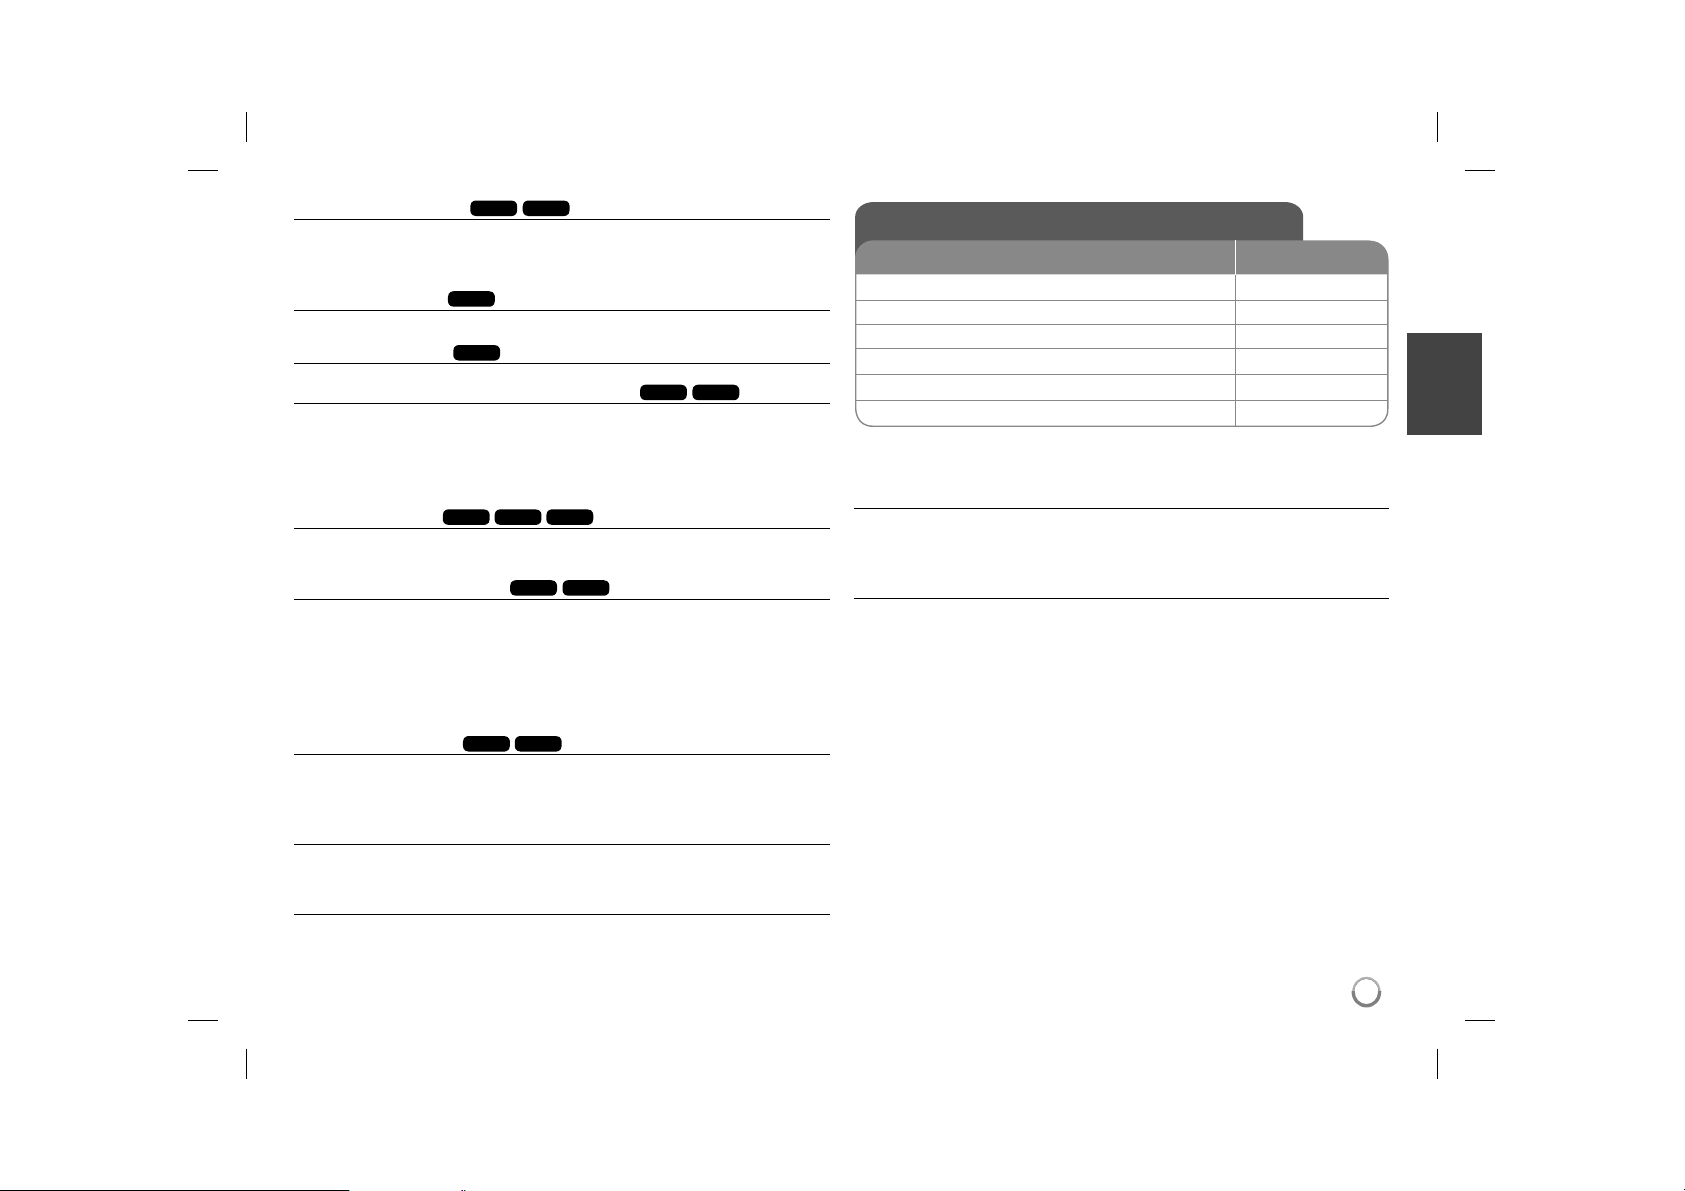
Types of Playable Discs
Type Logo
DVD-VIDEO: Discs such as movies that can be
purchased or rented.
DVD-R: Video mode and finalized only
DVD-RW: VR mode, Video mode and finalized only
DVD+R: Video mode only
DVD+RW: Video mode only
Audio CD: Music CDs or CD-R/CD-RW in music CD
format that can be purchased.
This unit plays DVD±R/RW and CD-R/RW that contains audio titles, DivX,
MP3, WMA and/or JPEG files. Some DVD±RW/DVD±R or CD-RW/CD-R cannot be played on this unit due to the recording quality or physical condition of
the disc, or the characteristics of the recording device and authoring software.
Manufactured under license from Dolby Laboratories. Dolby and the
double-D symbol are trademarks of Dolby Laboratories.
"DVD Logo" is a trademark of DVD format/Logo Licensing Corporation.
About the Symbol Display
“ ” may appear on your TV display during operation and indicates that the
function explained in this ownerʼs manual is not available on that disc.
Regional Codes
This unit has a regional code printed on the rear of the unit. This unit can play
only DVD discs labeled same as the rear of the unit or “ALL”.
• Most DVD discs have a globe with one or more numbers in it clearly visible
on the cover. This number must match your unitʼs regional code or the disc
cannot play.
• If you try to play a DVD with a different regional code from your player, the
message “Check Regional Code” appears on the TV screen.
Copyrights
It is forbidden by law to copy, broadcast, show, broadcast via cable, play in
public, or rent copyrighted material without permission. This product features
the copy protection function developed by Macrovision. Copy protection signals are recorded on some discs. When recording and playing the pictures
of these discs picture noise will appear. This product incorporates copyright
protection technology that is protected by U.S. patents and other intellectual
property rights. Use of this copyright protection technology must be authorized
by Macrovision, and is intended for home and other limited viewing uses only
unless otherwise authorized by Macrovision. Reverse engineering or disassembly is prohibited.
Rechargeable battery
• Its internal rechargeable battery provides you with the freedom to pass it
around and play the files without the power cord.
• The internal rechargeable battery will start charging only when the unit is
turned off and the AC adapter is connected to a power outlet.
• The charging stops if you turn on the unit.
• The charging will take approximately 2 hours and 30 minutes.
• Operating time on battery: approximately 2 hours and 30 minutes.
The operating time on battery may vary depending on the battery status,
operational status and environment conditions, and the maximum playing
time is possible up to 3 hours.
• The battery indicator will turn red while charging. Once the charging is complete, the indicator light changes to green.
• When the remaining time of the battery power is under a few minutes, “
will blink on the screen.
”
3
3
DP450-P.ADEULLK_ENG_MFL61857019.3 3DP450-P.ADEULLK_ENG_MFL61857019.3 3 2/23/09 3:27:17 PM2/23/09 3:27:17 PM
Page 4
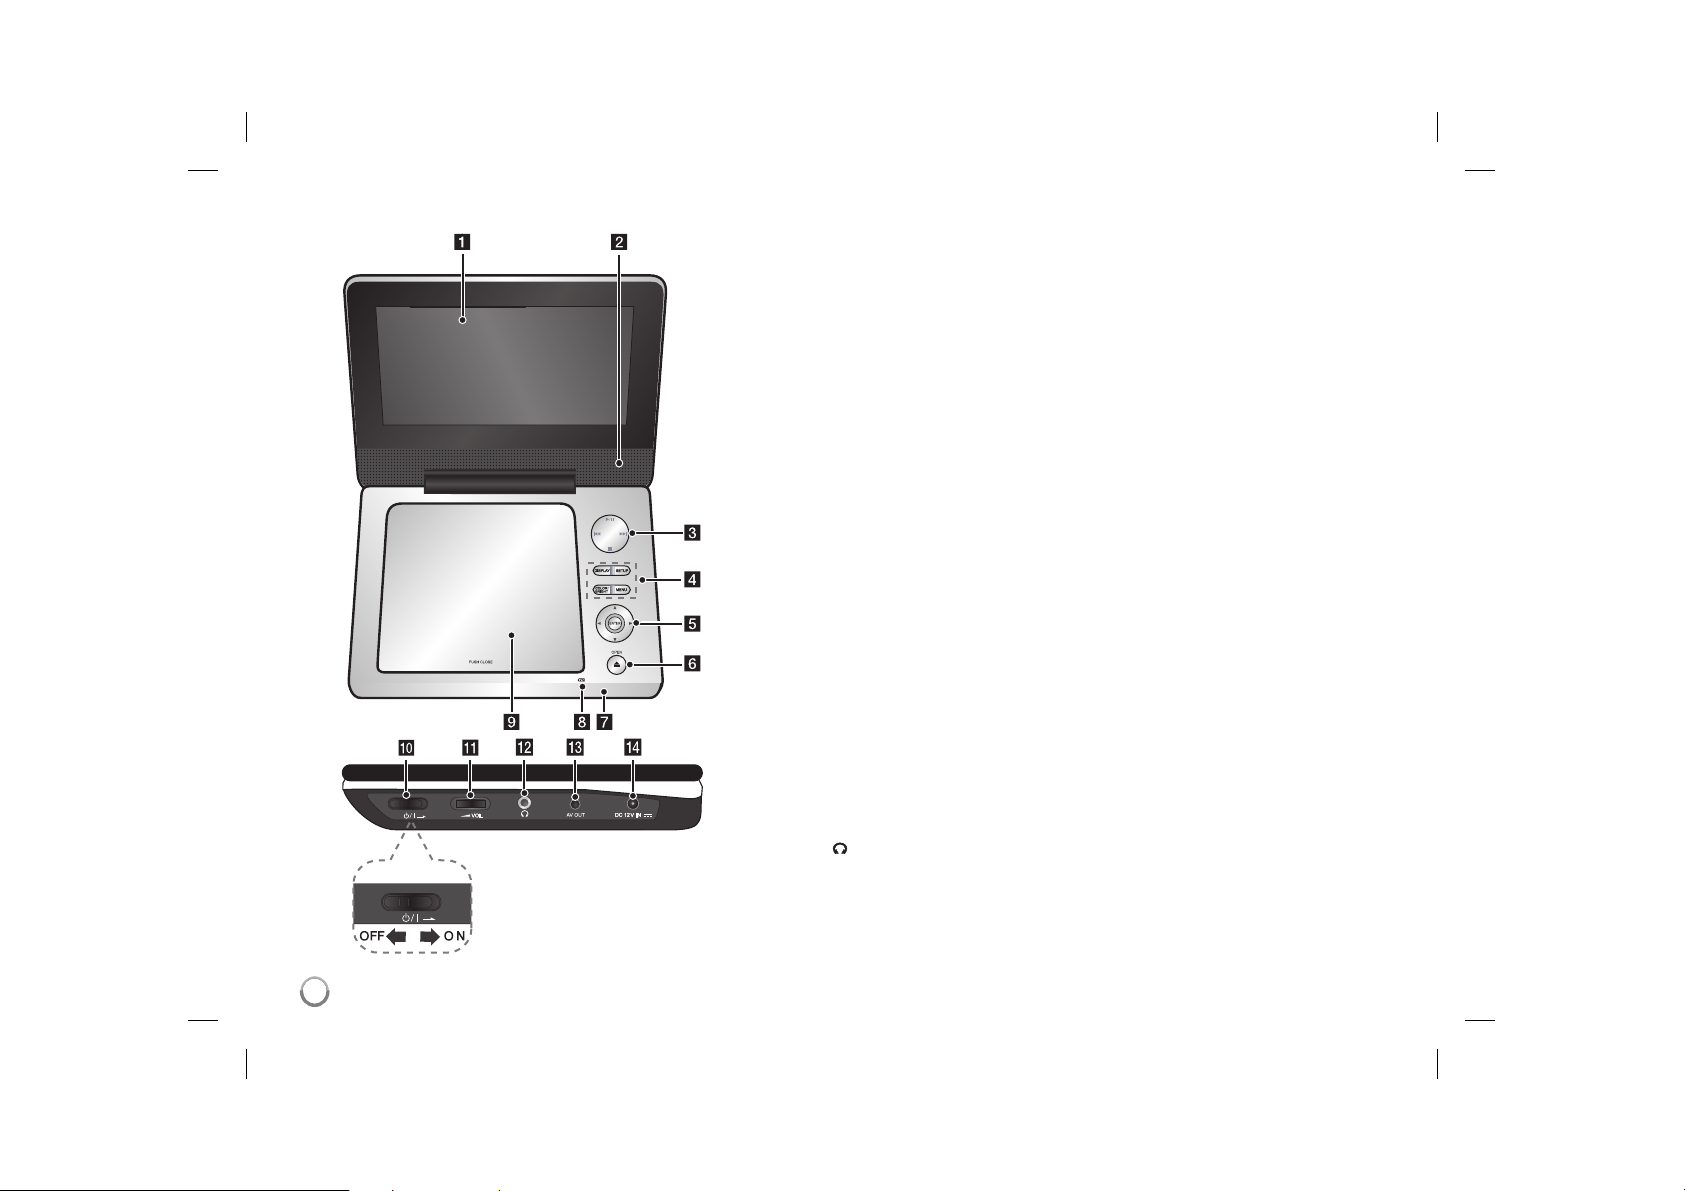
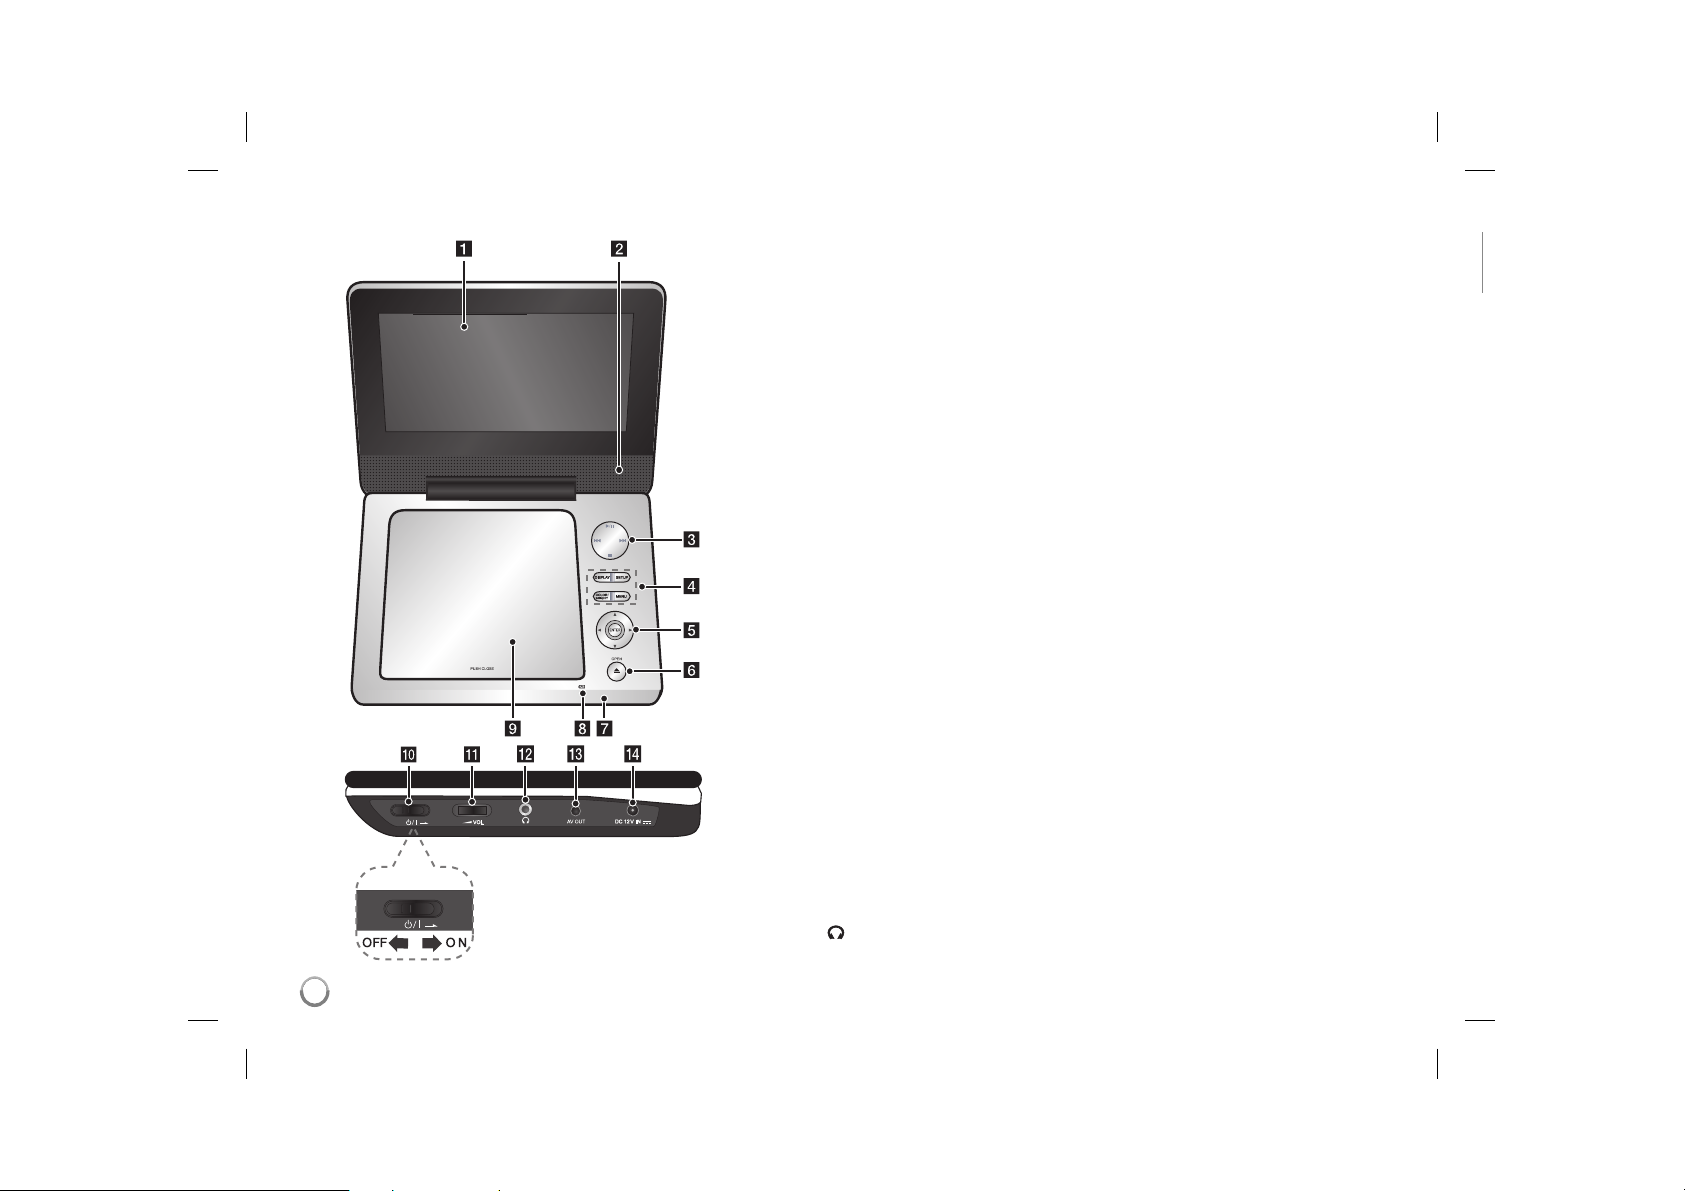
Main Unit
a LCD screen
b Speakers
c Playback control buttons
• N (Play) / X (Pause): Starts playback and pauses playback temporarily, press
again to exit pause mode.
• x (Stop): Stops playback.
• . (Skip): Searches backward* or returns to the beginning of current chapters/
tracks/ files or goes to the previous chapters/ tracks/ files.
• > (Skip): Searches forward* or goes to next chapters/ tracks/ files.
* Press and hold button for about two seconds.
d Function buttons
• DISPLAY: Accesses On-Screen Display.
• SETUP: Accesses or exits the setup menu.
• COLOR/BRIGHT*: Displays the Brightness or Colour menu for LCD display.
• MENU: Accesses the DVD menu.
* To adjust the colour or brightness of the LCD display, press COLOR/BRIGHT
repeatedly on the main unit to display the Brightness or Colour menu then use
b / B to adjust the value. Press ENTER to confirm the adjustment.
e Menu control buttons
• b B v V (left/right/up/down): Selects an item in the menu.
• ENTER: Confirms menu selection.
f OPEN (Z): Opens the disc lid.
g Remote sensor: Point the remote control here.
h Battery charge and power indicator
• The indicator turns red in charging and changes to green colour when the charging is complete. (Refer to page 3 for details.)
• The indicator turns green for a few seconds when the unit is turned on.
i Disc lid
j 1/q (Power switch): Turn the unit ON or OFF.
Note: To operate this unit , the power switch must be located ON.
k w VOL (Volume): Adjusts the volume level of the built-in speaker and earphones.
(Earphones): Connect earphones here.
l
m AV OUT: Connect to a TV with video and audio input.
n DC 12V IN: Connect the AC adapter or automotive adapter.
4
DP450-P.ADEULLK_ENG_MFL61857019.4 4DP450-P.ADEULLK_ENG_MFL61857019.4 4 2/23/09 3:27:18 PM2/23/09 3:27:18 PM
Page 5
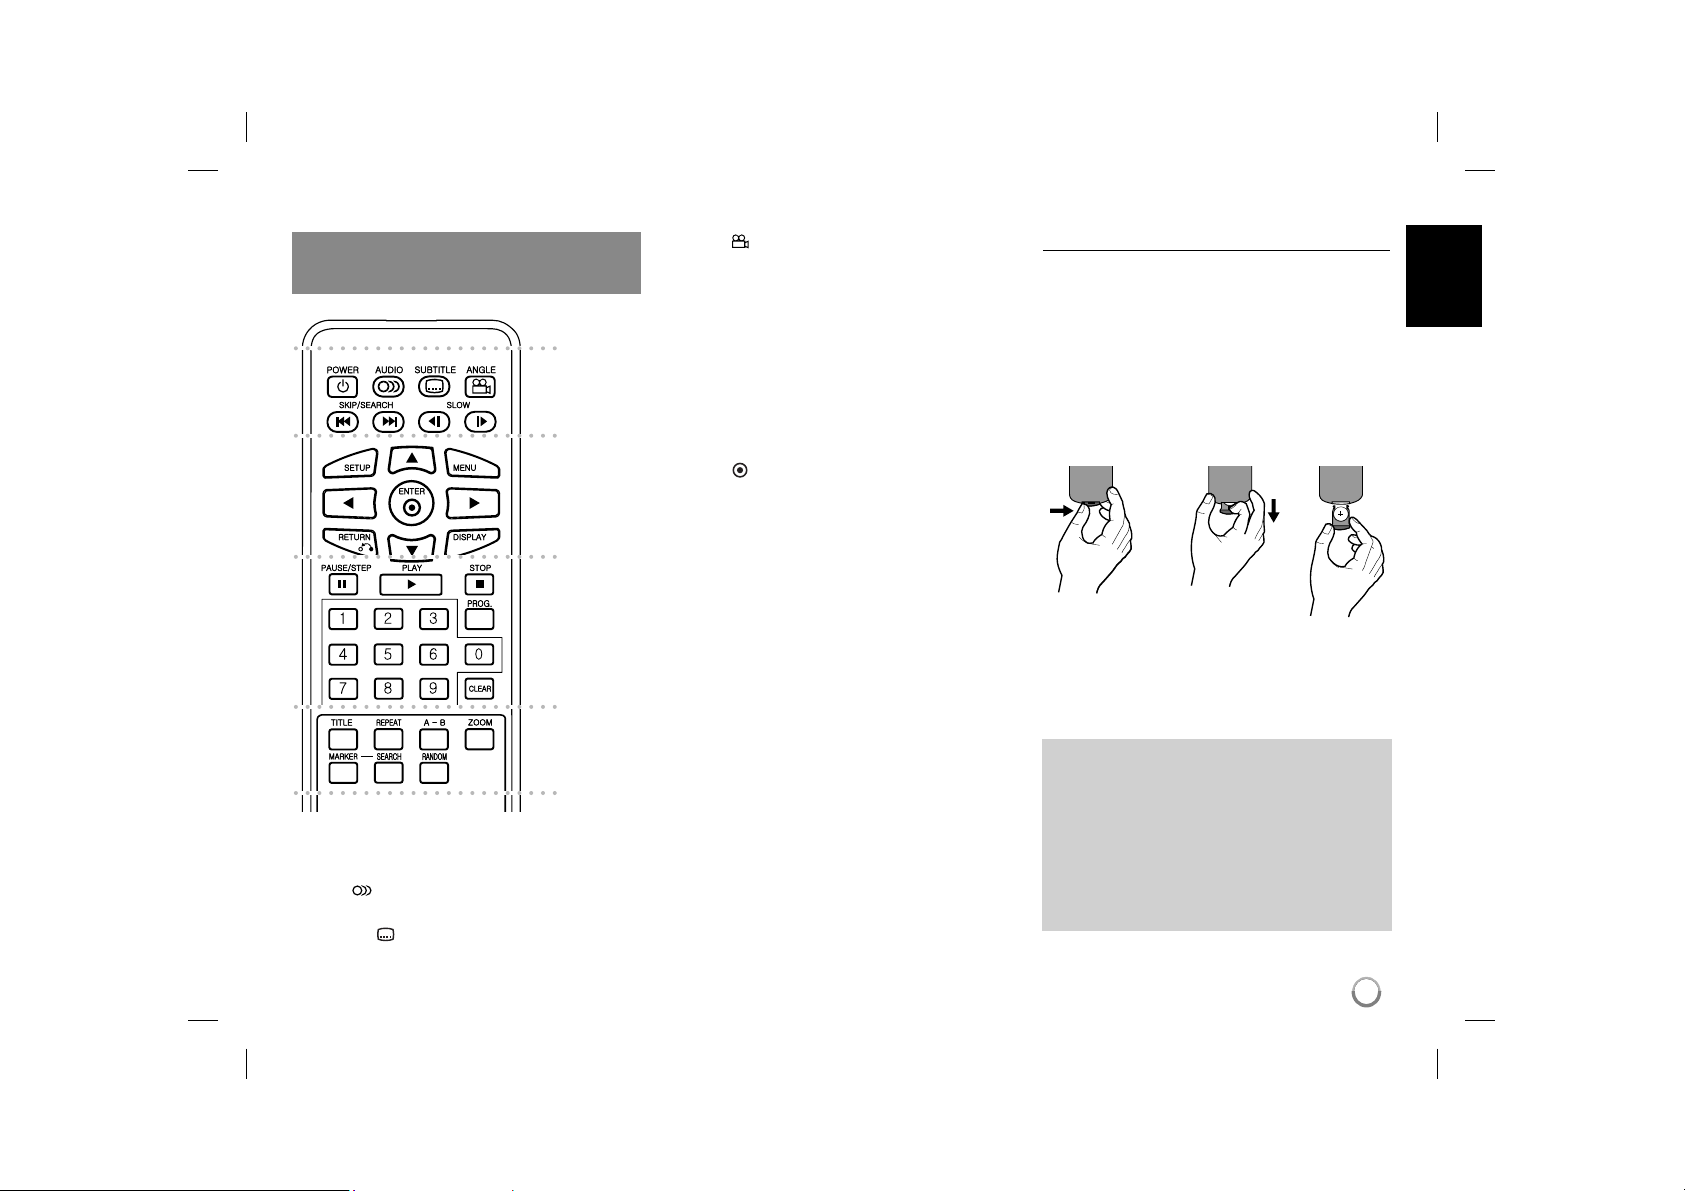
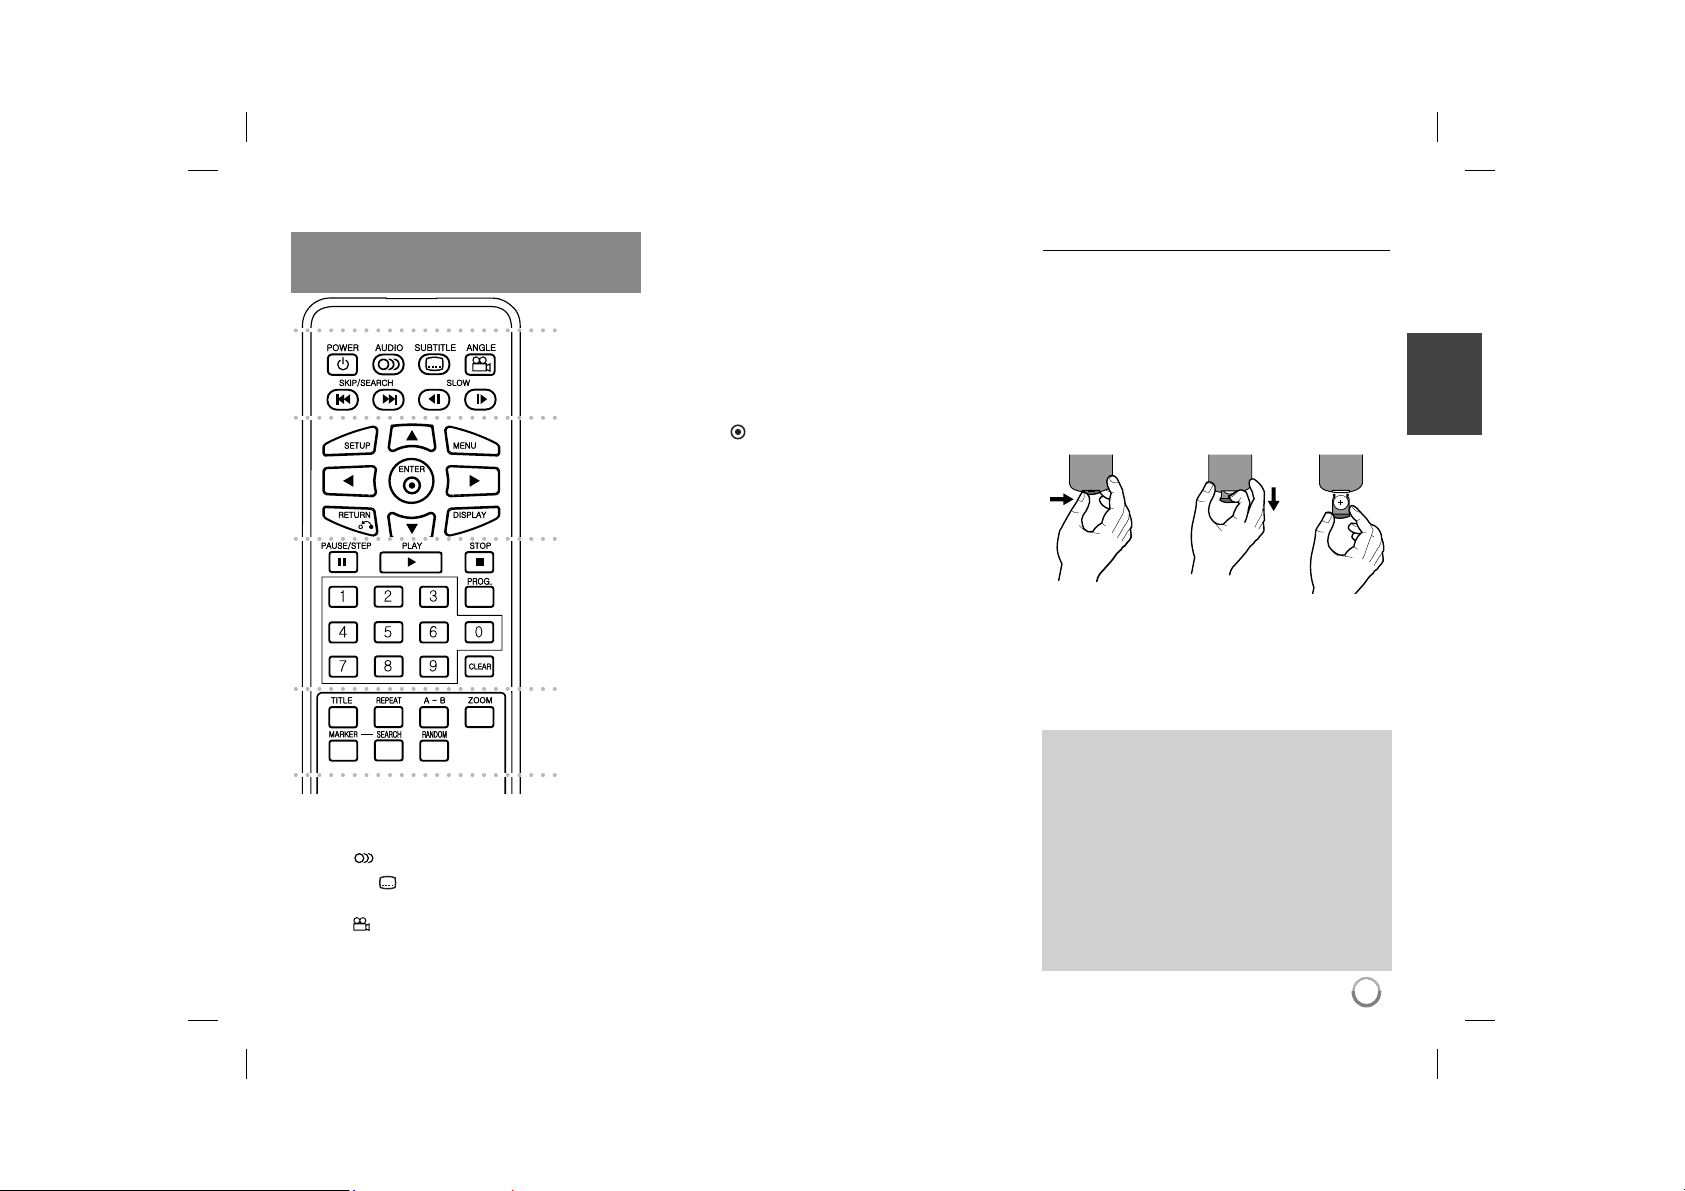
Remote Control
Note:
To operate this unit with remote control, the power
switch must be located ON. (Refer to 4 page)
a
b
c
d
l l l l l l l a l l l l l l l
POWER (1): Switches the unit ON or OFF.
AUDIO (
channel.
SUBTITLE (
): Selects an audio language or audio
): Selects a subtitle language.
ANGLE (
available.
SKIP/SEARCH (. / >): Searches* backward /
forward. Goes to next or previous chapter/track/file.
* Press and hold button for about two seconds.
SLOW (t / T): Reverse/ Forward slow playback.
l l l l l l l b l l l l l l l
SETUP: Accesses or exits the setup menu.
MENU: Accesses the DVD menu.
vV b B: Navigates the menus.
ENTER (
RETURN (O): Returns backwards in the menu or
exits the menu.
DISPLAY: Accesses On-Screen Display.
l l l l l l l c l l l l l l l
PAUSE/STEP (X): Pauses playback temporarily/
press repeatedly for frame-by-frame playback.
PLAY (N): Starts playback.
STOP (x): Stops playback.
Numerical buttons: Selects numbered options in
a menu.
PROG.: Enters the program edit mode.
CLEAR: Removes a track number on the Program
List.
l l l l l l l d l l l l l l l
TITLE: Accesses the discʼs title menu.
REPEAT: Repeats a chapter, track, title or all.
A-B: Repeats a section.
ZOOM: Enlarges a video image.
MARKER : Marks any point during playback.
SEARCH : Displays [Marker Search] menu.
RANDOM: Plays tracks in random order.
): Selects a DVD camera angle, if
): Confirms menu selection.
Put the battery into the Remote Control
Pinch the battery holder clip together then pull the
tab to remove the battery holder. Insert the battery
with the + facing in the same direction as the + on
the battery holder. Replace the battery holder with
battery into the Remote Control unit making sure
that it is fully inserted.
• Replace Remote Control unit battery with 3V
micro lithium cells such as CR. 2025 or its equivalent.
• Dispose of battery safety in accordance with
local laws. Do not dispose of in fire.
Warning for replaceable lithium battery
• Danger of explosion if battery incorrectly replaced.
• Replace only with the same type battery.
• Additional warning marking close to the battery if
intended to be replaced by users.
Warning : The battery used in this device may
present a fire or chemical burn hazard if mistreated. Do not recharge, disassemble, incinerate, or heat above 100 °C (212 °F).
Replace the battery with Matsushita Elec. Ind.
Co., Ltd. (Panasonic), part no. CR. 2025 only.
Use of another battery may present a risk of fire
or explosion. Dispose of used batteries. Keep
batteries away from children. Do not disassemble or dispose of in fire.
5
DP450-P.ADEULLK_ENG_MFL61857019.5 5DP450-P.ADEULLK_ENG_MFL61857019.5 5 2/23/09 3:27:18 PM2/23/09 3:27:18 PM
Page 6
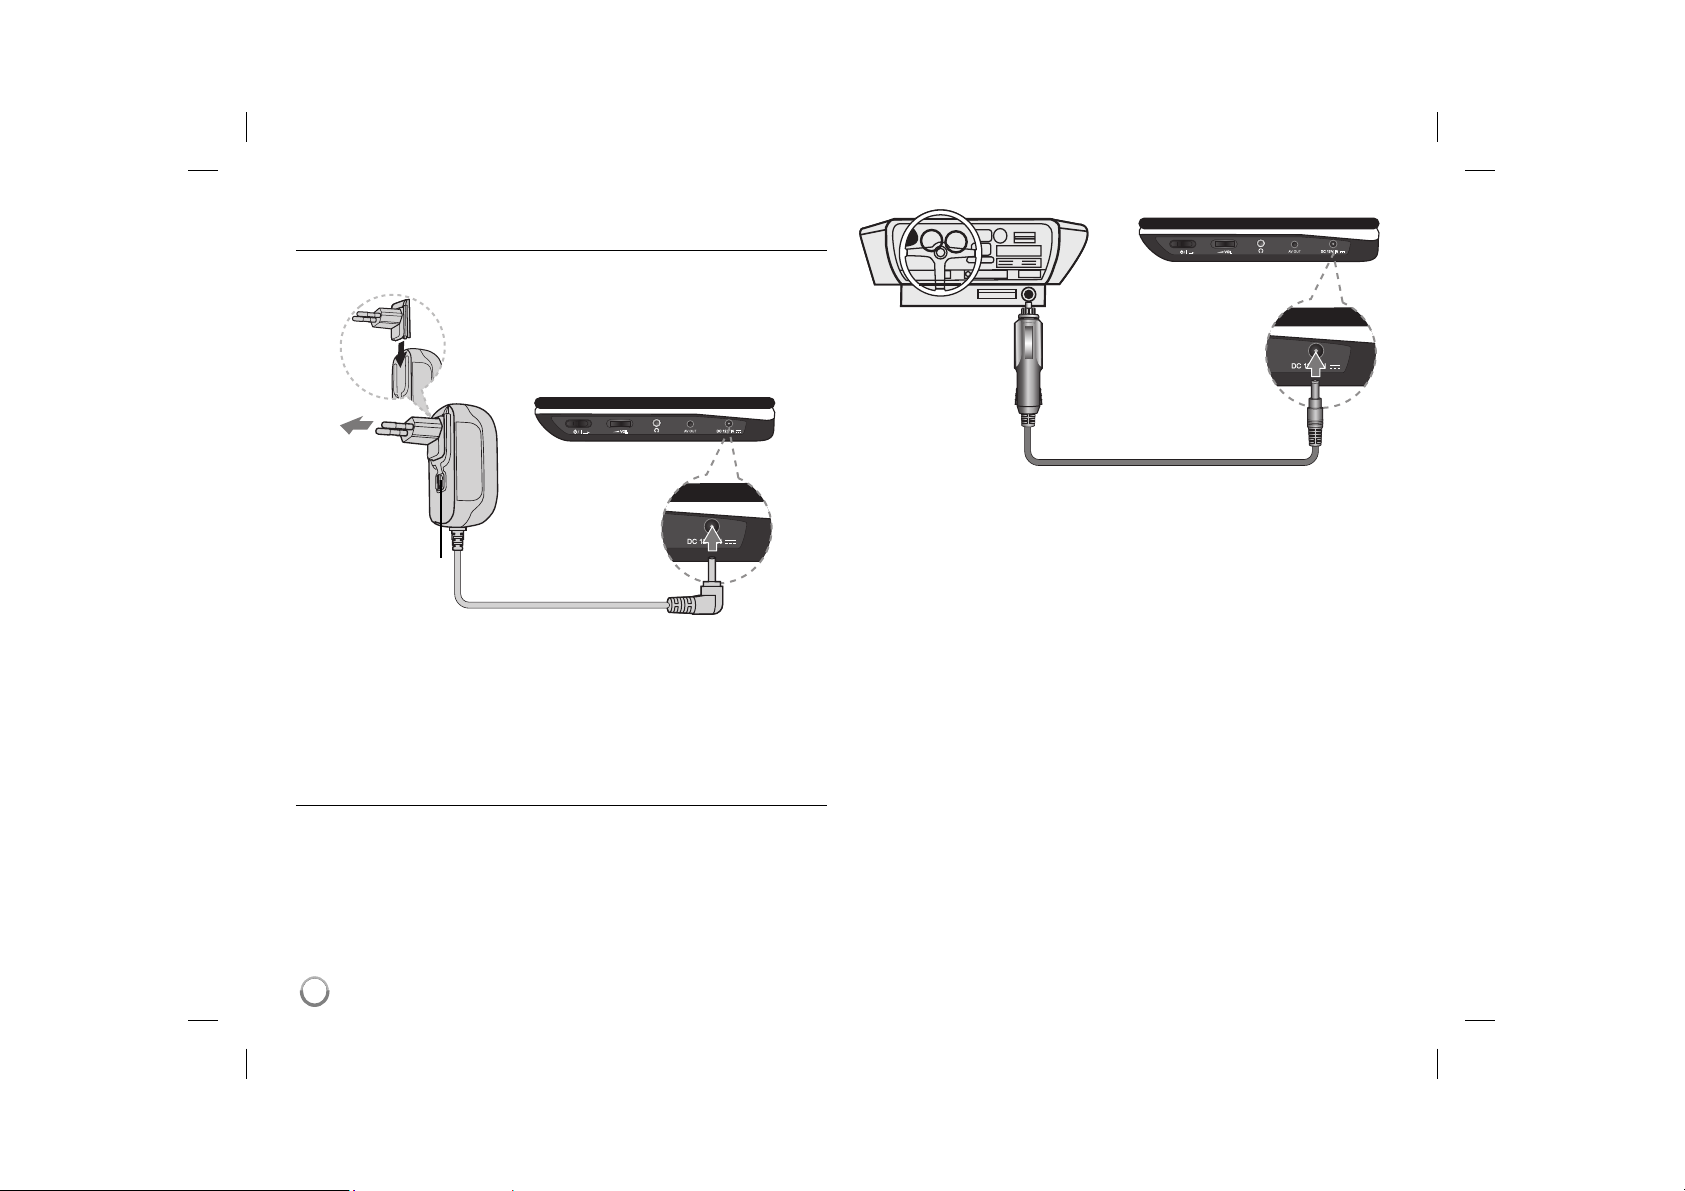
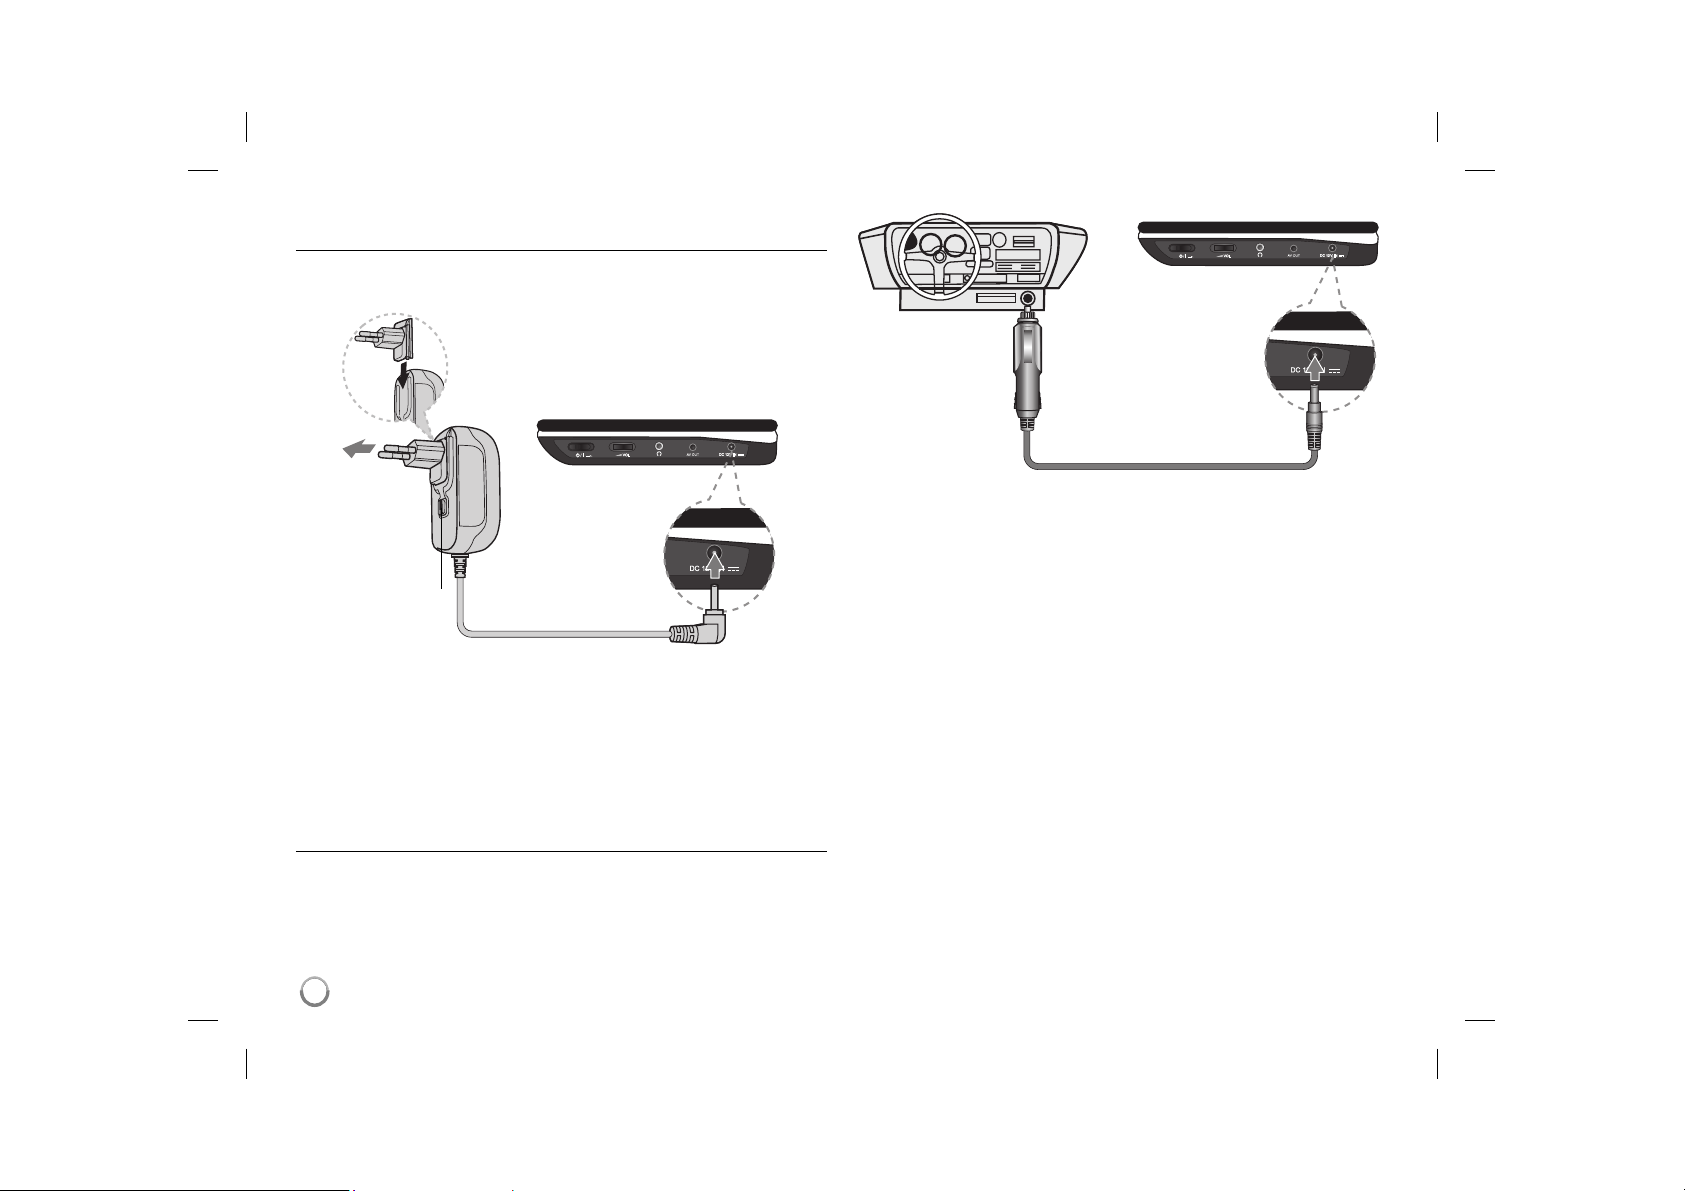
Power connections
Connecting the AC Adapter
Connect the supplied AC Adapter from the unit to a power socket.
Right side of the unit
Attach the power plug to the body of the AC adapter.
(The actual set may differ from the drawing.)
Right side of the unit
Plug into a
power source.
Power cord
release knob
Plug into the “DC 12V IN” jack.
AC adapter
• This AC adapter operates on 100-240V~ 1 A 50/60Hz.
• Contact an electrical parts distributor for assistance in selecting a suitable
AC plug adapter or AC cord set.
• Manufactured by NANJING WANLIDA TECHNOLOGY CO., LTD
Connect the Automotive adapter
This unit and its automotive adapter are designed for use in vehicles that have
8.5-16 volt, negative ground electrical systems. This is standard for most vehi-
cles. If your vehicle has a different type of the electrical system, the DC power
system cannot be used.
Plug into the carʼs
cigarette lighter
socket.
Plug into the
“DC 12V IN” jack.
Automotive adapter
• This automotive adapter operates on DC 8.5-16V.
• Contact an electrical parts distributor for assistance in selecting a suitable
automotive adapter.
• Manufactured by NANJING WANLIDA TECHNOLOGY CO., LTD.
Caution
• To prevent electrical shock and possible damage to your unit or vehicle,
always unplug the automotive adapter from the cigarette lighter socket
before you remove the plug from your unit.
• A 3 amp. 250V fuse for protection is installed in the automotive adapter.
• While the engine is being started, disconnect the automotive adapter from
the carʼs cigarette lighter socket.
• Do not operate your unit when the car battery is discharged.
Peak current from the car generator may cause the DC fuse to blow.
• If the vehicleʼs supply voltage drops below approximately 10 volts, your unit
may not work properly.
• Do not leave your unit in a place where the temperature exceeds 70°C
(158°F), or the pick-up device may be damaged.
Examples include:
- Inside a car with the windows closed and in direct sunshine.
- Near a heating appliance.
6
DP450-P.ADEULLK_ENG_MFL61857019.6 6DP450-P.ADEULLK_ENG_MFL61857019.6 6 2/23/09 3:27:19 PM2/23/09 3:27:19 PM
Page 7
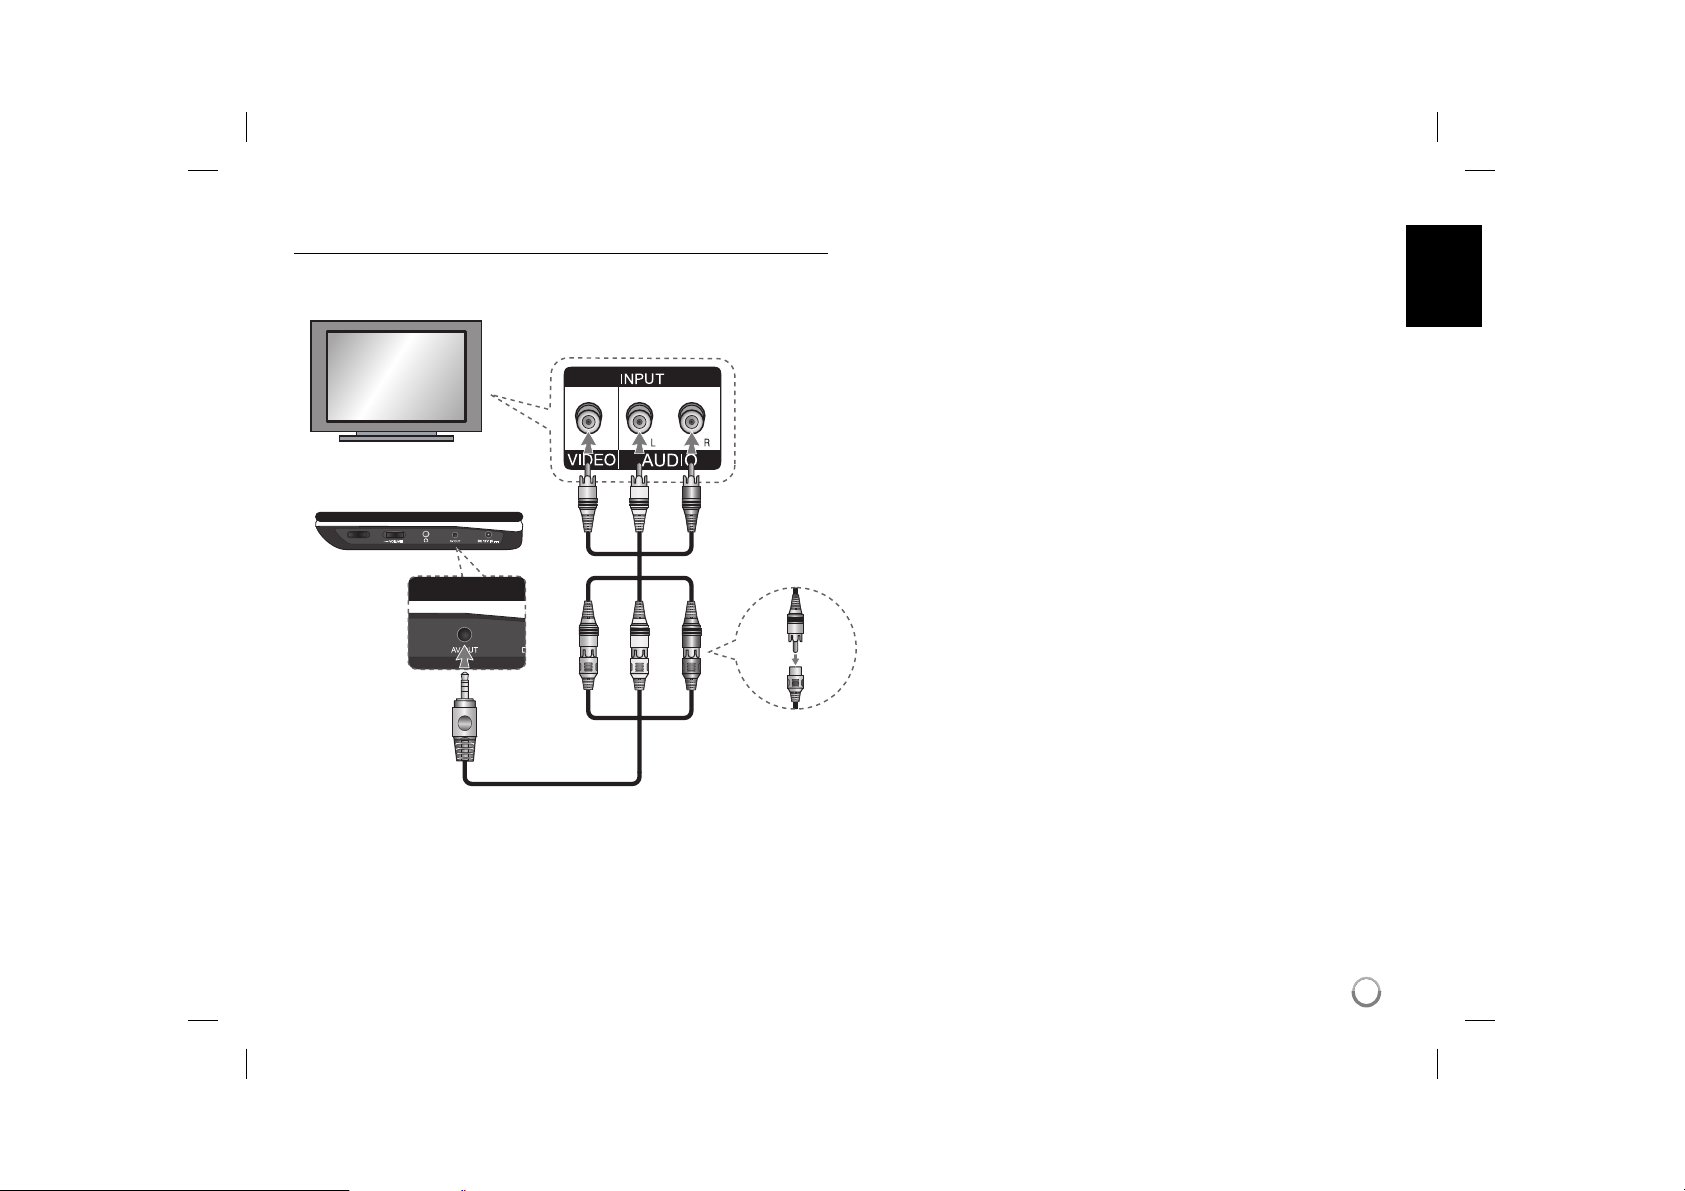
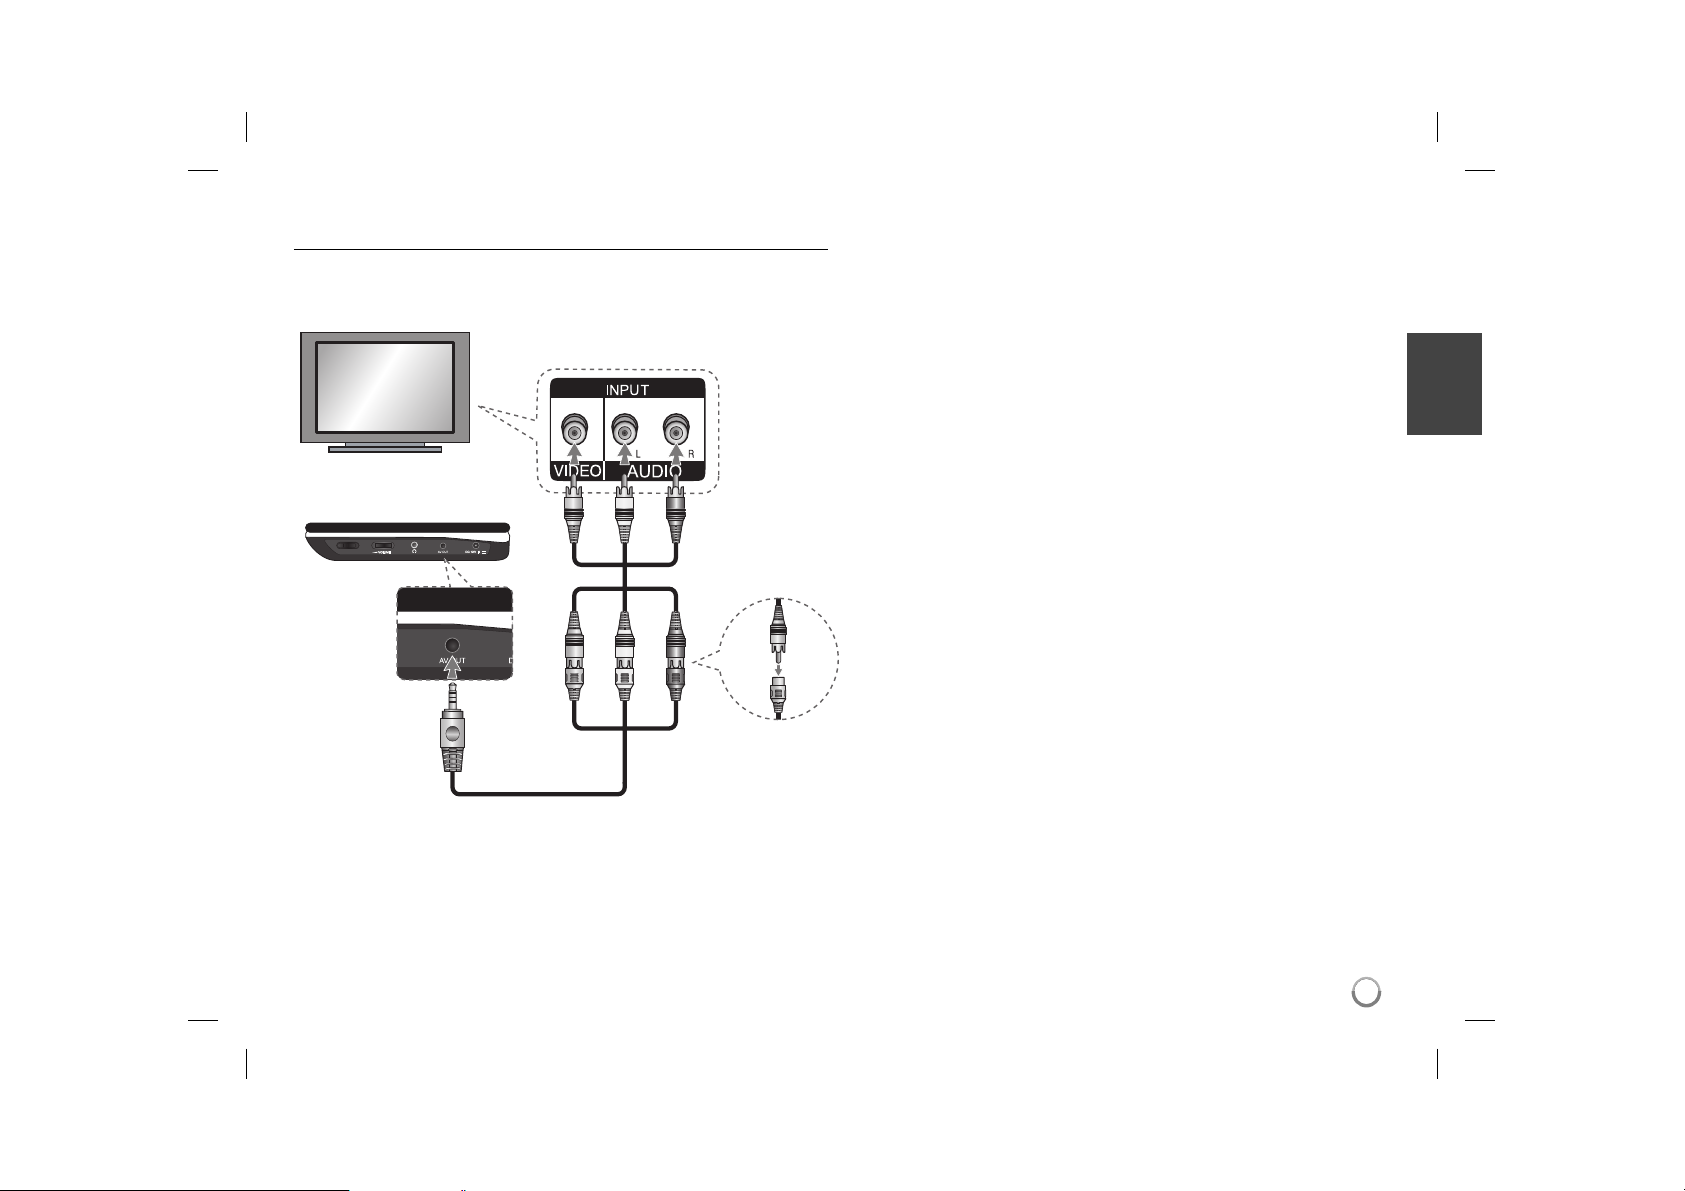
Hooking up the unit
Audio and Video Connections to your TV
Connect the AV OUT jack on the unit to the corresponding input jacks on your
TV as shown below.
TV
Right side of the unit
Plug into the
“AV OUT” jack.
yellow
white
red
Audio/Video Adapter
Audio/Video Cable
(not supplied)
7
DP450-P.ADEULLK_ENG_MFL61857019.7 7DP450-P.ADEULLK_ENG_MFL61857019.7 7 2/23/09 3:27:19 PM2/23/09 3:27:19 PM
Page 8
Adjust the settings
t
t
BUTTON
1 Display setup menu: SETUP
2 Select a desired option on the first level:
3 Move to second level:
4 Select a desired option on the second level:
5 Move to third level:
6 Change the setting:
Adjust the settings - more you can do
When you turn on for the first time (optional)
The menu for a language selection will appear when you turn on the unit for the
first time. You must select a language to use the unit. Use vV b B to select
a language then press ENTER and the confirm menu will appear. Use b B to
select [ENTER] then press ENTER.
Adjust the language settings
Menu Language – Select a language for the Setup menu and on-screen dis-
play.
Disc Audio/Subtitle/Menu – Select a language for the Disc Audio/Subtitle/
Menu.
[Original]: Refers to the original language in which the disc was recorded.
[Other]: To select another language, press number buttons then ENTER to
enter the corresponding 4-digit number according to the language code list.
(see page 13) If you make a mistake while entering number, press CLEAR to
delete numbers then correct it.
[Off] (for Disc Subtitle): Turn off Subtitle.
v V
B
v V
B
v V / ENTER
Adjust the display settings
TV Aspect – Select which screen aspect to use based on the shape of your TV
screen.
[4:3]: Select when a standard 4:3 TV is connected.
[16:9]: Select when a 16:9 wide TV is connected.
Display Mode – If you selected 4:3, youʼll need to define how you would like
widescreen programs and films to be displayed on your TV screen.
[Letterbox]: This displays a widescreen picture with black bands at the top
and bottom of the screen.
[Panscan]: This fills the entire 4:3 screen, cropping the picture as necessary.
Adjust the audio settings
DRC (Dynamic Range Control) – Make the sound clear when the volume is
turned down (Dolby Digital only). Set to [On] for this effect.
Vocal – Set to [On] only when a multi-channel karaoke DVD is playing. The
karaoke channels on the disc mix into normal stereo sound.
Adjust the lock settings
You must set the [Area Code] option to use the lock options. Select [Area Code]
option then press B. Enter a 4-digit password then press ENTER. Enter it again
then press ENTER to verify. If you make a mistake while entering number, press
CLEAR then correct it.
If you forget your password you can reset it. First, remove the disc in the unit.
Display setup menu then input the 6-digit number “210499” and the password
will be cleared.
Rating – Select a rating level. The lower the level, the stricter the rating. Select
[Unlock] to deactivate the rating.
Password – Sets or changes the password for lock settings.
[New]: Enter a new 4-digits password using the numerical buttons then press
ENTER. Enter the password again to confirm.
[Change]: Enter the new password twice after entering the current password.
Area Code – Select a code for a geographic area as the playback rating level.
This determ ines which areaʼs standards are used to rate DVDs controlled by the
parental lock. (See page 13)
8
DP450-P.ADEULLK_ENG_MFL61857019.8 8DP450-P.ADEULLK_ENG_MFL61857019.8 8 2/23/09 3:27:20 PM2/23/09 3:27:20 PM
Page 9
Adjust the others settings
DivX(R) VOD – We provide you with the DivX® VOD (Video On Demand) regis-
tration code that allows you to rent and purchase videos using the DivX® VOD
service. For more information, visit www.divx.com/vod.
Press ENTER when [Select] icon is highlighted and you can view the registration code of the unit.
All the downloaded videos from DivX® VOD can only be played back on this
unit.
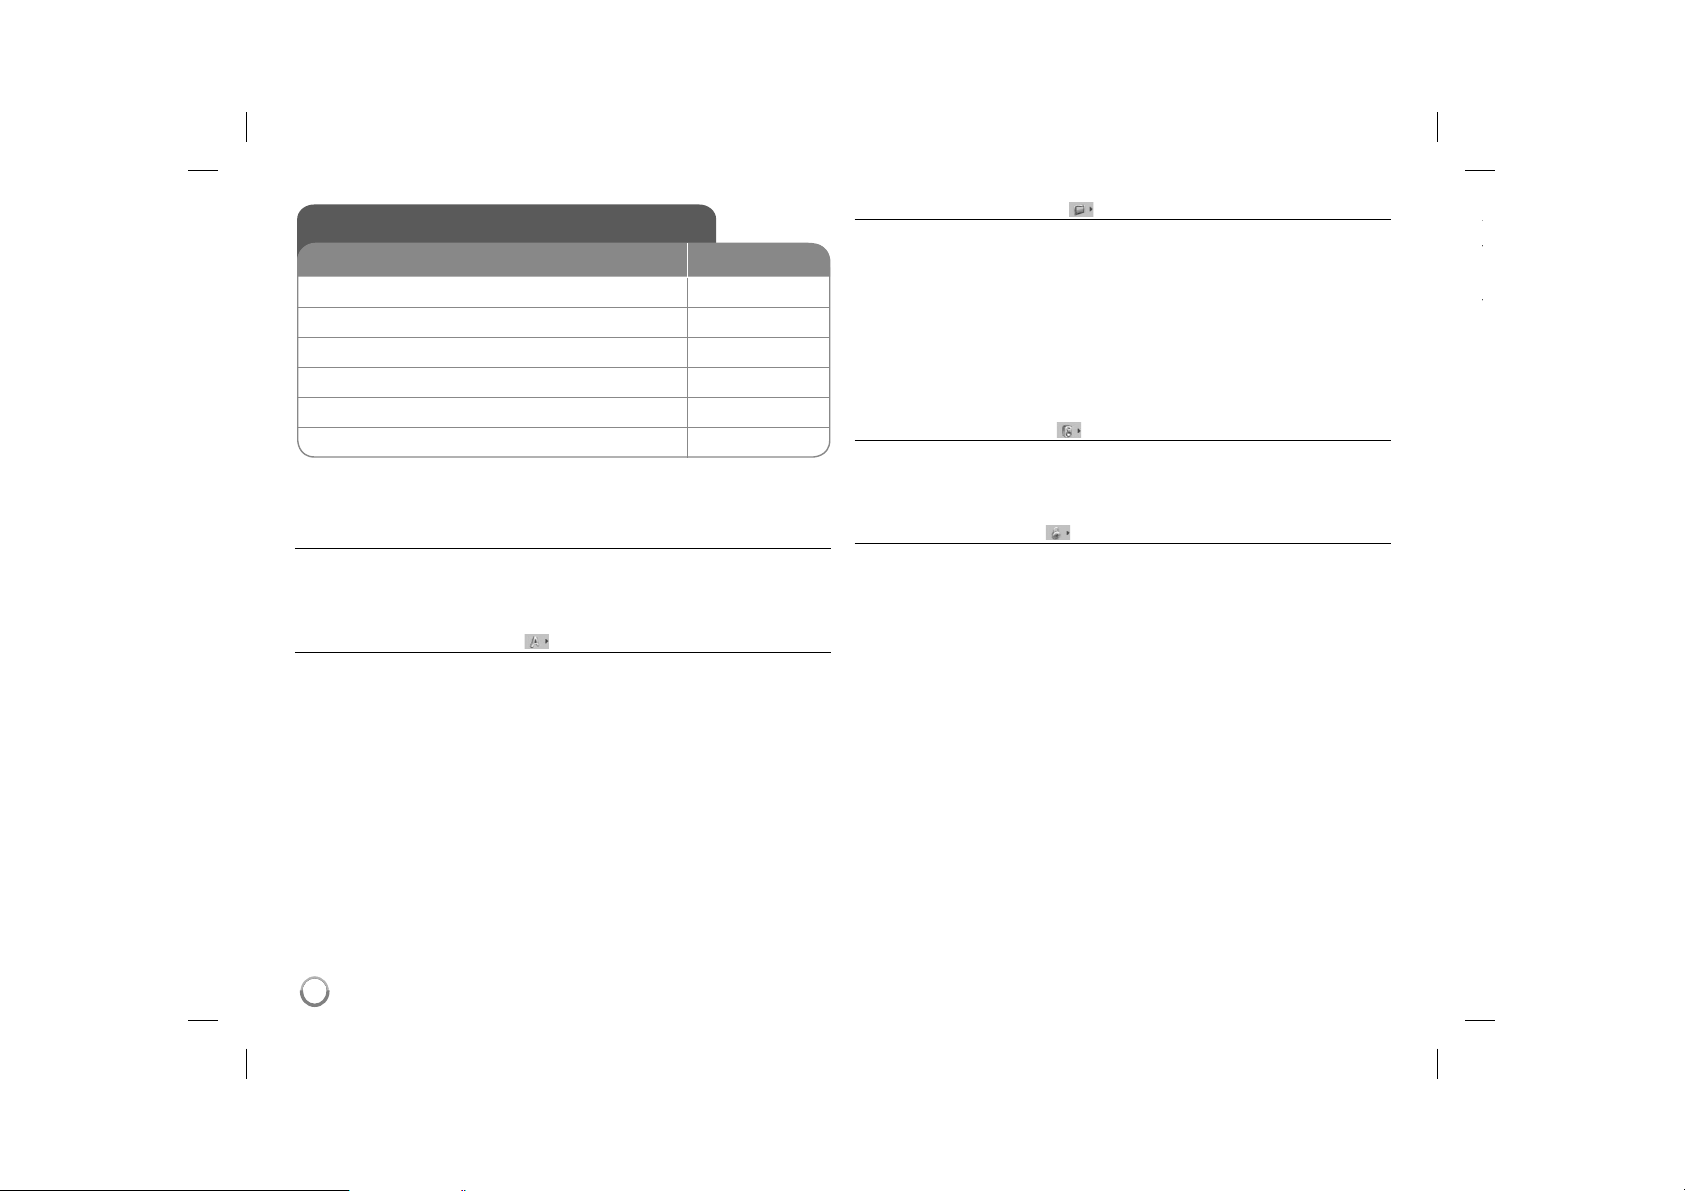
Displaying Disc Information
BUTTON
1 Press DISPLAY during playback: DISPLAY
2 Select an item:
3 Adjust the Display menu settings:
4 Exit the menu: DISPLAY
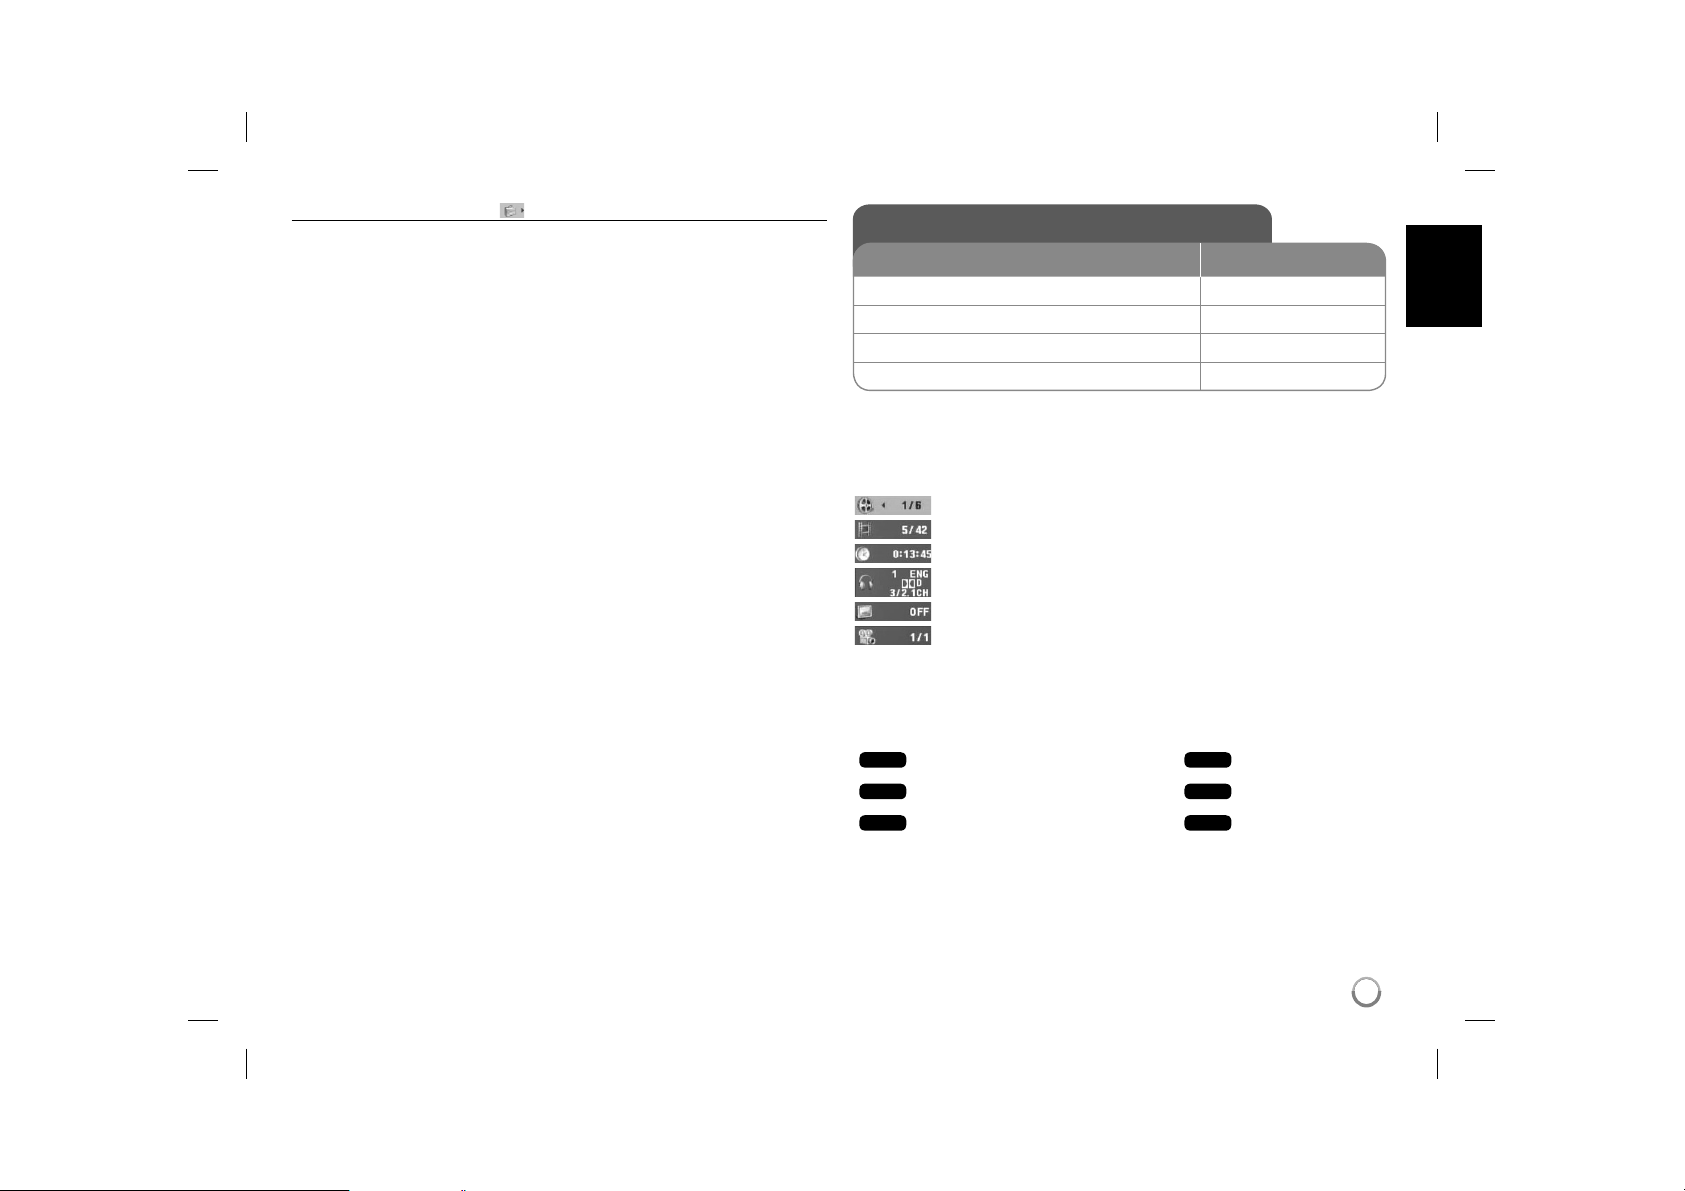
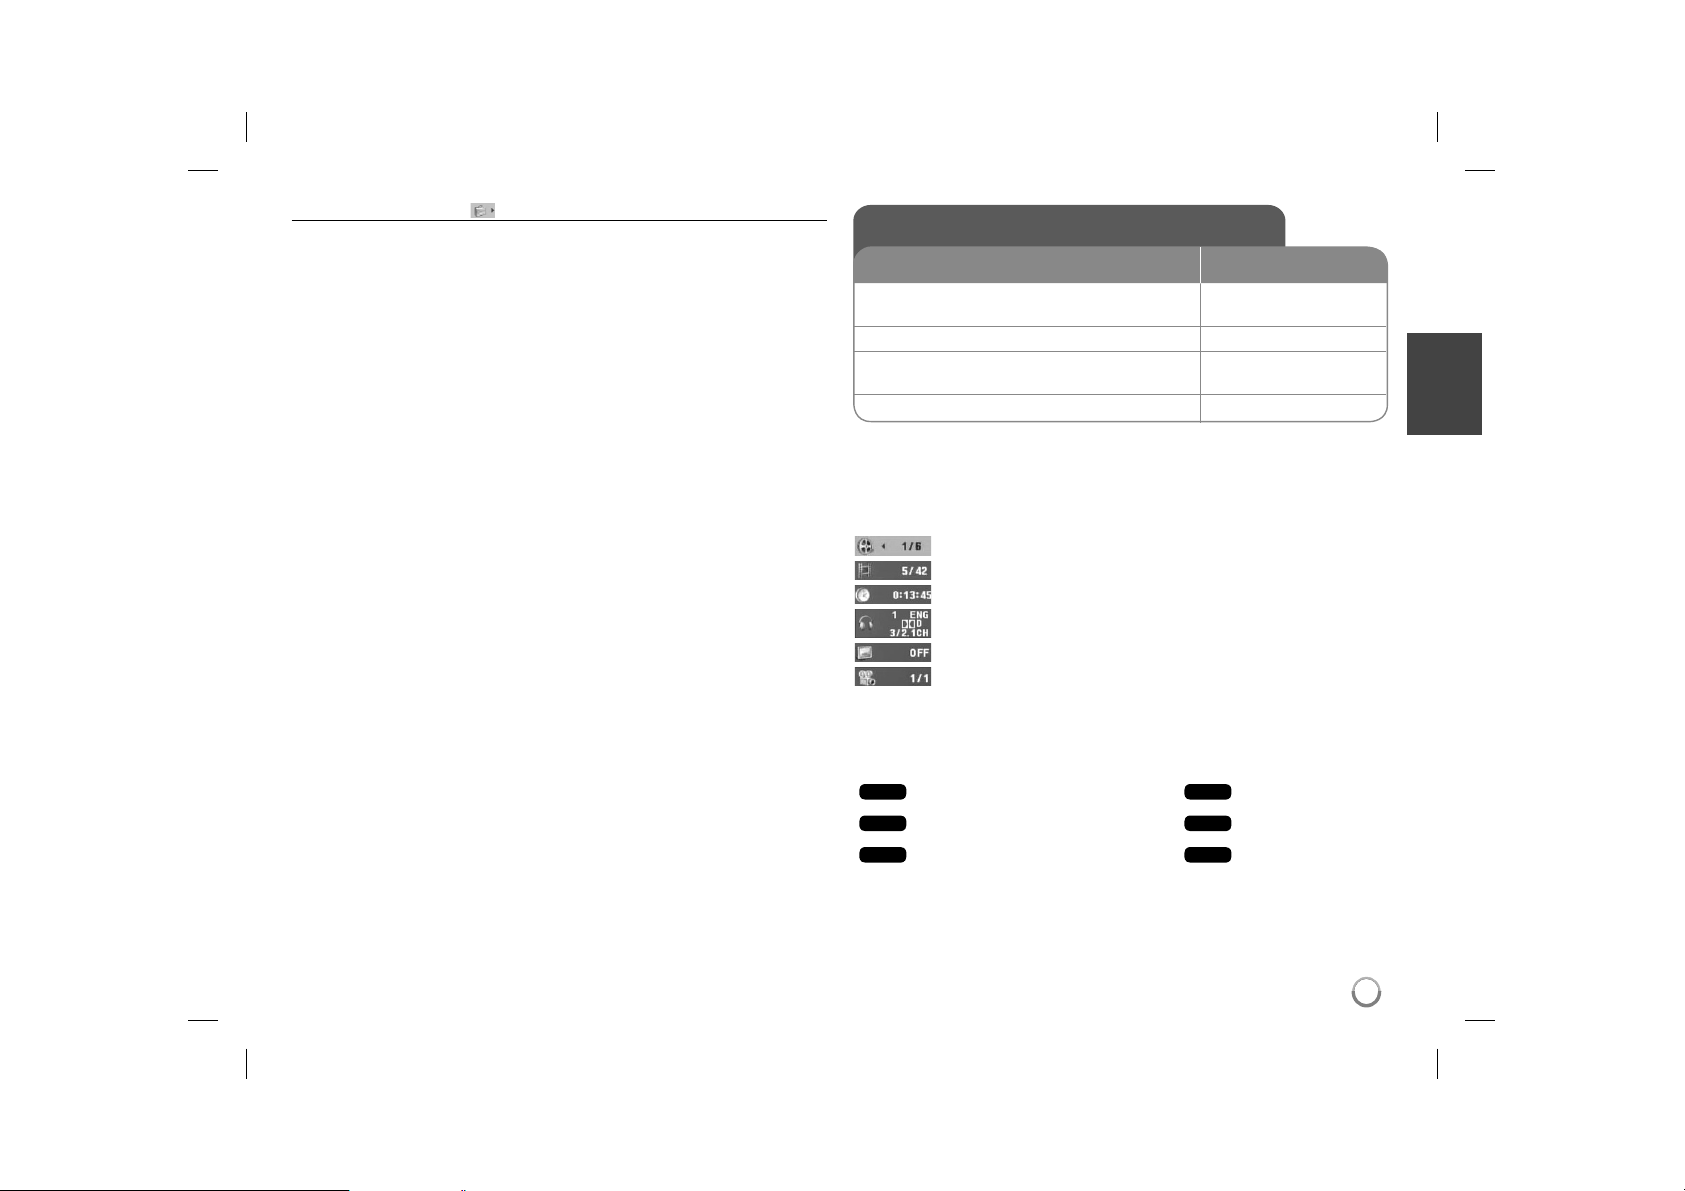
Displaying Disc Information - more you can do
You can select an item by pressing vV and change or select the setting by
pressing b B.
Current title number/total number of titles
Current chapter number/total number of chapters
Elapsed playing time
Selected audio language or channel
Selected subtitle
Selected angle/total number of angles
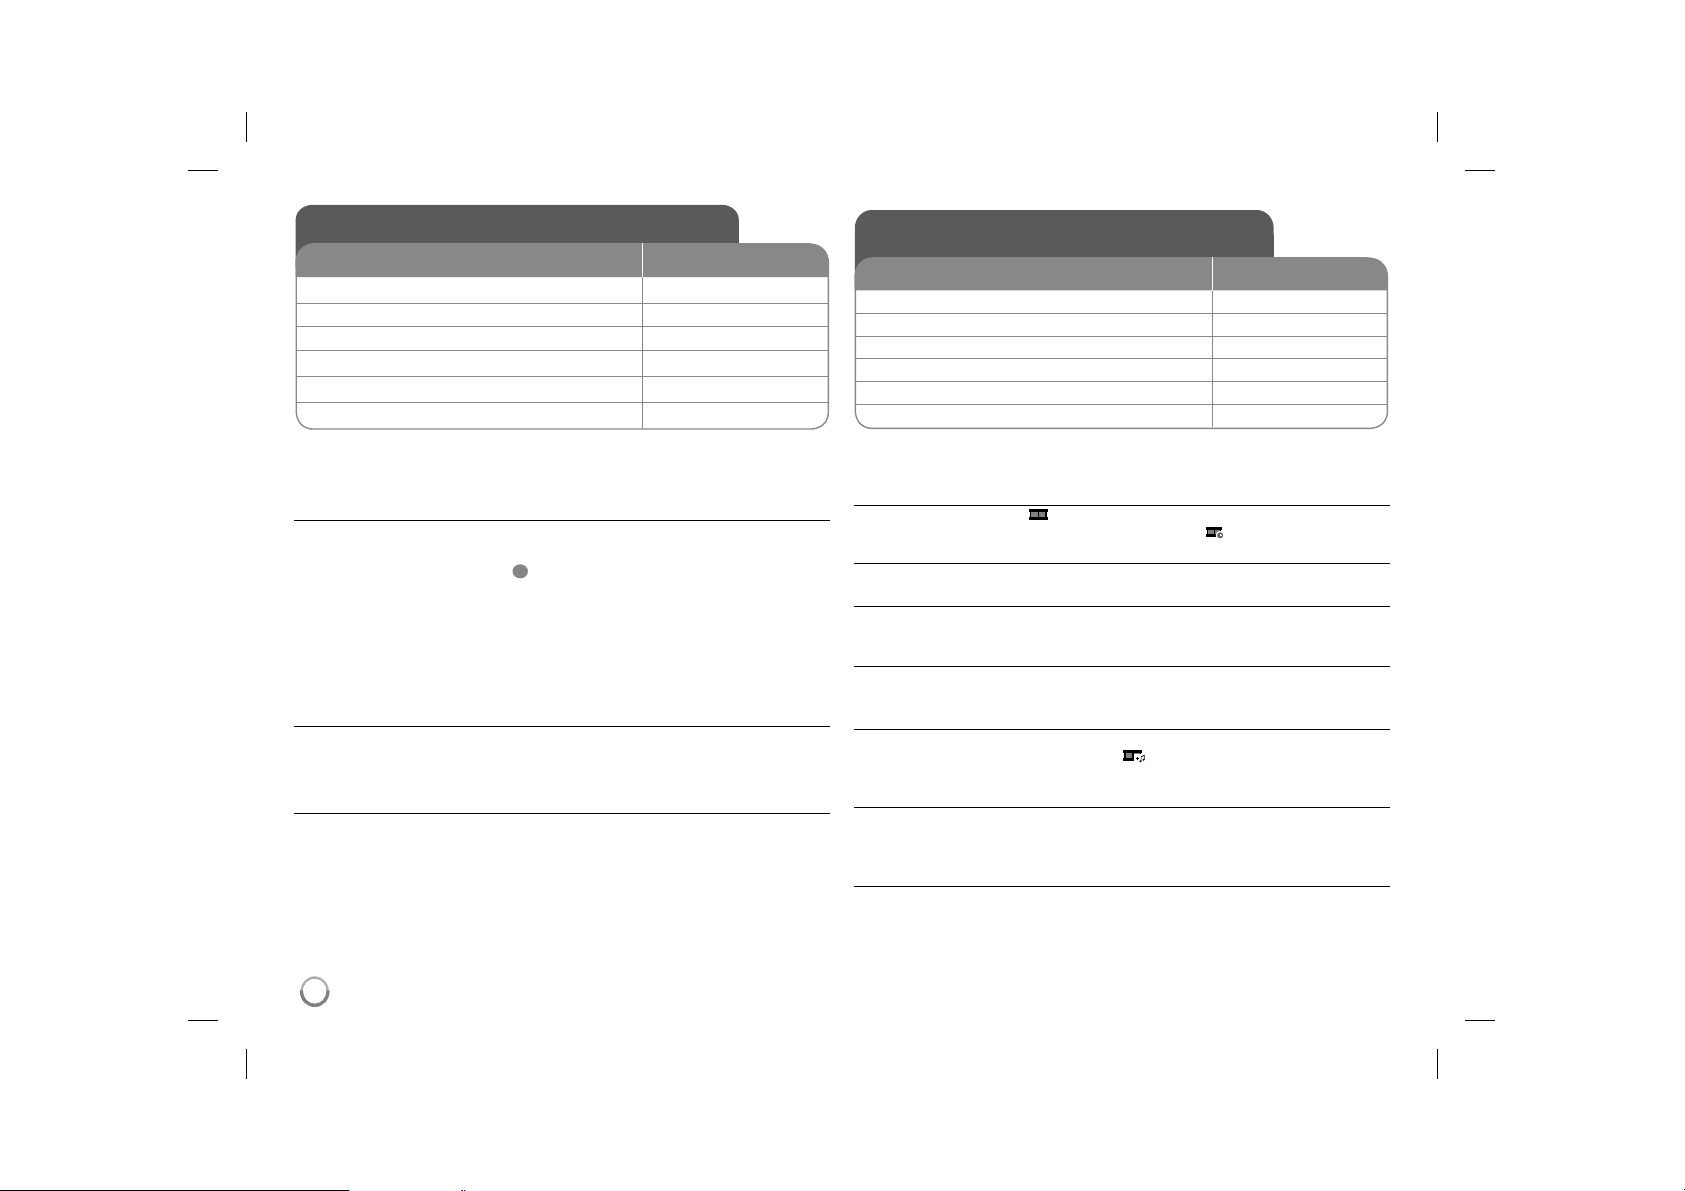
Symbol Used in this Manual
A section whose title has one of the following symbols are applicable only to the
disc or file represented by the symbol.
ALL
DVD
DivX
All discs and files
DVD and finalized DVD±R/RW
DivX files
v V
b B / ENTER
ACD
MP3
WMA
Audio CDs
MP3 files
WMA files
9
DP450-P.ADEULLK_ENG_MFL61857019.9 9DP450-P.ADEULLK_ENG_MFL61857019.9 9 2/23/09 3:27:20 PM2/23/09 3:27:20 PM
Page 10
Playing a Disc
BUTTON
1 Open the disc lid:
2 Insert a Disc: 3 Close the disc lid: 4 Start playback:
5 Adjust the volume: VOLUME
6 To stop playback:
Playing a Disc - more you can do
Stops the playback
Press STOP (x) to stop playback, the unit records the stopped point depending
on the disc. “ Xx ” appears on the screen briefly. Press PLAY ( N) to resume
playback (from the scene point). If you press STOP (x) again or unload the disc
(“ x ” appears on the screen), the unit will clear the stopped point.
(Xx =Resume Stop, x =Complete Stop) The resume point may be cleared
when a button is pressed. (for example: POWER, OPEN, etc)
Playing a DVD that has a menu
Most DVD now have menus which load first before the film begins to play. You
can navigate these menus using vV b B or number button to highlight an
option. Press ENTER to select.
Playing a DVD VR disc
This unit will play DVD-RW disc that is recorded using the Video Recording
(VR) format. When you insert a disc DVD VR disc, the menu will appear on the
screen. Use vV to select a title then press PLAY ( N). To display DVD-VR
menu, press MENU or TITLE.
Some DVD-VR disc are made with CPRM data by DVD RECORDER. The unit
does not support these kinds of discs.
Skip to the next/previous chapter/track/file
Press SKIP (>) to move to the next chapter/track/file.
Press SKIP (.) to return to the beginning of the current chapter/track/file.
Press SKIP (.) twice briefly to step back to the previous chapter/track/file.
DVD
OPEN (Z)
N PLAY
x STOP
ALL
Pause a playback
Press PAUSE/STEP (X) to pause playback. Press PLAY ( N) to continue
playback.
Frame-by-Frame playback
Press PAUSE/STEP (X) repeatedly to play Frame-by-Frame playback.
Playing repeatedly
Press REPEAT repeatedly to select an item to be repeated. The current title,
chapter track or all will be played back repeatedly. To return to normal playback,
press REPEAT repeatedly to select [Off].
Fast forward or fast reverse
Press and hold SKIP (. or >) to play fast forward or fast reverse during
playback. You can change the various playback speed by pressing and holding
SKIP (. or >) repeatedly. Press PLAY ( N) to continue play at normal
speed.
Repeating a specific portion (A-B)
Press A-B at the beginning of the portion you wish to repeat and again at the
end of the portion. Your selected portion will be repeated continually.
To return to normal playback, press A-B to select [Off].
Selecting a subtitle language
During playback, press SUBTITLE ( ) repeatedly to select a desired subtitle
language.
Watching from a different angle
If the angle indicator appears on the screen for a moment, you can select a different camera angle by pressing ANGLE ( ) repeatedly.
Hearing a different audio
During playback, press AUDIO ( ) repeatedly to switch between the available
audio languages, channels or encoding methods.
Slow down the playing speed
During playback, press SLOW (t or T) to slow down reverse or forward playback. You can change the various playback speed by pressing SLOW (t or T)
repeatedly. Press PLAY (
ALL
DivX
DVD
ALL
DivX
DVD
DVD
DVD
DVD
DVD
DivX
DVD
(
DivX
DivX
ACD
DivX
: Forward only)
N) to continue play at normal speed.
WMA
ACD
MP3
10
DP450-P.ADEULLK_ENG_MFL61857019.10 10DP450-P.ADEULLK_ENG_MFL61857019.10 10 2/23/09 3:27:21 PM2/23/09 3:27:21 PM
Page 11

DivX
Watching an enlarged video image
During playback or pause mode, press ZOOM repeatedly to select zoom
mode. You can move through the zoomed picture using vVb B buttons. Press
CLEAR to exit. (100 % p 200 % p 300 % p 400 % p 100 %)
Viewing the title menu
Press TITLE to display the disc's title menu, if available.
Viewing the DVD menu
Press MENU to display the disc menu, if available.
DVD
DVD
Starting play from selected time
Searches for the starting point of entered time code.
clock icon. Enter a time then press ENTER.
hour, 10 minutes, and 20 seconds, enter "11020" and press ENTER. If you
enter the wrong number, press CLEAR to enter again.
DVD
ACD
DVD
ACD
Playing in random order
During playback or in stop mode, press RANDOM for playback in random order.
Press RANDOM again to return to normal playback.
Mark a scene on a disc
You can mark a position on a disc to return to at the place. Simply press
MARKER at the desired position. The marker icon will appear on-screen briefly.
Repeat to place up to nine markers.
Also you can recall or clear the positions. Press SEARCH and [Marker Search]
menu will appear. Use b or B to select a desired marker on the menu, then
press ENTER to recall it or CLEAR to clear it.
Last Scene Memory
This unit memorizes last scene from the last disc that is viewed. The last scene
remains in memory even if you remove the disc from the player or switch off the
unit. If you load a disc that has the scene memorized, the scene is automatically recalled.
DVD
DivX
DVD
For example, to find a scene at 1
WMA
DivX
Press DISPLAY then select
MP3
Screen Saver
The screen saver appears when you leave the unit in Stop mode for about five
minutes. If the Screen Saver is displayed for five minutes, the unit automatically
turns itself off.
Mixed disc – DivX, MP3/WMA and JPEG
When playing a disc contained with DivX, MP3/WMA and JPEG files together,
you can select which menu of files you would like to play by pressing TITLE.
Playing a DivX movie file
BUTTON
1 Open the disc lid:
2 Insert a disc: 3 Close the disc lid: 4 Select a movie file from the menu:
5 Start playback:
6 To stop playback:
Playing a DivX movie file - more you can do
Changing the character set to display DivX® subtitle correctly
Press and hold SUBTITLE for 3 seconds during playback. The language code
will appear. Press b B to select another language code until the subtitle is displayed properly and then press ENTER.
DivX file requirement
DivX file compatibility with this player is limited as follows:
• Available resolution size: 720x576 (W x H) pixel.
• The file names of DivX and subtitle are limited to 45 characters.
• DivX file extensions: “.avi”, “.mpg”, “.mpeg”
• Playable DivX subtitle: SubRip (.srt / .txt), SAMI (.smi),
SubStation Alpha (.ssa/.txt), MicroDVD (.sub/.txt), VobSub (.sub),
SubViewer 2.0 (.sub/.txt), TMPlayer (.txt), DVD Subtitle System (.txt)
• Playable Codec format: “DIVX3.xx”, “DIVX4.xx”, “DIVX5.xx”, “MP43”, “3IVX”.
• Only the playback function is supported with DivX 6.0 in the unit.
• Playable Audio format: “Dolby Digital”, “PCM”, “MP3”, “WMA”
• Sampling frequency: within 8 - 48 kHz (MP3), within 32 - 48 kHz (WMA)
• Bit rate: within 8 - 320 kbps (MP3), within 32 - 192 kbps (WMA),
less than 4Mbps (DivX file)
• CD-R/RW, DVD±R/RW Format: ISO 9660
• Maximum Files/Folders: Less than 600 (total number of files and folders)
OPEN (Z)
v V, MENU
N PLAY
x STOP
11
DP450-P.ADEULLK_ENG_MFL61857019.11 11DP450-P.ADEULLK_ENG_MFL61857019.11 11 2/23/09 3:27:22 PM2/23/09 3:27:22 PM
Page 12
Listening to Music Disc or files
1 Open the disc lid:
2 Insert a disc: 3 Close the disc lid: 4 Select a music from the menu:
5 Start playback:
6 To stop playback:
OPEN (Z)
v V, MENU
N PLAY
x STOP
BUTTON
Viewing photo files
1 Open the disc lid:
2 Insert a disc: 3 Close the disc lid: 4 Select a photo file on the menu:
5 Display the selected file in full screen:
6 To return to the menu:
BUTTON
OPEN (Z)
v V, MENU
N PLAY
x STOP
Listening to Music Disc or files - more you can
do
Creating your own program
You can play the contents of a disc in the order you want by arranging the order
of the musics on the disc. To add a music(s) on the program list, press PROG.
to enter the program edit mode (
Select a desired music on the [List] then press ENTER to add the music to the
program list. Select a music from the program list then press ENTER to start
programmed playback. To clear a music from the program list, select the music
you want to clear then press CLEAR in program edit mode. To clear all music
from the program list, select [Clear All] then press ENTER in program edit
mode. The program is cleared when the disc is removed or the unit is turned
off.
Displaying file information (ID3 TAG)
While playing a MP3 file containing file information, you can display the information by pressing DISPLAY repeatedly. If the file does not have ID3-Tag informa-
tion, [No ID3 TAG] appears on the screen.
MP3/WMA music file requirement
MP3/WMA compatibility with this unit is limited as follows:
• File extensions: “.mp3”, “.wma”
• Sampling frequency: within 8 - 48 kHz (MP3), within 32 - 48kHz (WMA)
• Bit rate: within 8 - 320kbps (MP3), within 32 - 192kbps (WMA)
• CD-R/RW, DVD±R/RW Format: ISO 9660
• Maximum Files/Folders: Less than 600 (total number of files and folders)
12
E
mark appears on the menu).
Viewing photo files - more you can do
Viewing photo files as a slide show
Use vV b B to highlight ( ) icon then press ENTER to start slide show.
You can change slide show speed using b B when ( ) icon is highlighted.
Skip to the next/previous photo
Press SKIP (. or >) to view the previous/next photo.
Rotate a photo
Use vV to rotate the photo in full screen counter clockwise or clockwise while
viewing a photo in full screen.
Pause a slide show
Press PAUSE/STEP (X) to pause a slide show. Press PLAY ( N) to continue
the slide show.
Listening to music during slide show
You can listen to music during slide show, if the disc contain music and photo
files together. Use vV b B to highlight ( ) icon then press ENTER to start
slide show.
Watching an enlarged photo image
While viewing a photo in full screen, press ZOOM repeatedly to select zoom
mode. You can move through the zoomed photo using vVb B buttons. Press
CLEAR to exit.
Photo file requirement
JPEG file compatibility with this unit is limited as follows:
• File extensions: “.jpg”
• Photo size: Less than 2MB recommended
• CD-R/RW, DVD±R/RW Format: ISO 9660
• Maximum Files/Folders: Less than 600 (total number of files and folders)
DP450-P.ADEULLK_ENG_MFL61857019.12 12DP450-P.ADEULLK_ENG_MFL61857019.12 12 2/23/09 3:27:22 PM2/23/09 3:27:22 PM
Page 13

Language Codes
Use this list to input your desired language for the following initial settings: Disc Audio, Disc Subtitle, Disc Menu.
Language Code
Afar 6565
Afrikaans 6570
Albanian 8381
Ameharic 6577
Arabic 6582
Armenian 7289
Assamese 6583
Aymara 6588
Azerbaijani 6590
Bashkir 6665
Basque 6985
Bengali, Bangla 6678
Bhutani 6890
Bihari 6672
Breton 6682
Bulgarian 6671
Burmese 7789
Byelorussian 6669
Chinese 9072
Language Code
Croatian 7282
Czech 6783
Danish 6865
Dutch 7876
English 6978
Esperanto 6979
Estonian 6984
Faroese 7079
Fiji 7074
Finnish 7073
French 7082
Frisian 7089
Galician 7176
Georgian 7565
German 6869
Greek 6976
Greenlandic 7576
Guarani 7178
Gujarati 7185
Language Code
Hausa 7265
Hebrew 7387
Hindi 7273
Hungarian 7285
Icelandic 7383
Indonesian 7378
Interlingua 7365
Irish 7165
Italian 7384
Japanese 7465
Kannada 7578
Kashmiri 7583
Kazakh 7575
Kirghiz 7589
Korean 7579
Kurdish 7585
Laothian 7679
Latin 7665
Latvian, Lettish 7686
Language Code
Lingala 7678
Lithuanian 7684
Macedonian 7775
Malagasy 7771
Malay 7783
Malayalam 7776
Maori 7773
Marathi 7782
Moldavian 7779
Mongolian 7778
Nauru 7865
Nepali 7869
Norwegian 7879
Oriya 7982
Panjabi 8065
Pashto, Pushto 8083
Persian 7065
Polish 8076
Portuguese 8084
Area Codes
Choose an area code from this list.
Area Code
Afghanistan AF
Argentina AR
Australia AU
Austria AT
Belgium BE
Bhutan BT
Bolivia BO
Brazil BR
Cambodia KH
Canada CA
Chile CL
China CN
Colombia CO
Congo CG
Area Code
Costa Rica CR
Croatia HR
Czech Republic CZ
Denmark DK
Ecuador EC
Egypt EG
El Salvador SV
Ethiopia ET
Fiji FJ
Finland FI
France FR
Germany DE
Great Britain GB
Greece GR
Area Code
Greenland GL
Hong Kong HK
Hungary HU
India IN
Indonesia ID
Israel IL
Italy IT
Jamaica JM
Japan JP
Kenya KE
Kuwait KW
Libya LY
Luxembourg LU
Malaysia MY
Area Code
Maldives MV
Mexico MX
Monaco MC
Mongolia MN
Morocco MA
Nepal NP
Netherlands NL
Netherlands Antilles AN
New Zealand NZ
Nigeria NG
Norway NO
Oman OM
Pakistan PK
Panama PA
Language Code
Quechua 8185
Rhaeto-Romance 8277
Rumanian 8279
Russian 8285
Samoan 8377
Sanskrit 8365
Scots Gaelic 7168
Serbian 8382
Serbo-Croatian 8372
Shona 8378
Sindhi 8368
Singhalese 8373
Slovak 8375
Slovenian 8376
Spanish 6983
Sudanese 8385
Swahili 8387
Swedish 8386
Tagalog 8476
Area Code
Paraguay PY
Philippines PH
Poland PL
Portugal PT
Romania RO
Russian Federation RU
Saudi Arabia SA
Senegal SN
Singapore SG
Slovak Republic SK
Slovenia SI
South Africa ZA
South Korea KR
Spain ES
Language Code
Tajik 8471
Tamil 8465
Telugu 8469
Thai 8472
Tonga 8479
Turkish 8482
Turkmen 8475
Twi 8487
Ukrainian 8575
Urdu 8582
Uzbek 8590
Vietnamese 8673
Volapük 8679
Welsh 6789
Wolof 8779
Xhosa 8872
Yiddish 7473
Yoruba 8979
Zulu 9085
Area Code
Sri Lanka LK
Sweden SE
Switzerland CH
Taiwan TW
Thailand TH
Turkey TR
Uganda UG
Ukraine UA
United States US
Uruguay UY
Uzbekistan UZ
Vietnam VN
Zimbabwe ZW
13
DP450-P.ADEULLK_ENG_MFL61857019.13 13DP450-P.ADEULLK_ENG_MFL61857019.13 13 2/23/09 3:27:22 PM2/23/09 3:27:22 PM
Page 14
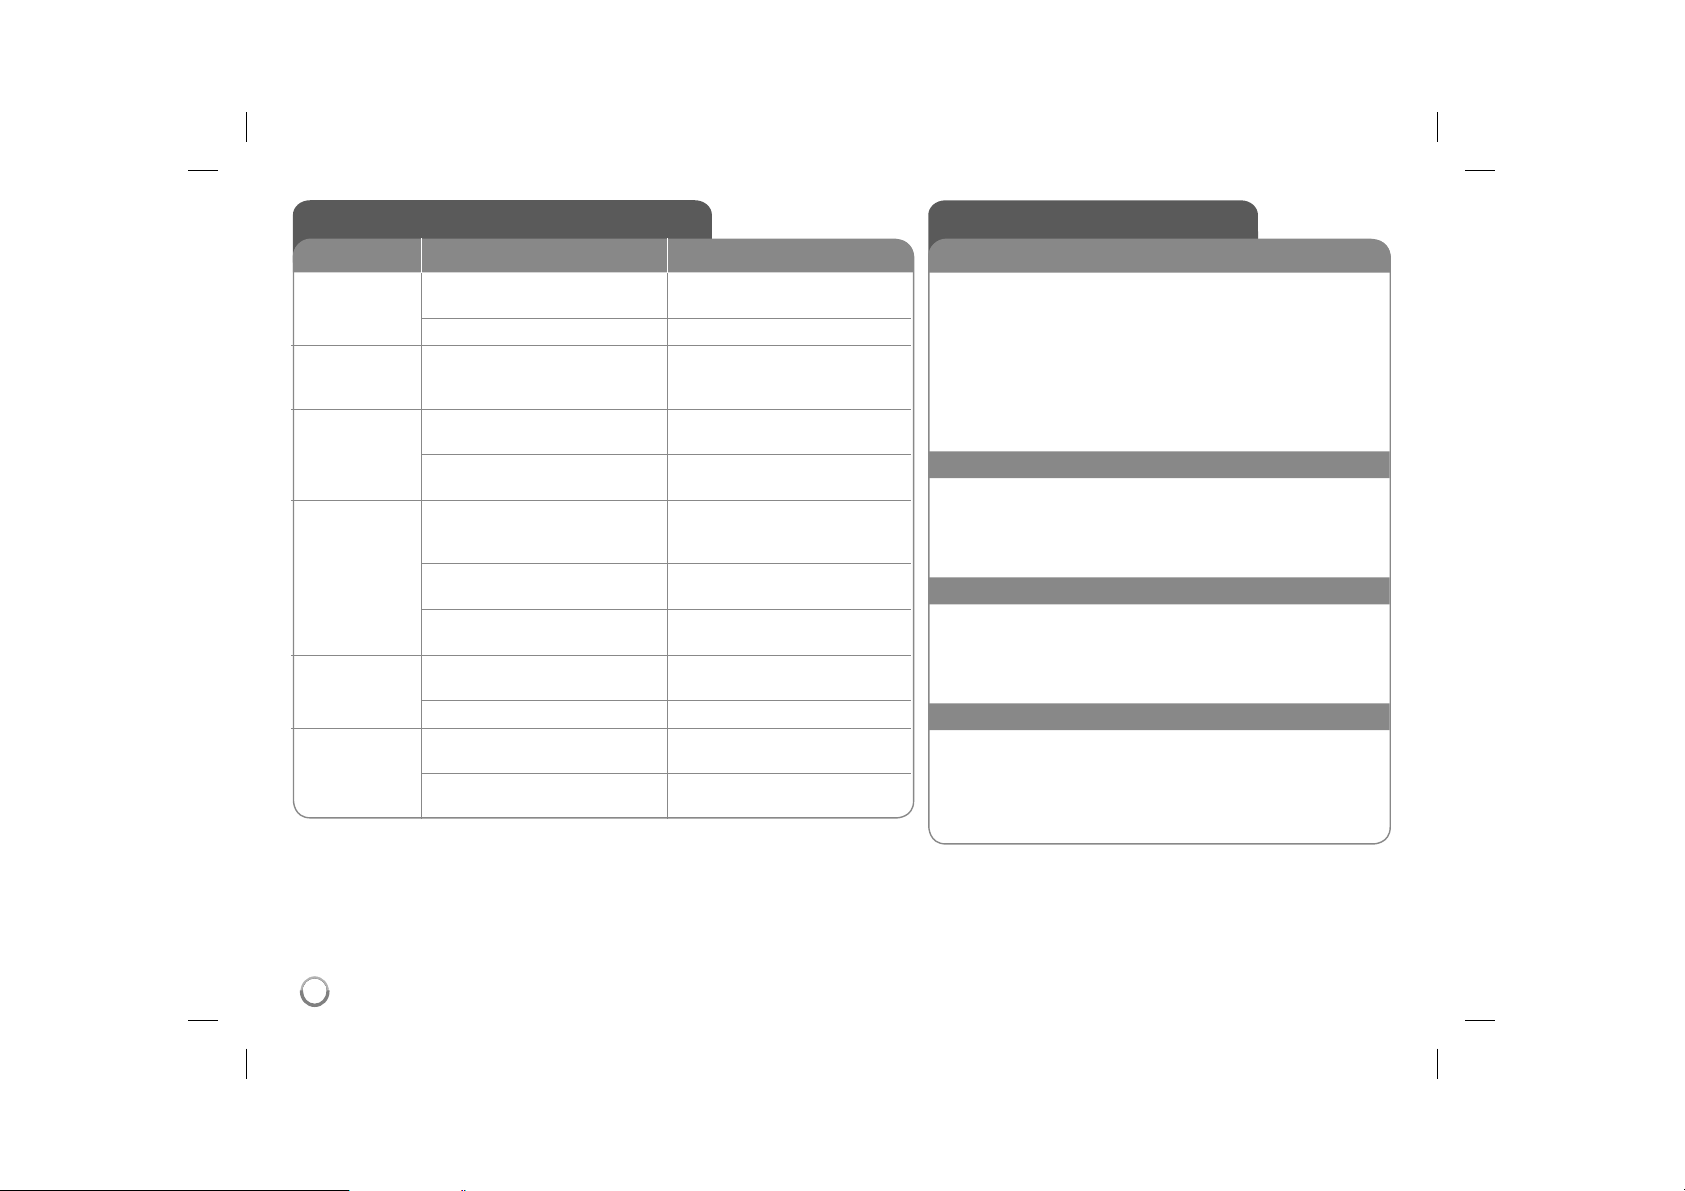
Troubleshooting
Symptom Cause Correction
No power. The power cord is disconnected. Plug the power cord into the wall
The battery is discharged. Recharge the battery.
The power is on,
but the unit does
not work.
No picture. The TV is not set to receive the
No sound. The equipment connected with
The unit does
not start playback.
The remote
control does not
work properly.
No disc is inserted. Insert a disc.
signal from the unit.
The video cable is not connected
securely.
the audio cable is not set to
receive the signal from the unit.
The volume is set to minimum. Use the volume controller to
The AUDIO options are set to the
wrong position.
An unplayable disc is inserted. Insert a playable disc. (Check the
The rating level is set. Change the rating level.
The remote control is not pointed
at the remote sensor on the unit.
The remote control is too far from
the unit.
outlet securely.
Select the appropriate video input
mode on the TV.
Connect the video cable securely.
Select the correct input mode of
the audio amplifier.
adjust the volume.
Set the AUDIO settings to the
correct position.
disc type and regional code.)
Point the remote control at the
remote sensor of the unit.
Operate the remote control closer
to the unit.
Specifications
General
Power requirements DC 12V
Power consumption 12W
External Dimensions 202 x 42.5 x 167 mm (W x H x D)
Net Weight (Approx.) 0.78kg
Operating temperature: 5 °C to 40 °C
Operating humidity 5 % to 90 %
Laser Semiconductor laser
Signal system PAL
Connectors
Audio/Video Output ø3.5mm mini jack x 1
- Video: 1.0 V (p-p), 75 Ω, sync negative
- Audio: 1.5 Vrms (1 KHz, 0 dB)
Earphone terminal ø3.5mm stereo mini jack x 1
Liquid Crystal Display
Panel size 7 inches wide (diagonal)
Projection system R.G.B. stripe
Driving system TFT active matrix
Resolution 480 x 234 (WQVGA)
Accessories
• Audio/Video adapter
• AC Adapter (MPA-630)
• Automotive Adapter (DPDC1)
• Remote Control
• Battery for Remote Control (Lithium Battery)
Designs and specifications are subject to change without
prior notice.
14
DP450-P.ADEULLK_ENG_MFL61857019.14 14DP450-P.ADEULLK_ENG_MFL61857019.14 14 2/23/09 3:27:23 PM2/23/09 3:27:23 PM
Page 15

DP450 / DP450P / DP450R
DEUTSCH
P/NO : MFL61857019
DP450-P.ADEULLK_GER_MFL61857019 1DP450-P.ADEULLK_GER_MFL61857019 1 2/23/09 3:25:07 PM2/23/09 3:25:07 PM
Page 16

ACHTUNG
GEFAHR VON STROMSCHLÄGEN
NICHT ÖFFNEN
VORSICHT: ZUR VERMEIDUNG VON
STROMSCHLÄGEN DIE ABDECKUNG (BZW.
RÜCKWAND) NICHT ABNEHMEN. KEINE VOM
BENUTZER ZU WARTENDEN BAUTEILE IM INNERN.
WARTUNGSARBEITEN NUR VON FACHPERSONAL
DURCHFÜHREN LASSEN.
Das Blitzsymbol innerhalb eines gleichseitigen Dreiecks warnt den Benutzer vor nicht
isolierter gefährlicher Spannung im Innern des
Produktgehäuses, die so stark sein kann, dass
für Personen die Gefahr von Strom-schlägen
besteht.
Das Ausrufungszeichen innerhalb eines gleichseitigen Dreiecks weist den Benutzer auf
wichtige Anleitungen zu Betrieb und Wartung
in der mit den Gerät gelieferten Literatur hin.
ACHTUNG: ZUR VERMEIDUNG VON BRÄNDEN
ODER STROMSCHLÄGEN DAS GERÄT NIEMALS
REGEN ODER FEUCHTIGKEIT AUSSETZEN.
ACHTUNG: Das Gerät nicht an einem beengten Ort
einbauen, wie z. B. in einem Bücherregal o. ä.
VORSICHT: Belüftungsöffnungen dürfen nicht
verdeckt werden. Das Gerät muss gemäß den
Herstellerangaben aufgestellt werden. Schlitze
und Öffnungen im Gehäuse dienen zur Belüftung,
gewährleisten einen ordnungsgemäßen Betrieb des
Produktes und schützen das Gerät vor Überhitzung.
Die Öffnungen sollten niemals verdeckt werden, indem
das Produkt auf ein Bett, ein Sofa, einen Teppich oder
eine ähnliche Oberfläche gestellt wird. Dieses Produkt
sollte nicht in einen eingelassenen Bereich, wie z. B.
einem Bücherschrank oder einem Regal, aufgestellt
werden, falls keine ordnungsgemäße Belüftung
gewährleistet werden kann oder falls die Richtlinien des
Herstellers nicht befolgt werden können.
VORSICHT: Dieses Gerät besitzt
ein Laser-System. Um das Gerät
richtig zu verwenden, lesen Sie
dieses Benutzerhandbuch sorgfältig durch und bewahren Sie es
auf. Setzen Sie sich zur Wartung
mit einem qualifizierten Servicebetrieb in Verbindung.
Durch Bedienungen, Einstellungen oder Verfahren, die
in dieser Anleitung nicht erwähnt werden, kann gefährliche Strahlung freigesetzt werden. Um direkten Kontakt
mit dem Laserstrahl zu vermeiden, darf das Gehäuse
nicht geöffnet werden. Ansonsten tritt eine sichtbare
Laserstrahlung auf. NIEMALS IN DEN LASERSTRAHL
BLICKEN.
VORSICHT: Das Gerät sollte keinem Wasser ausgesetzt werden (Tropf- oder Spritzwasser) und es sollten
keine mit Flüssigkeiten gefüllte Behälter auf das Gerät
gestellt werden, wie z. B. Vasen.
ACHTUNG
• Die Belüftungsöffnungen niemals mit
Gegenständen verdecken, wie z. B. Zeitungen,
Tischdecken oder Gardinen.
• Kein offenes Feuer auf das Gerät stellen, wie z.
B. Kerzen.
• Verbrauchte Batterien stets sicher entsorgen
und nicht ins Feuer werfen. Achten Sie auf eine
umweltgerechte Entsorgung der Altbatterien.
• Das Gerät sollte ausschließlich in tropischen und
gemäßigten Klimazonen eingesetzt werden.
• Ein übermäßiger Schalldruck durch die Kopfhörer
kann Gehörschäden
verursachen.
• Die Batterie keiner extremen Hitze aussetzen,
wie z. B. direkte Sonneneinstrahlung, Feuer o. ä.
• Die im Gerät eingelegte Batterie sollte aus
Sicherheitsgründen nicht herausgenommen
werden. Falls die Batterie ausgetauscht werden
muss, wenden Sie sich an den nächsten
autorisierten LG Electronics Kundendienst oder
an Ihren Händler.
VORSICHTSHINWEISE zum Netzkabel
Die meisten Geräte sollten an einen eigenen
Stromkreis angeschlossen werden.
D. h. eine einzelne Steckdose, an die ausschließlich
das jeweilige Gerät angeschlossen wird und die keine
weiteren Steckdosen oder Zweigschaltkreise besitzt.
Beachten Sie hierzu die technischen Daten des
Gerätes in diesem Benutzerhandbuch. Steckdosen
niemals überlasten. Überlastete, lockere oder
beschädigte Steckdosen, Verlängerungskabel,
beschädigte Stromkabel oder rissige
Leitungsisolationen bergen Gefahren und können
Stromschläge oder Brände verursachen. Überprüfen
Sie regelmäßig die Kabel des Gerätes. Bei Schäden
oder Verschleiß das entsprechende Kabel abziehen,
das Gerät nicht mehr verwenden und das Kabel von
einem zugelassenen Kundendienst durch ein gleich
wertiges Kabel ersetzen lassen.
Vermeiden Sie eine unsachgemäße physikalische
oder mechanische Nutzung des Stromkabels, wie z. B.
Verdrehen, Knicken, Zerstechen, Einklemmen in einer
Tür oder Darauftreten.
Achten Sie besonders auf Stecker, Steckdosen und
auf die Punkte, an denen das Kabel aus dem Gerät
heraustritt. Das Netzkabel beim Abziehen immer am
Netzstecker selbst festhalten. Achten Sie bei der
Montage des Gerätes darauf, dass der Netzstecker
leicht zugänglich ist.
Entsorgung von Altgeräten
1. Falls an einem Produkt das Symbol eines
durchgestrichenen Abfallbehälters angebracht ist, unterliegt es der EU-Richtlinie
2002/96/EC.
2. Alle elektrischen und elektronischen
Produkte sollten getrennt vom Hausmüll bei
einer Sammelstelle eines staatlichen oder
lokalen Entsorgungsunternehmens entsorgt
werden.
3. Eine ordnungsgemäße Entsorgung des
Altgerätes hilft bei der Vermeidung von
Umwelt- und Gesundheitsschäden.
4. Informationen zur Entsorgung Ihrer Altgeräte
erhalten Sie bei Ihrer Stadtverwaltung,
Ihrem Entsorgungsunternehmen oder beim
Händler, bei dem Sie das Produkt erworben
haben.
Dieses Produkt wurde gemäß der EMVRichtlinie 2004/108/EC und der
Niedrigspannungsrichtlinie 2006/95/EC
hergestellt.
Europäische Vertretung:
LG Electronics Service Europe B.V.
Veluwezoom 15, 1327 AE Almere, The
Netherlands
(Tel : +31–036–547–8940)
2
DP450-P.ADEULLK_GER_MFL61857019 2DP450-P.ADEULLK_GER_MFL61857019 2 2/23/09 3:25:08 PM2/23/09 3:25:08 PM
Page 17
Abspielbare Disc-Typen ............................................................................. 3
Akku-Batterie .............................................................................................. 3
Hauptgerät .................................................................................................. 4
Fernbedienung ........................................................................................... 5
Netzanschlüsse .......................................................................................... 6
Geräteanschlüsse ..................................................................................... 7
Einstellungen vornehmen ....................................................................... 8-9
Anzeige von Disc-Informationen ................................................................9
Wiedergabe einer Disc ........................................................................ 10-11
Wiedergabe von DivX-Filmdateien ............................................................11
Inhalt
Audio-Discs oder Musik-Dateien anhören ................................................ 12
Fotodateien anzeigen ............................................................................... 12
Sprachcodes............................................................................................. 13
Ländercodes ............................................................................................. 13
Störungsbehebung ................................................................................... 14
Technische Daten .................................................................................... 14
Abspielbare Disc-Typen
Typ Logo
DVD-VIDEO: Gekaufte oder ausgeliehene Spielfilm-DVDs.
DVD-R: Nur finalisierte Discs im Video-Modus
DVD-RW: Nur Discs im VR-Modus, Video-Modus und
finalisierte Discs
DVD+R: Nur Discs im Video-Modus
DVD+RW: Nur Discs im Video-Modus
Audio CD: Gekaufte Musik-CDs oder CD-R/CD-RW Discs im
Audio-CD-Format.
Des Weiteren können mit diesem Gerät DVD±R/RW- und CD-R/RW-Discs mit
Audio-, DivX-, MP3-, WMA- und/oder JPEG-Dateien wiedergegeben werden.
Abhängig von der Aufnahmequalität und dem physikalischen Zustand der
Disc bzw. von den Merkmalen des Aufnahmegerätes und der verwendeten
Brennsoftware können bestimmte DVD±RW-/DVD±R- oder CD-RW-/CD-R-Discs
auf diesem Gerät nicht wiedergegeben werden.
Hergestellt mit Genehmigung der Dolby Laboratories. Dolby und das
Doppel-D-Symbol sind Markenzeichen von Dolby Laboratories.
“DVD Logo” ist ein Markenzeichen von DVD Format/Logo Licensing
Corporation.
Über das Anzeigesymbol
Während des Betriebs erscheint auf dem Fernsehbildschirm u. U. das Symbol
“
” und zeigt an, dass die im Benutzerhandbuch erläuterte Funktion für
diese Disc nicht verfügbar ist.
Ländercodes
Der Ländercode dieses Players ist auf der Geräterückseite aufgedruckt. Es
können nur DVD-Discs mit diesem Ländercode oder mit dem Ländercode
“ALLE” wiedergegeben werden.
• Die meisten DVD-Discs besitzen ein Globus-Symbol mit einer oder
mehreren Nummern auf der Hülle. Diese Nummer muss zur Wiedergabe der
Disc mit dem Ländercode des Gerätes übereinstimmen.
• Bei der Wiedergabe einer DVD mit einem anderen Ländercode als
das Gerät erscheint die Meldung “Ländercode überprüfen” auf dem
Fernsehbildschirm.
Copyrights
Es ist gesetzlich verboten, urheberrechtlich geschütztes Material ohne
Genehmigung zu kopieren, auszustrahlen, zu zeigen, über Kabel zu
senden, öffentlich wiederzugeben oder zu verleihen. Dieses Gerät verfügt
über eine Kopierschutzfunktion von Macrovision. Einige Discs enthalten
Kopierschutzsignale. Wenn Sie die Bilder dieser Dieses Produkt verwendet
eine durch US-Patente und andere geistige Eigentumsrechte geschützte
Kopierschutz-Technologie. Für den Einsatz dieser Kopierschutz-Technologie ist
die Genehmigung durch Macrovision erforderlich. Der Einsatz ist ohne
zusätzliche Genehmigung von Macrovision ausschließlich für den
Heimgebrauch und andere begrenzte Vorführungen vorgesehen. Reverse
Engineering oder Zerlegung verboten.
Akku-Batterie
• Die interne Akku-Batterie ermöglicht es Ihnen, Ihre Dateien zu transportieren
und ohne Netzanschluss vorzuführen.
• Die interne Akku-Batterie wird nur aufgeladen, wenn das Gerät
ausgeschaltet und der Netzadapter an eine Steckdose angeschlossen ist.
• Beim Einschalten des Gerätes wird der Ladevorgang beendet.
• Der Ladevorgang dauert etwa zweieinhalb Stunden.
• Laufzeit im Akkubetrieb: ca. zweieinhalb Stunden.
Die Laufzeit im Akkubetrieb kann je nach Ladezustand der Batterie, den
Gebrauchsgewohnheiten sowie den Umgebungsbedingungen variieren, und
die maximal mögliche Spielzeit beträgt bis zu drei Stunden.
• Die Batterieanzeige leuchtet während des Ladevorgangs rot. Zodra het
opladen voltooid, zal de indicator uitgeschakeld worden.
• Indien de resterende tijd van het batterijvermogen minder is dan een paar
minuten, zal “
Check Battery” op het scherm getoond worden.
3
3
DP450-P.ADEULLK_GER_MFL61857019 3DP450-P.ADEULLK_GER_MFL61857019 3 2/23/09 3:25:09 PM2/23/09 3:25:09 PM
Page 18
Hauptgerät
4
a LCD-Anzeige
b Lautsprecher
c Tasten zur Wiedergabesteuerung
• N (Play)/ X (Pause): Startet die Wiedergabe. Wiedergabe vorübergehend unter-
brechen. Zum Fortfahren der Wiedergabe nochmal drücken.
• x (Stop): Wiedergabe anhalten.
• . (Überspringen): Suchlauf zurück*, oder zurück zum Anfang des aktuellen
Kapitels oder Tracks, oder zurück zum vorherigen Kapitel oder Track.
• > (Überspringen): Suchlauf vor*, oder zum nächsten Kapitel oder Track.
* Halten Sie die Taste ca. zwei Sekunden lang gedrückt.
d Funktionstasten
• DISPLAY: Bildschirmmenü einblenden.
• SETUP: Setup-Menü aufrufen oder verlassen.
• COLOR / BRIGHT*: Aufrufen des Menüs Helligkeit oder Farbe für die
LCD-Anzeige.
• MENU: DVD-Menü aufrufen.
* Drücken Sie zur Einstellung der Farbe oder Helligkeit der LCD-Anzeige mehrmals
die Taste COLOR/BRIGHT am Hauptgerät, um das Menü Helligkeit bzw. Farbe
aufzurufen, und nehmen Sie dann mit den Tasten b / B die Einstellung vor.
Drücken Sie zum Übernehmen der Einstellungen die Taste ENTER.
e Tasten zur Menüsteuerung
• b B v V (links/rechts/auf/ab): Auswahl eines Menüpunktes.
• ENTER: Bestätigen der Menüauswahl.
f OPEN (Z): CD-Klappe öffnen.
g Fernbedienungssensor: Die Fernbedienung auf diesen Punkt richten.
h Batterie-Ladeanzeige und Betriebsanzeige
• Diese Anzeige leuchtet während des Ladevorgangs rot und bei vollständig
aufgeladener Batterie grün. (Hinweise finden Sie auf Seite 3.)
Beim Einschalten des Gerätes leuchtet die Anzeige einige Sekunden lang grün auf.
•
i CD-Klappe
j 1/q (Netzschalter): Schaltet das Gerät EIN und AUS.
Hinweis: Zur Bedienung dieses Gerätes muss der Netzschalter auf EIN geschaltet
werden.
k w VOL (Lautstärkeregler): Einstellen der Lautstärke der integrierten Lautsprecher
und der Kopfhörer
(Kopfhörer): Anschluss für Kopfhörer.
l
m AV OUT: Anschluss an ein Fernsehgerät mit Video- und Audio-Eingang.
n DC 12V IN: Anschluss des Netzadapters oder Auto-Adapters.
DP450-P.ADEULLK_GER_MFL61857019 4DP450-P.ADEULLK_GER_MFL61857019 4 2/23/09 3:25:09 PM2/23/09 3:25:09 PM
Page 19
Fernbedienung
Hinweis: Zur Bedienung dieses Gerätes über die
Fernbedienung muss der Netzschalter auf EIN
geschaltet werden. (Siehe Seite 4)
a
b
c
d
l l l l l l l a l l l l l l l
POWER (1): Schaltet das Gerät EIN und AUS.
AUDIO (
SUBTITLE (
Untertitel.
ANGLE ( ): Auswahl des DVD-Blickwinkels, falls
verfügbar.
): Sprache oder Tonkanal wählen.
): Auswahl der Sprache für
SKIP/SEARCH (. / >): Suchlauf* zurück/vor.
Weiter zum nächsten bzw. vorherigen Kapitel/Titel.
* Halten Sie die Taste ca. zwei Sekunden lang
gedrückt.
SLOW (t / T): Zeitlupe zurück oder vor.
l l l l l l l b l l l l l l l
SETUP: Setup-Menü aufrufen oder verlassen.
MENU: DVD-Menü aufrufen.
vV b B: Bewegen innerhalb der Menüs.
ENTER (
RETURN (O): In einem Menü zurückbewegen
oder Menü verlassen.
DISPLAY: Bildschirmmenü einblenden.
l l l l l l l c l l l l l l l
PAUSE/STEP (X): Wiedergabe vorübergehend
unterbrechen. Zur Einzelbildwiedergabe mehrmals
drücken.
PLAY (N): Wiedergabe starten.
STOP (x): Wiedergabe anhalten.
Nummerntasten: Auswahl von
Aufzählungsoptionen in einem Menü.
PROG.: Aufrufen des Programmierungsmodus.
CLEAR: Löschen einer Track-Nummer aus der
Programmliste.
l l l l l l l d l l l l l l l
TITLE: Titelmenü der Disc aufrufen
REPEAT:
A-B: Wiederholung eines Abschnittes.
ZOOM: Vergrößern eines Bildes.
MARKER: Einen Punkt während der Wiedergabe
markieren.
SEARCH: Aufrufen des Menüs [Markierung
suchen].
RANDOM: Titel in zufälliger Reihenfolge
wiedergeben.
): Bestätigt die Menüauswahl.
Kapitel, Track, Titel oder alle wiederholen.
Batterie in die Fernbedienung einlegen
Drücken Sie die Batteriehalterung zusammen
und ziehen Sie das Batteriefach an der Lasche
heraus. Legen Sie die Lithium-Knopfzelle mit der
richtigen Polung in das Batteriefach ein. Setzen Sie
das Batteriefach mit der Knopfzelle wieder in der
Fernbedienung ein und achten Sie darauf, dass es
fest eingesetzt ist.
• Zum Austausch der Batterie der Fernbedienung
verwenden Sie immer 3V Lithium-Knopfzellen,
beispielsweise CR. 2025 oder gleichwertig.
• Entsorgen Sie verbrauchte Batterien gemäß den
örtlichen Vorschriften.
Vorsichtshinweise zur Lithium-Batterie
• Bei falsch eingelegter Batterie besteht
Explosionsgefahr.
• Die Batterie nur gegen eine Batterie desselben
Typs austauschen.
• Beachten Sie die Warnhinweise zum Austausch
in der Nähe der Batterie.
Warnung: Bei unsachgemäßer Behandlung
besteht Gefahr eines Brandes oder von
chemischen Verbrennungen. Laden Sie die
Knopfzelle nicht auf, zerlegen Sie sie nicht,
verbrennen Sie sie nicht und erhitzen Sie sie
nicht über 100°C (212°F).
Tauschen Sie die Batterie ausschließlich
gegen eine Batterie Matsushita Elec. Ind. Co.,
Ltd. (Panasonic), Teilenr. CR. 2025 aus. Bei
Verwendung eines anderen Batterietyps besteht
Brand- oder Explosionsgefahr. Entsorgen Sie
verbrauchte Batterien. Die Knopfzelle für Kinder
unzugänglich aufbewahren. Zerlegen Sie die
Batterie nicht und werfen Sie sie nicht ins Feuer.
5
DP450-P.ADEULLK_GER_MFL61857019 5DP450-P.ADEULLK_GER_MFL61857019 5 2/23/09 3:25:10 PM2/23/09 3:25:10 PM
Page 20
Netzanschlüsse
Anschluss des Netzadapters
Schließen Sie den mitgelieferten Netzadapter am Gerät sowie an eine
Steckdose an.
Rechte Geräteseite
Schließen Sie das Netzkabel am Netzadapter an.
(Die tatsächlichen Ausführungen können von den
Abbildungen abweichen.)
Rechte Geräteseite
Anschluss
an eine
Steckdose
Freigabetaste für
Netzkabel
Anschluss an die “DC 12V IN”-Buchse.
Netzadapter
• Dieser Netzadapter wird mit 100-240V, 1A bei 50/60Hz betrieben.
• Wenden Sie sich bei Fragen zum richtigen Netzstecker oder Netzkabel an
einen Elektrohändler.
• Hergestellt von NANJING WANLIDA TECHNOLOGY CO., LTD
Anschluss des Auto-Adapters
Dieses Gerät sowie der Auto-Adapter sind für den Gebrauch in Fahrzeugen
mit 8,5-16 Volt Stromversorgung und negativer Masse vorgesehen. Dies ist der
Standard bei den meisten Fahrzeugen. Falls Ihr Fahrzeug über eine andere Art der
Stromversorgung verfügt, kann das Gleichstromsystem nicht verwendet werden.
Anschluss an den
Zigarettenanzünder
des Fahrzeugs
Anschluss an die
“DC 12V IN”-Buchse
Auto-Adapter
• Dieser Auto-Adapter wird mit 8,5-16 V Gleichstrom betrieben.
• Wenden Sie sich bei Fragen zum richtigen Auto-Adapter an einen
Elektrohändler.
• Hergestellt von NANJING WANLIDA TECHNOLOGY CO., LTD.
Vorsicht
• Um Stromschläge und mögliche Beschädigungen am Gerät oder Fahrzeug
zu vermeiden, muss der Auto-Adapter stets vom Zigarettenanzünder
abgezogen werden, bevor der Stecker vom Gerät getrennt wird.
• Zur Sicherheit ist im Auto-Adapter eine Sicherung mit 250 V und 3 Ampere
integriert.
• Trennen Sie den Auto-Adapter vor dem Starten des Motors vom
Zigarettenanzünder des Fahrzeugs.
• Das Gerät darf nicht mit leerer Autobatterie betrieben werden. Durch
Spitzenströme des Autoanlassers kann die Gleichstromsicherung
durchbrennen.
• Wenn die Versorgungsspannung des Fahrzeugs unter etwa 10 Volt abfällt,
funktioniert das Gerät u. U. nicht richtig.
• Das Gerät darf nicht an Orten aufbewahrt werden, an denen die Temperatur
70°C übersteigt. Ansonsten könnte der Tonabnehmer beschädigt werden.
Zum Beispiel:
- In einem Auto mit geschlossenen Fenstern bei direkter
Sonneneinstrahlung.
- In der Nähe der Heizung.
6
DP450-P.ADEULLK_GER_MFL61857019 6DP450-P.ADEULLK_GER_MFL61857019 6 2/23/09 3:25:11 PM2/23/09 3:25:11 PM
Page 21
Geräteanschlüsse
Audio- und Videoanschlüsse zum Fernsehgerät
Verbinden Sie die AV OUT-Buchse am Gerät wie gezeigt mit den entsprechenden Eingangsbuchsen am Fernsehgerät.
TV
Rechte Geräteseite
Anschluss an
die “AV OUT”Buchse
Audio-/Videokabel
(nicht im Lieferumfang enthalten)
RotWeißGelb
Audio-/Video-Adapter
7
DP450-P.ADEULLK_GER_MFL61857019 7DP450-P.ADEULLK_GER_MFL61857019 7 2/23/09 3:25:12 PM2/23/09 3:25:12 PM
Page 22
Einstellungen vornehmen
w
TASTE
1 Setup-Menü aufrufen: SETUP
2
Gewünschte Option der ersten Ebene wählen
3 Zur zweiten Ebene wechseln:
4
Gewünschte Option der zweiten Ebene wählen
5 Zur dritten Ebene wechseln:
6 Einstellung ändern:
Einstellungen vornehmen - und mehr
Erstes Einschalten des Gerätes (optional)
Beim ersten Einschalten des Gerätes erscheint das Menü zur Sprachauswahl.
Hier können Sie eine Sprache festlegen, die das Gerät künftig verwendet.
Wählen Sie mit den Tasten vV b B die gewünschte Sprache und drücken Sie
zur Bestätigung der Auswahl auf ENTER. Wählen Sie mit den Tasten b B die
Option [Eingabe] und drücken Sie ENTER.
Spracheinstellungen
Menüsprache – Wählen Sie eine Sprache zur Anzeige des Setup- und des
Bildschirmmenüs.
Disc-Audio/Disc-Untertitel/Disc-Menü – Wählen Sie eine Sprache für Disc-
Audio/Untertitel/Menüs.
[Voreinstellung]: Die auf der Disc aufgezeichnete Originalsprache wird
verwendet.
[Andere]: Um eine andere Sprache zu wählen, geben Sie über die
Nummerntasten die entsprechende vierstellige Nummer ein, die Sie der
Liste der Sprachcodes entnehmen können (siehe Seite 13), und drücken Sie
ENTER. Um eine falsche Eingabe zu korrigieren, drücken Sie mehrmals die
Taste CLEAR, um die Ziffern nacheinander zu löschen und zu korrigieren.
[Aus] (Disc-Untertitel): Untertitel ausschalten.
Anzeigeeinstellungen vornehmen
Bildformat – Wählen Sie ein Bildschirmformat aus, je nach dem Format Ihres
Fernsehgerätes.
[4:3]: Beim Anschluss an ein Standard 4:3-Fernseher.
[16:9]: Beim Anschluss an einen 16:9-Fernseher.
:
v V
B
:
v V
B
v V / ENTER
Anzeigemodus – Bei Auswahl von 4:3 müssen Sie zudem festlegen, wie im
Breitbildformat ausgestrahlte Fernsehprogramme und Filme auf dem Bildschirm
angezeigt werden sollen.
[Letterbox]: Zeigt das Widescreen-Bild mit schwarzen Balken am oberen und
unteren Bildrand an.
[Panscan]: Der gesamte 4:3-Bildschirm wird ausgefüllt, wobei das Bild an
den Rändern u. U. abgeschnitten wird.
Audio-Spracheinstellungen
DRC (Steuerung des Dynamikbereichs) – Für einen klaren Klang bei
geringer Lautstärke (nur Dolby Digital). Stellen Sie diese Option auf [Ein], um
die Funktion zu aktivieren.
Vocal – Stellen Sie diese Option nur zur Wiedergabe einer Mehrkanal-KaraokeDVD auf [Ein]. Die Karaoke-Kanäle der Disc werden in normalen ZweikanalStereoton umgewandelt
.
Sperrfunktionen einstellen
Um die Sperrfunktionen zu nutzen, muss die Option [Orts Code] eingestellt
werden. Wählen Sie die Option [Orts Code] und drücken Sie die Taste B.
Geben Sie ein vierstelliges Kennwort ein und drücken Sie ENTER. Geben Sie
das Kennwort erneut ein und drücken Sie zur Bestätigung auf ENTER. Bei
falscher Eingabe des Kennwortes drücken Sie auf CLEAR und korrigieren Sie
die Eingabe.
Falls Sie das Kennwort vergessen sollten, kann es zurückgesetzt werden.
Nehmen Sie dazu zunächst die Disc aus dem Gerät heraus. Rufen Sie das
Setup-Menü auf und geben Sie die sechsstellige Nummer “210499” ein, um das
Kennwort zu löschen.
Rating – Festlegen einer Freigabestufe. Je geringer die Freigabestufe
eingestellt wird, desto höher sind die Einschränkungen. Wählen Sie die Option
[Aufheben], um die Einstufung zu deaktivieren.
Password – Festlegen oder Ändern des Kennwortes für die Sperrfunktionen.
[Neu]: Geben Sie über die Nummerntasten ein neues vierstelliges Kennwort
ein und drücken Sie ENTER. Geben Sie das Kennwort zur Bestätigung
nochmals ein.
[Ändern]: Geben Sie das aktuelle Kennwort und anschließend zweimal das
neue Kennwort ein.
Area Code – Auswahl eines Codes für Ihr jeweiliges Land als Freigabestufe
für die Wiedergabe. Durch diese Option wird festgelegt, welche
Standardeinstellungen für das jeweilige Land zur Einstufung von DVDs durch
die Kindersicherung angewendet werden sollen (siehe Seite 13).
8
DP450-P.ADEULLK_GER_MFL61857019 8DP450-P.ADEULLK_GER_MFL61857019 8 2/23/09 3:25:12 PM2/23/09 3:25:12 PM
Page 23
Weitere Einstellungen
DivX(R) VOD – Von uns erhalten Sie eine DivX® VOD-Registrierungskennung
(Video On Demand), die Sie zum Ausleihen bzw. zum Kauf von Filmen über
den DivX® VOD-Dienst berechtigt. Weitere Hinweise erhalten Sie unter
www.divx.com/vod. Markieren Sie das Symbol [Auswählen] und drücken Sie
ENTER, um den Registrierungscode für dieses Gerät anzuzeigen.
Sämtliche über DivX® VOD heruntergeladenen Filme können nur mit diesem
Gerät wiedergegeben werden.
Anzeige von Disc-Informationen
TASTE
Drücken Sie während der Wiedergabe
1
auf DISPLAY:
2 Eintrag auswählen:
Anzeigeeinstellungen für Menüs
3
vornehmen:
4 Menü verlassen: DISPLAY
Anzeige von Disc-Informationen - und mehr
Um einen Eintrag auszuwählen, drücken Sie die Taste vV und ändern oder
wählen Sie mit den Tasten b B eine Einstellung.
Aktuelle Titel- Nummer/Gesamtanzahl der Titel
Aktuelle Kapitelnummer/Gesamtanzahl der Kapitel
Verstrichene Spielzeit
Gewählte Sprache oder Kanal
Gewählte Untertitel
Ausgewählter Kamerawinkel/Gesamtanzahl der Kamerawinkel
In diesem Handbuch verwendete Symbole
Abschnitte, in deren Titel eines der folgenden Symbole angegeben ist, sind nur
für den dargestellten Disc- oder Dateityp gültig.
ALL
DVD
DivX
Alle Discs und Dateien
DVD und finalisierte DVD±R/RW
DivX-Dateien
DISPLAY
v V
b B / ENTER
ACD
MP3
WMA
Audio-CDs
MP3-Dateien
WMA-Dateien
9
DP450-P.ADEULLK_GER_MFL61857019 9DP450-P.ADEULLK_GER_MFL61857019 9 2/23/09 3:25:13 PM2/23/09 3:25:13 PM
Page 24
Wiedergabe einer Disc
TASTE
1 CD-Klappe öffnen:
2 Disc einlegen: -
3 CD-Klappe schließen: 4 Wiedergabe starten:
5 Lautstärke einstellen: VOLUME
6 Wiedergabe anhalten:
Wiedergabe einer Disc - und mehr
Wiedergabe anhalten
Je nach Disc-Typ speichert das Gerät den letzten Wiedergabepunkt beim
Anhalten der Wiedergabe über die Taste STOP (x). Auf dem Bildschirm
erscheint kurz die Anzeige “ Xx
Wiedergabe (vom Anhaltepunkt) auf PLAY (
STOP (x) oder beim Auswerfen der Disc (“ x” wird eingeblendet), wird der
Anhaltepunkt gelöscht.(Xx=Pause Stop, x=Stop) Der Fortsetzungspunkt wird
beim Betätigen einer Taste u. U. gelöscht (zum Beispiel POWER oder OPEN).
Wiedergabe einer DVD mit vorhandenem Menü
Die meisten heutigen DVDs enthalten Menüs, die vor der Wiedergabe eines
Films angezeigt werden. Menüeinträge werden über die Tasten vV b B oder
über die Nummerntasten ausgewählt. Drücken Sie zur Auswahl einer Option die
Taste ENTER.
Wiedergabe von DVD VR-Discs
Mit diesem Gerät können im Videoaufnahmeformat (VR) aufgenommene
DVD-RW-Discs wiedergegeben werden. Beim Einlegen einer DVD VR-Disc wird
das Menü auf dem Bildschirm angezeigt. Wählen Sie mit den Tasten vV einen
Titel aus und drücken Sie auf PLAY (
aufzurufen, drücken Sie die Taste MENU oder TITLE.
Einige DVD-VR-Discs enthalten CPRM-Daten des DVD-REKORDERS. Diese
Discs werden vom Player nicht unterstützt. Solche Discs können auf diesem
Gerät nicht abgespielt werden.
Zum nächsten/vorherigen Kapitel/Titel/Datei springen
Drücken Sie die Taste SKIP (>), um zum nächsten Kapitel/Titel/Datei zu springen.
Drücken Sie die Taste SKIP (.), um zum Anfang des aktuellen Kapitel/Titel/Datei
zu springen.
Drücken Sie zweimal kurz die Taste SKIP (.), um zum vorherigen Kapitel/Titel/
Datei zu springen.
10
”. Drücken Sie zum Fortsetzen der
N). Bei erneutem Drücken von
N). Um das DVD-VR-Menü
OPEN (Z)
N PLAY
x STOP
DVD
ALL
Wiedergabe Pause
Drücken Sie die Taste PAUSE/STEP (X), um die Wiedergabe zu unterbrechen.
Drücken Sie zum Fortsetzen der Wiedergabe auf PLAY (
Einzelbildwiedergabe
Drücken Sie zur Einzelbildwiedergabe mehrmals die Taste PAUSE/STEP (X).
Wiederholte Wiedergabe
Drücken Sie mehrmals die Taste REPEAT, um einen Titel zur wiederholten
Wiedergabe auszuwählen. Daraufhin wird der aktuelle Titel, das Kapitel oder
der Track mehrmals wiedergegeben. Drücken Sie zur normalen Wiedergabe
mehrmals die Taste REPEAT und wählen Sie die Option [Aus].
Schneller Vor- und Rücklauf
Halten Sie zum schnellen Vorlauf bzw. schnellen Rücklauf während der
Wiedergabe die Taste SKIP (. oder >) gedrückt. Die
Wiedergabege-schwindigkeit kann durch wiederholtes gedrückt halten von
SKIP (. oder >) angepasst werden. Drücken Sie zum Fortsetzen der
Wiedergabe mit normaler Geschwindigkeit die Taste PLAY (
Abschnittswiederholung (A-B)
Drücken Sie am gewünschten Startpunkt sowie am gewünschten Endpunkt der
Wiederholung die Taste A-B. Der gewählte Abschnitt wird daraufhin fortlaufend
wiederholt. Drücken Sie zur normalen Wiedergabe die Taste A-B und wählen
Sie die Option [Aus].
Auswahl der Untertitelsprache
Drücken Sie während der Wiedergabe mehrmals die Taste SUBTITLE ( ),
rum die gewünschte Untertitelsprache auszuwählen.
Anzeige verschiedener Kamerawinkel
Falls das Winkel-Anzeige kurz auf dem Bildschirm erscheint, können Sie
zwi-schen unterschiedlichen Kamerawinkeln wählen. Drücken Sie dazu
mehrmals die Taste ANGLE (
Tonkanal wechseln
Drücken Sie während der Wiedergabe mehrmals die Taste AUDIO ( ), um eine
andere Sprache, einen anderen Tonkanal oder eine andere Kodierungsmethode
einzustellen. audio languages, channels or encoding methods.
ALL
DVD
DVD
ALL
DVD
).
DivX
DivX
DVD
DVD
DivX
DivX
DivX
DVD
ACD
ACD
N).
WMA
N).
MP3
Wiedergabegeschwindigkeit verringern
DivX
DVD
(
Drücken Sie zur langsamen Wiedergabe zurück bzw. vor während der
Wiedergabe die Taste SLOW (t oder T). Die
Wiedergabegeschwindig-keit kann durch mehrmaliges Drücken der Taste
SLOW (t oder T) angepasst werden. Drücken Sie zum Fortsetzen der
Wiedergabe mit normaler Geschwindigkeit die Taste PLAY (N).
: nur Wiedergabe vor)
DP450-P.ADEULLK_GER_MFL61857019 10DP450-P.ADEULLK_GER_MFL61857019 10 2/23/09 3:25:14 PM2/23/09 3:25:14 PM
Page 25
DivX
DVD
DVD
ACD
DVD
DVD
WMA
DVD
ACD
MP3
DivX
DivX
DVD
Videobild vergrößern
Drücken Sie während oder bei angehaltener Wiedergabe mehrmals die Taste
ZOOM, um das Bild vergrößert anzuzeigen. Mit den Tasten vVb B können Sie
das vergrößerte Bild verschieben. Drücken Sie zur normalen Anzeige auf CLEAR.
(100 % p 200 % p 300 % p 400 % p 100 %)
Titelmenü aufrufen
Drücken Sie die Taste TITLE, um das Titelmenü der Disc einzublenden, falls
vorhanden.
DVD-Menü aufrufen
Drücken Sie die Taste MENU, um das Disc-Menü einzublenden, falls vorhanden.
Wiedergabe ab einer gewählten Zeitposition
Suche nach einem Startpunkt einer eingegebenen Wiedergabezeit. Drücken Sie
die Taste DISPLAY und wählen Sie das Uhr-Symbol. Geben Sie eine Zeit ein
und drücken Sie ENTER. Um beispielsweise eine Szene an der Wiedergabezeit
1 Stunde, 10 Minuten und 20 Sekunden zu suchen, geben Sie den Wert
"11020" ein und drücken Sie ENTER. Drücken Sie bei falscher Eingabe auf die
Taste CLEAR und korrigieren Sie die Eingabe.
Zufallswiedergabe
Drücken Sie während oder bei angehaltener Wiedergabe die Taste RANDOM,
um die Titel in zufälliger Reihenfolge wiederzugeben. Drücken Sie zur normalen
Wiedergabe nochmals auf RANDOM.
Lieblingsszenen markieren
Sie haben die Möglichkeit, eine Stele auf der Disc zum späteren Aufrufen zu
markieren. Drücken Sie an der gewünschten Stelle einfach die Taste MARKER.
Daraufhin wird kurz das Markierungs-Symbol auf dem Bildschirm angezeigt. Auf
diese Weise können bis zu neun Markierungen gesetzt werden.
Diese Lesezeichen können jederzeit aufgerufen oder gelöscht werden. Drücken
Sie die Taste SEARCH, um das Menü [Markierung suchen] aufzurufen. Wählen
Sie im Menü mit den Tasten b und B ein gewünschtes Lesezeichen aus und
drücken Sie zu Aufrufen auf ENTER bzw. zum Löschen auf CLEAR.
Letzte Szene merken
Dieses Gerät merkt sich die zuletzt gespielte Szene der letzten Disc. Die letzte
Szene wird im Speicher aufbewahrt, auch wenn die Disc aus dem Player
herausgenommen oder das Gerät ausgeschaltet wird. Beim erneuten Einlegen
dieser Disc wird die gespeicherte Szene automatisch wiedergegeben.
Bildschirmschoner
Der Bildschirmschoner erscheint, wenn auf dem Gerät ca. fünf Minuten lang
keine Wiedergabe erfolgt. Nachdem der Bildschirmschoner etwa fünf Minuten
lang aktiviert ist, schaltet sich das Gerät automatisch ab.
Discs mit Mischinhalten – DivX, MP3/WMA und JPEG
Bei der Wiedergabe einer Disc mit DivX-, MP3-/WMA- und JPEG-Dateien
können Sie wählen, für welche Dateien das Menü zur Wiedergabe angezeigt
werden soll, indem Sie die Taste TITLE drücken.
Wiedergabe von DivX-Filmdateien
TASTE
1 CD-Klappe öffnen:
2 Disc einlegen: -
3 CD-Klappe schließen: 4 Filmdatei aus dem Menü wählen:
5 Wiedergabe starten:
6 Wiedergabe anhalten:
Wiedergabe von DivX-Filmdateien - und mehr
Ändern des Zeichensatzes zur fehlerfreien Anzeige von DivX®Untertiteln
Halten Sie während der Wiedergabe die Taste SUBTITLE drei Sekunden lang
gedrückt. Daraufhin erscheint der Sprachcode. Wählen Sie mit den Tasten b B
einen Sprachcode aus, bis die Untertitel korrekt angezeigt werden, und drücken
Sie die Taste ENTER.
Voraussetzungen für DivX-Dateien
Die Kompatibilität dieses Gerätes mit DivX-Dateien unterliegt folgenden
Einschränkungen:
• Mögliche Auflösung: maximal 720 x 576 Bildpunkte (B x H).
• Der Dateiname von DivX- und Untertitel-Dateien darf maximal 45 Zeichen
lang sein.
• DivX-Dateierweiterungen: “.avi”, “.mpg”, “.mpeg”
• Abspielbare DivX-Untertitel: SubRip (.srt / .txt), SAMI (.smi),
SubStation Alpha (.ssa/.txt), MicroDVD (.sub/.txt), VobSub (.sub),
SubViewer 2.0 (.sub/.txt), TMPlayer (.txt), DVD Subtitle System (.txt)
• Abspielbare Codecs: “DIVX3.xx”, “DIVX4.xx”, “DIVX5.xx”, “MP43”, “3IVX”
• Die Wiedergabefunktion wird nur für DivX 6.0 unterstützt.
• Abspielbare Audioformate: “Dolby Digital”, “PCM”, “MP3”, “WMA”
• Abtastfrequenz: zwischen 8 - 48 kHz (MP3), zwischen 32 - 48 kHz (WMA)
• Bitrate: zwischen 8 - 320 Kbps (MP3), zwischen 32 - 192 Kbps (WMA),
maximal 4 Mbps (DivX-Datei)
• CD-R/RW-, DVD±R/RW-Format: ISO 9660
• Maximale Anzahl Dateien/Ordner: Unter 600 (Gesamtzahl der Dateien und
Ordner)
OPEN (Z)
v V, MENU
N PLAY
x STOP
11
DP450-P.ADEULLK_GER_MFL61857019 11DP450-P.ADEULLK_GER_MFL61857019 11 2/23/09 3:25:15 PM2/23/09 3:25:15 PM
Page 26
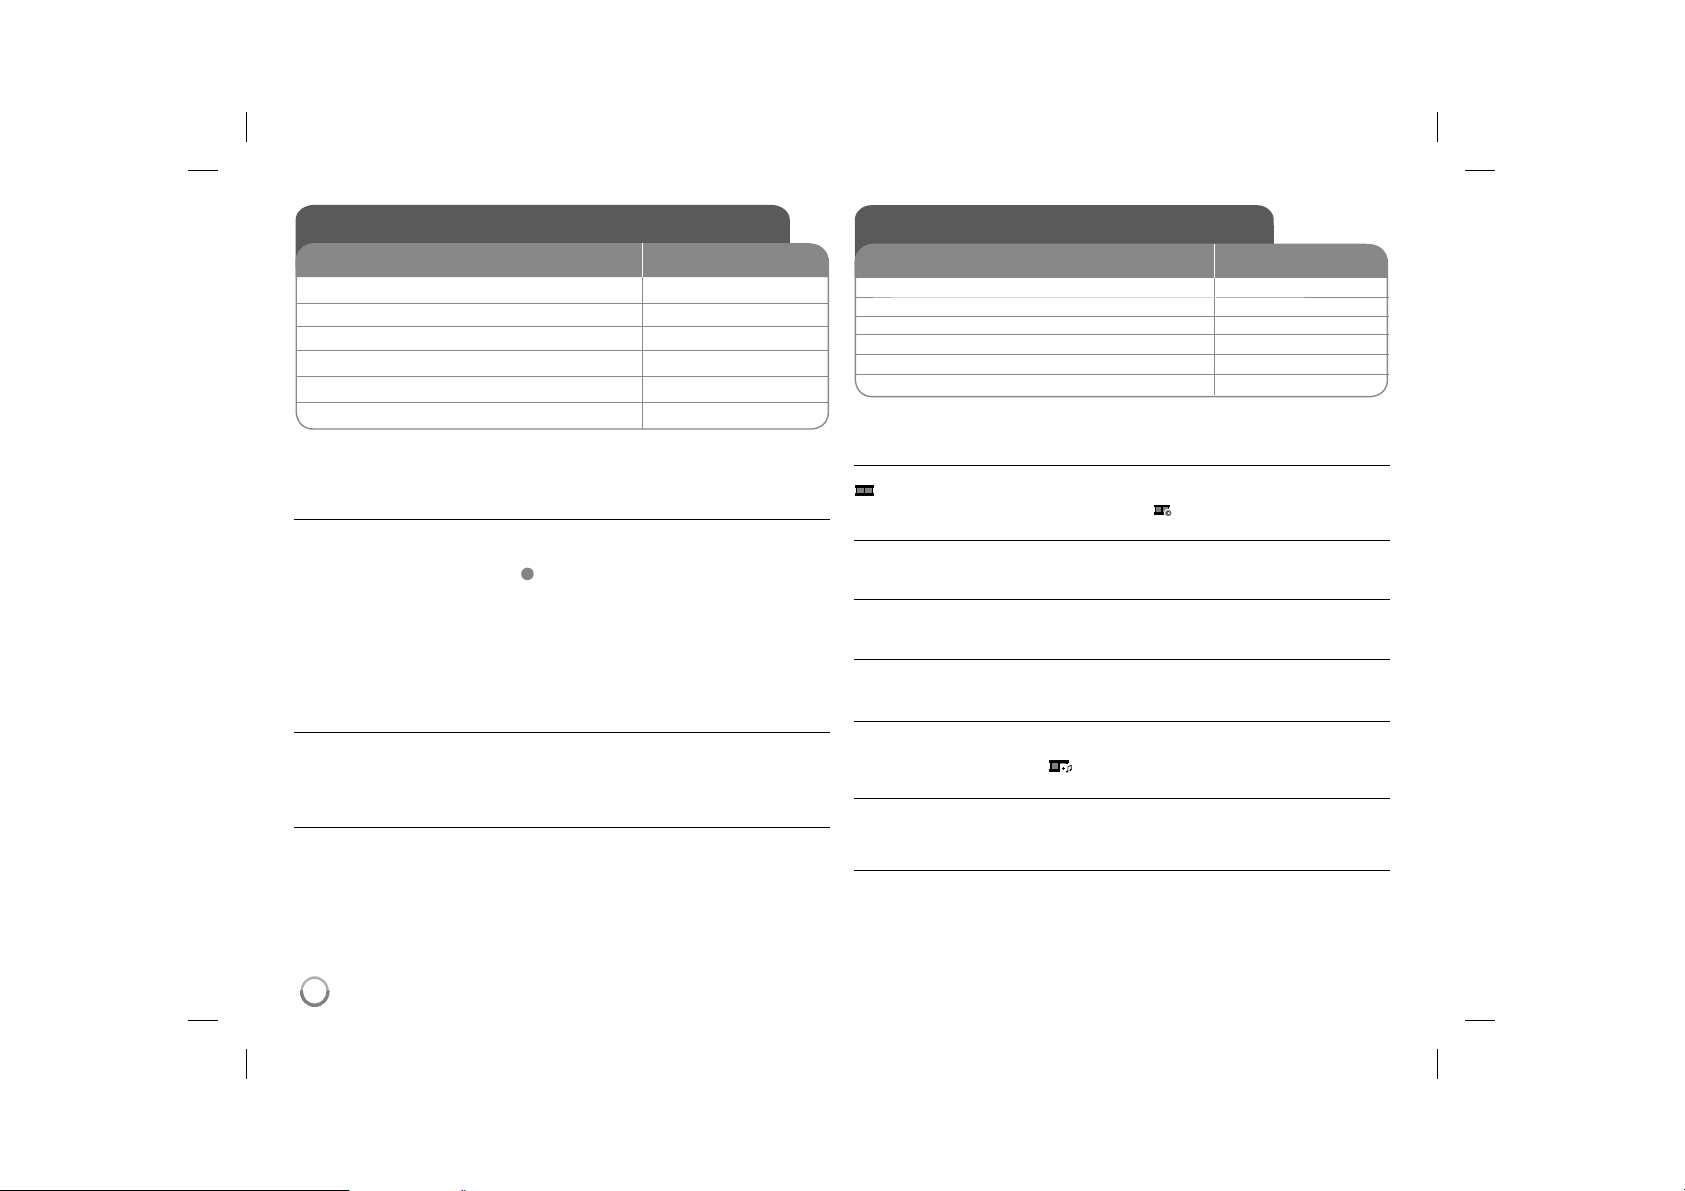
Audio-Discs oder Musik-Dateien anhören
TASTE
1 CD-Klappe öffnen:
2 Disc einlegen: -
3 CD-Klappe schließen: 4 Musikdatei aus dem Menü wählen:
5 Wiedergabe starten:
6 Wiedergabe anhalten:
Audio-Discs oder Musik-Dateien anhören und mehr
Eigene Titel programmieren
Die Titel auf einer Disc können in der gewünschten Reihenfolge wiedergegeben werden, indem die Musiktitel auf der Disc programmiert werden. Drücken
Sie die Taste PROG., um die Programmierfunktion aufzurufen und Musiktitel
zur Programmliste hinzuzufügen (
die gewünschten Musiktitel aus der [Liste] und drücken Sie ENTER, um diese
Titel in der Programmliste einzutragen. Zum Starten der programmier- ten
Wiedergabe wählen Sie einen Titel aus der Programmliste und drücken Sie
ENTER. Um einen Musiktitel aus der Programmliste zu löschen, wählen Sie
die gewünschten Titel aus und drücken Sie in der Programmierfunktion auf
CLEAR. Um alle Musiktitel aus der Programmliste zu löschen, wählen Sie die
Option [Alle Löschen] und drücken Sie ENTER. Die Programmierung wird beim
Herausnehmen der Disc oder beim Ausschalten des Gerätes gelöscht.
Dateiinformationen anzeigen (ID3-TAG)
Während der Wiedergabe einer MP3-Datei mit Dateiinformationen können diese
durch mehrmaliges Drücken der Taste DISPLAY angezeigt werden. Falls die
Datei keine ID3-Tag-Informationen besitzt, erscheint die Meldung [Kein ID3
TAG] auf dem Bildschirm.
Voraussetzungen für MP3-/WMA-Audiodateien
Die Kompatibilität dieses Gerätes mit MP3-/WMA-Dateien unterliegt folgenden
Einschränkungen:
• Dateierweiterungen: “.mp3”, “.wma”
• Abtastfrequenz: zwischen 8 - 48 kHz (MP3), zwischen 32 - 48 kHz (WMA)
• Bitrate: zwischen 8 - 320kbps (MP3), zwischen 32 - 192kbps (WMA)
• CD-R/RW-, DVD±R/RW-Format: ISO 9660
• Maximale Anzahl Dateien/Ordner: Unter 600 (Gesamtzahl der Dateien und
Ordner)
12
E
wird im Menü eingeblendet). Wählen Sie
OPEN (Z)
v V, MENU
N PLAY
x STOP
Fotodateien anzeigen
TASTE
1 CD-Klappe öffnen:
2 Disc einlegen: 3 CD-Klappe schließen: 4 Bilddatei aus dem Menü wählen:
5 Ausgewählte Datei im Vollbild anzeigen:
6 Zurück zum Menü:
Fotodateien anzeigen - und mehr
Fotodateien als Dia-Schau anzeigen
Um die Dia-Schau zu starten, wählen Sie mit den Tasten vV b B das Symbol
und drücken Sie ENTER. Um die Geschwindigkeit der Dia-Schau zu
ändern, drücken Sie bei markiertem Symbol die Tasten b B.
Zum vorherigen/nächsten Bild springen
Drücken Sie die Taste SKIP (. oder >), um das vorherige/nächste Bild
anzuzeigen.
Bilder drehen
Um ein Bild in der Vollbildansicht entgegen dem Uhrzeigersinn bzw. im
Uhrzeigersinn zu drehen, drücken Sie die Tasten vV.
Dia-Schau unterbrechen
Drücken Sie zum Unterbrechen der Dia-Schau die Taste PAUSE/STEP (X).
Drücken Sie zum Fortsetzen der Dia-Schau die Taste PLAY ( N).
Während der Dia-Schau Musik hören
Falls sich auf der Disc Musik- und Fotodateien befinden, können Sie während
einer Dia-Schau Musik hören. Um die Dia-Schau zu starten, wählen Sie mit den
Tasten vV b B das Symbol
Foto vergrößern
Drücken Sie mehrmals die Taste ZOOM, um das Bild während der Anzeige im
Vollbild zu vergrößern. Mit den Tasten vVb B können Sie das vergrößerte Bild
verschieben. Drücken Sie zur normalen Anzeige auf CLEAR.
Voraussetzungen für Fotodateien
Die Kompatibilität dieses Players mit JPEG-Dateien unterliegt folgenden
Einschränkungen:
• Dateierweiterungen: “.jpg”
• Größe der Fotodatei: Max. 2 MB empfohlen
• CD-R/RW, DVD±R/RW Format: ISO 9660
• Maximale Anzahl Dateien/Ordner: Unter 600 (Gesamtzahl der Dateien und
Ordner)
und drücken Sie ENTER.
OPEN (Z)
v V, MENU
N PLAY
x STOP
DP450-P.ADEULLK_GER_MFL61857019 12DP450-P.ADEULLK_GER_MFL61857019 12 2/23/09 3:25:16 PM2/23/09 3:25:16 PM
Page 27

Sprachcodes
Verwenden Sie diese Liste zur Einstellung der gewünschten Sprache für die folgenden Voreinstellungen: Disc-Audio, Disc-Untertitel, Disc-Menü.
Sprache Code
Afar 6565
Afrikaans 6570
Albanisch 8381
Amharisch 6577
Arabisch 6582
Armenisch 7289
Assamesisch 6583
Aymara 6588
Aserbeidschanisch 6590
Baschkirisch 6665
Baskisch 6985
Bengali, Bangla 6678
Bhutanisch 6890
Bihari 6672
Bretonisch 6682
Bulgarisch 6671
Myanmarisch 7789
Weißrussisch 6669
Chinesisch 9072
Sprache Code
Kroatisch 7282
Tschechisch 6783
Danish 6865
Niederländisch 7876
English 6978
Esperanto 6979
Estnisch 6984
Faroerisch 7079
Fiji 7074
Finnish 7073
Französisch 7082
Friesisch 7089
Galizisch 7176
Georgisch 7565
Deutsch 6869
Griechisch 6976
Grönländisch 7576
Guarani 7178
Gujarati 7185
Sprache Code
Haussa 7265
Hebräisch 7387
Ungarisch 7273
Ungarisch 7285
Isländisch 7383
Indonesisch 7378
Interlingua 7365
Irisch 7165
Italienisch 7384
Japanisch 7465
Kanadisch 7578
Kaschmir 7583
Kasachisch 7575
Kirgisisch 7589
Koreanisch 7579
Kurdish 7585
Laotisch 7679
Lateinisch 7665
Lettisch 7686
Sprache Code
Lingala 7678
Litauisch 7684
Mazedonisch 7775
Madagassisch 7771
Malaiisch 7783
Malajalam 7776
Maori 7773
Marathi 7782
Moldawisch 7779
Mongolisch 7778
Nauru 7865
Nepalesisch 7869
Norwegisch 7879
Oriya 7982
Pandschabi 8065
Paschtu 8083
Persisch 7065
Polnisch 8076
Portugiesisch 8084
Sprache Code
Quechua 8185
Retoromanisch 8277
Rumänisch 8279
Russisch 8285
Samoanisch 8377
Sanskrit 8365
Schottisch (Gälisch)
Serbisch 8382
Serbo-Kroatisch 8372
Shona 8378
Sindhi 8368
Singalesisch 8373
Slowakisch 8375
Slowenisch 8376
Spanisch 6983
Sudanesisch 8385
Swahilii 8387
Schwedisch 8386
Tagalog 8476
7168
Ländercodes
Wählen Sie einen Ländercode aus der Liste.
Land Code
Afghanistan AF
Argentinien AR
Australien AU
Österreich AT
Belgien BE
Bhutan BT
Bolivien BO
Brasilien BR
Kambodscha KH
Kanada CA
Chile CL
China CN
Kolumbien CO
Republik Kongo CG
Land Code
Costa Rica CR
Kroatien HR
Tschechische Republik
Dänemark DK
Ecuador EC
Ägypten EG
El Salvador SV
Äthiopien ET
Fiji FJ
Finnland FI
Frankreich FR
Deutschland DE
Großbritannien GB
Griechenland GR
CZ
Land Code
Grönland GL
Hongkong HK
Ungarn HU
Indien IN
Indonesien ID
Israel IL
Italien IT
Jamaika JM
Japan JP
Kenia KE
Kuwait KW
Libyen LY
Luxemburg LU
Malaysia MY
Land Code
Malediven MV
Mexiko MX
Monaco MC
Mongolei MN
Marokko MA
Nepal NP
Niederlande NL
Niederländische AN
Antillen
Neu Seeland NZ
Nigeria NG
Norwegen NO
Oman OM
Pakistan PK
Land Code
Panama PA
Paraguay PY
Philippinen PH
Polen PL
Portugal PT
Rumänien RO
Russische Föderation
Saudi Arabien SA
Senegal SN
Singapur SG
Slowakische Republik SK
Slowenien SI
Südafrika ZA
Südkorea KR
RU
Sprache Code
Tadschikisch 8471
Tamilisch 8465
Telugu 8469
Thai 8472
Tongalesisch 8479
Türkisch 8482
Turkmenisch 8475
Twi 8487
Ukrainisch 8575
Urdu 8582
Usbekisch 8590
Vietnamesisch 8673
Volapük 8679
Walisisch 6789
Wolof 8779
Xhosa 8872
Jiddish 7473
Yoruba 8979
Zulu 9085
Land Code
Spanien ES
Sri Lanka LK
Schweden SE
Schweiz CH
Taiwan TW
Thailand TH
Türkei TR
Uganda UG
Ukraine UA
USA US
Uruguay UY
Usbekistan UZ
Vietnam VN
Simbabwe ZW
13
DP450-P.ADEULLK_GER_MFL61857019 13DP450-P.ADEULLK_GER_MFL61857019 13 2/23/09 3:25:16 PM2/23/09 3:25:16 PM
Page 28

Störungsbehebung
Störung Ursache Behebung
Kein Strom. Das Netzkabel ist nicht
Das Gerät ist
eingeschaltet, es
arbeitet jedoch
nicht.
Kein Bild. Der Fernseher ist nicht für den
Kein Ton.
Das Gerät startet
die Wiedergabe
nicht.
Die
Fernbedienung
funktioniert nicht
richtig.
angeschlossen
Die Batterie ist leer. Batterie aufladen.
Es ist keine Disc eingelegt. Eine Disc einlegen.
Empfang der Geräte-Signale
eingestellt.
Das Videokabel ist nicht fest
angeschlossen.
Die über das Audiokabel
angeschlossenen Geräte sind
nicht für den Empfang von
Geräte-Signalen eingestellt.
Die Lautstärke ist zu gering
eingestellt.
Die AUDIO-Optionen sind falsch
eingestellt.
Es ist eine nicht spielbare Disc
eingelegt.
Es wurde eine Freigabestufe
festgelegt.
Die Fernbedienung ist nicht auf
den Fernbedienungs-Sensor des
Gerätes gerichtet.
Die Fernbedienung ist zu weit vom
Gerät entfernt.
Schließen Sie das Netzkabel fest
an die Netzsteckdose an.
Einen geeigneten
Videoeingangsmodus für den
Fernseher wählen.
Videokabel fest anschließen.
Korrekten Eingangsmodus des
Audio-Verstärkers wählen.
Stellen Sie die Lautstärke über
den Lautstärkeregler ein.
Stellen Sie die AUDIO-Option
richtig ein.
Eine spielbare Disc einlegen.
(Disc-Typ und Ländercode
überprüfen.)
Ändern Sie die Freigabestufe.
Richten Sie die Fernbedienung
auf den Fernbedienungs-Sensor
des Gerätes.
Halten Sie die Fernbedienung
näher an das Gerät.
Technische Daten
Allgemein
Stromversorgung DC 12V
Stromverbrauch 12W
Abmessungen 202 x 42,5x 167 mm (B x H x T)
Gesamtgewicht 0,78 kg
Betriebstemperatur 5°C bis 40°C
Feuchtigkeit 5% bis 90%
Laser Halbleiterlaser
Signalsystem PAL
Anschlüsse
Audio-/Videoausgang ø3,5 mm Anschlussbuchse x 1
- Video: 1,0 V (p-p), 75Ω, negative Synchr.
- Audio: 1,5 Vrms (1 kHz, 0 dB)
Kopfhörerbuchse ø3,5 mm Stereo-
Anschlussbuchse x 1
Flüssigkristallanzeige
Bildschirmgröße 7 Zoll (Diagonal)
Projektion RGB-Zeilen
Steuerungssystem TFT Active Matrix
Auflösung 480 x 234 (WQVGA)
Zubehör
• Audio-/Video-Adapter
• Netzadapter (MPA-630)
• Auto-Adapter (DPDC1)
• Fernbedienung
• Batterie für Fernbedienung (Lithium-Batterie)
Änderungen an Ausführung und technischen Daten sind
ohne Vorankündigung vorbehalten.
14
DP450-P.ADEULLK_GER_MFL61857019 14DP450-P.ADEULLK_GER_MFL61857019 14 2/23/09 3:25:18 PM2/23/09 3:25:18 PM
Page 29

FRANÇAIS
DP450 / DP450P / DP450R
P/NO : MFL61857019
DP450-P.ADEULLK_FRE_MFL61857019 1DP450-P.ADEULLK_FRE_MFL61857019 1 2/23/09 3:25:42 PM2/23/09 3:25:42 PM
Page 30

AVERTISSEMENT
RISQUE DE CHOC ÉLECTRIQUE
NE PAS OUVRIR
ATTENTION : AFIN DE MINIMISER LES RISQUES
D'ÉLECTROCUTION, NE RETIREZ PAS LE
COUVERCLE (OU L'ARRIÈRE). AUCUNE PIÈCE
DE CET APPAREIL N'EST SUSCEPTIBLE D'ÊTRE
RÉPARÉE PAR L'UTILISATEUR. CONFIEZ
L'ENTRETIEN DE L'APPAREIL À DES PERSONNES
QUALIFIÉES.
Le symbole d'un éclair à l'intérieur d'un triangle
sert à avertir l'utilisateur de la présence d'une
tension dangereuse non isolée dans le corps
de l'appareil, qui peut être suffisamment élevée
pour provoquer un risque d'électrocution.
Le symbole d'un point d'exclamation à
l'intérieur d'un triangle sert à avertir l'utilisateur
de la présence d'instructions d'utilisation et de
maintenance (entretien) importantes dans la
documentation qui accompagne l'appareil.
AVERTISSEMENT : POUR PRÉVENIR TOUT RISQUE
D'INCENDIE OU D'ÉLECTROCUTION, N'EXPOSEZ
PAS CET APPAREIL À LA PLUIE OU À L'HUMIDITÉ.
AVERTISSEMENT : n'installez pas cet appareil dans
un espace confiné tel qu'une bibliothèque ou tout autre
meuble similaire.
ATTENTION : n'obstruez pas les ouvertures d'aération.
Installez l'appareil conformément aux instructions du
fabricant. Les fentes et les ouvertures du boîtier servent
à assurer la ventilation et le bon fonctionnement de
l'appareil, ainsi qu'à le protéger contre la surchauffe.
Les ouvertures ne doivent jamais être bloquées en
installant l'appareil sur un lit, un canapé, un tapis ou
toute autre surface similaire. Cet appareil ne doit pas
être placé dans un emplacement fermé tel qu'une
bibliothèque ou une étagère, à moins d'assurer une
ventilation adéquate ou que les instructions du fabricant
l'autorisent.
ATTENTION : cet appareil utilise un système laser. Afin
de garantir l'utilisation correcte de cet appareil, veuillez
lire attentivement ce manuel
d'utilisation et conservez-le pour
vous y référer ultérieurement. Si
l'appareil nécessite une intervention de maintenance, contactez
un point de service après-vente
2
agréé. L'utilisation de commandes, de réglages ou de
procédures autres que ceux décrits dans ce document
peut entraîner une exposition à des radiations dangereuses. Pour éviter l'exposition directe au faisceau laser,
n'essayez pas d'ouvrir le boîtier. Le rayonnement laser
est visible lorsque l'appareil est ouvert. NE REGARDEZ
PAS DIRECTEMENT LE FAISCEAU.
ATTENTION : l'appareil ne doit pas être exposé à des
projections d'eau ou à des éclaboussures, et aucun
objet rempli de liquide tel qu'un vase ne doit être posé
sur l'appareil.
AVERTISSEMENT
• Ne gênez pas la ventilation en recouvrant les ouvertures d'aération avec des objets tels que des journaux, une nappe, des rideaux, etc.
• Ne posez pas sur l'appareil des sources de flamme
nue telle que des bougies allumées.
• Les batteries usagées ne doivent pas être jetées
comme des déchets ordinaires ni être incinérées.
L'élimination des batteries peut avoir des effets sur
l'environnement auxquels il convient de prêter attention.
• N'utilisez l'appareil que sous les climats tempérés ou
tropicaux.
• L'utilisation prolongée d'un casque ou d'écouteurs
à un volume élevé peut provoquer une perte
d'audition.
• La batterie ne doit pas être exposée à une chaleur
excessive, telle que la lumière directe du soleil, les
flammes, etc.
•
Pour votre propre sécurité, ne retirez pas la batterie intégrée à votre appareil.
Si vous devez remplacer la batterie, rapportez
l'appareil au service après-vente ou au
revendeur LG Electronics agréé le plus proche.
PRÉCAUTION concernant le cordon d'alimentation
Il est recommandé de brancher la plupart des
appareils sur un circuit dédié,
Autrement dit, il ne doivent pas être raccordés à une
autrement dit un circuit comportant une prise de courant qui alimente uniquement cet appareil et qui n'a ni
autres prises ni circuit dérivé. Reportez-vous à la page
des spécifications de ce manuel d'utilisation pour plus
de détails. Ne surchargez pas les prises murales. Les
prises murales surchargées, desserrées ou endommagées, les câbles de rallonge, les cordons d'alimentation
effilochés, ou les gaines isolantes craquelées ou
endommagées constituent un danger. Chacune de ces
conditions peut entraîner un risque de choc électrique
ou d'incendie. Examinez régulièrement le cordon de
votre appareil et, si son aspect indique qu'il est endommagé ou détérioré, débranchez-le, cessez d'utiliser
l'appareil, et faites remplacer le cordon par une pièce
de rechange appropriée auprès d'un point de service
après-vente agréé.
Protégez le cordon d'alimentation de sorte qu'il ne
puisse pas être tordu, entortillé, pincé, coincé dans une
porte ou piétiné. Faites particulièrement attention aux
fiches, aux prises murales et au point d'où sort le cordon de l'appareil.
Pour déconnecter l'appareil du réseau électrique,
retirez le cordon d'alimentation de la prise électrique.
Lors de l'installation de l'appareil, assurez-vous que la
prise soit facilement accessible.
Mise au rebut des produits
1. Le pictogramme d'une poubelle barrée sur le
produit indique que le produit est conforme à
la Directive européenne 2002/96/CE.
2. Tous les déchets électriques et électroniques
doivent être collectés séparément et transportés par les services de voirie municipaux
vers des installations spécifiques de collecte
des déchets, identifiées en conséquence par
le gouvernement ou par les autorités locales.
3. Le traitement correct de votre vieil appareil
contribue à protéger l'environnement et la
santé des personnes.
4. Pour plus d'informations sur le traitement de
votre appareil en fin de vie, merci de bien
vouloir vous adresser à votre mairie, au
service de la voirie ou au magasin où vous
avez acheté le produit.
Cet appareil est fabriqué conformément à
la directive CEM 2004/108/CE et la directive
2006/95/CE relative aux appareils
électriques à basse tension.
Représentant européen :
LG Electronics Service Europe B.V.
Veluwezoom 15, 1327 AE Almere, Pays-Bas
(Tél. : +31–036–547–8940)
DP450-P.ADEULLK_FRE_MFL61857019 2DP450-P.ADEULLK_FRE_MFL61857019 2 2/23/09 3:25:43 PM2/23/09 3:25:43 PM
Page 31

Disques compatibles ................................................................................. 3
Batterie rechargeable ................................................................................ 3
Présentation de l'unité principale ...............................................................4
Télécommande ........................................................................................... 5
Connexions d'alimentation ........................................................................ 6
Raccordement de l'appareil ..................................................................... 7
Réglage des paramètres ......................................................................... 8-9
Affichage des informations du disque ........................................................ 9
Lecture dʼun disque ............................................................................. 10-11
Lecture d'un fichier vidéo DivX ..................................................................11
Lecture d'un disque ou fichier musical ..................................................... 12
Lecture d'un fichier photo ......................................................................... 12
Codes de langue ...................................................................................... 13
Codes de région ....................................................................................... 13
Dépannage ............................................................................................... 14
Table des matières
Spécifications ........................................................................................... 14
Disques compatibles
Type Logo
DVD-VIDEO : disques tels que des films disponibles à l'achat ou
à la location.
DVD-R : mode vidéo et finalisé uniquement.
DVD-RW : mode VR, mode vidéo et finalisé uniquement.
DVD+R : mode vidéo uniquement
DVD+RW :
Audio CD : CD musicaux ou CD-R/CD-RW au format CD
musical disponibles à l'achat.
Cet appareil lit les disques DVD±R/RW et CD-R/RW qui contiennent des
fichiers audio, DivX, MP3, WMA et/ou JPEG. Certains DVD±RW/DVD±R
ou CD-RW/CD-R ne peuvent pas être lus sur cet appareil en raison de leur
qualité d'enregistrement ou de l'état physique du disque, ou encore des caractéristiques de l'appareil d'enregistrement et du logiciel de création.
Fabriqué sous licence de Dolby Laboratories. Dolby et le logo représentant un double D sont des marques de commerce de Dolby Laboratories
"DVD Logo" est une marque de commerce de DVD Format/Logo Licensing
Corporation.
mode vidéo uniquement
À propos du symbole ( )
Le symbole "( )" peut apparaître sur votre écran de téléviseur durant le
fonctionnement. Il signifie que la fonction décrite dans ce manuel n'est pas disponible avec ce disque.
Codes de région
Un code de région est indiqué à l'arrière de l'appareil. Ce dernier ne peut lire
que les disques DVD de la même zone ou portant la mention "ALL" (Toutes
zones).
• La plupart des disques DVD comportent un globe avec un ou plusieurs chiffres à l'intérieur clairement visible sur la pochette. Ce chiffre doit coïncider
avec le code de région de votre appareil, autrement le disque ne pourra pas
être lu.
• Si vous essayez de lire un DVD dont le code de région diffère de celui de
votre appareil, vous verrez s'afficher le message "Code régional incorrect" sur
l'écran de votre téléviseur.
Droits d'auteur
La loi interdit de copier, diffuser, montrer, transmettre par câble, présenter
en public ou louer du contenu protégé par droits d'auteur sans autorisation.
Cet appareil intègre la fonction de protection contre la copie développée par
Macrovision. Des signaux de protection contre la copie sont enregistrés sur certains disques. Lors de l'enregistrement et de la lecture des images contenues
sur ces disques, des déformations de l'image apparaîtront. Ce produit est doté
d'une technologie de protection des droits d'auteur protégée par des brevets
américains et d'autres droits sur la propriété intellectuelle. L'utilisation de cette
technologie de protection des droits d'auteur doit faire l'objet d'une autorisation
par Macrovision et est exclusivement réservée à un usage domestique et à
d'autres types de visionnage limités, sauf autorisation expresse de Macrovision.
Les opérations d'ingénierie inverse et de démontage sont interdites.
Batterie rechargeable
• Sa batterie interne rechargeable vous offre la liberté de faire passer l'appareil
de main en main et de lire les fichiers sans le cordon d'alimentation.
• La batterie interne rechargeable commencera à se charger uniquement
une fois l'appareil éteint et l'adaptateur secteur connecté à une prise
d'alimentation.
• Le chargement s'arrête dès que vous mettez l'appareil en marche.
• Le chargement dure environ 2 h 30.
• Autonomie de la batterie : environ 2 h 30.
La durée de fonctionnement sur batterie peut varier en fonction de l'état de la
batterie, du mode de fonctionnement et des conditions environnementales, et
la durée maximale de lecture est de 3 heures.
• Le voyant de la batterie s'allume en rouge pendant le chargement. Une fois
le chargement terminé, le voyant devient vert.
• Lorsque la batterie n'a plus que quelques minutes d'autonomie, le symbole
"
" clignote à l'écran.
3
3
DP450-P.ADEULLK_FRE_MFL61857019 3DP450-P.ADEULLK_FRE_MFL61857019 3 2/23/09 3:25:44 PM2/23/09 3:25:44 PM
Page 32

Présentation de l'unité principale
a Écran LCD
b Haut-parleurs
c Touches de contrôle de la lecture
• N (Play)/ X (Pause): permet de démarrer la lecture et de la suspendre
momentanément ; appuyez une nouvelle fois pour reprendre la lecture.
• x (Stop): permet d'arrêter la lecture.
• . (saut): permet d'effectuer une recherche vers l'arrière* ou de revenir au
début du chapitre, de la piste ou du fichier en cours ou bien à la piste, au fichier
ou au chapitre précédent.
• > (saut): permet d'effectuer une recherche vers l'avant* ou de passer à la piste,
au fichier ou au chapitre suivant.
* Maintenez la touche enfoncée pendant environ deux secondes.
d Touches de fonction
• DISPLAY : permet d'activer l'affichage à l'écran.
• SETUP : permet d'afficher ou de quitter le menu de configuration.
• COLOR/BRIGHT* (Couleur/Luminosité): permet d'afficher le menu Luminosité ou
Couleur pour régler l'écran LCD.
• MENU : permet d'accéder au menu du DVD.
* Pour régler la couleur ou la luminosité de l'écran LCD, appuyez plusieurs fois sur
la touche COLOR/BRIGHT sur l'unité principale pour afficher le menu Luminosité
ou Couleur, puis utilisez les touches b / B pour ajuster la valeur. Appuyez sur
ENTER pour confirmer le réglage.
e Touches de commandes des menus
• b B v V (gauche/droite/haut/bas) : permet de sélectionner une option dans le
menu.
• ENTER : permet de confirmer la sélection du menu.
f OPEN (Z) : permet d'ouvrir le couvercle du disque.
g . Capteur de la télécommande : dirigez la télécommande vers ce point.
• Le voyant s'allume en rouge pendant le chargement et devient vert lorsque le
chargement est terminé. (Voir page 3 pour plus de détails.)
Le voyant s'allume en vert pendant quelques secondes lors de la mise en marche de
•
l'appareil.
h Capteur infrarouge: pointez la télécommande en direction du capteur.
i Couvercle du disque
j 1/q (Alimentation): permet dʼallumer ou dʼéteindre lʼappareil.
Remarque : pour commander l'appareil, le bouton d'alimentation doit être mis en
position ON (Marche).
VOL (Volume): permet de régler le niveau du volume des écouteurs et du haut-parleur
k w
intégré.
l (Prise casque): permet de raccorder un casque ou des écouteurs.
m AV OUT: raccordez cette sortie à un téléviseur doté d'entrées audio et vidéo.
n DC 12V IN: permet de connecter lʼadaptateur secteur ou lʼadaptateur pour allume-cigares.
4
DP450-P.ADEULLK_FRE_MFL61857019 4DP450-P.ADEULLK_FRE_MFL61857019 4 2/23/09 3:25:44 PM2/23/09 3:25:44 PM
Page 33

Télécommande
Remarque : pour commander l'appareil à l'aide de
la télécommande, le bouton d'alimentation doit être
mis en position ON (Marche) (voir page 4).
a
b
c
d
l l l l l l l a l l l l l l l
POWER (1): permet d'allumer ou d'éteindre
l'appareil.
AUDIO ( ): permet de sélectionner une langue
ou un canal audio.
SUBTITLE (
langue pour les sous-titres.
ANGLE ( ): permet de sélectionner un angle de
prise de vue, si disponible.
): permet de sélectionner une
SKIP/SEARCH (. / >): permet d'effectuer
une recherche* vers l'arrière/l'avant. Permet de
passer à la piste, au fichier ou au chapitre
précédent/suivant.
* Maintenez la touche enfoncée pendant environ
deux secondes.
SLOW (t / T): permet de ralentir la lecture vers
l'arrière/l'avant.
l l l l l l l b l l l l l l l
SETUP: permet d'afficher ou de quitter le menu de
configuration.
MENU: permet d'accéder au menu du DVD.
vV b B: permettent de naviguer dans les menus.
ENTER ( ): permet de confirmer la sélection du
menu.
RETURN (O): permet de revenir au menu précé-
dent ou de quitter le menu.
DISPLAY: permet d'activer l'affichage à l'écran.
l l l l l l l c l l l l l l l
PAUSE/STEP (X): permet de suspendre momentanément la lecture. Appuyez à plusieurs reprises
pour la lecture image par image.
PLAY (N): permet de démarrer la lecture.
STOP (x): permet d'arrêter la lecture.
Touches numériques: permettent de sélectionner
les options numérotées dans un menu.
PROG.: permet de sélectionner le mode d'édition
du programme.
CLEAR: permet de supprimer un numéro de piste
de la liste de programmation.
l l l l l l l d l l l l l l l
TITLE: permet d'accéder au menu des titres du
disque.
REPEAT: permet de répéter un chapitre, une piste,
un titre ou tout le disque.
A-B: permet de répéter une section du disque.
ZOOM: permet d'agrandir l'image vidéo.
MARKER: permet de repérer un point lors de la
lecture.
SEARCH : : permet d'afficher le menu [Recherche
d'index].
RANDOM: permet de lire les pistes dans un ordre
aléatoire.
Insertion de la pile dans la télécommande
Pincez le clip du compartiment à pile, puis tirez la
languette pour extraire le compartiment. Insérez
la pile de sorte que le pôle positif (+) soit dans
le même sens que le + du compartiment à pile.
Replacez le compartiment avec la pile dans la télécommande en veillant à ce qu'il soit correctement
enclenché.
• Remplacez la pile de la télécommande par une
pile au lithium de 3 V, du type CR 2025 ou équivalent.
• etez la pile conformément aux réglementations
locales. Ne la mettez pas au feu.
Avertissement concernant le remplacement de
la pile au lithium
• Danger d'explosion si la pile n'est pas remplacée
correctement.
• Remplacez uniquement par le même type de pile.
• Un symbole d'avertissement supplémentaire doit
être apposé près de la pile si son remplacement
est prévu par l'utilisateur.
Avertissement : la pile utilisée dans cet appareil peut présenter un risque d'incendie ou de
brûlure chimique en cas de mauvaise manipulation. Veillez à ne pas la recharger, la démonter,
l'incinérer ou la chauffer au-dessus de 100
°C (212 °F). Remplacez la pile uniquement
par un modèle Matsushita Elec. Ind. Co., Ltd.
(Panasonic), numéro de référence CR 2025.
L'utilisation d'autres modèles peut présenter un
risque d'incendie ou d'explosion. Mettez au rebut
les piles usagées. Gardez les piles hors de la
portée des enfants. Ne démontez pas les piles et
ne les mettez pas au feu.
5
DP450-P.ADEULLK_FRE_MFL61857019 5DP450-P.ADEULLK_FRE_MFL61857019 5 2/23/09 3:25:45 PM2/23/09 3:25:45 PM
Page 34

Connexions d'alimentation
Connexion de l'adaptateur secteur
Connectez l'adaptateur secteur fourni de l'appareil à une prise secteur.
Fixez la prise dʼalimentation sur le boîtier du
transformateur. (lʼensemble peut être différent
de celui représenté).
Côté droit de l'appareil
Branchez
dans une
source
d'alimentation.
libération de la fiche
Adaptateur secteur
• Cet adaptateur secteur fonctionne sur courant alternatif à 100-240 V, 50/60
Hz et 1 A.
• Contactez un distributeur de pièces électriques pour vous aider à choisir un
adaptateur secteur ou un cordon d'alimentation adapté.
• Fabriqué par NANJING WANLIDA TECHNOLOGY CO., LTD
Connexion de l'adaptateur pour allume-cigares
Cet appareil et son adaptateur pour allume-cigares sont conçus pour une
utilisation dans les véhicules dotés d'un circuit électrique à masse négative de
8,5-16 V. C'est le cas de la plupart des véhicules. Si toutefois votre véhicule
possède un type de circuit électrique différent, le système d'alimentation CC ne
peut pas être utilisé.
Bouton de
d'alimentation
Connectez à la prise d'alimentation CC 12 V.
Côté droit de l'appareil
Connectez à la prise
allume-cigares du
véhicule.
Connectez à la prise
d'alimentation CC 12 V.
Adaptateur pour allume-cigares
• Cet adaptateur pour allume-cigares fonctionne sur courant continu à 8,5-16
V.
• Contactez un distributeur de pièces électriques pour vous aider à choisir un
adaptateur pour allume-cigares adapté.
• Fabriqué par NANJING WANLIDA TECHNOLOGY CO., LTD
Attention
• Afin d'éviter tout choc électrique et d'éventuels dommages à votre appareil
ou à votre véhicule, débranchez toujours l'adaptateur de la prise allume-cigares avant de sortir la fiche de votre appareil.
• Un fusible de 3 A/250 V est installé dans l'adaptateur pour allume-cigares à
des fins de protection.
• Pendant le démarrage du moteur, débranchez l'adaptateur de la prise
allume-cigares du véhicule.
• N'utilisez pas l'appareil lorsque la batterie du véhicule est déchargée. Le
courant de crête généré par l'alternateur du véhicule peut faire sauter le fusible CC.
• Si la tension d'alimentation du véhicule tombe en dessous de 10 V environ,
votre appareil risque de ne pas fonctionner correctement.
• Ne laissez pas votre appareil à un endroit où la température dépasse 70 °C
(158 °F), sous peine d'endommager le dispositif de lecture.
Par exemple :
- À l'intérieur d'un véhicule aux vitres fermées et en plein soleil.
- Près d'un appareil de chauffage.
6
DP450-P.ADEULLK_FRE_MFL61857019 6DP450-P.ADEULLK_FRE_MFL61857019 6 2/23/09 3:25:46 PM2/23/09 3:25:46 PM
Page 35

Raccordement de l'appareil
Raccordements audio et vidéo vers votre téléviseur
Connectez la prise AV OUT de lʼappareil aux prises dʼentrée correspondantes
de votre téléviseur, comme indiqué ci-dessous.
TV
Côté droit de l'appareil.
Connectez à la
prise
« AV OUT »
Jaune
blanc
rouge
Câble audio/vidéo
(non fourni)
Adaptateur audio/vidéo
7
DP450-P.ADEULLK_FRE_MFL61857019 7DP450-P.ADEULLK_FRE_MFL61857019 7 2/23/09 3:25:46 PM2/23/09 3:25:46 PM
Page 36

Réglage des paramètres
v
TOUCHE
1 Afficher le menu de configuration : SETUP
Sélectionner une option dans le premier
2
niveau de menu:
3 Accéder au deuxième niveau :
Sélectionner une option dans le deuxième
4
niveau :
5 Accéder au troisième niveau :
6 Modifier le réglage :
Réglage des paramètres - autres possibilités
Première mise en marche (facultatif)
Le menu de sélection de la langue s'affiche lorsque vous mettez l'appareil en
marche pour la première fois. Vous devez d'abord choisir une langue afin de
pouvoir utiliser l'appareil. Utilisez les touches vV b B pour sélectionner une
langue, puis appuyez sur ENTER pour faire apparaître le menu de confirmation.
Utilisez les touches b B pour sélectionner [ENTER], puis appuyez sur ENTER.
Réglage des paramètres de langue
Menu – choisissez une langue pour le menu de configuration et l'affichage à
l'écran.
Disque Audio/Sous-titres du disque/Menu du Disque – choisissez une
langue pour la bande audio, les sous-titres et le menu du disque.
[Original] : désigne la langue d'origine dans laquelle le disque a été
enregistré.
[Autre] : pour choisir une autre langue, appuyez sur les touches numériques,
puis sur ENTER pour saisir le numéro à 4 chiffres correspondant au code de
votre langue (voir la liste page 13). Si vous vous trompez en saisissant les
chiffres, appuyez sur la touche CLEAR pour effacer les chiffres et corriger.
Réglage des paramètres d'affichage
Format TV – sélectionnez le rapport largeur/hauteur en fonction du format
d'écran de votre téléviseur.
[4:3]: sélectionnez cette option lorsque l'appareil est connecté à un téléviseur
4:3 standard.
[16:9]: sélectionnez cette option lorsque l'appareil est connecté à un
téléviseur 16:9.
8
v V
B
v V
B
v V / ENTER
Display Mode (Mode d'affichage) – si vous avez choisi l'option 4:3, vous
devez définir de quelle façon vous voulez afficher les émissions et les films
avec une image large sur votre écran de téléviseur.
[LetterBox]: cette option affiche l'image au format "écran large" avec des
bandes noires en haut et en bas de l'écran.
[Panscan]: cette option affiche l'image en plein écran pour un téléviseur 4:3,
en la coupant si nécessaire.
Réglage des paramètres audio
DRC (Dynamic Range Control) – optimise la clarté du son lorsque le volume
est diminué (Dolby Digital uniquement). Pour obtenir cet effet, activez cette
option.
Vocal – activez cette option uniquement lorsque vous êtes en train de lire un
DVD de karaoké multicanal. Les canaux de karaoké du disque sont mixés pour
obtenir un son stéréo normal.
Réglage des paramètres de verrouillage
Vous devez définir l'option [Code régional] pour pouvoir utiliser les options de
verrouillage. Sélectionnez l'option [Code régional], puis appuyez sur la touche
B. Saisissez un mot de passe à 4 chiffres, puis appuyez sur ENTER.
Saisissez-le à nouveau, et appuyez une nouvelle fois sur ENTER pour confirmer. Si vous vous trompez en saisissant les chiffres, appuyez sur la touche
CLEAR pour corriger.
Si vous avez oublié votre mot de passe, vous pouvez le réinitialiser. Retirez
dʼabord le disque qui se trouve dans lʼunité. Affichez le menu dʼinstallation puis
saisissez le numéro à 6 chiffres « 210499 » pour effacer le mot de passe.
Contrôle parental – sélectionnez un niveau de contrôle. Plus le niveau est bas,
plus le contrôle est sévère. Sélectionnez [Déverrouillage] pour désactiver le
contrôle parental.
Mot De Passe – permet de définir ou de modifier le mot de passe pour les
paramètres de verrouillage.
[Nouveau]: saisissez un nouveau mot de passe à 4 chiffres à l'aide des
touches numériques, puis appuyez sur ENTER. Saisissez de nouveau le mot
de passe pour confirmer.
[Changement]: : saisissez le nouveau mot de passe deux fois de suite après
avoir entré le mot de passe actuel.
Code régional – sélectionnez le code de la zone géographique utilisée pour
déterminer le niveau de contrôle de la lecture. Ce code détermine la zone dont
les standards ont été utilisés pour classifier les DVD soumis au contrôle parental (voir page 13).
DP450-P.ADEULLK_FRE_MFL61857019 8DP450-P.ADEULLK_FRE_MFL61857019 8 2/23/09 3:25:47 PM2/23/09 3:25:47 PM
Page 37

Réglage des autres paramètres
DivX(R) VOD – nous vous fournissons le code d'enregistrement DivX® VOD
qui vous permettra de louer ou d'acheter des vidéos via ce service en ligne de
vidéo à la demande. Pour de plus amples informations, visitez le site web www.
divx.com/vod. Appuyez sur ENTER lorsque l'icône [Sélection] est mise en surbrillance pour voir le code d'enregistrement de l'appareil.
Toutes les vidéos téléchargées via le service DivX® VOD peuvent uniquement
être lues sur cet appareil.
Affichage des informations du disque
TOUCHE
1 Appuyer sur DISPLAY pendant la lecture : DISPLAY
2 Sélectionner une option :
3 Régler les paramètres du menu d'affichage :
4 Quitter le menu : DISPLAY
Affichage des informations du disque - autres
possibilités
Vous pouvez sélectionner une option en appuyant sur les touches vV et sélectionner ou modifier le réglage en appuyant sur les touches b B.
Numéro du titre en cours/nombre total de titres.
Numéro du chapitre en cours/nombre total de chapitres.
Temps de lecture écoulé.
Langue ou canal audio sélectionné.
Sous-titre sélectionné.
Angle sélectionné/nombre total d'angles
Symboles utilisés dans ce manuel
Une section dont le titre comporte l'un des symboles suivants ne s'applique
qu'aux disques ou aux fichiers représentés par ce symbole.
ALL
DVD
DivX
Tous les disques et fichiers
DVD et DVD±R/RW finalisés
Fichiers DivX
ACD
MP3
WMA
v V
b B / ENTER
CD audio
Fichiers MP3
Fichiers WMA
9
DP450-P.ADEULLK_FRE_MFL61857019 9DP450-P.ADEULLK_FRE_MFL61857019 9 2/23/09 3:25:48 PM2/23/09 3:25:48 PM
Page 38

Lecture d’un disque
TOUCHE
1 Ouvrir le couvercle du disque :
2 Insérer un disque : -
3 Fermer le couvercle du disque : 4 Démarrer la lecture :
5 Régler le volume : VOLUME
6 Arrêter la lecture :
Lecture d'un disque : autres possibilités
Arrêt de la lecture
Appuyez sur la touche STOP (x) pour arrêter la lecture. Si le disque le permet,
l'appareil garde en mémoire l'endroit où vous avez arrêté la lecture. Le symbole
" Xx " s'affiche brièvement à l'écran. Appuyez sur la touche PLAY (
reprendre la lecture là où vous l'aviez laissée. Si vous appuyez sur la touche
STOP (x) une nouvelle fois ou sortez le disque (le symbole " x " apparaît à
l'écran), l'appareil efface le repère de reprise de la lecture. (Xx = reprise de la
lecture possible, x = arrêt complet de la lecture). Le repère de reprise de la
lecture peut être effacé si vous appuyez sur une touche (par exemple :
POWER, OPEN, etc.).
Lecture d'un DVD comportant un menu
La plupart des DVD comportent désormais des menus qui s'affichent avant que
la lecture du film ne démarre. Vous pouvez naviguer dans ces menus à l'aide
des touches vV b B ou des touches numériques pour mettre en surbrillance
une option. Appuyez sur ENTER pour valider votre sélection.
Lecture d’un DVD VR
Cet appareil lira les disques DVD-RW enregistrés à l'aide du format Video
Recording (VR). Lorsque vous insérez un DVD VR, le menu apparaît à
l'écran. Utilisez la touche vV pour sélectionner un titre, puis appuyez sur
PLAY (
N). Certains DVD-VR sont créés avec des données CPRM par un
ENREGISTREUR DE DVD. Cet appareil ne prend pas en charge ces types de
disques.
Accès à la piste, au fichier ou au chapitre suivant/précédent
Appuyez sur la touche SKIP (>) pour accéder au chapitre, à la piste ou au
fichier suivant.
Appuyez sur la touche SKIP (.) pour revenir au début du chapitre, de la piste
ou du fichier en cours.
Appuyez deux fois brièvement sur la touche SKIP (.) pour revenir au chapitre,
à la piste ou au fichier précédent.
10
DVD
OPEN (Z)
N PLAY
x STOP
N) pour
ALL
ALL
DVD
ALL
DivX
DVD
DivX
DVD
DVD
DVD
DivX
(
: vers l'avant uniquement)
ACD
DVD
DivX
DVD
DivX
WMA
DivX
MP3
ACD
Suspension de la lecture
Appuyez sur la touche PAUSE/STEP (X) pour suspendre la lecture. Appuyez
sur la touche PLAY ( N) pour reprendre la lecture
Lecture image par image
Appuyez sur la touche PAUSE/STEP (X) plusieurs fois pour la lecture image
par image.
Lecture en boucle
Appuyez plusieurs fois sur la touche REPEAT pour sélectionner un élément à
répéter. Le titre, le chapitre, la piste ou l'ensemble du disque sera lu en boucle.
Pour revenir à la lecture normale, appuyez plusieurs fois sur la touche REPEAT
pour sélectionner [Arrêt].
Avance ou retour rapide
Maintenez enfoncée la touche SKIP (. ou >) pour utiliser l'avance ou le
retour rapide pendant la lecture. Vous pouvez modifier la vitesse de lecture en
appuyant sur la touche SKIP (. ou >) à plusieurs reprises et en la maintenant enfoncée. Appuyez sur la touche PLAY (N) pour poursuivre la lecture à
vitesse normale.
Répétition d'une section spécifique (A-B)
Appuyez sur la touche A-B au début de la section que vous souhaitez répéter
et une nouvelle fois à la fin de la section. La section ainsi sélectionnée sera lue
en boucle. Pour revenir à la lecture normale, appuyez sur la touche A-B pour
désactiver cette option.
Sélection de la langue des sous-titres
Lors de la lecture, appuyez sur la touche SUBTITLE ( ) à plusieurs reprises
afin de sélectionner la langue de votre choix pour les sous-titres.
Visualisation sous un angle différent
Si le symbole de l'angle apparaît à l'écran pendant quelques instants, vous pouvez sélectionner un autre angle de prise de vue en appuyant plusieurs fois sur
la touche ANGLE ( ).
Modification de la source audio
Pendant la lecture, appuyez plusieurs fois sur la touche AUDIO ( ) pour
alterner entre les langues, canaux et méthodes d'encodage audio disponibles.
Lecture au ralenti
Pendant la lecture, appuyez sur la touche SLOW (t ou T) pour ralentir la
lecture vers l'avant ou vers l'arrière. Vous pouvez modifier la vitesse de lecture
en appuyant plusieurs fois sur la touche SLOW (t ou T). Appuyez sur la touche PLAY (N) pour poursuivre la lecture à vitesse normale
DP450-P.ADEULLK_FRE_MFL61857019 10DP450-P.ADEULLK_FRE_MFL61857019 10 2/23/09 3:25:49 PM2/23/09 3:25:49 PM
Page 39

DivX
DVD
MP3
DVD ACD
DVD
DivX
DVD
DivX
DVD
Agrandissement de l’image vidéo
Pendant la lecture ou en mode pause, appuyez plusieurs fois sur la touche
ZOOM pour sélectionner le mode zoom. Vous pouvez vous déplacer dans
l'image agrandie à l'aide des touches vVb B. Appuyez sur la touche CLEAR
pour quitter ce mode. (100 % p 200 % p 300 % p 400 % p 100%)
Affichage du menu titre
Appuyez sur la touche TITLE pour afficher le menu des titres du disque, si
disponible.
DVD
Affichage du menu du DVD
Appuyez sur la touche MENU pour afficher le menu du disque, si disponible.
Démarrage de la lecture à partir d'un code de temps
Recherchez le point de départ du code du moment saisi. Appuyez sur DISPLAY
sélectionnez ensuite l'icône d'horloge. Entrez un moment et appuyez sur
ENTER. Par exemple, pour trouver une scène située à 1 heure, 10 minutes et
20 secondes, saisissez "11020" et appuyez sur ENTER. Si vous avez saisi le
mauvais numéro, appuyez CLEAR une fois encore sur.
Lecture aléatoire
Pendant la lecture ou en mode arrêt, appuyez sur la touche RANDOM pour
lancer la lecture en ordre aléatoire. Appuyez à nouveau sur RANDOM pour
reprendre la lecture normale.
ACD
WMA
Introduction d'un repère sur un disque
Vous pouvez introduire un repère sur un disque pour revenir à une scène précise. Il vous suffit d'appuyer sur la touche MARKER à l'endroit souhaité. L'icône
du repère s'affiche brièvement à l'écran. Vous pouvez placer jusqu'à neuf
repères. Vous pouvez également retourner à un repère ou l'effacer. Appuyez
sur la touche SEARCH et accédez au menu [Recherche d'index]. Utilisez
les touches b ou B pour sélectionner le repère souhaité dans le menu, puis
appuyez sur ENTER pour y accéder ou sur CLEAR pour l'effacer.
Mémoire de la dernière scène
Cette unité mémorise la dernière scène du dernier disque visionné. La dernière
scène reste en mémoire même si vous retirez le disque du lecteur ou si vous
éteignez lʼunité. Si vous chargez ensuite un disque dont la scène a été mémorisée, la lecture reprend automatiquement à la scène mémorisée.
Économiseur d'écran
L'économiseur d'écran s'active dès que l'appareil reste inactif pendant cinq minutes environ. Une fois l'économiseur d'écran activé, l'appareil s'éteint automatiquement au bout de cinq minutes.
Disque multiformat – DivX, MP3/WMA et JPEG
Lorsque vous lisez un disque contenant des fichiers DivX, MP3/WMA et JPEG
mélangés, vous pouvez sélectionner quel menu de fichiers lire en appuyant sur
la touche TITLE.
Lecture d'un fichier vidéo DivX
TOUCHE
1 Ouvrir le couvercle du disque :
2 Insérer un disque : -
3 Fermer le couvercle du disque : 4 Sélectionner un fichier vidéo dans le menu :
5 Démarrer la lecture :
6 Arrêter la lecture :
Lecture d'un fichier vidéo DivX - autres
possibilités
Modification du jeu de caractères pour afficher les sous-titres DivX®
correctement
Pendant la lecture, maintenez enfoncée la touche SUBTITLE pendant 3
secondes. Le code de langue s'affiche. Appuyez sur b B pour sélectionner un
autre code de langue jusqu'à ce que les sous-titres s'affichent correctement, puis
appuyez sur ENTER.
Impératifs à respecter pour les fichiers DivX
La compatibilité de ce lecteur avec les fichiers DivX est limitée comme suit.
• Taille de résolution disponible : 720 x 576 pixels (L x H).
• Les noms des fichiers DivX et des sous-titres sont limités à 45 caractères.
• Extensions des fichiers DivX : ".avi", ".mpg", ".mpeg".
• Formats de sous-titres DivX compatibles : SubRip (.srt / .txt), SAMI (.smi),
SubStation Alpha (.ssa/.txt), MicroDVD (.sub/.txt), VobSub (.sub)
SubViewer 2.0 (.sub/.txt), MPlayer (.txt), DVD Subtitle System (.txt),
• Formats codec compatibles : “DIVX3.xx”, “DIVX4.xx”, “DIVX5.xx”, “MP43”,
“3IVX”
• Seule la fonction de lecture est prise en charge avec DivX 6.0 sur cet
appareil.
• Formats audio compatibles : “Dolby Digital”, “PCM”, “MP3”, “WMA”
• Fréquence dʼéchantillonnage : 8 - 48 kHz (MP3), 32 - 48 kHz (WMA)
• Débit binaire : 32- 320 kbps (MP3), 32 - 192 kbps (WMA),
moins de 4 Mbps (DivX)
• Format des CD-R/RW et des DVD±R/RW : ISO 9660.
• Nombre maximal de fichiers par dossier : inférieur à 600 (nombre total de
fichiers et de dossiers)
OPEN (Z)
v V, MENU
N PLAY
x STOP
11
DP450-P.ADEULLK_FRE_MFL61857019 11DP450-P.ADEULLK_FRE_MFL61857019 11 2/23/09 3:25:50 PM2/23/09 3:25:50 PM
Page 40

Lecture d'un disque ou fichier musical
1 Ouvrir le couvercle du disque :
2 Insérer un disque : -
3 Fermer le couvercle du disque: -
Sélectionner un fichier musical dans le menu :
4
5 Démarrez la lecture:
6 Arrêtez la lecture:
OPEN (Z)
v V, MENU
N PLAY
x STOP
TOUCHE
Lecture d'un fichier photo
1 Ouvrir le couvercle du disque :
2 Insérer un disque : 3 Fermer le couvercle du disque : -
4
Sélectionner un fichier photo dans le menu :
5 Afficher le fichier sélectionné en plein écran :
6 Revenir au menu :
TOUCHE
OPEN (Z)
v V, MENU
N PLAY
x STOP
Lecture d'un disque ou fichier musical - autres
possibilités
Création de votre propre programme
Vous pouvez lire le contenu d'un disque dans l'ordre de votre choix en organisant l'ordre de la musique sur le disque. Pour ajouter des fichiers musicaux
à la liste programmée, appuyez sur la touche PROG. pour accéder au mode
d'édition du programme (le symbole
les fichiers souhaités dans la [Liste], puis appuyez sur la touche ENTER pour
ajouter de la musique à la liste programmée. Sélectionnez votre musique dans
la liste programmée, puis appuyez sur la touche ENTER pour démarrer la
lecture programmée. Pour supprimer des fichiers musicaux de la liste programmée, sélectionnez les fichiers à supprimer, puis appuyez sur la touche CLEAR
en mode d'édition du programme. Pour supprimer tous les fichiers musicaux
de la liste programmée, sélectionnez [Tout effacer], puis appuyez sur la touche
ENTER en mode d'édition du programme. Le programme est effacé lorsque le
disque est sorti ou lorsque l'appareil est éteint.
Affichage des informations sur les fichiers (balises ID3)
Lorsque vous lisez un fichier MP3 contenant des informations, vous pouvez
afficher ces informations en appuyant plusieurs fois sur la touche DISPLAY. Si
le fichier ne contient pas d'informations ID3, le message [No ID3 TAG] (Pas de
balise ID3) apparaît à l'écran.
Impératifs à respecter pour les fichiers musicaux MP3/WMA
La compatibilité de cet appareil avec les fichiers MP3/WMA est limitée comme
suit.
• Extension des fichiers : ".mp3", ".wma".
• Fréquence dʼéchantillonnage : 8 - 48 kHz (MP3), 32 - 48kHz (WMA)
• Débit binaire : 8 - 320kbps (MP3), 32 - 192kbps (WMA)
• Format des CD-R/RW et des DVD±R/RW : ISO 9660.
• Nombre maximal de fichiers par dossier : inférieur à 600 (nombre total de
fichiers et de dossiers)
12
E
apparaît dans le menu). Sélectionnez
Lecture d'un fichier photo - autres possibilités
Lecture de fichiers photo sous forme de diaporama
Utilisez les touches vV b B pour mettre en surbrillance l'icône ( ), puis
appuyez sur la touche ENTER pour lancer le diaporama. Vous pouvez modifier
la vitesse de défilement à l'aide des touches b B lorsque l'icône (
en surbrillance.
Accès à la photo suivante/précédente
Appuyez sur la touche SKIP (. ou >) pour voir la photo précédente/
suivante.
Rotation d'une photo
Utilisez les touches vV pour faire pivoter la photo en plein écran dans le sens
inverse des aiguilles d'une montre ou dans le sens des aiguilles d'une montre.
Interrompre provisoirement le diaporama
Appuyez sur PAUSE/STEP (X)pour interrompre le diaporama. Appuyez sur
N) pour reprendre le diaporama.
PLAY (
Agrandissement d'une image photo
Vous pouvez écouter de la musique pendant lʼexécution du diaporama, si le
disque contient à la fois de la musique et des photos. Utilisez vV b B pour mettre
en surimpression lʼicône(
) puis appuyez sur ENTER pour lancer le diaporama.
Visualisation d’une photo agrandie
Pendant l'affichage d'une photo en plein écran, appuyez plusieurs fois sur la
touche ZOOM pour sélectionner le mode zoom. Vous pouvez vous déplacer
dans la photo agrandie à l'aide des touches vVb B. Appuyez sur la touche
CLEAR pour quitter ce mode.
Impératifs à respecter pour les fichiers photo
Ce lecteur est compatible avec les fichiers JPEG remplissant les conditions
suivantes
• Extension des fichiers : ".jpg".
• Poids : moins de 2 Mo recommandés
• Format des CD-R/RW et des DVD±R/RW : ISO 9660.
• Nombre maximal de fichiers par dossier : inférieur à 600 (nombre total de
fichiers et de dossiers)
) est mise
DP450-P.ADEULLK_FRE_MFL61857019 12DP450-P.ADEULLK_FRE_MFL61857019 12 2/23/09 3:25:51 PM2/23/09 3:25:51 PM
Page 41

Codes de langue
Appuyez-vous sur cette liste pour entrer votre langue préférée pour les paramètres initiaux suivants : disque audio, sous-titre de disque, menu de
Langue Code
Afar 6565
Afrikaans 6570
Albanais 8381
Amharique 6577
Arabe 6582
Arménien 7289
Assamais 6583
Aymara 6588
Azerbaïdjanais 6590
Bachkir 6665
Basque 6985
Bengali 6678
Bhoutanais 6890
Bihari 6672
Breton 6682
Bulgare 6671
Birman 7789
Biélorusse 6669
Chinois 9072
Langue Code
Croate 7282
Tchèque 6783
Danois 6865
Néerlandais 7876
Anglais 6978
Espéranto 6979
Estonien 6984
Faroese 7079
Fidji 7074
Finnois 7073
Français 7082
Frisien 7089
Galicien 7176
Géorgien 7565
Allemand 6869
Grec 6976
Groenlandais 7576
Guarani 7178
Gujarâtî 7185
Langue Code
Hausa 7265
Hébreu 7387
Hindi 7273
Hongrois 7285
Islandais 7383
Indonésien 7378
Interlingua 7365
Irlandais 7165
Italien 7384
Japonais 7465
Kannada 7578
Cashmere 7583
Kazakh 7575
Kirghiz 7589
Coréen 7579
Kurde 7585
Laotien 7679
Latin 7665
Letton 7686
Langue Code
Lingala 7678
Lithuanien 7684
Macédonien 7775
Malagasy 7771
Malais 7783
Malayalam 7776
Maori 7773
Marathi 7782
Moldave 7779
Mongole 7778
Nauru 7865
Népalais 7869
Norvégien 7879
Oriya 7982
Panjabi 8065
Pashto 8083
Perse 7065
Polonais 8076
Portugais 8084
Langue Code
Quetchua 8185
Rhaeto-Roman 8277
Roumain 8279
Russe 8285
Samoan 8377
Sanskrit 8365
Gaëlique écossais 7168
Serbe 8382
Serbo-Croate 8372
Shona 8378
Sindhi 8368
Singhalais 8373
Slovaque 8375
Slovène 8376
Espagnol 6983
Soudanais 8385
Swahili 8387
Suédois 8386
Tagalog 8476
Codes de région
Sélectionnez une région à partir de la liste suivante.
Région Code
Afghanistan AF
Argentine AR
Australie AU
Autriche AT
Belgique BE
Bhoutan BT
Bolivie BO
Brésil BR
Cambodge KH
Canada CA
Chili CL
Chine CN
Colombie CO
Congo CG
Région Code
Costa Rica CR
Croatie HR
République Tchèque CZ
Danemark DK
Equateur EC
Egypte EG
El Salvador SV
Ethiopie ET
Fidji FJ
Finlande FI
France FR
Allemagne DE
Grande Brétagne GB
Grèce GR
Région Code
Groenland GL
Hong Kong HK
Hongrie HU
Inde IN
Indonésie ID
Israël IL
Italie IT
Jamaïque JM
Japon JP
Kenya KE
Koweït KW
Libye LY
Luxembourg LU
Malaisie MY
Région Code
Maldives MV
Mexique MX
Monaco MC
Mongolie MN
Maroc MA
Népal NP
Pays-Bas NL
Antilles Néerlandaises
Nouvelle Zélande NZ
Nigeria NG
Norvège NO
Oman OM
Pakistan PK
Panama PA
AN
Région Code
Paraguay PY
Philippines PH
Pologne PL
Portugal PT
Roumanie RO
Russie RU
Arabie Saoudite SA
Sénégal SN
Singapour SG
Slovaquie SK
Slovénie SI
Afrique du Sud ZA
Corée du Sud KR
Espagne ES
disque.
Langue Code
Tadjik 8471
Tamoul 8465
Telugu 8469
Thaï 8472
Tonga 8479
Turque 8482
Turkmène 8475
Twi 8487
Ukrainien 8575
Urdu 8582
Ouzbek 8590
Vietnamien 8673
Volapük 8679
Galois 6789
Wolof 8779
Xhosa 8872
Yiddish 7473
Yoruba 8979
Zoulou 9085
Région Code
Sri Lanka LK
Suède SE
Suisse CH
Taiwan TW
Thaïlande TH
Turquie TR
Ouganda UG
Ukraine UA
Etats-Unis US
Uruguay UY
Ouzbékistan UZ
Vietnam VN
Zimbabwe ZW
13
DP450-P.ADEULLK_FRE_MFL61857019 13DP450-P.ADEULLK_FRE_MFL61857019 13 2/23/09 3:25:52 PM2/23/09 3:25:52 PM
Page 42

Dépannage
Symptôme Cause Solution
Pas
d'alimentation.
L'unité ne fonctionne pas alors
que l'interrupteur
d'alimentation est
enfoncé.
Pas dʼimage. La TV n'est pas configurée pour
Pas de son L'équipement connecté avec le
L'unité ne lance
pas la lecture
La télécommande
ne fonctionne pas
correctement.
Le cordon d'alimentation est
débranché.
La batterie est déchargée. Rechargez la batterie.
Il n'y a pas de disque dans le
lecteur.
réceptionner le signal en provenance de l'unité.
Le cordon vidéo est mal branché. Brancher le cordon vidéo correcte-
cordon audio n'est pas configuré
pour réceptionner le signal en
provenance de l'unité.
Le niveau sonore est réglé au
minimum.
Les options audio sont mal configurées.
Un disque illisible ou non pris en
charge a été introduit dans le
lecteur.
Le control parental est activé.
La télécommande n'est pas dirigée
en direction du capteur infrarouge.
La télécommande est trop loin de
l'unité.
Brancher fermement le cordon
d'alimentation dans la prise
murale.
Insérer un disque.
Sélectionner le mode d'entrée
vidéo approprié sur la TV.
ment.
Sélectionner le mode d'entrée
audio approprié sur l'amplificateur.
Utilisez le bouton de réglage
du volume pour régler le niveau
sonore.
Configurer correctement les
options audio.
Introduire un disque lisible.
(vérifier le type de disque et le
code régional.)
Modifier le niveau de classification.
Diriger la télécommande vers le
capteur infrarouge de l'unité.
Utiliser la télécommande plus près
de l'unité.
Spécifications
Généralité
Alimentation électrique DC 12V
Consommation électrique 12W
Dimensions (externes)
Poids net (externes) 0,78kg
Température de fonctionnement
Humidité en fonctionnement 5 % à 90 %
Laser Diode laser
Norme de codage de la vidéo PAL
Connecteurs
Sortie Audio/Vidéo Prise mini ø3,5 mm x 1
- Vidéo: 1,0 V (p-p), 75 Ω, négatif synchronisé
- Audio: 1,5 Vrms (1 KHz, 0 dB)
Prise casque Prise mini ø3,5 mm stéréo x 1
Affichage à cristaux liquides
Taille du panneau 7 pouces (diagonale)
Système de protection Bande RVB.
Système de gestion TFT (matrice active)
Résolution 480 x 234 (WQVGA)
Accessoires
• Adaptateur audio/vidéo
• Adaptateur courant alternatif (MPA-630)
• Adaptateur pour automobile (DPDC1)
• Télécommande
• Pile pour la télécommande (pile au Lithium)
202 x 42,5 x 167 mm (W x H x D)
5 °C à 40 °C
Le contenu de ce manuel peut être modifié sans préavis.
14
DP450-P.ADEULLK_FRE_MFL61857019 14DP450-P.ADEULLK_FRE_MFL61857019 14 2/23/09 3:25:52 PM2/23/09 3:25:52 PM
Page 43

ITALIANO
DP450 / DP450P / DP450R
P/NO : MFL61857019
DP450-P.ADEULLK_ITA_MFL61857019.1 1DP450-P.ADEULLK_ITA_MFL61857019.1 1 2/23/09 3:24:29 PM2/23/09 3:24:29 PM
Page 44

ATTENZIONE
RISCHIO DI SCOSSE
ELETTRICHE NON APRIRE.
ATTENZIONE: PER RIDURRE IL RISCHIO DI
SCOSSE ELETTRICHE NON RIMUOVERE IL
COPERCHIO (O LA PARTE POSTERIORE).
ALLʼINTERNO NON SONO PRESENTI PARTI
UTILIZZABILI DALLʼUTENTE. LA MANUTENZIONE
DEVE ESSERE ESEGUITA ESCLUSIVAMENTE DA
PERSONALE QUALIFICATO.
Il simbolo del lampo con la punta a freccia
contenuto in un triangolo equilatero avverte
lʼutente della presenza di un voltaggio
pericoloso non isolato allʼinterno dellʼinvolucro
dellʼapparecchio, sufficientemente intenso
da costituire un rischio concreto di scossa
elettrica per le persone.
Il punto esclamativo contenuto in un triangolo
equilatero avverte lʼutente di importanti istruzioni di funzionamento e di manutenzione allegate allʼapparecchio.
ATTENZIONE: PER EVITARE IL RISCHIO DI INCENDI
O SCOSSE ELETTRICHE, SI CONSIGLIA DI NON
ESPORRE LʼAPPARECCHIATURA A PIOGGIA O
UMIDITAʼ.
ATTENZIONE: Non installare il dispositivo in uno
spazio ristretto come ad esempio lo scaffale di una
libreria o un elemento di arredo simile.
ATTENZIONE: Non ostruire le aperture di ventilazione.
Lʼinstallazione deve essere eseguita in base alle istruzioni fornite dal produttore. Le feritoie e le aperture nella
struttura di alloggiamento servono per la ventilazione e
per garantire il corretto funzionamento dellʼapparecchio
e per proteggerlo dal surriscaldamento. Tali aperture non devono mai essere bloccate posizionando
lʼapparecchio su un letto, un divano, un tappeto o altre
superfici simili. Questa unità non deve essere posizionata in un ambiente da incasso, come una libreria o
uno scaffale, a meno di fornire unʼadeguata ventilazione oppure se le istruzioni del produttore stabiliscono
diversamente.
ATTENZIONE: Questo prodotto impiega un sistema
laser. Per garantire lʼuso corretto del prodotto, leggere
attentamente il presente manuale di istruzioni e conservarlo per
consultazioni future. Nel caso in
cui dovesse rendersi necessario
un intervento in manutenzione,
contattare un centro di assistenza autorizzato. Lʼuso di
comandi di impostazione o lʼesecuzione di procedure
diverse da quelle specificate nel presente manuale
possono determinare lʼeventuale esposizione a radiazioni pericolose. Per evitare lʼesposizione diretta al
fascio laser non aprire il dispositivo. In caso di apertura
sussiste il pericolo di radiazioni laser visibili. NON
FISSARE LO SGUARDO SUL FASCIO LASER
ATTENZIONE: Lʼapparecchio non deve essere esposto
allʼacqua (gocce o spruzzi) e quindi sopra al dispositivo
non devono essere posti oggetti contenenti liquidi,
come ad esempio i vasi.
ATTENZIONE
•
Non impedire la ventilazione coprendo le aperture
con giornali, panni, tende, ecc.
• Non collocare sopra lʼapparecchiatura fiamme
libere come candele accese.
• Smaltire le batterie usate in base alle normative
vigenti; non bruciarle. Quando si smaltiscono le
batterie, rispettare lʼambiente.
• Usare lʼapparecchio solo in climi tropicali e moderati.
• Il volume eccessivo di cuffie e auricolari può provocare danni allʼudito.
• Non esporre la batteria a temperature eccessive,
ad esempio non esporla al sole, non gettarla sul
fuoco, ecc.
• Per la propria sicurezza, non rimuovere la batteria
integrata nel prodotto.Se occorre sostituire la
batteria, recarsi presso il punto assistenza o il
rivenditore autorizzato LG più vicino.
AVVERTENZA relativa al cavo di alimentazione
Si consiglia di collegare la maggior parte degli
elettrodomestici a un circuito dedicato.
In altre parole, si colleghi ogni elettrodomestico a un circuito a singola presa che alimenti solo
quellʼelettrodomestico e che non abbia altre uscite o
circuiti di diramazione. In caso di dubbi, consultare
la pagina delle specifiche nel manuale dellʼutente.
Non sovraccaricare le prese a muro. Prese sovraccariche, allentate o danneggiate, prolunghe, cavi
sfilacciati o isolamenti danneggiati sono pericolosi.
Ognuna delle situazioni elencate può provocare scosse
elettriche o incendi. Periodicamente, controllare il cavo
dellʼelettrodomestico e, se si notano danni o segni di
deterioramento, scollegarlo, interromperne lʼuso e far
sostituire il cavo con uno dello stesso tipo presso un
centro di assistenza autorizzato.
Proteggere il cavo di alimentazione da schiacciamento,
calpestamento o attorcigliamento. Porre particolare
attenzione alle spine, alle prese a muro e ai punti
di uscita del cavo dallʼelettrodomestico. Per scollegare lʼapparecchio dallʼalimentazione, disinserire la
spina dalla presa di corrente. Durante lʼinstallazione
dellʼapparecchio, accertarsi che la presa sia facilmente
accessibile.
Smaltimento degli apparecchi dismessi
1. La presenza del simbolo di un contenitore
per rifiuti attraversato da una croce indica
che lʼapparecchio è sottoposto alla Direttiva
Europea 2002/96/EC.
2. Tutti i prodotti elettrici ed elettronici devono
essere smaltiti separatamente dai rifiuti
domestici tramite appositi servizi messi a
disposizione dalle
istituzioni governative o dalle autorità locali.
3. Il corretto smaltimento degli apparecchi vecchi aiuterà a prevenire
conseguenze potenzialmente negative per
lʼambiente e per la salute umana.
4. Per informazioni più dettagliate riguardo
lo smaltimento degli apparecchi dismessi,
contattare gli uffici comunali, i servizi per lo
smaltimento dei rifiuti oppure il rivenditore.
Questo prodotto è stato fabbricato in conformità alla Direttiva EMC 2004/108/EC e alla
Direttiva basse tensioni 2006/95/EC.
Rappresentante europeo:
LG Electronics Service Europe B.V.
Veluwezoom 15, 1327 AE Almere, Paesi Bassi
(Tel: +31–036–547–8940)
2
DP450-P.ADEULLK_ITA_MFL61857019.2 2DP450-P.ADEULLK_ITA_MFL61857019.2 2 2/23/09 3:24:29 PM2/23/09 3:24:29 PM
Page 45

Tipi di dischi supportati ............................................................................... 3
Batteria ricaricabile ..................................................................................... 3
Unità principale ........................................................................................... 4
Telecomando .............................................................................................. 5
Connessioni di alimentazione..................................................................... 6
Collegamento dellʼunità ............................................................................. 7
Regolazione delle impostazioni ............................................................... 8-9
Visualizzazione delle informazioni del disco .............................................. 9
Riproduzione di un disco ..................................................................... 10-11
Riproduzione di un filmato DivX ................................................................11
Indice
Ascolto di dischi o file musicali ................................................................. 12
Visualizzazione di fotografie ..................................................................... 12
Codici lingua ............................................................................................. 13
Codici area ............................................................................................... 13
Risoluzione problemi ................................................................................ 14
Specifiche ................................................................................................. 14
Tipi di dischi supportati
Tipo Logo
DVD-VIDEO:
noleggiati.
DVD-R: Solo dischi in modalità video e finalizzati
DVD-RW: Solo dischi in modalità VR, modalità Video e
finalizzati
DVD+R: Solo dischi in modalità Video
DVD+RW: Solo dischi in modalità Video
CD audio: CD musicali oppure CD-R/CD-RW in formato CD
musicale normalmente in vendita
Questa unità riproduce DVD±R/RW e CD-R/RW contenenti titoli audio, file
DivX, MP3, WMA e/o JPEG. Alcuni DVD±RW/DVD±R o CD-RW/CD-R non
potranno essere riprodotti su questa unità a causa della qualità della
registrazione, delle condizioni fisiche del disco o delle caratteristiche del
dispositivo di registrazione e del software di authoring.
Prodotto su licenza di Dolby Laboratories. Dolby e il simbolo double-D
sono marchi registrati di Dolby Laboratories.
“DVD Logo” è un marchio di DVD Format/Logo Licensing Corporation.s
Film su DVD che possono essere acquistati o
Visualizzazione del simbolo
Durante il funzionamento dellʼunità, sullo schermo del TV potrebbe apparire il
simbolo “ ”, a indicare che la funzione descritta nel presente manuale utente
non è disponibile per quel particolare disco.
Codici regionali
Questa unità dispone di un codice regionale stampato sulla parte posteriore.
Questa unità può riprodurre solo dischi DVD etichettati con lo stesso codice
stampato sulla parte posteriore o contrassegnati come ALL (TUTTI).
• La maggior parte dei DVD presentano sulla copertina il simbolo di un globo
con uno o più numeri chiaramente visibili. Affinché il disco possa essere
riprodotto, tale numero deve coincidere con il codice regionale dellʼunità.
• In caso di riproduzione di DVD con codice regionale diverso, viene
visualizzato il messaggio “Verifica codice regionale” sullo schermo TV.
Copyright
La legge vieta la copia, la trasmissione, la visione, la trasmissione via cavo, la
visione pubblica o il noleggio di materiale protetto da copyright senza previo
consenso. Questo prodotto è caratterizzato dalla funzione di protezione da copia
sviluppato dalla Macrovision. Su alcuni dischi sono registrati i segnali di protezione
da copia. Durante la registrazione e la riproduzione di immagini presenti su questi
dischi, si possono avere disturbi allʼimmagine. Questo prodotto contiene
tecnologia di protezione del copyright protetto da brevetti USA e da altri diritti
di proprietà intellettuale. L'uso di tale tecnologia di protezione del copyright
deve essere autorizzato da Macrovision ed è previsto solo per uso domestico
e altri impieghi limitati di visualizzazione se non diversamente autorizzato da
Macrovision. La decodifica e il disassemblaggio sono vietati.
Batteria ricaricabile
• La batteria ricaricabile interna consente di utilizzare lʼapparecchiatura
allʼesterno e di riprodurre i file senza il cavo di alimentazione.
• La batteria ricaricabile interna comincia a ricaricarsi solo quando lʼunità è
spenta e lʼadattatore CA è collegato alla presa di alimentazione.
• La ricarica si interrompe non appena si accende lʼunità.
• Per il completamento della ricarica sono necessarie circa 2 ore e 30 minuti.
• Durata della batteria: circa 2 ore e 30 minuti.
Il tempo di funzionamento della batteria può variare in funzione dello stato
della batteria, dello stato operativo e delle condizioni ambientali; la durata
massima di riproduzione è di 3 ore.
• Durante la ricarica, lʼindicatore della batteria emette luce di colore rosso. Al
termine della ricarica, la spia dellʼindicatore emette luce di colore verde.
• Se lʼautonomia residua della batteria è di pochi minuti, “
sullo schermo.
” lampeggia
3
3
DP450-P.ADEULLK_ITA_MFL61857019.3 3DP450-P.ADEULLK_ITA_MFL61857019.3 3 2/23/09 3:24:30 PM2/23/09 3:24:30 PM
Page 46

Unità principale
4
a Schermo LCD
b Altoparlanti
c Pulsanti di controllo riproduzione
• N (Play)/ X (Pause): Avvia la riproduzione. Mette temporaneamente in pausa la
riproduzione, premere nuovamente per uscire dalla modalità di pausa.
• x (Stop): Arresta la riproduzione.
• . (Salta): Consente di eseguire la ricerca allʼindietro* o di tornare allʼinizio del
capitolo/brano corrente o di passare al capitolo/brano precedente.
• > (Salta): Consente di eseguire la ricerca in avanti* o di passare al brano/capi-
tolo successivo.
* Tenere premuto il pulsante per circa due secondi.
d Pulsanti delle funzioni
• DISPLAY: Accede alle informazioni a video.
• SETUP: Apre o chiude il menu di configurazione.
• COLOR/ BRIGHT*: Visualizza il menu Brightness o Color del display LCD.
• MENU: Accede al menu DVD.
* Per regolare il colore o la luminosità del display LCD, premere più volte COLOR/
BRIGHT sullʼunità principale per visualizzare il menu Brightness o Color e utilizzare b / B per regolare il valore. Premere ENTER per confermare la regolazione.
e Pulsanti di controllo menu
• b B v V (sinistra/destra/su/giù):
menu.
• ENTER: Consente di confermare la selezione.
f OPEN (Z): Consente di aprire il coperchio del disco.
g Sensore del telecomando: Puntare il telecomando qui.
h Indicatore alimentazione e carica batteria
• Lʼindicatore emette luce rossa durante la ricarica e verde al termine
dellʼoperazione di ricarica per informazioni, vedere a pagina 3.
• Lʼindicatore emette luce verde per alcuni secondi allʼaccensione dellʼunità.
i Coperchio del disco
j 1/q (Interruttore di alimentazione): Accende/spegne lʼunità.
Nota: per adoperare questa unità, lʼinterruttore di alimentazione deve essere
impostato su ON.
VOL (Volume): Regola il volume delle casse integrate e delle cuffie.
k w
l (Cuffie): Collega le cuffie.
m AV OUT: Collegare il televisore allʼuscita audio e video.
n DC 12V IN: Connettere un adattatore CA o adattatore per auto.
Consentono di selezionare unʼopzione nel
DP450-P.ADEULLK_ITA_MFL61857019.4 4DP450-P.ADEULLK_ITA_MFL61857019.4 4 2/23/09 3:24:31 PM2/23/09 3:24:31 PM
Page 47

Telecomando
Nota: per adoperare lʼunità con il telecomando,
lʼinterruttore di alimentazione deve essere impostato su ON (vedere pagina 4).
a
b
c
d
l l l l l l l a l l l l l l l
POWER (1): Accende/spegne lʼunità.
AUDIO ( ): Consente la selezione di una lingua
o di un canale audio.
SUBTITLE (
gua dei sottotitoli.
ANGLE ( ):
della telecamera del DVD se disponibile.
): Consente la selezione della lin-
Consente la selezione di unʼangolazione
SKIP/SEARCH (. / >): consentono di
cercare in indietro/avanti* e di passare al brano/
capitolo successivo o precedente.
* Tenere premuto il pulsante per circa due secondi.
SLOW (t / T): consente di ottenere un effetto
moviola avanti/indietro.
l l l l l l l b l l l l l l l
SETUP: Apre o chiude il menu di configurazione.
MENU: Accede al menu DVD.
vV b B: Consente di navigare nel menu.
ENTER ( ): Consente di confermare la selezione
del menu.
RETURN (O): Premere il tasto per tornare indietro
nel menu o per uscire dal menu.
DISPLAY: Accede alle informazioni a video.
l l l l l l l c l l l l l l l
PAUSE/STEP (X): Interrompe la riproduzione o la
registrazione temporaneamente / premere questo
pulsante ripetutamente per attivare la riproduzione
di un fotogramma alla volta.
PLAY (N): Avvia la riproduzione.
STOP (x): Arresta la riproduzione.
Pulsanti numerici: Consentono la selezione delle
opzioni numerate allʼinterno di un menu.
Accede alla modalità di modifica del PROG.
PROG.:
CLEAR: Consente di eliminare il numero di una
traccia dallʼelenco del programma.
l l l l l l l d l l l l l l l
TITLE (Titolo): Consente di accedere al menu
principale del disco.
REPEAT: Consente la ripetizione di capitoli, tracce,
titoli o di tutto.
A-B: Consente la ripetizione di una sezione.
ZOOM: Consente di ampliare lʼimmagine video.
MARKER : consente di contrassegnare un punto
durante la riproduzione.
SEARCH : visualizza il menu [Marker Search].
RANDOM: riproduce le tracce in modo casuale
Inserimento della batteria nel telecomando
Strizzare il supporto della batteria e tirare la
linguetta per rimuovere il supporto della batteria.
Inserire la batteria con il segno del positivo (+) nella
stessa direzione del segno positivo sul supporto
della batteria. Sostituire il supporto della batteria
con la batteria nellʼunità del telecomando
assicurandosi che sia completamente inserita.
• Sostituire la batteria dellʼunità del telecomando
con celle micro 3 V al litio quali CR. 2025 o
equivalente.
• Smaltire le batterie rispettando le norme di
sicurezza in conformità alle leggi locali. Non gettare nel fuoco.
Avviso per la batteria al litio sostituibile
• Pericolo di esplosione se la batteria non viene
sostituita correttamente.
• Sostituire solo con una batteria dello stesso tipo.
• Ulteriori indicazioni di attenzione vicino alla batteria
in caso di sostituzione da parte degli utenti.
Avvertenza : La batteria utilizzata in questo
dispositivo, se utilizzata in modo non
regolamentare, può causare pericolo di incendio o
ustioni chimiche. Non ricaricare, smontare, buttare
negli inceneritori o riscaldare a temperature
superiori ai 100° C (212 °F)
Sostituire la batteria solamente con una Matsushita
Elec. Ind. (Panasonic), n° di parte CR. 2025. Lʼuso
di una batteria di tipo diverso può comportare il
rischio di incendio o esplosione. Smaltire in modo
idoneo le batterie usate. Conservare le batterie
lontane dai bambini. Non smontare o gettare nel
fuoco.
5
DP450-P.ADEULLK_ITA_MFL61857019.5 5DP450-P.ADEULLK_ITA_MFL61857019.5 5 2/23/09 3:24:32 PM2/23/09 3:24:32 PM
Page 48

Connessioni di alimentazione
Collegamento dell’adattatore
Collegare lʼadattatore CA dellʼunità a una presa di corrented.
Lato destro dellʼunità
Collegare la spina di alimentazione al corpo
dellʼadattatore CA.
(Lʼadattatore potrebbe differire da quanto illustrato).
Lato destro dellʼunità
Collegare a
una presa di
alimentazione.
Pulsante di
rilascio cavo di
alimentazione
Collegare il jack alla presa “DC 12 V IN”.
Adattatore CA
• Questo adattatore CA funziona nel campo di tensione 100-240 V~ 1A
50/60 Hz.
• Per informazioni sulla scelta di un adattatore CA o di un set cavi CA idoneo,
rivolgersi a un distributore di articoli elettrici.
• Prodotto da NANJING WANLIDA TECHNOLOGY CO., LTD
Collegare l’adattatore per auto
Questa unità e il rispettivo adattatore per auto sono ideati per lʼimpiego in
veicoli con sistemi elettrici a 8,5-16 volt e massa negativa. Si tratta della norma
per la maggior parte dei veicoli. Se lʼimpianto elettrico del proprio veicolo è
diverso, non è possibile utilizzare il sistema di alimentazione CC.
Collegare alla presa
accendisigari del
veicolo.
Collegare il jack alla
presa “DC 12V IN”.
Adattatore per auto
• Questo adattatore per auto funziona a 8,5-16 VCC.
• Per informazioni sulla scelta di un adattatore per auto idoneo, rivolgersi a un
distributore di articoli elettrici.
• Prodotto da NANJING WANLIDA TECHNOLOGY CO., LTD
Attenzione
• Per prevenire scosse elettriche e danni allʼunità o al veicolo, scollegare
sempre lʼadattatore per auto dalla presa accendisigari prima di rimuovere la
spina dallʼunità.
• Nel sistema elettrico del veicolo è installato un fusibile di protezione da 3 A,
250 V.
• Durante lʼavviamento del motore, scollegare lʼadattatore per auto dalla presa
accendisigari.
• Non utilizzare lʼunità se la batteria del veicolo è scarica. La corrente di picco
del generatore del veicolo può provocare la bruciatura del fusibile CC.
• Se la tensione di alimentazione del veicolo scende a circa 10 V, lʼunità
potrebbe non funzionare correttamente.
• Non lasciare lʼunità in luoghi ove la temperatura supera i 70 °C per non
danneggiare il dispositivo di lettura del dispositivo.
Ad esempio:
- Allʼinterno di un veicolo esposto al sole con finestrini chiusi.
- Vicino a unʼapparecchiatura di riscaldamento.
6
DP450-P.ADEULLK_ITA_MFL61857019.6 6DP450-P.ADEULLK_ITA_MFL61857019.6 6 2/23/09 3:24:33 PM2/23/09 3:24:33 PM
Page 49

Collegamento dell’unità
Collegamenti audio e video alla TV
Collegare il connettore AV OUT dellʼunità al connettore di ingresso
corrispondente sulla TV come mostrato sotto.
TV
Lato destro dellʼunità
Collegare il
jack alla presa
“AV OUT”.
Giallo
rosso
bianco
Adattatore audio/video
Cavo audio/video
(non fornito)
7
DP450-P.ADEULLK_ITA_MFL61857019.7 7DP450-P.ADEULLK_ITA_MFL61857019.7 7 2/23/09 3:24:34 PM2/23/09 3:24:34 PM
Page 50

Regolazione delle impostazioni
v
PULSANTE
1 Visualizzare il menu di configurazione: SETUP
2
Selezionare l’opzione desiderata al primo livello:
3 Spostarsi al secondo livello:
4
Selezionare l’opzione desiderata al secondo livello:
5 Spostarsi al terzo livello:
6 Cambiare le impostazioni:
Regolazione delle impostazioni Ulteriori dettagli
Alla prima accensione dell’unità (opzionale)
Quando si accende lʼunità per la prima volta, viene presentato un menu per la
scelta della lingua. Bisogna selezionare una lingua per lʼunità. Utilizzare
vV b B per selezionare una lingua, quindi premere ENTER per visualizzare
il menu di conferma. Utilizzare b B per selezionare [ENTER], quindi premere
ENTER.
Regolazione delle impostazioni della lingua
Linguaggio Menu – Selezionare una lingua per il menu di configurazione e per
le informazioni a video.
Disco Audio/Sottotitoli/Menu – Selezionare una lingua per Disco Audio/
Sottotitoli/Menu.
[Default]: Si riferisce alla lingua originale con cui è stato registrato il disco.
[Altri]: Per selezionare una lingua diversa, premere i tasti numerici per
inserire il numero a 4 cifre, secondo lʼelenco dei codici delle lingue, e poi
ENTER. (vedere pagina 13). In caso di errore durante lʼinserimento, premere
CLEAR per cancellare i numeri e poi reinserirli correttamente.
[Off] (per i sottitoli): Disabilita i sottotitoli.
Regolazione delle impostazioni di visualizzazione
Rapporto D’aspetto - Selezionare il tipo di visualizzazione da usare in base
alle proporzioni dello schermo.
[4:3]: Scegliere questa impostazione quando è collegato un TV formato
standard 4:3.
v V
B
v V
B
v V / ENTER
[16:9]: Scegliere questa impostazione quando è collegato un TV formato
panoramico 16:9.
Modalità display – Se si seleziona 4:3, bisogna decidere come saranno
visualizzati sullʼapparecchio TV i programmi e i film widescreen.
[Letterbox]: Con questa impostazione le immagini widescreen saranno
visualizzate con bande nere nella parte inferiore e superiore dello schermo.
[Panscan]: Con questa impostazione viene riempito tutto lo schermo 4:3,
tagliando le immagini quando necessario.
Regolazione delle impostazioni audio
DRC (Dynamic Range Control) – Rende il suono chiaro quando il volume è
molto basso (solo Dolby Digital). Per ottenere questo effetto impostare DRC su
[On].
Vocal – Impostare su [On] (acceso) solo se si riproduce un DVD karaoke
multi-canale. I canali karaoke del disco si mescolano al suono audio normale.
Regolazione delle impostazioni di blocco
Per utilizzare le opzioni di blocco, è necessario selezionare lʼopzione [Codice
Area]. Selezionare lʼopzione [Codice Area] e premere B. Digitare una password
a 4 cifre, quindi premere ENTER. Digitarla nuovamente, quindi premere ENTER
per la verifica. Se si sbaglia la digitazione delle cifre, premere CLEAR ed
effettuare la correzione.
Se si dimentica la password, è possibile ripristinarla. Rimuovere il disco
dallʼunità. Visualizzare il menu di impostazione e immettere il numero a 6 cifre
“210499” per azzerare la password.
Restrizione – Scegliere un livello di classificazione. Più basso è il livello, più
restrittiva è la classificazione. Selezionare [Unlocked] per disabilitare la
classificazione
Password – Imposta o cambia la password per le impostazioni di blocco.
[Nuova]: Digitare una nuova password a 4 cifre mediante i tasti
numerici, quindi premere ENTER. Digitare nuovamente la password per
verifica.
[Modificare]: Digitare la vecchia password e quindi inserire due volte quella
nuova.
Codice Area – Selezionare un codice per lʼarea geografica abbinata al livello di
classificazione. In questo modo si individuano gli standard relativi allʼarea
geografica adoperati per classificare i DVD sotto il controllo del “parental lock”
(vedere pag. 13).
8
DP450-P.ADEULLK_ITA_MFL61857019.8 8DP450-P.ADEULLK_ITA_MFL61857019.8 8 2/23/09 3:24:34 PM2/23/09 3:24:34 PM
Page 51

Regolazione delle altre impostazioni
DivX(R) VOD – Forniamo il codice di registrazione DivX® VOD (Video On
Demand) con il quale è possibile noleggiare ed acquistare video tramite il servizio DivX® VOD. Per ulteriori informazioni, visitare il sito www.divx.com/vod.
Premere ENTER quando è evidenziata lʼicona [Selezione] per visualizzare il
codice di registrazione dellʼunità.
Tutti i video scaricati da DivX® VOD possono essere riprodotti solo su questa
unità.
Visualizzazione delle informazioni del disco
PULSANTE
1
Premere DISPLAY durante la riproduzione:
2 Selezionare una voce:
3
Regolare le impostazioni di visualizzazione:
4 Per uscire: DISPLAY
Visualizzazione delle informazioni del disco
- Ulteriori dettagli
È possibile selezionare una voce premendo v V e cambiando o selezionando
lʼimpostazione premendo b B.
Numero della traccia corrente / numero totale di titoli
Numero del capitolo corrente / numero totale di capitoli
Tempo di riproduzione trascorso
Selezione della lingua audio o del canale
Scelta dei sottotitoli
Selezione dellʼangolazione / numero totale di angolazioni
Simboli adoperati nel presente manuale
Una sezione il cui titolo presenta uno dei simboli seguenti è applicabile solo al
disco o file rappresentato dal simbolo.
ALL
DVD
DivX
Tutti i dischi e i file
DVD e DVD±R/RW finalizzati
File DivX
DISPLAY
v V
b B / ENTER
ACD
MP3
WMA
CD Audio
File MP3
File WMA
9
DP450-P.ADEULLK_ITA_MFL61857019.9 9DP450-P.ADEULLK_ITA_MFL61857019.9 9 2/23/09 3:24:35 PM2/23/09 3:24:35 PM
Page 52

Riproduzione di un disco
PULSANTE
1 Aprire il coperchio del disco:
2 Inserire un disco: 3 Chiudere il coperchio del disco: 4 Iniziare la riproduzione:
5 Regolare il volume: VOLUME
6 Per arrestare la riproduzione:
Riproduzione di un disco - Ulteriori dettagli
Arresto della riproduzione
Premere STOP (x) per interrompere la riproduzione; in base al disco, lʼunità
registra il punto di arresto. Sullo schermo appare brevemente “ Xx ”. Premere
PLAY ( N) per riprendere la riproduzione (dal punto della scena). Se si preme
nuovamente STOP (x) o si rimuove il disco (sullo schermo viene visualizzato
(“ x ”), lʼunità cancella il punto di arresto.
(Xx = Riprende la riproduzione, x = Interruzione completa)
Il punto di interruzione può essere cancellato premendo un tasto
(ad esempio: POWER, OPEN, ecc).
Riproduzione di un DVD con menu
La maggior parte dei DVD dispongono di menu che vengono caricati prima dell'inizio
della riproduzione del film. È possibile spostarsi in tali menu mediante vV b B o un
pulsante numerico per evidenziare un'opzione. Premere ENTER per selezionare.
Riproduzione di un DVD VR
Questa unità riproduce DVD-RW registrati adoperando il formato Video
Recording (VR). Quando si inserisce un DVD VR, sullo schermo viene
visualizzato il menu. Adoperare vV per selezionare un titolo, quindi premere
PLAY (N). Per visualizzare il menu del DVD-VR, premere MENU oppure
TITLE. Alcuni dischi DVD-VR contengono dati CPRM di registratori DVD.
Lʼunità non supporta questi tipi di dischi.
Passaggio al capitolo/alla traccia / file successivi
Premere SKIP (>) per spostarsi al capitolo / traccia / file successivo.
Premere SKIP (.) per tornare allʼinizio del capitolo / traccia / file corrente.
Premere brevemente due volte SKIP (.) per tornare indietro al capitolo /
traccia / file precedente.
DVD
OPEN (Z)
N PLAY
x STOP
ALL
ALL
ALL
DivX
DVD
Interruzione della riproduzione
Premere PAUSE/STEP (X) per mettere in pausa la riproduzione.
Premere PLAY ( N) per continuare la riproduzione.
Riproduzione di un fotogramma alla volta
Premere PAUSE/STEP (X) ripetutamente per visualizzare un fotogramma alla
volta.
Riproduzione continua
Premere ripetutamente REPEAT per selezionare una voce da ripetere. Il titolo,
il capitolo o la traccia corrente sarà riprodotto ripetutamente. Per tornare alla
riproduzione normale, premere ripetutamente REPEAT fino a selezionare [Off].
Avanzamento veloce o riavvolgimento veloce
ACD
DVD
DivX
Premere e tenere premuto SKIP (.o >) per avanzare o arretrare rapidamente durante la riproduzione. È possibile passare tra le diverse velocità di riproduzione tenendo premuto ripetutamente SKIP (.o >).
Premere PLAY (N) per continuare la riproduzione alla velocità normale.
Ripetizione di un segmento specifico (A-B)
Premere A-B allʼinizio del segmento che si desidera ripetere e premere di nuovo
alla fine del segmento. Il segmento selezionato sarà riprodotto continuamente.
Per tornare alla riproduzione normale, premere A-B fino a selezionare [Off].
Scelta della lingua dei sottotitoli
Premere ripetutamente SUBTITLE ( ) durante la riproduzione per selezionare
la lingua desiderata per i sottotitoli.
Visione da un’angolazione diversa
Se lʼindicatore dellʼangolazione compare per un istante sullo schermo, è possibile
selezionare un diverso punto di vista premendo ripetutamente ANGLE ( ).
Ascolto di un audio diverso
Premere ripetutamente AUDIO ( ) durante la riproduzione per selezionare le
lingue disponibili, i canali o i metodi di codifica.
Rallentamento della velocità di riproduzione (
Durante la riproduzione, premere SLOW (t o T) per ottenere un effetto
moviola avanti o indietro. È possibile passare tra le diverse velocità di
riproduzione premendo ripetutamente SLOW (t o T). Premere PLAY (N)
per continuare la riproduzione alla velocità normale.
WMA
MP3
DivX
: solo avanti)
ACD
DVD
DVD
DVD
DivX
DVD
DivX
DivX
10
DP450-P.ADEULLK_ITA_MFL61857019.10 10DP450-P.ADEULLK_ITA_MFL61857019.10 10 2/23/09 3:24:36 PM2/23/09 3:24:36 PM
Page 53

DivX
ACD
DVD
DVD
ACD
DVD
WMA
DVD
DivX
DVD
MP3
DivX
Ingrandimento dell’immagine video
Durante la riproduzione oppure in modalità pausa, premere ZOOM ripetutamente per selezionare la modalità zoom. È possibile muoversi attraverso
lʼimmagine ingrandita adoperando i tasti vVb B. Premere CLEAR per uscire.
(100% p 200 % p 300% p 400% p 100%)
Visualizzazione del menu del titolo
Premere TITLE per visualizzare il menu del titolo, se disponibile.
Visualizzazione del menu del DVD
Premere MENU per visualizzare il menu del disco, se disponibile.
Inizio della riproduzione dal tempo desiderato
Cerca il punto di partenza tramite lʼinserimento del tempo. Premere DISPLAY,
quindi selezionare lʼicona dellʼorologio. Inserire il tempo, quindi premere
ENTER. Ad esempio, per trovare una scena posizionata su 1 ora, 10 minuti e
20 secondi, inserire “11020” e premere ENTER. Se i numeri digitati sono errati,
premere CLEAR per ripetere lʼinserimento.
Riproduzione in ordine casuale
Durante la riproduzione o nella modalità stop, premere RANDOM per avviare la
riproduzione in ordine casuale. Premere di nuovo RANDOM per ritornare alla
riproduzione normale.
Contrassegnare una scena preferita
È possibile contrassegnare un punto sul disco per riprendere la riproduzione da
quella posizione. Premere MARKER al punto desiderato. Sullo schermo appare
per alcuni secondi lʼicona del contrassegno. È possibile inserire fino a nove
contrassegni. Premere SEARCH (CERCA) per aprire il menu [Marker Seach].
Utilizzare b o B per selezionare un contrassegno desiderato dal menu, quindi
premere ENTER per richiamarlo o CLEAR per cancellarlo.
Memoria dell’ultima scena
Questa unità memorizza lʼultima scena dellʼultimo disco visionato. Lʼultima
scena resta in memoria anche se si rimuovere il disco dal lettore o si spegne
lʼunità. Se si carica un disco di cui si è memorizzata la scena, questʼultima verrà
automaticamente richiamata.
DVD
Salva schermo
Lo screen saver compare quando si lascia lʼunità in modalità Stop per oltre
cinque minuti. Se lo screen saver resta attivo per cinque minuti, lʼunità si spegne automaticamente.
Disco misto – DivX, MP3/WMA e JPEG
Quando si riproduce un disco contenente file DivX, MP3/WMA e JPEG insieme,
è possibile selezionare quale serie di file riprodurre premendo TITLE.
Riproduzione di un filmato DivX
PULSANTE
1 Aprire il coperchio del disco:
2 Inserire un disco: -
3 Chiudere il coperchio del disco: -
Selezionare un film dal menu:
4
5 Iniziare la riproduzione:
6 Per arrestare la riproduzione:
Riproduzione di un film DivX - ulteriori dettagli
Cambiare il set di caratteri per visualizzare correttamente i sottotitoli
del DivX
Tenere premuto il tasto SUBTITLE per 3 secondi durante la riproduzione. Appare
il codice della lingua. Premere
quando i sottotitoli non sono visualizzati correttamente; quindi, premere ENTER
Requisiti per i file DivX
La compatibilità dei file DivX con questo lettore è limitata secondo le seguenti
modalità:
• Risoluzione supportata: 720x576 (L x A) pixel
• Il nome dei file DivX e dei sottotitoli sono limitati a 45 caratteri
• Estensioni dei file DivX: “.avi”, “.mpg”, “.mpeg”
• Sottotitoli DivX supportati: SubRip (.srt / .txt), SAMI (.smi),
•
•
• Formati Audio supportati: “Dolby Digital”, “PCM”, “MP3”, “WMA”
•
• Bit rate: entro 8 -320 kHz (MP3), entro 32 - 192 kHz (WMA),
• Formato CD-R/RW, DVD±R/RW: ISO 9660
•
®
b B
per selezionare un altro codice di lingua fin
SubStation Alpha (.ssa/.txt), MicroDVD (.sub/.txt), VobSub (.sub),
SubViewer 2.0 (.sub/.txt), TMPlayer (.txt), DVD Subtitle System (.txt)
Formati Codec supportati: “DIVX3.xx”, “DIVX4.xx”, “DIVX5.xx”, “MP43”, “3IVX”
Con il formato DivX 6.0 questa unità supporta solo la funzione di riproduzione.
Frequenza di campionamento: entro 8 - 48 kHz (MP3), entro 32 - 48kHz (WMA)
meno di 4 Mbps (file DivX)
Max file/cartelle: inferiore a 600 (numero totale di file e cartelle)
OPEN (Z)
v V, MENU
N PLAY
x STOP
.
11
DP450-P.ADEULLK_ITA_MFL61857019.11 11DP450-P.ADEULLK_ITA_MFL61857019.11 11 2/23/09 3:24:38 PM2/23/09 3:24:38 PM
Page 54

Ascolto di dischi o file musicali
PULSANTE
1 Aprire il coperchio del disco:
2 Inserire un disco: 3 Chiudere il coperchio del disco: -
Selezionare un brano musicale dal menu:
4
5 Iniziare la riproduzione:
6 Per arrestare la riproduzione:
Ascolto di dischi o file musicali - Ulteriori dettagli
Creazione del proprio programma
È possibile riprodurre i contenuti di un disco nellʼordine preferito, riorganizzando i file. Per aggiungere un brano allʼelenco del programma, premere il
tasto PROG. per accedere alla modalità di modifica del programma (sul menu
compare il simbolo
inserirla nellʼelenco del programma. Selezionare un brano dallʼelenco del programma, quindi premere ENTER per iniziare la riproduzione. Per cancellare un
brano dallʼelenco del programma, selezionarlo e premere CLEAR in modalità di
modifica del programma. Per cancellare tutti i brani dallʼelenco del programma,
selezionare [Clear All] e premere ENTER in modalità di modifica del programma. Quando il disco viene rimosso o lʼunità è spenta, la programmazione viene
cancellata.
Visualizzazione delle informazioni del file (ID3 TAG)
Durante la riproduzione di un file MP3 che contiene informazioni, è possibile
visualizzarle premendo ripetutamente DISPLAY. Se il file non ha le informazioni
ID3-Tag, sullo schermo apparirà [No ID3-Tag].
Requisiti per i file musicali MP3/WMA
La compatibilità dei file MP3/WMA con questa unità è soggetta alle restrizioni
sotto riportate:
• Estensioni dei file: “.mp3”, “.wma”
• Frequenza di campionamento: 8 - 48 kHz (MP3), entro 32 - 48 kHz (WMA)
• Bit rate: 8 - 320 kbps (MP3), 32 - 192 kbps (WMA)
• Formato CD-R/RW, DVD±R/RW: ISO 9660
• Max file/cartelle: inferiore a 600 (numero totale di file e cartelle)
12
E
). Scegliere una traccia [List], quindi premere ENTER per
OPEN (Z)
v V, MENU
N PLAY
x STOP
Visualizzazione di fotografie
PULSANTE
1 Aprire il coperchio del disco:
2 Inserire un disco: -
3 Chiudere il coperchio del disco: -
Selezionare una fotografia dal menu:
4
Visualizzare il file selezionato a schermo intero:
5
6 Per tornare al menu:
Visualizzazione di fotografie - Ulteriori dettagli
Visualizzazione di fotografie come presentazione
Usare vV b Bper selezionare lʼicona (
la presentazione. È possibile cambiare la velocità della presentazione usando
b B quando è selezionata lʼicona (
Passaggio alla fotografia successiva/precedente
Premere SKIP (. oppure >) per visualizzare la fotografia precedente/
successiva.
Rotazione di una fotografia
Usare vV per ruotare in senso orario o antiorario la fotografia, mentre è
visualizzata a schermo intero.
Sospensione di una presentazione
Premere PAUSE/STEP (X) per mettere in pausa la presentazione. Premere
N) per continuare la presentazione.
PLAY (
Ascolto di musica durante una presentazione
È possibile ascoltare musica durante una presentazione se il disco contiene sia
fotografie che file musicali. Usare
premere ENTER per avviare la presentazione.
Ingrandimento di una fotografia
Mentre si visualizza una fotografia a schermo intero, premere ripetutamente il
tasto ZOOM per selezionare la modalità zoom. È possibile muoversi attraverso
la fotografia ingrandita adoperando i tasti vV b B Premere CLEAR per uscire.
Requisiti per le fotografie
La compatibilità dei file JPEG con questa unità è limitata secondo le seguenti
modalità:
• Estensioni dei file: “.jpg”
• Dimensioni della fotografia: Si consiglia meno di 2 MB
• Formato CD-R/RW, DVD±R/RW: ISO 9660
• Max file/cartelle: inferiore a 600 (numero totale di file e cartelle)
), quindi premere ENTER per avviare
).
vV b B per selezionare lʼicona ( ), quindi
OPEN (Z)
v V, MENU
N PLAY
x STOP
DP450-P.ADEULLK_ITA_MFL61857019.12 12DP450-P.ADEULLK_ITA_MFL61857019.12 12 2/23/09 3:24:38 PM2/23/09 3:24:38 PM
Page 55

Codici lingua
Utilizzare questo elenco per inserire la lingua preferita per le seguenti impostazioni iniziali: Disc Audio, Disc Subtitle, Disc Menu.
Lingua Codice
Afar 6565
Afrikaans 6570
Albanese 8381
Ameharic 6577
Arabo 6582
Armeno 7289
Assamese 6583
Aymara 6588
Azerbaigiano 6590
Bashkir 6665
Basco 6985
Bengali, Bangla 6678
Bhutani 6890
Bihari 6672
Bretone 6682
Bulgaro 6671
Birmano 7789
Bielorusso 6669
Cinese 9072
Lingua Codice
Croato 7282
Ceco 6783
Danese 6865
Olandese 7876
Inglese 6978
Esperanto 6979
Estone 6984
Faroese 7079
Fiji 7074
Finlandese 7073
Francese 7082
Frisone 7089
Galiziano 7176
Georgiano 7565
Tedesco 6869
Greco 6976
Groenlandese 7576
Guarani 7178
Gujarati 7185
Lingua Codice
Hausa 7265
Ebraico 7387
Hindi 7273
Ungherese 7285
Islandese 7383
Indonesiano 7378
Interlingua 7365
Irlandese 7165
Italiano 7384
Giapponese 7465
Kannada 7578
Kashmiri 7583
Kazako 7575
Kirghiso 7589
Coreano 7579
Curdo 7585
Laothian 7679
Latino 7665
Lettone, Lettish 7686
Lingua Codice
Lingala 7678
Lituano 7684
Macedone 7775
Malgascio 7771
Malese 7783
Malayalam 7776
Maori 7773
Maratto 7782
Moldavo 7779
Mongolo 7778
Nauru 7865
Nepali 7869
Norvegese 7879
Oriya 7982
Panjabi 8065
Pashto, Pushto 8083
Persiano 7065
Polacco 8076
Portoghese 8084
Lingua Codice
Quechua 8185
Retoromanzo 8277
Romeno 8279
Russo 8285
Samoano 8377
Sanscrito 8365
Gaelico Scozzese 7168
Serbo 8382
Serbo-Croato 8372
Shona 8378
Sindhi 8368
Cingalese 8373
Slovacco 8375
Sloveno 8376
Spagnolo 6983
Sudanese 8385
Swahili 8387
Svedese 8386
Tagalog 8476
Codici area
Selezionare un codice area dallʼelenco.
Area Codice
Afghanistan AF
Argentina AR
Australia AU
Austria AT
Belgio BE
Bhutan BT
Bolivia BO
Brasile BR
Cambogia KH
Canada CA
Cile CL
Cina CN
Colombia CO
Congo CG
Area Codice
Costa Rica CR
Croazia HR
Repubblica Ceca CZ
Danimarca DK
Ecuador EC
Egitto EG
El Salvador SV
Etiopia ET
Fiji FJ
Finlandia FI
Francia FR
Germania DE
Gran Bretagna GB
Grecia GR
Area Codice
Groenlandia GL
Hong Kong HK
Ungheria HU
India IN
Indonesia ID
Israele IL
Italia IT
Giamaica JM
Giappone JP
Kenya KE
Kuwait KW
Libia LY
Lussemburgo LU
Malaysia MY
Area Codice
Maldive MV
Messico MX
Monaco MC
Mongolia MN
Marocco MA
Nepal NP
Paesi Bassi NL
Antille Olandesi AN
Nuova Zelanda NZ
Nigeria NG
Norvegia NO
Oman OM
Pakistan PK
Panama PA
Area Codice
Paraguay PY
Filippine PH
Polonia PL
Portogallo PT
Romania RO
Federazione Russa RU
Arabia Saudita SA
Senegal SN
Singapore SG
Repubblica Slovacca SK
Slovenia SI
Sud Africa ZA
Corea del Sud KR
Spagna ES
Lingua Codice
Tajik 8471
Tamilico 8465
Telugu 8469
Tailandese 8472
Tonga 8479
Turco 8482
Turcomanno 8475
Twi 8487
Ucraino 8575
Urdu 8582
Uzbeco 8590
Vietnamese 8673
Volapük 8679
Gallese 6789
Wolof 8779
Xhosa 8872
Yiddish 7473
Yoruba 8979
Zulu 9085
Area Codice
Sri Lanka LK
Svezia SE
Svizzera CH
Taiwan TW
Tailandia TH
Turchia TR
Uganda UG
Ucraina UA
Stati Uniti US
Uruguay UY
Uzbekistan UZ
Vietnam VN
Zimbabwe ZW
13
DP450-P.ADEULLK_ITA_MFL61857019.13 13DP450-P.ADEULLK_ITA_MFL61857019.13 13 2/23/09 3:24:39 PM2/23/09 3:24:39 PM
Page 56

Risoluzione problemi
Problema Causa Soluzione
Assenza di
alimentazione.
Lʼunità è
alimentata, ma il
lettore non
funziona.
Assenza di
immagine.
Assenza di
suono.
Lʼunità non avvia
la riproduzione.
Il telecomando
non funziona in
maniera corretta.
Il cavo di alimentazione è scollegato.
La batteria è scarica. Ricaricare la batteria.
Non è inserito alcun disco. Inserire un disco.
Il televisore non riceve il segnale
dallʼunità.
Il cavo video non è assicurato in
modo corretto.
Lʼapparecchio collegato con il
cavo audio non è impostato per la
ricezione del segnale dallʼunità.
Il volume è al minimo.
Le opzioni AUDIO sono impostate
in maniera errata.
È inserito un disco non riproducibile.
Il livello di classificazione è
impostato.
Il telecomando non è puntato
verso il sensore remoto dellʼunità.
Il telecomando è troppo distante
dallʼunità.
Assicurare il cavo di alimentazione alla presa di corrente.
Selezionare sullʼapparecchio TV
la modalità di ingresso video più
adeguata.
Collegare correttamente il cavo
video.
Selezionare la modalità di input
adatta allʼamplificatore audio.
Utilizzare il comando del volume
per regolarne lʼintensità.
Regolare correttamente le
impostazioni AUDIO.
Inserire un disco riproducibile.
Controllare il tipo di disco e il
sistema regionale.
Cambiare il livello di
classificazione.
Puntare il telecomando verso il
sensore remoto dellʼunità.
Adoperare il telecomando nelle
vicinanze dellʼunità.
Specifiche
Generale
Requisiti di alimentazione 12 VCC
Consumo energetico 12 W
Dimensioni (approssimative) 202 x 42.5 x 167 mm
(L x H x P)
Peso netto (approssimativo) 0,78 kg
Temperatura di funzionamento da 5 °C a 40 °C
Operating humidity da 5 % a 90 %
Laser Laser semiconduttore
Sistema del segnale PAL
Connettori
Uscita audio/video mini jack ø3,5 mm x 1
- Video: 1,0 V (p-p), 75 Ω, sinc negativa
- Audio: 1,5 Vrms (1 KHz, 0 dB)
Uscita cuffie: mini jack stereo ø3,5 mm x 1
Display a cristalli liquidi (LCD)
Dimensioni schermo 7" panoramico (diagonale)
Sistema di proiezione Striscia R.G.B.
Sistema di azionamento Matrice attiva TFT
Risoluzione 480 x 234 (WQVGA)
Accessori
• Adattatore audio/video
• Adattatore CA (MPA-630)
• Adattatore per auto (DPDC1)
• Telecomando
• Batteria per telecomando (batteria al litio)
I disegni e le specifiche sono soggetti a modifiche senza
preavviso.
14
DP450-P.ADEULLK_ITA_MFL61857019.14 14DP450-P.ADEULLK_ITA_MFL61857019.14 14 2/23/09 3:24:40 PM2/23/09 3:24:40 PM
Page 57

DP450 / DP450P / DP450R
NEDERLANDS
P/NO : MFL61857019
DP450-P.ADEULLK_dut_MFL61857019 1DP450-P.ADEULLK_dut_MFL61857019 1 2/23/09 3:29:32 PM2/23/09 3:29:32 PM
Page 58

LET OP
RISICO OP ELEKTRISCHE
SCHOKKEN NIET OPENEN
WAARSCHUWING: OM HET RISICO OP
ELEKTRISCHE SCHOKKEN TE VERMINDEREN
VERWIJDER DE ACHTERKLEP (OF
ACHTERKANT) NIET. GEEN ONDERDELEN
AANWEZIG DIE DOOR DE GEBRUIKER
ONDERHOUDEN DIENEN TE WORDEN. NEEM
CONTACT OP MET GEKWALIFICEERD SERVICE
PERSONEEL VOOR ONDERHOUD.
Dit symbool waarschuwt de gebruiker op de
aanwezigheid van niet geïsoleerd “gevaarlijk
voltage” in de kast van het product, van voldoende kracht om een risico op elektrocutie
voor personen te vormen.
Dit symbool waarschuwt de gebruiker op de
aanwezigheid van belang-Rijke gebruik- en
onderhoudinstructies in de handleiding van
het apparaat.
WAARSCHUWING: VOORKOM BRAND OF
ELEKTROCUTIEGEVAAR, EN STEL DIT
PRODUCT NIET BLOOT AAN REGEN OF VOCHT.
WAARSCHUWING: Plaats het product niet in een
afgesloten ruimte zoals een boekenkast of gelijkwaardig.
VOORZICHTIG: Blokkeer geen ventilatie openingen. Installeer volgens de instructies van de fabrikant. Gleuven en openingen in de kast zijn er voor
ventilatie doeleinden en om betrouwbaar gebruik
van het product te garanderen, en te beschermen
tegen oververhitting. De openingen mogen nooit
geblokkeerd worden door het product op een bed,
tapijt, bank of soortgelijk iets te plaatsen. Dit product mag niet ingebouwd worden waarbij er onvoldoende ventilatie is, zoals een boekenkast of rek, volg
de instructies van de fabrikant op.
VOORZICHTIG: Dit product
gebruikt een Laser Systeem.
Lees voor correct gebruik de
gebruikershandleiding aandachtig door en bewaar voor
toekomstig gebruik. Mocht het apparaat onderhoud
nodig hebben, neem contact op met een erkend
servicecentrum. Gebruik van bediening of afstellingen of performance van procedures anders dan
hierin aangegeven kunnen leiden tot gevaarlijke
blootstelling aan straling. Voorkomen directe blootstelling aan de laserstraal, open de behuizing niet.
Zichtbare laserstraling indien geopend. KIJK NIET
IN DE STRAAL.
VOORZICHTIG: Stel niet bloot aan water (druppels
of spetters) en plaats geen met water gevulde voorwerpen, zoals een vaas, bovenop het apparaat.
VOORZICHTIG
• Belemmer de ventilatie niet door de ventilatieopeningen te bedekken met een krant,
tafelkleed, gordijn e.d.
• Plaats geen bronnen met open vuur zoals brandende kaarsen op de speler.
• Doe uitgeputte batterijen veilig weg en gooi ze
niet in het vuur. Houd u aan de milieuregels voor
het wegdoen van batterijen.
• Gebruik het toestel alleen in tropische en
gematigde klimaten.
• Uw gehoor kan worden beschadigd als u het
geluid van uw oortelefoon of hoofdtelefoon te
hard zet.
• Stel de batterij (accu) niet bloot aan de hoge
temperatuur van rechtstreekse zonnestraling, een
open haard e.d.
• Met het oog op uw veiligheid is het beter dat u de
in dit product ingebouwde batterij niet zelf verwijdert. Breng het product naar het dichtstbijzijnde
erkende LG Electronics servicecentrum als u de
batterij wilt laten vervangen.
WAARSCHUWING betreffende de Stroomkabel
Het wordt voor de meeste apparaten aanbevolen
om ze aan te sluiten op een toegewezen circuit.
Dat is een enkel circuit dat alleen dat toestel van
stroom voorziet, zonder extra stopcontacten of
stekkerdozen. Controleer de specificatiebladzijde in
deze handleiding.
Sluit niet teveel apparaten aan op
wandcontactdozen. Overladen wandcontactdozen
die los zitten of beschadigd zijn, verlengkabels,
kapotte stroomkabels, of beschadigde of gebarsten
kabelisolatie zijn eveneens gevaarlijk. Al deze
omstandigheden kunnen leiden tot elektrocutie of
brand.
Onderzoek regelmatig de kabel van uw toestel en
het uiterlijk op tekenen van schade, slijtage, trek de
kabel uit, en stop het gebruik van het toestel, en
laat de kabel vervangen door een exacte vervanging door erkend servicepersoneel indien deze beschadigd blijkt te zijn.
Bescherm de kabel tegen fysiek of mechanisch misbruik, zoals draaien, vast zetten, perforeren, klem
zitten tussen een deur, of dat erop gelopen wordt.
Let op stekkers, stopcontacten, en het punt waar de
kabel uit het toestel gaat.
Trek aan de stekker en niet aan de kabel voor loskoppeling uit het stopcontact. Plaats het product zo
dat de stekker makkelijk te bereiken is.
Verwijdering van uw oude apparaat
1. Indien dit doorkruiste afvalbak symbool zich
bevindt op het product, betekent dit dat het
product valt onder de Europese Richtlijn
2002/96/EC.
2. Alle elektrische en elektronische producten
dienen apart van het huishoudelijk afval
verwijderd te worden via door de overheid of
gemeente toegewezen inzamelpunten.
3. De correcte verwijdering van uw oude apparaat voorkomt mogelijke negatieve gevolgen
voor het milieu en de menselijke gezondheid.
4. Voor meer informatie over de verwijdering
van uw oude apparaat, neemt u contact op
met uw gemeente, afvalverwerkingsbedrijf of
de winkel waar u het product heeft gekocht.
Dit product is gemaakt volgens de EMC
Richtlijn 2004/1008/EC, en Laag Voltage
Richtlijn 2006/95/EC.
Europese vertegenwoordiger:
LG Electronics Service Europe B.V.
Veluwezoom 15, 1327 AE Almere, The
Netherlands
(Tel : +31–036–547–8940)
2
DP450-P.ADEULLK_dut_MFL61857019 2DP450-P.ADEULLK_dut_MFL61857019 2 2/23/09 3:29:33 PM2/23/09 3:29:33 PM
Page 59

Afspeelbare schijftypes .............................................................................. 3
Oplaadbare batterij ..................................................................................... 3
Hoofdtoestel ............................................................................................... 4
Afstandsbediening ...................................................................................... 5
Voeding aansluiten ..................................................................................... 6
De speler aansluiten ................................................................................. 7
Aanpassen van de taalinstellingen ......................................................... 8-9
Schijfinformatie tonen ................................................................................. 9
Een schijf afspelen .............................................................................. 10-11
Een DivX filmbestand afspelen .................................................................11
Luisteren naar Muziekschijf of bestanden ................................................ 12
Fotobestanden bekijken ........................................................................... 12
Taalcodes ................................................................................................. 13
Regiocodes............................................................................................... 13
Inhoudsopgave
Problemen ................................................................................................ 14
Specificaties ............................................................................................. 14
Afspeelbare schijftypes
Type Logo
DVD-VIDEO: Schijven zoals films die kunnen worden
gekocht of gehuurd.
DVD-R: Alleen videomodus en voltooid
DVD-RW: Alleen VR modus, Videomodus en voltooid
Betreffende het Symbool scherm
“ ” kan op uw TV-scherm verschijnen tijdens gebruik en geeft aan dat de
functie die wordt uitgelegd in deze gebruikershandleiding niet beschikbaar is bij
die specifieke media.
Regiocodes
De regionale code is bij dit toestel op de achterkant afgedrukt. Dit toestel kan
alleen DVD schijven afspelen met hetzelfde label als op de achterkant van het
toestel of “ALL”.
• Meeste DVD schijven hebben een wereldbol met een of meer nummers erop,
afgebeeld op de hoes. Dit nummer moet overeenkomen met de regionale code
van uw toestel anders kan de schijf niet afgespeeld worden.
• Als u een DVD met een andere regionale code dan op uw speler wilt afspelen,
zal het bericht “Controleer Regionale Code” op het tv-scherm afgebeeld worden.
Auteursrechten
Het is verboden bij de wet om materiaal met auteursrecht zonder toestemming
te kopiëren, tonen, of uitzenden via kabel, afspelen in publiek of te verhuren.
Dit product is uitgerust met een beveiliging tegen kopiëren die ontwikkeld werd
door Macrovision. Kopiebeveiliging signalen worden op sommige schijven
opgenomen. Bij het opnemen en afspelen van beelden van deze schijven, zal
er storing optreden. Dit product maakt gebruik van technologie voor
bescherming van auteursrechten die beschermd wordt door U.S. patenten en
andere intellectuele eigendomsrechten. Gebruik van deze technologie ter bescherming van auteursrechten moet geautoriseerd worden door Macrovision, en
is bedoeld voor thuisgebruik en beperkt aantal kijkbeurten, tenzij
anderszins aangegeven door Macrovision. Omgekeerde engineering of
demontage is verboden.
DVD+R: Alleen videomodus
DVD+RW: Alleen videomodus
Audio CD: Muziek CDʼs of CD-R/CD-RW in muziek
CD formaat die gekocht kunnen worden.
Daarnaast kan dit toestel DVD+R/RW en CD-R/RW met audiotitels, DivX,
MP3, WMA en/of JPEG bestanden afspelen. Sommige DVD±RW/DVD±R
of CD-RW/CD-R kunnen niet op dit toestel afgespeeld worden vanwege de
opnamekwaliteit of fysieke staat van de schijf, of de eigenschappen van het
opnametoestel en autorisatiesoftware.
Geproduceerd onder licentie van Dolby Laboratories. “Dolby” en het
dubbel-D symbool zijn handelsmerken van Dolby Laboratories.
“DVD Logo” is een handelsmerk van DVD Format/Logo Licensing
Corporation.
DP450-P.ADEULLK_dut_MFL61857019 3DP450-P.ADEULLK_dut_MFL61857019 3 2/23/09 3:29:33 PM2/23/09 3:29:33 PM
Oplaadbare batterij
•
Dankzij de ingebouwde oplaadbare batterij kunt u de speler overal meenemen en schijven en bestanden zonder netkabel en een stopcontact afspelen.
• De ingebouwde oplaadbare batterij wordt alleen opgeladen als de speler is
uitgeschakeld en de netvoedingsadapter op een stopcontact is aangesloten.
• Het opladen stopt als u de speler inschakelt.
• Het opladen duurt ongeveer 2,5 uur.
• Bedrijfstijd op batterijvoeding ongeveer 2,5 uur.
De gebruikstijd van de batterij is afhankelijk van de batterijstatus, operationele status en de omgevingsomstandigheden, en de maximum afspeeltijd is
3 uren.
• Tijdens het opladen licht het statuslampje van de batterijvoeding rood op.
Nadat het opladen voltooid is, licht het statuslampje van de batterijvoeding
groen op.
• Als de resterende batterijcapaciteit minder is dan een paar minuten, gaat
op het scherm knipperen.
”
“
3
3
Page 60

Hoofdtoestel
a Lcd-scherm
b Luidsprekers
c Bedieningsknoppen voor afspelen
• N (Play)/ X (Pause): De weergave starten. Pauzeert tijdelijk het afspelen, druk
opnieuw om de pauzemodus af te sluiten.
• x (Stop): Stopt het afspelen.
• . (Overslaan): Achteruit* zoeken of naar het begin van het huidige hoofdstuk
of nummer teruggaan of naar het vorige hoofdstuk of nummer springen.
• > (Overslaan): Vooruit* zoeken of naar het volgende hoofdstuk of nummer
springen.
* Knop ongeveer twee seconden indrukken.
d Functieknoppen
• SETUP: Opent of sluit het Setupmenu.
• MENU: Opent het DVD menu.
• DISPLAY: Opent Display op scherm.
• COLOR (Kleur)/ BRIGHT* (Helder): De helderheid of het kleurenmenu van het
lcd-scherm weergeven.
* Om de kleuren of de helderheid van het lcd-scherm aan te passen drukt u op het
hoofdapparaat meermaals op COLOR/BRIGHT om het menu voor helderheid of
kleur op te roepen. Vervolgens stelt u met b / B de gewenste waarde in. Druk op
ENTER om uw keuze te bevestigen.
e Menubedieningsknoppen
• b B v V (links / rechts / omhoog / omlaag): Een menuonderwerp kiezen.
• ENTER: De gekozen menuopties bevestigen.
f OPEN (Z): Deksel van de schijflade openen.
g Sensor afstandsbediening: Richt de afstandsbediening hierop.
h Statuslampje voor batterij opladen en netvoeding.
• Dit statuslampje licht tijdens het opladen rood op en het licht groen op als het
laden voltooid is. (Zie pagina 3 voor meer informatie.)
• Het statuslampje licht gedurende een paar seconden groen op wanneer de speler
wordt ingeschakeld.
i Deksel van de schijflade.
j 1/q (Power Schakelaar): Schakel het toestel AAN/UIT.
Opmerking: Om dit toestel te gebruiken, moet de power schakelaar ingesteld zijn op
positie ON (AAN).
k w VOL (Volume): Aanpassen van het volume van de ingebouwde luidspreker en
hoofdtelefoon.
(Oortelefoon): Sluit een hoofdtelefoon aan.
l
m AV OUT: Aansluiten op een tv met video- en audio-ingangen.
n DC 12V IN: Anschluss des Netzadapters oder Auto-Adapters.
4
DP450-P.ADEULLK_dut_MFL61857019 4DP450-P.ADEULLK_dut_MFL61857019 4 2/23/09 3:29:34 PM2/23/09 3:29:34 PM
Page 61

Afstandsbediening
Opmerking: Om dit toestel met de afstandsbedi-
ening te gebruiken, moet de power schakelaar
ingesteld zijn op positie ON (AAN). (Zie pagina 4).
a
b
c
d
l l l l l l l a l l l l l l l
POWER (1): Schakel het toestel AAN/UIT.
AUDIO (
kanaal.
SUBTITLE (
ANGLE ( ): Selecteert, indien beschikbaar, een
DVD camerahoek.
): Selecteert een audiotaal of audio-
): Selecteert een ondertitelingtaal.
SKIP/SEARCH (. / >): Achteruit of vooruit
zoeken*. Naar het volgende of vorige nummer of
hoofdstuk gaan.
* Knop ongeveer twee seconden indrukken.
SLOW (t / T): Vertraagd achteruit of vooruit
afspelen.
l l l l l l l b l l l l l l l
SETUP: Opent of sluit het Setupmenu.
MENU: Opent het DVD menu.
vV b B:Navigeert door de menuʼs.
ENTER (
RETURN (O): Druk om achteruit in het menu te
gaan of het menu af te sluiten.
DISPLAY: Opent Display op scherm.
l l l l l l l c l l l l l l l
PAUSE/STEP (X): Pauzeert het afspelen tijdelijk /
druk herhaaldelijk voor stap voor stap afspelen.
PLAY (N): Start het afspelen.
STOP (x): Stopt het afspelen.
Numerieke toetsen: Selecteert genummerde
opties in een menu.
PROG.: Opent de programma bewerken modus.
CLEAR: Verwijdert een tracknummer uit de
Programmalijst.
l l l l l l l d l l l l l l l
TITLE: Opent het titelmenu van de schijf.
REPEAT: Herhaal hoofdstuk, track, titel of alles.
A-B: Herhaalt een gedeelte.
ZOOM: Vergroot videobeeld.
MARKER : Tijdens het afspelen een stoppunt
vastleggen.
SEARCH : [Marker Search]-menu oproepen.
RANDOM: Als u hierop drukt worden de nummers
in willekeurige volgorde afgespeeld.
): Bevestigt menukeuze.
Plaats de batterijen in de afstandsbediening
Duw de batterijhouderclip samen en trek aan de
tab om de batterijhouder te verwijderen. Volg de
aanwijzing in de batterijhouder wat betref + en
+ op bij het plaatsen van de batterij. Plaats de
batterijhouder met nieuwe batterij In de afstandsBediening, controleer of deze goed geladen is.
• Vervang de batterij van de afstandbediening door
een 3V micro lithium cel zoals een CR. 2025 of
gelijkwaardig.
• Let op de bij u geldende regels wat betreft
chemisch afval, waaronder ook batterijen horen.
Gooi de batterij niet in vuur.
Waarschuwing voor uitwisselbare lithiumbatterij.
•
Explosiegevaar bij gebruik van een verkeerde batterij
• Vervang de lithiumbatterij uitsluitend door een lithiumbatterij van hetzelfde type.
• Extra waarschuwing bij de batterij als de gebruiker
deze wil vervangen
Waarschuwing :De batterij is dit toestel kan
brand veroorzaken of chemische brandwonden
indien niet correct behandeld. Laad de batterij niet opnieuw op, demonteer, verpletter
of verhit boven 100 °C (212 °F). Vervang de
batterij alleen door een CR. 2025 batterij van
Matsushita Elec. Ind.Co. Ltd. (Panasonic).
Het gebruik van een andere batterij kan brand
of elektrische schokken veroorzaken. Lege batterijen horen bij chemisch afval. Houdt batterijen
buiten gebruik van kinderen. Niet demonteren of
in vuur werpen.
5
DP450-P.ADEULLK_dut_MFL61857019 5DP450-P.ADEULLK_dut_MFL61857019 5 2/23/09 3:29:34 PM2/23/09 3:29:34 PM
Page 62

Voeding aansluiten
De AC-adapter aansluiten
Sluit de meegeleverde AC-adapter van de eenheid aan op het stopcontact.
Bevestig de netstekker aan de netvoedingsadapter.
(De speler kan in werkelijkheid afwijken van de tekening.)
Rechterkant van de speler
Op een
stopcontact
aansluiten.
ontkoppelen van de
Netvoedingsadapter
• Deze netvoedingsadapter is geschikt voor 100-240 V 50/60 Hz 1 A netspanning.
• Vraag in een winkel voor elektrische materialen advies bij de keuze van een
geschikte netstekkeradapter of een netkabelset.
• Gefabriceerd door NANJING WANLIDA TECHNOLOGY CO., LTD.
Autoadapter aansluiten
Dit apparaat en de bijbehorende autoadapter zijn geschikt voor gebruik in autoʼs met
een elektrisch systeem van 8,5 – 16 V, min aan massa. Dit is de standaardspanning
voor de meeste autoʼs. Als uw auto een afwijkend elektrisch systeem heeft, kunt u
de meegeleverde autoadapter niet gebruiken.
Knop voor
netkabel.
Stekker op een “DC 12V IN”-stekkerbus
aansluiten.
Rechterkant van de speler
Op de
sigarettenaansteker
van de auto
aansluiten.
Stekker op een “DC 12V
IN”-stekkerbus aansluiten.
Autoadapter
• Deze autoadapter is geschikt voor 8,5 – 16 V gelijkspanning.
• Vraag in een automaterialenhandel naar een geschikte autoadapter.
• Gefabriceerd door NANJING WANLIDA TECHNOLOGY CO., LTD.
Let op!
• Om een elektrische schok en beschadiging van de speler of uw auto te
voorkomen moet u altijd eerst de autoadapter uit de sigarettenaansteker
trekken voordat u de stekker uit de speler trekt.
• Om veiligheidsredenen bevat de autoadapter een zekering van 3 A 250 V.
• Trek de autoadapter altijd uit de autosigarettenaansteker voordat u de auto
start.
• Gebruik de speler niet wanneer de autoaccu uitgeput is. Door een spanningspiek van de startmotor kan de gelijkstroomzekering doorbranden.
• Als de spanning van het elektrische systeem van de auto terugloopt tot
onder plm. 10 V is het mogelijk dat de speler niet goed werkt.
• Laat de speler niet achter in een omgeving waar de temperatuur tot boven
70 °C kan oplopen. Hierdoor kan de leeskop beschadigd worden.
Bijvoorbeeld:
- In een auto met gesloten ramen die in de volle zon staat.
- In de buurt van een verwarmingsapparaat.
6
DP450-P.ADEULLK_dut_MFL61857019 6DP450-P.ADEULLK_dut_MFL61857019 6 2/23/09 3:29:35 PM2/23/09 3:29:35 PM
Page 63

De speler aansluiten
Audio en Video Aansluitingen op uw TV
Sluit de AV UIT stekker van het toestel aan op de overeenkomende ingangen
op uw TV, zoals hieronder getoond.
TV
Rechterkant van de speler
Aansluiten op de
AV OUT-
stekkerbus.
Geel
Audio/Video Adapter
Audio/Video Kabel
(niet geleverd)
RoodWit
7
DP450-P.ADEULLK_dut_MFL61857019 7DP450-P.ADEULLK_dut_MFL61857019 7 2/23/09 3:29:35 PM2/23/09 3:29:35 PM
Page 64

Aanpassen van de taalinstellingen
t
KNOP
1 Scherm instellingenmenu: SETUP
2
Selecteer een gewenste optie in het eerste niveau:
3 Ga naar het tweede niveau:
4
Selecteer een gewenste optie in het tweede niveau:
5 Ga naar het derde niveau:
6 Wijzig de instelling:
Aanpassen van de taalinstellingen – wat u nog
meer kunt doen
Bij de eerste keer inschakelen (optioneel)
Het menu voor taalselectie wordt getoond indien u het toestel voor de eerste
keer inschakelt. U moet een taal te selecteren voor het gebruik van het toestel.
Selecteer een taal met behulp van vV b B en druk op ENTER, het
bevestigingsmenu wordt getoond. Kies [ENTER] met behulp van b B en druk
op ENTER.
Aanpassen van de taalinstellingen
Menutaal – Kies een taal voor het Instellingenmenu en onscreen scherm.
Schijf Audio / Schijfondertiteling / Schijfmenu – Selecteer een taal voor de
schijf audio / ondertiteling / menu.
[Standaard]: Verwijst naar de originele taal waarin de schijf opgenomen is.
[Overige]: Om een andere taal te selecteren, drukt u op de numerieke
toetsen en vervolgens op ENTER voor het invoeren van het overeenkomende 4-cijferige nummer, volgens de taalcodelijst. (zie bladzijde 13) Indien
u een fout maakt tijdens het invoeren, drukt u op de CLEAR om de nummers
te verwijderen en ze vervolgens de corrigeren.
[Uit] (voor schijfondertiteling): Uitschakelen van de ondertiteling.
v V
B
v V
B
v V / ENTER
Aanpassen van de scherminstellingen
TV Beeldformaat – Selecteren van de schermverhouding gebaseerd op de
vorm van uw TV-scherm.
[4:3]: Selecteer indien een standaard 4:3 TV aangesloten is.
[16:9]: Selecteer indien een 16:9 breedbeeld TV aangesloten is.
Schermmodus – Indien u 4:3 geselecteerd heeft, dient u aan te geven hoe u
naar breedbeeldprogrammaʼs en films wilt kijken op uw TV.
[Letterbox]: Hier wordt een breedbeeld scherm getoond met zwarte balken
onderin en bovenin het scherm.
[Panscan]: Hierbij wordt het gehele 4:3 scherm getoond, waarbij het beeld
ingeknipt wordt.
Aanpassen van de audioinstellingen
DRC (Dynamic Range Control) – Zorgt dat het geluid helder blijft bij het verla-
gen van het volume (alleen Dolby Digital). Stel voor dit effect in op [Aan].
Vocal – Insteld op [Aan], alleen indien een multi kanaal karaoke DVD
afgespeeld wordt. De karaokekanalen op de schijf worden gemengd naar normaal stereogeluid.
Aanpassen van de vergrendelinginstellingen
U moet de [Regiocode] optie instellen om de vergrendelingsfunctie te kunnen
gebruiken. Kies [Regiocode] optie en druk op B. Voer een 4-cijferig wachtwoord
in en druk op ENTER. Voer opnieuw in en druk op ENTER ter bevestiging. Druk
op CLEAR indien u een fout maakt bij het invoeren van het getal.
Als u uw wachtwoord hebt vergeten kunt u een nieuw wachtwoord invoeren.
Verwijder eerst de schijf uit het toestel. Roep het setupmenu op en voer het
zescijferige getal “210499” in. Daardoor wordt het bestaande wachtwoord
gewist.
Beveiligingsniveau – Selecteer een beoordelingsniveau. Hoe lager het niveau,
hoe strenger de beoordeling. Selecteer [Ontgrendelen] om de beoordeling uit te
schakelen.
Wachtwoord – Wachtwoord instellen of wijzigen voor de vergrendelingsinstellingen.
[Nieuw]: Voer een nieuw 4-cijferig wachtwoord in met behulp van de nummerieke toetsen en druk op ENTER. Voer het wachtwoord ter controle opnieuw
in.
[Wijzigen]: Voer het nieuwe wachtwoord twee keer in na het invoeren van het
huidige wachtwoord.
Regiocode – Selecteer een code voor een geografisch gebied als afspeel
beoordelingsniveau. Dit bepaalt welke standaards van de regio gebruikt worden
om DVDʼs te controleren wat betreft ondervergrendeling. (zie bladzijde 13)
8
DP450-P.ADEULLK_dut_MFL61857019 8DP450-P.ADEULLK_dut_MFL61857019 8 2/23/09 3:29:36 PM2/23/09 3:29:36 PM
Page 65

Aanpassen van de andere instellingen
DivX(R) VOD – We verstrekken een DivX® VOD (Video On Demand)
registratiecode waarmee u videoʼs kunt kopen en huren via de DivX® VOD
service. Voor meer informatie bezoekt u www.divx.com/vod. Druk op ENTER
indien het pictogram [Kiezen] gemarkeerd is, en u kunt de registratiecode van
het toestel zien. Alle gedownloade videoʼs van DivX® VOD kunnen alleen op dit
toestel afgespeeld worden.
Schijfinformatie tonen
KNOP
1 Druk tijdens afspelen op DISPLAY: DISPLAY
2 Selecteer een onderdeel:
3 Aanpassen van de schermmenu instellingen:
4 Afsluiten: DISPLAY
Schijfinformatie tonen – wat u nog meer kunt
doen
Tijdens het afspelen kunt u een onderdeel selecteren met behulp van vV en de
instelling wijzigen of selecteren door op b B te drukken.
Huidige titel nummer / totaal aantal bestanden
Huidig hoofdstuknummer/totaal aantal hoofdstukken
Verstreken afspeeltijd
Geselecteerde audiotaal of kanaal
Geselecteerde ondertiteling
Geselecteerde ondertiteling
Gebruikte symbolen in deze handleiding
Een alinea waarvan de titel een van de volgende symbolen bevat, geldt alleen
voor de schijf of het bestand waarop dit symbool van toepassing is.
ALL
DVD
DivX
Alle schijven en bestanden
DVD en voltooide DVD±R/RW
DivX bestanden
ACD
MP3
WMA
v V
b B / ENTER
Audio CDs
MP3 bestanden
WMA bestanden
9
DP450-P.ADEULLK_dut_MFL61857019 9DP450-P.ADEULLK_dut_MFL61857019 9 2/23/09 3:29:36 PM2/23/09 3:29:36 PM
Page 66

Een schijf afspelen
KNOP
1 De schijflade openen:
2 Plaats een schijf: 3 De schijflade sluiten: 4 Start het afspelen:
5 Pas het volume aan: VOLUME
6 Het afspelen stoppen:
Een schijf afspelen – wat u nog meer kunt doen
Het afspelen stoppen
Druk op STOP (x) om het afspelen te stoppen. De speler legt afhankelijk van
de schijf een stoppunt in zijn geheugen vast. “ Xx ” verschijnt op het scherm.
Druk op PLAY (
u opnieuw op STOP (x) drukt, of de schijf verwijderd
(“ x ”verschijnt op het scherm), zal het toestel het stoppunt wissen.
(Xx =Hervat Stop, x =Volledige Stop) Het hervattingspunt kan gewist worden door een knop in te drukken (bijvoorbeeld: POWER, OPEN, etc).
Een DVD met menu afspelen
De meeste DVDʼs hebben tegenwoordig een menu dat wordt geladen voordat
de film afgespeeld wordt. U kunt door deze menuʼs bladeren door met behulp
van vV b B of een nummertoets een optie te markeren. Druk om te selecteren
op ENTER.
Een DVD VR schijf afspelen
Dit toestel speelt DVD-RW schijven af die zijn opgenomen in het Video
Opname (VR) formaat. Indien u een DVD VR schijf plaatst, zal het menu op
het scherm getoond worden. Kies een taal met behulp van vV en druk op
PLAY (
Sommige DVD-VR schijven worden gemaakt met CPRM gegevens door de
DVD RECORDER. De schijven van dit type worden door de speler niet
ondersteund.
Overslaan naar volgende/vorige hoofdstuk/track/bestand
Druk op SKIP (>) om naar het volgende hoofdstuk/track/bestand te gaan.
Druk op SKIP (.) om terug te keren naar het begin van huidige hoofdstuk/
track/bestand.
Druk twee keer kort op SKIP (.) om een stap terug te gaan in huidige
hoofdstuk/track/bestand.
N) om het afspelen te hervatten (vanaf het scènepunt). Indien
DVD
N). Druk op MENU of TITLE om een DVD-VR menu te tonen.
OPEN (Z)
N PLAY
x STOP
ALL
Afspelen pauzeren
Druk op PAUSE/STEP (X) om het afspelen te pauzeren. Druk op PLAY ( N)
om verder te gaan met afspelen.
Frame-voor-Frame afspelen
Druk herhaaldelijk op PAUSE/STEP (X) om frame-voor-frame af te spelen.
Herhaald afspelen
Druk herhaaldelijk op REPEAT om een te herhalen onderdeel te selecteren.
De huidige titel, hoofdstuk of track zal herhaaldelijk afgespeeld worden. Om
terug te keren naar normaal afspelen, druk herhaaldelijk op REPEAT om [Uit] te
selecteren.
Snel vooruit of snel achteruit
Houd SKIP (. of >) ingedrukt om tijdens het afspelen versneld vooruit
of achteruit af te spelen. Door SKIP (. of >) herhaald in te drukken en
dan ingedrukt te houden kunt u met verschillende snelheden afspelen. Druk op
N) om het afspelen te vervolgen met normale snelheid.
PLAY (
Een specifiek gedeelte (A-B) herhalen
Druk op A-B aan het begin van het gedeelte dat u wilt herhalen, en opnieuw
aan het einde van het gedeelte. Uw geselecteerde gedeelte zal voortdurend
herhaald worden. Om terug te keren naar normaal afspelen, druk op A-B om
[Uit] te selecteren
Een ondertiteltaal selecteren
Tijdens het afspelen drukt u herhaaldelijk op SUBTITLE ( ) om een gewenste
ondertiteltaal te selecteren.
Bekijken vanuit een andere hoek
Indien de hoekindicator op het scherm wordt getoond, kunt u een andere
camerahoek selecteren door herhaaldelijk op ANGLE (
Andere audio horen
Druk tijdens het afspelen herhaaldelijk op AUDIO ( ) om een andere
audiotaal, kanaal of coderingsmethode te horen.
De afspeelsnelheid vertragen
Druk tijdens het afspelen op SLOW (t of T) om het vooruit of achteruit afspelen te vertragen. U kunt de weergavesnelheid wijzigen door meermaals op
SLOW (t of T) te drukken. Om terug te schakelen naar afspelen met normale snelheid drukt u op PLAY (
Een vergroot videobeeld bekijken
Tijdens het afspelen of pauzeren drukt u herhaaldelijk op ZOOM om een zoom
modus te selecteren. U kunt door het ingezoomde beeld gaan met behulp van
de vVb B knoppen. Druk op CLEAR om af te sluiten.
(100 % p 200 % p 300 % p 400 % p 100 %)
ALL
ALL
DVD
DivX
DVD
ACD
DVD
DVD
DivX
N).
DVD
DivX
DVD
DivX
DVD
DivX
(
DVD
WMA
ACD
DivX
) te drukken.
: alleen vooruit)
DivX
MP3
10
DP450-P.ADEULLK_dut_MFL61857019 10DP450-P.ADEULLK_dut_MFL61857019 10 2/23/09 3:29:37 PM2/23/09 3:29:37 PM
Page 67

Het titelmenu bekijken
Duk op TITLE om het titelmenu van de schijf, indien beschikbaar te tonen.
Het DVD-menu bekijken
Druk op MENU om het schijfmenu, indien beschikbaar, te tonen.
Afspelen starten op geselecteerd tijdstip
Zoek naar het startpunt of ingevoerde tijdcode. Druk op DISPLAY om het
klokpictogram te selecteren. Voer een tijd in en druk op ENTER. Voorbeeld, om
een scene te vinden op 1 uur, 10 minuten en 20 seconden, voer “11020” in en
druk op ENTER. Indien u het verkeerde nummer invoert, drukt u op CLEAR om
het opnieuw in te kunnen voeren.
In willekeurige volgorde afspelen
Als u tijdens het afspelen of in de stopstand op RANDOM drukt, worden de
nummers in willekeurige volgorde afgespeeld. Als u nogmaals op RANDOM
drukt, worden de nummers in normale volgorde afgespeeld.
Een favoriete scene markeren
U kunt op een schijf een punt vastleggen dat u later eenvoudig kunt opzoeken.
Druk op MARKER wanneer u het gewenste punt bereikt. Het MARKERpictogram verschijnt een paar seconden op het scherm. Zo kunt u tot negen
stoppunten op een schijf vastleggen.
U kunt deze punten eenvoudig opzoeken of wissen. Druk op SEARCH (zoeken)
en het menu [Marker Search] (markering zoeken) wordt geopend. Selecteer
met b of B een stoppunt in het menu en druk vervolgens op ENTER om het
terug te zoeken of op CLEAR om het te wissen.
Laatste Scene geheugen
Dit toestel onthoudt de laatste scène van de laatst bekeken schijf. De laatste
scène blijft in het geheugen, zelfs als u de schijf verwijdert uit het toestel of het
toestel uitschakelt. Indien u een schijf laadt waarvan de scène onthouden is,
wordt de scène automatisch opgeroepen.
DVD
DVD
DVD
DivX
DVD
ACD
WMA
MP3
DVD
ACD
DivX
Schermbeveiliging
De schermbeveiliging wordt getoond indien u het toestel ongeveer vijf minuten
in de Stop modus laat staan. Het toestel schakelt zich automatisch uit nadat de
schermbeveiliging vijf minuten getoond is.
Gemengde schijf – DivX, MP3/WMA en JPEG
Als u een schijf afspeelt waarop zowel divx- als mp3/wma- en jpeg-bestanden
zijn opgenomen, kunt u door op TITLE te drukken selecteren welk menu of
welke bestanden u wilt afspelen.
Een DivX filmbestand afspelen
KNOP
1 De schijflade openen:
2 Plaats een schijf: 3 De schijflade sluiten: 4 Selecteer een filmbestand uit het menu:
5 Start het afspelen:
6 THet afspelen stoppen:
OPEN (Z)
v V, MENU
N PLAY
x STOP
Een DivX filmbestand afspelen – wat u nog
meer kunt doen
De karakterset wijzigen voor het juist tonen van DivX® ondertiteling
Houd SUBTITLE gedurende 3 seconden ingedrukt tijdens het afspelen. De
taalcode wordt getoond. Druk op b B om een andere taalcode te selecteren
totdat de ondertiteling juist getoond wordt en druk op ENTER.
DivX Bestandsvereisten
DivX schijf compatibiliteit met deze speler is als volgt beperkt:
• Beschikbare resoluatiegrootte: 720x576 (B x H) pixel.
• De bestandsnaam van DivX en ondertiteling zijn beperkt tot 45 tekens.
• DivX bestandextensies : “.avi”, “.mpg”, “.mpeg”
• Afspeelbare DivX ondertiteling: SubRip (.srt / .txt), SAMI (.smi),
SubStation Alpha (.ssa/.txt), MicroDVD (.sub/.txt), VobSub (.sub),
SubViewer 2.0 (.sub/.txt), TMPlayer (.txt), DVD Subtitle System (.txt),
• Afspeelbaar Codecformaat “DIVX3.xx”, “DIVX4.xx”, “DIVX5.xx”, “MP43”,
“3IVX”
• Alleen de afspeelfunctie wordt ondersteund met divx 6.0 in het toestel.
• Afspeelbaar Audioformaat “Dolby Digital”, “PCM”, “MP3”, “WMA”
• Bemonsteringsfrequentie: Binnen 8 – 48 kHz (MP3),
binnen 32 – 48 kHz (WMA)
• Bit rate: binnen 8 - 320 kbps (MP3), binnen 32 - 192 kbps (WMA),
minder dan 4Mbps (DivX bestand)
• CD-R/RW, DVD±R/RW Formaat: ISO 9660
• Maximum aantal bestanden/mappen: Minder dan 600 (totaal aantal
bestanden en mappen)
11
DP450-P.ADEULLK_dut_MFL61857019 11DP450-P.ADEULLK_dut_MFL61857019 11 2/23/09 3:29:38 PM2/23/09 3:29:38 PM
Page 68

Luisteren naar Muziekschijf of bestanden
KNOP
1 De schijflade openen:
2 Plaats een schijf: 3 De schijflade sluiten: 4 Selecteer muziek het menu:
5 Start het afspelen:
6 Het afspelen stoppen:
Luisteren naar Muziekschijf of bestanden - wat
u nog meer kunt doen
Uw eigen programma maken
U kunt de inhoud van een schijf afspelen in elke gewenste volgorde door de
volgorde van de muziek op de schijf in te delen. Om muziek aan de
programmalijst toe te voegen, drukt u op PROG. om de programma
bewerken modus te openen (E verschijnt in het menu).
Selecteer de gewenste muziek in de [Lijst] en druk op ENTER om muziek toe te
voegen aan de programmalijst. Selecteer muziek uit de programmalijst en druk
op ENTER om het geprogrammeerd afspelen te starten. Om muziek te wissen
uit de programmalijst, selecteer de muziek die u wilt wissen en druk op CLEAR
in de programma bewerken modus. Om alle muziek uit de programmalijst te
verwijderen, selecteert u [Alles wissen] en drukt u op ENTER in de programma
bewerken modus. Het programma wordt gewist indien de schijf verwijderd wordt
of het toestel uitgeschakeld wordt.
Bestandsinformatie tonen (ID3 TAG)
Bij het afspelen van een MP3 bestand met bestandsinformatie, kunt u de
informatie tonen door herhaaldelijk op DISPLAY te drukken. Als het bestand
geen ID3-Tag-informatie heeft, verschijnt [No ID3 TAG] op het beeldscherm.
MP3/WMA muziekbestand vereisten
MP3/WMA Schijf compatibileit met dit toestel is als volgt:
• Bestandextensies: “.mp3”, “.wma”
•
Bemonsteringsfrequentie: Binnen 8 – 48 kHz (MP3), binnen 32 – 48 kHz (WMA)
• Bit rate: Binnen 8 – 320 kbps (MP3), binnen 32 – 192 kbps (WMA)
• CD-R/RW, DVD±R/RW Formaat: ISO 9660
• Maximum aantal bestanden/mappen: Minder dan 600 (totaal aantal bestanden en mappen)
12
OPEN (Z)
v V, MENU
N PLAY
x STOP
Fotobestanden bekijken
KNOP
1 De schijflade openen:
2 Plaats een schijf: 3 De schijflade sluiten: 4 Selecteer een fotobestand uit het menu:
Toon het geselecteerde bestand in volledig scherm:
5
6 Terugkeren naar het menu:
Fotobestanden bekijken - wat u nog meer kunt doen
Fotobestanden bekijken als diavoorstelling
Markeer het vV b B pictogram met ( ) en druk op ENTER om de
diavoorstelling te starten. U kunt de snelheid van de diavoorstelling wijzigen met
behulp van b B ndien het (
Overslaan naar volgende/vorige foto
Druk op SKIP (. of >) to view the previous/next photo.
Een foto roteren
Gebruik vV om de foto in volledig scherm tegen de klok in of met de klok mee
te draaien terwijl u een foto op volledig beeld bekijkt.
Pauzeren van een diavoorstelling.
Druk op PAUSE/STEP (X) om een diavoorstelling te pauzeren.
Druk op PLAY ( N) om verder te gaan met de diavoorstelling.
Naar muziek luisteren tijdens een diavoorstelling
U kunt naar muziek luisteren tijdens een diavoorstelling, indien de schijf muziek
en fotobestanden bevat. Markeer het vV b B pictogram met (
ENTER om de diavoorstelling te starten.
Een vergroot fotobeeld bekijken
Bij het bekijken van een foto in volledig scherm, drukt u herhaald op ZOOM
om de zoommodus te selecteren. U kunt door het ingezoomde beeld gaan met
behulp van de vVb B knoppen. Druk op CLEAR om af te sluiten.
Vereisten fotobestand
JPEG bestandscompatibiliteit met dit toestel is als volgt beperkt:
• Bestandextensies: “.jpg”
• Foto grootte: Aanbevolen wordt minder dan 2MB
• CD-R/RW, DVD±R/RW Formaat: ISO 9660
• Maximum aantal bestanden/mappen: Minder dan 600 (totaal aantal bestanden en mappen)
) pictogram gemarkeerd is.
OPEN (Z)
v V, MENU
N PLAY
x STOP
) en druk op
DP450-P.ADEULLK_dut_MFL61857019 12DP450-P.ADEULLK_dut_MFL61857019 12 2/23/09 3:29:38 PM2/23/09 3:29:38 PM
Page 69

Taalcodes
Gebruik deze lijst om uw gewenste taal voor de volgende begininstellingen te selecteren: Schijfaudio, Schijfondertiteling, Schijfmenu.
Taal Code
Afaars 6565
Afrikaans 6570
Albanees 8381
Ameharisch 6577
Arabisch 6582
Armeens 7289
Assamees 6583
Aymara 6588
Azerbajaans 6590
Bashkir 6665
Basks 6985
Bengali; Bangladesh
Bhutani 6890
Bihari 6672
Bretons 6682
Bulgaars 6671
Burmees 7789
Wit-russisch 6669
Chinees 9072
6678
Taal Code
Kroatisch 7282
Tsjechisch 6783
Deens 6865
Nederlands 7876
English 6978
Esperanto 6979
Ests 6984
Faroëse 7079
Fijis 7074
Fins 7073
Frans 7082
Fries 7089
Keltisch 7176
Georgies 7565
Duits 6869
Grieks 6976
Gronelands 7576
Guarani 7178
Gujarati 7185
Taal Code
Hausa 7265
Hebreeuws 7387
Hindi 7273
Hongaars 7285
Ijslands 7383
Indonesisch 7378
Interlingua 7365
Iers 7165
Italiaans 7384
Japans 7465
Kannada 7578
Kashmiri 7583
Kazakh 7575
Kirghiz 7589
Koreaans 7579
Koerdisch 7585
Laothiaans 7679
Latijns 7665
Lets 7686
Taal Code
Lingalaas 7678
Litouws 7684
Macedonies 7775
Malagasy 7771
Malay 7783
Malayalam 7776
Maori 7773
Marathi 7782
Moldavies 7779
Mongools 7778
Nauru 7865
Nepals 7869
Noors 7879
Oriya 7982
Panjabi 8065
Pashto, Pushto 8083
Persisch 7065
Pools 8076
Portugees 8084
Taal Code
Quechua 8185
Rhaeto-Romance 8277
Roemeens 8279
Russisch 8285
Samoaans 8377
Sanskrit 8365
Schots Keltisch 7168
Servisch 8382
Serbo-Kroatisch 8372
Shona 8378
Sindhi 8368
Singalees 8373
Slovaaks 8375
Sloveens 8376
Spaans 6983
Soedanees 8385
Swahili 8387
Zweeds 8386
Tagalog 8476
Regiocodes
Kies een regiocode uit de lijst.
Gebied Code
Afghanistan AF
Argentinië AR
Australië AU
Oostenrijk AT
België BE
Bhutan BT
Bolivia BO
Brazilië BR
Cambodia KH
Canada CA
Chili CL
China CN
Colombia CO
Congo CG
Gebied Code
Costa Rica CR
Kroatië HR
Tsjechië CZ
Denemarken DK
Ecuador EC
Egypte EG
El Salvador SV
Ethiopië ET
Fijis FJ
Finland FI
Frankrijk FR
Duitsland DE
Groot-Brittanië GB
Griekenland GR
Gebied Code
Groenland GL
Hong Kong HK
Hongarije HU
India IN
Indonesië ID
Israël IL
Italië IT
Jamaica JM
Japan JP
Kenya KE
Kuweit KW
Libië LY
Luxemburg LU
Maleisië MY
Gebied Code
Malediven MV
Mexico MX
Monaco MC
Mongolië MN
Marokko MA
Nepal NP
Nederland NL
Nederlandse Antillen AN
Nieuw Zeeland NZ
Nigeria NG
Noorwegen NO
Oman OM
Pakistan PK
Panama PA
Gebied Code
Paraguay PY
Filipijnen PH
Polen PL
Portugal PT
Roemenië RO
Russische Federatie RU
Saudi Arabië SA
Senegal SN
Singapore SG
Slowakije SK
Slovenië SI
Zuid-Afrika ZA
Zuid-Korea KR
Spanje ES
Taal Code
Tajik 8471
Tamil 8465
Telugu 8469
Thai 8472
Tonga 8479
Turks 8482
Turkmeens 8475
Twi 8487
Oekraïns 8575
Urdu 8582
Oezbeeks 8590
Vietnamees 8673
Volapük 8679
Welsh 6789
Wolof 8779
Xhosa 8872
Yiddish 7473
Yoruba 8979
Zulu 9085
Gebied Code
Sri Lanka LK
Zweden SE
Zitserland CH
Taiwan TW
Thailand TH
Turkije TR
Oeganda UG
Oekraïne UA
Verenigde Staten US
Uruguay UY
Oezbekistan UZ
Vietnam VN
Zimbabwe ZW
13
DP450-P.ADEULLK_dut_MFL61857019 13DP450-P.ADEULLK_dut_MFL61857019 13 2/23/09 3:29:39 PM2/23/09 3:29:39 PM
Page 70

Problemen
Symptoom Oorzaak Correctie
Geen vermogen. De stroomkabel is losgekoppeld. Steek de stroomkabel in een
De batterij is uitgeput. Batterij (accu) opnieuw opladen.
Toestel is
ingeschakeld,
maar werkt niet.
Geen beeld. De TV is niet ingesteld op het
Geen geluid. De aangesloten apparatuur met
Het toestel start
het afspelen niet.
De afstandsbediening werkt niet
.
goed
Geen schijf geplaatst. Een schijf laden.
ontvangen van het signaal van
het toestel.
De videokabel is niet goed aangesloten.
de audiokabel is niet ingesteld
op het ontvangen van het signaal
van het toestel.
Het geluidsvolume staat in de
laagste stand.
De AUDIO opties zijn ingesteld op
de verkeerde positie.
Een niet afspeelbare schijf is
geplaatst.
Het beoordelingsniveau is
ingesteld.
De afstandsbediening is niet gericht
op de sensor in het toestel
De afstandsbediening bevindt zich
te ver van het toestel.
wandcontactdoos.
Selecteer de juiste video invoermodus op de TV.
Sluit de videokabel goed aan.
Selecteer de juiste invoermodus
van de audio versterker.
Stel het volume in met de volumeregeling.
Stel de AUDIO instellingen in op
de juiste positie.
Plaats een afspeelbare schijf.
(controleer het schijftype en
regiocode).
Wijzig het beoordelingsniveau.
Richt de afstandsbediening op de
sensor van de afstandsbediening
in het toestel.
Gebruik de afstandsbediening
dichter bij het toestel.
Specificaties
Algemeen
Stroomvereisten DC 12V
Stroomverbruik 12W
Afmetingen (Ongeveer)
Netto gewicht (Ongeveer) 0.78kg
Gebruikstemperatuur 5 °C tot 40 °C
Gebruiksvochtigheid 5 % tot 90 %
Laser Halfgeleidende laser
Signaalsysteem PAL
Aansluitingen
Audio/video-uitgang 1x mini-stekkerbus ø 3,5 mm
- Video: 1,0 V (p-p), 75 ohm, negatieve synchronisatie
- Audio: 1,5 Vrms (1 KHz, 0 dB)
Oortelefoonaansluiting 1x stereo mini-stekkerbussen
Lcd-beeldscherm
Afmetingen beeldscherm Diagonaal 178 mm
Projectiesysteem RGB-stripe videosysteem
Stuursysteem Actieve tft-matrix
Resolutie 480 x 234 (WQVGA)
Accessoires
• Audio/Video Adapter
• Netvoedingsadapter (MPA-630)
• Autoadapter (DPDC1)
• Afstandsbediening
• Batterij voor afstandsbediening (lithiumbatterij)
202 x 42.5 x 167 mm (B x H x
D) zonder voet
ø 3,5 mm
Ontwerp en specificaties zijn onderhevig aan verandering
zonder voorafgaande mededeling.
14
DP450-P.ADEULLK_dut_MFL61857019 14DP450-P.ADEULLK_dut_MFL61857019 14 2/23/09 3:29:39 PM2/23/09 3:29:39 PM
Page 71

P/NO : MFL61857019
DP450 / DP450P / DP450R
SLOVENIAN
DP450-P.ADEULLK_SLOVEN_MF#EE118 2/23/09 3:30 PM Page 1
Page 72

2
POZOR : ČE ŽELITE ZMANJŠATI NEVARNOST
ELEKTRIČNEGA ŠOKA, NE ODSTRANITE POKROVA
(ALI ZADNJEGA DELA). DELOV V NOTRANJOSTI
NAPRAVE NE POPRAVLJAJTE SAMI. TE DELE
LAHKO POPRAVLJA LE STROKOVNO OSEBJE.
Simbol strele s puščico v enakostraničnem
trikotniku opozarja uporabnika na prisotnost
neizolirane nevarne napetosti v ohišju izdelka,
ki lahko v zadostni meri predstavlja nevarnost
električnega šoka.
Klicaj v enakostraničnem trikotniku opozarja
uporabnika na prisotnost pomembnih navodil
za delovanje in vzdrževanje (servisiranje), ki jih
dobite v dokumentaciji skupaj z izdelkom.
OPOZORILO: DA BI PREPREČILI MOŽNOST POŽARA
ALI ELEKTRIČNEGA ŠOKA, TEGA IZDELKA NE
IZPOSTAVLJAJTE DEŽJU ALI VLAGI.
OPOZORILO: Te opreme ne postavite v utesnjen prostor, npr. na knjižno polico ali kaj podobnega.
POZOR: Poskrbite, da odprtine ventilatorja ne bodo
zamašene. Napravo namestite v skladu z navodili
proizvajalca. Reže in odprtine na ohišju so namenjene
prezračevanju, zagotavljanju zanesljivega delovanja in
zaščiti izdelka pred pregretjem. Odprtin ne smete blokirati, tako da postavite izdelek na posteljo, kavč,
preprogo ali druge podobne površine. Tega izdelka ne
smete postaviti v vgradne omare ali police, razen če
poskrbite za primerno zračenje ali se ravnate po
navodilih proizvajalca.
POZOR: Ta izdelek uporablja
laserski sistem. Za pravilno
uporabo tega izdelka pazljivo
preberite ta navodila in jih
shranite za prihodnjo uporabo. Če enota potrebuje
vzdrževanje, se obrnite na pooblaščen servisni center.
Upravljanje, prilagajanje ali učinkovitost delovanja
postopkov, ki niso določeni tukaj, lahko povzroči
nevarno izpostavljanje žarčenju. Če želite preprečiti
neposredno izpostavljanje laserskemu žarku, ne
poskušajte odpreti ohišja. Ko je odprto, je vidno
lasersko žarčenje. NE GLEJTE V ŽAREK.
POZOR: Naprave ne izpostavljajte vodi (kapljam ali
curkom) in nanjo ne postavljajte predmetov, napolnjenih
s tekočinami, kot je npr. vaza.
POZOR
•
Ne prekrivajte prezračevalnih odprtin aparata s predmeti, kot so npr. časopis, prt, zavese itd.
•
Na aparat ne postavljajte virov odprtega ognja, na
primer prižganih sveč.
•
Pazite, da odvržete rabljene baterije na ustrezno mesto
in jih ne sežigajte. Baterije odvrzite v skladu z okoljevarstvenimi načeli.
•
Napravo uporabljajte le v okolju s tropskim in zmernim
podnebjem.
•
Ne uporabljajte slušalk pri preveliki glasnosti, ker si
lahko poškodujete sluh.
•
Baterije ne izpostavljajte vročini, na primer sončni svetlobi, ognju ipd.
•
Zaradi varnosti ne poskušajte odstraniti vgrajene
baterije.
Če morate baterijo zamenjati, odnesite izdelek k
najbližjemu pooblaščenemu servisu ali prodajalcu
izdelkov LG Electronics.
POZOR pri napajalnem kablu
Priporočamo, da naprave priklopite na ustrezno
omrežje;
To je omrežje z enim izhodom, ki napaja samo to napravo in nima dodatnih izhodov ali podomrežij. Če se želite
prepričati, preverite stran s tehničnimi podatki v teh
navodilih. Ne preobremenjujte zidnih vtičnic.
Preobremenjene, razmajane ali poškodovane zidne
vtičnice, podaljški kablov, obrabljeni napajalni kabli in
poškodovana ali razpokana izolacija žic so nevarni. Te
razmere lahko povzročijo električni šok ali požar.
Redno pregledujte kabel naprave, in če je videti
poškodovan ali dotrajan, ga odklopite in ga ne
uporabljajte več ter ga v pooblaščenem servisnem
centru zamenjajte z enakim nadomestnim delom.
Napajalni kabel zaščitite pred fizičnimi in mehanskimi
poškodbami ter pazite, da se ne prepogne, zaplete,
preščipne, pripre z vrati ali pohodi. Še posebej pazite
na vtikače, zidne vtičnice in na predel kabla, ki pride iz
naprave.
Če želite prekiniti napajanje naprave, izvlecite napajalni
kabel iz vtičnice. Ko nameščate napravo, poskrbite,
da bo vtikač kabla lahko dostopen.
Odstranjevanje stare naprave
1. Če je izdelek označen s prečrtanim smetnjakom, pomeni, da je naprava zajeta v evropski
direktivi 2002/96/ES.
2. Vsi električni in elektronski izdelki morajo
biti odstranjeni ločeno od
preostalih gospodinjskih odpadkov na posebnih
zbirališčih, ki jih določijo državne ustanove ali
lokalna uprava.
3. S pravilnim odlaganjem in recikliranjem
boste preprečili morebitne škodljive vplive na
okolje in zdravje ljudi.
4. Če želite izvedeti več o odstranjevanju stare
opreme, se obrnite na lokalno upravo, odpad
ali na prodajalca, pri katerem ste kupili napravo.
Ta izdelek je v skladu z evropsko Direktivo o
elektromagnetni združljivosti (EMC)
2004/108/ES in Direktivo o nizki napetosti
2006/95/ES.
Evropski predstavnik :
LG Electronics Service Europe B.V.
Veluwezoom 15, 1327 AE Almere, The
Netherlands
(Tel : +31–036–547–8940)
POZOR
NEVARNOST ELEKTRIČNEGA
ŠOKA NE ODPIRAJTE
DP450-P.ADEULLK_SLOVEN_MF#EE118 2/23/09 3:30 PM Page 2
Page 73

3
i
h
Prikaz simbola
Znak « » se med delovanjem lahko pojavi na televizijskem zaslonu, označuje
pa, da funkcija, ki je pojasnjena v teh navodilih, ni na voljo za ustrezen disk.
Področne kode
Področna koda je natisnjena na zadnji strani enote. Ta enota lahko predvaja le
diske DVD, ki imajo oznake v skladu z oznako na zadnji strani naprave ali
oznako “ALL (VSI)”.
• Na ovitkih večine diskov DVD je jasno viden globus, v katerem je ena ali več
številk. Ta številka se mora ujemati s področno kodo vaše naprave, sicer
diska ne bo možno predvajati.
• Če poskušate predvajati DVD s področno kodo, ki se razlikuje od kode
predvajalnika, se na televizijskem zaslonu pojavi sporočilo “Check Regional
Code (Preverite področno kodo)”.
Avtorske pravice
Po zakonu je prepovedano kopirati, oddajati, prikazovati, oddajati prek kabla,
predvajati v javnosti ali si sposoditi avtorsko zaščiten material brez dovoljenja.
Ta izdelek vsebuje funkcijo zaščite proti kopiranju, ki jo je razvilo podjetje
Macrovision. Na nekaterih diskih so zapisani znaki zaščite proti kopiranju. Če
snemate ali predvajate slike na teh diskih, se bodo na slikah pojavile motnje.
V ta izdelek je vključena tehnologija za zaščito avtorskih pravic, ki jo ščitijo
ameriški patenti in druge pravice avtorske lastnine. Uporabo te tehnologije za
zaščito avtorskih pravic mora odobriti Macrovision, namenjena pa je za
domače in drugo omejeno gledanje, razen če Macrovision odobri drugače.
Obratni inženiring ali povratno zbiranje je prepovedano.
Baterija za ponovno polnjenje
• Z vgrajeno baterijo za ponovno polnjenje boste lahko enoto brez skrbi premikali
naokoli in predvajali datoteke brez uporabe napajalnega kabla.
• Vgrajena baterija za ponovno polnjenje se začne polniti, ko je enota izklopljena,
adapter AC pa povezan z električno vtičnico.
• Ko enoto vklopite, se polnjenje prekine.
• Postopek polnjenja baterije traja približno dve uri in pol.
• Čas delovanja baterije: približno dve uri in pol.
Čas delovanja z baterijo je odvisen od stanja baterije, stanja uporabe in pogojev
okolja, največji čas predvajanja pa znaša 3 ure.
• Med polnjenjem sveti indikator baterije rdeče. Ko je polnjenje končano, indikator
zasveti zeleno.
• Ko je preostali čas delovanja baterije manj kot nekaj minut, začne oznaka » «
na zaslonu utripati.
DVD-VIDEO: Diski, npr. s filmi, ki se lahko kupijo ali
sposodijo.
DVD-R: Samo v zaključenem video načinu.
DVD-RW: Samo načinu VR in zaključenem video načinu.
DVD+R: Samo v video načinu.
DVD+RW: Samo v video načinu.
Audio CD: Glasbeni CD-ji ali CD-R-i/CD-RW-ji v obliki
glasbenih CD-jev, ki se lahko kupijo.
Ta enota predvaja diske DVD±R/RW in CD-R/RW, ki vsebujejo avdio naslove,
datoteke DivX, MP3 ter WMA, in/ali datoteke JPEG. Glede na kakovost posnetka,
fizično stanje diska ali lastnosti snemalne naprave in avtorske programske
opreme, enota ne more predvajati nekaterih diskov DVD±RW/DVD±R ali CDRW/CD-R.
Logotip
Vrste diskov za predvajanje
Vrsta
Vrste diskov za predvajanje . . . . . . . . . . . . . . . . . . . . . . . . . . . .3
Baterija za ponovno polnjenje . . . . . . . . . . . . . . . . . . . . . . . . . .3
Glavna enota . . . . . . . . . . . . . . . . . . . . . . . . . . . . . . . . . . . . . . .4
Daljinski upravljalnikl . . . . . . . . . . . . . . . . . . . . . . . . . . . . . . . . .5
Povezave za napajanje . . . . . . . . . . . . . . . . . . . . . . . . . . . . . . .6
Povezovanje enote . . . . . . . . . . . . . . . . . . . . . . . . . . . . . . . . . .7
Prilagoditev nastavitev jezika . . . . . . . . . . . . . . . . . . . . . . . . .8-9
Prikaz podatkov o disku . . . . . . . . . . . . . . . . . . . . . . . . . . . . . . .9
Predvajanje diska . . . . . . . . . . . . . . . . . . . . . . . . . . . . . . . .10-11
Predvajanje datoteke DivX s filmom . . . . . . . . . . . . . . . . . . . . .11
Poslušanje glasbenih diskov in datotek . . . . . . . . . . . . . . . . . .12
Ogled datotek s slikami . . . . . . . . . . . . . . . . . . . . . . . . . . . . . .12
Jezikovne kode . . . . . . . . . . . . . . . . . . . . . . . . . . . . . . . . . . . .13
Področne kode . . . . . . . . . . . . . . . . . . . . . . . . . . . . . . . . . . . .13
Odpravljanje težav . . . . . . . . . . . . . . . . . . . . . . . . . . . . . . . . . .14
Tehnični podatki . . . . . . . . . . . . . . . . . . . . . . . . . . . . . . . . . . . .14
Vsebina
Proizvedeno v skladu z licenco laboratorijev Dolby. Dolby in simbol DD so
blagovne znamke podjetja Dolby Laboratories.
»DVD Logo« je blagovna znamka družbe DVD Format/Logo Licensing
Corporation.
DP450-P.ADEULLK_SLOVEN_MF#EE118 2/23/09 3:30 PM Page 3
Page 74

4
Glavna enota
a
Zaslon LCD
b
Zvočniki
c
Tipke za upravljanje predvajanja
• N (Play)/ X (Pause): Začne predvajanje.Začasno zaustavi predvajanje ali
snemanje: pritisnite ponovno, če želite izstopiti iz načina začasne zaustavitve.
• x (Stop): Ustavi predvajanje.
• . (Skip)
(Preskoči): Išče po posnetku nazaj* oziroma se vrne na začetek
trenutnega poglavja ali posnetka oz. na prejšnje poglavje ali posnetek.
• > (Skip)
(Preskoči): Išče po posnetku naprej* oziroma se premakne
na naslednje poglavje ali posnetek.
*
Pritisnite in približno dve sekundi zadržite tipko.
d
Funkcijski gumbi
• DISPLAY:
Dostop do prikaza na zaslonu.
• SETUP:
Dostopi v ali zapre meni Setup (Nastavitve).
• MENU:
Dostopi v meni DVD-ja.
• COLOR (BARVA)/ BRIGHT (SVETLOST)*:
Prikaže meni za nastavitev svetlosti in
barv za zaslon LCD.
*
Če želite nastaviti barve in svetlost zaslona LCD, na glavni enoti pritiskajte
COLOR/BRIGHT (Barve/Svetlost), da se pojavi meni za nastavitev svetlosti oz. barv,
in s tipkama
b/ B
prilagodite vrednost. Pritisnite ENTER (Potrdi) za potrditev.
e
Gumbi za nadzor menija
• bBvV
(levo/desno/gor/dol): Izbere predmet menija.
• ENTER
(Potrdi): Potrdi izbiro v meniju.
f OPEN
(Odpri)
(Z):
Odpre pokrov diska.
g
Indikator baterije in napajanja
•
Indikator sveti med polnjenjem rdeče, po končanem polnjenju pa zeleno. (Za več
podrobnosti glejte stran 3.)
•
Ob vklopu enote indikator za nekaj sekund zasveti zeleno.
h Tipalo za daljinski upravljalnik: Sem usmerite daljinski upravljalnik.
i
Pokrov diska
j
1/[
(Vklopno stikalo):
Vklopi ON ali izklopi OFF enoto.
Opomba: Za upravljanje te enote mora biti vklopno stikalo postavljeno na ON (VKLOP).
k
w
VOL (Glasnost):
NNastavi glasnost vgrajenega zvočnika in slušal.
l (Slušalke):
Sem priključite slušalk.
m AV OUT: Povežite na televizijo z video in avdio vhodom.
n DC 12V IN:
Na napravo priključite adapter AC ali avtomobilski adapter.
P
A
S
A
D
O
u
je
DP450-P.ADEULLK_SLOVEN_MF#EE118 2/23/09 3:30 PM Page 4
Page 75

5
a
POWER (1):
Vklopi ON ali izklopi OFF enoto.
AUDIO ():
Izbere avdio jezik ali avdio kanal.
SUBTITLE ():
Izbere jezik podnapisov.
ANGLE ():
Izbere kot kamere DVD-ja, če je na voljo
SKIP/SEARCH
(Preskoči/Išči)
(. / >):
Išče* v smeri nazaj/naprej. Preskoči na naslednje ali
prejšnje poglavje/posnetek.
*
Pritisnite in približno dve sekundi zadržite tipko.
SLOW
(Počasi)
(t / T):
Počasno predvaja
naprej/nazaj.
b
SETUP:
Dostopi v ali zapre meni Setup (Nastavitve).
MENU:
Dostopi v meni DVD-ja.
vV b B:
Upravlja menije.
ENTER ( ):
Potrdi izbiro v meniju.
RETURN (O):
Vrne se nazaj v meniju oz. ga zapre.
Preklopi v način USB.
DISPLAY:
Dostop do prikaza na zaslonu.
c
PAUSE/STEP (X):
Začasno zaustavi predvajanje;
pritisnite večkrat za predvajanje po okvirjih.
PLAY (N):
Začne predvajanje.
STOP (x):
Ustavi predvajanje.
Tipke s številkami 0-9: Dostopi v ali zapre meni
Setup (Nastavitve).
PROG.:
Vstopi v način urejanja programa.
CLEAR:
Odstrani posnetek iz programskega menija ali
oznako v meniju MARKER SEARCH (ISKANJE OZNAK)
d
TITLE:
Dostopi v naslovni meni na disku.
REPEAT:
Ponovi poglavje, posnetek, naslov ali vse
skupaj.
A-B:
Ponovi odsek.
ZOOM:
Poveča sliko videa.
MARKER
: Označi katero koli točko med
predvajanjem.
SEARCH
: Prikaže meni [Marker Search] (Iskanje
oznak).
RANDOM: Predvaja posnetke v naključnem
zaporedju
Vstavite baterije v daljinski upravljalnik
Z dvema prstoma stisnite nosilec baterije, nato
povlecite jeziček, da ga odstranite. Vstavite baterijo
tako, da bo + na njej obrnjen v isto smer kot + na
nosilcu baterije. Vstavite nosilec baterije nazaj v
daljinski upravljalnik in preverite ali je dobro
vstavljen.
• Zamenjajte baterijo daljinskega upravljalnika z
baterijo 3 V z mikro litijevimi celicami, npr.
CR.2025 ali enakovredno.
• Baterijo zavrzite v skladu z lokalnimi zakoni. Ne
vrzite je v ogenj.
Opozorilo v zvezi litijevo baterijo, ki jo je mogoče
zamenjati
•
Če napačno zamenjate baterijo, obstaja nevarnost
eksplozije.
•
Uporabite samo baterijo iste vrste.
•
V bližini baterije je dodatno opozorilo uporabnikom,
ki jo želijo zamenjati.
a
b
c
d
Daljinski upravljalnik
Pozor: Pri napačni uporabi baterije obstaja
nevarnost vžiga ali kemičnih opeklin. Baterije ne
smete polniti, razstaviti, sežgati ali segreti nad
100 °C (212 °F).
Uporabljajte samo baterije proizvajalca
Matsushita Elec. Ind. Co., Ltd. (Panasonic), št.
izdelka CR. 2025. Uporaba drugih baterij lahko
povzroči nevarnost požara ali eksplozije. Prazne
baterije zavrzite. Baterije hranite izven dosega
otrok. Ne razstavljajte in ne vrzite v ogenj.
Opomba: Za upravljanje te enote z daljinskim
upravljalnikom mora biti vklopno stikalo postavljeno na ON (VKLOP). (Glejte stran 4)
DP450-P.ADEULLK_SLOVEN_MF#EE118 2/23/09 3:30 PM Page 5
Page 76

Povezave za napajanje
Povežite adapter za izmenični tok
Priključite priložen adapter za izmenični tok od enote s omrežno vtičnico.
Adapter AC
•
Ta adapter AC deluje pri 100-240 V~ 1 A, 50/60 Hz.
•
Za pomoč pri izbiri ustreznega adapterja AC ali kabla AC se obrnite na
distributerja električnih naprav.
•
Proizvajalec: NANJING WANLIDA TECHNOLOGY CO., LTD
Povežite avtomobilski adapter
Ta enota in priložen avtomobilski adapter sta zasnovana za uporabo v vozilih z
8,5- od 16-voltnimi električnimi sistemi z negativno ozemljitvijo. To je standardno za
večino vozil. Če ima vaše vozilo drugačen električni sistem, napajalnega sistema
DC ne morete uporabljati.
Avtomobilski adapter
•
Ta avtomobilski adapter deluje pri enosmerni napetosti 8,5 - 16 V.
•
Za pomoč pri izbiri ustreznega avtomobilskega adapterja se obrnite na
distributerja električnih naprav.
•
Proizvajalec: NANJING WANLIDA TECHNOLOGY CO., LTD.
Pozor
•
Preden iztaknete vtikač iz enote, vedno iztaknite avtomobilski adapter iz vtičnice
vžigalnika. Tako preprečite električni udar in morebitne poškodbe enote ali
vozila
•
Za zaščito je v avtomobilskem adapterju nameščena varovalka (3 A, 250 V).
•
Med zagonom motorja izklopite avtomobilski adapter iz vtičnice vžigalnika.
•
Ne uporabljajte enote, kadar je akumulator avtomobila prazen. Močan tok iz
avtomobilskega generatorja lahko povzroči eksplozijo varovalke DC.
•
Če napajanje vozila pade pod 10 voltov, enota morda ne bo delovala pravilno.
•
Enote ne puščajte na mestih, kjer je temperatura večja od 70 °C (158 °F), sicer
lahko pride do poškodbe bralne naprave.
To pomeni tudi:
-
v notranjosti avtomobila z zaprtimi okni in neposredno na soncu.
-
v bližini grelnih naprav.
6
Vtaknite v vhodni priključek
»DC 12V IN«
Napajalni priključek namestite na adapter AC.
(Dejanski deli se lahko razlikujejo od tistih na sliki.)
Gumb za
sprostitev
napajalnega kabla
Priključite na vir
električne
energije.
Desna stran enote
Vtaknite v vhodni
priključek
»DC 12V IN«.
Priključite v vtičnico za
vžigalnik v avtomobilu.
Desna stran enote
P
A
P
va
DP450-P.ADEULLK_SLOVEN_MF#EE118 2/23/09 3:30 PM Page 6
Page 77

7
Povezovanje enote
Avdio in video povezave k vaši televiziji
Priključite na vtičnico AV OUT (AV IZHOD) enote z ustrezno vhodno vtičnico na
vašem televizorji tako, kot je prikazano spodajj.
Desna stran enote
Vtaknite v izhodni
priključek
»AV OUT«.
Kabel za avdio/video
(ni priložen)
rumeno
belo
redeče
Prilagodilnik za avdio/video
DP450-P.ADEULLK_SLOVEN_MF#EE118 2/23/09 3:30 PM Page 7
TV
Page 78

Prilagajanje nastavitev – to in še več
Pri prvem vklopu enote (dodatno)
Ko prvič vklopite enoto, se prikaže meni za izbiro jezika. Izberite jezik za
uporabo enote. S tipkami vV b B izberite jezik ter pritisnite tipko ENTER
(POTRDI) in pojavil se bo meni za potrditev. Če želite izbrati [ENTER] (Potrdi),
pritisnite bB in nato tipko ENTER (POTRDI).
Prilagodite nastavitve jezika
Menu Language (Jezik menija) – izberite jezik menija Setup (Nastavitve) in
prikaza na zaslonu.
Disc Audio/Subtitle/Menu (Avdio/podnapisi/meni diska) – izberite jezik za
avdio, podnapise in meni diska.
[Original] (Izvirno): Nanaša se na izvirni jezik, v katerem je bil disk posnet.
[Other] (Drugo): Če želite izbrati drug jezik, pritisnite tipke s številkami in nato
ENTER (POTRDI), da vnesete ustrezno 4-mestno število glede na seznam
kod jezikov. (glejte stran 13) Če se pri vnosu številke zmotite, pritisnite tipko
CLEAR (POČISTI), da številke izbrišete, in jih nato ponovno vnesite.
[Off] (Izključeno) (za podnapise diska): Izklopi prikazovanje podnapisov.
Prilagoditev nastavitev zaslona
TV Aspect (Format televizorja) – izberite format zaslona glede na obliko
zaslona televizorja.
[4:3]: Izberite, ko je priključen standardni televizor z velikostjo slike 4:3.
[16:9]: Izberite, ko je priključen širokozaslonski televizor z velikostjo slike
16:9.
Display Mode (Način prikaza) – če ste izbrali velikost 4:3, določite način
prikaza širokozaslonskih programov in filmov na zaslonu televizorja.
[Letterbox] (Podolgovato): Prikaže širokozaslonsko sliko s temnimi robovi na
vrhu in dnu zaslona.
[Panscan] (Samodejno prilagajanje): Zapolni celoten zaslon 4:3 in po potrebi
obreže sliko.
Prilagoditev nastavitev avdio
DRC (Dynamic Range Control – Nadzor dinamičnega obsega) – ko
zmanjšate glasnost, ta funkcija poskrbi za jasen zvok (samo pri uporabi
funkcije Dolby Digital). Če želite ta učinek, nastavite možnost [On] (Vključeno).
Vocal (Glas) – Nastavite glas na On (Vključeno) samo takrat, kadar predvajate
večkanalni karaoke DVD. Kanali karaoke na disku se pretvorijo v navaden
stereo zvok.
Prilagoditev zaščitnih nastavitev
Če želite uporabiti zaščitne možnosti, nastavite možnost [Area Code] (Področna
koda). Izberite možnost [Area Code] (Področna koda) in pritisnite B. Vnesite
4-mestno geslo in pritisnite tipko ENTER (POTRDI). Geslo ponovno vnesite in
pritisnite tipko ENTER (POTRDI), da ga potrdite. Če se pri vnosu številke
zmotite, pritisnite tipko CLEAR (POČISTI) in jo nato ponovno vnesite.
Če ste geslo pozabili, ga lahko ponovno nastavite.
Najprej odstranite disk iz enote.
V meniju nastavitev vnesite 6-mestno številko »210499« in geslo bo izbrisano.
Rating (Ocena) – izberite raven ocene. Nižja kot je raven, strožja je ocena. Če
želite izključiti oceno, izberite [Unlock] (Odkleni).
Password (Geslo) – Nastavi ali spremeni geslo za zaščitne nastavitve.
[New] (Novo): S številčnimi tipkami vnesite novo 4-mestno geslo in nato
pritisnite tipko ENTER (POTRDI). Ponovno vnesite geslo, da ga potrdite.
[Change] (Spremeni): Po tem, ko vnesete trenutno geslo, dvakrat vnesite
novo geslo.
Area Code (Področna koda) – izberite kodo geografskega področja za raven
ocene predvajanja. S tem se določijo področni standardi za oceno DVD-jev, ki
so zaščiteni s starševskim nadzorom. (Glejte stra13.)
Prilagoditev nastavitev jezika
1 Odprite nastavitveni meni: SETUP
2 Izberite želeno možnost na prvi ravni: v V
3 Pomaknite se na naslednjo raven: B
4 Izberite želeno možnost na drugi ravni: v V
5 Pomaknite se na naslednjo raven: B
6 Spremenite nastavitev: v V / ENTER
TIPKA
8
P
D
D
D
ob
ik
V
le
DP450-P.ADEULLK_SLOVEN_MF#EE118 2/23/09 3:30 PM Page 8
Page 79

9
Prilagoditev ostalih nastavitev
DivX(R) VOD (Video na zahtevo) – nudimo vam registracijsko kodo
DivX®VOD (Video On Demand – Video na zahtevo), ki vam v okviru storitev
DivX®VOD omogoča nakup in izposojo videov. Če želite več informacij,
obiščite www.divx.com/vod. Če pritisnete ENTER (POTRDI), ko je označena
ikona [Select] (Izberi), si lahko ogledate registracijsko kodo enote.
Vse videe, ki jih boste prenesli prek storitve DivX® VOD, boste lahko predvajali
le v tej enoti.
Prikaz podatkov o disku – to in še več
S pritiskom na tipki vV lahko izberete in spremenite element ali izberete
nastavitev s pritiskom na tipki bB.
Številka trenutnega naslova /število vseh naslovov
Številka trenutnega poglavja/skupno število poglavij
Pretečeni čas predvajanja
Izbrani avdio jezik ali kanal
Izbrani podnapisi
Izbrani kot/skupno število kotov
Simboli v tem priročniku
Odsek z naslovom, ki ima enega od teh simbolov, se nanaša samo na disk ali
datoteko, ki jo predstavlja simbol.
Vsi diski in datoteke
Avdio CD-ji
DVD in zaključen DVD
±
R/RW Datoteke MP3
Datoteke DivX
Datoteke WMA
WMA
DivX
MP3DVD
ACDALL
Prikaz podatkov o disku
1
Med predvajanjem pritisnite tipko DISPLAY: DISPLAY
2 Izberite element:
vv VV
3 Prilagodite nastavitve menija DISPLAY:
bb BB
/ ENTER
4 Za izhod iz menija: DISPLAY
TIPKA
DP450-P.ADEULLK_SLOVEN_MF#EE118 2/23/09 3:30 PM Page 9
Page 80

Predvajanje CD-jev – to in še več
Zaustavitev predvajanja
Za prekinitev predvajanja pritisnite
STOP (xx)
. Enota pri posameznem disku
posname točko zaustavitve.
Na zaslonu se za trenutek pojavi znak “ X
xx
”. S
tipko PLAY (
NN
) boste nadaljevali predvajanje (tam, kjer ste ga prej ustavili).
Če ponovno pritisnete STOP (xx) ali odstranite disk (na zaslonu se pojavi “
xx
”),
enota izbriše točko ustavitve.
(
XXxx
=
začasna zaustavitev predvajanja,
xx
=
popolna zaustavitev
predvajanja) Če pritisnete tipko (npr. POWER , OPEN itd.), lahko izbrišete
točko ustavitve.
Predvajanje DVD-ja z menijem
Večina DVD-jev ima zdaj menije, ki se naložijo še pred začetkom predvajanja
filma. Če želite v teh menijih označiti možnost, uporabite gumbe vV b B ali
ustrezno tipko s številko. Pritisnite ENTER (POTRDI), da izberete možnost.
Predvajanje diska DVD VR
Ta enota bo predvajala disk DVD-RW, ki je bil posnet v obliki VR (Video
Recording (Video snemanje)). Ko vstavite disk DVD VR, se bo na zaslonu
prikazal meni. S tipkama vV izberite naslov in pritisnite tipko PLAY (
NN
).Če
želite odpreti meni DVD-VR, pritisnite MENU ali TITLE.
SNEMALNIK DVD naredi nekatere diske DVD-VR s podatki CPRM.
Enota ne
podpira naslednjih vrst plošč.
Pomik na naslednje/prejšnje poglavje/posnetek
Če se želite pomakniti na naslednje poglavje/posnetek, pritisnite tipko SKIP
(>).
Pritisnite tipko SKIP (.), če se želite vrniti na začetek trenutnega
poglavja/posnetka.
Če se želite vrniti k prejšnjemu poglavju/posnetku, dvakrat za trenutek pritisnite
tipko SKIP (.).
Začasna zaustavitev predvajanja
Pritisnite tipko PAUSE/STEP (X) za prekinitev predvajanja. Za nadaljevanje
predvajanja pritisnite tipko PLAY ( NN).
Predvajanje po okvirjih
Za predvajanje po slikah pritiskajte tipko PAUSE/STEP (X).
Večkratno predvajanje
Če želite izbrati element za večkratno predvajanje, pritisnite REPEAT. Trenutni
naslov, poglavje ali posnetek bo večkrat predvajan. Če se želite vrniti v običajno
predvajanje, pritiskajte tipko REPEAT, da izberete možnost [Off] (Izključeno).
Hitro previjanje naprej ali nazaj
Če želite med predvajanjem uporabiti hitro previjanje naprej ali nazaj, pritisnite in
zadržite tipko SKIP (
.
ali >). S pritiskanjem tipke SKIP (.ali >) lahko
spreminjate hitrost predvajanja. Za predvajanje v običajni hitrosti pritisnite tipko
PLAY (
N
).
Ponavljanje določenega dela (A–B)
Pritisnite tipko A-B na začetku in koncu dela, ki ga želite ponoviti. Izbrani del se
bo neprekinjeno ponavljal. Če se želite vrniti v običajno predvajanje, pritisnite
tipko A-B, da izberete možnost [Off] (Izključeno).
Izbira jezika podnapisov
Med predvajanjem s pritiskanjem tipke SUBTITLE ( ) izberite želene podnapise.
Watching from a different angle
Če se na zaslonu za kratek čas pojavi znak za kot, lahko izbirate med pogledi z
različnih kotov kamere, tako da pritiskate ANGLE ( ).
Predvajanje različnega avdia
Če želite preklopiti med različnimi avdio jeziki, kanali ali metodami kodiranja,
med predvajanjem pritiskajte tipko AUDIO ( ).
Upoãasnitev hitrosti predvajanja ( : samo naprej)
Med predvajanjem pritisnite tipko SLOW (tali T), da upočasnite predvajanje ali
premikanje po posnetku nazaj. S pritiskanjem tipke SLOW (
t
ali T) lahko
spreminjate hitrost predvajanja. Za predvajanje v običajni hitrosti pritisnite tipko
PLAY (
N
)
DivXDVD
DivXDVD
DVD
DivXDVD
ACDDivXDVD
MP3WMAACDDivXDVD
ALL
DivXDVD
ALL
ALL
DVD
Predvajanje diska
TIPKA
1
Odprite pladenj za disk:
OPEN (Z)
2 Vstavite disk: -
3
Zaprite pladenj za disk:
-
4 Začnite predvajanje:
NN
PLAY
5 Nastavite glasnost.: VOLUME
6 Zaustavitev predvajanja:
xx
STOP
10
P
M
p
n
O
P
O
P
O
Č
P
že
E
P
M
p
p
O
N
p
o
O
m
M
za
S
E
p
e
O
O
m
iz
P
P
v
(N
DP450-P.ADEULLK_SLOVEN_MF#EE118 2/23/09 3:30 PM Page 10
Page 81

11
Povečava slike videa
Med predvajanjem s pritiskanjem tipke ZOOM izberete način povečave. Po
povečani sliki se lahko pomikate s tipkami vVb B. Če želite zapreti meni, pritisnite tipko CLEAR. (100 % p 200 % p 300 % p 400 % p 100 %)
Ogled naslovnega menija
Pritisnite TITLE, da odprete naslovni meni na disku, če je na voljo.
Ogled menija DVD-ja
Pritisnite MENU, da odprete meni diska, če je na voljo.
Označitev priljubljenega prizora
Če želite označiti prizore (do devet), pritisnite tipko MARKER na želenem mestu.
Prizore lahko prikličete ali izbrišete s pritiskom na tipko SEARCH. Za izbiro
želene oznake v meniju MARKER SEARCH uporabite b ali B in pritisnite
ENTER za priklic oz. CLEAR za izbris oznake.
Predvajanje v naključnem vrstnem redu
Med predvajanjem ali v mirujočem stanju pritisnite tipko RANDOM, če želite začeti z
predvajanje v naključnem vrstnem redu.Če se želite vrniti v normalno predvajanje,
ponovno pritisnite tipko RANDOM.
Označitev priljubljenega prizora
Na disku lahko označite mesto, kamor se lahko vrnete. Na želenem mestu diska
pritisnite tipko MARKER. Na zaslonu se bo za kratek čas prikazala ikona
oznake. Postopek lahko ponavljate, dokler ne vnesete do devet oznak.
Oznake lahko tudi prikličete ali izbrišete .Pritisnite SEARCH (IŠČI) in pojavi se
meni [Marker Search] (Iskanje zaznamovalca). Za izbiro želene oznake v meniju
MARKER SEARCH (Iskanje oznak) uporabite tipko b ali B in pritisnite ENTER
za priklic oz. CLEAR za izbris oznake.
Spomin zadnjega prizora
Enota si zapomni zadnji prizor z diska, ki ste si ga nazadnje ogledali. Zadnji
prizor ostane v pomnilniku, tudi če odstranite disk iz predvajalnika ali izklopite
enoto. Če naložite disk s prizorom v pomnilniku, se ta prizor samodejno prikliče.
Ohranjevalnik zaslona
Ohranjevalnik zaslona se prikaže, ko je enota v mirujočem stanju približno pet
minut. Če je ohranjevalnik zaslona prikazan pet minut, se enota samodejno
izklopi.
Plošča z več vrstami datotek – DivX, MP3/WMA in JPEG
Pri predvajanju plošče, na kateri so datoteke DivX, MP3/WMA in JPEG, lahko
v meniju izberete katere datoteke želite predvajati, tako da pritisnete TITLE
(NASLOV).
Predvajanje datoteke DivX s filmom – to in
še več
Spreminjanje števila znakov za pravilen prikaz podnapisov DivX®
Med predvajanjem pritisnite in za 3 sekunde zadržite tipko SUBTITLE. Pojavi se
koda jezika. Pritiskajte tipki bB, če želite izbrati drugo kodo jezika, dokler se
podnapis ne prikaže pravilno, in pritisnite ENTER.
Zahteve glede datotek DivX
Združljivost datoteke DivX s predvajalnikom je omejena na naslednje načine:
• Na voljo je naslednja ločljivost: 720x576 (Š x V) slikovnih pik.
• Dolžina imen datotek z DivX podnapisi je omejena na 45 znakov.
• Pripone datoteke DivX: “.avi”, “.mpg”, “.mpeg”
• DivX podnapisi, ki jih lahko predvajate: SubRip (.srt / .txt), SAMI (.smi),
SubStation Alpha (.ssa/.txt), MicroDVD (.sub/.txt), VobSub (.sub),
SubViewer 2.0 (.sub/.txt), TMPlayer (.txt), DVD Subtitle System (.txt)
• Oblike kodekov, ki jih lahko predvajate: “DIVX3.xx”, “DIVX4.xx”, “DIVX5.xx”,
“MP43”, “3IVX”
• DivX 6.0 v enoti podpira le funkcijo predvajanja.
• Oblike avdio posnetkov, ki jih lahko predvajate: “Dolby Digital”, “PCM”, “MP3”,
“WMA”
• Frekvenca vzorčenja: med 8 in 48 kHz (MP3), med 32 in 48 kHz (WMA)
• Bitna hitrost: med 8 in 320 kb/s (MP3), med 32 in 192 kb/s (WMA),
manj kot 4 Mb/s (datoteka DivX)
• Oblika CD-R/RW, DVD
±
R/RW: ISO 9660
• Maks. št datotek/map: manj kot 600 (skupno število datotek in map)
ACDDVD
DivXDVD
MP3WMAACD
DivXDVD
DVD
DVD
DivXDVD
Predvajanje datoteke DivX s filmom
1
Odprite pladenj za disk:
OPEN (Z)
2 Vstavite disk: -
3
Zaprite pladenj za disk:
-
4 Izberite datoteko s filmom v meniju:
vv VV
, MENU
5 Začnite predvajanje:
NN
PLAY
6 Zaustavitev predvajanja:
xx
STOP
TIPKA
DP450-P.ADEULLK_SLOVEN_MF#EE118 2/23/09 3:30 PM Page 11
Page 82

Poslušanje diskov in datotek z glasbo – to in
še več
Ustvarjanje lastnega programa
Vsebino diska lahko predvajate v izbranem vrstnem redu, tako da določite
zaporedje pesmi na disku. Če želite dodati pesmi na programirani seznam, pritisnite PROG. da vstopite v način urejanja programa (v meniju se pojavi oznaka
). Izberite pesem na seznamu [List] (Seznam) in pritisnite ENTER, če jo
želite dodati na programirani seznam. Izberite pesem na programiranem seznamu in pritisnite ENTER za začetek programiranega predvajanja. Če želite
odstraniti pesmi s programiranega seznama, v načinu urejanja programa
označite izbrano pesem in pritisnite CLEAR. Če želite odstraniti vse pesmi s programiranega seznama, v načinu urejanja programa izberite [Clear All] (Počisti
vse) in pritisnite ENTER. Če prekinete napajanje ali odstranite disk, se programirani seznam počisti.
Prikaz podatkov o datotekah (ID3 TAG)
Pri predvajanju datoteke MP3, ki vsebuje informacije, si jih lahko ogledate tako,
da večkrat pritisnete tipko DISPLAY. Če datoteka nima informacij o oznakah
ID3, se na zaslonu pojavi sporočilo [No ID3 TAG] (Ni oznak ID3).
Zahteve glasbenih datotek MP3/WMA
Združljivost datotek MP3/WMA s to enoto je omejena na naslednje načine:
• Pripone datotek: “.mp3”, “.wma”
• Frekvenca vzorčenja: med 8 in 48 kHz (MP3), med 32 in 48 kHz (WMA)
• Bitna hitrost: med 8 in 320 kb/s (MP3), 32 in 192 kb/s (WMA)
• Oblika CD-R/RW, DVD
±
R/RW: ISO 9660
• Maks. št datotek/map: manj kot 600 (skupno število datotek in map)
Ogled slikovnih datotek – to in še več
Ogled diaprojekcije slikovnih datotek
S tipkami vV b B označite ikono ( ) in pritisnite tipko ENTER za začetek
diaprojekcije.
Hitrost diaprojekcije lahko spremenite s tipkami bB, ko je označena ikona ( ).
Pomik na naslednjo/prejšnjo sliko
Za prikaz naslednje ali prejšnje slike pritisnite SKIP (. ali >).
Zasuk slike
Med ogledom slike na celotnem zaslonu jo lahko s tipkami vV zasučete v
(nasprotni) smeri urinega kazalca.
Pause a slide show
Če želite začasno zaustaviti diaprojekcijo, pritisnite tipko PAUSE/STEP (X). Za
nadaljevanje diaprojekcije pritisnite PLAY (
NN
).
Poslušanje glasbe med diaprojekcijo
Če so na disku skupaj glasbene in slikovne datoteke, lahko med diaprojekcijo
poslušate glasbo. S tipkami vV b B označite ikono ( ) in pritisnite tipko
ENTER za začetek diaprojekcije.
Povečava slike
Med ogledom slike na celotnem zaslonu s pritiskanjem tipke ZOOM izberete
način povečave. Po povečani sliki se lahko pomikate s tipkami vVb B. Če želite
zapreti meni, pritisnite tipko CLEAR.
Zahteve glede datotek s sliko
Združljivost datotek JPEG z enoto je omejena na naslednje načine:
• Pripone datotek: “.jpg”
• Velikost slik: Priporočena manj kot 2 MB
• Oblika CD-R/RW, DVD±R/RW: ISO 9660
• Maks. št datotek/map: manj kot 600 (skupno število datotek in map)
Poslušanje glasbenih diskov in datotek
TIPKA
1
Odprite pladenj za disk:
OPEN (Z)
2 Vstavite disk: -
3
Zaprite pladenj za disk:
-
4 Izberite datoteko z glasbo v meniju:
vv VV
, MENU
5 Začnite predvajanje:
NN
PLAY
6 Zaustavitev predvajanja:
xx
STOP
Ogled datotek s slikami
1
Odprite pladenj za disk:
OPEN (Z)
2 Vstavite disk: -
3
Zaprite pladenj za disk:
-
4 Izberite slikovno datoteko v meniju:
vv VV
, MENU
5
Prikažite izbrano datoteko na celotnem zaslonu: NNPLAY
6 Če se želite vrniti v meni:
xx
STOP
TIPKA
12
DP450-P.ADEULLK_SLOVEN_MF#EE118 2/23/09 3:30 PM Page 12
E
Page 83

13
Jezikovne kode
Uporabite ta seznam, če želite določiti želeni jezik za naslednje začetne nastavitve: avdio diska, podnapisi diska, meni diska.
Področne kode
Izberite področno kodo s seznama.
Jezik Koda
afar 6565
afrikanščina 6570
albanščina 8381
amharščina 6577
arabščina 6582
armenšč in a 7289
asamščina 6583
ajmarščina 6588
azerščina 6590
baškirščina 6665
baskovščina 6985
bengalščina (Bangla)
6678
butanščina 6890
bihari 6672
bretonščina 6682
bolgarščina 6671
burmanščina 7789
beloruščina 6669
kitajščina 9072
Jezik Koda
hrvaščina 7282
češčina 6783
danščina 6865
nizozemščina 7876
Slovensko 6978
esperanto 6979
estonščina 6984
ferščina 7079
fidžijščina 7074
finščina 7073
francoščina 7082
frizijščina 7089
galicijščina 7176
gruzinščina 7565
nemščina 6869
gr šči na 6976
grenlandščina 7576
gvaranščina 7178
gudžarati 7185
Jezik Koda
hausa 7265
hebrejščina 7387
hindijščina 7273
madžarščina 7285
islandščina 7383
indonezijščina 7378
interlingua 7365
irščina 7165
italijanščina 7384
javanščina 7487
kanada 7578
kašmirščina 7583
kazaščina 7575
kirgiščina 7589
korejščina 7579
kurdščina 7585
laoščina 7679
latinščina 7665
latvijščina 7686
Jezik Koda
lingala 7678
litovščina 7684
makedonščina 7775
malgaščina 7771
malajščina 7783
malajalamščina 7776
maorščina 7773
marati 7782
moldavščina 7779
mongolščina 7778
nauru 7865
nepalščina 7869
norveščina 7879
orija 7982
pandžabščina 8065
paštu 8083
perzijščina 7065
poljščina 8076
portugalščina 8084
Jezik Koda
kečua 8185
retoromanščina 8277
romunščina 8279
ru šči na 8285
samoa 8377
sanskrt 8365
škotščina 7168
srbščina 8382
srbohrvaščina 8372
shona 8378
sindi 8368
sinhaleščina 8373
slovaščina 8375
Slovenščina 8376
španščina 6983
sudanščina 8385
svahili 8387
švedščina 8386
tagalog 8476
Jezik Koda
tadžiščina 8471
tamilščina 8465
telugu 8469
tajščina 8472
tonga 8479
turščina 8482
turkmenščina 8475
tvi 8487
ukrajinščina 8575
urdu 8582
uzbeščina 8590
vietnamščina 8673
volapük 8679
valižanščina 6789
volof 8779
xhosa 8872
jidiš 7473
joruba 8979
zulujščina 9085
Področje Koda
Afganistan AF
Argentina AR
Avstralija AU
Avstrija AT
Belgija BE
Butan BT
Bolivija BO
Brazilija BR
Kambodža KH
Kanada CA
Čile CL
Kitajska CN
Kolumbija CO
Kongo CG
Področje Koda
Kostarika CR
Hrvaška HR
Češka republika CZ
Danska DK
Ekvador EC
Egipt EG
Salvador SV
Etiopija ET
Fidži FJ
Finska FI
Francija FR
Nemčija DE
Velika Britanija GB
Grčija GR
Področje Koda
Grenlandija GL
Hongkong HK
Madžarska HU
Indija IN
Indonezija ID
Izrael IL
Italija IT
Jamajka JM
Japonska JP
Kenija KE
Kuvajt KW
Libija LY
Luksemburg LU
Malezija MY
Področje Koda
Maldivi MV
Mehika MX
Monako MC
Mongolija MN
Maroko MA
Nepal NP
Nizozemska NL
Nizozemski Antili AN
Nova Zelandija NZ
Nigerija NG
Norveška NO
Oman OM
Pakistan PK
Panama PA
Področje Koda
Paragvaj PY
Filipini PH
Poljska PL
Portugalska PT
Romunija RO
Ruska federacija RU
Saudova Arabija SA
Senegal SN
Singapur SG
Slovaška republika SK
Slovenija SI
Južna Afrika ZA
Južna Koreja KR
Španija ES
Področje Koda
Šrilanka LK
Švedska S E
Švica C H
Tajvan TW
Tajska TH
Turčija TR
Uganda UG
Ukrajina UA
Združene države Amerike
US
Urugvaj UY
Uzbekistan UZ
Vietnam VN
Zimbabve ZW
.
DP450-P.ADEULLK_SLOVEN_MF#EE118 2/23/09 3:30 PM Page 13
Page 84

14
Tehnični podatki
Odpravljanje težav
Znak
Rešitev
Električni kabel je iztaknjen.
Baterija je prazna.
Ni vstavljenega diska.
Televizor ni nastavljen tako, da bi
sprejemal signal enote.
Video kabel ni trdno priključen.
Oprema, povezana z avdio
kablom, ni nastavljena tako, da bi
sprejemala signal enote.
Nastavljena je najnižja glasnost.
Možnosti AUDIO (AVDIO) so nastavljene na napačno mesto.
Vstavljen je disk, ki ga ni mogoče
predvajati.
Nastavljena je raven ocene.
Daljinski upravljalnik ni usmerjen
proti senzorju enote.
Daljinski upravljalnik je predaleč
od enote.
Električni kabel trdno priključite v
zidno vtičnico.
Napolnite baterijo.
Vstavite disk.
Izberite ustrezen vhodni video
način na televizorju.
Trdno priključite video kabel.
Izberite pravilen vhodni način
ojačevalca zvoka.
Glasnost prilagodite s tipko za
nastavitev glasnosti.
Nastavitve AUDIO (AVDIO) nastavite na pravilni položaj.
Vstavite disk, ki ga je mogoče
predvajati. (Preverite vrsto diska in
področno kodo.)
Spremenite raven ocene.
Daljinski upravljalnik usmerite v
senzor enote.
Daljinski upravljalnik uporabljajte
bližje enoti.
Ni napajanja.
Enota je
vklopljena,
vendar ne deluje
Ni slike.
Ni zvoka.
Enota ne začne
predvajati.
Daljinski
upravljalnik ne
deluje pravilno.
Zasnova in specifikacije se lahko spremenijo brez
predhodnega opozorila.
Vzrok
Splošno
Napajanje DC 12V
Poraba energije 12W
Mere (približno) 202 x 42,5 x 167 mm (Š x V x G)
Neto teža (približno) 0,78kg
Delovna temperatura od 5 °C do 40 °C
Delovna vlažnost od 5 % do 90 %
Laser Polprevodni laser
Sistem signala PAL
Priključki
Avdio/video izhod 3,5-milimetrski mini priključek x 1
-
video: 1,0 V (p-p), 75 Ω, negativna sinhronizacija
-
avdio: 1,5 Vrms (1 kHz, 0 dB)
Terminal za slušalke 3,5-milimetrski stereo mini priključek x 1
Zaslon s tekočimi kristali
Velikost zaslona 7 palcev (diagonala)
Projekcijski sistem črte R.G.B.
Pogonski sistem aktivna matrica TFT
Ločljivost 480 x 234 (WQVGA)
Dodatki
• Prilagodilnik za avdio/video
•
Napajalnik AC (MPA-630)
•
Avtomobilski adapter (DPDC1)
•
Daljinski upravljalnik
•
Baterija za daljinski upravljalnik (litijeva baterija)
DP450-P.ADEULLK_SLOVEN_MF#EE118 2/23/09 3:30 PM Page 14
 Loading...